The glossaries package: a guide for...
36
The glossaries package v4.37: a guide for beginners Nicola L.C. Talbot 2018-04-07 Abstract The glossaries package is very flexible, but this means that it has a lot of options, and since a user guide is supposed to provide a complete list of all the high-level user commands, the main user manual is quite big. This can be rather daunting for beginners, so this document is a brief introduction just to help get you started. If you find yourself saying, “Yeah, but how can I do. . . ?” then it’s time to move on to the main user manual (glossaries-user.pdf). I’ve made some statements in this document that don’t actually tell you the full truth, but it would clutter the document and cause confusion if I keep writing “ex- cept when . . . ” or “but you can also do this, that or the other” or “you can do it this way but you can also do it that way, but that way may cause complications under certain circumstances”. Contents 1 Getting Started 1 2 Defining Terms 8 3 Using Entries 14 4 Displaying a List of Entries 16 5 Customising the Glossary 27 6 Multiple Glossaries 29 7 glossaries and hyperref 33 8 Cross-References 34 9 Further Information 35 1
Transcript of The glossaries package: a guide for...

The glossaries package v4.37: a guide forbeginners
Nicola L.C. Talbot
2018-04-07
Abstract
The glossaries package is very flexible, but this means that it has a lot of options,and since a user guide is supposed to provide a complete list of all the high-leveluser commands, the main user manual is quite big. This can be rather daunting forbeginners, so this document is a brief introduction just to help get you started. Ifyou find yourself saying, “Yeah, but how can I do. . . ?” then it’s time to move on tothe main user manual (glossaries-user.pdf).
I’ve made some statements in this document that don’t actually tell you the fulltruth, but it would clutter the document and cause confusion if I keep writing “ex-cept when . . . ” or “but you can also do this, that or the other” or “you can do it thisway but you can also do it that way, but that way may cause complications undercertain circumstances”.
Contents
1 Getting Started 1
2 Defining Terms 8
3 Using Entries 14
4 Displaying a List of Entries 16
5 Customising the Glossary 27
6 Multiple Glossaries 29
7 glossaries and hyperref 33
8 Cross-References 34
9 Further Information 35
1

1 Getting Started
As with all packages, you need to load glossaries with \usepackage, but there arecertain packages that must be loaded before glossaries, if they are required: hyperref,babel, polyglossia, inputenc and fontenc. (You don’t have to load these packages, but if youwant them, you must load them before glossaries.)
If you require multilingual support you must also install the relevant languagemodule. Each language module is called glossaries-〈language〉, where〈language〉 is the root language name. For example, glossaries-french orglossaries-german. If a language module is required, the glossaries packagewill automatically try to load it and will give a warning if the module isn’t found.
Once you have loaded glossaries, you need to define your terms in the preamble andthen you can use them throughout the document. Here’s a simple example:
\documentclass{article}
\usepackage{glossaries}
\newglossaryentry{ex}{name={sample},description={an example}}
\begin{document}Here's my \gls{ex} term.\end{document}
This produces:
Here’s my sample term.
Here’s another example:
\documentclass{article}
\usepackage{glossaries}
\setacronymstyle{long-short}
\newacronym{svm}{SVM}{support vector machine}
\begin{document}First use: \gls{svm}. Second use: \gls{svm}.\end{document}
This produces:
First use: support vector machine (SVM). Second use: SVM.
2

In this case, the text produced by \gls{svm} changed after the first use. The firstuse produced the long form followed by the short form in parentheses because I setthe acronym style to long-short. I suggest you try the above two examples to makesure you have the package correctly installed. If you get an undefined controlsequence error, check that the version number at the top of this document matchesthe version you have installed. (Open the .log file and search for the line that startswith Package: glossaries followed by a date and version.)
Abbreviations are slightly different if you use the extension package glossaries-extra(which needs to be installed separately):
\documentclass{article}
\usepackage{glossaries-extra}
\setabbreviationstyle{long-short}% glossaries-extra.sty
\newabbreviation{svm}{SVM}{support vector machine}% glossaries-extra.sty
\begin{document}First use: \gls{svm}. Second use: \gls{svm}.\end{document}
If you still want to use \newacronym (rather than \newabbreviation) then youneed the optional argument of \setabbreviationstyle:
\documentclass{article}
\usepackage{glossaries-extra}
\setabbreviationstyle[acronym]{long-short}% glossaries-extra.sty only
\newacronym{svm}{SVM}{support vector machine}
\begin{document}First use: \gls{svm}. Second use: \gls{svm}.\end{document}
You can’t use \setacronymstyle with glossaries-extra.
If you like, you can put all your definitions in another file (for example, defns.tex)and load that file in the preamble using \loadglsentries with the filename as theargument. For example:
\loadglsentries{defns}
If you find you have a really large number of definitions that are hard to manage ina .tex file, you might want to have a look at bib2gls (installed separately) whichrequires a .bib format instead that can be managed by an application such as JabRef.
3

Don’t try inserting formatting commands into the definitions as they can interferewith the underlying mechanism. Instead, the formatting should be done by the style.For example, suppose I want to replace SVM with \textsc{svm}, then I need to selecta style that uses \textsc, like this (for the base glossaries style):
\documentclass{article}
\usepackage{glossaries}
\setacronymstyle{long-sc-short}
\newacronym{svm}{svm}{support vector machine}
\begin{document}First use: \gls{svm}. Second use: \gls{svm}.\end{document}
The abbreviation styles have a different naming scheme with glossaries-extra:
\documentclass{article}
\usepackage{glossaries-extra}
\setabbreviationstyle{long-short-sc}% glossaries-extra.sty
\newabbreviation{svm}{svm}{support vector machine}% glossaries-extra.sty
\begin{document}First use: \gls{svm}. Second use: \gls{svm}.\end{document}
With glossaries-extra you can have multiple abbreviation styles for different categories.Many of these styles have their own associated formatting commands that can be rede-fined for minor adjustments. For example:
\documentclass{article}
\usepackage{glossaries-extra}
\setabbreviationstyle[statistical]{long-short-sc}\setabbreviationstyle[bacteria]{long-only-short-only}
% Formatting commands used by 'long-only-short-only' style:\renewcommand*{\glsabbrvonlyfont}[1]{\emph{#1}}\renewcommand*{\glslongonlyfont}[1]{\emph{#1}}
% Formatting command used by 'long-short-sc' style:% (make sure abbreviation is converted to lower case)\renewcommand*{\glsabbrvscfont}[1]{\textsc{\MakeLowercase{#1}}}
4

\newabbreviation[
category={statistical}% glossaries-extra.sty key]{svm}{SVM}{support vector machine}
\newabbreviation[
category={bacteria}% glossaries-extra.sty key]{cbot}{C.~botulinum}{Clostridium botulinum}
\begin{document}First use: \gls{svm}, \gls{cbot}.
Next use: \gls{svm}, \gls{cbot}.\end{document}
This produces:
First use: support vector machine (SVM), Clostridium botulinum.
Next use: SVM, C. botulinum.
As you can hopefully see from the above examples, there are two main ways ofdefining a term: as a general entry (\newglossaryentry) or as an abbreviation(\newacronym or, with glossaries-extra, \newabbreviation).
Regardless of the method of defining a term, the term is always given a label. In thefirst example, the label was ex and in the other examples the label was svm (and cbotin the last example). The label is used to uniquely identify the term (like the standard\label/\ref or \cite mechanism). It’s best to just use the following alphanumericsin the labels: a, . . . , z, A, . . . , Z, 0, . . . , 9. Sometimes you can also use punctuationcharacters but not if another package (such as babel) meddles with them. Don’t tryusing any characters outside of the basic Latin set with inputenc (for example, é or ß) orthings will go horribly wrong. This warning only applies to the label. It doesn’t applyto the text that appears in the document.
Don’t use \gls in chapter or section headings as it can have some unpleasantside-effects. Instead use \glsentrytext for regular entries and one of\glsentryshort, \glsentrylong or \glsentryfull for acronyms.Alternatively use glossaries-extra which provides special commands for use insection headings, such as \glsfmtshort{〈label〉}.
The above examples are reasonably straightforward. The difficulty comes if you wantto display a sorted list of all the entries you have used in the document. The glossaries-extra package provides a really easy way of listing all the defined entries:
\documentclass{article}
5
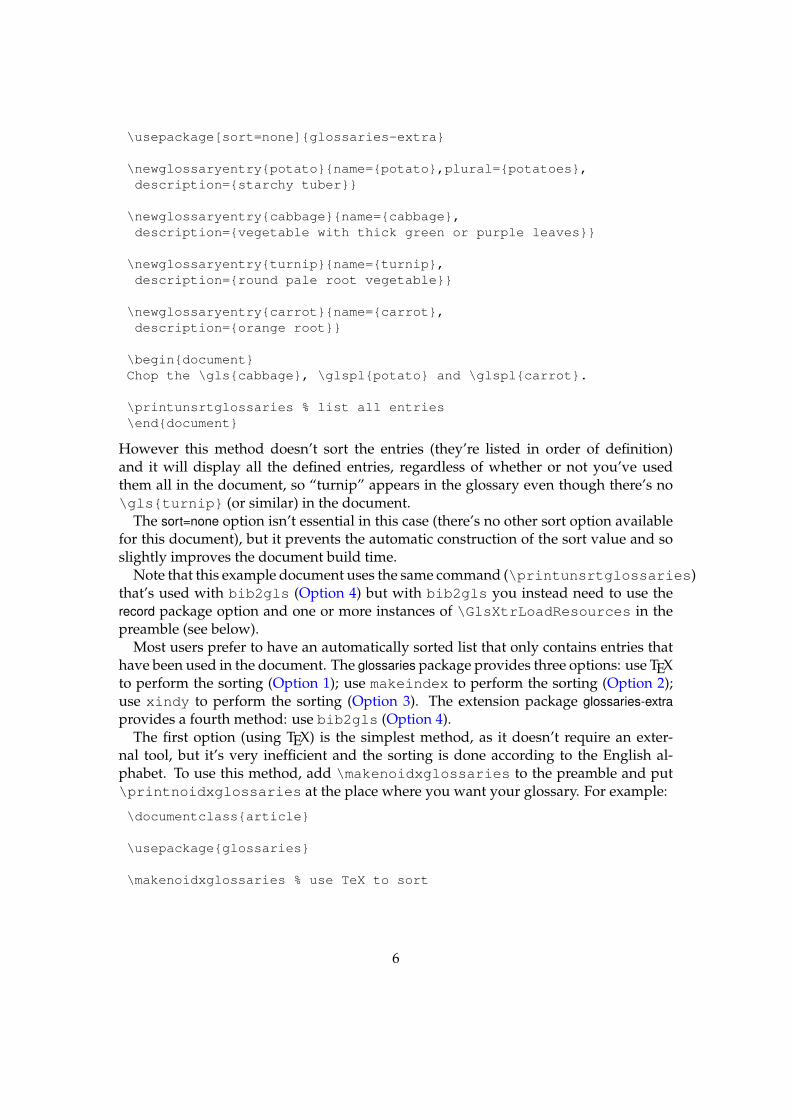
\usepackage[sort=none]{glossaries-extra}
\newglossaryentry{potato}{name={potato},plural={potatoes},description={starchy tuber}}
\newglossaryentry{cabbage}{name={cabbage},description={vegetable with thick green or purple leaves}}
\newglossaryentry{turnip}{name={turnip},description={round pale root vegetable}}
\newglossaryentry{carrot}{name={carrot},description={orange root}}
\begin{document}Chop the \gls{cabbage}, \glspl{potato} and \glspl{carrot}.
\printunsrtglossaries % list all entries\end{document}
However this method doesn’t sort the entries (they’re listed in order of definition)and it will display all the defined entries, regardless of whether or not you’ve usedthem all in the document, so “turnip” appears in the glossary even though there’s no\gls{turnip} (or similar) in the document.
The sort=none option isn’t essential in this case (there’s no other sort option availablefor this document), but it prevents the automatic construction of the sort value and soslightly improves the document build time.
Note that this example document uses the same command (\printunsrtglossaries)that’s used with bib2gls (Option 4) but with bib2gls you instead need to use therecord package option and one or more instances of \GlsXtrLoadResources in thepreamble (see below).
Most users prefer to have an automatically sorted list that only contains entries thathave been used in the document. The glossaries package provides three options: use TEXto perform the sorting (Option 1); use makeindex to perform the sorting (Option 2);use xindy to perform the sorting (Option 3). The extension package glossaries-extraprovides a fourth method: use bib2gls (Option 4).
The first option (using TEX) is the simplest method, as it doesn’t require an exter-nal tool, but it’s very inefficient and the sorting is done according to the English al-phabet. To use this method, add \makenoidxglossaries to the preamble and put\printnoidxglossaries at the place where you want your glossary. For example:
\documentclass{article}
\usepackage{glossaries}
\makenoidxglossaries % use TeX to sort
6

\newglossaryentry{potato}{name={potato},plural={potatoes},description={starchy tuber}}
\newglossaryentry{cabbage}{name={cabbage},description={vegetable with thick green or purple leaves}}
\newglossaryentry{turnip}{name={turnip},description={round pale root vegetable}}
\newglossaryentry{carrot}{name={carrot},description={orange root}}
\begin{document}Chop the \gls{cabbage}, \glspl{potato} and \glspl{carrot}.
\printnoidxglossaries\end{document}
The \makenoidxglossaries method is very slow, uses an ASCII comparatorand often breaks if there are commands in the name key.
Try this out and run LATEX (or pdfLATEX) twice. The first run won’t show the glossary.It will only appear on the second run. This doesn’t include “turnip” in the glossarybecause that term hasn’t been used (with commands like \gls{turnip}) in the doc-ument.
The glossary has a vertical gap between the “carrot” term and the “potato” term. Thisis because the entries in the glossaries are grouped according to their first letter. If youdon’t want this gap, just add nogroupskip to the package options:
\usepackage[nogroupskip]{glossaries}
or you may want to try out a style that shows the group headings:
\usepackage[style=indexgroup]{glossaries}
If you try out this example you may also notice that the description is followed by afull stop (period) and a number. The number is the location in the document where theentry was used (page 1 in this case), so you can lookup the term in the glossary andbe directed to the relevant pages. It may be that you don’t want this back-reference, inwhich case you can suppress it using the nonumberlist package option:
\usepackage[nonumberlist]{glossaries}
If you don’t like the terminating full stop, you can suppress that with the nopostdotpackage option:
\usepackage[nopostdot]{glossaries}
7

If you tried out the previous example with glossaries-extra and \printunsrtglossariesthe terminating full stop is missing and there are no number lists. You can add the fullstop back with
\usepackage[nopostdot=false]{glossaries-extra}
or
\usepackage[postdot]{glossaries-extra}
If you want the number lists then you need to use an indexing option.You may have noticed that I’ve used another command in the above example:
\glspl. This displays the plural form. By default, this is just the singular form withthe letter “s” appended, but in the case of “potato” I had to specify the correct pluralusing the plural key.
As I mentioned earlier, using TEX to sort the entries is the simplest but least efficientmethod. If you have a large glossary or if your terms contain non-Latin or extendedLatin characters, then you will have a much faster build time if you use makeindex(Option 2) or xindy (Option 3) or bib2gls (Option 4). If you are using extendedLatin or non-Latin characters, then xindy or bib2gls are the recommended methods.These methods are described in more detail in Section 4.
The rest of this document briefly describes the main commands provided by the glos-saries package. (Most of these are also available with glossaries-extra but may behaveslightly differently.)
2 Defining Terms
When you use the glossaries package, you need to define glossary entries in the docu-ment preamble. These entries could be a word, phrase, abbreviation or symbol. They’reusually accompanied by a description, which could be a short sentence or an in-depthexplanation that spans multiple paragraphs. The simplest method of defining an entryis to use:
\newglossaryentry{〈label〉}{
name={〈name〉},description={〈description〉},〈other options〉
}
where 〈label〉 is a unique label that identifies this entry. (Don’t include the angle brack-ets 〈 〉. They just indicate the parts of the code you need to change when you use thiscommand in your document.) The 〈name〉 is the word, phrase or symbol you are defin-ing, and 〈description〉 is the description to be displayed in the glossary.
This command is a “short” command, which means that 〈description〉 can’t containa paragraph break. If you have a long description, you can instead use:
8

\longnewglossaryentry{〈label〉}{
name={〈name〉},〈other options〉
}{〈description〉}
Examples:
1. Define the term “set” with the label set:
\newglossaryentry{set}{
name={set},description={a collection of objects}
}
2. Define the symbol ∅ with the label emptyset:
\newglossaryentry{emptyset}{
name={\ensuremath{\emptyset}},description={the empty set}
}
(This will also need a sort key if you use Options 1 or 3, see below.)
3. Define the phrase “Fish Age” with the label fishage:
\longnewglossaryentry{fishage}{name={Fish Age}}{%
A common name for the Devonian geologic periodspanning from the end of the Silurian Period tothe beginning of the Carboniferous Period.
This age was known for its remarkable variety offish species.
}
(The percent character discards the end of line character that would otherwisecause an unwanted space to appear at the start of the description.)
4. Take care if the first letter is an extended Latin or non-Latin character (either spec-ified via a command such as \’e or explicitly via the inputenc package such as é).This first letter must be placed in a group:
9

\newglossaryentry{elite}{name={{\'e}lite},description={select group or class}
}
or
\newglossaryentry{elite}{
name={{é}lite},description={select group or class}
}
(For further details, see the section “UTF-8” of the mfirstuc user manual.)If you use bib2gls with glossaries-extra then the terms must be defined in a .bib
file. For example:
% Encoding: UTF-8
@entry{set,name={set},description={a collection of objects}
}
@entry{emptyset,name={\ensuremath{\emptyset}},description={the empty set}
}
@entry{fishage,name={Fish Age},description={A common name for the Devonian geologic periodspanning from the end of the Silurian Period tothe beginning of the Carboniferous Period.
This age was known for its remarkable variety offish species.}
}
@entry{elite,name={{é}lite},description={select group or class}
}
10

(The .bib format doesn’t allow spaces in labels so you can’t have fish age as thelabel, but you can have fish-age.) This method requires the glossaries-extra’s recordpackage option:
\usepackage[record]{glossaries-extra}
and the .bib file is specified in the resource command. For example, if the .bib file iscalled entries.bib then put the following line in the document preamble:
\GlsXtrLoadResources[src={entries}]
You can have a comma-separated list. For example, if you also have entries defined inthe file entries2.bib:
\GlsXtrLoadResources[src={entries,entries2.bib}]
There are other keys you can use when you define an entry. For example, the namekey indicates how the term should appear in the list of entries (glossary), but if the termshould appear differently when you reference it with \gls{〈label〉} in the document,you need to use the text key as well.
For example:
\newglossaryentry{latinalph}{
name={Latin Alphabet},text={Latin alphabet},description={alphabet consisting of the lettersa, \ldots, z, A, \ldots, Z}
}
This will appear in the text as “Latin alphabet” but will be listed in the glossary as“Latin Alphabet”. With bib2gls this entry is defined in the .bib file as:
@entry{latinalph,name={Latin Alphabet},text={Latin alphabet},description={alphabet consisting of the lettersa, \ldots, z, A, \ldots, Z}
}
Another commonly used key is plural for specifying the plural of the term. Thisdefaults to the value of the text key with an “s” appended, but if this is incorrect, justuse the plural key to override it:
\newglossaryentry{oesophagus}{
name={{\oe}sophagus},plural={{\oe}sophagi},description={canal from mouth to stomach}
}
11

(Remember from earlier that the initial ligature \oe needs to be grouped.)Abbreviations can be defined using
\newacronym[〈options〉]{〈label〉}{〈short〉}{〈long〉}
where 〈label〉 is the label (as per \newglossaryentry), 〈short〉 is the short form and〈long〉 is the long form. For example, the following defines an abbreviation:
\newacronym{svm}{SVM}{support vector machine}
This internally uses \newglossaryentry to define an entry with the label svm.By default, the name key is set to 〈short〉 (“SVM” in the above example) and thedescription key is set to 〈long〉 (“support vector machine” in the above example).If, instead, you want to be able to specify your own description you can do this usingthe optional argument:
\newacronym[description={statistical pattern recognition technique}]{svm}{SVM}{support vector machine}
Before you define your acronyms (or other types of abbreviations), you need to spec-ify which style to use with
\setacronymstyle{〈style name〉}
where 〈style name〉 is the name of the style. There are a number of predefined styles,such as: long-short (on first use display the long form with the short form in paren-theses); short-long (on first use display the short form with the long form in paren-theses); long-short-desc (like long-short but you need to specify the descrip-tion); or short-long-desc (like short-long but you need to specify the descrip-tion). There are some other styles as well that use \textsc to typeset the acronym orthat use a footnote on first use. See the main user guide for further details.
The glossaries-extra package provides improved abbreviation handling with a lot morepredefined styles. With this extension package, abbreviations are defined using:
\newabbreviation[〈options〉]{〈label〉}{〈short〉}{〈long〉}
You can still use \newacronym but it’s redefined to use the new abbreviation interface.The style must now be set using:
\setabbreviationstyle[〈category〉]{〈style name〉}
The default 〈category〉 is abbreviation. If you use \newacronym the category isacronym, which is why you need to use the optional argument if you define abbrevia-tions with \newacronym when glossaries-extra has been loaded:
12

\setabbreviationstyle[acronym]{〈style name〉}
If you use bib2gls then abbreviations are defined in the .bib file in the format:
@abbreviation{〈label〉,long={〈long form〉},short={〈short form〉}
}
The plural forms for abbreviations can be specified using the longplural andshortplural keys. For example:
\newacronym[longplural={diagonal matrices}]{dm}{DM}{diagonal matrix}
or (with glossaries-extra):
\newabbreviation % glossaries-extra.sty[longplural={diagonal matrices}]{dm}{DM}{diagonal matrix}
If omitted, the defaults are again obtained by appending an “s” to the singular versions.With bib2gls, the definition in the .bib file is:
@abbreviation{dm,short={DM},long={diagonal matrix},longplural={diagonal matrices}
}
It’s also possible to have both a name and a corresponding symbol. Just use the namekey for the name and the symbol key for the symbol. For example:
\newglossaryentry{emptyset}{
name={empty set},symbol={\ensuremath{\emptyset}},description={the set containing no elements}
}
or with bib2gls the definition in the .bib file is:
@entry{emptyset,name={empty set},symbol={\ensuremath{\emptyset}},description={the set containing no elements}
}
13

If you want the symbol in the name field then you must supply a sort value withOptions 1 and 3 otherwise you’ll end up with errors from TEX or xindy. With Option 2(makeindex) it’s not quite so important but you may find the resulting order is a littleodd. For example:
\newglossaryentry{emptyset}{
name={\ensuremath{\emptyset}},sort={empty set},description={the set containing no elements}
}
This displays the symbol as ∅ but sorts according to “empty set”. You may want toconsider using glossaries-extra’s symbols package option which provides
\glsxtrnewsymbol[〈options〉]{〈label〉}{〈symbol〉}
This internally uses \newglossaryentry but automatically sets the sort key to the〈label〉. For example:
\documentclass{article}
\usepackage[symbols]{glossaries-extra}
\makeglossaries
\glsxtrnewsymbol % requires glossaries-extra.sty 'symbols' option[description={the set containing no elements}]{emptyset}% label (and sort value){\ensuremath{\emptyset}}% symbol
\begin{document}\gls{emptyset}
\printglossaries\end{document}
Now the sort value is “emptyset” rather than the previous “empty set”.With bib2gls you can define this in the .bib file as
@entry{emptyset,name={\ensuremath{\emptyset}},description={the set containing no elements}
}
in which case bib2gls will try to interpret the name field to determine the sort value.Alternatively you can use:
@symbol{emptyset,name={\ensuremath{\emptyset}},
14

description={the set containing no elements}}
which will use the label (emptyset) as the sort value. (You don’t need the symbolspackage option in this case, unless you want a separate symbols list.) The correspond-ing document (where the definition is in the file entries.bib) is now:
\documentclass{article}
\usepackage[record]{glossaries-extra}
\GlsXtrLoadResources[src=entries]
\begin{document}\gls{emptyset}
\printunsrtglossaries\end{document}
3 Using Entries
Once you have defined your entries, as described above, you can reference them inyour document. There are a number of commands to do this, but the most commonone is:
\gls{〈label〉}
where 〈label〉 is the label you assigned to the entry when you defined it. For exam-ple, \gls{fishage} will display “Fish Age” in the text (given the definition from theprevious section). If you are using bib2gls then this will display ?? (like \ref and\cite) until bib2gls has created the relevant files and LATEX is rerun.
If you are using the hyperref package (remember to load it before glossaries) \glswill create a hyperlink to the corresponding entry in the glossary. If you want to sup-press the hyperlink for a particular instance, use the starred form \gls* for example,\gls*{fishage}. The other commands described in this section all have a similarstarred form.
If the entry was defined as an acronym (using \newacronym with glossaries de-scribed above) or an abbreviation (using \newabbreviation with glossaries-extra),then \gls will display the full form the first time it’s used and just the short form onsubsequent use. For example, if the style is set to long-short, then \gls{svm} willdisplay “support vector machine (SVM)” the first time it’s used, but the next occurrenceof \gls{svm} will just display “SVM”. (If you use \newacronym with glossaries-extrathe default doesn’t show the long form on first use. You’ll need to change the style first,as described earlier.)
If you want the plural form, you can use:
15

\glspl{〈label〉}
instead of \gls{〈label〉}. For example, \glspl{set} displays “sets”.If the term appears at the start of a sentence, you can convert the first letter to upper
case using:
\Gls{〈label〉}
for the singular form or
\Glspl{〈label〉}
for the plural form. For example:
\Glspl{set} are collections.
produces “Sets are collections”.If you’ve specified a symbol using the symbol key, you can display it using:
\glssymbol{〈label〉}
4 Displaying a List of Entries
In Section 1, I mentioned that there are three options you can choose from to createan automatically sorted glossary with the base glossaries package. These are also avail-able with the extension package glossaries-extra along with a fourth option. These fouroptions are listed below in a little more detail. Table 1 summarises the main advan-tages and disadvantages. (There’s a more detailed summary in the main glossaries usermanual.)
Option 1:
This is the simplest option but it’s slow and if you want a sorted list, it doesn’twork for non-Latin alphabets. The namemustn’t contain commands (or, if it does,the sort value must be supplied) unless you have the package option sanitizesortor sort=def or sort=use.
1. Add \makenoidxglossaries to your preamble (before you start definingyour entries, as described in Section 2).
2. Put
\printnoidxglossary[sort=〈order〉,〈other options〉]
16
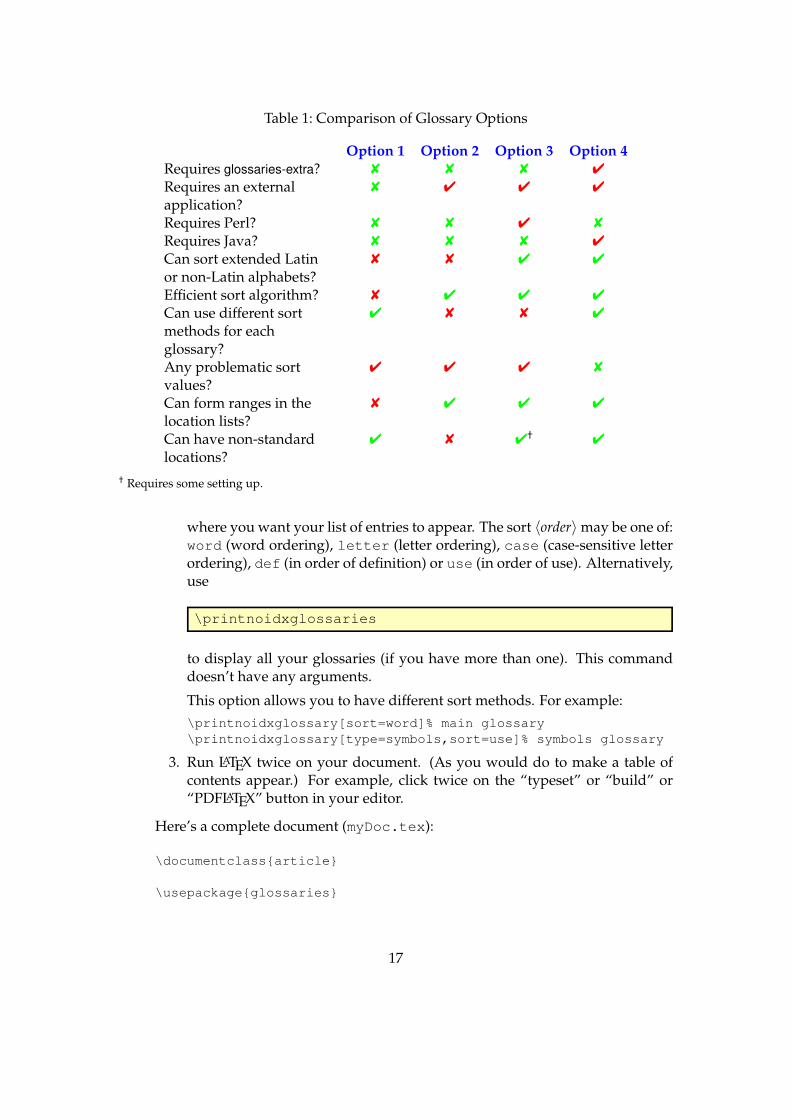
Table 1: Comparison of Glossary Options
Option 1 Option 2 Option 3 Option 4Requires glossaries-extra? 8 8 8 4
Requires an externalapplication?
8 4 4 4
Requires Perl? 8 8 4 8
Requires Java? 8 8 8 4
Can sort extended Latinor non-Latin alphabets?
8 8 4 4
Efficient sort algorithm? 8 4 4 4
Can use different sortmethods for eachglossary?
4 8 8 4
Any problematic sortvalues?
4 4 4 8
Can form ranges in thelocation lists?
8 4 4 4
Can have non-standardlocations?
4 8 4† 4
† Requires some setting up.
where you want your list of entries to appear. The sort 〈order〉 may be one of:word (word ordering), letter (letter ordering), case (case-sensitive letterordering), def (in order of definition) or use (in order of use). Alternatively,use
\printnoidxglossaries
to display all your glossaries (if you have more than one). This commanddoesn’t have any arguments.
This option allows you to have different sort methods. For example:\printnoidxglossary[sort=word]% main glossary\printnoidxglossary[type=symbols,sort=use]% symbols glossary
3. Run LATEX twice on your document. (As you would do to make a table ofcontents appear.) For example, click twice on the “typeset” or “build” or“PDFLATEX” button in your editor.
Here’s a complete document (myDoc.tex):
\documentclass{article}
\usepackage{glossaries}
17
\makenoidxglossaries % use TeX to sort
\newglossaryentry{sample}{name={sample},description={an example}}
\begin{document}A \gls{sample}.
\printnoidxglossaries % iterate over all indexed entries\end{document}
Document build:
pdflatex myDocpdflatex myDoc
Option 2:
This option uses an application called makeindex to sort the entries. This ap-plication comes with all modern TEX distributions, but it’s hard-coded for thenon-extended Latin alphabet. This process involves making LATEX write the glos-sary information to a temporary file which makeindex reads. Then makeindexwrites a new file containing the code to typeset the glossary. LATEX then readsthis file on the next run. The makeindex application is automatically invoked bythe helper makeglossaries script, which works out all the appropriate settingsfrom the .aux file.
1. If you are using ngerman1 or some other package that makes the double-quote character " a shorthand, then use \GlsSetQuote to change this tosome other character. For example:\GlsSetQuote{+}
Use this as soon as possible after you’ve loaded the glossaries package.
2. Add \makeglossaries to your preamble (before you start defining yourentries).
3. Put
\printglossary[〈options〉]
where you want your list of entries (glossary) to appear. (The sort key isn’tavailable in 〈options〉.) Alternatively, use
\printglossaries
1deprecated, use babel instead
18

which will display all glossaries (if you have more than one). This commanddoesn’t have any arguments.
All glossaries are sorted using the same method which may be identifiedwith one of the package options: sort=standard (default), sort=use orsort=def.
4. Run LATEX on your document. This creates files with the extensions .gloand .ist (for example, if your LATEX document is called myDoc.tex, thenyou’ll have two extra files called myDoc.glo and myDoc.ist). If you lookat your document at this point, you won’t see the glossary as it hasn’t beencreated yet.
5. Run makeglossaries with the base name of your document (without the.tex) extension. If you have access to a terminal or a command prompt(for example, the MSDOS command prompt for Windows users or the bashconsole for Unix-like users) then you need to run the command:makeglossaries myDoc
(Replace myDoc with the base name of your LATEX document file withoutthe .tex extension. Avoid spaces in the file name.) If you don’t have Perlinstalled use makeglossaries-lite instead:makeglossaries-lite myDoc
Some beginners get confused by makeglossaries the application (runas a system command) and \makeglossaries the LATEX commandwhich should be typed in the document preamble. These are twodifferent concepts that happen to have similar looking names.
If you don’t know how to use the command prompt, then you can probablyconfigure your text editor to add makeglossaries (or makeglossaries-lite)as a build tool, but each editor has a different method of doing this, so I can’tgive a general description. You will have to check your editor’s manual. Ifyou still have problems, try adding the automake package option:\usepackage[automake]{glossaries}
The default sort is word order (“sea lion” comes before “seal”). If you wantletter ordering you need to add the order=letter package option\usepackage[order=letter]{glossaries}
6. Once you have successfully completed the previous step, you can now runLATEX on your document again.
19

Here’s a complete document (myDoc.tex):
\documentclass{article}
\usepackage{glossaries}
\makeglossaries % create makeindex files
\newglossaryentry{sample}{name={sample},description={an example}}
\begin{document}A \gls{sample}.
\printglossaries % input files created by makeindex\end{document}
Document build:
pdflatex myDocmakeglossaries myDocpdflatex myDoc
or
pdflatex myDocmakeglossaries-lite myDocpdflatex myDoc
Option 3:
This option uses an application called xindy to sort the entries. This applicationis more flexible than makeindex and is able to sort extended Latin or non-Latinalphabets. It comes with both TEX Live and MiKTEX. Since xindy is a Perl script,you will also need to ensure that Perl is installed. In a similar way to Option 2, thisoption involves making LATEX write the glossary information to a temporary filewhich xindy reads. Then xindy writes a new file containing the code to typesetthe glossary. LATEX then reads this file on the next run. The xindy application isautomatically invoked by the helper makeglossaries script, which works outall the appropriate settings from the .aux file.
1. Add the xindy option to the glossaries package option list:\usepackage[xindy]{glossaries}
2. Add \makeglossaries to your preamble (before you start defining yourentries).
20

3. Put
\printglossary[〈options〉]
where you want your list of entries (glossary) to appear. (The sort key isn’tavailable in 〈options〉.) Alternatively, use
\printglossaries
All glossaries are sorted using the same method which may be identifiedwith one of the package options: sort=standard (default), sort=use orsort=def.
4. Run LATEX on your document. This creates files with the extensions .gloand .xdy (for example, if your LATEX document is called myDoc.tex, thenyou’ll have two extra files called myDoc.glo and myDoc.xdy). If you lookat your document at this point, you won’t see the glossary as it hasn’t beencreated yet.
5. Run makeglossaries with the base name of the document (omitting the.tex extension). If you have access to a terminal or a command prompt(for example, the MSDOS command prompt for Windows users or the bashconsole for Unix-like users) then you need to run the command:makeglossaries myDoc
(Replace myDoc with the base name of your LATEX document file without the.tex extension. Avoid spaces in the file name. If you don’t know how touse the command prompt, then as mentioned above, you may be able toconfigure your text editor to add makeglossaries as a build tool.
The default sort is word order (“sea lion” comes before “seal”). If you wantletter ordering you need to add the order=letter package option:\usepackage[xindy,order=letter]{glossaries}
6. Once you have successfully completed the previous step, you can now runLATEX on your document again.
Here’s a complete document (myDoc.tex):
\documentclass{article}
\usepackage[xindy]{glossaries}
\makeglossaries % create xindy files
21

\newglossaryentry{sample}{name={sample},description={an example}}
\begin{document}A \gls{sample}.
\printglossaries % input files created by xindy\end{document}
Document build:
pdflatex myDocmakeglossaries myDocpdflatex myDoc
Option 4:
This requires the extension package glossaries-extra and an application calledbib2gls. This application is able to sort extended Latin or non-Latin alphabets.It comes with both TEX Live and MiKTEX but requires at least Java 7. This methodworks differently to Options 2 and 3. Instead of creating a file containing the codeto typeset the glossary it creates a .glstex file containing the entry definitionsfetched from the .bib file (or files), but only those entries that are required in thedocument are defined and they are defined in the order obtained from the cho-sen sort method. This means that you can just use \printunsrtglossary todisplay each glossary (or \printunsrtglossaries to display them all).
1. Add the record option to the glossaries-extra package option list:\usepackage[record]{glossaries-extra}
2. Add one or more
\GlsXtrLoadResources[src={〈bib list〉},〈options〉]
to your preamble where 〈bib list〉 is the list of .bib files containing the en-tries. You may use different sort methods for each resource set. For example:\usepackage[record,% using bib2glsabbreviations,symbols,numbers
]{glossaries-extra}
\GlsXtrLoadResources[src={terms},% entries in terms.bibtype=main,% put these entries in the 'main' (default) listsort={de-CH-1996}% sort according to this locale
22

]\GlsXtrLoadResources[
src={abbrvs},% entries in abbrvs.bibtype=abbreviations,% put these entries in the 'abbreviations' listsort={letter-case}% case-sensitive letter (non-locale) sort
]\GlsXtrLoadResources[
src={syms},% entries in syms.bibtype=symbols,% put these entries in the 'symbols' listsort={use}% sort according to first use in the document
]\GlsXtrLoadResources[
src={constants},% entries in constants.bibtype=numbers,% put these entries in the 'numbers' listsort-field={user1},% sort according to this fieldsort={double}% double-precision sort
]
The last resource set assumes that the entries defined in the file constants.bibhave a number stored in the user1 field. For example:@number{pi,
name={\ensuremath{\pi}},description={pi},user1={3.141592654}
}
3. Put
\printunsrtglossary[type={〈type〉},〈options〉]
where you want your list of entries (glossary) to appear. (The sort keyisn’t available in 〈options〉. It needs to be used in \GlsXtrLoadResourcesinstead.) Alternatively, use
\printunsrtglossaries
4. Run LATEX on your document. The record option adds information to the.aux file that provides bib2gls with all required details for each resourceset. For example, if the file is called myDoc.tex:pdflatex myDoc
5. Run bib2gls
bib2gls myDoc
or (if you need letter groups)bib2gls --group myDoc
23

6. Run LATEX again.
Here’s a complete document (myDoc.tex):
\documentclass{article}
\usepackage[record]{glossaries-extra}
\GlsXtrLoadResources % input file created by bib2gls[% instructions to bib2gls:
src={entries}, % terms defined in entries.bibsort={en-GB}% sort according to this locale
]
\newglossaryentry{sample}{name={sample},description={an example}}
\begin{document}A \gls{sample}.
\printunsrtglossaries % iterate over all defined entries\end{document}
The accompanying entries.bib file:
@entry{sample,name = {sample},description = {an example}
}
Document build:
pdflatex myDocbib2gls myDocpdflatex myDoc
If you are having difficulty integrating makeglossaries into your document buildprocess, you may want to consider using arara, which is a Java application thatsearches the document for special comment lines that tell arara which applicationsto run. For example, the file myDoc.tex might start with:
% arara: pdflatex% arara: makeglossaries% arara: pdflatex\documentclass{article}\usepackage{glossaries}\makeglossaries
then to build the document you just need the single system call:
arara myDoc
24

(The currently pending version 4.0 of arara has directives for makeglossaries-liteand bib2gls. These aren’t available in earlier versions, but you could try copying andadapting the makeglossaries.yaml file and replace makeglossaries as appropri-ate.)
When sorting the entries, the string comparisons are made according to each entry’ssort key. If this is omitted, the name key is used. For example, recall the earlierdefinition:
\newglossaryentry{elite}{
name={{\'e}lite},description={select group or class}
}
No sort key was used, so it’s set to the same as the name key: {\’e}lite. How thisis interpreted depends on which option you have used:
Option 1: By default, the accent command will be stripped so the sort value will beelite. This will put the entry in the “E” letter group. However if you use thesanitizesort=true package option, the sort value will be interpreted as the sequenceof characters: { \ ’ e } l i t and e. This will place this entry in the “symbols”group since it starts with a symbol.
Option 2: The sort key will be interpreted the sequence of characters: { \ ’ e } l i tand e. The first character is an opening curly brace { so makeindex will put thisentry in the “symbols” group.
Option 3: xindy disregards LATEX commands so it sorts on elite, which puts this en-try in the “E” group. If stripping all commands leads to an empty string (suchas \ensuremath{\emptyset}) then xindy will fail, so in these situations youneed to provide an appropriate sort value that xindy will accept.
xindy merges entries with duplicate sort values. xindy forbids empty sortvalues. A sort value may degrade into an empty or duplicate value oncexindy has stripped all commands and braces.
Option 4: bib2gls has a primitive LATEX parser that recognises a limited set of com-mands, which includes the standard accent commands and some maths com-mands, so it can convert {\’e}lite to élite. It disregards unknown com-mands. This may lead to an empty sort value, but bib2gls doesn’t mind that.
Note that even if the name is given as {\’e}lite, the letter group heading (if the--group switch is used) may end up with the character É depending on the localeused by the sort comparator. In this case you will need to ensure the documentcan support this character either with inputenc or by switching to a LATEX enginewith native UTF-8 support.
25

If the inputenc package is used:
\usepackage[utf8]{inputenc}
and the entry is defined as:
\newglossaryentry{elite}{name={{é}lite},description={select group or class}
}
then:
Option 1: By default the sort value will be interpreted as elite so the entry will beput in the “E” letter group. If you use the sanitizesort=true package option, the sortvalue will be interpreted as élite where é has been sanitized (so it’s no longeran active character and is in fact seen as two octets 0xC3 0xA9) which will putthis entry before the “A” letter group. (The group is determined by the first octet0xC3.)
Option 2: makeindex sees é as two octets (0xC3 0xA9) rather than a single characterso it tries to put élite in the 0xC3 (“Ô) letter group (which, in this case, comesafter “Z”).
Option 3: xindy will correctly recognise the sort value élite and will place it in what-ever letter group is appropriate for the given language setting. (In English, thiswould just be the “E” letter group, but another language might put it in the “É”letter group.)
Option 4: The inputenc package doesn’t affect the encoding used with .bib entry def-initions, since these are dependent on the encoding used to save the .bib file(although the labels must still be ASCII). You can help bib2gls (and JabRef) byputting an encoding comment at the start of the .bib file:
% Encoding: UTF-8
With the correct encoding set up, bib2gls will determine that the sort value isélite and will place it in whatever letter group is appropriate for the given sortrule. For example, sort=en-GB (or just sort=en) will put élite in the “E”letter group, but another language might put it in the “É” letter group.
Therefore if you have extended Latin or non-Latin characters, your best option isto use either xindy (Option 3) or bib2gls (Option 4) with the inputenc or fontspecpackage. If you use makeindex (Option 2) you need to specify the sort key like this:
\newglossaryentry{elite}{
26

name={{\'e}lite},sort={elite},description={select group or class}
}
or
\newglossaryentry{elite}{
name={{é}lite},sort={elite},description={select group or class}
}
If you use Option 1, you may or may not need to use the sort key, but you will needto be careful about fragile commands in the name key if you don’t set the sort key.
If you use Option 3 and the name only contains a command or commands (such as\P or \ensuremath{\pi}) you must add the sort key. This is also advisable for theother options (except Option 4), but is essential for Option 3. For example:
\newglossaryentry{P}{name={\P},sort={P},description={paragraph symbol}}
5 Customising the Glossary
The default glossary style uses the description environment to display the entry list. Eachentry name is set in the optional argument of \item which means that it will typicallybe displayed in bold. You can switch to medium weight by redefining \glsnamefont:
\renewcommand*{\glsnamefont}[1]{\textmd{#1}}
Some classes and packages redefine the description environment in such as way that’sincompatible with the glossaries package. In which case you’ll need to select a differentglossary style (see below).
By default, a full stop is appended to the description (unless you use glossaries-extra).To prevent this from happening use the nopostdot package option:
\usepackage[nopostdot]{glossaries}
or to add it with glossaries-extra:
\usepackage[postdot]{glossaries-extra}
By default, a location list is displayed for each entry (unless you use \printunsrtglossarywithout bib2gls). This refers to the document locations (for example, the page num-ber) where the entry has been referenced. If you use Options 2 or 3 described in Sec-tion 4 or Option 4 (with bib2gls and glossaries-extra) then location ranges will be com-pressed. For example, if an entry was used on pages 1, 2 and 3, with Options 2 or 3 or
27

Option 4 the location list will appear as 1–3, but with Option 1 it will appear as 1, 2,3. If you don’t want the locations displayed you can hide them using the nonumberlistpackage option:
\usepackage[nonumberlist]{glossaries}
or with bib2gls use save-locations=false in the optional argument of the ap-propriate \GlsXtrLoadResources (it’s possible to have some resource sets with lo-cations and some without).
Entries are grouped according to the first letter of each entry’s sort key. By defaulta vertical gap is placed between letter groups. You can suppress this with the nogroup-skip package option:
\usepackage[nogroupskip]{glossaries}
If the default style doesn’t suit your document, you can change the style using:
\setglossarystyle{〈style name〉}
There are a number of predefined styles. Glossaries can vary from a list of symbols witha terse description to a list of words or phrases with descriptions that span multipleparagraphs, so there’s no “one style fits all” solution. You need to choose a style thatsuits your document. For example:
\setglossarystyle{index}
You can also use the style package option for the preloaded styles. For example:
\usepackage[style=index]{glossaries}
Examples:
1. You have entries where the name is a symbol and the description is a brief phraseor short sentence. Try one of the “mcol” styles defined in the glossary-mcols pack-age. For example:
\usepackage[nopostdot]{glossaries}\usepackage{glossary-mcols}\setglossarystyle{mcolindex}
or
\usepackage[stylemods={mcols},style=mcolindex]{glossaries-extra}
2. You have entries where the name is a word or phrase and the description spansmultiple paragraphs. Try one of the “altlist” styles. For example:
\usepackage[nopostdot]{glossaries}\setglossarystyle{altlist}
28

or
\usepackage[stylemods,style=altlist]{glossaries-extra}
3. You have entries where the name is a single word, the description is brief, and anassociated symbol has been set. Use one of the styles that display the symbol (notall of them do). For example, one of the tabular styles:
\usepackage[nopostdot,nonumberlist]{glossaries}\setglossarystyle{long4col}
or one of the “tree” styles:
\usepackage[nopostdot,nonumberlist]{glossaries}\setglossarystyle{tree}
If your glossary consists of a list of abbreviations and you also want to specify a de-scription as well as the long form, then you need to use an abbreviation style that willsuit the glossary style. For example, use the long-short-desc acronym style:
\setacronymstyle{long-short-desc}
Define the acronyms with a description:
\newacronym[description={statistical pattern recognition technique}]{svm}{SVM}{support vector machine}
Alternatively with glossaries-extra:
\setabbreviationstyle{long-short-desc}
\newabbreviation[description={statistical pattern recognition technique}]{svm}{SVM}{support vector machine}
Choose a glossary style that suits wide entry names. For example:
\setglossarystyle{altlist}
6 Multiple Glossaries
The glossaries package predefines a default main glossary. When you define an entry(using one of the commands described in Section 2), that entry is automatically assignedto the default glossary, unless you indicate otherwise using the type key. However youfirst need to make sure the desired glossary has been defined. This is done using:
\newglossary[〈glg〉]{〈label〉}{〈gls〉}{〈glo〉}{〈title〉}
29
The 〈label〉 is a label that uniquely identifies this new glossary. As with other typesof identifying labels, be careful not to use active characters in 〈label〉. The finalargument 〈title〉 is the section or chapter heading used by \printglossary or\printnoidxglossary. The other arguments indicate the file extensions used bymakeindex/xindy (described in Section 4). If you use Option 1 described above (orbib2gls and \printunsrtglossaries), then the 〈glg〉, 〈gls〉 and 〈glo〉 argumentsare ignored, in which case you may prefer to use the starred version where you don’tspecify the extensions:
\newglossary*{〈label〉}{〈title〉}
In the case of Options 2 or 3, all glossary definitions must come before \makeglossaries.(Entries definitions should come after \makeglossaries.) In the case of Option 4,all glossary definitions must come before any \GlsXtrLoadResources that requiresthem.
Since it’s quite common for documents to have both a list of terms and a list of ab-breviations, the glossaries package provides the package option acronym (or acronyms),which is a convenient shortcut for
\newglossary[alg]{acronym}{acr}{acn}{\acronymname}
The option also changes the behaviour of \newacronym so that acronyms are auto-matically put in the list of acronyms instead of the main glossary. The glossaries-extrapackage also provides this option for abbreviations defined using \newacronym butadditionally has the package option abbreviations to create a list of abbreviations for\newabbreviation.
There are some other package options for creating commonly used lists: symbols (listsof symbols), numbers (lists of numbers), index (index of terms without descriptions de-fined with \newterm[〈options〉]{〈label〉}).
For example, suppose you want a main glossary for terms, a list of acronyms anda list of notation:
\usepackage[acronyms]{glossaries}\newglossary[nlg]{notation}{not}{ntn}{Notation}
After \makeglossaries (or \makenoidxglossaries) you can define the entries inthe preamble. For example:
\newglossaryentry{gls:set}{% This entry goes in the `main' glossary
name=set,description={A collection of distinct objects}
}
% This entry goes in the `acronym' glossary:\newacronym{svm}{svm}{support vector machine}
30

\newglossaryentry{not:set}{% This entry goes in the `notation' glossary:
type=notation,name={\ensuremath{\mathcal{S}}},description={A set},sort={S}}
or if you don’t like using \ensuremath:
\newglossaryentry{not:set}{% This entry goes in the `notation' glossary:
type=notation,name={$\mathcal{S}$},text={\mathcal{S}},description={A set},sort={S}}
Each glossary is displayed using:
\printnoidxglossary[type=〈type〉]
(Option 1) or
\printglossary[type=〈type〉]
(Options 2 and 3). Where 〈type〉 is the glossary label. If the type is omitted the defaultmain glossary is assumed.
If you’re using bib2gls then each glossary is displayed using:
\printunsrtglossary[type=〈type〉]
With this method you don’t use \makeglossaries or \makenoidxglossaries. In-stead you can assign the entry type with the resource command. For example:
\usepackage[record,abbreviations,symbols]{glossaries-extra}
\GlsXtrLoadResources[src={terms}, % entries defined in terms.bibtype={main}% put in main glossary]\GlsXtrLoadResources[src={abbrvs}, % entries defined in abbrvs.bibtype={abbreviations}% put in abbreviations glossary]\GlsXtrLoadResources[src={syms}, % entries defined in syms.bibtype={symbols}% put in symbols glossary]
31

Later in the document:
\printunsrtglossary % main\printunsrtglossary[type=abbreviations]\printunsrtglossary[type=symbols]
There’s a convenient shortcut that will display all the defined glossaries dependingon the indexing method:
\printnoidxglossaries
(Option 1) or
\printglossaries
(Options 2 and 3) or (glossaries-extra only)
\printunsrtglossaries
If you use Option 1, you don’t need to do anything else. If you use Options 2 or 3with the makeglossaries Perl script or the makeglossaries-lite Lua script,you similarly don’t need to do anything else. If you use Options 2 or 3 without themakeglossaries Perl script then you need to make sure you run makeindex/xindyfor each defined glossary. The 〈gls〉 and 〈glo〉 arguments of \newglossary specify thefile extensions to use instead of .gls and .glo. The optional argument 〈glg〉 is the fileextension for the transcript file. This should be different for each glossary in case youneed to check for makeindex/xindy errors or warnings if things go wrong.
For example, suppose you have three glossaries in your document (main, acronymand notation), specified using:
\usepackage[acronyms]{glossaries}\newglossary[nlg]{notation}{not}{ntn}{Notation}
Then (assuming your LATEX document is in a file called myDoc.tex):
Option 2 Either use one makeglossaries or makeglossaries-lite call:
makeglossaries myDoc
or
makeglossaries-lite myDoc
Or you need to run makeindex three times:
makeindex -t myDoc.glg -s myDoc.ist -o myDoc.gls myDoc.glomakeindex -t myDoc.alg -s myDoc.ist -o myDoc.acr myDoc.acnmakeindex -t myDoc.nlg -s myDoc.ist -o myDoc.not myDoc.ntn
32

Option 3 Either use one makeglossaries call:
makeglossaries myDoc
Or you need to run xindy three times (be careful not to insert line breaks wherethe line has wrapped.)
xindy -L english -C utf8 -I xindy -M myDoc -t myDoc.glg-o myDoc.gls myDoc.gloxindy -L english -C utf8 -I xindy -M myDoc -t myDoc.alg-o myDoc.acr myDoc.acnxindy -L english -C utf8 -I xindy -M myDoc -t myDoc.nlg-o myDoc.not myDoc.ntn
Option 4 With bib2gls only one call is required:
pdflatex myDocbib2gls --group myDocpdflatex myDoc
(Omit --group if you don’t need letter groups.)
7 glossaries and hyperref
Take care if you use the glossaries package with hyperref. Contrary to the usual advicethat hyperref should be loaded last, glossaries (and glossaries-extra) must be loaded afterhyperref:
\usepackage[colorlinks]{hyperref}\usepackage{glossaries}
If you use hyperref make sure you use PDFLATEX rather than the LATEX to DVI engine. TheDVI format can’t break hyperlinks across a line so long glossary entries (such as the fullform of acronyms) won’t line wrap with the DVI engine. Also, hyperlinks in sub- orsuperscripts aren’t correctly sized with the DVI format.
By default, if the hyperref package has been loaded, commands like \gls will forma hyperlink to the relevant entry in the glossary. If you to disable this for all yourglossaries, then use
\glsdisablehyper
If you want hyperlinks suppressed for entries in specific glossaries, then use the no-hypertypes package option. For example, if you don’t want hyperlinks for entries inthe acronym and notation glossaries but you do want them for entries in the mainglossary, then do:
\usepackage[colorlinks]{hyperref}\usepackage[acronym,nohypertypes={acronym,notation}]{glossaries}\newglossary[nlg]{notation}{not}{ntn}{Notation}
33

If you want the hyperlinks suppressed the first time an entry is used, but you wanthyperlinks for subsequence references then use the hyperfirst=false package option:
\usepackage[colorlinks]{hyperref}\usepackage[hyperfirst=false]{glossaries}
Take care not to use non-expandable commands in PDF bookmarks. This isn’t spe-cific to the glossaries package but is a limitation of PDF bookmarks. Non-expandablecommands include commands like \gls, \glspl, \Gls and \Glspl. The hyper-ref package provides a way of specifying alternative text for the PDF bookmarks via\texorpdfstring. For example:
\section{The \texorpdfstring{\gls{fishage}}{Fish Age}}
However, it’s not a good idea to use commands like \gls in a section heading as you’llend up with the table of contents in your location list. Instead you can use
\glsentrytext{〈label〉}
This is expandable provided that the text key doesn’t contain non-expandable code.For example, the following works:
\section{The \glsentrytext{fishage}}
and it doesn’t put the table of contents in the location list.If you use glossaries-extra then use the commands that are provided specifically for
use in section headers. For example:
\section{The \glsfmttext{fishage}}
8 Cross-References
You can add a reference to another entry in a location list using the see={〈label list〉}key when you define an entry. The referenced entry (or entries) must also be defined.
For example:
\longnewglossaryentry{devonian}{name={Devonian}}%{%
The geologic period spanning from the end of theSilurian Period to the beginning of the Carboniferous Period.
This age was known for its remarkable variety offish species.
}
\newglossaryentry{fishage}{
name={Fish Age},
34

description={Common name for the Devonian period},see={devonian}
}
The cross-reference will appear as “see Devonian”. You can change the “see” tag usingthe format see=[〈tag〉]〈label〉. For example:
\newglossaryentry{latinalph}{
name={Latin alphabet},description={alphabet consisting of the lettersa, \ldots, z, A, \ldots, Z},see=[see also]{exlatinalph}
}\newglossaryentry{exlatinalph}{
name={extended Latin alphabet},description={The Latin alphabet extended to includeother letters such as ligatures or diacritics.}
}
If you use the see key in the optional argument of \newacronym, make sure youenclose the value in braces. For example:
\newacronym{ksvm}{ksvm}{kernel support vector machine}\newacronym[see={[see also]{ksvm}}]{svm}{svm}{support vector machine}
The glossaries-extra package provides a seealso key. This doesn’t allow a tag but be-haves much like see={[\seealsoname]{〈label〉}}. For example:
\newabbreviation{ksvm}{ksvm}{kernel support vector machine}\newabbreviation[seealso={ksvm}]{svm}{svm}{support vector machine}
Since the cross-reference appears in the location list, if you suppress the locationlist using the nonumberlist package option, then the cross-reference will also be sup-pressed. With bib2gls, don’t use the nonumberlist package option. Instead use thesave-locations=false in the resource options. For example:
\usepackage[record,abbreviations,symbols]{glossaries-extra}
\GlsXtrLoadResources[src={terms}, % entries defined in terms.bibtype={main}% put in main glossary
]\GlsXtrLoadResources[src={abbrvs}, % entries defined in abbrvs.bib
35

type={abbreviations},% put in abbreviations glossarysave-locations=false% no number list for these entries
]\GlsXtrLoadResources[src={syms}, % entries defined in syms.bibtype={symbols}% put in symbols glossary
]
9 Further Information
Further information can be found in the main glossaries user manual (glossaries-user.pdf) or in the glossaries FAQ. See also the glossaries-extra package and thebib2gls document, both of which can be found on CTAN (http://ctan.org/pkg/glossaries-extra and http://ctan.org/pkg/bib2gls). There is also an arti-cle on the glossaries and glossaries-extra packages on the LATEX Community’s2 KnowHow section and a chapter on the glossaries package in Using LATEX to Write a PhDThesis.
2http://www.latex-community.org/
36

![ATEX Package for Timing Diagrams The tikz timing Packagemirrors.ibiblio.org/CTAN/graphics/pgf/contrib/tikz... · 2017. 12. 20. · 1 Introduction This package uses the [pgf]tikz package](https://static.fdocuments.net/doc/165x107/60d71321372e1949da77f3ae/atex-package-for-timing-diagrams-the-tikz-timing-2017-12-20-1-introduction.jpg)