
The following is a Health Promotion Brief brought to you by: Marine Forces Reserve Semper Fit Health...
44
The following is a Health Promotion Brief brought to you by: Marine Forces Reserve Semper Fit Health Promotions
-
Upload
peregrine-long -
Category
Documents
-
view
217 -
download
0
Transcript of The following is a Health Promotion Brief brought to you by: Marine Forces Reserve Semper Fit Health...
The following is a Health Promotion Brief brought to you by:
Marine Forces Reserve Semper Fit
Health Promotions
INJURY PREVENTION:Structural Integrity & Integrated Flexibility
Overview
• When [Some] Pain is Gain– DOMS (Delayed Onset Muscle Soreness)
• When Pain is Not Gain– Symptoms of Injury– Classes of Injury
• It’s Your House– Check Your Foundation
• Four Corners• Pronation/Supination
– Check Your Frame• Holding Patterns
– Musculoskeletal Imbalances• Loosening Up
– Integrated Flexibility– Proprioceptive Neuromuscular Facilitation– Foam Rolling

When [Some] Pain is Gain
• Delayed Onset Muscle Soreness (DOMS):– Most soreness occurs 24-48 hrs after PT– Less soreness after 72 hrs– Slight burning feeling– No swelling or bruising– Pain alleviated by gentle stretching / massage
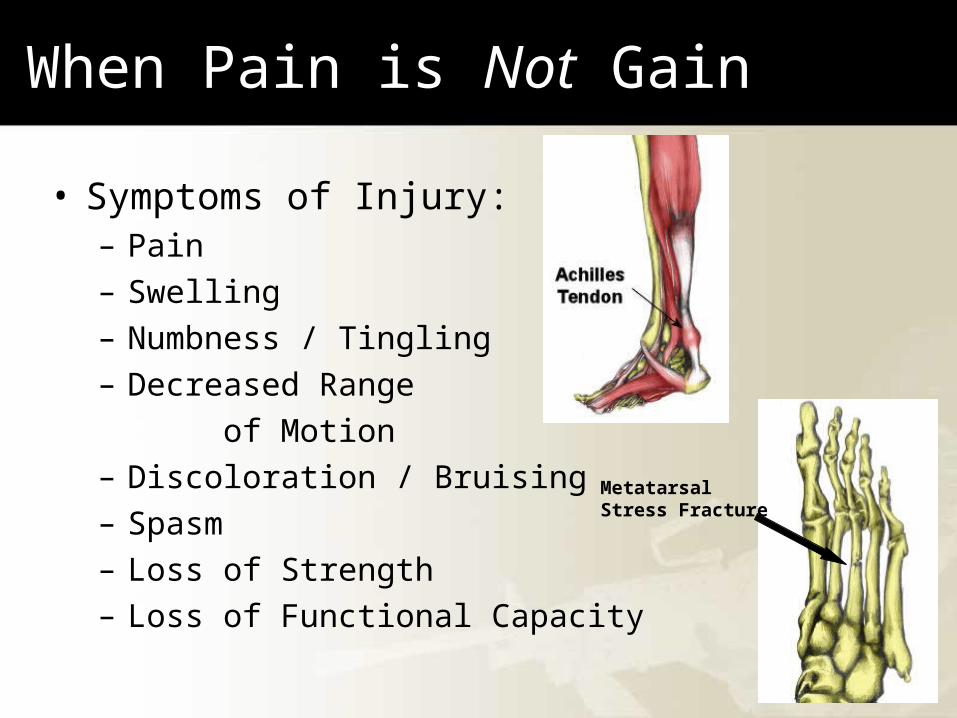
When Pain is Not Gain
• Symptoms of Injury:– Pain – Swelling – Numbness / Tingling – Decreased Range
of Motion– Discoloration / Bruising– Spasm– Loss of Strength– Loss of Functional Capacity
Metatarsal Stress Fracture

When Pain is Not Gain: 2 Classes of Injuries
Acute Chronic Onset: Immediate Onset: Gradual
Caused By: Trauma Caused By: Repeated Stress
Ex: Muscle Tears, Sprains Ex: Stress Fractures, Plantar Faciitis
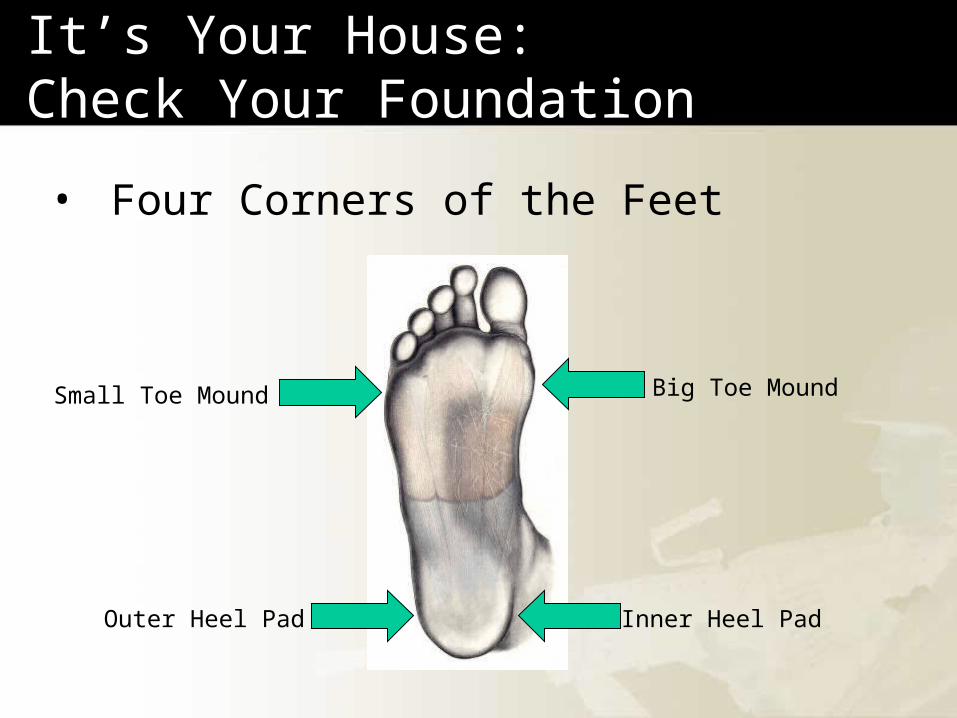
It’s Your House:Check Your Foundation
• Four Corners of the Feet
Small Toe Mound Big Toe Mound
Inner Heel PadOuter Heel Pad
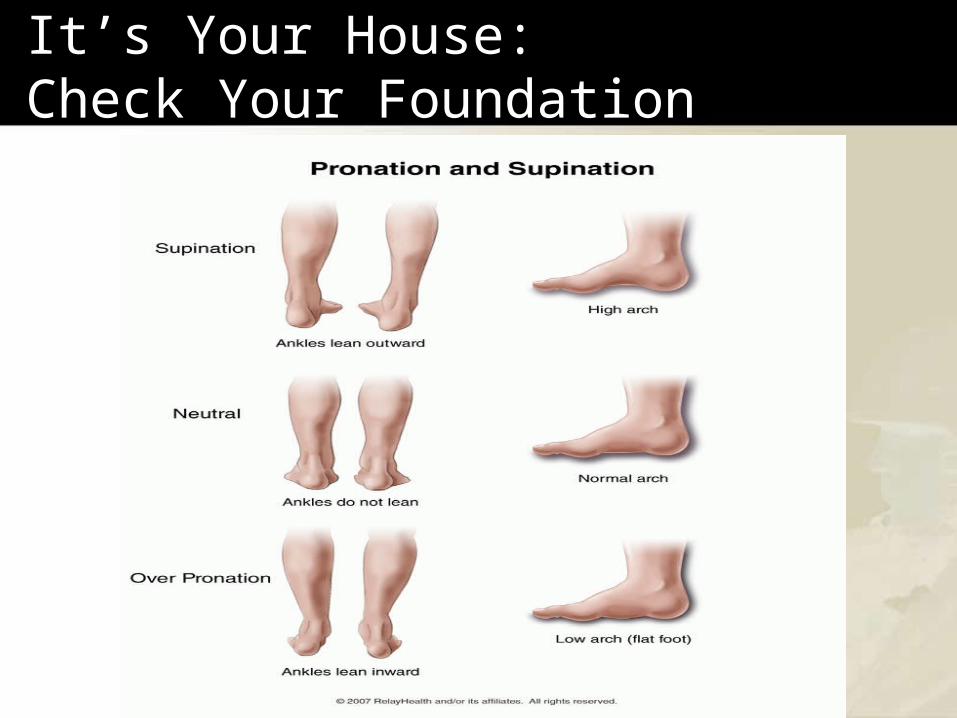
It’s Your House:Check Your Foundation

Stretches for Supination

Stretches for Pronation

It’s Your House:Check Your Frame
Strengthen From the Inside Out
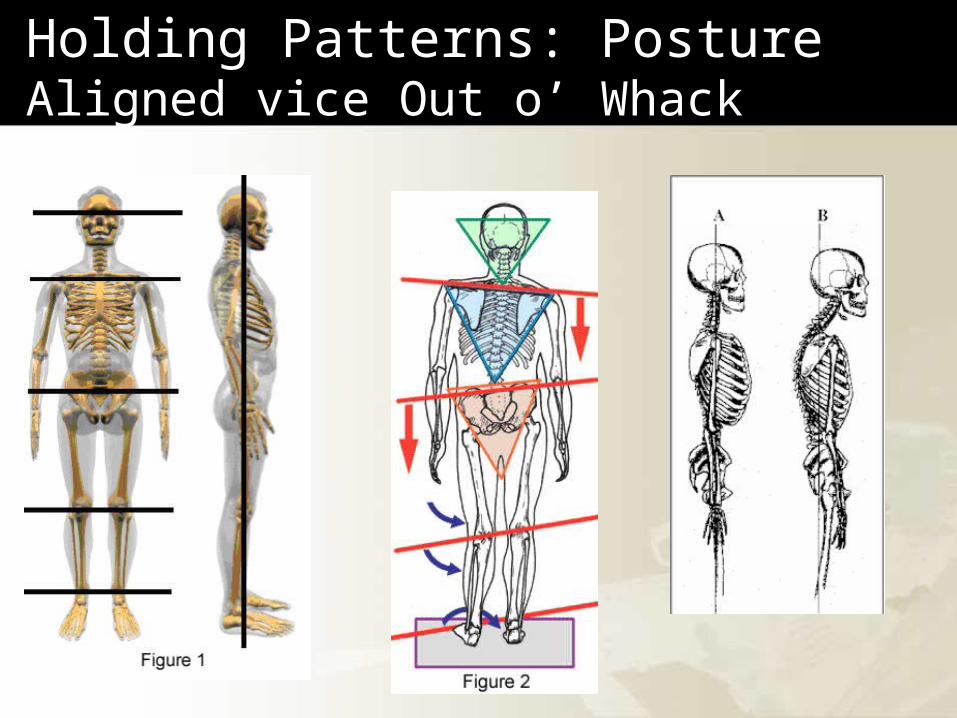
Holding Patterns: PostureAligned vice Out o’ Whack
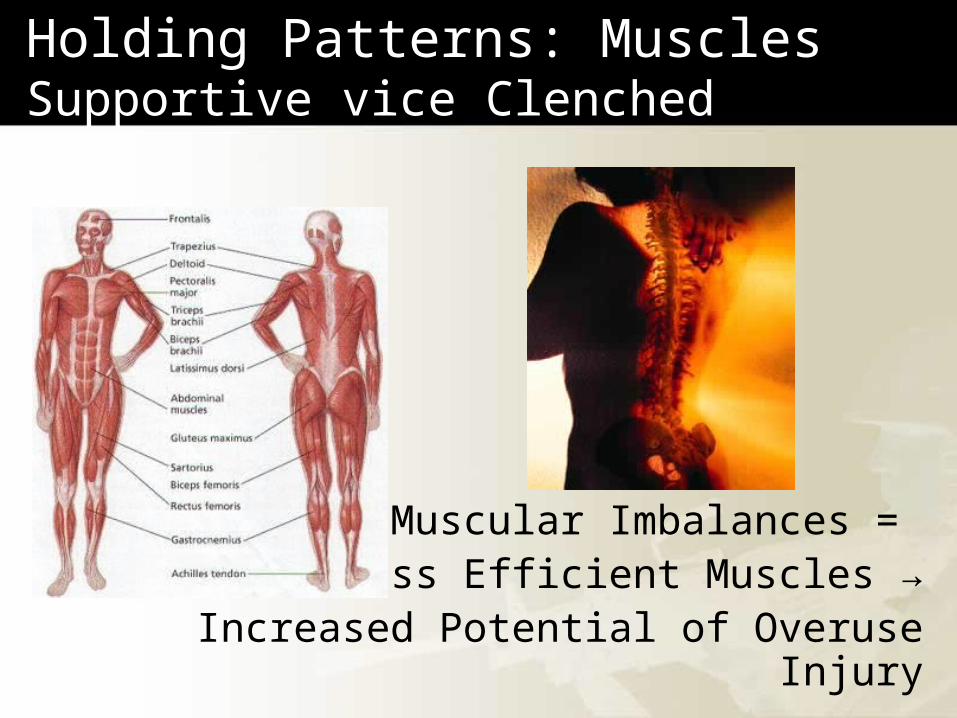
Holding Patterns: MusclesSupportive vice Clenched
Muscular Imbalances = Less Efficient Muscles →
Increased Potential of Overuse Injury

Holding Patterns: BreathDiaphragmatic vice Chest Breathing
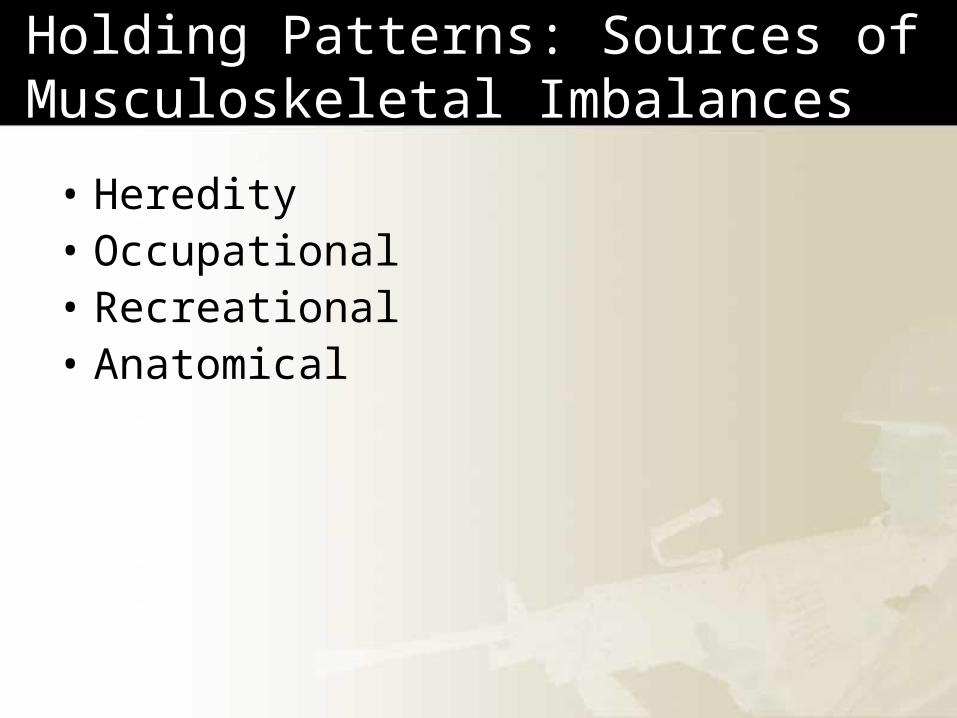
Holding Patterns: Sources of Musculoskeletal Imbalances
• Heredity• Occupational• Recreational• Anatomical

Holding Patterns: Musculoskeletal Imbalances
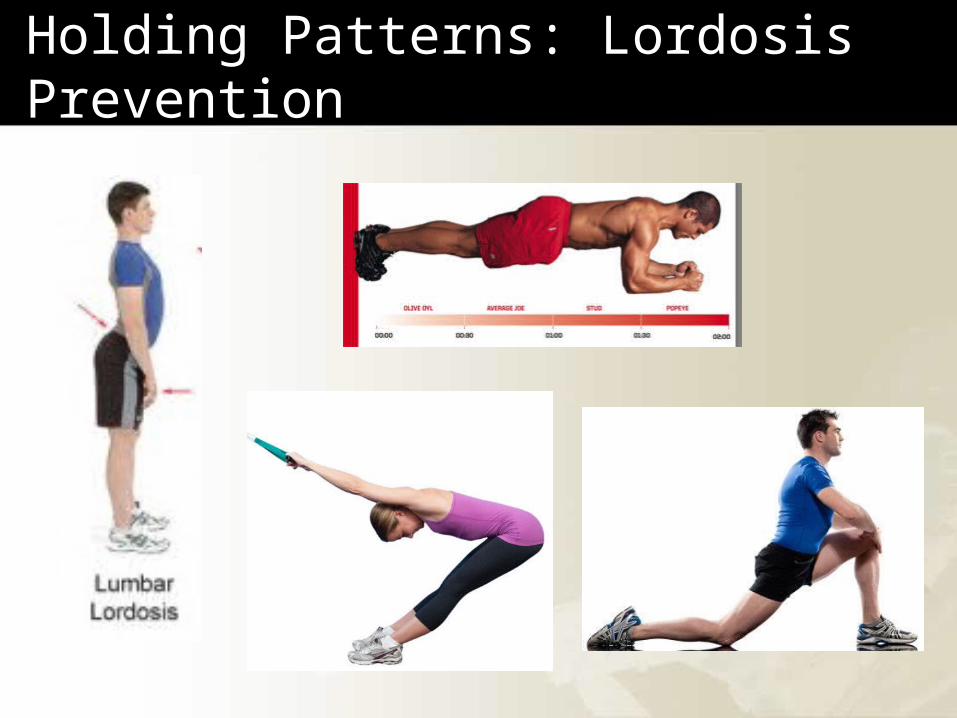
Holding Patterns: Lordosis Prevention
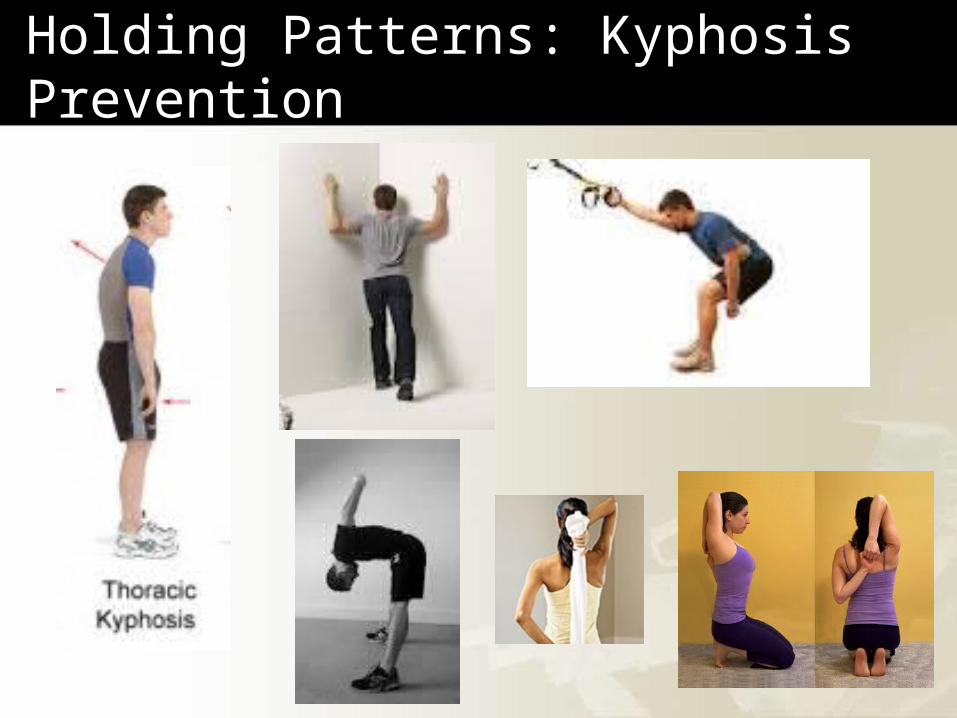
Holding Patterns: Kyphosis Prevention

Holding Patterns: Forward Head Prevention
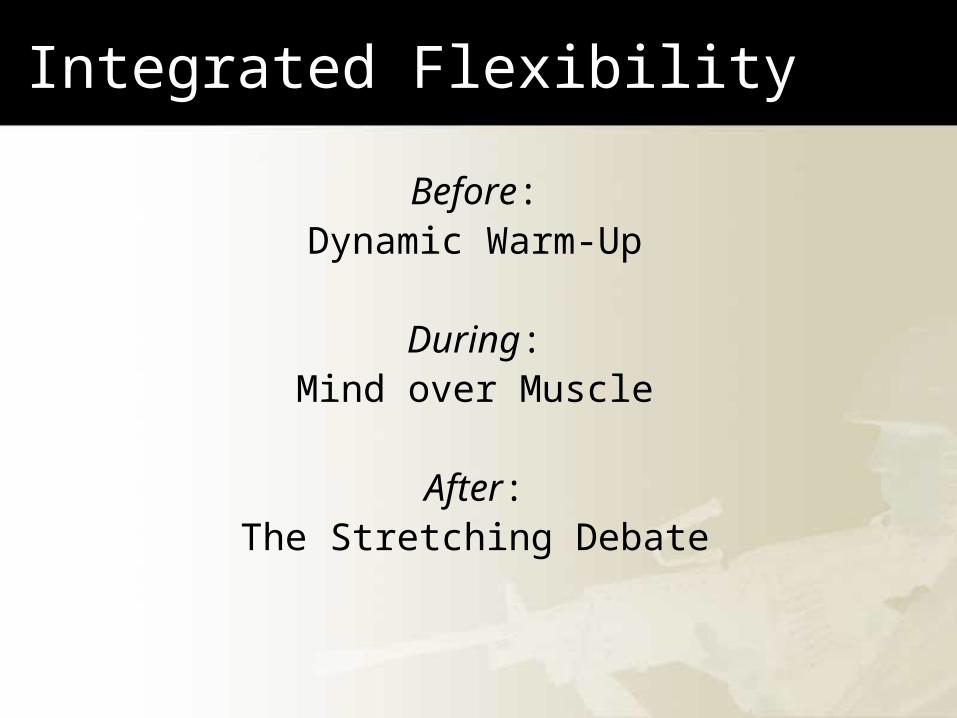
Integrated Flexibility
Before:Dynamic Warm-Up
During:Mind over Muscle
After:The Stretching Debate
Integrated Flexibility
• Static:– Low-force, long-duration, nonmoving– Hold stretch for 15 – 30 seconds– Has been shown to produce good results on warm muscles
• Ballistic or Dynamic: *NOT RECOMMENDED*– High-force, short-duration, bobbing, bouncing– Invokes a “stretch reflex” or muscle contraction that can increase muscle
tension• Proprioceptive Neuromuscular Facilitation (PNF)
– Static stretch immediately following contraction against resistance– Developed for rehab purposes in physical therapy– Superior to static & ballistic stretching– *Requires PARTNER TRAINED IN THE TECHNIQUE*
• Self Myofascial Release (SMR or foam rolling)– A foam roller is a tool to used to apply self-massage to various muscles
in the body. Use this technique by placing body weight on the foam roll and moving slowly up or down on a muscle, searching for tender areas or knots in the muscle. Once you find a tender area, stop and hold the pressure for 30 seconds.
Flexibility Guidelines
• Warm up muscles before stretching • Avoid bouncing or jerking• Stretch gently only to point of perceived
muscle tension• Move within normal range of motion• Stretching should not be painful• Flexibility varies greatly from person to
person (based on genetics & training)

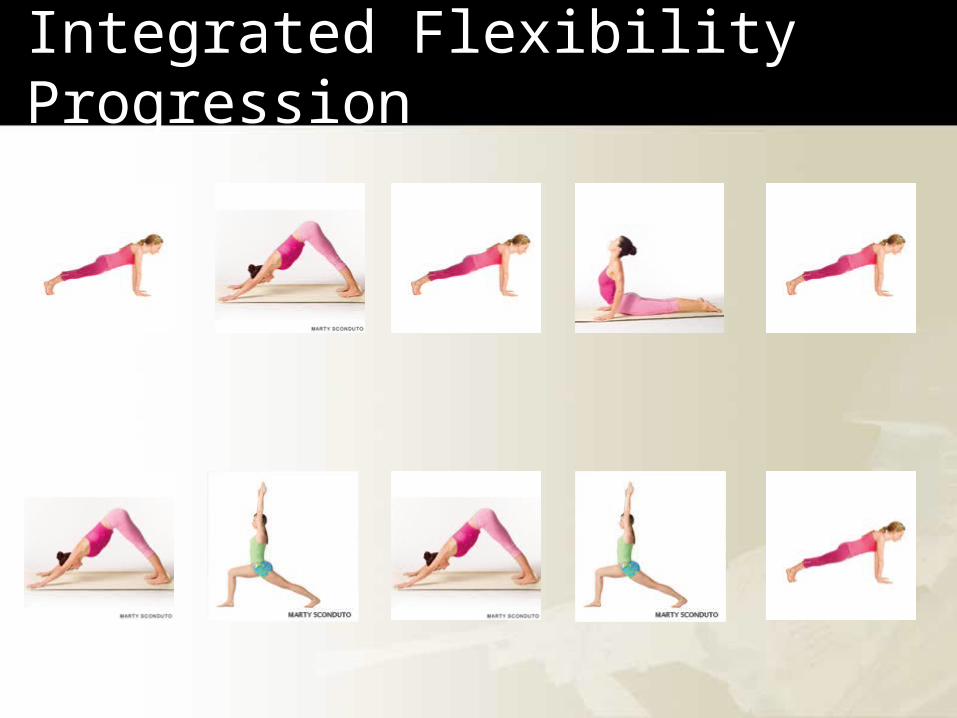
Integrated Flexibility Progression

Integrated Flexibility ProgressionStart in the plank position. Hold for 10-15 seconds.
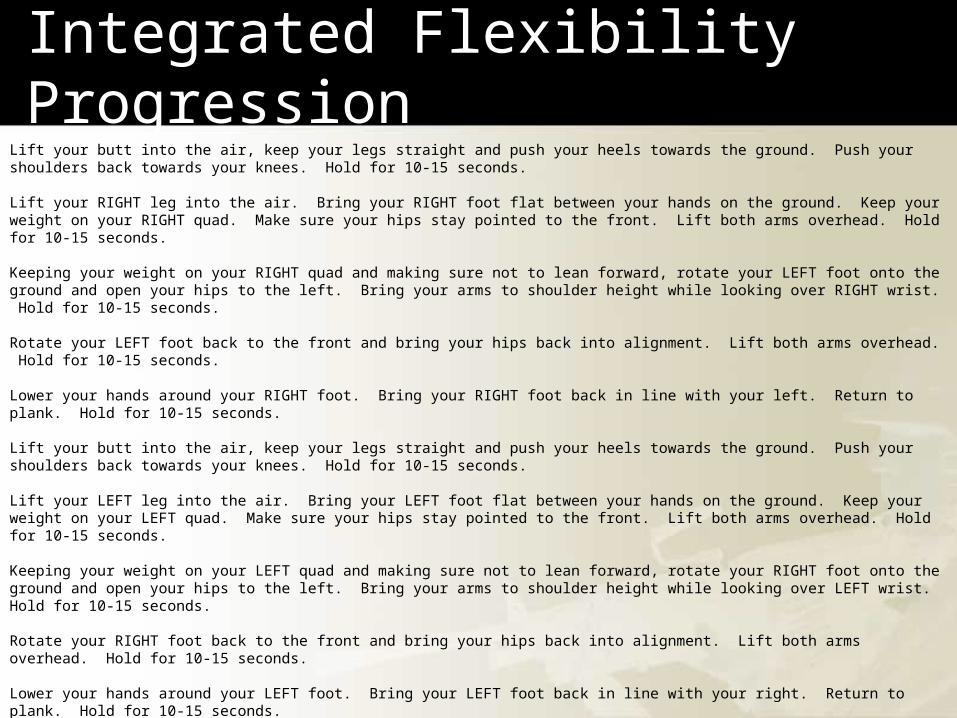
Lift your butt into the air, keep your legs straight and push your heels towards the ground. Push your shoulders back towards your knees. Hold for 10-15 seconds.
Return to plank. Hold for 10-15 seconds.
Lower to the ground. Keep your pelvis on the ground and lift your chest and head up. Keep as much space as possible between your ears and shoulders. Hold for 10-15 seconds.
Return to plank. Hold for 10-15 seconds.
Lift your butt into the air, keep your legs straight and push your heels towards the ground. Push your shoulders back towards your knees. Hold for 10-15 seconds.
Lift your RIGHT leg into the air. Bring your RIGHT foot flat between your hands on the ground. Keep your weight on your RIGHT quad. Make sure your hips stay pointed to the front. Lift both arms overhead. Hold for 10-15 seconds.
Place your hands on the ground around your RIGHT foot. Then, move your RIGHT foot back in line with your LEFT foot. Lift your butt into the air, keep your legs straight and push your heels towards the ground. Push your shoulders back towards your knees. Hold for 10-15 seconds.
Lift your LEFT leg into the air. Bring your LEFT foot flat between your hands on the ground. Keep your weight on your LEFT quad. Make sure your hips stay pointed to the front. Lift both arms overhead. Hold for 10-15 seconds.
Place your hands on the ground around your LEFT foot. Then, move your LEFT foot back in line with your RIGHT foot. Return to plank. Hold for 10-15 seconds.
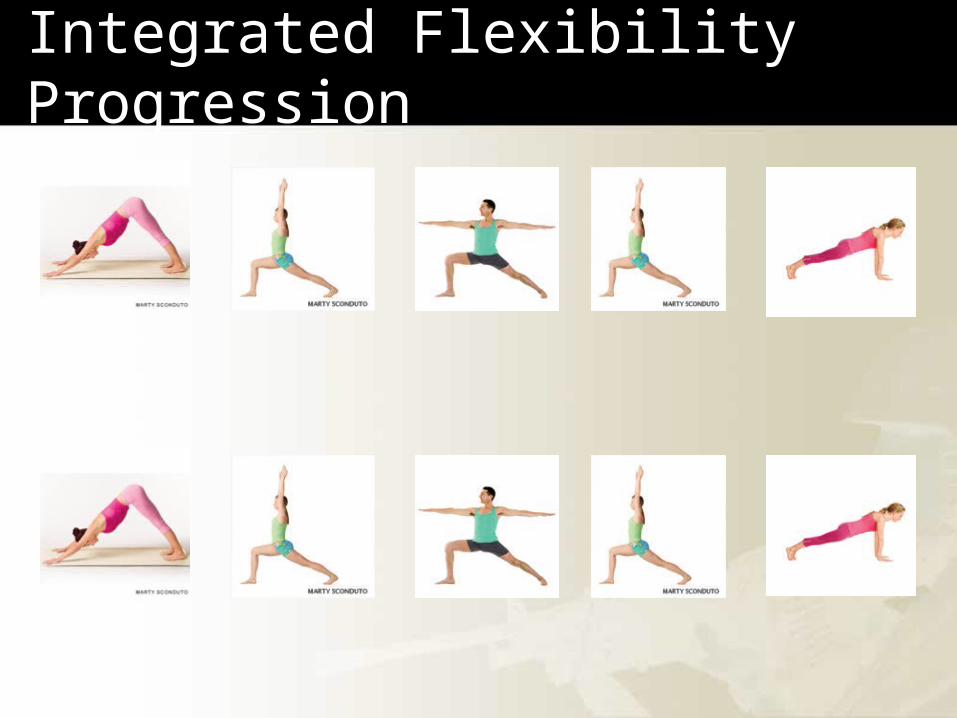
Integrated Flexibility Progression
Integrated Flexibility ProgressionLift your butt into the air, keep your legs straight and push your heels towards the ground. Push your shoulders back towards your knees. Hold for 10-15 seconds.
Lift your RIGHT leg into the air. Bring your RIGHT foot flat between your hands on the ground. Keep your weight on your RIGHT quad. Make sure your hips stay pointed to the front. Lift both arms overhead. Hold for 10-15 seconds.
Keeping your weight on your RIGHT quad and making sure not to lean forward, rotate your LEFT foot onto the ground and open your hips to the left. Bring your arms to shoulder height while looking over RIGHT wrist. Hold for 10-15 seconds.
Rotate your LEFT foot back to the front and bring your hips back into alignment. Lift both arms overhead. Hold for 10-15 seconds.
Lower your hands around your RIGHT foot. Bring your RIGHT foot back in line with your left. Return to plank. Hold for 10-15 seconds.
Lift your butt into the air, keep your legs straight and push your heels towards the ground. Push your shoulders back towards your knees. Hold for 10-15 seconds.
Lift your LEFT leg into the air. Bring your LEFT foot flat between your hands on the ground. Keep your weight on your LEFT quad. Make sure your hips stay pointed to the front. Lift both arms overhead. Hold for 10-15 seconds.
Keeping your weight on your LEFT quad and making sure not to lean forward, rotate your RIGHT foot onto the ground and open your hips to the left. Bring your arms to shoulder height while looking over LEFT wrist. Hold for 10-15 seconds.
Rotate your RIGHT foot back to the front and bring your hips back into alignment. Lift both arms overhead. Hold for 10-15 seconds.
Lower your hands around your LEFT foot. Bring your LEFT foot back in line with your right. Return to plank. Hold for 10-15 seconds.

Integrated Flexibility Progression

Integrated Flexibility ProgressionLower to the ground. Keep your pelvis on the ground and lift your chest and head up. Keep as much space as possible between your ears and shoulders. Hold for 10-15 seconds.
Return to plank. Hold for 10-15 seconds.
Lift your butt into the air, keep your legs straight and push your heels towards the ground. Push your shoulders back towards your knees. Hold for 10-15 seconds.
Bring your RIGHT leg into the air, place your RIGHT foot flat on the ground between your hands. Bring your LEFT foot half-way to your hands. Slowly lift your LEFT foot off the ground as you straighten your RIGHT leg. Then, slowly lift your arms to hip height. Make sure to keep your hips pointing straight down to the ground. Hold for 10-15 seconds.
Lower your hands to the ground. Place your LEFT leg on the ground behind you. Bend your RIGHT leg and slowly lift your arms to shoulder height, looking over your RIGHT wrist, keeping your weight on your RIGHT quad. Hold for 10-15 seconds.
Rotate to same position on opposite side with LEFT knee bent, weight on your LEFT quad, arms at shoulder height, looking over LEFT wrist. Rotate both hips to the LEFT, lower your hands to the ground around your LEFT foot. Bring your RIGHT foot half-way to your hands. Slowly lift your RIGHT foot off the ground as you straighten your LEFT leg. Then, slowly lift your arms to hip height. Make sure to keep your hips pointing straight down to the ground. Hold for 10-15 seconds.
Lower your hands to the ground. Place your RIGHT leg on the ground behind you. Bend your LEFT leg and slowly lift your arms to shoulder height, looking over your LEFT wrist, keeping your weight on your LEFT quad. Hold for 10-15 seconds.
Extend your LEFT hand as far to the LEFT as you can reach. Straighten your LEFT leg. Lower your LEFT hand as close to the ground as you can while keeping BOTH legs straight (you may only be able to reach your shin, and that’s okay). Hold for 10-15 seconds.
Inhale as you slowly stand up right. Exhale as you bend your RIGHT leg, extend your RIGHT arm as far to the RIGHT as you can reach. Straighten your RIGHT leg. Lower your RIGHT hand as close to the ground as you can while keeping both legs straight. Hold for 10-15 seconds.
Integrated Flexibility Progression

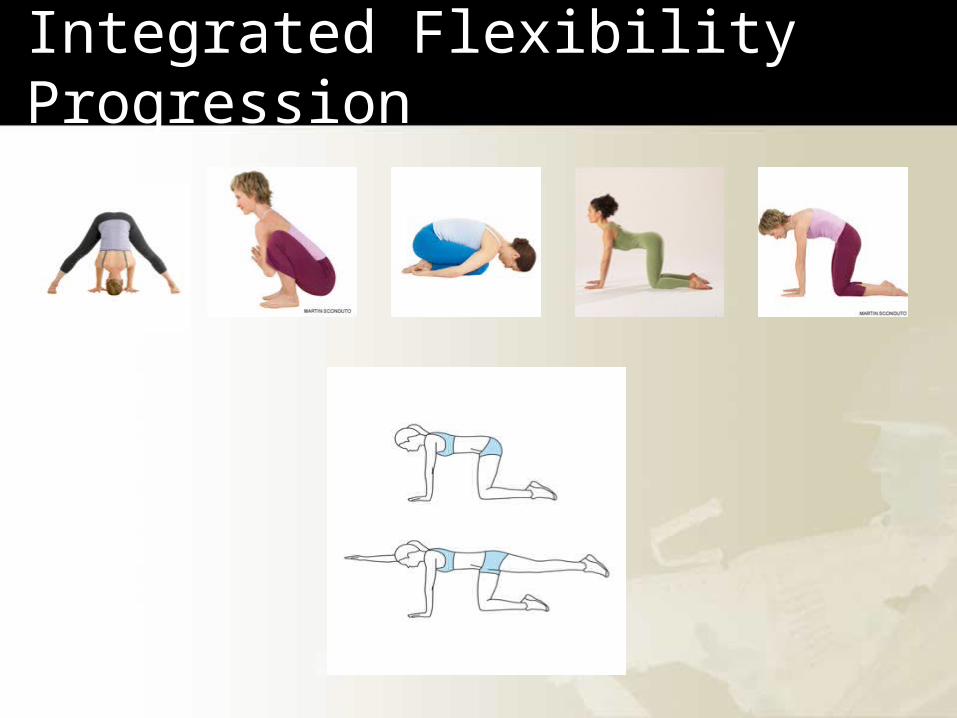
Integrated Flexibility ProgressionInhale as you slowly stand upright. Keeping your feet spread wide (a good marker is if you extend your arms out sideways, the ankles should be under the wrists), keep your legs straight as you slowly lower yourself toward the ground. Hold for 10-15 seconds.
Staying in this position, walk your feet closer together, bend your knees, sit down as low as you can and push your knees out with your elbows. Hold for 10-15 seconds.
Place your hands on the ground in front of you. Bring your knees to the ground. Sit back on your heels. Either extend your arms out in front of you or bring them along your sides. Breathe deeply and hold for 30 SECONDS!
Push back up onto your hands and knees. Arch your back as high as you can as you exhale, inhale back to neutral, repeat 5 times.
Return to neutral hands and knees and spine position. Extend your RIGHT arm next to your RIGHT ear. Straighten your LEFT leg behind you. Make sure to keep your hips pointing straight down to the ground. Hold for 10-15 seconds. * progression = bring your opposite elbow and knee together at your bellybutton and then extend back out to starting position. Repeat 8-12 times.
Repeat with LEFT arm and RIGHT leg.
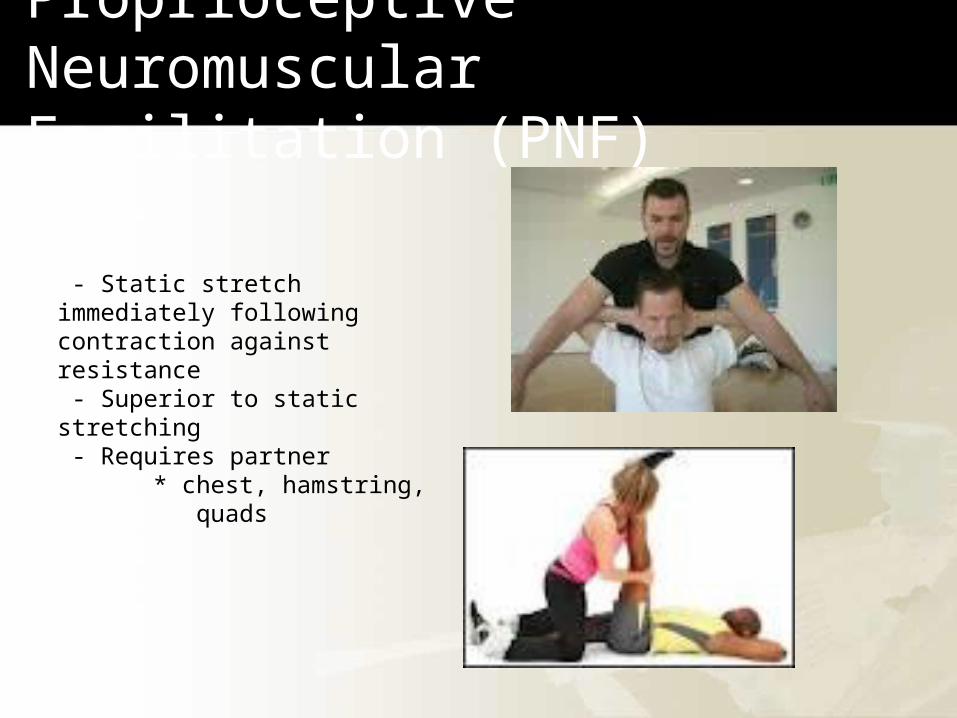
Proprioceptive Neuromuscular Facilitation (PNF)
- Static stretch immediately following contraction against resistance - Superior to static stretching - Requires partner
* chest, hamstring, quads
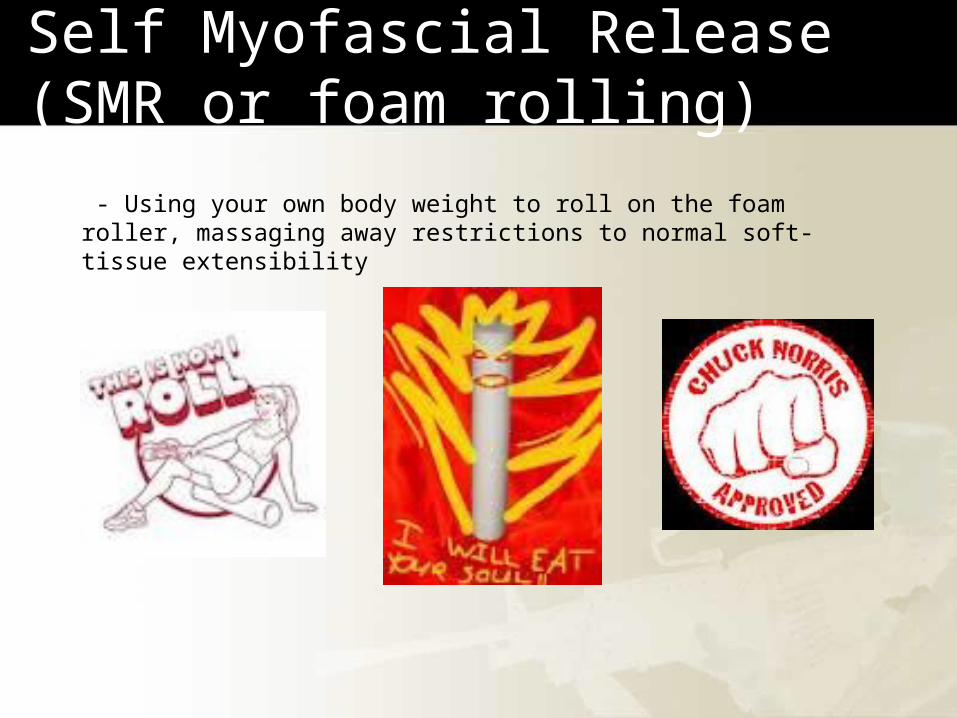
Self Myofascial Release (SMR or foam rolling)
- Using your own body weight to roll on the foam roller, massaging away restrictions to normal soft-tissue extensibility
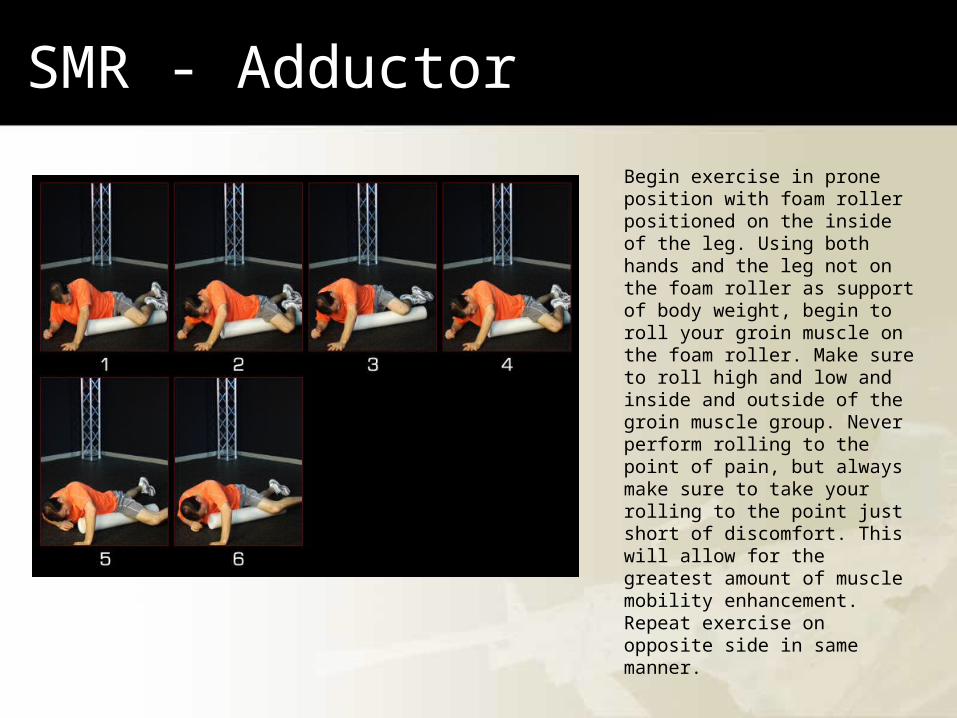
SMR - Adductor
Begin exercise in prone position with foam roller positioned on the inside of the leg. Using both hands and the leg not on the foam roller as support of body weight, begin to roll your groin muscle on the foam roller. Make sure to roll high and low and inside and outside of the groin muscle group. Never perform rolling to the point of pain, but always make sure to take your rolling to the point just short of discomfort. This will allow for the greatest amount of muscle mobility enhancement. Repeat exercise on opposite side in same manner.
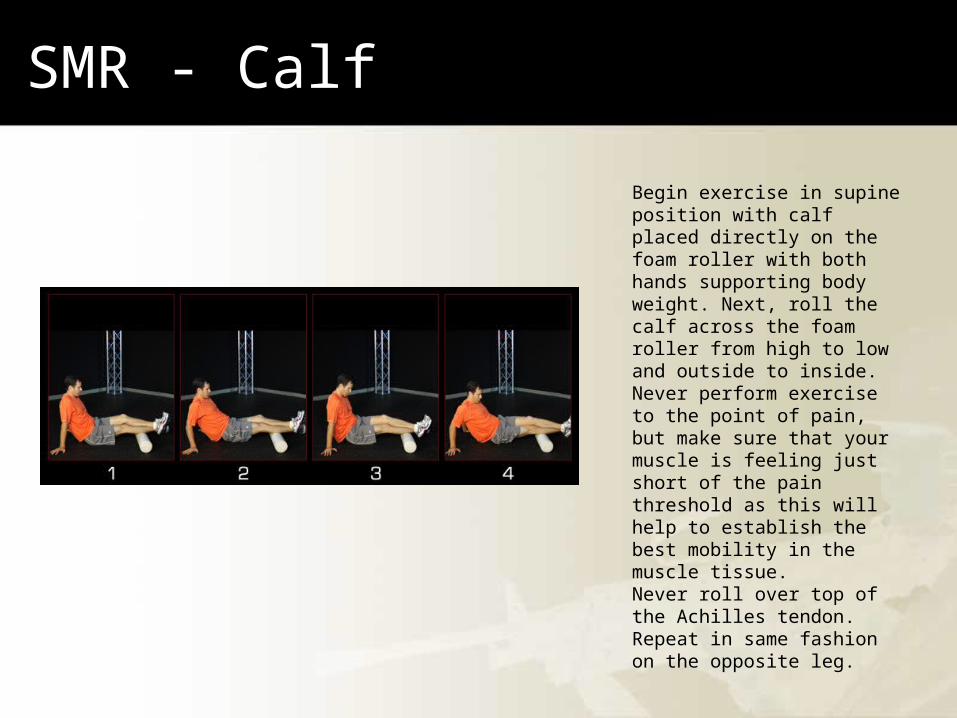
SMR - Calf
Begin exercise in supine position with calf placed directly on the foam roller with both hands supporting body weight. Next, roll the calf across the foam roller from high to low and outside to inside. Never perform exercise to the point of pain, but make sure that your muscle is feeling just short of the pain threshold as this will help to establish the best mobility in the muscle tissue. Never roll over top of the Achilles tendon. Repeat in same fashion on the opposite leg.
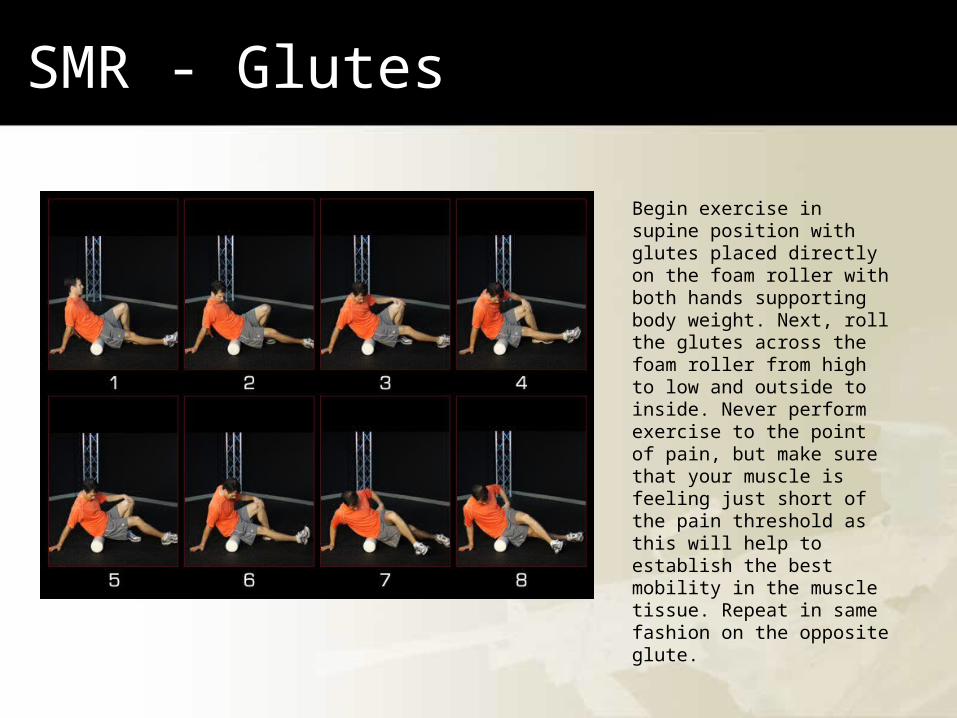
SMR - Glutes
Begin exercise in supine position with glutes placed directly on the foam roller with both hands supporting body weight. Next, roll the glutes across the foam roller from high to low and outside to inside. Never perform exercise to the point of pain, but make sure that your muscle is feeling just short of the pain threshold as this will help to establish the best mobility in the muscle tissue. Repeat in same fashion on the opposite glute.

SMR - Hamstring
Begin exercise in supine position with hamstring placed directly on the foam roller with both hands supporting body weight. Next, roll the hamstring across the foam roller from high to low and outside to inside. Never perform exercise to the point of pain, but make sure that your muscle is feeling just short of the pain threshold as this will help to establish the best mobility in the muscle tissue. Repeat in same fashion on the opposite hamstring. Repeat in same fashion on the opposite glute.
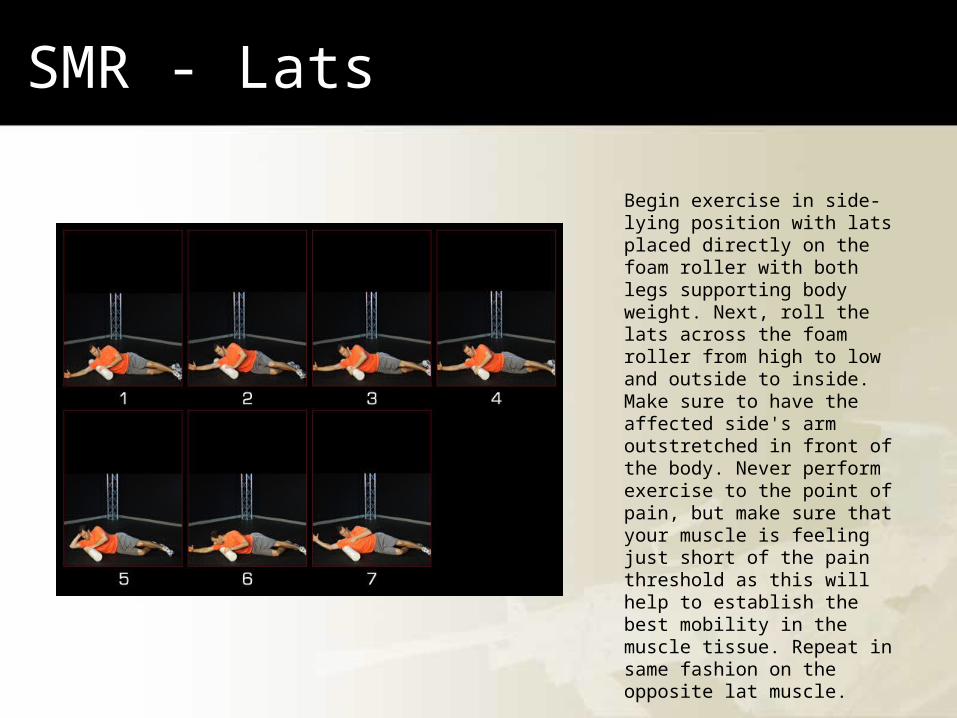
SMR - Lats
Begin exercise in side-lying position with lats placed directly on the foam roller with both legs supporting body weight. Next, roll the lats across the foam roller from high to low and outside to inside. Make sure to have the affected side's arm outstretched in front of the body. Never perform exercise to the point of pain, but make sure that your muscle is feeling just short of the pain threshold as this will help to establish the best mobility in the muscle tissue. Repeat in same fashion on the opposite lat muscle.
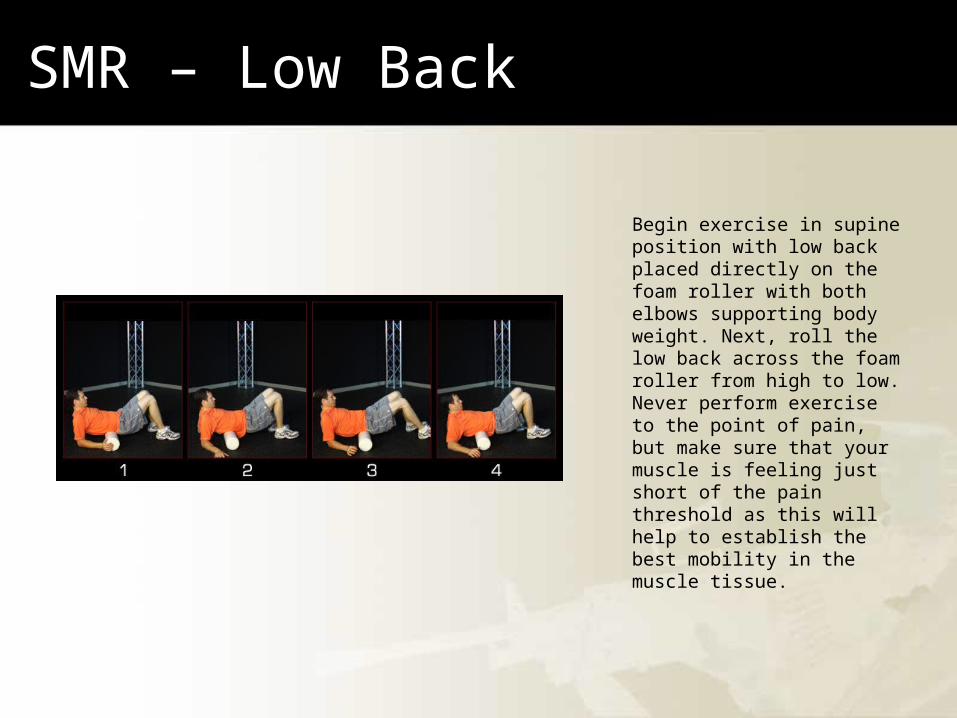
SMR – Low Back
Begin exercise in supine position with low back placed directly on the foam roller with both elbows supporting body weight. Next, roll the low back across the foam roller from high to low. Never perform exercise to the point of pain, but make sure that your muscle is feeling just short of the pain threshold as this will help to establish the best mobility in the muscle tissue.
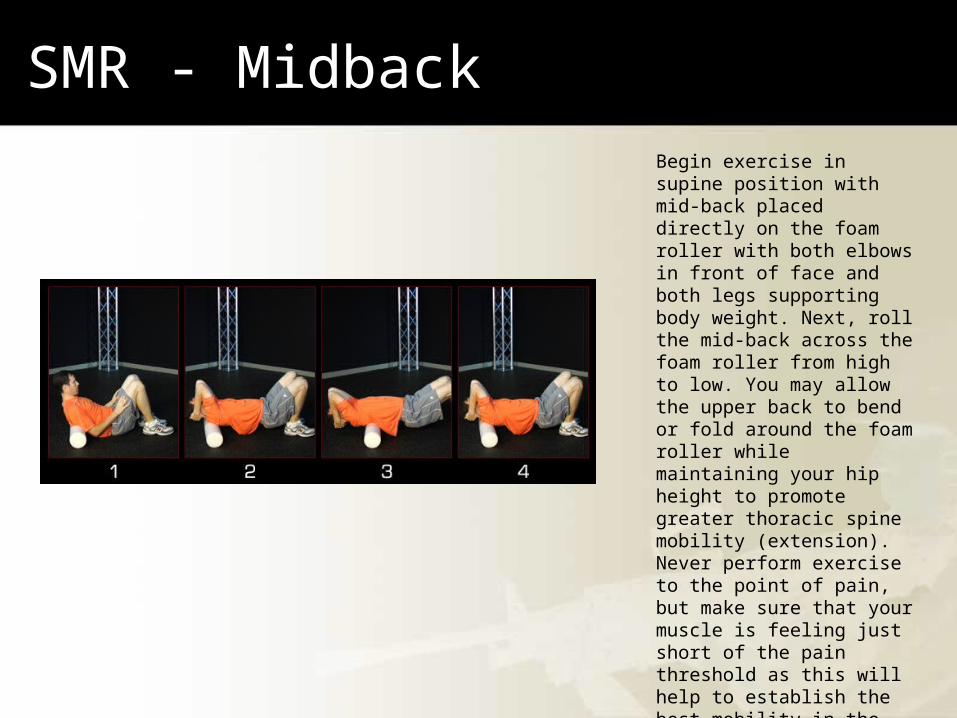
SMR - MidbackBegin exercise in supine position with mid-back placed directly on the foam roller with both elbows in front of face and both legs supporting body weight. Next, roll the mid-back across the foam roller from high to low. You may allow the upper back to bend or fold around the foam roller while maintaining your hip height to promote greater thoracic spine mobility (extension). Never perform exercise to the point of pain, but make sure that your muscle is feeling just short of the pain threshold as this will help to establish the best mobility in the muscle tissue.
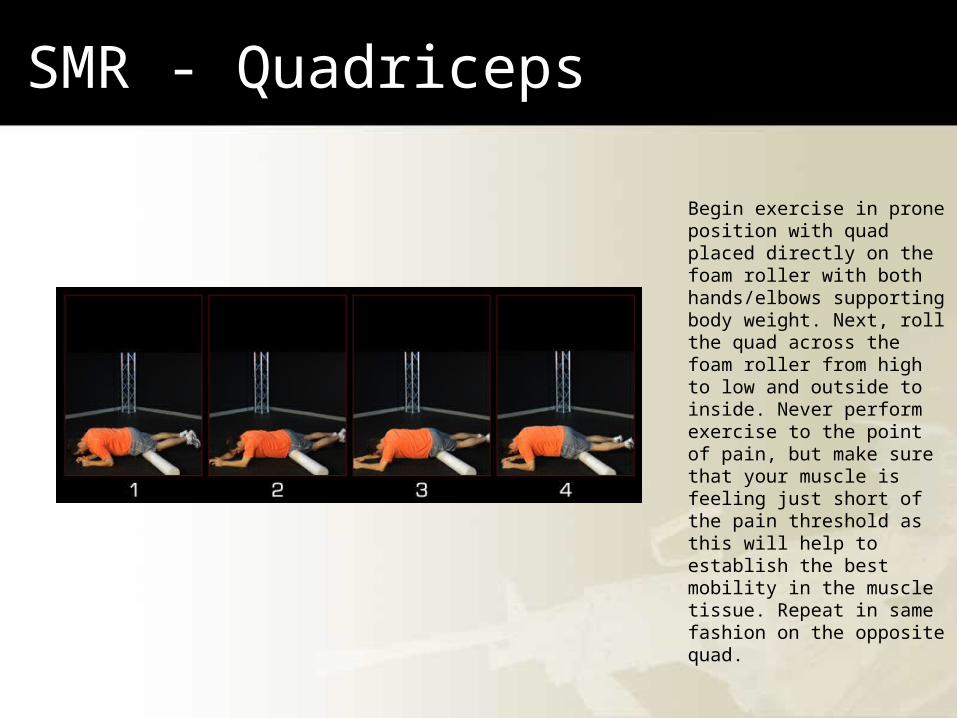
SMR - Quadriceps
Begin exercise in prone position with quad placed directly on the foam roller with both hands/elbows supporting body weight. Next, roll the quad across the foam roller from high to low and outside to inside. Never perform exercise to the point of pain, but make sure that your muscle is feeling just short of the pain threshold as this will help to establish the best mobility in the muscle tissue. Repeat in same fashion on the opposite quad.

SMR – ITB
Begin exercise in side-lying position with ITB placed directly on the foam roller with bottom hand and opposite leg supporting body weight. Next, roll the ITB across the foam roller from high to low and outside to inside. Never perform exercise to the point of pain, but make sure that your muscle is feeling just short of the pain threshold as this will help to establish the best mobility in the muscle tissue. Repeat in same fashion on the opposite ITB.
REVIEW
• DOMS
• When Pain is Not Gain
• Check Your Foundation
• Check Your Frame
• Holding Patterns
• Integrated Flexibility

MARFORRES - Marine Corps Community ServicesSemper Fit Program
2000 Opelousas Avenue, New Orleans, LA 70146(504) 697-9768 (Fax)
http://www.marines.mil/unit/marforres/MFRHQ/MCCS/SemperFit/Health.aspx
http://www.facebook.com/pages/New-Orleans-LA/MCCSSEMPER-FIT-MARFORRES/126284770729139
Semper Fit Director Health Promotion Coordinator Semper Fit Coordinator
(504) 697-8121 (504) 697-9693 (504) 697-9691


![PRINT PROMOTIONS GROUP [ENCOMPASS HEALTH]€¦ · PG 11 Print Promotions Group LLC is a wholly owned subsidiary of Encompass Health Corporation (NYSE: EHC) , the $7.5 Billion NYSE-listed](https://static.fdocuments.net/doc/165x107/5fcc79e6c0fea555e53d9920/print-promotions-group-encompass-health-pg-11-print-promotions-group-llc-is-a.jpg)


