
the-eye.eu Archive... · My checklist included the following points: 1. ... 2. How does my...
4
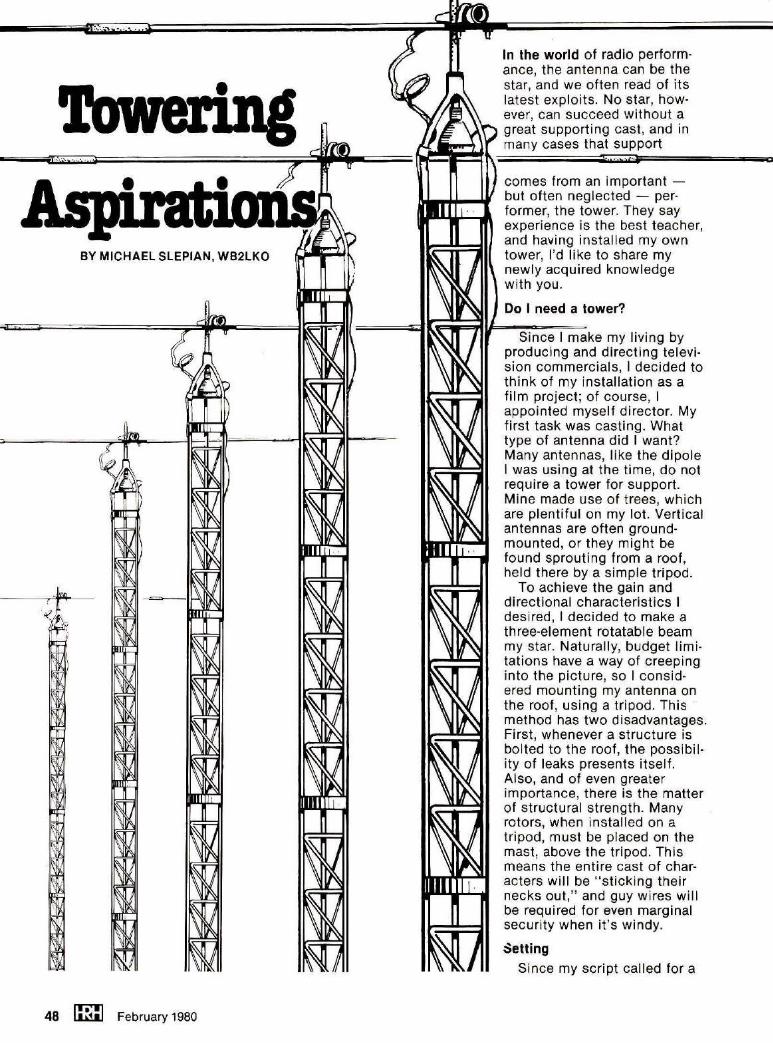
: .. .... BY MICHAEL SLEPIAN, WB2LKO 48 February 1980 In the world of radio perform- ance, the antenna can be the star, and we often read of its latest exploits. No star, how- ever, can succeed wi t hout a great supporti ng cast, and in many cases that support comes from an important - but of t en neglected - per- former, the tower. They say experience is the best teacher, and having installed my own tower, I'd like to share my newly acquired knowledge with you. Do I need a tower? Since I make my living by producing and directing televi- sion commercials, I decided to th ink of my installation as a film project; of course, I appointed mys el f director. My first task was casting. What type of antenna did I want? Many antennas, li ke the dipole I was using at the time, do not require a tower for support. Mine made use of trees, which are plentiful on my lot. Vertical antennas are often ground- mounted, or they might be found sprouting from a roof, held there by a simple tripod. To achieve the gain and directional characteristics I desired, I decided to make a three-element rotatable beam my star. Naturally, budget limi- tations have a way of creepi ng into the picture, so I consid- ered mounting my antenna on the roof, using a tripod. This · method has two disadvantages. First, whenever a structure is bolted to t he roof, the possibil- ity of leaks presents itself. Also, and of even greater i mportance, t he re is the matter of structural strength. Many rotors, when in st alled on a tripod, must be placed on the mast, above the trip od. Th is means the entire cast of char- acters will be " sticking their necks out," and guy wires will be required for even marginal security when i t's windy. Setting Since my script called for a
Transcript of the-eye.eu Archive... · My checklist included the following points: 1. ... 2. How does my...
: .. ~ ·~ ....
BY MICHAEL SLEPIAN, WB2LKO
48 ~ February 1980
In the world of radio performance, the antenna can be the star, and we often read of its latest exploits. No star, however, can succeed wi thout a great support ing cast, and in many cases that support
comes from an important -but often neglected - performer, the tower. They say experience is the best teacher, and having installed my own tower, I'd like to share my newly acquired knowledge with you.
Do I need a tower?
Since I make my living by producing and directing television commercials, I decided to th ink of my installation as a film project; of course, I appointed mysel f director. My fi rst task was casting. What type of antenna did I want? Many antennas, li ke the dipole I was using at the time, do not require a tower for support. Mine made use of trees, which are plenti ful on my lot. Vertical antennas are often groundmounted, or they might be found sprouting from a roof, held there by a simple tripod.
To ach ieve the gain and directional characteristics I desired, I decided to make a three-element rotatable beam my star. Naturally, budget limitations have a way of creep ing into the picture, so I cons idered mounting my antenna on the roof, using a t ripod. This · method has two disadvantages. First , whenever a structure is bolted to t he roof, the possibility of leaks presents itself. Also, and of even greater importance, t here is the matter of structural strength. Many rotors, when installed on a tripod, must be placed on the mast, above the tripod. Th is means the entire cast of characters wil l be " sticking their necks out," and guy wires will be required for even marginal security when it's windy.
Setting Since my script called for a
tower, my next challenge was choosing the proper setting. It is imperative to stay clear of all power lines! All antenna and tower manufacturers include a stern warning that their products are excellent conductors of electricity, and should never be erected within falling distance of power lines. If any part of the assembly were to come in contact with even the service lines that enter your house, you could be killed! Keep in mind the size of your antenna once it is assembled. Will it clear all power lines and other cables entering your house, as you haul it up the tower for final placement on the mast?
Before I went any further, I decided to check on my star's popularity rating. My checklist included the following points:
1. Does the proposed structure comply with all local building codes? The town my tower is in does not seem to be overly concerned, as long as the installation is being used for non-commercial purposes. Your town may be just as accommodating, but it's wise to check first. 2. How does my insurance agent feel about towers? Does my homeowner's policy coverdamagetothetowe~ and damage that may be inflicted on my house if the tower should collapse, or take a lightning stroke? 3. Will my antenna extend beyond my property line, violating my neighbor's property? I did not wish to be responsible for damage which might be caused by ice falling from my antenna, onto my neighbor's house. 4. Even though I was directing this extravaganza, final approval had to be obtained from the executive producer, my wife. Casting was almost com
plete. All that remained was the decision as to the type of tower to be erected. There are two main types, and both have vari-
variety. This type may have tapered sections, the widest being at the bottom with each ascending section getting narrower. The crank-up tower is generally included in the selfsupporting category. Crank-ups are made of sections which " nest," one inside the other, as it is lowered. This type of tower allows you to perform antenna installation and maintenance without scaling great heights. Also, if high winds are expected, the tower can be lowered to better withstand the
/ >
rigors of mother nature. Many crank-up towers use electric winches, making the job of rai sing and lowering the structure easier and safer.
The second, and probably more popular, variety is the supported tower. Guy wires or brackets - or a combination of both - may be used, depending on tower design , height, and anticipated wind conditions. Literature supplied by the manufacturers will help you determ ine the amount of "moral support" your tower will
I ' Q .
~·l
'
-"·
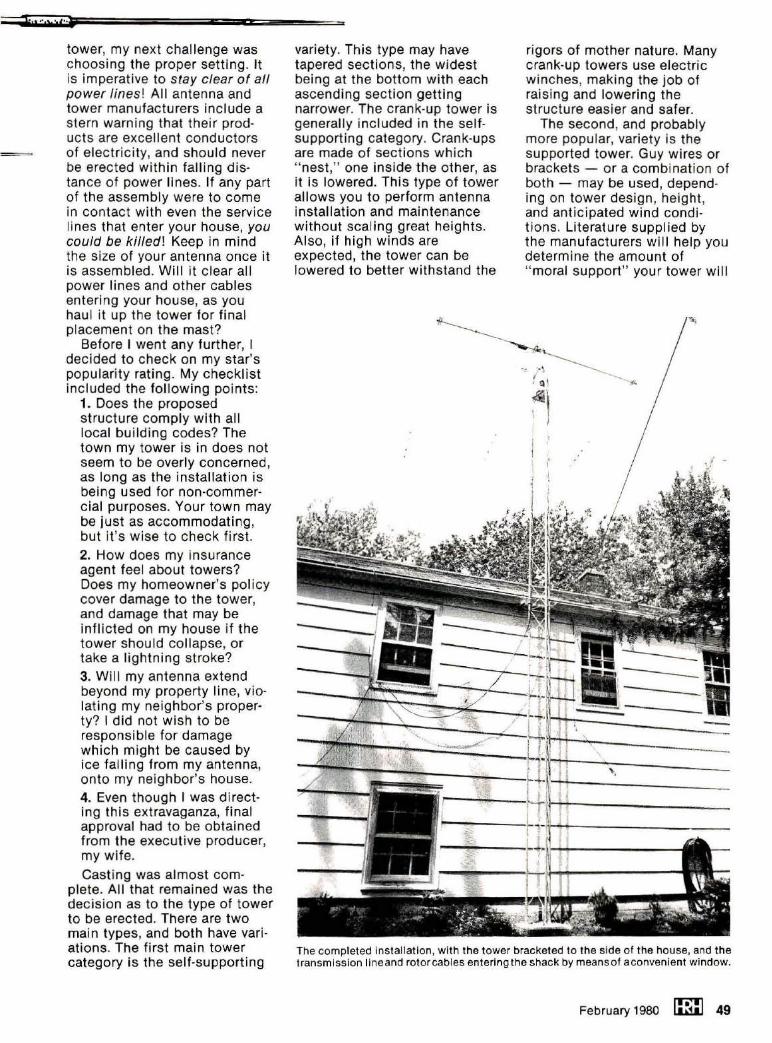
ations. The first main tower The completed Installation, with the tower bracketed to the side of the house, and the category is the self-supporting transmission lineand rotorcables entering the shack by means of aconvenient window.
February 1980 lIN:J 49
require. If you have adequate space, you may wish to choose a tilt-over tower. You'll enjoy the same advantages the crankup type offers. Obviously, however, you'll need enough room on your property to accommodate the tower as it lies flat. Care must also be taken, when raising or lowering a tilt-over arrangement, to prevent twisting of the tower sections.
If your scenario calls for a guyed-tower installation, find out , based on manufacturer's recommendations, the number of guy wires you'll need and where they must be anchored. If your property isn't big enough for guy wires, don't despair. A bracketed tower may save the script.
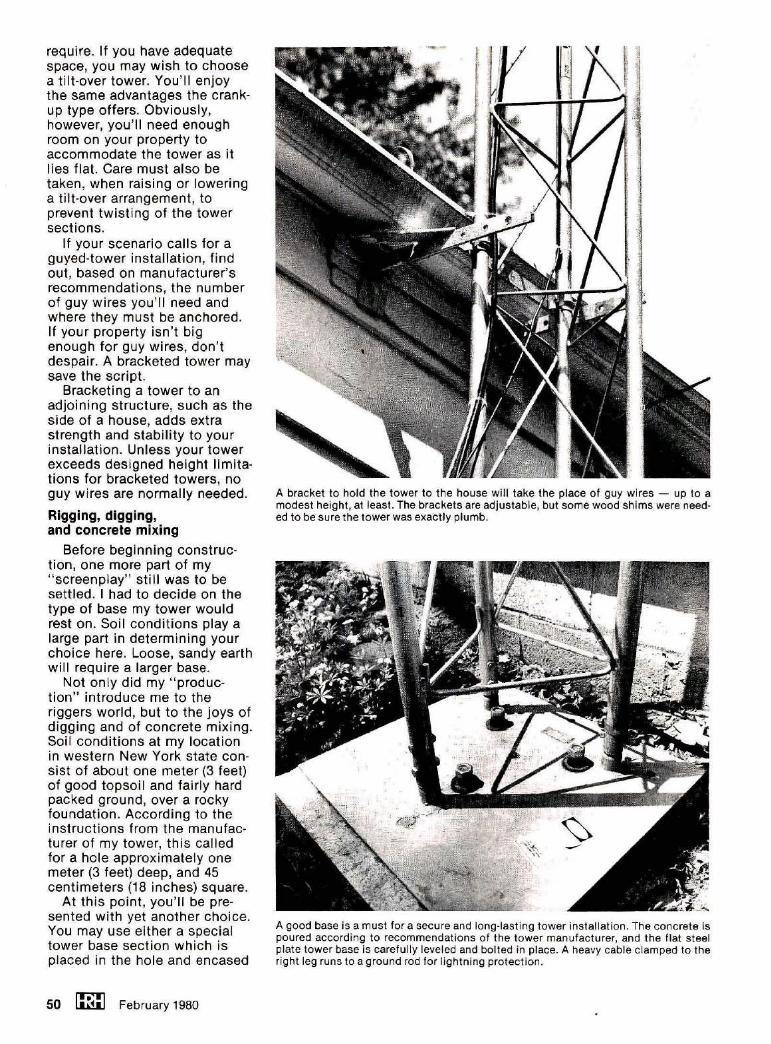
Bracketing a tower to an adjoining structure, such as the side of a house, adds extra strength and stability to your installation. Unless your tower exceeds designed height limitations for bracketed towers, no guy wires are normally needed.
Rigging, digging, and concrete mixing
Before beginning construction, one more part of my "screenplay" sti 11 was to be settled. I had to decide on the type of base my tower would rest on. Soil conditions play a large part in determining your choice here. Loose, sandy earth will require a larger base.
Not only did my "production" introduce me to the riggers world, but to the joys of digging and of concrete mixing. Soil conditions at my location in western New York state consist of about one meter (3 feet) of good topsoil and fairly hard packed ground, over a rocky foundation. According to the instructions from the manufacturer of my tower, this called for a hole approximately one meter (3 feet) deep, and 45 centimeters (18 inches) square.
At this point , you ' ll be presented with yet another choice. You may use either a special tower base section which is placed in the hole and encased
50 m February 1980
A bracket to hold the tower to the house will take the place of guy wires - up to a modest height, at least. The brackets are adjustable, but some wood shims were need· ed to be sure the tower was exactly plumb.
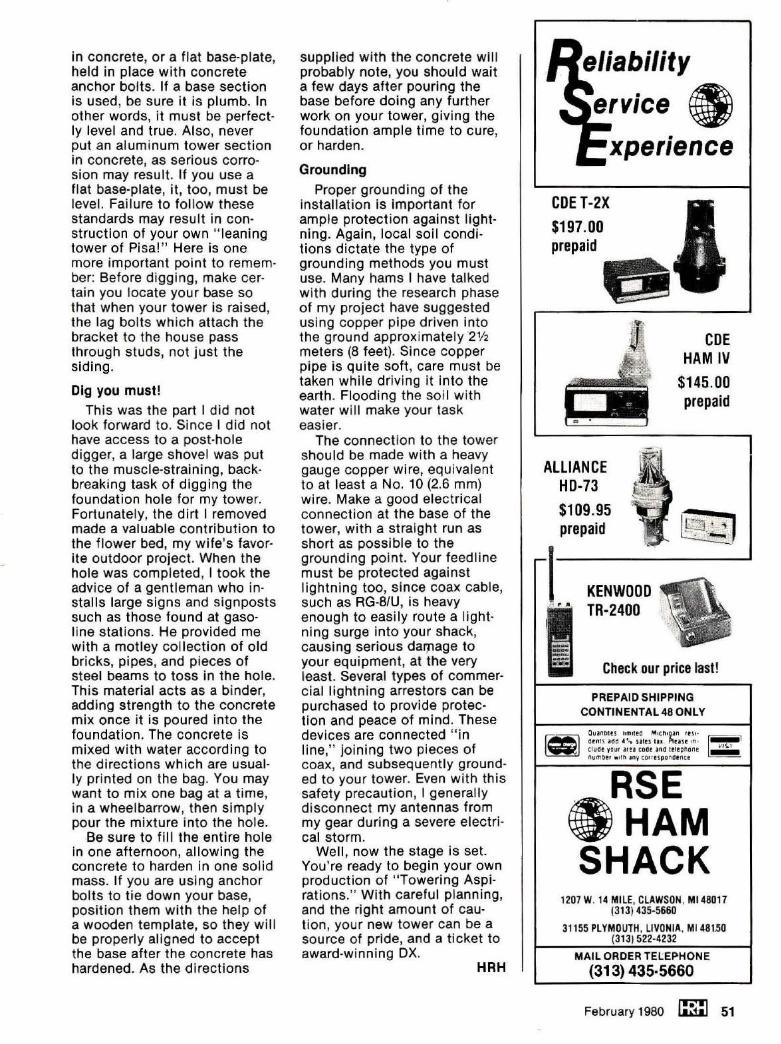
A good base is a must for a secure and long-lasting tower installation. The concrete is poured according to recommendations of the tower manufacturer, and the flat steel plate tower base is carefully leveled and bolted in place. A heavy cable clamped to the right leg runs to a ground rod for lightni ng protect ion .
in concrete, or a flat base-plate, held in place with concrete anchor bolts. If a base section is used, be sure it is plumb. In other words, it must be perfectly level and true. Also, never put an aluminum tower section in concrete, as serious corrosion may result. If you use a flat base-plate, it, too, must be level. Failure to follow these standards may result in construction of your own "leaning tower of Pisa!" Here is one more important point to remember: Before digging, make certain you locate your base so that when your tower is raised, the lag bolts which attach the bracket to the house pass through studs, not just the siding.
Dig you must! This was the part I did not
look forward to . Since I did not have access to a post-hole digger, a large shovel was put to the muscle-straining, backbreaking task of digging the foundation hole for my tower. Fortunately, the dirt I removed made a valuable contribution to the flower bed, my wife's favorite outdoor project. When the hole was completed, I took the advice of a gentleman who installs large signs and signposts such as those found at gasoline stations. He provided me with a motley collection of old bricks, pipes, and pieces of steel beams to toss in the hole. This material acts as a binder, adding strength to the concrete mix once it is poured into the foundation . The concrete is mixed with water according to the directions which are usually printed on the bag. You may want to mix one bag at a time, in a wheelbarrow, then simply pour the mixture into the hole.
Be sure to fill the entire hole in one afternoon, allowing the concrete to harden in one solid mass. If you are using anchor bolts to tie down your base, position them with the help of a wooden template, so they will be properly aligned to accept the base after the concrete has hardened. As the directions
supplied with the concrete will probably note, you should wait a few days after pouring the base before doing any further work on your tower, giving the foundation ample time to cure, or harden.
Grounding
Proper grounding of the installation is important for ample protect ion against light· ning. Again , local soil condi tions dictate the type of grounding methods you must use. Many hams I have talked with during the research phase of my project have suggested using copper pipe driven into the ground approximately 2 1/2 meters (8 feet). Since copper pipe is quite soft, care must be taken while driving it into the earth. Flooding the soil with water will make your task easier.
The connection to the tower should be made with a heavy gauge copper wire, equivalent to at least a No. 10 (2.6 mm) wire. Make a good electrical connection at the base of the tower, with a straight run as short as possible to the grounding point. Your feedline must be protected against lightning too, since coax cable, such as RG-8/U, is heavy enough to easily route a light· ning surge into your shack, causing serious da171age to your equipment, at the very least. Several types of commercial lightning arrestors can be purchased to provide protection and peace of mind. These devices are connected " in line," joining two pieces of coax, and subsequently ground· ed to your tower. Even with this safety precaution, I generally disconnect my antennas from my gear during a severe electri· cal storm.
Well , now the stage is set. You're ready to begin your own production of " Towering Aspirations." With careful planning, and the right amount of caution, your new tower can be a source of pride, and a ticket to award-winning DX.
HRH
eliability
-xperience
COE T-2X
$197.00 prepaid
D COE
HAM IV
$145 .. 00 prepaid
ALLIANCE HD-73
I $109.95 prepaid
,1·= -0 ......,.
KENWOOD TR-2400
Check our price last!
PREPAID SHIPPING CONTINENTAL 48 ONLY
~~~;s11~~5d ~·~.11 : ~1e s ~~~hi~aenu~e~~ : elude your uea code and telel) f\One number wllh .;1ny correspondence
ARSE rvHAM SHACK
1207 W. 14 MILE, CLAWSON , Ml 48017 (313} 435-5660
31155 PLYMOUTH, LIVONIA, Ml 481.'iO (313) 522-4232
MAIL ORDER TELEPHONE
(313) 435-5660
February 1980 m 51


![Need To Sell My House[Checklist pg1]...Need_To_Sell_My_House[Checklist pg1] Created Date 9/18/2015 9:03:44 PM ...](https://static.fdocuments.net/doc/165x107/5f3b4622e5ec0f576903b71b/need-to-sell-my-housechecklist-pg1-needtosellmyhousechecklist-pg1-created.jpg)

