The End of Day process transmits your shipment … The End of Day process transmits your shipment...
13
© Copyright 2016, United Parcel Service of America, Inc. All rights reserved. 1 WorldShip ® Install on a Single or Workgroup Workstation PRE-INSTALLATION INSTRUCTIONS: This document discusses using the WorldShip DVD to install WorldShip. You can also install WorldShip from the Web. Go to the following Web page and click the appropriate download link: https://www.ups.com/content/us/en/bussol/offering/worldship_download.html Install UPS WorldShip on the Workgroup Admin before installing it on the Workgroup Remote. Temporarily disable any virus scan software that you may have installed and do not perform any other installations while WorldShip installs. For a Workgroup Admin installation: o Create a folder in which to install the shared database, shared files, and Workgroup Remote installation files. This folder must be a shared Microsoft ® folder and can reside on either the Workgroup Admin or on any other drive accessible from both the Workgroup Admin and Workgroup Remote. o Install the “local” files and the “remote” (shared) files in different folders. For a Workgroup Remote installation: o Request access to the network share drive created by the Workgroup Admin. o Map a drive to the folder containing the shared files. Using Microsoft ® Windows Explorer, select Map Network Drive from the Tools menu. If you are going to move WorldShip data from another Single workstation to this Single workstation during installation, you must do the following on the other Single workstation: o On the Manage Data menu in WorldShip, click Move WorldShip Data to Another Computer. o In the Move WorldShip Data Instructions window, click Backup to make a copy of your data. Note: Be sure to record the location of the folder where your data will be saved. This location will be needed during the installation of WorldShip on the other computer. INSTALLATION INSTRUCTIONS: Follow these steps to install WorldShip on a Single Workstation or Workgroup Admin Workstation from the WorldShip DVD or to install WorldShip on a Workgroup Remote Workstation from a network share drive or the WorldShip DVD: Step Window (if available) 1. Insert the WorldShip DVD into the drive. The installation should begin automatically. If not, use Microsoft Explorer to navigate to the DVD drive and double-click Setup.exe. If installing on a Workgroup Remote Workstation from a network share drive, browse to and double-click \UPS\WSTD\Remote\Install\Disk1\ Setup.exe. None
Transcript of The End of Day process transmits your shipment … The End of Day process transmits your shipment...
© Copyright 2016, United Parcel Service of America, Inc. All rights reserved. 1
WorldShip®
Install on a Single or Workgroup Workstation
PRE-INSTALLATION INSTRUCTIONS:
This document discusses using the WorldShip DVD to install WorldShip. You can also install WorldShip from the Web. Go to the following Web page and click the appropriate download link: https://www.ups.com/content/us/en/bussol/offering/worldship_download.html
Install UPS WorldShip on the Workgroup Admin before installing it on the Workgroup Remote.
Temporarily disable any virus scan software that you may have installed and do not perform any other installations while WorldShip installs.
For a Workgroup Admin installation:
o Create a folder in which to install the shared database, shared files, and Workgroup Remote installation files. This folder must be a shared Microsoft
® folder and can reside on either the Workgroup Admin or on
any other drive accessible from both the Workgroup Admin and Workgroup Remote.
o Install the “local” files and the “remote” (shared) files in different folders.
For a Workgroup Remote installation:
o Request access to the network share drive created by the Workgroup Admin.
o Map a drive to the folder containing the shared files. Using Microsoft® Windows Explorer, select Map
Network Drive from the Tools menu.
If you are going to move WorldShip data from another Single workstation to this Single workstation during installation, you must do the following on the other Single workstation:
o On the Manage Data menu in WorldShip, click Move WorldShip Data to Another Computer.
o In the Move WorldShip Data Instructions window, click Backup to make a copy of your data. Note: Be sure to record the location of the folder where your data will be saved. This location will be needed during the installation of WorldShip on the other computer.
INSTALLATION INSTRUCTIONS:
Follow these steps to install WorldShip on a Single Workstation or Workgroup Admin Workstation from the WorldShip DVD or to install WorldShip on a Workgroup Remote Workstation from a network share drive or the WorldShip DVD:
Step Window (if available)
1. Insert the WorldShip DVD into the drive. The installation should begin automatically. If not, use Microsoft Explorer to navigate to the DVD drive and double-click Setup.exe. If installing on a Workgroup Remote Workstation from a network share drive, browse to and double-click \UPS\WSTD\Remote\Install\Disk1\ Setup.exe.
None
© Copyright 2016, United Parcel Service of America, Inc. All rights reserved. 2
WorldShip®
Install on a Single or Workgroup Workstation
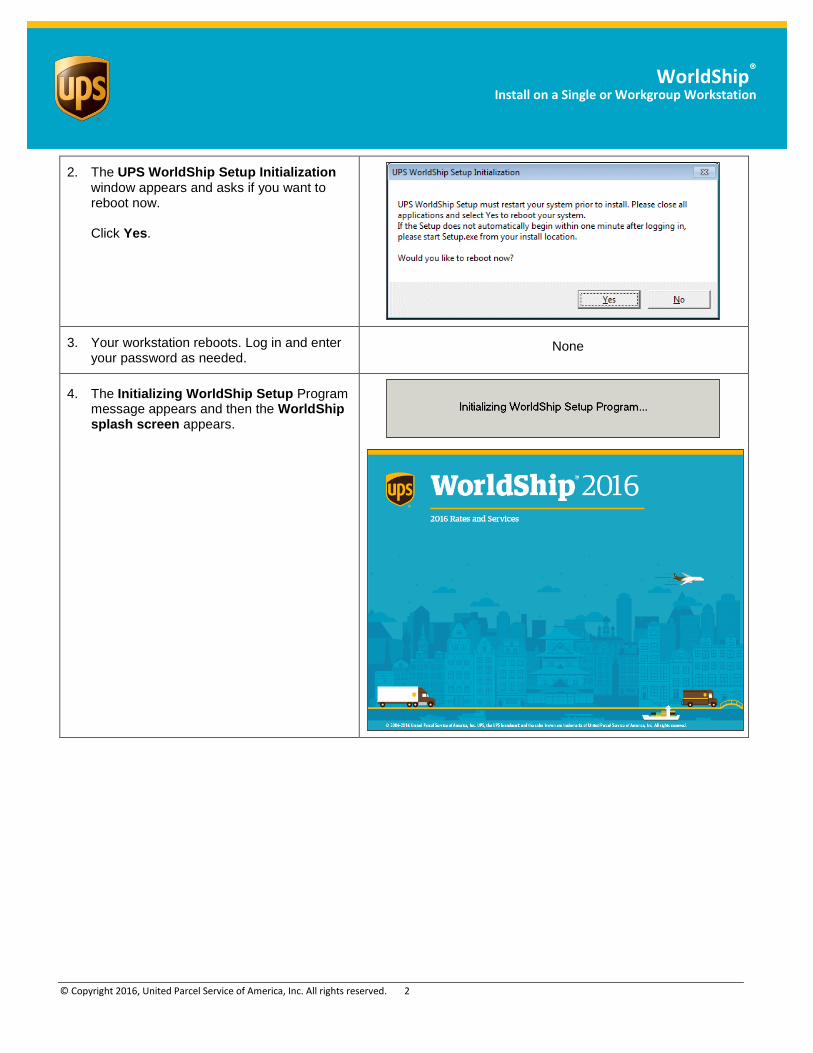
2. The UPS WorldShip Setup Initialization window appears and asks if you want to reboot now. Click Yes.
3. Your workstation reboots. Log in and enter your password as needed.
None
4. The Initializing WorldShip Setup Program message appears and then the WorldShip splash screen appears.
© Copyright 2016, United Parcel Service of America, Inc. All rights reserved. 3
WorldShip®
Install on a Single or Workgroup Workstation
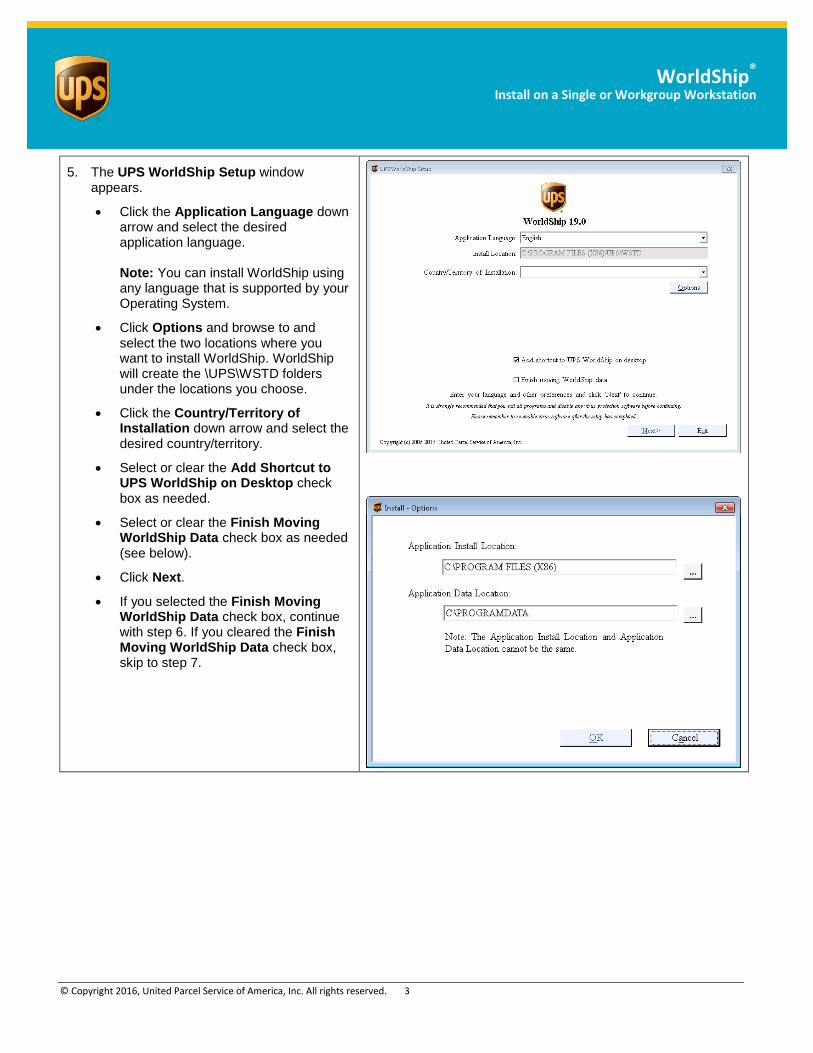
5. The UPS WorldShip Setup window appears.
Click the Application Language down arrow and select the desired application language. Note: You can install WorldShip using any language that is supported by your Operating System.
Click Options and browse to and select the two locations where you want to install WorldShip. WorldShip will create the \UPS\WSTD folders under the locations you choose.
Click the Country/Territory of Installation down arrow and select the desired country/territory.
Select or clear the Add Shortcut to UPS WorldShip on Desktop check box as needed.
Select or clear the Finish Moving WorldShip Data check box as needed (see below).
Click Next.
If you selected the Finish Moving WorldShip Data check box, continue with step 6. If you cleared the Finish Moving WorldShip Data check box, skip to step 7.
© Copyright 2016, United Parcel Service of America, Inc. All rights reserved. 4
WorldShip®
Install on a Single or Workgroup Workstation
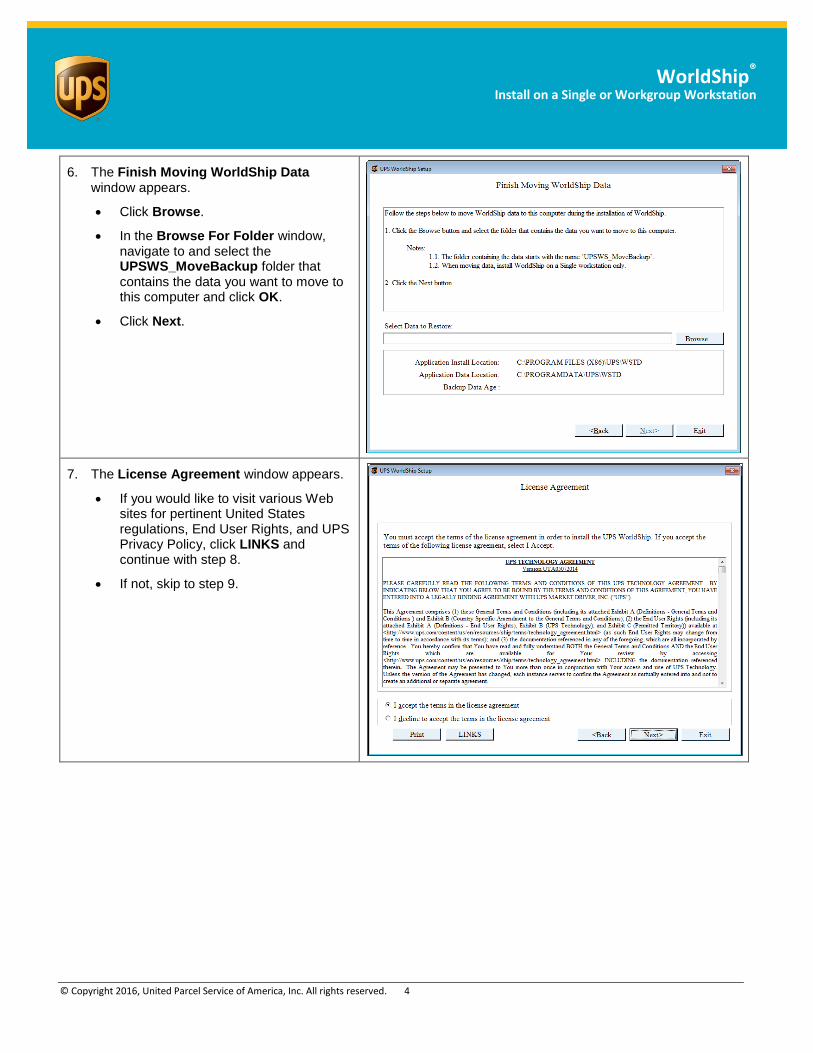
6. The Finish Moving WorldShip Data window appears.
Click Browse.
In the Browse For Folder window, navigate to and select the UPSWS_MoveBackup folder that contains the data you want to move to this computer and click OK.
Click Next.
7. The License Agreement window appears.
If you would like to visit various Web sites for pertinent United States regulations, End User Rights, and UPS Privacy Policy, click LINKS and continue with step 8.
If not, skip to step 9.
© Copyright 2016, United Parcel Service of America, Inc. All rights reserved. 5
WorldShip®
Install on a Single or Workgroup Workstation
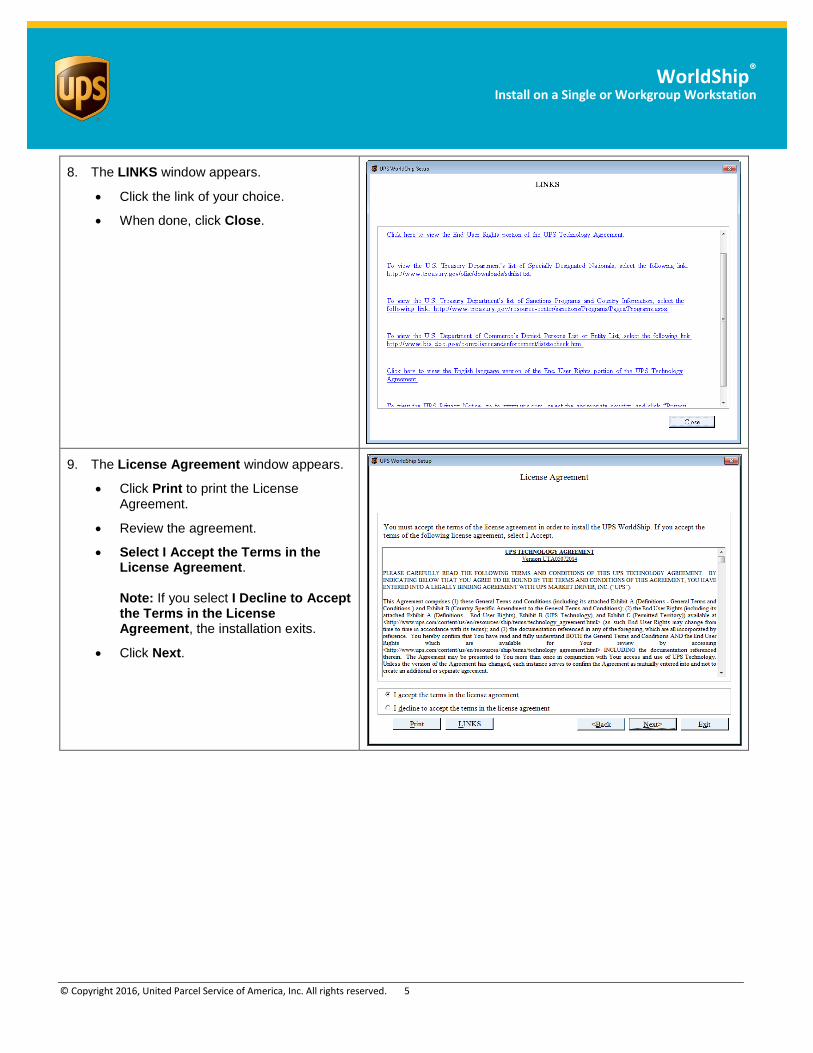
8. The LINKS window appears.
Click the link of your choice.
When done, click Close.
9. The License Agreement window appears.
Click Print to print the License Agreement.
Review the agreement.
Select I Accept the Terms in the License Agreement. Note: If you select I Decline to Accept the Terms in the License Agreement, the installation exits.
Click Next.
© Copyright 2016, United Parcel Service of America, Inc. All rights reserved. 6
WorldShip®
Install on a Single or Workgroup Workstation
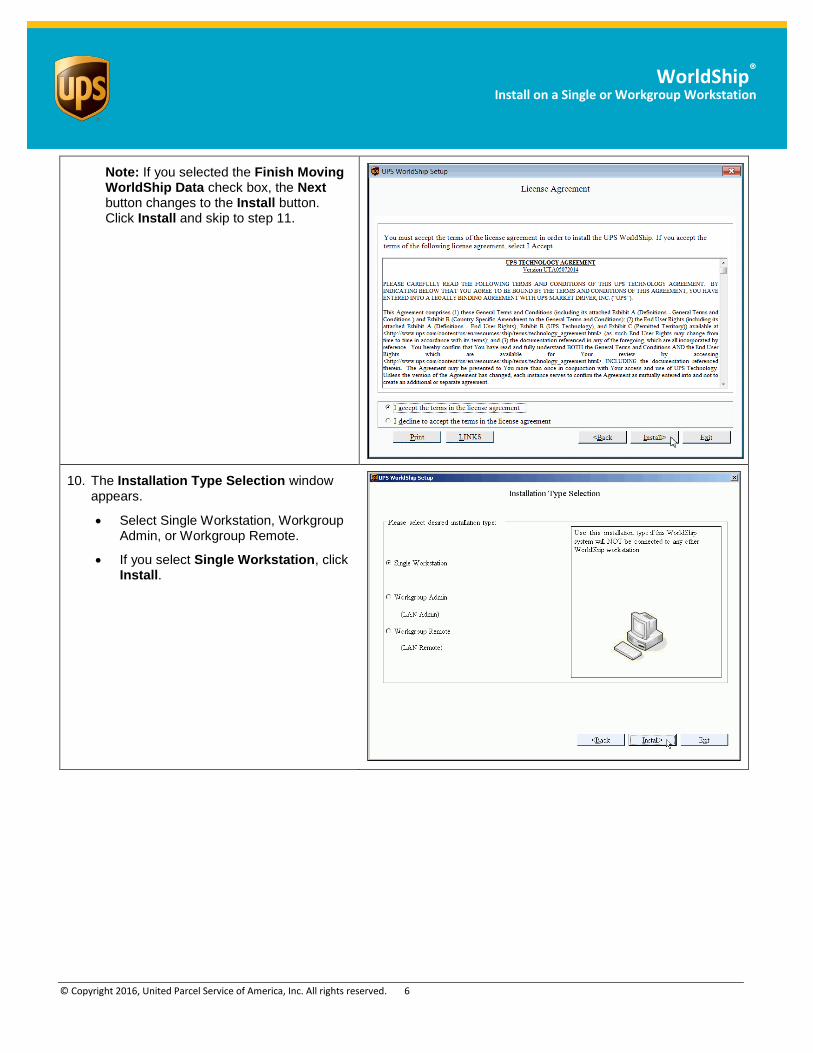
Note: If you selected the Finish Moving WorldShip Data check box, the Next button changes to the Install button. Click Install and skip to step 11.
10. The Installation Type Selection window appears.
Select Single Workstation, Workgroup Admin, or Workgroup Remote.
If you select Single Workstation, click Install.
© Copyright 2016, United Parcel Service of America, Inc. All rights reserved. 7
WorldShip®
Install on a Single or Workgroup Workstation
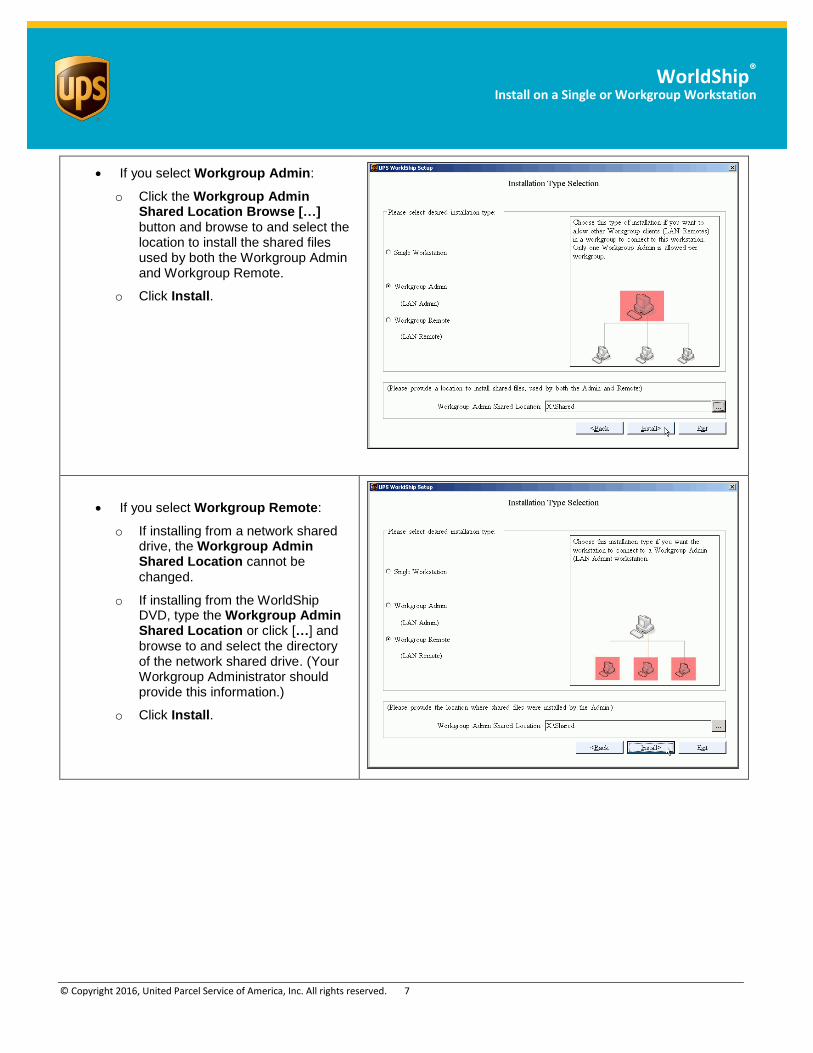
If you select Workgroup Admin:
o Click the Workgroup Admin Shared Location Browse […] button and browse to and select the location to install the shared files used by both the Workgroup Admin and Workgroup Remote.
o Click Install.
If you select Workgroup Remote:
o If installing from a network shared drive, the Workgroup Admin Shared Location cannot be changed.
o If installing from the WorldShip DVD, type the Workgroup Admin Shared Location or click […] and browse to and select the directory of the network shared drive. (Your Workgroup Administrator should provide this information.)
o Click Install.
© Copyright 2016, United Parcel Service of America, Inc. All rights reserved. 8
WorldShip®
Install on a Single or Workgroup Workstation
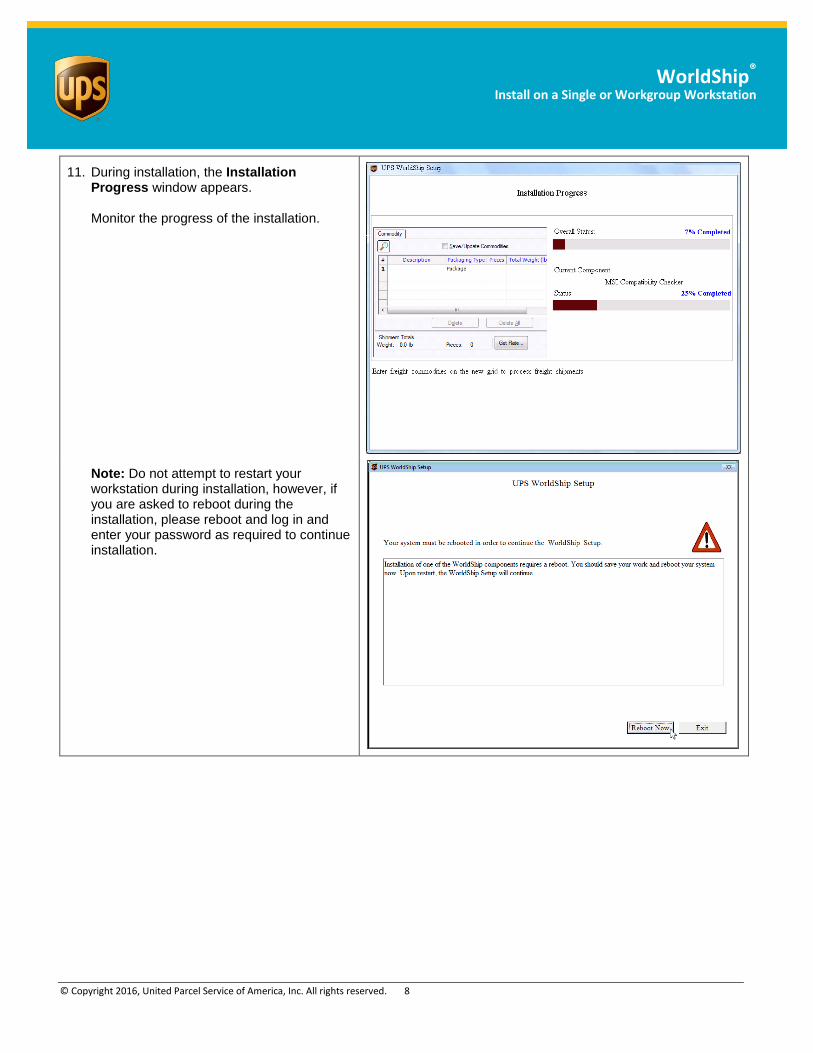
11. During installation, the Installation Progress window appears. Monitor the progress of the installation.
Note: Do not attempt to restart your workstation during installation, however, if you are asked to reboot during the installation, please reboot and log in and enter your password as required to continue installation.
© Copyright 2016, United Parcel Service of America, Inc. All rights reserved. 9
WorldShip®
Install on a Single or Workgroup Workstation
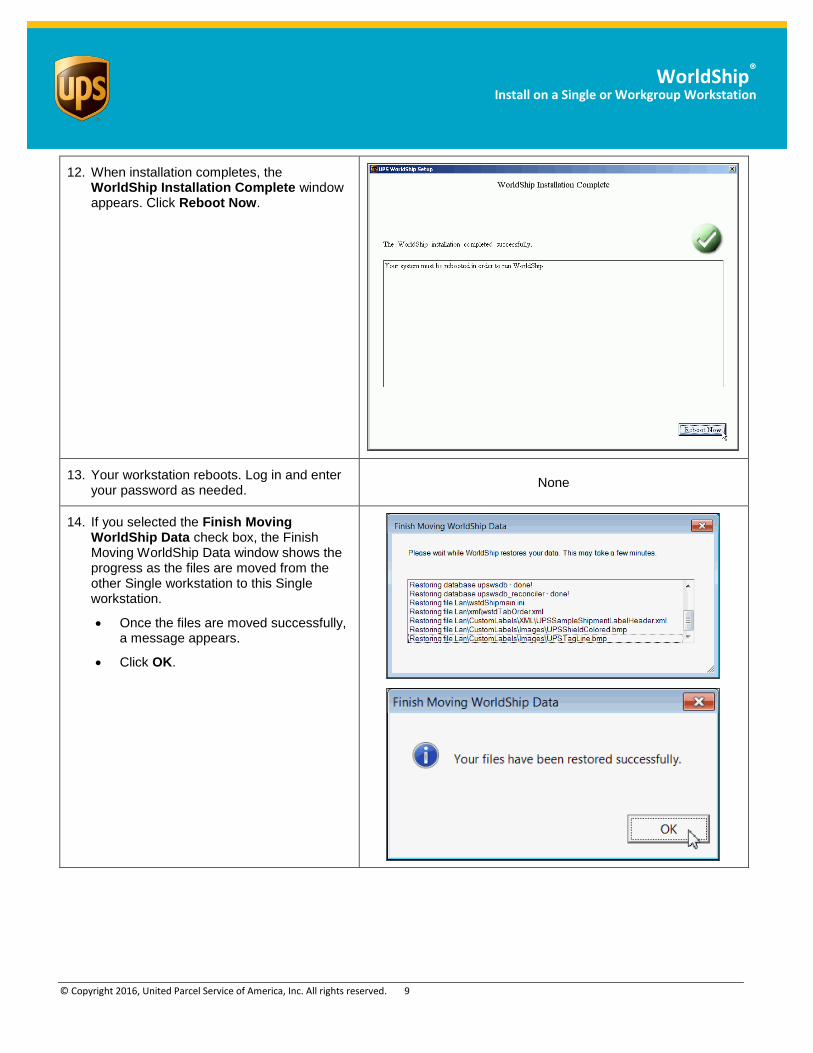
12. When installation completes, the WorldShip Installation Complete window appears. Click Reboot Now.
13. Your workstation reboots. Log in and enter your password as needed.
None
14. If you selected the Finish Moving WorldShip Data check box, the Finish Moving WorldShip Data window shows the progress as the files are moved from the other Single workstation to this Single workstation.
Once the files are moved successfully, a message appears.
Click OK.

© Copyright 2016, United Parcel Service of America, Inc. All rights reserved. 10
WorldShip®
Install on a Single or Workgroup Workstation
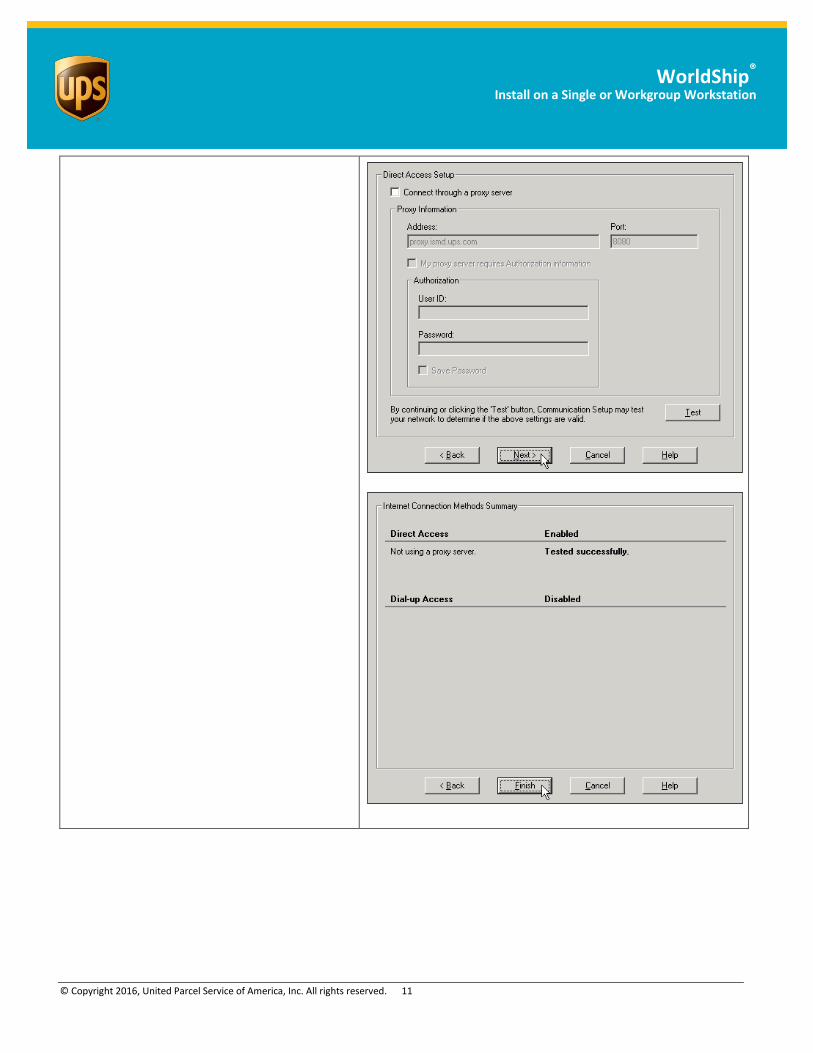
15. WorldShip starts. During start up, the progress appears on the WorldShip splash screen, and the Communication Setup windows appear so you can set up your communications. Note: The Communication Setup windows do not appear on Remote Workgroup workstations.
Complete the required information on each window.
Click Next on the first two windows and Finish on the third window (see next page).
© Copyright 2016, United Parcel Service of America, Inc. All rights reserved. 11
WorldShip®
Install on a Single or Workgroup Workstation
© Copyright 2016, United Parcel Service of America, Inc. All rights reserved. 12
WorldShip®
Install on a Single or Workgroup Workstation
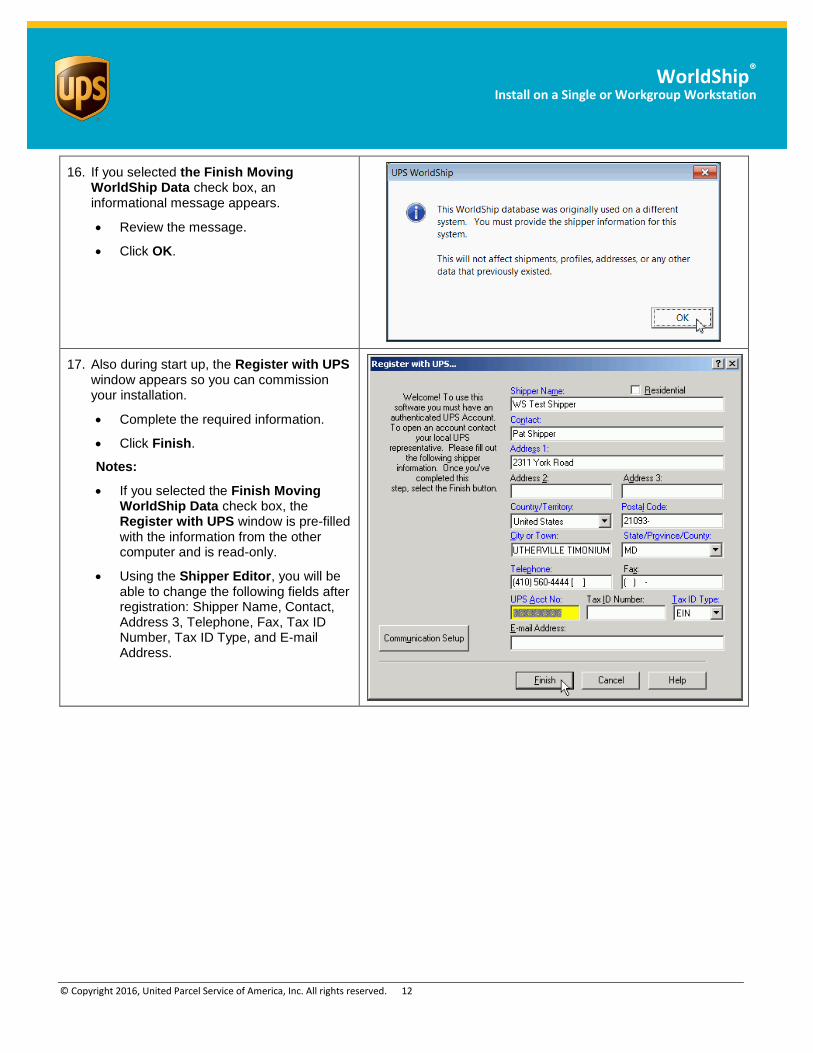
16. If you selected the Finish Moving WorldShip Data check box, an informational message appears.
Review the message.
Click OK.
17. Also during start up, the Register with UPS window appears so you can commission your installation.
Complete the required information.
Click Finish.
Notes:
If you selected the Finish Moving WorldShip Data check box, the Register with UPS window is pre-filled with the information from the other computer and is read-only.
Using the Shipper Editor, you will be able to change the following fields after registration: Shipper Name, Contact, Address 3, Telephone, Fax, Tax ID Number, Tax ID Type, and E-mail Address.
© Copyright 2016, United Parcel Service of America, Inc. All rights reserved. 13
WorldShip®
Install on a Single or Workgroup Workstation
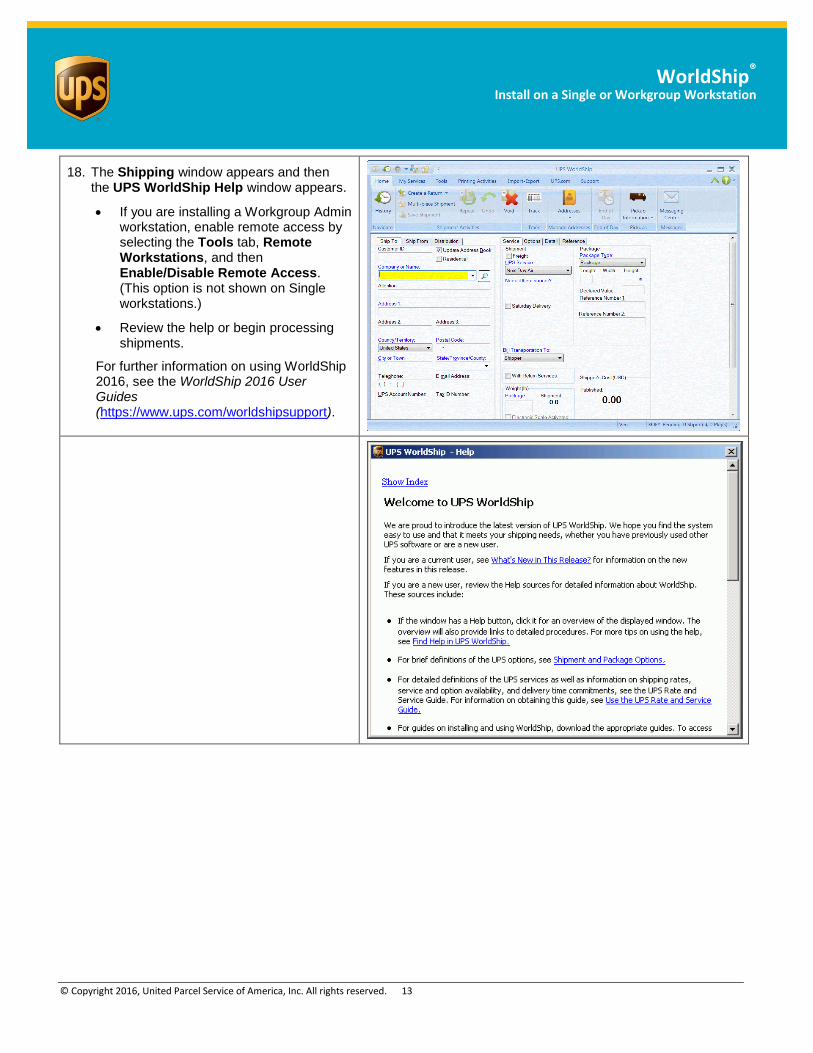
18. The Shipping window appears and then the UPS WorldShip Help window appears.
If you are installing a Workgroup Admin workstation, enable remote access by selecting the Tools tab, Remote Workstations, and then Enable/Disable Remote Access. (This option is not shown on Single workstations.)
Review the help or begin processing shipments.
For further information on using WorldShip 2016, see the WorldShip 2016 User Guides (https://www.ups.com/worldshipsupport).