
THE CUB GRUB COOKBOOK - Balboa Oaks District, BSAbalboaoaks.bsa-la.org/download/blog/Cub Grub...
70
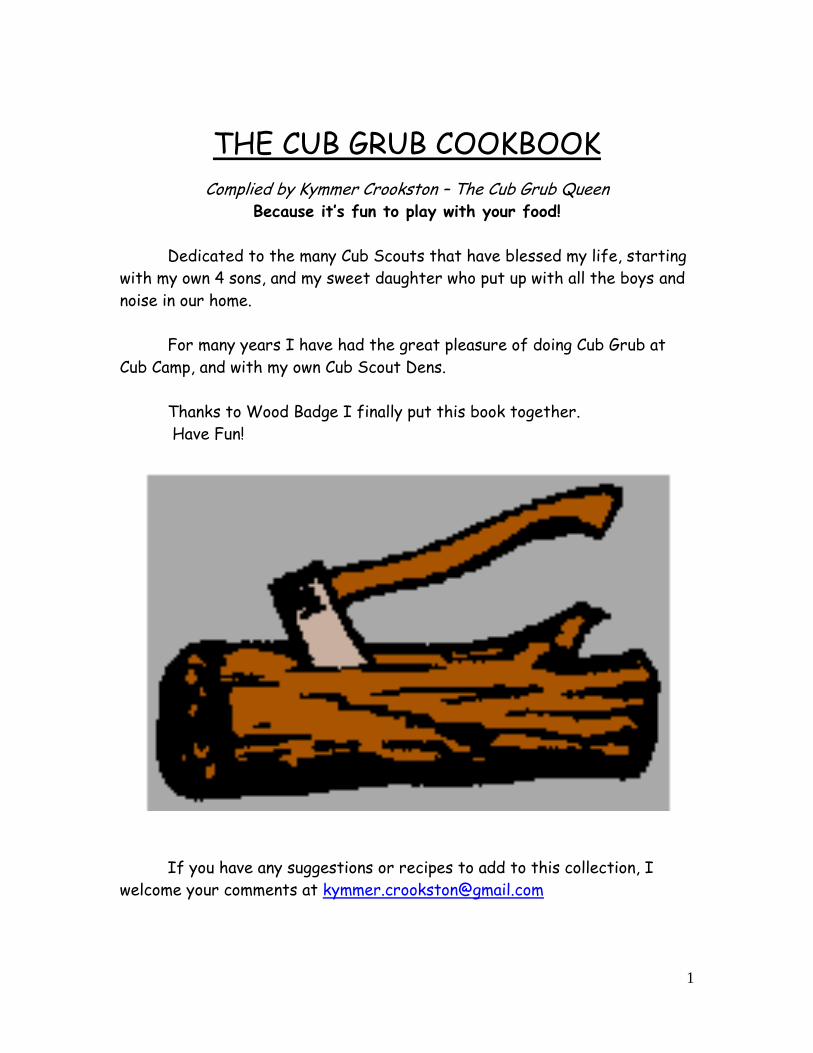
1 THE CUB GRUB COOKBOOK Complied by Kymmer Crookston – The Cub Grub Queen Because it’s fun to play with your food! Dedicated to the many Cub Scouts that have blessed my life, starting with my own 4 sons, and my sweet daughter who put up with all the boys and noise in our home. For many years I have had the great pleasure of doing Cub Grub at Cub Camp, and with my own Cub Scout Dens. Thanks to Wood Badge I finally put this book together. Have Fun! If you have any suggestions or recipes to add to this collection, I welcome your comments at [email protected]
Transcript of THE CUB GRUB COOKBOOK - Balboa Oaks District, BSAbalboaoaks.bsa-la.org/download/blog/Cub Grub...
1
THE CUB GRUB COOKBOOK
Complied by Kymmer Crookston – The Cub Grub Queen Because it’s fun to play with your food!
Dedicated to the many Cub Scouts that have blessed my life, starting
with my own 4 sons, and my sweet daughter who put up with all the boys and
noise in our home.
For many years I have had the great pleasure of doing Cub Grub at
Cub Camp, and with my own Cub Scout Dens.
Thanks to Wood Badge I finally put this book together.
Have Fun!
If you have any suggestions or recipes to add to this collection, I
welcome your comments at [email protected]

2
Many of these recipes make fun den and pack treats,
or they can help fill cub scouting requirements.
Tiger
Elective 25 – Snack Time
Make a snack and share it with your family or den.
Wolf
Achievement #8 – Cooking and Eating
8b – Plan the meals you and your family should have for one day. …
8c – Help fix at least 1 meal for our family. Help …, cook the food, …
8d – Fix your own breakfast. …
8e – With an adult, help plan, prepare, and cook an outdoor meal.
Elective #18 – Outdoor Adventure
18a – Help plan and hold a picnic with your family or den.
Bear Achievement #9 - What’s Cooking?
9a – With adult, bake cookies. (How about doing this in a cardboard oven).
9b – With an adult, make snacks for the next den meeting.
9c – With an adult prepare one part of your breakfast, one part of your lunch, and
one part of your supper.
9e – Make some trail food for a hike.
9f – With an adult, make a dessert for your family.
9g – With an adult, cook something outdoors.
Achievement #12 – Family Outdoor Adventure
12a – Go camping with your family. (Here are ideas for camp meals.)
12a – Go on a hike with your family. (Make snack to take with you.)
12c- Have a picnic with your family.
Webelos
Outdoorsman Activity Badge
Requirement #7 – Discuss with your Webelos den leader the rules of outdoor fire
safety. (This is where it would be fun to use Edible Fire to teach safe fire
building.) Using these rules, show how to build a safe fire and put it out. Requirement #8 – With your accompanying adult on a campout or outdoor activity, assist in
preparing, cooking, and cleanup for one of your den’s meals. …
For art activities that call for clay, how about using edible play dough for some added fun.
3
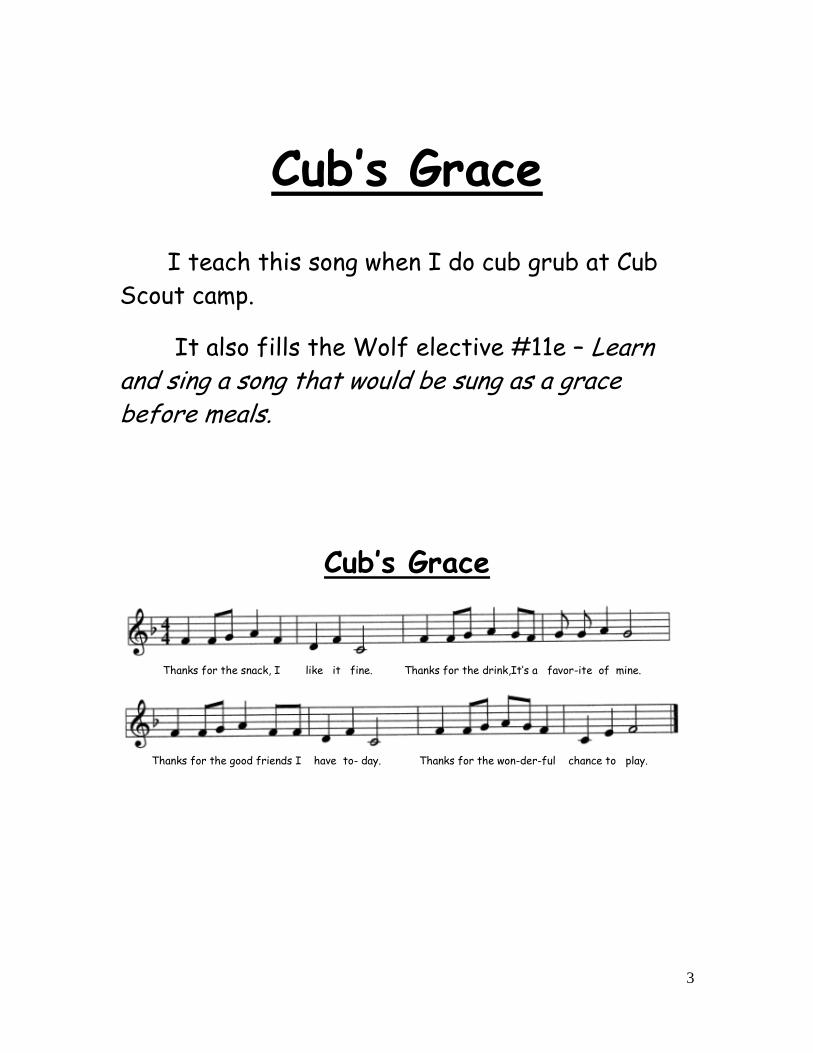
Cub’s Grace
I teach this song when I do cub grub at Cub
Scout camp.
It also fills the Wolf elective #11e – Learn and sing a song that would be sung as a grace before meals.
Cub’s Grace
Thanks for the snack, I like it fine. Thanks for the drink,It’s a favor-ite of mine.
Thanks for the good friends I have to- day. Thanks for the won-der-ful chance to play.
4
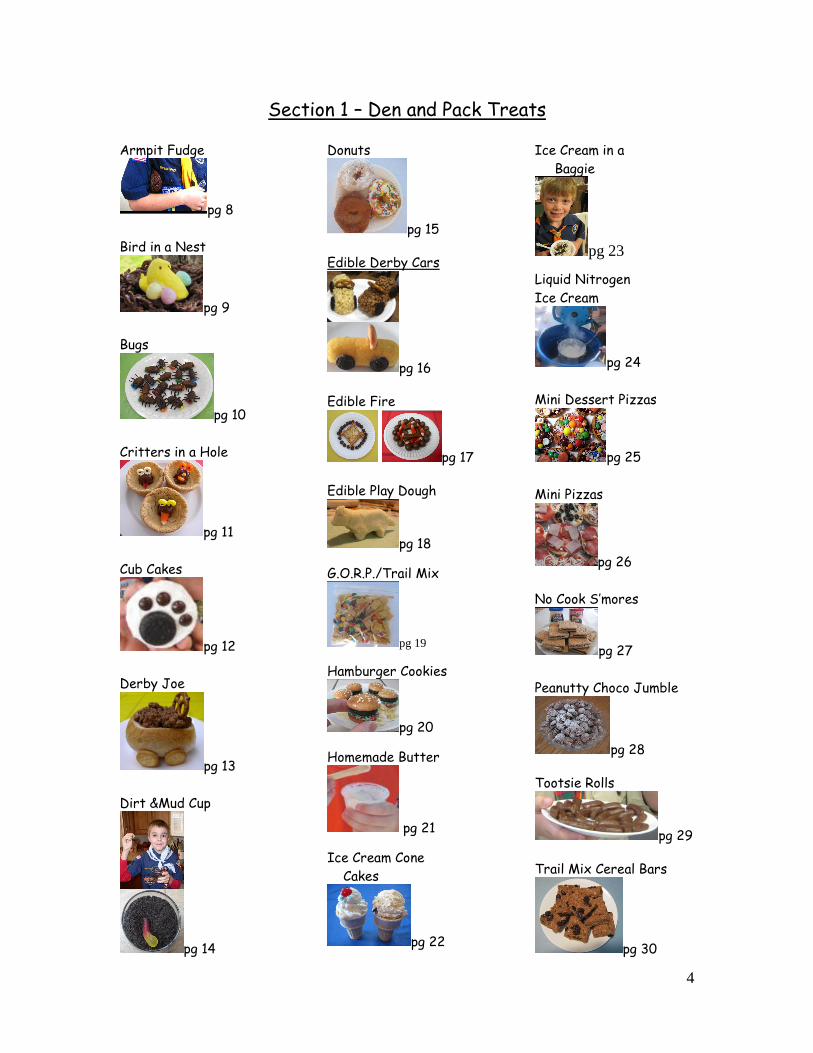
Section 1 – Den and Pack Treats
Armpit Fudge
pg 8
Bird in a Nest
pg 9
Bugs
pg 10
Critters in a Hole
pg 11
Cub Cakes
pg 12
Derby Joe
pg 13
Dirt &Mud Cup
pg 14
Donuts
pg 15
Edible Derby Cars
pg 16
Edible Fire
pg 17
Edible Play Dough
pg 18
G.O.R.P./Trail Mix
pg 19
Hamburger Cookies
pg 20
Homemade Butter
pg 21
Ice Cream Cone
Cakes
pg 22
Ice Cream in a
Baggie
pg 23
Liquid Nitrogen
Ice Cream
pg 24
Mini Dessert Pizzas
pg 25
Mini Pizzas
pg 26
No Cook S’mores
pg 27
Peanutty Choco Jumble
pg 28
Tootsie Rolls
pg 29
Trail Mix Cereal Bars
pg 30
5
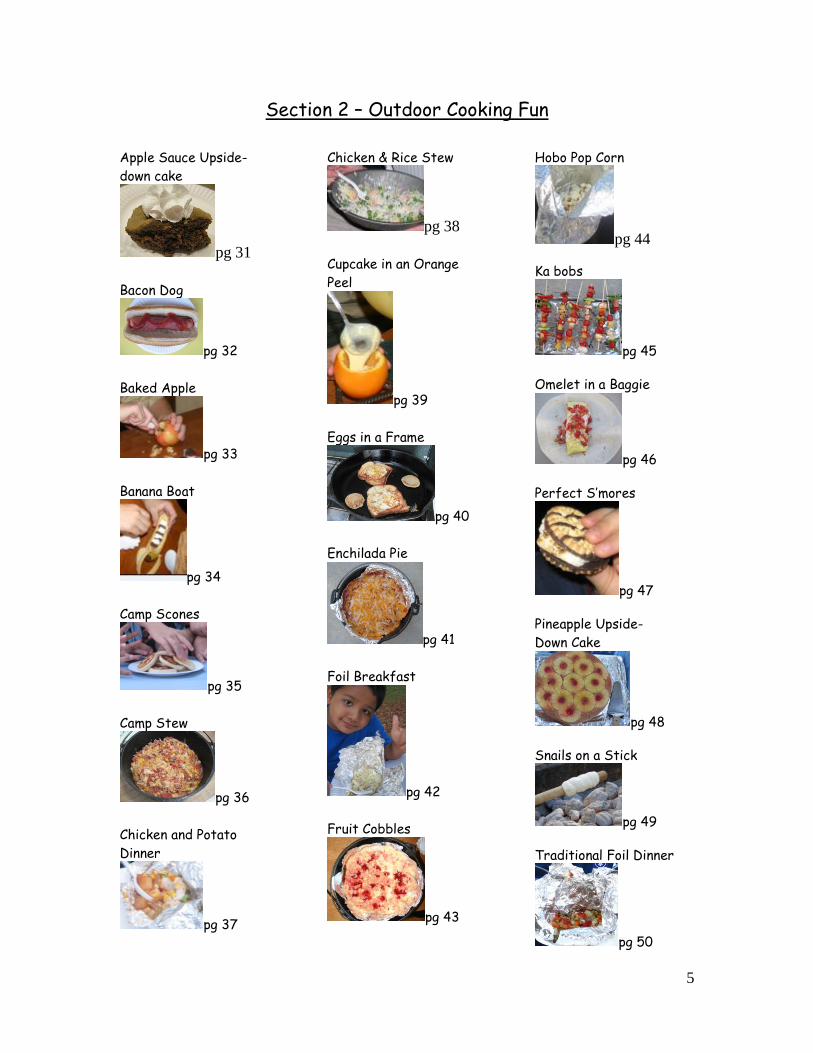
Section 2 – Outdoor Cooking Fun
Apple Sauce Upside-
down cake
pg 31
Bacon Dog
pg 32
Baked Apple
pg 33
Banana Boat
pg 34
Camp Scones
pg 35
Camp Stew
pg 36
Chicken and Potato
Dinner
pg 37
Chicken & Rice Stew
pg 38
Cupcake in an Orange
Peel
pg 39
Eggs in a Frame
pg 40
Enchilada Pie
pg 41
Foil Breakfast
pg 42
Fruit Cobbles
pg 43
Hobo Pop Corn
pg 44
Ka bobs
pg 45
Omelet in a Baggie
pg 46
Perfect S’mores
pg 47
Pineapple Upside-
Down Cake
pg 48
Snails on a Stick
pg 49
Traditional Foil Dinner
pg 50
6
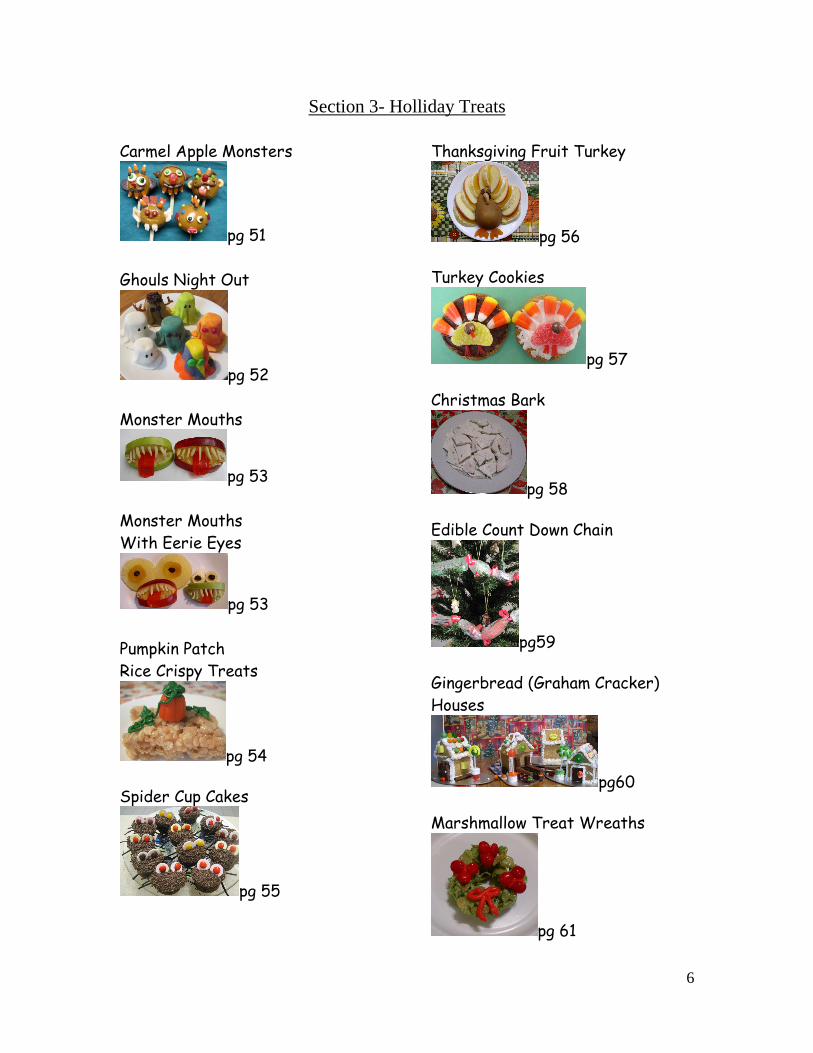
Section 3- Holliday Treats
Carmel Apple Monsters
pg 51
Ghouls Night Out
pg 52
Monster Mouths
pg 53
Monster Mouths
With Eerie Eyes
pg 53
Pumpkin Patch
Rice Crispy Treats
pg 54
Spider Cup Cakes
pg 55
Thanksgiving Fruit Turkey
pg 56
Turkey Cookies
pg 57
Christmas Bark
pg 58
Edible Count Down Chain
pg59
Gingerbread (Graham Cracker)
Houses
pg60
Marshmallow Treat Wreaths
pg 61
7
Section 4 - Outdoor Cooking Methods Most often when we are camping we use a camp stove or a campfire to cook
our food. Here are some other fun ways to cook food while camping.
Cardboard Box Oven
pg 62
Chimney Charcoal Starter
pg 66
Dutch Ovens
pg 67
Fire Starters
pg 68 Just kidding about the sticks
Foil Pot
pg 69
Tin Can Stove
pg 70
8
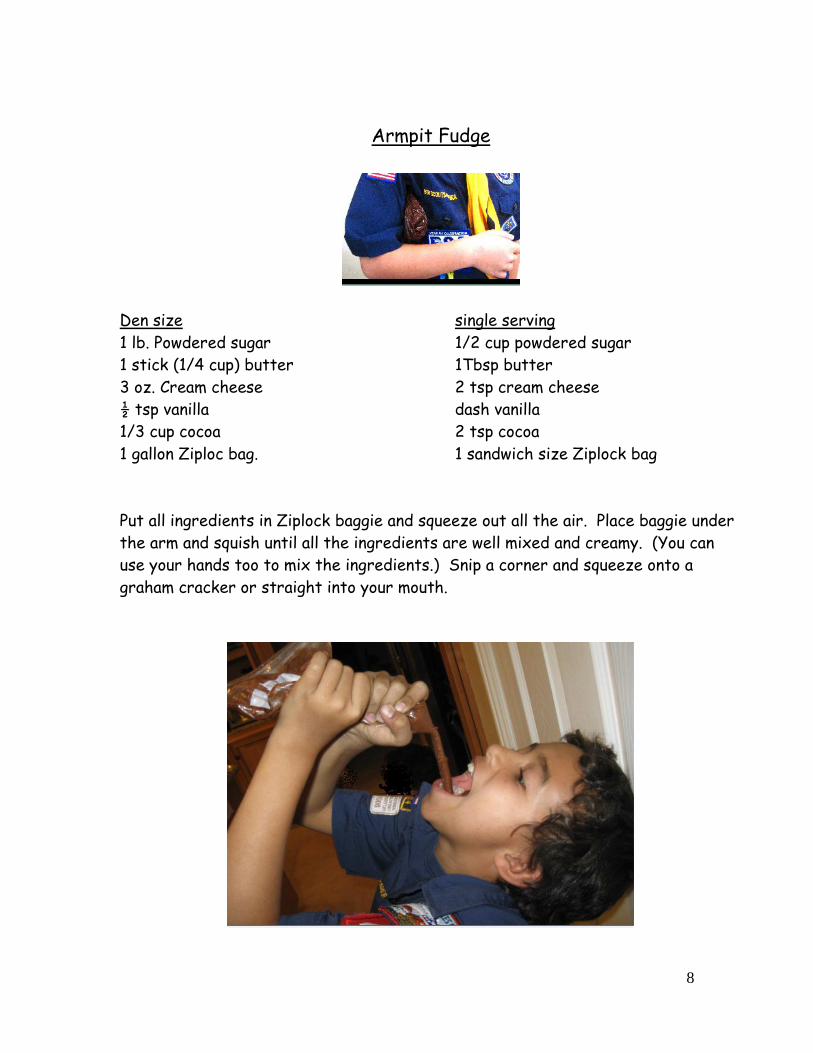
Armpit Fudge
Den size single serving
1 lb. Powdered sugar 1/2 cup powdered sugar
1 stick (1/4 cup) butter 1Tbsp butter
3 oz. Cream cheese 2 tsp cream cheese
½ tsp vanilla dash vanilla
1/3 cup cocoa 2 tsp cocoa
1 gallon Ziploc bag. 1 sandwich size Ziplock bag
Put all ingredients in Ziplock baggie and squeeze out all the air. Place baggie under
the arm and squish until all the ingredients are well mixed and creamy. (You can
use your hands too to mix the ingredients.) Snip a corner and squeeze onto a
graham cracker or straight into your mouth.
9
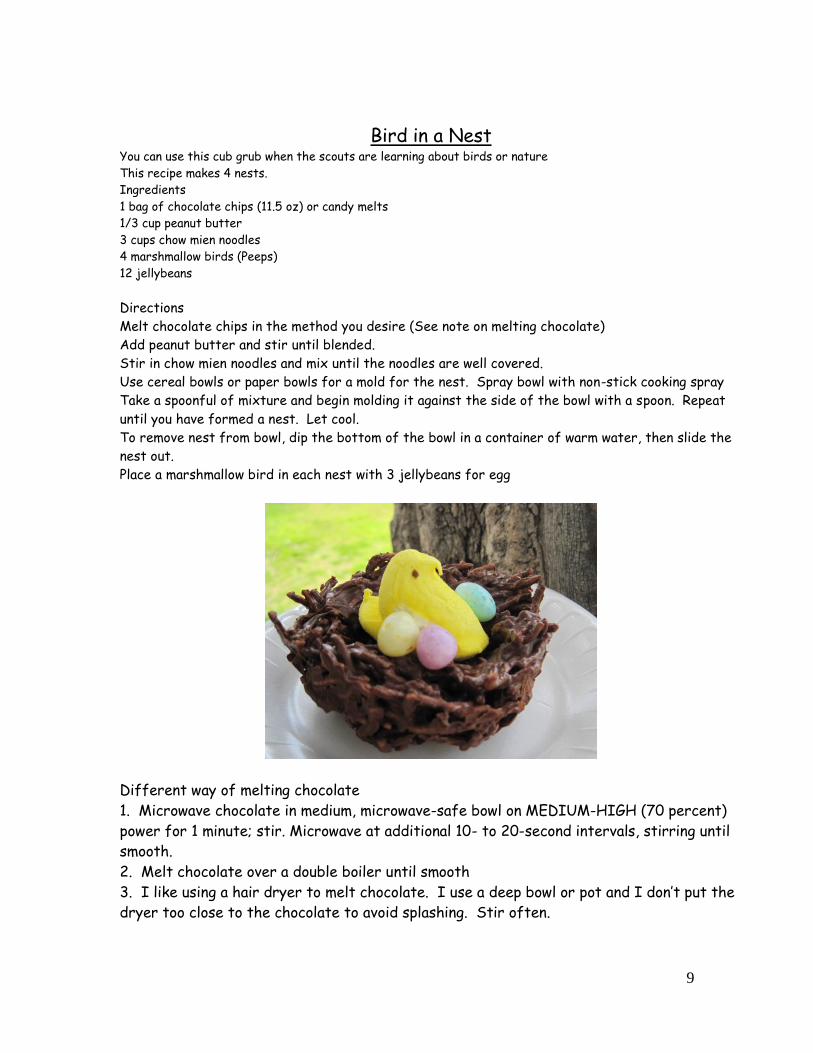
Bird in a Nest You can use this cub grub when the scouts are learning about birds or nature
This recipe makes 4 nests.
Ingredients
1 bag of chocolate chips (11.5 oz) or candy melts
1/3 cup peanut butter
3 cups chow mien noodles
4 marshmallow birds (Peeps)
12 jellybeans
Directions
Melt chocolate chips in the method you desire (See note on melting chocolate)
Add peanut butter and stir until blended.
Stir in chow mien noodles and mix until the noodles are well covered.
Use cereal bowls or paper bowls for a mold for the nest. Spray bowl with non-stick cooking spray
Take a spoonful of mixture and begin molding it against the side of the bowl with a spoon. Repeat
until you have formed a nest. Let cool.
To remove nest from bowl, dip the bottom of the bowl in a container of warm water, then slide the
nest out.
Place a marshmallow bird in each nest with 3 jellybeans for egg
Different way of melting chocolate
1. Microwave chocolate in medium, microwave-safe bowl on MEDIUM-HIGH (70 percent)
power for 1 minute; stir. Microwave at additional 10- to 20-second intervals, stirring until
smooth.
2. Melt chocolate over a double boiler until smooth
3. I like using a hair dryer to melt chocolate. I use a deep bowl or pot and I don’t put the
dryer too close to the chocolate to avoid splashing. Stir often.
10
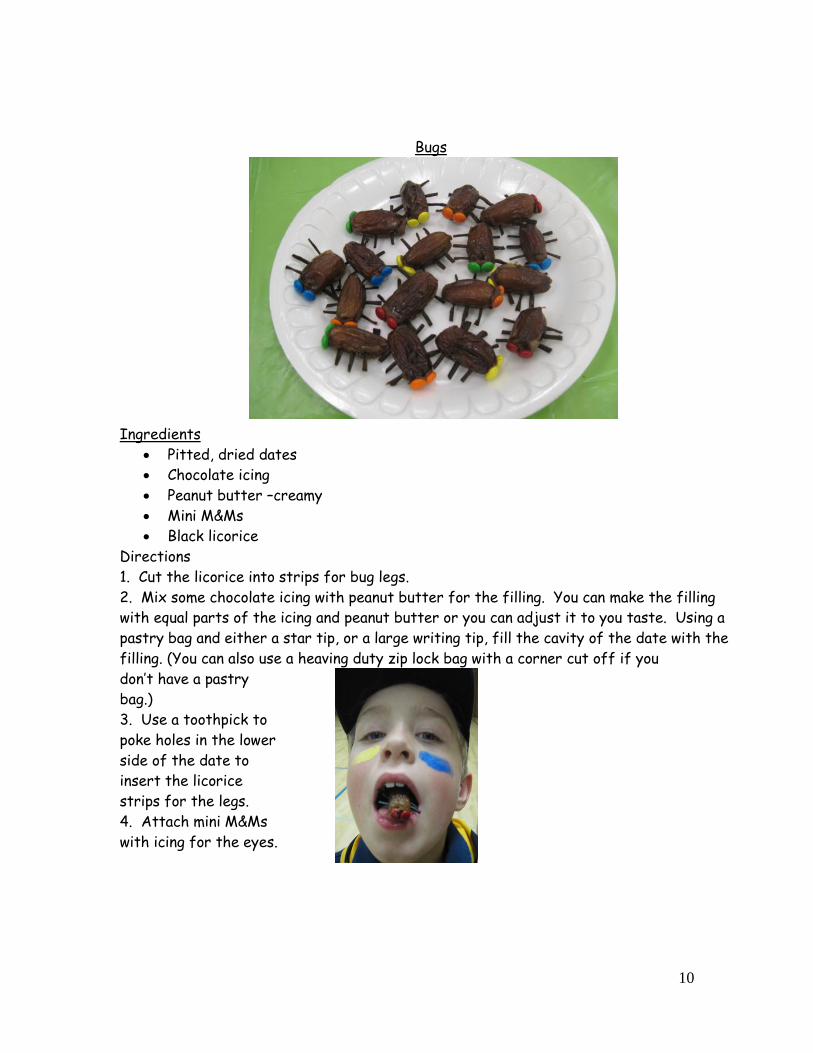
Bugs
Ingredients
Pitted, dried dates
Chocolate icing
Peanut butter –creamy
Mini M&Ms
Black licorice
Directions
1. Cut the licorice into strips for bug legs.
2. Mix some chocolate icing with peanut butter for the filling. You can make the filling
with equal parts of the icing and peanut butter or you can adjust it to you taste. Using a
pastry bag and either a star tip, or a large writing tip, fill the cavity of the date with the
filling. (You can also use a heaving duty zip lock bag with a corner cut off if you
don’t have a pastry
bag.)
3. Use a toothpick to
poke holes in the lower
side of the date to
insert the licorice
strips for the legs.
4. Attach mini M&Ms
with icing for the eyes.
11
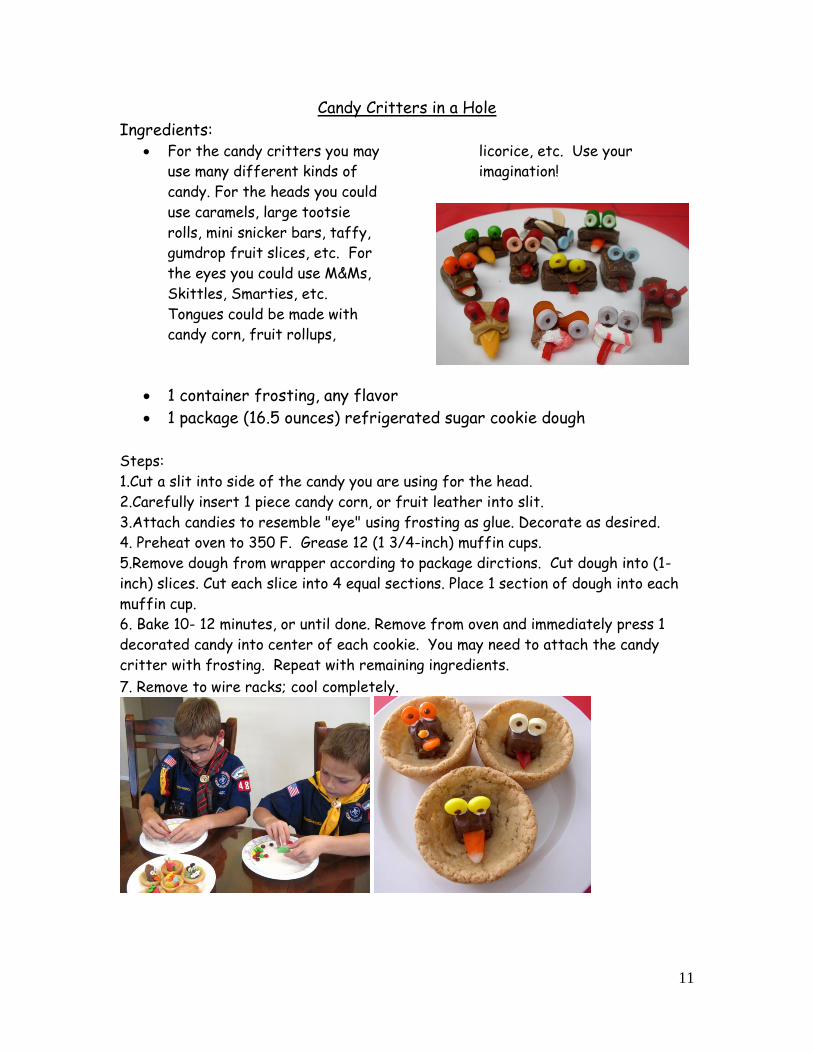
Candy Critters in a Hole
Ingredients: For the candy critters you may
use many different kinds of
candy. For the heads you could
use caramels, large tootsie
rolls, mini snicker bars, taffy,
gumdrop fruit slices, etc. For
the eyes you could use M&Ms,
Skittles, Smarties, etc.
Tongues could be made with
candy corn, fruit rollups,
licorice, etc. Use your
imagination!
1 container frosting, any flavor
1 package (16.5 ounces) refrigerated sugar cookie dough
Steps:
1.Cut a slit into side of the candy you are using for the head.
2.Carefully insert 1 piece candy corn, or fruit leather into slit.
3.Attach candies to resemble "eye" using frosting as glue. Decorate as desired.
4. Preheat oven to 350 F. Grease 12 (1 3/4-inch) muffin cups.
5.Remove dough from wrapper according to package dirctions. Cut dough into (1-
inch) slices. Cut each slice into 4 equal sections. Place 1 section of dough into each
muffin cup.
6. Bake 10- 12 minutes, or until done. Remove from oven and immediately press 1
decorated candy into center of each cookie. You may need to attach the candy
critter with frosting. Repeat with remaining ingredients.
7. Remove to wire racks; cool completely.
12
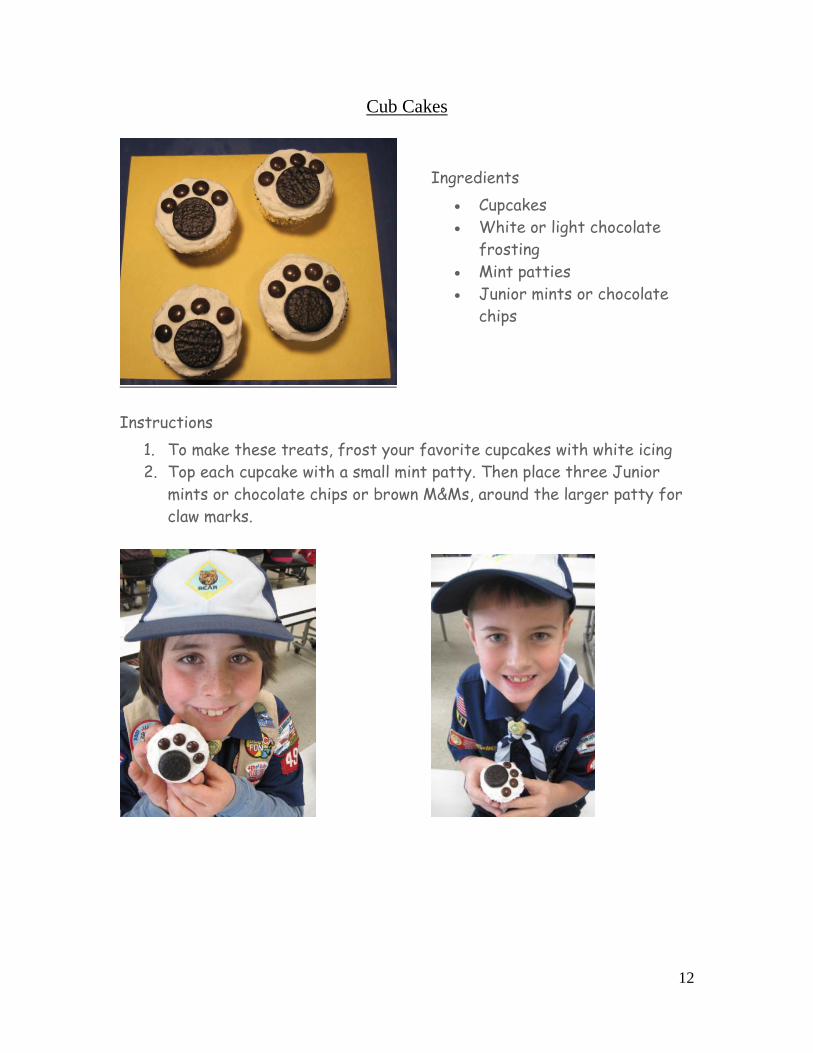
Cub Cakes
Instructions
Ingredients
Cupcakes
White or light chocolate
frosting
Mint patties
Junior mints or chocolate
chips
1. To make these treats, frost your favorite cupcakes with white icing
2. Top each cupcake with a small mint patty. Then place three Junior
mints or chocolate chips or brown M&Ms, around the larger patty for
claw marks.
13
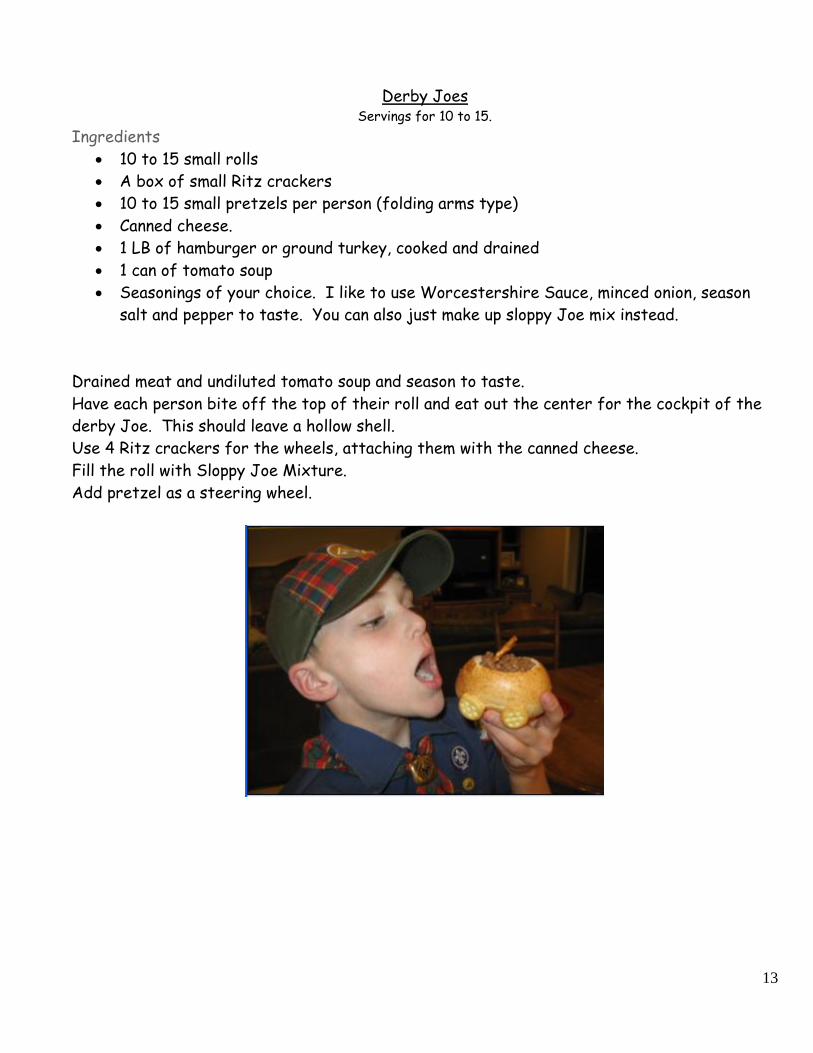
Derby Joes Servings for 10 to 15.
Ingredients
10 to 15 small rolls
A box of small Ritz crackers
10 to 15 small pretzels per person (folding arms type)
Canned cheese.
1 LB of hamburger or ground turkey, cooked and drained
1 can of tomato soup
Seasonings of your choice. I like to use Worcestershire Sauce, minced onion, season
salt and pepper to taste. You can also just make up sloppy Joe mix instead.
Drained meat and undiluted tomato soup and season to taste.
Have each person bite off the top of their roll and eat out the center for the cockpit of the
derby Joe. This should leave a hollow shell.
Use 4 Ritz crackers for the wheels, attaching them with the canned cheese.
Fill the roll with Sloppy Joe Mixture.
Add pretzel as a steering wheel.
14
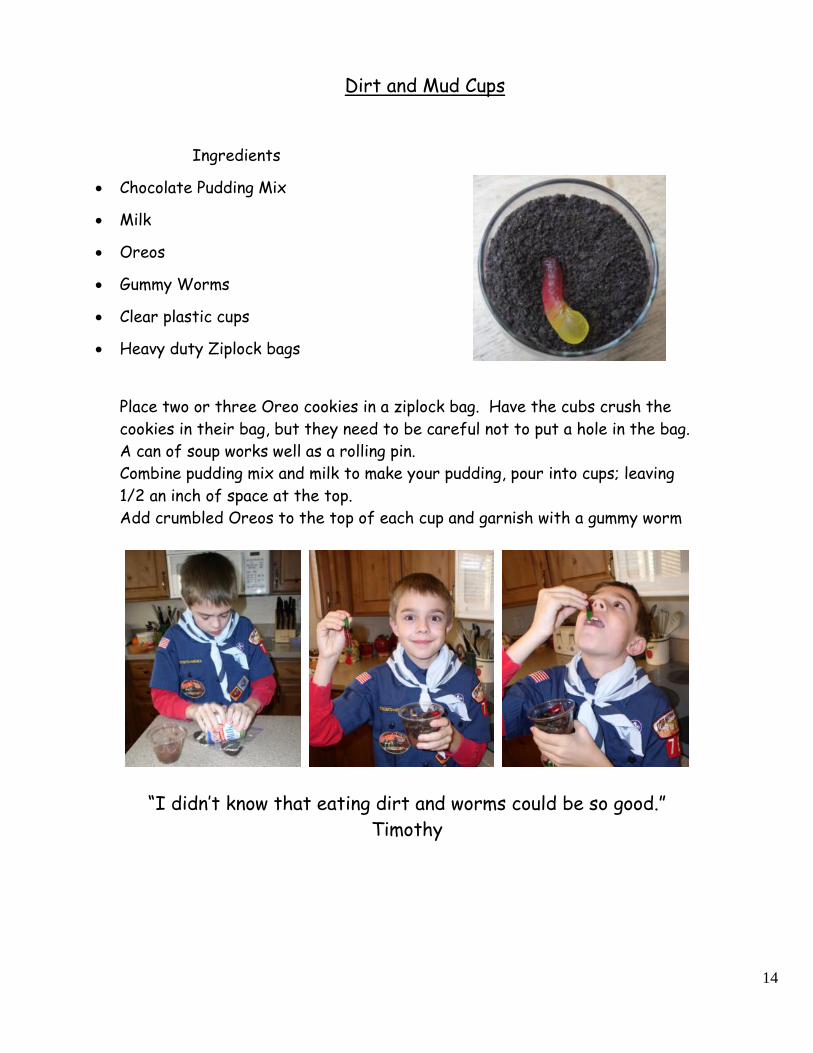
Dirt and Mud Cups
Ingredients
Chocolate Pudding Mix
Milk
Oreos
Gummy Worms
Clear plastic cups
Heavy duty Ziplock bags
Place two or three Oreo cookies in a ziplock bag. Have the cubs crush the
cookies in their bag, but they need to be careful not to put a hole in the bag.
A can of soup works well as a rolling pin.
Combine pudding mix and milk to make your pudding, pour into cups; leaving
1/2 an inch of space at the top.
Add crumbled Oreos to the top of each cup and garnish with a gummy worm
“I didn’t know that eating dirt and worms could be so good.”
Timothy
15
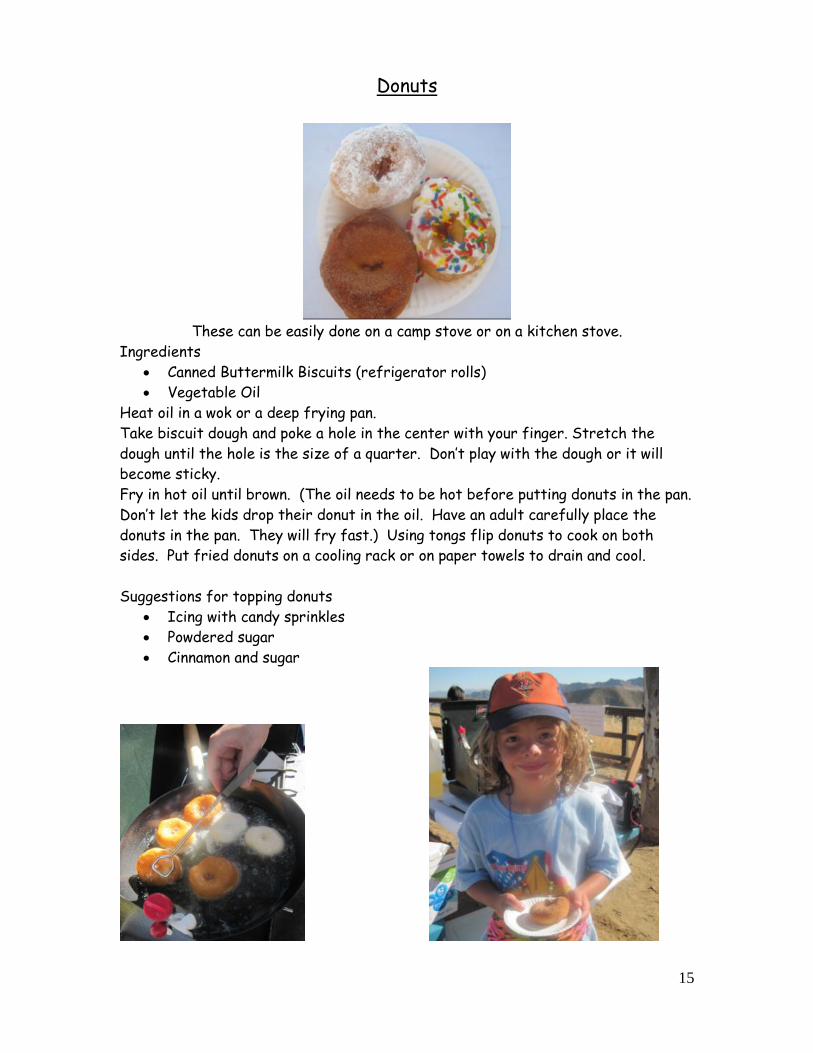
Donuts
These can be easily done on a camp stove or on a kitchen stove.
Ingredients
Canned Buttermilk Biscuits (refrigerator rolls)
Vegetable Oil
Heat oil in a wok or a deep frying pan.
Take biscuit dough and poke a hole in the center with your finger. Stretch the
dough until the hole is the size of a quarter. Don’t play with the dough or it will
become sticky.
Fry in hot oil until brown. (The oil needs to be hot before putting donuts in the pan.
Don’t let the kids drop their donut in the oil. Have an adult carefully place the
donuts in the pan. They will fry fast.) Using tongs flip donuts to cook on both
sides. Put fried donuts on a cooling rack or on paper towels to drain and cool.
Suggestions for topping donuts
Icing with candy sprinkles
Powdered sugar
Cinnamon and sugar
16
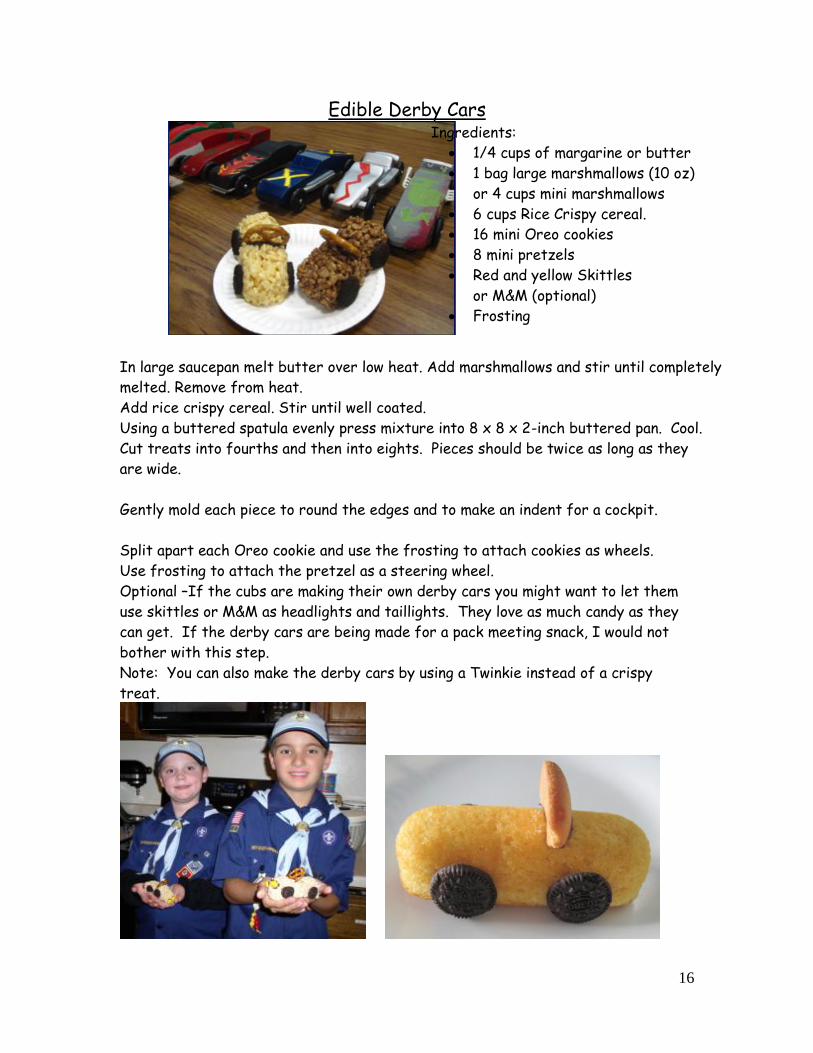
Edible Derby Cars
Ingredients:
1/4 cups of margarine or butter
1 bag large marshmallows (10 oz)
or 4 cups mini marshmallows
6 cups Rice Crispy cereal.
16 mini Oreo cookies
8 mini pretzels
Red and yellow Skittles
or M&M (optional)
Frosting
In large saucepan melt butter over low heat. Add marshmallows and stir until completely
melted. Remove from heat.
Add rice crispy cereal. Stir until well coated.
Using a buttered spatula evenly press mixture into 8 x 8 x 2-inch buttered pan. Cool.
Cut treats into fourths and then into eights. Pieces should be twice as long as they
are wide.
Gently mold each piece to round the edges and to make an indent for a cockpit.
Split apart each Oreo cookie and use the frosting to attach cookies as wheels.
Use frosting to attach the pretzel as a steering wheel.
Optional –If the cubs are making their own derby cars you might want to let them
use skittles or M&M as headlights and taillights. They love as much candy as they
can get. If the derby cars are being made for a pack meeting snack, I would not
bother with this step.
Note: You can also make the derby cars by using a Twinkie instead of a crispy
treat.
17
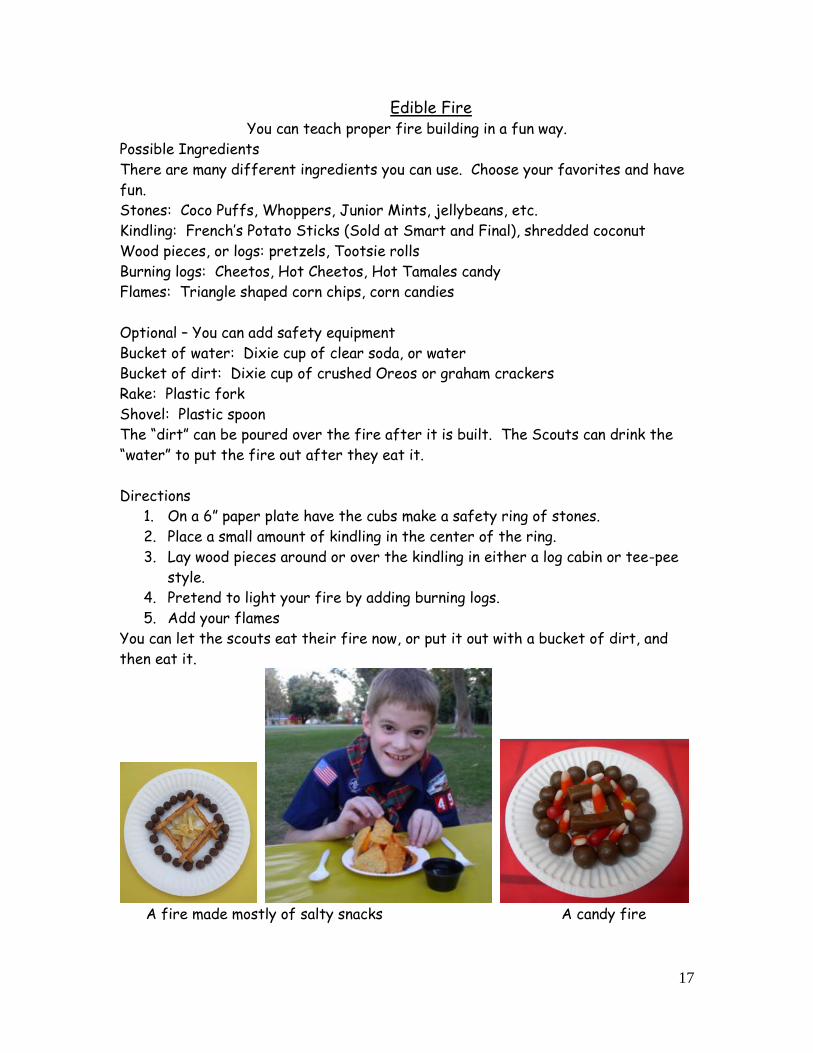
Edible Fire You can teach proper fire building in a fun way.
Possible Ingredients
There are many different ingredients you can use. Choose your favorites and have
fun.
Stones: Coco Puffs, Whoppers, Junior Mints, jellybeans, etc.
Kindling: French’s Potato Sticks (Sold at Smart and Final), shredded coconut
Wood pieces, or logs: pretzels, Tootsie rolls
Burning logs: Cheetos, Hot Cheetos, Hot Tamales candy
Flames: Triangle shaped corn chips, corn candies
Optional – You can add safety equipment
Bucket of water: Dixie cup of clear soda, or water
Bucket of dirt: Dixie cup of crushed Oreos or graham crackers
Rake: Plastic fork
Shovel: Plastic spoon
The “dirt” can be poured over the fire after it is built. The Scouts can drink the
“water” to put the fire out after they eat it.
Directions
1. On a 6” paper plate have the cubs make a safety ring of stones.
2. Place a small amount of kindling in the center of the ring.
3. Lay wood pieces around or over the kindling in either a log cabin or tee-pee
style.
4. Pretend to light your fire by adding burning logs.
5. Add your flames
You can let the scouts eat their fire now, or put it out with a bucket of dirt, and
then eat it.
A fire made mostly of salty snacks A candy fire
18
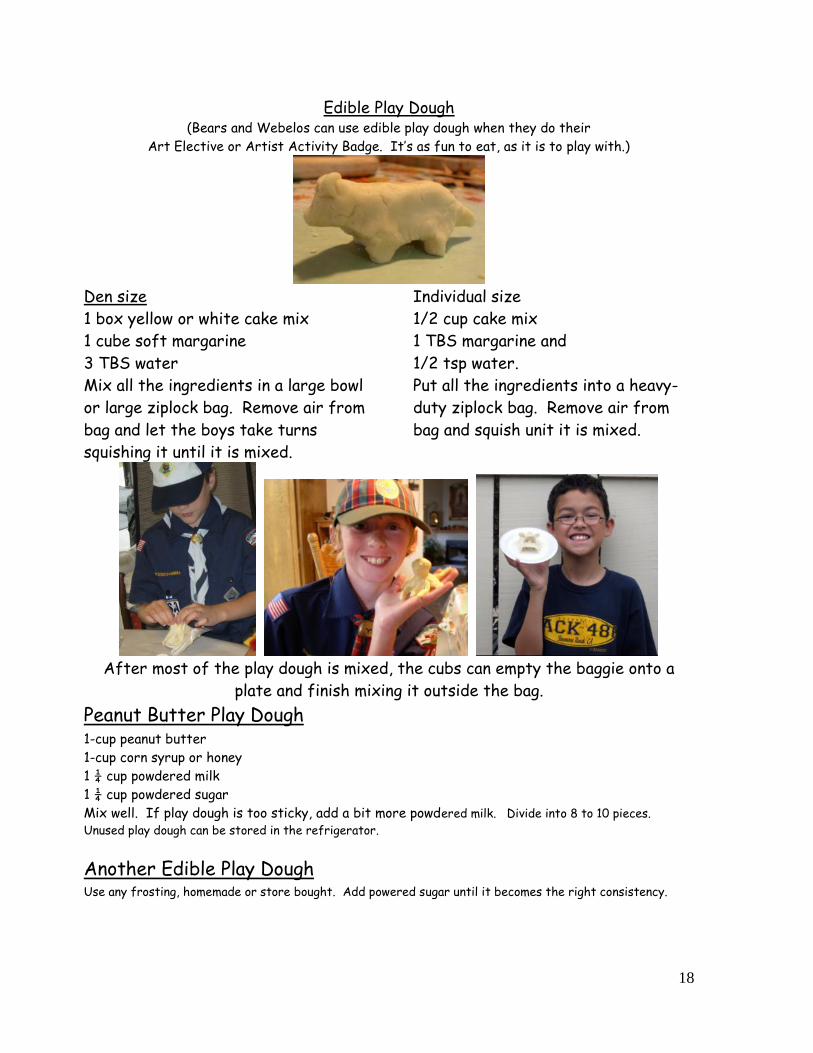
Edible Play Dough (Bears and Webelos can use edible play dough when they do their
Art Elective or Artist Activity Badge. It’s as fun to eat, as it is to play with.)
Den size
1 box yellow or white cake mix
1 cube soft margarine
3 TBS water
Mix all the ingredients in a large bowl
or large ziplock bag. Remove air from
bag and let the boys take turns
squishing it until it is mixed.
Individual size
1/2 cup cake mix
1 TBS margarine and
1/2 tsp water.
Put all the ingredients into a heavy-
duty ziplock bag. Remove air from
bag and squish unit it is mixed.
After most of the play dough is mixed, the cubs can empty the baggie onto a
plate and finish mixing it outside the bag.
Peanut Butter Play Dough 1-cup peanut butter
1-cup corn syrup or honey
1 ¼ cup powdered milk
1 ¼ cup powdered sugar
Mix well. If play dough is too sticky, add a bit more powdered milk. Divide into 8 to 10 pieces.
Unused play dough can be stored in the refrigerator.
Another Edible Play Dough Use any frosting, homemade or store bought. Add powered sugar until it becomes the right consistency.
19
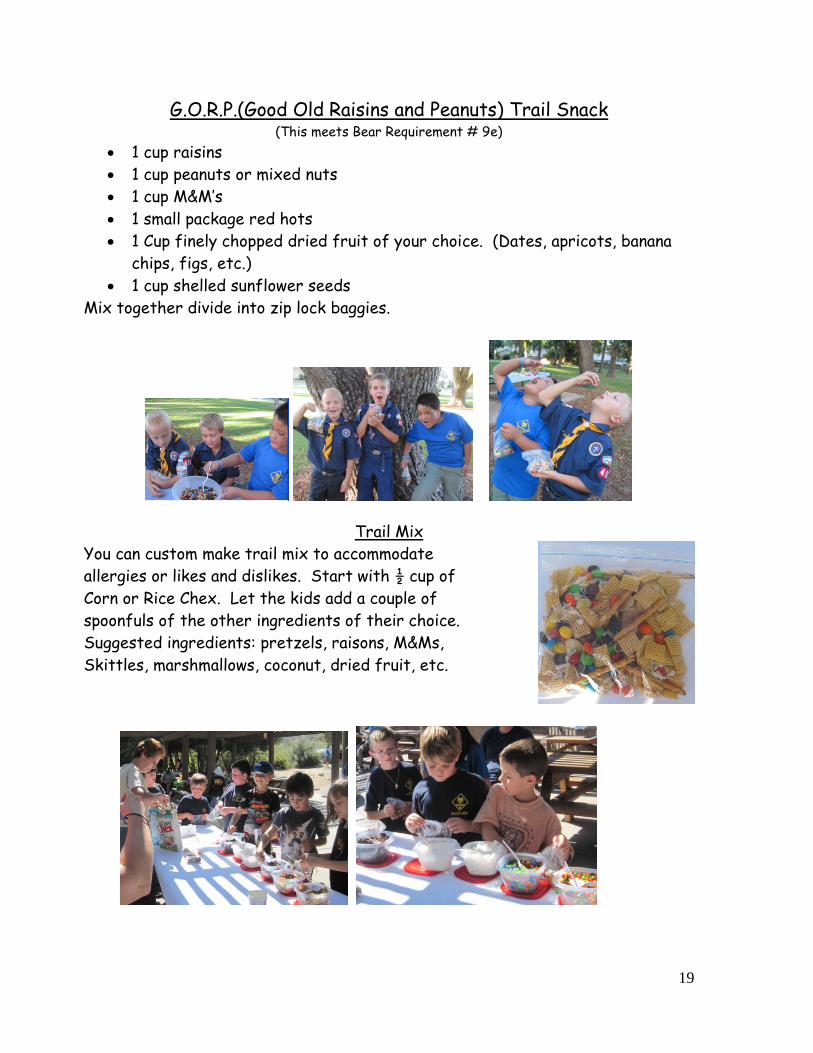
G.O.R.P.(Good Old Raisins and Peanuts) Trail Snack (This meets Bear Requirement # 9e)
1 cup raisins
1 cup peanuts or mixed nuts
1 cup M&M’s
1 small package red hots
1 Cup finely chopped dried fruit of your choice. (Dates, apricots, banana
chips, figs, etc.)
1 cup shelled sunflower seeds
Mix together divide into zip lock baggies.
Trail Mix
You can custom make trail mix to accommodate
allergies or likes and dislikes. Start with ½ cup of
Corn or Rice Chex. Let the kids add a couple of
spoonfuls of the other ingredients of their choice.
Suggested ingredients: pretzels, raisons, M&Ms,
Skittles, marshmallows, coconut, dried fruit, etc.
20
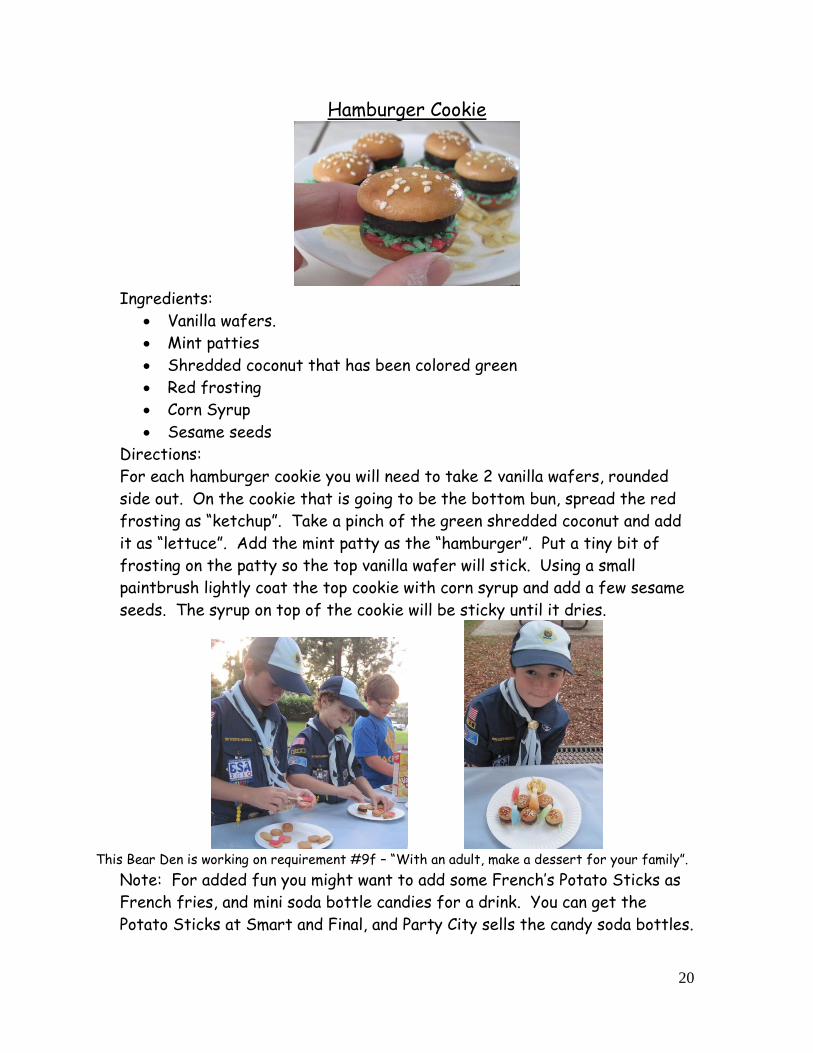
Hamburger Cookie
Ingredients:
Vanilla wafers.
Mint patties
Shredded coconut that has been colored green
Red frosting
Corn Syrup
Sesame seeds
Directions:
For each hamburger cookie you will need to take 2 vanilla wafers, rounded
side out. On the cookie that is going to be the bottom bun, spread the red
frosting as “ketchup”. Take a pinch of the green shredded coconut and add
it as “lettuce”. Add the mint patty as the “hamburger”. Put a tiny bit of
frosting on the patty so the top vanilla wafer will stick. Using a small
paintbrush lightly coat the top cookie with corn syrup and add a few sesame
seeds. The syrup on top of the cookie will be sticky until it dries.
This Bear Den is working on requirement #9f – “With an adult, make a dessert for your family”.
Note: For added fun you might want to add some French’s Potato Sticks as
French fries, and mini soda bottle candies for a drink. You can get the
Potato Sticks at Smart and Final, and Party City sells the candy soda bottles.
21
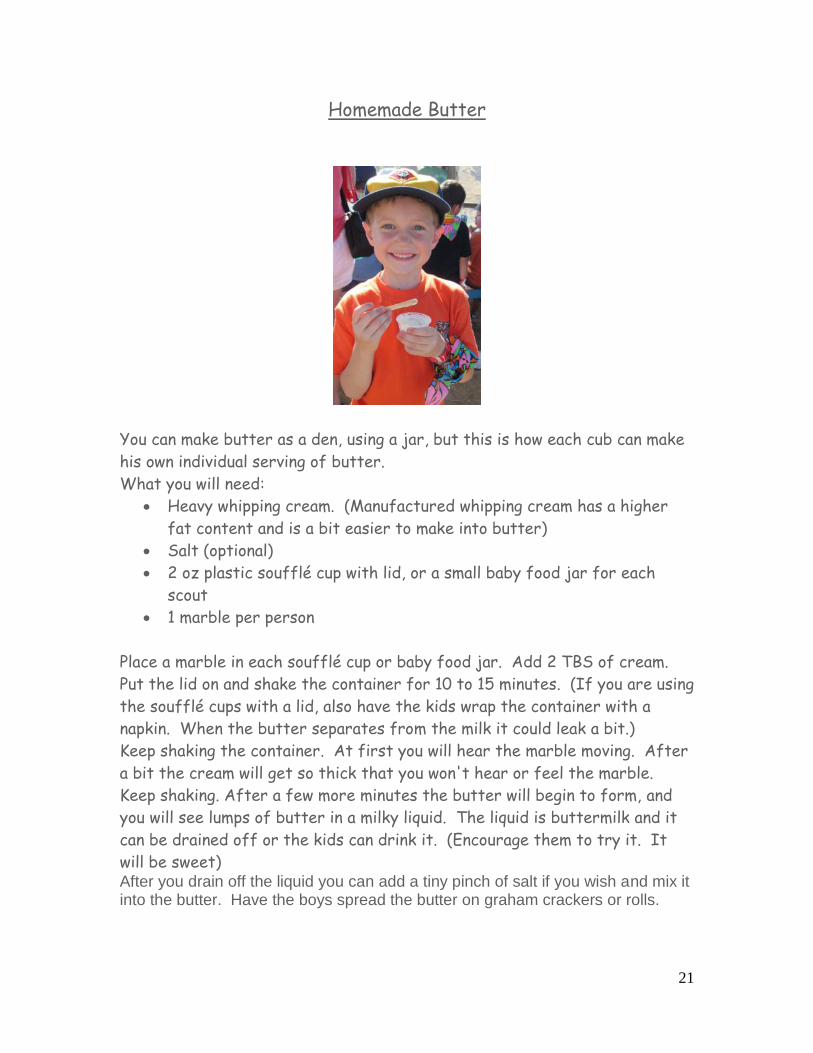
Homemade Butter
You can make butter as a den, using a jar, but this is how each cub can make
his own individual serving of butter.
What you will need:
Heavy whipping cream. (Manufactured whipping cream has a higher
fat content and is a bit easier to make into butter)
Salt (optional)
2 oz plastic soufflé cup with lid, or a small baby food jar for each
scout
1 marble per person
Place a marble in each soufflé cup or baby food jar. Add 2 TBS of cream.
Put the lid on and shake the container for 10 to 15 minutes. (If you are using
the soufflé cups with a lid, also have the kids wrap the container with a
napkin. When the butter separates from the milk it could leak a bit.)
Keep shaking the container. At first you will hear the marble moving. After
a bit the cream will get so thick that you won't hear or feel the marble.
Keep shaking. After a few more minutes the butter will begin to form, and
you will see lumps of butter in a milky liquid. The liquid is buttermilk and it
can be drained off or the kids can drink it. (Encourage them to try it. It
will be sweet) After you drain off the liquid you can add a tiny pinch of salt if you wish and mix it into the butter. Have the boys spread the butter on graham crackers or rolls.
22
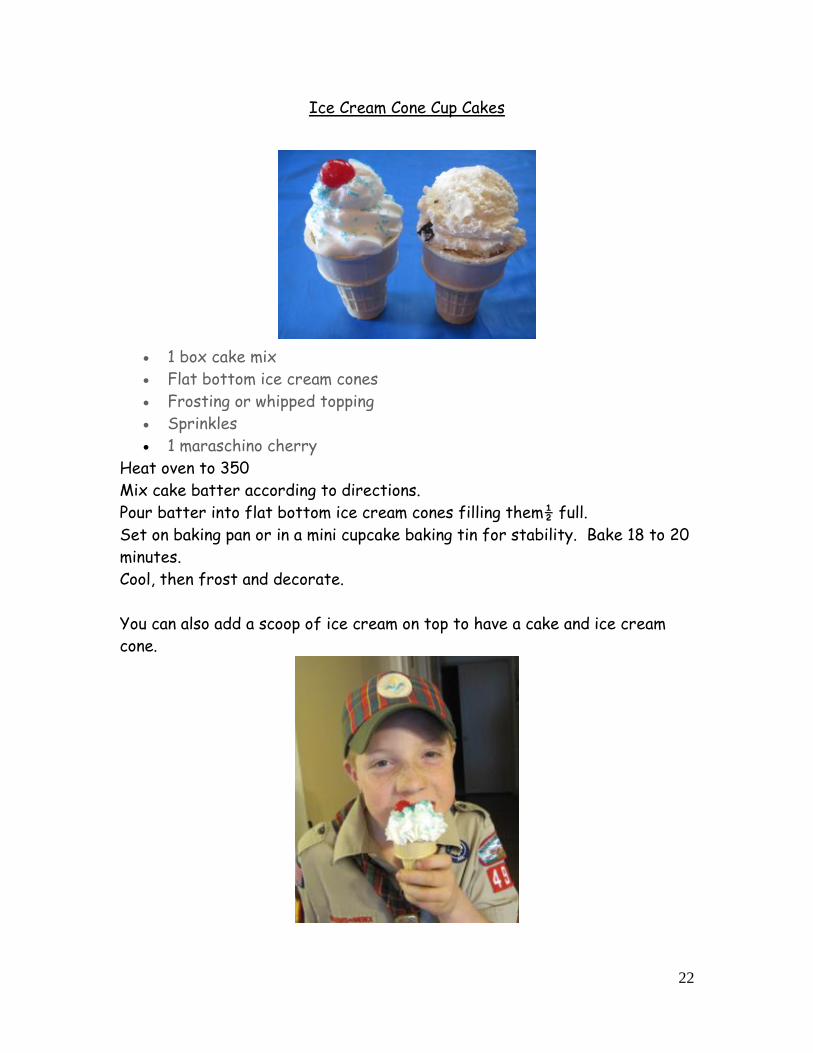
Ice Cream Cone Cup Cakes
1 box cake mix
Flat bottom ice cream cones
Frosting or whipped topping
Sprinkles
1 maraschino cherry
Heat oven to 350
Mix cake batter according to directions.
Pour batter into flat bottom ice cream cones filling them½ full.
Set on baking pan or in a mini cupcake baking tin for stability. Bake 18 to 20
minutes.
Cool, then frost and decorate.
You can also add a scoop of ice cream on top to have a cake and ice cream
cone.
23
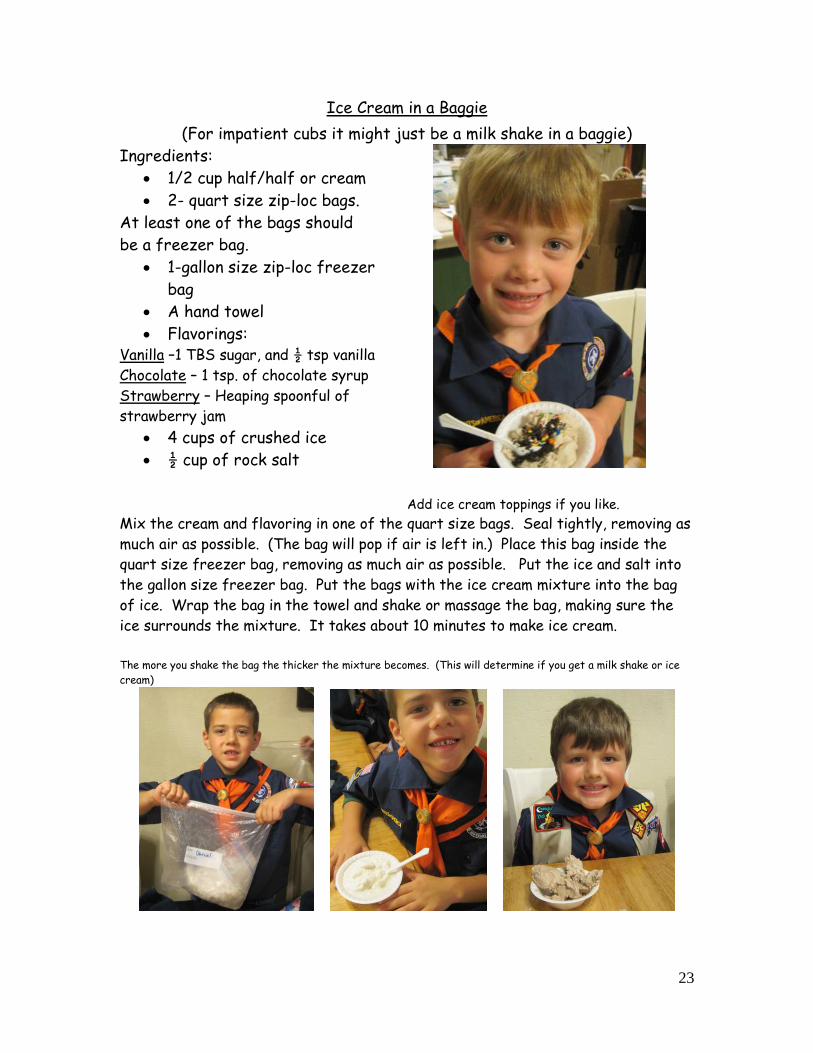
Ice Cream in a Baggie
(For impatient cubs it might just be a milk shake in a baggie)
Ingredients:
1/2 cup half/half or cream
2- quart size zip-loc bags.
At least one of the bags should
be a freezer bag.
1-gallon size zip-loc freezer
bag
A hand towel
Flavorings: Vanilla –1 TBS sugar, and ½ tsp vanilla
Chocolate – 1 tsp. of chocolate syrup
Strawberry – Heaping spoonful of
strawberry jam
4 cups of crushed ice
½ cup of rock salt
Add ice cream toppings if you like.
Mix the cream and flavoring in one of the quart size bags. Seal tightly, removing as
much air as possible. (The bag will pop if air is left in.) Place this bag inside the
quart size freezer bag, removing as much air as possible. Put the ice and salt into
the gallon size freezer bag. Put the bags with the ice cream mixture into the bag
of ice. Wrap the bag in the towel and shake or massage the bag, making sure the
ice surrounds the mixture. It takes about 10 minutes to make ice cream.
The more you shake the bag the thicker the mixture becomes. (This will determine if you get a milk shake or ice
cream)
24
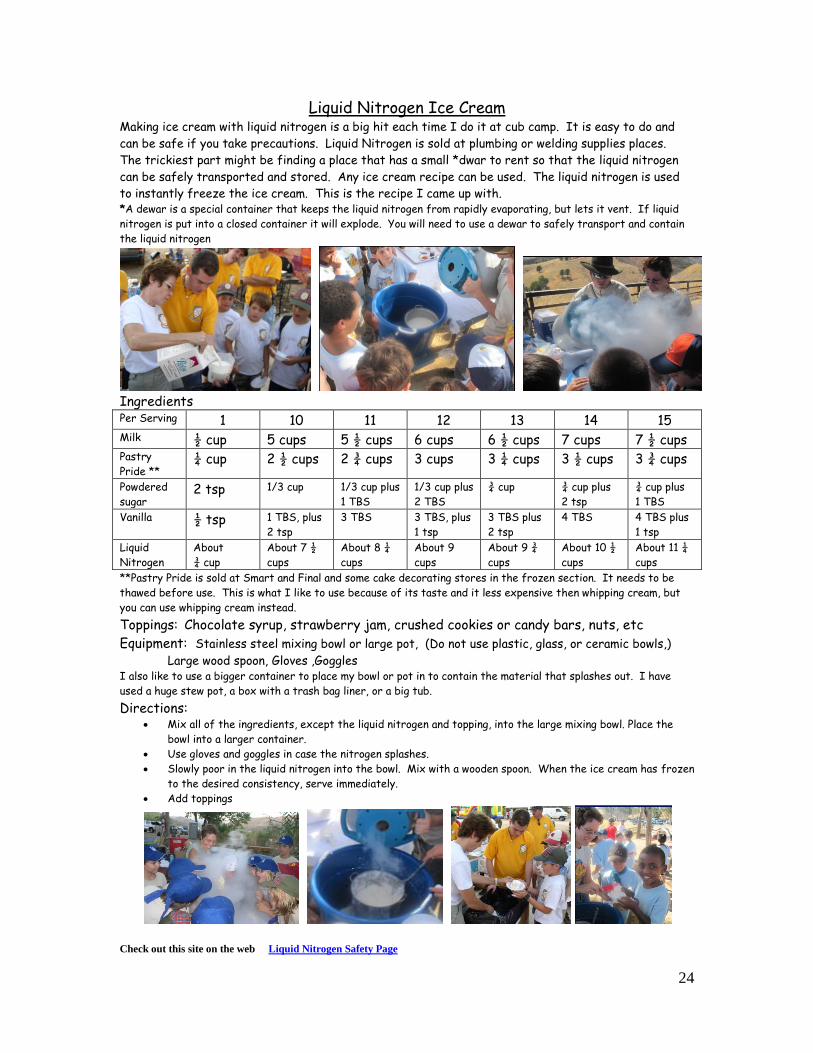
Liquid Nitrogen Ice Cream Making ice cream with liquid nitrogen is a big hit each time I do it at cub camp. It is easy to do and
can be safe if you take precautions. Liquid Nitrogen is sold at plumbing or welding supplies places.
The trickiest part might be finding a place that has a small *dwar to rent so that the liquid nitrogen
can be safely transported and stored. Any ice cream recipe can be used. The liquid nitrogen is used
to instantly freeze the ice cream. This is the recipe I came up with. *A dewar is a special container that keeps the liquid nitrogen from rapidly evaporating, but lets it vent. If liquid
nitrogen is put into a closed container it will explode. You will need to use a dewar to safely transport and contain
the liquid nitrogen
Ingredients
Per Serving 1 10 11 12 13 14 15 Milk ½ cup 5 cups 5 ½ cups 6 cups 6 ½ cups 7 cups 7 ½ cups Pastry
Pride ** ¼ cup 2 ½ cups 2 ¾ cups 3 cups 3 ¼ cups 3 ½ cups 3 ¾ cups
Powdered
sugar 2 tsp 1/3 cup 1/3 cup plus
1 TBS
1/3 cup plus
2 TBS
¾ cup ¾ cup plus
2 tsp
¾ cup plus
1 TBS
Vanilla ½ tsp 1 TBS, plus
2 tsp
3 TBS 3 TBS, plus
1 tsp
3 TBS plus
2 tsp
4 TBS 4 TBS plus
1 tsp
Liquid
Nitrogen
About
¾ cup
About 7 ½
cups
About 8 ¼
cups
About 9
cups
About 9 ¾
cups
About 10 ½
cups
About 11 ¼
cups
**Pastry Pride is sold at Smart and Final and some cake decorating stores in the frozen section. It needs to be
thawed before use. This is what I like to use because of its taste and it less expensive then whipping cream, but
you can use whipping cream instead.
Toppings: Chocolate syrup, strawberry jam, crushed cookies or candy bars, nuts, etc
Equipment: Stainless steel mixing bowl or large pot, (Do not use plastic, glass, or ceramic bowls,)
Large wood spoon, Gloves ,Goggles I also like to use a bigger container to place my bowl or pot in to contain the material that splashes out. I have
used a huge stew pot, a box with a trash bag liner, or a big tub.
Directions: Mix all of the ingredients, except the liquid nitrogen and topping, into the large mixing bowl. Place the
bowl into a larger container.
Use gloves and goggles in case the nitrogen splashes.
Slowly poor in the liquid nitrogen into the bowl. Mix with a wooden spoon. When the ice cream has frozen
to the desired consistency, serve immediately.
Add toppings
Check out this site on the web Liquid Nitrogen Safety Page
25
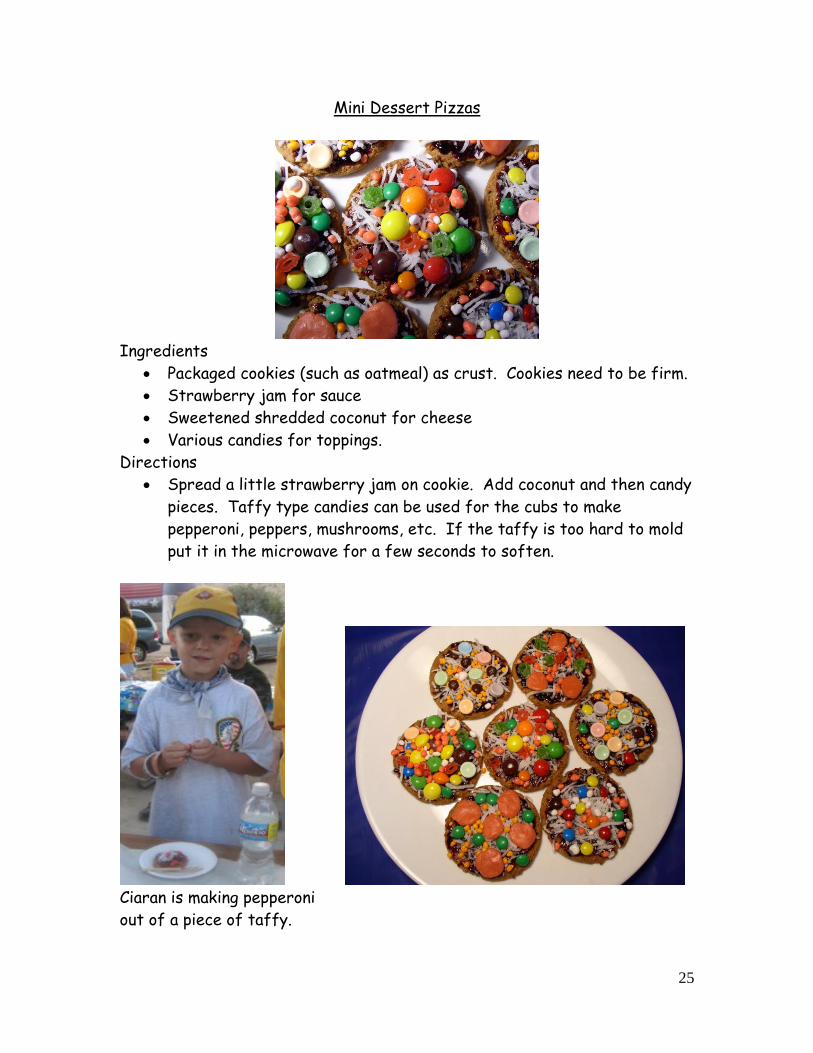
Mini Dessert Pizzas
Ingredients
Packaged cookies (such as oatmeal) as crust. Cookies need to be firm.
Strawberry jam for sauce
Sweetened shredded coconut for cheese
Various candies for toppings.
Directions
Spread a little strawberry jam on cookie. Add coconut and then candy
pieces. Taffy type candies can be used for the cubs to make
pepperoni, peppers, mushrooms, etc. If the taffy is too hard to mold
put it in the microwave for a few seconds to soften.
Ciaran is making pepperoni
out of a piece of taffy.
26
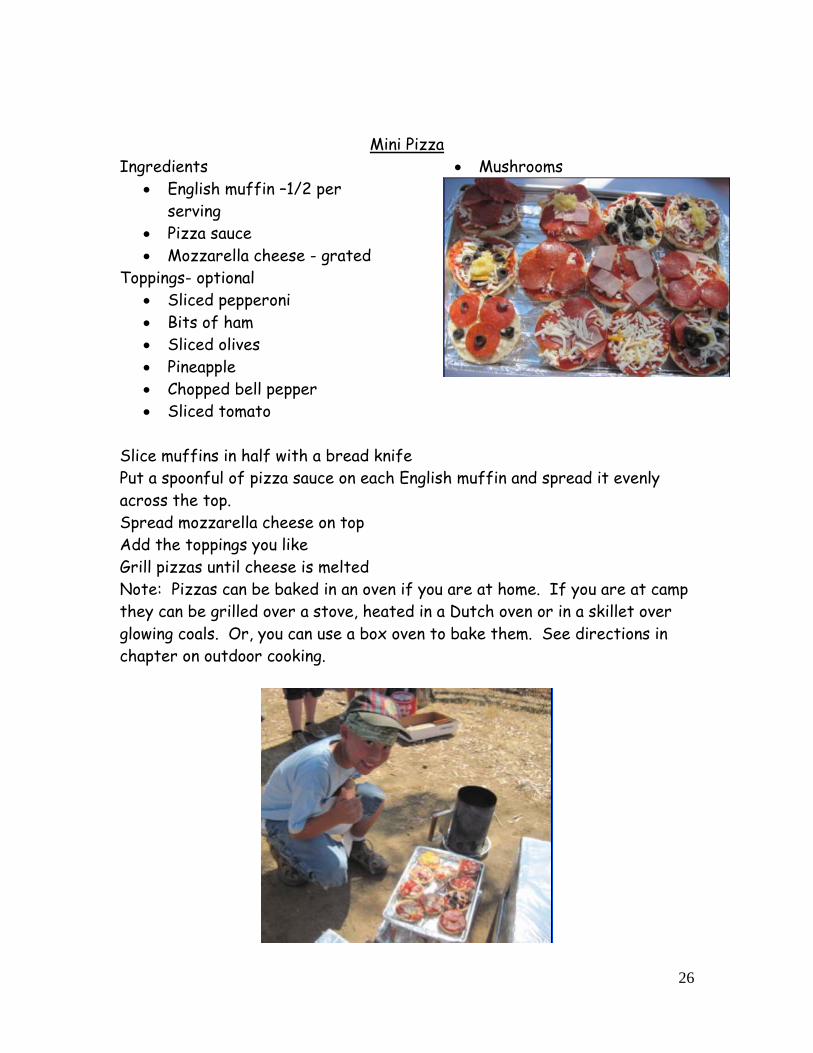
Mini Pizza
Ingredients
English muffin –1/2 per
serving
Pizza sauce
Mozzarella cheese - grated
Toppings- optional
Sliced pepperoni
Bits of ham
Sliced olives
Pineapple
Chopped bell pepper
Sliced tomato
Mushrooms
Slice muffins in half with a bread knife
Put a spoonful of pizza sauce on each English muffin and spread it evenly
across the top.
Spread mozzarella cheese on top
Add the toppings you like
Grill pizzas until cheese is melted
Note: Pizzas can be baked in an oven if you are at home. If you are at camp
they can be grilled over a stove, heated in a Dutch oven or in a skillet over
glowing coals. Or, you can use a box oven to bake them. See directions in
chapter on outdoor cooking.
27
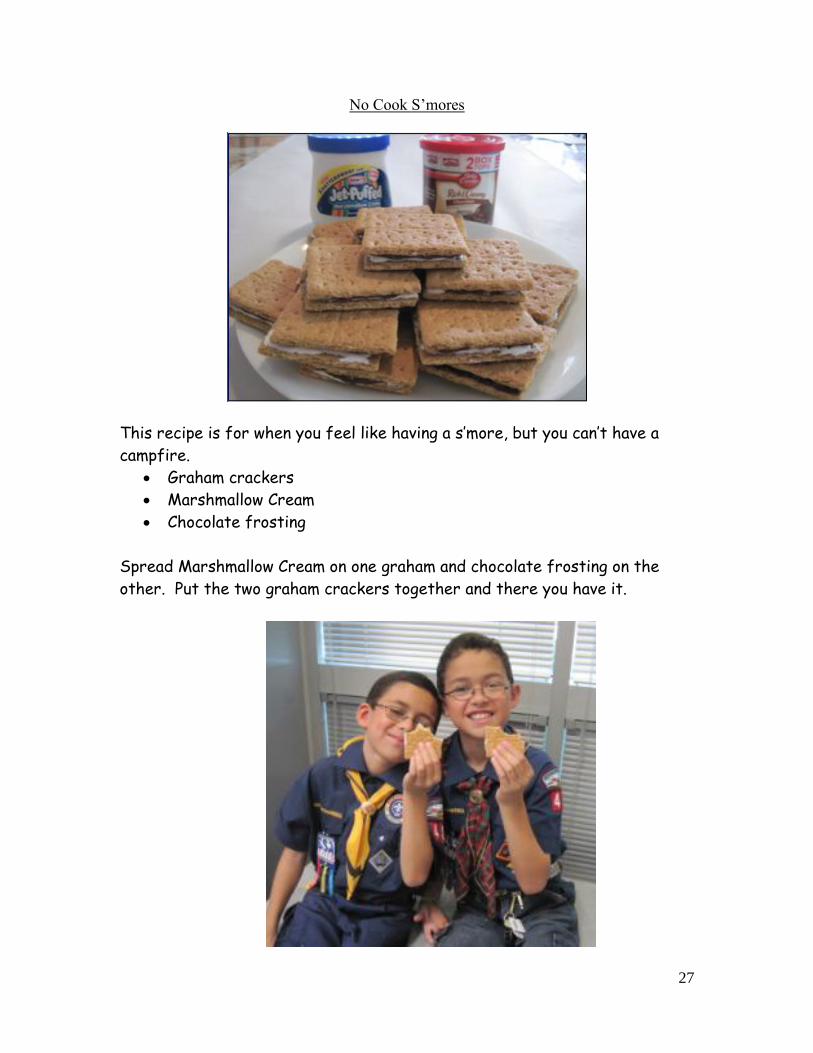
No Cook S’mores
This recipe is for when you feel like having a s’more, but you can’t have a
campfire.
Graham crackers
Marshmallow Cream
Chocolate frosting
Spread Marshmallow Cream on one graham and chocolate frosting on the
other. Put the two graham crackers together and there you have it.
28
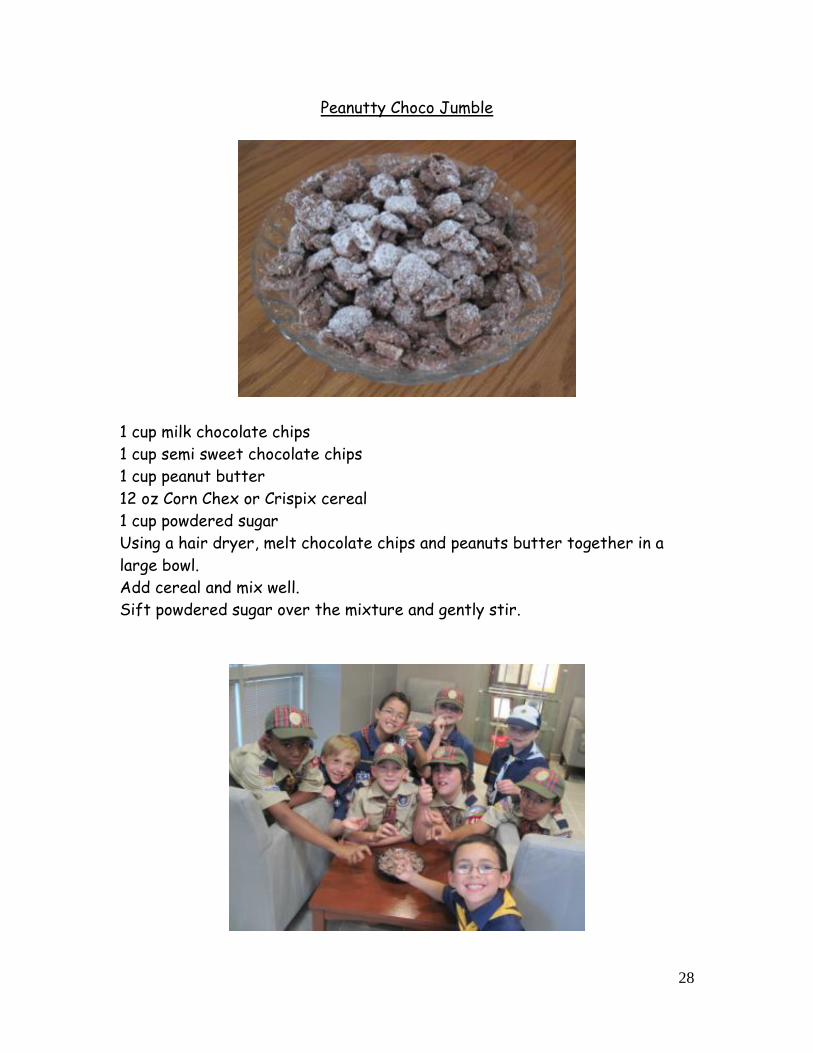
Peanutty Choco Jumble
1 cup milk chocolate chips
1 cup semi sweet chocolate chips
1 cup peanut butter
12 oz Corn Chex or Crispix cereal
1 cup powdered sugar
Using a hair dryer, melt chocolate chips and peanuts butter together in a
large bowl.
Add cereal and mix well.
Sift powdered sugar over the mixture and gently stir.
29
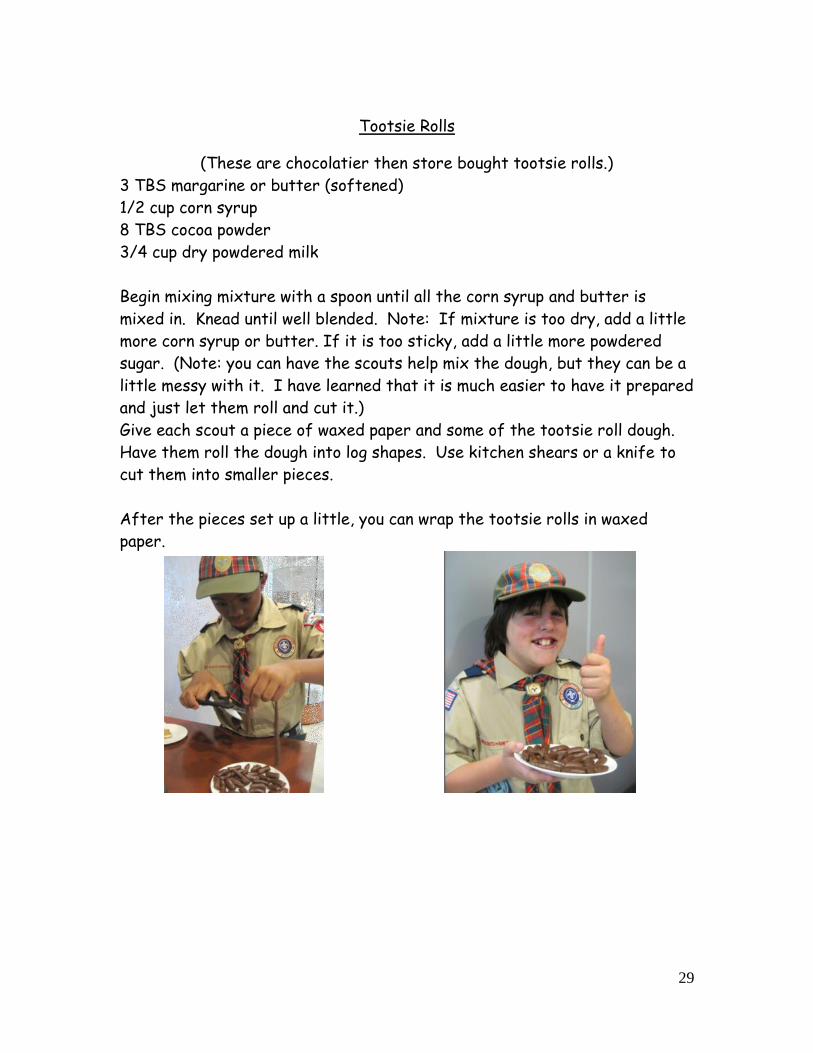
Tootsie Rolls
(These are chocolatier then store bought tootsie rolls.)
3 TBS margarine or butter (softened)
1/2 cup corn syrup
8 TBS cocoa powder
3/4 cup dry powdered milk
Begin mixing mixture with a spoon until all the corn syrup and butter is
mixed in. Knead until well blended. Note: If mixture is too dry, add a little
more corn syrup or butter. If it is too sticky, add a little more powdered
sugar. (Note: you can have the scouts help mix the dough, but they can be a
little messy with it. I have learned that it is much easier to have it prepared
and just let them roll and cut it.)
Give each scout a piece of waxed paper and some of the tootsie roll dough.
Have them roll the dough into log shapes. Use kitchen shears or a knife to
cut them into smaller pieces.
After the pieces set up a little, you can wrap the tootsie rolls in waxed
paper.
30
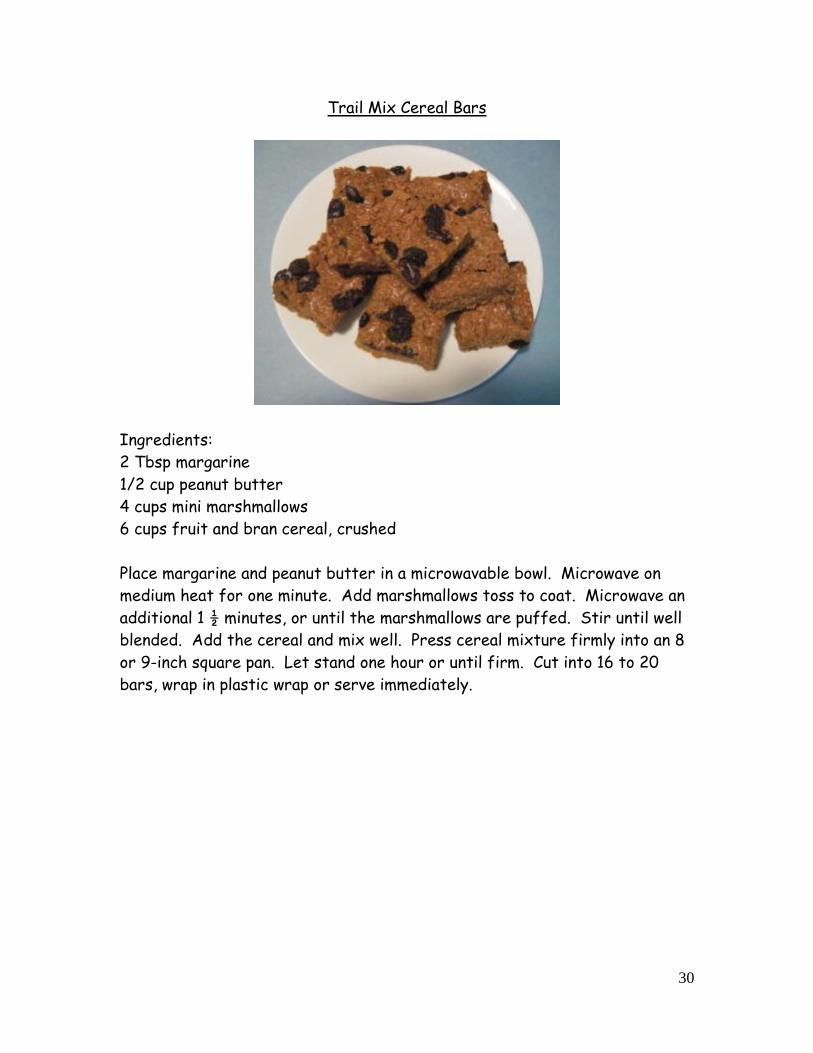
Trail Mix Cereal Bars
Ingredients:
2 Tbsp margarine
1/2 cup peanut butter
4 cups mini marshmallows
6 cups fruit and bran cereal, crushed
Place margarine and peanut butter in a microwavable bowl. Microwave on
medium heat for one minute. Add marshmallows toss to coat. Microwave an
additional 1 ½ minutes, or until the marshmallows are puffed. Stir until well
blended. Add the cereal and mix well. Press cereal mixture firmly into an 8
or 9-inch square pan. Let stand one hour or until firm. Cut into 16 to 20
bars, wrap in plastic wrap or serve immediately.
31
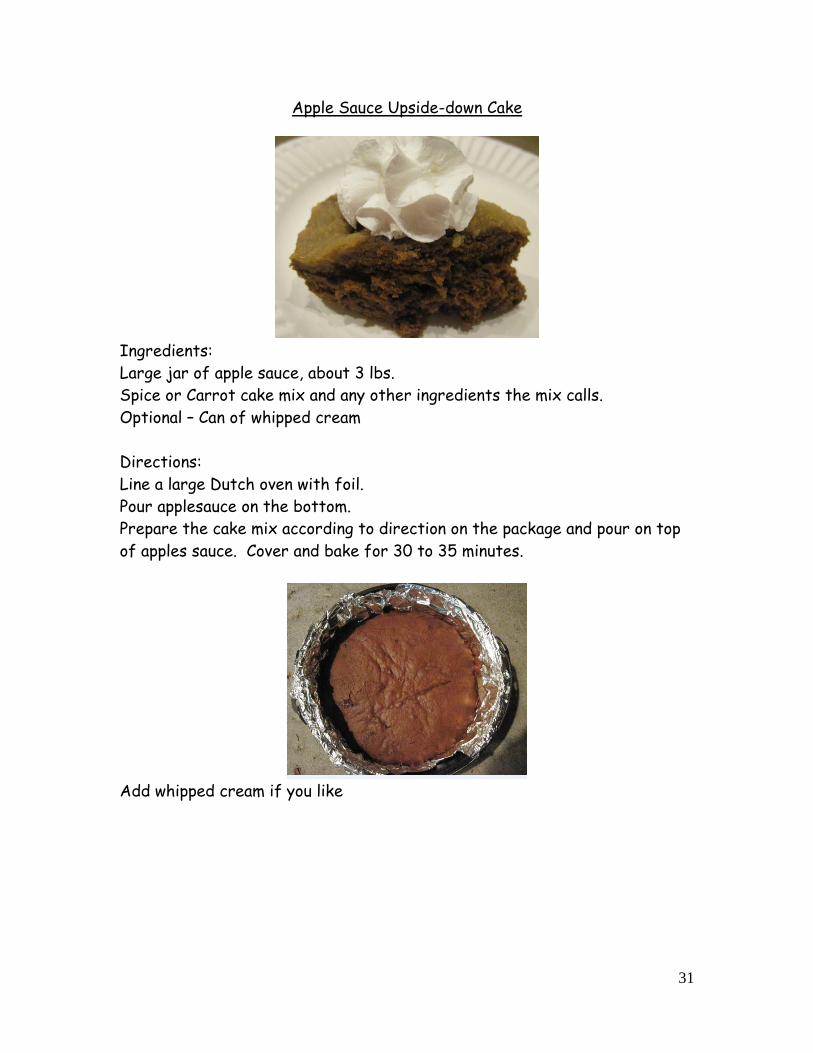
Apple Sauce Upside-down Cake
Ingredients:
Large jar of apple sauce, about 3 lbs.
Spice or Carrot cake mix and any other ingredients the mix calls.
Optional – Can of whipped cream
Directions:
Line a large Dutch oven with foil.
Pour applesauce on the bottom.
Prepare the cake mix according to direction on the package and pour on top
of apples sauce. Cover and bake for 30 to 35 minutes.
Add whipped cream if you like
32
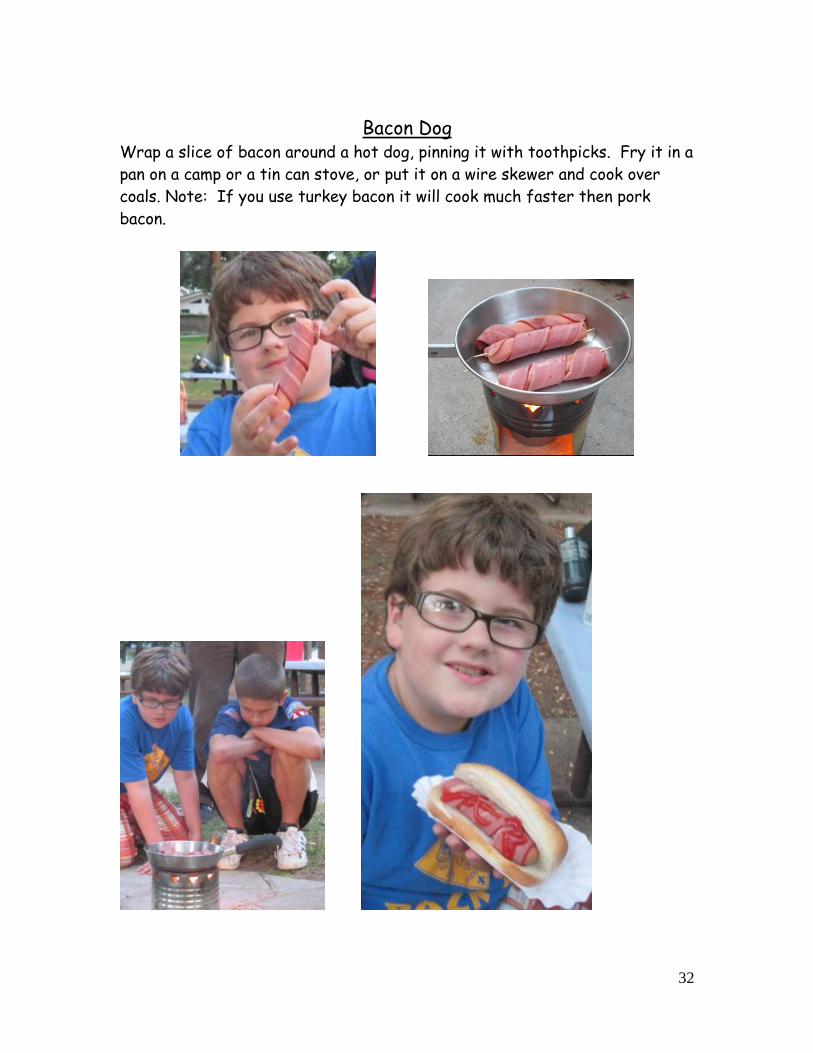
Bacon Dog Wrap a slice of bacon around a hot dog, pinning it with toothpicks. Fry it in a
pan on a camp or a tin can stove, or put it on a wire skewer and cook over
coals. Note: If you use turkey bacon it will cook much faster then pork
bacon.
33
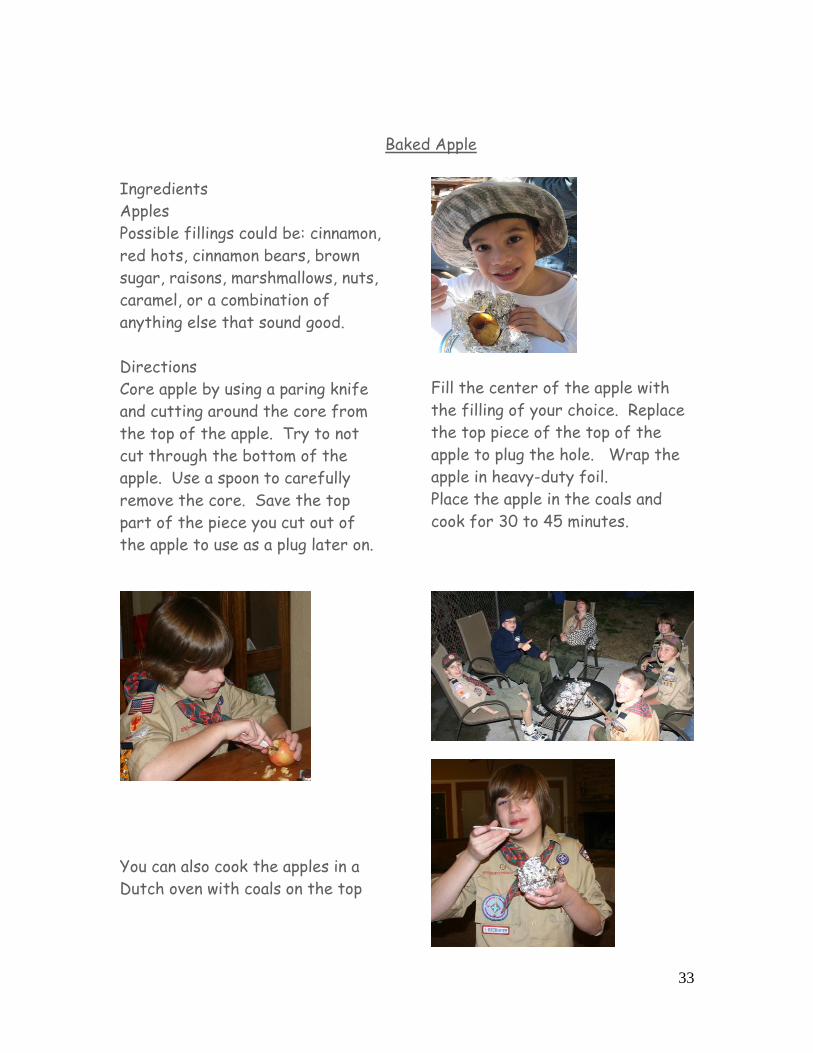
Baked Apple
Ingredients
Apples
Possible fillings could be: cinnamon,
red hots, cinnamon bears, brown
sugar, raisons, marshmallows, nuts,
caramel, or a combination of
anything else that sound good.
Directions
Core apple by using a paring knife
and cutting around the core from
the top of the apple. Try to not
cut through the bottom of the
apple. Use a spoon to carefully
remove the core. Save the top
part of the piece you cut out of
the apple to use as a plug later on.
Fill the center of the apple with
the filling of your choice. Replace
the top piece of the top of the
apple to plug the hole. Wrap the
apple in heavy-duty foil.
Place the apple in the coals and
cook for 30 to 45 minutes.
You can also cook the apples in a
Dutch oven with coals on the top
34
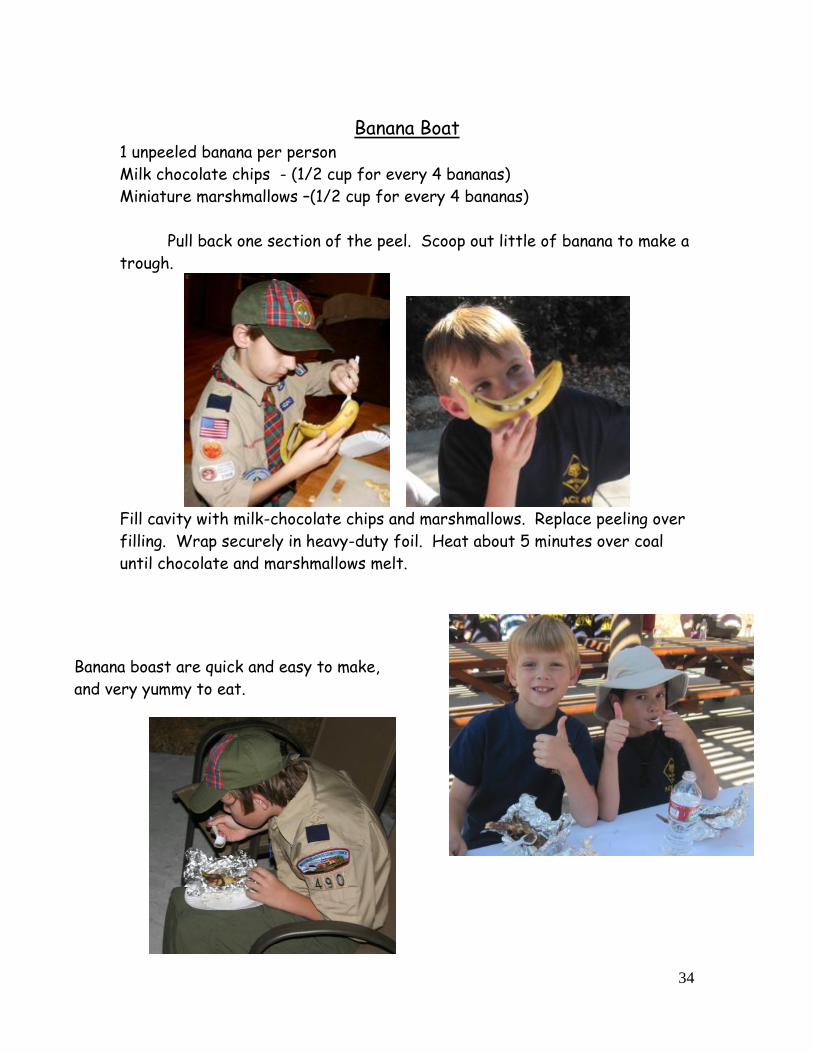
Banana Boat 1 unpeeled banana per person
Milk chocolate chips - (1/2 cup for every 4 bananas)
Miniature marshmallows –(1/2 cup for every 4 bananas)
Pull back one section of the peel. Scoop out little of banana to make a
trough.
Fill cavity with milk-chocolate chips and marshmallows. Replace peeling over
filling. Wrap securely in heavy-duty foil. Heat about 5 minutes over coal
until chocolate and marshmallows melt.
Banana boast are quick and easy to make,
and very yummy to eat.
35
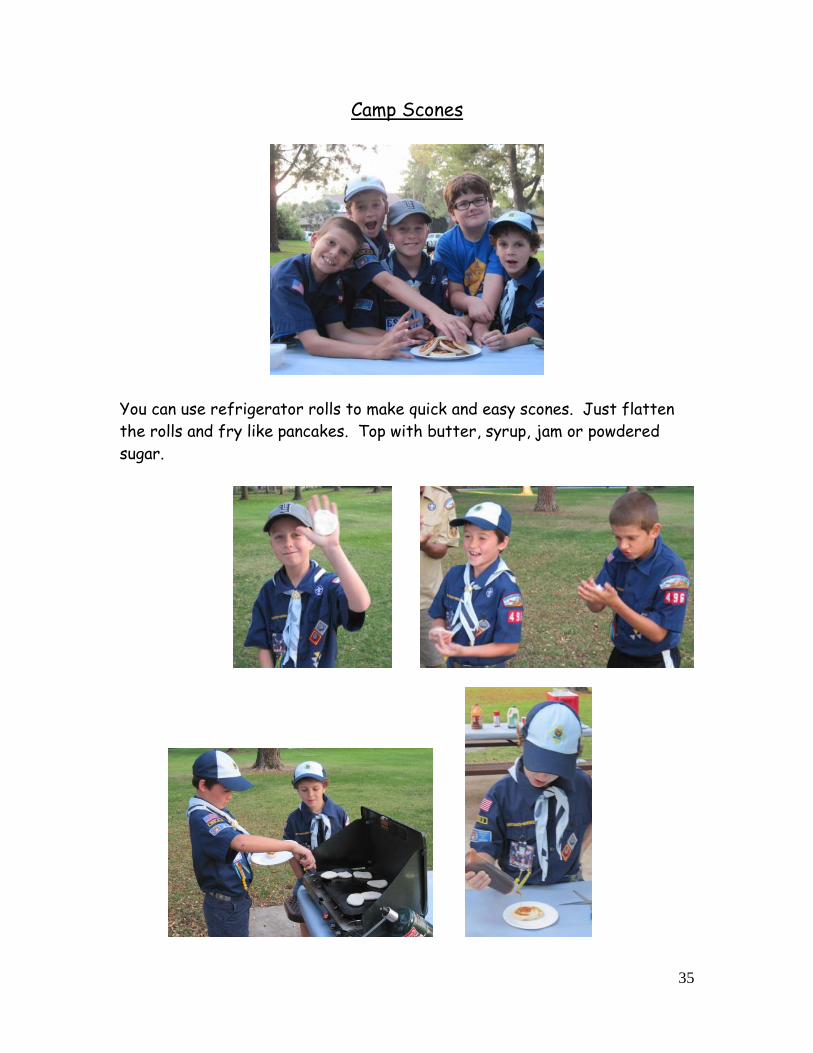
Camp Scones
You can use refrigerator rolls to make quick and easy scones. Just flatten
the rolls and fry like pancakes. Top with butter, syrup, jam or powdered
sugar.
36
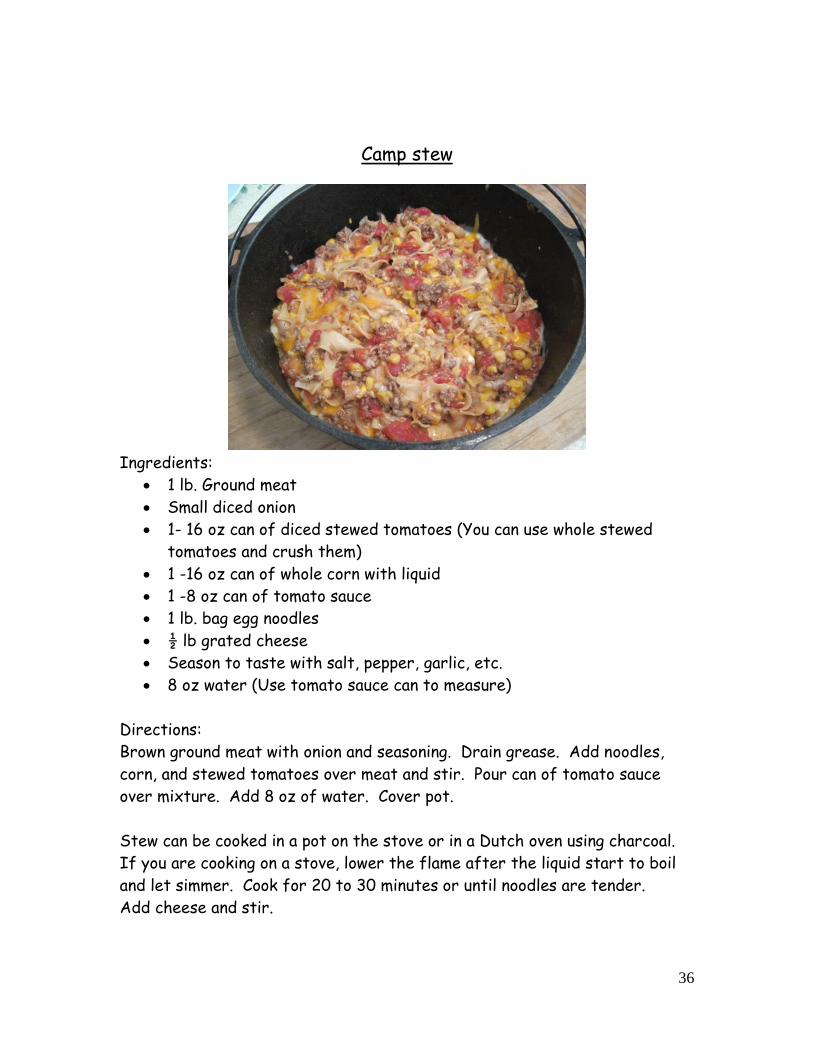
Camp stew
Ingredients:
1 lb. Ground meat
Small diced onion
1- 16 oz can of diced stewed tomatoes (You can use whole stewed
tomatoes and crush them)
1 -16 oz can of whole corn with liquid
1 -8 oz can of tomato sauce
1 lb. bag egg noodles
½ lb grated cheese
Season to taste with salt, pepper, garlic, etc.
8 oz water (Use tomato sauce can to measure)
Directions:
Brown ground meat with onion and seasoning. Drain grease. Add noodles,
corn, and stewed tomatoes over meat and stir. Pour can of tomato sauce
over mixture. Add 8 oz of water. Cover pot.
Stew can be cooked in a pot on the stove or in a Dutch oven using charcoal.
If you are cooking on a stove, lower the flame after the liquid start to boil
and let simmer. Cook for 20 to 30 minutes or until noodles are tender.
Add cheese and stir.
37
Chicken & Potato Dinner
This Bear Den made this dinner for requirement # 9g –Cook something outdoors.
In a foil pot (See Cooking Methods) place 1/2 cup of cubed chicken
1/2 cup diced potatoes
1/2 cup mixed vegetables.
Add any of the following to seasons:
Soy sauce
Bar-B-Q sauce
Salt, Pepper
Onion or garlic salt.
Lemon pepper
Or what ever sounds good.
Seal foil and cook over coals until done. About 25 to 30 minutes
38
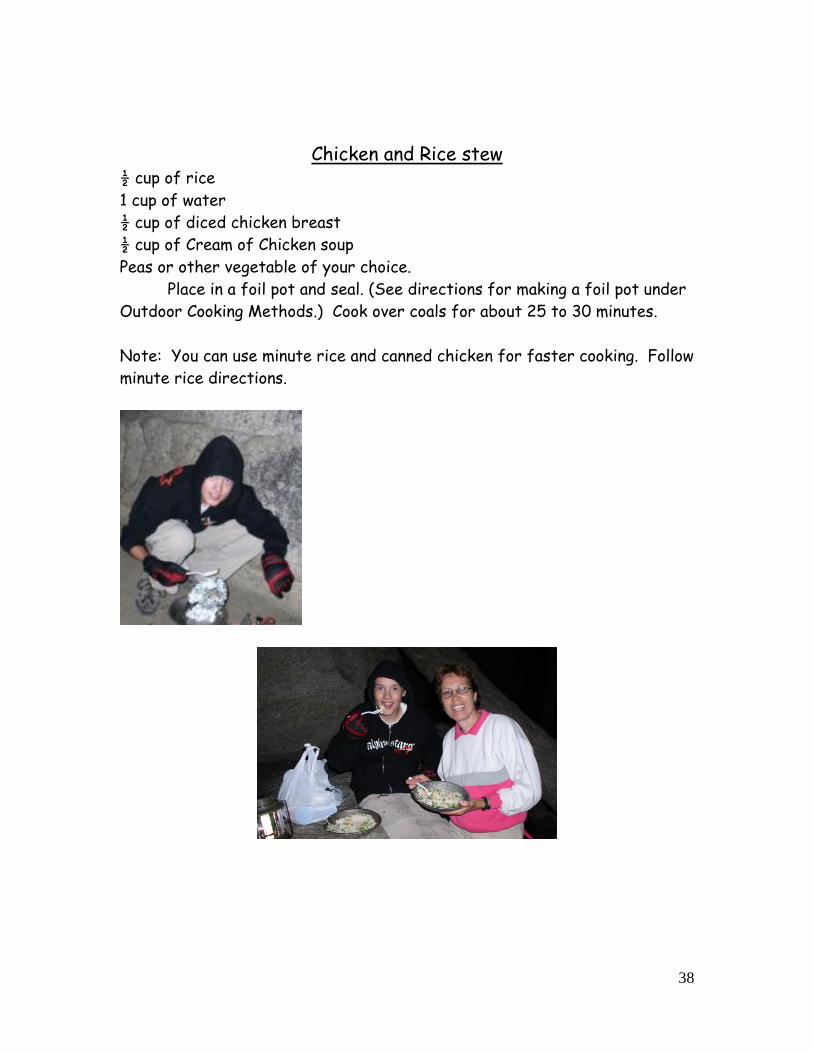
Chicken and Rice stew ½ cup of rice
1 cup of water
½ cup of diced chicken breast
½ cup of Cream of Chicken soup
Peas or other vegetable of your choice.
Place in a foil pot and seal. (See directions for making a foil pot under
Outdoor Cooking Methods.) Cook over coals for about 25 to 30 minutes.
Note: You can use minute rice and canned chicken for faster cooking. Follow
minute rice directions.
39
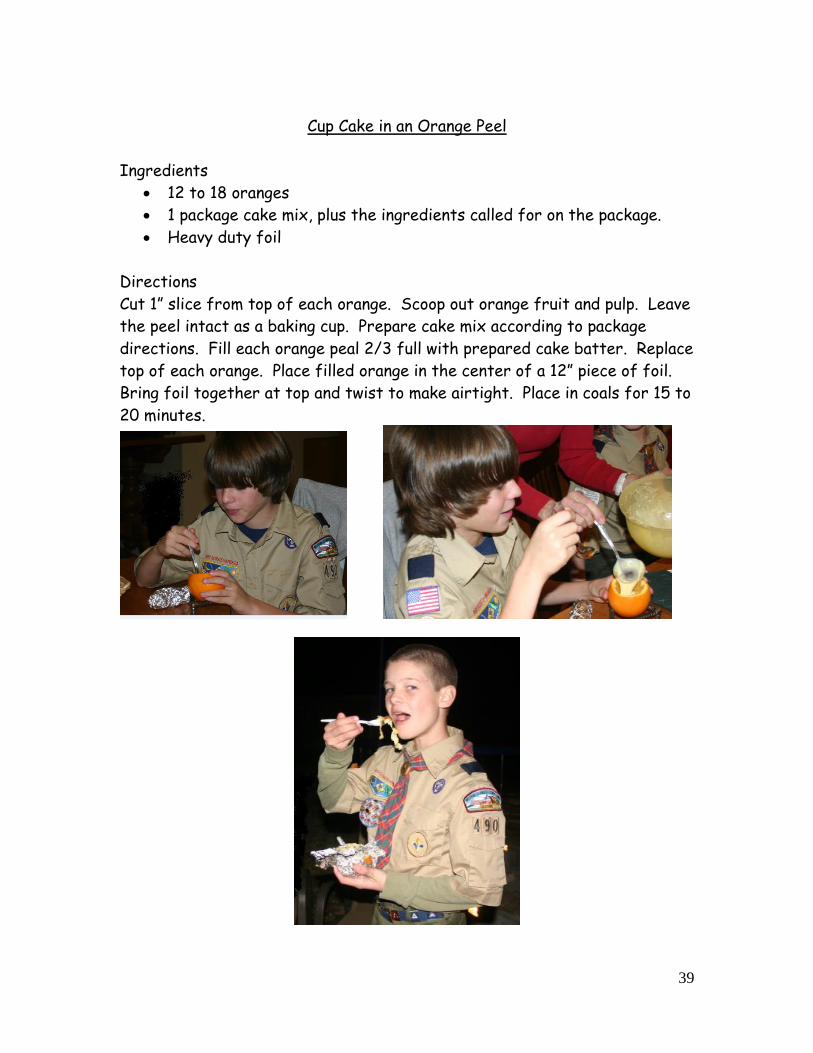
Cup Cake in an Orange Peel
Ingredients
12 to 18 oranges
1 package cake mix, plus the ingredients called for on the package.
Heavy duty foil
Directions
Cut 1” slice from top of each orange. Scoop out orange fruit and pulp. Leave
the peel intact as a baking cup. Prepare cake mix according to package
directions. Fill each orange peal 2/3 full with prepared cake batter. Replace
top of each orange. Place filled orange in the center of a 12” piece of foil.
Bring foil together at top and twist to make airtight. Place in coals for 15 to
20 minutes.
40
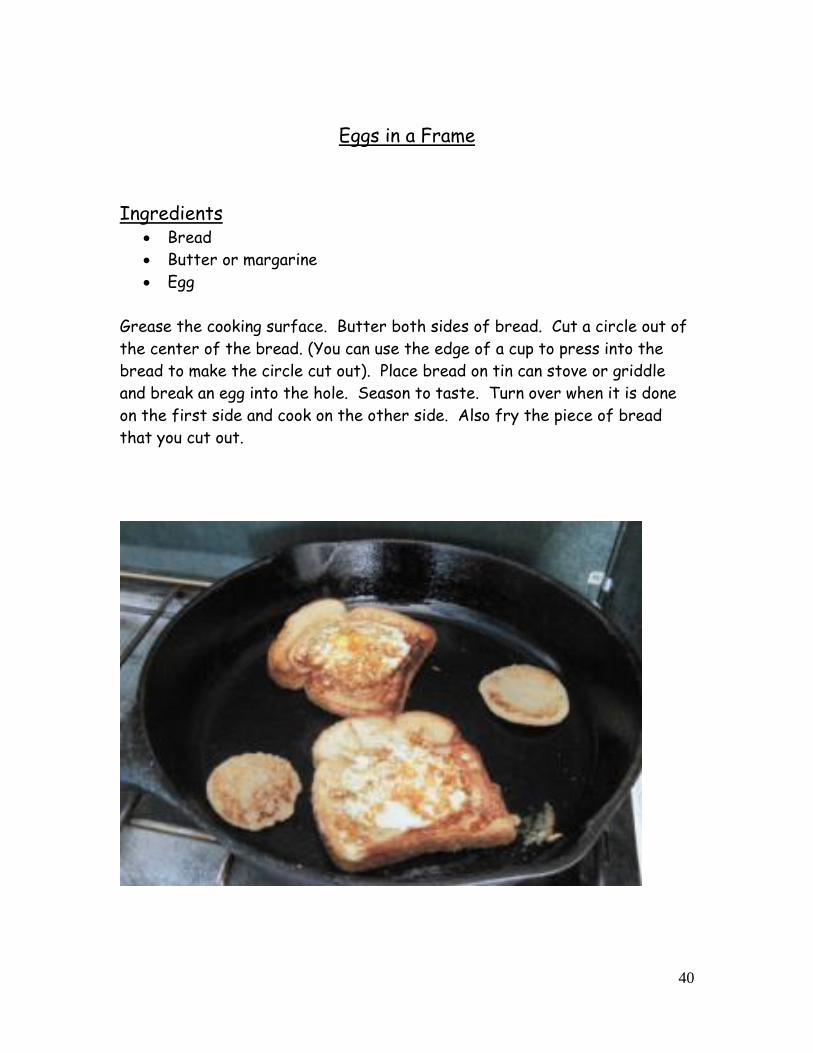
Eggs in a Frame
Ingredients Bread
Butter or margarine
Egg
Grease the cooking surface. Butter both sides of bread. Cut a circle out of
the center of the bread. (You can use the edge of a cup to press into the
bread to make the circle cut out). Place bread on tin can stove or griddle
and break an egg into the hole. Season to taste. Turn over when it is done
on the first side and cook on the other side. Also fry the piece of bread
that you cut out.
41
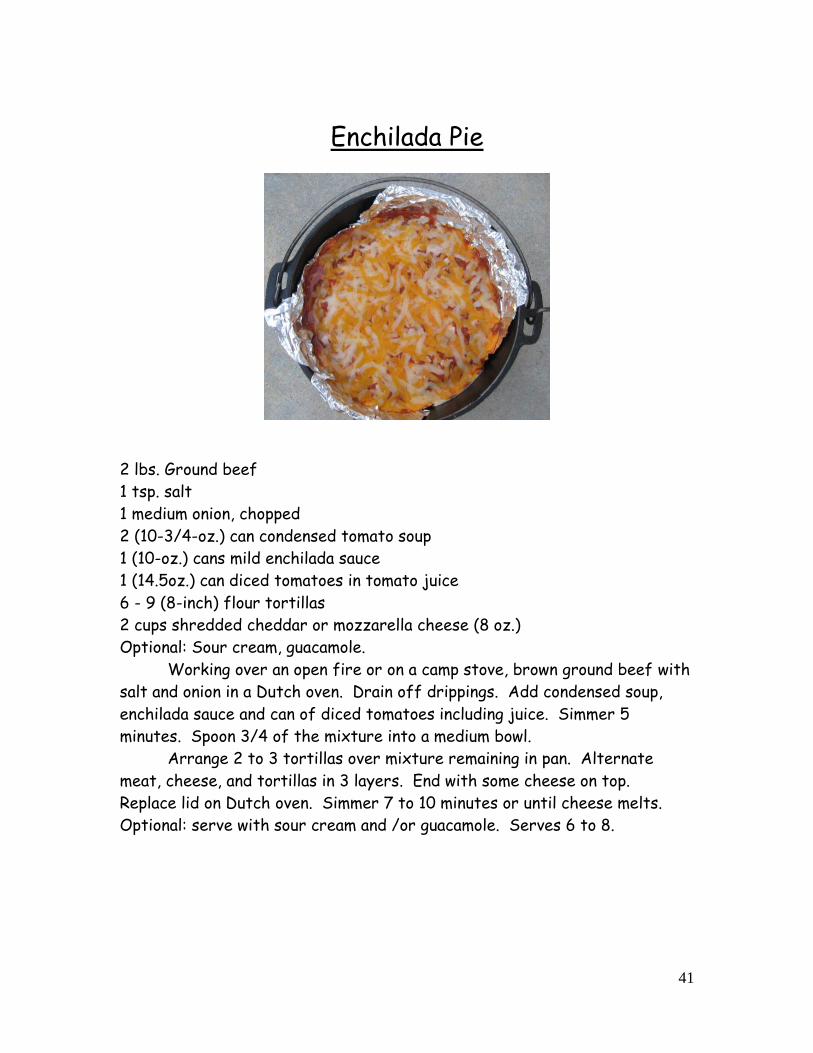
Enchilada Pie
2 lbs. Ground beef
1 tsp. salt
1 medium onion, chopped
2 (10-3/4-oz.) can condensed tomato soup
1 (10-oz.) cans mild enchilada sauce
1 (14.5oz.) can diced tomatoes in tomato juice
6 - 9 (8-inch) flour tortillas
2 cups shredded cheddar or mozzarella cheese (8 oz.)
Optional: Sour cream, guacamole.
Working over an open fire or on a camp stove, brown ground beef with
salt and onion in a Dutch oven. Drain off drippings. Add condensed soup,
enchilada sauce and can of diced tomatoes including juice. Simmer 5
minutes. Spoon 3/4 of the mixture into a medium bowl.
Arrange 2 to 3 tortillas over mixture remaining in pan. Alternate
meat, cheese, and tortillas in 3 layers. End with some cheese on top.
Replace lid on Dutch oven. Simmer 7 to 10 minutes or until cheese melts.
Optional: serve with sour cream and /or guacamole. Serves 6 to 8.
42
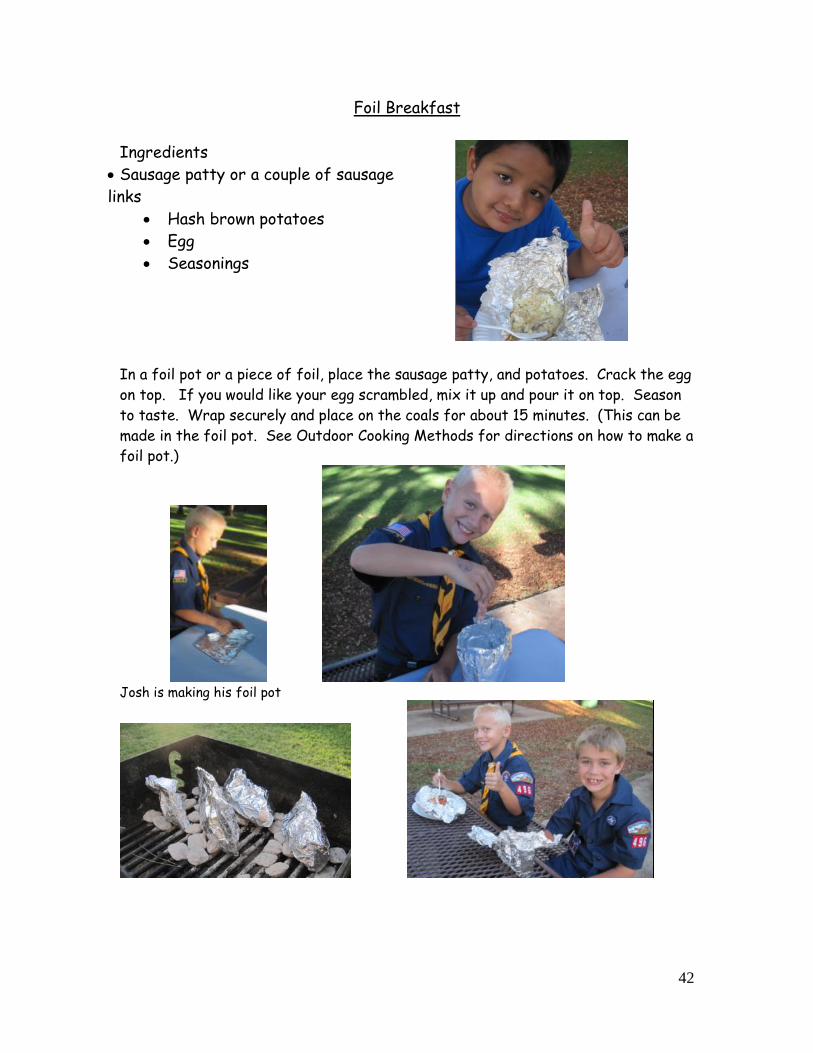
Foil Breakfast
Ingredients
Sausage patty or a couple of sausage
links
Hash brown potatoes
Egg
Seasonings
In a foil pot or a piece of foil, place the sausage patty, and potatoes. Crack the egg
on top. If you would like your egg scrambled, mix it up and pour it on top. Season
to taste. Wrap securely and place on the coals for about 15 minutes. (This can be
made in the foil pot. See Outdoor Cooking Methods for directions on how to make a
foil pot.)
Josh is making his foil pot
43
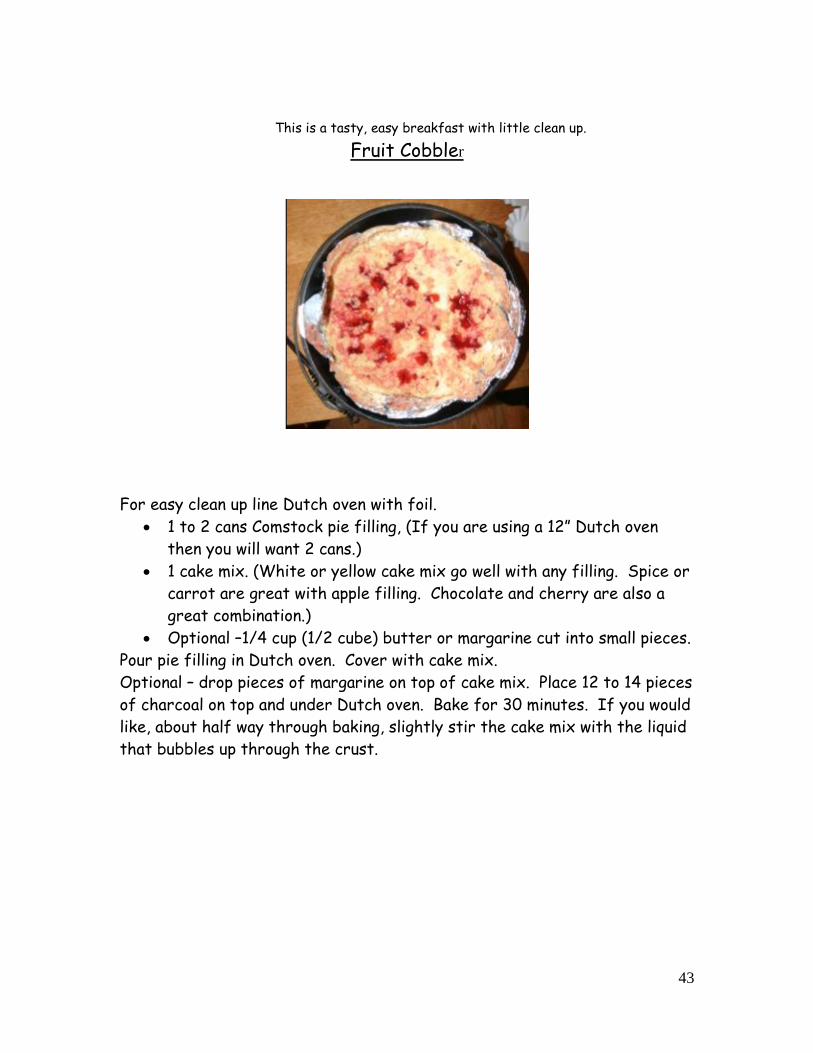
This is a tasty, easy breakfast with little clean up.
Fruit Cobbler
For easy clean up line Dutch oven with foil.
1 to 2 cans Comstock pie filling, (If you are using a 12” Dutch oven
then you will want 2 cans.)
1 cake mix. (White or yellow cake mix go well with any filling. Spice or
carrot are great with apple filling. Chocolate and cherry are also a
great combination.)
Optional –1/4 cup (1/2 cube) butter or margarine cut into small pieces.
Pour pie filling in Dutch oven. Cover with cake mix.
Optional – drop pieces of margarine on top of cake mix. Place 12 to 14 pieces
of charcoal on top and under Dutch oven. Bake for 30 minutes. If you would
like, about half way through baking, slightly stir the cake mix with the liquid
that bubbles up through the crust.
44
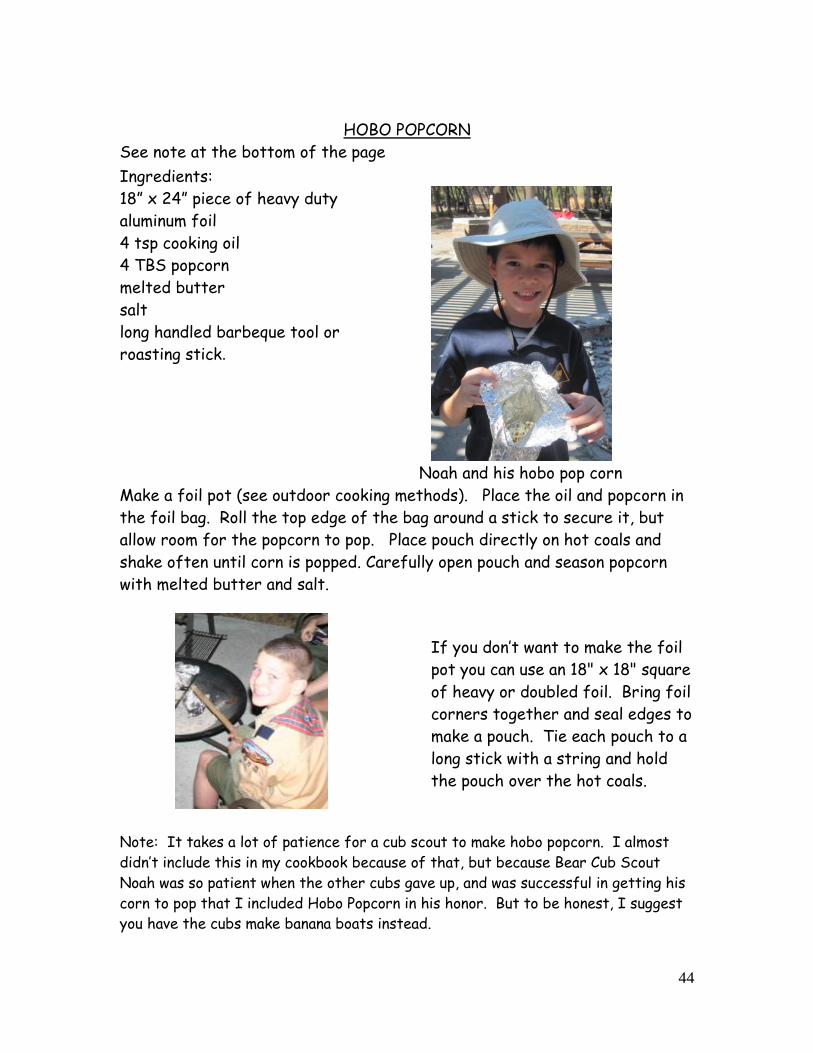
HOBO POPCORN
See note at the bottom of the page
Ingredients:
18” x 24” piece of heavy duty
aluminum foil
4 tsp cooking oil
4 TBS popcorn
melted butter
salt
long handled barbeque tool or
roasting stick.
Noah and his hobo pop corn
Make a foil pot (see outdoor cooking methods). Place the oil and popcorn in
the foil bag. Roll the top edge of the bag around a stick to secure it, but
allow room for the popcorn to pop. Place pouch directly on hot coals and
shake often until corn is popped. Carefully open pouch and season popcorn
with melted butter and salt.
If you don’t want to make the foil
pot you can use an 18" x 18" square
of heavy or doubled foil. Bring foil
corners together and seal edges to
make a pouch. Tie each pouch to a
long stick with a string and hold
the pouch over the hot coals.
Note: It takes a lot of patience for a cub scout to make hobo popcorn. I almost
didn’t include this in my cookbook because of that, but because Bear Cub Scout
Noah was so patient when the other cubs gave up, and was successful in getting his
corn to pop that I included Hobo Popcorn in his honor. But to be honest, I suggest
you have the cubs make banana boats instead.
45
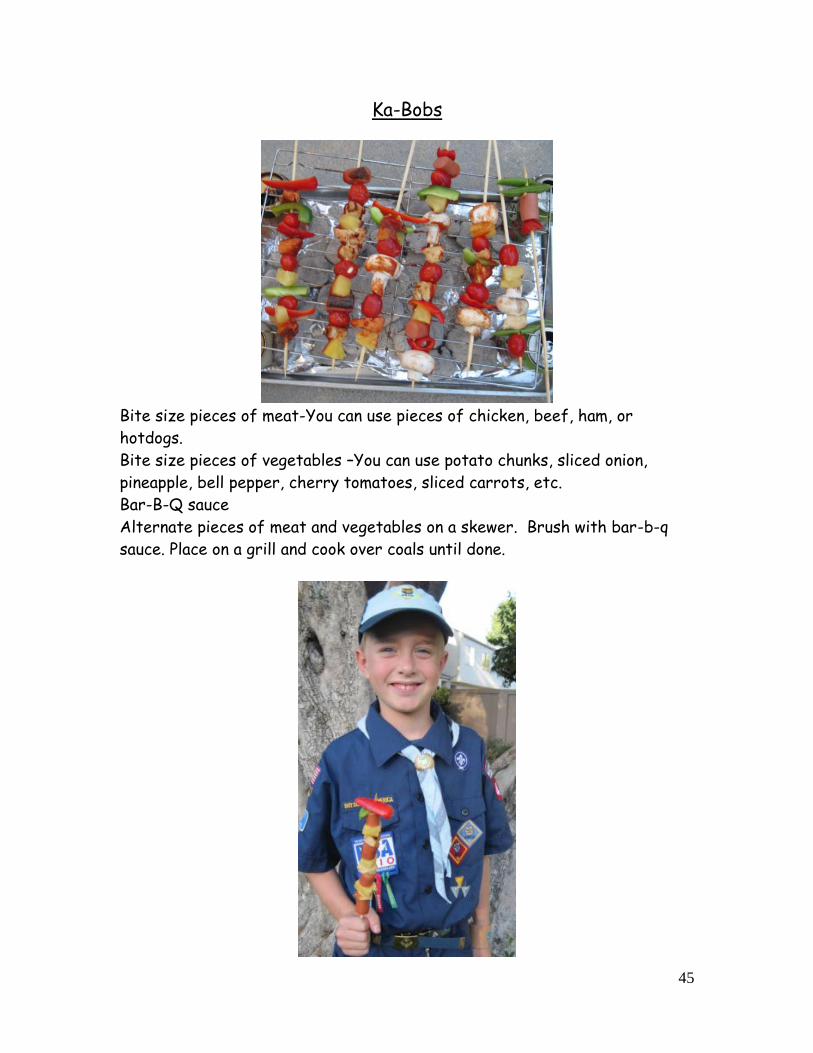
Ka-Bobs
Bite size pieces of meat-You can use pieces of chicken, beef, ham, or
hotdogs.
Bite size pieces of vegetables –You can use potato chunks, sliced onion,
pineapple, bell pepper, cherry tomatoes, sliced carrots, etc.
Bar-B-Q sauce
Alternate pieces of meat and vegetables on a skewer. Brush with bar-b-q
sauce. Place on a grill and cook over coals until done.
46
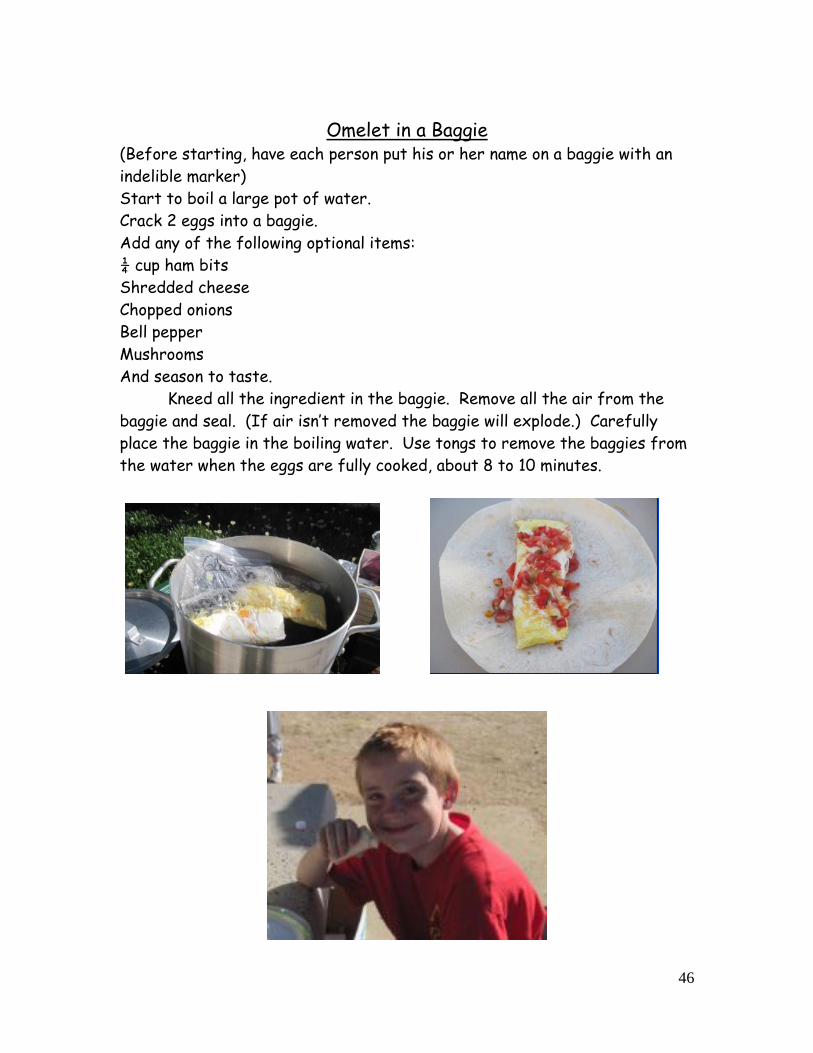
Omelet in a Baggie (Before starting, have each person put his or her name on a baggie with an
indelible marker)
Start to boil a large pot of water.
Crack 2 eggs into a baggie.
Add any of the following optional items:
¼ cup ham bits
Shredded cheese
Chopped onions
Bell pepper
Mushrooms
And season to taste.
Kneed all the ingredient in the baggie. Remove all the air from the
baggie and seal. (If air isn’t removed the baggie will explode.) Carefully
place the baggie in the boiling water. Use tongs to remove the baggies from
the water when the eggs are fully cooked, about 8 to 10 minutes.
47
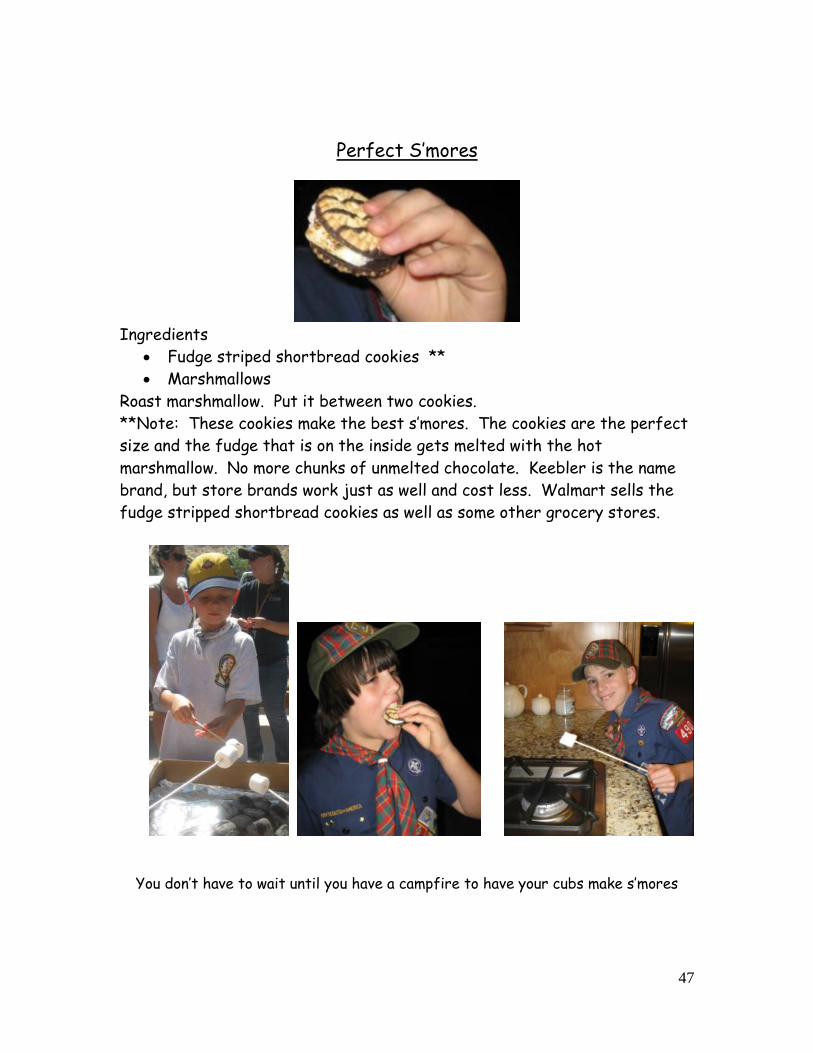
Perfect S’mores
Ingredients
Fudge striped shortbread cookies **
Marshmallows
Roast marshmallow. Put it between two cookies.
**Note: These cookies make the best s’mores. The cookies are the perfect
size and the fudge that is on the inside gets melted with the hot
marshmallow. No more chunks of unmelted chocolate. Keebler is the name
brand, but store brands work just as well and cost less. Walmart sells the
fudge stripped shortbread cookies as well as some other grocery stores.
You don’t have to wait until you have a campfire to have your cubs make s’mores
48
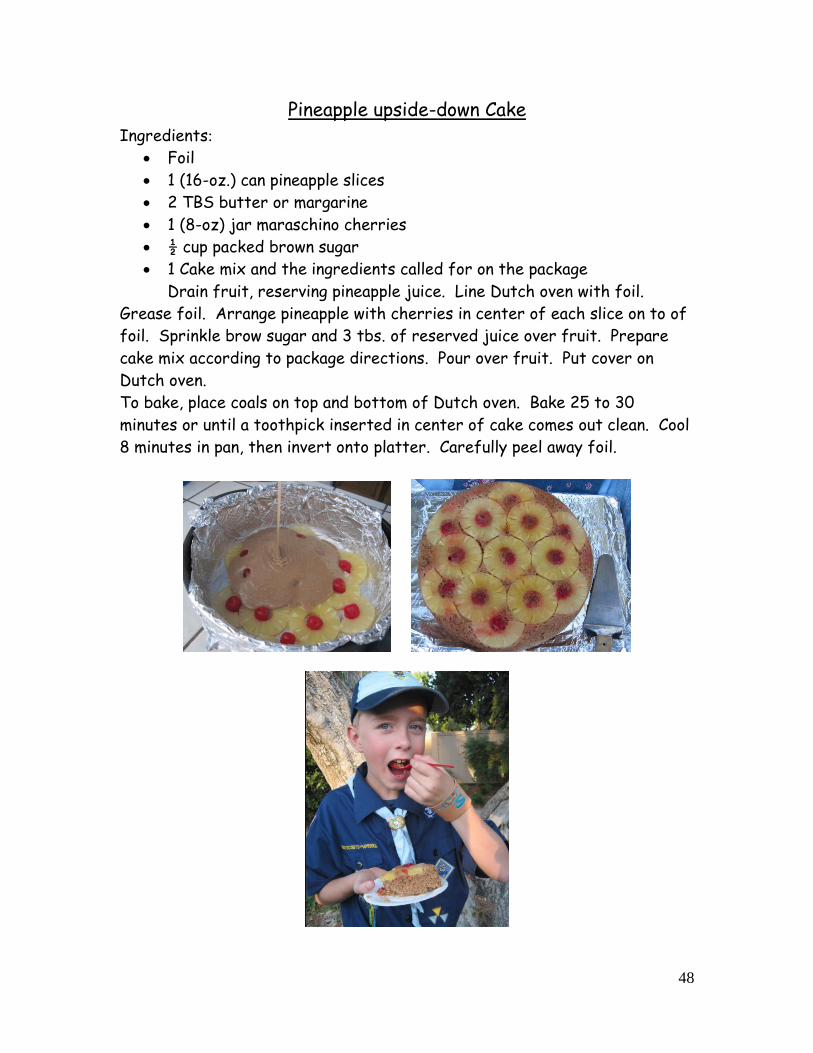
Pineapple upside-down Cake Ingredients:
Foil
1 (16-oz.) can pineapple slices
2 TBS butter or margarine
1 (8-oz) jar maraschino cherries
½ cup packed brown sugar
1 Cake mix and the ingredients called for on the package
Drain fruit, reserving pineapple juice. Line Dutch oven with foil.
Grease foil. Arrange pineapple with cherries in center of each slice on to of
foil. Sprinkle brow sugar and 3 tbs. of reserved juice over fruit. Prepare
cake mix according to package directions. Pour over fruit. Put cover on
Dutch oven.
To bake, place coals on top and bottom of Dutch oven. Bake 25 to 30
minutes or until a toothpick inserted in center of cake comes out clean. Cool
8 minutes in pan, then invert onto platter. Carefully peel away foil.
49
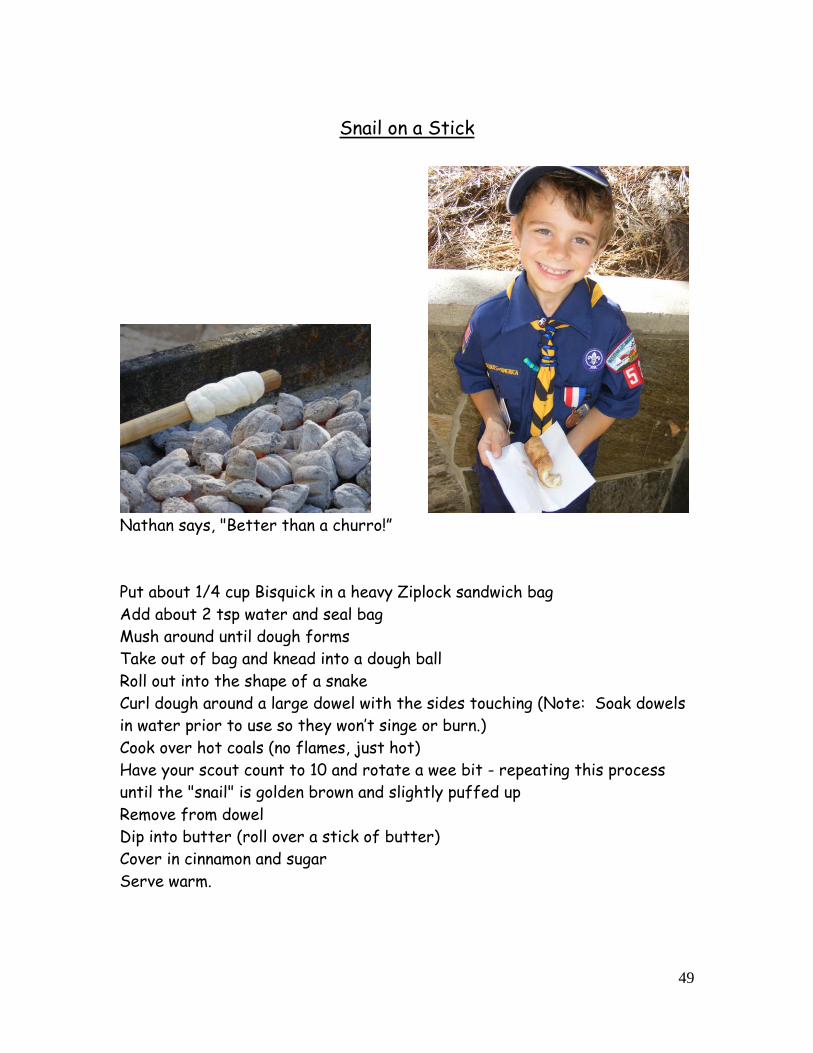
Snail on a Stick
Nathan says, "Better than a churro!”
Put about 1/4 cup Bisquick in a heavy Ziplock sandwich bag
Add about 2 tsp water and seal bag
Mush around until dough forms
Take out of bag and knead into a dough ball
Roll out into the shape of a snake
Curl dough around a large dowel with the sides touching (Note: Soak dowels
in water prior to use so they won’t singe or burn.)
Cook over hot coals (no flames, just hot)
Have your scout count to 10 and rotate a wee bit - repeating this process
until the "snail" is golden brown and slightly puffed up
Remove from dowel
Dip into butter (roll over a stick of butter)
Cover in cinnamon and sugar
Serve warm.
50
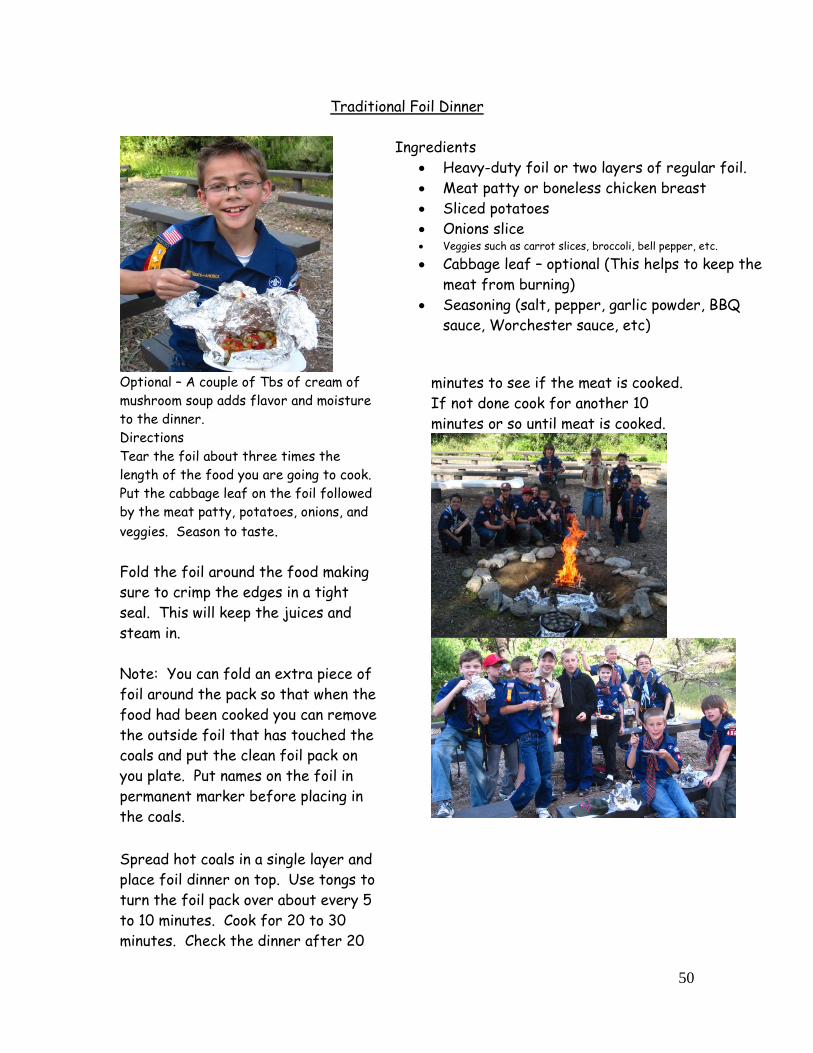
Traditional Foil Dinner
Ingredients
Heavy-duty foil or two layers of regular foil.
Meat patty or boneless chicken breast
Sliced potatoes
Onions slice Veggies such as carrot slices, broccoli, bell pepper, etc.
Cabbage leaf – optional (This helps to keep the
meat from burning)
Seasoning (salt, pepper, garlic powder, BBQ
sauce, Worchester sauce, etc)
Optional – A couple of Tbs of cream of
mushroom soup adds flavor and moisture
to the dinner.
Directions
Tear the foil about three times the
length of the food you are going to cook.
Put the cabbage leaf on the foil followed
by the meat patty, potatoes, onions, and
veggies. Season to taste.
Fold the foil around the food making
sure to crimp the edges in a tight
seal. This will keep the juices and
steam in.
Note: You can fold an extra piece of
foil around the pack so that when the
food had been cooked you can remove
the outside foil that has touched the
coals and put the clean foil pack on
you plate. Put names on the foil in
permanent marker before placing in
the coals.
Spread hot coals in a single layer and
place foil dinner on top. Use tongs to
turn the foil pack over about every 5
to 10 minutes. Cook for 20 to 30
minutes. Check the dinner after 20
minutes to see if the meat is cooked.
If not done cook for another 10
minutes or so until meat is cooked.
51
Caramel Apple Monsters
The easiest way for cubs to make
caramel apples is to use caramel wraps
that you can buy in the produce
section during the fall. They come 5
in a pack and the craft sticks are
included. You don’t need to heat the
wrapped apples as it tells you to do on
the package. Just have the kids wrap
the caramel sheets over the apple.
The caramel will stretch to cover the
whole apple. Then you are ready to
turn your caramel apples into
monsters.
Ingredients
5 medium apples
1 pack of caramel wraps (5
caramel sheets per pack, plus
craft sticks)
Assorted candy
Frosting or melted chocolate
to use as glue to attach candy
to caramel apple. (The easiest
way for cubs to melt chocolate
is to put it in a deep bowl and
use a hair dryer. Don’t have
the dryer too close to the
chocolate or the chocolate will
splash. Stir the chocolate until
it is all melted.)
Let the cubs have fun turning their
caramel apples into monsters using
the frosting or melted chocolate as
glue to attach the candy.
.
52
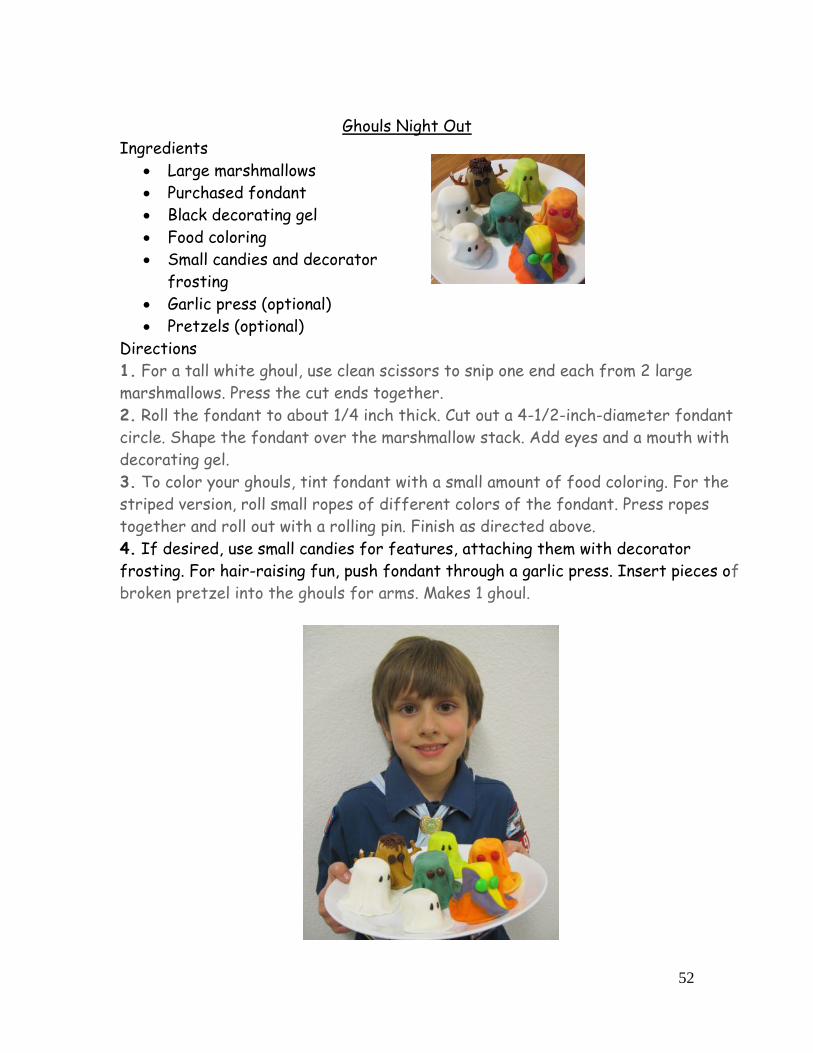
Ghouls Night Out
Ingredients
Large marshmallows
Purchased fondant
Black decorating gel
Food coloring
Small candies and decorator
frosting
Garlic press (optional)
Pretzels (optional)
Directions
1. For a tall white ghoul, use clean scissors to snip one end each from 2 large
marshmallows. Press the cut ends together.
2. Roll the fondant to about 1/4 inch thick. Cut out a 4-1/2-inch-diameter fondant
circle. Shape the fondant over the marshmallow stack. Add eyes and a mouth with
decorating gel.
3. To color your ghouls, tint fondant with a small amount of food coloring. For the
striped version, roll small ropes of different colors of the fondant. Press ropes
together and roll out with a rolling pin. Finish as directed above.
4. If desired, use small candies for features, attaching them with decorator
frosting. For hair-raising fun, push fondant through a garlic press. Insert pieces of
broken pretzel into the ghouls for arms. Makes 1 ghoul.
53
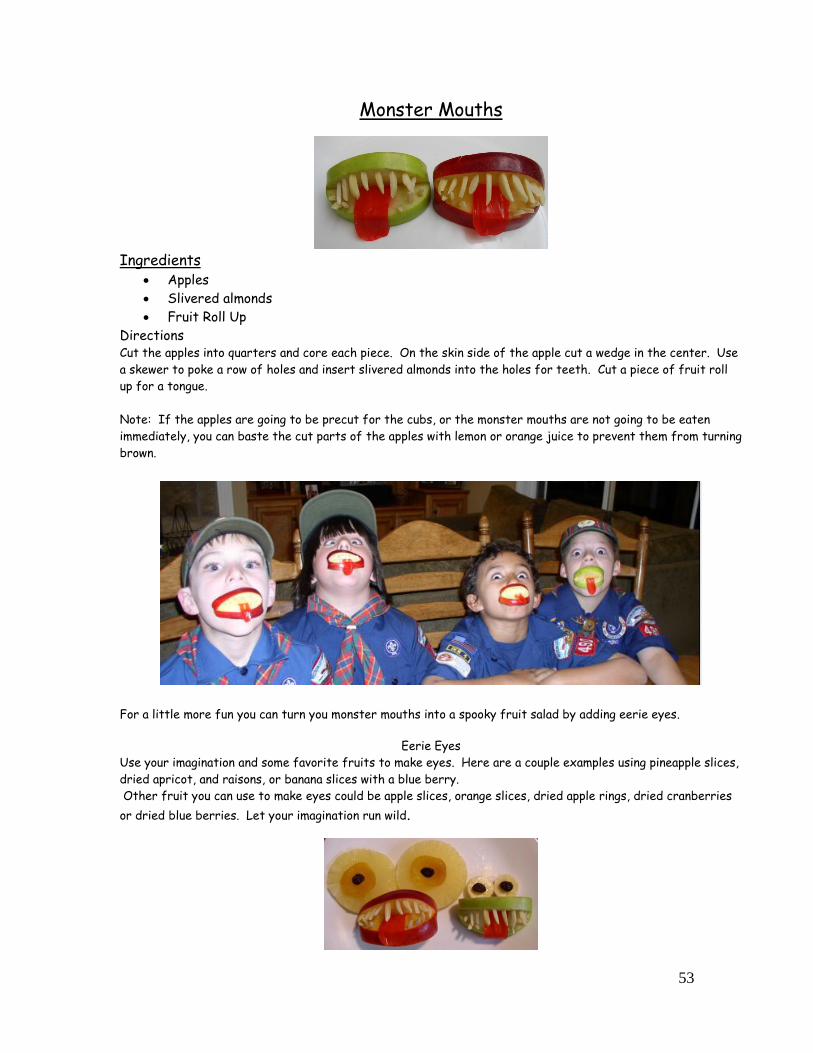
Monster Mouths
Ingredients
Apples
Slivered almonds
Fruit Roll Up
Directions Cut the apples into quarters and core each piece. On the skin side of the apple cut a wedge in the center. Use
a skewer to poke a row of holes and insert slivered almonds into the holes for teeth. Cut a piece of fruit roll
up for a tongue.
Note: If the apples are going to be precut for the cubs, or the monster mouths are not going to be eaten
immediately, you can baste the cut parts of the apples with lemon or orange juice to prevent them from turning
brown.
For a little more fun you can turn you monster mouths into a spooky fruit salad by adding eerie eyes.
Eerie Eyes
Use your imagination and some favorite fruits to make eyes. Here are a couple examples using pineapple slices,
dried apricot, and raisons, or banana slices with a blue berry.
Other fruit you can use to make eyes could be apple slices, orange slices, dried apple rings, dried cranberries
or dried blue berries. Let your imagination run wild.
54
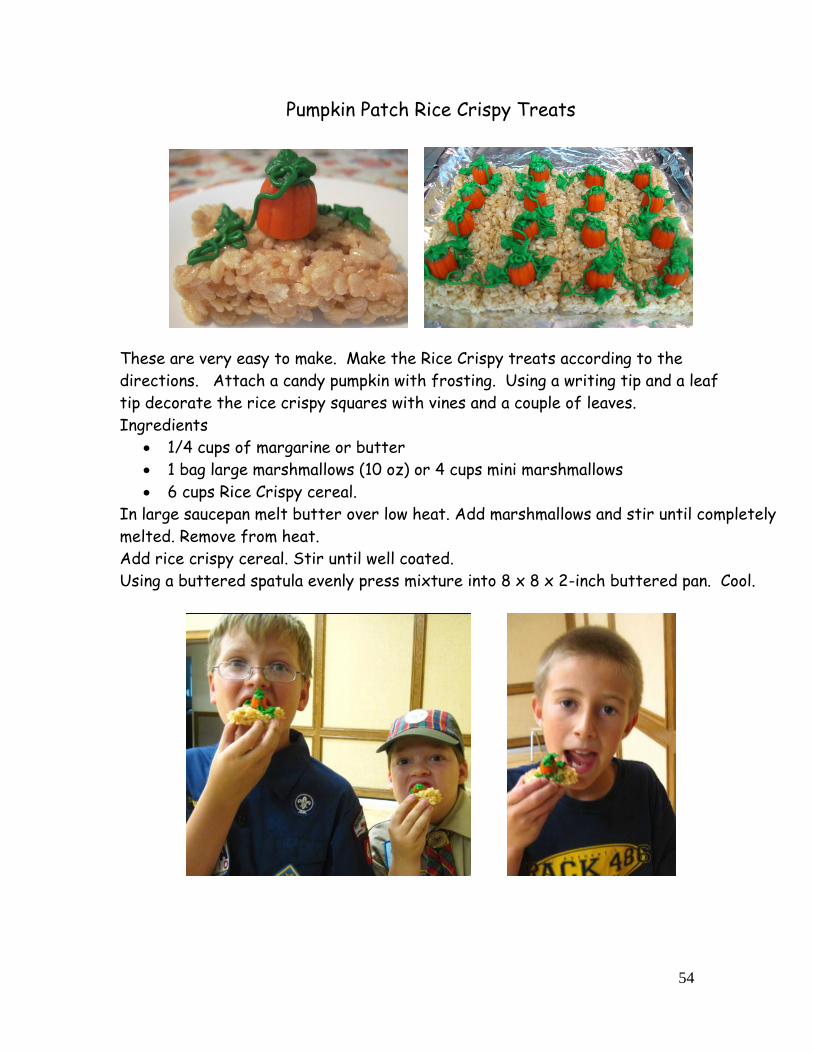
Pumpkin Patch Rice Crispy Treats
These are very easy to make. Make the Rice Crispy treats according to the
directions. Attach a candy pumpkin with frosting. Using a writing tip and a leaf
tip decorate the rice crispy squares with vines and a couple of leaves.
Ingredients
1/4 cups of margarine or butter
1 bag large marshmallows (10 oz) or 4 cups mini marshmallows
6 cups Rice Crispy cereal.
In large saucepan melt butter over low heat. Add marshmallows and stir until completely
melted. Remove from heat.
Add rice crispy cereal. Stir until well coated.
Using a buttered spatula evenly press mixture into 8 x 8 x 2-inch buttered pan. Cool.
55
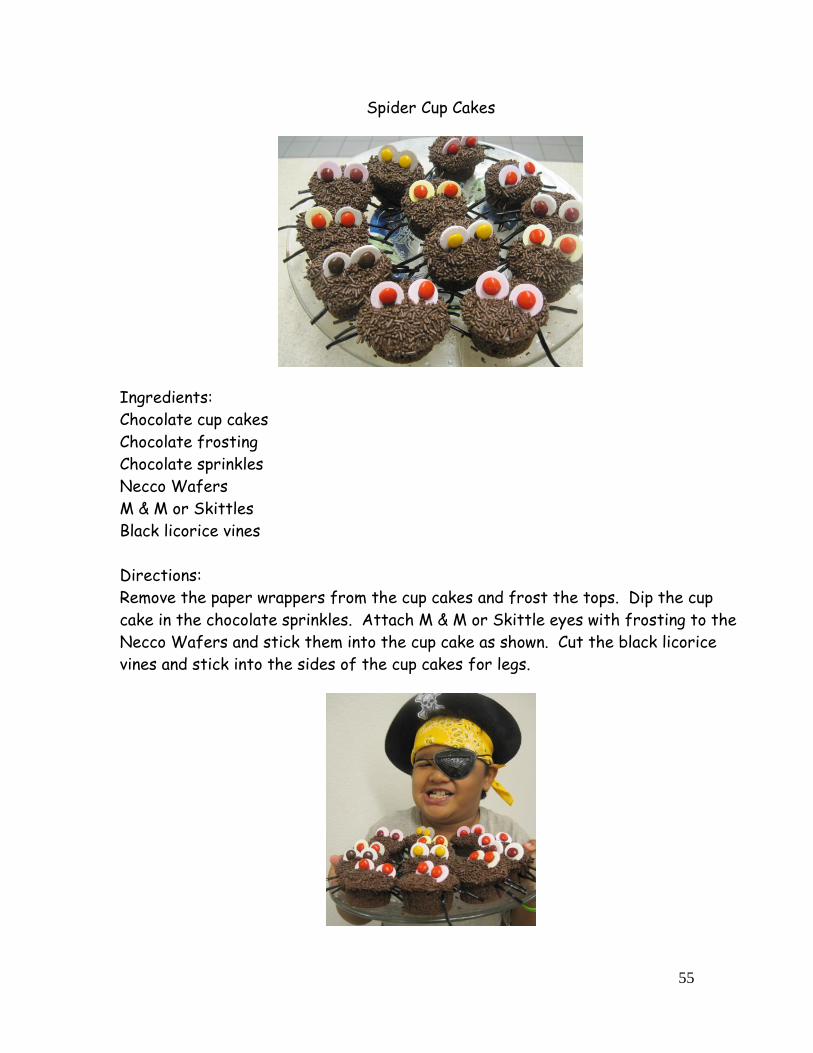
Spider Cup Cakes
Ingredients:
Chocolate cup cakes
Chocolate frosting
Chocolate sprinkles
Necco Wafers
M & M or Skittles
Black licorice vines
Directions:
Remove the paper wrappers from the cup cakes and frost the tops. Dip the cup
cake in the chocolate sprinkles. Attach M & M or Skittle eyes with frosting to the
Necco Wafers and stick them into the cup cake as shown. Cut the black licorice
vines and stick into the sides of the cup cakes for legs.
56
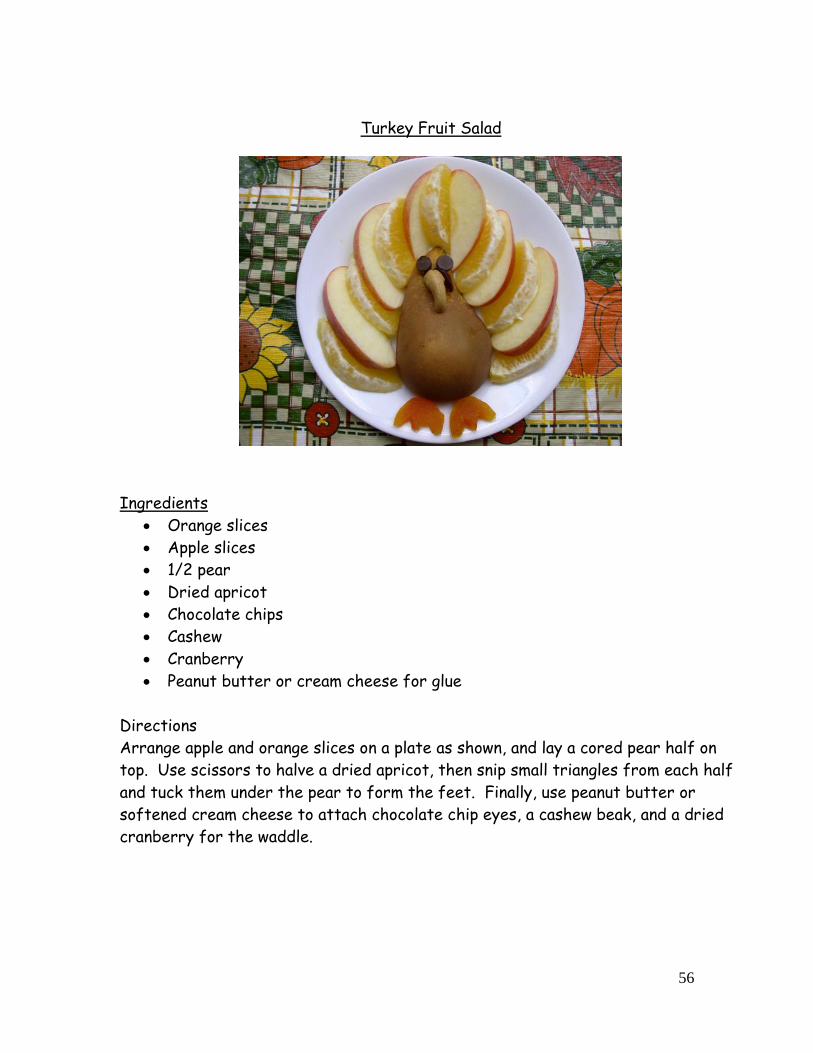
Turkey Fruit Salad
Ingredients
Orange slices
Apple slices
1/2 pear
Dried apricot
Chocolate chips
Cashew
Cranberry
Peanut butter or cream cheese for glue
Directions
Arrange apple and orange slices on a plate as shown, and lay a cored pear half on
top. Use scissors to halve a dried apricot, then snip small triangles from each half
and tuck them under the pear to form the feet. Finally, use peanut butter or
softened cream cheese to attach chocolate chip eyes, a cashew beak, and a dried
cranberry for the waddle.
57
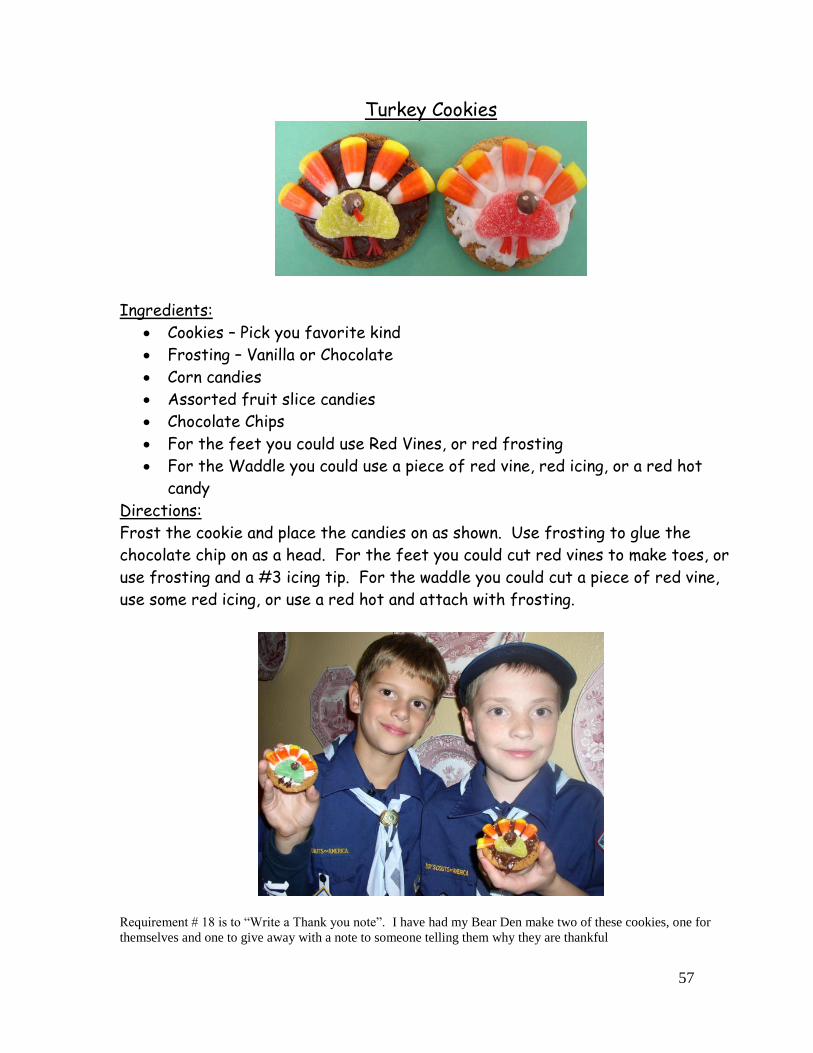
Turkey Cookies
Ingredients:
Cookies – Pick you favorite kind
Frosting – Vanilla or Chocolate
Corn candies
Assorted fruit slice candies
Chocolate Chips
For the feet you could use Red Vines, or red frosting
For the Waddle you could use a piece of red vine, red icing, or a red hot
candy
Directions:
Frost the cookie and place the candies on as shown. Use frosting to glue the
chocolate chip on as a head. For the feet you could cut red vines to make toes, or
use frosting and a #3 icing tip. For the waddle you could cut a piece of red vine,
use some red icing, or use a red hot and attach with frosting.
Requirement # 18 is to “Write a Thank you note”. I have had my Bear Den make two of these cookies, one for
themselves and one to give away with a note to someone telling them why they are thankful
58
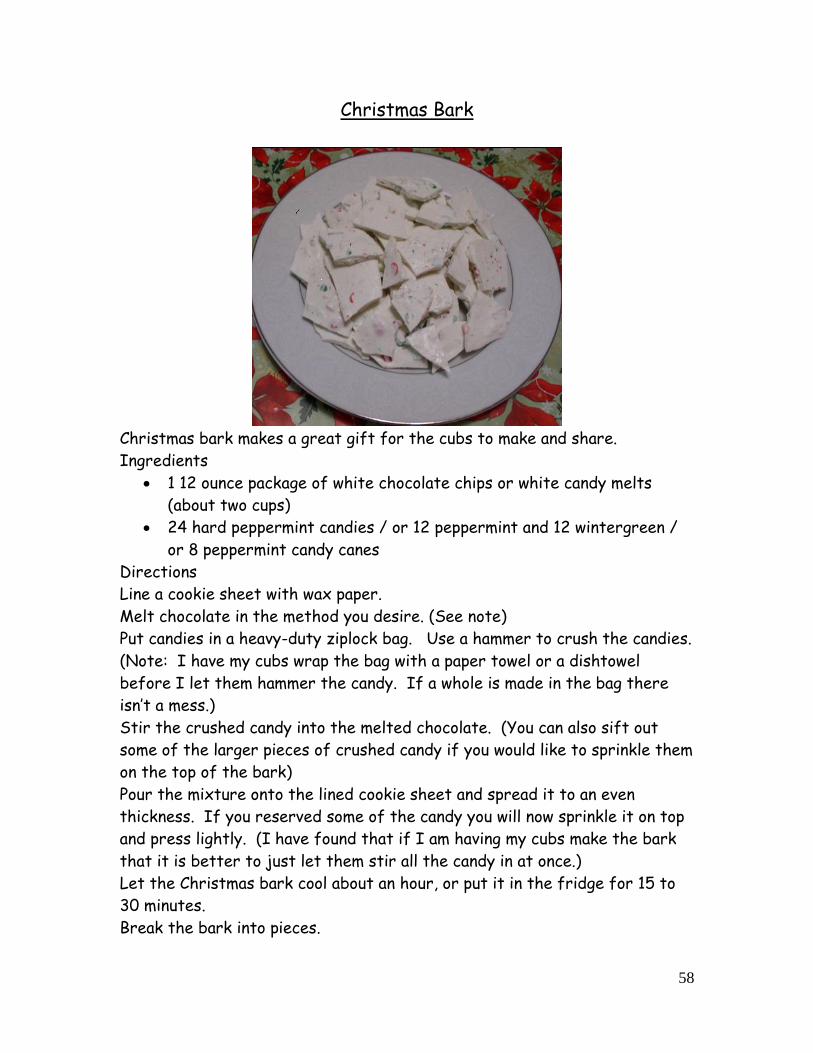
Christmas Bark
Christmas bark makes a great gift for the cubs to make and share.
Ingredients
1 12 ounce package of white chocolate chips or white candy melts
(about two cups)
24 hard peppermint candies / or 12 peppermint and 12 wintergreen /
or 8 peppermint candy canes
Directions
Line a cookie sheet with wax paper.
Melt chocolate in the method you desire. (See note)
Put candies in a heavy-duty ziplock bag. Use a hammer to crush the candies.
(Note: I have my cubs wrap the bag with a paper towel or a dishtowel
before I let them hammer the candy. If a whole is made in the bag there
isn’t a mess.)
Stir the crushed candy into the melted chocolate. (You can also sift out
some of the larger pieces of crushed candy if you would like to sprinkle them
on the top of the bark)
Pour the mixture onto the lined cookie sheet and spread it to an even
thickness. If you reserved some of the candy you will now sprinkle it on top
and press lightly. (I have found that if I am having my cubs make the bark
that it is better to just let them stir all the candy in at once.)
Let the Christmas bark cool about an hour, or put it in the fridge for 15 to
30 minutes.
Break the bark into pieces.

59
Edible Count Down Chain
Got some special event you want to count down the days to, such as
Christmas? Here is a fun way to do that. You will need:
Plastic wrap
Ribbon
Various candies
Line up 25 pieces of candy (or what ever number you need for your count
down). Leave a small space between each piece of candy. Tear a piece of
plastic wrap that is just a bit longer then your line of candy. Place your
pieces of candy a couple of inches from the edge of the plastic wrap. Wrap
that edge over the line of candy. Roll the line of candy up until all of the
plastic wrap surrounds the candy. Tie a piece of ribbon on the ends and in
between each piece of candy.
Each day that you count down, cut a piece of candy off the chain.
60
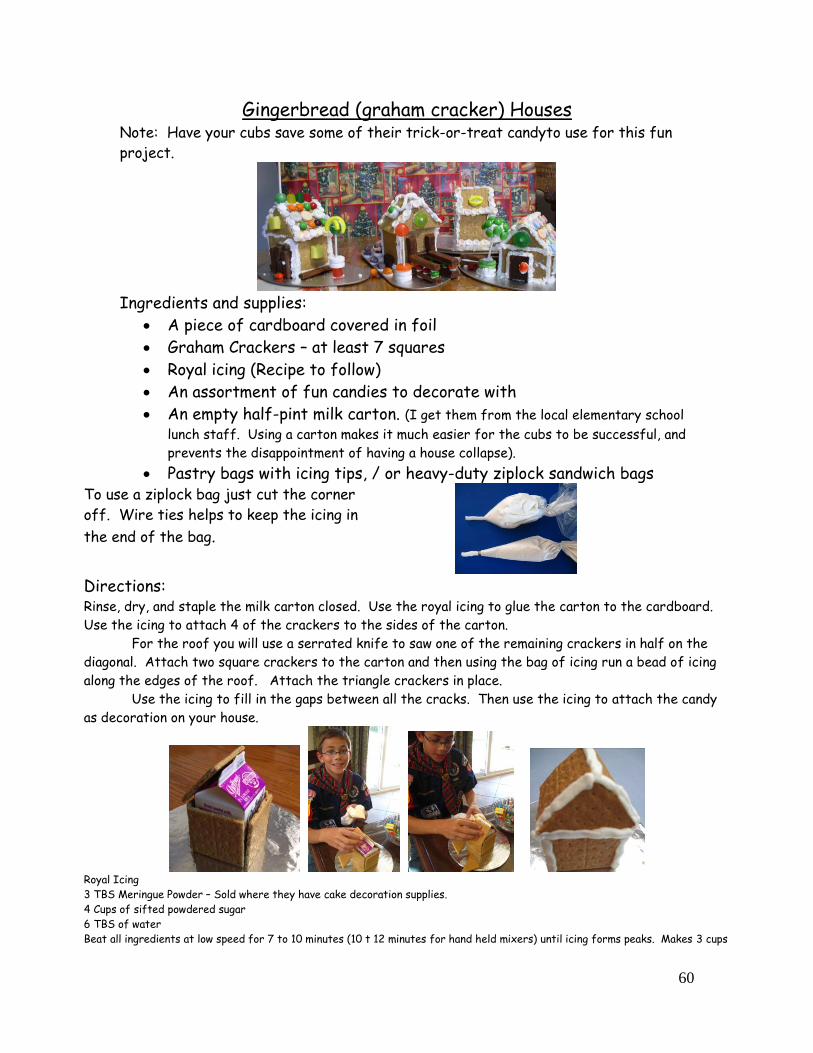
Gingerbread (graham cracker) Houses Note: Have your cubs save some of their trick-or-treat candyto use for this fun
project.
Ingredients and supplies:
A piece of cardboard covered in foil
Graham Crackers – at least 7 squares
Royal icing (Recipe to follow)
An assortment of fun candies to decorate with
An empty half-pint milk carton. (I get them from the local elementary school
lunch staff. Using a carton makes it much easier for the cubs to be successful, and
prevents the disappointment of having a house collapse). Pastry bags with icing tips, / or heavy-duty ziplock sandwich bags
To use a ziplock bag just cut the corner
off. Wire ties helps to keep the icing in
the end of the bag.
Directions: Rinse, dry, and staple the milk carton closed. Use the royal icing to glue the carton to the cardboard.
Use the icing to attach 4 of the crackers to the sides of the carton.
For the roof you will use a serrated knife to saw one of the remaining crackers in half on the
diagonal. Attach two square crackers to the carton and then using the bag of icing run a bead of icing
along the edges of the roof. Attach the triangle crackers in place.
Use the icing to fill in the gaps between all the cracks. Then use the icing to attach the candy
as decoration on your house.
Royal Icing
3 TBS Meringue Powder – Sold where they have cake decoration supplies. 4 Cups of sifted powdered sugar
6 TBS of water
Beat all ingredients at low speed for 7 to 10 minutes (10 t 12 minutes for hand held mixers) until icing forms peaks. Makes 3 cups
61
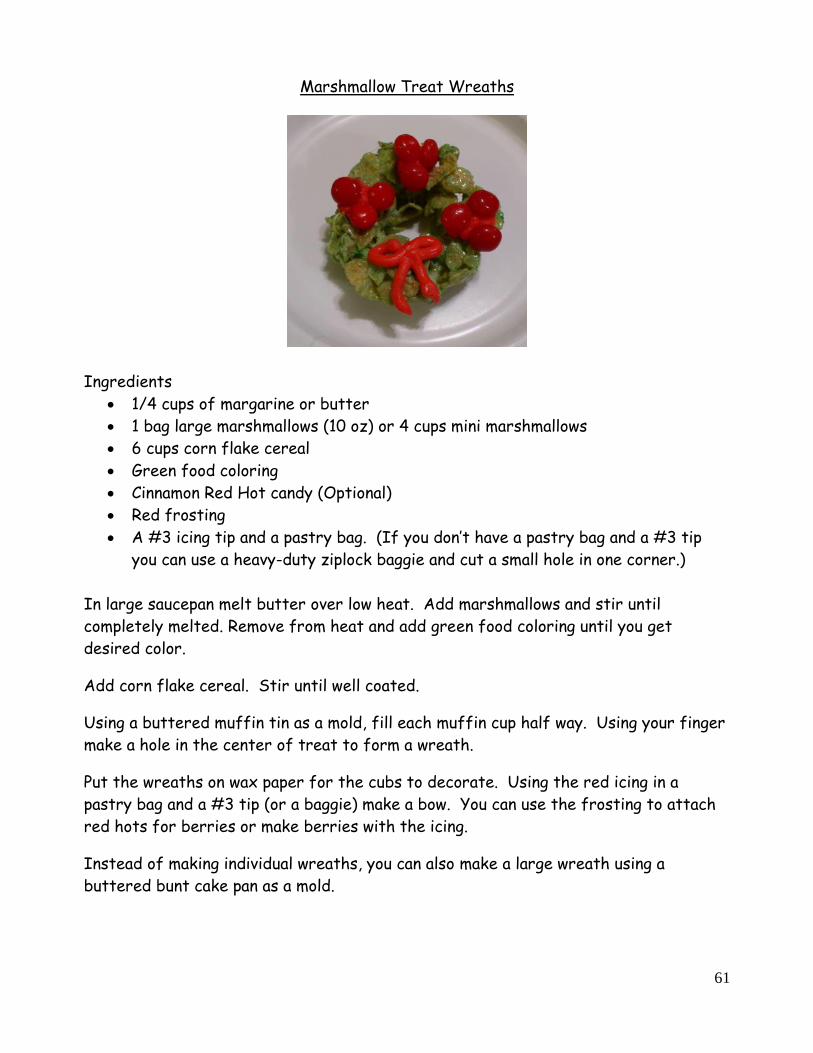
Marshmallow Treat Wreaths
Ingredients
1/4 cups of margarine or butter
1 bag large marshmallows (10 oz) or 4 cups mini marshmallows
6 cups corn flake cereal
Green food coloring
Cinnamon Red Hot candy (Optional)
Red frosting
A #3 icing tip and a pastry bag. (If you don’t have a pastry bag and a #3 tip
you can use a heavy-duty ziplock baggie and cut a small hole in one corner.)
In large saucepan melt butter over low heat. Add marshmallows and stir until
completely melted. Remove from heat and add green food coloring until you get
desired color.
Add corn flake cereal. Stir until well coated.
Using a buttered muffin tin as a mold, fill each muffin cup half way. Using your finger
make a hole in the center of treat to form a wreath.
Put the wreaths on wax paper for the cubs to decorate. Using the red icing in a
pastry bag and a #3 tip (or a baggie) make a bow. You can use the frosting to attach
red hots for berries or make berries with the icing.
Instead of making individual wreaths, you can also make a large wreath using a
buttered bunt cake pan as a mold.
62
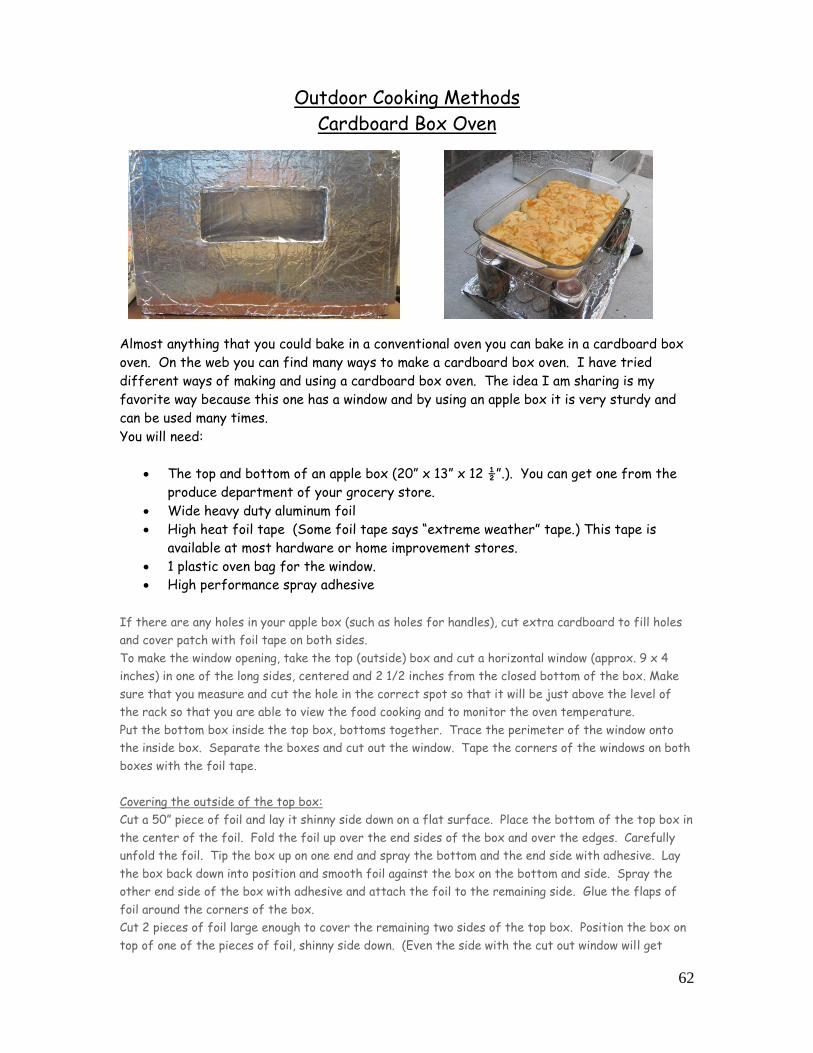
Outdoor Cooking Methods
Cardboard Box Oven
Almost anything that you could bake in a conventional oven you can bake in a cardboard box
oven. On the web you can find many ways to make a cardboard box oven. I have tried
different ways of making and using a cardboard box oven. The idea I am sharing is my
favorite way because this one has a window and by using an apple box it is very sturdy and
can be used many times. You will need:
The top and bottom of an apple box (20” x 13” x 12 ½”.). You can get one from the
produce department of your grocery store.
Wide heavy duty aluminum foil
High heat foil tape (Some foil tape says “extreme weather” tape.) This tape is
available at most hardware or home improvement stores.
1 plastic oven bag for the window.
High performance spray adhesive
If there are any holes in your apple box (such as holes for handles), cut extra cardboard to fill holes
and cover patch with foil tape on both sides.
To make the window opening, take the top (outside) box and cut a horizontal window (approx. 9 x 4
inches) in one of the long sides, centered and 2 1/2 inches from the closed bottom of the box. Make
sure that you measure and cut the hole in the correct spot so that it will be just above the level of
the rack so that you are able to view the food cooking and to monitor the oven temperature.
Put the bottom box inside the top box, bottoms together. Trace the perimeter of the window onto
the inside box. Separate the boxes and cut out the window. Tape the corners of the windows on both
boxes with the foil tape.
Covering the outside of the top box:
Cut a 50” piece of foil and lay it shinny side down on a flat surface. Place the bottom of the top box in
the center of the foil. Fold the foil up over the end sides of the box and over the edges. Carefully
unfold the foil. Tip the box up on one end and spray the bottom and the end side with adhesive. Lay
the box back down into position and smooth foil against the box on the bottom and side. Spray the
other end side of the box with adhesive and attach the foil to the remaining side. Glue the flaps of
foil around the corners of the box.
Cut 2 pieces of foil large enough to cover the remaining two sides of the top box. Position the box on
top of one of the pieces of foil, shinny side down. (Even the side with the cut out window will get
63
covered). Fold the foil around the edges of the box to make sure that the foil will cover the open
edges. Remove the foil and spray the adhesive to the side of the box, then attach the foil and smooth
it. Repeat with the remaining side. Use the foil tape to cover all the edges and to make sure the foil
is attached.
On the inside of the box you will see where the foil covers the window. On the exposed foil draw a
horizontal line through the center. From each corner of the window draw a diagonal line that meets
the center line. (>----<) Using a utility knife cut the diagonal lines and the center line. Fold the tabs
on the inside and use the foil tape to secure the edges. Tape around the inside edged of the window
to make sure all the cardboard is covered.
Covering the inside of the bottom box
Take a 50” piece of foil and find the center by gently folding the foil in half (shinny side in). Place the
center of the foil in the center of the bottom box. Starting at the center gently press the foil along
the bottom and into the edges and corners of the box, and up the sides. There should be plenty of
foil to fold over the top edges onto the outside of the box. After you have molded the foil to fit the
box, pull back half the foil on one side and spray the bottom and one side with adhesive. Replace the
foil and smooth it against the box. Fold back the foil on the other side and spray the adhesive on the
box. Replace the foil and smooth into place. Repair any tears with a piece of foil tape. The foil that
extends beyond the end of the box’s opening will need to be split at the corners so that it can be
folded over the edges and glued into place. Tape all edges of the foil.
Cut two pieces of foil large enough to cover the remaining two sides (Again you will cover the opening
for the window.) After molding the foil into place, remove the foil and spray the box with adhesive.
Attach, smooth, and tape the foil into place. Repeat on the remaining side. Make the same cuts on
the foil covering the window as you did in the other box. Fold the tabs over the edges onto the
outside of the box. Glue flaps down and tape the edges of the box.
Window
From the outside of the bottom box, secure two pieces of plastic oven bag (10”x5”) over the window
opening. Stretching the plastic as you tape it in place with the foil tape. (I suggest that you cut the
plastic bag on the fold.)
At this point you should have the outside of the top box covered with foil and the inside of the
bottom box covered with foil. Slide the top box over the bottom box, bottoms together. Make sure
all exposed surfaces of both boxes are covered in foil and all edges have been secured with the foil
tape.
To bake with your cardboard box oven you will need:
4 empty soda cans, filled part way with rocks or sand so the cans will not tip over
You can cover the can openings with foil tape to keep the sand and rocks in.
Cookie sheet- 10”x15”, (Use a light colored cookie sheet so that baked foods do not
get too dark on the bottom), and or
Cookie cooling rack. Get a rack that is 10” wide and 14” to 16” long. (Depending on
what I am baking I will use either the rack or cookie sheet.
Oven thermometer
Heavy-duty foil – 36” for a ground cover. (See personal note at the end of the
instructions.)
Charcoal briquettes
1 unlit piece of charcoal or a small rock of similar size.
64
Chimney charcoal starter
Long handled tongs
Matches
Newspaper
Oven mitts or hot pads
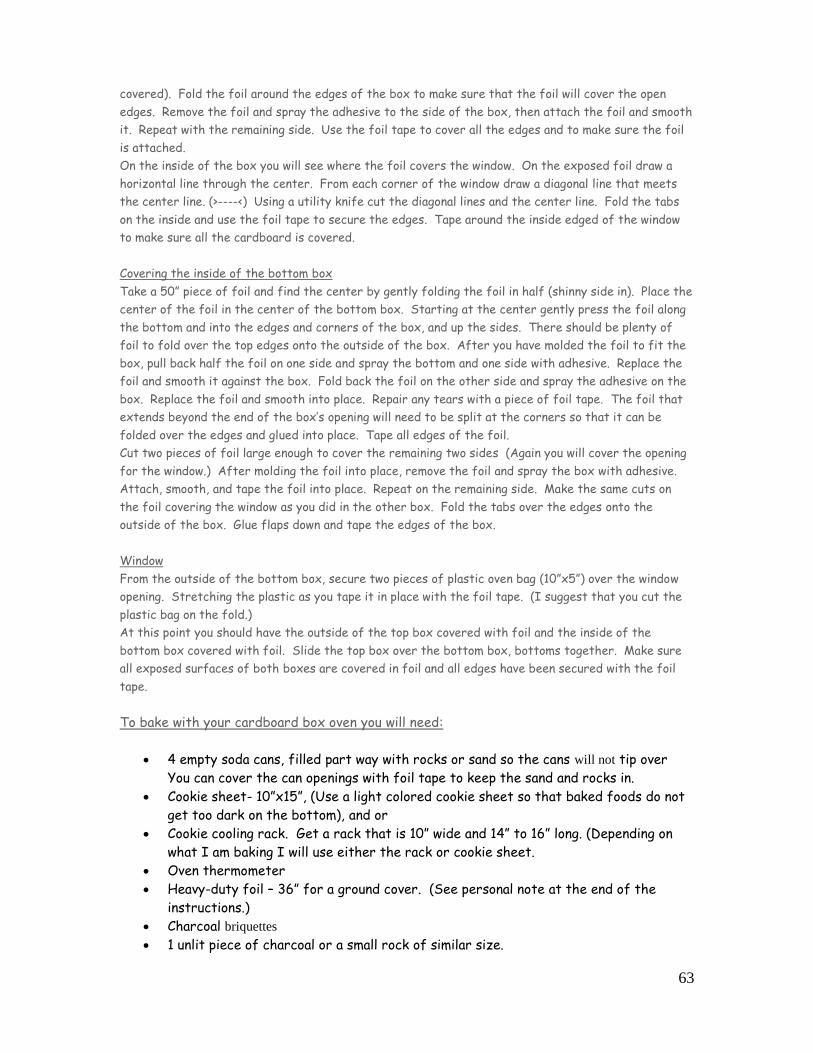
To Bake:
Prepare your charcoal. Put desired number of coals into the charcoal chimney. Place the
chimney on a piece of foil on the ground. Place a wadded up piece of newspaper in the base
of chimney and light.
1. Place ground foil, shiny side up, on level ground. Important: Make sure that you use
your oven on the ground or on cement. Do not put oven on anything flammable.
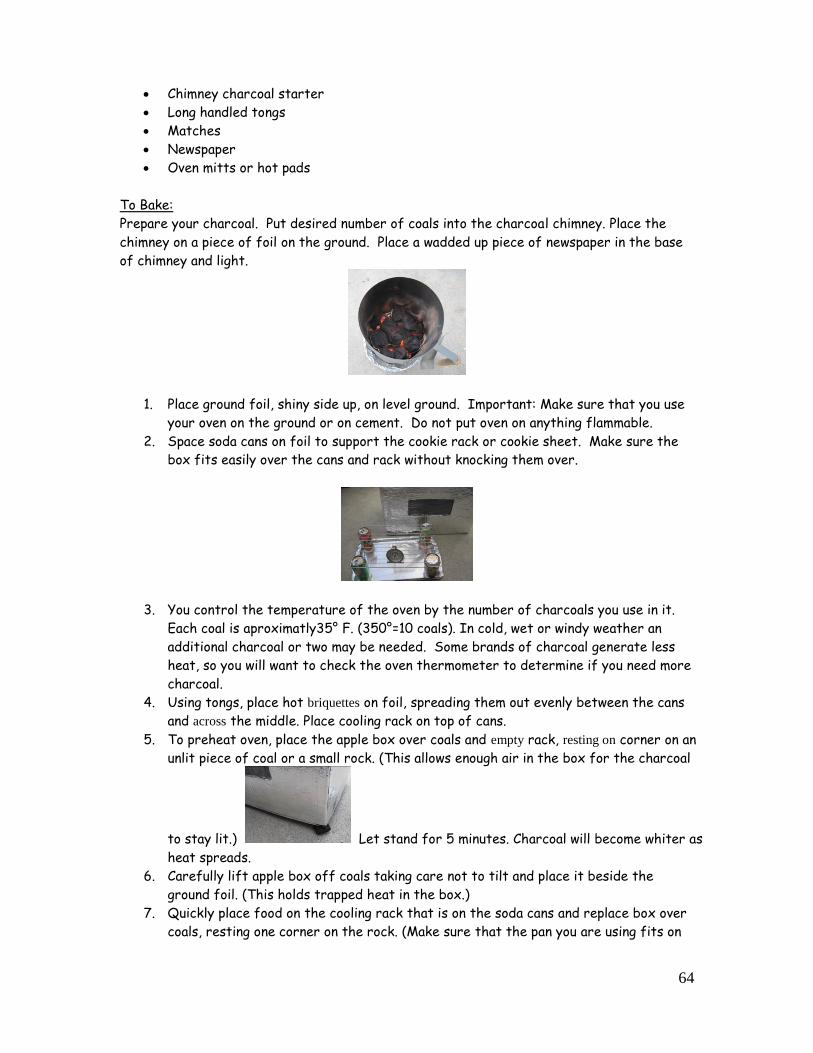
2. Space soda cans on foil to support the cookie rack or cookie sheet. Make sure the
box fits easily over the cans and rack without knocking them over.
3. You control the temperature of the oven by the number of charcoals you use in it.
Each coal is aproximatly35° F. (350°=10 coals). In cold, wet or windy weather an
additional charcoal or two may be needed. Some brands of charcoal generate less
heat, so you will want to check the oven thermometer to determine if you need more
charcoal.
4. Using tongs, place hot briquettes on foil, spreading them out evenly between the cans
and across the middle. Place cooling rack on top of cans.
5. To preheat oven, place the apple box over coals and empty rack, resting on corner on an
unlit piece of coal or a small rock. (This allows enough air in the box for the charcoal
to stay lit.) Let stand for 5 minutes. Charcoal will become whiter as
heat spreads.
6. Carefully lift apple box off coals taking care not to tilt and place it beside the
ground foil. (This holds trapped heat in the box.)
7. Quickly place food on the cooling rack that is on the soda cans and replace box over
coals, resting one corner on the rock. (Make sure that the pan you are using fits on
65
the center of the rack since the heat will not bake any food that is directly over the
soda cans.)
8. The charcoal will burn for about 35-40 minutes. When longer cooking times are
required, you can add more hot charcoals by slightly lifting the box and slipping
them in with long tongs. Check your thermometer to maintain correct temperature.
Your oven will get hot so make sure you use oven mitts or hot pads when handling the box.
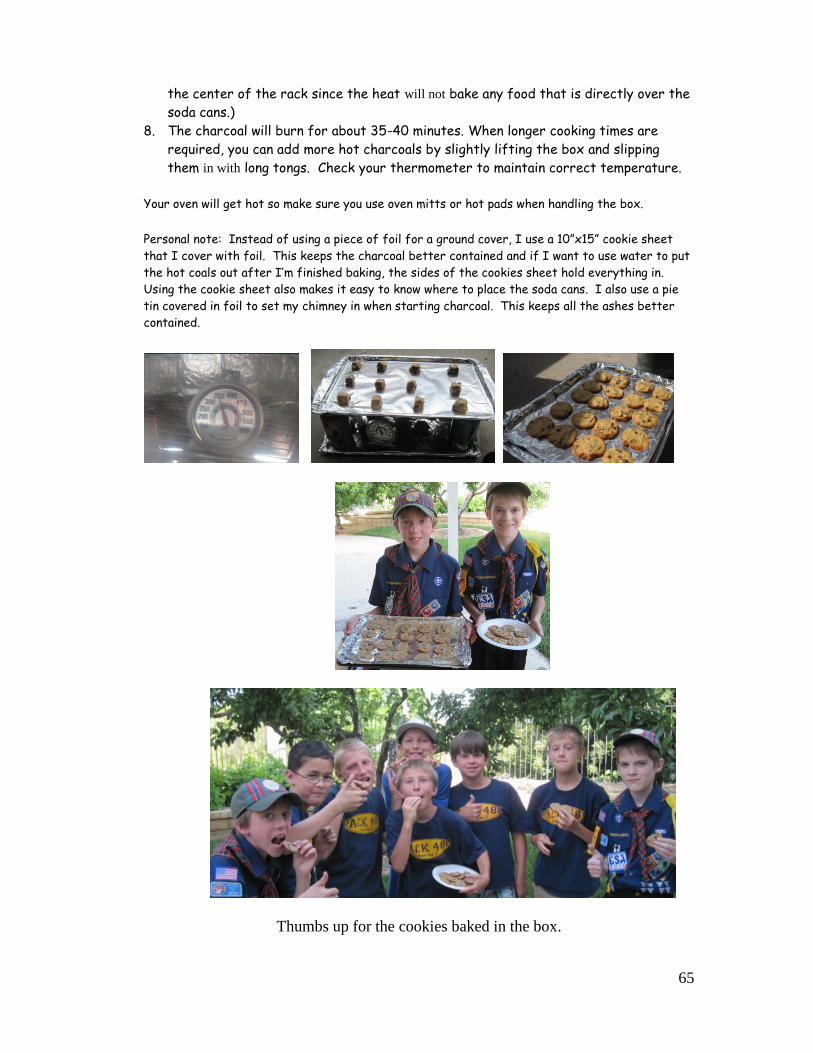
Personal note: Instead of using a piece of foil for a ground cover, I use a 10”x15” cookie sheet
that I cover with foil. This keeps the charcoal better contained and if I want to use water to put
the hot coals out after I’m finished baking, the sides of the cookies sheet hold everything in.
Using the cookie sheet also makes it easy to know where to place the soda cans. I also use a pie
tin covered in foil to set my chimney in when starting charcoal. This keeps all the ashes better
contained.
Thumbs up for the cookies baked in the box.
66
Chimney Charcoal Starter
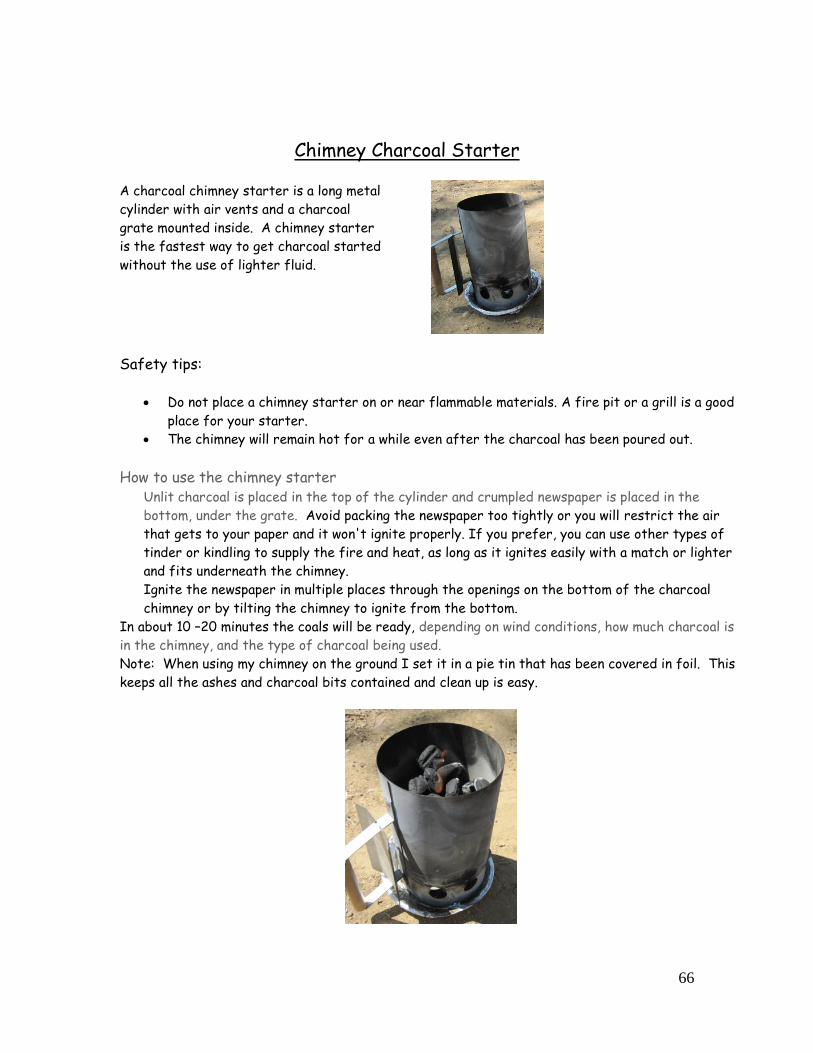
A charcoal chimney starter is a long metal
cylinder with air vents and a charcoal
grate mounted inside. A chimney starter
is the fastest way to get charcoal started
without the use of lighter fluid.
Safety tips:
Do not place a chimney starter on or near flammable materials. A fire pit or a grill is a good
place for your starter. The chimney will remain hot for a while even after the charcoal has been poured out.
How to use the chimney starter Unlit charcoal is placed in the top of the cylinder and crumpled newspaper is placed in the
bottom, under the grate. Avoid packing the newspaper too tightly or you will restrict the air
that gets to your paper and it won't ignite properly. If you prefer, you can use other types of
tinder or kindling to supply the fire and heat, as long as it ignites easily with a match or lighter
and fits underneath the chimney.
Ignite the newspaper in multiple places through the openings on the bottom of the charcoal
chimney or by tilting the chimney to ignite from the bottom.
In about 10 –20 minutes the coals will be ready, depending on wind conditions, how much charcoal is
in the chimney, and the type of charcoal being used. Note: When using my chimney on the ground I set it in a pie tin that has been covered in foil. This
keeps all the ashes and charcoal bits contained and clean up is easy.
67
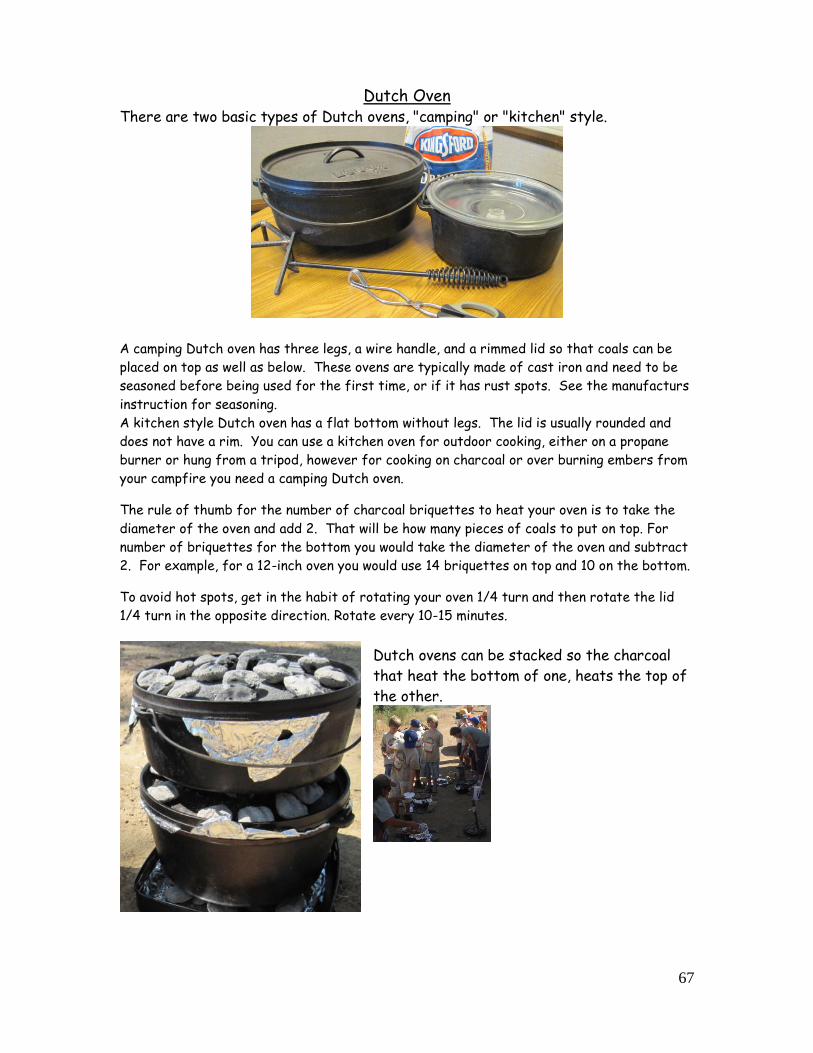
Dutch Oven There are two basic types of Dutch ovens, "camping" or "kitchen" style.
A camping Dutch oven has three legs, a wire handle, and a rimmed lid so that coals can be
placed on top as well as below. These ovens are typically made of cast iron and need to be
seasoned before being used for the first time, or if it has rust spots. See the manufacturs
instruction for seasoning.
A kitchen style Dutch oven has a flat bottom without legs. The lid is usually rounded and
does not have a rim. You can use a kitchen oven for outdoor cooking, either on a propane
burner or hung from a tripod, however for cooking on charcoal or over burning embers from
your campfire you need a camping Dutch oven.
The rule of thumb for the number of charcoal briquettes to heat your oven is to take the
diameter of the oven and add 2. That will be how many pieces of coals to put on top. For
number of briquettes for the bottom you would take the diameter of the oven and subtract
2. For example, for a 12-inch oven you would use 14 briquettes on top and 10 on the bottom.
To avoid hot spots, get in the habit of rotating your oven 1/4 turn and then rotate the lid
1/4 turn in the opposite direction. Rotate every 10-15 minutes.
Dutch ovens can be stacked so the charcoal
that heat the bottom of one, heats the top of
the other.
68
Fire starters
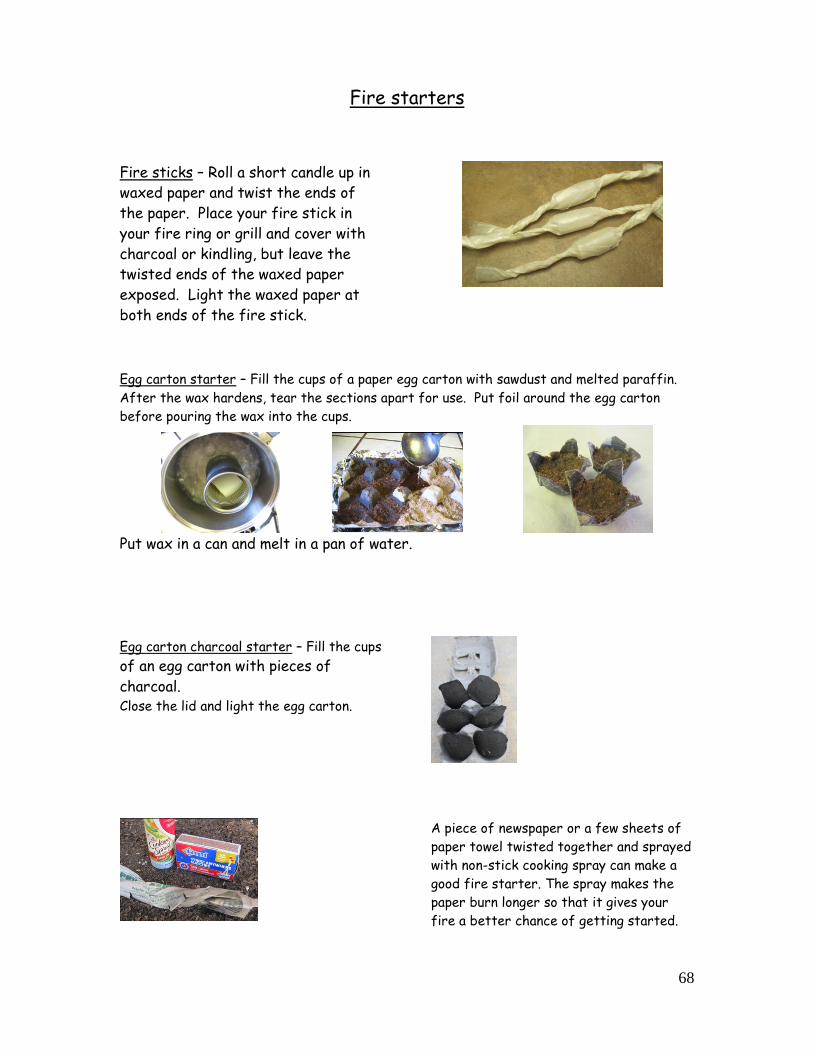
Fire sticks – Roll a short candle up in
waxed paper and twist the ends of
the paper. Place your fire stick in
your fire ring or grill and cover with
charcoal or kindling, but leave the
twisted ends of the waxed paper
exposed. Light the waxed paper at
both ends of the fire stick.
Egg carton starter – Fill the cups of a paper egg carton with sawdust and melted paraffin.
After the wax hardens, tear the sections apart for use. Put foil around the egg carton
before pouring the wax into the cups.
Put wax in a can and melt in a pan of water.
Egg carton charcoal starter – Fill the cups
of an egg carton with pieces of
charcoal. Close the lid and light the egg carton.
A piece of newspaper or a few sheets of
paper towel twisted together and sprayed
with non-stick cooking spray can make a
good fire starter. The spray makes the
paper burn longer so that it gives your
fire a better chance of getting started.
69
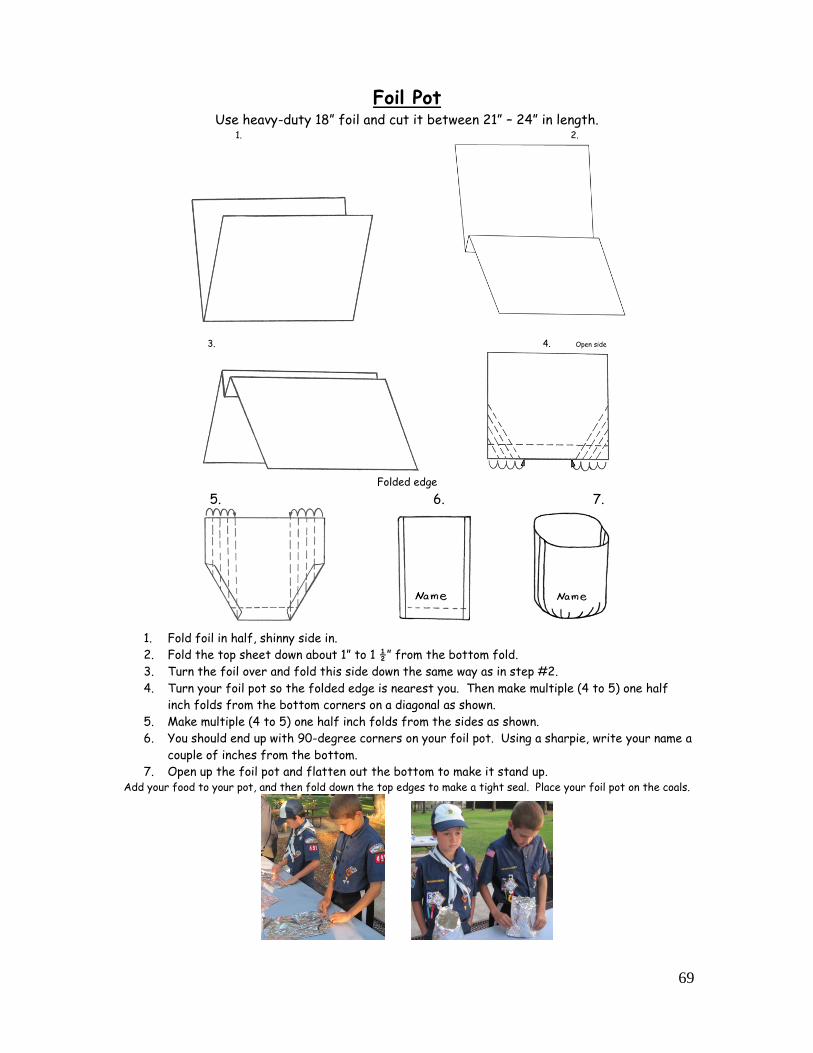
Foil Pot Use heavy-duty 18” foil and cut it between 21” – 24” in length.
1. 2.
3. 4. Open side
Folded edge
5. 6. 7.
1. Fold foil in half, shinny side in.
2. Fold the top sheet down about 1” to 1 ½” from the bottom fold.
3. Turn the foil over and fold this side down the same way as in step #2.
4. Turn your foil pot so the folded edge is nearest you. Then make multiple (4 to 5) one half
inch folds from the bottom corners on a diagonal as shown.
5. Make multiple (4 to 5) one half inch folds from the sides as shown.
6. You should end up with 90-degree corners on your foil pot. Using a sharpie, write your name a
couple of inches from the bottom.
7. Open up the foil pot and flatten out the bottom to make it stand up. Add your food to your pot, and then fold down the top edges to make a tight seal. Place your foil pot on the coals.
70
Tin Can Stove
(The cubs will need an adult to help cut the can)
This stove must only be used outside
Equipment
One #10 (one gallon) can.
Tin snips
Pliers
A can opener (punch type)
Before cutting the can you might want to
draw your cutting lines and fold lines using
a sharpie.
You will want to cut a door in you stove that will be about 4” high and 4 ½ “ wide. See the example. The solid lines
are to be cut and the dotted lines are folds.
From the open end of the can, you will need to cut a 4” vertical line with tin snips.
Above the vertical cut, mark a 4 ½” horizontal fold line, centering it so you have 2 ¼” on each side of the cut.
Cut the diagonal lines as shown in the above picture.
Using the pliers fold the tabs back against the inside of the can.
Using the can opener (punch type) make several holes on the upper sides of the closed end of the can.
You can heat your stove with charcoal or a buddy burner.
Buddy Burner Equipment
Tuna can
Corrugated cardboard cut into strips that are the same height as the can.
Paraffin wax
Coil the strips of cardboard and insert them in the
empty can. Fill the can with melted paraffin. To
light the burner, turn it on its side and hold a match
next to the cardboard. To smother the burner,
cover the can with something nonflammable. You can
make you own snuffer to go with your buddy burner.
Burner will burn 1-2 hours. You can refill the burner
with new wax and use it again.
Snuffer Equipment
Wire clothes hanger
Duct tape
Foil tape
Lid from tuna can
Using a wire cutter and pliers make a handle out of the coat hanger. Tape the sharp edges of the lid
with the duct tape. Attach the handle to the lid with the foil tape.


![the GRUB manual - Unixy.pl · 03/12/2002 · Besides the GRUB boot loader itself, there is a grub shell grub (see Chapter 15 [Invoking the grub shell], page 43) which can be run](https://static.fdocuments.net/doc/165x107/5e7212f1c3ed9e2213482e55/the-grub-manual-unixypl-03122002-besides-the-grub-boot-loader-itself-there.jpg)