The Brief Money Box - WordPress.com
29
Money Box The Brief To make a money box The Specification Must hold money Must be a wooden box Must be made using 2 different joints Ben Roberts / 7.5 DT / Money Box
Transcript of The Brief Money Box - WordPress.com

Money Box
The Brief
To make a money box
The Specification
Must hold money
Must be a wooden box
Must be made using 2 different joints
Ben Roberts / 7.5 DT / Money Box
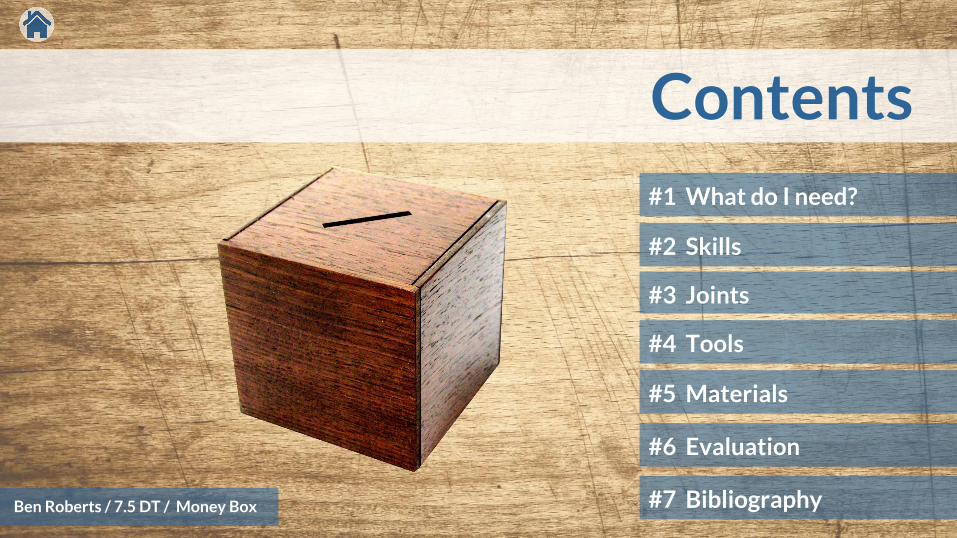
Contents #1 What do I need?
#2 Skills
#3 Joints
#4 Tools
#5 Materials
#6 Evaluation
#7 Bibliography Ben Roberts / 7.5 DT / Money Box

#1 What do I need?
Skills
Knowledge
Tools
Materials
To create a wooden product with a high quality finish To make jointsTo make accurate measurements To use a saw
To know which tools are most suited for measuringTo know which saw to use for different jobsTo know the different types of joints and which are suitable for this project
Measures (e.g. rules / try squares)Saws (e.g. hacksaws / coping / dovetail / tenon)
PineMDFAbrasive Paper
Ben Roberts / 7.5 DT / Money Box

#2 Skills#2.1 Measuring
#2.2 Cutting
#2.3 Sanding
#2.4 Jointing
Ben Roberts / 7.5 DT / Money Box
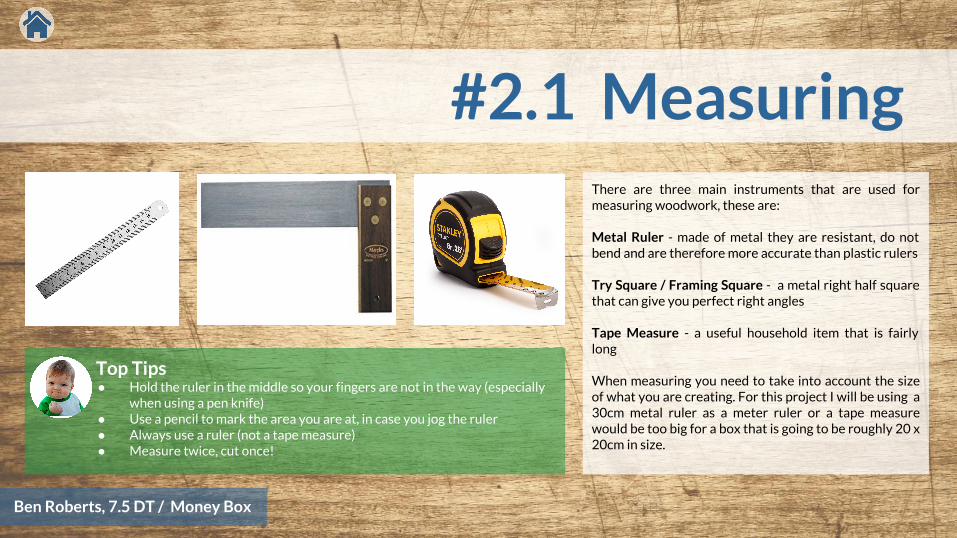
#2.1 Measuring
Ben Roberts, 7.5 DT / Money Box
There are three main instruments that are used for measuring woodwork, these are:
Metal Ruler - made of metal they are resistant, do not bend and are therefore more accurate than plastic rulers
Try Square / Framing Square - a metal right half square that can give you perfect right angles
Tape Measure - a useful household item that is fairly long
When measuring you need to take into account the size of what you are creating. For this project I will be using a 30cm metal ruler as a meter ruler or a tape measure would be too big for a box that is going to be roughly 20 x 20cm in size.
Top Tips● Hold the ruler in the middle so your fingers are not in the way (especially
when using a pen knife)● Use a pencil to mark the area you are at, in case you jog the ruler● Always use a ruler (not a tape measure)● Measure twice, cut once!

#2.2 Cutting
Ben Roberts, 7.5 DT / Money Box
There are a four main types of saws used for cutting:
Hacksaw / Junior Hacksaw - for cutting straight lines
Coping saw - for cutting curves in wood
Dovetail - is used for very neat finishes and dovetail joints
Tenon - is a middle sized back saw for tenon joints in particular
When cutting it is best to mark out the area that you are going to cut so you can see the direct path that your saw is going to go through. Once you have started do not stop or else you will get a rough edge as the saw will be positioned incorrectly.
Top Tips● Secure the wood you are
cutting in a vice or clamp● Only apply a small
amount of pressure● Stand like an archer, hold
it like a gangster!
#2.3 Sanding
Ben Roberts, 7.5 DT / Money Box
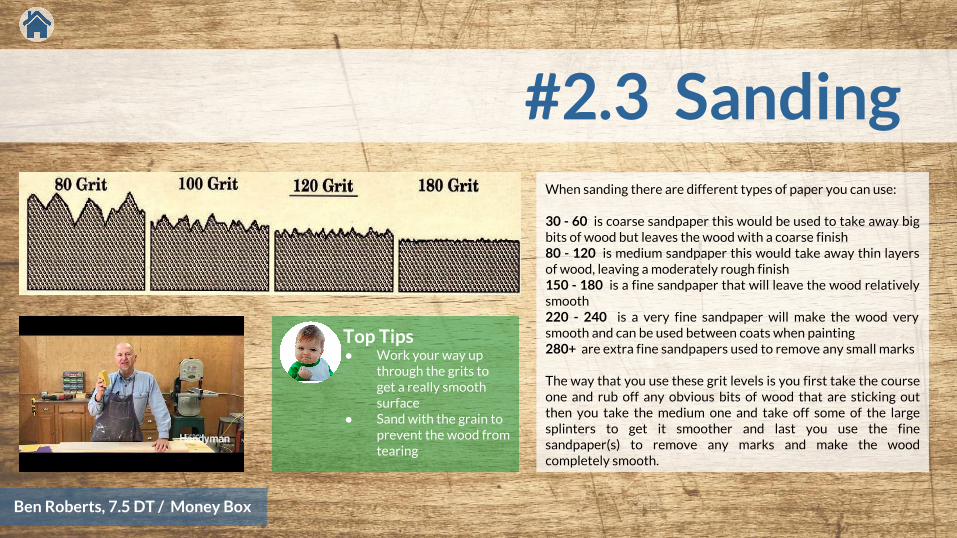
When sanding there are different types of paper you can use:
30 - 60 is coarse sandpaper this would be used to take away big bits of wood but leaves the wood with a coarse finish80 - 120 is medium sandpaper this would take away thin layers of wood, leaving a moderately rough finish150 - 180 is a fine sandpaper that will leave the wood relatively smooth220 - 240 is a very fine sandpaper will make the wood very smooth and can be used between coats when painting 280+ are extra fine sandpapers used to remove any small marks
The way that you use these grit levels is you first take the course one and rub off any obvious bits of wood that are sticking out then you take the medium one and take off some of the large splinters to get it smoother and last you use the fine sandpaper(s) to remove any marks and make the wood completely smooth.
Top Tips● Work your way up
through the grits to get a really smooth surface
● Sand with the grain to prevent the wood from tearing

#2.4 Jointing
Ben Roberts, 7.5 DT / Money Box
There are many types of woodwork joints, including:
Butt - This the most simple joint where you put two pieces of wood togetherDoweled - These are small pins used to reinforce a jointLap - This is where you half the end of a joint and then fit them togetherFinger - This is where you carve fingers into the two pieces of wood and fit them togetherDovetail - This joint is similar to a finger joint but has wedge-shaped pieces that fit together and are very strong
Depending on the amount of skill you have with wood will affect what type of joint you use. So a person who is not confident with wood would use a butt joint as it is the easiest to do, however, a professional would use a dovetail joint as it shows a sign of true craftsmanship. The type of joints that we will be using for this project are butt and doweled joints.
Top Tips● Use a measure to
make sure your joints are accurate
● The stronger your joints, the longer your item is going to last!

#3 Joints#3.1 Butt Joint
#3.2 Doweled Joint
#3.3 Lap Joint
#3.4 Finger Joint
#3.5 Dovetail Joint
Ben Roberts / 7.5 DT / Money Box

#3.1 Butt Joint
Ben Roberts / 7.5 DT / Money Box
This is the most simple of joints, however, it is the weakest. A butt joint is made by simply butting two pieces of wood together and then joining them with glue, screws or dowels.
How to Make a Butt Joint1. Measure two pieces of wood using a try square to ensure you’ve got
a perfect right angle2. Secure your first piece of wood in a vice or clamp, keeping the top of
the wood flush with the bench3. Apply glue to the top of the secured piece of wood4. Place your second piece of wood on top, ensuring they line up
correctly. Use a clamp to hold them together or use some screws or nails to hold them together
5. Use your try square to ensure that your joint is an accurate right angle
6. You can insert a corner piece to make the joint stronger if you wish.

#3.2 Doweled Joint
Ben Roberts / 7.5 DT / Money Box
Dowels are basically small pieces of wood that are pushed into two pieces of wood to hold them together. These have grooves going along them which allows excess air and glue to leave the hole and gives a firmer grip. If you want a really firm joint multiple dowels can be added.
How to Make a Doweled Joint1. Take two pieces of wood and a drill and measure where your hole is
going to be on each piece of wood marking it for later2. Take the drill and make a hole that the dowel can fit into on both the
pieces of wood (if the drill head is to small or big you can change it for one the right size)
3. Add some glue to the end of the dowel and push it into the hole firmly (you can add some glue to the piece of wood for more strength)
4. Then add some glue to the other end of the dowel and push it firmly into the other piece of wood
5. Clamp the two pieces firmly together6. You can insert a corner piece to make the joint stronger if you wish.

#3.3 Lap Joint
Ben Roberts / 7.5 DT / Money Box
This joint is commonly used as it is fairly simple. You take away half off the wood for the end of two pieces of wood and then glue them together. There are many variations to this joint like the Half-lap and the Centre lap. This is a strong and firm joint
How to Make a Lap Joint1. Take the two pieces of wood 2. Use a ruler to measure where you are going to cut3. Use a saw or a bandwidth saw to cut into the wood (take into
consideration the size and width of the saw as it will affect the end piece of wood)
4. Once the wood is cut take one of the pieces and add some glue to the side and hold them firmly together (it is best to do this on a vice so that you can get the position perfect)
5. You can make this stronger by adding a screw through both the pieces of wood

#3.4 Finger Joint
Ben Roberts / 7.5 DT / Money Box
The finger joint is similar to a dovetail joint, but it involves less cutting skills and less accuracy. It got its name from the way the bits of wood looks like joined fingers on a hand. It is also known as a comb joint due to its appearance. This type of joint is often used in draws and for decoration as it gives a good affect if you have two contrasting types of wood.
How to Make a Finger Joint1. Take the two pieces of wood 2. Use a try square to measure where you are going to cut to and make
sure the fingers are all even lengths3. Use a tenon saw to cut off fine bits of wood and cut the fingers into
one of the pieces of wood. Repeat to the other piece, however, make the fingers opposite so the two pieces fit together
4. Push and join the two pieces of wood together5. You can make this stronger by adding some glue or a support piece
of wood to the joint

#3.5 Dovetail Joint
Ben Roberts / 7.5 DT / Money Box
This is the most complicated type of joint and it shows a sign of true craftsmanship. A dovetail joint consists of a pin and a tail. It is difficult to make as all the angles and your measurements and sawing have to be exact or else the two pieces will not fit together accurately. However, if done correctly it can look great and is the strongest type of joint that you can make.
How to Make a Dovetail Joint1. Use a marking gauge to measure your two pieces of wood and to
mark out your pins and tails (make sure you mark the waste so you don’t cut the wrong bit)
2. Use a dovetail saw to cut the tails and a chisel to make your cuts perfect. It is better to undercut to ensure you don’t have any gaps
3. Repeat with the second piece of wood to cut out your pins. 4. Push and join the two pieces of wood together5. You can make this stronger by adding some glue or a support piece
of wood to the joint

#4 Tools#4.1 Tenon Saw
#4.2 Dovetail Saw
#4.3 Hacksaw
#4.4 Coping Saw
Ben Roberts / 7.5 DT / Money Box
#4.5 Jigsaw
#4.6 Drills
#4.7 Jigs

#4.1 Tenon Saw
Ben Roberts / 7.5 DT / Money Box
The Tenon saw has a fairly short blade and a stiff spine that is often made of wood or steel, which helps keep the blade steady. They are most commonly used for making straight cuts in wood and for making mortise & tenon joints and this is where it gets its name from. They are used for both hard and softwood and the blade is not detachable.
The blade on a tenon saw has more spikes per inch than other saws which means that it is mainly used for finishing off designs and adding fine cuts. They have from 10 to 14 teeth per inch. This is the most commonly used backsaw. Backsaws are most commonly used for making joints.
Top Tips● To keep the saw steady,
hold the handle like a pistol, with your forefinger extended.
● Always clamp your wood high up to prevent vibrations

#4.2 Dovetail Saw
Ben Roberts / 7.5 DT / Money Box
The dovetail saw’s main use is to cut dovetail joints - hence its name. However, it can also be used as a backsaw as gives very clean and fine cuts to the wood.
Dovetail saws have a thinner blade then a tenon saw and more teeth per inch (between 14 and 20) for finer cutting and a neater finish.
Dovetail saws generally cut on the push stroke, however, nowadays you can also get some saws that cut on both the push and pull strokes.
Top Tips● Mark the line where you
want to cut & mark the waste bits so that you don’t cut the wrong part
● Rest your saw against the wood, using the tip of your thumb as a guide (but be careful!) and hold your saw using the pistol grip (forefinger extended)
● Pull the saw gently towards you a few times and then use long, smooth forward and back strokes, applying little pressure.

#4.3 Hacksaw
Ben Roberts / 7.5 DT / Money Box
Hacksaws are mainly used for cutting metals and plastics but they can also be used for cutting wood.
Junior hacksaws have a shorter blade and are much smaller than regular ones which means that they have neater cuts and create a neater finish.
Hacksaws cut on the push stroke and have very small teeth, making cutting a slow process. Hacksaws have between 14 and 32 teeth per inch. Top Tips
● Secure your wood/metal with a vice or clamp● Push your blade slowly applying slight downward pressure (the
hacksaw cuts on the push stroke) and ease off on when you pull the saw back towards yourself.

#4.4 Coping Saw
Ben Roberts / 7.5 DT / Money Box
Coping saws are mainly used for cutting curves and corners in wood. As their blade is removable, you can also use them to cut shapes in the middle of a piece of wood. Coping saws get their name as they are often used to make coped joints.
A coping saw is usually used for wood and plastic, however, you can get special blades that can cut through metal and ceramic as well.
A coping saw has a very thin blade with between 12 and 20 teeth per inch. Coping saws can create very fine finishes, however, they are very hard to use.
Top Tips● Coping saw blades are removable. When inserting the blade, make
sure the teeth are facing towards the handle so that the saw will cut on the pull stroke (otherwise you might end up breaking or bending the blade).

#4.5 Jigsaw
Ben Roberts / 7.5 DT / Money Box
A jigsaw is a type of power saw and it uses a blade that moves up and down in order to cut the wood. The jigsaw normally cuts on the upstroke. It is easier to use than most other power tools as it is easier to control and to handle.
Depending on the blade inserted, it can be used to cut wood, metal, plastic and ceramic.
Jigsaws can be used for making straight cuts, curved cuts, circular cuts and for making fancy edges and intricate designs.
Top Tips● Always unplug your jigsaw before changing blades● Most jigsaws cut on the upstroke, so keep the good side of your wood face
down to prevent any tearing or splintering on the finished side.

#4.6 Drills
Ben Roberts / 7.5 DT / Money Box
Drills are used for making holes in wood, in particular for screws and dowels. You can get both manual and battery powered drills.
Hand drills give you exact control as you are in charge of when you want to stop and how deep you want to drill. However, they take much longer and are much harder work than battery powered drills!
Battery powered drills allow you to pick fast speeds for drilling and let you drill holes in wood, plastic or metal.
Top Tips● When using a drill to put a screw into a piece of
wood, it is important to make a pilot hole first. This stops the wood from splintering or splitting.
#4.7 Jigs
Ben Roberts / 7.5 DT / Money Box
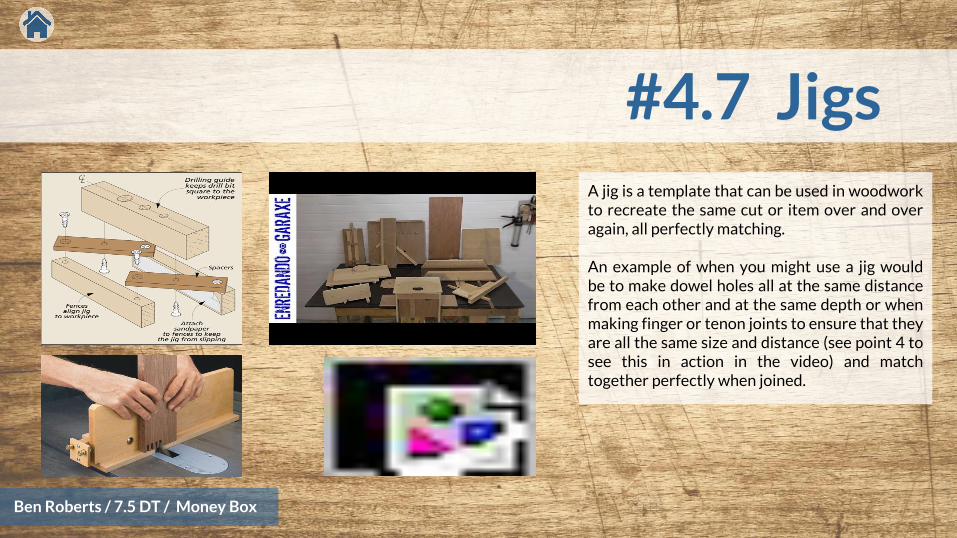
A jig is a template that can be used in woodwork to recreate the same cut or item over and over again, all perfectly matching.
An example of when you might use a jig would be to make dowel holes all at the same distance from each other and at the same depth or when making finger or tenon joints to ensure that they are all the same size and distance (see point 4 to see this in action in the video) and match together perfectly when joined.

#5 Materials#5.1 Pine
#5.2 MDF
#5.3 Abrasive Paper
Ben Roberts / 7.5 DT / Money Box

#5.1 Pine
Ben Roberts / 7.5 DT / Money Box
Pine is a softwood. It comes from evergreen conifer trees such as Douglas Firs. There are over 100 species of pine across the World. Hardwoods come from deciduous trees such as oak, mahogany or cherry. Pine is a more affordable type of wood than hardwoods.
Pine is used for carpentry items such as floors, windows, furniture and toys. It is easy to cut and its known for its ability to not shrink or expand in different temperatures and humidities, making it an ideal wood to work with. However, because it is a softwood, it can be marked or dented easily, so for heavy usage items such as chairs and tables, a hardwood would be better as it would last longer.
Pros ConsRelatively cheap Can dent or scratchEasy to cut/use Pattern isn’t the prettiestResists shrinking & swelling

#5.2 MDF
Ben Roberts / 7.5 DT / Money Box
MDF stands for Medium Density Fibreboard. It is an engineered product, which is made by breaking down hardwood and softwood fibres, which are mixed with resin and wax and then compressed together to make a fibreboard.
When cut, MDF can let off tiny pieces of wood and glue, which makes it very dangerous. When cutting MDF, you should wear gloves, goggles and a dust mask for safety.
Pros ConsInexpensive Dangerous to produce & Can be cut easily work withUses recycled wood No natural wood patternDoesn’t shrink or swell If chipped, can’t be fixed
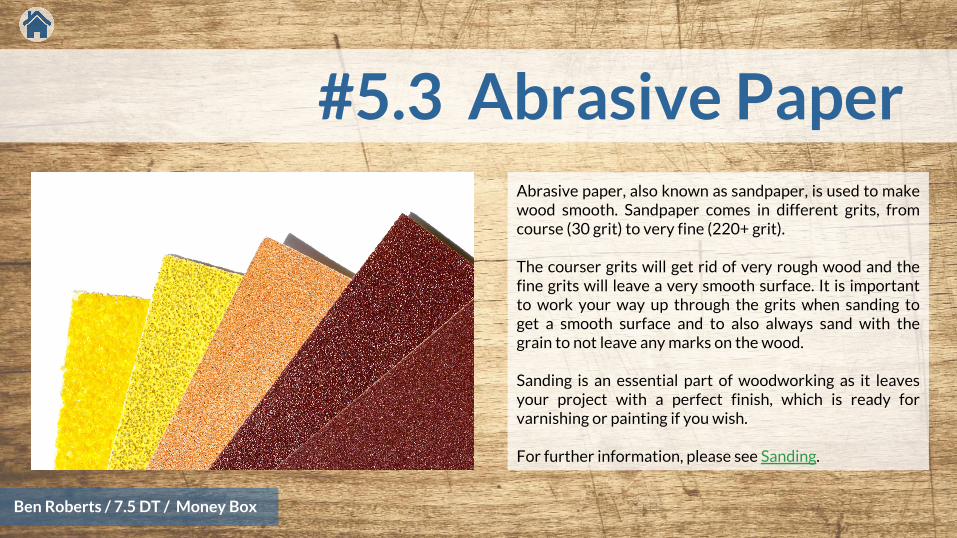
#5.3 Abrasive Paper
Ben Roberts / 7.5 DT / Money Box
Abrasive paper, also known as sandpaper, is used to make wood smooth. Sandpaper comes in different grits, from course (30 grit) to very fine (220+ grit).
The courser grits will get rid of very rough wood and the fine grits will leave a very smooth surface. It is important to work your way up through the grits when sanding to get a smooth surface and to also always sand with the grain to not leave any marks on the wood.
Sanding is an essential part of woodworking as it leaves your project with a perfect finish, which is ready for varnishing or painting if you wish.
For further information, please see Sanding.

#6 Evaluation
Ben Roberts / 7.5 DT / Money Box
Coming Soon

#7 Bibliography
Ben Roberts / 7.5 DT / Money Box
https://www.houzz.com/ideabooks/4706383/list/7-must-have-measuring-tools-for-woodworkinghttps://www.diynetwork.com/how-to/skills-and-know-how/tools/how-to-cut-wood-with-a-hand-sawhttps://home.howstuffworks.com/difference-between-grits-sandpaper.htmhttps://knowledge.axminster.co.uk/hand-sanding/https://www.toolstoday.com/g-46-dovetail-joints-different-types-and-their-useshttps://en.wikipedia.org/wiki/Finger_jointhttp://www.startwoodworking.com/post/lap-joint-basicshttp://www.craftsmanspace.com/knowledge/dowelling-dowel-joint.htmlhttps://en.wikipedia.org/wiki/Butt_jointhttps://www.wonkeedonkeetools.co.uk/handsaws/what-is-a-tenon-saw/https://en.wikipedia.org/wiki/Backsawhttps://www.wonkeedonkeetools.co.uk/handsaws/what-is-a-dovetail-saw/http://www.design-technology.org/woodsaws.htmhttps://en.wikipedia.org/wiki/Backsawhttps://www.wonkeedonkeetools.co.uk/handsaws/how-to-use-a-tenon-or-dovetail-saw/https://www.wonkeedonkeetools.co.uk/handsaws/how-to-use-a-junior-hacksaw
http://www.technologystudent.com/equip1/coping1.htmhttps://www.familyhandyman.com/tools/jigsaw-tips-and-essentials/view-all/https://www.wonkeedonkeetools.co.uk/handsaws/what-is-a-dovetail-saw/https://www.wonkeedonkeetools.co.uk/handsaws/what-is-a-coping-sawhttps://www.wonkeedonkeetools.co.uk/hand-drills-and-braces/wonkee-donkeea-s-top-tips-for-using-a-hand-drill-or-brace/http://www.modgsi.com/What-The-Heck-Is-MDF-Anyway_b_24.htmlhttp://www.woodworkbasics.com/how-to-make-butt-joints.htmlhttp://www.finewoodworking.com/2005/09/12/all-about-lap-jointshttps://www.wwgoa.com/article/woodworking-joints-which-ones-should-you-use/https://www.wonkeedonkeetrend.co.uk/router-how-to-guides/how-to-make-a-finger-joint-with-a-router-table-how-to-make-a-comb-joint-on-a-router-table/
Special thanks to Jeff Cordery who showed me around his workshop and let me film him talking about different joints (see films under Doweled Joint, Lap Joint, Finger Joint and Dovetail Joint) and wood types.

Thanks for watching
Ben Roberts / 7.5 DT / Money Box