The BR-1180 Digital Recording Studio. · take on the role of recording, mixing and mastering...
42
The BR-1180 Digital Recording Studio. Part I. Getting Started Record Modes Inputting a Signal Outputs Microphones Signal Flow Gain Structure Recording a Track Bounce Mode V-Tracks Punch In/Punch Out Effects Equalization Panning Compression Track Editing Scenes Mixdown Mastering Burning a CD Part II. The Rhythm Arranger Synchronization Part III. Drive Maintenance and Data Management Optimize Backup and Recovery Formatting a Drive Wave and AIFF files. 1 1 2 3 4 11 12 14 14 15 16 17 21 23 24 25 27 28 29 31 32 36 37 37 37 38 39
Transcript of The BR-1180 Digital Recording Studio. · take on the role of recording, mixing and mastering...
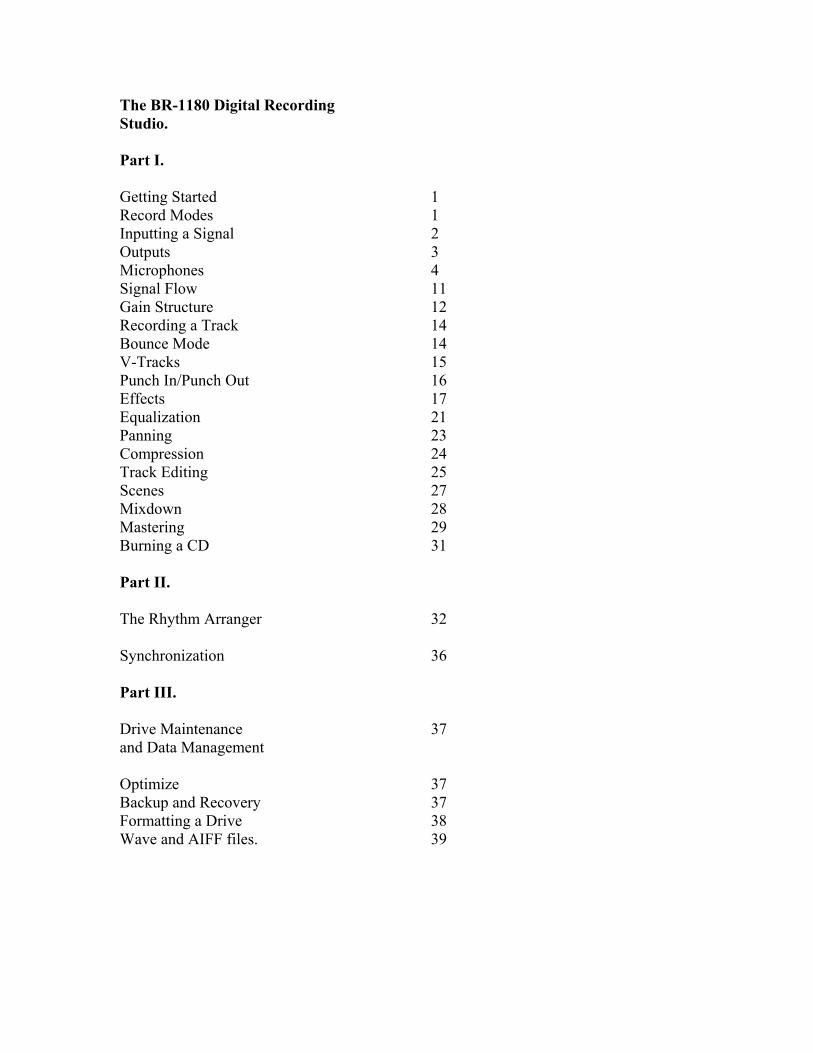
The BR-1180 Digital Recording Studio. Part I. Getting Started Record Modes Inputting a Signal Outputs Microphones Signal Flow Gain Structure Recording a Track Bounce Mode V-Tracks Punch In/Punch Out Effects Equalization Panning Compression Track Editing Scenes Mixdown Mastering Burning a CD Part II. The Rhythm Arranger Synchronization Part III. Drive Maintenance and Data Management Optimize Backup and Recovery Formatting a Drive Wave and AIFF files.
1 1 2 3 4 11 12 14 14 15 16 17 21 23 24 25 27 28 29 31 32 36 37 37 37 38 39
The Boss BR-1180 Digital Recording Studio. Most of us have acquired the BR-1180 because we are aspiring songwriters and want to get our music recorded to share with anyone that will listen. Much of our success will depend on our skills as songwriters and musicians but since we have all decided to also take on the role of recording, mixing and mastering engineers we will have to develop an additional set of skills. Fortunately, the tools given to us in the BR-1180 arguably surpass anything that was even available at any level 10 to 15 years ago. And the interface is one of the easiest and most intuitive of any recorder available to date. Keeping that in mind, we should be able to create some great recordings by developing some understanding of basic recording concepts and through some “hands on” experience. Let’s start with some basic navigation. How do we get around? • The 4 CURSOR buttons above the MASTER FADER allow us to navigate to
different positions on the BR-1180’s LCD screen. • The TIME/VALUE wheel will allow us to change the value of any number or
character that is underscored by the CURSOR. • The EXIT/NO and ENTER/YES buttons are used for entering and exiting menus as
well as for responding to prompts that will display during certain functions. Getting started with a new song. All of the BR-1180’s menus that are not CD or effects related can be found under the UTILITY button. That includes SONG and TRACK menus as well as menus that take us to SYSTEM related and many other functions. To create a new song: 1. Press UTILITY. 2. CURSOR to SONG. 3.Press ENTER. 4. CURSOR to NEW. 5. Press ENTER. 6. Turn the VALUE wheel to select LIN. 7. CURSOR to GO 8.Press ENTER. 9.Press YES to Save the current song or press NO to not save the current song. About recording modes. There are 5 different record modes to chose from when you create a new song. LIN (linear), MT1 (Multitrack 1), MT2 (Multitrack 2), LV1(Live 1), LV2 (Live 2). The LIN mode is a linear 16 bit mode. The same as a CD. It is the highest quality yet it will give
1
you approximately 60 hours worth of total tracking time. The other 4 modes use various degrees of RDAC encoding to increase that time even further with minimal degradation. Inputting a Signal. There are 4 types of audio inputs and 3 different types of audio outputs on your BR-1180. Inputs connections. • The LINE IN inputs are unbalanced RCA connections. These can be used as stereo
inputs from the left and right outputs of a stereo instrument such as a keyboard or a drum machine. These cables can have ¼” on one end and RCA on the other end or they can have RCA on both ends depending on what you need for your particular instrument.
• The XLR inputs will typically be the inputs that you will use for microphones. These inputs are balanced inputs. A Balanced cable uses an extra wire internally as a shield to help prevent noise from being picked up by the cable as it carries sound from its source to the input of the BR-1180.
• The ¼ inch MIC inputs are also balanced inputs that can be used instead of the XLR inputs for microphones or they can be used to connect instruments that have balanced or unbalanced outputs. There really is not any benefit to using a balanced cable for connecting a balanced output to a balanced input. Check the specs on your instrument find out what type of output that it has. Typically most keyboards and drum machines have unbalanced outs.
• The GUITAR/BASS jack is a high impedance input that will allow you to directly connect an electric guitar or bass.
Input Select. To select a source input to record from press the corresponding input select button. It will light red. • GUITAR/BASS, MIC 2- Select this when recording sounds from an instrument
connected to the GUITAR/BASS jack or a mic connected to the MIC 2 jack or XLR connector.
You will not be able to select both MIC 2 and the GUITAR/BASS at the same time. • MIC 1- Select this when connected to the MIC 1 jack or XLR connector. • LINE- Select this when connected to the LINE IN connectors. • SIMUL- By depressing both the GUITAR/BASS (MIC 2) and MIC 1 buttons
simultaneously, you can record a signal from both mic inputs or from the GUITAR/BASS and the MIC 1 input at the same time. Each signal will be recorded to its own discreet track if 2 tracks are selected to record to. Also note that if an instrument and a mic are connected to both the GUITAR/BASS jack and MIC respectively, the GUITAR/BASS jack will take priority.
2
Output Connections. To monitor a signal or to send the signal to an external destination such as a cassette recorder, CD recorder or computer interface there are 3 different types of connections. • The PHONES output is a ¼” stereo output for headphones. The volume is controlled
by the knob located next to the jack. • The left and right LINE OUT RCA outputs can be used to send your main mix to
analog inputs on powered monitor speakers or an amplifier. They could also be connected to inputs on other recording devices. Also, depending on the quality of the sound card on your computer , you can connect a stereo “Y” cable from the left and right LINE OUT to the 1/8” Line Input on your sound card to record into software.
• The DIGITAL OUT is a 2 channel SPDIF (Sony Phillips Digital Interface) Optical output. Through this connection can carry your main mix to Digital speakers, “Stand alone” CD burners that have SPDIF optical inputs and computer interfaces that have SPDIF optical.
3
Microphones. A microphone-or mic- is what your recorder uses to capture live sounds, turning them into electric signals that can then be converted into digital audio through the BR-1180’s 24bit converters. There are basically two categories of transducer microphones. Dynamic mics and condenser mics. How a dynamic microphone works. A sound wave strikes a thin plastic membrane called a diaphragm causing it to vibrate. A small coil of wire attached to the back of the diaphragm called a voice coil subsequently vibrates along with it. The voice coil itself is surrounded by a magnetic field created by a small magnet in the microphone. As the voice coil moves through this magnetic field it creates an electrical signal that corresponds with sound that is being picked up by the microphone. Dynamic microphones can withstand extremely high sound levels and they do not require any external power to operate. They are generally very rugged and can serve multi-purposes. Shure SM-57’s are probably the most common instrument mics found in the mic cabinets of professional studios. Dynamic mics are most useful for close miking of instrument amplifiers and close miking of drums. How a condenser microphone works. Condenser mics are more sensitive and allow for a wider frequency response than dynamic mics. They’re also usually more expensive and more delicate as well. You will want to use condensers for vocals and for most acoustic instruments. A condenser microphone works by utilizing an electrically charged diaphragm and a metal backplate placed closely together to form a capacitor. A capacitor, also called a condenser, has the ability to store an electrical charge. The sound waves strike the thin metal or metal coated plastic diaphragm , causing it to vibrate, thus creating corresponding variations in the spacing between the diaphragm and back plate. In turn this causes the stored electrical charge to change generating an electrical signal that corresponds with the incoming sound. Condenser mics require a phantom power supply or a battery to operate. The BR-1180 can supply phantom power through its XLR inputs to condenser mics. Generally it is ok to connect a dynamic mic to a phantom power supply if you find yourself in a situation that would require connecting a condenser mic to one of the BR-1180’s inputs and a dynamic to the other. To turn on the phantom power supply use the following procedure: 1) Press UTILTY 2) CURSOR to “System” and Press ENTER. 3) CURSOR to “Phantom” then rotate the VALUE wheel to “On.” 4) Press EXIT 2 times.
4

Microphone Directionality. A mic’s directionality helps determine its usefulness in a specific recording environment. You can tell how a mic will “hear” by noting its pickup or polar pattern. There are three basic types of pattern. Omnidirectional An omnidirectional (or omni) microphone is sensitive to sound a full 360 degrees around the head of the mic, its capsule. Omnidirectional microphones are good for recording room sound. Unidirectional A Unidirectional microphone captures most of its signal from one direction, the front. The most common type of unidirectional microphone is called a cardioid, based on its heart-shaped pickup pattern. There can be variations in cardioid patterns. A hypercardioid pickup pattern will register sound from its front at greater distances but less from its sides. This provides a more narrow pattern than a cardioid A supercardioid mic registers sound at great distances from its front but is also sensitive from its back yet picks up almost nothing from its sides. These “special” types of cardioid mics can be useful for capturing sound without being close to its source. In general a unidirectional microphone is most often used for recording sounds that need to be isolated, such as vocals, guitar amps, woodwinds etc. It is the most commonly used mic in recording. Bi-directional A bidirectional microphone is equally sensitive to sound from both the back and front. This type of mic is often used for capturing the sound of two vocalists facing each other. And finally, a multidirectional microphone uses multiple diaphragms. This will allow you to switch to between different pickup patterns.
5

A Few things to consider when selecting the right mic for the right situation. • Use a microphone with a frequency response that’s suited to the frequency response
of the sound that you are recording. • Place the microphone at various distances and positions until you find a spot that
gives you the best tonal balance and desired amount of room acoustics. • If you don’t like what you hear, try another mic position, try another microphone, try
isolating the mic further, or change the sound of the instrument itself. Replacing worn out strings will change the sound of a guitar. Replacing or retuning drum heads will change the sound of drums.
• Not every microphone is right for every situation. The more versatile your mic cabinet the more recording situations you will be prepared for. (Also consider what microphones your friends might have, to borrow.)
Great Sounds have come from experimentation and seemingly unconventional techniques. Here are just a few ideas for a good starting place.
6
Microphone Placement Common Microphone Situations Individual Vocalist A good, clean vocal recording usually requires isolation from other instruments and the use of a unidirectional mic. Also remember that a condenser mic is going to be more sensitive than a dynamic mic and probably should be your first choice for recording vocals in most situations. Generally you will want to place the microphone somewhere between the mouth and nose of the vocalist. You will also may want to put a little bit of distance between the microphone and the vocalist. Approximately 8 inches. This will help reduce “boominess” that is created due to what is called the proximity effect. Use a Pop Filter to reduce the amount of “pops” created from harsh consonants such as “p,” “b,” “d,” and “t.” An extremely effective pop filter can be made by stretching nylon stocking over an embroidering hoop or even a coat hanger. Then place it a couple inches from the microphone between the vocalist and the mic. The consonant “s” can be desirable to help create clarity in a vocal line but it can be potentially harsh or piercing. The emphasis of “s” and “sh” sounds, called sibilance can be reduced by cutting the high EQ for the vocal channel around at 8kHz. The BR-1180 also has a de-esser as part of its vocal multi effects. Acoustic Guitar For acoustic guitar you will want to use one or even two unidirectional condenser microphones. If you are using only one mic, try placing it three to six inches from the front of the guitar’s sound hole. You could also place the mic 6 to 12 inches from the 12th fret of the fretboard. Use your ears as a guide. For 2 microphones, try placing one microphone at the 12th fret and another at the bridge or in front of the sound hole. Another option would be to stereo mic the guitar from about 3 to even 6 feet away to also capture your room’s natural reverb. And again, your ears will be the best judge as to how you want to capture the sound of the guitar. Note: When using microphones in close proximity to each other you may experience an undesirable effect known as phase cancellation. Phase cancellation occurs when two microphones inadvertently capture the same soundwave but with opposite sound pressures. As one mic’s soundwave gets stronger, the other’s gets weaker. If microphones are out of phase you may hear a “swirling” sound when you listen to them together. You may also notice a significant drop in volume. Two microphones that are 180 degrees out-of-phase will cancel each other out completely.
7
To correct phase cancellation simply change the positions of the mics. As a general rule, the distance between microphones should be at least three times the distance from each other in relation to their intended sound source. For example, if two mics are 1 foot away from their sound source then they should be placed 3 feet from each other This is actually known as the 3-to-1 rule. Singer/Guitarist You would usually want to overdub vocals and acoustic guitar separately however if you choose to record both at once there are a few different techniques that you could try out.
• Use a pickup on the guitar and a mic for the vocals. • Try isolating the guitar and vocal sources by angling the vocal mic upward and
the guitar mic down towards the sound hole. • You could use a stereo pair of mics 1 to 2 feet away and raise or lower the mics to
get the desired balance between the vocals and guitar. Guitar and Bass Amps It is possible to plug a guitar or bass directly into the GTR/BASS input on the BR-1180 but if you wanted to capture the color of your favorite amp you can record it by miking it. Place a single cardioid dynamic such as an SM-57 about an inch away from the speaker cone. Not exactly center of the cone but on the outside edge where it meets the dome. For Bass or for guitar you might want to move the mic as far away six inches from the speaker to get the desired colors. Saxophone To capture the most natural sound of a saxophone, place a unidirectional mic about 1 ½ feet away from the front of the horn and point the microphone at the player’s left hand. For a harder and brighter sound mike the sax near the bell. A condenser or dynamic mic can be used for miking a saxophone. It is possible to record an entire sax section around one mic. Brass Instruments Place a microphone 1 to 2 feet directly in front of the horn’s bell for a brighter sound. For a mellower sound place the microphone off-axis from the bell. If you are using a condenser microphone you may want record off axis to avoid overloading the mic. As with saxophones you can record an entire section around one microphone.
8

Woodwinds For most woodwinds, aim a microphone about 1 foot away from its key holes. If you are miking a section try pointing a bidirectional mike down over the section. For miking a single flute place the mike a few inches away from the head joint between the mouthpiece and the left hand. You can also mike directly in front of the mouth piece if you want to capture more of the breath sounds. You might need to use a pop filter for this scenario Acoustic Grand Piano There can be several different possibilities for recording an acoustic grand depending on your situation. To capture a solo piano performance in a concert hall you will also want to capture the sound of the hall itself. Open the piano lid to its highest peg and ideally you will want to place a stereo pair of mics approximately 7 feet away and 7 feet high. Experiment with distances closer or farther away to find the desired reverb amount. To capture a jazz or pop performance there are some close miking techniques that will probably work better for you. If you are using only one mic, try placing it about 12 inches above the middle strings and about 8 inches horizontally from the hammers with the lid in its most open position. Ideally, removing the lid altogether will reduce possible “boominess.” With two cardioid or even two omni directional condensers you can place one mic center over the upper strings and one center over the bass strings. Again, place the microphones about 8 inches horizontally from the hammers and 8 to 12 inches above the strings. Acoustic Upright Piano Most of us typically do not have grand pianos at our disposal so if you want to record that upright piano sitting in your den here are a few suggestions.
• Move the piano away from the wall remove the top lid. Then position a stereo pair of mics about a foot above and a foot in from of the top of the piano.
• Remove the front panel and place a mic approximately 8 inches in front of the bass strings and a second mic 8 inches in front of the upper strings.
• Mike the back of the piano using dynamic microphones positioned a couple of inches from the soundboard. Put one of them in the bass area and the other in the treble area. Make sure the piano’s back is facing out into the room.
9
Miking live drums with two microphones. Many great recordings in the past have been made using few microphones. You can actually achieve a bigger drum sound in many instances because you will be capturing more room ambience than you would be using close miking techniques. Try using a stereo pair of cardioid or omnidirectional microphones 10 to 20 feet out in front of the kit. Another method would be to use a large diaphragm cardioid dynamic such as an AKG D-112 to close mic the kick drum and then place an omnidirectional condenser in the center of the drummer’s setup. Experiment with positions to dial in the best balance. For the kick drum microphone use a boom stand and place the mic inside the drum near where the beater hits. The closer to the beater the more attack you will get. If the drum has a head on the front place the mike close to the head or just inside the hole if it has one. Again, experiment with positions to get the best sound. Stereo Microphone Techniques As mentioned earlier, the BR-1180 is capable of recording one or two channels at one time. We could record two different signals at one time or we can actually employ stereo mic techniques if a situation calls for it. Here are the three most common methods for microphone placement in stereo: A/B or Spaced Pair This method uses two identical cardioid or omni microphones spaced several feet apart, pointed directly at the sound source and panned hard right and hard left. The farther the two microphones are placed apart the greater the stereo image that is created. This type of miking is useful for recording an ensemble as well as for some instruments. X/Y or Coincident Pair To record in stereo using this method take two identical unidirectional (cardioid or otherwise) and mount one on top of the other with the capsules placed as close as possible to each other. The grilles of the two microphones can actually touch. From there adjust the microphones so that they cross to form an angle of anywhere from 90 to 140 degrees. The wider the angle, the wider the stereo spread. Near-Coincident Pair To record stereo using the near-coincident pair method, mount two identical unidirectional microphones but angle the capsules away from each other. The greater the space between their grilles or the greater the angle, the larger the stereo image that is created. Try mounting the mics about 7 inches apart and angle the mics to about 110 degrees. (This will form an “X”.)
10
Recording Direct For instruments such as electric keyboards synthesizers, drum machines, samplers and even guitars and basses you will get the cleanest single recording directly through the BR-1180’s inputs. For guitars and basses use the GTR/BASS input. For Keyboards and modules and drum machines use the stereo line inputs as most of these instruments are stereo. Always use good quality cables. Most likely the cables that you need will have a ¼” for the end that connects to your keyboard and an RCA type connection to connect to the line inputs. Use separate cables for each of the left and right connections. Now that we have an idea as to how to input sound to our BR-1180s lets discuss two important recording concepts-signal flow and gain structure. Signal Flow. Signal flow refers to exactly that. How and where a signal travels. An audio signal is captured from a live source through a microphone or it is generated from a keyboard or guitar directly plugged into inputs on the BR-1180. The signal reaches the recorder’s preamps and then is converted from an analog signal into a digital signal. All incoming signals as well as all recorded signals are bussed to the MASTER so that they can be sent to the LINE OUT for monitoring as well as to the DIGITAL OUT and HEADPHONE outputs. Keeping that in mind know that you will need to have your MASTER FADER turned up in order to hear anything. Signals can also be sent to tracks for recording and to effects for processing. We use a combination of INPUT SELECT, REC MODE select and REC TRACK select buttons to route signals to tracks for recording.
• INPUT SELECT selects where the initial signal is coming from. • The REC MODE buttons determine whether the signal is being routed from an
INPUT to a track to record or from an existing track (BOUNCE) to another track or pair of tracks to record.
• The MASTERING button is a special button for routing your final mixed tracks to Master tracks.
• The individual REC TRACK buttons that are located beneath each fader in the AUDIO TRACK MIXER section can be used to determine the track or tracks that a signal will be recorded on to. Pressing a REC TRACK button will cause it to flash. This will let you know that this is your destination track. To record to 2 tracks press adjacent buttons.
NOTE: There will always be at least one or two buttons flashing at all times. To send signals to loop effects we will be using effect sends. We can also manipulate the signal with EQ, PAN and COSM. We will discuss that in detail when we get into effects.
11

Gain Structure. A signal’s level or volume or gain is controlled by knobs and faders at various stages in its path. It is a crucial part of the recording process to be aware how these are set as they will affect the quality of your recording. For starters we will discuss gain structure as it applies to INPUT MODE. The first stage of gain happens at the source. That’s the keyboard’s volume or the loudness of the vocalist etc. To get the best recording from a direct instrument you will generally want to have its volume turned up to maximum. Of course you may need to bring it down according to how hard the player hits the keys or strings or pads. Because in the end setting gains is going to be about give and take to get the best sound. When recording live sounds, the level is going to depend on the loudness of the instrument as well as the sensitivity, settings and placement of your microphone or microphones. When you press INPUT select for MIC 1, the SENS knob above that button becomes the next stage of gain control. Think of it as a faucet of sorts that as you slowly turn it clockwise you are allowing more signal to come in. Turn the SENS knob up as you are checking the source at its loudest until you get the PEAK LED to flash occasionally but not continuously. This will insure that you are getting the maximum amount of signal. The next stage of gain is determined by the INPUT LEVEL knob. As you bring this knob up you will be adjusting the amount of signal being sent to record. As you turn this knob up, watch the IN meter on your LCD screen. Ideally you will want the meter to bounce above -12db and below 0db. (DB or decibel is the standard reference measurement for volume, named after Alexander Graham Bell.) You’ll notice that the L-LINE-R input does not have a SENS knob. Therefore the record level will be determined by the volume of the source and then the INPUT LEVEL knob. The TRACK FADER will determine what you are listening to but will not affect the record level.
12
Here’s the catch… !!! . If at any point along the signal path the signal is weak and you compensate by turning it up after that point, you risk introducing noise into the signal path. For example, if your microphone is not close enough to the source or is not sensitive enough to pickup what you are recording you may find yourself cranking the SENS knob to compensate. If you do, you might begin to hear a “hiss.” On the other side of things if you overdrive a signal at any point you will get distortion. Digital distortion is much different harmonic distortion. Harmonic distortion is the traditional type of distortion that is created when overdriving a guitar amp or a channel on an analog system. This can often be a desired effect. It may add “warmth” or “color” to a sound. Digital distortion is the type of distortion that can happen on any digital audio device, such as the BR-1180. It occurs when a signal goes above digital 0db on your meters or the signal overdrives the inputs themselves. It is a most undesired effect as it sounds like a static crackle or pop. So the bottom line is that volumes will need to be adjusted up or down at different places in the signal path depending on what is being recorded. Use your ears and the meters to get the best signal.
13
Recording a Track. Now that we have signal coming in and levels properly set and our destination tracks selected, the next step is to actually record that signal. Transport controls are used for starting, stopping , rewinding, fast forwarding and putting the recorder into its record mode.
1) Press the red REC button to put the recorder into record standby. 2) Press PLAY to begin recording. 3) Press STOP to stop recording. 4) Press ZERO to take the recorder back to the beginning. 5) Press PLAY, to playback the recording.
FF (fast forward) and REW (rewind) will advance or rewind the tracks 1 second at a time. If you playback your track and you decide that you do not want to keep that take press the UNDO/REDO button. Then Press ENTER. That will undo your last action. To REDO your last UNDO:
1) Press the UNDO/REDO button. 2) CURSOR to REDO. 3) Press ENTER
To record a second track or overdub as it is called simply press the REC TRACK button for a different destination track, set your levels for the new track. Then press REC and PLAY. As you are recording your second track you will be hearing the first track. Use track FADERS to control the balance between the two tracks. Bounce mode. What if I need more than 8 tracks? A track BOUNCE is the process of rerecording audio from one or more existing tracks to new tracks. All of the same rules apply as if you were recording from inputs. The only difference is that your source signals are coming from tracks that you have already recorded. You could sub mix (bounce) tracks 1-6 to tracks 7/8. After the BOUNCE your music will play back on 7/8. That will allow you to record new tracks on 1-6. Because the BR-1180 is digital and records in a linear mode (when using LIN) it is possible to bounce tracks without any degradation. In the days of tape based recording each bounce brought in an added generation of noise (hiss).
14
What is a V-Track? After you perform a BOUNCE then go back to your INPUT mode you will notice that all of your tracks look blank except for the tracks that you bounced to. Actually what happens is that all of the source tracks advance to the next available virtual track (V-TRACK.) This will allow you to record more tracks on the same song without recording over your original tracks. Whenever you record to a track for the first time you are recording on V-Track 1 of any channel. After your track bounce, your original tracks are still safe on V-Track 1 but you are now automatically set up to begin recording on V-Track 2 of each channel. If at any time you want to revert back to the original tracks press V-TRACK then press the REC TRACK number that you want to change and dial its v-track number back to the previous number using the VALUE wheel. There are 8 V-tracks for every channel. Another use for V-tracks can be for alternate takes. Suppose you record a vocal performance on a track and you would like to keep it but want to attempt another try at it. If you were working with tape then you have to go to new track number. On the BR-1180 you can record on an alternate V-Track on the same channel. You could record the second take on V-2 the third on V-3 etc. You could decide later which take that you want to keep. It is important to note: You can only play back one V-track at a time on any one channel. To change between V-TRACKS is the same as reverting after a bounce as mentioned above.
1) Press V-TRACK 2) Press the REC TRACK button for the channel that you want to change. 3) CURSOR to V-TRACK 4) Use the VALUE wheel to dial the V-track number that you want. 5) Press V-TRACK to exit.
15

Punch in/Punch out. Not every performance is perfect all the way through every time. Fortunately you can replace a section of a track by punching in over a portion of a “bad” take and punching out before you would record over a section that you want to keep. On your BR-1180 there are three different methods for punching in and out. Manually
1) Cue up your music to before your desired punch in point. 2) Press Play 3) Press REC at the punch in point 4) Press REC to disengage record at the Punch out point.
With a foot pedal. To set up your BR-1180 for doing punch in and punch out using a foot pedal use the following procedure: 1) Press UTILITY 2) CURSOR to System 3) CURSOR to Foot Switch 4) Turn the TIME/VALUE wheel to select PUNCH I/O 5) Press EXIT 2 Times. With a momentary foot pedal such as a keyboard foot pedal or FS-5U plugged into the FOOT SW jack you will be able to enable and disable REC using the Pedal instead of pressing REC. Auto Punch Using Auto Punch you can preset your in and out points so that you can punch in and out without using a pedal or manually pressing REC. This is extremely useful if you are the engineer and the performer.
1) To set your IN point cue up the time that you want to punch in then press the IN button so that it lights
2) Next cue up your punch out point then press the OUT button so that it lights. 3) Press ON/OFF. 4) Cue up your music before the IN point. 5) Press REC. 6) Press PLAY The track that you are recording to will automatically engage when it reaches the IN point and then disengage when it reaches OUT. To clear out old IN and OUT times, press the IN and OUT buttons while holding down DELETE. The Light will go out.
16
Effects. There a basically two ways to apply an effect to a signal. You can insert an effect or you can create an effects loop. Insert effects. When you are inserting an effect you are placing the effect in the direct path of the signal. The entire signal goes into the effect and comes out effected. One example of an insert effect would be a guitar “stomp” box. A guitar is plugged directly into the pedal. The pedal processes the guitar sound then outputs the signal to a guitar amp or a mixer or a recorder. You can insert an effect using the BR-1180’s internal effects processor by simply pressing the EFFECTS COSM button so that it is lit. By default, turning this on inserts an effect in the path of whatever INPUT is selected.
1) Press the MIC 1 INPUT SELECT button. Button. 2) Press EFFECT COSM so that it is lit. 3) Turn the TIME/VALUE wheel to select any of the BR-1180’s internal vocal
effects. 4) Talk or sing into your microphone.
As a really drastic example try P16 “D. Vader” or P17 “Alien Vox.” To select where the effect is going to be inserted CURSOR down to INSERT on the EFFECTS menu then turn the TIME/VALUE wheel to dial.
• IN (Normal)- This will insert the effect and print (record the effect on the track with the original signal)
• IN (REC DRY)- You will hear the effect but not record it. • TRACK 1...TRACK 9&10- This will insert the effect on the selected track. • MASTER- This will insert the effect across the master bus.
Note: As there is only one insert effect processor the effect can only be inserted in one place at a time. With this in mind you will need to print insert effects if you intend to have different effects on different channels. To print an effect while recording, select the IN (NORMAL) optional while recording. To print an effect that is inserted on a track, bounce the effected track to a new track. (We will discuss track bouncing in a later section.)
17
Loop Effects. (Also referred to as Send and Return Effects) A loop effect uses an auxiliary bus to split a signal off from a channel to send a selectable amount of signal into an effects processor. The effected signal is then returned from the effects processor’s output and summed with the original signal. This will give you a combination of “dry” signal and “wet” (effected) signal. The amount of “wet” signal is determined by a channel’s effects send. The higher the send the more effected the sound will become. A send can be a prefade or postfade send. A prefade signal as it applies it to an aux bus is unaffected the amount of “dry” signal. If an aux bus is set to be prefade it gets its signal before the channel’s fader. That means that the only its send level determines the amount of signal being sent and not the channel’s fader. The fader will only control the “dry” signal. For example if the fader is all of the way down and a prefade send is going to an effect then you will only hear the effect and not hear the dry signal. This would not be very desirable in most situations. Prefade busses are most useful for setting up headphone or monitor mixes and not for using as effects sends on mixers. A postfade bus gets its signal after the fader on a channel. You can still control the amount of send level but it will change proportionately to the amount of the channel’s fader level or “dry” level. In other words the send level is set in relation to the dry level but the amount being sent to the effect will increase as the channel’s volume increases and it will decrease as the channel’s volume decreases. A post fade send is what you would typically use for sending signals to effects processors. The individual sends for the LOOP EFFECTS on the BR-1180 are post fade sends. To apply Reverb to the MIC 1 input, use the following procedure:
1) Press REVERB. 2) CURSOR to the left to highlight IN. 3) Use the TIME/VALUE wheel to increase or decrease the amount of reverb being
applied to the mic input. You can CURSOR to each individual track to enable you to adjust the reverb amount for your recorded tracks or you can simply press the status button for the track that you want to affect and the turn the VALUE/WHEEL.
18
What is Reverb?
Natural reverberation occurs as sound bounces off of the surfaces of a room and gradually decays as it repeats. As there can be many surfaces in a room there are many of these reflections happening at the same time. The size of the room as well as the number and type of surfaces determine how a room sounds. A reverb effect essentially simulates the sound of a room. On the BR-1180 you can select the type of room (ROOM or HALL) and you can select the simulated distance of the source and the surfaces (REVERB TIME). The larger the number, the longer and denser the reflections become. EFFECT LEVEL controls the return or over all output of the effects processor. Applying reverb to a track can add ambience or a sense of space to a track. Reverb is very common recording tool. The difference between reverb and an echo or delay is that an echo or delay simply repeats the initial sound.
Why shouldn’t reverb be applied as an insert effect? Remember that when you are using a send and return or loop effect you are hearing a combination of the wet and dry signal. Therefore you are hearing the original sound and then the reflections. If a reverb or delay were to be inserted you would only hear the reflections and your music would most likely sound out of time.
What is Doubling? A doubling effect is just that. It simulates doubling of a track by summing the original single with a very short delayed signal. It can be accessed and applied by pressing the CHORUS/DELAY button two times and turning the TIME/VALUE wheel clockwise to select DOUBL’N.
Chorus. Chorus is another commonly used effect. A very subtle pitch shifting is created by slowing and continuously changing a delay rate. That detuned signal is then combined with the original signal to create the chorus effect. This effect is often used to “fatten” a sound such as a guitar or bass. You almost never hear a fender Rhodes sound that is not being chorused.
19

Time Based versus Dynamic effects All of the above mentioned effects (reverb, delay, chorus) are said to be time based effects. These types of effects create a change of the signal over time. Dynamic Effects Dynamic effects are effects that manipulate volume in some way. Dynamic effects are typically insert effects. Some examples of dynamic effects are EQ (equalization), panning, compression and expansion (gating).
20
What is EQ? An EQ or equalizer can boost or cut the volume of a defined portion or portions of a sound’s frequency spectrum. All sounds (with a few exceptions such as electronically generated sine waves) are made up of a fundamental tone and various weaker overtones. These tones and overtones (also referred to as harmonics) make up the color of a sound. A tone is created out of vibrations that disturb the air. We perceive these waves as sound. The faster the vibration, the higher the perceived pitch. In musical terms pitches are notes. For the purpose of equalization we work with tone in terms of the frequency (the speed of a sound waves vibration.) Frequency is measured in hertz. The second factor that we work with is volume or the size of those wave forms. Volume or gain is measured in decibels. By adjusting the gains up or down of frequencies within a sound’s frequency spectrum we can reshape the color of a sound. The most common types of EQs are graphic and parametric EQs. A graphic EQ uses sliders (physical or virtual) to adjust the gains of individual fixed frequency bands. A frequency band includes the selected frequency and affects the frequencies above and below it. A typical graphic EQ can have anywhere from 5 to 31 bands. You might find these kinds of EQ’s on your home stereo or as the last device before the power amp in a studio or stage setup to EQ the overall sound of a room. A parametric EQ lets you select the frequency band to be manipulated and often it lets you select the width of the frequency band to be manipulated. The size of an adjustable bandwidth is referred to as its Q. Both graphic and parametric equalizers can also be classified as to how adjusting the gain of a frequency affects the frequencies above and below that frequency. An EQ that affects adjacent frequencies evenly in a gradated manner is said to be a peaking EQ. Its easy to picture if you visualize a hill or peak being created when a frequency is boosted or a valley as the frequency gain is decreased. A shelving EQ creates a shelf above a frequency or it can create a shelf below a selected frequency. For example if a high frequency is boosted there is a slope up to that frequency and all frequencies above are boosted evenly. The two band equalizers on the channels of the BR-1180 are of the shelving type. To boost or cut frequencies on a track in the BR-1180 use the following procedure: 1) Press the EQ button. 2) Press the REC TRACK button for the track that you want to EQ. 3) Use the TIME/VALUE wheel to turn that channel’s EQ to on. 4) CURSOR to the parameter that you want to adjust.
• LOW GAIN- cuts or boosts what is selected for LOW FREQ • LOW FREQ-selects the frequency to be adjusted for the low EQ. • HIGH GAIN- cuts or boosts what is selected for HIGH FREQ. • HIGH FREQ- Selects the frequency to adjusted for the high EQ.
21
When and why should I use EQ? EQ can be used in different ways.
• To “fix” a problematic track or mix. Ideally, if you have great sounding instruments and the right microphones and techniques and the tracks are recorded well, then you will never have to “fix” the sound of a track. However if you need to, you can cut or boost frequencies to improve the sound quality of a track.
• To blend together two instruments that might be competing for the same sonic space in the frequency spectrum. If two instruments typically sound in the same range the sound may become “muddy.” To help clear up the sound it’s a common technique to decrease some of the “shared’ frequencies of one of those tracks and maybe even boost those frequencies on the other instrument. For example a kick drum and a bass might be competing for frequencies in the low end. By thinning out one of those instruments and fattening the other you will be creating a space for both.
• For special effects. Using extreme EQ settings can drastically change the natural color of an instrument but it can make for interesting effects. Rolling off both the highs and lows of a vocal track will create a “telephone” quality sound.
Some basic ideas as to how certain frequencies affect certain instruments. Numbers are a good starting reference for adjusting EQ and there are many different opinions as to what numbers to start with. In the end you will need to use your ears to help you make the right adjustments for your situation. One way to get started is to start with an approximate frequency in the range that you think you are hearing and boost that frequency to extremes. Then slowly adjust that frequency up and down (sweep it) until it sounds like that frequency matches the colors that you are trying to affect. At that point slowly bring down the gain until you get the sound that you are going for. Here are some possible starting references:
• Vocals- 5 kHz is presence. 6 kHz and above is sibilance. 500 Hz to 1 kHz is nasal. For male vocals fullness is at 100 to 150 Hz. For female vocals fullness is at 200 to 250 Hz. • Acoustic Guitar- Fullness at about 80 HZ, Presence at about 5 kHz, Pick noise above 10 kHz. • Electric Guitar- Body at 100 to 300 Hz, presence at 2 to 3 kHz. • Bass Guitar- Lots of “bottom” at 60 to 80 Hz, Fullness at 250 -260 Hz, Boxy or hollow at 300Hz, Finger noise at 700 to 800 Hz, Presence at 2 kHz. • Drums- 60-80 Hz is the power heard in a kick drum, 100-125 Hz is overall fullness on a drum kit, sizzle and crispness of cymbals are at 10 kHz.
22

Panning Any CD is a two track recording. One track represents the left channel and the other track represents the right channel. For clarity, most music is mixed so that the listener gets different sonic “images” from the left and right sides. We refer to this effect as a stereo image. A stereo image is achieved through panning. Panning is a type of volume control. When you pan a channel to the left you are increasing the volume being sent to the left speaker while decreasing it in the right speaker and vice versa. If a channel is panned to the center, the signal is getting equal distribution to both speakers. A well mixed stereo recording will give the listener the perception that different sounds are coming from different spaces in the stereo field. Typically a lead vocal or featured instrument is panned center and other instruments fill in around it at various positions left and right. It’s a very common mistake for someone that is new to recording to leave all tracks panned to the center
23

Compression. A musical performance that is extremely soft in some places and extremely loud in others can present problems for a recording engineer. While you are recording you want to make sure that you are able to record the softest parts at a good record level but when it gets loud the channel might peak. If you set the record levels to accommodate the loudest parts of the song then the soft sections are going to get lost in the mix. One solution to even out the signal would be to manually “ride” the levels up and down using knobs or faders. An easier and more consistent solution would be to insert a compressor in the signal path. The purpose of a compressor is to bring down the gain of a signal automatically if it passes over a defined volume threshold. This can be a useful tool for getting control of signals that have a wide dynamic range because it allows you run the overall signal hotter. The softer parts will become louder while the louder parts are being automatically brought down. The four main components of a compressor are its threshold, ratio, attack and release.
• Threshold- indicated in decibels, determines the point at which any signal going above this level will get compressed.
• Ratio- represents the input to output level of the compressor above the threshold. For example a compression ration of 4:1 indicates that an input level above the threshold that was 4 times higher than the level that is being output. Specifically if the signal goes 8db above the threshold it is reduced to only 2db above that threshold.
• Attack- This determines how fast the level will get reduced. Slowing the attack time makes for a gradual reduction.
• Release- determines the amount of time it takes for the compressor to stop affecting the signal after it drops back below the threshold.
There are two places that you will find compressors on the BR-1180. There is a compressor that is part of the effects chain for the vocal and guitar multi effects and there is also a multi band compressor as part of any of the mastering toolkits.
24
Track Editing. In the days of tape based recording, cutting a portion of a song meant physically cutting out a portion of tape with a razor blade and “splicing” the remaining ends back together with scotch tape. There was not any room for error. Track editing on digital recorders has become much easier and certainly less destructive. You can cut, copy, move and erase tracks in much the same way as you would edit paragraphs on a word processor. You define a track (or tracks) and region that you want to edit and then tell the recorder how you want to edit it. Because editing on a BR-1180 is “non-destructive” if you decide that you don’t like the edit you can UNDO that edit. To access the track edit menus press UTILITY, CURSOR to TRACK and then press ENTER. To go to a specific type of edit use the CURSORS to highlight its menu then press ENTER. Here is a list of the types of edits that can be performed on the BR-1180.
• COPY- allows you to copy and “paste” a specified portion of a track or tracks. • COPY+ INS- is the same as COPY but it will insert blank space to make room for
the copies. • MOVE- moves a specified portion of a track or tracks to a new location. • MOVE+INS- the same as MOVE but inserts blank space at the destination
location for the move. • EXCHANGE- swaps the audio between two targeted tracks. • INSERT- inserts blank space on a track by “sliding” over existing audio. • NORMALIZE- takes the loudest portion of the selected audio and turns it up to
0.0db (or a user defined level). The volume of the rest of the selected audio will also increase in proportion to the loudest parts.
• CUT- deletes a selected portion of audio and also eliminates the space that would otherwise be the result of the cut.
• ERASE-deletes the audio but leaves a blank space where it had existed. The first page that comes up in any of the track edit menus is almost the same for all of them. It is on the first page that you establish which tracks are going to be affected by the edit. A pair of question marks on this page represents the original track and v-track (target) that you want to edit. For some edits there is a second pair of question marks. A second pair of question marks (to the right of the arrow) represents the destination for the track edit. In either pair the first number is the track number and the second is the v-track number. Use the CURSOR buttons and VALUE wheel to select a track to edit (source) and a destination. The source and destination can be the same if you want to COPY or MOVE a section of a track to another section of the same track. What if I want to edit more than one track at a time? You will notice that your choices for selecting tracks to edit are limited to a single track or an adjacent pair of tracks. However you can elect to perform more than one edit at a time. To select a second track to be edited CURSOR to the number to the left of TR and dial the 1: to 2. Then enter in a new set of track values. You could continue to set up to edit 80 different tracks simultaneously for this single edit.
25

The next step is to define the location in time for the edit to affect. CURSOR to LOC and press ENTER. Here is a break down for parameters you will see in LOC menus. By default, edit times are defined by measures and beats. If you want to set up your edit times using hours, minutes, seconds and frames, CURSOR to DISP then press ENTER.
• START- this is the starting measure or starting time for the edit. • END- this is the ending measure or ending time for the edit. • TO- this is the new location for the edited material when you are doing a track
COPY or track MOVE. • FROM- this is the location that you are copying or moving from. Usually you will
be copying FROM the START. In that case START and FROM will be the same number.
• COPY X- this will be the number of times that you want the audio between the START and END points to copy.
TIP: The easiest way to enter values in for your edit times is to cue up each of the edit points in your song and press MARK. This will create a marker. Once you have created markers for all of your edit points you can CURSOR to any place that you need to enter a value and use the SEARCH left and right arrows to enter in that marker’s time. It will fill in the number for you. To select an entire track CURSOR to ALL and press ENTER. After you have all of your values entered CURSOR to GO then press ENTER to perform the edit. Always go back and listen to your edit. If you don’t like what you hear press UNDO. The BR-1180 Owner’s Manual has a step by step walk through for every track edit on pages 66-74.
26
Scenes. It is possible to store up to fifty SCENES on the BR-1180. A scene is basically a “picture” of your current settings. Scenes “remember” all of your fader positions as well as pan and EQ settings, effects send levels and insert effect parameters. You can call up a scene manually or have scenes change automatically while a song is playing. To enable the BR-1180 to include EQ and effects parameters go to UTILTY, CURSOR to SYSTEM and press ENTER. Next CURSOR down to INS. EFFECTS and turn it ON. Then CURSOR to TRACK EQ and turn it to ON. Levels, pan and effects sends are already enabled. To create a scene for manual recall, use the following procedure:
1) Make all of your channel settings. (level, EQ etc,) 2) Press UTILTY. 3) CURSOR to SCENE and press ENTER. 4) CURSOR to SAVE and press ENTER.
If an * appears next to a SCENE number then there is already a scene stored there. You can overwrite it or you can use the VALUE wheel to select a new number. To recall a scene use the VALUE wheel to select a scene number then CURSOR to CALL and then press ENTER. TRACK LEVEL in this menu determines if you want volumes to be called up by SCENES or by FADERS. Automation. Auto Scene allows you to have scenes change while a song is playing back. For each place that you want a change to occur, make your settings then hold down STOP and press MARK. When you playback the song your scenes will change every time it passes one of those markers. To disable the Auto Scene function press UTILTY,CURSOR to SYSTEM then CURSOR down to AUTO SCENE and turn it to OFF.
27
Mixdown. Mixing down is a real time recording process in which you are combining all of your signals down to two tracks for burning a CD. Any audio CD is a two track recording. The mix down mode on the BR-1180 is the BOUNCE mode. Press the REC MODE button so that BOUNCE is lit. Then press the 9/10 REC TRACK button so that it is flashing. Once you press the REC button and then PLAY you will be rerecording all of your audible signals to tracks 9/10 in real time. That in itself is a very simple process however: since what you are creating is the mix for your CD there are several things that you are going to want to consider first.
• Panning- set pan positions so that different parts have there own “space” in the stereo field.
• EQ- Adjust each channel’s EQ as necessary. (see When and why should I use EQ?) Moderation is usually best.
• Set your effects and tweak them to taste. It’s a very common mistake for someone that is new to mixing down to apply too much reverb. Again moderation is best.
• Listen to your tracks individually and all together. How you make choices concerning EQ, panning and effects may change as you listen in both situations.
• Make sure your overall mix is as loud as it can be without clipping. Set your master fader as well as the 9/10 fader in the center of the black hash marks and watch your master meters on the LCD screen. You will want your meters to peak consistently between 0db and -4db if you want your levels to compare to commercial recordings. If this is too loud for your monitor speakers then turn the speakers down.
• Be careful with low instruments such as basses, synthesizers and drums. A bottom heavy mix will distort your home stereo system before you reach a level where there is any clarity in the middle and upper ranges. Lower frequencies require more energy. So make sure it’s not just the lows that are pushing your levels. Use EQ to cut frequencies around 60 to 80Hz if necessary.
• A mix that lacks bottom end is also not a good thing. Balance is key. • Mix using near field studio monitors and not in headphones. Mixing in
headphones only can be really deceiving in terms of how you perceive bass frequencies.
• Use as many speaker references as available to you. Burn mixes to play in your car and home stereo and boom boxes. Take notice as to what works and what does not. You want to strive for consistency. If you are using Roland DS-90A, DS-50A or DS-30A speakers then you can use the COSM speaker modeling to have those speakers emulate other speakers.
1) Press EFFECTS COSM 2) CURSOR to USE SP and press ENTER. 3) CURSOR to EDIT and Press ENTER. 4) CURSOR to SP. M and press ENTER 5) Use the VALUE wheel to select which DS-speakers that you are using 6) MODEL will determine which type of speaker will be output.
28
Mastering. Once you have created the perfect mix its easy to assume that the only step left to is to burn your mix to CD. With the BR-1180 you certainly can take your mix down tracks straight to CD but if you really want to refine that two track mix so that is sounds as loud or dynamic as a song on the radio or a commercial CD the you will want to master your song. The process of mastering involves playing your two track mix down tracks through a series of dynamic effects that might include compression, EQ, bass cut, enhancers, expansion and/or a limiter and rerecording their output to a new pair of tracks. To set up your two track mix so that you can master it:
1) Press the MASTERING button in REC MODE select. You should see • SOURCE V-TRACK: this is the v-track # on 9/10 that you actually did your
mix down bounce to. • DESTINATION V-TRACK: this is where you are going to record your
master tracks. 2) Select your SOURCE and DESTINATION tracks by using the CURSOR buttons
and VALUE wheel. 3) CURSOR to MTK and turn the VALUE wheel to select ON. Turning MTK to the ON position inserts a “Mastering Tool Kit” on your mix down tracks. A Mastering Tool Kit is a preset effects patch that consists of essential mastering tools such as compression, EQ etc. There are 19 different Preset patches. Each one is customized for a specific musical style or type of mastering. Try selecting different presets to find the one that is most appropriate for your song. To select a Mastering Tool Kit: 1) Press MASTERING TOOL KIT. 2) Use the VALUE wheel to select a Preset patch. 3) Press PLAY to hear how it is going to affect your song If you like the results that you hear, then REW back to the beginning of the song. Make sure that the MASTER fader as well as the 9/10 faders are within the black hash marks. The press REC and PLAY to begin recording from your SOURCE tracks to the DESTINATION tracks. Adjust the Fader on 9/10 if necessary so the master meter is registering as close to 0db as possible without going over.
29
If you really want to tweak the mastering tools to suit your music CURSOR to EDIT then press ENTER. If you CURSOR to any of the effects in the MTK EDIT CHAIN you can press edit to access parameters for that effect.
• EQ-The EQ in the Mastering tool kit is a 4 band EQ with adjustable Qs as well as adjustable type (shelving or peaking) for the lows and highs.
• BASS CUT FILTER- deletes unwanted low frequencies that might other wise “muddy” the mix.
• ENHANCER- enhances the presence of the sound by adding a phase-shifted signal to the original signal. An enhancer can help bring life to a dull-sounding mix.
• EXPANDER- An expander is a gate that turns down the level below the specified threshold. This is useful for keeping down the noise floor. The expander here is three bands. One for highs, mids and lows.
• COMPRESSOR-This is a three band compressor. see Compression from the previous discussion on dynamic effects.
• LIMITER- This is placed at the end of the effects chain for the mastering tool kit to help limit any overall excessive levels. A limiter is a compressor that uses a very high ratio. The ratio for the limiter here is a fixed ratio. You will want your threshold to be set very high as to only affect the very loudest signals without “squashing” your sound.
If you are putting together an entire CD there are also a few other factors to consider during the mastering process. The main thing to consider is consistency. You will want the levels and overall sound of your songs to make musical sense as they go from one to another. And you certainly never want to force a listener to constantly turn up and down the levels on their stereo to listen all of the way through your CD. As with your mix down, test your CD on different systems and take notice as to what works and what doesn’t. With trial and error and time spent listening closely to your own as well as your favorite commercial CDs the process will become easier. .
30
How do I burn a CD? Once you have mixed down your tracks or mixed and mastered your tracks there are two different methods that you can use to burn an audio CD of your music. Track at Once is for writing one song at a time onto a CD.
1) Place a blank CD-R in the disk drive. 2) Press AUDIO CD WRITE/PLAY 3) CURSOR to CD WRITE and then Press ENTER. 4) CURSOR to TRACK and then Press ENTER. 5) For SOURCE TRACK use the VALUE wheel to select the tracks (9/10) and the
V-track number that you want to put on the CD. Remember that your initial mix down went to 9/10-1. If you also mastered your song make sure that you are selecting the same tracks here as you did for DESTINATION when you mastered.
6) CURSOR to GO then press ENTER. 7) Set your WRITE SPEED to 8X. 8) Press Enter two times If you get a message that reads “DATA TOO SHORT” you have not selected tracks that you have recorded to. After the track is written to CD you will be prompted to finalize your CD. A finalized CD will play in a commercial CD player however; it is “closed” so that you can no longer add additional tracks to it. If you want to put additional tracks to a track at once CD then select NO after it writes to CD for every song that you write until you get to the final song. When you select YES after the finale song it will then finalize the CD. Disk at once allows you to preassemble all of the mixed down tracks from all of your songs for the CD. 1) Press AUDIO CD WRITE/PLAY then press ENTER. 2) CURSOR to DISK and then press ENTER. 3) Highlight INSERT then press ENTER. 4) Use the VALUE wheel to select track NO 1 for your CD. 5) CURSOR to the right and then use the VALUE wheel to select your tracks. 6) CURSOR down to INSERT and press ENTER to go to Track NO 2. 7) Repeat steps 4, 5 and 6 until you have selected all of the tracks that you want for
your CD. 8) CURSOR to GO and then press ENTER three times. Disk at Once automatically finalizes the CD at the end of the burn.
31
The Rhythm Arranger With most of us not having access to a live drummer whenever we want to write a song, the STEREO RHYTHM/LOOP on the BR-1180 is very useful tool. You can create arrangements from preset drum patterns or from patterns that you create from scratch or from imported midi files. You can also import patterns from audio wave files or from audio tracks. The arranger exists on is own stereo tracks controlled by FADER 11 without using up audio tracks. To activate and access the rhythm guide press the ON/OFF AUTO button so that it is flashing then press the EDIT button. This is the RHYTHM ARRANGE main page.
• BPM- Represents beats per minute. This is the tempo of your song. • LEVEL RHY LOOP- Because the arranger can incorporate patterns that use the
internal drum sounds and also have a separate track for wave files (loops) the numbers here represent the volumes for each.
• ARRANGE- This is where you select an arrangement. There are 50 Preset arrangements, 50 User arrangements that you create and 50 Song arrangements that are also user created. The difference between User and Song is that arrangements stored in the User bank can be called up in any song. Arrangements stored in the Song bank can only be called up in the song that they were created. That means the each song could have up to 50 different arrangements!
• DRUMKIT- This is where you can select one of the nine internal drum kits for your arrangement.
• PTN- Access this to create patterns from scratch. • COPY- allows you to copy arrangements from one location to another location. • DEL- To delete user or song arrangements. • WRITE- Any time that you want to save an arrangement you will need to “write”
it into a user or song bank. Otherwise your work will be lost. • TMAP-It is possible to have different tempos throughout an arrangement. No.1
MEAS 1 is your starting tempo. This is also where you can setup meter changes. • EDIT- where the arrangements are created.
32

Creating an arrangement. To start with an empty pattern CURSOR to ARRANGE in the main RHYTHM ARRANGE screen and use the TIME/VALUE wheel to select S 1. Next, CURSOR to EDIT and then press ENTER. Listed are the parameters that you will be working with for putting together an arrangement.
• MEASURE- Represents the starting measure that you want a pattern to playback • RHY- From here select the P, S or U bank that you want to use a pattern from. • #- This is the pattern number that you want to start at the currently selected
measure number. • NAME- If you are selecting a preset, this is the name of the style that is selected. • The abbreviations to the right of NAME are the different parts of the pattern style
that can be used. IN is an intro. V1 and V2 are verse patterns. F1 and F2 are fills. END is an ending.
• LEN- is the number of measures that you want the current pattern to play. Here is a “recipe” for a 10 measure Hip Hop arrangement. MEASURE 1 RHY P 241 Hip Hop 1- IN LEN 1 MEASURE 2 RHY P 241 Hip Hop 1- V1 LEN 3 MEASURE 5 RHY P 241 Hip Hop 1- F1 LEN 1 MEASURE 6 RHY P241 Hip Hop 1- V2 LEN 4 MEASURE 10 RHY P 241 Hip Hop 1-END LEN 1 Note: You can mix and match styles and patterns within an arrangement. Your arrangement can also include a mixture of preset and user patterns.
33
Creating a user pattern. To create a user pattern in real time to use in your arrangements: 1) CURSOR to PTN from the main RHYTHM ARRANGE page. 2) Press ENTER 3) Use the TIME/VALUE wheel to select an empty PATTERN. 4) CURSOR to BEAT and use the VALUE wheel to select the time signature. 5) CURSOR to MEASURE, then use the VALIUE wheel to select the total number of measures for your pattern. 6) CURSOR to REC, then press ENTER. This will put you into PATTERN REALTIME REC STANDBY. You will hear the metronome. Before you actually start recording the pattern you will need to set a tempo (BPM) and select the drum kit sounds that you want (DRUMKIT). You will also need to set the level of quantization (QTZ) that you want. See- What is quantization? Below. 7) Press PLAY 8) After the count in, begin “playing” the round TRACK buttons below the faders to make a pattern. Or you could play in notes using an external MIDI controller plugged into the BR-1180’s MIDI IN jack. The pattern will continue to loop around so that you can overdub drum parts in real time. You can also erase in real time. While your pattern is looping in record mode CURSOR to ERASE then press ENTER. This puts the pattern recorder into erase mode. It works the same as if you were inputting notes. The difference is that when you press a TRACK button in erase mode it will erase the drum notes in the pattern instead of creating them. If you press the ENTER button when ERASE is highlighted you can toggle back and forth between the two modes in real time. The word ERASE will appear in the left side of the LCD screen when it is activated. Press STOP to stop recording.
What is Quantization? Since they work with MIDI notes and not actual audio, sequencers and drum machines can correct the timing imperfections of a performance. Some sequencers anddrum machines have quantization as an edit function for correcting “mistakes” after they are sequenced. Some quantize as notes are being played in. The way a drum machine quantizes is that it will “correct” a note to the nearest user defined note value. For example if a pattern or song is in 4/4 and quantize is set to eighth notes, any note played that does not land exactly on an downbeat or an upbeat will get moved to the eighth note that it is closest to.
34

Saving a Pattern. If you want to save the pattern that you have created then you will need to write it into the pattern memory by moving the CURSOR to WRITE and pressing ENTER. CURSOR to an empty user location and press ENTER. Once a pattern is written into the memory you can select it in the RHTHYM ARRANGER as a User pattern. Using sample loops with the Rhythm Arranger. The Preset as well as the User internal drum patterns discussed in the previous section are MIDI based patterns. Drum sounds that are triggered by midi note numbers. You can also use sampled audio loops in the rhythm arranger. Sampled audio loops are loops that are taken from existing audio recordings. Often just a small section of audio is used. Audio loops can come from sample libraries on CD ROM, WAV or AIFF files that are burned on to CD ROM from a computer or from tracks that you have recorded on the BR-1180. The BR-1180 has its own internal memory to store audio loops. When a sample is imported it can be assigned to a track or it can be imported to one of 8 banks of 50 for use in the rhythm arranger. (There is also a 9th bank option for storing samples with a song) To import wave files from a CD to the internal banks of the BR-1180:
1) Insert a CD that contains WAV files. (such as DISCREET DRUMS) 2) Press LOOP PHASE IMPORT 3) CURSOR to IMPORT 4) Press ENTER This will open up to the CD’s directory. Use the CURSOR to select a folder then press ENTER to open a folder. A sample CD may be organized so that there are folders within folders. Once you open folders to the level that you are seeing .WAV next to file names you will be able to preview and load samples. To preview a loop, highlight a sample name using the CURSORS then press ENTER. The loop will begin to play. If you want to load that sample into the BR-1180’s internal memory CURSOR to SEL then press ENTER. Or if you want to import the entire contents of the folder onto the hard drive, CURSOR to ALL and press ENTER The letter designation next to TO: is the bank destination for the sample. You have a choice of banks from A through H for User locations or S to store the sample with the current song only. For each of these banks you have a choice of 50 different number locations. Once you have chosen a destination for the sample highlight GO than press ENTER.
Once loops have been stored onto the hard drive they can be accessed in the rhythm arranger exactly the same as the internal patterns. The difference is that you will be selecting them from LOOP instead of RHY in RHYTHM ARRANGE EDIT.
35
To get an audio loop to play in sync with the internal tempo you will need to CURSOR past LEN 2 times in RHYTHM ARRANGE EDIT and turn TEMPO MATCH to ON. Loops and internal patterns can be used in the same arrangement. Synchronization. If you use a sequencer or an external drum machine you can sync it through MIDI so that it will play in time with the internal rhythm arranger. Connect a MIDI cable from the MIDI OUT of the BR-1180 to the MIDI IN of a sequencer or drum machine. Put the sequencer into its external midi sync mode. (The terminology will vary on different sequencers and drum machines. Look for terms such as “ext MIDI” or “slave” or “ext midi clock” when you are setting your sync in options on a sequencer.) To set the BR-1180 so that it will function as the clock master:
1) Press UTILITY. 2) CURSOR to UTIL:SYNC 3) Press ENTER. 4) Use the TIME/VALUE wheel to change GEN from OFF to MIDI CLOCK. 5) Press EXIT twice.
When you press PLAY, the BR-1180 and the external sequencer will both start. TIP: Plug the audio outputs of the drum machine or keyboard or sound module that is being triggered by the sequencer into the L-LINE-R and you can set it up so that you can monitor input without recording it.
1) Press UTILITY. 2) CURSOR to SYSTEM 3) Press ENTER 4) CURSOR to SUB MIXER. 5) Use the TIME/VALUE wheel to turn it to ON.
This will allow you to record “live” parts through the other inputs while monitoring your sequenced parts without using up extra tracks. When you are ready to bounce down your tracks to 9/10 for your final mix, the signal coming in on the Sub Mixer will be included in the mix down.
MIDI Clock versus MIDI Time Code. MIDI Clock is typically what you will find on drum machines and sequencers as it uses measures and beats as its reference. MTC or MIDI Time Code uses hours, minute, seconds and frames. It is useful for time locking tape based recorders or video machines.36

Drive Maintenance and Data Management. The BR-1180 is a hard disk recorder. It records directly to a 2 ½” IDE drive. The same as you would find in a laptop computer. As a computer hard drive is a spinning magnetic media it is very important to take care of the drive as well as what is on it. There are three things that you can do on a regular basis to keep your digital recorder running smoothly and your songs safe. 1-Optimize. Every time that you press record and play, information is stored on your hard drive even if you immediately record over it. To get rid of this extra data that is taking up space on the hard drive optimize each song after you have done any significant amount of recording on that song. To Optimize:
1) Press UTILTY 2) CURSOR to SONG and then press ENTER. 3) CURSOR to the right to OPTIMIZE and then press ENTER. 4) Press ENTER two times.
This will also reduce the file size for backing up. 2-Backup and Recovery Backing up is the process of taking your song data and storing it onto CD. This is different than an audio CD in that you are creating a digital copy of the data that makes up your multi track recording and all of its settings. This will allow you to later recover the song onto the hard drive in its original multi track form. Backing up your songs is something that you want to do any time you spent any significant time working on a song. There is an expression in the world of digital recording- “Your song does not exist unless it exists in two places!” BACKUP, BACKUP, BACKUP!!!
1) Insert a blank CD or CD-RW. 2) Press DATA SAVE/LOAD. 3) CURSOR to BACKUP and then press ENTER. 4) CURSOR to SONG and then press ENTER. 5) CURSOR to each song that you want to backup and press ENTER. 6) CURSOR to GO and then press ENTER twice.
If the selected number of file’s sizes exceeds the capacity of one disk then you will be prompted to insert additional blank disks. In addition to being able to back up songs you can elect to backup the entire hard drive or just User banks from effects and rhythm guide. See the owner’s manual for specifics..
37

To recover song data from a CD:
1) Press DATA/SAVE LOAD. 2) CURSOR to RECOVER and then press ENTER. 3) CURSOR to SONG and then press ENTER. 4) CURSOR to each song that you want to recover back onto the hard drive and
press ENTER. 5) CURSOR to GO then press ENTER.
3-Formatting a Drive. When a drive has been freshly initialized, a hard disk recorder writes each file’s data as a single chunk in one area of the drive. As the drive gets used the areas of free space for writing new data become smaller and smaller and are scattered all over the drive. A drive in this condition is considered to be “fragmented.” As the drive becomes more and more fragmented it becomes difficult to access data and can ultimately lead to errors. Typical symptoms of a severely fragmented drive include sluggish transport controls, “Drive Busy” messages and eventually the inability to read and write data to the hard drive or to CD. To prevent fragmentation backup your songs and initialize your hard drive every couple of months or so depending on how much recording that you do. Once the drive has been initialized recover your songs back onto the hard drive To Initialize (format) the BR-1180’s hard drive:
1) Press UTILITY. 2) CURSOR to HDD. 3) Press ENTER. 4) CURSOR to HDD:INITIALIZE 5) Press ENTER. 6) CURSOR to GO 7) Press ENTER two times.
Note: Initializing will erase the contents of you hard drive. Make sure that you are backed up before you begin this process.
38
Sharing Data with software programs. You may find occasion to take your tracks into a software system to manipulate. Or you may need to use tracks from someone that does software based recording. Suppose that you recorded some tracks on your BR-1180 but needed to have a musician lay down some tracks for you that lived in another city. If that person uses software to record music then you could mail to them a CD with wave file versions of your tracks. Wave files can be read by most audio software applications as well as many stand alone recorders. Once those tracks are loaded into software your musician can overdub their parts to your song. From there the new tracks can be saved as wave files and sent back to you to import back into your BR-1180. To Export tracks as wave files:
1) Load up the song that contains the tracks that you want to export. 2) Place a blank CD into the CD drive.. 3) Press DATA SAVE/LOAD. 4) CURSOR to WAVE MENU and then press ENTER. 5) CURSOR to WAVE EXPORT and then press ENTER. 6) Use the VALUE wheel to select WAV for the FORMAT TYPE. (AIF could also
be used for MAC systems only) 7) CURSOR to TRACK and use the VALUE wheel to replace the “???” with the
track number that you want to export. From this point it works like the TRACK edit menus. Changing the number to the left of TRACK will allow you to select more than one track to export. *.* will select all of the tracks. 8) CURSOR to LOC and then press ENTER. 9) Define your START and END points or highlight ALL and press ENTER. 10) CURSOR to GO and then press ENTER.
To import WAV or AIFF files into a BR-1180 song:
1) Load up the song that you want import tracks into. 2) Place a CD containing WAV (or AIFF) files into the CD drive 3) Press DATA SAVE/LOAD. 4) CURSOR to WAVE MENU and then press ENTER. 5) CURSOR to WAVE IMPORT and then press ENTER. From this point follow the steps exactly like we did when we imported files to the RHYTHM ARRANGER. The difference is that instead of importing to BANKS you will be selecting track numbers to import to.
39

Tony Bray Product Support
Boss Corporation US (323)890-3741
9/2003
40

41


![SERIES 1180 SERIES 1180Delivery package Proximity switch, 2 fixing nuts, instructions. [mm] s [mm] a 700 600 500 400 300 200 100 80 40 0 80 40 s a LTK-1180-301-LTS-1180-301-LTK-1180-303-LTS-1180-303-G,](https://static.fdocuments.net/doc/165x107/5fd8adb449e21042a454e611/series-1180-series-delivery-package-proximity-switch-2-fixing-nuts-instructions.jpg)