
The BeagleBone Black Primer -...
39
Transcript of The BeagleBone Black Primer -...


800 East 96th Street,Indianapolis, Indiana 46240 USA
THE BEAGLEBONE BLACK PRIMER
Brian McLaughlin

ii The BeagleBone Black Primer
The BeagleBone Black Primer
Copyright © 2016 by Que PublishingAll rights reserved. No part of this book shall be reproduced, stored in a retrieval system, or transmitted by any means, electronic, mechanical, photocopying, recording, or otherwise, without written permission from the publisher. No patent liability is assumed with respect to the use of the information contained herein. Although every precaution has been taken in the preparation of this book, the publisher and author assume no responsibility for errors or omissions. Nor is any liability assumed for damages resulting from the use of the information contained herein.
ISBN-13: 978-0-7897-5386-1ISBN-10: 0-7897-5386-3
Library of Congress Control Number: 2015946119
Printed in the United States of America
First Printing: September 2015
TrademarksAll terms mentioned in this book that are known to be trademarks or service marks have been appropriately capitalized. Que Publishing cannot attest to the accuracy of this information. Use of a term in this book should not be regarded as affecting the validity of any trademark or service mark.
This book was not created by and is not endorsed by Texas Instruments.
Warning and DisclaimerEvery effort has been made to make this book as complete and as accurate as possible, but no warranty or fi tness is implied. The information provided is on an “as is” basis. The author and the publisher shall have neither liability nor responsibility to any person or entity with respect to any loss or damages arising from the information contained in this book.
Special SalesFor information about buying this title in bulk quantities, or for special sales opportunities (which may include electronic versions; custom cover designs; and content particular to your business, training goals, marketing focus, or branding interests), please contact our corporate sales department at [email protected] or (800) 382-3419.
For government sales inquiries, please contact [email protected].
For questions about sales outside the U.S., please contact [email protected].
Editor-in-Chief
Greg Wiegand
Executive Editor
Rick Kughen
Development Editor
Ginny Bess Munroe
Managing Editor
Sandra Schroeder
Project Editor
Seth Kerney
Copy Editor
Bart Reed
Indexer
Tim Wright
Proofreader
Laura Hernandez
Technical Editor
Anton Olsen
Publishing Coordinator
Kristen Watterson
Interior Designer
Mark Shirar
Cover Designer
Mark Shirar
Compositor
Jake McFarland
Photography
Helene McLaughlin

iiiContents at a Glance
Contents at a Glance Introduction 1
CHAPTER 1 Embedded Computers and Electronics 5
CHAPTER 2 Introduction to the Hardware 15
CHAPTER 3 Getting Started 25
CHAPTER 4 Hardware Basics 39
CHAPTER 5 A Little Deeper into Development 57
CHAPTER 6 Trying Other Operating Systems 71
CHAPTER 7 Expanding the Hardware Horizon 81
CHAPTER 8 Low-Level Hardware and Capes 97
CHAPTER 9 Interacting with Your World, Part 1: Sensors 113
CHAPTER 10 Remote Monitoring and Data Collection 127
CHAPTER 11 Interacting with Your World, Part 2: Feedback and Actuators 149
CHAPTER 12 Computer Vision 171
CHAPTER 13 Sniffi ng Out Car Trouble 189
CHAPTER 14 Ground Control to Major Beagle 205
CHAPTER 15 Moving Forward 225
Index 233

iv The BeagleBone Black Primer
Table of Contents Introduction .............................................................. 1
Who This Book Is For ....................................................................1
How This Book Is Organized .........................................................2
Conventions Used in This Book .....................................................3
Let Me Know What You Think .......................................................3
Chapter 1 Embedded Computers and Electronics ......................... 5
What Are Embedded Electronics? ..................................................5
Arduino .........................................................................................9
What Should Readers Get Out of This Book? ...............................12
Chapter 2 Introduction to the Hardware ................................... 15
A Short Lineage of the BeagleBone Black .....................................15
BeagleBone Black Hardware Specification ....................................19
Processor .................................................................................20
RAM ........................................................................................21
Onboard Flash and MicroSD External Storage ...........................22
Ethernet ...................................................................................22
General-Purpose Input/Output .................................................22
Chapter 3 Getting Started ....................................................... 25
Setting Up and Saying “Hello, World!” ........................................26
Connecting to Ethernet ................................................................32
Chapter 4 Hardware Basics ..................................................... 39
Electronics Basics: Voltage, Current, Power, and Resistance .........39
The Short Circuit .........................................................................43
The Resistor .............................................................................45
Diodes and LEDs ......................................................................48
Build an LED Circuit .................................................................50
Chapter 5 A Little Deeper into Development .............................. 57
Interpreted Code .........................................................................57
Python—A Step Above Interpreted Language ..............................59
Implementing Blinking Lights In Python .....................................62
Compiled Code ...........................................................................65

vTable of Contents
Chapter 6 Trying Other Operating Systems ............................... 71
History of the Linux World: Part I ................................................71
Picking an Operating System .......................................................73
Loading the microSD Card ..........................................................73
Chapter 7 Expanding the Hardware Horizon .............................. 81
Binary Basics ...............................................................................81
Hardware Representation .........................................................83
Serial Communications ................................................................91
Inspecting UART ......................................................................93
Chapter 8 Low-Level Hardware and Capes ................................. 97
Linux Hardware Through The File System .....................................97
Hardware in the File System .......................................................100
One Pin, Multiple Functions ......................................................103
Hardware Configuration ............................................................108
Chapter 9 Interacting with Your World, Part 1: Sensors .......... 113
Sensor Basics ............................................................................113
Analog Versus Digital .............................................................120
Sample Rates .........................................................................124
Chapter 10 Remote Monitoring and Data Collection ................... 127
Project Outline ..........................................................................127
Wiring Up The Project ...............................................................130
Seeing the Light .........................................................................134
Publishing the Sensor Data ........................................................137
Start Collecting Data .................................................................142
Chapter 11 Interacting with Your World, Part 2: Feedback and Actuators 149
Controlling Current ...................................................................149
Blinking to Fading .....................................................................156
Vibration Motors .......................................................................159
Servo Motors ............................................................................161
Stepper Motors .........................................................................165
Chapter 12 Computer Vision ................................................... 171
Connecting a Camera ................................................................171
Utilizing OpenCV Libraries .........................................................177

vi The BeagleBone Black Primer
A Better Photo Booth ................................................................178
Cascade Classifiers ....................................................................180
Tracking a Face .........................................................................182
Chapter 13 Sniffing Out Car Trouble ......................................... 189
Car Computers ..........................................................................189
Interfacing to the Car ................................................................191
Reading the Car’s Status ............................................................198
Interpreting the Data .................................................................199
Chapter 14 Ground Control to Major Beagle ............................. 205
Radio Data ...............................................................................205
WiFi ..........................................................................................210
Software Defined Radio .............................................................212
Grabbing Libraries with Git ........................................................215
Radio Testing ............................................................................216
Calibrating the Radio ................................................................219
Listening to Aviation Data .........................................................221
BeagleBone Black Air Traffic Control Station..............................223
Chapter 15 Moving Forward .................................................... 225
Project Ideas .............................................................................226
Portable Gaming Solutions .....................................................226
Weather Station .....................................................................227
In-Car Computer ....................................................................227
More Advanced Aircraft “RADAR” ..........................................228
Satellite Ground Station .........................................................228
Tools ........................................................................................230
Resources ..................................................................................230
Index ................................................................... 233

viiAbout the Author
About the AuthorBrian McLaughlin is an engineer by profession and by hobby. Brian earned a bachelor’s degree in computer science from North Carolina State University and a masters of engineering in systems engineering from the University of Maryland. With a solid foundation in software, Brian was initially exposed to more advanced topics in hardware while working on the Hubble Space Telescope Project. Over time, Brian began writing for GeekDad and has become a part of the growing Maker community. Brian lives in Maryland with his beau-tiful wife and two boys.

viii The BeagleBone Black Primer
DedicationFor Mom & Dad
AcknowledgmentsI wish I could acknowledge everyone who ever taught me something about STEAM (science, technology, engineering, art, and mathematics) topics, but that would be almost every teacher, instructor, mentor, and co-worker I have ever had to this point in my life. I would like to start by thanking the Integration and Test and software development teams for the Wide Field Camera 3 instrument on the Hubble Space Telescope, the first place I worked where the rubber met the road between hardware and software. I would like to thank my mentors—specifically Larry Barrett and Curtis Fatig—with whom I worked on the James Webb Space Telescope project and other projects. From them I was always learning something about engineering, working in a high-pressure environment, travelling the world, and finding out about life in general. I would like to thank my friends at GeekDad who helped me find a passion for writing about technical topics for fun and not just for my 9-to-5 job.
I would like to thank the people and companies who provided hardware and parts in support of this book including Tektronix, Oscium, SparkFun, and Element14.
I would like to offer my apologies to my neighbors in my little cul-de-sac in Columbia, Maryland. Writing a book while still holding down a full-time job was much harder than I had anticipated, and my lawn and yard suffered as a consequence. I promise I will keep them looking better!
I of course need to thank my parents, Glen and Diane, and my brother, Glen. Our parents always encouraged us to explore, learn, and grow, and my brother, in addition to sharing systems with me, showed me the Mosaic web browser before most people knew what the Web even was. I also need to thank my Uncle Lou, who passed along computers as he upgraded, and always made sure we were working on learning the basics of flying with Flight Simulator. It was also thanks to my parents and my Uncle Lou that I went to Space Camp in seventh grade.
Finally, I must acknowledge all of the rest of my loving family, particularly my beautiful wife, Helene, and my boys, Sean and Liam. Without everyone’s support, patience, understanding, love, and patience, I never would have finished this book. (Yes, patience needed to be there twice.)

Reader Services ix
We Want to Hear from You!As the reader of this book, you are our most important critic and commentator. We value your opinion and want to know what we’re doing right, what we could do better, what areas you’d like to see us publish in, and any other words of wisdom you’re willing to pass our way.
We welcome your comments. You can email or write to let us know what you did or didn’t like about this book—as well as what we can do to make our books better.
Please note that we cannot help you with technical problems related to the topic of this book.
When you write, please be sure to include this book’s title and author as well as your name and email address. We will carefully review your comments and share them with the author and editors who worked on the book.
Email: [email protected]
Mail: Que PublishingATTN: Reader Feedback800 East 96th StreetIndianapolis, IN 46240 USA
Reader ServicesVisit our website and register this book at quepublishing.com/register for convenient access to any updates, downloads, or errata that might be available for this book.

This page intentionally left blank

IntroductionThe world is becoming a place where the traditional technical disciplines of science, technology, engineering, and mathematics (STEM) have boiled over into the world of art to produce STEAM (that is, STEM with Art thrown in the mix). It is the beginning of a new Renaissance. Just like in Da Vinci’s time, cross-domain studies in all the STEAM topics are critical, and they are often unified via some form of electronics.
For example, an art installation may allow for a mechanical, interactive sculpture. This sculpture may require some “senses” to understand changes in the environment—everything from a change in temperature to the traditional senses of touch, sight, sound, taste, and smell. These changes are processed by some electronic means, and then some action is taken with that information. Maybe the head of a statue “looks” at you when you walk past.
For some, even the most technical work can seem like art. The layout of a circuit on a board, an elegant programming solution, and the RS-25 rocket engine, among many other technical solutions, are all like looking at art to me.
This book strives to provide the information necessary for you to find your own art in the world of STEAM. We will use a very accessible and powerful electronics board for this task—the BeagleBone Black.
Who This Book Is ForTargeting an audience for a book such as this can be tricky. For example, there are people in the artistic world—I’ve known many myself—who want to integrate electronics into their art projects, but they find the task daunting. I wrote this book so that those individuals can start to understand how electronics work and forge a path forward to bring their artistic creations to life.
There are others out there who have plenty of experience with electronics and building projects, but want to move toward using the power of the BeagleBone Black. For those readers, many of the sec-tions of this book will provide quick reference to information on accessing the pins and functionality of the board and how to accomplish the basic tasks they need to know to build larger projects.
None of the projects are completely finished out in the course of the book. They are left at the level of the breadboard and still lack the finalized look of a project with a completed enclosure and instal-lation. This is on purpose. I only give you enough information to be dangerous—and to go out on your own and build something amazing.

2 Introduction
How This Book Is OrganizedI try not to make any assumptions concerning what you may know about electronics and computers, other than basic familiarity with traditional desktop environments. With that in mind, I attempt to start off slowly. Here’s what you’ll find in the chapters of this book:
■ Chapters 1–5: These chapters provide you with an overview of embedded electronics and development platforms. In these chapters, you learn what the BeagleBone Black represents and what major parts it is made from. You also learn how to procure a board, hook it up for the first time, and get something running. You learn some basics of electronics and how to get electrons to obey your will and desires. Well, they won’t obey, but they will follow the paths you force them down and at the rates you desire. Finally, you learn how to use programming to make things happen on the board, and you get some exposure to a couple of the programming languages available and learn some of the differences between them.
■ Chapters 6–8: These chapters provide some more advanced topics on hardware interactions and the environments you can use for operating your board. A number of operating system environments are available to run on the board, and in these chapters you learn how to switch out an operating system. You also learn some more low-level hardware interface information and about the ecosystem of standardized hardware expansion boards for the BeagleBone Black (known as Capes).
■ Chapters 9–14: These chapters offer some insight into building more complex projects with the BeagleBone Black. You learn about how sensors work, build an environment-monitoring station for your working area, and find out how to manipulate items in your environment via motors. Finally, you get into various projects. You’ll learn how to give your creator’s vision, which can be used to actually track a person’s face. You’ll also tap into the computer in your car, and even listen to the data sent from aircraft so that you can track the aircraft in your area.
■ Chapter 15: This chapter leaves you with some room to think about where you can go after reading the book. You’ll learn about places to start expanding on what you have learned, a little about securing your BeagleBone Black, and some of my favorite project resources.
Only you know how much knowledge and experience you have as you begin reading this book. If you’re completely new to this world, you will probably want to work through the book sequentially and build your knowledge as you go. If you’re an experienced user who just wants examples of how to accomplish specific tasks with the BeagleBone Black, you will probably tend to bounce around and grab the bits you need.

Let Me Know What You Think 3
Conventions Used in This BookA couple of conventions are used throughout this book. Monospaced font calls out source code and terminal interactions. For example:
print “This is a line of source code”
~/bbb-primer/$ this is a terminal interaction
Note that source code is called out as a Listing, but terminal interactions are not. Also note that, in terminal interaction, content the user should enter is in bold mono font.
Let Me Know What You ThinkIf you want to contact me, feel free to email me at [email protected]. I welcome questions that clarify points made in the book and constructive criticism.
However, as with many technical topics, there is often more than one way to accomplish a goal. Therefore, if you offer a comment that just shows a different way to accomplish the same thing or a quicker, more efficient way when the point of the example was obviously to be clear and thoughtful and not efficient, I will likely mentally acknowledge your point, archive the email, and move on with my life. Remember, my goal is to be as clear and acces-sible to as many levels of interest as possible.
With all of that said, I think you will enjoy the book, and I hope that you will learn how to accomplish whatever it is you set out to do after reading it. Allons-y!

This page intentionally left blank

3Getting StartedTo get started with the BeagleBone Black, you will want to obtain the board itself and some of the basic parts. The board is available from a number of resources. The beagleboard.org website provides some great places to buy the board (see http://beagleboard.org/black). Of course, I have my favorite suppliers, which are both a major part of the Maker community:
■ SparkFun Electronics (http://sparkfun.com)—Boulder, Colorado–based SparkFun Electronics was founded on the idea of open source and open hardware. The company has an extensive catalog of electronics parts and components and consistently supports the community. SparkFun also has excellent tutorials and active forums where you can always find help on your projects. If you live in the Boulder area, be sure to watch for the in-person classes and other events the company sponsors!
■ Adafruit (http://adafruit.com)—Based i n New York City, Adafruit was founded by Limor “Ladyada” Fried, a true celebrity in the Maker community. The company is another great source for all the components and parts you might need for your projects and for taking the steps to move your projects beyond the introductory ones in this book. Adafruit also has an extensive tutorial section on its website.
When I am shopping for parts, I am often torn between these two suppliers. They are both excellent companies that have provided great support to me and countless others. Determining which to use, however, shouldn’t be as much of a struggle as I might make it seem. The two companies work well together, participate in events together, and are both friendly. They represent the best of the community because they aren’t there to compete against each other; they support the community and make sure we have what we need to get our projects off the ground. If you have questions on electronics basics or more complicated techniques, you can generally find a tutorial on one of the two sites or find willing support in the forums and via email.
In each chapter, I will outline the parts you will need for that chapter’s project. We will take a practice run with this chapter and look at getting your BeagleBone Black set up and running. First, note some of the parts you’ll need:
■ BeagleBone Black ■ USB cable (USB A to USB Mini B) ■ +5 volt DC power supply (at least 1,000 milliamps) ■ Ethernet cable

26 CHAPTER 3: Getting Started
The USB cable should come with the BeagleBone Black; if it does not, make sure you inform your supplier. If a friend gave you the board, then just ask nicely. To get started, you also need a way to communicate with the board. In this chapter I’m going to discuss how to connect the BeagleBone Black to another computer and also how to connect remotely via Ethernet. Another option is to connect a monitor, keyboard, and mouse directly.
Setting Up and Saying “Hello, World!”The big moment has arrived, and it is time to power up your BeagleBone Black and start working! We start with a direct computer connection via USB. This is a simple step. Simply plug the USB cable into the BeagleBone Black and the other end into a USB port on the computer.
As soon as the board is connected to your computer, you should see the lights on the board come to life. Four lights should start blinking on the board. These are four “user” lights, labeled USR0, USR1, USR2, and USR3, as shown in Figure 3.1. There is also a power light labeled PWR. The power light should stay constantly lit. The user lights will blink with different activities. At the default boot on a clean board, you will find the user lights configured as follows:
■ USR0—This light blinks in a heartbeat pattern: two quick flashes, a pause, and then repeat.
■ USR1—This light is configured to blink on activity from the microSD card. Because the board isn’t plugged in a microSD card yet, you shouldn’t see any activity on this light yet.
■ USR2—This light flashes on CPU activity. ■ USR3—This light flashes when the built-in flash memory is accessed. The default operat-
ing system should be installed in this embedded Multi-Media Card, or eMMC, memory, so you should see activity as the board is accessing the built-in, default operating system and file system.
FIGURE 3.1 The BeagleBone Black user lights, power light, and USB port highlighted.

Setting Up and Saying “Hello, World!” 27
Next, you’re going to have to install the drivers necessary for your computer to talk to the BeagleBone Black. On a Windows 7 laptop, you just plug the board in via USB to allow a drive to mount from the board that contains driver files. Use these files directly so that you don’t have to look for them. You also have the option of downloading the drivers from the BeagleBoard organization website (http://beagleboard.org/getting-started). Drivers are available for Windows 32- and 64-bit environments, OS X, and Linux. You should refer to the specific setup instructions for your machine.
Now that you have your BeagleBone Black up and operating and have the drivers installed, what can you do? Your BeagleBone Black is already running a web server! You can use the Chrome or Firefox web browser to navigate to the board’s web server at http://192.168.7.2.
NOTEWeb Browser Warning
The web server is not compatible with Microsoft Internet Explorer. Just stick with Chrome- or Firefox-compatible browsers. You really shouldn’t use Internet Explorer anyway. For anything. Take this as a public service message. You can get Chrome or Firefox at the following links:
http://www.google.com/chrome/browser
http://www.mozilla.org/en-US/firefox/new
Navigate to the BeagleBone Black website at http://192.168.7.2. Your browser should present a very colorful and active website, and you should see something like the banner shown in Figure 3.2.
FIGURE 3.2 Banner from the BeagleBone built-in website letting you know everything is working just fine.
This banner gives you information about your BeagleBone Black. First, the banner is green and has a check mark. That must mean everything is good, right? Also, the banner tells you that the board is connected. These are all good indications that all is right with your BeagleBone Black’s world. Table 3.1 explains the other information that is supplied.

28 CHAPTER 3: Getting Started
TABLE 3.1 Default Website Banner Information
Listed Information Description
BeagleBone Black You bought a BeagleBone Black, right? This is a good sign that you bought what you thought you were buying.
Rev 000C This tells you that, in this case, version 000 of the revision C BeagleBone Black hardware is running.
S/N 2314BBBK0577 This is the serial number of the specific BeagleBone Black.
Running BoneScript 0.2.4 The board runs BoneScript version 0.2.4. BoneScript is a version of JavaScript for the BeagleBone environments.
At 192.168.7.2 This is the IP address of the board on the virtualized network over the USB connection. It should match the address you typed into the address bar of the browser.
Congratulations! You’ve now successfully powered up, connected to, and communicated with your board! That was easy, wasn’t it? Let’s make a couple changes and use one of the user lights we discussed before to make it flash. About halfway down the page is a section titled “Cloud9 IDE” (IDE stands for integrated development environment). Click the header, and the Cloud9 IDE will launch in a new browser window or tab (see Figure 3.3). This is a powerful IDE running directly on the BeagleBone Black through a web interface.
So, what is an IDE? In short, an IDE is used as an all-in-one place where you can write software directly on the BeagleBone Black. It includes an editor, a way to execute code, and many other useful features.
When a person is just starting out with a new programming language, there is a tradition that the first program they write simply displays “Hello, World!” in some manner that fits into the environment. In many languages, this is accomplished by simply printing the message, whereas in some Windows environments, an alert message is displayed. That tradition has been extended into the hardware world with a program that makes a light blink once a second.
In our case, we are approaching a board for the first time and trying out a language for the first time, so why don’t we try both displaying a message and blinking a light? Follow these steps to create a new file, write the code to accomplish our task, execute the code, and get blinking:
1. In the main window of the Cloud9 environment you’ll find a + button. Click this button and select New File. This will open a blank text file where you can enter code. If there are other tabs open, you can close them. Feel free to peruse any “getting started” informa-tion on those pages.
2. Enter the code shown in Listing 3.1 into the document.
3. Save the file on the board. In this case, the file’s name is blink.js.
4. In the environment, click the Run button.

Setting Up and Saying “Hello, World!” 29
FIGURE 3.3 The Cloud9 IDE running on the BeagleBone Black.
LISTING 3.1 blink.js
1: /*
2: * blink.js - BoneScript File to blink the USR1 LED on the BeagleBone Black.
3: *
4: * Example script for “The BeagleBone Black Primer”
5: *
6: */
7: var bbb = require(‘bonescript’); // Declare a bbb variable, board h/w object
8: var state = bbb.LOW; // Declare a variable to represent LED state
9:
10:
11: bbb.pinMode(‘USR1’, bbb.OUTPUT); // Set the USR1 LED control to output
12: setInterval(blink, 1000); // Call blink fn the LED every 1 second
13: console.log(‘Hello, World!’); // Output the classic introduction
14:
15: /*
30 CHAPTER 3: Getting Started
16: * Function - blink
17: *
18: * Toggle the value of the state variable between high and low when called.
19: */
20: function blink() {
21: if(state == bbb.LOW) { // If the current state is LOW then...
22: state = bbb.HIGH; // ...change the state to HIGH
23: } else { // Otherwise, the state is HIGH...
24: state = bbb.LOW; // ...change the state to LOW
25: }
26:
27: bbb.digitalWrite(‘USR1’, state); // Update the USR1 state
28: }
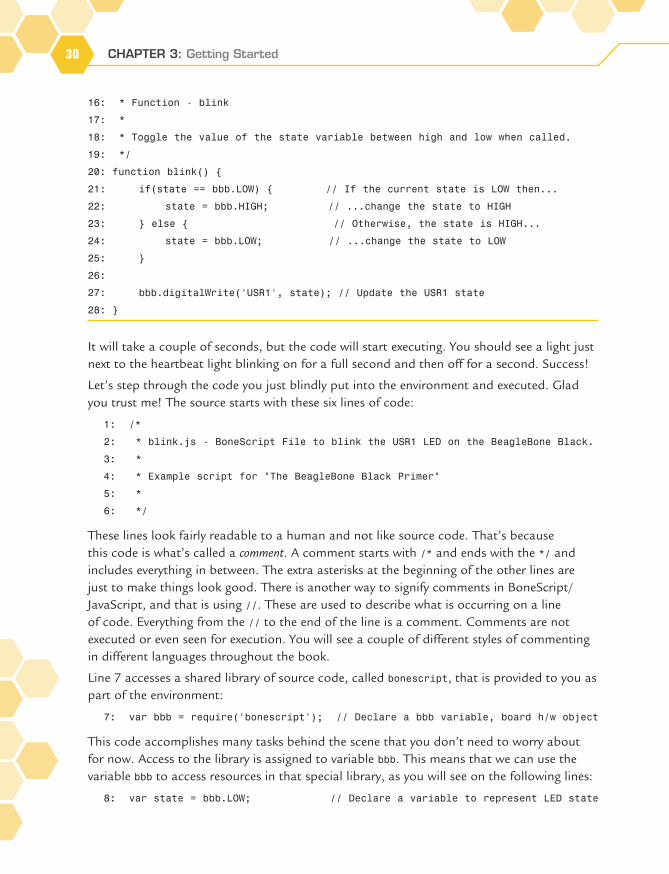
It will take a couple of seconds, but the code will start executing. You should see a light just next to the heartbeat light blinking on for a full second and then off for a second. Success!
Let’s step through the code you just blindly put into the environment and executed. Glad you trust me! The source starts with these six lines of code:
1: /*
2: * blink.js - BoneScript File to blink the USR1 LED on the BeagleBone Black.
3: *
4: * Example script for “The BeagleBone Black Primer”
5: *
6: */
These lines look fairly readable to a human and not like source code. That’s because this code is what’s called a comment. A comment starts with /* and ends with the */ and includes everything in between. The extra asterisks at the beginning of the other lines are just to make things look good. There is another way to signify comments in BoneScript/JavaScript, and that is using //. These are used to describe what is occurring on a line of code. Everything from the // to the end of the line is a comment. Comments are not executed or even seen for execution. You will see a couple of different styles of commenting in different languages throughout the book.
Line 7 accesses a shared library of source code, called bonescript, that is provided to you as part of the environment:
7: var bbb = require(‘bonescript’); // Declare a bbb variable, board h/w object
This code accomplishes many tasks behind the scene that you don’t need to worry about for now. Access to the library is assigned to variable bbb. This means that we can use the variable bbb to access resources in that special library, as you will see on the following lines:
8: var state = bbb.LOW; // Declare a variable to represent LED state

Setting Up and Saying “Hello, World!” 31
Line 8 declares another variable called state. We are going to use state to track whether we set our signal for the USR1 light to HIGH or LOW. When the state is set to HIGH, the voltage on the electronics attached to that light is set to +5V, and it is set to 0V for LOW. When the voltage is set HIGH at +5V, the electrical potential on the light is increased, which means the light can do work. What happens when a light can do work? It lights up!
Something important to remember here is that setting the state variable to HIGH or LOW doesn’t actually change the power supplied. We do that using a function called digitalWrite, which is a part of the bonescript library we can now access through the bbb variable. More on that function later. Now we hit a line that does something with the electricity on the board:
11: bbb.pinMode(‘USR1’, bbb.OUTPUT); // Set the USR1 LED control to output
With this line, we are calling a function called pinMode, which is part of the bonescript library, and using another bonescript library constant called OUTPUT. This means we are configuring the USR1 pin to output the voltage rather than sensing a voltage from somewhere else in a circuit. In total, this line says, “Take the pin attached to the light USR1 and get it ready to output, please.”
The next line utilizes a function called setInterval to run the meat of the program:
12: setInterval(blink, 1000); // Call blink fn the LED every 1 second
This line of code tells the system to execute the function blink once every second. Line 13 has nothing to do with blinking our light. This is a simple statement that prints our classic first-time program announcement out to a console:
13: console.log(‘Hello, World!’); // Output the classic introduction
In the Cloud9 IDE environment, you will see this printed on a lower tab labeled “/blink.js – Running,” as shown in Figure 3.4.
FIGURE 3.4 The “Hello, World!” statement written to the console log.
The final lines define a function called blink. This function simply checks the status of the state variable and changes it to the opposite state. This function is called once every

32 CHAPTER 3: Getting Started
second by the setInterval function. The real meat of the function is on line 27. The call to digitalWrite makes the actual change to the hardware to change the status of the physical circuit attached to the USR1 light:
27: bbb.digitalWrite(‘USR1’, state); // Update the USR1 state
That is all the code required to use BoneScript to blink a light and print a message to the console! It is important to remember that BoneScript is defined only by the bonescript library. The underlying syntax and structure is just JavaScript, a scripting language used in many places on the Web . This means that you can use JavaScript tutorial and reference resources to help you understand or to get any clarification.
For simple examples throughout the book, I will stick to BoneScript just to make it easy. For more complex code and functionality, I use other programming languages such as C/C++ and Python. I will comment the code to help with readability if you are not familiar with those languages; however, I highly encourage you to seek out other resources to learn those languages in depth because that is not the focus of this book. The next chapter will delve into some more complex development with BoneScript and the Cloud9 IDE to enable your own explorations. It will also introduce you to the basics of programming with other languages.
Connecting to EthernetThus far, we have talked to the BeagleBone Black through a USB connection to a computer. This is all fine and well, but the power of the BeagleBone Black is that it’s a standalone computer capable of working on its own. Our next step is to cut the cord from our computer and connect the BeagleBone Black to a network.
In accomplishing this, we can drop the USB cable from our setup and exchange it for an Ethernet cable. We also need to power our board. Ethernet, unlike USB, does not provide power in normal configurations. There’s an option called Power over Ethernet, abbreviated PoE, but this is not a normal network configuration, so we will assume you need a separate power supply. I purchased the power supply I am using from SparkFun. It has a 5V output and can provide up to 1A of current.
Most home networks use a system called Dynamic Host Configuration Protocol (DHCP). In this configuration, a component on a network is assigned an address on the network automatically. To make this easy on ourselves, we know when the BeagleBone Black is connected via USB that it has an address of 192.168.7.2. We can use this to our advantage and connect to both Ethernet and USB at the same time and see what address our board is assigned for the Ethernet connection. So, with your board already connected to the USB, plug your Ethernet cable into the board and into your network.

Connecting to Ethernet 33
When you connect the Ethernet cable, you should see the lights on the Ethernet port of your board light up. This means you’ve connected! Now, to see the IP address that has been assigned, we are going to break out to a new piece of software and connect via Secure Shell (SSH). We are about to delve into the world of the Linux command line.
There are many ways to connect via SSH. If your computer runs Linux or OS X, getting to a terminal is as easy as opening a Terminal session. The commands to use are the same as you would see working on the command line of a Linux or OS X machine. Following is an example of connecting via SSH from the Linux command line first. The process is the same for OS X. We will get to Windows in a moment.
From the Terminal, execute the following command:
[brian@mercury-fedora-vm ]$ ssh [email protected]
With this command, you ask the system to use the ssh command to connect as root to the computer at 192.168.7.2, which we know is our BeagleBone Black’s USB connection. When you execute this command and you have all the connections set right, you are presented with the following prompt:
The authenticity of host ‘192.168.7.2 (192.168.7.2)’ can’t be established.
ECDSA key fingerprint is c0:81:1a:f4:58:b9:51:15:00:df:ee:71:c4:d9:fd:54.
Are you sure you want to continue connecting (yes/no)?
This prompt is associated with security (referring to the first S in SSH). Your computer has never connected to this host via SSH before, and it wants to validate that this is the computer you mean to connect with. What does this buy you? It allows you to be sure that the computer you are connecting to in the future is the one you intended to, with no hacker interference. You should accept this by entering yes. The ssh program will let you know that it has accepted the security key and that it is added to the list of known servers.
The authenticity of host ‘192.168.7.2 (192.168.7.2)’ can’t be established.
ECDSA key fingerprint is c0:81:1a:f4:58:b9:51:15:00:df:ee:71:c4:d9:fd:54.
Are you sure you want to continue connecting (yes/no)? yes
Warning: Permanently added ‘192.168.7.2’ (ECDSA) to the list of known hosts.
Now, you request to log in as the root user. The root account is a powerful account and should be password protected by default, but the BeagleBone Black has a blank root password by default. We will change this later before we set the board up to be on a network doing a job.
In the Windows environment, I recommend PuTTY for SSH connections. It is easy to find with a Google search, and installation is a breeze. When you start the application, you are presented with the configuration window shown in Figure 3.5. Notice in the hostname that I’ve entered the USB assigned address of your BeagleBone Black, 192.168.7.2. Just below the Host Name text entry, you select the connection type, which is SSH in this case. Once you’ve entered these settings, click the Open button.

34 CHAPTER 3: Getting Started
FIGURE 3.5 The PuTTY Configuration window.
Another window will pop up that looks a lot like the information you saw the first time you tried to connect in the Linux terminal, and it serves the same function (see Figure 3.6). Click the Yes button to accept the security key and continue by logging on.
FIGURE 3.6 The PuTTY Security Alert window.
From here on, regardless of the operating system or Terminal application you are using, the output will be the same. That is because what you’ll see now is actually on the BeagleBone Black.
From now on, if you log in with SSH via the USB default connection, you will not see the prompt for the security key. The session will now present you with the following command prompt:
root@beaglebone:#
Connecting to Ethernet 35
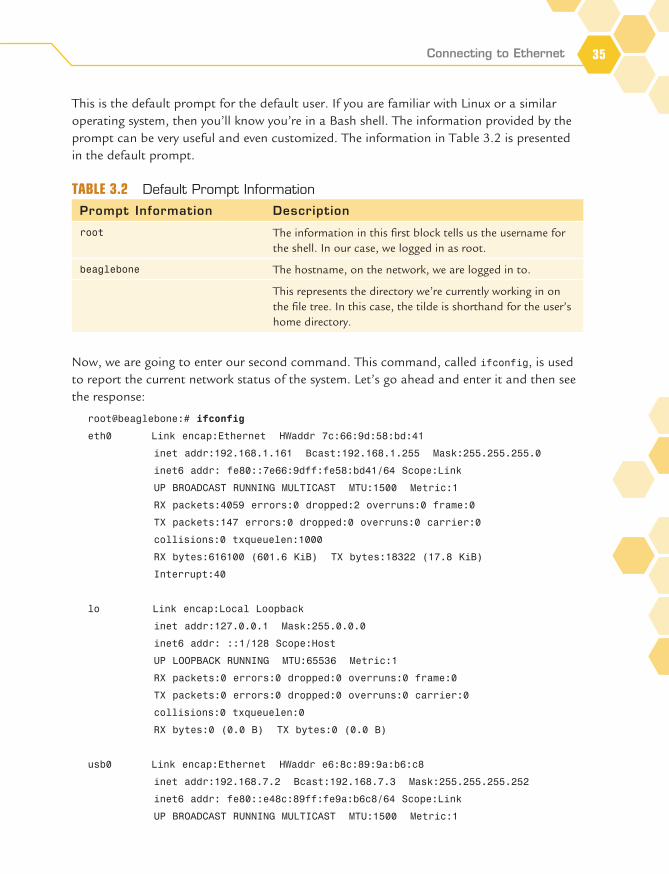
This is the default prompt for the default user. If you are familiar with Linux or a similar operating system, then you’ll know you’re in a Bash shell. The information provided by the prompt can be very useful and even customized. The information in Table 3.2 is presented in the default prompt.
TABLE 3.2 Default Prompt Information
Prompt Information Description
root The information in this first block tells us the username for the shell. In our case, we logged in as root.
beaglebone The hostname, on the network, we are logged in to.
This represents the directory we’re currently working in on the file tree. In this case, the tilde is shorthand for the user’s home directory.
Now, we are going to enter our second command. This command, called ifconfig, is used to report the current network status of the system. Let’s go ahead and enter it and then see the response:
root@beaglebone:# ifconfig
eth0 Link encap:Ethernet HWaddr 7c:66:9d:58:bd:41
inet addr:192.168.1.161 Bcast:192.168.1.255 Mask:255.255.255.0
inet6 addr: fe80::7e66:9dff:fe58:bd41/64 Scope:Link
UP BROADCAST RUNNING MULTICAST MTU:1500 Metric:1
RX packets:4059 errors:0 dropped:2 overruns:0 frame:0
TX packets:147 errors:0 dropped:0 overruns:0 carrier:0
collisions:0 txqueuelen:1000
RX bytes:616100 (601.6 KiB) TX bytes:18322 (17.8 KiB)
Interrupt:40
lo Link encap:Local Loopback
inet addr:127.0.0.1 Mask:255.0.0.0
inet6 addr: ::1/128 Scope:Host
UP LOOPBACK RUNNING MTU:65536 Metric:1
RX packets:0 errors:0 dropped:0 overruns:0 frame:0
TX packets:0 errors:0 dropped:0 overruns:0 carrier:0
collisions:0 txqueuelen:0
RX bytes:0 (0.0 B) TX bytes:0 (0.0 B)
usb0 Link encap:Ethernet HWaddr e6:8c:89:9a:b6:c8
inet addr:192.168.7.2 Bcast:192.168.7.3 Mask:255.255.255.252
inet6 addr: fe80::e48c:89ff:fe9a:b6c8/64 Scope:Link
UP BROADCAST RUNNING MULTICAST MTU:1500 Metric:1

36 CHAPTER 3: Getting Started
RX packets:1717 errors:0 dropped:0 overruns:0 frame:0
TX packets:136 errors:0 dropped:0 overruns:0 carrier:0
collisions:0 txqueuelen:1000
RX bytes:200409 (195.7 KiB) TX bytes:31059 (30.3 KiB)
The results provided tell us about three different network adapters represented on the system: eth0, lo, and usb0. We can ignore lo for now; it’s the local loopback connection. The two of interest to us are eth0 and usb0. The default USB connection is usb0. There are a lot of fields here, but the field we are interested in is labeled inet addr. Here is the usb0 interface information again, with that field highlighted in bold:
usb0 Link encap:Ethernet HWaddr e6:8c:89:9a:b6:c8
inet addr:192.168.7.2 Bcast:192.168.7.3 Mask:255.255.255.252
inet6 addr: fe80::e48c:89ff:fe9a:b6c8/64 Scope:Link
UP BROADCAST RUNNING MULTICAST MTU:1500 Metric:1
RX packets:1717 errors:0 dropped:0 overruns:0 frame:0
TX packets:136 errors:0 dropped:0 overruns:0 carrier:0
collisions:0 txqueuelen:1000
RX bytes:200409 (195.7 KiB) TX bytes:31059 (30.3 KiB)
The value associated with this address should look familiar. It is the same address we used to access the website and to log in to the board. Now, what we are looking for is the address that has been given to the board via DHCP. The Ethernet port is represented by interface eth0, and by looking at its inet addr field, we know that, in this case, the DHCP has assigned the board an address of 192.168.1.161, as shown here:
eth0 Link encap:Ethernet HWaddr 7c:66:9d:58:bd:41
inet addr:192.168.1.161 Bcast:192.168.1.255 Mask:255.255.255.0
inet6 addr: fe80::7e66:9dff:fe58:bd41/64 Scope:Link
UP BROADCAST RUNNING MULTICAST MTU:1500 Metric:1
RX packets:4059 errors:0 dropped:2 overruns:0 frame:0
TX packets:147 errors:0 dropped:0 overruns:0 carrier:0
collisions:0 txqueuelen:1000
RX bytes:616100 (601.6 KiB) TX bytes:18322 (17.8 KiB)
Interrupt:40
Unless you have changed the IP address space in your network, and if you have I trust that you know what you are doing with your network, your board will have an IP Address in one of the public IP Address spaces, either 192.168.x.x or 10.0.x.x.
Now, with the board connected to Ethernet and assigned an address on the network, you can unplug the USB connection and plug in the +5V power adapter. You’ve now put your BeagleBone Black on the network, independent of the computer you were using before. You are ready to be an active member of your home’s network ecosystem!

Connecting to Ethernet 37
Let’s check the website connection via your network connection. Using your browser, navigate to the address provided earlier for eth0. In the case of my network, that’s 192.168.1.161, as you can see in Figure 3.7.
FIGURE 3.7 Banner from the BeagleBone built-in website letting you know everything is working just fine—this time, via the Ethernet connection.
Now, let’s log in via SSH to the eth0 connection. It is going to look familiar:
[brian@mercury-fedora-vm ]$ ssh [email protected]
The authenticity of host ‘192.168.1.161 (192.168.1.161)’ can’t be established.
ECDSA key fingerprint is c0:81:1a:f4:58:b9:51:15:00:df:ee:71:c4:d9:fd:54.
Are you sure you want to continue connecting (yes/no)? yes
Warning: Permanently added ‘192.168.1.161’ (ECDSA) to the list of known hosts.
Debian GNU/Linux 7
BeagleBoard.org BeagleBone Debian Image 2014-04-23
Support/FAQ: http://elinux.org/Beagleboard:BeagleBoneBlack_Debian
Last login: Fri Jul 18 15:06:44 2014 from mercury-win.local
root@beaglebone:#
As you can see, it is the same process for logging in as before, but with a different address. This example is from a Linux machine, but the process is identical as the one we used previously for PuTTY, but with a different address.
Something interesting to note is that if you run the ifconfig command, the usb0 adapter is still available. That’s because we haven’t actually changed anything in the operating system configuration; we just used a different connection. The USB option is still there waiting for us to connect, and it will be unless we turn it off in the operating system. We will get into more detail about the underlying operating system and some of the options we have for alternate operating systems on the BeagleBone Black. In our next chapter, we delve into the hardware and discuss some basics of electronics that will be necessary for many of the remaining chapters.

This page intentionally left blank

This page intentionally left blank

Symbols12-bit converter, 120
Aactuators, 149Adafruit, 25Adafruit_BBIO PWM library,
162Adafruit Industries, 24ADS-B
adsbSCOPE, 223listening to aviation data,
221-223adsbSCOPE, 223aircraft tracking system, 228alert.py project, 161AM (amplitude modulation),
207amps, 40-41analog signals
pulse sensors, 122-124analog-to-digital converters,
120-121counts, 121
and operator, 87aplay command, 218
APT (Automatic Picture Transfer), 228
apt-get command, 59-60Arduino, 9
Microcontroller, 10-11arguments, 86ARM
TI Sitara processor, 20ARM architecture, 15array indexes, 89Artificial Intelligence, 175Atmel ATMega 328P, 11aviation data, listening to,
221-223adsbSCOPE, 223
BBabbage, Charles, 71bandwidth, 217Bash shell, 35baud, 92bbbservo.py project, 183-185BB-View LCD Capes, 111BeagleBoard, 15-16BeagleBoard.org website, 73BeagleBoard-xM, 16BeagleBone, 17
OpenROV project, 17-18BeagleBone Black
connecting to computer, 26Sitara processor, 19TI Sitara processor, 20
binarybaud, 92bits, 81
parity bit, 92bytes, 82-83counting in, 82hardware representation,
83-89LSB, 85MSB, 85
bits, 81-82baud, 92parity bit, 92
bitwise shift left, 86BJT (bi-junction transistor),
151blink.js, 30-32blink.py project, 154blinking lights
implementing in Python,62-65
bonescript, 30pinMode function, 31
Index

234 BoneScript
BoneScript, 57blink.js, 32
breadboard, 50brightness of LEDs
controlling, 158browsers
compatibility, 27default website banner
information, 27building
LED circuit, 50-55button circuits, 114
pull-down resistor, 114-115
pull-up resistor, 116buttons
finger graphic, 150bytes, 82-83
Ccalculating
pulse durations, 162calibrating the radio,
219-221capacitors, 130
smoothing capacitors, 130
CapeManager, 108Capes, 108, 111
BB-View LCD Capes, 111CryptoCape, 110ProtoCape, 109
capturingphotographs, 178-179pictures, 173video, 175
car computers, 189MIL, 190OBD, 190
OBD-II, 190commands, 198connecting to UART,
191-198PIDs, 190
statusinterpreting the data,
199-203reading, 198-199
car_monitor.py program, 202-203
CascadeClassifier object, 181
cat command, 99chmod command, 142-144choosing
operating systems, 73circuits
building, 50-55clock, 7
RTC, 19updating, 59
cmake command, 176, 215code
commenting, 30collectors, 151command() method, 196commands
aplay, 218apt-get, 59-60cat, 99chmod, 142-144cmake, 176, 216echo, 98git, 176grep, 99ipconfig, 35, 210lsusb, 210make, 216man, 97-99
mkdir, 62more, 99OBD-II, 198pip, 61pipe, 99print, 194
comments, 30docstrings, 132-133
communications protocolsADS-B
listening to aviation data, 221-223
communications_test.py project, 194
comparinglaptops and BeagleBone
Black, 8microcontrollers and
microprocessors, 10NPN and PNP
transistors, 152compatibility
web browsers, 27compiled code, 65-69computers
clock, 7embedded computers,
5, 8Arduino, 9
microcontroller, 10-11
GPIO ports, 8Computer Vision, 175connecting
board to computer, 26to Ethernet, 32-37to WiFi, 210-212UART to OBD-II, 191,
197-198webcam, 171

flow control 235
controllingcurrent, 152-154LED brightness, 158
copyingimage file, 74-75
counting in binary, 82bits, 81bytes, 82-83hardware representation,
84-89counts, 121CPU clock, updating, 59creating
portable gaming environment, 226
weather station, 227CryptoCape, 110current
controlling, 152-154fading LEDs, 156-158
cycles per second, 124
Ddatasheets, 118dd, 75decimal counting, 81default website banner
information, 27demodulation, 212desktops
comparing with BeagleBone Black, 8
Device Tree, 108DHCP, 32digital multimeters, 230digital signals, 120diodes, 48-50, 160
flow control, 160LEDs, 48-49
circuit, building, 50-55
disk image, 73copying, 74-75
distributions, 71Ubuntu, 73
docstrings, 132-133drivers
installing on your computer, 27
dump1090, 223duration of pulses,
calculating, 162duty cycle, 157
EEasyDriver, 165echo command, 98ECM
car statusinterpreting the data,
199-203reading, 198-199
ECM (Engine Control Module), 189
electricitycapacitors, 130
electromagnetic spectrum, 205
radio waves, 205-206electronics
actuators, 149amps, 40-41diodes, 48-50ground, 50jumper wires, 52oscilloscope, 54resistance, 41-42resistors, 45-48, 154short circuit, 43-45transducers, 113transistors, 149-154
BJT, 151
LEDs, fading, 156-158NPN, 151-152PNP, 152turn-on voltage, 152
voltage, 39-41Watts, 40-41work, 41-42
Element14 website, 66embedded computers, 5, 8
Arduino, 9microcontroller, 10-11
GPIO ports, 8emitters, 151eMMC, 74ENIAC, 71environment_monitor.py,
137results, publishing,
137-138, 142EOBD (European OBD),
190Ethernet, 22
connecting, 32-33, 36-37
Ffaces
identifying, 179-181tracking, 182, 185, 188
face_tracker.py project, 180-181
fading LEDs, 156-158file systems
GPIOmemory locations,
100-103files, transferring, 62FileZilla, 62finger graphic, 150flash memory, 22flow control, 160

236 FM
FMbandwidth, 217wideband FM, 217
FM (frequency modulation), 207
functions(), 200obd_read, 194pinMode, 31read_adc, 123strip(), 201wait for edge(), 116
functrionsarguments, 86
funtions, 86
Ggain, 217gaming
portable gaming environment,
creating, 226git, 176Git, 215GitHub, 215goal of this book, 225GPIO, 23, 24
current, controlling, 152-154
headers, 23memory locations,
100-103pins, 102
default state for BeagleBone Black, 105, 108
mapping to GPIO memory locations, 100-102
mux, 103-105slew rate, 105
GPIO (general-purpose input/output) ports, 5
GPIO ports, 8grep command, 99ground, 50
HHakko FX888D soldering
station, 230hardware
actuators, 149Capes, 108, 111
BB-View LCD Capes, 111
CryptoCape, 110ProtoCape, 109
digital multimeters, 230diodes, 48-50
LED circuit, building, 50-55
LEDsrepresenting binary,
83-89mux, 103-105oscilloscope, 54radio, testing, 216-219resistors, 45-48soldering irons, 230voltage regulator, 94webcam
connecting, 171testing, 172
webcamssnapshot.py project,
173-175GPIO, 23-24
headers, 23
processor, 20RAM, 21, 22
hardware specifications for BeagleBone Black
Ethernet, 22flash memory, 22MicroSD, 22
headers, 23heartbeats, 120“Hello World!”, 28-31Hertz, 124history
of Linux, 71-72
IIDE (integrated
development environment), 28
identifyingfaces, 179-181
image filecopying, 74-75
imagescapturing, 173, 178-179faces, identifying,
180-181faces, tracking, 182, 185,
188in-car computer, 227-228inspecting
UART, 93-96insserv program, 144-146installing
drivers, 27Kalibrate, 219-220OpenCV libraries,
175-176operating system, 76-79packages, 61streamer, 172

237motors
Internet radio, 205interpreted code, 57-58
Python, 59-60blinking lights,
implementing, 62-65functions, 86
interpretingOBD-II data, 199-203
int() funtion, 200ipconfig command, 35, 210
JJavaScript, 32joysticks, 118jumper wires, 52
KKalibrate
installing, 219-220
Llaptops
comparing with BeagleBone Black, 8
LBP (Local Binary Pattern), 180
LED circuitbuilding, 50-55
LEDs, 48-49binary, representing,
83-89fading, 156-158polarity sensitive, 51
librariesAdafruit_BBIO PWM
library, 162Git, 215libusb-1.0, 215
OpenCV, 177-178installing, 175-176
RCS, 215twisted, 61
libusb-1.0, 215Linux
Bash shell, 35cat command, 99distributions, 71echo command, 98grep command, 99history of, 71-72man command, 97-99more command, 99pipe command, 99redirects, 99
listeningto aviation data,
221-223adsbSCOPE, 223
list indexes, 89loading
microSD card, 74-77logic analyzers
Oscium LogiScope, 230logic-level converter, 192logic states, 120loss in waveform resolution,
125LSB (least-significant bit),
85lsusb command, 210
Mmachine code, 57make command, 216man command, 97-99mapping
pins to GPIO memory locations, 100-102
memoryflash memory, 22MicroSD external
storage, 22RAM, 7
in BeagleBone Black, 21-22
paging, 22registers, 104volatile memory, 21
methodscommand(), 196speed(), 201
microcontrollers, 10-11Atmel ATMega 328P, 11
microprocessorsARM
TI Sitara processor, 20ARM architecture, 15TI Sitara, 19
microSD cardloading, 74-77
MicroSD external storage, 22
MIL (Malfunction Indicator Lamp), 190
mkdir command, 62modes, 198modifying
permissions, 142-144modulation, 207
demodulation, 212phase modulation, 209
more command, 99motors
diodes, 160servo motors, 161-163stepper motors, 165-166
stepper.py project, 167, 170
winding inductance, 167

238 motors
vibration motors, 159alert.py project, 161
MSB (most-significant bit), 85
mux, 103-105
Nnetworking
Ethernet, 22NOAA, 228NPN transistors, 151-152NTP (Network Time
Protocol), 59Nyquist sampling, 125
OOBD-II, 190
car statusinterpreting the data,
199-203reading, 198-199
car status, reading, 198commands, 198connecting to UART,
191, 197-198PIDs, 190
OBD (On-Board Diagnostics), 190
obd.py project, 195-196obd_read function, 194onboard computers, 189
ECM statusinterpreting received
data, 199-203 reading, 198-199
MIL, 190OBD, 190OBD-II, 190
commands, 198
connecting to UART, 191, 197-198
PIDs, 190online resources, 230-231on/off sensors, 113-116OpenCV, 175
bbbservo.py project, 183-185
face_tracker.py project, 180-181
libraries, 177-178libraries, installing,
175-176photobooth.py project,
178-179system installation, 177tracker.py project,
185, 188OpenCV (Open Computer
Vision), 175OpenROV project, 17-18operating system
installing on BeagleBone Black, 76-79
operating systemsLinux
cat command, 99distributions, 71echo command, 98grep command, 99history of, 71-72man command, 97-99more command, 99pipe command, 99
selecting, 73VMS, 72
operatorsand, 87bitwise shift left, 86
oscilloscope, 54
oscilloscopesOscium iMSO-104, 230 Tektronix MSO2024B,
230Oscium iMSO-104, 230Oscium LogiScope, 230
Ppackages, installing, 61paging, 22parallel communications
ribbon cables, 91parity bit, 92permissions
changing, 142-144Phant, 138phase modulation, 209photobooth.py project,
178-179photocells, 127, 134-136photo_collection.py, 136pictures
capturing, 173PIDs, 198PIDs (parameter IDs), 190pinMode function, 31pins, 102
default state, 105, 108mapping to GPIO
memory locations, 100-102
mux, 103-105slew rate, 105UART, 96
pip command, 61pipe command, 99PNP transistors, 152polarity sensitive, 51

239radio
portable gaming environment,
creating, 226ported operating systems,
71potentiometers, 118-120power, 40-41
short circuit, 43-45ppm (parts per million),
219print command, 194print statement, 133programming languages
compiled code, 65-66, 69interpreted code, 57-58Python, 59-60
programsblink.js, 30car_monitor.py program,
202-203dd, 75dump1090, 223environment_monitor.
py, 137results, publishing,
137-138, 142insserv, 144-146snapshot.py, 173-175
project ideasaircraft tracking system,
228in-car computer,
227-228portable gaming
environment, 226satellite ground station,
228-230weather station, 227
projectsbbbservo.py, 183-185blink.py, 154
communications_test.py, 194
face_tracker.py, 180-181obd.py, 195-196photo_collection.py, 136photobooth.py, 178-179pwm_blink.py, 156-157pwm_fade.py, 158servo.py, 162-163snapshot.py, 173-175tracker.py, 185, 188video.py, 177-178
ProtoCape, 109publishing
environment_monitor.py results, 137, 142
pull-down resistors, 114-115
pull-up resistors, 116pulse sensors, 122-124pushbutton circuit with LED
indicator, 116-118PuTTY, 33PWM, 156-158
Adafruit_BBIO PWM library, 162
duty cycle, 157pulse durations,
calculating, 162pwm_blink.py, 156-157pwm_fade.py, 158PWM (pulse-width
modulation), 156Python, 59-60
alert.py project, 161bbbservo.py project,
183-185binary counter program,
84-89blinking lights,
implementing, 62-65
blink.py project, 154chmod command,
142-144communications_test
project, 194face_tracker.py project,
180-181functions, 86obd.py project, 195-196photobooth.py project,
178-179projects
car_monitor.py, 202-203
photo_collection.py, 136
pwm_blink.py, 156-157
pwm_fade.py, 158tmp36_collection.py,
130-132servo.py project,
162-163snapshot.py project,
173-175stepper.py project,
167, 170tracker.py project,
185, 188
Rradio
AM, 207calibrating, 219-221FM, 207
bandwidth, 217gain, 217Internet radio, 205listening to aviation data,
221-223adsbSCOPE, 223

240 radio
phase modulation, 209SDR, 212
RTL-SDR, 212-213testing, 216-219WiFi, 210-211
connecting to, 210-212
radio waves, 205-206RAM, 7
in BeagleBone Black, 21-22
paging, 22RCS (revision control
system), 215read_adc function, 123reading
ECM status, 198-199reconstructing waveforms,
125redirects, 99registers, 104repository, 176representing binary, 83-89resistance, 41-42
short circuit, 43-45resistors, 45-48, 154ribbon cables, 91rotation
sensing, 118-120RTC (real-time clock), 19RTL-SDR, 212-213
testing, 217-219
Ssample rates, 124-125
loss in waveform resolution, 125
Nyquist sampling, 125sampling, 217satellite ground station,
228-230
schematicscollectors, 151emitters, 151finger graphic, 150
SDRlistening to aviation
data, 221-223adsbSCOPE , 223
RTL-SDR, 212-213SDR (software-defined
radio), 212security
permissionschanging, 142-144
selectingoperating systems, 73
sensors, 113-116analog-to-digital
converters, 120-121buttons, 118joysticks, 118on/off sensors, 113photocells, 127, 134-136pulse sensors, 122-124pushbutton circuit with
LED indicator, 116-118variable resistors,
118-120serial communication
baud, 92serial communications, 91
UART, 91-93inspecting, 93-96pins, 96
servo motors, 161-163servo.py project, 162-163shell scripts, 142short circuit, 43-45Sitara processor, 19-20
slew rate, 105smoothing capacitors, 130snapshot.py project,
173-175SNES, 77soldering irons
Hakko FX888D soldering station, 230
SparkFunCryptoCape, 110ProtoCape, 109publishing environment_
monitor.py results, 137-138, 142
SparkFun EasyDriver Stepper Motor Driver, 165
SparkFun Electronics, 25SparkFun Pulse Sensor kit,
122-124spectrum, 206speed() method, 201SSD (solid-state drive), 22SSH
PuTTY, 33SSH (Secure Shell), 33start bits, 92step angle, 165stepper motors, 165-166
stepper.py project, 167, 170
winding inductance, 167stepper.py project, 167, 170stop bits, 92streamer, 172
installing, 172strip() function, 201suppliers, 25system disk
microSD cardloading, 74-77

241work
TTektronix MSO2024B
oscilloscope, 230testing
radio hardware, 216-219webcam, 172
TI Sitara processor, 19-20tmp36_collection.py,
130-132Torvalds, Linus, 72tracker.py project, 185-188tracking
faces, 182-188transducers, 113
sensorsanalog-to-digital
converters, 120-121buttons, 118joysticks, 118pulse sensors,
122-124variable resistors,
118-120transferring files, 62transistors, 49, 149-154
BJT, 151LEDs, fading, 156-158NPN, 151-152PNP, 152turn-on voltage, 152
truth tables, 87turn-on voltage, 152twisted library, 61
UUART
baud, 92connecting to OBD-II,
191, 197-198parity bit, 92pins, 96
UART (Universal Asynchronous, 93-96
UART (Universal Asynchronous Receiver/Transmitter), 91-93
Ubuntu, 73Unix, 72updating the clock, 59USB Audio Adapter
(Adafruit), 218user lights, 26utilities
cmake, 215rtl_fm, 217
Vvariable resistors, 118-120vibration motors, 159
alert.py project, 161video
capturing, 175video camera
connecting, 171testing, 172
video camerasOpenCV
bbbservo.py project, 183-185
face_tracker.py project, 180-181
libraries, 177-178library installation,
176photobooth.py
project, 178-179system installation,
177tracker.py project,
185, 188video.py project, 177-178VMS, 72
volatile memory, 21voltage, 39-41
brightness, 136capacitors, 130turn-on voltage, 152
voltage divider circuit, 119voltage regulator, 94
Wwait for edge() function,
116Watts, 40-41waveforms
loss in resolution, 125reconstructing, 125
weather stationcreating, 227
web browserscompatibility, 27default website banner
information, 27webcam
connecting, 171-172webcams
snapshot.py project, 173-175
websitesAdafruit, 25BeagleBoard.org, 73Element14, 66GitHub, 215online resources,
230-231SparkFun Electronics, 25
wideband FM, 217WiFi, 210-211
connecting to, 210-212Win32 Disk Imager, 74winding inductance, 167work, 41-42


