The BEADSMITH Super Duos Minos Double Wrap Leather Bracelet by … · & Minostm Double Wrap Leather...
14
1 Super Duos tm & Minos tm Double Wrap Leather Bracelet by Deb Moffett-Hall Materials: Super Duos in turquoise or coral, (Note Two hole beads: The first hole that thread passes through is hole A and the 2 nd is hole B.) seed beads sizes 11 (small) & 8 (large) in silver or bronze to be called “metal”, size 11 seed beads in turquoise or coral to be called “color”, Minos tm in silver or matte bronze, leather: black or brown, thread: black or brown. Also need (not supplied): one 16-20mm shank button: silver or bronze, bead weaving needle, scissors 1 2 3 4 1-2 Select the pair of sizing rods for the desired bracelet size and assemble the loom. 3. Using elastic bands attach a thick tensioning rod to each end bar as shown. 4. Measure your leather as follows: two times around the assembled loom for each bracelet wrap plus 1 ½ again for the knots. IE: for a two-wrap bracelet wrap the leather around the loom 5 ½ - 6 times. You will complete @1/2 - 1” of beading before placing the cords on the loom. 5 6 7 8 5-6 Slide on your button and position at the center of the leather, matching the cut ends. 7-8 Tie an over-hand knot that will lay at the edge of the button. This allows room for the closure loops directly under the button when the bracelet is fastened. 9 10 11 12 9-12 On the back, Pass the needle through the leather knot and exit leaving a 5” tail to hide later. Working thread exits from behind the bottom cord. Tie two half-hitch knots on bottom leather cord next to the knot by passing around bottom cord, forming a loop, passing through the loop, and pulling tight. The BEADSMITH tm
Transcript of The BEADSMITH Super Duos Minos Double Wrap Leather Bracelet by … · & Minostm Double Wrap Leather...

1
Super Duostm
& Minostm
Double Wrap Leather Bracelet by Deb Moffett-Hall
Materials: Super Duos in turquoise or coral, (Note Two hole beads: The first hole that thread passes
through is hole A and the 2nd
is hole B.) seed beads sizes 11 (small) & 8 (large) in silver or bronze to be
called “metal”, size 11 seed beads in turquoise or coral to be called “color”, Minostm in silver or matte
bronze, leather: black or brown, thread: black or brown.
Also need (not supplied): one 16-20mm shank button: silver or bronze, bead weaving needle, scissors
1 2 3 4
1-2 Select the pair of sizing rods for the desired bracelet size and assemble the loom.
3. Using elastic bands attach a thick tensioning rod to each end bar as shown.
4. Measure your leather as follows: two times around the assembled loom for each bracelet wrap plus 1
½ again for the knots. IE: for a two-wrap bracelet wrap the leather around the loom 5 ½ - 6 times. You
will complete @1/2 - 1” of beading before placing the cords on the loom.
5 6 7 8
5-6 Slide on your button and position at the center of the leather, matching the cut ends.
7-8 Tie an over-hand knot that will lay at the edge of the button. This allows room for the closure loops
directly under the button when the bracelet is fastened.
9 10 11 12
9-12 On the back, Pass the needle through the leather knot and exit leaving a 5” tail to hide later.
Working thread exits from behind the bottom cord. Tie two half-hitch knots on bottom leather cord next
to the knot by passing around bottom cord, forming a loop, passing through the loop, and pulling tight.
The BEADSMITHtm

2
13 14 15 16
13. The two leather cords will be called “top” and “bottom”. To create a tapered start to the beadwork
string 1 size 8 (large) metal seed bead and pass under the bottom and over the top placing the bead in the
center as shown.
14. Wrap around the top to pass under the top and back through the bead and over the bottom cord on
the return. This thread path forms a figure “8”.
15-16 Repeat the thread path one more time. (always perform the up and back a total of two times
through each bead or bead hole) This insures that the beads lie straight and strengthens the bracelet.
17 18 19 20
17. String 2 large metal seed beads. Pass under the bottom and over the top cords placing beads in the
center.
18. Pass around to return under the top, back through the 2 beads and over the bottom. Repeat the thread
path one more time.
19-20 String 1 large metal, 1 small color, 1 large metal. Pass under the bottom and over the top cords
placing beads in the center. Pass around to return under the top, back through the 3 beads and over the
bottom. Repeat the thread path one more time.
21 222 3 24
21. String 1 small metal seed bead, hole “A” on a super duo, 1 small metal seed. Pass under the bottom
cord over the top cord placing beads in the center.
22. Pass around, then under the top cord back through the beads and over the bottom cord. Repeat the
thread path one more time
23 - 24 Pass under the bottom cord. String 1 small metal, pass through hole “B” on the super duo, string
1 small metal. Pass over the top cord, Pass around, then under the top cord back through the beads and
over the bottom cord. Repeat the thread path one more time.

3
25 26 27
25 String 1 large metal, 1 small color, 1 large metal. Pass under the bottom and over the top cord placing
beads in the center. Pass around to return under the top, back through the 3 beads and over the bottom.
Repeat the thread path one more time.
26. String one elastic band around the button and tie a temporary overhand knot to join the cut ends of
the leather cord.
27. Attach the button elastic onto the wooden knob on the left side of the loom as shown.
28 29 30
28. Carefully wrap the cords around the loom keeping the cords parallel, not overlapping. Wrap a 2nd
elastic around the knot tied at the end of the leather cords and use this elastic to secure the cord ends to a
wooden knob on the right side of the loom.
29. Notice how the large tension rod holds the cords away from the curved end bar creating space under
the cords to add new beads and manipulate the needle.
30. The tension rods can be positioned under the cords or under the beads just added. Sometimes
placing the tension rod under the working beads holds the beads in a more convenient angle for the
needle passes.
31 32 33 34
Bead Groups to complete bracelet:
31. Large metal/color/large metal = “color” 32. Small metal/Duo/small metal holes A & B= “duo”
33. Large metal/small metal/large metal= “metal” 34 small metal/Minos/small metal= “Minos”

4
38
The last bead group added was a color (red star on left) now add the following bead groups:
1 metal, 1 color, 1duo, 1color, 1metal, 1 color, 1duo, 1color, 1metal, 1color, 1duo, 1color, 1metal,
1 color, 1duo, 1color, 1metal (Total of 5 duo groupings) 1minos, 1metal, 1minos, 1metal, 1minos,
1metal, (total 3 Minos groupings) This segment ends at the red arrow on the right.
39
This segment picks up just after #38 as shown by the red arrow on left. New segment lies between
yellow arrows. Add the following bead groups: 1color, 1duo, 1color, 1metal, 1minos, 1metal, 1color,
1duo, 1color, 1metal, 1minos, 1metal, 1color, 1duo, 1color, 1metal, 1minos, 1metal, 1minos, 1metal,
1minos, 1metal, this completes the yellow segment and you are at the yellow arrow on the right.
Begin again from #38 red arrow on left 1 color and repeat until desired bracelet length is beaded.
40 41
40. When you have nearly completed two beaded wraps around the Endless Loom remove the bracelet
from the loom and check the fit. Allow 1/2” for reducing the beadwork to a point (reverse of the start)
and the knots that create the first button hole. Add beads if needed to achieve the desired length. Reverse
steps 13-19 to bring the beadwork to a point.
41. Tie one over hand knot close to the last bead. Place the widest part of the button next to the knot just
tied and between the cords to determine the position of the next knot. Repeat if two button holes or more
are desired.

5
Materials: seed beads size 8 (large color) mixed blues or mixed reds, seed beads size 8 (large metal) in
silver or bronze, seed beads size 11 (small metal) in silver or bronze, pearls (red kit) OR fire polish
(blue kit), bead slide clasp, and thread.
Also needed (not supplied): a bead weaving needle, scissors, and jewelry pliers bright sewing thread.
Attach one medium size tension rod to the curved side of one end bar with elastic bands. Assemble loom
Important: Assemble the loom to ½” smaller than desired finished bracelet size when using bead
slide clasps to complete your project.
1 2 3 4 5
1. Stitch the first starter unit using 18” of thread, string 2 large metal seed beads
2. Leave a 6” tail and pass through both beads again moving in the same direction
3. Pass through the first bead strung again and exit
4. Draw the thread snug and position the beads side by side as shown with the working thread top left.
Beads will now be referred to as column left and column right
5. String 2 large color, pass down through the metal bead on the right
The BEADSMITHtm Bead Slide Clasp Bracelets By Deb Moffett-Hall www.patternstobead.com

6
6 7 8 9 10
6. Draw thread to position the new beads on top of the existing pair. Without adding new beads pass up
through both beads on the left.
7. String 2 large metal, pass down through the top color bead on the right column
8. Without adding new beads pass up through the top two beads on the left. (1 old and 1 new bead)
9. String 3small metal, 2 large metal, 3 small metal,
10. Pass down through the top metal bead on the right
11 12 13 14 15
1.1 Without adding new beads pass up through 1 large metal, 3 small metal, 1 large metal on the left.
12. Draw the thread snug to position beads.
13. String 2 large color, pass down through the top large metal bead on the right
14. Without adding new beads pass up through the top two beads on the left. (1 old and 1 new bead)
15. String 2 large metal beads, pass down through the top large color bead on the right
16 17 18 19 20 21 22
16. Without adding new beads pass up through the top two beads on the left. (1 old and 1 new bead)
17. Do not add any new beads, pass down the large metal just added on the right
18. Pass up through the top large metal on the left.
19 -22 Completed starter unit. Pass under thread on the side and tie off and hide the thread ends, trim.

7
23 24 25 26 27
23. Premeasure a longer thread for the 2nd
starter unit: Wrap thread around the assembled loom one time
for each warp thread needed. This design requires 8 warp threads.
24. Then wrap an additional 6 times around the loom for sufficient thread to make the starter unit and to
begin weaving. Cut from spool and unwrap thread from the loom.
25. Using the long thread repeat steps 2-19
26. Only tie off and trim the tail thread from the 2nd
starter unit. Position the two completed starter units
side by side as shown with the long thread top right.
27. Thread a needle onto an 11” length of VERY different color thread (any sewing thread will do) It
must be very obvious which is the extra thread as it will be cut or undone later and you don’t want to
risk cutting an important thread in your bracelet. You will weave back and forth between the inner
columns of the 1st and 2
nd starter units. Begin at the top right and zig zag down. Treating the 3 small
beads in the middle as one.
28 29 30 31a&b
28-31.When you reach the bottom begin to zig zag back up much like lacing a pair of shoes. Tie off at
the top. A blue starter unit and a red starter unit are shown.
32 33 34
32. Warping the loom: position the starter unit with the long thread (on a needle) upper right.
33.Wrap the thread over the back of the loom, around underneath and up the front. Pass right to left
through the first bead on the lower right. (#1 on the warping diagram – next page)
34. Refer to the warping diagram on the next page. to stitch your warp threads back and forth around the
loom. The nearly completed warps will look like figure #34.

8
35 36 37
35. Warp thread begins upper right “A” as shown in step #33 follow the green path over the top back of
the loom, around and under the front and pass right to left through bead 1.
Orange: Pass down under the front, under the loom to come up at the back and pass right to left through
upper bead B
Purple: Pass over top back of the loom, around and under the front, pass right to left through bead 3.
Light Green: Pass down under the front, under the loom to come up at the back and pass right to left
through all 3 small metal upper beads D
Pink: Pass over top back of the loom, around and under the front, pass right to left through bead 5.
Brown: Pass down under the front, under the loom to come up at the back and pass right to left through
upper bead F
Blue: Pass over top back of the loom, around and under the front, pass right to left through bead 7.
Fuchsia: Pass down under the front, under the loom to come up at the back and down under the thread
that lies between the two bead rows at the left side of the top starter unit. (see #36 & 37) Keep your
thumb on the starter unit and draw the thread to snug the warp threads. Keep the warp threads under
tension and tie two half hitch knots around the last warp (Fuchsia) Warping is now complete. If you
need more tension on the warps replace the medium rod with a larger rod.
38 39 40
38-40 Position the starter units so the top edge is in the middle weaving area. String as shown for your
colorway. Pass under the warp threads, press up with forefinger to position the beads between the warp
threads and pass back crossing OVER the warp threads between beads to complete the first woven row.
Loom
Warping
Diagram

9
41
41-43 Second woven row: String as shown for your colorway. Pass under the warp threads, press up
with forefinger to position the beads between the warp threads and pass back crossing OVER the warp
threads between the beads to complete the second row. Repeat first and second woven rows.
44 45 46 47
44-46 When the weaving area fills with beads drop the tension by pressing up on the tension rod with
both thumbs til it falls into the center. Shift the beadwork forward to bring more open warps into the
weaving area. Press up with thumbs to position the tension rod up onto either front or back loom end.
47. Continue to repeat woven rows until warp thread is ALMOST filled. (leave about ¼” open warp. Do
not tie off your weaving thread yet. Remove beadwork from loom and allow to rest overnight. If space
remains for another row of beads add them now, if beads have buckled, remove a row. When beads lie
flat you are ready to attach the clasp. (a small gap can be eased into the beadwork)
48 49 50 51
48-50. Tie off the weaving thread. Untie or cut the OTHER COLOR thread to open your beadwork flat.
51. If needed gently pry open the slot on the edge of the clasp so it will slide smoothly over the first row.
52 53
52 – 53 Gently slide the first row of beads into the tube on the side of the clasp, pinch the tube if needed
to snug the length over the beads. Use jewelry pliers to fold down the end flaps on the clasp to capture
the first row of beads inside the clasp tube. Repeat with other beadwork end to complete the bracelet.
42 43

10
Materials: Fire polish 4mm, pearls 4mm, seed beads size 8, mixed colors, seed beads size 8, silver or
bronze (large metal) and size 11 silver or bronze (small metal), elastic, and regular thread.
Also need (not supplied): a big eye needle for elastic, a bead weaving needle, and glue for elastic knots
1 2 3
1. Assemble the loom for the desired bracelet size. Attach one medium size tension rod to one end bar
with elastic bands. Set loom aside and stitch one starter piece.
2. Use 18” thread to string 2 fire polish 4mm beads and leave a 6” tail.
3. Pass through the first bead strung again moving in the same direction, draw thread and position the
beads side by side with the working thread top left.
4 5 6 7 8 9
4. String 2 color seeds, 1 pearl and pass down fire polish bead on right, position new beads side by side.
5. Pass up through both beads: fire polish and pearl on left.
6. String 1 pearl, 2 color seeds, pass down top 2 color beads on right, position new beads side by side.
7. Pass up through pearl and 2 color seed beads on left.
8. String 2 fire polish and pass down top pearl only on right, position new beads side by side.
9. Pass up through 2 color seeds and fire polish on left.
The BEADSMITHtm
Ruffled Pearls
Stretch Bracelet By Deb Moffett-Hall
A seed bead ruffle adds
a fun flirty edge to this
pearl and fire polish
stretch bangle.
11
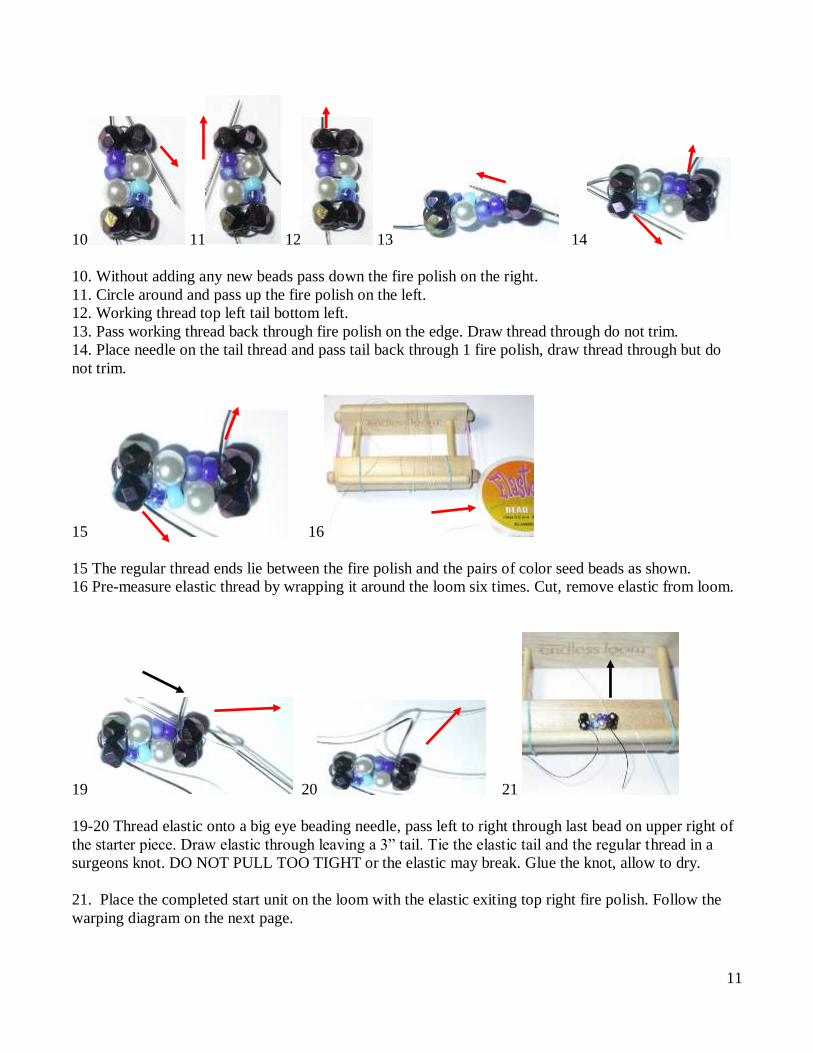
10 11 12 13 14
10. Without adding any new beads pass down the fire polish on the right.
11. Circle around and pass up the fire polish on the left.
12. Working thread top left tail bottom left.
13. Pass working thread back through fire polish on the edge. Draw thread through do not trim.
14. Place needle on the tail thread and pass tail back through 1 fire polish, draw thread through but do
not trim.
15 16
15 The regular thread ends lie between the fire polish and the pairs of color seed beads as shown.
16 Pre-measure elastic thread by wrapping it around the loom six times. Cut, remove elastic from loom.
19 20 21
19-20 Thread elastic onto a big eye beading needle, pass left to right through last bead on upper right of
the starter piece. Draw elastic through leaving a 3” tail. Tie the elastic tail and the regular thread in a
surgeons knot. DO NOT PULL TOO TIGHT or the elastic may break. Glue the knot, allow to dry.
21. Place the completed start unit on the loom with the elastic exiting top right fire polish. Follow the
warping diagram on the next page.

12
Warping Diagram
22 23
22. Follow warping diagram using the elastic thread. Warp thread begins upper right bead #1 in diagram
follow the Green path over the top back of the loom, around and under the front and pass right to left
through bottom row bead A.
Orange: Pass down under the front, under the loom to come up at the back and pass right to left through
2 color seeds upper beads #2
Purple: Pass over top back of the loom, around and under the front, pass right to left through 2 color
beads C on the bottom row.
Red: Pass down under the front, under the loom to come up at the back and pass right to left through
upper bead #4
Blue: Pass over top back of the loom, around and under the front, pass left to right into bottom row
bead D. Draw elastic snug around the loom. Tie a surgeons knot using the regular tail thread and the
elastic thread. Glue and hide the knot, allow glue to dry.
23 Push the beadwork to the back of the open weaving area. Leaving a 6” tail to hide later, tie a regular
working thread onto the left elastic warp near beads. If you need more tension on the elastic to weave
replace the medium tension rod with the large one.
24 25 26 27
24. First woven row: String 1 fire polish, 1 pearl, 2 large color seed beads, 1 fire polish.
25. Pass the thread and beads under the elastic warp, press up to position beads between elastic warps.
26. Pass needle back through beads passing OVER the elastic warps on the return pass.
27. Second woven row: String 1 fire polish, 2 large color seed beads, 1 pearl, 1 fire polish.

13
28 29 30
28. Pass the thread and beads under the elastic warp, press up to position beads between elastic warps.
29. Pass needle back through beads passing OVER the elastic warps on the return pass.
30. Repeat first and second woven rows. The open weaving area will fill with beads.
31 32 33
31. To bring more open warps into the weaving area drop the tension bar into the center, slide the beads
backward and around the loom and return the tension bar to position on the loom end.
32. Continue to alternate first and second woven rows until the warps are ALMOST filled. See small ¼”
gap in figure 33. Do not tie off working thread! Allow the bracelet to rest for about an hour.
34 35 36
34. If the beads lie flat without bunching and there is room for another row add a row, if the beads bunch
up remove a row. If the beads lie flat and smooth but there is a small gap remaining massage the beads
to distribute the gap back into the beadwork. Bracelet is pretty without the ruffle too. If no ruffle is
desired tie off the working thread, hide the ends and trim. Enjoy!
35. Ruffle: knot the working thread to the outer elastic warp using a half hitch. String 1 large metal seed.
Pass under the edge elastic warp back to front and between two fire polish beads (fp#1 & fp#2).
36. Pass back through the large metal seed just added.
14
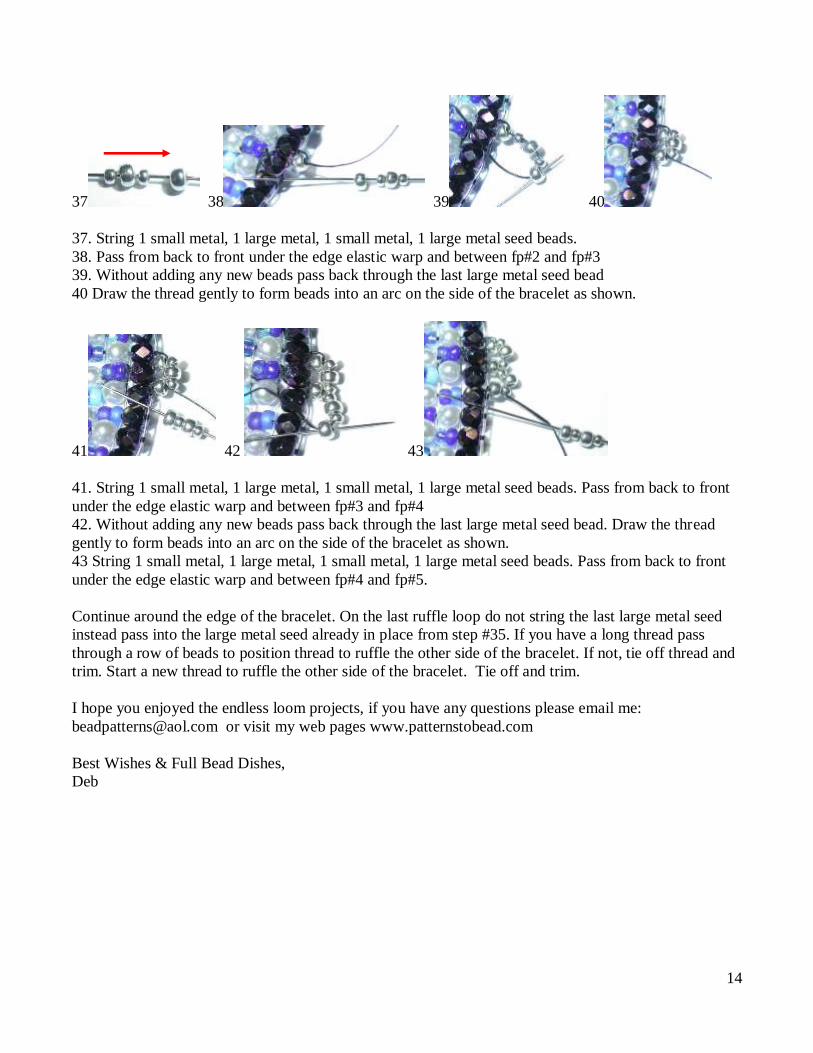
37 38 39 40
37. String 1 small metal, 1 large metal, 1 small metal, 1 large metal seed beads.
38. Pass from back to front under the edge elastic warp and between fp#2 and fp#3
39. Without adding any new beads pass back through the last large metal seed bead
40 Draw the thread gently to form beads into an arc on the side of the bracelet as shown.
41 42 43
41. String 1 small metal, 1 large metal, 1 small metal, 1 large metal seed beads. Pass from back to front
under the edge elastic warp and between fp#3 and fp#4
42. Without adding any new beads pass back through the last large metal seed bead. Draw the thread
gently to form beads into an arc on the side of the bracelet as shown.
43 String 1 small metal, 1 large metal, 1 small metal, 1 large metal seed beads. Pass from back to front
under the edge elastic warp and between fp#4 and fp#5.
Continue around the edge of the bracelet. On the last ruffle loop do not string the last large metal seed
instead pass into the large metal seed already in place from step #35. If you have a long thread pass
through a row of beads to position thread to ruffle the other side of the bracelet. If not, tie off thread and
trim. Start a new thread to ruffle the other side of the bracelet. Tie off and trim.
I hope you enjoyed the endless loom projects, if you have any questions please email me:
[email protected] or visit my web pages www.patternstobead.com
Best Wishes & Full Bead Dishes,
Deb