The Basics of Photoelectric Controls -...
20
The Basics of Photoelectric Controls
-
Upload
nguyenmien -
Category
Documents
-
view
222 -
download
6
Transcript of The Basics of Photoelectric Controls -...

The Basics of Photoelectric Controls

Table of Contents
Theory of Operation Modes of Detection Fiber Optics Excess Gain Contrast Photoelectric Control Logic Output Devices and Switch Logic Logic Functions Using Switch Logic Appendix
1 3 5 6 9 9
12 14
Inside back cover

A photoelectric sensor is a type of switch. It is a switch that is turned off and on by the presence or absence of received light. The inherent advantages of such a "non-contact" switch have resulted in widespread application throughout the industrial world. Some of these advantages include:
• The presence or absence of an object can be detected withoutdirect contact. • There are no mechanical parts or levers to wear out.• The switch can be mounted a great distance from the object tobe detected.
In its basic form a photoelectric control is the simplest of electronic circuits. The basic components consist of a power supply, light source, a photo detector, and an output device.
Key to this system is the photo detector. It is composed of a silicon semiconductor material that conducts current whenever it sees light. Photoelectric controls make use of this property to control output devices such as mechanical relays, triacs, and transistors. These, in turn, are used to control machinery.
Early Photoelectric Controls Used in Industry
Early industrial photoelectric controls used focused light from incandescent bulbs to activate a cadmium sulfide photocell. Since they were not modulated, ambient light such as arc welders, sun light, or fluorescent light could easily "false trigger" these devices. Also, the delicate filaments in the incandescent bulbs had a relatively short life span, and did not hold up well under high vibration and the kind of shock loads normally found in an industrial environment. Switching speed was also limited by the slow response of the photo cell to light/dark changes
The development of light emitting diodes (LED) introduced a solid state alternative to incandescent lamps as source elements in photoe-lectric controls.
In 1970 Opcon introduced the first modulated LED photoelectric control system suitable for use in sawmills, steel factories, and other harsh environments.
Light Emitting Diodes - a Powerful Light Source
Today, LED's are recognized by almost everyone. Since their development in the early 1960's, they have found their way into many common products used everyday, including wrist watches, calculators, and counters.
LED's are solid state devices that function just the opposite from photo detectors. When current is applied to them, LED's emit light energy. LED's offer several advantages over incandescent bulbs when applied to photoelectric controls. They can be rapidly turned on and off, are extremely small, consume very little power, and have an extremely long life (100,000 hours continuous). Also, since LED's are solid state devices they are much more immune to vibration than incandescent bulbs.
LED's emit light energy over a narrow wavelength. In comparing the relative efficiency of various light sources, one can see that infrared gallium arsenide (I.R.) LED's emit energy only at 940 nanometers. (See figure 4 below.) Because this wavelength is at the peak of a sili-con photodiode's response, maximum energy transfer between source and detector is achieved. A silicon photo detector's sensitivity to light energy also peaks in the infrared light spectrum. This contributes to the high efficiency and long range possible when used in conjunction with I.R. LED's.
Visible LED's are sometimes used as light sources in photoelectric controls. Because the beam is visible to the naked eye, the principle advantage of visible LED's is ease of alignment. Visible beam photoelectric controls usually have lower optical performance than controls using I.R. LED's.
Theory of Operation
- --Fig. 1 A simple photoelectric control
Fig. 2 An early incandescent photoelectric control with cadmium sulfide photocell
detector
Fig. 3
Fig. 4 Comparing various light sources

Solid State Technology Brings Many Benefits to the End User The application of light emitting diodes and silicon photo detectors in photoelectric controls has resulted in many benefits to the user of these systems. These include:
• Long life• Small sensor size• Immunity to vibration• Long sensing distances• Immunity to ambient light
Modulated Photoelectric Controls A modulated photoelectric control operates on a principle similar to that of a radio station and radio receiver. The receiver is tuned to accept the desired radio frequency and reject other possible interfering modulation frequencies from other radio sources. The photoelectric sensor must be able to distinguish its own source light and ignore other light interference.
Two advantages of a modulated beam sensor system are:
• Increased immunity to false triggering from ambient light (i.e.sunlight, fluorescent and incandescent lamps) • Longer sensing ranges.
Modulation gives the detector the ability to distinguish between pulsed LED light and ambient light. This makes it possible to increase the detector's input signal sensitivity. Also, because the source LED is being energized for only a fraction of the modulation time period, normal operating drive current levels can be increased providing a high light output without exceeding the allowable heat dissipation of the device thereby increasing its useful life.
EXAMPLE: An LED rated for a maximum drive current of 100 mA continuous can, by modulating the current "on" 50% of the time and "off" 50% of the time (50% duty cycle), increase the drive current to 200 mA without damage to the LED.
A Complete Modulated Photoelectric Control A complete photoelectric control is made up of 8 basic components. They include:
The Power Supply provides regulated DC voltage and current to the sensor circuitry. It may be built internally into the control, or it may be externally connected.
The Modulator is a pulse generator which cycles the Source Current Amplifier and Source LED at the desired frequency and duty cycle. The Photo Detector is either a photodiode or phototransistor device selected for maximum sensitivity at the source LEDs emitted light wavelength. The detector generates a small amount of current when it sees light. This is connected to the Detector Amplifier which blocks current generated by background light and provides amplification of the detected signal to a usable level for the photoelectric control. The Demodulator comes in two types: Synchronous and Asynchronous.
A Synchronous Demodulator is connected to the output of the Modulator so it is energized to "look" whenever the source is turned on. Synchronizing the modulator and demodulator creates a shutter effect that makes the sensor virtually immune to any ambient light conditions. Due to the fact that the modulator and demodulator are electronically tied together, this scheme is utilized mainly in self-contained reflex and diffuse proximity sensors where the source and detector are in the same housing. This system is also used in our 70 Series control units with the 70 Series remote optic sensors since the modulator and demodulator are contained in the same housing.
The second type of demodulation system is called an A-synchronous Demodulator. These are designed to respond to the narrow pulse created by the modulated source signal, and have no direct connection to the modulator. This system is ideal for use in self-contained through-beam sensor systems where the optics are separated by long distances. Excellent ambient light immunity is also a feature with this method of demodulation.
Lastly, the Output device is the active part of the control for the end user. Depending on the application and the switching requirements of the load, this device may be a relay, solid state triac, FET or transistor device. In some cases the device is built into the control or is available as a replaceable module.
Fig. 5 A radio transmitter and receiver are similar to a modulated LED source and detector system.
Fig. 6 Modulation provides more light energy.
Fig. 7 Modulated LED photoelectric sensor block diagram

Optical sensor elements can be packaged and positioned in a variety of ways according to application requirements.
Sensing modes consist of two basic detection principles:
1. Thru-beam2. Reflection (diffuse reflection, reflex detection)
Thru-Beam Detection
A thru-beam sensor consists of separate source and detector elements. They are aligned facing each other across an area which the target object crosses. Detection occurs when an object blocks the entire effective beam. The effective beam area is defined as the column of light that travels in a straight line between lenses. In non-lensed versions, it is the light traveling from source chip to detector chip.
Because light from the source is transmitted directly to the photo-detector, thru-beam sensors offer the longest range, highest possible signal strength and greatest light/dark contrast ratio.
Features—Thru-beam detection • Longest optical range• Highest possible signal strength (excess gain)• Greatest light/dark contrast ratio• Surface reflectivity and color have little effect• Best trip point repeatability
Limitations—Thru-beam detection • Two components to wire across detection zone• Alignment can be difficult
Reflex Detection
Reflex photoelectric controls position the source and detector parallel to each other on the same side of the object to be detected. The light source is directed at a retroreflector (a specially designed device that returns most light it receives back in the same direction from which it came). An example of a retroreflector is a bicycle reflector. The detector receives the light returned from the retroreflector. An output occurs when an object breaks the beam between the photoelectric sensor and the retroreflector.
Because the light must travel in 2 directions (to the retroreflector and back to the control), reflex controls will typically not sense as far, nor will they have the optical performance of a thru-beam control. Reflex controls do offer a powerful sensing system that does not require electrical wire to be run to both sides of the sensing area. This combination of high sensing power and ease of mounting has made reflex sensors the most popular choice of all sensing modes.
Features—Reflex detection • Long range• High light/dark contrast ratio• Easy installation and alignment
Limitations—Reflex detection • Can be false triggered by shiny surfaced objects
Polarized Reflex Detection
Polarized reflex sensors use a polarizing filter over the source and detector that "conditions" the light from the source such that the photoelectric control only sees light returned from the retroreflector. A polarized reflex sensor is used in applications where shiny surfaces such as metal or shrink wrapped boxes may false trigger the control.
Modes of Detection
Fig. 8
Fig. 9 Thru-beam sensor effective beam pattern
Fig. 10 If the object to be detected is smaller than the effective beam diameter, apertures over the lenses may be required.
Fig. 11 Reflex controls provide a powerful sensing system with both source and detector mounted on the same side of the sensing
region.

Polarized reflex sensing is achieved by combining some unique properties of polarizers and retroreflectors. These properties are: • Polarizers pass light that is aligned along only one plane.• Corner cube retroreflectors depolarize light as it travels throughthe plastic face of the retroreflector.
Light emitted from the source is aligned by a polarizer. When this light reflects off the retroreflector, it is depolarized. The returning light passes through another polarizing filter in front of the detector. The detector's polarizer is mounted 90° to the source's polarizer. Only the light which has been rotated by the corner cube retroreflector can pass through the detector's polarizer. Light that bounces off other shiny objects, and has not been rotated 90°, cannot pass through the detector's polarizer, and will not trigger the control.
Note that polarized reflex sensors will not work with reflective tape utilizing glass bead reflective surfaces. Also, shiny objects wrapped with clear plastic shrink-wrap will potentially false trigger a polarized reflex control since under certain conditions these act like a corner cube reflector.
Features—Polarized reflex detection • Will not be confused by surface reflections from target objects.• High light /dark contrast ratio.• Simple installation and alignment. Wire only one side of sensingzone.
Limitations—Polarized reflex detection • Operating range is half that of non-polarized sensors since muchof the signal is lost using a polarizing filter. • The sensor can be fooled by shiny objects wrapped with shrinkwrap material.
Proximity (Diffuse Reflective) Detection Proximity detection is similar to reflex detection in that the source and detector elements are mounted on the same side of the object being detected. The difference is that the optics are positioned so that the source and detector's field of view cross. Light from the source bounces off the target back onto the detector when it enters the area of coincidence (detection zone). The detection zone can be controlled or shaped by the angle, separation, power and beam patterns of the source and detector.
Optical detection is affected by the type, texture and composition of the target object's surface.
Other considerations when selecting a proximity sensor for an application are: the amount of contamination in the environment and the distance to the nearest background surface.
Focused proximity sensors are a special type of proximity sensor where the source and detector are focused to a point in front of the sensor. Focused proximity sensors can detect extremely small objects, or look into holes or cavities in special applications. Background ob-jects will not false trigger a focused proximity sensor since they are "cross-eyed" and cannot see past a certain point.
Features—Proximity detection • Simple installation and alignment. Wire only one side of sensingzone. • Can detect differences in surface reflectivity.
Limitations—Proximity detection • Limited sensing range.• Light / dark contrast and sensing range are object surface
reflectivity dependent.
Background Rejection (Perfect Prox®) Detection
This detection scheme is really a special type of diffuse reflective sensor. It combines extremely high sensing power with a sharp optical cut-off. This allows the sensor to reliably detect targets regardless of color, reflectance, contrast or surface shape, while ignoring objects just outside of the target range.
This method uses two different photo-detectors. For the Perfect Prox unit with a six-inch range, the near detector has a range of 0 to 24 inches. Its far detector has a range of 6 to 24 inches. Objects closer than six inches are detected only by the near detector. Objects between 6 and 24 inches are detected by both detectors. If the near signal is stronger than the far signal, the sensor output is ON. If the far signal is stronger or equal to the near signal, the output is OFF. The result is a sensor with a high excess gain for six inches, followed by a sharp cutoff.
Fig. 12
Fig. 13 Optical proximity sensors detect light bounced off the target object.
Fig. 14 Focused proximity sensors focus the source and detector on a small spot to detect small objects, or look into holes or cavities.
Fiber optics are bundles of thin plastic or glass fibers that operate on a principle discovered in 1854 by John Tyndahl. When Tyndahl shined a beam of light through a stream of water, rather than emerge straight from the stream of water as might be expected, the light tended to bend with the water as it arced towards the floor. Tyndahl discovered that the light was transmitted along the stream of water. The light rays inside the stream bounced off the internal walls of water and were thereby contained inside. This principle has come to be known as "total internal reflection."
Industry has since discovered that the principle of total internal reflection also applies to small diameter glass and plastic fibers, and this has lead to a rapid growth of applications throughout the industry. For example, fiber optics are used to optically transmit data in the communications field, and to transmit images or light in medicine and industry. Photoelectric controls use fiber optics to bend the light from the LED source and return it to the detector so sensors can be placed in locations where common photoelectric sensors could not be ap-plied.
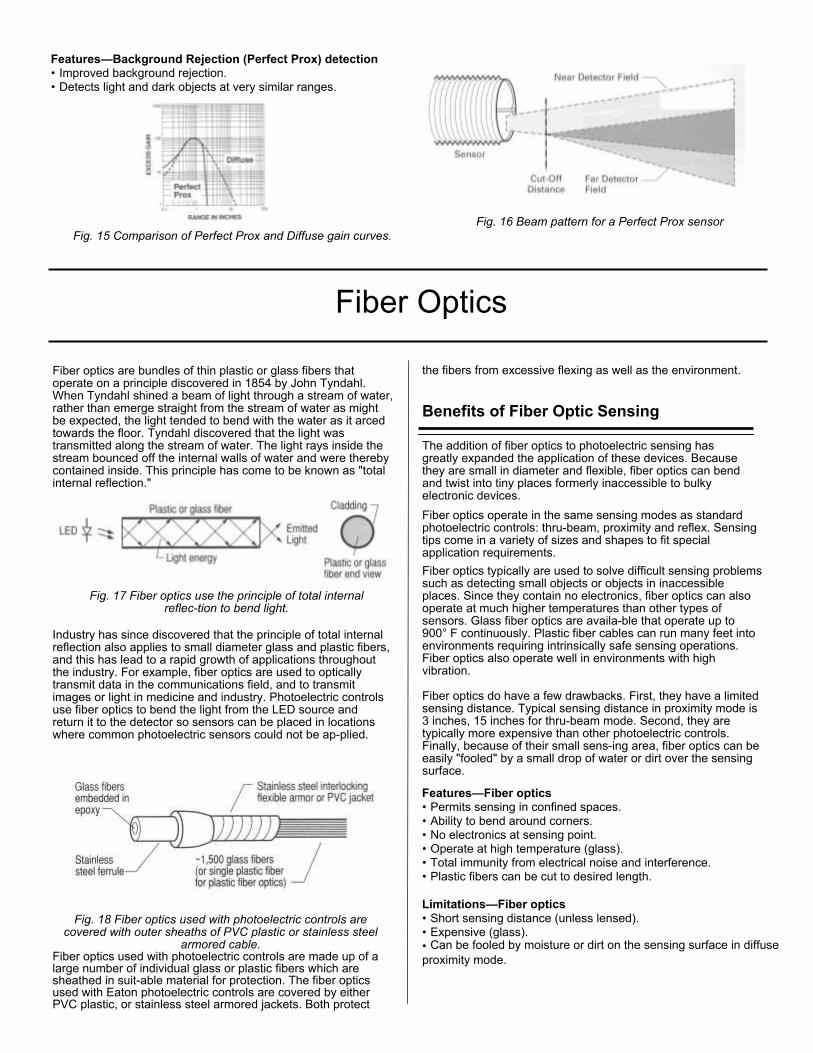
armored cable. Fiber optics used with photoelectric controls are made up of a large number of individual glass or plastic fibers which are sheathed in suit-able material for protection. The fiber optics used with Eaton photoelectric controls are covered by either PVC plastic, or stainless steel armored jackets. Both protect
the fibers from excessive flexing as well as the environment.
Benefits of Fiber Optic Sensing
The addition of fiber optics to photoelectric sensing has greatly expanded the application of these devices. Because they are small in diameter and flexible, fiber optics can bend and twist into tiny places formerly inaccessible to bulky electronic devices. Fiber optics operate in the same sensing modes as standard photoelectric controls: thru-beam, proximity and reflex. Sensing tips come in a variety of sizes and shapes to fit special application requirements. Fiber optics typically are used to solve difficult sensing problems such as detecting small objects or objects in inaccessible places. Since they contain no electronics, fiber optics can also operate at much higher temperatures than other types of sensors. Glass fiber optics are availa-ble that operate up to 900° F continuously. Plastic fiber cables can run many feet into environments requiring intrinsically safe sensing operations. Fiber optics also operate well in environments with high vibration.
Fiber optics do have a few drawbacks. First, they have a limited sensing distance. Typical sensing distance in proximity mode is 3 inches, 15 inches for thru-beam mode. Second, they are typically more expensive than other photoelectric controls. Finally, because of their small sens-ing area, fiber optics can be easily "fooled" by a small drop of water or dirt over the sensing surface.
Features—Fiber optics • Permits sensing in confined spaces.• Ability to bend around corners.• No electronics at sensing point.• Operate at high temperature (glass).• Total immunity from electrical noise and interference.• Plastic fibers can be cut to desired length.
Limitations—Fiber optics • Short sensing distance (unless lensed).• Expensive (glass).• Can be fooled by moisture or dirt on the sensing surface in diffuseproximity mode.
Fiber Optics
Fig. 15 Comparison of Perfect Prox and Diffuse gain curves.
Fig. 17 Fiber optics use the principle of total internal reflec-tion to bend light.
Fig. 18 Fiber optics used with photoelectric controls are covered with outer sheaths of PVC plastic or stainless steel
Features—Background Rejection (Perfect Prox) detection • Improved background rejection.• Detects light and dark objects at very similar ranges.
Fig. 16 Beam pattern for a Perfect Prox sensor

The ability of a photoelectric control to detect an object at a given distance is measured in units of "excess gain." Excess gain is a measure of energy available between the source and detector to overcome signal loss due to dirt or contamination in the environment. Excess gain is the single most important factor that must be considered when choosing a photoelectric control for a particular application.
By definition, excess gain is the ratio of the amount of light the detector sees to the minimum amount of light required to trip the sensor. This ratio is depicted graphically for all photoelectric sensors. In figure 18, excess gain is plotted along the vertical (or Y) axis, starting at 1, the minimum amount of light required to trigger the detector. Every point above 1 represents an amount of light more than that required to trigger the photoelectric control. This is the "excess gain" that the detector sees.
When this excess gain is plotted against distance, the result is an excess gain curve. For example, in figure 18, the excess gain for the proximity sensor at 2 inches is 100, or 100 times the minimum amount of light required to trigger the photoelectric control.
The Importance of Excess Gain Often, the standard of comparison when making a choice between different photoelectrics is range. More important to most applications is the amount of sensing "punch" or the excess gain that is available within the detecting region. For a typical application, the higher the excess gain within the sensing region, the more likely the application will work. It is this power or "punch," that will determine whether the photoelectric control will continue to operate despite the buildup of dirt on the lens, or the presence of contamination in the air.
For example, figure 19 shows an application detecting boxes on a conveyor in a filthy industrial environment.
The boxes will pass about two to five inches from the sensor as they move along the conveyor at the sensing location. Given a choice between the two proximity sensors whose excess gain curves appear in figure 20, which photoelectric control should be selected for this application?
If the decision were based solely on specified range, unit number 1 would be selected. However, if this unit were installed in this application, it might fail after a short time in operation. Over time, contaminants from the environment would settle on the lens, decreasing the amount of light the sensor is seeing. Eventually, enough lens contamination would occur that the photoelectric control would not have enough excess gain to overcome the signal loss created by the coating, and the application would fail.
A better choice for this application would be unit 2. Unit 2 delivers much more excess gain in the operating region required for this application, and will therefore work much more successfully than unit 1. Do not be taken in by maximum range specifications. ALWAYS LOOK FOR MAXIMUM EXCESS GAIN AT THE RANGE WHERE THE DETECTION IS TO OCCUR!
Excess Gain and Modes of Detection
Thru-Beam Performance
Excess gain for thru-beam photoelectric controls is the simplest to measure since it is almost exclusively a function of the separation between the source and detector. The excess gain at a given distance can be determined by the following formula:
Excess Gain = (Maximum Range/Operating Range)2
For example, the excess gain at 10 feet for a thru-beam control with a maximum range of 100 feet would be:
(100/10)2 = 100.
Plotted as shown:
Excess Gain
Fig. 19 Typical excess gain curves for different detection modes.
Fig. 20 Box detection
Fig. 21 Excess gain for two proximity controls.
Fig. 22 Excess gain curve for a thru-beam control rated for 100 feet.

The excess gain a thru-beam sensor pair will ultimately have depends on how well aligned the sensors are, the separation between them, the sensitivity of the Detector Amplifier and the optical beam pattern the sensors exhibit. Every lens generates a different pattern. These patterns are determined by the size, shape, material and quality of the lens, the size and intensity or sensitivity of the source or detector chip and the focal length between chip and lens. A relationship that clarifies the understanding of various patterns is the comparison of radiation patterns to shotgun patterns.
A shotgun barrel's length and choke can be seen as the counterpart of focal length. Similarly, barrel gauge is comparable to chip size and shell load is comparable to radiant power and sensitivity. If you had a box of shotgun shells in which all the shells were exactly the same, you could get different performance from each shell by putting each in a different style shotgun. If you fired one from a sawed off shotgun, the resulting pattern would be very broad with little appreciable range. If you placed another shell in a regular barreled shotgun, the pattern would be narrower but with much greater range. A third shell could be fired from a shotgun with a choke on it and the pattern would be narrower and the range longer.
(See the Eaton’s Sensing Solutions catalog for a breakdown of sensing fields for specific models)
Diffuse Proximity Performance
Because excess gain in proximity units is dependent on more variables than a thru-beam system, the graphic plot is more complex. Since nearly every proximity sensor has a different combination of lenses and beam angles, nearly every excess gain curve for proximity sensors is different. The excess gain for a proximity sensor is expressed as a ratio between the amount of light received to the amount of light required to trigger the sensor.
Excess Gain = Light Received /Minimum Light Required
Published excess gain curves for proximity sensors are determined using a large Kodak #R-27 90% reflectance test card. The following figures are typical of proximity excess gain curves.
Compare the excess gain curves in figure 23. The short range sensor delivers high excess gain over a short sensing distance and then drops off rapidly. This is due to the fact that the source beam and the detector's field of view converge over a short distance from the lenses, so the energy present in the area of coincidence is very high. This makes detecting small or difficult to sense surfaces possible. It also provides you with the ability to ignore objects or surfaces in the near background.
The long range sensor's source beam and detectors field of view are positioned close together on the same axis. This results in maximum convolvement of the source beam and detector field of view out to the maximum range of the sensor. Excess gain peaks several inches out from the sensor then drops off slowly over distance. Optical detection up to 10 feet on a white surface is possible. A clear field of view several feet from the sensor is necessary to prevent latch up or false triggering.
In a focused spot proximity sensor the source and detector are positioned behind the lens in order to focus the energy to a point. The source beam and detector field of view converge at the focus point forming a sensing zone about 0.128 inches or smaller in diameter. The excess gain is extremely high at this focused point and drops off very fast on either side of the sensing zone. A focused proximity sensor is excellent for sensing into holes or cavities, for detecting very small objects, or level detection between two surfaces.
Fig. 24 Excess gain curves for long range, short range and focused proximity photoelectric controls.
Fig. 23 Comparison of beam patterns to shotgun patterns.
Fig. 25 Short range proximity sensors provide high excess gain at close range without triggering on near
background objects. Long range sensors detect objects up to 10 feet away.

Reflex Performance
Excess gain curves for reflex sensors are similar in appearance to proximity sensors. In this case, excess gain and range are related to the light returned from a retroreflective target. Other than the actual retroreflector type used, the maximum operating range is also dependent on lens geometry and detector amplifier gain. Reflex sensors feature ranges up to 75 feet to a 3 inch retroreflector. As shown in Figure 26 the effective beam is defined as the actual size of the retroreflector surface. The entire reflector must be blocked by the target object before the sensor will recognize a beam blockage and switch its output.
Retroreflectors and Reflex Performance
Reflex sensor range and excess gain are dependent on reflector quality. Two types of retroreflector target materials are available, corner cube and embedded glass bead reflectors.
Corner cube retroreflectors provide the highest signal return to the sensor. Cube style reflectors exhibit 2000 to 3000 times the reflectivity of white paper. When a ray of light strikes one of the three adjoining sides (A) arranged at right angles to each other, the ray is reflected to the second side (B) and then to a third (C) then back to its source in a direction parallel to its original course. Thousands of these cube shapes are molded into a rugged plastic reflector or vinyl material. The fact that the light returned from a corner cube surface is depolarized with respect to the received light makes this the only retroreflec-tor to use with polarized reflex sensors.
Target size affects the maximum sensing range.
Glass bead retroreflectors are available in tape form for use in dispensers for package coding on conveyors and in sheet form which the user can cut to size. The bead style surface is typically rated at 200 to 900 times the reflectivity of white paper. Glass bead type retroreflectors cannot be used with polarized reflex sensors.
Fig. 27 Beam pattern for a reflex sensor.
Fig. 26 On a focused spot sensor, the energy is focused to a point out from the lenses, thus forming a detection zone which will be blind at any spot other than the point of focus.
Fig. 28 Corner cube and glass bead retroreflectors.
Fig. 29 Reflector areas affect on reflex performance.

Contrast measures the ability of a photoelectric control to detect an object. It is expressed as a ratio between excess gain under light conditions and excess gain under dark conditions.
Contrast Ratio = Excess Gain under light conditions / Excess Gain under dark conditions
When applying photoelectric controls, the sensing mode that provides the greatest contrast ratio should be selected. For reliable operation, a ratio of 10:1 is recommended.
Contrast and Sensing Modes The contrast a thru-beam or reflex sensor perceives is affected by:
• The light transmissivity of an object or surface.• The size of an object in relation to the effective beam size.
The contrast a proximity sensor perceives is related to the amount of light an object or surface reflects back to the sensor. This reflectivity is affected by:
• How far the object or surface is from the sensor.• Color or material of the object or surface.• Size of the object or surface.
The ideal application provides infinite contrast ratio of the detection event. This is the case, for example, when 100% of the beam is blocked in reflex or thru-beam sensing modes, or when nothing is present in the case of proximity sensing modes. Understanding the contrast ratio becomes critical when this situation does not exist, such as detecting semi transparent objects, or when sensing extremely small objects.
For example, a thru-beam sensor is positioned 10 inches apart to
detect a semi-transparent plastic bottle moving through the sensing zone. Given that the excess gain at that range equals 100, and the bottle blocks 5% of the light energy and passes 95% of the light, the contrast ratio would be approximately 1 (100/95). This does not meet the 10:1 ratio recommended, and indeed the application would not work. The thru-beam pair is simply too powerful for this application. Note that the high excess gain provided by this thru-beam sensor pair does not offer any advantage in this application.
A focused proximity sensor with the excess gain shown on the chart in figure 30, and positioned 3 to 4 inches from the bottle could provide the high contrast required, and provide excellent back-ground rejection. This product would work better in this application than the thru-beam pair.
Contrast
Fig. 30
Photoelectric Control Logic
Photoelectric control logic can be divided into two categories. First, are devices that "condition" the signal between the detector and the output device. Typically, these are logic modules that are mounted inside the photoelectric control and include timing or counting functions. Second, is switch logic. Output devices from two or more controls can be wired in series or parallel providing an output to the load only when the correct combination of controls is energized.
Timing Functions Timing functions provide a natural extension to the simple sensor by altering the raw sensor signal to make it more useful for controlling local action in response to sensed events. Timing functions "condition" the detection event causing the output signal from the sensor to be stretched, shortened or displaced in time.
Light Operate Versus Dark Operate
In most applications, photoelectric controls generate an output whenever an object is detected. This occurs in one of two modes. If the control generates an output when the photo detector sees light, the control is said to be working in the "Light Operate" mode. If the control generates an output when the photo detector does not see light, the control is said to be working in the "Dark Operate" mode. Light /dark operation is normally selected by a switch mounted inside the control. This is most useful when the sensor is equipped with a single pole output device.
In the detection zone 3 to 4 inches from the sensor, the excess gain is 20 to 100. The background will have no affect on the reliability because excess gain = 0.

When a photoelectric control is operating without a logic function, an output is generated for the length of time an object is detected. This can be expressed in the following diagram.
On Delay Logic
On delay logic allows the output signal to turn on only after the object has been detected for a predetermined period of time. The output will turn off immediately after the object is no longer detected. This logic is useful if a sensor must avoid false interruptions from small objects, but detect a large or slow moving object. On delay is useful in bin fill detection, or jam detection since it will not false trigger on the normal flow of objects going past.
Off Delay Logic
Off delay logic holds the output on for a predetermined period of time after an object is no longer detected. The output is turned on as soon as the object is detected. Off delay ensures that the output will not drop out despite short periods of signal loss. If an object is once again detected before the output times out, the output will remain on. Delay off logic is useful in marginal applications susceptible to periodic signal loss such as web detections.
On/Off Delay Logic
On/off delay logic combines on and off delay so the output will be generated only after the object has been detected for a predetermined period of time, and will drop out only after the object has no longer been detected for a predetermined period of time. Combining on and off delay "smooths" the output of the photoelectric control for applications such as jam detection, fill level detection and edge guide.
One-Shot Logic
One-shot logic generates an output of predetermined length no matter how long an object is detected. A one shot can be programmed to trigger on the leading or trailing edge of the object detected. A standard one-shot must time out before it can be retriggered. One-shot logic is useful in applications that require an output of specified length, such as an air valve actuating a kicker on a conveyor line.
Fig. 35 On/off delay logic
Fig. 34 Off delay logic.
Fig. 33 On delay logic.
Fig. 32 Diagram showing object detected versus output.
Fig. 31 Demonstration of light operation versus dark opera-tion.
Fig. 36 One-Shot Logic

Retriggerable One-Shot Logic
Just like a standard one-shot, a retriggerable one-shot generates an output of predetermined length whenever an object is detected. A retriggerable one-shot will restart each time an object is detected and will remain triggered as long as a stream of objects are detected before the one-shot times out. A retriggerable one-shot is useful in detecting underspeed conditions in conveyor lines.
Delayed One-Shot
Delayed one-shot logic combines on delay and one-shot logic. In this function the one-shot feature is delayed for a predetermined period of time after an object has been detected. A delayed one-shot is useful in applications where the photoelectric control cannot be mounted exactly at the site where the action caused by the output device is taking place. Applications include a spray paint booth (the control cannot be mounted inside the booth), high temperature ovens or drying bins.
Fig. 38 Delayed one-shot logic.
Underspeed Detection Logic
Underspeed detection logic operates identically to a retriggerable one-shot in that it detects speeds that fall below a certain predetermined level. In addition to this feature, the underspeed detector has a built in latch feature that shuts the system completely down when the speed slows to the predetermined level. This prevents the one-shot from retriggering once it times out, thereby eliminating erratic switching while the motor is winding down.
Underspeed/Overspeed Detection Logic
This detection logic is capable of detecting overspeed conditions as well as underspeed conditions. An underspeed / overspeed detector counts a predetermined number of objects within a specified length of time. If the system operates either at a higher or lower rate, an output is generated.
.
Fig. 39 Underspeed detection logic
Fig. 37 Retriggerable one-shot logic.
Fig. 40 Overspeed/underspeed detection logic.

A photoelectric control actively interfaces to the outside world through an output switching device. The load to be energized may be a solenoid or relay coil, counter module, or input card to a programmable controller. Depending on the current requirement, AC or DC operating voltage, and switching speed, an appropriate output device must be selected for best long term performance. Photoelectric con-trols are available with built-in solid state AC, DC or AC /DC switches, as well as with sockets for replaceable output modules for quick repair and system flexibility.
Types of Output Devices and Their Symbols
Relay Devices
A relay is a mechanical switch which is available with a variety of contact configurations. Relays can handle large load currents at high voltages allowing them to directly interface with motors, large solenoids, brakes and ejectors. They can switch either AC or DC loads. Contact life depends on the load current, and frequency of operation. Relays are subject to contact wear and contact resistance build-up. Also, because of contact bounce they can produce erratic results with coun-ters and programmable controller inputs unless the input is filtered. Being mechanical, they can add 10 to 25 mS to a photoelectric's response time.
Since relays are most familiar to factory personnel, and because they provide multiple contacts, relays are the most common output device used with photoelectric sensors.
Features—Mechanical relays • Switch high currents /voltages• Multiple contacts• Switch AC/DC voltages• Tolerant of momentary short circuits and large inrush currents
Limitations—Mechanical relays • Slow response time (10-25 mS)• Contact and mechanical wear• Contact bounce• Affected by shock and vibration
Transistor devices (DC switch)
Transistors are solid state DC switching devices. They are most commonly used in low voltage DC powered photoelectric sensors as the output switch. Two types of transistors are commonly used depending on the switching function. The NPN current sink provides a contact closure to DC common and the PNP current source provides a contact closure to the DC positive rail. A transistor can be thought of as a single pole switch which must be operated within its voltage and maximum current ratings. Any short on the load will immediately destroy a transistor switch.
Switching inductive loads creates voltage spikes many times the control voltage level which would exceed the maximum voltage rating of the transistor. Peak voltage clamps such as zener diodes or transorbs are utilized to protect the output device. Transistor outputs are typically rated to switch loads of 250 mA at 30 VDC maximum.
Output Devices and Switch Logic
Fig. 43 A transistor can be looked at as a single pole switch.
Fig. 41
Fig. 42
Fig. 44 Action of a Zener diode used to clamp inductive spikes for transistor protection

Features—Transistor switches • Virtually instantaneous response time• Low off state leakage and voltage drop• Infinite life when operated within rated current/voltage• Not affected by shock/vibration• Interface direct to TTL and CMOS circuits
Limitations—Transistor switches • Low current handling• Cannot tolerate large inrush currents (unless clamped)• Destroyed by short circuit
Triac Devices
A triac is a solid state device designed to control AC current. Triac switches turn "ON" in less than a microsecond when its gate (control leg) is energized and shuts "OFF" at zero crossing of the AC power cycle. Because a triac is a solid state device, it is not subject to the mechanical limitations of a relay such as contact bounce, pitting and corrosion of contacts, or shock and vibration sensitivity. Switching response time is limited only to the time it takes the 60 Hz AC power to go through one-half cycle.
As long as the triac is used within its rated maximum current and voltage specifications, life expectancy is virtually infinite. Triac devices used with photoelectric sensors generally are rated for 2 A loads or less.
Triacs do have limitations. Like a transistor, shorting the load will destroy a triac. Inductive loads directly connected to the triac or large voltage spikes from other sources can false trigger a triac device. To reduce the effect of these spikes a snubber circuit composed of a resis-tor and capacitor in series is connected across the device. Depending on the maximum load expected to be switched, an appropriate snubbing network to protect the triac must be used. The snubbing network contributes to the "OFF STATE" leakage the load would see. A triac rated for 1 A loads may have 5 mA of "OFF STATE" leakage. This leakage must be taken into account switching loads requiring little current such as inputs to PLC's. In "ON STATE" triacs exhibit about 1.7 VRMS voltage drop.
triggering by inductive
spikes. Features—Triac switches • Fast response time (8.33 mS)• Tolerant of large inrush currents• Direct interface to counters and programmable controllers• Infinite life when operated within rated current/voltage• Not affected by shock/vibration
Limitations—Triac switches • Can be false triggered by large induced currents• Snubber network contributes "OFF STATE" leakage• Destroyed by short circuits
Bilateral FET Device (AC/DC Switch)
The FET (Field Effect Transistor) is slated to be the solid state switch of the future because of its near ideal operating characteristics. The voltage applied to the gate controls the conduction resistance between the source and drain. In the "OFF STATE," source to drain resistance is typically hundreds of megohms and only about 1 ohm when "ON." FET switches exhibit no "OFF STATE" leakage and, being resistive devices, do not develop the fixed voltage drop across its terminals like other solid state switch devices. Unlike a triac switch, switching occurs immediately. FET devices are independent of voltage or current phase. FET switches can be configured in circuits which will control AC or DC voltages and will not generate switch induced line noise like relay and triac switches. FET switches cannot tolerate line spikes or large inrush currents. The device must be protected by using a voltage spike clamping device such as a transorb. It shunts voltage spikes which exceed the conduction threshold voltage of the transorb and dissipates the energy as heat.
Fig. 45 Optically isolated triac switch
Fig. 46 Triac switches can be turned "ON" at any point in the AC power cycle, "OFF" only at zero
crossing.
Fig. 47 Use of R.C. snubber networks to reduce triac false
Fig. 48

Features—Bilateral FET switches • Switch AC or DC voltages• Low "ON STATE" voltage drop• Extremely fast response time• Infinite life when operated within voltage/current ratings• Interface direct into TTL and CMOS circuits• Does not self-generate line noise
Limitations—Bilateral FET switches • Cannot tolerate large inrush currents• Can be destroyed by line spikes (if not clamped)
Two-wire switch device (AC/DC)
A two-wire photoelectric sensor is composed of 3 main components: the photoelectric sensing head, the power switch base, and the wiring receptacle. The power base assembly is a standard mechanical limit switch style body which houses the sensor power supply, output switch circuit, and socket for plug-in logic modules. As the name implies, it requires only 2 connections just like the standard mechanical limit switch. All electronics are encapsulated in epoxy for electrical insulation of components and to provide vibration and shock resistance.
A two-wire electronic switch approximates a mechanical switch with the circuit shown above. When the switch is open the resistor provides a leakage path around the switch to power the photoelectric circuitry. This creates an "OFF STATE" leakage of about 1.7 mA. When the switch is closed the zener diode regulator maintains enough voltage to power the circuitry. The diode bridge converts AC load current to DC for powering the sensor. Two-wire switches "steal" their operat-ing power from the load circuit. This means there will be some leak-age current when the switch is off and about 7 to 9 volts dropped across the switch when it is on. Leakage current must be about 1.7 mA or less to ensure compatibility with programmable controller inputs.
Because very little power is available to operate the control (including LED status indicators, source, detector, switch circuitry, and logic module), large lens surfaces are needed to provide reasonable optical performance and make up for the lack of available operating current. A two-wire photoelectric control compromises optical performance for low "OFF STATE" leakage.
The voltage drop across the switch is cumulative when more than one switch is wired in series with a load. The "OFF STATE" leakage current is cumulative when more than one switch is connected in parallel with a load.
Features-2-wire switch • Two-wire connection (low wiring cost)• Familiar wiring and rugged package• Switch AC or DC loads• Low leakage current in "OFF STATE"• Short circuit protection and EMI /RFI immune models available
Limitations-2-wire switch • Reduced optical performance compared to 3 and 4 wire style sen-sors • High "ON STATE" voltage drop across the switch
Logic Function Using Switch Devices
The output devices from two or more photoelectric sensors can be wired together in series or parallel to perform logic functions. It is important to keep in mind when dealing with output device logic that an "ON" condition may represent either object presence or absence. The user has a choice, through selection of light operate or dark operate outputs or a light/dark switch in the control.
The user should also be aware of the possible side effects of these connections dependent on the type of switch used. These side effects include: excessive voltage drop in series connected switches and excessive leakage current in parallel connected switch devices. The load being switched is a determining factor at which point the above effects will interfere with proper operation. Output switches that exhibit the above effects are: triac devices ("OFF STATE" leakage current), and two-wire devices ("OFF STATE" leakage and "ON STATE" voltage drop).
Parallel ("OR" Function) The term "OR" in binary logic defines the resultant output as being ON if one "OR" more of the inputs is on.
Fig. 49 Two-wire switch circuit
Fig. 50 "OR" function truth table.

The "OR" function is accomplished by connecting switches in parallel. The diagram shows normally open relay contacts. If switch A, B, "OR" C closes, the load will be energized. The switches shown could be any optically isolated solid state switch having both its terminals available for connection including: (A) isolated NPN transistor, (B) isolated bilateral FET, and (C) isolated triac device. "OR" logic functions can also be accomplished using 3-wire type sensors.
10 to 30 VDC powered sensors employing transistor output switches normally have one leg of the switch connected to DC common (the emitter on NPN transistors), or the positive rail (the emitter on PNP transistors). In this case, NPN current sink outputs may only switch loads in parallel to circuit common and PNP current source outputs may only switch in parallel to the positive DC rail.
Two, three and four-wire AC switches can be connected in an "OR" circuit configuration. Proper wiring techniques recommend only switching the hot side of the line in AC circuits. When parallel connecting triac switches or two-wire photoelectric sensors, attention should be paid to how much "OFF STATE" leakage current the load will see. The leakage current is summed in parallel connections as shown in the two-wire "OR" circuit, Fig. 54.
Summed leakage currents equal: (1.7 mA)(3) = 5.1 mA total "OFF STATE" leakage delivered to the load. If the load is effected by the total leakage applied, a shunt resistor can be connected across the load to reduce the leakage seen by the load. This problem is only encountered when switching programmable controller inputs or other high impedance inputs.
Example application utilizing parallel "OR" logic
Two thru-beam sensor systems are positioned to monitor the possible presence of intruders into a building. The output devices from the photoelectric sensors are connected in parallel with each other with normally open contacts as long as the beams are complete. The sensors are set for dark energize. The load to be energized is a solenoid that will release the latch on a cage full of hungry guard dogs.
Series "AND" logic/gating functions
The term "AND" in binary logic defines the resultant output as being ON only when all inputs are ON. This is accomplished by connecting switches in series with the load. This type of circuit is best suited for the application of isolated switch devices not tied to power supply rails with one of their connections, such as a three-wire switch.
Fig. 51 Symbols of optically isolated solid state switches.
Fig. 52 Current sink and current source “OR” circuits with output devices tied internally to one side of the DC supply
line.
Fig. 53 “OR" circuit utilizing solid state AC switches and the affect of summed leakage currents.
Fig. 54 "AND" function truth table with example series circuit.

When using solid state switches for this function the voltage drop across each switch will reduce the power the load will receive. This is mainly a problem only when utilizing two-wire photoelectrics because of the significant voltage drop (7 to 9 V) they exhibit. Depending on the minimum amount of voltage a load will require to operate properly will determine how many two-wire switches or voltage drops may be connected in series.
"OFF STATE" leakage currents are not cumulative in a series circuit. The idle state of the switch contacts must be set depending on the sensing mode by programming the light/dark energize switch in the photoelectric sensor.
"AND" Gating function
The logical "AND" configuration is commonly used to perform gating functions. We can use the gating function to perform inspection of fill levels, object placement or presence. The gate sensor usually will employ a one-shot logic module set to trigger on detection of an edge (light/dark, or dark/light). The one-shot will allow a short period of time for the inspection sensor to determine whether the object is OK. If not, the circuit will be completed signaling an alarm, firing a sole-noid for rejection of the object, or shutting down the machine.
Example gating application
A short range proximity sensor is positioned near the neck of a jar. The sensor will be set to energize when the jar is detected. A one-shot logic module inside the proximity sensor is set to trigger on the dark to light transition for a short period of time. The proximity gating sensor's output device is connected in series with a thru-beam sensor switch that is set in light energize mode. The sensors interface to a programmable controller which monitors the inspection system input. Jars with labels will never complete the series circuit so the programmable controller will ignore them. If a jar without a label is detected, the series circuit will be energized for the gate sensors one-shot period signaling the programmable controller to reject the jar at the reject location.
Fig. 55 Some solid state switches can reduce the amount of voltage the load will ultimately see.
Fig. 56 Using the gating function to inspect jars for presence of labels. System rejects non-labeled items.
This manual has been prepared for use by personnel, licensees and customers of Eaton Corporation. The information contained herein is the property of Eaton, and may not be copied or reproduced in whole or in part, without prior written approval. Eaton reserves the right to make changes, without notice, in the specifications and materials contained herein and shall not be responsible for any damages, direct or consequential, caused by reliance on the materials presented.
Any information and/or application example, including circuitry and/or wiring diagrams, programming, operation and/or use shown and/or described in this manual are intended solely to illustrate the operating principles of the product. The presentation of an example of use shown and/or described herein does not guarantee nor imply such example will perform in a particular environment when converted to practice. Eaton does not assume responsibility or liability for actual use based on the examples illustrated and/or described herein. No patent liability is assumed by Eaton with respect to use of any applications, information, circuitry, diagrams, equipment or programs shown and/or described herein.

Speed Conversion Table
feet/minute inches/minute inches/second seconds/inch 0.5 6 0.1 10 1 12 0.2 5 2 24 0.4 2.500 3 36 0.6 1.666 4 48 0.8 1.250 5 60 1.0 1.000 6 72 1.2 0.833 7 84 1.4 0.714 8 96 1.6 0.625 9 108 1.8 0.555 10 120 2.0 0.500 11 132 2.2 0.435 12 144 2.4 0.417 13 156 2.6 0.385 14 168 2.8 0.358 15 180 3.0 0.333 16 192 3.2 0.313 17 204 3.4 0.294 18 216 3.6 0.278 19 228 3.8 0.263 20 240 4.0 0.250 21 252 4.2 0.238 22 264 4.4 0.227 23 276 4.6 0.217 24 288 4.8 0.208 25 300 5 0.200 30 360 6 0.167 40 480 8 0.125 50 600 10 0.100
feet/minute inches/minute inches/second seconds/inch 60 720 12 0.083 70 840 14 0.071 80 960 16 0.063 90 1080 18 0.056 100 1200 20 0.050 125 1500 25 0.040 150 1800 30 0.033 175 2100 35 0.029 200 2400 40 0.025 225 2700 45 0.022 250 3000 50 0.20 275 3300 55 0.018 300 3600 60 0.016 325 3900 65 0.015 350 4200 70 0.014 375 4500 75 0.013 400 4800 80 0.012 450 5400 90 0.011 500 6000 100 0.010 600 7200 120 0.008 700 8400 140 0.007 800 9600 160 0.006 900 10800 180 0.0055 1000 12000 200 0.005 1250 15000 250 0.004 1665 19980 333 0.003 2500 30000 500 0.002 5000 60000 1000 0.001
Appendix

For more information,call 1-800-426-9184