THE ANCIENT WORLD - GMT Games · The Ancient World is a series of games, in several volumes,...
32
The Campaigns of Ancient History Version 2.2 July, 203 THE ANCIENT WORLD RULEBOOK RULEBOOK 0505 GMT Games, LLC P.O. Box 308, Hanford, CA 93232-308 www.GMTGames.com . Introduction............................................................. 2 2. Components ............................................................ 2 3. The Sequence of Play ............................................. 3 4. The Initiative System .............................................. 4 5. Leaders.................................................................... 5 6. Movement ............................................................... 7 7. The Naval Superiority System .............................. 4 8. Land Combat ........................................................ 6 9. Cities and Sieges ................................................... 22 0. Manpower ............................................................. 27 . Control .................................................................. 27 2. Diplomacy............................................................. 28 3. Auguries................................................................ 29 4. Winning the Game ................................................ 29 T A B L E O F C O N T E N T S
Transcript of THE ANCIENT WORLD - GMT Games · The Ancient World is a series of games, in several volumes,...
The Ancient World v2.2 �
© 2005 GMT Games, LLC
The Campaigns of Ancient HistoryVersion 2.2 July, 20�3
THE ANCIENT WORLD
RULEBOOKRULEBOOK
0505
GMT Games, LLCP.O. Box �308, Hanford, CA 93232-�308www.GMTGames.com
�. Introduction ............................................................. 22. Components ............................................................ 23. The Sequence of Play ............................................. 34. The Initiative System .............................................. 45. Leaders .................................................................... 56. Movement ............................................................... 77. The Naval Superiority System .............................. �4
8. Land Combat ........................................................ �69. Cities and Sieges ................................................... 22�0. Manpower ............................................................. 27��. Control .................................................................. 27�2. Diplomacy ............................................................. 28�3. Auguries ................................................................ 29�4. Winning the Game ................................................ 29
T A B L E O F C O N T E N T S
The Ancient World v2.2 2
© 2005 GMT Games, LLC
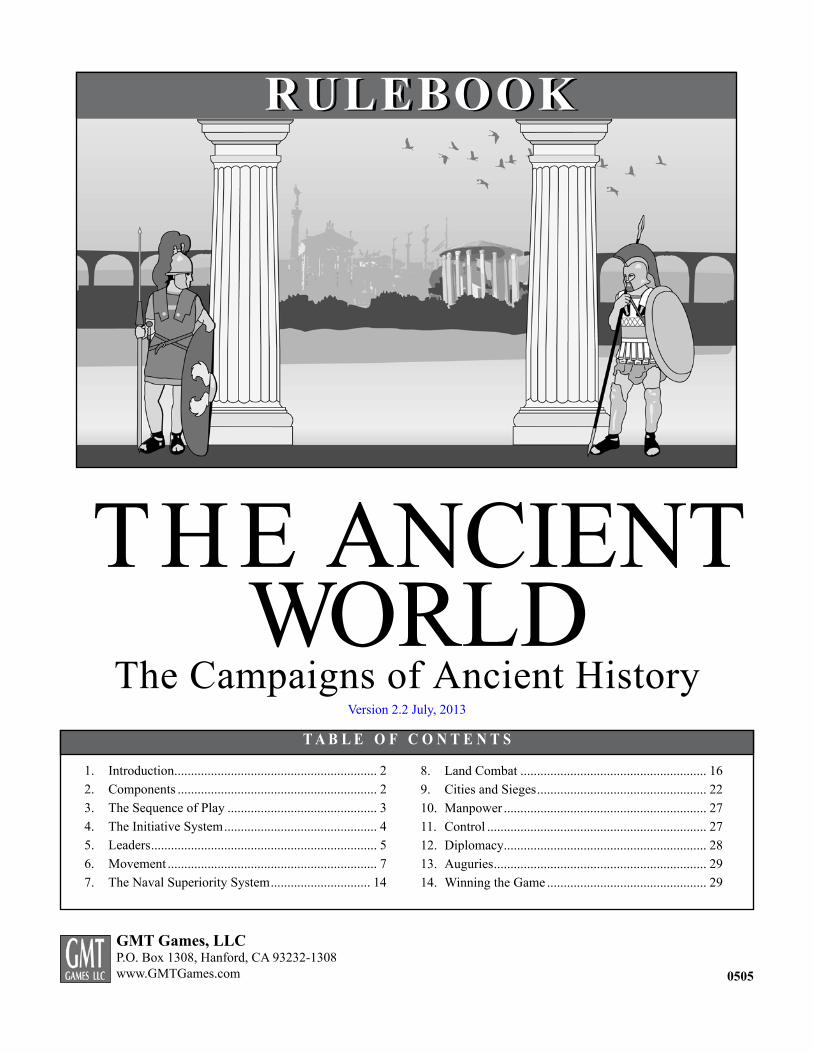
(1.0) INTRODUCTION The Ancient World is a series of games, in several volumes, covering the major campaigns and wars that formed the Ancient World, from the Greek/Hoplite Era up through the Roman Em-pire...almost �000 years of history.
(2.0) COMPONENTS See the Scenario Book for the components of the individual games.
(2.1) THE MAP See the volume specific rule book
(2.2) THE COUNTERS The following applies, generally, to all games in The Ancient World system.
There are three basic types of counters: Combat Units, Leaders, and Informational Markers.
(2.21) Combat Units: The combat units represent types of weapons systems prevalent in this period of warfare, reduced to a manageable number of generic types:
Infantry: The main body of fighting infantry, usually wearing body armor and carrying shields, using such weapons as pikes, spears, swords, and whatever edged or pointed weapon could cause havoc. We have not differentiated between “heavy” and “light” infantry (archers, slingers, etc.) as we are, essentially, dealing with armies that had a massive preponderance of heavy over light infantry (usually about �0-�).
Cavalry: Mounted troops, often wearing some armor, and using lances, spears and swords. We have lumped heavy cavalry in with light cavalry-horsemen more suited to guard the flanks and do reconnaissance work on the march, often unarmored and field-ing “ranged” weapons, such as bow-and-arrow. The differences between the two at this level of simulation, and in this era, were not significant enough to include the rules minutiae necessary to reproduce such.
War Elephants: Scary beasts, but highly suspect. Just as likely to trample on your own men as the opposition’s. Elephants can be devastating when used well; equally as devastating-but in the wrong direction-when ill-used, or used hastily.
Siege Equipment: Siege warfare was not a highly developed craft in this era. Republican-era siege engines mostly consisted of lumbering machinery, such as long-range catapults, towers, etc.
The combat units are identified by type, contingent, and strength. Within a given contingent and type, the units are interchange-able like money. Some contingents are considered “Elite” (see 8.�7).
(2.22) Leaders: These are the guys that lead the armies around the map. Leaders have numerical and alphabetical ratings. See 5.�� for explanation of the ratings.
Roman Legion Infantry
Roman Legion Cavalry
Type Strength Type Strength
War Elephants Numidian Cavalry
Type Strength
Nationality
Siege Engines
Type
EliteStatus
Strength
Type StrengthType Strength
RomanQuinquireme
RomanTrireme
NameGuile Points
Faction StripeLeader #Mortality Rating
Battle Letter
CampaignRating
InitiativeRating
NameGuile Points
Leader ID#Mortality Rating
Battle Letter
CampaignRating
InitiativeRating
Roman Leader
Non-Roman Leader
The Ancient World v2.2 3
© 2005 GMT Games, LLC
Each leader also has a number of Leader Activation Markers (LAMs) equal to his Initiative Rating. See 4.� for further eluci-dation on this very important game mechanic.
(2.23) Information Markers: Counters with words and numbers on them are used to record various game mechanics. Examples include markers for Under Siege, Sacked, Scattered, Devastated, Useless, etc.
(2.3) CHARTS AND TABLES See the volume specific rule book
(2.4) TERMINOLOGYSee side bar.
(2.5) GAME SCALE The game-turns are yearly.
Each hex represents approximately �3 miles from side-to-op-posite-side. One hex of traversable terrain would represent about one day’s normal march for an army-depending on who was in charge and how anxious they were to get where they were going.
Each Infantry SP represents 500 men; each cavalry SP, 300 horsemen; and each Elephant SP, �0 elephants.
(2.6) THE DIE Play of The Ancient World requires one �0-sided die, with a ‘0’ being a ‘0’, and the range 0-9.
(2.7) ADDITIONAL NOTES As this is a projected series covering much history, every once in a while the rules will refer to mechanics for, or use examples of, events and details that will appear in future games.
(3.0) THE SEQUENCE OF PLAY DESIGN NOTE: The Sequence of Play listed below describes the major Phases and the general course of play common to all the volumes in the series. Each volume has its own detailed Sequence of Play listed in its scenario book.
The Ancient World uses a randomization-based sequence of play, although some mechanics are done in strict sequence. The players do not “go” in a set, pre-determined order; rather, you have to make the most of an opportunity when (and if) it arises. Basically, a player picks a Leader Activation Marker (LAM) out of a cup; the marker (usually) contains the name of a Leader. The player controlling that leader may then move that leader’s units, attack enemy armies/cities... whatever the rules for Operations (5.3) allow. There is no limit as to how far or how much a leader can do with his units, other than his Campaign Rating (5.25), the grinding force of attrition, and certain other restrictions.
A. The Upgrade PhaseSee the volume specific rule book
TERMINOLOGYBRT: Acronym for Battle Results Table (see 8.3).Contingent: Term used to denote separate groups of troops operating within a force. This usually occurs when an army is made up of men from different areas, such as the armies fielded by Hannibal and Pyrrhus. For example, Pyrrhus’ army may consist of contingents from Epirus, Tarentum, and Italy. Each of those would be a separate contingent, which is important for determining who takes losses. Continuation: The mechanic whereby a Leader (and his army) gets to keep moving during his turn, after Stopping to undertake some action. Devastation: A reduction in the status of a Province (see 6.7).DR and DRM: Acronym for die roll and die roll modifier. Finished: The leader whose Initiative and Operations Phase it is, may not undertake any further operations in that Operations Phase. The Operations Phase for that leader is over. With most Operations, this is a die roll result. With others, the Finished is automatic at the conclusion of the operation. Force: Any stack of friendly combat/leader units in one hex. If the hex contains a city, the friendly units inside and outside the city are considered separate stacks and thus separate forces. Friendly: Combat units and Cities/Ports are considered friendly to a player if they are controlled by the player or Allied to that player.IDS: The Intrinsic Defensive Strength of a city; its walls, city militia, etc. LAM: Leader Activation Marker...used to determine who goes, and when. Operation: What a force can do when the leader commanding it is activated. See 5.3.OC: Acronym for Overall Commander. See 5.�2, 5.�3 and 5.42.Province: The territory within the Provincial Boundary lines. Named islands with Attrition Ratings are also provinces; Cor-sica, Melita, are examples. Each Province has an Attrition Rating printed next to its name; see 6.4. SADS: Acronym for Siege Assault Defense Strength. This the defense strength used by the city’s defenders against a Siege Assault. SCR: Acronym for Siege Capability Rating. This is the nation’s overall effectiveness in conducting siege warfare. Stop: Whenever an army or leader halts movement or finishes an Operation. In many cases, a “stop” signals that the leader is Finished. SP: Acronym for Strength Point. Strength Point: This represents the strength (manpower) of a given unit (see 2.5). Under Siege: The state a city must be under in order to conduct
The Ancient World v2.2 4
© 2005 GMT Games, LLC
B. Strategic PhaseSee the volume specific rule book
C. The Initiative Phase 1. LAM Pool Segment: Each player places all the LAMs avail-able for every leader he has in play in a cup or similarly opaque container. In addition, place the Augury marker and the three (3) Siege Attrition markers in the same cup.
2. Initiative Determination Segment: Either player, blindly and randomly, chooses one marker from the cup. If it is a LAM or a Siege Attrition marker, go to the Operations Phase (D). If it is the Augury marker, go to the Augury Phase (E). If there are no LAMs in the cup, proceed to the Devastation Phase (F).
D. The Operations PhaseThe player who controls the leader chosen may do anything with that Leader that the rules (5.3) allow. The phase ends when the leader is Finished. Play now reverts to C/2. If the LAM says Siege Attrition, the players resolve that and play then reverts to C/2.
E. The Augury PhaseIf the player has chosen the Augury marker he rolls on the Augury Tables and the players follow the instructions contained therein. If there are LAMs left, return to C/2.
F. Devastation Phase1. Devastation Recovery Segment: Players roll to see if Dev-astated provinces can recover (see 6.7).
2. Naval Superiority Construction/Re-allotment Segment: The players may reassign NS Levels (as per 7.�5). Roll to see who does this first.
PLAY NOTE: This segment is only used if the Naval Superiority rules are in effect. See the volume specific rule book for further details.
3. Devastation Attempt Segment: Players, if they wish, may attempt to Devastate provinces (see 6.7).
G. End-Turn Phase1. Inertia Attrition Segment: Players determine the effects of Attrition on those units that remained in the same province for the entire turn (see 6.46).
2. Recovery from Battle: Forces can improve their After Battle Status (see 8.56).
3. Victory Determination: Check scenario victory rules to see if either player satisfied automatic victory conditions. If not, the turn is over; start another beginning with the Rebuild Phase (A).
(4.0) THE INITIATIVE SYSTEM The Initiative mechanics are used to “drive” the randomized sequence of play. It explains how each player gets to move his units. The basic proposition is that a player gets to use (move) only one leader-and his army-at a time (with some exceptions to that theme).
(4.1) LEADER ACTIVATION MARKERS (LAMs) (4.11) Each scenario has a series of Leader Activation Mark-ers (LAMs) for each leader. The number of markers for each leader, which varies from � to 4, is equivalent to that leader’s Initiative Rating. PLAY NOTE: Thus, Hannibal, with an Initiative Rating of ‘4’, has four LAMs. Most other leaders have Initiative Ratings of ‘1’ or ‘2’.
(4.12) There are no LAMs for allied forces without a leader. These forces are moved only when that ally becomes “active” (see �2.0) and only when either an active leader of the controlling side picks them up or that side’s Overall Commander expends one of his LAMs to move that allied force (per 6.�3).
(4.13) The leader whose LAM has been selected has the Ini-tiative; it is his Operations Phase within which to undertake Operations (5.3).
(4.14) When a leader has undertaken his final allowed activation that turn, flip him to his reverse “Activations Complete” side to keep visual track.
(4.15) There is also an Augury LAM and a Siege Attrition LAM, see 9.0 and �3.0 for what to do when they are picked. Some of the shorter scenarios do not use the Augury LAM.
(4.2) THE LAM POOL At the start of each Initiative Phase, the players place all LAMs for each leader in play (as per 4.�� and 4.�2), the Siege Attrition LAMs, and the Augury marker (unless the scenario says otherwise), in an opaque cup. This cup, and its contents, represents the LAM Pool. LAMs are used only for those leaders in play at that time... “in play” meaning on the map or available to enter as a Reinforce-ment, as per scenario instructions. If a leader’s LAM is picked, that leader may campaign until he is Finished (see 5.3). If a leader has more than one LAM, that leader will have the opportunity to campaign more than once in a turn. PLAY NOTE: A careful use of those leaders with good Initiative Ratings is important, as often these leaders are called upon to do things other than simply move and fight ... and when they do these “other” things can often be critical.
(4.21) Whenever a new leader enters the game after the first LAM is drawn for that game turn, that leader’s LAMs are placed in the pool. However, if the leader arrives after at least two of that player’s LAMs have been drawn that turn, place only one of that leader’s LAMs in the pool. Thus, regardless of his Initiative Rating, that newly-arrived leader is limited to one Operations Phase of operations.
The Ancient World v2.2 5
© 2005 GMT Games, LLC
(5.0) LEADERS Leaders represent the various kings, tyrants, consuls, and generals who conduct military campaigns. Es-sentially, combat units cannot do anything-except to defend against an attack-without a leader, and
each leader has a variety of ratings to reflect his capabilities (or lack thereof). These ratings paint a personality portrait of each leader. Players will find that while there are a few greats and a couple of bozos, most leaders are “yeoman-like” in at least one or two areas.
(5.1) LEADER RATINGS (5.11) Leaders have the following ratings, although some ratings are applicable only to certain types of leaders:
Initiative Rating: Represents the number of Operations Phases that leader may undertake in a turn (year). ‘4’ is best (and un-usual); most are in the ‘�’ section. The rating also indicates the number of LAM markers available for that leader, per turn.
Battle Letter: That leader’s tactical/battle capabilities when leading an army, including conducting a siege, range from “A” (a Hannibal-level genius), to “E” (fairly incompetent and/or “fish out of water”), and they are always used in comparison to the opposing leader in a battle.
Subordinate Battle Rating: Some leaders have a small number following the Battle Letter. (E.g. “C�”) This number is used to adjust Battle die rolls when this leader is not the active com-mander (see 8.3�). If there is no Subordinate Battle Rating on the counter, it is a ‘0’.
Campaign Rating: A rating, the higher the better, against which a die roll is compared to affect a variety of campaign-type de-cisions, such as Battle Avoidance, Interception, Continuation, Coordination, etc. This rating reflects a commander’s ability to “keep going.”
Guile Rating: A finite number of points used to do a host of unusual things, such as dupe a city into surrendering, initiate “treachery”, impress the natives, raise troops back home, etc. (see 5.5).
Diplomacy Rating (Ambassador only): Used to effect alliances, sway minds and hearts, etc. (see �2.34).
Mortality Rating: The likelihood of the leader surviving the rigors of warfare (and life in general) during this period of history. The higher the number, the more likely he’ll stay around.
DESIGN NOTE: Don’t look for major insight here, as the actu-arial tables from the All-SPQR Insurance Company did not arrive in time. The ratings are based, though, on the man’s life-span and propensity for dying in battle.
(5.12) Overall Commanders: Each scenario designates (usually) one leader as the Overall Commander (OC). He is the highest ranking leader for that side. Overall Commanders function in the same manner as other Leaders, except that they have the following special attributes:
• the OC is the only leader that can conduct Manpower, Diplo-macy and Ally Movement operations
• the OC is the only leader who may use his Guile Points to effect certain, specific items (see 5.5)
• the presence of the OC restricts the size of a force other leaders in the hex can use for operations (5.4�)
• if the OC is involved in combat, his ratings are used whether active or not (5.43)
(5.13) All other leaders on a player’s side are subordinate to (i.e. are lower ranked than) the OC. Unless otherwise specified in the volume specific or scenario rules, all subordinate leaders have the same rank.
(5.2) LEADER ACTIVATION(5.21) A leader may undertake operations in the Operations Phase only when activated. A leader is activated when his LAM is drawn from the pool in the Initiative Determination Segment. Only one leader may be active at any one time.
(5.22) An activated leader may engage in any of the operations listed in 5.3 that are available to him. He may continue to be ac-tive and conduct operations until he is Finished (see 5.25).
(5.23) The only time an inactive leader may be “used” is in battle, when subordinate leaders’ Subordinate Battle Rating may be used to affect combat (8.3�).
(5.24) A leader Stops each time he completes an operation. Each time a leader Stops, he may be Finished (5.25). If a leader is wounded/killed while conducting an operation, he is automati-cally Finished.
(5.25) Continuation Die Roll: Some Stops result in a manda-tory (automatic) Finish; others depend on a die roll. If the latter, the player rolls the die and compares it to his active leader’s Campaign Rating: ≤Ifthedierollisthesameasorlowerthanthatrating,the
leader may continue to be active; > if the die roll is higher, he is Finished for that Operations Phase.
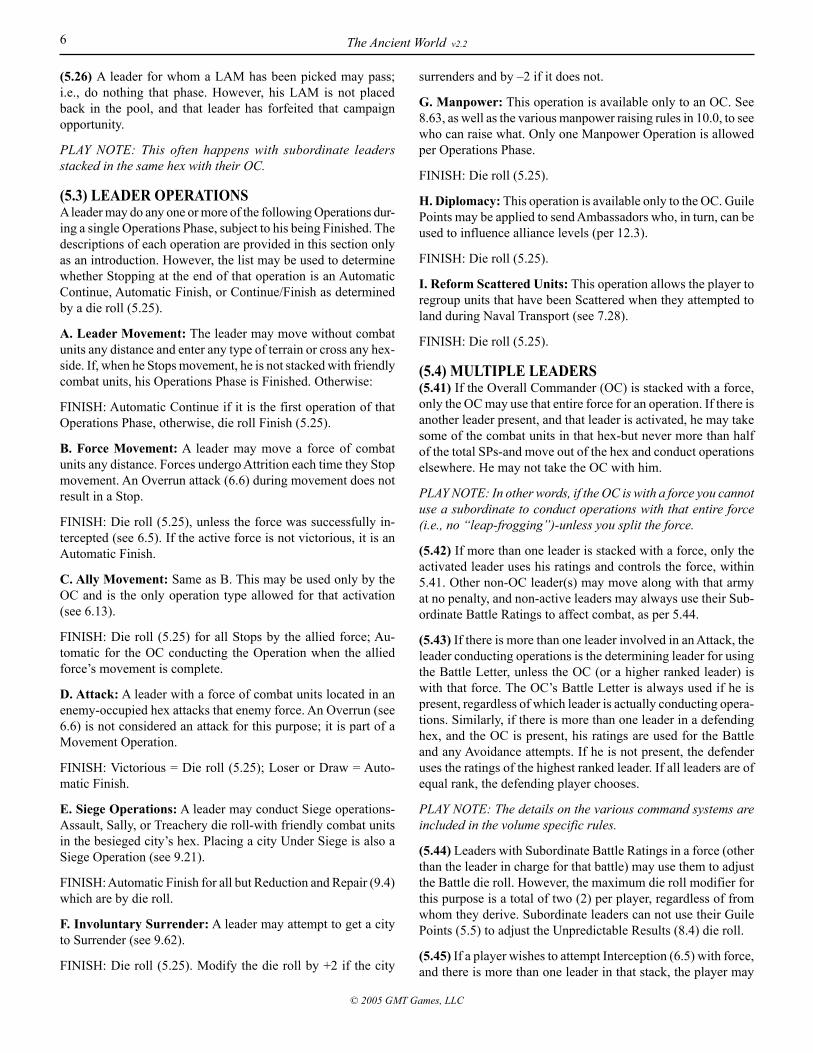
EXAMPLE OF CONTINUATION: Consul A. Claudius moves a Roman force from hex “A” to hex “B” and enters a city in the hex. Entry into a city is a Stop so Claudius must check to see if he can continue to conduct additional operations (Force Movement requires a die roll to Continue, see 5.3), including further movement. The Roman player rolls an ‘8’ which is greater than Claudius’s Campaign Rating (6) so he is Finished, thus ending the Operations Phase.
A B
The Ancient World v2.2 6
© 2005 GMT Games, LLC
(5.26) A leader for whom a LAM has been picked may pass; i.e., do nothing that phase. However, his LAM is not placed back in the pool, and that leader has forfeited that campaign opportunity.
PLAY NOTE: This often happens with subordinate leaders stacked in the same hex with their OC.
(5.3) LEADER OPERATIONS A leader may do any one or more of the following Operations dur-ing a single Operations Phase, subject to his being Finished. The descriptions of each operation are provided in this section only as an introduction. However, the list may be used to determine whether Stopping at the end of that operation is an Automatic Continue, Automatic Finish, or Continue/Finish as determined by a die roll (5.25).
A. Leader Movement: The leader may move without combat units any distance and enter any type of terrain or cross any hex-side. If, when he Stops movement, he is not stacked with friendly combat units, his Operations Phase is Finished. Otherwise:
FINISH: Automatic Continue if it is the first operation of that Operations Phase, otherwise, die roll Finish (5.25).
B. Force Movement: A leader may move a force of combat units any distance. Forces undergo Attrition each time they Stop movement. An Overrun attack (6.6) during movement does not result in a Stop.
FINISH: Die roll (5.25), unless the force was successfully in-tercepted (see 6.5). If the active force is not victorious, it is an Automatic Finish.
C. Ally Movement: Same as B. This may be used only by the OC and is the only operation type allowed for that activation (see 6.�3).
FINISH: Die roll (5.25) for all Stops by the allied force; Au-tomatic for the OC conducting the Operation when the allied force’s movement is complete.
D. Attack: A leader with a force of combat units located in an enemy-occupied hex attacks that enemy force. An Overrun (see 6.6) is not considered an attack for this purpose; it is part of a Movement Operation.
FINISH: Victorious = Die roll (5.25); Loser or Draw = Auto-matic Finish.
E. Siege Operations: A leader may conduct Siege operations-Assault, Sally, or Treachery die roll-with friendly combat units in the besieged city’s hex. Placing a city Under Siege is also a Siege Operation (see 9.2�).
FINISH: Automatic Finish for all but Reduction and Repair (9.4) which are by die roll.
F. Involuntary Surrender: A leader may attempt to get a city to Surrender (see 9.62).
FINISH: Die roll (5.25). Modify the die roll by +2 if the city
surrenders and by –2 if it does not.
G. Manpower: This operation is available only to an OC. See 8.63, as well as the various manpower raising rules in �0.0, to see who can raise what. Only one Manpower Operation is allowed per Operations Phase.
FINISH: Die roll (5.25).
H. Diplomacy: This operation is available only to the OC. Guile Points may be applied to send Ambassadors who, in turn, can be used to influence alliance levels (per �2.3).
FINISH: Die roll (5.25).
I. Reform Scattered Units: This operation allows the player to regroup units that have been Scattered when they attempted to land during Naval Transport (see 7.28).
FINISH: Die roll (5.25).
(5.4) MULTIPLE LEADERS (5.41) If the Overall Commander (OC) is stacked with a force, only the OC may use that entire force for an operation. If there is another leader present, and that leader is activated, he may take some of the combat units in that hex-but never more than half of the total SPs-and move out of the hex and conduct operations elsewhere. He may not take the OC with him.
PLAY NOTE: In other words, if the OC is with a force you cannot use a subordinate to conduct operations with that entire force (i.e., no “leap-frogging”)-unless you split the force.
(5.42) If more than one leader is stacked with a force, only the activated leader uses his ratings and controls the force, within 5.4�. Other non-OC leader(s) may move along with that army at no penalty, and non-active leaders may always use their Sub-ordinate Battle Ratings to affect combat, as per 5.44.
(5.43) If there is more than one leader involved in an Attack, the leader conducting operations is the determining leader for using the Battle Letter, unless the OC (or a higher ranked leader) is with that force. The OC’s Battle Letter is always used if he is present, regardless of which leader is actually conducting opera-tions. Similarly, if there is more than one leader in a defending hex, and the OC is present, his ratings are used for the Battle and any Avoidance attempts. If he is not present, the defender uses the ratings of the highest ranked leader. If all leaders are of equal rank, the defending player chooses.
PLAY NOTE: The details on the various command systems are included in the volume specific rules.
(5.44) Leaders with Subordinate Battle Ratings in a force (other than the leader in charge for that battle) may use them to adjust the Battle die roll. However, the maximum die roll modifier for this purpose is a total of two (2) per player, regardless of from whom they derive. Subordinate leaders can not use their Guile Points (5.5) to adjust the Unpredictable Results (8.4) die roll.
(5.45) If a player wishes to attempt Interception (6.5) with force, and there is more than one leader in that stack, the player may
The Ancient World v2.2 7
© 2005 GMT Games, LLC
use the Campaign Rating of any leader present, within the restric-tions listed. The units that comprise his force may be limited by 5.4� and specific command restrictions given in the individual volume rules.
(5.5) GUILE (5.51) Each leader has a certain number of Guile Points, which he may use during the game turn to effect a variety of things. If a leader has a ‘0’ (or no) Guile Rating, he has no ability to use this rule.
(5.52) The Guile Rating is a finite number of points, usable per game turn. There is no limit as to how many available Guile Points may be used at any one time, but the rating is the total number of points that may be used in one game turn. Use Guile Point markers to keep track of how many Guile Points have been used.
(5.53) Guile Points may be used to effect/affect several items (see the Guile Point Reference Chart), the rules for which are explained elsewhere.
(5.54) Where both players are going to use Guile Points (as in Sieges) the points are allotted in secret, and revealed simultane-ously.
(6.0) MOVEMENT DESIGN NOTE: The movement rules are somewhat longer, and more involved, than those in many games, mostly because of the continual movement mechanic, and the fact that there are no Movement Points, per se; the movement system is based on Attrition, not movement range.
(6.1) LEADERS AND MOVEMENT (6.11) Combat units may not move unless they are stacked with a leader or activated as part of an Ally Movement Operation (see 6.�3). For a leader to move combat units or other leaders, he must begin the Force Movement operation stacked with those units, with both the leader and units either all outside a city or all inside a city. Only units that the leader is eligible to command may be included in the operation (see the volume specific com-mand rules for limitations and of course note 5.4�). These units comprise the leader’s force for the operation.
(6.12) Leaders may move alone, but if they Stop in a hex without a friendly combat unit, they are Automatically Finished for that Operations Phase. If Leader Movement is the first Operation undertaken by the leader in his Operations Phase, he may au-tomatically continue after a Stop in hex with a friendly combat unit. If it is a subsequent operation, the player must roll for Continuation (5.25).
PLAY NOTE: This allows players to “re-assign” leaders at the start of their activation, as long as they could actually reach their destination by movement (you cannot use this section to take a leader out of a city under siege).
(6.13) Ally Movement Operation: OCs-and only OCs-may move any force of allied combat units without their own leader
as an Ally Movement operation. Such units may only move; they may not do anything else. They may Stop, and if the player wishes to Continue, he rolls to do so using the OC’s Campaign Rating. The OC does not have to be stacked with-or within any specific distance of-the allied force. Ally Movement operations may only be used with one force per LAM, though the moving force may Stop and then attempt to Continue as many times as the player wishes. Ally Movement operations with this force are the sole undertaking for that LAM.
(6.2) CONTINUAL MOVEMENT (6.21) There are no Movement Allowances in Ancient World. A leader may continue to move as far as the player wishes. How-ever, if a leader Stops (5.24 and 6.22)—for whatever reason—the owning player must immediately check for Attrition (6.4). If the leader wished to conduct other operations or continue to move, he must check to see if he can Continue (5.25).
(6.22) Stops: A leader must Stop before he does, or attempts to do, anything other than move; Overrun is treated as part of movement (see 6.6). In addition, any time a leader enters a city (6.37) as part of a Movement Operation, it is a Stop. The leader may continue to move, as per 6.23. A Leader may also voluntarily Stop at any time; 6.23 applies.
(6.23) Every time a leader Stops the player must:• check for Attrition (6.4) if moving a force; and then• check the Operations Chart to see if that Stop is an Automatic
Finish or a Die roll Finish (5.25). If by die roll and the player desires to continue to conduct operations with the leader, the player rolls to see if he is Finished.
(6.24) Force Composition. The composition of a force is determined at the start of each Force Movement operation. A force can consist of any/all eligible units subject to 5.4� and any specific command restrictions given in the individual volume rules. The leader may adjust the composition of the force by picking up eligible units in a hex and/or leaving units in a hex (but see 6.25). Note that if a leader is outside a city, only those units outside the city may be used to determine the force com-position. Similarly, if a leader is inside a city, only units inside the city are considered.
(6.25) An active leader may never leave units that he moved into a hex, in that hex, unless he also leaves a leader eligible to command those units, or such a leader is already in the hex. This restriction does not apply to units left inside a city. When determining his force for subsequent operations, the active leader is not required to add to his force any leaderless units that were already in the hex, though he certainly may do so.
The Ancient World v2.2 8
© 2005 GMT Games, LLC
(6.3) TERRAIN General Principle: There are no movement point costs to enter a given hex. Instead of expending movement points, moving forces accumulate Attrition Points (6.4).
(6.31) There are four different types of land hexes: • FLAT: no effect other than to note that entering such a hex
without using a road produces greater Attrition (see 6.4�). • ROUGH: same as Flat. In addition, Rough terrain reduces the
effectiveness of cavalry in battle • MOUNTAIN and MARSH: Heavy attrition cost, and they
negate the use of cavalry or elephants
(6.32) Impassable Hexsides: There are several Impassable hexsides on the map. These represent terrain so imposing (usu-ally mountains, but not always) that movement across them was militarily impossible in this era. No combat unit may cross such a hex side (but leaders moving alone may, see 5.3/A). The same applies to land units and all-sea and/or all-lake hexsides, though units may move by sea using Naval Transport (see 7.2).
(6.33) Road Levels: The road network on the map does not exactly speed movement; it simply makes it easier—and less “corrosive”—to move a large body of men. The remarkable Ro-man network of roads was built over a long period of time. Thus, some roads that exist in one scenario do not exist in others. To that end, we have given the roads available in each scenario different symbols/colors, noting their Existence Level, as follows:Level “A”: Available in scenarios that start after 3�0 BCLevel “B”: Available in the �st and 2nd Punic War scenarios, only. Level “C”: These will be used for games in later eras.
HISTORICAL NOTE: Major road building—roads that used lime mortar and cement—did not start until the Via Appia (from Rome into Campania) was constructed in c. 312 B.C. There were “roads” before then, but, most likely, these were dirt tracks (sometimes augmented with gravel), the most famous of which was the original Via Latina (which pretty much followed the road that leads from Rome through Latium into Cassinum).
HISTORICAL & PLAY NOTE: No, it’s not a mistake. There is no road in It-4015 (the Pontine Marshes) until the Empire. The engineers of the republican era could not solve the problem of driving piles into swamp, so the two sections of the Via Appia were separated by about 20 miles of channels, marsh and gen-erally watery muck—traversable by ferry, if you had the bucks. Armies? They had to slosh on through.
DESIGN & HISTORICAL NOTE: The roads in the game rep-resent only the major roads constructed by Rome, the ones that had names like Via Appia, Via Clodia, etc. There were, to be sure, other (minor) roads—really “tracks” which armies used—e.g., the road alongside the eastern shore of Lake Trasimene (essen-tially, hex It-2912) where Hannibal showed the Romans exactly how effective “Punic Treachery” could be—but these were far too numerous to include, and their effect, albeit minimal, was
sometimes taken into account when figuring out exactly what AP level a given hex should have. There is some disagreement among the sources as to exactly when some of these roads were completed. In case of such disagreement, we have opted for a usage context.
(6.34) Road Effects: Roads have the following effects, but only if the units move directly from one road hex into another, con-nected road hex. • When moving entirely by road within a province, the province
Attrition cost is only � AP • They negate the Attrition cost of crossing a river. This applies
only if the road exists in the scenario and actually crosses the river hex side.
• They reduce the Interception die roll adjustment for moving through Marsh and Mountain; see 6.54.
EXAMPLE: On the Italy map, movement from It-3514 to It-3615 uses the road; movement from It-3514 to It-3515 does not.
(6.35) River Effects: Although there are no Zones of Control as in other games, armies of a certain size and composition can “control” the side of the river they are on. The following forces are capable of River Control: • Any force that contains at least 4 SPs of cavalry, or• Any force of 20 SPs or more of any type.
A leader able to conduct operations with the force must also be present.
Such a force controls the hex it is in, and all hexes adjacent to that hex that are on the same side of any river(s) that are part of the hex the unit is in. Control does not extend across any river hex side or any impassible hex side.
If an enemy force crosses the associated river and enters a con-trolled hex not occupied by the friendly force, the owning player may immediately move the leader and the force to the hex entered and immediately use Same Hex Interception (6.54) if the player so wishes. The friendly force does not check for Attrition. If an enemy force enters the friendly occupied hex itself, the leader of the friendly force may attempt Same Hex Interception im-mediately (he doesn’t have to wait for the enemy force to move through the hex).
(6.36) Non-Existent Cities: The map is littered with a whole bunch of cities (most are more towns than cities). These cities are classified as Small, Medium or Large in terms of their In-trinsic Defense Strength—IDS (see 9.�). Unfortunately, some cities exist in one scenario but are non-existent—or of different “strength”—in others. We have provided the Provincial Informa-tion Charts (PIC) in the volume specific rules and/or scenarios to help you. The PIC also notes if a given city does not exist in that scenario, in which case you ignore it. The counter mix includes several markers with the terrain type that can be used to cover up the non-existent cities.
The Ancient World v2.2 9
© 2005 GMT Games, LLC
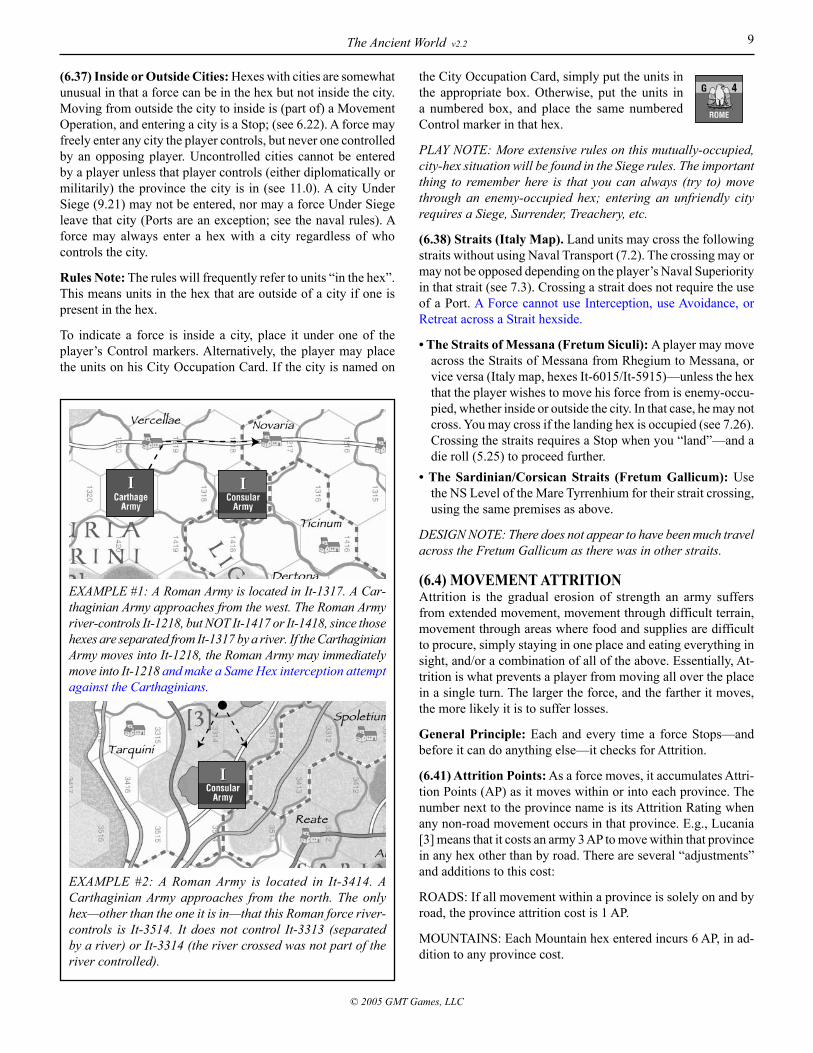
(6.37) Inside or Outside Cities: Hexes with cities are somewhat unusual in that a force can be in the hex but not inside the city. Moving from outside the city to inside is (part of) a Movement Operation, and entering a city is a Stop; (see 6.22). A force may freely enter any city the player controls, but never one controlled by an opposing player. Uncontrolled cities cannot be entered by a player unless that player controls (either diplomatically or militarily) the province the city is in (see ��.0). A city Under Siege (9.2�) may not be entered, nor may a force Under Siege leave that city (Ports are an exception; see the naval rules). A force may always enter a hex with a city regardless of who controls the city.
Rules Note: The rules will frequently refer to units “in the hex”. This means units in the hex that are outside of a city if one is present in the hex.
To indicate a force is inside a city, place it under one of the player’s Control markers. Alternatively, the player may place the units on his City Occupation Card. If the city is named on
the City Occupation Card, simply put the units in the appropriate box. Otherwise, put the units in a numbered box, and place the same numbered Control marker in that hex.
PLAY NOTE: More extensive rules on this mutually-occupied, city-hex situation will be found in the Siege rules. The important thing to remember here is that you can always (try to) move through an enemy-occupied hex; entering an unfriendly city requires a Siege, Surrender, Treachery, etc.
(6.38) Straits (Italy Map). Land units may cross the following straits without using Naval Transport (7.2). The crossing may or may not be opposed depending on the player’s Naval Superiority in that strait (see 7.3). Crossing a strait does not require the use of a Port. A Force cannot use Interception, use Avoidance, or Retreat across a Strait hexside.
• The Straits of Messana (Fretum Siculi): A player may move across the Straits of Messana from Rhegium to Messana, or vice versa (Italy map, hexes It-60�5/It-59�5)—unless the hex that the player wishes to move his force from is enemy-occu-pied, whether inside or outside the city. In that case, he may not cross. You may cross if the landing hex is occupied (see 7.26). Crossing the straits requires a Stop when you “land”—and a die roll (5.25) to proceed further.
• The Sardinian/Corsican Straits (Fretum Gallicum): Use the NS Level of the Mare Tyrrenhium for their strait crossing, using the same premises as above.
DESIGN NOTE: There does not appear to have been much travel across the Fretum Gallicum as there was in other straits.
(6.4) MOVEMENT ATTRITION Attrition is the gradual erosion of strength an army suffers from extended movement, movement through difficult terrain, movement through areas where food and supplies are difficult to procure, simply staying in one place and eating everything in sight, and/or a combination of all of the above. Essentially, At-trition is what prevents a player from moving all over the place in a single turn. The larger the force, and the farther it moves, the more likely it is to suffer losses.
General Principle: Each and every time a force Stops—and before it can do anything else—it checks for Attrition.
(6.41) Attrition Points: As a force moves, it accumulates Attri-tion Points (AP) as it moves within or into each province. The number next to the province name is its Attrition Rating when any non-road movement occurs in that province. E.g., Lucania [3] means that it costs an army 3 AP to move within that province in any hex other than by road. There are several “adjustments” and additions to this cost:
ROADS: If all movement within a province is solely on and by road, the province attrition cost is � AP.
MOUNTAINS: Each Mountain hex entered incurs 6 AP, in ad-dition to any province cost.
EXAMPLE #1: A Roman Army is located in It-1317. A Car-thaginian Army approaches from the west. The Roman Army river-controls It-1218, but NOT It-1417 or It-1418, since those hexes are separated from It-1317 by a river. If the Carthaginian Army moves into It-1218, the Roman Army may immediately move into It-1218 and make a Same Hex interception attempt against the Carthaginians.
EXAMPLE #2: A Roman Army is located in It-3414. A Carthaginian Army approaches from the north. The only hex—other than the one it is in—that this Roman force river-controls is It-3514. It does not control It-3313 (separated by a river) or It-3314 (the river crossed was not part of the river controlled).
The Ancient World v2.2 �0
© 2005 GMT Games, LLC
MARSHES: Each Marsh hex entered incurs 3 AP, in addition to any province cost.
RIVERS: Each Minor River incurs � AP, each Moderate River 2 AP, and each Major River 3 AP. There is no River AP cost if the river is crossed via a Road that exists in the scenario.
DEVASTATED PROVINCES: If a province is Devastated (6.7), double (2x) the cost of that province—which means road move-ment now incurs 2 AP.
Players keep track of the AP’s accumulated by a moving Force on his Attrition Point Track.
PLAY NOTE: Roads do not negate the Attrition effects of Moun-tains or Marshes.
(6.42) Adjusted SP Total: To check for Attrition, the player first totals the number of SPs in the affected force. Cavalry SPs are doubled for the purposes of determining this total. Thus, �0 cavalry SPs are treated as 20 SPs for determining the strength of that force for attrition.
(6.43) Attrition Loss Points: After determining his Adjusted SP total, the player then consults the Attrition Chart and locates the row corresponding to the number of accumulated Attrition Points (drop fractions), adjusted per 6.44. The final row may be adjusted if any of the following apply: • MOUNTAINS: If, at any time during movement, the army
entered more than two consecutive Mountain hexes, the player adjusts one row “down.”
• AFTER BATTLE STATUS (8.54): A force assumes the status of its worst unit. If any units in the force are Disorganized, the player adjusts one row “down”; if any are Useless, the player adjusts two rows “down.”
• LARGE FORCES: For every 50 SPs above 250, or fraction thereof, the player adjusts one row “down.”
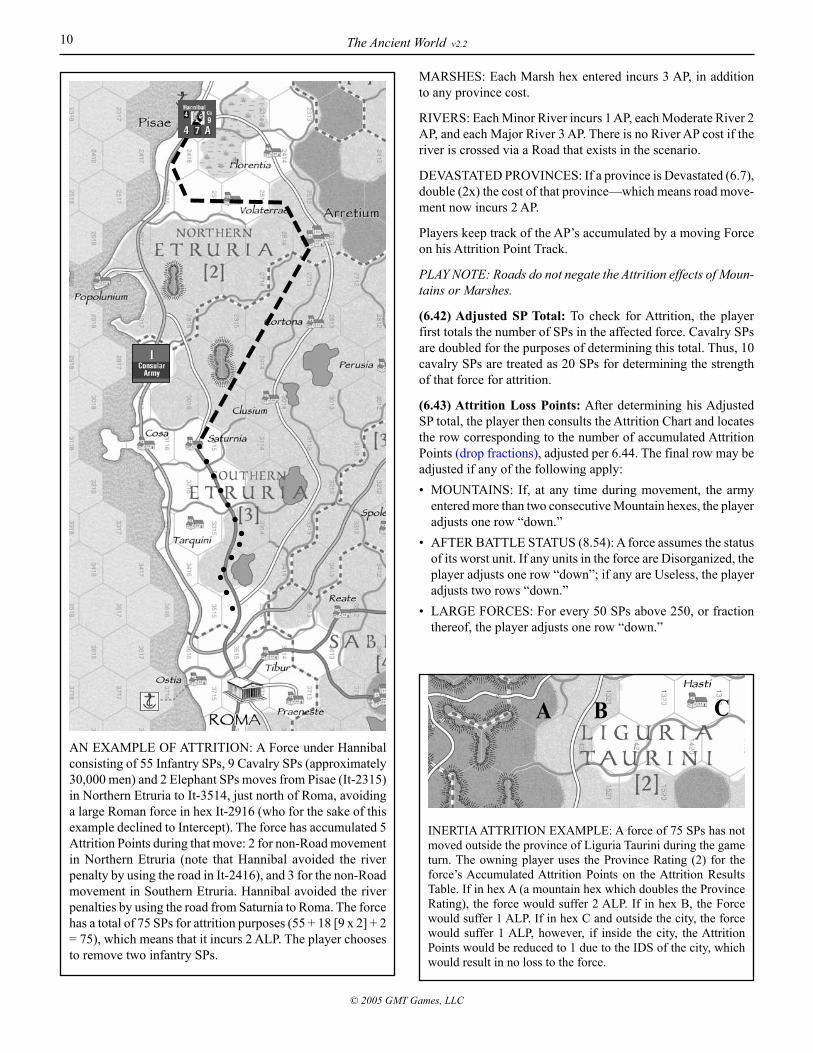
AN EXAMPLE OF ATTRITION: A Force under Hannibal consisting of 55 Infantry SPs, 9 Cavalry SPs (approximately 30,000 men) and 2 Elephant SPs moves from Pisae (It-23�5) in Northern Etruria to It-35�4, just north of Roma, avoiding a large Roman force in hex It-29�6 (who for the sake of this example declined to Intercept). The force has accumulated 5 Attrition Points during that move: 2 for non-Road movement in Northern Etruria (note that Hannibal avoided the river penalty by using the road in It-24�6), and 3 for the non-Road movement in Southern Etruria. Hannibal avoided the river penalties by using the road from Saturnia to Roma. The force has a total of 75 SPs for attrition purposes (55 + �8 [9 x 2] + 2 = 75), which means that it incurs 2 ALP. The player chooses to remove two infantry SPs.
INERTIA ATTRITION EXAMPLE: A force of 75 SPs has not moved outside the province of Liguria Taurini during the game turn. The owning player uses the Province Rating (2) for the force’s Accumulated Attrition Points on the Attrition Results Table. If in hex A (a mountain hex which doubles the Province Rating), the force would suffer 2 ALP. If in hex B, the Force would suffer � ALP. If in hex C and outside the city, the force would suffer � ALP, however, if inside the city, the Attrition Points would be reduced to � due to the IDS of the city, which would result in no loss to the force.
A B C
The Ancient World v2.2 ��
© 2005 GMT Games, LLC
• OVERRUNS: If Overrun (6.63) was part of movement, the player adjusts one row “down.”
The maximum Row Adjustment allowable is “down four (4).”
Cross-indexing the Adjusted Strength Points with the adjusted Accumulated Attrition Points gives the number of Attrition Loss Points. See 6.47 for the effects.
(6.44) City Attrition Point Adjustment: If the force has stopped inside a city (not just in a city hex), subtract that city’s IDS from the Accumulated Attrition Point total. Thus a force that halts movement inside a Small city would subtract one (–�) from any APs incurred during that movement.
(6.45) If a force Stops simply to check for attrition—as opposed to doing some other operation—this is still treated as a Stop, and requires a Continuation die roll (5.25).
(6.46) Inertia Attrition: Forces that do not move outside a province for the entire game turn are subject to possible Attrition because of the difficulty of supplying a large body of men for an extended period of time in one locale. Therefore, any such force—other than besieged and besieging forces (9.3) must check for Inertia Attrition in the Inertia Attrition Segment. To check for Inertia Attrition, the player uses the Province Rating (doubled if Devastated) as the Accumulated Attrition Points total, adjusted as follows: • MOUNTAINS: If, at the time of checking for Attrition, the
force is in a Mountain hex, double (2x) the province cost. • INSIDE CITY: If, at the time of checking for Attrition, the
force is inside a city, subtract the IDS.
And make the following row adjustments: • AFTER BATTLE STATUS (8.54): A force assumes the status
of its worst unit. If any unit in the force is Disorganized, the player adjusts one row “down”; if any are Useless, the player adjusts two rows “down.”
• LARGE FORCES: For every 50 SPs above 250, or fraction thereof, the player adjusts one row “down.”
DESIGN NOTE: Supply in this era was either through granaries, where large quantities of grains and foodstuffs were kept for the purpose of feeding the troops, or by foraging on the move. To stand still without a grain supply (here represented by the cities/towns) for an extended period of time, was to invite trouble.
(6.47) Attrition Effects: Attrition Loss Points (ALP) are used to reduce that forces strength, using the ratios listed below. The type of unit reduced is up to the player, within the following restrictions: • Each ALP requires the removal of � SP of any type.• Each 7th ALP requires the removal of a cavalry SP. Thus, for
every 7 ALPs, one eliminated SP must be a cavalry SP.• A player may use 2 ALPs to eliminate � Elephant SP if he has
accumulated more than �� ALPs. Thus, a player who accumu-lates �2 ALPs may lose � EL, � Cavalry and 9 Infantry.
(6.48) After a force checks for Movement Attrition, it’s AP level returns to ‘0’ (zero). There is no AP carry-over.
(6.5) INTERCEPTION There are no Zones of Control in Ancient World, as the sizes of the hexes and the methods of ancient war combat require a dif-ferent technique. Instead, the game provides a mechanic called Interception which allows an inactive leader with a force to stop an enemy force that is conducting a Force/Ally Movement Operation or an Interception. Along with Avoidance (8.22) and
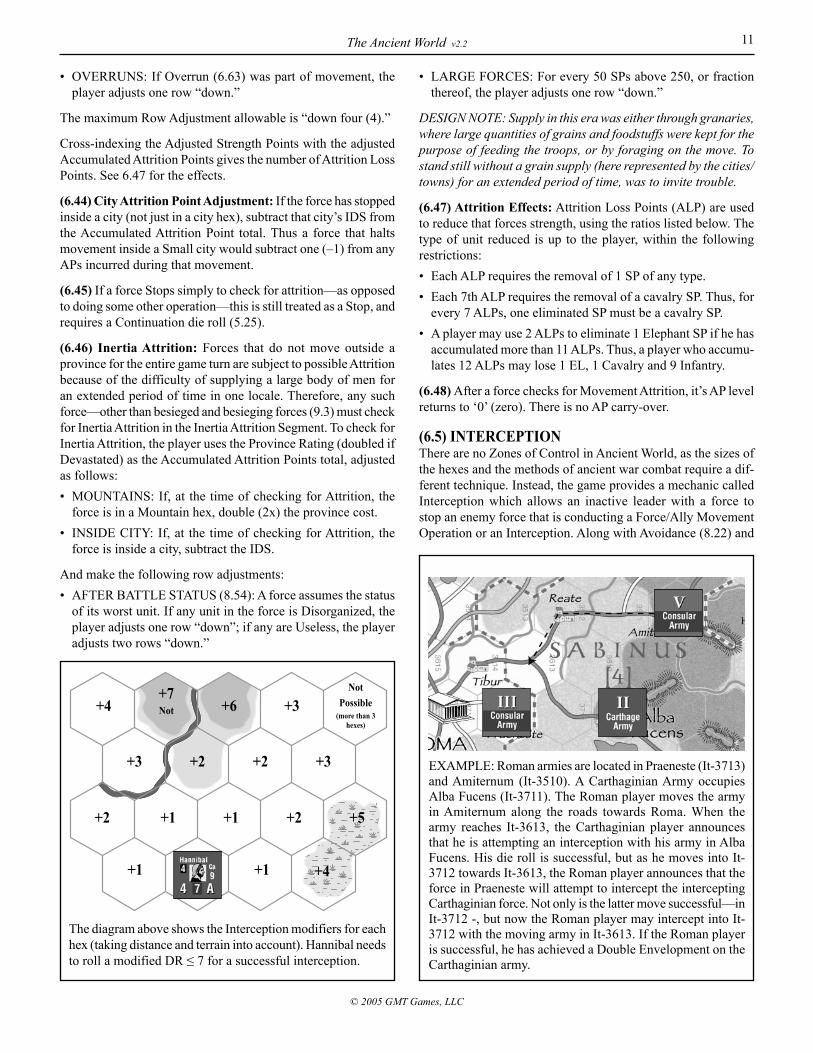
The diagram above shows the Interception modifiers for each hex (taking distance and terrain into account). Hannibal needs torollamodifiedDR≤7forasuccessfulinterception.
+1 +1
+1
+2
+3
+4
+3
+2+3
+4
+5
+2
+7Not +6
+1
+2
NotPossible
(more than 3 hexes)
EXAMPLE: Roman armies are located in Praeneste (It-37�3) and Amiternum (It-35�0). A Carthaginian Army occupies Alba Fucens (It-37��). The Roman player moves the army in Amiternum along the roads towards Roma. When the army reaches It-36�3, the Carthaginian player announces that he is attempting an interception with his army in Alba Fucens. His die roll is successful, but as he moves into It-37�2 towards It-36�3, the Roman player announces that the force in Praeneste will attempt to intercept the intercepting Carthaginian force. Not only is the latter move successful—in It-37�2 -, but now the Roman player may intercept into It-37�2 with the moving army in It-36�3. If the Roman player is successful, he has achieved a Double Envelopment on the Carthaginian army.
The Ancient World v2.2 �2
© 2005 GMT Games, LLC
Coordination (8.25), this is the only time an inactive leader and his force may move, and his ability to do so depends on his posi-tion, location, and Campaign Rating. Note that a force can move through an enemy-occupied hex at any time, and if the leader of the stationary force does not choose to intercept that moving force, it just keeps moving.
(6.51) A leader must have a force to attempt an Interception. A leader does not have to intercept with all the units at his disposal; he can intercept with less, and may only intercept with those units he is eligible to command. Combat units that are Disorganized or Useless may not participate in an Interception.
(6.52) Interception Range: A leader with a force outside of a city has an Interception Range of three (3) hexes, not including the hex the leader is in. If the leader and his force are inside a city, his Interception Range is four (4) hexes, not including the hex the leader is in. The range is traced to the hex the unit is mov-ing into/from. The Interception Range may not be traced into a hex or across a hexside if the intercepting force could not move into/across that hex/hexside, nor may it be traced across a strait (6.38). The path cannot be traced through an enemy-occupied hex although it can be traced into one.
(6.53) A leader can make an Interception attempt against an enemy force conducting a Movement operation that begins in, enters, or leaves any hex within his Interception Range. However, a leader may not intercept a force that moves into his hex and Stops unless that force crossed a river (6.35 River Control), a strait (6.38), or disembarked (7.27) in the hex; but may attempt Interception (Same Hex) against a force leaving his hex. A force moving into a city in the same hex cannot be intercepted.
A leader can attempt an Interception against a moving enemy force only once per Movement Operation unless the enemy force moves out of range of the friendly force and then, later in the same Movement Operation, moves back within range. In the latter case, the leader may attempt another Interception.
(6.54) Interception Procedure: If an activated force attempts to leave a hex with a city, and there is enemy leader with a force inside the city, any Interception attempt by that leader is automatically successful, otherwise the player rolls the die and compares it to the Campaign Rating of the intercepting leader. Adjust the die roll as follows: • DISTANCE: Add one (+�) for each hex distant. Thus a player
would add two (+2) if attempting to intercept an enemy force moving into a hex two hexes away.
• SAME HEX INTERCEPTION: There is no distance modifier for an attempt at intercepting an enemy force trying to leave the same hex as occupied by the potential interceptor (Exception: River Control, see 6.35).
• RIVERS: Add one (+�) for each river hex side crossed by the intercepting leader’s force to reach the targeted enemy.
• MARSHES: Add two (+2) for each Marsh hex the intercept-ing leader’s force would have to either move through or into (including the hex it is in) to reach the targeted enemy—unless the intercepting force uses a road to move through that hex.
Such road movement must be from connecting road hexes. • MOUNTAINS: Add three (+3) for each Mountain hex the
intercepting leader’s force would have to either move through or into to reach the targeted enemy—unless the that force uses a road to move through that hex. Such road movement must be from connecting road hexes.
• DISRUPTED: Add two (+2) if any unit in the intercepting leader’s force is Disrupted (8.54).
(6.55) Interception Die Roll: Having made the above adjust-ments, if the adjusted die roll is higher than the leader’s Campaign Rating, the attempt has failed and the enemy keeps moving. It is not considered to have stopped for attrition purposes. The intercepting force stays put; it never moved. If the adjusted die roll is the same as or lower than the leader’s Campaign Rating the Interception is successful. If successful:
STEP �: the active, enemy force Stops moving and checks for Attrition.
STEP 2: the intercepting force is moved into the enemy’s hex, af-ter which it stops and checks for Attrition (however, see 6.56).
STEP 3: A battle is immediately fought, with the interceptor being the attacker. If the moving player is Victorious (8.5), con-tinued movement is determined by a die roll (5.25), otherwise that leader is Finished.
FAILED INTERCEPTIONS: If a leader attempts Interception and fails, place a “Failed Intercep-tion” marker on his force. If that force is attacked during that same Operations Phase, the attacker adds two (+2) to his Battle die roll. Remove the marker at the end of the Phase.
PLAY NOTE: Interception applies only to a moving force. Other, non-moving forces belonging to the intercepted player use Co-ordination (8.26) if they want to get involved.
(6.56) Intercepting an Interception: A successful intercepting force moving to the target hex, may itself be intercepted by a dif-ferent, enemy force, using the same rules above. Thus, you may have a situation where Army X is moving along. It attempts to pass by Army A. The leader of Army A attempts to intercept and is successful, but in moving to do so, it, passes within Intercep-tion Range of an enemy Army Z, whose leader may then attempt to intercept Army A (before A reaches Army X). If Z’s leader’s interception is successful, Z attacks A, after which X continues its move as if nothing had happened. If Z is unsuccessful, A moves in to intercept X and attack it.
(6.57) Double Envelopment: In the above situation (6.56), if the Interception target hex of Z was within range of X, X could wait until Z entered that hex to intercept and attack A and then roll for its own Interception! In that case, X and Z are now considered the attackers!! ... and won’t A be an unhappy camper . This is called, for game purposes, a Double Envelopment. If attacking with a Double Envelopment, the attacker adds four (+4) to the Battle die roll in addition to any other adjustments. This is the only situation
The Ancient World v2.2 �3
© 2005 GMT Games, LLC
where an active force can attempt an interception.
PLAY NOTE: This (6.56 – 7) all sounds a mite confusing, but it doesn’t happen too often and it’s much simpler when you are actu-ally moving your troops around than when reading about it.
(6.58) Ambush, or “Punic Treachery”: A player may attempt to Ambush the moving Force as part of an Interception. To Ambush, the intercepting leader must start: • in a Rough, Marsh or Mountain hex,• outside a city,• may not cross a river to intercept, and• must attempt the Interception from the same or an adjacent hex
The target unit must not be:• inside a city• in a Mountain or Marsh hex
To resolve an Ambush, the intercepting player follows 6.54, with the following die roll adjustments: • +3 to the die roll for the Ambush attempt• Adjust the die roll for the Battle Letter differences between
the leaders, treating an ‘A’ as a ‘�’ and an ‘E’ as a ‘5’. Thus an ‘A’ attempting to Ambush an ‘E’ would subtract four (–4)
AMBUSH EFFECT: If the Ambush/Interception attempt is suc-cessful, when resolving combat, the ambushing player adds five (+5) to his die roll!!
(6.6) OVERRUNOverrun is a situation where a moving force encounters a much smaller enemy force that it simply pushes aside as it continues to roll inexorably forward.
(6.61) A moving force can Overrun an enemy force if it has a 9-� or better SP ratio (8.3�); and more cavalry SPs than the enemy. This latter condition only applies if the enemy force has cavalry.
(6.62) Units inside a city, or in Mountain or Marsh hexes, may not be Overrun, nor may a moving force cross a river to directly enter a hex to Overrun. Roads do not negate the effects of rivers for this rule. Units using naval movement may not Overrun units in their landing hex. In all these instances, normal combat/siege rules apply.
(6.63) If an Overrun situation does apply, the moving force simply eliminates the entire enemy force including leaders. The overrunning force incurs no loss nor do any leaders present check for casualties. An Overrun is not a Stop (although the player may certainly do so if he wishes), so Attrition is not checked at this time. The next time the leader Stops and checks for Attrition, the player adjusts one row down for the Overrun.
(6.7) DEVASTATION (6.71) Devastation—the reduction of the ability of provinces to feed troops—occurs in two possible ways: • Specific Devastation attempts (6.72).• As a result of a besieging Force foraging to feed its troops (9.53).
(6.72) Devastation may be conducted in the Devastation Attempt Segment (F/3) of the Devastation Phase. A player may attempt the Devastation of any province in which: • He has a force of 25 or more SPs• That force has not moved outside the province in the game
turn.• There is no enemy force of 25 or more SPs in that province
that is outside a city.
(6.73) Procedure: To Devastate a province the player notes the number of SPs in the friendly force and consults the Devasta-tion Chart to determine the Devastation Value of those SPs. He then rolls a die. If the DR is less than or equal to the Devastation Value, that Province is Devastated and marked accordingly. If more than one friendly force meets the criteria, repeat the above procedure for each.
(6.74) Effects: Devastation doubles (2x) the Attrition Rating of the province, as well as the road cost for that province. It does not affect Attrition costs for Mountain/Marsh hexes.
(6.75) Recovery: Devastation is not permanent; provinces may recover. In the Devastation Recovery Segment (F/�), one player (it does not matter which) rolls one die for each Devastated prov-ince. That DR is adjusted based on the total number (both players) of SPs in the province outside of a city. Consult the Devastation
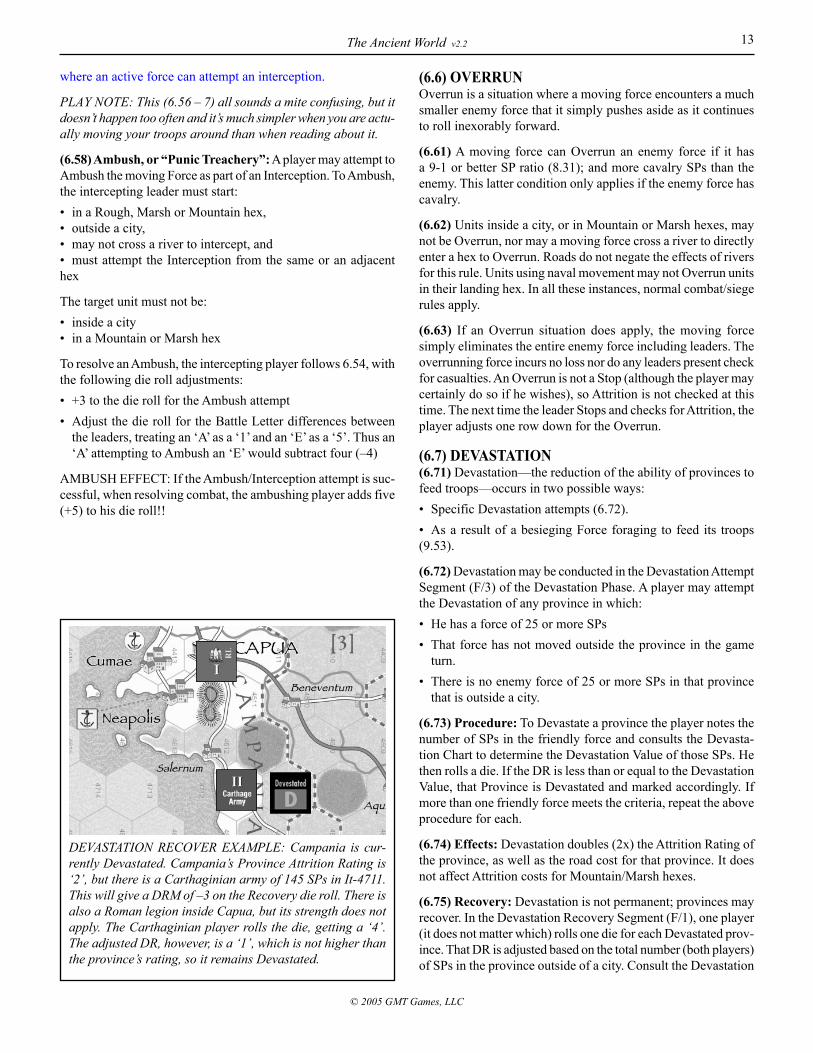
DEVASTATION RECOVER EXAMPLE: Campania is cur-rently Devastated. Campania’s Province Attrition Rating is ‘2’, but there is a Carthaginian army of 145 SPs in It-4711. This will give a DRM of –3 on the Recovery die roll. There is also a Roman legion inside Capua, but its strength does not apply. The Carthaginian player rolls the die, getting a ‘4’. The adjusted DR, however, is a ‘1’, which is not higher than the province’s rating, so it remains Devastated.
The Ancient World v2.2 �4
© 2005 GMT Games, LLC
Chart to determine the Devastation Value of the SPs present and roll a die, subtracting the Devastation Value from the roll. If the adjusted DR is higher than the Province’s printed Attrition Rate, the province recovers. Remove the marker.
(6.76) For Foraging Devastation (9.53), the player wishing to Forage undertakes the same die roll as in 6.73, with the same results applying.
(6.77) Devastation may have adverse effects on Diplomacy (see �2.3�).
(6.8) STACKING (6.81) There is no limit to the number of SPs that can be in any hex at any one time.
PLAY NOTE: Overloading cities can be dangerous when it comes to withstanding a siege, as another one of those “brief glances” at the Attrition Table will show. These guys have to eat.
(6.82) It is possible that two opposing forces will occupy the same hex with neither inside a city. This is allowed.
(7.0) THE NAVAL SUPERIORITY SYSTEM DESIGN NOTE: This rule is used in scenarios in which naval activities were minimal. The Naval Superiority System covers the biggest problem: the incredible dangers of crossing the Mediter-ranean in ships ill-suited for such purposes.
(7.1) NAVAL SUPERIORITY (7.11) The seas are divided into Naval Zones. At the beginning of the game, each Naval Zone is given a Naval Superiority (NS) Level, representing the “superiority” one side currently has over the other in terms of its naval presence in that area and the abil-ity to patrol it.
PLAY NOTE: On the Italy map, the Sicilian Straits are a separate Naval Zone; the Corsica-Sardinian Straits are not.
(7.12) NS Markers: Naval Superiority Levels are represented by a marker for each player, placed in a given naval zone, showing numbers from +4 (best) to 0 (balance of power) to –4 (nary a galley
in sight). The NS Level represents just how much better one side was than the other, and it is used to augment Naval Transport and Siege Assault on Ports (see 9.43) die rolls. “+4” would be the equivalent of Naval Supremacy. Place NS markers in each Naval Zone to keep track of that zone’s NS Level.
EXAMPLE: Rome +3 and Carthage –3 NS markers in the Mare Tyrrenhium would indicate the respective and relative naval pres-ence of each player in that sea. Note that it is possible for the NS markers to be “unbalanced”; e.g., +3 and –1. This occurs in scenarios where there are factors other than those supplied solely by the two protagonists.
(7.13) Effects: Every time a player wishes to transport units by
sea (see 7.2) he adds (or subtracts) to/from the die roll his NS Level for the “least friendly” Naval Zone into which he has to move. Thus, a player that starts Naval Transport in a +� NS Level zone, transports into a +2, and then into a –� would subtract one from his transport die roll (in addition to any other adjustments; 7.24), because the –� NS Level zone was the “least friendly”.
(7.14) NS Levels can be changed by a Re-Allotment of naval assets or Construction of new fleets, both of which are handled abstractly for this mechanic. Re-allotment and Construction are available per scenario instructions.
(7.15) Re-Allotment: In the Naval Superiority Construction/Re-allotment Segment (F/2) a player may raise the level of any Naval Zone any number of NS levels in his favor by removing a similar number of levels from any other zone(s). The maximum number of NS levels that can be removed from any one zone in any one turn is one (�). When increasing (or decreasing) an NS level in any Zone in your favor, lower (raise) the NS level of the opposing player in that zone by a similar, but opposite, level.
EXAMPLE: The Roman is +4 (Carthage –4) in both the Mare Tyrrhenum and the Mare Adriaticum. He wishes to increase his presence in the Mare Africum, which is presently Roman –1/Car-thage +1. He removes one level from both the Tyrrhenum and Adriaticum, reducing them to Roman +3/–3, and increases his presence in the Africum to Roman +1/–1.
(7.16) A player may both re-allot and construct NS levels in the same phase. Re-allotment has no effect on raising legions or troops.
(7.17) Certain results on the Basic Naval Transport Table will affect the NS Levels; these are clearly indicated and represent loss of galleys, etc. Regardless, NS Levels may never go beyond +4/–4.
(7.2) NAVAL TRANSPORT (7.21) Players may transport forces across coastal and deep sea hexes. To do this, the player moves the force into a Port hex and Stops. If the leader is successful in Continuing, or starts inside a Port, he then states his wish to move by sea, traces the path of movement through the sea hexes (7.24), and then rolls on the Naval Transport Table, applying the results. Naval Transport is not used for crossing straits.
(7.22) All Naval Transport must start from inside a Port city. All transported units may land either inside a port city or, with severe limitations, in certain types of hexes, as delineated by the Naval Transport Chart. Units may be Scattered (7.28). There are three types of ports: Major, Secondary and Minor; the latter two have debarkation and embarkation limitations (see 7.25).
DESIGN NOTE: [Italy Map] Thurii (It-5509) IS a port, even though it is inland. Many sources refer to Thurii as a usable port—and all maps place it where it is. It is probable that the river it is on was navigable to commerce. Naval transport reaching It-5508 or It-5609 can consider itself to have reached Thurii.
PLAY NOTE: The ability to land small forces in non-port hexes

The Ancient World v2.2 �5
© 2005 GMT Games, LLC
allows for “raids”, a venture often used in this era—with vary-ing success.
(7.23) There is no limit as to how far players may attempt to carry units in one Naval Transport Movement Operation, but the success of the movement depends on the results from the Naval Transport Table. The latter determines whether all, some or none of the transported units arrive safely. As required by 7.24, the moving player must note the path of sea hexes to be traveled. Players should use the Naval Transport markers to indicate what units are “at sea” and where they are.
(7.24) The Naval Transport die roll may be adjusted, as fol-lows:• Naval Superiority Level of the least friendly Naval Zone en-
tered (7.�3)• For every full 20 coastal hexes traveled, subtract one from the
die roll; amounts less than 20 do not count.• For every 5 deep sea hexes, or fractions thereof, traveled
subtract one from the die roll; amounts less than 5 do count.
EXAMPLE: The trip from Neapolis to Messana costs no DRM, as it is less than 20 coastal hexes. From Caralis (Sardinia) to Drepanum would incur a –2 DRM, as it would entail 7 Deep Sea Hexes (and a few coastal hexes, which have no effect).
DESIGN & HISTORICAL NOTE: As noted, triremes and Quinqueremes, the galleys of the era, were ill-suited for long distance, deep sea trips—not only because they were relatively unseaworthy but because they couldn’t carry very many sup-plies. Therefore, most (like 95%) voyages consisted of simply short-hopping along the coast line from one friendly port/beach to another. It was tedious—but it was safe. Players will find it “safer” to make short haul trips.
(7.25) Port Capabilities: The number of SPs that can volun-tarily embark/debark into or out of a port is limited by the size of the port. Units can only embark from a port, though units can debark (safely) in certain non-port hexes. See the Naval Transport Chart.
(7.26) Stopping Procedure: Units using Naval Transport must “stop”—end their movement—in a coastal hex. They do not have
to debark at that time, but they cannot stop in an all-sea hex. Upon stopping, the player must roll on the Naval Transport Table for the distance traveled, taking any losses incurred, and then also roll for continuation, if desired. If there is a Scattered result (7.28) it is immediately applied!! Units using Naval Transport may not stop in any coastal hex containing enemy land units, a garrisoned enemy city, or in any coastal hex adjacent a gar-risoned enemy city, unless the land units being transported are going to disembark.
(7.27) Amphibious Attacks: As soon as a force disembarks it Stops. There is no Attrition die roll—that is handled by the Naval Transport die roll). If the hex is occupied and the active force desires to attack, there is a –3 to the die roll to the Battle Results Table (BRT). If it does not attack but is, in turn, attacked by enemy forces in that game turn before leaving the landing hex, there is a +3 adjustment to the attacker’s die roll on the BRT.
(7.28) Scattered: If the Naval Transport result is Scattered, the force must disembark (see the Disembark column on the Naval Transport Chart for special allowances for units that are forced to Disembark due to Scatter); place a Scattered marker on top of it. In addition, roll for Leader Casualty (8.6) for all leaders therein. A Scattered force is treated as if it were Useless; see 8.55. The force remains Scattered until a suitable leader conducts a Reform Scattered Unit operation at which point the force is now at normal status and the marker removed.
(7.29) End of Turn Automatic Scatter: Any units that are in the middle of a Naval Transport—i.e., they have not landed—when the turn ends are automatically Scattered in the coastal hex they occupy. If the coastal hex is enemy occupied or the hex has a garrisoned enemy city, the fleet is considered sunk and all leaders and SPs are eliminated.
(7.3) CROSSING STRAITS (7.31) Land units may directly cross straits without using Naval Transport. However, to do so, the units crossing must check to see whether enemy fleets in the zone, represented by the NS Level therein, intercepted such crossing and initiated a naval battle (see also 6.38). Any strait crossing where the moving player has a level of +3 or less has the possibility the crossing will be opposed. If the player has a level of +4 in that strait (or zone) the crossing is automatically unopposed.
(7.32) To see if the crossing was opposed, the moving player rolls the die, adjusts the roll by his NS level, and consults the Strait Crossing Table.
EXAMPLE: A Player trying to cross a Force over a strait where his NS is “–1” would be opposed on an unadjusted DR of ‘4’ or less, as the –1 would reduce that to the required ‘3’ or lower.
(7.33) If the crossing was opposed, the moving player checks to see how many, if any, of his SPs were lost based on his NS Level, per the instructions on the table.
EXAMPLE: NS Level is +2, the DR is a ‘5’. 5 –2 =3, doubled = 6. That force has lost 6 SPs. If NS Level were –1, the player
Neapolisto
Messana
Caralisto
Drepanum
The Ancient World v2.2 �6
© 2005 GMT Games, LLC
would cross-index row A of the Attrition Results Chart with the size of the force, losing the number of SPs listed.
(7.34) If cavalry or Elephants are present, at least one-third of losses must be in Cavalry and/or Elephants, until both are eliminated totally.
(8.0) LAND COMBAT DESIGN NOTE: The basic design and historical theory being applied here is that battles of the ancient period were won by a combination of leadership skills, cavalry superiority, and tactical position superiority. The Romans added some spice to this mix by elevating discipline and training into the pantheon. While sheer strength in numbers was not unimportant, it was rarely the deciding factor.
(8.1) COMBAT UNITS AND STRENGTHS (8.11) There are four different types of land combat units (in-fantry, cavalry, elephants and siege engines), reflecting the basic tactical systems of the era, somewhat reduced and homogenized for game purposes. The different types are listed in 2.2.
(8.12) Each force consists of counters representing the strength of each combat type for each different Contingent.
EXAMPLE: A typical Punic War Carthaginian army might consist of: 20 SPs (�0,000) Libyan Infantry �5 SPs (7,500) Iberian Infantry 20 SPs (�0,000) Gallic Infantry �2 SPs (3,600) Elite Numidian Cavalry �6 SPs (4,800) Iberian Cavalry 2 SPs (20) Elephants
This force would be represented by combat units of the appro-priate strength for each of the six Contingent/Types. This rather unwieldy stack of counters would then be placed in one of the Army boxes on the appropriate Army Display while the corre-sponding Army marker and the Hannibal leader counter would represent that force on the map—unless you like the Pisa Tower Effect of seeing them all on the map.
PLAY NOTE: Those of you who like a little “fog of war” can play that you cannot inspect what is under the Leader counter (or in his Box off-map).
(8.13) Elite Units: Certain units may be designated by the sce-nario as “Elite”. There are combat units that are marked “Elite”, and these should be used to note those units.
(8.14) Special Units: Special units such as the Roman Legions are described in the volume specific rules.
(8.2) PRE-COMBAT: ATTACK, AVOIDANCE, AND COORDINATION The General Pre-Combat Resolution Sequence is:
�. The player controlling the active leader announces he is initiat-ing an Attack operation against the enemy force in the same hex.
2. The defending player states whether he will attempt Avoidance (8.23) and then determines same.
3. If Avoidance was unsuccessful or not attempted, the Attack operation is conducted, otherwise, the Attack operation is can-celled and the active player may select another operation.
4. If the Attack operation is conducted, both players check for Coordination (8.26), if possible and desired.
5. Proceed to Resolving Combat (8.3).
PLAY NOTE: If the active player moved his force into the hex he must first Stop and check for Attrition to conclude the Movement operation, and then check for Continuation prior to initiating the Attack operation. There is no Continuation role if the attacking player’s force starts the Operations Phase in the same hex as the defender and the attacking player announces the Attack as his first operation.
(8.21) Combat occurs as result of an Attack Operation (or a successful Interception, see 6.5). In order to conduct an attack, there must be enemy units (outside of a city) in the same hex as the player’s force. An enemy force inside a city cannot be the object of an Attack Operation (for that, see the Siege rules in 9.0), though a force inside can conduct an Attack Operation against an enemy force in the hex. Attacking is strictly voluntary (except for Interceptions), and opposing forces can coexist in the same hex.
The attacking player may use any/all eligible units in the hex, subject to 5.4� and any specific command restrictions given in the individual volume rules, as part of the attacking force. All defending units in the hex must participate in the combat.
PLAY NOTE: The attacking force need not include all friendly units in the hex. If the player moved into the hex, he can exclude units that were part of the moving force and/or include units were already in the hex.
(8.22) Avoidance: The defending player may attempt to avoid battle (or Siege see 9.22) immediately after the attacker has an-nounced his Attack (or Under Siege) operation. All defending units in the hex are considered part of one force and must partici-pate. The leader in charge is determined by 5.43. The defending player cannot attempt Avoidance if the defending force:• has been intercepted (6.5)• cannot either leave the hex or enter a friendly city in the same
hex• is being Overrun (6.6)• has a city Under Siege (9.24) and is attacked by the Besieged
force
(8.23) Avoidance Procedure: To determine whether a potential defender may avoid battle, the player rolls the die. If the adjusted DR is the same as or lower than the commanding leader’s Cam-paign Rating the force retreats up to two (2) hexes away from the
The Ancient World v2.2 �7
© 2005 GMT Games, LLC
attacker, incurring one ALP (6.43) for each Flat or Rough hex entered and two ALP for each Mountain or Marsh entered.
The force cannot retreat:• across the hexside through which the attacking force entered
the hex• across an impassable hexside or into an impassable hex • into a hex the force already entered
The force may enter:• an enemy occupied hex, but may not leave that hex unless the
hex is also occupied by a friendly force. • a friendly city including one in the same hex ending the re-
treat
Exception #1: the maximum attrition loss that can be incurred by such retreat is �0% of the retreating SPs
Exception #2: There is no Attrition if the retreat is into a friendly city.
If the adjusted DR is higher than his leader’s Campaign Rating the force is stuck and must defend with a +2 to the Battle DR (8.3�). Attempting avoidance is not a harmless undertaking.
AVOIDANCE DRMS:–2 if the force will retreat into a friendly city in the same or
adjacent hex –� if the force will retreat into a friendly city two hexes away –� if the force is in a Mountain or Marsh hex–� for each Guile Point expended by defending leader+� for each Guile Point expended by attacking leader+3 if the only path of retreat is across a river
The above is summarized in the AVOIDANCE CHART.
(8.24) If a defender has successfully avoided battle, the Attack operation is cancelled and the active leader may select another Operation. He is free to go after the retreating force and attempt another Attack Operation against that force, or conduct any other eligible Operation.
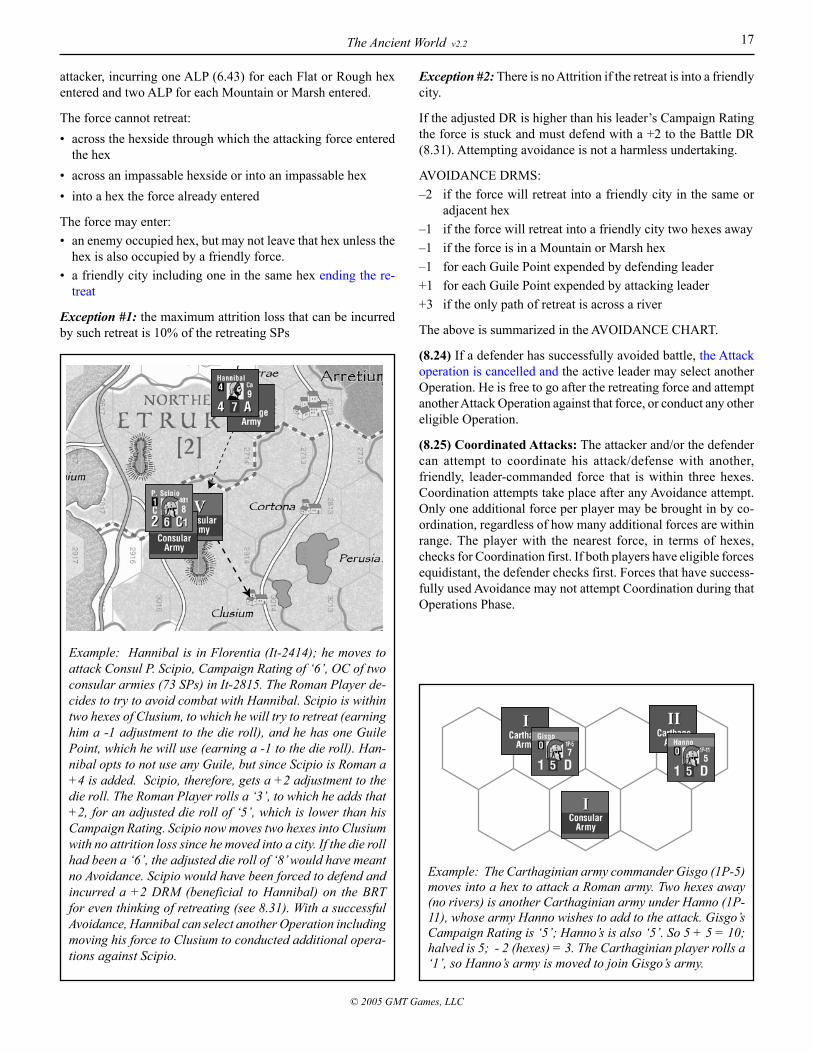
(8.25) Coordinated Attacks: The attacker and/or the defender can attempt to coordinate his attack/defense with another, friendly, leader-commanded force that is within three hexes. Coordination attempts take place after any Avoidance attempt. Only one additional force per player may be brought in by co-ordination, regardless of how many additional forces are within range. The player with the nearest force, in terms of hexes, checks for Coordination first. If both players have eligible forces equidistant, the defender checks first. Forces that have success-fully used Avoidance may not attempt Coordination during that Operations Phase.
Example: Hannibal is in Florentia (It-2414); he moves to attack Consul P. Scipio, Campaign Rating of ‘6’, OC of two consular armies (73 SPs) in It-2815. The Roman Player de-cides to try to avoid combat with Hannibal. Scipio is within two hexes of Clusium, to which he will try to retreat (earning him a -1 adjustment to the die roll), and he has one Guile Point, which he will use (earning a -1 to the die roll). Han-nibal opts to not use any Guile, but since Scipio is Roman a +4 is added. Scipio, therefore, gets a +2 adjustment to the die roll. The Roman Player rolls a ‘3’, to which he adds that +2, for an adjusted die roll of ‘5’, which is lower than his Campaign Rating. Scipio now moves two hexes into Clusium with no attrition loss since he moved into a city. If the die roll had been a ‘6’, the adjusted die roll of ‘8’ would have meant no Avoidance. Scipio would have been forced to defend and incurred a +2 DRM (beneficial to Hannibal) on the BRT for even thinking of retreating (see 8.31). With a successful Avoidance, Hannibal can select another Operation including moving his force to Clusium to conducted additional opera-tions against Scipio.
Example: The Carthaginian army commander Gisgo (1P-5) moves into a hex to attack a Roman army. Two hexes away (no rivers) is another Carthaginian army under Hanno (1P-11), whose army Hanno wishes to add to the attack. Gisgo’s Campaign Rating is ‘5’; Hanno’s is also ‘5’. So 5 + 5 = 10; halved is 5; - 2 (hexes) = 3. The Carthaginian player rolls a ‘1’, so Hanno’s army is moved to join Gisgo’s army.
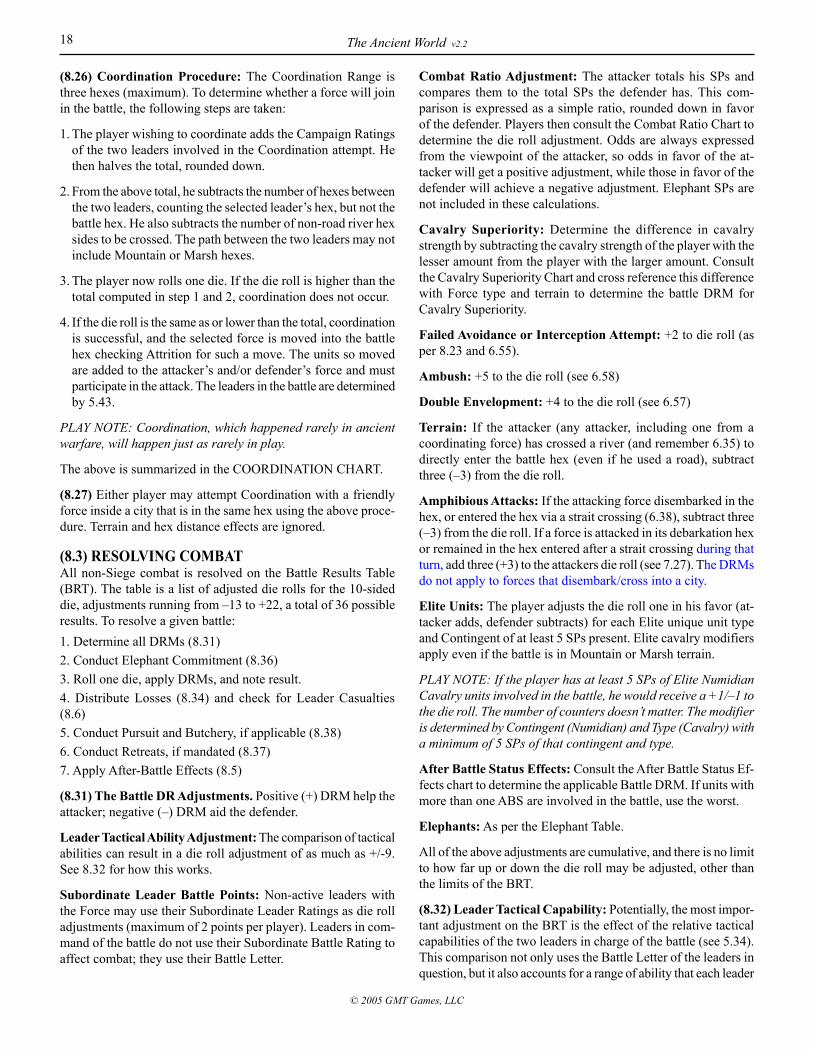
The Ancient World v2.2 �8
© 2005 GMT Games, LLC
(8.26) Coordination Procedure: The Coordination Range is three hexes (maximum). To determine whether a force will join in the battle, the following steps are taken:
�. The player wishing to coordinate adds the Campaign Ratings of the two leaders involved in the Coordination attempt. He then halves the total, rounded down.
2. From the above total, he subtracts the number of hexes between the two leaders, counting the selected leader’s hex, but not the battle hex. He also subtracts the number of non-road river hex sides to be crossed. The path between the two leaders may not include Mountain or Marsh hexes.
3. The player now rolls one die. If the die roll is higher than the total computed in step � and 2, coordination does not occur.
4. If the die roll is the same as or lower than the total, coordination is successful, and the selected force is moved into the battle hex checking Attrition for such a move. The units so moved are added to the attacker’s and/or defender’s force and must participate in the attack. The leaders in the battle are determined by 5.43.
PLAY NOTE: Coordination, which happened rarely in ancient warfare, will happen just as rarely in play.
The above is summarized in the COORDINATION CHART.
(8.27) Either player may attempt Coordination with a friendly force inside a city that is in the same hex using the above proce-dure. Terrain and hex distance effects are ignored.
(8.3) RESOLVING COMBAT All non-Siege combat is resolved on the Battle Results Table (BRT). The table is a list of adjusted die rolls for the �0-sided die, adjustments running from –�3 to +22, a total of 36 possible results. To resolve a given battle: �. Determine all DRMs (8.3�)2. Conduct Elephant Commitment (8.36)3. Roll one die, apply DRMs, and note result.4. Distribute Losses (8.34) and check for Leader Casualties (8.6)5. Conduct Pursuit and Butchery, if applicable (8.38)6. Conduct Retreats, if mandated (8.37)7. Apply After-Battle Effects (8.5)
(8.31) The Battle DR Adjustments. Positive (+) DRM help the attacker; negative (–) DRM aid the defender.
Leader Tactical Ability Adjustment: The comparison of tactical abilities can result in a die roll adjustment of as much as +/-9. See 8.32 for how this works.
Subordinate Leader Battle Points: Non-active leaders with the Force may use their Subordinate Leader Ratings as die roll adjustments (maximum of 2 points per player). Leaders in com-mand of the battle do not use their Subordinate Battle Rating to affect combat; they use their Battle Letter.
Combat Ratio Adjustment: The attacker totals his SPs and compares them to the total SPs the defender has. This com-parison is expressed as a simple ratio, rounded down in favor of the defender. Players then consult the Combat Ratio Chart to determine the die roll adjustment. Odds are always expressed from the viewpoint of the attacker, so odds in favor of the at-tacker will get a positive adjustment, while those in favor of the defender will achieve a negative adjustment. Elephant SPs are not included in these calculations.
Cavalry Superiority: Determine the difference in cavalry strength by subtracting the cavalry strength of the player with the lesser amount from the player with the larger amount. Consult the Cavalry Superiority Chart and cross reference this difference with Force type and terrain to determine the battle DRM for Cavalry Superiority.
Failed Avoidance or Interception Attempt: +2 to die roll (as per 8.23 and 6.55).
Ambush: +5 to the die roll (see 6.58)
Double Envelopment: +4 to the die roll (see 6.57)
Terrain: If the attacker (any attacker, including one from a coordinating force) has crossed a river (and remember 6.35) to directly enter the battle hex (even if he used a road), subtract three (–3) from the die roll.
Amphibious Attacks: If the attacking force disembarked in the hex, or entered the hex via a strait crossing (6.38), subtract three (–3) from the die roll. If a force is attacked in its debarkation hex or remained in the hex entered after a strait crossing during that turn, add three (+3) to the attackers die roll (see 7.27). The DRMs do not apply to forces that disembark/cross into a city.
Elite Units: The player adjusts the die roll one in his favor (at-tacker adds, defender subtracts) for each Elite unique unit type and Contingent of at least 5 SPs present. Elite cavalry modifiers apply even if the battle is in Mountain or Marsh terrain.
PLAY NOTE: If the player has at least 5 SPs of Elite Numidian Cavalry units involved in the battle, he would receive a +1/–1 to the die roll. The number of counters doesn’t matter. The modifier is determined by Contingent (Numidian) and Type (Cavalry) with a minimum of 5 SPs of that contingent and type.
After Battle Status Effects: Consult the After Battle Status Ef-fects chart to determine the applicable Battle DRM. If units with more than one ABS are involved in the battle, use the worst.
Elephants: As per the Elephant Table.
All of the above adjustments are cumulative, and there is no limit to how far up or down the die roll may be adjusted, other than the limits of the BRT.
(8.32) Leader Tactical Capability: Potentially, the most impor-tant adjustment on the BRT is the effect of the relative tactical capabilities of the two leaders in charge of the battle (see 5.34). This comparison not only uses the Battle Letter of the leaders in question, but it also accounts for a range of ability that each leader
The Ancient World v2.2 �9
© 2005 GMT Games, LLC
may have on a given day, within the parameters of his capability. To determine the DRM for Tactical Ability, the players use the Leader Battle Ability Table, as follows:
STEP �: Each player notes the Battle Letter of the leader who is commanding in the battle (see 5.4�).
STEP 2: He then rolls one die and cross references that die roll with the letter rating, on the Leader Battle Ability Table, to get that leader’s Tactical Rating for that battle.
STEP 3: The leader with the highest numerical Tactical Rating now subtracts the Tactical Rating of the “lower” leader, and the resultant number is the die roll modifier in his favor.
UNLED DEFENDERS: Defending units without a leader are considered to have a leader with a Tactical Rating of “0” for that battle.
Combat Losses (8.33) All results are expressed in terms of the percentage of SPs lost by the attacker (to the left of the slash) and by the defender (to the right of the slash). Thus a 30/20 result means the attacker loses 30% of his men, the defender 20%. The Percentage Loss given on the BRT is adjusted as follows: • If the Combat Ratio DRM was greater than +3, decrease the
attacker’s loss by 5% for each DRM greater than +3. If the attacker’s BRT result was a “*”, the attacker suffers no loss.
• If the Combat Ratio DRM was less than –3, decrease the de-fender’s loss by 5% for each DRM below –3. If the defender’s BRT result was a “*”, the defender suffers no loss.
An adjusted percentage can never be more than �00% or less than 0%. A � SP force is automatically eliminated in any battle where either of the above two conditions apply. The Percentage Loss is not adjusted if that result occurred through an Unpredictable Result (8.4). Furthermore, the unadjusted percentage from the BRT is used to determine who Retreats (8.37).
EXAMPLE: A force of 50 SPs attacks a force of 10 SPs with a BRT result of 10/30. The attacker takes no loss, (+5 Combat Ratio DRM), while the defender loses 3 SPs (30% of 10) and must Retreat.
(8.34) The adjusted percentage loss is applied as follows:
INFANTRY: Consult the Percentage Loss Chart and cross refer-ence the percent loss from the BRT with the total infantry strength present to determine the total SP loss. The SP losses are divided as evenly as possible among the different contingents. Any uneven losses are assigned by the affected player with the exception that any Elite contingents must take the loss first.
CAVALRY: Consult the Percentage Loss Chart and cross refer-ence the percent loss from the BRT with the total cavalry strength present to determine the total SP loss. SP losses are distributed as the owning player sees fit with the exception that the contingent
Elite Units: One of the Roman legions are “veteran”, so there is a –� adjustment for Roman training. However, Hannibal’s Numidian cavalry is Elite for an adjust-
ment of +�. They cancel each other out, for no adjustment.
There is an additional +5 DRM due to some rules specific to the Romans that will be covered in detail in the volume specific rules.
The total DRM, expressed from the attacker’s viewpoint, is +�3. (In order, from above, +3 +2 –2 +4+�+5 = +�3) The Carthagin-ian player rolls a ‘9’, to which he adds �3 for an adjusted die roll of +22. The Roman player suffers 75% losses-�38 SPs!!!-to his army; the Carthaginian player, whose result was a (*), rolls a ‘4’, which means he loses 4 SPs (which is less than 5% of his 97 SPs).
HISTORICAL NOTE: The above example is a game repre-sentation of the smashing defeat of the Romans by Hannibal at Cannae. Notice how little effect sheer numbers had on the outcome, and how the result was greatly affected by the level of command capability on both sides. Although the DR was the best the Carthaginian could have gotten, we did not take into account the Pursuit and Butchery Rule (8.38).
EXAMPLE OF A BATTLE
Hannibal, with a Combat Rating of “A”, attacks a Roman army in 4705 (Flat) un-der Consul Varro, who has an “E” Rating. The numerical odds, expressed in terms
of the Carthaginian attackers, are �-2 (97 SPs to �84 SPs). However, the Carthaginians have �3 more cavalry SPs than the Romans. The following die roll adjustments apply:
Overall Leadership: The Carthaginian player rolls a ‘3’ for Hannibal, giving him a Leadership Tactical Ability Rating of ‘6’. The Roman player rolls a ‘6’ for Varro, for a ‘3’ Leader-ship Tactical Ability Rating. The Leadership Tactical Ability Adjustment is then +3 (Hannibal’s 6 minus Varro’s3).
Subordinate Leaders: Rome has no leaders with a SBR, but Hannibal has Mago and Maharbal, both supplying � point each, for a +2 adjustment (the
maximum).
Strength Comparison: The Carthaginians are attacking at �-2, which is a –2 adjustment of the die roll.
Cavalry Superiority: Hannibal has �3 more cavalry SPs than the Romans, which gives him a +4 die roll adjustment, the terrain being “flat”.
The Ancient World v2.2 20
© 2005 GMT Games, LLC
in the battle with the most cavalry SP must take more SP losses than any other individual contingent.
ELEPHANTS: Committed Elephants use the Cavalry method for extracting losses. Uncommitted Elephants (8.36) do not suffer losses.
PLAY NOTE: To use the Percentage Loss Table, cross index the percent loss with the number of either infantry and/or cavalry SPs. If the size of the force is 10 or less, read the result directly from the table—a 20% loss on a 4 SP force would give a 1 SP loss. If the number of SPs is greater than 10, use the column as-sociated with the 10’s digit of the force size added to the column for the 1’s digit—a 20% loss on a 25 SPs force would produce a 4+1=5 SPs loss.
EXAMPLE: A Carthaginian army composed of 78 infantry SPs (45 Libyan, 15 Iberian, and 18 Gauls), 18 cavalry SPs (10 Ibe-rian and 8 Numidian), and 2 committed EL SPs that takes 20% losses removes 16 infantry SPs, 4 cavalry SPs … and no EL SPs (more of which below). Each infantry contingent would take a 5 SP loss, with the remaining 1 SP removed as the Carthaginian sees fit. The cavalry loss would be 3 SPs of Iberian horse and 1 SP of Gallic horse since the Iberian contingent was the largest so must take more losses than any other single contingent.
(8.35) Cavalry Loss Option: A Player may choose to trade cavalry losses for infantry. For every cavalry SP loss he wishes to take above the number of SPs he is mandated to lose, he may reduce his infantry losses by two (2). Thus, using the the example in 8.34, the player could take 5 cavalry SPs losses, instead of 4, and then reduce his infantry losses from �6 to �4. This choice is made before undertaking the retreat (8.37).
(8.36) Elephants: Elephants are used to, hopefully, negate the use of enemy SPs or add to the BRT die roll. They could end up doing just the opposite. Prior to rolling on the BRT, each player decides whether to commit his Elephants, and how many of them he will commit. For each Elephant SP committed to battle, the player rolls one die and consults the War Elephants Table applying the results as they happen. Thus, a player with �0 SPs of Elephants may choose to commit up to �0 SPs and make ten separate die rolls. He may stop committing elephants at any time; he is not locked into committing a specific number, even if he announces such. Elephant SPs are never included in the SPs totals for normal battle resolution, and uncommitted elephants are not subject to percentage losses. Committed Elephant SPs are subject to percentage losses.
If both players have elephants, each player commits one Elephant SP at a time, alternating the die roll for such. Attacker commits first. If one player halts his commitment, the other may always continue, as per above. After all the commitment rolls are re-solved, the Combat Ratio Adjustment and Cavalry Superiority DRM are adjusted to reflect any losses that have occurred.
TERRAIN: Elephants may not be committed or used in any battle in Mountain or Marsh terrain.
(8.37) Retreats: Retreats are only sometimes mandatory. It is also
possible that both players may remain in the hex after combat.
MANDATORY RETREATS: The player who has suffered �0% or more BRT losses greater than his opponent has suffered (e.g., a 20/�0 result means the attacker has suffered �0% greater losses), must Retreat all of his units in the hex including those that did not participate in the battle. He is the “loser” (see 8.5). If the winner earned a Major Victory (8.52), the loser must retreat regardless of the BRT result. Retreats are conducted according to the Retreat Procedure described below.
TIES: If both players suffer equal percentage losses neither has to Retreat; Retreat is voluntary, the defender choosing first.
VOLUNTARY RETREAT: The player who has less than �0% more losses than his opponent may voluntarily retreat using the Retreat Procedure described below.
Treat an (*) result as less than (<) 5%.
RETREAT PROCEDURE: The player retreats his force up to three hexes. The force must leave the starting hex unless the force can retreat into a friendly city in the same hex. The force cannot retreat:• across the hexside through which the attacking force entered
the hex• across an impassable hexside or into an impassable hex • into a hex the force already entered
The force may enter:• an enemy occupied hex, but may not leave that hex unless the
hex is also occupied by a friendly force. • a friendly city including one in the same hex
A retreating force is eliminated if it must leave the hex and can’t due to impassable terrain and/or the entry hex of the attacking force. A retreating force cannot drop off units, nor can the force be intercepted.
A besieged force that must Retreat stays in the city.
All retreats incur one ALP (6.43) for each hex more than one retreated (two ALP for Mountain/Marsh hexes), plus one for each non-road river hex side crossed (see 6.47).
(8.38) Pursuit and Butchery: A force that must retreat is subject to additional losses as the fleeing troops get cut down while run-ning away. The ability to so inflict such losses is dependent on the Cavalry Superiority die roll adjustment (as per 8.3�), but using the cavalry SPs remaining after the battle. Only those cavalry that participated in the battle are considered. The post-battle, Cavalry DRM for the winner becomes the Pursuit Factor (PF). • if the winner does not have more Cavalry SP than the loser,
there is no Pursuit and Butchery • if the winner has more Cavalry SP than the loser, the minimum
PF is one (�) even if battle took place in a Mountain or Marsh hex.
EXAMPLE: If after losses are taken, a non-Roman winner, in a Flat hex, have 14 Cavalry SPs and the losers 6 SPs, that Cavalry
The Ancient World v2.2 2�
© 2005 GMT Games, LLC
Superiority results in a PF of 2.
The victorious player rolls a die, multiplying the die roll by the PF. The result is the percentage of additional losses incurred by the losing army, rounded down to the nearest percent value on the Percentage Loss Chart. Thus a PF of 3 and a die roll of 6 would produce a �5% butcher’s bill (�8% rounded down to �5%). Regardless of the die roll, the maximum Butchery percentage is always 50%. Losses are distributed per 8.34. All retreating units are affected.
Post-battle Butchery does not affect the After Battle Status (8.54); but it may affect victory determination.
PLAY NOTE: There is no actual movement in Pursuit & Butchery, other than the retreat being undertaken by the defeated force.
DESIGN NOTE: In ancient battles, many (if not most) of the casualties occurred after the battle was lost or won, and these casualties could be extremely heavy. Losing a battle was not simply a matter of reaching a “breaking point”—which, in terms of casualties, was often very low. It was the fact that the winners usually butchered the fleeing losers. Losing a battle is usually a disaster, even if the actual battle results weren’t.
(8.4) UNPREDICTABLE RESULTS HISTORICAL & DESIGN NOTE: Ancient battles sometimes—but not often—produced results far out of line with what one would normally think would happen. Maybe the gods were angry, maybe the laws of possibility had a direct link-up to the local priesthood. Whatever, regardless of what you bring to the battle table, you must operate under that old Sabine proverb, “One Never Knows, Do One.”
If a combat result on the BRT is an “X”, the attacker has attained an Unpredictable Result. Grab your valium, sacrifice that lamb, burn that incense ... and roll again, adjusting the DR by the number next to the “x”. Both players may also choose to add (attacker)/subtract (defender) to his die roll any Guile Points their commander for that battle has available. Such choice is made first by the attacker and then by the defender. This adjusted DR (which is never adjusted below 0 or above 9) is the number in brackets—e.g., [4] on the BRT, and the result for that battle.
EXAMPLE: An adjusted UR die roll of [2] would produce a 20/5 result.
(8.5) VICTORY, LOSS AND AFTER EFFECTS (8.51) The player whose force did not retreat (8.37) wins the battle. If neither player retreats, or if both players voluntarily retreat, there is no winner.
(8.52) Major Victory: A player wins a Major Victory if he wins a Battle and the force he defeated had at least 20 SPs before the battle and the defeated force suffered at least twice as many SP losses as did the winning force. Elephant losses do not count but losses from Pursuit and Butchery do.
(8.54) After Battle Status (ABS): Aside from the political ef-fects of winning or losing, a major battle pretty much finished a large number of the participants. It is extremely rare to find an army—even an army as spectacularly victorious as Hannibal’s was from 2�8-2�6 B.C.—fighting more than one battle a year. Therefore, in addition to the combat losses, the following statuses are applied to all combat units after a battle:
Winners (any level): DISRUPTEDLosers (but not Major): DISORGANIZEDMajor Losers: USELESSNoWinner(andlossesare≤15%):DISRUPTEDNo Winner (and losses are > �5%): DISORGANIZED
If a unit already has an ABS, it retains that ABS unless the new result is worse. Thus a Disorganized unit would remain so unless it received a Useless result.
The above status applies only to land battles where one side started with at least 20 SPs. In addition, the status does not apply to winning force that loses no SPs, nor do they apply to sieges.
PLAY NOTE: Instead of using a Disrupted marker, the reverse side of the army marker may be used to indicate that status.
(8.55) The effects of ABS apply to a force if any units therein have that status. See the After Battle Status Effect Chart for a complete list of effects.
(8.56) Units with ABS may recover in one of two ways: • RECOVERY FROM BATTLE: In the End-Turn Phase Re-
covery from Battle segment (G/2), all units with an ABS automatically improve their status by one level from Useless to Disorganized, Disorganized to Disrupted, or Disrupted no ABS.
• CITY RECOVERY: Units with an ABS that are inside a Large or Medium city may improve their status by one level as above if stacked with the active leader provided that the leader can command (5.4�/2) all units in the city, and that leader remains in the city for his entire Operations Phase.
PLAY NOTE: ABS has no effect on Avoidance, as this capability is more reflective of a leader’s ability. ABS also has no effect on individual leaders—only combat units.
(8.6) LEADER CASUALTIES Leader casualties usually occur as the result of battles, sieges, etc. However, they also may occur as Augury Events (�3.0) or the inexorable progress of time, disease, etc. (Mortality 8.62). Killed/wounded leaders—regardless of how/where/when it hap-pens—may be replaced.
(8.61) Every time a leader is involved in a combat where his side lost at least � SP, the owning player must check to see if he
The Ancient World v2.2 22
© 2005 GMT Games, LLC
survives. For that, the player uses the Mortality Rating (MR). For battle casualties, the player checks for each and every leader in the stack at the conclusion of the battle, as follows:
STEP �: Roll the die. For any leader on the “losing” side (if any), add one (+�) to this die roll.
STEP 2: If the adjusted die roll is lower than the MR there is no effect. If the die roll is same as or higher than the MR: there is a Leader Casualty. Roll Again. There is no adjustment to the second die roll.
STEP 3: If the second die roll is lower than the MR, the leader is wounded and may not undergo any more Operations Phases this turn. He may return next turn.
STEP 4: If the second die roll is the same as or higher than the MR, the leader has been killed.
(8.62) Killed leaders are removed from the game. Wounded leaders return at the beginning of the next turn and are placed in any hex with a friendly unit. Any replacement brought in to fill in for the wounded leader is removed and is once again available as a replacement.
(8.63) Leader Replacements: There are three times during a turn when a Killed/Wounded leader can be replaced:
A. When a leader is Killed/Wounded, leave his LAM in the Pool. When/if his LAM is later picked, that LAM may be used—only—for purposes of bringing in a replacement leader.
B. Leaders may be brought in as replacements at the beginning of the next turn.
C. An OC may use a Guile Point to bring in a replacement leader as a Manpower Operation (5.3[7]). All rules that apply to that Operation for raising troops also apply here (in terms of how many times per turn, Finishes, etc.)
(8.64) Leaders may (not must) be replaced, and the replacements come from any leaders for that player that are available and not yet in the game, including leaders labeled “Replacement” leaders. The latter are leaders used—and available—solely for the purpose of taking the place of killed leaders when no other leaders are available.
Leaders entering the game as replacements are placed in the hex/city with either the force the former leader was with when he met his demise or with the player’s Overall Commander.
(8.65) The number of LAMs available to a replacement leader is highly restricted if he enters at any time other than at the begin-ning of a turn. If he enters at the beginning of the game turn before any Operations Phase has been undertaken, there are no restric-tions. When entering the game during an Operations Phase:• if the removed leader has any LAMs remaining in the pool
(not including the one that enabled the new leader to enter the game; 8.64), remove all of them and replace them with one (�) of the new leader’s LAMs.
• if none of the removed leader’s LAMs are remaining, no new ones are put in.
(9.0) CITIES AND SIEGESAll cities, regardless of size, are assumed to have at least a couple of guys hanging around as a garrison, so cannot simply be entered unless they are already controlled by or friendly to the moving player (see 6.37). Units inside a city may not be attacked using the normal combat rules. Instead, cities can be taken (and any units therein “removed”)—captured—by one of the following methods:• Assault (9.3)• Attrition (9.5)• Treachery (9.6)• Surrender (9.7) All but Surrender require the target city to be placed Under Siege.
DESIGN AND HISTORICAL NOTE: The Art of Siege was not one fully attainable by most of the “protagonists” in this game. Much of the Hellenistic Art of Siege, as perfected under Alex-ander the great had, curiously, and unlike the use of elephants, not progressed westward to any great extent. The “science” of siege defense—huge walls encircling even the largest cities—far outstripped the technology of siege tactics. Most sieges consisted of simply trying to swindle, scare and/or starve the inhabitants into submission. Treachery was the favored methodology. All-out assaults were often a costly hit-or-miss proposition. The Punic Wars was one of the turning points in the development of Siege techniques in this era.
(9.1) CITY INTRINSIC DEFENSE STRENGTHS (IDS) (9.11) City Size: Cities are Large (e.g., Carthage/Cr-3028), Medium (e.g., Lilybaeum/It-5526), or Small (e.g., Ausculum/It-4608). See the Terrain legend on the maps for visuals.
(9.12) IDS: Each city has an Intrinsic Defense Strength (IDS), according to their size. A city’s IDS represents the difficulty besiegers will encounter in taking that city by siege, if the city is well-defended by an appropriate garrison. In some scenarios, and in certain periods of time, these IDS may vary. E.g., Agrigentum (It-5923; also known, historically, as Acragas) during the Punic Wars. These changes are noted in each scenario.
• Large City IDS = 7 • Medium City IDS = 3 • Small City IDS = �.
The IDS also determines the number of City Militia SPs placed in the city when it is placed Under Siege (9.2�).
PLAY NOTE: IDS represents a variety of items, from walls, to available city militias, to morale.
(9.2) CONDUCTING A SIEGE To capture a city, the attacking player must undertake a siege.
The Ancient World v2.2 23
© 2005 GMT Games, LLC
No Siege Operation—Reduction, Attrition, Assault or Treach-ery—may be undertaken unless the city is Under Siege. You may ask for surrender before placing the city Under Siege. Involuntary Surrender (9.72) is not a Siege Operation.
(9.21) Under Siege Definition: A city may be placed Under Siege by having the active leader conduct a Siege Operation in the city’s hex. In order for a player to place a city Under Siege, the force outside the city (in the hex) must contain at least twice (2x) as many infantry SPs as the IDS of the city. The active player places an Under Siege marker on top of that hex; the leader is automati-cally Finished. The now besieged player places city militia SPs inside the city equal to the city’s IDS. All friendly units in the hex, but outside the city, are considered to be “besieging”. Any friendly forces that enter the hex in subsequent Operations Phases are considered “beseiging” while in the hex.
EXAMPLE: To besiege a city that has an IDS of ‘4’ requires at least 8 infantry SPs present.
(9.22) Avoiding a Siege: If a player has a force with a leader inside a city that is about to be placed Under Siege, that player can attempt Avoidance with that leader/force rather than risk the vicissitudes of a siege. Use the Avoidance procedure described in 8.22-8.24 to resolve the attempt, with the exception that a garrison can be left behind in the city. Whether the Avoidance attempt is successful or not, the city is placed Under Siege and city militia placed per 9.2�.
(9.23) Lifting a Siege: The Under Siege marker remains in effect until one of the following:• The besieging player voluntarily removes it during the besieg-
ing leader’s Operations Phase• The besieger no longer has twice (2x) as many infantry SPs as
the IDS of the city at the conclusion of any Operation (either player) or after rolling for Siege/Inertia Attrition.
• There are no leaders in the besieging force
(9.24) Successful Siege: The besieging force is victorious, and may enter the city, when:• The city falls to an Assault (9.3)• There are no infantry or militia SPs in the city’s Garrison after
resolving Attrition (9.5)• The city falls to Treachery (9.6)• The city Surrenders (9.7)
The player concluding a successful siege by Assault or Attrition earns a Major Victory if the city is Medium or Large regardless of garrison size, or if a Small city that held at least 40 SPs (any type excluding militia) inside the city at any point during the siege. A successful siege by Assault/Attrition of a Small city that held 20 SPs or more at any during the siege earns a (non-Major) victory.
(9.25) Captured Cities: The occupation (entering) of a captured city is considered part the Operation that resulted in the capture (Involuntary Surrender, Assault, or Treachery). If the city is
captured through Attrition, the besieging player may enter im-mediately. Captured cities regain their IDS immediately. See 9.82 for the IDS of sacked cities.
(9.26) Attacks on Besieger. A besieging force can be attacked by the besieged force or another enemy force in the hex via an Attack Operation. The entire Besieging force must be attacked. If the besieged force is part of the attack, the besieging force cannot use Avoidance. The besieged player may attempt Coordination between a force in the hex and the force inside the city regardless of which friendly force initiated the attack.
(9.27) Sallying: A Sally is an attack by the defenders on the besieging force in an attempt to inflict some damage and, per-haps, make them think twice about continuing. A Sally can be conducted in two ways:• as a Siege Operation conducted by a leader within the besieged
city; a leader that conducts a Sally is automatically Finished; or,
• as a result incurred as part of the besieging force’s Reduction attempt (9.4).
A Sally is not conducted using the Battle Results Table, but, rather the Sally Effects Table. The sole factor in Sally is the Battle Rat-ing of the Leader of the besieging force. The besieging player rolls on the Leader Tactical Ability Table (8.32) to determine the column used on the Sally Table. The player conducting the Sally then rolls a die and cross references that roll with this column to find the result. Losses are in infantry SPs and are distributed as the owning player sees fit. EXAMPLE: Hamilcar (1P-7), Battle Rating “B” is besieging Agrigentum (It-6923). The Romans have a legion led by a Prae-tor within the city. The Praetor is activated and conducts a Sally operation. The Carthaginian player rolls a “5” on the Leader Tactical Ability Table. Using Hamilcar’s “B” rating gives a result of “6” (note that the Praetor’s Battle Rating is not used). The Roman player then rolls on the Sally Effects Table to determine the effect. He rolls an ‘8’ which is cross referenced with the “6” result from the Leader Tactical Ability Table to produce a “1/1” result. Both players must remove 1 infantry SP. The Praetor is then Finished.
(9.28) Siege Engines are used to aid Assault and Reduction. Siege Engines are moved like any other combat units, with the following exceptions:• They may not enter Marsh or Mountain hexes or
cross a river except by road.• forces with Siege Engines may not use Avoidance unless they
eliminate the Siege Engines.• forces with Siege Engines may not use Coordination or Inter-
ception unless they leave the Siege Engines behind.• Siege Engines may be carried by Naval Transport. However,
if more than �0% of that force is lost, so are any Siege En-gines.
(9.29) If a force with a Siege Engine is attacked, and it loses the battle, the engine(s) is eliminated. If an enemy force enters a hex that contains only a Siege Engine, or overruns a hex containing
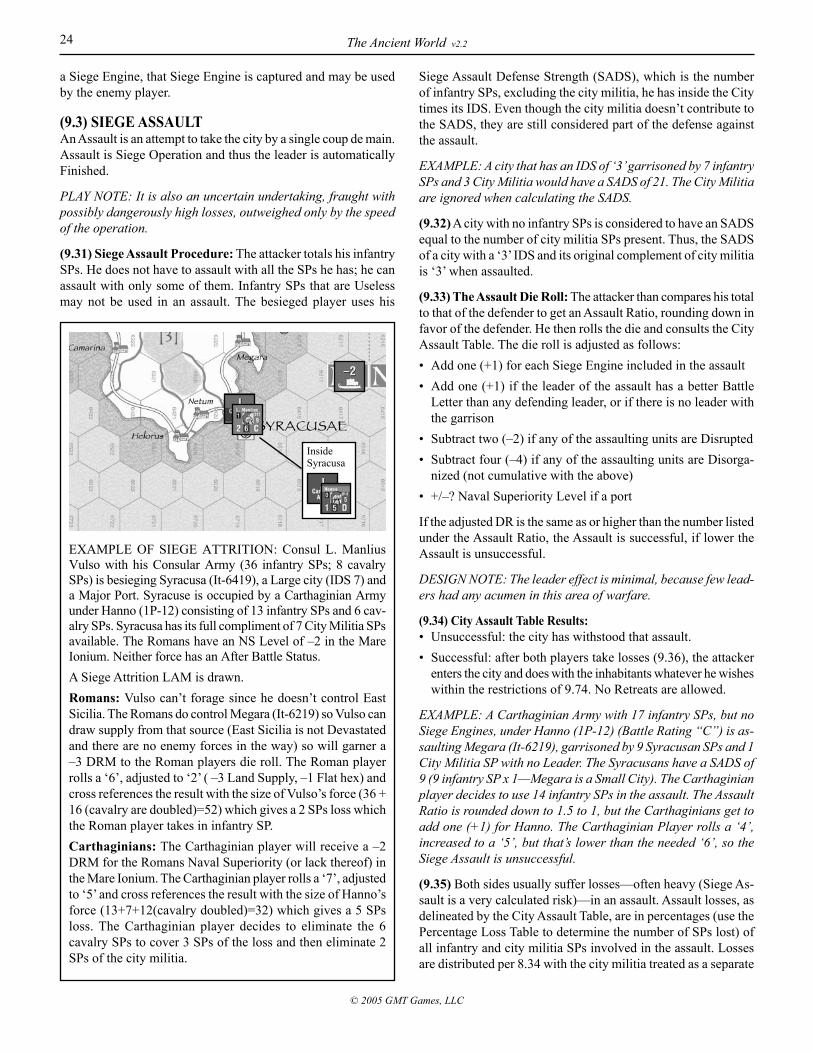
The Ancient World v2.2 24
© 2005 GMT Games, LLC
a Siege Engine, that Siege Engine is captured and may be used by the enemy player.
(9.3) SIEGE ASSAULT An Assault is an attempt to take the city by a single coup de main. Assault is Siege Operation and thus the leader is automatically Finished.
PLAY NOTE: It is also an uncertain undertaking, fraught with possibly dangerously high losses, outweighed only by the speed of the operation.
(9.31) Siege Assault Procedure: The attacker totals his infantry SPs. He does not have to assault with all the SPs he has; he can assault with only some of them. Infantry SPs that are Useless may not be used in an assault. The besieged player uses his
Siege Assault Defense Strength (SADS), which is the number of infantry SPs, excluding the city militia, he has inside the City times its IDS. Even though the city militia doesn’t contribute to the SADS, they are still considered part of the defense against the assault.
EXAMPLE: A city that has an IDS of ‘3’ garrisoned by 7 infantry SPs and 3 City Militia would have a SADS of 21. The City Militia are ignored when calculating the SADS.
(9.32) A city with no infantry SPs is considered to have an SADS equal to the number of city militia SPs present. Thus, the SADS of a city with a ‘3’ IDS and its original complement of city militia is ‘3’ when assaulted.
(9.33) The Assault Die Roll: The attacker than compares his total to that of the defender to get an Assault Ratio, rounding down in favor of the defender. He then rolls the die and consults the City Assault Table. The die roll is adjusted as follows: • Add one (+�) for each Siege Engine included in the assault• Add one (+�) if the leader of the assault has a better Battle
Letter than any defending leader, or if there is no leader with the garrison
• Subtract two (–2) if any of the assaulting units are Disrupted• Subtract four (–4) if any of the assaulting units are Disorga-
nized (not cumulative with the above)• +/–? Naval Superiority Level if a port
If the adjusted DR is the same as or higher than the number listed under the Assault Ratio, the Assault is successful, if lower the Assault is unsuccessful.
DESIGN NOTE: The leader effect is minimal, because few lead-ers had any acumen in this area of warfare.
(9.34) City Assault Table Results: • Unsuccessful: the city has withstood that assault. • Successful: after both players take losses (9.36), the attacker
enters the city and does with the inhabitants whatever he wishes within the restrictions of 9.74. No Retreats are allowed.
EXAMPLE: A Carthaginian Army with 17 infantry SPs, but no Siege Engines, under Hanno (1P-12) (Battle Rating “C”) is as-saulting Megara (It-6219), garrisoned by 9 Syracusan SPs and 1 City Militia SP with no Leader. The Syracusans have a SADS of 9 (9 infantry SP x 1—Megara is a Small City). The Carthaginian player decides to use 14 infantry SPs in the assault. The Assault Ratio is rounded down to 1.5 to 1, but the Carthaginians get to add one (+1) for Hanno. The Carthaginian Player rolls a ‘4’, increased to a ‘5’, but that’s lower than the needed ‘6’, so the Siege Assault is unsuccessful.
(9.35) Both sides usually suffer losses—often heavy (Siege As-sault is a very calculated risk)—in an assault. Assault losses, as delineated by the City Assault Table, are in percentages (use the Percentage Loss Table to determine the number of SPs lost) of all infantry and city militia SPs involved in the assault. Losses are distributed per 8.34 with the city militia treated as a separate
EXAMPLE OF SIEGE ATTRITION: Consul L. Manlius Vulso with his Consular Army (36 infantry SPs; 8 cavalry SPs) is besieging Syracusa (It-64�9), a Large city (IDS 7) and a Major Port. Syracuse is occupied by a Carthaginian Army under Hanno (�P-�2) consisting of �3 infantry SPs and 6 cav-alry SPs. Syracusa has its full compliment of 7 City Militia SPs available. The Romans have an NS Level of –2 in the Mare Ionium. Neither force has an After Battle Status. A Siege Attrition LAM is drawn. Romans: Vulso can’t forage since he doesn’t control East Sicilia. The Romans do control Megara (It-62�9) so Vulso can draw supply from that source (East Sicilia is not Devastated and there are no enemy forces in the way) so will garner a –3 DRM to the Roman players die roll. The Roman player rolls a ‘6’, adjusted to ‘2’ ( –3 Land Supply, –� Flat hex) and cross references the result with the size of Vulso’s force (36 + �6 (cavalry are doubled)=52) which gives a 2 SPs loss which the Roman player takes in infantry SP. Carthaginians: The Carthaginian player will receive a –2 DRM for the Romans Naval Superiority (or lack thereof) in the Mare Ionium. The Carthaginian player rolls a ‘7’, adjusted to ‘5’ and cross references the result with the size of Hanno’s force (�3+7+�2(cavalry doubled)=32) which gives a 5 SPs loss. The Carthaginian player decides to eliminate the 6 cavalry SPs to cover 3 SPs of the loss and then eliminate 2 SPs of the city militia.
InsideSyracusa
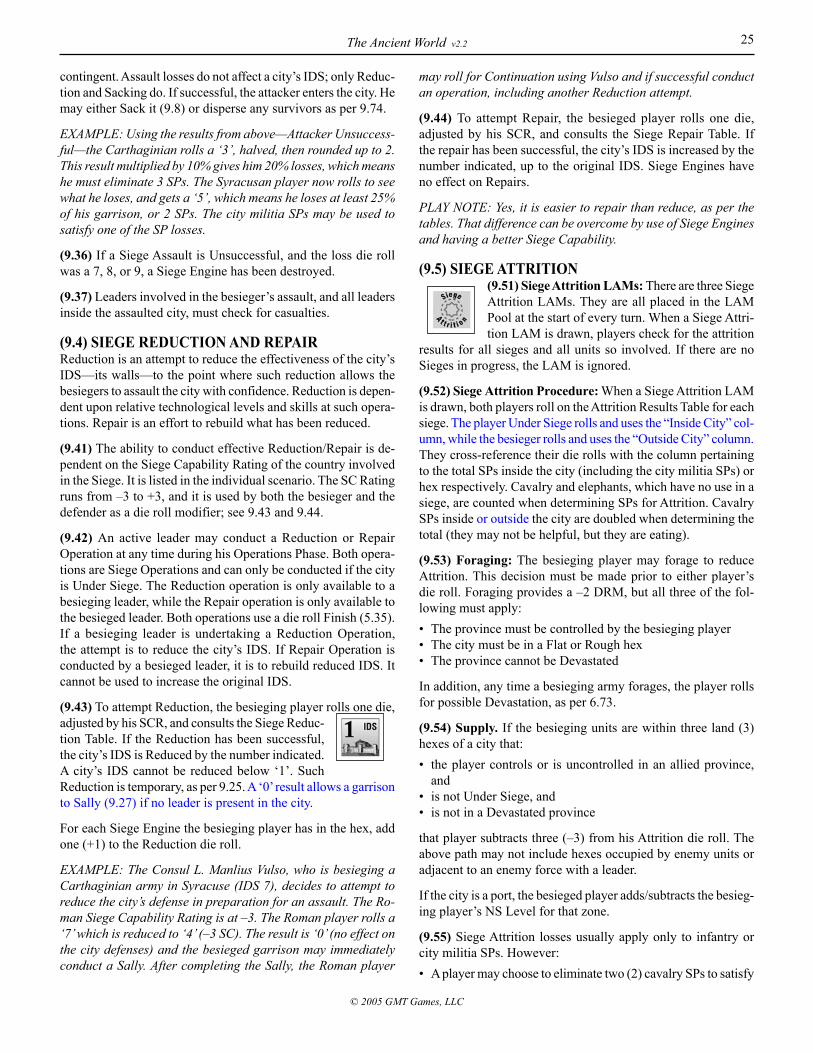
The Ancient World v2.2 25
© 2005 GMT Games, LLC
contingent. Assault losses do not affect a city’s IDS; only Reduc-tion and Sacking do. If successful, the attacker enters the city. He may either Sack it (9.8) or disperse any survivors as per 9.74.
EXAMPLE: Using the results from above—Attacker Unsuccess-ful—the Carthaginian rolls a ‘3’, halved, then rounded up to 2. This result multiplied by 10% gives him 20% losses, which means he must eliminate 3 SPs. The Syracusan player now rolls to see what he loses, and gets a ‘5’, which means he loses at least 25% of his garrison, or 2 SPs. The city militia SPs may be used to satisfy one of the SP losses.
(9.36) If a Siege Assault is Unsuccessful, and the loss die roll was a 7, 8, or 9, a Siege Engine has been destroyed.
(9.37) Leaders involved in the besieger’s assault, and all leaders inside the assaulted city, must check for casualties.
(9.4) SIEGE REDUCTION AND REPAIRReduction is an attempt to reduce the effectiveness of the city’s IDS—its walls—to the point where such reduction allows the besiegers to assault the city with confidence. Reduction is depen-dent upon relative technological levels and skills at such opera-tions. Repair is an effort to rebuild what has been reduced.
(9.41) The ability to conduct effective Reduction/Repair is de-pendent on the Siege Capability Rating of the country involved in the Siege. It is listed in the individual scenario. The SC Rating runs from –3 to +3, and it is used by both the besieger and the defender as a die roll modifier; see 9.43 and 9.44.
(9.42) An active leader may conduct a Reduction or Repair Operation at any time during his Operations Phase. Both opera-tions are Siege Operations and can only be conducted if the city is Under Siege. The Reduction operation is only available to a besieging leader, while the Repair operation is only available to the besieged leader. Both operations use a die roll Finish (5.35). If a besieging leader is undertaking a Reduction Operation, the attempt is to reduce the city’s IDS. If Repair Operation is conducted by a besieged leader, it is to rebuild reduced IDS. It cannot be used to increase the original IDS.
(9.43) To attempt Reduction, the besieging player rolls one die, adjusted by his SCR, and consults the Siege Reduc-tion Table. If the Reduction has been successful, the city’s IDS is Reduced by the number indicated. A city’s IDS cannot be reduced below ‘�’. Such Reduction is temporary, as per 9.25. A ‘0’ result allows a garrison to Sally (9.27) if no leader is present in the city.
For each Siege Engine the besieging player has in the hex, add one (+�) to the Reduction die roll.
EXAMPLE: The Consul L. Manlius Vulso, who is besieging a Carthaginian army in Syracuse (IDS 7), decides to attempt to reduce the city’s defense in preparation for an assault. The Ro-man Siege Capability Rating is at –3. The Roman player rolls a ‘7’ which is reduced to ‘4’ (–3 SC). The result is ‘0’ (no effect on the city defenses) and the besieged garrison may immediately conduct a Sally. After completing the Sally, the Roman player
may roll for Continuation using Vulso and if successful conduct an operation, including another Reduction attempt.
(9.44) To attempt Repair, the besieged player rolls one die, adjusted by his SCR, and consults the Siege Repair Table. If the repair has been successful, the city’s IDS is increased by the number indicated, up to the original IDS. Siege Engines have no effect on Repairs.
PLAY NOTE: Yes, it is easier to repair than reduce, as per the tables. That difference can be overcome by use of Siege Engines and having a better Siege Capability.
(9.5) SIEGE ATTRITION (9.51) Siege Attrition LAMs: There are three Siege Attrition LAMs. They are all placed in the LAM Pool at the start of every turn. When a Siege Attri-tion LAM is drawn, players check for the attrition
results for all sieges and all units so involved. If there are no Sieges in progress, the LAM is ignored.
(9.52) Siege Attrition Procedure: When a Siege Attrition LAM is drawn, both players roll on the Attrition Results Table for each siege. The player Under Siege rolls and uses the “Inside City” col-umn, while the besieger rolls and uses the “Outside City” column. They cross-reference their die rolls with the column pertaining to the total SPs inside the city (including the city militia SPs) or hex respectively. Cavalry and elephants, which have no use in a siege, are counted when determining SPs for Attrition. Cavalry SPs inside or outside the city are doubled when determining the total (they may not be helpful, but they are eating).
(9.53) Foraging: The besieging player may forage to reduce Attrition. This decision must be made prior to either player’s die roll. Foraging provides a –2 DRM, but all three of the fol-lowing must apply:• The province must be controlled by the besieging player• The city must be in a Flat or Rough hex• The province cannot be Devastated
In addition, any time a besieging army forages, the player rolls for possible Devastation, as per 6.73.
(9.54) Supply. If the besieging units are within three land (3) hexes of a city that:• the player controls or is uncontrolled in an allied province,
and • is not Under Siege, and• is not in a Devastated province
that player subtracts three (–3) from his Attrition die roll. The above path may not include hexes occupied by enemy units or adjacent to an enemy force with a leader.
If the city is a port, the besieged player adds/subtracts the besieg-ing player’s NS Level for that zone.
(9.55) Siege Attrition losses usually apply only to infantry or city militia SPs. However:• A player may choose to eliminate two (2) cavalry SPs to satisfy
The Ancient World v2.2 26
© 2005 GMT Games, LLC
one infantry SP loss• The besieging player (only) may choose to eliminate one
Elephant SP to satisfy one infantry SP loss• The besieged player (only) automatically loses one Elephant
SP. This loss is in addition to any SP lost from the attrition roll.
(9.56) The owning player may distribute his losses among his Contingents in any way he chooses. If the city falls, use 9.74 to determine the fate of any surviving leaders in the city.
(9.6) TREACHERY (9.61) An enemy-occupied city can be taken by Treachery (a nom de jeu that includes bribery, inside politics, fifth columnists, fear, and a whole host of other seemingly good reasons). Unoc-cupied cities may not be taken by Treachery; see 9.72. Treachery is a Siege Operation which requires the target city to be Under Siege, requires Guile Points, and, at the conclusion of which attempt, the leader is automatically Finished (possibly forever, as we shall soon see).
(9.62) A city’s susceptibility to Treachery is dependent upon its IDS, its defending leaders, and the guile of the commander at-tempting such underhanded and dastardly deeds.
PROCEDURE: To make the attempt, the player decides how many Guile Points he wishes to expend to influence the die roll, rolls a die, and cross references the attempting leader’s Campaign Rating and the City’s original IDS (ignore any Reduction) on the Treachery Table.
RESULTS: • Treachery Succeeds: If the die roll is higher than the value
listed on the chart, the city has fallen by Treachery. The leader and any besieging units may enter the city. The leader is auto-matically Finished. The defenders? Well, that’s up to the player. He can Sack (see below), or simply place them elsewhere (as in Involuntary Surrender).
• Treachery Fails: If the die roll is lower than the value listed on the chart, the Treachery attempt has failed, the leader is Finished and the siege continues.
• Trap: If the die roll is the same as the value listed on the chart not only has the Treachery failed, but the whole thing has proven to be a clever ploy on the part of the inhabitants to suck the leader into a position where he could be assassinated! Roll the die. If it is higher than the leader’s Campaign Rating (yes, the Campaign Rating) he has been assassinated (dead).
TREACHERY TABLE MODIFIERS:• The player attempting Treachery adds one (+�) to the die roll
for each Guile Point he decided to expend• The defending player subtracts one (–�) from the die roll for
each Guile Point available to all leaders in the city. These points are not expended but must be available for use.
EXAMPLE: A force inside city an IDS ‘3’ has three leaders with a total of 2 Guile Points available. The besieging leader has a Campaign Rating of ‘6’, and he expends one Guile Point.
The besieging player would need a die roll of ‘8’ or better to be successful.
(9.7) SURRENDER (9.71) Voluntary Surrender: A besieged player may always Surrender, rather than undergo Reduction, Attrition or Assault. Surrender may occur at any time. The besieging player simply enters the city. Both players must agree on what to do with the city’s defenders (9.74). But they both must agree, or no Volun-tary Surrender.
(9.72) Involuntary Surrender: Cities may surrender upon a show of force, without an actual siege. The active leader may conduct an Involuntary Surrender Operation against a city in a hex where the leader’s force has at least ten times (�0x) more infantry SPs than city’s SADS (9.3�). If the city has no infantry garrison, use the city’s IDS instead. If this condition is met, the active player rolls the die and consults the Involuntary Surrender Table using the row corresponding to the City’s original IDS. If the surrender is successful, the active player may (not must, but see ��.3� and ��.32) move his force into the city. The Involuntary Surrender Operation has a die roll Finish, with a DRM depending on the outcome of the attempt. If successful, add two (+2) to the die roll; if unsuccessful, subtract two (–2).
EXAMPLE #1: Venusia (It-4707) is a Small city with a garrison of one SP. Hannibal is in the hex with a force of 10 infantry SPs (10x the SADS). The Carthaginian player can conduct an Involuntary Surrender operation needing a ‘2’ or higher to succeed.
EXAMPLE #2: Capua (It-4412), an IDS ‘7’ Large city with a gar-rison of 3 SPs has an SADS of 21. To be eligible for Involuntary Surrender, the “asking” force must number at least 210 infantry SPs. A die roll of ‘8’ or higher would be required for success.
DESIGN NOTE: It is not a misprint that it is more difficult to continue on after a successful surrender than an unsuccessful one. This accounts for the looting, pillage and generally running amok that occurs and takes some effort to control.
(9.73) Only one Involuntary Surrender attempt may be made per city per Operations Phase. Involuntary Surrender may not be attempted against a city already Under Siege.
(9.74) Cities that Surrender (voluntarily or involuntarily) may not be Sacked (9.8), thus no SPs are eliminated. Defending SPs are placed in any city (mutually agreed to if a Voluntary Surrender, active player’s choice otherwise), but the hex must be accessible by land movement. The units may not be dispersed to more than three (3) cities. If there are no eligible cities, the owning player places the units in any one city in a Home province. Leaders are dealt with as the winning player wishes (held for ransom, killed, placed in a playable hex) subject to whatever terms that were mutually agreed to in the case of a Voluntary Surrender. City militia SPs are removed.
(9.8) SACKING CITIES (9.81) Cities that are captured by Siege Attrition, Assault or Treachery may be Sacked.
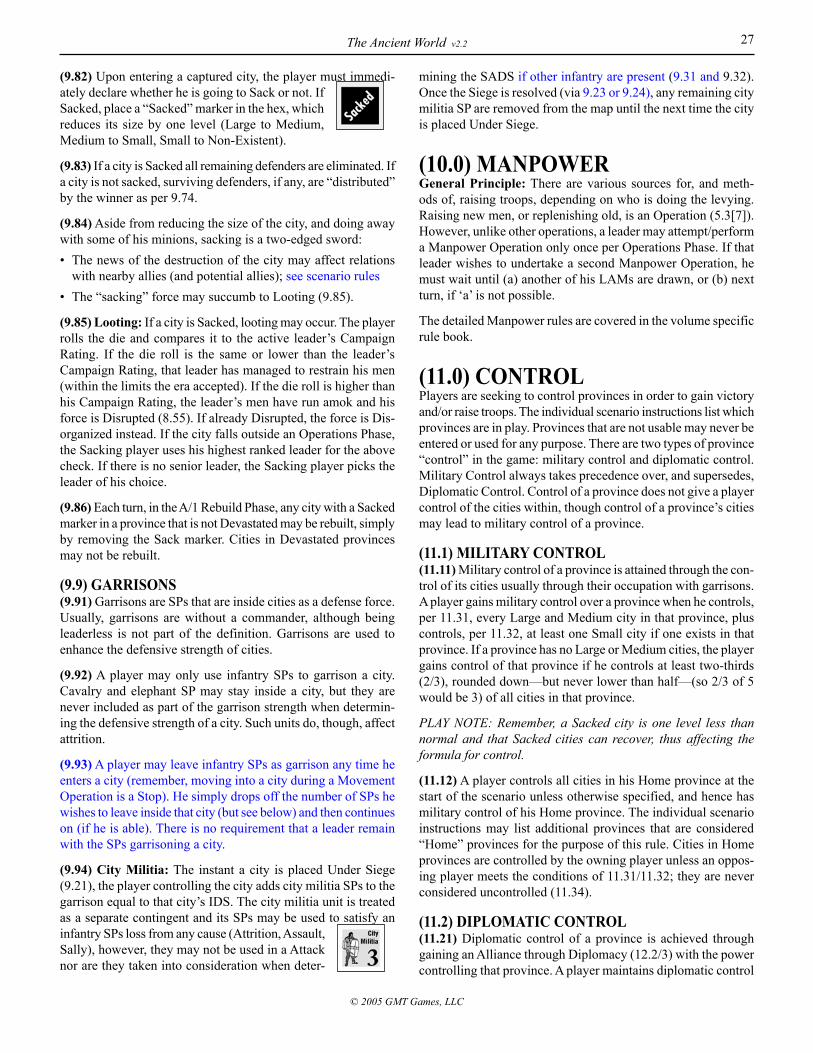
The Ancient World v2.2 27
© 2005 GMT Games, LLC
(9.82) Upon entering a captured city, the player must immedi-ately declare whether he is going to Sack or not. If Sacked, place a “Sacked” marker in the hex, which reduces its size by one level (Large to Medium, Medium to Small, Small to Non-Existent).
(9.83) If a city is Sacked all remaining defenders are eliminated. If a city is not sacked, surviving defenders, if any, are “distributed” by the winner as per 9.74.
(9.84) Aside from reducing the size of the city, and doing away with some of his minions, sacking is a two-edged sword:• The news of the destruction of the city may affect relations
with nearby allies (and potential allies); see scenario rules• The “sacking” force may succumb to Looting (9.85).
(9.85) Looting: If a city is Sacked, looting may occur. The player rolls the die and compares it to the active leader’s Campaign Rating. If the die roll is the same or lower than the leader’s Campaign Rating, that leader has managed to restrain his men (within the limits the era accepted). If the die roll is higher than his Campaign Rating, the leader’s men have run amok and his force is Disrupted (8.55). If already Disrupted, the force is Dis-organized instead. If the city falls outside an Operations Phase, the Sacking player uses his highest ranked leader for the above check. If there is no senior leader, the Sacking player picks the leader of his choice.
(9.86) Each turn, in the A/� Rebuild Phase, any city with a Sacked marker in a province that is not Devastated may be rebuilt, simply by removing the Sack marker. Cities in Devastated provinces may not be rebuilt.
(9.9) GARRISONS (9.91) Garrisons are SPs that are inside cities as a defense force. Usually, garrisons are without a commander, although being leaderless is not part of the definition. Garrisons are used to enhance the defensive strength of cities.
(9.92) A player may only use infantry SPs to garrison a city. Cavalry and elephant SP may stay inside a city, but they are never included as part of the garrison strength when determin-ing the defensive strength of a city. Such units do, though, affect attrition.
(9.93) A player may leave infantry SPs as garrison any time he enters a city (remember, moving into a city during a Movement Operation is a Stop). He simply drops off the number of SPs he wishes to leave inside that city (but see below) and then continues on (if he is able). There is no requirement that a leader remain with the SPs garrisoning a city.
(9.94) City Militia: The instant a city is placed Under Siege (9.2�), the player controlling the city adds city militia SPs to the garrison equal to that city’s IDS. The city militia unit is treated as a separate contingent and its SPs may be used to satisfy an infantry SPs loss from any cause (Attrition, Assault, Sally), however, they may not be used in a Attack nor are they taken into consideration when deter-
mining the SADS if other infantry are present (9.3� and 9.32). Once the Siege is resolved (via 9.23 or 9.24), any remaining city militia SP are removed from the map until the next time the city is placed Under Siege.
(10.0) MANPOWER General Principle: There are various sources for, and meth-ods of, raising troops, depending on who is doing the levying. Raising new men, or replenishing old, is an Operation (5.3[7]). However, unlike other operations, a leader may attempt/perform a Manpower Operation only once per Operations Phase. If that leader wishes to undertake a second Manpower Operation, he must wait until (a) another of his LAMs are drawn, or (b) next turn, if ‘a’ is not possible.
The detailed Manpower rules are covered in the volume specific rule book.
(11.0) CONTROL Players are seeking to control provinces in order to gain victory and/or raise troops. The individual scenario instructions list which provinces are in play. Provinces that are not usable may never be entered or used for any purpose. There are two types of province “control” in the game: military control and diplomatic control. Military Control always takes precedence over, and supersedes, Diplomatic Control. Control of a province does not give a player control of the cities within, though control of a province’s cities may lead to military control of a province.
(11.1) MILITARY CONTROL (11.11) Military control of a province is attained through the con-trol of its cities usually through their occupation with garrisons. A player gains military control over a province when he controls, per ��.3�, every Large and Medium city in that province, plus controls, per ��.32, at least one Small city if one exists in that province. If a province has no Large or Medium cities, the player gains control of that province if he controls at least two-thirds (2/3), rounded down—but never lower than half—(so 2/3 of 5 would be 3) of all cities in that province.
PLAY NOTE: Remember, a Sacked city is one level less than normal and that Sacked cities can recover, thus affecting the formula for control.
(11.12) A player controls all cities in his Home province at the start of the scenario unless otherwise specified, and hence has military control of his Home province. The individual scenario instructions may list additional provinces that are considered “Home” provinces for the purpose of this rule. Cities in Home provinces are controlled by the owning player unless an oppos-ing player meets the conditions of ��.3�/��.32; they are never considered uncontrolled (��.34).
(11.2) DIPLOMATIC CONTROL(11.21) Diplomatic control of a province is achieved through gaining an Alliance through Diplomacy (�2.2/3) with the power controlling that province. A player maintains diplomatic control
The Ancient World v2.2 28
© 2005 GMT Games, LLC
over a province as long as its owning power is allied to that player.
(11.22) The fact that a province is diplomatically controlled by a player through an Alliance (�2.2) does not mean it is controlled militarily by that player, nor does it mean he controls the cities therein. Similarly, a player who controls a province militarily does not necessarily control it diplomatically.
(11.3) CONTROL OF CITIES Control of cities often determines who controls a province, as per the above section. All Cities in Home provinces are initially controlled by that player.
(11.31) Large and Medium Cities: To control such a city, the player must occupy it with at least � SP of infantry. Large/Me-dium cities in Home provinces do not have to be garrisoned by SPs to maintain control.
(11.32) Small Cities: To control such a city, a player simply needs to be the last player to have a combat unit of any type in that city. PLAY NOTE: Use the appropriate control markers to indicate ownership that differs from the control status at the beginning of the scenario.
(11.33) Players may transfer control of cities by agreements reached in Surrender terms or at any time during the game that players so agree. There are no restrictions on this, except that, if transfer of control of a city is affected, any combat units inside belonging to the player relinquishing control must be placed outside the city in the same hex. If the transferred city is Me-dium/Large, the new owner must place at least � SP of infantry from those he has in play to gain control, otherwise the city is uncontrolled. Again, whatever players mutually agree to is do-able. A player may at any time voluntarily relinquish control of any controlled city without a garrison.
(11.34) Uncontrolled Cities: A player may freely enter any city he controls, but never one controlled by an opposing player. Uncontrolled cities cannot be entered by a player unless that player controls, either diplomatically or militarily, the province the city is in (but remember ��.�2). A player may gain control of a friendly uncontrolled city via ��.32 by simply entering the city and by ��.3� by leaving a garrison.
(12.0) DIPLOMACY Sometimes, winning hearts and minds was just as important as galumphing around the countryside laying waste to local industry. If neither player has Military Control over a province, the player who has Diplomatic Control over (i.e., an Active Alliance with) that province controls it for Manpower and Victory purposes.
(12.1) HOME AND AVAILABLE PROVINCES (12.11) Each player (usually) has a Home province(s), a province that may never be controlled diplomatically by the opposing
player. All other provinces are eligible for Diplomatic Control. The Home provinces are given in the scenario setup.
(12.12) Some independent provinces start with combat units deployed. These units may not be moved unless and until that province becomes controlled by one player or the other.
(12.13) Most provinces contain no troops but, instead, are capable of providing troops when the controlling player levies them, as per the manpower rules.
(12.2) ALLIANCES (12.21) At the start of a scenario, all provinces available for diplo-matic control are listed as either allied or independent. Provinces that are allied are controlled diplomatically by the player to whom they are allied. Provinces may be controlled militarily by either player regardless of the diplomatic status.
(12.22) Provincial Alliance Track: The diplomatic relations between the provinces and the main protagonists is kept track of on the Provincial Alliance Tracks. This is a series of boxes, ranging from 0 to 4 (on either side) reflecting the level of rela-tions between that province and a given player. Any province whose Alliance Level is ‘4’ is allied to, and, thus, diplomatically controlled by, that Player. EXAMPLE: Campania is allied to Rome. Place the Campania Diplomacy Marker on the 4 box in favor of Rome on the Roman Allies portion of the Alliance Track. On the other hand, Etruria begins the game as an Independent, but with a 3 favoring Rome. Place the Etruria Diplomacy Marker on the Independent portion of the track in the box indicated.
(12.23) For provinces that are listed as diplomatically controlled at the beginning of a scenario, place the province’s Diplomatic Control marker in the ‘4’ box on the track belonging to the player that has Diplomatic Control.
(12.24) Once a player has achieved an Alliance with a prov-ince-Level 4 in his favor—Diplomatic Control of that province remains with him until an opposing player achieves a Level ‘4’ in his favor! EXAMPLE: Using the Campania example, above. For any op-ponent to change that diplomatic status he would have to move the Alliance Level eight boxes, from Rome/4 to Opponent/4. The marker would then be placed on the Non-Roman Allies track in the 4 box favoring the non-Roman player. And remember, Military Control always rules, regardless of what’s happening on the Alliance Track.
PLAY NOTE: So why bother with Diplomatic Control? Well, in the first place, it’s a relatively bloodless way to exercise suzer-ainty. (12.25) Military control has no effect on the Alliance Level and thus the province’s diplomatic control status.
(12.3) ALLIANCE LEVELS AND AMBASSADORS (12.31) The Alliance Level of any province(s) may be changed—in favor of the Player who effects the change—as follows: 1 Box In favor of a player who wins a Major Victory in any
The Ancient World v2.2 29
© 2005 GMT Games, LLC
adjacent/adjoining province. Provinces separated by sea are not adjoining. 2 Boxes in favor of a player who wins a Major Victory in that province. 3 Boxes in favor of the player who successfully concludes a Siege by Attrition or Assault (but not Surrender or Treachery) of any Large or Medium city in that province. 4 Boxes in favor of the opposing player if a player Devastates that province. ?? Boxes • for use of Ambassadors, as per below. • Augury Events
The adjustment for Major Victory is not cumulative with the adjustment for Siege. The Alliance Level adjustment is made at the conclusion of the operation or phase in which the above conditions are met.
(12.32) In an OC’s Operations Phase, he may use a Diplomacy Operation to affect alliance levels. To do this he “sends” Ambas-sadors to the province/country with which he wishes to improve relations. It costs an OC � Guile Point to send an Ambassador. Only an OC may undertake this operation.
(12.33) Ambassadors are drawn randomly from each player’s leader pool as specified in the scenario setup.
(12.34) An ambassador is assigned to the targeted power before being chosen. He is then selected and, to determine the effect of his diplomatic skills and oratorical abilities, his Diplomatic Rating is noted, the die is rolled, and the die roll cross-referenced with that rating, on the Ambassador Table, to see what effect, if any, he has had. The effects are in boxes adjusted, as per �2.3�. If a “D” result is obtained, roll the die again and consult the Disaster instructions.
(12.35) An ambassador may not be used more than once per game turn.
(13.0) AUGURIES; or THE CONSUL’S CHICKEN IS FINGER-LICK’N GOOD Place the Augury marker in the LAM Pool at the start of each turn. Whenever this is drawn the players refer to the Augury Table for that scenario and roll the die twice, the first number being the �0’s digit, the second the �’s. So a roll of ‘5’ and ‘0’ is 50. The number corresponds to a random event. Simply follow the instructions for that “event”; they’re pretty much self-explanatory.
Not every scenario has Auguries/Events. The shorter scenarios tend to omit such chaos.
DESIGN NOTE: This is our Random Events system, wherein
we get to throw in a whole host of goodies to upset your best
laid plans. In case you didn’t know, the Romans often consulted augurs to pre-determine how events were going to come out. The local augster would cut open a live chicken and read its entrails. Tarot cards are neater, but you can’t make soup with them afterwards.
14.0 WINNING THE GAME The Victory conditions for each game are given in the individual scenarios, as they vary from subject to subject.
Where there are multiple entries, references in Bold indicate the primary rules section for that entry.
ABS, see After Battle Status
The Ancient World v2.2 30
© 2005 GMT Games, LLC
After Battle Status, 6.43, 6.46, 8.3�, 8.38, 8.54, 8.55, 8.56; Disorganized, 6.43, 6.46, 6.5�, 8.54, 9.33, 9.85; Disrupted, 6.54, 8.54, 9.33, 9.85; Useless, 6.43, 6.46, 6.5�, 7.28, 8.2�, 8.54, 9.3�; recovery, 8.56
ALP, see Attrition Loss Points
Ambassador, 12.31-12.35; Ambassador Table, �2.34
Amphibious Attack, 7.27
Attrition Loss Points, 6.43, 8.23, 8.37; Attrition Effects, 6.47
Augury, 8.6, �2.3�, 13.0; LAM 4.2
Avoidance, 5.43, 6.5, 8.2, 8.22, 8.23, 8.3�, 9.22, 9.26, 9.28; Pursuit, 8.24
Battle, see Combat Resolution
Cavalry, 7.34, 6.47, 6.42, 6.35, 8.�2, 8.34, 8.35, 9.55, 9.92
Cavalry Superiority, 8.3�, 8.36, 8.28
City; Size, 6.36, 8.56, 9.�, 9.�2, 9.24, 9.82, ��.��, ��.3�, ��.32, �2.3�; Entry, 6.22, 6.37, 6.44, 8.23, 8.37, 9.35, ��.34; Forces, 6.24; Inside/Outside, 6.37, 6.46, 6.52, 6.58, 7.22, 8.2�, 8.22, 8.27, 9.22; IDS, 6.44, 6.46; Besieged/Un-Besieged, 8.23, 9.2�, 9.54; Rebuild, 9.86; Non-existent, 6.36; Control, 9.54, ��.��, ��.�2, 11.3, ��.3�,��.32; Uncontrolled, 6.37, ��.34; Transfer, ��.33; Control Markers, 6.37, 9.92; City Occupation Card, 6.37, 9.92; Capture, 9.25
City Militia, 9.�2, 9.2�, 9.22, 9.24, 9.3�, 9.32, 9.35, 9.43, 9.94
Combat Ratio, 8.3�, 8.36
Combat Resolution, 6.55, 8.3; Loss Distribution, 8.33-8.35, 8.38; Battle Results Table (BRT), 8.33; Cavalry Loss Option, 8.35; Un-led Defenders, 8.32
Combat Units, see Cavalry, Elephants, Infantry, Siege Engines
Contingent, 8.�2, 8.3�, 8.34, 9.35, 9.94
Control, ��.0; see also City, Province
Coordination, 6.5, 8.2, 8.25, 9.26, 928; Procedure, 8.26
Devastation, 6.7; Requirements, 6.72; Procedure, 6.73; Value, 6.73, 6.75; Effects, 6.74, 9.54, 9.86, �2.3�; Recovery, 6.75; Foraging, 6.76, 9.53, 9.54
Diplomacy, 6.7, 12.0; Power, ��.2�; Alliance, ��.2�, ��.22, 12.2, �2.24, �2.25; Alliance Level, �2.3; Province Alliance Track, �2.22, �2.25
Elephants, 7.34, 6.47, 6.35, 8.�2, 8.3, 8.3�, 8.34, 8.36, 8.52, 9.55, 9.92
Elephant Commitment, 8.36
Elite Units, 8.�3, 8.3�
Foraging, 6.7�, 6.76, 9.53
Force, 5.�2, 5.45, 6.��, 6.35, 6.37, 6.4, 6.45, 6.5, 6.55, 6.6�, 7.2�, 8.2�, 9.26, 9.54, 9.72; Composition, 6.24; Besieging Force, 6.46, 9.2�, 9.23, 926, 9.27; Besieged Force, 8.22, 9.2�, 9.23, 9.26, 9.27; inactive, 6.52; Independent, �2.�2;
Garrisons, 9.9, ��.��; Definition, 9.9�; Composition, 9.92
Guile, 5.��, 5.�2, 5.44, 5.5, 8.23, 8.4, 8.63, 9.6�, 9.62, �2.32
Inertia Attrition, 6.46, 9.23
Infantry, 6.47, 6.35, 8.�2, 8.34, 8.35, 9.3�, 9.35, 9.55, 9.72, 9.92, 9.94
Interception, 5.45, 6.34, 6.35, 6.5, 6.5�, 6.53, 8.2�, 8.22, 8.37, 9.28; Procedure, 6.54, 6.55; Automatic, 6.52; Same hex, 6,52; Range, 6.52; Failed Interceptions, 6.55, 8.3�; Intercepting an Interception, 6.56; Double Envelopment, 6.57, 8.3�; Ambush, 6.58, 8.3�
Intrinsic Defense Strength (IDS), 6.44, 6.46, 9.�, 9.�2, 9.2�, 9.23, 9.25, 9.3�, 9.32, 9.35, 9.42, 9.44, 9.62, 9.72, 9.94
LAM, 4.�; Initiative, 4.0; Pool, 8.63, 8.65; Siege Attrition, 4.2, 9.5�, 9.52; Augury, 4.2;
Leaders 5.0; Overall Commander, 5.12, 5.4�, 5.43, 8.63, 8.64, �2.32; Rank, 5.43, 9.85; Multiple Leaders, 5.4; Command Restrictions, 5.45, 6.5�
Land Combat, 8.0
Leader Activation, 5.2; Continuation, 5.25, 6.2�, 6.45, 6.55, 8.2, 8.2�, 8.24, 9.42, 9.72; Stop, 5.24, 6.2�, 6.22, 6.23, 6.45, 6.52, 6.55, 6.63, 7.2�, 7.27, 9.72, 9.93; Finished, 5.24, 5.25, 6.23, 6.55, 9.2�, 9.27, 9.6�, 9.62; Pass, 5.26
Leader Casualty, 7.28, 8.3, 8.6, 9.37; Killed, 8.6�-8.64; Wounded, 8.6�-8.63; Replacement, 8.63-8.64
Leader Operations, see Operations
Leader Ratings, Initiative, 4.0, 5.��; Battle Letter, 5.��, 5.43, 6.58, 9.27, 9.33; Subordinate Battle, 5.��, 5.23, 5.42, 5.44, 8.3�; Campaign, 5.��, 6.5, 6.54, 6.55, 8.23,8.26, 9.62, 9.85; Guile, see Guile; Diplomacy, 5.��, 5.�2, �2.34; Mortality, 5.��, 8.6�
Leader Tactical Ability, 8.3�, 8.32, 9.27
Looting, 9.84, 9.85
Manpower, 5.3, 10.0, �2.�3
Movement, 6.0; Leader Effects, 6.�; Leaders Alone, 6.�2; Combat units, 6.��, 6.�3, 6.2�; Continual, 6.2; Pick up units, 6.24, 6.25; Leave units, 6.24, 6.25, 8.37, 9.93, ��.34; Attrition, see Movement Attrition
Rules Index
The Ancient World v2.2 3�
© 2005 GMT Games, LLC
Movement Attrition, 6.2�, 6.23, 6.34, 6.35, 6.4, 6.42, 6.55, 6.63, 7.27, 8.2, 8.2�; Adjusted SP, 6.42; Large Forces, 6.43; Overruns, 6.43; City Attrition Point Adjustment, 6.44; Attrition Points, 6.41, 6.43, 6.44, 6.48; Attrition Point Track, 6.4�
Naval Superiority, 7.�; Naval Zones, 7.��; Superiority Levels, 7.��-7.�7; NS Markers, 7.�2; Effects, 7.�3; Re-allotment, 7.�4-7.�6; Construction, 7.�4, 7.�6
Naval Transport, 6.32, 7.�2, 7.�3, 7.�7, 7.2, 9.28; Procedure, 7.2�, 7.23, 7.24; Ports, 7.22; Transport Table, 7.2�, 7.26; Scat-ter, 7.22, 7.26, 7.28; Automatic Scatter, 7.29; Markers, 7.23;
Stopping, 7.26; Amphibious Attacks, 7.27, 8.3�;
Operations, 5.2; Leader Movement, 5.3 [A], 6.22, 6.32; Force Movement, 5.3 [B], 5.�2, 6.22, 6.5; Ally Movement, 5.3 [C], 5.�2, 6.�3, 6.5; Attack, 5.3 [D], 5.�2, 5.43, 8.2�, 9.26; Siege Operations, 5.3 [E], 5.�2, 9.2�, 9.27, 9.3, 9.4, 9.5; Involuntary Surrender, 5.3 [F], 9.72, 9.73; Manpower, 5.3 [G], 5.�2, 8.63; Diplomacy, 5.3 [H], 5.�2, 12.32; Reform Scattered Units, 5.3 [I], 7.28
Overrun, 6.22, 6.43, 6.6, 6.6�, 8.22, 9.29
Percentage Loss, 8.33, 8.38, 9.35
Port, 7.2�; Size, 7.22; Capability Chart, 7.25; Embarkation/Debarkation, 7.25
Pre-Combat Sequence, 8.2; see Avoidance, Coordination;
Province, 6.4�, 6.34; Rating, 6.4�, 6.46, 6.75; Devastated, 6.4�, 6.74; Military Control, ��.�, 11.11, ��.22, �2.25; Diplomatic Control, ��.2, 11.21, ��.22, �2.��,�2.22, �2.23, �2.24; Home, ��.�2, �2.��; Allied (friendly), 6.4�, 9.54, ��.��; Independent, �2.�2; Province Information Chart (PIC), 6.36
Pursuit & Butchery, 8.33, 8.38, 8.52; Pursuit Factor, 8.38
Rank, 5.�2, 5.�3
Reduction, 9.27, 9.28, 9.4, 9.42, 9.52, 9.72; Procedure, 9.43, 9.45; Siege Reduction Table, 9.43
Repair, 9.4, 9.42; Procedure, 9.44; Siege Repair Table, 9.44
Retreats, 8.37, 8.38; Procedure, 8.37; Mandatory, 8.37; Vol-untary, 8.37
Rivers, 6.34, 6.35, 6.4�, 6.54, 6.58, 8.23, 8.26, 8.37, 9.28; Control, 6.35, 6.52
Roads, 6.33; Effects, 6.34, 6.4�, 8.26, 8.3�, 8.37, 9.28
Sack, 9.35, 9.62, 9.74, 9.8; Requirements, 9.8�; Procedure, 9.82; Losses, 9.83; Diplomacy Effects, 9.84
SADS, 9.3�, 9.32, 9.72, 9.94
Sally, 9.27, 9.43
SCR, see Siege Capability Rating
Siege, 9.0; Conducting, 9.2; Avoiding, 9.22; Lifting, 9.23; Suc-cessful, 9.24, 9.25, 9.56; see also Under Siege
Siege Assault, 7.�2, 9.24, 9.28, 9.3, �2.3�; Procedure, 9.3�, 9.33, 9.35; Losses, 9.35; Assault Ratio, 9.33; City Assault Table, 9.33, 9.34, 9.35
Siege Attrition, 9.23, 9.24, 9.5, �2.3�; Procedure, 9.52; Siege Attrition Table, 9.52; Land Supply, 9.54; Losses, 9.55, 9.56
Siege Capability Rating, 9.41, 9.43, 9.44
Siege Engines, 8.�2, 9.28, 9.29, 9.33, 9.36, 9.45
Special Units, 8.�4
Stacking, 8.4�; Opposing Forces, 8.42
Straits, 6.38, 7.25, 7.3
Straits Crossing, 7.25, 7.3; Opposed, 7.3�; Procedure, 7.32, 7.33; Losses, 7.34, 9.55
Subordinate Leader, 5.13
Surrender, 9.24, 9.7; Voluntary, 9.7�; Involuntary, 9.72, 9.73; Involuntary Surrender Table, 9.72; Garrison Distribu-tion, 9.74
Terrain, 6.3; Flat, 6.31, 8.23, 9.53; Rough, 6.31, 6.58, 8.23, 9.53; Mountain, 6.31, 6.34, 6.4�, 6.43, 6.46, 6.54, 6.58, 6.74, 8.23, 8.26, 8.36, 8.37, 8.38, 9.28; Marsh, 6.31, 6.34, 6.4�, 6,54, 6.58, 6.74, 8.23, 8.26, 8.36, 8.37, 8.38, 9.28; Impassible, 6.32, 8.23, 8.37; Roads, see Roads; Rivers, see Rivers; Straits, see Straits
Treachery, 9.24, 9.6; Requirements, 9.6�; Procedure, 9.62; Treachery Table, 9.62; Trap 9.62;
Under Siege, 6.37, 8.22, 9.�2, 9.21, 9.23, 9.22, 9.72, 9.94
Unpredictable Results, 5.44, 8.4, 8.33
Victory (Combat), 6.55; Major Victory, 8.37, 8.52, 9.24, �2.3�; Winner, 8.5�, 8.54; Loser, 8.37, 8.54, 9.29; No Winner (Draw), 8.54
Winning, 14.0
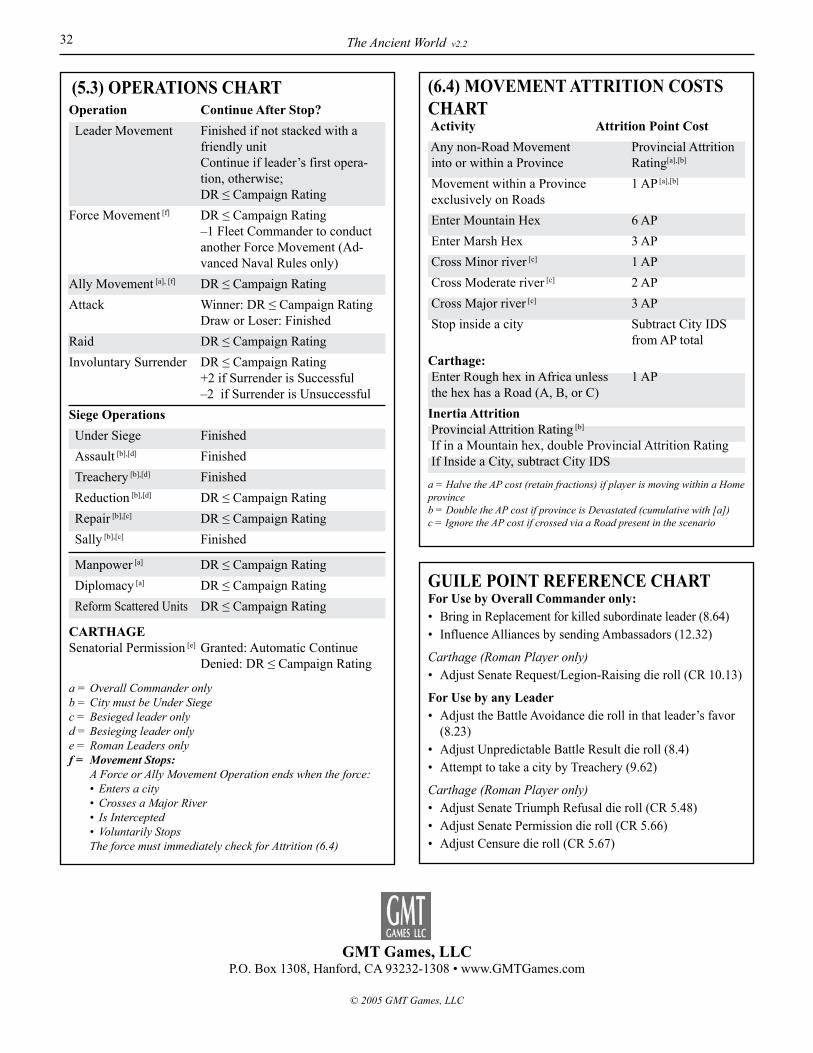
The Ancient World v2.2 32
© 2005 GMT Games, LLC
GMT Games, LLCP.O. Box �308, Hanford, CA 93232-�308 • www.GMTGames.com
(5.3) OPERATIONS CHARTOperation Continue After Stop? Leader Movement Finished if not stacked with a
friendly unit Continue if leader’s first opera-
tion, otherwise; DR≤CampaignRatingForce Movement [f] DR≤CampaignRating –� Fleet Commander to conduct
another Force Movement (Ad-vanced Naval Rules only)
Ally Movement [a], [f] DR≤CampaignRatingAttack Winner:DR≤CampaignRating Draw or Loser: FinishedRaid DR≤CampaignRatingInvoluntarySurrender DR≤CampaignRating +2 if Surrender is Successful –2 if Surrender is UnsuccessfulSiege Operations Under Siege Finished Assault [b],[d] Finished Treachery [b],[d] Finished Reduction [b],[d] DR≤CampaignRating Repair [b],[c] DR≤CampaignRating Sally [b],[c] Finished
Manpower [a] DR≤CampaignRating Diplomacy [a] DR≤CampaignRating Reform Scattered Units DR≤CampaignRating
CARTHAGE Senatorial Permission [e] Granted: Automatic Continue Denied:DR≤CampaignRating
a = Overall Commander only b = City must be Under Siegec = Besieged leader onlyd = Besieging leader onlye = Roman Leaders onlyf = Movement Stops: A Force or Ally Movement Operation ends when the force: • Enters a city • Crosses a Major River • Is Intercepted • Voluntarily Stops The force must immediately check for Attrition (6.4)
(6.4) MOVEMENT ATTRITION COSTS CHART Activity Attrition Point Cost Any non-Road Movement Provincial Attrition into or within a Province Rating[a],[b]
Movement within a Province � AP [a],[b]
exclusively on Roads Enter Mountain Hex 6 AP Enter Marsh Hex 3 AP Cross Minor river [c] � AP Cross Moderate river [c] 2 AP Cross Major river [c] 3 AP Stop inside a city Subtract City IDS
from AP totalCarthage: Enter Rough hex in Africa unless � AP the hex has a Road (A, B, or C) Inertia Attrition Provincial Attrition Rating [b]
If in a Mountain hex, double Provincial Attrition Rating If Inside a City, subtract City IDS
a = Halve the AP cost (retain fractions) if player is moving within a Home provinceb = Double the AP cost if province is Devastated (cumulative with [a])c = Ignore the AP cost if crossed via a Road present in the scenario
GUILE POINT REFERENCE CHART For Use by Overall Commander only: • Bring in Replacement for killed subordinate leader (8.64)• Influence Alliances by sending Ambassadors (�2.32)
Carthage (Roman Player only)• Adjust Senate Request/Legion-Raising die roll (CR �0.�3)
For Use by any Leader• Adjust the Battle Avoidance die roll in that leader’s favor
(8.23)• Adjust Unpredictable Battle Result die roll (8.4)• Attempt to take a city by Treachery (9.62)
Carthage (Roman Player only)• Adjust Senate Triumph Refusal die roll (CR 5.48)• Adjust Senate Permission die roll (CR 5.66)• Adjust Censure die roll (CR 5.67)