The 4 Moduleslghttp.60951.nexcesscdn.net/80487FB/Downloads/resources/... · 2018-07-26 · The 4...
12
Transcript of The 4 Moduleslghttp.60951.nexcesscdn.net/80487FB/Downloads/resources/... · 2018-07-26 · The 4...


The 4 Modules ¨ Module 1 - Solving the Cube ¨ Module 2 - Competitions ¨ Module 3 - Building Mosaics ¨ Module 4 - DIY Mosaics
Teaching students to solve the Rubik’s Cube is highly rewarding especially if you have memories of your own frustrations from childhood. K-12 students can learn important mathematics skills such as: area, volume, measurement, fractions, decimals, geometry, algebra and so much more. In addition, a variety of standards aligned lesson plans are available for free at www.YouCanDoTheCube.com using the Rubik’s Cube as a manipulative in a number of K-12 STEM disciplines to engage your students and make learning more fun.
This Implementation Guide has been designed to assist schools, clubs, and other programs combine all the components offered within the You CAN Do The Rubik’s Cube (YCDTRC) Education Program. Each activity and module is built on the previous one and developed to both challenge and motivate students while meeting required standards. Each module description contains a suggested timeline, an objective, materials needed, and benefits to the students, all of which meet the goals of 21st Century Skills and can be modified to best fit the needs and desired outcomes of your individual program. The suggested timelines are based on 45-50 minute classes. Any combination or variation of these modules will provide an exciting and valuable experience for the instructor and students.
Getting Started
Yes! You CAN learn to solve the Rubik’s Cube and easily incorporate the Program into your standards-based curriculum or after school program.
1

3x3 Solution Guide ¨ English:
https://www.youcandothecube.com/resources/downloads/Rubiks_3x3_Solution_Guide.pdf
¨ Spanish:https://www.youcandothecube.com/resources/downloads/Rubiks_Spanish_3x3_Solution_Guide.pdf
2x2 Solution Guide ¨ English: ¨ https://www.youcandothecube.com/resources/downloads/Rubiks_2x2_
Solution_Guide.pdf ¨ Spanish:
https://www.youcandothecube.com/resources/downloads/Rubiks_Spanish_2x2_Solution_Guide.pdf
The Competition Guidehttps://www.youcandothecube.com/resources/downloads/Rubiks_Comp_Guide.pdf
The Mosaic Guidehttps://www.youcandothecube.com/resources/downloads/Rubiks_Mosaic_Builder_Guide.pdf
Instructional Materials: ¨ Purchase Kit & Curriculums:
https://www.youcandothecube.com/shop/ ¨ Rubik’s Cube Units & Lessons:
https://www.youcandothecube.com/educators/rubiks-cube-units-and-lessons/Mosaic Templates & Lessons: https://www.youcandothecube.com/mosaics
Helpful Resources
In addition to this booklet, the following guides will give you more in-depth understanding of the activities in each module. Each booklet can be downloaded for free at the corresponding URLs.
Rubik’s Cube sets can be borrowed from the YCDTRC Cube Lending Program at no charge. To apply, go to: http://www.youcandothecube.com/lending-library/Mosaic Builder Sets of up to 600 Rubik’s Cubes can also be borrowed by applying at: https://www.youcandothecube.com/mosaics/borrow-a-set/
2
Tip
Tip

A) Use the Solution Guide provided in the Education Kit to solve the cube. You can walk students through the process or have students use the guide to learn to solve the cube on their own or in small groups.
B) Use the Learn to Solve the Rubik’s Cube Instructional Curriculum. This curriculum is geared towards Elementary and Middle School and aligned to general math standards for Grades 1-6. This curriculum includes everything instructors need to lead students through the solving stages while incorporating a number of strands including Number & Operations, Algebra, Geometry, Measurement and Problem Solving. C) Watch the videos demonstrating the solution. The videos included with the educational kits follow the You Can Do The Rubik’s Cube solution guide. Regardless of which method used, students will become familiar with the behaviors of the cube which will enhance their experience in Modules 2, 3 and 4. Once students have learned to solve the cube, and throughout Modules 1, 2, 3 and 4, you may want to incorporate some of the free standing math lessons and activities found in the Education Kit. These lessons area also aligned to Common Core Standards, National Mathematics Standards, and 21st Century Learning Skills. The lessons and activities utilize the cube as a math manipulative, which allows the student to learn more about the behaviors of the cube while mastering required math concepts.
Cost:
Educators should work through the Solution Guide and try to solve the cube before teaching. This may take a couple hours of “quiet” time.
Module 1 Overview:Within Module 1, participants will learn to solve the Rubik’s Cube. Resources are available for teachers and youth leaders at https://www.youcandothecube.com/educators/teach-to-solve/
There are many ways to help your students:
The Education Kit represents the majority of the cost for the entire year. Kits can be borrowed from the YCDTRC Cube Lending Program or purchased at https://www.youcandothecube.com/shop/ The YCDTRC program meets the requirements of Title 1 and 21st Century funding grants.
3
Tip
Module 1

Solving the Rubik’s Cube
Materials:
Benefits to Students:
Time:If you are using the Learn to Solve Curriculum, plan for six lessons.
¨ Hands-on modeling ¨ Differentiated instruction ¨ Following written instructions ¨ Learning new vocabulary ¨ Working as a group ¨ Asking questions ¨ Independent learning
¨ Personal achievement ¨ Critical thinking ¨ Problem solving ¨ Perseverance ¨ Visual & tactile learning ¨ Managing frustration ¨ Builds confidence/self esteem
The Education Kit
Objective:Participants will learn to solve the Rubik’s Cube
Available for separate purchase:
• Learn to Solve the Rubik’s Cube Curriculum - Teacher’s Guide & PowerPoint • Rubik’s Cube Unit Study (grades 5-8) - Teacher’s Guide & Student Workbook• Elementary STEM unit (grades 2-5) - Teacher’s Guide, Student Workbook & PowerPoint• Middle School STEM unit (grades 6-8) - Teacher’s Guide with lesson plans and student pages
Includes: ¨ 12 Rubik’s Cubes ¨ 12 Solution Guides ¨ 1 USB with 50+ lessons and curriculum aligned to
Common Core standards, including a Learn to Solve program to assist teachers and students learning to solve the Rubik’s Cube (grades 3-12), Rubik’s Cube Unit Study teacher’s guide and student workbook (grades 5-8), STEM Elementary unit from STEM.org (grades 2-5), and Middle School STEM unit (grades 6-8)
¨ 1 Printed Implementation Guide ¨ 1 Printed Competition Guide ¨ 1 Printed Mosaic Builder Guide ¨ 1 Poster
If you are using the Solution Guide or demonstration videos, plan for three or four class periods. Students will master solving at different rates and can help one another, or work on memorization and speed.
4

Solving Stages of the CubeYou may have students who are not quite ready to solve the cube entirely in a competition. Instead of having these students solve the entire cube, students can solve to specific stages (see Solution Guide).
Creating patterns on the CubeOnce students have mastered solving the cube at a competitive pace, creating patterns on the cube at a competitive pace is a fun challenge to include when planning your Module 2 competitions. Patterns may be found online (such as Rubik’s Cube checkerboard) or created by the instructor or students.
The following chart shows 12 possible variations for competitions:
¨ Solving the Cube ¨ Solve to Stages of the Cube ¨ Creating Patterns on the Cube
Individual vs. Individual
Teams vs. Teams (with other schools or
organizations)
Teams vs. Teams(within a school or
organization)
Pairs vs. Pairs ¨ Solving the Cube ¨ Solve to Stages of the Cube ¨ Creating Patterns on the Cube
¨ Solving the Cube ¨ Solve to Stages of the Cube ¨ Creating Patterns on the Cube
¨ Solving the Cube ¨ Solve to Stages of the Cube ¨ Creating Patterns on the Cube
Module 2 Overview: This module is very exciting for students. It is important to spend plenty of time preparing and scheduling practices in order to promote a positive and supportive competition atmosphere. The most traditional competition is the team competition (details in the YCDTRC Competition Guide), with participants collectively solving cubes in the fastest time. However, the goal of the competition can also be modified. For example:
Depending on the number of weeks you spend on Module 2, you may choose to do all of the above options, select one or more, or create your own competition options.
5
Module 2

Time: Six to eight weeks will allow for 2-3 classes of competition practice and 4-6 classes of competitions with one competition a class.
Objective:Participants will apply the skills they learned in Module 1. They will compete individually, and as a team, building confidence and promoting teamwork.
Benefits to Students: ¨ Promotion of teamwork ¨ Personal achievement ¨ Self-confidence ¨ Promotion of school spirit ¨ Mathematics skills in a non-traditional learning environment ¨ Positive competitive atmosphere ¨ Parent involvement
Materials:The Competition Guide. Other competition supplies include a venue (classroom, gym, multi-purpose room, etc), Rubik’s Cubes, timers (can be borrowed from YCDTRC for team events), tables, rules, score sheets (all downloadable for free on the YCDTRC website), pens & pencils, prizes and volunteers. Details regarding the supplies can be found in the Competition Guide.
Cost:The cost to host a competition is minimal. YCDTRC will loan timers or there are several free stopwatch software downloads available on the internet. You will have the cubes from Module 1, and stopwatches, tables, pens, pencils, are most likely available on campus. Prizes are optional but can be any sort of reward or certificate.
Competitions
Prior to beginning Module 3, select the mosaic template your group will build and submit an application (https://www.youcandothecube.com/mosaics/borrow-a-set/) to borrow a Mosaic Builder Set (cubes) for your project. There is no charge (other than return shipping). Supplies are limited, so it is wise to make these requests during Module 2 or earlier if possible.
6
Tip

Time: Depending on the size and skill level of your group, most mosaics can be completed in a few class periods. The time you allow for this module will depend on the number and size of the mosaics your group wants to build.
Objective:Participants will learn to manipulate the cube into patterns to create a mosaic image.
Benefits to Students: ¨ Promotion of teamwork ¨ Personal achievement ¨ Self-confidence ¨ Promotion of school spirit ¨ Problem solving skills in a non-traditional learning environment ¨ Creativity and color theory
Materials: ¨ Rubik’s Cube Mosaic Building Guide ¨ Mosaic template(s) from the Kit (on the USB) or download at
https://www.youcandothecube.com/mosaics/mosaic-templates/ ¨ Sufficient cubes for the largest mosaic you plan to complete; either from
purchased kits or a borrowed Mosaic Builder Set ¨ Workspace large enough for your mosaic (Example: 100 cube mosaics
require 4 sq. feet and 225 cube mosaics require 9 sq. feet.)
Cost:This module does not require any additional costs beyond what has been purchased for Module 1. However, if you borrow a Mosaic Builder Set, you will incur the cost of return shipping.
Mosaic Builder
Module 3 Overview: While competitions focus on solving the cube quickly, mosaics foster a more challenging atmosphere, where teamwork is imperative. In this module, the students will focus primarily on the relationship between the pieces of the cube in order to create a realistic image.
7
Module 3

1. You can get the wood cut to your specifications at the hardware store. For example, the 225 cube mosaic requires 4 lengths each cut to about 37” long (actual mosaic size is 33.75” x 33.75”).
2. Use nails or screws to attach the 4 sides together.
If space is limited, you could attach a solid piece of cardboard to the back of the frame and then rest the frame against a wall at a slight angle so the cubes won’t fall out.
When assembling, remember the inner perimeter of the frame should equal the size of your mosaic and create a snug fit to properly house the cubes.
Gradients 36 Cubes
Abraham Lincoln 225 Cubes
Build a Rubik’s Cube Mosaic
You may want to create a frame to house your mosaic during the building process. For a simple frame, you can purchase lengths of 2x4 pieces of wood cut to the mosaic size at the hardware store and held together with a few nails. Estimated Cost: $3-$7
Getting Started: The Rubik’s Cube Mosaic Building Guide will help you get started with tips on following the templates, creating mosaic patterns on the cubes, and organizing your work. It also includes templates for creating small mosaics with 36 cubes, which are great for beginners.
8
Tip

Time: Three to four weeks will allow students 1-4 classes to pixelate and design the selected image, and additional classes to create templates and build the mosaic.
Objective:Participants will use creative design and problem solving to create a mosaic design using Rubik’s Cubes.
Benefits to Students: ¨ Promotion of teamwork ¨ Personal achievement ¨ Self-confidence ¨ Promotion of school spirit ¨ Problem solving skills in a non-traditional learning environment ¨ Computer and Technology Skills
Materials: ¨ Grid or graph paper for template ¨ Colored pencils or markers ¨ Computer to assist with pixelation (optional) ¨ DIY Mosaic Lessons (optional)
Cost:This module does not require any additional costs beyond what has been purchased for Modules 1 and 3. However, if you borrow a Mosaic Builder Set, you will incur the cost of return shipping.
Mosaic Builder
Module 4 Overview:Now that students have mastered the pre-designed mosaics, they will create their own mosaic and cube pattern template. Templates can be made manually or use our DIY Mosaic Lessons aligned to standards which include links to free software. This module can be completed as a large group or in small groups and is a great way to promote school spirit. Creating a mosaic of the school logo, mascot, or flag is a unique way to share the accomplishments of the students in the Rubik’s Cube program.
9
Module 4
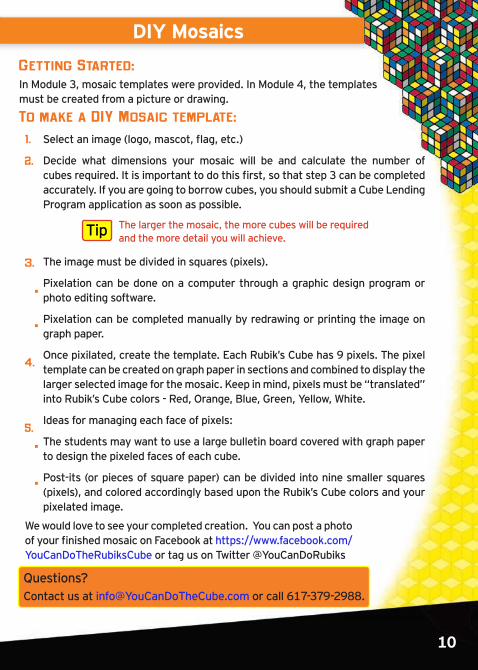
To make a DIY Mosaic template:
Select an image (logo, mascot, flag, etc.)
Decide what dimensions your mosaic will be and calculate the number of cubes required. It is important to do this first, so that step 3 can be completed accurately. If you are going to borrow cubes, you should submit a Cube Lending Program application as soon as possible.
The image must be divided in squares (pixels).
Pixelation can be done on a computer through a graphic design program or photo editing software.
Pixelation can be completed manually by redrawing or printing the image on graph paper.
Once pixilated, create the template. Each Rubik’s Cube has 9 pixels. The pixel template can be created on graph paper in sections and combined to display the larger selected image for the mosaic. Keep in mind, pixels must be “translated” into Rubik’s Cube colors - Red, Orange, Blue, Green, Yellow, White.
Ideas for managing each face of pixels:
The students may want to use a large bulletin board covered with graph paper to design the pixeled faces of each cube.
Post-its (or pieces of square paper) can be divided into nine smaller squares (pixels), and colored accordingly based upon the Rubik’s Cube colors and your pixelated image.
DIY Mosaics
Getting Started: In Module 3, mosaic templates were provided. In Module 4, the templates must be created from a picture or drawing.
The larger the mosaic, the more cubes will be required and the more detail you will achieve.
Questions?Contact us at [email protected] or call 617-379-2988.
1.
2.
3.
•
•
•
•
4.
5.
10
Tip
We would love to see your completed creation. You can post a photo of your finished mosaic on Facebook at https://www.facebook.com/YouCanDoTheRubiksCube or tag us on Twitter @YouCanDoRubiks

©1974 Rubik’s® Used under license Rubik’s Brand Ltd. All rights reserved.
www.YouCanDoTheCube.com V7 - 6/18