Thank you - Powered Blinds€¦ · perform (open or close your blinds, your curtains, switch your...
47
Transcript of Thank you - Powered Blinds€¦ · perform (open or close your blinds, your curtains, switch your...


Thank you !
for choosing
Need more information? Need assistance?www.somfy.co.uk

3/47
Connexoon Window RTS app is a new way to control your motorised blinds and curtains.Enjoy the experience of controling your RTS motorised solutions from your smartphone, and enjoy the many benefits they provide: light management, privacy and convenience.
Connexoon Window RTSCompatible with RTS motorised blinds and curtains. Available on Android and IOS smartphones

4/47
STAY IN CONTROL
Connexoon Window RTS, is a user friendly interface with 3 key functions
CENTRALISATIONOpen and close your all your equipment with a simple click.
TIMERSchedule the opening and closing of your equipment at the time and date of your choice, and simulate your presence.
AMBIANCE REPLAYIn one click, repeat a preset ambiance scenario that you have programmed for opening and closing blinds and linking with lights.

5/47
Connexoon window RTS is compatible with:
light plug Philips Hue
interior venetian blind
interior roller blind
roman blind cellular blind zebra blind
curtains

6/47
CONTENTS
Connexoon• The Pack• The Connexoon unit
Installing Connexoon• Registering RTS products in the Connexoon unit (prog-prog)• Activating the Connexoon unit• Downloading the Connexoon application• Customising previously saved RTS products in the application from the
unit
Using Connexoon Window• The interface• Controlling my products• Simplify your life: scenarios and ambiances• My timer
Managing my installation• Control panel• Messaging system• Settings• My account• Help• Legal notices
Advanced functions of the installation• Renaming your products in the application• Saving your RTS products via the application• Deleting your RTS products via the application

7/47
< Back to Contents

8/47
< Back to Contents
A. THE PACK
2
6
1
The pack contains
Connexoon RTS Unit
USB cable
Mains adapter
Ethernet cable
2 Quick installation guides (installer and end user)
Legal notices
1
2
3
4
5
6
43
5

9/47
< Back to Contents
B. THE CONNEXOON UNIT
The PROG button enables your motorised Somfy products to be registered in your Connexoon RTS unit, without an internet connection. Connexoon (prog-prog)
The LAN socket enables the Connexoon unit to be connected to the internet unit via an ethernet cable.
The USB port enables the Connexoon unit to be supplied via a power cable.
The LED indicator light shows the status of the unit, as well as the actions in progress.
1. Start-up 2. Connection status
Internet connection problem
Functional internet connection10 seconds13s
The SELECT button enables the channel to be selected (6 available channels)

10/47
< Back to Contents
INSTALLATION
Customise the registered
products
Enjoy!Registering RTS products in the Connexoon unit
(prog-prog)
Activate the Connexoon unit.
Download the Connexoon application
A B C D E

11/47
< Back to Contents
A. REGISTERING RTS products in the Connexoon unit (prog-prog)
If your equipment to be connected is paired to a remote control without feedback (Smoove, Keygo, Situo):
Pairing may be carried out without an internet connection and without having activated the account, using the following simplified procedure.
Switch on Connexoon
Press the equipment's individual control point Prog button for 2 seconds
Select the channel on which you wish to register the product (channel 1 to channel 6) by briefly pressing the SEL button. The LED on the side of the unit indicates which channel you are on.
Press the PROG (PRG) button on the Connexoon unit for 0.5 of a second.Once the product has been saved it will then perform an up and down movement.
Tip: to remove a product that has already been registered, you just need to select the channel on which it has been registered and follow the procedure (points 2 to 3.2) described below.
4
Registering your products may be carried out without an internet connection and without having activated the account, using the following simplified procedure.
PROG 0,5s
< 5s
@6
SEL
@5SEL
@4SEL
@3
SEL
SEL@2
SEL@1
< 5s
PROG 2s
LED

12/47
< Back to Contents
Select the channel on which you wish to carry out the register test
Press the PROG and SEL buttons simultaneously for 0.5 of a second.The registered product then performs a movement.To stop this movement, press the PROG and SEL buttons again briefly.To make the movement in the reverse direction, press the PROG and SEL buttons a third time, etc.=> see process described opposite
To test that products have been correctly registered in your Connexoon unit:
A. REGISTER RTS products in the Connexoon unit (prog-prog)
PROG + SEL
STOP
PROG + SEL
PROG + SEL
PROG + SEL
STOP
< 5sPROG + SELECT
< 5s
@6
SEL
@5SEL
@4SEL
@3
SEL
SEL@2
SEL@1
< 5s

13/47
< Back to Contents
B. ACTIVATING THE CONNEXOON UNITConnect to
somfy-connect.com
Enter your PIN codeChoose your deviceEnter your information
Check that your Connexoon unit and your internet box are correctly connected, via the ethernet cable.
(Green LED)
Step 2Step 1 Step 3 Step 4
www.somfy-connect.com

14/47
< Back to Contents
Enter your personal information
Login and password Summary Confirmation
Connexoon Window activation steps
B. ACTIVATE THE CONNEXOON UNIT
Step 5 Step 6 Step 7 Step 8

15/47
< Back to Contents
Receipt of the confirmation email
Confirmation email
B. ACTIVATING THE CONNEXOON UNIT

16/47
< Back to Contents
Download the smartphone application Connexoon Window available for IOS and Android.
C. DOWNLOADING THE CONNEXOONWINDOW RTS APPLICATION

17/47
< Back to Contents
B Set your personal identity. Your identity enables you to find out what actions have been performed from your Smartphone.
You can change your identity at any time in the "settings" tab in the menu
( see page 36, my account menu )
A Enter the email address and password that you have defined during the activation of your RTS Connexoon window unit ( see page 14, Activation screen )
C. DOWNLOADING THE RTS CONNEXOON WINDOW APPLICATION

18/47
< Back to Contents
D. FIRST USE:CUSTOMISING REGISTERED EQUIPMENT RAPIDLY (VIA PRO-PROG)
A To complete your installation, you need to customise the registered equipment. Click on the pencil positioned to the right of the equipment to be customised.
B.1 Click "identify" to display theequipment concerned.The equipment will then make anup and down movement or flash(lights).
C Name your equipment in the grey field, then press "save".
Do this again to customise all of your equipment
Select the icon for your equipment from the 20 available icons.Click "next"
B.2
< Back to Contents
USE CONNEXOON WINDOW RTS
19/47

20/47
A. THE INTERFACE
Home page:ModesScenariosProg. timer
Mode editor
Products registered in Connexoon
Menu
Pre-set and customised modes
Weather
Need assistance?
Description< Back to Contents

back
CELLULAR SHADE
21/47
B. CONTROL MY PRODUCTSCreation
< Back to Contents
A You can control your blinds, curtains, lighting, within the grey frame located at the bottom of your interface.
Scroll-down the list by dragging it right or left. Press the icon of the product that you wish to control.
B Adjust the position of your equipment by pressing the arrows or the "my" button. This will cause your equipment to move. Press "back" to return to the home page.
! Equipment with adjustable slats.To vary the position of the slats, press the circles on the left of the screen.The more round and large a circle is, the greater the slat's angle of rotation.
close
VENETIAN BLIND

22/47
Connexoon Window RTS offers 4 scenarios - At home- Away- Sun protection- Privacy
Customise any of these scenarios by selecting the actions that you wish to perform (open or close your blinds, your curtains, switch your lights on or off, etc.) and by activating or deactivating your programmes.
These scenarios have a default setting, which includes all your equipment.
Change your scenarios in just one click.
Eg: you are going on holiday, one press closes your selected blinds, switches off your lights and activates the simulated presence mode you have programmed.
C. SIMPLIFY YOUR LIFE: SCENARIOSDescription
< Back to Contents
23/47
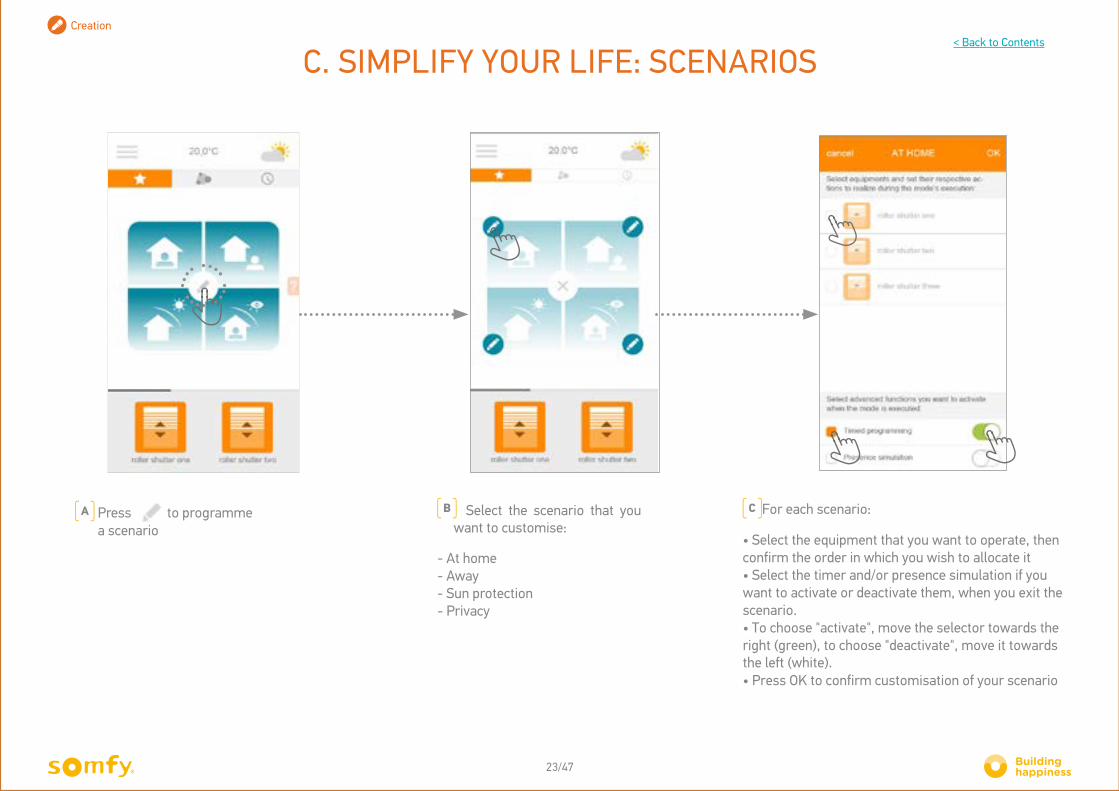
C For each scenario:
• Select the equipment that you want to operate, thenconfirm the order in which you wish to allocate it• Select the timer and/or presence simulation if youwant to activate or deactivate them, when you exit thescenario.• To choose "activate", move the selector towards theright (green), to choose "deactivate", move it towardsthe left (white).• Press OK to confirm customisation of your scenario
A Press to programme a scenario
B Select the scenario that you want to customise:
- At home- Away- Sun protection- Privacy
Creation
C. SIMPLIFY YOUR LIFE: SCENARIOS< Back to Contents
24/47Connected Solutions - Smart Home & EMEA - October 2015
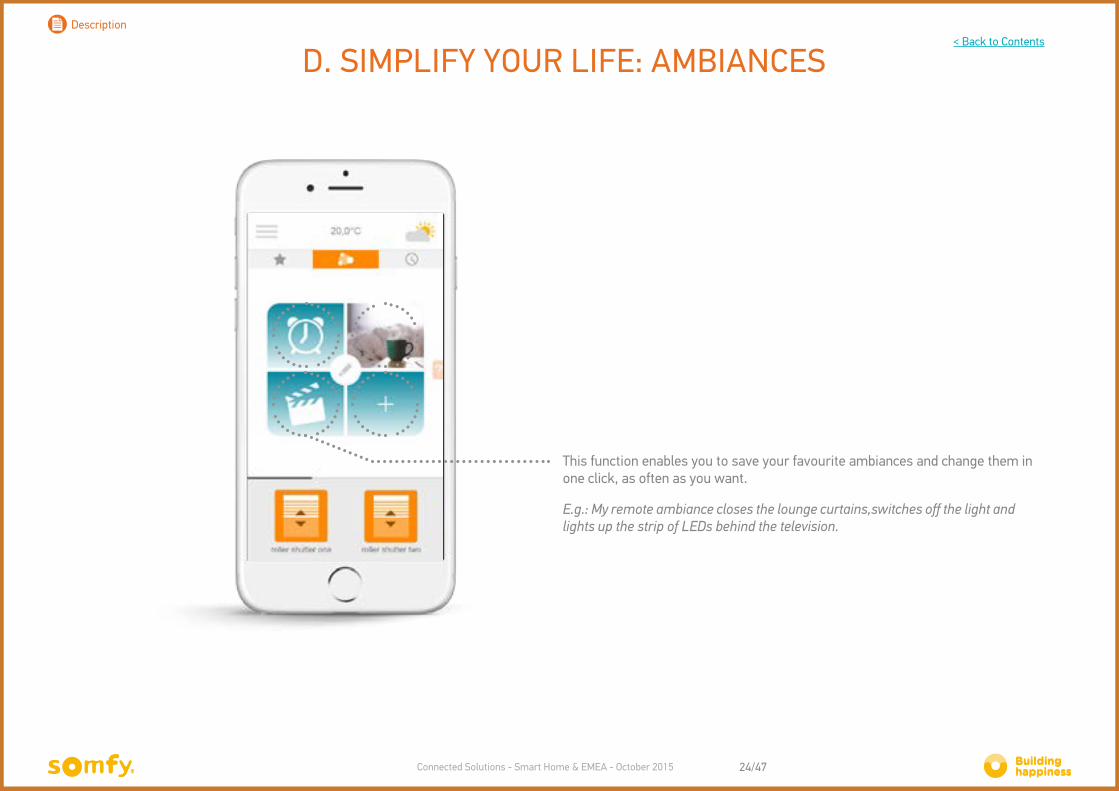
This function enables you to save your favourite ambiances and change them in one click, as often as you want.
E.g.: My remote ambiance closes the lounge curtains,switches off the light andlights up the strip of LEDs behind the television.
D. SIMPLIFY YOUR LIFE: AMBIANCESDescription
< Back to Contents

25/47Connected Solutions - Smart Home & EMEA - October 2015
Creation
A After pressing the button to edit your ambiances, select the one you want to amend by pressing
B To customise your ambiance, Connexoon enables you to take a photo of your setup.
Press icon to capture the setup.
D. SIMPLIFY YOUR LIFE: AMBIANCES

26/47Connected Solutions - Smart Home & EMEA - October 2015
Creation
C To customise your ambiance using an icon, press
To customise your ambiance with a photo/image from your photo gallery, press
To take a photo again, press
E Select the equipment that you want to include in your ambiance
F Press the equipment icons to adjust them
G Choose the position of the product that you want to associate with the programmed ambiance. Press OK.
H Confirm your ambiance to save it
D Name your ambiance
D. SIMPLIFY YOUR LIFE: AMBIANCES

27/47
E. TIMERDescription
Click on the icon to access the timer menu.
The timer enables actions to be scheduled on my equipment at a particular time.
< Back to Contents

28/47
E. TIMERCreation
Activate or deactivate
your timer
A Press to access the "Timer" menu, then
to configure this function
B Press to add a new
timer programme
< Back to Contents

29/47
E. TIMERCreation
C Name your timer programme(e.g.: morning, wake-up, sunlight, evening, bedtime, etc.)
D you can define a timer programme OR
choose to use the "sunset" or "sunrise" functions. You can adjust this setting by using the lower cursor.
E Select the days on which you want your timer to activate.
F Select the equipment you want to operate by ticking the box to its left.Click on the equipment icon to set the order that you wish to allocate it.
7h30
< Back to Contents
< Back to Contents
MANAGE MY INSTALLATION 4
30/47

< Back to Contents
By clicking on menu , you can access several configuration and management functions for your Connexoon Window application:
• the control panel• your messaging system• the application settings• your account• your system's configuration• help• legal notices• disconnection of your application
The "configuration" menu provides access to the advanced installation functions.
MANAGE MY INSTALLATIONDescription
31/47

< Back to Contents
This menu enables you to display the history of the actions taken on all your connected equipment.
• The red dot indicates that command has beenintentionally stopped.
Press the icon for more information.
A. CONTROL PANELDescription
32/47

< Back to Contents
B. MESSAGING SYSTEM
You will find all the information on forthcoming updates and new features in the Connexoon messaging system.
Description
33/47

< Back to Contents
C. SETTINGS
Geolocalise your home for local weather information
Activate/Deactivate the weather display on the home page
Activate/Deactivate the help button display
on the right of all the screens
Description
34/47

< Back to Contents
D. MY ACCOUNT
In this tab, you will find the information that you have entered when activating Connexoon.
Description
35/47
Press the arrow to access the modification page for your identity.
save
Nicolas
USER NAME

< Back to Contents
E. HELP
You or your installer can fill out this tab. This will enable you to contact him directly if you have any questions.
You can also contact Somfy customer services ([email protected]).
Description
36/47
Direct link to make a call
Direct link to send an email

37/47
< Back to Contents
F. LEGAL NOTICESDescription
37/47
The "legal notices" menu enables you to find all of the legal notices and precautions for use.

< Back to Contents
ADVANCED FUNCTIONS OF THE INSTALLATION
38/47

< Back to Contents
ADVANCED INSTALLATION FUNCTIONS
In this menu, you can:
• Register new RTS equipment compatible with yourConnexoon.
• Remove equipment registered on your Connexoon
To access these functions press
Description
39/47

40/47
< Back to ContentsCreation
A. RENAMING YOUR PRODUCTS IN THE APPLICATION
40/47
C Press on the pencil to the right of the equipment to change its name
B Press the configuration tabA Press menu

41/47
< Back to ContentsCreation
A. RENAMING YOUR PRODUCTS IN THE APPLICATION
D You can rename your product by editing the "name" field in the grey rectangle positioned at the top of the screen.To check that it is the right product to be renamed, press "identiy". The product will then make an up and down movement or flash.To stop identification, press "stop".Press "save" to save the new name.

< Back to Contents
B. REGISTER RTS EQUIPMENTON YOUR CONNEXOON
C Press B Press the configuration tabA Press the menu
Creation
42/47
< Back to Contents
B. REGISTER RTS EQUIPMENTON YOUR CONNEXOON
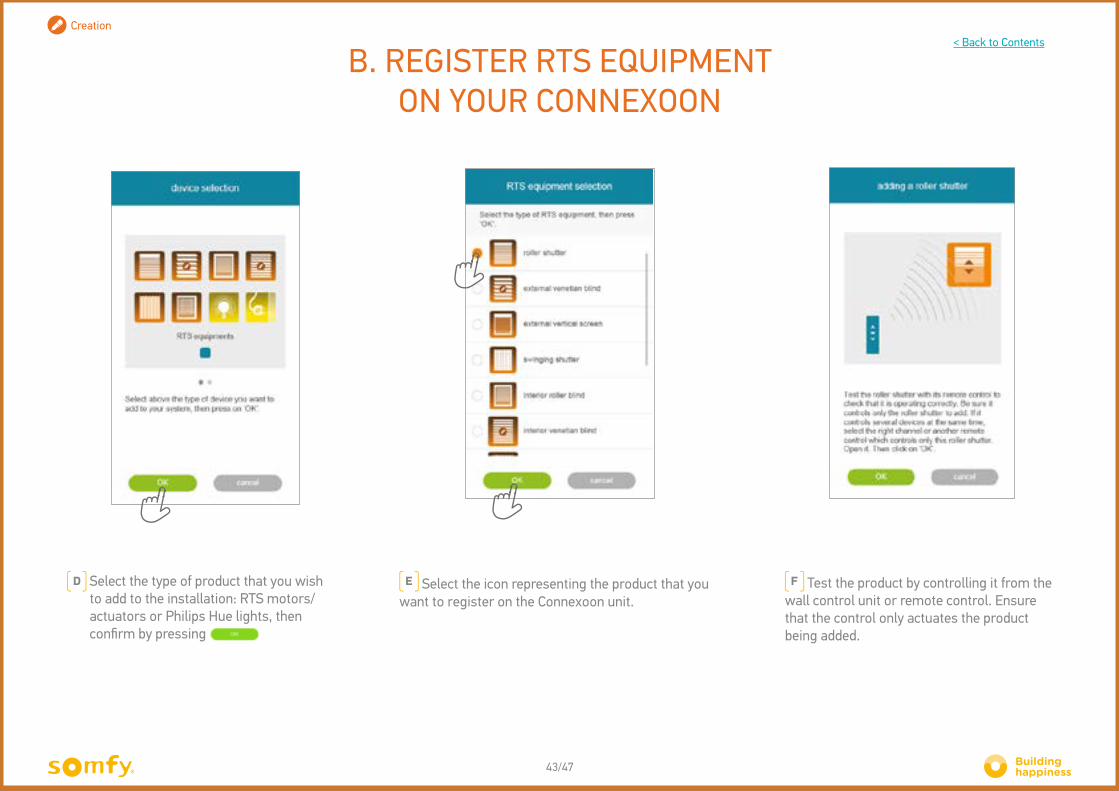
F Test the product by controlling it from the wall control unit or remote control. Ensure that the control only actuates the product being added.
D Select the type of product that you wish to add to the installation: RTS motors/actuators or Philips Hue lights, then confirm by pressing
E Select the icon representing the product that you want to register on the Connexoon unit.
Creation
43/47

44/47
< Back to Contents
B. REGISTER RTS EQUIPMENTON YOUR CONNEXOON
I Press OK if your product has moved, or "start again" if it has not. If the product does not move after several tests, click "cancel".
G Press the PROG button of the handset of the product to be added until it makes an up and down movement (or flashes). You then have 2 minutes to confirm by pressing "add"
H Check the product has been successfully registered by pressing "test". The product will move (or flash) for 5 seconds.
Creation

45/47
< Back to Contents
B. REGISTER RTS EQUIPMENTON YOUR CONNEXOON
J Name your product, then press OK
Creation
K The product then appears on your list.
46/47
< Back to Contents
C. REMOVING RTS PRODUCTS VIATHE APPLICATION
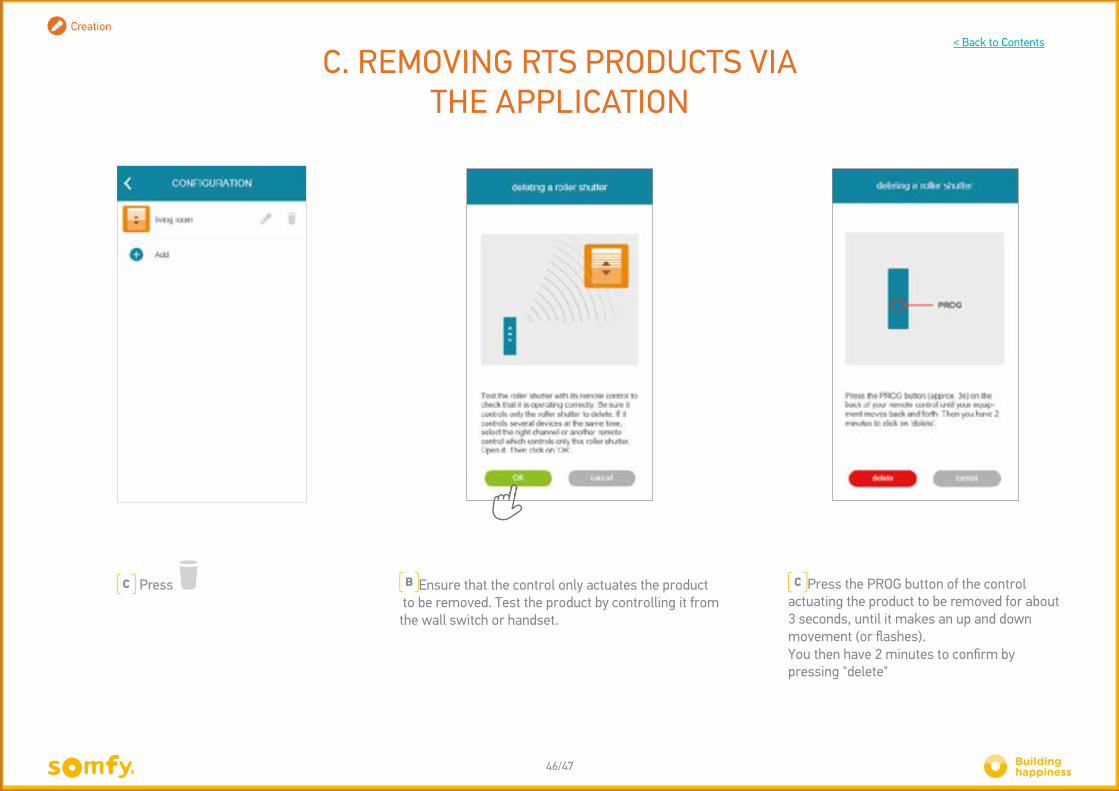
C Press the PROG button of the control actuating the product to be removed for about 3 seconds, until it makes an up and down movement (or flashes). You then have 2 minutes to confirm by pressing "delete"
B Ensure that the control only actuates the product to be removed. Test the product by controlling it from the wall switch or handset.
Creation
C Press

47/47
< Back to Contents
C. REMOVING RTS PRODUCTS VIATHE APPLICATION
C Press OK to close the procedure.A Test that removal has been successful by pressing "test". If removal has successfully taken place, the product will not respond.
B Press OK if your product has not moved, or "start again" if it has not.
Creation