TERAPRESS TP 7001 Mounting Press - PACE Technologies · TERAPRESS TP-7001 Mounting Press The...
44
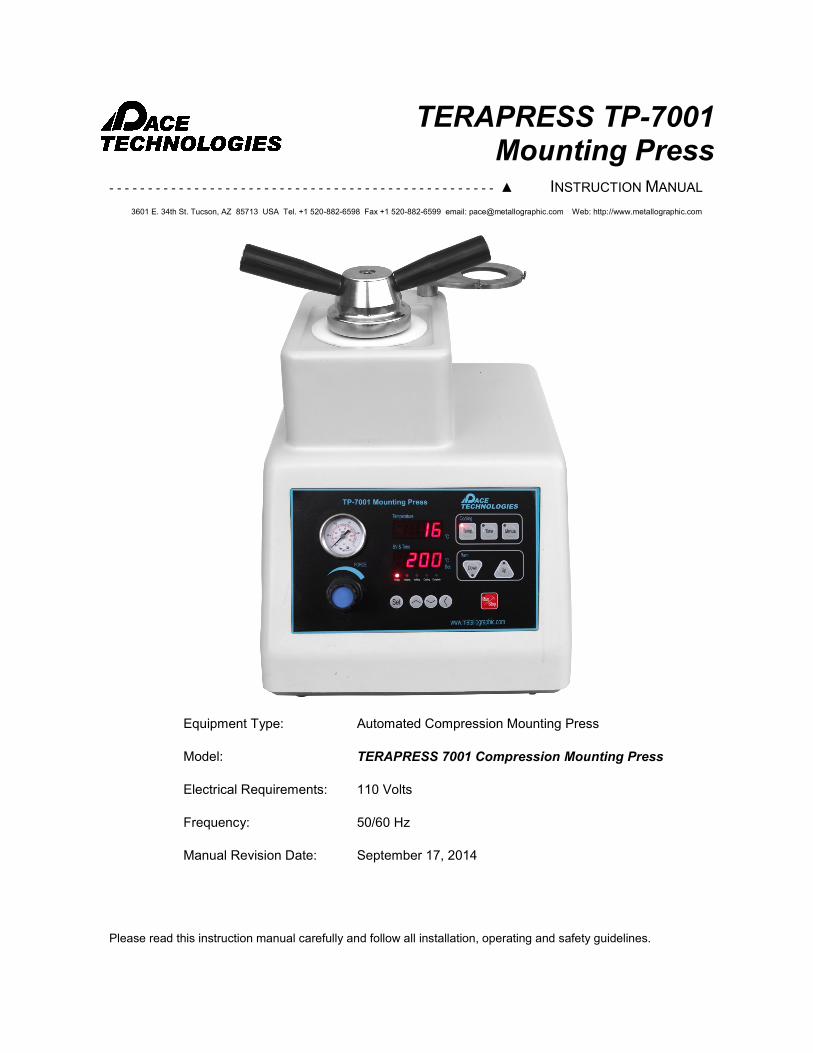
- - - - - - - - - - - - - - - - - - - - - - - - - - - - - - - - - - - - - - - - - - - - - - - - - - ▲ INSTRUCTION MANUAL TERAPRESS TP-7001 Mounting Press Please read this instruction manual carefully and follow all installation, operating and safety guidelines. 3601 E. 34th St. Tucson, AZ 85713 USA Tel. +1 520-882-6598 Fax +1 520-882-6599 email: [email protected] Web: http://www.metallographic.com Equipment Type: Automated Compression Mounting Press Model: TERAPRESS 7001 Compression Mounting Press Electrical Requirements: 110 Volts Frequency: 50/60 Hz Manual Revision Date: September 17, 2014
Transcript of TERAPRESS TP 7001 Mounting Press - PACE Technologies · TERAPRESS TP-7001 Mounting Press The...
- - - - - - - - - - - - - - - - - - - - - - - - - - - - - - - - - - - - - - - - - - - - - - - - - - ▲ INSTRUCTION MANUAL
TERAPRESS TP-7001 Mounting Press
Please read this instruction manual carefully and follow all installation, operating and safety guidelines.
3601 E. 34th St. Tucson, AZ 85713 USA Tel. +1 520-882-6598 Fax +1 520-882-6599 email: [email protected] Web: http://www.metallographic.com
Equipment Type: Automated Compression Mounting Press
Model: TERAPRESS 7001 Compression Mounting Press
Electrical Requirements: 110 Volts
Frequency: 50/60 Hz
Manual Revision Date: September 17, 2014
- - - - - - - - - - - - - - - - - - - - - - - - - - - - - - - - - - - - - - - - - - - - - - - - - - ▲ INSTRUCTION MANUAL
TERAPRESS TP-7001 Mounting Press
Please read this instruction manual carefully and follow all installation, operating and safety guidelines.
3601 E. 34th St. Tucson, AZ 85713 USA Tel. +1 520-882-6598 Fax +1 520-882-6599 email: [email protected] Web: http://www.metallographic.com
Contents
PAGE
Warranty ii
1.0 Product Description 1
2.0 Shipping, Unpacking and Installation 6
3.0 Safety Guidelines 8
4.0 Start-Up and Operation 10
5.0 Maintenance 19
6.0 Trouble Shooting 20
7.0 Technical 22
8.0 Replacement Parts 31
Appendix II Electrical Diagram 40
i

- - - - - - - - - - - - - - - - - - - - - - - - - - - - - - - - - - - - - - - - - - - - - - - - - - ▲ INSTRUCTION MANUAL
TERAPRESS TP-7001 Mounting Press
Please read this instruction manual carefully and follow all installation, operating and safety guidelines.
3601 E. 34th St. Tucson, AZ 85713 USA Tel. +1 520-882-6598 Fax +1 520-882-6599 email: [email protected] Web: http://www.metallographic.com
ii
WARRANTY
Terms and Conditions applying to all PACE Technologies Products
1. LIMITED WARRANTY AND DISCLAIMER: PACE Technologies Products are warranted for one year from the purchase date to be free from defects in
material and workmanship under correct use, normal operating conditions, and proper application. PACE
Technologies obligation under this warranty shall be limited to the repair or exchange, at PACE Technologies
option, of any PACE Technologies Product or part which proves to be defective as provided herein. PACE
Technologies reserves the right to either inspect the product at Buyer’s location or require it to be returned to the
factory for inspection. Buyer is responsible for freight to and from factory on all warranty claims. The above
warranty does not extend to goods damaged or subjected to accident, abuse or misuse after release from PACE
Technologies warehouse, nor goods altered or repaired by anyone other than specifically authorized PACE
Technologies representatives. PACE Technologies shall not in any way be responsible for the consequences of
any alteration, modification or misuse unless previously approved in writing by an officer of PACE
Technologies.
PACE TECHNOLOGIES MAKES NO EXPRESS WARRANTIES OTHER THAN THOSE WHICH ARE
SPECIFICALLY DESCRIBED HEREIN. Any description of the goods sold hereunder, including any reference
to Buyer’s specifications and any description in catalogs, circulars and other written material published by PACE
Technologies, is the sole purpose of identifying such goods and shall not create an express warranty that the
goods shall conform to such description.
THIS WARRANTY IS EXPRESSLY IN LIEU OF ALL OTHER WARRANTIES, EXPRESSED OR IMPLIED.
THERE ARE NO IMPLIED WARRANTIES OF MECHANTABILITY OR FITNESS FOR PARTICULAR
PURPOSE. THIS WARRANTY STATES PACE TECHNOLOGIES ENTIRE AND EXCLUSIVE LIABILITY
AND BUYER’S EXCLUSIVE REMEDY FOR ANY CLAIM FOR DAMAGES IN CONNECTIONS WITH
PACE TECHNOLOGIES PRODUCTS. PACE TECHNOLOGIES WILL IN NO EVENT BE LIABLE FOR
INCIDENTAL OR CONSEQUENTIAL DAMAGES WHATSOEVER, NOR FOR ANY SUM IN EXCESS OF
THE PURCHASE PRICE.
2. LIABILITY CAP: PACE Technologies maximum aggregate liability for loss and damage arising under, resulting from or in
connection with the supply or use of the Equipment and Consumables provided under this purchase, or from the
performance or breach of any obligation (s) imposed hereunder, whether such liability arises from any one or
more claims or actions for breach of contract, tort, (including negligence), delayed completion, warranty,
indemnity, strict liability or otherwise, unless otherwise limited by the terms hereof, shall be limited to one
hundred percent (100%) of the purchase price.
3. DELIVERY: Customer assumes and shall bear the risk of all loss or damage to the Products from every cause whatsoever,
whether or not insured, and title to such Products shall pass to Customer upon PACE Technologies delivery of
the Products to the common carrier of Pace Technologies choice, or the carrier specified in writing by Customer,
for shipment to Customer. Any claims for breakage, loss, delay, or damage shall be made to the carrier by the
Customer and Pace Technologies will render customer reasonable assistance in prosecuting such claims.
- - - - - - - - - - - - - - - - - - - - - - - - - - - - - - - - - - - - - - - - - - - - - - - - - - ▲ INSTRUCTION MANUAL
TERAPRESS TP-7001 Mounting Press
Please read this instruction manual carefully and follow all installation, operating and safety guidelines.
3601 E. 34th St. Tucson, AZ 85713 USA Tel. +1 520-882-6598 Fax +1 520-882-6599 email: [email protected] Web: http://www.metallographic.com
4. ACCEPTANCE: Customer shall inspect the Products promptly upon receipt of delivery. Unless customer objects in writing
within thirty (30) business days thereafter, customer shall be deemed to have accepted the Products. All
claims for damages, errors, or shortage in Products delivered shall be made by Customer in writing within
such five (5) business day period. Failure to make any claim timely shall constitute acceptance of the
Products.
5. PAYMENT: Customer agrees to provide timely payment for the Products in accordance with the terms of payment set forth
on the reverse side hereof or in any proposal submitted herewith. If any payment is not paid on or before its
due date, Customer shall pay interest on such late payment from the due date until paid at the lesser of 12%
per annum or the maximum rate allowed by law.
6. DEFAULT:
If Buyer is in default (including, but not limited to, the failure by Buyer to pay all amounts due and payable to
Seller) under the work or purchase order or any other agreement between Buyer and Seller, Buyer’s rights
under the warranty shall be suspended during any period of such default and the original warranty period will
not be extended beyond its original expiration date despite such suspension of warranty rights.
7. MISCELLANEOUS PROVISIONS:
This agreement has been made in and shall be governed by the laws of the State of Arizona. These terms and
conditions and the description of the Products on the reverse side hereof or in any proposal submitted
herewith constitute the entire agreement and understanding of the parties with respect to this sale and
supersede all prior and contemporaneous agreements or understandings, inducements or representations,
expressed or implied, written or oral, between the parties with respect hereto. Any term or provision of this
Agreement may be amended, and any observance of any term of this Agreement may be waived, only by a
writing signed by the party to be bounds. The waiver by a party of any breach shall not be deemed to
constitute a waiver of any other breach. Should suit be brought on this Agreement, the prevailing party shall
be entitled to recover its reasonable attorneys’ fees and other costs of suit including costs and attorneys’ fees
incurred on appeal or in collection of any judgment.
iii
- - - - - - - - - - - - - - - - - - - - - - - - - - - - - - - - - - - - - - - - - - - - - - - - - - ▲ INSTRUCTION MANUAL
TERAPRESS TP-7001 Mounting Press
Please read this instruction manual carefully and follow all installation, operating and safety guidelines.
3601 E. 34th St. Tucson, AZ 85713 USA Tel. +1 520-882-6598 Fax +1 520-882-6599 email: [email protected] Web: http://www.metallographic.com
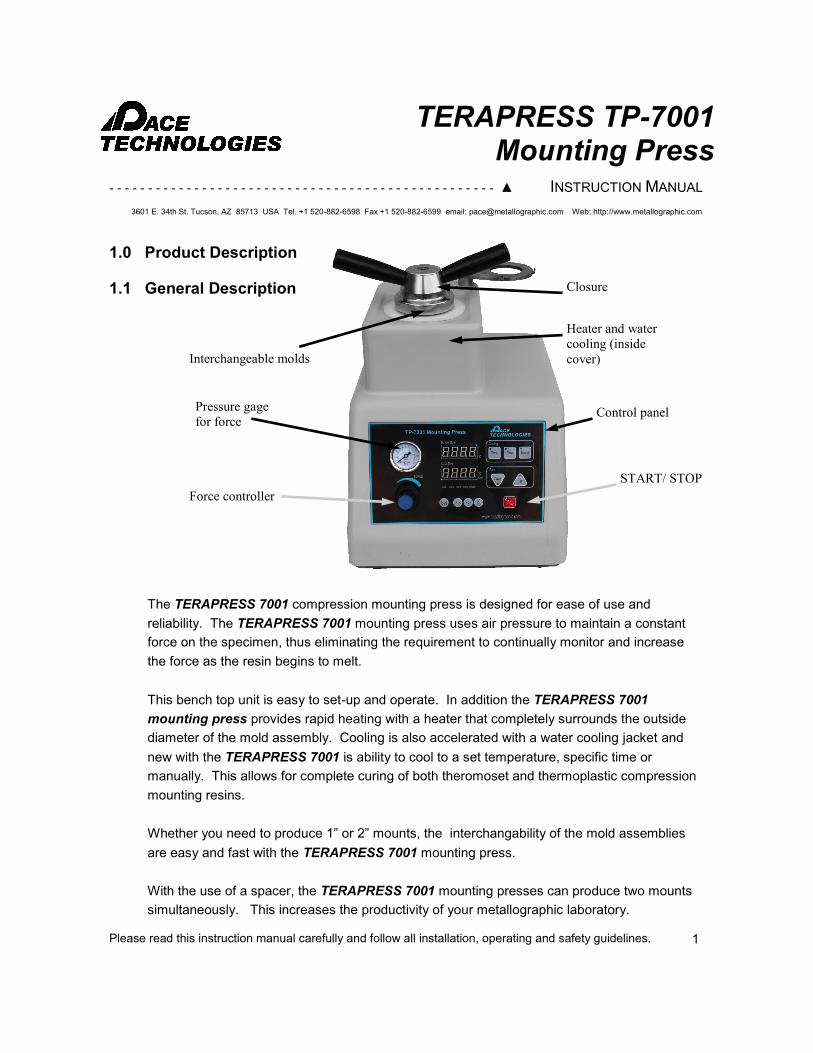
Pressure gage
for force
Force controller
Interchangeable molds
1.0 Product Description
1.1 General Description
The TERAPRESS 7001 compression mounting press is designed for ease of use and
reliability. The TERAPRESS 7001 mounting press uses air pressure to maintain a constant
force on the specimen, thus eliminating the requirement to continually monitor and increase
the force as the resin begins to melt.
This bench top unit is easy to set-up and operate. In addition the TERAPRESS 7001
mounting press provides rapid heating with a heater that completely surrounds the outside
diameter of the mold assembly. Cooling is also accelerated with a water cooling jacket and
new with the TERAPRESS 7001 is ability to cool to a set temperature, specific time or
manually. This allows for complete curing of both theromoset and thermoplastic compression
mounting resins.
Whether you need to produce 1” or 2” mounts, the interchangability of the mold assemblies
are easy and fast with the TERAPRESS 7001 mounting press.
With the use of a spacer, the TERAPRESS 7001 mounting presses can produce two mounts
simultaneously. This increases the productivity of your metallographic laboratory.
Control panel
Closure
1
Heater and water
cooling (inside
cover)
START/ STOP

- - - - - - - - - - - - - - - - - - - - - - - - - - - - - - - - - - - - - - - - - - - - - - - - - - ▲ INSTRUCTION MANUAL
TERAPRESS TP-7001 Mounting Press
Please read this instruction manual carefully and follow all installation, operating and safety guidelines.
3601 E. 34th St. Tucson, AZ 85713 USA Tel. +1 520-882-6598 Fax +1 520-882-6599 email: [email protected] Web: http://www.metallographic.com
1.2 Technical Specifications
2
Electrical specifications: 110 or 220 Volts (set at factory)
Heating power: 800 Watts
Thermostat range: Room temperature to 575ºF (300ºC)
Incoming pressure range: Max. 95 psi
Timer: 0 - 99 minutes
Mold sizes: 1, 1.25, 1.5 and 2-inch
Weight: 55 lbs (25 kg)
Dimensions (WxHxD): 12” x 16” x 26” (305mm x 400mm x 635mm)
Working temperature: 32° - 100°F (0 - 40ºC)
Shipping temperature: 32° - 100°F (0 - 40ºC)
Storage temperature: 32° - 100°F (0 - 40ºC)
Water supply connection: 8 mm quick connect
Water drain connection: 1/4” heater hose
Air supply connection: 6 mm quick connect
Fuse: 10 amp fast blow
EU Directives: Machinery directive 2006/42/EC
Low Voltage Directive 2006/95/EC
Electromagnetic Compatibility directive 2004/108/EC
EU Harmonized Standards: EN ISO 1200:2010
EN 61010-1:2010
EN 61326-1:2006
- - - - - - - - - - - - - - - - - - - - - - - - - - - - - - - - - - - - - - - - - - - - - - - - - - ▲ INSTRUCTION MANUAL
TERAPRESS TP-7001 Mounting Press
Please read this instruction manual carefully and follow all installation, operating and safety guidelines.
3601 E. 34th St. Tucson, AZ 85713 USA Tel. +1 520-882-6598 Fax +1 520-882-6599 email: [email protected] Web: http://www.metallographic.com
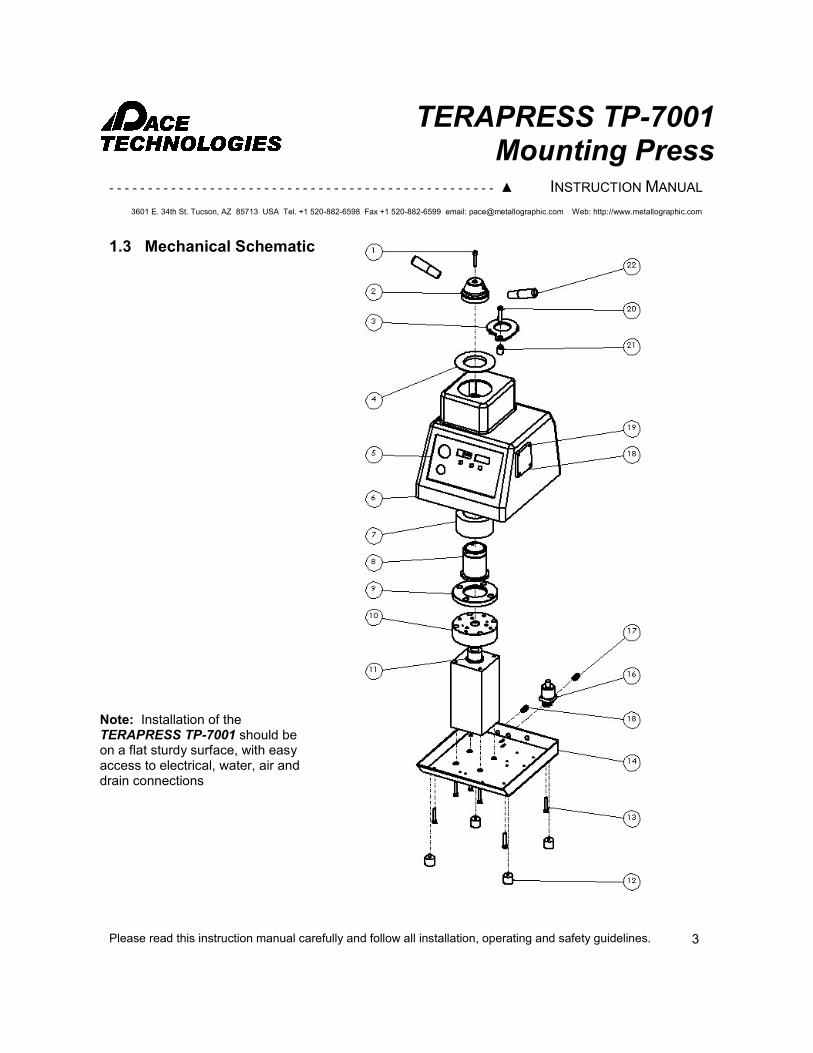
1.3 Mechanical Schematic
Note: Installation of the TERAPRESS TP-7001 should be on a flat sturdy surface, with easy access to electrical, water, air and drain connections
3

- - - - - - - - - - - - - - - - - - - - - - - - - - - - - - - - - - - - - - - - - - - - - - - - - - ▲ INSTRUCTION MANUAL
TERAPRESS TP-7001 Mounting Press
Please read this instruction manual carefully and follow all installation, operating and safety guidelines.
3601 E. 34th St. Tucson, AZ 85713 USA Tel. +1 520-882-6598 Fax +1 520-882-6599 email: [email protected] Web: http://www.metallographic.com
4
- - - - - - - - - - - - - - - - - - - - - - - - - - - - - - - - - - - - - - - - - - - - - - - - - - ▲ INSTRUCTION MANUAL
TERAPRESS TP-7001 Mounting Press
Please read this instruction manual carefully and follow all installation, operating and safety guidelines.
3601 E. 34th St. Tucson, AZ 85713 USA Tel. +1 520-882-6598 Fax +1 520-882-6599 email: [email protected] Web: http://www.metallographic.com
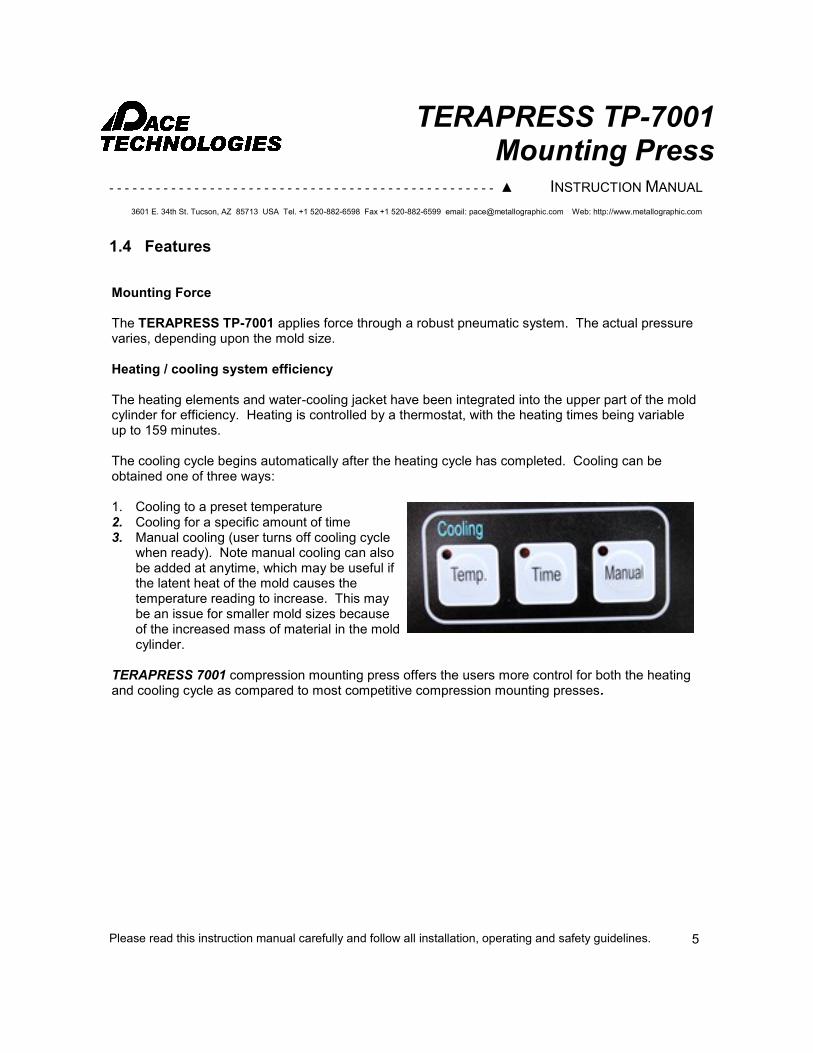
1.4 Features
Mounting Force The TERAPRESS TP-7001 applies force through a robust pneumatic system. The actual pressure varies, depending upon the mold size. Heating / cooling system efficiency The heating elements and water-cooling jacket have been integrated into the upper part of the mold cylinder for efficiency. Heating is controlled by a thermostat, with the heating times being variable up to 159 minutes. The cooling cycle begins automatically after the heating cycle has completed. Cooling can be obtained one of three ways: 1. Cooling to a preset temperature 2. Cooling for a specific amount of time 3. Manual cooling (user turns off cooling cycle
when ready). Note manual cooling can also be added at anytime, which may be useful if the latent heat of the mold causes the temperature reading to increase. This may be an issue for smaller mold sizes because of the increased mass of material in the mold cylinder.
TERAPRESS 7001 compression mounting press offers the users more control for both the heating and cooling cycle as compared to most competitive compression mounting presses.
5

- - - - - - - - - - - - - - - - - - - - - - - - - - - - - - - - - - - - - - - - - - - - - - - - - - ▲ INSTRUCTION MANUAL
TERAPRESS TP-7001 Mounting Press
Please read this instruction manual carefully and follow all installation, operating and safety guidelines.
3601 E. 34th St. Tucson, AZ 85713 USA Tel. +1 520-882-6598 Fax +1 520-882-6599 email: [email protected] Web: http://www.metallographic.com
2.0 Unpacking, Shipping and Installation
2.1 Unpacking Unit is delivered in a box. Unpack and check for completeness of parts. Measures WxHxD: 12” x 16” x 25” (305mm x 40mm x 635mm) Weight: Approx. 55 lbs
2.2 Shipping When moving box, lift from bottom. The TERAPRESS TP-7001 compression mounting press is constructed of sensitive electronic and mechanical components. Do not drop.
! Use caution when unloading to prevent injury.
6
2.3 Installation
! Install unit carefully! Improper installation voids warranty.
The TERAPRESS TP-7001 compression mounting press should be placed on a flat stable surface. Connect to air supply, water supply, drain and electrical connections.
After water, air, drain and electrical connections are completed, the system is ready for operation by activating the main power switch.
Installation continued on next page

- - - - - - - - - - - - - - - - - - - - - - - - - - - - - - - - - - - - - - - - - - - - - - - - - - ▲ INSTRUCTION MANUAL
TERAPRESS TP-7001 Mounting Press
Please read this instruction manual carefully and follow all installation, operating and safety guidelines.
3601 E. 34th St. Tucson, AZ 85713 USA Tel. +1 520-882-6598 Fax +1 520-882-6599 email: [email protected] Web: http://www.metallographic.com
Serial Name plate
10 amp fast blowing fuse
Backside connections
Electrical connection: Verify the operating voltage which is printed on the name plate. The standard voltage is 110V; however, the system is also available in 220V. IT IS ALSO RECOMMENDED THAT NO EXTENSION CORDS OR MULTIPLE OUTLET CONNECTORS BE USED AS THIS MAY CAUSE THE FUSE TO OVERHEAT BUT NOT BLOW DURING OPERATION!
Coolant drain: The coolant drain line requires a 1/4-inch hose. CAUTION: The mold temperature is very hot and the initial contact of the cooling water turns to steam, which exits the drain hose very hot.
Coolant supply: The coolant supply line requires an 8 mm hose. It is recommended that the water supply be turned off when the unit is not in use. Inlet water should be clean and contamination-free to extend the life and cooling performance of the system.
Air supply: Air supply line requires a 6 mm pressure hose. Clean dry air is recommended (a filter lubricator is recommended)
Electrical connection and main power switch
External Coolant tank Pump connection
Coolant drain
7
Inlet Coolant supply
Air supply line
- - - - - - - - - - - - - - - - - - - - - - - - - - - - - - - - - - - - - - - - - - - - - - - - - - ▲ INSTRUCTION MANUAL
TERAPRESS TP-7001 Mounting Press
Please read this instruction manual carefully and follow all installation, operating and safety guidelines.
3601 E. 34th St. Tucson, AZ 85713 USA Tel. +1 520-882-6598 Fax +1 520-882-6599 email: [email protected] Web: http://www.metallographic.com
3.0 Safety Guidelines
3.1 Warning Sign
! This sign points to special safety features on the machine.
3.2 Safety Precautions
8
(Safety Precautions continued on next page)
Careful attention to this instruction manual and the recommended safety guidelines is essential for the safe operation of the TERAPRESS TP-7001 compression mounting press. Proper operator training is required for operation of the TERAPRESS TP-7001 compression mounting press. Unauthorized mechanical and electrical changes, as well as improper operation, voids all warranty claims. All service issues need to be reported to the manufacturer / supplier.
!
!
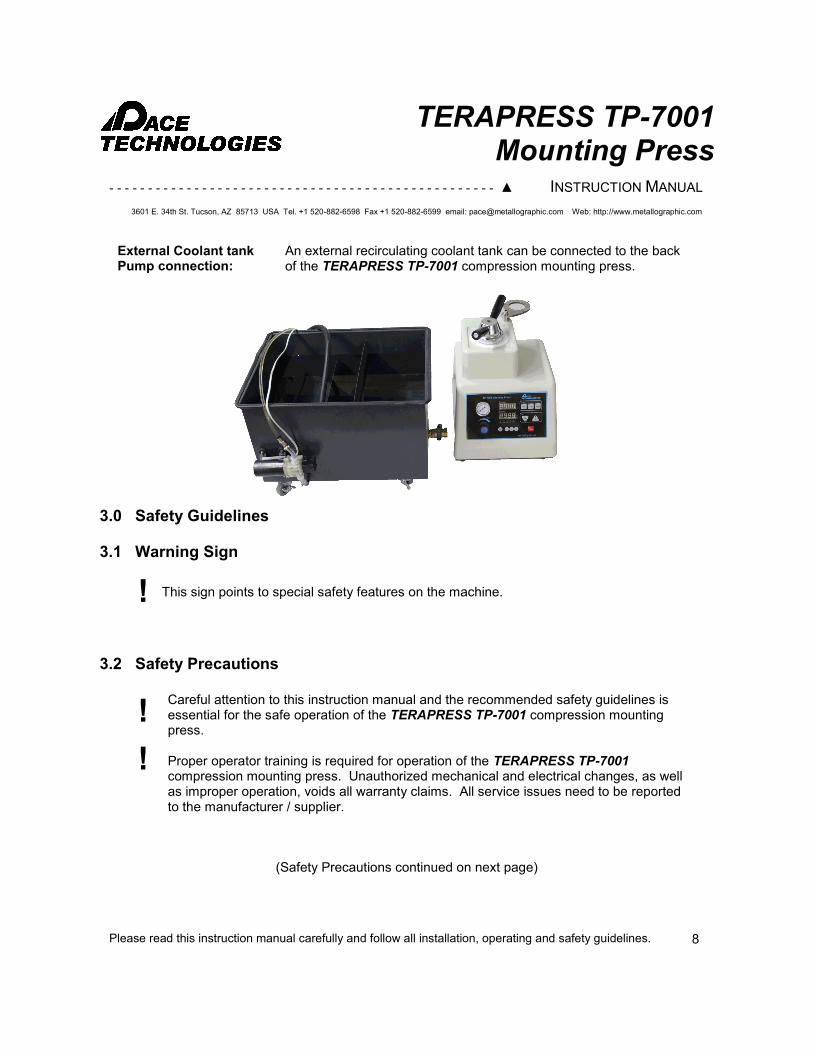
External Coolant tank Pump connection:
An external recirculating coolant tank can be connected to the back of the TERAPRESS TP-7001 compression mounting press.
- - - - - - - - - - - - - - - - - - - - - - - - - - - - - - - - - - - - - - - - - - - - - - - - - - ▲ INSTRUCTION MANUAL
TERAPRESS TP-7001 Mounting Press
Please read this instruction manual carefully and follow all installation, operating and safety guidelines.
3601 E. 34th St. Tucson, AZ 85713 USA Tel. +1 520-882-6598 Fax +1 520-882-6599 email: [email protected] Web: http://www.metallographic.com
The TERAPRESS TP-7001 mounting press has been designed for mounting non-flammable metallographic specimens up to 2-inch diameter. Always follow proper operational guidelines and avoid contact with moving parts, lubricants and abrasives. Seek appropriate medical care for cutting injuries.
3.3 Emergency Statement
9
! Caution: DO NOT POSITION HEAD OR OTHER BODY PARTS OVER THE MOLD WHEN RAISING THE RAM TO REMOVE THE SPECIMEN MOUNT
! During operation, the closure and upper parts of the heating and cooling block can get very hot. For safety, do not touch the closure unit. Use protective gloves if required.
!
Always completely screw tighten the bayonet cover and back off a fraction so it is not too tight. Improper installation can result in hot molten mounting material leaking (danger of burning).
!
Initial cooling water coming into contact with mold will produce an initial burst of steam. To avoid danger of burning, secure the drain line and use caution when the TERAPRESS TP-7001 compression mounting press is in use.
! Mold cylinder and ram get very hot during the mounting process. Take care before changing (danger of burning).
! Mounting samples must be chemically compatible with the mounting material. Do not mount flammable samples.
! Before opening the unit, disconnect main power plug. Replacement parts should be installed only by qualified personnel.
! Follow proper operating instructions (Section 4.0) and obtain proper training before operation.
! Do not leave press unattended during operation.
! Turn-off external water supply when press is not in operation.
3.2 Safety Precautions (continued)
- - - - - - - - - - - - - - - - - - - - - - - - - - - - - - - - - - - - - - - - - - - - - - - - - - ▲ INSTRUCTION MANUAL
TERAPRESS TP-7001 Mounting Press
Please read this instruction manual carefully and follow all installation, operating and safety guidelines.
3601 E. 34th St. Tucson, AZ 85713 USA Tel. +1 520-882-6598 Fax +1 520-882-6599 email: [email protected] Web: http://www.metallographic.com
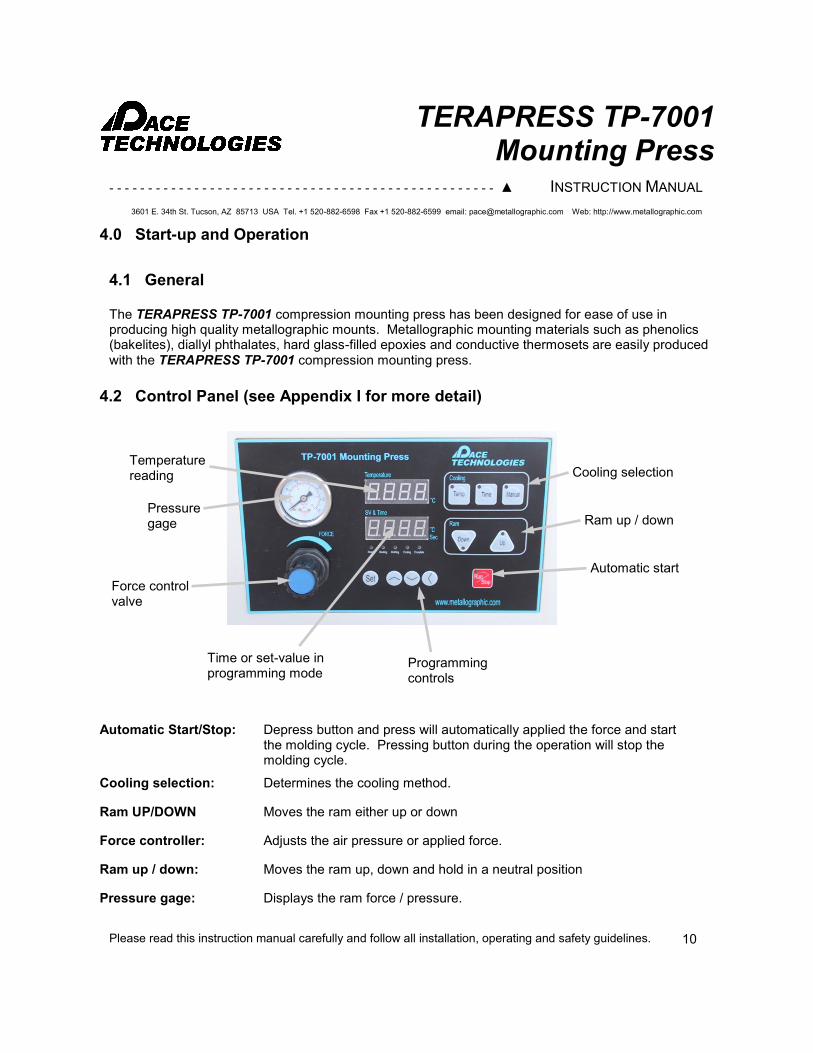
Temperature reading
Pressure gage
The TERAPRESS TP-7001 compression mounting press has been designed for ease of use in producing high quality metallographic mounts. Metallographic mounting materials such as phenolics (bakelites), diallyl phthalates, hard glass-filled epoxies and conductive thermosets are easily produced with the TERAPRESS TP-7001 compression mounting press.
4.0 Start-up and Operation
4.1 General
10
4.2 Control Panel (see Appendix I for more detail)
Automatic Start/Stop: Depress button and press will automatically applied the force and start the molding cycle. Pressing button during the operation will stop the molding cycle.
Cooling selection: Determines the cooling method.
Ram UP/DOWN Moves the ram either up or down
Force controller: Adjusts the air pressure or applied force.
Ram up / down: Moves the ram up, down and hold in a neutral position
Pressure gage: Displays the ram force / pressure.
Ram up / down
Force control valve
Cooling selection
Automatic start
Time or set-value in programming mode
Programming controls
- - - - - - - - - - - - - - - - - - - - - - - - - - - - - - - - - - - - - - - - - - - - - - - - - - ▲ INSTRUCTION MANUAL
TERAPRESS TP-7001 Mounting Press
Please read this instruction manual carefully and follow all installation, operating and safety guidelines.
3601 E. 34th St. Tucson, AZ 85713 USA Tel. +1 520-882-6598 Fax +1 520-882-6599 email: [email protected] Web: http://www.metallographic.com
11
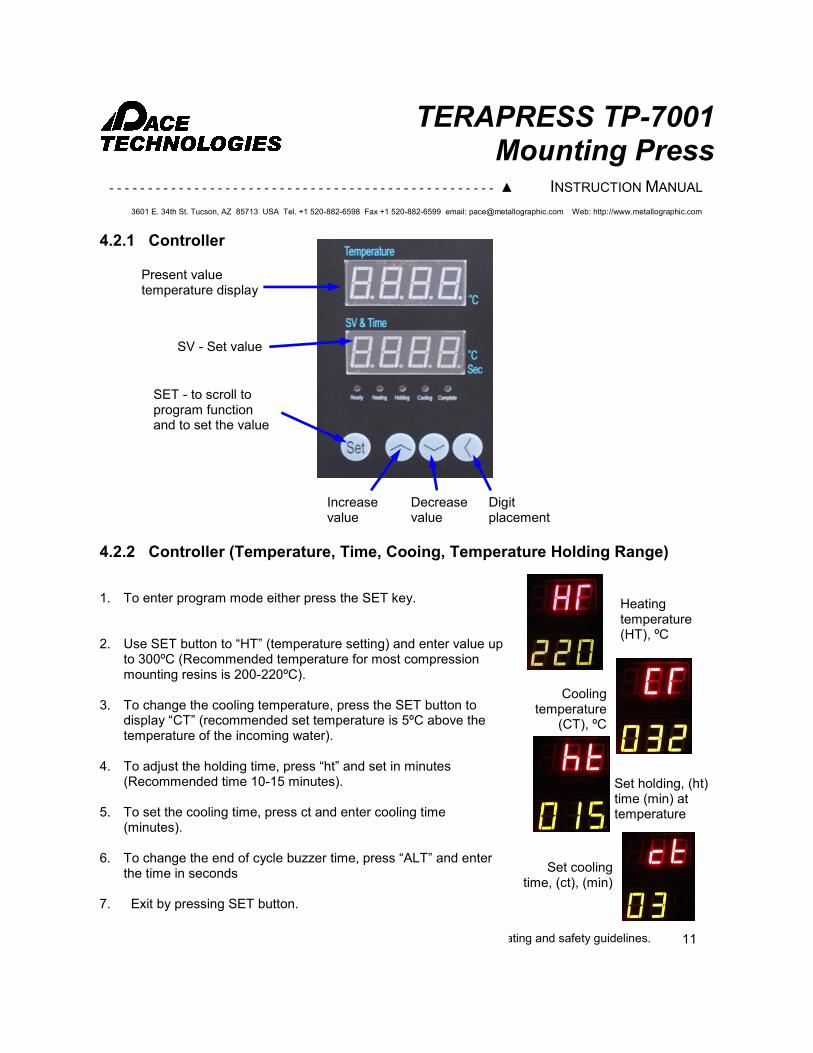
4.2.1 Controller
Present value temperature display
SV - Set value
SET - to scroll to program function and to set the value
Digit placement
4.2.2 Controller (Temperature, Time, Cooing, Temperature Holding Range)
1. To enter program mode either press the SET key.
2. Use SET button to “HT” (temperature setting) and enter value up to 300ºC (Recommended temperature for most compression mounting resins is 200-220ºC).
3. To change the cooling temperature, press the SET button to display “CT” (recommended set temperature is 5ºC above the temperature of the incoming water).
4. To adjust the holding time, press “ht” and set in minutes (Recommended time 10-15 minutes).
5. To set the cooling time, press ct and enter cooling time (minutes).
6. To change the end of cycle buzzer time, press “ALT” and enter the time in seconds
7. Exit by pressing SET button.
Increase value
Heating temperature (HT), ºC
Set holding, (ht) time (min) at temperature
Decrease value
Cooling temperature
(CT), ºC
Set cooling time, (ct), (min)

- - - - - - - - - - - - - - - - - - - - - - - - - - - - - - - - - - - - - - - - - - - - - - - - - - ▲ INSTRUCTION MANUAL
TERAPRESS TP-7001 Mounting Press
Please read this instruction manual carefully and follow all installation, operating and safety guidelines.
3601 E. 34th St. Tucson, AZ 85713 USA Tel. +1 520-882-6598 Fax +1 520-882-6599 email: [email protected] Web: http://www.metallographic.com
To change the maximum mounting pressure adjust the air regulator, increasing by turning clockwise, decreasing by turning the knob counterclockwise. Press in the knob to lock in the force.
Pressure gage
Force controller
4.6 Pressure
12
Ram DOWN / UP
- - - - - - - - - - - - - - - - - - - - - - - - - - - - - - - - - - - - - - - - - - - - - - - - - - ▲ INSTRUCTION MANUAL
TERAPRESS TP-7001 Mounting Press
Please read this instruction manual carefully and follow all installation, operating and safety guidelines.
3601 E. 34th St. Tucson, AZ 85713 USA Tel. +1 520-882-6598 Fax +1 520-882-6599 email: [email protected] Web: http://www.metallographic.com
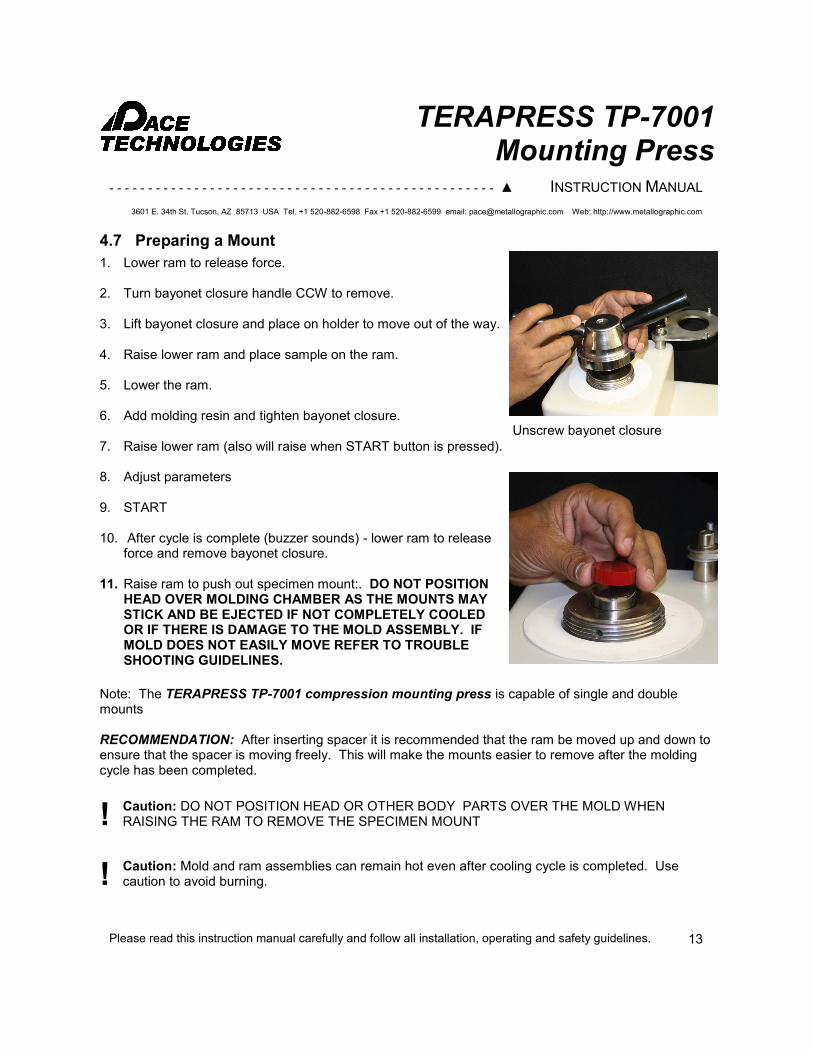
4.7 Preparing a Mount
1. Lower ram to release force.
2. Turn bayonet closure handle CCW to remove.
3. Lift bayonet closure and place on holder to move out of the way.
4. Raise lower ram and place sample on the ram.
5. Lower the ram.
6. Add molding resin and tighten bayonet closure.
7. Raise lower ram (also will raise when START button is pressed).
8. Adjust parameters
9. START
10. After cycle is complete (buzzer sounds) - lower ram to release force and remove bayonet closure.
11. Raise ram to push out specimen mount:. DO NOT POSITION HEAD OVER MOLDING CHAMBER AS THE MOUNTS MAY STICK AND BE EJECTED IF NOT COMPLETELY COOLED OR IF THERE IS DAMAGE TO THE MOLD ASSEMBLY. IF MOLD DOES NOT EASILY MOVE REFER TO TROUBLE SHOOTING GUIDELINES.
Note: The TERAPRESS TP-7001 compression mounting press is capable of single and double mounts RECOMMENDATION: After inserting spacer it is recommended that the ram be moved up and down to ensure that the spacer is moving freely. This will make the mounts easier to remove after the molding cycle has been completed.
! Caution: Mold and ram assemblies can remain hot even after cooling cycle is completed. Use caution to avoid burning.
13
! Caution: DO NOT POSITION HEAD OR OTHER BODY PARTS OVER THE MOLD WHEN RAISING THE RAM TO REMOVE THE SPECIMEN MOUNT
Unscrew bayonet closure

- - - - - - - - - - - - - - - - - - - - - - - - - - - - - - - - - - - - - - - - - - - - - - - - - - ▲ INSTRUCTION MANUAL
TERAPRESS TP-7001 Mounting Press
Please read this instruction manual carefully and follow all installation, operating and safety guidelines.
3601 E. 34th St. Tucson, AZ 85713 USA Tel. +1 520-882-6598 Fax +1 520-882-6599 email: [email protected] Web: http://www.metallographic.com
4.7.1 Changing mold and ram assembly
1. Lower ram.
2. Unscrew bayonet closure.
3. Raise lower ram up and unscrew to remove (regular thread).
4. Unscrew (reverse threaded) the upper ram to remove.
5. Mold can be removed by loosening the three hex screws by the top of the mold.
Unscrew bayonet closure
Raise lower ram up and unscrew to remove
Unscrew the upper ram to remove
Remove by loosening the three hex screws and lifting mold
14

- - - - - - - - - - - - - - - - - - - - - - - - - - - - - - - - - - - - - - - - - - - - - - - - - - ▲ INSTRUCTION MANUAL
TERAPRESS TP-7001 Mounting Press
Please read this instruction manual carefully and follow all installation, operating and safety guidelines.
3601 E. 34th St. Tucson, AZ 85713 USA Tel. +1 520-882-6598 Fax +1 520-882-6599 email: [email protected] Web: http://www.metallographic.com
Sample placement
Mounting material
Locking bayonet closure
To position sample, raise the lower ram for easy access. Position sample on ram and lower into mold.
! Caution: Do not mount flammable materials.
Lower ram and add mounting material. It is recommended that a funnel be used to minimize spilling and to keep the top of the mold clean (easier installation and removal of upper ram).
Upper ram and bayonet closure must be lowered into position for bayonet closure to lock properly. After properly positioning upper ram and bayonet, turn to tighten. It is recommended that the bayonet be turned 1/8 turn counterclockwise for easier removal after mounting is complete.
! Caution: Improper closure can result in hot mounting material being extruded out of the mold.
If such a case arises, turn off mounting press and let it cool before cleaning.
15
! Caution: If you need to handle
the top mold assembly while the mold is hot it is recommended that you use proper heat resistant gloves to prevent burning
Add resin with funnel
Resin Preforms
- - - - - - - - - - - - - - - - - - - - - - - - - - - - - - - - - - - - - - - - - - - - - - - - - - ▲ INSTRUCTION MANUAL
TERAPRESS TP-7001 Mounting Press
Please read this instruction manual carefully and follow all installation, operating and safety guidelines.
3601 E. 34th St. Tucson, AZ 85713 USA Tel. +1 520-882-6598 Fax +1 520-882-6599 email: [email protected] Web: http://www.metallographic.com
Setting temperature
Setting heating time
Setting force
Summary
Sample removal
Set temperature according to mounting material recommendations (see Tables 4-1 to 4-5 on the following pages).
Set heating time according to mounting material recommendations (see Tables 4-1 to 4-5 on the following pages).
Set force according to mounting material recommendations (see Tables 4-1 to 4-5 on the following pages).
1. Select and install required mold assembly.
2. Insert sample and add mounting material.
3. Select temperature, heating time and force.
4. Activate mounting operation by pushing start button.
Upon completion a buzzer rings. Open closure as described under “Releasing bayonet closure” and lift ram to remove completed mount.
! Caution: Bayonet closure and upper ram may still be very hot.
Recommendation: Clean ram before producing next mount and remove and clean mold assembly after every 40 hours of operation.
16

- - - - - - - - - - - - - - - - - - - - - - - - - - - - - - - - - - - - - - - - - - - - - - - - - - ▲ INSTRUCTION MANUAL
TERAPRESS TP-7001 Mounting Press
Please read this instruction manual carefully and follow all installation, operating and safety guidelines.
3601 E. 34th St. Tucson, AZ 85713 USA Tel. +1 520-882-6598 Fax +1 520-882-6599 email: [email protected] Web: http://www.metallographic.com
Table 4-1 Phenolic Mounting Powders
Table 4-2 Diallyl Phthalate Powders
* Grams of powder to produce a 5/8” mount without any sample
4.5 Mounting Guidelines
Table 4-3 Epoxy Powders
17
Parameters 1-inch
mounts 1.25-inch mounts
1.5-inch mounts
2-inch mounts
Temperature (ºC) 200°C
(420°F)
200°C
(420°F)
200°C
(420°F)
200°C
(420°F)
Machine gage pressure (psi) MPa
80-90 0.6-0.7
80-90 0.6-0.7
90-95 0.7-0.8
90-95 0.7-0.8
Time (minutes) - minimum 8 10 12 12
Grams of powder* 10.2 16.0 23 40.8
Parameters 1-inch
mounts 1.25-inch mounts
1.5-inch mounts
2-inch mounts
Temperature (ºC) 200°C
(420°F)
200°C
(420°F)
200°C
(420°F)
200°C
(420°F)
Machine gage pressure (psi) MPa
80-90 0.6-0.7
80-90 0.6-0.7
90-95 0.7-0.8
90-95 0.7-0.8
Time (minutes) - minimum 8 10 12 12
Grams of powder* 13.7 21.4 30.8 55

- - - - - - - - - - - - - - - - - - - - - - - - - - - - - - - - - - - - - - - - - - - - - - - - - - ▲ INSTRUCTION MANUAL
TERAPRESS TP-7001 Mounting Press
Please read this instruction manual carefully and follow all installation, operating and safety guidelines.
3601 E. 34th St. Tucson, AZ 85713 USA Tel. +1 520-882-6598 Fax +1 520-882-6599 email: [email protected] Web: http://www.metallographic.com
4.5 Mounting Guidelines (continued)
Table 4-4 Conductive Mounting Powders
* Grams of powder to produce a 5/8” mount without any sample
18
Parameters 1-inch
mounts 1.25-inch mounts
1.5-inch mounts
2-inch mounts
Temperature (ºC) 200°C
(420°F)
200°C
(420°F)
200°C
(420°F)
200°C
(420°F)
Machine gage pressure (psi) MPa
80-90 0.6-0.7
80-90 0.6-0.7
90-95 0.7-0.8
90-95 0.7-0.8
Time (minutes) - minimum 8 10 12 12
Grams of powder* 10.2 16.0 23 40.8
- - - - - - - - - - - - - - - - - - - - - - - - - - - - - - - - - - - - - - - - - - - - - - - - - - ▲ INSTRUCTION MANUAL
TERAPRESS TP-7001 Mounting Press
Please read this instruction manual carefully and follow all installation, operating and safety guidelines.
3601 E. 34th St. Tucson, AZ 85713 USA Tel. +1 520-882-6598 Fax +1 520-882-6599 email: [email protected] Web: http://www.metallographic.com
5.0 Maintenance
5.1 Introduction The TERAPRAESS TP-7001 compression mounting press requires very minimal maintenance. However, it is recommended that the mold and assembly be removed after every 40 hours of operation to remove any mounting material build-up. This will extend the life of the mold assemblies.
5.2 Cleaning outside cabinet
Cabinet and front shield should be cleaned occasionally with a moist cloth. Do not use any chemicals or cleaning medium containing abrasive particles.
5.3 Cleaning inside cabinet
Over time, small quantities of mounting residual can build up inside the cabinet. It is recommended that once a year the TERAPRAESS TP-7001 compression mounting press be cleaned with a vacuum cleaner (be sure to disconnect the power before opening the panel).
5.4 Filter It is recommended that a filter be used on the incoming water line and cleaned as required.
5.5 Cleaning and Storing mold assemblies
Overtime it is possible for residue to build up inside the mold cylinder. It is recommended that periodically the mold cylinder be removed and cleaned. Scrapping with a blade such as a scissors is on effective way. When changing and storing the molds it is recommended that a light oil such as WD-40 be sprayed onto the rams and cylinder to prevent corrosion (especially in high humidity environments.
19
- - - - - - - - - - - - - - - - - - - - - - - - - - - - - - - - - - - - - - - - - - - - - - - - - - ▲ INSTRUCTION MANUAL
TERAPRESS TP-7001 Mounting Press
Please read this instruction manual carefully and follow all installation, operating and safety guidelines.
3601 E. 34th St. Tucson, AZ 85713 USA Tel. +1 520-882-6598 Fax +1 520-882-6599 email: [email protected] Web: http://www.metallographic.com
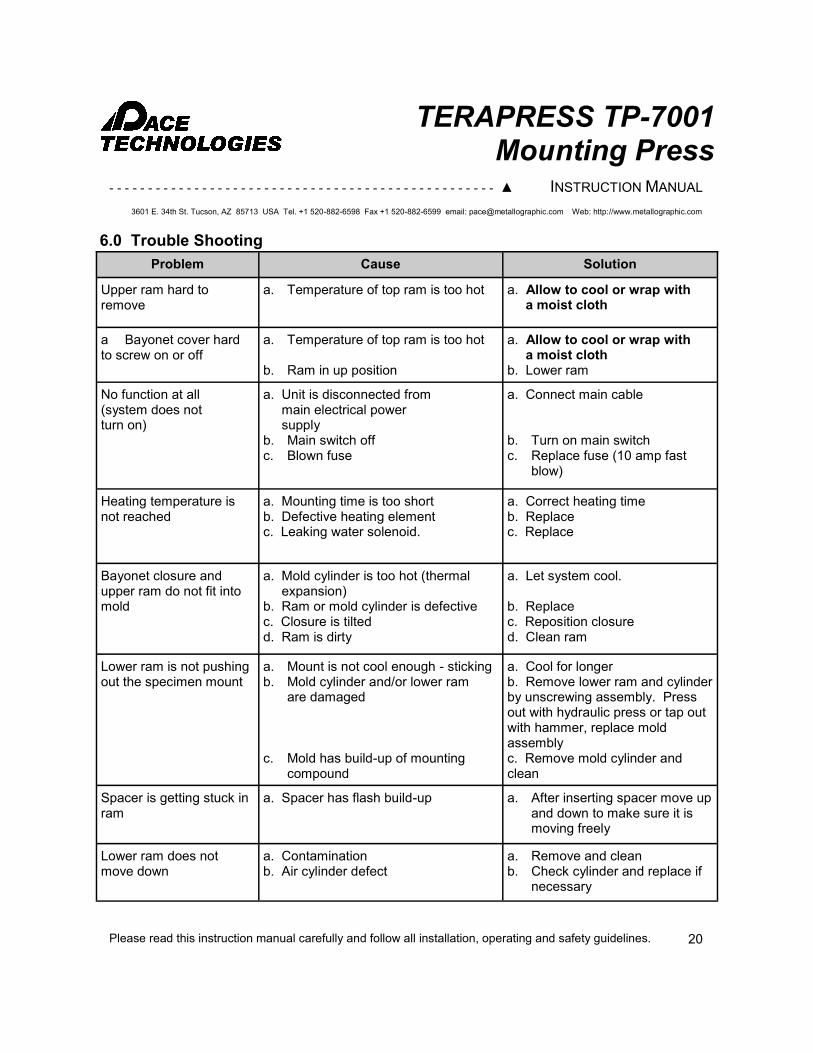
6.0 Trouble Shooting
20
Problem Cause Solution
Upper ram hard to remove
a. Temperature of top ram is too hot a. Allow to cool or wrap with a moist cloth
a Bayonet cover hard to screw on or off
a. Temperature of top ram is too hot
b. Ram in up position
a. Allow to cool or wrap with a moist cloth b. Lower ram
No function at all (system does not turn on)
a. Unit is disconnected from main electrical power supply b. Main switch off c. Blown fuse
a. Connect main cable b. Turn on main switch c. Replace fuse (10 amp fast
blow)
Heating temperature is not reached
a. Mounting time is too short b. Defective heating element c. Leaking water solenoid.
a. Correct heating time b. Replace c. Replace
Bayonet closure and upper ram do not fit into mold
a. Mold cylinder is too hot (thermal expansion) b. Ram or mold cylinder is defective c. Closure is tilted d. Ram is dirty
a. Let system cool. b. Replace c. Reposition closure d. Clean ram
Lower ram is not pushing out the specimen mount
a. Mount is not cool enough - sticking b. Mold cylinder and/or lower ram
are damaged
c. Mold has build-up of mounting compound
a. Cool for longer b. Remove lower ram and cylinder by unscrewing assembly. Press out with hydraulic press or tap out with hammer, replace mold assembly c. Remove mold cylinder and clean
Spacer is getting stuck in ram
a. Spacer has flash build-up a. After inserting spacer move up and down to make sure it is moving freely
Lower ram does not move down
a. Contamination b. Air cylinder defect
a. Remove and clean b. Check cylinder and replace if
necessary

- - - - - - - - - - - - - - - - - - - - - - - - - - - - - - - - - - - - - - - - - - - - - - - - - - ▲ INSTRUCTION MANUAL
TERAPRESS TP-7001 Mounting Press
Please read this instruction manual carefully and follow all installation, operating and safety guidelines.
3601 E. 34th St. Tucson, AZ 85713 USA Tel. +1 520-882-6598 Fax +1 520-882-6599 email: [email protected] Web: http://www.metallographic.com
Problem Cause Solution
Mold cylinder cannot be removed
a. Temperature difference b. Contamination or corrosion between the cylinder and heating / cooling block
a. Completely cool down b. After cooling, slowly heat up and disassemble immediately
Cooling water flow is weak or none at all
a. Water supply is off b. Solenoid is damaged
a. Open valve b. Clean and/or replace
ON/OFF power switch getting too hot
a. Fuse overheating b. Too many amps being pulled from the incoming power outlet
a. Replace fuse, 10 amp fast blow b. Plug directly into wall outlet (do not use any extension cords or multiple outlet connections
Water leaking a. Cooling water supply tube leaks b. Screw coupling is loose c. Cooling water return line leaks
a. Check and seal b. Tighten or replace c. Replace
Pressure cannot be changed
a. Defective pressure switch a. Replace switch
Ram does not go down, until pressure is turned to zero and turn back up
Incoming pressure is too high Set the pressure gage to a maximum of 95 psi
21
Pry open fuse holder with small flat head screwdriver
Replace fuse (10 amp fast blow)
6.0 Trouble Shooting (continued)
More extensive trouble shooting, repair guides, video’s, parts list are provided online at www.metallographic.com or http://www.metallographic.com/PACE-service/TP-7001-service.html

- - - - - - - - - - - - - - - - - - - - - - - - - - - - - - - - - - - - - - - - - - - - - - - - - - ▲ INSTRUCTION MANUAL
TERAPRESS TP-7001 Mounting Press
Please read this instruction manual carefully and follow all installation, operating and safety guidelines.
3601 E. 34th St. Tucson, AZ 85713 USA Tel. +1 520-882-6598 Fax +1 520-882-6599 email: [email protected] Web: http://www.metallographic.com
COMPRESSION MOUNTING
Compression mounting is a very useful mounting technique which can provide better
specimen edge retention compared to castable mounting resins. Compression mounting
resins are available in different colors and with various fillers to improve hardness or
conductivity (Figure 7-1).
Several compression mounting characteristics include:
- Convenient means to hold the specimen
- Provides a standard format to mount multiple specimens
- Protects edges
- Provides proper specimen orientation
- Provides the ability to label and store the specimens
Figure 7-1 Wide variety of compression mounting resins.
7.0 Technical
22
- - - - - - - - - - - - - - - - - - - - - - - - - - - - - - - - - - - - - - - - - - - - - - - - - - ▲ INSTRUCTION MANUAL
TERAPRESS TP-7001 Mounting Press
Please read this instruction manual carefully and follow all installation, operating and safety guidelines.
3601 E. 34th St. Tucson, AZ 85713 USA Tel. +1 520-882-6598 Fax +1 520-882-6599 email: [email protected] Web: http://www.metallographic.com
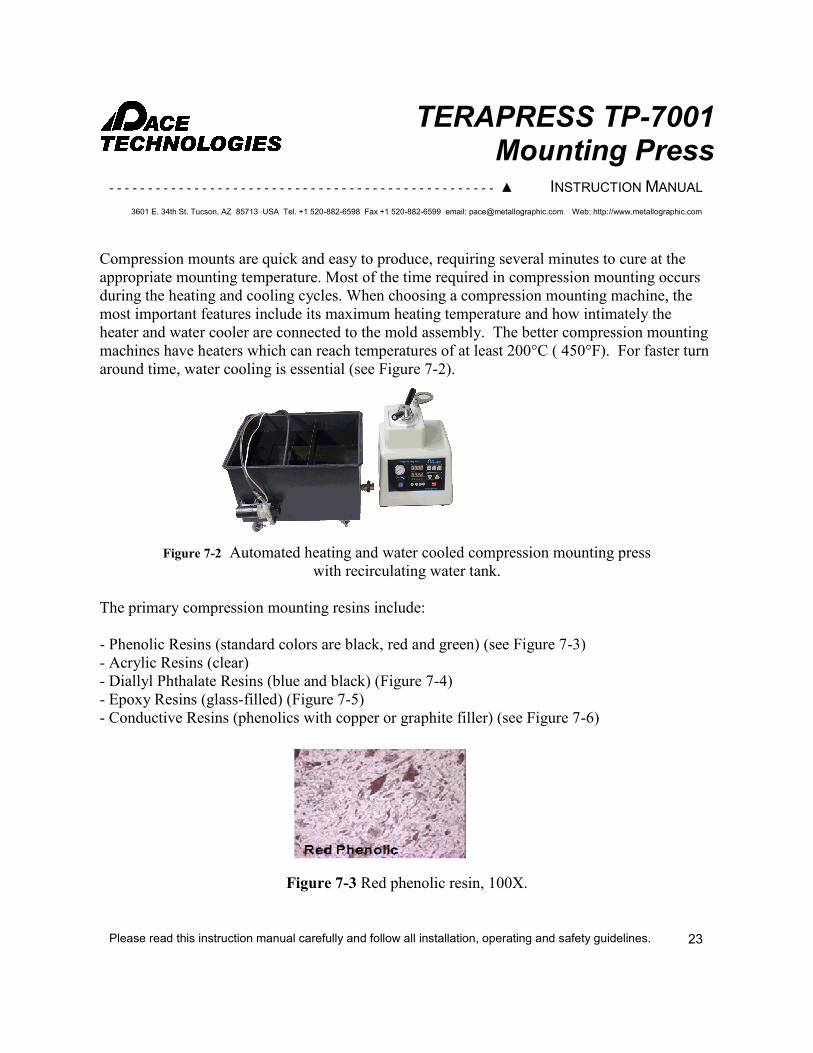
Compression mounts are quick and easy to produce, requiring several minutes to cure at the
appropriate mounting temperature. Most of the time required in compression mounting occurs
during the heating and cooling cycles. When choosing a compression mounting machine, the
most important features include its maximum heating temperature and how intimately the
heater and water cooler are connected to the mold assembly. The better compression mounting
machines have heaters which can reach temperatures of at least 200°C ( 450°F). For faster turn
around time, water cooling is essential (see Figure 7-2).
Figure 7-2 Automated heating and water cooled compression mounting press
with recirculating water tank.
The primary compression mounting resins include:
- Phenolic Resins (standard colors are black, red and green) (see Figure 7-3)
- Acrylic Resins (clear)
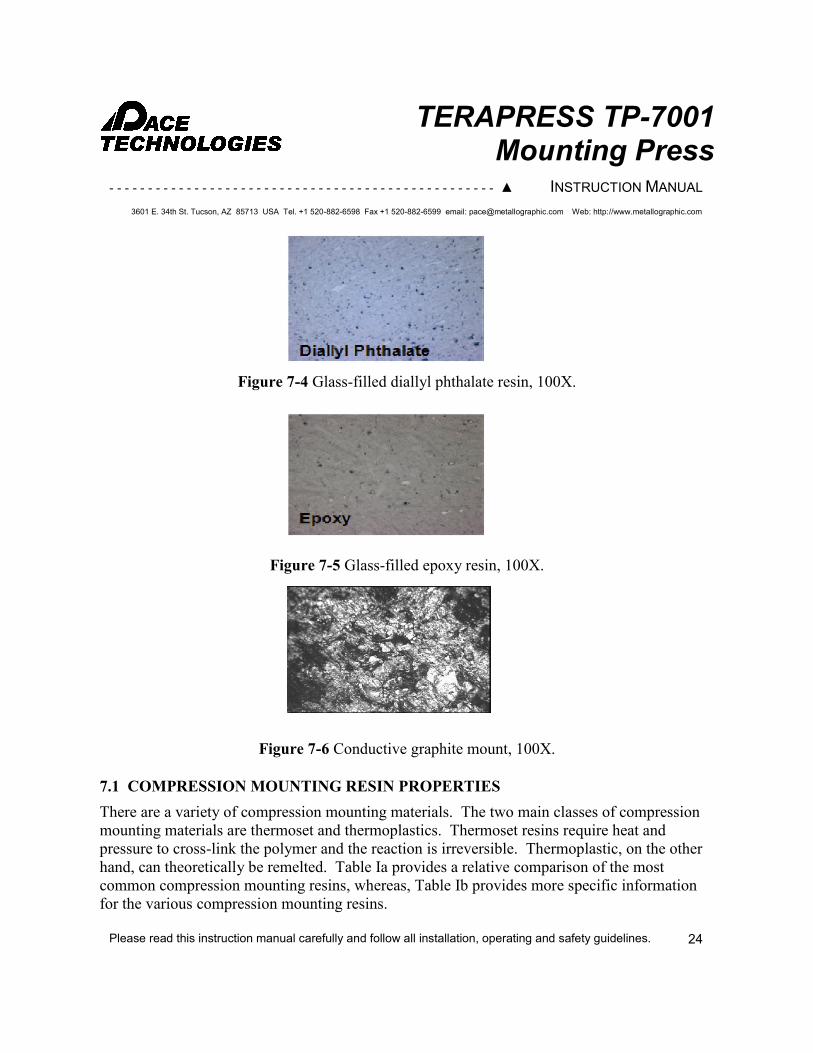
- Diallyl Phthalate Resins (blue and black) (Figure 7-4)
- Epoxy Resins (glass-filled) (Figure 7-5)
- Conductive Resins (phenolics with copper or graphite filler) (see Figure 7-6)
Figure 7-3 Red phenolic resin, 100X.
23
- - - - - - - - - - - - - - - - - - - - - - - - - - - - - - - - - - - - - - - - - - - - - - - - - - ▲ INSTRUCTION MANUAL
TERAPRESS TP-7001 Mounting Press
Please read this instruction manual carefully and follow all installation, operating and safety guidelines.
3601 E. 34th St. Tucson, AZ 85713 USA Tel. +1 520-882-6598 Fax +1 520-882-6599 email: [email protected] Web: http://www.metallographic.com
Figure 7-4 Glass-filled diallyl phthalate resin, 100X.
Figure 7-5 Glass-filled epoxy resin, 100X.
Figure 7-6 Conductive graphite mount, 100X.
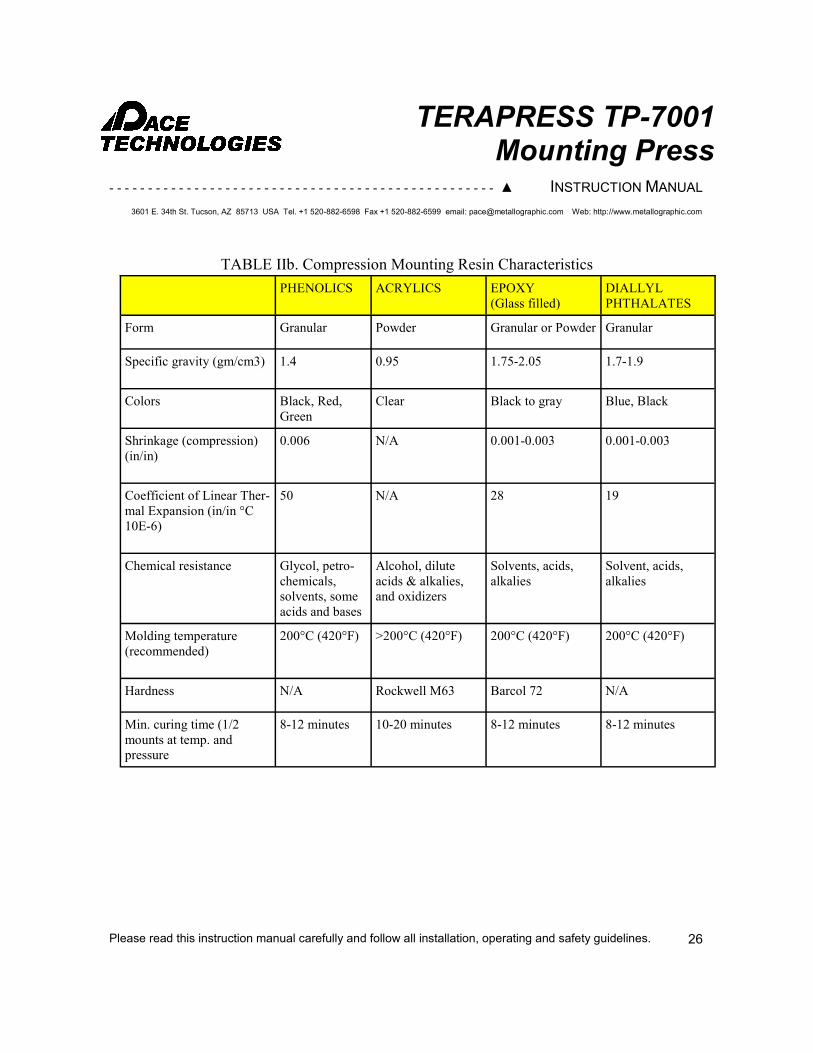
7.1 COMPRESSION MOUNTING RESIN PROPERTIES
There are a variety of compression mounting materials. The two main classes of compression
mounting materials are thermoset and thermoplastics. Thermoset resins require heat and
pressure to cross-link the polymer and the reaction is irreversible. Thermoplastic, on the other
hand, can theoretically be remelted. Table Ia provides a relative comparison of the most
common compression mounting resins, whereas, Table Ib provides more specific information
for the various compression mounting resins.
24

- - - - - - - - - - - - - - - - - - - - - - - - - - - - - - - - - - - - - - - - - - - - - - - - - - ▲ INSTRUCTION MANUAL
TERAPRESS TP-7001 Mounting Press
Please read this instruction manual carefully and follow all installation, operating and safety guidelines.
3601 E. 34th St. Tucson, AZ 85713 USA Tel. +1 520-882-6598 Fax +1 520-882-6599 email: [email protected] Web: http://www.metallographic.com
TIP: Compression mounting at higher then the recommended minimum temperature generally
improves the properties of the mount.
TIP: A useful tip for marking or identifying a specimen is to mold the label inside of the
mount (Figure 7-7). If the entire mount is an acrylic, just place the label on top the mount and
cover it with a little acrylic powder. To label other compression mounting resins, add a thin
layer of acrylic over the other mounting material and then position the label on this layer.
Finish off the mount with another layer of acrylic.
Figure 7-7. Example of labeling mounts using acrylic resin on top of a phenolic base.
TABLE Ia. Compression Mounting Resin Characteristics
PHENOLICS ACRYLICSEPOXY
(Glass-filled)
DIALLYL
PHTHALATES
Type Thermoset Thermoplastic Thermoset Thermoset
Cost Low Moderate Moderate Moderate
Ease of use Excellent Moderate Good Good
Availability
of ColorsYes No No Yes
Cycle times Excellent Moderate Good Good
Edge
retentionFair Good Excellent Excellent
Clarity None Excellent None None
Hardness Low Medium High High
25
- - - - - - - - - - - - - - - - - - - - - - - - - - - - - - - - - - - - - - - - - - - - - - - - - - ▲ INSTRUCTION MANUAL
TERAPRESS TP-7001 Mounting Press
Please read this instruction manual carefully and follow all installation, operating and safety guidelines.
3601 E. 34th St. Tucson, AZ 85713 USA Tel. +1 520-882-6598 Fax +1 520-882-6599 email: [email protected] Web: http://www.metallographic.com
TABLE IIb. Compression Mounting Resin Characteristics
26
PHENOLICS ACRYLICS EPOXY
(Glass filled)
DIALLYL
PHTHALATES
Form Granular Powder Granular or Powder Granular
Specific gravity (gm/cm3) 1.4 0.95 1.75-2.05 1.7-1.9
Colors Black, Red,
Green
Clear Black to gray Blue, Black
Shrinkage (compression)
(in/in)
0.006 N/A 0.001-0.003 0.001-0.003
Coefficient of Linear Ther-
mal Expansion (in/in °C
10E-6)
50 N/A 28 19
Chemical resistance Glycol, petro-
chemicals,
solvents, some
acids and bases
Alcohol, dilute
acids & alkalies,
and oxidizers
Solvents, acids,
alkalies
Solvent, acids,
alkalies
Molding temperature
(recommended)
200°C (420°F) >200°C (420°F) 200°C (420°F) 200°C (420°F)
Hardness N/A Rockwell M63 Barcol 72 N/A
Min. curing time (1/2
mounts at temp. and
pressure
8-12 minutes 10-20 minutes 8-12 minutes 8-12 minutes

- - - - - - - - - - - - - - - - - - - - - - - - - - - - - - - - - - - - - - - - - - - - - - - - - - ▲ INSTRUCTION MANUAL
TERAPRESS TP-7001 Mounting Press
Please read this instruction manual carefully and follow all installation, operating and safety guidelines.
3601 E. 34th St. Tucson, AZ 85713 USA Tel. +1 520-882-6598 Fax +1 520-882-6599 email: [email protected] Web: http://www.metallographic.com
7.1.1 Phenolics
In general, phenolics are used because of their relatively low cost. In addition, phenolics are
available in a variety of colors (Figure 7-8).
Figure 7-8 Phenolic resins are available in a variety of colors.
TIP: Use different color phenolics to color code jobs, specimens types, or for different testing
dates. For example, changing the phenolic color each month will show which samples or jobs
are getting old.
TIP: If the color dye in the mount bleeds out when rinsing with an alcohol, this is an indication
that the mount was not cured either at a high enough temperature or for the proper length of
time (see Figure 7-9).
Figure 7-9 Insufficient curing of phenolic resin causes alcohol to dissolve the dye.
27

- - - - - - - - - - - - - - - - - - - - - - - - - - - - - - - - - - - - - - - - - - - - - - - - - - ▲ INSTRUCTION MANUAL
TERAPRESS TP-7001 Mounting Press
Please read this instruction manual carefully and follow all installation, operating and safety guidelines.
3601 E. 34th St. Tucson, AZ 85713 USA Tel. +1 520-882-6598 Fax +1 520-882-6599 email: [email protected] Web: http://www.metallographic.com
Figure 7-10 Glass-filled diallyl phthalate and epoxies have a glass filler to provide better edge
retention during grinding and polishing.
7.1.3 Epoxies / Diallyl Phthalates
Glass-filled epoxies and diallyl phthalates are compression mounting resins used to provide a
harder mounting support edge next to the specimen (see Figure 7-10). These resins are
commonly used to support the edges of coatings, heat treated samples and other specimens
requiring better flatness. Figure 7-11 shows the polished interface between a glass-filled epoxy
and tungsten carbide specimen. Note that there is no noticeable gap between the specimen and
the mounting material, therefore showing that glass-filled epoxies provide excellent support to
the specimen edge even for extremely hard specimens.
Figure 7-11. Polished edge for tungsten carbide mounted in glass-filled epoxy.
28

- - - - - - - - - - - - - - - - - - - - - - - - - - - - - - - - - - - - - - - - - - - - - - - - - - ▲ INSTRUCTION MANUAL
TERAPRESS TP-7001 Mounting Press
Please read this instruction manual carefully and follow all installation, operating and safety guidelines.
3601 E. 34th St. Tucson, AZ 85713 USA Tel. +1 520-882-6598 Fax +1 520-882-6599 email: [email protected] Web: http://www.metallographic.com
TIP: Epoxies (glass-filled) and diallyl phthalates are significantly more expensive then
phenolic and acrylics. In order to reduce the cost of these mounts, they can be laminated with a
lower cost mounting compound such as a phenolic. The technique is to place a sufficiently
thick enough layer of the glass-filled epoxy or diallyl phthalate around the specimen in order to
compensate for any grinding loss. The rest of the mount can then be supported with a lower
cost compression mounting compound such as a phenolic. Red phenolics are used frequently
for this technique (Figure 7-12).
Figure 7-12 Glass-filled epoxy laminated with phenolic to reduce the cost of the mount.
7.1.4 Specialized Compression Mounting Resins
With the addition of fillers such as graphite or copper, the compression mounting compounds
can be made conductive (Figure 7-13). Conductive mounts are used in scanning electron
microscopes (SEM) to prevent the specimen from building up a charge. Conductive mounts are
also used for specimens requiring electrolytic etching or polishing.
Figure 7-13 Graphite and copper are common fillers used to increase the conductivity of
compression mounting resins.
29

- - - - - - - - - - - - - - - - - - - - - - - - - - - - - - - - - - - - - - - - - - - - - - - - - - ▲ INSTRUCTION MANUAL
TERAPRESS TP-7001 Mounting Press
Please read this instruction manual carefully and follow all installation, operating and safety guidelines.
3601 E. 34th St. Tucson, AZ 85713 USA Tel. +1 520-882-6598 Fax +1 520-882-6599 email: [email protected] Web: http://www.metallographic.com
7.2 COMPRESSION MOUNTING PROCEDURES
- Clean specimens to remove cutting and handling residues
- Remove debris from mold assembly
- Apply thin coat of mold release compound to mold assembly
- Raise mold ram to up position
- Center specimen on ram
- Lower ram assembly
- Pour predetermined amount of resin into mold
- Clean and remove any excess resin from around the mold assembly threads
- Lock mold assembly cover
- Slowly raise ram into up position
- Apply recommended heat and maintain pressure for specified period of time
- Cool to near room temperature
- Remove mounted specimen
- Clean mold and ram assembly
TIP: Preheat resin and sample to 35°C (95°F) to expedite the initial heating process and for
increasing throughput.
30

- - - - - - - - - - - - - - - - - - - - - - - - - - - - - - - - - - - - - - - - - - - - - - - - - - ▲ INSTRUCTION MANUAL
TERAPRESS TP-7001 Mounting Press
Please read this instruction manual carefully and follow all installation, operating and safety guidelines.
3601 E. 34th St. Tucson, AZ 85713 USA Tel. +1 520-882-6598 Fax +1 520-882-6599 email: [email protected] Web: http://www.metallographic.com
31
8.0 Replacement Parts
Part no. Description Image
Electrical
TP-017 TERAPRESS TP-7000/ TP-7001
Thermal couple wire
24RELAY 24 volt relay switch
RELAY-B 24 volt relay switch base
PS-001 TP-7000/ TP-7001 ON/OFF power
switch
SOL-24V TP-7001 Solenoid 24V
TP-010-110 TERAPRESSTP-7000/ TP-7001
Heater 110V
TP-010-220 TERAPRESS TP-7000/ TP-7001
Heater 220V
- - - - - - - - - - - - - - - - - - - - - - - - - - - - - - - - - - - - - - - - - - - - - - - - - - ▲ INSTRUCTION MANUAL
TERAPRESS TP-7001 Mounting Press
Please read this instruction manual carefully and follow all installation, operating and safety guidelines.
3601 E. 34th St. Tucson, AZ 85713 USA Tel. +1 520-882-6598 Fax +1 520-882-6599 email: [email protected] Web: http://www.metallographic.com
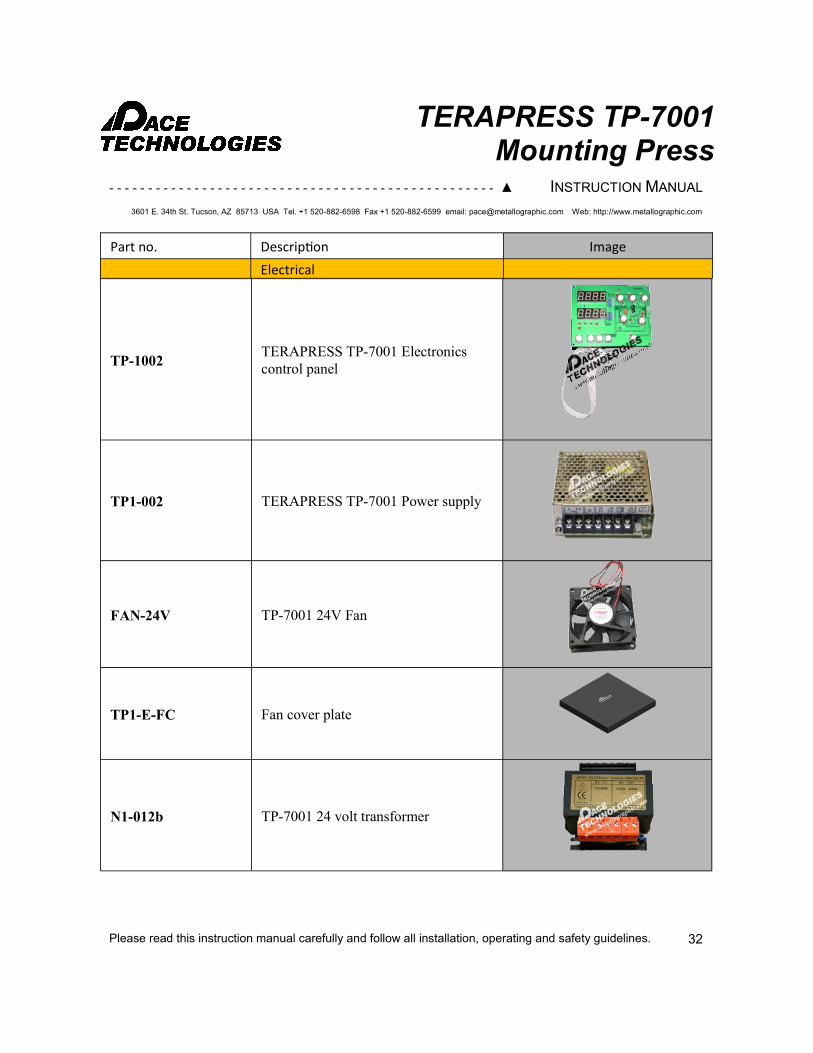
TP-1002 TERAPRESS TP-7001 Electronics
control panel
TP1-002 TERAPRESS TP-7001 Power supply
FAN-24V TP-7001 24V Fan
TP1-E-FC Fan cover plate
N1-012b TP-7001 24 volt transformer
Part no. Description Image
Electrical
32

- - - - - - - - - - - - - - - - - - - - - - - - - - - - - - - - - - - - - - - - - - - - - - - - - - ▲ INSTRUCTION MANUAL
TERAPRESS TP-7001 Mounting Press
Please read this instruction manual carefully and follow all installation, operating and safety guidelines.
3601 E. 34th St. Tucson, AZ 85713 USA Tel. +1 520-882-6598 Fax +1 520-882-6599 email: [email protected] Web: http://www.metallographic.com
TP-R Rectifier
TP-Pump TERAPRESS TP-7001 recirculating
tank pump
CORD-110 110V USA power cord
CORD-220R 220V round prong power cord
CORD-220F 220V flat prong power cord
TP-COM-CN TP-7001 communication tank
connector
TP-COM TP-7001 communication cable to
coolant tank
Part no. Description Image
Electrical
33
- - - - - - - - - - - - - - - - - - - - - - - - - - - - - - - - - - - - - - - - - - - - - - - - - - ▲ INSTRUCTION MANUAL
TERAPRESS TP-7001 Mounting Press
Please read this instruction manual carefully and follow all installation, operating and safety guidelines.
3601 E. 34th St. Tucson, AZ 85713 USA Tel. +1 520-882-6598 Fax +1 520-882-6599 email: [email protected] Web: http://www.metallographic.com
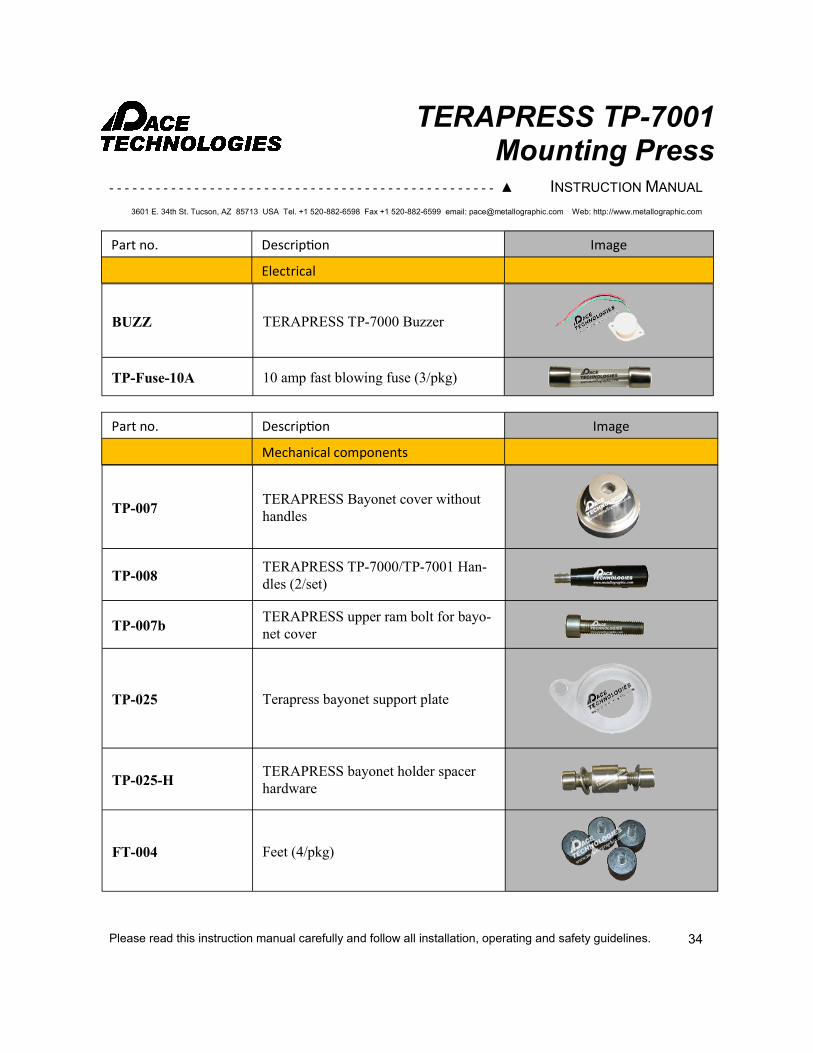
BUZZ TERAPRESS TP-7000 Buzzer
TP-Fuse-10A 10 amp fast blowing fuse (3/pkg)
Part no. Description Image
Electrical
Part no. Description Image
Mechanical components
TP-007 TERAPRESS Bayonet cover without
handles
TP-008 TERAPRESS TP-7000/TP-7001 Han-
dles (2/set)
TP-007b TERAPRESS upper ram bolt for bayo-
net cover
TP-025 Terapress bayonet support plate
TP-025-H TERAPRESS bayonet holder spacer
hardware
FT-004 Feet (4/pkg)
34

- - - - - - - - - - - - - - - - - - - - - - - - - - - - - - - - - - - - - - - - - - - - - - - - - - ▲ INSTRUCTION MANUAL
TERAPRESS TP-7001 Mounting Press
Please read this instruction manual carefully and follow all installation, operating and safety guidelines.
3601 E. 34th St. Tucson, AZ 85713 USA Tel. +1 520-882-6598 Fax +1 520-882-6599 email: [email protected] Web: http://www.metallographic.com
TP1-M-001 TERAPRESS TP-7001 FRP cover
TP-T1 TP-7001 Template
TP-RING TERAPRESS-white insulating ring
TP-MS TERAPRESS Mold sleeve
TP1-M-005 Heater spacer
TP1-M-006 Insulating block
Part no. Description Image
Mechanical components
35

- - - - - - - - - - - - - - - - - - - - - - - - - - - - - - - - - - - - - - - - - - - - - - - - - - ▲ INSTRUCTION MANUAL
TERAPRESS TP-7001 Mounting Press
Please read this instruction manual carefully and follow all installation, operating and safety guidelines.
3601 E. 34th St. Tucson, AZ 85713 USA Tel. +1 520-882-6598 Fax +1 520-882-6599 email: [email protected] Web: http://www.metallographic.com
TP1-M-007 Base
TP1-M-008 Aluminum template base
Part no. Description Image
Mechanical components
Part no. Description Image
Plumbing components
TP-TANK TERAPRESS TP-7001 recirculation
tank with pump
TP-SE TP-7001 Brass extension fixture for
solenoid
TP-DC TP-7001 Brass coupler for drain hose
barb
TP-BARB TP-7001 Drain hose barb
TP1-P-WFI Incoming water filter
36

- - - - - - - - - - - - - - - - - - - - - - - - - - - - - - - - - - - - - - - - - - - - - - - - - - ▲ INSTRUCTION MANUAL
TERAPRESS TP-7001 Mounting Press
Please read this instruction manual carefully and follow all installation, operating and safety guidelines.
3601 E. 34th St. Tucson, AZ 85713 USA Tel. +1 520-882-6598 Fax +1 520-882-6599 email: [email protected] Web: http://www.metallographic.com
TP-2000 TP-7000/ TP-7001 Water inlet hose (3
meters)
TP-2001 TP-7000/ TP-7001 Drain hose (3
meters)
W-8MM TP-7000/ TP-7001 6 mm diameter
water supply hose connector
TP-TS 90 degree connector for solenoid and
drain connectors
TP-TH 90 degree connector for heater (Cat.
No. TP-TH)
Part no. Description Image
Plumbing components
Part no. Description Image
Pneumatic components
TP-009 TERAPRESS TP-7000 Piston cylinder
(high temperature seals)
TP-ACC TERAPRESS air piston connectors
(each)
37

- - - - - - - - - - - - - - - - - - - - - - - - - - - - - - - - - - - - - - - - - - - - - - - - - - ▲ INSTRUCTION MANUAL
TERAPRESS TP-7001 Mounting Press
Please read this instruction manual carefully and follow all installation, operating and safety guidelines.
3601 E. 34th St. Tucson, AZ 85713 USA Tel. +1 520-882-6598 Fax +1 520-882-6599 email: [email protected] Web: http://www.metallographic.com
AR-001 TP-7000/ TP7001 Air regulator
AP-002 TP-7000/ TP-7001 Pressure guage
TP1-001 TERAPRESS TP-7001 air distribution
manifold
TP1-M-MSB Manifold support bar
AH-6MM TERAPRESS 6 mm air hose (2 meters)
TP-AIR TP-7001 Air hose connector (2-sided)
Part no. Description Image
Pneumatic components
38
- - - - - - - - - - - - - - - - - - - - - - - - - - - - - - - - - - - - - - - - - - - - - - - - - - ▲ INSTRUCTION MANUAL
TERAPRESS TP-7001 Mounting Press
Please read this instruction manual carefully and follow all installation, operating and safety guidelines.
3601 E. 34th St. Tucson, AZ 85713 USA Tel. +1 520-882-6598 Fax +1 520-882-6599 email: [email protected] Web: http://www.metallographic.com
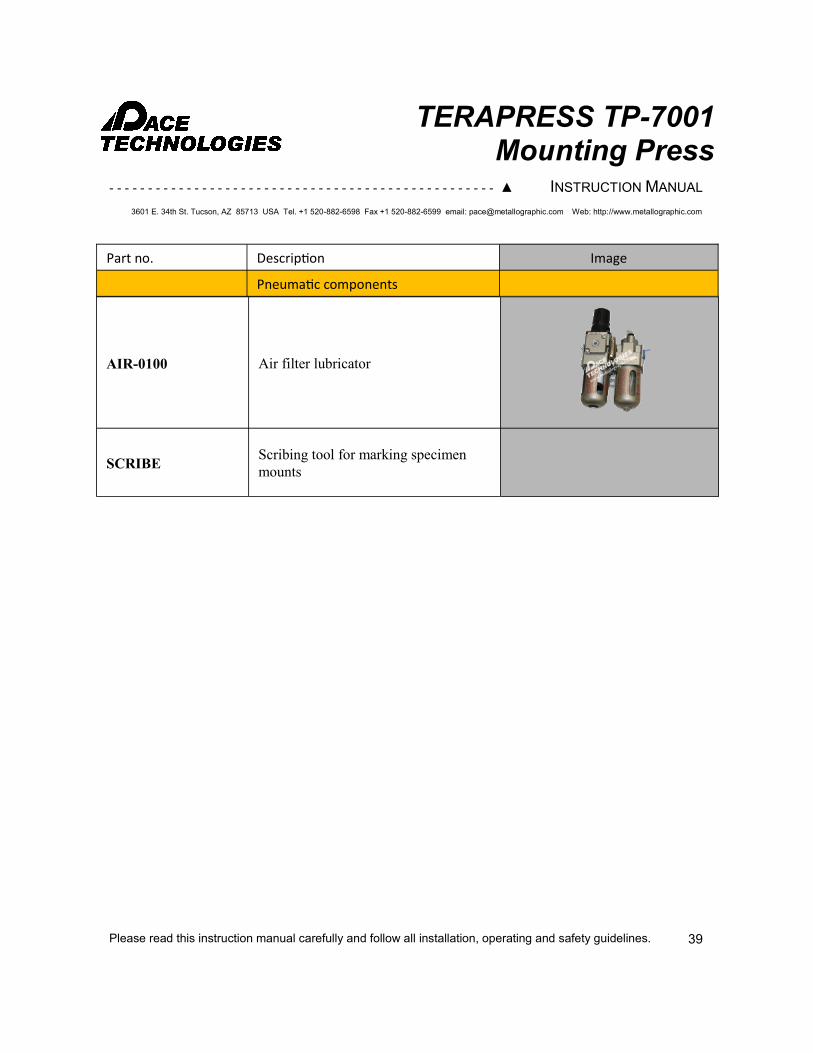
Part no. Description Image
Pneumatic components
AIR-0100 Air filter lubricator
SCRIBE Scribing tool for marking specimen
mounts
39

- - - - - - - - - - - - - - - - - - - - - - - - - - - - - - - - - - - - - - - - - - - - - - - - - - ▲ INSTRUCTION MANUAL
TERAPRESS TP-7001 Mounting Press
Please read this instruction manual carefully and follow all installation, operating and safety guidelines.
3601 E. 34th St. Tucson, AZ 85713 USA Tel. +1 520-882-6598 Fax +1 520-882-6599 email: [email protected] Web: http://www.metallographic.com
APPENDIX II Electrical Diagram
40


![Dnevni avaz [broj 7001 djelimičan, 3.2.2015]](https://static.fdocuments.net/doc/165x107/577cc0231a28aba7118efb23/dnevni-avaz-broj-7001-djelimican-322015.jpg)