Teradata Administrator User Guide - Anatella - ETL Administrator... · Teradata Administrator User...
142
Teradata Administrator User Guide Release 14.10 B035-2502-082K March 2013
Transcript of Teradata Administrator User Guide - Anatella - ETL Administrator... · Teradata Administrator User...

Teradata AdministratorUser Guide
Release 14.10B035-2502-082K
March 2013

The product or products described in this book are licensed products of Teradata Corporation or its affiliates.
Teradata, Active Enterprise Intelligence, Applications-Within, Aprimo, Aprimo Marketing Studio, Aster, BYNET, Claraview, DecisionCast, Gridscale, MyCommerce, Raising Intelligence, Smarter. Faster. Wins., SQL-MapReduce, Teradata Decision Experts, "Teradata Labs" logo, "Teradata Raising Intelligence" logo, Teradata ServiceConnect, Teradata Source Experts, "Teradata The Best Decision Possible" logo, The Best Decision Possible, WebAnalyst, and Xkoto are trademarks or registered trademarks of Teradata Corporation or its affiliates in the United States and other countries.Adaptec and SCSISelect are trademarks or registered trademarks of Adaptec, Inc.AMD Opteron and Opteron are trademarks of Advanced Micro Devices, Inc.Apache, Apache Hadoop, Hadoop, and the yellow elephant logo are either registered trademarks or trademarks of the Apache Software Foundation in the United States and/or other countries.Axeda is a registered trademark of Axeda Corporation. Axeda Agents, Axeda Applications, Axeda Policy Manager, Axeda Enterprise, Axeda Access, Axeda Software Management, Axeda Service, Axeda ServiceLink, and Firewall-Friendly are trademarks and Maximum Results and Maximum Support are servicemarks of Axeda Corporation.Data Domain, EMC, PowerPath, SRDF, and Symmetrix are registered trademarks of EMC Corporation.GoldenGate is a trademark of Oracle.Hewlett-Packard and HP are registered trademarks of Hewlett-Packard Company.Hortonworks, the Hortonworks logo and other Hortonworks trademarks are trademarks of Hortonworks Inc. in the United States and other countries.Intel, Pentium, and XEON are registered trademarks of Intel Corporation.IBM, CICS, RACF, Tivoli, and z/OS are registered trademarks of International Business Machines Corporation.Linux is a registered trademark of Linus Torvalds.LSI is a registered trademark of LSI Corporation.Microsoft, Active Directory, Windows, Windows NT, and Windows Server are registered trademarks of Microsoft Corporation in the United States and other countries.NetVault is a trademark or registered trademark of Quest Software, Inc. in the United States and/or other countries.Novell and SUSE are registered trademarks of Novell, Inc., in the United States and other countries.Oracle, Java, and Solaris are registered trademarks of Oracle and/or its affiliates.QLogic and SANbox are trademarks or registered trademarks of QLogic Corporation.Red Hat is a trademark of Red Hat, Inc., registered in the U.S. and other countries. Used under license.SAS and SAS/C are trademarks or registered trademarks of SAS Institute Inc.SPARC is a registered trademark of SPARC International, Inc.Symantec, NetBackup, and VERITAS are trademarks or registered trademarks of Symantec Corporation or its affiliates in the United States and other countries.Unicode is a registered trademark of Unicode, Inc. in the United States and other countries.UNIX is a registered trademark of The Open Group in the United States and other countries.Other product and company names mentioned herein may be the trademarks of their respective owners.
THE INFORMATION CONTAINED IN THIS DOCUMENT IS PROVIDED ON AN "AS-IS" BASIS, WITHOUT WARRANTY OF ANY KIND, EITHER EXPRESS OR IMPLIED, INCLUDING THE IMPLIED WARRANTIES OF MERCHANTABILITY, FITNESS FOR A PARTICULAR PURPOSE, OR NON-INFRINGEMENT. SOME JURISDICTIONS DO NOT ALLOW THE EXCLUSION OF IMPLIED WARRANTIES, SO THE ABOVE EXCLUSION MAY NOT APPLY TO YOU. IN NO EVENT WILL TERADATA CORPORATION BE LIABLE FOR ANY INDIRECT, DIRECT, SPECIAL, INCIDENTAL, OR CONSEQUENTIAL DAMAGES, INCLUDING LOST PROFITS OR LOST SAVINGS, EVEN IF EXPRESSLY ADVISED OF THE POSSIBILITY OF SUCH DAMAGES.
The information contained in this document may contain references or cross-references to features, functions, products, or services that are not announced or available in your country. Such references do not imply that Teradata Corporation intends to announce such features, functions, products, or services in your country. Please consult your local Teradata Corporation representative for those features, functions, products, or services available in your country.Information contained in this document may contain technical inaccuracies or typographical errors. Information may be changed or updated without notice. Teradata Corporation may also make improvements or changes in the products or services described in this information at any time without notice.To maintain the quality of our products and services, we would like your comments on the accuracy, clarity, organization, and value of this document. Please email: [email protected]. Any comments or materials (collectively referred to as "Feedback") sent to Teradata Corporation will be deemed non-confidential. Teradata Corporation will have no obligation of any kind with respect to Feedback and will be free to use, reproduce, disclose, exhibit, display, transform, create derivative works of, and distribute the Feedback and derivative works thereof without limitation on a royalty-free basis. Further, Teradata Corporation will be free to use any ideas, concepts, know-how, or techniques contained in such Feedback for any purpose whatsoever, including developing, manufacturing, or marketing products or services incorporating Feedback.
Copyright © 1994-2013 by Teradata Corporation. All Rights Reserved.

Teradata Administrator User Guide 3
Preface
Purpose
This book provides information about Teradata Administrator, which is a Teradata® Tools and Utilities product. Teradata Tools and Utilities is a group of products designed to work with Teradata Database.
Teradata Administrator provides an easy-to-use Windows-based graphical interface to the Teradata Database Data Dictionary for performing a multitude of database administration tasks on the Teradata Database.
Audience
This book is intended for use by:
• System administrators
• Database administrators
• Technical personnel using Teradata Administrator
Supported Releases
This book supports the following releases:
• Teradata Database 14.1
• Teradata Tools and Utilities 14.10
• Teradata Administrator 14.10
Note: See Table 8 on page 29 to verify the Teradata Administrator version number.
To locate detailed supported-release information:
1 Go to http://www.info.teradata.com/.
2 Click General Search under Online Publications.
3 Type 3119 in the Publication Product ID box.
4 Under Sort By, select Date.
5 Click Search.
6 Open the version of the Teradata Tools and Utilities ##.##.## Supported Platforms and Product Versions spreadsheet associated with this release.
PrefacePrerequisites
4 Teradata Administrator User Guide
The spreadsheet includes supported Teradata Database versions, platforms, and product release numbers.
Prerequisites
The following prerequisite knowledge is required for this product:
• Computer technology and terminology
• Teradata Database
• Connectivity software, such as ODBC or CLIv2
• Microsoft® Windows® operating system
Changes to This Book
The following changes were made to this book in support of the current release. Changes are marked with change bars. For a complete list of changes to the product, see the Release Definition associated with this release.
Additional Information
Additional information that supports this product and Teradata Tools and Utilities is available at the web sites listed in the table that follows. In the table, mmyx represents the publication date of a manual, where mm is the month, y is the last digit of the year, and x is an internal publication code. Match the mmy of a related publication to the date on the cover of this book. This ensures that the publication selected supports the same release.
Date and Release Description
March 2013
Teradata Tools and Utilities 14.10
• Version update.
November 2011Teradata Tools and Utilities 14.00
• Added support for the array type for UDT. For more information, see “Administer User-Defined Types” on page 75.
August 2011Teradata Tools and Utilities 14.00
• Added support for security constraints for users connected to Teradata Database 14.0 and greater.

PrefaceAdditional Information
Teradata Administrator User Guide 5
Type of Information Description Access to Information
Release overview
Late information
Use the Release Definition for the following information:
• Overview of all of the products in the release
• Information received too late to be included in the manuals
• Operating systems and Teradata Database versions that are certified to work with each product
• Version numbers of each product and the documentation for each product
• Information about available training and the support center
1 Go to http://www.info.teradata.com/.
2 Under Online Publications, click General Search
3 Type 2029 in the Publication Product ID box.
4 Click Search.
5 Select the appropriate Release Definition from the search results.
Additional product information
Use the Teradata Information Products web site to view or download specific manuals that supply related or additional information to this manual.
1 Go to http://www.info.teradata.com/.
2 Under the Online Publications subcategory, Click Data Warehousing under Online Publications, Browse by Category.
3 Do one of the following:
• For a list of Teradata Tools and Utilities documents, click Teradata Tools and Utilities, and then select an item under Releases or Products.
• Select a link to any of the data warehousing publications categories listed.
Specific books related to Teradata Administrator are as follows:
• Database AdministrationB035-1093-mmyx
• Data DictionaryB035-1092-mmyx
• ODBC Driver for Teradata User GuideB035-2509-mmyx
• Security AdministrationB035-1100-mmyx
• SQL Data Definition LanguageB035-1144-mmyx
• Teradata Tools and Utilities Installation Guide for Microsoft WindowsB035-2407-mmyx
• MessagesB035-1096-mmyx
CD-ROM images Access a link to a downloadable CD-ROM image of all customer documentation for this release. Customers are authorized to create CD-ROMs for their use from this image.
1 Go to http://www.info.teradata.com/.
2 Click Data Warehousing under Online Publications, Browse by Category.
3 Click CD-ROM Images.

PrefaceAdditional Information
6 Teradata Administrator User Guide
Ordering information for manuals
Use the Teradata Information Products web site to order printed versions of manuals.
1 Go to http://www.info.teradata.com/.
2 Click How to Order under Print & CD Publications.
3 Follow the ordering instructions.
General information about Teradata
The Teradata home page provides links to numerous sources of information about Teradata. Links include:
• Executive reports, case studies of customer experiences with Teradata, and thought leadership
• Technical information, solutions, and expert advice
• Press releases, mentions, and media resources
1 Go to Teradata.com.
2 Select a link.
Type of Information Description Access to Information
Teradata Administrator User Guide 7
Table of Contents
Preface. . . . . . . . . . . . . . . . . . . . . . . . . . . . . . . . . . . . . . . . . . . . . . . . . . . . . . . . . . . . . . . . . . . . .3
Purpose . . . . . . . . . . . . . . . . . . . . . . . . . . . . . . . . . . . . . . . . . . . . . . . . . . . . . . . . . . . . . . . . . . . . . . .3
Audience . . . . . . . . . . . . . . . . . . . . . . . . . . . . . . . . . . . . . . . . . . . . . . . . . . . . . . . . . . . . . . . . . . . . . .3
Supported Releases . . . . . . . . . . . . . . . . . . . . . . . . . . . . . . . . . . . . . . . . . . . . . . . . . . . . . . . . . . . . . .3
Prerequisites . . . . . . . . . . . . . . . . . . . . . . . . . . . . . . . . . . . . . . . . . . . . . . . . . . . . . . . . . . . . . . . . . . .4
Changes to This Book. . . . . . . . . . . . . . . . . . . . . . . . . . . . . . . . . . . . . . . . . . . . . . . . . . . . . . . . . . . .4
Additional Information . . . . . . . . . . . . . . . . . . . . . . . . . . . . . . . . . . . . . . . . . . . . . . . . . . . . . . . . . .4
Chapter 1: Introduction . . . . . . . . . . . . . . . . . . . . . . . . . . . . . . . . . . . . . . . . . . . . . . . . . . . . . . . . . . . . 17
Overview . . . . . . . . . . . . . . . . . . . . . . . . . . . . . . . . . . . . . . . . . . . . . . . . . . . . . . . . . . . . . . . . . . . . 17
Program Fixes and Change Requests . . . . . . . . . . . . . . . . . . . . . . . . . . . . . . . . . . . . . . . . . . . . . 18
Online Help . . . . . . . . . . . . . . . . . . . . . . . . . . . . . . . . . . . . . . . . . . . . . . . . . . . . . . . . . . . . . . . . . . 18
Installation. . . . . . . . . . . . . . . . . . . . . . . . . . . . . . . . . . . . . . . . . . . . . . . . . . . . . . . . . . . . . . . . . . . 18
Chapter 2: Getting Started with Teradata Administrator. . . . . . . . . . . . . . . . . . . 19
Overview . . . . . . . . . . . . . . . . . . . . . . . . . . . . . . . . . . . . . . . . . . . . . . . . . . . . . . . . . . . . . . . . . . . . 19
Main Window . . . . . . . . . . . . . . . . . . . . . . . . . . . . . . . . . . . . . . . . . . . . . . . . . . . . . . . . . . . . . . . . 20
Database Tree . . . . . . . . . . . . . . . . . . . . . . . . . . . . . . . . . . . . . . . . . . . . . . . . . . . . . . . . . . . . . 20
Grid Area. . . . . . . . . . . . . . . . . . . . . . . . . . . . . . . . . . . . . . . . . . . . . . . . . . . . . . . . . . . . . . . . . 20
Menu Bar . . . . . . . . . . . . . . . . . . . . . . . . . . . . . . . . . . . . . . . . . . . . . . . . . . . . . . . . . . . . . . . . . . . . 21
File Menu . . . . . . . . . . . . . . . . . . . . . . . . . . . . . . . . . . . . . . . . . . . . . . . . . . . . . . . . . . . . . . . . 22
Edit Menu . . . . . . . . . . . . . . . . . . . . . . . . . . . . . . . . . . . . . . . . . . . . . . . . . . . . . . . . . . . . . . . . 23
View Menu . . . . . . . . . . . . . . . . . . . . . . . . . . . . . . . . . . . . . . . . . . . . . . . . . . . . . . . . . . . . . . . 24
Database Menu. . . . . . . . . . . . . . . . . . . . . . . . . . . . . . . . . . . . . . . . . . . . . . . . . . . . . . . . . . . . 24
Object Menu. . . . . . . . . . . . . . . . . . . . . . . . . . . . . . . . . . . . . . . . . . . . . . . . . . . . . . . . . . . . . . 25
Tools Menu. . . . . . . . . . . . . . . . . . . . . . . . . . . . . . . . . . . . . . . . . . . . . . . . . . . . . . . . . . . . . . . 26
Window Menu . . . . . . . . . . . . . . . . . . . . . . . . . . . . . . . . . . . . . . . . . . . . . . . . . . . . . . . . . . . . 28
Help Menu . . . . . . . . . . . . . . . . . . . . . . . . . . . . . . . . . . . . . . . . . . . . . . . . . . . . . . . . . . . . . . . 28
Table of Contents
8 Teradata Administrator User Guide
Keyboard Shortcuts. . . . . . . . . . . . . . . . . . . . . . . . . . . . . . . . . . . . . . . . . . . . . . . . . . . . . . . . . . . . .29
Command Shortcut Keys . . . . . . . . . . . . . . . . . . . . . . . . . . . . . . . . . . . . . . . . . . . . . . . . . . . . . . . .30
Drag and Drop Copying. . . . . . . . . . . . . . . . . . . . . . . . . . . . . . . . . . . . . . . . . . . . . . . . . . . . . . . . .31
Print or Save Data . . . . . . . . . . . . . . . . . . . . . . . . . . . . . . . . . . . . . . . . . . . . . . . . . . . . . . . . . . . . . .32
Chapter 3: Configuring Teradata Administrator . . . . . . . . . . . . . . . . . . . . . . . . . . . . . . .33
Database Access Prerequisites . . . . . . . . . . . . . . . . . . . . . . . . . . . . . . . . . . . . . . . . . . . . . . . . . . . .33
Step 1 - Define a Data Source . . . . . . . . . . . . . . . . . . . . . . . . . . . . . . . . . . . . . . . . . . . . . . . . . . . .34
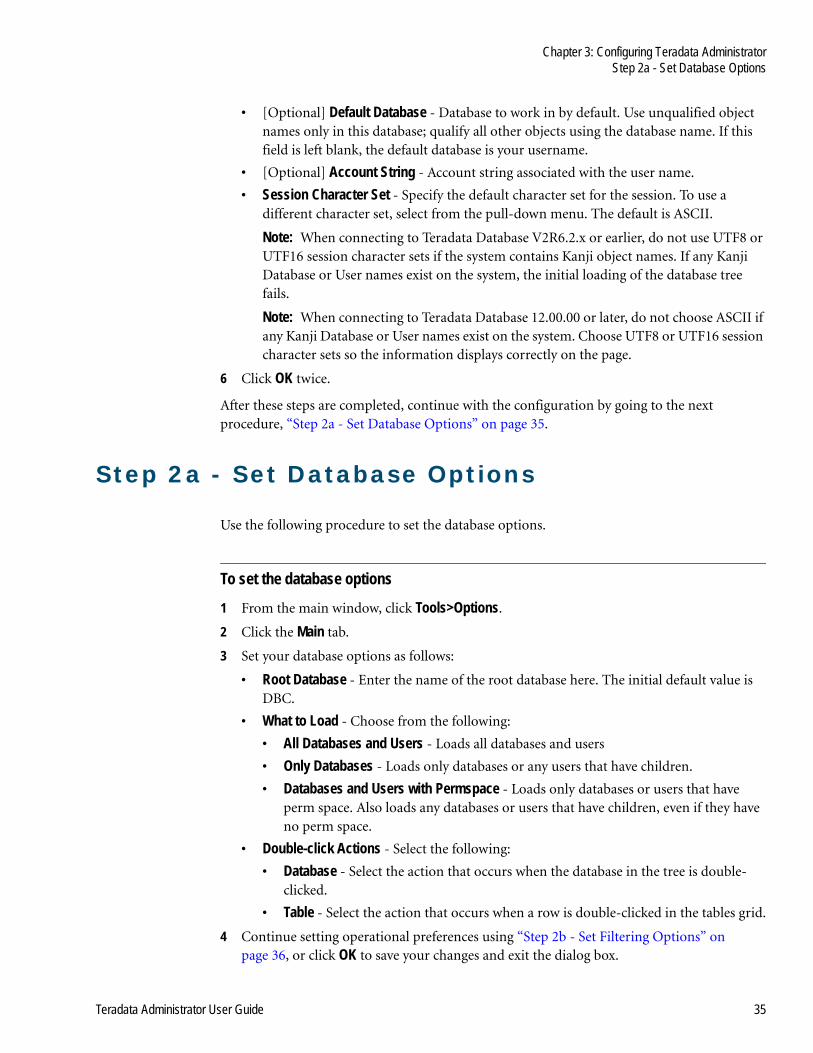
Step 2a - Set Database Options . . . . . . . . . . . . . . . . . . . . . . . . . . . . . . . . . . . . . . . . . . . . . . . . . . .35
Step 2b - Set Filtering Options. . . . . . . . . . . . . . . . . . . . . . . . . . . . . . . . . . . . . . . . . . . . . . . . . . . .36
Step 2c - Set Confirmation Options . . . . . . . . . . . . . . . . . . . . . . . . . . . . . . . . . . . . . . . . . . . . . . .36
Preview Mode. . . . . . . . . . . . . . . . . . . . . . . . . . . . . . . . . . . . . . . . . . . . . . . . . . . . . . . . . . . . . .37
Step 2d - Set Browse Options. . . . . . . . . . . . . . . . . . . . . . . . . . . . . . . . . . . . . . . . . . . . . . . . . . . . .38
Step 2e - Set General Options . . . . . . . . . . . . . . . . . . . . . . . . . . . . . . . . . . . . . . . . . . . . . . . . . . . .38
Step 2f - Set the Data Directory . . . . . . . . . . . . . . . . . . . . . . . . . . . . . . . . . . . . . . . . . . . . . . . . . . .39
Step 3 - Connect to a Data Source. . . . . . . . . . . . . . . . . . . . . . . . . . . . . . . . . . . . . . . . . . . . . . . . .40
Chapter 4: Working with Databases . . . . . . . . . . . . . . . . . . . . . . . . . . . . . . . . . . . . . . . . . . . . .43
Database Tree . . . . . . . . . . . . . . . . . . . . . . . . . . . . . . . . . . . . . . . . . . . . . . . . . . . . . . . . . . . . . . . . .43
Open or Close a Database in the Tree Display . . . . . . . . . . . . . . . . . . . . . . . . . . . . . . . . . . .43
Duplicate Databases. . . . . . . . . . . . . . . . . . . . . . . . . . . . . . . . . . . . . . . . . . . . . . . . . . . . . . . . .44
Arrange the Displayed Windows . . . . . . . . . . . . . . . . . . . . . . . . . . . . . . . . . . . . . . . . . . . . . . . . . .44
Refresh the Display . . . . . . . . . . . . . . . . . . . . . . . . . . . . . . . . . . . . . . . . . . . . . . . . . . . . . . . . . . . . .44
Find a Database, Object or Text String . . . . . . . . . . . . . . . . . . . . . . . . . . . . . . . . . . . . . . . . . . . . .45
Copy Database Object Information to the Clipboard . . . . . . . . . . . . . . . . . . . . . . . . . . . . . . . . .45
Abort the Current Database Operation . . . . . . . . . . . . . . . . . . . . . . . . . . . . . . . . . . . . . . . . . . . .45
Drop a Database or Database Object . . . . . . . . . . . . . . . . . . . . . . . . . . . . . . . . . . . . . . . . . . . . . .46
Rename Database Objects . . . . . . . . . . . . . . . . . . . . . . . . . . . . . . . . . . . . . . . . . . . . . . . . . . . . . . .46
Copy Database Objects From One Database to Another . . . . . . . . . . . . . . . . . . . . . . . . . . . . . .46
Delete All Objects in the Database. . . . . . . . . . . . . . . . . . . . . . . . . . . . . . . . . . . . . . . . . . . . . . . . .47
Browse Window . . . . . . . . . . . . . . . . . . . . . . . . . . . . . . . . . . . . . . . . . . . . . . . . . . . . . . . . . . . . . . .48
Displaying the Browse Window . . . . . . . . . . . . . . . . . . . . . . . . . . . . . . . . . . . . . . . . . . . . . . .48
Sorting the Browse Window . . . . . . . . . . . . . . . . . . . . . . . . . . . . . . . . . . . . . . . . . . . . . . . . . .48

Table of Contents
Teradata Administrator User Guide 9
Open Another Outline Window to a Data Source. . . . . . . . . . . . . . . . . . . . . . . . . . . . . . . . . . . 49
Chapter 5: Performing Maintenance Tasks . . . . . . . . . . . . . . . . . . . . . . . . . . . . . . . . . . . . 51
Create or Modify User Accounts . . . . . . . . . . . . . . . . . . . . . . . . . . . . . . . . . . . . . . . . . . . . . . . . . 51
User Attributes and Options . . . . . . . . . . . . . . . . . . . . . . . . . . . . . . . . . . . . . . . . . . . . . . . . . 52
Create or Modify Databases . . . . . . . . . . . . . . . . . . . . . . . . . . . . . . . . . . . . . . . . . . . . . . . . . . . . . 55
Database Attributes and Options . . . . . . . . . . . . . . . . . . . . . . . . . . . . . . . . . . . . . . . . . . . . . 55
Create Tables . . . . . . . . . . . . . . . . . . . . . . . . . . . . . . . . . . . . . . . . . . . . . . . . . . . . . . . . . . . . . . . . . 56
Table Attributes and Options . . . . . . . . . . . . . . . . . . . . . . . . . . . . . . . . . . . . . . . . . . . . . . . . 57
Column Attributes and Options. . . . . . . . . . . . . . . . . . . . . . . . . . . . . . . . . . . . . . . . . . . . . . 59
Define Primary Key and Indices Constraints . . . . . . . . . . . . . . . . . . . . . . . . . . . . . . . . . . . 63
Define Check Constraints . . . . . . . . . . . . . . . . . . . . . . . . . . . . . . . . . . . . . . . . . . . . . . . . . . . 64
Define Foreign Key Constraints . . . . . . . . . . . . . . . . . . . . . . . . . . . . . . . . . . . . . . . . . . . . . . 65
Administer Roles . . . . . . . . . . . . . . . . . . . . . . . . . . . . . . . . . . . . . . . . . . . . . . . . . . . . . . . . . . . . . . 67
Create a New Role . . . . . . . . . . . . . . . . . . . . . . . . . . . . . . . . . . . . . . . . . . . . . . . . . . . . . . . . . 67
Modify the Comment on an Existing Role . . . . . . . . . . . . . . . . . . . . . . . . . . . . . . . . . . . . . 67
View Access Rights on an Existing Role. . . . . . . . . . . . . . . . . . . . . . . . . . . . . . . . . . . . . . . . 67
Drop an Existing Role . . . . . . . . . . . . . . . . . . . . . . . . . . . . . . . . . . . . . . . . . . . . . . . . . . . . . . 67
Role Attributes and Options . . . . . . . . . . . . . . . . . . . . . . . . . . . . . . . . . . . . . . . . . . . . . . . . . 68
Administer Authorizations. . . . . . . . . . . . . . . . . . . . . . . . . . . . . . . . . . . . . . . . . . . . . . . . . . . . . . 69
List All Authorizations Currently Defined on the System . . . . . . . . . . . . . . . . . . . . . . . . . 69
Create an Authorization . . . . . . . . . . . . . . . . . . . . . . . . . . . . . . . . . . . . . . . . . . . . . . . . . . . . 69
Replace an Authorization . . . . . . . . . . . . . . . . . . . . . . . . . . . . . . . . . . . . . . . . . . . . . . . . . . . 70
Drop an Authorization . . . . . . . . . . . . . . . . . . . . . . . . . . . . . . . . . . . . . . . . . . . . . . . . . . . . . 70
Authorization Attributes and Options. . . . . . . . . . . . . . . . . . . . . . . . . . . . . . . . . . . . . . . . . 71
Administer Profiles . . . . . . . . . . . . . . . . . . . . . . . . . . . . . . . . . . . . . . . . . . . . . . . . . . . . . . . . . . . . 72
Profile Attributes and Options . . . . . . . . . . . . . . . . . . . . . . . . . . . . . . . . . . . . . . . . . . . . . . . 72
Administer User-Defined Types . . . . . . . . . . . . . . . . . . . . . . . . . . . . . . . . . . . . . . . . . . . . . . . . . 75
Create a New UDT. . . . . . . . . . . . . . . . . . . . . . . . . . . . . . . . . . . . . . . . . . . . . . . . . . . . . . . . . 75
Modify the Comment on an Existing UDT. . . . . . . . . . . . . . . . . . . . . . . . . . . . . . . . . . . . . 76
List All Objects that Use and Implement a UDT . . . . . . . . . . . . . . . . . . . . . . . . . . . . . . . . 76
Drop an Existing UDT. . . . . . . . . . . . . . . . . . . . . . . . . . . . . . . . . . . . . . . . . . . . . . . . . . . . . . 77
UDT Attributes and Options . . . . . . . . . . . . . . . . . . . . . . . . . . . . . . . . . . . . . . . . . . . . . . . . 77
Retrieve UDT Data. . . . . . . . . . . . . . . . . . . . . . . . . . . . . . . . . . . . . . . . . . . . . . . . . . . . . . . . . 78
Additional Information on UDTs and UDFs . . . . . . . . . . . . . . . . . . . . . . . . . . . . . . . . . . . 78
Manage Security Constraints . . . . . . . . . . . . . . . . . . . . . . . . . . . . . . . . . . . . . . . . . . . . . . . . . . . . 78
Create or Administer Security Constraints . . . . . . . . . . . . . . . . . . . . . . . . . . . . . . . . . . . . . 78
Add Security Constraints to Users or Profiles . . . . . . . . . . . . . . . . . . . . . . . . . . . . . . . . . . . 79
Add a Security Constraint Column to a Table . . . . . . . . . . . . . . . . . . . . . . . . . . . . . . . . . . 80

Table of Contents
10 Teradata Administrator User Guide
Move Space Between Databases. . . . . . . . . . . . . . . . . . . . . . . . . . . . . . . . . . . . . . . . . . . . . . . . . . .81
Move Space Options . . . . . . . . . . . . . . . . . . . . . . . . . . . . . . . . . . . . . . . . . . . . . . . . . . . . . . . .81
Chapter 6: Setting Access Rights . . . . . . . . . . . . . . . . . . . . . . . . . . . . . . . . . . . . . . . . . . . . . . . . .83
Grant or Revoke Object Rights . . . . . . . . . . . . . . . . . . . . . . . . . . . . . . . . . . . . . . . . . . . . . . . . . . .83
Grant / Revoke Object Rights Fields. . . . . . . . . . . . . . . . . . . . . . . . . . . . . . . . . . . . . . . . . . . .84
Grant or Revoke System Rights . . . . . . . . . . . . . . . . . . . . . . . . . . . . . . . . . . . . . . . . . . . . . . . . . . .85
Grant / Revoke System Rights Fields . . . . . . . . . . . . . . . . . . . . . . . . . . . . . . . . . . . . . . . . . . .86
Grant or Revoke Column Rights . . . . . . . . . . . . . . . . . . . . . . . . . . . . . . . . . . . . . . . . . . . . . . . . . .86
Grant / Revoke Column Rights Fields . . . . . . . . . . . . . . . . . . . . . . . . . . . . . . . . . . . . . . . . . .87
Grant or Revoke Logon Rights . . . . . . . . . . . . . . . . . . . . . . . . . . . . . . . . . . . . . . . . . . . . . . . . . . .88
Grant / Revoke Logon Rights Fields . . . . . . . . . . . . . . . . . . . . . . . . . . . . . . . . . . . . . . . . . . . .88
Grant or Revoke Connect Through Rights. . . . . . . . . . . . . . . . . . . . . . . . . . . . . . . . . . . . . . . . . .89
Grant / Revoke Connect Through Rights Fields . . . . . . . . . . . . . . . . . . . . . . . . . . . . . . . . . .89
Chapter 7: Setting Rules for Logging . . . . . . . . . . . . . . . . . . . . . . . . . . . . . . . . . . . . . . . . . . . .91
Work with the Access Log . . . . . . . . . . . . . . . . . . . . . . . . . . . . . . . . . . . . . . . . . . . . . . . . . . . . . . .91
Access Logging Fields and Controls . . . . . . . . . . . . . . . . . . . . . . . . . . . . . . . . . . . . . . . . . . . .92
Work with the Query Log . . . . . . . . . . . . . . . . . . . . . . . . . . . . . . . . . . . . . . . . . . . . . . . . . . . . . . .93
Query Logging Fields and Controls . . . . . . . . . . . . . . . . . . . . . . . . . . . . . . . . . . . . . . . . . . . .93
Chapter 8: Displaying Database Information . . . . . . . . . . . . . . . . . . . . . . . . . . . . . . . . . .97
Display All Objects . . . . . . . . . . . . . . . . . . . . . . . . . . . . . . . . . . . . . . . . . . . . . . . . . . . . . . . . . . . . .97
List All Objects Report Contents . . . . . . . . . . . . . . . . . . . . . . . . . . . . . . . . . . . . . . . . . . . . . .97
Display Tables and Indexes . . . . . . . . . . . . . . . . . . . . . . . . . . . . . . . . . . . . . . . . . . . . . . . . . . . . . .98
List Tables and Indexes Report Contents . . . . . . . . . . . . . . . . . . . . . . . . . . . . . . . . . . . . . . .98
Display Views . . . . . . . . . . . . . . . . . . . . . . . . . . . . . . . . . . . . . . . . . . . . . . . . . . . . . . . . . . . . . . . . .99
List Views Report Contents. . . . . . . . . . . . . . . . . . . . . . . . . . . . . . . . . . . . . . . . . . . . . . . . . . .99
Display Macros and Stored Procedures . . . . . . . . . . . . . . . . . . . . . . . . . . . . . . . . . . . . . . . . . . .100
List Macros and Procedures Report Contents. . . . . . . . . . . . . . . . . . . . . . . . . . . . . . . . . . .100
Display Databases and Users . . . . . . . . . . . . . . . . . . . . . . . . . . . . . . . . . . . . . . . . . . . . . . . . . . . .100
List Databases and Users Report Contents . . . . . . . . . . . . . . . . . . . . . . . . . . . . . . . . . . . . .101
Table of Contents
Teradata Administrator User Guide 11
Display Database Information . . . . . . . . . . . . . . . . . . . . . . . . . . . . . . . . . . . . . . . . . . . . . . . . . . 101
Database Information Report Contents. . . . . . . . . . . . . . . . . . . . . . . . . . . . . . . . . . . . . . . 102
Display Rights on DB and User . . . . . . . . . . . . . . . . . . . . . . . . . . . . . . . . . . . . . . . . . . . . . . . . . 103
Database Rights On... Report Contents . . . . . . . . . . . . . . . . . . . . . . . . . . . . . . . . . . . . . . . 103
Display Rights Held by DB and User . . . . . . . . . . . . . . . . . . . . . . . . . . . . . . . . . . . . . . . . . . . . 103
Database Rights Held By... Report Contents . . . . . . . . . . . . . . . . . . . . . . . . . . . . . . . . . . . 104
Access Rights Codes . . . . . . . . . . . . . . . . . . . . . . . . . . . . . . . . . . . . . . . . . . . . . . . . . . . . . . . 104
Display Role Memberships for the DB and User . . . . . . . . . . . . . . . . . . . . . . . . . . . . . . . . . . . 106
Role Memberships Report Contents . . . . . . . . . . . . . . . . . . . . . . . . . . . . . . . . . . . . . . . . . 107
Display Table Space Usage . . . . . . . . . . . . . . . . . . . . . . . . . . . . . . . . . . . . . . . . . . . . . . . . . . . . . 107
Table Space Report Contents . . . . . . . . . . . . . . . . . . . . . . . . . . . . . . . . . . . . . . . . . . . . . . . 108
Display Child Space Usage . . . . . . . . . . . . . . . . . . . . . . . . . . . . . . . . . . . . . . . . . . . . . . . . . . . . . 108
Child Space Report Contents . . . . . . . . . . . . . . . . . . . . . . . . . . . . . . . . . . . . . . . . . . . . . . . 108
Chapter 9: Displaying Object Information . . . . . . . . . . . . . . . . . . . . . . . . . . . . . . . . . . . . 111
Display Table Columns . . . . . . . . . . . . . . . . . . . . . . . . . . . . . . . . . . . . . . . . . . . . . . . . . . . . . . . 111
List Columns Report Contents . . . . . . . . . . . . . . . . . . . . . . . . . . . . . . . . . . . . . . . . . . . . . . 111
Display Table Indexes . . . . . . . . . . . . . . . . . . . . . . . . . . . . . . . . . . . . . . . . . . . . . . . . . . . . . . . . . 112
Indexes Report Contents . . . . . . . . . . . . . . . . . . . . . . . . . . . . . . . . . . . . . . . . . . . . . . . . . . . 112
Display Table References . . . . . . . . . . . . . . . . . . . . . . . . . . . . . . . . . . . . . . . . . . . . . . . . . . . . . . 113
Display Table Statistics . . . . . . . . . . . . . . . . . . . . . . . . . . . . . . . . . . . . . . . . . . . . . . . . . . . . . . . . 114
Display Table Row Count . . . . . . . . . . . . . . . . . . . . . . . . . . . . . . . . . . . . . . . . . . . . . . . . . . . . . 114
Display Table Row Data . . . . . . . . . . . . . . . . . . . . . . . . . . . . . . . . . . . . . . . . . . . . . . . . . . . . . . . 114
Display Table Space Usage . . . . . . . . . . . . . . . . . . . . . . . . . . . . . . . . . . . . . . . . . . . . . . . . . . . . . 114
Space Summary Report Contents. . . . . . . . . . . . . . . . . . . . . . . . . . . . . . . . . . . . . . . . . . . . 115
Display Table Space Usage by AMP . . . . . . . . . . . . . . . . . . . . . . . . . . . . . . . . . . . . . . . . . . . . . 115
Space by AMP Report Contents . . . . . . . . . . . . . . . . . . . . . . . . . . . . . . . . . . . . . . . . . . . . . 115
Display Object Access Rights . . . . . . . . . . . . . . . . . . . . . . . . . . . . . . . . . . . . . . . . . . . . . . . . . . . 116
Rights Report Contents . . . . . . . . . . . . . . . . . . . . . . . . . . . . . . . . . . . . . . . . . . . . . . . . . . . . 116
Display Users’ Access Rights on an Object . . . . . . . . . . . . . . . . . . . . . . . . . . . . . . . . . . . . . . . . 117
Display the Journal Table . . . . . . . . . . . . . . . . . . . . . . . . . . . . . . . . . . . . . . . . . . . . . . . . . . . . . . 117
Display the Object Definition . . . . . . . . . . . . . . . . . . . . . . . . . . . . . . . . . . . . . . . . . . . . . . . . . . 117
Table of Contents
12 Teradata Administrator User Guide
Chapter 10: Working With Queries. . . . . . . . . . . . . . . . . . . . . . . . . . . . . . . . . . . . . . . . . . . . . . . .119
Run or Explain a Query . . . . . . . . . . . . . . . . . . . . . . . . . . . . . . . . . . . . . . . . . . . . . . . . . . . . . . . .119
Query Window . . . . . . . . . . . . . . . . . . . . . . . . . . . . . . . . . . . . . . . . . . . . . . . . . . . . . . . . . . . . . . .120
Query Window File Menu . . . . . . . . . . . . . . . . . . . . . . . . . . . . . . . . . . . . . . . . . . . . . . . . . .120
Query Window Edit Menu . . . . . . . . . . . . . . . . . . . . . . . . . . . . . . . . . . . . . . . . . . . . . . . . . .121
Query Window Tools Menu . . . . . . . . . . . . . . . . . . . . . . . . . . . . . . . . . . . . . . . . . . . . . . . . .121
Query Window View Menu . . . . . . . . . . . . . . . . . . . . . . . . . . . . . . . . . . . . . . . . . . . . . . . . .121
Query Window Help Menu . . . . . . . . . . . . . . . . . . . . . . . . . . . . . . . . . . . . . . . . . . . . . . . . .122
Query Builder Overview. . . . . . . . . . . . . . . . . . . . . . . . . . . . . . . . . . . . . . . . . . . . . . . . . . . . . . . .122
SQL Statements . . . . . . . . . . . . . . . . . . . . . . . . . . . . . . . . . . . . . . . . . . . . . . . . . . . . . . . . . . .122
Procedure Builder . . . . . . . . . . . . . . . . . . . . . . . . . . . . . . . . . . . . . . . . . . . . . . . . . . . . . . . . .123
<User Defined> . . . . . . . . . . . . . . . . . . . . . . . . . . . . . . . . . . . . . . . . . . . . . . . . . . . . . . . . . . .123
Query Builder . . . . . . . . . . . . . . . . . . . . . . . . . . . . . . . . . . . . . . . . . . . . . . . . . . . . . . . . . . . . . . . .123
Open Query Builder. . . . . . . . . . . . . . . . . . . . . . . . . . . . . . . . . . . . . . . . . . . . . . . . . . . . . . . .123
Query Builder Options . . . . . . . . . . . . . . . . . . . . . . . . . . . . . . . . . . . . . . . . . . . . . . . . . . . . .124
Description of the Options . . . . . . . . . . . . . . . . . . . . . . . . . . . . . . . . . . . . . . . . . . . . . . . . . .124
Create a Custom Syntax File . . . . . . . . . . . . . . . . . . . . . . . . . . . . . . . . . . . . . . . . . . . . . . . . .125
Insert a Statement or Procedure into the Query Window . . . . . . . . . . . . . . . . . . . . . . . . .126
Use Query Builder in the Future . . . . . . . . . . . . . . . . . . . . . . . . . . . . . . . . . . . . . . . . . . . . .126
Results Window . . . . . . . . . . . . . . . . . . . . . . . . . . . . . . . . . . . . . . . . . . . . . . . . . . . . . . . . . . . . . .126
Results Window File Menu . . . . . . . . . . . . . . . . . . . . . . . . . . . . . . . . . . . . . . . . . . . . . . . . . .126
Results Window Edit Menu . . . . . . . . . . . . . . . . . . . . . . . . . . . . . . . . . . . . . . . . . . . . . . . . .127
Results Window View Menu. . . . . . . . . . . . . . . . . . . . . . . . . . . . . . . . . . . . . . . . . . . . . . . . .127
Results Window Help Menu. . . . . . . . . . . . . . . . . . . . . . . . . . . . . . . . . . . . . . . . . . . . . . . . .127
SQL History Window . . . . . . . . . . . . . . . . . . . . . . . . . . . . . . . . . . . . . . . . . . . . . . . . . . . . . . . . . .128
SQL History Window File Menu . . . . . . . . . . . . . . . . . . . . . . . . . . . . . . . . . . . . . . . . . . . . .128
SQL History Window Edit Menu . . . . . . . . . . . . . . . . . . . . . . . . . . . . . . . . . . . . . . . . . . . . .128
SQL History Window View Menu . . . . . . . . . . . . . . . . . . . . . . . . . . . . . . . . . . . . . . . . . . . .128
SQL History Window Help Menu . . . . . . . . . . . . . . . . . . . . . . . . . . . . . . . . . . . . . . . . . . . .129
Glossary . . . . . . . . . . . . . . . . . . . . . . . . . . . . . . . . . . . . . . . . . . . . . . . . . . . . . . . . . . . . . . . . .131
Index . . . . . . . . . . . . . . . . . . . . . . . . . . . . . . . . . . . . . . . . . . . . . . . . . . . . . . . . . . . . . . . . . . . . .137

Teradata Administrator User Guide 13
List of Figures
Figure 1: Teradata Administrator Main Window . . . . . . . . . . . . . . . . . . . . . . . . . . . . . . . . . . . 20

List of Figures
14 Teradata Administrator User Guide
Teradata Administrator User Guide 15
List of Tables
Table 1: File Menu Commands . . . . . . . . . . . . . . . . . . . . . . . . . . . . . . . . . . . . . . . . . . . . . . . . . . 22
Table 2: Edit Menu Commands. . . . . . . . . . . . . . . . . . . . . . . . . . . . . . . . . . . . . . . . . . . . . . . . . . 23
Table 3: View Menu Commands . . . . . . . . . . . . . . . . . . . . . . . . . . . . . . . . . . . . . . . . . . . . . . . . . 24
Table 4: Database Menu Commands . . . . . . . . . . . . . . . . . . . . . . . . . . . . . . . . . . . . . . . . . . . . . 24
Table 5: Object Menu Commands . . . . . . . . . . . . . . . . . . . . . . . . . . . . . . . . . . . . . . . . . . . . . . . 25
Table 6: Tools Menu Commands . . . . . . . . . . . . . . . . . . . . . . . . . . . . . . . . . . . . . . . . . . . . . . . . 26
Table 7: Window Menu Commands . . . . . . . . . . . . . . . . . . . . . . . . . . . . . . . . . . . . . . . . . . . . . . 28
Table 8: Help Menu Commands . . . . . . . . . . . . . . . . . . . . . . . . . . . . . . . . . . . . . . . . . . . . . . . . . 29
Table 9: Keyboard Shortcuts . . . . . . . . . . . . . . . . . . . . . . . . . . . . . . . . . . . . . . . . . . . . . . . . . . . . 29
Table 10: Command Shortcut Keys. . . . . . . . . . . . . . . . . . . . . . . . . . . . . . . . . . . . . . . . . . . . . . . 30
Table 11: Create User and Modify User Dialog Box Description. . . . . . . . . . . . . . . . . . . . . . . 52
Table 12: Create Database Dialog Box and Modify Database Dialog Box Description . . . . . 55
Table 13: Create Table Dialog Box Description . . . . . . . . . . . . . . . . . . . . . . . . . . . . . . . . . . . . . 57
Table 14: Column Attributes and Options . . . . . . . . . . . . . . . . . . . . . . . . . . . . . . . . . . . . . . . . . 59
Table 15: Define Primary Key and Indices Dialog Box Description . . . . . . . . . . . . . . . . . . . . 63
Table 16: Define Check Constraints Dialog Box Description. . . . . . . . . . . . . . . . . . . . . . . . . . 64
Table 17: Define Foreign Key Constraints Dialog Box Description . . . . . . . . . . . . . . . . . . . . . 65
Table 18: Administer Roles Dialog Box Description . . . . . . . . . . . . . . . . . . . . . . . . . . . . . . . . . 68
Table 19: Authorizations Dialog Box Description . . . . . . . . . . . . . . . . . . . . . . . . . . . . . . . . . . . 71
Table 20: Administer Profiles Dialog Box Description . . . . . . . . . . . . . . . . . . . . . . . . . . . . . . . 72
Table 21: Administer UDTs Dialog Box Description . . . . . . . . . . . . . . . . . . . . . . . . . . . . . . . . 77
Table 22: Administer Security Constraints Dialog Box Description . . . . . . . . . . . . . . . . . . . . 79
Table 23: Add Security Constraints Dialog Box (Users and Profiles) Description . . . . . . . . . 80
Table 24: Add Security Constraints Dialog Box (Tables) Description. . . . . . . . . . . . . . . . . . . 80
Table 25: Move Space Dialog Box Description . . . . . . . . . . . . . . . . . . . . . . . . . . . . . . . . . . . . . 81
Table 26: Object Rights Dialog Box Description . . . . . . . . . . . . . . . . . . . . . . . . . . . . . . . . . . . . 83
Table 27: Grant/Revoke Objects Dialog Box Description . . . . . . . . . . . . . . . . . . . . . . . . . . . . . 84
Table 28: Grant/Revoke System Dialog Box Description . . . . . . . . . . . . . . . . . . . . . . . . . . . . . 86
Table 29: Grant/Revoke Columns Dialog Box Description . . . . . . . . . . . . . . . . . . . . . . . . . . . 87
Table 30: Grant/Revoke Logon Dialog Box Description . . . . . . . . . . . . . . . . . . . . . . . . . . . . . . 88
Table 31: Grant/Revoke Connect Through Dialog Box Description . . . . . . . . . . . . . . . . . . . . 89
Table 32: Access Logging Dialog Box Description . . . . . . . . . . . . . . . . . . . . . . . . . . . . . . . . . . . 92

List of Tables
16 Teradata Administrator User Guide
Table 33: Query Logging Rules Dialog Box Description . . . . . . . . . . . . . . . . . . . . . . . . . . . . . . .93
Table 34: List All Objects Report . . . . . . . . . . . . . . . . . . . . . . . . . . . . . . . . . . . . . . . . . . . . . . . . . .97
Table 35: List Tables and Indexes Report . . . . . . . . . . . . . . . . . . . . . . . . . . . . . . . . . . . . . . . . . . .98
Table 36: List Views Report . . . . . . . . . . . . . . . . . . . . . . . . . . . . . . . . . . . . . . . . . . . . . . . . . . . . . .99
Table 37: List Macros and Procedures Report . . . . . . . . . . . . . . . . . . . . . . . . . . . . . . . . . . . . . .100
Table 38: List Databases and Users . . . . . . . . . . . . . . . . . . . . . . . . . . . . . . . . . . . . . . . . . . . . . . .101
Table 39: Database Information Report . . . . . . . . . . . . . . . . . . . . . . . . . . . . . . . . . . . . . . . . . . .102
Table 40: Rights on DB/User Report. . . . . . . . . . . . . . . . . . . . . . . . . . . . . . . . . . . . . . . . . . . . . .103
Table 41: Rights Held by DB/User Report . . . . . . . . . . . . . . . . . . . . . . . . . . . . . . . . . . . . . . . . .104
Table 42: Access Rights Codes . . . . . . . . . . . . . . . . . . . . . . . . . . . . . . . . . . . . . . . . . . . . . . . . . . .104
Table 43: Role Memberships Report . . . . . . . . . . . . . . . . . . . . . . . . . . . . . . . . . . . . . . . . . . . . . .107
Table 44: Table Space Report. . . . . . . . . . . . . . . . . . . . . . . . . . . . . . . . . . . . . . . . . . . . . . . . . . . .108
Table 45: Child Space Report. . . . . . . . . . . . . . . . . . . . . . . . . . . . . . . . . . . . . . . . . . . . . . . . . . . .109
Table 46: List Columns Report . . . . . . . . . . . . . . . . . . . . . . . . . . . . . . . . . . . . . . . . . . . . . . . . . .112
Table 47: Indexes Report . . . . . . . . . . . . . . . . . . . . . . . . . . . . . . . . . . . . . . . . . . . . . . . . . . . . . . .113
Table 48: Space Summary Report . . . . . . . . . . . . . . . . . . . . . . . . . . . . . . . . . . . . . . . . . . . . . . . .115
Table 49: Space by AMP Report . . . . . . . . . . . . . . . . . . . . . . . . . . . . . . . . . . . . . . . . . . . . . . . . .115
Table 50: Rights Report . . . . . . . . . . . . . . . . . . . . . . . . . . . . . . . . . . . . . . . . . . . . . . . . . . . . . . . .116
Table 51: Query Window File Menu Commands . . . . . . . . . . . . . . . . . . . . . . . . . . . . . . . . . . .120
Table 52: Query Window Edit Menu Commands . . . . . . . . . . . . . . . . . . . . . . . . . . . . . . . . . . .121
Table 53: Query Window Tools Menu Commands. . . . . . . . . . . . . . . . . . . . . . . . . . . . . . . . . .121
Table 54: Query Window View Menu Commands . . . . . . . . . . . . . . . . . . . . . . . . . . . . . . . . . .122
Table 55: Help Menu Commands . . . . . . . . . . . . . . . . . . . . . . . . . . . . . . . . . . . . . . . . . . . . . . . .122
Table 56: Query Builder Usage Options . . . . . . . . . . . . . . . . . . . . . . . . . . . . . . . . . . . . . . . . . . .122
Table 57: Query Builder Usage Options . . . . . . . . . . . . . . . . . . . . . . . . . . . . . . . . . . . . . . . . . . .124
Table 58: Results Window File Menu Commands. . . . . . . . . . . . . . . . . . . . . . . . . . . . . . . . . . .126
Table 59: Results Window Edit Menu Commands . . . . . . . . . . . . . . . . . . . . . . . . . . . . . . . . . .127
Table 60: Results Window View Menu Commands . . . . . . . . . . . . . . . . . . . . . . . . . . . . . . . . .127
Table 61: Results Window Help Menu Commands . . . . . . . . . . . . . . . . . . . . . . . . . . . . . . . . .127
Table 62: SQL History Window File Menu Commands . . . . . . . . . . . . . . . . . . . . . . . . . . . . . .128
Table 63: SQL History Window Edit Menu Commands. . . . . . . . . . . . . . . . . . . . . . . . . . . . . .128
Table 64: SQL History Window View Menu Commands. . . . . . . . . . . . . . . . . . . . . . . . . . . . .128
Table 65: SQL History Window Help Menu Commands . . . . . . . . . . . . . . . . . . . . . . . . . . . . .129
Teradata Administrator User Guide 17
CHAPTER 1
Introduction
The following topics provide an introduction to Teradata Administrator:
• Overview
• Program Fixes and Change Requests
• Online Help
• Installation
Overview
For an overview of the capabilities of Teradata Administrator and an introduction to the graphical interface including the menu bar, see Chapter 2: “Getting Started with Teradata Administrator.”
To get familiar with the Teradata Administrator interface, see the following chapters:
Task Location
Set up the initial installation of Teradata Administrator, set operational preferences and log on to the Teradata Database
Chapter 3: “Configuring Teradata Administrator”
Perform general operations with the Teradata Database
Chapter 4: “Working with Databases”
Work with users, profiles, roles and modifying databases
Chapter 5: “Performing Maintenance Tasks”
Grant or revoke access rights for various objects Chapter 6: “Setting Access Rights”
Work with access and query logs Chapter 7: “Setting Rules for Logging”
View detailed information on the Teradata Database Chapter 8: “Displaying Database Information”
View detailed information on various objects in the Teradata Database
Chapter 9: “Displaying Object Information”
Work with SQL queries Chapter 10: “Working With Queries”

Chapter 1: IntroductionProgram Fixes and Change Requests
18 Teradata Administrator User Guide
Program Fixes and Change Requests
For the latest documentation on program fixes and changes included in this release, see the following:
• The history.txt file located in the bin directory.
The default is drive:\Program Files\Teradata\Teradata Administrator 14.10\bin.
• Teradata Tools and Utilities Release Definition.
Online Help
Teradata Administrator online help answers questions about how to use Teradata Administrator features. Online help (including context-sensitive help) opens in a browser window. Microsoft Internet Explorer, version 6.0 or later, is the recommended browser for viewing online help and context-sensitive help. A browser other than the recommended browser might result in incorrectly displayed help.
To open online help
✔ From the toolbar, click .
The Help window opens. Use the tools available from the Help window to navigate to other topics.
To open context-sensitive help
✔ From most windows and dialog boxes, press F1 to see context-sensitive help for the active window or dialog box.
Installation
For information on installing Teradata Administrator and the rest of the Teradata Tools and Utilities, see the Teradata Tools and Utilities Installation Guide for Microsoft Windows.

Teradata Administrator User Guide 19
CHAPTER 2
Getting Started with TeradataAdministrator
The following topics provide the basic information to get started using Teradata Administrator:
• Overview
• Main Window
• Menu Bar
• Keyboard Shortcuts
• Command Shortcut Keys
• Drag and Drop Copying
• Print or Save Data
Overview
Teradata Administrator provides a comprehensive Windows-based graphical interface to the Teradata Database Data Dictionary for performing a multitude of database administration tasks on the Teradata Database.
The following functions can be performed:
• Create, Modify and Drop Databases, Users, Roles, Profiles, and User-Defined Types.
• Create Tables (using ANSI or Teradata syntax)
• Grant or Revoke access and system rights
• Copy Table, View or Macro definitions to another database, or to another system
• Drop or Rename Tables, Views or Macros
• Move space from one database to another
• Run an SQL query
• Display information about a Database or Users
• Display information about a Table, View or Macro
• Set up the rules for Query and Access Logging
Teradata Administrator keeps a record of all the actions that are taken and can optionally save this record to a file. This record contains a time stamp together with the SQL that is executed, and other information such as the statement's success or failure.
Chapter 2: Getting Started with Teradata AdministratorMain Window
20 Teradata Administrator User Guide
Main Window
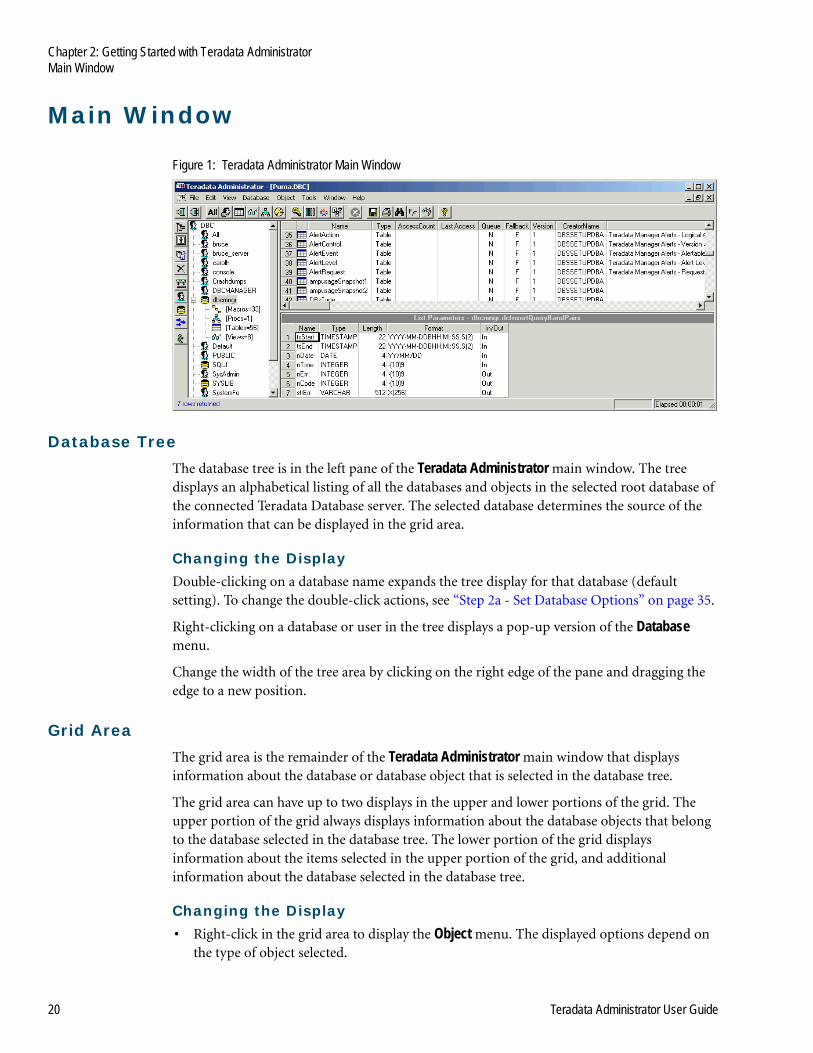
Figure 1: Teradata Administrator Main Window
Database TreeThe database tree is in the left pane of the Teradata Administrator main window. The tree displays an alphabetical listing of all the databases and objects in the selected root database of the connected Teradata Database server. The selected database determines the source of the information that can be displayed in the grid area.
Changing the DisplayDouble-clicking on a database name expands the tree display for that database (default setting). To change the double-click actions, see “Step 2a - Set Database Options” on page 35.
Right-clicking on a database or user in the tree displays a pop-up version of the Database menu.
Change the width of the tree area by clicking on the right edge of the pane and dragging the edge to a new position.
Grid AreaThe grid area is the remainder of the Teradata Administrator main window that displays information about the database or database object that is selected in the database tree.
The grid area can have up to two displays in the upper and lower portions of the grid. The upper portion of the grid always displays information about the database objects that belong to the database selected in the database tree. The lower portion of the grid displays information about the items selected in the upper portion of the grid, and additional information about the database selected in the database tree.
Changing the Display• Right-click in the grid area to display the Object menu. The displayed options depend on
the type of object selected.
Chapter 2: Getting Started with Teradata AdministratorMenu Bar
Teradata Administrator User Guide 21
• Right-click on the Header of a grid, or anywhere in the lower grid, to display a menu for performing functions on the entire grid.
Resizing the GridChange the width of any column in the grid area by clicking on the right edge of the column title cell and dragging to a new position.
Sorting the Grid ContentsSort the grid by clicking on a column header. The first click sorts the column in ascending order. Subsequent clicks on the same column alternates the sort order between ascending and descending.
Hiding or Showing ColumnsUse the following procedure to show or hide columns from the grid area.
To hide a column
1 Right-click on the heading row.
2 Click Hide Columns.
The Column List dialog box appears. The Highlight to Select Columns list shows each column in the grid area for the grid that is active.
3 Select the column to hide. To select multiple columns, press and hold Ctrl.
4 Click Hide.
The columns in the grid area are hidden from view.
To show all columns
1 Right-click on the heading row.
2 Click Hide Columns.
The Column List dialog box appears.
3 Click Show all.
The configuration is reset to show all of the columns in the grid area.
Menu Bar
Teradata Administrator provides a wide array of administrative options that can all be easily accessed from the menu bar. After becoming comfortable with the menu categories displayed on the menu bar, using Teradata Administrator becomes quite intuitive.

Chapter 2: Getting Started with Teradata AdministratorMenu Bar
22 Teradata Administrator User Guide
File MenuUse the File menu to establish a connection, define a data source, or exit the Teradata Administrator application.
The File menu displays three selections until a connection with a database server is established. Establishing a connection adds the remaining selections to the File menu. Use these to perform file maintenance functions on the objects of the connected database, and to open and terminate connections.
Table 1: File Menu Commands
Command Button Description Additional Information
Abort Abort the current database operation.
“Abort the Current Database Operation” on page 45.
Connect Connect to an available Teradata Database server system.
“Step 3 - Connect to a Data Source” on page 40.
Disconnect Relinquish a connection to a Teradata Database server system and close all open outline windows for that data source.
Not applicable.
Close Database List
Close the outline window. Does not disconnect the session unless this is the only window open for that data source.
Not applicable.
Define Data Source None Add, delete, or configure the data source or install new ODBC drivers on your PC.
“Step 1 - Define a Data Source” on page 34.
New Database List Open another outline window to a currently selected data source.
“Open Another Outline Window to a Data Source” on page 49.
Copy Objects Copy a database or database tables, views, or macros from one database to another.
“Copy Database Objects From One Database to Another” on page 46.
Drop Drop a database or database tables, views, or macros from a database.
“Drop a Database or Database Object” on page 46.
Rename Object None Change the name of selected tables, views, or macros.
“Rename Database Objects” on page 46.
Drop All Objects in DB
None Delete all of the objects in the selected database.
“Delete All Objects in the Database” on page 47.
Print Print the contents of the active database tree or grid.
“Print or Save Data” on page 32.

Chapter 2: Getting Started with Teradata AdministratorMenu Bar
Teradata Administrator User Guide 23
Edit MenuUse the Edit menu to perform routine edit functions on the currently selected display.
Note: The Edit menu does not appear on the Teradata Administrator menu bar until a connection is established with a database server.
Save As Save the contents of the active database tree or grid to a disk file.
“Print or Save Data” on page 32.
Exit None Close Teradata Administrator and return to the Windows desktop.
Not applicable.
Table 1: File Menu Commands (continued)
Command Button Description Additional Information
Table 2: Edit Menu Commands
Command Button Description Additional Information
Copy Copy the selected database objects to your PC clipboard file.
“Copy Database Object Information to the Clipboard” on page 45.
Select All Grid None Select all of the database objects listed in the active grid.
“Copy Database Object Information to the Clipboard” on page 45.
Clear Grid None Deselect (clear) all of the database objects listed in the active grid.
“Copy Database Object Information to the Clipboard” on page 45.
Find Find a particular database or database object in the database tree or the grid area.
“Find a Database, Object or Text String” on page 45.
Expand One Level None Expand the database tree to display the immediate children of the selected database.
“Database Tree” on page 43.
Expand Branch None Expand the database tree display for the selected database to show all of its child databases.
“Database Tree” on page 43.
Expand All Levels None Expand the database tree to display all databases in the hierarchy below the root database.
“Database Tree” on page 43.
Close All None Collapse all of the expanded databases.
“Database Tree” on page 43.

Chapter 2: Getting Started with Teradata AdministratorMenu Bar
24 Teradata Administrator User Guide
View MenuUse the View menu to enable and disable the tool bar, tool tips, and status bar displays, and to change the appearance of Teradata Administrator displays.
Database MenuUse the Database menu to indicate the type of information to display from the selected database. A check mark indicates the current setting of your database Default View option. That is, the information displayed when the database is double-clicked.
Note: The Database menu does not appear on the menu bar until a connection is established with a database server.
Table 3: View Menu Commands
Command Button Description Additional Information
ToolBar None Show or hide the main window tool bar.
“Step 2e - Set General Options” on page 38.
Status Bar None Show or hide the status bar in the Teradata Administrator window.
“Step 2e - Set General Options” on page 38.
Set Font Display the Font dialog box to change the font type, style, or size for text displayed in Teradata Administrator windows.
Not applicable.
Hide Columns None Delete selected columns from the Teradata Administrator displays.
“Hiding or Showing Columns” on page 21.
Last Error None Display the most recent SQL error message in a popup dialog box.
Not applicable.
Table 4: Database Menu Commands
Command Button Description Additional Information
List All Objects Display each object in the selected database.
“Display All Objects” on page 97.
List Tables & Indexes
Display each table and index in the selected database.
“Display Tables and Indexes” on page 98.
List Views Display each view in the selected database.
“Display Views” on page 99.
List Macros & Procedures
Display each macro, stored procedure in the selected database.
“Display Macros and Stored Procedures” on page 100.

Chapter 2: Getting Started with Teradata AdministratorMenu Bar
Teradata Administrator User Guide 25
Object MenuUse the Object menu to display detail information about the selected objects (such as tables, views, macros).
Note: The Object menu does not appear on the menu bar until a connection is established with a database server. Teradata Administrator only displays options relevant to the type of objects loaded.
List Databases & Users
Display all databases and users created under the selected database.
“Display Databases and Users” on page 100.
Database Information
None Display information on the selected database.
“Display Database Information” on page 101.
Rights on DB/User None Display access rights for each table, view, and macro in the selected database.
“Display Rights on DB and User” on page 103.
Rights Held by DB/User
None Display the access rights held by the selected database or user.
“Display Rights Held by DB and User” on page 103.
Role Memberships None Display role memberships assigned to the selected user.
“Display Role Memberships for the DB and User” on page 106.
Table Space Display space usage for each table in the selected database.
“Display Table Space Usage” on page 107.
Child Space None Display space usage for each database that is owned directly by a selected database.
“Display Child Space Usage” on page 108.
Open/Close DB None Open to display or close to hide the children of the selected database node.
“Open or Close a Database in the Tree Display” on page 43.
Table 4: Database Menu Commands (continued)
Command Button Description Additional Information
Table 5: Object Menu Commands
Command Button Description Additional Information
List Columns Information about the columns of the selected object.
“Display Table Columns” on page 111.
Indexes The indexes for the selected object.
“Display Table Indexes” on page 112.
References None Information about references to the selected object.
“Display Table References” on page 113.

Chapter 2: Getting Started with Teradata AdministratorMenu Bar
26 Teradata Administrator User Guide
Tools MenuUse the Tools menu to perform database maintenance and administration functions.
Note: The Options command is the only command available on the Tools menu until a connection is established with a database server.
Statistics None Statistics information for the selected object.
“Display Table Statistics” on page 114.
Row Count None The number of rows in the selected object.
“Display Table Row Count” on page 114.
Browse Information from the data rows of the selected object.
“Display Table Row Data” on page 114.
Space Summary None Space usage information for the selected object.
“Display Table Space Usage” on page 114.
Space by AMP None Space usage by AMP information for the selected object.
“Display Table Space Usage by AMP” on page 115.
Rights None Access rights for the selected object.
“Display Object Access Rights” on page 116.
Users None The users who have access rights to the selected object.
“Display Users’ Access Rights on an Object” on page 117.
Journal None The journal table for the selected object.
“Display the Journal Table” on page 117.
Show Definition The text that is used to create the selected object.
“Display the Object Definition” on page 117.
Table 5: Object Menu Commands (continued)
Command Button Description Additional Information
Table 6: Tools Menu Commands
Command Button Description Additional Information
Create>Database Create an entirely new database, with no shared specifications from an existing database.
“Create or Modify Databases” on page 55.
Create>Table None Create a new table. “Create Tables” on page 56.
Create>User Create an entirely new user, with no shared specifications from an existing user.
“Create or Modify User Accounts” on page 51.
Create>Profile None Create database profiles and assign users permissions to use them.
“Administer Profiles” on page 72.

Chapter 2: Getting Started with Teradata AdministratorMenu Bar
Teradata Administrator User Guide 27
Create>Role None Create roles and assign users to them.
“Administer Roles” on page 67.
Create>Type None Create user-defined types. “Administer User-Defined Types” on page 75
Create> Authorization
None Create an authorization. “Administer Authorizations” on page 69
Grant/Revoke> Object Rights
Grant or revoke general database access privileges to users or roles.
“Grant or Revoke Object Rights” on page 83.
Grant/Revoke> System Rights
None Grant or revoke system privileges to users or roles.
“Grant or Revoke System Rights” on page 85.
Grant/Revoke> Logon Rights
None Grant or revoke logon privileges to users.
“Grant or Revoke Logon Rights” on page 88.
Grant/Revoke> Column Rights
None Grant or revoke column privileges to users or roles.
“Grant or Revoke Column Rights” on page 86.
Grant/Revoke> Connect Through
None Grant or revoke connection privileges to users or roles.
“Grant or Revoke Connect Through Rights” on page 89
Administer> Profiles None Administer profile access. “Administer Profiles” on page 72.
Administer>Roles None Administer database roles. “Administer Roles” on page 67.
Administer> UDTs None Administer user-defined types. “Administer User-Defined Types” on page 75
Administer> Authorizations
None Administer authorizations. “Administer Authorizations” on page 69
Administer> Security Constraints
None Administer security constraints. This feature only appears when connected to Teradata Database 14.0 or above.
“Manage Security Constraints” on page 78.
Clone Database None Create a new database that is either identical or closely related to an existing database.
“Create or Modify Databases” on page 55.
Modify Database None Change the specifications of an existing database.
“Create or Modify Databases” on page 55.
Clone User None Create a new user either identical or closely related to an existing user.
“Create or Modify User Accounts” on page 51.
Modify User None Change the specifications of an existing user.
“Create or Modify User Accounts” on page 51.
Access Logging None Start or stop access logging for specific tables, databases or users, or view currently defined Access Log Rules.
“Work with the Access Log” on page 91.
Table 6: Tools Menu Commands (continued)
Command Button Description Additional Information

Chapter 2: Getting Started with Teradata AdministratorMenu Bar
28 Teradata Administrator User Guide
Window MenuUse the Window menu to arrange, select, refresh, and select Teradata Administrator windows, and to display the SQL History window.
Help MenuUse the Help menu to get assistance in using Teradata Administrator, or to view Teradata Administrator version numbers and server information.
Move Space Reallocate permanent disk space from one database to another.
“Move Space Between Databases” on page 81.
Query Create, modify, test, and run SQL query scripts.
“Run or Explain a Query” on page 119.
Query Logging None Log SQL queries processed by a system.
“Work with the Query Log” on page 93.
Options None Configure the operational preferences for Teradata Administrator.
• “Step 2a - Set Database Options” on page 35.
• “Step 2b - Set Filtering Options” on page 36.
• “Step 2c - Set Confirmation Options” on page 36.
• “Step 2d - Set Browse Options” on page 38.
• “Step 2e - Set General Options” on page 38.
• “Step 2f - Set the Data Directory” on page 39.
Table 6: Tools Menu Commands (continued)
Command Button Description Additional Information
Table 7: Window Menu Commands
Command Button Description Additional Information
Cascade None Arrange the open windows in a cascading pattern.
“Arrange the Displayed Windows” on page 44.
Tile None Arrange the open windows in a tile pattern.
“Arrange the Displayed Windows” on page 44.
Vertical None Arrange the open windows in a vertical pattern.
“Arrange the Displayed Windows” on page 44.
Refresh None Refresh the open windows. “Refresh the Display” on page 44.
SQL History None Open the SQL History window.
“SQL History Window” on page 128.
Window List None List of all open windows. Not applicable.
Chapter 2: Getting Started with Teradata AdministratorKeyboard Shortcuts
Teradata Administrator User Guide 29
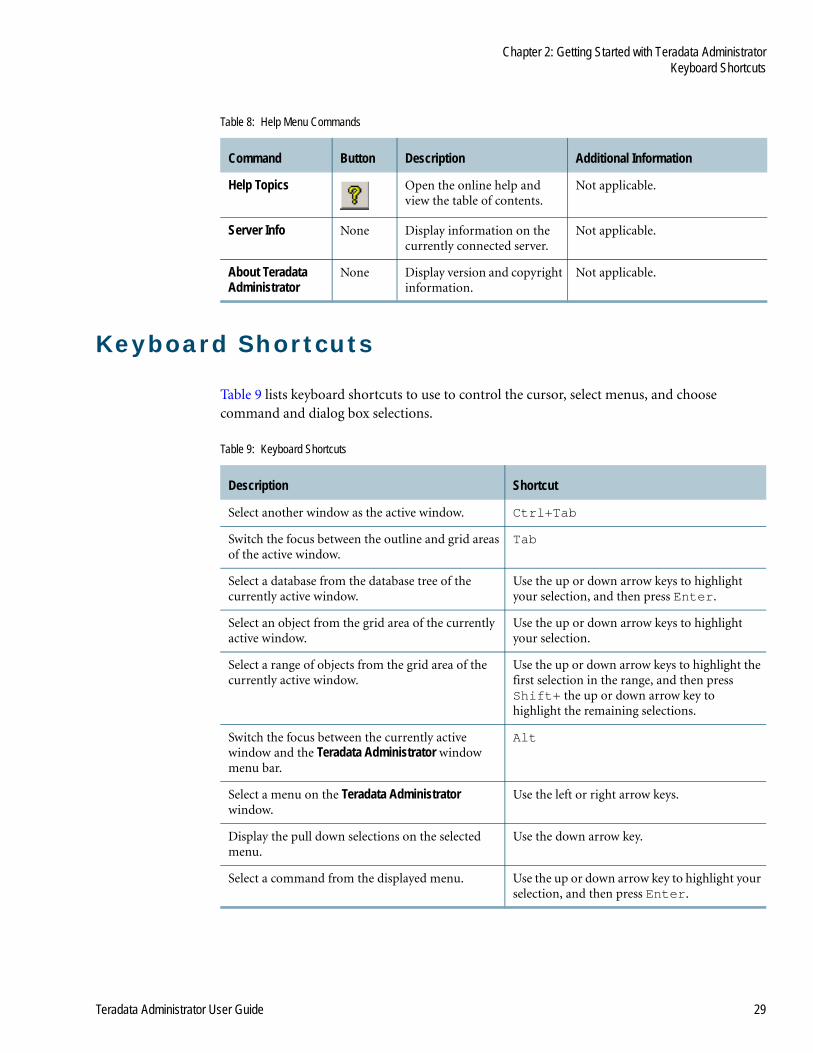
Keyboard Shortcuts
Table 9 lists keyboard shortcuts to use to control the cursor, select menus, and choose command and dialog box selections.
Table 8: Help Menu Commands
Command Button Description Additional Information
Help Topics Open the online help and view the table of contents.
Not applicable.
Server Info None Display information on the currently connected server.
Not applicable.
About Teradata Administrator
None Display version and copyright information.
Not applicable.
Table 9: Keyboard Shortcuts
Description Shortcut
Select another window as the active window. Ctrl+Tab
Switch the focus between the outline and grid areas of the active window.
Tab
Select a database from the database tree of the currently active window.
Use the up or down arrow keys to highlight your selection, and then press Enter.
Select an object from the grid area of the currently active window.
Use the up or down arrow keys to highlight your selection.
Select a range of objects from the grid area of the currently active window.
Use the up or down arrow keys to highlight the first selection in the range, and then press Shift+ the up or down arrow key to highlight the remaining selections.
Switch the focus between the currently active window and the Teradata Administrator window menu bar.
Alt
Select a menu on the Teradata Administrator window.
Use the left or right arrow keys.
Display the pull down selections on the selected menu.
Use the down arrow key.
Select a command from the displayed menu. Use the up or down arrow key to highlight your selection, and then press Enter.
Chapter 2: Getting Started with Teradata AdministratorCommand Shortcut Keys
30 Teradata Administrator User Guide
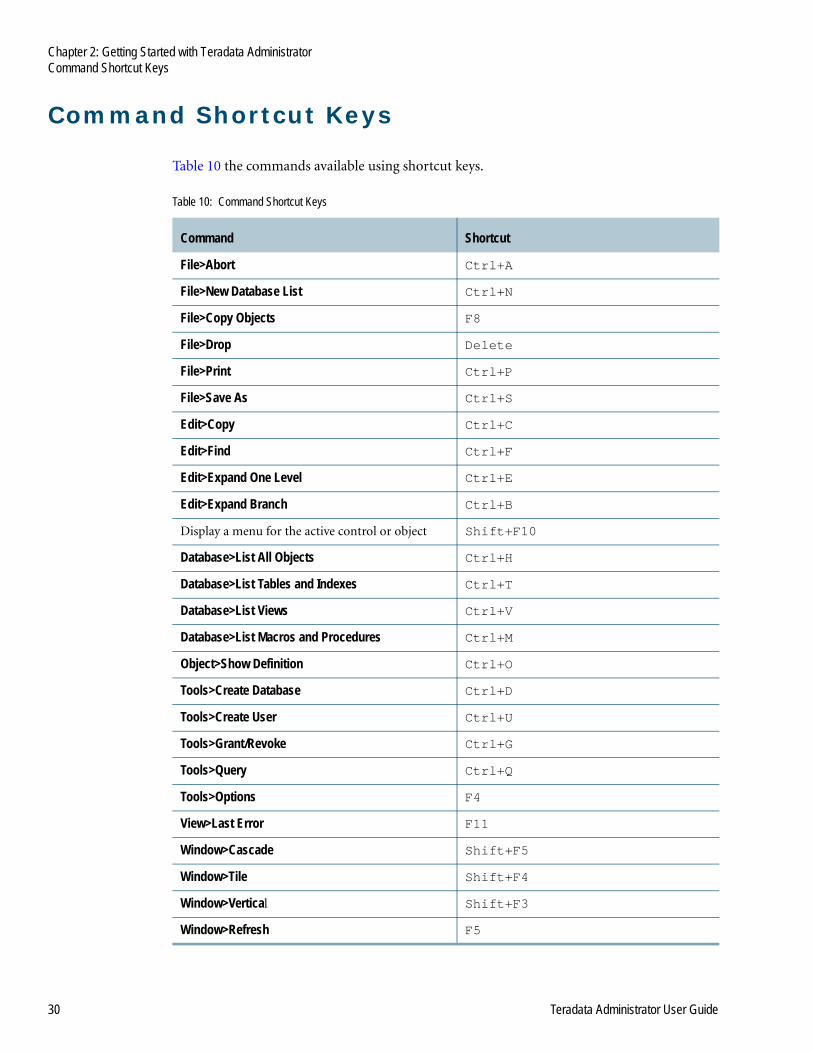
Command Shortcut Keys
Table 10 the commands available using shortcut keys.
Table 10: Command Shortcut Keys
Command Shortcut
File>Abort Ctrl+A
File>New Database List Ctrl+N
File>Copy Objects F8
File>Drop Delete
File>Print Ctrl+P
File>Save As Ctrl+S
Edit>Copy Ctrl+C
Edit>Find Ctrl+F
Edit>Expand One Level Ctrl+E
Edit>Expand Branch Ctrl+B
Display a menu for the active control or object Shift+F10
Database>List All Objects Ctrl+H
Database>List Tables and Indexes Ctrl+T
Database>List Views Ctrl+V
Database>List Macros and Procedures Ctrl+M
Object>Show Definition Ctrl+O
Tools>Create Database Ctrl+D
Tools>Create User Ctrl+U
Tools>Grant/Revoke Ctrl+G
Tools>Query Ctrl+Q
Tools>Options F4
View>Last Error F11
Window>Cascade Shift+F5
Window>Tile Shift+F4
Window>Vertical Shift+F3
Window>Refresh F5
Chapter 2: Getting Started with Teradata AdministratorDrag and Drop Copying
Teradata Administrator User Guide 31
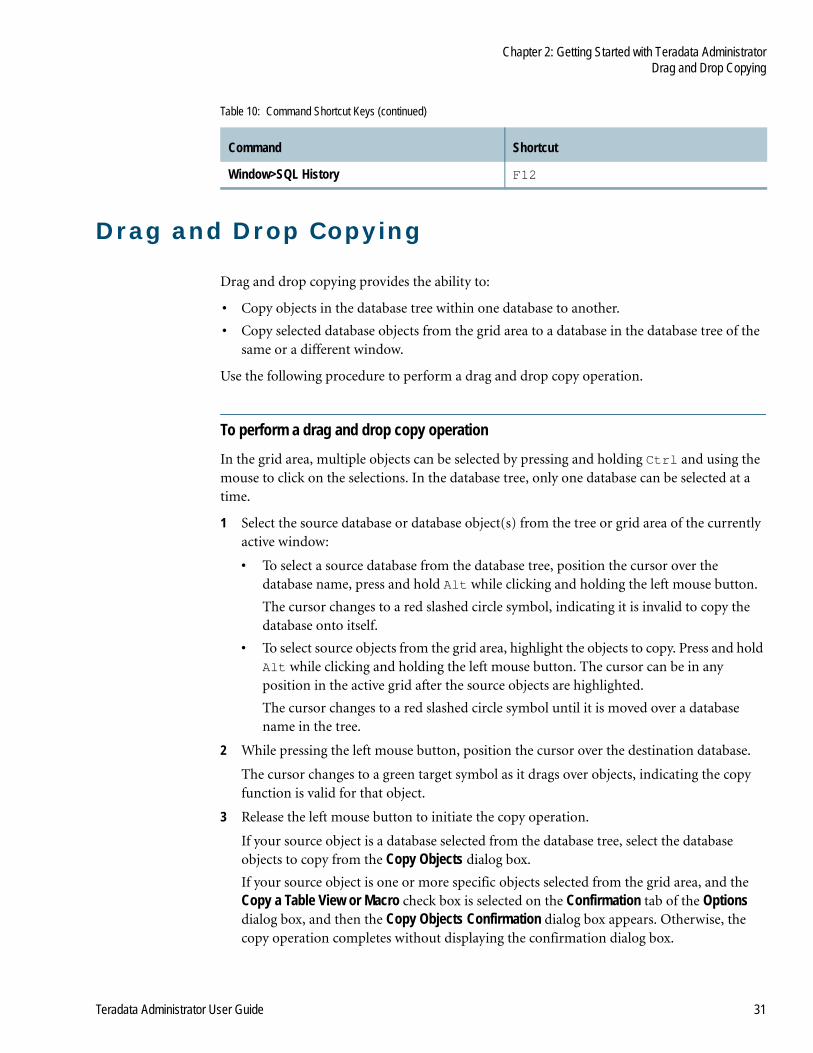
Drag and Drop Copying
Drag and drop copying provides the ability to:
• Copy objects in the database tree within one database to another.
• Copy selected database objects from the grid area to a database in the database tree of the same or a different window.
Use the following procedure to perform a drag and drop copy operation.
To perform a drag and drop copy operation
In the grid area, multiple objects can be selected by pressing and holding Ctrl and using the mouse to click on the selections. In the database tree, only one database can be selected at a time.
1 Select the source database or database object(s) from the tree or grid area of the currently active window:
• To select a source database from the database tree, position the cursor over the database name, press and hold Alt while clicking and holding the left mouse button.
The cursor changes to a red slashed circle symbol, indicating it is invalid to copy the database onto itself.
• To select source objects from the grid area, highlight the objects to copy. Press and hold Alt while clicking and holding the left mouse button. The cursor can be in any position in the active grid after the source objects are highlighted.
The cursor changes to a red slashed circle symbol until it is moved over a database name in the tree.
2 While pressing the left mouse button, position the cursor over the destination database.
The cursor changes to a green target symbol as it drags over objects, indicating the copy function is valid for that object.
3 Release the left mouse button to initiate the copy operation.
If your source object is a database selected from the database tree, select the database objects to copy from the Copy Objects dialog box.
If your source object is one or more specific objects selected from the grid area, and the Copy a Table View or Macro check box is selected on the Confirmation tab of the Options dialog box, and then the Copy Objects Confirmation dialog box appears. Otherwise, the copy operation completes without displaying the confirmation dialog box.
Window>SQL History F12
Table 10: Command Shortcut Keys (continued)
Command Shortcut
Chapter 2: Getting Started with Teradata AdministratorPrint or Save Data
32 Teradata Administrator User Guide
Print or Save Data
The data in the active database tree, grid, or report can be printed, or its contents saved to a text file.
Use the following procedures to print the data in, or save the data from, the active window.
To print the data in the active window
1 From the main window, click File>Print.
A standard Windows Print dialog box appears.
2 Select the Page Range option:
• Select All to print the entire database tree or grid contents.
• Select Selection to print only the databases in the branch which starts with the currently selected database, or to prints only those cells selected in the grid.
3 Choose additional print options, and then click OK.
To save the data from the active window
1 From the main window, click File>Save As.
A standard Windows Save As dialog box appears.
2 Use the controls on the dialog box to navigate to the folder where the data is saved.
3 Enter a file name for the report in the File Name field.
4 Click Save to save the file to the selected location.

Teradata Administrator User Guide 33
CHAPTER 3
Configuring Teradata Administrator
Before using Teradata Administrator:
1 Ensure the proper access privileges are set
2 Define the data sources to connect to
3 Define operational preferences
4 Connect to a data source
The following topics describe these procedures in detail. If a new installation of Teradata Administrator is being configured, complete steps one through three.
• Database Access Prerequisites
• Step 1 - Define a Data Source
• Step 2a - Set Database Options
• Step 2b - Set Filtering Options
• Step 2c - Set Confirmation Options
• Step 2d - Set Browse Options
• Step 2e - Set General Options
• Step 2f - Set the Data Directory
• Step 3 - Connect to a Data Source
Database Access Prerequisites
The following access privileges are required to use the Teradata Administrator functions:
• To use the viewing functions, Select access privileges are needed for the DBC views of the Teradata Database.
Note: A few reports require Select access to the base tables.
• To use the Copy, Drop, Create or Grant tools, the corresponding privilege is needed on the table or database that is being modified or created.
• To use the Browse or Row Count features, Select access privileges are needed to the Table or View.
For more details about the access right for specific tables and views, refer to the setup.sql file in the SQL sub-directory of the Teradata Administrator installation directory. This file also contains instructions for the use of an alternate 'restricted access' control file, which limits users to only those items they can access using X view.

Chapter 3: Configuring Teradata AdministratorStep 1 - Define a Data Source
34 Teradata Administrator User Guide
Step 1 - Define a Data Source
Define a data source for each Teradata Database prior to connecting with ODBC. Use the ODBC Data Source Administrator to create ODBC data sources and to configure the drivers.
Note: When defining the UserId, do not use a collation sequence of EBCDIC as this might cause unpredictable sorting results.
Use the following procedure to define a data source.
To define a data source
1 From the main window, click File>Define Data Source.
The ODBC Data Source Administrator dialog box appears and displays the User DSN tab by default.
2 Click the Drivers tab, and ensure the required ODBC driver is installed on your system.
3 Click the System DSN tab or User DSN tab, and then click the Add button.
The Create New Data Source dialog box appears.
4 Select the Teradata ODBC driver, and then click Finish.
The ODBC Driver Setup for Teradata Database dialog box appears.
5 Enter the following fields.
For in depth information, refer to the ODBC Driver for Teradata User Guide.
• Name - Name for the data source.
Type a unique description such as Payroll or Accounts Payable.
• [Optional] Description - Descriptive text about this data source.
• Name(s) and IP address(es) - Name or IP address of the server of your Teradata Database to connect to.
• Do not resolve alias name to IP address - Select to not resolve alias names during set up. Clear this check box to allow aliases to be resolved whenever connecting to a database.
• Use Integrated Security - Select to connect to the database through Single Sign On (SSO). The Mechanism, Parameter, Username and Password boxes are unavailable and your logon information is authenticated by network security when logging on to your computer.
• [Optional] Mechanism - If a security mechanism is in place, select the authentication mechanism.
• [Optional] Parameter - If a mechanism is selected, enter the applicable authentication string.
• [Optional] Username - User name to use to log on to the Teradata Database.
• [Optional] Password - Password for the user name.
Chapter 3: Configuring Teradata AdministratorStep 2a - Set Database Options
Teradata Administrator User Guide 35
• [Optional] Default Database - Database to work in by default. Use unqualified object names only in this database; qualify all other objects using the database name. If this field is left blank, the default database is your username.
• [Optional] Account String - Account string associated with the user name.
• Session Character Set - Specify the default character set for the session. To use a different character set, select from the pull-down menu. The default is ASCII.
Note: When connecting to Teradata Database V2R6.2.x or earlier, do not use UTF8 or UTF16 session character sets if the system contains Kanji object names. If any Kanji Database or User names exist on the system, the initial loading of the database tree fails.
Note: When connecting to Teradata Database 12.00.00 or later, do not choose ASCII if any Kanji Database or User names exist on the system. Choose UTF8 or UTF16 session character sets so the information displays correctly on the page.
6 Click OK twice.
After these steps are completed, continue with the configuration by going to the next procedure, “Step 2a - Set Database Options” on page 35.
Step 2a - Set Database Options
Use the following procedure to set the database options.
To set the database options
1 From the main window, click Tools>Options.
2 Click the Main tab.
3 Set your database options as follows:
• Root Database - Enter the name of the root database here. The initial default value is DBC.
• What to Load - Choose from the following:
• All Databases and Users - Loads all databases and users
• Only Databases - Loads only databases or any users that have children.
• Databases and Users with Permspace - Loads only databases or users that have perm space. Also loads any databases or users that have children, even if they have no perm space.
• Double-click Actions - Select the following:
• Database - Select the action that occurs when the database in the tree is double-clicked.
• Table - Select the action that occurs when a row is double-clicked in the tables grid.
4 Continue setting operational preferences using “Step 2b - Set Filtering Options” on page 36, or click OK to save your changes and exit the dialog box.

Chapter 3: Configuring Teradata AdministratorStep 2b - Set Filtering Options
36 Teradata Administrator User Guide
Step 2b - Set Filtering Options
Use the following procedure to set the filtering options.
To set the filtering options
1 From the main window, click Tools>Options.
2 Click the Filter tab.
3 Set your filter preferences by choosing one of the following:
• All Databases and Users (No Filter) - Does not filter the databases and users.
• Owned by- Loads only databases and users that belong to a specific owner. Enter an owner in the input field.
• Created by - Loads only databases and users created by a specific user. Enter a creator in the input field.
• Like - Loads only databases and users that match a specific string. Enter a string in the input field. Wildcard characters are allowed.
• Not Like - Loads only databases and users that do not match a specific string. Enter a string in the input field. Wildcard characters are allowed.
4 Continue setting operational preferences using “Step 2c - Set Confirmation Options” on page 36, or click OK to save your changes and exit the dialog box.
Step 2c - Set Confirmation Options
Use the following procedure to set the confirmation options.
To set the confirmation options
1 From the main window, click Tools>Options.
2 Click the Confirmation tab.
3 Set your confirmation preferences by choosing the following:
• Confirm all Copy Operations - Displays a confirmation message before executing a command to copy a table, view, or macro.
• Confirm all Delete or Drop Operations - Displays a confirmation message before executing a command to delete any database object.
• Confirm Close Window or Disconnect actions - Displays a confirmation message before executing a disconnect command, or closing a root window.
• Warn if an Expanded Account String is invalid- Displays a warning if an expanded account string is invalid.

Chapter 3: Configuring Teradata AdministratorStep 2c - Set Confirmation Options
Teradata Administrator User Guide 37
• Preview SQL before submitting it - Select to view the SQL text in a Query window before it is submitted for processing. See the results of your changes, and then change them again if needed. For more information on this option, see “Preview Mode” on page 37.
Note: When using any of the dialog boxes from the Tools menu to create, clone, or modify databases or database objects, or to grant or revoke user privileges, Teradata Administrator generates the SQL text to perform the specified task.
4 Continue setting operational preferences using “Step 2d - Set Browse Options” on page 38, or click OK to save your changes and exit the dialog box.
Preview ModeUse Preview mode to view the generated SQL text in a Query window before submitting it for processing. The displayed SQL can be changed before submitting it to the Teradata Database or cancelled without submitting it. Preview mode can also be used to generate scripts for later execution or as a learning tool for the DBA.
Preview mode can be used with all Create, Modify, Grant, and Revoke commands. It can also be used when adding or removing members from a role and when moving space. Preview mode cannot be used for Drop or View commands.
Note: Although Comment commands are not displayed in the Query window, if a comment is added or changed in dialog boxes from the Tools menu, it is submitted even if Preview mode is on. It is even submitted if the Query window is closed without executing the query.
To use Preview mode
✔ Do one of the following to turn Preview mode on:
• From the toolbar, click .
• From the menu, click Tools>Options or press F4 from any open dialog box from the Tools menu. Click the Confirmation tab, and select the Preview SQL before submitting it check box.
When Preview mode is on:
• The SQL (generated by dialog boxes from the Tools menu) is displayed in a Query window instead of automatically being executed.
• Objects that are created by executing the preview query are not automatically added to or removed from any list. To update the lists, click Window>Refresh to reload the data from the Teradata Database.
Executing Multiple StatementsTeradata Administrator executes the entire contents of the Query window as a single request. However, the Teradata Database does not process requests containing multiple DDL statements. When the generated query contains multiple DDL statements, such as adding or removing more than 25 members to a role or when moving space between unrelated databases, the Execute button is unavailable.
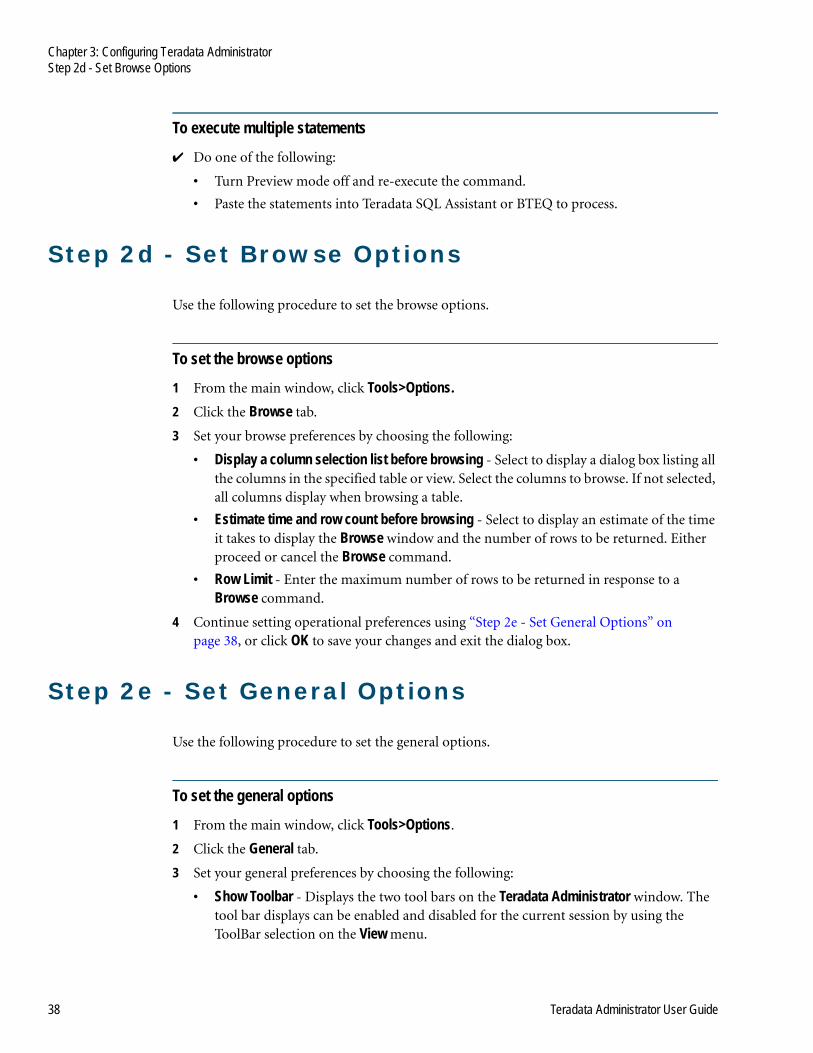
Chapter 3: Configuring Teradata AdministratorStep 2d - Set Browse Options
38 Teradata Administrator User Guide
To execute multiple statements
✔ Do one of the following:
• Turn Preview mode off and re-execute the command.
• Paste the statements into Teradata SQL Assistant or BTEQ to process.
Step 2d - Set Browse Options
Use the following procedure to set the browse options.
To set the browse options
1 From the main window, click Tools>Options.
2 Click the Browse tab.
3 Set your browse preferences by choosing the following:
• Display a column selection list before browsing - Select to display a dialog box listing all the columns in the specified table or view. Select the columns to browse. If not selected, all columns display when browsing a table.
• Estimate time and row count before browsing - Select to display an estimate of the time it takes to display the Browse window and the number of rows to be returned. Either proceed or cancel the Browse command.
• Row Limit - Enter the maximum number of rows to be returned in response to a Browse command.
4 Continue setting operational preferences using “Step 2e - Set General Options” on page 38, or click OK to save your changes and exit the dialog box.
Step 2e - Set General Options
Use the following procedure to set the general options.
To set the general options
1 From the main window, click Tools>Options.
2 Click the General tab.
3 Set your general preferences by choosing the following:
• Show Toolbar - Displays the two tool bars on the Teradata Administrator window. The tool bar displays can be enabled and disabled for the current session by using the ToolBar selection on the View menu.

Chapter 3: Configuring Teradata AdministratorStep 2f - Set the Data Directory
Teradata Administrator User Guide 39
• Show Status Bar - Displays the status bar on the Teradata Administrator window. The status bar display can be enabled and disabled for the current session by using the Status Bar selection on the View menu.
• Define KB, MB, GB as multiples of 1000, instead of 1024 - Specify the way the terms KB, MB, and GB are interpreted when working in Teradata Administrator.
• Save the SQL History to a file at program termination - Automatically saves the contents of the SQL history file whenever the Teradata Administrator application is terminated.
The data is saved to a file named TAdm_YYYYMMDD.log where YYYYMMDD represents the current date. When running Teradata Administrator multiple times on the same day, the data is appended to the existing file.
By default, the file is stored in your Windows personal directory under Teradata\Teradata Manager\Data. To change the location where the file is stored by, see “Step 2f - Set the Data Directory” on page 39.
• Use only the X views (See help file) - Select if your user id has access to only the X views of the Teradata data dictionary. These views restrict your access to only your owned or controlled objects.
Caution: When this option is selected, database performance is impacted. X views are slower than the corresponding regular views.
After selecting this option, restart Teradata Administrator. Before X views are used, the DBA must execute the XViews.sql script located in the \sql directory of the installation directory. This creates additional dictionary views in the DBC database. The DBA who is setting up the access rights to X views should read the setup.sql file also located in the \sql directory.
Note: When this option is selected, creating and administering UDT functions are not available.
• Use SQL Assistant instead of the Administrator Query window - Select to run the queries using Teradata SQL Assistant, leaving Teradata Administrator free to do other work.
Note: This option is only available if Teradata SQL Assistant is installed on your system. The initial display of Teradata SQL Assistant takes a few moments. However, after it is loaded, it operates with the same speed as the Teradata Administrator Query window.
4 Continue setting operational preferences using “Step 2f - Set the Data Directory” on page 39, or click OK to save your changes and exit the dialog box.
Step 2f - Set the Data Directory
Use the following procedure to set the data directory. The directory specified is used as the default directory when saving data to a file. It is also the directory in which the History file is saved.

Chapter 3: Configuring Teradata AdministratorStep 3 - Connect to a Data Source
40 Teradata Administrator User Guide
To set the data directory
1 From the main window, click Tools>Options.
2 Click the Directory tab.
Note the following directory display fields:
• Old Path - The current path to the data directory
• New Path - The new path to the data directory
3 Select a drive and then click the directory to navigate to the data directory.
The path to the directory changes automatically in the New Path box.
4 Click OK to save your changes and exit the dialog box.
5 [Optional] Connect to a data source using “Step 3 - Connect to a Data Source” on page 40.
Step 3 - Connect to a Data Source
Before proceeding, the data sources must be defined using the ODBC Data Source Administrator. See “Step 1 - Define a Data Source” on page 34.
After connecting to a data source, Teradata Administrator displays a database tree and one or two data grids in a grid area.
Note: When connecting to Teradata Database V2R6.2.x or earlier, do not use UTF8 or UTF16 session character sets if the system contains Kanji object names. If any Kanji Database or User names exist on the system, the initial loading of the database tree fails.
Connect to one or more data sources, and then open additional windows to a currently connected data source. Each data source connection or additional window creates another child window, each with its own database tree and grid areas. Create up to five child windows. Use the Window menu to display all the open windows in either horizontal or vertical tile arrangements to perform drag-and-drop copy operations between two windows.
Note: Teradata Administrator only runs in direct connect mode. Even if Teradata Manager is running in client-server mode and Teradata Administrator is launched from Teradata Manager, Teradata Administrator does not run from outside a firewall.
Use the following procedure to connect to a data source.
To connect to a data source
1 From the main window, click File>Connect.
2 Select the ODBC data source from the list, and click OK.
The Teradata Database Connect dialog box appears.
3 Fill in the fields as follows:
• DBC Name or Address - The TDPid of the Teradata Database.
Chapter 3: Configuring Teradata AdministratorStep 3 - Connect to a Data Source
Teradata Administrator User Guide 41
• Use Integrated Security - Select to connect to the database through Single Sign On.
• Mechanism - If a security mechanism is in place, select the authentication mechanism.
• Parameter - If a mechanism is selected, enter the applicable authentication string.
• Username - User name to use to log on to the Teradata Database.
• Password - Password for the user name.
• Default Database - Database to work in by default. Use unqualified object names only in this database; qualify all other objects using the database name. If this field is left blank, the default database is your username.
• Account String - Account string associated with the user name.
4 Click OK to connect to the data source.

Chapter 3: Configuring Teradata AdministratorStep 3 - Connect to a Data Source
42 Teradata Administrator User Guide

Teradata Administrator User Guide 43
CHAPTER 4
Working with Databases
The following topics provide instructions for working with databases:
• Database Tree
• Arrange the Displayed Windows
• Refresh the Display
• Find a Database, Object or Text String
• Copy Database Object Information to the Clipboard
• Abort the Current Database Operation
• Drop a Database or Database Object
• Rename Database Objects
• Copy Database Objects From One Database to Another
• Delete All Objects in the Database
• Browse Window
• Open Another Outline Window to a Data Source
Database Tree
The database tree is the left side of the Teradata Administrator window. It displays an alphabetical listing of all the databases and objects in the selected root database of the connected Teradata Database server.
The database selected in the tree determines the source of the information that can be displayed in the grid area.
Double-clicking on a database name expands the tree display for that database (default setting). To set the double-click actions, see “Step 2a - Set Database Options” on page 35.
Clicking the mouse button with the cursor over a Database or User in the Tree displays a pop up version of the Database menu.
Change the width of the tree area by clicking on the right edge of the display and dragging it to a new position.
Open or Close a Database in the Tree DisplayUse the following procedure to open (to display) or close (to hide) the children of the selected database node.

Chapter 4: Working with DatabasesArrange the Displayed Windows
44 Teradata Administrator User Guide
To open or close a database in the tree display
1 Select the database in the tree area.
2 Click Database>Open / Close DB.
Duplicate DatabasesIf a message indicates there is a duplicate database, there might be a database or user that starts with a blank character that is exactly the same as another database or user name. The database or user with the blank at the beginning of the name does not load into the database tree. If this database or user was created in error, use the following procedure to drop it.
To drop a duplicate database or user
✔ In the Query window, type the following where the duplicate name is dbname.
The quotes and blank character are required.
DROP DATABASE “ dbname”
or
DROP USER “ dbname”
For more information, see “Drop a Database or Database Object” on page 46.
Arrange the Displayed Windows
Use the following procedure to arrange the displayed windows.
To arrange the displayed windows
✔ Use the standard commands on the Window menu to arrange and select the Teradata Administrator windows. For more information, see “Window Menu” on page 28.
Until a connection with a database server is established, SQL History is the only selection on the Window menu. For details on establishing a connection with a database server, see “Step 3 - Connect to a Data Source” on page 40.
Refresh the Display
Teradata Administrator does not automatically refresh the display. If another application is used to add or drop databases and users while Teradata Administrator is running, those changes are not reflected until the display is manually refreshed.
Use the following procedure to refresh the display.

Chapter 4: Working with DatabasesFind a Database, Object or Text String
Teradata Administrator User Guide 45
To refresh the display
✔ From the main window, click Window>Refresh.
Find a Database, Object or Text String
Use the following procedure to find a database, object, or text string in the database tree or grid area.
To find a particular database, object or text string
1 Select the window to make it active.
2 Click Edit>Find.
3 Enter the text string, database, or user name to locate.
4 To find a string exactly matching the case of the one entered, click Match Case.
5 To find all occurrences of the text string in a grid, click Find All.
If the string exists in the active grid, Teradata Administrator scrolls to the first match and highlights all matches.
Copy Database Object Information to the Clipboard
Use the following procedure to copy database object information to the Clipboard.
To copy database object information to the Clipboard
1 Select the objects in the grid area.
To select multiple objects, hold Shift, and click with the left mouse button.
2 Click Edit>Copy.
Abort the Current Database Operation
Use the following procedure to abort the current database operation.
To abort the current database operation
✔ From the main window, click File>Abort.

Chapter 4: Working with DatabasesDrop a Database or Database Object
46 Teradata Administrator User Guide
Drop a Database or Database Object
Use the following procedure to drop a database or database object (table, view, or macro) from a database.
To drop a database or database object (table, view or macro) from a database
1 Select the database in the tree area, or the objects in the grid area.
To select multiple objects, hold Shift, and click with the left mouse button.
2 Click File>Drop.
Rename Database Objects
Use the following procedure to rename selected database objects (tables, view, or macros).
To rename selected database objects (tables, views, or macros)
1 Select the objects in the grid area.
To select multiple objects, hold Shift, and click with the left mouse button.
2 Click File>Rename Object.
3 Enter the new name of the object in the “To” section of the Rename Object dialog box.
4 Click Rename.
Copy Database Objects From One Database to Another
There are several methods for copying database objects and the correct authorization must be set up to create an object in the destination database.
Functions or External Procedures cannot be copied from one database to another. If the specified database contains only functions or procedures and copying is done at the database level, No objects in database appears in the status bar.
When copying a table, only the table structure is copied. No data is copied.
Use the following procedures to copy objects from one database to another or copy objects.

Chapter 4: Working with DatabasesDelete All Objects in the Database
Teradata Administrator User Guide 47
To copy objects from one database to another using drag and drop
1 Select one or more specific objects from the grid area.
To select multiple objects, hold Ctrl, and click with the left mouse button.
2 Hold Alt, and click with the left mouse button. Drag the objects from the grid area to the destination database, and then release the mouse button.
3 If confirmation of copy operations is requested on the options screen, click Copy or Copy All on the confirmation screen to complete the operation.
To copy objects using a dialog box
1 Do one of the following:
• In the grid area, select one or more specific objects.
• In the database tree, select the database containing the objects to copy.
2 Click File>Copy Objects.
3 Do one of the following:
• If this procedure is started by selecting one or more specific objects, define the destination database for the copy operation.
• If this procedure is started by selecting a database, define the destination database for the copy operation, and then select the objects to copy.
4 To complete the operation, click Copy or Copy All.
Delete All Objects in the Database
To delete all objects in the selected database
1 Click File>Drop to drop join or hash indexes defined on tables, as well as authorizations and UDTs.
2 Drop any journal table by issuing a MODIFY DATABASE <name> DROP DEFAULT JOURNAL TABLE statement from the Query window.
Note: All objects listed in Step 1 and journal tables must be dropped before proceeding to Step 3.
3 Select the database in the tree area.
4 Click File>Drop all Objects in DB.
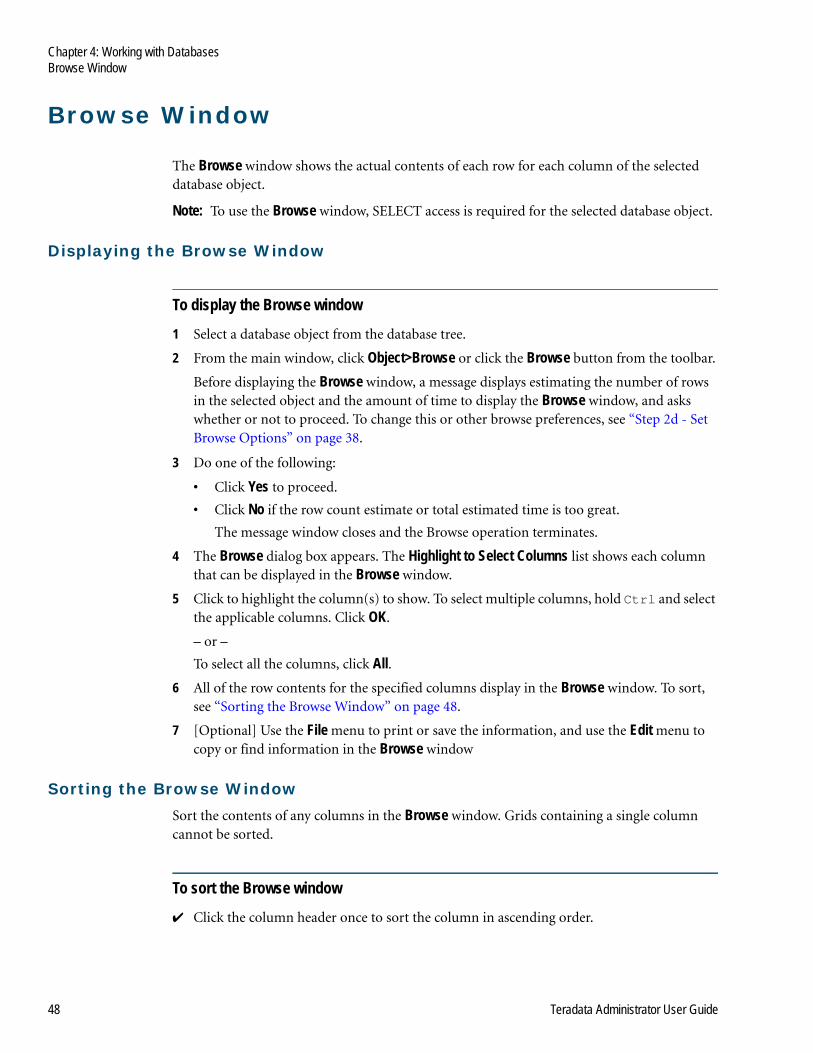
Chapter 4: Working with DatabasesBrowse Window
48 Teradata Administrator User Guide
Browse Window
The Browse window shows the actual contents of each row for each column of the selected database object.
Note: To use the Browse window, SELECT access is required for the selected database object.
Displaying the Browse Window
To display the Browse window
1 Select a database object from the database tree.
2 From the main window, click Object>Browse or click the Browse button from the toolbar.
Before displaying the Browse window, a message displays estimating the number of rows in the selected object and the amount of time to display the Browse window, and asks whether or not to proceed. To change this or other browse preferences, see “Step 2d - Set Browse Options” on page 38.
3 Do one of the following:
• Click Yes to proceed.
• Click No if the row count estimate or total estimated time is too great.
The message window closes and the Browse operation terminates.
4 The Browse dialog box appears. The Highlight to Select Columns list shows each column that can be displayed in the Browse window.
5 Click to highlight the column(s) to show. To select multiple columns, hold Ctrl and select the applicable columns. Click OK.
– or –
To select all the columns, click All.
6 All of the row contents for the specified columns display in the Browse window. To sort, see “Sorting the Browse Window” on page 48.
7 [Optional] Use the File menu to print or save the information, and use the Edit menu to copy or find information in the Browse window
Sorting the Browse WindowSort the contents of any columns in the Browse window. Grids containing a single column cannot be sorted.
To sort the Browse window
✔ Click the column header once to sort the column in ascending order.

Chapter 4: Working with DatabasesOpen Another Outline Window to a Data Source
Teradata Administrator User Guide 49
Subsequent clicks on the same column header alternate the sort between ascending and descending order.
Open Another Outline Window to a Data Source
Use the following procedure to open another outline window to a data source.
To open another outline window to a data source
1 From the main window, click File>New Database List.
2 Select the ODBC data source from the list, and enter the required Root database and click What to Load.
3 Click OK to open the new window.

Chapter 4: Working with DatabasesOpen Another Outline Window to a Data Source
50 Teradata Administrator User Guide

Teradata Administrator User Guide 51
CHAPTER 5
Performing Maintenance Tasks
Teradata Administrator is a powerful tool for administering your database. The maintenance tasks include the following:
• Create or Modify User Accounts
• Create or Modify Databases
• Create Tables
• Administer Roles
• Administer Authorizations
• Administer Profiles
• Administer User-Defined Types
• Manage Security Constraints
• Move Space Between Databases
Create or Modify User Accounts
Use the following procedure to create or modify a user account.
To create or modify a user account
1 Choose one of the following options:
• To create a new user with no shared specifications from an existing one, click Tools>Create>User.
• To create a new user either identical or closely related to an existing one, highlight the user to be cloned in the main window, and then click Tools>Clone User.
• To modify an existing user, first highlight the user to be modified in the main window, and then click Tools>Modify User.
2 Define the attributes and options as indicated in Table 11.
3 Click Create or Modify.
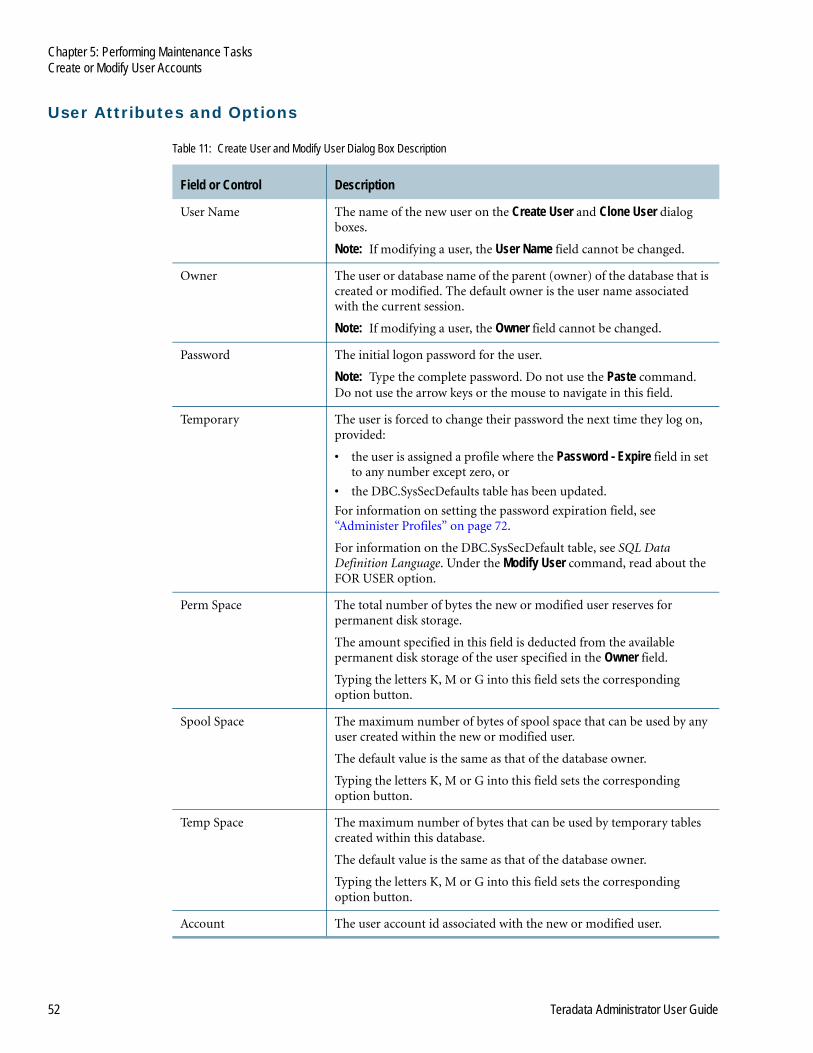
Chapter 5: Performing Maintenance TasksCreate or Modify User Accounts
52 Teradata Administrator User Guide
User Attributes and Options
Table 11: Create User and Modify User Dialog Box Description
Field or Control Description
User Name The name of the new user on the Create User and Clone User dialog boxes.
Note: If modifying a user, the User Name field cannot be changed.
Owner The user or database name of the parent (owner) of the database that is created or modified. The default owner is the user name associated with the current session.
Note: If modifying a user, the Owner field cannot be changed.
Password The initial logon password for the user.
Note: Type the complete password. Do not use the Paste command. Do not use the arrow keys or the mouse to navigate in this field.
Temporary The user is forced to change their password the next time they log on, provided:
• the user is assigned a profile where the Password - Expire field in set to any number except zero, or
• the DBC.SysSecDefaults table has been updated.
For information on setting the password expiration field, see “Administer Profiles” on page 72.
For information on the DBC.SysSecDefault table, see SQL Data Definition Language. Under the Modify User command, read about the FOR USER option.
Perm Space The total number of bytes the new or modified user reserves for permanent disk storage.
The amount specified in this field is deducted from the available permanent disk storage of the user specified in the Owner field.
Typing the letters K, M or G into this field sets the corresponding option button.
Spool Space The maximum number of bytes of spool space that can be used by any user created within the new or modified user.
The default value is the same as that of the database owner.
Typing the letters K, M or G into this field sets the corresponding option button.
Temp Space The maximum number of bytes that can be used by temporary tables created within this database.
The default value is the same as that of the database owner.
Typing the letters K, M or G into this field sets the corresponding option button.
Account The user account id associated with the new or modified user.

Chapter 5: Performing Maintenance TasksCreate or Modify User Accounts
Teradata Administrator User Guide 53
Startup String Specifies one or more Teradata SQL statements, separated by semicolons, that execute to establish the initial session environment when the user logs on.
Default Database The database to work in by default. Use unqualified object names only in this database; qualify all other objects using the database name.
The user name specified in the User Name field is used as the default database name if a Default Database name is not specified.
Profile Name Assigns a profile to this user.
Important: When assigning a profile, the values defined in the profile override the values specified on this dialog box. (The fields that might be overridden have a pale yellow background after a profile is selected.)
Note: Click the drop down arrow to load the profiles. A fairly long delay occurs if there are many profiles to load. Click the drop down arrow a second time to display the loaded list.
Default Role Selects a default role for the user. This box contains all the roles that the user is assigned membership to, and is disabled if no membership exists.
Note: Click the drop down arrow to load the roles. A fairly long delay occurs if there are many roles to load. Click the drop down arrow a second time to display the loaded list.
Default Journal The default table for journal images of tables the new or modified user creates.
By default, the journal table is created in the user space of the new or modified database unless a database and table name is specified.
A default journal table name must be provided if a journal option is specified, but it need not reside within the user or database space.
Collation Specifies the collation option for the user.
This option determines the ordering of data characters during comparison operations, and when sorting data in response to select queries that include ORDER BY or WITH…BY clauses.
If a collation option is not specified, the default is HOST.
Note: Do not use a collation sequence of EBCDIC as this might cause unpredictable sorting results.
Before Journal Specifies the journaling requirement for “before” change row images as follows:
• Yes - specifies a single journal.
• No - specifies no journal.
• Dual - specifies dual journals.
These are actual journaling requirements when specified on the Create Table dialog box, or Default values when specified on the Create User dialog box.
Table 11: Create User and Modify User Dialog Box Description (continued)
Field or Control Description
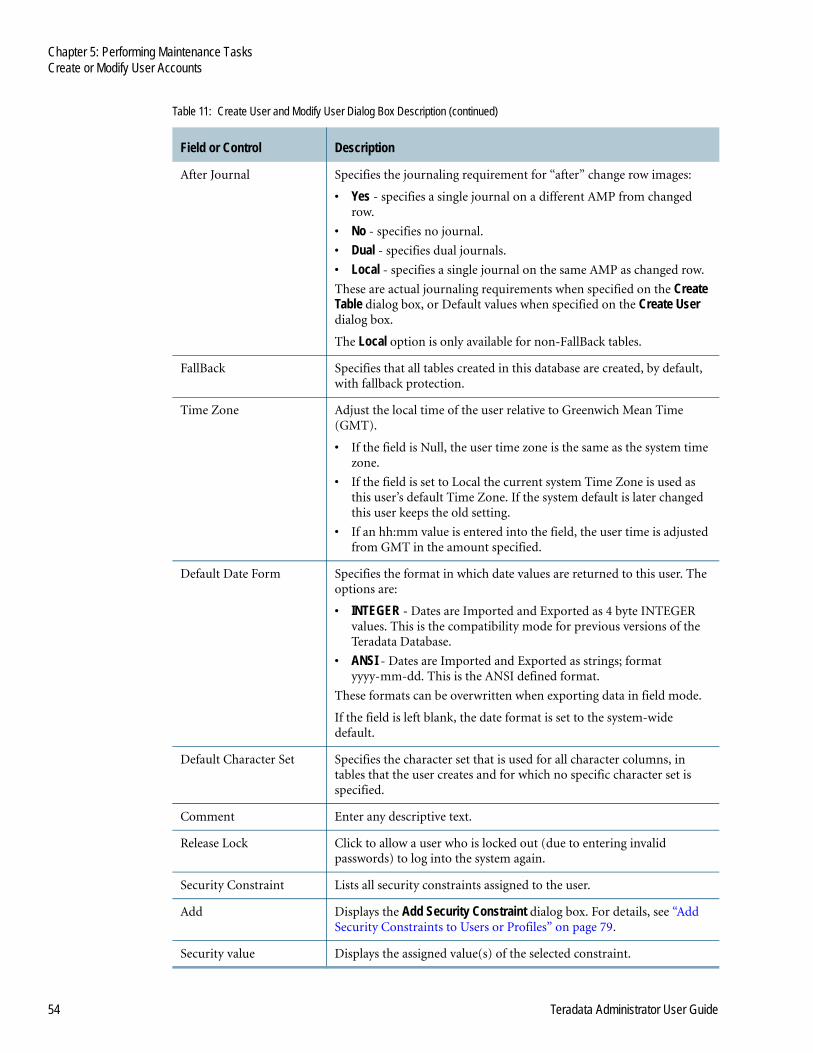
Chapter 5: Performing Maintenance TasksCreate or Modify User Accounts
54 Teradata Administrator User Guide
After Journal Specifies the journaling requirement for “after” change row images:
• Yes - specifies a single journal on a different AMP from changed row.
• No - specifies no journal.
• Dual - specifies dual journals.
• Local - specifies a single journal on the same AMP as changed row.
These are actual journaling requirements when specified on the Create Table dialog box, or Default values when specified on the Create User dialog box.
The Local option is only available for non-FallBack tables.
FallBack Specifies that all tables created in this database are created, by default, with fallback protection.
Time Zone Adjust the local time of the user relative to Greenwich Mean Time (GMT).
• If the field is Null, the user time zone is the same as the system time zone.
• If the field is set to Local the current system Time Zone is used as this user’s default Time Zone. If the system default is later changed this user keeps the old setting.
• If an hh:mm value is entered into the field, the user time is adjusted from GMT in the amount specified.
Default Date Form Specifies the format in which date values are returned to this user. The options are:
• INTEGER - Dates are Imported and Exported as 4 byte INTEGER values. This is the compatibility mode for previous versions of the Teradata Database.
• ANSI - Dates are Imported and Exported as strings; format yyyy-mm-dd. This is the ANSI defined format.
These formats can be overwritten when exporting data in field mode.
If the field is left blank, the date format is set to the system-wide default.
Default Character Set Specifies the character set that is used for all character columns, in tables that the user creates and for which no specific character set is specified.
Comment Enter any descriptive text.
Release Lock Click to allow a user who is locked out (due to entering invalid passwords) to log into the system again.
Security Constraint Lists all security constraints assigned to the user.
Add Displays the Add Security Constraint dialog box. For details, see “Add Security Constraints to Users or Profiles” on page 79.
Security value Displays the assigned value(s) of the selected constraint.
Table 11: Create User and Modify User Dialog Box Description (continued)
Field or Control Description

Chapter 5: Performing Maintenance TasksCreate or Modify Databases
Teradata Administrator User Guide 55
Create or Modify Databases
Use the following procedure to create or modify a database.
To create or modify a database
1 Choose one of the following options:
• To create a new database with no shared specifications from an existing database, click Tools>Create>Database.
• To create a new database either identical or closely related to an existing database, highlight the database to be cloned in the main window, and then click Tools>Clone Database.
• To modify an existing database, highlight the database to be modified in the main window, and then click Tools>Modify Database.
2 Define the attributes and options as indicated in Table 12.
3 Click Create or Modify.
Database Attributes and Options
Table 12: Create Database Dialog Box and Modify Database Dialog Box Description
Field or Control Description
Database Name The source database for the create, clone, modify, and drop database functions.
Owner The user or database name of the parent (owner) of the database to create or modify. The default owner is the user name associated with the current session.
Note: The Owner field cannot be changed when the database is being modified.
Perm Space The total number of bytes to reserve for permanent disk storage in the new or modified database.
The amount specified in this field is deducted from the available permanent disk storage of the database specified in the Owner field.
Typing the letters K, M or G into this field sets the corresponding option button.
Spool Space The maximum number of bytes of spool space that can be used by any user created within the new or modified database.
The default value is the same as that of the database owner.
Typing the letters K, M or G into this field sets the corresponding option button.

Chapter 5: Performing Maintenance TasksCreate Tables
56 Teradata Administrator User Guide
Create Tables
Use the following procedure to create a table.
Temp Space The maximum number of bytes that can be used by temporary tables created within this database.
The default value is the same as that of the database owner.
Typing the letters K, M or G into this field sets the corresponding option button.
Account The user account id associated with the new or modified database.
Default Journal The default table for journal images of tables created in the new or modified database.
By default, the journal table is created in the user space of the new or modified database unless a database and table name is specified.
A default journal table name must be provided if a journal option is specified, but it need not reside within the database space.
Before Journal Specifies the journaling requirement for “before” change row images as follows:
• Yes - specifies a single journal.
• No - specifies no journal.
• Dual - specifies dual journals.
These are actual journaling requirements when specified on the Create Table dialog box, or Default values when specified on the Create Database dialog box.
After Journal Specifies the journaling requirement for “after” change row images:
• Yes - specifies a single journal on a different AMP from changed row.
• No - specifies no journal.
• Dual - specifies dual journals.
• Local - specifies a single journal on the same AMP as changed row.
These are actual journaling requirements when specified on the Create Table dialog box, or Default values when specified on the Create Database dialog box.
The Local option is only available for non-FallBack tables.
FallBack Specifies that all tables created in this database are created, by default, with fallback protection.
Comment Enter descriptive text.
Table 12: Create Database Dialog Box and Modify Database Dialog Box Description (continued)
Field or Control Description

Chapter 5: Performing Maintenance TasksCreate Tables
Teradata Administrator User Guide 57
To create a table
1 From the main window, click Tools>Create>Table.
The Create Table dialog box appears.
2 Define the Table and Column attributes and options as indicated in Table 13 and Table 14.
3 Click Create when finished.
Table Attributes and Options
Table 13: Create Table Dialog Box Description
Field or Control Description
Table Type Specify the following type for the new table:
• Teradata – Create a SET table. Duplicate rows are not allowed.
• ANSI – Create a MultiSet table. Duplicate rows are allowed.
• NoPI – Create a table with no primary index. NoPI tables are always ANSI and cannot have journals.
• Queue – Create a Queue Table. Queue tables cannot be temporary or have journals. These tables require a Not Null Timestamp (6) field as the first column.
Table Name The name of the new table
In Database The name of the database in which to create the table. If a database is not specified, the new table is created in the default database for the current session.
Note: The In Database field is not equivalent to the optional IN DATABASE clause of the SQL CREATE TABLE command.
Journal Table The table used to store change journal images for the new table.
By default, Teradata Administrator creates the journal table in the same database as the new table.
Enter the journal table name specification as either:
tname
or
dbname.tname
Where:
tname is the journal table namedbname is the optional database name
Provide a journal table name if: 1) a journal option is specified for the new table and 2) there is no default journal table specified for the database in which this table is being created.
Block Size The maximum size of the data blocks, in bytes, for the table.
The actual maximum block size is the number entered in the Block Size field rounded to the nearest multiple of the 512 byte disk sector size.
The minimum size is 8192. The maximum is 127.5K (255 sectors).

Chapter 5: Performing Maintenance TasksCreate Tables
58 Teradata Administrator User Guide
Free Space This specification, entered as a percentage, determines the amount of space to be left on each cylinder when the table is loaded. This allows users to insert extra data rows without incurring the additional system overhead associated with rearranging data blocks.
The minimum free space specification is 0%; the maximum is 75%.
MergeBlockRatio This field is used by the FileSystem to determine the maximum size of a merged datablock. The value is interpreted as a percentage of the maximum multi-row datablock size applicable to the table to which the block belongs.
Enter a value from 1–100. The default value is 60.
Checksum Specify the level of disk I/O integrity checking to perform on this table. The Low, Medium and High values are user-definable, and can be set by your system administrator.
• Default – uses the CheckSum default the system administrator sets.
• None – disables disk I/O integrity checking.
• All – samples 100% of the words in each disk sector of a data block.
Temporary Create a Global Temporary table that can be instantiated by a user at a later date.
No Log When a Temporary table is created, select this option to not keep a transaction log of changes to this table.
Preserve When a Temporary table is created, select this option to preserve the rows in the table after a transaction commits. The default for a Temporary table is to delete (not preserve) the rows as soon as the transaction is committed.
FallBack Specifies that this table is created with fallback protection.
Before Journal Specifies the journaling requirement for “before” change row images as follows:
• Yes - specifies a single journal.
• No - specifies no journal.
• Dual - specifies dual journals.
These are actual journaling requirements when specified on the Create Table dialog box, or Default values when specified on the Create Database dialog box.
Table 13: Create Table Dialog Box Description (continued)
Field or Control Description

Chapter 5: Performing Maintenance TasksCreate Tables
Teradata Administrator User Guide 59
Column Attributes and OptionsA new row can be added to the column definition grid immediately above the row containing the cursor by pressing Ctrl-Insert.
A row can be deleted from the column definition grid by pressing Ctrl-Delete.
After Journal Specifies the journaling requirement for “after” change row images:
• Yes - specifies a single journal on a different AMP from changed row.
• No - specifies no journal.
• Dual - specifies dual journals.
• Local - specifies a single journal on the same AMP as changed row.
These are actual journaling requirements when specified on the Create Table dialog box, or Default values when specified on the Create Database dialog box.
The Local option is only available for non-FallBack tables.
Constraint Displays a menu with the following choices for selecting the type of constraint to define:
• Primary Key – See “Define Primary Key and Indices Constraints” on page 63.
• Index/Unique – See “Define Primary Key and Indices Constraints” on page 63.
• Check – See “Define Check Constraints” on page 64.
• Foreign Key – See “Define Foreign Key Constraints” on page 65.
• Security – See “Add a Security Constraint Column to a Table” on page 80. This feature only displays when connected to Teradata Database 14.0 and above.
Note: Activate the Constraint button by specifying the table name and at least one column name.
Table 13: Create Table Dialog Box Description (continued)
Field or Control Description
Table 14: Column Attributes and Options
Field or Control Description
Column Name Specifies the name for each column of the new table.
Data Type Specifies the data type for each column of the new table.

Chapter 5: Performing Maintenance TasksCreate Tables
60 Teradata Administrator User Guide
Size Specifies any integer value that the data type selection requires. The size specification determines the number of characters, or numeric precision, of the column.
For data types other than DECIMAL, type a single number in the following range:
• CHAR - 1 to 65000 - Number of characters in the string.
• FLOAT - 1 to 54 - The Teradata Database does not use it.
• TIME - 0 to 6 - Number of digits used for fractional seconds.
• INTERVAL - 1 to 4 - Number of digits in first (or only) part of Interval.
For DECIMAL columns, the size specification can be two numbers separated by a comma. In this case, the first number specifies the total number of digits, and the second number specifies the number of digits to the right of the decimal point.
The format for the DECIMAL size specification is:
n,m
Where:
n is between 1 and 38
m is less than or equal to n
Char Set Specifies the character set to be used in this column.
If this field is left blank, the database uses the default character set defined for your user id.
This column applies only to CHAR, VARCHAR, LONG VARCHAR, and CLOB data types.
Format Specifies the Teradata SQL FORMAT phrase that controls the display of expressions and column data.
For example, a numeric field can be formatted as follows:
zz,zz9.99
A date field can be formatted as follows:
mm/dd/yyyy
Default Specifies the Teradata SQL DEFAULT control phrase, which is the value (constantvalue) to insert, by default, in the column when a specific value is not provided in an inserted row.
Title Specifies the Teradata SQL TITLE phrase that defines the column heading for printed or displayed reports. The column title is not necessarily the same as the column name, which is used as a default if a title is not specified.
Table 14: Column Attributes and Options (continued)
Field or Control Description

Chapter 5: Performing Maintenance TasksCreate Tables
Teradata Administrator User Guide 61
Compress Specifies the Teradata SQL COMPRESS phrase that compresses certain column values to zero space.
Enter either a specific value to be compressed or enter NULL to specify that NULLs be compressed.
Multiple values separated by commas can be entered.
Check Specifies the Teradata CHECK constraint for the column.
Enter the check specification as a Boolean conditional expression using a comparator (>, >=, =, <, <=, <>) followed by a value, as in:
>=0
String multiple check conditional expressions together using “and” or “or”. In this case, precede all additional check specifications with the column name. The following specification, for example, specifies that column Score be between 0 and 100:
>=0 and Score <=100
References Specifies the Teradata REFERENCES attribute for the column. Enter the References specification as a table name that can be optionally:
• Prefixed by a database name and a period.
• Followed by a column name in parentheses.
For example:
MyDatabase.MyTable(MyColumn)
Compress UDFs Enter the names of the COMPRESS and DECOMPRESS functions, separated by a comma, for use in the algorithmic compression. This applies only to the CHAR, BYTE, and LOB columns in Teradata Database 13.10 and higher.
Not Null Applies the Teradata SQL NOT NULL constraint specification to the table column. The NOT NULL specification ensures that every row in the table includes a value for the column.
Note: Clearing the Not Null check box disables the Primary Key and Unique check boxes.
UpperCase Enables the Teradata SQL UPPERCASE option for the column. The UPPERCASE option converts characters to uppercase for comparison and sorting operations.
Note: The UpperCase check box and the Case Specific check box are mutually exclusive. Select either, but not both.
Table 14: Column Attributes and Options (continued)
Field or Control Description

Chapter 5: Performing Maintenance TasksCreate Tables
62 Teradata Administrator User Guide
Valid Time Specifies the VALIDTIME attribute for the column. This attribute can only be specified for columns with PERIOD (DATE) or PERIOD (TIMESTAMP) data type. Only one column can be selected for Valid Time.
This option specifies that the table being created is a temporal table. See the CREATE TABLE section of SQL Data Definition Language for more information about temporal tables.
Note: This attribute is only available when connected to Teradata Database version 13.10 or higher.
With Default Applies the Teradata SQL WITH DEFAULT constraint specification to the table column. The WITH DEFAULT specification inserts the system-defined default value in the column whenever a value is not included with an inserted row.
Note: The With Default check box is mutually exclusive with any entry in the Default column.
Case Specific Enables the Teradata SQL CASESPECIFIC option for the column. The CASESPECIFIC option compares data characters in the same case in which they were entered.
Note: The Case Specific check box and the UpperCase check box are mutually exclusive. Select either, but not both.
Transaction Time Specifies the TRANSACTIONTIME attribute for the column. This attribute can only be specified for columns with PERIOD (TIMESTAMP(6) WITH TIME ZONE) data type. Only one column can be selected for Transaction Time. When this attribute is selected, Not Null is automatically selected.
This option specifies that the table being created is a temporal table. See the CREATE TABLE section of SQL Data Definition Language for more information about temporal tables.
Note: This attribute is only available when connected to Teradata Database version 13.10 or higher.
Primary Key Specifies that the column is used as the primary key to the table.
Selecting the Primary Key check box automatically selects the Not Null check box and clears the Unique check box.
Note: The Primary Key and the Unique check boxes are mutually exclusive, and both require the Not Null check box to be selected.
Unique Specifies that no two rows can have the same value in this column.
Note: The Primary Key and the Unique check boxes are mutually exclusive, and both require the Not Null check box to be selected. Selecting the Unique check box automatically selects the Not Null check box and clears the Primary Key check box.
Table 14: Column Attributes and Options (continued)
Field or Control Description

Chapter 5: Performing Maintenance TasksCreate Tables
Teradata Administrator User Guide 63
Define Primary Key and Indices ConstraintsSelecting either Primary Key or Index/Unique from the Constraint button in the Create Table dialog box displays the Define Primary Key and Indices dialog box. Enter the INDEX specifications for the table that is being created.
Note: Add an ANSI Unique constraint by defining a unique secondary index on the unique columns.
Identity (Always) Specifies the corresponding column is assigned the IDENTITY attribute. This attribute adds the phrase 'GENERATED ALWAYS AS IDENTITY' to the column definition.
To define an identity column, the data type must be a 4 byte (or less) numeric type which include BYTEINT, DECIMAL (18 or less), INTEGER, NUMERIC (18 or less), and SMALLINT. No other types are valid, including a UDT that is based entirely on one (distinct UDT) or several (structured UDT) of these types.
Identity (Default) When selected, the corresponding column is assigned the IDENTITY attribute. This attribute adds the phrase 'GENERATED BY DEFAULT AS IDENTITY' to the column definition.
To define an identity column, the data type must be a 4 byte (or less) numeric type which include BYTEINT, DECIMAL (18 or less), INTEGER, NUMERIC (18 or less), and SMALLINT. No other types are valid, including a UDT that is based entirely on one (distinct UDT) or several (structured UDT) of these types.
Table 14: Column Attributes and Options (continued)
Field or Control Description
Table 15: Define Primary Key and Indices Dialog Box Description
Field or Control Description
Indices Displays the name of each index specified for the table. Selecting an index in the list then reflects its specifications in the Index Columns list and in the configuration of the primary and secondary index type option buttons.
Name Specify an optional name for the index. The specified name is displayed in the Indices list when the Add button is used to save the index specification.
Note: Index names are optional. If a name is not entered in this field, index type (primary or secondary) is displayed in the Indices list and creates the table without an index name specification.
Type Click Primary or Secondary to add the respective index type attribute to the index.
Note: Each table can have only one primary index.
Unique Select this check box to add the UNIQUE attribute to the index.

Chapter 5: Performing Maintenance TasksCreate Tables
64 Teradata Administrator User Guide
Define Check ConstraintsSelecting Check from the Constraint button in the Create Table dialog box displays the Define Check Constraints dialog box.
Use the Define Check Constraints dialog box to define a Boolean condition Check constraints for the table.
Table Columns This list shows all of the columns specified for the table.
Select the columns whose values are used as the basis for an index or constraint specification.
To add columns
✔ Do one of the following:
• From the Table Columns list, double-click on the column name to add it to the Index Columns list.
• Or, click once to highlight the column and click Add to add it to the Index Columns list.
Index Columns Shows all of the columns selected to provide index or constraint value.
To remove columns
✔ Do one of the following:
• From the Index Columns list, double-click on the column name to remove it from the Index Columns list.
• Or, click once to highlight the column and click Remove.
Table 15: Define Primary Key and Indices Dialog Box Description (continued)
Field or Control Description
Table 16: Define Check Constraints Dialog Box Description
Field or Control Description
Check This list displays the name of each Check constraint specified for the table. Selecting a constraint in this list then displays its specifications in the Boolean Condition field.
Name Use this field to specify an optional name for the Check constraint. The name specify is displayed in the checklist when the Add button is used to save your constraint specification.
Note: Constraint names are optional. If a name is not entered, Teradata Administrator displays UnNamed in this field and creates the table without a constraint name specification.

Chapter 5: Performing Maintenance TasksCreate Tables
Teradata Administrator User Guide 65
Define Foreign Key ConstraintsSelecting Foreign Key from the Constraint button in the Create Table dialog box displays the Define Foreign Key Constraints dialog box.
Use the Define Foreign Key Constraints dialog box to define the references of Foreign Key constraints for the table.
Boolean Condition Use this field to enter the conditional expression for the Check constraint.
Table 16: Define Check Constraints Dialog Box Description (continued)
Field or Control Description
Table 17: Define Foreign Key Constraints Dialog Box Description
Field or Control Description
Foreign Key This list displays the name of each Foreign Key constraint specified for the table. Selecting a constraint in the list then displays its specifications in the Key Columns and References Columns lists.
Table Columns This list displays all the columns specified for the table.
Select the columns to be used as the basis for a Foreign Key constraint Reference specification.
To add columns
✔ Do one of the following:
• From the Table Columns list, double-click on the column name to add it to the Key Columns list.
• Or, click once to highlight the column and click Add to add it to the Key Columns list.
Key Columns This list shows all of the columns selected to provide Foreign Key constraint values.
To remove columns
✔ Do one of the following:
• From the Key Columns list, double-click on the column name to remove it from the list.
• Or, click once to highlight the column and click Remove.

Chapter 5: Performing Maintenance TasksCreate Tables
66 Teradata Administrator User Guide
Name Use this field to specify an optional name for the Foreign Key constraint. The name specified is displayed in the Foreign Key list when the Add button is used to save your constraint specification.
Note: Constraint names are optional. If a name is not entered, Teradata Administrator displays UnNamed in this field and creates the table without a constraint name specification.
References
Database and Table Name The database specified on the Create Table dialog box is initially selected and its tables listed.
Use this list to specify the Reference database and table name attribute for your Foreign Key constraint.
This list first displays all of the databases in the Teradata Database. Then, after the database is selected for the reference name field. The list displays all of the tables in the selected database.
When a table is selected, all of the columns of the selected table display in the Table Columns list.
Table Columns This list shows all the columns in the table selected for the Reference specification.
Select the columns to be used as the basis for a Reference specification.
To add columns
✔ Do one of the following:
• From the Table Columns list, double-click on the column name to add it to the Reference Columns list.
• Or, click once to highlight the column and click Add to add it to the Reference Columns list.
Reference Columns This list shows all of the columns selected to provide Reference values.
Note: Reference columns are optional. If no reference columns are specified, the reference is to the primary index of the selected table.
To remove columns
✔ Do one of the following:
• From the Reference Columns list, double-click on the column name to remove it from the list.
• Or, click once to highlight the column and click Remove.
Table 17: Define Foreign Key Constraints Dialog Box Description (continued)
Field or Control Description
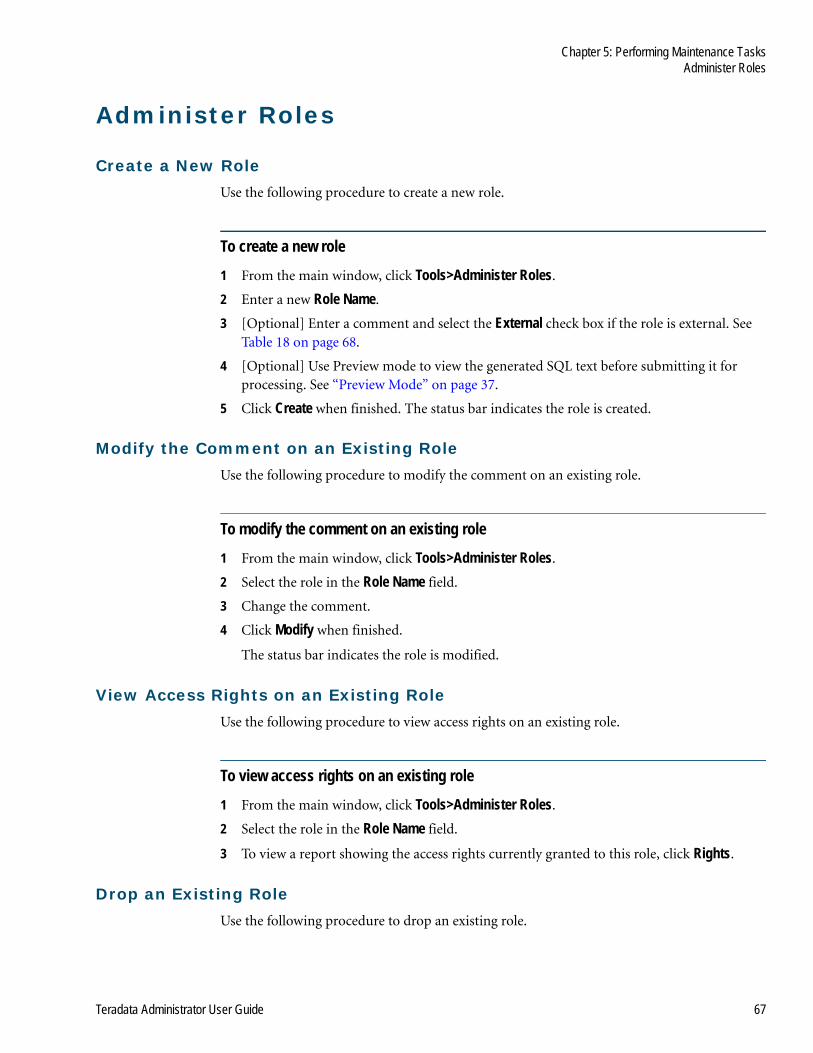
Chapter 5: Performing Maintenance TasksAdminister Roles
Teradata Administrator User Guide 67
Administer Roles
Create a New RoleUse the following procedure to create a new role.
To create a new role
1 From the main window, click Tools>Administer Roles.
2 Enter a new Role Name.
3 [Optional] Enter a comment and select the External check box if the role is external. See Table 18 on page 68.
4 [Optional] Use Preview mode to view the generated SQL text before submitting it for processing. See “Preview Mode” on page 37.
5 Click Create when finished. The status bar indicates the role is created.
Modify the Comment on an Existing RoleUse the following procedure to modify the comment on an existing role.
To modify the comment on an existing role
1 From the main window, click Tools>Administer Roles.
2 Select the role in the Role Name field.
3 Change the comment.
4 Click Modify when finished.
The status bar indicates the role is modified.
View Access Rights on an Existing RoleUse the following procedure to view access rights on an existing role.
To view access rights on an existing role
1 From the main window, click Tools>Administer Roles.
2 Select the role in the Role Name field.
3 To view a report showing the access rights currently granted to this role, click Rights.
Drop an Existing RoleUse the following procedure to drop an existing role.
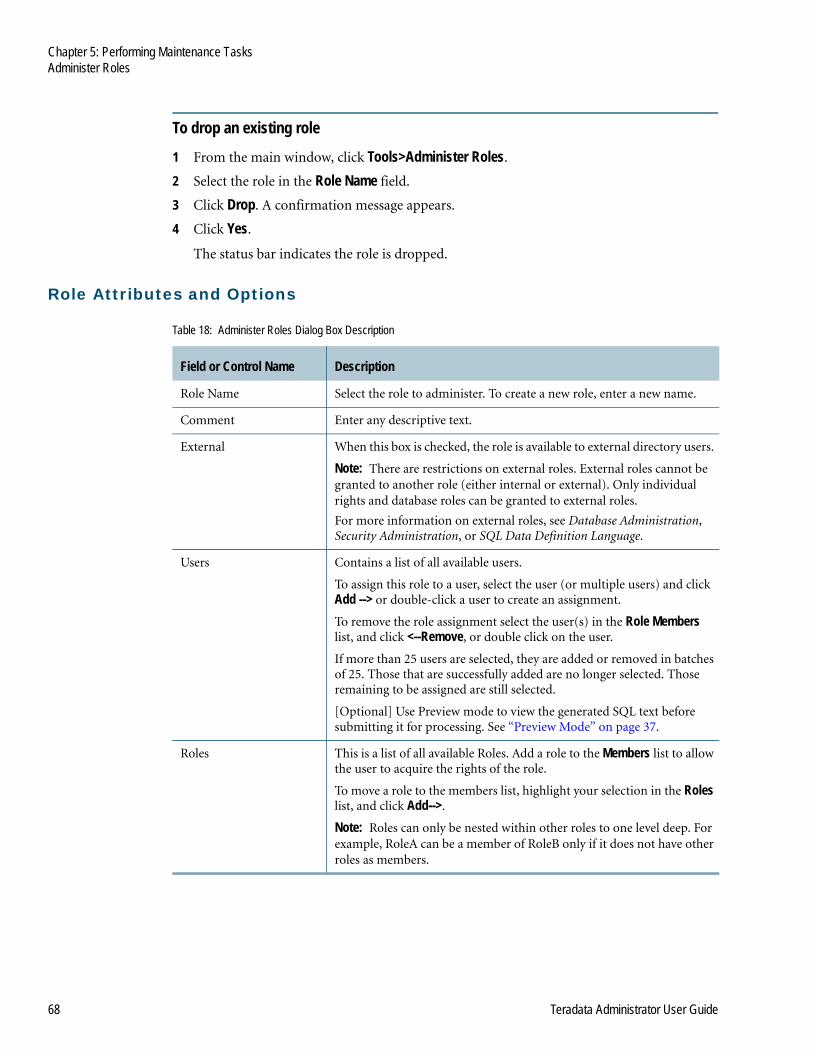
Chapter 5: Performing Maintenance TasksAdminister Roles
68 Teradata Administrator User Guide
To drop an existing role
1 From the main window, click Tools>Administer Roles.
2 Select the role in the Role Name field.
3 Click Drop. A confirmation message appears.
4 Click Yes.
The status bar indicates the role is dropped.
Role Attributes and Options
Table 18: Administer Roles Dialog Box Description
Field or Control Name Description
Role Name Select the role to administer. To create a new role, enter a new name.
Comment Enter any descriptive text.
External When this box is checked, the role is available to external directory users.
Note: There are restrictions on external roles. External roles cannot be granted to another role (either internal or external). Only individual rights and database roles can be granted to external roles.
For more information on external roles, see Database Administration, Security Administration, or SQL Data Definition Language.
Users Contains a list of all available users.
To assign this role to a user, select the user (or multiple users) and click Add --> or double-click a user to create an assignment.
To remove the role assignment select the user(s) in the Role Members list, and click <--Remove, or double click on the user.
If more than 25 users are selected, they are added or removed in batches of 25. Those that are successfully added are no longer selected. Those remaining to be assigned are still selected.
[Optional] Use Preview mode to view the generated SQL text before submitting it for processing. See “Preview Mode” on page 37.
Roles This is a list of all available Roles. Add a role to the Members list to allow the user to acquire the rights of the role.
To move a role to the members list, highlight your selection in the Roles list, and click Add-->.
Note: Roles can only be nested within other roles to one level deep. For example, RoleA can be a member of RoleB only if it does not have other roles as members.
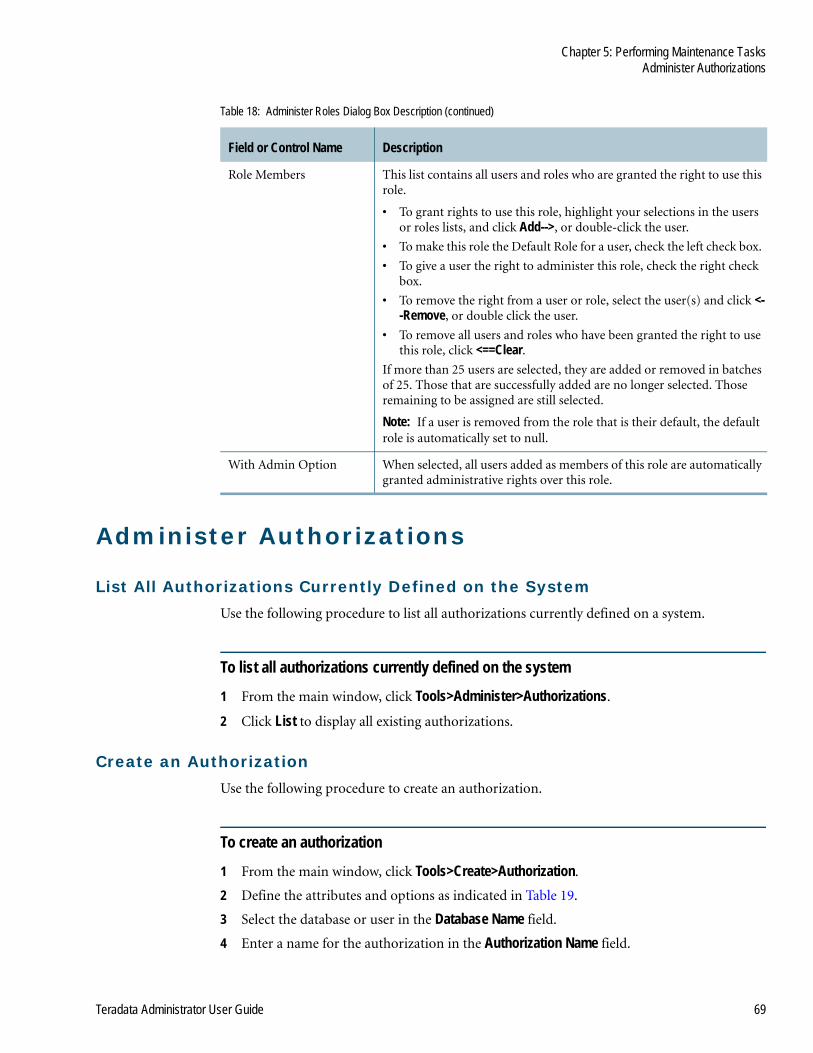
Chapter 5: Performing Maintenance TasksAdminister Authorizations
Teradata Administrator User Guide 69
Administer Authorizations
List All Authorizations Currently Defined on the SystemUse the following procedure to list all authorizations currently defined on a system.
To list all authorizations currently defined on the system
1 From the main window, click Tools>Administer>Authorizations.
2 Click List to display all existing authorizations.
Create an AuthorizationUse the following procedure to create an authorization.
To create an authorization
1 From the main window, click Tools>Create>Authorization.
2 Define the attributes and options as indicated in Table 19.
3 Select the database or user in the Database Name field.
4 Enter a name for the authorization in the Authorization Name field.
Role Members This list contains all users and roles who are granted the right to use this role.
• To grant rights to use this role, highlight your selections in the users or roles lists, and click Add-->, or double-click the user.
• To make this role the Default Role for a user, check the left check box.
• To give a user the right to administer this role, check the right check box.
• To remove the right from a user or role, select the user(s) and click <--Remove, or double click the user.
• To remove all users and roles who have been granted the right to use this role, click <==Clear.
If more than 25 users are selected, they are added or removed in batches of 25. Those that are successfully added are no longer selected. Those remaining to be assigned are still selected.
Note: If a user is removed from the role that is their default, the default role is automatically set to null.
With Admin Option When selected, all users added as members of this role are automatically granted administrative rights over this role.
Table 18: Administer Roles Dialog Box Description (continued)
Field or Control Name Description

Chapter 5: Performing Maintenance TasksAdminister Authorizations
70 Teradata Administrator User Guide
Authorizations make an association between a database user and an operating system server user identification, allowing an external routine to run in secure mode using the context, privileges, and access control accrued to the specified operating system user.
5 Select either Invoker or Definer as the authorization type.
6 [Optional] If Definer is selected, Default can be selected.
7 Enter the Domain, User Name, and Password.
The UNIX or Windows User Name and Password must be defined on every node of the system, and it must be a member of the tdatudf user group.
Note: Type the complete password. Do not use the Paste command in the Password field. Do not use the arrow keys or the mouse to navigate in the Password field.
8 [Optional] Enter a Comment.
9 Click Create.
The status bar indicates the authorization has been created.
Replace an AuthorizationUse the following procedure to replace an authorization.
To replace an authorization
Replacing an authorization allows the authorization definition to change without having to recompile any UDFs or XSPs that reference this authorization. Recompiling is required if an authorization is dropped and then created.
1 From the main window, click Tools>Administer>Authorizations.
2 Select the database or user in the Database Name field.
3 Enter the authorization name.
4 Click Display to view the current definition.
5 Change the User Name, Password, and Comment.
Note: Type the complete password. Do not use the Paste command in the Password field. Do not use the arrow keys or the mouse to navigate in the Password field.
6 Click Replace.
The status bar indicates the authorization has been replaced.
Drop an AuthorizationUse the following procedure to drop an authorization.
To drop an authorization
1 From the main window, click Tools>Administer>Authorizations.
2 Select the database or user in the Database Name field.
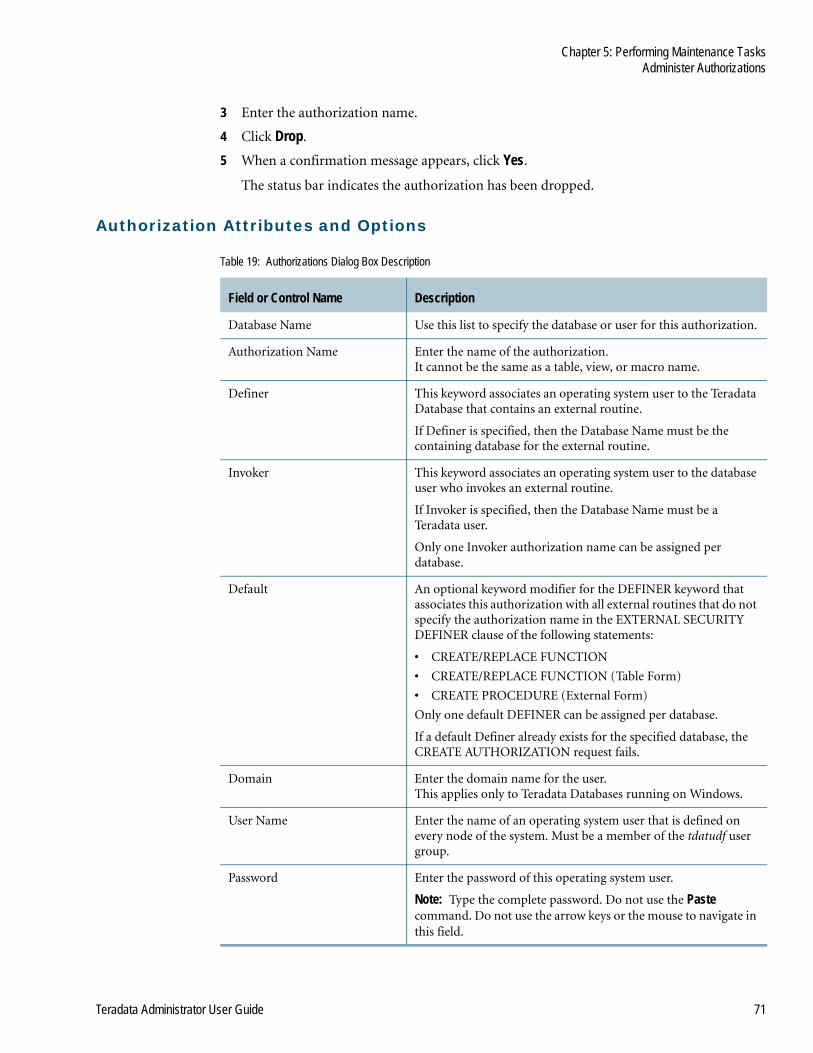
Chapter 5: Performing Maintenance TasksAdminister Authorizations
Teradata Administrator User Guide 71
3 Enter the authorization name.
4 Click Drop.
5 When a confirmation message appears, click Yes.
The status bar indicates the authorization has been dropped.
Authorization Attributes and Options
Table 19: Authorizations Dialog Box Description
Field or Control Name Description
Database Name Use this list to specify the database or user for this authorization.
Authorization Name Enter the name of the authorization. It cannot be the same as a table, view, or macro name.
Definer This keyword associates an operating system user to the Teradata Database that contains an external routine.
If Definer is specified, then the Database Name must be the containing database for the external routine.
Invoker This keyword associates an operating system user to the database user who invokes an external routine.
If Invoker is specified, then the Database Name must be a Teradata user.
Only one Invoker authorization name can be assigned per database.
Default An optional keyword modifier for the DEFINER keyword that associates this authorization with all external routines that do not specify the authorization name in the EXTERNAL SECURITY DEFINER clause of the following statements:
• CREATE/REPLACE FUNCTION
• CREATE/REPLACE FUNCTION (Table Form)
• CREATE PROCEDURE (External Form)
Only one default DEFINER can be assigned per database.
If a default Definer already exists for the specified database, the CREATE AUTHORIZATION request fails.
Domain Enter the domain name for the user. This applies only to Teradata Databases running on Windows.
User Name Enter the name of an operating system user that is defined on every node of the system. Must be a member of the tdatudf user group.
Password Enter the password of this operating system user.
Note: Type the complete password. Do not use the Paste command. Do not use the arrow keys or the mouse to navigate in this field.

Chapter 5: Performing Maintenance TasksAdminister Profiles
72 Teradata Administrator User Guide
Administer Profiles
Use the following procedure to administer profiles.
To administer profiles
1 From the main window, click Tools>Administer Profiles.
2 Choose from the following:
• To create a new profile, enter a new Profile Name, and then continue with Step 3.
• To modify an existing profile, select the profile in the Profile Name field, and then continue with Step 3.
• To drop an existing profile, select the profile in the Profile Name field, and then click Drop.
3 Define the attributes and options as indicated in Table 20.
4 Click Create or Modify when finished.
Profile Attributes and Options
Comment Enter an optional comment to describe this Authorization object.
Table 19: Authorizations Dialog Box Description (continued)
Field or Control Name Description
Table 20: Administer Profiles Dialog Box Description
Field or Control Name Description
Profile Name Select the profile to modify. To create a new profile, enter a name.
General Tab
Account This account string is used in any session connected by a user who is assigned to this profile.
Default Database This is the default database of any user who is assigned to this profile.
Spool Space The maximum number of bytes of spool space that can be used by any user who is assigned to this profile.
Typing the letters K, M or G into this field sets the corresponding option button.
Temp Space The maximum number of bytes that can be used by temporary tables created by any user who is assigned to this profile.
Typing the letters K, M or G into this field sets the corresponding option button.
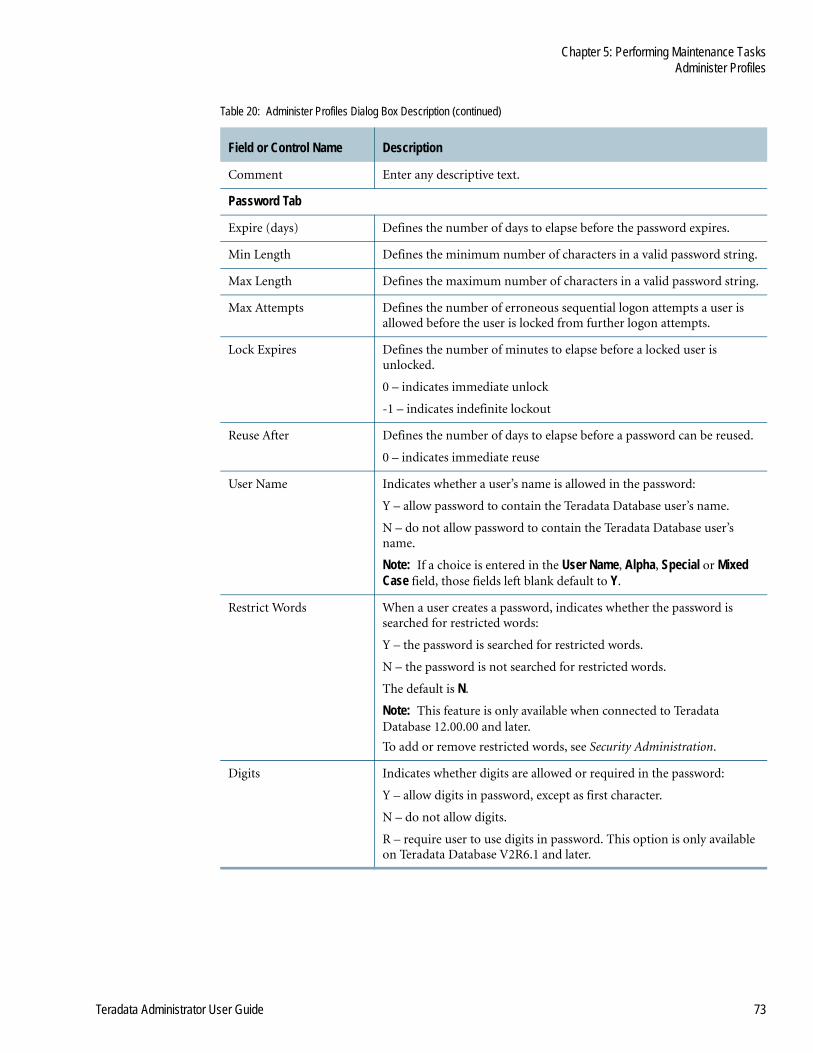
Chapter 5: Performing Maintenance TasksAdminister Profiles
Teradata Administrator User Guide 73
Comment Enter any descriptive text.
Password Tab
Expire (days) Defines the number of days to elapse before the password expires.
Min Length Defines the minimum number of characters in a valid password string.
Max Length Defines the maximum number of characters in a valid password string.
Max Attempts Defines the number of erroneous sequential logon attempts a user is allowed before the user is locked from further logon attempts.
Lock Expires Defines the number of minutes to elapse before a locked user is unlocked.
0 – indicates immediate unlock
-1 – indicates indefinite lockout
Reuse After Defines the number of days to elapse before a password can be reused.
0 – indicates immediate reuse
User Name Indicates whether a user’s name is allowed in the password:
Y – allow password to contain the Teradata Database user’s name.
N – do not allow password to contain the Teradata Database user’s name.
Note: If a choice is entered in the User Name, Alpha, Special or Mixed Case field, those fields left blank default to Y.
Restrict Words When a user creates a password, indicates whether the password is searched for restricted words:
Y – the password is searched for restricted words.
N – the password is not searched for restricted words.
The default is N.
Note: This feature is only available when connected to Teradata Database 12.00.00 and later.
To add or remove restricted words, see Security Administration.
Digits Indicates whether digits are allowed or required in the password:
Y – allow digits in password, except as first character.
N – do not allow digits.
R – require user to use digits in password. This option is only available on Teradata Database V2R6.1 and later.
Table 20: Administer Profiles Dialog Box Description (continued)
Field or Control Name Description
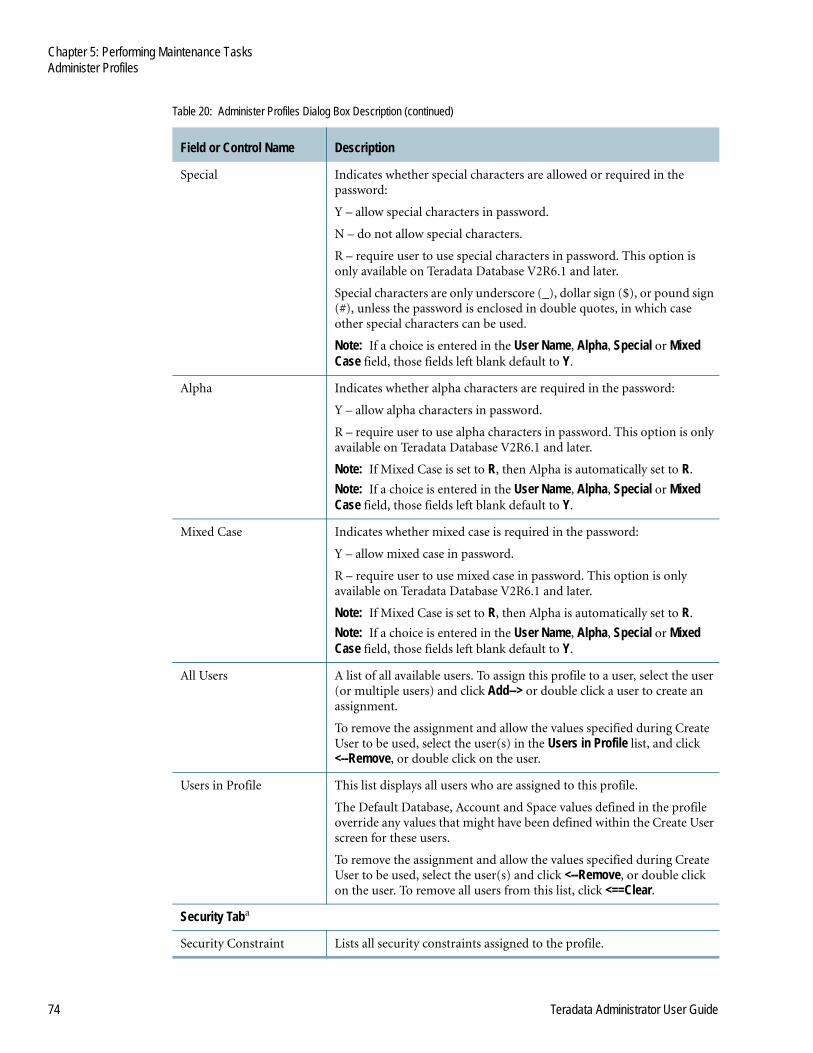
Chapter 5: Performing Maintenance TasksAdminister Profiles
74 Teradata Administrator User Guide
Special Indicates whether special characters are allowed or required in the password:
Y – allow special characters in password.
N – do not allow special characters.
R – require user to use special characters in password. This option is only available on Teradata Database V2R6.1 and later.
Special characters are only underscore (_), dollar sign ($), or pound sign (#), unless the password is enclosed in double quotes, in which case other special characters can be used.
Note: If a choice is entered in the User Name, Alpha, Special or Mixed Case field, those fields left blank default to Y.
Alpha Indicates whether alpha characters are required in the password:
Y – allow alpha characters in password.
R – require user to use alpha characters in password. This option is only available on Teradata Database V2R6.1 and later.
Note: If Mixed Case is set to R, then Alpha is automatically set to R.
Note: If a choice is entered in the User Name, Alpha, Special or Mixed Case field, those fields left blank default to Y.
Mixed Case Indicates whether mixed case is required in the password:
Y – allow mixed case in password.
R – require user to use mixed case in password. This option is only available on Teradata Database V2R6.1 and later.
Note: If Mixed Case is set to R, then Alpha is automatically set to R.
Note: If a choice is entered in the User Name, Alpha, Special or Mixed Case field, those fields left blank default to Y.
All Users A list of all available users. To assign this profile to a user, select the user (or multiple users) and click Add--> or double click a user to create an assignment.
To remove the assignment and allow the values specified during Create User to be used, select the user(s) in the Users in Profile list, and click<--Remove, or double click on the user.
Users in Profile This list displays all users who are assigned to this profile.
The Default Database, Account and Space values defined in the profile override any values that might have been defined within the Create User screen for these users.
To remove the assignment and allow the values specified during Create User to be used, select the user(s) and click <--Remove, or double click on the user. To remove all users from this list, click <==Clear.
Security Taba
Security Constraint Lists all security constraints assigned to the profile.
Table 20: Administer Profiles Dialog Box Description (continued)
Field or Control Name Description
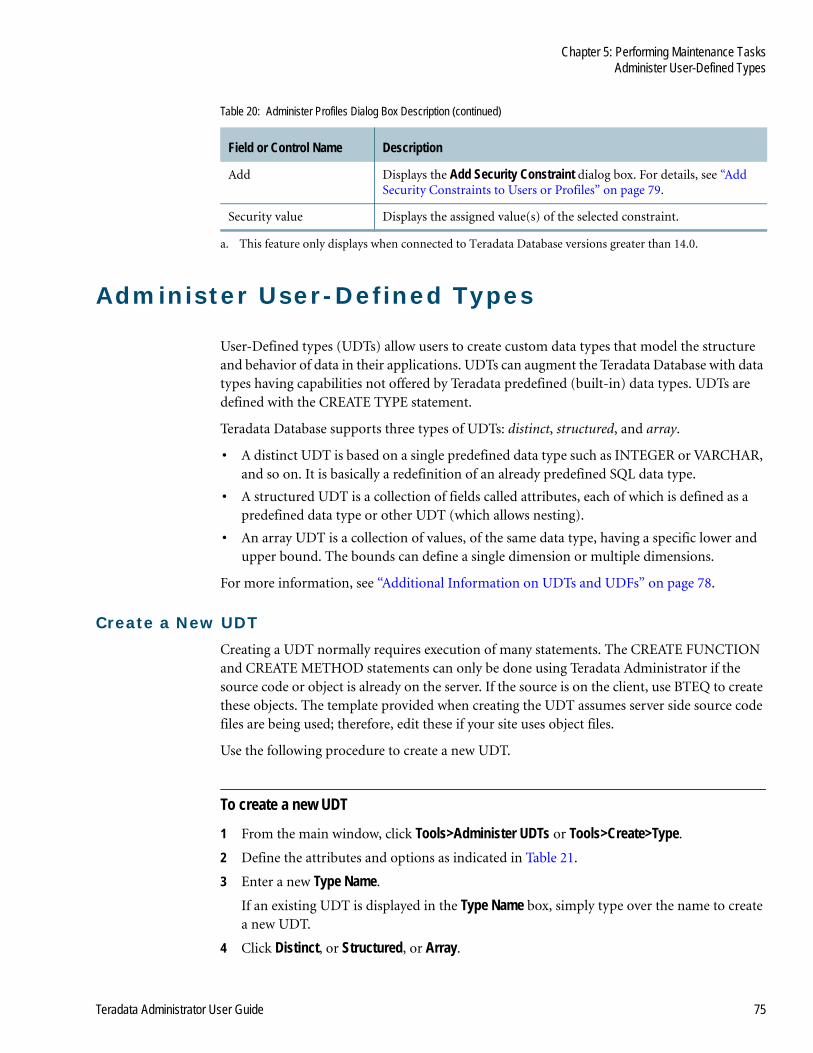
Chapter 5: Performing Maintenance TasksAdminister User-Defined Types
Teradata Administrator User Guide 75
Administer User-Defined Types
User-Defined types (UDTs) allow users to create custom data types that model the structure and behavior of data in their applications. UDTs can augment the Teradata Database with data types having capabilities not offered by Teradata predefined (built-in) data types. UDTs are defined with the CREATE TYPE statement.
Teradata Database supports three types of UDTs: distinct, structured, and array.
• A distinct UDT is based on a single predefined data type such as INTEGER or VARCHAR, and so on. It is basically a redefinition of an already predefined SQL data type.
• A structured UDT is a collection of fields called attributes, each of which is defined as a predefined data type or other UDT (which allows nesting).
• An array UDT is a collection of values, of the same data type, having a specific lower and upper bound. The bounds can define a single dimension or multiple dimensions.
For more information, see “Additional Information on UDTs and UDFs” on page 78.
Create a New UDTCreating a UDT normally requires execution of many statements. The CREATE FUNCTION and CREATE METHOD statements can only be done using Teradata Administrator if the source code or object is already on the server. If the source is on the client, use BTEQ to create these objects. The template provided when creating the UDT assumes server side source code files are being used; therefore, edit these if your site uses object files.
Use the following procedure to create a new UDT.
To create a new UDT
1 From the main window, click Tools>Administer UDTs or Tools>Create>Type.
2 Define the attributes and options as indicated in Table 21.
3 Enter a new Type Name.
If an existing UDT is displayed in the Type Name box, simply type over the name to create a new UDT.
4 Click Distinct, or Structured, or Array.
Add Displays the Add Security Constraint dialog box. For details, see “Add Security Constraints to Users or Profiles” on page 79.
Security value Displays the assigned value(s) of the selected constraint.
a. This feature only displays when connected to Teradata Database versions greater than 14.0.
Table 20: Administer Profiles Dialog Box Description (continued)
Field or Control Name Description
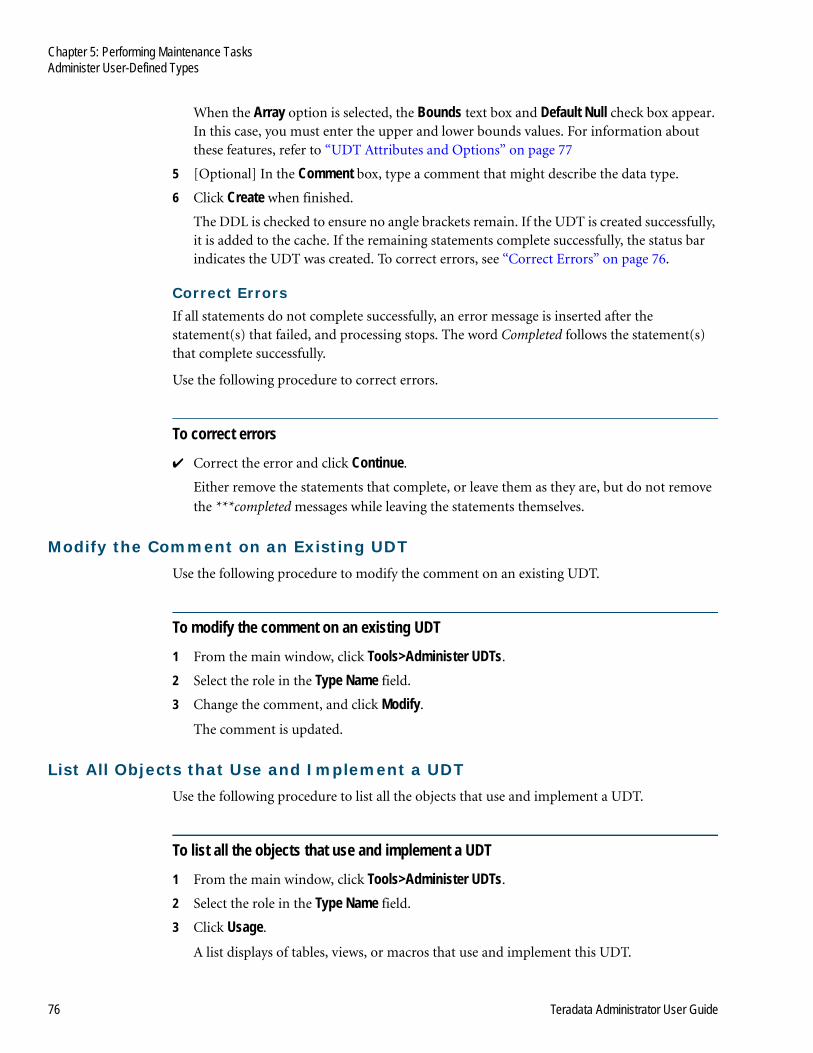
Chapter 5: Performing Maintenance TasksAdminister User-Defined Types
76 Teradata Administrator User Guide
When the Array option is selected, the Bounds text box and Default Null check box appear. In this case, you must enter the upper and lower bounds values. For information about these features, refer to “UDT Attributes and Options” on page 77
5 [Optional] In the Comment box, type a comment that might describe the data type.
6 Click Create when finished.
The DDL is checked to ensure no angle brackets remain. If the UDT is created successfully, it is added to the cache. If the remaining statements complete successfully, the status bar indicates the UDT was created. To correct errors, see “Correct Errors” on page 76.
Correct ErrorsIf all statements do not complete successfully, an error message is inserted after the statement(s) that failed, and processing stops. The word Completed follows the statement(s) that complete successfully.
Use the following procedure to correct errors.
To correct errors
✔ Correct the error and click Continue.
Either remove the statements that complete, or leave them as they are, but do not remove
the ***completed messages while leaving the statements themselves.
Modify the Comment on an Existing UDTUse the following procedure to modify the comment on an existing UDT.
To modify the comment on an existing UDT
1 From the main window, click Tools>Administer UDTs.
2 Select the role in the Type Name field.
3 Change the comment, and click Modify.
The comment is updated.
List All Objects that Use and Implement a UDTUse the following procedure to list all the objects that use and implement a UDT.
To list all the objects that use and implement a UDT
1 From the main window, click Tools>Administer UDTs.
2 Select the role in the Type Name field.
3 Click Usage.
A list displays of tables, views, or macros that use and implement this UDT.

Chapter 5: Performing Maintenance TasksAdminister User-Defined Types
Teradata Administrator User Guide 77
Drop an Existing UDTUse the following procedure to drop an existing UDT.
To drop an existing UDT
1 From the main window, click Tools>Administer UDTs.
2 Select the role in the Type Name field.
3 Click Drop.
A confirmation message appears. Teradata Administrator checks to ensure this Type is not used in a table, procedure, or other objects.
4 Click Yes.
If the drop is successful, the UDT is deleted from the cache.
If the drop fails, messages appear at the top of the DDL showing which objects were dropped and the error that occurred for the last object that failed to drop.
5 Click Usage to list the remaining objects to be dropped. A list displays of tables, views, and macros that use this Type, and UDFs that implement it.
UDT Attributes and Options
Examples1 Distinct data type: Define ‘Salary’ as a Decimal(9,2), but with a function that prevents someone from entering a value of less than 20,000 or more than 2,000,000.
2 Structured data type: If ‘Address’ is defined as a UDT with sub-fields for Street, Apartment, City, State, and Zip Code, Transform functions must be provided that convert input and output data into and from an ‘Address’ object. Suggest inputting and outputting it as a string with all the fields concatenated, either using fixed field lengths or a delimiter such as a comma between them.
3 The following table demonstrates how the values entered in the Bounds text box are handled as SQL values.
Table 21: Administer UDTs Dialog Box Description
Field or Control Name Description
Type Name A list of all available UDTs. To create a new type, enter a new name.
Distinct Select to clone an existing data type and add additional restrictions, or functionality, to the clone. 1
Structured Select to create a data type with multiple fields.2
Array Select to create an array type.
Comment Type any descriptive text.
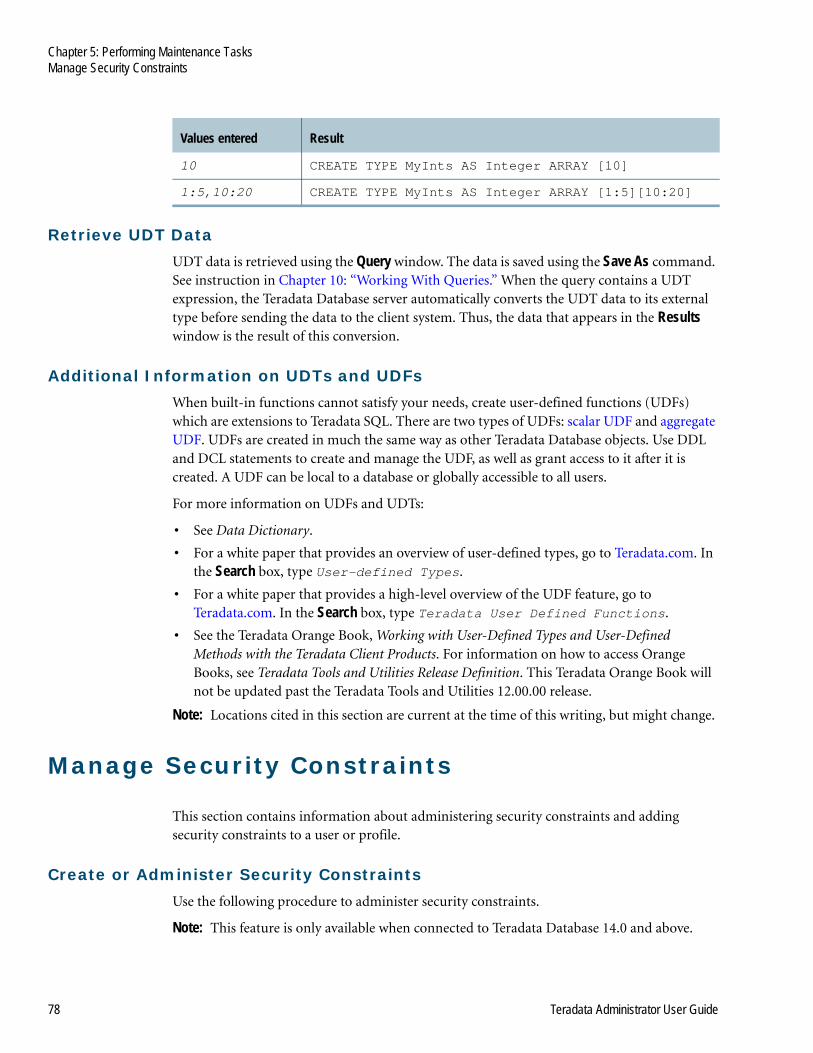
Chapter 5: Performing Maintenance TasksManage Security Constraints
78 Teradata Administrator User Guide
Retrieve UDT DataUDT data is retrieved using the Query window. The data is saved using the Save As command. See instruction in Chapter 10: “Working With Queries.” When the query contains a UDT expression, the Teradata Database server automatically converts the UDT data to its external type before sending the data to the client system. Thus, the data that appears in the Results window is the result of this conversion.
Additional Information on UDTs and UDFsWhen built-in functions cannot satisfy your needs, create user-defined functions (UDFs) which are extensions to Teradata SQL. There are two types of UDFs: scalar UDF and aggregate UDF. UDFs are created in much the same way as other Teradata Database objects. Use DDL and DCL statements to create and manage the UDF, as well as grant access to it after it is created. A UDF can be local to a database or globally accessible to all users.
For more information on UDFs and UDTs:
• See Data Dictionary.
• For a white paper that provides an overview of user-defined types, go to Teradata.com. In the Search box, type User-defined Types.
• For a white paper that provides a high-level overview of the UDF feature, go to Teradata.com. In the Search box, type Teradata User Defined Functions.
• See the Teradata Orange Book, Working with User-Defined Types and User-Defined Methods with the Teradata Client Products. For information on how to access Orange Books, see Teradata Tools and Utilities Release Definition. This Teradata Orange Book will not be updated past the Teradata Tools and Utilities 12.00.00 release.
Note: Locations cited in this section are current at the time of this writing, but might change.
Manage Security Constraints
This section contains information about administering security constraints and adding security constraints to a user or profile.
Create or Administer Security ConstraintsUse the following procedure to administer security constraints.
Note: This feature is only available when connected to Teradata Database 14.0 and above.
Values entered Result
10 CREATE TYPE MyInts AS Integer ARRAY [10]
1:5,10:20 CREATE TYPE MyInts AS Integer ARRAY [1:5][10:20]

Chapter 5: Performing Maintenance TasksManage Security Constraints
Teradata Administrator User Guide 79
To create or administer security constraints
1 From the main window, click Tools>Administer>Security Constraints.
2 Choose from the following:
• To create a new security constraint, enter a new Name, and continue to the next step.
• To modify an existing security constraint, select the security constraint in the Name field, and continue to the next step.
• To drop an existing security constraint, select the security constraint in the Name field, and then click Drop.
3 Define the attributes and options as indicated in Table 22.
4 Click Create or Modify.
Security Constraint Attributes and Options
Add Security Constraints to Users or ProfilesThis section describes how to apply existing security constraints to a user or profile.
To add a security constraint to a user or profile
1 Create one or more security constraints. For instructions, see “To create or administer security constraints” on page 79.
2 Perform one of the following actions to add a predefined security constraint:
• For user accounts, click Tools>Modify User, select the user to be modified, and click Add under Security Constraints. Table 11 contains more information about the Modify User dialog.
Table 22: Administer Security Constraints Dialog Box Description
Field or Control Name Description
Name Lists all constraints currently defined on the Teradata Database.
Type Sets or identifies the selected constraint type as Integer or Binary.
Size Sets or displays the size of the constraint if the constraint type is Binary. The value must be between 1 and 32.
Nullable Indicates if the selected constraint is nullable.
Values Enter one value per line. Each line must contain a name followed by a colon and an integer value.
Function Names (optional)
Lists all user-defined functions in the SYSLIB database. Select the UDF for determining the user level for each action (Select, Insert, Update, and Delete).
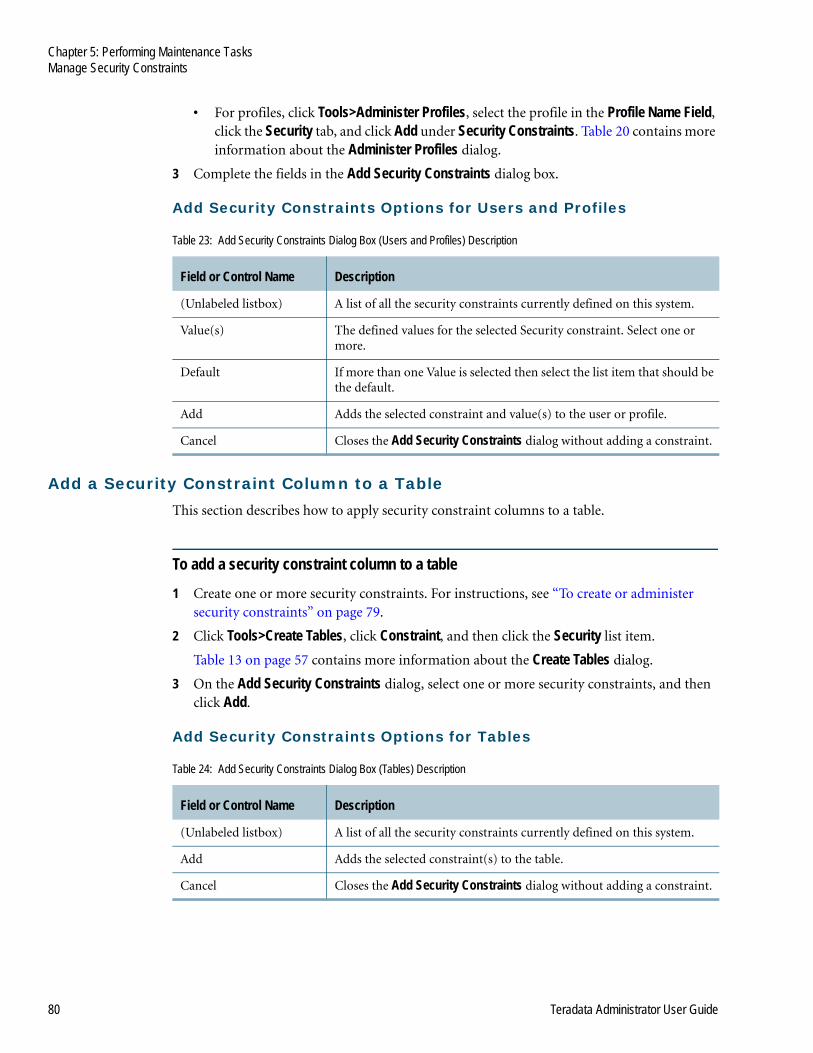
Chapter 5: Performing Maintenance TasksManage Security Constraints
80 Teradata Administrator User Guide
• For profiles, click Tools>Administer Profiles, select the profile in the Profile Name Field, click the Security tab, and click Add under Security Constraints. Table 20 contains more information about the Administer Profiles dialog.
3 Complete the fields in the Add Security Constraints dialog box.
Add Security Constraints Options for Users and Profiles
Add a Security Constraint Column to a TableThis section describes how to apply security constraint columns to a table.
To add a security constraint column to a table
1 Create one or more security constraints. For instructions, see “To create or administer security constraints” on page 79.
2 Click Tools>Create Tables, click Constraint, and then click the Security list item.
Table 13 on page 57 contains more information about the Create Tables dialog.
3 On the Add Security Constraints dialog, select one or more security constraints, and then click Add.
Add Security Constraints Options for Tables
Table 23: Add Security Constraints Dialog Box (Users and Profiles) Description
Field or Control Name Description
(Unlabeled listbox) A list of all the security constraints currently defined on this system.
Value(s) The defined values for the selected Security constraint. Select one or more.
Default If more than one Value is selected then select the list item that should be the default.
Add Adds the selected constraint and value(s) to the user or profile.
Cancel Closes the Add Security Constraints dialog without adding a constraint.
Table 24: Add Security Constraints Dialog Box (Tables) Description
Field or Control Name Description
(Unlabeled listbox) A list of all the security constraints currently defined on this system.
Add Adds the selected constraint(s) to the table.
Cancel Closes the Add Security Constraints dialog without adding a constraint.

Chapter 5: Performing Maintenance TasksMove Space Between Databases
Teradata Administrator User Guide 81
Move Space Between Databases
Use the following procedure to reallocate permanent disk space from one database to another.
Note: To move space between a database and its parent, use the Modify Database or Modify User options on the Tools menu. Changing the Perm Space field on this dialog box takes the additional space from its parent, or gives the freed space to its parent.
To move space from one database to another
1 From the main window, click Tools>Move Space.
2 Define the options as indicated in Table 25.
3 [Optional] Use Preview mode to view the generated SQL text before submitting it for processing. See “Preview Mode” on page 37.
4 Click Move when finished.
Move Space Options
Table 25: Move Space Dialog Box Description
Field or Control Name Description
From Database The source database from where to copy an object or move permanent disk space.
To Database The destination database to where to copy an object or move permanent disk space.
Number of Bytes The amount of permanent disk space to reallocate from one database to another.
The amount entered is subtracted from the database specified in the From Database field and is added to the database specified in the To Database field.
Typing the letters K, M or G into this field sets the corresponding option button.

Chapter 5: Performing Maintenance TasksMove Space Between Databases
82 Teradata Administrator User Guide

Teradata Administrator User Guide 83
CHAPTER 6
Setting Access Rights
The following topics provide ways of setting access rights for the database.
• Grant or Revoke Object Rights
• Grant or Revoke System Rights
• Grant or Revoke Column Rights
• Grant or Revoke Logon Rights
Grant or Revoke Object Rights
Use the following procedure to grant or revoke object rights (database-, table-, view-, or macro-level) to users or roles.
To grant or revoke object rights
1 From the main window, click Tools>Grant / Revoke>Object Rights.
2 Fill in or modify the fields as indicated in Table 27 on page 84.
User rights are indicated by check boxes displaying the following states:
3 Do one of the following:
• Click Grant to grant the selected privileges to the user.
• Click Revoke to revoke the selected privileges from the user.
• Click Display to show the privileges for the currently selected user.
• Click Clear to clear all the check boxes.
Table 26: Object Rights Dialog Box Description
State Description
User does not have the right.
User has the right but not the authority to grant it.
User has the right and also the authority to grant it.

Chapter 6: Setting Access RightsGrant or Revoke Object Rights
84 Teradata Administrator User Guide
4 Click Close when finished.
Grant / Revoke Object Rights Fields
Table 27: Grant/Revoke Objects Dialog Box Description
Field or Control Description
Database Name Specify the database or user to grant or revoke privileges.
Note: The UDT Usage check box is only available when the SYSUDTLIB database is selected.
Object Type Specify the type of object to grant privileges.
When one of the Types is selected, the check boxes for the privileges that are available for that type of object are activated.
If any type except Database is chosen, the Object list displays all the objects of the selected type contained in the selected database.
Object Displays all of the database object names of the type specified in the Object Type box for the user or database selected in the Database field.
Select the name of the object to grant or revoke general access privileges.
To/From User Displays all of the users and databases of the data source that are being worked with.
Select the name of the user or database to grant general access privileges.
To select multiple users, press and hold Ctrl and click the users.
Role Displays all of the roles that exist on the data source that are being worked with.
Select the name of the role to grant general access privileges.
To select multiple roles, press and hold Ctrl and click on the roles.
And All Children Applies to the user or database selected in the To User list. Select to extend general access privileges to all the children of the selected user or database.
This extension applies to all currently-owned users and databases, and to any that might become owned in the future.
Note: If multiple users are selected, the And All Children option is added only to the first user in the list.
Public Select to extend the general access or column privileges to all users and databases on the currently selected database.
This applies to all currently defined users and databases, and to any that might be defined in the future.
Normal Select to specify the general access privileges to grant or revoke for the user specified in the To User or From User box.
Create Select to specify the create privileges to grant or revoke for the user specified in the To User or From User box.

Chapter 6: Setting Access RightsGrant or Revoke System Rights
Teradata Administrator User Guide 85
Grant or Revoke System Rights
Use the following procedure to grant or revoke system privileges to users or roles.
To grant or revoke system rights
1 From the main window, click Tools>Grant / Revoke>System Rights.
2 Fill in or modify the fields as indicated in Table 28 on page 86.
User rights are indicated by check boxes displaying the following states:
3 Do one of the following:
• Click Grant to grant the selected privileges to the user.
Drop Select to specify the drop privileges to grant or revoke for the user specified in the To User or From User box.
All Selects all available rights for those whose check boxes are active in the Normal, Create, and Drop areas of the dialog box.
Dictionary Selects all available dictionary-related rights.
• Create - selects all available create object rights.
• Drop - selects all available drop object rights.
Access Selects all available data access rights.
All But Select to either grant or revoke all of the privileges whose check boxes are active except those that have been selected.
Grant Select to grant the selected privileges to the selected To User. It also gives this user the ability to Grant the selected privileges to others.
Select to revoke, from the selected To User, the right to Grant the selected privileges. To revoke the privileges themselves, issue a second Revoke command without this check box selected.
Table 27: Grant/Revoke Objects Dialog Box Description (continued)
Field or Control Description
State Description
User does not have the right.
User has the right but not the authority to grant it.
User has the right and also the authority to grant it.

Chapter 6: Setting Access RightsGrant or Revoke Column Rights
86 Teradata Administrator User Guide
• Click Revoke to revoke the selected privileges from the user.
• Click Display to show the privileges for the currently selected user.
4 Click Close when finished.
Grant / Revoke System Rights Fields
Grant or Revoke Column Rights
Use the following procedure to grant or revoke column privileges to users or roles.
Table 28: Grant/Revoke System Dialog Box Description
Field or Control Description
To/From User Displays all of the users and databases of the data source that are being worked with.
Select the name of the user or database to grant monitor or system-wide privileges.
To select multiple users, press and hold Ctrl and click on the users.
Role Displays all of the roles that exist on the data source that are being worked with.
Select the name of the role to grant monitor or system-wide privileges.
To select multiple roles, press and hold Ctrl and click on the roles.
And All Children Applies to the user or database selected in the To User list. Select to extend the monitor or system-wide privileges to all the children of the selected user or database.
This extension applies to all currently-owned users and databases, and to any that might become owned in the future.
Note: If multiple users are selected, the And All Children option is added only to the first user in the list.
Privileges Check Boxes Select to specify the system privileges to grant or revoke for the user specified in the To User or From User box.
All A shortcut to select or clear all the Privileges check boxes.
Grant Select to grant the selected privileges to the selected To User. It also gives this user the ability to grant the selected privileges to others.
Select to revoke, from the selected To User, the right to grant the selected privileges. To revoke the privileges themselves, issue a second Revoke command without this check box selected.

Chapter 6: Setting Access RightsGrant or Revoke Column Rights
Teradata Administrator User Guide 87
To grant or revoke column rights
1 From the main window, click Tools>Grant / Revoke>Column Rights.
2 Fill in or modify the fields as indicated in Table 29 on page 87.
3 Do one of the following:
• Click Grant to grant the selected privileges to the user.
• Click Revoke to revoke the selected privileges from the user.
4 Click Close when finished.
Grant / Revoke Column Rights Fields
Table 29: Grant/Revoke Columns Dialog Box Description
Field or Control Description
Database Name Specify the database or user to grant or revoke privileges.
Table Name Select the table or view to grant column privileges.
When an object is selected from the table name list, all the columns related to that object display in the Columns list.
Type The two Object Type buttons specify the type of object to grant column privileges:
• Table
• View
When an Object Type is selected, all the objects related to the type display in the Table Name list.
Columns Specify the column to grant or revoke column privileges.
To select multiple columns, press and hold Ctrl and click on the columns.
All But Grant or revoke the selected privileges on all columns except those that have been selected in the Columns list.
Privileges Specify the column privileges to grant or revoke.
To / From User Displays all the users and databases of the data source that are being worked with.
Select the name of the user or database to grant column privileges.
To select multiple users, press and hold Ctrl and click on the users.
And All Children Applies to the user or database selected in the To User list. Select to extend the column privileges to all the children of the selected user or database.
This extension applies to all currently-owned users and databases, and to any that might become owned in the future.
Note: If multiple users are selected, the And All Children specification is added only to the first user in the list.

Chapter 6: Setting Access RightsGrant or Revoke Logon Rights
88 Teradata Administrator User Guide
Grant or Revoke Logon Rights
Use the following procedure to grant or revoke logon privileges to users.
To grant or revoke logon rights
1 From the main window, click Tools>Grant / Revoke>Logon Rights.
2 Fill in or modify the fields as indicated in Table 30 on page 88.
3 Do one of the following:
• Click Grant to grant the selected privileges to the user.
• Click Revoke to revoke the selected privileges from the user.
4 Click Close when finished.
Grant / Revoke Logon Rights Fields
Role Displays all the roles that exist on the data source that is being worked with.
Select the name of the role to grant column privileges.
To select multiple roles, press and hold Ctrl and click on the roles.
Public Select this option to extend the general access or column privileges to all users and databases on the currently selected database.
This applies to all currently-defined users and databases, and to any that might be defined in the future.
Table 29: Grant/Revoke Columns Dialog Box Description (continued)
Field or Control Description
Table 30: Grant/Revoke Logon Dialog Box Description
Field or Control Description
To / From User Displays all the users of the data source that is being worked with.
Select the name of the user or database to grant logon privileges.
To select multiple users, press and hold Ctrl and click on the users.
Default This creates the default rule for the Host IDs that is being defined.
This applies to any user for whom there is no specific rule defined.
On Host(s) Enter the Host IDs to grant or revoke access for the selected user(s). Use commas to separate multiple host IDs.
All Hosts Select this option to grant logon rights for the selected user on all available hosts.

Chapter 6: Setting Access RightsGrant or Revoke Connect Through Rights
Teradata Administrator User Guide 89
Grant or Revoke Connect Through Rights
Use the following procedure to grant or revoke connection privileges to users.
To grant or revoke connect through rights
1 From the main window, click Tools>Grant / Revoke>Connect Through.
2 Fill in or modify the fields as indicated in Table 31.
3 Do one of the following:
• Click Grant to grant the Connect Through right for the user(s).
• Click Revoke to revoke the Connect Through right for the user(s).
• Click Display to display all users who have rights to use the selected Trusted User.
• Click Show All to display all Trusted Users and the users who can use them.
4 Click Close when finished.
Grant / Revoke Connect Through Rights Fields
With Null Password Select this option to allow the selected user(s) to logon to the Teradata Database without providing a password.
Table 30: Grant/Revoke Logon Dialog Box Description (continued)
Field or Control Description
Table 31: Grant/Revoke Connect Through Dialog Box Description
Field or Control Description
Trusted User Select the DBS user that you want other users to be able to connect through.
Application Users A list of external (non-DBS defined) user names (separated by commas) who are allowed to connect through the selected Trusted User. A maximum of 25 users are allowed.
The user name is set using Query Bands.
The list is mutually exclusive with DBS Users.
DBS Users Select the DBS-defined users who are allowed to connect through the selected Trusted User.
The user name will be set using Query Bands.
The list is mutually exclusive with Application Users.
Roles Select up to 15 roles that can be used by the Trusted User when the DBS/Application users connect through.
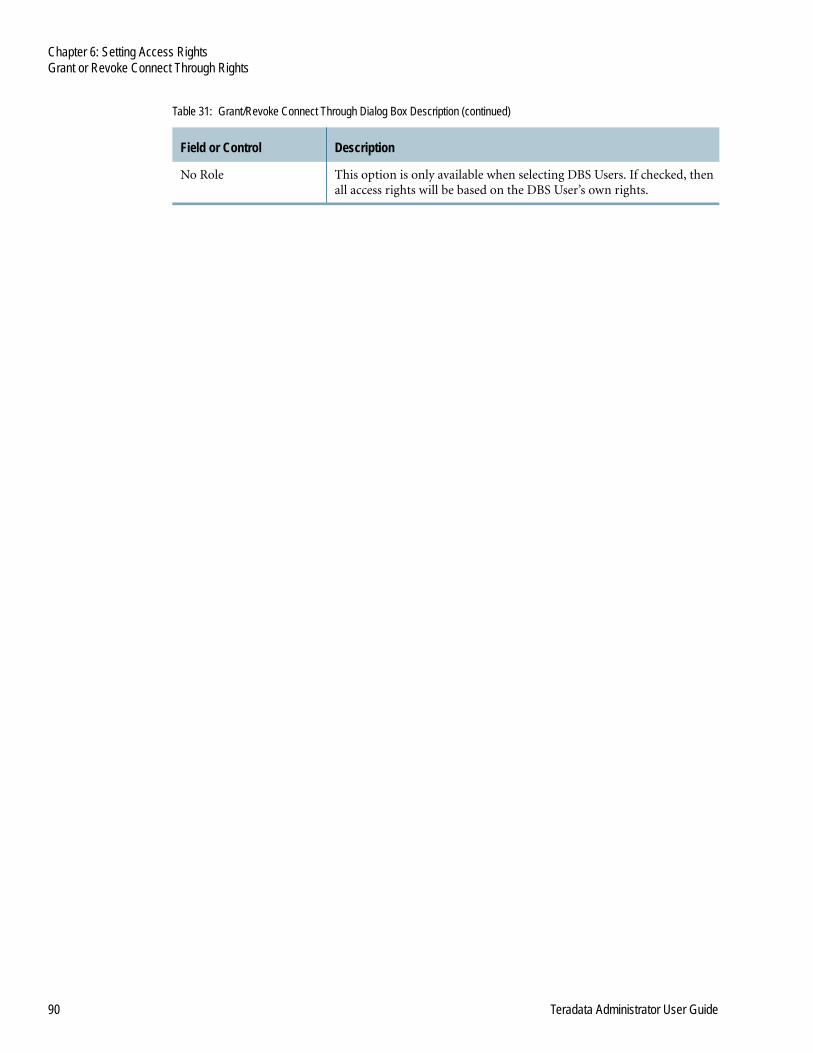
Chapter 6: Setting Access RightsGrant or Revoke Connect Through Rights
90 Teradata Administrator User Guide
No Role This option is only available when selecting DBS Users. If checked, then all access rights will be based on the DBS User’s own rights.
Table 31: Grant/Revoke Connect Through Dialog Box Description (continued)
Field or Control Description
Teradata Administrator User Guide 91
CHAPTER 7
Setting Rules for Logging
Set complex rules for creating access and query logs. Read the following topics to learn how to set these rules and how to start and stop the logs.
• Work with the Access Log
• Work with the Query Log
Work with the Access Log
With Teradata Administrator, start or stop access logging for specific tables, databases, or users. Also, review all the current Access Log rules that are defined on the database.
Use the following procedure for access logging.
To work with the access log
1 From the main window, click Tools>Access Logging.
2 Define the attributes and options as indicated in Table 32 on page 92.
3 Use the buttons on the dialog box as follows:
• Begin Log - defines an access logging rule for the selected user(s), database, and object (optional).
• End Log - revokes an existing access logging rule for the selected user(s), database, and object (optional).
If SQL is used for logging and the user ends logging with SQL, this simply removes the “with SQL” attribute. To remove the rule itself, clear the with SQL check box, and then issue an End Log command.
• Display - displays a report of the existing access logging rules. To limit the scope of this report, select a specific database or user.
• Clear - clears the fields in this dialog box.
4 Click Close when finished.
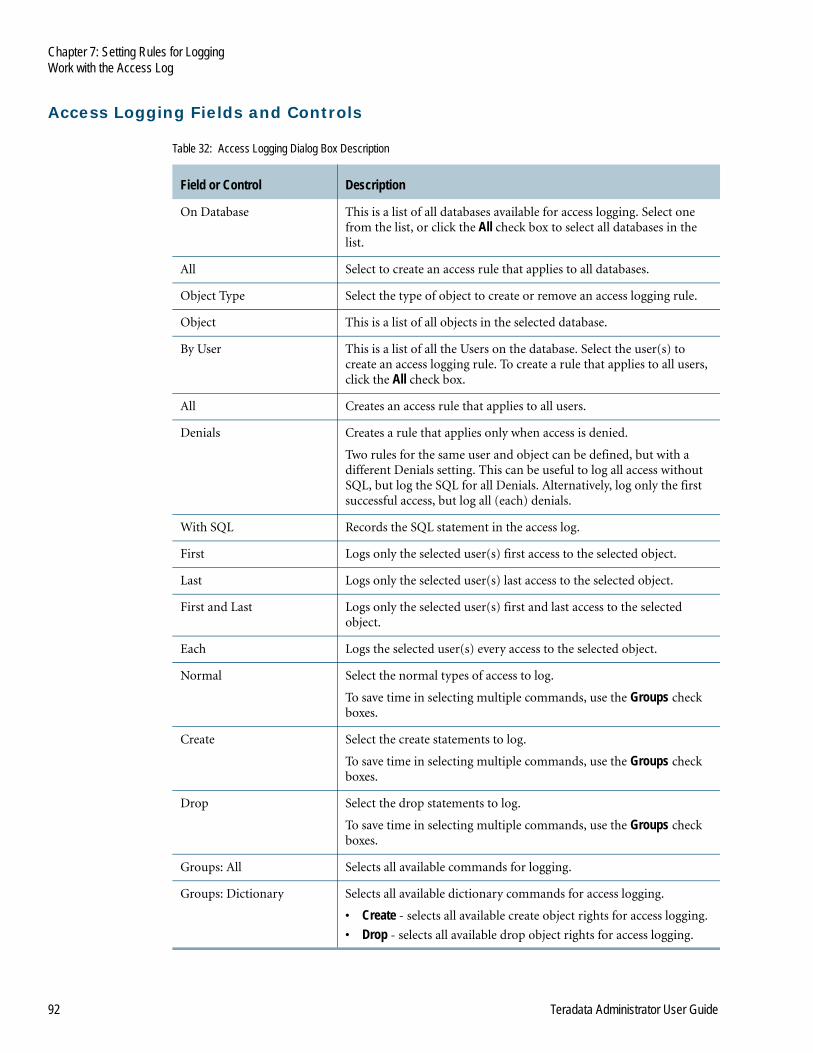
Chapter 7: Setting Rules for LoggingWork with the Access Log
92 Teradata Administrator User Guide
Access Logging Fields and Controls
Table 32: Access Logging Dialog Box Description
Field or Control Description
On Database This is a list of all databases available for access logging. Select one from the list, or click the All check box to select all databases in the list.
All Select to create an access rule that applies to all databases.
Object Type Select the type of object to create or remove an access logging rule.
Object This is a list of all objects in the selected database.
By User This is a list of all the Users on the database. Select the user(s) to create an access logging rule. To create a rule that applies to all users, click the All check box.
All Creates an access rule that applies to all users.
Denials Creates a rule that applies only when access is denied.
Two rules for the same user and object can be defined, but with a different Denials setting. This can be useful to log all access without SQL, but log the SQL for all Denials. Alternatively, log only the first successful access, but log all (each) denials.
With SQL Records the SQL statement in the access log.
First Logs only the selected user(s) first access to the selected object.
Last Logs only the selected user(s) last access to the selected object.
First and Last Logs only the selected user(s) first and last access to the selected object.
Each Logs the selected user(s) every access to the selected object.
Normal Select the normal types of access to log.
To save time in selecting multiple commands, use the Groups check boxes.
Create Select the create statements to log.
To save time in selecting multiple commands, use the Groups check boxes.
Drop Select the drop statements to log.
To save time in selecting multiple commands, use the Groups check boxes.
Groups: All Selects all available commands for logging.
Groups: Dictionary Selects all available dictionary commands for access logging.
• Create - selects all available create object rights for access logging.
• Drop - selects all available drop object rights for access logging.

Chapter 7: Setting Rules for LoggingWork with the Query Log
Teradata Administrator User Guide 93
Work with the Query Log
With Teradata Administrator, log SQL queries that the system processes.
Use the following procedure for query logging.
To work with the query log
1 From the main window, click Tools>Query Logging.
2 Define the attributes and options as indicated in Table 33.
3 Use the buttons on the dialog box as follows:
• Begin Log - starts query logging for the selected user.
Note: In Teradata Database version 13.10 and later you do not need to use the End Log command before issuing a new Begin Log command for the same criteria.
• End Log - stops query logging for the selected user.
• Display - displays the query logging rules for the selected user.
• Delete - deletes all existing rules for the selected user.
4 Click Close when finished.
Query Logging Fields and Controls
Groups: Access Selects all available access commands for access logging.
Groups: Maintenance Selects all available maintenance commands for access logging.
Security Constraint Lists all available security constraints. This feature is only available when connected to Teradata Database 14.0 and later.
Table 32: Access Logging Dialog Box Description (continued)
Field or Control Description
Table 33: Query Logging Rules Dialog Box Description
Field or Control Description
By Application Name As an alternative to creating a rule by User(s) or Account(s), select to create a rule by Application Name, and then type the application name in the text box located directly below this check box.
Note: This check box is only available when connected to Teradata Database 13.00.00 and later.
User(s) Lists of all the Users on the database. Select the user(s) to create a query logging rule.
All Select to create an access rule that applies to all users.

Chapter 7: Setting Rules for LoggingWork with the Query Log
94 Teradata Administrator User Guide
Account(s) Enter an Account, or a list of accounts separated by commas, to restrict logging to only those sessions for which the selected user logs on with one of the specified accounts.
Note: If an account is entered, select only one user.
What to Log
No Logging Select for user(s) to be exempt from logging when these user(s) would otherwise be logged by a broader rule such as All Users or Account.
Note: This check box is only available when connected to Teradata Database 13.00.00 and later.
Object Names Select to reference the names of the database objects (Tables, Views, and so forth.) in the query to be saved to the DBQLObjTbl table.
Full SQL Text Select to save the full SQL text to the DBQLSQLTbl table (besides whatever is specified in the SQL Length field).
Step Information Select to save the statistics for each execution step within the queries to the DBQLStepTbl table.
Explain Text Select to save the Explain text for the queries to the DBQLExplainTbl table.
XML Plan Adds XML Plan information to the Query Log for later use by the DBQAT products.
Everything Logs all possible options.
Limits
SQL Length Limits the length of the SQL stored in the main query logging table: DBQLLogTbl. (The maximum length is 10,000 characters.)
Note: If this option is not selected, the Teradata Database logs the first 200 characters of the SQL.
Summary Logs only summary statistics for the executed queries.
Enter 3 threshold values. These values define thresholds (seconds) for query response time. They are used to group queries into 4 'size' categories. A count of the number of queries in each category is logged every 10 minutes.
For example: If the three threshold values entered are 5, 10 and 15, counts for the queries that run between 0 and 5 seconds, 5 to 10 seconds, 10 to 15 seconds and above 15 is logged. Every 10 minutes, a DBQL object row is written for any count that is greater than 0. For example, if 1 query ran under 5 seconds, 2 queries ran 7 seconds each and 3 queries each ran over 15 seconds, 3 rows is written to the DBQL object table.
Note: When Summary is selected, none of the other dialog box options apply.
Table 33: Query Logging Rules Dialog Box Description (continued)
Field or Control Description

Chapter 7: Setting Rules for LoggingWork with the Query Log
Teradata Administrator User Guide 95
Threshold Select to count those queries that run in less than 'n' seconds (in the summary record written every 10 minutes).
Queries that run longer than ‘n’ seconds are logged using the other settings.
Elapsed (sec), Elapsed (1/100), CPU Time, CPU (Normalized), and I/O Count option buttons
These options specify the content of the Summary and Threshold fields. Elapsed (sec) is the default.
Begin Log Click Begin to start Query Logging for the selected user.
Note: In Teradata Database version 13.10 and later you do not need to use the End Log command before issuing a new Begin Log command for the same criteria.
End Log Click End to stop Query Logging for the selected user.
Display Click Display to view the Query Logging rules for the selected user.
Delete Click Delete to delete all existing rule(s) for the selected user.
Select the All check box, and then click Delete to delete all existing rule(s) for all users. The All check box is only available when the By Application Id check box is not selected.
Note: The Delete button is only available when connected to Teradata Database 13.00.00 and later.
Table 33: Query Logging Rules Dialog Box Description (continued)
Field or Control Description

Chapter 7: Setting Rules for LoggingWork with the Query Log
96 Teradata Administrator User Guide

Teradata Administrator User Guide 97
CHAPTER 8
Displaying Database Information
Teradata Administrator provides the following options for viewing database information:
• Display All Objects
• Display Tables and Indexes
• Display Views
• Display Macros and Stored Procedures
• Display Databases and Users
• Display Database Information
• Display Rights on DB and User
• Display Rights Held by DB and User
• Display Role Memberships for the DB and User
• Display Table Space Usage
• Display Child Space Usage
Display All Objects
Use the following procedure to display all objects in the selected database.
To display all objects in the selected database
1 Select the database in the database tree.
2 From the main window, click Database>List All Objects.
The database tree expands to show the child databases for the selected database. See Table 34.
List All Objects Report ContentsNote: The actual column headings are a function of the database itself.
Table 34: List All Objects Report
Field or Control Description
Table Name Name of each table, view, and macro in the selected database.
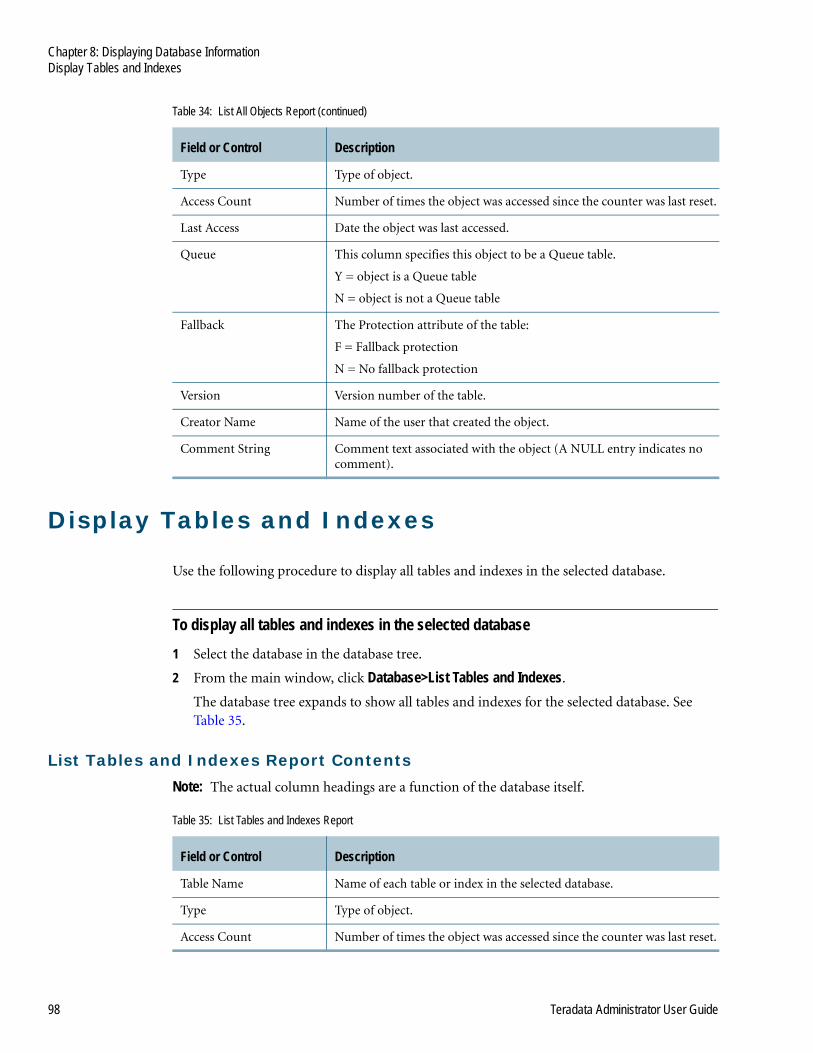
Chapter 8: Displaying Database InformationDisplay Tables and Indexes
98 Teradata Administrator User Guide
Display Tables and Indexes
Use the following procedure to display all tables and indexes in the selected database.
To display all tables and indexes in the selected database
1 Select the database in the database tree.
2 From the main window, click Database>List Tables and Indexes.
The database tree expands to show all tables and indexes for the selected database. See Table 35.
List Tables and Indexes Report ContentsNote: The actual column headings are a function of the database itself.
Type Type of object.
Access Count Number of times the object was accessed since the counter was last reset.
Last Access Date the object was last accessed.
Queue This column specifies this object to be a Queue table.
Y = object is a Queue table
N = object is not a Queue table
Fallback The Protection attribute of the table:
F = Fallback protection
N = No fallback protection
Version Version number of the table.
Creator Name Name of the user that created the object.
Comment String Comment text associated with the object (A NULL entry indicates no comment).
Table 34: List All Objects Report (continued)
Field or Control Description
Table 35: List Tables and Indexes Report
Field or Control Description
Table Name Name of each table or index in the selected database.
Type Type of object.
Access Count Number of times the object was accessed since the counter was last reset.

Chapter 8: Displaying Database InformationDisplay Views
Teradata Administrator User Guide 99
Display Views
Use the following procedure to display all views in the selected database.
To display all views in the selected database
1 Select the database in the database tree.
2 From the main window, click Database>List Views.
The database tree expands to show all views for the selected database. See Table 36.
List Views Report ContentsNote: The actual column headings are a function of the database itself.
Last Access Date the object was last accessed.
Protection Type Protection attribute for tables in the selected database:
F = Fallback protection
N = No fallback protection
Version Version number of the table.
Creator Name Name of the user that created the object.
Comment String Comment text associated with the object (A NULL entry indicates no comment).
Table 35: List Tables and Indexes Report (continued)
Field or Control Description
Table 36: List Views Report
Field or Control Description
Table Name Name of each view in the selected database.
Type Type of object.
Access Count Number of times the object was accessed since the counter was last reset.
Last Access Date the object was last accessed.
Creator Name Name of the user that created the object.
Comment String Comment text associated with the object (A NULL entry indicates no comment).

Chapter 8: Displaying Database InformationDisplay Macros and Stored Procedures
100 Teradata Administrator User Guide
Display Macros and Stored Procedures
Use the following procedure to display all macros and stored procedures in the selected database.
To display all macros and stored procedures in the selected database
1 Select the database in the database tree.
2 From the main window, click Database>List Macros and Procedures.
The database tree expands to show all macros and stored procedures for the selected database. See Table 37.
List Macros and Procedures Report ContentsNote: The actual column headings are a function of the database itself.
Display Databases and Users
Use the following procedure to display all databases and users in the selected database.
To display all databases and users in the selected database
1 Select the database in the database tree.
2 From the main window, click Database>List Databases and Users.
The database tree expands to show all databases and users for the selected database. See Table 38.
Table 37: List Macros and Procedures Report
Field or Control Description
Macro Name Name of each macro, function or stored procedure in the selected database.
Type Type of object.
Access Count Number of times the object was accessed since the counter was last reset.
Last Access Date the object was last accessed.
Creator Name Name of the user who created the object.
Comment String Comment text associated with the object (A NULL entry indicates no comment).

Chapter 8: Displaying Database InformationDisplay Database Information
Teradata Administrator User Guide 101
List Databases and Users Report ContentsNote: The actual column headings are a function of the database itself.
Display Database Information
Use the following procedure to display information about the selected database.
Table 38: List Databases and Users
Field or Control Description
Database Name Name of the database or user.
Type Type of object where:
D = Database
U = User
Perm Space Total amount of permanent disk space, in bytes, reserved for the selected database’s use.
Spool Space Total amount of temporary disk space available to the user for query results and intermediate result files.
Temp Space Total amount of disk space available for use by Temporary tables built in this database.
Access Count Number of times the object was accessed since the counter was last reset.
Last Access Date the object was last accessed.
Account Name The account associated with this database.
Protection Type Protection attribute for tables in the selected database:
F = Fallback protection
N = No fallback protection
Journal Flag Journal default for tables in the selected database where:
N = No journaling
S = Single journal
D = Dual journal
L = Local journal
Note: The journal flag has two characters. The first indicates the before-journal type and the second indicates the after-journal type.
Creator Name Name of the user that created the object.
Comment String Comment text associated with the object (A NULL entry indicates no comment).

Chapter 8: Displaying Database InformationDisplay Database Information
102 Teradata Administrator User Guide
To display information about the selected database
1 Select the database in the database tree.
2 From the main window, click Database>Database Information.
The database tree expands to show information about the selected database. See Table 39.
Database Information Report ContentsNote: The actual column headings are a function of the database itself.
Table 39: Database Information Report
Field or Control Description
Type Type of object where:
D = Database
U = User
Perm Space Total amount of permanent disk space, in bytes, reserved for the selected database’s use.
Spool Space Total amount of temporary disk space available to the user for query results and intermediate result files.
Temp Space Total amount of disk space available for use by Temporary tables built in this database.
Access Count Number of times the object was accessed since the counter was last reset.
Last Access Date the object was last accessed.
Account Name The account associated with this database.
Protection Type Protection attribute for tables in the selected database:
F = Fallback protection
N = No fallback protection
Journal Flag Journal default for tables in the selected database where:
N = No journaling
S = Single journal
D = Dual journal
L = Local journal
Note: The journal flag has two characters. The first indicates the before-journal type and the second indicates the after-journal type.
Creator Name Name of the user that created the object.
Comment String Comment text associated with the object (A NULL entry indicates no comment).

Chapter 8: Displaying Database InformationDisplay Rights on DB and User
Teradata Administrator User Guide 103
Display Rights on DB and User
Use the following procedure to display the rights on the selected database or user.
To display the rights on the selected database or user
1 Select the database in the database tree.
2 From the main window, click Database>Rights on DB/User.
The database tree expands to show the rights for the selected database or user. See Table 40.
Database Rights On... Report ContentsNote: The actual column headings are a function of the database itself.
Display Rights Held by DB and User
Use the following procedure to display the access rights held by a selected database or user.
To display the access rights held by a database or user
1 Select the database in the database tree.
2 From the main window, click Database>Rights held by DB/User.
Table 40: Rights on DB/User Report
Field or Control Description
UserName Name of the user who holds rights over this database.
AccessRight One or two character code (see Table 42 on page 104) for each access privilege the user has on this database, table, or column.
GrantAuthority Indicates whether the user is allowed to grant this right to another user:
Y = user is allowed to grant this right
N = user is not allowed to grant this right
Grantor Name of the user who granted this access privilege.
AllnessFlag Indicates whether the right is automatically propagated to databases created below this user:
Y = the right is automatically propagated
N = the right is not automatically propagated

Chapter 8: Displaying Database InformationDisplay Rights Held by DB and User
104 Teradata Administrator User Guide
The database tree expands to show the access rights held by a database or user. See Table 41.
Database Rights Held By... Report ContentsNote: The actual column headings are a function of the database itself.
Access Rights CodesThese access rights codes describe the user access privilege on a particular database, table, or column.
Table 41: Rights Held by DB/User Report
Field or Control Description
Database Name Name of the database that the right applies to, or which contains the table to which the right applies.
Object Name Name of the object to which the right applies, if a table-level right.
Column Name Name of the column to which the right applies, if a column-level right.
Access Rights One- or two-character code (see Table 42) for each access privilege the user has on this database, table, or column.
Grant/Role Indicates if the user has authority to grant this right to others (Y for yes or N for no).
If the right is held directly by a user, it wll be Y or N. If the right is granted through role membership, the RoleName displays.
Allness Flag Indicates whether the right is automatically propagated to databases created below this user:
Y = the right is automatically propagated
N = the right is not automatically propagated
Grantor Name Name of the user who granted this access privilege.
Table 42: Access Rights Codes
Access Right Code Description
AF Alter Function
AP Alter Procedure
AS Abort Session
CA Create Authorization
CD Create Database
CF Create Function
CG Create Trigger
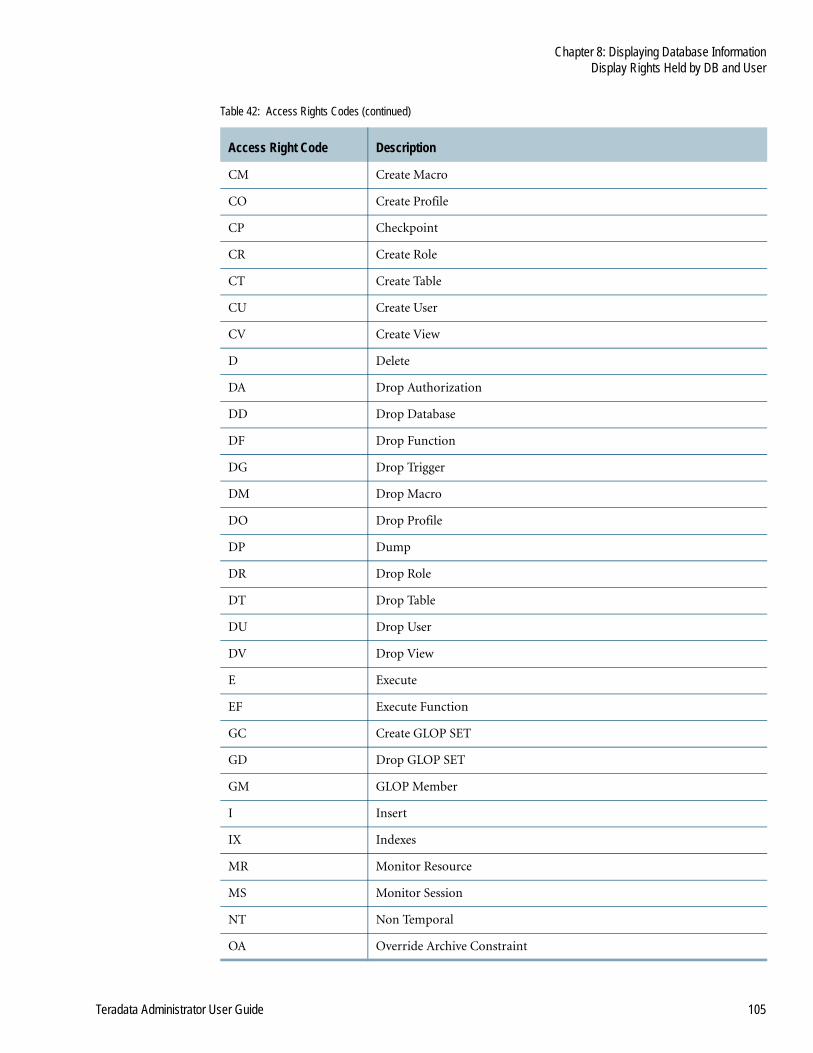
Chapter 8: Displaying Database InformationDisplay Rights Held by DB and User
Teradata Administrator User Guide 105
CM Create Macro
CO Create Profile
CP Checkpoint
CR Create Role
CT Create Table
CU Create User
CV Create View
D Delete
DA Drop Authorization
DD Drop Database
DF Drop Function
DG Drop Trigger
DM Drop Macro
DO Drop Profile
DP Dump
DR Drop Role
DT Drop Table
DU Drop User
DV Drop View
E Execute
EF Execute Function
GC Create GLOP SET
GD Drop GLOP SET
GM GLOP Member
I Insert
IX Indexes
MR Monitor Resource
MS Monitor Session
NT Non Temporal
OA Override Archive Constraint
Table 42: Access Rights Codes (continued)
Access Right Code Description

Chapter 8: Displaying Database InformationDisplay Role Memberships for the DB and User
106 Teradata Administrator User Guide
Display Role Memberships for the DB and User
Use the following procedure to display role memberships for the database or user.
OD Override Delete Constraint
OI Override Insert Constraint
OP Create Owner Procedure
OR Override Restore Constraint
OS Override Select Constraint
OU Override Update Constraint
PC Create Procedure
PD Drop Procedure
PE Execute Procedure
R Retrieve or Select
RF References
RS Restore
SH Show
SA Constraint Assignment
SD Constraint Definition
SS Set Session Rate
SR Set Resource Rate
ST Statistics
TH Connect Through
U Update
UM UDT Method
UT UDT Type
UU UDT Usage
Table 42: Access Rights Codes (continued)
Access Right Code Description

Chapter 8: Displaying Database InformationDisplay Table Space Usage
Teradata Administrator User Guide 107
To display role memberships for the database or user
1 Select the database or user in the database tree.
2 From the main window, click Database>Role Memberships.
The database tree expands to show role membership for the selected database or user. See Table 43.
Role Memberships Report ContentsNote: The actual column headings are a function of the database itself.
Display Table Space Usage
Use the following procedure to display table space usage.
To display table space usage
1 Select the database in the database tree.
2 From the main window, click Database>Table Space.
The database tree expands to show table space usage for the selected database. See Table 44.
Table 43: Role Memberships Report
Field or Control Description
Role Name The name of the role the DB and User is a member of.
Default Whether or not this role is a default assignment for this DB and User
Y = Yes
N = No
If this is a role that the user has indirect membership of, this field is blank.
Admin Whether or not this user is granted role administration rights
Y = Yes
N = No
If this is a role that the user has indirect membership of, this field is blank.
Grantor The DB and User that granted this role membership.
If this is a role that the user has indirect membership of, this field contains the name of the role that gives the user membership of this role.
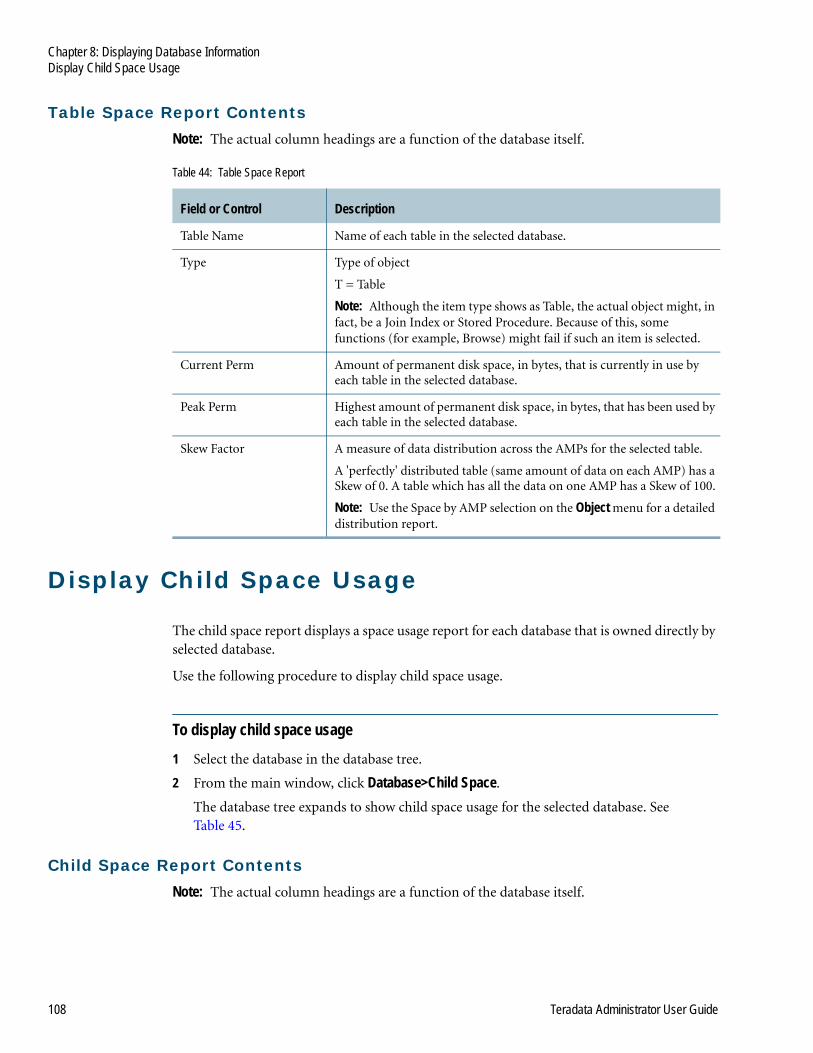
Chapter 8: Displaying Database InformationDisplay Child Space Usage
108 Teradata Administrator User Guide
Table Space Report ContentsNote: The actual column headings are a function of the database itself.
Display Child Space Usage
The child space report displays a space usage report for each database that is owned directly by selected database.
Use the following procedure to display child space usage.
To display child space usage
1 Select the database in the database tree.
2 From the main window, click Database>Child Space.
The database tree expands to show child space usage for the selected database. See Table 45.
Child Space Report ContentsNote: The actual column headings are a function of the database itself.
Table 44: Table Space Report
Field or Control Description
Table Name Name of each table in the selected database.
Type Type of object
T = Table
Note: Although the item type shows as Table, the actual object might, in fact, be a Join Index or Stored Procedure. Because of this, some functions (for example, Browse) might fail if such an item is selected.
Current Perm Amount of permanent disk space, in bytes, that is currently in use by each table in the selected database.
Peak Perm Highest amount of permanent disk space, in bytes, that has been used by each table in the selected database.
Skew Factor A measure of data distribution across the AMPs for the selected table.
A 'perfectly' distributed table (same amount of data on each AMP) has a Skew of 0. A table which has all the data on one AMP has a Skew of 100.
Note: Use the Space by AMP selection on the Object menu for a detailed distribution report.

Chapter 8: Displaying Database InformationDisplay Child Space Usage
Teradata Administrator User Guide 109
Table 45: Child Space Report
Field or Control Description
Database Name Name of each database that is owned directly by a selected database.
Current Perm Amount of permanent disk space, in bytes, that is currently in use by each child database.
Max Perm Total amount of permanent disk space that is allocated to each child database.
Peak Perm Highest amount of permanent disk space, in bytes, that has been used at any one time by each child database.
Max Spool Total amount of spool disk space, in bytes, that is allocated to each child database.
Peak Spool Highest amount of spool disk space, in bytes, that has been used at any one time by each child database.
Max Temp Total amount of disk space, in bytes, that is allocated for global temporary tables.
Peak Temp Highest amount of temporary disk space, in bytes, that has been used since the last session.

Chapter 8: Displaying Database InformationDisplay Child Space Usage
110 Teradata Administrator User Guide

Teradata Administrator User Guide 111
CHAPTER 9
Displaying Object Information
Teradata Administrator provides the following options for viewing object information:
Note: Teradata Administrator only displays options relevant to the type of objects loaded.
• Display Table Columns
• Display Table Indexes
• Display Table References
• Display Table Statistics
• Display Table Row Count
• Display Table Row Data
• Display Table Space Usage
• Display Table Space Usage by AMP
• Display Object Access Rights
• Display Users’ Access Rights on an Object
• Display the Journal Table
• Display the Object Definition
Display Table Columns
Use the following procedure to view information about the columns of the selected table.
To view all columns in the selected table
1 Select the table(s) in the grid.
2 From the main window, click Object>List Columns.
Displays all columns in the selected table. See Table 46.
List Columns Report ContentsNote: The actual column headings are a function of the database itself.

Chapter 9: Displaying Object InformationDisplay Table Indexes
112 Teradata Administrator User Guide
Display Table Indexes
Use the following procedure to view indexes for the selected table.
To view indexes for the selected table
1 Select the table(s) in the grid.
2 From the main window, click Object>Indexes.
Displays all indexes for the selected table. See Table 47.
Indexes Report ContentsNote: The actual column headings are a function of the database itself.
Table 46: List Columns Report
Field or Control Description
Column Name Name of each column.
Type Data type for the column.
Length Maximum number of bytes used to store a column value in the row.
Total Digits The total number of digits for Decimal or Number columns.
Fractional Digits The number of digits after the decimal point for Decimal or Number columns.
Access Count Number of times the object was accessed since the counter was last reset.
Last Access Date the object was last accessed.
Format Default display format.
CharSet Type of character set.
Nullable Null code indicating whether the column can have a null value or not:
Y = Yes
N = No
DefaultValue Any default value assigned to the column.
ColumnTitle Heading associated with the column.
CommentString Comment text associated with the column (A NULL entry indicates no comment).
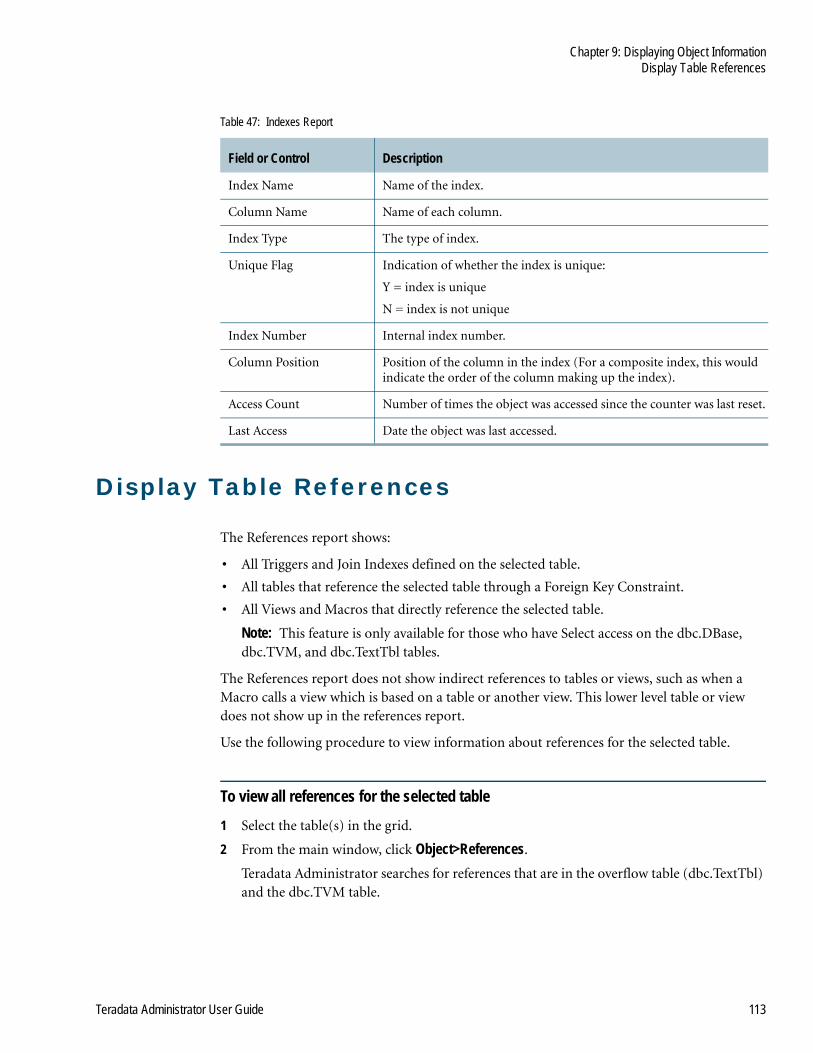
Chapter 9: Displaying Object InformationDisplay Table References
Teradata Administrator User Guide 113
Display Table References
The References report shows:
• All Triggers and Join Indexes defined on the selected table.
• All tables that reference the selected table through a Foreign Key Constraint.
• All Views and Macros that directly reference the selected table.
Note: This feature is only available for those who have Select access on the dbc.DBase, dbc.TVM, and dbc.TextTbl tables.
The References report does not show indirect references to tables or views, such as when a Macro calls a view which is based on a table or another view. This lower level table or view does not show up in the references report.
Use the following procedure to view information about references for the selected table.
To view all references for the selected table
1 Select the table(s) in the grid.
2 From the main window, click Object>References.
Teradata Administrator searches for references that are in the overflow table (dbc.TextTbl) and the dbc.TVM table.
Table 47: Indexes Report
Field or Control Description
Index Name Name of the index.
Column Name Name of each column.
Index Type The type of index.
Unique Flag Indication of whether the index is unique:
Y = index is unique
N = index is not unique
Index Number Internal index number.
Column Position Position of the column in the index (For a composite index, this would indicate the order of the column making up the index).
Access Count Number of times the object was accessed since the counter was last reset.
Last Access Date the object was last accessed.
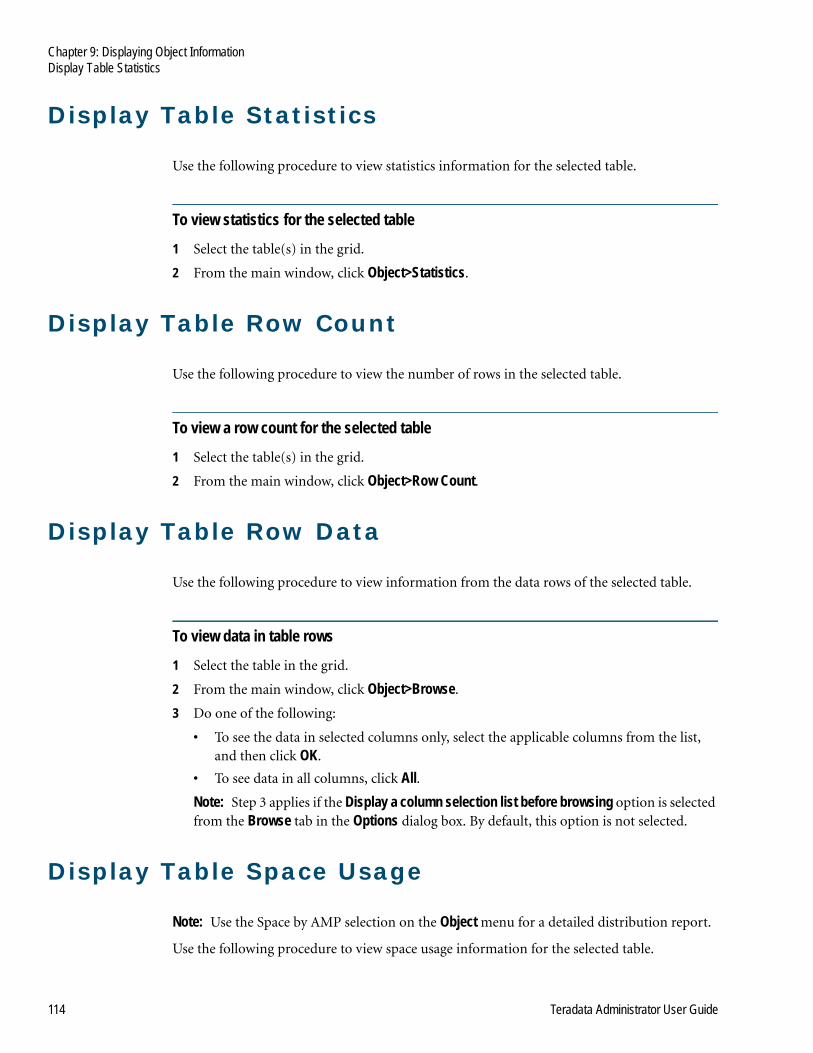
Chapter 9: Displaying Object InformationDisplay Table Statistics
114 Teradata Administrator User Guide
Display Table Statistics
Use the following procedure to view statistics information for the selected table.
To view statistics for the selected table
1 Select the table(s) in the grid.
2 From the main window, click Object>Statistics.
Display Table Row Count
Use the following procedure to view the number of rows in the selected table.
To view a row count for the selected table
1 Select the table(s) in the grid.
2 From the main window, click Object>Row Count.
Display Table Row Data
Use the following procedure to view information from the data rows of the selected table.
To view data in table rows
1 Select the table in the grid.
2 From the main window, click Object>Browse.
3 Do one of the following:
• To see the data in selected columns only, select the applicable columns from the list, and then click OK.
• To see data in all columns, click All.
Note: Step 3 applies if the Display a column selection list before browsing option is selected from the Browse tab in the Options dialog box. By default, this option is not selected.
Display Table Space Usage
Note: Use the Space by AMP selection on the Object menu for a detailed distribution report.
Use the following procedure to view space usage information for the selected table.
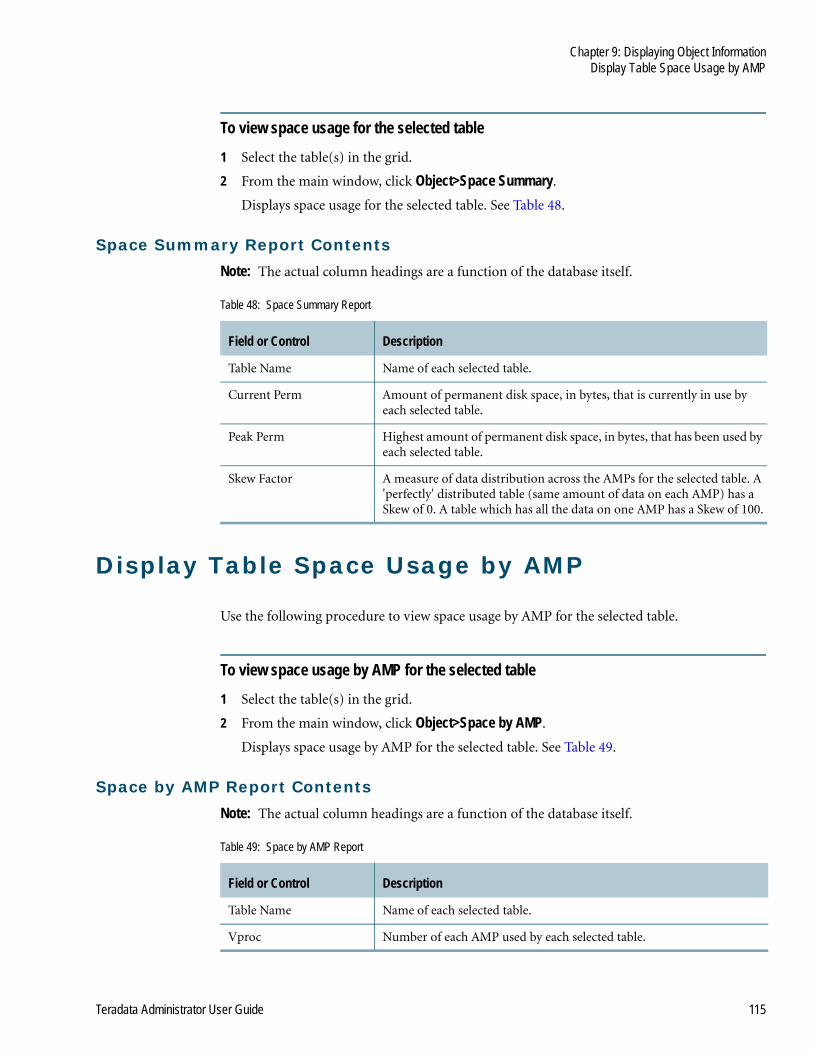
Chapter 9: Displaying Object InformationDisplay Table Space Usage by AMP
Teradata Administrator User Guide 115
To view space usage for the selected table
1 Select the table(s) in the grid.
2 From the main window, click Object>Space Summary.
Displays space usage for the selected table. See Table 48.
Space Summary Report ContentsNote: The actual column headings are a function of the database itself.
Display Table Space Usage by AMP
Use the following procedure to view space usage by AMP for the selected table.
To view space usage by AMP for the selected table
1 Select the table(s) in the grid.
2 From the main window, click Object>Space by AMP.
Displays space usage by AMP for the selected table. See Table 49.
Space by AMP Report ContentsNote: The actual column headings are a function of the database itself.
Table 48: Space Summary Report
Field or Control Description
Table Name Name of each selected table.
Current Perm Amount of permanent disk space, in bytes, that is currently in use by each selected table.
Peak Perm Highest amount of permanent disk space, in bytes, that has been used by each selected table.
Skew Factor A measure of data distribution across the AMPs for the selected table. A 'perfectly' distributed table (same amount of data on each AMP) has a Skew of 0. A table which has all the data on one AMP has a Skew of 100.
Table 49: Space by AMP Report
Field or Control Description
Table Name Name of each selected table.
Vproc Number of each AMP used by each selected table.
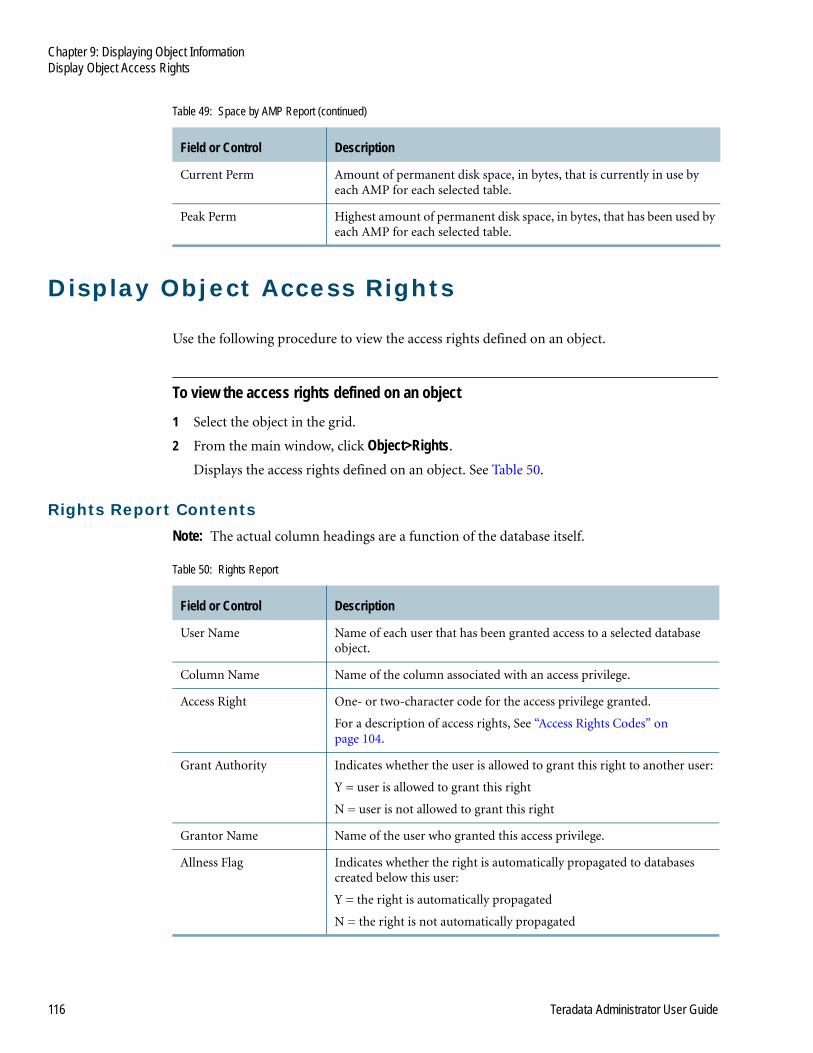
Chapter 9: Displaying Object InformationDisplay Object Access Rights
116 Teradata Administrator User Guide
Display Object Access Rights
Use the following procedure to view the access rights defined on an object.
To view the access rights defined on an object
1 Select the object in the grid.
2 From the main window, click Object>Rights.
Displays the access rights defined on an object. See Table 50.
Rights Report ContentsNote: The actual column headings are a function of the database itself.
Current Perm Amount of permanent disk space, in bytes, that is currently in use by each AMP for each selected table.
Peak Perm Highest amount of permanent disk space, in bytes, that has been used by each AMP for each selected table.
Table 49: Space by AMP Report (continued)
Field or Control Description
Table 50: Rights Report
Field or Control Description
User Name Name of each user that has been granted access to a selected database object.
Column Name Name of the column associated with an access privilege.
Access Right One- or two-character code for the access privilege granted.
For a description of access rights, See “Access Rights Codes” on page 104.
Grant Authority Indicates whether the user is allowed to grant this right to another user:
Y = user is allowed to grant this right
N = user is not allowed to grant this right
Grantor Name Name of the user who granted this access privilege.
Allness Flag Indicates whether the right is automatically propagated to databases created below this user:
Y = the right is automatically propagated
N = the right is not automatically propagated
Chapter 9: Displaying Object InformationDisplay Users’ Access Rights on an Object
Teradata Administrator User Guide 117
Display Users’ Access Rights on an Object
Use the following procedure to view the users who have access rights on the selected object.
To view users who have access rights on the selected object
1 Select the object in the grid.
2 From the main window, click Object>Users.
Display the Journal Table
Use the following procedure to view the journal table for the selected table.
To view the journal table for the selected table
1 Select the table in the grid.
2 From the main window, click Object>Journal.
Display the Object Definition
Use the following procedure to view the definition (text used to create) the selected object.
To view the definition for the selected object
1 Select the object in the grid.
2 From the main window, click Object>Show Definition.

Chapter 9: Displaying Object InformationDisplay the Object Definition
118 Teradata Administrator User Guide

Teradata Administrator User Guide 119
CHAPTER 10
Working With Queries
Teradata Administrator provides an easy way to run or explain SQL queries on the database. Read the following topics to learn more:
• Run or Explain a Query
• Query Window
• Query Builder Overview
• Results Window
• SQL History Window
Run or Explain a Query
Use the following procedures to run or explain a query.
To run a query
1 From the main window, click Tools>Query.
The Query window appears. For more information, see “Query Window” on page 120.
2 Do one of the following:
• To enter a new query, type it into the note pad area.
• To load a previously saved query:
i From the Query window, click File>Open.
ii From the Open dialog box, select the SQL file (*.sql).
iii Click Open to load the file into the note pad area.
3 Click Tools>Run Query.
The output appears in the Query Results window. For more information, see “Results Window” on page 126.
To explain a query
1 From the main window, click Tools>Query.
The Query window appears.
2 Do one of the following:
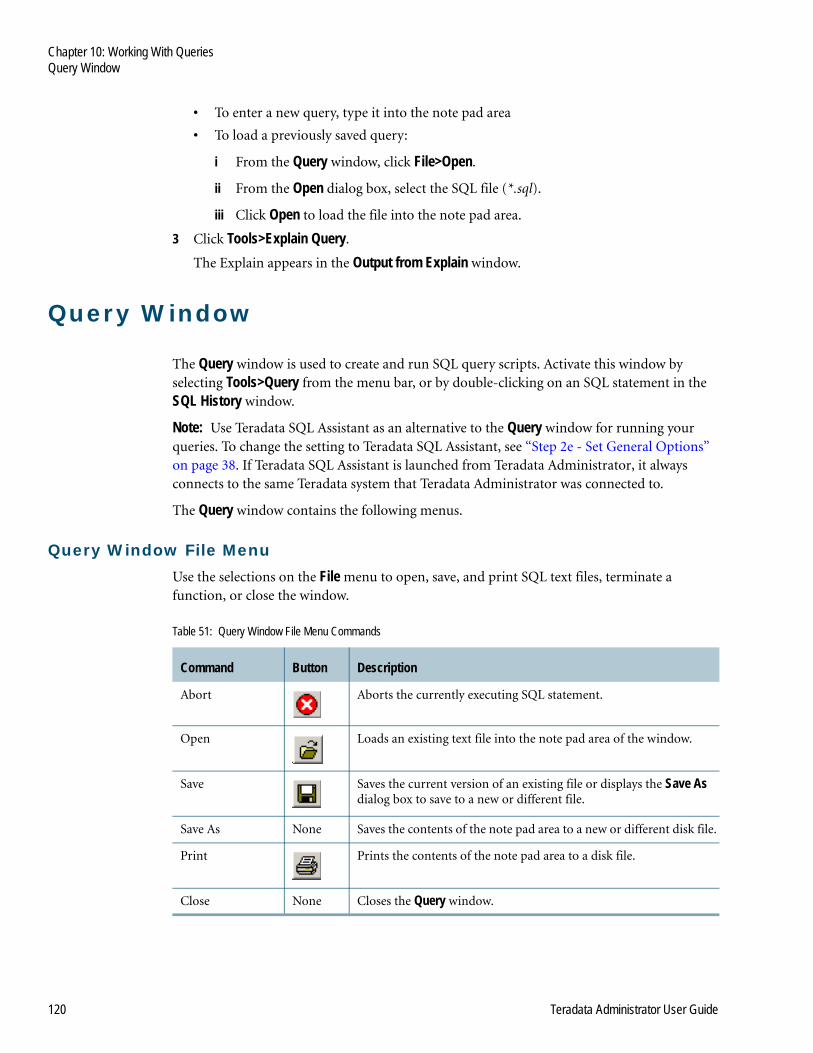
Chapter 10: Working With QueriesQuery Window
120 Teradata Administrator User Guide
• To enter a new query, type it into the note pad area
• To load a previously saved query:
i From the Query window, click File>Open.
ii From the Open dialog box, select the SQL file (*.sql).
iii Click Open to load the file into the note pad area.
3 Click Tools>Explain Query.
The Explain appears in the Output from Explain window.
Query Window
The Query window is used to create and run SQL query scripts. Activate this window by selecting Tools>Query from the menu bar, or by double-clicking on an SQL statement in the SQL History window.
Note: Use Teradata SQL Assistant as an alternative to the Query window for running your queries. To change the setting to Teradata SQL Assistant, see “Step 2e - Set General Options” on page 38. If Teradata SQL Assistant is launched from Teradata Administrator, it always connects to the same Teradata system that Teradata Administrator was connected to.
The Query window contains the following menus.
Query Window File MenuUse the selections on the File menu to open, save, and print SQL text files, terminate a function, or close the window.
Table 51: Query Window File Menu Commands
Command Button Description
Abort Aborts the currently executing SQL statement.
Open Loads an existing text file into the note pad area of the window.
Save Saves the current version of an existing file or displays the Save As dialog box to save to a new or different file.
Save As None Saves the contents of the note pad area to a new or different disk file.
Print Prints the contents of the note pad area to a disk file.
Close None Closes the Query window.
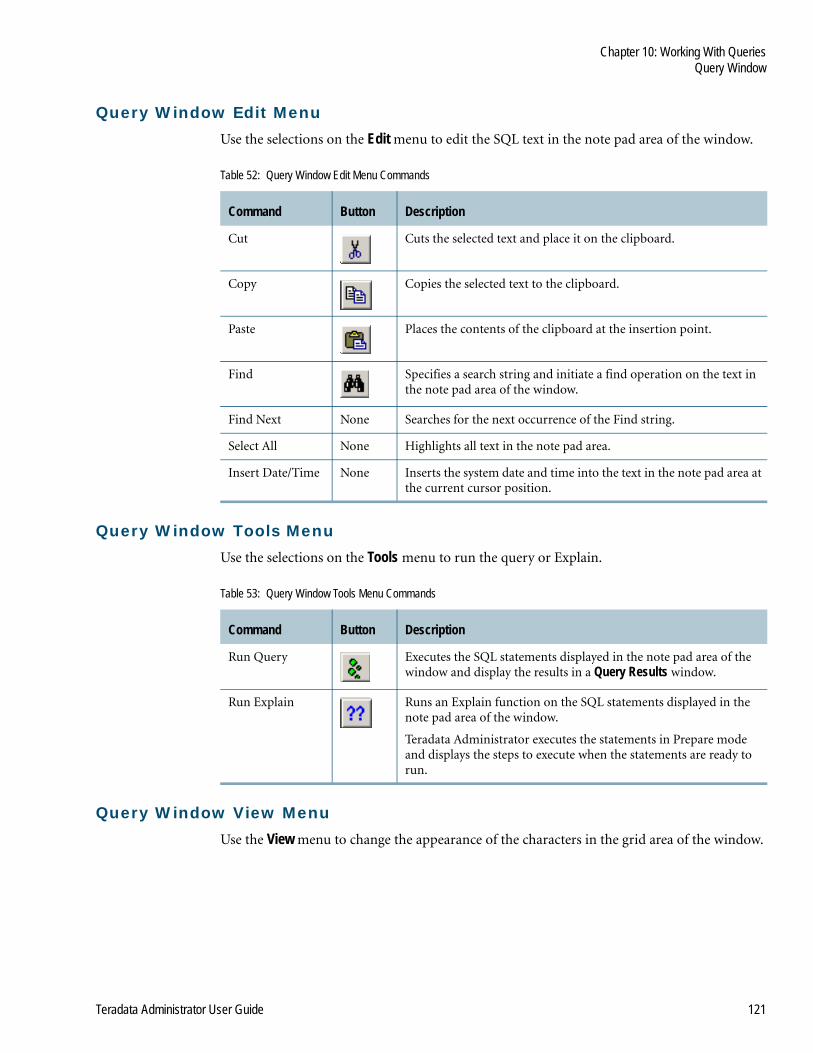
Chapter 10: Working With QueriesQuery Window
Teradata Administrator User Guide 121
Query Window Edit MenuUse the selections on the Edit menu to edit the SQL text in the note pad area of the window.
Query Window Tools MenuUse the selections on the Tools menu to run the query or Explain.
Query Window View MenuUse the View menu to change the appearance of the characters in the grid area of the window.
Table 52: Query Window Edit Menu Commands
Command Button Description
Cut Cuts the selected text and place it on the clipboard.
Copy Copies the selected text to the clipboard.
Paste Places the contents of the clipboard at the insertion point.
Find Specifies a search string and initiate a find operation on the text in the note pad area of the window.
Find Next None Searches for the next occurrence of the Find string.
Select All None Highlights all text in the note pad area.
Insert Date/Time None Inserts the system date and time into the text in the note pad area at the current cursor position.
Table 53: Query Window Tools Menu Commands
Command Button Description
Run Query Executes the SQL statements displayed in the note pad area of the window and display the results in a Query Results window.
Run Explain Runs an Explain function on the SQL statements displayed in the note pad area of the window.
Teradata Administrator executes the statements in Prepare mode and displays the steps to execute when the statements are ready to run.
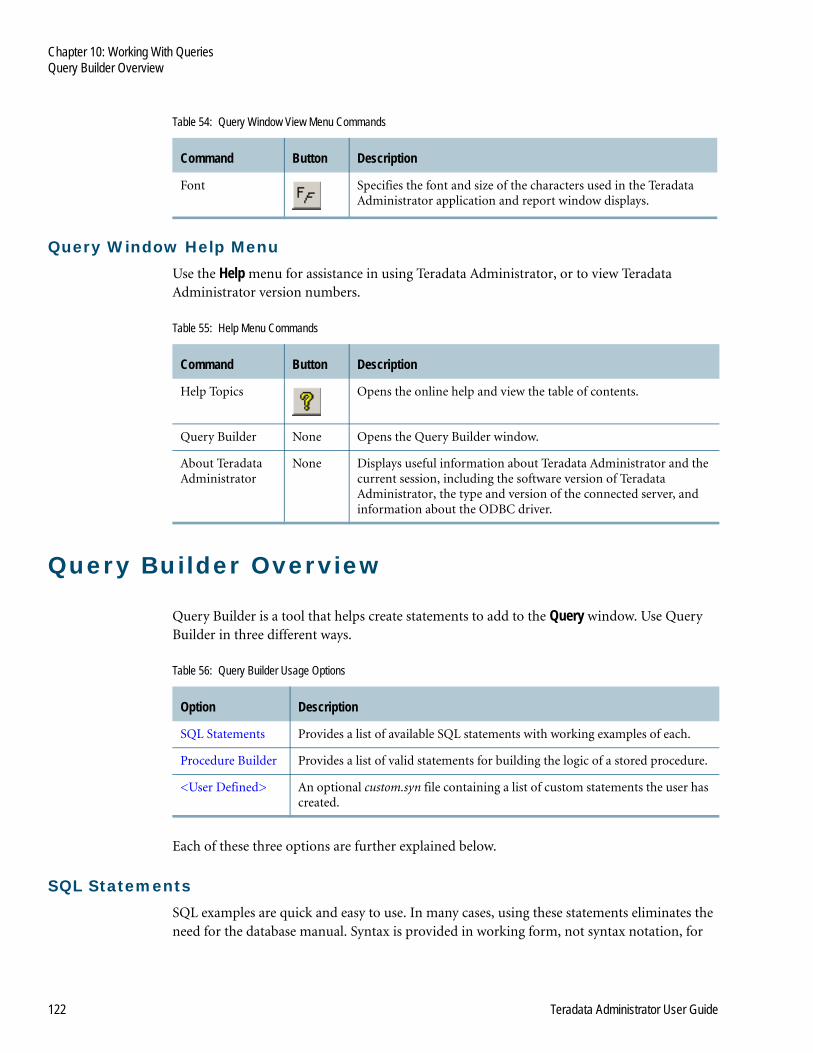
Chapter 10: Working With QueriesQuery Builder Overview
122 Teradata Administrator User Guide
Query Window Help MenuUse the Help menu for assistance in using Teradata Administrator, or to view Teradata Administrator version numbers.
Query Builder Overview
Query Builder is a tool that helps create statements to add to the Query window. Use Query Builder in three different ways.
Each of these three options are further explained below.
SQL StatementsSQL examples are quick and easy to use. In many cases, using these statements eliminates the need for the database manual. Syntax is provided in working form, not syntax notation, for
Table 54: Query Window View Menu Commands
Command Button Description
Font Specifies the font and size of the characters used in the Teradata Administrator application and report window displays.
Table 55: Help Menu Commands
Command Button Description
Help Topics Opens the online help and view the table of contents.
Query Builder None Opens the Query Builder window.
About Teradata Administrator
None Displays useful information about Teradata Administrator and the current session, including the software version of Teradata Administrator, the type and version of the connected server, and information about the ODBC driver.
Table 56: Query Builder Usage Options
Option Description
SQL Statements Provides a list of available SQL statements with working examples of each.
Procedure Builder Provides a list of valid statements for building the logic of a stored procedure.
<User Defined> An optional custom.syn file containing a list of custom statements the user has created.

Chapter 10: Working With QueriesQuery Builder
Teradata Administrator User Guide 123
ease of use. Choose a statement that best fits your requirements and insert it into the Query window. Then tailor it to your needs.
These syntax examples reflect the SQL syntax of the currently-connected data source. If there is no connection to a server, syntax is based on the most recently connected server. If there has been no connection to any server during the current session, Teradata syntax is the default.
Procedure BuilderProcedure Builder provides a list of valid statements for building the logic of a stored procedure. Vendor-specific syntax is available for Oracle, DB2, Sybase, Informix, MySQL and Microsoft SQL Server; otherwise, Teradata syntax is displayed.
Note: To see syntax for Oracle, DB2, Sybase, Informix, MySQL and MS SQL Server, disconnect from the currently connected Teradata system and reconnect to the database of the vendor.
When viewing the Procedure Builder statements, the example text is hidden by default. Click the >> button to show the statement example.
<User Defined>Syntax files are replaced with each Teradata Administrator release. To avoid reapplying your edits to new files with each new release, Teradata Administrator looks for a custom syntax file that might have been created. If Teradata Administrator doesn't find a custom file, this option does not appear in the drop-down list of options. If a custom file is found, it loads it can be accessed from the drop-down list. This file can be accessed regardless of the database connection.
For information on creating a custom file, see “Description of the Options” on page 124.
Query Builder
The Query Builder window is a floating window that can be left open when working within the Teradata Administrator main window.
Open Query Builder
To open Query Builder
1 From the Teradata Administrator main window, click Tools>Query.
2 From the Query window, do one of the following:
• Press F2.
• Select Help>Query Builder.
• Right-click in the Query window and select Query Builder from the shortcut menu.
This window can be left open while editing and executing your queries.

Chapter 10: Working With QueriesQuery Builder
124 Teradata Administrator User Guide
Query Builder Options
To choose a Query Builder option
1 From the drop-down list in the upper left corner, choose one option as described in Table 57.
For more information on these options, see “Description of the Options” on page 124.
2 Click the command in the left pane to automatically copy the statement into the Query window.
Description of the Options
SQL StatementsWhen the SQL Statements option is chosen, the statement list in the left pane shows each of the statement types available on the current data source. These syntax examples reflect the SQL syntax of the connected data source. The syntax file name matches the database type with the file type of .syn. For example, the Teradata syntax file is Teradata.syn.
Note: The Teradata syntax file includes new syntax to support Teradata Database V2R6.1 and later.
Customize the .syn file by editing the file. To do this, follow the procedure, “Create a Custom Syntax File” on page 125 except skip step 2 (do not include a header line at the start of the file). When the file is saved, ensure the file name matches the database type. For example, Teradata.syn.
Procedure BuilderWhen the Procedure Builder option is chosen, the left pane shows a list of statements that are valid only when used in a CREATE or REPLACE procedure statement.
<User Defined>Create a user-defined syntax file using any text editor such as Notepad or Microsoft Word. The name of the file must be custom.syn. The format of this file is the same as the other syntax files
Table 57: Query Builder Usage Options
Option Description
SQL Statements
Select a command from the statement list in the left pane to display an example of its syntax in the right pane.
Procedure Builder
Select a stored procedure statement from the list in the left pane to display an example of its syntax in the right pane.
<User Defined>
If custom.syn file is created, this option appears in the drop-down list. The name is the name specified in the first line of the custom.syn file. Select this option and the queries defined in this file display.

Chapter 10: Working With QueriesQuery Builder
Teradata Administrator User Guide 125
except it has an additional line at the start of the file containing the name that is seen in the drop-down list in the Query Builder dialog box. For additional information, see “Create a Custom Syntax File” on page 125.
Create a Custom Syntax File
To create a custom syntax file
1 Open a text editor such as Notepad or Microsoft Word.
2 Create a header line at the start of the file. This header can be any word(s). In the examples shown in the figures below, it is Reports.
This header displays in the Query Builder dialog box as the text on the third line in the drop-down list.
3 Ensure the remaining lines in this file contain pairs of strings, each enclosed in double quotes and separated by a comma. The first string is the statement type, the second is the statement itself.
4 Select Save As and name the file custom.syn.
5 Put this file in the bin subdirectory of the Teradata Administrator installation directory. By default, the location is: c:\Program Files\Teradata\Teradata Administrator 14.10\bin.
The following is an example of the custom.syn file:
The following is an example of how those statements appear when using Query Builder:

Chapter 10: Working With QueriesResults Window
126 Teradata Administrator User Guide
Insert a Statement or Procedure into the Query Window
To insert a statement or procedure into the Query window
✔ Do one of the following:
• Double-click on the statement or procedure to insert it at the current insertion point in the Query window.
• Click the right mouse button in the statement list or Example text to display the shortcut menu, then choose one of the following:
• Insert into query - inserts the statement at the current cursor position in the Query window
• Replace query - replaces the statement in the Query window
• Copy to clipboard - copies the statement to the Clipboard
• Drag the statement from the left pane and drop it into the Query window at any location.
Note: Do not use drag-and-drop in the Unicode Query window.
Use Query Builder in the FutureThe state of the window is saved in the registry, including the lists being viewed and whether the example text is visible. Future uses of this dialog box start in the same state they were last left in.
Results Window
The Results window displays the output created by running a query or an explain.
Columns defined as BIGINT or Decimal (n), where n is more than 15. do not sort correctly.
The Results window contains the following menus.
Results Window File MenuUse the selections on the File menu to save and print your SQL output or close the window.
Table 58: Results Window File Menu Commands
Command Button Description
Save As Saves the contents of the window to a disk file.
Print Prints the contents of the window.
Close None Closes the Results window.
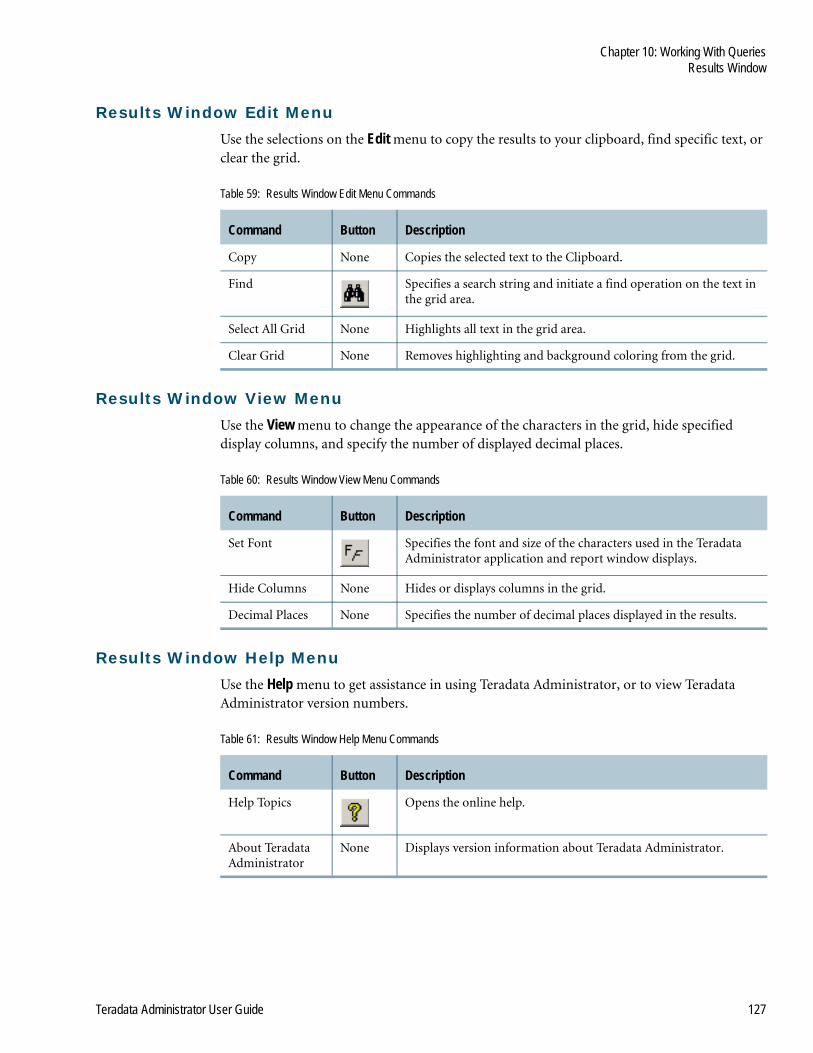
Chapter 10: Working With QueriesResults Window
Teradata Administrator User Guide 127
Results Window Edit MenuUse the selections on the Edit menu to copy the results to your clipboard, find specific text, or clear the grid.
Results Window View MenuUse the View menu to change the appearance of the characters in the grid, hide specified display columns, and specify the number of displayed decimal places.
Results Window Help MenuUse the Help menu to get assistance in using Teradata Administrator, or to view Teradata Administrator version numbers.
Table 59: Results Window Edit Menu Commands
Command Button Description
Copy None Copies the selected text to the Clipboard.
Find Specifies a search string and initiate a find operation on the text in the grid area.
Select All Grid None Highlights all text in the grid area.
Clear Grid None Removes highlighting and background coloring from the grid.
Table 60: Results Window View Menu Commands
Command Button Description
Set Font Specifies the font and size of the characters used in the Teradata Administrator application and report window displays.
Hide Columns None Hides or displays columns in the grid.
Decimal Places None Specifies the number of decimal places displayed in the results.
Table 61: Results Window Help Menu Commands
Command Button Description
Help Topics Opens the online help.
About Teradata Administrator
None Displays version information about Teradata Administrator.

Chapter 10: Working With QueriesSQL History Window
128 Teradata Administrator User Guide
SQL History Window
The SQL History window displays a history of the SQL commands submitted by Teradata Administrator.
The SQL History window contains the following menus.
SQL History Window File MenuUse the selections on the File menu to save and print your SQL output.
SQL History Window Edit MenuTable 63 describes the Edit menu commands in the SQL History window.
SQL History Window View MenuTable 64 describes the View menu commands in the SQL History window.
Table 62: SQL History Window File Menu Commands
Command Button Description
Save As Save the contents of the window to a file.
Print Display the Print dialog box to print the contents of the grid.
Close None Close the SQL History window and return to the main window.
Table 63: SQL History Window Edit Menu Commands
Command Button Description
Copy None Copy selected text to the Clipboard.
Find Display the Find dialog box to search for specified text in the note pad area of the window.
Select All Grid None Highlight all text in the grid.
Clear Grid None Removes highlighting and background coloring from the grid.
Table 64: SQL History Window View Menu Commands
Command Button Description
Set Font Display the Font dialog box to change the font type, style, or size for text displayed in the main window and report window.
Hide Columns None Hide or display columns in the grid.
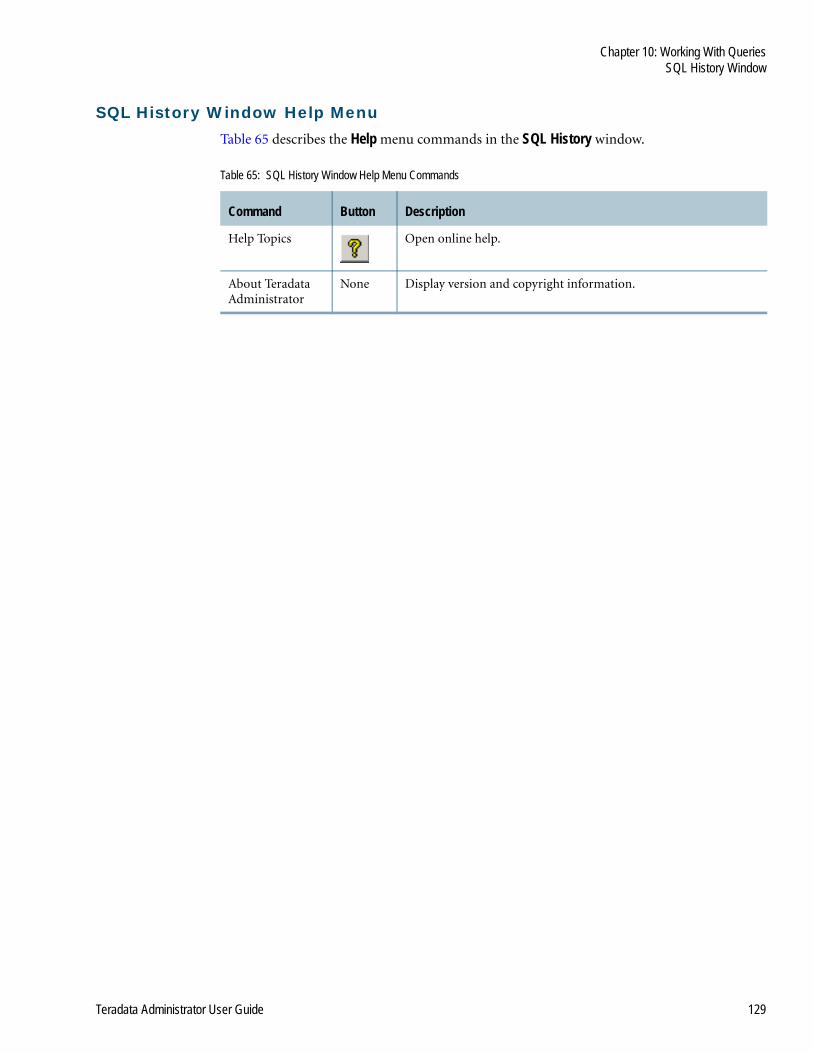
Chapter 10: Working With QueriesSQL History Window
Teradata Administrator User Guide 129
SQL History Window Help MenuTable 65 describes the Help menu commands in the SQL History window.
Table 65: SQL History Window Help Menu Commands
Command Button Description
Help Topics Open online help.
About Teradata Administrator
None Display version and copyright information.

Chapter 10: Working With QueriesSQL History Window
130 Teradata Administrator User Guide
Teradata Administrator User Guide 131
Glossary
AAccess Module Processor See AMP.
access right A user's right to perform the Teradata SQL statements against a table, database, user, macro, or view. Also known as privilege.
action definition A logical action consisting of a single physical action and related attributes.
aggregate UDF In contrast to a scalar UDF, an aggregate UDF returns a single result that represents information about one or more sets of relational data. The row sets are created by way of grouping clauses in an SQL statement. Like scalar functions, the aggregate functions can appear anywhere in an SQL expression that built-in aggregate functions can. Aggregate functions can also be passed column references and literal values. Some examples of common aggregate functions are SUM, AVG, MIN, and MAX. Aggregate functions can save context or state between invocations.
Alert Policy Editor A component used to define alert policies: create actions, set event thresholds, assign actions to events, and apply the policy to Teradata Database.
American National Standards Institute See ANSI.
American Standard Code for Information Interchange See ASCII.
AMP Access Module Processor. A virtual processor that receives steps from a PE and performs database functions to retrieve or update data. Each AMP is associated with one vdisk, where the data is stored. An AMP manages only its own vdisk and not the vdisk of any other AMP.
ANSI American National Standards Institute. ANSI maintains a standard for SQL. For information about Teradata compliance with ANSI SQL, see SQL Fundamentals.
ASCII American Standard Code for Information Interchange. Pronounced as-key. A character set used primarily on personal computers.
BBasic Teradata Query See BTEQ.
BTEQ Basic Teradata Query. A utility that allows users on a workstation to access data on a Teradata Database. BTEQ commands are used for controlling sessions, submitting Teradata SQL requests, formatting results, and handling output data. BTEQ can also be used to verify the installation of Teradata client utilities.
Glossary
132 Teradata Administrator User Guide
CCall-Level Interface , Version 2 See CLIv2.
central processing unit See CPU.
character set A grouping of alphanumeric and special characters used by computer systems to support different user languages and applications. Various character sets have been codified by ANSI.
CLIv2 Call-Level Interface, Version 2. A library of routines that enable an application program to access data stored in Teradata Database.
coexistence system A Teradata Database system running on mixed platforms.
CPU Central Processing Unit. The part of a computer which controls all the other parts. CPUs are not physically associated with vprocs.
Ddata dictionary The Teradata Database Data Dictionary is composed of tables and views that reside in the system database. The system reserves these tables and views for use and they contain information about the system’s associated data. Data Dictionary system tables include current definitions, control information, and general information.
data source name See DSN.
database administrator See DBA.
database computer See DBC.
database query log See DBQL.
database tree An alphabetical listing that displays all the databases and objects in the selected root database of the connected Teradata Database server. It is located on the left side of the Teradata Administrator main window.
DBA Database Administrator. Generally, a person responsible for the design and management of one or more databases and for the evaluation, selection and implementation of database management systems.
DBC Database Computer. A dedicated relational database management computer.
DBQL Database Query Log. A series of system tables, created in the DBC database during Teradata Database installation, used to track query processing. See Database Administration to learn more about the DBQL.
distinct UDT Based on a single predefined data type such as INTEGER or VARCHAR, a distinct UDT is basically a redefinition of an already predefined SQL data type.
DLL Dynamic Link Library. A .dll file contains a library of functions and other information that can be accessed by a Windows program. When a program is launched, links to the necessary .dll files are created. If a static link is created, the .dll files are in use as long as the
Glossary
Teradata Administrator User Guide 133
program is active. If a dynamic link is created, the .dll files are only used when needed. Dynamic links help programs use resources, such as memory and hard drive space, more efficiently.
DSN Data Source Name. The logical name used by Open Database Connectivity (ODBC) to refer to the drive and other information that is required to access data. The name is used by Internet Information Services (IIS) for a connection to an ODBC data source. Use the ODBC Data Source Administrator to set this name.
dynamic link library See DLL.
EEBCDIC Extended Binary Coded Decimal Interchange Code. A standard method of assigning binary (numeric) values to alphabetic, numeric, punctuation, and transmission-control characters.
Extended Binary Coded Decimal Interchange Code See EBCDIC.
external role A DBA can use a Teradata Database extension that adds the keyword prefix ‘EXTERNAL’ to create roles for directory users. After external roles have been created, they must assign (not GRANT) them to directory users. There are restrictions on external roles. For more information on external roles, see Database Administration, Security Administration, or SQL Data Definition Language.
external routine A generic term for UDFs, table UDFs, UDMs, and external stored procedures.
external stored procedure See XSP.
GGMT Greenwich Mean Time. The time at Greenwich, England, which is used as the basis for standard time throughout the world.
Greenwich Mean Time See GMT.
grid area Also referred to as the grid, it displays information about the database or database object that is selected in the database tree. It is located on the right side of the Teradata Administrator main window and can have up to two displays in the upper and lower portions of the grid.
HHTML Hypertext Markup Language. The coding language used to create hypertext documents for use on the World Wide Web.
Hypertext Markup Language See HTML.

Glossary
134 Teradata Administrator User Guide
IInput/Output See I/O.
Internet Protocol See IP.
I/O Input/Output. Communication between a computer and its users, its storage devices, other computers (over a network) or the outside world. The devices the computer uses to do this are called peripherals.
IP Internet Protocol. Data transmission standard. The standard that controls the routing and structure of data transmitted over the Internet.
Llogical action A named action that is defined on the Alert Policy Editor's Actions tab. Logical actions can be assigned to events in the alert policy.
OODBC Open Database Connectivity. Type of driver used to connect applications with databases. The ODBC driver processes ODBC calls from an application, but passes SQL requests to the Teradata Database for processing.
Open Database Connectivity See ODBC.
Ppermanent space Commonly referred to as perm space. All databases have a defined upper limit of perm space. Perm space is the maximum amount of space available for tables. Perm space is not pre-allocated; a limit is just allocated.
privilege A user's right to perform the Teradata SQL statements against a table, database, user, macro, or view. Also known as access right. See access right.
Procedure Builder Provides a list of valid statements for building the logic of a stored procedure. This feature is available in Teradata SQL Assistant for Microsoft Windows and Teradata SQL Assistant/Web Edition.
profile A set of parameters assigned to a user, a group of users, or an account that determines what scheduling capabilities are available.
QQuery Builder A tool that to create statements to add to the Query window. This tool is available in Teradata SQL Assistant for Microsoft Windows and Teradata SQL Assistant/Web Edition.

Glossary
Teradata Administrator User Guide 135
Sscalar UDF A scalar UDF accepts input by way of its argument list and returns a single result value. It can be used wherever a value expression of the same type as its declared return value is allowed. The Teradata Database also allows UDFs to be called in a SELECT statement without a table name. The function is invoked once, in parallel, for each result row in a query when the SQL expression is evaluated. Some examples of built-in Teradata Database SQL scalar functions include CHARACTER_LENGTH, ABS, and SQRT. Scalar functions do not save context or state between invocations.
session A session begins when the user logs on to Teradata Database and ends when the user logs off Teradata Database. In client software, a logical connection between an application program on a host and Teradata Database. The connection permits the application program to send one request at a time to and receive one response at a time from Teradata Database.
Single Sign On See SSO.
skew This value is calculated based on a single database collection interval. If the session collection rate is 60, then the skew is calculated for a 60 second period. The value is calculated using current data values. For example, the max CPU used during the past 60 seconds relative to the average used over that same 60 seconds: skew = 100 * (1 - avg/max).
spool space Temporary space used to hold intermediate query results or formatted answer sets to queries. After the query is complete, the spool space is released. All databases have an upper limit of spool space. If no limit is defined for a particular database or user, limits are inherited from parents.
SQL Structured Query Language. Standardized query language for requesting information from a database. SQL consists of a set of facilities for defining, manipulating, and controlling data in a relational database.
SSO Single Sign On. An authentication option that allows Teradata Database on Windows 2000 users to access Teradata Database based on authorized network usernames and passwords. This feature simplifies the procedure requiring users to enter an additional username and password when logging on to Teradata Database using client applications.
startup string One or more Teradata SQL statements, separated by semicolons, that are executed to establish the initial session environment when the user logs on.
Structured Query Language See SQL.
structured UDT A collection of fields called attributes, each of which is defined as a predefined data type or other UDT (which allows nesting).
TTDPID Teradata Director Program Identifier. The name of the Teradata Database being accessed or monitored.
Glossary
136 Teradata Administrator User Guide
temporary space Commonly referred to as temp space. Temp space is used for global and volatile temporary tables, and these results remain available to the user until the session is terminated. Tables created in temp space do survive a restart.
Teradata Director Program Identifier See TDPID.
Teradata Tools and Utilities See TTU.
TTU Teradata Tools and Utilities. A set of software tools and utilities used for connecting to a Teradata Database, as well as loading, unloading, accessing, managing, manipulating, and storing data.
UUDF User-Defined Function. By providing a mechanism that supports the creation of SQL functions, scalar and aggregate UDFs allow users to add their own extensions to Teradata Database SQL. These functions can be used to operate on any Teradata Database data type and can be utilized wherever built-in functions are used. If a function doesn’t exist to perform a specific task or algorithm, write one that does. UDFs can also simplify complex SQL syntax.
UDM User-Defined Method. A special kind of user-defined function (UDF) that is associated with a UDT. The term method and the acronym UDM are interchangeable. Teradata Database supports two types of UDMs: Instance and Constructor.
UDT User-Defined Type. Allow users to create custom data types that model the structure and behavior of data in their applications.
UTF8 or UTF16 Unicode Translation Format, 8 bit or 16 bit. The name of a Teradata Client Character Set.
user-defined functions See UDF.
user-defined methods See UDM.
user-defined types See UDT.
Unicode Translation Format, 8 bit or 16 bit See UTF8 or UTF16.
XXSP External Stored Procedure. Defined and stored as a database object. The XSP attributes are stored in the DBC.TVM data dictionary table. Similar to the user-defined function objects, the source code and the object code of external stored procedures are stored in the database of the user space.

Teradata Administrator User Guide 137
Index
AAbort command
Query window 120aborting
database operations 45executing SQL statements 120
About Teradata Administrator commandQuery window 122Results window 127SQL History window 129Teradata Administrator window 29
access logdefining rules 91displaying rules 91revoking rules 91starting and stopping 91
Access Loggingdialog box 92
access rightscodes 104objects, displaying 116
accounts, user 51acronyms 131Add Security Constraint 54, 74Administer Authorizations
dialog box 71Administer Profiles
dialog box 72Administer Roles
dialog box 68Administer UDTs
dialog box 77array type 76authorizations
creating 69dropping 70listing all defined on the system 69replacing 70
Authorizations dialog box 71
BBounds text box 76Browse
dialog box 48options 38
Ccancelling database operations 45change requests 18changing
column rights 87connect through rights 89database object names 46display in grid area 20logon rights 88object rights 83system rights 85tree display 20
character set, specifying 35child space
report 108usage 108
Clear Grid commandResults window 127SQL History window 128
Close commandQuery window 120Results window 126SQL History window 128
Close Database List command 22closing a database 44codes, access rights 104Column List dialog box 21columns
attributes 59displaying 111grid area, hiding or showing 21report window, hiding or showing 21rights, granting or revoking 87
commands See specific command nameconfiguring Teradata Administrator 33confirmation options 36connecting to a data source 40connection rights, granting or revoking 89constraints 54, 74
defining 59list assigned 54, 59, 74security constraint 93
context-sensitive help, accessing 18Copy command
Query window 121Results window 127

Index
138 Teradata Administrator User Guide
SQL History window 128copying
database object information 45database objects 47functions or procedures 46tables 46
Create Databasedialog box 55
Create Tabledialog box 57
Create Userdialog box 52
custom syntax filecreating 125user defined option 122, 124
customizingSQL statements 122, 124, 125syntax 124
Cut command, Query window 121
DData Dictionary documentation 5data directory, setting 39data source
connecting to 40defining 34opening an outline window to 49
data typesdistinct 77structured 77
databaseaborting operations 45copying
object information 45objects 47
creating, modifying or cloning 55defining connection to 34displaying
all objects 97databases and users 100macros and stored procedures 100rights 103role memberships 107table space usage 107tables and join indexes 98views 99
dropping 46duplicate database message 44finding 45moving space 81opening or closing 44renaming objects 46rights, granting or revoking 83
setting options 35tree See database tree
Database Administration documentation 5Database Information
displaying 102Database menu 24database tree
closing 44database, finding a 45duplicate database message 44object, finding an 45opening 44text string, finding a 45using the database tree 43width, changing 43
Decimal Places command, Results window 127default
character set, setting 54database, setting 53, 72date form, setting 54journal, setting 53owner 52role, setting 53, 69
Default Null check box 76Define Check Constraints dialog box 64Define Foreign Key Constraints dialog box 65Define KB, MB, GB as multiples of 1000 instead of 1024 39Define Primary Key and Indices dialog box 63definition, displaying for selected object 117deleting
all objects 47See Also dropping
Disconnect command 22Display a column selection list before browsing 38, 114distinct data type 77Double-click Actions, option 35dropping
authorizations 70databases or database objects 46
EEBCDIC collation sequence 34Edit menu
Query window 121Results window 127SQL History window 128Teradata Administrator window 23
error messagesdocumentation 5SQL, displaying 24UDT 76
estimate time and row count before browsing, option 38explaining a query 119

Index
Teradata Administrator User Guide 139
external rolescreating 68defined 133
FFile menu
Results window 126SQL History window 128Teradata Administrator window 22
filtering databases and users 36Find All command 45Find command
Query window 121Results window 127SQL History window 128Teradata Administrator window 45
Find Next command, Query window 121finding a database or object 45Font command, Query window 122functions, copying functions 46
GGeneral tab, setting 38granting
column rights 87connect through rights 89logon rights 88object rights 83system rights 85
grid area 43database, finding a 45object, finding an 45text string, finding a 45
HHelp menu
Query Window 122Results window 127SQL History window 129Teradata Administrator window 28
Help Topics command 29Query window 122Results window 127
help, accessing online help 18Hide Columns command
Results window 127SQL History window 128
hiding columns 21
IIndexes
displaying 112Indexes Report 112Insert Date/Time command, Query window 121installation
documentation 5getting help 18
Jjoin indexes, displaying all in database 98journal table, displaying 117
Kkeyboard cursor control shortcuts 29
LLast Error command 24List All Objects
report 97List Columns
report 111List Databases and Users
report 101List Macros and Procedures
report 100List Tables and Indexes
report 98List Views
report 99logon rights, granting or revoking 88logs
access 91query 93
Mmacros
displaying all in database 100dropping 46renaming 46rights, granting or revoking 83
memberships, displaying role 107menu bar 21menus See specific menu namesMessage documentation 5Modify Database
dialog box 55Modify User
dialog box 52Move Space
dialog box 79, 80, 81

Index
140 Teradata Administrator User Guide
OObject menu, Teradata Administrator window 25objects
copying information to the clipboard 45copying to another database 47deleting all 47displaying
access rights, object 116access rights, user 117all in database 97database information 102databases and users 100definition 117macros and stored procedures 100rights held by database or user 103role memberships 107table space usage 107tables and join indexes 98views 99
dropping 46finding 45renaming 46rights, granting or revoking 83
ODBCdata source
connecting 34selecting 40
Data Source Administrator 34documentation 5
ODBC Driver Setup for Teradata Database dialog box 34online help, accessing 18Open command, Query window 120opening a database 44options
browse 38confirmation 36data directory 39database, setting 35double-click actions 35filtering 36general 38root database, setting 35what to load 35
outline window, opening 49overviews
Query Builder 122Teradata Administrator 19UDF features 78UDTs 78
Ppasswords
expiration, setting the 73
restricting words 73temporary passwords 52
Paste command, Query window 121Preview mode 37
add members to role, using to 68create role, using to 67move space, using to 81remove members from role, using to 68using 37
preview SQL before submitting it, option 37Print command
Query window 120Results window 126SQL History window 128
printing data 32procedures, copying external procedures 46product version numbers 3, 29profiles
creating 72dropping 72modifying 72security constraints, adding 79
program fixes 18
QQuery Builder
command 122, 123opening 123options, choosing 124overview 122statement or procedure, inserting 126stored procedures, creating 124using it in the future 126
query log, starting and stopping 93Query Logging Rules dialog box 93Query window 120query, running or explaining a 119
RReferences
display table 113References Report 113registry, system 126Release Definition 5, 18removing See droppingreports See specific report nameResults window 126revoking
column rights 87connect through rights 89logon rights 88object rights 83system rights 85
Index
Teradata Administrator User Guide 141
rightsaccess codes 104access rights
displaying object 116displaying user 117
displaying held 103granting or revoking
columns 87connection 89logon 88objects 83system 85
report contents 116Rights Held by DB/User
report 104Role Memberships
report 107roles
creating 67dropping 68external 68, 133modifying the comment 67viewing access rights 67
root database, setting 35row count, displaying table 114row data, displaying table 114row limit, option 38Run Explain command, Query window 121Run Query command, Query window 121running a query 119
SSave As command
Query window 120Results window 126SQL History window 128
Save command, Query window 120Save the SQL History to a file at program termination 39saving data 32Security Administration documentation 5security constraints
addingprofiles 74table 59user 54
administer 78apply existing 79, 80create 78drop 78listing 59, 93modify 78
security See authorizationsSelect All command, Query window 121
Select All Grid commandResults window 127SQL History window 128
Server Info command 29session character set, specifying 35Set Font command 24
Results window 127SQL History window 128
shortcuts, keyboard cursor control 29Show Status Bar, option 39Show Toolbar, option 38showing columns 21Single Sign On 34, 41software releases, supported 3Space by AMP
report 115Space Summary
report 115space usage, table 107, 115space, moving between databases 81SQL Assistant, setting option 39SQL History
window 128SQL Reference documentation 5SQL statements
customizing 122using Query Builder 122
statistics, displaying table 114stored procedures
creating 124displaying all in database 100inserting into Query window 126using Procedure Builder option 122
structured data type 77syntax
SQL syntax examples 122using Query Builder 123vendor-specific 123
system rights, granting or revoking 85
TTable Space
report 108tables
column attributes and options 59copying 46creating 56displaying
all tables in database 98columns 111indexes 112journal table 117references 113
Index
142 Teradata Administrator User Guide
row count 114row data 114space usage 115statistics 114table space usage 107
dropping 46renaming 46rights, granting or revoking 83security constraints, adding 80
Teradata Administratoroverview 19window 28
Teradata SQL Assistant, setting option 39Tools menu
Query window 121Teradata Administrator window 26
UUDFs 78UDTs
additional information 78comments, modifying 76creating 75data, retrieving 78dropping an existing UDT 77errors, handling 76
Use only the X views, option 39Use SQL Assistant, option 39user
access logging rules, creating 92access rights on objects, displaying 117accounts, creating 51cloning 51databases, displaying all 100existing, modifying 51new, creating 51profiles, assigning 74rights 103roles, assigning 68security constraints, adding 79
user-defined functions See UDFsuser-defined types See UDTs
Vversion numbers
displaying 29ODBC driver 122Teradata Administrator 3, 122Teradata Database 3Teradata Tools and Utilities 3
View menuQuery Window 121Results window 127
Teradata Administrator window 24views
displaying all in database 99dropping 46renaming 46rights, granting or revoking 83
WWarn if an Expanded Account String is invalid, option 36What to Load, option 35Window List command 28
XX views option 39