TENOR BANJO KIT - Musicmakers BANJO KIT Wooden Parts: a) Main Body b) Back Ring c) Neck w/peghead d)...
12
TENOR BANJO KIT 651-439-9120 www.harpkit.com
Transcript of TENOR BANJO KIT - Musicmakers BANJO KIT Wooden Parts: a) Main Body b) Back Ring c) Neck w/peghead d)...
TENOR BANJO KIT
651-439-9120www.harpkit.com
TENOR BANJO KITWooden Parts:
a) Main Bodyb) Back Ringc) Neck w/pegheadd) Fretboard
Hardware Parts:
1 Textured Plastic Skin Head1 Wooden Tone Ring1 Set of 4 Strings, your choice 7 Pearl Marking Dots40” Fretwire4 Planetary Banjo Tuners (straight)1 Blackwood Nut1 Needle File1 Bridge (Padauk)4 Escutcheon Tail Pins1 Drill bit, 1/16” for tail pins1 Drill bit, 1/4” for Pearl Dots1 Drill bit, 3/8” for Tuning Gears3 Tiny Nails 1 Leather Scrap, 3/4” X 1-1/2”9 Wood Screws, #8 X 1-1/2”7 Hex Drive Cap Screws, #10-24 X 3/4”1 Hex Drive Cap Screw, #10-24 X 1-1/4”1 Washer, #88 T-Nuts, #10-24 (installed in Back Ring)1 Allen Wrench, 5/32”1 Assembly Instructions
BEFORE YOU BEGINPlease take the time to check over the parts of your kit now, to make sure everything is there. If you discover a problem, contact us right away so we can rectify it quickly without causing you much delay in your project. We also suggest skim-ming through the entire directions before beginning, just to get an overview of the project. You may decide that you need to gather more tools or purchase a few optional decorations or accessories to enhance the finished instrument. Now is a good time to decide so you can avoid delays when you reach those steps of construction.
ACCESSORY ITEMS AVAILABLE FOR THE BANJO
FINISHKIT Musicmaker’s finishing kit with instructions STRAP-2 Shoulder strap & 2 mounting buttons BANJBAG Padded carrying bag for banjo
See our website (www.harpkit.com) or current catalog for prices.
2
3
ASSEMBLY INSTRUCTIONS:
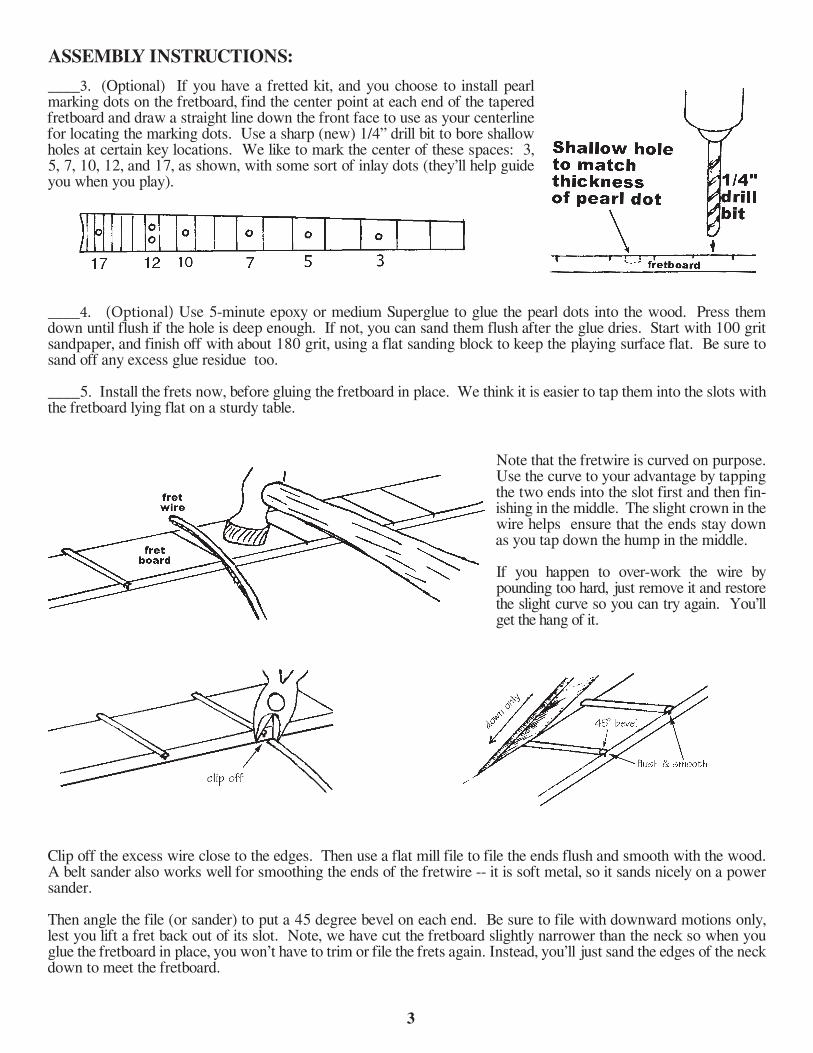
____3. (Optional) If you have a fretted kit, and you choose to install pearl marking dots on the fretboard, find the center point at each end of the tapered fretboard and draw a straight line down the front face to use as your centerline for locating the marking dots. Use a sharp (new) 1/4” drill bit to bore shallow holes at certain key locations. We like to mark the center of these spaces: 3, 5, 7, 10, 12, and 17, as shown, with some sort of inlay dots (they’ll help guide you when you play).
____4. (Optional) Use 5-minute epoxy or medium Superglue to glue the pearl dots into the wood. Press them down until flush if the hole is deep enough. If not, you can sand them flush after the glue dries. Start with 100 grit sandpaper, and finish off with about 180 grit, using a flat sanding block to keep the playing surface flat. Be sure to sand off any excess glue residue too.
____5. Install the frets now, before gluing the fretboard in place. We think it is easier to tap them into the slots with the fretboard lying flat on a sturdy table.
Note that the fretwire is curved on purpose. Use the curve to your advantage by tapping the two ends into the slot first and then fin-ishing in the middle. The slight crown in the wire helps ensure that the ends stay down as you tap down the hump in the middle.
If you happen to over-work the wire by pounding too hard, just remove it and restore the slight curve so you can try again. You’ll get the hang of it.
Clip off the excess wire close to the edges. Then use a flat mill file to file the ends flush and smooth with the wood. A belt sander also works well for smoothing the ends of the fretwire -- it is soft metal, so it sands nicely on a power sander.
Then angle the file (or sander) to put a 45 degree bevel on each end. Be sure to file with downward motions only, lest you lift a fret back out of its slot. Note, we have cut the fretboard slightly narrower than the neck so when you glue the fretboard in place, you won’t have to trim or file the frets again. Instead, you’ll just sand the edges of the neck down to meet the fretboard.
4
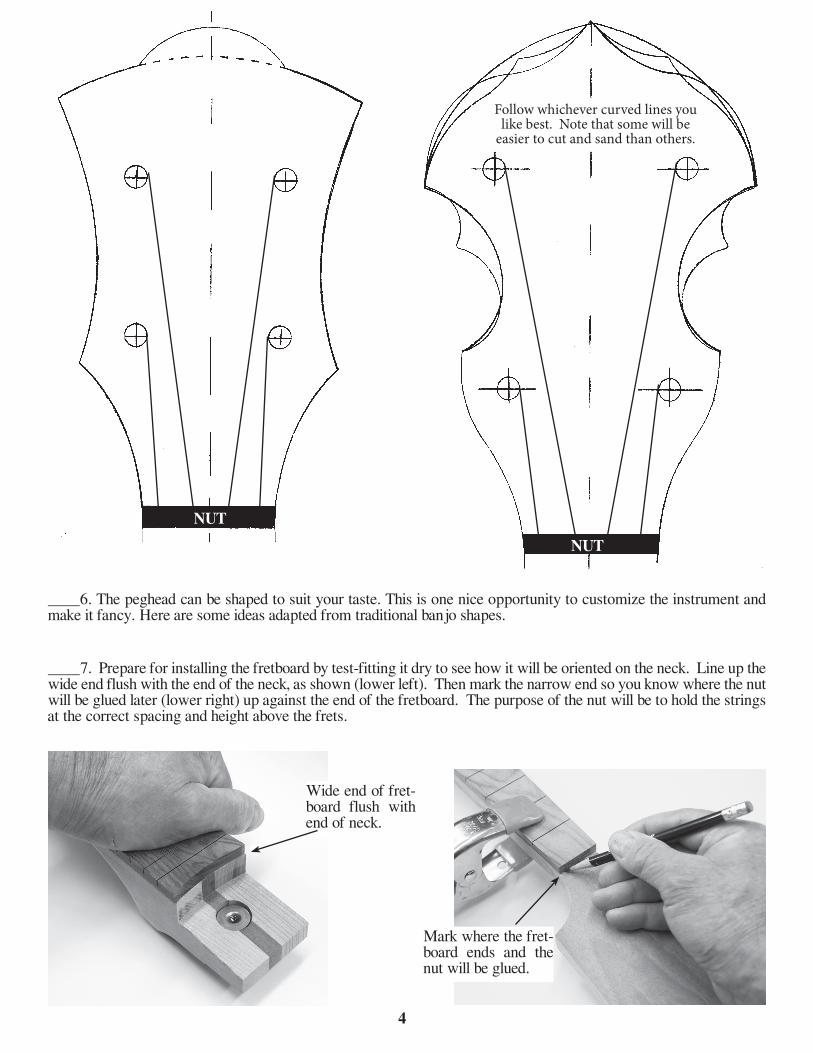
Follow whichever curved lines you like best. Note that some will be
easier to cut and sand than others.
NUT
NUT
____7. Prepare for installing the fretboard by test-fitting it dry to see how it will be oriented on the neck. Line up the wide end flush with the end of the neck, as shown (lower left). Then mark the narrow end so you know where the nut will be glued later (lower right) up against the end of the fretboard. The purpose of the nut will be to hold the strings at the correct spacing and height above the frets.
____6. The peghead can be shaped to suit your taste. This is one nice opportunity to customize the instrument and make it fancy. Here are some ideas adapted from traditional banjo shapes.
Mark where the fret-board ends and the nut will be glued.
Wide end of fret-board flush with end of neck.
5
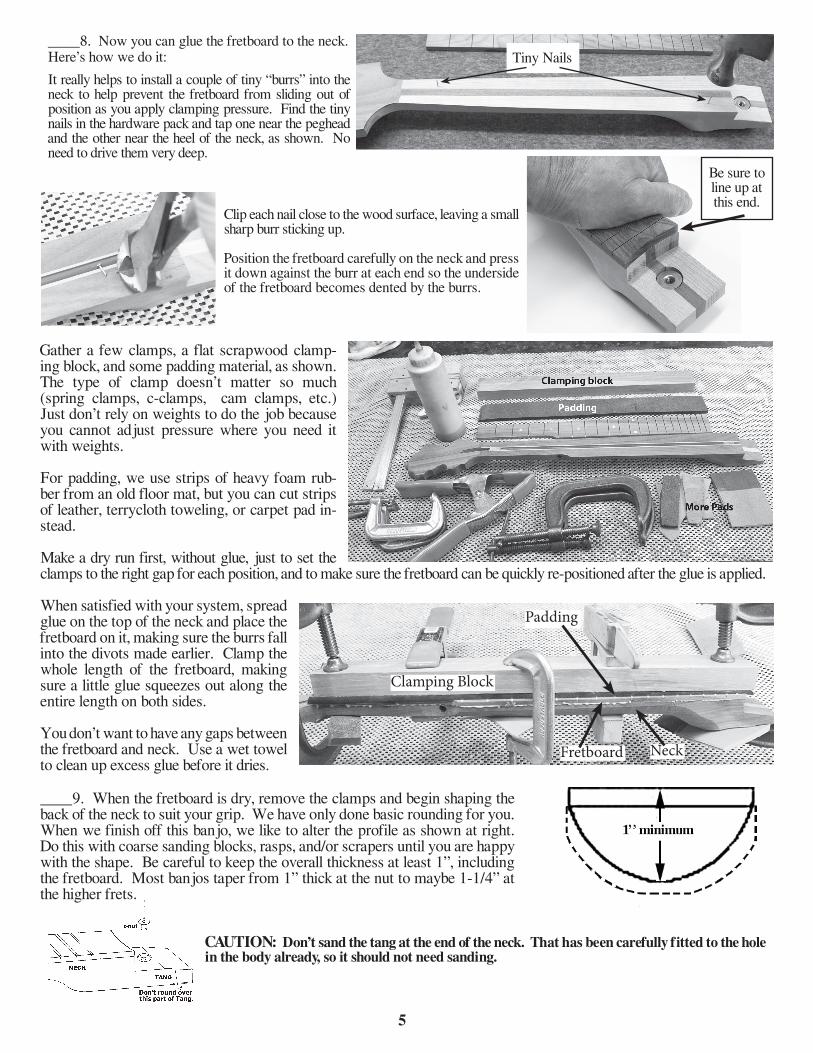
____8. Now you can glue the fretboard to the neck. Here’s how we do it:
It really helps to install a couple of tiny “burrs” into the neck to help prevent the fretboard from sliding out of position as you apply clamping pressure. Find the tiny nails in the hardware pack and tap one near the peghead and the other near the heel of the neck, as shown. No need to drive them very deep.
Gather a few clamps, a flat scrapwood clamp-ing block, and some padding material, as shown. The type of clamp doesn’t matter so much (spring clamps, c-clamps, cam clamps, etc.) Just don’t rely on weights to do the job because you cannot adjust pressure where you need it with weights.
For padding, we use strips of heavy foam rub-ber from an old floor mat, but you can cut strips of leather, terrycloth toweling, or carpet pad in-stead.
Make a dry run first, without glue, just to set the clamps to the right gap for each position, and to make sure the fretboard can be quickly re-positioned after the glue is applied.
When satisfied with your system, spread glue on the top of the neck and place the fretboard on it, making sure the burrs fall into the divots made earlier. Clamp the whole length of the fretboard, making sure a little glue squeezes out along the entire length on both sides.
You don’t want to have any gaps between the fretboard and neck. Use a wet towel to clean up excess glue before it dries.
Clip each nail close to the wood surface, leaving a small sharp burr sticking up.
Position the fretboard carefully on the neck and press it down against the burr at each end so the underside of the fretboard becomes dented by the burrs.
Be sure to line up at this end.
____9. When the fretboard is dry, remove the clamps and begin shaping the back of the neck to suit your grip. We have only done basic rounding for you. When we finish off this banjo, we like to alter the profile as shown at right. Do this with coarse sanding blocks, rasps, and/or scrapers until you are happy with the shape. Be careful to keep the overall thickness at least 1”, including the fretboard. Most banjos taper from 1” thick at the nut to maybe 1-1/4” at the higher frets.
CAUTION: Don’t sand the tang at the end of the neck. That has been carefully fitted to the hole in the body already, so it should not need sanding.
Clamping Block
Fretboard Neck
Padding
Tiny Nails
6
____10. Drill the four holes for the tuning machines, taking care to test the hole size in a piece of scrap wood first, to make sure you have the correct size. Use the same pattern for drilling that you used for cutting the peghead shape. If you went off the deep end and designed something wild and crazy, then we suggest making a paper outline of it and drawing the string lines up from the nut to see where you want to place the tuning pegs. It is helpful to keep the strings from crossing or rubbing against other pegs, as shown in our patterns from page 4.
OPTIONAL: If you want to decorate the body of your banjo, this would be a good time to do that work. Some people enjoy carving solid wood like this, and others like decorating with a woodburning tool. Either technique will make your instrument unique and give it a nice handcrafted appearance. If you want to add painted decorations, we recommend sealing the wood with one clear coat first, then sand it smooth before applying the decorative paints. Further clear coats will seal in the decorations.
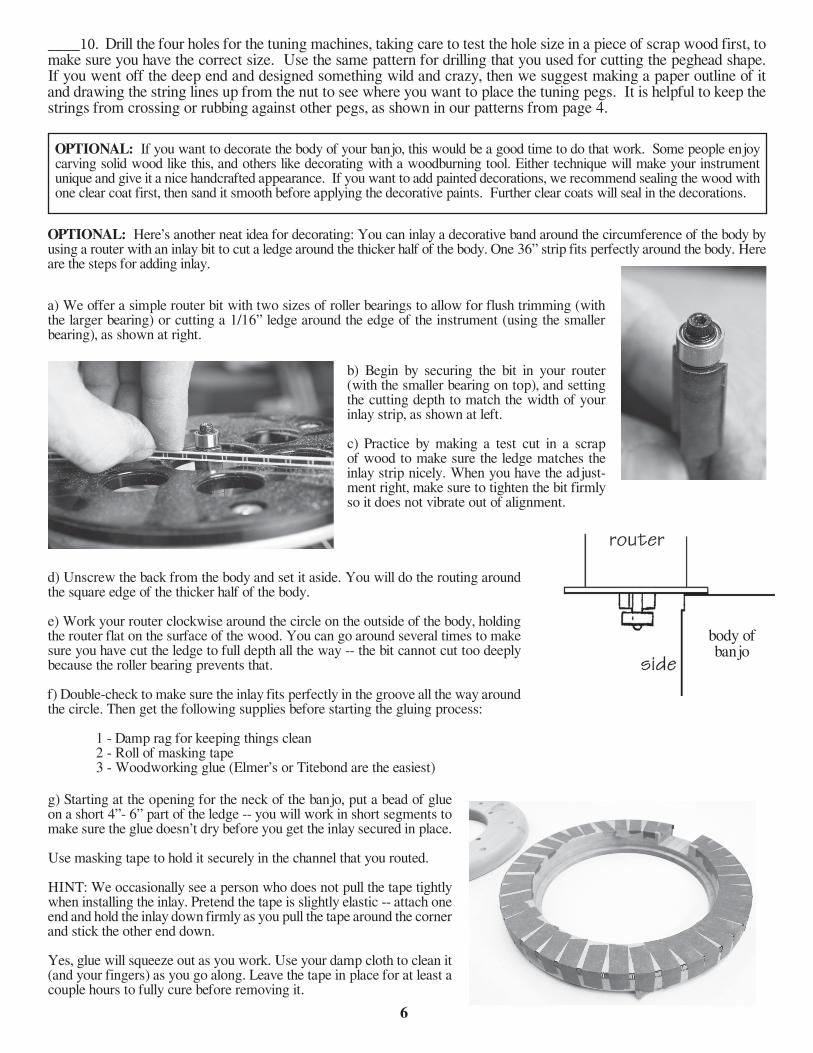
OPTIONAL: Here’s another neat idea for decorating: You can inlay a decorative band around the circumference of the body by using a router with an inlay bit to cut a ledge around the thicker half of the body. One 36” strip fits perfectly around the body. Here are the steps for adding inlay.
a) We offer a simple router bit with two sizes of roller bearings to allow for flush trimming (with the larger bearing) or cutting a 1/16” ledge around the edge of the instrument (using the smaller bearing), as shown at right.
b) Begin by securing the bit in your router (with the smaller bearing on top), and setting the cutting depth to match the width of your inlay strip, as shown at left.
c) Practice by making a test cut in a scrap of wood to make sure the ledge matches the inlay strip nicely. When you have the adjust-ment right, make sure to tighten the bit firmly so it does not vibrate out of alignment.
d) Unscrew the back from the body and set it aside. You will do the routing around the square edge of the thicker half of the body.
e) Work your router clockwise around the circle on the outside of the body, holding the router flat on the surface of the wood. You can go around several times to make sure you have cut the ledge to full depth all the way -- the bit cannot cut too deeply because the roller bearing prevents that.
f) Double-check to make sure the inlay fits perfectly in the groove all the way around the circle. Then get the following supplies before starting the gluing process:
1 - Damp rag for keeping things clean 2 - Roll of masking tape 3 - Woodworking glue (Elmer’s or Titebond are the easiest)
body ofbanjo
g) Starting at the opening for the neck of the banjo, put a bead of glue on a short 4”- 6” part of the ledge -- you will work in short segments to make sure the glue doesn’t dry before you get the inlay secured in place.
Use masking tape to hold it securely in the channel that you routed.
HINT: We occasionally see a person who does not pull the tape tightly when installing the inlay. Pretend the tape is slightly elastic -- attach one end and hold the inlay down firmly as you pull the tape around the corner and stick the other end down.
Yes, glue will squeeze out as you work. Use your damp cloth to clean it (and your fingers) as you go along. Leave the tape in place for at least a couple hours to fully cure before removing it.
7
APPLYING THE FINISH_____12. Mask off the top playing surface of the fretboard with masking tape. It is best to avoid putting varnish or lacquer on this playing surface. After finishing the rest of the instrument, you can remove the masking tape and lightly oil the fretboard with linseed oil, or just leave it unfinished (that wood has natural oils for protection).
STAIN -- Stains are coloring agents and should only be used if you dislike the natural color of the wood. We usually do not ap-ply stains to our projects, especially when they are made with naturally beautiful hardwoods such as cherry and walnut. These woods look very nice with just a clear finish. But, if you want to color the wood differently, your staining should be accom-plished before applying a surface finish such as oil, varnish, or lacquer.
OIL -- An oil finish will give your wood a low luster appearance, bringing out the natural color of the grain. The principal advan-tage of an oil finish is that it can be applied and wiped dry immediately, so you can proceed with installing hardware (and strings) right away. The disadvantages of oil are that it usually does not give much surface protection or sheen, and it tends to hold dust, although there are some brands that include waxes and/or varnishes to give more surface build-up and luster. We sometimes wipe boiled linseed oil on the playing surface of the fingerboard, but we like a harder finish for the rest of the instrument.
VARNISH -- Any regular varnish will work fine on this project, but we recommend our wipe-on Gel Topcoat polyurethane made by General Finishes. Our complete finishing kit includes two sandpaper sheets, foam applicator, and a half pint can of gel finish. The advantages of this product are its simple application, durability, and deep, soft luster. Unlike many other types of varnishes, the wipe-on poly has very little odor, and when you apply thin coats you won’t have trouble with drips and sags. We use the same product for both a sealer that penetrates the wood grain, and a few top coats to build up a smooth protective finish.
LACQUER -- Many professional instrument makers still use lacquer for their finish. The most readily available lacquer is called Deft Clear Wood Finish. If you choose this product, it is best to purchase a can of liquid to brush on as a sealer coat first, and then use an aerosol can of the same product to spray on the final coats. The advantage of this finish is its quick drying time, but the disadvantage is the strong odor of the toxic lacquer fumes.
So, choose your weapon and have at it. We always recommend multiple coats of finish, sanding with very fine (600 grit) paper in between. That should give you beautiful results.
No need to apply finish way inside the body, by the way. Remember that the skin head and the tone ring will hide those inner spaces from view anyway.
SUGGESTION: As you are applying the first coat of finish, watch carefully for glue residue that pre-vents the finish from penetrating the wood. Take the time to sand or scrape the glue off, before proceed-ing further with the finish. Scraping a sharp chisel across the area usually does the trick without adding deep scratches in the surface. Yes, this can get messy, but you’ll be glad you took the time to do it. Nothing looks more amateurish than a woodworking project with glue spots still showing.
____11. Now you are ready for final sanding. Take your time to scrub out machining marks and remove glue residue from all the areas that will be visible on the finished instrument. Use 60 or 80 grit sandpaper for heavy shaping, but then switch to 100 or 120 grit to smooth the surfaces more, and then move to 180 grit for finer smoothing. This will prepare the instrument for finishing.
NOTE: It is smart to keep the back ring screwed to the main body while sanding, so you smooth and shape the outside of those parts equally.
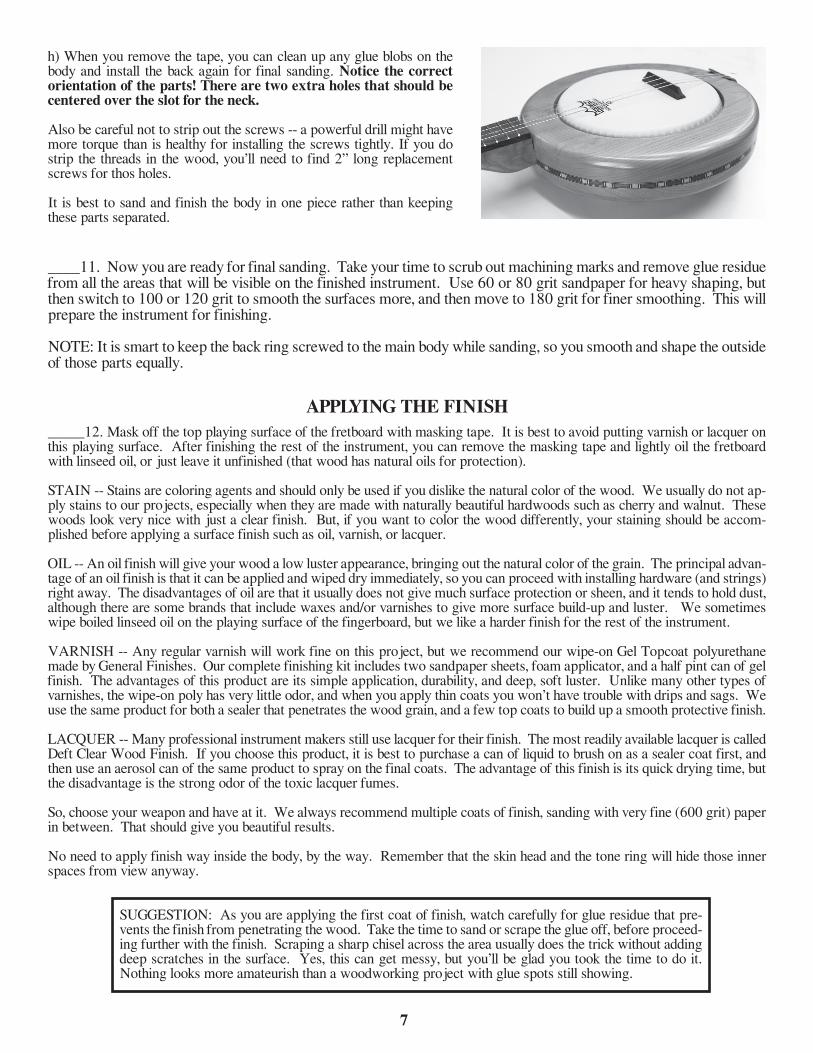
h) When you remove the tape, you can clean up any glue blobs on the body and install the back again for final sanding. Notice the correct orientation of the parts! There are two extra holes that should be centered over the slot for the neck.
Also be careful not to strip out the screws -- a powerful drill might have more torque than is healthy for installing the screws tightly. If you do strip the threads in the wood, you’ll need to find 2” long replacement screws for thos holes.
It is best to sand and finish the body in one piece rather than keeping these parts separated.
8
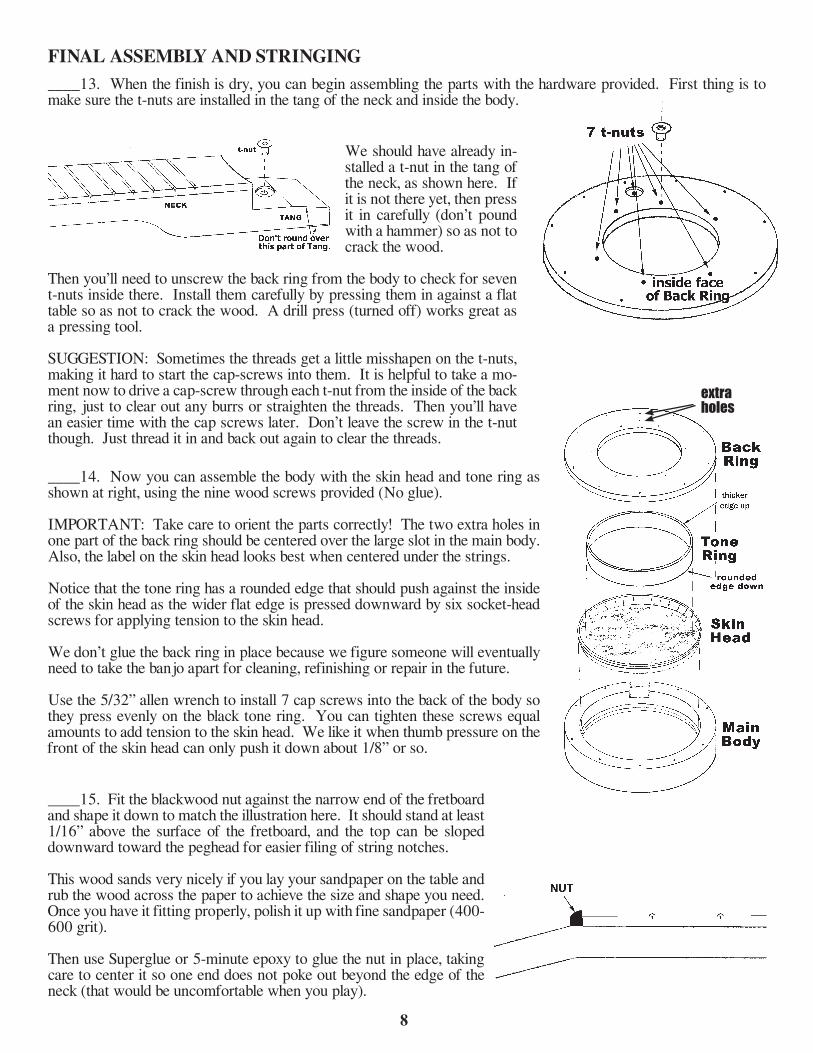
We should have already in-stalled a t-nut in the tang of the neck, as shown here. If it is not there yet, then press it in carefully (don’t pound with a hammer) so as not to crack the wood.
Then you’ll need to unscrew the back ring from the body to check for seven t-nuts inside there. Install them carefully by pressing them in against a flat table so as not to crack the wood. A drill press (turned off) works great as a pressing tool.
SUGGESTION: Sometimes the threads get a little misshapen on the t-nuts, making it hard to start the cap-screws into them. It is helpful to take a mo-ment now to drive a cap-screw through each t-nut from the inside of the back ring, just to clear out any burrs or straighten the threads. Then you’ll have an easier time with the cap screws later. Don’t leave the screw in the t-nut though. Just thread it in and back out again to clear the threads.
FINAL ASSEMBLY AND STRINGING____13. When the finish is dry, you can begin assembling the parts with the hardware provided. First thing is to make sure the t-nuts are installed in the tang of the neck and inside the body.
____14. Now you can assemble the body with the skin head and tone ring as shown at right, using the nine wood screws provided (No glue).
IMPORTANT: Take care to orient the parts correctly! The two extra holes in one part of the back ring should be centered over the large slot in the main body. Also, the label on the skin head looks best when centered under the strings.
Notice that the tone ring has a rounded edge that should push against the inside of the skin head as the wider flat edge is pressed downward by six socket-head screws for applying tension to the skin head.
We don’t glue the back ring in place because we figure someone will eventually need to take the banjo apart for cleaning, refinishing or repair in the future.
Use the 5/32” allen wrench to install 7 cap screws into the back of the body so they press evenly on the black tone ring. You can tighten these screws equal amounts to add tension to the skin head. We like it when thumb pressure on the front of the skin head can only push it down about 1/8” or so.
extra holes
____15. Fit the blackwood nut against the narrow end of the fretboard and shape it down to match the illustration here. It should stand at least 1/16” above the surface of the fretboard, and the top can be sloped downward toward the peghead for easier filing of string notches.
This wood sands very nicely if you lay your sandpaper on the table and rub the wood across the paper to achieve the size and shape you need. Once you have it fitting properly, polish it up with fine sandpaper (400-600 grit).
Then use Superglue or 5-minute epoxy to glue the nut in place, taking care to center it so one end does not poke out beyond the edge of the neck (that would be uncomfortable when you play).

9
____16. Install the 4 straight gears using a 10mm wrench or nut driver, as shown here (or adjustable wrench). The washer and threaded sleeve go down through the top of the peghead to engage the main body of the gear.
10 mm wrench or nut driver
____18. Find the center of the of the body at the tail end, as shown in diagram (below right). Put masking tape on the wood for marking these centers and the positions for the tail pins. Find a straight-edge to use for extending the line of the fingerboard (see next step).
____17. Now you can install the neck into the body. It should be a tight fit. There are 2 cap screws left in your kit -- one longer than the other. The long one needs the washer. Screw that one into the hole closest to the top edge of the body, as shown at right, and into the hole in the tang. It should thread itself into the t-nut in the tang, but you may need to wiggle the neck a little to get it started.
Screw the last short cap screw into the lower hole until it contacts the metal plate on the tang. This will be used for tilting the neck forward and back, but the upper screw must be loosened before you can make that sort of adjustment.
____19. Lay a straight-edge along each side of the neck and mark where it cross-es the tape at the tail end of the body. Find the center between those two marks and extend it over the edge and down an inch or so on the tail end of the body. Use a ruler to draw a perpendicular line on the edge of the body, and to mark 4 points spaced about 1/4” apart, two marks on either side of the center point, as shown in drawing (below right).
Punch into the wood with an awl at each point, and use the 1/16” drill bit to drill pilot holes for the tail pins. No special angle is required -- just drill straight into the thick wood to a depth of about 1/2”.
____20. Then you can remove the tape and use a hammer to tap the tail pins in so the heads are about 1/16” above the surface of the wood, as shown.
10
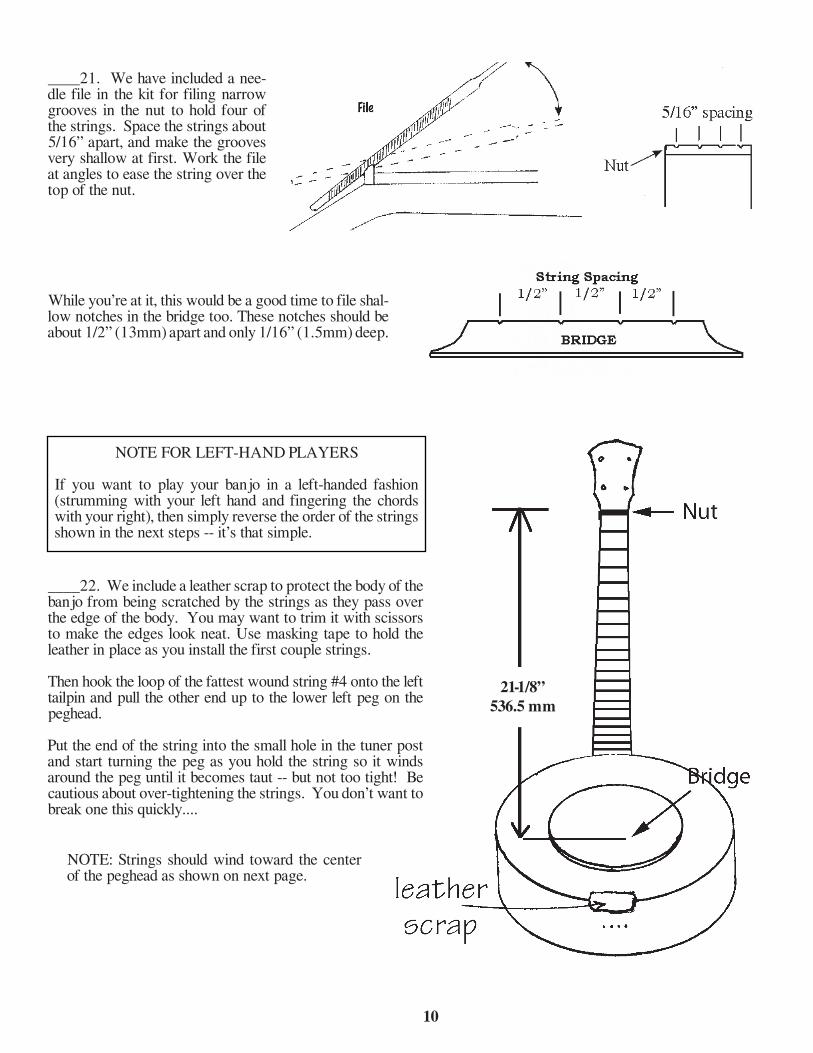
____21. We have included a nee-dle file in the kit for filing narrow grooves in the nut to hold four of the strings. Space the strings about 5/16” apart, and make the grooves very shallow at first. Work the file at angles to ease the string over the top of the nut.
____22. We include a leather scrap to protect the body of the banjo from being scratched by the strings as they pass over the edge of the body. You may want to trim it with scissors to make the edges look neat. Use masking tape to hold the leather in place as you install the first couple strings.
Then hook the loop of the fattest wound string #4 onto the left tailpin and pull the other end up to the lower left peg on the peghead.
Put the end of the string into the small hole in the tuner post and start turning the peg as you hold the string so it winds around the peg until it becomes taut -- but not too tight! Be cautious about over-tightening the strings. You don’t want to break one this quickly....
21-1/8”536.5 mm
NOTE: Strings should wind toward the center of the peghead as shown on next page.
While you’re at it, this would be a good time to file shal-low notches in the bridge too. These notches should be about 1/2” (13mm) apart and only 1/16” (1.5mm) deep.
NOTE FOR LEFT-HAND PLAYERS
If you want to play your banjo in a left-handed fashion (strumming with your left hand and fingering the chords with your right), then simply reverse the order of the strings shown in the next steps -- it’s that simple.

11
____23. Slide the bridge under that first string, positioning the bridge on the skin head 21-1/8” from the nut. This string should rest in the first groove near the left end of the bridge.
____24. You will probably need to make some adjustments at the back of the banjo to get this first string to hang properly above the fretboard:
Use the 5/32” Allen wrench to loosen the long screw at the top of the body (in back) by just one turn or so. Then switch the wrench to the screw below it and tighten that screw as you watch how the neck moves. The goal is to push the peghead down until this first string hangs about 1/4” over the frets nearest the body. When you get to that point, switch back to the upper screw and tighten it back up again. You can do more fine adjusting after the rest of the strings are installed.
____25. Install three more strings in the positions shown below, hooking their loops over the proper tailpins as you install them in order. HINT: If you find the lightest string slipping on the tuning peg, thread the loose end twice through the little hole in the peg. This helps secure the string to the post.
POINT OF INTEREST Some people ask about the numbers next to the notes. They are the scientific method of identifying the octave the notes. Middle C on the piano is C4, for example, and E4 is the E just above Middle C. The notes marked with the number 3 are below Middle C, and the G2 is below C3, more than an octave lower than Middle C.
Tune your banjo according to the strings you have installed (see below)
Tenor Tuning(Like Mandola)
C -G-D-A
#4 D3 wound
#3 G3 wound
#2 B3 plain
#1 E4 plain
Chicago Tuning(Like Baritone Uke)
D-G-B-E
#3 G3 wound
#2 D4 plain
Irish Tuning(Like Octave Mandolin)
G-D-A-E
#4 G2 wound
#3 D3 wound
#1 E4 plain
#2 A3plain
#3 C3 wound
#1 A4 plain
MUSICMAKERSPO BOX 2117
STILLWATER, MN 55082
651-439-9120www.harpkit.com
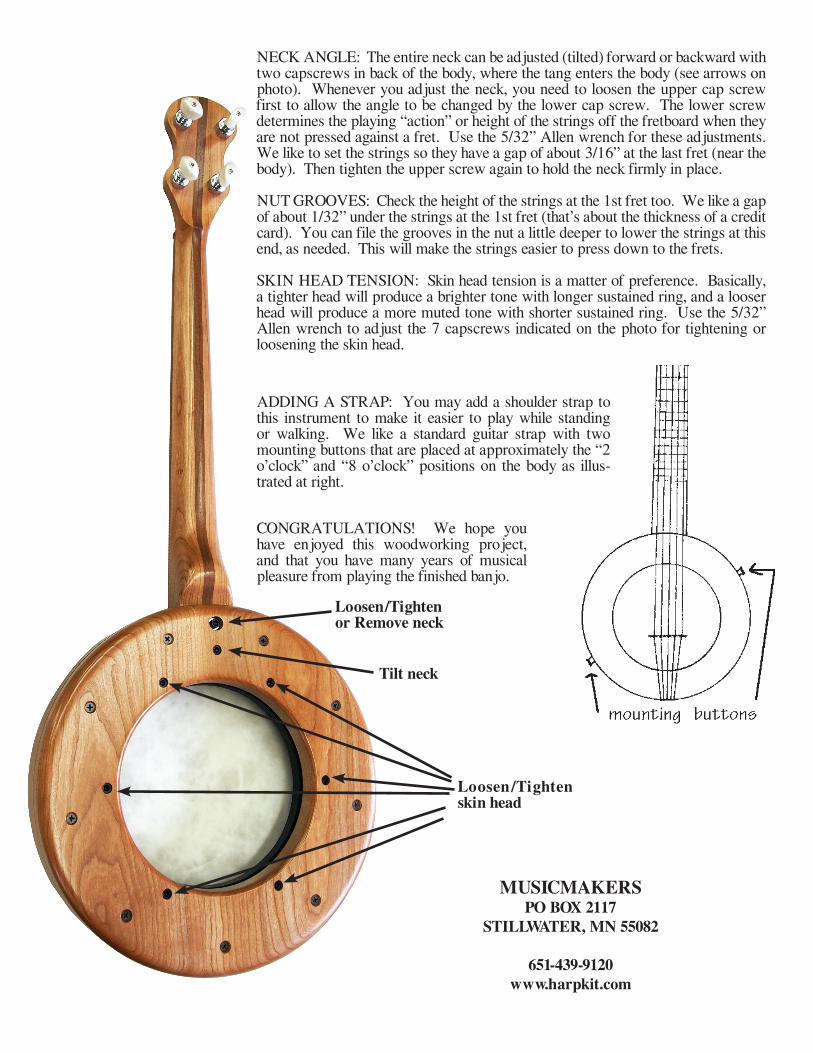
NECK ANGLE: The entire neck can be adjusted (tilted) forward or backward with two capscrews in back of the body, where the tang enters the body (see arrows on photo). Whenever you adjust the neck, you need to loosen the upper cap screw first to allow the angle to be changed by the lower cap screw. The lower screw determines the playing “action” or height of the strings off the fretboard when they are not pressed against a fret. Use the 5/32” Allen wrench for these adjustments.We like to set the strings so they have a gap of about 3/16” at the last fret (near the body). Then tighten the upper screw again to hold the neck firmly in place.
NUT GROOVES: Check the height of the strings at the 1st fret too. We like a gap of about 1/32” under the strings at the 1st fret (that’s about the thickness of a credit card). You can file the grooves in the nut a little deeper to lower the strings at this end, as needed. This will make the strings easier to press down to the frets.
SKIN HEAD TENSION: Skin head tension is a matter of preference. Basically, a tighter head will produce a brighter tone with longer sustained ring, and a looser head will produce a more muted tone with shorter sustained ring. Use the 5/32” Allen wrench to adjust the 7 capscrews indicated on the photo for tightening or loosening the skin head.
Loosen/Tighten or Remove neck
Tilt neck
Loosen /Tighten skin head
ADDING A STRAP: You may add a shoulder strap to this instrument to make it easier to play while standing or walking. We like a standard guitar strap with two mounting buttons that are placed at approximately the “2 o’clock” and “8 o’clock” positions on the body as illus-trated at right.
CONGRATULATIONS! We hope you have enjoyed this woodworking project, and that you have many years of musical pleasure from playing the finished banjo.