Tenable Appliance 300 Guide - Tenable™ - The Cyber...
45
Tenable Appliance 300 Guide March 23, 2016 (Revision 2)
Transcript of Tenable Appliance 300 Guide - Tenable™ - The Cyber...

Tenable Appliance 300 Guide March 23, 2016
(Revision 2)

Copyright © 2016. Tenable Network Security, Inc. All rights reserved. Tenable Network Security and Nessus are registered trademarks of Tenable Network Security, Inc.
SecurityCenter, Passive Vulnerability Scanner, and Log Correlation Engine are trademarks of Tenable Network Security, Inc. All other products or services are trademarks
of their respective owners.
2
Table of Contents
Introduction ............................................................................................................................................................... 4
Standards and Conventions....................................................................................................................................................................... 4
Abbreviations ................................................................................................................................................................................................. 4
Skill Requirements ........................................................................................................................................................................................ 4
Tenable Hardware Appliance 300 Installation ............................................................................................... 4
Prerequisites ................................................................................................................................................................................................... 4
Unpacking the Box ........................................................................................................................................................................................ 5
Rack Mount Instructions ............................................................................................................................................................................ 5
Hardware Specifications............................................................................................................................................................................. 5
Hardware Features....................................................................................................................................................................................... 6
Network Connections and Initialization ............................................................................................................................................... 7
Obtaining and Installing Updates for Tenable Appliance 300 ....................................................................................................... 8
Configuration and Operations ............................................................................................................................. 8
Set Admin Password ................................................................................................................................................................................. 12
Configuration/Operation Tabs .............................................................................................................................................................. 13
Appliance Tab .............................................................................................................................................................................................. 15
Application License Information ........................................................................................................................................................... 15
Appliance Information............................................................................................................................................................................. 16
Version Information ................................................................................................................................................................................. 16
Administration Tab .................................................................................................................................................................................... 16
Update Appliance ..................................................................................................................................................................................... 19
Update Availability Detection ............................................................................................................................................................... 19
Restart/Shutdown Appliance................................................................................................................................................................. 19
Appliance Management Interface Users ............................................................................................................................................. 19
Configure Website SSL Certificate ........................................................................................................................................................ 21
Generate Certificate Signing Request .................................................................................................................................................. 22
Configure Clock Settings ......................................................................................................................................................................... 22 Time Zone ..................................................................................................................................................................................................................... 22 NTP Local Reference Clock .................................................................................................................................................................................... 23 Ignore NTP Requests ................................................................................................................................................................................................ 23 Custom NTP Servers ................................................................................................................................................................................................ 23 Configure SNMP Agent Strings ............................................................................................................................................................................ 23
Logout Redirection URL .......................................................................................................................................................................... 23
Restrict Console Operations .................................................................................................................................................................. 23
Reinstall Appliance (Hardware Appliance Only) ............................................................................................................................... 23
System Log Forwarding ........................................................................................................................................................................... 24
Backup Tab ................................................................................................................................................................................................... 25
Backup Appliance ..................................................................................................................................................................................... 25
Standalone Application Import ............................................................................................................................................................. 26
Restore from File ....................................................................................................................................................................................... 27
Networking Tab .......................................................................................................................................................................................... 27
Configure Networking ............................................................................................................................................................................. 29 Configure Hostname ................................................................................................................................................................................................ 29
Interfaces .................................................................................................................................................................................................... 30

Copyright © 2016. Tenable Network Security, Inc. All rights reserved. Tenable Network Security and Nessus are registered trademarks of Tenable Network Security, Inc.
SecurityCenter, Passive Vulnerability Scanner, and Log Correlation Engine are trademarks of Tenable Network Security, Inc. All other products or services are trademarks
of their respective owners.
3
Logs Tab ......................................................................................................................................................................................................... 32
Support Tab .................................................................................................................................................................................................. 33
Applications Tab .................................................................................................................................................... 35
Enabling Applications ............................................................................................................................................................................... 35
LCE Clients ................................................................................................................................................................................................... 35
The PVS Application .................................................................................................................................................................................. 37
Manage PVS ............................................................................................................................................................................................... 39
PVS Monitoring Configuration .............................................................................................................................................................. 39
Certificate Management ......................................................................................................................................................................... 39
Webserver Authentication ..................................................................................................................................................................... 40
Using PVS ................................................................................................................................................................................................... 40
Troubleshooting ..................................................................................................................................................... 41
About Tenable Network Security ...................................................................................................................... 42
Acknowledgements ............................................................................................................................................... 43
Related Third-Party and Open-Source Licenses ............................................................................................................................. 45
Copyright © 2016. Tenable Network Security, Inc. All rights reserved. Tenable Network Security and Nessus are registered trademarks of Tenable Network Security, Inc.
SecurityCenter, Passive Vulnerability Scanner, and Log Correlation Engine are trademarks of Tenable Network Security, Inc. All other products or services are trademarks
of their respective owners.
4
Introduction
This document describes the installation and operation of the Tenable Appliance 300. The Tenable Appliance 300 is a browser-managed device that hosts the Passive Vulnerability Scanner (PVS).
The Tenable Appliance 300 is available as a physical hardware appliance. Please email any comments and suggestions to [email protected].
Standards and Conventions
Throughout the documentation, filenames, daemons, and executables are indicated with a courier bold font such as
gunzip, httpd, and /etc/passwd.
Important notes and considerations are highlighted with this symbol and grey text boxes.
Tips, examples, and best practices are highlighted with this symbol and white on blue text.
Abbreviations
The following abbreviations are used throughout this documentation:
LCE Log Correlation Engine
PVS Passive Vulnerability Scanner
SC SecurityCenter
VM Virtual Machine
SSL Secure Sockets Layer
Skill Requirements
It is recommended that the Tenable Appliance 300 be configured by personnel familiar with the Passive Vulnerability Scanner, and the organization’s security policies and procedures. If training is required for the Passive Vulnerability Scanner, please visit: http://tenable.com/training/.
Tenable Hardware Appliance 300 Installation
Prerequisites
The Tenable Hardware Appliance must be installed by personnel able to configure IP addresses and perform basic networking tests using tools such as ping and traceroute to verify connectivity.
Before beginning installation, please be sure to have the following hardware and information available:
At least one static IP address for the appliance (not required where DHCP will be used)
The network subnet mask for the appliance

Copyright © 2016. Tenable Network Security, Inc. All rights reserved. Tenable Network Security and Nessus are registered trademarks of Tenable Network Security, Inc.
SecurityCenter, Passive Vulnerability Scanner, and Log Correlation Engine are trademarks of Tenable Network Security, Inc. All other products or services are trademarks
of their respective owners.
5
The IP address of the Default Gateway for the appliance (if applicable)
The IP address of the DNS servers for the appliance (if applicable)
A hostname for the appliance
A VGA monitor and USB keyboard
It is recommended that the appliance be assigned a dedicated IP address so it can be more easily identified and whitelisted by devices such as firewalls and other security tools.
It is necessary to have a hostname available to assign to the appliance during installation to ensure the SSL certificate is generated properly. The appliance ships with the default hostname of “tnsappliance”. If this is
changed, a new server certificate will be generated automatically, requiring a reboot.
Unpacking the Box
While unpacking the box that the appliance is shipped in please be sure to identify the following contents:
Tenable Appliance
Power Cable
Rack Mount Kit
Paper Documents:
- Quick Start Guide
- Rack Mount Instructions (inside the rack mount kit)
Either a straight-through or crossover cable can be used for appliance configuration because the appliance uses Auto-MDIX for link type determination.
Rack Mount Instructions
Follow the rack mount instructions provided in the Rack Mount Kit box to mount the appliance in your cabinets after you have completed installation and verified that the appliance is functioning properly.
Hardware Specifications
Specifications Series 100 Series 200 Series 300
Processor(s) 1 (Quad-Core) Xeon E5-2407 2.4GHz/6.4 GT/s/10MB
1 (Eight-Core) Xeon E5-2450v2.5GHz/8 GT/s/20MB
1 (Ten-Core) E5-2470V2 2.4 Ghz, 8 GT/s, 25MB Cache
Memory 8 GB 16 GB 16 GB
RAM DDR3-1600 DDR3-1600 DDR3-1600

Copyright © 2016. Tenable Network Security, Inc. All rights reserved. Tenable Network Security and Nessus are registered trademarks of Tenable Network Security, Inc.
SecurityCenter, Passive Vulnerability Scanner, and Log Correlation Engine are trademarks of Tenable Network Security, Inc. All other products or services are trademarks
of their respective owners.
6
Disk(s) 1x1TB 7200 RPM 128MB Cache SATA 6.0Gb/s - No RAID
2x1TB 7200 RPM 128MB Cache SATA 6.0Gb/s - RAID1 (1TB Usable)
2x1TB 7200 RPM 128MB Cache SATA 6.0Gb/s - RAID1 (1TB Usable)
Network Interfaces 4 Ports Quad Port Intel Gb Ethernet
4 Ports Quad Port Intel Gb Ethernet
4 - Intel Gb Ethernet Ports 2 - Intel 10GbE Ethernet Ports
Power Supply Dual 450-watt, redundant PFC Dual 450-watt, redundant PFC Dual 450-watt, redundant PFC
Chassis 1U Rack Chassis 21”depth; 28 lbs
1U Rack Chassis 21”depth; 29 lbs
1U Rack Chassis 21” depth; 29 lbs
Intended Use Nessus, SecurityCenter, and PVS (Single Application)
Nessus, SecurityCenter, and PVS
Nessus, SecurityCenter, and PVS
Hardware Features
This section describes the hardware features of the Series 300 Tenable Appliance.
Series 300 Tenable Hardware Appliance Diagram
The Series 300 Tenable Appliance comes with a dual hard drive RAID 1 configuration. In the event of a hard drive failure, the appliance will emit a constant beeping sound. This does not necessarily indicate total system failure since the configuration is mirrored, but it is recommended that Tenable Support be contacted immediately to resolve the issue.
Copyright © 2016. Tenable Network Security, Inc. All rights reserved. Tenable Network Security and Nessus are registered trademarks of Tenable Network Security, Inc.
SecurityCenter, Passive Vulnerability Scanner, and Log Correlation Engine are trademarks of Tenable Network Security, Inc. All other products or services are trademarks
of their respective owners.
7
Network Connections and Initialization
The hardware appliance comes with a pre-assigned IP address of 192.168.168.21. Web configuration takes place using this IP address or one assigned via the appliance console. Initialize and access the appliance console as follows:
Plug a network-enabled cable into the NIC5 port of the appliance.
Connect a monitor and USB keyboard to the “Video” and USB port connectors of the appliance.
Connect the provided power cables to the AC power receptacle and to a suitable AC power source and turn on the appliance.
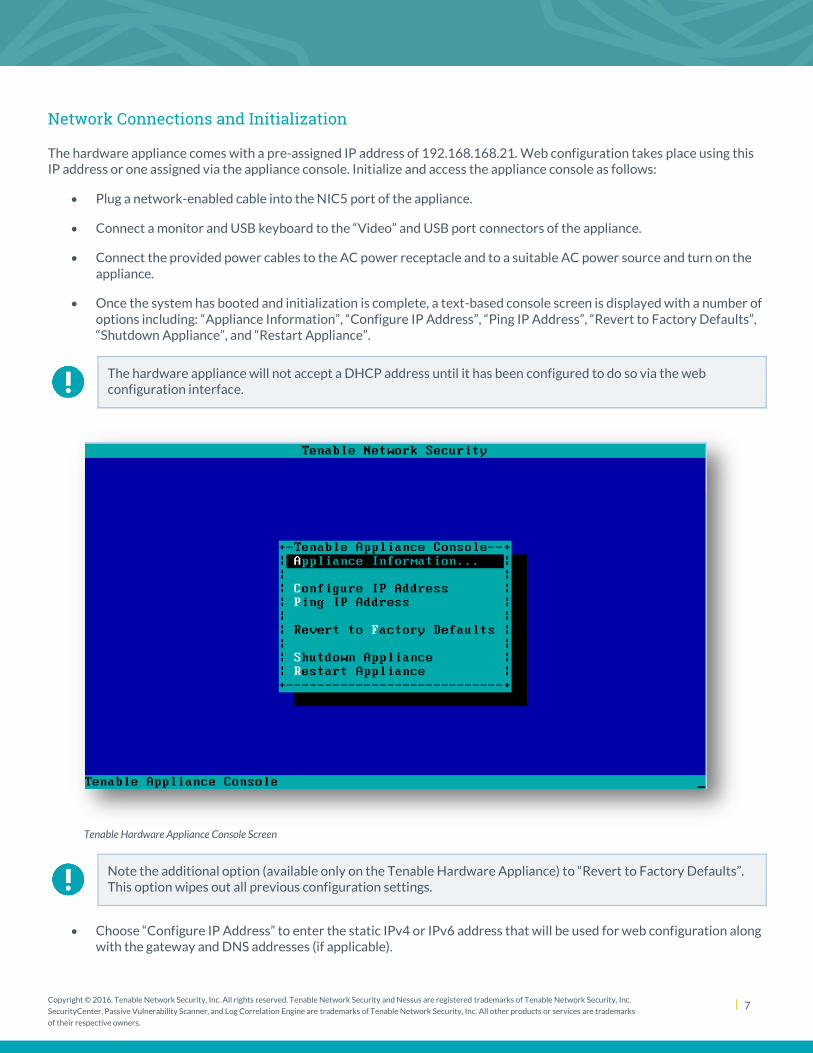
Once the system has booted and initialization is complete, a text-based console screen is displayed with a number of options including: “Appliance Information”, “Configure IP Address”, “Ping IP Address”, “Revert to Factory Defaults”, “Shutdown Appliance”, and “Restart Appliance”.
The hardware appliance will not accept a DHCP address until it has been configured to do so via the web configuration interface.
Tenable Hardware Appliance Console Screen
Note the additional option (available only on the Tenable Hardware Appliance) to “Revert to Factory Defaults”. This option wipes out all previous configuration settings.
Choose “Configure IP Address” to enter the static IPv4 or IPv6 address that will be used for web configuration along
with the gateway and DNS addresses (if applicable).

Copyright © 2016. Tenable Network Security, Inc. All rights reserved. Tenable Network Security and Nessus are registered trademarks of Tenable Network Security, Inc.
SecurityCenter, Passive Vulnerability Scanner, and Log Correlation Engine are trademarks of Tenable Network Security, Inc. All other products or services are trademarks
of their respective owners.
8
No further steps are required from the console although it can be used to display appliance information, reconfigure the static IPv4 and IPv6 address on the first Ethernet device NIC1, ping an IPv4 or IPv6 address or hostname, revert the appliance to factory defaults, shut down, and restart the appliance.
Obtaining and Installing Updates for Tenable Appliance 300
Prior to updating the system it is strongly recommended that a backup is performed and downloaded to the desktop or another location.
Appliance updates are made available on the Tenable Support Portal located at https://support.tenable.com/. Updates are cumulative, so the newest update package for the Tenable Appliance version contains previous updates.
To install the software, log into your appliance web interface (https://<ipaddress>:8000/) and navigate to the Administration tab. Using the “Update Appliance” section at the top of the screen, click the “Choose File” button and select the update package that was downloaded. Once selected, click the “Apply Update” button to update the appliance.
Note that the once the update process begins, it may take some time to process and complete. When successfully completed a web restart page will be displayed at an address of https://<ipaddress>I:8000/static/webrestart.html. If a red error banner is displayed at the top during the update process, please contact Tenable Support. Restarting the appliance prior to the completion of the update may lead to data loss and damage to the appliance OS and/or filesystem. A backup file may be needed for restoration. It is recommended you verify that the update has completed successfully by examining the system logs. To be sure the update has completed successfully, or if you do not see https://<ipaddress>:8000/static/webrestart.html, return to the appliance web interface and navigate to the Logs page. Check the “System Log” and look for the message that includes “yum: Updated: tenableappliance-3.1.0-x86_64-update.
Configuration and Operations
Many of the configuration changes that are made via the Appliance web interface will not take effect until the corresponding service is restarted. For example, changing the XMLRPC port used by PVS from “8835” to another port will modify the configuration file; however, the “Restart PVS” button on the same page must first be clicked before the changes take effect (even though the page does not explicitly say a restart is required). This applies to most application-specific configuration items and is good practice when making configuration changes on the Tenable Appliance.
Copyright © 2016. Tenable Network Security, Inc. All rights reserved. Tenable Network Security and Nessus are registered trademarks of Tenable Network Security, Inc.
SecurityCenter, Passive Vulnerability Scanner, and Log Correlation Engine are trademarks of Tenable Network Security, Inc. All other products or services are trademarks
of their respective owners.
9
The console screen enables you to display information about the appliance, configure a static IPv4 or IPv6 address, ping an IP address or hostname, revert to factory defaults, and shutdown/restart the appliance. All other functions are performed through the web browser interface.
When the Tenable Hardware Appliance 300 is first booted, a static IP address of 192.168.168.21 is configured by default. If you want to change this IP address via the web interface, follow the directions in the “Interfaces” section.
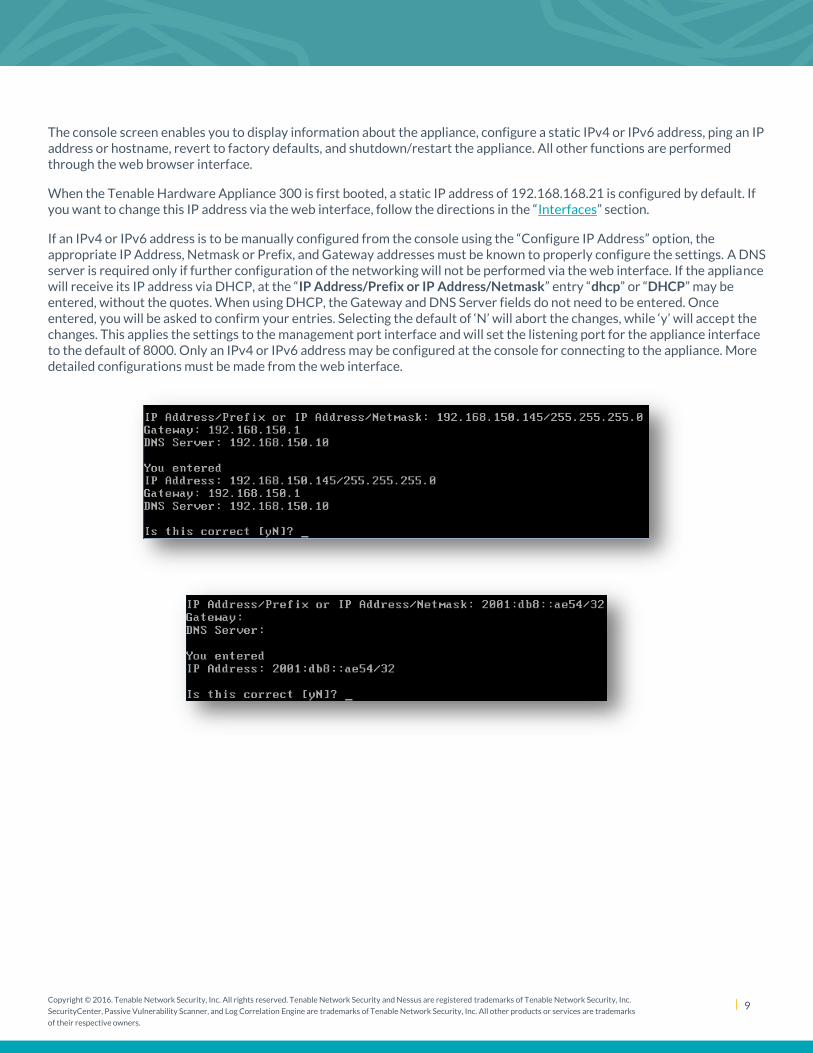
If an IPv4 or IPv6 address is to be manually configured from the console using the “Configure IP Address” option, the appropriate IP Address, Netmask or Prefix, and Gateway addresses must be known to properly configure the settings. A DNS server is required only if further configuration of the networking will not be performed via the web interface. If the appliance will receive its IP address via DHCP, at the “IP Address/Prefix or IP Address/Netmask” entry “dhcp” or “DHCP” may be entered, without the quotes. When using DHCP, the Gateway and DNS Server fields do not need to be entered. Once entered, you will be asked to confirm your entries. Selecting the default of ‘N’ will abort the changes, while ‘y’ will accept the changes. This applies the settings to the management port interface and will set the listening port for the appliance interface to the default of 8000. Only an IPv4 or IPv6 address may be configured at the console for connecting to the appliance. More detailed configurations must be made from the web interface.

Copyright © 2016. Tenable Network Security, Inc. All rights reserved. Tenable Network Security and Nessus are registered trademarks of Tenable Network Security, Inc.
SecurityCenter, Passive Vulnerability Scanner, and Log Correlation Engine are trademarks of Tenable Network Security, Inc. All other products or services are trademarks
of their respective owners.
10
To confirm that the correct IP address was set, use the arrow keys to highlight “Appliance Information” and press the “Enter” key. This will display information similar to the following:
Tenable Appliance Status Screen
If the console display becomes unreadable for any reason (e.g., diagnostic or log messages), use Ctrl-L (hold down “Ctrl” while pressing the “L” key) to refresh.
Using a web browser, enter the URL displayed under “Appliance Information”. For example, the URL in the example above for IPv4 is “https://192.168.133.139:8000/” and IPv6 is https://[fe80::20c:29ff:fe29:9147]:8000/. Note that when using a link-local IPv6 address the NIC identifier must be used at the end of the IPv6 address.
By default, the appliance uses a self-signed SSL certificate that may display a warning in your web browser indicating “the site’s security certificate was not issued by a trusted Certificate Authority (CA)”. During the initial installation, such errors may safely be ignored. You will be able to upload a custom certificate during configuration later. See the “Administration Tab” section for details on how to perform this action.

Copyright © 2016. Tenable Network Security, Inc. All rights reserved. Tenable Network Security and Nessus are registered trademarks of Tenable Network Security, Inc.
SecurityCenter, Passive Vulnerability Scanner, and Log Correlation Engine are trademarks of Tenable Network Security, Inc. All other products or services are trademarks
of their respective owners.
11
Once the administrative web interface is loaded, a license screen will be displayed as shown below:
Tenable Appliance License Agreement
Please be sure to read all the information in the License Agreement before proceeding with the installation. A text or PDF version of the license can be downloaded and saved, if desired.
Click on the “Accept License Agreement” button to proceed with the installation, or the “Shutdown” button to shut down the appliance without accepting the license.
Copyright © 2016. Tenable Network Security, Inc. All rights reserved. Tenable Network Security and Nessus are registered trademarks of Tenable Network Security, Inc.
SecurityCenter, Passive Vulnerability Scanner, and Log Correlation Engine are trademarks of Tenable Network Security, Inc. All other products or services are trademarks
of their respective owners.
12
Set Admin Password
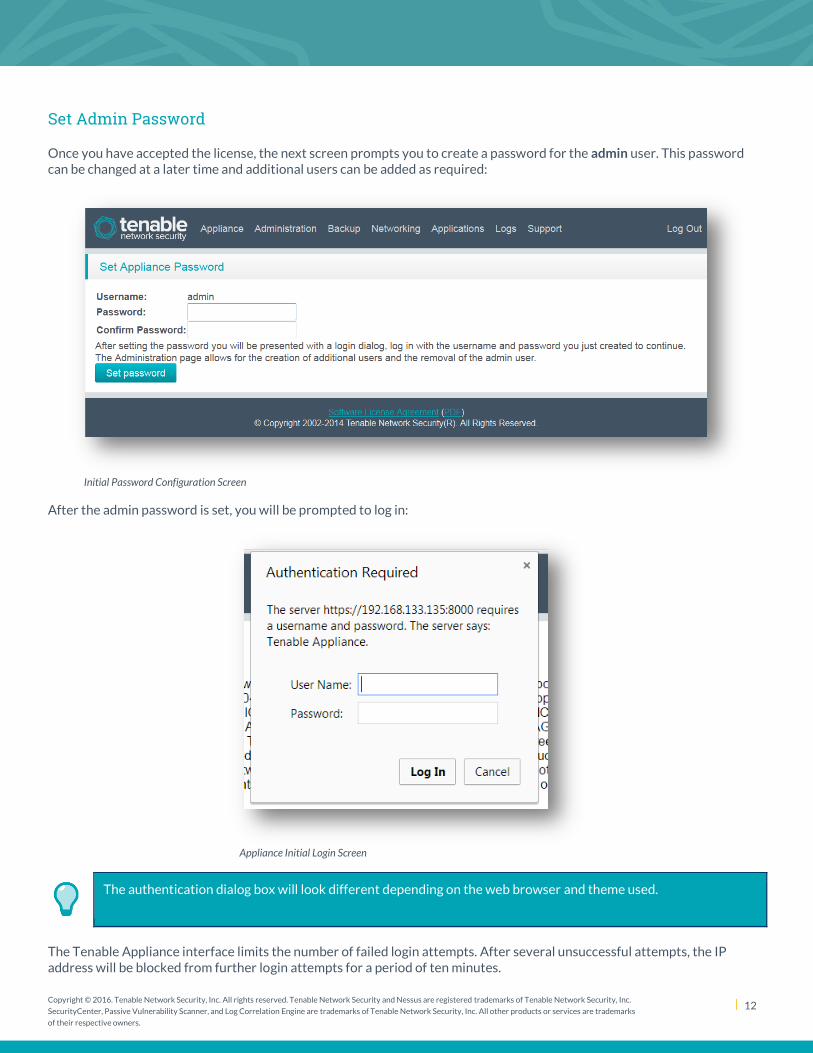
Once you have accepted the license, the next screen prompts you to create a password for the admin user. This password can be changed at a later time and additional users can be added as required:
Initial Password Configuration Screen
After the admin password is set, you will be prompted to log in:
Appliance Initial Login Screen
The authentication dialog box will look different depending on the web browser and theme used.
The Tenable Appliance interface limits the number of failed login attempts. After several unsuccessful attempts, the IP address will be blocked from further login attempts for a period of ten minutes.

Copyright © 2016. Tenable Network Security, Inc. All rights reserved. Tenable Network Security and Nessus are registered trademarks of Tenable Network Security, Inc.
SecurityCenter, Passive Vulnerability Scanner, and Log Correlation Engine are trademarks of Tenable Network Security, Inc. All other products or services are trademarks
of their respective owners.
13
The QRCode image of Recovery Secret page is displayed when you first log in. While not mandatory, scanning the image or entering the text of the recovery secret to your HOTP program will provide a method to reset your password if lost or forgotten utilizing a onetime password. Once your HTOP software is set up to provide a password, enter the code and click the “Check” button to confirm the correct code is generated. For more information about the HOTP functionality, please review the Appliance Management Interface Users section later in this document.
Configuration/Operation Tabs
Each page of the Tenable Appliance displays the following navigation tabs:
Appliance Administration Backup Networking Applications Logs Support
Copyright © 2016. Tenable Network Security, Inc. All rights reserved. Tenable Network Security and Nessus are registered trademarks of Tenable Network Security, Inc.
SecurityCenter, Passive Vulnerability Scanner, and Log Correlation Engine are trademarks of Tenable Network Security, Inc. All other products or services are trademarks
of their respective owners.
14
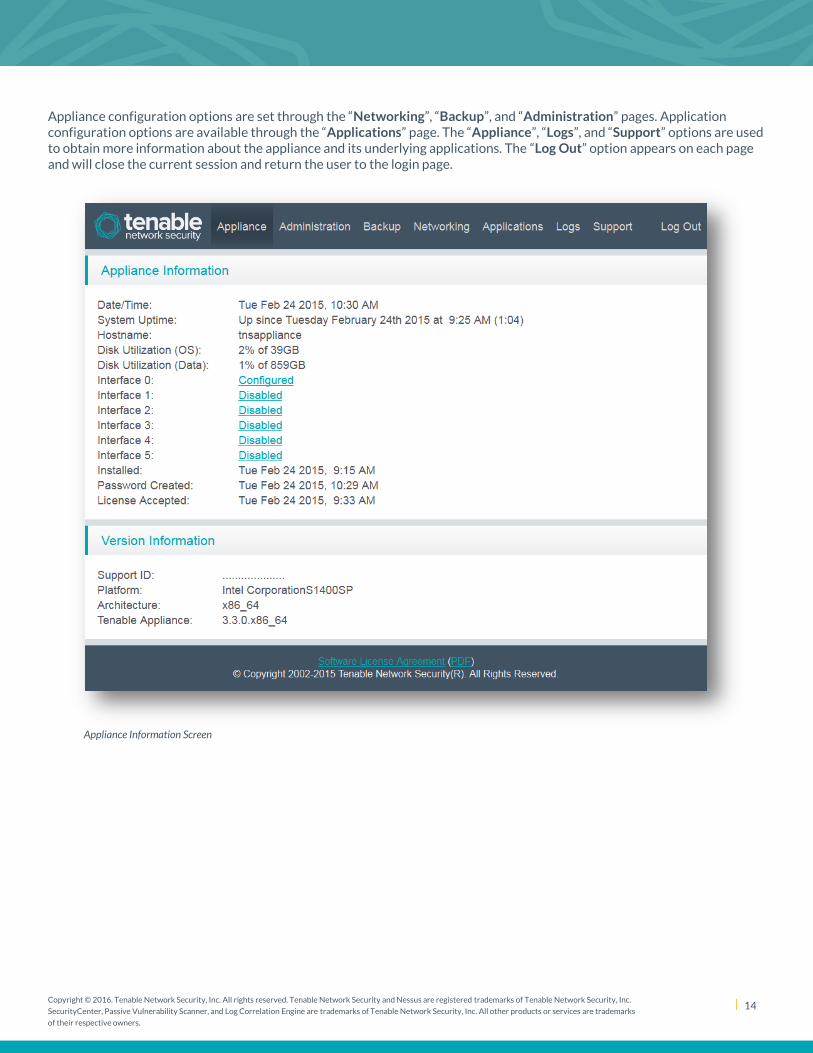
Appliance configuration options are set through the “Networking”, “Backup”, and “Administration” pages. Application configuration options are available through the “Applications” page. The “Appliance”, “Logs”, and “Support” options are used to obtain more information about the appliance and its underlying applications. The “Log Out” option appears on each page and will close the current session and return the user to the login page.
Appliance Information Screen
Copyright © 2016. Tenable Network Security, Inc. All rights reserved. Tenable Network Security and Nessus are registered trademarks of Tenable Network Security, Inc.
SecurityCenter, Passive Vulnerability Scanner, and Log Correlation Engine are trademarks of Tenable Network Security, Inc. All other products or services are trademarks
of their respective owners.
15
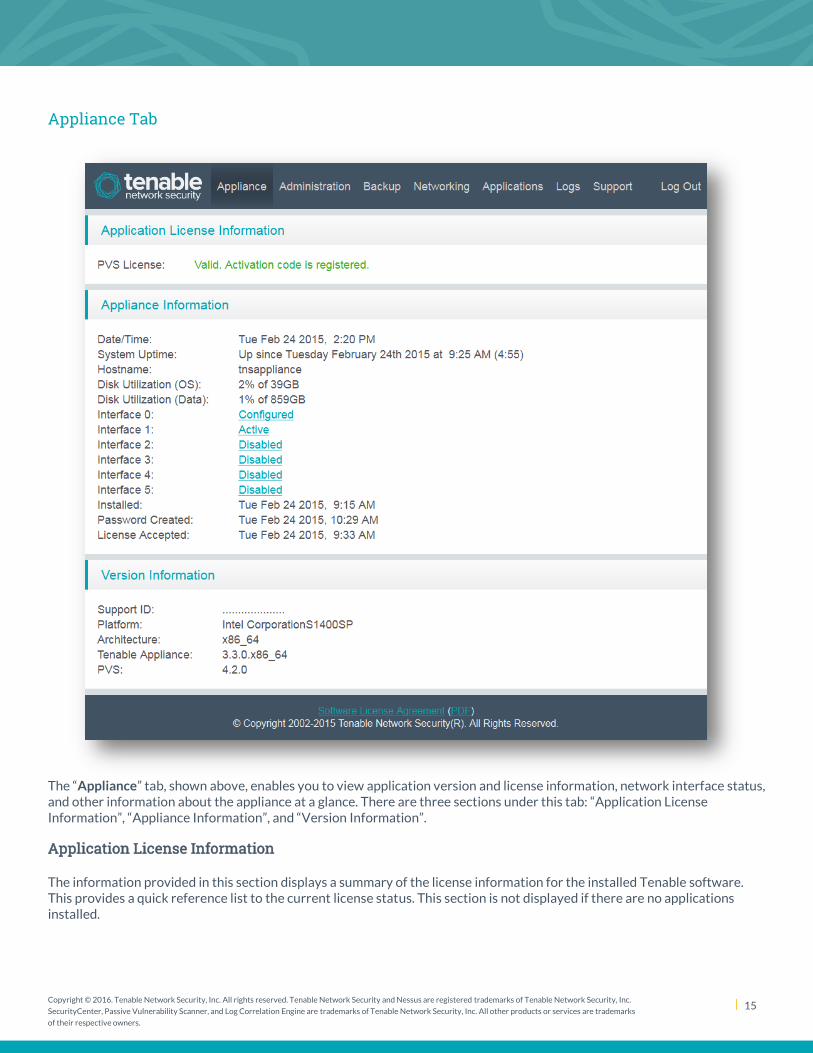
Appliance Tab
The “Appliance” tab, shown above, enables you to view application version and license information, network interface status, and other information about the appliance at a glance. There are three sections under this tab: “Application License Information”, “Appliance Information”, and “Version Information”.
Application License Information
The information provided in this section displays a summary of the license information for the installed Tenable software. This provides a quick reference list to the current license status. This section is not displayed if there are no applications installed.

Copyright © 2016. Tenable Network Security, Inc. All rights reserved. Tenable Network Security and Nessus are registered trademarks of Tenable Network Security, Inc.
SecurityCenter, Passive Vulnerability Scanner, and Log Correlation Engine are trademarks of Tenable Network Security, Inc. All other products or services are trademarks
of their respective owners.
16
Appliance Information
This section contains a variety of information pertinent to your particular appliance configuration including current date/time as seen by the appliance, system uptime, hostname, disk utilization, Ethernet interface links, installation date, admin user password creation date, and the date the license was accepted. The “Interface” text contains clickable links that navigates to the “Networking” tab configuration.
The “Installed” date information is the date the appliance software was installed (or reinstalled), not the date of the local appliance deployment.
Version Information
This section contains the Support ID and the current versions of the base appliance and installed applications. This information is important when contacting Tenable Support.
Administration Tab
The “Administration” tab provides several options to customize the appliance for your environment. An example screen capture is shown below:

Copyright © 2016. Tenable Network Security, Inc. All rights reserved. Tenable Network Security and Nessus are registered trademarks of Tenable Network Security, Inc.
SecurityCenter, Passive Vulnerability Scanner, and Log Correlation Engine are trademarks of Tenable Network Security, Inc. All other products or services are trademarks
of their respective owners.
17
Appliance Administration Page (continued below)

Copyright © 2016. Tenable Network Security, Inc. All rights reserved. Tenable Network Security and Nessus are registered trademarks of Tenable Network Security, Inc.
SecurityCenter, Passive Vulnerability Scanner, and Log Correlation Engine are trademarks of Tenable Network Security, Inc. All other products or services are trademarks
of their respective owners.
18
Appliance Administration Page
Copyright © 2016. Tenable Network Security, Inc. All rights reserved. Tenable Network Security and Nessus are registered trademarks of Tenable Network Security, Inc.
SecurityCenter, Passive Vulnerability Scanner, and Log Correlation Engine are trademarks of Tenable Network Security, Inc. All other products or services are trademarks
of their respective owners.
19
Update Appliance
Prior to updating the system it is strongly recommended that a backup is performed and download to the desktop or other location.
Available updates can be downloaded from the Tenable Support Portal and are located under “Updates” on the Tenable Appliance download page. Save these locally before installing on the appliance.
To apply an update, browse to the location where the update file archive was saved and click on “Apply Update”. If the update was successful, a green banner will be displayed at the top of the screen. If there was an error, a red banner will be displayed indicating what occurred to prevent the update.
Once the success banner is noted, you may also confirm the update by viewing the version information for the appliance. In the line that reads “Tenable Appliance”, the number after the dash (-) indicates the currently installed update. Tenable Appliance updates are cumulative (for example, if update 3 is applied it will include changes from update 1 and 2).
Ensure that the update for each product has completed by monitoring the logs before performing a reboot. Restarting the system prior to the update completing may lead to data loss.
If you have been provided a support script by Tenable Support you can upload that file through this interface.
Update Availability Detection
The Tenable Appliance has the ability to check for the availability of updates for the appliance. When an update has been detected, a banner will appear at the top of the appliance GUI until it is installed.
The check may be run automatically on a regular schedule or only when a user actively checks using the “Check for Updates” button. By default it is set to check automatically once per day. Using the drop-down, the automatic check option may be set to “on a regular schedule” or “never”. Clicking the “Configure Automatic Update Detection” button will apply changes.
This feature requires an active connection to the Internet. An HTTP proxy may be configured, if needed. This proxy setting only applies to the Update Availability Detection option.
Restart/Shutdown Appliance
This section allows the shutdown or restart of the appliance from the web interface rather than the console. In addition to “Shutdown Appliance” and “Restart Appliance”, “Restart Appliance Services” may be chosen to restart only the appliance web server, NTP service, and Tenable applications being hosted on the appliance.
After the appliance is restarted, you must reload the management interface in your web browser. Use the “reload” or “refresh” function in your browser after the device has rebooted.
Appliance Management Interface Users
New and existing appliance users are managed through the “Appliance Management Interface Users” section. First, select the user to modify by selecting the drop-down box next to “Set Password for”. If the user is a new user, make sure “New User” is selected. Next, fill out the relevant details for the username and password fields, if applicable. Finally, choose the button pertinent to the operation being performed. Available buttons include “Add User”, “Set Password”, and “Delete

Copyright © 2016. Tenable Network Security, Inc. All rights reserved. Tenable Network Security and Nessus are registered trademarks of Tenable Network Security, Inc.
SecurityCenter, Passive Vulnerability Scanner, and Log Correlation Engine are trademarks of Tenable Network Security, Inc. All other products or services are trademarks
of their respective owners.
20
User”. After successful completion, a green box is displayed at the top of the screen describing the status and details of the operation.
When the “Restrict Console Operations” option is enabled, an additional drop-down option “Console Only User” is displayed. When set to “Yes” the new user or edited user can only control protected console options. The user is not able to log into the web management interface of the appliance. When set to “No” the indicated user can control the protected console options and log into the web management interface of the appliance.
Selecting the recovery code link displays a page that enables use of HMAC-Based One Time Password (HOTP) authentication (as implemented in Google’s Authenticator, Duo Mobile, Authomator, Authenticator, Virtual TokenFactor, and other tools) to change the appliance login password when it has been forgotten and the user is unable to log in.
The first step to set this up for a user is to have a HOTP supported application on a device. Once installed, select the “recovery code” link in the Tenable Appliance interface to display the information required to set up the appliance’s HOTP information on the device. Only the recovery page for the logged-in user can be displayed. The page displays two different methods for entering the information.

Copyright © 2016. Tenable Network Security, Inc. All rights reserved. Tenable Network Security and Nessus are registered trademarks of Tenable Network Security, Inc.
SecurityCenter, Passive Vulnerability Scanner, and Log Correlation Engine are trademarks of Tenable Network Security, Inc. All other products or services are trademarks
of their respective owners.
21
The first method on the page is the QRCode Image of Recovery Secret, which displays a QRCode image. Scan the QRCode image with your application to import the relevant information to your HOTP application. Your application will display the information about the new credentials using its standard method.
The second method is to manually enter the information supplied in the “Text Entry of Recovery Secret” section. Depending on the application used, you will need to enter one or more pieces of the supplied information. Select “Counter” or “Key” based if/when asked during the manual account setup. The “Counter” field displayed indicates the number of times the user has reset the recovery secret.
A new recovery secret can be created for the user if the HOTP device should become compromised. As the compromised user, select your own username from the drop-down and enter your password in both the password and confirm password fields. Then click the “Setup Recovery Secret” button to generate a new recovery code. A green banner will be displayed with text indicating the change succeeded or a red banner with text indicating a failure if there was incorrect information entered or selected.
To confirm the HTOP application is configured correctly, generate a code from your software and enter it in the “Enter a code from your software” field and click the “Check” button. Entering the correct value will display the correct token and a message that it was validated successfully. Entering an incorrect value will note the entered token used was not correct and the page must be reloaded to try again. Entering an invalid code turn the field red and will accept another code to try again.
If the password is lost and must be changed, navigate to https://<IP address or hostname>:8000/password. On this page, enter your username, the new password to associate with your account, and three of the codes in sequential order as provided by your HOTP application.
Whenever the password is changed, a new recovery code is generated. The HOTP program must be updated as the previous HOTP code becomes invalid when a new password is set.
All Appliance Management Interface Users have equal and complete access to the appliance.
Configure Website SSL Certificate
Copyright © 2016. Tenable Network Security, Inc. All rights reserved. Tenable Network Security and Nessus are registered trademarks of Tenable Network Security, Inc.
SecurityCenter, Passive Vulnerability Scanner, and Log Correlation Engine are trademarks of Tenable Network Security, Inc. All other products or services are trademarks
of their respective owners.
22
The appliance is shipped with a self-signed SSL certificate. To replace this with a certificate from a trusted Certificate Authority, select the “Choose File” button, browse for the certificate, and click on the “Install Server Certificates” button. The Server Certificate and Server Key files must be uploaded. In some environments, an Intermediate and/or Custom Root CA Certificate must be provided.
The private key must NOT be password protected.
After installing the certificate(s), you may test that everything worked correctly by reloading the management interface in your browser. If needed, the “Remove Server Certificates” button will let you remove the current certificate and create a new self-signed SSL certificate.
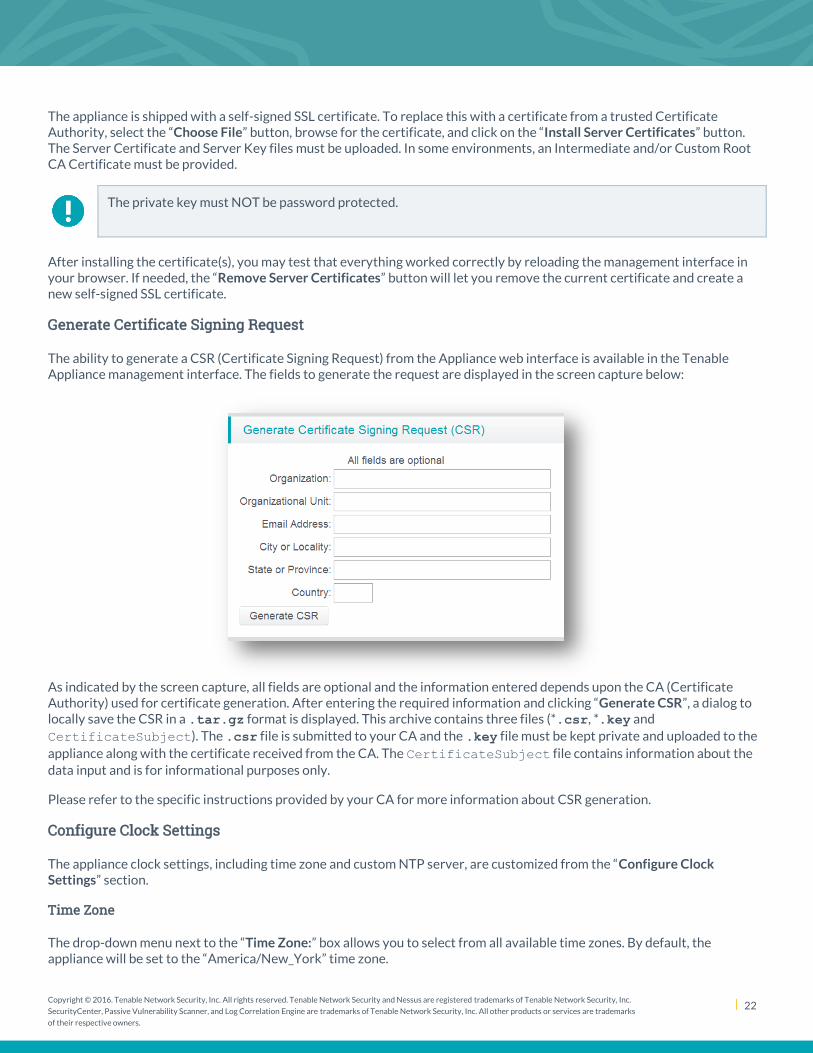
Generate Certificate Signing Request
The ability to generate a CSR (Certificate Signing Request) from the Appliance web interface is available in the Tenable Appliance management interface. The fields to generate the request are displayed in the screen capture below:
As indicated by the screen capture, all fields are optional and the information entered depends upon the CA (Certificate Authority) used for certificate generation. After entering the required information and clicking “Generate CSR”, a dialog to locally save the CSR in a .tar.gz format is displayed. This archive contains three files (*.csr, *.key and
CertificateSubject). The .csr file is submitted to your CA and the .key file must be kept private and uploaded to the
appliance along with the certificate received from the CA. The CertificateSubject file contains information about the
data input and is for informational purposes only.
Please refer to the specific instructions provided by your CA for more information about CSR generation.
Configure Clock Settings
The appliance clock settings, including time zone and custom NTP server, are customized from the “Configure Clock Settings” section.
Time Zone
The drop-down menu next to the “Time Zone:” box allows you to select from all available time zones. By default, the appliance will be set to the “America/New_York” time zone.
Copyright © 2016. Tenable Network Security, Inc. All rights reserved. Tenable Network Security and Nessus are registered trademarks of Tenable Network Security, Inc.
SecurityCenter, Passive Vulnerability Scanner, and Log Correlation Engine are trademarks of Tenable Network Security, Inc. All other products or services are trademarks
of their respective owners.
23
NTP Local Reference Clock
When set to “On”, the NTP service will utilize the local clock as a time reference when external time sources are unavailable. Due to the nature of VM environments, when the appliance is run as a VM, it is recommended to turn this option off. When running and enabled on the hardware version of the appliance, this option can be useful to maintain accurate time.
Ignore NTP Requests
Enabling this option prevents the NTP service from responding to time requests made from other devices on the network. It is recommended to enable this option in most hardware environments, and particularly when run as a VM guest.
Custom NTP Servers
The Tenable Appliance is configured with a built-in NTP client that, by default, synchronizes with public NTP servers from NTP.org. In most environments this will be modified to use an NTP server on the local network to ensure time is accurate with the appliance’s peers. To modify the NTP servers, enter the IP address or FQDN in the field provided. Standard ntp.conf server configuration lines may be used for server entries. Once the appropriate settings for the environment
have been selected, click on “Submit Clock Settings” for the changes to take effect and initiate the first synchronization with the updated settings.
In addition to the “Submit Clock Settings” command button, a “Synchronize Time” command button is provided to allow the user to manually synchronize the appliance time if required. Using this option is not required (or recommended) under normal circumstances.
Configure SNMP Agent Strings
When monitoring the appliance via SNMP, there are three settings to be configured: “SNMP Community”, “System Contact”, and “System Location”. Once set to the desired configuration, select the “Submit SNMP Settings” button to apply the new settings. If the SNMP agent is enabled, the service will restart and enable them. Selecting the “Enable SNMP Agent” or “Disable SNMP Agent” will perform the appropriate action for the agent.
Logout Redirection URL
When logging out of the Tenable Appliance management interface, by default the redirection page is the login page for the appliance management interface. Modifying this setting to a selected web page will redirect the logout page to the specified page. If the page is not located on the appliance, a full URL is required (e.g., http://www.tenable.com).
Restrict Console Operations
By default, anyone with console access to the appliance may perform any actions available from the console menu. Setting this option to “Yes” will require a username and password as set in the Appliance Management Interface Users section to perform actions that reassign the IP address, reinstall the appliance (hardware only option), shutdown, or restart the appliance. When enabled, an additional option to make a user a “Console Only User” will appear in the Appliance Management Interface Users section when managing or creating users.
Reinstall Appliance (Hardware Appliance Only)
Hardware appliance users have the option to reinstall the software system to various update levels or even factory defaults (also available from the appliance console). From this section, choose the drop-down selection based on the desired reinstall level. Only available reversion points will be enabled, in bold black lettering, for selection. Greyed lettering indicates that the previous reversion point is unavailable.

Copyright © 2016. Tenable Network Security, Inc. All rights reserved. Tenable Network Security and Nessus are registered trademarks of Tenable Network Security, Inc.
SecurityCenter, Passive Vulnerability Scanner, and Log Correlation Engine are trademarks of Tenable Network Security, Inc. All other products or services are trademarks
of their respective owners.
24
Choosing “Factory Defaults” will revert everything back to the appliance default as it was shipped. Backups, applied updates, etc. are all removed. Choosing “Base Version” just installs the OS as it was when it was first shipped (versions of software and update level, etc.), but backups and updates remain available.
System Log Forwarding
This option allows the user to add configuration lines to the syslog configuration on the appliance. Only forwarding entries
are allowed. An example syslog configuration line would be:
*.err @192.168.0.12
The setting above sends syslog messages with a priority of “error” (or higher) to a system with the IPv4 address of
192.168.0.12 (change this IP address to that of your syslog server). After entering the desired value, click on “Configure
System Log” to write the entries to the syslog configuration and begin using the new setting(s).
Copyright © 2016. Tenable Network Security, Inc. All rights reserved. Tenable Network Security and Nessus are registered trademarks of Tenable Network Security, Inc.
SecurityCenter, Passive Vulnerability Scanner, and Log Correlation Engine are trademarks of Tenable Network Security, Inc. All other products or services are trademarks
of their respective owners.
25
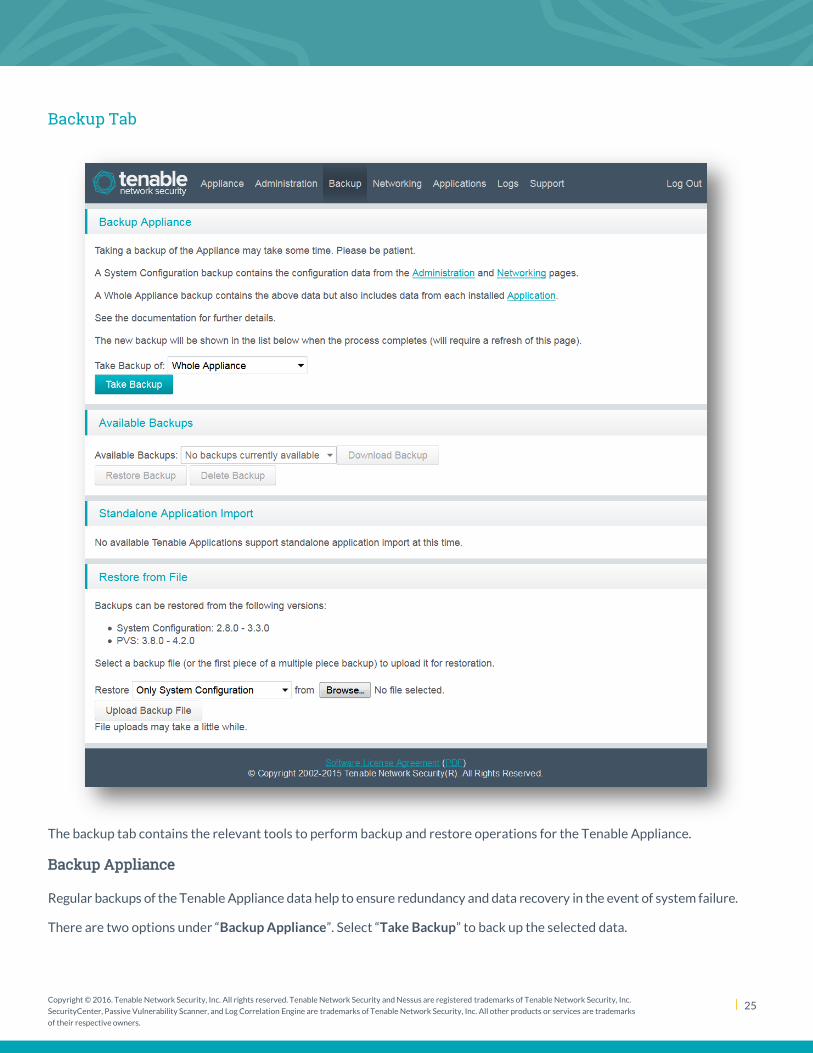
Backup Tab
The backup tab contains the relevant tools to perform backup and restore operations for the Tenable Appliance.
Backup Appliance
Regular backups of the Tenable Appliance data help to ensure redundancy and data recovery in the event of system failure.
There are two options under “Backup Appliance”. Select “Take Backup” to back up the selected data.

Copyright © 2016. Tenable Network Security, Inc. All rights reserved. Tenable Network Security and Nessus are registered trademarks of Tenable Network Security, Inc.
SecurityCenter, Passive Vulnerability Scanner, and Log Correlation Engine are trademarks of Tenable Network Security, Inc. All other products or services are trademarks
of their respective owners.
26
The backup process occurs in the background after a confirmation window opens with a warning that running services will be stopped before the backup begins. After several minutes, refresh the browser window to see the newly generated backup.
To back up the entire appliance configuration, including Tenable application specific data, choose “Whole Appliance” from the drop-down. The other option is to back up the “System Configuration”. In addition, it is strongly recommended that you select “Download Backup” to save the .tar archive to a secondary storage device for data recovery. The drop-down next to
“Download Backup” contains a list of all backups that are available on the appliance and their size.
Choose “Restore Backup” to restore a backup file from the locally available backup files. If the backup file is large, it may be split into smaller “chunks” to be uploaded in parts. The backup file may be split with any standard tool to perform such a process. When initially choosing the backup file to upload, select the first part of the split backup files. After that upload is complete, the confirmation window will prompt for the next part of the backup file to be uploaded or to begin restoring the backup if all of the file parts are uploaded.
Choose “Delete Backup” to remove previously saved backups.
Standalone Application Import
The Tenable Appliance supports backups of some standalone products that may be imported to the appliance. If an application is available for importing, a link to a migration script and directions will be displayed.
Copyright © 2016. Tenable Network Security, Inc. All rights reserved. Tenable Network Security and Nessus are registered trademarks of Tenable Network Security, Inc.
SecurityCenter, Passive Vulnerability Scanner, and Log Correlation Engine are trademarks of Tenable Network Security, Inc. All other products or services are trademarks
of their respective owners.
27
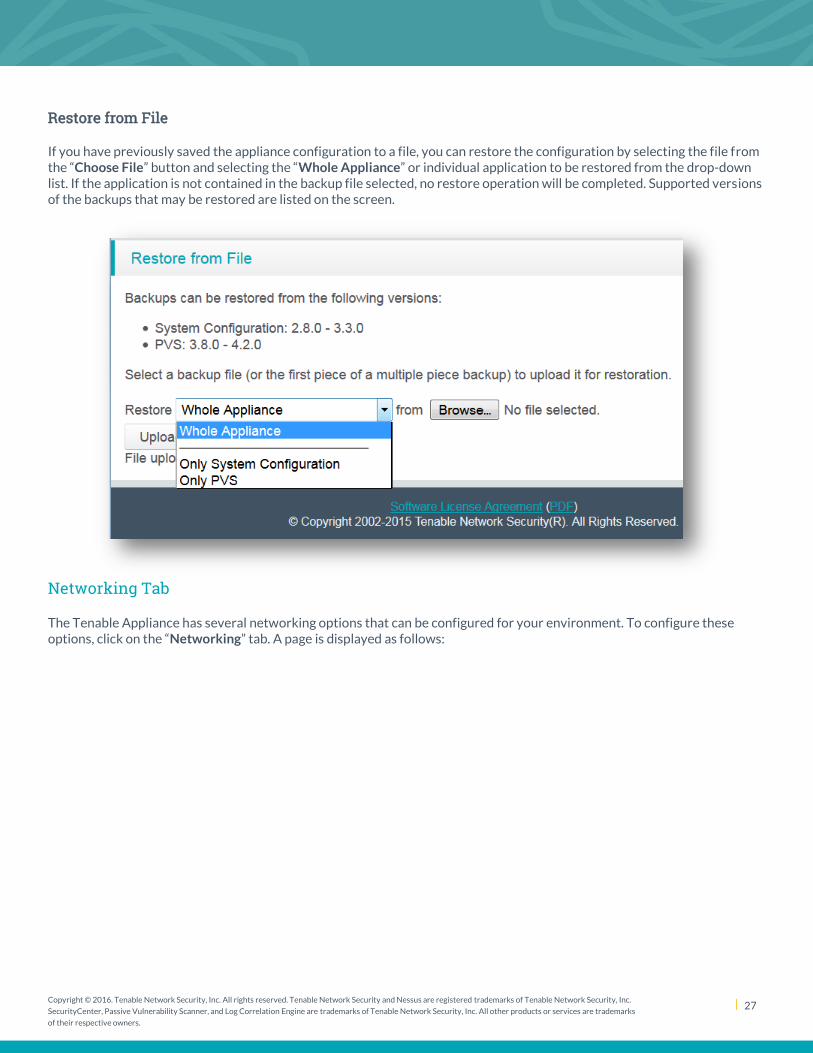
Restore from File
If you have previously saved the appliance configuration to a file, you can restore the configuration by selecting the file from the “Choose File” button and selecting the “Whole Appliance” or individual application to be restored from the drop-down list. If the application is not contained in the backup file selected, no restore operation will be completed. Supported versions of the backups that may be restored are listed on the screen.
Networking Tab
The Tenable Appliance has several networking options that can be configured for your environment. To configure these options, click on the “Networking” tab. A page is displayed as follows:

Copyright © 2016. Tenable Network Security, Inc. All rights reserved. Tenable Network Security and Nessus are registered trademarks of Tenable Network Security, Inc.
SecurityCenter, Passive Vulnerability Scanner, and Log Correlation Engine are trademarks of Tenable Network Security, Inc. All other products or services are trademarks
of their respective owners.
28

Copyright © 2016. Tenable Network Security, Inc. All rights reserved. Tenable Network Security and Nessus are registered trademarks of Tenable Network Security, Inc.
SecurityCenter, Passive Vulnerability Scanner, and Log Correlation Engine are trademarks of Tenable Network Security, Inc. All other products or services are trademarks
of their respective owners.
29
Configure Networking
The following networking options are available:
Hostname – the hostname given to the Tenable VM/appliance
Webserver Listening Port – Change the port that the appliance management web server listens on for incoming connections
Domain Name Server(s) – the IP address(es) of the server(s) that handle DNS queries, one per line
Default Gateway (optional) – the IPv4 and/or IPv6 address of the gateway system to send all packets that are not in the local network
Search Domain (optional) – the domain name that is attached to unqualified DNS queries
Interfaces – Configure and view settings for each of the available network interfaces
If changes are required, enter the appropriate information in the fields provided and click on the appropriate button to apply the changes.
Configure Hostname
To change the hostname from the default (“tnsappliance”), enter the new hostname (less than 64 characters) in the box
next to “New hostname” and click on the “Set Hostname” button. Immediately after clicking “Set Hostname”, a note appears indicating that the appliance needs to be restarted for the change to take full effect. The user is presented with a screen similar to the screen capture below.
Network Restart Warning
Note that changing the hostname will cause the appliance to issue a new self-generated SSL certificate.
This reboot ensures that operating system specific changes related to the hostname change fully take effect. Perform this reboot either through the web “Administration” page or via the console “Restart Appliance” option.

Copyright © 2016. Tenable Network Security, Inc. All rights reserved. Tenable Network Security and Nessus are registered trademarks of Tenable Network Security, Inc.
SecurityCenter, Passive Vulnerability Scanner, and Log Correlation Engine are trademarks of Tenable Network Security, Inc. All other products or services are trademarks
of their respective owners.
30
Interfaces
Network interfaces can be configured from the “Networking” page.
Network Interface Configuration
The Tenable Hardware Appliance ships with a static IPv4 address. This can be changed to a DHCP address by selecting “Version 4” from the “Use DHCP” drop-down menu.

Copyright © 2016. Tenable Network Security, Inc. All rights reserved. Tenable Network Security and Nessus are registered trademarks of Tenable Network Security, Inc.
SecurityCenter, Passive Vulnerability Scanner, and Log Correlation Engine are trademarks of Tenable Network Security, Inc. All other products or services are trademarks
of their respective owners.
31
If the IP address is changed on the listening web interface, you will need to adjust the IP address in the URL of your browser to connect to the appliance again.
In the configuration area for each interface, the first line displays the MAC address of the NIC. Below the interface’s “MAC Address” box is a section called “Interface In Use By”, which indicates what appliance services are utilizing the interface.
The “Negotiated Speed” option displays the speed at which the interface is currently communicating on the network. If the interface is not connected to the network, this field will be called “Supported Speeds” and will display the speed with which the interface can connect to the network.
The “Status” drop-down determines if the interface is disabled, configured only for IPv4, or configured for both IPv4 and IPv6. The “Use DHCP” drop-down offers options to disable the interface from using DHCP, only use DHCP to configure IPv4 or IPv6, or use DHCP to configure the interface for both IPv4 and IPv6. The “Use Nameservers from DHCP” drop-down offers options for no, for IPv4 or IPv6, and both IPv4 and IPv6. When set to an option other than “no”, locally configured Domain Name Servers are not used.
The IPv6 protocol offers an autoconfiguration option as a part of the protocol. This is different than DHCP. The “Accept IPv6 Autoconfiguration” option offers the ability to enable or disable this feature on the interface.
For interfaces other than the one being used to access the management interface, the “Web Interface Accessible” option can be configured as desired by adjusting the “Yes/No” toggle. The toggle option is disabled on the interface that is used to manage the appliance.
“Current IP Addresses” lists the current IPv4 and IPv6 addresses configured for the interface. “Configured IP Addresses” is a text entry field to configure static IPv4 and/or IPv6 addresses. Addresses may be entered as the IP Address/Prefix, IP Address/CIDR, or IP Address/Netmask.
If static routes are required to facilitate networking needs, enter in one or more static routes in the “Static Routes” box. When entered, the static route is applied to the interface on which it is entered.
Input as: <HOST/NETWORK> (via <GATEWAY>) (dev eth#) (metric #) For example: 10.200.200.0 via 10.100.201.1
For example: 2001:db8::/32 via 2001:db8::1
When using multiple network interfaces, there is not a provided method to configure IP forwarding or bridging between interfaces. The appliance and its applications will use the best interface for network communications based on the system's routing table configuration.
When finished configuring additional interfaces, click on the “Configure Interfaces” button to save and restart networking services with the new configuration. Click “Restart Interfaces” to restart networking with the current configuration.

Copyright © 2016. Tenable Network Security, Inc. All rights reserved. Tenable Network Security and Nessus are registered trademarks of Tenable Network Security, Inc.
SecurityCenter, Passive Vulnerability Scanner, and Log Correlation Engine are trademarks of Tenable Network Security, Inc. All other products or services are trademarks
of their respective owners.
32
Logs Tab
Clicking on the “Logs” tab will display a selection of available logs based on the installed software as shown in the following screen capture:
Log View Screen
Available logs are displayed as grouped together under a heading for the Tenable Appliance itself or the application they belong to.
To display a log, highlight the desired log in the “View Logs” section and select the number of “Lines to view” from the drop-down menu then click on the “View Log File Snippet” button. Selecting a log file from the available list and clicking the “Download Log File” button will download the complete log file, regardless of the number of lines selected.

Copyright © 2016. Tenable Network Security, Inc. All rights reserved. Tenable Network Security and Nessus are registered trademarks of Tenable Network Security, Inc.
SecurityCenter, Passive Vulnerability Scanner, and Log Correlation Engine are trademarks of Tenable Network Security, Inc. All other products or services are trademarks
of their respective owners.
33
Log View Output
You also have the option to download a monthly log archive by selecting the month you wish to download from the drop-down menu and clicking on the “Download Log Archive” button.
The log display may be cached by your browser. Click on your browser’s refresh button to ensure you are viewing the current log.
Support Tab
If you have an issue that you are working with Tenable Support on, you may be asked to generate a support report to aid in troubleshooting the problem. If this is requested, click on the “Support” tab and then the “Generate Support Report” button and optionally select “Sanitize the generated support report” to remove IP addresses from the logs in the Tenable applications which support the feature, as shown in the following screen capture:

Copyright © 2016. Tenable Network Security, Inc. All rights reserved. Tenable Network Security and Nessus are registered trademarks of Tenable Network Security, Inc.
SecurityCenter, Passive Vulnerability Scanner, and Log Correlation Engine are trademarks of Tenable Network Security, Inc. All other products or services are trademarks
of their respective owners.
34
Appliance Support Report Screen
Once the report is generated, it will be accessible on the “Available Support Reports” drop-down. Select the report to download, click “Download Report”, and then send the full report (the entire .tar.gz file) to [email protected].
When the support archive is no longer needed it may safely be deleted. Select the report to delete from the drop-down and click the “Delete Report” button. While multiple support archives may be created each day, a daily cron job runs to delete all but the 10 most recent support reports each day.
The “Generate Packet Capture” option gives the user the ability to create a packet capture of one or all of the available interfaces from a drop-down selection. The capture time is for a period ranging from 1 to 15 minutes, incremented by minutes, and utilizes the tcpdump utility. Providing a filter string for tcpdump gives the ability to filter the results of the report provided by tcpdump. This utility is useful for troubleshooting network connectivity issues.
The “Available Packet Captures” section provides a drop-down list of the completed packet capture (pcap) files. Selecting a capture file from the list and selecting the download button will download the pcap file uncompressed or compressed as a gzipped file if the “Compress Capture” feature was used. Selecting a capture file and selecting the “View Capture Snippet”
Copyright © 2016. Tenable Network Security, Inc. All rights reserved. Tenable Network Security and Nessus are registered trademarks of Tenable Network Security, Inc.
SecurityCenter, Passive Vulnerability Scanner, and Log Correlation Engine are trademarks of Tenable Network Security, Inc. All other products or services are trademarks
of their respective owners.
35
option will display the selected number of lines of the capture file without downloading the entire file. Clicking the “Delete Capture” button” will permanently delete the selected capture file.
Information about tcpdump and its filter options is available at http://www.tcpdump.org.
Applications Tab
The Tenable applications that are available for installation on the appliance are accessed and configured through the “Applications” tab. The available applications require an appropriate license to be activated once enabled. Each available application page initially contains an “enable it” button, license agreement for the application, a link to the Tenable website’s product page, and a description of the product.
Enabling Applications
To use any of the available applications they must first be enabled. This is accomplished by navigating to the desired application’s page under the “Applications” page and clicking the “enable it” button on the page. Enabling an application indicates an acceptance of the corresponding license agreement.
For peak performance, Tenable strongly recommends that only one Tenable application (other than LCE client(s)) be installed on each appliance.
LCE Clients
Three LCE clients have been added in the Tenable Appliance: the LCE tail client, Tenable Network Monitor, and Tenable Netflow Monitor.

Copyright © 2016. Tenable Network Security, Inc. All rights reserved. Tenable Network Security and Nessus are registered trademarks of Tenable Network Security, Inc.
SecurityCenter, Passive Vulnerability Scanner, and Log Correlation Engine are trademarks of Tenable Network Security, Inc. All other products or services are trademarks
of their respective owners.
36
Enabling the clients is completed by entering the IP address or Hostname of the LCE server and the correct port to send the data to. The LCE default listening port of 31300 is entered initially and may be changed as needed. Once enabled, the only configuration option for the local client is to change the IP address or Hostname and port of the LCE listening server.
As shown in the LCE Client example above, once a client is enabled other options are displayed. These options are the same except for the names for each of the available LCE clients. A “Disable LCE Client” button is available to disable the client from sending further data until the client is re-enabled. The client status is displayed along with the version of the client installed. The client may be started, restarted, or stopped using the appropriate button.
The policy file to configure the LCE Client on the appliance contains a white list of directories that may be monitored. The policy may be edited to monitor only a subset of the allowed directories or eliminate specific files or directories from being monitored. However, adding additional files and directories not listed will not be honored by the policy.
Copyright © 2016. Tenable Network Security, Inc. All rights reserved. Tenable Network Security and Nessus are registered trademarks of Tenable Network Security, Inc.
SecurityCenter, Passive Vulnerability Scanner, and Log Correlation Engine are trademarks of Tenable Network Security, Inc. All other products or services are trademarks
of their respective owners.
37
The PVS Application
Tenable’s Passive Vulnerability Scanner (patent 7,761,918 B2) is a network discovery and vulnerability analysis software solution, delivering real-time network profiling and monitoring for continuous assessment of an organization’s security posture in a non-intrusive manner. The Passive Vulnerability Scanner (PVS) monitors network traffic at the packet layer to determine topology, services, and vulnerabilities. Where an active scanner takes a snapshot of the network in time, the PVS behaves like a security motion detector on the network.
The Tenable Appliance 300 adds two 10G Ethernet ports, NIC 5 and NIC 6. By default, NIC 5 is used as the default management port and NIC 6 is used by PVS to monitor network traffic at up to 10G speeds when attached to a correctly configured network TAP point.
The PVS application must be activated and configured to make the system manageable via a web browser or used by SecurityCenter.
Until a valid Activation Code is entered, the message “PVS is not activated” will be displayed in red on the appliance page.
The screen below displays options available to enable and configure the PVS application with SecurityCenter:

Copyright © 2016. Tenable Network Security, Inc. All rights reserved. Tenable Network Security and Nessus are registered trademarks of Tenable Network Security, Inc.
SecurityCenter, Passive Vulnerability Scanner, and Log Correlation Engine are trademarks of Tenable Network Security, Inc. All other products or services are trademarks
of their respective owners.
38

Copyright © 2016. Tenable Network Security, Inc. All rights reserved. Tenable Network Security and Nessus are registered trademarks of Tenable Network Security, Inc.
SecurityCenter, Passive Vulnerability Scanner, and Log Correlation Engine are trademarks of Tenable Network Security, Inc. All other products or services are trademarks
of their respective owners.
39
Manage PVS
The “Manage PVS” section of this page displays information about the current state of the PVS including the license state, running state, and version. There is a link to the PVS Web UI that may be selected to perform setup, configuration, and view scan results of the PVS application. In addition, three buttons are available to perform the following actions:
Start PVS Restart PVS Stop PVS
Please refer to the Nessus Installation and Configuration Guide available on the Tenable Support Portal for specifics on initial configuration of the PVS application, including instructions on how to obtain and apply the appropriate PVS license.
PVS Monitoring Configuration
If the PVS application is not configured to monitor any interface the option to set the monitoring configuration is displayed on the page. The option lists the available interfaces along with their status, which is a link to its configuration page and a drop-down with the options of “Unmonitored” or “Monitored”. When at least one interface is selected to be monitored and the “Configure Monitored Network Interfaces” button is clicked, PVS will be configured to monitor the selected interface(s) and the section will no longer be displayed.
Further adjustments to the monitored interfaces may be made within the PVS application.
This option is only displayed if PVS is configured and there is not an interface set to monitor traffic.
Certificate Management
In this section, custom certificates for PVS can be installed or removed. These certificates are used to access the PVS Web interface with a proper CA certificate. The top section contains a browse dialog for the Server Certificate and Server Key File and optionally the Intermediate and Custom Root CA Certificates that are used for PVS web user interface browser access, while the bottom section (CA Certificate) is used for client to PVS server certificate-based communications.

Copyright © 2016. Tenable Network Security, Inc. All rights reserved. Tenable Network Security and Nessus are registered trademarks of Tenable Network Security, Inc.
SecurityCenter, Passive Vulnerability Scanner, and Log Correlation Engine are trademarks of Tenable Network Security, Inc. All other products or services are trademarks
of their respective owners.
40
Certificate Management Interface
Webserver Authentication
The Web Server Authentication section controls the configuration of the SSL Client Certificate authentication permissions. The two options are a password or an SSL Client Certificate. This setting will control the option available for users to log into the PVS server via password authentication or SSL client certificate.
The “an SSL Client Certificate” option configures the PVS web server to only accept connections from web browsers
that present a valid SSL client certificate. Other connection attempts will be rejected by the web server with the exact message displayed dependent on the web browser in use.
The “a password” option configures the PVS web server to ignore any SSL client certificates but allow the web browser connection. This is the default setting and works with most web browsers without issue.
Using PVS
Documentation for using the PVS application installed on the Tenable Appliance is available at https://support.tenable.com/.

Copyright © 2016. Tenable Network Security, Inc. All rights reserved. Tenable Network Security and Nessus are registered trademarks of Tenable Network Security, Inc.
SecurityCenter, Passive Vulnerability Scanner, and Log Correlation Engine are trademarks of Tenable Network Security, Inc. All other products or services are trademarks
of their respective owners.
41
Troubleshooting
Q. I forgot the IP address of the appliance. How do I retrieve it?
A. If you forget the IP address of the appliance, access the appliance console and move the arrow keys to highlight “Appliance Information” and press “Enter”.
Q. I lost my password to the admin account. How do I reset it?
A. To set up password recovery, follow the steps in the Appliance Management Interface Users section of this document.
If the password recovery steps have not been performed, another admin account may reset the password for the affected user.
If the first two options are not available to be used, the following steps must be performed, and all data will be lost.
For the VM appliance, you must reload the image from a saved VM copy or from the original on the Tenable Support Portal. If you reload the original image from the Tenable Support Portal, you may apply your saved configuration.
For the hardware appliance, use the appliance console “Revert to Factory Defaults” option to restore the appliance to the default configuration. Immediately after reverting, login to the appliance web interface to set the initial administrative password.
Note that reverting to factory defaults or going back to an original VM image will cause you to lose any data that has not been captured and restored from a previous backup. See the section titled “Backup Appliance” for more information.

Copyright © 2016. Tenable Network Security, Inc. All rights reserved. Tenable Network Security and Nessus are registered trademarks of Tenable Network Security, Inc.
SecurityCenter, Passive Vulnerability Scanner, and Log Correlation Engine are trademarks of Tenable Network Security, Inc. All other products or services are trademarks
of their respective owners.
42
Q. I have modified one of the application configuration items but the change doesn’t seem to have taken effect.
A. Many of the configuration changes that are made via the Appliance web interface will not take effect until the corresponding service is restarted. This applies to most application-specific configuration items and is good practice when making configuration changes on the Tenable Appliance.
Q. I cannot log into the web interface for the Tenable Appliance. Is it possible to see error messages on the console?
A. While a history of messages is not available, you can see the current messages being written to the system log. If you go to the console of your appliance and type Alt-F3 (hold down “Alt” while pressing the “F3” key), you will see the current messages which may help narrow down issues with the appliance. Typing Alt-F1 (hold down “Alt” while pressing the “F1” key) will return you to the main appliance console screen.
About Tenable Network Security
Tenable Network Security provides continuous network monitoring to identify vulnerabilities, reduce risk, and ensure compliance. Our family of products includes SecurityCenter Continuous View™, which provides the most comprehensive and integrated view of network health, and Nessus®, the global standard in detecting and assessing network data. Tenable is relied upon by many of the world’s largest corporations, not-for-profit organizations and public sector agencies, including the entire U.S. Department of Defense. For more information, visit tenable.com.

Copyright © 2016. Tenable Network Security, Inc. All rights reserved. Tenable Network Security and Nessus are registered trademarks of Tenable Network Security, Inc.
SecurityCenter, Passive Vulnerability Scanner, and Log Correlation Engine are trademarks of Tenable Network Security, Inc. All other products or services are trademarks
of their respective owners.
43
Acknowledgements
This product uses the scripting language written by Lua.org (http://www.lua.org/). Copyright © 1994-2011 Lua.org, PUC-Rio.
Permission is hereby granted, free of charge, to any person obtaining a copy of this software and associated documentation files (the "Software"), to deal in the Software without restriction, including without limitation the rights to use, copy, modify, merge, publish, distribute, sublicense, and/or sell copies of the Software, and to permit persons to whom the Software is furnished to do so, subject to the following conditions:
The above copyright notice and this permission notice shall be included in all copies or substantial portions of the Software.
THE SOFTWARE IS PROVIDED "AS IS", WITHOUT WARRANTY OF ANY KIND, EXPRESS OR IMPLIED, INCLUDING BUT NOT LIMITED TO THE WARRANTIES OF MERCHANTABILITY, FITNESS FOR A PARTICULAR PURPOSE AND NONINFRINGEMENT. IN NO EVENT SHALL THE AUTHORS OR COPYRIGHT HOLDERS BE LIABLE FOR ANY CLAIM, DAMAGES OR OTHER LIABILITY, WHETHER IN AN ACTION OF CONTRACT, TORT OR OTHERWISE, ARISING FROM, OUT OF OR IN CONNECTION WITH THE SOFTWARE OR THE USE OR OTHER DEALINGS IN THE SOFTWARE.
This product uses the lighttpd web server written by Jan Kneschke. Copyright (c) 2004, Jan Kneschke, incremental. All rights reserved.
Redistribution and use in source and binary forms, with or without modification, are permitted provided that the following conditions are met:
- Redistributions of source code must retain the above copyright notice, this list of conditions and the following disclaimer. - Redistributions in binary form must reproduce the above copyright notice, this list of conditions and the following disclaimer in the documentation and/or other materials provided with the distribution. - Neither the name of the 'incremental' nor the names of its contributors may be used to endorse or promote products derived from this software without specific prior written permission.
THIS SOFTWARE IS PROVIDED BY THE COPYRIGHT HOLDERS AND CONTRIBUTORS "AS IS" AND ANY EXPRESS OR IMPLIED WARRANTIES, INCLUDING, BUT NOT LIMITED TO, THE IMPLIED WARRANTIES OF MERCHANTABILITY AND FITNESS FOR A PARTICULAR PURPOSE ARE DISCLAIMED. IN NO EVENT SHALL THE COPYRIGHT OWNER OR CONTRIBUTORS BE LIABLE FOR ANY DIRECT, INDIRECT, INCIDENTAL, SPECIAL, EXEMPLARY, OR CONSEQUENTIAL DAMAGES (INCLUDING, BUT NOT LIMITED TO, PROCUREMENT OF SUBSTITUTE GOODS OR SERVICES; LOSS OF USE, DATA, OR PROFITS; OR BUSINESS INTERRUPTION) HOWEVER CAUSED AND ON ANY THEORY OF LIABILITY, WHETHER IN CONTRACT, STRICT LIABILITY, OR TORT (INCLUDING NEGLIGENCE OR OTHERWISE) ARISING IN ANY WAY OUT OF THE USE OF THIS SOFTWARE, EVEN IF ADVISED OF THE POSSIBILITY OF SUCH DAMAGE.
This product uses Aranha, a Lua/FastCGI web application platform written by Daniel Silverstone ([email protected]). Copyright 2004-2008 Daniel Silverstone [email protected]
Permission is hereby granted, free of charge, to any person obtaining a copy of this software and associated documentation files (the "Software"), to deal in the Software without restriction, including without limitation the rights to use, copy, modify, merge, publish, distribute, sublicense, and/or sell copies of the Software, and to permit persons to whom the Software is furnished to do so, subject to the following conditions:
The above copyright notice and this permission notice shall be included in all copies or substantial portions of the Software.
THE SOFTWARE IS PROVIDED "AS IS", WITHOUT WARRANTY OF ANY KIND, EXPRESS OR IMPLIED, INCLUDING BUT NOT LIMITED TO THE WARRANTIES OF MERCHANTABILITY, FITNESS FOR A PARTICULAR PURPOSE AND NONINFRINGEMENT. IN NO EVENT SHALL THE AUTHORS OR COPYRIGHT HOLDERS BE LIABLE FOR ANY CLAIM,

Copyright © 2016. Tenable Network Security, Inc. All rights reserved. Tenable Network Security and Nessus are registered trademarks of Tenable Network Security, Inc.
SecurityCenter, Passive Vulnerability Scanner, and Log Correlation Engine are trademarks of Tenable Network Security, Inc. All other products or services are trademarks
of their respective owners.
44
DAMAGES OR OTHER LIABILITY, WHETHER IN AN ACTION OF CONTRACT, TORT OR OTHERWISE, ARISING FROM, OUT OF OR IN CONNECTION WITH THE SOFTWARE OR THE USE OR OTHER DEALINGS IN THE SOFTWARE.
The Tenable Appliance console menu is provided by Pdmenu (http://kitenet.net/~joey/code/pdmenu/), written by Joey Hess [email protected]. This program is Copyright 1995-2002 by Joey Hess, and may be distributed under the terms of the GPL.
This program is free software: you can redistribute it and/or modify it under the terms of the GNU General Public License as published by the Free Software Foundation, either version 3 of the License, or (at your option) any later version.
This program is distributed in the hope that it will be useful, but WITHOUT ANY WARRANTY; without even the implied warranty of MERCHANTABILITY or FITNESS FOR A PARTICULAR PURPOSE. See the GNU General Public License for more details (http://www.gnu.org/licenses/).
The Tenable Appliance internal interface uses lbase64 (http://www.tecgraf.puc-rio.br/~lhf/ftp/lua/#lbase64), software that has been placed in the public domain.
The Tenable Appliance internal interface uses LuaFileSystem (http://keplerproject.org/luafilesystem/), designed and implemented by Roberto Ierusalimschy, André Carregal and Tomás Guisasola. Copyright © 2003 Kepler Project.
Permission is hereby granted, free of charge, to any person obtaining a copy of this software and associated documentation files (the "Software"), to deal in the Software without restriction, including without limitation the rights to use, copy, modify, merge, publish, distribute, sublicense, and/or sell copies of the Software, and to permit persons to whom the Software is furnished to do so, subject to the following conditions:
The above copyright notice and this permission notice shall be included in all copies or substantial portions of the Software.
THE SOFTWARE IS PROVIDED "AS IS", WITHOUT WARRANTY OF ANY KIND, EXPRESS OR IMPLIED, INCLUDING BUT NOT LIMITED TO THE WARRANTIES OF MERCHANTABILITY, FITNESS FOR A PARTICULAR PURPOSE AND NONINFRINGEMENT. IN NO EVENT SHALL THE AUTHORS OR COPYRIGHT HOLDERS BE LIABLE FOR ANY CLAIM, DAMAGES OR OTHER LIABILITY, WHETHER IN AN ACTION OF CONTRACT, TORT OR OTHERWISE, ARISING FROM, OUT OF OR IN CONNECTION WITH THE SOFTWARE OR THE USE OR OTHER DEALINGS IN THE SOFTWARE.
The Tenable Appliance internal interface uses LuaLogging (http://keplerproject.org/lualogging/), designed by Danilo Tuler and implemented by Danilo Tuler, Thiago Ponte and André Carregal. Copyright © 2004-2007 Kepler Project.
Permission is hereby granted, free of charge, to any person obtaining a copy of this software and associated documentation files (the "Software"), to deal in the Software without restriction, including without limitation the rights to use, copy, modify, merge, publish, distribute, sublicense, and/or sell copies of the Software, and to permit persons to whom the Software is furnished to do so, subject to the following conditions:
The above copyright notice and this permission notice shall be included in all copies or substantial portions of the Software.
THE SOFTWARE IS PROVIDED "AS IS", WITHOUT WARRANTY OF ANY KIND, EXPRESS OR IMPLIED, INCLUDING BUT NOT LIMITED TO THE WARRANTIES OF MERCHANTABILITY, FITNESS FOR A PARTICULAR PURPOSE AND NONINFRINGEMENT. IN NO EVENT SHALL THE AUTHORS OR COPYRIGHT HOLDERS BE LIABLE FOR ANY CLAIM, DAMAGES OR OTHER LIABILITY, WHETHER IN AN ACTION OF CONTRACT, TORT OR OTHERWISE, ARISING FROM, OUT OF OR IN CONNECTION WITH THE SOFTWARE OR THE USE OR OTHER DEALINGS IN THE SOFTWARE.
The Tenable Appliance internal interface uses (Lua) MD5 (http://www.keplerproject.org/md5/), designed and implemented by Roberto Ierusalimschy and Marcela Ozório Suarez. The DES 56 C library, as used in (Lua) MD5, was implemented by Stuart Levy. Copyright © 2003 PUC-Rio. All rights reserved.
Copyright © 2016. Tenable Network Security, Inc. All rights reserved. Tenable Network Security and Nessus are registered trademarks of Tenable Network Security, Inc.
SecurityCenter, Passive Vulnerability Scanner, and Log Correlation Engine are trademarks of Tenable Network Security, Inc. All other products or services are trademarks
of their respective owners.
45
Permission is hereby granted, free of charge, to any person obtaining a copy of this software and associated documentation files (the "Software"), to deal in the Software without restriction, including without limitation the rights to use, copy, modify, merge, publish, distribute, sublicense, and/or sell copies of the Software, and to permit persons to whom the Software is furnished to do so, subject to the following conditions:
The above copyright notice and this permission notice shall be included in all copies or substantial portions of the Software.
THE SOFTWARE IS PROVIDED "AS IS", WITHOUT WARRANTY OF ANY KIND, EXPRESS OR IMPLIED, INCLUDING BUT NOT LIMITED TO THE WARRANTIES OF MERCHANTABILITY, FITNESS FOR A PARTICULAR PURPOSE AND NONINFRINGEMENT. IN NO EVENT SHALL THE AUTHORS OR COPYRIGHT HOLDERS BE LIABLE FOR ANY CLAIM, DAMAGES OR OTHER LIABILITY, WHETHER IN AN ACTION OF CONTRACT, TORT OR OTHERWISE, ARISING FROM, OUT OF OR IN CONNECTION WITH THE SOFTWARE OR THE USE OR OTHER DEALINGS IN THE SOFTWARE.
Related Third-Party and Open-Source Licenses
phantomjs – https://github.com/ariya/phantomjs/blob/master/LICENSE.BSD
QT – http://qt-project.org/doc/qt-4.8/lgpl.html
Webkit – http://www.webkit.org/coding/lgpl-license.html and http://www.webkit.org/coding/bsd-license.html
Mongoose – https://github.com/valenok/mongoose/blob/master/LICENSE
Breakpad – http://code.google.com/p/google-breakpad/source/browse/trunk/COPYING
OpenSSL – http://www.openssl.org/source/license.html
Linenoise – https://github.com/tadmarshall/linenoise/blob/master/linenoise.h
QCommandLine – http://gitorious.org/qcommandline/qcommandline/blobs/master/COPYING
CoffeeScript – https://github.com/jashkenas/coffee-script/blob/master/LICENSE
GIFLIB – http://giflib.cvs.sourceforge.net/viewvc/giflib/giflib/COPYING
Wkhtmlpdf – https://github.com/antialize/wkhtmltopdf/blob/master/COPYING