Telis Soliris RTS - Partsale · Somfy’s expertise delivers satisfaction guaranteed. Thank you for...
32
Operating and installation guide Telis Soliris RTS www.somfy.com Ref.5054468A
-
Upload
hoangxuyen -
Category
Documents
-
view
218 -
download
0
Transcript of Telis Soliris RTS - Partsale · Somfy’s expertise delivers satisfaction guaranteed. Thank you for...
Operating and installation guide
Telis Soliris RTS
www.somfy.comR
ef.5
0544
68A

1. Brief introduction to the Telis Soliris RTS remote control 31.1 What is the Telis Soliris RTS for? 31.2 A few definitions 3
2. Safety - Important information 42.1 Installation and commissioning 42.2 Operating 42.3 Environment 4
3. Content of the kit and tools required 53.1 List of parts 53.2 Tools required 5
4. The Telis Soliris RTS in detail 64.1 Components 64.2 Technical data 6
5. Adding a new Telis Soliris RTS 75.1 Identifying the original control point 75.2 One-touch point 85.3 Point with Up/STOP/Down buttons 135.4 Timer 165.5 Situo control point 185.6 Telis 1 RTS/Telis Soliris RTS remote controls 205.7 Telis 4 RTS/Telis 4 Soliris RTS remote controls 23
6. Replacing a lost or broken control point 256.1 Sole control point lost or broken 256.2 One lost or broken control point amongst others 25
7. Mounting the bracket 258. Everyday use of the Telis Soliris RTS 26
8.1 Sun function 268.2 Up and Down buttons 278.3 My button 278.4 Replacing the battery 288.5 Maintenance 28
9. Problems with the Telis Soliris RTS? 28
Contents
2 Copyright © 2008 Somfy SAS. All rights reserved.
Telis Soliris RTS

Somfy’s expertise delivers satisfaction guaranteed.Thank you for choosing a Somfy Telis Soliris RTS . Before installing and using the Telis Soliris RTS, please read this guide carefully.Somfy solutions animate your windows and entrances to bring your whole house alive. Somfy solutions are designed so that everyone can enjoy the benefits of the products in their home, based on their specific requirements.In this guide, the term ‘product’ can include your awning, blind, curtain, garage door, gate, projection screen, roller shutter.Well thought-out and easy to use, Somfy solutions are one of life’s little daily pleasures, making home life more enjoyable.
1. Brief introduction to the Telis Soliris RTS remote control
This guide describes the installation steps required to make the best use of the Telis Soliris RTS. Advanced installation functions are available on our website (address on the back cover of this guide).
1.1 What is the Telis Soliris RTS for?The Telis Soliris RTS is a wireless radio remote control compatible only with products fitted with Radio Technology Somfy (RTS): roller shutter motors, awning motors, etc.The Telis Soliris RTS is used:
As an individual control to control a single product (e.g. roller blind) • at a time;
As a group control to command several products at the same time • (e.g. several roller blinds) (advanced installation function).
1.2 A few definitionsInstallationAll of the Radio Technology Somfy products a house is equipped with.Favourite position:The favourite position is your ideal position for your product in certain common situations, for example, your curtains or blinds partially closed
3Copyright © 2008 Somfy SAS. All rights reserved.
Telis Soliris RTS
3

4 Copyright © 2008 Somfy SAS. All rights reserved.
Telis Soliris RTS
to shield the TV from afternoon sunlight; your awning partially extended when you are dining beneath it in summer but don’t want to deprive your houseplants of sunlight.
2. Safety - Important information2.1 Installation and commissioningBefore installing and using the Telis Soliris RTS, please read these instructions carefully, which describe how to install, commission and operate the Telis Soliris RTS.Never begin installing without first checking the compatibility of the Telis Soliris RTS with the associated equipment and accessories.Any incorrect use will invalidate the warranty and Somfy's liability.
2.2 OperatingSomfy recommends that at least one control point is located close to -the product or group of products. Do not allow children to play with the fixed control points. Keep remote -controls out of the reach of children.Monitor the product (especially the roller shutter/awning) while it is -moving, especially during commissioning of the Telis Soliris RTS, and keep people at a distance until the product is completely closed.Make sure the power supply to the product is turned off before any -maintenance operation in the vicinity of the product (for example, when cleaning windows near your blind).Avoid moving the product if ice has formed in it, unless the motor is -fitted with anti-freeze protection.Do not leave the Telis Soliris RTS behind a window in full sunlight: as -it cannot withstand temperatures greater than 60°C.Do not leave the Telis Soliris RTS in a car in winter. -Do not immerse or soak the Telis Soliris RTS in any liquid. -Only use maintenance products recommended by Somfy. -Frequently check the product (e.g. awning) to detect any defects in -balance or any signs of wear. Do not use the product if a repair or adjustment is required.
2.3 EnvironmentDamaged electrical or electronic products, such as used batteries, should not be disposed of with household waste. Please take them to

5Copyright © 2008 Somfy SAS. All rights reserved.
Telis Soliris RTS
a collection point or an approved centre to ensure they are recycled correctly.
3. Content of the kit and tools required3.1 List of parts - Before starting installation and commissioning of the Telis Soliris RTS, check that all parts listed in the table below are present in the correct quantity (Q):
No. Components Q.
1 Telis Soliris RTS remote control 12 Mounting pin 13 Bracket 14 Plug 15 Screw 1
4
31
5
2
3.2 Tools required• Phillips screwdriver
Insulated flathead electricians • screwdriverDrill and drill bit• Pencil•

6 Copyright © 2008 Somfy SAS. All rights reserved.
Telis Soliris RTS
4. The Telis Soliris RTS in detail4.1 ComponentsA. Up buttonB. STOP/my buttonC. Down buttonD. Wind and Sun indicator lightE. Wind indicator lightF. Wind or Wind and Sun Selection ButtonG. PROG button
4.2 Technical data4.2.1 Pure, Lounge, Silver ModelsDimensions in mm (Height x Width x Depth): Pure model: 134 x 41 x 21 mm Lounge, Silver models: 145 x 49 x 22 mmOperating temperature: 0°C to + 60°CProtection rating: Inside use, in a dry room IP 30Frequency: 433.42 MHz.Range: 20m through two concrete walls; 200m in open spaceBattery: 3 V type CR 24304.2.2 Patio ModelDimensions in mm (H x w x d): 145 x 49 x 22 mmOperating temperature: 0 °C to + 60 °CProtection rating IP 44: Rain-resistant and shockproofFrequency: 433.42 MHzRange: 20 m through two concrete walls; 200 m in open spaceBattery: 3 V type CR 2430
mysomfy.com
C
D
BA
G
F
E
7Copyright © 2008 Somfy SAS. All rights reserved.
Telis Soliris RTS
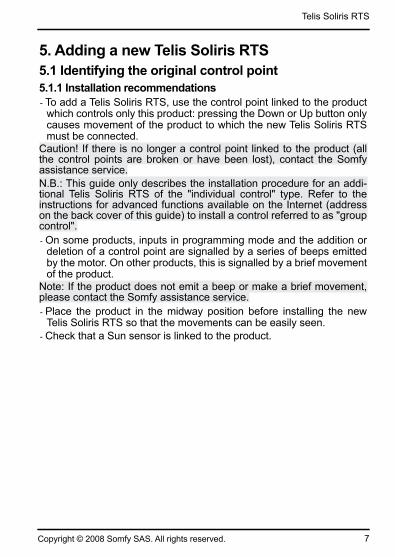
5. Adding a new Telis Soliris RTS5.1 Identifying the original control point5.1.1 Installation recommendations
To add a Telis Soliris RTS, use the control point linked to the product -which controls only this product: pressing the Down or Up button only causes movement of the product to which the new Telis Soliris RTS must be connected.
Caution! If there is no longer a control point linked to the product (all the control points are broken or have been lost), contact the Somfy assistance service.N.B.: This guide only describes the installation procedure for an addi-tional Telis Soliris RTS of the "individual control" type. Refer to the instructions for advanced functions available on the Internet (address on the back cover of this guide) to install a control referred to as "group control".
On some products, inputs in programming mode and the addition or -deletion of a control point are signalled by a series of beeps emitted by the motor. On other products, this is signalled by a brief movement of the product.
Note: If the product does not emit a beep or make a brief movement, please contact the Somfy assistance service.
Place the product in the midway position before installing the new -Telis Soliris RTS so that the movements can be easily seen.Check that a Sun sensor is linked to the product. -

8 Copyright © 2008 Somfy SAS. All rights reserved.
Telis Soliris RTS
5.1.2 Original control points - Find the original control point in the list below and refer to the paragraph given to add the new Telis Soliris RTS:1) Control point fixed to the wall with a single button, called a One-touch point, see paragraph 5.2;2) Control point fixed to the wall with Up/STOP/Down buttons, called a Point with Up/STOP/Down buttons, see paragraph 5.3;3) Programmer type control point, called a Timer, see paragraph 5.4;4) Situo control point fixed to the wall, see paragraph 5.5;5a) Telis 1 RTS remote control, see paragraph 5.6;5b) Telis Soliris RTS remote control, see paragraph 5.6;6a) Telis 4 RTS remote control, see paragraph 5.7;6b) Telis 4 Soliris RTS remote control, see paragraph 5.7.
5.2 One-touch pointMove close to the product to install the new Telis Soliris RTS.5.2.1 Identifying the model
Check that the original control point -has an elongated button.Bring the product to the midway -position.Remove the front cover from the one- -touch point:
One-touch point with a white and grey front cover
Gently remove the front cover with a -flat, pointed tool (such as a flathead screwdriver) where the white section
5b
5a
6a 6b
3
21
4

9Copyright © 2008 Somfy SAS. All rights reserved.
Telis Soliris RTS
and the grey section join.Lever it, without using force, to -detach the mounting lugs from the front cover.
One-touch point with a white front cover: Lever it with a flat, pointed tool -(such as a flathead screwdriver), without using force, around the upper section of the front cover to detach it from its mounting.
Turn the front cover over to find out the - model:
If there is a metal plate inscribed -PROG next to the battery: model A.If there is no metal plate inscribed -PROG next to the battery: model B.
5.2.2 Adding the Telis Soliris RTSModel A: - Make a contact between the PROG metal plate on the electrical circuit and the battery bracket using a flathead screwdriver, until the product moves briefly (or there is a series of 3 beeps): the programming function is activated for approximately 2 minutes.Take the new Telis Soliris RTS and turn -it over.
- Press the PROG button (G) on the new Telis Soliris RTS briefly with the tip of a pencil: the product will make another brief movement (or emit a series of 8 beeps) to indicate that the new Telis Soliris RTS is stored.
A B
G

10 Copyright © 2008 Somfy SAS. All rights reserved.
Telis Soliris RTS
- Press the Down button on the new Telis Soliris RTS:
If the product is lowered, the Telis -Soliris RTS is operational.If the product does not move, contact -the Somfy assistance service.
If the original control point must be dele- -ted, go to paragraph 5.2.3 "Deleting an original control point".If the original control point is to be kept, -refit the front cover:
One-touch point with a white and grey front cover:
Insert the mounting lugs into their -notches on one side of the front cover.Press on the other side until it clicks, -to fix the front cover in its bracket.
One-touch point with a white front cover:Refit the front cover on its bracket -
Model B: - Remove the battery from the original control point using a plastic object.Press on the centre section of the one- -touch point button.Refit the battery in the base of its brac- -ket (with text legible).Press the button again until the product -moves briefly (or there is a series of 3 beeps): the programming function is activated for approximately 2 minutes.Take the new Telis Soliris RTS and turn -it over
- Press the PROG button (G) on the new Telis Soliris RTS briefly with the tip of a pencil: the product will make another brief movement (or emit a series of 8 beeps) to indicate that the new Telis Soliris RTS is stored.
G

11Copyright © 2008 Somfy SAS. All rights reserved.
Telis Soliris RTS
- Press the Down button on the new Telis Soliris RTS:
If the product is lowered, the Telis -Soliris RTS is operational.If the product does not move, contact -the Somfy assistance service.
If the original control point must be dele- -ted, go to paragraph 5.2.3 "Deleting an original control point".If the original control point is to be kept, -refit the front cover:
One-touch point with a white and grey front cover:
Insert the mounting lugs into their -notches on one side of the front cover.Press on the other side until it clicks, -to fix the front cover in its bracket.
One-touch point with a white front cover:Refit the front cover on its bracket -
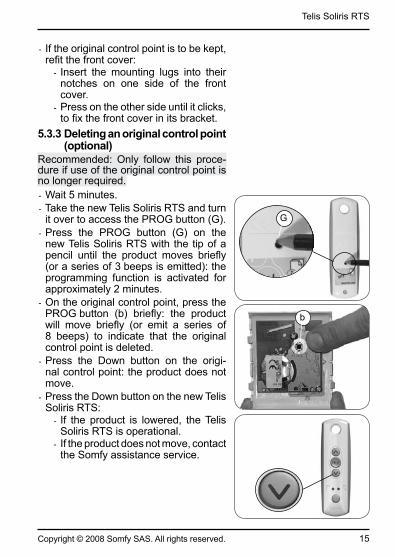
5.2.3 Deleting an original control point (optional)
Recommended: Only follow this proce-dure if use of the original control point is no longer required.Model A:
Wait 5 minutes. -Take the new Telis Soliris RTS and -turn it over to access the PROG button (G).Press the PROG button (G) on the new Telis Soliris RTS with the tip of a pencil until the product moves briefly (or a series of 3 beeps is emitted): the programming function is activated for approximately 2 minutes.
G

12 Copyright © 2008 Somfy SAS. All rights reserved.
Telis Soliris RTS
- Make a contact between the PROG metal plate on the electrical circuit and the battery bracket using a flathead screwdriver: the product will move briefly (or emit a series of 8 beeps) to indicate that the original control point is deleted.Press the one-touch point button: the -product does not move.
- Press the Down button on the new Telis Soliris RTS:
If the product is lowered, the Telis -Soliris RTS is operational.If the product does not move, contact -the Somfy assistance service.
Remove the one-touch point. -Do not dispose of the original control point with household waste, see para-graph 2.3.Model B:
Wait 5 minutes. - - Take the new Telis Soliris RTS and turn it over to access the PROG button (G). Press the PROG button (G) on the -new Telis Soliris RTS with the tip of a pencil until the product moves briefly (or a series of 3 beeps is emitted): the programming function is activated for approximately 2 minutes.
G

13Copyright © 2008 Somfy SAS. All rights reserved.
Telis Soliris RTS
- Remove the battery from the original control point using a plastic object.Press on the centre section of the one- -touch point button.Refit the battery in the base of its -housing (with text legible).Press the front panel button again: -the product will move briefly (or emit a series of 8 beeps) to indicate that the original control point is deleted.Press the one-touch point button: the -product does not move.
- Press the Down button on the new Telis Soliris RTS:
If the product is lowered, the Telis -Soliris RTS is operational.If the product does not move, contact -the Somfy assistance service.
Remove the one-touch point. -Do not dispose of the original control point with household waste, see para-graph 2.3.
5.3 Point with Up/STOP/Down buttons
Move close to the product to install the Telis Soliris RTS.5.3.1 Checking the compatibility - Bring the product to the midway position.Cut off the mains power supply or -detach the battery connected to the motor (eg for a battery operated roller blind).Remove the front cover: -
Gently remove the front cover with a -flat, pointed tool (such as a flathead screwdriver) where the white section and the grey section join.
14 Copyright © 2008 Somfy SAS. All rights reserved.
Telis Soliris RTS
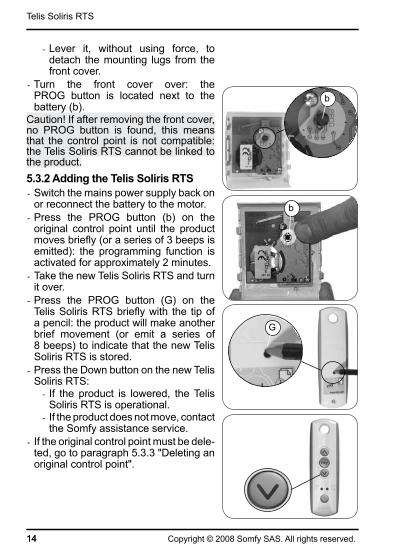
Lever it, without using force, to -detach the mounting lugs from the front cover.
- Turn the front cover over: the PROG button is located next to the battery (b).
Caution! If after removing the front cover, no PROG button is found, this means that the control point is not compatible: the Telis Soliris RTS cannot be linked to the product.5.3.2 Adding the Telis Soliris RTS
Switch the mains power supply back on -or reconnect the battery to the motor.
- Press the PROG button (b) on the original control point until the product moves briefly (or a series of 3 beeps is emitted): the programming function is activated for approximately 2 minutes.Take the new Telis Soliris RTS and turn -it over.
- Press the PROG button (G) on the Telis Soliris RTS briefly with the tip of a pencil: the product will make another brief movement (or emit a series of 8 beeps) to indicate that the new Telis Soliris RTS is stored.
- Press the Down button on the new Telis Soliris RTS:
If the product is lowered, the Telis -Soliris RTS is operational.If the product does not move, contact -the Somfy assistance service.
If the original control point must be dele- -ted, go to paragraph 5.3.3 "Deleting an original control point".
b
b
G
14
15Copyright © 2008 Somfy SAS. All rights reserved.
Telis Soliris RTS
If the original control point is to be kept, -refit the front cover:
Insert the mounting lugs into their -notches on one side of the front cover.Press on the other side until it clicks, -to fix the front cover in its bracket.
5.3.3 Deleting an original control point (optional)
Recommended: Only follow this proce-dure if use of the original control point is no longer required.
Wait 5 minutes. - - Take the new Telis Soliris RTS and turn it over to access the PROG button (G).Press the PROG button (G) on the -new Telis Soliris RTS with the tip of a pencil until the product moves briefly (or a series of 3 beeps is emitted): the programming function is activated for approximately 2 minutes.
- On the original control point, press the PROG button (b) briefly: the product will move briefly (or emit a series of 8 beeps) to indicate that the original control point is deleted.Press the Down button on the origi- -nal control point: the product does not move.
- Press the Down button on the new Telis Soliris RTS:
If the product is lowered, the Telis -Soliris RTS is operational.If the product does not move, contact -the Somfy assistance service.
G
b
16 Copyright © 2008 Somfy SAS. All rights reserved.
Telis Soliris RTS
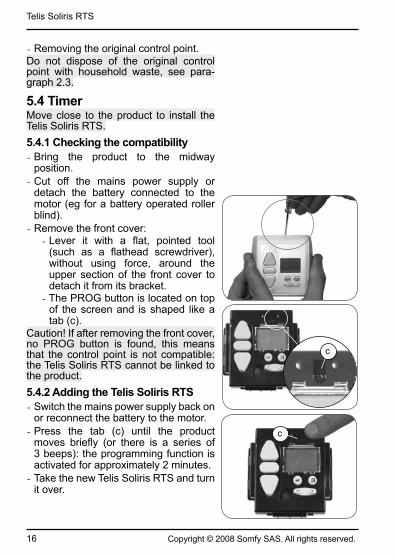
Removing the original control point. -Do not dispose of the original control point with household waste, see para-graph 2.3.
5.4 TimerMove close to the product to install the Telis Soliris RTS.5.4.1 Checking the compatibility - Bring the product to the midway position.Cut off the mains power supply or -detach the battery connected to the motor (eg for a battery operated roller blind).Remove the front cover: -
Lever it with a flat, pointed tool -(such as a flathead screwdriver), without using force, around the upper section of the front cover to detach it from its bracket.
- The PROG button is located on top of the screen and is shaped like a tab (c).
Caution! If after removing the front cover, no PROG button is found, this means that the control point is not compatible: the Telis Soliris RTS cannot be linked to the product.5.4.2 Adding the Telis Soliris RTS
Switch the mains power supply back on -or reconnect the battery to the motor.
- Press the tab (c) until the product moves briefly (or there is a series of 3 beeps): the programming function is activated for approximately 2 minutes.Take the new Telis Soliris RTS and turn -it over.
c
c

17Copyright © 2008 Somfy SAS. All rights reserved.
Telis Soliris RTS
- Press the PROG button (G) on the new Telis Soliris RTS briefly with the tip of a pencil: the product will make another brief movement (or emit a series of 8 beeps) to indicate that the new Telis Soliris RTS is stored.
- Press the Down button on the new Telis Soliris RTS:
If the product is lowered, the Telis -Soliris RTS is operational.If the product does not move, contact -the Somfy assistance service.
If the original control point must be dele- -ted, go to paragraph 5.4.3 "Deleting an original control point".If the original control point is to be kept, -refit the front cover:
Insert the front cover on its brac- -ket, allowing the buttons to come through their housings.Press the front until it clicks, to fix -the front cover in its bracket.
5.4.3 Deleting an original control point (optional)
Recommended: Only follow this proce-dure if use of the original timer is no longer required.
Wait 5 minutes. -Take the new Telis Soliris RTS and turn -it over to access the PROG button (G).
- Press the PROG button (G) on the Telis Soliris RTS with the tip of a pencil until the product moves briefly (or a series of 3 beeps is emitted): the programming function is activated for approximately 2 minutes.
G
G

18 Copyright © 2008 Somfy SAS. All rights reserved.
Telis Soliris RTS
- On the original timer, briefly press the tab (c): the product will move briefly (or emit a series of 8 beeps) to indicate that the original control point is deleted. Press the timer Down button: the -product does not move.
- Press the Down button on the new Telis Soliris RTS:
If the product is lowered, the Telis -Soliris RTS is operational.If the product does not move, contact -the Somfy assistance service.
Remove the timer. -Do not dispose of the original control point with household waste, see para-graph 2.3.
5.5 Situo control pointMove close to the product to install the Telis Soliris RTS.5.5.1 Adding the Telis Soliris RTS
Bring the product to the midway -position.
- Remove the front cover from the Situo:Gently remove the front cover with a -flat, pointed tool (such as a flathead screwdriver) around the lower section.Lever it, without using force, to -detach the mounting lugs from the front cover.Turn the front cover over: the -PROG button is located next to the battery (d).
c

19Copyright © 2008 Somfy SAS. All rights reserved.
Telis Soliris RTS
- Press the PROG button (d) on the Situo until the product moves briefly (or a series of 3 beeps is emitted): the programming function is activated for approximately 2 minutes.Take the new Telis Soliris RTS and turn -it over.
- Press the PROG button (G) on the new Telis Soliris RTS briefly with the tip of a pencil: the product will make another brief movement (or emit a series of 8 beeps) to indicate that the new Telis Soliris RTS is stored.
- Press the Down button on the new Telis Soliris RTS:
If the product is lowered, the Telis -Soliris RTS is operational.If the product does not move, contact -the Somfy assistance service.
If the Situo must be deleted, go to -paragraph 5.5.2 "Deleting the original Situo".If the Situo is to be kept, refit the front -cover:
Insert the mounting lugs in their -notches.Press the lower section until it clicks, -to fix the front cover in its bracket.
5.5.2 Deleting the original Situo (optional)
Recommended: Only follow this proce-dure if use of the original Situo is no longer required.
Wait 5 minutes. -Take the new Telis Soliris RTS and turn -it over to access the PROG button (G).
d
G

20 Copyright © 2008 Somfy SAS. All rights reserved.
Telis Soliris RTS
- Press the PROG button (G) on the new Telis Soliris RTS with the tip of a pencil until the product moves briefly (or a series of 3 beeps is emitted): the programming function is activated for approximately 2 minutes.
- On the Situo, briefly press the PROG button (d): the product will make a brief movement (or emit a series of 8 beeps) to indicate that the Situo is deleted. Press the Situo Down button: the -product does not move.
- Press the Down button on the new Telis Soliris RTS:
If the product is lowered, the Telis -Soliris RTS is operational.If the product does not move, contact -the Somfy assistance service.
Remove the Situo. -Do not dispose of the original control point with household waste, see para-graph 2.3.
5.6 Telis 1 RTS/Telis Soliris RTS remote controls
The Telis 1 RTS has 1 indicator light (5a) and the Telis Soliris RTS has 2 indicator lights (5b). If the original remote control has more than 2 indicator lights, refer to the section "Telis 4 RTS/Telis 4 Soliris RTS remote controls". Move close to the product to install the Telis Soliris RTS.
G
d
5a 5b

21Copyright © 2008 Somfy SAS. All rights reserved.
Telis Soliris RTS
5.6.1 Adding a Telis Soliris RTSBring the product to the midway -position.
- Turn the original Telis over: the PROG button (e) is located on the rear panel.Press the PROG button (e) with the tip -of a pencil until the product moves brie-fly (or a series of 3 beeps is emitted): the programming function is activated for approximately 2 minutes.Take the new Telis Soliris RTS and turn -it over.
- Press the PROG button (G) on the new Telis Soliris RTS briefly with the tip of a pencil: the product will make another brief movement (or emit a series of 8 beeps) to indicate that the new Telis Soliris RTS is stored.
- Press the Down button on the new Telis Soliris RTS:
If the product is lowered, the Telis -Soliris RTS is operational.If the product does not move, contact -the Somfy assistance service.
If the original Telis must be deleted, go -to paragraph 5.6.2 "Deleting the origi-nal Telis".
5.6.2 Deleting the original Telis (optional)
Recommended: Only follow this proce-dure if use of the original Telis is no longer required.Warning! Before deleting a Telis Soliris, contact the Somfy assistance service to check the compatibility of the control point with the product.
e
G

22 Copyright © 2008 Somfy SAS. All rights reserved.
Telis Soliris RTS
Wait 5 minutes. - - Take the new Telis Soliris RTS and turn it over to access the PROG button (G). Press the PROG button (G) on the -new Telis Soliris RTS with the tip of a pencil until the product moves briefly (or a series of 3 beeps is emitted): the programming function is activated for approximately 2 minutes.
- Press the PROG button (e) on the origi-nal Telis briefly with the tip of a pencil: the product will make another brief movement (or emit a series of 8 beeps) to indicate that the original Telis is deleted.
- Press the Down button on the original Telis: the product does not move.Press the Down button on the new Telis -Soliris RTS:
If the product is lowered, the Telis -Soliris RTS is operational.If the product does not move, contact -the Somfy assistance service.
Do not dispose of the original control point with household waste, see para-graph 2.3
G
e
23Copyright © 2008 Somfy SAS. All rights reserved.
Telis Soliris RTS
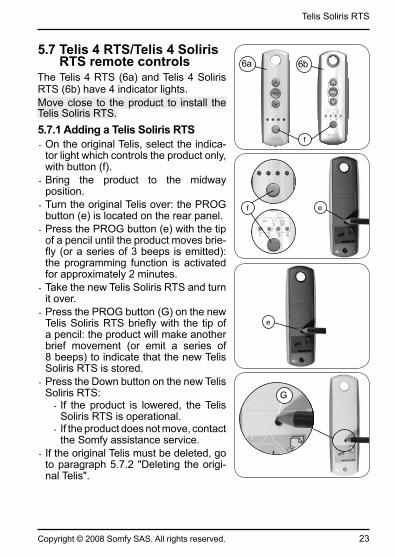
5.7 Telis 4 RTS/Telis 4 Soliris RTS remote controls
The Telis 4 RTS (6a) and Telis 4 Soliris RTS (6b) have 4 indicator lights.Move close to the product to install the Telis Soliris RTS.5.7.1 Adding a Telis Soliris RTS - On the original Telis, select the indica-tor light which controls the product only, with button (f).Bring the product to the midway -position.Turn the original Telis over: the PROG -button (e) is located on the rear panel.
- Press the PROG button (e) with the tip of a pencil until the product moves brie-fly (or a series of 3 beeps is emitted): the programming function is activated for approximately 2 minutes.Take the new Telis Soliris RTS and turn -it over.
- Press the PROG button (G) on the new Telis Soliris RTS briefly with the tip of a pencil: the product will make another brief movement (or emit a series of 8 beeps) to indicate that the new Telis Soliris RTS is stored.Press the Down button on the new Telis -Soliris RTS:
If the product is lowered, the Telis -Soliris RTS is operational.If the product does not move, contact -the Somfy assistance service.
If the original Telis must be deleted, go -to paragraph 5.7.2 "Deleting the origi-nal Telis".
6a 6b
f
ef
e
G

24 Copyright © 2008 Somfy SAS. All rights reserved.
Telis Soliris RTS
5.7.2 Deleting the original Telis (optional)
Recommended: Only follow this proce-dure if use of the original Telis is no longer required.Warning! Before deleting a Telis Soliris RTS, contact the Somfy assistance service to check the compatibility of the control point with the product.
Wait 5 minutes. - - Take the new Telis Soliris RTS and turn it over to access the PROG button (G). Press the PROG button (G) on the -new Telis Soliris RTS with the tip of a pencil until the product moves briefly (or a series of 3 beeps is emitted): the programming function is activated for approximately 2 minutes.
- Select the indicator light which corres-ponds to the product only, on the origi-nal Telis, with button (f).
- Press the PROG button (e) on the origi-nal Telis briefly with the tip of a pencil: the product will make a brief movement (or emit a series of 8 beeps) to indicate that the original Telis is deleted. On the original Telis, select the indica- -tor light which controls the product only, with button (f).Press the Down button on the original -Telis: the product does not move.Press the Down button on the new Telis -Soliris RTS:
If the product is lowered, the Telis -Soliris RTS is operational.If the product does not move, contact -the Somfy assistance service.
Do not dispose of the original control point with household waste, see para-graph 2.3.
G
ef
e

25Copyright © 2008 Somfy SAS. All rights reserved.
Telis Soliris RTS
6. Replacing a lost or broken control pointIf the original control point is lost or broken, there are two possible situations:
the lost or broken control point is the only control point for the product,• the lost or broken control point is not the only one which controls •
the product.
6.1 Sole control point lost or brokenContact the Somfy assistance service so they can provide guidance for the replacement of the sole lost or broken control point.
6.2 One lost or broken control point amongst othersFind one of the control points linked to the product. -Follow the steps described in the section "Adding the Telis Soliris RTS" -according to the control point model.
Note: If, after having followed this operation, there is not a brief move-ment (or a series of beeps) from the product, contact the Somfy assis-tance service so they can provide guidance for the replacement.
7. Mounting the bracketSomfy advises that the Telis Soliris RTS is installed in close proximity to the product to which it is linked, to avoid it having to perform any unnecessary searches.The minimum distance which must be kept between RTS enabled products is 30cm: (e.g. 30 cm between any RTS control points and/or between any control point and any motor).
Drill a 6 mm diameter hole. -Push in the plug (4). -Fix the bracket (3) with the screw (5). -Screw the mounting pin (2) on the -bracket (3).Hook the Telis Soliris RTS (1) onto the -mounting pin (2).
Note: Do not attach the Telis Soliris RTS to a metal surface.
43 5
32
2
1
26 Copyright © 2008 Somfy SAS. All rights reserved.
Telis Soliris RTS
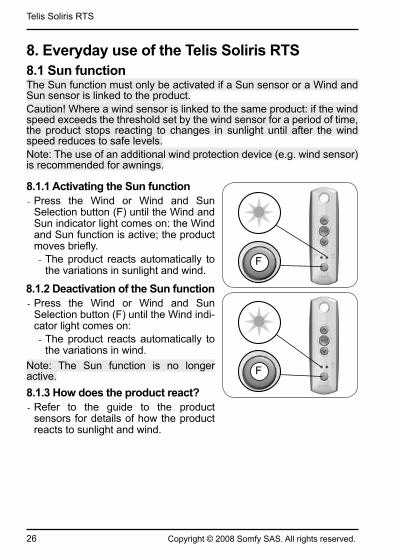
8.1.1 Activating the Sun function - Press the Wind or Wind and Sun Selection button (F) until the Wind and Sun indicator light comes on: the Wind and Sun function is active; the product moves briefly.
The product reacts automatically to -the variations in sunlight and wind.
8.1.2 Deactivation of the Sun functionPress the Wind or Wind and Sun -Selection button (F) until the Wind indi-cator light comes on:
The product reacts automatically to -the variations in wind.
Note: The Sun function is no longer active.8.1.3 How does the product react?
Refer to the guide to the product -sensors for details of how the product reacts to sunlight and wind.
F
F
8. Everyday use of the Telis Soliris RTS8.1 Sun functionThe Sun function must only be activated if a Sun sensor or a Wind and Sun sensor is linked to the product.Caution! Where a wind sensor is linked to the same product: if the wind speed exceeds the threshold set by the wind sensor for a period of time, the product stops reacting to changes in sunlight until after the wind speed reduces to safe levels.Note: The use of an additional wind protection device (e.g. wind sensor) is recommended for awnings.

27Copyright © 2008 Somfy SAS. All rights reserved.
Telis Soliris RTS
8.2 Up and Down buttons - Press the Up button (h): the product moves upwards/in and automatically stops in the raised position.Press the Down button (i): the product -moves downwards/out and automati-cally stops in the lowered position.
To move from the Up to the Down direc-tion (and vice versa), it is not necessary to press the my button.
8.3 My buttonThe my button has two functions:
A STOP function: a brief press of the -my button stops the product moving.A my function: if the product is statio- -nary, a brief press of the my button sends the product to the favourite posi-tion, if a favourite position has been stored.
To find out more about the my function, visit Somfy's website at the following address: http://www.somfy.com/mysomfy/
h
i

28 Copyright © 2008 Somfy SAS. All rights reserved.
Telis Soliris RTS
8.4 Replacing the batteryEnvironment! Do not dispose of the used battery with household waste, see paragraph 2.3. - Unscrew the rear casing of the Telis Soliris RTS.Push the battery out of its housing with -a plastic object.Insert a battery with identical specifica- -tions, the face marked with a plus (+) and with text legible.Push the battery fully into its housing. -Screw the rear casing of the Telis -Soliris RTS back on.
- Press a button on the front panel: if the indicator light comes on, the battery has been replaced correctly.
8.5 MaintenanceClean the Telis Soliris RTS with a damp -cloth using multipurpose household or glass cleaning product.Never immerse or soak the Telis Soliris -RTS in any liquid.
9. Problems with the Telis Soliris RTS?Problem Possible causes Solutions
The product does not react when the sun appears/disappears.
The Wind and Sun func-tion is not activated.
Activate the Wind and Sun function.
There is no Sun sensor. Add a Sun sensor.
The threshold is incor-rectly set.
See the sensor guide.

29Copyright © 2008 Somfy SAS. All rights reserved.
Telis Soliris RTS
Problem Possible causes Solutions
The product does not move after a button on the Telis Soliris RTS is pressed.
The Telis Soliris RTS is too far away from the product to be controlled.
Move it closer to the product and press a button on the Telis Soliris RTS again. If it still does not work, replace the battery.
The Telis Soliris RTS battery is weak.
Replace the battery with a battery which has identi-cal specifications - see the paragraph: "Replacing the battery".
The indicator light on the Telis Soliris RTS does not come on.
The Telis Soliris RTS battery is weak.
Replace the battery with a battery which has identical specifications - see the paragraph: "Replacing the battery".
The product is raised when the Down button is pressed.The product is lowered when the Up button is pressed.
The Telis Soliris RTS is held upside down.
Turn the Telis Soliris RTS so that the indicator light is below the Up/my/Down buttons.
The original control point has a single button.
Contact the Somfy assis-tance service.
The new Telis Soliris RTS cannot be used even after following the procedure step by step.
The new Telis Soliris RTS was not linked successfully.
Contact the Somfy assis-tance service.
The motor does not move or emit any beeps.
Contact the Somfy assis-tance service.
The Telis Soliris RTS controls another product.
A problem occurred whilst linking the Telis Soliris RTS.
Contact the Somfy assis-tance service.
For any problems or unresolved questions, please contact the Somfy -assistance service on the number given on the back cover of this guide.

30 Copyright © 2008 Somfy SAS. All rights reserved.
Telis Soliris RTS
NOTES

31Copyright © 2008 Somfy SAS. All rights reserved.
Telis Soliris RTS
NOTES

AustraliaSomfy PTY LTDTel: +61 (0)2 9638 0744Website: www.somfy.com/au/index.cfm
CanadaSomfy ULCTel: +1 (0) 905 564 6446Website: www.somfy.com/nam/index.cfm?language=en-us
United KingdomSomfy LTDTel: +44 (0) 113 391 3030Website: www.somfy.co.uk/
United States of AmericaSomfy Systems Inc.Tel: +1 (0) 609 395 1300Website: www.somfy.com/nam/index.cfm?language=en-us
Where to find us
Som
fy S
AS, w
ith c
apita
l of 2
0,00
0,00
0 Eu
ros,
RC
S Bo
nnev
ille 3
03.9
70.2
30 -
04/2
008
Somfy hereby declares that this product conforms to the essential requirements and other relevant provisions of Directive 1999/5/CE. A Declaration of Conformity is available at www.somfy.com/ce. For use in the European Union, the Swiss Confederation (Switzerland) and Norway.
Photos are not contractually binding