TeliCamSDK - SUN HIGH TECH...
57
Copyright © 2014 TOSHIBA TELI CORPORATION, All rights reserved. www.toshiba-teli.co.jp D4232625B TeliCamSDK Start-Up Guide Version 1.0.1 Information contained in this document is subject to change without prior notice.
Transcript of TeliCamSDK - SUN HIGH TECH...
Copyright © 2014 TOSHIBA TELI CORPORATION, All rights reserved. www.toshiba-teli.co.jp
D4232625B
TeliCamSDK
Start-Up Guide
Version 1.0.1
Information contained in this document is subject to change without prior notice.

1
Copyright © 2014 TOSHIBA TELI CORPORATION, All rights reserved. www.toshiba-teli.co.jp
D4232625B
Contents
1. Introduction ........................................................................................................................................ 2
2. Configuration ..................................................................................................................................... 3
3. Operating Environment..................................................................................................................... 4
4. Installation .......................................................................................................................................... 5
4.1. Package installation (TeliCamSDK, TeliCamSDK ContainDNet) .................................................. 5
4.2. GenICam Installation .................................................................................................................... 9
4.3. VC++ 2010 SP1 Redistributable installation ............................................................................... 12
4.4. Folder configuration .................................................................................................................... 13
5. GigE Vision Digital Camera Guide ................................................................................................. 15
5.1. Driver Installation (Using Tool) .................................................................................................... 15
5.2. Driver Inatallation (Manual) ......................................................................................................... 17
5.3. Firewall ........................................................................................................................................ 22
5.4. Network adapter .......................................................................................................................... 23
5.4.1. IP Address ............................................................................................................................ 23
5.4.2. Jumbo frame (Jumbo packet) .............................................................................................. 26
5.4.3 Option of performance .......................................................................................................... 28
5.5. GigE vision camera configuration ............................................................................................... 29
5.5.1 IP address ............................................................................................................................. 29
5.5.2. Persistent IP Setting ............................................................................................................. 31
5.5.3 Different network ................................................................................................................... 33
5.5.4. User-defined name [User Defined] ...................................................................................... 37
6. USB3 Vision Digital Camera Guide ................................................................................................ 39
6.1. Driver Installation (Using Tool) .................................................................................................... 39
6.2. Driver Inatallation (Manual) ......................................................................................................... 41
7. Uninstallation ................................................................................................................................. 49
7.1. GigE Vision camera driver uninstallation .................................................................................... 49
7.1.1. Driver Uninstallation (Using Tool) ......................................................................................... 49
7.1.1. Driver Uninstallation (Manual) .............................................................................................. 51
7.2. USB3 Vision Uninstallation ......................................................................................................... 53
7.3.GenICam Uninstallation ............................................................................................................... 54
7.4.TeliCamSDK Uninstallation .......................................................................................................... 55
8. Others ............................................................................................................................................... 56
8.1. Rivision History ........................................................................................................................... 56
8.2. Disclaimer ................................................................................................................................... 56
8.3. License ........................................................................................................................................ 56
8.4. Inquiry ......................................................................................................................................... 56

2
Copyright © 2014 TOSHIBA TELI CORPORATION, All rights reserved. www.toshiba-teli.co.jp
D4232625B
1. Introduction This document is a start-up guide of TeliCamSDK. TeliCamSDK is a software development kit, and it
can control our USB3 Vision I/F Digital Camera series and GigE Vision I/F Digital Camera series.
This document is targeted at engineers who build a system using a camera.
Various settings necessary for use of a camera are described in this document.
Specifications of individual functions necessary for programming to use a camera are described in
another document called “TeliCamSDK Library Manual”.

3
Copyright © 2014 TOSHIBA TELI CORPORATION, All rights reserved. www.toshiba-teli.co.jp
D4232625B
2. Configuration Software configuration of TeliCamSDK is as follows:
TeliU3vDriver is a dedicated driver for our USB3 Vision digital camera series, which is loaded to the
Windows USB driver stack. The driver is loaded to a PC for each camera.
TeliU3vViewer is a sample viewer to check the features and the images of camera.
TeliGevDriver is installed in the Windows NDIS (Network Driver Interface Specification) stack.
IP Configuration Tool is an application to configure IP address of the camera.
TeliGevViewer is a sample viewer to check operations of the camera.
TeliCamApi is a a high-level API. The application will be created by using TeliCamApi.
Use TeliCamDNETApi.dll, which is a class library based on high-level APIs of TeliCamApi.dll, for
designing .NET Framework applications.
TeliCamApi.dll
TeliU3vCamApi.dll TeliGevCamApi.dll
TeliU3vApi2.dll
TeliU3vDriver.sys
Bus Driver
Controller Driver
USB3.0 Adapter
NDIS
Protocol Driver
TeliGevDriver.sys
Miniport Driver
GigE Adapter
Software
Hardware
User mode
Kernel mode
USB3 Vision Camera GigE Vision Camera
IP Configuration Tool
IpConfig.exe
Viewer
TeliGevViewer.exe Viewer
TeliU3vViewer.exe
TeliCamUtl.dll
TeliU3vApi.dll
TeliGevApi2.dll
TeliGevApi.dll
User Application
TeliCamDNetApi.dll
※ Postfix “64” or “_64”is inserted fo
file name of files for 64bit OS.
Example: TeliCamApi64.dll
TelU3vApi2_64.dll
Windows socket

4
Copyright © 2014 TOSHIBA TELI CORPORATION, All rights reserved. www.toshiba-teli.co.jp
D4232625B
3. Operating Environment To use TeliCamSDK, it is necessary to meet the following conditions.
Also, higher performance may be required depending on the use conditions.
Supported OS ・Windows XP 32bit all editions
・Windows Vista 32/64bit all editions
・Windows 7 32/64bit all editions
Recommended PC spec. ・CPU : Intel Core2 2.40GHz or more
・Memory : 2Gbyte or more
・Graphics : 256Mbyte or more VRAM
USB3.0 adapter (recommended) Adapters with a USB3.0 host controller manufactured by
Renesas Electronics
Network adapter (recommended) Jumbo Frame(Jumbo Packet)-compliant products(9014byte or
more). (Intel PRO/1000 series etc.)。
Runtime ・Microsoft Visual C++ 2010 SP1 Redistributable Package
・GenICam GenApi reference implementation v.2.3.1
・Microsoft Direct X End-User Runtime (DirectX 9.0c or later)
Supported camera ・USB3 Vision Camera manufactured by Toshiba Teli
・GigE Vision Camera manufactured by Toshiba Teli

5
Copyright © 2014 TOSHIBA TELI CORPORATION, All rights reserved. www.toshiba-teli.co.jp
D4232625B
4. Installation Disconnect a camera or power off the camera before starting installation.
Before installation of TeliCamSDK, please confirm the version in Version Information.txt. (The default
installation folder is ”C:\Program Files\TOSHIBA TELI\TeliCamSDK\Documents”.)
If an old version is already installed, make sure to uninstall it before starting installation of a new
version.
4.1. Package installation (TeliCamSDK, TeliCamSDK ContainDNet)
Double-click “SetupTeliCamSDK_x64.exe” (“SetupTeliCa_SDK_x86.exe” for 32bit) or
“SetupTeliCamSDK_ContainDNet_x64.exe” (“SetupTeliCamSDK_ContainDNet_x86.exe” for 32bit) to
run the installer.
(“SetupTeliCamSDK_ContainDNet_x64.exe”(“SetupTeliCamSDK_ContainDNet_x86.exe” for 32bit)
includes .Net API)
Continue operations in accordance with the dialog box.
The installation procedure is as follows.
Installation wizard will appear when you run the .exe file.
Click [Next], and the installation will continue.

6
Copyright © 2014 TOSHIBA TELI CORPORATION, All rights reserved. www.toshiba-teli.co.jp
D4232625B
If you accept the terms in the license agreement, click [Next].
Enter your information, and click [Next].

7
Copyright © 2014 TOSHIBA TELI CORPORATION, All rights reserved. www.toshiba-teli.co.jp
D4232625B
If you change the default installation folder, click [Change].
Select the installation folder, and click [Next].
If you click [Install], the installation program starts installing.

8
Copyright © 2014 TOSHIBA TELI CORPORATION, All rights reserved. www.toshiba-teli.co.jp
D4232625B
On completion of successful installation, the following dialog box will appear.
click [Finish].

9
Copyright © 2014 TOSHIBA TELI CORPORATION, All rights reserved. www.toshiba-teli.co.jp
D4232625B
4.2. GenICam Installation
To use TeliCamSDK, installation of GenICam Runtime (Ver. 2.3.1) is required.
GenICam installation file is stored in the following folder.
x86 : [installation folder]\GenICam_V2_3_1\x86\GenICam_VC80_Win32_i86_v2_3_1.exe
x64 : [installation folder]\GenICam_V2_3_1\x64\GenICam_VC80_Win64_x64_v2_3_1.exe
If you run the above file, the installation wizard will appear.
Click [Next], and the installation will continue.
If you accept the terms in the license agreement, click [Next].

10
Copyright © 2014 TOSHIBA TELI CORPORATION, All rights reserved. www.toshiba-teli.co.jp
D4232625B
If you change the default installation folder, click [Browse …].
Select the installation folder, and click [Next].
Choose a Start Menu folder, and click [Next].

11
Copyright © 2014 TOSHIBA TELI CORPORATION, All rights reserved. www.toshiba-teli.co.jp
D4232625B
Choose which features of GenICam you want to install.
Select “Typical Installation” as an installation type, and click [Install].
Click [Finish] to close this wizard.

12
Copyright © 2014 TOSHIBA TELI CORPORATION, All rights reserved. www.toshiba-teli.co.jp
D4232625B
4.3. VC++ 2010 SP1 Redistributable installation
To use TeliCamSDK, installation of the Visual C++ 2010 SP1 Runtime is required. Search installed
programs as below, and if Redistributable or Runtime cannot be found, installation of Microsoft Visual
C++ 2010 SP1 Redistributable Package is required. Redistributable Package can be downloaded from
the Microsoft Corporation website.

13
Copyright © 2014 TOSHIBA TELI CORPORATION, All rights reserved. www.toshiba-teli.co.jp
D4232625B
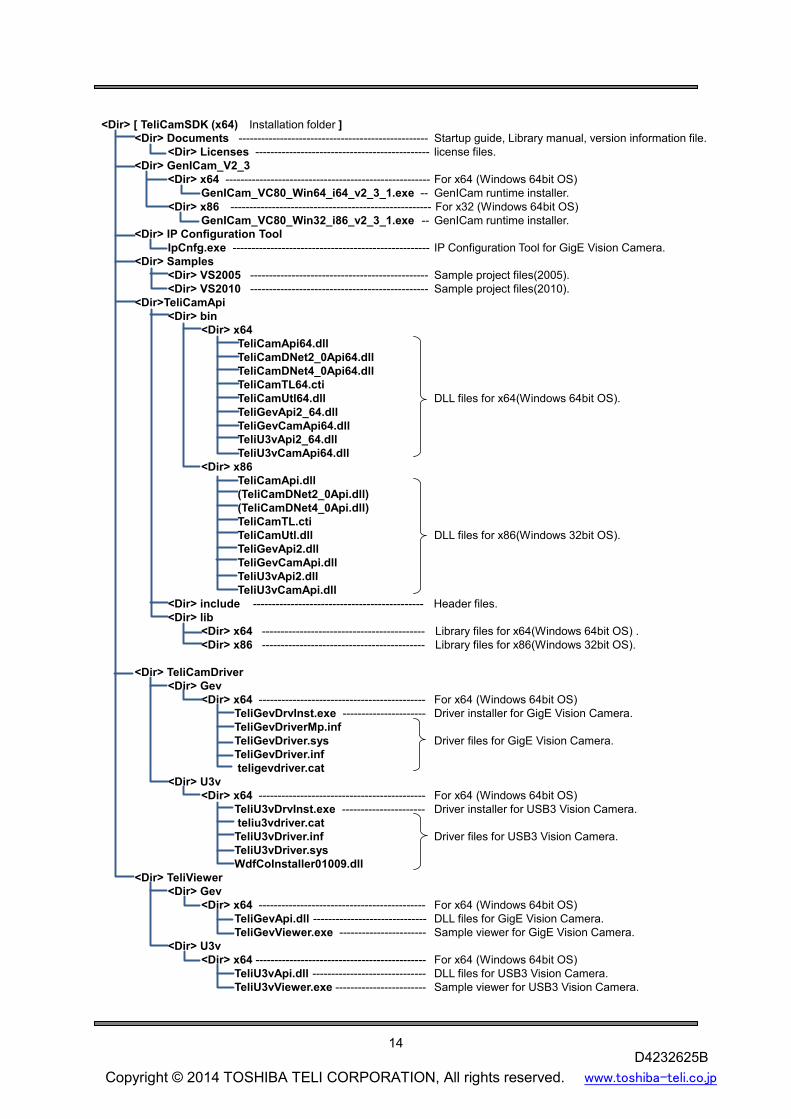
4.4. Folder configuration
On completion of successful installation, the following files will be created under the installation folder
( \Program Files\TOSHIBA TELI\TeliCamSDK unless otherwise specified).
(In the case of 32 bits OS, some "x64" is replaced by "x86".)
“TeliCamDNet2_0Api64.dll” (TeliCamDNet4_0Api.dll) and “TeliCamDNet2_0Api64.dll”
(TeliCamDNet2_0Api.dll) are different installation location in 64-bit and 32-bit.
Case of 64-bit
<Dir> [ TeliCamSDK (x64) Installation folder ]
<Dir>TeliCamApi
<Dir> bin
<Dir> x64
TeliCamApi64.dll
TeliCamDNet2_0Api64.dll
TeliCamDNet4_0Api64.dll
TeliCamTL64.cti
TeliCamUtl64.dll DLL files for x64(Windows 64bit OS).
TeliGevApi2_64.dll
TeliGevCamApi64.dll
TeliU3vApi2_64.dll
TeliU3vCamApi64.dll
<Dir> x86
TeliCamApi.dll
TeliCamTL.cti
TeliCamUtl.dll
TeliGevApi2.dll DLL files for x86(Windows 32bit OS).
TeliGevCamApi.dll
TeliU3vApi2.dll
TeliU3vCamApi.dll
Case of 32-bit
<Dir> [ TeliCamSDK (x86) Installation folder ]
<Dir>TeliCamApi
<Dir> bin
<Dir> x64
TeliCamApi64.dll
TeliCamTL64.cti
TeliCamUtl64.dll
TeliGevApi2_64.dll DLL files for x64(Windows 64bit OS).
TeliGevCamApi64.dll
TeliU3vApi2_64.dll
TeliU3vCamApi64.dll
<Dir> x86
TeliCamApi.dll
TeliCamDNet2_0Api.dll
TeliCamDNet4_0Api.dll
TeliCamTL.cti
TeliCamUtl.dll DLL files for x86(Windows 32bit OS).
TeliGevApi2.dll
TeliGevCamApi.dll
TeliU3vApi2.dll
TeliU3vCamApi.dll
14
Copyright © 2014 TOSHIBA TELI CORPORATION, All rights reserved. www.toshiba-teli.co.jp
D4232625B
<Dir> [ TeliCamSDK (x64) Installation folder ]
<Dir> Documents -------------------------------------------------- Startup guide, Library manual, version information file.
<Dir> Licenses ---------------------------------------------- license files.
<Dir> GenICam_V2_3
<Dir> x64 ------------------------------------------------------ For x64 (Windows 64bit OS)
GenICam_VC80_Win64_i64_v2_3_1.exe -- GenICam runtime installer.
<Dir> x86 ----------------------------------------------------- For x32 (Windows 64bit OS)
GenICam_VC80_Win32_i86_v2_3_1.exe -- GenICam runtime installer.
<Dir> IP Configuration Tool
IpCnfg.exe ---------------------------------------------------- IP Configuration Tool for GigE Vision Camera.
<Dir> Samples
<Dir> VS2005 ----------------------------------------------- Sample project files(2005).
<Dir> VS2010 ----------------------------------------------- Sample project files(2010).
<Dir>TeliCamApi
<Dir> bin
<Dir> x64
TeliCamApi64.dll
TeliCamDNet2_0Api64.dll
TeliCamDNet4_0Api64.dll
TeliCamTL64.cti
TeliCamUtl64.dll DLL files for x64(Windows 64bit OS).
TeliGevApi2_64.dll
TeliGevCamApi64.dll
TeliU3vApi2_64.dll
TeliU3vCamApi64.dll
<Dir> x86
TeliCamApi.dll
(TeliCamDNet2_0Api.dll)
(TeliCamDNet4_0Api.dll)
TeliCamTL.cti
TeliCamUtl.dll DLL files for x86(Windows 32bit OS).
TeliGevApi2.dll
TeliGevCamApi.dll
TeliU3vApi2.dll
TeliU3vCamApi.dll
<Dir> include --------------------------------------------- Header files.
<Dir> lib
<Dir> x64 ------------------------------------------- Library files for x64(Windows 64bit OS) .
<Dir> x86 ------------------------------------------- Library files for x86(Windows 32bit OS).
<Dir> TeliCamDriver
<Dir> Gev
<Dir> x64 -------------------------------------------- For x64 (Windows 64bit OS)
TeliGevDrvInst.exe ---------------------- Driver installer for GigE Vision Camera.
TeliGevDriverMp.inf
TeliGevDriver.sys Driver files for GigE Vision Camera.
TeliGevDriver.inf
teligevdriver.cat
<Dir> U3v
<Dir> x64 -------------------------------------------- For x64 (Windows 64bit OS)
TeliU3vDrvInst.exe ---------------------- Driver installer for USB3 Vision Camera.
teliu3vdriver.cat
TeliU3vDriver.inf Driver files for USB3 Vision Camera.
TeliU3vDriver.sys
WdfCoInstaller01009.dll
<Dir> TeliViewer
<Dir> Gev
<Dir> x64 -------------------------------------------- For x64 (Windows 64bit OS)
TeliGevApi.dll ------------------------------ DLL files for GigE Vision Camera.
TeliGevViewer.exe ----------------------- Sample viewer for GigE Vision Camera.
<Dir> U3v
<Dir> x64 --------------------------------------------- For x64 (Windows 64bit OS)
TeliU3vApi.dll ------------------------------ DLL files for USB3 Vision Camera.
TeliU3vViewer.exe ------------------------ Sample viewer for USB3 Vision Camera.

15
Copyright © 2014 TOSHIBA TELI CORPORATION, All rights reserved. www.toshiba-teli.co.jp
D4232625B
5. GigE Vision Digital Camera Guide The installation of the GigE Vision driver is required not only installation of TeliCamSDK package if you
use the GigE Vision digital camera,.
See section ”5.2. Driver installation (Manual)” if you want to install manually.
5.1. Driver Installation (Using Tool)
The GigE Vision driver installation / uninstallation file is stored in the following folder.
x86 : [installation folder]\TeliCamDriver\Gev\x86\TeliGevDrvInst.exe
x64 : [installation folder]\TeliCamDriver\Gev\x64\TeliGevDrvInst64.exe
Run the above file. The version of the driver to be installed will appear on “Driver file version”. The
version of the driver currently installed will appear on “Installed driver version”. If the driver has not
been installed yet, ”---“ will appear.
Click [Install], and the installation will begin.
A warning dialog as below may appear during installation. Select [Install this driver software anyway],
and the installation will continue. Please note that the network may be temporarily interrupted during
installation.

16
Copyright © 2014 TOSHIBA TELI CORPORATION, All rights reserved. www.toshiba-teli.co.jp
D4232625B
On completion of successful driver installation, the version of the installed driver will appear. A list of
network adapters installed on PC will also appear.
Uncheck everything except an adapter connected to the camera, and click [Apply].
Now installation is completed. Click [Exit] to finish the installer. Reboot PC so that the installation of
driver can take effect.

17
Copyright © 2014 TOSHIBA TELI CORPORATION, All rights reserved. www.toshiba-teli.co.jp
D4232625B
5.2. Driver Inatallation (Manual)
Even if it uses a driver installation tool, when a driver is not installed normally, a driver can also be
installed manually.
Go to [Control Panel] → [Network and Internet] → [Network and Sharing Center].
Click [Change adapter settings] on the left navigation bar.
Select the adapter which a camera is connected to. Right-click, and Select [Properties].

18
Copyright © 2014 TOSHIBA TELI CORPORATION, All rights reserved. www.toshiba-teli.co.jp
D4232625B
[Properties] dialog will appear. Click [Install].
[A Select Network Feature Type]dialog will appear. Click the [Service], and click [Add…].
[Select Network Service] dialog will appear. Click [Have Disk…].

19
Copyright © 2014 TOSHIBA TELI CORPORATION, All rights reserved. www.toshiba-teli.co.jp
D4232625B
[Install From Disk]dialog will appear. Click [Browse…].
[Locate File]dialog will appear. Here, specify the ”TeliGevDriver.inf” file.

20
Copyright © 2014 TOSHIBA TELI CORPORATION, All rights reserved. www.toshiba-teli.co.jp
D4232625B
”TeliGevDriver.inf” file is stored in the following folder.
x86 : [installation folder]\TeliCamDriver\Gev\x86\
x64 : [installation folder]\TeliCamDriver\Gev\x64\
Select the ”TeliGevDriver.inf” file and Click [Open].
Go back to [Installation From Floppy Disk] dialog. The directory of ”TeliGevDriver.inf” file will appear.
Click [OK].

21
Copyright © 2014 TOSHIBA TELI CORPORATION, All rights reserved. www.toshiba-teli.co.jp
D4232625B
Go back to [Select Network Service] dialog. The [TeliGevDriver GigE Vision Filter] item will be
displayed in the [Network Service] list box. Click [OK] to begin installation of the driver.
On completion of driver installation, the screen will go back to [Properties] dialog. The item
[TeliGevDriver GigE Vision Filter] will appear in a list box in the middle of the screen, with its check box
checked.
Click [OK]. Now the manual installation of the driver is completed.

22
Copyright © 2014 TOSHIBA TELI CORPORATION, All rights reserved. www.toshiba-teli.co.jp
D4232625B
5.3. Firewall
To ensure communication with a camera using an IP address configuration tool, viewer or user
application, we recommend that you should disable Windows Firewall or installed firewall manufactured
by a third party.
Go to [Control Panel] → [System and Security] → [Windows Firewall].
Click [Windows Firewall] in [Control Panel]. Then click [Turn Windows Firewall on or off].
Select [Turn off Windows Firewall (not recommended)] and Click [OK].

23
Copyright © 2014 TOSHIBA TELI CORPORATION, All rights reserved. www.toshiba-teli.co.jp
D4232625B
5.4. Network adapter
Configure IP address of the network adapter. Also, configuration of the network adapter can improve its
performance.
5.4.1. IP Address
To perform communication with a camera, IP address is required for the network adapter.
[Obtain an IP address automatically] is selected by default in the IP configuration of the network
adapter. In this case, IP address is assigned to the adapter by the DCHP server on the network.
IP address in a range from 169.254.0.1 to 169.254.255.254 and the subnet mask 255.255.0.0 are
automatically assigned by automatic private IP address configuration when DHCP server is not
available, or alternative configuration is not specified. In this case, it will take a little time before IP
address of network adapter is determined.
Setting IP address in advance can shorten the time. Also, IP address configuration is required to use
network different from a default one. The configuration procedure is as follows:
Select [Run...] from Start Menu. The [Run...] dialog will start. It can also start with “Windows key” +
“R”.
Enter “ncpa.cpl” in the [Open] field, and Click [OK]. Then, [Network Connections] dialog will start.

24
Copyright © 2014 TOSHIBA TELI CORPORATION, All rights reserved. www.toshiba-teli.co.jp
D4232625B
A list of network adapters connected to PC will appear. Select one of them and right-click. Select
[Properties] from the context menu.
Select [Internet Protocol Version 4 (TCP/IPv4)] from a list in the center of [Networking] tab, and click
[Properties].
英語表記に変更
25
Copyright © 2014 TOSHIBA TELI CORPORATION, All rights reserved. www.toshiba-teli.co.jp
D4232625B
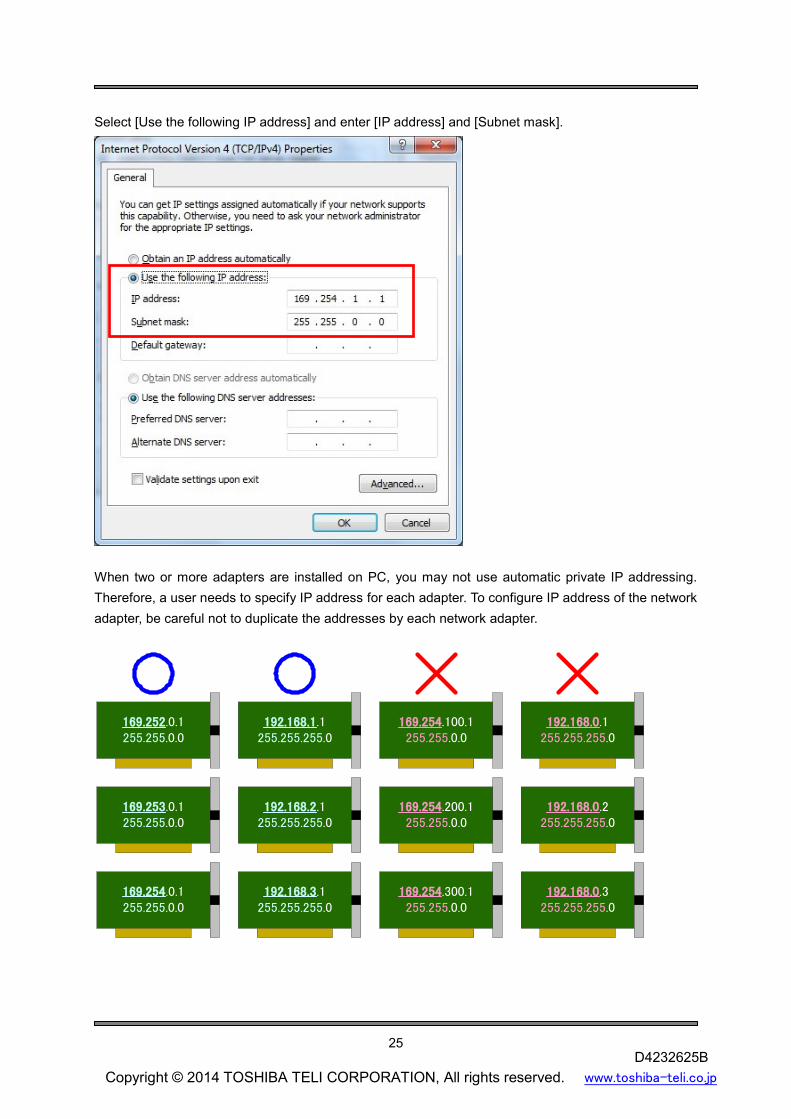
Select [Use the following IP address] and enter [IP address] and [Subnet mask].
When two or more adapters are installed on PC, you may not use automatic private IP addressing.
Therefore, a user needs to specify IP address for each adapter. To configure IP address of the network
adapter, be careful not to duplicate the addresses by each network adapter.
169.254.100.1255.255.0.0
169.254.200.1255.255.0.0
169.254.300.1255.255.0.0
169.252.0.1255.255.0.0
169.253.0.1255.255.0.0
169.254.0.1255.255.0.0
192.168.0.1255.255.255.0
192.168.0.2255.255.255.0
192.168.0.3255.255.255.0
192.168.1.1255.255.255.0
192.168.2.1255.255.255.0
192.168.3.1255.255.255.0

26
Copyright © 2014 TOSHIBA TELI CORPORATION, All rights reserved. www.toshiba-teli.co.jp
D4232625B
5.4.2. Jumbo frame (Jumbo packet)
When the jumbo frame function is used, the overhead of streaming is decreased and the throughput is
improved. To use this function, all devices such as a camera and a network adapter are required to be
compatible with the function.
Select [Run...] from Start Menu. The [Run...] dialog will start. It can also start with “Windows key” +
“R”.
Enter “ncpa.cpl” in the [Open] field, and Click [OK]. Then, [Network Connections] dialog will start.
A list of network adapters connected to PC will appear. Select one of them and right-click.
Select [Properties] from the context menu.
Click [Configuration] of [Network] tab.

27
Copyright © 2014 TOSHIBA TELI CORPORATION, All rights reserved. www.toshiba-teli.co.jp
D4232625B
Property of network adapter will appear. Select [Advanced Setting] tab and select the jumbo packet
from [Setting] list. Select the maximum value from [Value] combo box on the right side.
Property or configuration procedure may differ depending on the network adapter. Also, the size
available for the Jumbo frame becomes the minimum of the value configured to the network adapter or
the relaying network switch. For example, the packet size configurable to the camera will be 7000byte
or less if the maximum value of network switch is 9000byte and the setting value of network adapter is
7000byte.

28
Copyright © 2014 TOSHIBA TELI CORPORATION, All rights reserved. www.toshiba-teli.co.jp
D4232625B
5.4.3 Option of performance
To configure the receive buffer and the interrupt throttle rate can reduce CPU utilization. For these
configurations, its name or its configuration procedure may differ when the function is not implemented
depending on the network adapter. Please use the latest network adapter driver.
1. Select [Advanced Setting] tab of property of network adapter
2. Select [Option of Performance] from [Setting] list.
3. Click [Properties].
4. Select [Receive Buffer] from [Setting] list.
5. Select the maximum value in [Value] on the right side.
①
②
③
④ ⑤

29
Copyright © 2014 TOSHIBA TELI CORPORATION, All rights reserved. www.toshiba-teli.co.jp
D4232625B
5.5. GigE vision camera configuration
Configure IP address of the network adapter. Also, describe User-defined name register, a user space
inside the camera.
5.5.1 IP address
To perform communication with a PC, IP address is also required for the camera.
[Use DHCP] is selected by default in IP configuration of the camera. In this case, IP address is
assigned to the camera by the DCHP server on the network.
IP address in a range from 169.254.0.1 to 169.254.255.254 and the subnet mask 255.255.0.0 are
automatically assigned by automatic private IP address configuration when DHCP server is not
available. In this case, it will take a little time before IP address of camera is determined.
To shorten the time, we recommend that the user fixes IP address. Also, IP address configuration is
required to use network different from a default one. The configuration procedure is as follows:
Run “IpCnfg.exe” in [IP Configuration Tool] in the TeliCamSDK installation folder. [IP Configuration Tool]
will start.
Left hand of the screen is the bias list. Icon indicates the network adapter. Icon indicates the
camera connected to it.
①
②

30
Copyright © 2014 TOSHIBA TELI CORPORATION, All rights reserved. www.toshiba-teli.co.jp
D4232625B
For IP configuration of camera, DHCP is selected at the time of factory shipment. IP address of
169.254.***.*** is automatically configured because there is no DHCP server on the network. In this
case, a communication with a camera can be performed since the network address of adapter is same
as that of camera.
If you want to search the device on the network again after application is started, click [Refresh Device
List].
The number of network × [AckWaitTime] second is required to finish this operation.
Select the camera performing the configuration from the device list on the left side. The information of
selected camera will appear on the right side.

31
Copyright © 2014 TOSHIBA TELI CORPORATION, All rights reserved. www.toshiba-teli.co.jp
D4232625B
5.5.2. Persistent IP Setting
Setting IP address in advance can shorten the time.
1. Check [Persistent IP] inside [IP Configuration Setting].
2. Enter IP address fixed to [Persistent IP Setting] below.
3. Click [Save IP Configuration & Persistent IP].
The following dialog will appear when IP address to the camera is successfully written.
Camera restart is required so that the new IP address of camera can take effect.
①
②
③

32
Copyright © 2014 TOSHIBA TELI CORPORATION, All rights reserved. www.toshiba-teli.co.jp
D4232625B
Force IP address is displayed in [Device’s Information] after camera restarted.

33
Copyright © 2014 TOSHIBA TELI CORPORATION, All rights reserved. www.toshiba-teli.co.jp
D4232625B
5.5.3 Different network
When starting a camera, the application cannot communicate with the camera if the network is different
from that of network adapter. In this case, configure IP address after the network of camera is fit to that
of adapter temporarily and set it to be in a state where the communication can be done.
The values of [IP Address] and [Subnet mask] are displayed in red when the different networks in IP
Configuration Tool.

34
Copyright © 2014 TOSHIBA TELI CORPORATION, All rights reserved. www.toshiba-teli.co.jp
D4232625B
1. Fit [IP Address] and [Subnet Mask] of [Force IP Setting] to the network of adapter and
configure it. (There is no any problem if you use them as it is because the recommended
address in consideration of network has already been configured to this item in advance.)
2. Click [Send Force IP Command] to write IP configuration into camera.
The following dialog box will appear after you click [Send Force IP Command].
Click [OK].
①
②

35
Copyright © 2014 TOSHIBA TELI CORPORATION, All rights reserved. www.toshiba-teli.co.jp
D4232625B
Click [Refresh Device List] to acquire the information of camera once again.
The following dialog box will be appear after you click [Refresh Device List].
Click [OK].

36
Copyright © 2014 TOSHIBA TELI CORPORATION, All rights reserved. www.toshiba-teli.co.jp
D4232625B
Setting of [Force IP Setting] , [IP Address] and [Subnet Mask] will be reflected in [Device’s Information]
group box. You can check whether IP configuration of camera has been changed.
This setting value is a temporary one, and it will disappear as soon as the power of camera is turned off.
Perform the procedure in “Persistent IP Setting” to fix IP address of camera.
In any of the following cases, the error message may appear.
・When the cable is disconnected, or the power of camera is turned off after camera search is
successful and it is displayed in the device list;
・When the camera refuses it because IP to save is wrong;
・When the other applications have already acquired the control of camera;
・When the communication condition is so bad that the packets sent and received are out of order.

37
Copyright © 2014 TOSHIBA TELI CORPORATION, All rights reserved. www.toshiba-teli.co.jp
D4232625B
5.5.4. User-defined name [User Defined]
The camera has the User-defined name register that is the user space. String of 16byte (15byte +
NULL) specified by the user can be written to this register and it can be maintained even if the power is
turned off. The configuration procedure is as follows.
1. Specify any character within 15 characters to [User Defined]. The 15 characters starting at the
character will be valid, and NULL will be attached by application when the number of
characters more than that is specified.
2. Press [Save User Defined Name [15byte]].
The following dialogue will appear when the specified string is successfully written. We recommend a
restart of camera for confirmation.
① ②

38
Copyright © 2014 TOSHIBA TELI CORPORATION, All rights reserved. www.toshiba-teli.co.jp
D4232625B
The string saved can be read out by Cam_ReadReg() function of TeliCamApi. In addition,
Cam_GetInformation() function can also be used.
It can also be directly written by Cam_WriteReg() function.
User-defined name register
Address : 0x00E8
Length : 16 byte
Access : Read/Write

39
Copyright © 2014 TOSHIBA TELI CORPORATION, All rights reserved. www.toshiba-teli.co.jp
D4232625B
6. USB3 Vision Digital Camera Guide
The installation of the USB3 Vision driver is required not only installation of TeliCamSDK package if you
use the USB3E Vision digital camera,.
See section ”6.2. Driver installation (Manual)” if you want to install manually.
6.1. Driver Installation (Using Tool)
The USB3 Vision driver installation / uninstallation file is stored in the following folder.
x86 : [installation folder]\TeliCamDriver\U3v\x86\TeliU3vDrvInst.exe
x64 : [installation folder]\TeliCamDriver\U3v\x64\TeliU3vDrvInst64.exe
Run the above file. Please check that the attached to the [Install], and Click [Go]. Installation will begin.
A warning dialog as below may appear during installation. Select [Install this driver software anyway],
and the installation will continue. Please note that the network may be temporarily interrupted during
installation.

40
Copyright © 2014 TOSHIBA TELI CORPORATION, All rights reserved. www.toshiba-teli.co.jp
D4232625B
The driver installation might take a little time to complete.
If the following dialog is displayed, the driver installation is completed.

41
Copyright © 2014 TOSHIBA TELI CORPORATION, All rights reserved. www.toshiba-teli.co.jp
D4232625B
6.2. Driver Inatallation (Manual)
Even if it uses a driver installation tool, when a driver is not installed normally, a driver can also be
installed manually.
Connect the camera to the PC of the USB3.0 port. The installation of the driver dialog may be displayed.
If that is the case, close that dialog temporary.
Open “Device Manager”, “USB3 Vision Device” item with an exclamation mark in the “Other devices”
will be displayed. Then double-click it.

42
Copyright © 2014 TOSHIBA TELI CORPORATION, All rights reserved. www.toshiba-teli.co.jp
D4232625B
[USB3 Vision Device Properties] dialog is displayed. Click [Update Driver...].
[Update Driver Software – USB3 Vision Device] is displayed.
Select [Browse my computer for driver software].

43
Copyright © 2014 TOSHIBA TELI CORPORATION, All rights reserved. www.toshiba-teli.co.jp
D4232625B
Select [Let me pick from a list of device drivers on my computer].
The list of select device type is displayed. Select [Show All Device] item from the list, then Click [Next].

44
Copyright © 2014 TOSHIBA TELI CORPORATION, All rights reserved. www.toshiba-teli.co.jp
D4232625B
The dialog of select device driver is displayed. Click [Hard Disk...].
The dialog of select device driver is displayed. Click [Hard Disk...].

45
Copyright © 2014 TOSHIBA TELI CORPORATION, All rights reserved. www.toshiba-teli.co.jp
D4232625B
[Install From Disk] dialog is displayed. Click [Browse...]
[Locate File] dialog is displayed.
In this part, specify the “TeliU3vDriver.inf” file.
“TeliU3vDriver.inf” file is stored in the following folder.
x86 : [installation folder]\TeliCamDriver\TeliCamDriver\U3v\x86
x64 : [installation folder] \TeliCamDriver\TeliCamDriver\U3v\x64
Select the “TeliU3vDriver.inf” file and click [Open].

46
Copyright © 2014 TOSHIBA TELI CORPORATION, All rights reserved. www.toshiba-teli.co.jp
D4232625B
Go back to [Install From Disk] dialog. The directory of “TeliU3vDriver.inf” file is displayed.
Click [OK].
Go back to [Update Driver Software – USB3 Vision Device] dialog.
[USB3 Vision Camera] will be displayed in the list. Select it, and Click [Next] to begin installation of the
driver.

47
Copyright © 2014 TOSHIBA TELI CORPORATION, All rights reserved. www.toshiba-teli.co.jp
D4232625B
During installation, [Update Driver Warning] dialog might be displayed. Click [Yes] to continue
installation.
During installation, [Windows Security] dialog also might be displayed. Click [Install this driver software
anyway] to continue installation.

48
Copyright © 2014 TOSHIBA TELI CORPORATION, All rights reserved. www.toshiba-teli.co.jp
D4232625B
The driver installation might take a little time to complete.
If the following dialog is displayed, the driver installation is completed.
* If a driver has not been installed correctly, please install again after performing a full deletion
of a driver that are installed.

49
Copyright © 2014 TOSHIBA TELI CORPORATION, All rights reserved. www.toshiba-teli.co.jp
D4232625B
7. Uninstallation TeliCamSdk uninstall methods are as follows.
7.1. GigE Vision camera driver uninstallation
7.1.1. Driver Uninstallation (Using Tool)
The GigE Vision driver installation / uninstallation file is stored in the following folder.
x86 : [installation folder]\TeliCamDriver\Gev\x86\TeliGevDrvInst.exe
x64 : [installation folder]\TeliCamDriver\Gev\x64\TeliGevDrvInst64.exe
Run the above file.
Check the check box for the network adapter that you want to uninstall. Click [Uninstall].
On completion of successful uninstallation, the following screen will appear.
If all network adapter’s drivers are uninstalled, the following message appears on the “Installed driver
version” : ”---“.
50
Copyright © 2014 TOSHIBA TELI CORPORATION, All rights reserved. www.toshiba-teli.co.jp
D4232625B
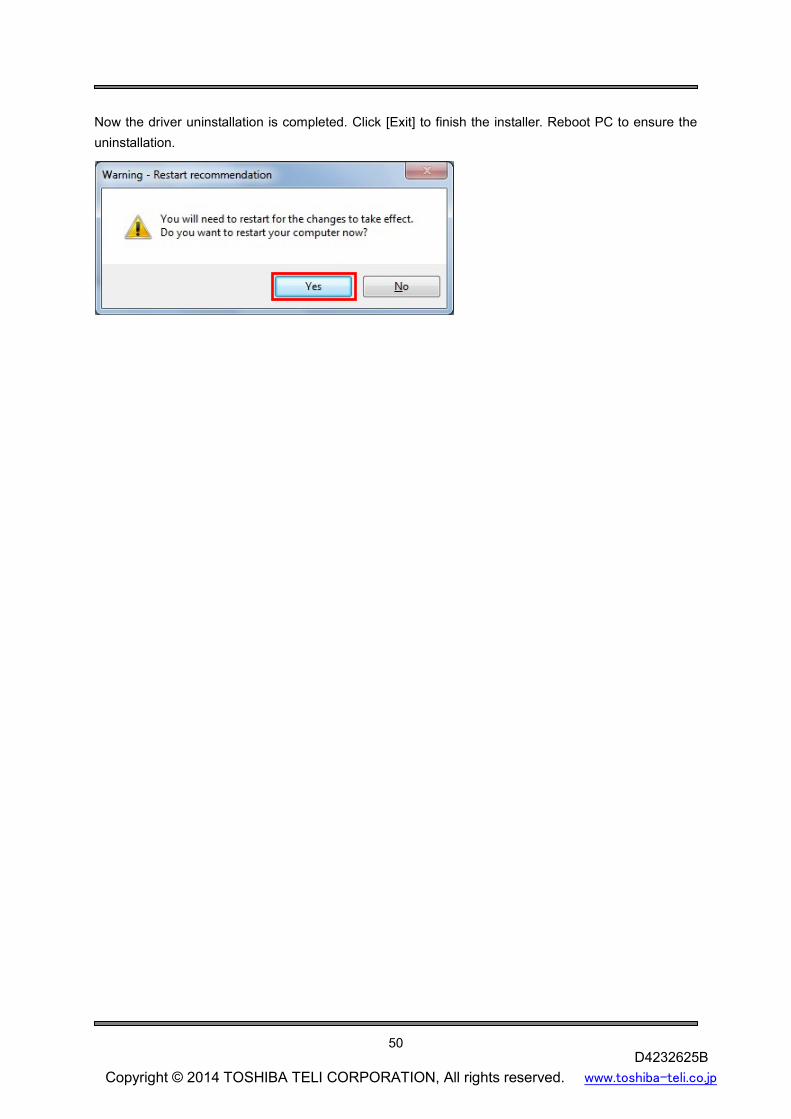
Now the driver uninstallation is completed. Click [Exit] to finish the installer. Reboot PC to ensure the
uninstallation.

51
Copyright © 2014 TOSHIBA TELI CORPORATION, All rights reserved. www.toshiba-teli.co.jp
D4232625B
7.1.1. Driver Uninstallation (Manual)
You can uninstall the driver by the following procedure instead of uninstalling a driver using the driver
installation / uninstallation file.
Go to [Control Panel] → [Network and Internet] → [Network and Sharing Center].
Click [Change adapter settings] on the left navigation bar.
Select the adapter which a camera is connected to. Right-click, and Select [Properties].
The screen appears as below, listing network adapters. Select one of them, right-click, and select
[Properties] from context menu.
[Properties] dialog will appear. Select [TeliGevDriver GigE Vision Filter], and click [Uninstall].

52
Copyright © 2014 TOSHIBA TELI CORPORATION, All rights reserved. www.toshiba-teli.co.jp
D4232625B
[Uninstall TeliGevDriver GigE Vision Filter] dialog will appear. Click [Yes] to continue uninstallation.
On completion of driver uninstallation, go back to the [Properties] dialog. The item [TeliGevDriver GigE
Vision Filter] is deleted from a list box in the middle of the screen.

53
Copyright © 2014 TOSHIBA TELI CORPORATION, All rights reserved. www.toshiba-teli.co.jp
D4232625B
7.2. USB3 Vision Uninstallation
The USB3 Vision driver installation / uninstallation file is stored in the following folder.
x86 : [installation folder]\TeliCamDriver\U3v\x86\TeliU3vDrvInst.exe
x64 : [installation folder]\TeliCamDriver\U3v\x64\TeliU3vDrvInst64.exe
Run the above file. Please check that the attached to the [Uninstall], and Click [Go].
The following dialog will appear.
Click [Yes] to begin uninstallation of the driver.
If the following dialog is displayed, the driver uninstallation is completed.

54
Copyright © 2014 TOSHIBA TELI CORPORATION, All rights reserved. www.toshiba-teli.co.jp
D4232625B
7.3.GenICam Uninstallation
Run the “Uninstall.exe” in the installation folder of GenICam. (If you did not change the installation
folder, it located in the following folder : “C:\Program Files\GenICam_v2_3” )
Click [Yes] to begin uninstallation of GenICam.
Click [Close]. GenICam uninstallation is completed.

55
Copyright © 2014 TOSHIBA TELI CORPORATION, All rights reserved. www.toshiba-teli.co.jp
D4232625B
Another uninstall method is using “Uninstall or change a program” in the control panel.
Select “GenICam v2.3”, and operate it according to the dialog that appears.
7.4.TeliCamSDK Uninstallation
Uninstall method is using “Uninstall or change a program” in the control panel.
Select “TeliCamSDK”, and operate it according to the dialog that appears.

56
Copyright © 2014 TOSHIBA TELI CORPORATION, All rights reserved. www.toshiba-teli.co.jp
D4232625B
8. Others
8.1. Rivision History
Date Version Description
2014/09/09 1.0.0 Create the initial version.
2015/01/21 1.0.1 Added the TeliCamSDK ContainDNet description.
8.2. Disclaimer
The disclaimer of this Software is described in another “TeliCamSDK License Agreement Eng.pdf”.
Make sure to read this Agreement carefully before using it.
Refer to TeliCamSDK installation folder / Documents / License folder.
8.3. License
Microsoft, Windows, Windows XP, Windows Vista, Windows 7 and Visual C++ are the trademark or the
registered trademark of Microsoft Corporation. Furthermore, the trade name used in this document is
the trademark or the registered trademark of each company.
Viewer uses the library that the third party retains the copyright. Refer to TeliCamSDK installation folder
/ Documents / License folder for license.
8.4. Inquiry
Please contact to each sales section or solution sales section for inquiry regarding TeliCamSDK, GigE
Vision camera and USB3 Vision camera.
191-0065
7-1, 4 chome, Asahigaoka, Hino-shi, Tokyo 191-0065, Japan
Toshiba Teli Corporation
Sales & Marketing Division : Solution Section
TEL: 0081-42-589-8772
FAX: 0081-42-589-8774