VMukti SQL Server Installation during server installation For V1034 to V1038


Teamwork Server Installation Guide
0-3
Teamwork Server 3.0 Installation Guide
The software and documentation are furnished under the Teamwork Server license agreement and may be used only in accordance with the terms of the agreement.
Copyright Information Copyright © 1999-2007 by Visual Paradigm. All rights reserved.
The material made available by Visual Paradigm in this document is protected under the laws and various international laws and treaties. No portion of this document or the material contained on it may be reproduced in any form or by any means without prior written permission from Visual Paradigm.
Every effort has been made to ensure the accuracy of this document. However, Visual Paradigm makes no warranties with respect to this documentation and disclaims any implied warranties of merchantability and fitness for a particular purpose. The information in this document is subject to change without notice.
All examples with names, company names, or companies that appear in this document are imaginary and do not refer to, or portray, in name or substance, any actual names, companies, entities, or institutions. Any resemblance to any real person, company, entity, or institution is purely coincidental.
Trademark Information
Teamwork Server is registered trademark of Visual Paradigm. Sun, Sun ONE, Java, Java2, J2EE and EJB, NetBeans are all registered trademarks of Sun Microsystems, Inc. Eclipse is registered trademark of Eclipse. JBuilder is registered trademark of Borland Corporation. IntelliJ and IntelliJ IDEA are registered trademarks of JetBrains. Microsoft, Windows, Windows NT, Visio, and the Windows logo are trademarks or registered trademarks of Microsoft Corporation. Oracle is a registered trademark, and JDeveloper is a trademark or registered trademark of Oracle Corporation. BEA is registered trademarks of BEA Systems, Inc. BEA WebLogic Workshop is trademark of BEA Systems, Inc. Rational Rose is registered trademark of International Business Machines Corporation. WinZip is a registered trademark of WinZip Computing, Inc. Other trademarks or service marks referenced herein are property of their respective owners.
Teamwork Server License Agreement
THE USE OF THE SOFTWARE LICENSED TO YOU IS SUBJECT TO THE TERMS AND CONDITIONS OF THIS SOFTWARE LICENSE AGREEMENT. BY INSTALLING, COPYING, OR OTHERWISE USING THE SOFTWARE, YOU ACKNOWLEDGE THAT YOU HAVE READ THIS AGREEMENT, UNDERSTAND IT, AND AGREE TO BE BOUNDED BY ALL OF THE TERMS AND CONDITIONS OF THIS SOFTWARE LICENSE AGREEMENT.
1. Limited License Grant. Visual Paradigm grants to you ("the Licensee") a personal, non-exclusive, non-transferable, limited, perpetual, revocable license to install and use Visual Paradigm Products ("the Software" or "the Product"). The Licensee must not re-distribute the Software in whole or in part, either separately or included with a product.
2. Restrictions. The Software is confidential copyrighted information of Visual Paradigm, and Visual Paradigm and/or its licensors retain title to all copies. The Licensee shall not modify, adapt, decompile, disassemble, decrypt, extract, or otherwise reverse engineer the Software. Software may not be leased, rented, transferred, distributed, assigned, or sublicensed, in whole or in part. The Software contains valuable trade secrets. The Licensee promises not to extract any information or concepts from it as part of an effort to compete with the licensor, nor to assist anyone else in such an effort. The Licensee agrees not to remove, modify, delete or destroy any proprietary right notices of Visual Paradigm and its licensors, including copyright notices, in the Software.
3. Disclaimer of Warranty. The software and documentation are provided "AS IS," WITH NO WARRANTIES WHATSOEVER. ALL EXPRESS OR IMPLIED REPRESENTATIONS AND WARRANTIES, INCLUDING ANY IMPLIED WARRANTY OF MERCHANTABILITY, FITNESS FOR A PARTICULAR PURPOSE, TITLE OR NON-INFRINGEMENT, ARE HEREBY EXCLUDED. THE ENTIRE RISK AS TO SATISFACTORY QUALITY, PERFORMANCE, ACCURACY AND EFFORT IS WITH THE LICENSEE. THERE IS NO WARRANTY THE DOCUMENTATION, Visual Paradigm's EFFORTS OR THE LICENSED SOFTWARE WILL FULFILL ANY OF LICENSEE'S PARTICULAR PURPOSES OR NEEDS. IF THESE WARRANTIES ARE UNENFORCEABLE UNDER APPLICABLE LAW, THEN Visual Paradigm DISCLAIMS SUCH WARRANTIES TO THE MAXIMUM EXTENT PERMITTED BY SUCH APPLICABLE LAW.
4. Limitation of Liability. Visual Paradigm AND ITS LICENSORS SHALL NOT BE LIABLE FOR ANY DAMAGES SUFFERED BY THE LICENSEE OR ANY THIRD PARTY AS A RESULT OF USING OR DISTRIBUTING SOFTWARE. IN NO EVENT WILL Visual Paradigm OR ITS LICENSORS BE LIABLE FOR ANY LOST REVENUE, PROFIT OR DATA, OR FOR DIRECT, INDIRECT, EXEMPLARY, SPECIAL, CONSEQUENTIAL, INCIDENTAL OR PUNITIVE DAMAGES, HOWEVER CAUSED AND REGARDLESS OF THE THEORY OF LIABILITY, ARISING OUT OF THE USE OF OR INABILITY TO USE THE SOFTWARE, EVEN IF Visual Paradigm HAS BEEN ADVISED OF THE POSSIBILITY OF SUCH DAMAGES.

Teamwork Server Installation Guide
0-4
5. Termination. The Licensee may terminate this License at any time by destroying all copies of Software. Visual Paradigm will not be obligated to refund any License Fees, if any, paid by the Licensee for such termination. This License will terminate immediately without notice from Visual Paradigm if the Licensee fails to comply with any provision of this License. Upon such termination, the Licensee must destroy all copies of the Software. Visual Paradigm reserves all rights to terminate this License.
SPECIFIC DISCLAIMER FOR HIGH-RISK ACTIVITIES. The SOFTWARE is not designed or intended for use in high-risk activities including, without restricting the generality of the foregoing, on-line control of aircraft, air traffic, aircraft navigation or aircraft communications; or in the design, construction, operation or maintenance of any nuclear facility. Visual Paradigm disclaims any express or implied warranty of fitness for such purposes or any other purposes.
NOTICE. The Product is not intended for personal, family or household use; rather, it is intended exclusively for professional use. Its utilization requires skills that differ from those needed to use consumer software products such as word processing or spreadsheet software.
GOVERNMENT RIGHTS. If the Software is licensed by or on behalf of a unit or agency of any government, the Licensee agrees that the Software is "commercial computer software", "commercial computer software documentation" or similar terms and that, in the absence of a written agreement to the contrary, the Licensee's rights with respect to the Software are limited by the terms of this Agreement.
Acknowledgments
This Product includes software developed by the Apache Software Foundation (http://www.apache.org). Copyright © 1999 The Apache Software Foundation. All rights reserved.

Teamwork Server Installation Guide
0-5
Table of Contents
Chapter 1 - Installing Teamwork Server Downloading Teamwork Server....................................................................................................................................... 1 -2 Installing the Server Application...................................................................................................................................... 1 -4 Administration.................................................................................................................................................................. 1 -7
Chapter 2 - Installing Teamwork Server with No-Install Introduction to the No-Install version .............................................................................................................................. 2 -2 Downloading Teamwork Server....................................................................................................................................... 2 -2 Installing the Server Application...................................................................................................................................... 2 -4 Administration.................................................................................................................................................................. 2 -5

Teamwork Server Installation Guide
0-6

Installing Teamwork Server 1

Teamwork Server Installation Guide Chapter 1 – Installing Teamwork Server
1-2
Chapter 1 - Installing Teamwork Server
This document explains in detail how to setup the teamwork environment and how to perform administration tasks such as adding users, creating projects as well as assigning projects to users with permission.
• Downloading Teamwork Server from the Internet • Installing Teamwork Server • Introduction to Server Administration
Downloading Teamwork Server
To download Teamwork Server:
1. Visit Visual Paradigm's official download site at: http://www.visual-paradigm.com/download/
2. Click on the image for Teamwork Server.
Figure 1.1 - Click to visit the download page of Teamwork Server
3. Enter your account information, and click Continue to proceed.
Figure 1.2 - Login to proceed to download

Teamwork Server Installation Guide Chapter 1 – Installing Teamwork Server
1-3
4. Choose the way of receiving the evaluation key, or not to receive it. Here are the description of each of the possible ways:
Ways of receiving an evaluation key Description
Download Product Only (without request evaluation key)
Just to download Teamwork Server without the need of an evaluation key.
Send evaluation key as attachment
You will receive an email attached with the key file. Make sure your server allows email with attachments for choosing this option. If this option is unchecked, you will receive an email, which includes a download link of the key file.
5. Select your operating system from the Platform drop-down menu. 6. From the Mirror Site drop-down menu, choose the location that is closest to your current location for a faster
download speed. 7. Click Download to proceed with downloading Teamwork Server.
Figure 1.3 - Teamwork Server download page
Teamwork Server Installation Guide Chapter 1 – Installing Teamwork Server
1-4
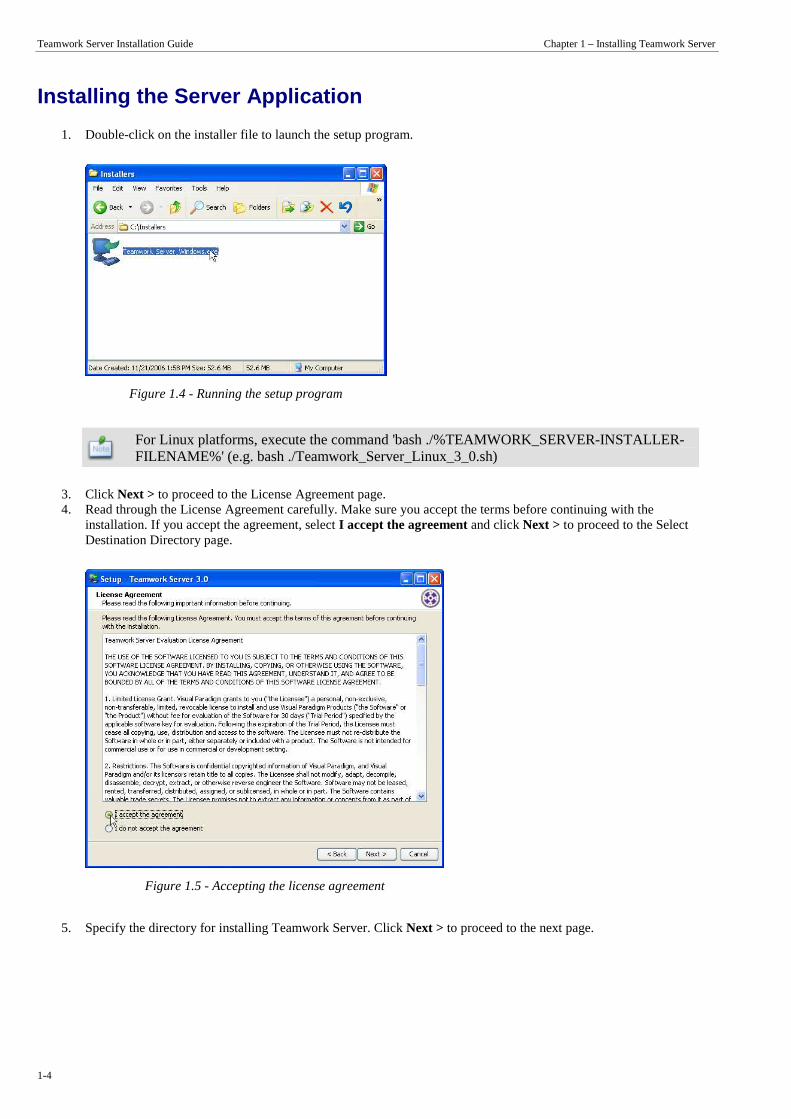
Installing the Server Application
1. Double-click on the installer file to launch the setup program.
Figure 1.4 - Running the setup program
For Linux platforms, execute the command 'bash ./%TEAMWORK_SERVER-INSTALLER-FILENAME%' (e.g. bash ./Teamwork_Server_Linux_3_0.sh)
3. Click Next > to proceed to the License Agreement page. 4. Read through the License Agreement carefully. Make sure you accept the terms before continuing with the
installation. If you accept the agreement, select I accept the agreement and click Next > to proceed to the Select Destination Directory page.
Figure 1.5 - Accepting the license agreement
5. Specify the directory for installing Teamwork Server. Click Next > to proceed to the next page.

Teamwork Server Installation Guide Chapter 1 – Installing Teamwork Server
1-5
6. Specify the name of the Start Menu folder that will be used to store the shortcuts. Keep Create shortcuts for all users checked if you want the shortcut to be available in all the user accounts in the machine. Click Next > to proceed.
For Linux platforms, select a folder for creating symlinks. You may select Don't create symlinks if you do not want to. For Mac OS X platforms, select whether you want to create desktop icon(s) that act as shortcut(s) to the installed products.
7. (For Windows users only) Select Install service "Teamwork Server Service" if you want Teamwork Server to be installed as a Windows service. And select Start on bootup if you want the Teamwork Server service to be started automatically on startup of the computer. Click Next > to proceed.
8. In the Installation Type screen, select an installation type and then click Next > to continue.
You can choose to install both the Server and Admin program, or only the Server, or only the Admin. The recommended option is Server and Admin if it is a fresh installation. If you have already installed the Server or Admin (either on the same computer or a different one), you may choose the Server Only or Admin Only option.
Figure 1.6 - Installation type
9. Server and Admin/Server Only
If you have chosen to install as Server and Admin or Server Only, you are brought to the Server Configuration page.
Specify the port number that will be used by Teamwork Server. The default port is 1999. Please make sure that the specified port will not be used by other applications.
The Teamwork Server Repository field allows you to specify the Teamwork Server repository location, where the configuration and data files used by the Teamwork Server are stored. If there is an existing teamwork server repository, you can import it into the new repository by checking Import Existing Repository and entering its path in the Import Directory field.
You can also import the license key file in this step (since Teamwork Server will not function if there is no valid license key, though you can import the key later, it is advised that you import the key during installation).

Teamwork Server Installation Guide Chapter 1 – Installing Teamwork Server
1-6
Click Next > to proceed with copying files.
Figure 1.7 - Server Configuration
Admin Only
If you have chosen to install as Admin Only, you are brought to the Admin Configuration page.
Specify the host and port number that is used by Teamwork Server.
Click Next > to proceed with copying files.
Figure 1.8 - Admin Configuration
10. Click Finish to close the setup program.

Teamwork Server Installation Guide Chapter 1 – Installing Teamwork Server
1-7
Administration
The Teamwork Administrator will be started if you finished the installation of Server and Admin or Admin Only.
1. If the Teamwork Administrator failed to connect to the Teamwork Server, the Checking Server page will show so that you can specify the appropriate server/connection information. Click Start Server to make sure the Teamwork Server is started before proceeding. If no valid key is found, you can click Import License Key to select the license key file in this step. After that, click Next to proceed with changing the administrator.
Figure 1.9 - The Checking Server page
2. In the Change Administrator Password screen, change the administrator password other than the default one. This step is compulsory right after the installation for security reason. After that, click Next to continue.
Figure 1.10 - The Change Administrator Password page

Teamwork Server Installation Guide Chapter 1 – Installing Teamwork Server
1-8
3. In the Create User page, add users to the Teamwork Server and assign permissions to them. You can add multiple users by repeating the steps of entering user information and click Add User. The Existing Users area shows the current users in the Teamwork Server, click Refresh if users are added/removed/modified externally. This step is optional and you may choose to do this at a later time. Click Next to continue.
Figure 1.11 - The Create User page
4. In the Create Project screen, add projects to the Teamwork Server and assign users to the projects. You can add multiple projects by repeating the steps of entering project information and click Add Project. The Existing Projects area shows the current projects in the Teamwork Server, click Refresh if project are added/removed/modified externally. This step is optional and you may choose to do this at a later time.
Figure 1.12 - The Create Project page
5. Click Finish to close the administrator program.

Installing Teamwork Server with No-Install 2

Teamwork Server Installation Guide Chapter 2 – Installing Teamwork Server with No-Install
2-2
Chapter 2 - Installing Teamwork Server with No-Install
While most of the applications nowadays require an installation, the No-Install approach is considered to be a lightweight alternative. This document will give you an introduction to what the No-Install version is, and explain how to perform administration tasks such as adding users, creating projects as well as assigning projects to users with permission.
• Introduction to the No-Install version • Downloading Teamwork Server from the Internet • Installing Teamwork Server • Introduction to Server Administration
Introduction to the No-Install version
No-Install, as suggested by its name, is a compressed file that contains Teamwork Server in a ready-to-run form. You can run Teamwork Server as soon as the file is decompressed. A characteristic that makes a No-Install different from the installer is that, it will not register itself to the system, nor to create any shortcuts. This make the installation more flexible as you can move the installation to somewhere else simply by moving the whole installation folder without the concern of breaking any linkage to the system.
Downloading Teamwork Server
To download Teamwork Server:
1. Visit Visual Paradigm's official download site at: http://www.visual-paradigm.com/download/
2. Click on the image for Teamwork Server.
Figure 2.1 - Click to visit the download page of Teamwork Server

Teamwork Server Installation Guide Chapter 2 – Installing Teamwork Server with No-Install
2-3
3. Enter your account information, and click Continue to proceed.
Figure 2.2 - Login to proceed to download
4. Choose the way of receiving the evaluation key, or not to receive it. Here are the description of each of the possible ways:
Ways of receiving an evaluation key Description
Download Product Only (without request evaluation key)
Just to download Teamwork Server without the need of an evaluation key.
Send evaluation key as attachment
You will receive an email attached with the key file. Make sure your server allows email with attachments for choosing this option. If this option is unchecked, you will receive an email, which includes a download link of the key file.
5. Select your operating system from the Platform drop-down menu. Choose the item with a bracket (No-Install) added to the name of the platform.
6. From the Mirror Site drop-down menu, choose the location that is closest to your current location for a faster download speed.
7. Click Download to proceed with downloading Teamwork Server.
Figure 2.3 - Teamwork Server download page

Teamwork Server Installation Guide Chapter 2 – Installing Teamwork Server with No-Install
2-4
Installing the Server Application
To install Teamwork Server:
1. Decompress the No-Install file.
Figure 2.4 - The No-Install file (zipped)
For Linux platforms, run the following command to decompress the No-Install file: tar -zxf %NO-INSTALL-FILE.tar.gz% -C %DESTINATION-FOLDER%
3. Execute %NO-INSTALL-DECOMPRESSED_FOLDER%/bin/TeamworkServerConfig.exe.
Figure 2.5 - Executing TeamworkServerConfig.exe
For Linux and Mac OS X platforms, execute the file TeamworkServerConfig inside %NO-INSTALL-DECOMPRESSED-FOLDER%/bin/
5. From the Teamwork Server Configuration dialog box, specify the port number that will be used by Teamwork Server. The default port is 1999. Please make sure that the specified port will not be used by other applications.
6. The Teamwork Server Repository field allows you to specify the Teamwork Server repository location, where the configuration and data files used by the Teamwork Server are stored. If there is an existing teamwork server repository, you can import it into the new repository by checking Import Existing Repository and entering its path in the Import Directory field.
7. You can also import the license key file in this step (since Teamwork Server will not function if there is no valid license key, though you can import the key later, it is advised that you import the key during installation).
Click Next > to finish the configuration.
8. If you want the teamwork server to start immediately after the configuration, keep Start Teamwork Server now selected and click Next.

Teamwork Server Installation Guide Chapter 2 – Installing Teamwork Server with No-Install
2-5
Administration
If Start Teamwork Server now is selected at the end of the configuration, the Teamwork Administrator will be started.
1. In the Login dialog box, enter the administrator user name and password, which are Admin/Admin (case-sensitive) be default. Besides, enter the host and the port number of the Teamwork Server, which can be the host name or an IP address can be entered. If the connection to the Teamwork Server requires a proxy setting, check Use Proxy and enter the proxy host and number. Click Login to log into the server.
Figure 2.6 - The Login screen
2. In the Users page, add users to the Teamwork Server and assign permissions to them. You can add multiple users by repeating the steps of entering user information and click Add User. The center of the page shows the current users in the Teamwork Server, click Refresh if users are added/removed/modified externally. This step is optional and you may choose to do this at a later time.
Figure 2.7 - The Users page

Teamwork Server Installation Guide Chapter 2 – Installing Teamwork Server with No-Install
2-6
3. In the Projects screen, add projects to the Teamwork Server and assign users to the projects. You can add multiple projects by repeating the steps of entering project information and click Add Project. The center of the page shows the current projects in the Teamwork Server, click Refresh if project are added/removed/modified externally. This step is optional and you may choose to do this at a later time.
Figure 2.8 - The Projects page
4. Select Session > Exit from the menu to close the administrator program.