Teaching earth science in developing countries: Volcano … resources/K_12 Lessons... · Teaching...
45
Teaching earth science in developing countries: Volcano lessons and activities Lara Kapelanczyk Department of Geological and Mining Engineering and Sciences April 2008 Michigan Technological University, Houghton, MI Introduction In many developed and developing countries around the world, earth science education is lacking. Many children (and adults) do not have a formal understanding of the structure of the earth or earth processes. This is unfortunate as a large number of people all over the world live at or near areas where earth processes can and do create large amounts of damage and living in these areas increases people’s vulnerability to hazards. Volcanic eruptions, earthquakes, landslides, floods, and tsunamis are all examples of earth processes that affect huge amounts of people every year. Based on data from the Center for Research on the Epidemiology of Disasters (CRED), in 2007 hundreds of people were killed in geologic disasters and over one million people were affected by these events (EM-DAT 2007). For these reasons, the earth sciences should be a part of the school curriculum. A basic knowledge of the earth is important. The purpose of this paper is to provide examples of lessons and activities that can be used in developing countries (with a focus on Latin America) to help teach children about basic earth science principals and in particular, teach children about volcanoes. Volcano Lessons and Activities This section of the paper is divided into two parts: dinámicas and lessons and activities. For use in the classroom they will have to be translated into the local language. Dinámicas. Dinámicas is a Spanish word that roughly translated means “icebreakers.” According to returned Peace Corps Volunteers, dinámicas are highly encouraged by the Peace Corps when working with children in Latin American countries (Engberg 2008). They are little games to play with the children before you start your lessons. The children like them and it helps them let out a little energy before the start of a lesson. Below is a list of dinámicas followed by brief descriptions. Some of the dinámicas can be altered to fit the lesson of the day. • Act like a volcano : In this dinámica the children are asked to stand up and show the teacher how they think a volcano acts using their body as the volcano. They can include sounds or act like different parts of the volcano such as lava flows and plumes. (Gross 2008). This would be a good activity to use on the first day of lessons about volcanoes. • Simon Says: In this dinámica the teacher starts out as Simon and asks the children to do certain activities related to the topic of the day (Engberg 2008). For example, if you are
-
Upload
nguyenkhuong -
Category
Documents
-
view
223 -
download
0
Transcript of Teaching earth science in developing countries: Volcano … resources/K_12 Lessons... · Teaching...
Teaching earth science in developing countries: Volcano lessons and activities Lara Kapelanczyk Department of Geological and Mining Engineering and Sciences April 2008 Michigan Technological University, Houghton, MI
Introduction In many developed and developing countries around the world, earth science education is
lacking. Many children (and adults) do not have a formal understanding of the structure of the earth or earth processes. This is unfortunate as a large number of people all over the world live at or near areas where earth processes can and do create large amounts of damage and living in these areas increases people’s vulnerability to hazards. Volcanic eruptions, earthquakes, landslides, floods, and tsunamis are all examples of earth processes that affect huge amounts of people every year. Based on data from the Center for Research on the Epidemiology of Disasters (CRED), in 2007 hundreds of people were killed in geologic disasters and over one million people were affected by these events (EM-DAT 2007).
For these reasons, the earth sciences should be a part of the school curriculum. A basic
knowledge of the earth is important. The purpose of this paper is to provide examples of lessons and activities that can be used in developing countries (with a focus on Latin America) to help teach children about basic earth science principals and in particular, teach children about volcanoes.
Volcano Lessons and Activities This section of the paper is divided into two parts: dinámicas and lessons and activities. For use in the classroom they will have to be translated into the local language. Dinámicas. Dinámicas is a Spanish word that roughly translated means “icebreakers.” According to returned Peace Corps Volunteers, dinámicas are highly encouraged by the Peace Corps when working with children in Latin American countries (Engberg 2008). They are little games to play with the children before you start your lessons. The children like them and it helps them let out a little energy before the start of a lesson. Below is a list of dinámicas followed by brief descriptions. Some of the dinámicas can be altered to fit the lesson of the day.
• Act like a volcano: In this dinámica the children are asked to stand up and show the teacher how they think a volcano acts using their body as the volcano. They can include sounds or act like different parts of the volcano such as lava flows and plumes. (Gross 2008). This would be a good activity to use on the first day of lessons about volcanoes.
• Simon Says: In this dinámica the teacher starts out as Simon and asks the children to do certain activities related to the topic of the day (Engberg 2008). For example, if you are
working on volcanoes you could say, “Simon says make a sound like volcano,” or if you are outside, “Simon says find a volcanic rock.” Or you could use it to review some of the ideas learned in the lesson the day before, such as “Simon says show me how two different plates can move next to each other using your hands.” Once one of the children does an activity wrong or when the teacher does not say “Simon says” they are out. Continue until there is one student left who is the winner.
• Ball toss: In this dinámica the children and teacher stand in a circle with one person holding a ball. The person tosses it to someone else who must come up with a word or phrase that the teacher stipulates (Engberg 2008). For example, if you are working on volcanoes you could have the children name the parts of the volcano as they catch the ball or before they can throw it to someone else. This game can be tailored to the topic of the day or as review of past days.
• Bingo: If you have the materials to make a bingo game you can use terms that you are teaching in the class as the marks on the bingo board (Engberg 2008). You can either just state the term, such as “lava” or you can give a description of the term or you can ask the kids a question such as “what is the name for molten rock that is erupted by a volcano?” This way the kids have to come up the term themselves.
• Board walk: If you have some boards (for example 2” x 4” x 36” boards) you can attach ropes around each of them at two different spots so that you can fit a foot inside them. Then you have the children step their feet inside the ropes of two boards so that one child is behind another and they have to learn to walk together. Using these board you can play Simon Says, or play games where you ask them questions about what they have learned and they get to take a step or two for every question they answer right and whoever gets to the finish line first wins. (Engberg 2008).
• Pop cans under pressure: To teach children about the buildup of pressure in a volcano you can give each of the kids a small can or bottle of pop. Have them go outside and ask them about what happens if you were to open one. Demonstrate how nothing happens. Then have them shake up their pop cans explaining how it is building up pressure in the can, like a volcano. Then have them open the cans and see how it fizzes and “erupts” like a volcano. (Engberg 2008).
• Duck, Duck, Goose: In this game the kids sit in a circle with one kid walking around the outside of the circle. They lightly tap each of the kids on the head as they walk by saying duck at the same time. When they tap and kid and say goose instead of duck, the kid that is sitting down gets up and chases the person who tapped them around the circle. If the tapper gets back to the other person’s spot without being tagged then the other person has to walk around the circle. If they get touched before they can sit down, then they remain the person on the outside of the circle. This game can be altered to fit the topic by changing the words. For example, if they are learning about volcanoes they could use the terms dormant volcano and active volcano.
Other simple dinámicas that can be done are crossword puzzles or word searches that the teacher creates if they have access to a copy machine. Alternatively they can be drawn on the board.
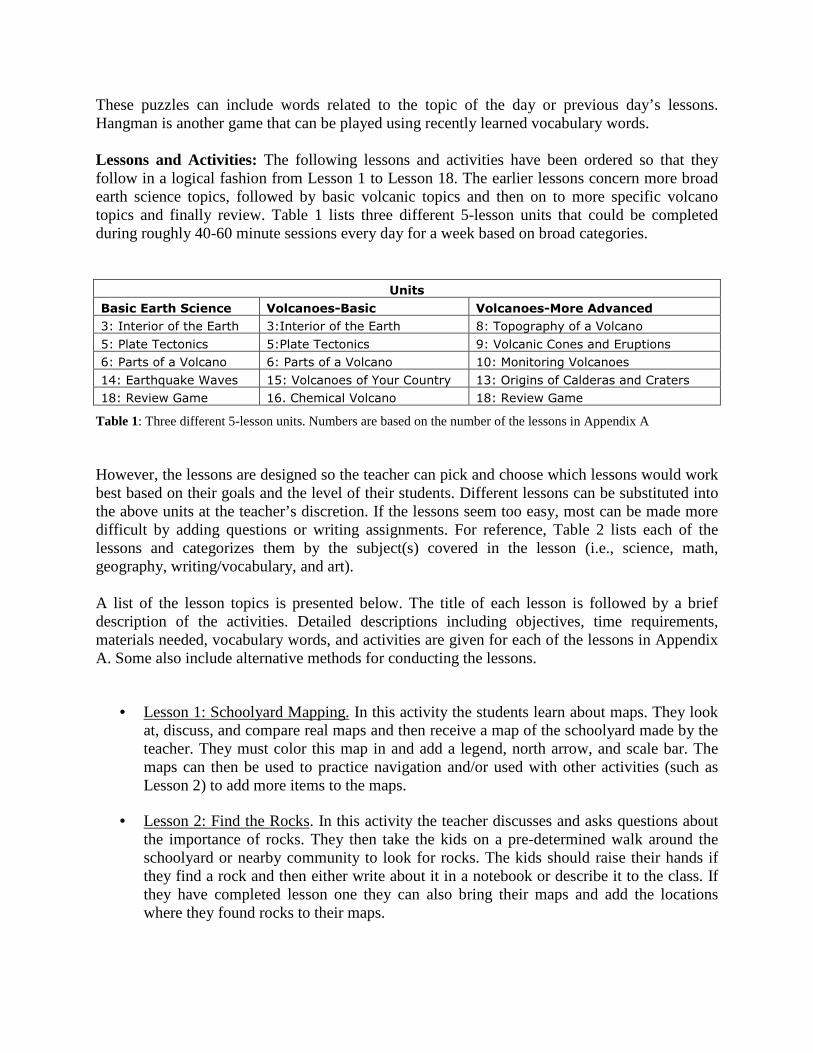
These puzzles can include words related to the topic of the day or previous day’s lessons. Hangman is another game that can be played using recently learned vocabulary words. Lessons and Activities: The following lessons and activities have been ordered so that they follow in a logical fashion from Lesson 1 to Lesson 18. The earlier lessons concern more broad earth science topics, followed by basic volcanic topics and then on to more specific volcano topics and finally review. Table 1 lists three different 5-lesson units that could be completed during roughly 40-60 minute sessions every day for a week based on broad categories.
������
���������� ����� �������������� ����������������������
���������������� ����� ��������������� ����� ����������������������
����������������� ���������������� ������������������� �������
������������������� ������������������� � ��!��������������
�"�� ����#��$��%�&��� ��������������'���������� ����(����������������������������
����)�&�*�+�,�� ��-����,���������� ����)�&�*�+�,��
Table 1: Three different 5-lesson units. Numbers are based on the number of the lessons in Appendix A However, the lessons are designed so the teacher can pick and choose which lessons would work best based on their goals and the level of their students. Different lessons can be substituted into the above units at the teacher’s discretion. If the lessons seem too easy, most can be made more difficult by adding questions or writing assignments. For reference, Table 2 lists each of the lessons and categorizes them by the subject(s) covered in the lesson (i.e., science, math, geography, writing/vocabulary, and art). A list of the lesson topics is presented below. The title of each lesson is followed by a brief description of the activities. Detailed descriptions including objectives, time requirements, materials needed, vocabulary words, and activities are given for each of the lessons in Appendix A. Some also include alternative methods for conducting the lessons.
• Lesson 1: Schoolyard Mapping. In this activity the students learn about maps. They look at, discuss, and compare real maps and then receive a map of the schoolyard made by the teacher. They must color this map in and add a legend, north arrow, and scale bar. The maps can then be used to practice navigation and/or used with other activities (such as Lesson 2) to add more items to the maps.
• Lesson 2: Find the Rocks. In this activity the teacher discusses and asks questions about the importance of rocks. They then take the kids on a pre-determined walk around the schoolyard or nearby community to look for rocks. The kids should raise their hands if they find a rock and then either write about it in a notebook or describe it to the class. If they have completed lesson one they can also bring their maps and add the locations where they found rocks to their maps.
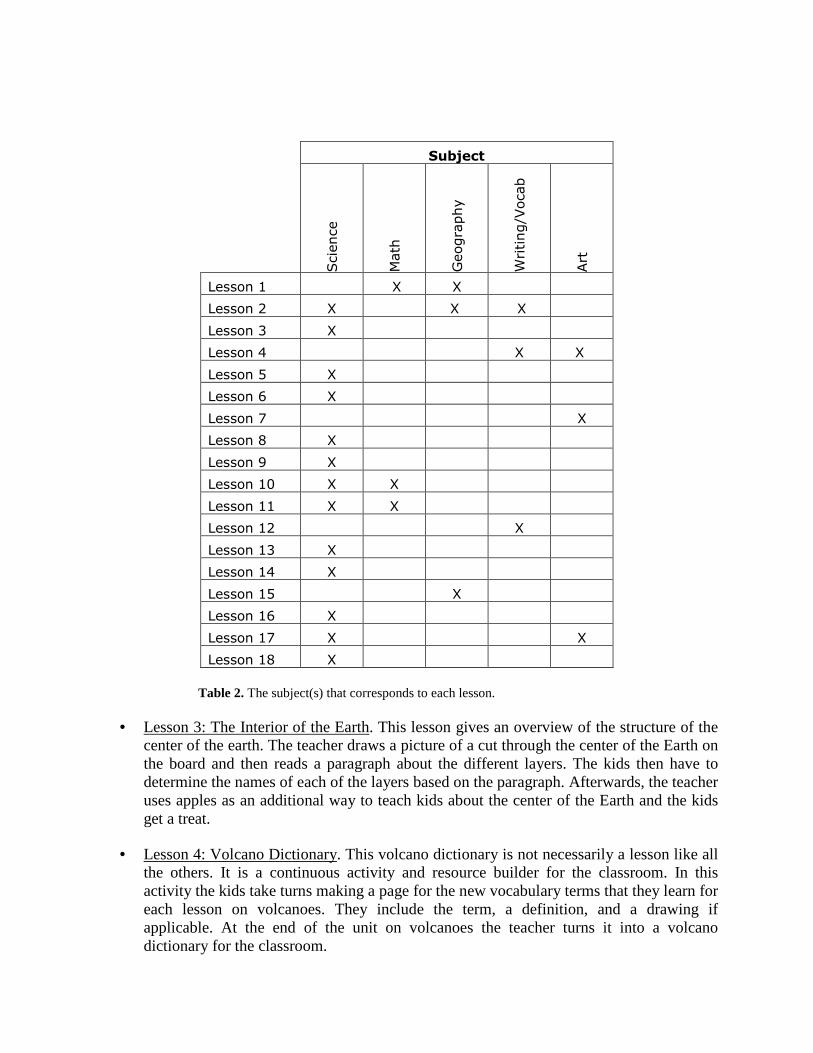
Table 2. The subject(s) that corresponds to each lesson.
• Lesson 3: The Interior of the Earth. This lesson gives an overview of the structure of the center of the earth. The teacher draws a picture of a cut through the center of the Earth on the board and then reads a paragraph about the different layers. The kids then have to determine the names of each of the layers based on the paragraph. Afterwards, the teacher uses apples as an additional way to teach kids about the center of the Earth and the kids get a treat.
• Lesson 4: Volcano Dictionary. This volcano dictionary is not necessarily a lesson like all the others. It is a continuous activity and resource builder for the classroom. In this activity the kids take turns making a page for the new vocabulary terms that they learn for each lesson on volcanoes. They include the term, a definition, and a drawing if applicable. At the end of the unit on volcanoes the teacher turns it into a volcano dictionary for the classroom.
� ������
� .������
!����
+��������
%����/���0�
1���
2������� �� �3� 3� �� ��
2�����4� 3� �� 3�� �3� ��
2������� 3� �� �� � ��
2�����"� �� �� �� 3� 3��
2������� 3� �� �� �� ��
2������� 3� �� �� �� ��
2�����5� �� �� �� �� 3�
2������� 3� �� �� �� ��
2������� 3� �� �� �� ��
2������ � 3� 3� �� �� ��
2�������� 3� 3� �� �� ��
2������4� �� �� �� 3� ��
2�������� 3� �� �� �� ��
2������"� 3� �� �� �� ��
2�������� � �� 3� �� ��
2�������� 3� �� �� �� ��
2������5� �3�� �� �� �� 3�
2�������� 3� �� �� �� ��
• Lesson 5: Plate Tectonics. In this lesson the kids learn the basics of plate tectonics using large, thin sponges. The teacher discusses plate tectonics and then demonstrates the three main ways that plates move around each other. The teacher also covers some of the results of plate tectonics (i.e., mountain building and the formation of volcanoes). Finally, the teacher has the kids use their hands as plates as another way to look at plate tectonics.
• Lesson 6: Parts of a Volcano. In this lesson the kids learn the terms for the different parts of a volcano. First they put together a small paper puzzle and then read definitions off a card. Based on the definitions they have to find the part they are describing on the puzzle. They also have to copy the drawing and parts into their notebooks.
• Lesson 7: Volcano Drawing Contest and Mural. In this activity the kids have a drawing contests to see who can draw the best picture of the local volcano and community. The kids then vote on the best drawing and the winner will have their drawing recreated in a mural on a school building wall. The winner will be in charge of the mural and will help guide the other kids in the painting. (The teacher must obtain permission from the school before starting this project.) The mural can than be used as a talking point to discuss volcanic risks with the community.
• Lesson 8: Topography of a Volcano. In this lesson the teacher discusses the importance of topography in regard to volcanoes. The teacher then makes a small representation of a volcano using construction paper. Sand is dropped onto the top of the volcano with someone blowing to represent the wind direction to determine where ash will go. Then water is dropped on the top of the volcano to show where water flows down a volcano. The kids are asked to predict what will happen before doing this. At the end of the lesson the teacher discusses the risks of living near volcanoes.
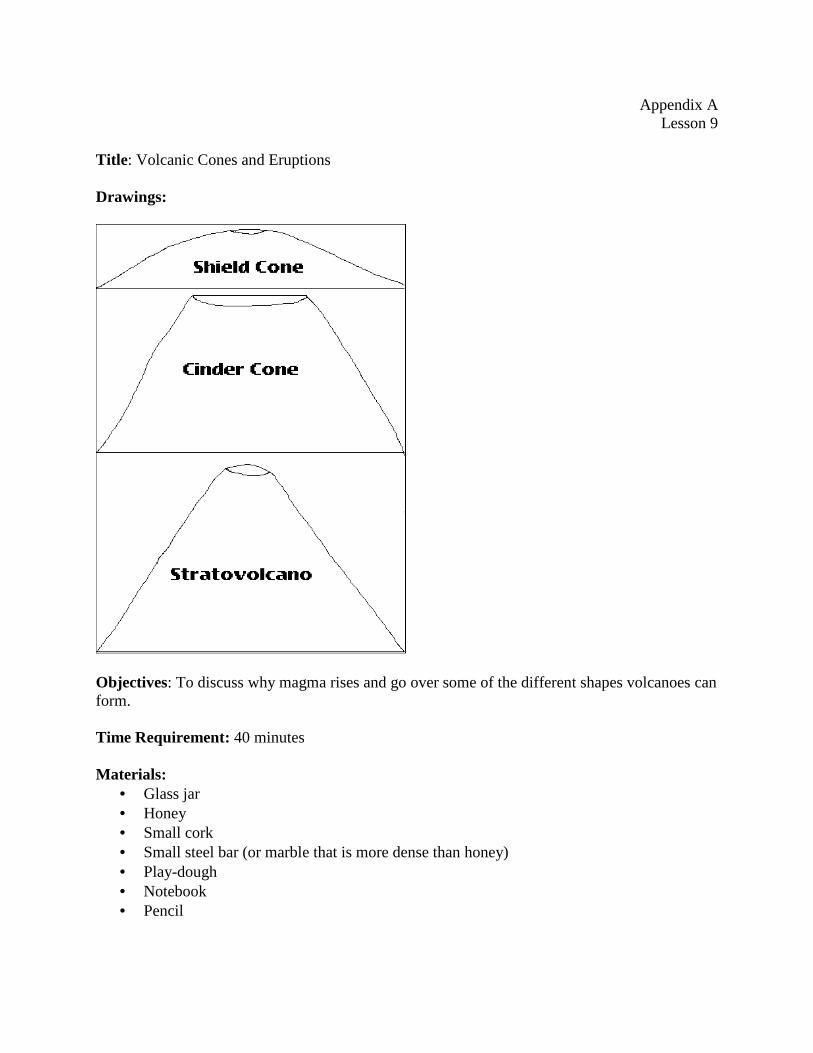
• Lesson 9: Volcanic Cones and Eruptions. In this lesson the kids learn about the three main shapes of volcanoes: shield cones, cinder cones, and composite cones or stratovolcanoes by building them. The teacher also conducts an experiment using honey, a cork, and a heavy marble to explain why magma rises in the crust. Depending on the level of the kids, it would be a good opportunity to describe the differences in the lava/eruptions that cause the different volcanic shapes to form.
• Lesson 10: Monitoring Volcanoes. In this lesson the teacher uses a balloon to demonstrate how volcanologists measure deformation at a volcano. The kids record “deformation” in the balloon and measure the changes. They also predict where they think the “volcano” is going to rupture and test it out when the balloon pops. The teacher then discusses the results and goes over why volcanologists monitor volcanoes.
• Lesson 11: Cake Batter Lava. In this lesson, cake batter is used to represent and learn about lava flows. Cake batter is poured onto an inclined pan and certain measurements are recorded. The kids learn about the structure of lava flows. The experiment is then repeated using a steeper incline and compared to the first.
• Lesson 12: Group Creative Writing. In this lesson the teacher lists a number of volcanic terms already learned on the board. The kids then have to come up with a short story
using all of the words. The activity can be done as a group or each kid can write and then share their own story depending on their age and writing ability.
• Lesson 13: The Origin of Calderas and Craters. For this lesson the kids learn about why some volcanoes have calderas and craters. Using flour and a balloon, the teacher demonstrates how they form. The flour can be built up in different ways around the balloon to represent the different volcanic shapes. At the end the teacher discusses how the experiment is like real calderas and craters and how it is different.
• Lesson 14: Earthquake Waves. This lesson is designed to teach kids about shockwaves felt on earthquakes. Sand is placed on a table and a rubber mallet is used to gently hit the table so that the sand “jumps.” The experiment is then repeated with the sand in the center of the table and at the opposite end of table. The kids are asked to predict what will happen each time.
• Lesson 15: Volcanoes of Your Country. This lesson offers an example of how to teach the kids about volcanoes in their country. Using Nicaragua as an example, the kids are given a map of the country with the locations of the main and local volcanoes. The kids are then asked to answer a list of questions about where the volcanoes are located and questions on directions. This is also a good time to talk about volcanic eruptions from their country that the kids know about.
• Lesson 16: Chemical Volcano. In this lesson the kids get to make their own volcanoes using sodium bicarbonate, vinegar and soap. The kids are given the materials and they build up a “volcano” made of dirt around a bottle filled with vinegar, soap, and water. Sodium bicarbonate is then added slowly at first and then faster to represent an eruption. Afterwards the teacher can discuss the reaction that is occurring.
• Lesson17: My Volcano. In this lesson the kids get to make their own paper volcanoes. Afterwards they add drawings or write on them to show the teacher what they have learned about volcanoes. Students then go around the room and compare their volcanoes.
• Lesson 18: Review Game. In this lesson the kids play a game while reviewing what they have already learned. The kids are first put into two teams and then they form lines. Using a garbage can as a volcanic “crater” and scrunched up pieces of paper as “volcanic bombs” they take turns throwing the volcanic bombs into the crater. If they get it in, they get to answer a questions. And if they get the question right their team gets a point. The team with the most points wins.
Conclusion
The earth sciences remain an important but often overlooked part of school curriculum. This paper offers some simple lesson plans, games and activities to help teach kids about basic earth science and volcanoes so that they can better understand the earth processes that are going on around them and the possible hazards that might be caused associated with those processes.
References: EM-DAT (2007): The OFDA/CRED International Disaster Database – www.emdat.net –
Université Catholique de Louvain – Brussels – Belgium. Engberg, Ellen. Personal Interview. 12 March 2008. Gross, Essa. Personal Interview. 29 February 2008.
Appendix A Lessons 1 through 18
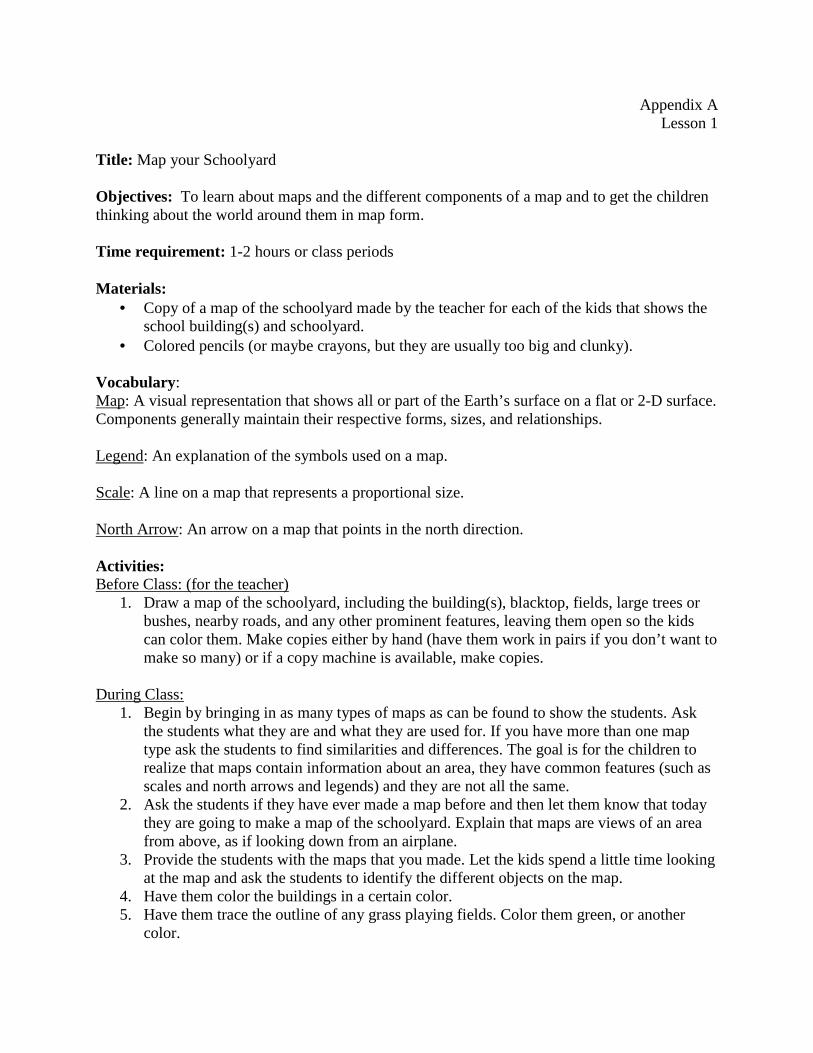
Appendix A Lesson 1
Title: Map your Schoolyard Objectives: To learn about maps and the different components of a map and to get the children thinking about the world around them in map form. Time requirement: 1-2 hours or class periods Materials:
• Copy of a map of the schoolyard made by the teacher for each of the kids that shows the school building(s) and schoolyard.
• Colored pencils (or maybe crayons, but they are usually too big and clunky). Vocabulary: Map: A visual representation that shows all or part of the Earth’s surface on a flat or 2-D surface. Components generally maintain their respective forms, sizes, and relationships. Legend: An explanation of the symbols used on a map. Scale: A line on a map that represents a proportional size. North Arrow: An arrow on a map that points in the north direction. Activities: Before Class: (for the teacher)
1. Draw a map of the schoolyard, including the building(s), blacktop, fields, large trees or bushes, nearby roads, and any other prominent features, leaving them open so the kids can color them. Make copies either by hand (have them work in pairs if you don’t want to make so many) or if a copy machine is available, make copies.
During Class:
1. Begin by bringing in as many types of maps as can be found to show the students. Ask the students what they are and what they are used for. If you have more than one map type ask the students to find similarities and differences. The goal is for the children to realize that maps contain information about an area, they have common features (such as scales and north arrows and legends) and they are not all the same.
2. Ask the students if they have ever made a map before and then let them know that today they are going to make a map of the schoolyard. Explain that maps are views of an area from above, as if looking down from an airplane.
3. Provide the students with the maps that you made. Let the kids spend a little time looking at the map and ask the students to identify the different objects on the map.
4. Have them color the buildings in a certain color. 5. Have them trace the outline of any grass playing fields. Color them green, or another
color.
6. Have them trace other features that you see on the schoolyard, using different colors when you want to.
7. In the end, you should have a nice map of your school. 8. Every map has a legend -- this is the part of the map where you explain what each color
means. For example, if you used green to indicate the color of grassy areas, draw a small green square at the bottom of your map and put the word "grass" next to the square.
9. Every map should indicate which way is north. Draw a compass rose on your map to indicate north.
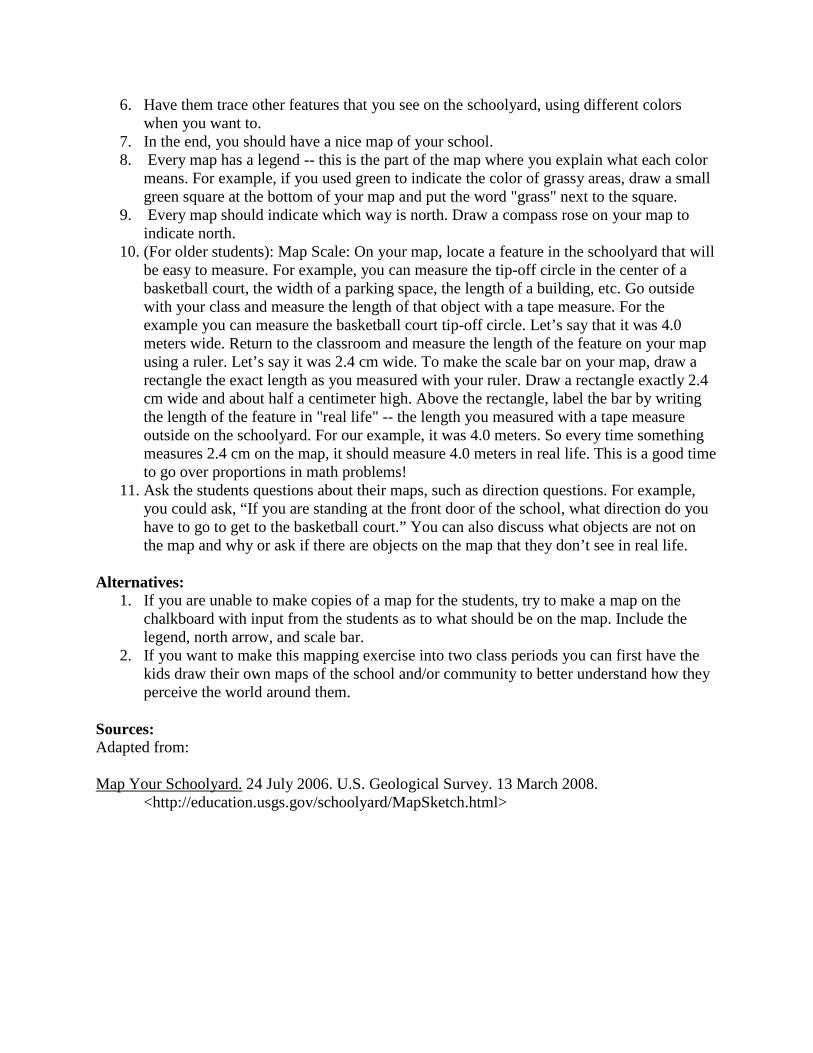
10. (For older students): Map Scale: On your map, locate a feature in the schoolyard that will be easy to measure. For example, you can measure the tip-off circle in the center of a basketball court, the width of a parking space, the length of a building, etc. Go outside with your class and measure the length of that object with a tape measure. For the example you can measure the basketball court tip-off circle. Let’s say that it was 4.0 meters wide. Return to the classroom and measure the length of the feature on your map using a ruler. Let’s say it was 2.4 cm wide. To make the scale bar on your map, draw a rectangle the exact length as you measured with your ruler. Draw a rectangle exactly 2.4 cm wide and about half a centimeter high. Above the rectangle, label the bar by writing the length of the feature in "real life" -- the length you measured with a tape measure outside on the schoolyard. For our example, it was 4.0 meters. So every time something measures 2.4 cm on the map, it should measure 4.0 meters in real life. This is a good time to go over proportions in math problems!
11. Ask the students questions about their maps, such as direction questions. For example, you could ask, “If you are standing at the front door of the school, what direction do you have to go to get to the basketball court.” You can also discuss what objects are not on the map and why or ask if there are objects on the map that they don’t see in real life.
Alternatives:
1. If you are unable to make copies of a map for the students, try to make a map on the chalkboard with input from the students as to what should be on the map. Include the legend, north arrow, and scale bar.
2. If you want to make this mapping exercise into two class periods you can first have the kids draw their own maps of the school and/or community to better understand how they perceive the world around them.
Sources: Adapted from: Map Your Schoolyard. 24 July 2006. U.S. Geological Survey. 13 March 2008.
<http://education.usgs.gov/schoolyard/MapSketch.html>
Appendix A Lesson 2
Title: Find the Rocks Objectives: To learn about rocks and where they come from. To realize that rocks are all around them and that they play a large role in the community (concrete buildings, roads, etc). To learn more about navigating with a map. Time Requirements: 30-40 minutes Materials:
• Notebook • Pencil • Pre-drawn maps of schoolyard (if this activity has already been completed – see Lesson
1). Activities: Before Class (for the teacher)
1. Determine a safe route around the schoolyard/community that will lead the kids past different types of rocks or different uses of rocks by people.
During Class
1. To begin, ask the kids why rocks are important. Then ask them where they see rocks and if anyone knows what people use them for (examples may include cement for buildings, crushed rock for roads, copper for electronic wiring, gold for jewelry, metal for cars, petroleum for fuel, etc.). (If students don’t know much about rocks, a lesson on rocks could be conducted on a previous day or this lesson could be extended to include a brief introduction to rocks or rock types). Lead the students toward gold. Ask them why it costs so much. (It is rare and therefore hard to find). Inform them that today they are going outside to the schoolyard to look for rocks. It unlikely that gold will be found but they are going to look for places where we find rocks.
2. Take the kids out into the schoolyard in a single-file line and walk them along the pre-determined route. Ask them to raise their hands if they locate a rock. If they have a notebook and pencil ask them to write out a description of the rock (one sentence for younger kids and longer for older kids). They can describe what the rock looked like or where it was found. (If students don’t have a notebook, ask them to verbally describe the rock or location.)
3. If students have their maps of the schoolyard they can also mark on the map where they saw the rocks.
4. On returning to the classroom talk about the activity. Ask the students about where they saw rocks. Were they all on the ground? Were they all the same size, shape, or color? Did they see any rocks in man-made objects? If so, where do they think the rocks came from?
Alternatives: 1. Allow the students to roam around the schoolyard for five minutes to look for rocks. For
incentive you can offer bonus points or a prize for whoever describes the most rocks in their notebook.
2. Have the students draw a rock that they see. Source: Adapted from: Find the Rocks. 24 July 2006. U.S. Geological Survey. 14 March 2008.
<http://education.usgs.gov/schoolyard/MapFindTheRocks.html>
Appendix A Lesson 3
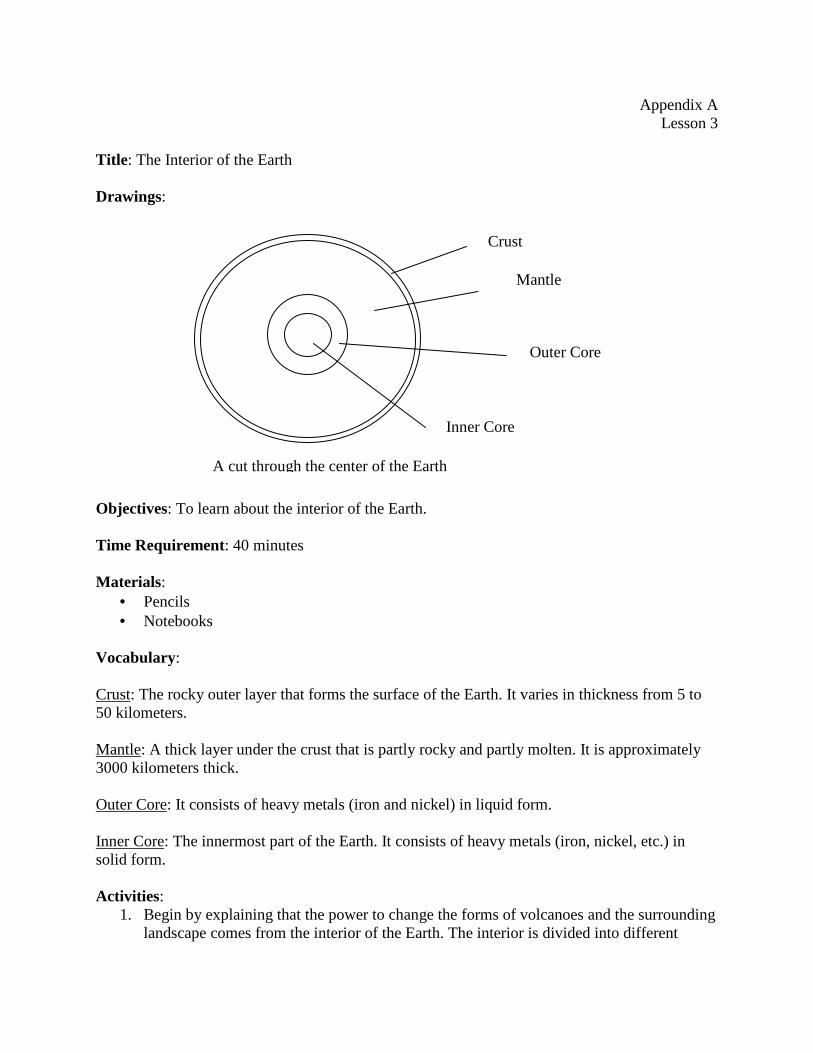
Title : The Interior of the Earth Drawings: Objectives: To learn about the interior of the Earth. Time Requirement: 40 minutes Materials:
• Pencils • Notebooks
Vocabulary: Crust: The rocky outer layer that forms the surface of the Earth. It varies in thickness from 5 to 50 kilometers. Mantle: A thick layer under the crust that is partly rocky and partly molten. It is approximately 3000 kilometers thick. Outer Core: It consists of heavy metals (iron and nickel) in liquid form. Inner Core: The innermost part of the Earth. It consists of heavy metals (iron, nickel, etc.) in solid form. Activities:
1. Begin by explaining that the power to change the forms of volcanoes and the surrounding landscape comes from the interior of the Earth. The interior is divided into different
Crust
Mantle
Outer Core
Inner Core
A cut through the center of the Earth
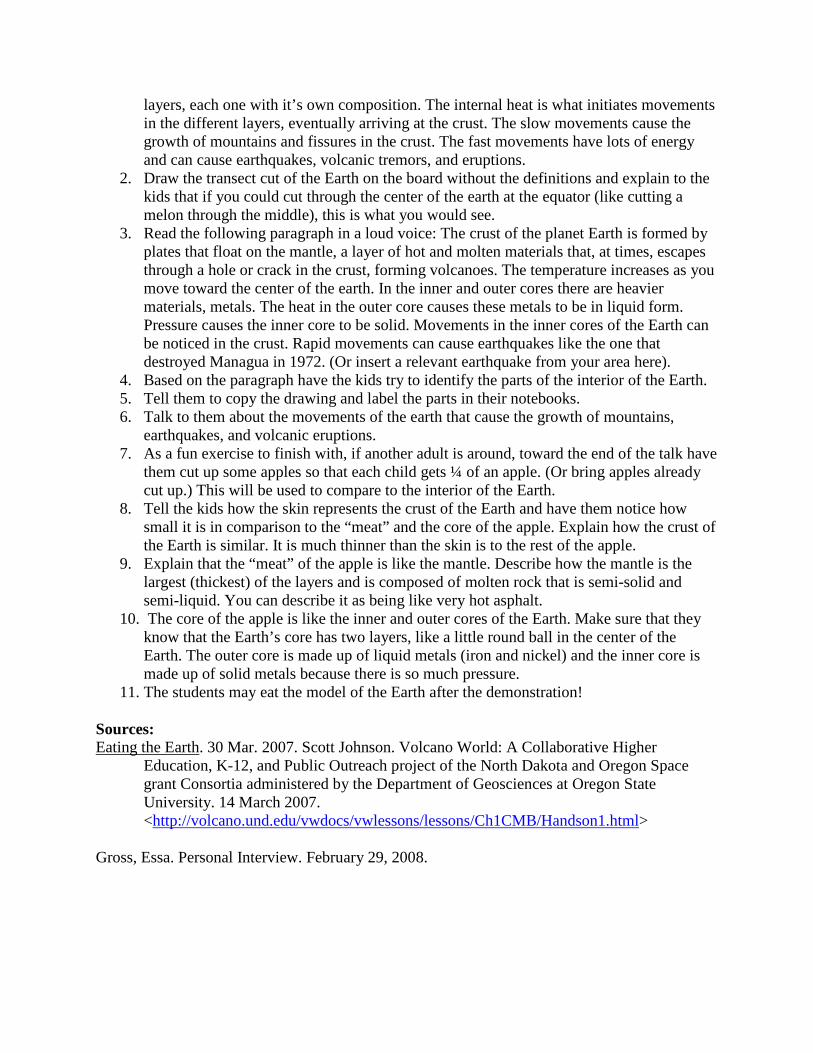
layers, each one with it’s own composition. The internal heat is what initiates movements in the different layers, eventually arriving at the crust. The slow movements cause the growth of mountains and fissures in the crust. The fast movements have lots of energy and can cause earthquakes, volcanic tremors, and eruptions.
2. Draw the transect cut of the Earth on the board without the definitions and explain to the kids that if you could cut through the center of the earth at the equator (like cutting a melon through the middle), this is what you would see.
3. Read the following paragraph in a loud voice: The crust of the planet Earth is formed by plates that float on the mantle, a layer of hot and molten materials that, at times, escapes through a hole or crack in the crust, forming volcanoes. The temperature increases as you move toward the center of the earth. In the inner and outer cores there are heavier materials, metals. The heat in the outer core causes these metals to be in liquid form. Pressure causes the inner core to be solid. Movements in the inner cores of the Earth can be noticed in the crust. Rapid movements can cause earthquakes like the one that destroyed Managua in 1972. (Or insert a relevant earthquake from your area here).
4. Based on the paragraph have the kids try to identify the parts of the interior of the Earth. 5. Tell them to copy the drawing and label the parts in their notebooks. 6. Talk to them about the movements of the earth that cause the growth of mountains,
earthquakes, and volcanic eruptions. 7. As a fun exercise to finish with, if another adult is around, toward the end of the talk have
them cut up some apples so that each child gets ¼ of an apple. (Or bring apples already cut up.) This will be used to compare to the interior of the Earth.
8. Tell the kids how the skin represents the crust of the Earth and have them notice how small it is in comparison to the “meat” and the core of the apple. Explain how the crust of the Earth is similar. It is much thinner than the skin is to the rest of the apple.
9. Explain that the “meat” of the apple is like the mantle. Describe how the mantle is the largest (thickest) of the layers and is composed of molten rock that is semi-solid and semi-liquid. You can describe it as being like very hot asphalt.
10. The core of the apple is like the inner and outer cores of the Earth. Make sure that they know that the Earth’s core has two layers, like a little round ball in the center of the Earth. The outer core is made up of liquid metals (iron and nickel) and the inner core is made up of solid metals because there is so much pressure.
11. The students may eat the model of the Earth after the demonstration! Sources: Eating the Earth. 30 Mar. 2007. Scott Johnson. Volcano World: A Collaborative Higher
Education, K-12, and Public Outreach project of the North Dakota and Oregon Space grant Consortia administered by the Department of Geosciences at Oregon State University. 14 March 2007. <http://volcano.und.edu/vwdocs/vwlessons/lessons/Ch1CMB/Handson1.html>
Gross, Essa. Personal Interview. February 29, 2008.
Appendix A Lesson 4
Title : Vocabulary Dictionary Objectives: To create a reference to keep in the classroom that the kids can look at and help create Time Requirement: 10 minutes each class period Materials:
• Paper • Pencils/pens • Colored pencils/crayons/markers
Activities: Before Class (for the teacher):
1. Before each class on volcanoes make sure to determine which terms you would like added to the dictionary.
During Class:
1. Explain that as the class is studying volcanoes, it will also be making a volcano dictionary for the classroom.
2. As you cover new material on volcanoes during each class period have the kids take turns creating a page for the new terms that they learned. They should write the term at the top of the page and put a definition under it. If appropriate they should also draw a picture of the term.
3. When all the pages are done, the teacher should put all the terms together in alphabetical order and make it into a book. The teacher can make a cover, or the kids can all help design a cover.
Alternatives:
1. If material and time is available you can have each of the kids make their own dictionary. 2. If you don’t have time at the end of each lesson you could turn the volcano dictionary
into a review session and make it all in one day. You could go over each of the terms again and then have the kids write out the pages during the class. Then you could make it into a book.
Source: Adapted from: Web Quest: Investigating a Volcano. July 2008. Barbara Jean Ratliff. Arizona State University.
14 Mar. 2008. <http://coe.west.asu.edu/students/bratliff/webquest.htm>

Appendix A Lesson 5
Title: Plate Tectonics Objectives: To learn about the different motions of plate tectonics and some of the affects of these plate movements. Time Requirement: 40 minutes Materials:
• Large thin sponges • Permanent marker • Large pan • Notebooks • Pencils
Activities:
1. Begin by explaining that the Earth is constantly changing and that the crust does not cover the Earth like a solid sheet of rock. Describe how the crust is made up of lots of plates that are deep in the Earth and they float on a layer that is soft and moveable. (Based on a previous lesson, you should be able to ask the kids what layer this is: the mantle). The plates are able to move very slowly over this hot layer. Sometimes we find magma that comes up between the plates from the mantle and at the same time we can have colder, heavier rocks sinking down into the Earth. The movement of the plates can cause changes on the surface of the Earth. If they collide, one plate may be forced under another and part of it can melt, causing more magma to rise to the surface which may rise through the crust and form a volcano. Lots of mountains in the world are actually volcanoes. They are land builders. Sometimes plates get caught on one another, which builds up pressure and results in an earthquake. Other times, plates pull apart and let magma up.
2. Draw lines on the side the sponges with a permanent marker to show how the plates are made up of layers. Dampen the sponges.
3. Move the sponges around to show the three main ways that plates move next to each other (convergent boundaries, transform boundaries, and divergent boundaries).
4. Then bump two of the sponges against each other gently and ask the kids what are happening to the plates. Ask them to predict what will happen if you push them together harder. Do it and then make sure to discuss how this can be a way to build mountains.
5. Then show them how one plate can move under another plate. Ask them how the plates move and what kind of change this can cause on the surface of the Earth. Be sure to mention how the melting of the subducting plate can create volcanoes.
6. Then show two plates side by side getting stuck and building up pressure until they are forced to move. Ask them what kind of changes this could cause on the surface of the earth. Be sure to mention earthquakes.
7. Ask them to draw a picture of this in their notebook. Older kids can write a small description under the pictures.
8. Allow the kids a little time to go over the movements themselves. 9. After this is done you can then ask to kids to pretend that their hands are the plates. Ask
them to put their hands side by side and press them together hard. 10. Then tell them to try to slide one hand forward or backward. Moving the hands in this
way represents two plates moving past one another. Ask them to describe the motion. Was it jerky or smooth? What could this represent?
11. Next, ask them to interlock their fingers and try to pull their hands apart while their fingers try to hold on. Again, ask them to describe the motion. What could this represent?
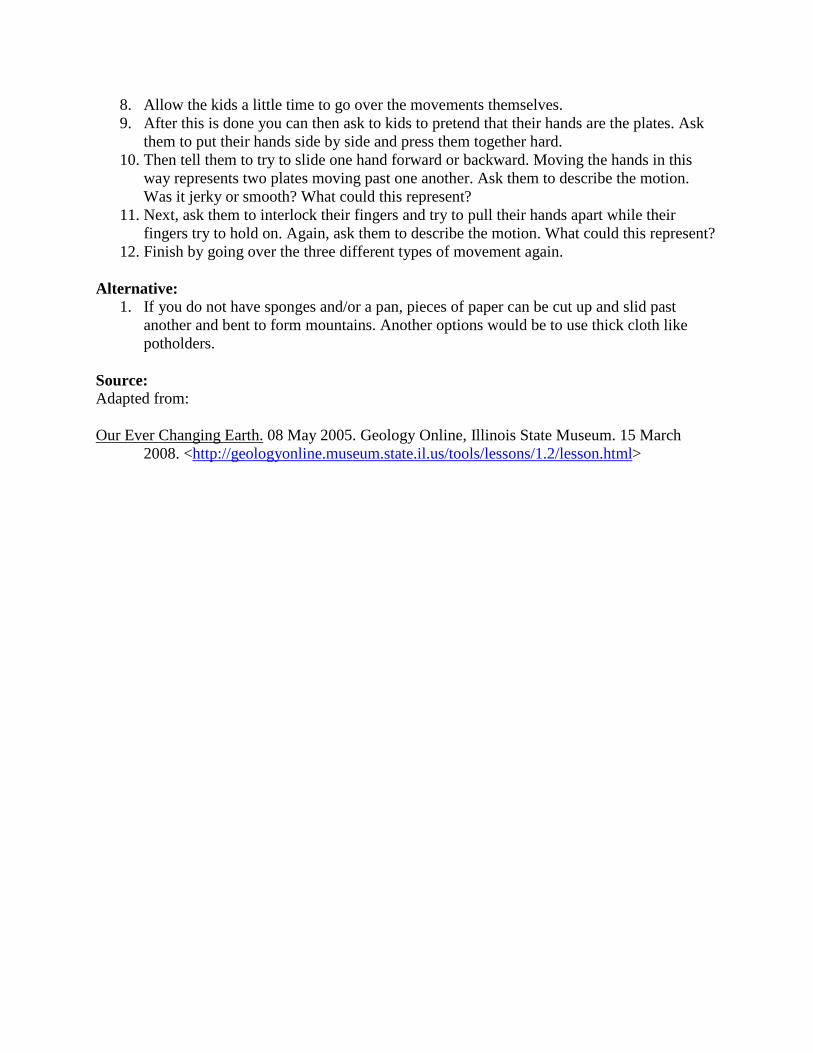
12. Finish by going over the three different types of movement again. Alternative:
1. If you do not have sponges and/or a pan, pieces of paper can be cut up and slid past another and bent to form mountains. Another options would be to use thick cloth like potholders.
Source: Adapted from: Our Ever Changing Earth. 08 May 2005. Geology Online, Illinois State Museum. 15 March
2008. <http://geologyonline.museum.state.il.us/tools/lessons/1.2/lesson.html>
Appendix A Lesson 6
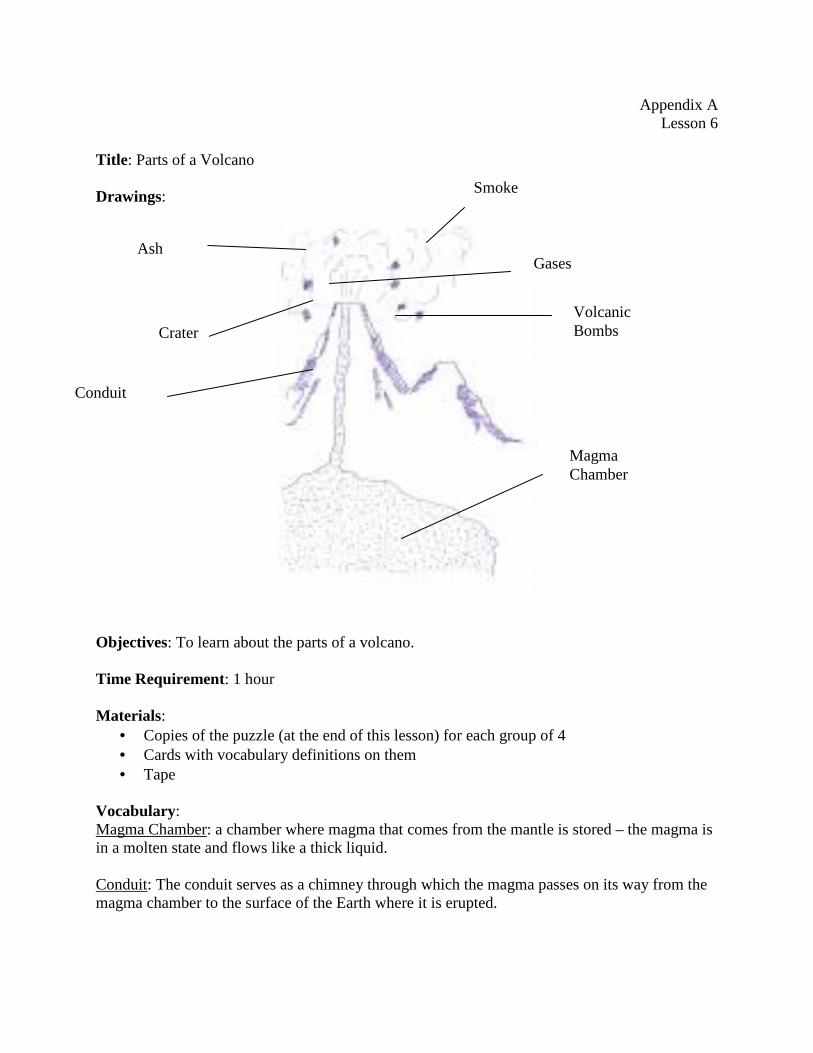
Title : Parts of a Volcano Drawings:
Objectives: To learn about the parts of a volcano. Time Requirement: 1 hour Materials:
• Copies of the puzzle (at the end of this lesson) for each group of 4 • Cards with vocabulary definitions on them • Tape
Vocabulary: Magma Chamber: a chamber where magma that comes from the mantle is stored – the magma is in a molten state and flows like a thick liquid. Conduit: The conduit serves as a chimney through which the magma passes on its way from the magma chamber to the surface of the Earth where it is erupted.
Smoke
Gases
Volcanic Bombs
Magma Chamber
Conduit
Crater
Ash
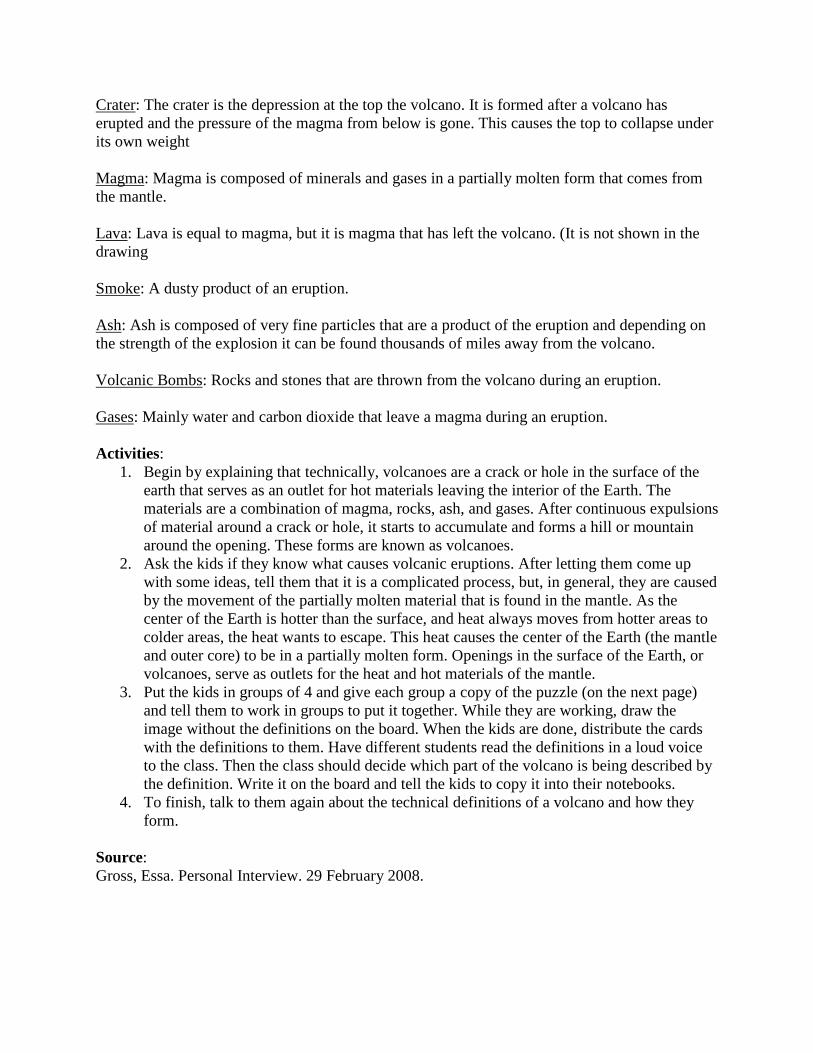
Crater: The crater is the depression at the top the volcano. It is formed after a volcano has erupted and the pressure of the magma from below is gone. This causes the top to collapse under its own weight Magma: Magma is composed of minerals and gases in a partially molten form that comes from the mantle. Lava: Lava is equal to magma, but it is magma that has left the volcano. (It is not shown in the drawing Smoke: A dusty product of an eruption. Ash: Ash is composed of very fine particles that are a product of the eruption and depending on the strength of the explosion it can be found thousands of miles away from the volcano. Volcanic Bombs: Rocks and stones that are thrown from the volcano during an eruption. Gases: Mainly water and carbon dioxide that leave a magma during an eruption. Activities:
1. Begin by explaining that technically, volcanoes are a crack or hole in the surface of the earth that serves as an outlet for hot materials leaving the interior of the Earth. The materials are a combination of magma, rocks, ash, and gases. After continuous expulsions of material around a crack or hole, it starts to accumulate and forms a hill or mountain around the opening. These forms are known as volcanoes.
2. Ask the kids if they know what causes volcanic eruptions. After letting them come up with some ideas, tell them that it is a complicated process, but, in general, they are caused by the movement of the partially molten material that is found in the mantle. As the center of the Earth is hotter than the surface, and heat always moves from hotter areas to colder areas, the heat wants to escape. This heat causes the center of the Earth (the mantle and outer core) to be in a partially molten form. Openings in the surface of the Earth, or volcanoes, serve as outlets for the heat and hot materials of the mantle.
3. Put the kids in groups of 4 and give each group a copy of the puzzle (on the next page) and tell them to work in groups to put it together. While they are working, draw the image without the definitions on the board. When the kids are done, distribute the cards with the definitions to them. Have different students read the definitions in a loud voice to the class. Then the class should decide which part of the volcano is being described by the definition. Write it on the board and tell the kids to copy it into their notebooks.
4. To finish, talk to them again about the technical definitions of a volcano and how they form.
Source: Gross, Essa. Personal Interview. 29 February 2008.
Appendix A Lesson 7
Title : Volcano Drawing Contest and Mural Objectives: To choose a drawing made by one of the kids to turn into a mural for the school Time Requirement: 40 minutes plus additional time to paint the mural Materials:
• Paper • Pencils • Colored pencils/crayons/markers • Rulers • Paint • Paintbrushes
Activities: Before Class (for the teacher):
1. Talk with the school officials to determine if it is okay to have a drawing contest where the winner’s picture can be painted on a mural on an outside wall of the school.
During Class:
1. Explain to the kids that while they are studying volcanoes there is going to be a drawing contest.
2. Ask each of the kids to draw a picture of the local volcano and the surrounding area. They can include such things as rivers, houses, the school, or other objects they think are important. Ask them to think about their relationship to the volcano.
3. Once the drawings are complete they should be displayed somewhere so that the children can vote on their favorite one.
4. Once the winner is determined they will become the leader for the mural project. 5. The drawing should be divided into squares and the wall for the mural should also be
divided into proportionate squares of a larger size so that it fits the large wall. 6. Using the squares as guidelines the leader can then help delegate how the paining should
be done. 7. After the mural is complete, a small party can be thrown for the kids and their parents and
local community members to show off the new mural. 8. Be sure to use the mural to ask the kids (and possibly the parents) about the relationship
between the volcano and the community. It would also be a good time to talk about any hazards associated with the volcano.
Source: Engberg, Ellen. Personal Interview. 13 Feb. 2008.
Appendix A Lesson 8
Title: Topography of a Volcano Objectives: Learning about how topography can act as a road map for ash and mud. Time Requirement: 40 minutes Materials:
• 11” x 18” dark paper • Cup of water • Table salt, sand, or soap shavings • Today’s wind direction • Felt marker • Masking tape • Newspaper or other lighter colored paper to place under the “volcano”
Vocabulary: Topography: The study and mapping of features on the surface of the Earth, such as mountains, and rivers, and in particular their relief compared to the surrounding area. Mudflow: A moving mass of soil/dirt/ash made mobile by rain or snow. Often occur on volcanoes after eruptions because of the increase in ash and other deposits in the area. Pyroclastic Flow: A fast moving current of hot air and ash and debris that travels very quickly down the side of the volcano. Lahar: A moving mass of soil/dirt/ash made mobile by water. Usually occur during an eruption and are very hot and dangerous. Activities:
1. Begin by discussing how the topography of a volcano is very important for scientists to help them predict where mudflows, lava flows, and pyroclastic flows might go. Discuss the common geological phrase “the past predicts the future.” Ask the kids if they know what it means. Tell them that you are going to demonstrate how topography can help scientists make predictions on volcanoes.
2. Take the kids outside and help them determine the wind direction. 3. Come back inside and layout the newspaper or other white paper on a table. 4. Lay the black sheet of paper over top of this. Apply 6 pieces of masking tape to it as seen
in the picture below. One tape in the upper left corner should have a north arrow and below it there should be another arrow indicating the wind direction. For the other pieces, number them 1-5, with 5 being in the middle.
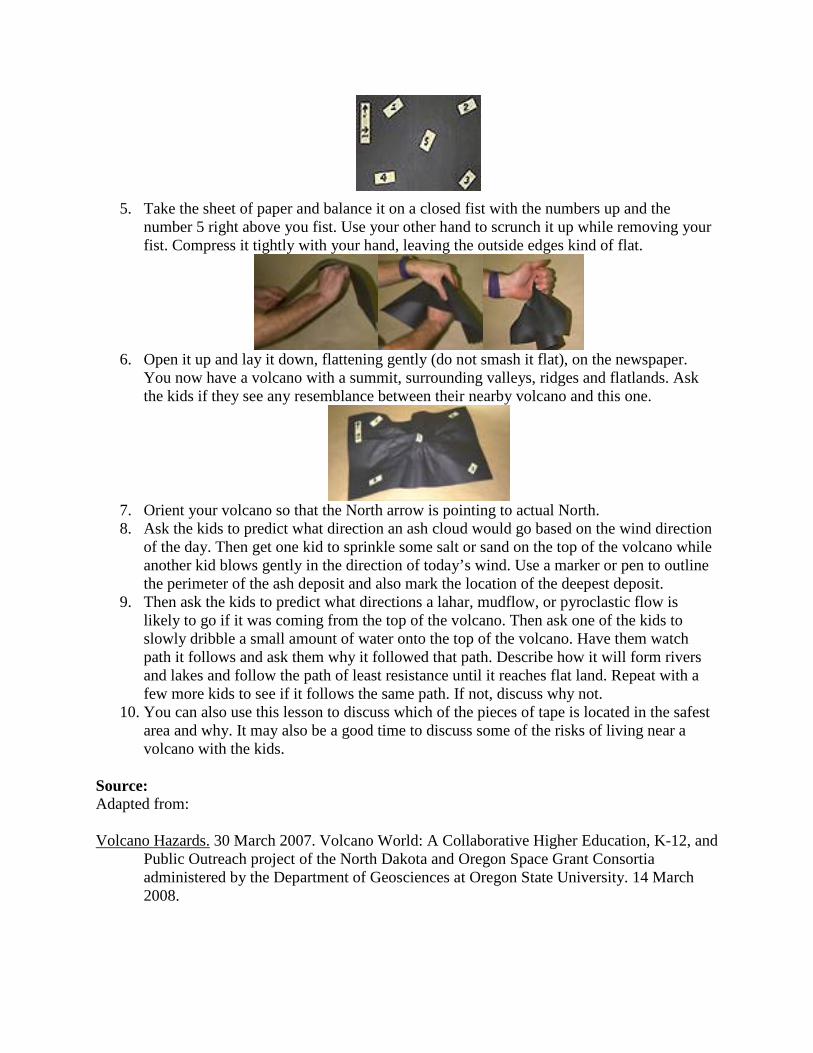
5. Take the sheet of paper and balance it on a closed fist with the numbers up and the number 5 right above you fist. Use your other hand to scrunch it up while removing your fist. Compress it tightly with your hand, leaving the outside edges kind of flat.
6. Open it up and lay it down, flattening gently (do not smash it flat), on the newspaper.
You now have a volcano with a summit, surrounding valleys, ridges and flatlands. Ask the kids if they see any resemblance between their nearby volcano and this one.
7. Orient your volcano so that the North arrow is pointing to actual North. 8. Ask the kids to predict what direction an ash cloud would go based on the wind direction
of the day. Then get one kid to sprinkle some salt or sand on the top of the volcano while another kid blows gently in the direction of today’s wind. Use a marker or pen to outline the perimeter of the ash deposit and also mark the location of the deepest deposit.
9. Then ask the kids to predict what directions a lahar, mudflow, or pyroclastic flow is likely to go if it was coming from the top of the volcano. Then ask one of the kids to slowly dribble a small amount of water onto the top of the volcano. Have them watch path it follows and ask them why it followed that path. Describe how it will form rivers and lakes and follow the path of least resistance until it reaches flat land. Repeat with a few more kids to see if it follows the same path. If not, discuss why not.
10. You can also use this lesson to discuss which of the pieces of tape is located in the safest area and why. It may also be a good time to discuss some of the risks of living near a volcano with the kids.
Source: Adapted from: Volcano Hazards. 30 March 2007. Volcano World: A Collaborative Higher Education, K-12, and
Public Outreach project of the North Dakota and Oregon Space Grant Consortia administered by the Department of Geosciences at Oregon State University. 14 March 2008.
Appendix A Lesson 9
Title : Volcanic Cones and Eruptions Drawings:
Objectives: To discuss why magma rises and go over some of the different shapes volcanoes can form. Time Requirement: 40 minutes Materials:
• Glass jar • Honey • Small cork • Small steel bar (or marble that is more dense than honey) • Play-dough • Notebook • Pencil
Vocabulary: Shield Cone: A shield cone is a type of volcano that resembles a shield in profile. It is created by the deposition of many flows of hot, runny lava erupted from the crater or flanks of the volcano. Cinder Cone: A steep conical hill of volcanic fragments that accumulate around a vent of a volcano. Stratovolcano: Also known as a composite volcano. It is a tall, conical volcano created by many layers of hardened lava, tephra, and ash. This lava is more viscous than the lava that produces shield volcanoes. Activities:
1. Tell the kids that you are going to do an experiment about why magma rises to the surface of the earth.
2. Have the students place a small cork and a small steel ball or marble into the glass jar. 3. Fill the jar with honey and watch what happens. 4. Ask the kids to predict what will happen after the honey is placed in the jar (or you can
have them write it down in a notebook). 5. The students will see that the material made of less dense material than the honey (the
cork) will rise and the material made of more dense material (the marble) with remain on the bottom of the jar. Explain how magma will rise in the Earth for the same reason. The magma is produced by the melting of the oceanic crust and the top of the mantle is less dense than the surrounding material and it rises.
6. This would also be a good time to discuss the different shapes of volcanoes by discussing how magmas can have different compositions that make them move more like water (basalt) or more like honey (rhyolite) and how these form different volcanic shapes: shield volcanoes, cinder cones, and composite cones or stratovolcanoes.
7. Play-dough can be used by the teacher to demonstrate each of the different types of volcanic shapes. Or the children can be given play-dough to make their own small volcanoes.
Alternatives:
1. If play-dough is not available the shapes can be drawn on the board and copied in a notebook or perhaps the teacher can use soil or sand to construct the different types of volcanoes
Source: Volcanic Cones and Eruptions. 30 Mar. 2007. Scott Johnson. Volcano World: A Collaborative
Higher Education, K-12, and Public Outreach project of the North Dakota and Oregon Space grant Consortia administered by the Department of Geosciences at Oregon State University. 14 March 2007. <http://volcano.und.edu/vwdocs/vwlessons/lessons/Ch3CM/Handson8Cones.html>
Appendix A Lesson 10
Title : Monitoring Volcanoes Objectives: To learn about dome growth and some of the ways that volcanologists monitor volcanoes. Time Requirement: 1 hour Materials:
• Light colored balloons • Black and red felt pens • 2’ of string • Ruler • 1’ x 1’ cardboard volcano • Someone to measure, someone to record, someone to keep time, and someone to blow up
the balloon Activities: Before Class (for the teacher):
1. Create a recording sheet for the kids to record information on. During Class:
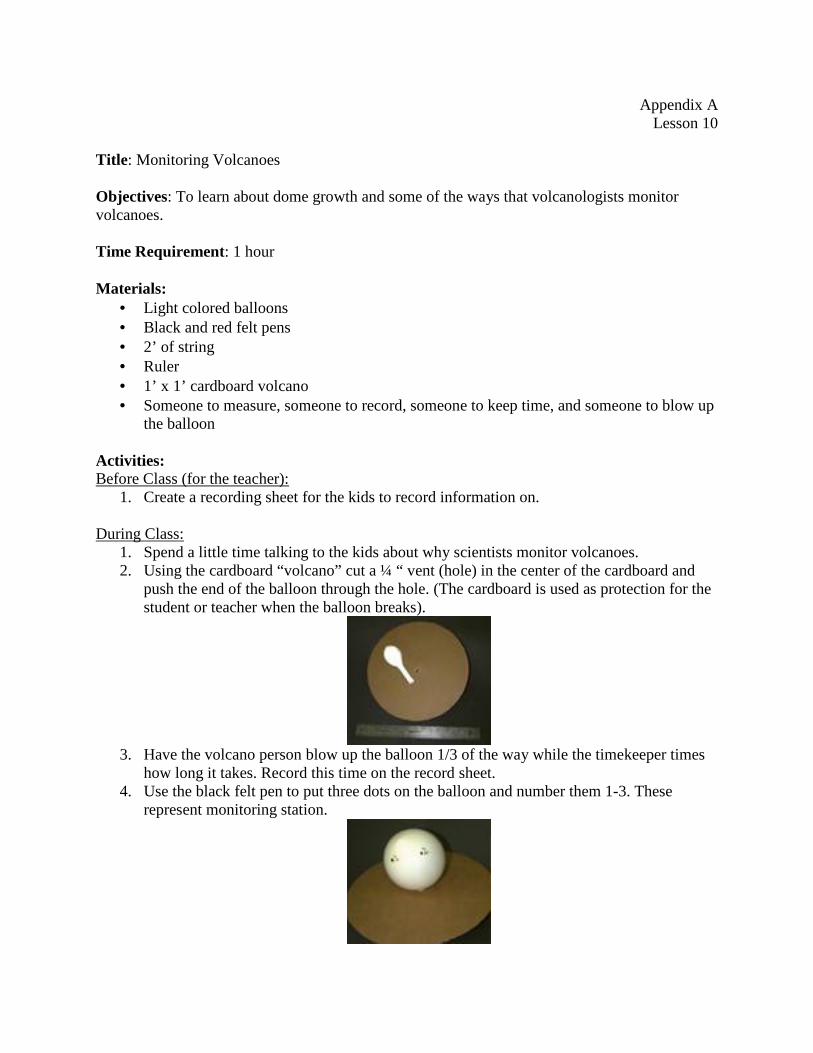
1. Spend a little time talking to the kids about why scientists monitor volcanoes. 2. Using the cardboard “volcano” cut a ¼ “ vent (hole) in the center of the cardboard and
push the end of the balloon through the hole. (The cardboard is used as protection for the student or teacher when the balloon breaks).
3. Have the volcano person blow up the balloon 1/3 of the way while the timekeeper times
how long it takes. Record this time on the record sheet. 4. Use the black felt pen to put three dots on the balloon and number them 1-3. These
represent monitoring station.
5. Use the string to measure the distance between stations #1 and #2 and use the ruler to measure the distance. Repeat for the other stations. Record on the record sheet.
6. Blow up the balloon two thirds of the way, again timing how long it takes and recording it. Again measure the distance between the numbers and record your data.
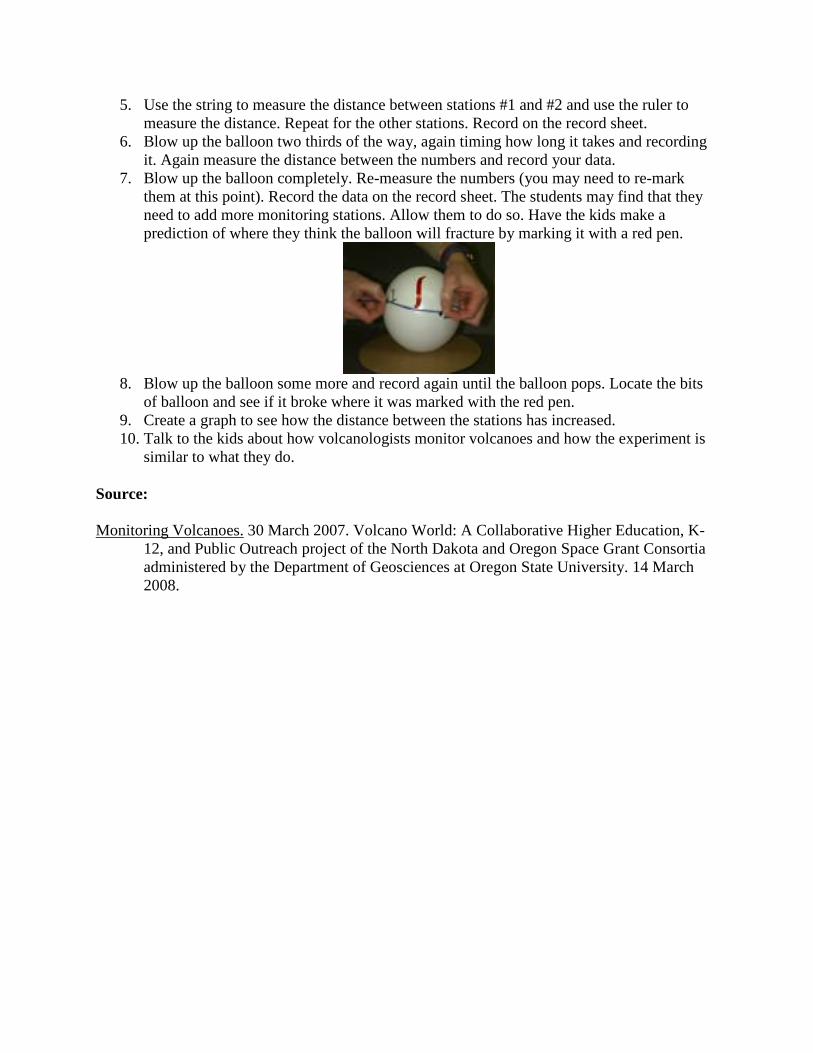
7. Blow up the balloon completely. Re-measure the numbers (you may need to re-mark them at this point). Record the data on the record sheet. The students may find that they need to add more monitoring stations. Allow them to do so. Have the kids make a prediction of where they think the balloon will fracture by marking it with a red pen.
8. Blow up the balloon some more and record again until the balloon pops. Locate the bits
of balloon and see if it broke where it was marked with the red pen. 9. Create a graph to see how the distance between the stations has increased. 10. Talk to the kids about how volcanologists monitor volcanoes and how the experiment is
similar to what they do. Source: Monitoring Volcanoes. 30 March 2007. Volcano World: A Collaborative Higher Education, K-
12, and Public Outreach project of the North Dakota and Oregon Space Grant Consortia administered by the Department of Geosciences at Oregon State University. 14 March 2008.
Appendix A Lesson 11
Title: Cake Batter Lava Objectives: To learn about lava flows and geological processes by using cake batter as a representation of lava. Time Requirement: 1 hour Materials:
• Boxed caked mix • Baking sheet or other flat surface • Paper • Pencils • Notebooks • Rulers • Plastic wrap • Record sheet (see attached sheet) • Timer
Vocabulary: Aa lava: A basaltic lava that is characterized by a rough surface. It is hard to walk on. Pahoehoe lava: A basaltic lava that has a smooth or ropey surface that is formed by lava moving under a partially hardened upper crust. Levee: A natural wall that forms parallel to both sides of a lava flow. (Levees are also found at rivers.) Activities: Before Class (for the teacher):
1. Open a standard cake mix box, and mix dry cake mix with water only and stir until it is the consistency of thick cream. It should be uniform with few lumps. If it is too runny, add flour.
2. On a piece of paper draw a grid with 10 cm spacing. Tape this to the baking sheet and then cover it with plastic wrap.
During Class:
1. Discuss lava flows with the class. If they have grown up near a volcano they should understand the difference between a’a’ flows and pahoehoe flows. Describe how each is formed. Tell them that they are going to do an experiment to represent a’a’ flows.
2. Use a block or a stack of books, or anything else available, to prop up the baking sheet at an angle of about 15 to 25º. (If a protractor and plumb line is available the students can measure the exact angle). Or you can set it at about 15º and then repeat the experiment at 25º.

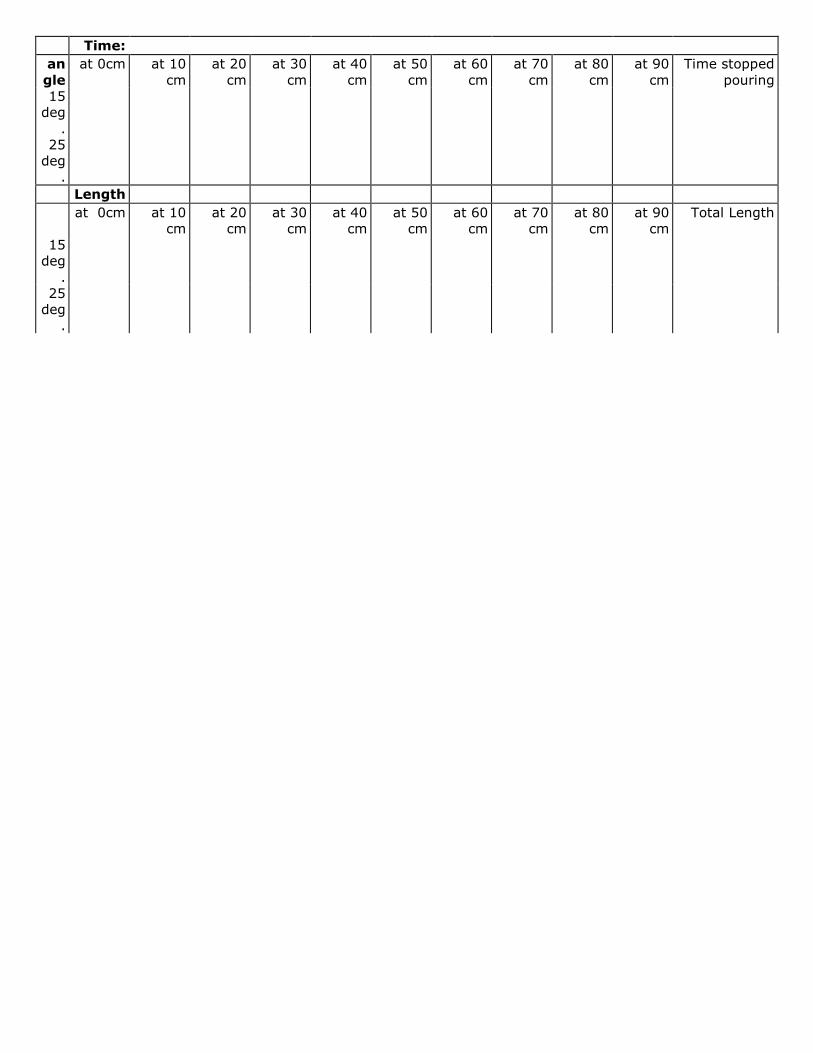
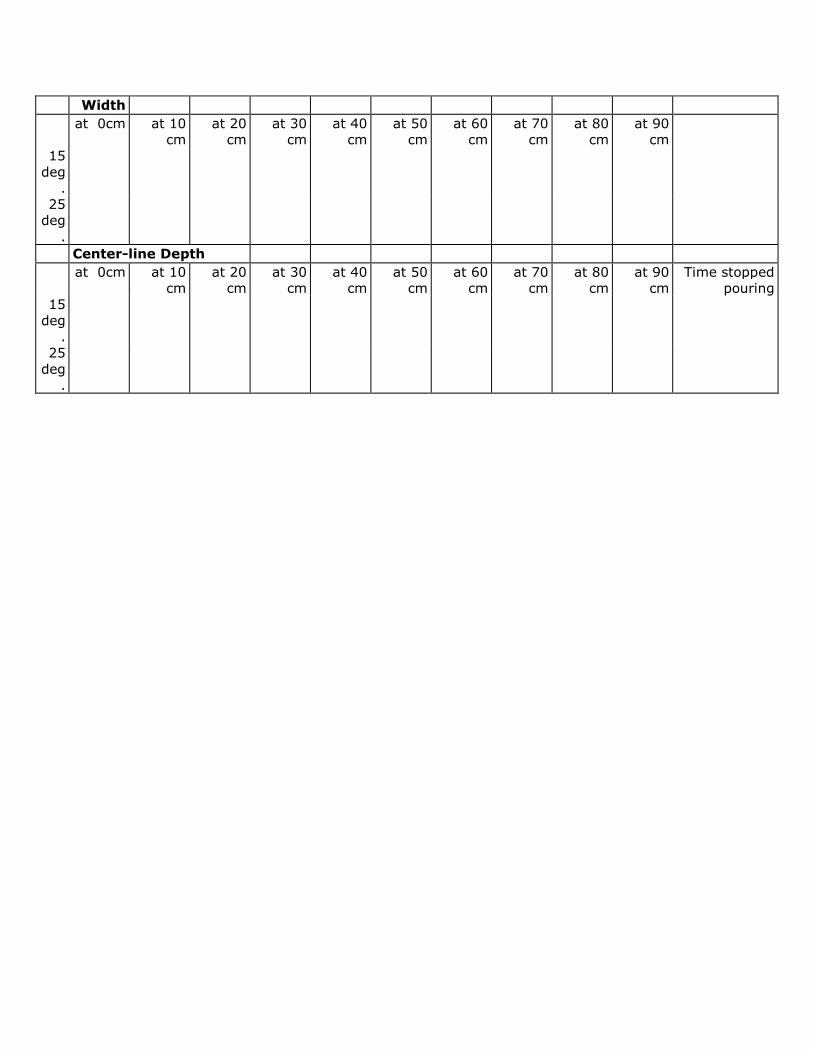
3. Have one of the kids pour the batter very slowly and at a constant rate down the sheet. Make sure that the container of batter is held about 10 cm from the end of the board when pouring.
4. At each of the 10 cm marks the kids should measure the time, the length, the width, and the depth of the flow at the center and record these on the record sheet
5. Have the kids look for areas where the flow rate is low or zero (near the edges). You can try sprinkling something on top (such as confetti) to demonstrate that it is moving faster in the center. Explain how these are the levees.
6. Repeat either at a different angle or by adding more flour to the mixture so it is thicker. Record the information on the record sheet.
7. Have the kids compare the two flows. Do they have the same channel width to flow width ratio? They can also draw the flow with the flow channel and the levees and describe it in their notebooks.
8. This is also a good opportunity to discuss with the kids the dangers of living near a volcano and the dangers of lava flows.
Alternatives.
1. If cake batter is not available perhaps the teacher could mix together dirt and water to form a mud that is the same consistency.
Source: Cake Batter Lava. 1996. Hawai'i Space Grant College, Hawai'i Institute of Geophysics and
Planetology, University of Hawai'i. 15 March 2008. <http://www.spacegrant.hawaii.edu/class_acts/CakeLavaTe.html>
� ������ � � � � � � � � � �
��
����
��� �,� ���� �
�,�
���4 �
�,�
���� �
�,�
���" �
�,�
���� �
�,�
���� �
�,�
���5 �
�,�
���� �
�,�
���� �
�,�
�,���������
������
���
���
-�
� � � � � � � � � � �
4��
���
-�
� � � � � � � � � � �
� ������� � � � � � � � � � �
� ���� �,� ���� �
�,�
���4 �
�,�
���� �
�,�
���" �
�,�
���� �
�,�
���� �
�,�
���5 �
�,�
���� �
�,�
���� �
�,�
�����2������
���
���
-�
� � � � � � � � � � �
4��
���
-�
� � � � � � � � � � �
� ������ � � � � � � � � � �
� ���� �,� ���� �
�,�
���4 �
�,�
���� �
�,�
���" �
�,�
���� �
�,�
���� �
�,�
���5 �
�,�
���� �
�,�
���� �
�,�
�
���
���
-�
� � � � � � � � � � �
4��
���
-�
� � � � � � � � � � �
� �����������!�"��� � � � � � � � �
� ���� �,� ���� �
�,�
���4 �
�,�
���� �
�,�
���" �
�,�
���� �
�,�
���� �
�,�
���5 �
�,�
���� �
�,�
���� �
�,�
�,���������
������
���
���
-�
� � � � � � � � � � �
4��
���
-�
� � � � � � � � � � �
Appendix A Lesson 12
Title: Group Creative Writing Objectives: To practice writing skills and to practice using new vocabulary terms. Time Requirement: 40 minutes Materials:
• Blackboard • Chalk • Notebooks • Pencils
Activities:
1. Begin by writing out a list of vocabulary words on volcanoes on the board. Use words that you have already gone over in previous classes For example: DISASTER, CRATER, ASH, ERUPTION, DORMANT, LAVA, MAGMA, VOLCANOLOGIST, PUMICE, VENT, SUMMIT.
2. Tell that kids that they are going to write a story that must include each of the words on the board.
3. Go around the room and have each kid come up with a sentence for the story as you write it on the board. Make sure someone defines each of the vocabulary words as they are mentioned. Go over any words that they are having difficulty with.
4. Have the kids copy the story down in their notebooks as you go. 5. When the story is complete, have everyone read it out together as a group.
Alternatives: 1. If the kids are older, go through each of the words and then have each of them write their own story. Then go around the room and have each of them read it aloud. Source: Adapted from: Volcano Group Creative Writing. 2007. Teach-nology, Inc. 16 March, 2008. <http://www.teach-
nology.com/worksheets/science/volcano/group/>

Appendix A Lesson 13
Title: The Origin of Calderas and Craters Objectives: To learn more about calderas and craters and how they form. Time Requirement: 1 hour Materials:
• A small box • Flour (or other fine material) • A balloon (red is best) • Plastic tubing (or large straw) • A clamp (or clothes pin) • Newspaper
Vocabulary: Crater: A circular depression in the ground caused by volcanic activity (the eruption of gas, magma or ejecta). Caldera: A volcanic feature that forms at volcanoes after an eruption causes collapse of land at the volcano. Activities:
1. Explain to the kids that today you are going to talk about and demonstrate how calderas and craters are formed. Define what calderas and craters are and explain how they are common on volcanoes. Point out any local volcanoes that have calderas or craters.
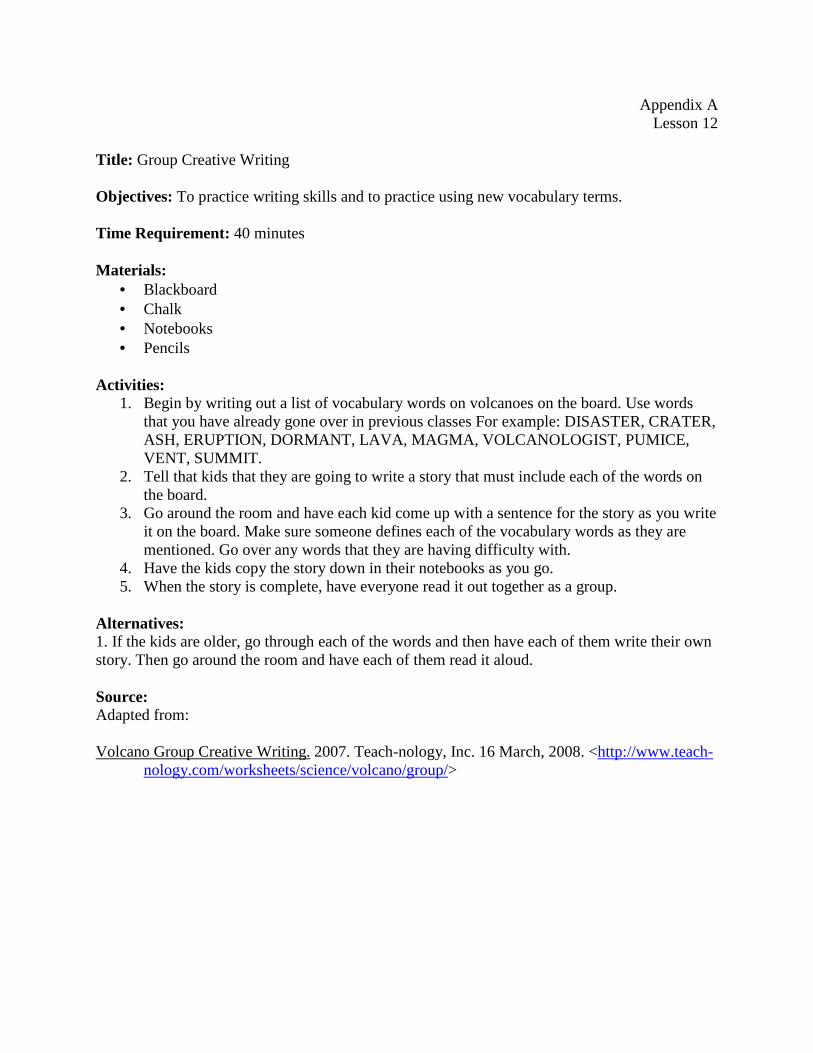
2. Line the box with newspaper and punch a small hole through the center of the bottom of the box and newspaper (should be just big enough to pass the plastic tubing through). Put the tubing through the hole and tape the balloon to the tubing. Use the tubing to blow up the balloon until it is a few inches in diameter. Use the clamp to close off the plastic tubing.
3. Cover the balloon in flour and gently press it into the shape of a stratovolcano. Mention
how the gas pressure in the balloon is holding up the top of the cone of the volcano. Explain how this is like gas in a magma that puts pressure on the surrounding rocks.
Explain how the pressure is large enough to hold up the top of the volcano for much of the volcano’s history.
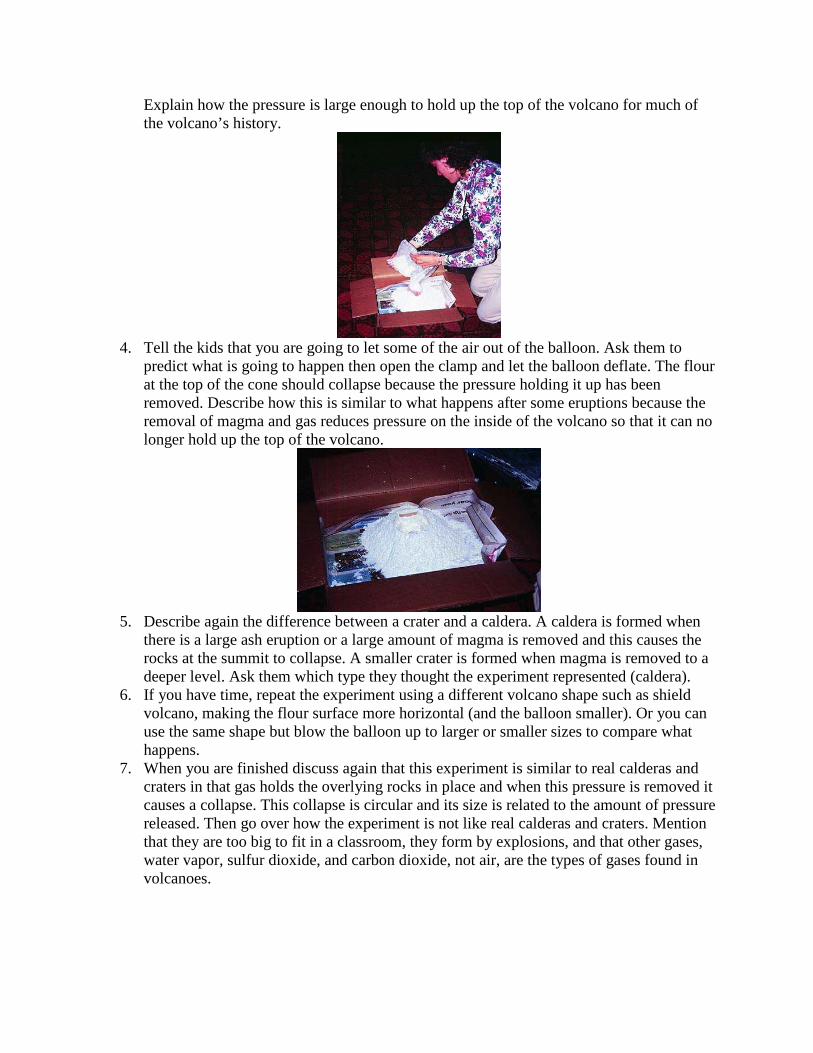
4. Tell the kids that you are going to let some of the air out of the balloon. Ask them to
predict what is going to happen then open the clamp and let the balloon deflate. The flour at the top of the cone should collapse because the pressure holding it up has been removed. Describe how this is similar to what happens after some eruptions because the removal of magma and gas reduces pressure on the inside of the volcano so that it can no longer hold up the top of the volcano.
5. Describe again the difference between a crater and a caldera. A caldera is formed when
there is a large ash eruption or a large amount of magma is removed and this causes the rocks at the summit to collapse. A smaller crater is formed when magma is removed to a deeper level. Ask them which type they thought the experiment represented (caldera).
6. If you have time, repeat the experiment using a different volcano shape such as shield volcano, making the flour surface more horizontal (and the balloon smaller). Or you can use the same shape but blow the balloon up to larger or smaller sizes to compare what happens.
7. When you are finished discuss again that this experiment is similar to real calderas and craters in that gas holds the overlying rocks in place and when this pressure is removed it causes a collapse. This collapse is circular and its size is related to the amount of pressure released. Then go over how the experiment is not like real calderas and craters. Mention that they are too big to fit in a classroom, they form by explosions, and that other gases, water vapor, sulfur dioxide, and carbon dioxide, not air, are the types of gases found in volcanoes.
Source: Adapted from: The Origin of Calderas and Craters. 30 March 2007. Volcano World: A Collaborative Higher
Education, K-12, and Public Outreach project of the North Dakota and Oregon Space Grant Consortia administered by the Department of Geosciences at Oregon State University. 16 March 2008. <http://volcano.und.edu/vwdocs/volc_models/Caldera/Caldera.html>
Appendix A Lesson 14
Title: Earthquake Waves Objectives: To learn about earthquakes and the types of earthquake waves. Time Requirement: 30 minutes Materials
• Table • Three cups of sand • Rubber mallet (or hammer) • Notebooks • Pencils
Vocabulary: Shock Waves: Seismic waves that originate from an earthquake Focus: The place where the earthquake originated. Activities:
1. Before the experiment, talk to the kids about earthquakes. Ask them if they have ever felt an earthquake and if so what did it feel like. Then discuss how when they feel an earthquake they are feeling shock waves and what shock waves are.
2. Tell the kids to pour the three cups of sand onto the table near the edge. 3. Have someone lightly tap the end of the table with the rubber mallet and ask the kids
what they see. They should see the sand “jumping” into the air. Have them write down their observations in their notebooks.
4. Explain how when rocks break at the focus or center of an earthquake it sends out shock waves in all directions and the “jumping” sand represents the release of the energy from the hammer through the table, similar to an earthquake.
5. Next have the kids move the sand farther away to the middle of the table to see what happens. Ask them to predict first what they think will happen. Then hit the table with the same strength and see what happens. The sand should “jump” less. This is similar to being farther away from the earthquake focus so that you will feel the shock waves less.
6. Have them move the sand to the opposite end of the table and repeat. The sand should not jump much at all.
Alternatives: 1. If you have access to a slinky and the kids are old enough to understand, you can also describe and demonstrate P and S waves Source: Earthquake Waves. 30 Mar. 2007. Scott Johnson. Volcano World: A Collaborative Higher
Education, K-12, and Public Outreach project of the North Dakota and Oregon Space grant
Consortia administered by the Department of Geosciences at Oregon State University. 16 March 2007.
�http://volcano.und.edu/vwdocs/vwlessons/lessons/Ch2CM/Handson4Earthquakes.html�

Appendix A Lesson 15
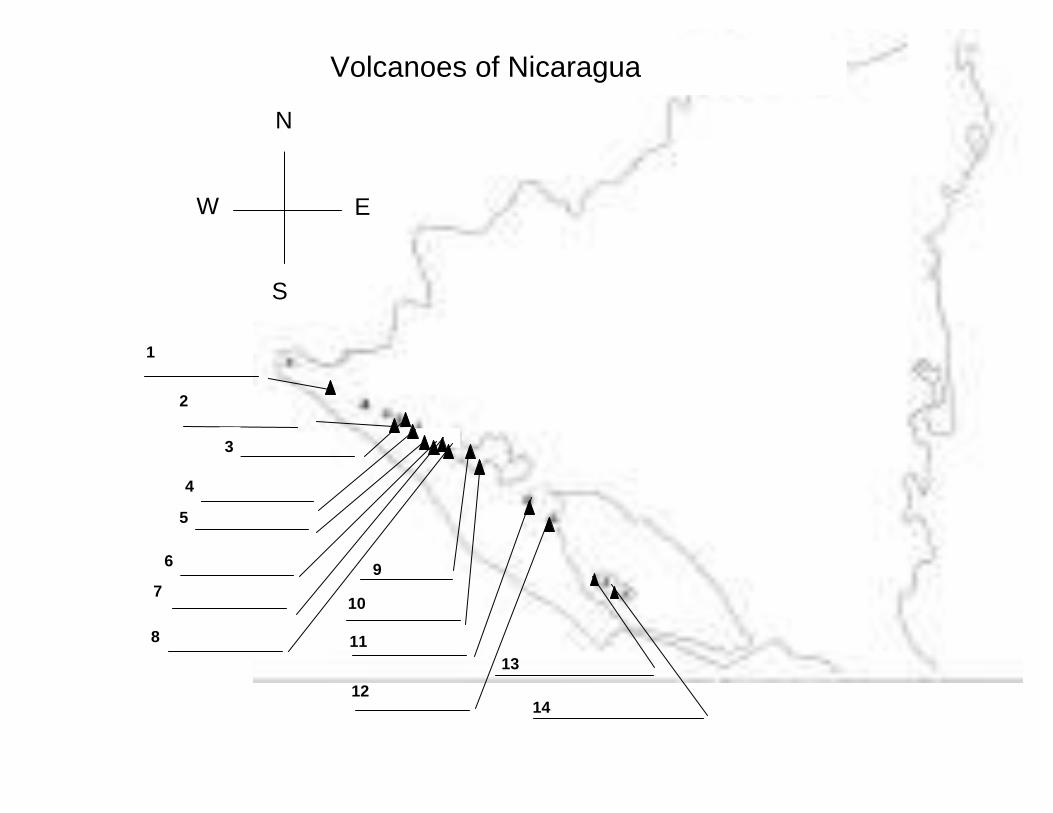
Title : Volcanoes of Your Country Drawings: See attached map. Objectives: To learn about the geographic distribution of some volcanoes from your country. Time Requirement: 40 minutes Materials:
• Pencils • Notebooks • Political map of your country • Copies of the attached drawing for each student (optional and you will probably have to
create your own). Vocabulary: Dormant volcano: A volcano that has not erupted in the last 10,000 years. Active volcano: A volcano that has erupted in the last 10,000 years. Volcanologist: A scientist that studies volcano and volcanic phenomenon. Geologic fault: A fracture or crack in the Earth’s crust. Activities: Before Class (for the teacher):
1. Look through this lesson and attached map of Nicaragua ahead of time and try to come up with similar types of questions and a map for your country. For the rest of this lesson we will use Nicaragua as an example.
During Class:
1. Introduce the volcanoes of Nicaragua to the kids. Explain how Nicaragua contains a 300 kilometer chain of volcanoes consisting of 18 craters and cones from the northwest point of Nicaragua, the peninsula of Cosigüina, to Omotepe Island in the southwest. This chain is formed by a geologic fault, located 10 km deep in the crust. The magma that is located underneath the fault takes advantage of it as a route leading to the surface, resulting in the formation of volcanoes. Some of the volcanoes are so old that they are considered dormant, meaning they have not erupted in the last 10,000 years. Casita, Rota, Maderas, and Mombach are all dormant Nicaraguan volcanoes. Nicaragua also has young volcanoes including Cerro Negro, which is considered one of the youngest volcanoes in the world. It began erupting in 1850 and is still erupting today. Volcanologists come from all over the world to study Cerro Negro because it is so active.

2. Pass out copies of the map to each student or if they are not available draw a rough map on the board and have the kids copy it in their notebooks.
3. Identify the volcanoes on the sheet. From the northeast the south they are: 1. Cosigüina, 2. El Chonco, 3. San Cristóbal, 4. Casita, 5. Telica, 6. Rota, 7. Cerro Negro, 8. El Hoyo, 9. Mombotombo, 10. Mombotombito, 11. Masaya, 12. Mombacho, 13. Concepción, 14. Maderas. Explain that there are 18 volcanoes in Nicaragua, but not all of them appear on the drawing.
4. With the drawing and map of Nicaragua in front of them, ask the kids the following questions. Tell them that they can write names of cities, towns, and lakes on their map. 1. The volcanoes are located on which side of Nicaragua – the north, south, east, or
west? (West) 2. Which to volcanoes are on Omotepe Island? (Concepción y Maderas) 3. Which volcano is closest to where we live? 4. Are there any volcanoes in our department? 5. If so, what are their names? 6. Mombach and Maderas are dormant volcanoes. Where are they located on the map? 7. What is the northernmost volcano in Nicaragua? (Cosigüina) 8. What is the southernmost volcano in Nicaragua? (Maderas) 9. What is the easternmost volcano in Nicaragua? (Cosigüina) 10. What is the westernmost volcano in Nicaragua? (Maderas ) 11. Which volcano is located in Managua Lake? (Mombotombito) 12. Which volcano is located just north of Managua Lake? (Mombotombo) 13. Which volcano is closest to Managua? (Masaya) 14. Which volcanoes are located in Lake Nicaragua? (Concepción y Maderas) 15. Granada is located closest to which volcano(Mombacho) 16. Cosigüina volcano is located in which department of Nicaragua? (Chinandega)
5. Talk to the kids about how volcanoes can affect the lives of the people living near them. Are there precautions that they have to take? What type? Have they heard of any volcanoes that have erupted in their lives? If so, what happened? Sources: Atlas Básico Ilustrado: Nicaragua y el Mundo, Eneydo Oviedo Plazaola et al., Managua,
Campaña Nicaragua, Måste Överleva, 1993, 56p. Geográfica Dinámica de Nicaragua, Incer Barquero, Jaime, 2a ed., Managua, HISPAMER, 2000,
281p. Gross, Essa. Personal Interview. 29 February 2008.
N
E
S
W
Volcanoes of Nicaragua
1
2
3
4
5
6
7 9
8
13
12
11
10
14
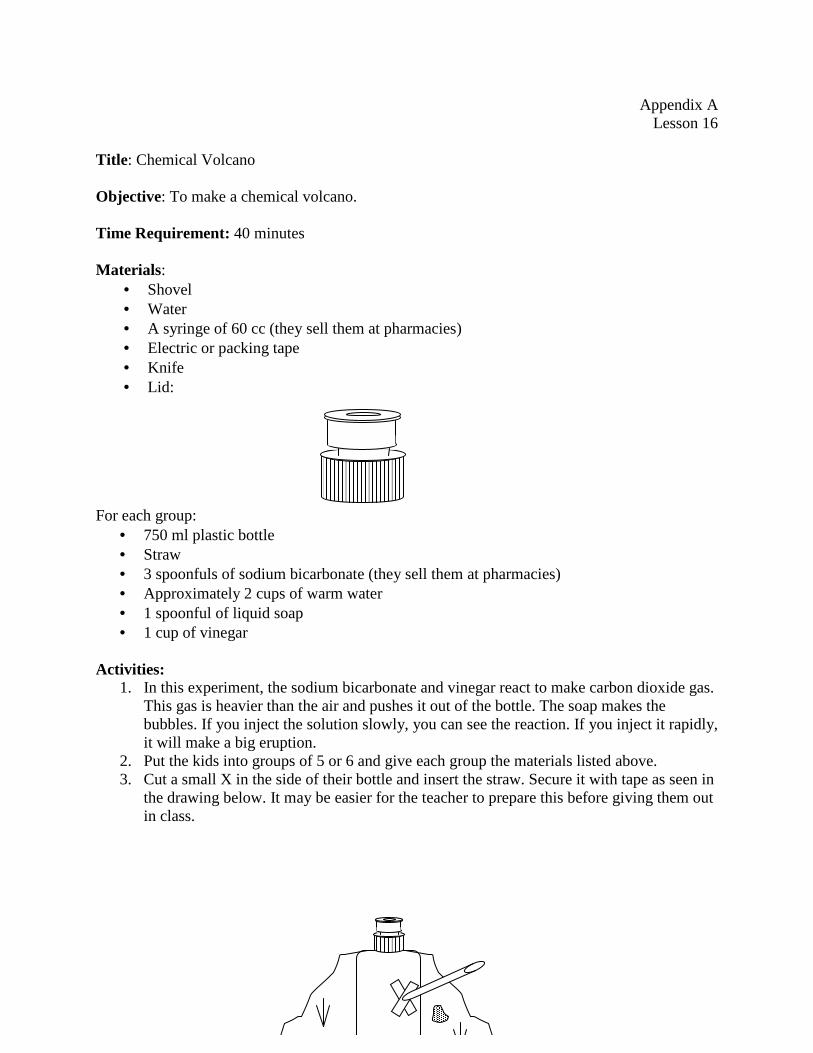
Appendix A Lesson 16
Title : Chemical Volcano Objective: To make a chemical volcano. Time Requirement: 40 minutes Materials:
• Shovel • Water • A syringe of 60 cc (they sell them at pharmacies) • Electric or packing tape • Knife • Lid:
For each group: • 750 ml plastic bottle • Straw • 3 spoonfuls of sodium bicarbonate (they sell them at pharmacies) • Approximately 2 cups of warm water • 1 spoonful of liquid soap • 1 cup of vinegar
Activities:
1. In this experiment, the sodium bicarbonate and vinegar react to make carbon dioxide gas. This gas is heavier than the air and pushes it out of the bottle. The soap makes the bubbles. If you inject the solution slowly, you can see the reaction. If you inject it rapidly, it will make a big eruption.
2. Put the kids into groups of 5 or 6 and give each group the materials listed above. 3. Cut a small X in the side of their bottle and insert the straw. Secure it with tape as seen in
the drawing below. It may be easier for the teacher to prepare this before giving them out in class.
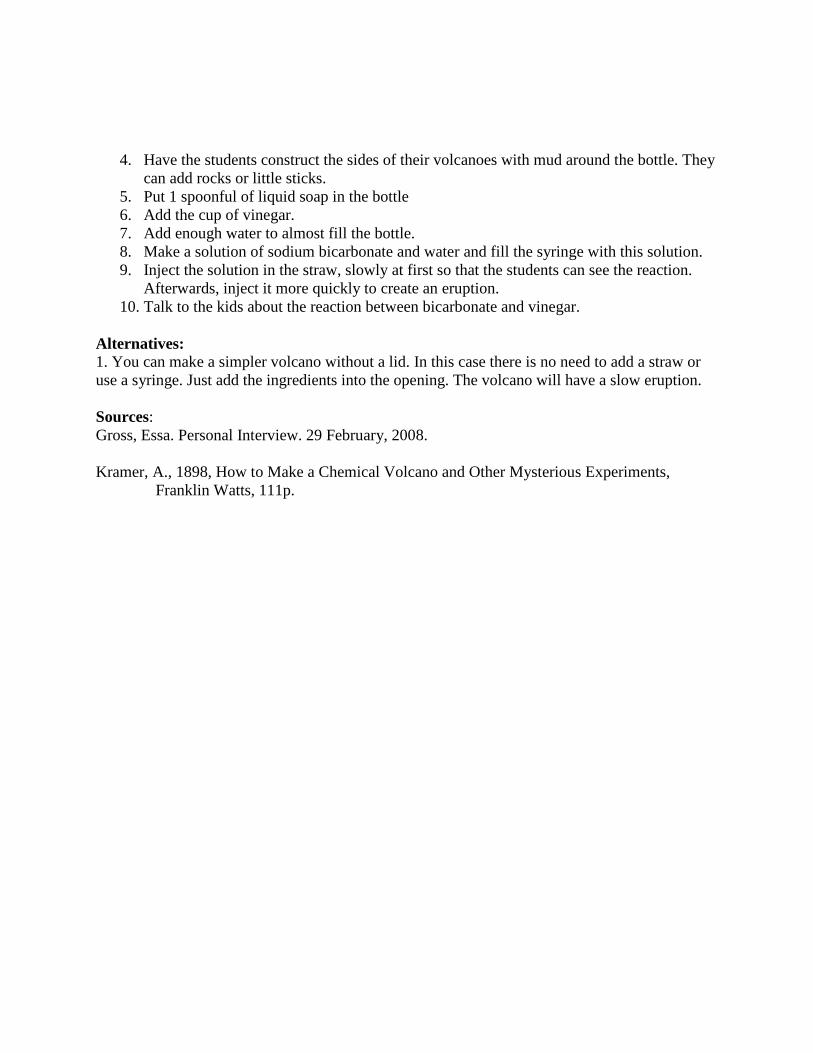
4. Have the students construct the sides of their volcanoes with mud around the bottle. They can add rocks or little sticks.
5. Put 1 spoonful of liquid soap in the bottle 6. Add the cup of vinegar. 7. Add enough water to almost fill the bottle. 8. Make a solution of sodium bicarbonate and water and fill the syringe with this solution. 9. Inject the solution in the straw, slowly at first so that the students can see the reaction.
Afterwards, inject it more quickly to create an eruption. 10. Talk to the kids about the reaction between bicarbonate and vinegar.
Alternatives: 1. You can make a simpler volcano without a lid. In this case there is no need to add a straw or use a syringe. Just add the ingredients into the opening. The volcano will have a slow eruption. Sources: Gross, Essa. Personal Interview. 29 February, 2008. Kramer, A., 1898, How to Make a Chemical Volcano and Other Mysterious Experiments,
Franklin Watts, 111p.
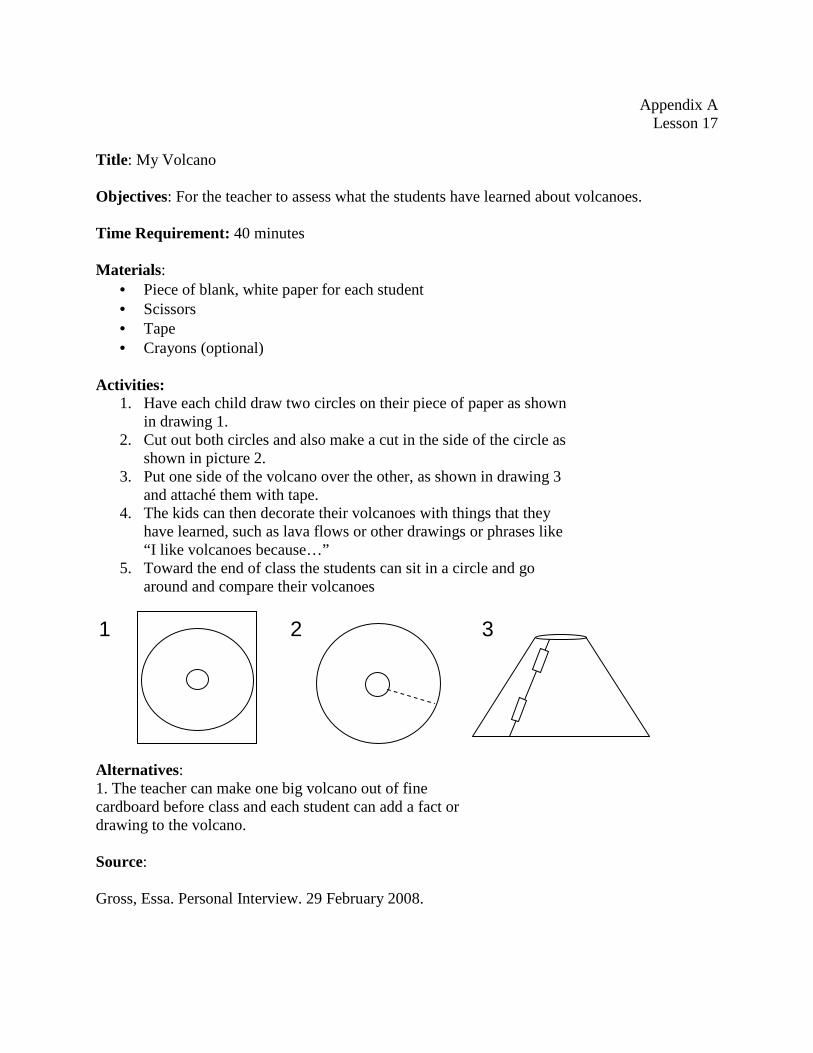
Appendix A Lesson 17
Title : My Volcano Objectives: For the teacher to assess what the students have learned about volcanoes. Time Requirement: 40 minutes Materials:
• Piece of blank, white paper for each student • Scissors • Tape • Crayons (optional)
Activities:
1. Have each child draw two circles on their piece of paper as shown in drawing 1.
2. Cut out both circles and also make a cut in the side of the circle as shown in picture 2.
3. Put one side of the volcano over the other, as shown in drawing 3 and attaché them with tape.
4. The kids can then decorate their volcanoes with things that they have learned, such as lava flows or other drawings or phrases like “I like volcanoes because…”
5. Toward the end of class the students can sit in a circle and go around and compare their volcanoes
Alternatives: 1. The teacher can make one big volcano out of fine cardboard before class and each student can add a fact or drawing to the volcano. Source: Gross, Essa. Personal Interview. 29 February 2008.
1 2 3
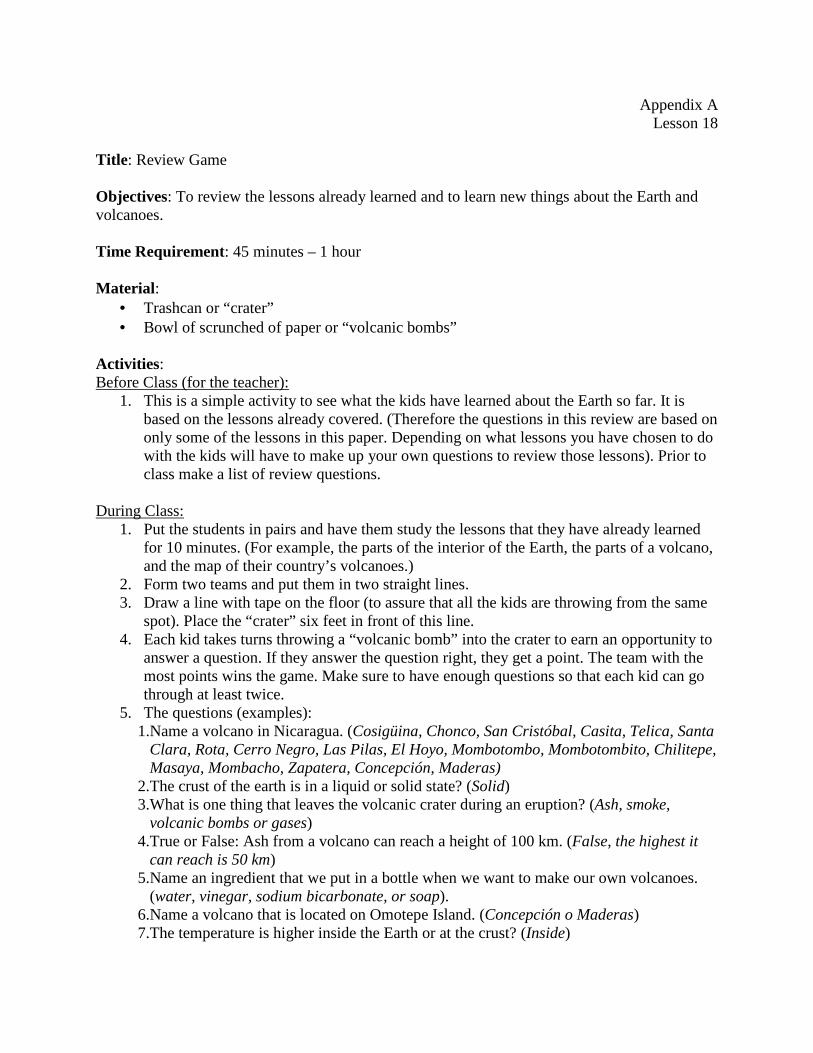
Appendix A Lesson 18
Title : Review Game Objectives: To review the lessons already learned and to learn new things about the Earth and volcanoes. Time Requirement: 45 minutes – 1 hour Material :
• Trashcan or “crater” • Bowl of scrunched of paper or “volcanic bombs”
Activities: Before Class (for the teacher):
1. This is a simple activity to see what the kids have learned about the Earth so far. It is based on the lessons already covered. (Therefore the questions in this review are based on only some of the lessons in this paper. Depending on what lessons you have chosen to do with the kids will have to make up your own questions to review those lessons). Prior to class make a list of review questions.
During Class:
1. Put the students in pairs and have them study the lessons that they have already learned for 10 minutes. (For example, the parts of the interior of the Earth, the parts of a volcano, and the map of their country’s volcanoes.)
2. Form two teams and put them in two straight lines. 3. Draw a line with tape on the floor (to assure that all the kids are throwing from the same
spot). Place the “crater” six feet in front of this line. 4. Each kid takes turns throwing a “volcanic bomb” into the crater to earn an opportunity to
answer a question. If they answer the question right, they get a point. The team with the most points wins the game. Make sure to have enough questions so that each kid can go through at least twice.
5. The questions (examples): 1.Name a volcano in Nicaragua. (Cosigüina, Chonco, San Cristóbal, Casita, Telica, Santa
Clara, Rota, Cerro Negro, Las Pilas, El Hoyo, Mombotombo, Mombotombito, Chilitepe, Masaya, Mombacho, Zapatera, Concepción, Maderas)
2.The crust of the earth is in a liquid or solid state? (Solid) 3.What is one thing that leaves the volcanic crater during an eruption? (Ash, smoke,
volcanic bombs or gases) 4.True or False: Ash from a volcano can reach a height of 100 km. (False, the highest it
can reach is 50 km) 5.Name an ingredient that we put in a bottle when we want to make our own volcanoes.
(water, vinegar, sodium bicarbonate, or soap). 6.Name a volcano that is located on Omotepe Island. (Concepción o Maderas) 7.The temperature is higher inside the Earth or at the crust? (Inside)
8.Is the material that comes out of a volcano called magma or lava? (Lava (It is called magma when it is located below the surface of the Earth)
9.True or false: Lava can reach a temperature of 1150ºC. (True) 10. Cosigüina volcano is located in which department? (Chinandega) 11. Inside a volcano, the magma sits in the magma chamber or inner core? (Magma
chamber) 12. What do they call the rocks and stones that are thrown from a volcano during an
eruption? (Volcanic bombs) 13. Name the volcano that is located closest to the city of Granada. (Mombacho). 14. True or False: Volcanoes can exist below the ocean’s surface? (True) 15. Which is hotter, the mantle or the crust? (Mantle) 16. True or False: When a volcano is dormant, it is possible for lakes to form in their
calderas. (True) 17. Which is in a solid state, the inner or outer core? (Inner core) 18. What phenomena occured in Managua in 1972 that destroyed the city – a volcanic
eruption, a volcanic bomb, or an earthquake? (Earthquake) 19. The mantle is in a solid or semi-molten state? (Semi-molten) 20. True or False: There are no volcanoes on the other planets in the solar system. (False,
there are volcanoes on other planets. The largest volcano that we know of is Olimpus Mons on Mars that has a height of 27 km)
21. What do we call the center or hottest part of the Earth? (Inner core) 22. Name another ingredient that we haven’t mentioned yet that we put in the chemical
volcano that we made. (Water, vinegar, sodium bicarbonate, soap) 23. The conduit connects which two parts of the volcano? (The crater and the magma
chamber) 24. True or False, at any moment 15-20 volcanoes are erupting. (True) 25. The volcanoes of Nicaragua are located in the north, south, east or west of the
country? (West) 26. What is the difference between magma and lava? (They are the same minerals and
gases, but they call it magma when it is located below the surface of the earth and lava after it has reached the surface of the earth.)
Sources: Atlas Básico Ilustrado: Nicaragua y el Mundo, Eneydo Oviedo Plazaola et al., Managua,
Campaña Nicaragua, Måste Överleva, 1993, 56p. Gross, Essa. Personal Interview. 29 February 2008.