Teaching advanced calisthenic movements - JumpJet . · PDF fileTeaching advanced calisthenic...
65
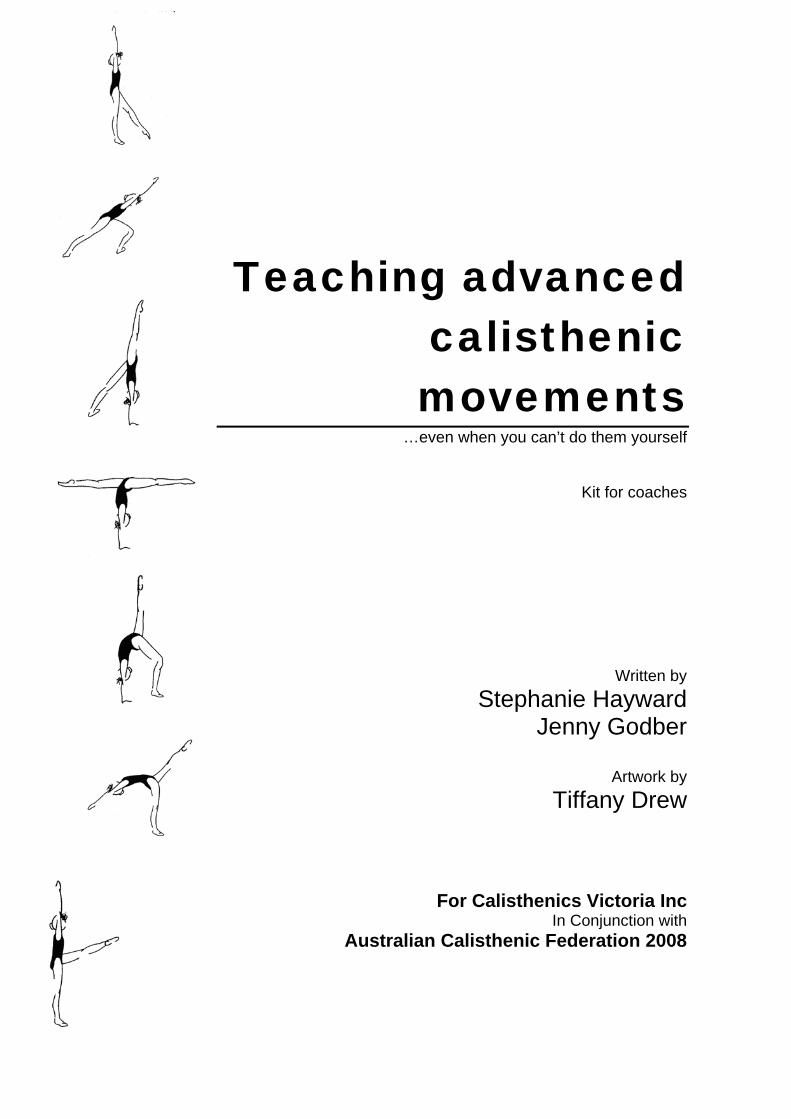
Teaching advanced calisthenic movements …even when you can’t do them yourself Kit for coaches Written by Stephanie Hayward Jenny Godber Artwork by Tiffany Drew For Calisthenics Victoria Inc In Conjunction with Australian Calisthenic Federation 2008
Transcript of Teaching advanced calisthenic movements - JumpJet . · PDF fileTeaching advanced calisthenic...
Teaching advanced calisthenic movements
…even when you can’t do them yourself
Kit for coaches
Written by Stephanie Hayward
Jenny Godber
Artwork by Tiffany Drew
For Calisthenics Victoria IncIn Conjunction with
Australian Calisthenic Federation 2008
1. Introduction
What are advanced calisthenic movements? Advanced calisthenic movements require a high level of flexibility and strength from specific muscles to be executed safely. To develop these components they require exercises to accelerate development by the pupils. Examples of advanced movements includes: walkovers, tigerstands and valdez. The importance of flexibility and strength
Safety Without the required level of flexibility, the pupil is at risk of soft tissue injury.
Without the required level of strength, the pupil runs the risk of ‘powering’ through movements and placing strain on the spine, and other joints of the body.
Correct alignment and technique
Without correct alignment and technique, marks are deducted at adjudication because of safety and aesthetic appeal.
Developing flexibility and strength for advanced calisthenic movements For pupils to be able to perform advanced movements safely and correctly, coaches need to be able to identify pre-requisite skills (primary requirement), which pupils must be able to perform before attempting the advanced movement. Once the pre-requisite skills are known coaches can test to see if the pupil can perform them. If any pre-requisite skill cannot be performed then coaches can prescribe specific exercises for the individual pupil to help accelerate their development of the new skill. The aim of this kit This document provides a systematic approach to coaching pupils to execute advanced calisthenic movements safely and correctly. Specifically it covers:
1) components of an adequate warm up 2) the five primary pre-requisite movements for a calisthenic pupil 3) a six step methodology for teaching advanced callisthenic movements 4) exercises to help develop strength and flexibility to advanced movements.
2. The physical components of calisthenics The physical components required in calisthenics are:
• strength • flexibility • power • muscular endurance.
Four key physical components
Definitions
Strength
• This is the amount of force a muscle/group can exert against a load.
• In calisthenics, pupils use strength to move their own body weight, and control the movement of their limbs. It is also used to lift objects with control.
Flexibility
• This is the range of movement about a joint or series of joints (e.g. hip and spine).
• Passive range: is the range of movement, achieved by application of external force (eg splits).
• Active range: is the range of movement achieved by voluntary muscle contraction (eg arabesque).
Power
• ‘Powerful’ activities are often faster movements. It is a combination of strength and speed.
• These can be seen in jumps, leaps, recovery of advanced calisthenic movements.
Muscular Endurance
• It is the capacity to perform continuous repetitions of a skill or performance without fatigue occurring and/or losing execution.
• This is related to a specific muscle group(s)- e.g. stomach muscles, arms, back.
The two physical components mainly used in calisthenics are strength and flexibility, followed by power. This document will focus on the specific muscles which require strength and flexibility in advanced calisthenic movements.
3. How to prepare the body for the physical component demands of calisthenics 3.1 Warming up and conditioning At the beginning of each training session pupils must undertake a warm up to prepare the body for the activity it is about to perform. A good warm up will prevent injury and will increase the pupil’s performance. The warm up should consist of three components:
1. cardiovascular exercise 2. stretches 3. strengthening exercises.
1. Cardiovascular exercise: 5-10 minutes
This involves full body movements, such as jogging, aerobics and fast games that increase the heart rate. The component needs to be made fun by the coach, and this can be achieved by using the pupil’s favourite music, conducting team games or leading fun dance moves. Cardiovascular exercises in the warm up do four important things. They increase:
1. the amount of oxygen into the lungs and to the muscles 2. the blood flow and lubrication to the muscles, joints and ligaments 3. the temperature of the muscle ( therefore reducing chances of injury) 4. endorphins which make the pupil more alert.
The pupils should be slightly perspiring at the end of the cardiovascular exercise and this
indicates a rise in blood temperature. 2. Stretching: 15-30 minutes
Stretching increases the soft muscle tissue length. It is ideal to stretch after cardiovascular exercise when the muscles have adequate blood flow and increased temperature. Stretching requires specific technique and the coach needs to demonstrate and explain each stretch correctly. For optimal results the American College of Sports Medicine (ASCM, 2007) recommends flexibility training a minimum 3 days per week (up to daily) holding each stretch for 30- 60 seconds to mild discomfort, with 2-4 repetitions per stretch. A warm up should consist of at least two stretches for each major muscle groups used in calisthenics.
The major muscles groups that require stretching in calisthenic include:
hamstrings lower back hip flexors adductors (groin) shoulders
The time dedicated to stretching in the warm up is dependant on the pupil’s age. Younger sub-juniors and juniors may require only 15 minutes because of laxity in the muscles, where seniors may require up to 30 minutes.
For more detail on specific exercises refer to section 7.3
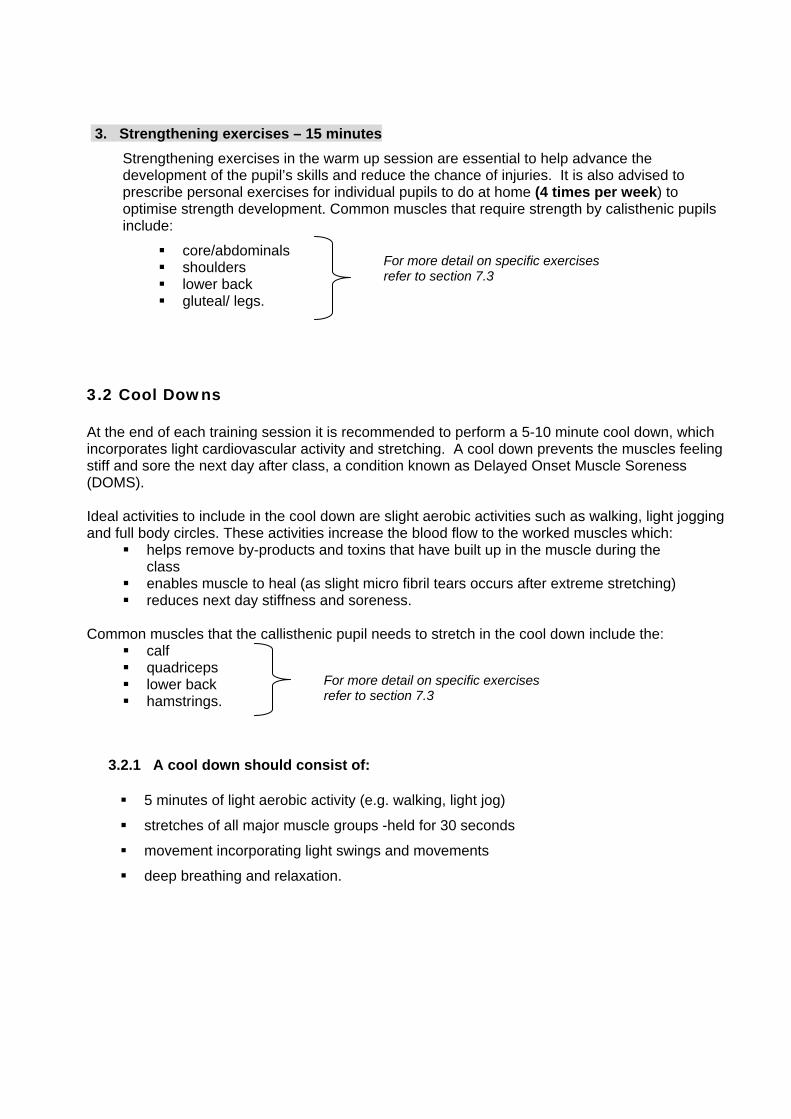
3. Strengthening exercises – 15 minutes Strengthening exercises in the warm up session are essential to help advance the development of the pupil’s skills and reduce the chance of injuries. It is also advised to prescribe personal exercises for individual pupils to do at home (4 times per week) to optimise strength development. Common muscles that require strength by calisthenic pupils include:
core/abdominals shoulders lower back gluteal/ legs.
3.2 Cool Downs At the end of each training session it is recommended to perform a 5-10 minute cool down, which incorporates light cardiovascular activity and stretching. A cool down prevents the muscles feeling stiff and sore the next day after class, a condition known as Delayed Onset Muscle Soreness (DOMS). Ideal activities to include in the cool down are slight aerobic activities such as walking, light jogging and full body circles. These activities increase the blood flow to the worked muscles which:
helps remove by-products and toxins that have built up in the muscle during the class
enables muscle to heal (as slight micro fibril tears occurs after extreme stretching) reduces next day stiffness and soreness.
Common muscles that the callisthenic pupil needs to stretch in the cool down include the:
calf quadriceps lower back hamstrings.
3.2.1 A cool down should consist of:
5 minutes of light aerobic activity (e.g. walking, light jog)
stretches of all major muscle groups -held for 30 seconds
movement incorporating light swings and movements
deep breathing and relaxation.
For more detail on specific exercises refer to section 7.3
For more detail on specific exercises refer to section 7.3
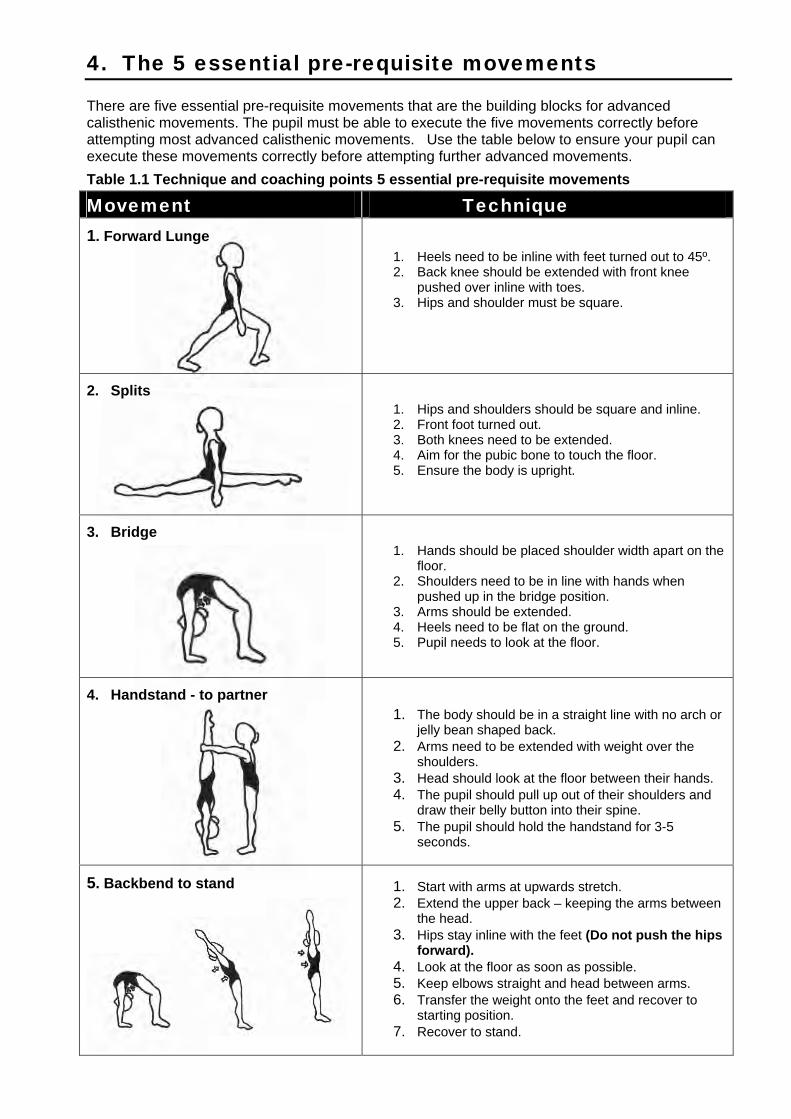
4. The 5 essential pre-requisite movements There are five essential pre-requisite movements that are the building blocks for advanced calisthenic movements. The pupil must be able to execute the five movements correctly before attempting most advanced calisthenic movements. Use the table below to ensure your pupil can execute these movements correctly before attempting further advanced movements.
Table 1.1 Technique and coaching points 5 essential pre-requisite movements
Movement Technique 1. Forward Lunge
1. Heels need to be inline with feet turned out to 45º. 2. Back knee should be extended with front knee
pushed over inline with toes. 3. Hips and shoulder must be square.
2. Splits
1. Hips and shoulders should be square and inline. 2. Front foot turned out. 3. Both knees need to be extended. 4. Aim for the pubic bone to touch the floor. 5. Ensure the body is upright.
3. Bridge
1. Hands should be placed shoulder width apart on the
floor. 2. Shoulders need to be in line with hands when
pushed up in the bridge position. 3. Arms should be extended. 4. Heels need to be flat on the ground. 5. Pupil needs to look at the floor.
4. Handstand - to partner
1. The body should be in a straight line with no arch or
jelly bean shaped back. 2. Arms need to be extended with weight over the
shoulders. 3. Head should look at the floor between their hands. 4. The pupil should pull up out of their shoulders and
draw their belly button into their spine. 5. The pupil should hold the handstand for 3-5
seconds.
5. Backbend to stand
1. Start with arms at upwards stretch. 2. Extend the upper back – keeping the arms between
the head. 3. Hips stay inline with the feet (Do not push the hips
forward). 4. Look at the floor as soon as possible. 5. Keep elbows straight and head between arms. 6. Transfer the weight onto the feet and recover to
starting position. 7. Recover to stand.
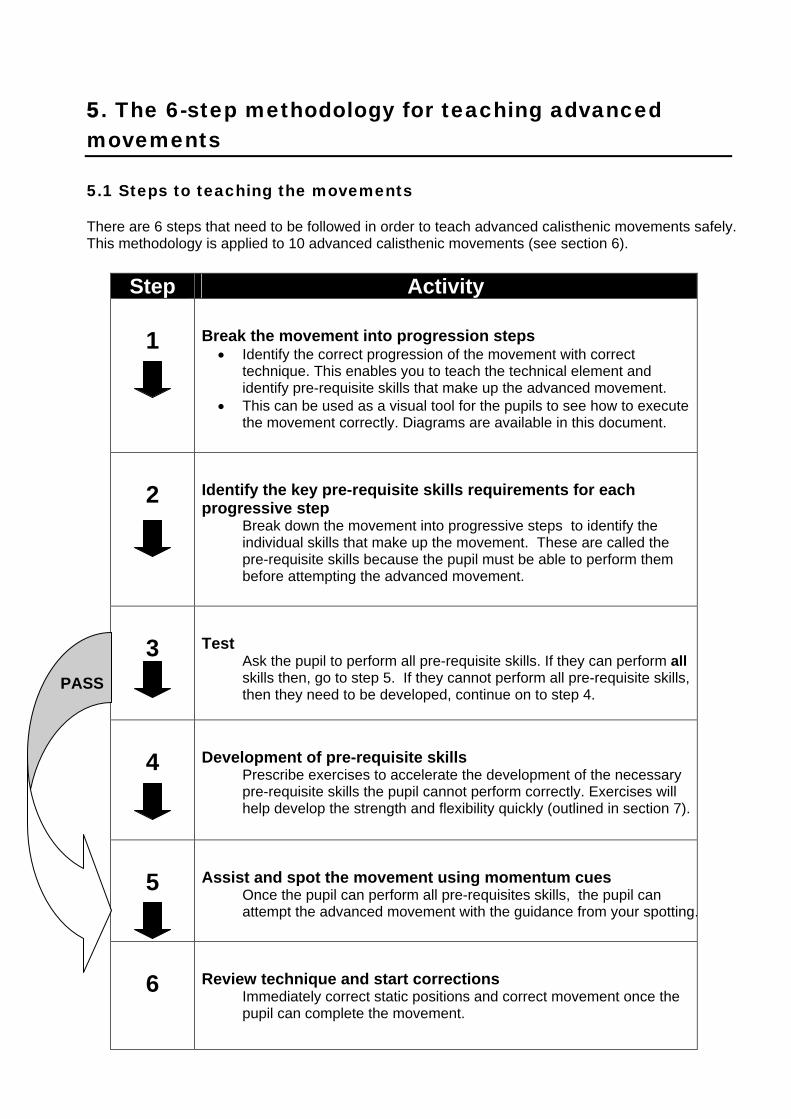
5. The 6-step methodology for teaching advanced movements 5.1 Steps to teaching the movements There are 6 steps that need to be followed in order to teach advanced calisthenic movements safely. This methodology is applied to 10 advanced calisthenic movements (see section 6).
Step Activity
1
Break the movement into progression steps
• Identify the correct progression of the movement with correct technique. This enables you to teach the technical element and identify pre-requisite skills that make up the advanced movement.
• This can be used as a visual tool for the pupils to see how to execute the movement correctly. Diagrams are available in this document.
2 Identify the key pre-requisite skills requirements for each progressive step
Break down the movement into progressive steps to identify the individual skills that make up the movement. These are called the pre-requisite skills because the pupil must be able to perform them before attempting the advanced movement.
3
Test
Ask the pupil to perform all pre-requisite skills. If they can perform all skills then, go to step 5. If they cannot perform all pre-requisite skills, then they need to be developed, continue on to step 4.
4
Development of pre-requisite skills
Prescribe exercises to accelerate the development of the necessary pre-requisite skills the pupil cannot perform correctly. Exercises will help develop the strength and flexibility quickly (outlined in section 7).
5
Assist and spot the movement using momentum cues
Once the pupil can perform all pre-requisites skills, the pupil can attempt the advanced movement with the guidance from your spotting.
6 Review technique and start corrections
Immediately correct static positions and correct movement once the pupil can complete the movement.
PASS
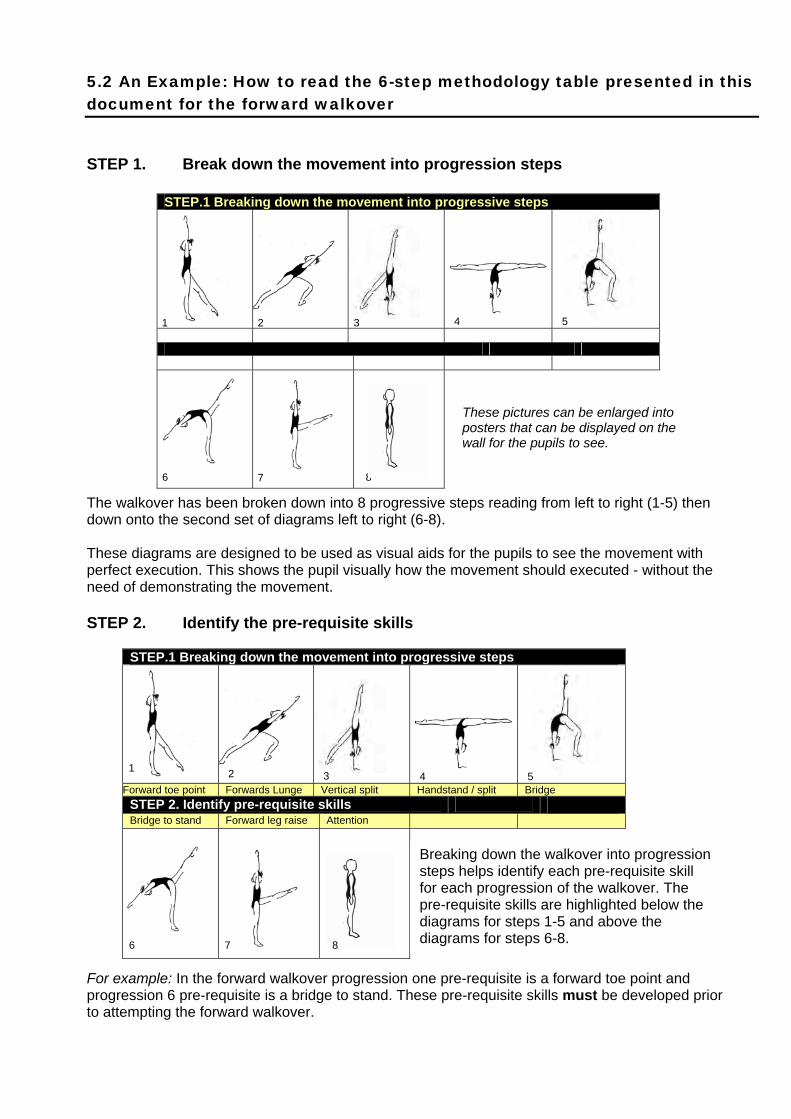
5.2 An Example: How to read the 6-step methodology table presented in this document for the forward walkover STEP 1. Break down the movement into progression steps The walkover has been broken down into 8 progressive steps reading from left to right (1-5) then down onto the second set of diagrams left to right (6-8). These diagrams are designed to be used as visual aids for the pupils to see the movement with perfect execution. This shows the pupil visually how the movement should executed - without the need of demonstrating the movement. STEP 2. Identify the pre-requisite skills
For example: In the forward walkover progression one pre-requisite is a forward toe point and progression 6 pre-requisite is a bridge to stand. These pre-requisite skills must be developed prior to attempting the forward walkover.
STEP.1 Breaking down the movement into progressive steps
STEP.1 Breaking down the movement into progressive steps
Forward toe point Forwards Lunge Vertical split Handstand / split Bridge STEP 2. Identify pre-requisite skills Bridge to stand Forward leg raise Attention
2 3 4 51
Breaking down the walkover into progression steps helps identify each pre-requisite skill for each progression of the walkover. The pre-requisite skills are highlighted below the diagrams for steps 1-5 and above the diagrams for steps 6-8.
2 3 4 51
6 8 7
These pictures can be enlarged into posters that can be displayed on the wall for the pupils to see.
6 7 8
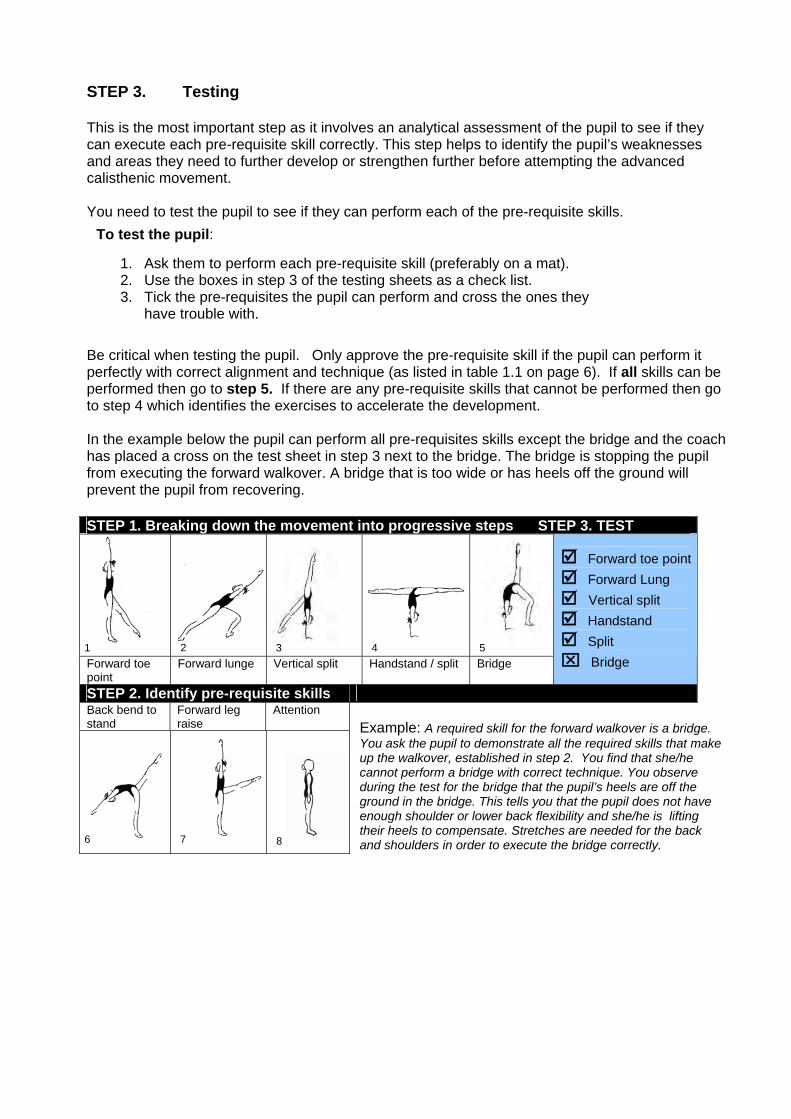
STEP 3. Testing This is the most important step as it involves an analytical assessment of the pupil to see if they can execute each pre-requisite skill correctly. This step helps to identify the pupil’s weaknesses and areas they need to further develop or strengthen further before attempting the advanced calisthenic movement. You need to test the pupil to see if they can perform each of the pre-requisite skills.
Be critical when testing the pupil. Only approve the pre-requisite skill if the pupil can perform it perfectly with correct alignment and technique (as listed in table 1.1 on page 6). If all skills can be performed then go to step 5. If there are any pre-requisite skills that cannot be performed then go to step 4 which identifies the exercises to accelerate the development. In the example below the pupil can perform all pre-requisites skills except the bridge and the coach has placed a cross on the test sheet in step 3 next to the bridge. The bridge is stopping the pupil from executing the forward walkover. A bridge that is too wide or has heels off the ground will prevent the pupil from recovering. STEP 1. Breaking down the movement into progressive steps STEP 3. TEST
Forward toe point
Forward lunge Vertical split Handstand / split Bridge
Forward toe point Forward Lung Vertical split Handstand Split ⌧ Bridge
STEP 2. Identify pre-requisite skills Back bend to stand
Forward leg raise
Attention
To test the pupil:
1. Ask them to perform each pre-requisite skill (preferably on a mat). 2. Use the boxes in step 3 of the testing sheets as a check list. 3. Tick the pre-requisites the pupil can perform and cross the ones they
have trouble with.
1 2 3 4 5
6 7 8
Example: A required skill for the forward walkover is a bridge. You ask the pupil to demonstrate all the required skills that make up the walkover, established in step 2. You find that she/he cannot perform a bridge with correct technique. You observe during the test for the bridge that the pupil’s heels are off the ground in the bridge. This tells you that the pupil does not have enough shoulder or lower back flexibility and she/he is lifting their heels to compensate. Stretches are needed for the back and shoulders in order to execute the bridge correctly.
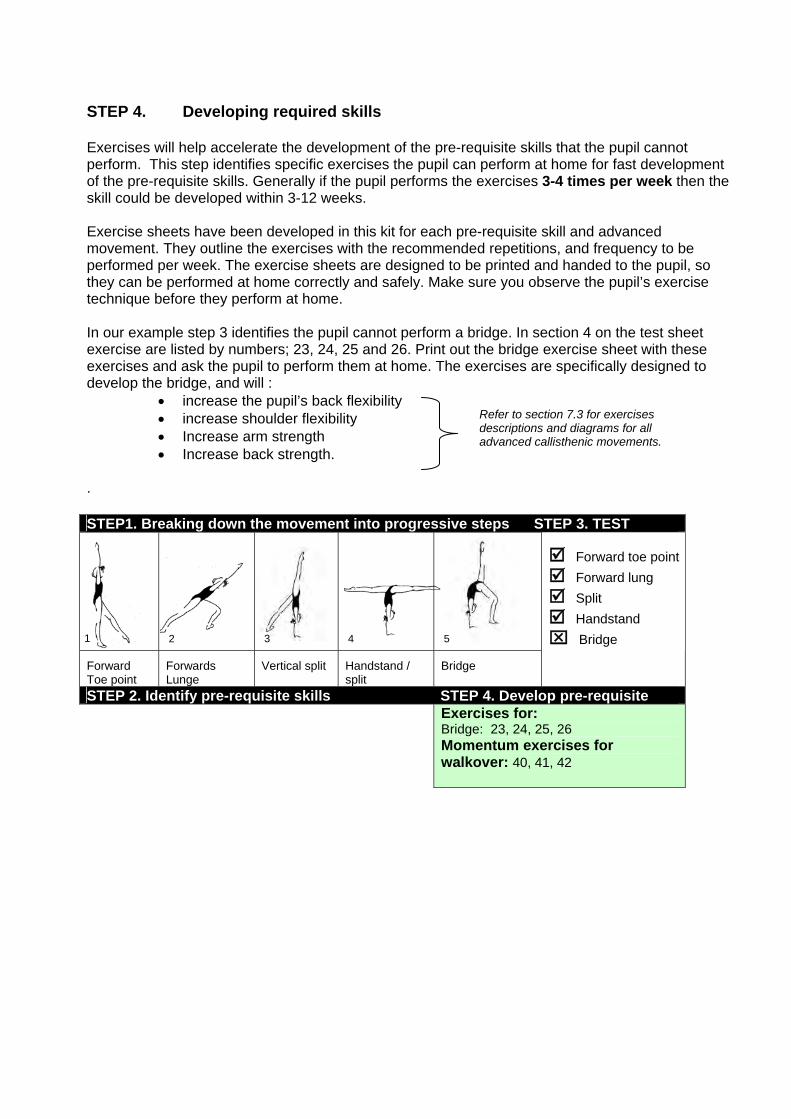
STEP 4. Developing required skills Exercises will help accelerate the development of the pre-requisite skills that the pupil cannot perform. This step identifies specific exercises the pupil can perform at home for fast development of the pre-requisite skills. Generally if the pupil performs the exercises 3-4 times per week then the skill could be developed within 3-12 weeks. Exercise sheets have been developed in this kit for each pre-requisite skill and advanced movement. They outline the exercises with the recommended repetitions, and frequency to be performed per week. The exercise sheets are designed to be printed and handed to the pupil, so they can be performed at home correctly and safely. Make sure you observe the pupil’s exercise technique before they perform at home. In our example step 3 identifies the pupil cannot perform a bridge. In section 4 on the test sheet exercise are listed by numbers; 23, 24, 25 and 26. Print out the bridge exercise sheet with these exercises and ask the pupil to perform them at home. The exercises are specifically designed to develop the bridge, and will :
• increase the pupil’s back flexibility • increase shoulder flexibility • Increase arm strength • Increase back strength.
.
STEP1. Breaking down the movement into progressive steps STEP 3. TEST
Forward Toe point
Forwards Lunge
Vertical split Handstand / split
Bridge
Forward toe point Forward lung Split Handstand ⌧ Bridge
STEP 2. Identify pre-requisite skills STEP 4. Develop pre-requisite Exercises for: Bridge: 23, 24, 25, 26 Momentum exercises for walkover: 40, 41, 42
Refer to section 7.3 for exercises descriptions and diagrams for all advanced callisthenic movements.
1 2 3 4 5
STEP 5. Assist in spotting the movement using momentum cues When the pupil can perform all the pre-requisite skills, they can attempt the advanced movement with the assistance of spotting/padding by the coach. At this stage they can attempt the movement safely but need assistance as they have not yet developed the necessary strength to recover safely. Spotting will help create the momentum to complete the advanced calisthenic movement safely, and enable the pupil to get a understanding and feel of the new skill. Step 5 outlines the safe spotting technique to use and helpful momentum cues to assist the pupil through each advanced movement. Start using momentum cues – and prescribes the momentum exercise to help them develop necessary strength and power to complete the advanced movement independently. STEP 6. Review technique and start corrections This step reviews the correct technique for the advanced movements as marked by the adjudicators. Correction tips:
1. Correct the preparation and early progressive movements (eg steps 1, 2, 3 of the walkover) straight away. This includes deportment, extension, alignments and engagement of the core muscles. This will achieve the best preparation for attempting the advanced movement.
2. When the pupil can complete the advanced movement, start correcting the recovery as soon as possible. For example in the forward walkover ensure the pupil stands at attention with good deportment. If the recovery is not executed correctly the pupil displays a lack of body control and marks may be deducted.
3. Once the pupil has completed the advanced movement several times, start correcting the
technical elements. These include the; feet, knees, head and any other incorrect technique you see. Use the technical information that is written in step 6 to ensure the technique is correct.
6. The 6-step coaches’ testing sheet for teaching advanced calisthenic movements
______________________________________________________________________________
Coaches Instructions:
1. Select the advanced calisthenic movement you wish to teach.
2. Print the corresponding testing sheet and display the progressive diagrams for the pupil to see.
3. Use the test boxes in step 3 and test the pupil to see if they can perform all pre-requisite skills.
- the boxes they can execute correctly
⌧ - the box they cannot perform
4. If there are any pre-requisite movements the pupil cannot perform, go to step 4 and prescribe the exercises to develop the skill (outlined in section 7).
5. When the pupil can perform all pre-requisite movements let the pupil attempt the moment with the guidance of your spotting and prescribing momentum exercises
6. Start correcting all preparation movements early, and then use the technical guide to correct the movement once the pupil can perform it independently.
7. Review pre-requisite skills if the pupil is displaying difficulty at any time.

1. .
2. 4. 5.
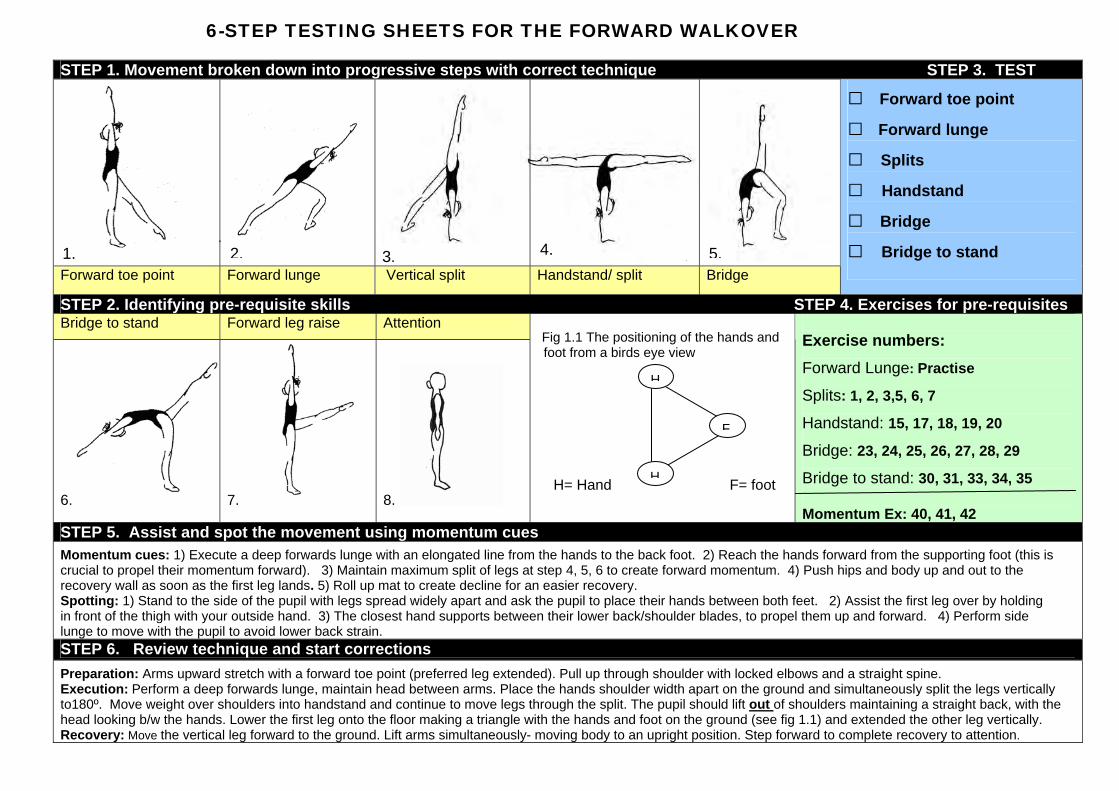
6-STEP TESTING SHEETS FOR THE FORWARD WALKOVER
STEP 1. Movement broken down into progressive steps with correct technique STEP 3. TEST
3.
Forward toe point Forward lunge Vertical split Handstand/ split Bridge
□ Forward toe point
□ Forward lunge
□ Splits
□ Handstand
□ Bridge
□ Bridge to stand
STEP 2. Identifying pre-requisite skills STEP 4. Exercises for pre-requisites Bridge to stand Forward leg raise Attention
6.
7.
8.
Fig 1.1 The positioning of the hands and foot from a birds eye view
H= Hand F= foot
Exercise numbers: Forward Lunge: Practise
Splits: 1, 2, 3,5, 6, 7 Handstand: 15, 17, 18, 19, 20
Bridge: 23, 24, 25, 26, 27, 28, 29
Bridge to stand: 30, 31, 33, 34, 35 Momentum Ex: 40, 41, 42
STEP 5. Assist and spot the movement using momentum cues Momentum cues: 1) Execute a deep forwards lunge with an elongated line from the hands to the back foot. 2) Reach the hands forward from the supporting foot (this is crucial to propel their momentum forward). 3) Maintain maximum split of legs at step 4, 5, 6 to create forward momentum. 4) Push hips and body up and out to the recovery wall as soon as the first leg lands. 5) Roll up mat to create decline for an easier recovery. Spotting: 1) Stand to the side of the pupil with legs spread widely apart and ask the pupil to place their hands between both feet. 2) Assist the first leg over by holding in front of the thigh with your outside hand. 3) The closest hand supports between their lower back/shoulder blades, to propel them up and forward. 4) Perform side lunge to move with the pupil to avoid lower back strain. STEP 6. Review technique and start corrections Preparation: Arms upward stretch with a forward toe point (preferred leg extended). Pull up through shoulder with locked elbows and a straight spine. Execution: Perform a deep forwards lunge, maintain head between arms. Place the hands shoulder width apart on the ground and simultaneously split the legs vertically to180º. Move weight over shoulders into handstand and continue to move legs through the split. The pupil should lift out of shoulders maintaining a straight back, with the head looking b/w the hands. Lower the first leg onto the floor making a triangle with the hands and foot on the ground (see fig 1.1) and extended the other leg vertically. Recovery: Move the vertical leg forward to the ground. Lift arms simultaneously- moving body to an upright position. Step forward to complete recovery to attention.
H
H
F

5.
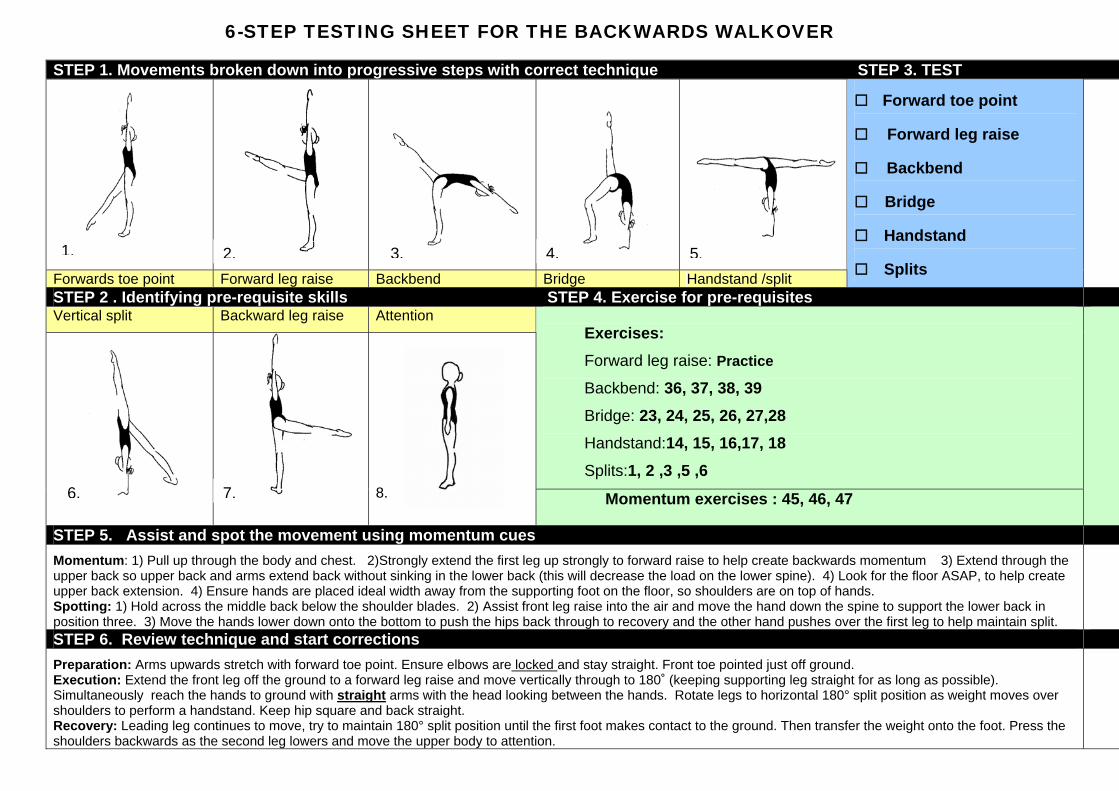
STEP 1. Movements broken down into progressive steps with correct technique STEP 3. TEST
Forwards toe point Forward leg raise Backbend Bridge Handstand /split
□ Forward toe point
□ Forward leg raise
□ Backbend
□ Bridge
□ Handstand
□ Splits
STEP 2 . Identifying pre-requisite skills STEP 4. Exercise for pre-requisites Vertical split Backward leg raise Attention
Exercises: Forward leg raise: Practice
Backbend: 36, 37, 38, 39 Bridge: 23, 24, 25, 26, 27,28 Handstand:14, 15, 16,17, 18 Splits:1, 2 ,3 ,5 ,6
8. Momentum exercises : 45, 46, 47
STEP 5. Assist and spot the movement using momentum cues
Momentum: 1) Pull up through the body and chest. 2)Strongly extend the first leg up strongly to forward raise to help create backwards momentum 3) Extend through the upper back so upper back and arms extend back without sinking in the lower back (this will decrease the load on the lower spine). 4) Look for the floor ASAP, to help create upper back extension. 4) Ensure hands are placed ideal width away from the supporting foot on the floor, so shoulders are on top of hands. Spotting: 1) Hold across the middle back below the shoulder blades. 2) Assist front leg raise into the air and move the hand down the spine to support the lower back in position three. 3) Move the hands lower down onto the bottom to push the hips back through to recovery and the other hand pushes over the first leg to help maintain split.
STEP 6. Review technique and start corrections
Preparation: Arms upwards stretch with forward toe point. Ensure elbows are locked and stay straight. Front toe pointed just off ground. Execution: Extend the front leg off the ground to a forward leg raise and move vertically through to 180˚ (keeping supporting leg straight for as long as possible). Simultaneously reach the hands to ground with straight arms with the head looking between the hands. Rotate legs to horizontal 180° split position as weight moves over shoulders to perform a handstand. Keep hip square and back straight. Recovery: Leading leg continues to move, try to maintain 180° split position until the first foot makes contact to the ground. Then transfer the weight onto the foot. Press the shoulders backwards as the second leg lowers and move the upper body to attention.
1. 2. 3. 4.
6. 7.
6-STEP TESTING SHEET FOR THE BACKWARDS WALKOVER

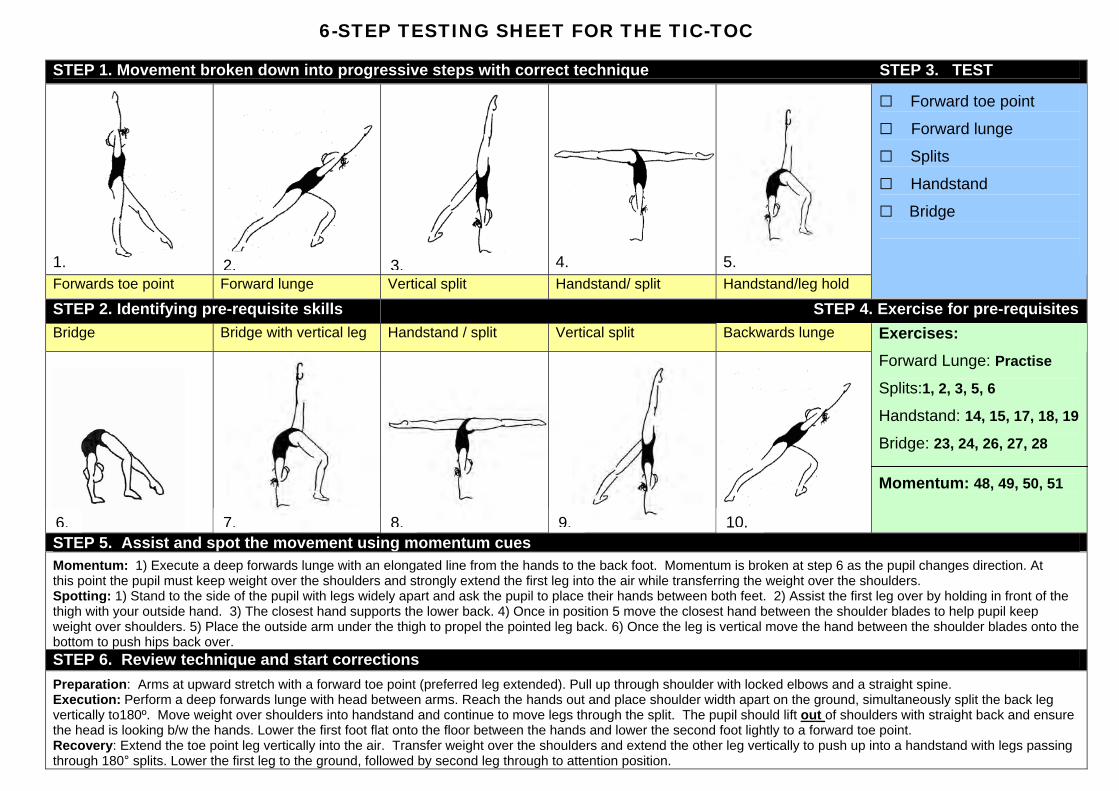
6-STEP TESTING SHEET FOR THE TIC-TOC
2. 3.
STEP 1. Movement broken down into progressive steps with correct technique STEP 3. TEST
1.
4.
5.
Forwards toe point Forward lunge Vertical split Handstand/ split Handstand/leg hold
□ Forward toe point
□ Forward lunge
□ Splits □ Handstand
□ Bridge
STEP 2. Identifying pre-requisite skills STEP 4. Exercise for pre-requisites Bridge Bridge with vertical leg Handstand / split Vertical split Backwards lunge
Exercises: Forward Lunge: Practise
Splits:1, 2, 3, 5, 6
Handstand: 14, 15, 17, 18, 19
Bridge: 23, 24, 26, 27, 28 Momentum: 48, 49, 50, 51
STEP 5. Assist and spot the movement using momentum cues Momentum: 1) Execute a deep forwards lunge with an elongated line from the hands to the back foot. Momentum is broken at step 6 as the pupil changes direction. At this point the pupil must keep weight over the shoulders and strongly extend the first leg into the air while transferring the weight over the shoulders. Spotting: 1) Stand to the side of the pupil with legs widely apart and ask the pupil to place their hands between both feet. 2) Assist the first leg over by holding in front of the thigh with your outside hand. 3) The closest hand supports the lower back. 4) Once in position 5 move the closest hand between the shoulder blades to help pupil keep weight over shoulders. 5) Place the outside arm under the thigh to propel the pointed leg back. 6) Once the leg is vertical move the hand between the shoulder blades onto the bottom to push hips back over. STEP 6. Review technique and start corrections Preparation: Arms at upward stretch with a forward toe point (preferred leg extended). Pull up through shoulder with locked elbows and a straight spine. Execution: Perform a deep forwards lunge with head between arms. Reach the hands out and place shoulder width apart on the ground, simultaneously split the back leg vertically to180º. Move weight over shoulders into handstand and continue to move legs through the split. The pupil should lift out of shoulders with straight back and ensure the head is looking b/w the hands. Lower the first foot flat onto the floor between the hands and lower the second foot lightly to a forward toe point. Recovery: Extend the toe point leg vertically into the air. Transfer weight over the shoulders and extend the other leg vertically to push up into a handstand with legs passing through 180° splits. Lower the first leg to the ground, followed by second leg through to attention position.
6. 7. 8. 9. 10.
1.2.
6.
. .
.
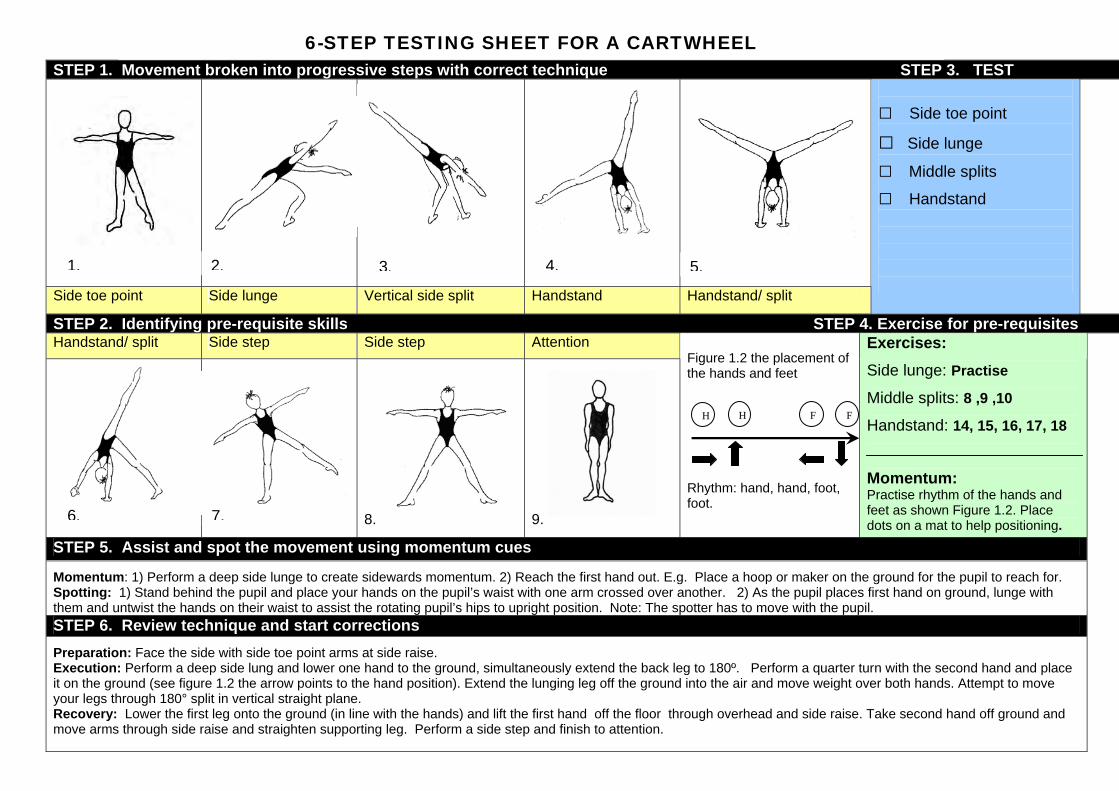
STEP 1. Movement broken into progressive steps with correct technique STEP 3. TEST
Side toe point Side lunge Vertical side split Handstand Handstand/ split
□ Side toe point □ Side lunge □ Middle splits □ Handstand
STEP 2. Identifying pre-requisite skills STEP 4. Exercise for pre-requisites Handstand/ split Side step Side step Attention
7
8.
9.
Figure 1.2 the placement of the hands and feet Rhythm: hand, hand, foot, foot.
Exercises: Side lunge: Practise
Middle splits: 8 ,9 ,10
Handstand: 14, 15, 16, 17, 18
Momentum: Practise rhythm of the hands and feet as shown Figure 1.2. Place dots on a mat to help positioning.
STEP 5. Assist and spot the movement using momentum cues
Momentum: 1) Perform a deep side lunge to create sidewards momentum. 2) Reach the first hand out. E.g. Place a hoop or maker on the ground for the pupil to reach for. Spotting: 1) Stand behind the pupil and place your hands on the pupil’s waist with one arm crossed over another. 2) As the pupil places first hand on ground, lunge with them and untwist the hands on their waist to assist the rotating pupil’s hips to upright position. Note: The spotter has to move with the pupil. STEP 6. Review technique and start corrections
Preparation: Face the side with side toe point arms at side raise. Execution: Perform a deep side lung and lower one hand to the ground, simultaneously extend the back leg to 180º. Perform a quarter turn with the second hand and place it on the ground (see figure 1.2 the arrow points to the hand position). Extend the lunging leg off the ground into the air and move weight over both hands. Attempt to move your legs through 180° split in vertical straight plane. Recovery: Lower the first leg onto the ground (in line with the hands) and lift the first hand off the floor through overhead and side raise. Take second hand off ground and move arms through side raise and straighten supporting leg. Perform a side step and finish to attention.
5.3. 4.
H H F F
2.1.
6. 7.
6-STEP TESTING SHEET FOR A CARTWHEEL
STEP 1. Movement broken down into progressive steps with correct technique STEP 3. TEST
1.
Forward toe point Forward lunge Vertical split Handstand from standing Handstand
□ Forward toe point □ Forward lunge □ Splits □ Handstand □ Bridge □ Bridge to stand
STEP 2. Identifying pre-requisite skills STEP 4. Exercises for pre-requisites Handstand/ split Bridge Bridge to stand Attention
Exercises:
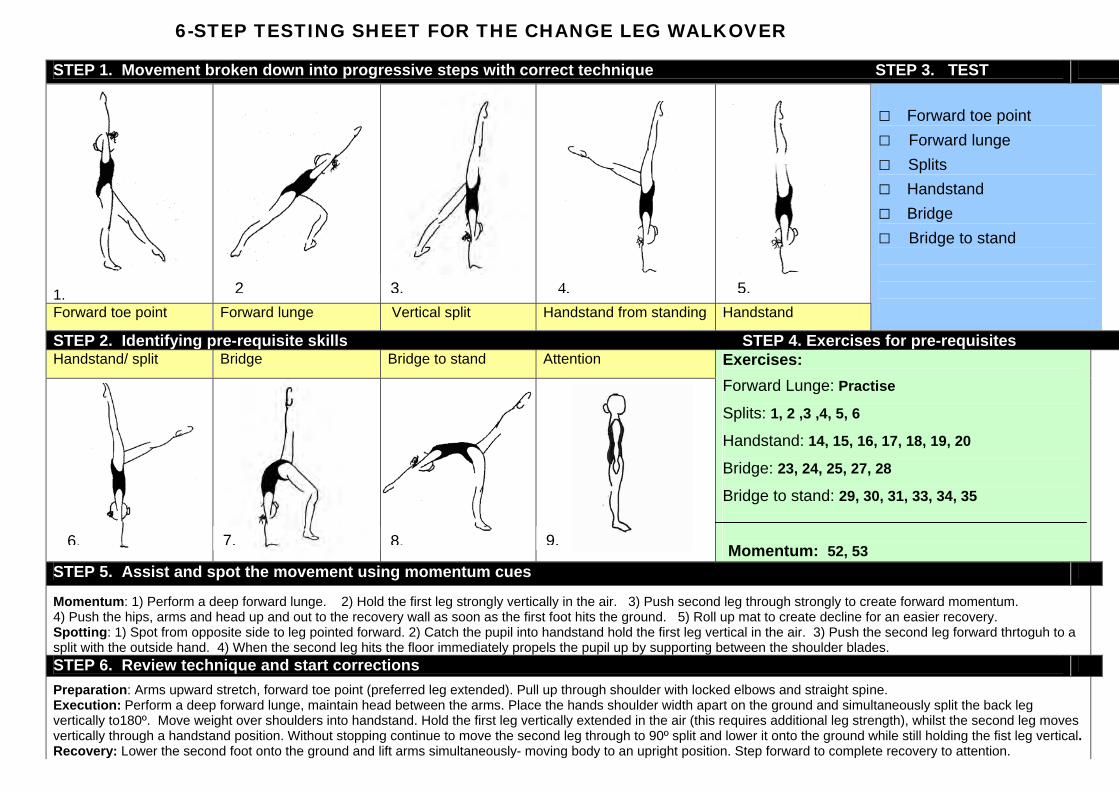
Forward Lunge: Practise
Splits: 1, 2 ,3 ,4, 5, 6
Handstand: 14, 15, 16, 17, 18, 19, 20
Bridge: 23, 24, 25, 27, 28
Bridge to stand: 29, 30, 31, 33, 34, 35
Momentum: 52, 53 STEP 5. Assist and spot the movement using momentum cues
Momentum: 1) Perform a deep forward lunge. 2) Hold the first leg strongly vertically in the air. 3) Push second leg through strongly to create forward momentum. 4) Push the hips, arms and head up and out to the recovery wall as soon as the first foot hits the ground. 5) Roll up mat to create decline for an easier recovery. Spotting: 1) Spot from opposite side to leg pointed forward. 2) Catch the pupil into handstand hold the first leg vertical in the air. 3) Push the second leg forward thrtoguh to a split with the outside hand. 4) When the second leg hits the floor immediately propels the pupil up by supporting between the shoulder blades. STEP 6. Review technique and start corrections
Preparation: Arms upward stretch, forward toe point (preferred leg extended). Pull up through shoulder with locked elbows and straight spine. Execution: Perform a deep forward lunge, maintain head between the arms. Place the hands shoulder width apart on the ground and simultaneously split the back leg vertically to180º. Move weight over shoulders into handstand. Hold the first leg vertically extended in the air (this requires additional leg strength), whilst the second leg moves vertically through a handstand position. Without stopping continue to move the second leg through to 90º split and lower it onto the ground while still holding the fist leg vertical. Recovery: Lower the second foot onto the ground and lift arms simultaneously- moving body to an upright position. Step forward to complete recovery to attention.
2 3. 4. 5.
6. 7. 8. 9.
6-STEP TESTING SHEET FOR THE CHANGE LEG WALKOVER
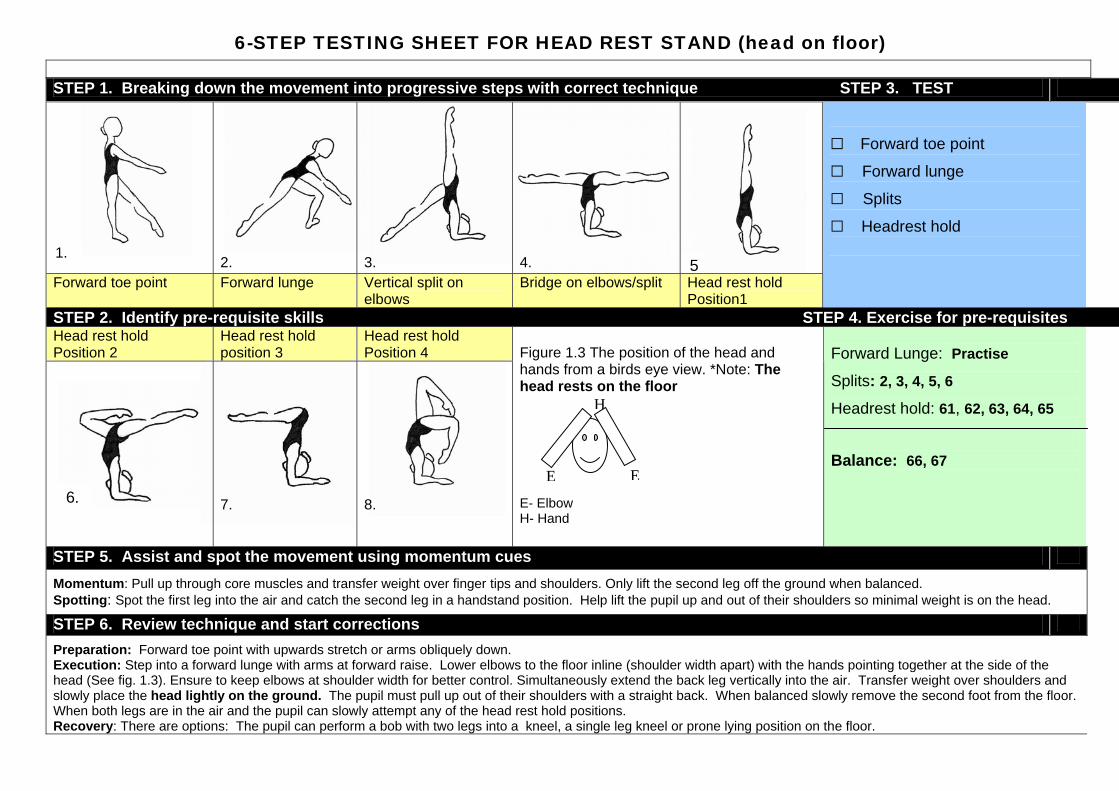
6-STEP TESTING SHEET FOR HEAD REST STAND (head on floor)
1.
E E
H
H
5
STEP 1. Breaking down the movement into progressive steps with correct technique STEP 3. TEST
2.
3.
4.
Forward toe point Forward lunge Vertical split on elbows
Bridge on elbows/split Head rest hold Position1
□ Forward toe point
□ Forward lunge
□ Splits
□ Headrest hold
STEP 2. Identify pre-requisite skills STEP 4. Exercise for pre-requisites Head rest hold Position 2
Head rest hold position 3
Head rest hold Position 4
7.
8.
Figure 1.3 The position of the head and hands from a birds eye view. *Note: The head rests on the floor E- Elbow H- Hand
Forward Lunge: Practise
Splits: 2, 3, 4, 5, 6
Headrest hold: 61, 62, 63, 64, 65 Balance: 66, 67
STEP 5. Assist and spot the movement using momentum cues
Momentum: Pull up through core muscles and transfer weight over finger tips and shoulders. Only lift the second leg off the ground when balanced. Spotting: Spot the first leg into the air and catch the second leg in a handstand position. Help lift the pupil up and out of their shoulders so minimal weight is on the head.
STEP 6. Review technique and start corrections
Preparation: Forward toe point with upwards stretch or arms obliquely down. Execution: Step into a forward lunge with arms at forward raise. Lower elbows to the floor inline (shoulder width apart) with the hands pointing together at the side of the head (See fig. 1.3). Ensure to keep elbows at shoulder width for better control. Simultaneously extend the back leg vertically into the air. Transfer weight over shoulders and slowly place the head lightly on the ground. The pupil must pull up out of their shoulders with a straight back. When balanced slowly remove the second foot from the floor. When both legs are in the air and the pupil can slowly attempt any of the head rest hold positions. Recovery: There are options: The pupil can perform a bob with two legs into a kneel, a single leg kneel or prone lying position on the floor.
6.

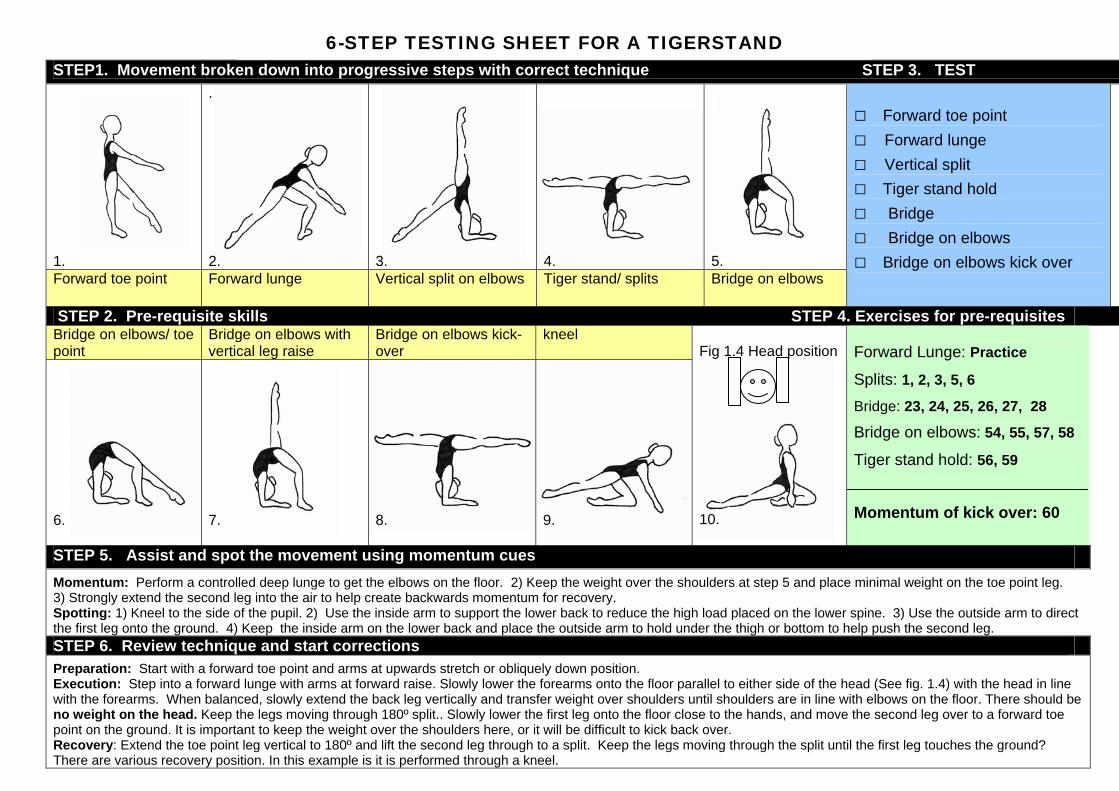
STEP1. Movement broken down into progressive steps with correct technique STEP 3. TEST 1.
. 2.
3.
4.
5.
Forward toe point Forward lunge Vertical split on elbows Tiger stand/ splits Bridge on elbows
□ Forward toe point □ Forward lunge □ Vertical split □ Tiger stand hold □ Bridge □ Bridge on elbows □ Bridge on elbows kick over
STEP 2. Pre-requisite skills STEP 4. Exercises for pre-requisites Bridge on elbows/ toe point
Bridge on elbows with vertical leg raise
Bridge on elbows kick-over
kneel
6.
7.
8.
9.
Fig 1.4 Head position 10.
Forward Lunge: Practice
Splits: 1, 2, 3, 5, 6
Bridge: 23, 24, 25, 26, 27, 28
Bridge on elbows: 54, 55, 57, 58
Tiger stand hold: 56, 59
Momentum of kick over: 60
STEP 5. Assist and spot the movement using momentum cues
Momentum: Perform a controlled deep lunge to get the elbows on the floor. 2) Keep the weight over the shoulders at step 5 and place minimal weight on the toe point leg. 3) Strongly extend the second leg into the air to help create backwards momentum for recovery. Spotting: 1) Kneel to the side of the pupil. 2) Use the inside arm to support the lower back to reduce the high load placed on the lower spine. 3) Use the outside arm to direct the first leg onto the ground. 4) Keep the inside arm on the lower back and place the outside arm to hold under the thigh or bottom to help push the second leg. STEP 6. Review technique and start corrections Preparation: Start with a forward toe point and arms at upwards stretch or obliquely down position. Execution: Step into a forward lunge with arms at forward raise. Slowly lower the forearms onto the floor parallel to either side of the head (See fig. 1.4) with the head in line with the forearms. When balanced, slowly extend the back leg vertically and transfer weight over shoulders until shoulders are in line with elbows on the floor. There should be no weight on the head. Keep the legs moving through 180º split.. Slowly lower the first leg onto the floor close to the hands, and move the second leg over to a forward toe point on the ground. It is important to keep the weight over the shoulders here, or it will be difficult to kick back over. Recovery: Extend the toe point leg vertical to 180º and lift the second leg through to a split. Keep the legs moving through the split until the first leg touches the ground? There are various recovery position. In this example is it is performed through a kneel.
6-STEP TESTING SHEET FOR A TIGERSTAND
2. 3. 4.
6.
STEP 1. Movement broken into progressive steps with correct technique STEP 3. TEST 1.
Forward toe point Forward lunge Vertical split Handstand / split
□ Forward toe point □ Forward lunge □ Splits □ Handstand □ Bridge □ Single arm bridge □ Bridge to stand
STEP 2. Pre-requisite skills STEP 4. Exercises for pre-requisites Single arm bridge Single arm bridge to sit Sit on floor
5.
7.
Forward lunge: Practice
Splits: 2, 3, 4, 5, 6
Handstand: 14, 15, 17, 18, 19, 20, 21
Bridge: 23, 24, 25, 26, 27, 28
Single arm bridge: 70
Single arm bridge to sit: 66, 67, 68, 69, 71
Momentum: 71 STEP 5. Assist and spot the movement using momentum cues
Momentum cues: 1) Execute a deep forward lunge with an elongated line from the hands to the back foot. 2) Reach the hands forward from the supporting foot. 3) Maintain maximum split of legs at steps 3 and 4. 4) Whilst in the bridge hold the second leg in the air and slowly lift one arm. 5) Push the bottom back towards the hand on the ground. Spotting: 1) Stand to the side of the pupil with wide legs and ask the pupil to place their hands between both feet. 2) Assist the first leg over by lightly pushing the front of the thigh with your outside hand. 3) Hold second leg vertically in the air with the outside hand. 4) Place the inside arm between the shoulders blades, and help raise the upper body to upright seated position as the other hand assist the leg to the ground. STEP 6. Review technique and start corrections Preparation: Arms upward stretch, forward toe point (preferred leg extended). Pull up through shoulder blades with locked elbows and straight spine. Execution: Perform a deep forwards lunge. Place the hands shoulder width apart on the ground (hands slightly turned inwards) and simultaneously split the back leg vertically to180º. Move weight over shoulders into handstand and continue to move legs through the split. The pupil should lift out of shoulders with the head looking b/w the hands. Lower the first leg onto the floor and extend the other leg vertically. Slowly transfer the weight onto one arm and take the other hand off the floor in the bridge whilst the leg in the air maintains vertical. The hand on the floor rotates 180 º inwards. The pupil then bends the supporting leg and the arm comes over to upwards stretch. Recovery: Weight is placed on the supporting arm and the hips move back wards towards the supporting foot to a sit position on the floor. The arm moves through upwards stretch to forward raise.
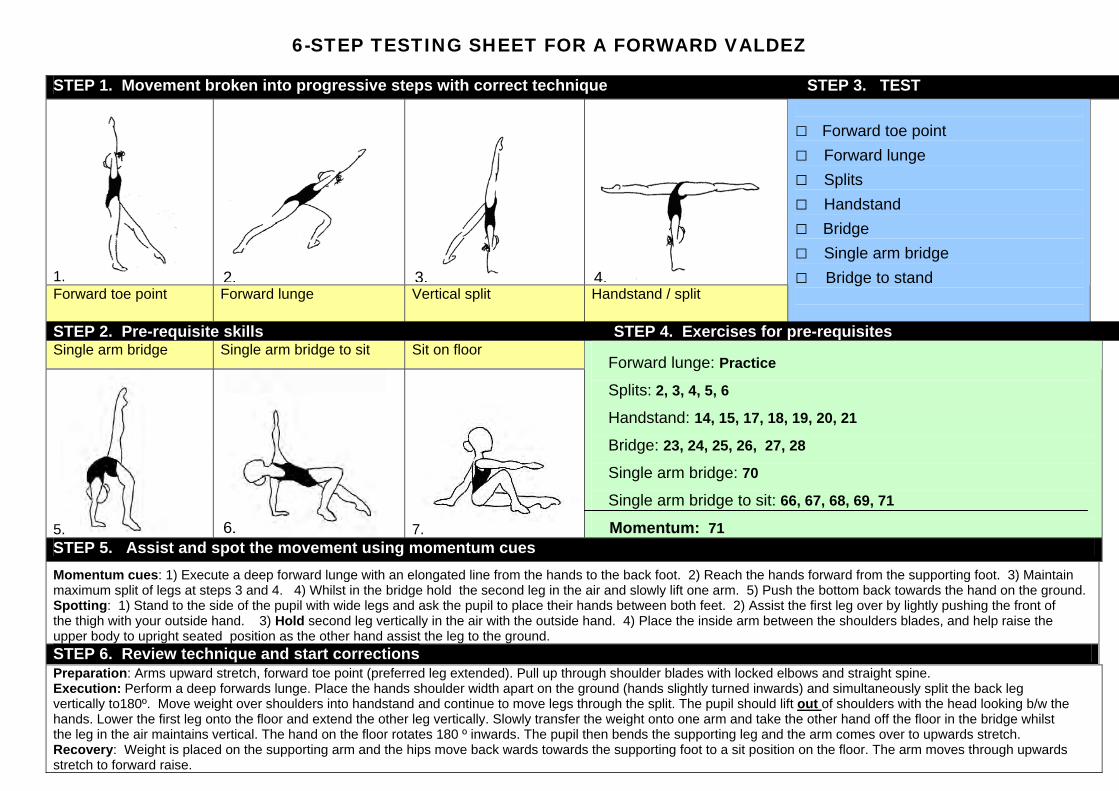
6-STEP TESTING SHEET FOR A FORWARD VALDEZ
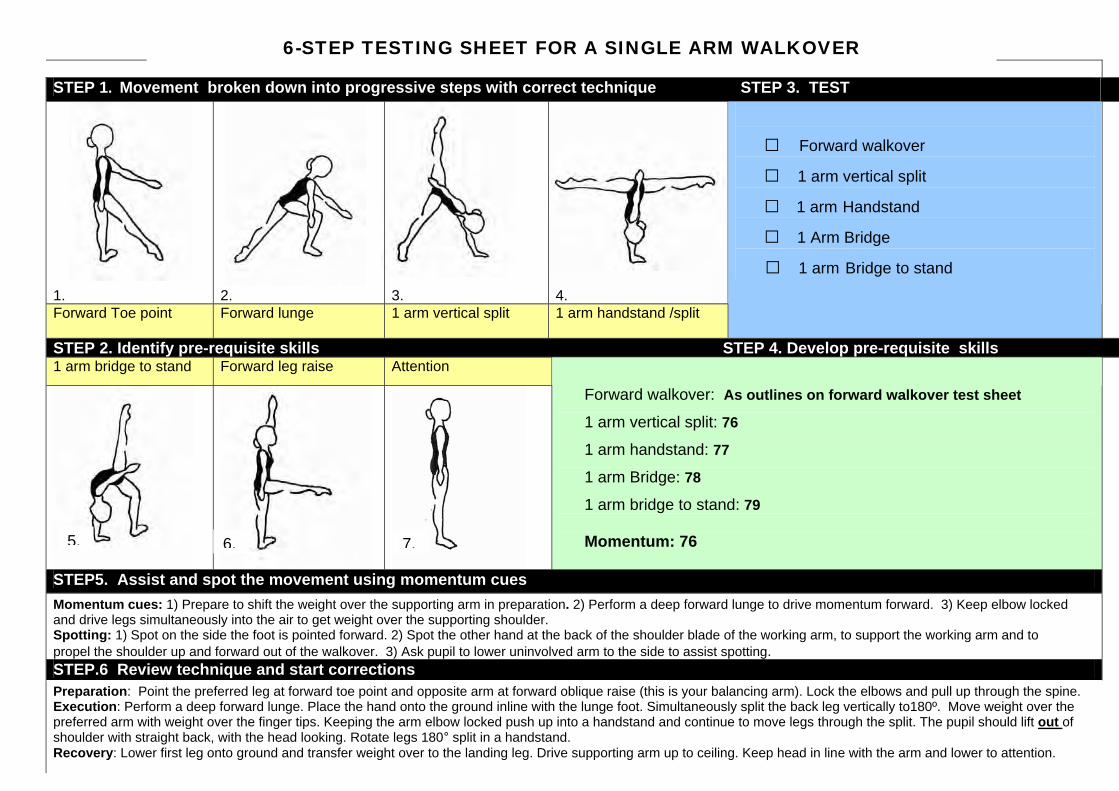
STEP 1. Movement broken down into progressive steps with correct technique STEP 3. TEST 1.
2.
3.
4.
Forward Toe point
Forward lunge 1 arm vertical split 1 arm handstand /split
□ Forward walkover □ 1 arm vertical split
□ 1 arm Handstand
□ 1 Arm Bridge
□ 1 arm Bridge to stand
STEP 2. Identify pre-requisite skills STEP 4. Develop pre-requisite skills 1 arm bridge to stand Forward leg raise Attention
Forward walkover: As outlines on forward walkover test sheet 1 arm vertical split: 76
1 arm handstand: 77
1 arm Bridge: 78
1 arm bridge to stand: 79 Momentum: 76
STEP5. Assist and spot the movement using momentum cues
Momentum cues: 1) Prepare to shift the weight over the supporting arm in preparation. 2) Perform a deep forward lunge to drive momentum forward. 3) Keep elbow locked and drive legs simultaneously into the air to get weight over the supporting shoulder. Spotting: 1) Spot on the side the foot is pointed forward. 2) Spot the other hand at the back of the shoulder blade of the working arm, to support the working arm and to propel the shoulder up and forward out of the walkover. 3) Ask pupil to lower uninvolved arm to the side to assist spotting. STEP.6 Review technique and start corrections
Preparation: Point the preferred leg at forward toe point and opposite arm at forward oblique raise (this is your balancing arm). Lock the elbows and pull up through the spine. Execution: Perform a deep forward lunge. Place the hand onto the ground inline with the lunge foot. Simultaneously split the back leg vertically to180º. Move weight over the preferred arm with weight over the finger tips. Keeping the arm elbow locked push up into a handstand and continue to move legs through the split. The pupil should lift out of shoulder with straight back, with the head looking. Rotate legs 180° split in a handstand. Recovery: Lower first leg onto ground and transfer weight over to the landing leg. Drive supporting arm up to ceiling. Keep head in line with the arm and lower to attention.
6-STEP TESTING SHEET FOR A SINGLE ARM WALKOVER
5. 6. 7.
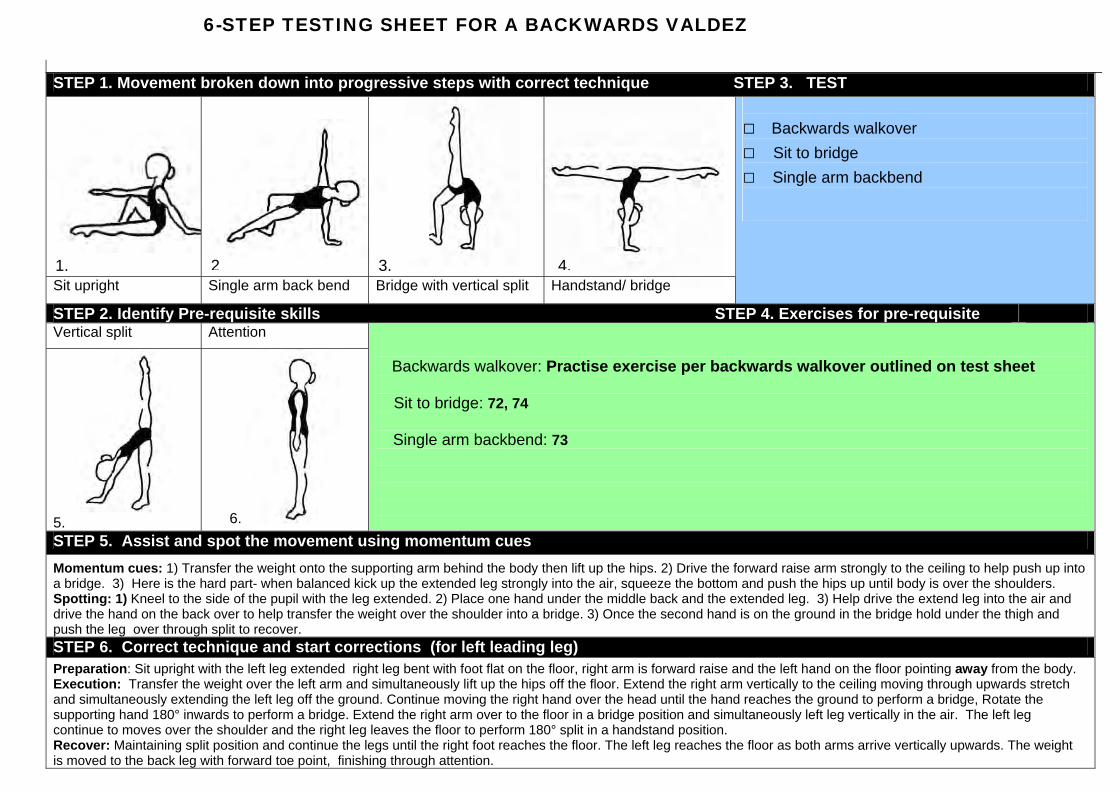
6-STEP TESTING SHEET FOR A BACKWARDS VALDEZ
STEP 1. Movement broken down into progressive steps with correct technique STEP 3. TEST
Sit upright Single arm back bend Bridge with vertical split Handstand/ bridge
□ Backwards walkover □ Sit to bridge □ Single arm backbend
STEP 2. Identify Pre-requisite skills STEP 4. Exercises for pre-requisite Vertical split Attention
5. 6.
Backwards walkover: Practise exercise per backwards walkover outlined on test sheet Sit to bridge: 72, 74 Single arm backbend: 73
STEP 5. Assist and spot the movement using momentum cues
Momentum cues: 1) Transfer the weight onto the supporting arm behind the body then lift up the hips. 2) Drive the forward raise arm strongly to the ceiling to help push up into a bridge. 3) Here is the hard part- when balanced kick up the extended leg strongly into the air, squeeze the bottom and push the hips up until body is over the shoulders. Spotting: 1) Kneel to the side of the pupil with the leg extended. 2) Place one hand under the middle back and the extended leg. 3) Help drive the extend leg into the air and drive the hand on the back over to help transfer the weight over the shoulder into a bridge. 3) Once the second hand is on the ground in the bridge hold under the thigh and push the leg over through split to recover. STEP 6. Correct technique and start corrections (for left leading leg)
Preparation: Sit upright with the left leg extended right leg bent with foot flat on the floor, right arm is forward raise and the left hand on the floor pointing away from the body. Execution: Transfer the weight over the left arm and simultaneously lift up the hips off the floor. Extend the right arm vertically to the ceiling moving through upwards stretch and simultaneously extending the left leg off the ground. Continue moving the right hand over the head until the hand reaches the ground to perform a bridge, Rotate the supporting hand 180° inwards to perform a bridge. Extend the right arm over to the floor in a bridge position and simultaneously left leg vertically in the air. The left leg continue to moves over the shoulder and the right leg leaves the floor to perform 180° split in a handstand position. Recover: Maintaining split position and continue the legs until the right foot reaches the floor. The left leg reaches the floor as both arms arrive vertically upwards. The weight is moved to the back leg with forward toe point, finishing through attention.
1. 2 3. 4.


7. Development exercises for advanced calisthenic movements
7.1 Exercise categories There are two main categories of exercises to assist in the development of the advanced calisthenic movements.
1. Flexibility (stretching) 2. Strengthening
Our body is made up of hundreds of muscles and it is important to stretch and strengthen the right muscles specific for each advanced movement. Each advanced movement requires specific exercise to develop the strength and flexibility of the specific muscles used in each movement. The following table lists 10 common advanced movements in calisthenics and the muscle groups that require strengthening and stretching. Exercises are listed in the table to help develop the movement which are outlined with diagrams in section 7.3 How to read the table:
1. Select a movement you wish to teach along the left hand column. 2. Read across to the second column and see the pre-requisite skill the pupil must be
able to do. 3. Read across to the highlighted boxes to see the muscles groups used with the
exercises to develop them (Exercises are detailed in section 7.3).
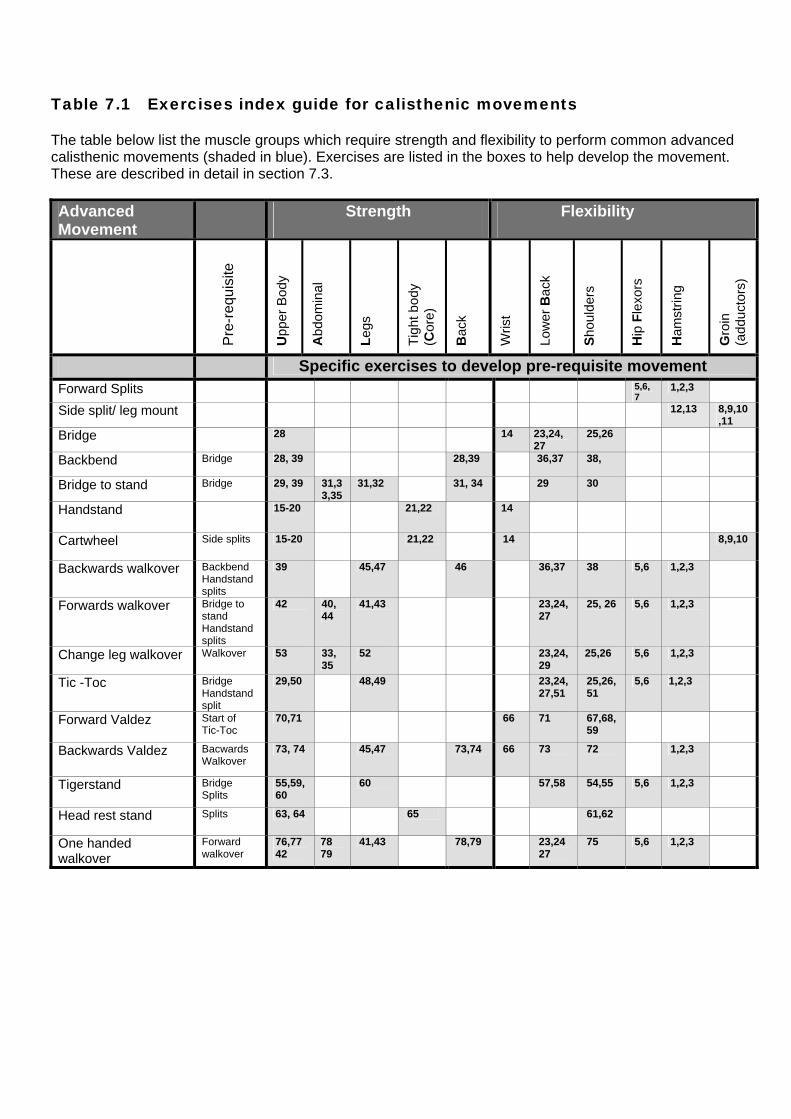
Table 7.1 Exercises index guide for calisthenic movements The table below list the muscle groups which require strength and flexibility to perform common advanced calisthenic movements (shaded in blue). Exercises are listed in the boxes to help develop the movement. These are described in detail in section 7.3.
Advanced Movement
Strength
Flexibility
P
Pre
-req
uisi
te
Upp
er B
ody
Abd
omin
al
Legs
Tigh
t bod
y (C
ore)
Bac
k
Wris
t
Low
er B
ack
Shou
lder
s
Hip
Fle
xors
Ham
strin
g
Gro
in
(add
ucto
rs)
Specific exercises to develop pre-requisite movement Forward Splits 5,6,
7 1,2,3
Side split/ leg mount
12,13 8,9,10,11
Bridge 28 14 , 23,24, 27
25,26
Backbend Bridge
28, 39 28,39 36,37 38,
Bridge to stand Bridge
29, 39 31,33,35
31,32 31, 34 29 30
Handstand
15-20 21,22 14
Cartwheel Side splits
15-20 21,22 14 8,9,10
Backwards walkover Backbend Handstand splits
39 45,47 46 36,37 38 5,6 1,2,3
Forwards walkover Bridge to stand Handstand splits
42 40, 44
41,43 23,24,27
25, 26 5,6 1,2,3
Change leg walkover Walkover
53 33, 35
52 23,24,29
25,26 5,6 1,2,3
Tic -Toc Bridge Handstand split
29,50 48,49 23,24,27,51
25,26,51
5,6 1,2,3
Forward Valdez Start of Tic-Toc
70,71 66 71 67,68,59
Backwards Valdez Bacwards Walkover
73, 74 45,47 73,74 66 73 72 1,2,3
Tigerstand Bridge Splits
55,59,60
60 57,58 54,55 5,6 1,2,3
Head rest stand Splits
63, 64 65 61,62
One handed walkover
Forward walkover
76,77 42
78 79
41,43 78,79 23,24 27
75 5,6 1,2,3
7.2 Exercise guidelines Before prescribing exercise, please read the exercise carefully. Most of the exercises can be prescribed and printed in a hard copy for the pupil and performed at home, except exercises listed with ‘coach assistance required’. These must not be attempted without the assistance of a coach. Ensure you read the ‘requirements’ carefully and ensure the pupil can perform them before attempting the exercises.
7.2.1 Stretching guidelines
Stretch after a cardiovascular warm up. Stretches should not be painful.
- The pupil should feel a slight pull or tension in the muscle (this is hard to distinguish at first if the pupil is quite inflexible). Ensure the tension on a scale of ten is 6/10.
- If the stretch is too strong the muscle fibres will not relax and lengthen. Do not go into the stretch forcefully as this can damage the muscle. Hold the stretches for 60 seconds for optimal gains. Do not bounce in the stretch. Prescribe the easiest stretch and progress to a harder stretch when little tension is felt in the
muscle.
7.2.2 Strengthening exercises
Ensure the pupil can perform necessary requirements before prescribing the exercises. Prescribe the easiest strengthening exercises first and progress when they find the exercise
too easy (Example for an ideal progression is 2-4 weeks). Prescribe the correct repetitions and sets outlined in the exercise.
- Start with the smallest repetitions and progressively increase weekly. - The correct repetitions are prescribed when the pupil can perform the exercise with
correct technique and control and they find the last couple of repetitions difficult. Ensure you see the pupil performing the skill correctly before attempting at home. Ensure the pupil performs a light warm up prior to performing the exercises.
Guidelines for stretching exercises:
Perform when the body is warm (lightly perspiring)
Hold stretch for 60 seconds, and perform twice
Perform 3-4 days a week for optimal gains
Guidelines for strengthening exercises:
Perform when the body is warm (lightly perspiring).
Perform 3-4 times a week for optimal strength gains.
7.3 Exercise for advanced calisthenic movements The following section outlines exercises to develop pre-requisite skills and 10 common advanced calisthenic movements. The exercises are outline for the following movements;
7.3.1 Forward splits 7.3.2 Middle splits/leg mounts 7.3.3 Handstand 7.3.4 Bridge 7.3.5 Bridge to stand 7.3.6 Backbend 7.3.7 Forward walkover 7.3.8 Backwards walkover 7.3.9 Tic-toc 7.3.10 Change leg walkover 7.3.11 Tigerstand 7.3.12 head rest holds 7.3.13 Forward Valdez 7.3.14 Backwards Valdez 7.3.15 One handed walkover
7.31 Exercises to develop the forward splits
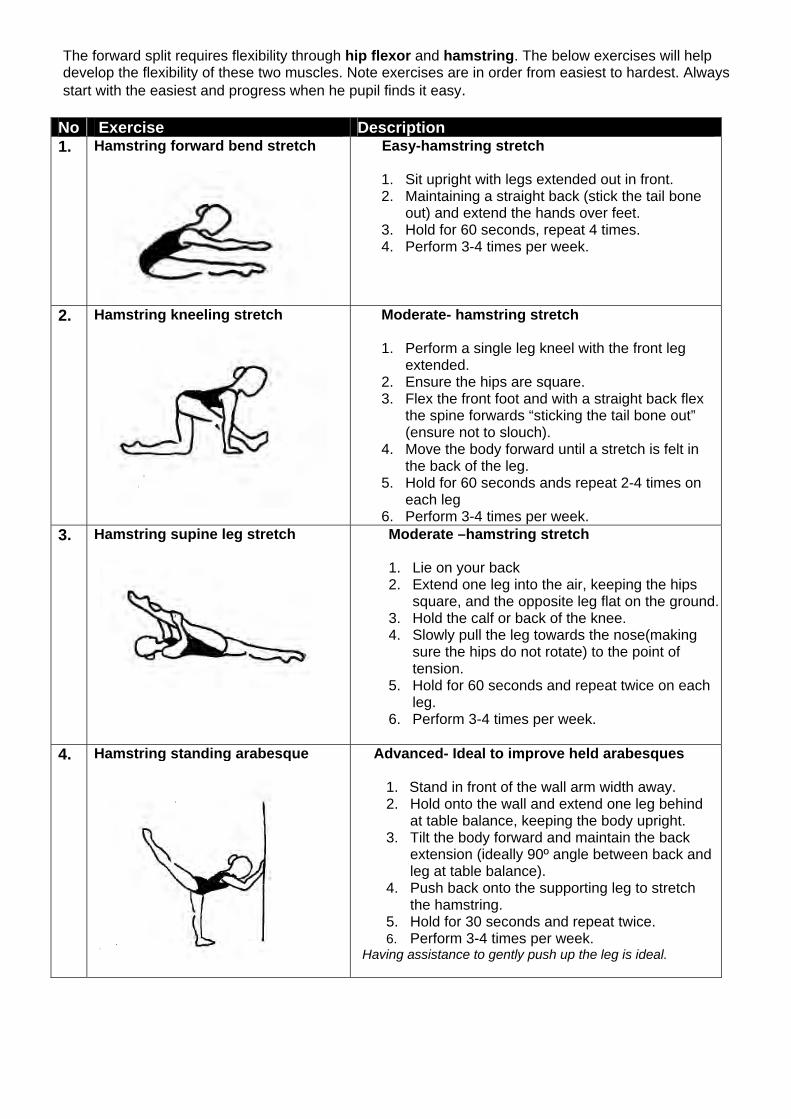
The forward split requires flexibility through hip flexor and hamstring. The below exercises will help develop the flexibility of these two muscles. Note exercises are in order from easiest to hardest. Always start with the easiest and progress when he pupil finds it easy.
No Exercise Description 1. Hamstring forward bend stretch
Easy-hamstring stretch
1. Sit upright with legs extended out in front. 2. Maintaining a straight back (stick the tail bone
out) and extend the hands over feet. 3. Hold for 60 seconds, repeat 4 times. 4. Perform 3-4 times per week.
2. Hamstring kneeling stretch
Moderate- hamstring stretch 1. Perform a single leg kneel with the front leg
extended. 2. Ensure the hips are square. 3. Flex the front foot and with a straight back flex
the spine forwards “sticking the tail bone out” (ensure not to slouch).
4. Move the body forward until a stretch is felt in the back of the leg.
5. Hold for 60 seconds ands repeat 2-4 times on each leg
6. Perform 3-4 times per week. 3. Hamstring supine leg stretch
Moderate –hamstring stretch 1. Lie on your back 2. Extend one leg into the air, keeping the hips
square, and the opposite leg flat on the ground.3. Hold the calf or back of the knee. 4. Slowly pull the leg towards the nose(making
sure the hips do not rotate) to the point of tension.
5. Hold for 60 seconds and repeat twice on each leg.
6. Perform 3-4 times per week.
4. Hamstring standing arabesque
Advanced- Ideal to improve held arabesques
1. Stand in front of the wall arm width away. 2. Hold onto the wall and extend one leg behind
at table balance, keeping the body upright. 3. Tilt the body forward and maintain the back
extension (ideally 90º angle between back and leg at table balance).
4. Push back onto the supporting leg to stretch the hamstring.
5. Hold for 30 seconds and repeat twice. 6. Perform 3-4 times per week.
Having assistance to gently push up the leg is ideal.
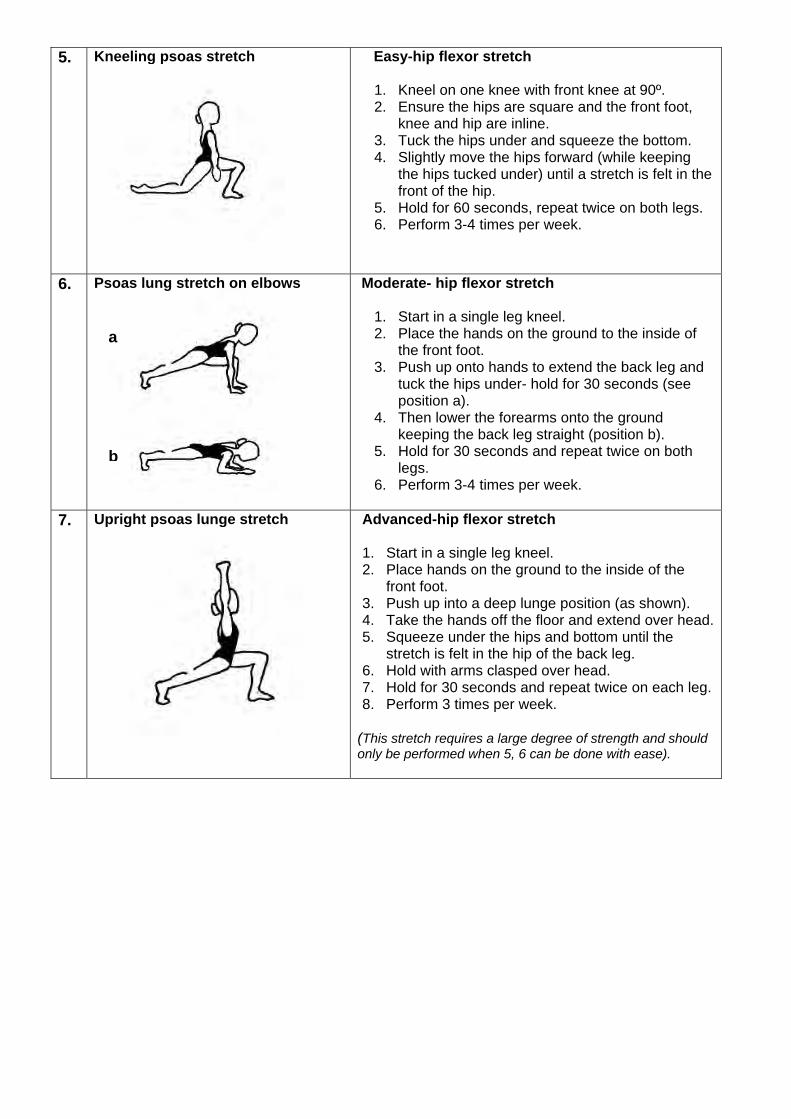
5. Kneeling psoas stretch Easy-hip flexor stretch
1. Kneel on one knee with front knee at 90º. 2. Ensure the hips are square and the front foot,
knee and hip are inline. 3. Tuck the hips under and squeeze the bottom. 4. Slightly move the hips forward (while keeping
the hips tucked under) until a stretch is felt in the front of the hip.
5. Hold for 60 seconds, repeat twice on both legs. 6. Perform 3-4 times per week.
6. Psoas lung stretch on elbows
Moderate- hip flexor stretch
1. Start in a single leg kneel. 2. Place the hands on the ground to the inside of
the front foot. 3. Push up onto hands to extend the back leg and
tuck the hips under- hold for 30 seconds (see position a).
4. Then lower the forearms onto the ground keeping the back leg straight (position b).
5. Hold for 30 seconds and repeat twice on both legs.
6. Perform 3-4 times per week.
7. Upright psoas lunge stretch
Advanced-hip flexor stretch 1. Start in a single leg kneel. 2. Place hands on the ground to the inside of the
front foot. 3. Push up into a deep lunge position (as shown). 4. Take the hands off the floor and extend over head.5. Squeeze under the hips and bottom until the
stretch is felt in the hip of the back leg. 6. Hold with arms clasped over head. 7. Hold for 30 seconds and repeat twice on each leg. 8. Perform 3 times per week.
(This stretch requires a large degree of strength and should only be performed when 5, 6 can be done with ease).
a
b
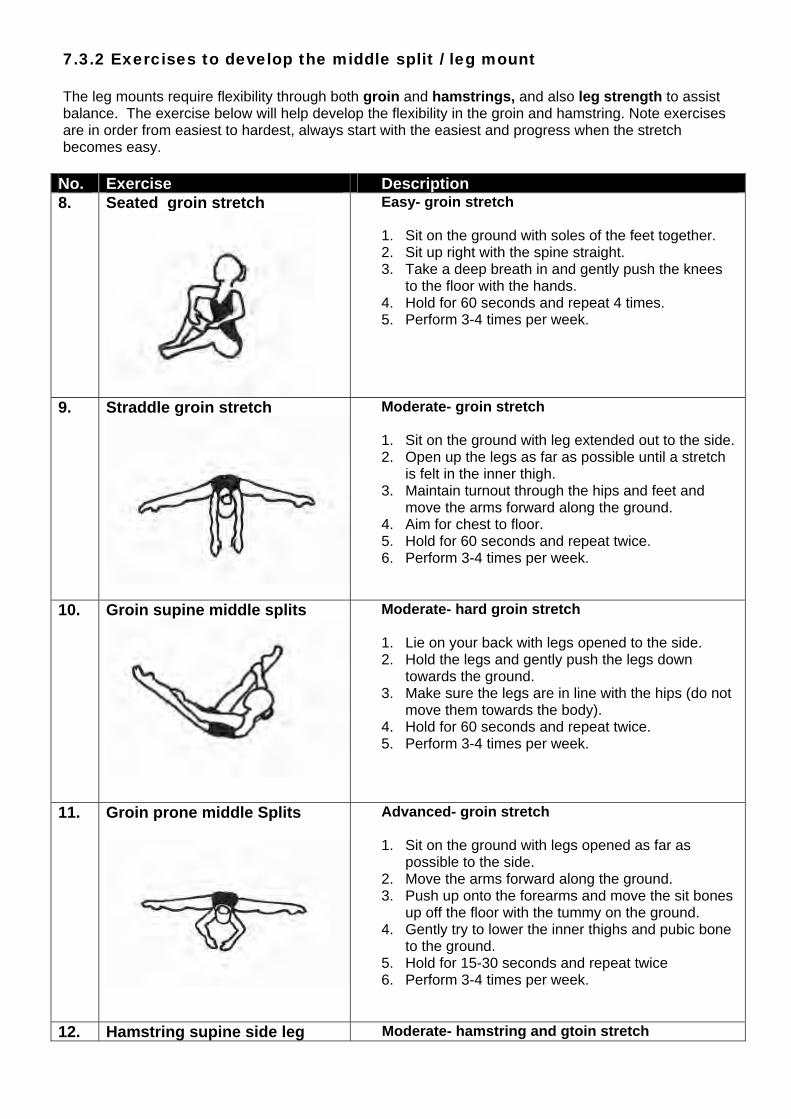
7.3.2 Exercises to develop the middle split / leg mount The leg mounts require flexibility through both groin and hamstrings, and also leg strength to assist balance. The exercise below will help develop the flexibility in the groin and hamstring. Note exercises are in order from easiest to hardest, always start with the easiest and progress when the stretch becomes easy.
No. Exercise Description 8. Seated groin stretch
Easy- groin stretch 1. Sit on the ground with soles of the feet together. 2. Sit up right with the spine straight. 3. Take a deep breath in and gently push the knees
to the floor with the hands. 4. Hold for 60 seconds and repeat 4 times. 5. Perform 3-4 times per week.
9. Straddle groin stretch Moderate- groin stretch 1. Sit on the ground with leg extended out to the side. 2. Open up the legs as far as possible until a stretch
is felt in the inner thigh. 3. Maintain turnout through the hips and feet and
move the arms forward along the ground. 4. Aim for chest to floor. 5. Hold for 60 seconds and repeat twice. 6. Perform 3-4 times per week.
10. Groin supine middle splits Moderate- hard groin stretch 1. Lie on your back with legs opened to the side. 2. Hold the legs and gently push the legs down
towards the ground. 3. Make sure the legs are in line with the hips (do not
move them towards the body). 4. Hold for 60 seconds and repeat twice. 5. Perform 3-4 times per week.
11. Groin prone middle Splits
Advanced- groin stretch 1. Sit on the ground with legs opened as far as
possible to the side. 2. Move the arms forward along the ground. 3. Push up onto the forearms and move the sit bones
up off the floor with the tummy on the ground. 4. Gently try to lower the inner thighs and pubic bone
to the ground. 5. Hold for 15-30 seconds and repeat twice 6. Perform 3-4 times per week.
12. Hamstring supine side leg Moderate- hamstring and gtoin stretch
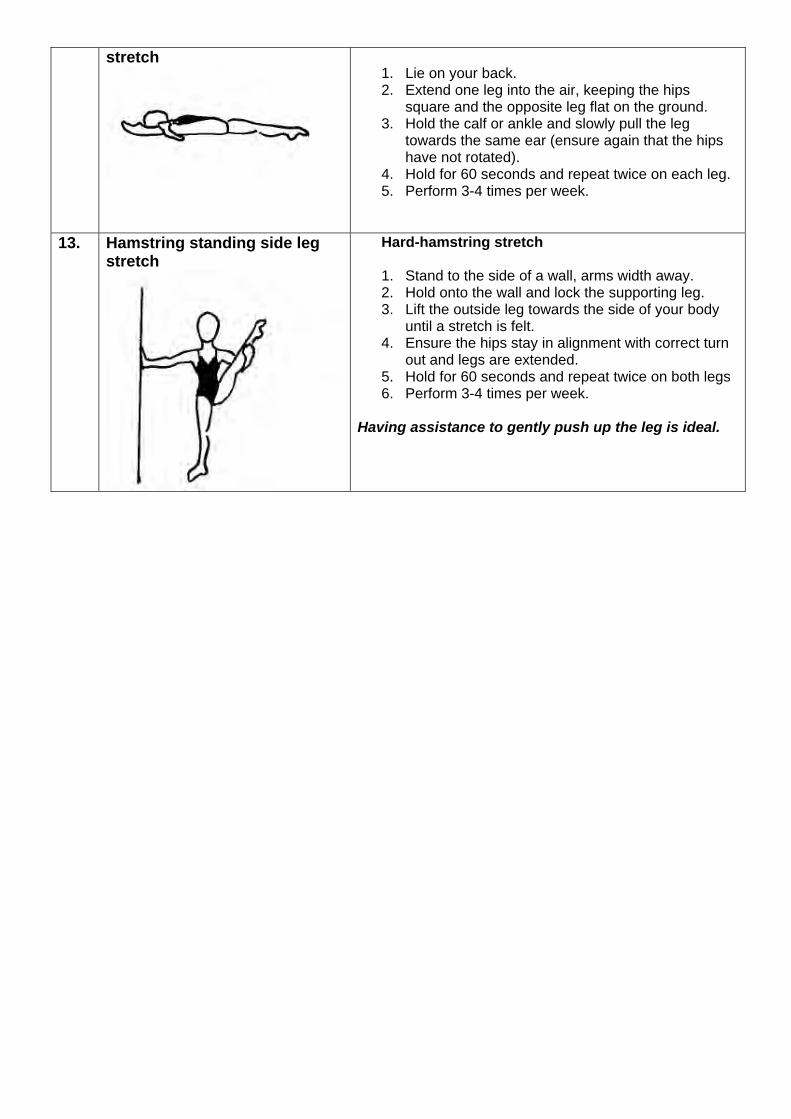
stretch 1. Lie on your back. 2. Extend one leg into the air, keeping the hips
square and the opposite leg flat on the ground. 3. Hold the calf or ankle and slowly pull the leg
towards the same ear (ensure again that the hips have not rotated).
4. Hold for 60 seconds and repeat twice on each leg. 5. Perform 3-4 times per week.
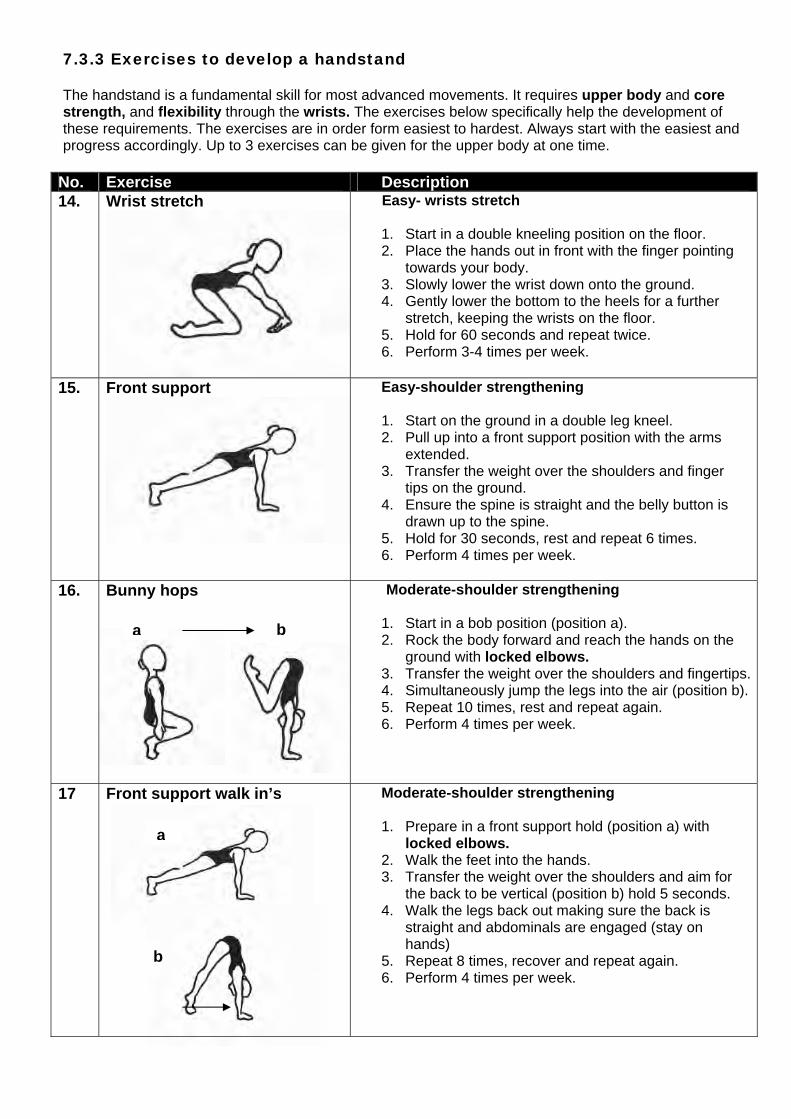
13. Hamstring standing side leg stretch
Hard-hamstring stretch 1. Stand to the side of a wall, arms width away. 2. Hold onto the wall and lock the supporting leg. 3. Lift the outside leg towards the side of your body
until a stretch is felt. 4. Ensure the hips stay in alignment with correct turn
out and legs are extended. 5. Hold for 60 seconds and repeat twice on both legs 6. Perform 3-4 times per week.
Having assistance to gently push up the leg is ideal.
7.3.3 Exercises to develop a handstand The handstand is a fundamental skill for most advanced movements. It requires upper body and core strength, and flexibility through the wrists. The exercises below specifically help the development of these requirements. The exercises are in order form easiest to hardest. Always start with the easiest and progress accordingly. Up to 3 exercises can be given for the upper body at one time.
No. Exercise Description 14. Wrist stretch Easy- wrists stretch
1. Start in a double kneeling position on the floor. 2. Place the hands out in front with the finger pointing
towards your body. 3. Slowly lower the wrist down onto the ground. 4. Gently lower the bottom to the heels for a further
stretch, keeping the wrists on the floor. 5. Hold for 60 seconds and repeat twice. 6. Perform 3-4 times per week.
15. Front support Easy-shoulder strengthening
1. Start on the ground in a double leg kneel. 2. Pull up into a front support position with the arms
extended. 3. Transfer the weight over the shoulders and finger
tips on the ground. 4. Ensure the spine is straight and the belly button is
drawn up to the spine. 5. Hold for 30 seconds, rest and repeat 6 times. 6. Perform 4 times per week.
16. Bunny hops
Moderate-shoulder strengthening
1. Start in a bob position (position a). 2. Rock the body forward and reach the hands on the
ground with locked elbows. 3. Transfer the weight over the shoulders and fingertips. 4. Simultaneously jump the legs into the air (position b). 5. Repeat 10 times, rest and repeat again. 6. Perform 4 times per week.
17 Front support walk in’s Moderate-shoulder strengthening 1. Prepare in a front support hold (position a) with
locked elbows. 2. Walk the feet into the hands. 3. Transfer the weight over the shoulders and aim for
the back to be vertical (position b) hold 5 seconds. 4. Walk the legs back out making sure the back is
straight and abdominals are engaged (stay on hands)
5. Repeat 8 times, recover and repeat again. 6. Perform 4 times per week.
a b
a
b
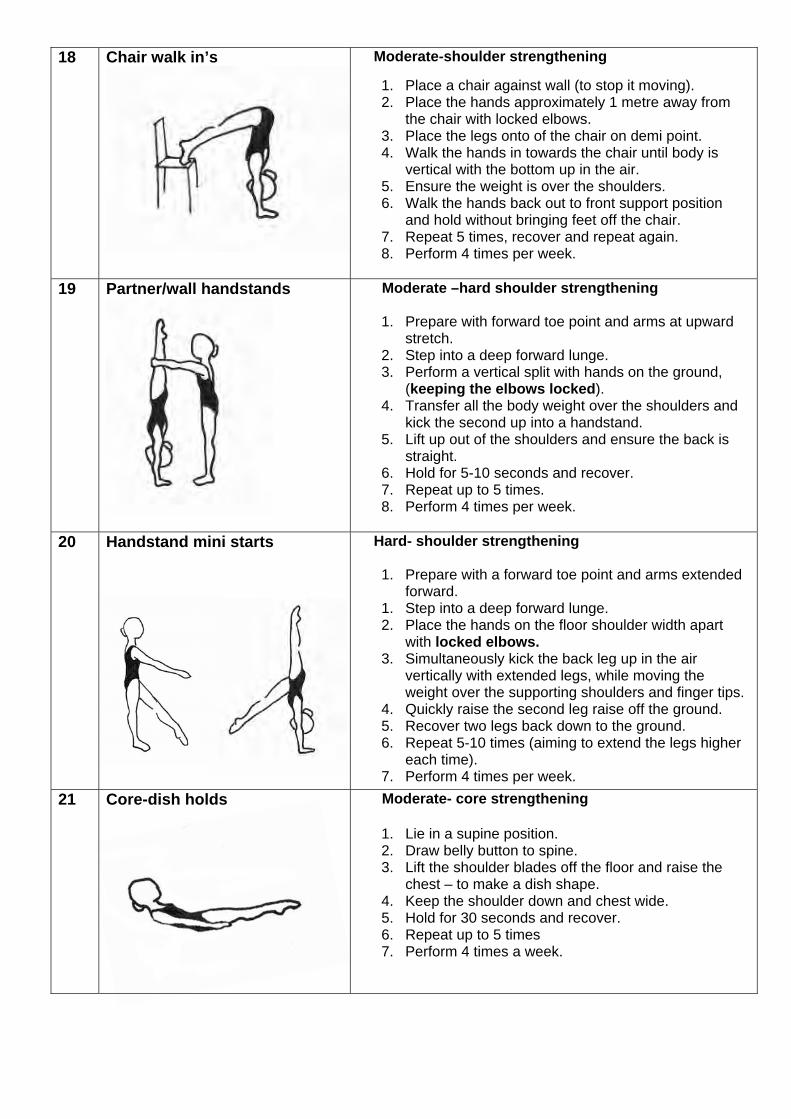
18 Chair walk in’s
Moderate-shoulder strengthening
1. Place a chair against wall (to stop it moving). 2. Place the hands approximately 1 metre away from
the chair with locked elbows. 3. Place the legs onto of the chair on demi point. 4. Walk the hands in towards the chair until body is
vertical with the bottom up in the air. 5. Ensure the weight is over the shoulders. 6. Walk the hands back out to front support position
and hold without bringing feet off the chair. 7. Repeat 5 times, recover and repeat again. 8. Perform 4 times per week.
19 Partner/wall handstands
Moderate –hard shoulder strengthening
1. Prepare with forward toe point and arms at upward stretch.
2. Step into a deep forward lunge. 3. Perform a vertical split with hands on the ground,
(keeping the elbows locked). 4. Transfer all the body weight over the shoulders and
kick the second up into a handstand. 5. Lift up out of the shoulders and ensure the back is
straight. 6. Hold for 5-10 seconds and recover. 7. Repeat up to 5 times. 8. Perform 4 times per week.
20 Handstand mini starts
Hard- shoulder strengthening
1. Prepare with a forward toe point and arms extended forward.
1. Step into a deep forward lunge. 2. Place the hands on the floor shoulder width apart
with locked elbows. 3. Simultaneously kick the back leg up in the air
vertically with extended legs, while moving the weight over the supporting shoulders and finger tips.
4. Quickly raise the second leg raise off the ground. 5. Recover two legs back down to the ground. 6. Repeat 5-10 times (aiming to extend the legs higher
each time). 7. Perform 4 times per week.
21 Core-dish holds
Moderate- core strengthening
1. Lie in a supine position. 2. Draw belly button to spine. 3. Lift the shoulder blades off the floor and raise the
chest – to make a dish shape. 4. Keep the shoulder down and chest wide. 5. Hold for 30 seconds and recover. 6. Repeat up to 5 times 7. Perform 4 times a week.
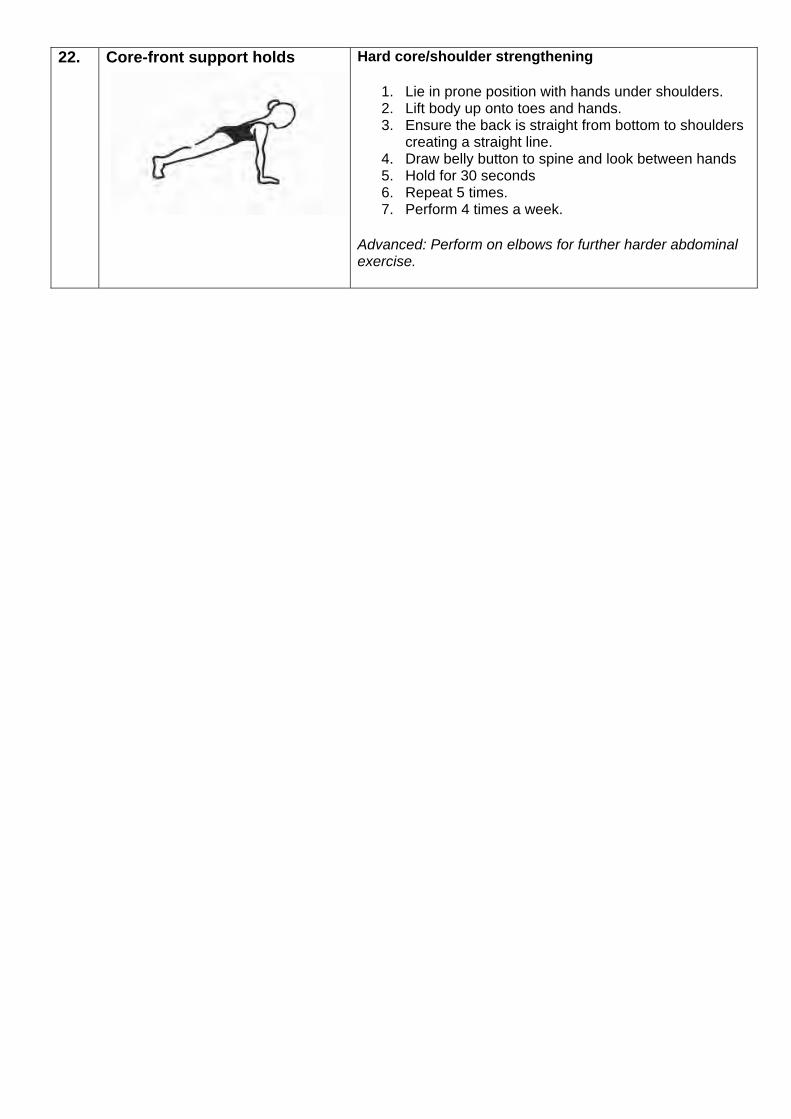
22. Core-front support holds Hard core/shoulder strengthening
1. Lie in prone position with hands under shoulders. 2. Lift body up onto toes and hands. 3. Ensure the back is straight from bottom to shoulders
creating a straight line. 4. Draw belly button to spine and look between hands 5. Hold for 30 seconds 6. Repeat 5 times. 7. Perform 4 times a week.
Advanced: Perform on elbows for further harder abdominal exercise.
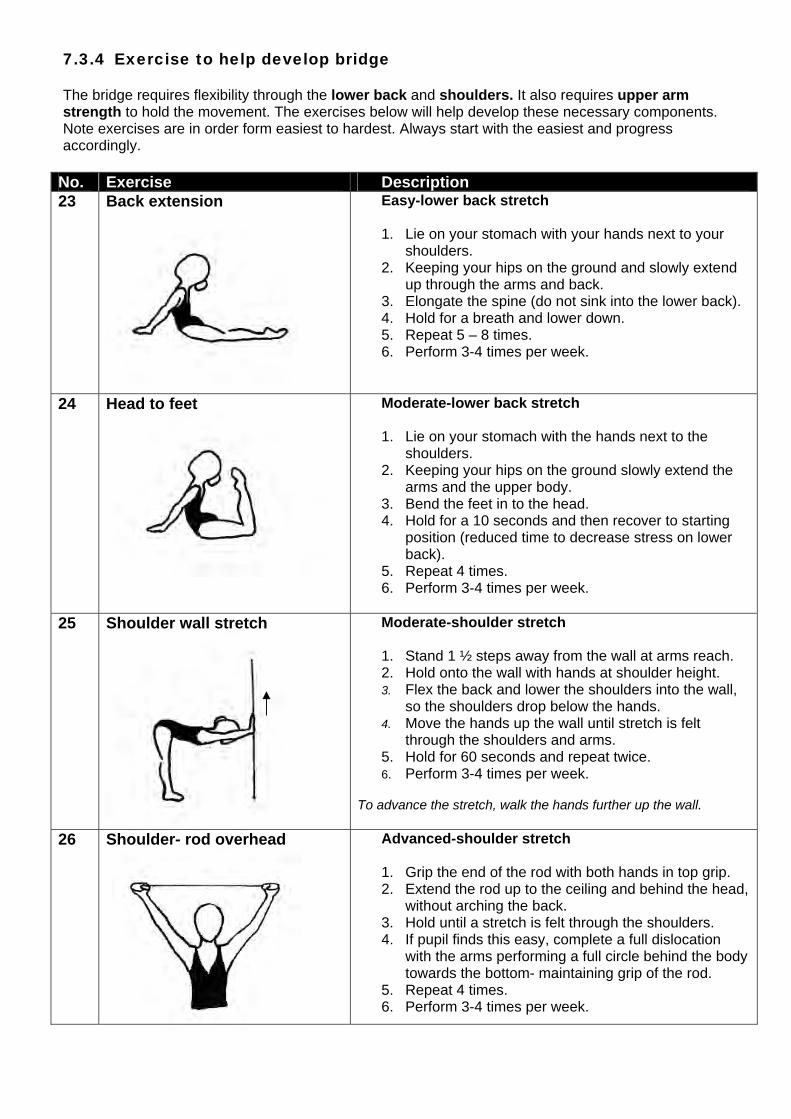
7.3.4 Exercise to help develop bridge The bridge requires flexibility through the lower back and shoulders. It also requires upper arm strength to hold the movement. The exercises below will help develop these necessary components. Note exercises are in order form easiest to hardest. Always start with the easiest and progress accordingly.
No. Exercise Description 23 Back extension
Easy-lower back stretch 1. Lie on your stomach with your hands next to your
shoulders. 2. Keeping your hips on the ground and slowly extend
up through the arms and back. 3. Elongate the spine (do not sink into the lower back). 4. Hold for a breath and lower down. 5. Repeat 5 – 8 times. 6. Perform 3-4 times per week.
24 Head to feet
Moderate-lower back stretch 1. Lie on your stomach with the hands next to the
shoulders. 2. Keeping your hips on the ground slowly extend the
arms and the upper body. 3. Bend the feet in to the head. 4. Hold for a 10 seconds and then recover to starting
position (reduced time to decrease stress on lower back).
5. Repeat 4 times. 6. Perform 3-4 times per week.
25 Shoulder wall stretch
Moderate-shoulder stretch 1. Stand 1 ½ steps away from the wall at arms reach. 2. Hold onto the wall with hands at shoulder height. 3. Flex the back and lower the shoulders into the wall,
so the shoulders drop below the hands. 4. Move the hands up the wall until stretch is felt
through the shoulders and arms. 5. Hold for 60 seconds and repeat twice. 6. Perform 3-4 times per week.
To advance the stretch, walk the hands further up the wall.
26 Shoulder- rod overhead
Advanced-shoulder stretch 1. Grip the end of the rod with both hands in top grip. 2. Extend the rod up to the ceiling and behind the head,
without arching the back. 3. Hold until a stretch is felt through the shoulders. 4. If pupil finds this easy, complete a full dislocation
with the arms performing a full circle behind the body towards the bottom- maintaining grip of the rod.
5. Repeat 4 times. 6. Perform 3-4 times per week.
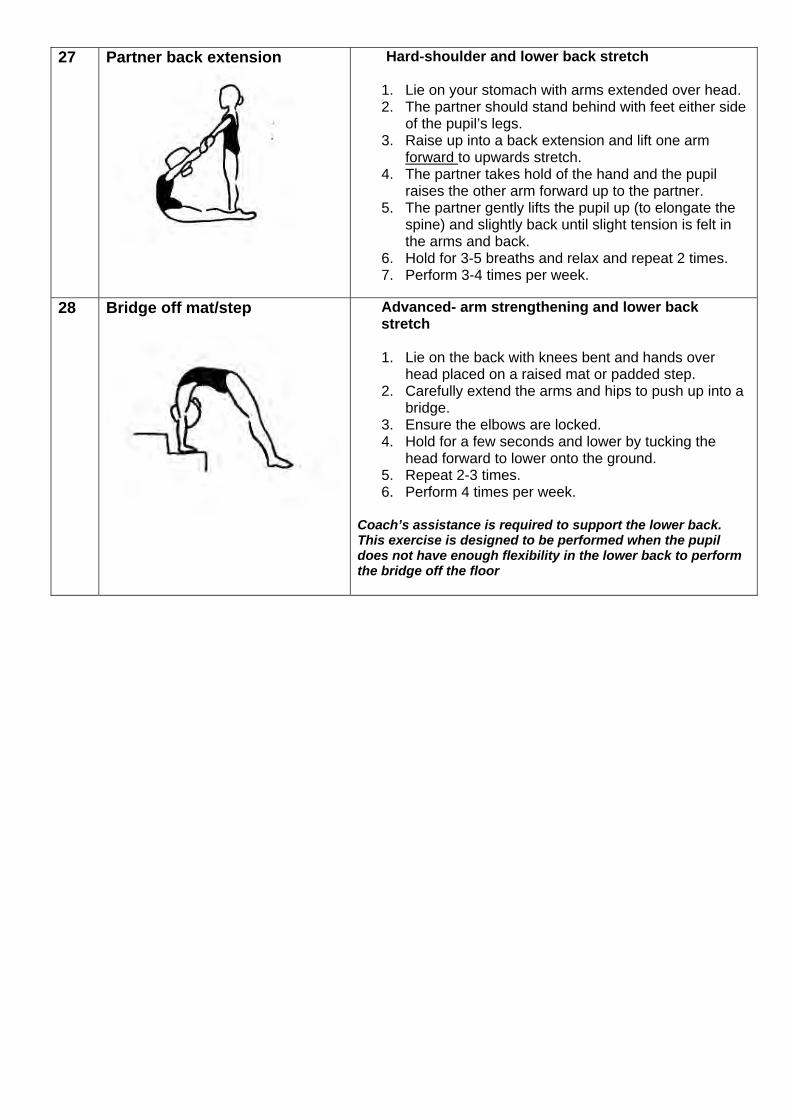
27 Partner back extension
Hard-shoulder and lower back stretch
1. Lie on your stomach with arms extended over head. 2. The partner should stand behind with feet either side
of the pupil’s legs. 3. Raise up into a back extension and lift one arm
forward to upwards stretch. 4. The partner takes hold of the hand and the pupil
raises the other arm forward up to the partner. 5. The partner gently lifts the pupil up (to elongate the
spine) and slightly back until slight tension is felt in the arms and back.
6. Hold for 3-5 breaths and relax and repeat 2 times. 7. Perform 3-4 times per week.
28 Bridge off mat/step
Advanced- arm strengthening and lower back stretch 1. Lie on the back with knees bent and hands over
head placed on a raised mat or padded step. 2. Carefully extend the arms and hips to push up into a
bridge. 3. Ensure the elbows are locked. 4. Hold for a few seconds and lower by tucking the
head forward to lower onto the ground. 5. Repeat 2-3 times. 6. Perform 4 times per week.
Coach’s assistance is required to support the lower back. This exercise is designed to be performed when the pupil does not have enough flexibility in the lower back to perform the bridge off the floor
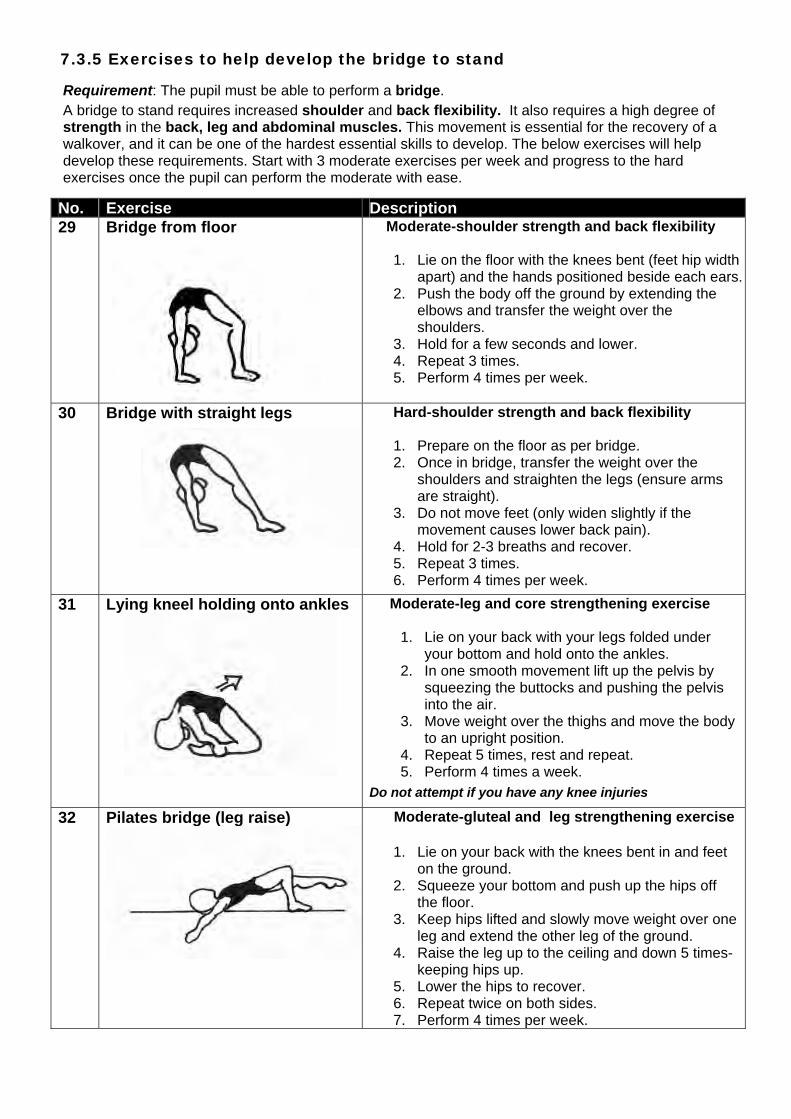
7.3.5 Exercises to help develop the bridge to stand Requirement: The pupil must be able to perform a bridge.
A bridge to stand requires increased shoulder and back flexibility. It also requires a high degree of strength in the back, leg and abdominal muscles. This movement is essential for the recovery of a walkover, and it can be one of the hardest essential skills to develop. The below exercises will help develop these requirements. Start with 3 moderate exercises per week and progress to the hard exercises once the pupil can perform the moderate with ease.
No. Exercise Description 29 Bridge from floor
Moderate-shoulder strength and back flexibility 1. Lie on the floor with the knees bent (feet hip width
apart) and the hands positioned beside each ears. 2. Push the body off the ground by extending the
elbows and transfer the weight over the shoulders.
3. Hold for a few seconds and lower. 4. Repeat 3 times. 5. Perform 4 times per week.
30 Bridge with straight legs
Hard-shoulder strength and back flexibility 1. Prepare on the floor as per bridge. 2. Once in bridge, transfer the weight over the
shoulders and straighten the legs (ensure arms are straight).
3. Do not move feet (only widen slightly if the movement causes lower back pain).
4. Hold for 2-3 breaths and recover. 5. Repeat 3 times. 6. Perform 4 times per week.
31 Lying kneel holding onto ankles
Moderate-leg and core strengthening exercise
1. Lie on your back with your legs folded under your bottom and hold onto the ankles.
2. In one smooth movement lift up the pelvis by squeezing the buttocks and pushing the pelvis into the air.
3. Move weight over the thighs and move the body to an upright position.
4. Repeat 5 times, rest and repeat. 5. Perform 4 times a week.
Do not attempt if you have any knee injuries
32 Pilates bridge (leg raise) Moderate-gluteal and leg strengthening exercise
1. Lie on your back with the knees bent in and feet on the ground.
2. Squeeze your bottom and push up the hips off the floor.
3. Keep hips lifted and slowly move weight over one leg and extend the other leg of the ground.
4. Raise the leg up to the ceiling and down 5 times- keeping hips up.
5. Lower the hips to recover. 6. Repeat twice on both sides. 7. Perform 4 times per week.
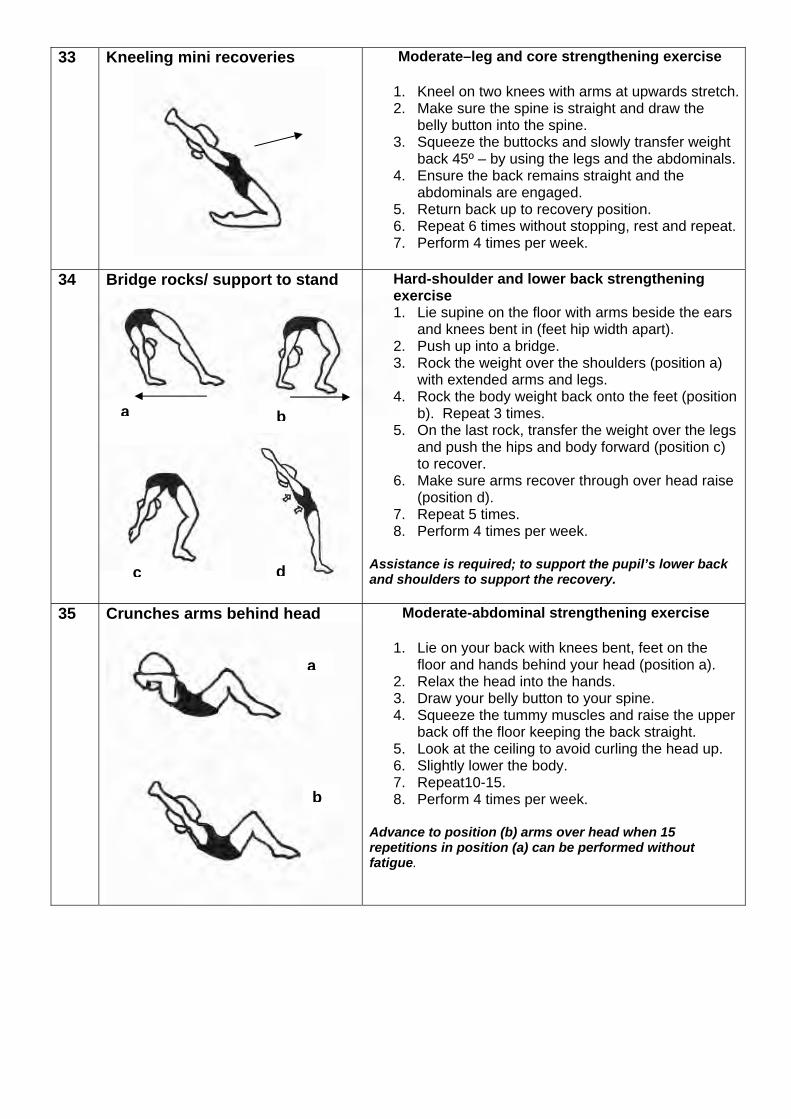
33 Kneeling mini recoveries
Moderate–leg and core strengthening exercise
1. Kneel on two knees with arms at upwards stretch.2. Make sure the spine is straight and draw the
belly button into the spine. 3. Squeeze the buttocks and slowly transfer weight
back 45º – by using the legs and the abdominals. 4. Ensure the back remains straight and the
abdominals are engaged. 5. Return back up to recovery position. 6. Repeat 6 times without stopping, rest and repeat. 7. Perform 4 times per week.
34 Bridge rocks/ support to stand
Hard-shoulder and lower back strengthening exercise 1. Lie supine on the floor with arms beside the ears
and knees bent in (feet hip width apart). 2. Push up into a bridge. 3. Rock the weight over the shoulders (position a)
with extended arms and legs. 4. Rock the body weight back onto the feet (position
b). Repeat 3 times. 5. On the last rock, transfer the weight over the legs
and push the hips and body forward (position c) to recover.
6. Make sure arms recover through over head raise (position d).
7. Repeat 5 times. 8. Perform 4 times per week.
Assistance is required; to support the pupil’s lower back and shoulders to support the recovery.
35 Crunches arms behind head Moderate-abdominal strengthening exercise
1. Lie on your back with knees bent, feet on the floor and hands behind your head (position a).
2. Relax the head into the hands. 3. Draw your belly button to your spine. 4. Squeeze the tummy muscles and raise the upper
back off the floor keeping the back straight. 5. Look at the ceiling to avoid curling the head up. 6. Slightly lower the body. 7. Repeat10-15. 8. Perform 4 times per week.
Advance to position (b) arms over head when 15 repetitions in position (a) can be performed without fatigue.
a b
c
a
b
d

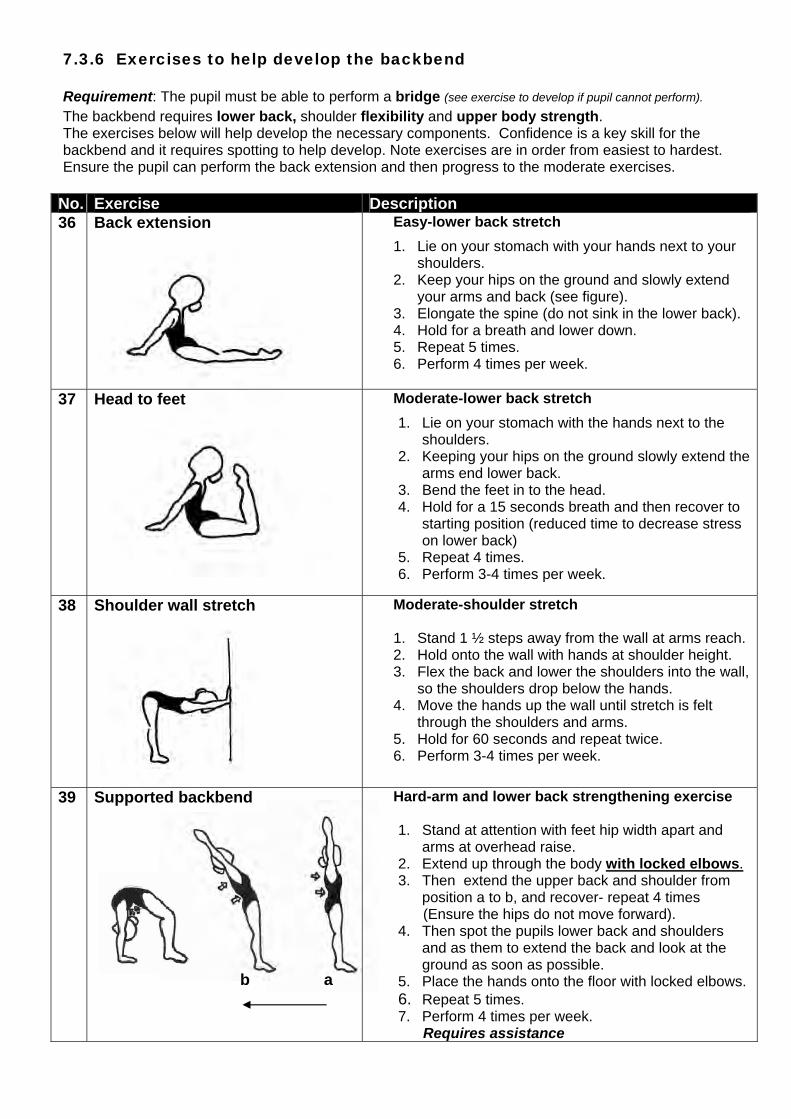
7.3.6 Exercises to help develop the backbend Requirement: The pupil must be able to perform a bridge (see exercise to develop if pupil cannot perform).
The backbend requires lower back, shoulder flexibility and upper body strength. The exercises below will help develop the necessary components. Confidence is a key skill for the backbend and it requires spotting to help develop. Note exercises are in order from easiest to hardest. Ensure the pupil can perform the back extension and then progress to the moderate exercises.
No. Exercise Description 36 Back extension
Easy-lower back stretch
1. Lie on your stomach with your hands next to your shoulders.
2. Keep your hips on the ground and slowly extend your arms and back (see figure).
3. Elongate the spine (do not sink in the lower back). 4. Hold for a breath and lower down. 5. Repeat 5 times. 6. Perform 4 times per week.
37 Head to feet
Moderate-lower back stretch
1. Lie on your stomach with the hands next to the shoulders.
2. Keeping your hips on the ground slowly extend the arms end lower back.
3. Bend the feet in to the head. 4. Hold for a 15 seconds breath and then recover to
starting position (reduced time to decrease stress on lower back)
5. Repeat 4 times. 6. Perform 3-4 times per week.
38 Shoulder wall stretch
Moderate-shoulder stretch 1. Stand 1 ½ steps away from the wall at arms reach. 2. Hold onto the wall with hands at shoulder height. 3. Flex the back and lower the shoulders into the wall,
so the shoulders drop below the hands. 4. Move the hands up the wall until stretch is felt
through the shoulders and arms. 5. Hold for 60 seconds and repeat twice. 6. Perform 3-4 times per week.
39 Supported backbend
Hard-arm and lower back strengthening exercise 1. Stand at attention with feet hip width apart and
arms at overhead raise. 2. Extend up through the body with locked elbows. 3. Then extend the upper back and shoulder from
position a to b, and recover- repeat 4 times (Ensure the hips do not move forward).
4. Then spot the pupils lower back and shoulders and as them to extend the back and look at the ground as soon as possible.
5. Place the hands onto the floor with locked elbows. 6. Repeat 5 times. 7. Perform 4 times per week.
Requires assistance
ab
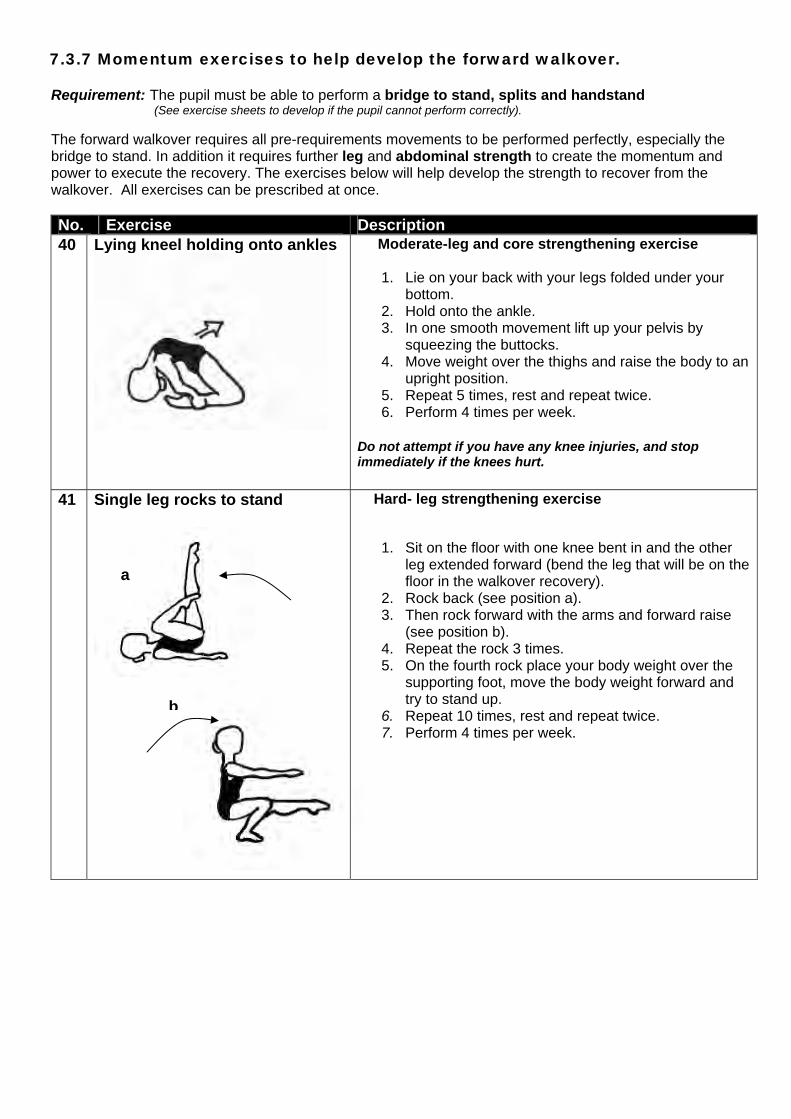
7.3.7 Momentum exercises to help develop the forward walkover. Requirement: The pupil must be able to perform a bridge to stand, splits and handstand (See exercise sheets to develop if the pupil cannot perform correctly). The forward walkover requires all pre-requirements movements to be performed perfectly, especially the bridge to stand. In addition it requires further leg and abdominal strength to create the momentum and power to execute the recovery. The exercises below will help develop the strength to recover from the walkover. All exercises can be prescribed at once. No. Exercise Description 40 Lying kneel holding onto ankles
Moderate-leg and core strengthening exercise
1. Lie on your back with your legs folded under your bottom.
2. Hold onto the ankle. 3. In one smooth movement lift up your pelvis by
squeezing the buttocks. 4. Move weight over the thighs and raise the body to an
upright position. 5. Repeat 5 times, rest and repeat twice. 6. Perform 4 times per week.
Do not attempt if you have any knee injuries, and stop immediately if the knees hurt.
41 Single leg rocks to stand
Hard- leg strengthening exercise
1. Sit on the floor with one knee bent in and the other leg extended forward (bend the leg that will be on the floor in the walkover recovery).
2. Rock back (see position a). 3. Then rock forward with the arms and forward raise
(see position b). 4. Repeat the rock 3 times. 5. On the fourth rock place your body weight over the
supporting foot, move the body weight forward and try to stand up.
6. Repeat 10 times, rest and repeat twice. 7. Perform 4 times per week.
a
b
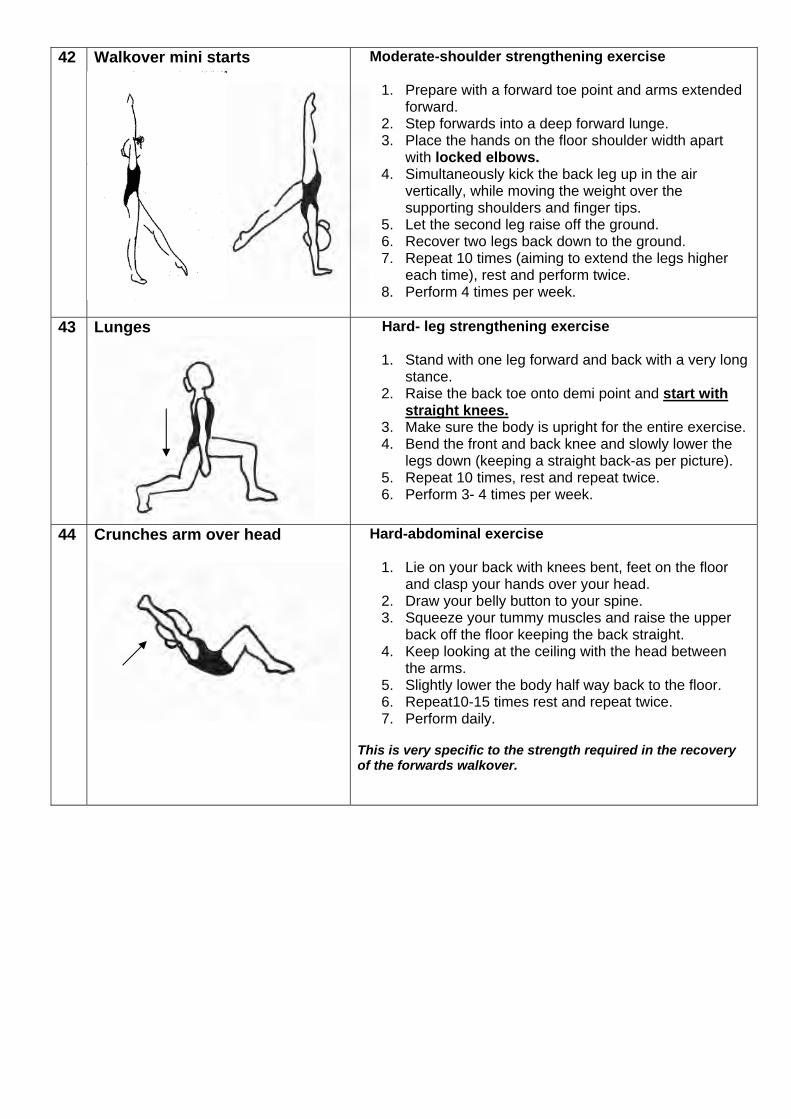
42 Walkover mini starts
Moderate-shoulder strengthening exercise
1. Prepare with a forward toe point and arms extended forward.
2. Step forwards into a deep forward lunge. 3. Place the hands on the floor shoulder width apart
with locked elbows. 4. Simultaneously kick the back leg up in the air
vertically, while moving the weight over the supporting shoulders and finger tips.
5. Let the second leg raise off the ground. 6. Recover two legs back down to the ground. 7. Repeat 10 times (aiming to extend the legs higher
each time), rest and perform twice. 8. Perform 4 times per week.
43 Lunges
Hard- leg strengthening exercise
1. Stand with one leg forward and back with a very long stance.
2. Raise the back toe onto demi point and start with straight knees.
3. Make sure the body is upright for the entire exercise. 4. Bend the front and back knee and slowly lower the
legs down (keeping a straight back-as per picture). 5. Repeat 10 times, rest and repeat twice. 6. Perform 3- 4 times per week.
44 Crunches arm over head
Hard-abdominal exercise
1. Lie on your back with knees bent, feet on the floor and clasp your hands over your head.
2. Draw your belly button to your spine. 3. Squeeze your tummy muscles and raise the upper
back off the floor keeping the back straight. 4. Keep looking at the ceiling with the head between
the arms. 5. Slightly lower the body half way back to the floor. 6. Repeat10-15 times rest and repeat twice. 7. Perform daily.
This is very specific to the strength required in the recovery of the forwards walkover.
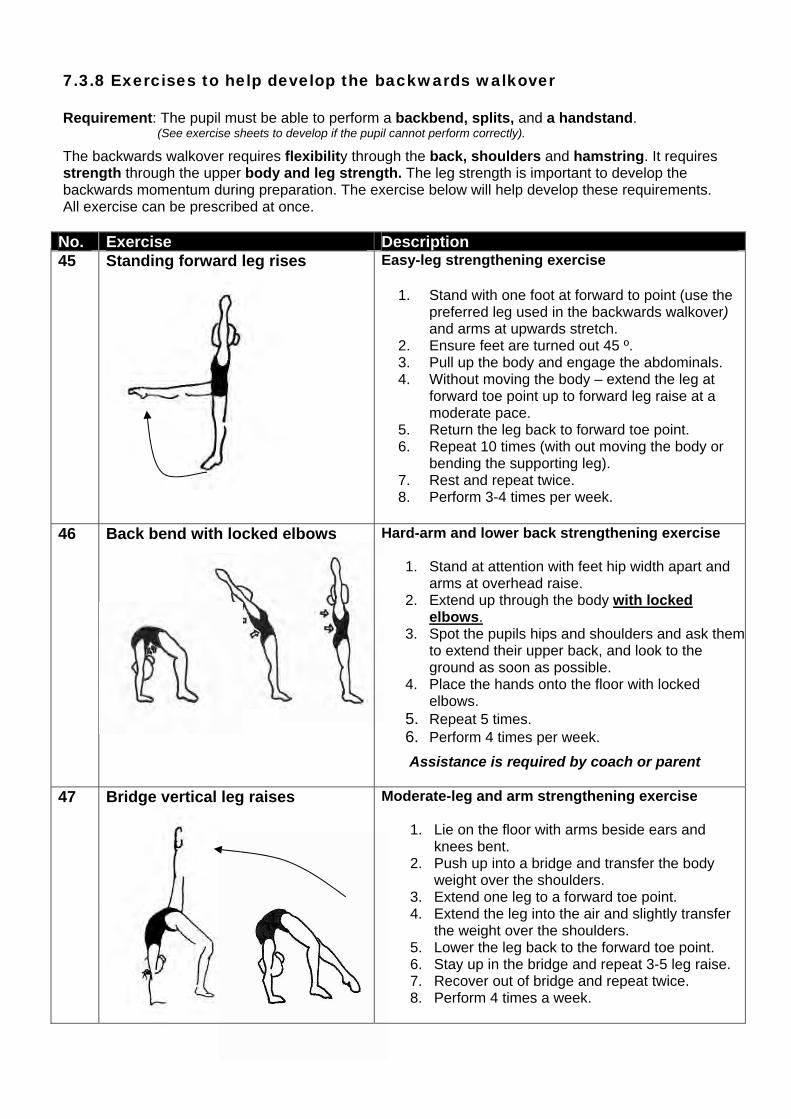
7.3.8 Exercises to help develop the backwards walkover Requirement: The pupil must be able to perform a backbend, splits, and a handstand.
(See exercise sheets to develop if the pupil cannot perform correctly).
The backwards walkover requires flexibility through the back, shoulders and hamstring. It requires strength through the upper body and leg strength. The leg strength is important to develop the backwards momentum during preparation. The exercise below will help develop these requirements. All exercise can be prescribed at once.
No. Exercise Description 45 Standing forward leg rises
Easy-leg strengthening exercise
1. Stand with one foot at forward to point (use the preferred leg used in the backwards walkover) and arms at upwards stretch.
2. Ensure feet are turned out 45 º. 3. Pull up the body and engage the abdominals. 4. Without moving the body – extend the leg at
forward toe point up to forward leg raise at a moderate pace.
5. Return the leg back to forward toe point. 6. Repeat 10 times (with out moving the body or
bending the supporting leg). 7. Rest and repeat twice. 8. Perform 3-4 times per week.
46 Back bend with locked elbows
Hard-arm and lower back strengthening exercise 1. Stand at attention with feet hip width apart and
arms at overhead raise. 2. Extend up through the body with locked
elbows. 3. Spot the pupils hips and shoulders and ask them
to extend their upper back, and look to the ground as soon as possible.
4. Place the hands onto the floor with locked elbows.
5. Repeat 5 times. 6. Perform 4 times per week.
Assistance is required by coach or parent
47 Bridge vertical leg raises
Moderate-leg and arm strengthening exercise
1. Lie on the floor with arms beside ears and knees bent.
2. Push up into a bridge and transfer the body weight over the shoulders.
3. Extend one leg to a forward toe point. 4. Extend the leg into the air and slightly transfer
the weight over the shoulders. 5. Lower the leg back to the forward toe point. 6. Stay up in the bridge and repeat 3-5 leg raise. 7. Recover out of bridge and repeat twice. 8. Perform 4 times a week.
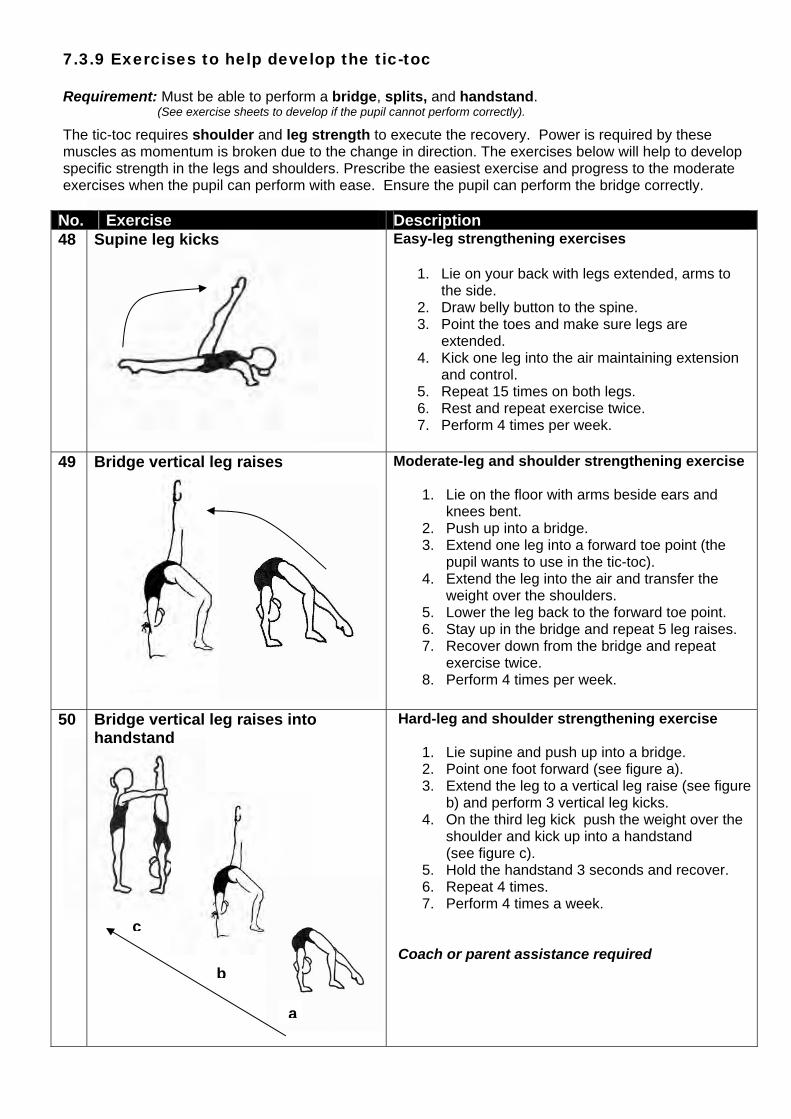
7.3.9 Exercises to help develop the tic-toc Requirement: Must be able to perform a bridge, splits, and handstand.
(See exercise sheets to develop if the pupil cannot perform correctly).
The tic-toc requires shoulder and leg strength to execute the recovery. Power is required by these muscles as momentum is broken due to the change in direction. The exercises below will help to develop specific strength in the legs and shoulders. Prescribe the easiest exercise and progress to the moderate exercises when the pupil can perform with ease. Ensure the pupil can perform the bridge correctly.
No. Exercise Description 48 Supine leg kicks
Easy-leg strengthening exercises
1. Lie on your back with legs extended, arms to the side.
2. Draw belly button to the spine. 3. Point the toes and make sure legs are
extended. 4. Kick one leg into the air maintaining extension
and control. 5. Repeat 15 times on both legs. 6. Rest and repeat exercise twice. 7. Perform 4 times per week.
49 Bridge vertical leg raises
Moderate-leg and shoulder strengthening exercise
1. Lie on the floor with arms beside ears and knees bent.
2. Push up into a bridge. 3. Extend one leg into a forward toe point (the
pupil wants to use in the tic-toc). 4. Extend the leg into the air and transfer the
weight over the shoulders. 5. Lower the leg back to the forward toe point. 6. Stay up in the bridge and repeat 5 leg raises. 7. Recover down from the bridge and repeat
exercise twice. 8. Perform 4 times per week.
50 Bridge vertical leg raises into
handstand
Hard-leg and shoulder strengthening exercise
1. Lie supine and push up into a bridge. 2. Point one foot forward (see figure a). 3. Extend the leg to a vertical leg raise (see figure
b) and perform 3 vertical leg kicks. 4. On the third leg kick push the weight over the
shoulder and kick up into a handstand (see figure c).
5. Hold the handstand 3 seconds and recover. 6. Repeat 4 times. 7. Perform 4 times a week.
Coach or parent assistance required
a
b
c
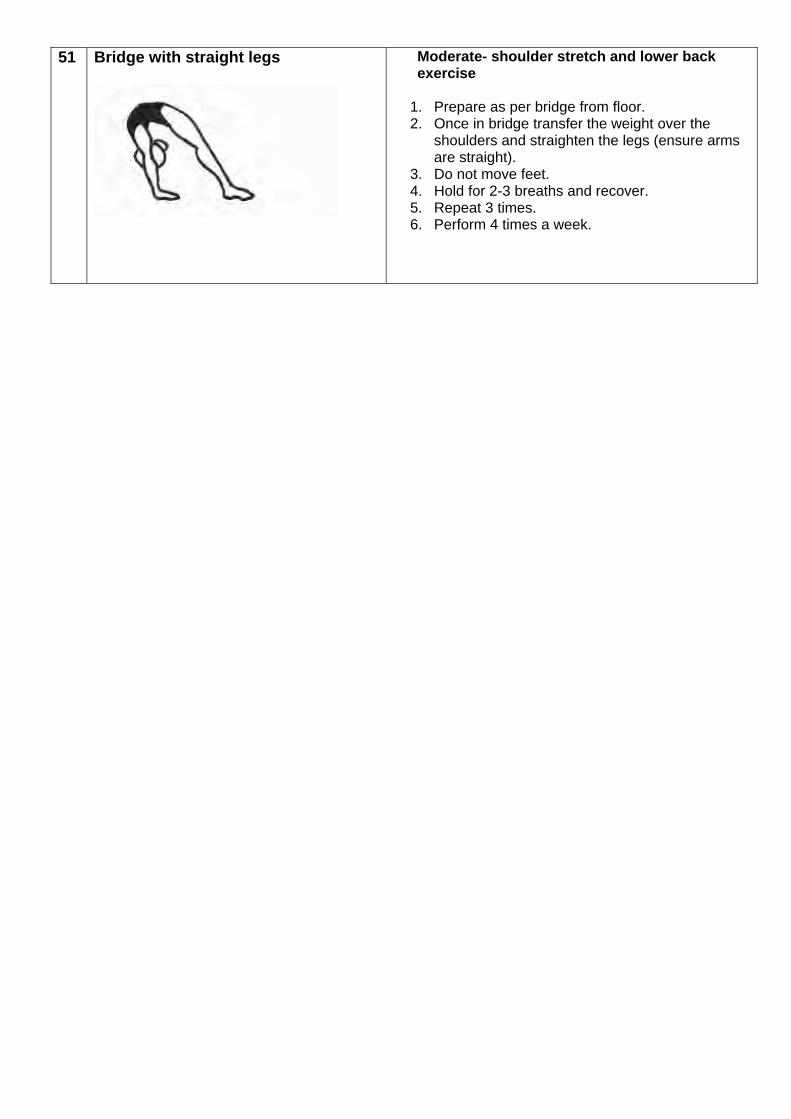
51 Bridge with straight legs
Moderate- shoulder stretch and lower back exercise
1. Prepare as per bridge from floor. 2. Once in bridge transfer the weight over the
shoulders and straighten the legs (ensure arms are straight).
3. Do not move feet. 4. Hold for 2-3 breaths and recover. 5. Repeat 3 times. 6. Perform 4 times a week.
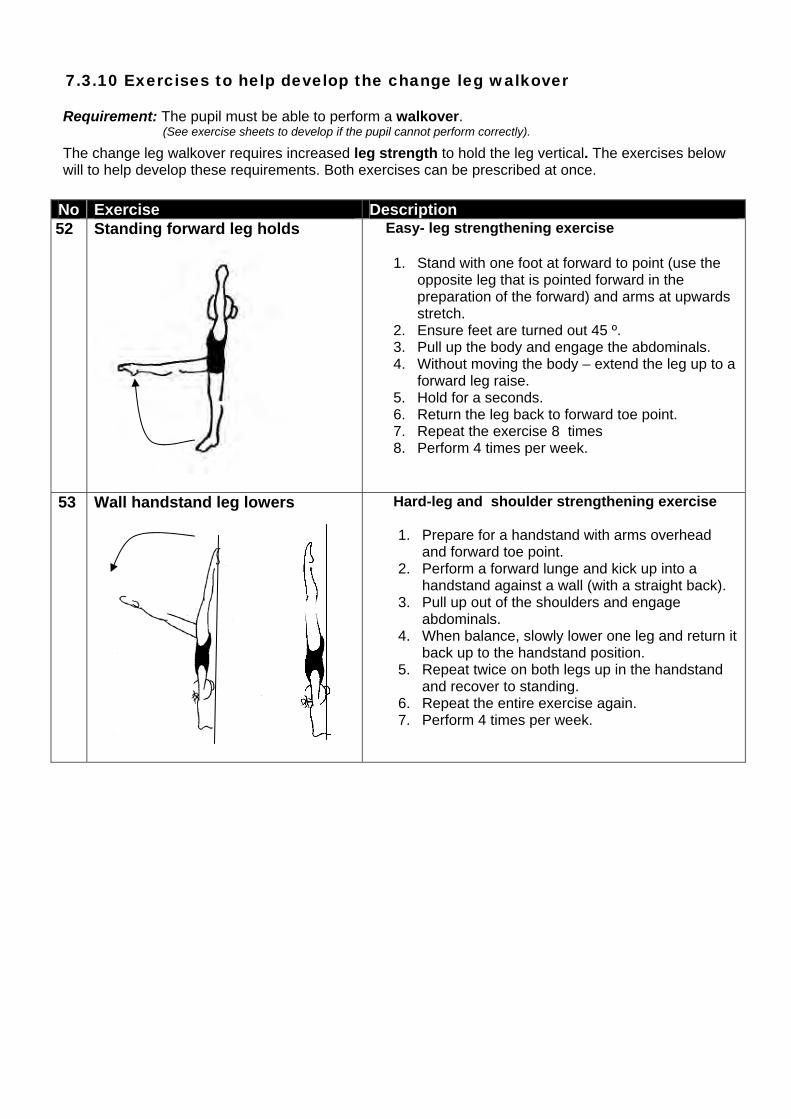
7.3.10 Exercises to help develop the change leg walkover
Requirement: The pupil must be able to perform a walkover. (See exercise sheets to develop if the pupil cannot perform correctly).
The change leg walkover requires increased leg strength to hold the leg vertical. The exercises below will to help develop these requirements. Both exercises can be prescribed at once.
No Exercise Description 52 Standing forward leg holds
Easy- leg strengthening exercise
1. Stand with one foot at forward to point (use the opposite leg that is pointed forward in the preparation of the forward) and arms at upwards stretch.
2. Ensure feet are turned out 45 º. 3. Pull up the body and engage the abdominals. 4. Without moving the body – extend the leg up to a
forward leg raise. 5. Hold for a seconds. 6. Return the leg back to forward toe point. 7. Repeat the exercise 8 times 8. Perform 4 times per week.
53 Wall handstand leg lowers
Hard-leg and shoulder strengthening exercise 1. Prepare for a handstand with arms overhead
and forward toe point. 2. Perform a forward lunge and kick up into a
handstand against a wall (with a straight back). 3. Pull up out of the shoulders and engage
abdominals. 4. When balance, slowly lower one leg and return it
back up to the handstand position. 5. Repeat twice on both legs up in the handstand
and recover to standing. 6. Repeat the entire exercise again. 7. Perform 4 times per week.
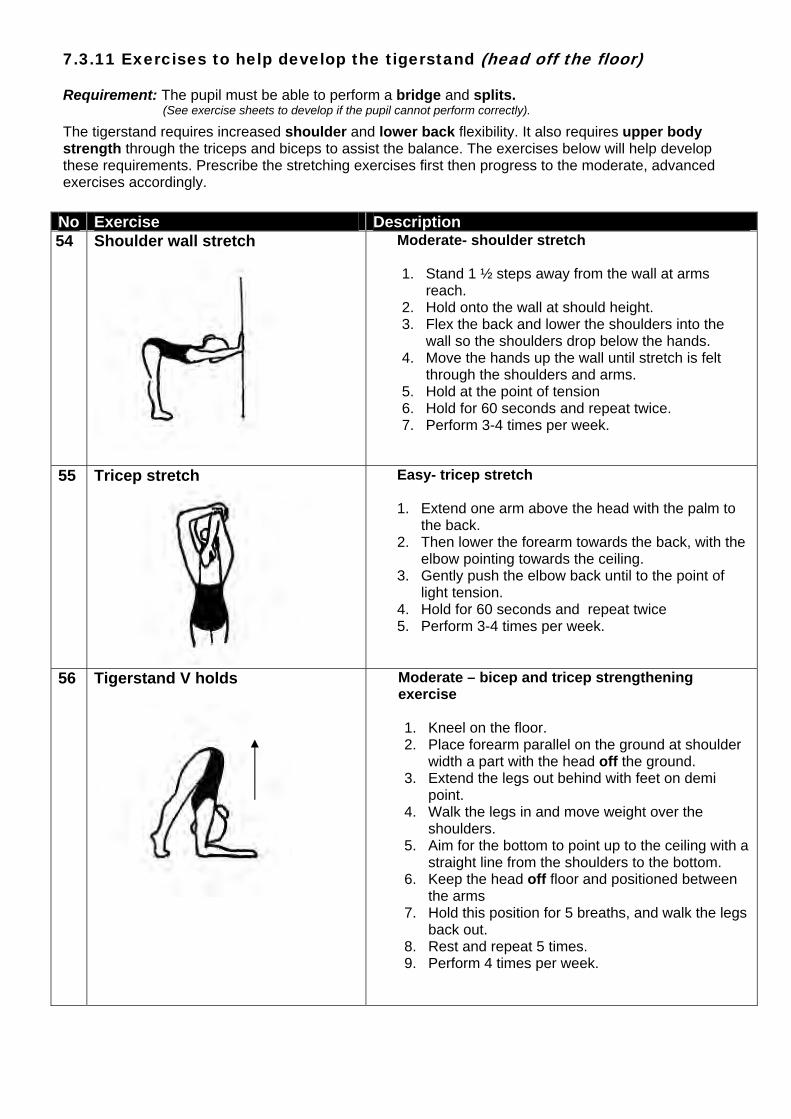
7.3.11 Exercises to help develop the tigerstand (head off the floor) Requirement: The pupil must be able to perform a bridge and splits. (See exercise sheets to develop if the pupil cannot perform correctly).
The tigerstand requires increased shoulder and lower back flexibility. It also requires upper body strength through the triceps and biceps to assist the balance. The exercises below will help develop these requirements. Prescribe the stretching exercises first then progress to the moderate, advanced exercises accordingly.
No Exercise Description 54 Shoulder wall stretch
Moderate- shoulder stretch 1. Stand 1 ½ steps away from the wall at arms
reach. 2. Hold onto the wall at should height. 3. Flex the back and lower the shoulders into the
wall so the shoulders drop below the hands. 4. Move the hands up the wall until stretch is felt
through the shoulders and arms. 5. Hold at the point of tension 6. Hold for 60 seconds and repeat twice. 7. Perform 3-4 times per week.
55 Tricep stretch
Easy- tricep stretch 1. Extend one arm above the head with the palm to
the back. 2. Then lower the forearm towards the back, with the
elbow pointing towards the ceiling. 3. Gently push the elbow back until to the point of
light tension. 4. Hold for 60 seconds and repeat twice 5. Perform 3-4 times per week.
56 Tigerstand V holds
Moderate – bicep and tricep strengthening exercise
1. Kneel on the floor. 2. Place forearm parallel on the ground at shoulder
width a part with the head off the ground. 3. Extend the legs out behind with feet on demi
point. 4. Walk the legs in and move weight over the
shoulders. 5. Aim for the bottom to point up to the ceiling with a
straight line from the shoulders to the bottom. 6. Keep the head off floor and positioned between
the arms 7. Hold this position for 5 breaths, and walk the legs
back out. 8. Rest and repeat 5 times. 9. Perform 4 times per week.
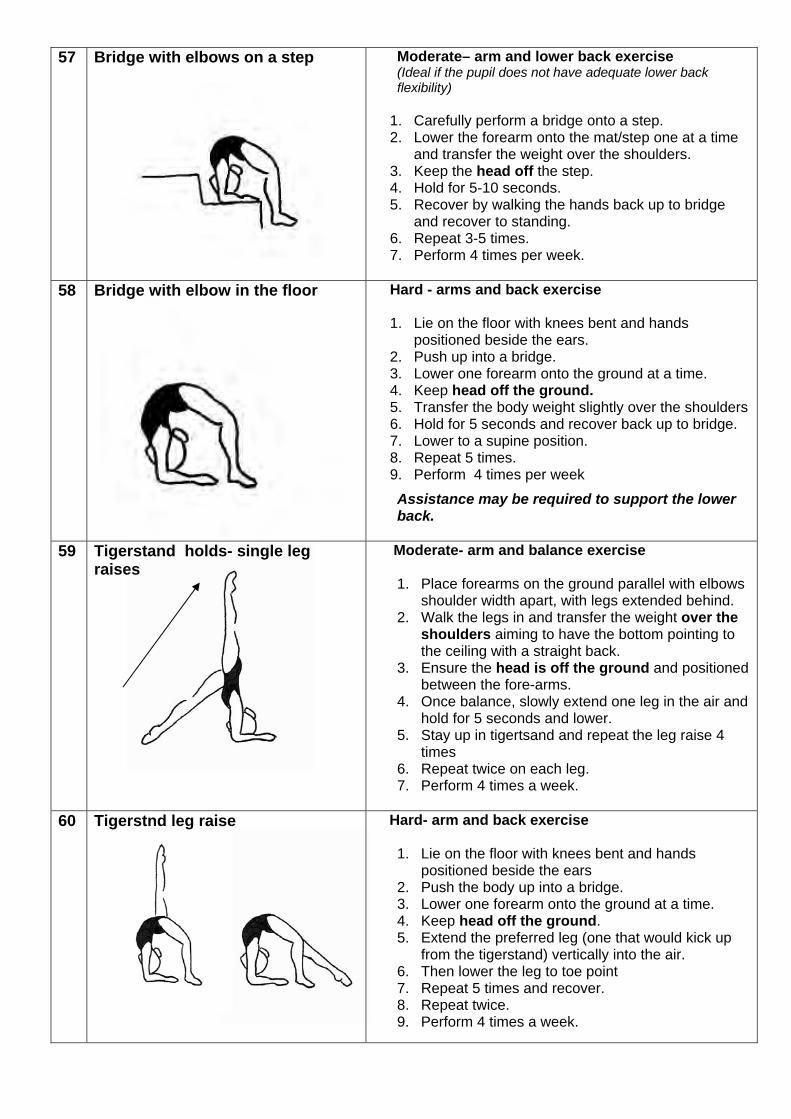
57 Bridge with elbows on a step
Moderate– arm and lower back exercise (Ideal if the pupil does not have adequate lower back flexibility)
1. Carefully perform a bridge onto a step. 2. Lower the forearm onto the mat/step one at a time
and transfer the weight over the shoulders. 3. Keep the head off the step. 4. Hold for 5-10 seconds. 5. Recover by walking the hands back up to bridge
and recover to standing. 6. Repeat 3-5 times. 7. Perform 4 times per week.
58 Bridge with elbow in the floor
Hard - arms and back exercise 1. Lie on the floor with knees bent and hands
positioned beside the ears. 2. Push up into a bridge. 3. Lower one forearm onto the ground at a time. 4. Keep head off the ground. 5. Transfer the body weight slightly over the shoulders 6. Hold for 5 seconds and recover back up to bridge. 7. Lower to a supine position. 8. Repeat 5 times. 9. Perform 4 times per week
Assistance may be required to support the lower back.
59 Tigerstand holds- single leg raises
Moderate- arm and balance exercise
1. Place forearms on the ground parallel with elbows shoulder width apart, with legs extended behind.
2. Walk the legs in and transfer the weight over the shoulders aiming to have the bottom pointing to the ceiling with a straight back.
3. Ensure the head is off the ground and positioned between the fore-arms.
4. Once balance, slowly extend one leg in the air and hold for 5 seconds and lower.
5. Stay up in tigertsand and repeat the leg raise 4 times
6. Repeat twice on each leg. 7. Perform 4 times a week.
60 Tigerstnd leg raise
Hard- arm and back exercise
1. Lie on the floor with knees bent and hands positioned beside the ears
2. Push the body up into a bridge. 3. Lower one forearm onto the ground at a time. 4. Keep head off the ground. 5. Extend the preferred leg (one that would kick up
from the tigerstand) vertically into the air. 6. Then lower the leg to toe point 7. Repeat 5 times and recover. 8. Repeat twice. 9. Perform 4 times a week.
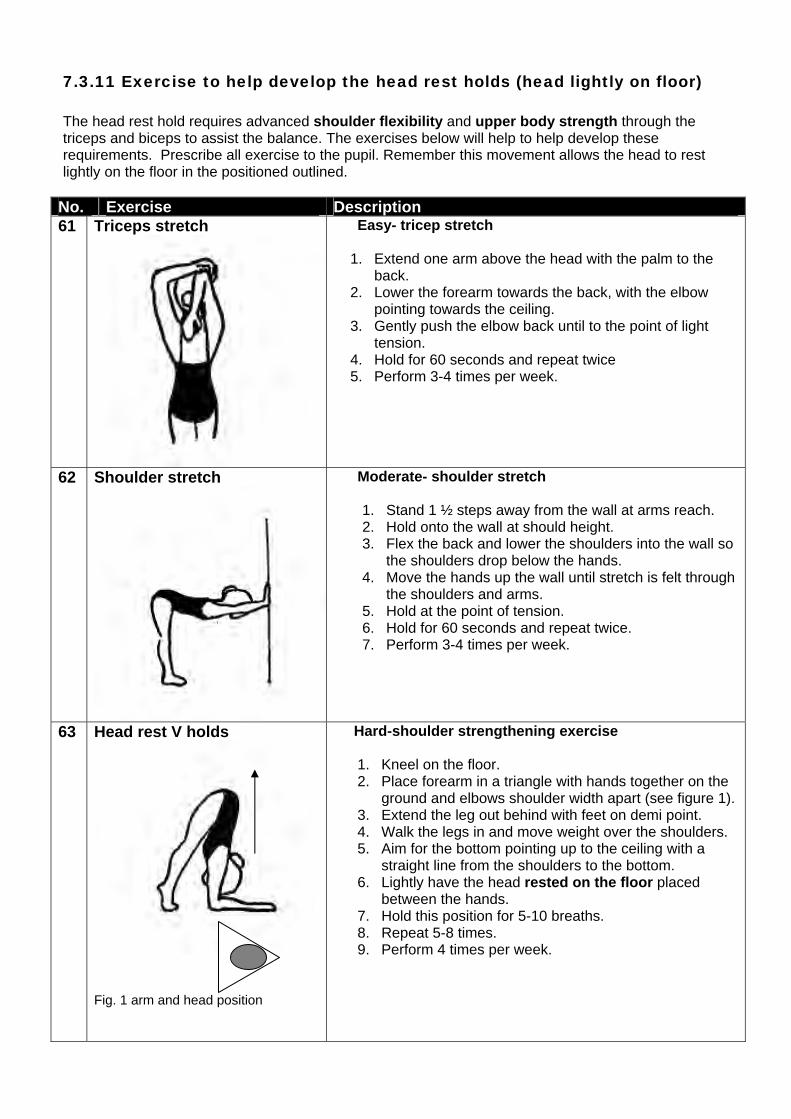
7.3.11 Exercise to help develop the head rest holds (head lightly on floor)
The head rest hold requires advanced shoulder flexibility and upper body strength through the triceps and biceps to assist the balance. The exercises below will help to help develop these requirements. Prescribe all exercise to the pupil. Remember this movement allows the head to rest lightly on the floor in the positioned outlined.
No. Exercise Description 61 Triceps stretch Easy- tricep stretch
1. Extend one arm above the head with the palm to the
back. 2. Lower the forearm towards the back, with the elbow
pointing towards the ceiling. 3. Gently push the elbow back until to the point of light
tension. 4. Hold for 60 seconds and repeat twice 5. Perform 3-4 times per week.
62 Shoulder stretch Moderate- shoulder stretch 1. Stand 1 ½ steps away from the wall at arms reach. 2. Hold onto the wall at should height. 3. Flex the back and lower the shoulders into the wall so
the shoulders drop below the hands. 4. Move the hands up the wall until stretch is felt through
the shoulders and arms. 5. Hold at the point of tension. 6. Hold for 60 seconds and repeat twice. 7. Perform 3-4 times per week.
63 Head rest V holds
Fig. 1 arm and head position
Hard-shoulder strengthening exercise
1. Kneel on the floor. 2. Place forearm in a triangle with hands together on the
ground and elbows shoulder width apart (see figure 1). 3. Extend the leg out behind with feet on demi point. 4. Walk the legs in and move weight over the shoulders. 5. Aim for the bottom pointing up to the ceiling with a
straight line from the shoulders to the bottom. 6. Lightly have the head rested on the floor placed
between the hands. 7. Hold this position for 5-10 breaths. 8. Repeat 5-8 times. 9. Perform 4 times per week.
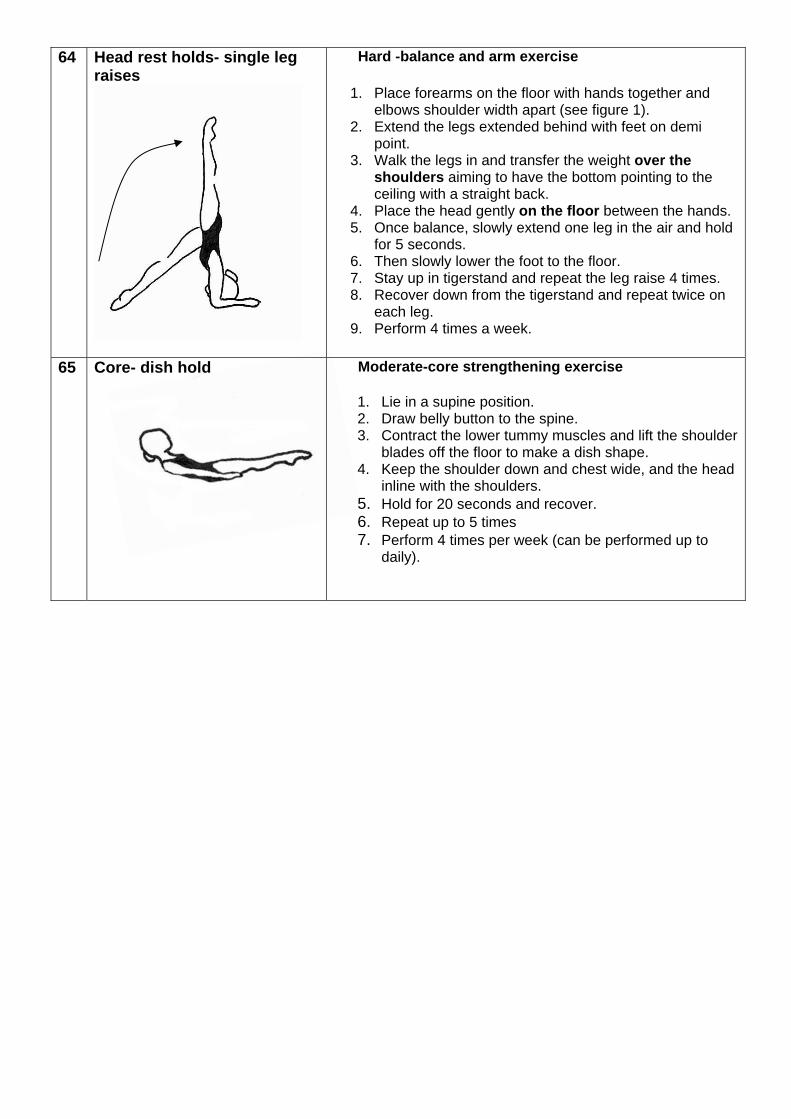
64 Head rest holds- single leg raises
Hard -balance and arm exercise
1. Place forearms on the floor with hands together and elbows shoulder width apart (see figure 1).
2. Extend the legs extended behind with feet on demi point.
3. Walk the legs in and transfer the weight over the shoulders aiming to have the bottom pointing to the ceiling with a straight back.
4. Place the head gently on the floor between the hands. 5. Once balance, slowly extend one leg in the air and hold
for 5 seconds. 6. Then slowly lower the foot to the floor. 7. Stay up in tigerstand and repeat the leg raise 4 times. 8. Recover down from the tigerstand and repeat twice on
each leg. 9. Perform 4 times a week.
65 Core- dish hold
Moderate-core strengthening exercise
1. Lie in a supine position. 2. Draw belly button to the spine. 3. Contract the lower tummy muscles and lift the shoulder
blades off the floor to make a dish shape. 4. Keep the shoulder down and chest wide, and the head
inline with the shoulders. 5. Hold for 20 seconds and recover. 6. Repeat up to 5 times 7. Perform 4 times per week (can be performed up to
daily).
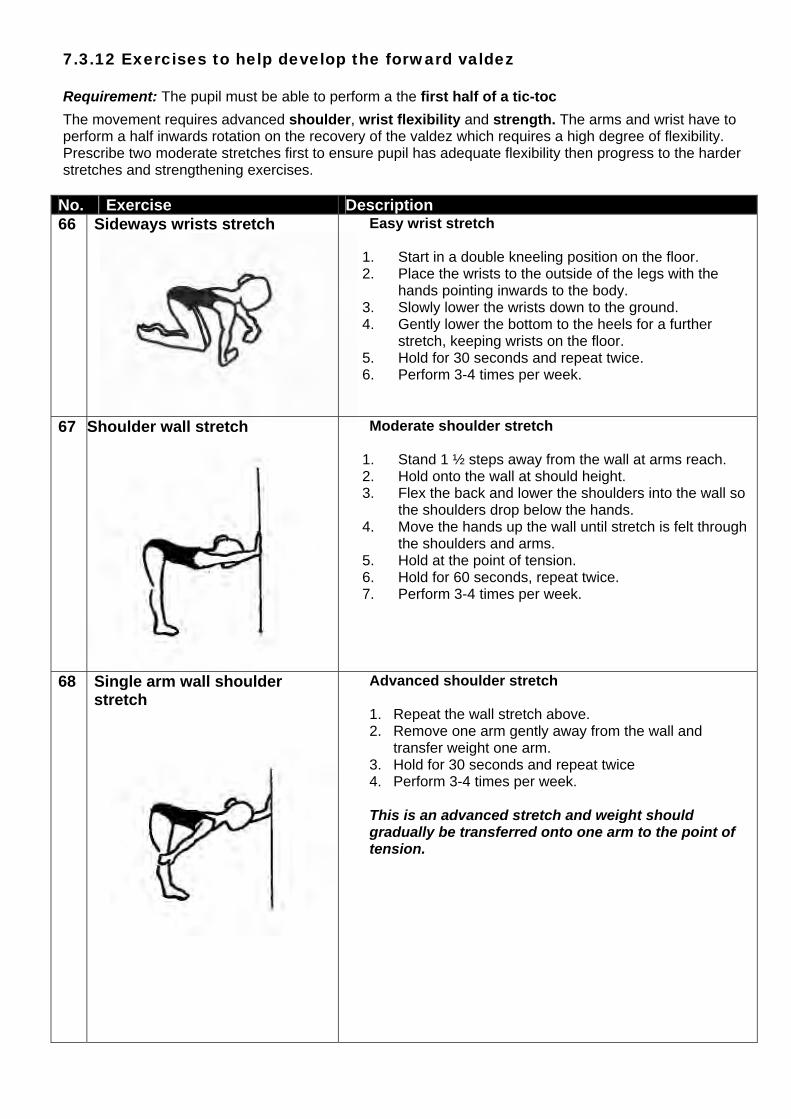
7.3.12 Exercises to help develop the forward valdez
Requirement: The pupil must be able to perform a the first half of a tic-toc
The movement requires advanced shoulder, wrist flexibility and strength. The arms and wrist have to perform a half inwards rotation on the recovery of the valdez which requires a high degree of flexibility. Prescribe two moderate stretches first to ensure pupil has adequate flexibility then progress to the harder stretches and strengthening exercises.
No. Exercise Description 66 Sideways wrists stretch
Easy wrist stretch
1. Start in a double kneeling position on the floor. 2. Place the wrists to the outside of the legs with the
hands pointing inwards to the body. 3. Slowly lower the wrists down to the ground. 4. Gently lower the bottom to the heels for a further
stretch, keeping wrists on the floor. 5. Hold for 30 seconds and repeat twice. 6. Perform 3-4 times per week.
67 Shoulder wall stretch Moderate shoulder stretch
1. Stand 1 ½ steps away from the wall at arms reach. 2. Hold onto the wall at should height. 3. Flex the back and lower the shoulders into the wall so
the shoulders drop below the hands. 4. Move the hands up the wall until stretch is felt through
the shoulders and arms. 5. Hold at the point of tension. 6. Hold for 60 seconds, repeat twice. 7. Perform 3-4 times per week.
68 Single arm wall shoulder stretch
Advanced shoulder stretch 1. Repeat the wall stretch above. 2. Remove one arm gently away from the wall and
transfer weight one arm. 3. Hold for 30 seconds and repeat twice 4. Perform 3-4 times per week.
This is an advanced stretch and weight should gradually be transferred onto one arm to the point of tension.
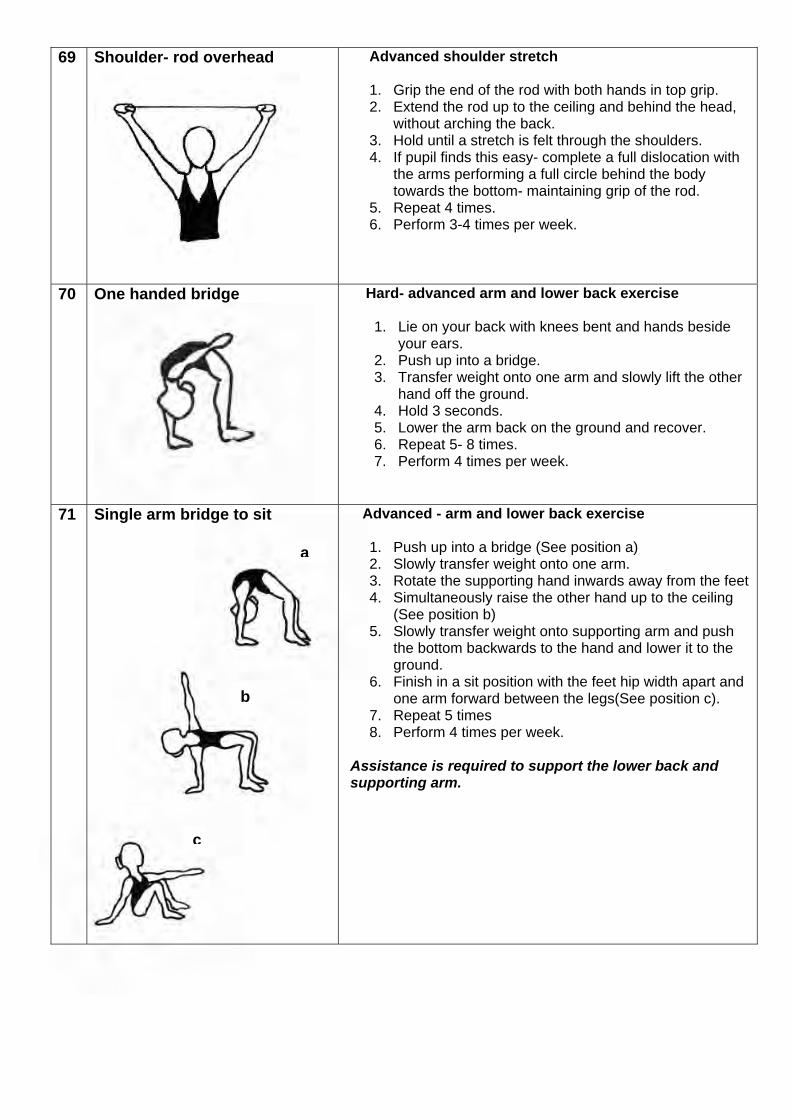
69 Shoulder- rod overhead
Advanced shoulder stretch 1. Grip the end of the rod with both hands in top grip. 2. Extend the rod up to the ceiling and behind the head,
without arching the back. 3. Hold until a stretch is felt through the shoulders. 4. If pupil finds this easy- complete a full dislocation with
the arms performing a full circle behind the body towards the bottom- maintaining grip of the rod.
5. Repeat 4 times. 6. Perform 3-4 times per week.
70 One handed bridge
Hard- advanced arm and lower back exercise
1. Lie on your back with knees bent and hands beside your ears.
2. Push up into a bridge. 3. Transfer weight onto one arm and slowly lift the other
hand off the ground. 4. Hold 3 seconds. 5. Lower the arm back on the ground and recover. 6. Repeat 5- 8 times. 7. Perform 4 times per week.
71 Single arm bridge to sit
Advanced - arm and lower back exercise
1. Push up into a bridge (See position a) 2. Slowly transfer weight onto one arm. 3. Rotate the supporting hand inwards away from the feet 4. Simultaneously raise the other hand up to the ceiling
(See position b) 5. Slowly transfer weight onto supporting arm and push
the bottom backwards to the hand and lower it to the ground.
6. Finish in a sit position with the feet hip width apart and one arm forward between the legs(See position c).
7. Repeat 5 times 8. Perform 4 times per week.
Assistance is required to support the lower back and supporting arm.
a
b
c
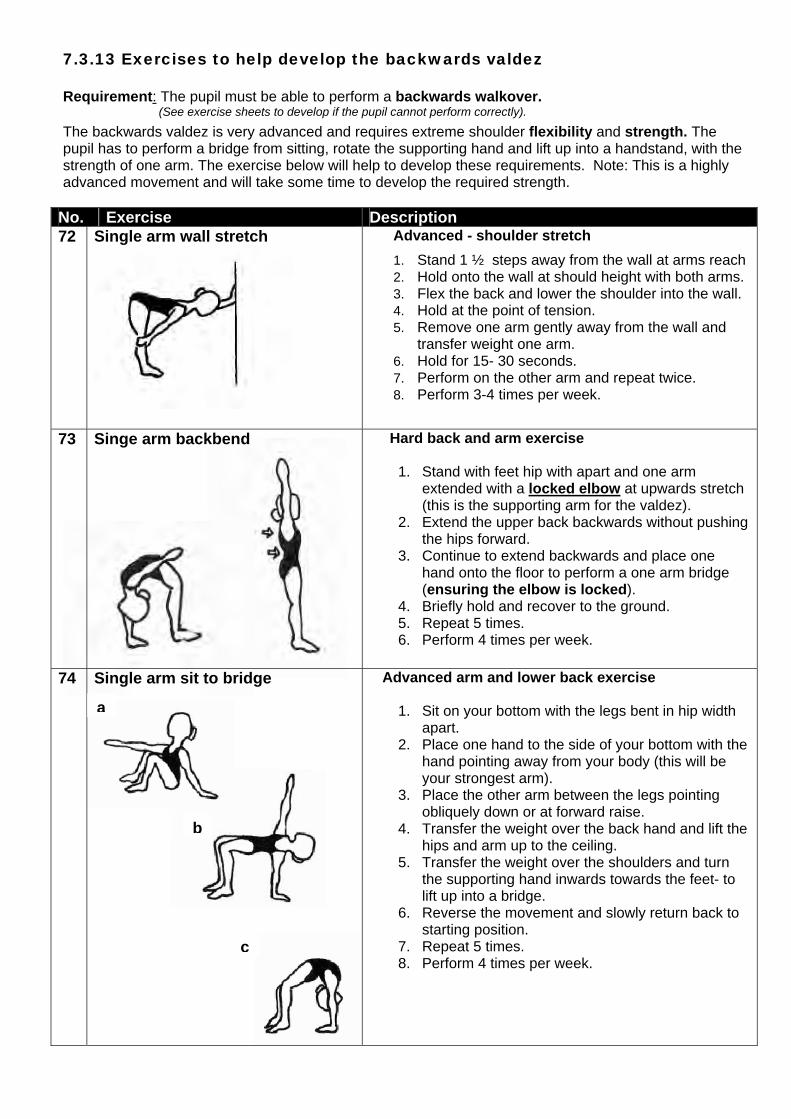
7.3.13 Exercises to help develop the backwards valdez Requirement: The pupil must be able to perform a backwards walkover.
(See exercise sheets to develop if the pupil cannot perform correctly).
The backwards valdez is very advanced and requires extreme shoulder flexibility and strength. The pupil has to perform a bridge from sitting, rotate the supporting hand and lift up into a handstand, with the strength of one arm. The exercise below will help to develop these requirements. Note: This is a highly advanced movement and will take some time to develop the required strength.
No. Exercise Description 72 Single arm wall stretch
Advanced - shoulder stretch
1. Stand 1 ½ steps away from the wall at arms reach 2. Hold onto the wall at should height with both arms. 3. Flex the back and lower the shoulder into the wall. 4. Hold at the point of tension. 5. Remove one arm gently away from the wall and
transfer weight one arm. 6. Hold for 15- 30 seconds. 7. Perform on the other arm and repeat twice. 8. Perform 3-4 times per week.
73 Singe arm backbend
Hard back and arm exercise
1. Stand with feet hip with apart and one arm extended with a locked elbow at upwards stretch (this is the supporting arm for the valdez).
2. Extend the upper back backwards without pushing the hips forward.
3. Continue to extend backwards and place one hand onto the floor to perform a one arm bridge (ensuring the elbow is locked).
4. Briefly hold and recover to the ground. 5. Repeat 5 times. 6. Perform 4 times per week.
74 Single arm sit to bridge
Advanced arm and lower back exercise
1. Sit on your bottom with the legs bent in hip width apart.
2. Place one hand to the side of your bottom with the hand pointing away from your body (this will be your strongest arm).
3. Place the other arm between the legs pointing obliquely down or at forward raise.
4. Transfer the weight over the back hand and lift the hips and arm up to the ceiling.
5. Transfer the weight over the shoulders and turn the supporting hand inwards towards the feet- to lift up into a bridge.
6. Reverse the movement and slowly return back to starting position.
7. Repeat 5 times. 8. Perform 4 times per week.
a
b
c

7.3.14 Exercises to develop the one handed walkover Requirement: The pupil must be able to perform a forward walkover
(See exercise sheets to develop if the pupil cannot perform correctly).
The one handed walkover requires additional shoulder flexibility and strength to execute the single arm recovery. The exercise below will help to develop these requirements. Note: this is a highly advanced movement and will take some time to develop the required strength. Start with the hard strengthening exercise and progress to the advanced when others can be performed with control.
No. Exercise Description 75 Single arm wall stretch
Advanced- shoulder stretch 1. Stand 1 ½ steps away from the wall at arms reach. 2. Hold onto the wall at shoulder height. 3. Flex the back and lower the shoulders into the wall
Hold at the point of tension. 4. Remove one arm (non supporting arm in walkover)
away from the wall. 5. Hold for 30 seconds and repeat twice 6. Perform 3-4 times per week.
76 Single arm mini starts
Hard- arm exercise
1. Perform on a mat or soft surface. 2. Prepare with preferred arm at forward raise with the
opposite leg at forward toe point. 3. Pull up through the body and legs. 4. Perform a forward lunge and extend the arm forward
out on the ground (with a locked elbow). 5. Transfer the weight onto the arm and simultaneously
extend the back leg into the air, followed by the lunge leg into a small kick up.
6. Return the legs back to the ground and return to standing.
7. Repeat 10 times to develop strength for the start of the walkover. Perform 4 times per week.
a
b
c
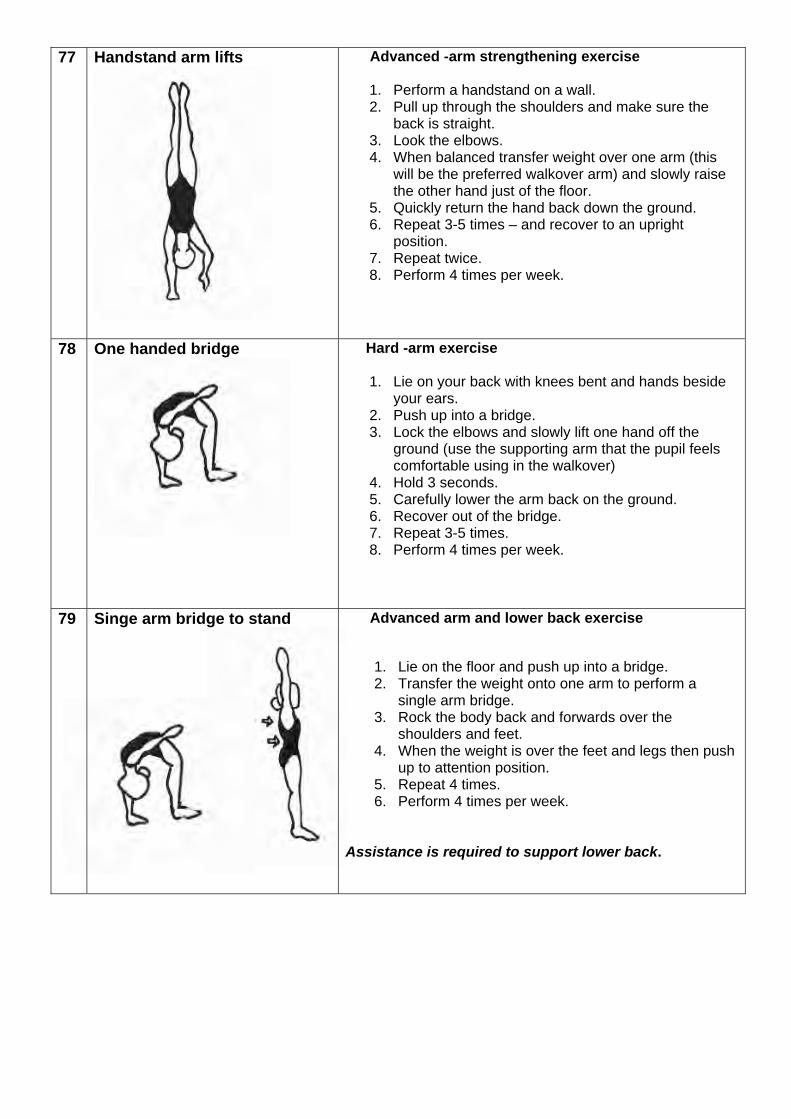
77 Handstand arm lifts
Advanced -arm strengthening exercise
1. Perform a handstand on a wall. 2. Pull up through the shoulders and make sure the
back is straight. 3. Look the elbows. 4. When balanced transfer weight over one arm (this
will be the preferred walkover arm) and slowly raise the other hand just of the floor.
5. Quickly return the hand back down the ground. 6. Repeat 3-5 times – and recover to an upright
position. 7. Repeat twice. 8. Perform 4 times per week.
78 One handed bridge
Hard -arm exercise
1. Lie on your back with knees bent and hands beside your ears.
2. Push up into a bridge. 3. Lock the elbows and slowly lift one hand off the
ground (use the supporting arm that the pupil feels comfortable using in the walkover)
4. Hold 3 seconds. 5. Carefully lower the arm back on the ground. 6. Recover out of the bridge. 7. Repeat 3-5 times. 8. Perform 4 times per week.
79 Singe arm bridge to stand
Advanced arm and lower back exercise
1. Lie on the floor and push up into a bridge. 2. Transfer the weight onto one arm to perform a
single arm bridge. 3. Rock the body back and forwards over the
shoulders and feet. 4. When the weight is over the feet and legs then push
up to attention position. 5. Repeat 4 times. 6. Perform 4 times per week.
Assistance is required to support lower back.
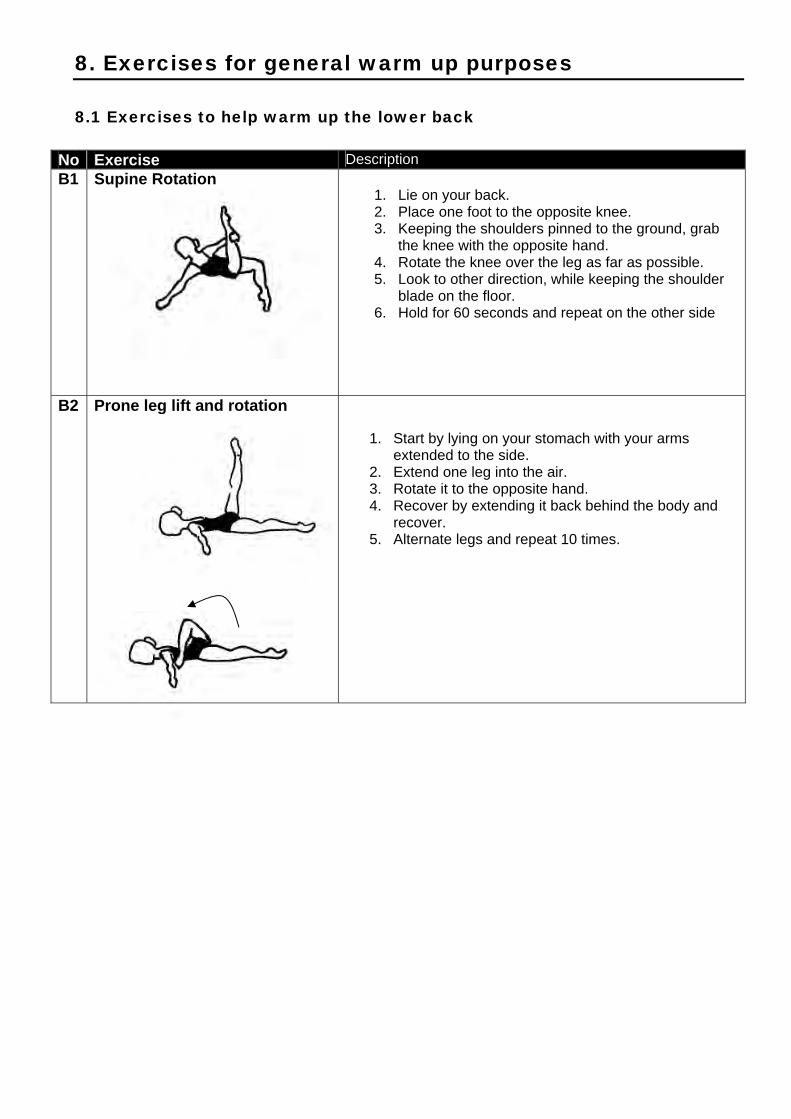
8. Exercises for general warm up purposes 8.1 Exercises to help warm up the lower back
No Exercise Description B1 Supine Rotation
1. Lie on your back. 2. Place one foot to the opposite knee. 3. Keeping the shoulders pinned to the ground, grab
the knee with the opposite hand. 4. Rotate the knee over the leg as far as possible. 5. Look to other direction, while keeping the shoulder
blade on the floor. 6. Hold for 60 seconds and repeat on the other side
B2 Prone leg lift and rotation
1. Start by lying on your stomach with your arms
extended to the side. 2. Extend one leg into the air. 3. Rotate it to the opposite hand. 4. Recover by extending it back behind the body and
recover. 5. Alternate legs and repeat 10 times.
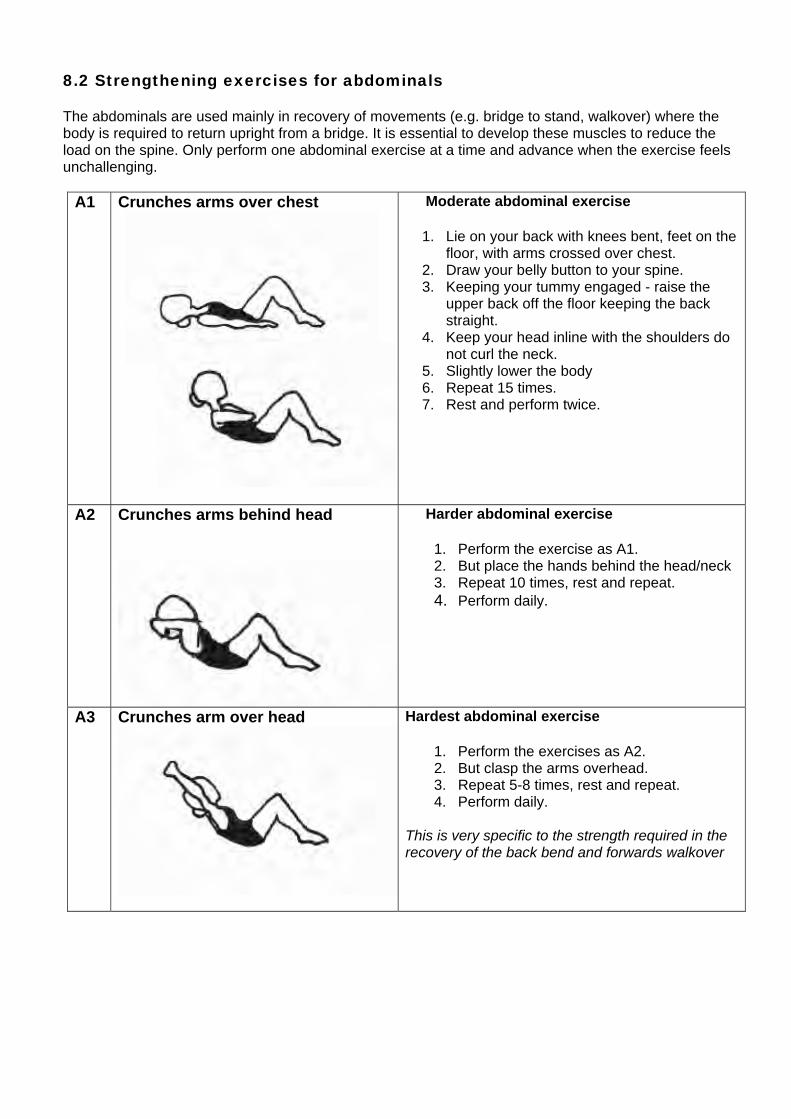
8.2 Strengthening exercises for abdominals The abdominals are used mainly in recovery of movements (e.g. bridge to stand, walkover) where the body is required to return upright from a bridge. It is essential to develop these muscles to reduce the load on the spine. Only perform one abdominal exercise at a time and advance when the exercise feels unchallenging.
A1 Crunches arms over chest
Moderate abdominal exercise
1. Lie on your back with knees bent, feet on the floor, with arms crossed over chest.
2. Draw your belly button to your spine. 3. Keeping your tummy engaged - raise the
upper back off the floor keeping the back straight.
4. Keep your head inline with the shoulders do not curl the neck.
5. Slightly lower the body 6. Repeat 15 times. 7. Rest and perform twice.
A2 Crunches arms behind head
Harder abdominal exercise
1. Perform the exercise as A1. 2. But place the hands behind the head/neck 3. Repeat 10 times, rest and repeat. 4. Perform daily.
A3 Crunches arm over head Hardest abdominal exercise
1. Perform the exercises as A2. 2. But clasp the arms overhead. 3. Repeat 5-8 times, rest and repeat. 4. Perform daily.
This is very specific to the strength required in the recovery of the back bend and forwards walkover
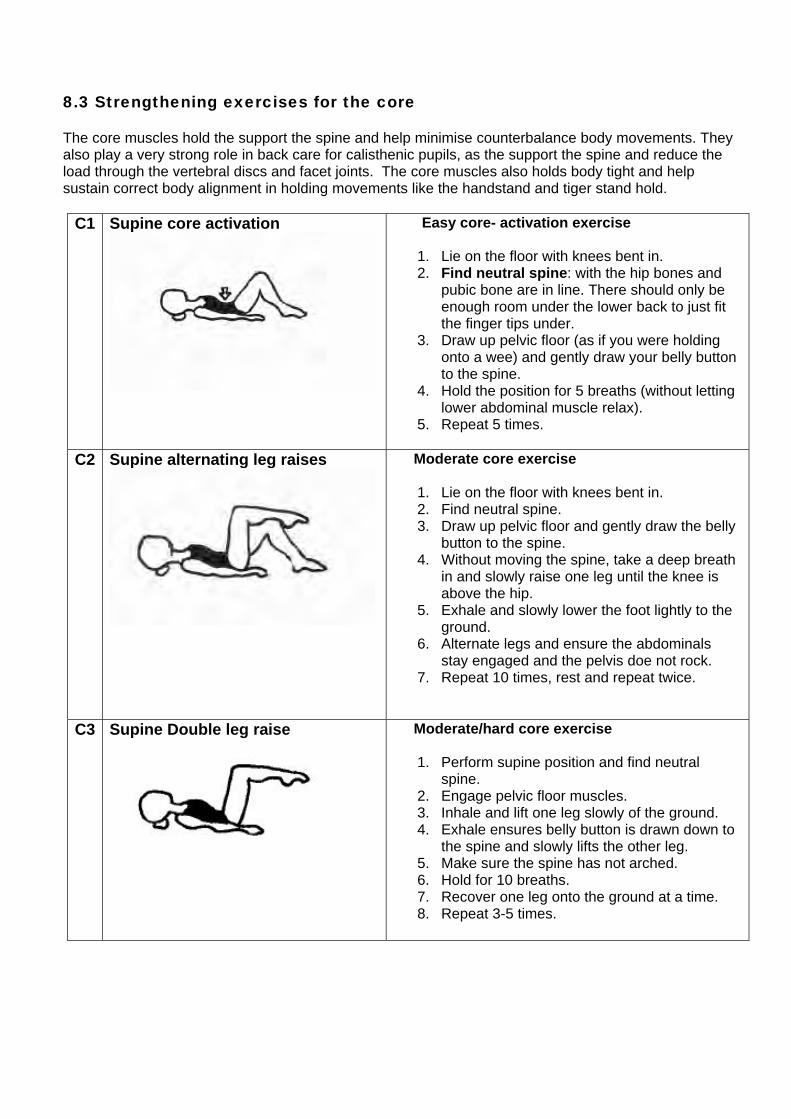
8.3 Strengthening exercises for the core The core muscles hold the support the spine and help minimise counterbalance body movements. They also play a very strong role in back care for calisthenic pupils, as the support the spine and reduce the load through the vertebral discs and facet joints. The core muscles also holds body tight and help sustain correct body alignment in holding movements like the handstand and tiger stand hold.
C1 Supine core activation
Easy core- activation exercise
1. Lie on the floor with knees bent in. 2. Find neutral spine: with the hip bones and
pubic bone are in line. There should only be enough room under the lower back to just fit the finger tips under.
3. Draw up pelvic floor (as if you were holding onto a wee) and gently draw your belly button to the spine.
4. Hold the position for 5 breaths (without letting lower abdominal muscle relax).
5. Repeat 5 times.
C2 Supine alternating leg raises
Moderate core exercise
1. Lie on the floor with knees bent in. 2. Find neutral spine. 3. Draw up pelvic floor and gently draw the belly
button to the spine. 4. Without moving the spine, take a deep breath
in and slowly raise one leg until the knee is above the hip.
5. Exhale and slowly lower the foot lightly to the ground.
6. Alternate legs and ensure the abdominals stay engaged and the pelvis doe not rock.
7. Repeat 10 times, rest and repeat twice.
C3 Supine Double leg raise
Moderate/hard core exercise
1. Perform supine position and find neutral spine.
2. Engage pelvic floor muscles. 3. Inhale and lift one leg slowly of the ground. 4. Exhale ensures belly button is drawn down to
the spine and slowly lifts the other leg. 5. Make sure the spine has not arched. 6. Hold for 10 breaths. 7. Recover one leg onto the ground at a time. 8. Repeat 3-5 times.
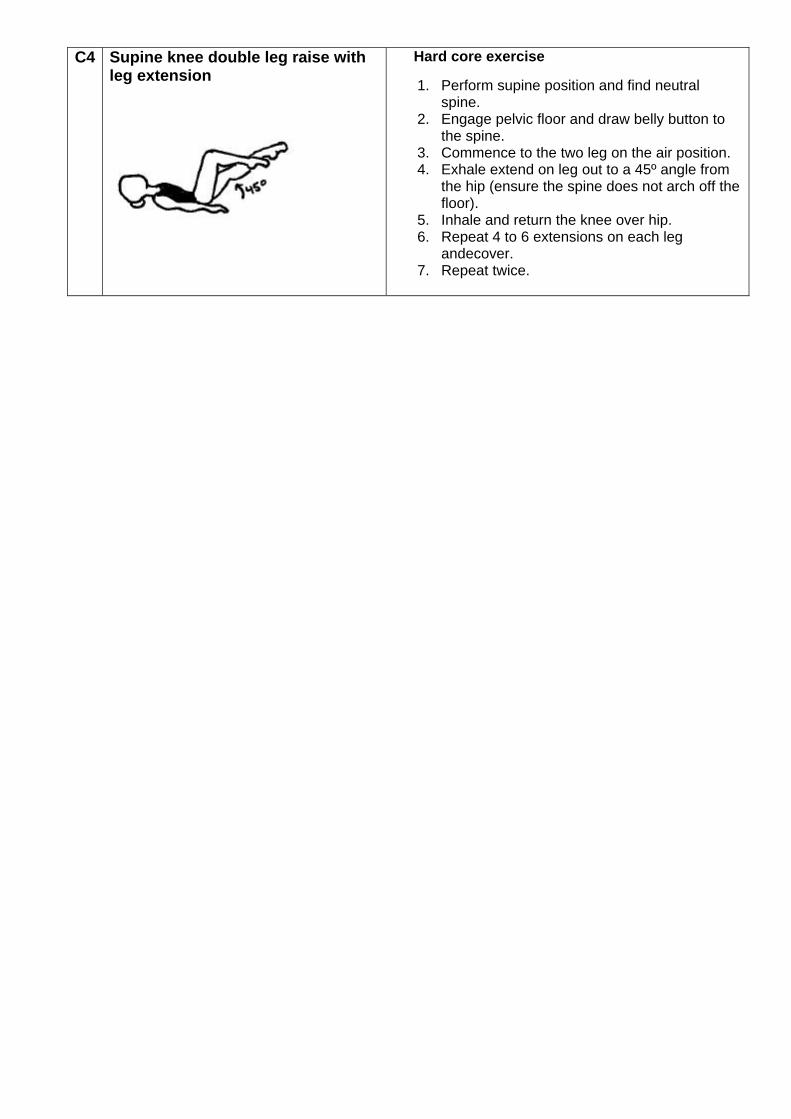
C4 Supine knee double leg raise with leg extension
Hard core exercise
1. Perform supine position and find neutral spine.
2. Engage pelvic floor and draw belly button to the spine.
3. Commence to the two leg on the air position. 4. Exhale extend on leg out to a 45º angle from
the hip (ensure the spine does not arch off the floor).
5. Inhale and return the knee over hip. 6. Repeat 4 to 6 extensions on each leg
andecover. 7. Repeat twice.
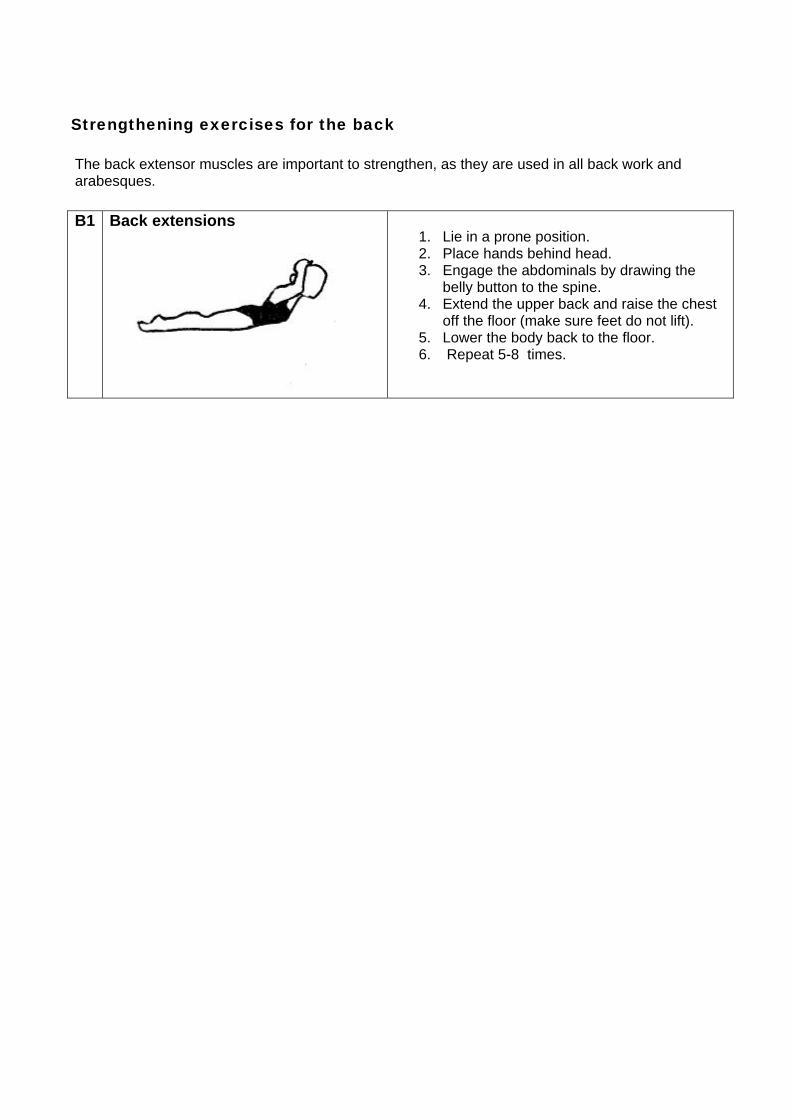
Strengthening exercises for the back
The back extensor muscles are important to strengthen, as they are used in all back work and arabesques.
B1 Back extensions
1. Lie in a prone position. 2. Place hands behind head. 3. Engage the abdominals by drawing the
belly button to the spine. 4. Extend the upper back and raise the chest
off the floor (make sure feet do not lift). 5. Lower the body back to the floor. 6. Repeat 5-8 times.