TeacherVUE User Guide - Edupoint
117
SISTXUG-80715 TeacherVUE User Guide Release 2018.01 December 2017
Transcript of TeacherVUE User Guide - Edupoint

SISTXUG-80715
TeacherVUE User Guide
Release 2018.01
December 2017
The Edupoint software and any form of supporting documentation are proprietary and confidential.Unauthorized reproduction or distribution of the software and any form of supporting documentation is strictlyprohibited andmay result in severe civil and criminal penalties.Information in this document is provided in connection with Edupoint Educational Systems, LLC. products. Nolicense to any intellectual property rights is granted by this document.
The screens, procedural steps, and sample reports in this manual may be slightly different from the actualsoftware due tomodifications in the software based on state requirements and/or school districtcustomization.
The data in this document may include the names of individuals, schools, school districts, companies, brands,and products. Any similarities to actual names and data are entirely coincidental.
Copyright ©2015-2017 Edupoint Educational Systems, LLC.
Edupoint, Synergy Student Information System, Synergy Special Education, Synergy Assessment,TeacherVUE, LessonVUE, StudentVUE, and ParentVUE are registered trademarks of Edupoint EducationalSystems. Inspect is a registered trademark of Key Data Systems. Google and theGoogle logo are registeredtrademarks of Google Inc. Apple and iPad Pro are trademarks of Apple Inc. Microsoft andOneDrive aretrademarks of theMicrosoft group of companies.
Other names and brands may be claimed as the property of others.
Copyright 2015-2017 Edupoint Educational Systems, LLC.
About This ManualEdupoint Educational Systems, LLC. develops software with multiple release dates for the softwareand related documentation. The documentation is released inmultiple volumes tomeet thiscommitment.
This document serves as a reference for Edupoint's recommendations and Best Practices forSynergy processes. Due to the complex nature andmyriad configurations possible within theSynergy software, it is not feasible to include every possible scenario within this guide.
Conventions Used in This Manual
l Bold indicates user interactions such as a button or field on the screen.l Italics indicate the option to select or text to enter.l Notes, Tips, References, and Cautions appear in themargin to provide additional information.
Notes provide additional informationabout the subject.
Tips suggest advanced options orother ways of approaching thesubject.
References list another source ofinformation, such as another manualor website.
Cautionswarn of potential problems.Take special care when readingthese sections.
Before You Begin
Before installing any of the Edupoint family of software products, be sure to review the systemrequirements andmake sure the district’s computer hardware and softwaremeet theminimumrequirements.
Software and Document History
DocumentVersion
ReleaseDate
SoftwareRelease Description
1.0 Aug 2015 10 Initial release of this document
- Oct 2015 10.01 No changes required
- Dec 2015 10.02 No changes required
2.0 May 2016 10.03 Updated
3.0 Jul 2016 10.04 Updated
3.1 Sep 2016 10.04 Added Accessibility in TeacherVUE
TeacherVUE User Guide 3
Copyright 2015-2017 Edupoint Educational Systems, LLC
DocumentVersion
ReleaseDate
SoftwareRelease Description
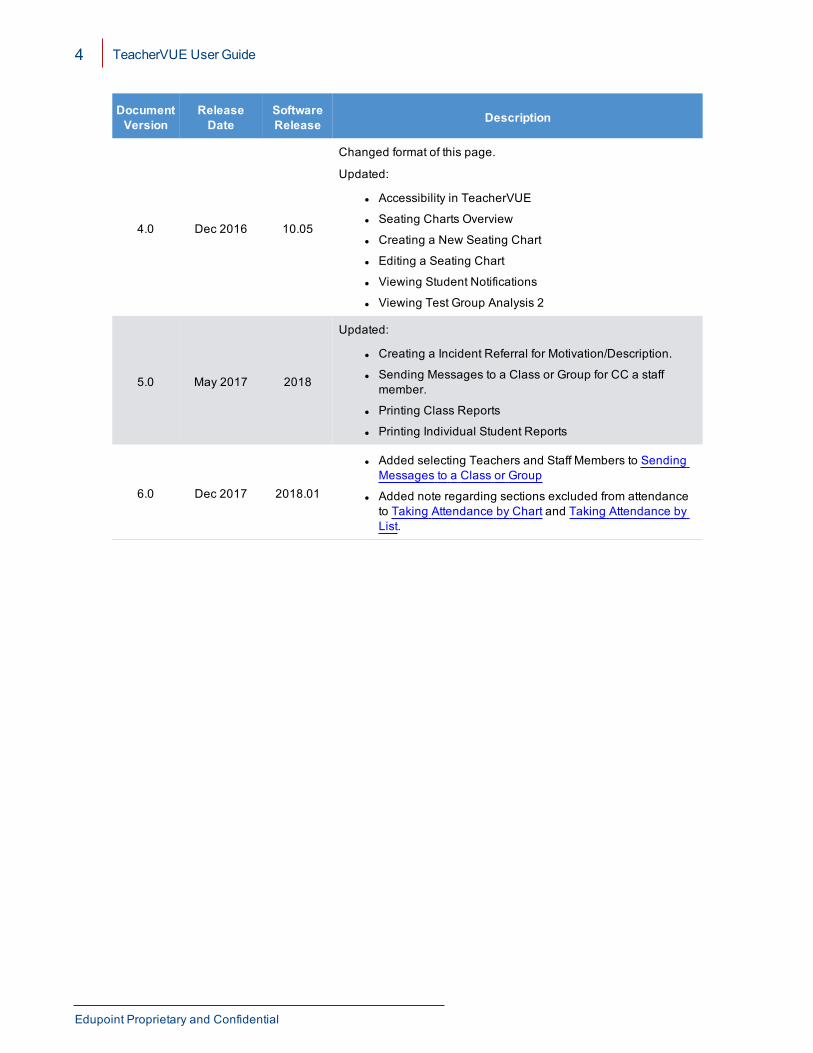
4.0 Dec 2016 10.05
Changed format of this page.
Updated:
l Accessibility in TeacherVUE
l Seating Charts Overview
l Creating a New Seating Chart
l Editing a Seating Chart
l Viewing Student Notifications
l Viewing Test Group Analysis 2
5.0 May 2017 2018
Updated:
l Creating a Incident Referral for Motivation/Description.
l Sending Messages to a Class or Group for CC a staffmember.
l Printing Class Reports
l Printing Individual Student Reports
6.0 Dec 2017 2018.01
l Added selecting Teachers and Staff Members to SendingMessages to a Class or Group
l Added note regarding sections excluded from attendanceto Taking Attendance by Chart and Taking Attendance byList.
4 TeacherVUE User Guide
Edupoint Proprietary and Confidential
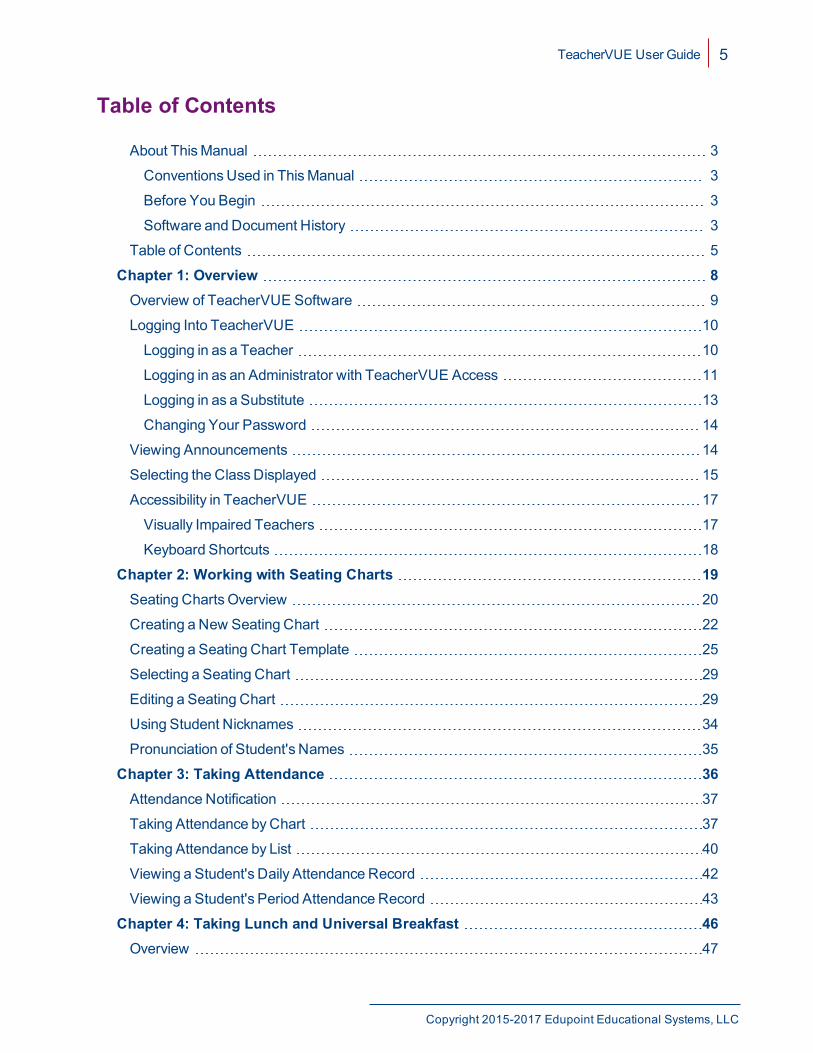
Table of Contents
About ThisManual 3
ConventionsUsed in ThisManual 3
Before You Begin 3
Software and Document History 3
Table of Contents 5
Chapter 1: Overview 8Overview of TeacherVUE Software 9
Logging Into TeacherVUE 10
Logging in as a Teacher 10
Logging in as an Administrator with TeacherVUE Access 11
Logging in as a Substitute 13
Changing Your Password 14
Viewing Announcements 14
Selecting the ClassDisplayed 15
Accessibility in TeacherVUE 17
Visually Impaired Teachers 17
Keyboard Shortcuts 18
Chapter 2: Working with Seating Charts 19Seating ChartsOverview 20
Creating a New Seating Chart 22
Creating a Seating Chart Template 25
Selecting a Seating Chart 29
Editing a Seating Chart 29
Using Student Nicknames 34
Pronunciation of Student's Names 35
Chapter 3: Taking Attendance 36Attendance Notification 37
Taking Attendance byChart 37
Taking Attendance by List 40
Viewing a Student's Daily Attendance Record 42
Viewing a Student's Period Attendance Record 43
Chapter 4: Taking Lunch and Universal Breakfast 46Overview 47
TeacherVUE User Guide 5
Copyright 2015-2017 Edupoint Educational Systems, LLC
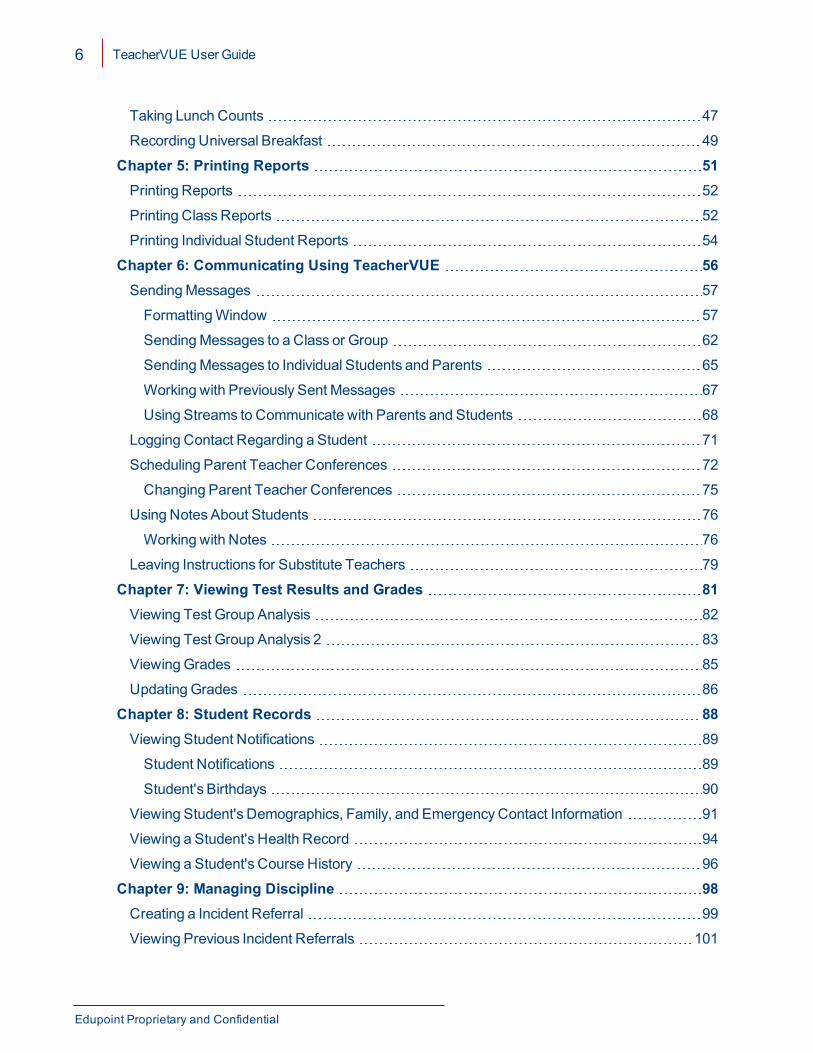
Taking Lunch Counts 47
Recording Universal Breakfast 49
Chapter 5: Printing Reports 51Printing Reports 52
Printing ClassReports 52
Printing Individual Student Reports 54
Chapter 6: Communicating Using TeacherVUE 56SendingMessages 57
FormattingWindow 57
SendingMessages to a Class or Group 62
SendingMessages to Individual Students and Parents 65
Working with Previously Sent Messages 67
Using Streams to Communicate with Parents and Students 68
Logging Contact Regarding a Student 71
Scheduling Parent Teacher Conferences 72
Changing Parent Teacher Conferences 75
Using Notes About Students 76
Working with Notes 76
Leaving Instructions for Substitute Teachers 79
Chapter 7: Viewing Test Results and Grades 81Viewing Test Group Analysis 82
Viewing Test Group Analysis 2 83
ViewingGrades 85
Updating Grades 86
Chapter 8: Student Records 88Viewing Student Notifications 89
Student Notifications 89
Student's Birthdays 90
Viewing Student's Demographics, Family, and EmergencyContact Information 91
Viewing a Student's Health Record 94
Viewing a Student's Course History 96
Chapter 9: Managing Discipline 98Creating a Incident Referral 99
Viewing Previous Incident Referrals 101
6 TeacherVUE User Guide
Edupoint Proprietary and Confidential
Viewing a Student's Discipline Record 103
Chapter 10: Using Special Education Features 104Referring a Student for Special Education 105
Viewing a Student's IEP 107
Viewing a Student’s IEP at a Glance 108
Viewing a Student's 504 Plan 109
Chapter 11: Accessing StudentVUE and Grade Book 110Accessing StudentVUE 111
Accessing Grade Book Student Summary 112
Chapter 12: Work Samples 113UsingWork Samples 114
AddingWork Samples 114
Editing StudentWork Samples 115
TeacherVUE User Guide 7
Copyright 2015-2017 Edupoint Educational Systems, LLC
Chapter 1:Overview
Overview of TeacherVUE Software 9Logging Into TeacherVUE 10Viewing Announcements 14Selecting the Class Displayed 15Accessibility in TeacherVUE 17
TeacherVUE User GuideChapter 1: Overview 9
Overview of TeacherVUE SoftwareTeacherVUE gives teachers the ability to manage all aspects of their classes. Using TeacherVUE,the teachers perform basic, daily tasks, such as:
l Take attendancel Enter lunch countsl Communicate directly with students and parentsl Refer a student for special servicesl Leave detailed instructions for substitute teachers
TeacherVUE integrateswith Synergy SIS and Synergy SE and includes the ParentVUE andStudentVUEmodules to engage every stakeholder in the education process to raise studentoutcomes.
Thismanual illustrates to administrators how to set up and configure the TeacherVUE software.
Thismanual reviews all the functionality available in TeacherVUE. Your district manageswhichfeatures are available to their teachers and related security settings.
The companionmanual to the User Guide,Synergy SIS – TeacherVUEAdministrator Guide, illustrates how to set up and configure theTeacherVUE software.
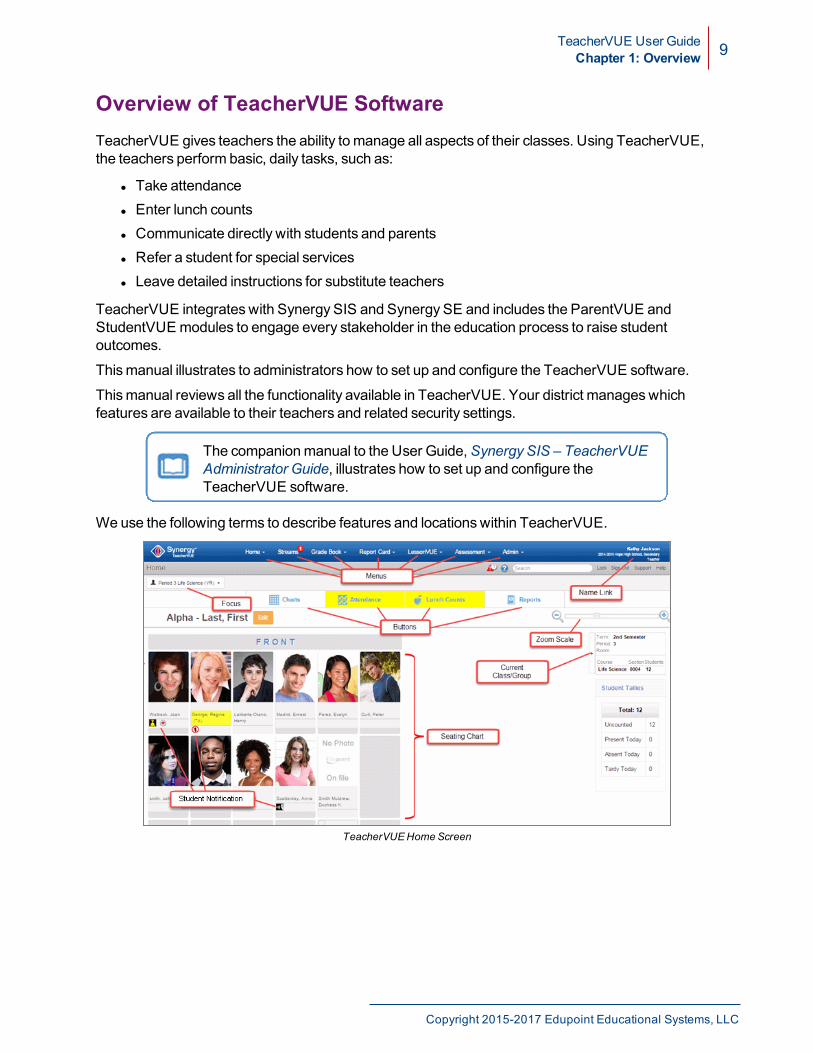
We use the following terms to describe features and locationswithin TeacherVUE.
TeacherVUEHomeScreen
Copyright 2015-2017 Edupoint Educational Systems, LLC
10 TeacherVUE User GuideChapter 1: Overview
The followingmenus are used with functionality that you can add toTeacherVUE. For more information on the features, see thesemanuals:
l Synergy SIS – StreamsCollaboration Tool Guidel Synergy SIS –Grade BookUser Guide – Elementary andSynergySIS –Grade BookUser Guide – Secondary
l Synergy SIS – LessonVUE User Guidel Synergy SIS – Assessment Administrator and User Guide
Logging Into TeacherVUEYou can log into TeacherVUE several different ways. How you access TeacherVUE depends onyour role.
Logging in as a Teacher
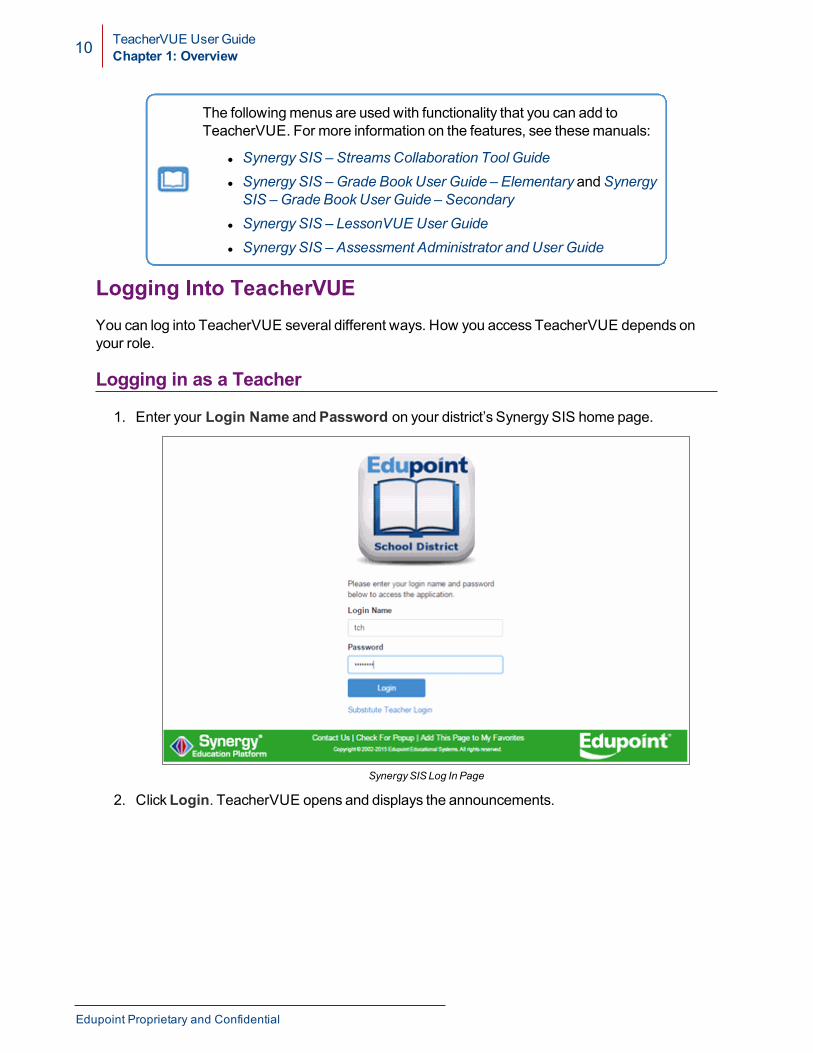
1. Enter your Login Name andPassword on your district’s Synergy SIS home page.
SynergySIS Log In Page
2. ClickLogin. TeacherVUE opens and displays the announcements.
Edupoint Proprietary and Confidential
TeacherVUE User GuideChapter 1: Overview 11
Logging in as an Administrator with TeacherVUE Access
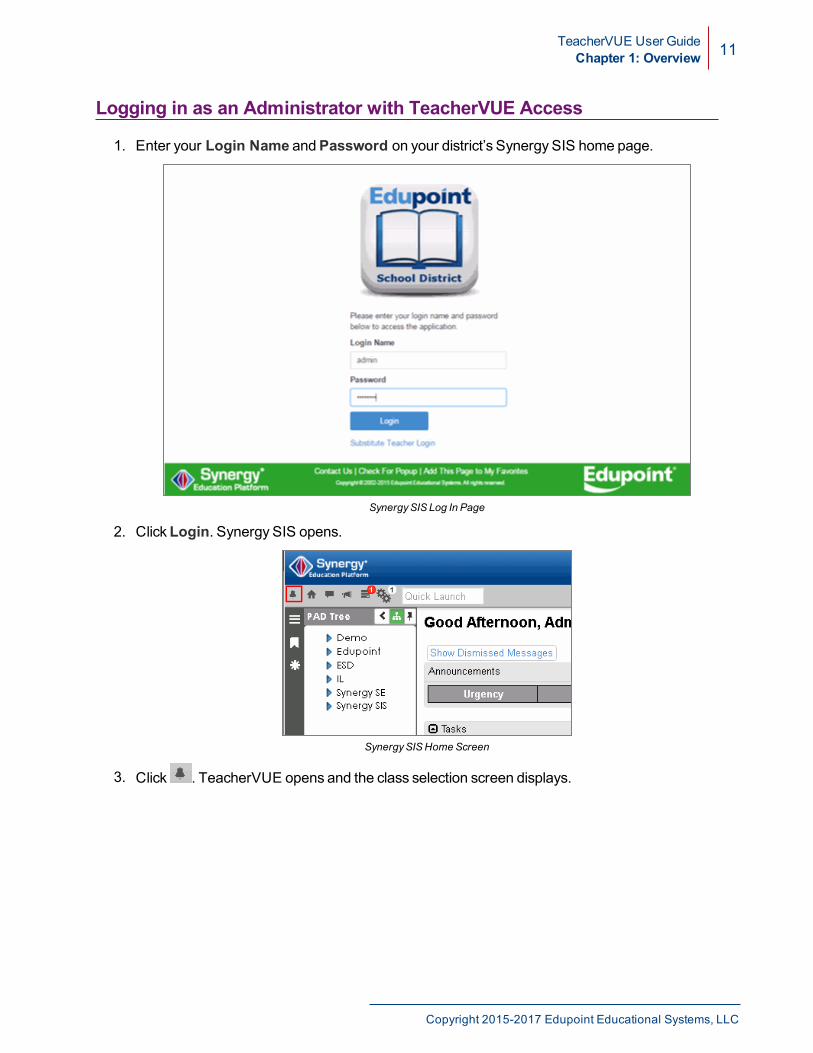
1. Enter your Login Name andPassword on your district’s Synergy SIS home page.
SynergySIS Log In Page
2. ClickLogin. Synergy SIS opens.
SynergySISHomeScreen
3. Click . TeacherVUE opens and the class selection screen displays.
Copyright 2015-2017 Edupoint Educational Systems, LLC
12 TeacherVUE User GuideChapter 1: Overview
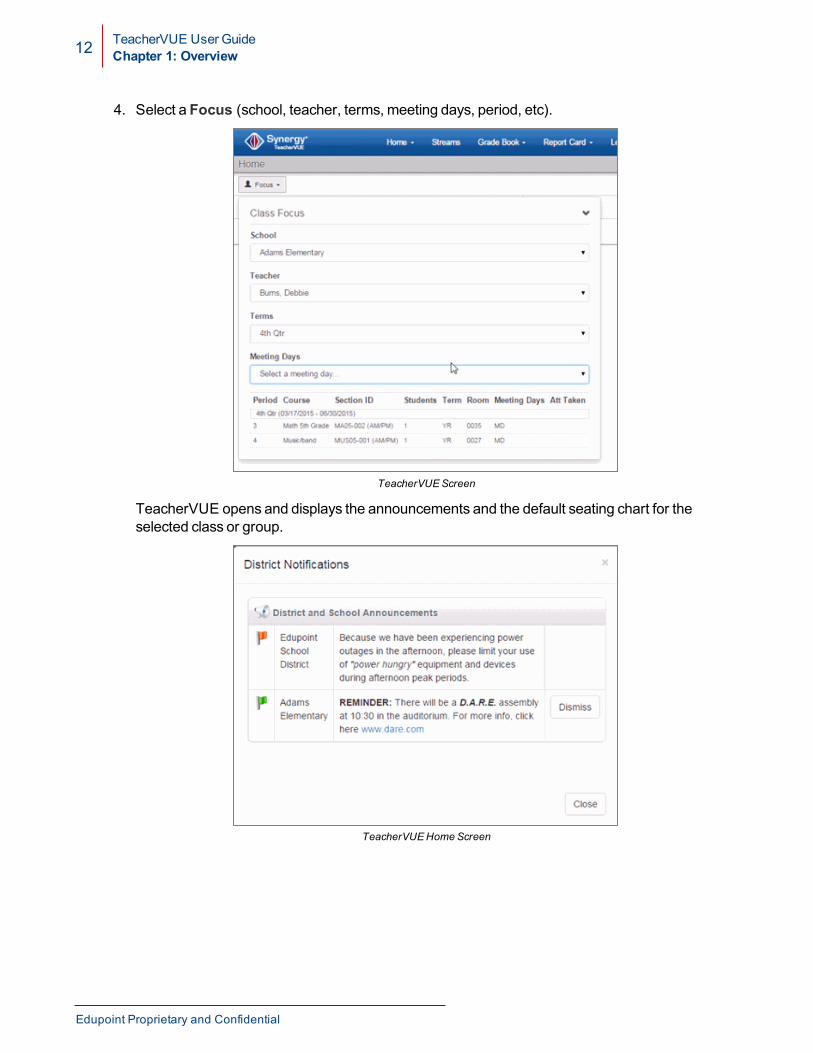
4. Select a Focus (school, teacher, terms, meeting days, period, etc).
TeacherVUEScreen
TeacherVUE opens and displays the announcements and the default seating chart for theselected class or group.
TeacherVUEHomeScreen
Edupoint Proprietary and Confidential
TeacherVUE User GuideChapter 1: Overview 13
Logging in as a Substitute
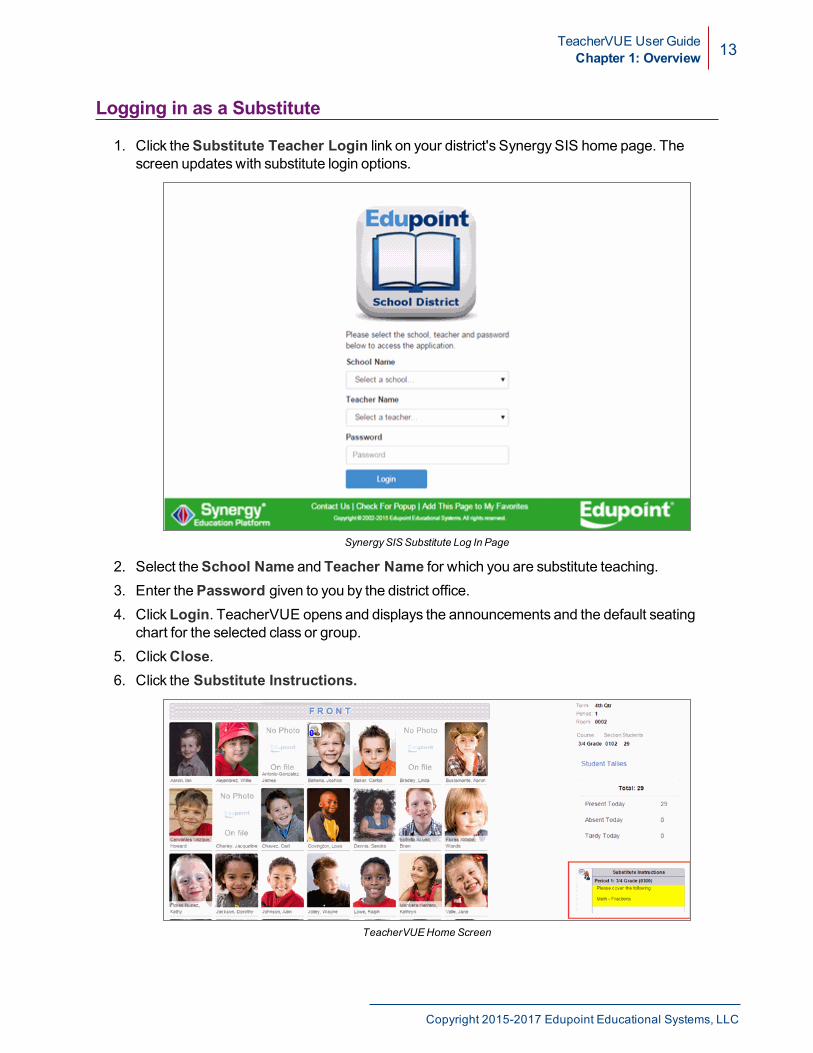
1. Click theSubstitute Teacher Login link on your district's Synergy SIS home page. Thescreen updateswith substitute login options.
SynergySISSubstitute Log In Page
2. Select theSchool Name and Teacher Name for which you are substitute teaching.3. Enter thePassword given to you by the district office.4. ClickLogin. TeacherVUE opens and displays the announcements and the default seating
chart for the selected class or group.5. ClickClose.6. Click the Substitute Instructions.
TeacherVUEHomeScreen
Copyright 2015-2017 Edupoint Educational Systems, LLC
14 TeacherVUE User GuideChapter 1: Overview
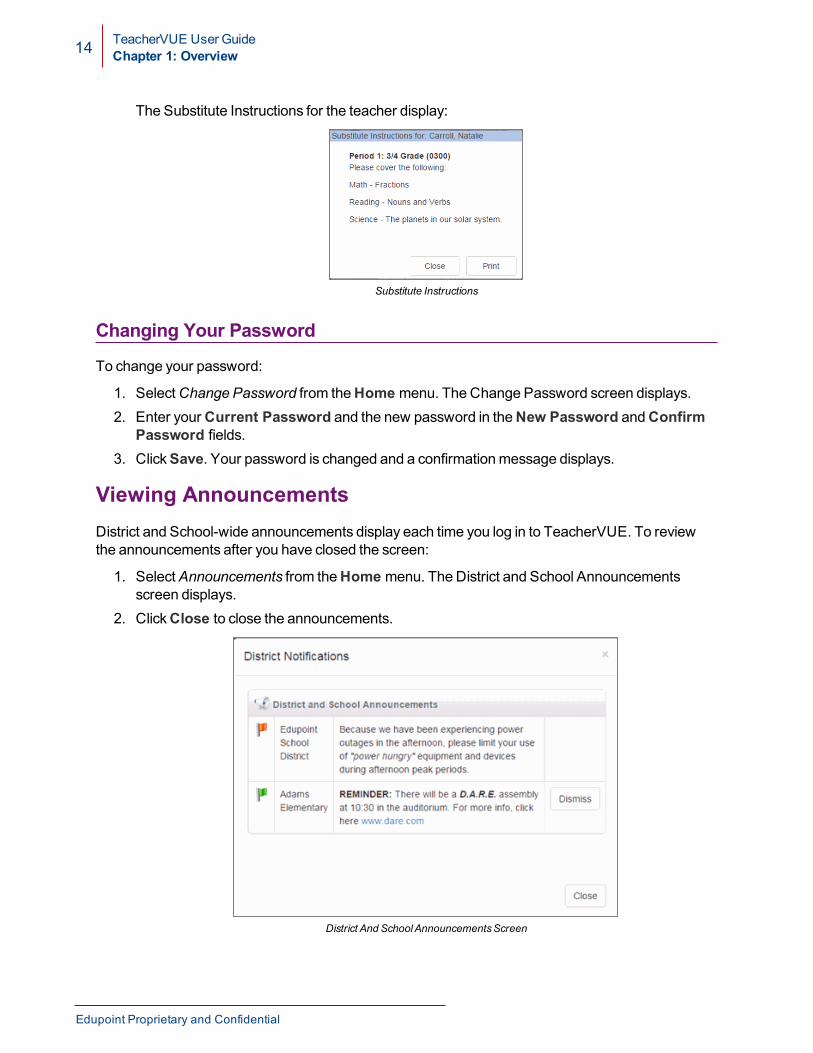
The Substitute Instructions for the teacher display:
Substitute Instructions
Changing Your Password
To change your password:
1. SelectChange Password from theHome menu. The Change Password screen displays.2. Enter yourCurrent Password and the new password in theNew Password andConfirm
Password fields.3. ClickSave. Your password is changed and a confirmationmessage displays.
Viewing AnnouncementsDistrict and School-wide announcements display each time you log in to TeacherVUE. To reviewthe announcements after you have closed the screen:
1. SelectAnnouncements from theHome menu. The District and School Announcementsscreen displays.
2. ClickClose to close the announcements.
District And SchoolAnnouncementsScreen
Edupoint Proprietary and Confidential
TeacherVUE User GuideChapter 1: Overview 15
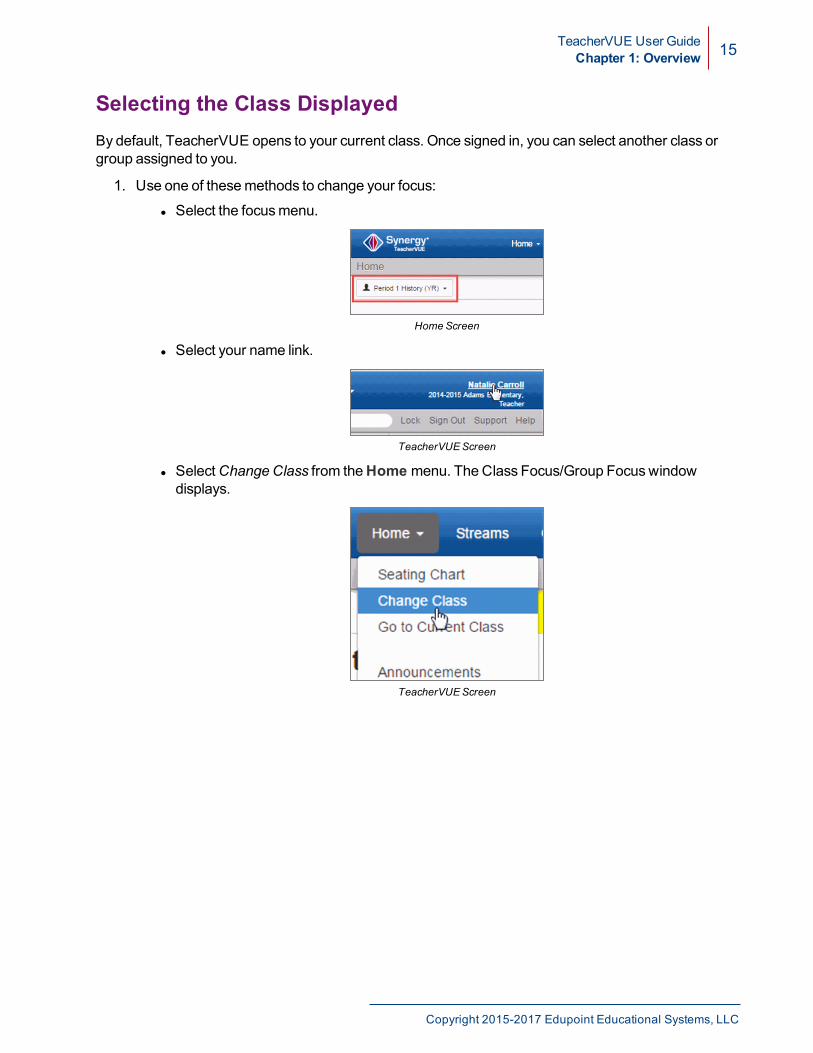
Selecting the Class DisplayedBy default, TeacherVUE opens to your current class. Once signed in, you can select another class orgroup assigned to you.
1. Use one of thesemethods to change your focus:
l Select the focusmenu.
HomeScreen
l Select your name link.
TeacherVUE Screen
l SelectChange Class from theHome menu. The Class Focus/Group Focuswindowdisplays.
TeacherVUE Screen
Copyright 2015-2017 Edupoint Educational Systems, LLC
16 TeacherVUE User GuideChapter 1: Overview
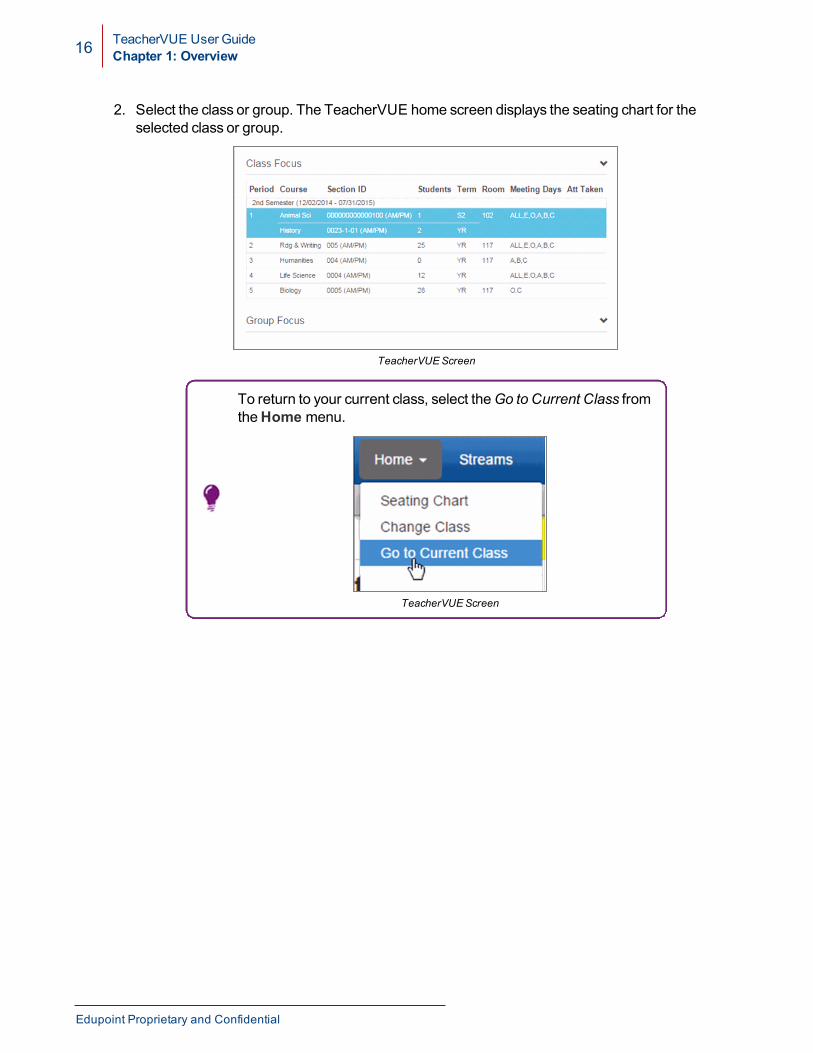
2. Select the class or group. The TeacherVUE home screen displays the seating chart for theselected class or group.
TeacherVUE Screen
To return to your current class, select theGo to Current Class fromtheHome menu.
TeacherVUE Screen
Edupoint Proprietary and Confidential
TeacherVUE User GuideChapter 1: Overview 17
Accessibility in TeacherVUE
Visually Impaired Teachers
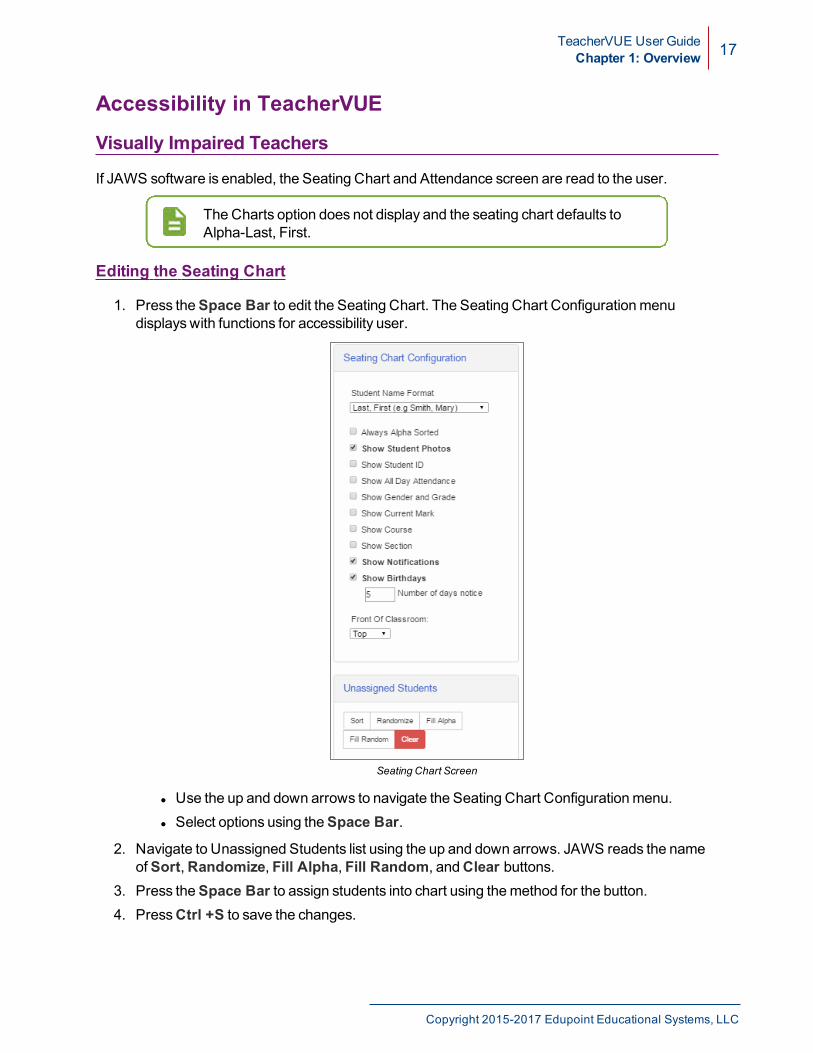
If JAWS software is enabled, the Seating Chart and Attendance screen are read to the user.
The Charts option does not display and the seating chart defaults toAlpha-Last, First.
Editing the Seating Chart
1. Press theSpace Bar to edit the Seating Chart. The Seating Chart Configurationmenudisplayswith functions for accessibility user.
Seating Chart Screen
l Use the up and down arrows to navigate the Seating Chart Configurationmenu.l Select options using theSpace Bar.
2. Navigate to Unassigned Students list using the up and down arrows. JAWS reads the nameof Sort,Randomize, Fill Alpha, Fill Random, andClear buttons.
3. Press theSpace Bar to assign students into chart using themethod for the button.4. PressCtrl +S to save the changes.
Copyright 2015-2017 Edupoint Educational Systems, LLC
18 TeacherVUE User GuideChapter 1: Overview
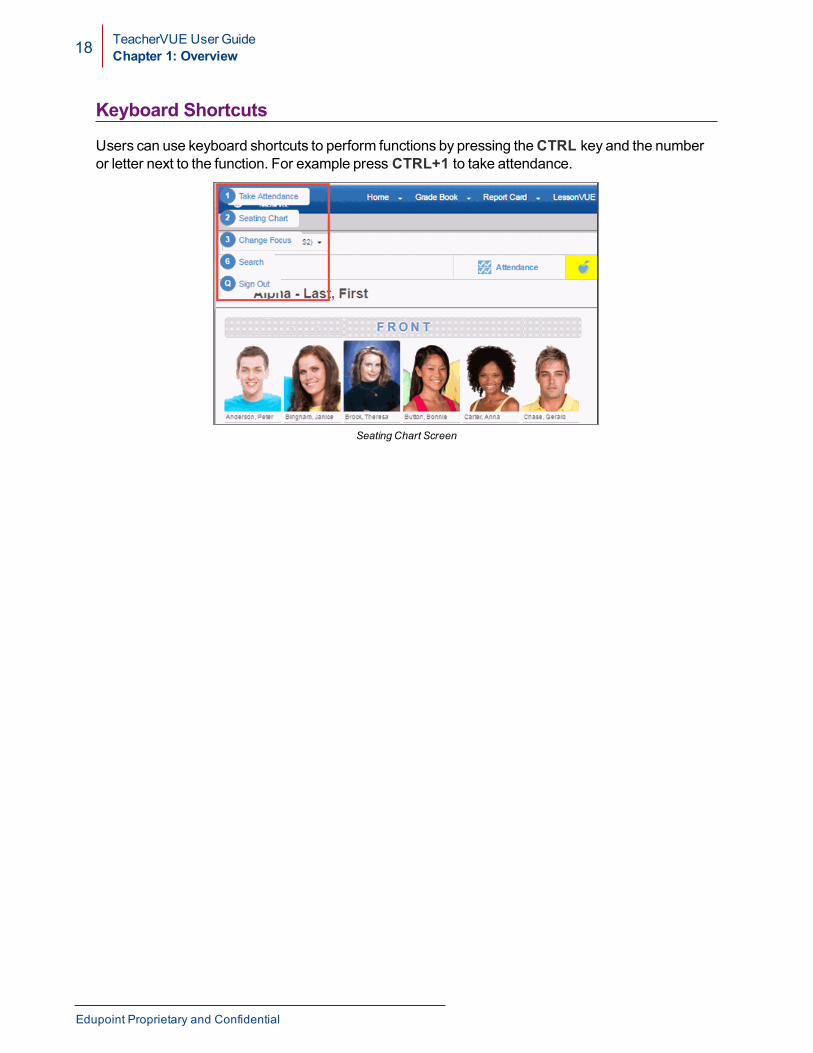
Keyboard Shortcuts
Users can use keyboard shortcuts to perform functions by pressing theCTRL key and the numberor letter next to the function. For example press CTRL+1 to take attendance.
Seating Chart Screen
Edupoint Proprietary and Confidential
Chapter 2:Working with Seating Charts
Seating Charts Overview 20Creating a New Seating Chart 22Creating a Seating Chart Template 25Selecting a Seating Chart 29Editing a Seating Chart 29Using Student Nicknames 34Pronunciation of Student's Names 35
20 TeacherVUE User GuideChapter 2: Working with Seating Charts
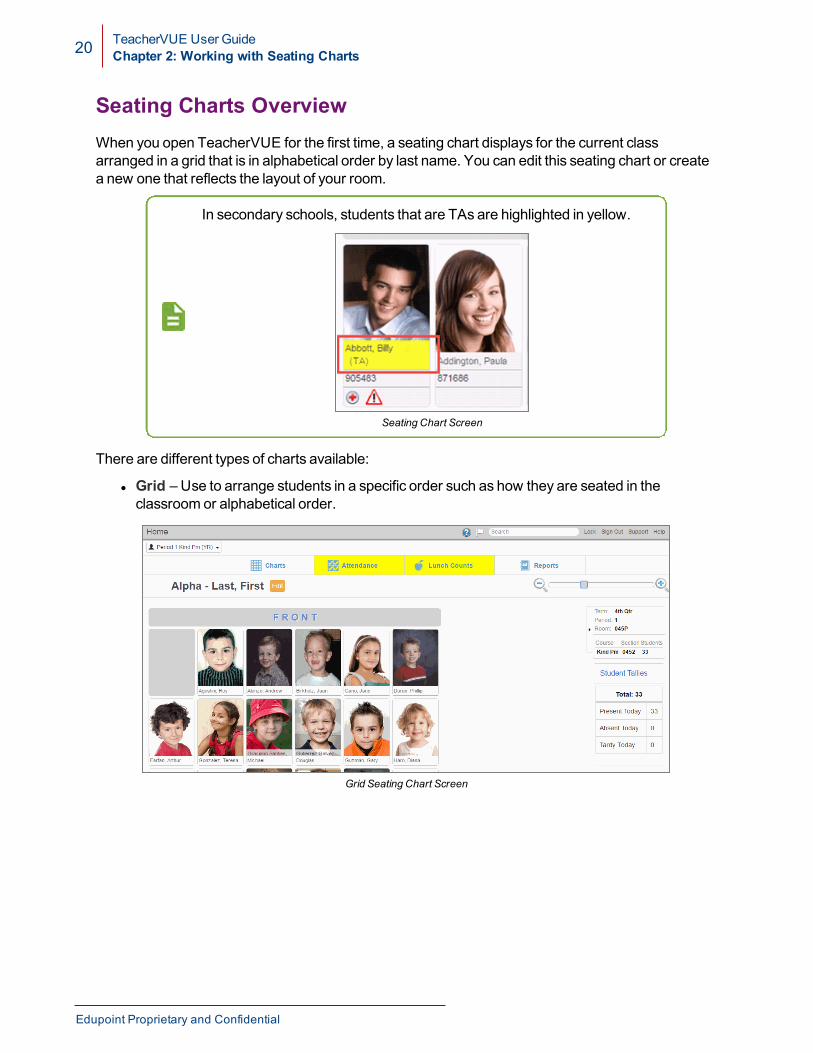
Seating Charts OverviewWhen you open TeacherVUE for the first time, a seating chart displays for the current classarranged in a grid that is in alphabetical order by last name. You can edit this seating chart or createa new one that reflects the layout of your room.
In secondary schools, students that are TAs are highlighted in yellow.
Seating Chart Screen
There are different types of charts available:
l Grid – Use to arrange students in a specific order such as how they are seated in theclassroom or alphabetical order.
Grid Seating Chart Screen
Edupoint Proprietary and Confidential
TeacherVUE User GuideChapter 2: Working with Seating Charts 21
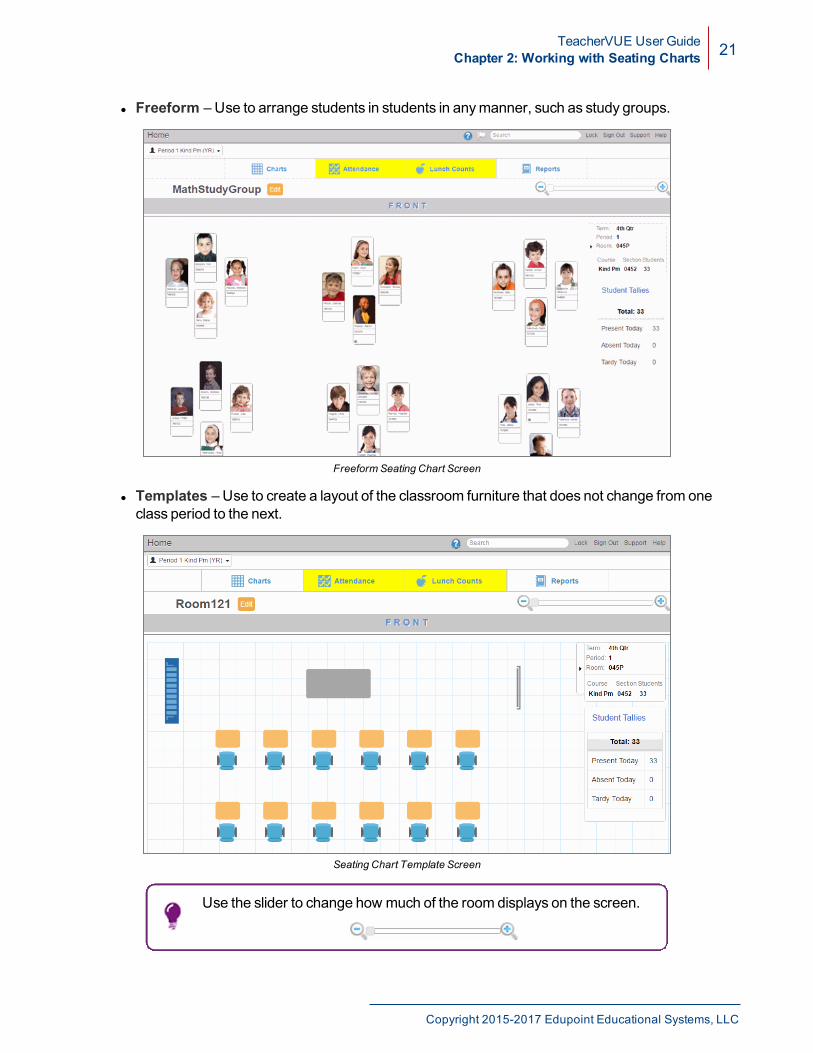
l Freeform – Use to arrange students in students in anymanner, such as study groups.
Freeform Seating Chart Screen
l Templates – Use to create a layout of the classroom furniture that does not change from oneclass period to the next.
Seating Chart Template Screen
Use the slider to change how much of the room displays on the screen.
Copyright 2015-2017 Edupoint Educational Systems, LLC
22 TeacherVUE User GuideChapter 2: Working with Seating Charts
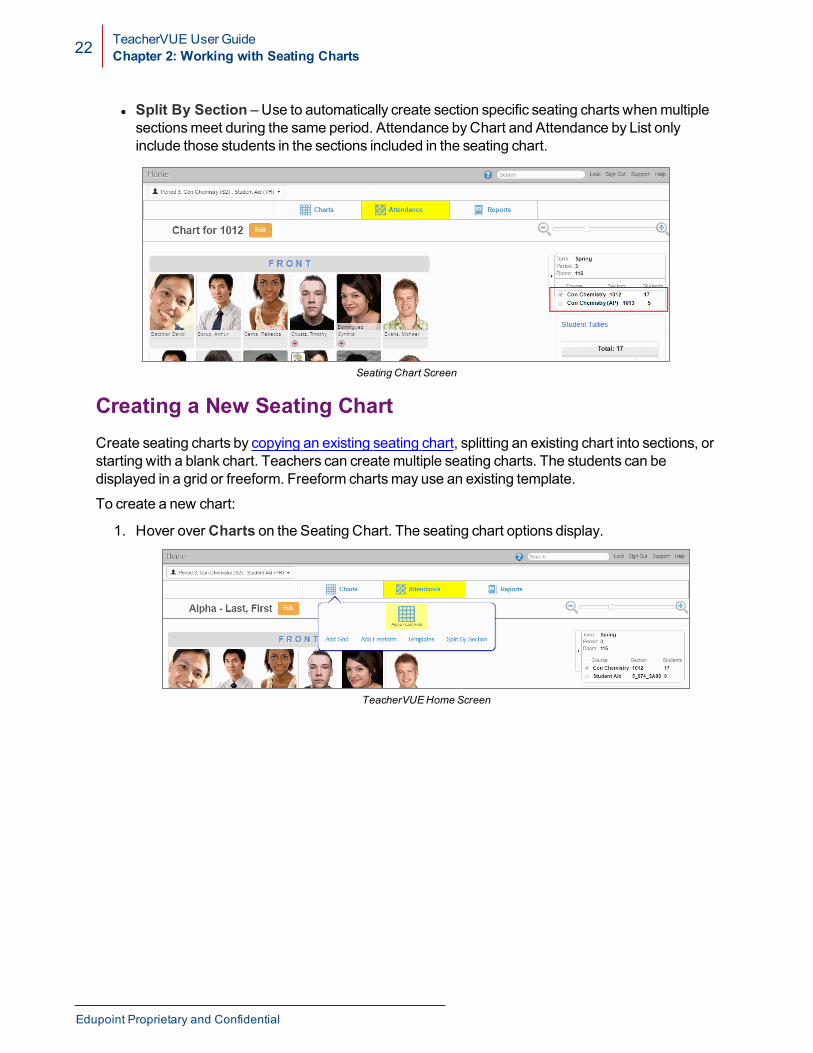
l Split By Section – Use to automatically create section specific seating charts whenmultiplesectionsmeet during the same period. Attendance byChart and Attendance by List onlyinclude those students in the sections included in the seating chart.
Seating Chart Screen
Creating a New Seating ChartCreate seating charts by copying an existing seating chart, splitting an existing chart into sections, orstarting with a blank chart. Teachers can createmultiple seating charts. The students can bedisplayed in a grid or freeform. Freeform chartsmay use an existing template.
To create a new chart:
1. Hover overCharts on the Seating Chart. The seating chart options display.
TeacherVUEHomeScreen
Edupoint Proprietary and Confidential
TeacherVUE User GuideChapter 2: Working with Seating Charts 23
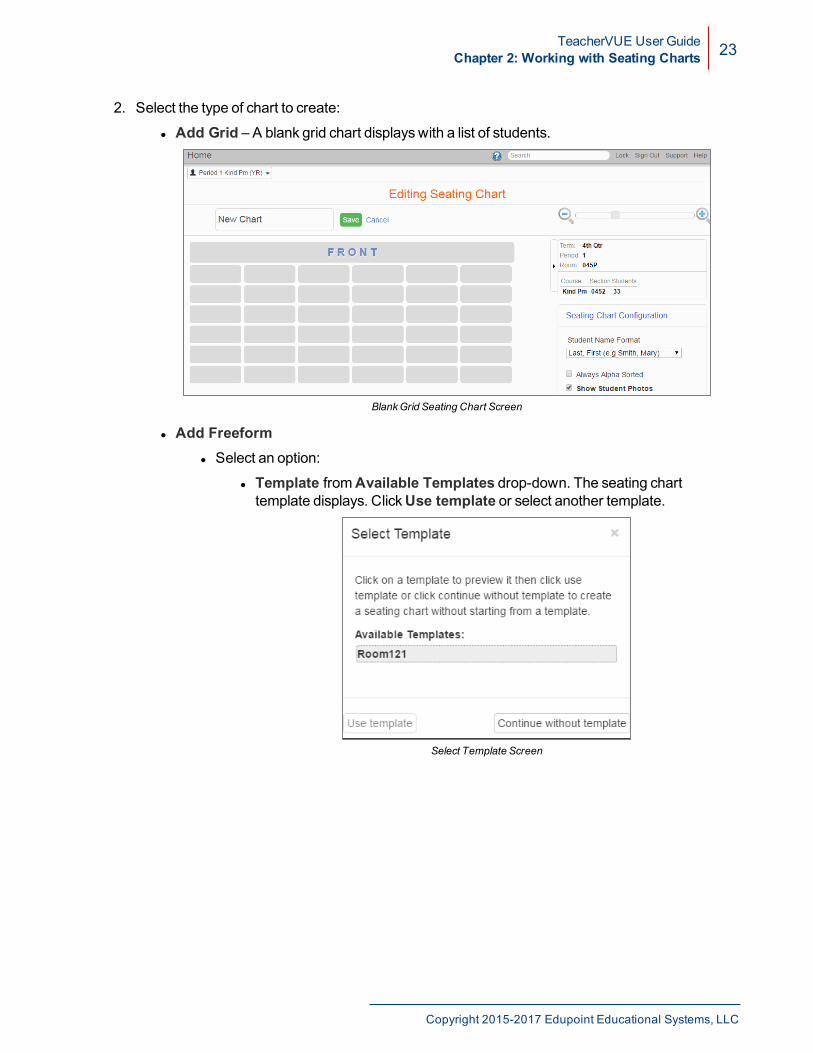
2. Select the type of chart to create:
l Add Grid – A blank grid chart displayswith a list of students.
BlankGrid Seating Chart Screen
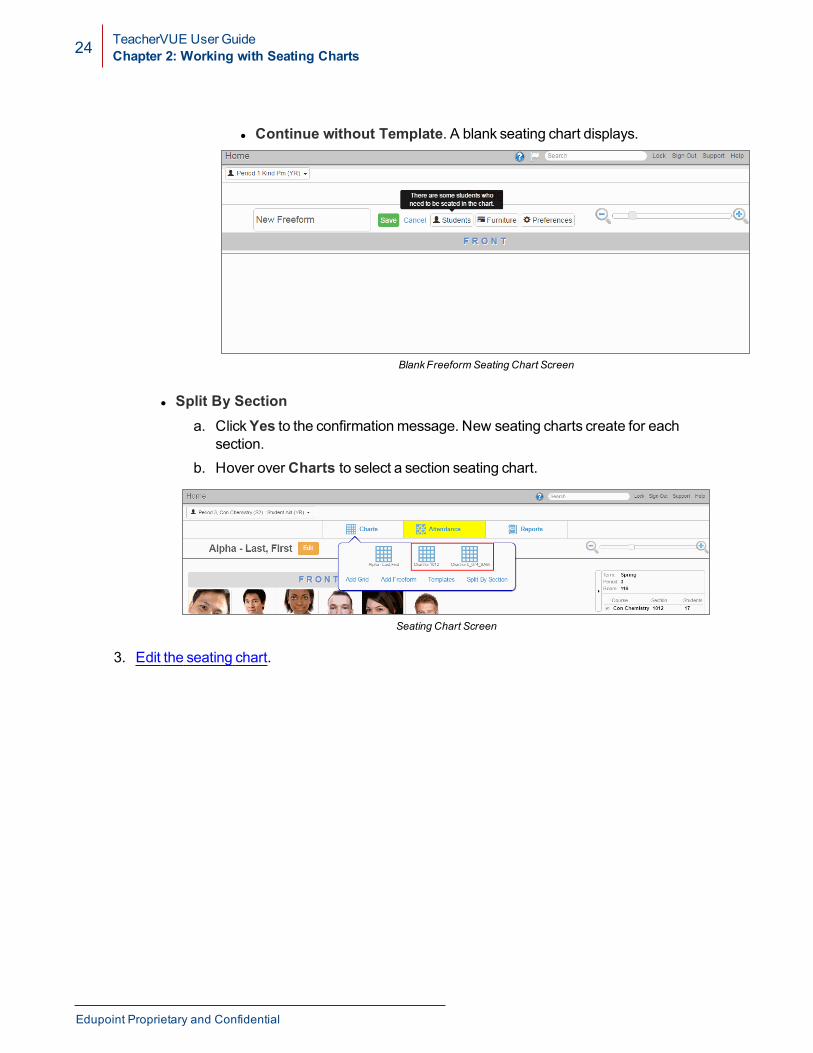
l Add Freeforml Select an option:
l Template fromAvailable Templates drop-down. The seating charttemplate displays. ClickUse template or select another template.
Select Template Screen
Copyright 2015-2017 Edupoint Educational Systems, LLC
24 TeacherVUE User GuideChapter 2: Working with Seating Charts
l Continue without Template. A blank seating chart displays.
BlankFreeform Seating Chart Screen
l Split By Sectiona. ClickYes to the confirmationmessage. New seating charts create for each
section.b. Hover overCharts to select a section seating chart.
Seating Chart Screen
3. Edit the seating chart.
Edupoint Proprietary and Confidential
TeacherVUE User GuideChapter 2: Working with Seating Charts 25
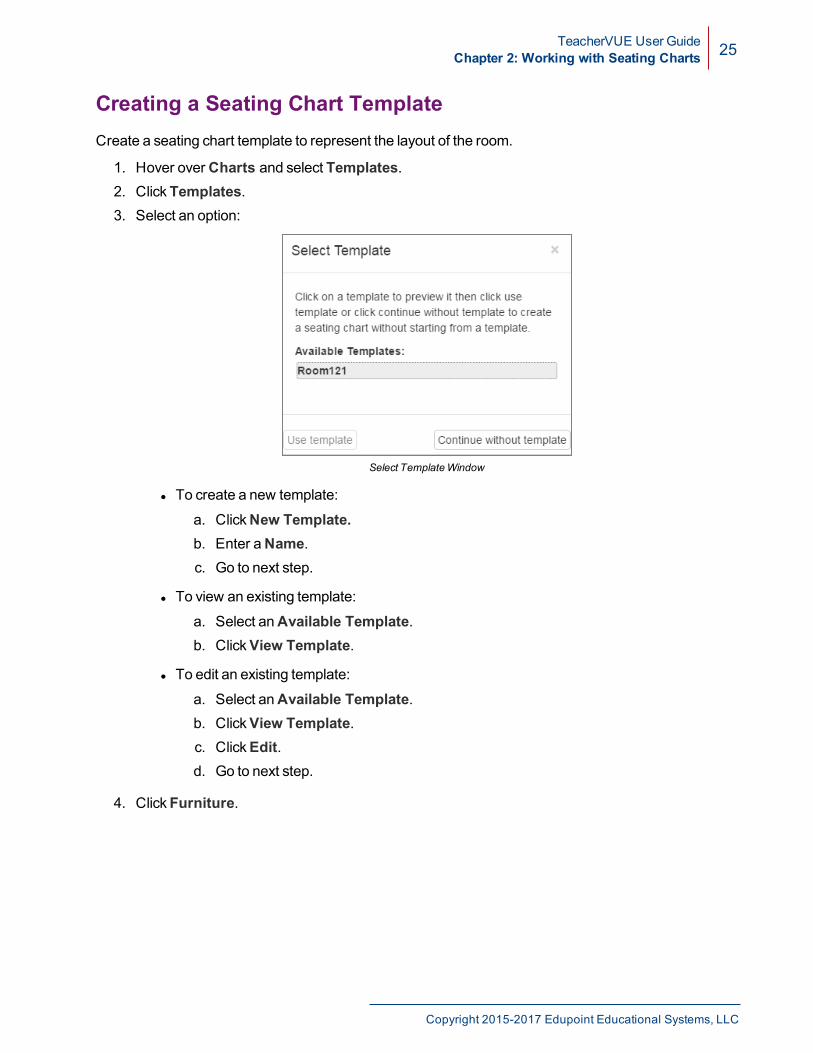
Creating a Seating Chart TemplateCreate a seating chart template to represent the layout of the room.
1. Hover overCharts and select Templates.2. ClickTemplates.3. Select an option:
Select TemplateWindow
l To create a new template:
a. ClickNew Template.b. Enter aName.c. Go to next step.
l To view an existing template:
a. Select anAvailable Template.b. ClickView Template.
l To edit an existing template:
a. Select anAvailable Template.b. ClickView Template.c. ClickEdit.d. Go to next step.
4. ClickFurniture.
Copyright 2015-2017 Edupoint Educational Systems, LLC
26 TeacherVUE User GuideChapter 2: Working with Seating Charts
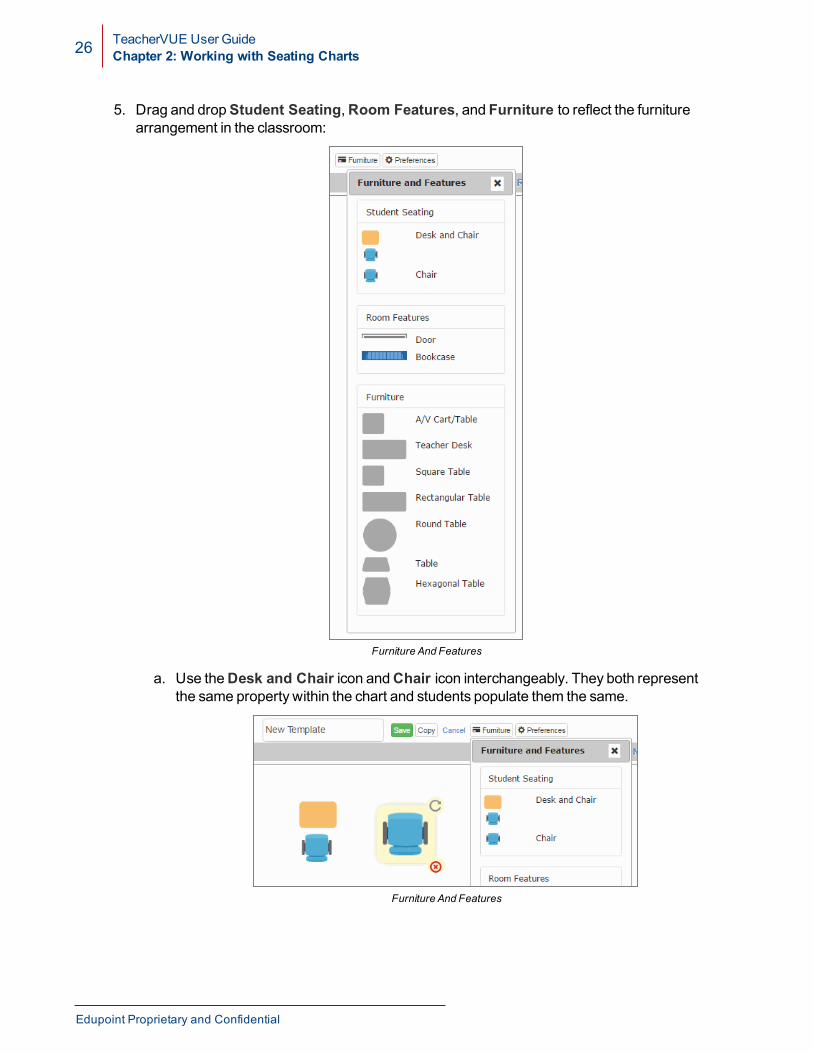
5. Drag and dropStudent Seating,Room Features, and Furniture to reflect the furniturearrangement in the classroom:
Furniture And Features
a. Use theDesk and Chair icon andChair icon interchangeably. They both representthe same property within the chart and students populate them the same.
Furniture And Features
Edupoint Proprietary and Confidential
TeacherVUE User GuideChapter 2: Working with Seating Charts 27
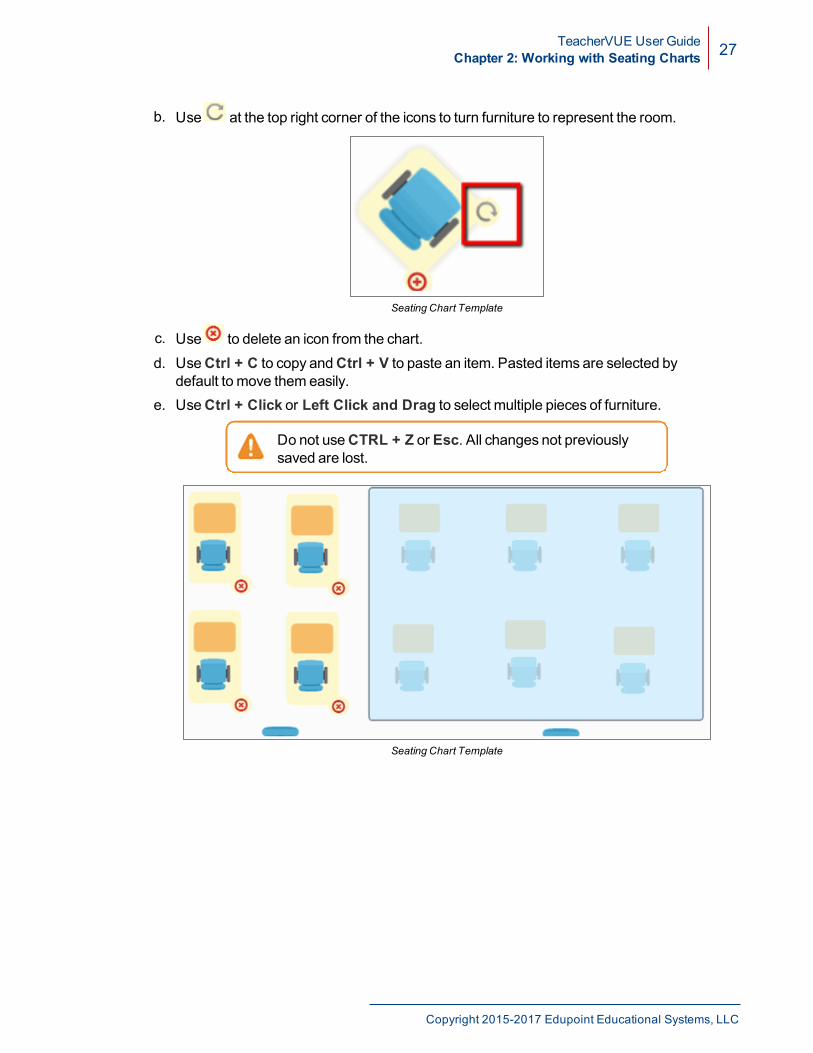
b. Use at the top right corner of the icons to turn furniture to represent the room.
Seating Chart Template
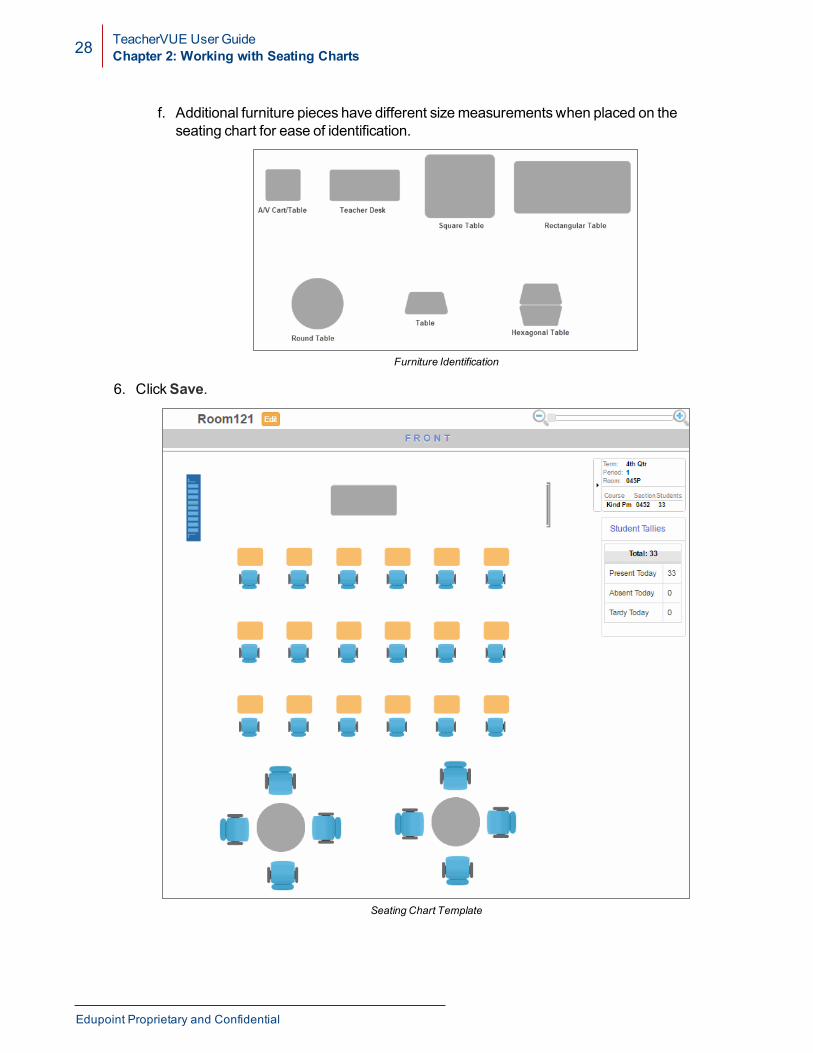
c. Use to delete an icon from the chart.d. UseCtrl + C to copy andCtrl + V to paste an item. Pasted items are selected by
default to move them easily.e. UseCtrl + Click or Left Click and Drag to select multiple pieces of furniture.
Do not useCTRL + Z or Esc. All changes not previouslysaved are lost.
Seating Chart Template
Copyright 2015-2017 Edupoint Educational Systems, LLC
28 TeacherVUE User GuideChapter 2: Working with Seating Charts
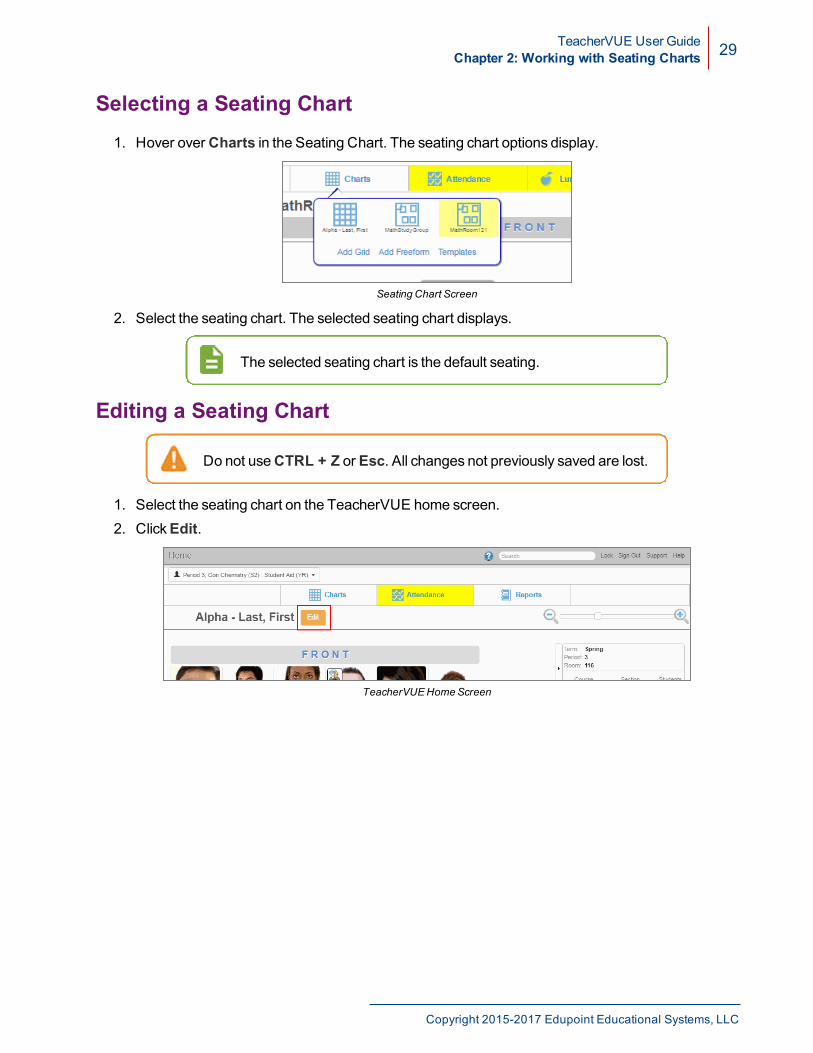
f. Additional furniture pieces have different sizemeasurements when placed on theseating chart for ease of identification.
Furniture Identification
6. ClickSave.
Seating Chart Template
Edupoint Proprietary and Confidential
TeacherVUE User GuideChapter 2: Working with Seating Charts 29
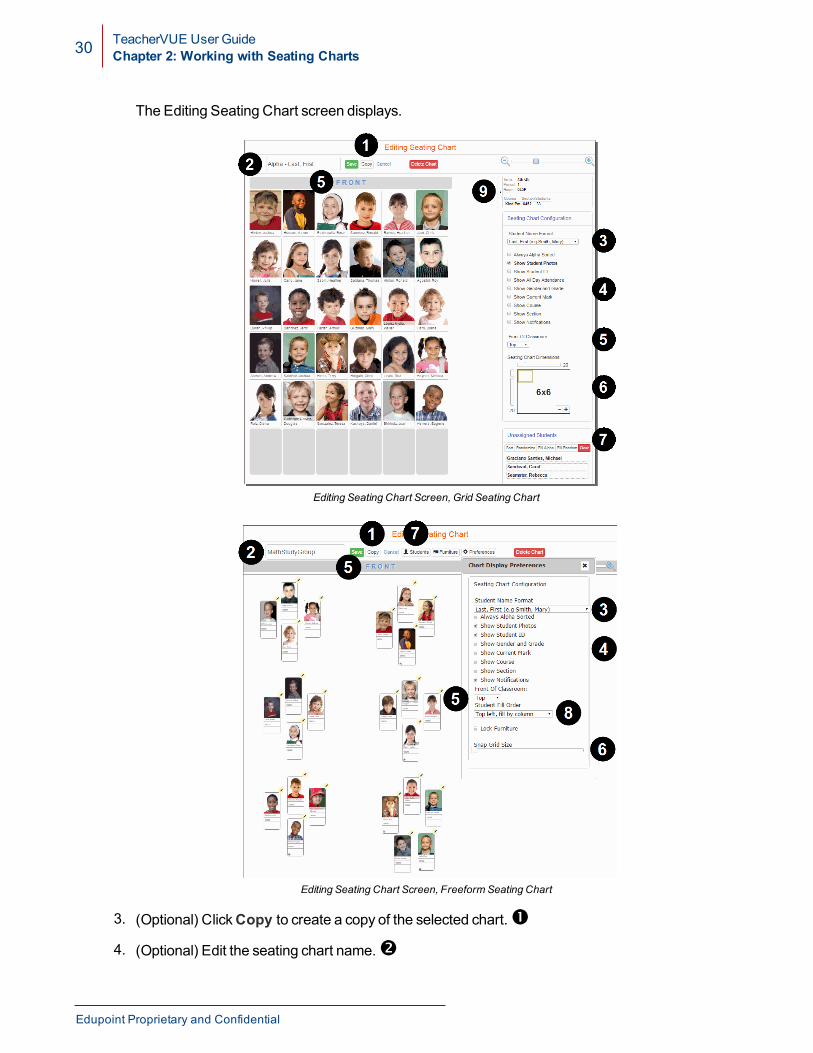
Selecting a Seating Chart1. Hover overCharts in the Seating Chart. The seating chart options display.
Seating Chart Screen
2. Select the seating chart. The selected seating chart displays.
The selected seating chart is the default seating.
Editing a Seating Chart
Do not useCTRL + Z or Esc. All changes not previously saved are lost.
1. Select the seating chart on the TeacherVUE home screen.2. ClickEdit.
TeacherVUEHomeScreen
Copyright 2015-2017 Edupoint Educational Systems, LLC
30 TeacherVUE User GuideChapter 2: Working with Seating Charts
The Editing Seating Chart screen displays.
Editing Seating Chart Screen, Grid Seating Chart
Editing Seating Chart Screen, Freeform Seating Chart
3. (Optional) ClickCopy to create a copy of the selected chart.�
4. (Optional) Edit the seating chart name.�
Edupoint Proprietary and Confidential
TeacherVUE User GuideChapter 2: Working with Seating Charts 31
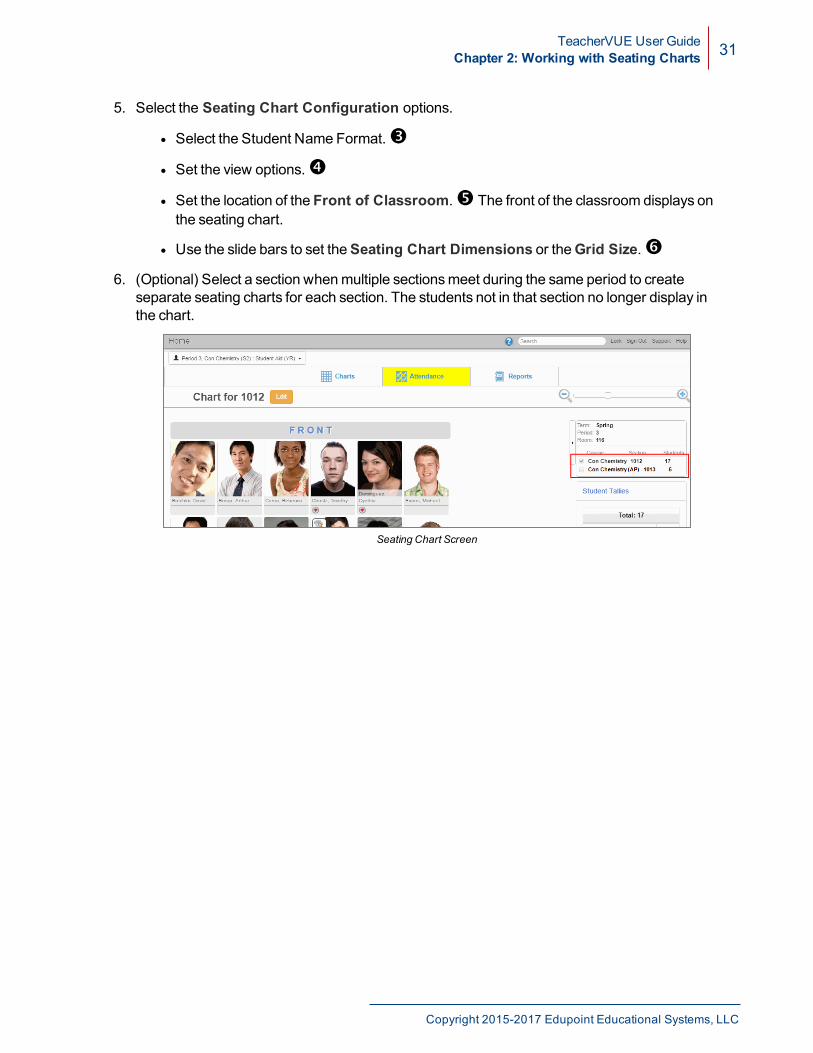
5. Select the Seating Chart Configuration options.
l Select the Student Name Format.�
l Set the view options.�
l Set the location of the Front of Classroom.� The front of the classroom displays onthe seating chart.
l Use the slide bars to set theSeating Chart Dimensions or theGrid Size.�
6. (Optional) Select a section whenmultiple sectionsmeet during the same period to createseparate seating charts for each section. The students not in that section no longer display inthe chart.
Seating Chart Screen
Copyright 2015-2017 Edupoint Educational Systems, LLC
32 TeacherVUE User GuideChapter 2: Working with Seating Charts
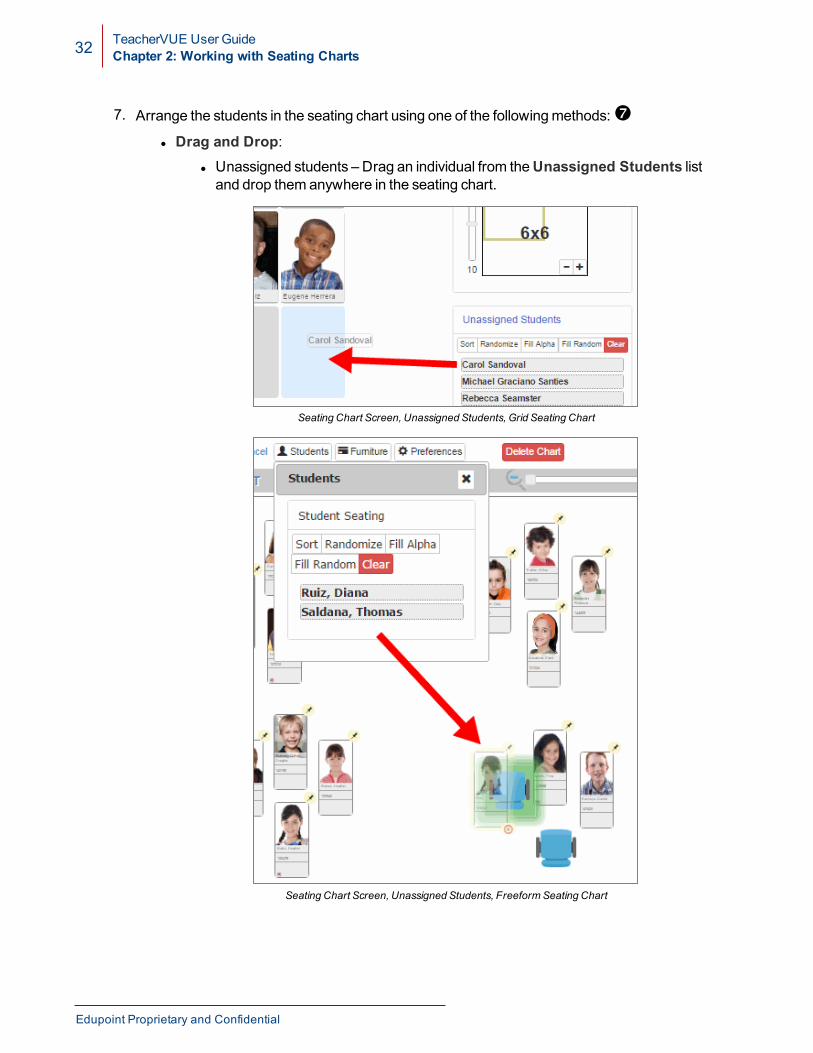
7. Arrange the students in the seating chart using one of the followingmethods:�l Drag and Drop:
l Unassigned students – Drag an individual from theUnassigned Students listand drop them anywhere in the seating chart.
Seating Chart Screen, Unassigned Students, Grid Seating Chart
Seating Chart Screen, Unassigned Students, Freeform Seating Chart
Edupoint Proprietary and Confidential
TeacherVUE User GuideChapter 2: Working with Seating Charts 33
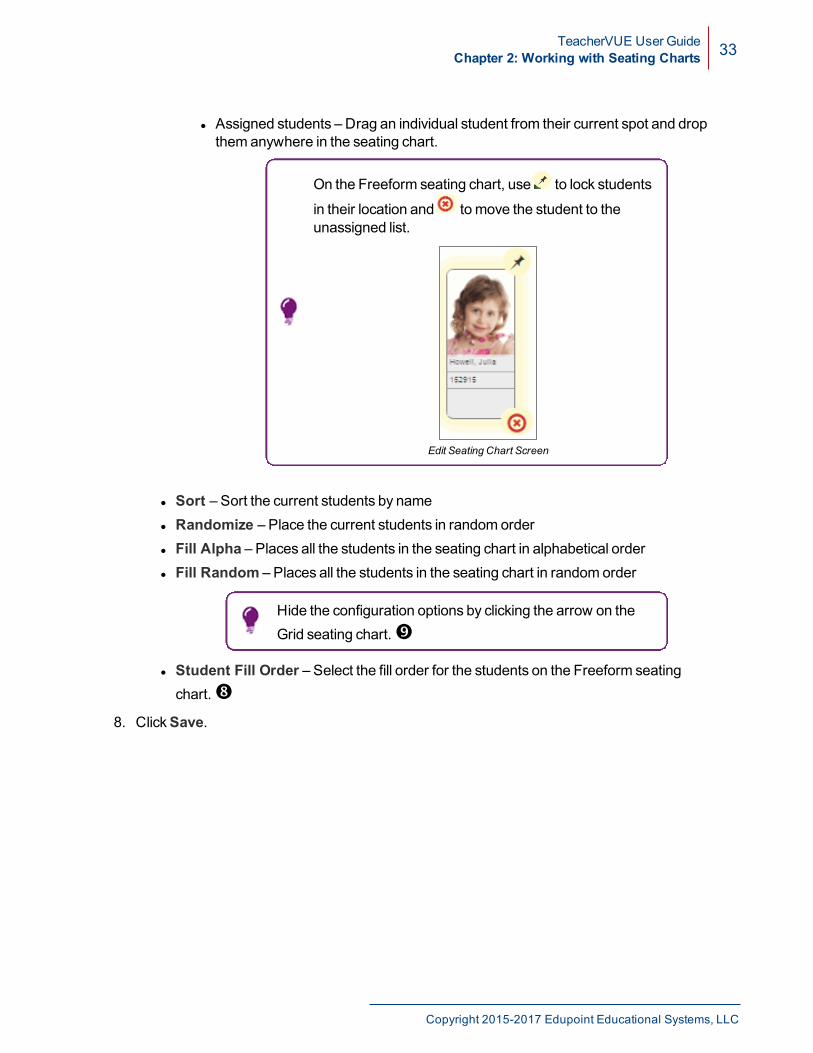
l Assigned students – Drag an individual student from their current spot and dropthem anywhere in the seating chart.
On the Freeform seating chart, use to lock students
in their location and tomove the student to theunassigned list.
Edit Seating Chart Screen
l Sort – Sort the current students by namel Randomize – Place the current students in random orderl Fill Alpha – Places all the students in the seating chart in alphabetical orderl Fill Random – Places all the students in the seating chart in random order
Hide the configuration options by clicking the arrow on theGrid seating chart.�
l Student Fill Order – Select the fill order for the students on the Freeform seatingchart.�
8. ClickSave.
Copyright 2015-2017 Edupoint Educational Systems, LLC
34 TeacherVUE User GuideChapter 2: Working with Seating Charts
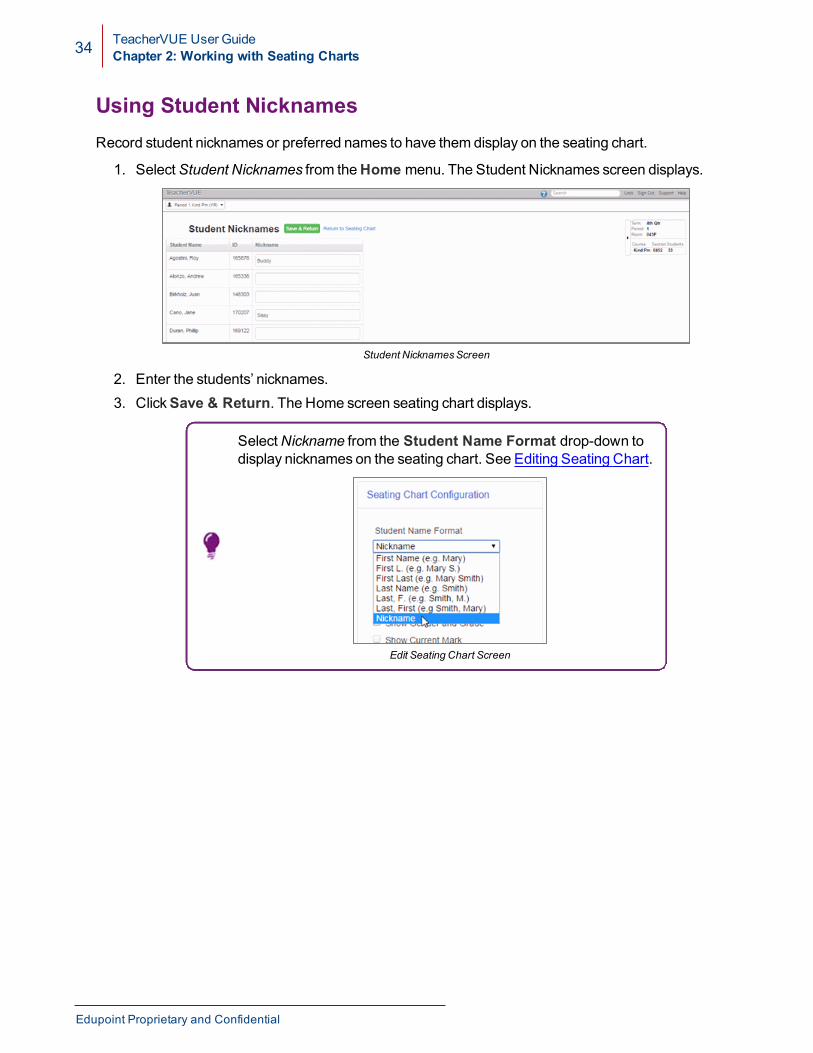
Using Student NicknamesRecord student nicknames or preferred names to have them display on the seating chart.
1. SelectStudent Nicknames from theHome menu. The Student Nicknames screen displays.
Student NicknamesScreen
2. Enter the students’ nicknames.3. ClickSave & Return. The Home screen seating chart displays.
SelectNickname from the Student Name Format drop-down todisplay nicknames on the seating chart. See Editing Seating Chart.
Edit Seating Chart Screen
Edupoint Proprietary and Confidential
TeacherVUE User GuideChapter 2: Working with Seating Charts 35
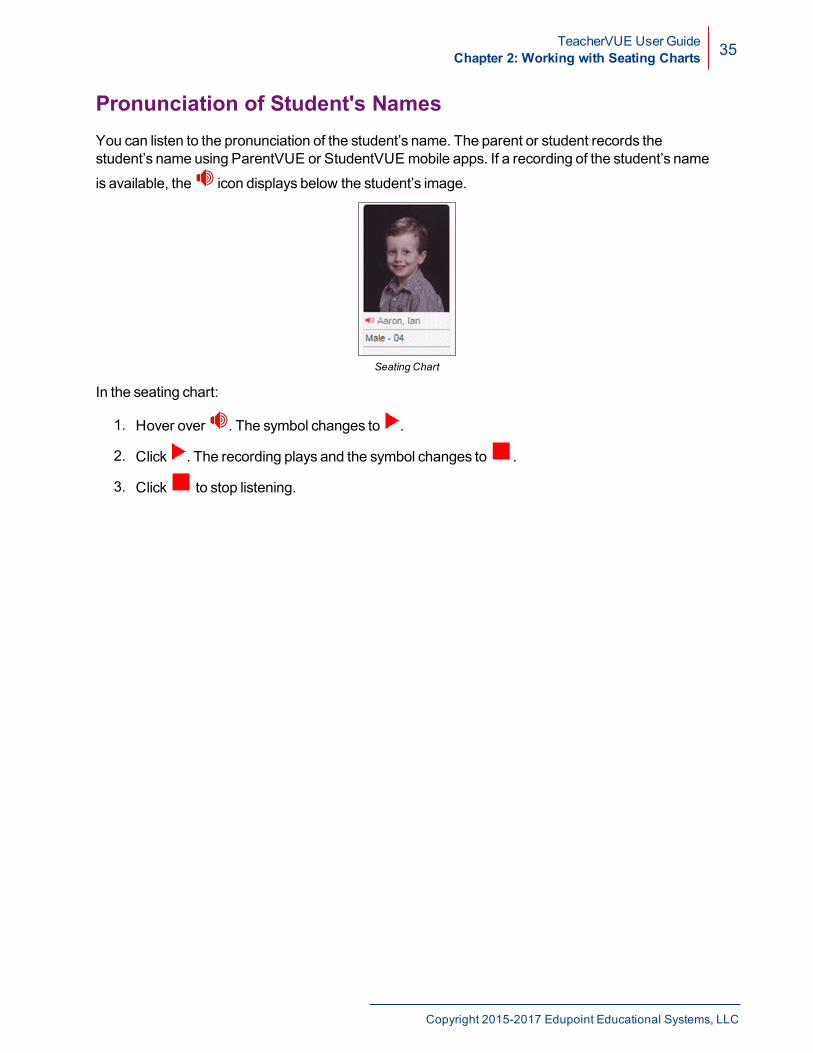
Pronunciation of Student's NamesYou can listen to the pronunciation of the student’s name. The parent or student records thestudent’s name using ParentVUE or StudentVUEmobile apps. If a recording of the student’s name
is available, the icon displays below the student’s image.
Seating Chart
In the seating chart:
1. Hover over . The symbol changes to .
2. Click . The recording plays and the symbol changes to .
3. Click to stop listening.
Copyright 2015-2017 Edupoint Educational Systems, LLC
Chapter 3:Taking Attendance
Attendance Notification 37Taking Attendance by Chart 37Taking Attendance by List 40Viewing a Student's Daily Attendance Record 42Viewing a Student's Period Attendance Record 43
TeacherVUE User GuideChapter 3: Taking Attendance 37
Attendance NotificationWhen you log into TeacherVUE, theAttendance button highlights in yellow to remind you to takeattendance.
Districtsmay choose to take:
l Positive attendance, marking students who are presentl Negative attendance tomark students who are not present such as absent or tardy
You cannot overwrite attendance taken by the office.
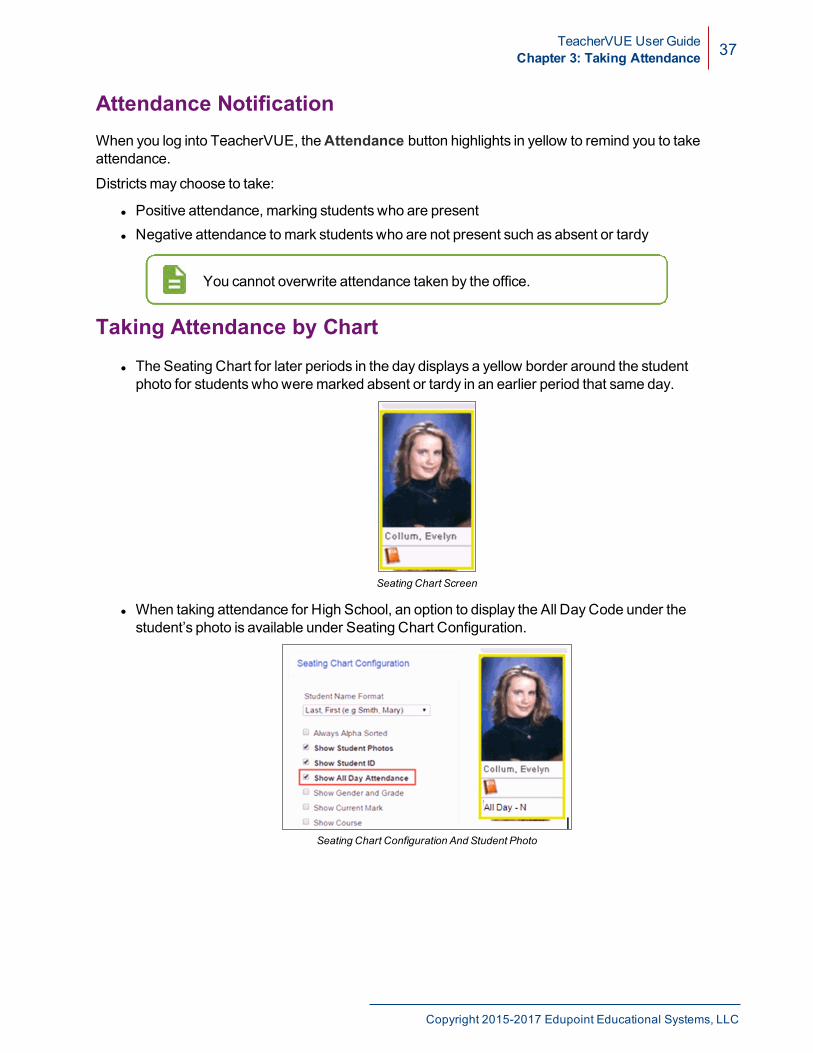
Taking Attendance by Chartl The Seating Chart for later periods in the day displays a yellow border around the studentphoto for students who weremarked absent or tardy in an earlier period that same day.
Seating Chart Screen
l When taking attendance for High School, an option to display the All DayCode under thestudent’s photo is available under Seating Chart Configuration.
Seating Chart Configuration And Student Photo
Copyright 2015-2017 Edupoint Educational Systems, LLC
38 TeacherVUE User GuideChapter 3: Taking Attendance
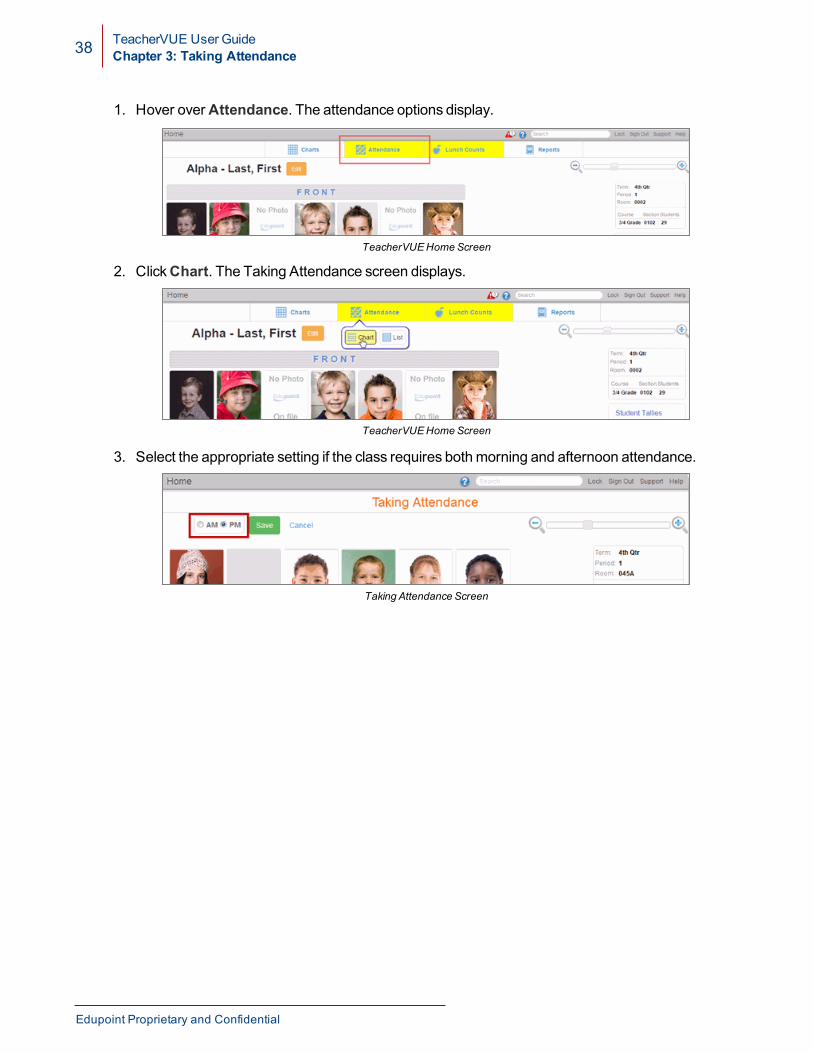
1. Hover overAttendance. The attendance options display.
TeacherVUEHomeScreen
2. ClickChart. The Taking Attendance screen displays.
TeacherVUEHomeScreen
3. Select the appropriate setting if the class requires bothmorning and afternoon attendance.
Taking Attendance Screen
Edupoint Proprietary and Confidential
TeacherVUE User GuideChapter 3: Taking Attendance 39
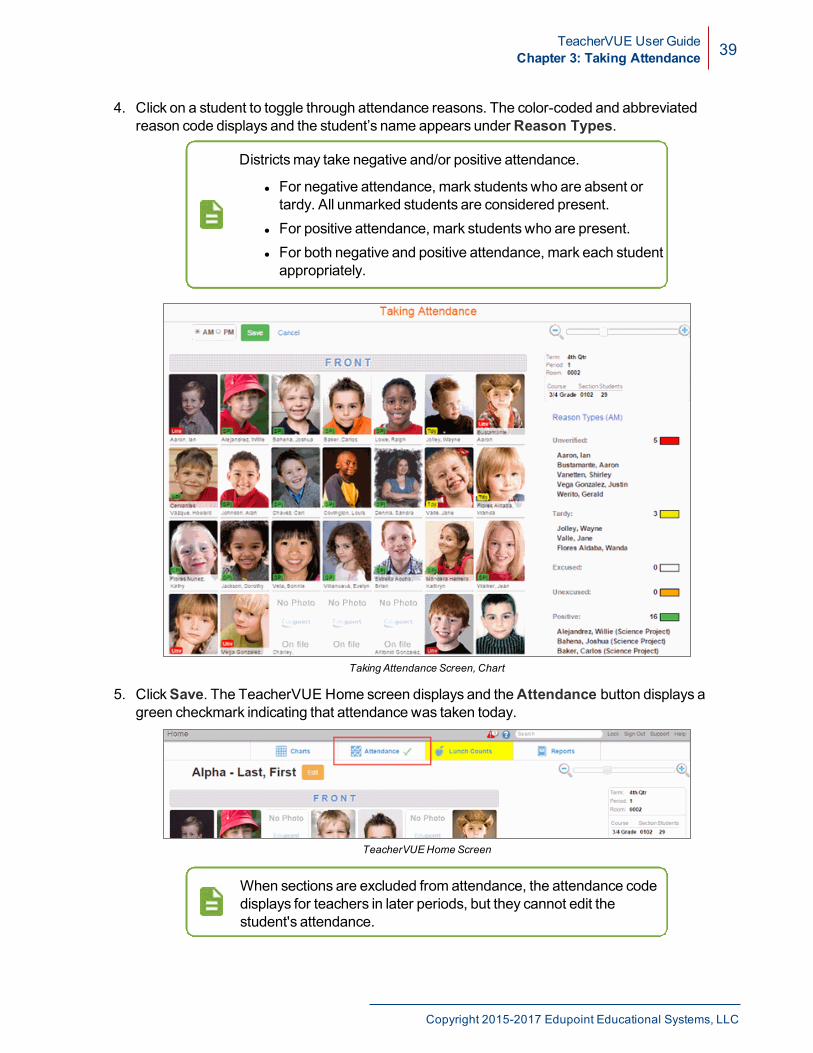
4. Click on a student to toggle through attendance reasons. The color-coded and abbreviatedreason code displays and the student’s name appears underReason Types.
Districtsmay take negative and/or positive attendance.
l For negative attendance, mark students who are absent ortardy. All unmarked students are considered present.
l For positive attendance, mark students who are present.l For both negative and positive attendance, mark each studentappropriately.
Taking Attendance Screen, Chart
5. ClickSave. The TeacherVUE Home screen displays and theAttendance button displays agreen checkmark indicating that attendance was taken today.
TeacherVUEHomeScreen
When sections are excluded from attendance, the attendance codedisplays for teachers in later periods, but they cannot edit thestudent's attendance.
Copyright 2015-2017 Edupoint Educational Systems, LLC
40 TeacherVUE User GuideChapter 3: Taking Attendance
Taking Attendance by List
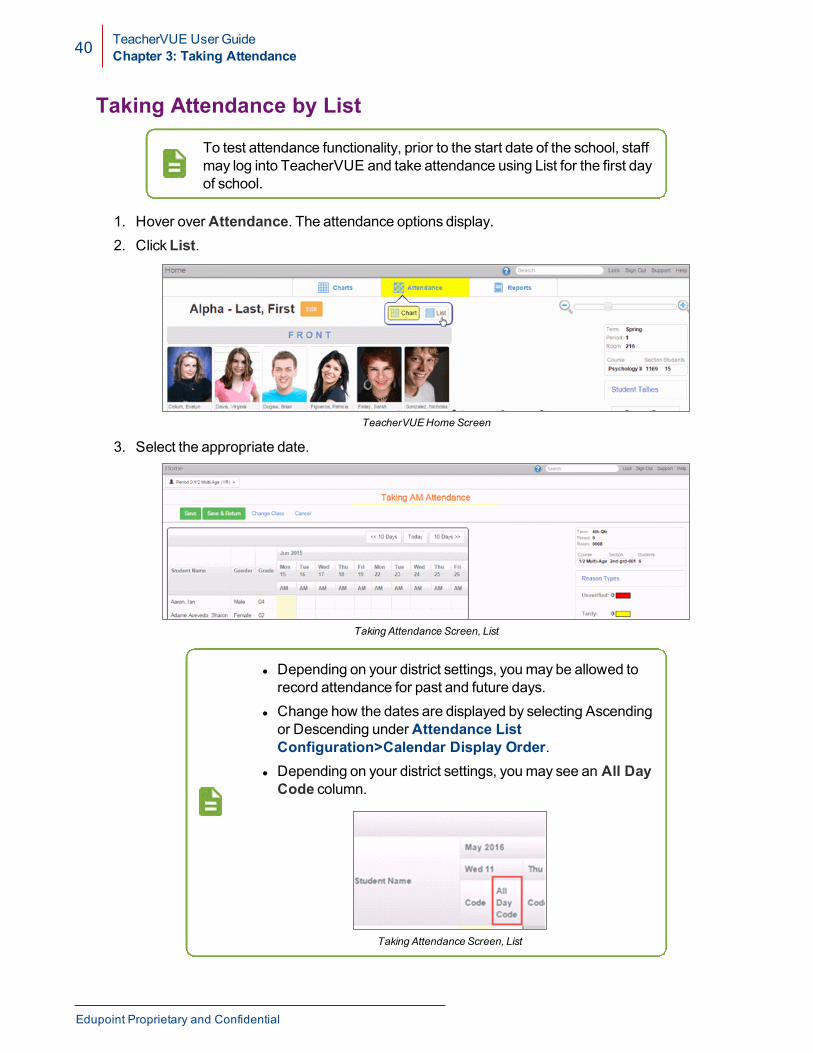
To test attendance functionality, prior to the start date of the school, staffmay log into TeacherVUE and take attendance using List for the first dayof school.
1. Hover overAttendance. The attendance options display.2. ClickList.
TeacherVUEHomeScreen
3. Select the appropriate date.
Taking Attendance Screen, List
l Depending on your district settings, youmay be allowed torecord attendance for past and future days.
l Change how the dates are displayed by selecting Ascendingor Descending underAttendance ListConfiguration>Calendar Display Order.
l Depending on your district settings, youmay see an All DayCode column.
Taking Attendance Screen, List
Edupoint Proprietary and Confidential
TeacherVUE User GuideChapter 3: Taking Attendance 41
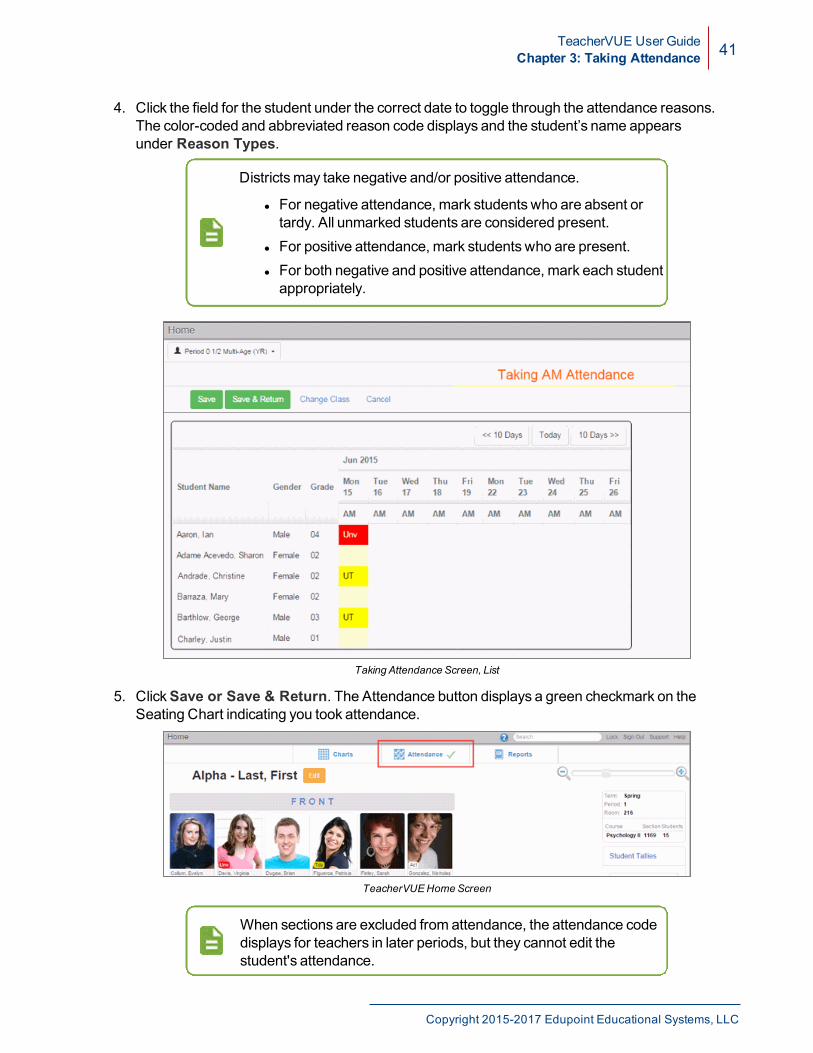
4. Click the field for the student under the correct date to toggle through the attendance reasons.The color-coded and abbreviated reason code displays and the student’s name appearsunder Reason Types.
Districtsmay take negative and/or positive attendance.
l For negative attendance, mark students who are absent ortardy. All unmarked students are considered present.
l For positive attendance, mark students who are present.l For both negative and positive attendance, mark each studentappropriately.
Taking Attendance Screen, List
5. ClickSave or Save & Return. The Attendance button displays a green checkmark on theSeating Chart indicating you took attendance.
TeacherVUEHomeScreen
When sections are excluded from attendance, the attendance codedisplays for teachers in later periods, but they cannot edit thestudent's attendance.
Copyright 2015-2017 Edupoint Educational Systems, LLC
42 TeacherVUE User GuideChapter 3: Taking Attendance
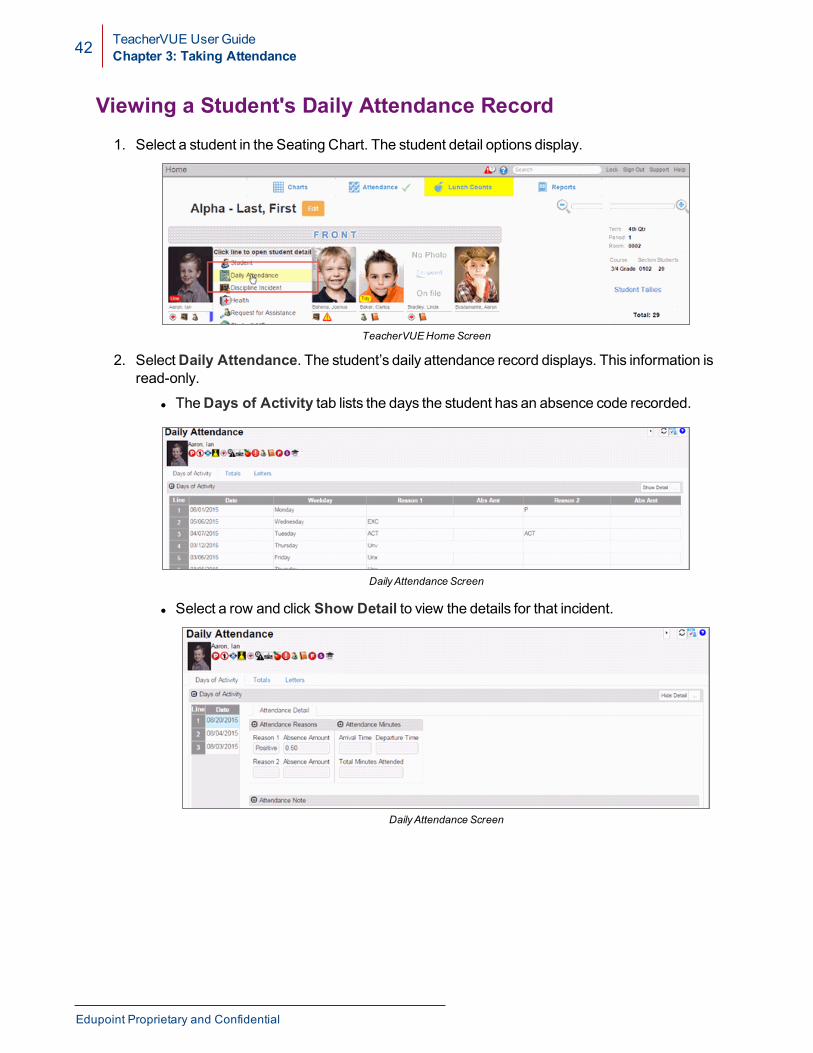
Viewing a Student's Daily Attendance Record1. Select a student in the Seating Chart. The student detail options display.
TeacherVUEHomeScreen
2. SelectDaily Attendance. The student’s daily attendance record displays. This information isread-only.
l TheDays of Activity tab lists the days the student has an absence code recorded.
DailyAttendance Screen
l Select a row and click Show Detail to view the details for that incident.
DailyAttendance Screen
Edupoint Proprietary and Confidential
TeacherVUE User GuideChapter 3: Taking Attendance 43
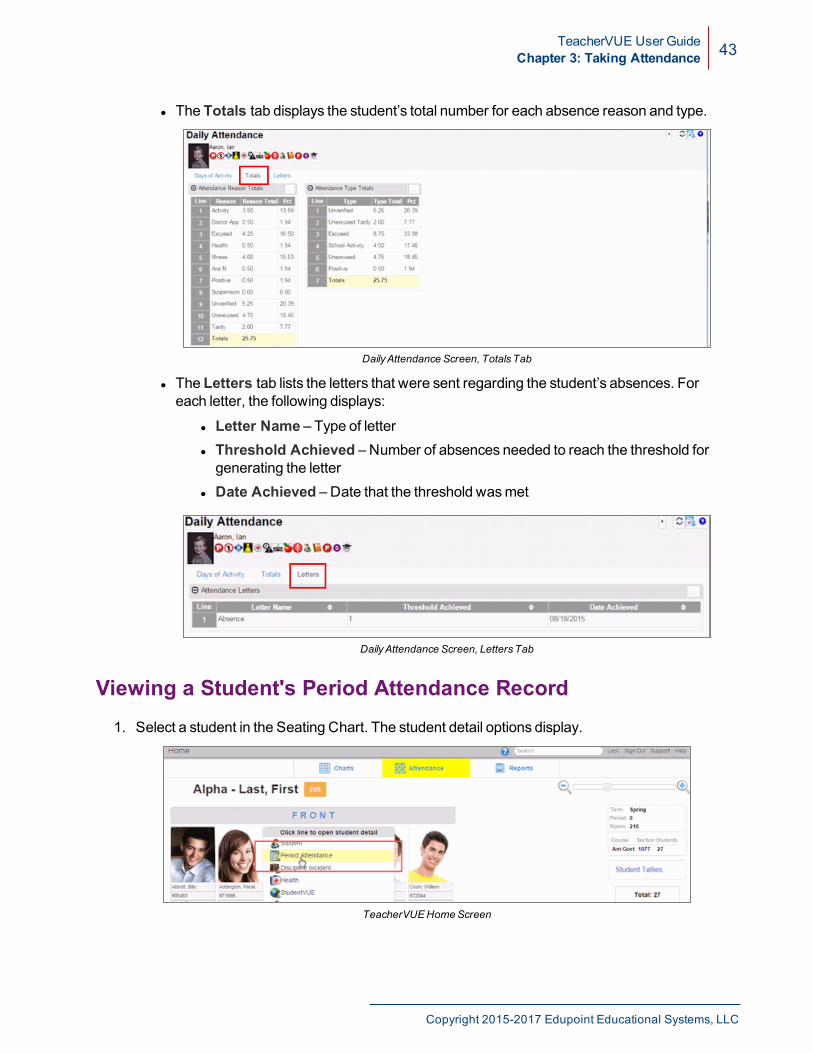
l The Totals tab displays the student’s total number for each absence reason and type.
DailyAttendance Screen, TotalsTab
l The Letters tab lists the letters that were sent regarding the student’s absences. Foreach letter, the following displays:
l Letter Name – Type of letterl Threshold Achieved – Number of absences needed to reach the threshold forgenerating the letter
l Date Achieved – Date that the threshold wasmet
DailyAttendance Screen, LettersTab
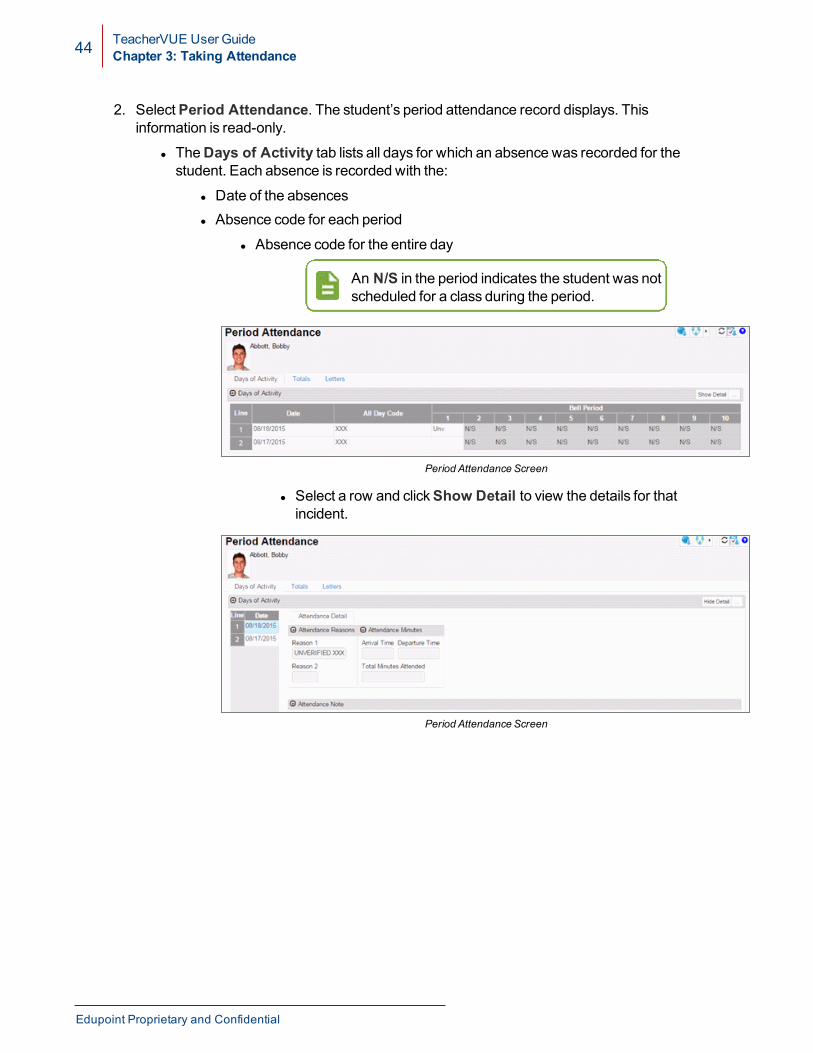
Viewing a Student's Period Attendance Record1. Select a student in the Seating Chart. The student detail options display.
TeacherVUEHomeScreen
Copyright 2015-2017 Edupoint Educational Systems, LLC
44 TeacherVUE User GuideChapter 3: Taking Attendance
2. SelectPeriod Attendance. The student’s period attendance record displays. Thisinformation is read-only.
l TheDays of Activity tab lists all days for which an absence was recorded for thestudent. Each absence is recorded with the:
l Date of the absencesl Absence code for each period
l Absence code for the entire day
An N/S in the period indicates the student was notscheduled for a class during the period.
Period Attendance Screen
l Select a row and clickShow Detail to view the details for thatincident.
Period Attendance Screen
Edupoint Proprietary and Confidential
TeacherVUE User GuideChapter 3: Taking Attendance 45
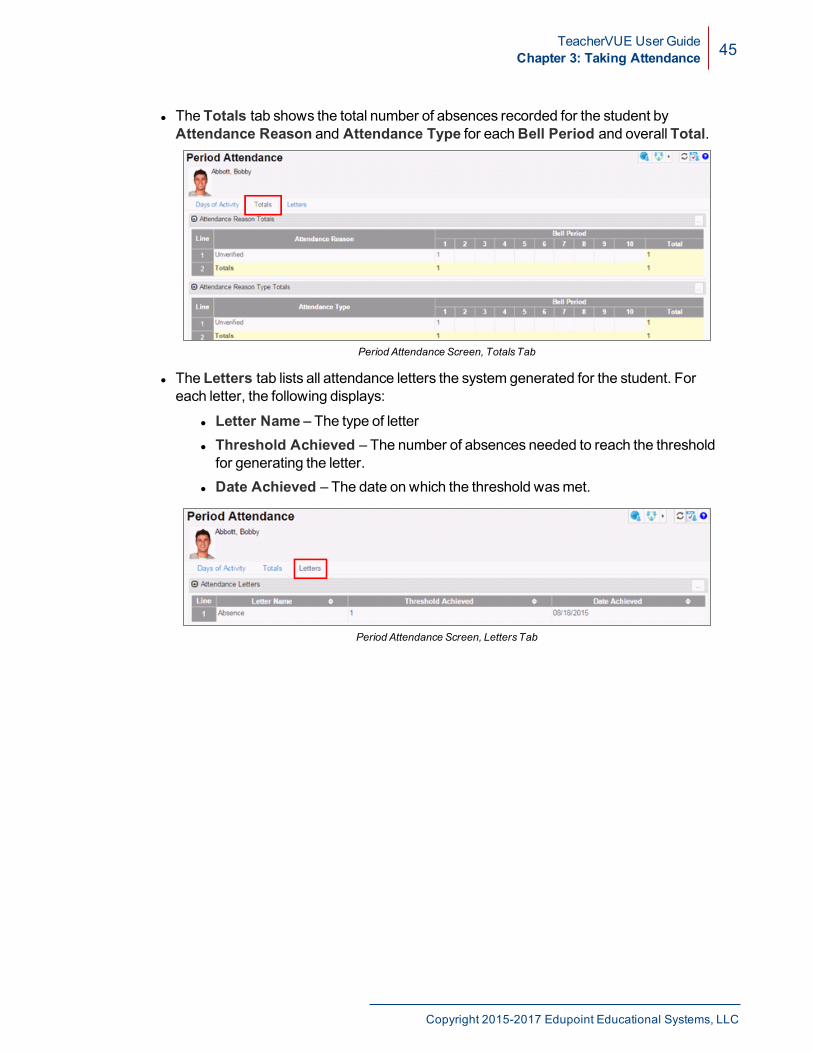
l The Totals tab shows the total number of absences recorded for the student byAttendance Reason and Attendance Type for eachBell Period and overall Total.
Period Attendance Screen, TotalsTab
l The Letters tab lists all attendance letters the system generated for the student. Foreach letter, the following displays:
l Letter Name – The type of letterl Threshold Achieved – The number of absences needed to reach the thresholdfor generating the letter.
l Date Achieved – The date on which the threshold wasmet.
Period Attendance Screen, LettersTab
Copyright 2015-2017 Edupoint Educational Systems, LLC

Chapter 4:Taking Lunch and Universal
BreakfastOverview 47Taking Lunch Counts 47Recording Universal Breakfast 49
TeacherVUE User GuideChapter 4: Taking Lunch and Universal Breakfast 47
OverviewDepending on your district’s settings, youmay be able to take lunch counts for your class or recordyour students’ participation in a Universal Breakfast program.
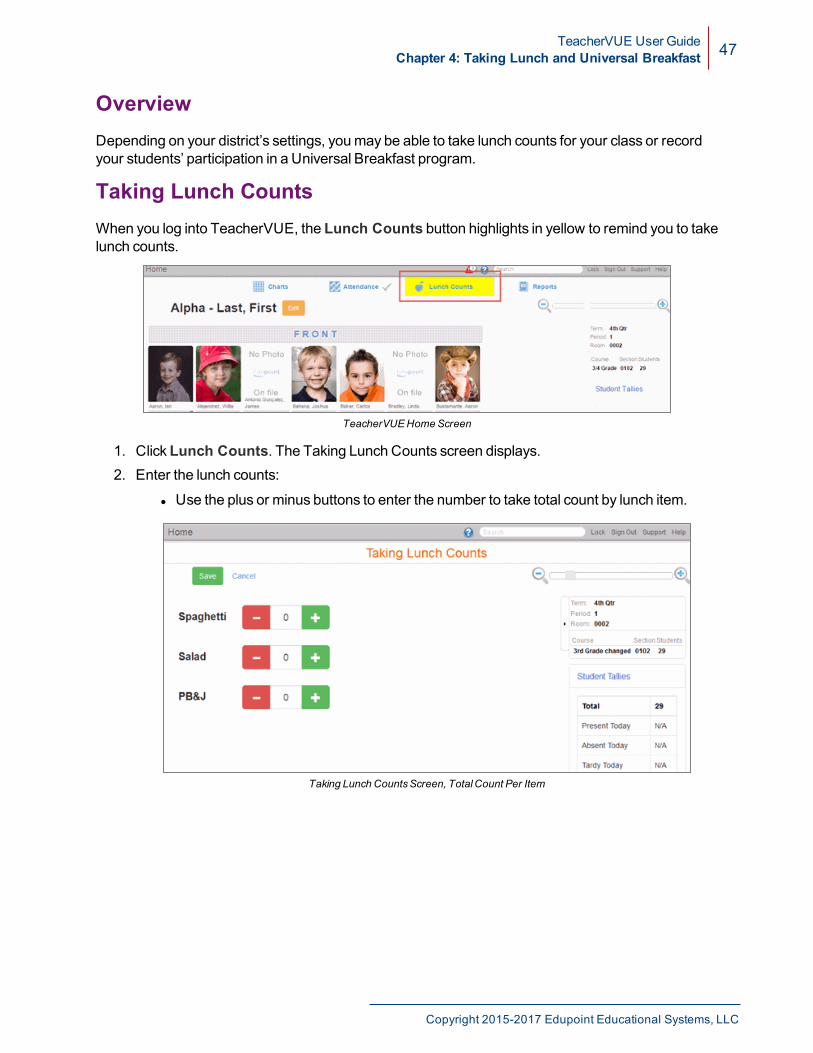
Taking Lunch CountsWhen you log into TeacherVUE, the Lunch Counts button highlights in yellow to remind you to takelunch counts.
TeacherVUEHomeScreen
1. ClickLunch Counts. The Taking Lunch Counts screen displays.2. Enter the lunch counts:
l Use the plus or minus buttons to enter the number to take total count by lunch item.
Taking Lunch CountsScreen, TotalCount Per Item
Copyright 2015-2017 Edupoint Educational Systems, LLC
48 TeacherVUE User GuideChapter 4: Taking Lunch and Universal Breakfast
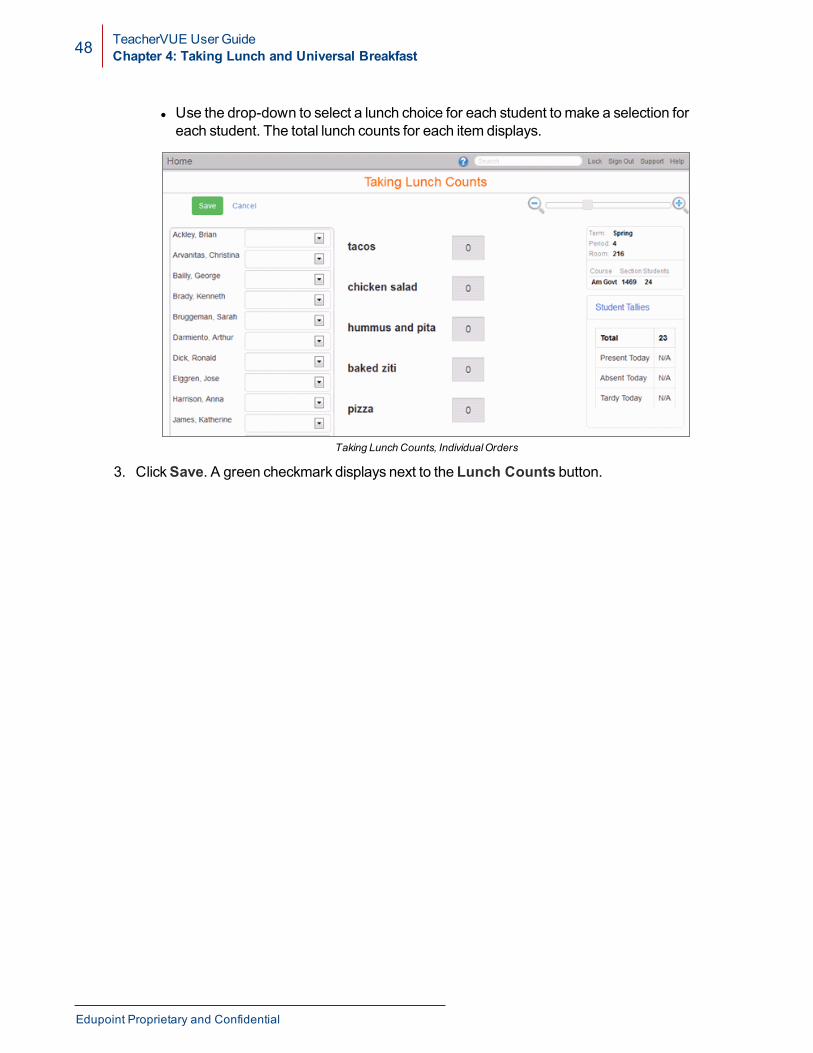
l Use the drop-down to select a lunch choice for each student to make a selection foreach student. The total lunch counts for each item displays.
Taking Lunch Counts, IndividualOrders
3. ClickSave. A green checkmark displays next to the Lunch Counts button.
Edupoint Proprietary and Confidential
TeacherVUE User GuideChapter 4: Taking Lunch and Universal Breakfast 49
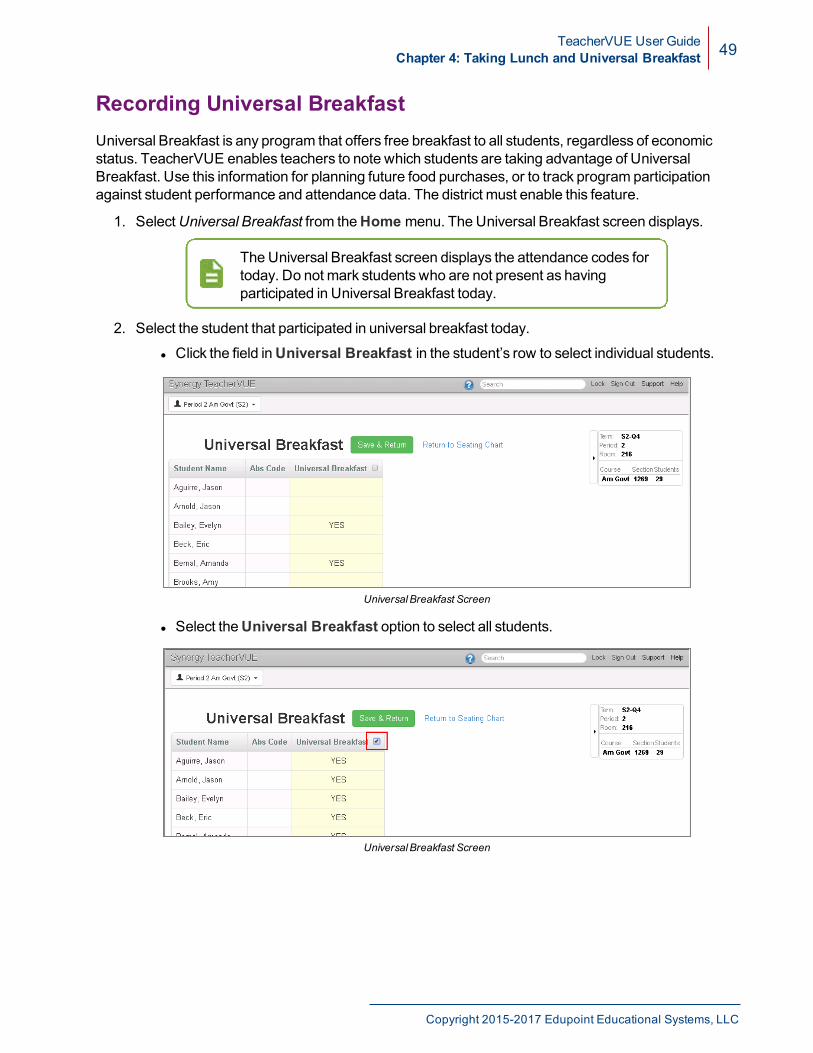
Recording Universal BreakfastUniversal Breakfast is any program that offers free breakfast to all students, regardless of economicstatus. TeacherVUE enables teachers to note which students are taking advantage of UniversalBreakfast. Use this information for planning future food purchases, or to track program participationagainst student performance and attendance data. The district must enable this feature.
1. SelectUniversal Breakfast from theHome menu. The Universal Breakfast screen displays.
The Universal Breakfast screen displays the attendance codes fortoday. Do not mark students who are not present as havingparticipated in Universal Breakfast today.
2. Select the student that participated in universal breakfast today.
l Click the field inUniversal Breakfast in the student’s row to select individual students.
UniversalBreakfast Screen
l Select theUniversal Breakfast option to select all students.
UniversalBreakfast Screen
Copyright 2015-2017 Edupoint Educational Systems, LLC
50 TeacherVUE User GuideChapter 4: Taking Lunch and Universal Breakfast
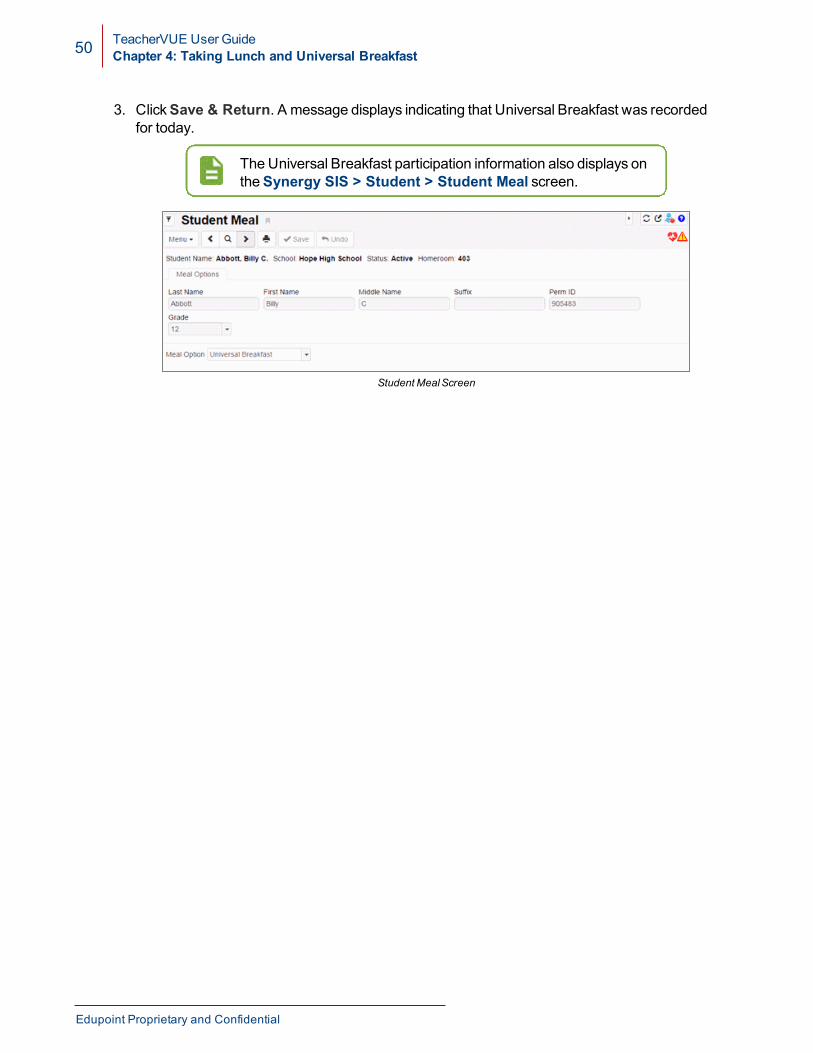
3. ClickSave & Return. A message displays indicating that Universal Breakfast was recordedfor today.
The Universal Breakfast participation information also displays ontheSynergy SIS > Student > Student Meal screen.
Student MealScreen
Edupoint Proprietary and Confidential

Chapter 5:Printing Reports
Printing Reports 52Printing Class Reports 52Printing Individual Student Reports 54
52 TeacherVUE User GuideChapter 5: Printing Reports
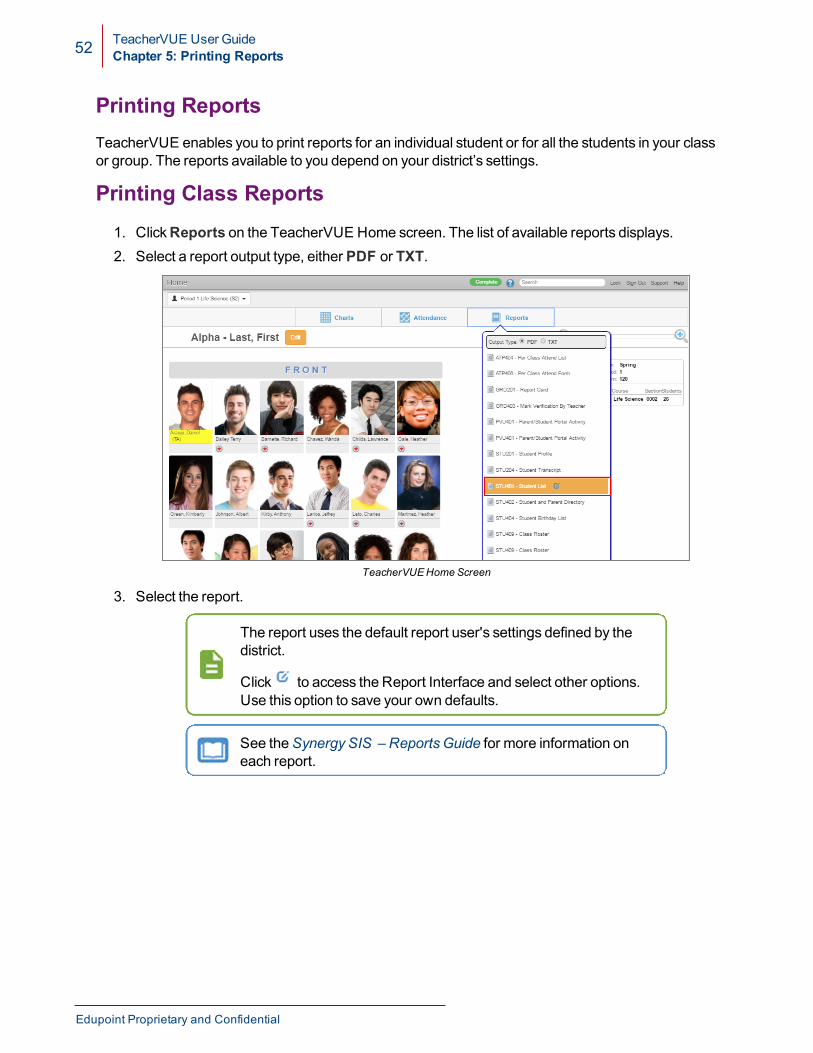
Printing ReportsTeacherVUE enables you to print reports for an individual student or for all the students in your classor group. The reports available to you depend on your district’s settings.
Printing Class Reports1. ClickReports on the TeacherVUE Home screen. The list of available reports displays.2. Select a report output type, either PDF or TXT.
TeacherVUEHomeScreen
3. Select the report.
The report uses the default report user's settings defined by thedistrict.
Click to access the Report Interface and select other options.Use this option to save your own defaults.
See theSynergy SIS – ReportsGuide for more information oneach report.
Edupoint Proprietary and Confidential

TeacherVUE User GuideChapter 5: Printing Reports 53
The status displays at the top of the screen.
TeacherVUEHomeScreen
An error couldmean that defaults were not saved for the report for
the default user. Click to access the Report Interface and enterthe required information.
The report displays in the selected format.
Report Output
Copyright 2015-2017 Edupoint Educational Systems, LLC
54 TeacherVUE User GuideChapter 5: Printing Reports
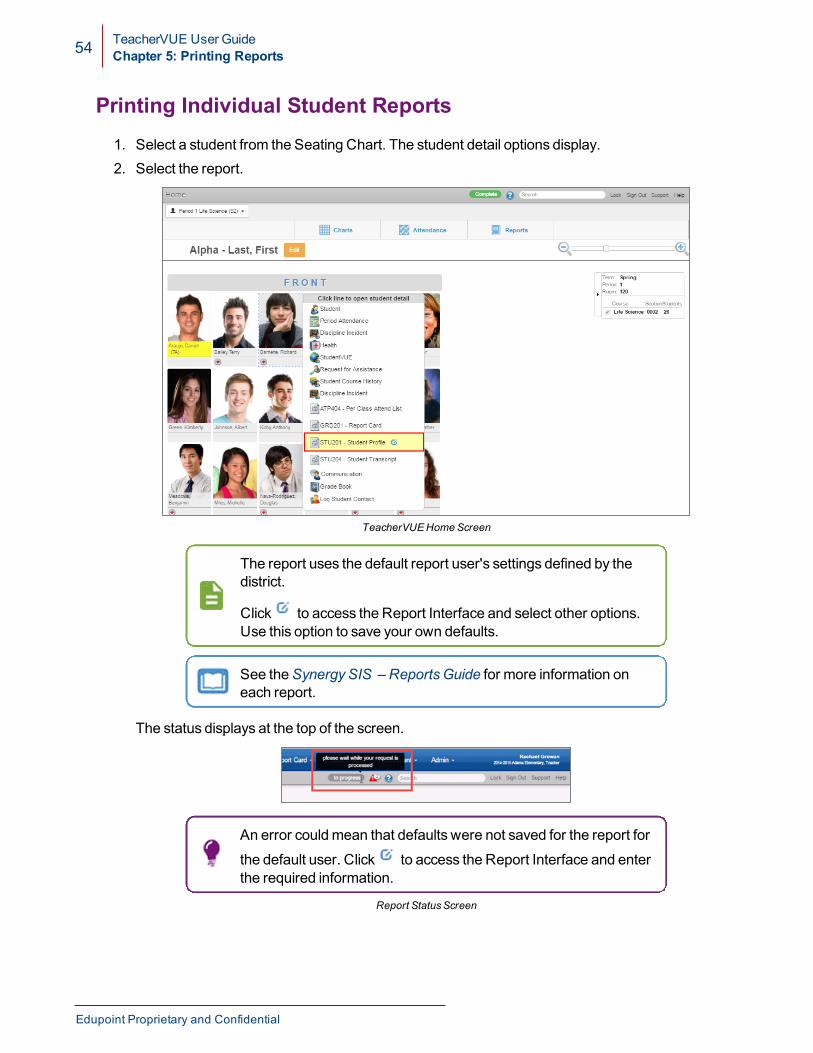
Printing Individual Student Reports1. Select a student from the Seating Chart. The student detail options display.2. Select the report.
TeacherVUEHomeScreen
The report uses the default report user's settings defined by thedistrict.
Click to access the Report Interface and select other options.Use this option to save your own defaults.
See theSynergy SIS – ReportsGuide for more information oneach report.
The status displays at the top of the screen.
An error couldmean that defaults were not saved for the report for
the default user. Click to access the Report Interface and enterthe required information.
Report StatusScreen
Edupoint Proprietary and Confidential
TeacherVUE User GuideChapter 5: Printing Reports 55
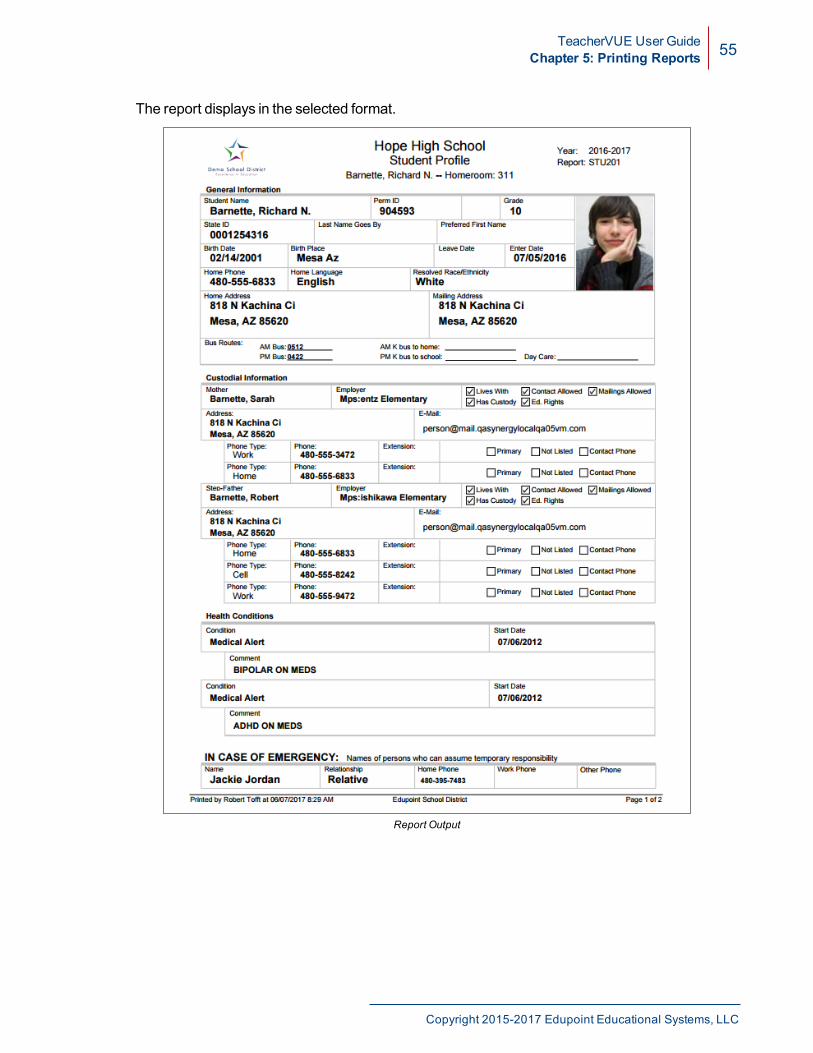
The report displays in the selected format.
Report Output
Copyright 2015-2017 Edupoint Educational Systems, LLC
Chapter 6:Communicating Using
TeacherVUESending Messages 57Logging Contact Regarding a Student 71Scheduling Parent Teacher Conferences 72Using Notes About Students 76Leaving Instructions for Substitute Teachers 79
TeacherVUE User GuideChapter 6: Communicating Using TeacherVUE 57
Sending MessagesYou can send amessage from TeacherVUE to:
l Your assigned classes and groups and their parents.l An individual student and their parents.
Pressing theSend button:
l Posts themessages in ParentVUE/StudentVUE for the selected recipientsl Sends an email to the selected recipients
How long amessage displays in ParentVUE/StudentVUE is dependenton the Recent Event Configuration. See theSynergy SIS – ParentVUEand StudentVUE Administrator Guide for more information.
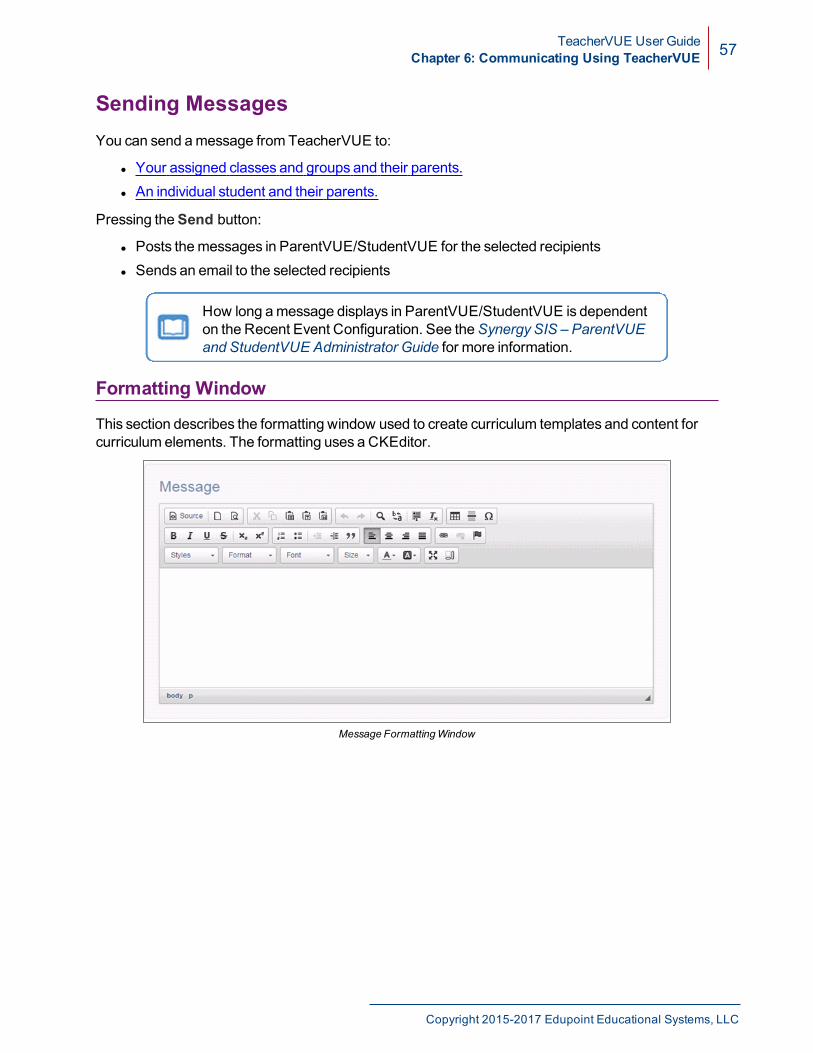
Formatting Window
This section describes the formatting window used to create curriculum templates and content forcurriculum elements. The formatting uses a CKEditor.
Message FormattingWindow
Copyright 2015-2017 Edupoint Educational Systems, LLC
58 TeacherVUE User GuideChapter 6: Communicating Using TeacherVUE
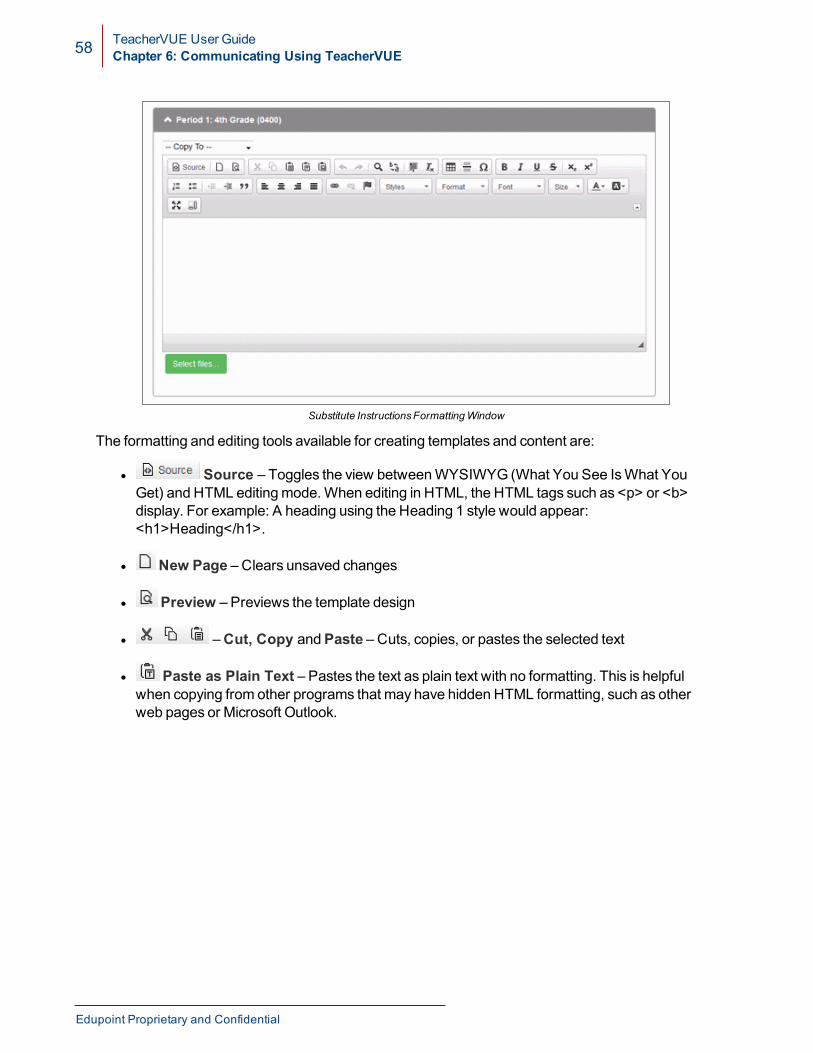
Substitute InstructionsFormattingWindow
The formatting and editing tools available for creating templates and content are:
l Source – Toggles the view betweenWYSIWYG (What You See IsWhat YouGet) and HTML editingmode.When editing in HTML, the HTML tags such as <p> or <b>display. For example: A heading using the Heading 1 style would appear:<h1>Heading</h1>.
l New Page – Clears unsaved changes
l Preview – Previews the template design
l –Cut, Copy andPaste – Cuts, copies, or pastes the selected text
l Paste as Plain Text – Pastes the text as plain text with no formatting. This is helpfulwhen copying from other programs that may have hidden HTML formatting, such as otherweb pages or Microsoft Outlook.
Edupoint Proprietary and Confidential
TeacherVUE User GuideChapter 6: Communicating Using TeacherVUE 59
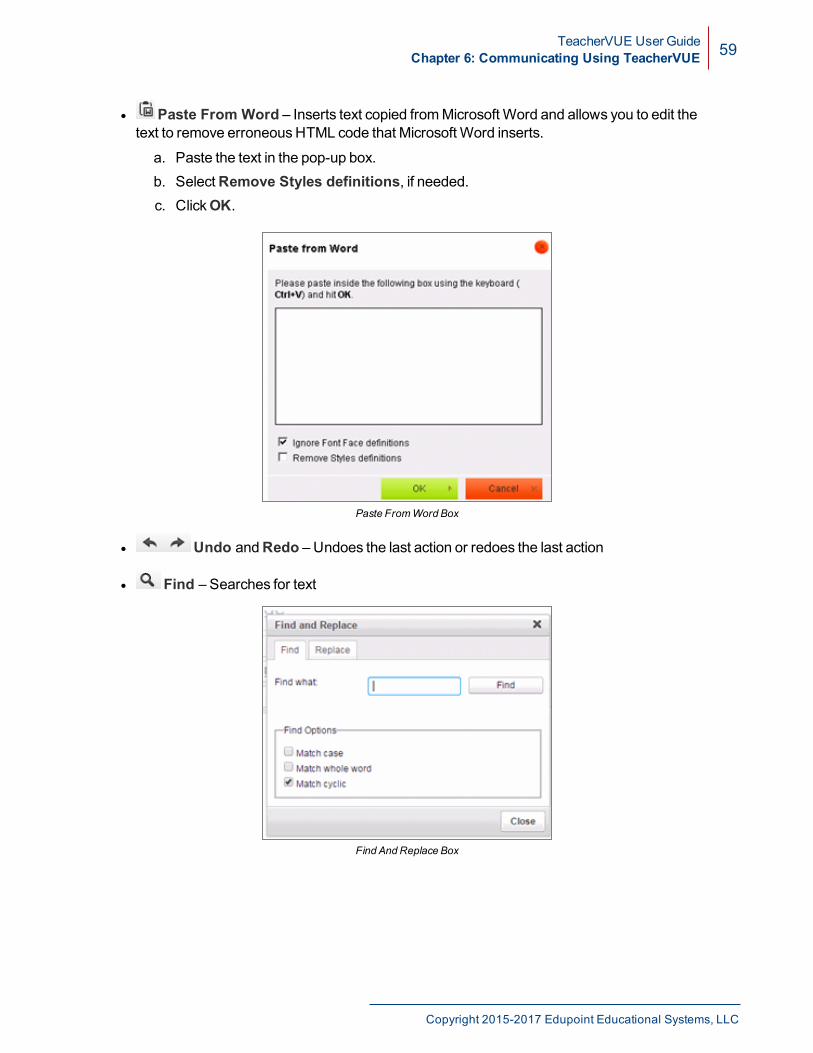
l Paste From Word – Inserts text copied fromMicrosoft Word and allows you to edit thetext to remove erroneousHTML code that Microsoft Word inserts.
a. Paste the text in the pop-up box.b. SelectRemove Styles definitions, if needed.c. ClickOK.
Paste FromWord Box
l Undo andRedo – Undoes the last action or redoes the last action
l Find – Searches for text
Find And Replace Box
Copyright 2015-2017 Edupoint Educational Systems, LLC
60 TeacherVUE User GuideChapter 6: Communicating Using TeacherVUE
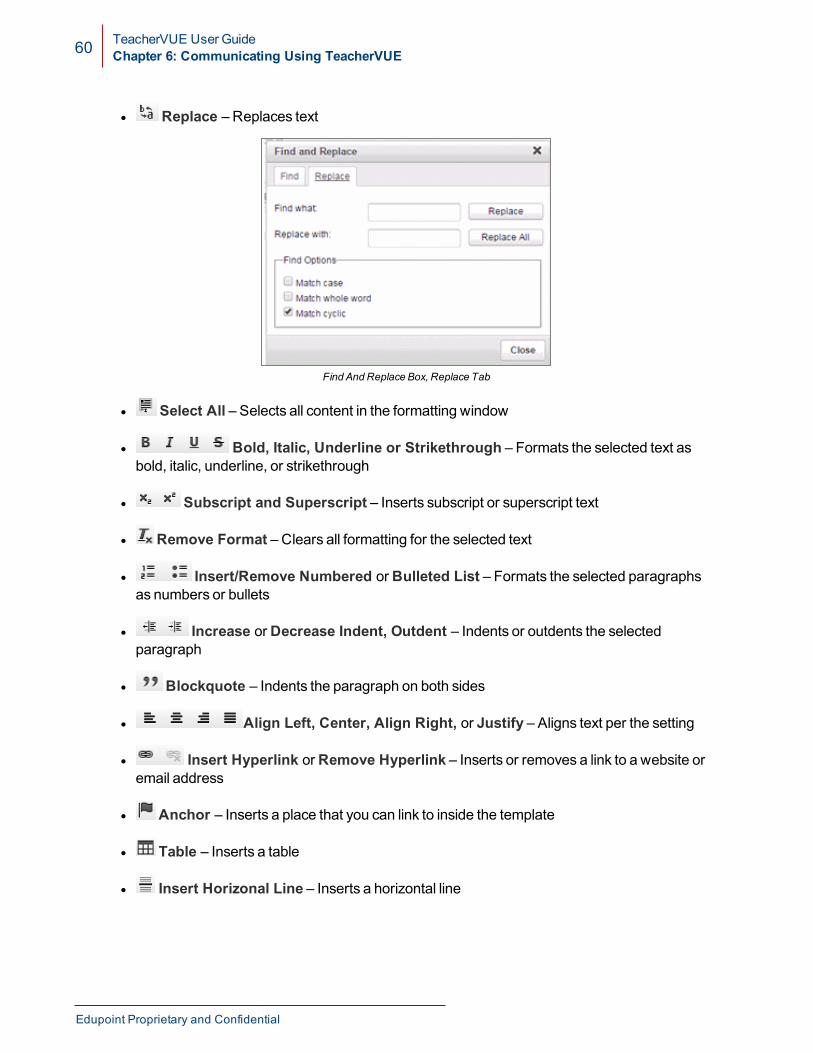
l Replace – Replaces text
Find And Replace Box, Replace Tab
l Select All – Selects all content in the formatting window
l Bold, Italic, Underline or Strikethrough – Formats the selected text asbold, italic, underline, or strikethrough
l Subscript and Superscript – Inserts subscript or superscript text
l Remove Format – Clears all formatting for the selected text
l Insert/Remove Numbered orBulleted List – Formats the selected paragraphsas numbers or bullets
l Increase orDecrease Indent, Outdent – Indents or outdents the selectedparagraph
l Blockquote – Indents the paragraph on both sides
l Align Left, Center, Align Right, or Justify – Aligns text per the setting
l Insert Hyperlink orRemove Hyperlink – Inserts or removes a link to a website oremail address
l Anchor – Inserts a place that you can link to inside the template
l Table – Inserts a table
l Insert Horizonal Line – Inserts a horizontal line
Edupoint Proprietary and Confidential
TeacherVUE User GuideChapter 6: Communicating Using TeacherVUE 61
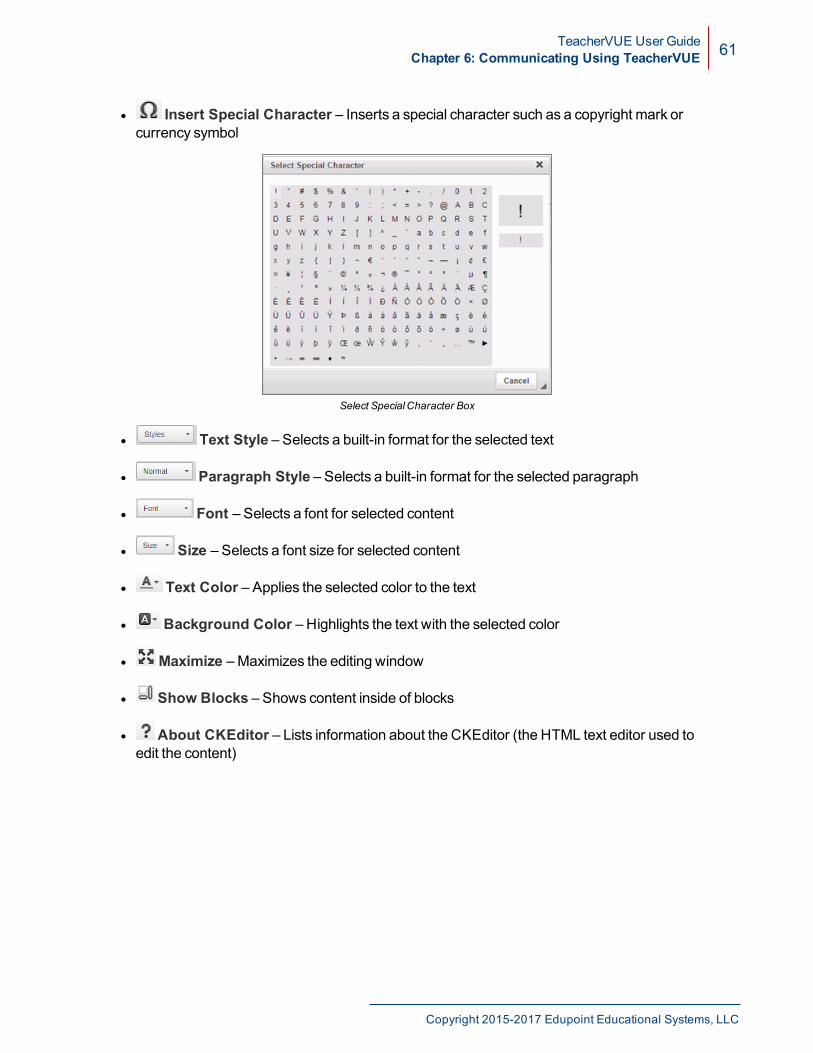
l Insert Special Character – Inserts a special character such as a copyright mark orcurrency symbol
Select SpecialCharacter Box
l Text Style – Selects a built-in format for the selected text
l Paragraph Style – Selects a built-in format for the selected paragraph
l Font – Selects a font for selected content
l Size – Selects a font size for selected content
l Text Color – Applies the selected color to the text
l Background Color – Highlights the text with the selected color
l Maximize –Maximizes the editing window
l Show Blocks – Shows content inside of blocks
l About CKEditor – Lists information about the CKEditor (the HTML text editor used toedit the content)
Copyright 2015-2017 Edupoint Educational Systems, LLC
62 TeacherVUE User GuideChapter 6: Communicating Using TeacherVUE
Sending Messages to a Class or Group
Teachers who have onlyGroups, but not sections assigned to them haveaccess toCommunication from theHome menu.
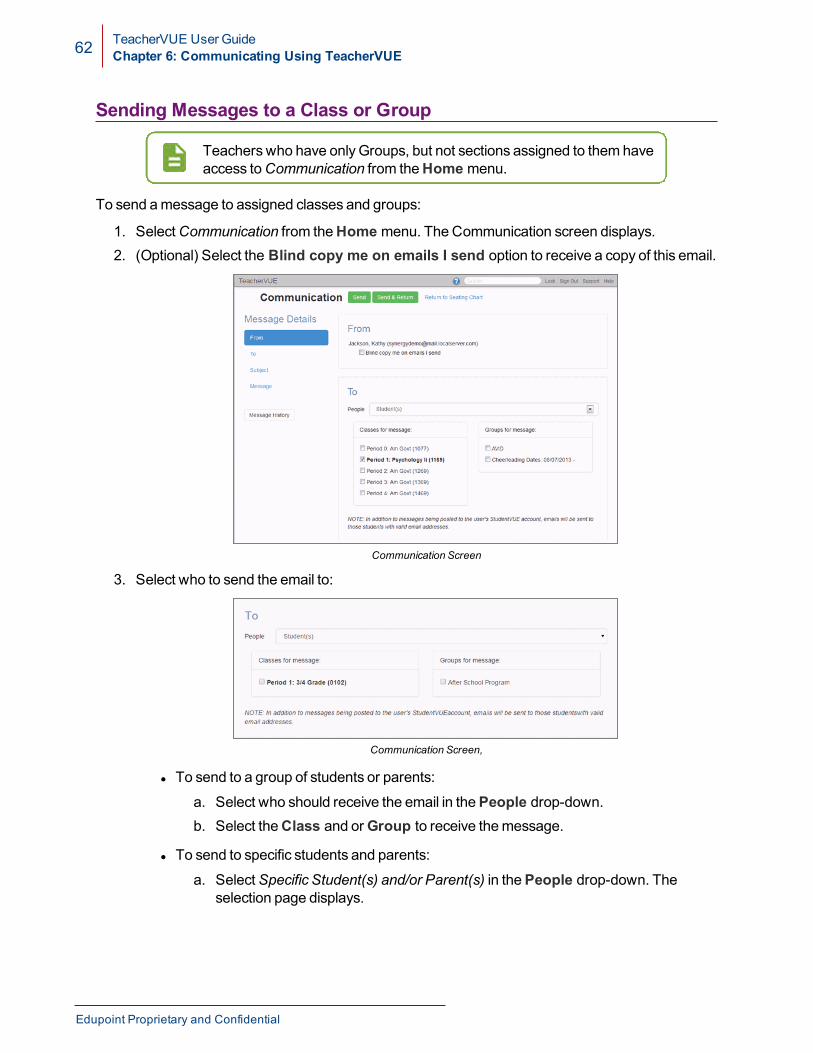
To send amessage to assigned classes and groups:
1. SelectCommunication from theHome menu. The Communication screen displays.2. (Optional) Select the Blind copy me on emails I send option to receive a copy of this email.
Communication Screen
3. Select who to send the email to:
Communication Screen,
l To send to a group of students or parents:
a. Select who should receive the email in thePeople drop-down.b. Select theClass and orGroup to receive themessage.
l To send to specific students and parents:
a. SelectSpecific Student(s) and/or Parent(s) in thePeople drop-down. Theselection page displays.
Edupoint Proprietary and Confidential

TeacherVUE User GuideChapter 6: Communicating Using TeacherVUE 63
b. Select specific people or select all by using .
Communication Screen
c. ClickDone.
4. (Optional) Type the name of the Staff Member you want to send a copy of the email to andselect from the list displayed.
Communication Screen
5. Enter themessageSubject.
Communication Screen
6. Enter and format theMessage.
Copyright 2015-2017 Edupoint Educational Systems, LLC
64 TeacherVUE User GuideChapter 6: Communicating Using TeacherVUE
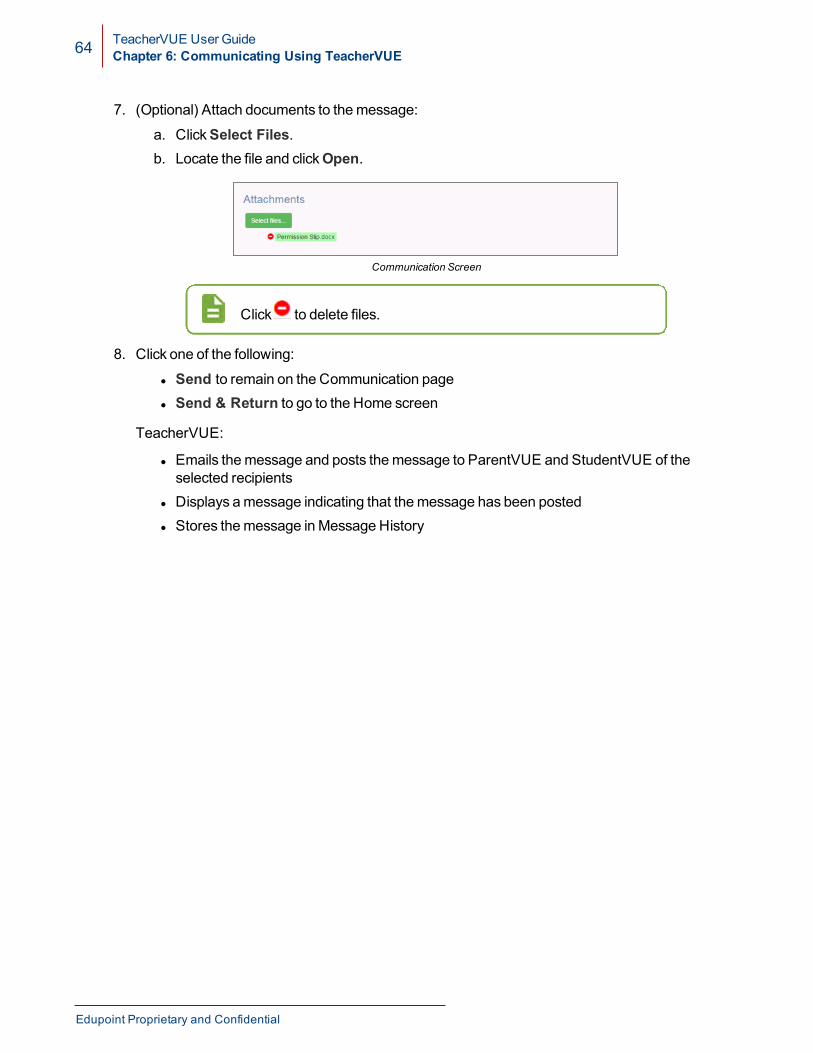
7. (Optional) Attach documents to themessage:
a. ClickSelect Files.b. Locate the file and clickOpen.
Communication Screen
Click to delete files.
8. Click one of the following:
l Send to remain on the Communication pagel Send & Return to go to the Home screen
TeacherVUE:
l Emails themessage and posts themessage to ParentVUE and StudentVUE of theselected recipients
l Displays amessage indicating that themessage has been postedl Stores themessage inMessage History
Edupoint Proprietary and Confidential
TeacherVUE User GuideChapter 6: Communicating Using TeacherVUE 65
Sending Messages to Individual Students and Parents
You can send amessage to an individual student and their parents through TeacherVUE. Themessage sends an email to the parents of record and posts amessage in ParentVUE/StudentVUE.
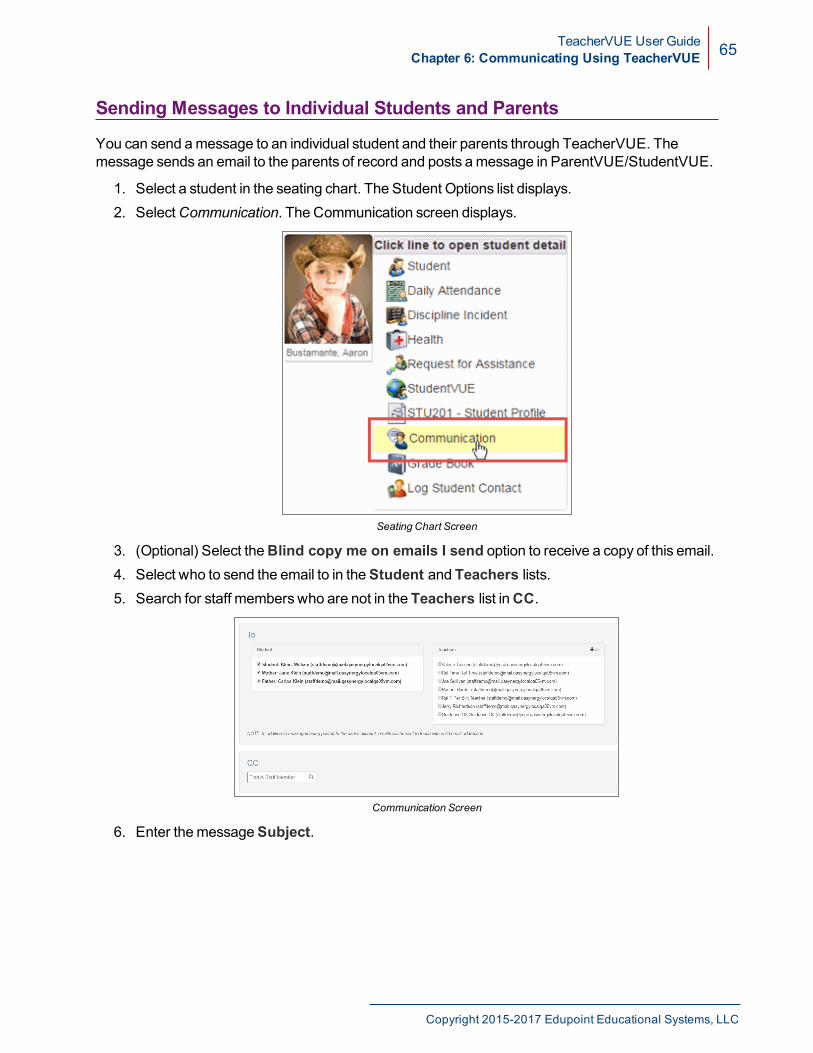
1. Select a student in the seating chart. The Student Options list displays.2. SelectCommunication. The Communication screen displays.
Seating Chart Screen
3. (Optional) Select theBlind copy me on emails I send option to receive a copy of this email.4. Select who to send the email to in theStudent and Teachers lists.5. Search for staff members who are not in the Teachers list inCC.
Communication Screen
6. Enter themessageSubject.
Copyright 2015-2017 Edupoint Educational Systems, LLC
66 TeacherVUE User GuideChapter 6: Communicating Using TeacherVUE
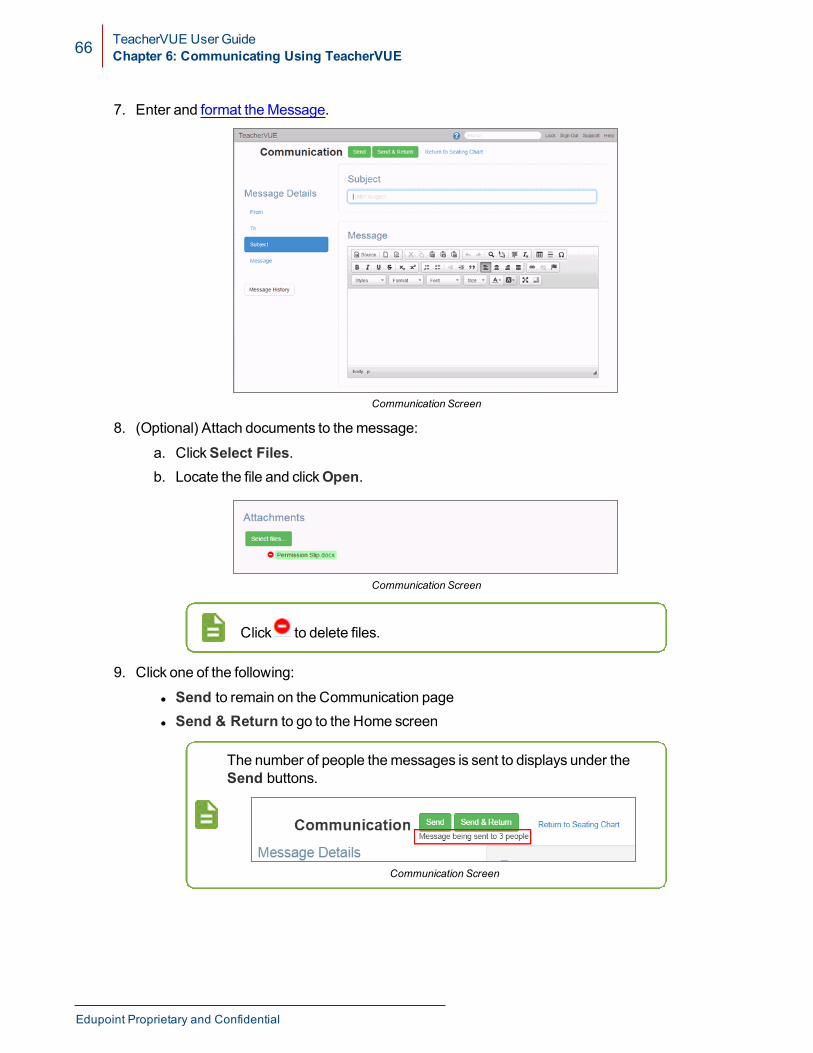
7. Enter and format theMessage.
Communication Screen
8. (Optional) Attach documents to themessage:
a. ClickSelect Files.b. Locate the file and clickOpen.
Communication Screen
Click to delete files.
9. Click one of the following:
l Send to remain on the Communication pagel Send & Return to go to the Home screen
The number of people themessages is sent to displays under theSend buttons.
Communication Screen
Edupoint Proprietary and Confidential
TeacherVUE User GuideChapter 6: Communicating Using TeacherVUE 67
TeacherVUE:
l Emails themessage and posts themessage to ParentVUE and StudentVUE of theselected recipients
l Displays amessage indicating that themessage has been postedl Stores themessage inMessage History
Working with Previously Sent Messages
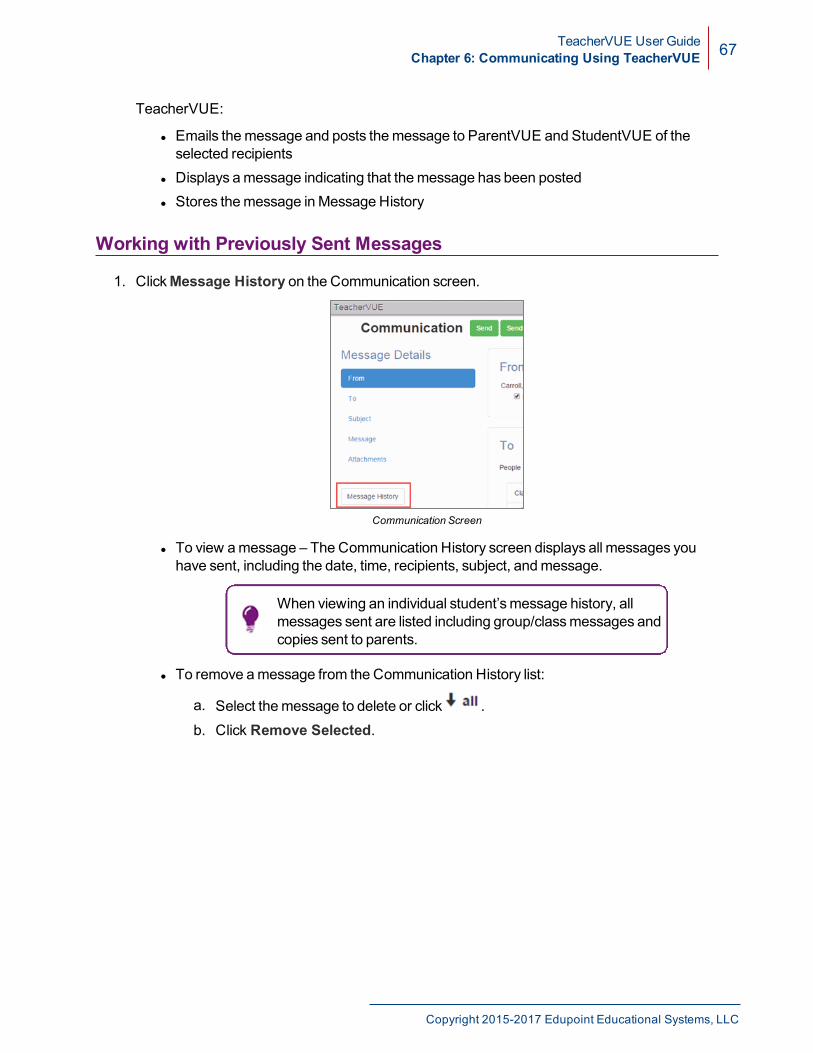
1. ClickMessage History on the Communication screen.
Communication Screen
l To view amessage – The Communication History screen displays all messages youhave sent, including the date, time, recipients, subject, andmessage.
When viewing an individual student’smessage history, allmessages sent are listed including group/classmessages andcopies sent to parents.
l To remove amessage from the Communication History list:
a. Select themessage to delete or click .b. Click Remove Selected.
Copyright 2015-2017 Edupoint Educational Systems, LLC
68 TeacherVUE User GuideChapter 6: Communicating Using TeacherVUE
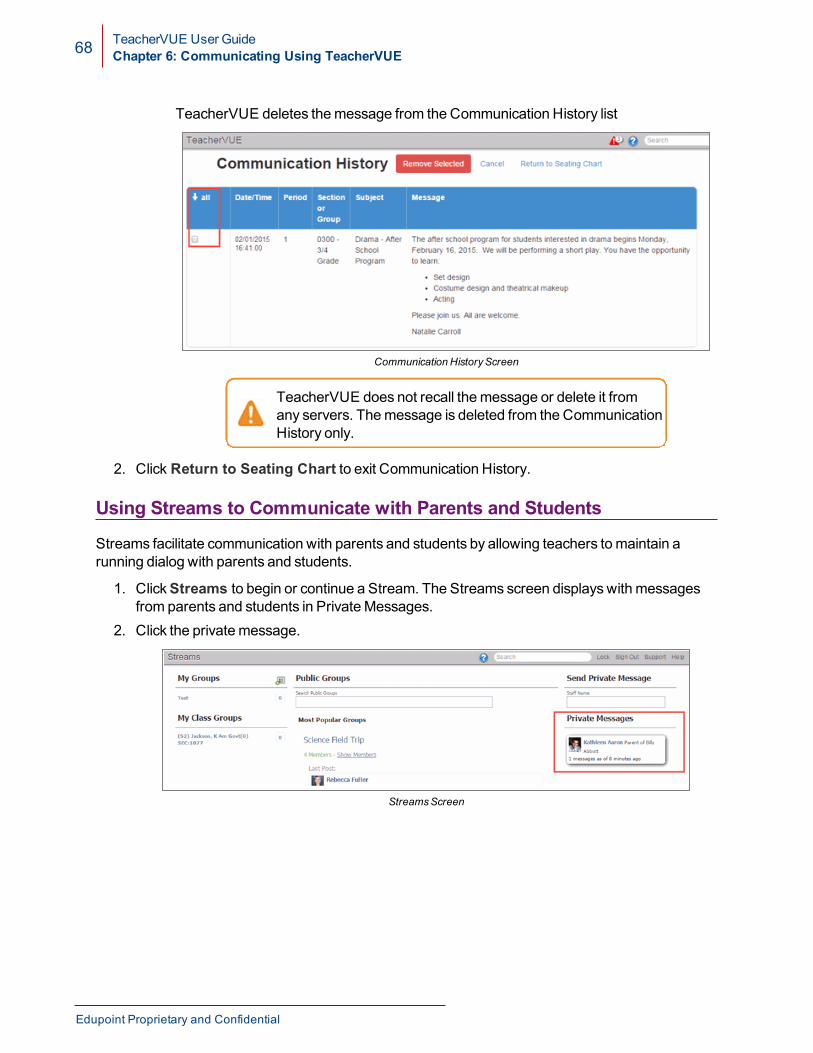
TeacherVUE deletes themessage from the Communication History list
Communication HistoryScreen
TeacherVUE does not recall themessage or delete it fromany servers. Themessage is deleted from the CommunicationHistory only.
2. Click Return to Seating Chart to exit Communication History.
Using Streams to Communicate with Parents and Students
Streams facilitate communication with parents and students by allowing teachers tomaintain arunning dialog with parents and students.
1. ClickStreams to begin or continue a Stream. The Streams screen displayswith messagesfrom parents and students in PrivateMessages.
2. Click the privatemessage.
StreamsScreen
Edupoint Proprietary and Confidential
TeacherVUE User GuideChapter 6: Communicating Using TeacherVUE 69
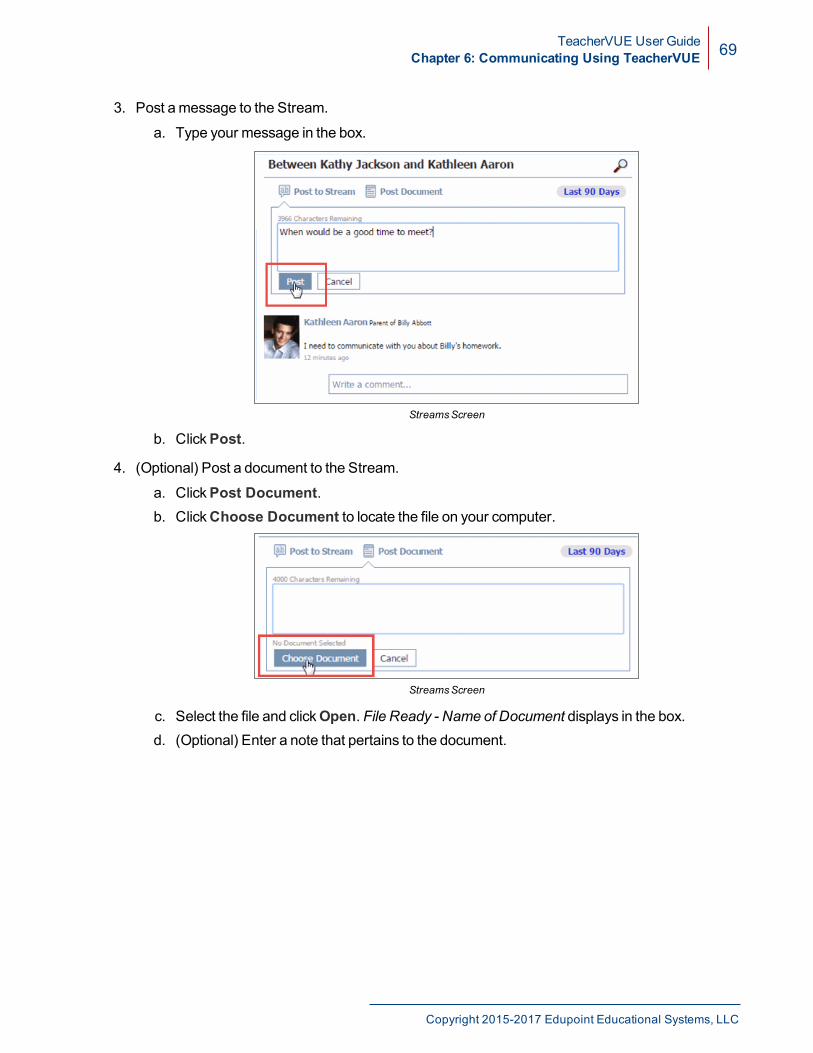
3. Post amessage to the Stream.
a. Type your message in the box.
StreamsScreen
b. ClickPost.
4. (Optional) Post a document to the Stream.
a. ClickPost Document.b. ClickChoose Document to locate the file on your computer.
StreamsScreen
c. Select the file and clickOpen. File Ready - Name of Document displays in the box.d. (Optional) Enter a note that pertains to the document.
Copyright 2015-2017 Edupoint Educational Systems, LLC
70 TeacherVUE User GuideChapter 6: Communicating Using TeacherVUE
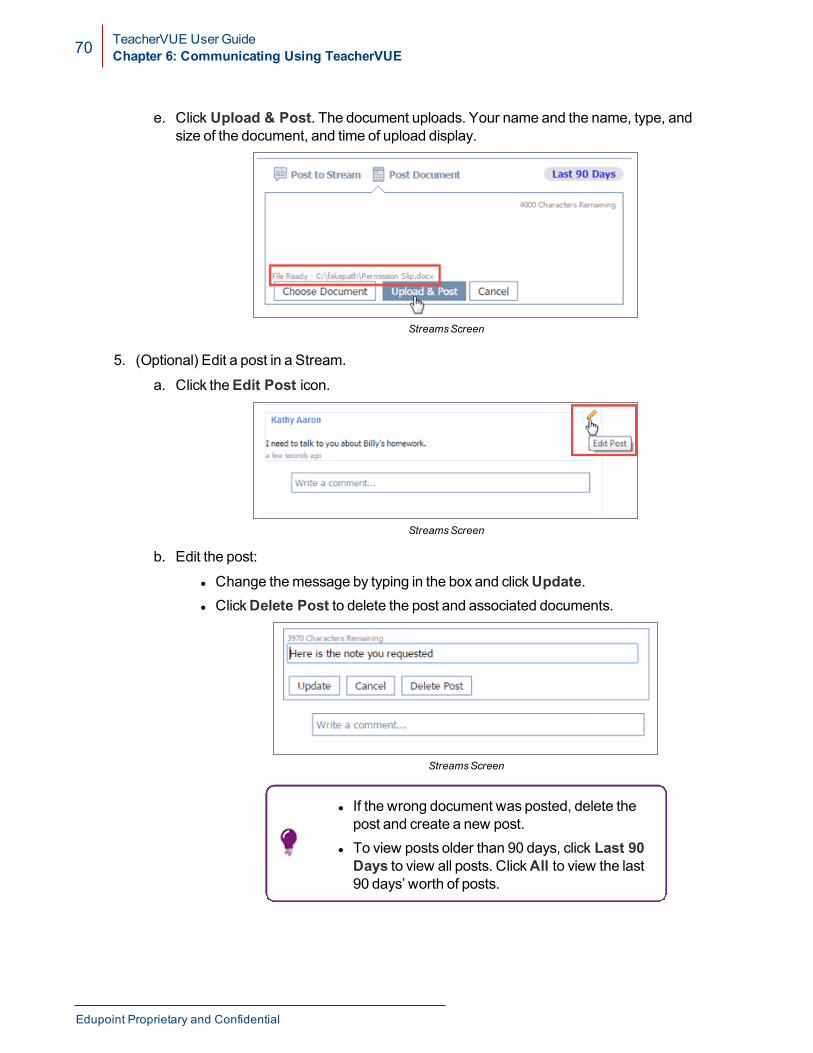
e. Click Upload & Post. The document uploads. Your name and the name, type, andsize of the document, and time of upload display.
StreamsScreen
5. (Optional) Edit a post in a Stream.
a. Click theEdit Post icon.
StreamsScreen
b. Edit the post:
l Change themessage by typing in the box and clickUpdate.l ClickDelete Post to delete the post and associated documents.
StreamsScreen
l If the wrong document was posted, delete thepost and create a new post.
l To view posts older than 90 days, click Last 90Days to view all posts. ClickAll to view the last90 days’ worth of posts.
Edupoint Proprietary and Confidential
TeacherVUE User GuideChapter 6: Communicating Using TeacherVUE 71
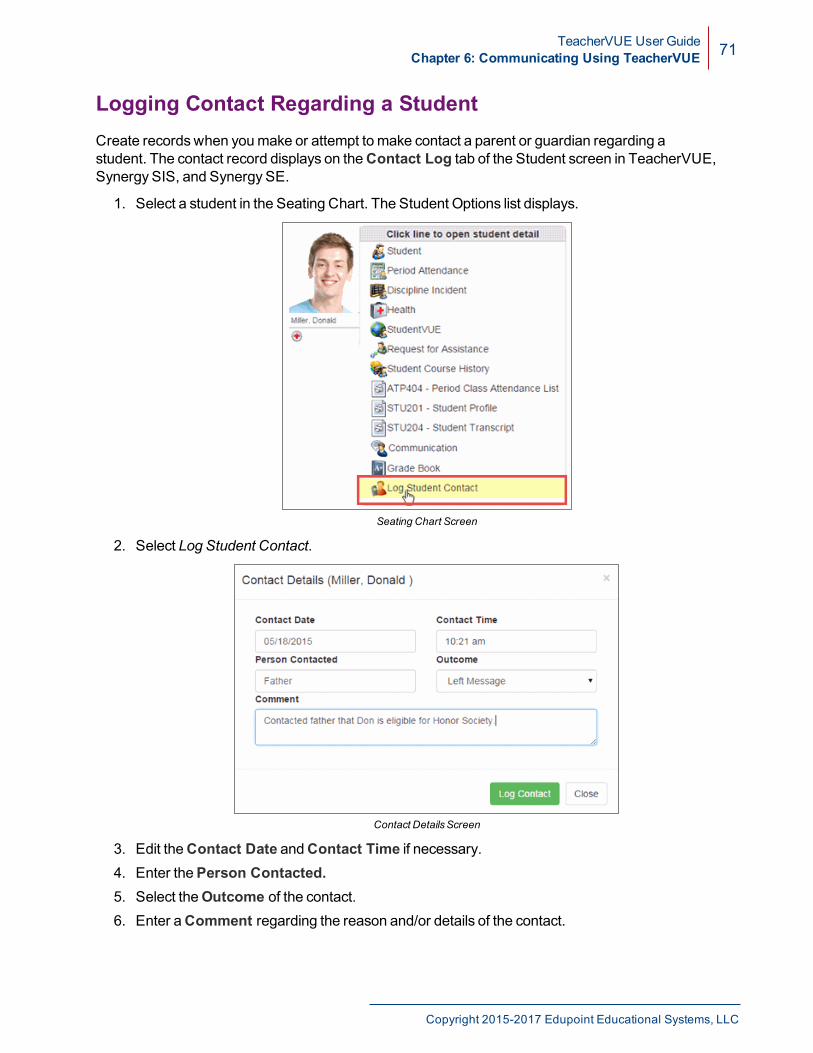
Logging Contact Regarding a StudentCreate recordswhen youmake or attempt to make contact a parent or guardian regarding astudent. The contact record displays on theContact Log tab of the Student screen in TeacherVUE,Synergy SIS, and Synergy SE.
1. Select a student in the Seating Chart. The Student Options list displays.
Seating Chart Screen
2. Select Log Student Contact.
Contact DetailsScreen
3. Edit theContact Date andContact Time if necessary.4. Enter thePerson Contacted.5. Select theOutcome of the contact.6. Enter aComment regarding the reason and/or details of the contact.
Copyright 2015-2017 Edupoint Educational Systems, LLC
72 TeacherVUE User GuideChapter 6: Communicating Using TeacherVUE
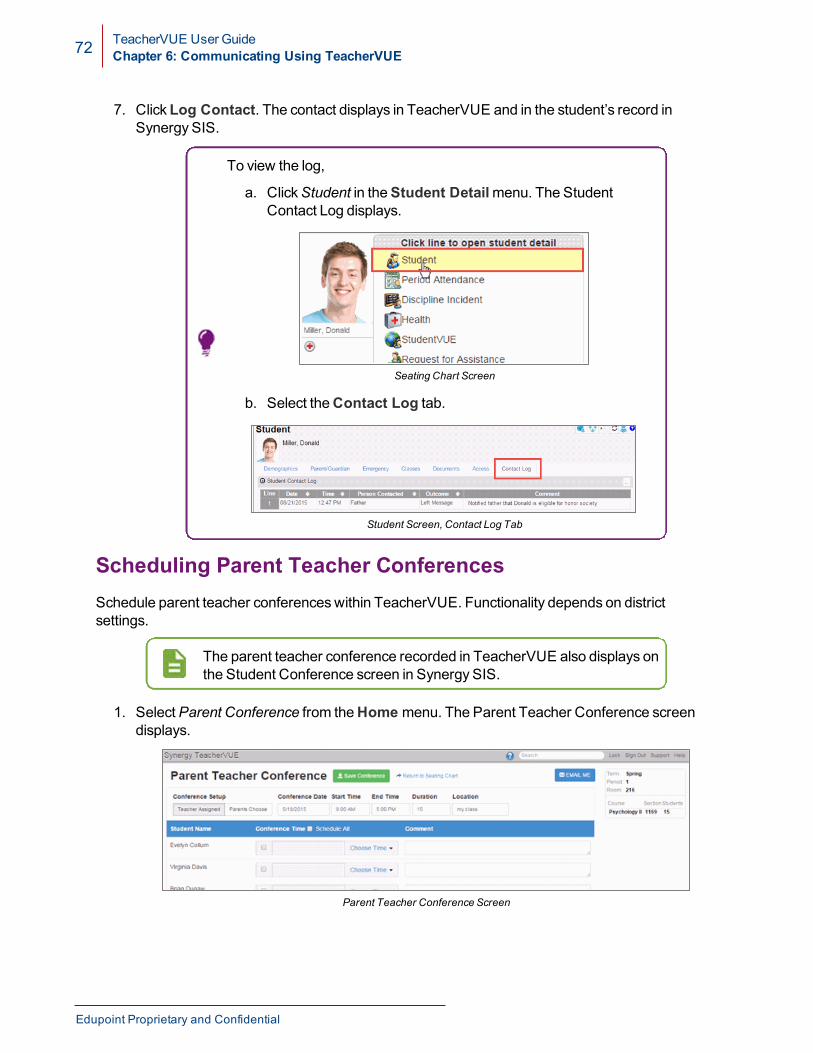
7. ClickLog Contact. The contact displays in TeacherVUE and in the student’s record inSynergy SIS.
To view the log,
a. ClickStudent in theStudent Detailmenu. The StudentContact Log displays.
Seating Chart Screen
b. Select theContact Log tab.
Student Screen, Contact Log Tab
Scheduling Parent Teacher ConferencesSchedule parent teacher conferenceswithin TeacherVUE. Functionality depends on districtsettings.
The parent teacher conference recorded in TeacherVUE also displays onthe Student Conference screen in Synergy SIS.
1. SelectParent Conference from theHome menu. The Parent Teacher Conference screendisplays.
Parent Teacher Conference Screen
Edupoint Proprietary and Confidential
TeacherVUE User GuideChapter 6: Communicating Using TeacherVUE 73
2. Select theConference Date, Start Time, End Time,Duration, and Location.
l The time displayed is in increments of the selected duration.l To schedule a conference at a different time, select a differentday and time.
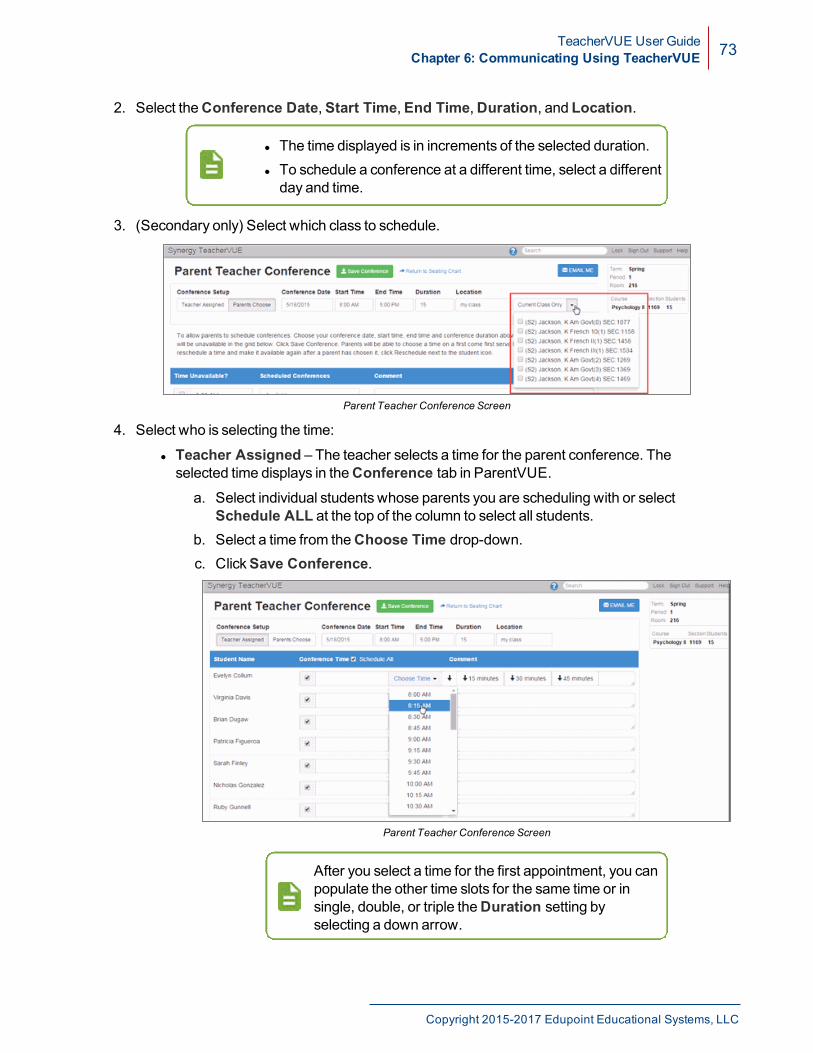
3. (Secondary only) Select which class to schedule.
Parent Teacher Conference Screen
4. Select who is selecting the time:
l Teacher Assigned – The teacher selects a time for the parent conference. Theselected time displays in theConference tab in ParentVUE.
a. Select individual students whose parents you are scheduling with or selectSchedule ALL at the top of the column to select all students.
b. Select a time from theChoose Time drop-down.c. ClickSave Conference.
Parent Teacher Conference Screen
After you select a time for the first appointment, you canpopulate the other time slots for the same time or insingle, double, or triple theDuration setting byselecting a down arrow.
Copyright 2015-2017 Edupoint Educational Systems, LLC
74 TeacherVUE User GuideChapter 6: Communicating Using TeacherVUE
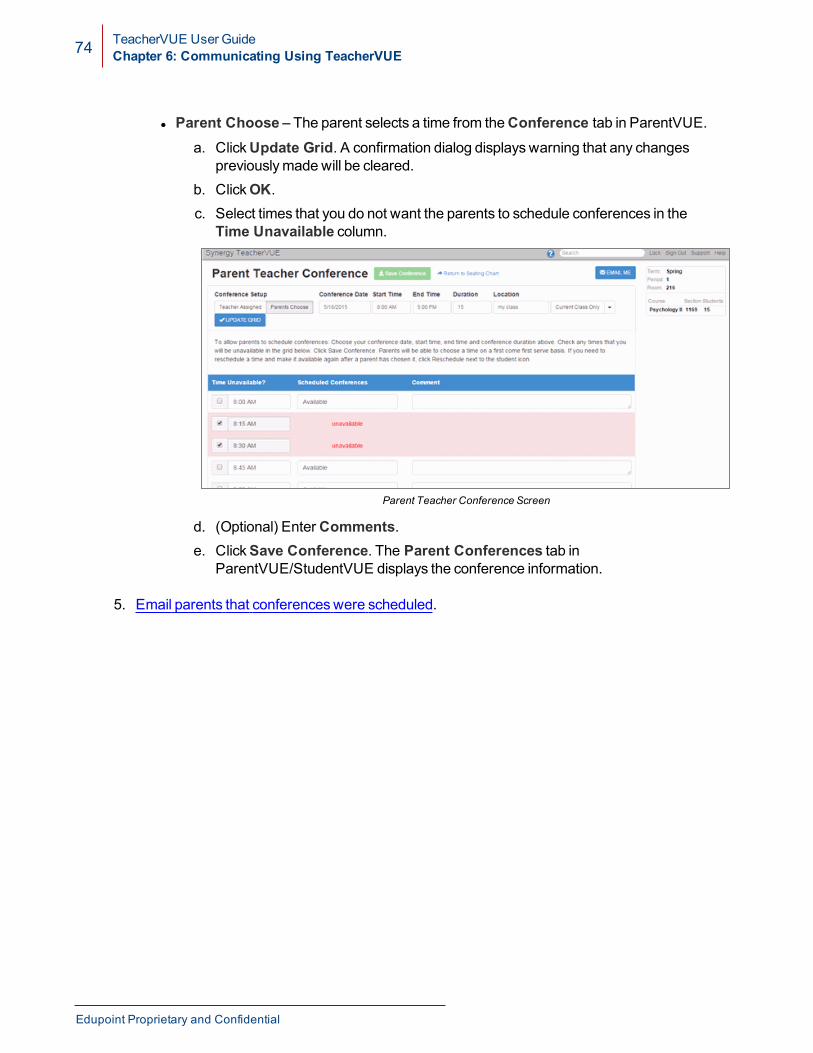
l Parent Choose – The parent selects a time from theConference tab in ParentVUE.a. ClickUpdate Grid. A confirmation dialog displayswarning that any changes
previouslymade will be cleared.b. ClickOK.c. Select times that you do not want the parents to schedule conferences in the
Time Unavailable column.
Parent Teacher Conference Screen
d. (Optional) EnterComments.e. ClickSave Conference. The Parent Conferences tab in
ParentVUE/StudentVUE displays the conference information.
5. Email parents that conferenceswere scheduled.
Edupoint Proprietary and Confidential
TeacherVUE User GuideChapter 6: Communicating Using TeacherVUE 75
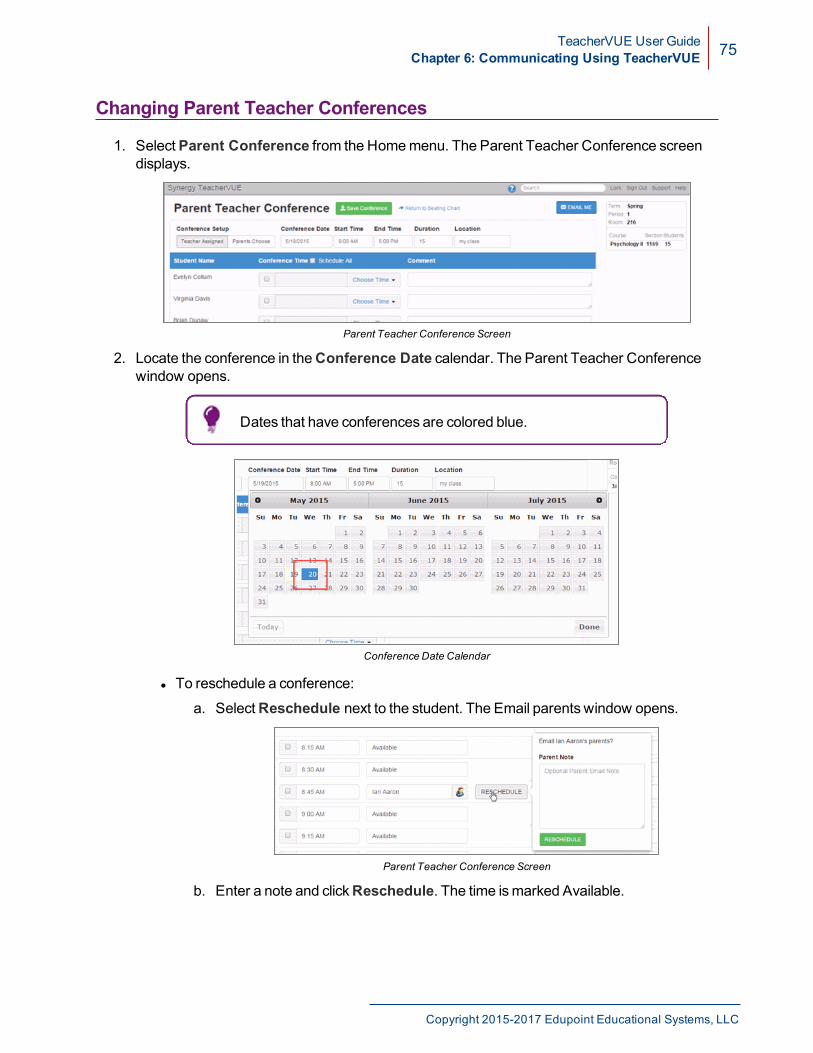
Changing Parent Teacher Conferences
1. SelectParent Conference from the Homemenu. The Parent Teacher Conference screendisplays.
Parent Teacher Conference Screen
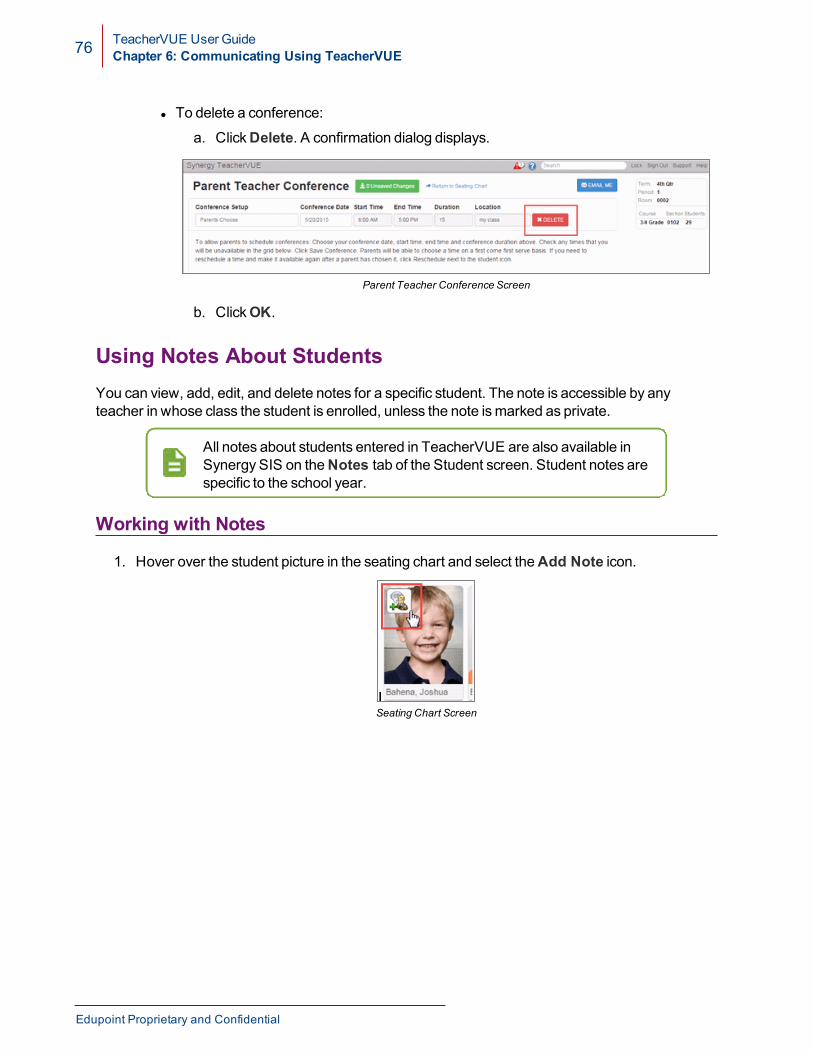
2. Locate the conference in theConference Date calendar. The Parent Teacher Conferencewindow opens.
Dates that have conferences are colored blue.
Conference Date Calendar
l To reschedule a conference:
a. SelectReschedule next to the student. The Email parents window opens.
Parent Teacher Conference Screen
b. Enter a note and clickReschedule. The time ismarked Available.
Copyright 2015-2017 Edupoint Educational Systems, LLC
76 TeacherVUE User GuideChapter 6: Communicating Using TeacherVUE
l To delete a conference:
a. ClickDelete. A confirmation dialog displays.
Parent Teacher Conference Screen
b. ClickOK.
Using Notes About StudentsYou can view, add, edit, and delete notes for a specific student. The note is accessible by anyteacher in whose class the student is enrolled, unless the note ismarked as private.
All notes about students entered in TeacherVUE are also available inSynergy SIS on theNotes tab of the Student screen. Student notes arespecific to the school year.
Working with Notes
1. Hover over the student picture in the seating chart and select theAdd Note icon.
Seating Chart Screen
Edupoint Proprietary and Confidential
TeacherVUE User GuideChapter 6: Communicating Using TeacherVUE 77
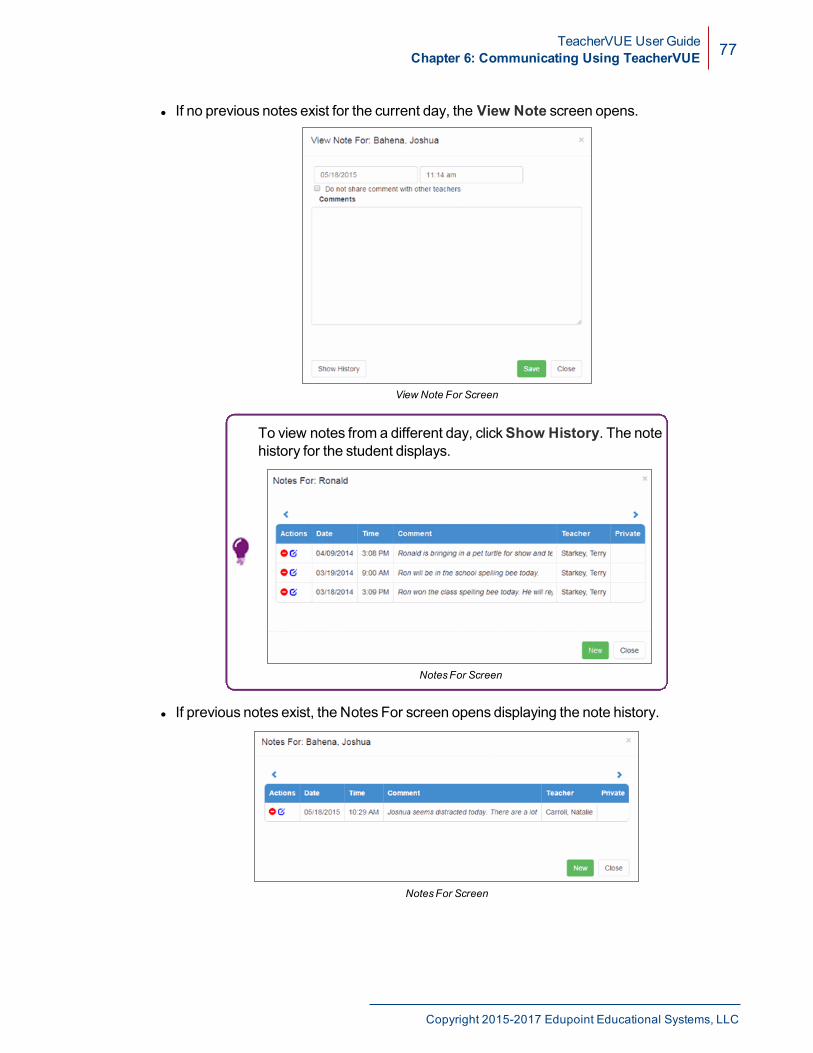
l If no previous notes exist for the current day, the View Note screen opens.
View Note For Screen
To view notes from a different day, clickShow History. The notehistory for the student displays.
NotesFor Screen
l If previous notes exist, the Notes For screen opens displaying the note history.
NotesFor Screen
Copyright 2015-2017 Edupoint Educational Systems, LLC
78 TeacherVUE User GuideChapter 6: Communicating Using TeacherVUE
l To view a long comment, hover over the Comment section.
NotesFor Screen
l To add a note, clickNew. The View Note screen opens.
l To edit a note, click the edit icon .
l To delete the note, click the delete icon and clickYes in the confirmationdialog. TeacherVUE removes the note the list. No further action is required.
2. Select the date and time of the note. The system defaults to the current date and time.3. Select Do Not Share Comment with Other Teachers to mark note as private.
If notes are not marked as private, an icon displays on allTeacherVUE charts where this student appears and on theNotestab of the Student screen with Synergy SIS .
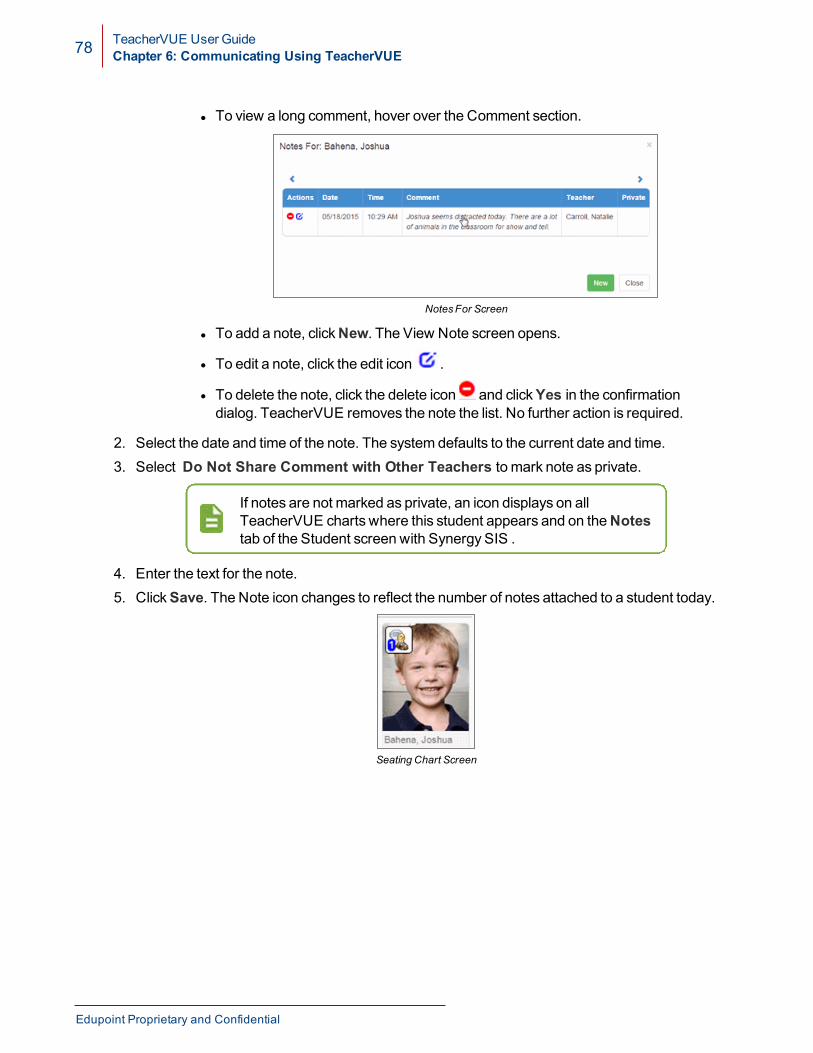
4. Enter the text for the note.5. ClickSave. The Note icon changes to reflect the number of notes attached to a student today.
Seating Chart Screen
Edupoint Proprietary and Confidential
TeacherVUE User GuideChapter 6: Communicating Using TeacherVUE 79
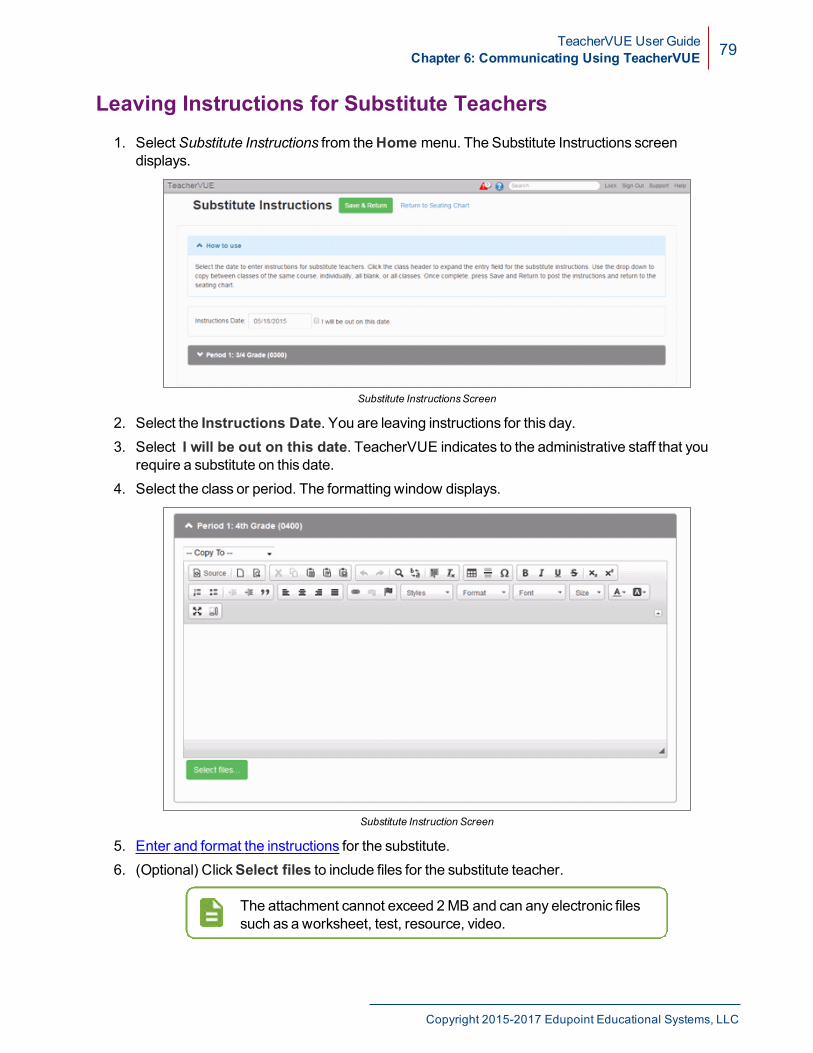
Leaving Instructions for Substitute Teachers1. SelectSubstitute Instructions from theHome menu. The Substitute Instructions screen
displays.
Substitute InstructionsScreen
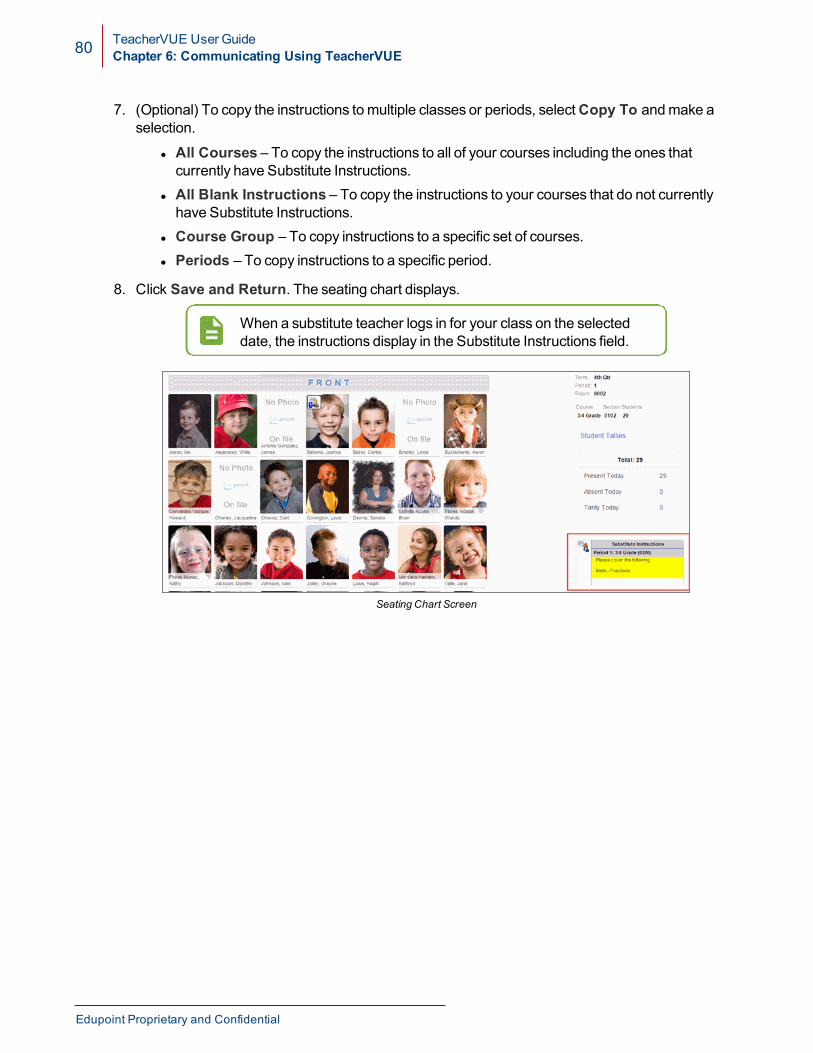
2. Select the Instructions Date. You are leaving instructions for this day.3. Select I will be out on this date. TeacherVUE indicates to the administrative staff that you
require a substitute on this date.4. Select the class or period. The formatting window displays.
Substitute Instruction Screen
5. Enter and format the instructions for the substitute.6. (Optional) ClickSelect files to include files for the substitute teacher.
The attachment cannot exceed 2MB and can any electronic filessuch as a worksheet, test, resource, video.
Copyright 2015-2017 Edupoint Educational Systems, LLC
80 TeacherVUE User GuideChapter 6: Communicating Using TeacherVUE
7. (Optional) To copy the instructions tomultiple classes or periods, selectCopy To andmake aselection.
l All Courses – To copy the instructions to all of your courses including the ones thatcurrently have Substitute Instructions.
l All Blank Instructions – To copy the instructions to your courses that do not currentlyhave Substitute Instructions.
l Course Group – To copy instructions to a specific set of courses.l Periods – To copy instructions to a specific period.
8. Click Save and Return. The seating chart displays.
When a substitute teacher logs in for your class on the selecteddate, the instructions display in the Substitute Instructions field.
Seating Chart Screen
Edupoint Proprietary and Confidential
Chapter 7:Viewing Test Results and GradesViewing Test Group Analysis 82Viewing Test Group Analysis 2 83Viewing Grades 85Updating Grades 86
82 TeacherVUE User GuideChapter 7: Viewing Test Results and Grades
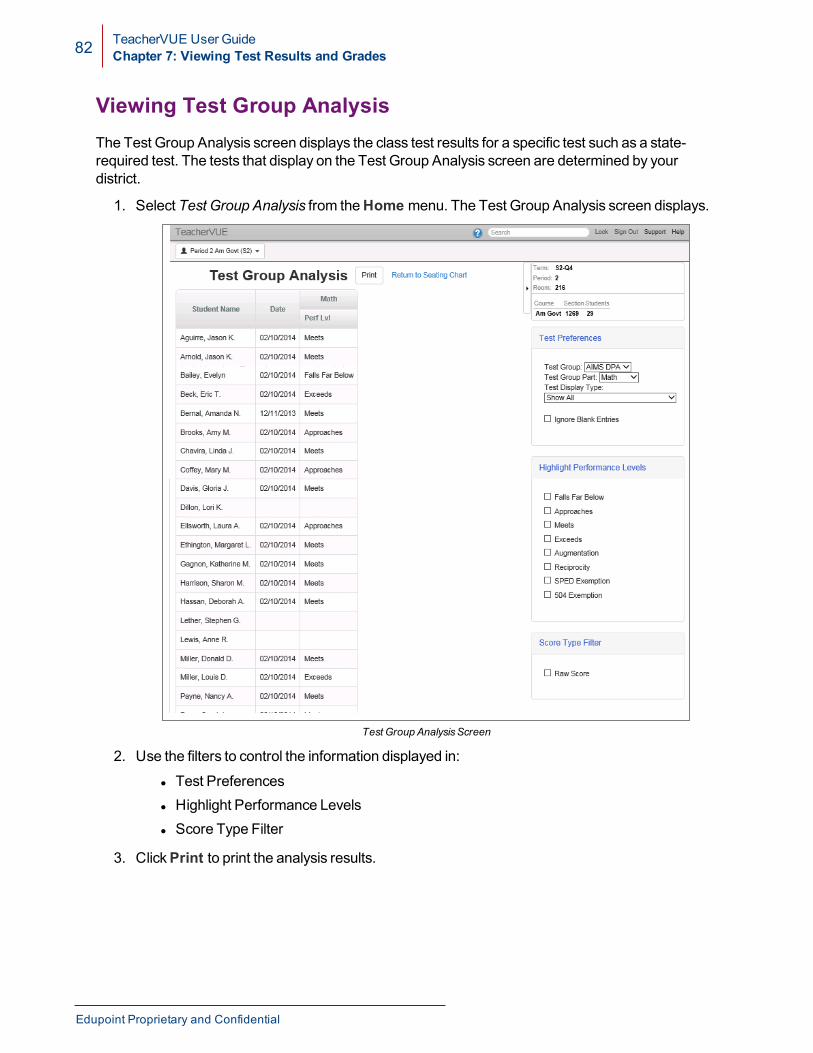
Viewing Test Group AnalysisThe Test Group Analysis screen displays the class test results for a specific test such as a state-required test. The tests that display on the Test Group Analysis screen are determined by yourdistrict.
1. Select Test Group Analysis from theHome menu. The Test Group Analysis screen displays.
Test Group AnalysisScreen
2. Use the filters to control the information displayed in:
l Test Preferencesl Highlight Performance Levelsl Score Type Filter
3. ClickPrint to print the analysis results.
Edupoint Proprietary and Confidential
TeacherVUE User GuideChapter 7: Viewing Test Results and Grades 83
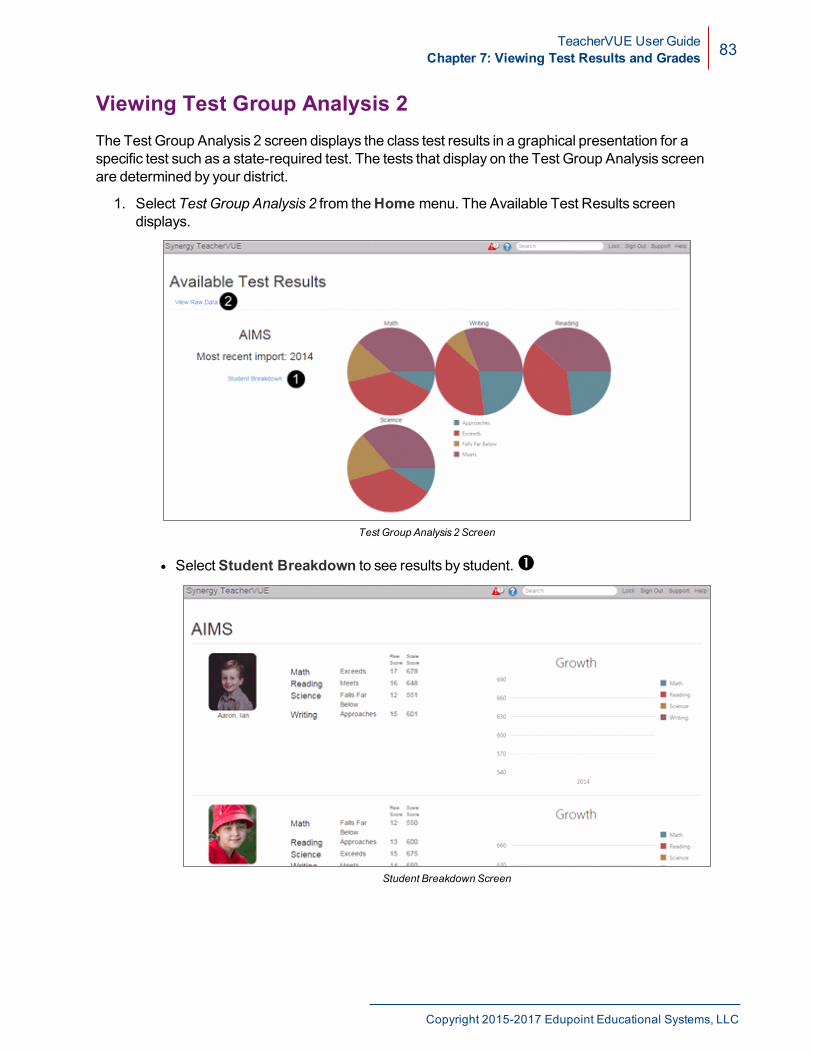
Viewing Test Group Analysis 2The Test Group Analysis 2 screen displays the class test results in a graphical presentation for aspecific test such as a state-required test. The tests that display on the Test Group Analysis screenare determined by your district.
1. Select Test Group Analysis 2 from theHome menu. The Available Test Results screendisplays.
Test Group Analysis 2 Screen
l SelectStudent Breakdown to see results by student.�
Student Breakdown Screen
Copyright 2015-2017 Edupoint Educational Systems, LLC
84 TeacherVUE User GuideChapter 7: Viewing Test Results and Grades
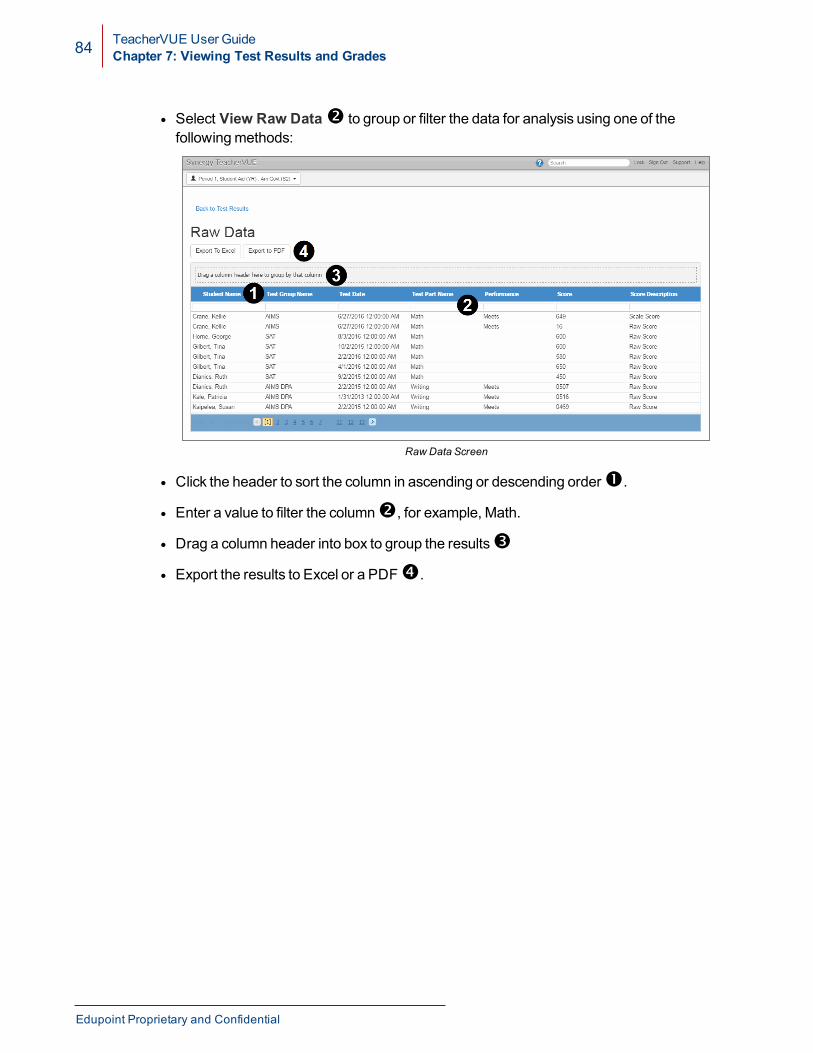
l Select View Raw Data� to group or filter the data for analysis using one of thefollowingmethods:
Raw Data Screen
l Click the header to sort the column in ascending or descending order�.
l Enter a value to filter the column�, for example, Math.
l Drag a column header into box to group the results�
l Export the results to Excel or a PDF�.
Edupoint Proprietary and Confidential
TeacherVUE User GuideChapter 7: Viewing Test Results and Grades 85
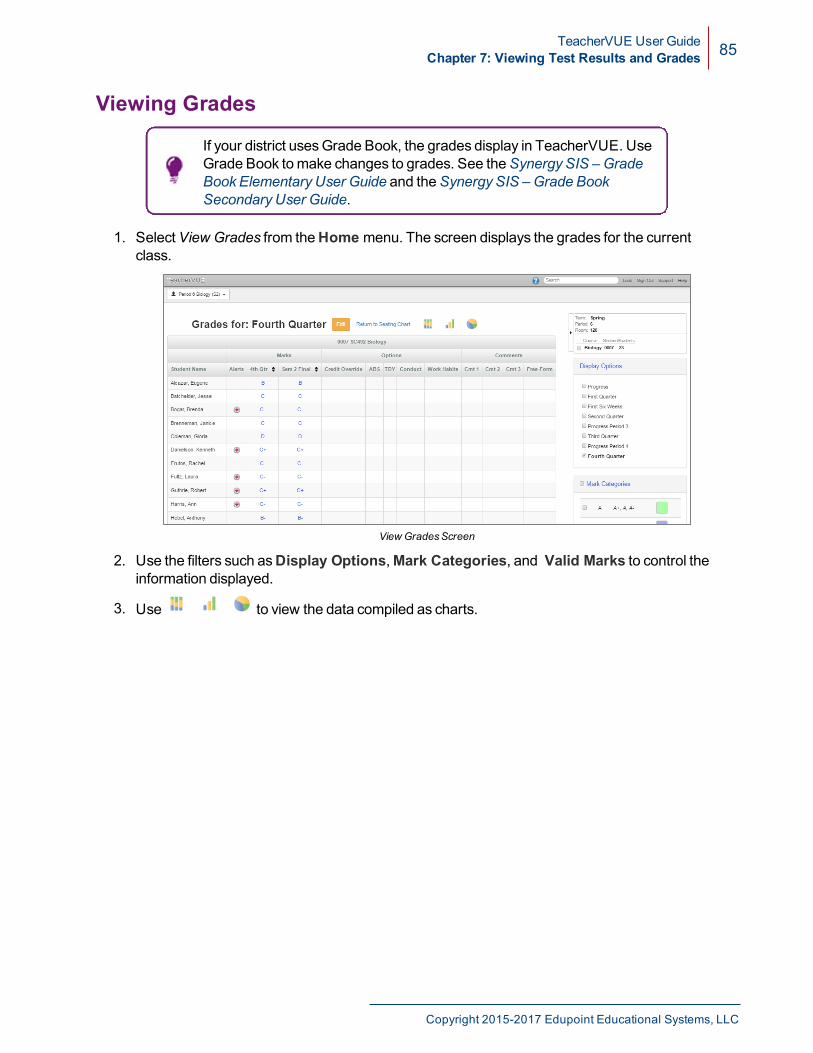
Viewing Grades
If your district usesGrade Book, the grades display in TeacherVUE. UseGrade Book tomake changes to grades. See theSynergy SIS –GradeBook Elementary User Guide and theSynergy SIS –Grade BookSecondary User Guide.
1. SelectView Grades from theHome menu. The screen displays the grades for the currentclass.
View GradesScreen
2. Use the filters such asDisplay Options,Mark Categories, and Valid Marks to control theinformation displayed.
3. Use to view the data compiled as charts.
Copyright 2015-2017 Edupoint Educational Systems, LLC
86 TeacherVUE User GuideChapter 7: Viewing Test Results and Grades
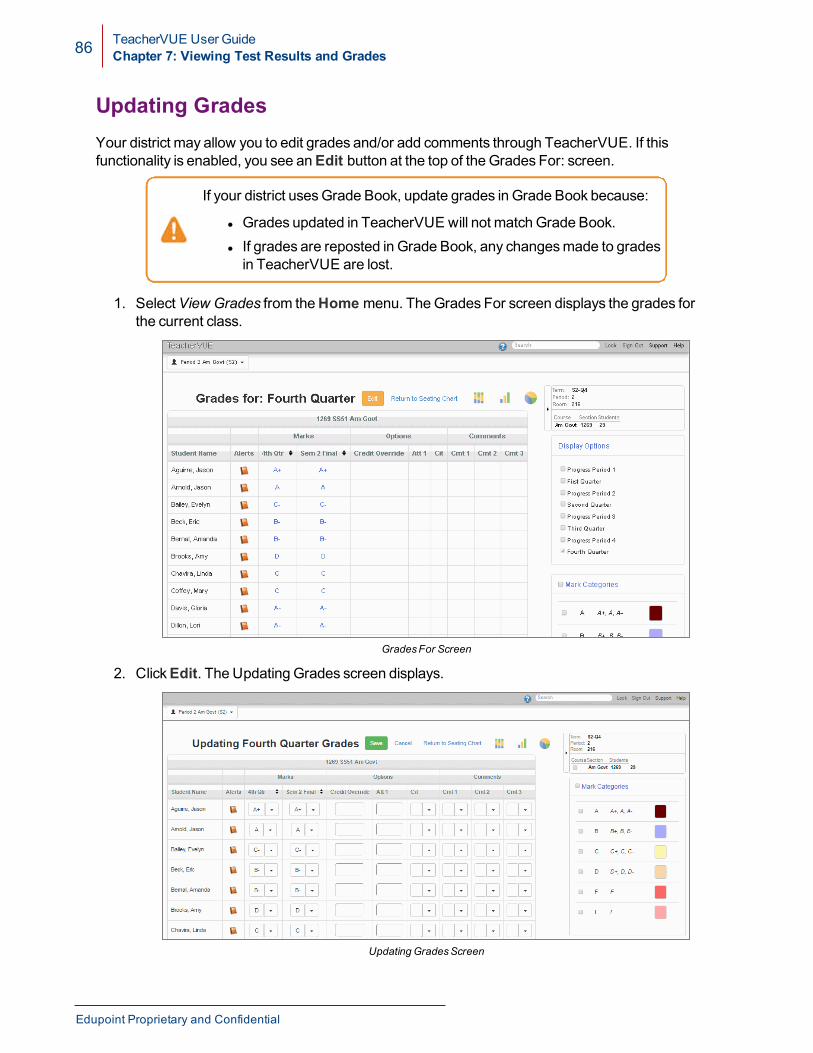
Updating GradesYour district may allow you to edit grades and/or add comments through TeacherVUE. If thisfunctionality is enabled, you see anEdit button at the top of the Grades For: screen.
If your district usesGrade Book, update grades in Grade Book because:
l Grades updated in TeacherVUE will not match Grade Book.l If grades are reposted in Grade Book, any changesmade to gradesin TeacherVUE are lost.
1. SelectView Grades from theHome menu. TheGrades For screen displays the grades forthe current class.
GradesFor Screen
2. ClickEdit. The Updating Grades screen displays.
Updating GradesScreen
Edupoint Proprietary and Confidential
TeacherVUE User GuideChapter 7: Viewing Test Results and Grades 87
3. Edit the grades as needed.
Use the green arrow to use the same grade in any empty cellsbelow the current cell in a column.
4. Enter comments:
l Select the comment from theComment drop-down, if available.l Enter a comment in the Free Form Comment field.
l Scroll to the bottom of the screen to view the availablecomments and their codes.
l Commentsmay be split into categories such asConduct orCitizenship.
l Click the green arrow to fill the comment down to all the otherstudents.
5. ClickSave.
Copyright 2015-2017 Edupoint Educational Systems, LLC
Chapter 8:Student Records
Viewing Student Notifications 89Viewing Student's Demographics, Family, and Emergency ContactInformation 91Viewing a Student's Health Record 94Viewing a Student's Course History 96
TeacherVUE User GuideChapter 8: Student Records 89
Viewing Student Notifications
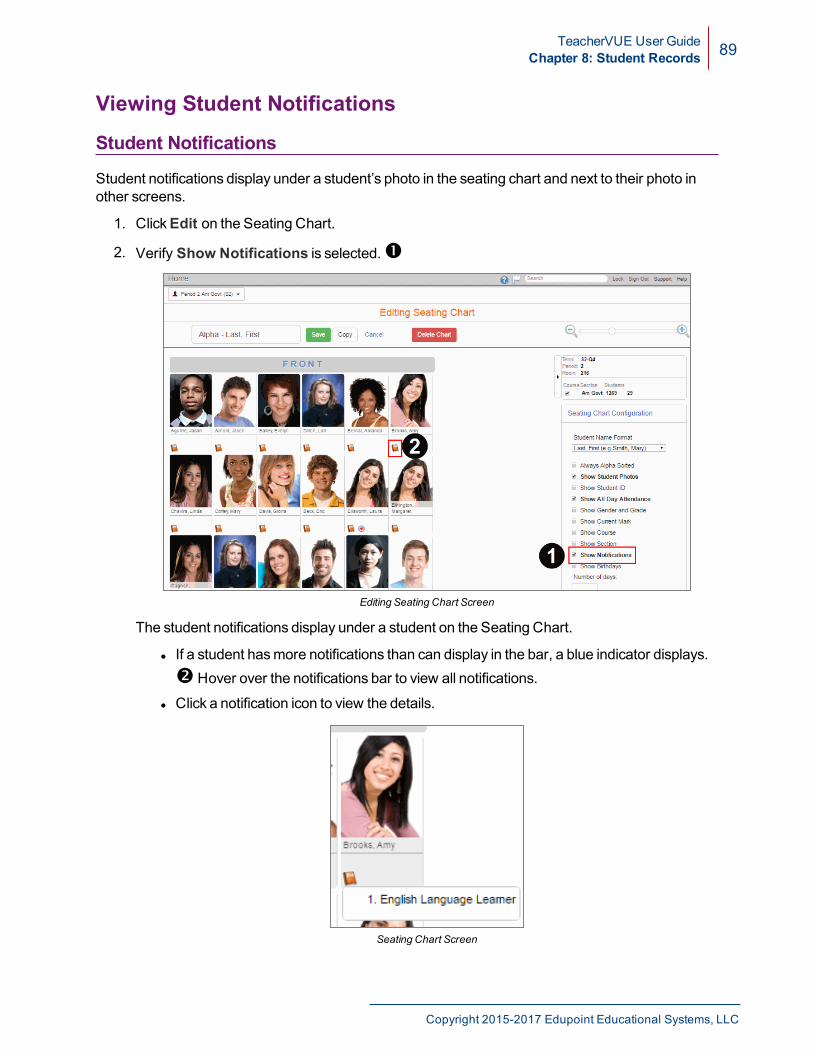
Student Notifications
Student notifications display under a student’s photo in the seating chart and next to their photo inother screens.
1. ClickEdit on the Seating Chart.
2. Verify Show Notifications is selected.�
Editing Seating Chart Screen
The student notifications display under a student on the Seating Chart.
l If a student hasmore notifications than can display in the bar, a blue indicator displays.�Hover over the notifications bar to view all notifications.
l Click a notification icon to view the details.
Seating Chart Screen
Copyright 2015-2017 Edupoint Educational Systems, LLC
90 TeacherVUE User GuideChapter 8: Student Records
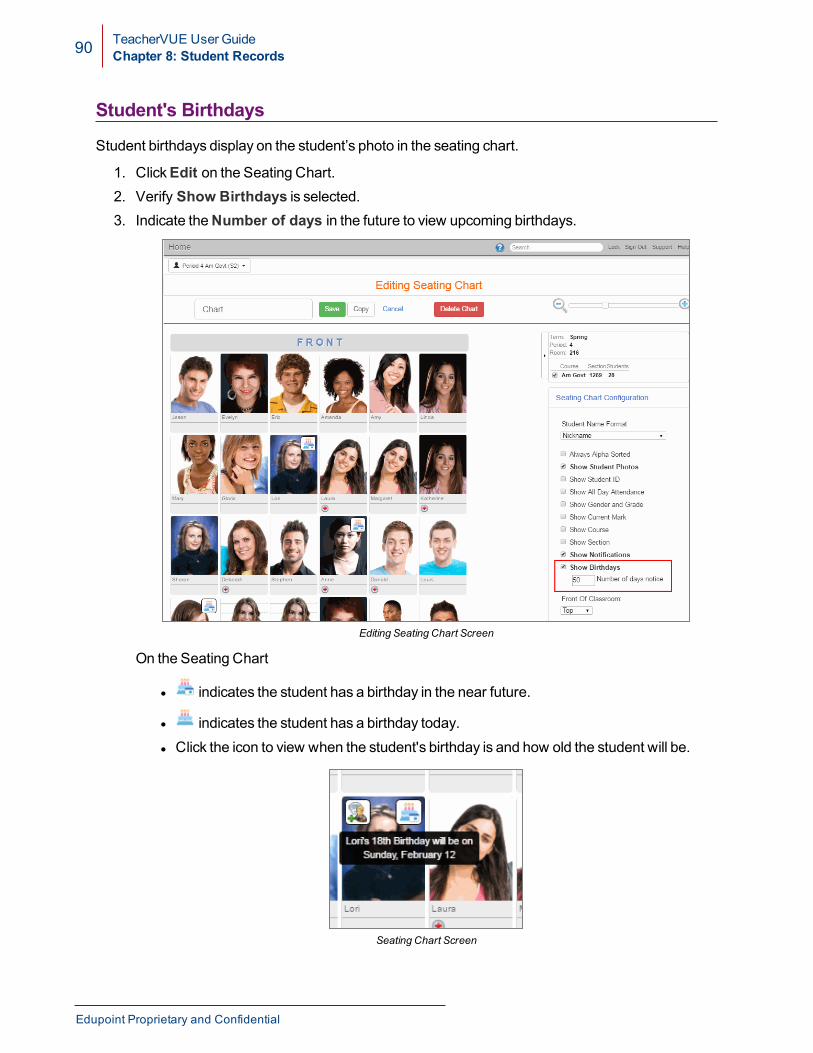
Student's Birthdays
Student birthdays display on the student’s photo in the seating chart.
1. ClickEdit on the Seating Chart.2. Verify Show Birthdays is selected.3. Indicate theNumber of days in the future to view upcoming birthdays.
Editing Seating Chart Screen
On the Seating Chart
l indicates the student has a birthday in the near future.
l indicates the student has a birthday today.l Click the icon to view when the student's birthday is and how old the student will be.
Seating Chart Screen
Edupoint Proprietary and Confidential
TeacherVUE User GuideChapter 8: Student Records 91
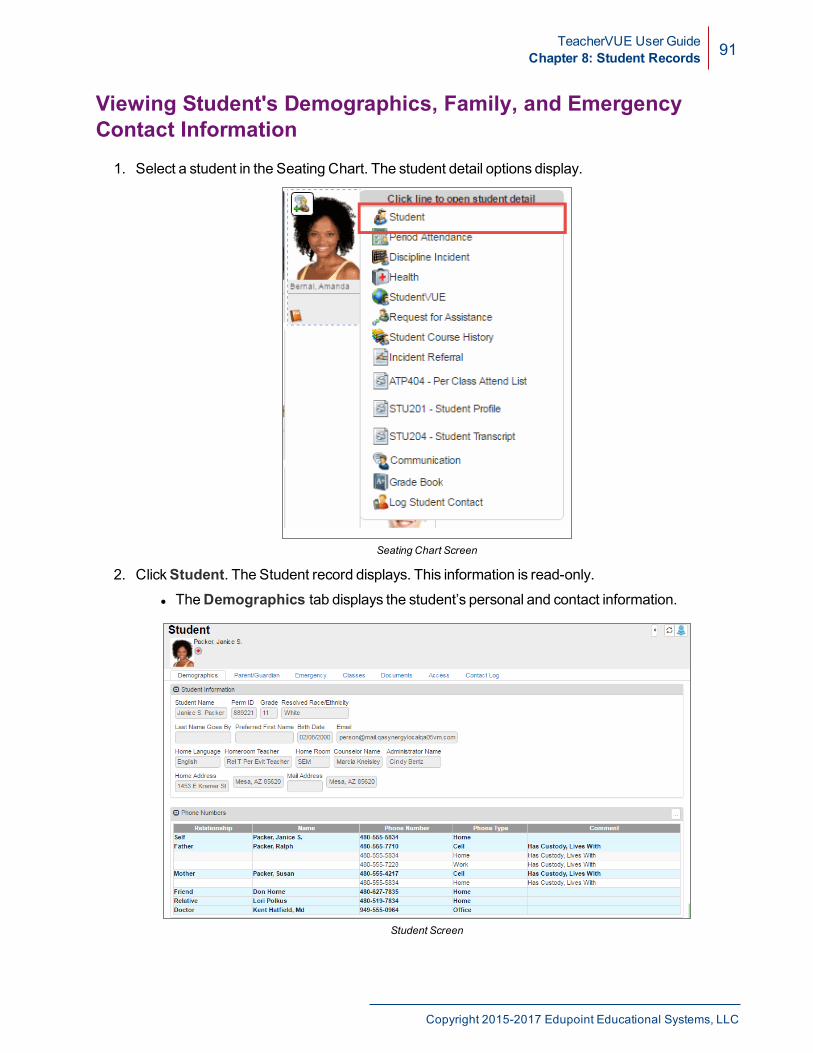
Viewing Student's Demographics, Family, and EmergencyContact Information
1. Select a student in the Seating Chart. The student detail options display.
Seating Chart Screen
2. ClickStudent. The Student record displays. This information is read-only.l TheDemographics tab displays the student’s personal and contact information.
Student Screen
Copyright 2015-2017 Edupoint Educational Systems, LLC
92 TeacherVUE User GuideChapter 8: Student Records
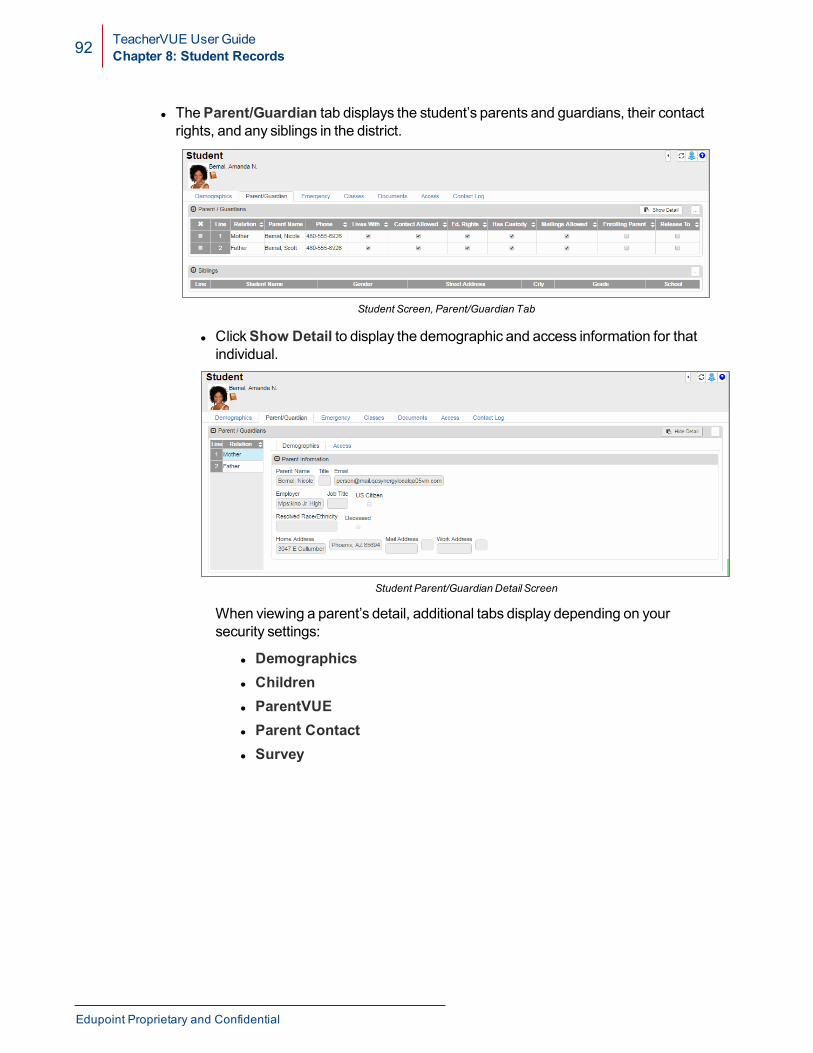
l TheParent/Guardian tab displays the student’s parents and guardians, their contactrights, and any siblings in the district.
Student Screen, Parent/Guardian Tab
l ClickShow Detail to display the demographic and access information for thatindividual.
Student Parent/Guardian Detail Screen
When viewing a parent’s detail, additional tabs display depending on yoursecurity settings:
l Demographicsl Childrenl ParentVUEl Parent Contactl Survey
Edupoint Proprietary and Confidential
TeacherVUE User GuideChapter 8: Student Records 93
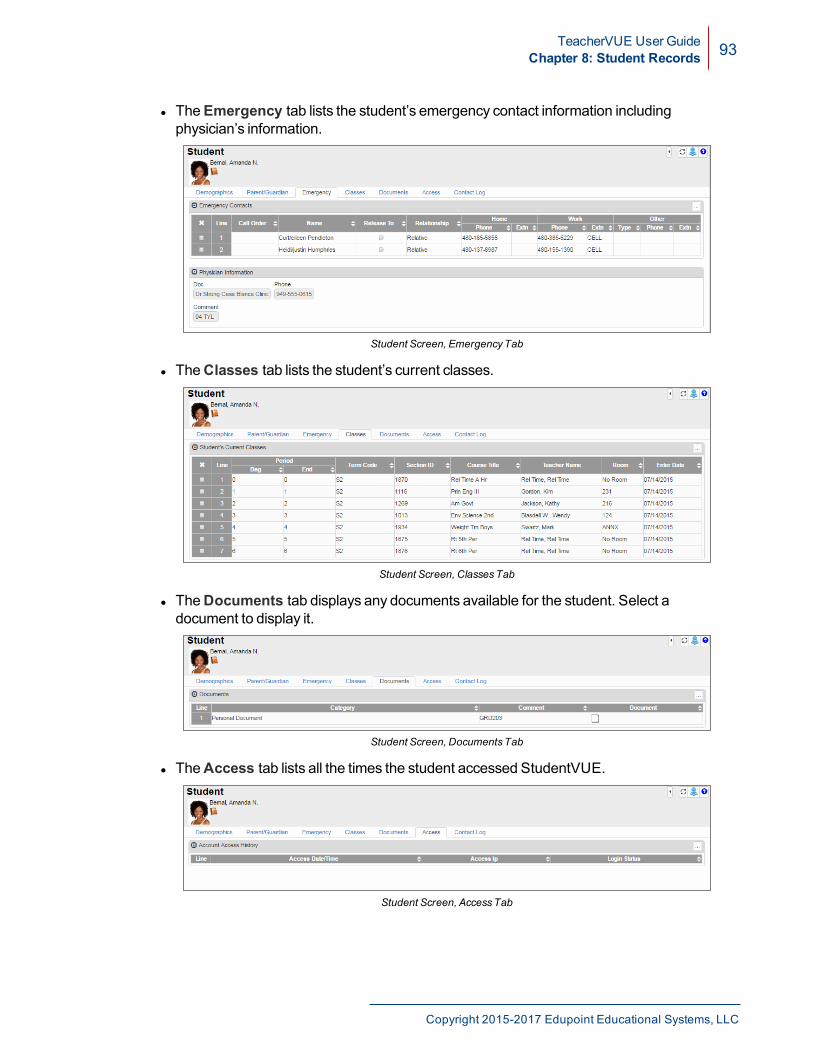
l TheEmergency tab lists the student’s emergency contact information includingphysician’s information.
Student Screen, EmergencyTab
l TheClasses tab lists the student’s current classes.
Student Screen, ClassesTab
l TheDocuments tab displays any documents available for the student. Select adocument to display it.
Student Screen, DocumentsTab
l TheAccess tab lists all the times the student accessed StudentVUE.
Student Screen, AccessTab
Copyright 2015-2017 Edupoint Educational Systems, LLC
94 TeacherVUE User GuideChapter 8: Student Records
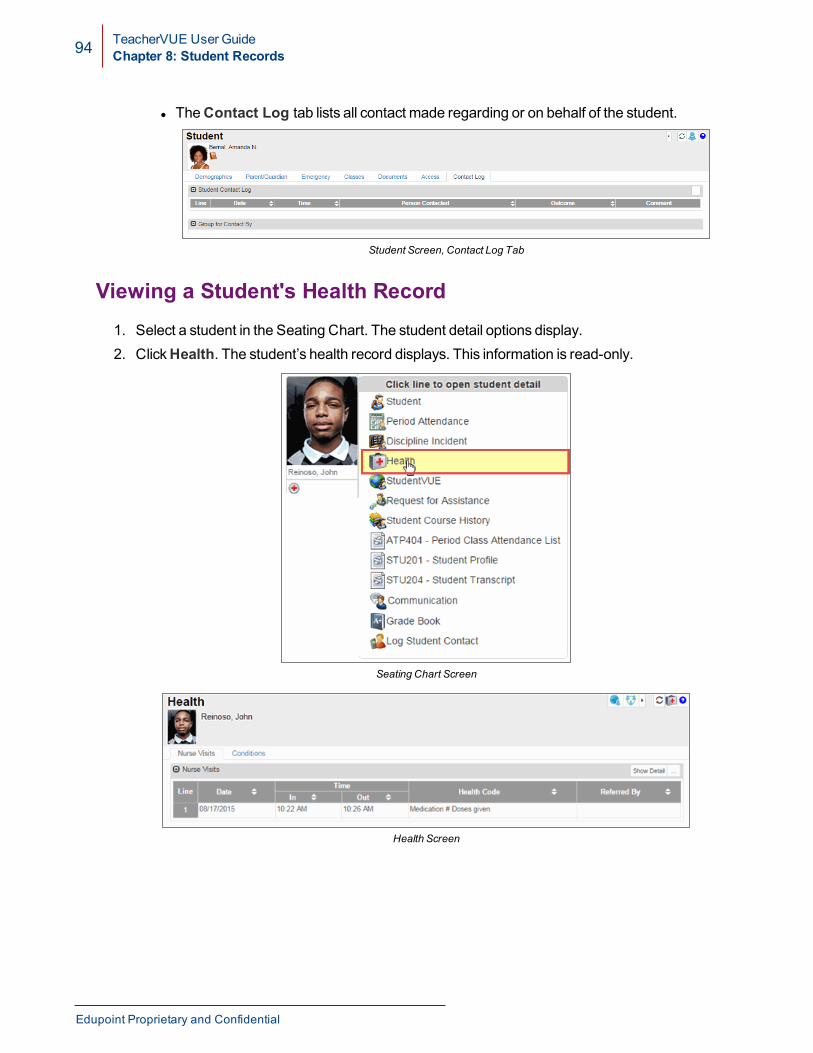
l TheContact Log tab lists all contact made regarding or on behalf of the student.
Student Screen, Contact Log Tab
Viewing a Student's Health Record1. Select a student in the Seating Chart. The student detail options display.2. ClickHealth. The student’s health record displays. This information is read-only.
Seating Chart Screen
Health Screen
Edupoint Proprietary and Confidential
TeacherVUE User GuideChapter 8: Student Records 95
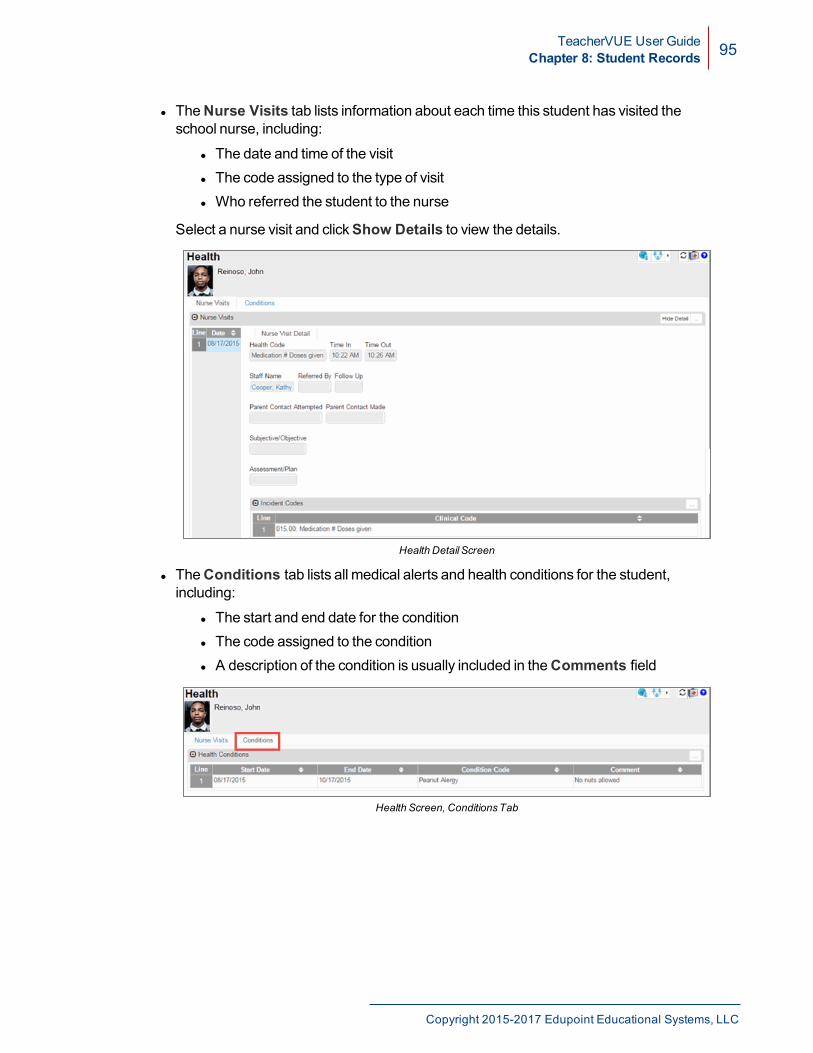
l TheNurse Visits tab lists information about each time this student has visited theschool nurse, including:
l The date and time of the visitl The code assigned to the type of visitl Who referred the student to the nurse
Select a nurse visit and clickShow Details to view the details.
Health Detail Screen
l TheConditions tab lists all medical alerts and health conditions for the student,including:
l The start and end date for the conditionl The code assigned to the conditionl A description of the condition is usually included in theComments field
Health Screen, ConditionsTab
Copyright 2015-2017 Edupoint Educational Systems, LLC
96 TeacherVUE User GuideChapter 8: Student Records
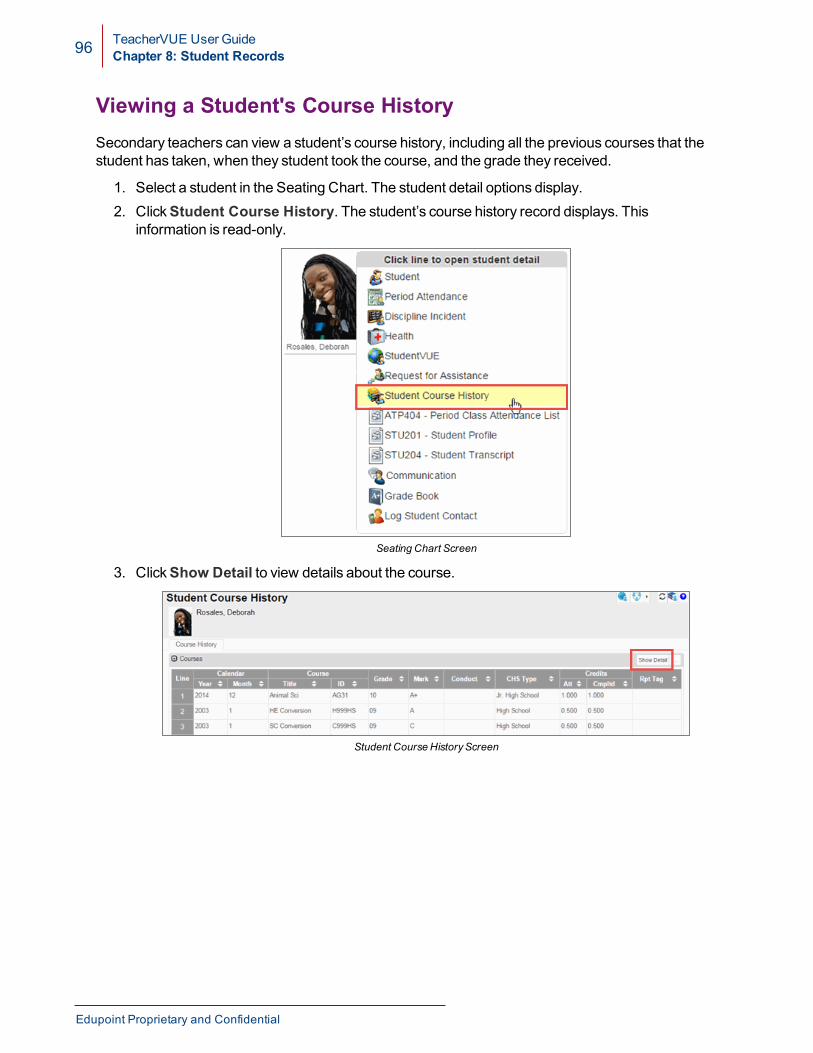
Viewing a Student's Course HistorySecondary teachers can view a student’s course history, including all the previous courses that thestudent has taken, when they student took the course, and the grade they received.
1. Select a student in the Seating Chart. The student detail options display.2. ClickStudent Course History. The student’s course history record displays. This
information is read-only.
Seating Chart Screen
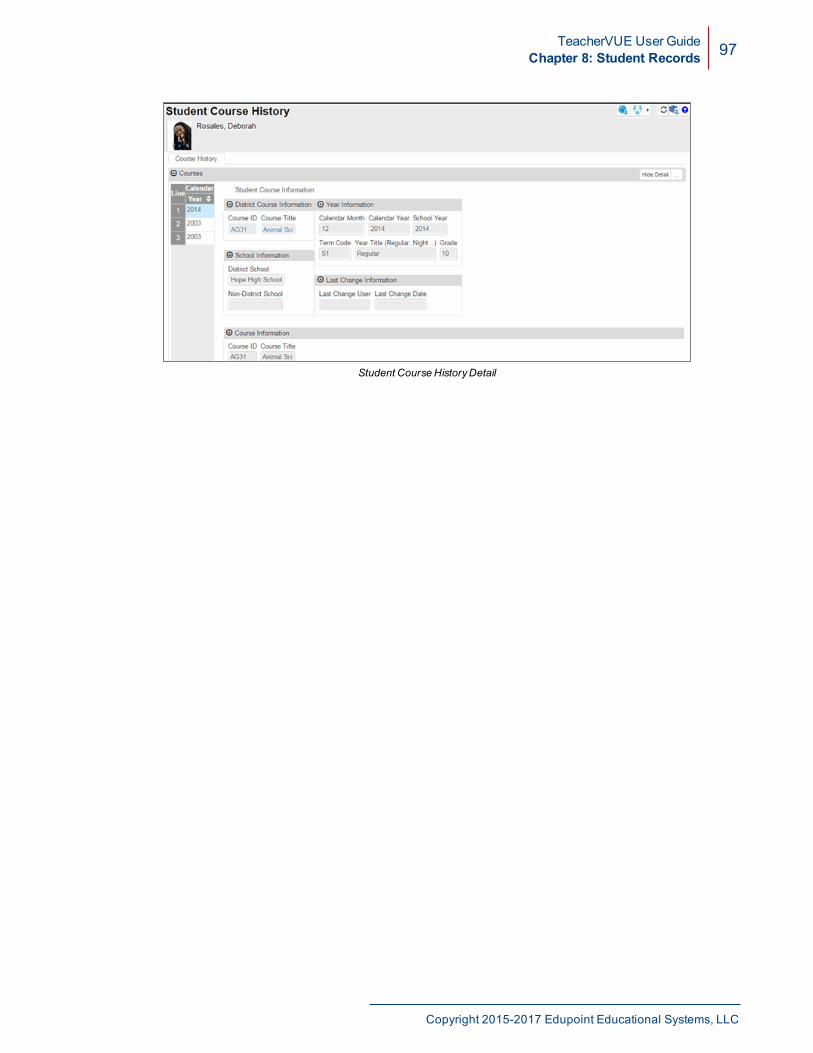
3. ClickShow Detail to view details about the course.
Student Course HistoryScreen
Edupoint Proprietary and Confidential
TeacherVUE User GuideChapter 8: Student Records 97
Student Course HistoryDetail
Copyright 2015-2017 Edupoint Educational Systems, LLC
Chapter 9:Managing Discipline
Creating a Incident Referral 99Viewing Previous Incident Referrals 101Viewing a Student's Discipline Record 103

TeacherVUE User GuideChapter 9: Managing Discipline 99
Creating a Incident ReferralTeachers enter discipline incidents in the Incident Referral screen. TeacherVUE forwards thereferral to the appropriate staff member to handle and resolve with the student.
1. Select Incident Referral from theHome menu. The Incident Referral screen displays.2. Enter theDiscipline Incident Data. TheDate and Time fields default to the current date
and time.
Incident Referral Screen
3. SelectViolations.
Incident Referral Screen
Copyright 2015-2017 Edupoint Educational Systems, LLC
100 TeacherVUE User GuideChapter 9: Managing Discipline
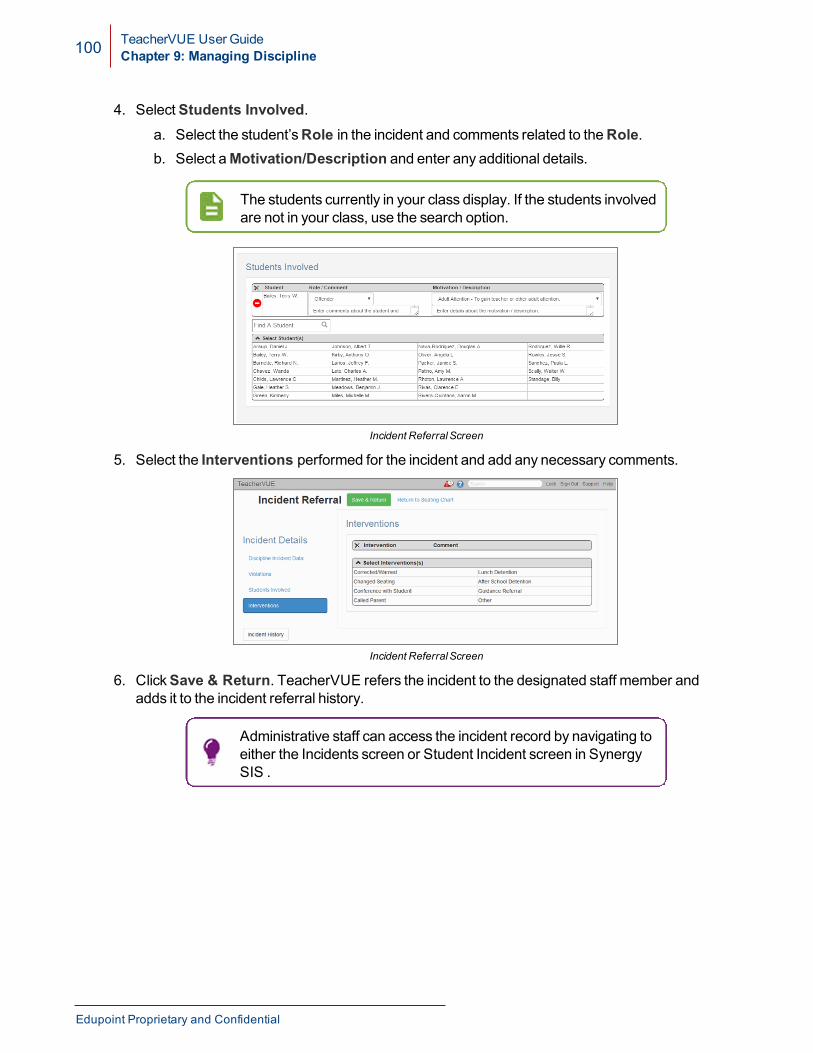
4. SelectStudents Involved.a. Select the student’sRole in the incident and comments related to theRole.b. Select aMotivation/Description and enter any additional details.
The students currently in your class display. If the students involvedare not in your class, use the search option.
Incident Referral Screen
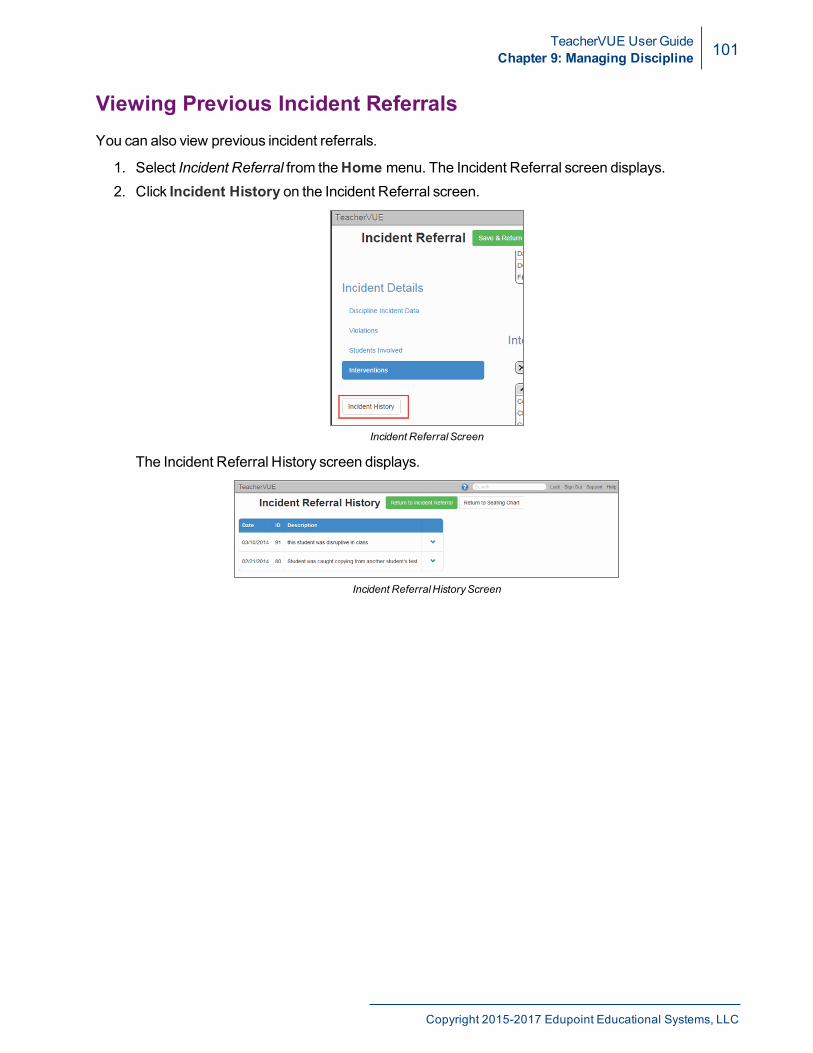
5. Select the Interventions performed for the incident and add any necessary comments.
Incident Referral Screen
6. ClickSave & Return. TeacherVUE refers the incident to the designated staff member andadds it to the incident referral history.
Administrative staff can access the incident record by navigating toeither the Incidents screen or Student Incident screen in SynergySIS .
Edupoint Proprietary and Confidential
TeacherVUE User GuideChapter 9: Managing Discipline 101
Viewing Previous Incident ReferralsYou can also view previous incident referrals.
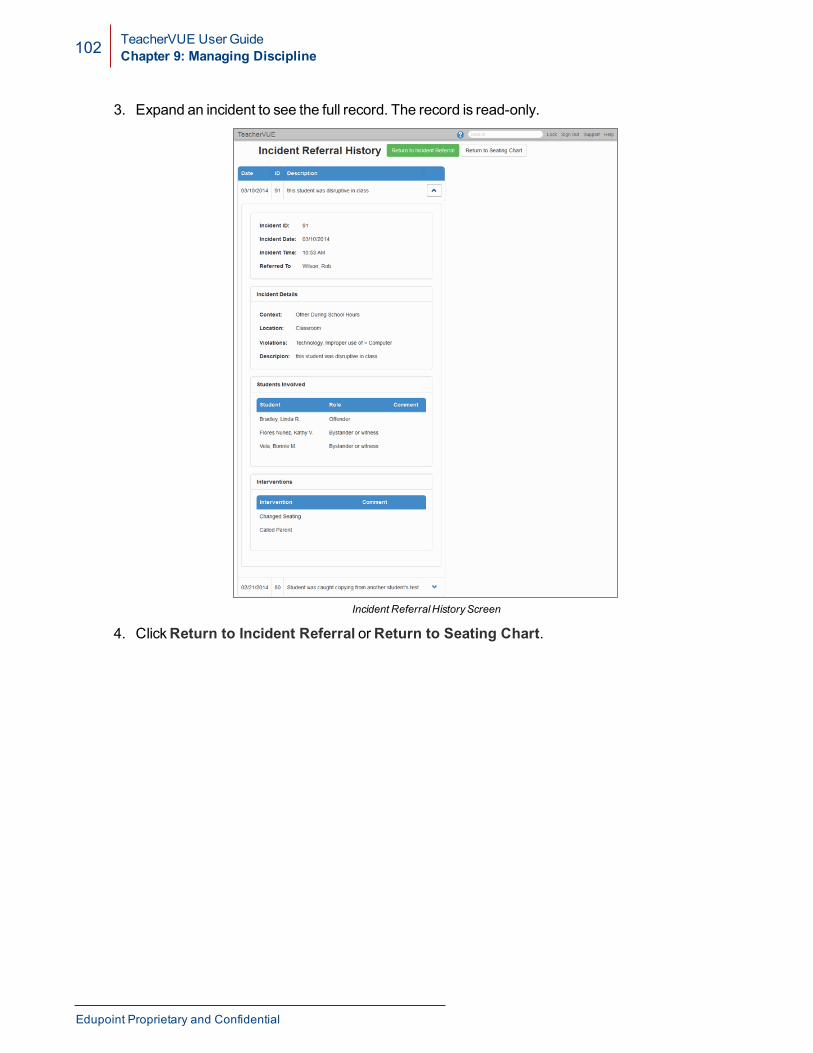
1. Select Incident Referral from theHome menu. The Incident Referral screen displays.2. Click Incident History on the Incident Referral screen.
Incident Referral Screen
The Incident Referral History screen displays.
Incident ReferralHistoryScreen
Copyright 2015-2017 Edupoint Educational Systems, LLC
102 TeacherVUE User GuideChapter 9: Managing Discipline
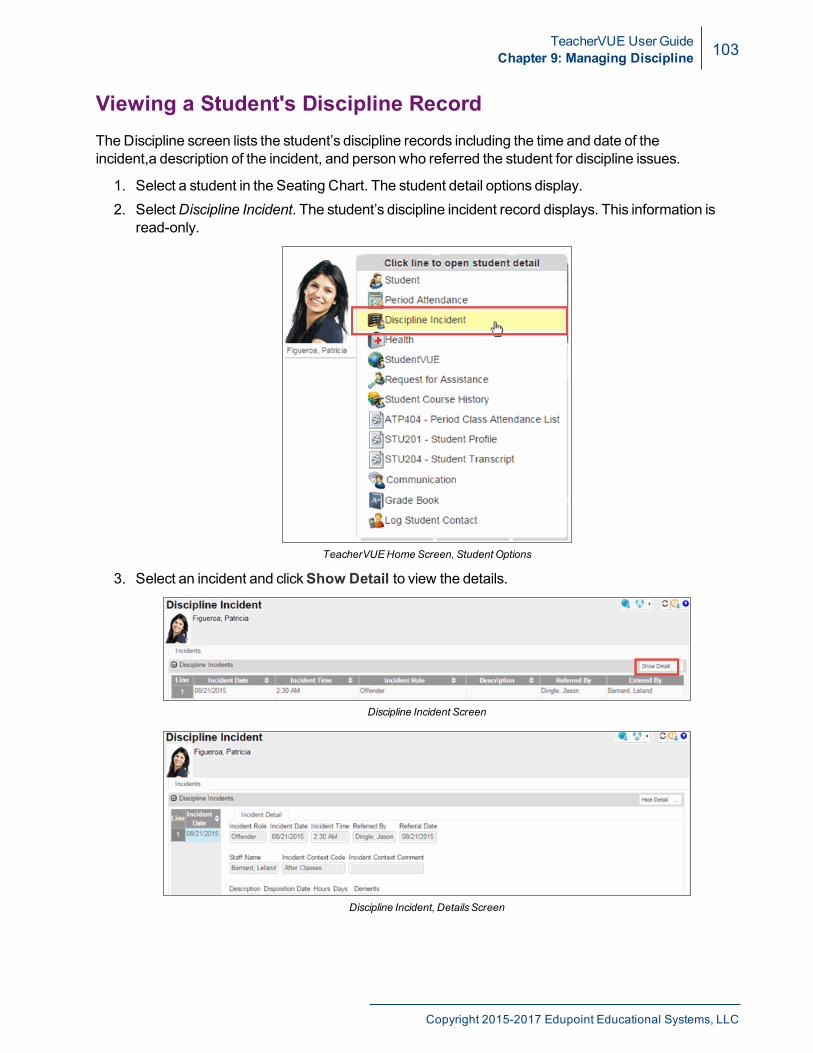
3. Expand an incident to see the full record. The record is read-only.
Incident ReferralHistoryScreen
4. ClickReturn to Incident Referral orReturn to Seating Chart.
Edupoint Proprietary and Confidential
TeacherVUE User GuideChapter 9: Managing Discipline 103
Viewing a Student's Discipline RecordTheDiscipline screen lists the student’s discipline records including the time and date of theincident,a description of the incident, and person who referred the student for discipline issues.
1. Select a student in the Seating Chart. The student detail options display.2. SelectDiscipline Incident. The student’s discipline incident record displays. This information is
read-only.
TeacherVUEHomeScreen, Student Options
3. Select an incident and clickShow Detail to view the details.
Discipline Incident Screen
Discipline Incident, DetailsScreen
Copyright 2015-2017 Edupoint Educational Systems, LLC
Chapter 10:Using Special Education
FeaturesReferring a Student for Special Education 105Viewing a Student's IEP 107Viewing a Student's 504 Plan 109
TeacherVUE User GuideChapter 10: Using Special Education Features 105
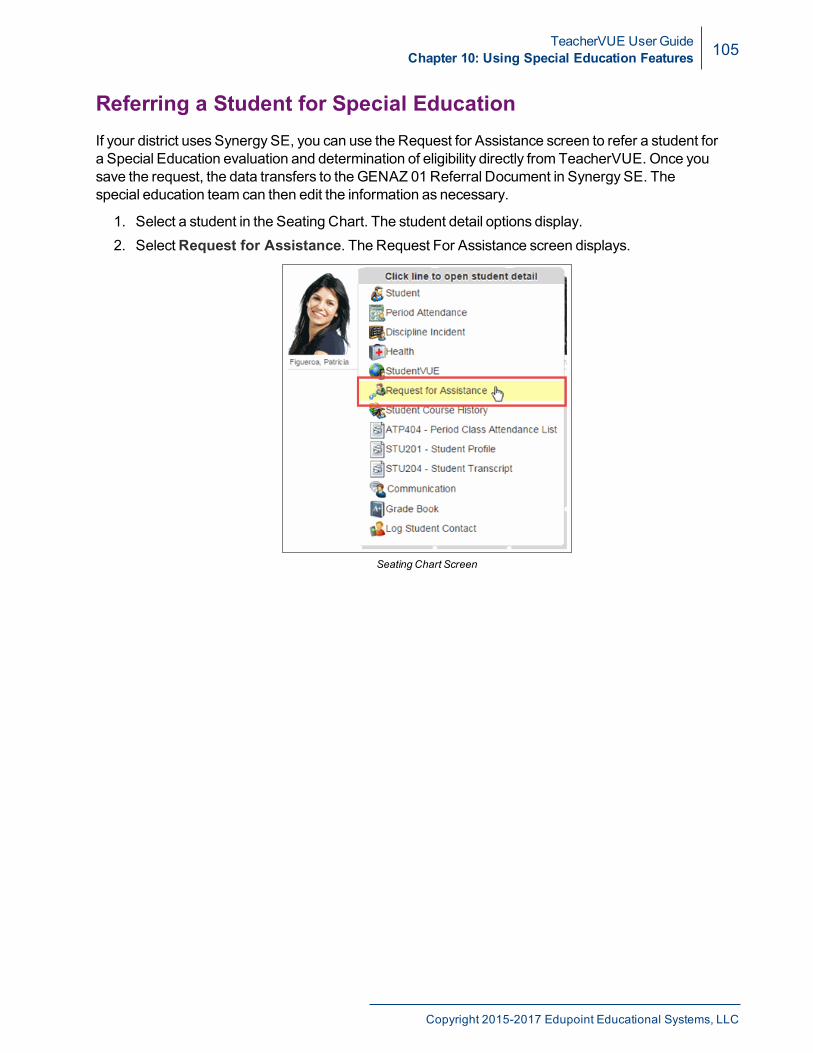
Referring a Student for Special EducationIf your district uses Synergy SE, you can use the Request for Assistance screen to refer a student fora Special Education evaluation and determination of eligibility directly from TeacherVUE. Once yousave the request, the data transfers to the GENAZ 01Referral Document in Synergy SE. Thespecial education team can then edit the information as necessary.
1. Select a student in the Seating Chart. The student detail options display.2. SelectRequest for Assistance. The Request For Assistance screen displays.
Seating Chart Screen
Copyright 2015-2017 Edupoint Educational Systems, LLC

106 TeacherVUE User GuideChapter 10: Using Special Education Features
3. Complete the fields:
l SelectSubmit in the Submit completed document for review drop-down.l Enter your comments regarding the referral in Comment Teacher.l Enter yourReason for Referral.l Enter any issues the student may be experiencing in the appropriate section.l Enter any Interventions performed for this student.
Request For Assistance Screen
4. ClickSave. The form becomes read-only.
Edupoint Proprietary and Confidential
TeacherVUE User GuideChapter 10: Using Special Education Features 107
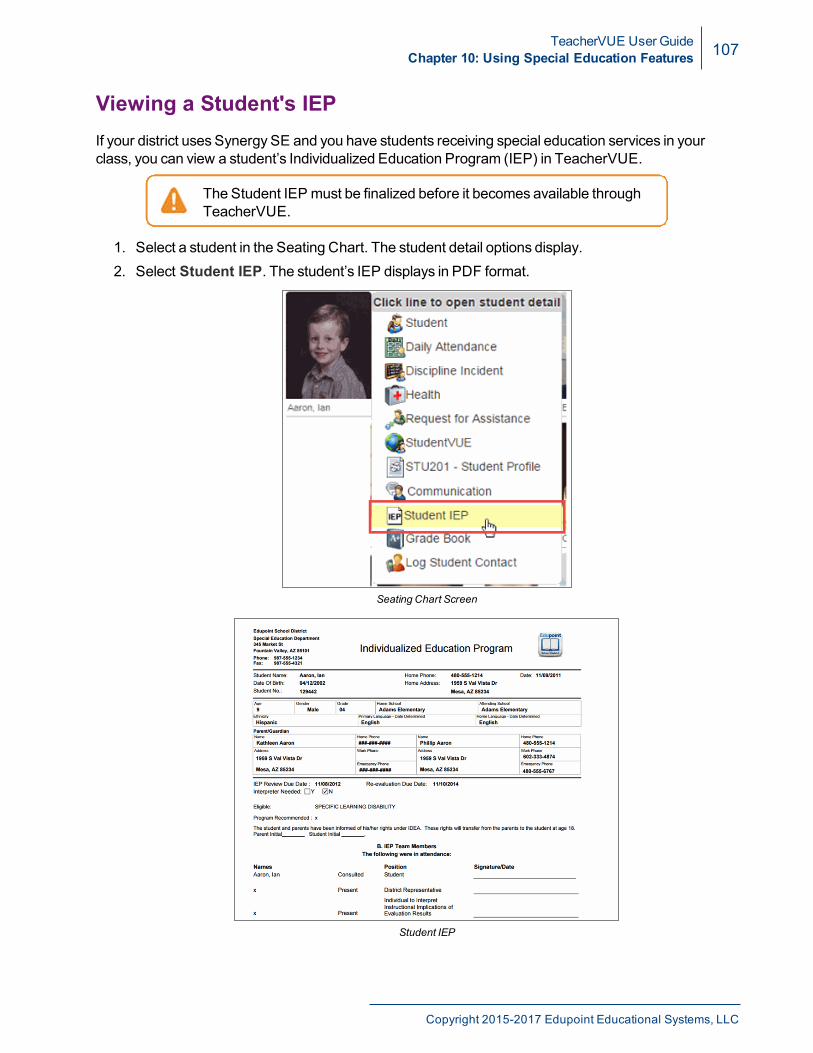
Viewing a Student's IEPIf your district uses Synergy SE and you have students receiving special education services in yourclass, you can view a student’s Individualized Education Program (IEP) in TeacherVUE.
The Student IEP must be finalized before it becomes available throughTeacherVUE.
1. Select a student in the Seating Chart. The student detail options display.2. Select Student IEP. The student’s IEP displays in PDF format.
Seating Chart Screen
Student IEP
Copyright 2015-2017 Edupoint Educational Systems, LLC
108 TeacherVUE User GuideChapter 10: Using Special Education Features
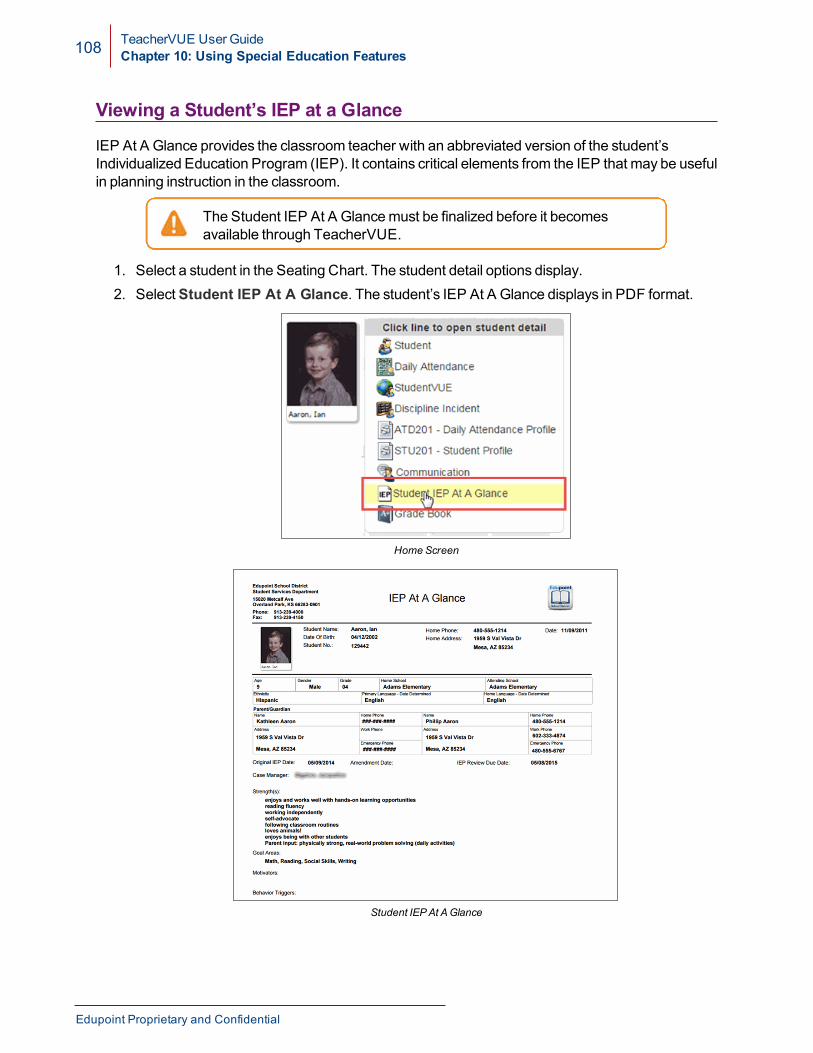
Viewing a Student’s IEP at a Glance
IEP At A Glance provides the classroom teacher with an abbreviated version of the student’sIndividualized Education Program (IEP). It contains critical elements from the IEP that may be usefulin planning instruction in the classroom.
The Student IEP At A Glancemust be finalized before it becomesavailable through TeacherVUE.
1. Select a student in the Seating Chart. The student detail options display.2. SelectStudent IEP At A Glance. The student’s IEP At A Glance displays in PDF format.
HomeScreen
Student IEPAt AGlance
Edupoint Proprietary and Confidential
TeacherVUE User GuideChapter 10: Using Special Education Features 109
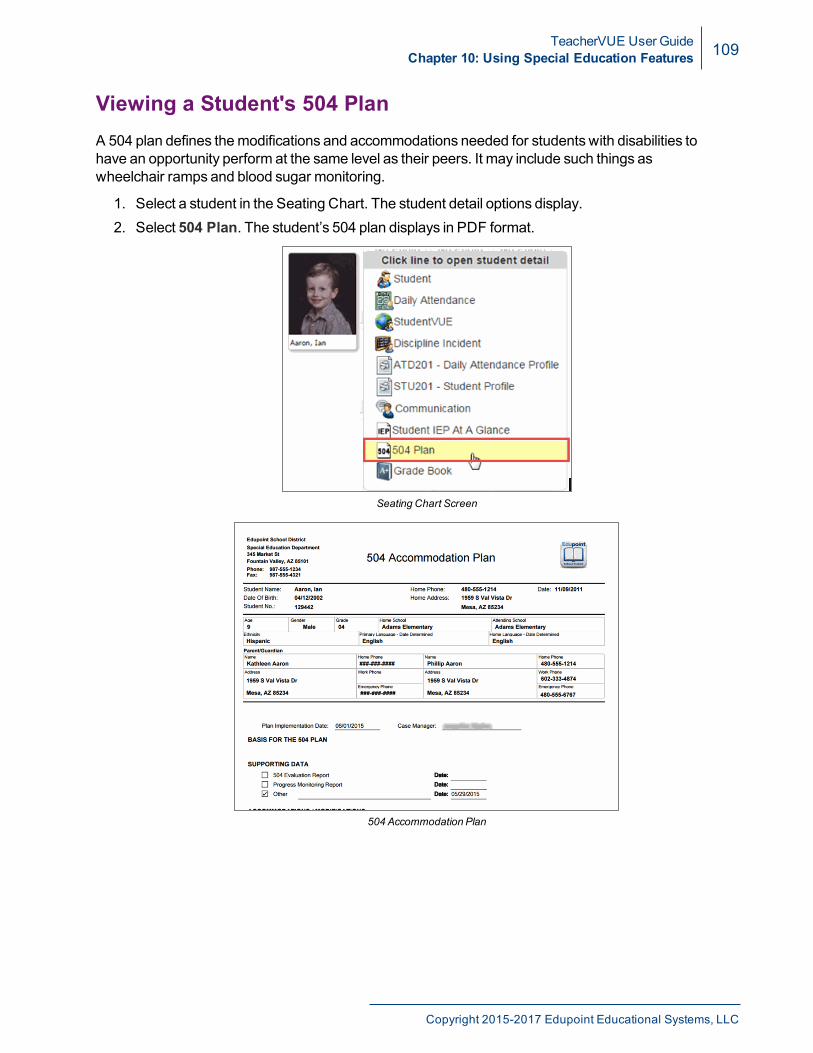
Viewing a Student's 504 PlanA 504 plan defines themodifications and accommodations needed for students with disabilities tohave an opportunity perform at the same level as their peers. It may include such things aswheelchair ramps and blood sugar monitoring.
1. Select a student in the Seating Chart. The student detail options display.2. Select 504 Plan. The student’s 504 plan displays in PDF format.
Seating Chart Screen
504 Accommodation Plan
Copyright 2015-2017 Edupoint Educational Systems, LLC
Chapter 11:Accessing StudentVUE and
Grade BookAccessing StudentVUE 111Accessing Grade Book Student Summary 112
TeacherVUE User GuideChapter 11: Accessing StudentVUE and Grade Book 111
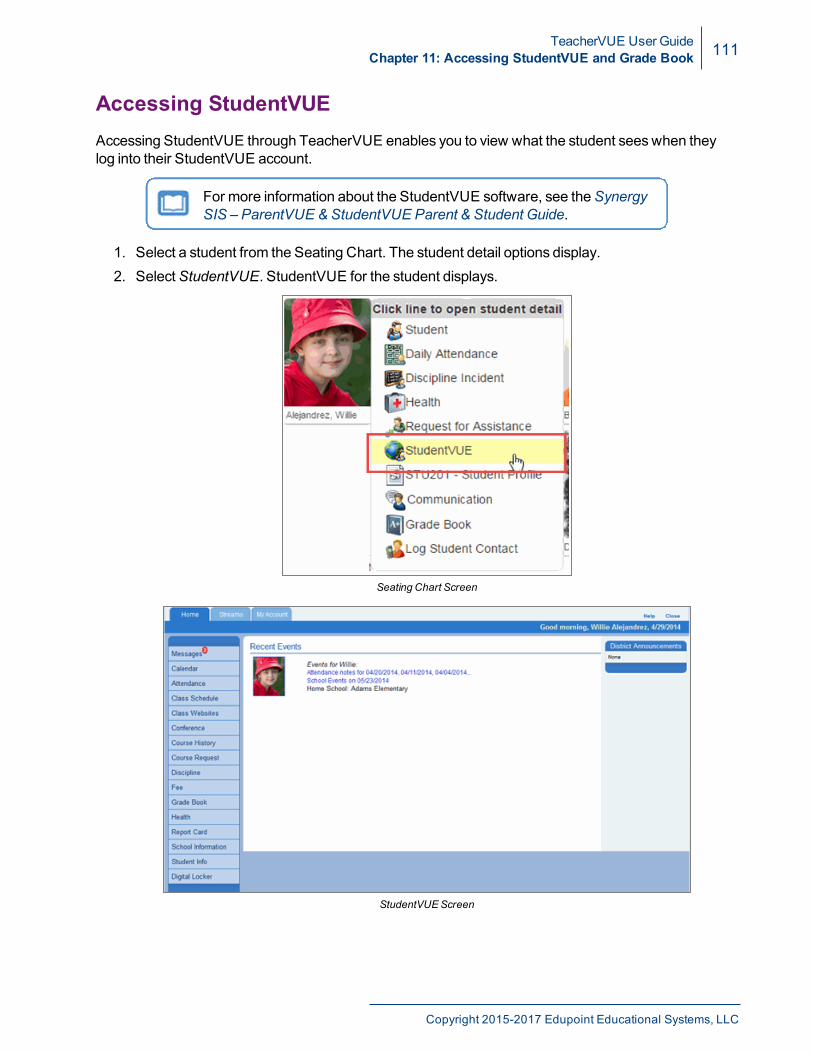
Accessing StudentVUEAccessing StudentVUE through TeacherVUE enables you to view what the student seeswhen theylog into their StudentVUE account.
For more information about the StudentVUE software, see theSynergySIS – ParentVUE & StudentVUE Parent & Student Guide.
1. Select a student from the Seating Chart. The student detail options display.2. SelectStudentVUE. StudentVUE for the student displays.
Seating Chart Screen
StudentVUEScreen
Copyright 2015-2017 Edupoint Educational Systems, LLC
112 TeacherVUE User GuideChapter 11: Accessing StudentVUE and Grade Book
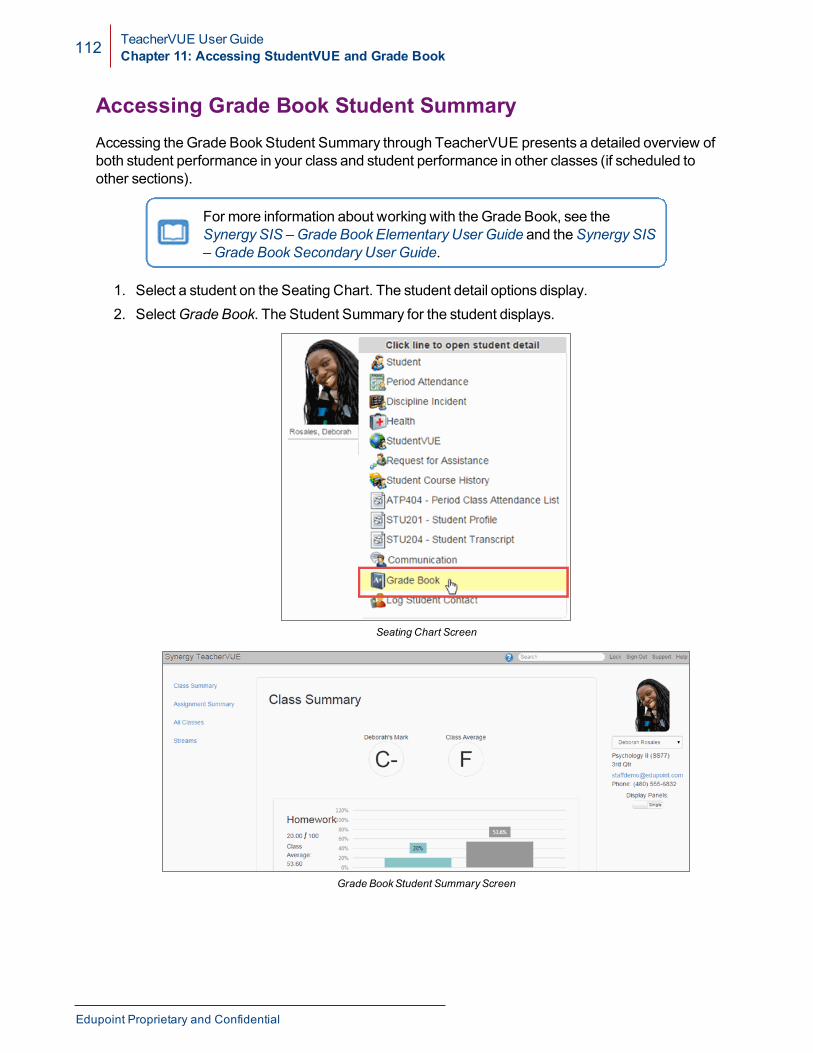
Accessing Grade Book Student SummaryAccessing theGrade Book Student Summary through TeacherVUE presents a detailed overview ofboth student performance in your class and student performance in other classes (if scheduled toother sections).
For more information about working with the Grade Book, see theSynergy SIS –Grade Book Elementary User Guide and theSynergy SIS–Grade Book Secondary User Guide.
1. Select a student on the Seating Chart. The student detail options display.2. SelectGrade Book. The Student Summary for the student displays.
Seating Chart Screen
Grade BookStudent SummaryScreen
Edupoint Proprietary and Confidential
Chapter 12:Work Samples
Using Work Samples 114
114 TeacherVUE User GuideChapter 12: Work Samples
Using Work SamplesWork samples are representative samples of individual student work, such as a research paper,statistical experiment, or speaking presentation.
Adding Work Samples
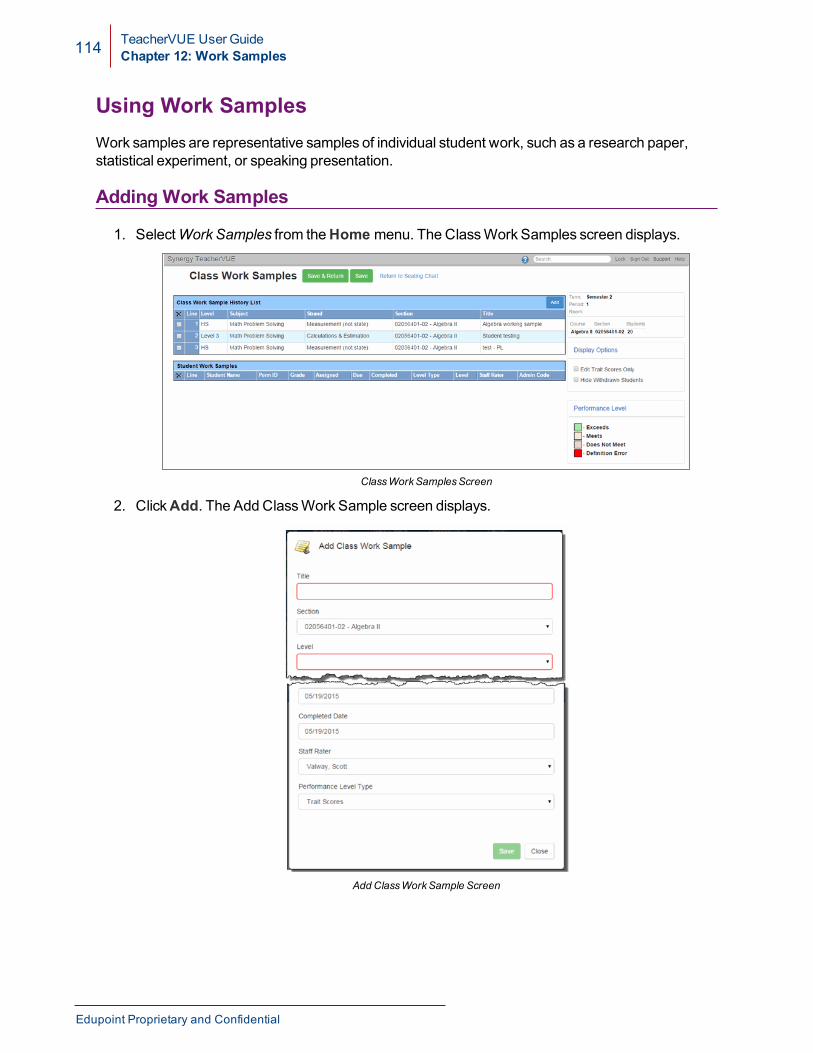
1. SelectWork Samples from theHome menu. The ClassWork Samples screen displays.
ClassWorkSamplesScreen
2. ClickAdd. The Add ClassWork Sample screen displays.
AddClassWorkSample Screen
Edupoint Proprietary and Confidential
TeacherVUE User GuideChapter 12: Work Samples 115
3. Complete the fields:
l Title – Enter a title for the work samplel Sectionl Level – Select from listl Subject – Select from listl Strand – If your district uses standards, select from list.l Select the dates from the calendar.l Staff Rater – Select amember of staff to rate the work samples.l Performance Level Type.
4. ClickSave.
Editing Student Work Samples
To enter performance levels or trait scores to StudentWork Samples:
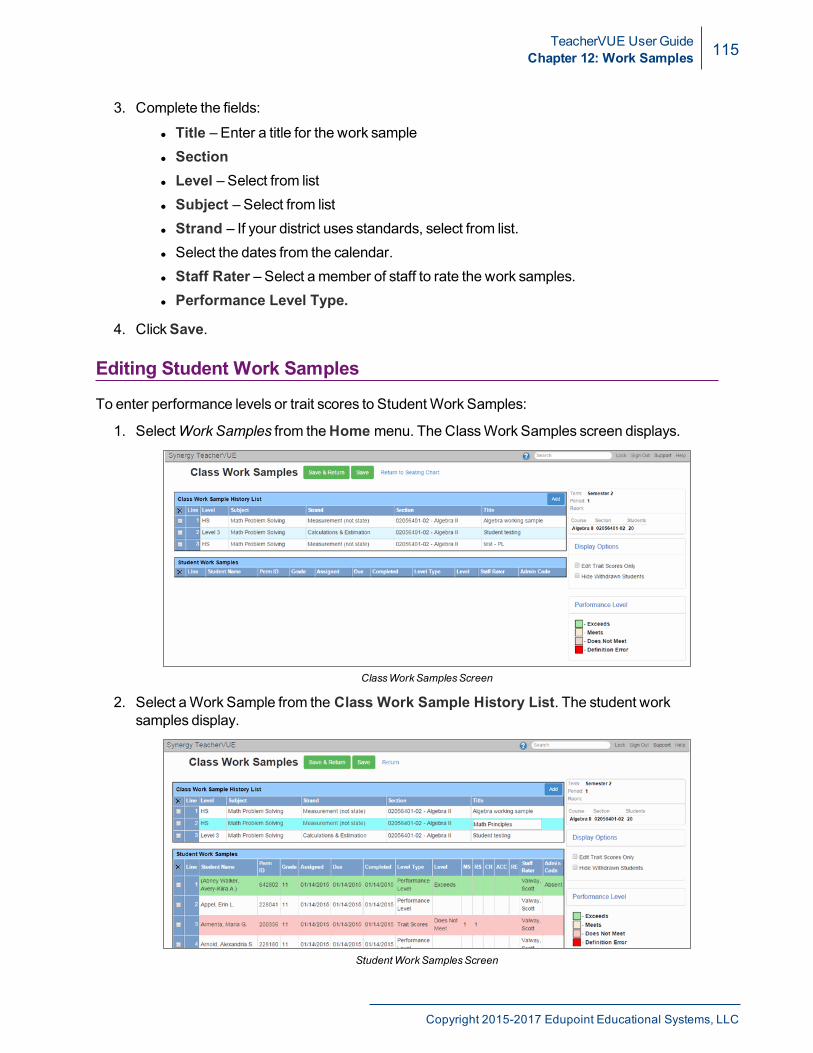
1. SelectWork Samples from theHome menu. The ClassWork Samples screen displays.
ClassWorkSamplesScreen
2. Select aWork Sample from the Class Work Sample History List. The student worksamples display.
StudentWorkSamplesScreen
Copyright 2015-2017 Edupoint Educational Systems, LLC
116 TeacherVUE User GuideChapter 12: Work Samples
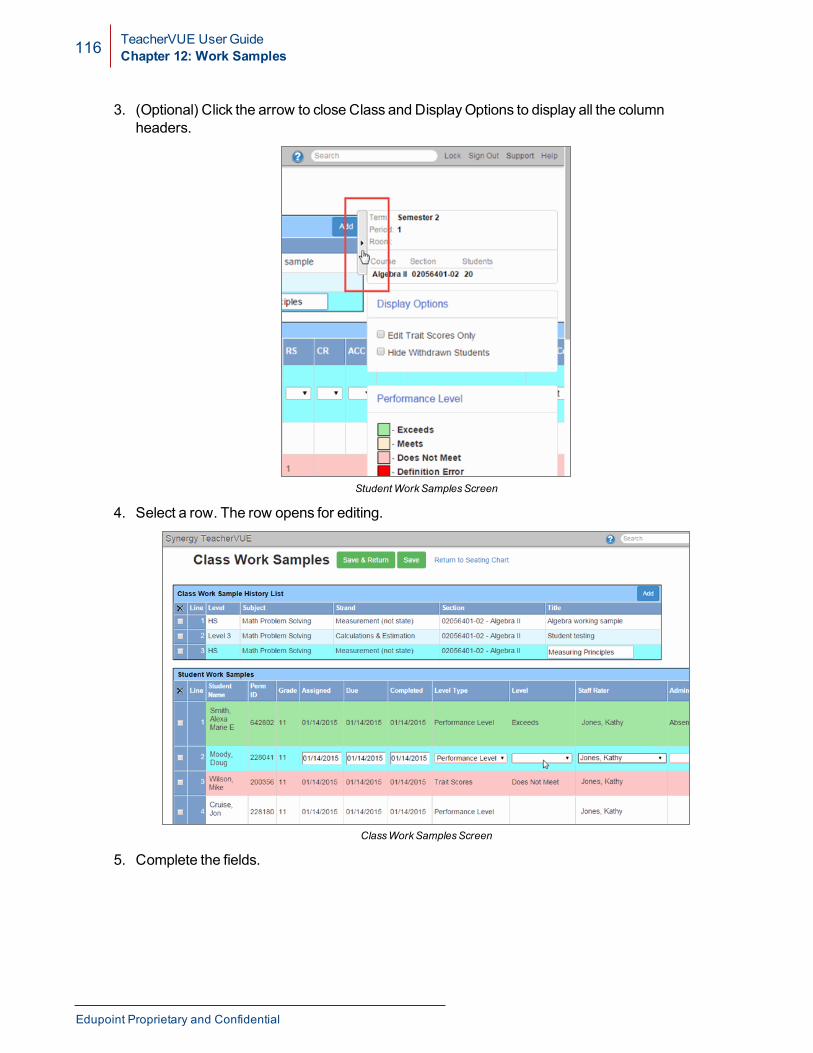
3. (Optional) Click the arrow to close Class and DisplayOptions to display all the columnheaders.
StudentWorkSamplesScreen
4. Select a row. The row opens for editing.
ClassWorkSamplesScreen
5. Complete the fields.
Edupoint Proprietary and Confidential
TeacherVUE User GuideChapter 12: Work Samples 117
6. Save the changes.
l ClickSave to save the changes and remain on the ClassWork Samples screen.l Click Save & Return to return to the seating chart
The edited StudentWork Sample record also displays on theStudentWork Sample History screen in Synergy SIS .
Copyright 2015-2017 Edupoint Educational Systems, LLC