Teacher: Kenji Tachibana Digital Photography I x Making Images – 20 slides.
Upload
cori-nicholsonCategory
view
215download
1
Teacher: Kenji TachibanaDigital Photography IDigital Photography I.
Shooting Assignment 3Shooting Assignment 3
Self Portrait - ID (passport) shotSelf Portrait - ID (passport) shot
59 slides59 slides
Copyright © 2003 - 2009 Kenji Tachibana

Teacher: Kenji TachibanaDigital Photography IDigital Photography IAssignment: Self portrait ID shot (Assignment: Self portrait ID shot (beyond the maiden voyagebeyond the maiden voyage))
HHistoryistory: Previous experience…: Previous experience…
The The Free ChoiceFree Choice and and Re-shootRe-shoot assignments were ‘warm assignments were ‘warm up’ exercises to get you use to…up’ exercises to get you use to…
- Using your camera with exacting requirementsUsing your camera with exacting requirements- Shooting with a deadline and a tight layoutShooting with a deadline and a tight layout- Delivering the ‘goods’ on time and to the right folder(s)Delivering the ‘goods’ on time and to the right folder(s)- Working with your team and class matesWorking with your team and class mates- Using the 17 topic class textbook and your specific Using the 17 topic class textbook and your specific
camera manualcamera manual- Using online class resource, dpreview.com and GoogleUsing online class resource, dpreview.com and Google

Teacher: Kenji TachibanaDigital Photography IDigital Photography IAssignment: Self portrait ID shotAssignment: Self portrait ID shot
OObjectivebjective: Shoot a simple ID (passport) shot of yourself. : Shoot a simple ID (passport) shot of yourself. This will continue to build on your image reference. And This will continue to build on your image reference. And you will continue to customize your ‘require’ doc.you will continue to customize your ‘require’ doc.
TTraditionradition: This shoot might be the first time for most of : This shoot might be the first time for most of you taking a self portrait. Although, self portrait has a you taking a self portrait. Although, self portrait has a long tradition in the arts. A practical reason for that long tradition in the arts. A practical reason for that might be the cheap, reliable, and model availability.might be the cheap, reliable, and model availability.
MMoreore: An added reason in this class is that I want you to : An added reason in this class is that I want you to shoot something familiar. And get even more familiar shoot something familiar. And get even more familiar with different aspects of yourself.with different aspects of yourself.

Teacher: Kenji TachibanaDigital Photography IDigital Photography IAssignment: Self portrait ID shotAssignment: Self portrait ID shot
TThreehree: This is the simplest of the three progressively : This is the simplest of the three progressively complex self portrait assignment shot series.complex self portrait assignment shot series.
DDetailsetails: Stages of difficulty: Stages of difficulty
1.1. Simplest Simplest – ID (passport) shot.– ID (passport) shot.
2.2. More complexMore complex – Head and shoulder shot with more – Head and shoulder shot with more background and smaller head. background and smaller head.
3.3. Most complexMost complex – Much smaller subject in an – Much smaller subject in an environment field (real world background).environment field (real world background).

Teacher: Kenji TachibanaDigital Photography IDigital Photography IAssignment: Self portrait ID shotAssignment: Self portrait ID shot
PPartnerartner:: Self portraits means shots taken by the subject. Self portraits means shots taken by the subject. Although working with a partner as an assistant Although working with a partner as an assistant is allowed but a tripod must be used. The is allowed but a tripod must be used. The assistant is limited in their action as follows: assistant is limited in their action as follows:
- Confirming accurate framingConfirming accurate framing- Pressing the 2-stage shutter button to trigger Pressing the 2-stage shutter button to trigger
the self timerthe self timer
HHelpelp: : Team mates are ideal assistants. Although, the Team mates are ideal assistants. Although, the assistant is in no way responsible for the end assistant is in no way responsible for the end result.result.

Teacher: Kenji TachibanaDigital Photography IDigital Photography IAssignment: Self portrait ID shotAssignment: Self portrait ID shot
RReference Imageeference Image: You might have been able to create a reliable reference : You might have been able to create a reliable reference image during the Free Choice or the classroom EC test shoots. If not, image during the Free Choice or the classroom EC test shoots. If not, you must create a reliable reference image during this self portrait you must create a reliable reference image during this self portrait assignment.assignment.
BBracket Exposure: racket Exposure: So, at the minimum, you must bracket your exposure to So, at the minimum, you must bracket your exposure to get images that go from too light to too dark with the just-right get images that go from too light to too dark with the just-right exposure in the middle of the exposure series.exposure in the middle of the exposure series.
UnderUnder / Dark / Dark NormalNormal Exposure Exposure OverOver / Light / Light

Teacher: Kenji TachibanaDigital Photography IDigital Photography IAssignment: Self portrait ID shotAssignment: Self portrait ID shot
RReference Imageeference Image: It must exhibit…: It must exhibit…
1.1.Good exposureGood exposure Not light nor dark.Not light nor dark.
2.2.Color Color Not warm or cool but neutral.Not warm or cool but neutral.
3.3.Focus Focus The eyes, nose, and lips must be The eyes, nose, and lips must be sharp but the ear can be soft.sharp but the ear can be soft.
4.4.Composition Composition It should look like a passport image It should look like a passport image with a centered head. Use the with a centered head. Use the
camera in its vertical format.camera in its vertical format.
5.5.Camera angleCamera angle Level with the subject. Do not shoot Level with the subject. Do not shoot obviously up or downobviously up or down
6.6.LightingLighting Slight side light to show form but the Slight side light to show form but the cast shadows should be kept to a cast shadows should be kept to a minimum.minimum.

Teacher: Kenji TachibanaDigital Photography IDigital Photography IAssignment: Self portrait ID shotAssignment: Self portrait ID shot
RResponsibility: esponsibility: You’re in charge You’re in charge
Plan to shoot early leaving enough time for a re-shoot if Plan to shoot early leaving enough time for a re-shoot if necessary. Shooting at the last minute guarantees high necessary. Shooting at the last minute guarantees high anxiety and a strong possibility of not getting it right anxiety and a strong possibility of not getting it right and/or not delivering.and/or not delivering.
At the very least, it will not be your best work because At the very least, it will not be your best work because rushing things never result in high quality work.rushing things never result in high quality work.

Teacher: Kenji TachibanaDigital Photography IDigital Photography IAssignment: Self portrait ID shotAssignment: Self portrait ID shot
MMy Expectation: y Expectation: Mac use knowledgeMac use knowledge
This is not a computer class. I expect basic computer This is not a computer class. I expect basic computer literacy. If you’re new to the Mac, I expect you to literacy. If you’re new to the Mac, I expect you to spend some time at NSCC Computer Lab (IB3303) to spend some time at NSCC Computer Lab (IB3303) to bring yourself up to speed on Mac and Artshare usage.bring yourself up to speed on Mac and Artshare usage.

Teacher: Kenji TachibanaDigital Photography IDigital Photography IAssignment: Self portrait ID shotAssignment: Self portrait ID shot
MMy Expectation: y Expectation: TTextbook extbook
There has been two shooting assignments already. So, There has been two shooting assignments already. So, you have studied it to the end at least twice. You are you have studied it to the end at least twice. You are expected to review all 17 textbook topics prior to shooting expected to review all 17 textbook topics prior to shooting any assignment.any assignment.
In addition – you are to continue revising your personal In addition – you are to continue revising your personal shooting requirement list with each assignment with shooting requirement list with each assignment with personally relevant notes. personally relevant notes.

Teacher: Kenji TachibanaDigital Photography IDigital Photography IAssignment: Self portrait ID shotAssignment: Self portrait ID shot
TTextbook Purpose:extbook Purpose:
I created the textbook so that you can have me by your I created the textbook so that you can have me by your side as you work on the assignment. The textbook is a side as you work on the assignment. The textbook is a step-by-step guide taking you from story conception to final step-by-step guide taking you from story conception to final assignment delivery.assignment delivery.
Use the textbook each time you work on an assignment. Use the textbook each time you work on an assignment. Once you get use to using the textbook, you’ll get to know Once you get use to using the textbook, you’ll get to know exactly what you have to review.exactly what you have to review.
Please try not to short change yourself by avoiding to use Please try not to short change yourself by avoiding to use the textbook.the textbook.

Teacher: Kenji TachibanaDigital Photography IDigital Photography IAssignment: Self portrait ID shotAssignment: Self portrait ID shot
LLearning Objectives:earning Objectives:
1.1. StoryStory Passport (ID) shot.Passport (ID) shot.2.2. Direction: Direction: Follow simple but specific Follow simple but specific
instructions. instructions. Do not make it harder for yourself Do not make it harder for yourself by by trying to get creative.trying to get creative.
3.3. CompositionComposition Use the camera on itsUse the camera on itsvertical orientation and fillvertical orientation and fillthe frame with the face asthe frame with the face asshown to the right.shown to the right.
4. 4. TechniqueTechnique Make it transparent. Don’t distract Make it transparent. Don’t distract the the viewer with technical flaws, let viewer with technical flaws, let them them clearly see the face for ID clearly see the face for ID purposes.purposes.

Teacher: Kenji TachibanaDigital Photography IDigital Photography IAssignment: Self portrait ID shotAssignment: Self portrait ID shot
LLearning Objectives:earning Objectives:
5.5. LightingLighting Use a single soft (broad-source) light Use a single soft (broad-source) light positioned slightly to one side.positioned slightly to one side.
6.6. PosePose Orient both the body and the face directly Orient both the body and the face directly at at the camera.the camera.
7.7. Report Report Use the writing template, Use the writing template, tempReport.doctempReport.doc..
8.8. PresentPresent It’s about sharing your pro, con, and It’s about sharing your pro, con, and constructive conclusion about the constructive conclusion about the
assignment assignment process. Keep it focused on PCC and do process. Keep it focused on PCC and do it init in
9.9. a relaxed, conversational, and short.a relaxed, conversational, and short.

Teacher: Kenji TachibanaDigital Photography IDigital Photography IAssignment: Self portrait ID shotAssignment: Self portrait ID shot
LLearning Opportunity: earning Opportunity:
1.1. Shoot something FAMILIAR (yourself).Shoot something FAMILIAR (yourself).
2.2. Shoot a PERSON as a subject.Shoot a PERSON as a subject.
3.3. Shoot to a TIGHT LAYOUT (Passport).Shoot to a TIGHT LAYOUT (Passport).
4.4. Shoot to TIGHT REQUIREMENTS (your own).Shoot to TIGHT REQUIREMENTS (your own).
5.5. Shoot to a TIGHT DEADLINE (next class).Shoot to a TIGHT DEADLINE (next class).
6.6. Write a REPORT (PCC from your shoot.Write a REPORT (PCC from your shoot.
7.7. Present your REPORT to an audience (your team).Present your REPORT to an audience (your team).
8.8. Get FEEDBACK on your shoot (from team&).Get FEEDBACK on your shoot (from team&).
9.9. IMPROVE your story and technique based on team& IMPROVE your story and technique based on team& feedback. feedback.

Teacher: Kenji TachibanaDigital Photography IDigital Photography IAssignment: Self portrait ID shotAssignment: Self portrait ID shot
LLearn: earn: Shoot something FAMILIARShoot something FAMILIAR
Writing student are told to write about something Writing student are told to write about something that they know. The same goes for you. Whether that they know. The same goes for you. Whether with words or pictures we’re still telling a story.with words or pictures we’re still telling a story.
The only way to get depth and human interest into The only way to get depth and human interest into a story is by being very familiar with the subject a story is by being very familiar with the subject either through relationship, research, or intuition.either through relationship, research, or intuition.
I hope that you end up learning something real or I hope that you end up learning something real or different about yourself doing the self portrait different about yourself doing the self portrait series…series…
Teacher: Kenji TachibanaDigital Photography IDigital Photography IAssignment: Self portrait ID shotAssignment: Self portrait ID shot
LLearn: earn: Shoot a PERSON as a subjectShoot a PERSON as a subject
This will be your chance to shoot a Person from the four This will be your chance to shoot a Person from the four (4) kinds of shooting categories… (4) kinds of shooting categories…
1)1)PersonPerson2)2)PlacePlace3)3)ThingThing4)4)IdeaIdea
If not done alreadyt, talk about the cop directing traffice at If not done alreadyt, talk about the cop directing traffice at an intersection…an intersection…
Teacher: Kenji TachibanaDigital Photography IDigital Photography IAssignment: Self portrait ID shotAssignment: Self portrait ID shot
LLearn: earn: About the PERSON categoryAbout the PERSON category
The first self portrait shoot will be at the simplest The first self portrait shoot will be at the simplest ‘Identification’ level of image making. For a human, ‘Identification’ level of image making. For a human, the face is the most significant characteristic. And the face is the most significant characteristic. And the frontal view is the most informative.the frontal view is the most informative.
Except for grooming (washing your hair the night Except for grooming (washing your hair the night before), you should try to look ordinary. If you wear before), you should try to look ordinary. If you wear glasses, leave it on.glasses, leave it on.
Don’t do anything to make yourself look different. Don’t do anything to make yourself look different. Although the expression should look neutral but Although the expression should look neutral but pleasant if possible.pleasant if possible.

Teacher: Kenji TachibanaDigital Photography IDigital Photography IAssignment: Self portrait ID shotAssignment: Self portrait ID shot
LLearn: earn: Shoot to a TIGHT layoutShoot to a TIGHT layout
Use the vertical camera framing and Use the vertical camera framing and fill the frame loosely with the head. fill the frame loosely with the head. And position the head at the optical And position the head at the optical center.center.
Make sure that your image can be Make sure that your image can be cropped to a square as shown to the cropped to a square as shown to the right by the red line.right by the red line.
Make your expression softer than the Make your expression softer than the example.example.
Teacher: Kenji TachibanaDigital Photography IDigital Photography IAssignment: Self portrait ID shotAssignment: Self portrait ID shot
LLearn: earn: Shoot to TIGHT REQUIREMENTSShoot to TIGHT REQUIREMENTS
Now that you have done two warm up shoots, you are Now that you have done two warm up shoots, you are familiar with and have hands on experience applying ‘tight’ familiar with and have hands on experience applying ‘tight’ assignment requirements to your weekly shoot.assignment requirements to your weekly shoot.
You shot the second warm up shoot using your own You shot the second warm up shoot using your own ‘personalize’ ‘require’ document.‘personalize’ ‘require’ document.
Be sure to update your ‘require’ Word document. And to use Be sure to update your ‘require’ Word document. And to use it as a ‘check list’ they get done.it as a ‘check list’ they get done.

Teacher: Kenji TachibanaDigital Photography IDigital Photography IAssignment: RequirementsAssignment: Requirements
CCompact Digitalompact Digital: check list: check list Image Size:Image Size: 2547 x 1955 or close as possible2547 x 1955 or close as possible Image Quality:Image Quality: Highest quality jpegHighest quality jpeg Exposure Mode:Exposure Mode: Auto ‘P’ for more controlAuto ‘P’ for more control Exposure meter:Exposure meter: Matrix – not Center Weighted or SpotMatrix – not Center Weighted or Spot Aperture:Aperture: f/3.2 to f/3.5 preferred for shallow DOFf/3.2 to f/3.5 preferred for shallow DOF Shutter speed:Shutter speed: 1/301/30thth – combine with tripod and self – combine with tripod and self
timertimer White balance:White balance: Auto – combined with SkylightAuto – combined with Skylight Chip Sensitivity:Chip Sensitivity: ISO 100 – don’t use any other speedsISO 100 – don’t use any other speeds Focus:Focus: Auto – this has been problematic for Auto – this has been problematic for
many many students. Consider using face students. Consider using face recognition recognition but expect to test.but expect to test.
Focal Length:Focal Length: 105mm equiv – set zoom to 105mm equiv – set zoom to TTelephoto elephoto @ @ 17 to 22mm. 22mm preferred.17 to 22mm. 22mm preferred.
Digital zoom:Digital zoom: Marketing lie - never use!Marketing lie - never use! Flash:Flash: Don’t‘ use for class assignments. If the Don’t‘ use for class assignments. If the
flash flash comes on automatically, that is a clue comes on automatically, that is a clue about about the light level being too low.the light level being too low.
Be sure to rewrite any of the remarks using your own Be sure to rewrite any of the remarks using your own words as needed. And update it for each weekly words as needed. And update it for each weekly assignment.assignment.

Teacher: Kenji TachibanaDigital Photography IDigital Photography IAssignment: Self portrait ID shotAssignment: Self portrait ID shot
LLearn: earn: Shoot to a TIGHT DEADLINEShoot to a TIGHT DEADLINE
Shooting to a deadline can give an ‘aura of the real Shooting to a deadline can give an ‘aura of the real thing’. Shooting the real thing always gives extra thing’. Shooting the real thing always gives extra energy to any process. energy to any process.
Use that extra energy productively making sure that all Use that extra energy productively making sure that all the requirements are being fulfilled. Otherwise it will the requirements are being fulfilled. Otherwise it will end up as stress. And stress usually has the negative end up as stress. And stress usually has the negative effect of blocking your creative energy.effect of blocking your creative energy.
Teacher: Kenji TachibanaDigital Photography IDigital Photography IAssignment: More on…Assignment: More on…
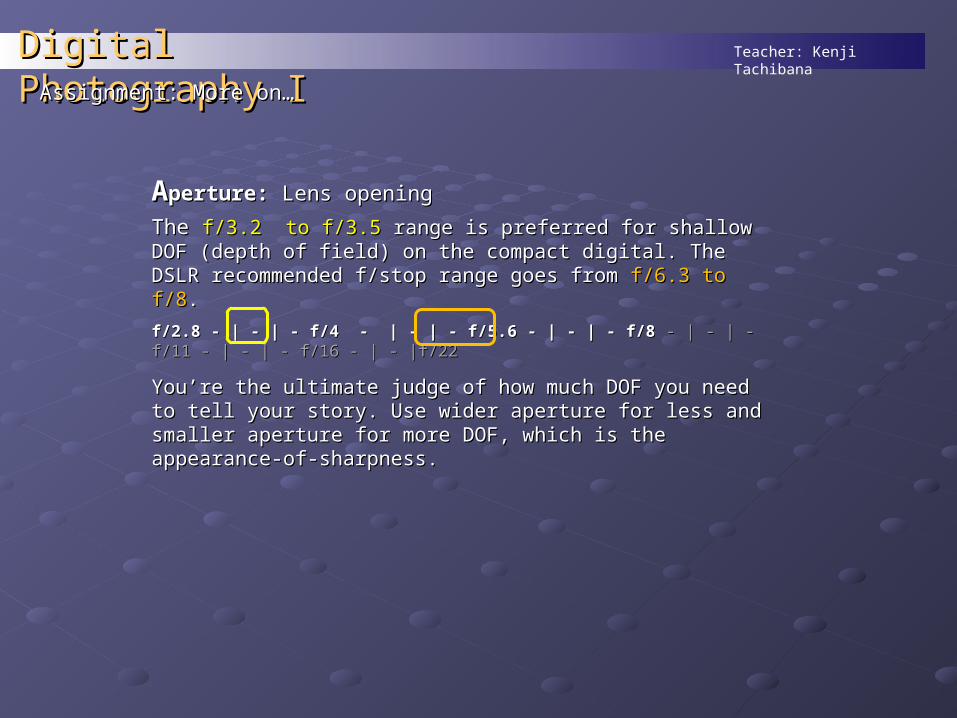
AAperture: perture: Lens opening Lens opening
The The f/3.2 to f/3.5 f/3.2 to f/3.5 range is preferred for shallow DOF (depth range is preferred for shallow DOF (depth of field) on the compact digital. The DSLR recommended of field) on the compact digital. The DSLR recommended f/stop range goes from f/stop range goes from f/6.3 to f/8f/6.3 to f/8..
f/2.8 - | - | - f/4 - | - | - f/5.6 - | - | - f/8 f/2.8 - | - | - f/4 - | - | - f/5.6 - | - | - f/8 - | - | - f/11 - | - | - f/16 - | - |f/22- | - | - f/11 - | - | - f/16 - | - |f/22
You’re the ultimate judge of how much DOF you need to tell You’re the ultimate judge of how much DOF you need to tell your story. Use wider aperture for less and smaller aperture your story. Use wider aperture for less and smaller aperture for more DOF, which is the appearance-of-sharpness.for more DOF, which is the appearance-of-sharpness.

Teacher: Kenji TachibanaDigital Photography IDigital Photography IAssignment: More on…Assignment: More on…
AAperture: perture: Appearance of sharpnessAppearance of sharpness
The fact is that only a thin plane-of-focus is actually sharp. The fact is that only a thin plane-of-focus is actually sharp. DOF is about the illusion-of-sharpness. And that illusion relies DOF is about the illusion-of-sharpness. And that illusion relies on two things. One is image size and the other is the viewer’s on two things. One is image size and the other is the viewer’s distance from the image.distance from the image.
Example – talk about the ipod silkscreen images on buses…Example – talk about the ipod silkscreen images on buses…

Teacher: Kenji TachibanaDigital Photography IDigital Photography IAssignment: More on…Assignment: More on…
IImage Size: mage Size: 2547 x 1955 or within 10%2547 x 1955 or within 10%
The numbers describes a 5 MP compact digital set to its The numbers describes a 5 MP compact digital set to its maximum image size. Current digitals have much higher maximum image size. Current digitals have much higher pixel count. So, you must lower the image size to meet the pixel count. So, you must lower the image size to meet the class requirement.class requirement.
The assignment image size is based on practical concerns The assignment image size is based on practical concerns related to file size. A larger files require longer handling and related to file size. A larger files require longer handling and more storage space requirements. It also means slower more storage space requirements. It also means slower Photoshop performance.Photoshop performance.
5 MP image translates to approximately 2 to 2.5 MB file size5 MP image translates to approximately 2 to 2.5 MB file size. .

Teacher: Kenji TachibanaDigital Photography IDigital Photography IAssignment: Do this…Assignment: Do this…
LLightingighting: Put this check list on a 3x5 card: Put this check list on a 3x5 card Quality: Quality: Soft light is easy and forgiving to work with.Soft light is easy and forgiving to work with. Kind:Kind: Skylight, Open Shade, and Cloudy Bright Skylight, Open Shade, and Cloudy Bright
are all on the recommended list.are all on the recommended list. Direction:Direction: Moderate sidelight to draw the facial form.Moderate sidelight to draw the facial form. Position: Position: Slightly above and to the side but NOT the Slightly above and to the side but NOT the
top, back, extreme side, or bottom.top, back, extreme side, or bottom. Number:Number: Single light source (single shadows). Single light source (single shadows).
Multiple light source can easily mean Multiple light source can easily mean different colors.different colors.

Teacher: Kenji TachibanaDigital Photography IDigital Photography IAssignment:Assignment:
LLight: ight: You and the camera can’t see without itYou and the camera can’t see without it
Actually, more light is needed for photography. With Actually, more light is needed for photography. With light level, much more is usually better. There is no light level, much more is usually better. There is no perfect lighting but there is a certain light quality that perfect lighting but there is a certain light quality that tends to produce beautiful images. And we are lucky tends to produce beautiful images. And we are lucky in the Pacific Northwest with our many gray and in the Pacific Northwest with our many gray and overcast days.overcast days.
Because ISO 100 is slow, theBecause ISO 100 is slow, theMidday Skylight tend to offer theMidday Skylight tend to offer thehighest luminance level. Skylighthighest luminance level. Skylightis the sky only portion of Daylight.is the sky only portion of Daylight.And Daylight is the combination ofAnd Daylight is the combination ofdirect sun plus the skylight.direct sun plus the skylight.

Teacher: Kenji TachibanaDigital Photography IDigital Photography IAssignment:Assignment:
LLight: Sight: Skylight preferredkylight preferred
Skylight can easily be found in Open Shade Skylight can easily be found in Open Shade conditions under trees, next to buildings, or under conditions under trees, next to buildings, or under overhang.overhang.

Teacher: Kenji TachibanaDigital Photography IDigital Photography IAssignment:Assignment:
LLight: ight: Drawing with lightDrawing with light
As an advertising studio photographer in LA, I As an advertising studio photographer in LA, I exercised total lighting control. And that took special exercised total lighting control. And that took special (expensive) lighting gear. Some of it was custom (expensive) lighting gear. Some of it was custom made. Talk about sound trigger…made. Talk about sound trigger…
In my current life as a photographer and a teacher, I In my current life as a photographer and a teacher, I control light by ‘seeing it’ and using simple light control light by ‘seeing it’ and using simple light modifiers from make up mirrors to led book lights modifiers from make up mirrors to led book lights and even white envelopes.and even white envelopes.

Teacher: Kenji TachibanaDigital Photography IDigital Photography IAssignment:Assignment:
LLight: ight: North LightNorth Light
Still-life and portrait artists have used north light for Still-life and portrait artists have used north light for hundreds of years because of its delicate and hundreds of years because of its delicate and elegant way of drawing the subject. Artists brought elegant way of drawing the subject. Artists brought the north light into the studio via huge north facing the north light into the studio via huge north facing windows.windows.
Similar light quality can be had by using Skylight, Similar light quality can be had by using Skylight, Open Shade, or Cloudy Bright light. Another way to Open Shade, or Cloudy Bright light. Another way to achieve elegant lighting is to diffuse direct sunlight achieve elegant lighting is to diffuse direct sunlight using a white sheet. using a white sheet.

Teacher: Kenji TachibanaDigital Photography IDigital Photography IAssignment:Assignment:
LLight: ight: ModificationModification
Whether Skylight or diffused sunlight, both usually Whether Skylight or diffused sunlight, both usually needs modest amount of lighting modification using needs modest amount of lighting modification using white reflector cards to ‘fill’ the shadow areas to bring white reflector cards to ‘fill’ the shadow areas to bring up shadow detail.up shadow detail.
In order to ‘see’ the lighting, use the ‘squint-view’ In order to ‘see’ the lighting, use the ‘squint-view’ technique. Squint viewing is about reducing the scene technique. Squint viewing is about reducing the scene into an abstraction of tones. Repeat the squint-view into an abstraction of tones. Repeat the squint-view demo if necessary…demo if necessary…

Teacher: Kenji TachibanaDigital Photography IDigital Photography IAssignment: General informationAssignment: General information
LLighting: ighting: DiagramsDiagrams
Our ideas about lighting is influence by our planet having only a Our ideas about lighting is influence by our planet having only a single sun (also a single moon). With that as our model, most single sun (also a single moon). With that as our model, most people are use to having a single light coming from above. The 2 people are use to having a single light coming from above. The 2 diagrams below show good lighting from the top and side.diagrams below show good lighting from the top and side.
Side view Side view Top viewTop view

Teacher: Kenji TachibanaDigital Photography IDigital Photography I.
LLightingighting: Subject’s point-of-view: Subject’s point-of-view
As the portrait subject, check the lighting position. Your scene As the portrait subject, check the lighting position. Your scene should look somewhat like the diagram below. This lighting formula should look somewhat like the diagram below. This lighting formula usually provides good ‘catch light’ in the eyes.usually provides good ‘catch light’ in the eyes.
Slight side lightSlight side light Optional sideOptional side
The cameraThe camera
Assignment: General informationAssignment: General information

Teacher: Kenji TachibanaDigital Photography IDigital Photography I.
LLight Source Shot: ight Source Shot: The dotted white line shows the camera framing of the #4 light source shot.The dotted white line shows the camera framing of the #4 light source shot.
OverhangOverhang
Assignment: General informationAssignment: General information

Teacher: Kenji TachibanaDigital Photography IDigital Photography IAssignment: Self portrait ID shotAssignment: Self portrait ID shot
FFile Managementile Management: Image selection process 1: Image selection process 1
1.1. Copy all the assignment files from your digital film Copy all the assignment files from your digital film to your permanent to your permanent imageArchive imageArchive (storage). I (storage). I recommend a 100 GB USB external hard drive for recommend a 100 GB USB external hard drive for your storage. 60 GB capacity minimum but, based your storage. 60 GB capacity minimum but, based on affordability, larger capacity the better.on affordability, larger capacity the better.
2.2. The computer hard drive is the last place-of-choice The computer hard drive is the last place-of-choice for your permanent image storage! And your new for your permanent image storage! And your new USB thumb drive is only meant to be a temporary USB thumb drive is only meant to be a temporary file transfer device.file transfer device.

Teacher: Kenji TachibanaDigital Photography IDigital Photography IAssignment: Self portrait ID shotAssignment: Self portrait ID shot
FFile Managementile Management: Image selection process 2: Image selection process 2
3.3. Set the Windows Explorer (file manager) in its Set the Windows Explorer (file manager) in its thumbnail thumbnail view mode. The view mode. The ViewView choices are choices are Thumbnail, Tile, Icon, List, and Detail.Thumbnail, Tile, Icon, List, and Detail.
4.4. Point the file manager to your current assignment Point the file manager to your current assignment imageArchive imageArchive folder. ‘folder. ‘spIDspID’ would be a good name ’ would be a good name for the folder. Explorer will display for the folder. Explorer will display spID spID images as images as small pictures (thumbnail).small pictures (thumbnail).
5.5. The side by side small image comparisons will make The side by side small image comparisons will make it easier to select the ones that work (keepers). Do it easier to select the ones that work (keepers). Do not linger over this process. If you take too long, you not linger over this process. If you take too long, you will only end up confusing yourself.will only end up confusing yourself.

Teacher: Kenji TachibanaDigital Photography IDigital Photography IAssignment: Self portrait ID shotAssignment: Self portrait ID shot
FFile Managementile Management: Image selection process 3: Image selection process 3
6.6. Make a new folder ‘imageWork’ (Make a new folder ‘imageWork’ (spID-wkspID-wk) and copy ) and copy your chosen images to the new folder. Try to limit the your chosen images to the new folder. Try to limit the ‘keepers’ to a dozen or less.‘keepers’ to a dozen or less.
7.7. Double click on the first of the ‘keepers’ image to Double click on the first of the ‘keepers’ image to display it full screen. You may take a little more time display it full screen. You may take a little more time but, again, don’t take too long and get yourself but, again, don’t take too long and get yourself bogged down. Select down to half a dozen (6) bogged down. Select down to half a dozen (6) images.images.
8.8. Make a sub-folder and name it ‘Make a sub-folder and name it ‘holdhold’. Move all the ’. Move all the rejects to the new rejects to the new holdhold folder. folder.
Practical folder Practical folder name suggestion.name suggestion.

Teacher: Kenji TachibanaDigital Photography IDigital Photography IAssignment: Self portrait ID shotAssignment: Self portrait ID shot
FFile Managementile Management: Image selection process 4: Image selection process 4
9.9. Now take more time to review the remaining 6 Now take more time to review the remaining 6 images in the images in the spID-wk folder. spID-wk folder. You only need 4 You only need 4 final images.final images.
10.10. Be sure to ‘inspect’ all 6 images in the ‘Actual Size’ Be sure to ‘inspect’ all 6 images in the ‘Actual Size’ viewing-mode which will enlarge the image to show viewing-mode which will enlarge the image to show you critical focus details.you critical focus details.
11.11. By doing these things, you should be able to select By doing these things, you should be able to select down to the four (4) final class assignment images.down to the four (4) final class assignment images.

Teacher: Kenji TachibanaDigital Photography IDigital Photography IAssignment: Self portrait ID shotAssignment: Self portrait ID shot
FFile Managementile Management: 4 final images and their names: 4 final images and their names
You must select (edit) and rename the images at home You must select (edit) and rename the images at home (before class). Rename them (before class). Rename them exactlyexactly as follows:as follows:
FormatFormat ExampleExample
1_firstnameLight.jpg 1_firstnameLight.jpg 1_kenjiLight.jpg1_kenjiLight.jpg
2_firstnameBest.jpg2_firstnameBest.jpg 2_kenjiBest.jpg2_kenjiBest.jpg
3_firstnameNext.jpg 3_firstnameNext.jpg 3_kenjiNext.jpg3_kenjiNext.jpg
4_firstnameLeast.jpg4_firstnameLeast.jpg 4_kenjiLeast.jpg4_kenjiLeast.jpg
Until I give Photoshop ‘cropFraqme’ Layer directions, the Until I give Photoshop ‘cropFraqme’ Layer directions, the image must not be changed in any way except for the required image must not be changed in any way except for the required file rennaming.file rennaming.
And do not e-mail assignment images to me or to yourselfAnd do not e-mail assignment images to me or to yourself..
Teacher: Kenji TachibanaDigital Photography IDigital Photography IAssignment: Self portrait ID shotAssignment: Self portrait ID shot
LLearn More: earn More: Write a Write a reportreport
It’s really about increasing awareness. Writing the It’s really about increasing awareness. Writing the reportreport is is also about getting that ‘new’ awareness from your short-also about getting that ‘new’ awareness from your short-term into the long-term memory. Write the term into the long-term memory. Write the reportreport by using by using the template from the online resource. the template from the online resource. http://facweb.northseattle.edu/ktachiba/art1145sp/template/
Once there, select and download the ‘Once there, select and download the ‘reportTemp.docreportTemp.doc’. ’. Make sure to save it to your local class/assignment Make sure to save it to your local class/assignment folder.folder.
Use the template and follow the precise instructions. Use the template and follow the precise instructions. Read and delete all green text before writing your report.Read and delete all green text before writing your report.

Teacher: Kenji TachibanaDigital Photography IDigital Photography IAssignment: Self portrait ID shotAssignment: Self portrait ID shot
LLearn: earn: Where is the EXIF info?Where is the EXIF info?
The EXIF information is embedded in the ’header’ of the The EXIF information is embedded in the ’header’ of the image file. It can be accessed in number of ways…image file. It can be accessed in number of ways…
1.1.Camera playback (you have already seen this).Camera playback (you have already seen this).
2.2.Windows ‘Explorer’ using (right click) file ‘Properties’.Windows ‘Explorer’ using (right click) file ‘Properties’.
3.3.Adobe Bridge (you have already seen this) right column.Adobe Bridge (you have already seen this) right column.
4.4.Your camera probably came with its own image and EXIF Your camera probably came with its own image and EXIF info viewer application.info viewer application.

Teacher: Kenji TachibanaDigital Photography IDigital Photography IAssignment: Self portrait ID shotAssignment: Self portrait ID shot
LLearn: earn: Right way Right way
Some of you haven’t been doing the assignment Report Some of you haven’t been doing the assignment Report correctly. Start by using the correct writing template correctly. Start by using the correct writing template which is the ‘which is the ‘reportTemp.docreportTemp.doc’.’.
Provide EXIF information on all four (4) images. And Provide EXIF information on all four (4) images. And each information data must have some personally each information data must have some personally meaningful ‘meaningful ‘commentscomments’.’.
At the minimum, write ‘At the minimum, write ‘No commentNo comment’. I rather have that ’. I rather have that then some PR nonsense. Although, by this time, I expect then some PR nonsense. Although, by this time, I expect most of the ‘fmost of the ‘factsacts’ to have some personal meaning.’ to have some personal meaning.

Teacher: Kenji TachibanaDigital Photography IDigital Photography IAssignment: Self portrait ID shotAssignment: Self portrait ID shot
LLearn: earn: Repurpose your writingRepurpose your writing
Present your report as a short conversation to your Present your report as a short conversation to your team. Try to share ‘how it was’ rather than ‘how team. Try to share ‘how it was’ rather than ‘how wonderful you are’.wonderful you are’.
One student from each team will probably give their One student from each team will probably give their presentation to the whole class in a more formal style presentation to the whole class in a more formal style conversation.conversation.
Whether to your team or to the class. The main goal is Whether to your team or to the class. The main goal is to be ‘to be ‘relaxed and conversationalrelaxed and conversational’. ’. Your manner of Your manner of delivery can be more important and memorable than delivery can be more important and memorable than your presentation content!your presentation content!

Teacher: Kenji TachibanaDigital Photography IDigital Photography IAssignment: Self portrait ID shotAssignment: Self portrait ID shot
LLearn: earn: Fully being there…Fully being there…
When a student is presenting, you as an audience When a student is presenting, you as an audience member must be fully present. You must do your best member must be fully present. You must do your best to fully hear, internalize, and to make a feeling to fully hear, internalize, and to make a feeling connection to the image and story. Ideally, make the connection to the image and story. Ideally, make the image your own…image your own…
Don’t look for imperfections but, also, avoid ‘I like it Don’t look for imperfections but, also, avoid ‘I like it statements’ that is not supported by concrete details.statements’ that is not supported by concrete details.

Teacher: Kenji TachibanaDigital Photography IDigital Photography IAssignment: Self portrait ID shotAssignment: Self portrait ID shot
LLearn: earn: Be predictiveBe predictive
Be able to give my feedback before I do. It is important Be able to give my feedback before I do. It is important to be unique but, it is also important to get consistent to be unique but, it is also important to get consistent feedback. Consistent feedback that result in positive feedback. Consistent feedback that result in positive changes is priceless.changes is priceless.
‘‘I don’t like it feedback must be avoided. But factual I don’t like it feedback must be avoided. But factual feedback about the image being too dark or too light feedback about the image being too dark or too light can be useful. Focus remarks such as front or back can be useful. Focus remarks such as front or back focus is also useful. focus is also useful.

Teacher: Kenji TachibanaDigital Photography IDigital Photography IAssignment: Self portrait ID shotAssignment: Self portrait ID shot
LLearn: earn: Class goalClass goal
Class goal is to learn and to derive enjoyment from Class goal is to learn and to derive enjoyment from the process. This class is not about pretty pictures nor the process. This class is not about pretty pictures nor unrecognized happy accidents. This class is about unrecognized happy accidents. This class is about learning to tell a simple story. And to do so skillfully learning to tell a simple story. And to do so skillfully with the camera, framing, staging, propping, lighting, with the camera, framing, staging, propping, lighting, and packing. And to take advantage of happy and packing. And to take advantage of happy accidents.accidents.

Teacher: Kenji TachibanaDigital Photography IDigital Photography IAssignment: Self portrait ID shot Assignment: Self portrait ID shot
HHappy Accidents: Embrace and run with them…appy Accidents: Embrace and run with them…
This class is not about happy accidents but it certainly This class is not about happy accidents but it certainly is about taking advantage of them when they occur. is about taking advantage of them when they occur. To take advantage of them, you must recognize them To take advantage of them, you must recognize them when they occur. Keep your eyes open for them when they occur. Keep your eyes open for them during your camera playback review.during your camera playback review.
This class is not about pretty pictures but when all the This class is not about pretty pictures but when all the image elements are working together and telling a image elements are working together and telling a good story, the final image will have a high wow factor.good story, the final image will have a high wow factor.

Teacher: Kenji TachibanaDigital Photography IDigital Photography IAssignment: Self portrait ID shotAssignment: Self portrait ID shot
LLearn: earn: Pack, pack, and pack (3 times)Pack, pack, and pack (3 times)
Packing the image with story telling elements is very Packing the image with story telling elements is very important to story telling. And it will take practice to important to story telling. And it will take practice to pack well. But once you know about the packing idea, pack well. But once you know about the packing idea, you will start to see it being used all around you. you will start to see it being used all around you.
Pack at least 3 story telling elements but don’t over Pack at least 3 story telling elements but don’t over pack. After a point, it will become confusing.pack. After a point, it will become confusing.
Additional Homework: Additional Homework: Bring in a published image Bring in a published image example with packed image elements…example with packed image elements…

Teacher: Kenji TachibanaDigital Photography IDigital Photography ISelf portrait ID shot: Student example Self portrait ID shot: Student example
LLearn: earn: Illusion of success…Illusion of success…
This Free Choice shot probably This Free Choice shot probably looked very good in the camera’s looked very good in the camera’s tiny LCD monitor. It probably even tiny LCD monitor. It probably even looked good in the computer looked good in the computer monitor. And it may still look good monitor. And it may still look good to some of you.to some of you.
Although, it has some serious Although, it has some serious problems.problems.

Teacher: Kenji TachibanaDigital Photography IDigital Photography ISelf portrait ID shot: Student example Self portrait ID shot: Student example
LLearn: earn: Raise your expectationRaise your expectation
1.1. Light source in the image.Light source in the image.2.2. Top light position is over-Top light position is over-
exposing the forehead.exposing the forehead.3.3. Light direction is highlighting Light direction is highlighting
the ear.the ear.4.4. Background is too busy. Background is too busy. 5.5. The top light is also putting The top light is also putting
the eyes in deep shadow.the eyes in deep shadow.
Light source in Light source in backgroundbackground
Background Background too busytoo busy
Temple Temple blown out?blown out?
Ear is too Ear is too prominenprominen
tt
Eyes in deep Eyes in deep shadowshadow

Teacher: Kenji TachibanaDigital Photography IDigital Photography ISelf portrait ID shot: Student example Self portrait ID shot: Student example
LLearn: earn: Making compromisesMaking compromises
The image was lab worked The image was lab worked to fix all the issues to fix all the issues mentioned in the previous mentioned in the previous slide. Often, lab work slide. Often, lab work decisions are a matter of decisions are a matter of making compromises.making compromises.
Use the keyboard Up & Use the keyboard Up & Down arrows keys to Down arrows keys to compare this After image compare this After image with the previous camera with the previous camera original image.original image.

Teacher: Kenji TachibanaDigital Photography IDigital Photography ISelf portrait ID shot: Student example Self portrait ID shot: Student example
LLearn: earn: Better lighting Better lighting
The light source is coming from the The light source is coming from the top and to the right of the subject. It top and to the right of the subject. It needed to be much lower to ‘open- needed to be much lower to ‘open- up’ the eyes, which are in shadow. It up’ the eyes, which are in shadow. It also needed to come from the also needed to come from the opposite side to put the ear in opposite side to put the ear in shadow. shadow.
The new improved lighting would The new improved lighting would have also put ‘catch light’ in both have also put ‘catch light’ in both eyes making them sparkle with eyes making them sparkle with delight.delight.

Teacher: Kenji TachibanaDigital Photography IDigital Photography ISelf portrait ID shot: Student example Self portrait ID shot: Student example
LLearn: earn: Framing Framing
I would have recommended a I would have recommended a less tight framing for this Free less tight framing for this Free Choice assignment shot.Choice assignment shot.
Backing off slightly would be the Backing off slightly would be the simplest solution to increasing simplest solution to increasing image area. I would put the image area. I would put the added image area to the left and added image area to the left and top as indicated by the yellow top as indicated by the yellow ‘cropFrame’ line.‘cropFrame’ line.
Both changes are modest but Both changes are modest but are important fine-tuning image are important fine-tuning image composition ideas. composition ideas.

Teacher: Kenji TachibanaDigital Photography IDigital Photography IAssignment: Self portrait ID shotAssignment: Self portrait ID shot
GGroom Yourself and More:room Yourself and More:
Everyday natural appearance requires less grooming than Everyday natural appearance requires less grooming than when having a picture taken. I strongly advise that you wash when having a picture taken. I strongly advise that you wash your hair the night before the shoot. And use a mirror to your hair the night before the shoot. And use a mirror to groom yourself before the actual shoot. groom yourself before the actual shoot.
Unlike the real passport shot, you’re allowed to look Unlike the real passport shot, you’re allowed to look friendly. Put a neutral to pleasant expression on your face. friendly. Put a neutral to pleasant expression on your face. Similar to grooming, your natural expression could come out Similar to grooming, your natural expression could come out looking unfriendly in a photograph.looking unfriendly in a photograph.
Wear a fresh shirt or a blouse, it will help your to feel good. Wear a fresh shirt or a blouse, it will help your to feel good. And hopefully, that might help your pleasant expression And hopefully, that might help your pleasant expression authentic.authentic.
Teacher: Kenji TachibanaDigital Photography IDigital Photography IAssignment: Self portrait ID shotAssignment: Self portrait ID shot
CConclusiononclusion::
1.1. Shoot a simple Passport (ID) shot of yourself.Shoot a simple Passport (ID) shot of yourself.2.2. Use the easy to work with soft Skylight. Use the easy to work with soft Skylight. 3.3. Find a shooting location under a porch which will help Find a shooting location under a porch which will help
you to control the soft skylight.you to control the soft skylight.4.4. Shoot in the middle of the day for maximum light level.Shoot in the middle of the day for maximum light level.5.5. Consider 1/30Consider 1/30thth sec as slow shutter speed. Do not shoot sec as slow shutter speed. Do not shoot
yourself in the act of laughing. yourself in the act of laughing. 6.6. Hold a relaxed friendly expression for your self portrait. Hold a relaxed friendly expression for your self portrait.
Use the default 10 second self timer delay.Use the default 10 second self timer delay.7.7. White background required.White background required.o Consider using a white bed sheet (very portable)Consider using a white bed sheet (very portable)o If you use a sheet, it must be iron-flat and not wrinkledIf you use a sheet, it must be iron-flat and not wrinkledo The background needs to be at least 3 ft. behind the The background needs to be at least 3 ft. behind the
subject but no more than 6 ft. back.subject but no more than 6 ft. back.

Teacher: Kenji TachibanaDigital Photography IDigital Photography IAssignment: Self portrait ID shotAssignment: Self portrait ID shot
HHuge Concern: uge Concern: FocusFocus
Pay particular attention to focus. Many student images Pay particular attention to focus. Many student images have suffered from ‘back-focus’ even when the camera have suffered from ‘back-focus’ even when the camera is set to Auto. is set to Auto.
I recommend manual focus. Or to have an assistant I recommend manual focus. Or to have an assistant triggers the self timer and confirm the composition. triggers the self timer and confirm the composition. Camera support is also recommended:Camera support is also recommended:1.1.Tripod – full size preferred.Tripod – full size preferred.2.2.Tripod – a mini pod is better than non.Tripod – a mini pod is better than non.3.3.Been bag – less than ideal but better than non.Been bag – less than ideal but better than non.4.4.In order to get the height, use something solid like a In order to get the height, use something solid like a bookcase that reaches about 5’. Both the mini pod and bookcase that reaches about 5’. Both the mini pod and the bean bag can be set on the bookcase.the bean bag can be set on the bookcase.

Teacher: Kenji TachibanaDigital Photography IDigital Photography IAssignment: Self portrait ID shotAssignment: Self portrait ID shot
AAlways Test: And use common senselways Test: And use common sense
Be sure to test shoot prior to shooting the real thing. Be sure to test shoot prior to shooting the real thing. Make sure to take your test shoot all the way to viewing Make sure to take your test shoot all the way to viewing your image on a computer monitor at ‘Actual Size’.your image on a computer monitor at ‘Actual Size’.
The real shoot is no time to be ‘figuring things out’. The real shoot is no time to be ‘figuring things out’. Since you’re the model, the model will wait for you. But, Since you’re the model, the model will wait for you. But, the lighting and situation will not…the lighting and situation will not…

Teacher: Kenji TachibanaDigital Photography IDigital Photography IAssignment: Self portrait ID shotAssignment: Self portrait ID shot
OOnline Research: Story and compositionnline Research: Story and composition
I Googled I Googled passportpassport and easily found the official Government and easily found the official Government resource for Passport. I found this requirement diagram there.resource for Passport. I found this requirement diagram there.
My layout is much simpler byMy layout is much simpler bycomparison. Thecomparison. Thered rectangle isred rectangle isthe camerathe cameraframing guide.framing guide.
Put a squarePut a squareFraming guideFraming guide mask on your camera LCD. Even if you mask on your camera LCD. Even if you shoot using the viewfinder, the playback review is done using shoot using the viewfinder, the playback review is done using the LCD.the LCD.

Teacher: Kenji TachibanaDigital Photography IDigital Photography IAssignment: Self portrait ID shotAssignment: Self portrait ID shot
CClosing Shots:losing Shots:
Except for the serious expression, your Except for the serious expression, your assignment image should look exactly like assignment image should look exactly like the example to the left. In your passport the example to the left. In your passport shot, make your expression softer. That shot, make your expression softer. That means less somber.means less somber.
Do not process or crop the image. The only Do not process or crop the image. The only changes that you will make is in the file changes that you will make is in the file name…name…
FormatFormat ExampleExample
1_firstnameLight.jpg 1_firstnameLight.jpg 1_kenjiLight.jpg1_kenjiLight.jpg2_firstnameBest.jpg2_firstnameBest.jpg 2_kenjiBest.jpg2_kenjiBest.jpg3_firstnameNext.jpg 3_firstnameNext.jpg 3_kenjiNext.jpg3_kenjiNext.jpg4_firstnameLeast.jpg4_firstnameLeast.jpg 4_kenjiLeast.jpg4_kenjiLeast.jpg
Teacher: Kenji TachibanaDigital Photography IDigital Photography IAssignment: Self portrait ID shotAssignment: Self portrait ID shot
LLast Word: ast Word: Project managementProject management
Make sure to project manage this assignment so that you Make sure to project manage this assignment so that you deliver a useable image instead of excuses. Project deliver a useable image instead of excuses. Project manage means to plan well knowing that the ID shoot will manage means to plan well knowing that the ID shoot will take 3x more time than you think it will. You might actually take 3x more time than you think it will. You might actually want to allow 5x more time so that re-shoot is possible.want to allow 5x more time so that re-shoot is possible.
Project manage also is about having enough time to Project manage also is about having enough time to review the 17 textbook slides, review the camera manual, review the 17 textbook slides, review the camera manual, and to finalize and use the ‘require’ check list before and and to finalize and use the ‘require’ check list before and during your shoot.during your shoot.

Teacher: Kenji TachibanaDigital Photography IDigital Photography I
xx
EndEnd