Teacher: Kenji Tachibana Digital Photography I. Print Making Phase Costco Recommended.
26
Teacher: Kenji Tachibana Digital Digital Photography I Photography I . Print Making Phase Print Making Phase Costco Recommended Costco Recommended
-
Upload
merry-newton -
Category
Documents
-
view
219 -
download
0
Transcript of Teacher: Kenji Tachibana Digital Photography I. Print Making Phase Costco Recommended.
Teacher: Kenji TachibanaDigital Photography IDigital Photography I.
Print Making PhasePrint Making Phase
Costco RecommendedCostco Recommended
Teacher: Kenji TachibanaDigital Photography IDigital Photography IPrint Making Phase:Print Making Phase:
Final Production: Phase-1 partsFinal Production: Phase-1 parts
This phase is about finalizing the image with required This phase is about finalizing the image with required lab work from steps 1 to 4.lab work from steps 1 to 4.
Step 1 – cropFrame for final-shape usually limited to Step 1 – cropFrame for final-shape usually limited to removing the 10% ‘safeImage’ margin.removing the 10% ‘safeImage’ margin.Step 2 – process using the 3 basic nondestructive Step 2 – process using the 3 basic nondestructive filter-affectfilter-affect adjustments. adjustments.Step 3 – Retouch from simple spotting to area Step 3 – Retouch from simple spotting to area dodgedodge((lighteninglightening) or ) or burnburn ( (darkeningdarkening).).Step 4 – Step 4 – Mask-retouchingMask-retouching which often involves which often involves painting directly on the mask to remove the filter-painting directly on the mask to remove the filter-adjustment affect.adjustment affect.
Teacher: Kenji TachibanaDigital Photography IDigital Photography IPrint Making Phase:Print Making Phase:
Final Production: Phase-1 goalFinal Production: Phase-1 goal
The goal of the lab work is to bring out the The goal of the lab work is to bring out the image image potential potential that was suggested in the original scene. that was suggested in the original scene. Or in bringing out the storytelling elements that you Or in bringing out the storytelling elements that you carefully packed into your image.carefully packed into your image.
Be sure to Be sure to DuplicateDuplicate your image before moving to your image before moving to the lab work phase. the lab work phase.
Teacher: Kenji TachibanaDigital Photography IDigital Photography IPrint Making PhasePrint Making Phase::
Final Production: Phase-2Final Production: Phase-2
1.1. Have the 1-Lab make exposure (brightness) Have the 1-Lab make exposure (brightness) adjustment on the machine to make light, normal, and adjustment on the machine to make light, normal, and dark 4x6 color prints.dark 4x6 color prints.
2.2.Advanced: You provide a light, normal, and dark Advanced: You provide a light, normal, and dark prints. Have the lab make the standard 3 print prints. Have the lab make the standard 3 print variations from your ‘advanced’ starting point.variations from your ‘advanced’ starting point.
For the Advanced to work properly, the ‘normal’ image For the Advanced to work properly, the ‘normal’ image must be both darkened and lightened creating 3 must be both darkened and lightened creating 3 image files.image files.
And the 3 files must be named properly with the exact And the 3 files must be named properly with the exact file name appearing on the image.file name appearing on the image.
Teacher: Kenji TachibanaDigital Photography IDigital Photography IPrint Making Phase:Print Making Phase:
One-Hour Lab:One-Hour Lab:
My recommended print source is Costco’s One-Hour My recommended print source is Costco’s One-Hour lab (Membership required). It’s $1.49 (cheap) for an lab (Membership required). It’s $1.49 (cheap) for an 8x10 lustre (8x10 lustre (semi-glosssemi-gloss) color prints. And it’s one-) color prints. And it’s one-hour fast.hour fast.
Other Labs can charge between $3 to $8. And they Other Labs can charge between $3 to $8. And they may not even have the may not even have the semi-gloss semi-gloss print surface nor print surface nor do it in 1-hour. do it in 1-hour.
Doing it yourself will end up being much more costly, Doing it yourself will end up being much more costly, not standardized, and very time consuming. not standardized, and very time consuming. Standardized mean that I can have the print made at Standardized mean that I can have the print made at a Costco here or in Minnesota with the same result…a Costco here or in Minnesota with the same result…
Teacher: Kenji TachibanaDigital Photography IDigital Photography IPrint Making Phase:Print Making Phase:
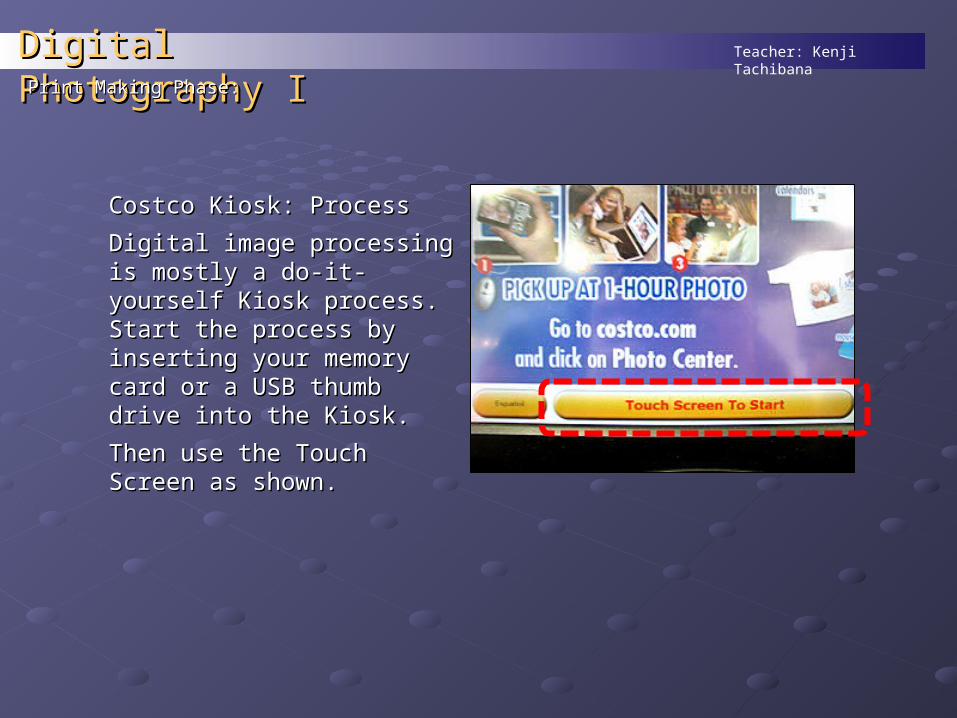
Costco Kiosk: ProcessCostco Kiosk: Process
Digital image processing is Digital image processing is mostly a do-it-yourself Kiosk mostly a do-it-yourself Kiosk process. Start the process by process. Start the process by inserting your memory card or a inserting your memory card or a USB thumb drive into the Kiosk.USB thumb drive into the Kiosk.
Then use the Touch Screen as Then use the Touch Screen as shown.shown.
Teacher: Kenji TachibanaDigital Photography IDigital Photography IPrint Making Phase:Print Making Phase:
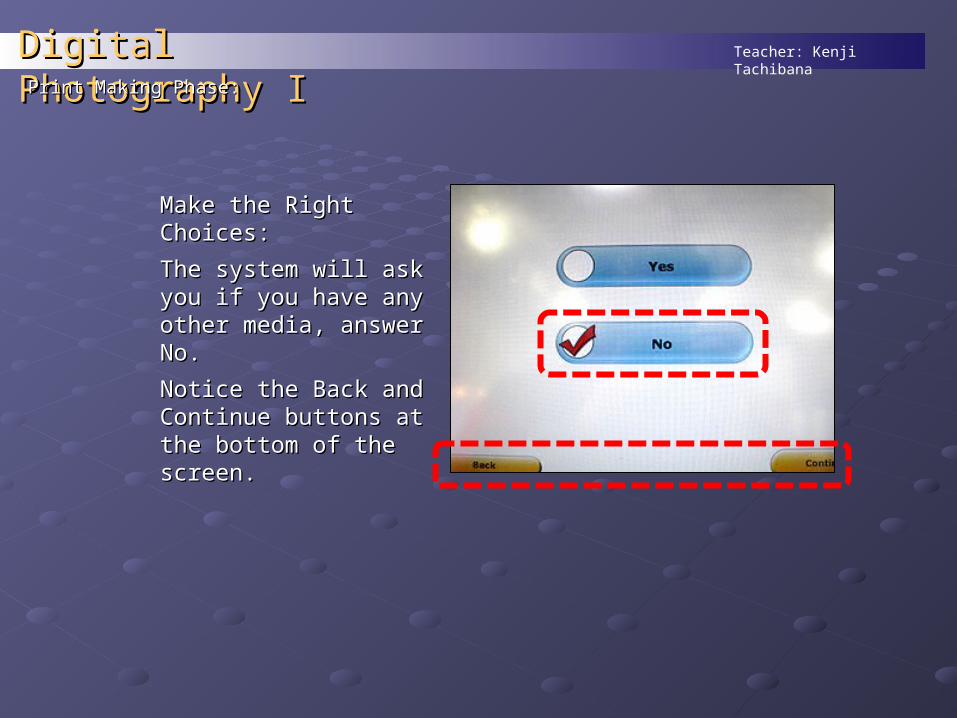
Make the Right Choices:Make the Right Choices:
The system will ask you The system will ask you if you have any other if you have any other media, answer No.media, answer No.
Notice the Back and Notice the Back and Continue buttons at the Continue buttons at the bottom of the screen.bottom of the screen.
Teacher: Kenji TachibanaDigital Photography IDigital Photography IPrint Making Phase:Print Making Phase:
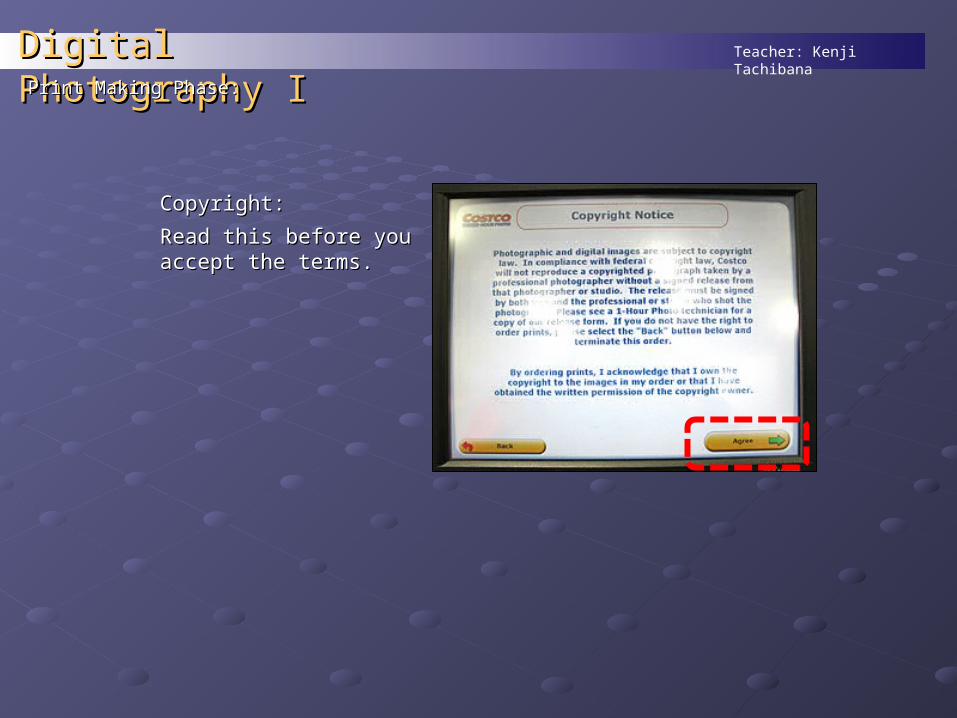
Copyright:Copyright:
Read this before you Read this before you accept the terms. accept the terms.
Teacher: Kenji TachibanaDigital Photography IDigital Photography IPrint Making Phase:Print Making Phase:
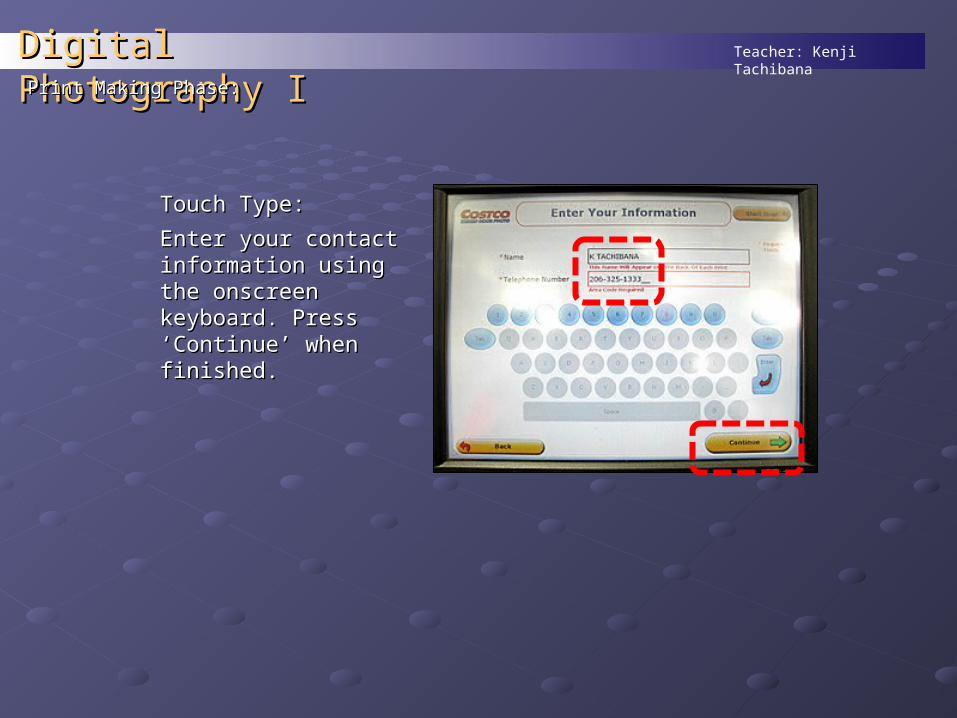
Touch Type:Touch Type:
Enter your contact Enter your contact information using the information using the onscreen keyboard. onscreen keyboard. Press ‘Continue’ when Press ‘Continue’ when finished.finished.
Teacher: Kenji TachibanaDigital Photography IDigital Photography IPrint Making PhasePrint Making Phase::
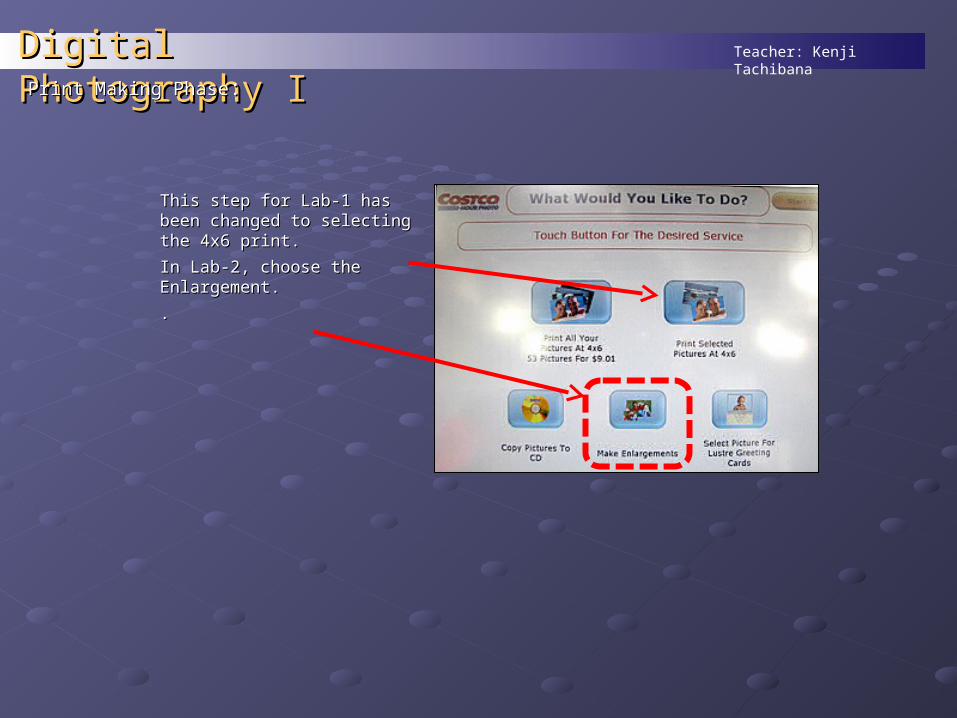
This step for Lab-1 has been This step for Lab-1 has been changed to selecting the 4x6 changed to selecting the 4x6 print.print.
In Lab-2, choose the In Lab-2, choose the Enlargement.Enlargement.
..
Teacher: Kenji TachibanaDigital Photography IDigital Photography IPrint Making PhasePrint Making Phase::
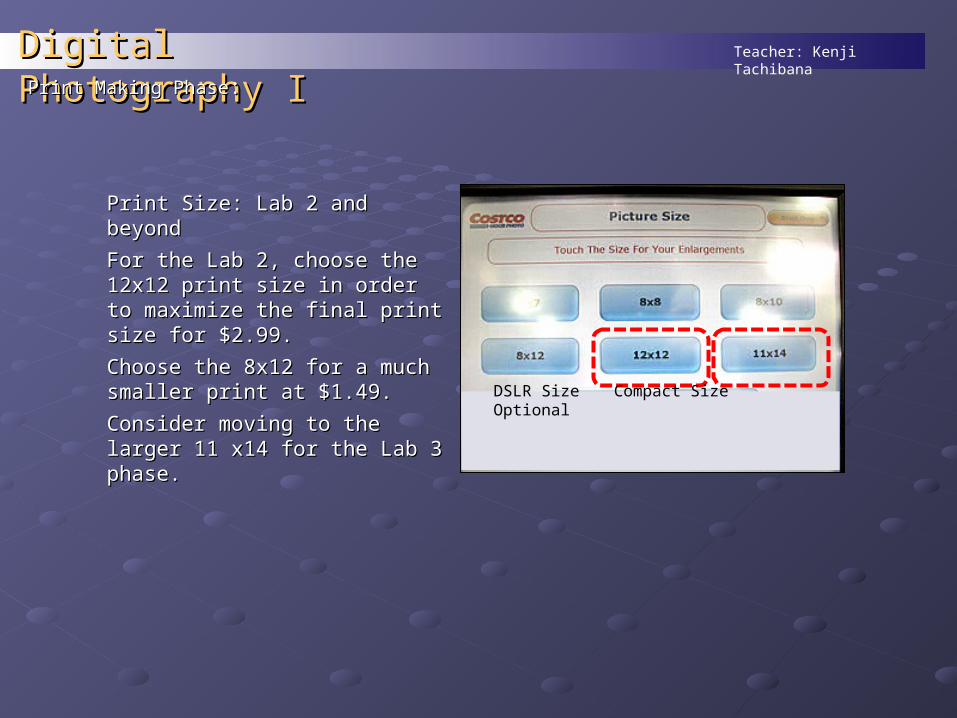
Print Size: Lab 2 and beyondPrint Size: Lab 2 and beyond
For the Lab 2, choose the For the Lab 2, choose the 12x12 print size in order to 12x12 print size in order to maximize the final print size for maximize the final print size for $2.99. $2.99.
Choose the 8x12 for a much Choose the 8x12 for a much smaller print at $1.49.smaller print at $1.49.
Consider moving to the larger Consider moving to the larger 11 x14 for the Lab 3 phase.11 x14 for the Lab 3 phase.
DSLR Size Compact Size Optional
Teacher: Kenji TachibanaDigital Photography IDigital Photography IPrint Making Phase:Print Making Phase:
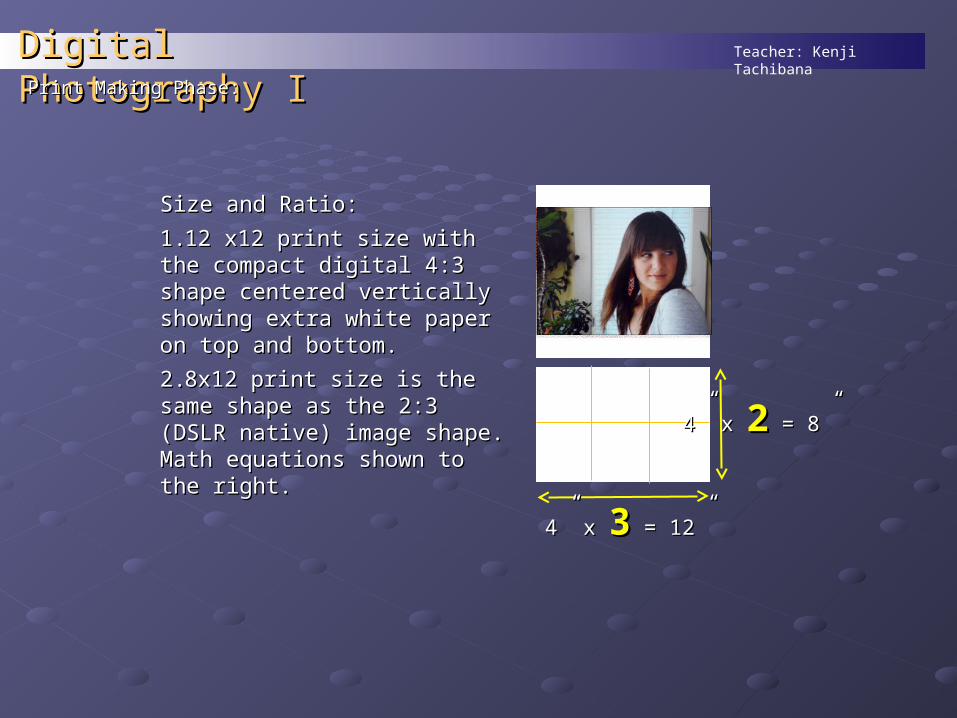
Size and Ratio:Size and Ratio:
1.1.12 x12 print size with the 12 x12 print size with the compact digital 4:3 shape compact digital 4:3 shape centered vertically showing extra centered vertically showing extra white paper on top and bottom.white paper on top and bottom.
2.2.8x12 print size is the same 8x12 print size is the same shape as the 2:3 (DSLR native) shape as the 2:3 (DSLR native) image shape. Math equations image shape. Math equations shown to the right.shown to the right.
4” x 4” x 22 = 8” = 8”
4” x 4” x 33 = 12” = 12”

Teacher: Kenji TachibanaDigital Photography IDigital Photography IPrint Making Phase:Print Making Phase:
Shape and Shape Distortion:Shape and Shape Distortion:
Image shape and framing Image shape and framing concerns flow through the concerns flow through the entire image creation process entire image creation process from shooting to final output.from shooting to final output.
Maintaining shape Maintaining shape (proportion) is also critical to (proportion) is also critical to the image creation process. the image creation process. The example 2 and 3 are The example 2 and 3 are warped…warped…
Teacher: Kenji TachibanaDigital Photography IDigital Photography IPrint Making Phase:Print Making Phase:
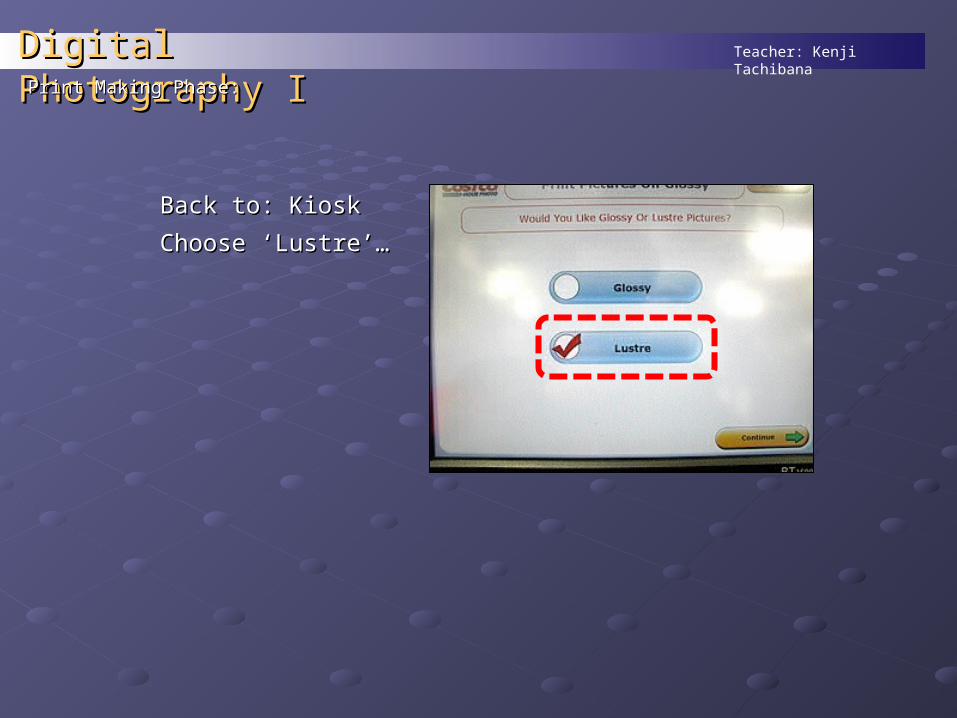
Back to: KioskBack to: Kiosk
Choose ‘Lustre’…Choose ‘Lustre’…
Teacher: Kenji TachibanaDigital Photography IDigital Photography IPrint Making PhasePrint Making Phase::
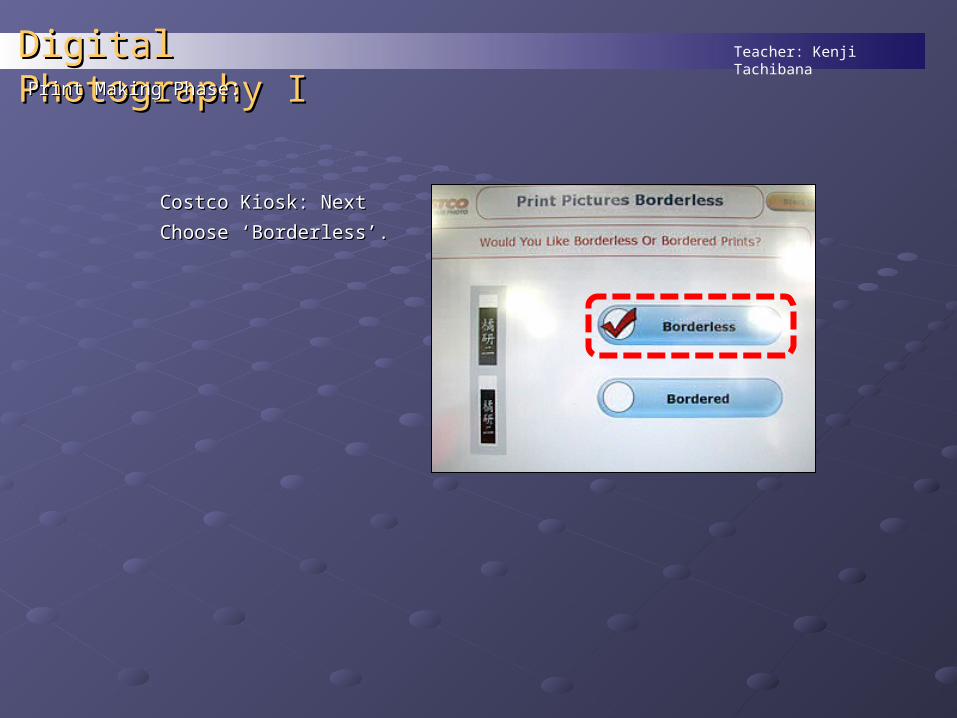
Costco Kiosk: NextCostco Kiosk: Next
Choose ‘Borderless’.Choose ‘Borderless’.

Teacher: Kenji TachibanaDigital Photography IDigital Photography IPrint Making Phase:Print Making Phase:
Almost Finished:Almost Finished:
Choose ‘Color’…Choose ‘Color’…
Teacher: Kenji TachibanaDigital Photography IDigital Photography IPrint Making Phase:Print Making Phase:
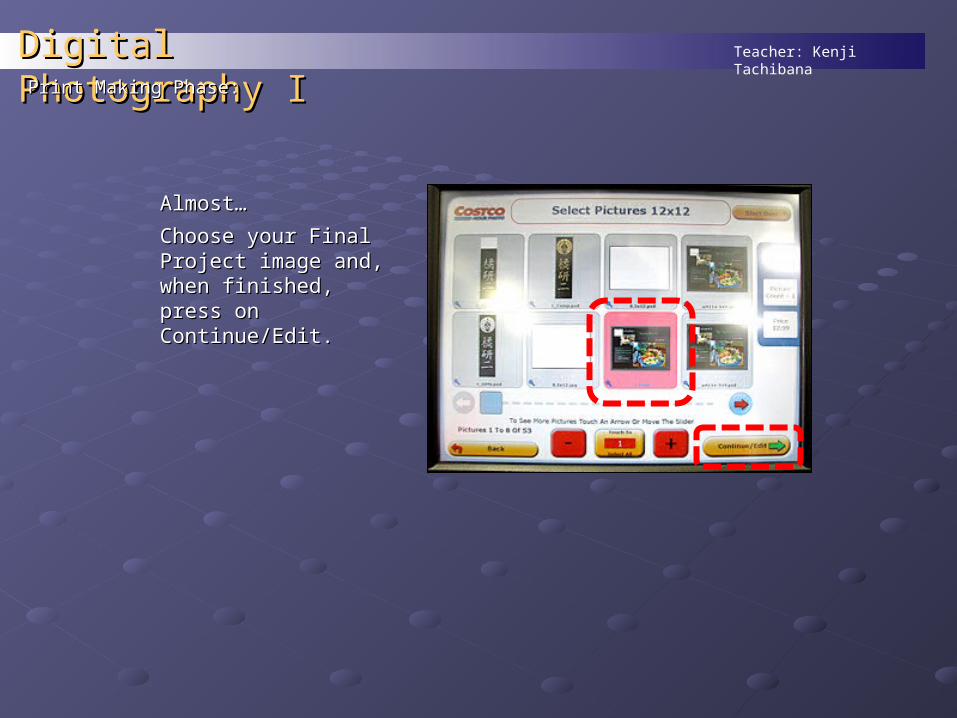
Almost…Almost…
Choose your Final Choose your Final Project image and, Project image and, when finished, press when finished, press on Continue/Edit.on Continue/Edit.
Teacher: Kenji TachibanaDigital Photography IDigital Photography IPrint Making PhasePrint Making Phase::
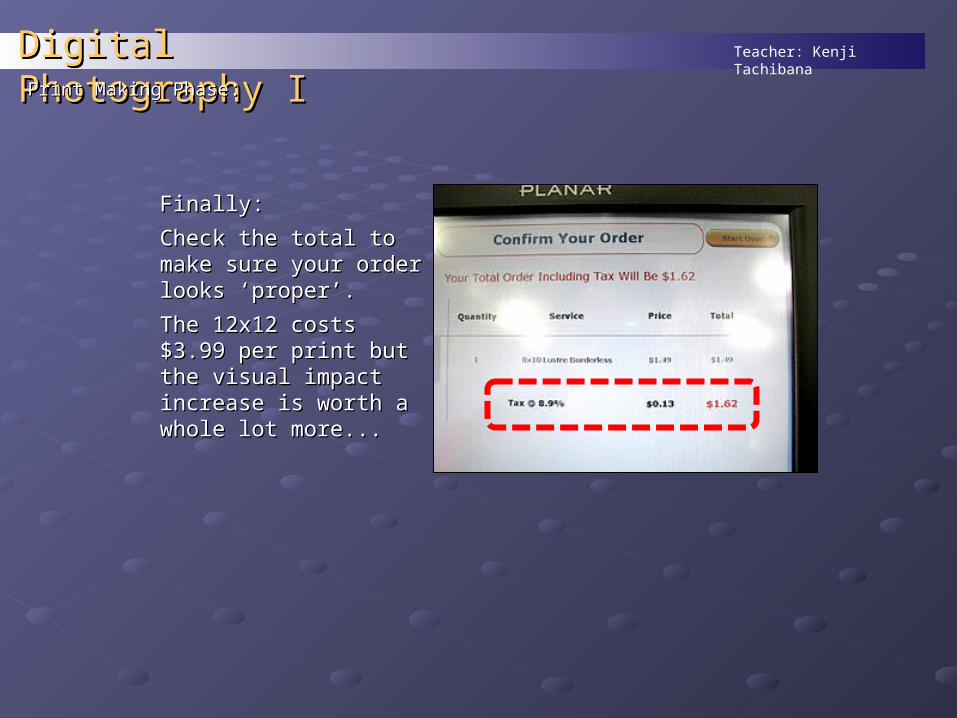
Finally:Finally:
Check the total to make Check the total to make sure your order looks sure your order looks ‘proper’.‘proper’.
The 12x12 costs $3.99 The 12x12 costs $3.99 per print but the visual per print but the visual impact increase is worth impact increase is worth a whole lot more...a whole lot more...
Teacher: Kenji TachibanaDigital Photography IDigital Photography IPrint Making PhasePrint Making Phase::
Print: Final remindersPrint: Final reminders
1.1.Don’t make the print on a ‘glossy’ photo paper. The Don’t make the print on a ‘glossy’ photo paper. The reflections from the mirror like surface will make it hard reflections from the mirror like surface will make it hard to see the image. And it’s prone to finger prints and other to see the image. And it’s prone to finger prints and other kinds of marks that can be nearly impossible to remove. kinds of marks that can be nearly impossible to remove.
2.2.Without prior knowledge or experience, making your Without prior knowledge or experience, making your own print can be very time consuming, more expensive, own print can be very time consuming, more expensive, and not ‘standardized’.and not ‘standardized’.
3.3.Prints with Borders works the best when put into a Prints with Borders works the best when put into a picture frame that ‘eats-up’ the edge of the image.picture frame that ‘eats-up’ the edge of the image.
Teacher: Kenji TachibanaDigital Photography IDigital Photography IPrint Making PhasePrint Making Phase::
More About Shapes:More About Shapes:
Shape is similar to ratio and proportion. They Shape is similar to ratio and proportion. They are sometimes used interchangeably. The are sometimes used interchangeably. The compact digital 4:3 ratio is the same as the compact digital 4:3 ratio is the same as the traditional CRT shape. They share the same traditional CRT shape. They share the same 4:3 proportion.4:3 proportion.
Many new LCD monitors no longer share the Many new LCD monitors no longer share the same shape. They are usually much wider. same shape. They are usually much wider.
Teacher: Kenji TachibanaDigital Photography IDigital Photography IPrint Making PhasePrint Making Phase::
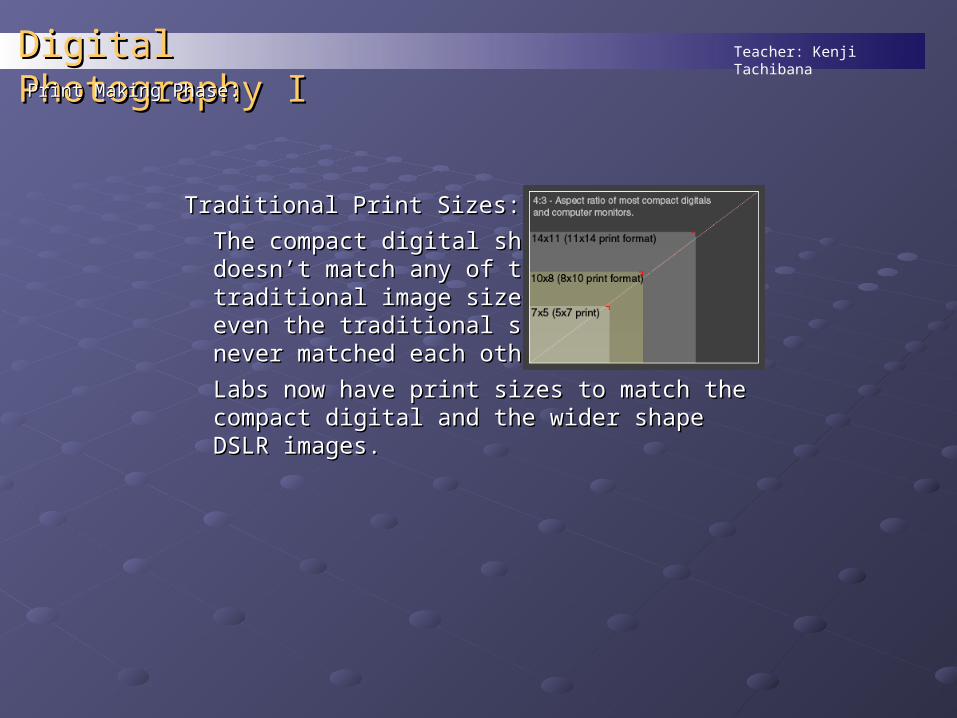
Traditional Print Sizes:Traditional Print Sizes:
The compact digital shapeThe compact digital shapedoesn’t match any of thedoesn’t match any of thetraditional image sizes. Andtraditional image sizes. Andeven the traditional sizeseven the traditional sizesnever matched each other.never matched each other.
Labs now have print sizes to match the compact Labs now have print sizes to match the compact digital and the wider shape DSLR images.digital and the wider shape DSLR images.
Teacher: Kenji TachibanaDigital Photography IDigital Photography IMount print for showcasingMount print for showcasing
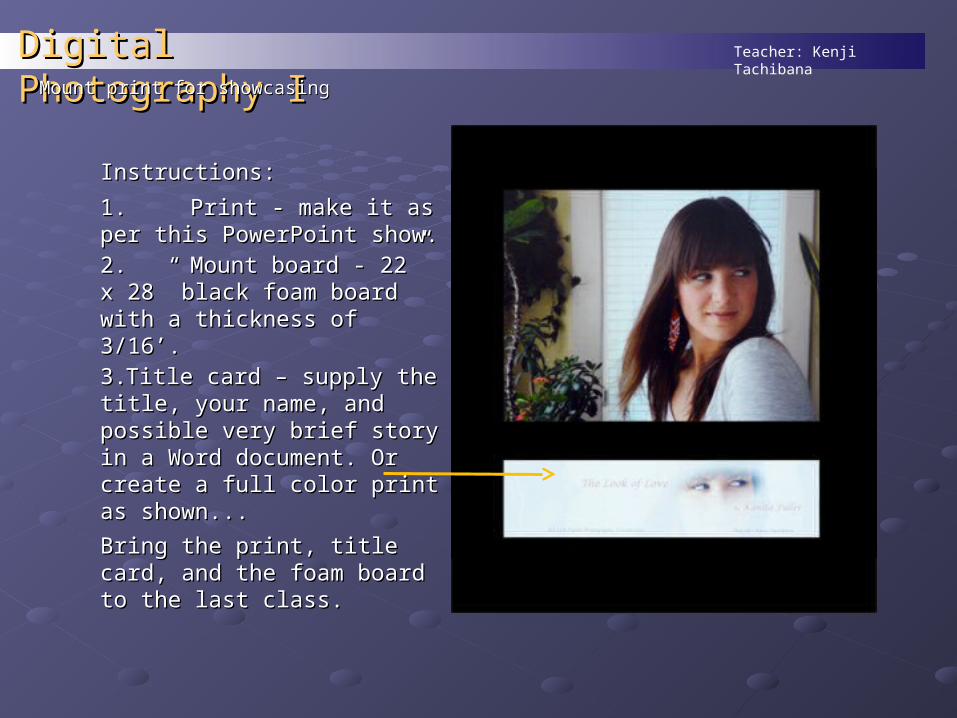
Instructions:Instructions:
1.1. Print - make it as per Print - make it as per this PowerPoint show.this PowerPoint show.
2.2. Mount board - 22” x Mount board - 22” x 28” black foam board with a 28” black foam board with a thickness of 3/16’.thickness of 3/16’.
3.3.Title card – supply the title, Title card – supply the title, your name, and possible very your name, and possible very brief story in a Word document. brief story in a Word document. Or create a full color print as Or create a full color print as shown...shown...
Bring the print, title card, and Bring the print, title card, and the foam board to the last class.the foam board to the last class.
Teacher: Kenji TachibanaDigital Photography IDigital Photography IFinal Phase: Final Phase: I will take care of the final phaseI will take care of the final phase
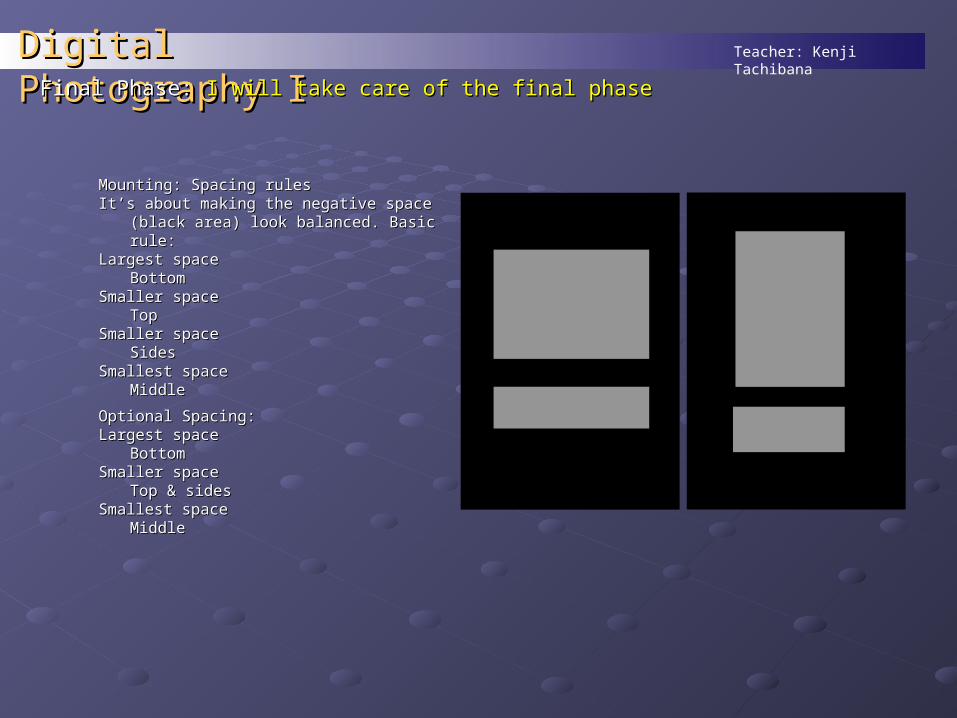
Mounting: Spacing rulesMounting: Spacing rulesIt’s about making the negative space (black It’s about making the negative space (black
area) look balanced. Basic rule:area) look balanced. Basic rule:Largest space Largest space
BottomBottomSmaller space Smaller space
TopTopSmaller space Smaller space
SidesSidesSmallest space Smallest space
MiddleMiddle
Optional Spacing:Optional Spacing:Largest spaceLargest space
BottomBottomSmaller space Smaller space
Top & sidesTop & sidesSmallest spaceSmallest space
MiddleMiddle
Teacher: Kenji TachibanaDigital Photography IDigital Photography IFinal PhaseFinal Phase
Special Permission Request:Special Permission Request:
I would like to borrow the mounted ‘ready to show’ final I would like to borrow the mounted ‘ready to show’ final project for two quarters. It will get displayed in the project for two quarters. It will get displayed in the NSCC Library and possibly in the Spring Student Art NSCC Library and possibly in the Spring Student Art Show. It may even get shown to students at SSCC.Show. It may even get shown to students at SSCC.
Lastly, Sharon Simes (Library Director) came up with Lastly, Sharon Simes (Library Director) came up with the idea to put student images into a book. sometime the idea to put student images into a book. sometime in the near future.in the near future.
Teacher: Kenji TachibanaDigital Photography IDigital Photography IFinal PhaseFinal Phase
Presentation:Presentation:
Presentation is about communication. It’s vital to make Presentation is about communication. It’s vital to make it relaxed and conversational. it relaxed and conversational.
1.1.State your full name while making State your full name while making eye contact with eye contact with everyoneeveryone in the room. Try something like “Good in the room. Try something like “Good evening, my name is…”. Be a host.evening, my name is…”. Be a host.2.2.Simply state the title of your image. ‘The title of my Simply state the title of your image. ‘The title of my work is ………..’.work is ………..’.3.3.Flesh out your title with a simple and short story. Let Flesh out your title with a simple and short story. Let your image tell the story. And let the audience ask your image tell the story. And let the audience ask questions that you can respond to flesh out things that questions that you can respond to flesh out things that are of interest to the audience…are of interest to the audience…4.4.Give a clear indication that you are finished by Give a clear indication that you are finished by asking for questions or comments.asking for questions or comments.
Teacher: Kenji TachibanaDigital Photography IDigital Photography I
xx
EndEnd