TAC I/NET - Schneider Electric Automatyka budynkowa... · TAC I/NET Seven Installation Guide Micro...
56
TAC I/NET Installation Guide Micro Regulator Controller and I/STAT MR88, MR88R, MR160, and MR632 for TAC I/NET Building Automation Systems TCON126.– 09/10 vi
Transcript of TAC I/NET - Schneider Electric Automatyka budynkowa... · TAC I/NET Seven Installation Guide Micro...
TAC I/NETSeven
Installation Guide
Micro Regulator Controller and I/STAT
MR88, MR88R, MR160, and MR632
for TAC I/NET Building Automation Systems
TCON126.– 09/10
vi

We at Schneider Electric have tried to make the information contained in this manual as accurate and reliable as possible. Never-theless, Schneider Electric disclaims any warranty of any kind, whether express or implied, as to any matter whatsoever relating to this manual, including without limitation the merchantability or fitness for any particular purpose.
Information in this document is based on specifications determined at the time of publication. As we introduce design enhance-ments, we reserve the right to make changes in specifications and models without obligation to notify the purchaser. In no event shall Schneider Electric be liable for any indirect, special, incidental, or consequential damages arising out of purchase or use of this manual or the information contained herein.
The software described in this document is furnished under a license agreement or nondisclosure agreement. The software may be used or copied only in accordance with the terms of the agreement. It is against the law to copy Schneider Electric’s TAC I/NET System software onto magnetic tape, disk, or any other medium for any purpose other than the purchaser's personal use.
Printed in the United States of America.
Document Number: TCON126–09/10
Copyright 2010 Schneider Electric. All rights reserved.
On October 1st, 2009, TAC became the Buildings business of its parent company Schneider Electric. This document reflects the visual identity of Schneider Electric; however, there remains references to TAC as a corporate brand in the body copy. As each document is updated, the body copy will be changed to reflect appropriate corporate brand changes.
Contents
FCC Warning . . . . . . . . . . . . . . . . . . . . . . . . . . . . . . . . . . . . . . . . . . . vi
Overview . . . . . . . . . . . . . . . . . . . . . . . . . . . . . . . . . . . . . . . . . . . . 1
I/STAT . . . . . . . . . . . . . . . . . . . . . . . . . . . . . . . . . . . . . . . . . . . . . . . 1
Micro Regulator Controllers . . . . . . . . . . . . . . . . . . . . . . . . . . . . . . . . . . . 2
Communication . . . . . . . . . . . . . . . . . . . . . . . . . . . . . . . . . . . . . . . . . . . . . . . . . 2Reset . . . . . . . . . . . . . . . . . . . . . . . . . . . . . . . . . . . . . . . . . . . . . . . . . . . . . . . 2MR88 Input/Output Terminals . . . . . . . . . . . . . . . . . . . . . . . . . . . . . . . . . . . . . . . . . 2MR88R Input/Output Terminals . . . . . . . . . . . . . . . . . . . . . . . . . . . . . . . . . . . . . . . . 2MR160 Input Terminals . . . . . . . . . . . . . . . . . . . . . . . . . . . . . . . . . . . . . . . . . . . . . 2MR632 Input/Output Terminals . . . . . . . . . . . . . . . . . . . . . . . . . . . . . . . . . . . . . . . . . 2
Physical Description . . . . . . . . . . . . . . . . . . . . . . . . . . . . . . . . . . . . 3
Power Supply . . . . . . . . . . . . . . . . . . . . . . . . . . . . . . . . . . . . . . . . . . . 3
Input/Output Terminals . . . . . . . . . . . . . . . . . . . . . . . . . . . . . . . . . . . . . . 3
Input Terminations . . . . . . . . . . . . . . . . . . . . . . . . . . . . . . . . . . . . . . . . . . . . . . . . 3MR88 . . . . . . . . . . . . . . . . . . . . . . . . . . . . . . . . . . . . . . . . . . . . . . . . . . . . . 4
MR88R . . . . . . . . . . . . . . . . . . . . . . . . . . . . . . . . . . . . . . . . . . . . . . . . . . . . 5
MR160 . . . . . . . . . . . . . . . . . . . . . . . . . . . . . . . . . . . . . . . . . . . . . . . . . . . . 6
MR632 . . . . . . . . . . . . . . . . . . . . . . . . . . . . . . . . . . . . . . . . . . . . . . . . . . . . 7
Output Terminations . . . . . . . . . . . . . . . . . . . . . . . . . . . . . . . . . . . . . . . . . . . . . . . 8MR 88 . . . . . . . . . . . . . . . . . . . . . . . . . . . . . . . . . . . . . . . . . . . . . . . . . . . . 8
MR 88R . . . . . . . . . . . . . . . . . . . . . . . . . . . . . . . . . . . . . . . . . . . . . . . . . . . 8
MR 160 . . . . . . . . . . . . . . . . . . . . . . . . . . . . . . . . . . . . . . . . . . . . . . . . . . . . 8
MR 632 . . . . . . . . . . . . . . . . . . . . . . . . . . . . . . . . . . . . . . . . . . . . . . . . . . . . 8
LAN Communication Port . . . . . . . . . . . . . . . . . . . . . . . . . . . . . . . . . . . . . . . . . . . . 8Memory . . . . . . . . . . . . . . . . . . . . . . . . . . . . . . . . . . . . . . . . . . . . . . . . . . . . . 8
I/STAT . . . . . . . . . . . . . . . . . . . . . . . . . . . . . . . . . . . . . . . . . . . . . . . 9
Communications Port . . . . . . . . . . . . . . . . . . . . . . . . . . . . . . . . . . . . . . . . . . . . . . 9Power Supply . . . . . . . . . . . . . . . . . . . . . . . . . . . . . . . . . . . . . . . . . . . . . . . . . . . 9
Universal Enclosure . . . . . . . . . . . . . . . . . . . . . . . . . . . . . . . . . . . . . . . . 10
Installation Procedures . . . . . . . . . . . . . . . . . . . . . . . . . . . . . . . . . . 11
Installing the I/STAT . . . . . . . . . . . . . . . . . . . . . . . . . . . . . . . . . . . . . . . 11
Common Installation for the MRs . . . . . . . . . . . . . . . . . . . . . . . . . . . . . . . . 12
© 2010 Schneider Electric. All rights reserved. iiiTCON126–09/10
Contents Micro Regulator and I/STAT Installation Guide
Grounding Requirements . . . . . . . . . . . . . . . . . . . . . . . . . . . . . . . . . . . . . . . . . . . . 12Earth Ground . . . . . . . . . . . . . . . . . . . . . . . . . . . . . . . . . . . . . . . . . . . . . . . . 12
Baseplate Ground . . . . . . . . . . . . . . . . . . . . . . . . . . . . . . . . . . . . . . . . . . . . . . 13
LAN Ground . . . . . . . . . . . . . . . . . . . . . . . . . . . . . . . . . . . . . . . . . . . . . . . . 13
Installing the MR Input Field Connections . . . . . . . . . . . . . . . . . . . . . . . . . . . . . . . . . . . 13Connecting Space Sensor (Thermistor) Inputs . . . . . . . . . . . . . . . . . . . . . . . . . . . . . . 14
Connecting 0–10 V Sensors . . . . . . . . . . . . . . . . . . . . . . . . . . . . . . . . . . . . . . . . 15
Connecting Discrete or Pulse Input Points . . . . . . . . . . . . . . . . . . . . . . . . . . . . . . . . . 16
Connecting 0–20 mA Loop Sensors . . . . . . . . . . . . . . . . . . . . . . . . . . . . . . . . . . . . 16
Connecting an MR Controller to the SubLAN . . . . . . . . . . . . . . . . . . . . . . . . . . . . . . . . . 17Connecting the Power Supply . . . . . . . . . . . . . . . . . . . . . . . . . . . . . . . . . . . . . . . . . . 18
Installing the MR88 Output Field Connections . . . . . . . . . . . . . . . . . . . . . . . . . 19
Installing the MR88R Output Field Connections . . . . . . . . . . . . . . . . . . . . . . . . 20
Installing the MR632 Output Field Connections . . . . . . . . . . . . . . . . . . . . . . . . . 20
Triac Output Connection . . . . . . . . . . . . . . . . . . . . . . . . . . . . . . . . . . . . . . . . . . . . 20Analog Output Connection . . . . . . . . . . . . . . . . . . . . . . . . . . . . . . . . . . . . . . . . . . . 21
Setup and Operation . . . . . . . . . . . . . . . . . . . . . . . . . . . . . . . . . . . 23
Micro Regulator Features . . . . . . . . . . . . . . . . . . . . . . . . . . . . . . . . . . . . . 23
Hardware Inputs . . . . . . . . . . . . . . . . . . . . . . . . . . . . . . . . . . . . . . . . . . . . . . . . 230–10 V Inputs . . . . . . . . . . . . . . . . . . . . . . . . . . . . . . . . . . . . . . . . . . . . . . . . 23
0–20 mA Inputs . . . . . . . . . . . . . . . . . . . . . . . . . . . . . . . . . . . . . . . . . . . . . . . 23
Discrete or Pulse Inputs . . . . . . . . . . . . . . . . . . . . . . . . . . . . . . . . . . . . . . . . . . 24
Universal Inputs . . . . . . . . . . . . . . . . . . . . . . . . . . . . . . . . . . . . . . . . . . . . . . 24
I/STAT Sensor Port . . . . . . . . . . . . . . . . . . . . . . . . . . . . . . . . . . . . . . . . . . . . . 25
Look-Up Tables . . . . . . . . . . . . . . . . . . . . . . . . . . . . . . . . . . . . . . . . . . . . . . . 25
Automatic Time Schedule . . . . . . . . . . . . . . . . . . . . . . . . . . . . . . . . . . . . . . . . . . . . 26
SubLAN Port . . . . . . . . . . . . . . . . . . . . . . . . . . . . . . . . . . . . . . . . . . . 27
SubLAN Addressing . . . . . . . . . . . . . . . . . . . . . . . . . . . . . . . . . . . . . . . . . . . . 27
SubLAN Speed . . . . . . . . . . . . . . . . . . . . . . . . . . . . . . . . . . . . . . . . . . . . . . . 28
Micro Regulator Setup . . . . . . . . . . . . . . . . . . . . . . . . . . . . . . . . . . . . . . 28
MR88 Control Outputs . . . . . . . . . . . . . . . . . . . . . . . . . . . . . . . . . . . . . . . . . . . . . 28MR88R Control Outputs . . . . . . . . . . . . . . . . . . . . . . . . . . . . . . . . . . . . . . . . . . . . 30MR632 Control Outputs . . . . . . . . . . . . . . . . . . . . . . . . . . . . . . . . . . . . . . . . . . . . 31
I/STAT Setup . . . . . . . . . . . . . . . . . . . . . . . . . . . . . . . . . . . . . . . . . . . 32
LED Display . . . . . . . . . . . . . . . . . . . . . . . . . . . . . . . . . . . . . . . . . . . . . . . . . . . 32I/STAT Functions . . . . . . . . . . . . . . . . . . . . . . . . . . . . . . . . . . . . . . . . . . . . . . . . 33
On/Off . . . . . . . . . . . . . . . . . . . . . . . . . . . . . . . . . . . . . . . . . . . . . . . . . . . 33
iv © 2010 Schneider Electric. All rights reserved.
TCON126–09/10
Micro Regulator and I/STAT Installation Guide Contents
Call . . . . . . . . . . . . . . . . . . . . . . . . . . . . . . . . . . . . . . . . . . . . . . . . . . . . . . 33
Service . . . . . . . . . . . . . . . . . . . . . . . . . . . . . . . . . . . . . . . . . . . . . . . . . . . . 33
Point Address and Switch Summary . . . . . . . . . . . . . . . . . . . . . . . . 39
Inputs . . . . . . . . . . . . . . . . . . . . . . . . . . . . . . . . . . . . . . . . . . . . . . . 39
Outputs . . . . . . . . . . . . . . . . . . . . . . . . . . . . . . . . . . . . . . . . . . . . . . 40
DIP Switch Settings . . . . . . . . . . . . . . . . . . . . . . . . . . . . . . . . . . . . . . . . 40
Pinout Chart . . . . . . . . . . . . . . . . . . . . . . . . . . . . . . . . . . . . . . . . . . . . 41
MR88 . . . . . . . . . . . . . . . . . . . . . . . . . . . . . . . . . . . . . . . . . . . . . . . . . . . . . . . 41MR88R . . . . . . . . . . . . . . . . . . . . . . . . . . . . . . . . . . . . . . . . . . . . . . . . . . . . . . 42MR160 . . . . . . . . . . . . . . . . . . . . . . . . . . . . . . . . . . . . . . . . . . . . . . . . . . . . . . 43MR632 . . . . . . . . . . . . . . . . . . . . . . . . . . . . . . . . . . . . . . . . . . . . . . . . . . . . . . 44
Specifications . . . . . . . . . . . . . . . . . . . . . . . . . . . . . . . . . . . . . . . . . 45
Index . . . . . . . . . . . . . . . . . . . . . . . . . . . . . . . . . . . . . . . . . . . . . . . 47
© 2010 Schneider Electric. All rights reserved. vTCON126–09/10

FCC Warning Micro Regulator and I/STAT Installation Guide
FCC Warning FCC Warning
The Federal Communications Commission (FCC) requirements prescribe certification of personal computers and any intercon-nected peripherals in the FCC rules and regulations.
This device complies with Part 15 of the FCC rules. Operation is subject to the following two conditions: this device may not cause harmful interference, and this device must accept any interference received, including interference that may cause undes-ired operation.
This equipment generates and uses radio frequency (rf) energy for its operation and, if not installed and used in accordance with the installation and operation manual, may cause interference to radio and television reception. It has been found to comply with the limits for a Class A computing device pursuant to the aforementioned regulations. These are designed to provide reasonable protection against such interference when operated in a residential area. Only peripherals (computer input/output devices) certified to comply with the Class A limits may be connected to this device. Operation with noncertified computer peripherals is likely to result in interference with radio and television reception. If this equipment does cause interference to radio or television reception, the user is encouraged to correct the situation by one or more of the following measures.
✦ Relocate the receiver with respect to the computer.
✦ Move the computer away from the receiver.
✦ Plug the equipment into a different outlet, so that the computing device and receiver are on different branch circuits.
✦ Disconnect and remove any unused cables that may be acting as a transmission source.
✦ Make certain that the computing device is plugged into a grounded outlet receptacle.
If necessary, contact Schneider Electric for additional suggestions.
vi © 2010 Schneider Electric. All rights reserved.
TCON126–09/10
Micro Regulator and I/STAT Installation Guide Overview
46
Overview
The Micro Regulator (MR) family of distributed intelligent controllers function within the TAC I/NET integrated network system, providing an extremely flexible array of user-programmable control functions within an economical price and point range. Similar in organization to the Unitary Controller family, the MR family uses the Micro Regulator Interface (MRI) or Micro Control Interface (MCI) to connect to the TAC I/NET LAN and communicate with TAC I/NET workstations and other controllers. The Micro Regu-lator models reside on the subLAN controlled by the MRI/MCI. The MR family includes multiple models of controllers with different input/output point capabilities.
The family includes the Micro Regulator Interface (MRI/MCI), which is the connection between the TAC I/NET system and the Micro Regulators, the Micro Regulator control-lers MR88 (MRF), MR632 (MRG), MR160 (MRH), MR88R (MRK), and a Micro Regu-lator Thermostat (I/STAT) or Maintenance Thermostat (M/STAT). Each controller model is aimed at a specific application environment although they can migrate to other applications that can be handled through the Micro Regulator’s DDC and calculated point capability.
Note: The M/STAT is a portable version of the I/STAT, with a plug-in jack connection. The keypad, displays, and functions of the M/STAT are identical to the I/STAT. All references to I/STAT displays and operation in this document also apply to the M/STAT. As this is a hand-held model, installation instructions are not given for the M/STAT unit.
I/STAT
The I/STAT is an intelligent space sensor with local temperature and setpoint display, override select and setpoint adjustment. The I/STAT has three 7-segment LED digits, each with a decimal point, and five discrete LEDs.
The 7-segment LED digits display alphanumeric data, such as local temperature and setpoint information, as well as programming information input at the I/STAT keypad. The bank of four discrete LEDs located at the bottom of the I/STAT provide an indication of which user-selected parameter is currently being displayed. The legends on the current (standard) I/STAT indicate a selection of temperature setpoint, fan speed, room temperature, and outside temperature. The user has total control of the actual value/point displayed on the 7-segment LEDs and may choose to vary the indication to other parameters in the system.
The I/STAT may be programmed from the TAC I/NET software using the MR parame-ters editor. Additionally, the I/STAT may be controlled using the keypad on the I/STAT.
© 2010 Schneider Electric. All rights reserved. 1TCON126–09/10
Overview Micro Regulator and I/STAT Installation Guide
Micro Regulator Controllers
The family of micro regulator controllers provide stand-alone DDC control of a collec-tion of several input and output points. Both discrete and PWM modulated control is supported by the micro regulators. The micro regulators have a 32 KB EPROM chip for processing and look-up table data. The downloaded database resides in NOVRAM.
CommunicationThe micro regulator controllers provide two communication ports: a standard asynchro-nous RS485 subLAN port, and a port for the I/STAT sensor.
ResetUpon power loss/restoration, the micro regulator executes a self-test, checking the microprocessor, a checksum on EPROM contents, a checksum on NOVRAM contents, and the operation of the analog-to-digital (A/D) convertor.
MR88 Input/Output TerminalsThe MR88 has seven universal inputs that are user-configured as 0–5 V, 0–10 V, 0–20 mA, thermistor or discrete, and the I/STAT. All seven input terminals are config-ured (selected) using plug-in resistor banks. It has eight low-voltage (24 VAC) triac outputs. The outputs operate in PWM (AO) proportional or latched (discrete) mode.
MR88R Input/Output TerminalsThe MR88R has seven universal inputs that are user configured as 0–5 V, 0–10 V, 0–20 mA, thermistor or discrete, and the I/STAT. All seven inputs are configured (selected) using plug-in resistor banks. The MR88R provides eight low-voltage, single form-C relay outputs.
MR160 Input TerminalsThe MR160 has fifteen universal inputs. These inputs are user-configurable as 0–5 V, 0–10 V, 0–20 mA, thermistor, or discrete, using plug-in resistor banks. The MR160 also has one limited-function I/STAT input, which can used as a thermistor or I/STAT input. The MR160 provides no output points or MR-resident DDC modules.
MR632 Input/Output TerminalsThe MR632 has five universal inputs that are user-configured as 0–5 V, 0–10 V, 0–20 mA, thermistor, or discrete, and the I/STAT. All five input terminals are configured (selected) using plug-in resistor banks. It has three-low-voltage (24 VAC) triac outputs and two 0–10 V analog outputs. The triac outputs operate in PWM (AO) proportional or latched (discrete) mode.
2 © 2010 Schneider Electric. All rights reserved.
TCON126–09/10

Micro Regulator and I/STAT Installation Guide Physical Description
Physical Description
Each micro regulator is a single printed circuit board. All I/O connections are accom-plished through plug-in terminal blocks. The micro regulator controller board measures 4.0" W 7.0" H (10.16 17.78 cm) and is mounted on a baseplate that measures 5.5" W 8.5" H (13.97 21.59 cm) which may then be mounted inside the TAC Universal Enclosure (see Figure 3). The perforated backplane should be used to mount the base-plates. All controllers or interface units are attached to a baseplate for mounting in a Universal Enclosure. Universal Enclosures are available in varying capacities and sizes (refer to Table 3 on page 10).
Power Supply
Electrical power connections are provided at terminal block TB1 on the top left edge of the board (see Figures 1 through 4). The power provided must be 24 VAC, 50/60 Hz. The power supply must be capable of providing sufficient current for the base board plus the current required by the low-voltage triac outputs. The maximum power requirements are given in Table 1.
Input/Output Terminals
The micro regulator’s input and output terminals are located along the left and right sides of the board. The input terminals, including the sensor port, are on the left side and the outputs are on the right side. The MR88 and MR632 have low-voltage triac outputs. The MR160 has no outputs. The MR88R has eight low-voltage single form-C relay outputs.
Input TerminationsSignal inputs are provided for a thermistor (I/STAT or 10K ohm thermistor sensor), 0–5 V, 0–10 V, 0–20 mA analog and discrete contact or pulsed inputs. The I/STAT sensor port (TB3) is located on the left edge of the micro regulators.
Table 1. Transformer VA Limits
Controller Transformer VA Limit
MR 88 55 VA maximum
MR 88R 7 VA maximum *
MR 160 7 VA maximum
MR 632 42 VA maximum
* If the power supply must also provide current for the controlled devices, the power supply must be capable of providing up to 103 VA maximum.
© 2010 Schneider Electric. All rights reserved. 3TCON126–09/10
Physical Description Micro Regulator and I/STAT Installation Guide
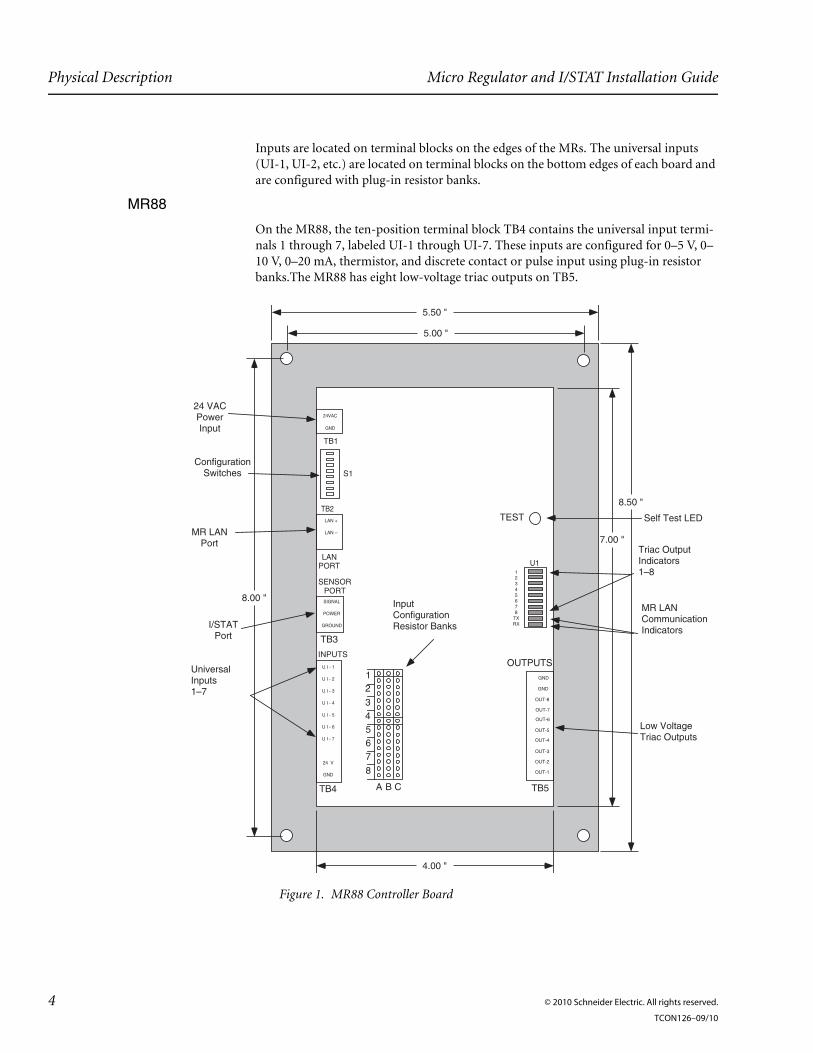
Inputs are located on terminal blocks on the edges of the MRs. The universal inputs (UI-1, UI-2, etc.) are located on terminal blocks on the bottom edges of each board and are configured with plug-in resistor banks.
MR88
On the MR88, the ten-position terminal block TB4 contains the universal input termi-nals 1 through 7, labeled UI-1 through UI-7. These inputs are configured for 0–5 V, 0–10 V, 0–20 mA, thermistor, and discrete contact or pulse input using plug-in resistor banks.The MR88 has eight low-voltage triac outputs on TB5.
Figure 1. MR88 Controller Board
LAN +
LAN –
TB2
LANPORT
24VAC
GND
TB1
SENSORPORT
INPUTS
U112345678
TXRX
SIGNAL
POWER
GROUND
U I - 1
U I - 2
U I - 3
U I - 4
U I - 5
U I - 6
U I - 7
24 V
GND
5.00 "
5.50 "
24 VACPowerInput
ConfigurationSwitches
MR LANPort
I/STATPort
8.50 "
S1
8.00 "
7.00 "
4.00 "
TB3
TB4
OUTPUTS
TB5
GND
GND
OUT-8
OUT-7
OUT-6
OUT-5
OUT-4
OUT-3
OUT-2
OUT-1
12
34567
8
A B C
UniversalInputs1–7
InputConfigurationResistor Banks
Low VoltageTriac Outputs
Triac OutputIndicators1–8
MR LANCommunicationIndicators
TEST Self Test LED
4 © 2010 Schneider Electric. All rights reserved.
TCON126–09/10
Micro Regulator and I/STAT Installation Guide Physical Description
MR88R
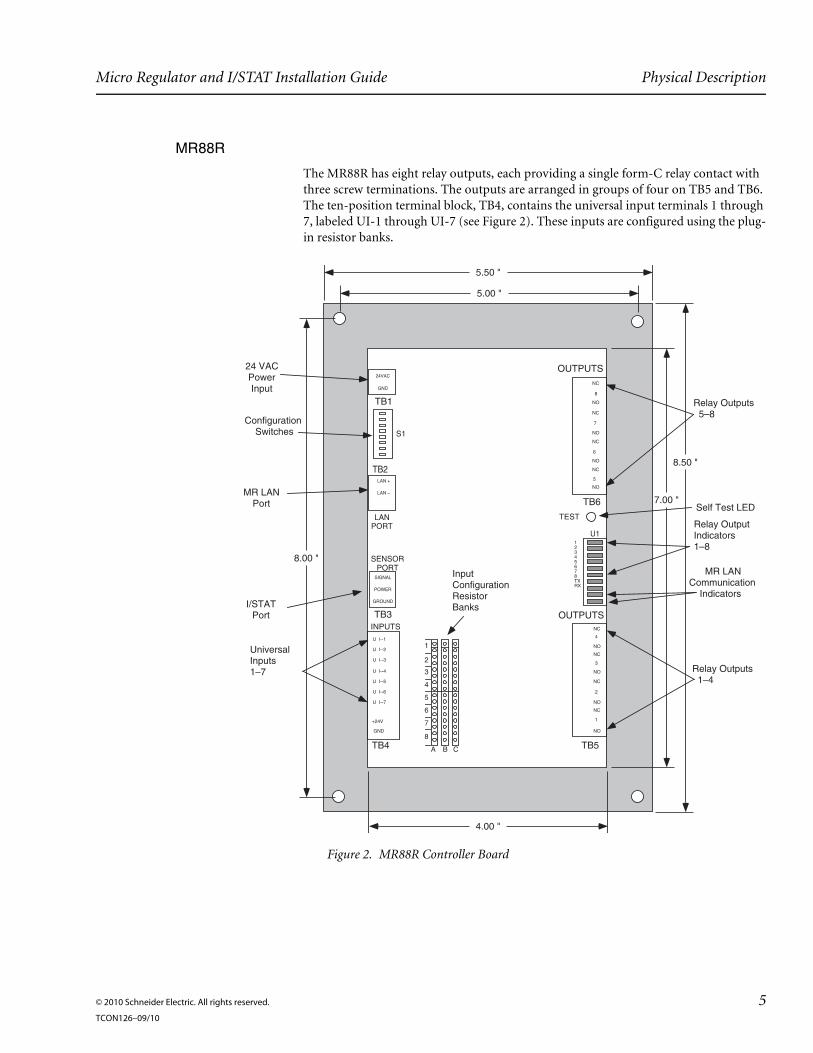
The MR88R has eight relay outputs, each providing a single form-C relay contact with three screw terminations. The outputs are arranged in groups of four on TB5 and TB6. The ten-position terminal block, TB4, contains the universal input terminals 1 through 7, labeled UI-1 through UI-7 (see Figure 2). These inputs are configured using the plug-in resistor banks.
Figure 2. MR88R Controller Board
LAN +
LAN –
TB2
LANPORT
24VAC
GND
TB1
SENSORPORT
INPUTS
U1
SIGNAL
POWER
GROUND
5.00 "
5.50 "
24 VACPowerInput
Configuration Switches
MR LANPort
I/STATPort
8.50 "
S1
8.00 "
7.00 "
4.00 "
TB3
TB4
OUTPUTS
TB5
OUTPUTS
TB6
+24V
U I--1
GND
U I--2
U I--3
U I--4
U I--5
U I--6
U I--7
UniversalInputs1–7
NC
NO
NC
7
NC
NC
5
NO
NO
6
NO
8
NC
4
NC
3
NC
2
NC
1
NO
NO
NO
NO
Relay OutputIndicators1–8
MR LANCommunication Indicators
Relay Outputs 5–8
Relay Outputs 1–4
1
2
3
InputConfigurationResistorBanks
A B C
4
5
6
7
8
12345678TXRX
TEST Self Test LED
© 2010 Schneider Electric. All rights reserved. 5TCON126–09/10
Physical Description Micro Regulator and I/STAT Installation Guide
MR160
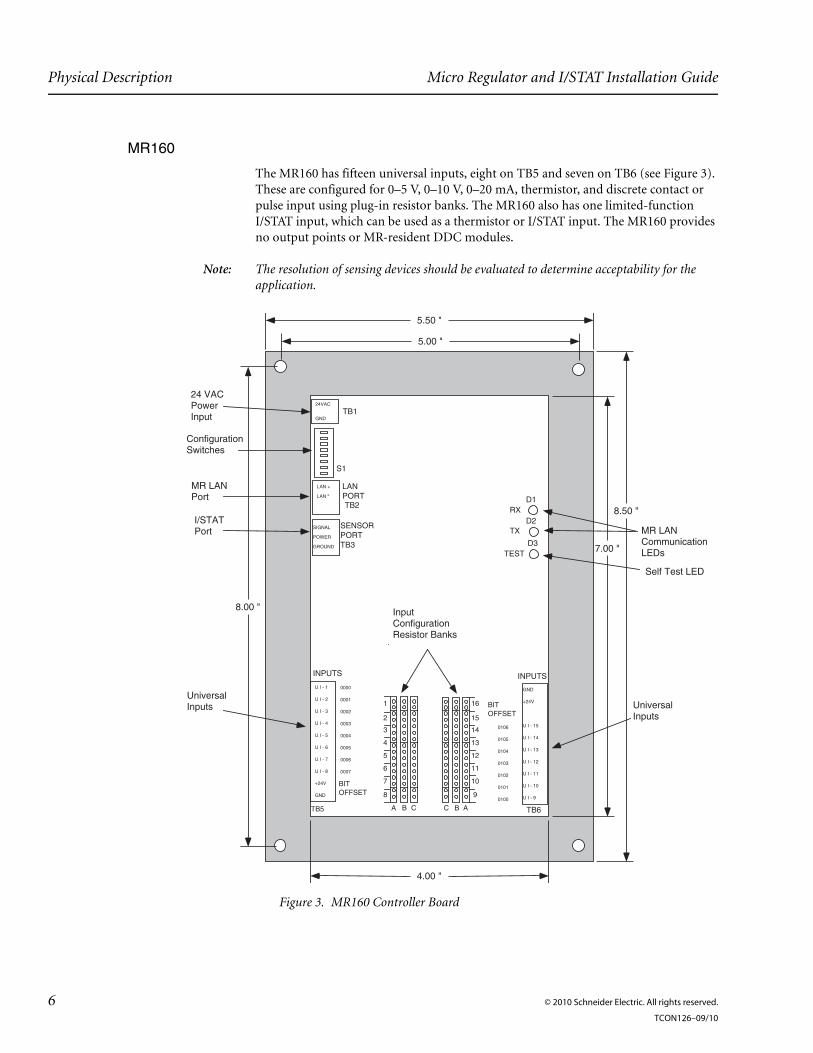
The MR160 has fifteen universal inputs, eight on TB5 and seven on TB6 (see Figure 3). These are configured for 0–5 V, 0–10 V, 0–20 mA, thermistor, and discrete contact or pulse input using plug-in resistor banks. The MR160 also has one limited-function I/STAT input, which can be used as a thermistor or I/STAT input. The MR160 provides no output points or MR-resident DDC modules.
Note: The resolution of sensing devices should be evaluated to determine acceptability for the application.
Figure 3. MR160 Controller Board
LAN +
LAN º
TB2
LANPORT
24VAC
GNDTB1
SENSORPORTTB3
INPUTS
TB6TB5
SIGNAL
POWER
GROUND
U I - 1
U I - 2
U I - 3
U I - 4
U I - 5
U I - 6
U I - 7
U I - 8
+24V
GND
5.00 "
5.50 "
24 VACPowerInput
MR LANPort
I/STATPort
8.50 "
8.00 "
7.00 "
4.00 "
GND
+24V
U I - 15
U I - 14
U I - 13
U I - 12
U I - 11
U I - 10
U I - 9
INPUTS
0000
0001
0002
0003
0004
0005
0006
0007
0106
0105
0104
0103
0102
0101
0100
1
2
3
4
5
6
7
8
A B C
BITOFFSET
BITOFFSET
ABC
16
15
14
13
12
11
10
9
UniversalInputs Universal
Inputs
InputConfigurationResistor Banks
S1
ConfigurationSwitches
D1
D2
D3
RX
TX
TEST
MR LANCommunicationLEDs
Self Test LED
6 © 2010 Schneider Electric. All rights reserved.
TCON126–09/10
Micro Regulator and I/STAT Installation Guide Physical Description
MR632
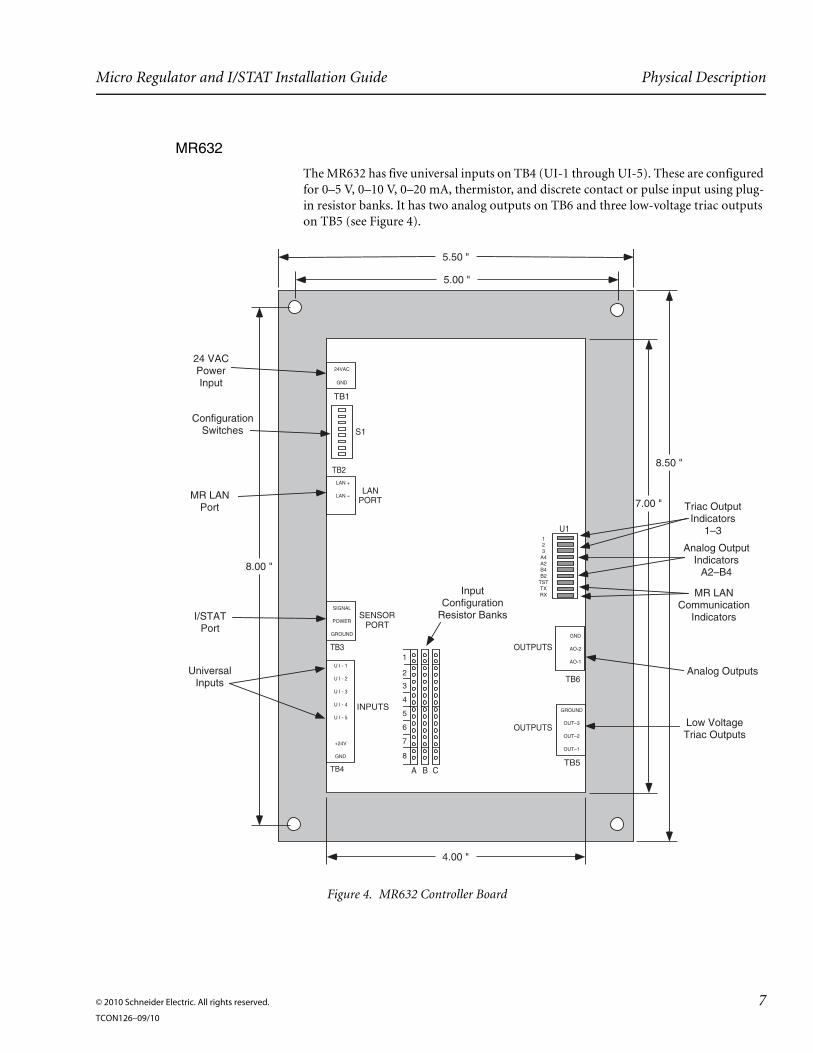
The MR632 has five universal inputs on TB4 (UI-1 through UI-5). These are configured for 0–5 V, 0–10 V, 0–20 mA, thermistor, and discrete contact or pulse input using plug-in resistor banks. It has two analog outputs on TB6 and three low-voltage triac outputs on TB5 (see Figure 4).
Figure 4. MR632 Controller Board
LAN +
LAN –
TB2
LANPORT
24VAC
GND
TB1
SENSORPORT
INPUTS
TB3
TB4TB5
TB6
U1
OUTPUTS
123
A4A2B4B2
TSTTXRX
SIGNAL
POWER
GROUND
U I - 1
U I - 2
U I - 3
U I - 4
U I - 5
+24V
GND
GND
AO-2
AO-1
GROUND
OUT–3
OUT–2
OUT–1
5.00 "
5.50 "
24 VACPowerInput
MR LANPort
I/STATPort
UniversalInputs
Triac OutputIndicators
1–3
MR LANCommunication
Indicators
Analog Outputs
Low VoltageTriac Outputs
8.50 "
S1
8.00 "
7.00 "
4.00 "
Analog OutputIndicators
A2–B4
OUTPUTS
ConfigurationSwitches
1
2
3
4
5
6
7
8
InputConfiguration
Resistor Banks
A B C
© 2010 Schneider Electric. All rights reserved. 7TCON126–09/10
Physical Description Micro Regulator and I/STAT Installation Guide
Output TerminationsMR 88
The MR88 has eight low-voltage sourcing (24 VAC) triac outputs on TB5. The outputs are configured as voltage sourcing using the controller’s 24 VAC input power after it has been passed through a 4 A fuse. The triac outputs supply a maximum continuous current of 0.5 A each (2 A maximum).
MR 88R
The MR88R has eight relay outputs, four each on TB5 and TB6. These outputs are single form-C relay contacts with three screw terminations. Each contact may be wired to the output device as Normally Open (NO) or Normally Closed (NC). The center terminal of each group (the terminal output number) is the common terminal (see Figure 2 on page 5). Contacts are rated at 24 VAC/DC @ 0.5 A maximum each output.
MR 160
The MR160 has no outputs.
MR 632
The MR632 has three low-voltage sourcing (24 VAC) triac outputs on TB5 and two 0–10 V analog outputs on TB6. The triac outputs are configured as voltage sourcing using the controller’s 24 VAC input power after it has been passed through a 2.5 A fuse. The triac outputs supply a maximum continuous current of 0.5 A each.
LAN Communication PortThere is one communication port on the MR board. This is TB2, the connection to the subLAN. The subLAN communications port is located along the upper left side of the controller, below the DIP switch block S1.
A terminal block provides connection of the RS485 shielded, twisted pair cable on the standard controller. See Figure 3 on page 6 for port location. The communication speed on the subLAN is 9,600 baud.
MemoryThe MR provides support for several types of memory that is currently organized as follows:
Table 2. Micro Regulator Memory
Amount Memory type
236 bytes RAM storage internal to the microprocessor
32 KB EPROM
1024 bytes NOVRAM
8 © 2010 Schneider Electric. All rights reserved.
TCON126–09/10
Micro Regulator and I/STAT Installation Guide Physical Description
I/STAT
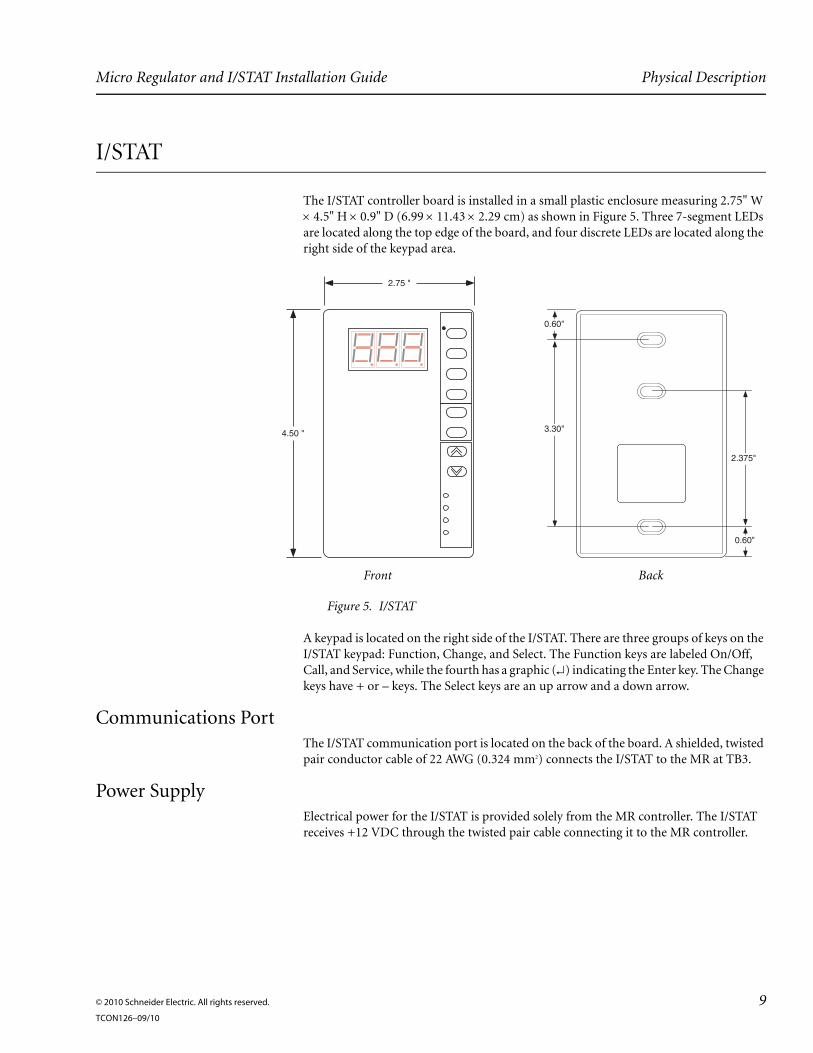
The I/STAT controller board is installed in a small plastic enclosure measuring 2.75" W 4.5" H 0.9" D (6.99 11.43 2.29 cm) as shown in Figure 5. Three 7-segment LEDs are located along the top edge of the board, and four discrete LEDs are located along the right side of the keypad area.
A keypad is located on the right side of the I/STAT. There are three groups of keys on the I/STAT keypad: Function, Change, and Select. The Function keys are labeled On/Off, Call, and Service, while the fourth has a graphic () indicating the Enter key. The Change keys have + or – keys. The Select keys are an up arrow and a down arrow.
Communications PortThe I/STAT communication port is located on the back of the board. A shielded, twisted pair conductor cable of 22 AWG (0.324 mm2) connects the I/STAT to the MR at TB3.
Power SupplyElectrical power for the I/STAT is provided solely from the MR controller. The I/STAT receives +12 VDC through the twisted pair cable connecting it to the MR controller.
Figure 5. I/STAT
Front Back
2.75 "
4.50 "
2.375"
0.60"
3.30"
0.60"
© 2010 Schneider Electric. All rights reserved. 9TCON126–09/10
Physical Description Micro Regulator and I/STAT Installation Guide
Universal Enclosure
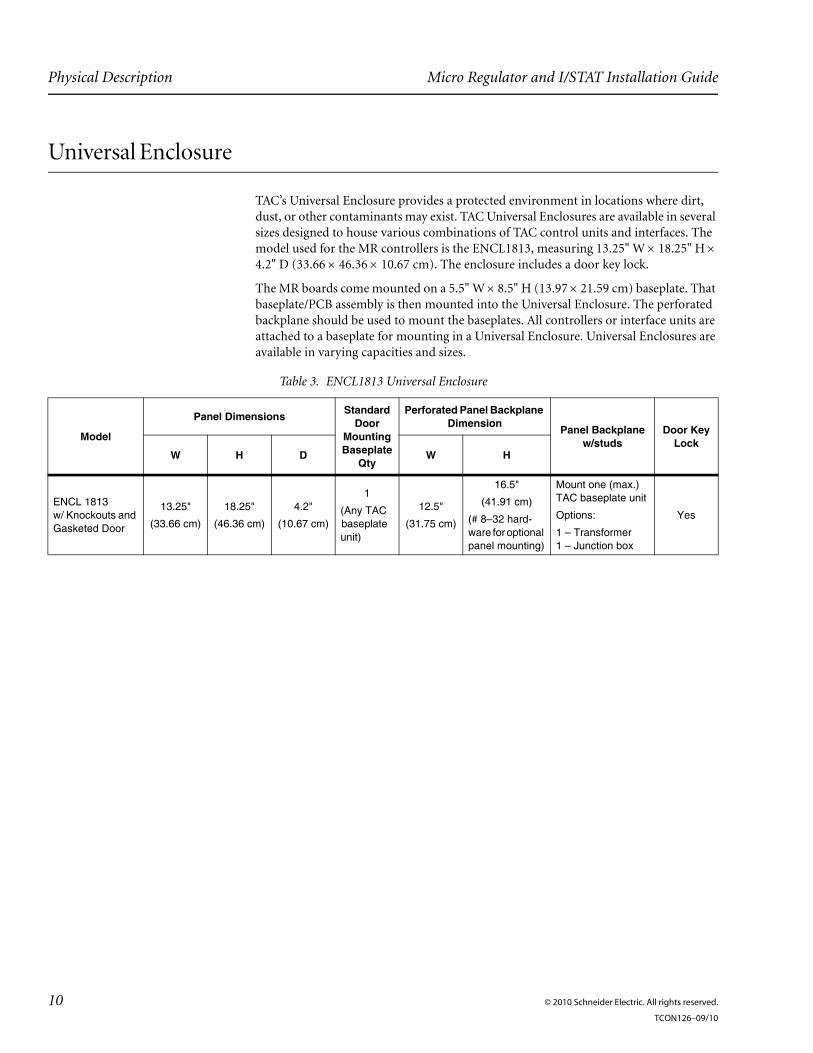
TAC’s Universal Enclosure provides a protected environment in locations where dirt, dust, or other contaminants may exist. TAC Universal Enclosures are available in several sizes designed to house various combinations of TAC control units and interfaces. The model used for the MR controllers is the ENCL1813, measuring 13.25" W 18.25" H 4.2" D (33.66 46.36 10.67 cm). The enclosure includes a door key lock.
The MR boards come mounted on a 5.5" W 8.5" H (13.97 21.59 cm) baseplate. That baseplate/PCB assembly is then mounted into the Universal Enclosure. The perforated backplane should be used to mount the baseplates. All controllers or interface units are attached to a baseplate for mounting in a Universal Enclosure. Universal Enclosures are available in varying capacities and sizes.
Table 3. ENCL1813 Universal Enclosure
Model
Panel Dimensions Standard Door
Mounting Baseplate
Qty
Perforated Panel Backplane Dimension Panel Backplane
w/studsDoor Key
LockW H D W H
ENCL 1813w/ Knockouts and Gasketed Door
13.25"
(33.66 cm)
18.25"
(46.36 cm)
4.2"
(10.67 cm)
1
(Any TAC baseplate unit)
12.5"
(31.75 cm)
16.5"
(41.91 cm)
(# 8–32 hard-ware for optional panel mounting)
Mount one (max.) TAC baseplate unit
Options:
1 – Transformer1 – Junction box
Yes
10 © 2010 Schneider Electric. All rights reserved.
TCON126–09/10

Micro Regulator and I/STAT Installation Guide Installation Procedures
Installation Procedures
This section provides installation instructions for the I/STAT and Micro Regulator controllers’ input, output, LAN, and power connections.
Note: Operational errors may occur if equipment is inadequately grounded. Symptoms may include, but are not limited to: intermittent LAN or subLAN communications, improper control actions, or loss of NOVRAM contents. Refer to “Grounding Requirements” on page 12 during equipment installation.
Installing the I/STAT
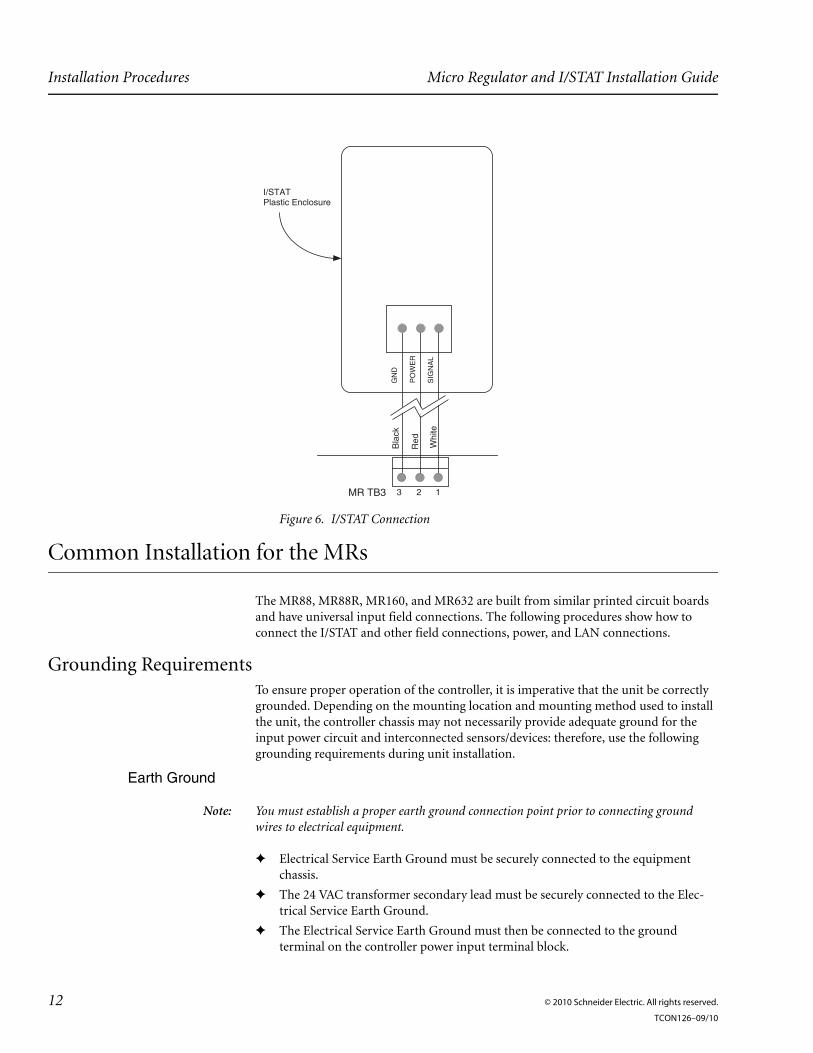
The three-pin terminal block (TB3) provides connection of the 18–24 AWG (0.897–0.206 cm2), 3-conductor cable (see Figure 6). The I/STAT is designed to mount on a stan-dard electrical utility box. Use the following steps to install the I/STAT.
1. Ensure power is disconnected to the I/STAT.
2. Disconnect power to all devices to be connected to the I/STAT.
Warning: Failure to disconnect power from all interconnected equipment when performing electrical installation may result in electrical shock or burns.
3. Mount the I/STAT base to a wall-mounted, standard electrical utility box no more than 100 feet (30 m) from the MR controller.
4. Connect the three-conductor cable from the MR to the pigtail leads on the I/STAT.
a. Connect the I/STAT terminal 1 (white/signal) to TB3, terminal 1.
Note: If the white signal wire is not properly connected to terminal 1, the I/STAT will display a flashing “TAC”.
b. Connect the I/STAT terminal 2 (red/+12 VDC power) to TB3, terminal 2.
c. Connect the I/STAT terminal 3 (black/ground) to TB3, terminal 3.
Note: When using shielded cable, the drain/shield wire may be used to connect the black (ground) lead from the I/STAT. In retrofit applications, the three conductors of the existing I/STAT cable may be used in most cases for a distance up to 100 feet (30 m).
5. Reconnect power to the MR that is connected to the I/STAT.
6. Program the I/STAT from the host workstation (details in the TAC I/NET Operator Guide).
© 2010 Schneider Electric. All rights reserved. 11TCON126–09/10
Installation Procedures Micro Regulator and I/STAT Installation Guide
Common Installation for the MRs
The MR88, MR88R, MR160, and MR632 are built from similar printed circuit boards and have universal input field connections. The following procedures show how to connect the I/STAT and other field connections, power, and LAN connections.
Grounding RequirementsTo ensure proper operation of the controller, it is imperative that the unit be correctly grounded. Depending on the mounting location and mounting method used to install the unit, the controller chassis may not necessarily provide adequate ground for the input power circuit and interconnected sensors/devices: therefore, use the following grounding requirements during unit installation.
Earth Ground
Note: You must establish a proper earth ground connection point prior to connecting ground wires to electrical equipment.
✦ Electrical Service Earth Ground must be securely connected to the equipment chassis.
✦ The 24 VAC transformer secondary lead must be securely connected to the Elec-trical Service Earth Ground.
✦ The Electrical Service Earth Ground must then be connected to the ground terminal on the controller power input terminal block.
Figure 6. I/STAT Connection
MR TB3
GN
D
SIG
NA
L
PO
WE
R
I/STATPlastic Enclosure
3 2 1
Red
Bla
ck
Whi
te
12 © 2010 Schneider Electric. All rights reserved.
TCON126–09/10

Micro Regulator and I/STAT Installation Guide Installation Procedures
Baseplate Ground
Note: Baseplate grounding requirements apply to all controllers having a baseplate.
✦ Good contact must exist between the baseplate and chassis. Ensure that all mounting screws are tight.
✦ If you suspect that a good ground on the chassis is not present, attach a 12-AWG (3.331 mm2) ground wire from the Electrical Service Earth Ground wire to the baseplate. Attach the ground wire between the PCB and the baseplate, using one of the mounting screws.
Caution: Take care not to allow the ground wire or the washer to touch any components on the PCB.
✦ If resolving a grounding issue with previously-installed equipment, use star-tooth lock washers to ensure a tight connection between the PCB and the baseplate.
LAN Ground
Note: This procedure applies to all LAN and subLAN connections.
✦ Ensure that the subLAN cable shield drain wire is not connected to the controller subLAN terminal block.
✦ Shield drain wire continuity must be maintained as the subLAN cable passes through each controller. Shield drain wires from each controller subLAN cable must be twisted together, insulated, and tied back such that wires do not come in contact with ground or any conductive surface within a controller.
✦ Connect the shield drain wire directly to Electrical Service Earth Ground at only one location on the cable (e.g., at the MCI, MRI, I/SITE™ LAN, or controller).
Installing the MR Input Field ConnectionsThe MR88, MR88R, MR160, and MR632 provide universal inputs (UI) that are config-ured using plug-in resistor banks. Use the procedures shown below to connect the sensors you use to the MRs.
Caution: The input, output and power wiring must be routed along the side of the controller. The wiring must not lay across the controller.
The universal inputs support DI, AI or PI point types. The point type is selectable using plug-in resistors, as shown in Table 4. The inputs are shipped configured for 10K ther-mistor inputs with 10K ohm, 0.1%, 18 W resistors in all positions of resistor bank B.
Table 4. Point Type Resistor Configuration
Point Type Resistor Type Resistor Bank Factory Resistor Configuration
0–5 V (Normal span) or2–4 V (Narrow span)
None None None
0–10 V (Normal span) or4–8 V (Narrow span)
100K Ohm 1%, 18 W C1–C15 only None
0–20 mA (Normal span) or8–16 mA (Narrow span)
249 Ohm 0.1%, 18 W A1–A15 only None
© 2010 Schneider Electric. All rights reserved. 13TCON126–09/10
Installation Procedures Micro Regulator and I/STAT Installation Guide
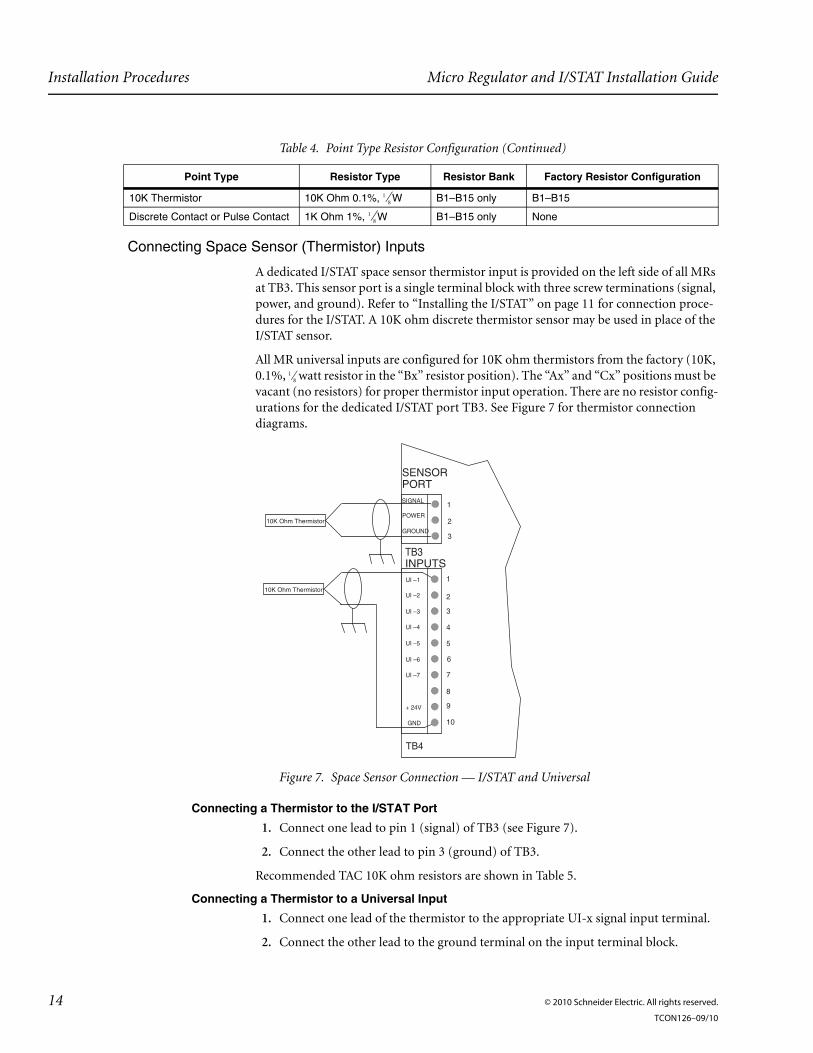
Connecting Space Sensor (Thermistor) Inputs
A dedicated I/STAT space sensor thermistor input is provided on the left side of all MRs at TB3. This sensor port is a single terminal block with three screw terminations (signal, power, and ground). Refer to “Installing the I/STAT” on page 11 for connection proce-dures for the I/STAT. A 10K ohm discrete thermistor sensor may be used in place of the I/STAT sensor.
All MR universal inputs are configured for 10K ohm thermistors from the factory (10K, 0.1%, 18 watt resistor in the “Bx” resistor position). The “Ax” and “Cx” positions must be vacant (no resistors) for proper thermistor input operation. There are no resistor config-urations for the dedicated I/STAT port TB3. See Figure 7 for thermistor connection diagrams.
Connecting a Thermistor to the I/STAT Port1. Connect one lead to pin 1 (signal) of TB3 (see Figure 7).
2. Connect the other lead to pin 3 (ground) of TB3.
Recommended TAC 10K ohm resistors are shown in Table 5.
Connecting a Thermistor to a Universal Input1. Connect one lead of the thermistor to the appropriate UI-x signal input terminal.
2. Connect the other lead to the ground terminal on the input terminal block.
10K Thermistor 10K Ohm 0.1%, 18 W B1–B15 only B1–B15
Discrete Contact or Pulse Contact 1K Ohm 1%, 18 W B1–B15 only None
Figure 7. Space Sensor Connection — I/STAT and Universal
Table 4. Point Type Resistor Configuration (Continued)
Point Type Resistor Type Resistor Bank Factory Resistor Configuration
10K Ohm Thermistor
INPUTSTB3
TB4
SIGNAL
UI –1
UI –2
UI –3
UI –4
UI –5
1
2
3
4
5
7
8
6
SENSORPORT
POWER
GROUND
1
2
3
+ 24V
GND
10K Ohm Thermistor
UI –6
UI –7
9
10
14 © 2010 Schneider Electric. All rights reserved.
TCON126–09/10
Micro Regulator and I/STAT Installation Guide Installation Procedures
Caution: Lini-Temp sensors should not be used on this input since the MR may not provide adequate or required resolution of temperature. Where the 2.732–3.332 volt output of the Lini-temp is connected to the 2–4 V Narrow input span of the MR, resulting resolution would be 1.42° F versus 0.3° F provided by a thermistor.
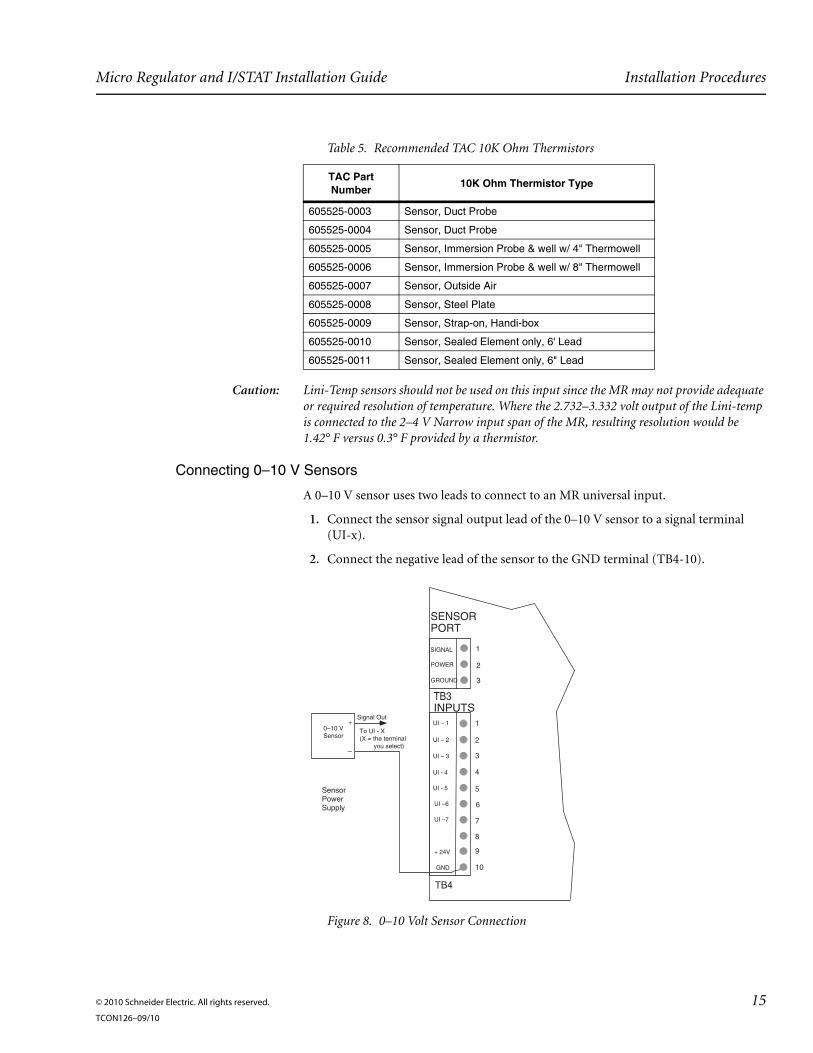
Connecting 0–10 V Sensors
A 0–10 V sensor uses two leads to connect to an MR universal input.
1. Connect the sensor signal output lead of the 0–10 V sensor to a signal terminal (UI-x).
2. Connect the negative lead of the sensor to the GND terminal (TB4-10).
Table 5. Recommended TAC 10K Ohm Thermistors
TAC Part Number 10K Ohm Thermistor Type
605525-0003 Sensor, Duct Probe
605525-0004 Sensor, Duct Probe
605525-0005 Sensor, Immersion Probe & well w/ 4" Thermowell
605525-0006 Sensor, Immersion Probe & well w/ 8" Thermowell
605525-0007 Sensor, Outside Air
605525-0008 Sensor, Steel Plate
605525-0009 Sensor, Strap-on, Handi-box
605525-0010 Sensor, Sealed Element only, 6' Lead
605525-0011 Sensor, Sealed Element only, 6" Lead
Figure 8. 0–10 Volt Sensor Connection
INPUTSTB3
TB4
SIGNAL
UI – 1
UI – 2
UI – 3
UI - 4
UI - 5
1
2
3
4
5
7
8
6
SENSORPORT
POWER
GROUND
1
2
3
Signal Out
SensorPowerSupply
To UI - X(X = the terminal you select)
+ 24V
GND
UI –6
UI –7
9
10
0–10 VSensor
–
+
© 2010 Schneider Electric. All rights reserved. 15TCON126–09/10
Installation Procedures Micro Regulator and I/STAT Installation Guide
3. Plug a 100K ohm, 1%, 18 watt resistor into the appropriate “Cx” resistor bank loca-tion with the I/NET span set to Normal. Setting the span to Narrow results in a higher input resolution over a 4–8 volt input range. Refer to “Hardware Inputs” on page 23 for a discussion of the normal and narrow span settings.
4. The 0–10 V sensor is typically powered by a separate external power supply. Connect the appropriate leads from the sensor power supply to the sensor (see Figure 8).
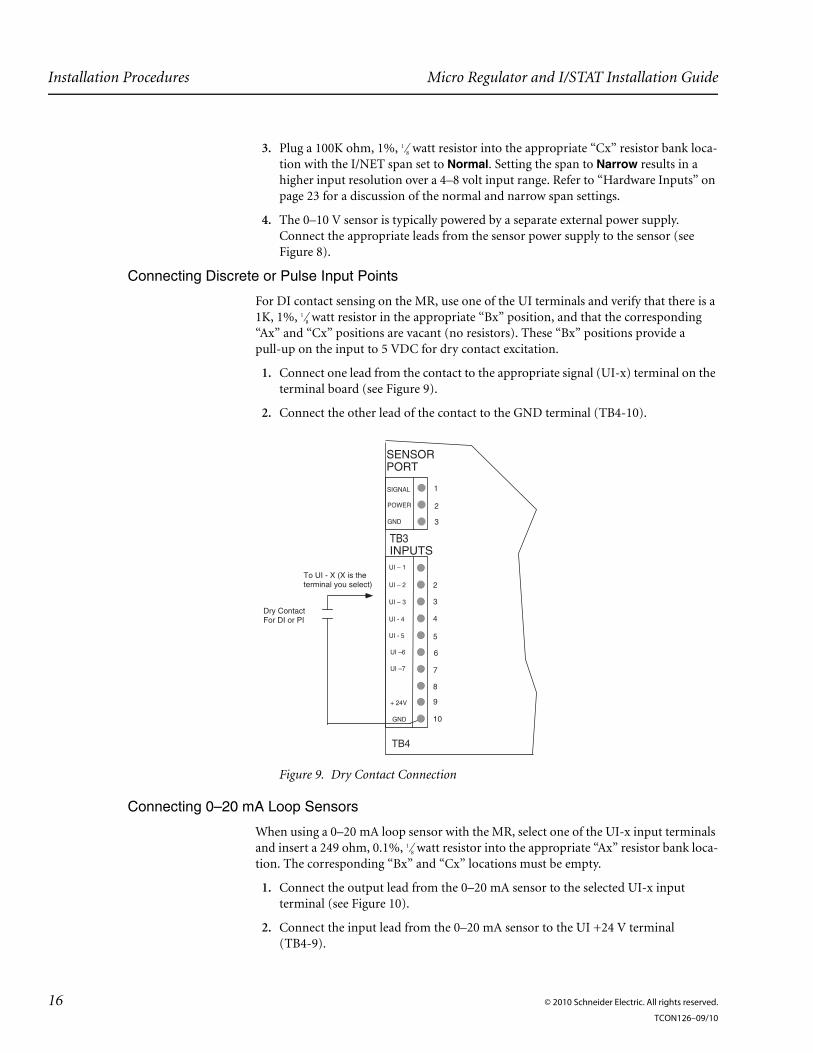
Connecting Discrete or Pulse Input Points
For DI contact sensing on the MR, use one of the UI terminals and verify that there is a 1K, 1%, 18 watt resistor in the appropriate “Bx” position, and that the corresponding “Ax” and “Cx” positions are vacant (no resistors). These “Bx” positions provide a pull-up on the input to 5 VDC for dry contact excitation.
1. Connect one lead from the contact to the appropriate signal (UI-x) terminal on the terminal board (see Figure 9).
2. Connect the other lead of the contact to the GND terminal (TB4-10).
Connecting 0–20 mA Loop Sensors
When using a 0–20 mA loop sensor with the MR, select one of the UI-x input terminals and insert a 249 ohm, 0.1%, 18 watt resistor into the appropriate “Ax” resistor bank loca-tion. The corresponding “Bx” and “Cx” locations must be empty.
1. Connect the output lead from the 0–20 mA sensor to the selected UI-x input terminal (see Figure 10).
2. Connect the input lead from the 0–20 mA sensor to the UI +24 V terminal (TB4-9).
Figure 9. Dry Contact Connection
INPUTSTB3
SIGNAL
SENSORPORT
POWER
GND
1
2
3
Dry ContactFor DI or PI
To UI - X (X is theterminal you select)
UI – 1
UI – 2
UI – 3
UI - 4
UI - 5
2
3
4
5
7
8
6
+ 24V
GND
UI –6
UI –7
9
10
TB4
16 © 2010 Schneider Electric. All rights reserved.
TCON126–09/10

Micro Regulator and I/STAT Installation Guide Installation Procedures
A +24 VDC supply terminal, located next to the ground terminal, is provided on all input terminal blocks, which may be used to power up to five 0–20 mA loop sensors.
Note: If more than five 0–20 mA loop sensors are required, an external DC power supply must be used (see Figure 10).
Connecting an MR Controller to the SubLANThe LAN port is located along the upper left side of the controller. It provides asynchro-nous communications to the RS485 subLAN.
A three-pin terminal block provides connection of the RS485 shielded, twisted pair cable (see Figure 11).
1. Connect the Com + line to terminal 1.
2. Connect the Com – line to terminal 2.
3. Twist shield wires for all controllers together at each controller, and connect to a good earth ground at one location only. Ensure that shield wire continuity is main-tained (see “LAN Ground” on page 13).
Caution: Ensure that you connect terminal 1 to 1 and terminal 2 to 2 on all MR controllers. Also ensure that the subLAN shield is grounded at only one location (usually at the MRI/MCI controller). Refer to “Grounding Requirements” on page 12.
Figure 10. 0–20 mA Loop Sensor Connection
INPUTSTB3
TB4
SIGNAL
UI – 1
UI – 2
UI – 3
UI - 4
UI - 5
1
2
3
4
5
7
8
6
SENSORPORT
POWER
GROUND
1
2
3
SensorPowerSupply
+ 24V
GND
UI –6
UI –7
9
10
0–20 mALoop Sensor
OutIn
0–20 mALoop Sensor
OutIn
–
+
Externalpowersupply
© 2010 Schneider Electric. All rights reserved. 17TCON126–09/10
Installation Procedures Micro Regulator and I/STAT Installation Guide
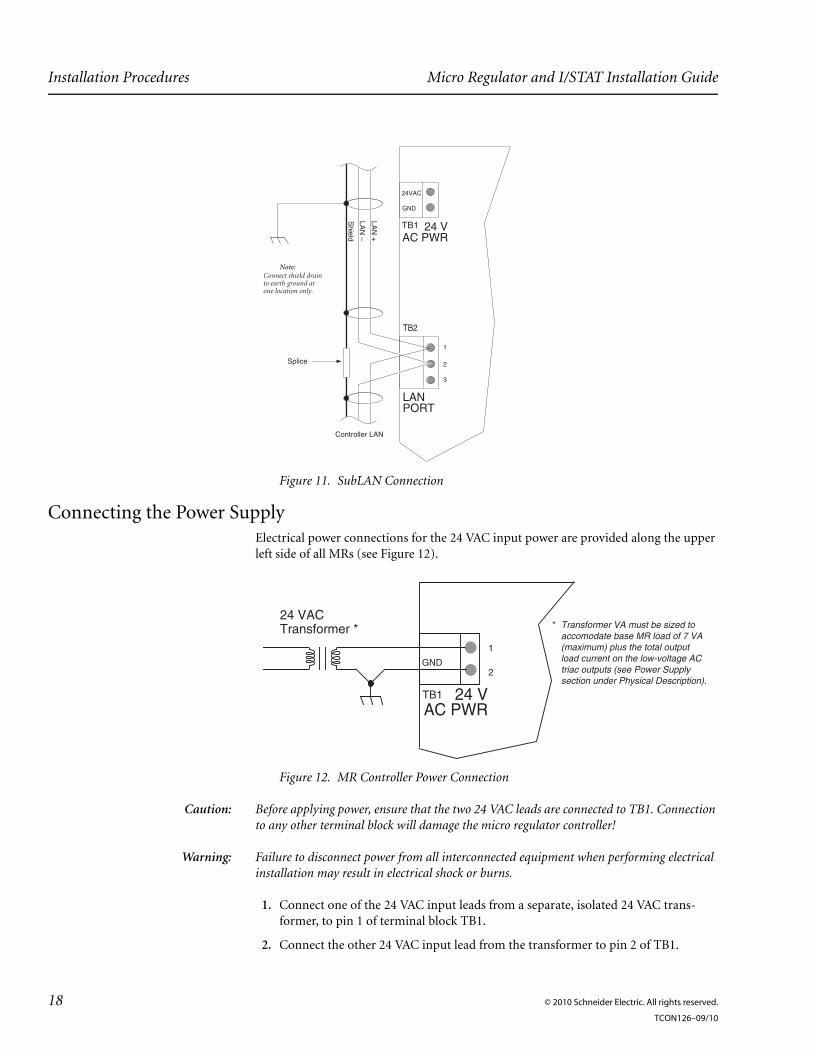
Connecting the Power SupplyElectrical power connections for the 24 VAC input power are provided along the upper left side of all MRs (see Figure 12).
Caution: Before applying power, ensure that the two 24 VAC leads are connected to TB1. Connection to any other terminal block will damage the micro regulator controller!
Warning: Failure to disconnect power from all interconnected equipment when performing electrical installation may result in electrical shock or burns.
1. Connect one of the 24 VAC input leads from a separate, isolated 24 VAC trans-former, to pin 1 of terminal block TB1.
2. Connect the other 24 VAC input lead from the transformer to pin 2 of TB1.
Figure 11. SubLAN Connection
Figure 12. MR Controller Power Connection
TB2
LANPORT
24VAC
TB1 24 VAC PWR
GND
1
2
3
Note:Connect shield drainto earth ground atone location only.
Splice
LAN
+
LAN
–
Shield
Controller LAN
TB1 24 VAC PWR
24 VACTransformer *
GND
1
2
* Transformer VA must be sized toaccomodate base MR load of 7 VA(maximum) plus the total outputload current on the low-voltage ACtriac outputs (see Power Supplysection under Physical Description).
18 © 2010 Schneider Electric. All rights reserved.
TCON126–09/10
Micro Regulator and I/STAT Installation Guide Installation Procedures
Note: Do not attempt to use the same AC transformer for any subLAN device (MR, DPU, UC, or transducer) and its associated LAN interface device (MRI, DPI, MCI, or UCI). This will result in improper operation, and may cause damage to one or both devices.
3. The conductor connecting to pin 2 of TB1 (GND) must also be connected to a good earth ground (see Figure 12).
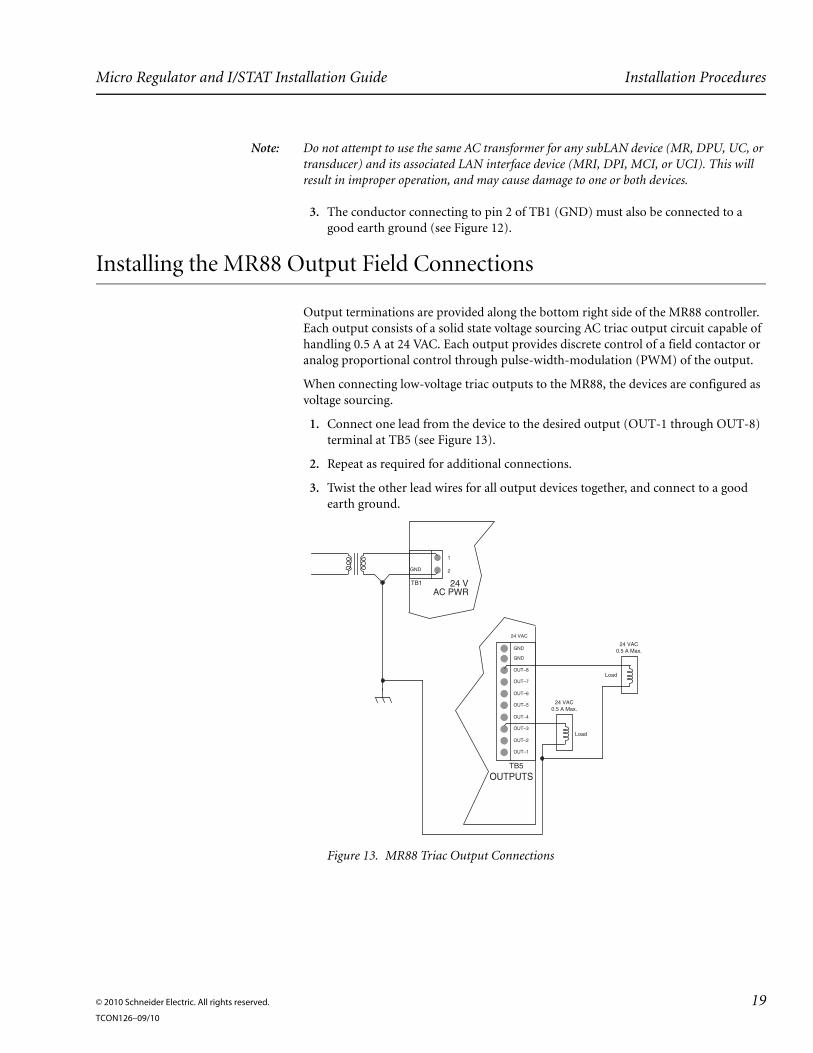
Installing the MR88 Output Field Connections
Output terminations are provided along the bottom right side of the MR88 controller. Each output consists of a solid state voltage sourcing AC triac output circuit capable of handling 0.5 A at 24 VAC. Each output provides discrete control of a field contactor or analog proportional control through pulse-width-modulation (PWM) of the output.
When connecting low-voltage triac outputs to the MR88, the devices are configured as voltage sourcing.
1. Connect one lead from the device to the desired output (OUT-1 through OUT-8) terminal at TB5 (see Figure 13).
2. Repeat as required for additional connections.
3. Twist the other lead wires for all output devices together, and connect to a good earth ground.
Figure 13. MR88 Triac Output Connections
OUT–1
OUT–2
OUT–3
OUT–4
OUT–5
OUT–6
OUT–7
GND
GND
OUT–8
TB5
OUTPUTS
24 VAC
Load
24 VAC0.5 A Max.
Load
24 VAC0.5 A Max.
TB1 24 VAC PWR
GND
1
2
© 2010 Schneider Electric. All rights reserved. 19TCON126–09/10
Installation Procedures Micro Regulator and I/STAT Installation Guide
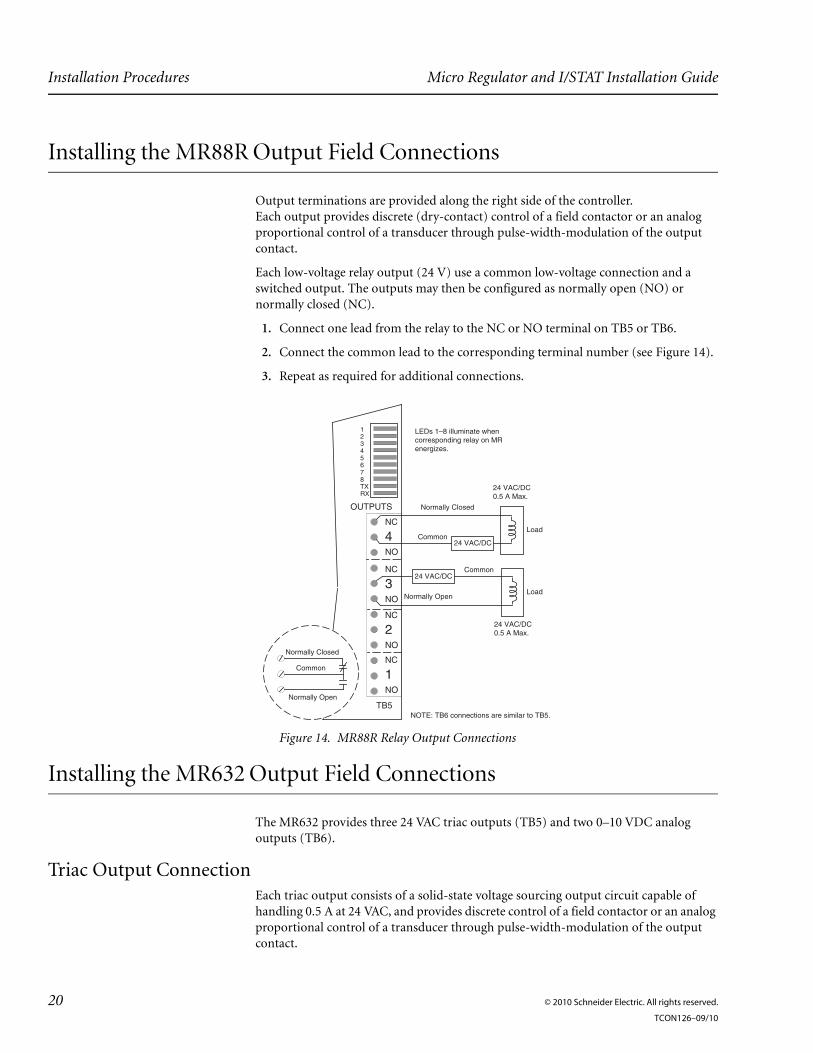
Installing the MR88R Output Field Connections
Output terminations are provided along the right side of the controller. Each output provides discrete (dry-contact) control of a field contactor or an analog proportional control of a transducer through pulse-width-modulation of the output contact.
Each low-voltage relay output (24 V) use a common low-voltage connection and a switched output. The outputs may then be configured as normally open (NO) or normally closed (NC).
1. Connect one lead from the relay to the NC or NO terminal on TB5 or TB6.
2. Connect the common lead to the corresponding terminal number (see Figure 14).
3. Repeat as required for additional connections.
Installing the MR632 Output Field Connections
The MR632 provides three 24 VAC triac outputs (TB5) and two 0–10 VDC analog outputs (TB6).
Triac Output ConnectionEach triac output consists of a solid-state voltage sourcing output circuit capable of handling 0.5 A at 24 VAC, and provides discrete control of a field contactor or an analog proportional control of a transducer through pulse-width-modulation of the output contact.
Figure 14. MR88R Relay Output Connections
NC
4NO
NC
3NO
NC
2NO
NC
1NO
OUTPUTS
TB5
12345678TXRX
24 VAC/DC
24 VAC/DC0.5 A Max.
LoadCommon
Common24 VAC/DC
Load
24 VAC/DC0.5 A Max.
Normally Closed
Normally Open
NOTE: TB6 connections are similar to TB5.
LEDs 1–8 illuminate whencorresponding relay on MRenergizes.
Common
Normally Closed
Normally Open
20 © 2010 Schneider Electric. All rights reserved.
TCON126–09/10
Micro Regulator and I/STAT Installation Guide Installation Procedures
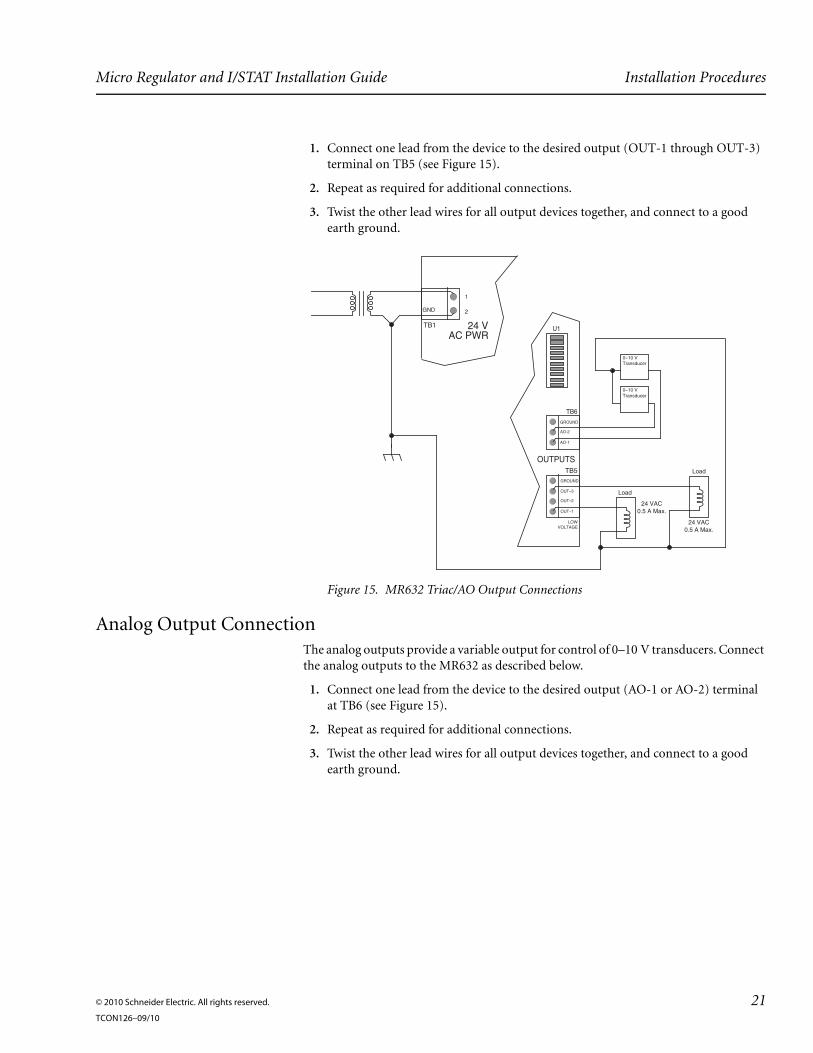
1. Connect one lead from the device to the desired output (OUT-1 through OUT-3) terminal on TB5 (see Figure 15).
2. Repeat as required for additional connections.
3. Twist the other lead wires for all output devices together, and connect to a good earth ground.
Analog Output ConnectionThe analog outputs provide a variable output for control of 0–10 V transducers. Connect the analog outputs to the MR632 as described below.
1. Connect one lead from the device to the desired output (AO-1 or AO-2) terminal at TB6 (see Figure 15).
2. Repeat as required for additional connections.
3. Twist the other lead wires for all output devices together, and connect to a good earth ground.
Figure 15. MR632 Triac/AO Output Connections
TB1 24 VAC PWR
GND
1
2
TB5
TB6
U1
OUTPUTS
LOWVOLTAGE
OUT–1
OUT–2
OUT–3
GROUND
AO-1
AO-2
GROUND
0–10 VTransducer
0–10 VTransducer
Load
Load
24 VAC0.5 A Max.
24 VAC0.5 A Max.
© 2010 Schneider Electric. All rights reserved. 21TCON126–09/10
Installation Procedures Micro Regulator and I/STAT Installation Guide
22 © 2010 Schneider Electric. All rights reserved.
TCON126–09/10
Micro Regulator and I/STAT Installation Guide Setup and Operation
Setup and Operation
This chapter describes the various components of the I/STAT and MRs, and their setup and operation. These units mount indoors on a wall surface in an area that meets the specifications outlined (see “Specifications” on page 45). You should set the MR’s address with DIP switch S1 before powering up the unit, or with the I/STAT prior to connection to the subLAN. Identify and record input and output terminals and addresses with their physical terminal block and pin numbers. Also identify the devices to which they connect. Write this information on a copy of the “Pinout Chart” on page 41. The MR setup requirements include connecting the inputs and outputs and setting the subLAN address.
Micro Regulator Features
The MRs are based on the same board design and share certain features. All of these boards have the same type of hardware inputs, dedicated sensor port, look-up tables, Automatic Time Schedules, and LAN communication port. The MRs also have universal inputs that are configured using plug-in resistor banks.
Hardware InputsThe MRs have one I/STAT space sensor and various numbers of universal inputs. The space sensor point is connected either to an I/STAT sensor or 10K ohm thermistor (see Figure 6 on page 12 and Figure 7 on page 14).
The MR88 and MR88R provide 7 universal inputs each; the MR632 provides 5 universal inputs. These inputs are processed by a single 8-bit A/D convertor. The MR160 provides 15 universal inputs with processing done by two A/D convertors.
You can select the normal span or narrow span for each possible universal input address in the TAC I/NET system MR parameters editor. When Normal is selected for the channel in the MR configuration editor, the input is processed using an A/D conversion range of 0–5 volts. When Narrow is selected the input is processed using an A/D conver-sion range of 2–4 volts.
0–10 V Inputs
The 0 –10 V range is accomplished by selecting Normal and inserting a divide-by-two resistance network in front of the analog Mux on the applicable channel. This is accom-plished by plugging a 100K, 1%, 18 watt resistor into the appropriate Cx position in the configuration resistor bank (see Table 4). The x corresponds to the input number (1–15). Setting the span selection to Narrow results in an input span of 4–8 volts.
0–20 mA Inputs
The universal inputs can be configured for 0–20 mA operation by selecting Normal and inserting a current-sensing resistor (249 ohm, 0.1%, 18 watt) into the appropriate Ax position (see Table 6), with x corresponding to the input number (1–15). Setting the span selection to Narrow results in an input span of 8–16 mA.
© 2010 Schneider Electric. All rights reserved. 23TCON126–09/10
Setup and Operation Micro Regulator and I/STAT Installation Guide
Discrete or Pulse Inputs
For discrete/pulse contact input operation, select Normal and insert a contact excitation resistor (1K ohm, 1%, 18 watt) into the appropriate Bx position (see Table 6), with x corresponding to the input number (1–15). The field contact will be wired between the input and ground and will pull the 5-volt level to ground when the contact is closed. A voltage below 1.25 V (25% scale) is considered a closed contact; a voltage above 3.75 V (75% scale) is considered an open contact.
Universal Inputs
The universal inputs are configured for thermistor (temperature sensing) operation by selecting the normal or narrow span and inserting a thermistor excitation resistor (10K ohm, 0.1%, 18 watt) into the appropriate Bx position (see Table 6), with x corresponding to the input number (1–15). The thermistor input circuit consists of a 10K ohm, NTC thermistor connected between the signal input and ground. The thermistor signal input is biased/excited on the MR controller using a precision 5-volt reference. The MR meters the resulting voltage divider network and translates the voltage to temperature.
To achieve better resolution (0.27° F per count or better) over the indoor temperature span of interest (32–90° F, 0–32° C) the A/D conversion span can be reduced from the normal 0–5 V range. A reduced (narrow) range of 2–4 V can be selected. This is set in the TAC I/NET system MR parameters editor.
When using thermistors for outside temperature measurements or standard 1–5 V or 4–20 mA devices, the user sets the span to Normal. When set for Normal, the thermistor span covers a range of –40 to 176° F (–40 to 80° C).
The narrow span can also be used to achieve better resolution on the 0–5 V and 0–20 mA sensors by reducing the conversion span to 2–4 V and 8–16 mA. This improves resolu-tion with many sensors, especially those with 4–20 mA outputs.
The MRs provide a glitch filter on the AI inputs that takes the median of the last three averaged samples. The points defined as DI or PI are considered to have changed state after seeing two consecutive samples in the new state (above 75% or below 25%).
The MRs also provide a mean value filter to reduce/eliminate random electrical noise, especially AC (60 Hz) power line noise.
Table 6. Point Type Resistor Configuration
Point Type Resistor Type Resistor Bank
Factory Resistor Configuration
0–5 V (Normal span) or2–4 V (Narrow span)
None None None
0–10 V (Normal span) or4–8 V (Narrow span)
100K Ohm 1%, 18 W C1–C15 only None
0–20 mA (Normal span) or8–16 mA (Narrow span)
249 Ohm 0.1%, 18 W A1–A15 only None
10K Thermistor 10K Ohm 0.1%, 18 W B1–B15 only B1–B15
Discrete Contact or Pulse Contact
1K Ohm 1%, 18 W B1–B15 only None
24 © 2010 Schneider Electric. All rights reserved.
TCON126–09/10
Micro Regulator and I/STAT Installation Guide Setup and Operation
I/STAT Sensor Port
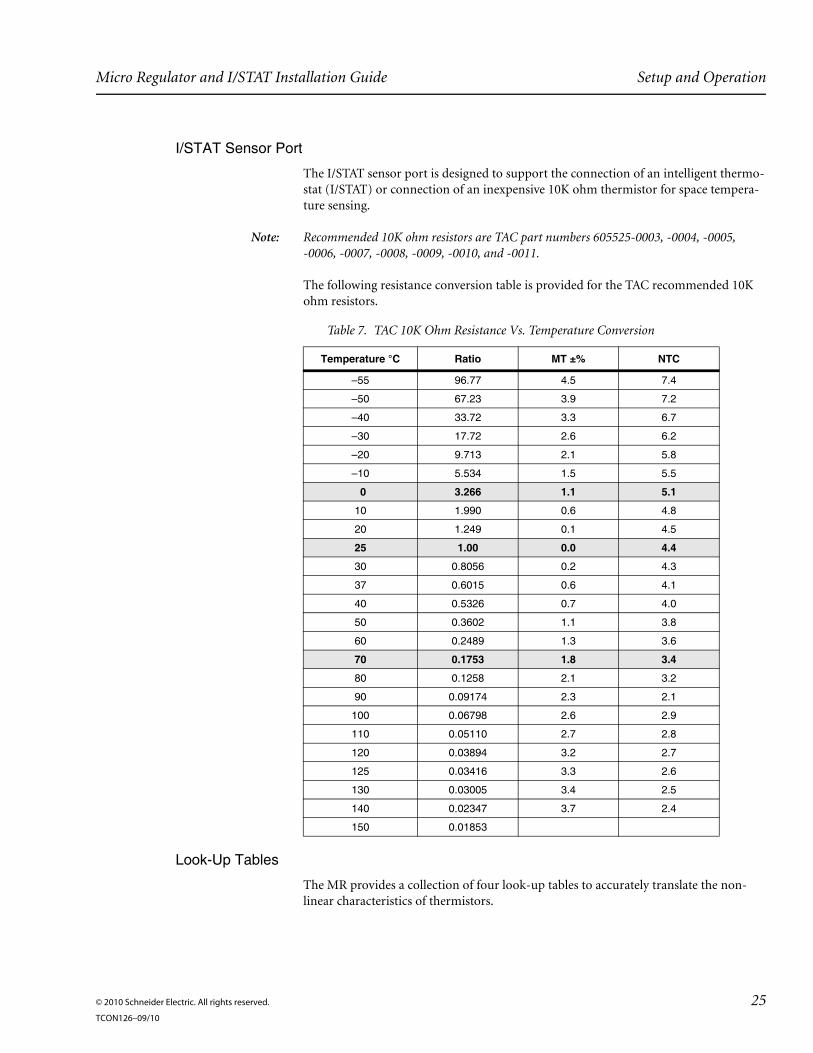
The I/STAT sensor port is designed to support the connection of an intelligent thermo-stat (I/STAT) or connection of an inexpensive 10K ohm thermistor for space tempera-ture sensing.
Note: Recommended 10K ohm resistors are TAC part numbers 605525-0003, -0004, -0005, -0006, -0007, -0008, -0009, -0010, and -0011.
The following resistance conversion table is provided for the TAC recommended 10K ohm resistors.
Look-Up Tables
The MR provides a collection of four look-up tables to accurately translate the non-linear characteristics of thermistors.
Table 7. TAC 10K Ohm Resistance Vs. Temperature Conversion
Temperature °C Ratio MT ±% NTC
–55 96.77 4.5 7.4
–50 67.23 3.9 7.2
–40 33.72 3.3 6.7
–30 17.72 2.6 6.2
–20 9.713 2.1 5.8
–10 5.534 1.5 5.5
0 3.266 1.1 5.1
10 1.990 0.6 4.8
20 1.249 0.1 4.5
25 1.00 0.0 4.4
30 0.8056 0.2 4.3
37 0.6015 0.6 4.1
40 0.5326 0.7 4.0
50 0.3602 1.1 3.8
60 0.2489 1.3 3.6
70 0.1753 1.8 3.4
80 0.1258 2.1 3.2
90 0.09174 2.3 2.1
100 0.06798 2.6 2.9
110 0.05110 2.7 2.8
120 0.03894 3.2 2.7
125 0.03416 3.3 2.6
130 0.03005 3.4 2.5
140 0.02347 3.7 2.4
150 0.01853
© 2010 Schneider Electric. All rights reserved. 25TCON126–09/10
Setup and Operation Micro Regulator and I/STAT Installation Guide
Note: There are several variations of curves, dissipation characteristics and accuracies available for 10K ohm thermistors, not all 10K thermistors are alike. Contact TAC to identify the required thermistor specifications.
The look-up tables translate the thermistor-controlled voltage directly to temperature in degrees centigrade with a 100° positive bias to permit readings below zero. The look-up table entries are defined by the equation 100(°C+100).
The output from the look-up table will apply the user defined M and B conversion coef-ficients to create the engineering unit value. The typical M and B coefficients are as follows for counts m = 1 and b = 0.
For engineering units of °C: M = 0.0100 B = –100
For engineering units of °F: M = 0.0180 B = –148
When connecting an I/STAT to the sensor port (TB3), you specify the database point to use Look-up Table 1 (normal or narrow). The factory defined look-up tables take into consideration the normal versus narrow span selection, and no change to the conversion coefficients is required. Table 1 also accounts for an elevated self-heating error that is a function of the I/STAT. A separate pair (normal and narrow) of look-up tables, defined as Table 2, is provided in the MR firmware to support accommodation of 10K ohm ther-mistors connected to any available analog input (including the I/STAT sensor port).
Automatic Time ScheduleThe MRI/MCI maintains a clock for its connected MRs. The MRI/MCI sends a Time/Day of Week synchronization broadcast every minute to its family of MRs. If communication between the MRs and the MRI/MCI is severed, the MRs revert to their local resident ATS schedule. The local resident schedule provides one start and stop command for each day of the week. When communication with the MRI/MCI is rees-tablished, the MRs return to the clock ATS commands controlled by the MRI/MCI.
Note: If MR power is lost and subsequently restored following an MRI/MCI-to-MR communica-tions failure, the master device control point (controlled by the MR stand-alone ATS schedule) will default to its deenergized state. No further time-based commands will be issued to the point until MRI/MCI-to-MR communications are reestablished.
Table 8. Look-Up Table 1 and 2 Ranges
Low High
Table 1 Normal –104° F 1134° F
Table 1 Narrow 24.5° F 91.6° F
Table 2 Normal –104° F 1134° F
Table 2 Narrow 25.3° F 94.1° F
Usable range depends upon the capabilities of the selected sensor.
26 © 2010 Schneider Electric. All rights reserved.
TCON126–09/10

Micro Regulator and I/STAT Installation Guide Setup and Operation
SubLAN Port
The RS485 subLAN port (TB2) is accessed through a three-position terminal block located along the left edge of the MR (see Figure 16). When connected through this port, the MR controllers can communicate with the MRI, MCI, or I/SITE.
Field connections for the RS485 LAN port are shown in Table 9.
SubLAN Addressing
Set the subLAN address (point address of the MR) through DIP switches located in switch bank S1, between TB1 and TB2. The MR address range is 0 through 31, and corre-sponds to the PP (point) portion of the LLSSPPBB LAN address.
Figure 16. MR Board RS485 LAN Port
Table 9. RS485 Port Termination
Terminal Function
1 LAN +
2 LAN –
3 No connection
TB2
LANPORT
24VAC
TB1 24 VAC PWR
GND
1
2
3
S1Note:
Connect shield drainto earth ground atone location only.
Splice
LAN
+
LAN
–
Shield
Controller LAN
© 2010 Schneider Electric. All rights reserved. 27TCON126–09/10

Setup and Operation Micro Regulator and I/STAT Installation Guide
The switch values are given in Table 10. The value of the switches are added together when they are in the ON position. All switches OFF equal an address of zero. All switches ON equal an address of 31. For example, an address of 13 would have switches 1, 3, and 4 ON (1 + 4 + 8 = 13).
Note: Each MR on the same subLAN must have a unique LAN address for proper operation.
You may also set the LAN address through the I/STAT keypad. Refer to “MR Address” on page 35 for the procedure.
SubLAN Speed
Set the subLAN communications speed for the MRs on DIP switches 6 and 7. Set the subLAN speed to 9,600 baud using Table 11.
Note: Switch 8 must be set Off, unless you choose to set the address and baud rate from an I/STAT.
You may also set the subLAN communications speed for the MR using the I/STAT keypad. Refer to “Parameters” on page 34 for the procedure.
Caution: When using the I/STAT to set the subLAN parameters, turn DIP switch 8 to the On posi-tion. If switch 8 is placed in the Off position, any address or baud rate entered with the I/STAT will be overwritten with the DIP switch settings at the next power cycle.
Micro Regulator Setup
The micro regulator setup requirements include connecting the inputs and outputs, setting the subLAN data rate, and setting the subLAN address.
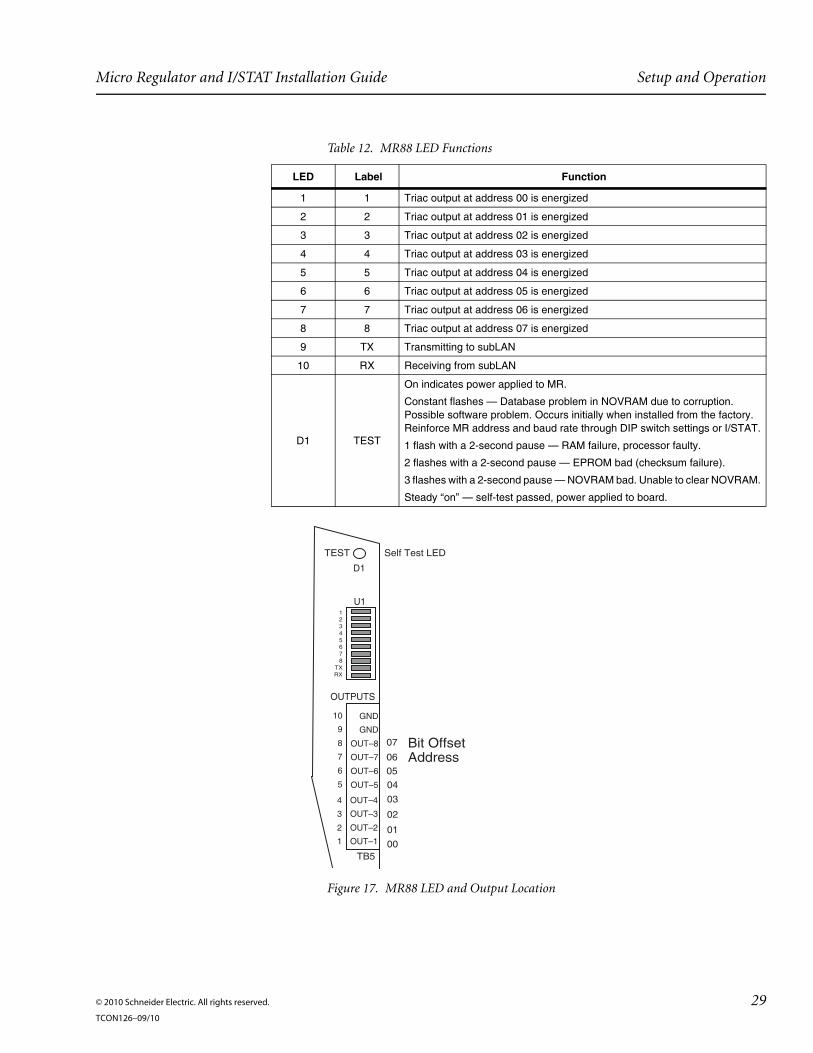
MR88 Control OutputsThe MR88 provides eight low-voltage triac outputs for 24 VAC at a maximum of 0.5 A. These outputs occupy the address range of 00 through 07. The MR88 also provides a bank of ten LEDs (U1) to indicate specific output status. The Test LED (D1) is a self-test/power indicator. If the MR88 self-test passes, the LED will come on and remain illu-minated. If the self-test fails, the LED will flash according to the specific self-test failure listed in Table 12. The functions of the MR88 LEDs are listed in Table 12.
Table 10. MR Addressing Switch Values
Switch Number 1 2 3 4 5
Switch Values 1 2 4 8 16
Table 11. SubLAN Communications Speed Setting
Baud Rate Switch 6 Switch 7 Switch 8
9,600 baud On On Off
28 © 2010 Schneider Electric. All rights reserved.
TCON126–09/10
Micro Regulator and I/STAT Installation Guide Setup and Operation
Table 12. MR88 LED Functions
LED Label Function
1 1 Triac output at address 00 is energized
2 2 Triac output at address 01 is energized
3 3 Triac output at address 02 is energized
4 4 Triac output at address 03 is energized
5 5 Triac output at address 04 is energized
6 6 Triac output at address 05 is energized
7 7 Triac output at address 06 is energized
8 8 Triac output at address 07 is energized
9 TX Transmitting to subLAN
10 RX Receiving from subLAN
D1 TEST
On indicates power applied to MR.
Constant flashes — Database problem in NOVRAM due to corruption. Possible software problem. Occurs initially when installed from the factory. Reinforce MR address and baud rate through DIP switch settings or I/STAT.
1 flash with a 2-second pause — RAM failure, processor faulty.
2 flashes with a 2-second pause — EPROM bad (checksum failure).
3 flashes with a 2-second pause — NOVRAM bad. Unable to clear NOVRAM.
Steady “on” — self-test passed, power applied to board.
Figure 17. MR88 LED and Output Location
U1
OUTPUTS
12345678
TXRX
GND
GND
OUT–8
OUT–7
OUT–6
OUT–5
TB5
OUT–4
OUT–3
OUT–2
OUT–1
04
03
00
05
06
01
02
10
9
8
7
6
5
4
3
2
1
Bit OffsetAddress
07
D1
TEST Self Test LED
© 2010 Schneider Electric. All rights reserved. 29TCON126–09/10
Setup and Operation Micro Regulator and I/STAT Installation Guide
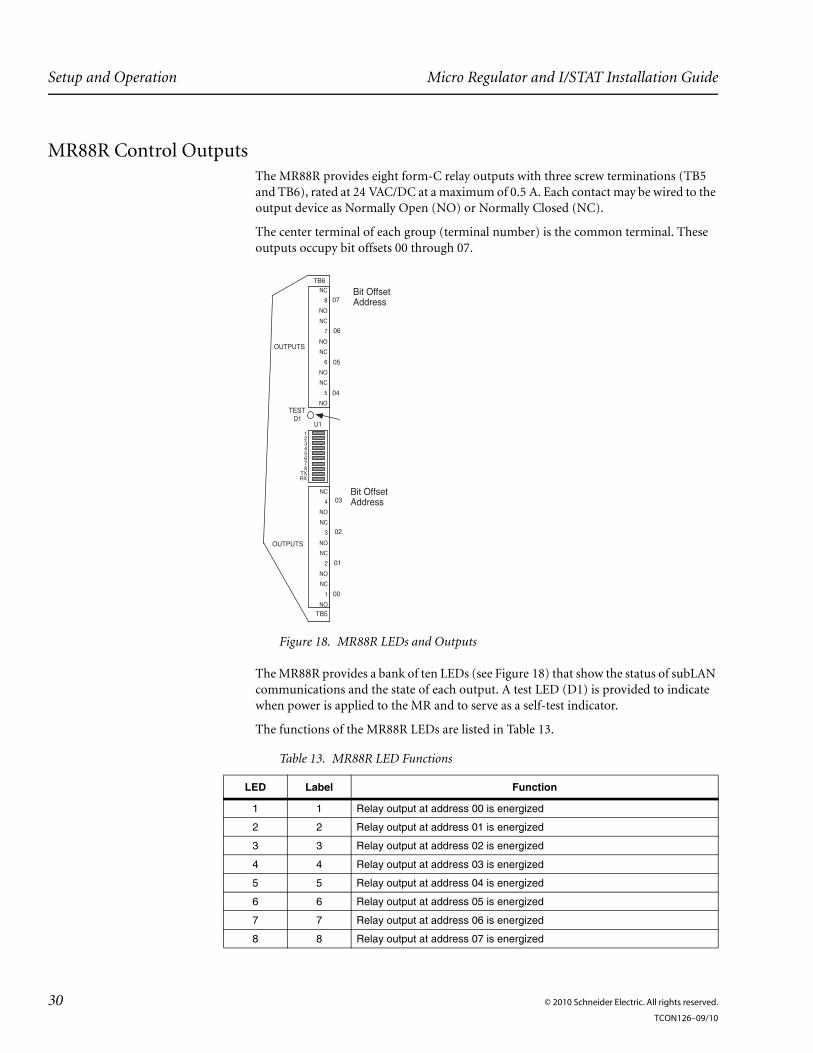
MR88R Control OutputsThe MR88R provides eight form-C relay outputs with three screw terminations (TB5 and TB6), rated at 24 VAC/DC at a maximum of 0.5 A. Each contact may be wired to the output device as Normally Open (NO) or Normally Closed (NC).
The center terminal of each group (terminal number) is the common terminal. These outputs occupy bit offsets 00 through 07.
The MR88R provides a bank of ten LEDs (see Figure 18) that show the status of subLAN communications and the state of each output. A test LED (D1) is provided to indicate when power is applied to the MR and to serve as a self-test indicator.
The functions of the MR88R LEDs are listed in Table 13.
Figure 18. MR88R LEDs and Outputs
Table 13. MR88R LED Functions
LED Label Function
1 1 Relay output at address 00 is energized
2 2 Relay output at address 01 is energized
3 3 Relay output at address 02 is energized
4 4 Relay output at address 03 is energized
5 5 Relay output at address 04 is energized
6 6 Relay output at address 05 is energized
7 7 Relay output at address 06 is energized
8 8 Relay output at address 07 is energized
TB6
U1
OUTPUTS
12345678
TXRX
NC
4
NO
NC
3
NO
NC
2
NO
NC
1
NO
TB5
01
03
06
05
Bit OffsetAddress
02
00
NC
8
NO
NC
7
NO
NC
6
NO
NC
5
NO
OUTPUTS
Bit OffsetAddress
04
07
TESTD1
30 © 2010 Schneider Electric. All rights reserved.
TCON126–09/10
Micro Regulator and I/STAT Installation Guide Setup and Operation
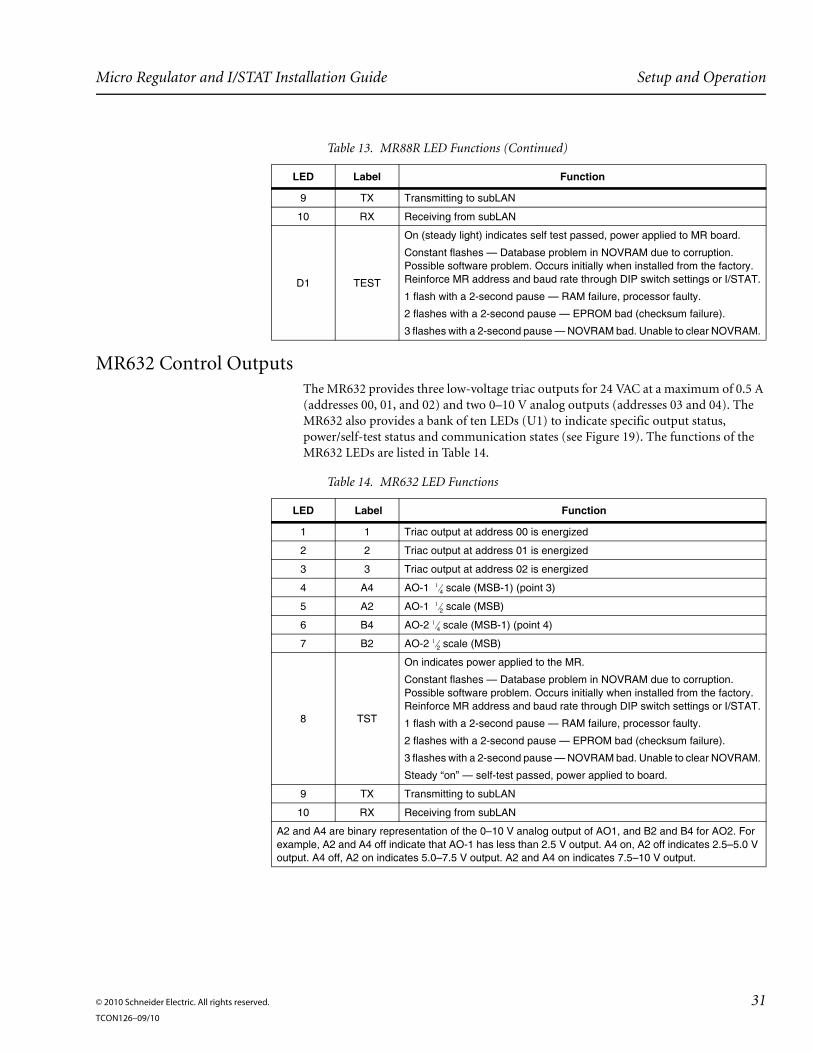
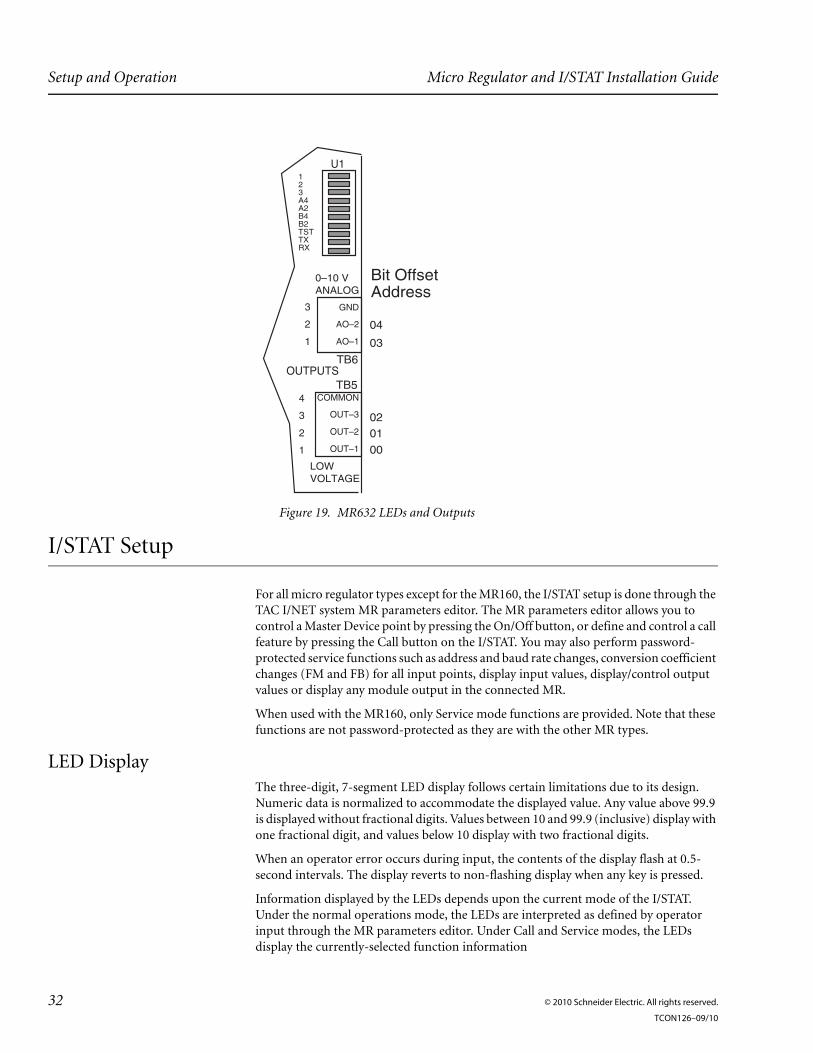
MR632 Control OutputsThe MR632 provides three low-voltage triac outputs for 24 VAC at a maximum of 0.5 A (addresses 00, 01, and 02) and two 0–10 V analog outputs (addresses 03 and 04). The MR632 also provides a bank of ten LEDs (U1) to indicate specific output status, power/self-test status and communication states (see Figure 19). The functions of the MR632 LEDs are listed in Table 14.
9 TX Transmitting to subLAN
10 RX Receiving from subLAN
D1 TEST
On (steady light) indicates self test passed, power applied to MR board.
Constant flashes — Database problem in NOVRAM due to corruption. Possible software problem. Occurs initially when installed from the factory. Reinforce MR address and baud rate through DIP switch settings or I/STAT.
1 flash with a 2-second pause — RAM failure, processor faulty.
2 flashes with a 2-second pause — EPROM bad (checksum failure).
3 flashes with a 2-second pause — NOVRAM bad. Unable to clear NOVRAM.
Table 14. MR632 LED Functions
LED Label Function
1 1 Triac output at address 00 is energized
2 2 Triac output at address 01 is energized
3 3 Triac output at address 02 is energized
4 A4 AO-1 14 scale (MSB-1) (point 3)
5 A2 AO-1 12 scale (MSB)
6 B4 AO-2 14 scale (MSB-1) (point 4)
7 B2 AO-2 12 scale (MSB)
8 TST
On indicates power applied to the MR.
Constant flashes — Database problem in NOVRAM due to corruption. Possible software problem. Occurs initially when installed from the factory. Reinforce MR address and baud rate through DIP switch settings or I/STAT.
1 flash with a 2-second pause — RAM failure, processor faulty.
2 flashes with a 2-second pause — EPROM bad (checksum failure).
3 flashes with a 2-second pause — NOVRAM bad. Unable to clear NOVRAM.
Steady “on” — self-test passed, power applied to board.
9 TX Transmitting to subLAN
10 RX Receiving from subLAN
A2 and A4 are binary representation of the 0–10 V analog output of AO1, and B2 and B4 for AO2. For example, A2 and A4 off indicate that AO-1 has less than 2.5 V output. A4 on, A2 off indicates 2.5–5.0 V output. A4 off, A2 on indicates 5.0–7.5 V output. A2 and A4 on indicates 7.5–10 V output.
Table 13. MR88R LED Functions (Continued)
LED Label Function
© 2010 Schneider Electric. All rights reserved. 31TCON126–09/10
Setup and Operation Micro Regulator and I/STAT Installation Guide
I/STAT Setup
For all micro regulator types except for the MR160, the I/STAT setup is done through the TAC I/NET system MR parameters editor. The MR parameters editor allows you to control a Master Device point by pressing the On/Off button, or define and control a call feature by pressing the Call button on the I/STAT. You may also perform password-protected service functions such as address and baud rate changes, conversion coefficient changes (FM and FB) for all input points, display input values, display/control output values or display any module output in the connected MR.
When used with the MR160, only Service mode functions are provided. Note that these functions are not password-protected as they are with the other MR types.
LED DisplayThe three-digit, 7-segment LED display follows certain limitations due to its design. Numeric data is normalized to accommodate the displayed value. Any value above 99.9 is displayed without fractional digits. Values between 10 and 99.9 (inclusive) display with one fractional digit, and values below 10 display with two fractional digits.
When an operator error occurs during input, the contents of the display flash at 0.5-second intervals. The display reverts to non-flashing display when any key is pressed.
Information displayed by the LEDs depends upon the current mode of the I/STAT. Under the normal operations mode, the LEDs are interpreted as defined by operator input through the MR parameters editor. Under Call and Service modes, the LEDs display the currently-selected function information
Figure 19. MR632 LEDs and Outputs
TB6
U1
OUTPUTS
123A4A2B4B2TSTTXRX
GND
AO–2
AO–1
TB5
LOWVOLTAGE
COMMON
OUT–3
OUT–2
OUT–1
04
03
0201
00
3
2
1
4
3
2
1
Bit OffsetAddress
0–10 VANALOG
32 © 2010 Schneider Electric. All rights reserved.
TCON126–09/10
Micro Regulator and I/STAT Installation Guide Setup and Operation
I/STAT FunctionsOther than the basic display and control features accessed through the Select buttons/LEDs on the I/STAT, there are three functions provided from the I/STAT keypad: On/Off, Call and Service.
On/Off
Note: This function is not available with the MR160.
This function controls the Master Device Control Point of the MR from the I/STAT. The point controlled is assigned through the MR parameters editor. The On/Off LED shows the current status of this function. When the On/Off key is pressed while the point is off, the point is controlled on, and an interval timer (assigned from the MR parameters editor) begins to count down. When the timer expires, the point and the LED are controlled off. If the interval timer is set to zero, the point and LED will be controlled on when the key is pressed and will remain on until the key is pressed again, or until the ATS off time occurs.
When the On/Off key is pressed while the point is on, the point and LED are controlled off. The command to turn the point off is actually delayed two seconds to allow a resumption of the interval timer without short-cycling the controlled equipment.
If an ATS extension has scheduled the point on, the first time the On/Off key is pressed the point and LED will be controlled off. The second time the key is pressed, it will turn the point and LED on.
Note: If the interval timer expires before the ATS scheduled off time, the point will follow the ATS off time. If the interval timer expires after the scheduled ATS off time, the point will follow the interval timer off time.
Call
Note: This function is not available with the MR160.
The Call function allows you to control a discrete point output, which must be assigned in the MR parameters editor. Pressing the Call button causes this point to toggle states. For advanced applications, attach an event definition (EV) extension to this point to enable event actions and event sequences.
Service
The Service function mode allows you to adjust parameters (MR address and subLAN speed). You may also calibrate the hardware coefficient parameters (factory-calibrated coefficients). Offset calibration (P1) allows you to adjust the analog input point’s offset value (FB). Gain and offset calibration (P2) allows you to adjust both the offset value (FB) and gain value (FM) for any of the analog input points. The Point function allows you to display any input point or display/control any output point. The Module function works the same as the Point function, except that you can only display the output of the MR module.
Note: The MR160 provides limited Service mode functions only. These functions are not pass-word-protected as they are with the other MR types.
© 2010 Schneider Electric. All rights reserved. 33TCON126–09/10
Setup and Operation Micro Regulator and I/STAT Installation Guide
Password
Note: This function is not available with the MR160.
After pressing Service, you must enter a numeric password that is set through the MR parameters editor in the TAC I/NET system software. The default password is 000. The password is entered and displayed on the LED from left to right, one digit at a time. The I/STAT identifies the digit position you are entering by illuminating the accompanying decimal point. The LED displays 000 and you must press the Select arrow keys to display the desired number. Use the following steps to enter the password.
1. Press the Change (+ or –) keys until the desired number appears.
2. When the number displays, press the Enter [] key.
3. Repeat this procedure for each number.
The MR controller validates the password and enables the Select LED functions on the I/STAT. At this point, select the target function by pressing the Select up/down arrows. One of the four LEDs located on the lower right corner of the I/STAT illuminates as you press the up/down arrows. When the desired function LED illuminates press the Enter key. Change the displayed state or value, or the point parameter number, and again press the Enter key. The specific procedures for each adjustable parameter are listed in Table 15.
Note: The I/STAT password may be created or modified using the TAC I/NET system software.
Parameters
The Parameters function allows modification of the MR controller address and the MRI/MCI/MR subLAN communications speed.
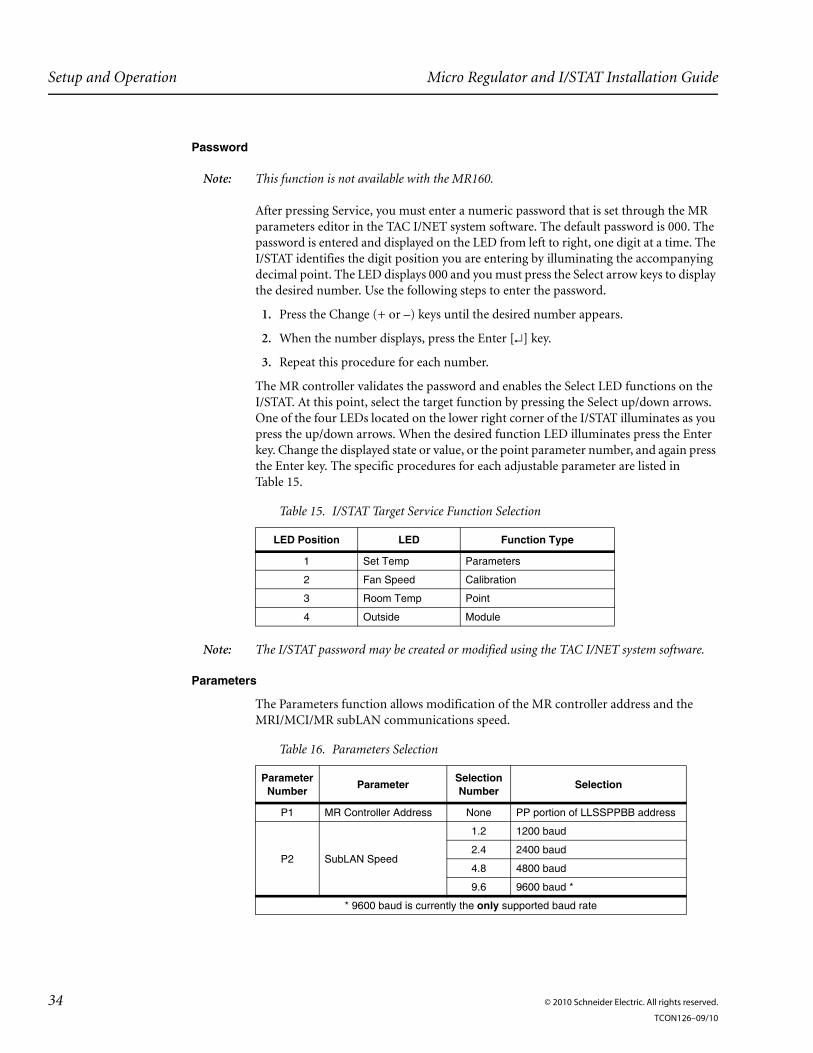
Table 15. I/STAT Target Service Function Selection
LED Position LED Function Type
1 Set Temp Parameters
2 Fan Speed Calibration
3 Room Temp Point
4 Outside Module
Table 16. Parameters Selection
ParameterNumber Parameter Selection
Number Selection
P1 MR Controller Address None PP portion of LLSSPPBB address
P2 SubLAN Speed
1.2 1200 baud
2.4 2400 baud
4.8 4800 baud
9.6 9600 baud *
* 9600 baud is currently the only supported baud rate
34 © 2010 Schneider Electric. All rights reserved.
TCON126–09/10

Micro Regulator and I/STAT Installation Guide Setup and Operation
Note: The I/STAT can be used to override the MR address and baud rate at any time. However, if dip switch S1-8 is placed in the OFF position, any address or baud rate entered with the I/STAT will be overwritten with the DIP switch settings at the next power cycle.
Caution: Exercise caution when inspecting or changing the MR address/baud rate from the I/STAT. If the I/STAT Enter button is pressed while the new (or current) MR address/baud rate is displayed, the MR address/baud rate will be changed (or re-enforced) and all previously-entered MR database information will be erased. This is true even if the current address/baud rate is not changed. To inspect the current MR address or baud rate without erasing any existing MR information, use the I/STAT Service button when exiting the I/STAT Service mode.
1. Press the Service key.
2. Enter the numeric password by using the Change + or – keys and then Enter key. The prompt SEL appears.
3. Select the function type by pressing the Select up or down arrow keys until the Set Temp LED is lighted.
4. Press the Enter key. P1 displays in the LED (see Table 16).
5. Use the Select keys to switch between P1 (address) and P2 (baud rate).
MR Address – Use the following steps to set the MR’s subLAN address.
1. To select or change the MR address, select P1 and press the Enter key. The current MR address appears in the LED display.
2. Change the address by pressing the Change + or – keys until the desired selection appears in the LED display.
3. Press the Enter key to accept the displayed address.
4. The I/STAT returns control of the keypad and displays the initial P1 selection.
Note: The MR160 is a 2-station device, requiring two addresses.
MR Baud Rate – Use the following steps to set the MR’s baud rate (data transfer speed).
1. To display or set the MR baud rate, select P2 and press the Enter key. The current baud rate appears in the LED display
Note: The current release of the MRs supports only 9600 baud.
2. Change the baud rate by pressing the Change + or – keys until the desired baud rate appears in the LED display.
3. Press the Enter key to accept the displayed baud rate.
4. The I/STAT returns control of the keypad and displays the initial P2 selection.
Calibration
This function allows you to change the factory calibrated M and B coefficients (FM and FB). There are two calibration procedures: adjust offset (FB), and adjust gain (FM) and offset (FB).
© 2010 Schneider Electric. All rights reserved. 35TCON126–09/10
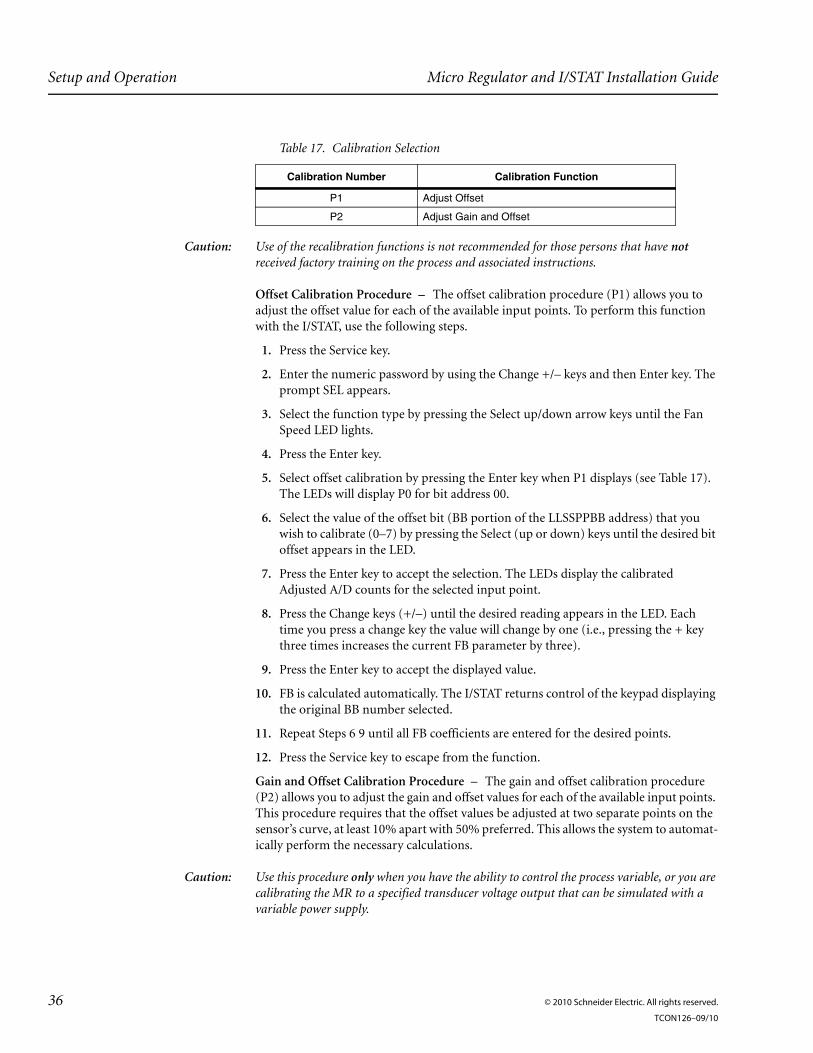
Setup and Operation Micro Regulator and I/STAT Installation Guide
Caution: Use of the recalibration functions is not recommended for those persons that have not received factory training on the process and associated instructions.
Offset Calibration Procedure – The offset calibration procedure (P1) allows you to adjust the offset value for each of the available input points. To perform this function with the I/STAT, use the following steps.
1. Press the Service key.
2. Enter the numeric password by using the Change +/– keys and then Enter key. The prompt SEL appears.
3. Select the function type by pressing the Select up/down arrow keys until the Fan Speed LED lights.
4. Press the Enter key.
5. Select offset calibration by pressing the Enter key when P1 displays (see Table 17). The LEDs will display P0 for bit address 00.
6. Select the value of the offset bit (BB portion of the LLSSPPBB address) that you wish to calibrate (0–7) by pressing the Select (up or down) keys until the desired bit offset appears in the LED.
7. Press the Enter key to accept the selection. The LEDs display the calibrated Adjusted A/D counts for the selected input point.
8. Press the Change keys (+/–) until the desired reading appears in the LED. Each time you press a change key the value will change by one (i.e., pressing the + key three times increases the current FB parameter by three).
9. Press the Enter key to accept the displayed value.
10. FB is calculated automatically. The I/STAT returns control of the keypad displaying the original BB number selected.
11. Repeat Steps 6 9 until all FB coefficients are entered for the desired points.
12. Press the Service key to escape from the function.
Gain and Offset Calibration Procedure – The gain and offset calibration procedure (P2) allows you to adjust the gain and offset values for each of the available input points. This procedure requires that the offset values be adjusted at two separate points on the sensor’s curve, at least 10% apart with 50% preferred. This allows the system to automat-ically perform the necessary calculations.
Caution: Use this procedure only when you have the ability to control the process variable, or you are calibrating the MR to a specified transducer voltage output that can be simulated with a variable power supply.
Table 17. Calibration Selection
Calibration Number Calibration Function
P1 Adjust Offset
P2 Adjust Gain and Offset
36 © 2010 Schneider Electric. All rights reserved.
TCON126–09/10

Micro Regulator and I/STAT Installation Guide Setup and Operation
Note: The difference between the two adjustment points must be at least 10% of the span. The I/STAT will indicate an error condition (flashing LED) if this criteria is not met.
1. Press the Service key.
2. Enter the numeric password by using the Change +/– keys and then Enter key. The prompt SEL appears.
3. Select the function type by pressing the Select up/down arrow keys until the Fan Speed LED lights.
4. Press the Enter key.
5. Select gain and offset calibration by pressing the Select key until P2 displays (see Table 17).
6. Press the Enter key to accept the function. The LEDs will display P0.
7. Select the value of the offset bit (BB portion of the LLSSPPBB address) that you wish to calibrate (0–7) by pressing the Select (up or down) keys until the desired point’s bit offset appears in the LED.
8. Press the Enter key to accept the selected offset point. The selected point’s Adjusted A/D count value displays in the LED.
9. Press the Change +/– keys until the respective sensor input is driven to the low end of the applicable span.
10. Press the Enter key to accept the displayed value.
11. Drive the selected process variable to the high end of the applicable span. This must be at least 10% above the low end, with a 50% increase preferred.
12. Press the Change +/– keys until the correct value is displayed in the LED.
13. Press the Enter key to accept the displayed value.
14. FM and FB are calculated automatically. The I/STAT returns control of the keypad displaying the original bit offset selection.
15. Repeat Steps 7 13 until all FM and FB coefficients are set for the desired points.
16. Press the Service key to escape from the function.
Point
At times you may want to display the current status of a point or control an output point. Using the I/STAT keyboard, follow the steps shown below.
1. Press the Service key.
2. Enter the numeric password by using the Change (+ or –) keys, then press the Enter key.
3. Press the up/down Select arrows until the Room Temp LED lights, then press the Enter key. The LEDs will display the output points designated PC0 through PC09, and the input points as P0 through P9.
© 2010 Schneider Electric. All rights reserved. 37TCON126–09/10
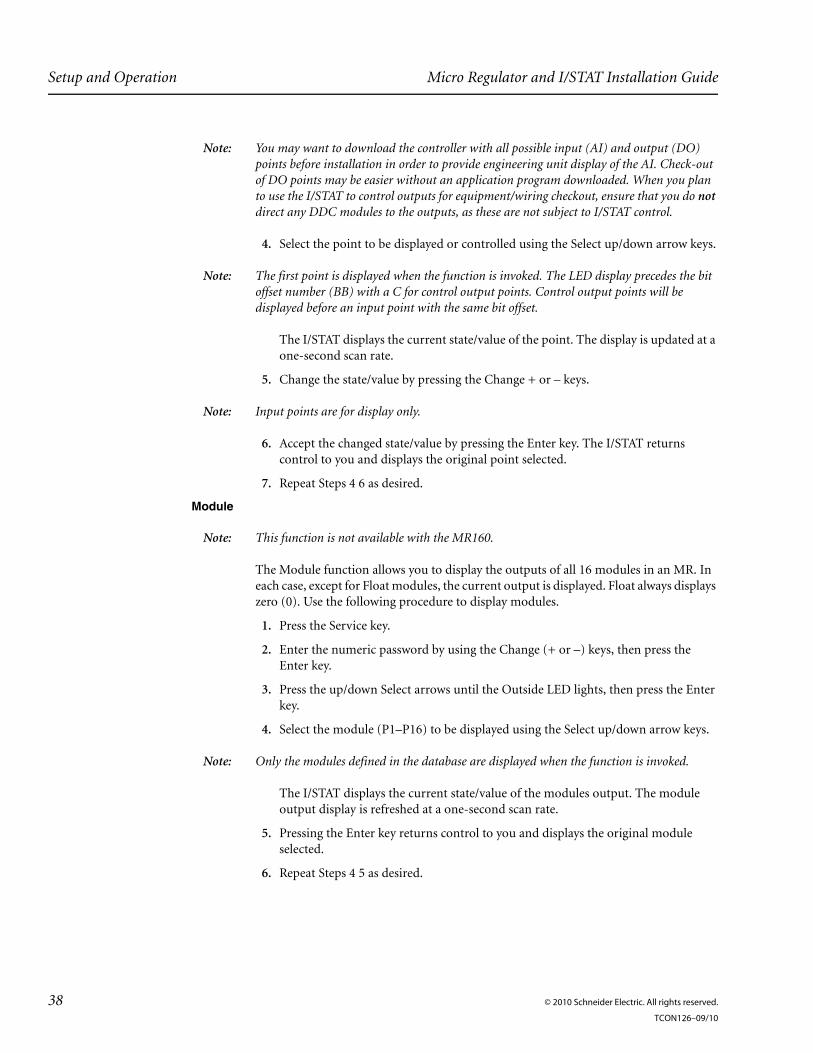
Setup and Operation Micro Regulator and I/STAT Installation Guide
Note: You may want to download the controller with all possible input (AI) and output (DO) points before installation in order to provide engineering unit display of the AI. Check-out of DO points may be easier without an application program downloaded. When you plan to use the I/STAT to control outputs for equipment/wiring checkout, ensure that you do not direct any DDC modules to the outputs, as these are not subject to I/STAT control.
4. Select the point to be displayed or controlled using the Select up/down arrow keys.
Note: The first point is displayed when the function is invoked. The LED display precedes the bit offset number (BB) with a C for control output points. Control output points will be displayed before an input point with the same bit offset.
The I/STAT displays the current state/value of the point. The display is updated at a one-second scan rate.
5. Change the state/value by pressing the Change + or – keys.
Note: Input points are for display only.
6. Accept the changed state/value by pressing the Enter key. The I/STAT returns control to you and displays the original point selected.
7. Repeat Steps 4 6 as desired.
Module
Note: This function is not available with the MR160.
The Module function allows you to display the outputs of all 16 modules in an MR. In each case, except for Float modules, the current output is displayed. Float always displays zero (0). Use the following procedure to display modules.
1. Press the Service key.
2. Enter the numeric password by using the Change (+ or –) keys, then press the Enter key.
3. Press the up/down Select arrows until the Outside LED lights, then press the Enter key.
4. Select the module (P1–P16) to be displayed using the Select up/down arrow keys.
Note: Only the modules defined in the database are displayed when the function is invoked.
The I/STAT displays the current state/value of the modules output. The module output display is refreshed at a one-second scan rate.
5. Pressing the Enter key returns control to you and displays the original module selected.
6. Repeat Steps 4 5 as desired.
38 © 2010 Schneider Electric. All rights reserved.
TCON126–09/10
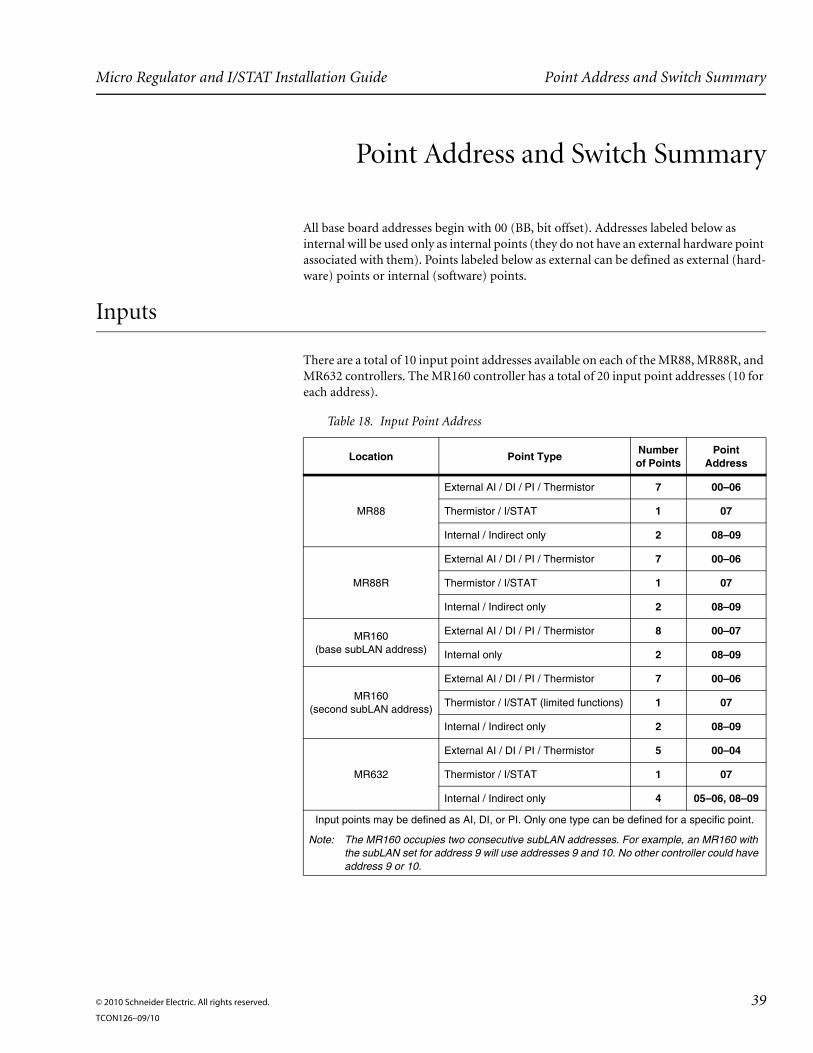
Micro Regulator and I/STAT Installation Guide Point Address and Switch Summary
Point Address and Switch Summary
All base board addresses begin with 00 (BB, bit offset). Addresses labeled below as internal will be used only as internal points (they do not have an external hardware point associated with them). Points labeled below as external can be defined as external (hard-ware) points or internal (software) points.
Inputs
There are a total of 10 input point addresses available on each of the MR88, MR88R, and MR632 controllers. The MR160 controller has a total of 20 input point addresses (10 for each address).
Table 18. Input Point Address
Location Point Type Number of Points
Point Address
MR88
External AI / DI / PI / Thermistor 7 00–06
Thermistor / I/STAT 1 07
Internal / Indirect only 2 08–09
MR88R
External AI / DI / PI / Thermistor 7 00–06
Thermistor / I/STAT 1 07
Internal / Indirect only 2 08–09
MR160(base subLAN address)
External AI / DI / PI / Thermistor 8 00–07
Internal only 2 08–09
MR160(second subLAN address)
External AI / DI / PI / Thermistor 7 00–06
Thermistor / I/STAT (limited functions) 1 07
Internal / Indirect only 2 08–09
MR632
External AI / DI / PI / Thermistor 5 00–04
Thermistor / I/STAT 1 07
Internal / Indirect only 4 05–06, 08–09
Input points may be defined as AI, DI, or PI. Only one type can be defined for a specific point.
Note: The MR160 occupies two consecutive subLAN addresses. For example, an MR160 with the subLAN set for address 9 will use addresses 9 and 10. No other controller could have address 9 or 10.
© 2010 Schneider Electric. All rights reserved. 39TCON126–09/10
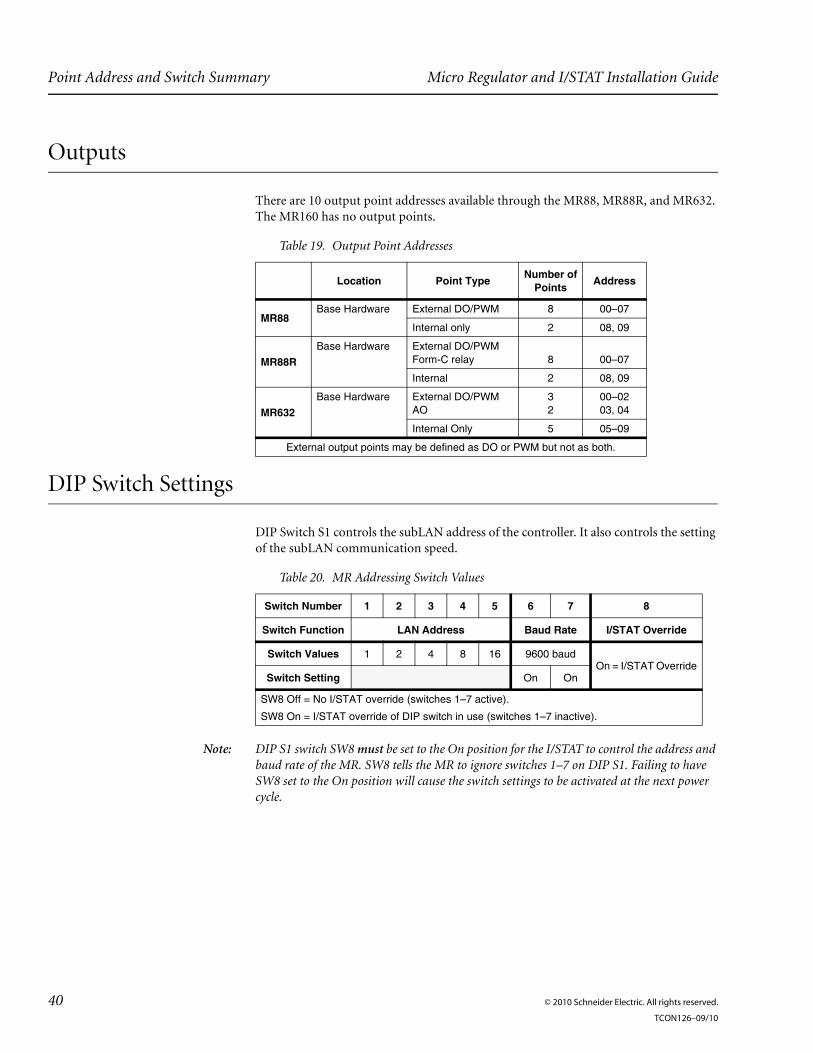
Point Address and Switch Summary Micro Regulator and I/STAT Installation Guide
Outputs
There are 10 output point addresses available through the MR88, MR88R, and MR632. The MR160 has no output points.
DIP Switch Settings
DIP Switch S1 controls the subLAN address of the controller. It also controls the setting of the subLAN communication speed.
Note: DIP S1 switch SW8 must be set to the On position for the I/STAT to control the address and baud rate of the MR. SW8 tells the MR to ignore switches 1–7 on DIP S1. Failing to have SW8 set to the On position will cause the switch settings to be activated at the next power cycle.
Table 19. Output Point Addresses
Location Point Type Number ofPoints Address
MR88Base Hardware External DO/PWM 8 00–07
Internal only 2 08, 09
MR88RBase Hardware External DO/PWM
Form-C relay 8 00–07
Internal 2 08, 09
MR632Base Hardware External DO/PWM
AO32
00–0203, 04
Internal Only 5 05–09
External output points may be defined as DO or PWM but not as both.
Table 20. MR Addressing Switch Values
Switch Number 1 2 3 4 5 6 7 8
Switch Function LAN Address Baud Rate I/STAT Override
Switch Values 1 2 4 8 16 9600 baudOn = I/STAT Override
Switch Setting On On
SW8 Off = No I/STAT override (switches 1–7 active).
SW8 On = I/STAT override of DIP switch in use (switches 1–7 inactive).
40 © 2010 Schneider Electric. All rights reserved.
TCON126–09/10
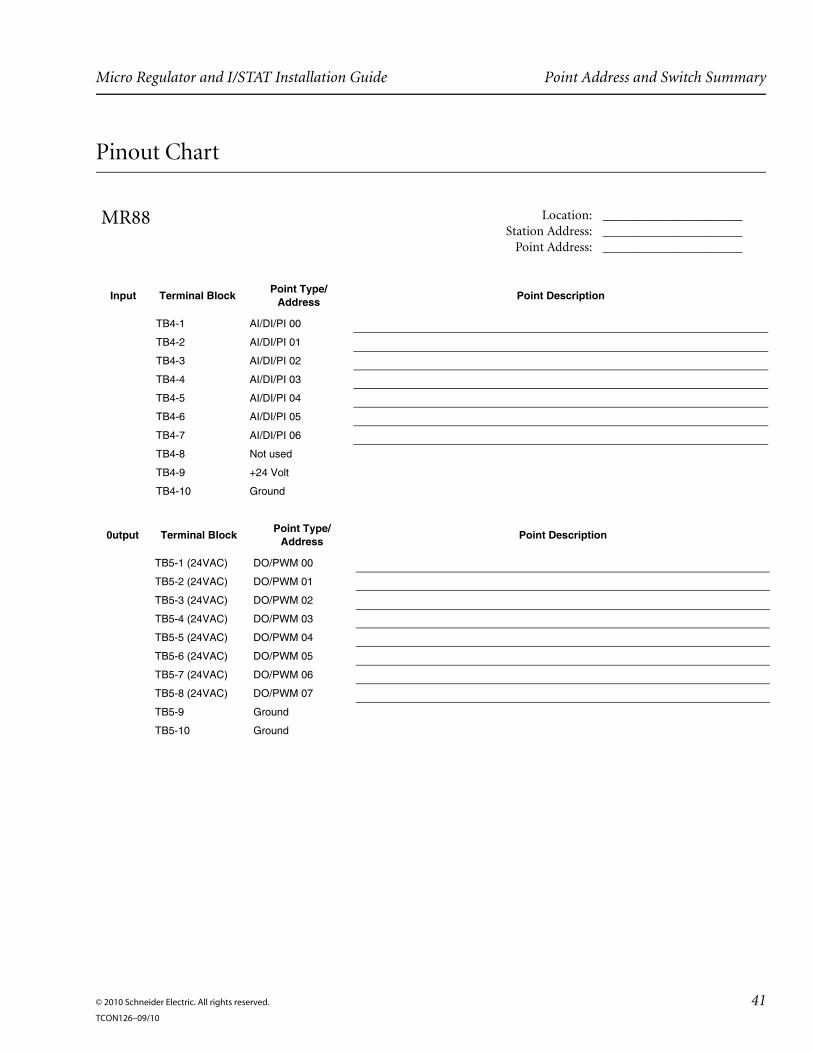
Micro Regulator and I/STAT Installation Guide Point Address and Switch Summary
Pinout Chart
MR88 Location:Station Address:
Point Address:
_______________________________________________________________
Input Terminal Block Point Type/Address Point Description
TB4-1 AI/DI/PI 00
TB4-2 AI/DI/PI 01
TB4-3 AI/DI/PI 02
TB4-4 AI/DI/PI 03
TB4-5 AI/DI/PI 04
TB4-6 AI/DI/PI 05
TB4-7 AI/DI/PI 06
TB4-8 Not used
TB4-9 +24 Volt
TB4-10 Ground
0utput Terminal Block Point Type/Address Point Description
TB5-1 (24VAC) DO/PWM 00
TB5-2 (24VAC) DO/PWM 01
TB5-3 (24VAC) DO/PWM 02
TB5-4 (24VAC) DO/PWM 03
TB5-5 (24VAC) DO/PWM 04
TB5-6 (24VAC) DO/PWM 05
TB5-7 (24VAC) DO/PWM 06
TB5-8 (24VAC) DO/PWM 07
TB5-9 Ground
TB5-10 Ground
© 2010 Schneider Electric. All rights reserved. 41TCON126–09/10
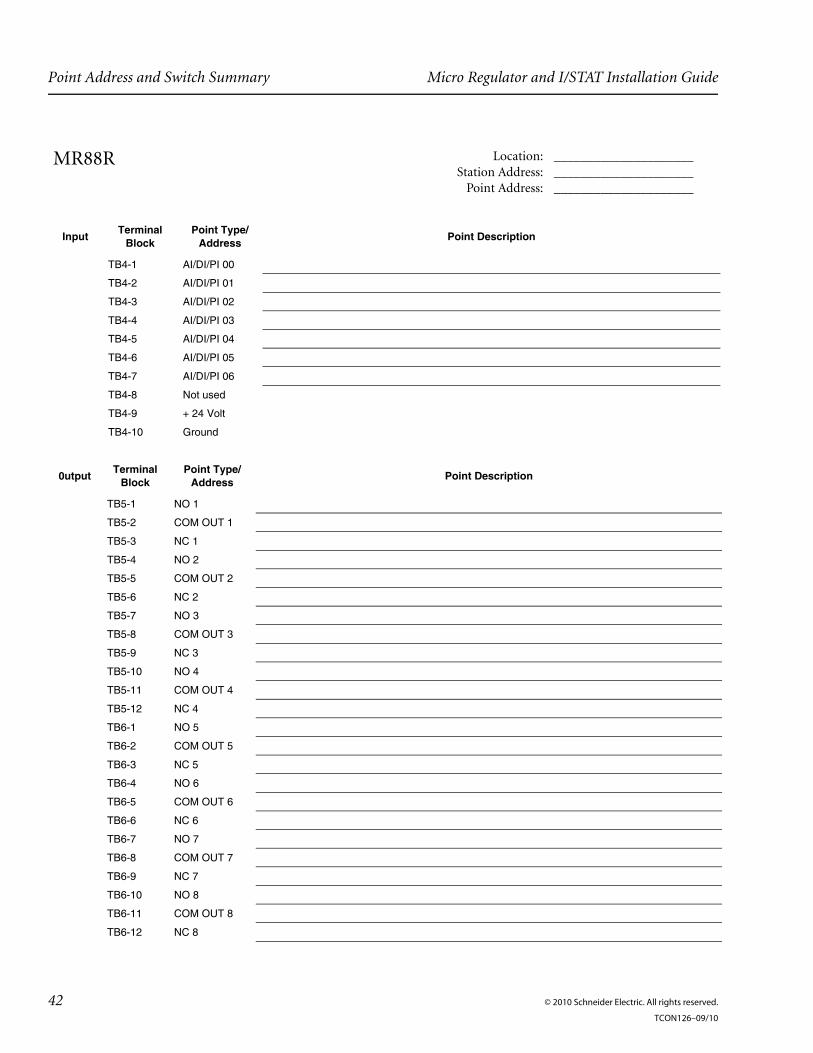
Point Address and Switch Summary Micro Regulator and I/STAT Installation Guide
MR88R Location:Station Address:
Point Address:
_______________________________________________________________
Input Terminal Block
Point Type/Address Point Description
TB4-1 AI/DI/PI 00
TB4-2 AI/DI/PI 01
TB4-3 AI/DI/PI 02
TB4-4 AI/DI/PI 03
TB4-5 AI/DI/PI 04
TB4-6 AI/DI/PI 05
TB4-7 AI/DI/PI 06
TB4-8 Not used
TB4-9 + 24 Volt
TB4-10 Ground
0utput Terminal Block
Point Type/Address Point Description
TB5-1 NO 1
TB5-2 COM OUT 1
TB5-3 NC 1
TB5-4 NO 2
TB5-5 COM OUT 2
TB5-6 NC 2
TB5-7 NO 3
TB5-8 COM OUT 3
TB5-9 NC 3
TB5-10 NO 4
TB5-11 COM OUT 4
TB5-12 NC 4
TB6-1 NO 5
TB6-2 COM OUT 5
TB6-3 NC 5
TB6-4 NO 6
TB6-5 COM OUT 6
TB6-6 NC 6
TB6-7 NO 7
TB6-8 COM OUT 7
TB6-9 NC 7
TB6-10 NO 8
TB6-11 COM OUT 8
TB6-12 NC 8
42 © 2010 Schneider Electric. All rights reserved.
TCON126–09/10
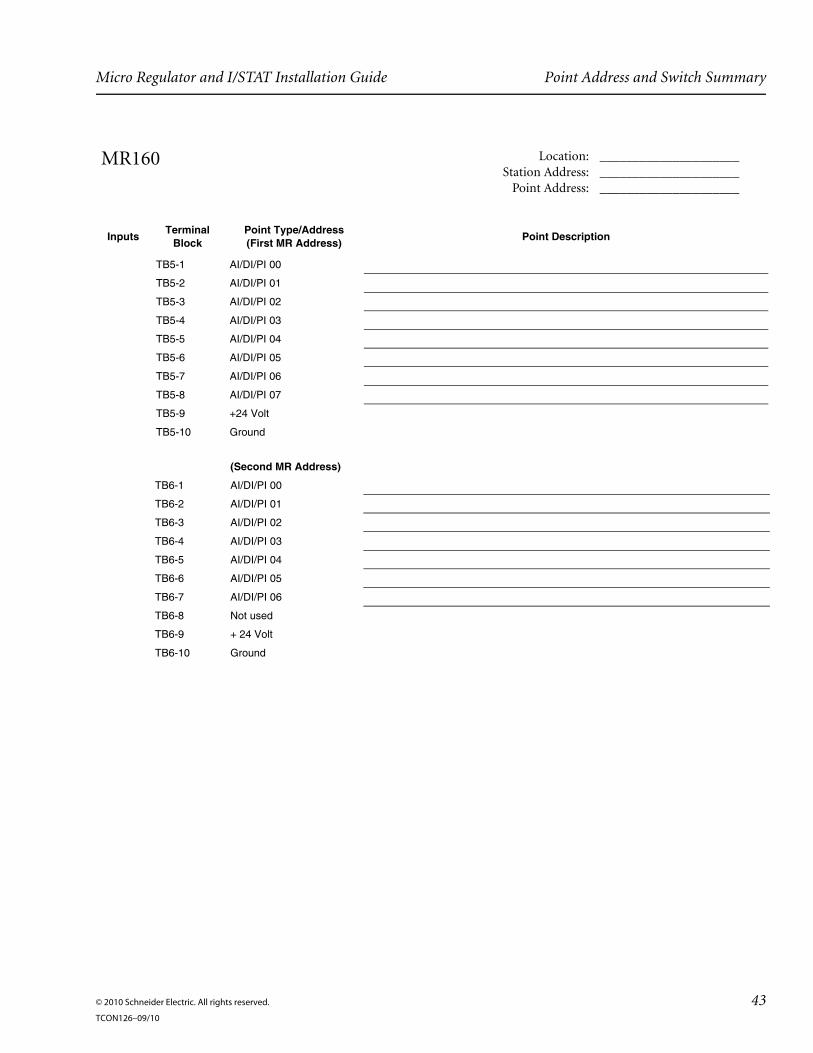
Micro Regulator and I/STAT Installation Guide Point Address and Switch Summary
MR160 Location:Station Address:
Point Address:
_______________________________________________________________
Inputs Terminal Block
Point Type/Address (First MR Address) Point Description
TB5-1 AI/DI/PI 00
TB5-2 AI/DI/PI 01
TB5-3 AI/DI/PI 02
TB5-4 AI/DI/PI 03
TB5-5 AI/DI/PI 04
TB5-6 AI/DI/PI 05
TB5-7 AI/DI/PI 06
TB5-8 AI/DI/PI 07
TB5-9 +24 Volt
TB5-10 Ground
(Second MR Address)
TB6-1 AI/DI/PI 00
TB6-2 AI/DI/PI 01
TB6-3 AI/DI/PI 02
TB6-4 AI/DI/PI 03
TB6-5 AI/DI/PI 04
TB6-6 AI/DI/PI 05
TB6-7 AI/DI/PI 06
TB6-8 Not used
TB6-9 + 24 Volt
TB6-10 Ground
© 2010 Schneider Electric. All rights reserved. 43TCON126–09/10
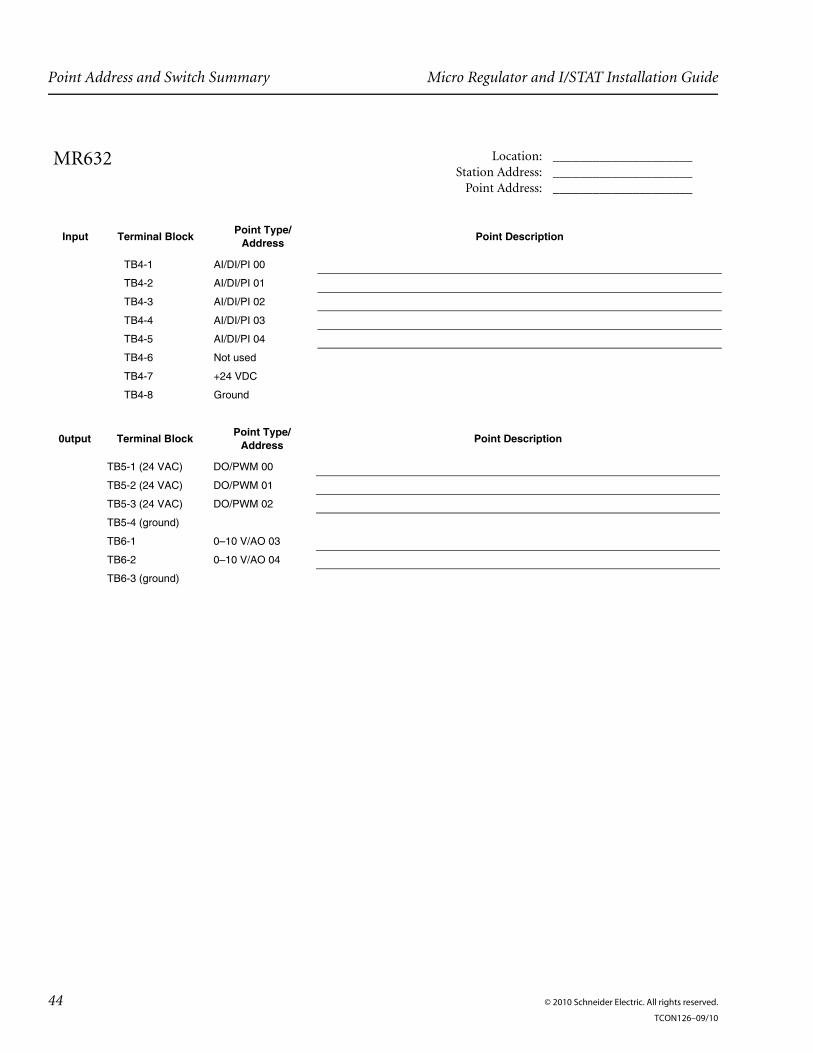
Point Address and Switch Summary Micro Regulator and I/STAT Installation Guide
MR632 Location:Station Address:
Point Address:
_______________________________________________________________
Input Terminal Block Point Type/Address Point Description
TB4-1 AI/DI/PI 00
TB4-2 AI/DI/PI 01
TB4-3 AI/DI/PI 02
TB4-4 AI/DI/PI 03
TB4-5 AI/DI/PI 04
TB4-6 Not used
TB4-7 +24 VDC
TB4-8 Ground
0utput Terminal Block Point Type/Address Point Description
TB5-1 (24 VAC) DO/PWM 00
TB5-2 (24 VAC) DO/PWM 01
TB5-3 (24 VAC) DO/PWM 02
TB5-4 (ground)
TB6-1 0–10 V/AO 03
TB6-2 0–10 V/AO 04
TB6-3 (ground)
44 © 2010 Schneider Electric. All rights reserved.
TCON126–09/10

Micro Regulator and I/STAT Installation Guide Specifications
Specifications
Dimensions
I/STAT . . . . . . . . . . . . . 2.75" W 4.5" H 0.9" D . . . . . . . . . . . . . . . .(6.99 11.43 2.29 cm)
MR Controllers: PCB . . . . . . . . 4.0" W 7.0" H (10.16 17.78 cm) Baseplate . . . . . 5.5" W 8.5" H (13.97 21.59 cm)
Operating Environment
Temperature . . . . . . . . . . . . . 32–122° F (0–50° C)
Humidity . . . . . . . . . 10% to 90%, noncondensing
Input power . . . . . 24 VAC @ 7 VA + output triac load
Micro Regulator 88, 88R, 160, and 632 Inputs
Universal analog inputs:
Quantity MR88 . . . . . . . . . . . . . . . . . . . . . . . . 7 MR88R . . . . . . . . . . . . . . . . . . . . . . . 7 MR160 . . . . . . . . . . . . . . . . . . . . . . 15 MR632 . . . . . . . . . . . . . . . . . . . . . . . 5
Range . . . . . . . . . . . . 0–5 V selectable to 2–4 V . . . . . . . . . . . . . . .0–10 V selectable to 4–8 V . . . . . . . . . . . . 0–20 mA selectable to 8–16 mA . . . . . . . . . . . . . . 10K ohm thermistor (NTC)
Resolution. . . . . . . . . . . . . . . . . . . . . 0.4%
Accuracy . . . . . . . . . . . . . . . . 1.0% (0–5 V) . . . . . . . . . 2.0% (0–10 V, 0–20 mA, thermistor)
Discrete contact inputs:
Contact excitation . . . . . . . . . . . . 5 V @ 5 mA Pulse input rate . . . . . . . . . . . . 4 Hz maximum Input duration . . . . . . . . . . 100 msec minimum
MR88 Outputs
Quantity. . . . . . . . . . . . . . . . . . . . . . . . . 8
Type . . . . . . . . . low-voltage triac, voltage sourcing . . . . . . . . . 24 VAC @ 0.5 A each (2 A maximum)
Operating Modes . . . . Latched or PWM Proportional
External 24 V supply output (on input terminal TB4) . . . . . . . . . . . . . . . . . .Unregulated 22–36 V . . . . . . . . . . . . . . . . 100 mA maximum load
MR88R Outputs
Quantity. . . . . . . . . . . . . . . . . . . . . . . . . 8
Type . . . . . . . . . . . . . . .low-voltage form-C relay . . . . . . . . . . . . 24 VAC/DC @ 0.5 A maximum
External 24 V supply output (on input terminal TB4) . . . . . . . . . . . . . . . . . .Unregulated 22–36 V . . . . . . . . . . . . . . . . 100 mA maximum load
MR160 Outputs
External 24 V supply output (on input terminal TB4) . . . . . . . . . . . . . . . . . .Unregulated 22–36 V . . . . . . . . . . . . . . . . 100 mA maximum load
MR632 Outputs
Low-voltage triac (voltage sourcing): Quantity . . . . . . . . . . . . . . . . . . . . . . . 3 Type . . . . . . . . . . . . . . . 24 VAC @ 0.5 A each
Analog:: Quantity . . . . . . . . . . . . . . . . . . . . . . . 2 Operating Modes . . . . . . . . . Analog and Latched Type . . . . . . . . . . . . . . . . . 0–10 V @ 10 mA
External 24 V supply output (on input terminal TB4) . . . . . . . . . . . . . . . . . .Unregulated 22–36 V . . . . . . . . . . . . . . . . 100 mA maximum load
© 2010 Schneider Electric. All rights reserved. 45TCON126–09/10
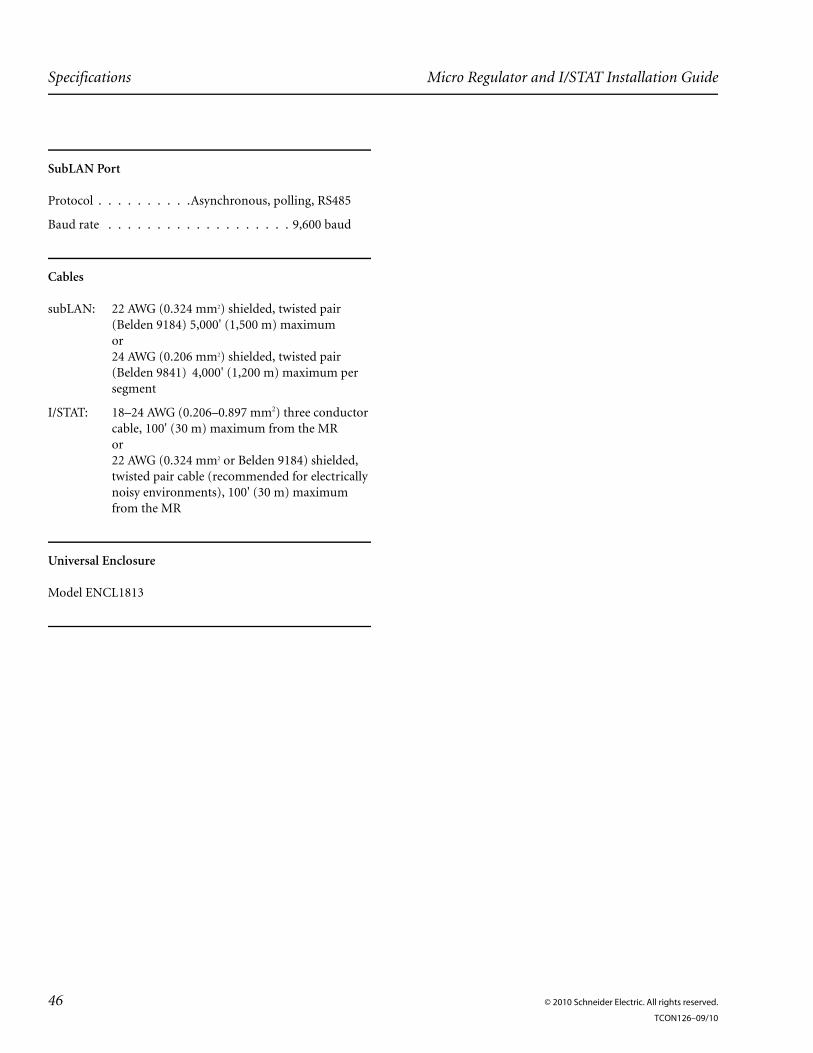
Specifications Micro Regulator and I/STAT Installation Guide
SubLAN Port
Protocol . . . . . . . . . .Asynchronous, polling, RS485
Baud rate . . . . . . . . . . . . . . . . . . . 9,600 baud
Cables
subLAN: 22 AWG (0.324 mm2) shielded, twisted pair (Belden 9184) 5,000' (1,500 m) maximumor24 AWG (0.206 mm2) shielded, twisted pair (Belden 9841) 4,000' (1,200 m) maximum per segment
I/STAT: 18–24 AWG (0.206–0.897 mm2) three conductor cable, 100' (30 m) maximum from the MRor22 AWG (0.324 mm2 or Belden 9184) shielded, twisted pair cable (recommended for electrically noisy environments), 100' (30 m) maximum from the MR
Universal Enclosure
Model ENCL1813
46 © 2010 Schneider Electric. All rights reserved.
TCON126–09/10
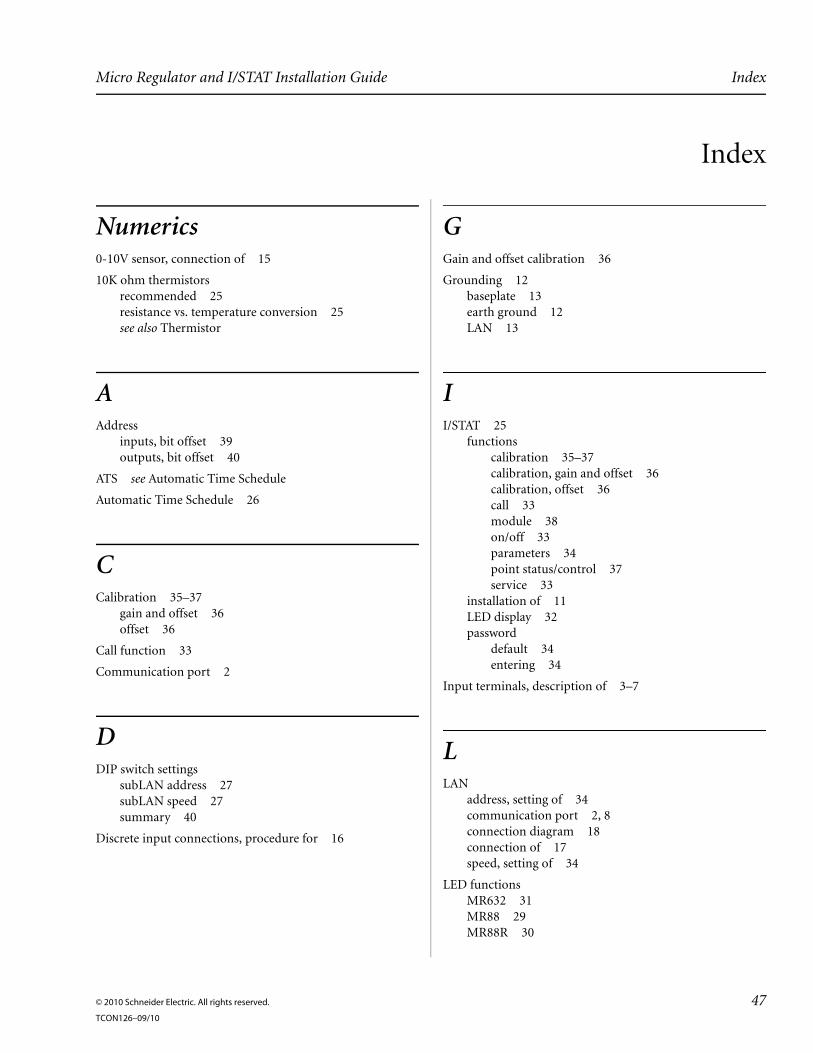
Micro Regulator and I/STAT Installation Guide Index
50
Index
Numerics0-10V sensor, connection of 15
10K ohm thermistorsrecommended 25resistance vs. temperature conversion 25see also Thermistor
AAddress
inputs, bit offset 39outputs, bit offset 40
ATS see Automatic Time Schedule
Automatic Time Schedule 26
CCalibration 35–37
gain and offset 36offset 36
Call function 33
Communication port 2
DDIP switch settings
subLAN address 27subLAN speed 27summary 40
Discrete input connections, procedure for 16
GGain and offset calibration 36
Grounding 12baseplate 13earth ground 12LAN 13
II/STAT 25
functionscalibration 35–37calibration, gain and offset 36calibration, offset 36call 33module 38on/off 33parameters 34point status/control 37service 33
installation of 11LED display 32password
default 34entering 34
Input terminals, description of 3–7
LLAN
address, setting of 34communication port 2, 8connection diagram 18connection of 17speed, setting of 34
LED functionsMR632 31MR88 29MR88R 30
© 2010 Schneider Electric. All rights reserved. 47TCON126–09/10
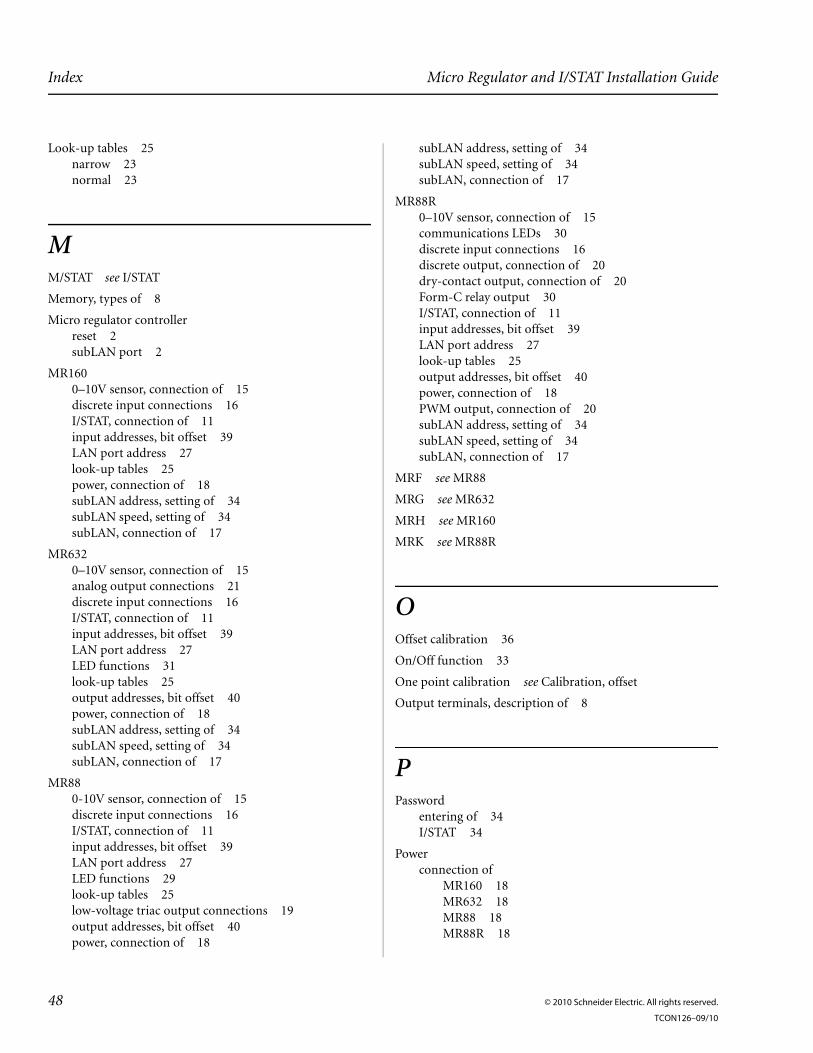
Index Micro Regulator and I/STAT Installation Guide
Look-up tables 25narrow 23normal 23
MM/STAT see I/STAT
Memory, types of 8
Micro regulator controllerreset 2subLAN port 2
MR1600–10V sensor, connection of 15discrete input connections 16I/STAT, connection of 11input addresses, bit offset 39LAN port address 27look-up tables 25power, connection of 18subLAN address, setting of 34subLAN speed, setting of 34subLAN, connection of 17
MR6320–10V sensor, connection of 15analog output connections 21discrete input connections 16I/STAT, connection of 11input addresses, bit offset 39LAN port address 27LED functions 31look-up tables 25output addresses, bit offset 40power, connection of 18subLAN address, setting of 34subLAN speed, setting of 34subLAN, connection of 17
MR880-10V sensor, connection of 15discrete input connections 16I/STAT, connection of 11input addresses, bit offset 39LAN port address 27LED functions 29look-up tables 25low-voltage triac output connections 19output addresses, bit offset 40power, connection of 18
subLAN address, setting of 34subLAN speed, setting of 34subLAN, connection of 17
MR88R0–10V sensor, connection of 15communications LEDs 30discrete input connections 16discrete output, connection of 20dry-contact output, connection of 20Form-C relay output 30I/STAT, connection of 11input addresses, bit offset 39LAN port address 27look-up tables 25output addresses, bit offset 40power, connection of 18PWM output, connection of 20subLAN address, setting of 34subLAN speed, setting of 34subLAN, connection of 17
MRF see MR88
MRG see MR632
MRH see MR160
MRK see MR88R
OOffset calibration 36
On/Off function 33
One point calibration see Calibration, offset
Output terminals, description of 8
PPassword
entering of 34I/STAT 34
Powerconnection of
MR160 18MR632 18MR88 18MR88R 18
48 © 2010 Schneider Electric. All rights reserved.
TCON126–09/10
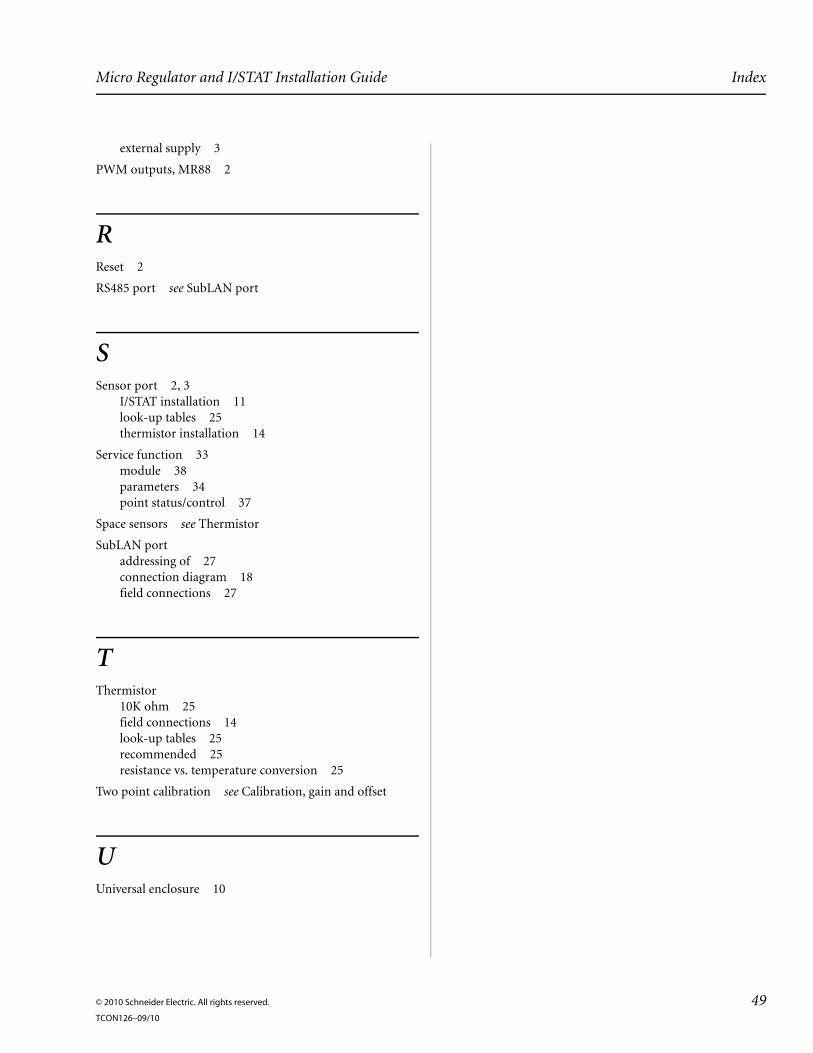
Micro Regulator and I/STAT Installation Guide Index
external supply 3
PWM outputs, MR88 2
RReset 2
RS485 port see SubLAN port
SSensor port 2, 3
I/STAT installation 11look-up tables 25thermistor installation 14
Service function 33module 38parameters 34point status/control 37
Space sensors see Thermistor
SubLAN portaddressing of 27connection diagram 18field connections 27
TThermistor
10K ohm 25field connections 14look-up tables 25recommended 25resistance vs. temperature conversion 25
Two point calibration see Calibration, gain and offset
UUniversal enclosure 10
© 2010 Schneider Electric. All rights reserved. 49TCON126–09/10
Repair or Replacement
If this unit fails to operate because of a defect in materials or workmanship within two (2) years of the date you purchased it, it will either be repaired or replaced by Schneider Electric at no charge to you. Before contacting Schneider Electric, it is recommended that you first contact the dealer from whom you purchased this equipment to determine whether they will have it repaired or replaced. If the dealer will not, please contact Schneider Electric to arrange to have this equipment repaired or replaced.
SCHNEIDER ELECTRIC EXPRESSLY RESERVES THE RIGHT TO REPAIR OR REPLACE THIS EQUIPMENT WITH NEW OR REFURBISHED PARTS OR EQUIPMENT.
Exclusions and Limitations
Your warranty does not cover:
• Damage by negligence, misuse, or accident
• Compatibility with the equipment of any other
manufacturer
• Modifications to the equipment to make it compatible
with the equipment of any other manufacturer
• Damage to the equipment resulting from improper
installation or operation.
Legal Rights and Limits
All applicable implied warranties, including the implied warranty of merchantability and of fitness for a particular purpose given to you by law are hereby limited in durability to the duration of this warranty. Under no circumstances will Schneider Electric be liable for any incidental or consequential damages.
Some states in the U.S.A. do not allow limitations on how long implied warranties last, or exclusions or limitations of incidental or consequential damages, so exclusions or limitations mentioned may not apply to you. This warranty gives you specific legal rights, and you may also have other rights which vary from state to state.
Purchaser’s Responsibility
In order to obtain service under this warranty, you must deliver the equipment to the place of purchase or to Schneider Electric and provide proof of the original purchase date along with the returned equipment. Failure to provide adequate proof of the original purchase date could result in denial of warranty service.
Out of Warranty Service
Direct requests for information on out-of-warranty service to Product Service Manager at the address below.
Schneider ElectricBuildings – EuropeJägershillgatan 18 213 75 MalmöSweden Phone: +46 40 38 68 50Fax: +46 40 21 82 87
Schneider ElectricBuildings – Americas1650 W. Crosby Rd.Dallas, TX 75006 USAPhone: +1 (972) 323 1111Fax: +1 (972) 242 0026
Schneider ElectricBuildings – Asia-PacificLevel 3/2A Lord StreetBotany NSW 2019 AustraliaPhone: +61 (0) 2 8336 6100Fax: +61 (0) 2 8336 6190www.schneider-electric.com/buildingsYou may obtain copies of this document by ordering document number TCON126–09/10.
Warranty
© 2010 Schneider Electric. All rights reserved.
TCON126–09/10