
Table of Contents - fluid.tuwien.ac.at Table of Contents 1 1. ... • Compile a damage report. ......
26
Transcript of Table of Contents - fluid.tuwien.ac.at Table of Contents 1 1. ... • Compile a damage report. ......


Table of Contents
1
1. Quality Assurance 2. . . . . . . . . . . . . . . . . . . . . . . . . .
2. Your Contacts atThermo Electron (Karlsruhe) GmbH 3. . . . . . . . . .
3. Key to Symbols 4. . . . . . . . . . . . . . . . . . . . . . . . . . . . .
4. Safety Precautions 4. . . . . . . . . . . . . . . . . . . . . . . . . .
5. Unpacking 6. . . . . . . . . . . . . . . . . . . . . . . . . . . . . . . . . . 5.1 Transportation damage? 6. . . . . . . . . . . . . . . . . 5.2 Before return delivery: 6. . . . . . . . . . . . . . . . . . . 5.3 Contents of Delivery 6. . . . . . . . . . . . . . . . . . . . . 5.4 Material for use 7. . . . . . . . . . . . . . . . . . . . . . . . . 5.5 Spare parts 7. . . . . . . . . . . . . . . . . . . . . . . . . . . . . 5.6 Waste disposal 7. . . . . . . . . . . . . . . . . . . . . . . . . .
6. Setting Up 7. . . . . . . . . . . . . . . . . . . . . . . . . . . . . . . . . . 6.1 Assembly 7. . . . . . . . . . . . . . . . . . . . . . . . . . . . . . .
7. Unit Description 8. . . . . . . . . . . . . . . . . . . . . . . . . . . . 7.1 Principle of the measurement 8. . . . . . . . . . . . . 7.2 Description of the instrument 8. . . . . . . . . . . . . .
8. Functional Elements 9. . . . . . . . . . . . . . . . . . . . . . . .
9. Measuring 10. . . . . . . . . . . . . . . . . . . . . . . . . . . . . . . . . . 9.1 Preparation for a test 10. . . . . . . . . . . . . . . . . . . .
9.1.1 Temperature control 10. . . . . . . . . . . . . . . 9.1.2 Loading the sample 10. . . . . . . . . . . . . . . . 9.1.3 Selection of the balls 11. . . . . . . . . . . . . . .
9.2 Measurement of the falling times 12. . . . . . . . . . 9.3 Evaluation of the test results 13. . . . . . . . . . . . . .
9.3.1 Reproducibility 14. . . . . . . . . . . . . . . . . . . 9.3.2 Comparability 14. . . . . . . . . . . . . . . . . . . . 9.3.3 Example 15. . . . . . . . . . . . . . . . . . . . . . . . .
9.4 Viscosity determination of gases 15. . . . . . . . . . . 10. Cleaning the Measuring Tube 16. . . . . . . . . . . . . . . .
11. Calibration of the Falling Ball Viscometer 17. . . . . 11.1 Example: Calibration of ball 1 18. . . . . . . . . . . . . 11.2 Determination of ball factors for special tests 18
12. Maintenance by the User 19. . . . . . . . . . . . . . . . . . . . 12.1 Exchange of the measuring tube and the
jacket tube 19. . . . . . . . . . . . . . . . . . . . . . . . . . . . . . 12.2 Order numbers 20. . . . . . . . . . . . . . . . . . . . . . . . . .
13. Spare Parts 21. . . . . . . . . . . . . . . . . . . . . . . . . . . . . . . . . 13.1 Recommended spare parts (of 3 years) 21. . . . 13.2 Single parts 22. . . . . . . . . . . . . . . . . . . . . . . . . . . . . 13.3 Contents of the ball box 23. . . . . . . . . . . . . . . . . .
14. List of calculation factors 24. . . . . . . . . . . . . . . . . . . .
Appendix: Precision Monitoring Thermometers 25. . .

Quality Assurance
2
1. ������������ �
Dear customer,Thermo Electron (Karlsruhe) implements a Quality Manage-ment System certified according to DIN/EN/ISO 9001:2000.This guarantees the presence of organizational structureswhich are necessary to ensure that our products are devel-oped, manufactured and managed according to our custom-ers expectations. Internal and external audits are carried outon a regular basis to ensure that our QMS is fully functional.We also check our products during the manufacturing pro-cess to certify that they are produced according to the speci-fications as well as to monitor correct functioning and to con-firm that they are safe. This is why we initiate this monitoringprocess of important characteristics already duringmanufacturing and record the results for future reference.
The “Final Test” label on the product is a sign that this unithas fulfilled all requirements at the time of final manufactur-ing.
Please inform us if, despite our precautionary measures,you should find any product defects. You can thus help us toavoid such faults in future.

Thermo ������������ ���������
TYP
V/Hz
Dieselstr. 476227 Karlsruhe
Contacts at Thermo Electron (Karlsruhe) GmbH
3
2. Your Contacts atThermo Electron (Karlsruhe) GmbH
Please get in contact with us or the authorized agent whosupplied you with the unit if you have any further questions.
Thermo Electron Corporation Material Characterization Business
International / Germany USADieselstrasse 4 5225 Verona RoadD-76227 Karlsruhe, Germany Madison, WI 53711Tel. +49(0)721 4094–444 Tel. 608–327–6777Fax +49(0)721 4094–300 Fax 608–273–6827Hotline +49(0)18 05 04 22 [email protected] [email protected]/haake www.thermo.com/haake
France UK16 Avenue du Québec Emerald WaySilic 76591963 Courtaboeuf Cedex
Stone Business Park, StoneStaffordshire St15 OSR
Tel. +33(0)1 60 92 48 00 Tel. +44(0)1 78 5 813 648Fax +33(0)1 60 92 49 00
[email protected] [email protected]/rheo www.thermo.com/prism
BeNeLuxTakkebijsters 14817 BL BredaTel. +31(0)76 5879888Fax +31(0)76 5795610
[email protected]/haake
The following specifications should be given when productenquiries are made:
Unit name printed on the front of the unit and specified onthe name plate.

!
!
!
!
!
!
!!
Safety Precautions
4
3. Key to Symbols
Warns the user of possible damage to the unit.
Denotes an important remark.
1 Indicates the next operating step to be carried out and…⇒ …what happens as a result thereof.
4. Safety Precautions
These notes are intended to draw your attention to riskswhich only YOU can recognize and avoid or overcome. Theyare intended to enhance your own safety consciousness.
We have set the highest quality standards for ourselves andthis unit during development and production. Every unitmeets relevant safety regulations. The correct unit usageand proper handling is however solely your responsibility.The following notes must be observed:
This instruction manual must be carefully studied!It contains important information on the connec-tion to the local mains supply, correct unit usageand safe handling.
Check for transportation damage during unpack-ing. Get in contact with supplier and/or carrier forsettlement of damage claims. Do not try to start upa damaged unit before the damage has been re-paired or you have ascertained the effect of the da-mage.
Ensure that this manual is always at hand for everyunit operator.
Only use this unit solely for the intended applica-tion.
Repairs, alterations or modifications must only becarried out by specialist personnel. Considerabledamage can be caused by improper repairs. TheThermo Electron (Karlsruhe)-service departmentis at your disposal for repair work.
Do not operate the unit with wet or oily hands.
Do not expose the unit to spray water.

!
!
Safety Precautions
5
Do not clean the unit with solvents (fire risk!) –a wet cloth soaked in household detergent is nor-mally sufficient.
Only use the heat transfer liquids recommended byThermo Electron (Karlsruhe). Please refer to therespective EC – Safety Data Sheet.
You alone are responsible for the handling of these sub-stances!
Our advice:
• If in doubt, consult a safety specialist.
• Read the product manufacturer’s or supplier’s “EC – SAFETY DATA SHEET”
• Read relevant regulations concerning dangerousmaterials
• Observe relevant guidelines for laboratories in yourcountry

Unpacking / Setting Up
6
5. Unpacking
5.1 Transportation damage?
• Notify carrier (forwarding merchant, railroad,post office etc.),
• Compile a damage report.
5.2 Before return delivery:
• Inform dealer or manufacturer(Small problems can often be dealt with on the spot).
5.3 Contents of Delivery
The following standard accessory is delivered togetherwith the falling ball viscometer:
Order-No. Description002-7580 Falling ball viscometer, ready for testing800-0182 Set of balls 1–6 (see chapter 10.3)800-0012 Hollow stopper800-0013 Stopper800-0119 Ball tweezers800-0125 Cleaning piston800-0131 Cleaning brush800-0014 Cover plate800-0027 Stopper gasket ∅ = 15.6 mm800-0061 Thermometer gasket ∅ = 10 mm003-2110 Socket wrench (see chapter 10.2)002-7585 Instruction manual
Unpacking / Setting Up
7
5.4 Material for use
No other material except for cleaning material (800-0125cleaning piston, 800-0131 cleaning brush) is necessary atnormal use.
5.5 Spare parts
See chapter 13.
5.6 Waste disposal
The transportation packing is made out of paper and can berecycled.
6. Setting Up
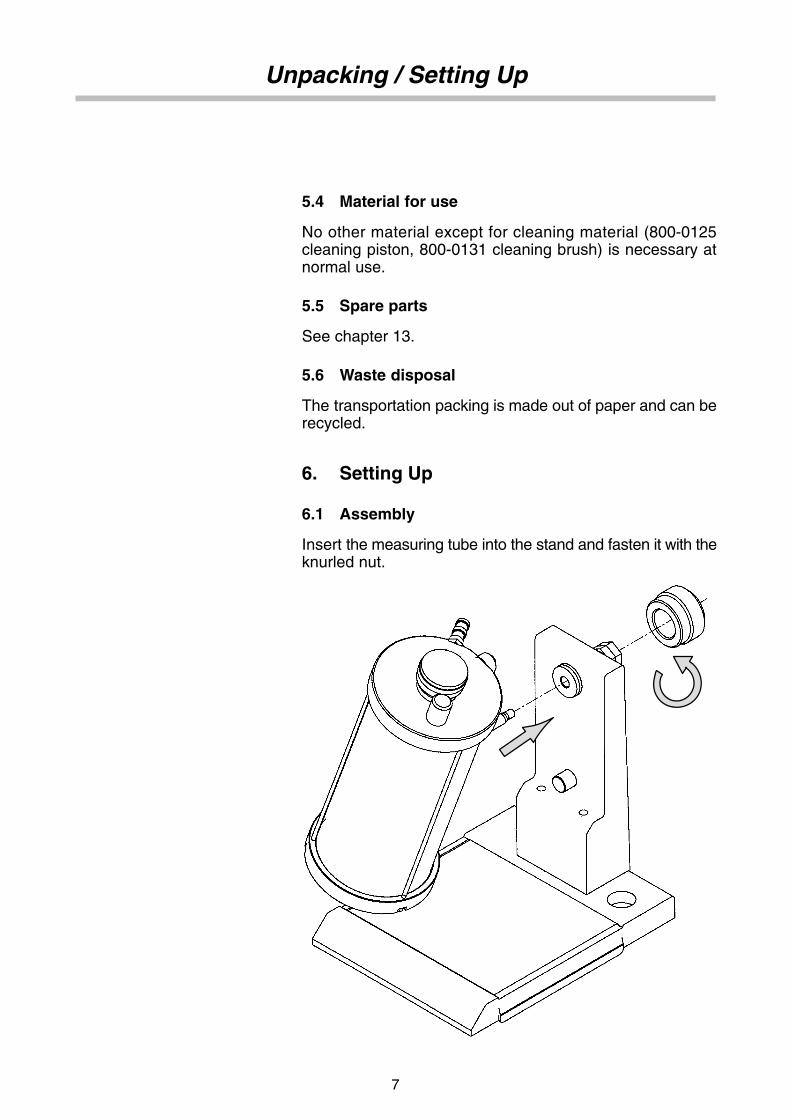
6.1 Assembly
Insert the measuring tube into the stand and fasten it with theknurled nut.

��
��
ACB
Thermometer
�
�
�
Unit Description
8
7. Unit Description
7.1 Principle of the measurement
The HAAKE Falling Ball Viscometer measures the viscosityof transparent newtonian liquids. This viscosity is correlatedto the time a ball requires to fall a defined distance. The rol-ling and sliding movement of the ball through the samplefilled into a slightly inclined cylindrical measuring tube is de-scribed by means of the fall time. The test results are givenas the dynamic viscosity using the internationally standard-ized absolute unit of ”milli Pascal seconds” (mPa�s).
Note: 1 mPa�s = 1 cP (centi Poise)
The Falling Ball Viscometer corresponds to the require-ments of many international standards, i.e. ISO 12058 andthe german standard DIN 53 015.
7.2 Description of the instrument
The heart of the instrument is the measuring tube made ofglass 1 and a ball 2. This tube carries two ring marks A andB, which are spaced 100 mm apart and which limit the mea-suring distance (ring mark C is equidistant between A and B).The measuring tube is jacketed by means of an outer glasstube, which encloses a room 3 to be filled with a temperaturecontrolled liquid. The measuring tube is fastened to thestand in such a way that its axis is inclined with respect to thevertical by 10° during the measurement.
The measuring tube together with the jacket may be pivotedin order to turn the tube upside down again to let the ball re-turn to the initial position before a measurement. The mea-suring tube is closed on both sides by two stoppers, one ofwhich 13 contains a capillary and a small reservoir. Thisstopper prevents undesirable changes of pressure in the liq-uid sample and has a passage for air bubbles when the tem-perature is being changed. The viscometer incloses all sam-ples completely to prevent volatization and film forming. Thestand may be levelled by means of its water level 16 and thelevelling screws 17. The easily interchangeable thermome-ter allows a precise temperature control.

Functional Elements
9
8. Functional Elements
�
��
��
�
�
�
�
����
��
�
�
�
�
��
��� ��
��
�
1 Falling tube 12 Jacket tube2 Ball 13 Hollow stopper3 Tempering room 14 Stopper4 Screw 15 Capillary7 Set screw 16 Closing plate8 Gasket 17 Gasket for falling tube9 Cover 18 Threaded bush
11 Brace 20 Connecting rod

��
�
�
�
Measuring
10
9. Measuring
9.1 Preparation for a test
9.1.1 Temperature control
The HAAKE Falling Ball Viscometer may be temperaturecontrolled in a temperature range from –20 up to +120°C us-ing liquid circulators, i.e. one of the HAAKE ”DC” or ”F”series.
The sample should rest at least some 15 minutes in the mea-suring tube at the test temperature before the measurementis started.
The temperature in the jacket around the measuring tubemust be maintained within a temperature tolerance of± 0.03°C for test temperatures between 10 up to 80°C.For test temperatures beyond these limits the tolerancesmay be increased to +0.05°C.
The tempering room 3 must be free of air bubbles.
9.1.2 Loading the sample
All parts of the viscometer being in direct contact with thesample must be kept clean and dry.
A sample volume of approximately 45 cm3 is poured into themeasuring tube 1 up to 20 mm below the rim of the tube.Then the ball 2 is placed into the tube and the hollow stopper13 is introduced. The liquid should reach a level just beyondthe capillary 15. The sample in the tube must be free of airbubbles.
Before the final test data are taken the ball should runthrough the tube up and down at least once to improve thehomogeniety of the samples and its temperature uniformity.

Measuring
11
9.1.3 Selection of the balls
The standard ball set contains 6 balls, which pass throughthe measuring tube of an inner diameter of approximately15.94 ±0.01 mm.
Order-No.
BallNo.
Made of Density ρg/cm3
Diameterof the ballmm
Constant K(approx.)mPa⋅s⋅cm3/g⋅s
Recomm.measuringrange mPa⋅s
800–0002 1 boron silica glass 2.2 15.81 ± 0.01 0.007 0.6 – 10
800–0003 2 boron silica glass 2.2 15.6 ± 0.05 0.09 7 – 130
800–0004 3 nickel iron alloy 8.1 15.6 ± 0.05 0.09 30 – 700
800–0005 4 nickel iron alloy 8.1 15.2 ± 0.1 0.7 200 – 4800
800–0006 5 W.-No. 4034 7.7–8.1 14.0 ± 0.5 4.5 800 – 10000
800–0007 6 W.-No. 4034 7.7–8.1 11.0 ± 1 33 6000 – 75000
Additionally the following balls are deliverable:
Order-No.
Ball Made of Density ρg/cm3
Diameterof the ballmm
Constant K(approx.)mPa⋅s⋅cm3/g⋅s
Recomm.measuringrange mPa⋅s
800–0009 G boron silica glass 2.2 15.91 ± 0.01 – gases
800–0010 G3 boron silica glass 2.2 15.30 0.4 20 to 200
800–0011 G4 boron silica glass 2.2 14.40 3.5 150 to 1500
The measuring ranges for viscosity indicated are related toDIN 53015 / ISO 12058.
Sometimes it may be necessary to use two different balls inorder to cover a wider measuring range, i.e. when the func-tion of viscosity versus temperature is measured over a widetemperature intervall; in this case, you insert two differentballs at the same time into the measuring tube with thesmaller ball inserted first. The reduced starting distance willnot influence the test result significantly, but increases theuncertainty.

Measuring
12
9.2 Measurement of the falling times
The jacket tube snaps into a defined 10°-position at the bot-tom of the instrument.
By turning over the jacket tube, the ball is set to the measu-ring position.
The falling time of the ball moving from the ring mark A to ringmark B is determined by using a stop watch. The time periodstarts when the lower periphery of the ball touches the ringmark A, which must appear as a straight line. The falling timeends when the lower periphery of the ball touches the ringmark B, which again must appear as a straight line. If oneuses the distance AC or CB to reduce very long falling timesfor high viscous liquids the double of the measuring time pe-riod must be taken into account.
Turning the jacket tube 180° again the ball returns to its startposition. It is good practice to take the mean value out of sev-eral falling time values (3 to 5).
The falling times for the ball returning may vary from the nor-mal value (up to 1 %). If the returning of the ball should alsobe used for exact measurements a new constant K must bedetermined.
Constant for the returning of the ball:
Kreturn = normal falling time ⋅ normal constant K falling time when returning
When testing dark liquids it is usually very difficult to see thelower part of the ball. In this case we advise to take the ballequator when it passes through the ring marks.

Measuring
13
9.3 Evaluation of the test results
The dynamic viscosity η (in mPa⋅s) is calculated using thefollowing equation:
η = K (ρ1 – ρ2) � t
where:
K = ball constant in mPa⋅s⋅cm3/g⋅s (see chapter 11)
ρ1 = density of the ball in g/cm3 (see chapter 11)
ρ2 = density of the liquid to be measured at the measuringtemperature in g/cm3
t = falling time of the ball in seconds.
Test results:
The dynamic viscosity η is given in units of mPa⋅s (cP) andmust be completed by stating the sample temperature.
The dynamic viscosity η may be converted to the kinematicviscosity ν by using the following equation:
ν = ηρ
ν = kinematic viscosity [mm2/s] [1 mm2/s = 1 cSt]
η = dynamic viscosity [mPa⋅s]
ρ = density of the liquid sample [g/cm3]
Measuring
14
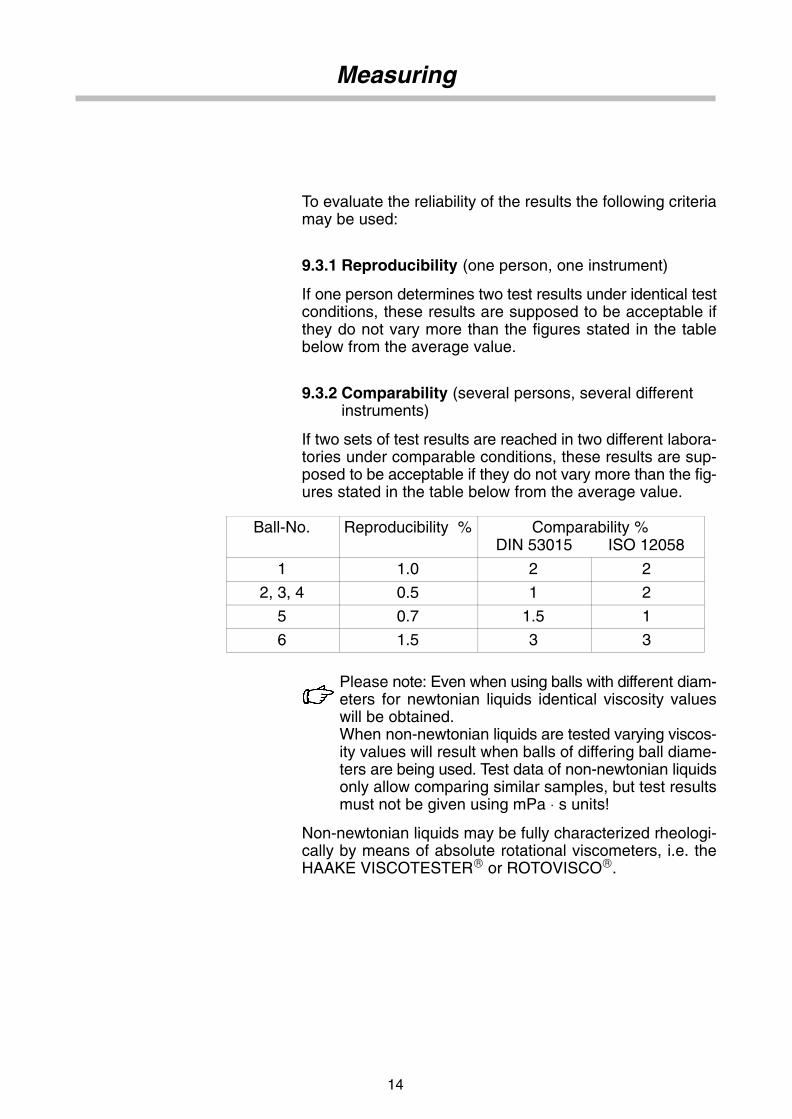
To evaluate the reliability of the results the following criteriamay be used:
9.3.1 Reproducibility (one person, one instrument)
If one person determines two test results under identical testconditions, these results are supposed to be acceptable ifthey do not vary more than the figures stated in the tablebelow from the average value.
9.3.2 Comparability (several persons, several differentinstruments)
If two sets of test results are reached in two different labora-tories under comparable conditions, these results are sup-posed to be acceptable if they do not vary more than the fig-ures stated in the table below from the average value.
Ball-No. Reproducibility % Comparability %DIN 53015 ISO 12058
1 1.0 2 2
2, 3, 4 0.5 1 2
5 0.7 1.5 1
6 1.5 3 3
Please note: Even when using balls with different diam-eters for newtonian liquids identical viscosity valueswill be obtained.When non-newtonian liquids are tested varying viscos-ity values will result when balls of differing ball diame-ters are being used. Test data of non-newtonian liquidsonly allow comparing similar samples, but test resultsmust not be given using mPa ⋅ s units!
Non-newtonian liquids may be fully characterized rheologi-cally by means of absolute rotational viscometers, i.e. theHAAKE VISCOTESTER or ROTOVISCO.

Measuring
15
9.3.3 Example(sugar solution of 40 %)
Density of ball 2: 2.2 (g/cm3)Density of the solution: 1.18 (g/cm3)Ball constant K : 0.09 (mPa⋅s⋅cm3/g⋅s)Falling time: 61 sMeasuring temperature: 20.0°C
The absolute viscosity is ...
η20°C = 0,09 ⋅ (2,2 – 1,18) ⋅ 61 = 5,60 (mPa ⋅ s)
In most cases the densities of the test liquids areknown. The evaluation may be simplified by introdu-cing a factor which includes the densities. In our exam-ple of the sugar solution the exact factor is ...
(ρ1 – ρ2) ⋅ K = 0,1098 (mPa ⋅ s / s)
9.4 Viscosity determination of gases
The viscosity determination of gases has to be done with ballG which is made out of glass.
1 The measuring tube must be closed with rubber stop-pers fitted with glass stopcocks.
Measuring tube, glass ball and gas must be clean anddry.
2 The tube is flushed several times with the gas to betested to push out any remains of air. Then the tube fil-led with the gas sample is closed with the stopcocksand raised to the test temperature.
The calculation of the gas viscosity is based on the compari-son with the viscosity of air at 20 ° C (η = 1815⋅10–5 mPa⋅s):
ηgas = FGFA
⋅ 1815 ⋅ 10–5 (mPa ⋅ s)
where:
ηgas: viscosity of the gas at the temperature T
FG : falling time of the ball in the gas at the temperature T
FA : falling time of the ball in air at a temperature of +20°C
Viscosity of the air at a temperature of +20°C:1815 ⋅ 10–5 (mPa ⋅ s)

Cleaning the Measuring Tube
16
10. Cleaning the Measuring Tube
1 Usually the tube is cleaned by rinsing it with a suitablesolvent.
2 High viscous liquids (glue and heavy oils, etc.) have tobe removed with the cleaning piston which is suppliedwith the instrument. Push this piston slowly through thetube.
⇒ After this, there will be only a thin film of the liquid lefton the walls of the tube which then can be removed witha solvent.
Especially when measuring with balls 1 and G it is veryimportant, that the tube and the ball are clean.

Calibration
17
11. Calibration of the Falling Ball Viscometer
The falling ball viscometer is checked according to theHAAKE regulations before delivery. The geometry relatesstrictly on the DIN 53015/ISO 12058 and therefore the listedball constants can be used.The calibration of the instrument can be done using nation-ally recyclable calibration fluids. This procedure is also rec-ommended for new balls or after repairs and for falling ballviscometers integrated into a measuring procedure accord-ing to ISO 9000.
Testing ...
periodically: to be defined by the user or to be read in the QC-hand book.
with nationally recyclablestandards: Calibration fluids acknowledged in the corresponding user
country, e.g. Europe: DKD/PTB calibration fluids, in Japan:JIS fluids or in the USA: Cannon calibration fluids.
The calibration excludes the influence of allowed toleranceswhen measuring balls and falling tubes.
The following Thermo Electron (Karlsruhe) products can beused for testing the instrument:
Order-No. Type η (mPas)at 20°C
for balls
082–5042 E7 5 1
082–5043 E200 120 2, 3
082–5044 E2000 1900 4
082–5046 E6000 6000 5, 6
082–5336 E15000 15000 6
For calibration of the falling ball viscometer the following cal-ibration fluids (recyclable in Europe) are recommended:
Order-No. Type η (mPas)at 20°C
for balls
082–5303 100 BW 100 2, 3
082–5304 2000 AW 2000 5
082–5305 10000 B 10000 5, 6

Calibration
18
The calibration fluids should be stored in dark rooms and beused within 3 months after their date of expiry.
The disposal depends of the composition of the substancewhich is listed in the “EC – SAFETY DATA SHEET”.
It is absolutely essential that for calibration the instructionsfor filling the tube and cleaning are closely adhered to.It is very important to observe the test temperature of the cal-ibration liquids as indicated on the bottles.
To avoid contamination the test fluid should neverbe poured back into the original bottle.
An officially calibrated thermometer is required which allowsreading the temperature with an accuracy of ± 0.02°C.
11.1 Example: Calibration of ball 1
K = ball constant to be found
ηE= 4.63 [mPa⋅s] viscosity of the standard liquid
ρ1 = 2.217 [g/cm3] density of the ball
ρ2 = 0.81 [g/cm3] density of the standard liquid
t = 417.7 [s] average of the falling time
For the calculation of the ball constant K the following for-mula applies:
K �
�E
(�1 � �2) � t�
4.63(2.217 � 0.81) � 417.7
� 0.00788
The determination of the constants of the other balls shouldbe done in the same way.
11.2 Determination of the ball factors for special tests
The ball factors can be determined by the user for the singleballs of the set and for different densities of the liquids.
The formula ”(ρ1 – ρ2) ⋅ K” can be described as the factor formeasurements with a constant density.
Consequently, when determining the viscosity, multiply thefactor by the measured falling time in order to obtain the vis-cosity in (mPa ⋅ s).

��
��
�
��
�
�
�
��
��
��
��
��
��
�
����
��
�
��
!
!
Maintenance by the User
19
12. Maintenance by the User
12.1 Exchange of the measuring tube and the jackettube
1 Unscrew the screws 4 and remove brace 11.
2 Loosen threaded bush 18 with socket spannerno. 003-2110.
3 Unscrew connecting rods 20.
4 Now remove both cover lids 7 and 9.
5 Exchange jacket tube 12.
6 In order to exchange the measuring tube removebush 19 and gasket 17.
Assembly
7 Screw jacket tube 12, flat gasket 8, cover 7 and9 together with the connecting rods 20.
Don’t tighten the connecting rods initially.
8 Insert measuring tube 1 with gasket 17 into thecovers 7 and 9.
9 Mount brace 11, don’t tighten the screws 4initially.
10 Please tighten the connecting rods 20 evenly andcarefully.
Recommended tightening moment 0,8-1,0 Nm.Please control, whether the jacket tube ismoveable axially.
11 Fix the screws 4.Please control, whether the jacket tube is move-able axially.
12 Fix threaded bush 18 with the socket spanner003-2110 slightly.

Maintenance by the User
20
12.2 Order numbers
002-7575 Stand (cast iron)002-2917 Levelling screws of the stand002-6968 Falling tube (1)800-0190 Balls (2)002-8746 Screws M 6x12 (4)003-2108 Cover (7)003-2109 Cover (9)002-9261 Brace, mounted (11)800-0030 Jacket tube(12)800-0012 Hollow plug (13) (15)800-0013 Plug (14)800-0014 Closing plate (16)003-2079 Threaded bush (18)003-2106 Connecting rod (20)800-0052 Closing Gap (21)799-3001 Set of gasket (8),(17),(22)

Spare Parts
21
13. Spare Parts
13.1 Recommended spare parts for a period of 3 years
800-0119 Ball tweezers
800-0131 Cleaning brush (3 x)
800-0125 Cleaning piston (3 x)
800-0182 Set of balls 1 – 6
002-6968 Falling tube
800-0030 Jacket tube
800-0015 Hollow plug, Perbunan
800-0090 Hollow plug, Brass
800-0017 Closing plate, Perbunan
800-0014 Closing plate, Brass
800-0016 Plug, Perbunan
800-0093 Plug, Brass
800-0052 Closing Gap
800-0190 Spirit level
800-1507 Checking thermometer –1 to 26° C,scaling 0.1° C
800-0176 Stop watch
799-3001 Set of gasket

Spare Parts
22
13.2 Single parts
800–0061gasket ∅ 10.0
(perbunan)
003-2110socket spanner
800–0131cleaning brush
800–0119ball tweezers
800–0125cleaning piston
800–0027gasket ∅ 15.6
(teflon)
Control thermometers:
800-1506 –35 to 1°C, scaling 0.2°C800-1507 –1 to 26°C, scaling 0.1°C800-1508 24 to 51°C, scaling 0.1°C800-1509 49 to 76°C, scaling 0.1°C800-1510 74 to 101°C, scaling 0.1°C800-1511 99 to 126°C, scaling 0.1°C800-1518 19 to 21°C, scaling 0.02°C806-1154 21 to 24°C, scaling 0.02°C
Spare Parts
23
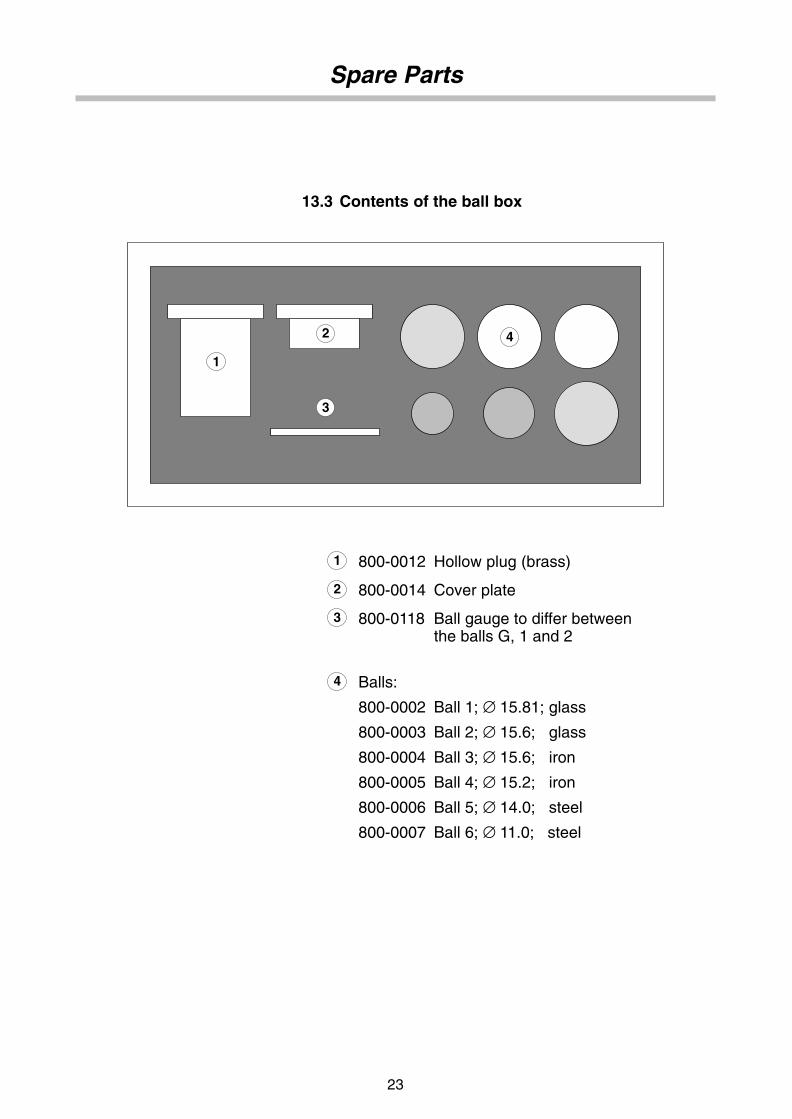
13.3 Contents of the ball box
1
2
3
4
1 800-0012 Hollow plug (brass)
2 800-0014 Cover plate
3 800-0118 Ball gauge to differ betweenthe balls G, 1 and 2
4 Balls:
800-0002 Ball 1; ∅ 15.81; glass
800-0003 Ball 2; ∅ 15.6; glass
800-0004 Ball 3; ∅ 15.6; iron
800-0005 Ball 4; ∅ 15.2; iron
800-0006 Ball 5; ∅ 14.0; steel
800-0007 Ball 6; ∅ 11.0; steel

List of calculation factors
24
14. List of calculation factors
Example:

Part-No. 002-7585cSubject to alterations Printed in Germany 2.1.072.2–01.04
Appendix
25
Präzisions- undKontrollthermometerDurch Erschütterungen, Überhitzungoder zu starke Abkühlung während desTransportes können bei Thermometernfehlerhafte Temperaturanzeigen auftre-ten. Bitte achten Sie deshalb vor demGebrauch auf folgende Punkte:
a) Geteilte Quecksilbersäule:Liegt die Trennstelle sehr tief, er-wärmen Sie bitte das Thermometer,bis die Trennstelle ungefähr bis zurMitte der oberen Kapillarerweite-rung gestiegen ist. Die Kapillarer-weiterung darf nicht bis oben mitQuecksilber gefüllt werden, da siesonst gesprengt wird. Klopfen Siedann das Thermometer (Quecksil-bergefäß unten) senkrecht auf eineweiche Unterlage. Dabei fügt sichdas Quecksilber wieder zusammen.Liegt die Trennstelle zu tief, sam-meln Sie das Quecksilber durchstarke Abkühlung unten im Queck-silbergefäß und vereinigen es danndurch vorsichtiges Klopfen.
b) Quecksilberteilchen in der oberenKapillarerweiterung:Sammeln Sie bitte die Teilchendurch vorsichtiges Klopfen im un-teren Bereich der Erweiterung undvereinigen Sie die Säule durch Er-wärmen des Quecksilbergefäßes.
c) Kleine Luftblase im Quecksilber-gefäß:Häufig sitzt die Luftblase an derÜbergangsstelle Quecksilbergefäß–Kapillare und ist zu erkennen an derLageveränderung bei leichtem Klop-fen. Zur Beseitigung ziehen Sie dasQuecksilber durch Abkühlen nachunten. Durch leichtes Klopfen steigtdie Luftblase nach oben in die trich-terförmige Verengung. Durch an-schließende Erwärmung wandertdie Blase in Form einer Trennstellenach oben.Diese Trennstelle beseitigen Siebitte wie unter a) beschrieben.
Fehler a) und c) haben eine zu hohe,Fehler b) hat eine zu tiefe Temperatur-anzeige zur Folge.
Precision MonitoringThermometersIncorrect thermometer temperaturereadings can occur after transportationas a result of vibration, overheating ortoo rapid cooling down. Please there-fore check the thermometers for the fol-lowing signs before usage:
a) Mercury filling split:If the mercury filling is split at a lowthermometer position, heat the ther-mometer until the separation point isapproximately in the middle of theupper capillary tube. Please ensurethat the upper capillary tube is notfilled completely to the top with mer-cury as this can burst the thermome-ter. Now tap the thermometer in avertical position (with the mercurybulb at the bottom) against a softsurface. The mercury filling shouldnow join up again. If the separationpoint is too low, collect all the mer-cury in the bulb by rapid coolingdown and then cause it to unify bycareful tapping.
b) Mercury droplets in the uppercapillary tube:Collect the droplets in the lower areaof the capillary tube by careful tap-ping against a soft surface and re-unify the filling by heating the mer-cury bulb.
c) Small air bubble in the mercurybulb:The air bubble is often situated be-tween the mercury bulb and the up-per capillary tube and can be recog-nized when its position changes af-ter careful tapping. Draw the mer-cury downwards by cooling downand cause the air bubble to risethrough the funnel-shaped passageby careful tapping. Subsequentheating causes the bubble to risefurther and form a separation point inthe mercury filling. This separationpoint can be removed by followingthe instructions in section a).
Faults a) and c) result in an excessivetemperature display and fault b) causesan insufficient reading.
Thermomètres de contrôleet de précisionLes vibrations, une température ou unrefroidissement excessif durant letransport peuvent être l’origine d’une in-dication de température erronée. Le caséchéant, conformez-vous aux instruc-tions ci-après:
a) Colonne de mercure divisée:Si la division se situe dans le bas dela colonne, réchauffez le thermomè-tre jusqu’à ce que la division atteigneapproximativement le milieu de lazone d’expansion du tube capillaire.Veillez cependant à ce que cettepartie ne se remplisse pas intégrale-ment de mercure au risque sinon defaire éclater le tube. Tapotez ensuitele thermomètre (réservoir de mer-cure orienté vers le bas) sur un sup-port souple. La colonne de mercurese reconstitue. Si la division est tropbasse, faites retourner le mercuredans le réservoir par un fort refroidis-sement et reconstituez la colonne entapotant légèrement.
b) Particules de mercure dans la zoned’expansion du tube capillaire:Regroupez les particules au fond dela zone d’expansion en tapotant lé-gèrement et reconstituez la colonneen chauffant le réservoir de mer-cure.
c) Petite bulle d’air dans le réservoirde mercure:La bulle d’air se trouve générale-ment dans la zone de transition en-tre le réservoir de mercure et le tubecapillaire. Elle se repère facilementen la faisant bouger par un léger ta-potement du thermomètre. Pour lafaire disparaître, rétractez la co-lonne de mercure par refroidisse-ment. Un léger tapotement fait re-monter la bulle dans l’étranglementconique. Réchauffez alors le ther-momètre pour faire remonter la bulledans la colonne. Supprimer la divi-sion constituée par la bulle commeindiqué sous a).
Les défauts a) et c) se traduisent parune indication supérieure, le défaut b)par une indication inférieure à la tempé-rature réelle.