Table of Contents C115 Instructions - New Mexico€¦ · Table of Contents C115 Instructions...
35
Page 1 Table of Contents C115 Instructions (Monthly Production Report - rev. 10/2/2017) Summary of the C-115 Process ..................................................................................................................(Page 3) First Time Steps (Before you begin submitting C115 Reports) Obtaining an OCD Online User ID ..........................................................................................................(Pages 4-6) Determine the Windows system you are running: Click on Start in the bottom left of your screen, click Control Panel, and then System. A pop-up will appear that looks like screen shot below. (This screen shot shows the Windows Edition as Windows 7 with a 64 bit Operating System.) Download the Excel Add-In (Macro) For Windows XP Instructions ................................................................................................................ (Pages 7-9) For Windows Vista and Windows 7 & 8 Instructions ........................................................................ (Pages 10-11) Download the Excel C-115 Template Instructions to Download the Excel C-115 Template .......................................................................... (Page 12-13) Congratulations! You are now set up!
Transcript of Table of Contents C115 Instructions - New Mexico€¦ · Table of Contents C115 Instructions...

Page 1
Table of Contents C115 Instructions
(Monthly Production Report - rev. 10/2/2017)
Summary of the C-115 Process ..................................................................................................................(Page 3)
First Time Steps (Before you begin submitting C115 Reports)
Obtaining an OCD Online User ID ..........................................................................................................(Pages 4-6)
Determine the Windows system you are running: Click on Start in the bottom left of your screen, click Control Panel, and then System. A pop-up will appear that looks like screen shot below. (This screen shot shows the Windows Edition as Windows 7 with a 64 bit Operating System.)
Download the Excel Add-In (Macro)
For Windows XP Instructions ................................................................................................................ (Pages 7-9)
For Windows Vista and Windows 7 & 8 Instructions ........................................................................ (Pages 10-11)
Download the Excel C-115 Template
Instructions to Download the Excel C-115 Template .......................................................................... (Page 12-13)
Congratulations! You are now set up!

Page 2
Monthly Steps (To be done every month)
Entering information into the Excel C-115 Spreadsheet
Definition of columns .............................................................................................................................. (Page 14)
Using the Add-in
For Windows XP ......................................................................................................................................... (Page 15)
For Windows Vista and Windows 7 & 8 .................................................................................................. (Page 16)
Submitting the C-115Online
Instructions on Submitting the C-115 Online ...........................................................................................(Page 17)
Errors, Troubleshooting and Solutions .............................................................................................(Pages 18-20)
For Runtime Error 2110 Solution .................................................................................................. (Page 21)
For Runtime Error 91 Solution ...................................................................................................... (Page 22)
C-115 Status and Verification of Data: (It is the C-115 Filers responsibility to verify that the data submitted
and what is posted on the website match and are correct to their knowledge. Do not submit your report
without verifying the data. Review any errors and re-submit if necessary)
Approvals and Rejections ................................................................................................................. (Pages 23-27)
Data Verification................................................................................................................................. (Pages 28-29)
Amendments and Corrections ................................................................................................................ (Page 30)
Additional Useful Information
C-115 Data Layout ............................................................................................................................ (Pages 31-34)
Visit our Website: http://www.emnrd.state.nm.us/ocd/c115instructions.html
Basic Instructions, Sample C-115, Excel Add-Ins, Excel Template, etc.
For a printout of C-115 Due Dates: Please contact OCD
Questions, Comments, Suggestions: Ashley M. Archuleta
Oil Conservation Division Energy, Minerals and Natural Resources Dept. 1220 South St. Francis Drive Santa Fe, New Mexico 87505
[email protected] (505)476-3532

Page 3
Summary of the C-115 Process
The C-115 process is slightly different depending on whether a well operator uses OCD’s Excel spreadsheet template or uses a custom system. All of the terms used below are more thoroughly described later in this document.
If the well operator does not use a vendor’s system, filing C-115s involves downloading an Excel add-in (a small macro) and an Excel C-115 template from the OCD’s web site. The well operator keys the wells and other information in a specified format into the Excel template which is simply a spreadsheet. Next, the well operator clicks on the add-in which puts the spreadsheet information (well production, disposition, transporters, etc.) into a structured format that we call the .txt file because the file extension is .txt.
The well operator then signs in to OCD’s web electronic permitting system called OCD Online and selects C-115 from a list of forms/permits and then submits the .txt file. OCD Online asks the user to attach the .txt file created from the previous step and the system compares the information in the .txt file to the wells that the operator operates. If OCD Online finds errors the user can view the reports with details of the problems.
Errors found are: production errors, disposition errors, omissions, and out of balance conditions. If necessary, the user returns to the Excel spreadsheet and changes the entries related to the errors. They will then re-run the add-in again and attach the new .txt file validating in OCD Online until no errors appear. At that point, the user can submit the C-115 to OCD for acceptance.
The user is notified by an automated e-mail when the C-115 has been accepted. Other tools in OCD Online that help the well operator see C-115 information are Action Status and the C-115 Reports options.
Operators who use custom software don’t use the Excel add-in or the Excel spreadsheet (template), but
they do attach the .txt file created by their software in OCD Online and follow the remaining steps
from that point.
Skim Oil on Salt Water Disposal wells is reported on Form C-117A
Page 4
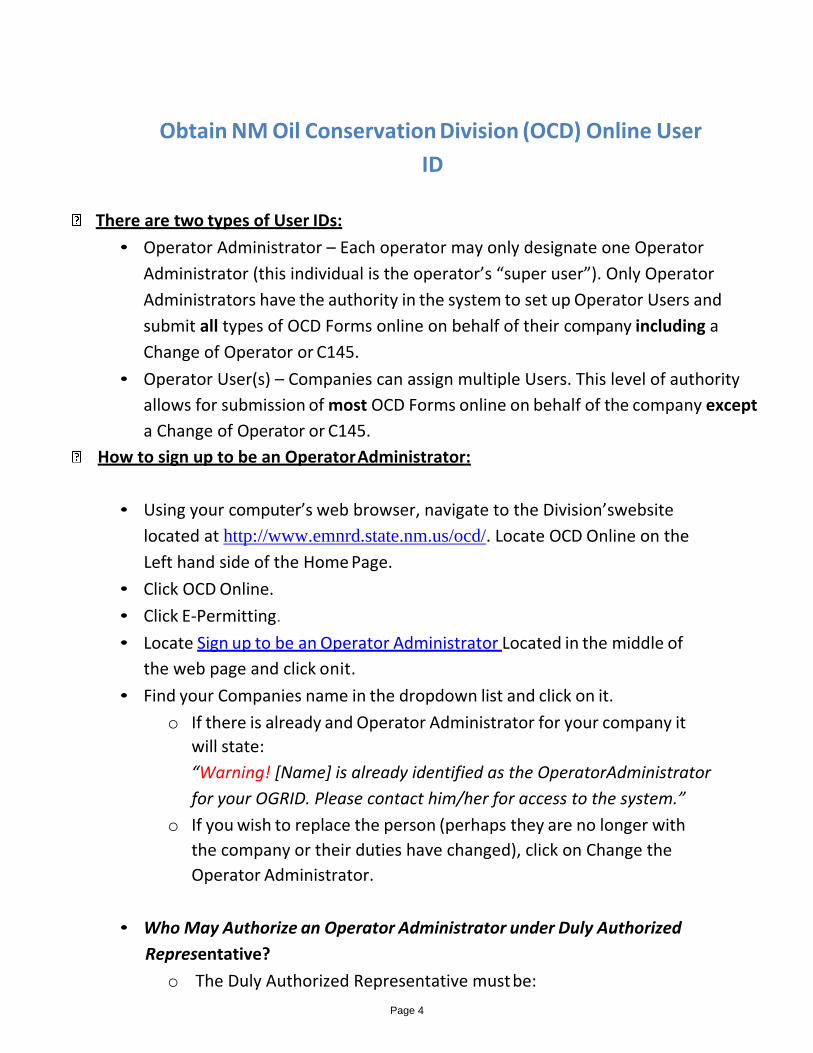
Obtain NM Oil Conservation Division (OCD) Online User
ID
There are two types of User IDs:
• Operator Administrator – Each operator may only designate one Operator
Administrator (this individual is the operator’s “super user”). Only Operator
Administrators have the authority in the system to set up Operator Users and
submit all types of OCD Forms online on behalf of their company including a
Change of Operator or C145.
• Operator User(s) – Companies can assign multiple Users. This level of authority
allows for submission of most OCD Forms online on behalf of the company except
a Change of Operator or C145.
How to sign up to be an Operator Administrator:
• Using your computer’s web browser, navigate to the Division’swebsite
located at http://www.emnrd.state.nm.us/ocd/. Locate OCD Online on the
Left hand side of the Home Page.
• Click OCD Online.
• Click E-Permitting.
• Locate Sign up to be an Operator Administrator Located in the middle of
the web page and click onit.
• Find your Companies name in the dropdown list and click on it.
o If there is already and Operator Administrator for your company it
will state:
“Warning! [Name] is already identified as the OperatorAdministrator
for your OGRID. Please contact him/her for access to the system.”
o If you wish to replace the person (perhaps they are no longer with
the company or their duties have changed), click on Change the
Operator Administrator.
• Who May Authorize an Operator Administrator under Duly Authorized
Representative?
o The Duly Authorized Representative must be:

Page 5
• The President of the company;
• The Vice President of the company;
• An employee of the corporation duly authorized (by corporate
resolution or Power of Attorney) to approve and sign an Oil
Conservation Division form on behalf of thecorporation;
• A Manager (if it does business as a limited liabilitycompany);
• A Partner (if it does business as a partnership); or
• The operator individually (if it is a sole proprietorship).
• Key in the Duly Authorized Representative’s Name and Title.
• Key in the Name of the proposed Operator Administrator.
• Key in the proposed Operator Administrator e-mail Address.
• Key in the proposed Operator Administrator Phone Number (in XXX-XXX-
XXXX format).
• Click on Click here to print the Request.
• Print form.
• Have the Duly Authorized Representative, Sign the form.
• Have the proposed Operator Administrator, Sign the form.
• Fax to Oil Conservation Division at (505) 476-3462.
• OCD will process your request and e-mail the new Operator Administrator
their User ID and Password. At this point, the process is complete and the
Operator Administrator is ready to establish any necessary Operator Users
using their “super user” authority.
How to establish Operator Users:
• Once an Operator Administrator is set up for your organization, that “super
user” can establish additional users under their account as an extensionof
the written authority the Operator Administrator has been granted by the
Duly Authorized Representative of the organization. Note that the
designated Operator Administrator for an organization is responsible for
the activities of any Operator Users that exist under that organization’s
account. For that reason, it is important that organizations and Operator
Administrator be fully aware of who has been granted authorities for the

Page 6
organization and that they immediately revoke authorities from any
individuals as soon as the organization desires for that individual to cease
to act on the organization’s behalf.
o The process an Operator Administrator would follow to establish
users under their account is as follows:
− Sign in.
− Click on Administration.
− Click Add or Remove Users.
− Follow the prompts to either identify the User being removed
or to enter the information for the new User beingadded.
• Acceptance or Rejection E-mail Notification
o When the C-115 has been either Rejected or Accepted
− The Operator Administrator and the Op Users whom have the
Receive Rejection Email and Receive Approval Email check
marked will receive an e-mail notification specifying if theC-
115 was Accepted or Rejected • You may verify your User ID has been set up to receive Approval and Rejection
Emails and update your information including the Email address if it has
changed by:
o signing in to OCDOnline
o Click on Administration
o Click on Modify Personal Information
o Then you may verify that the appropriateboxes are check marked and
that all the information is correct an up to date
o If there are changes needed you my enter appropriate changes and
click Update
− Sometimes the e-mail may get routed to your Spam mail
If problems are encountered that cannot be resolved by following
these instructions, please email [email protected].

Page 7
Download the Excel Add-in Instructions for XP
1. Open Internet Explorer Web Browser to Locate C115 Instructions and Add- In Macro
❖ Open Internet Explorer Web Browser
❖ Click on Address Bar located on the top tool bar ❖ Key in http://www.emnrd.state.nm.us/ocd/ ❖ Under Hot Topics on the Home Page ❖ Click on HOW DO I FILE A MONTHLY WELL PRODUCTION REPORT (C-
115)?
2. Download C115 Add-in Macro to Desktop ❖ Right click on Excel Add In (Macro) ❖ Select Save Target as or Save Link As ❖ Select C Drive or Local Disk C in the Save In drop down list ❖ Click Program File Folder ❖ Click Microsoft Office Folder ❖ Select one of the following Office11 or Office12 or Office13 or Office14,
ECT… (specific to your computer program) ❖ Click on XLSTART or 1033 folder. ❖ Change the file name from C115_000.xls to C115.xla ❖ Click Save ❖ When download complete, (click on Close) ❖ Minimize Internet Browser
3. Verify the C115 Add-in Macro is Active ❖ Open Microsoft Excel
• For Microsoft Office Newer than Microsoft Office 2003
− Locate the Add-Ins tab on the top tool bar
− Click Add-Ins − Verify that C115 Electronic Reporting appears twice.
• For Microsoft Office 2003 and older software
− Locate Tools on the Top Tool Bar − Click on Tools
− Verify that C115 Electronic Report Appears in the list (it should be listed after Options)
4. If the Add-in Tab does not appear in Excel you will need to activate it in Excel Add-ins by doing the following ❖ Open Microsoft Excel
• For Microsoft Office Software Newer than Microsoft Office 2003

Page 8
− Select the Office Button or the File Tab (Located on the upper Left-hand corner)
− Select Excel Options or Options, located on the bottom tool bar
− Locate Add-Ins on the left tool bar
− Click on Add-Ins
− Locate Manage Excel Add- Ins on the lower portion of the page
− Click Go a. (Sample)
− A pop up will appear titled Add-Ins
− Click on the Browse button located on the right hand side of the box
− Click on Look In Box
− Select C Drive (Local Disk C)
− Click on the Program Files Folder
− Click on the Microsoft Office folder − Select one of the following Office11 or Office12 or Office13
or Office14, ECT… (specific to your computer program) − Click on XLSTART or 1033 folder
− C115 or C115.xla should appear (Sample)
− Double click on C115.xla − Add-In box will appear with a checkmark in the NM
ONGARD option − Click OK (The Add-Ins Tab should appear)
− Locate the Add-Ins tab on the top tool bar
− Click Add-Ins
− Verify that C115 Electronic Reporting appears twice. −
• For Microsoft Office 2003 and older software
− Locate Tools on the Top Tool Bar
− Click on Tools − Locate Add-ins in the list
− Click on Add-ins
− Click on the Browse button located on the right hand side of the box
− Click on Look In Box
− Select C Drive (Local Disk C)

Page 9
− Click on the Program Files Folder − Click on the Microsoft Office folder
− Select one of the following Office11 or Office12 or Office13 or Office14, ECT… (specific to your computer program)
− Click on XLSTART or 1033 folder
− C115 or C115.xla should appear (Sample)
− Double click on C115.xla
− Add-In box will appear with a checkmark in the NM ONGARD option
− Click OK
− Locate Tools on the Top Tool Bar − Click on Tools
− Verify that C115 Electronic Report Appears in the list (it should be listed after Options)

Page 10
Download the Excel Add-inInstructions for Vista, Windows 7 & 8
1. Create Folder in C Drive
❖ Option 1 (using Computer icon on desktop)
• Create a New Folder Titled, C115 (no Dashes No Spaces just
C115) in your C Drive (Local Disk C)
• Double Click on My Computer or Computer from your Desktop
• Right Click on OSDisk C: or Local Disk C:
• Select New, Folder
• Name it C115
❖ Option 2 (using Windows Explorer)
• Create a New Folder Titled, C115 (no Dashes No Spaces just
C115) in your C Drive (Local Disk C)
• Right Click on OSDisk C: or Local Disk C:
• Select New, Folder
• Name it C115
2. Open Internet Explorer Web Browser to Locate C115 Instructions and Add- In Macro
❖ Open Internet Explorer Web Browser
❖ Click on Address Bar located on the top tool bar ❖ Key in http://www.emnrd.state.nm.us/ocd/
❖ Under Hot Topics on the Home Page
❖ Click on HOW DO I FILE A MONTHLY WELL PRODUCTIONREPORT
(C-115)?
3. Download C115 Add-in Macro
❖ Right click on Excel Add In Macro (Windows 7 64 bit) ❖ Select Save Target As ❖ Click on My Computer or Computer ❖ Select your C Drive ( OSDisk C: or Local Disk C:)
❖ D ou bl e Click on the C115 folder you created above ❖ I n F i l e N a m e b o x c hange the file name from C115_000.xls to
C115.xla
❖ Click Save ❖ When download complete, (click on Close or X) ❖ Minimize Internet Browser

Page 11
4. Verify the C115 Add-in Macro is Active ❖ Open Microsoft Excel ❖ Locate the Add-Ins tab on the top tool bar ❖ Click Add-Ins ❖ Verify that C115 Electronic Reporting appears twice.
5. If the Add-in Tab does not appear in Excel you will need to activate it in Excel Add-ins by doingthe
following ❖ Open Microsoft Excel
❖ Select the Office Button or the File Tab (Located on the upper Left-hand corner)
❖ Select Excel Options or Options ❖ Locate Add-Ins on the left tool bar ❖ Click on Add-Ins ❖ Locate Manage Excel Add- Ins on the lower portion of thepage ❖ Click Go
• (Sample) ❖ A pop up will appear titled Add-Ins ❖ Click on the Browse button located on the right hand side of the
box
❖ Select C Drive (OSDisk C: or Local Disk C:)
❖ D o u b l e c lick on the C115 folder
❖ C115 or C115.xla should appear ❖ Double click on C115.xla ❖ Add-In box will appear with a checkmark in the NMONGARD
option
•!• Click OK {The Add-Ins Tab should appear)
•!• Locate the Add-Ins tab on the top tool bar
•!• Click Add-Ins
•!• Verify that C115 Electronic Reporting appears twice.
•!• IF Add-Ins tab still doesn’t appear, close and restart Excel.
You may also try downloading the 32-bit macro.

Page 12
Add-In not showing up on Excel Ribbon
The issue here is that Excel is now placing certain untrusted files into protective viewing mode silently. This prevents the C-115 Add-in from being loaded as all files download from the internet are untrusted. Microsoft release a Security Update for Excel mid 2016 that enforces this new security policy. Our suggested fix is to unblock access to c115_000.xla this will indicate to excel that this is a trusted file. To do this: 1. Right click on c115_000.xla and choose Properties 2. On the General tab, click Unblock 3. Click OK 4. Restart Excel. Unable to run the Add-In The issue here is that the Add-In is installed and the Add-In ribbon is visible but clicking on the link does nothing. It appears that the user needs full control of the latest Office folder to run the Add-In. Our suggested fix is to grant the user group of the machine full access to the Office folder. To do this: 1. Go to C:\Program Files (x86)\Microsoft Office right click on latest Office folder (general the one with the highest number) and choose Properties 2. Go to the Security tab, click Edit 3. Click on Users (machine-name\Users) and check Allow for Full Control 4. Click on Ok 5. Restart Excel.
Page 13
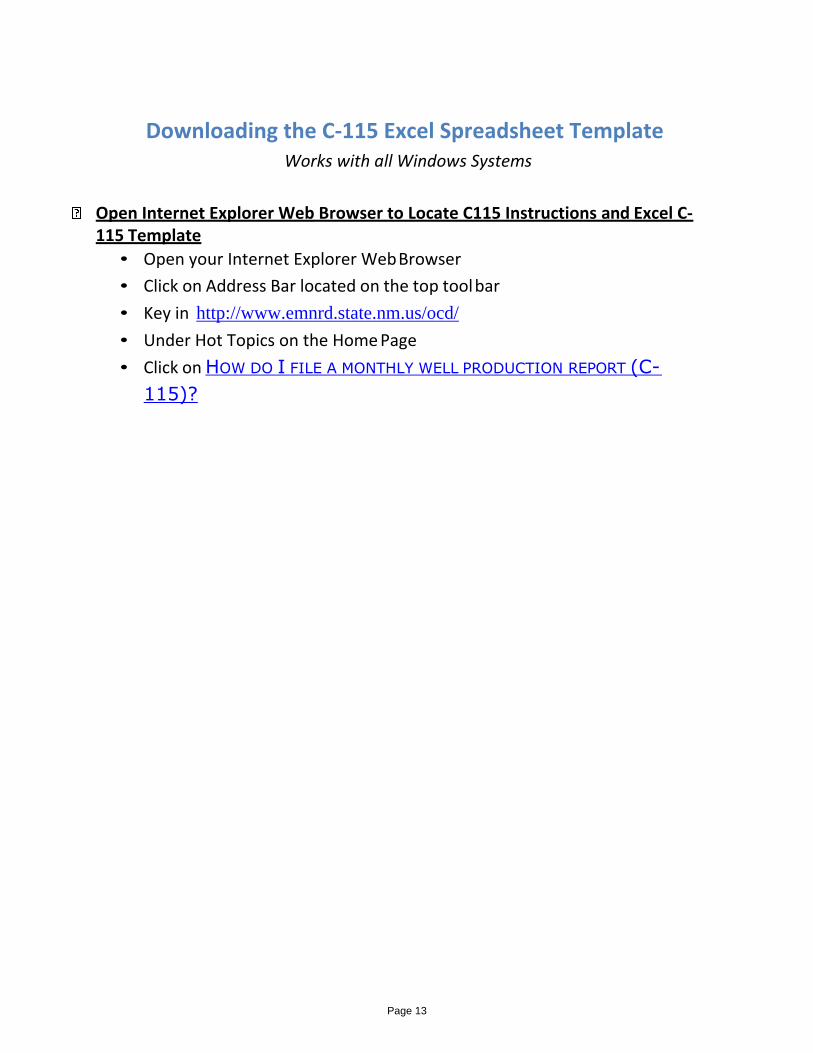
Downloading the C-115 Excel Spreadsheet Template Works with all Windows Systems
Open Internet Explorer Web Browser to Locate C115 Instructions and Excel C-
115 Template
• Open your Internet Explorer Web Browser
• Click on Address Bar located on the top tool bar
• Key in http://www.emnrd.state.nm.us/ocd/
• Under Hot Topics on the Home Page
• Click on HOW DO I FILE A MONTHLY WELL PRODUCTION REPORT (C-
115)?

Page 14
Download the C-115 Excel Spreadsheet Template• Locate Download the Excel C-115 Template
• Right click Excel C-115 Template
• Select Save Target As
• Select Desktop in the Save In drop down list
o You may move the file later to a location you prefer • No need to change the File Name C115Spreadsheet.xls unless you prefer to
o You will need to remember the file name this is where you will be entering all your production information eachmonth
• Click Save
• When download complete, (click on Close)

Definitions of Columns Revised 10/20/2015
Production Side of C115 Disposition Side of C115
8. CODE 1
Well Status (MUST BE IN CAPS)
F - Flowing
11. CODE 2
Type of injected fluidcode (MUST BE IN CAPS)
W - Water
G - Gas
C - CO²
O - Other
8. CODE 3
Disposition of produced
product. If you have all three
put them on separaterows. (MUST BE IN CAPS)
G - Gas (includes CO²)
O - Crude Oil, Condensate, Drip
W - Water
T - TemporarilyAbandoned P - Pumping
I - Injection Well (even ifshut-in)
G - Gas Lift
D - Salt Water Disposal Well (even if shut-in)
S - Shut-in
A - Plugged and Abandoned
8 CODE 4 Non Transported Disposition – is when the product is not transported by a
transporter (MUST BE IN CAPS)
Page 14
9. 10. Volume Pressure
Enter the Enter the
number injection
of barrels pressure
of water
or MCF
of gas
injected.
(PSIG).
Please do
not report
vacuum
(whole amounts-
no
decimals)
12. Barrels
of oil/
condensate
produced
Enter the #
of barrels of
crude oil or
condensate
produced
for the
month. (Whole
amounts, no
decimals)
13. Barrels
of Water
Produced
Enter the #
of barrels of
water pro-
duced for
the month.
(Whole
Amounts, No
Decimals)
14. MCF
Gas
Produced
Enter the MCF of
gas (include
CO²)
produced
for the month. (Whole
Amounts,
adjusted to
15.025 psia)
15. Days Produce Enter the
# of days
that the
well
produced
or
injected
during
the
month.
23. Oil
On
Hand at
the End
of the
Month
Enter
the
ending
oil
storage
volume. (whole
Amounts)
7.
Pool and Name Property
Number and Name Well
No U-L-S-T-R
API Number
1. Enter the 5-digit pool #
followed by the pool
name (in the same cell-
add zeros if necessary,
ex: 07227).
2. In the next row enter the
6-digit producing
property # followed
by the property name (in the same cell- add
zeros if necessary, ex:
026481).
3. In the next row enter the
well number followed by the unit-letter- section-township
range
(U-L-S-T-R) location for
the well. This entire
line is optional de-
pending on the opera-
tors’ preference.
4. In the next row enter the
wells API # (dashes
are important). Need to
appear like so,
Ex: 30-025-05250.
Repeat steps 3-4 for each well
within that property #. Repeat
entire procedure for each differ-
ent Pool and Property #.
17. Point Of 18. Gas 19. Oil on 20. Volume 21. Disposition
Enter the point-of-
disposition (POD)
Number
BTU Or Oil
API Gravity
Enter the gas BTU (Whole
Number) in effect for the
Hand at
Beginning of
Month
Enter the
beginning oil
Enter the volume of oil, gas, or
water transported
or
Transporter
OGRID
Enter a
transporter
OGRID for oil
and gas vol- (7-digits) for gas volume storage vol- otherwise umes transport-
each product transported ume for the disposition ed from the
transported from the property or enter the non
-transported
volumes and
oil storage
balance. An
Oil POD# is
required for
all reported
Oil disposi-
tion. The
(adjusted to
15.025 PISA
at 60° F) or enter the weighted average API
oil gravity (include one
decimal space
format: 00.0)
of oil transported.
current re-
porting
month.
(Whole
Amount, No
Decimals)
(lost, vented,
spilled, used
on property,
ect).
(Whole Num-
bers, No
Decimals)
POD. A list of
current
transporters is
available on
OCD’s website
under Statistics,
C115
Transporters.
Do not enter a
transporter
OGRID, if the
volume in Box
20 corresponds
assigned to non- POD# for transported each well disposition and completion a “code 4” is can be found entered on the OCD
Well List

Page 15
Using the Add-in with Windows XP Convert your C115 Excel Spreadsheet into a text file
• Locate your Completed C115 Excel Spreadsheet
• Double click your Completed C115 Excel Spreadsheet toopen
• For Microsoft Office Newer than Microsoft Office 2003
− Locate the Add-Ins tab on the top tool bar − Click Add-Ins
− C115 Electronic Reporting appears twice
• For Microsoft Office 2003 and older
− Locate Tools on the Top Tool Bar
− Click on Tools − C115 Electronic Report Appears in the list (it should be listed
after Options)
• Click on C115 Electronic Report
• On the first tab titled C115 Report Settings fill in ▪ OGRID ▪ Report Month ▪ Report Year (Must be 4 digits) ▪ Contact Name ▪ Phone (Ex. 505-123-4567)
• Click on the Output File Tab Uncheck the Confirmation Sheet box Then delete everything in the File Path Name Enter the following exactly C:/Feb08.txt
o Remember your unique name this will be the file name of your text file Ex. Feb08.txt
o To save to a different drive like an L Drive you would change the capital C to a capital L and so on for other drives.
(ex. L:/March08.txt) click Ok C-115 Processing Box will appear Click Exit

Page 16
Using the Add-in with Vista and Windows 7 & 8
Convert your C115 Excel Spreadsheet into a text file
• Locate your Completed C115 Excel Spreadsheet
• Double click your Completed C115 Excel Spreadsheet toopen
• Click on Add-Ins Tab • Click C115 Electronic Report (it will appear twice it doesn’t matter
which one you click on)
• On the first tab titled C115 Report Settings fill in
▪ OGRID ▪ Report Month ▪ Report Year (Must be 4 digits) ▪ Contact Name ▪ Phone (Ex. 505-123-4567)
• Click on the Output File Tab ▪ Uncheck the Confirmation Sheet box ▪ Then delete everything in the File Path Name ▪ Enter the following exactly C:/C115/Feb08.txt
o Remember your unique name this will be the file nameof your text file Ex. Feb08.txt
o To save to a different drive like an L Drive youwould need to create a new folder titled C115 in that drive, then you would change the capital C to a capital L andso on for other drives. (ex. L:/C115/March08.txt)
▪ click Ok ▪ C-115 Processing Box will appear ▪ Click Exit

Page 17
Submitting your C-115 Form on OCD Online
In order to submit your C115 you will have needed to Fill out the C115 Form and convert it to a text file
• Open your Internet Explorer Web Browser
• Click on Address Bar on the top tool bar • Key in http://www.emnrd.state.nm.us/ocd/
• Locate OCD Online on the left list of the Home Page
• Click OCD Online • Click E-permitting
• Under Operator Data Locate the Sign in Option listedlast
• Click on Sign In
• Enter your User Id and Password
• Click Sign In • Under Submit Forms locate Other
• Click Other
• Click C115 • Click Create a New C115
• Click on Browse to find your text (.txt) file
• Select C Drive (Local Disc C) in the Look In Drop DownList
• Locate C115 folder
• Click on C115 Folder • Click on Open
• Click on Add Attachment
• Click on Validate files
• If “No Errors Exist” then Click Submit If there are errors you will need to correct all errors on your C115 Form
• Save Changes in Excel • Run the Add-In C115 Electronic Report • Recreate the text file • Start from the beginning of this current list.

Page 18
Production Errors/Solutions
Error Code Solution
A Invalid Pool The pool # does not exist. Please refer to the Well Search option. Enter the affected API Number and
click on Find, look under Well Completions to locate the correct pool number. Pool numbers need tobe
5 digits long, if your pool number is less than 5 digits, add leading zeros, such as 05550. If correct then
look at the effective date for thatpool.
B Invalid Well The API # does not exist. Review the Well Search to search for the well name and number (property #) to
locate the correct API. Note: Review the History Tab under Well Search to verify Effective Date, Property
#, and Operator are correct and reflect the month and year of the C115 you are trying tosubmit.
C Invalid Well
Completion
OCD records indicate this API does not have an approved completion in this pool for the month of
production. Review the Well Search to search by the API for approved completions and their
corresponding pool #’s. Note: Review the History Tab under Well Search to verify Effective Date,
Property #, & Operator are correct and reflect the month and year of the C115 you are trying tosubmit.
D Invalid
Operator
OCD records indicate another operator operates this well. If a Change of Operator took place verify the
effective date of approval, effective dates can cause errors please verify that the effective dates are in
sequence with the C-115 month and year you are trying to submit. Contact the appropriate OCD district
office if you believe your organization operates this well.
E Invalid Fluid The injection fluid code (code 2) is not correct. Valid codes are and must be in CAPS: W, G, C or O Definitions W – Water; G – Gas; C - CO²; O – Other
F Invalid Status The status (code 1) for this completion is not correct. Valid codes are and must be in CAPS: F, P, G, S, T, I,
D or A. Definitions F – Flowing; T - Temporarily Abandoned; P – Pumping; I - Injection Well (evenif shut-
in); G - Gas Lift; D - Salt Water Disposal Well (even if shut-in); S - Shut-in; A – Plugged & Abandoned
G Plugged Zone This well completion is zone abandoned for this production month. Please remove the affected API from
this pool on your C-115. If this completion had production, confirm its removal does not result in an out
of balance condition with disposition.
H Duplicate Well
Completion
This completion was reported twice on the same C-115. This may occur because you havemultiple
sheets with the same API information on your C115 Excel Spreadsheet verify that you have only one
sheet for your C115 form.
I Non Numeric An entry on this line, such as the transporter OGRID # or a disposition number, was reported with an
alpha character instead of a # - typically an ‘O’ instead of a zero.
J Invalid Property The property # is incorrect. Review the Well Search. Enter the affected API Number and click on Find,
look under History to locate the correct Property #. Property numbers need to be 6 digits long if your
Property number is less than 6 digits then add preceding zeros such as 004226. * Note – Property
numbers change when a Change of Operator takes place, new Property numbers are issued. Referto
your Well List to record the new property numbers of the wells affected by the Change of Operator.
K No Water with Oil Production
This is an allowable error - Per 19.15.18.14 NMAC, an operator is required to report the volume of
water produced from an oil and/or associated pool. Produced water includes all water that is an
incidental byproduct from drilling for or the production of oil and gas, including load water. Please
verify that there was no water produced from the respective pools, and if you have oil and/or
associated pools with ZERO barrels of water produced, include a comment detailing the situation to
allow the OCD to process your C-115.

Page 19
Disposition Errors/Solutions
Error Code Solution
A Invalid Pool The pool # does not exist. Please review the Well Search. Use the edit/find option with the affected
API to locate the correct pool number. Your Pool #’s must be 5 digits, If it is less than 5 digits add
leading zeros, such as05550.
B Invalid Property The property # does not exist. Review the Well Search to find the valid property # for thiswell.
Property #’s must be 6 digits, if it is less than 6 digits, add leading zeros such as 002543. * Note –
Property numbers change when a Change of Operator takes place, new Property numbers are
issued. Refer to your Well List to record the new property numbers of the wells affected by the
Change of Operator.
C Invalid Operator for
Property
The property # is valid, but the OCD records indicate a different Operator for that property #. Look
up the valid property # using the Well Search.
D Invalid Transporter The transporter OGRID # is not correct or is missing. Check the transporter OGRID # with your
transporter, or review OCD’s Transporter List. Also confirm there is an OGRID # entered for each
sale.
E Invalid Product The product code (Code 3) is incorrect. Valid product disposition codes are and must be in CAPS:O,
G and W. Definitions G - Gas (includes CO²); O - Crude Oil, Condensate, Drip; W - Water
F No Completions in
the Pool/Property
There are no well completions in this pool/property combination for this month. Review the Well
List to find the correct property # for this API. If you believe OCD records are not current, please
contact the appropriate OCD District Office.
G Non Numeric An entry on this line, such as the transporter OGRID # or a disposition number, was reported with an
alpha character instead of a # - typically an ‘O’ instead of a zero.
H Can't report both a
transporter OGRID
and non-
transported
disposition code
Check your C-115 columns 21-22 and delete any codes (V, O, T, etc.) if you intend to report a
transported volume on that line, or delete the transporter OGRID if the product was not
transported.

Page 20
Other Errors/ Solutions
Omission Error Reports: display well completions that should be on the C-115 for this month,
but are not. Add these API’s to the C115. If you believe OCD’s records are not current, contact
the OCD District Office.
Out of Balance Variance Reports: display pool/properties with balancing variances. ‘Variance
Totals’ displays variance amounts for the entire C115 and ‘Variance Details’ displays property
level detail. If the variance is negative, more disposition was reported for a pool and property
than the total of production for that pool and property. If the variance is positive, more
production is being reported for that pool and property than disposition. Review the Well List
to confirm all wells for the property were included on the C115. Contact the OCD District Office
if you believe OCD records are notcurrent.
Effective Dates: can cause errors please verify that the effective dates are in sequence with the
C-115 month and year you are trying to submit. For example if a well was sold to Oil Inc on
01/01/2010 and Oil Inc tries to submit production for that well for 12/2009 they will receive
Errors, because they were not the Operator of the well in 12/2009.
NOTE: You may review the Well list and Well Search Options by going to
http://www.emnrd.state.nm.us/ocd/ clicking on OCD Online, E-Permitting, and Well
Information which will be located on the top left hand side listed under Operator Data.

DATE FIELD RUN TIME ERROR 2110
1st
If the Project Explorer Box, orthe
Properties Window Box do not
appear. You will have to clickon
View, and then click Project
Explorer and PropertiesWindow
2nd
3rd
Page 21
Project Explorer Box
Properties Window Box
Directions for fixing the Runtime Error 2110
When you receive the Runtime Error 2110 you will need to:
-Click the Debug Option
-Click on C115.XLS in the Project-C115.XLS box
-Click on Forms
-Click on C115Info
-The C115 electronic Reporting box will appear
-Click on the first tab the C115 Reporting Information Tab
-Then click on the Report year box it will highlight as shown
to the left
-Then you will need to look in the Properties Window to
the left to find MaxLength and change it from 5 to 10
-Then you will save

Page 22
Runtime Error 91
❖ Operators are receiving a Runtime Error 91 when they run the excel
add-in or C115 Electronic Report.
• The problem lies in the C115 Electronic Report or (Excel Add-In
Macro)
• Got to the third tab, Titled Output File Tab; there is something
wrong with the File path name.
• Verify that the Confirmation sheet is not check marked and then
verify or have them read you exactly what they have for the file
path name. Usually something is missing something to route itor
they are using too much characters (the limit is 36).
• For Vista or Windows 7 users verify that they created the file
titled C115 in their C Drive then the file path name should read
C:/C115/Jan08.txt
Windows 7 and Vista Windows XP

Page 23
C-115 Status Verification Approved/Rejected
Acceptance or Rejection E-mail Notification
• When the C-115 has been either Rejected or Accepted
o The Operator Administrator and the Op Users whomhave
the Receive Rejection Email and Receive Approval Email
check marked will receive an e-mail notification specifying if
the C-115 was Accepted or Rejected − You may verify your User ID has been set up to receive Approval and Rejection
Emails and update your information including the Email address if it has
changed by:
▪ signing in to OCDOnline
▪ Click on Administration
▪ Click on Modify Personal Information
▪ Then you may verify that the appropriateboxes are check marked and
that all the information is correct an up to date
▪ If there are changes needed you my enter appropriate changes and
click Update
o Sometimes the e-mail may get routed to you Spam mail
Acceptance or Rejection Status Verification Online
• If you do not receive an email for any reason you may verify on our
website
o Open your Internet Explorer Web Browser o Click on Address Bar on the top tool bar o Key in http://www.emnrd.state.nm.us/ocd/
o Locate OCD Online on the left list of the Home Page o Click OCD Online o Click E-permitting o Under Operator Data Locate the Sign in Option listedlast o Click on Sign In o Enter your User Id and Password o Click Sign In (Note: you do not have to sign in to view)
o Locate Operator Data on the top left corner of webpage
o Under Operator Data locate Action Status
o Click Action Status

Page 24
o Click the Operator Drop Down and select your Company or
enter in your OGRID number (Note: If you are Signed In your
company will already appear in the drop down list)
− The Operators are listed in ABC Order
o Locate the Permit Type Drop Down
o Select C115
o Leave everything else the same
o Click on Filter
Understanding the Status of the C-115 in Permit Status
• A list of C115s will appear with the status Submitted, Review,
Approved, Rejected and Draft Note: If you attached multiple months to one C115 submittal the newest only one
month will appear you will have to click View to see what text files were submitted
and approved.
o Submitted means you C115 has been submitted but not yet
reviewed
o Reviewed means that OCD is in the process of reviewing your
C-115
o Approved means your C-115 was Accepted
− Your data will update overnight changes can be viewed
the following day
o Rejected means your C-115 was rejected and corrections
need to be mad and resubmitted
− If your C-115 was rejected a comment explaining whyis
attached to view the comment you will need to do the
following:
▪ Locate View to the left of the ID Row
▪ Click View
▪ Locate View C115 Comments
▪ To the Right of View C115 Comments Clickon
View
▪ A Box will appear with comments explaining why
the C-115 was rejected

Page 25
o Draft (can only be viewed if you are signed in) means your C-115
has been created but is not submitted
Verification of data submitted Detailed Balancing Report
• You may view a readable copy of your C115 online for Oil andGas
Entries in the Detailed Balancing Report
o Open your Internet Explorer Web Browser o Click on Address Bar on the top tool bar o Key in http://www.emnrd.state.nm.us/ocd/
o Locate OCD Online on the left list of the Home Page o Click OCD Online o Click E-permitting o Under Operator Data Locate C-115 Reports o Click on C-115 Reports o Locate Detailed Balancing Report o Click on Detailed Balancing Report o You may enter the OGRID number of the Company youwish
to view or Search for it by doing the following
− You may key in the first three letters of the Company you wish to view and click Find to the right
− A drop down will appear with a list of Company names and their corresponding OGRID numbers to choose from
− Select Company from list
o Select the Production Year o Select Production Month o Click Get Report o This Report will show you all the Oil and Gas Production and
disposition for the Month and Year specified Verification of data submitted Well Search Tool
• You may view Injection / Production Totals submitted on the C115 by
API number in the Well Search Tool
o Open your Internet Explorer Web Browser o Click on Address Bar on the top tool bar o Key in http://www.emnrd.state.nm.us/ocd/
o Locate OCD Online on the left list of the Home Page o Click OCD Online

Page 26
o Click E-permitting o Under Operator Data Locate Well Information o Click on Well Information o Locate Well Search o Click on Well Search o Key in the remaining numbers of the API number o Click on Find o This will show all the Well Information click the expand
arrows to view more
o Scroll down to the Production / Injection title o You will see the years listed and the Injection and production
totals summed up for the year o If you click on the plus sign to the left of the year itwill
expand and separate the totals by month
− You may also export this information to excel by clicking on the export to excel button on the top righthand corner of the Production / Injectiontitle
o If there is an error on the data submitted you will need to
submit an Amended C115 to correct
Submitting Amendments (Corrections)
Note: For amendments you will need to submit the whole file for all wells
owned including the wells that do not need changes because the new file
submitted will completely erase and take the place of the old file
• You will need to open the C115 Excel Spread sheet for the
Month/Year you wish to correct
• Make corrections needed
• Re-run your Add-In C115 Electronic Report creating a new text file
with its unique name
o For instructions see
− Using the Add-in with Windows XP
− Using the Add-in with Window Vista and Windows 7
• Then submit the C115 attaching the new text file
Page 27
o The system already recognizes that there is a C115 accepted for this Month/Year and will code it amended for you
IMPORTANT - Wait until the original report has been accepted before you submit ammendments or corrections.

Page 28
C-115 Data Verification
It is the C-115 Filers responsibility to verify that the data submitted and what is posted on the website match and are correct to their knowledge.
Note: The approved C-115s update the OCD Website overnight you may view original production or changes the next business day after Approval.
Verification of data submitted Detailed Balancing Report
• You may view a readable copy of your C115 online for Oil andGas
Entries in the Detailed Balancing Report
o Open your Internet Explorer Web Browser o Click on Address Bar on the top tool bar o Key in http://www.emnrd.state.nm.us/ocd/
o Locate OCD Online on the left list of the Home Page o Click OCD Online o Click E-permitting o Under Operator Data Locate C-115 Reports o Click on C-115 Reports o Locate Detailed Balancing Report o Click on Detailed Balancing Report o You may enter the OGRID number of the Company youwish
to view or Search for it by doing the following
− You may key in the first three letters of the Company you wish to view and click Find to the right
− A drop down will appear with a list of Company names and their corresponding OGRID numbers to choose from
− Select Company from list
o Select the Production Year o Select Production Month o Click Get Report o This Report will show you all the Oil and Gas Production and
disposition for the Month and Year specified Verification of data submitted Well Search Tool

Page 29
• You may view Injection / Production Totals submitted on the C115 by
API number in the Well Search Tool
o Open your Internet Explorer Web Browser o Click on Address Bar on the top tool bar o Key in http://www.emnrd.state.nm.us/ocd/
o Locate OCD Online on the left list of the Home Page o Click OCD Online o Click E-permitting o Under Operator Data Locate Well Information o Click on Well Information o Locate Well Search o Click on well Search o Key in the remaining numbers of the API number o Click on Find o This will show all the Well Information click the expand
arrows to view more
o Scroll down to the Production / Injection title o You will see the years listed and the Injection and production
totals summed up for the year
o If you click on the plus sign to the left of the year itwill expand and separate the totals by month
− You may also export this information to excel by clicking on the export to excel button on the top righthand corner of the Production / Injectiontitle
o If there is an error on the data submitted you will need to
submit an Amended C115 to correct

C-115 SubmittingAmendments/Corrections
Submitting a C-115 Amendment (Correction)
Note: For amendments you will need to submit the whole file for all wells
owned including the wells that do not need changes because the new file
submitted will complete erase and take the place of the oldfile.
• Open the C115 Excel Spread sheet for the Month/Year you wish to
correct
• Make corrections needed
• Click Save As and rename you Spreadsheet
o (Ex. Jan2012Amend.xls or Jan2012A.xls)
• Re-run your Add-In C115 Electronic Report creating a new text file
with its unique name (Ex. Feb2012Amend.txt)
o For instructions on Using the Add-in Refer to
− Using the Add-in with Windows XP
− Using the Add-in with Window Vista and Windows 7
• Then submit the C115 attaching the new text file
o The system will already recognizes that there is a C115
accepted for this Month/Year and will code it amended after
it is submitted
PPaaggee3300

Page 31
New Mexico Oil Conservation Division C-115 (Operator’s Monthly Report)
Data Layout Updated 6/16/2009—APIGravity
Report Record: Occurs once for each report. This must be the first record in the report.
(Note that more than one report can be submitted in a file.)
Columns Contents Notes
1-6 Reporter’s OGRID Oil and Gas Reporting ID (OGRID) code assigned to the operator by the State of New Mexico.
7 Amended Report Y Report is an amended report N Report is an original report
8-9 Year of production Last two digits of the calendar year; for example, report 2006 as 06.
10-11 Month of production Calendar month value represented as two digits (01-12); for example, report July as 07.
12-17 Report Date YYMMDD format; for example, report July25, 2006 as 060725.
18-52 Contact name Name of the person signing the C-115 report.
53-66 Telephone number Telephone number of individual signing the C-
115 report.
67-68 Report Data Type Code indicating the type of data contained in this report.
OM Operator’s Monthly Report (C-115)
Blank is presumed to be “C-115".
69-78 Reporter’s Tracking Data Optional field which may be used by the report originator for identification information. (Must contain only printable data or spaces).
79 (Reserved for future use) Fill with space.
80 Record ID always “1”

Page 32
Injection/Production Record: Occurs once for each injection or production volume line
reported. Do not attempt to combine injection and production volume reports in a single
record; if both production and injection are to be reported for a well completion, use a
separate record to report each volume. Similarly, report multiple injection products with
separate records.
Columns Contents Notes
1-5 Pool Code Five character pool code associated with the well
completion; for example, 72439.
6-15 API Well Number First 10 digits of the API Well Number (State Code, County Code and Well Identification Number); do not use punctuation. For example, 3003905113.
16 Well Status Code F Flowing P Pumping G Gas Lift S Shut-in
T Temporarily Abandoned
I Injection Well for Enhanced Recovery
D Salt Water Disposal Well
A Plugged and Abandoned
17-23 Injection Volume Barrels of water or MCF of gas injected. Right justify, left zero fill. For example, 0001000.
24-30 Injection Pressure Injection pressure PSIG. Right justify, left zero fill. For example, 0000100.
31 Injected Fluid Type For injection reporting, use the following codes: W Water
G Gas C CO2
O Other
If reporting production, fill with space.
32-38 Oil/Condensate Produced Barrels of crude oil or condensate produced for the month. Right justify, left zero fill. For example, 0000150.
39-45 Water Produced Barrels of water produced for the month. Right justify, left zero fill. For example, 0000245.
46-52 MCF Gas Produced MCF of gas (including CO2 ) produced forthe month. Right justify, left zero fill. For example, 0000099. Adjustment to 15.025 psia.
53-54 Days Produced Number of days that the well completion
produced during the month. Right justify, left zero fill. For example, 09.
55-72 (Reserved for future use) Fill with spaces.

Page 33
Columns Contents Notes
73-78 Producing Property For OCD use only. For other originators, fill with spaces.
79 Verified For OCD use only. For other originators, fill with spaces.
80 Record ID always “3”

Page 34
Disposition Record: Occurs once for each line in the “Disposition of Oil, Gas, and
Water” portion of the C-115 report.
Columns Contents Notes
1-5 Pool Code Five character pool code associated with the well
completion; for example, 72439.
6-11 Property Number Six character property code. For example, 011575.
12 Product Code G Gas (includes CO2) O Crude Oil, Condensate, Drip
W Water
13-19 POD (Point of Disposition) Code
POD number for each product transported from the property or non-transported volume that affects oil storage balance. If a POD is not applicable, fill with spaces.
20-26 API Gravity or BTUs For oil, report API gravity to one decimal place; for gas, report BTUs to nearest whole number.
Right justify, left zero fill, key the decimalpoint. For example, to report an API gravity value of 41.0, use 00041.0; to report a BTU value of 1126, use 0001126.
27-33 Oil On Hand at Beginning of Month
Beginning oil storage volume. Right justify, left zero fill. For example, 0000100.
34-40 Disposition Volume Volume of oil, gas, or water transported or otherwise disposed (lost, vented, spilled, used on property, etc.). Right justify, left zero fill. For example, 0000150.
41-46 Transporter OGRID Transporter OGRID for oil and gas volumes transported from the POD. For example, 007057.
47 Non-Transported Disposition Code
Disposition code from Code 4 table for non- transported products. For transported products, must be a space. (Refer to the C-115 form instructions for the values for this field.)
48-54 Oil On Hand at End of Month
Ending oil storage volume. Right justify, left zero fill. For example, 0000219.
55-72 (Reserved for future use) Fill with spaces.
73-78 Producing Property For OCD use only. For other originators, fill
with spaces.
79 Verified For OCD use only. For other originators, fill
with spaces.
80 Record ID always “5”