TABLE OF CONTENT -...
27
-
Upload
truongkhanh -
Category
Documents
-
view
223 -
download
1
Transcript of TABLE OF CONTENT -...


TABLE OF CONTENTCREDITS . . . . . . . . . . . . . . . . . . . . . . . . . . . . . . . . . . . . . . . . . . . . . . . . . . . . . . . . . . . . . .2
I. INSTALLATION . . . . . . . . . . . . . . . . . . . . . . . . . . . . . . . . . . . . . . . . . . . . . . . . . . . . .5
II. MAIN MENU . . . . . . . . . . . . . . . . . . . . . . . . . . . . . . . . . . . . . . . . . . . . . . . . . . . . . .5A SINGLE PLAYER . . . . . . . . . . . . . . . . . . . . . . . . . . . . . . . . . . . . . . . . . . . . . . . . .5B MULTIPLAYER . . . . . . . . . . . . . . . . . . . . . . . . . . . . . . . . . . . . . . . . . . . . . . . . . . .8C OPTIONS . . . . . . . . . . . . . . . . . . . . . . . . . . . . . . . . . . . . . . . . . . . . . . . . . . . . .11D RATINGS . . . . . . . . . . . . . . . . . . . . . . . . . . . . . . . . . . . . . . . . . . . . . . . . . . . . .12E REPLAY . . . . . . . . . . . . . . . . . . . . . . . . . . . . . . . . . . . . . . . . . . . . . . . . . . . . . .13F CREDITS . . . . . . . . . . . . . . . . . . . . . . . . . . . . . . . . . . . . . . . . . . . . . . . . . . . . . .13G QUIT THE GAME . . . . . . . . . . . . . . . . . . . . . . . . . . . . . . . . . . . . . . . . . . . . . . . .13
III. NEW FEATURES IN SUDDEN STRIKE - RESOURCE WAR . . . . . . . . . . . . . . .14A UNIT’S FIELD OF VIEW . . . . . . . . . . . . . . . . . . . . . . . . . . . . . . . . .14B BUILDING RECONSTRUCTION . . . . . . . . . . . . . . . . . . . . . . . . . . . . .14C UNIT PRODUCTION . . . . . . . . . . . . . . . . . . . . . . . . . . . . . . . . . . . .14D FUEL . . . . . . . . . . . . . . . . . . . . . . . . . . . . . . . . . . . . . . . . . . . . . .15E ALLIED FRONT . . . . . . . . . . . . . . . . . . . . . . . . . . . . . . . . . . . . . . .15
IV. GAME CONTROLS . . . . . . . . . . . . . . . . . . . . . . . . . . . . . . . . . . . . . . . . . . . . . . . . .16A DISPLAY ELEMENTS . . . . . . . . . . . . . . . . . . . . . . . . . . . . . . . . . . . . . . . . . . . . . .16B MOVING ON THE MAP . . . . . . . . . . . . . . . . . . . . . . . . . . . . . . . . . . . . . . . . . . . .18C SELECTING UNITS . . . . . . . . . . . . . . . . . . . . . . . . . . . . . . . . . . . . . . . . . . . . . . .19D UNIT STATUS . . . . . . . . . . . . . . . . . . . . . . . . . . . . . . . . . . . . . . . . . . . . . . . . . .19E MOVING UNITS, HOLDING FORMATIONS, TROOP GATHERING . . . . . . . . . . . . . . . .20F PERFORMING ACTIONS . . . . . . . . . . . . . . . . . . . . . . . . . . . . . . . . . . . . . . . . . . .20G PAUSE MODE . . . . . . . . . . . . . . . . . . . . . . . . . . . . . . . . . . . . . . . . . . . . . . . . . .25H GAME MENU . . . . . . . . . . . . . . . . . . . . . . . . . . . . . . . . . . . . . . . . . . . . . . . . . .25I KEY CONFIGURATION . . . . . . . . . . . . . . . . . . . . . . . . . . . . . . . . . . . . . . . . . . . .27J END OF THE MISSION . . . . . . . . . . . . . . . . . . . . . . . . . . . . . . . . . . . . . . . . . . . .28K RATINGS MENU . . . . . . . . . . . . . . . . . . . . . . . . . . . . . . . . . . . . . . . . . . . . . . . .28L GAME FEATURES . . . . . . . . . . . . . . . . . . . . . . . . . . . . . . . . . . . . . . . . . . . . . . . .29
V. MULTIPLAYER MODE . . . . . . . . . . . . . . . . . . . . . . . . . . . . . . . . . . . . . . . . . . . . . . .30A THE AIM OF THE GAME . . . . . . . . . . . . . . . . . . . . . . . . . . . . . . . . . . . . . . . . . . .30B REINFORCEMENTS . . . . . . . . . . . . . . . . . . . . . . . . . . . . . . . . . . . . . . . . . . . . . . .30
NEWFEATURESSee page 14
SAFETY INFORMATION
About Photosensitive SeizuresA very small percentage of people may experience a seizure when exposed to certain visual images, including flashing lights orpatterns that may appear in video games. Even people who have no history of seizures or epilepsy may have an undiagnosedcondition that can cause these photosensitive epileptic seizures while watching video games.
These seizures may have a variety of symptoms including: lightheadedness, altered vision, eye or face twitching, jerking or shak-ing of arms or legs, disorientation, confusion, or momentary loss of awareness. Seizures may also cause loss of consciousness orconvulsions that can lead to injury from falling down or striking nearby objects.
Immediately stop playing and consult a doctor if you experience any of these symptoms. Parents should watch for or asktheir children about the abovesymptoms. Children and teenagers are more likely than adults to experience these seizures.
The risk of photosensitive epileptic seizures may be reduced by sitting farther from the television screen, using a smaller televi-sion screen, playing in a well-lit room, and not playing when you are drowsy or fatigued. If you or any of your relatives have ahistory of seizures or epilepsy, consult a doctor before playing.
Uses Bink Video. Copyright (C) 1997-2004 by RAD Game Tools, Inc.
CREDITSEXECUTIVE PRODUCERViktor Vinokurov
PROJECT MANAGERVladimir Medeiko
SENIOR PROGRAMMERDenis Konovalov
PROGRAMMERSAlexey "Cupper" NaumovNick KotlyarovOleg SemenovVictor "BukTop" BargachevVictor StreltsovYuri "KilleR" Belotserkovsky
ARTISTSAlexey BykovAlexey GoussevAlexey "Losidze" Krivorotko
Dmitry "Plastilin" JempalaEkaterina KrivorotkoGleb "troublemaker" KuznetsovGram PolupadloRoman "Popan" Barinov
SCENARIO DESIGNERSOstap "Ostap" DragomoschenkoSergey "Monty" Korshun
MUSIC, SOUND AND GAMEPLAYIgor "pocomaxa" Rzheffkin
QUALITY ASSURANCEPavel "Pasxa" Pleshachkov
HISTORCAL CONSULTINGSergey Pavlov
MANUALDenis KonovalovOleg Semenov

I. INSTALLATIONInsert the Sudden Strike - Resource War-CD into yourCD-ROM drive. The installation program should startautomatically. If the installation program does not startautomatically, the AutoPlay function of the CD-ROMdrive is probably deactivated. In this case, you canstart the installer manually by double-clicking the fileSETUP.EXE on the Sudden Strike - Resource War-CD.Then follow the instructions of the installer. After in-stallation is complete, you can start Sudden Strike -Resource War via the shortcut on your desktop orfrom the start menu. If the installation was cancelledfor some reason, you can remove all components thathave so far been copied to your hard drive by choos-ing the shortcut UNINSTALL SUDDEN STRIKE - RESOURCE WAR in the Sudden Strike - ResourceWar group folder in the start menu.
II. MAIN MENUAfter the program has started, the Main Menu willopen. In this menu you can select the desired gametype, change the game parameters and view previously saved replays and game ratings.
A. SINGLE PLAYER
Select the option SINGLE PLAYER in the Main Menuor press the S key in order to open the Single PlayerMenu. From this menu you can select the singleplayer mode you want and start both a new campaign and single missions. You can also load apreviously saved game, add new player names anddelete or rename existing players. If you would like to add the name of a new player,enter the name into the box in the upper left corner
C SPECIAL FEATURES OF THE MULTIPLAYER MODE . . . . . . . . . . . . . . . . . . . . . . . . . .31D COMPLETING A MULTIPLAYER GAME . . . . . . . . . . . . . . . . . . . . . . . . . . . . . . . . . .31
VI. DESCRIPTION OF THE VARIOUS UNIT TYPES . . . . . . . . . . . . . . . . . . . . . . . . . .32A INFANTRY . . . . . . . . . . . . . . . . . . . . . . . . . . . . . . . . . . . . . . . . . . . . . . . . . . . .32B ARTILLERY . . . . . . . . . . . . . . . . . . . . . . . . . . . . . . . . . . . . . . . . . . . . . . . . . . . .34C TRUCKS . . . . . . . . . . . . . . . . . . . . . . . . . . . . . . . . . . . . . . . . . . . . . . . . . . . . . .35D SUPPLY TRUCKS . . . . . . . . . . . . . . . . . . . . . . . . . . . . . . . . . . . . . . . . . . . . . . . .36E TANKER TRUCKS . . . . . . . . . . . . . . . . . . . . . . . . . . . . . . . . . . . . . . . . . . . . . . . .36F JEEPS . . . . . . . . . . . . . . . . . . . . . . . . . . . . . . . . . . . . . . . . . . . . . . . . . . . . . . .36G TANKS AND ARMORED VEHICLES . . . . . . . . . . . . . . . . . . . . . . . . . . . . . . . . . . . .37H MOTORCYCLES . . . . . . . . . . . . . . . . . . . . . . . . . . . . . . . . . . . . . . . . . . . . . . . . .37I MOBILE ANTI-AIRCRAFT CANNON . . . . . . . . . . . . . . . . . . . . . . . . . . . . . . . . . . . .38J MOBILE MISSILE LAUNCHERS AND ARTILLERY . . . . . . . . . . . . . . . . . . . . . . . . . . .39K SHIPS . . . . . . . . . . . . . . . . . . . . . . . . . . . . . . . . . . . . . . . . . . . . . . . . . . . . . . .40L TRAINS . . . . . . . . . . . . . . . . . . . . . . . . . . . . . . . . . . . . . . . . . . . . . . . . . . . . . .40M CRUISERS . . . . . . . . . . . . . . . . . . . . . . . . . . . . . . . . . . . . . . . . . . . . . . . . . . . .40N AIRCRAFT . . . . . . . . . . . . . . . . . . . . . . . . . . . . . . . . . . . . . . . . . . . . . . . . . . . . .41O V2 . . . . . . . . . . . . . . . . . . . . . . . . . . . . . . . . . . . . . . . . . . . . . . . . . . . . . . . . .42
VII. DESCRIPTION OF ADDITIONAL OBJECTS . . . . . . . . . . . . . . . . . . . . . . . . . . . . . . . .43A AMMO BOXES AND CONSTRUCTION PARTS . . . . . . . . . . . . . . . . . . . . . . . . . . . . .43B BUILDINGS . . . . . . . . . . . . . . . . . . . . . . . . . . . . . . . . . . . . . . . . . . . . . . . . . . .43C TUNNELS . . . . . . . . . . . . . . . . . . . . . . . . . . . . . . . . . . . . . . . . . . . . . . . . . . . . .43D BRIDGES . . . . . . . . . . . . . . . . . . . . . . . . . . . . . . . . . . . . . . . . . . . . . . . . . . . . .44E OIL TANKS . . . . . . . . . . . . . . . . . . . . . . . . . . . . . . . . . . . . . . . . . . . . . . . . . . . .44F RAILWAYS AND AIRFIELDS . . . . . . . . . . . . . . . . . . . . . . . . . . . . . . . . . . . . . . . . .44
VIII. SHORT DESCRIPTION OF THE CAMPAIGNS . . . . . . . . . . . . . . . . . . . . . . . . . . . . . .44A GERMAN CAMPAIGN I . . . . . . . . . . . . . . . . . . . . . . . . . . . . . . . . . . . . . . . . . . . .44B GERMAN CAMPAIGN II . . . . . . . . . . . . . . . . . . . . . . . . . . . . . . . . . . . . . . . . . . .44C US CAMPAIGN . . . . . . . . . . . . . . . . . . . . . . . . . . . . . . . . . . . . . . . . . . . . . . . . .44D UK CAMPAIGN . . . . . . . . . . . . . . . . . . . . . . . . . . . . . . . . . . . . . . . . . . . . . . . . .45
IX. HINTS . . . . . . . . . . . . . . . . . . . . . . . . . . . . . . . . . . . . . . . . . . . . . . . . . . . . . . . . . . .45A SCOUT, SCOUT, AND SCOUT . . . . . . . . . . . . . . . . . . . . . . . . . . . . . . . . . . . . . . . .45B WHY DO MY UNITS DISOBEY MY ORDERS? . . . . . . . . . . . . . . . . . . . . . . . . . . . . .46
X. FAQ . . . . . . . . . . . . . . . . . . . . . . . . . . . . . . . . . . . . . . . . . . . . . . . . . . . . . . . . . . . .47
LICENSE AGREEMENT . . . . . . . . . . . . . . . . . . . . . . . . . . . . . . . . . . . . . . . . . . . . . . . . . . . . .48
5

To start a new customized campaign click the CUSTOM button or press the C key. The custom cam-paign list will appear. In the list you can select a cus-tomized campaign and proceed to the first missionbriefing by clicking the START button or pressing theS key. Click the CANCEL button or press the ESC keyto return to the Campaigns Menu. You can create your own campaigns with the SuddenStrike - Resource War editor.Click the CANCEL button or press the ESC key to exitfrom the Campaigns Menu and return to the SinglePlayer Menu.
2. STARTING A SINGLE MISSION
Click the SINGLE MISSIONS button or press the Skey to start a new single mission. Select the desiredmission from the displayed list by left-clicking.
You will see a mission description as well as informa-tion about the map size and a reduced map image tothe right of the screen. Click the START button or pressthe S key in order to access the mission briefing.Click the CANCEL button or press ESC to exit theSingle Missions screen and return to the Single PlayerMenu.
3. LOADING A SAVED GAME
If you would like to load a previously saved game,click the LOAD button or press the L key. A list con-taining all saved games will appear where you canselect the desired saved game by left-clicking. Thenclick the LOAD button or press the L key to continuethe game.You can exit the Load screen and return to the SinglePlayer Menu with the CANCEL button or the ESC key.
and press the ENTER key or click the NEW button.In order to change an existing player name, selectthe desired name in the list by left-clicking it, thenenter the new name into the box in the upper left corner and click the RENAME button. The highlightedname from the list will then be changed.
NOTE: If you press the ENTER key instead of clickingthe RENAME button, the name of the player will beadded.
To delete an existing player name select the namefrom the list, and click the DELETE button. Confirmyour action by pressing the ENTER key or clicking theYES button, which deletes the player name as well asall the player's saved games and existing replays. To exit from the Single Player Menu and return to theMain Menu, click the CANCEL button or press ESC.
1. STARTING A NEW CAMPAIGN
If you would like to start a new campaign, click theCampaigns option or press the C key in the SinglePlayer Menu. In the Campaigns Menu, you can selectthe country you would like to play as - Germany,Great Britain and the United States. After choosing acountry, you will proceed to the first mission briefing.Here you will be informed about the general circum-stances and aims of the upcoming mission.
NOTE: All campaigns differ in type and difficulty level(see page 44 for details).
Click START or press the S key in the Briefings Menu.If you would like to repeat the briefing, click RESTART or click the R key. You can view your mis-sion objectives with the buttons to the left of the map.Click CANCEL or press ESC in order to return to theCampaigns Menu. If you would like to pause thebriefing, click PAUSE or press the P key.
6 7

2. JOINING AN EXISTING GAME
Click the JOIN button or press the J key to join an ex-isting multiplayer game. A list containing all hosts willappear. Select the host you want to connect to andclick the JOIN button or press the J key to proceed to the next screen.
NOTE: For an automatic search of all available sessions waiting for players leave the text box HOSTNAME blank and press JOIN.
If you would like to add a new host to the list, enterthe corresponding name or the IP address into thetext box HOST NAME, and press the ENTER key orclick the NEW button.
To delete an existing host, simply select the namefrom the list and click the DELETE button.In the next screen you can view a list of all gamesthat are still waiting for players. Select the game youwould like to join and proceed to the Players screenwith the button JOIN or the J key. Exit the screen and return to the Multiplayer Menu byclicking the CANCEL button or pressing ESC.
3. LOADING A SAVED GAME
You can load a game previously saved by a particularplayer by clicking the LOAD button or pressing the Lkey. A list containing all saved games will appearwhere you can select the desired saved game by left-clicking. Click the LOAD button or press the L key toproceed to the Players screen.Exit from the Load screen and return to theMultiplayer Menu with the CANCEL button or ESC.
4. THE MULTIPLAYER SCREEN
All players who have already joined the game are displayed in the list with their selected colors. The player's country, team, standby status and the pingrate (a measure for the quality of the network con-nection - smaller values are better) are displayedafter the player's name. To view additional informa-tion such as real name, clan, etc., click on a player'sname.
4 A. GAME SETTINGS AND GAME START
Please select the nation and the team you would liketo play for in order to start the game.Click the field COUNTRY or the button to the right ofthat field in order to select the nation. You can playfor Germany, Japan, Great Britain, the USA andRussia. If you would only like to watch the game, select the option OBSERVER.Click the field TEAM or the button to the right of itfor the team selection. You can select one of the fouravailable teams. Units of one team do not shoot eachother. You can change your color in the game with thecolored buttons to the upper right. Colors alreadychosen by other players are deactivated and therefore displayed in gray. Click READY to confirmyour choice or press the R key. As a host you have to wait until all the other players are ready.Then the button START will be activated. Click STARTor press the S key in order to start the game.The chat field in the bottom right corner enables youto send short messages to the other players. These aswell as the other players' messages are displayed inthe window under the player list.
NOTE: If the mouse cursor is within the chat field, youcannot use short keys to confirm your readiness andthe game start.
B. MULTIPLAYER
Select the MULTIPLAYER option in the Main Menu orpress the M key to open the Multiplayer Menu. In thismenu, you can modify some of the multiplayer gameparameters as well as enter new player names anddelete or rename existing players. You can select the connection IPX/SPX (local), TCP/IP(local/Internet) and modem with the button to theupper left of the screen. If you would like to changethe connection type of the current multiplayer ses-sion, simply click the button to the right of the de-scription of the connection.In this screen you can add, rename and delete playernames just as in the Single Player Menu (see section"Single Player", p. 5). Along with player names, youcan also enter additional information such as Name,Clan, URL, Info. This information will be available forall the players in the multiplayer game. Enter this additional information by clicking the appropriate
text box, typing the info in it and pressing the ENTER key.You can exit the Multiplayer Menu and return to theMain Menu by clicking CANCEL or pressing the ESC key.
1. CREATING A NEW GAME
Simply click the CREATE button or press the C key ifyou would like to generate a new multiplayer game.A list with all available multiplayer missions will ap-pear where you can select your desired mission byleft-clicking. To the right-hand side of the screen youwill see a mission description as well as informationabout player limitations, the map size and a reducedimage of the map. You can proceed to the Multiplayerscreen with the button OK or the ENTER key.Exit the Create Game screen and return to theMultiplayer Menu by clicking the CANCEL button orpressing the ESC key.
8 9

Encrypt Saved Games: This option allows you toprotect your saved games with a code algorithm,which can prove useful in tournaments. If this optionis activated, the game will save a little bit moreslowly.
Victory Score and Score Type: The VICTORYSCORE indicates the score necessary for winning thegame. Your score increases every time you eliminatean enemy unit. The SCORE TYPE indicates who hasto achieve the victory score - the whole team or anyone of the team members. If you would like to playwithout score limitation (default), enter zero into thebox VICTORY SCORE. In this case; the buttonSCORE TYPE has no effect.
C. OPTIONS
Select OPTIONS in the Main Menu or press the O keyto enter the Options Menu. In this menu, you can set
up some of the game parameters for single and multiplayer modes. The following options are available:
Game Difficulty: Choose between very easy/easy/normal/hard by clicking the button to theright. This option applies to single missions and cam-paigns only and has no effect in multiplayer games.
Game Resolution: To switch between the three predefined screen resolutions, click the correspondingbutton to the right of the text box. The selected gameresolution applies to all game modes.
Units in Player Color: If this option is enabled,your units are displayed in the selected colors in multiplayer games. This option cannot be used in single player missions and campaigns.
Use Details: This option displays rain or snow when enabled.
Click CANCEL or press the ESC key if you would liketo leave the menu and return to the multiplayermenu.
4 B. LOCKING/UNLOCKING PLAYERSLOTS, EXCLUDING PLAYERS
As a host you can change the number of players inthe game by locking and unlocking player slots. Click the button to the left to do so.As a host you can also exclude unwanted playersfrom the game. To do this, click the button to the rightof the player's name.
4 C. GAME OPTIONS
As a host, you can modify the game options as youlike. You cannot change any settings if you have onlyjoined an existing game.
The following game options are available:Game Speed: To change the game speed, use theGAME SPEED slider in the upper left corner
Zeppelin Inactivity Period: This is the time afterthe start of the game, when a zeppelin group (seepage 30 for details) can be taken for the first time.An inactivity period makes surprise attacks at the beginning more difficult.
Zeppelin Capture Delay: This refers to the time azeppelin group can be held until it is defined as captured.
Time-Out Defeat Delay: When a player has nozeppelin for longer than this time, the game is con-sidered lost.For all time options, the time is given in Minutes :Seconds. If you would like to change one of these values, left-click on the displayed time, enter the newtime and press the ENTER key.
10 11

E. REPLAY
Select the REPLAY option in the Main Menu or pressthe P key to open the REPLAY screen. You can viewreplays of previously played games in this screen.In order to watch a replay, you must first select aplayer name from the list to the right.If you would like to watch replays of single missionsor campaigns, click the button SINGLE PLAYER orpress the S key. Then you can select a replay from thelist and click the REPLAY button or press the R key.You can view the replay of multiplayer games withthe MULTIPLAYER button or the M key. Then selecta replay from the list and confirm your choice withthe REPLAY button or the R key.
NOTE: Replays are only saved with the game if theoption SAVE REPLAY FILE is enabled (see page 12for details).
Click the CANCEL button or press the ESC key inorder to exit the Replay Menu and return to the MainMenu.
F. CREDITS
In the Main Menu you can select the CREDITS optionor press the C key to view the Credits screen contain-ing all the people involved in the creation of thisgame.To exit from the Credits screen and return to the MainMenu, press the ESC key.
G. QUIT THE GAME
If you would like to exit the game, click the QUITbutton or press ESC in the Main Menu.
Save Replay File: If you choose this option, a replay file will be saved in a special format every timeyou save the game. Replays can be watched in theREPLAY Menu (see page 13). This option applies toall game modes.
Skip Intro: If enabled, the introduction will not beshown. (The intro can also be cancelled by pressingthe SPACEBAR.) Click the OK button or press theENTER key to exit from the Options Menu and returnto the Main Menu with all changes applied.
If you do not wish to apply the changes, click theCANCEL button or press ESC to exit the Options Menuand return to the Main Menu.
D. RATINGS
Select the option RATINGS in the Main Menu or pressthe R key to open the Ratings Menu. Here you canview the ratings for all the single player missions youhave won. You can browse the campaigns (custom campaignsexcluded) and individual missions with the button inthe upper left corner.If you select a mission from the right-hand list, the listto the left will display successful attempts to completethis mission along with the name of the player whocompleted it. The same player name can appear multiple times if this player completed the missionmore than once. Left-clicking on a player name showsyou the rating of this attempt in the right window.Click the CANCEL button or press ESC if you wouldlike to exit the Ratings screen and return to the MainMenu.
12 13

1514
III. NEW FEATURES INSUDDEN STRIKE - RESOURCE WAR
There are some new features in Sudden Strike -Resource War, such as unit's field of view, unit pro-duction, building restoration, fuel and allied front.
A. UNIT'S FIELD OF VIEWIn SSRW, as opposed to Sudden Strike, such units astanks and SPGs have largely limited base views butthey have received additional narrow view sectors.When tanks have two additional sectors - one for thedriver (in the forward direction), and the other forthe commander (directed where the turret is facing),SPGs have only one sector looking forward, but it iswider than the one for tanks. This makes tanks andSPGs more vulnerable against infantry and AT guns.For example, a flamethrower soldier can sneak up tothe tank from behind and burn the crew before thetank turns around.
Base view range of units (without binoculars andexperience modifiers) is as following:
B. BUILDING RECONSTRUCTION
Any building may now be reconstructed by supportunits (though it takes a lot of time and resources). Toreconstruct a building, select a support unit and clickon the damaged/destroyed building.As every building is an important tactical object onthe map, destruction and reconstruction of units al-lows the players to change the tactical scheme of themap dynamically, which is especially interesting inmultiplayer mode.
C. UNIT PRODUCTIONNext feature Sudden Strike - Resource War has is unitproduction. There are production facilities on mostcampaign maps. Read mission briefing carefully andlook for the flagstaff near building to recognize whatproduction facilities map contains.(Please remember! Not every building looking like afacility from previous map has to be a facility in nextmission. Furthermore, the building name and its functionality are different things too.)
To make any production facility working for you, atleast two conditions must be fulfilled:
1. Any enemy units must not be atadjacent to facility zone (2-3square border at usually).
2. Few units of yours must be there.(In some cases it is possible to putsoldiers into the building to control facility, but in other cases- not).
Almost every time, when you capture or lose the facility, the corresponding message will appear.
You do not need any resources to run the productionfacility, but in some cases, the facility building must befully repaired. Standard support/maintenance vehiclecan repair any building, as easy as it can repair anyother vehicle (just right-click on damaged object).
After capturing production facility, you will get firstreinforcement in few minutes. Other reinforcementswill arrive in some minutes as long as the facility willbe yours, or production limit will be reached.
You need to keep at least 2 units in facility borderzone, to get reinforcement at production facility. Donot occupy facility entrance. Reinforcement can't exitit if you do this.
There are some other facilities (electric power station,as example) witch must be controlled too for mainproduction facilities work properly, or produce bettervehicles.
D. FUELWhen some of your vehicles does not want to go, theyare out of fuel probably. Look at right indicator bar(orange line or black when empty). Every vehicle hasits own fuel tank capacity and fuel consumption, thatis why fuel indicator shows number of squares vehi-cle can go with current fuel reserve instead of fuel capacity (fuel tanker is an exclusion).
You can take the tanker and fill up your vehicles withfuel (select tanker and right-click on vehicle to refill it).
Now it's time to show where fuel tankers can be re-filled next ways:• Fuel Barrel. It work as ammo box for maintenance
vehicle. Just select tanker and right-click on barrel.• Tank-truck. Select tanker and right-click on it to
refill.• Fuel Refinery. It can refill any vehicle. To fill up
the vehicle move it to face border of building (1-3squares) and wait some seconds (up to 1 min). Fuelrefinery must be fully repaired to work properly.
E. ALLIED FRONTThere are allied (AI-controlled) units in some missions. Commonly, allied units are independent andperform their missions on battle region. They cancover your back, production objects, support in attacks and even attack by their own initiative.
Most of allied units has great manpower, but someunits has limited number of reinforcements. Supportand cover allied units, especially if it said in missionbriefing. If eliminated, some allied units will not takepart in next campaign operations, or will act in otherway!"
Officer - 13Infantry - 11 oder 12Planes - less then 10
(except for scout)Armored Trains - 10 (20 in tracks direction)Cars - 9 (+1 with passengers)Any support cars - 9Guns - 8 o. 9Armored cars and mobile AA - 8Tanks and SPGs - 3 (+3 with crew in hatch,
+4 with soldier on armor), 7-9 in narrow sectors

16 17
IV. GAME CONTROLS
A. DISPLAY ELEMENTS
1. MAIN WINDOW
The main window displays a detailed view of the unitsand terrain. Areas within your units' line of sight aredisplayed brighter than others; these are the onlyareas where you can see enemy units. Areas outsideof the range of all your units are darker; enemy unitswithin these regions will not be displayed (this of non-visible areas is often referred to as "Fog of War").
2. MAP
The map provides you with a bird's-eye view of theentire playing field on a smaller scale. Areas within
your units' line of sight appear brighter, the remain-der of the map is dark. Your units are displayed asgreen dots, enemy units within line of sight are dis-played as red dots. Allied units under enemy attackwill be briefly displayed with concentric red circlesaround them.
3. TACTICAL MAP
The tactical map provides you with an enlarged viewof the map. Press and hold down the CAPSLOCKkey to view the tactical map. Your units are displayedas green dots, enemy units within line of sight aredisplayed as red dots just as on the map. Map objects(like buildings, bridges, etc.) are also displayed. Inthis mode, you can change the position of the mainwindow with the mouse or arrow keys as usual, but itis not possible to select units or give them any orders.
3. INFORMATION AREA
The information area contains information on theunit which is currently positioned under the cursor.
Description
Displays the unit's name and primary weapon, if available.
Life (L; displayed in green)
The length of the bar represents the unit's current sta-tus in percent; the number below the bar representsthe unit's status in absolute values. This way playerscan compare different units. If this value sinks belowits maximum, it will rise again slowly, until soldiers
have recovered. Minor repairs to vehicles will bemade by the crew themselves. If the value is too closeto zero, it will continue to sink slowly (e.g. after seri-ous injuries or severe damage leading to consequen-tial damages). If this value reaches zero, the unit islost.
Experience (Ex; displayed in reddish pink)
Displays the unit's experience. The highest possibleexperience level is 1000; the bar displays the unit'sexperience as a percentage of the highest value.Units with higher experience levels can shoot moreaccurately and suffer less damage through scatteredfire and direct hits. Units with higher experience lev-els also make better use of the natural cover pro-vided by the landscape.

C. SELECTING UNITSThere are various ways of selecting a group of units.Selecting another group of units invalidates all previ-ous selections (Exception: selecting units while hold-ing the SHIFT key).
1. LEFT-CLICK/SELECTION
Clicking the left mouse button selects the unit cur-rently under the cursor.
2. LEFT-DRAG/SELECTION OF SEVERALUNITS
Pressing and holding the left mouse button whilemoving the cursor across the screen draws a selectionbox around the units. Release the mouse button toselect all units within the generated rectangle.
3. LEFT DOUBLE-CLICK/SELECTION OF ALL UNITS OF THE SAME TYPE
Double-clicking a unit with the left mouse button se-lects this and all other units of the same type withinthe main window. Hold the Ctrl key while double-clicking a unit to select all units of that type on theentire map.
4. NUMBER KEYS
Existing selections can be saved to one of 10 slots bypressing CTRL-0 to CTRL-9. Pressing the respectivenumber key reselects the units in the assigned group.Pressing the number key twice quickly reselects theunits and centers the view around them.
5. SELECTION WITH THE SHIFT KEY
Units can be added to existing groups by holding theSHIFT key while selecting them by clicking, drawinga rectangle, double clicking or pressing a numberkey. Units can be removed from the selection by hold-ing the SHIFT key and then left-clicking the unit or
units.
D. UNIT STATUS
The status bar is displayed for the selected units onthe screen.All data from the information area are displayed forevery unit. These are from top to bottom: one or twobars for ammo (in yellow; depending on whether theunit possesses secondary ammunition), one formorale (in blue), one for experience (in red) and onefor life (in green). For vehicles which are capable oftransporting other units, the number of availableplaces is displayed above the status bars as an emptyor filled box.
Objects containing units (e.g. cannon controlled bycrew, trucks towing cannon, etc.) display the statusbar of those units when they are selected. Buildings(houses, watchtowers, etc.) are an exception: If thesecontain units, their status bars are displayed even ifthe building has not been selected.
Morale (M; displayed in blue)
Displays the unit's morale. Like experience, moralehas effects on the unit's parameters, but unlike ex-perience it can increase or decrease during the game.Low morale influences the experience level nega-tively. Units with a high morale have parameterbonuses even if they are not experienced at all.Officer's morale increases during the course of thegame. Other units' morale values equals the averagemorale value of all officers nearby. If there is no of-ficer nearby, the value is 500 (neutral default value).A unit's morale can be decreased by enemy leafletand propaganda vehicles.
Fuel (F, orange bar)This shows the amount of fuel remaining in the tank.It is measured as the distance (in fuel cells) the unitmay travel without refueling.
Primary Ammo (A; first yellow bar)Determines the amount of remaining ammunition forthe unit's primary weapon.
Secondary Ammo (A; second yellow bar)Determines the amount of remaining ammunitionfor the unit's secondary weapon. The values for thetwo ammo types represent the exact number ofshots that can be fired using this weapon. (However,anti-aircraft cannon or rocket launchers use up a lotof bullets in a very short space of time. You can findfurther information in the section "Description of theVarious Unit Types").
NOTE: The amount removed from the supply truckswhen reloading (see page 36 for details) not onlydepends on the amount of ammunition that the cor-responding weapon requires, but also on the partic-ular weapon type. Because a supply truck may carryammunition for various types of weapon, its cargo ismeasured in weight rather than shots.
B. MOVING ON THE MAP
You have following options for choosing the section ofthe map to be displayed in the main window:
1. LEFT-CLICKING THE MAP
Left-clicking a particular point of the map displays thearea within the rectangle in the main window.
NOTE: Unlike left-clicking an area in the main win-dow, left-clicking the map does not select any units.However, right-clicking has the same effect in bothcases.
2. CHANGING THE VIEW WITH THE MOUSE
Moving the mouse to the edge of the screen or to oneof the four corners will turn the cursor into an arrowpointing in that direction. The section of the map thatis displayed in the main window will move continu-ously in that direction (the speed of the sectionchange can be altered in the Game Menu - see page26 for details).
3. CHANGING THE VIEW WITH THEARROW KEYS
By pressing the arrow keys (in combination), the sec-tion of the map that is visible in the main window willbe moved continuously in the respective direction(the speed of the section change can be altered in theGame Menu - see page 26 for details).
4. SAVING THE POSITION OF THE MAINWINDOW ON THE MAP
Map areas can be saved in up to 8 slots by pressingthe keys Ctrl-F1 to Ctrl-F8. The correspondingfunction keys then select the different positions of themain window.
18 19

3. STAND GROUND
This option can be toggled on and off using the G keyor by clicking the STAND GROUND button. When giving this order (the movement arrow is crossed outin red), units will not move automatically to attacktheir opponents. This option make sense when estab-lishing a front line just outside enemy defenses as itstops your units moving into the firing range of theenemy artillery. If only some of your selected unitshave the STAND GROUND option active, the crossand the movement arrow will be grey.The order to STAND GROUND stops the supply truckautomatically driving up to units in order to REPAIR/RELOAD them (see page 36 for details).
4. HOLD FIRE
This option can be activated and deactivated with theT key or by clicking the HOLD FIRE button. Whengiven this order (the target crosshair is crossed out inred), units will not automatically open fire on enemyunits which enter their line of sight. This option makessense if you want your units to move quickly acrossthe terrain without attracting attention. If only someof your selected units have the HOLD FIRE option active, the cross and the movement arrow will begrey. If all of the selected units have this option active, the cross will be red and the target crosshairwill be grey; The order to HOLD FIRE stops the sup-ply truck automatically driving up to units in order toREPAIR/RELOAD them (see page 36 for details).
5. SPECIAL ORDERS
You can give some types of unit so-called special orders. This option can be toggled on and off usingthe B key or by clicking on the appropriate button.The following special orders are available:
• Combat/March Mode for tanks and anti-tankunits. The Combat Mode is the usual mode fortanks. In the March Mode, a crew member of thetank leans out of the tank.This increases the tank's line of sight but that par-ticular soldier has absolutely no protection againstenemy fire. When a tank in the March Mode is at-tacked by the enemy, it automatically switches toCombat Mode.
• Foot/Crawl Mode for infantry. The Foot Modeis the usual mode for infantry units. In the CrawlMode, a unit has a decreased line of sight, butbetter protection against enemy fire. It will alsofire more accurately.
• Auto Repair Railway/Airfield option for sup-ply trucks. If this option is enabled, the supplytruck will automatically repair damaged railwaysor airfields, and then return to its previous posi-tion. If the option is disabled, the supply truck willignore railway and airfield damage.
• Distribution For Buildings. This option allowsyou to redistribute your soldiers inside buildingsusing three predefined orders. SEQUENTIALDISTRIBUTION allows you to distribute your in-fantry sequentially - at first occupying all roomson the ground floor, then on the first floor, etc.EVEN DISTRIBUTION allows you to distributeyour infantry evenly on the different floors - withthis distribution mode, every floor will have atleast one soldier on it. DISTRIBUTION BY VISI-BILITY has soldiers with better line of sight oc-cupy upper floors in order to get a better view.Moving soldiers manually between floors is calledUSER DISTRIBUTION of soldiers inside thebuilding.
E. MOVING UNITS, HOLDING FORMATIONS, TROOP GATHERING
Once you have selected one or more units, right-clickin the main window or the map to display the corre-sponding position on the terrain (unless the units donot have MOVE as their standard command).If the formation of these units is divided or separateddue to the structure of the terrain, try to gather yourtroops again once they have reached their target.Hold the CTRL key when giving the order to MOVE.Your units will move to the specified location and thengather together as closely as possible in their respec-tive groups.In any case, right-clicking displays concentric greencircles indicating the position the unit is approaching.
F. PERFORMING ACTIONS
1. MOUSE CURSOR, RIGHT-CLICK
Actions can be performed by selecting units and right-clicking a location in the main window or the map.The first option available is the respective unit's stan-dard command (usually MOVE; the cursor changesinto a circular crosshair with a dot in the center).Move the mouse cursor over another unit or objectyour selected unit (or units) to interact with. Then thecursor will automatically change into the appropriateicon (for example, if you have selected a truck andyou move your mouse over a cannon, the cursor willchange into the LOAD icon; if you have selected in-fantry units and move the cursor across a building or
transport vehicle, it will change to the ENTER icon,etc.). If you have selected several units at once, thecursor will change if at least one of these units is ca-pable of interacting with the object under the cursor.If you have selected an order from the Orders Menu,the cursor remains unaltered but the chosen action isstill carried out. If you have selected different unittypes and not all of these are capable of performingthe selected action, then only those capable of doingso will carry it out. You might, for example, ordermultiple trucks to UNLOAD; only those trucks whichactually have a cargo will move to the specified loca-tion.
2. ORDERS MENU
The Orders Menu is located to the right of the map.There is a 3x4 grid of boxes displaying only those or-ders which your units are capable of carrying out.Left-click on one of these orders to issue it (if it is anorder that does not involve interaction with anotherobject). Otherwise, the cursor will change into the appropriate icon and the order will be carried out assoon as you right-click an object in the main windowor a location on the map. If the desired action cannotbe carried out with the object you clicked on, nothingwill happen. The actions represented in the OrdersMenu can be chosen by clicking on them or by press-ing the following keys, representing the 3x4 block ofboxes: Q-W-E-R, A-S-D-F, Z-X-C-V.
20 21

Information On Different Aircraft Types
If you move the cursor across the aircraft icons, theinformation area will display the type of plane, thenumber of loaded (READY) planes and the number ofaircraft currently on the remote airfield (BOMBERS,SCOUTS, TRANSPORTS, INTERCEPTORS) as well as thenumber of cargo loads (BOMB CARGO, REFUELS, PARATROOPS, CARGO) including those already trans-ported.The cargo currently being transported by air is not represented.Every aircraft you send will have exactly one cargoload on board; you can never request more planesthan there are fuel cargo remaining at the airfield,even if there are more aircraft available (in short:You cannot send for empty planes).
Requesting Air Support
You can request air support by clicking on the respec-tive planes icon. This will open the Air Support Menuin the Orders Menu. This menu consists of one to fivebuttons (depending on how many aircraft you haveat your disposal) for selecting the requested numberof planes, and the CANCEL button. CANCEL allowsyou to terminate your request at any time before theair support has been dispatched.
Setting Waypoints
When you click on an aircraft icon, the mouse cursorin the main window and in the map will change to theWAYPOINT icon. You can now set waypoints byright-clicking on the desired location in the main win-dow or the map, depending on the type of aircraftyou have selected. Once you have set at least onewaypoint, the buttons REMOVE LAST WAY-POINT and OK will be added to the Orders Menu.Selecting the option REMOVE LAST WAYPOINT will
delete the last navigation point of the flight path.Selecting the option OK confirms your request for airsupport; the aircraft will be dispatched soon after.
Maximum Possible Amount of Waypointsper Aircraft Type
Planes transporting paratroopers and supplies canonly drop their freight at one waypoint per flight.Interceptors can patrol one determined area or eliminate one unit. After that, interceptors will findtargets close to the selected location automaticallyand attack enemy aircraft. Air scouts can patrol up to twelve waypoints in thesame order they were entered. At each waypoint theywill fly a bit lower (as shown by a yellow bar belowthe aircraft) and scout the area they are flying across.The lower they fly, the greater the danger that theywill be hit by enemy air defenses. Air scouts usuallyfly a few loops around each waypoint and then continue to the next one. However, clicking the button MOVE TO NEXT WAYPOINT (e.g. whenunder heavy anti aircraft fire) will stop your aircraftscouting the area around the waypoint and send theair scout straight to the next waypoint. The MOVETO NEXT WAYPOINT button is always availablewhen a scout is circling a waypoint. Clicking the but-ton will make all air scouts currently circling a waypoint proceed to the next.Bombers can drop their charges at up to three way-points. These three locations can be identical (right-click the same place three times), but bombers canonly drop a certain amount of bombs per attack flight(a third of their cargo). Therefore, they must fly aloop before repeating their attack at a waypoint.
NOTE: For safety reasons, all leftover bombs aredropped before landing. Therefore you should ordera bomber to attack at least three waypoints, as theunused cargo will be lost otherwise.
6. MANNING VEHICLES AND UNLOADING UNITS
Every vehicle in the game has a crew (with some exceptions - motorcycles, for instance). An empty vehicle is neutral. Vehicles can be manned by crewand officers. Planes can be manned by pilots. To unload crew from a vehicle, right-click on the respective soldier's icon which is to the right of theunit's name.If the number of a vehicle's crew is equal to the number of soldiers needed for steering it, you candrive it. If you have a complete crew on the vehicle,it will be able to carry out all commands.In addition to the crew, you can also transport pas-sengers with a vehicle. If there are any passengers inside, you will be unable to unload the crew. You canright-click on the respective soldier's icon or the UNLOAD button and determine the unloading pointin order to unload passengers. Another way to unloadpassengers is to give the UNLOAD order by holdingthe A key. If a truck is pulling a cannon, you shouldfirst uncouple the cannon together with its crew, thenunload the passengers and finally the truck's crew.
NOTE: The best way to unload cannon boats and landing ships is to find shallow waters. Navigate landing ships with the bow to the shore. You can unload infantry from a cannon boat by navigating itsrear side to the shore.
7. MOVING UNITS WITH EQUAL SPEED
To unite fast vehicles with limited line of sight andslow infantry with good line of sight in a group, youcan use the MOVE GROUP WITH EQUAL SPEEDorder. This button appears in the Orders Menu whenyou select more than two units with at least one vehicle. When you give the MOVE GROUP WITHEQUAL SPEED order, the speed of all selected unitsadjusts to the speed of the slowest vehicle or the fastest soldier in the group. If the slowest vehicle is slower than the fastest soldier, the vehicle will movebehind the selected group.
NOTE: Infantry cannot change its speed.
8. AIR SUPPORT
In some missions you will be supported by aircraft,i.e. transport planes dropping cargo and para-troopers, bombers, interceptors or air scouts.
22 23

G. PAUSE MODE
Pressing the PAUSE key toggles the Pause mode onor off. Orders can still be issued in the Pause Mode,i.e. you can still view information on your units, issuesingle commands and order queues or change yourunits´ MOVE/ATTACK/SPECIAL mode. These orderswill be carried out when you leave the Pause Mode.This option allows you to coordinate the actions oflarge numbers of units at the same place, e.g. inorder to attack the enemy from two sides at once orshake off pursuers by ordering your troops to retreatin various different directions.
H. GAME MENU
Click the MENU button or press the ESC key to pausethe game and enter the Game Menu.
The Game Menu contains the following options:
Save
Click the SAVE button or press the S key to enter theSave Menu. You can save the current game in thismenu. Enter the name of the current game into thetext box in the upper right, and click the SAVEbutton or press the ENTER key. After saving, you willautomatically return to the game.
To delete an unwanted saved game, you can select itsname from the list and then click the DELETE button.You will be asked to confirm by pressing the ENTERkey or clicking the YES button. The selected game aswell as the corresponding game replay (if any) will bedeleted.
Load
Click the LOAD button or press the L key to enter theLoad Menu. You can cancel your current game andload a previously saved one.To do so, select the game's name from the list, clickthe LOAD button or press the ENTER key. Just as in the Save Menu, you can delete savedgames from the Load Menu.
If you would like to exit the Load Menu without loading a new game and return to the Game Menu,click the CANCEL button or press the ESC key.
Sound
Click the SOUND button or press the O key to enterthe Sound Menu where you can set the audio optionsof the game.You can adjust the sound, voice and music volumeswith the corresponding sliders.The REVERSE STEREO button switches the assign-ment of the left and right stereo channels.
Selecting a Plane in the Air
You can select an aircraft in the air and have it landon an airfield. To do so, select an aircraft with themouse while holding the ALT key, click the LAND ONOUR AIRFIELD button and finally click on the de-sired airfield.
9. ORDER SEQUENCES
Order sequences are very effective and easy to carryout. If you hold the SHIFT key while clicking to startan action, the order will not be carried out immedi-ately but added to a list of orders. All further ordersgiven while holding the SHIFT key will also be addedto the end of this list. The unit will perform the actionsin the order in which they were added to the list. Thisenables you to set a waypoint and tell a unit to patrola route or program a more complex series of ordersin a simple and intuitive way.
24 25
OrdersSelect a motorcycle, right-click a location on the ter-rain, right-click further locations while holding theShift key.
Select a truck, right-click a cannon, select the UNLOAD icon, right-click the location while holdingthe Shift key, click another cannon while holdingthe Shift key.
Select a soldier, right-click a location, left-clickCOVER in the Orders Menu while holding the Shiftkey.
ActionsThe motorcycle will drive from the first location tothe second in the same order which was entered.
The truck will tow the first cannon, take it to the spe-cified location, drive to the second cannon and tow it.
The soldier will move to the specified location andtake cover once he has arrived.
If an action in the list cannot be performed, it will be skipped and the next order will be carried out. This enables further effective orders, especially when selecting multiple units:
Select a group of soldiers, right-click several bunkersand buildings while holding the SHIFT key.
Select a few trucks, right-click several cannon whileholding the SHIFT key, select the UNLOAD orderand right-click the location while holding the SHIFTkey.
The group of soldiers will move to the first building.As many soldiers as possible will enter the building,the remaining ones will continue this process frombuilding to building until all soldiers have enteredthe buildings or there is no room left inside the buildings.
The trucks will drive up to the cannon and tow themto the specified location.

26
I. KEY CONFIGURATIONQ Orders Menu, Position 1
W Orders Menu, Position 2
E Orders Menu, Position 3
R Orders Menu, Position 4
A Orders Menu, Position 5
S Orders Menu, Position 6
D Orders Menu, Position 7
F Orders Menu, Position 8
Z Orders Menu, Position 9
X Orders Menu, Position 10
C Orders Menu, Position 11
V Orders Menu, Position 12
T Hold Fire on/off
G Stand Ground on/off
B Special Order on/off
1 to 0 + Ctrl Save unit selection with respective number
1 to 0 Select saved unit selection with respective number
TAB Center view around selected units
SPACEBAR Center view around last event (red circle)
ESC Control Options Menu
PAUSE Pause Mode on/off
F1 to F8 + Ctrl Save position of main window section on the map
F1 to F8 Load position of main window section on the map
F9 Display mission objectives
F10 Exit game
F11 Open Save Menu
To exit from the Sound Menu with all changes appliedand return to the Game Menu, click the OK button orpress the ENTER key.
Graphics
Click the GRAPHICS button or the G key to enter theGraphics Menu and set the game display options.
Map Gamma: This slider allows you to set thegamma value (i.e. the brightness) of the main window and the game map.
Interface Gamma: With this slider, you can set thegamma value of the control elements.
Message Delay: Use this slider to set the amountof time a message remains visible on the screen.
You can exit the Graphics Menu with all changes applied and return to the Game Menu by clicking theOK button or pressing the ENTER key.
Speed
Click the SPEED button or press the P key to enterthe Speed Menu. In this menu, you can set the gamespeed options according to your wishes.
Game Speed: This slider allows you to set the gamespeed.
Mouse Scroll Speed: With this slider, you can determine how quickly the map section displayed inthe main window shifts when the mouse is moved tothe edge of the screen.
Keyboard Scroll Speed: Use this slider to determine how quickly the map section displayed inthe main window shifts when pressing the
LEFT/RIGHT/UP/DOWN arrow keys.
To apply all changes, exit from the Speed Menuscreen and return to the Game Menu, click the OKbutton or press the ENTER key.
Objectives
Click the OBJECTIVES button or press the J key toenter the Objectives Menu. A short summary of yourmission objectives is displayed.You can exit the Objectives Menu and return to theGame Menu with the OK button or the ENTER key.
Quit
Click the QUIT button or press the Q key to enter themenu for quitting the game where you can exit thecurrent game. If you would like to exit the currentmission and restart it, click the RESTART MISSIONbutton or press the R key. If you would like to exitthe current mission and the game, click the QUIT TOWINDOWS button.If you would like to exit the current mission and viewthe Ratings screen, click the option RETURN TOMENU.
NOTE: When you exit the game, a confirmation dialog will appear. Confirm by pressing the ENTERkey or clicking the YES button.
You can exit this menu and return to the Game Menuby clicking the CANCEL button or pressing the ESCkey.
Return to Game
Click the RETURN TO GAME button or press the ESCkey to exit the Game Menu and return to the currentgame.
27

L. GAME FEATURES
1. TERRAIN TYPES AND WEATHER
The map can contain up to three different types ofland - ground, water and shallows. Ground units(such as infantry or tanks) can move across theground and shallows. Water units (such as gunboatsor landing ships) can move across water and shal-lows. Cruisers can move across water only.The weather can be clear, raining, foggy or snowing.When the weather is not clear, the line of sight of allunits will decrease.
2. RECRUITING NEUTRAL UNITS
You can recruit neutral units during the game.Neutral units neither belong to you nor to yourenemy. If you keep close to such a unit with your of-ficer or general for some time, the unit will join yourside.
3. PROPAGANDA AGAINST ENEMY OFFICERS
If you get enemy officers or generals to defect toyour side (by using propaganda vehicles or leaflets),for a short time you will be able to see enemy forceswhich are usually invisible to you because of the fogof war. You will also see a point where there is cur-rently the highest amount of enemy units.
F12 Open Load Menu
selectable + SHIFT Add order to the end of list
MOVE order + Ctrl Gather at destination
Left-click + Ctrl While entering a message:
Selection map Determine recipient on map
Double left-click on unit + Ctrl Select all units of the same type on the entire map
; Display number of reinforcement units on their way
BACKSPACE Pass command over units to a different player
ENTER Message to team number
ENTER + SHIFT Message to everyone
ENTER + Ctrl Message to enemy
28 29
J. END OF THE MISSION
Once all mission objectives have been fulfilled or ifthe mission can no longer be completed successfully,the Mission End Menu will be displayed. Click theQUIT button to exit the mission and display theRatings screen. If you would like to continue yourmission, click the CONTINUE button.
K. RATINGS MENU
Once you have exited the mission or it has ended au-tomatically, the game statistics will be displayed.Here you can find a list of rankings containing thenames of all players who completed the mission suc-cessfully to the left. On the right-hand side of thescreen, the statistics of the current attempt are dis-played. If you would like to see the statistics of an-other attempt, click the corresponding player's nameto the left.
To start the next mission of the campaign, click theCONTINUE button or press the C key.
Click the REPLAY button or press the R key to restartthe mission from the beginning.Click the EXIT button or press the ESC key, to exitthe Ratings Menu and return to the Main Menu.
NOTE: The game will not automatically be savedwhen a mission has been completed. If you wish tointerrupt the game at this stage, start the next mis-sion and save the game before quitting.

C. SPECIAL FEATURES OF THEMULTIPLAYER MODE
In the multiplayer mode, you can send messages toyour team members using the ENTER key. A text lineappears where you can enter a text message. While you are in the enter mode, you can highlight apoint on the map by holding the CTRL key and click-ing with the left mouse button. The highlighted pointis briefly displayed with concentric green circles foryour team members when they receive the message.Press the ENTER key once more to send the message.If you press the ENTER key while holding the SHIFTkey, you can address a message to everybody (in-cluding your opponents). You can send this messageby pressing the ENTER key as well.You can also sendthe message only to your opponents by pressing theENTER key while holding the STRG key.
You can delegate the control over some of your unitsto a team partner. To do this, just highlight the unitsand press the BACKSPACE key. The mouse cursorwill change to a yellow arrow as soon as it is over ateam member's unit. Right-click to delegate the command over the highlighted units to the playerwhose unit the mouse cursor is next to.Pressing the ; key displays information on the num-ber of reinforcement units which are on their way toyour base. This feature is also available in the singleplayer mode.
D. COMPLETING A MULTIPLAYER GAME
After the end of the mission you will receive an evaluation. At first you get an overview of the distribution of points. You can view a more detailedlisting of the eliminated units by clicking the GAMESTATISTICS button.Here you can find a list stating in different categorieshow many enemy units of a type were destroyed byeach player, and how many units of the same typewere lost. Clicking the GAME STATISTICS buttononce more displays the amount of enemy units de-stroyed minus the amount of own units lost. Clickingthe GAME STATISTICS button another time takesyou back to the screen where the distribution of points is displayed.Click the EXIT button or press the ESC key to returnto the Main Menu.
V. MULTIPLAYER MODE
A. THE AIM OF THE GAME
The aim of the multiplayer game is the destruction ofall enemy units. The last player to own any unit is thewinner (that is not necessarily the player with themost points). If you enter a win score value in thePlayers screen though, the team reaching this scorewill win.
B. REINFORCEMENTS
Most important for winning the game in the multi-player mode is superiority in numbers. This is a-chieved through as many reinforcements as possible.
1. ZEPPELIN GROUPS
You can obtain reinforcements by taking a zeppelingroup. Such a group consists of several zeppelins ofthe same color which are displayed as dots in theirteam's color on the map. If you move the mouse cursor over a zeppelin on the map, all the zeppelinsof the same color will be displayed with a white rectangle around them. If you left-click a zeppelin onthe map and hold the left ALT key, a detaileddescription of this ZEPPELIN'S reinforcement willappear on the screen.
2. TAKING ZEPPELIN GROUPS
A zeppelin group is defined as taken for as long asunits of whatever kind are next to each zeppelingroup (with more than one player in the same team,they can share this task). If this condition is fulfilled,all the zeppelins of the respective group are usuallydisplayed in grey in the main window as well as onthe map.
NOTE: You cannot select the INFINITE REINFORCE-MENTS option in the Players Menu as it can only beset in the editor.
The zeppelins in a group keep their color for theother players, which means that reinforcements bytaking that zeppelin group are still possible.As long as your team has taken zeppelins of onegroup, the captured zeppelins (also visible for theother players) are displayed with the number of re-spective team members in the main window. They aresurrounded by a green rectangle on the map.Zeppelins taken by an opposing team are framed inred. If there are units of different teams in range ofa zeppelin, it will be defined as not taken.
3. COUNTDOWN
There is another way of losing the game apart fromthe destruction of all units: If there is no zeppelin con-trolled for more time than the 'Time-out defeatdelay' period (see page 10 for details). As soon as aplayer has no zeppelin, the countdown starts, which isdisplayed in the top left corner of the screen. Yourteam loses when the countdown reaches zero.
30 31
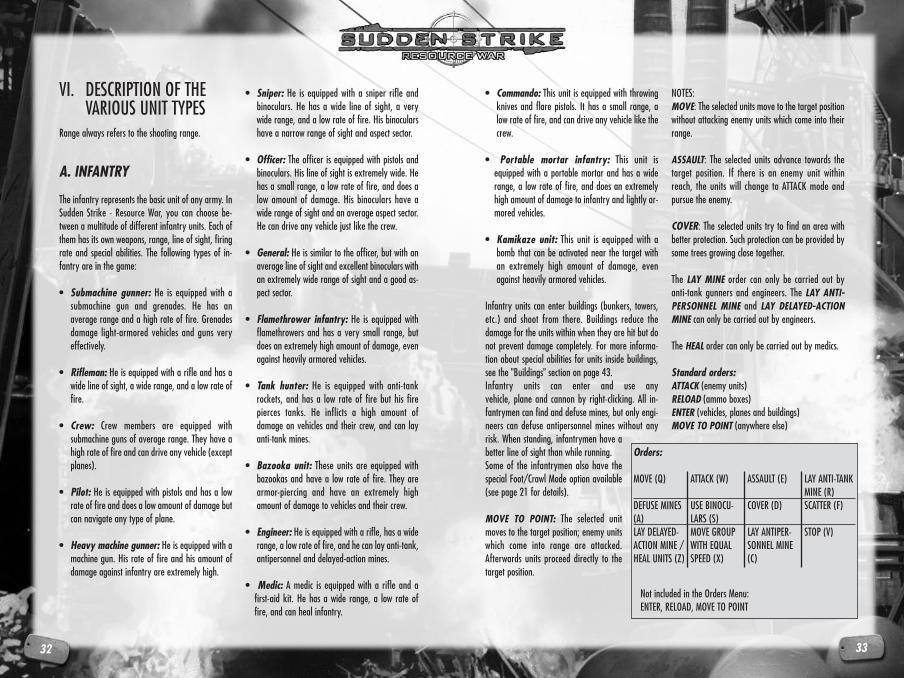
• Commando: This unit is equipped with throwingknives and flare pistols. It has a small range, alow rate of fire, and can drive any vehicle like thecrew.
• Portable mortar infantry: This unit isequipped with a portable mortar and has a widerange, a low rate of fire, and does an extremelyhigh amount of damage to infantry and lightly ar-mored vehicles.
• Kamikaze unit: This unit is equipped with abomb that can be activated near the target withan extremely high amount of damage, evenagainst heavily armored vehicles.
Infantry units can enter buildings (bunkers, towers,etc.) and shoot from there. Buildings reduce the damage for the units within when they are hit but donot prevent damage completely. For more informa-tion about special abilities for units inside buildings,see the "Buildings" section on page 43.Infantry units can enter and use any vehicle, plane and cannon by right-clicking. All in-fantrymen can find and defuse mines, but only engi-neers can defuse antipersonnel mines without anyrisk. When standing, infantrymen have abetter line of sight than while running.Some of the infantrymen also have thespecial Foot/Crawl Mode option available(see page 21 for details).
MOVE TO POINT: The selected unitmoves to the target position; enemy unitswhich come into range are attacked.Afterwards units proceed directly to thetarget position.
NOTES:MOVE: The selected units move to the target positionwithout attacking enemy units which come into theirrange.
ASSAULT: The selected units advance towards thetarget position. If there is an enemy unit withinreach, the units will change to ATTACK mode and pursue the enemy.
COVER: The selected units try to find an area with better protection. Such protection can be provided bysome trees growing close together.
The LAY MINE order can only be carried out by anti-tank gunners and engineers. The LAY ANTI-PERSONNEL MINE and LAY DELAYED-ACTIONMINE can only be carried out by engineers.
The HEAL order can only be carried out by medics.
Standard orders:ATTACK (enemy units)RELOAD (ammo boxes)ENTER (vehicles, planes and buildings)MOVE TO POINT (anywhere else)
VI. DESCRIPTION OF THE VARIOUS UNIT TYPES
Range always refers to the shooting range.
A. INFANTRY
The infantry represents the basic unit of any army. InSudden Strike - Resource War, you can choose be-tween a multitude of different infantry units. Each ofthem has its own weapons, range, line of sight, firingrate and special abilities. The following types of in-fantry are in the game:
• Submachine gunner: He is equipped with a submachine gun and grenades. He has an average range and a high rate of fire. Grenades damage light-armored vehicles and guns very effectively.
• Rifleman: He is equipped with a rifle and has awide line of sight, a wide range, and a low rate offire.
• Crew: Crew members are equipped with submachine guns of average range. They have ahigh rate of fire and can drive any vehicle (except planes).
• Pilot: He is equipped with pistols and has a lowrate of fire and does a low amount of damage butcan navigate any type of plane.
• Heavy machine gunner: He is equipped with amachine gun. His rate of fire and his amount ofdamage against infantry are extremely high.
• Sniper: He is equipped with a sniper rifle and binoculars. He has a wide line of sight, a verywide range, and a low rate of fire. His binocularshave a narrow range of sight and aspect sector.
• Officer: The officer is equipped with pistols andbinoculars. His line of sight is extremely wide. Hehas a small range, a low rate of fire, and does alow amount of damage. His binoculars have awide range of sight and an average aspect sector.He can drive any vehicle just like the crew.
• General: He is similar to the officer, but with anaverage line of sight and excellent binoculars withan extremely wide range of sight and a good as-pect sector.
• Flamethrower infantry: He is equipped withflamethrowers and has a very small range, butdoes an extremely high amount of damage, evenagainst heavily armored vehicles.
• Tank hunter: He is equipped with anti-tank rockets, and has a low rate of fire but his fire pierces tanks. He inflicts a high amount of damage on vehicles and their crew, and can layanti-tank mines.
• Bazooka unit: These units are equipped withbazookas and have a low rate of fire. They arearmor-piercing and have an extremely highamount of damage to vehicles and their crew.
• Engineer: He is equipped with a rifle, has a widerange, a low rate of fire, and he can lay anti-tank,antipersonnel and delayed-action mines.
• Medic: A medic is equipped with a rifle and afirst-aid kit. He has a wide range, a low rate offire, and can heal infantry.
32 33
Orders:
MOVE (Q)
DEFUSE MINES(A)LAY DELAYED-ACTION MINE /HEAL UNITS (Z)
ATTACK (W)
USE BINOCU-LARS (S)MOVE GROUPWITH EQUALSPEED (X)
ASSAULT (E)
COVER (D)
LAY ANTIPER-SONNEL MINE(C)
LAY ANTI-TANKMINE (R)SCATTER (F)
STOP (V)
Not included in the Orders Menu: ENTER, RELOAD, MOVE TO POINT

NOTES: You cannot give the order to attack a targetin the air. Anti-air targeting is triggered automatically.
The crew of a cannon can automatically reload ammofrom boxes of ammo located nearby.
Standard orders:ATTACK (enemy units)
NOTES:UNLOAD: The crew leaves the cannon.
C. TRUCKS
A truck is a transporter which can carry acertain number of soldiers, stationaryheavy machine guns, mortars or ammoboxes. Heavy machine guns and mortarstake two places each: one for the gun itselfand one for the gunner.The ambulance is a special truck which gradually increases the life value of the soldiers in it to the maximum.
Standard orders:ENTER (tunnels)LOAD (own artillery, soldiers, mortars, heavy machine guns or ammo boxes)MOVE (anywhere else)
NOTES: UNLOAD unloads the truck with the followingorder: If there are cannon, they are uncoupled firstand manned with their crew. Next, all soldiers notbelonging to the crew as well as any heavy machineguns or mortars are unloaded.
HITCHING CANNON:
Cannon can be hitched to and towedby trucks. In order to do this, the can-non has to be manned with at leastone infantryman. The crew of the can-non helps to connect it to the truck andthen gets into the truck. After uncou-pling the cannon, its original crew
mans it again. If there are not enough free seats forthe crew when hitching the cannon, some of the sol-diers who are already in the truck must disembark inorder to make room for the cannon's crew.
B. ARTILLERY
A cannon is neutral for as long as it is not held by aninfantry unit. If it is taken, it is owned by the corre-sponding player from that time on. A cannon cannotbe taken by two soldiers of different sides. At leastone soldier is necessary to fire a cannon. If the crewconsists of two soldiers, the rate of fire increases. Inorder to draw a cannon by hand, a crew of at leasttwo is required, but you can only advance very slowlyin this situation. Some of the heavyweight cannoncannot be transported by hand. Some of the hugehowitzers cannot be transported even by heavytrucks.
The following types of artillery are in the game:
• Anti-tank cannon (AT): These cannon do notfire ballistically, but directly (a clear target line tothe object is absolutely necessary) and use armor-piercing ammunition. The range and rate of fireof the cannon depends on its caliber. If a group of anti-tank cannon is highlighted, allof the anti-tank cannon shoot at the highlightedtarget object (cannons which are not ready to firewill reload and fire first). Several target objectscan be indicated by enabling ATTACK and SHIFTplus right mouse click. The cannon shoot one afteranother at each of the given target objects.
• Anti-aircraft cannon (AA): These cannon havethe same properties as anti-tank cannon (directfire only) but rotate much more quickly (the can-non can revolve and is fixed on a stationarybase), and they can target aircraft. Anti-aircraftcannon fire salvos and can be useful against largeamounts of enemy infantry.
• Light (field) howitzer: In addition to directfire, these cannon can fire ballistically (there does
not have to be a clear line to the target object). Inthe indirect fire mode, they have a wide range. Inthis mode, several target objects can be selectedand fired on one after the other without holdingthe SHIFT key. If a group of howitzers is selected,the targets are divided among them, i.e. each target object is only fired at by one howitzer. Agun can only shoot again when all other howitzersof the group have fired. In indirect mode, the rateof fire is lower than with direct fire.
• Heavy howitzer: These cannon only fire ballistically, have a low rate of fire, an extremelywide range and do a high amount of damage. Allof the cannons listed above can be towed bytrucks or armored vehicles for faster transport.
• Coastal artillery: These cannon fire ballisticallyonly, like heavy howitzers. They have an ex-tremely wide range, an extremely high damage radius, a very low rate of fire. Their ammunitionis very low , but their rate of damage is very high.These cannon cannot be towed, even by heavytrucks.
• Heavy mortars: They fire ballistically only,have a wide range and an average rate of fire.
• Grenade launchers and stationary heavymachine guns: Unlike the cannon listed above,these guns can be crewed by only one man.Grenade launchers have the same properties asheavy mortars but their range is not as wide.Heavy machine guns have an average range, ahigh rate of fire and do a high amount of damage to infantry. For transportation, theseguns must be placed inside trucks instead of beingtowed by them. They cannot be transported byhand.
34 35
Orders:
MOVE (Q)UNLOAD (A)
ATTACK (W)LONG-RANGEFIRE (S)
ROTATE (R)
STOP (V)
Not included in the Orders Menu: ENTER
Orders:
MOVE (Q) UNLOAD (A)
STOP (V)
Not included in the Orders Menu: ENTER, LOAD.LOAD: Loads soldiers, grenade launchers, heavy machine guns or ammo boxes.

For a supply truck (as well as for a tanker truck) tobe functioning normally, you need 2 crew members.Standard orders:MOVE (Q), REFUEL (W)
F. JEEPS
Jeeps are light and fast vehicles, which have thesame properties as trucks, except they can only carrysoldiers. Soldiers can fire from the jeep. Cannon cannot be connected to them.The same orders as for trucks, including ATTACK andASSAULT, are available for jeeps when there are infantrymen inside them.
NOTE: Some infantrymen, (those equipped with bazookas, for example) cannot fire from jeeps.
Standard orders:ENTER (tunnels)LOAD (own soldiers)ATTACK (enemy units, when any soldiers inside canattack enemies from the jeep)MOVE (anywhere else)
NOTES: ATTACK, ASSAULT: These orders are only availableif there are any soldiers inside that can attack ene-mies from the jeep.UNLOAD: All soldiers leave the jeep.
G. TANKS AND ARMORED VEHICLES
• Tanks are well-armored vehicles with a revolvingturret. Movement and firing of missiles are inde-pendent of each other. Tanks are better armoredat the front than at the back and the sides. Theycan also attack target objects in an area. If the se-lected area is in reach, the crosshair flashes inred/yellow. If the tank has to move in order toget into range, the crosshair constantly remains red.
This only takes the distance into account, not anyobstacles in the way! When a group of tanks ishighlighted, the crosshair will flash in red/yellowfor as long as the target position is in reach of anyof the members of the group. When given the
order to fire, those tanks which areclose enough to the target will fire im-mediately. The others will advanceuntil they are within firing range.
NOTE: If the crosshair is over an object,it will be constantly red in any case.
Tanks can carry soldiers on the look-out. These soldiers cannot fire and can
be easily damaged by enemy infantry. Men onthe lookout have an increased line of sight. Tanksalso have the special COMBAT/ MARCH option(see page 21 for details).
• Anti-tank vehicles have the same properties astanks except that they do not have a rotating turret and can therefore only fire forward.
• Armored vehicles have the same properties astanks, except they can transport infantry insideand the Combat and March Modes are not avail-able. Armored vehicles can also be equipped with
D. SUPPLY TRUCKS
Supply trucks can be used for:• reloading ammunition• repairing damaged vehicles• building barbed wire entangle-
ments and tank blockades• repairing bridges, railroad tracks
and airfields• building pontoon bridges
Supply trucks transport ammunitionand construction parts. If a supplytruck carries out an action, ammuni-tion and construction parts are reproduced with constant speed until they reach the maximum value. Ammunition is used for resupplyingunits. It is universal and suited for every weapon.Construction parts are used for building and repairing.
For a supply truck (as well as for a tanker truck) tobe functioning normally, you need 2 crew members.
NOTE: Tank blockades can be destroyed throughheavy bombardments. Cannon cannot be towed bysupply trucks.
Supply trucks work independently: If a damaged unitor a unit without ammunition is nearby, the supplytruck will repair or reload this unit automatically, i.e.approach the unit, repair or reload it and return to itsprevious position.The orders HOLD FIRE and STAND GROUND canalso be used for supply trucks. These commands prevent the trucks from going to a damaged unit aswell as from automatically repairing and reloading.Supply trucks also have the special AUTO REPAIRRAILWAY/AIRFIELD option (see page 21 for details). Supply trucks carry explosives.
Standard orders:
ENTER (tunnels)REPAIR/RELOAD(damaged units and units without ammunition)REPAIR BRIDGE (damaged bridges)REPAIR RAILWAY/AIRFIELD(damaged railways or airfields)RELOAD FROM AMMO BOX (ammo boxes)MOVE (anywhere else)
E. TANKER TRUCKSTanker trucks can be used for refueling vehicles. Allunits in the game use the same type of fuel, thoughthe fuel consumption differs between them. One fulltanker truck may refuel a few heavy tanks, or about10 or more light tanks. When the fuel in a tankertruck depletes, it begins to reproduce slowly (just likeammunition).A tanker truck may refuel itself quickly using tank-wagons or fuel barrels. To refuel, select a tankertruck and click on a tank-wagon or on a barrel.
The orders HOLD FIRE and STAND GROUND can beused for tanker trucks. These commands prevent thetrucks from going to a vehicle that out of fuel, and re-fueling it automatically.
36 37
Orders:
MOVE (Q)
TANK BLOCK-ADE (A)
REPAIR/RE-LOAD (W)
PONTOONBRIDGE (S)
REPAIR RAIL-WAY/AIRFIELD(E)REPAIR BRIDGE(D)
BARBED WIRE(R)
STOP (V)
Not included in the Orders Menu: ENTER, RELOAD FROM AMMOBOX.
Orders:
MOVE (Q)UNLOAD (A)
ATTACK (W) ASSAULT (E)
STOP (V)
Not included in the Orders Menu: ENTER, LOADLOAD: Load soldiers

Standard orders:ENTER (tunnels)ATTACK (enemy units)MOVE (anywhere else)
J. MOBILE MISSILELAUNCHERS ANDARTILLERY
Mobile missile launchers fire onlylonger salvos over a long distance andwith an extremely high amount of explosive damage.Low target accuracy is compensated or with severalmissiles per salvo. If the target of the LONG-RANGEFIRE is not in range, the missile launcher will advance towards it. If the targetis in reach, the LONG-RANGE FIRE icon will be constantly red, otherwise its interior becomes greenwith the edges flashing in red/green. If a group ofmobile missile launchers is highlighted, the crosshairis constantly red for as long as the target point is inreach of any member of the group.LONG-RANGE FIRE is similar to the way howitzersproceed. If there are several target objects indicated,the members of the group who are closest to the respective target object will fire first. Once all of themhave fired, any of the missile launchers which are stillout of range will move close enough to the target object to hit it and will open fire.Mobile howitzers and mortars have the same orders,but fire with a single grenade, not with a battery.
Standard orders:ENTER (tunnels)MOVE (anywhere else)
NOTES:LONG-RANGE FIRE: Missile launchers or mobile artillery move towards the target object if the targetis out of range. The mouse cursor indicates whethermovement is necessary.
a propaganda loudspeaker instead of a gun or machine gun.
• Kamikaze tanks are controlled automatically.They cannot be crewed or transport infantry. Theyhave the same properties as anti-tank vehiclesand attack like kamikaze units witha big explosion near the target.
NOTES:MOVE: The tank moves towards thetarget point and shoots at enemy unitsif necessary without stopping.
ASSAULT: The tank moves towardsthe target point. If any enemy units enter the line ofsight, it will stop and change to the Attack Mode topursue the enemy.
Standard orders:ENTER (tunnels)LOAD (own soldiers)ATTACK (enemy units)
MOVE (anywhere else)
H. MOTORCYCLES
Motorcycles are light and fast vehicleswith the same
properties as tank hunters. The only difference is that they are not able to transport infantry. In contrast to other vehicles, motorcycles have no crew.
Standard orders:ENTER (tunnels)ATTACK (enemy units)
MOVE (anywhere else)
I. MOBILE ANTI-AIRCRAFTCANNON
Mobile anti-aircraft cannon have the same propertiesas tanks, except that they cannot transport infantry
and the Combat and March Modes arenot available. They are armed withheavy machine guns and can fire ataircraft as well as ground targets.
NOTE: You cannot give the order to at-tack a target in the air. Anti-aircrafttargeting is triggered automatically.
38 39
Orders:
MOVE (Q) ATTACK (W) ASSAULT (E) ROTATE (R)
STOP (V)
Not included in the Orders Menu: ENTER
Orders:
MOVE (Q)UNLOAD (A)
ATTACK (W) ASSAULT (E) ROTATE (R)
STOP (V)
Not included in the Orders Menu: ENTER, LOADLOAD: Load soldiers
Orders:
MOVE (Q)LONG-RANGEFIRE (S)
STOP (V)
Not included in the Orders Menu: ENTER
Orders:
MOVE (Q)UNLOAD (A)
ATTACK (W) ASSAULT (E) ROTATE (R)
STOP (V)
Not included in the Orders Menu: ENTER

Standard orders (train):REPAIR RAILWAY(damaged railways)MOVE (anywhere else)
Standard orders (turret):ATTACK (enemy units)LONG-RANGE FIRE (anywhere else, if target pointis inrange)
M.CRUISERS
Cruisers are huge well-armored ships. They can onlysail straight across the water. Cruisers have the sameproperties as trains, except they cannot be connectedto each other and cannot repair railways and airfields.
NOTE: Cruisers cannot sail in shallow waters.
Cruisers are armed with anti-tank, long-range, anti-aircraft or missile turrets just like trains.
Standard orders (cruiser):MOVE (anywhere)
Standard orders (turret):ATTACK (enemy units)LONG-RANGE FIRE (anywhere else within range)
N. AIRCRAFT
With remote air support (see page 22 for details),you can use aircraft on the map. First assign pilots inorder to have the plane take off. Then you need afree and undamaged landing field. If there are anyobstacles or vehicles on the way, the plane will nottake off. Soldiers are not considered obstacles and (asin the case of trains) will be crushed by the plane ifthey are in the way. If there are any obstacles in theway while landing, the plane will crash into them andcause an explosion.Planes cannot take off using the same landing fieldwhile another aircraft is taking off or landing.If there is more than one airfield on the map you canland the plane on another airfield, but only if the target airfield is not damaged and has a free hangarfor refueling.
NOTE: Planes can be crewed only by pilots. Vehicles'crews cannot control the plane.
You can repair damaged airfields using supply trucks.Interceptors attack air targets automatically.Every plane has a fuel limit, so it cannot be in the air
for an unlimited amount of time. Whenthe fuel reaches a critical level, a mes-sage will appear on the screen. Whenthe aircraft has no fuel left, it willcrash.
NOTES:STOP: Returns plane to airfield.
KILL UNIT: Scans the area for the selected unit and attacks it.
PATROL AT POINT: Flies over a land point and scansthe area for enemy units. If there are any land units,the plane will attack them.
K. SHIPS
• Gunboats have the same properties as armoredvehicles. They are armed with heavy machineguns and can transport a small quantity of soldiers inside. Soldiers enter the gunboat fromthe sides.
• Transport ships have the same properties astrucks, except they cannot tow cannon. Soldiersenter the transport ship through a gate at the bowof the ship.
• Kamikaze boats have the same properties asgunboats, but instead of the machine gun theyare equipped with a highly explosive bomb. Thesebombs are activated near the target unit. Theycan inflict an extremely high rate of damage,even against cruisers.
Standard orders:LOAD (own soldiers)ATTACK (enemy units)MOVE (anywhere else)
L. TRAINS
Trains are well-armored vehicles that move onlystraight ahead. Usually trains consist of a number ofcars. A train can move if it has one or more locomo-tives available. You can couple additional cars to thetrain and uncouple cars to assign them to othertrains. Trains need railways to move. Trains cannot move ifthe rails are damaged. You can have damaged railways repaired by the train's crew or use a supplytruck to do so. If the train detects a damaged railwayon the way while moving, it will stop, repair the damage automatically, and then continue to carry outits previous order.
NOTE: Trains cannot repair damaged bridges. You canonly have damaged bridges repaired by supplytrucks.Trains cannot stop quickly when moving at a high
speed. If there is a soldier on the rails,he will be crushed. If there is a vehicleon the rails, the train will crash into itand cause an explosion.
Trains can be armed with one or moreturrets. Different types of turrets canfire anti-tank, long-range or anti-air-craft ammunition as well as launchmissiles.
40 41
Orders:
MOVE (Q)UNLOAD (A)
ATTACK (W) ASSAULT (E) ROTATE (R)
STOP (V)
Not included in the Orders Menu: LOADLOAD: Load soldiers
MOVE (Q) ATTACK (W)LONG-RANGEFIRE (S)
ROTATE (R)
STOP (V)
MOVE (Q)
UNLOAD (A)
ATTACK (W)
LONG-RANGEFIRE (S)
REPAIR RAILWAY(E)UNCOUPLELEFT CARRIAGE(D)
ROTATE (R)
UNCOUPLERIGHT CAR-RIAGE (F)STOP (V)
Orders (train with turrets):
Orders (cruiser with turrets):

VII. DESCRIPTION OF ADDITIONAL OBJECTS
A. AMMO BOXES AND CONSTRUCTION PARTS
Ammunition and construction parts are supplied inboxes. These boxes can be dropped by transportplanes (also on request, see page 23 for details), orthey may already exist on the map. Trucks can loadboxes, transport and unload them if necessary.Supply trucks can reload ammunition and construc-tion parts from them. Infantry and guns can also useammo boxes for reloading. Boxes of ammunition andconstruction parts are highly explosive.
B. BUILDINGS
Buildings can be occupied by infantry units. Buildings consist of different rooms on differentfloors. A building can contain up to four floors with abasement beneath. Units inside can move betweenthe rooms on different floors by command. You canalso use the DISTRIBUTION button to set the appro-priate distribution of people inside the building (seepage 21 for details).
Buildings help to reduce the damage to the unitswithin them, but they cannot fully protect the units.Protection is better on the lower floors than on theupper ones. Buildings also have an effect on the lineof sight of the units within. Units on the upper floorshave better sight than units in the basement, whosesight is restricted.
NOTE: Some units (such as anti-tank gunners or bazookas)can fire from the highest or lowest floors only.
Buildings with a basement can be occupied by in-fantry even if the building was destroyed. In this casethe building consists only of the basement.In contrast to vehicles, you can try to occupy a build-ing already occupied by the enemy. When enteringsuch a building, your units will attack the enemy in-side (you are unable to watch this battle). The battlewill occur floor by floor, one after another. If yourunits win, you will control the building. You cannot oc-cupy a building already occupied by an allied player.
C. TUNNELS
You can quickly move your infantry and vehicles toremote map areas by using tunnels. Tunnels look likenormal buildings but have different properties.Tunnels have no upper floors. Units cannot attackfrom tunnels or be attacked by the enemy.
NOTE: Some tunnels can be occupied by infantry only.
If you would like to move your units to a certain location, click the MOVE button, then click on the desired point on the map. Your units will then moveto the nearest undamaged exit point which is not oc-cupied by the enemy and move to the specified mappoint.If you set the target point on another tunnel, yourunits will move there and remain at this point.If the target tunnel is occupied by enemy forces,there will be a fight like in buildings.
NOTE: You cannot move to tunnels already occupiedby an allied player.
SPY POINT: Flies over a land point and observes it.
DROP DESCENT AT POINT: Tries to descend at selected point.
Standard orders:
LAND ON ANOTHER AIRFIELD(undamaged landing field)
KILL UNIT (enemy units, interceptors only)
PATROL AT POINT(anywhere else, interceptors only)
SPY POINT (anywhere else, spiesonly)
BOMB POINT (anywhere else,bombers only)
DROP DESCENT AT POINT (anywhere else, transports only)
O. V2
This unique German unit is a missile with both a hugerange and dead zone as well as an extremely highamount of damage. Just like the kamikaze tank, theV2 is automatically controlled and cannot be crewed.
42 43
MOVE (Q)
UNLOAD (A)
KILL UNIT (W) PATROL ATPOINT / BOMBPOINT / SPYPOINT / DROPDESCENT ATPOINT (E)
LAND ON ANOTHER AIRFIELD(R)
STOP (V)
Orders (train with turrets):
Orders:
ATTACK (W)
STOP (V)

D. UK CAMPAIGN
The campaign is set in summer 1944 near the Frenchtown of Caen. The player will have to command theforces of 7th Armored Division, take a hard battleand make a breakthrough north of the town to barthe way to retreat for the Germans. This campaign is the hardest of all SSRW campaigns.
IX. HINTS
A. SCOUT, SCOUT, AND SCOUT
One of the most effective ways of inflicting losses onthe enemy without being affected is to fire at thembefore they are able to do so. The dilemma is that theline of sight is limited for units with strong weapons,which have a wide shooting range, while units with awide line of sight are not equipped with the best weapons. The solution to this problem is to combineboth possibilities when advancing into unknown terri-tory or to enemy lines.Tanks, for example, are able to shoot at distant target objects and cause heavy damage, but the gun-ner has only a small view port, and his line of sight is heavily restricted.
If you add an officer to a tank unit, though, you willobtain a powerful unit which can attack enemiesheavily from a great distance.Fixed front lines make it appropriate to position anumber of anti-tank cannon as offensive weapons,and to order one or several of the officers to takecommand. Since officers are very vulnerable, theyshould be positioned directly behind the armoredanti-tank cannon, and there should be additional officers available in case of losses.
If you have artillery with LONG-RANGE FIREavailable, you will be able to employ an air scout andthus find and destroy large groups of enemy units oreven a supply base (see page 23 for details). Still, thenumber of bombers at your disposal can by no meansbe compared to the amount of artillery ammunition.Besides, bombers can easily be destroyed by enemyanti-aircraft artillery. In order to reconnoiter enemyterritory, quick units can be used as scouts. A motor-cycle, for example, can cross unknown territoryquickly and return without being hit by slow weaponssuch as cannon or tank guns. It is then possible to attack sighted target objects with wide rangeweapons. Another possibility is to drop paratroopersin the rear of valuable enemy equipment (e.g. how-itzers) in order to capture them.Fast scouting units should only be at one place for asshort a time as possible in order not to make a targetfor slow weapons.
This is why you should keep the following instructionsin mind.
Set sufficient waypoints
You should make sure your units do not come to ahalt just because there are no waypoints to be fol-lowed any more. In order to achieve this, enter thecourse in the PAUSE mode with the SHIFT key or always follow the scout unit in the main window(first having allocated a group number to yourscout) and set a new waypoint in good time beforethe unit reaches the last one. Following the unit bysight will give you an idea about the position ofenemy units.
Do not attack
Enable the HOLD FIRE mode so that units do notleave their course in order to attack enemy troops.
You can also move through other tunnels into a destroyed tunnel. You will be unable to unload in destroyed tunnels and you will have a limited line ofsight. To unload units from such tunnels, you have touse another tunnel as an exit point. If all of the tun-nels of the same type are destroyed, all the units in-side the tunnels will die.
D. BRIDGES
Bridges can be damaged and destroyed. When thedamage to a bridge is beyond a certain level, it can-not be crossed any more. When a bridge is damagedthat much, it will explode and destroy all units on it.Damaged bridges can be repaired by supply trucks.
E. OIL TANKS
Oil tanks are highly explosive and burst into flamesquickly, even if they are only slightly damaged. Inthis case, units in the affected area will be damagedas well.
F. RAILWAYS AND AIRFIELDS
Railways and airfields must be undamaged in orderto be used by trains and planes. Use supply trucks ortrains to repair damages on railways or airfields.
VIII. SHORT DESCRIPTION OFTHE CAMPAIGNS
All campaigns are based on historical World War IIevents. They are described in chronological order.
A. GERMAN CAMPAIGN
The campaign takes place during the early autumn of1941 in the region of Kiev. Throughout the cam-paign, the troops of Guderian's 2nd tank group roundup Kiev from north-east, preparing for a seriousstrike on city from the rears to destroy the enemyforces residing there.The difficulty of this campaign is average.
B. GERMAN CAMPAIGN 2The action takes place in the same time and place(spring 1945, Saar River). During this campaign, theforces of 7th German army will have to defend its po-sitions, to inflict maximum losses on the Americanforces, to evacuate or destroy strategic industrialforces. The difficulty level of this campaign is average.
C. US CAMPAIGNThe campaign takes place in spring of 1945 near theSaar River and the highlands east of it. During thecampaign, the units of 3rd American army shouldforce the 7th German army to retreat to the line onthe Rhine River, encircling a part of 7th's army forces.This campaign is rather difficult.
44 45

X. FAQ
Why don't my units attack the enemy? I'msure that the enemy is in shooting range andI see him!
A: There can be several different reasons why unitscannot attack the enemy:
• The unit's crew is not sufficient.It can only move and not attack.
• The unit is completely out of ammo.• The unit cannot damage the enemy
(e.g. rifleman vs. tank).• There are obstacles in the line of fire
(trees or houses for example, for direct-fire units).
None of my guns can hit the enemy tank!
A: Heavy tanks are well-armored, especially at thefront. Don't try to hit the VI E Tiger at the front orwith a 37mm gun. Try to hit such units from the rear or the sides.
My engineer laid an antipersonnel mine andwas blown up by it! How can that be?
A: Engineers with a neutral morale and no expe-rience have a chance of about 10% of being blownup by antipersonnel mines (particularly by theirown mines). Engineers must have more than 10%experience to be safe from their mines.
Which infantry units can lay anti-tank mines?
A: Engineers and anti-tank gunners.
My network game runs slowly underWindows XP.
A: Remove the channel limit. Run C:\WINDOWS\sys-tem32\gpedit.msc, then select Local ComputerPolicy -> Computer Configuration ->Administrative Templates -> Network -> QoSPacket Scheduler.
In the right window, select Limit reservable band-width and decrease the value to zero.
My plane cannot take off. I'm sure that itscrew is complete.
A: There can be different reasons for the plane nottaking off:
• The airfield is damaged. Use a support truck to re-pair it (activate the AUTO REPAIR RAILWAY/AIR-FIELD).
• Another plane is landing or taking off at the samelanding field. Just wait for a moment.
• There are vehicles on the airfield. Remove them.
This huge howitzer has only one missile! Do Ialways have to keep the supply truck near-by?
A: Alternative: Position some boxes with ammo nearthe howitzer. The crew will reload the howitzer automatically.
Why can't my anti-tank infantry fire from thejeep?
A: Of the anti-tank infantry, only PIAT riflemen canfire from the jeep. Portable mortars cannot befired from jeeps either.
I had some tanks from previous missions inthe campaign. I lost the mission and tried toplay it again. But where are my tanks?
A: All information from previous missions are savedin your save file. If you simply restart the mission,this information will be lost. So, always save yourgame at the beginning of the mission! If the mis-sion cannot be completed without forces from theprevious missions, you will get additional rein-forcements instead.
Use as few changes of course as possible
Instead, design a round stretch instead of orderingthe unit to turn 180 degrees, since that takes upmuch more time.
B. WHY DO MY UNITS DISOBEYMY ORDERS?
Sometimes units do not react to commands given tothem. This is by no means a refusal to obey ordersbut it is simply not possible for the units to obey thecommand. Here are some items listed which need tobe checked if units do not react to commands:
Units do not fire at a certain target objectalthough it is within their range.
Is the line of fire to the target object clear? Anti-tankcannon, for example, fire in a straight line as opposed to howitzers and missile launchers. If thereare any obstacles in the way, objects cannot be hit. Ofcourse, it is possible to clear those obstacles. Mobileanti-aircraft cannon are very useful for clearingwhole forests, but only with sufficient ammunition.
Units do not obey commands when theyhave to move to another position in order todo so.
Are there any obstacles in the way to the target posi-tion? Big units such as tanks cannot go through denseforests; narrow positions such as bridges can beblocked by units positioned on them. Units go as faras possible in the direction of the target position andstop only when the way is blocked. If the way is cleared within a certain period of time, the previouslyblocked units will go on automatically and obey thecommand.
46 47

49
YOU SHOULD CAREFULLY READ THEFOLLOWING LICENSE AGREEMENT BE-FORE INSTALLING THIS SOFTWAREPROGRAM.With the use/installation of the CD you agreeto the following license agreement:This License Agreement is a legal bindingcontract between you and the licenser for theabove mentioned software product, consistingof the computer software and possible rele-vant media, printing material and electronicoperating instructions (the "software prod-uct"). By installing the software product,copying it or using it in any other way, youadmit to the conditions of this LicenseAgreement unlimited. Should you not agreeto the conditions of this License Agreement,do not install this software product, but handit back to the person you received it from,in return for refund of the license fee within30 days.SOFTWARE PRODUCT LICENSEThis software product is copyrighted (by na-tional law and international contracts.). Thissoftware product has not been sold to you,but is only licensed to you. LICENSE WARRANTY.This License Agreement warrants you a li-cense with the following rights: Use of thedelivered software. This software productmust only be used by you. You are allowedto install this software product and use iton one computer only.
DESCRIPTION OF FURTHER RIGHTSAND RESTRICTIONS.Restrictions concerning Reverse Engineering,Decompilation and Disassembling. You are not allowed to change the soft-ware product, subject it to a ReverseEngineering, decompilize, or disassemble it.The software product is licensed in awhole. Its parts must not be separated, touse them on more than one computer.
Hiring out. You must never lease, rent or lend the soft-ware product to anybody.
Software negotiationYou are allowed to negotiate all rights youare entitled to under this LicenseAgreement completely and durable, as faras you
(a) do not retain any copies (of the wholesoftware product or single parts of it), (b) negotiate the whole software product(including all covering material (in media-or form), upgrades, and the LicenseAgreement durable and completely to theconsignee.
Responsibilities/ Restrictions. THE SOFTWARE PRODUCT CONTAINSA LEVEL/ WORLD EDITOR THAT AL-LOWS YOU TO CREATE CUSTOM LEV-ELS OR OTHER MATERIALS FOR YOURPERSONAL USE IN CONNECTIONWITH THE SOFTWARE PRODUCT("NEW MATERIALS"). YOU ARE NOTBE ENTITLED TO USE OR ALLOWTHIRD PARTIES TO USE THE LEVEL/WORLD EDITOR AND THE NEW MA-TERIALS CREATED THEREBY FORCOMMERCIAL PURPOSES INCLUDING,BUT NOT LIMITED TO, DITRIBUTIONOF NEW MATERIALS ON A STANDALONE BASIS OR PACKAGED WITHOTHER SOFTWARE OR HARDWARETHROUGH ANY AND ALL DISTRIBU-TION CHANNELS, INCLUDING, BUTNOT LIMITED TO, RETAIL SALES ANDON-LINE ELECTRONIC DISTRIBUTIONWITHOUT THE EXPRESS WRITTENCONSENT OF THE LICENSER. YOUARE EXPRESSLY PROHIBITED FROMSELLING OR OTHERWISE PROFITINGFROM ANY LEVELS, ADD-ON PACKS,SEQUELS OR OTHER ITEMS BASEDUPON OR RELATED TO THE SOFT-WARE PRODUCT WITHOUT THE EX-PRESS WRITTEN CONSENT OF CDVSOFT-WARE ENTERTAINMENT AG.
COPYRIGHT AND TRADEMARK RIGHTS.(1) The software product (inclusive all il-lustrations, photos, animation sequences,video, audio-, music- and text parts, whichwere embedded in the software product), aswell as all the connected trade-mark andrights of usufruct, the covering, printedmaterials and all copies of the softwareproducts are property of the licenser or aconnected enterprise.(2) The software product is protected copy-right and trade-mark-legal by national law,international law and international contractstipulations.
48
(3) With regards to archives purposes, youmust handle the software product like anyother by copyright protected work, and youmust not make copies of the printed materials which are covering the software product.(4) You must not remove, modify or changethe hints about copyrights and trade-marksfrom the software product. This particularlyregards to hints on the packing and thedata media, in hints which are publishedon the web site or which are accessible byinternet, or others which are included inthe software product or are created fromthis.
LIMITED WARRANTY.Limited warranty The licenser warrants, that the softwareproduct essentially works in agreement withthe written records being supplied with thesoftware product from the licenser. Thiswarranty covers 90 days, beginning withthe date stated on the receipt.
Legal remedy of the customers. The responsibility of the licenser and theirsuppliers as well as their excluding guar-antee claims limit to - by choice of the licenser - (a) the payback of the license fee you paid,as far as those was paid and do not overstep the recommended retail price, or(b) repair or replacement of the part, orthe parts of the software product, which ef-ficiency CDV Software Entertainment AGmust guarantee for, as far as the softwareproduct is given back to the licenser , in-cluding a copy of your receipt. This lim-ited warranty is not valid, if the defect isbased on an accident or misused or faultyhandling. For each replaced software prod-uct, the guarantee for a period of 30 days,or, as far as it causes a longer period of warranty, is taken over from the first guar-antee period the licenser yields this guar-antee steps and product services only, whenit is proved, that the software product wasobtained legally.
No further warranties. The licenser and their suppliers exclude, asfar as this is permitted by practicable law,any further warranty, as well as the lia-bility for occurring or failure of an explicit
or tacitly agreed condition. This includes especially the concludant legal warranty formarketable quality, for the suitability for aspecial aim, for property, for the non-vio-lation, concerning the software product andthe stipulation, which assigns service activ-ities, respective for shortcomings in thefield of service activities.
LIMITED LIABILITY.(1) As far as this is permitted by practi-cable law, the licenser and their suppliersare not liable for special damages beingbased on accident, or mediate damages,just as little as for any following damages,especially for compensation for the loss ofbusiness takings, for the interruption ofbusiness operation, for the loss of businessinformation or any other financial dam-ages, arising from the use or an impossi-bility of the use of the software product,or from the guarantee or abstained guar-antee of service activities. This even ap-plies, if the licenser was drawn to the pos-sibility of such damages.(2) In any case, the licenser´s entire lia-bility will be, by instruction of this LicenseAgreement, limited to the amount you ac-tually paid for the software product. Allthis restrictions are not valid, if the li-censer caused the damage willfully.
FINAL RESTRICTIONS.(1) Should restrictions of this contract benot legally binding in whole or in part,and/or not practicable, and/or loose theirlegal force later, the validity of the re-maining restrictions of the contracts shallnot be touched. This also applies, if itshould be proved, that the contract includesa settlement gap.(2) Instead of the ineffective and/or im-practicable restriction or for filling the gap,an adequate settlement shall be valid,which, as far as legally possible, ap-proaches best to the intended settlement.
LICENSE AGREEMENT

5150