T-shirts - designwritingresearch.org · a plain white t-shirt in Rebel without a Cause. ... iron-on...
4
• Unlike iron-on transfer paper, a silkscreened design will print cleanly, without any background texture. • Whereas transfer film is transparent, silkscreen ink is opaque, making it possible to print light inks on dark fabrics. (You will pay a little more for this, however, because an extra hit of white is needed to make the color completely opaque.) • Avoid tiny type and finely detailed, high-resolution images and designs. • Communicate with your printer throughout the job so there are no surprises at the end. Printing over seams or onto pockets, for example, can raise the cost of your project. • Silkscreen printers usually want a vector file, with type converted to outlines. Adobe Illustrator and Macromedia The basic cotton undershirt went public in 1955, when James Dean wore a plain white t-shirt in Rebel without a Cause. Shirts printed with pictures and slogans became essential street wear in the 1960s, and some of today’s most creative graphic designers view the t-shirt as a vital form of art and communication. Fashion designers continually experiment with the shape, drape, and proportions of this utilitarian classic. You can use a variety of techniques—geared for short-run and long-run production—to try your own hand at t-shirt design. silkscreen Most commercially-printed shirts are produced with a silkscreen, a device consisting of a fine-meshed fabric stretched tautly around a frame. Parts of the screen are blocked off, and ink is pressed through the open areas. Each color requires its own screen. You will pay a one-time set-up charge for each screen in addition to the cost of printing each shirt. The set-up charge is Freehand are typical software applications for making such files. • Always provide your printer with a paper proof of your graphic at the exact size that it will be reproduced. Tape a printout of the graphic to a sample shirt to indicate positioning. (Your printer may assume that you want a monster- sized graphic across the middle of the shirt, when what you really want is a discreet image just above the bustline.) • For an extra cost, you can order a printed sample before proceeding with the whole job. This cost is worthwhile for a big project. You would hate to foot the bill for dozens of misprinted t-shirts. spread out across the print run, becoming less significant the more shirts you print. There are companies in every metropolitan area that provide printed shirts (as well as bags, hats, and other items) to schools, businesses, clubs, and individuals. The printer will provide you with the shirts at a wholesale price as well as printing them for you. You can also learn to screenprint with your own equipment. T-Shirts Ellen Lupton designing for the silkscreen process 152 153
Transcript of T-shirts - designwritingresearch.org · a plain white t-shirt in Rebel without a Cause. ... iron-on...
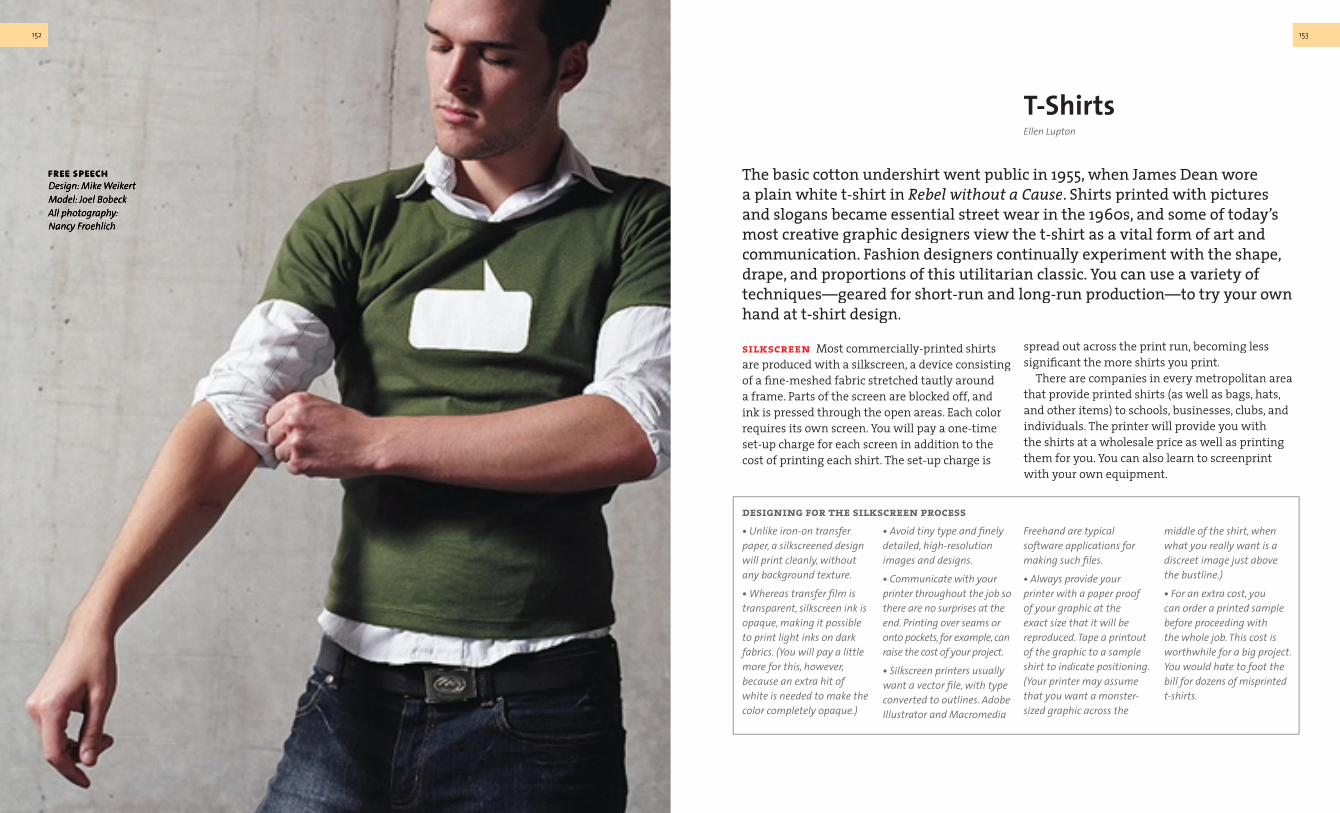
free speechDesign: Mike WeikertModel: Joel BobeckAll photography: Nancy Froehlich
• Unlike iron-on transfer paper, a silkscreened design will print cleanly, without any background texture.
• Whereas transfer fi lm is transparent, silkscreen ink is opaque, making it possible to print light inks on dark fabrics. (You will pay a little more for this, however, because an extra hit of white is needed to make the color completely opaque.)
• Avoid tiny type and fi nely detailed, high-resolution images and designs.
• Communicate with your printer throughout the job so there are no surprises at the end. Printing over seams or onto pockets, for example, can raise the cost of your project.
• Silkscreen printers usually want a vector fi le, with type converted to outlines. Adobe Illustrator and Macromedia
The basic cotton undershirt went public in 1955, when James Dean wore a plain white t-shirt in Rebel without a Cause. Shirts printed with pictures and slogans became essential street wear in the 1960s, and some of today’s most creative graphic designers view the t-shirt as a vital form of art and communication. Fashion designers continually experiment with the shape, drape, and proportions of this utilitarian classic. You can use a variety of techniques—geared for short-run and long-run production—to try your own hand at t-shirt design.
silkscreen Most commercially-printed shirts are produced with a silkscreen, a device consisting of a fi ne-meshed fabric stretched tautly around a frame. Parts of the screen are blocked off, and ink is pressed through the open areas. Each color requires its own screen. You will pay a one-time set-up charge for each screen in addition to the cost of printing each shirt. The set-up charge is
Freehand are typical software applications for making such fi les.
• Always provide your printer with a paper proof of your graphic at the exact size that it will be reproduced. Tape a printout of the graphic to a sample shirt to indicate positioning. (Your printer may assume that you want a monster-sized graphic across the
middle of the shirt, when what you really want is a discreet image just above the bustline.)
• For an extra cost, you can order a printed sample before proceeding with the whole job. This cost is worthwhile for a big project. You would hate to foot the bill for dozens of misprinted t-shirts.
spread out across the print run, becoming less signifi cant the more shirts you print. There are companies in every metropolitan area that provide printed shirts (as well as bags, hats, and other items) to schools, businesses, clubs, and individuals. The printer will provide you with the shirts at a wholesale price as well as printing them for you. You can also learn to screenprint with your own equipment.
T-ShirtsEllen Lupton
designing for the silkscreen process
152 153
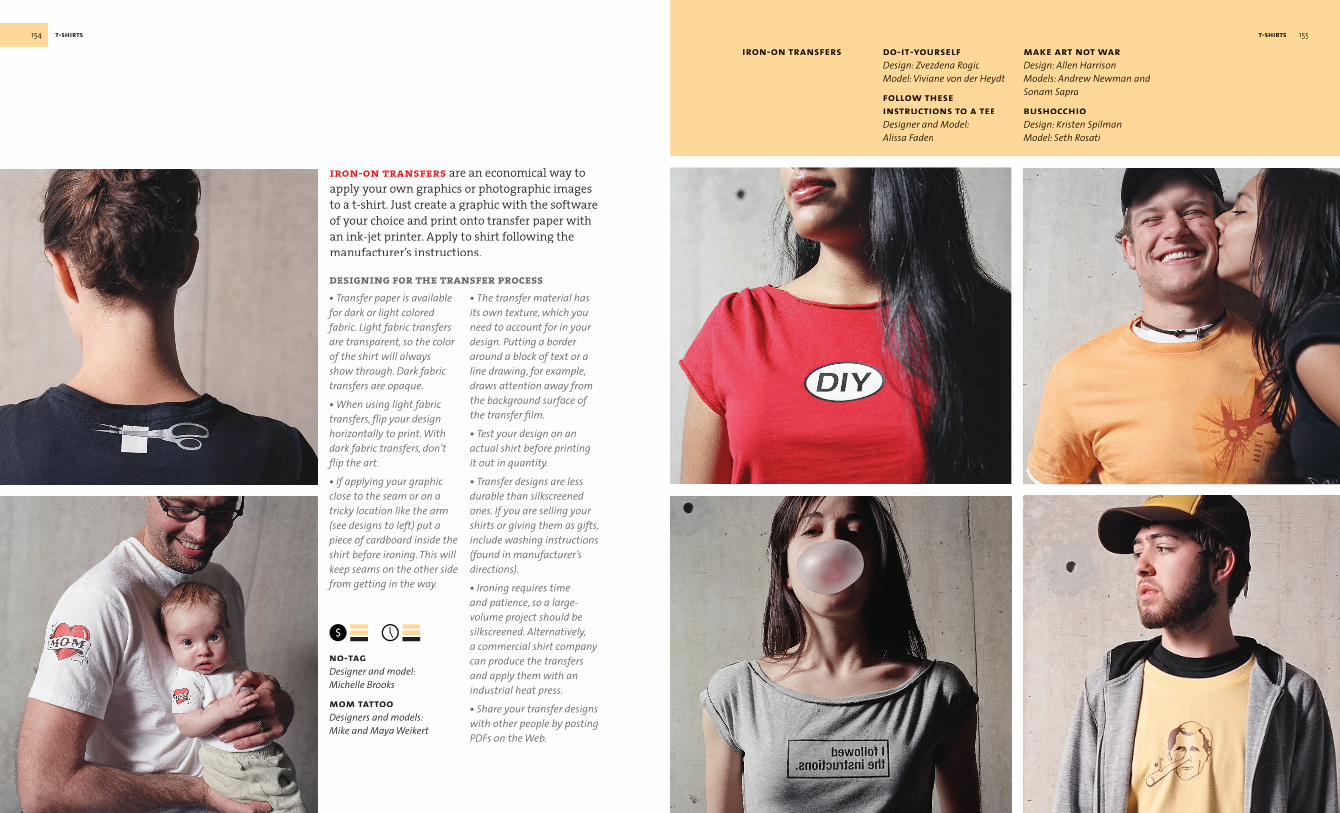
do-it-yourselfDesign: Zvezdena RogicModel: Viviane von der HeydtModel: Viviane von der HeydtModel: Viviane von der
follow these instructions to a teeDesigner and Model: Alissa Faden
make art not warDesign: Allen Harrison Models: Andrew Newman and Sonam Sapra
bushocchio Design: Kristen Spilman Model: Seth Rosati
• Transfer paper is available for dark or light colored fabric. Light fabric transfers are transparent, so the color of the shirt will always show through. Dark fabric transfers are opaque.
• When using light fabric transfers, fl ip your design horizontally to print. With dark fabric transfers, don’t fl ip the art.
• If applying your graphic close to the seam or on a tricky location like the arm (see designs to left) put a piece of cardboard inside the shirt before ironing. This will keep seams on the other side from getting in the way.
• The transfer material has its own texture, which you need to account for in your design. Putting a border around a block of text or a line drawing, for example, draws attention away from the background surface of the transfer fi lm.
• Test your design on an actual shirt before printing it out in quantity.
• Transfer designs are less durable than silkscreened ones. If you are selling your shirts or giving them as gifts, include washing instructions (found in manufacturer’s directions).
• Ironing requires time and patience, so a large-volume project should be silkscreened. Alternatively, a commercial shirt company can produce the transfers and apply them with an industrial heat press.
• Share your transfer designs with other people by posting PDFs on the Web.
iron-on transfers are an economical way to apply your own graphics or photographic images to a t-shirt. Just create a graphic with the software of your choice and print onto transfer paper with an ink-jet printer. Apply to shirt following the manufacturer’s instructions.
no-tag Designer and model: Michelle Brooks
mom tattooDesigners and models: Mike and Maya Weikert
iron-on transfers
designing for the transfer process
154 t-shirts 155t-shirts
other techniques In addition to these standard printing methods, there are other ways to apply imagery to a t-shirt.
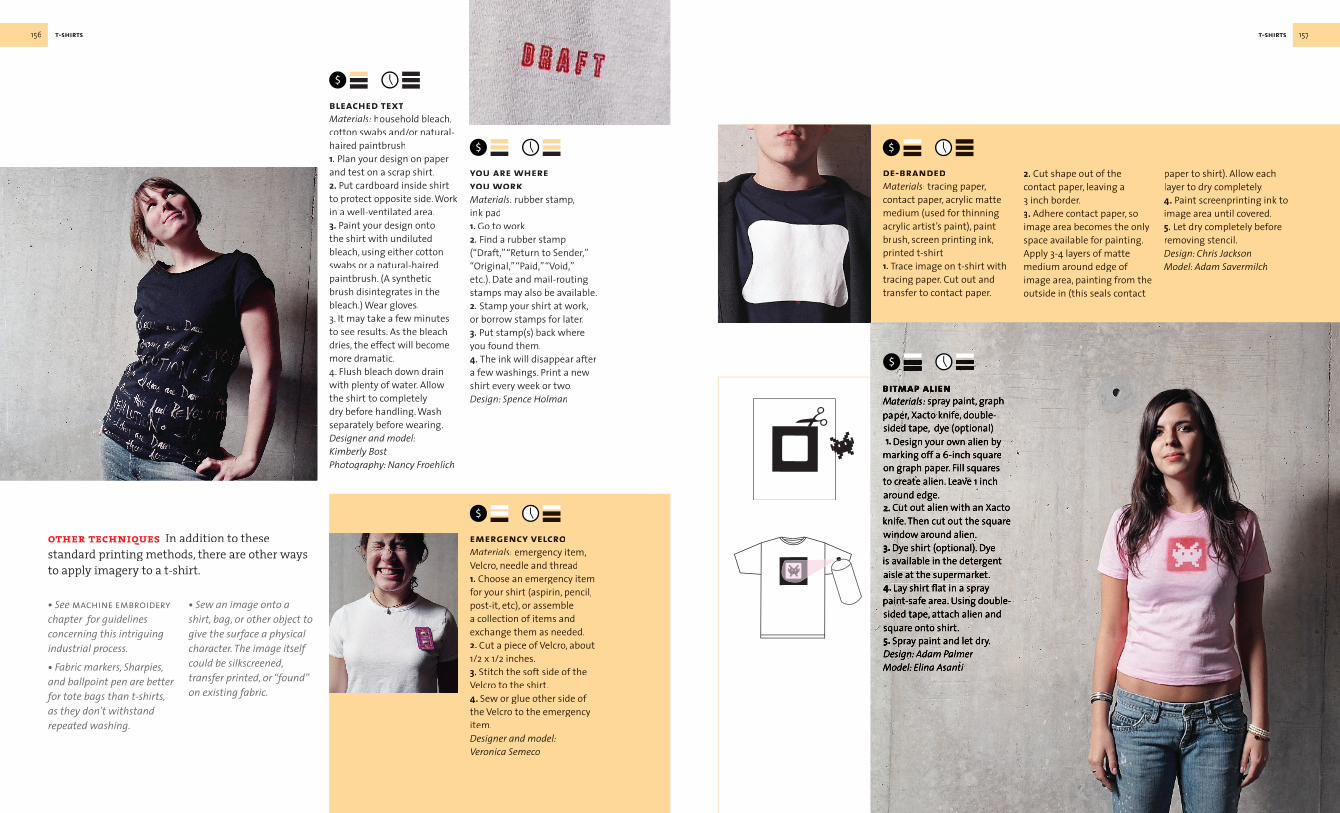
bleached textMaterials: household bleach, cotton swabs and/or natural-haired paintbrush1. Plan your design on paper and test on a scrap shirt. 2. Put cardboard inside shirt to protect opposite side. Work in a well-ventilated area.3. Paint your design onto the shirt with undiluted bleach, using either cotton swabs or a natural-haired paintbrush. (A synthetic brush disintegrates in the bleach.) Wear gloves.3. It may take a few minutes to see results. As the bleach dries, the effect will become more dramatic.4. Flush bleach down drain with plenty of water. Allow the shirt to completely dry before handling. Wash separately before wearing.Designer and model: Kimberly BostPhotography: Nancy Froehlich
• See machine embroidery chapter for guidelines concerning this intriguing industrial process.
• Fabric markers, Sharpies, and ballpoint pen are better for tote bags than t-shirts, as they don’t withstand repeated washing.
emergency velcroMaterials: emergency item, Velcro, needle and thread1. Choose an emergency item for your shirt (aspirin, pencil, post-it, etc), or assemble a collection of items and exchange them as needed.2. Cut a piece of Velcro, about 1/2 x 1/2 inches.3. Stitch the soft side of the Velcro to the shirt.4. Sew or glue other side of the Velcro to the emergency item.Designer and model:Veronica Semeco
• Sew an image onto a shirt, bag, or other object to give the surface a physical character. The image itself could be silkscreened, transfer printed, or “found” on existing fabric.
you are where you workMaterials: rubber stamp, ink pad1. Go to work.2. Find a rubber stamp (“Draft,” “Return to Sender,” “Original,” “Paid,” “Void,” etc.). Date and mail-routing stamps may also be available.2. Stamp your shirt at work, or borrow stamps for later.3. Put stamp(s) back where you found them.4. The ink will disappear after a few washings. Print a new shirt every week or two.Design: Spence Holman
de-brandedMaterials: tracing paper, contact paper, acrylic matte medium (used for thinning acrylic artist’s paint), paint brush, screen printing ink, printed t-shirt 1. Trace image on t-shirt with tracing paper. Cut out and transfer to contact paper.
bitmap alienMaterials: spray paint, graph paper, Xacto knife, double-per, Xacto knife, double-persided tape, dye (optional)1. Design your own alien by marking off a 6-inch square on graph paper. Fill squares to create alien. Leave 1 inch around edge.2. Cut out alien with an Xacto knife. Then cut out the square window around alien.3. Dye shirt (optional). Dye is available in the detergent aisle at the supermarket.4. Lay shirt fl at in a spray paint-safe area. Using double-sided tape, attach alien and square onto shirt.5. Spray paint and let dry. Design: Adam PalmerModel: Elina Asanti
2. Cut shape out of the contact paper, leaving a 3 inch border.3. Adhere contact paper, so image area becomes the only space available for painting. Apply 3-4 layers of matte medium around edge of image area, painting from the outside in (this seals contact
paper to shirt). Allow each layer to dry completely.4. Paint screenprinting ink to image area until covered.5. Let dry completely before removing stencil.Design: Chris JacksonModel: Adam Savermilch
156 t-shirts 157t-shirts
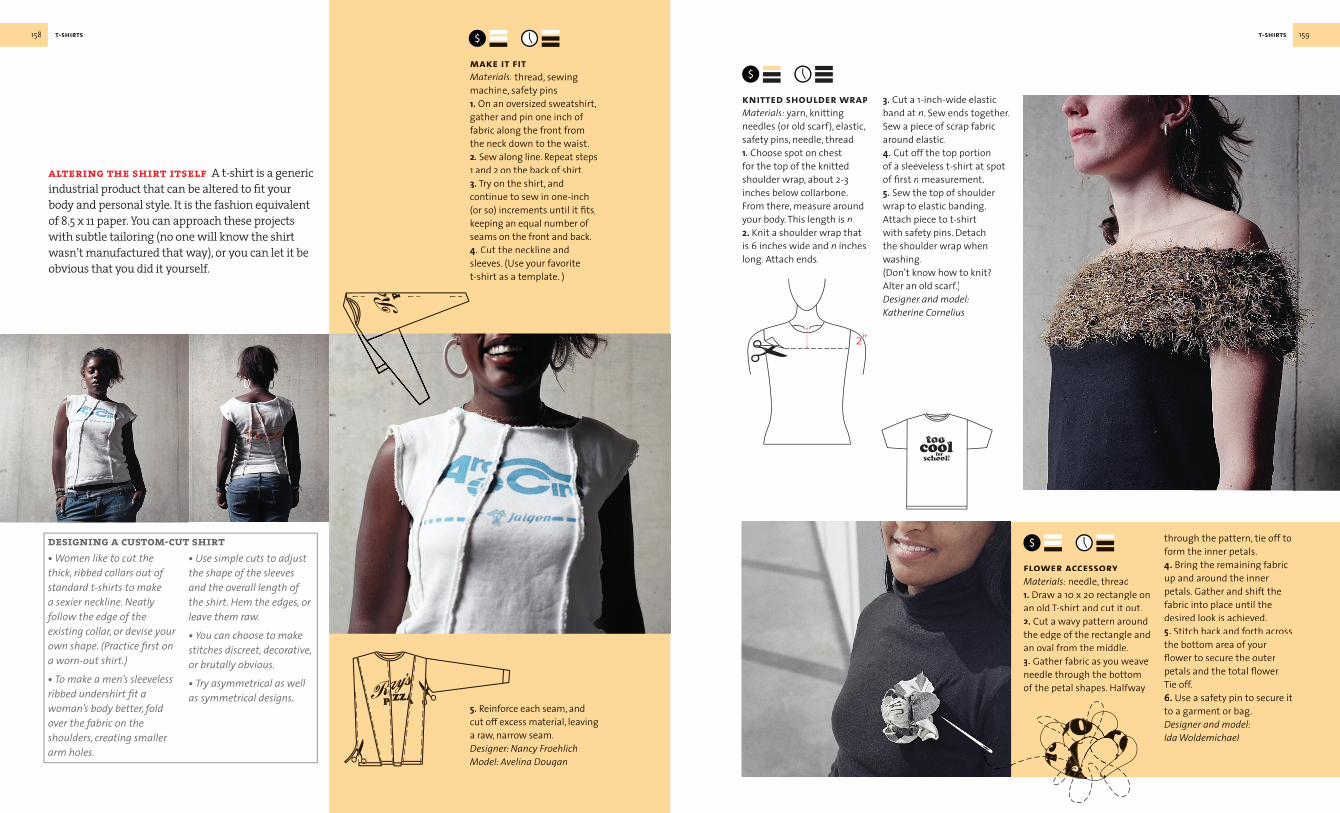
• Women like to cut the thick, ribbed collars out of standard t-shirts to make a sexier neckline. Neatly follow the edge of the existing collar, or devise your own shape. (Practice fi rst on a worn-out shirt.)
• To make a men’s sleeveless ribbed undershirt fi t a woman’s body better, fold over the fabric on the shoulders, creating smaller arm holes.
• Use simple cuts to adjust the shape of the sleeves and the overall length of the shirt. Hem the edges, or leave them raw.
• You can choose to make stitches discreet, decorative, or brutally obvious.
• Try asymmetrical as well as symmetrical designs.
altering the shirt itself A t-shirt is a generic industrial product that can be altered to fi t your body and personal style. It is the fashion equivalent of 8.5 x 11 paper. You can approach these projects with subtle tailoring (no one will know the shirt wasn’t manufactured that way), or you can let it be obvious that you did it yourself.
make it fitMaterials: thread, sewing machine, safety pins 1. On an oversized sweatshirt, gather and pin one inch of fabric along the front from the neck down to the waist. 2. Sew along line. Repeat steps 1 and 2 on the back of shirt. 3. Try on the shirt, and continue to sew in one-inch (or so) increments until it fi ts, keeping an equal number of seams on the front and back. 4. Cut the neckline and sleeves. (Use your favorite t-shirt as a template. )
5. Reinforce each seam, and cut off excess material, leaving a raw, narrow seam.Designer: Nancy Froehlich Model: Avelina Dougan
flower accessoryMaterials: needle, thread1. Draw a 10 x 20 rectangle on an old T-shirt and cut it out. 2. Cut a wavy pattern around the edge of the rectangle and an oval from the middle. 3. Gather fabric as you weave needle through the bottom of the petal shapes. Halfway
through the pattern, tie off to form the inner petals. 4. Bring the remaining fabric up and around the inner petals. Gather and shift the fabric into place until the desired look is achieved. 5. Stitch back and forth across the bottom area of your fl ower to secure the outer petals and the total fl ower. Tie off.6. Use a safety pin to secure it to a garment or bag. Designer and model:Ida Woldemichael
knitted shoulder wrapMaterials: yarn, knitting needles (or old scarf), elastic, safety pins, needle, thread1. Choose spot on chest for the top of the knitted shoulder wrap, about 2-3 inches below collarbone. From there, measure around your body. This length is n. 2. Knit a shoulder wrap that is 6 inches wide and n inches long. Attach ends.
3. Cut a 1-inch-wide elastic band at n. Sew ends together. Sew a piece of scrap fabric around elastic.4. Cut off the top portion of a sleeveless t-shirt at spot of fi rst n measurement. 5. Sew the top of shoulder wrap to elastic banding. Attach piece to t-shirt with safety pins. Detach the shoulder wrap when washing. (Don’t know how to knit? Alter an old scarf.)Designer and model: Katherine Cornelius
designing a custom-cut shirt
158 t-shirts 159t-shirts