4/4 ABBYY FlexiCapture 11 - FlexiLayout Studio & FormDesigner at #ABBYYSummit16

© 2011 ABBYY. All rights reserved.
ABBYY FlexiCapture 10 System Administrator’s Guide

© 2011 ABBYY. All rights reserved. 2
© 2011 ABBYY. All rights reserved. ABBYY, the ABBYY logo, FlexiCapture, FlexiLayout, FormReader, FineReader are either registered trademarks or trademarks of ABBYY Software Ltd. © 1984-2007 Adobe Systems Incorporated and its licensors. All rights reserved. Protected by U.S. Patents 5,929,866; 5,943,063; 6,289,364; 6,563,502; 6,639,593; 6,754,382; Patents pending. Adobe, Acrobat, the Acrobat logo, the Adobe logo, the Adobe PDF logo and Adobe PDF Library are either registered trademarks or trademarks of Adobe Systems Incorporated in the United States and/or other countries. WIBU, CodeMeter, SmartShelter, SmartBind are registered trademarks of Wibu-Systems. PixTools © 1994-2007 EMC Corporation. All rights reserved. JScript is a registered trademark of Microsoft Corporation in the United States and/or other countries. Unicode is a trademark of Unicode, Inc. JasPer Software © 1999-2000, Image Power, Inc. © 1999-2000, University of British Columbia, Canada. © 2001-2006 Michael David Adams. All rights reserved. All other trademarks are the property of their respective owners.

© 2011 ABBYY. All rights reserved. 3
Table of Contents
Installing ABBYY FlexiCapture 10 ....................................................................... 5 Standalone Installation ............................................................................................................................................................................................................................ 5
System Requirements ......................................................................................................................................... 5 Installation methods ............................................................................................................................................ 5 Interaction of the system components ............................................................................................................ 5 Manual (interactive) installation ........................................................................................................................ 5 Command line installation .................................................................................................................................. 6
Distributed Installation ............................................................................................................................................................................................................................ 7 System Requirements ......................................................................................................................................... 7 General information ........................................................................................................................................... 14 Preparing the Application Server for installation on Windows 2012 ...................................................... 14 Preparing the Application Server for installation on Windows Server 2008 R2 .................................. 15 Preparing the Application Server for installation on Windows 2003 ...................................................... 18 Installing the servers ......................................................................................................................................... 22 External components required for the correct operation of the system ................................................. 24 System components in IIS and their configuration ..................................................................................... 25 Database server ................................................................................................................................................. 36 Interaction of the system components .......................................................................................................... 37 Installing the stations ......................................................................................................................................... 37
Using Active Directory .......................................................................................................................................................................................................................... 39 Example: Deploying ABBYY FlexiCapture 10 using Active Directory ................................................... 40
Using SMS ....................................................................................................................................................................................................................................................... 43 Example: Deploying ABBYY FlexiCapture 10 using Microsoft SMS ..................................................... 43
Installing Remote Stations .................................................................................................................................................................................................................. 46 Updating your earlier ABBYY FlexiCapture 10 releases to Release 6 ................................................................................................................. 47
Distributed installation ....................................................................................................................................... 47 Standalone installation ...................................................................................................................................... 47 General notes ..................................................................................................................................................... 47
Upgrading from ABBYY FlexiCapture 9.0 .............................................................................................................................................................................. 47 Using ABBYY FlexiCapture 9.0 Professional projects (*.fcproj) ............................................................. 47 Using ABBYY FlexiLayout Studio 9.0 projects (*.fsp) in ABBYY FlexiLayout 10 ................................ 48 Using FlexiLayouts (*.afl) created in ABBYY FlexiLayout 9.0 ................................................................. 48
Upgrading from ABBYY FlexiCapture 8.0 Professional ................................................................................................................................................ 49 Using ABBYY FlexiCapture 8.0 Professional projects (*.fcproj) ............................................................. 49 Using ABBYY FlexiLayout Studio 8.0 projects (*.fsp) in ABBYY FlexiLayout 10 ................................ 49 Using FlexiLayouts (*.afl) created in ABBYY FlexiLayout 8.0 ................................................................. 49 Errors which may occur while converting FlexiLayouts ............................................................................ 49
Upgrading from ABBYY FormReader 6.5 ................................................................................................................................................................................ 50 Using ABBYY FlexiCapture Studio 1.5 projects (*.fsp) in ABBYY FlexiLayout 10 ............................. 50 Using FlexiLayouts (*.afl) created in ABBYY FlexiCapture Studio 1.5 .................................................. 50 Importing templates from ABBYY FormReader 6.5 batches (*.frm) ...................................................... 51
Managing Your Licenses ....................................................................................... 55 Overview ......................................................................................................................................................................................................................................................... 55 ABBYY FlexiCapture 10 License Manager .............................................................................................................................................................................. 55

© 2011 ABBYY. All rights reserved. 4
License properties ..................................................................................................................................................................................................................................... 56 License statuses ........................................................................................................................................................................................................................................... 56 Buttons ............................................................................................................................................................................................................................................................. 57 Activating a license .................................................................................................................................................................................................................................. 57
How activation is carried out? ......................................................................................................................... 57 Connecting stations to the Licensing Server ......................................................................................................................................................................... 57
Setting Up FlexiCapture 10 Distributed Installation .................................... 59 Quick setup of FlexiCapture for demonstration installations .................................................................................................................................. 59 Detailed setup of FlexiCapture........................................................................................................................................................................................................ 59
How to choose the user authentication type ................................................................................................ 59 Creating a database .......................................................................................................................................... 60 Connecting to an existing database .............................................................................................................. 63 Uploading project to server .............................................................................................................................. 63 Creating new users ............................................................................................................................................ 64 Setting up user roles and access rights ........................................................................................................ 66 Configuring the Processing Server ................................................................................................................ 67
Oracle database settings ....................................................................................................................................................................................................................... 69 Web�stations settings ............................................................................................................................................................................................................................. 71 Security Settings in FlexiCapture 10 Distributed ............................................................................................................................................................... 71 Recommendation for setting up FlexiCapture 10 ............................................................................................................................................................ 75
General recommendation ................................................................................................................................. 75 Using performance counters ........................................................................................................................... 78
Logging ....................................................................................................................... 83 Administration and Monitoring Console logs ...................................................................................................................................................................... 83 Task processing logs on the Processing Servers ................................................................................................................................................................. 83 OS event logs on the servers ............................................................................................................................................................................................................. 83
Working with Clusters ............................................................................................ 84 Setting Up the Processing Server ................................................................................................................................................................................................... 84
Deploying the Processing Server on a Failover Cluster ........................................................................... 84 Setting Up the Licensing Server ................................................................................................................................................................................................... 103 Setting Up the Application Server (and clustering the Administration and Monitoring Console and Web Stations) . 103
Setting Up an NLB Cluster for the Application Server ............................................................................. 103
Technical Support .................................................................................................. 105

© 2011 ABBYY. All rights reserved. 5
Installing ABBYY FlexiCapture 10
Before purchasing the product, analyze your document processing needs and select either the local or the distributed version. If you plan to process moderate amounts of documents (approximately 5,000 pages per day), employ one or two operators for the job, and do not require any sophisticated batch routing, then Standalone Installation is the best choice. If you plan to automate data capture and processing, require sophisticated batch routing based on document or batch types, and need a scalable pool of centrally administered workstations, then select Distributed Installation. Note: When installing the program under Windows Vista, Windows 7, Windows Server 2008 or Windows Server 2008 R2 opera-tions systems, the UAC must be disabled before installation or the native administrator account must be used. Important! The distributed and local versions cannot be installed on the same computer.
Standalone Installation
System Requirements • PC with Intel® Pentium®/Celeron®/Core™2 Duo/Quad/Xeon®/Core™ i5/Core™ i7, AMD
K6/Turion™/Athlon™/Duron™/Sempron™ with a minimum clock speed of 2 GHz
• Operating system: Windows XP SP3, Windows Vista SP2, Windows 7 SP1, Windows 8, Windows Server 2003 SP2, Windows Server 2008 SP2+ Desktop Experience, Windows Server 2008 R2 SP1+ Desktop Experience, Windows Server 2012 + Desktop Experience, (for localized interfaces, corresponding language support is required)
• Memory: 512 MB for each CPU core, but no less than 1 GB
• Hard disk space: 1,5 GB (including 1 GB for installation)
• Scanner supporting TWAIN, WIA or ISIS
• Video card and display with a resolution of 1024×768
• Microsoft .NET Framework 3.5 SP1
Installation methods The following installation methods are available to install the standalone version of ABBYY FlexiCapture:
• manually (interactive installation)
• from the command line
Interaction of the system components The following figure displays the system component interaction for standalone installation:
If you have one license and several operator stations, then for connecting operator stations to the Licensing Server, the 10040 port has to be opened manually in Firewall settings.
Manual (interactive) installation To install the standalone version of ABBYY FlexiCapture:
1. In the Autorun menu, select Standalone Installation (you can run the autorun.exe file manually).

© 2011 ABBYY. All rights reserved. 6
2. Select a setup language. The setup program will compare the locale of your system and the selected language. If the lan-guages are incompatible, a warning message is displayed.
3. Next, the setup program checks the version of your operating system and the availability of the administrative permis-sions. If the version of the operating system is not supported by the program or you do not have the administrative per-missions, a warning message is displayed and the setup program is terminated.
4. If all the checks are passed successfully, the end-user license agreement will be displayed. Read the license agreement carefully and if you agree with the terms of the agreement, select the corresponding option and click Next.
5. A dialog box will open prompting you to enter some information about yourself. Enter the required information and con-tinue with the installation.
6. In the next dialog box, select one of the available installation modes:
• Administrator Station – The setup program installs the Administrator Station, FormDesigner 10, and FlexiLayout Studio 10.
• Operator Station – The setup program installs only the Operator Station. (The Administrator Station, FormDesigner 10 and FlexiLayout Studio 10 will not be installed).
• Administrator and Operator Station – The setup program installs the Administrator Station, the Operator Station, FormDesigner 10 and FlexiLayout 10. By default this configuration is installed.
7. Next, select a destination folder. By default, the program is installed to %systemdrive%\Program Files\ABBYY FlexiCapture 10. If there is not enough space on the selected hard disk, a window is displayed showing your hard disks, the available free space, and the space required by the installation. Select a disk with sufficient free space and continue with the installation.
8. The program files will be copied onto your computer. Once the installation is finished, the setup program will display a message saying that the application has been successfully installed.
9. FlexiCapture 10 License Manager will be launched automatically so that you can activate your serial number. See the Managing Licenses section for details.
Note: For information about configuring multiple workstations to work with a single license server, see “Connecting stations to the Licensing Server”.
Command line installation In the default configuration, all recognition languages are installed on the local computer and the interface language is selected automatically based on the regional settings of the computer on which the program is installed. The default configuration includes the Administrator and Operator stations, guides, help files, ABBYY FlexiLayout and ABBYY FormDesigner tools and FlexiCap-ture 10 License Manager. Run the setup.exe file located in the administrative installation folder using the command line options described below.
Advertise installation For advertise installation, type Setup.exe /j The stations icons will appear in the Start menu. Clicking this icon automatically installs the program in default configuration. Clicking the Administrator Station icon installs the Administrator Station, guides, help files, ABBYY FlexiLayout and ABBYY FormDesigner tools and FlexiCapture 10 License Manager. Clicking the Operator Station icon installs the Operator Station, help files and FlexiCapture 10 License Manager.
Silent installation In the case of silent installation, no setup dialog boxes are displayed and the program is installed in default configuration. Setup.exe /qn Change “/qn” to “/qb” if you want an installation progress bar to be displayed. No other dialog boxes will be displayed. Additional command line options /L<language code> disables auto selection of the interface language and installs the program with the interface language you specified. The following language code values are available: 1033 English 1049 Russian 1031 German 1036 French
© 2011 ABBYY. All rights reserved. 7
2052 Chinese simplified 1040 Italian 1034 Spanish 2074 Serbian 1029 Czech 1038 Hungarian 1045 Polish 1046 Portuguese (Brazilian) 1042 Korean /V <command line> passes the specified command line directly to msiexec.exe. The <command line> string can be replaced with the following commands: INSTALLDIR="<destination>" – the path to the folder where ABBYY FlexiCapture 10 is to be installed. SETUPTYPE_CMD="<install mode>" – available installation modes. The following modes are available: Full – Full installation (the Administrator and the Operator Stations, guides, help files, ABBYY FlexiLayout and ABBYY FormDesigner as well as License Manager will be installed) Admin – Administrator Station (the Administrator Station, guides, help files, ABBYY FlexiLayout and ABBYY FormDesigner as well as License Manager will be installed) Operator – Operator Station Example: Setup.exe /qn /L1049 /v INSTALLDIR="D:\FC10" SETUPTYPE_CMD=Full As a result, the Administrator and Operator Stations will be installed into D:\FC10, and Russian will be used the language of the interface. Removing ABBYY FlexiCapture in silent mode msiexec /x {FC100000-0006-0000-0000-074957833700}
Distributed Installation
System Requirements
Servers
Application Server
• PC with Intel® Pentium®/Celeron®/Core™2 Duo/Quad/Xeon®/Core™ i3/Core™ i5/Core™ i7, AMD K6/Turion™/Athlon™/Duron™/Sempron™ with a minimum clock speed of 2 GHz. The use of processor which has 2 or more cores is recommended for Application Server.
• Operating system: Windows Server 2003 SP2, Windows Server 2008 SP2, Windows Server 2008R2 SP1, Windows Server 2012 (for localized interfaces, corresponding language support is required)
• Memory: no less than 2 GB for Application Server and 4 GB for MS SQL Server
• Hard disk space: 100 MB for installation, 2 GB for SQL Server database. Additional space is required for the file stor-age.
• The computer where the server is installed must be connected to your domain
• Internet Information Server 6, 7, 7.5 or 8.
• Microsoft .NET Framework 4.0 (4.5 if running under Windows Server 2012)
• Microsoft SQL Server 2005 SP2, 2008 SP1, 2008R2 SP1, 2012 Note: Microsoft Azure SQL is not supported.
• Oracle 10g or 11g
Administration and Monitoring Console
o Video card and display with a resolution of 1024×768
o Internet Information Server 6, 7, 7.5 or 8.
o Microsoft .NET Framework 4.0 (4.5 if running under Windows Server 2012)
o Crystal Reports for Visual Studio 2010 (Version 13), Crystal Reports 2008 (Version 12), Crystal Reports for Visual Studio 2008 (Version 10.5)

© 2011 ABBYY. All rights reserved. 8
o Internet Explorer 7, 8, 9 or 10
FlexiCapture Authentication Module
o Internet Information Server 7 or later
o Microsoft .NET Framework 4.0 (4.5 if running under Windows Server 2012)
For operation of Web Module for login and registration:
o Microsoft Internet Explorer version 7, 8, 9 or 10 (Internet Explorer 10 for desktop is only supported under Windows 8 and Windows Server 2012). Internet Explorer 64-bit is only supported under Windows 7 SP1, Windows 8, Windows Server 2008 R2 SP1 and Windows Server 2012 if SilverLight 5 is installed. FireFox 14 or later, Google Chrome 20 or later
o Browser security settings: Internet Explorer medium-high protection level. If high protection level is used, the following option must be specified explicitly:
Active scripting = Enable
Security settings for Google Chrome:
JavaScript = Allow all sites
Security settings for Mozilla FireFox:
Java scripting = Enable
Processing Server
• PC with Intel® Pentium®/Celeron®/Core™2 Duo/Quad/Xeon®/Core™ i3/Core™ i5/Core™ i7, AMD K6/Turion™/Athlon™/Duron™/Sempron™ with a minimum clock speed of 2 GHz.
• Operating system: Windows Server 2003 SP2, Windows Server 2008 SP2, Windows Server 2008R2 SP1, Windows Server 2012 (for localized interfaces, corresponding language support is required)
• Memory: no less than 2 GB
• Hard disk space: 100 MB for installation
• Video card and display with a resolution of 1024×768
• The computer where the server is installed must be connected to your domain
• Microsoft .NET Framework 4.0 (4.5 if running under Windows Server 2012)
Licensing Server
• PC with Intel® Pentium®/Celeron®/Core™2 Duo/Quad/Xeon®/Core™ i3/Core™ i5/Core™ i7, AMD K6/Turion™/Athlon™/Duron™/Sempron™ with a minimum clock speed of 2 GHz.
• Operating system: Windows Server 2003 SP2, Windows Server 2008 SP2, Windows Server 2008R2 SP1, Windows Server 2012 (for localized interfaces, corresponding language support is required)
• Memory: no less than 2 GB
• Hard disk space: 100 MB for installation
• The computer where the server is installed must be connected to your domain
• Microsoft .NET Framework 4.0 (4.5 if running under Windows Server 2012)
Stations Project Setup Station
• PC with Intel® Pentium®/Celeron®/Core™2 Duo/Quad/Xeon®/Core™ i3/Core™ i5/Core™ i7, AMD K6/Turion™/Athlon™/Duron™/Sempron™ with a minimum clock speed of 2 GHz
• Operating system: Windows XP SP3, Windows Vista SP2, Windows 7 SP1, Windows 8, Windows Server 2003 SP2, Windows Server 2008 SP2+ Desktop Experience, Windows Server 2008 R2 SP1+ Desktop Experience, Windows Server 2012 + Desktop Experience (for localized interfaces, corresponding language support is required)
• Memory: 512 MB for each CPU core, but no less than 1 GB
• Hard disk space: 1,5 GB (including 1 GB for installation)
• Scanner supporting TWAIN, WIA or ISIS
• Video card and display with a resolution of 1024×768
• The computer where the station is installed must be connected to your domain

© 2011 ABBYY. All rights reserved. 9
• Microsoft .NET Framework 3.5 SP1 Processing Station
• PC with Intel® Pentium®/Celeron®/Core™2 Duo/Quad/Xeon®/Core™ i3/Core™ i5/Core™ i7, AMD K6/Turion™/Athlon™/Duron™/Sempron™ with a minimum clock speed of 2 GHz.
• Operating system: Windows XP SP3, Windows Vista SP2, Windows 7 SP1, Windows 8, Windows Server 2003 SP2, Windows Server 2008 SP2, Windows Server 2008 R2 SP1, Windows Server 2012 (for localized interfaces, correspond-ing language support is required)
• Memory: 512 MB for each CPU core, but no less than 1 GB
• Hard disk space: 1,5 GB (including 1 GB for installation)
• The computer where the station is installed must be connected to your domain
• Microsoft .NET Framework 3.5 SP1 Verification Stations
Verification Station
o PC with Intel® Pentium®/Celeron®/Core™2 Duo/Quad/Xeon®/Core™ i3/Core™ i5/Core™ i7, AMD K6/Turion™/Athlon™/Duron™/Sempron™ with a minimum clock speed of 2 GHz.
o Operating system: Windows XP SP3, Windows Vista SP2, Windows 7 SP1, Windows 8, Windows Server 2003 SP2, Windows Server 2008 SP2, Windows Server 2008 R2 SP1, Windows Server 2012 (for localized interfaces, corresponding language support is required)
o Memory: 512 MB for each CPU core, but no less than 1 GB
o Hard disk space: 1,5 GB (including 1 GB for installation)
o Video card and display with a resolution of 1024×768
o The computer where the station is installed must be connected to your domain
o Microsoft .NET Framework 3.5 SP1 Remote Verification Station
o PC with Intel® Pentium®/Celeron®/Core™2 Duo/Quad/Xeon®/Core™ i3/Core™ i5/Core™ i7, AMD K6/Turion™/Athlon™/Duron™/Sempron™ with a minimum clock speed of 2 GHz.
o Operating system: Windows XP SP3, Windows Vista SP2, Windows 7 SP1, Windows 8, Windows Server 2003 SP2, Windows Server 2008 SP2, Windows Server 2008 R2 SP1, Windows Server 2012 (for localized interfaces, corresponding language support is required)
o Memory: 1 GB
o Hard disk space: 100 MB
o Video card and display with a resolution of 1024×768
o Microsoft .NET Framework 3.5 SP1 Web Verification Station
o Video card and display with a resolution of 1024×768
o Microsoft Internet Explorer version 7, 8, 9 or 10 (Internet Explorer 10 for desktop is only supported under Windows 8 and Windows Server 2012). Internet Explorer 64-bit is only supported under Windows 7 SP1, Windows 8, Windows Server 2008 R2 SP1 and Windows Server 2012 if SilverLight 5 is installed. FireFox 14 or later, Google Chrome 20 or later
o SilverLight 4.0.60129.0 or later; using SilverLight5 is strongly recommended
o Browser security settings: Internet Explorer medium-high protection level. Detailed required settings for Internet Explorer:
Run ActiveX controls and plugins = Enable
Script ActiveX controls marked safe for scripting = Enable
Active scripting = Enable
File Download = Enable (for installation of SilverLight)
Security settings for Google Chrome:
JavaScript = Allow all sites
Plugins = Run automatically

© 2011 ABBYY. All rights reserved. 10
Security settings for Mozilla FireFox:
Java scripting = Enable
FireFox will Remember History (Options -> Privacy) = Disable Data Verification Stations
Data Verification Station
o PC with Intel® Pentium®/Celeron®/Core™2 Duo/Quad/Xeon®/Core™ i3/Core™ i5/Core™ i7, AMD K6/Turion™/Athlon™/Duron™/Sempron™ with a minimum clock speed of 2 GHz.
o Operating system: Windows XP SP3, Windows Vista SP2, Windows 7 SP1, Windows 8, Windows Server 2003 SP2, Windows Server 2008 SP2, Windows Server 2008 R2 SP1, Windows Server 2012 (for localized interfaces, corresponding language support is required)
o Memory: 1 GB
o Hard disk space: 100 MB
o Video card and display with a resolution of 1024×768
o Microsoft .NET Framework 3.5 SP1 Web Data Verification Station
o Video card and display with a resolution of 1024×768
o Microsoft Internet Explorer version 7, 8, 9 or 10 (Internet Explorer 10 for desktop is only supported under Windows 8 and Windows Server 2012). Internet Explorer 64-bit is only supported under Windows 7 SP1, Windows 8, Windows Server 2008 R2 SP1 and Windows Server 2012 if SilverLight 5 is installed. Mozilla FireFox 14 or later, Google Chrome 20 or later
o SilverLight 4.0.60129.0 or later; using SilverLight5 is strongly recommended
o Browser security settings: Internet Explorer medium-high protection level. Detailed required settings for Internet Explorer:
Run ActiveX controls and plugins = Enable
Script ActiveX controls marked safe for scripting = Enable
Active scripting = Enable
File Download = Enable (for installation of SilverLight)
Security settings for Google Chrome:
JavaScript = Allow all sites
Plugins = Run automatically
Security settings for Mozilla FireFox:
Java scripting = Enable
FireFox will Remember History (Options -> Privacy) = Disable Scanning Stations
Scanning Station
o PC with Intel® Pentium®/Celeron®/Core™2 Duo/Quad/Xeon®/Core™ i3/Core™ i5/Core™ i7, AMD K6/Turion™/Athlon™/Duron™/Sempron™ with a minimum clock speed of 2 GHz.
o Operating system: Windows XP SP3, Windows Vista SP2, Windows 7 SP1, Windows 8, Windows Server 2003 SP2, Windows Server 2008 SP2+ Desktop Experience, Windows Server 2008 R2 SP1+ Desktop Ex-perience, Windows Server 2012 + Desktop Experience (for localized interfaces, corresponding language sup-port is required)
o Memory: 1 GB
o Hard disk space: 1 GB (including 200 MB for installation and space for scanned images)
o Scanner supporting TWAIN, WIA or ISIS
o Video card and display with a resolution of 1024×768
o Microsoft .NET Framework 3.5 SP1 ClickOnce Scanning Station
o PC with Intel® Pentium®/Celeron®/Core™2 Duo/Quad/Xeon®/Core™ i3/Core™ i5/Core™ i7, AMD K6/Turion™/Athlon™/Duron™/Sempron™ with a minimum clock speed of 2 GHz.
© 2011 ABBYY. All rights reserved. 11
o Operating system: Windows XP SP3, Windows Vista SP2, Windows 7 SP1, Windows 8, Windows Server 2003 SP2, Windows Server 2008 SP2+ Desktop Experience, Windows Server 2008 R2 SP1+ Desktop Ex-perience, Windows Server 2012 + Desktop Experience (for localized interfaces, corresponding language sup-port is required)
o Memory: 1 GB
o Hard disk space: 1 GB (including 90 MB for installation and space for scanned images). The size of downloadable file is 41 MB.
o Scanner supporting TWAIN, WIA or ISIS
o Video card and display with a resolution of 1024×768
o Internet Explorer 7 or higher for ClickOnce deployment
o Microsoft .NET Framework 3.5 SP1 Web Scanning Station
o Operating system: Windows XP SP3, Windows Vista SP2, Windows 7 SP1, Windows 8, Windows Server 2003 SP2, Windows Server 2008 SP2+ Desktop Experience, Windows Server 2008 R2 SP1+ Desktop Ex-perience, Windows Server 2012 + Desktop Experience (for localized interfaces, corresponding language sup-port is required)
o Video card and display with a resolution of 1024×768
o Scanner supporting TWAIN. WIA scanners are visible to the station but they are not guaranteed to work.
o Microsoft Internet Explorer version 7, 8, 9 or 10 (Internet Explorer 10 for desktop is only supported under Windows 8 and Windows Server 2012) 32-bit. Mozilla FireFox 14 or later 32-bit, Google Chrome 20 or later 32-bit
o SilverLight 4.0.60129.0 or later; using SilverLight5 is strongly recommended
o Browser security settings: Internet Explorer medium-high protection level. Detailed required settings for Internet Explorer:
Download signed ActiveX controls = Enable
Run ActiveX controls and plugins = Enable
Script ActiveX controls marked safe for scripting = Enable
Active scripting = Enable
File Download = Enable
Security settings for Google Chrome:
JavaScript = Allow all sites
Plugins = Run automatically
Security settings for Mozilla FireFox:
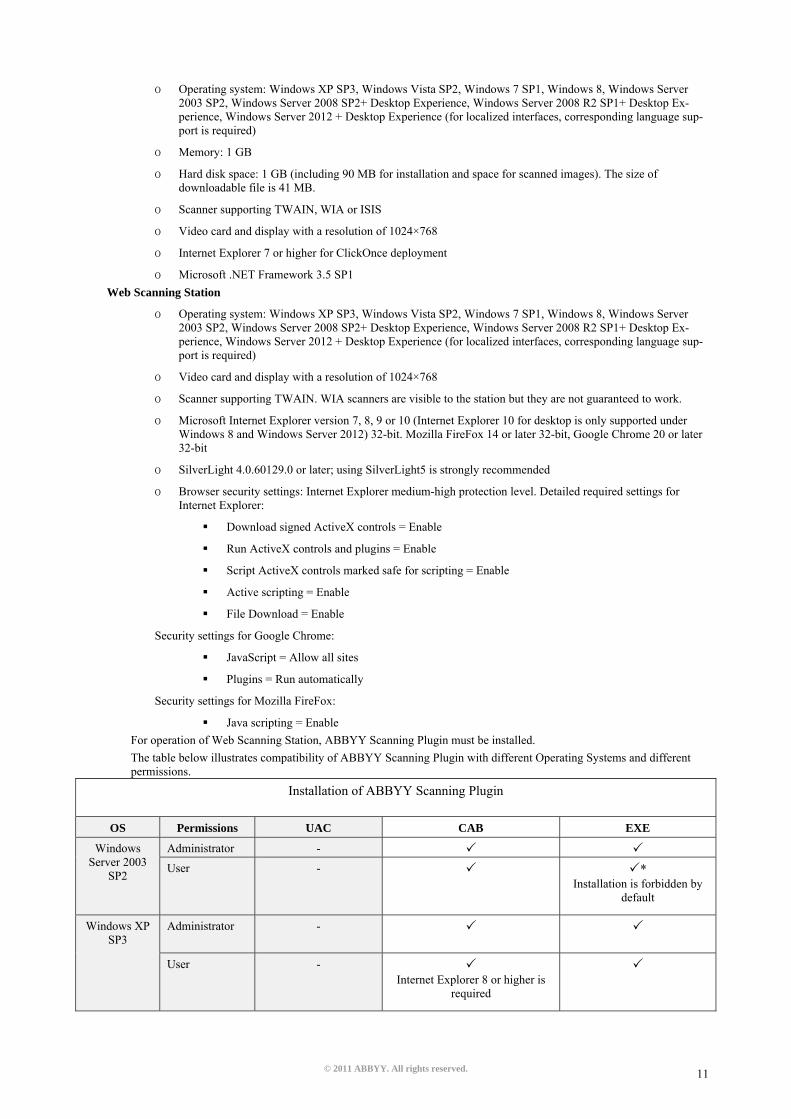
Java scripting = Enable For operation of Web Scanning Station, ABBYY Scanning Plugin must be installed. The table below illustrates compatibility of ABBYY Scanning Plugin with different Operating Systems and different permissions.
Installation of ABBYY Scanning Plugin
OS Permissions UAC CAB EXE
Windows Server 2003
SP2
Administrator - User - *
Installation is forbidden by default
Windows XP SP3
Administrator -
User - Internet Explorer 8 or higher is
required

© 2011 ABBYY. All rights reserved. 12
Windows Vista SP2, Windows
Server 2008 SP2
Administrator yes
no
User yes The administrator password will
be required
no Internet Explorer 8 or higher is
required
Windows 7 SP1,
Windows Server
2008 R2 SP1
Administrator recommended
no
User recommended The administrator password will
be required
no
Windows 8 Administrator recommended
no
User recommended The administrator password will
be required
no

© 2011 ABBYY. All rights reserved. 13
Windows Server 2012
Administrator recommended ** Installation is forbidden by
default
no ** Installation is forbidden by
default
User recommended The administrator password will
be required
** The administrator password
will be required
no ** Installation is forbidden by
default
*Note: To allow user installation of ABBYY Scanning Plugin, you should enable the setting Disable Windows In-staller (Computer Configuration -> Administrative Templates -> Windows Components -> Windows Installer) and set it to Never.
**Note: To allow installation of ABBYY Scanning Plugin for Windows Server 2012, it is necessary to run the executa-ble file Setup.exe as Administrator or change the security policy by setting the value of the registry key HKEY_LOCAL_MACHINE\Software\Policies\Microsoft\Windows\Installer DisableMSI to “0”.
Note: For detailed instruction on how to install ABBYY Scanning Plugin, see Web Scanning Station help. Web Capture Station
• Operating system: Windows XP SP3, Windows Vista SP2, Windows 7 SP1, Windows 8, Windows Server 2003 SP2, Windows Server 2008 SP2+ Desktop Experience, Windows Server 2008 R2 SP1+ Desktop Experience, Windows Server 2012 + Desktop Experience (for localized interfaces, corresponding language support is required)
• Video card and display with a resolution of 1024×768
• Scanner supporting TWAIN. WIA scanners are visible to the station but they are not guaranteed to work.
• Microsoft Internet Explorer version 7, 8, 9 or 10 (Internet Explorer 10 for desktop is only supported under Windows 8 and Windows Server 2012 32-bit. Mozilla FireFox 14 or later 32-bit, Google Chrome 20 or later 32-bit
• SilverLight 4.0.60129.0 or later; using SilverLight5 is strongly recommended
• Browser security settings: Internet Explorer medium-high protection level. Detailed required settings:
o Download signed ActiveX controls = Enable
o Run ActiveX controls and plugins = Enable
o Script ActiveX controls marked safe for scripting = Enable
o Active scripting = Enable
o File Download = Enable
Security settings for Google Chrome:
o JavaScript = Allow all sites
o Plugins = Run automatically
Security settings for Mozilla FireFox:
o Java scripting = Enable
For operation of Web Capture Station, ABBYY Scanning Plugin must be installed. Installation restrictions are listed in the table. For detailed instruction on how to install ABBYY Scanning Plugin, see Web Scanning Station help.
© 2011 ABBYY. All rights reserved. 14
Supported virtual machines The following virtual machines are supported:
• VMware Server 2.0 (this platform is no longer supported by the manufacturer) • VMware Workstation 6.5 - 9.0 • VMware ESXi 4.1.0 (server component of VMware vSphere) • Hyper-V 6.0, 6.1 or 6.2 (Hyper-V version corresponds to the version of the Operating system. Under Windows Server
2008, Hyper-V 6.0 is used) Note: Hyper-V virtual machines do not work with USB devices. VMware ESXi virtual machines work with Wibu drivers only, iKey drivers are not supported.
General information For distributed installation, it is recommended that a server operating system should be used. Windows XP, Windows Vista and Windows 7 are not server operating systems. They support only a limited number of connections and are not well suitable for server use. The distributed installation of FlexiCapture 10 includes three servers:
• Application Server • Licensing Server • Processing Server
The Application Server coordinates the work of the stations ensures the correct operation of ABBYY FlexiCapture 10. The following three steps are required to install the distributed version of ABBYY FlexiCapture 10:
1. Prepare the Application Server.
2. Install the servers.
3. Install the workstations.
Preparing the Application Server for installation on Windows 2012 This instruction can also be used when installing the Application Server on Windows 8. The following components must be installed on your computer before you can install the Application Server:
• Net Framework 4.0 • IIS (Internet Information Services) • This component can be installed by selecting Install External Components in the Autorun menu.
The .Net Framework 4.5 component is installed by default on Windows 2012 and Windows 8 and not needed to be installed. You can find information about the installed versions of Net.Framework in the registry. For more information, please refer to the Microsoft web-site.
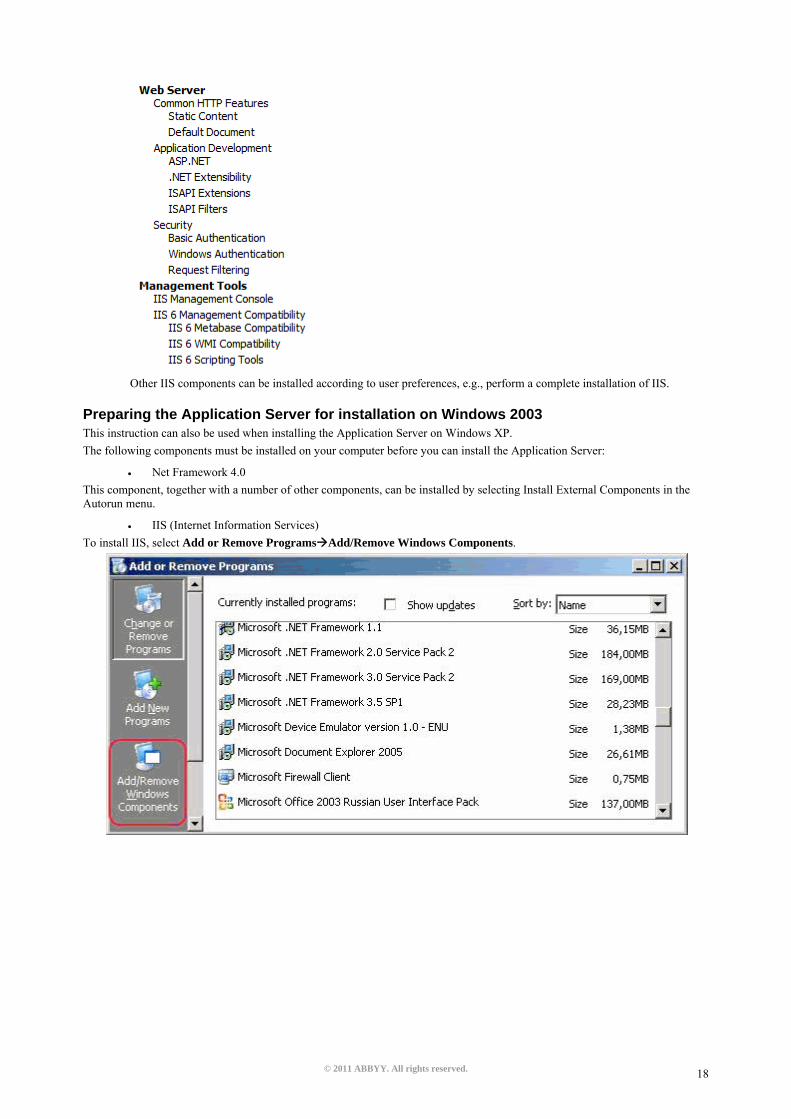
Installation of the IIS is performed using server administration console. Press the Add roles and features button and select the Web Server (IIS) value in the roles list to install IIS. You may need to have Windows installation disk to perform this action. The following components of the IIS must be installed:
.Net Framework 4.5 Features ASP.NET 4.5 Web Server (IIS) Web Server Common HTTP Features Static Content Default Document HTTP Errors HTTP Redirection Application Development .Net Extensibility 4.5 ASP.NET 4.5 ISAPI Extensions ISAPI Filters Security Basic Authentication Windows Authentication Request Filtering

© 2011 ABBYY. All rights reserved. 15
Management Tools IIS Management Console IIS 6 Management Compatibility IIS 6 Metabase Compatibility IIS 6 WMI Compatibility IIS 6 Scripting Tools
You may also install other components of the IIS, for example, full installation may be performed.
Preparing the Application Server for installation on Windows Server 2008 R2 This instruction can also be used when installing the Application Server on Windows 2008, Windows 7 and Windows Vista. Important! Before you start, disable the UAC or perform all actions using the native administrator account. To disable UAC:
1. In Control Panel open User Accounts.
2. Click Change User Account Control settings link and in the dialog box that opens, decrease the level of user control
to Never notify.
3. For changes to take effect, restart the computer after turning off UAC.
The Application Server coordinates the work of the stations ensures the correct operation of ABBYY FlexiCapture 10. The fol-lowing components must be installed on your computer before you can install the Application Server:
• Net Framework 4.0

© 2011 ABBYY. All rights reserved. 16
This component can be installed by selecting Install External Components in the Autorun menu. Note: You can find information about the installed versions of Net.Framework in the registry. For more information, please refer to the Microsoft web-site.
• IIS (Internet Information Services)
The Application Server can only be installed on a computer on which Microsoft Internet Information Server 5.1 or later is in-stalled. IIS is required for the correct operation of the Application Server, the Administration and Monitoring Console and Web Stations.
To install IIS, do the following:
1. In My Computer local menu, choose Manage. 2. In the Server Manager console, that opens click Add Roles and from the roles list select Web Server (IIS).

© 2011 ABBYY. All rights reserved. 17
3. During installation, Windows may ask for the source distribution files, so you need to have Windows installation CD. 4. Enable installation of the following IIS internal components:
-> Web Management Tools -> IIS Management Console -> IIS 6 Management Compatibility
-> IIS 6 Metabase and IIS 6 configuration compatibility -> IIS 6 Scripting Tools -> World Wide Web Services -> Application Development Features -> ASP.NET -> ISAPI Extensions -> Common HTTP Features -> Static Content -> Security -> Windows Authentication
-> Basic Authentication Components associated with these internal components will also be enabled. Here is the list of components installed for IIS 7.5:
© 2011 ABBYY. All rights reserved. 18
Other IIS components can be installed according to user preferences, e.g., perform a complete installation of IIS.
Preparing the Application Server for installation on Windows 2003 This instruction can also be used when installing the Application Server on Windows XP. The following components must be installed on your computer before you can install the Application Server:
• Net Framework 4.0 This component, together with a number of other components, can be installed by selecting Install External Components in the Autorun menu.
• IIS (Internet Information Services) To install IIS, select Add or Remove Programs Add/Remove Windows Components.

© 2011 ABBYY. All rights reserved. 19

© 2011 ABBYY. All rights reserved. 20
During installation, Windows may require files from the setup disk, therefore be sure to have the Windows disk ready at hand. If any of the components is missing on your computer, the setup program will display a warning message and the installation of the Application Server will stop. Once the installation is complete, open the Administrator Console and make sure that the IIS service is running. Important! In Windows 2003 ASP.NET is disabled by default for security reasons. This will cause “Error 404 File not found” when you attempt to start the Monitoring Station. To solve the problem, allow the ASP.NET v4.0 service extension in the IIS Manager:

© 2011 ABBYY. All rights reserved. 21
This service extension will appear in the list only after you install NET Framework 4.0. If ASP.net was installed before installation of IIS, registration of ASP.net must be performed: %systemdrive%\Windows\Microsoft.NET\Framework\v4.0.30319\aspnet_regiis.exe –i If your computer runs Windows 2003 (64-bit) or Windows XP (64 bit), do the following:
1. Execute the following command from the command line: cscript %system-drive%\Inetpub\AdminScripts\adsutil.vbs set W3SVC/AppPools/Enable32BitAppOnWin64 true This command switches the default pool to 32-bit mode, thus the default pool and the pools of the Administration and Monitoring Console run in the same mode which is required for registration of ASP.net. For this command to take effect, access to the Network Service account must be granted explicitly. To grand access to the Network Service account, execute the following command: aspnet_regiis -ga "NT Authority\Network Service".
2. Make sure that the World Wide Web Publishing service is running in 32-bit mode:

© 2011 ABBYY. All rights reserved. 22
3. Execute the following command from the command line: %system-
drive%\Windows\Microsoft.NET\Framework\v4.0.30319\aspnet_regiis.exe –i
4. The list of IIS service extensions (see below) will now include an entry for the 32-bit version of ASP.Net. Change its status to allowed:
Installing the servers Once you have made the preparations for installing the Application Server, install the servers. By default, all servers are installed on the same computer. However, you can install them on different computers by disabling the redundant servers in the setup program. To install the ABBYY FlexiCapture servers:
1. In the Autorun menu, select Distributed Installation. Next, select Install Servers to start the installation.
2. Select a setup language. The setup program will compare the locale of your system and the selected language. If the lan-guages are incompatible, a warning message is displayed.
3. Next, the setup program checks the version of your operating system and the availability of the administrative permis-sions. If the version of the operating system is not supported by the program or you do not have the administrative per-missions, a warning message is displayed and the setup program is terminated.

© 2011 ABBYY. All rights reserved. 23
4. If all the checks are passed successfully, the end-user license agreement will be displayed. Read the license agreement carefully and if you agree with the terms of the agreement, select the corresponding option and click Next.
5. A dialog box will open prompting you to enter some information about yourself. Enter the required information and con-tinue with the installation.
6. Next, select the servers to install. You can also specify a destination folder. By default, the program is installed to: %systemdrive%\Program Files (x86)\ABBYY FlexiCapture 10 Servers (%systemdrive%\Program Files\ABBYY FlexiCapture 10 Servers if 32-bit OS version is used).
• Processing Server – the server that controls the operation of the Processing Stations
• Licensing Server – the server that stores and manages licenses. When you install servers on different workstations, you must specify the address of this server or the Licensing Server in the format server, without \\ or http://
• Application Server – the server that controls the operation of the other components. When you install servers on different workstations, you must specify the address of this server or the Application Server in the format server, without \\ or http://
• Web Stations – the Application Server components which allow operators to connect to the server and work using a web-browser.
• FlexiCapture Authentication Module – the Application Server component which allows operators of web stations to register with the system and create requests for access rights to the web station. Provides operators of web sta-tions with a single entry point into the system. Installing this component is available on IIS 7 or later. By default this feature is not installed. For more information on how to choose the authentication method, please refer to “How to choose the user authentication type”.
• Stations Installer – selecting this option will copy the stations’ setup files onto the Application Server so that you can then deploy them from the server. SMS and Active Directory deployment are supported. Once you select this component, you can specify the destination folder where to copy the setup files.
7. Next the setup program will check if Net Framework 4.0 (4.5 if running under Windows Server 2012) and IIS are in-stalled on your computer. If any of the components is missing on your computer, the setup program will display a warn-ing message.
8. The program files will be copied onto your computer. Once the installation is finished, the setup program will display a message saying that the application has been successfully installed.
9. Once the installation is complete, FlexiCapture 10 License Manager will be launched automatically so that you can ac-tivate your serial number. See 1Managing Your Licenses section for details. The Monitoring Station will also be launched, where you can set up the installed Application Server.
10. After the installation is complete, in the IIS Manager console (Start -> Administrative Tools -> Internet Information Ser-vices (IIS) Manager), check if IIS server and Default Web Site are running:

© 2011 ABBYY. All rights reserved. 24
If the server is stopped, in the Manage Server menu, choose Start. Similarly, check whether Default Web Site is running. IMPORTANT! The Application Server should be available on the Internet if you wish to use the remote stations over the Inter-net. Removing ABBYY FlexiCapture servers in silent mode msiexec /x {FC100000-0006-0000-0000-074957833700}
External components required for the correct operation of the system • Ikey driver
This component is required if you are going to use a USB key license. On Windows Server 2008 R2 or another 64-bit operating system, it is necessary to install a 64-bit version of iKey driver manually. It can be installed by selecting Install External Components in the Autorun menu.
Note: On 32-bit operating systems, no additional steps are required to install the iKey driver. Installation will be done automatically.
• CodeMeter runtime
This component is required if you are going to use a USB key license. No additional steps are required to install the driver. Installation will be done automatically when Licensing Server is being installed.
• Microsoft Core XML Services (MSXML6)
This component is required for the operation of the Application Server. It is installed automatically.
• Crystal Reports This component is used by the Administration and Monitoring Console to generate reports. Crystal Reports can be in-stalled on the same computer where the Application Server is installed. Without this component, you will not be able to generate reports. However, all other Application Server management functionality will be available. ABBYY FlexiCap-ture 10 supports Crystal Reports basic for Visual Studio .NET 2008 and Crystal Reports 2010. Crystal Reports is not in-stalled automatically and should be installed manually. A 32-bit version of Crystal Reports basic for Visual Studio .NET 2008 can be installed by selecting Install External Components in the Autorun menu.
Note: Whether to install a 32- or 64-bit version of Crystal Reports is determined by the mode, in which the pool of the Administration and Monitoring Console is running in IIS (FlexiCapture 10 Monitoring). For details, see «System com-ponents in IIS and their configuration». By default the pool of Administration and Monitoring Console runs in 32-bit mode. However, it can be transferred to 64-bit mode, which allows you to use Crystal Reports 64-bit. For details, see
«Switching system components to 64-bit mode».
If the bit does not match or Crystal Reports is not installed, the following error message will appear:
A runtime error occurred: CrystalReports loading failed Details: Description Exception has been thrown by the target of an invocation. Source mscorlib Stack trace at System.RuntimeTypeHandle.CreateInstance(RuntimeType type, Boolean publicOnly, Boolean noCheck, Boolean& canBeCached, RuntimeMethodHandle& ctor, Boolean& bNeedSecurityCheck) at Sys-tem.RuntimeType.CreateInstanceSlow(Boolean publicOnly, Boolean fillCache) at Sys-tem.RuntimeType.CreateInstanceImpl(Boolean publicOnly, Boolean skipVisibilityChecks, Boolean fillCache) at Sys-tem.Activator.CreateInstance(Type type, Boolean nonPublic) at System.RuntimeType.CreateInstanceImpl(BindingFlags bindingAttr, Binder binder, Object[] args, CultureInfo culture, Object[] activationAttributes) at Sys-tem.Activator.CreateInstance(Type type, BindingFlags bindingAttr, Binder binder, Object[] args, CultureInfo culture, Object[] activationAttributes) at System.Reflection.Assembly.CreateInstance(String typeName, Boolean ignoreCase, BindingFlags bindingAttr, Binder binder, Object[] args, CultureInfo culture, Object[] activationAttributes) at Report-Manager.loadCrystalReports()

© 2011 ABBYY. All rights reserved. 25
System components in IIS and their configuration
This section describes the IIS configuration which is necessary for the operation of FlexiCapture. This configuration is configured automatically during installation and required no manual configuration. However, in case of errors this section can help you to check the settings specified in IIS.
Application pools During the installation of the Application Server, the installer automatically adds three IIS application pools associated with
ABBYY FlexiCapture 10. Application pools enable interaction with workflows bound to one or more applications and sharing
data between them.
FlexiCapture 10 Monitoring – enables operation of the Administration and Monitoring Console
FlexiCapture 10 Web Services – enables operation of the Application Server.
FlexiCapture 10 Web Stations – enables operation of the web stations: Web Verification station, Web Data Verification station,
Web Capture station.
All pools are configured automatically during the installation of ABBYY FlexiCapture. Pool settings critical for correct operation
of the Application Server, are listed below:
- .Net Framework Version = v4.0
- Managed Pipeline Mode = Integrated
- Identity = NetworkService
ABBYY FlexiCapture 10 application pools work in 32-bit mode. In IIS Manager Console, you can check if 32-bit mode is en-
abled. For this, do the following:
1. Run the IIS Manager Console from the menu: Start -> Administrative Tools -> Internet Information Services (IIS)
Manager.
2. Choose Application Pools.

© 2011 ABBYY. All rights reserved. 26
3. Choose a desired pool from the list. In the Actions menu, select Advanced Settings…
The value of Enable 32-Bit Application must be True. It means that the pool works in 32-bit mode.
Besides, the installer adds the following applications to Default Web Site (the set of applications depends on the configuration
selected during the installation):
Default Web Site\FlexiCapture10 – the Administration and Monitoring Console
Default Web Site\FlexiCapture10\Server – the Application Server, in particular:

© 2011 ABBYY. All rights reserved. 27
Default Web Site\FlexiCapture10\Server\WebServices.dll – a web service of the Application Server which supports both Win-
dows and Basic authentication.
Default Web Site\FlexiCapture10\Server\WebServicesExternal.dll – a web service of the Application Server which supports
authentication by means of the FlexiCapture Authentication Module (will be added if FlexiCapture Authentication Module was
selected during the installation of ABBYY FlexiCapture 10 Servers).
Default Web Site\Login – a web-based interface for login and registration (will be added if FlexiCapture Authentication Module
was selected during the installation of ABBYY FlexiCapture 10 Servers)
Default Web Site\DataVerification – Web Data Verification Station (will be added if the Web Stations component is selected
during the installation of ABBYY FlexiCapture 10 Servers)
Default Web Site\Verification – Web Verification Station (will be added if the Web Stations component is selected during the
installation of ABBYY FlexiCapture 10 Servers)
Default Web Site\Scanning – Web Scanning Station (will be added if the Web Stations component is selected during the installa-
tion of ABBYY FlexiCapture 10 Servers)
Default Web Site\Capture – Web Capture Station (will be added if the Web Stations component is selected during the installa-
tion of ABBYY FlexiCapture 10 Servers)
Authentication settings for FlexiCapture 10 Web Applications To control access to the applications via http protocol, it is necessary to configure authentication settings (login/password-based
connection verification of a user’s identity). For this, choose a desired application and then choose the Authentication item.
Then select a required authentication method from the list and enable it.

© 2011 ABBYY. All rights reserved. 28
To access ABBYY FlexiCapture 10 applications, different authentication types are used: Windows authentication – a user tries to login to the server using the same credential under which the user browser runs. (Using UTF-8-encoded characters in the user name and the password may be not supported.) To pass Windows authentication, the user must be either a local user of the computer or a user of the domain which includes this computer. Basic authentication – login and password are transmitted over the network in clear text. To pass Windows authentication, the user must be either a local user of the computer or a user of the domain which includes this computer. Anonymous authentication – the server does not require the client to transfer the credential. Users accessing the server operate under a special local account, that is, they are considered local users and are authenticated on their computers. FlexiCapture authentication module (ABBYY FlexiCapture Authentication) – user name and password are passed the same way as when using Basic authentication, authentication is performed against a FlexiCapture database which stores users’ logins and password hashes. To pass the authentication, it is necessary that the login and password of the account match the login and password specified in the FlexiCapture database. This makes it possible to use logins and passwords which are not related to Windows user accounts. By default FlexiCapture Authentication Module is not installed during the installation of servers. In this case, the following au-
thentication settings are specified in IIS:
Default Web Site\FlexiCapture10 (Administration and Monitoring Console) - only Windows authentication:

© 2011 ABBYY. All rights reserved. 29
Default Web Site\FlexiCapture10\Server (Application Server) - both Windows authentication and Basic authentication are en-
abled:
Default Web Site\DataVerification (Web Data Verification Station) - only Anonymous authentication is enabled:

© 2011 ABBYY. All rights reserved. 30
Default Web Site\Verification (Web Verification Station) - only Anonymous authentication is enabled.
Default Web Site\Scanning (Web Scanning Station) - only Anonymous authentication is enabled.
Default Web Site\Capture (Web Capture Station) - only Anonymous authentication is enabled.
If FlexiCapture Authentication Module was installed, the following authentication settings are specified in IIS:
Default Web Site\FlexiCapture10 (Administration and Monitoring Console) - only FlexiCapture authentication is enabled for
this folder and all its files and subfolders, except for the Default Web Site\FlexiCapture10\DBConnection.aspx page, for which
only Windows authentication is enabled, and the Server folder. For all pages, except for the DBConnection.aspx page, redirecting
to the Default Web Site\Login page is configured in case of HTTP 401 error which enables automatic switching to login page if
the user cannot pass the FlexiCapture authentication.
Default Web Site\FlexiCapture10\Server (Application Server) - Windows, Basic and FlexiCapture authentications are enabled
for this folder and all its files and subfolder, except for the Default Web Site\FlexiCapture10\Server\WebServices\External.dll
file, for which only FlexiCapture authentication is enabled.
Default Web Site\Login (web-based interface for logging on of existing users or registration of new users) - only Anonymous
authentication is enabled.
Default Web Site\DataVerification (Web Data Verification Station) - only Anonymous authentication is enabled.
Default Web Site\Verification (Web Verification Station) - only Anonymous authentication is enabled.
Default Web Site\Scanning (Web Scanning Station) - only Anonymous authentication is enabled.
Default Web Site\Capture (Web Capture Station) - only Anonymous authentication is enabled.
Handler Mappings In IIS services, handlers process requests to sites and applications. The handlers are mapped to resources on a web server and
create responses to those requests. Like the modules, the handlers are implemented using native or managed components, such a
dynamic DLL or managed code.
After the installation of ABBYY FlexiCapture 10 Application Server, the installer performs the following actions:
1) Adds to IIS the mappings required for correct processing requests from the Application Server. These mappings can be
view in the IIS Manager console. For this, select the Handler Mappings item for Default Web
Site\FlexiCapture10\Server (the Application Server).

© 2011 ABBYY. All rights reserved. 31
For correct operation of the Application Server, the installer creates a mapping «ABBYY FlexiCapture WebService» with the
following parameters:
Request path = «*.dll»
Executable = «C:\inetpub\wwwroot\FlexiCapture10\Server\WebServicesIsapi.dll»
Access = «Script» («Scripts and Executable» on IIS 6)

© 2011 ABBYY. All rights reserved. 32
Note: It may happen that a third-party application is installed on the same computer as the Application Server, and it can intercept
requests of ABBYY FlexiCapture 10. In this case, the following error message will occur when starting the Administration and
Monitoring console:
A runtime error occurred:
Cannot get file storage path
Details:
Description Client found response content type of 'text/html; charset=utf-8', but expected 'text/xml'. The request failed with the
error message: -- Server Error in Application "DEFAULT WEB SITE/FLEXICAPTURE10/SERVER"Internet Information Ser-
vices 7.5
Error Summary
HTTP Error 500.0 - Internal Server Error
There is a problem with the resource you are looking for, so it cannot be displayed. Detailed Error InformationModule IsapiMod-
ule
Notification ExecuteRequestHandler
Handler Custom Handler
Error Code 0x8007007f
Requested URL http://127.0.0.1:80/FlexiCapture10/Server/WebServices.dll?Handler=Default
Physical Path C:\inetpub\wwwroot\FlexiCapture10\Server\WebServices.dll
Logon Method Negotiate
Logon User WORKGROUP\WIN-COSLCUOARGA$
In this case, a handler which intercepts the request to the Application Server is called Custom Handler.
2) For the Default Web Site\Scanning and Default Web Site\Capture applications, installs the level AccessPolicy =
Read, Script (Execute = false). To set the parameter value manually, choose the application in the applications tree, go
to the Handler Mappings section and choose the Edit Feature Permissions command from the Actions menu.
ISAPI and CGI Restrictions The installer of FlexiCapture10 servers creates an allowance for the ISAPI-extension of the Application Server. To view the list of allowed ISAPI-extensions, at the upper level of the IIS Manager console (the level of IIS server) select ISAPI and CGI Restrictions.

© 2011 ABBYY. All rights reserved. 33
«FlexiCapture 10 Web Services» extension (path «C:\inetpub\wwwroot\FlexiCapture10\Server\WebServicesIsapi.dll») must be allowed.
Checking the operation of IIS To check the operation of IIS, start IIS by selecting Start Control Panel Administrative Tools Internet Information Ser-vices. If a problem occurs when starting IIS, the following message will be displayed: “Unexpected error 0x8ffe2740 occurred” for v. 5.1 (Windows XP) or “The process cannot access the file because it is being used by another process” for v. 6.0 (Windows 2003), v. 7.0 (Windows 2008) and v. 7.5 (Windows Server 2008 R2).
This error message means that port 80 is in use. To find out which application is using the port, do the following:
1. In the command line (Start Run), type netstat -anop TCP|find ":80" The list of connections to port 80 will be displayed and the ID of the corresponding process in the following format: TCP 0.0.0.0:80 0.0.0.0:0 LISTENING 1264
2. Type tasklist /SVC /FI "PID eq 1264" replacing 1264 with the ID of the process obtained at step 1. The result will be displayed in the following format: Image Name PID Services ================================ Virus.exe 1264 KillMePlz
3. End the process that uses the port. Important! Do not switch IIS over to another port, as you will not be able to start the Application Server in this case.
Switching system components to 64-bit mode Important! This configuration is not recommended (e.g., pool of the Application Server (FlexiCapture 10 Web Services) does not
work in 64-bit mode). In particular, when using Oracle as a database server, the Oracle client through which a connection to the

© 2011 ABBYY. All rights reserved. 34
database is performed must work in the same bit mode as both the pool of Administration and Monitoring console (FlexiCapture
10 Monitoring) and the pool of Application Server. If you switch the pool of Administration and Monitoring console to 64-bit
mode, it will work in a different mode than the Application Server pool (which works in 32-bit mode). A possible solution is to
install two identically configured Oracle clients one of which works in 32 bit mode and the other in 64 bit mode.
You may need to switch the pool of Administration and Monitoring console to 64-bit mode if you are using Crystal Reports x64
(a tool for generating reports), as they must work in the same bit mode, and using Crystal Reports x32 is not possible.
By default, the pool of the Administration and Monitoring console works in 32-bit mode. To switch it to 64-bit mode, do the fol-
lowing:
1. Open IIS Manager Console: Start -> Administrative Tools -> Internet Information Services (IIS) Manager.
2. Choose Application pools.

© 2011 ABBYY. All rights reserved. 35
3. From the list of pools, choose FlexiCapture 10 Monitoring and in the Actions menu, select Advanced Settings…
The value of Enable 32-Bit Application parameter must be False. It means that the Administration and Monitoring console
works in 64-bit mode.
In addition, check if using of 64-bit version of ASP.net is allowed in IIS settings. For this, open the IIS Manager console and
choose the IIS server. From the menu on the right, select ISAPI and CGI Restrictions.

© 2011 ABBYY. All rights reserved. 36
Allow using ASP.NET v4.0.30319 for Framework 64-bit (path C:\Windows\ Microsoft.NET\ Framework64\ v2.0.50727\ asp-
net_isapi.dll)
Database server SQL
• For the Application Server to work, MS SQL Server is required (for the supported versions, see System Requirements). On
the server, the "Mixed Mode" ("SQL server and Windows authentication") must be enabled for authentication. The installation

© 2011 ABBYY. All rights reserved. 37
CD contains MS SQL Server 2005 Express. It can be used for demonstrative purposes and small projects. This version has a limi-
tation on the database size of 4GB. If you already have an installed copy of MS SQL Server 2005 or 2008, you can use it.
Oracle
• Instead of SQL Server, the Oracle Server can be used as a database server (for the supported versions, see System Require-
ments). For this, a 32bit client for the Oracle database must be installed.
Important! By default, an Oracle database allows a maximum of 40 processes and 49 sessions. When these limits are reached, the following error message occurs: “ORA-12516: TNS:listener could not find available handler with matching protocol stack”. If required, increase the default values by using a script similar to the following: connect sys/<Login> as sysdba; alter system set sessions=<SessionCount> scope=spfile; alter system set processes=<ProcessCount> scope=spfile; shutdown immediate; startup;
Interaction of the system components The following figure displays the system component interaction for distributed installation:
File StorageSQL ServerTCP 1433
Processing StationTCP 10021
Application Server(IIS)
HTTP 80HTTPS 443
Processing ServerTCP 10020
License ServerTCP 10040
Tools
FormDesignerFlexiLayout Studio
Stations
Project Setup Station
Verification Station
Remote Stations
Scanning Station
Data Verification Station
Remote Verification Station
Web Applications
Administrationand Monitoring
Console
Web Capture Station
Web Scanning Station
Web Data Verification Station
Web Login Module
So the following ports have to be enabled:
• Application Server— 80 if HTTP is used or 443 if HTTPS is used
• Processing Server — 10020
• Licensing Server — 10040
• Processing Station — 10021
Note. It is recommended that you should disable the iPv6 protocol in the adapter properties, otherwise addresses of the hosts are not displayed correctly in the Administration and Monitoring Console.
Installing the stations The following installation methods are available to install the stations:
© 2011 ABBYY. All rights reserved. 38
• manually (interactive installation)
• from the command line
• using Active Directory
• using Microsoft Systems Management Server (SMS) The automated installation methods give you speed and flexibility when installing ABBYY FlexiCapture 10 on a local area net-work, as you do not have to install the program manually on each individual workstation.
Manual (interactive) installation To install ABBYY FlexiCapture stations:
1. In the Autorun menu, select Distributed Installation.
2. Select Install Workstations to start the installation.
3. Select a setup language. The setup program will compare the locale of your system and the selected language. If the lan-guages are incompatible, a warning message is displayed.
4. Next, the setup program checks the version of your operating system and the availability of the administrative permis-sions. If the version of the operating system is not supported by the program or you do not have the administrative per-missions, a warning message is displayed and the setup program is terminated.
5. If all the checks are passed successfully, the end-user license agreement will be displayed. Read the license agreement carefully and if you agree with the terms of the agreement, select the corresponding option and click Next.
6. A dialog box will open prompting you to enter some information about yourself. Enter the required information and con-tinue with the installation.
7. Next, select a destination folder. By default, the program is installed to: %systemdrive%\Program Files\ABBYY FlexiCapture 10 Stations
8. Select the stations to install:
• Scanning Station scans documents and sends them to the server for further processing
• Processing Station automatically recognizes, imports, and exports documents; controlled by the Processing Server
• Project Setup Station is used to set up projects on the server and local projects
• Data Verification Station is used to verify uncertainly recognized characters
• Verification Station is used to verify data, correct document assembly errors, handle exceptions
• FlexiCapture Studio is a tool for creating FlexiLayouts
• FormDesigner is a tool for creating forms Just like the servers, the stations can be installed on the same or on different computers.
9. If a Processing Station is selected, a dialog box will appear where you must select the account under which the Process-ing Station service will run. By default, the service runs under the user NETWORK SERVICE. If you plan to im-port/export data on this station from/to a storage location with restricted user rights, or if this station is not in the domain, you can specify the user that has the appropriate rights. In this case, the Processing Station service will run under this user.
10. The program files will be copied onto your computer. Once the installation is finished, the setup program will display a message saying that the application has been successfully installed.
11. If FlexiLayoutStudio, FormDesigner, Verification or Project Setup Station is installed, provide the address of the Licensing Server in the next dialog box. The Licensing Server is installed via server installation. The address should not contain slashes, for example: MainServer
Command line installation In the default configuration, all recognition languages are installed on the local computer and the interface language is selected automatically based on the regional settings of the computer on which the program is installed. All stations are installed, and the network name of the computer from which the setup program is run is used as the Licensing Server (in the case of standalone installation, “localhost” is specified). The default user becomes the user of the Processing Station. Run the setup.exe file located in the administrative installation folder using the command line options described below.
Advertise installation For advertise installation, type Setup.exe /j

© 2011 ABBYY. All rights reserved. 39
The program icon will appear in the Start menu of the workstation. Clicking this icon automatically installs the program in de-fault configuration.
Silent installation In the case of silent installation, no setup dialog boxes are displayed and the program is installed in default configuration. Setup.exe /qn Change “/qn” to “/qb” if you want an installation progress bar to be displayed. No other dialog boxes will be displayed. Additional command line options /L<language code> disables auto selection of the interface language and installs the program with the interface language you specified. The following language code values are available: 1033 English 1049 Russian 1031 German 1036 French 2052 Chinese simplified 1040 Italian 1034 Spanish 2074 Serbian 1029 Czech 1038 Hungarian 1045 Polish 1046 Portuguese (Brazilian) 1042 Korean /V <command line> passes the specified command line directly to msiexec.exe. The <command line> string can be replaced with the following commands: INSTALLDIR="<destination>" – the path to the folder where ABBYY FlexiCapture 10 is to be installed. STATIONS=0,1,2,3,4,5,6 – the list of stations to install. The numbers 0 to 6 correspond to the following stations: 0 – Scanning Station 1 – Processing Station 2 – Verification Station 3 – Data Verification Station 4 – Project Setup Station 5 - FlexiLayout Studio 6 - FormDesigner ACCOUNTTYPE=Custom, LOGIN=user name, PASSWORD=password You can specify an account under which to run the Processing Station service. Example: Setup.exe /qn /L1049 /v INSTALLDIR="D:\FC10" STATIONS=1,4 ACCOUNTTYPE=Custom LOGIN=Domain\UserLogin PASSWORD=PSWD As a result, the Processing and Project Setup Stations will be installed into D:\FC10, and Russian will be used the language of the interface. The Processing Station service will run under the account Domain\UserLogin and the password will be PSWD. PROTECTIONSERVER=ServerName – the name of the Licensing server. Removing ABBYY FlexiCapture in silent mode msiexec /x {FC10000C-0007-0000-0000-074957833700}
Using Active Directory Microsoft© Windows© 2000 Server and later include an integrated directory service, Active Directory, which in turn includes Group Policy. The Software Installation snap–in, which is part of Group Policy, allows you to install a software application on several workstations simultaneously. Three major installation methods are implemented in Active Directory: Publish to User, Assign to User, and Assign to Com-puter. ABBYY FlexiCapture 10 can be installed using the Assign to Computer method. ABBYY FlexiCapture 10 will be in-stalled on the specified workstation after the workstation is restarted.

© 2011 ABBYY. All rights reserved. 40
The Publish to User and Assign to User methods are not supported. When deploying ABBYY FlexiCapture 10 using Active Directory®, the account of the computers in the Domain Computers domain must have read right to the administrative installation folder.
Example: Deploying ABBYY FlexiCapture 10 using Active Directory The program is installed on one domain computer or on a group of domain computers:
1. During Server Installation, install the Station Installer. If you did not install the Station Installer when installing the Ap-plication Server, install the Station Installer by selecting Control Panel Add or Remove Programs Change.
2. Select Start Control Panel Administrative and then select the Active Directory Users and Computers item.
3. Right–click the site, domain, or another organized unit that contains the computer or group of computers onto which
ABBYY FlexiCapture 10 is to be installed.

© 2011 ABBYY. All rights reserved. 41
4. On the shortcut menu, select Properties and click the Group Policy tab:
5. Click New, enter a descriptive name, and click OK.
6. Right-click the Group Policy Object you have created and select Edit...
7. In the Group Policy window, right-click Computer Configuration/Software Settings/Software Installation.
8. On the shortcut menu, select New/Package.

© 2011 ABBYY. All rights reserved. 42
9. Provide the path to the file ABBYY FlexiCapture 10 Stations.msi, which is located in the administrative installation folder on the server.
10. Select the Advanced deployment method.
11. In the dialog box that opens, click the Modifications tab and then click the Add button.

© 2011 ABBYY. All rights reserved. 43
12. Select the interface language to be used in ABBYY FlexiCapture 10. The language files are located in the administrative installation folder on the server. The list of available files and their corresponding languages: 1033.mst English 1049.mst Russian
Using SMS Microsoft Systems Management Server automates software deployment and eliminates the need to go directly to the locations where the software is to be installed (computers, groups, or servers). SMS deployment includes the following three stages:
1. Creating an ABBYY FlexiCapture 10 deployment package.
2. Creating a deployment script (contains installation parameters: names of computers, time of installation, conditions for installation, etc.).
3. Deployment of the program on the workstations by SMS based on the script settings.
Example: Deploying ABBYY FlexiCapture 10 using Microsoft SMS 1. When installing the Application Server, create an installation package for ABBYY FlexiCapture 10 stations.
2. In the SMS Administrator console, select the Packages node.
3. In the Action menu, select New/Package.

© 2011 ABBYY. All rights reserved. 44
4. In the Package Properties dialog box, fill out the required fields.

© 2011 ABBYY. All rights reserved. 45
5. Click the Data Source tab.
6. Make sure that This package contains source files is cleared and click OK.
7. Expand the node of the newly created package and select Programs.
8. In the Action menu, select New/Program.
9. In the Program Properties dialog box, click the General tab and on this tab:
• In the Name field, type a descriptive name of the program
• In the Command Line field, type setup.exe /q
• In the Start in field, provide the network path to the ABBYY FlexiCapture administrative installation folder (e.g. \\MyFileServer\Programs Distribs\ABBYY FlexiCapture 10).
10. In the Program Properties dialog box, click the Environment tab and on this tab:
• Clear the User input required option
• Select the Runs with administrative rights option
• Make sure that the Run with UNC name option is selected
11. Adjust the running parameters if required and click OK.
12. You can also use the Distribute Software Wizard. In the Action menu of the package, select Distributive Software and follow the instructions of the wizard.

© 2011 ABBYY. All rights reserved. 46
Important! You cannot create Distribution Points.
Installing Remote Stations Using Remote Stations allows you to connect to the Licensing Server from the computers which are not part of the LAN. Remote Stations include the Data Verification and Scanning stations. The Verification station can be both regular and remote. Remote Stations can connect to the Application Server via HTTP. To install Remote Stations:
1. Select Distributed Installation.
2. Select a menu item corresponding to a station to be installed.
3. Select a setup language. The setup program will compare the locale of your system and the selected language. If the lan-guages are incompatible, a warning message is displayed.
4. Next, the setup program checks the version of your operating system and the availability of the administrative permis-sions. If the version of the operating system is not supported by the program or you do not have the administrative per-missions, a warning message is displayed and the setup program is terminated.
5. If all the checks are passed successfully, the end-user license agreement will be displayed. Read the license agreement carefully and if you agree with the terms of the agreement, select the corresponding option and click Next.
6. A dialog box will open prompting you to enter some information about yourself. Enter the required information and con-tinue with the installation.
7. Next, select a destination folder. By default, the program is installed to: %systemdrive%\Program Files\ABBYY FlexiCapture 10 <Station>\. If there is not enough space on the selected hard disk, a window is displayed showing your hard disks, the available free space, and the space required by the installation. Select a disk with sufficient free space and continue with the installation.
8. The program files will be copied onto your computer. Once the installation is finished, the setup program will display a message saying that the installation has completed successfully.
IMPORTANT!
1. The Application Server should be published to the Internet if you wish to use the remote stations over the Internet.
2. The Processing Server should be started to use remote stations.
3. Basic-authentication should be enabled in IIS in the Default Web Site\FlexiCapture10\Server folder to use such authen-tication type when connect to the Application Server.
© 2011 ABBYY. All rights reserved. 47
Updating your earlier ABBYY FlexiCapture 10 releases to Release 6 ABBYY FlexiCapture 10 R5 supports projects created in ABBYY FlexiCapture 10 and ABBYY FlexiLayout Studio 10 and will also work with FlexiLayouts created in the previous version.
Distributed installation Before updating:
- Stop the Processing Server using the Processing Server Monitor
- Close all the stations, making sure that the background applications FlexiBR.exe, FlexiEx.exe, and ScanStationBR.exe are no longer running.
To update ABBYY FlexiCapture 10 servers (with the exception of servers installed on Windows 8 or Windows Server 2012 com-puters), you must first install the .NetFramework 4.0 component, which can be found on the installation disk. ABBYY Flexi-Capture 10 stations still use .NetFramework 3.5 SP1. Next, update all the components, in any order you like, by running the ABBYY FlexiCapture 10 R6 setup program. If you have an earlier release of ABBYY FlexiCapture 10 installed, the setup program will detect the earlier release, remove the previous version of the component, and install the new version with the same configuration. Notes:
You do not need to reinstall the IIS, SQL server, and Crystal Reports components. However, you may need to re-enable Basic authentication for IIS (if it was enabled, say, for remote stations). You can continue using your database and File Storage Folder.
Once you have updated the ABBYY FlexiCapture 10 servers, you need to update the ABBYY FlexiCapture 10 database. To update the database, click the Update to required version link in the Administration and Monitoring Console (Service > Ap-plication Server). Next, start the Project Setup Station and open, one by one, all your projects on the Application Server to convert them to the ABBYY FlexiCapture R6 format. Once the projects have been converted, start the Processing Server to begin working with ABBYY FlexiCapture 10 R6.
Standalone installation Before updating, close ABBYY FlexiCapture 10, making sure that no background processes (e.g. import, recognition, export) are running. To update, simply start the ABBYY FlexiCapture 10 R6 setup program. If you have an earlier release of ABBYY FlexiCapture 10 installed, the setup program will detect the earlier release, remove the previous version of the component, and install the new ver-sion with the same configuration. When the update is completed, start the Administrator Station and open your project to convert it to the ABBYY FlexiCapture R6 format.
General notes Please note that after you convert you projects for use in ABBYY FlexiCapture 10 R6, you will no longer be able to use them in earlier versions of the program.
ABBYY FlexiCapture 10 R6 uses the same licenses as the previous releases.
Upgrading from ABBYY FlexiCapture 9.0 If you are installing ABBYY FlexiCapture 10 as an upgrade from version 9.0 you can use ABBYY FlexiCapture and ABBYY FlexiLayout projects as well as FlexiLayouts from the previous version.
Using ABBYY FlexiCapture 9.0 Professional projects (*.fcproj) All ABBYY FlexiCapture 9.0 local projects (.fcproj) can be opened and used in ABBYY FlexiCapture 10. Please note the follow-ing:
- It is impossible to open an .fcproj-project in ABBYY FlexiCapture 9.0 once it was opened in ABBYY FlexiCapture 10, so you should create a copy of the project before opening it in ABBYY FlexiCapture 10 if you still need to open it in ABBYY FlexiCapture 9.0
- After opening ABBYY FlexiCapture 9.0 project in ABBYY FlexiCapture 10 you may need to delete all processing re-sults and analyze all pages once again. (You can use the project without re-recognizing but some information may be presented improperly, for example if the FlexiCapture 9.0 project contains format errors, they will not be presented in the document window the same way they are currently presented in ABBYY FlexiCapture 10).
ABBYY FlexiCapture 9.0 network projects that were loaded on server can also be used in ABBYY FlexiCapture 10.

© 2011 ABBYY. All rights reserved. 48
Important! Both database and a project will be converted to new format and it will be impossible to use them in ABBYY Flexi-Capture 9.0 again. If you need to have a Database backup or to work with both ABBYY FlexiCapture 9.0 and ABBYY FlexiCapture 10 databases at the same time please follow the instruction below. If it is not necessary go to the 1-st item of the instruction about upgrade.
To create a Database backup:
- Create a FlexiCapture 9.0 Database backup by MS SQL Server means.
- Create a copy of FileStorage (if it is a folder on a disk) and save it in an appropriate place.
To connect ABBYY FlexiCapture 9.0 to the backup Database:
- Restore the Database from the backup
- Specify path to the File Storage in the FlexiCapture 9.0 Administration and Monitoring Console.
To create a Database copy for ABBYY FlexiCapture 10:
- Copy a FlexiCapture 9.0 Database and rename it (for example, to FC10Database)
- Copy a File Storage folder and rename it (for example, to FC10FileStorage)
- After installing ABBYY FlexiCapture 10 connect to the new database (here FC10Database) and specify the path to the File Storage folder (here FC10FileStorage)
- Continue working with the original FlexiCapture 9.0 database and the File Storage.
To upgrade a network FlexiCapture 9.0 project:
1. Finish processing of all batches in ABBYY FlexiCapture 9.0 if it is possible.
2. Close all opened sessions via the Administration and Monitoring Console.
3. Install ABBYY FlexiCapture 10 (both servers and stations).
4. Make sure that FlexiCapture 9.0 database is not used by FlexiCapture 9.0. For this, do either of the following:
- Remove ABBYY FlexiCapture 9.0 from the computer or
- Delete the Connection String from the Windows registry: find the registry branch HKEY_LOCAL_MACHINE\SOFTWARE\ABBYY\FlexiCapture\9.0\WebServices and delete the “DBConnec-tionString” parameter
5. Upgrade the database to the necessary version in the Administration and Monitoring Console.
6. In the Administration and Monitoring Console, open the Service -> Out-of-Processing page and check if there are any batches there. If yes, click the Return to processing button to send batches to further processing.
7. In the Project Setup Station, open a project from Server. It will be converted to ABBYY FlexiCapture 10 format.
8. Check if the project and the Document Definition settings are correct. We recommend checking state of the “Process whole batches” option on the Workflow tab of the Project or Batch type properties window.
9. Continue working with the project.
Using ABBYY FlexiLayout Studio 9.0 projects (*.fsp) in ABBYY FlexiLayout 10 All FlexiLayout Studio 9.0 projects can be opened in FlexiLayout Studio 10. Please note the following:
- It is impossible to open an .fsp-project in ABBYY FlexiLayout Studio 9.0 once it was opened in ABBYY FlexiLayout Studio 10, so you should create a copy of the project before opening it in ABBYY FlexiLayout Studio 10 if you still need to open it in ABBYY FlexiLayout Studio 9.0.
- After opening a FlexiLayout Studio 9.0 project in ABBYY FlexiLayout Studio 10 you may need to delete all processing results and analyze all pages once again.
- Due to changes in FlexiLayout language some compilation errors may occur. In this case you will need to correct errors and re-compile FlexiLayouts.
Using FlexiLayouts (*.afl) created in ABBYY FlexiLayout 9.0 FlexiLayouts compiled in ABBYY FlexiLayout 9.0 can be loaded into ABBYY FlexiCapture 10.
Sometimes due to changes in FlexiLayout language some compilation errors may occur. In this case open the *.fsp project in ABBYY FlexiLayout Studio 10, correct the errors and re-compile FlexiLayouts.
© 2011 ABBYY. All rights reserved. 49
Upgrading from ABBYY FlexiCapture 8.0 Professional If you are installing ABBYY FlexiCapture 10 as an upgrade from version 8.0 you can use ABBYY FlexiCapture and ABBYY FlexiLayout projects as well as FlexiLayouts from the previous version.
Using ABBYY FlexiCapture 8.0 Professional projects (*.fcproj) All ABBYY FlexiCapture 8.0 Professional projects (.fcproj) can be opened and used in ABBYY FlexiCapture 10 (both Stand-alone and Distributed). Please note the following:
- It is impossible to open an .fcproj-project in ABBYY FlexiCapture 8.0 once it was opened in ABBYY FlexiCapture 10, so you should create a copy of the project before opening it in ABBYY FlexiCapture 10 if you still need to open it in ABBYY FlexiCapture 8.0.
- After opening ABBYY FlexiCapture 8.0 project in ABBYY FlexiCapture 10 you may need to delete all processing re-sults and analyze all pages once again. (You can use the project without re-recognizing but some information may be presented improperly, for example if the FlexiCapture 9.0 project contains format errors, they will not be presented in the document window the same way they are currently presented in ABBYY FlexiCapture 10).
- All settings which were not available in ABBYY FlexiCapture 8.0 and have appeared in ABBYY FlexiCapture 10 will have default values. You can change settings, add batch types, set up workflow settings. To find more details about new possibilities of ABBYY FlexiCapture 10 please read the help file.
Using ABBYY FlexiLayout Studio 8.0 projects (*.fsp) in ABBYY FlexiLayout 10 All FlexiLayout Studio 8.0 projects can be opened in FlexiLayout Studio 10. Please note the following:
- It is impossible to open an .fsp-project in ABBYY FlexiLayout Studio 8.0 once it was opened in ABBYY FlexiLayout Studio 10, so you should create a copy of the project before opening it in ABBYY FlexiLayout Studio 10 if you still need to open it in ABBYY FlexiLayout Studio 8.0.
- After opening a FlexiLayout Studio 8.0 project in ABBYY FlexiLayout Studio 10 you may need to delete all processing results and analyze all pages once again.
- Due to changes in FlexiLayout language some compilation errors may occur. In this case you will need to correct errors and re-compile FlexiLayouts. See Errors which may occur while converting FlexiLayouts.
Using FlexiLayouts (*.afl) created in ABBYY FlexiLayout 8.0 FlexiLayouts compiled in ABBYY FlexiLayout 8.0 can be loaded into ABBYY FlexiCapture 10.
Sometimes due to changes in FlexiLayout language some compilation errors may occur. In this case open the *.fsp project in ABBYY FlexiLayout Studio 10, correct the errors and re-compile FlexiLayouts. See Errors which may occur while converting FlexiLayouts.
Errors which may occur while converting FlexiLayouts Sometimes, FlexiLayouts made in ABBYY FlexiLayout Studio 8.0 cannot be compiled in ABBYY FlexiLayout Studio 10, or errors occur when matching a FlexiLayout. If a FlexiLayout cannot be compiled, open the *.fsp project in ABBYY FlexiLayout Studio 10 and check if any of the elements are invalid and have error description on the Errors tab. It is also possible that the FlexiLayout is successfully compiled, but some errors occur during matching. If you have such problems after conversion, please check if it happened due to one of the errors described below. Please note that some elements may be found in a different way now and the logic of FlexiLayout may slightly change. Test all FlexiLayouts on your images before using them for recognition. If you need assistance please contact our Technical Support. Problem Comment Workaround A FlexiLayout will not be compiled with the following errors: The name of an element coincides with a function’s name that didn’t exist in pre-vious versions. Example: in version 8.0 it was possible to create a text element with a name “RSA” and reference it using the short name: RSA.IsNull. This code cannot be com-piled in ABBYY FlexiLayout Studio 10.
If the element’s name coincides with a func-tion’s name, it will be considered as a func-tion’s name in the code. It’s possible to cre-ate an element with the name PageNumber, but it is prohibited to write PageNum-ber.IsNull (the only possible way is to write SearchElements.PageNumber.IsNull );
Use the full name of an element. Example: SearchElements.RSA.IsNull

© 2011 ABBYY. All rights reserved. 50
If the element had a name which was allowed in version 8.0 but prohibited in ABBYY FlexiLayout Studio 10, and there was a reference to this element using a short name in the AdvancedCode, this element will be re-named during conversion, but the short name in the AdvancedCode is not changed. So, in the advanced code, there will be a reference to the element which doesn’t exist.
In AdvancedCode, the element should be re-named manually.
The structure like this is now prohibited: Let e = SearchElements.StaticText1; e = SearchElements.StaticText2;
As the elements now have user-defined properties, the elements of the same type are not considered identical.
Change the mentioned structure as follows: Hypothesis e; e = SearchElements.StaticText1; e = SearchElements.StaticText2;
Incorrect usage of elements’ short names. Example: There are elements: SearchEle-ments.A.A, SearchElements.A.B, SearchElements.A.C. In previous versions, it was possible to use the following structure in the code of element C: A.B In ABBYY FlexiLayout Studio 10, such a structure cannot be compiled. A is con-sidered SearchElements.A.A, but this element has not a B field.
A conflict may arise when short names are used. In version 8.0, in case of conflict, the high-level element was selected. In ABBYY FlexiLayout Studio 10, the low-level ele-ment is selected.
Use the full names of elements.
The following errors may occur during layout matching: Error in element "SearchEle-ments.StaticText", Pre-search relations section: D:\Tests\ForConversion\1.txt was not found.
In ABBYY FlexiLayout Studio 10, a refer-ence folder for relative paths to the text files used in the StaticText element was changed. In version 8.0 the relative path began from the batch’s folder (where the images are stored). In ABBYY FlexiLayout Studio 10, they begin from the project’s folder (the folder which contains the .fsp file).
Place the mentioned text file to the folder indicated in the message (for this example, you should put the file “1.txt” to the following folder: D:\Tests\ForConversion\). You can also change the path to the file.
Upgrading from ABBYY FormReader 6.5 In ABBYY FlexiCapture 10, the structure of projects is different, so the old projects cannot be used as they are. To be able to use your templates and flexible descriptions created in ABBYY FormReader 6.5, please read the instructions below and take all pos-sible issues and limitations into consideration.
Using ABBYY FlexiCapture Studio 1.5 projects (*.fsp) in ABBYY FlexiLayout 10 ABBYY FlexiCapture Studio 1.5 projects can be opened in ABBYY FlexiLayout Studio 10 – no conversion is needed. Please note the following:
- Once the project is opened in ABBYY FlexiLayout Studio 10, it is permanently converted into FlexiLayout Studio 10 format and can no longer be opened in ABBYY FlexiCapture Studio 1.5 after this point. Please make sure you create a backup copy of all projects for ABBYY FlexiCapture Studio 1.5 before opening them in ABBYY FlexiLayout Studio 10. This is a safety measure useful in the event you still need to open the projects in ABBYY FlexiCapture Studio 1.5.
- After opening a FlexiCapture Studio 1.5 project in ABBYY FlexiLayout Studio 10, you need to delete all processing results and analyze all pages once again in order to finish converting the project.
Due to the changes in FlexiLayout language, some compilation errors may occur. In this case, you will need to correct errors and re-compile FlexiLayouts. Please contact our support team if you need assistance. See Errors which may occur while converting FlexiLayouts.
Using FlexiLayouts (*.afl) created in ABBYY FlexiCapture Studio 1.5 There are numerous changes in ABBYY FlexiLayout Studio 10 as compared with ABBYY FlexiCapture Studio 1.5. That is why we recommend opening an *.fsp project in ABBYY FlexiLayout Studio 10 first to check that there are no errors, and re-compile it, even though FlexiLayouts compiled in ABBYY FlexiCapture Studio 1.5 can be loaded into ABBYY FlexiCapture 10. See Errors which may occur while converting FlexiLayouts.

© 2011 ABBYY. All rights reserved. 51
Importing templates from ABBYY FormReader 6.5 batches (*.frm) All ABBYY FormReader 6.5 templates can be imported to ABBYY FlexiCapture 10. You must specify from which FormReader 6.5 batches (*.frm) you want to import templates. Note: Batches created in versions earlier than 6.5 cannot be imported.
Conversion scenario
1. Open the ABBYY FlexiCapture 10 Project Setup Station for Distributed installation or the Administrator Station for Standalone installation.
2. Create a new project (File > New Project…).
3. Open the Document Definitions window (Project > Document Definitions…)
4. Click Import…, then select FormReader 6.5 Batches (*.frm) from the Files of type: list and browse the FormReader batch from which you want to import templates.
On clicking Open, the import will start. When the import is finished, you will see a window showing the import result with a path to the log file.
The log file contains information about conversion including description of warnings or errors, if there are any.
5. The imported template(s) will appear in the list of Document Definitions. Open them and check field marking, data types and validation rules. Both fixed and flexible layouts with fields and their names are imported completely (except additional fields). All data types are imported as Custom data types of the Document Definition. Some of the validation rules are converted automatically; the others have to be remade manually. The information about rules’ conversion can be found in the Compatibility with FormReader 6.5 validation rules table. Tips for converting rules that cannot be im-ported automatically can be found in the Help File (“Migrating from FormReader 6.5 rules and export to FlexiCapture 10 scripts”).
6. Export settings are not converted, so you will need to readjust them.
7. Test the imported Document Definition on the test batches. The images from ABBYY FormReader 6.5 batches are not imported, you can add them using the File > Load Images… command.
8. Publish the converted Document Definitions.

© 2011 ABBYY. All rights reserved. 52
Document and batch structure If the Document Definition imported from ABBYY FormReader 6.5 contains a custom structure which is not supported in ABBYY FlexiCapture 10, a set of one-page Document Definitions will be imported.
1. Document templates with predefined structure (one-page document, multi-page documents, sequence of pages) are cor-rectly converted into the document definitions for ABBYY FlexiCapture 10 with the same structure.
2. Custom document structure is not supported in ABBYY FlexiCapture 10. Templates with custom structure will be con-verted into separate one-page Document Definitions.
3. If the structure of a batch (custom sequence of documents) was defined in ABBYY FormReader 6.5, it will be ignored, and the batch will be considered as an arbitrary sequence of documents.
Compatibility with FormReader 6.5 validation rules Support of ABBYY FormReader 6.5 validation rules in ABBYY FlexiCapture 10:
FormReader 6.5 Equivalent in ABBYY FlexiCapture 10 Converted automatically
Check against a database “Database Check” rule. No
Check sums “Check Sum” rule. No
Merge blocks “Merge Fields” rule. Yes
Search in the list of suggestions
Field properties, “Data Type” tab. List the variants of allowed values in the “Validation” field.
Yes
Replace values from the list
Field properties, “Data Type” tab. “AutoCorrect options” field. Note. This rule will be converted if we find the value and write the result to the same field. If the fields are different, the rule cannot be converted, and the “Script” rule should be used.
Yes
Replace characters from the list
Field properties, “Data Type” tab. “AutoCorrect options” field. Note. This rule will be converted if we find the value and write the result to the same field. If the fields are different, the rule cannot be converted, the “Script” rule should be used.
Yes
Normalize and check dates
Field properties, “Data Type” tab. In the “Content” list, select “Date”; in the “Content Details” dialog box, select the required formats; in the “Validation” field, enter the required constraints.
No
Regular expressions
Field properties, “Data Type” tab. From the “Content” list, choose “Text” or select the “Process value as text” option for another content type. Enter the required regular expression in the “Validation” field.
Yes
Match blocks Can be implemented via a “Script” rule (see “Field match check” sample in Help).
No
If-Then rules Can be implemented via a “Script” rule (see Help for instructions on how to migrate).
No
Automation check
Can be implemented via a “Script” rule (see Help for instructions on how to migrate). If the logic of the rule is too complex and requires an external component to be used, the component should be called from within the code of a “Script” rule (see “Automation rule” sample in Help).
No
VBScript rules Can be implemented via a “Script” rule. No
Sum in digits - sum in writing “Sum in digits - sum in words” rule (for Russian language). No
Normalize prices
Not supported; can be implemented through an external COM component called from a “Script” rule.
Price in digits - price in writing
No
Validate passport series and number
The information about ABBYY FlexiCapture 10 rules can be found in the “Program Settings -> Document Definitions -> Rule validation” article of the FlexiCapture Help File. For more information on the “Script” rule, see the Appendix -> Using scripts in ABBYY FlexiCapture 10 -> Scripts for customiz-ing processing -> Types of scripts -> Script rule article.
Template conversion issues and possible workarounds The validation rules and batch or document structures used in ABBYY FormReader 6.5 have no analogs in ABBYY FlexiCapture 10 and should be re-created manually. The possible troubles with workarounds are described in the tables below.
© 2011 ABBYY. All rights reserved. 53
Problem Comment Workaround An error occurred during import: Import failed. Error: Unable to define fixed layout inside flexible.
This bug occurred when a field was absent in an original FlexiLayout, but the compiled layout contained it.
Open the *.fsp project in ABBYY FlexiLayout Studio 10 first to check that there are no errors, and re-compile it.
Images do not match the converted fixed Document Definition, although the same images matched the tem-plate before conversion.
This happens due to signifi-cant changes in technologies.
Open the converted Document Definition in ABBYY FlexiCap-ture 10, delete anchors, separa-tors and static text, and re-create them automatically or manually.
Some rules which can be converted (see the table) are not converted.
In ABBYY FormReader 6.5, it was possible to create several rules which changed the value of the same field. This isn’t possible in FlexiCapture 10.
Check if you really need such a complicated structure. Maybe, you can solve the problem using the standard ABBYY FlexiCap-ture 10 features. If not, use the “Script” rule.
In ABBYY FormReader 6.5 EE, multi-page documents were processed. After conversion, several one-page Document Definitions were created instead of a multi-page Document Definition.
We cannot convert Custom structure of documents be-cause it isn’t supported in ABBYY FlexiCapture 10. If Custom structure was used in FR65EE, one-page templates will be imported. See Documents and batches struc-ture. The documents structure is described in the FRE6BatchDefinition.sql file. If this file was damaged or deleted, only one-page tem-plates will be exported.
Some complicated structures cannot be created in ABBYY FlexiCapture 10. Check if the FRE6BatchDefinition.sql file wasn’t damaged or deleted.
There were annexes in the documents. The annexes are not enabled in ABBYY FlexiCapture 10 Document Defi-nitions.
In ABBYY FormReader 6.5, it was possible to add annexes using custom structure. We cannot import custom struc-ture of documents. See Documents and batches struc-ture.
Enable annex pages manually in the Document Definition Properties dialog box, Assem-bly tab.
The rules are converted, new rules are created but the order of rule execution differs from that in ABBYY FormReader 6.5.
In ABBYY FlexiCapture 10 the order of rule execution doesn’t depend on the user’s specification, it depends on the document structure.
Try to re-create rules in such a way that they won’t depend on the execution order. If the order is very important, try to create a “Script” rule which covers all your rules.
FlexiLayout couldn’t be compiled. There are numerous changes in ABBYY FlexiLayout Stu-dio 10 compared to ABBYY FlexiCapture Studio 1.5.
Open the *.fsp project in ABBYY FlexiLayout Studio 10, correct errors and re-compile it. If there are errors, you will see invalid elements with error de-scriptions on the Errors tab. Possible errors and workarounds are described in the Errors in converted FlexiLayouts section.
FlexiLayout has been compiled, but an error occurred during matching of this FlexiLayout.
There are numerous changes in ABBYY FlexiLayout Stu-dio 10 compared to ABBYY FlexiCapture Studio 1.5.
Open the *.fsp project in ABBYY FlexiLayout Studio 10, correct the code and re-compile it. Possible errors and workarounds are described in the Errors in converted FlexiLayouts section.
Errors which may occur while converting FlexiLayouts Sometimes, the converted Flexible Description cannot be compiled, or there are errors during FlexiLayout matching.
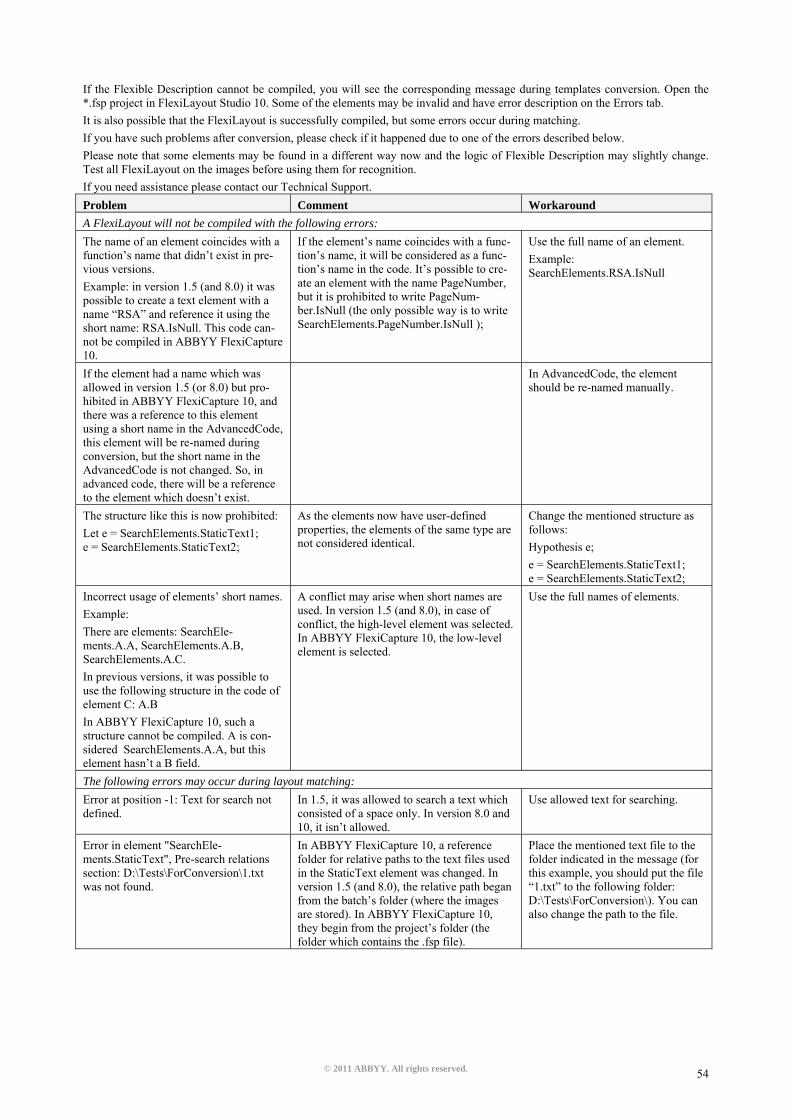
© 2011 ABBYY. All rights reserved. 54
If the Flexible Description cannot be compiled, you will see the corresponding message during templates conversion. Open the *.fsp project in FlexiLayout Studio 10. Some of the elements may be invalid and have error description on the Errors tab. It is also possible that the FlexiLayout is successfully compiled, but some errors occur during matching. If you have such problems after conversion, please check if it happened due to one of the errors described below. Please note that some elements may be found in a different way now and the logic of Flexible Description may slightly change. Test all FlexiLayout on the images before using them for recognition. If you need assistance please contact our Technical Support. Problem Comment Workaround A FlexiLayout will not be compiled with the following errors: The name of an element coincides with a function’s name that didn’t exist in pre-vious versions. Example: in version 1.5 (and 8.0) it was possible to create a text element with a name “RSA” and reference it using the short name: RSA.IsNull. This code can-not be compiled in ABBYY FlexiCapture 10.
If the element’s name coincides with a func-tion’s name, it will be considered as a func-tion’s name in the code. It’s possible to cre-ate an element with the name PageNumber, but it is prohibited to write PageNum-ber.IsNull (the only possible way is to write SearchElements.PageNumber.IsNull );
Use the full name of an element. Example: SearchElements.RSA.IsNull
If the element had a name which was allowed in version 1.5 (or 8.0) but pro-hibited in ABBYY FlexiCapture 10, and there was a reference to this element using a short name in the AdvancedCode, this element will be re-named during conversion, but the short name in the AdvancedCode is not changed. So, in advanced code, there will be a reference to the element which doesn’t exist.
In AdvancedCode, the element should be re-named manually.
The structure like this is now prohibited: Let e = SearchElements.StaticText1; e = SearchElements.StaticText2;
As the elements now have user-defined properties, the elements of the same type are not considered identical.
Change the mentioned structure as follows: Hypothesis e; e = SearchElements.StaticText1; e = SearchElements.StaticText2;
Incorrect usage of elements’ short names. Example: There are elements: SearchEle-ments.A.A, SearchElements.A.B, SearchElements.A.C. In previous versions, it was possible to use the following structure in the code of element C: A.B In ABBYY FlexiCapture 10, such a structure cannot be compiled. A is con-sidered SearchElements.A.A, but this element hasn’t a B field.
A conflict may arise when short names are used. In version 1.5 (and 8.0), in case of conflict, the high-level element was selected. In ABBYY FlexiCapture 10, the low-level element is selected.
Use the full names of elements.
The following errors may occur during layout matching: Error at position -1: Text for search not defined.
In 1.5, it was allowed to search a text which consisted of a space only. In version 8.0 and 10, it isn’t allowed.
Use allowed text for searching.
Error in element "SearchEle-ments.StaticText", Pre-search relations section: D:\Tests\ForConversion\1.txt was not found.
In ABBYY FlexiCapture 10, a reference folder for relative paths to the text files used in the StaticText element was changed. In version 1.5 (and 8.0), the relative path began from the batch’s folder (where the images are stored). In ABBYY FlexiCapture 10, they begin from the project’s folder (the folder which contains the .fsp file).
Place the mentioned text file to the folder indicated in the message (for this example, you should put the file “1.txt” to the following folder: D:\Tests\ForConversion\). You can also change the path to the file.

© 2011 ABBYY. All rights reserved. 55
Managing Your Licenses
After you install the program, you need to activate your serial number. This section describes the use of ABBYY FlexiCapture 10 License Manager, the license management utility supplied with ABBYY FlexiCapture 10.
Overview ABBYY FlexiCapture 10 License Manager is a license management utility. It is installed on the Licensing Server when the server are installed. The License Manager allows you to:
• add new licenses
• activate licenses
• view license parameters
• select and enable licenses Hardware licenses are activated in the same way as software licenses.
ABBYY FlexiCapture 10 License Manager The main License Manager window contains the following columns:
• Licenses – displays the list of the installed licenses
• License parameters – displays the parameters of the selected license

© 2011 ABBYY. All rights reserved. 56
License properties • General – the serial number, expiration date, licensing method, ability to use a virtual machine
• License purpose – type of license (software or hardware), ability to provide document processing services
• Work stations, Tools – restrictions on the number of stations in the system and the use of development tools (Flex-iLayout Studio, FormDesigner).
• Productivity – restrictions on the use of ABBYY FlexiCapture 10.
• Processing – additional document processing parameters: use of FlexiLayouts, use of additional recognition lan-guages
• Custom components – use of components created by users
• Import – additional import capabilities
• Export – additional document and image export capabilities
License statuses • Activated (the license had been activated)

© 2011 ABBYY. All rights reserved. 57
• Expired (the license had expired or the page limit has been reached) The current (i.e. active) license has a next to it and is highlighted in bold.
Buttons • Hide License Parameters<< (License Parameters>>) – hides (shows) the detailed information about the selected
license
• Activate License… - launches the ABBYY FlexiCapture Activation Wizard
• Update License… - refreshes the information about the activated license
• Select - makes the selected license current (i.e. active)
• Refresh – refreshes the information about the licenses available on the Licensing Server
• Close - closes the Licenses manager
Activating a license ABBYY takes steps to protect its intellectual property from piracy. Software piracy is harmful both to manufacturers and to end users alike. Unlike legally purchased software products, pirated software is never safe and secure. If your end-user license agreement allows you to install and use the product only one computer, installing it on several computers will breach the agreement and violate the copyright laws of the Russian Federation. The activation technology restricts the num-ber of software copies that can be used simultaneously and thus prevents the installation of one licensed copy on an unlimited number of computers. At the same time, one licensed copy may be installed and activated on one and the same computer any number of times without any restrictions. You will not be able to use the software product unless you activate it.
How activation is carried out? The activation process takes very little time and is carried out via an activation wizard. The activation wizard helps you to send the data required for activation to ABBYY. These activation data are sent to ABBYY in the form of a code (Product ID) which is generated based on the hardware on which the product is installed. No personal data are used to generate the code and the user remains completely anonymous. The following activation methods are available:
• via Internet - activation is carried out automatically and takes several seconds to complete; this method requires an active Internet connection
• by e-mail - an e-mail message is generated that contains the data required for activation; please do not alter the body or the subject of the message to ensure a prompt reply from the mail robot
• by e-mail from another computer – an e-mail message is generated that contains the data required for activation; you can use this method if the Licensing Server is not connected to the Internet and e-mail messages cannot be sent from it
• load activation file – connect an activation file you received by e-mail in response to an activation request Once the activation is complete, ABBYY FlexiCapture 10 can be used on the server on which it was activated. You can re-install ABBYY FlexiCapture 10 as many times as you need without additional activations (provided the Licensing Server is not re-installed). Note:
1. ABBYY FlexiCapture stations automatically connect to the Licensing Server and use the installed license.
2. If you re-install the Licensing Server on a different computer, you will need to re-activate your licenses (in the case of a license file) and change the address of the Licensing Server in the LicensingSettings.xml file on the stations (see the “Connecting stations to the Licensing Server” section for details).
3. If there are no free activated licenses available on the Licensing Server and a user tries to run the program on their work-station, the program will not start and a warning message will be displayed.
4. Hardware licenses can only be activated over the Internet.
Connecting stations to the Licensing Server All the stations installed in the system access the Licensing Server. The address of the Licensing Server is stored in the Licens-ingSettings.xml file, which can be found in the installation folder.

© 2011 ABBYY. All rights reserved. 58
The address of the server is specified in the ServerAddress tag of the MainNetworkLicenseServer attribute.
To enable a station to access a new Licensing Server, simply change the old name to the name of the computer where the Licens-ing Server is installed.
The same applies to the standalone version of ABBYY FlexiCapture 10. If you have one license and several operator stations, specify the address of the computer where the license is stored in the LicensingSettings.xml files on the workstations. Remote stations get licenses from the Application Server. The Processing Server connected to the Application Server must be running for you to get a license.

© 2011 ABBYY. All rights reserved. 59
Setting Up FlexiCapture 10 Distributed Installation
Quick setup of FlexiCapture for demonstration installations This paragraph briefly describes a fast minimal set-up of FlexiCapture which can be used for demonstration installations. If you need a more detailed understanding of the FlexiCapture settings, or you need to perform the installation other than the default or more performance-oriented, or if you encounter any difficulties following the instructions of this paragraph, please go to the sec-tion: Detailed setup of FlexiCapture.
Before you begin, make sure that all FlexiCapture servers are installed on your computer, the set of installed features must con-form to the default set in the Custom Setup dialog box of the program installer. FlexiCapture stations can be installed either on your computer or on any other computer that is accessible over the LAN. A MS SQL database server must also be available (you can install the MS SQL 2005 Express database server by running the Autorun.exe file from the FlexiCapture installation folder).
1. Open the Administration and Monitoring Console (from the menu Start –> ABBYY FlexiCapture 10 Serves -> Admini-stration and Monitoring Console or type the following link into the browser: http://<server name>/FlexiCapture10) and go to the page Service –> Application server. On this page, create a new database. For tis, click the Create New Da-tabase button and in the form that opens specify the following settings:
a. Database server name, for example <computer name>\sqlexpress
b. Database name, for example FCDemoDataBase
Click Ok.
Once the database is created, you are the administrator of this database.
2. Upload a project to the server. For this:
a. Run the Project Setup station (from the menu Start -> ABBYY FlexiCapture 10 Stations -> Project Setup Sta-tion)
b. Open a local project (from the menu File -> Open Project). You can choose a project from the samples located in the folder %public%\ABBYY\FlexiCapture (%allusersprofile%\ABBYY\FlexiCapture for Windows XP/2003)
c. Upload the project to the Application Server using the command File -> Upload Project to Server. The address of the Application Server must be specified in the following format: http://<server name> (if the Project Setup station and the Application Server are located on the same computer, the server address is as follows: http://localhost)
3. Configure the Processing Server. For this:
a. Open the Processing Server Monitor (from the menu Start -> ABBYY FlexiCapture 10 Serves -> Processing Server). Make sure that the Processing Server is started.
b. Add Processing Stations. For this, choose the Stations item from the ABBYY FlexiCapture 10 Servers -> <Server Name> tree, then select the Add Stations command from the Actions menu. In the dialog box that opens, click Custom and enter the name of the computer where the Processing Stations are installed (for ex-ample, localhost), or click Browse and choose desired computers.
c. If importing images from Hot Folders is performed in the project, processing Hot Folders must be enabled in the Processing Server. For this, from the ABBYY FlexiCapture 10 Servers -> <Server Name> tree, choose the Hot Folders item; the project name will appear to the right. Choose the project from the list and from the Ac-tions menu select Enable.
Congratulations, ABBYY FlexiCapture 10 Distributed is ready for demonstration.
Detailed setup of FlexiCapture
How to choose the user authentication type All components and users of ABBYY FlexiCapture 10 distributed installation interact with the Application Server while working and must be authenticated on the computer where it is installed. FlexiCapture supports two types of user authentication:
1. Standard IIS authentication. Users are authenticated with their Windows accounts using Windows or Basic authentica-tion in IIS. Then users’ identification in FlexiCapture is performed according to their logins.

© 2011 ABBYY. All rights reserved. 60
This method requires minimal configuration and is suitable for scenarios where all FlexiCapture components and users are in the same domain.
If the whole system or some of its components are outside of the domain, then a pass-through authentication should be used for the standard IIS authentication. The general principle of the pass-through authentication is as follows: for the user of computer M2 working under a local account M2/User[password] could be authorized at the computer M1, this account should be duplicated at the computer M1 up to a password (that is, M1/User[password] should be created).
Example of using pass-through authentication
For example, the Processing Station is installed on the computer M1 which is not included in the domain of the Applica-tion Server. In this case, a local user M2\User[password] must be created on the computer M2 where the Application Server is installed and the same local user must be created on the computer M1: M1\User[password]. Then the service of the Processing Station must be started under the M1\User[password] account. Now the Processing Station can be au-thenticated on the computer where the Application Server is installed.
Note: If where the Application Server is installed outside the domain, the setting up is time-consuming, though it is pos-sible to work in such a configuration. For this, it is necessary to start the IIS pools and the services of the Application Server and the Processing Stations under specially created local Windows accounts and configure pass-through authen-tication for these users on all computers of the system.
2. Authentication by means of FlexiCapture. In this case, FlexiCapture Authentication Module is installed in IIS. This module performs user authentication based on information which is stored in a FlexiCapture database. This allows you to use user accounts which are not related to Windows user accounts.
This method is convenient for users located outside the domain where the Application Server is installed, e.g. for opera-tors who work remotely over a web-based interface.
If this authentication method is used, a web-based interface for login to the system (http://<server name>/login) is also installed. This is a single entry point for web-operator using which new operators can self-register in the system and re-quest access rights to the stations.
Users of FlexiCapture stations processing interactive stages (scanning, verification, etc.) can use both types of authentication. The Processing Server and Processing Stations can work only with standard IIS authentication.
Note: In IIS, requests to the Application Server are processed by the <Default Site>\FlexiCapture10\Server\WebServices.dll li-brary which is available both with Windows and Basic authentication. During the installation of FlexiCapture Authentication Module, the <Default Site>\FlexiCapture10\Server\WebServicesExtrenal.dll is also installed. This library is a copy of WebSer-vices.dll, but it is available when using FlexiCapture authentication. Thus, the Application Server is available to all system com-ponents at the same time both with standard authentication and with FlexiCapture authentication. When the user on whose com-puter the workstations are installed tries to open a project, he is prompted to choose which authentication to use to access the Ap-plication Server. Web-clients can also work with both authentication types; the type being used is determined by using the key UseCustomAuthentication in the file web.config on each web-station: if the key is set to true, authentication is performed by means of FlexiCapture, if the key is set to false, standard means of authentication is used. By default the key is set to false if FlexiCapture Authentication Module is not installed, otherwise the key is set to true. To use only standard IIS authentication (the first method), the Authentication Module feature must be disabled during the installa-tion of FlexiCapture servers (the feature is disabled by default). To use FlexiCapture authentication (the second method), this feature must be selected when installing servers, or you can install it later via the Control Panel (Control Panel –> Program and Features -> Modify).
Creating a database After you install the program and activate the license, it is necessary to configure the system, the first step of which is to create a database. Important! Under Windows Vista, Windows 2008 or later versions, a database must be created with UAC disabled. If UAC is not disabled, a database can be created, but the Application Server will not be able to connect to it.
1. On the computer where the Application Server is installed, open the Service -> Application Server page of the Ad-ministration and Monitoring Console (http://<server name>/FlexiCapture10/DBConnection.aspx) under a user ac-count with privileges of Windows administrator.

© 2011 ABBYY. All rights reserved. 61
2. Click the Create New Database button.
Note: If you are already connected to another database, you will need to close existing sessions prior to creat-ing a new database. If for some reason it is not possible, add the following key in the web.config file which is located at <IIS Root Directory (by default “C:\inetpub\wwwroot”)>\<FlexiCapture10>:
<appSettings> <add key="IgnoreCurrentSessions" value="true"/> </appSettings>
In this case, a new database will be created without a warning about existing sessions. In the old database, all sessions are preserved. By default the key is set to false which means you will be prompted to close the ses-sions when recreating a database.
3. The database creation page will open.
On this page, specify the following:
a) Type of database server: Oracle or MS SQL Note: If you plan to use Oracle database server, you must configure it before creating a database (see Oracle database settings).
b) Name of a new database (if MS SQL server is selected). Pay attention to the limitations imposed by MS SQL on database names (see http://msdn.microsoft.com/en-us/library/ms175874.aspx).
c) A user with DBA permissions on SQL or Oracle server.
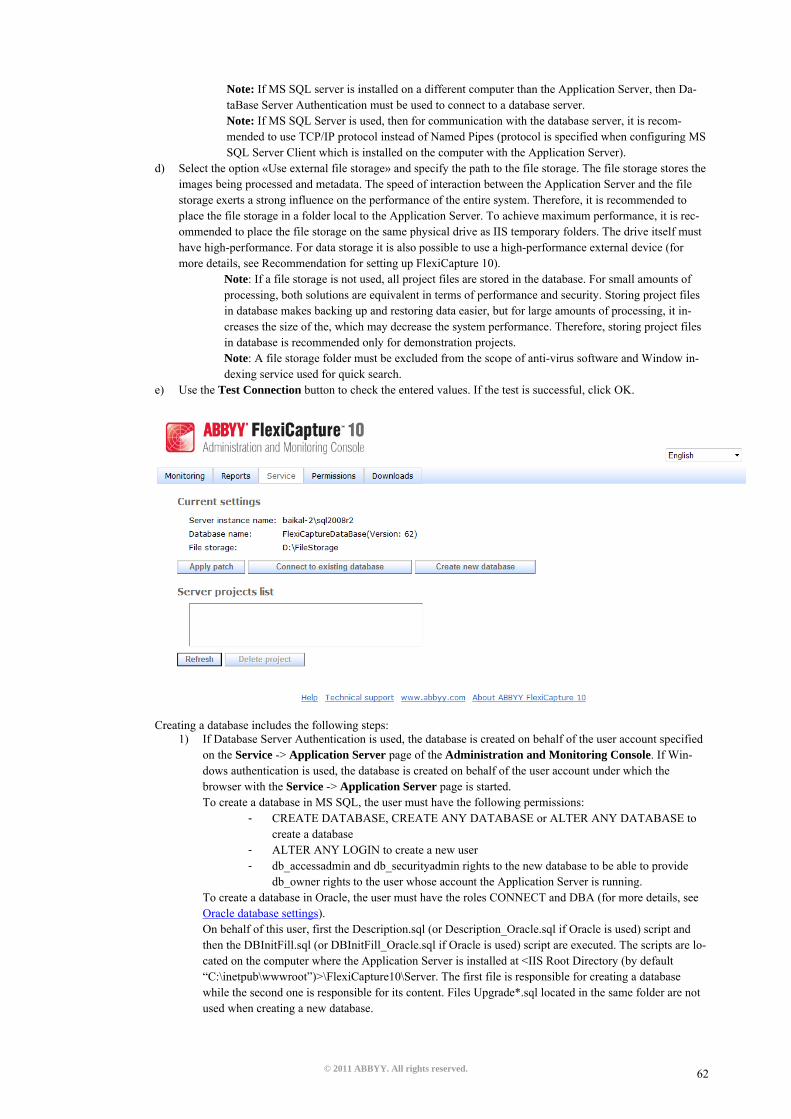
© 2011 ABBYY. All rights reserved. 62
Note: If MS SQL server is installed on a different computer than the Application Server, then Da-taBase Server Authentication must be used to connect to a database server. Note: If MS SQL Server is used, then for communication with the database server, it is recom-mended to use TCP/IP protocol instead of Named Pipes (protocol is specified when configuring MS SQL Server Client which is installed on the computer with the Application Server).
d) Select the option «Use external file storage» and specify the path to the file storage. The file storage stores the images being processed and metadata. The speed of interaction between the Application Server and the file storage exerts a strong influence on the performance of the entire system. Therefore, it is recommended to place the file storage in a folder local to the Application Server. To achieve maximum performance, it is rec-ommended to place the file storage on the same physical drive as IIS temporary folders. The drive itself must have high-performance. For data storage it is also possible to use a high-performance external device (for more details, see Recommendation for setting up FlexiCapture 10).
Note: If a file storage is not used, all project files are stored in the database. For small amounts of processing, both solutions are equivalent in terms of performance and security. Storing project files in database makes backing up and restoring data easier, but for large amounts of processing, it in-creases the size of the, which may decrease the system performance. Therefore, storing project files in database is recommended only for demonstration projects. Note: A file storage folder must be excluded from the scope of anti-virus software and Window in-dexing service used for quick search.
e) Use the Test Connection button to check the entered values. If the test is successful, click OK.
Creating a database includes the following steps:
1) If Database Server Authentication is used, the database is created on behalf of the user account specified on the Service -> Application Server page of the Administration and Monitoring Console. If Win-dows authentication is used, the database is created on behalf of the user account under which the browser with the Service -> Application Server page is started. To create a database in MS SQL, the user must have the following permissions:
- CREATE DATABASE, CREATE ANY DATABASE or ALTER ANY DATABASE to create a database
- ALTER ANY LOGIN to create a new user - db_accessadmin and db_securityadmin rights to the new database to be able to provide
db_owner rights to the user whose account the Application Server is running. To create a database in Oracle, the user must have the roles CONNECT and DBA (for more details, see Oracle database settings). On behalf of this user, first the Description.sql (or Description_Oracle.sql if Oracle is used) script and then the DBInitFill.sql (or DBInitFill_Oracle.sql if Oracle is used) script are executed. The scripts are lo-cated on the computer where the Application Server is installed at <IIS Root Directory (by default “C:\inetpub\wwwroot”)>\FlexiCapture10\Server. The first file is responsible for creating a database while the second one is responsible for its content. Files Upgrade*.sql located in the same folder are not used when creating a new database.

© 2011 ABBYY. All rights reserved. 63
2) In case of MS SQL, a new user account, under which the FlexiCapture 10 Web Services pool of the Ap-plication Server web-service is running, is added to the database server (by default the pool of the Appli-cation Server is started under the user account Network Service).
3) db_owner rights to the FlexiCapture database created in step 1 are assigned to the new user account cre-ated in step 2 (if MS SQL is used). All further operations concerning server interaction with the database are performed on behalf of the user created in step 2. The account used for creating a database in step 1 can be deleted from the database server if necessary. In case of Oracle, all further work with the database during the operation of the FlexiCapture system is performed under the account used for creating the database in step 1, no additional accounts are created (in contrast to MS SQL).
4. If you are using FlexiCapture authentication (for this, Authentication Module must be installed), then after creating a database, you will receive a message saying that a temporary password password has been created for your account. To continue working with the system, it is necessary to change the password. For this, go to the login page (http://<server name>/Login). When trying to open any page of the Administration and Monitoring Console after creating a database, the user will be automatically redirected to the login page to change the password. Once the password is changed, the user will be returned to the page of the Administration and Monitoring Console.
5. The user who created the FlexiCapture database, automatically gets administrative privileges for the system. The admin-istrator also has the right to change the settings of the Application Server, upload projects to the Application Server, grant access rights for projects, create new users of the system and manage their roles and access rights. The administrator of the system can grant the administrator role to another user and delegate further configuration of the system to that user. The user who created the database cannot be deprived of the administrator role, neither can the user’s account be deleted from the system.
Connecting to an existing database Instead of creating a new database you may need to connect to an existing database created in one of the previous releases of FlexiCapture 10 or FlexiCapture 9.0 (see Upgrading from ABBYY FlexiCapture 9.0). Important! Under Windows Vista, Windows 2008 or later versions, UAC must be disabled on the computer where the Applica-tion Server is installed before connecting to the database. To connect to an existing database, do the following:
1. On the computer where the Application Server is installed, run the Administration and Monitoring Console under a user account with privileges of Windows administrator and go the page Service -> Application Server (http://<server name>/FlexiCapture10/DBConnection.aspx). If the Application Server is already connected to a database, go to step 4.
2. Click Connect to Existing Database.
3. In the form that opens, fill in the following fields: type of database server, name of the existing database (if MS SQL Server is used), the user who is the administrator of the database server, path to file storage (if the file storage is used). Click Ok.
4. Now you server is connected to the database. If the Upgrade link is displayed on the Service -> Application Server page (http://<server name>/FlexiCapture10/DBConnection.aspx), near the database version, then you should upgrade the da-tabase before you proceed.
5. If you have installed the Authentication Module and authentication by means of FlexiCapture has not been used for this database before, a temporary password password is assigned to the user under whose account the Administration and Monitoring Console was started.
Note: If the database was created in FlexiCapture 10 Release 2 or earlier versions and was then upgraded to the current version using the Administration and Monitoring Console, then for all users using FlexiCapture Authentication Mod-ule, passwords will be changed to the temporary password password after upgrading the database. This password is only valid for authentication by means of FlexiCapture Authentication Module. It means, that users who worked using standard IIS authentication, will continue working as before.
Uploading project to server For ABBYY FlexiCapture 10 Distributed operators could work with the same project(-s) together, the project(-s) must be up-loaded to the Application Server. To upload a project to the server, the user must have the role of administrator of the system.
To upload project to the server, open the Project Setup Station and do one of the following:
• Create a new project (File New project…). Create or import at least one Document Definition (Pro-ject Document Definitions).

© 2011 ABBYY. All rights reserved. 64
• Open a sample project (sample projects are located at %public%\ABBYY\FlexiCapture\10\Samples for Microsoft Windows Vista and later versions or %allusersprofile%\Application Data\ABBYY\FlexiCapture\10\Samples for other version of Microsoft Windows).
• Open your own project created in an earlier version of ABBYY FlexiCapture.
• Create a new project and import a batch created in FormReader 6.5 DE or EE. For successful operation, it is essential the project should have at least one correct attached Document Definition for which export settings are specified.
Then upload the project to the Application Server (File Upload Project to Server…). Note: When uploading a local project to the Application Server, a new project which is similar to the local one is created on the server. A newly created project contains the same Document Definitions, batch types, import sources and project settings. Work-ing batches with images are not copied from a local project to the server. Test batches (they are created for a particular user) are available to the user both from the local and from the server project.
Creating new users The way of creating new users varies depending on the authentication type which is supposed to be used for these users (see How to choose the uesr authentication type).
Note: If standard IIS authentication is used, FlexiCapture requires only user’s Windows-login to authenticate the user. If authenti-cation by FlexiCapture means is used (the Authentication Module feature must be installed), the user password must be also stored in the system (password hash is stored in FlexiCapture database).
In general, login of the account that will be authenticated by means of FlexiCapture can be arbitrary; in particular, it may coincide with user’s Windows-login. In this case, the user will use the same login, but different passwords to access the system using dif-ferent authentication types (for standard IIS authentication, the password specified in Windows is used; for authentication by means of FlexiCapture, the password specified in FlexiCapture is used). FlexiCapture identifies users by their logins, so in terms of FlexiCapture, it will be the same user regardless of the authentication method.
Thus, if FlexiCapture knows only user’s login, the user can be authenticated by standard IIS authentication only. In case, user password is specified in FlexiCapture, the user can be authenticated by means of FlexiCapture Authentication Module. To enable authentication by means of FlexiCapture for the user, a temporary password can be created for this user account. For this, on the User Permissions page of the Administration and Monitoring Console click Reset Password.
Adding users manually
To add users manually, the FlexiCapture administrator must do the following actions:
• Open Administration and Monitoring Console, go the Permissions –> Users page and click New User.
• On the page that opens, specify the login of the new user and click Save.
• If the Authentication Module feature is installed, a message will be displayed saying that the user is assigned a tem-porary password password.
A user added in this way:
- can be authenticated using standard IIS authentication, if the user’s login in the system matches user’s Windows login. In this case, the Windows password must be used for authentication. If the user is not a user of the domain where the Application Server is located, the pass-through authentication can be used.
- can be authenticated by means of FlexiCapture authentication module, if the Authentication Module feature is installed. In this case, a login and a temporary password password specified by the administrator are used for authentication (the password must be changed at first logon to the web-station or on the page http://<server name>/Login).
Import from Active Directory
This method of adding users is usually used when the system is installed in the domain and users of the system are employees of the organization whose accounts are stored in Active Directory.
To import users from Active Directory, the FlexiCapture administrator should open the Administration and Monitoring Console and on the Permissions –> Users page click the Import button. Both individual users and existing user groups can be imported.
Users added in this way can be authenticated by IIS standard authentication using their Windows logins.
If the Authentication Module feature is installed and you want to enable user authentication by means of FlexiCapture authen-tication module, go to the editing user permissions and roles page and set a temporary password for each user using the Reset Password button.

© 2011 ABBYY. All rights reserved. 65
Note: If the Reset Password button is missing, it means that the user password has already been changed to a default pass-word password.
Self-registration of users through the web interface
This method of adding users applies when a large number of users are remote operators (e.g. working through a web-based in-terface) and do not belong to the domain where the Application Server is installed. To use this method, the Authentication Module feature must be installed.
To enable operators outside of the domain where the Application Server is installed to be authenticated on the Application Server, it is recommended to use FlexiCapture authentication. For this, the Authentication Module feature must be installed.
New users can self-register in the system through the web-interface following the Registration link on the http://<server name>/Login page.
Note: For the web-application http://<server name>/Login, anonymous authentication is enabled in IIS settings, so the regis-tration page can be accessed by any user.
After filling in the registration form and clicking Sign up, the user will be added to the system and redirected to the personal page.
Clicking on the Create Request link, the user can create a request for access rights and roles.

© 2011 ABBYY. All rights reserved. 66
Request for assigning roles and granting access rights are processed by the administrator on the Permissions -> Requests page of the Administration and Monitoring Console.
To process the request, the administrator must click on the Go to user permissions link, assign necessary roles and grant ac-cess rights to the user, then return to the Permissions -> Requests page and click Complete.
Once the roles are assigned and access rights are granted to the user, the list of available stations will be displayed on the user’s personal page. To update information on the personal page, click the Refresh button.
Thus, as soon as the administrator has processed the request and clicked Complete, the user can see on his personal page that the request has been processed.
Self-registration of users (without using web-interface)
This method of adding new users is suitable for the case when standard IIS authentication is used and FlexiCapture authenti-cation module is not used. The described method allows the administrator to skip entering user logins manually, instead the administrator has only to assign roles and grant access rights to already created loing.
With this registration method, the user can log into the station using a Windows login and try to open a project. An error mes-sage: “Access denied. Contact your administrator” will occur. At the same time the user’s login will be displayed on the Per-missions –> Users page of the Administration and Monitoring Console which will help avoid errors when typing user log-ins manually by the administrator and will reduce the administrator’ work to assigning roles and granting access rights to us-ers.
Setting up user roles and access rights To manage user roles and access rights, the administrator must go to the Permissions – Users page of the Administration and Monitoring Console, find a desired user and click on the user’s login to open the link.

© 2011 ABBYY. All rights reserved. 67
The administrator can assign roles to the user (scanning operator, verification operator, etc.) and grant access rights to projects and individual batch types within the assigned role. The roles of Administrator, Processing Server and Monitoring Operator are as-signed for all projects at once.
The role of the Processing Server should be assigned only to the user under whose account the Processing Server is running (see. 1Configuring the Processing Server).
Note: For the role of Web Capture Operator, the list of projects and batch types can be displayed without the possibility to choose them. The reason is that within the given role, access rights can be granted only to the projects in which the «for WebCapture station» or «Advanced for WebCapture station» workflow scheme is used.
The Reset Password button is displayed only if the Authentication Module feature is installed. In this case, the button allows you to create a temporary password password for a user. In particular, this allows users added via ActiveDirectory to get a temporaty password in FlexiCapture system and use it for authentication by means of FlexiCapture (see How to choose the user authentica-tion type).
Note: If FlexiCapture authentication module is installed and the Reset Password button is missing on the user’s page, it means that the password has already been changed to a temporary one.
Configuring the Processing Server In FlexiCapture system, the Processing Server processes tasks of non-interactive (automatic) stages, for example, importing im-ages from a hot folder, recognition, export, etc. The Processing Server contains a pool of Processing stations which perform proc-essing tasks.
Besides, the Processing Server ensures the efficiency of protection and licensing for remote and web-stations: for the stations to start, the Processing Server must be also started, otherwise a message saying that there is no license will occur when the station starts.
In order to start work, it is necessary:
1. Assign the role of the Processing Server to the user under whose account the Processing Server is running.
By default the Processing Server is installed on the same computer as the Application Server and started under the Net-work Service user account. In this case, the role is assigned to the Processing Server automatically and this step can be skipped.
Otherwise, you should grant access rights to the Processing Server on the Permissions –> Users page of the Administra-tion and Monitoring Console.
If the Processing Server is installed on the computer other than the Application Server, but is started under the Network Service user account, the user will be displayed as <Domain>\<Machine Name>$ in the Administration and Monitor-

© 2011 ABBYY. All rights reserved. 68
ing Console. If the service of the Processing Server is started under a different user, it is necessary to assign the role to this user.
2. Start the Processing Server Monitor (Start ABBYY FlexiCapture 10 Servers Processing Server) for further con-figuration.
3. In the Processing Server Monitor, select the menu item Actions Properties and in the dialog box that opens, specify the address of the Application Server (e.g, http://ApplicationServer). If the Processing Server and the Application Server are installed on the same computer, the address of the Application Server will be specified automatically.
4. Start the Processing Server using the button.
5. Add Processing stations. For this, in the server tree, select Stations and click . In the dialog box that opens, select the stations by the computer name or find them in the network:
After adding a station you specify its parameters in the Station Properties dialog box (Actions -> Properties menu). The station is started automatically within a minute. If the station requires a long-term setting or you do not want to start the station, deselect the Start automatically option in the station properties. To start desired stations manually, select them from the list in the main window of the Processing Server Monitor and
start them by clicking the button. Note: It is not recommended to install the Processing Station on the computer where FlexiCapture servers are installed as it reduces the performance of server.
6. If in some projects it is necessary to import images from hot folder, enable hot folders in the Processing Server Moni-tor using the corresponding item in the server tree:

© 2011 ABBYY. All rights reserved. 69
7. If necessary, in the Project Setup Station, specify processing settings for the project (specified settings will apply to
batches of the Default type). To configure processing settings, choose the menu item Project Project Properties… and open the Workflow tab. If the project contains batch types, specify workflow settings for each of them. For this, choose the menu item Project Batch Types…, then select a desired type, click Edit… and in the dialog box that opens go to the Workflow tab.
Oracle database settings Prior to creating a database in Oracle, do the following actions:
1. On the computer on which the Application Server is installed, install the Oracle client for Windows 32bit (even though Windows x64 is installed) and Oracle DBMS for this OS. The Application Server does not work with the Oracle client for Windows x64. If Windows x64 is installed, pools for the Administration and Monitoring Console and the Application Server must be set to 32-bit mode. For this, do the following: - Execute the following command from the command line: cscript %system-drive%\Inetpub\AdminScripts\adsutil.vbs set W3SVC/AppPools/Enable32BitAppOnWin64 true This command switches the default pool to 32-bit mode, thus the default pool and the pools of the Administration and Monitoring Console run in the same mode which is required for registration of ASP.net. For this command to take effect, access to the Network Service account must be granted explicitly. To grand access to the Network Service account, execute the following command: aspnet_regiis -ga "NT Authority\Network Service".
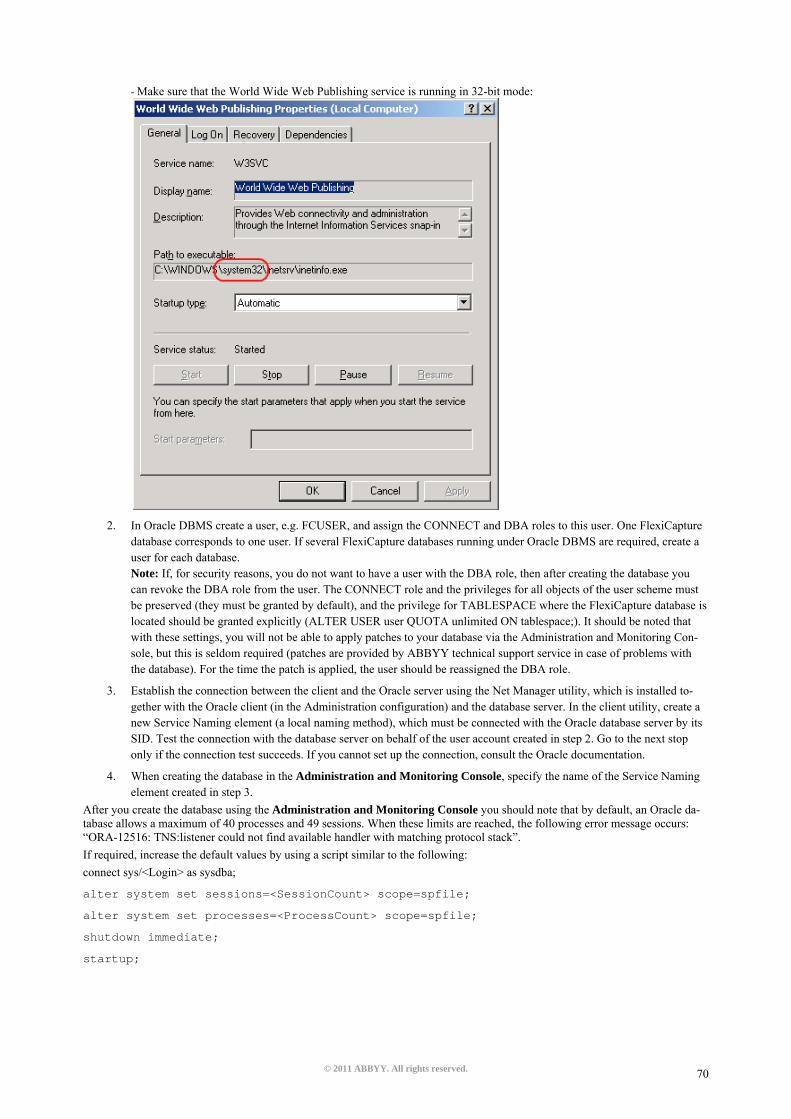
© 2011 ABBYY. All rights reserved. 70
- Make sure that the World Wide Web Publishing service is running in 32-bit mode:
2. In Oracle DBMS create a user, e.g. FCUSER, and assign the CONNECT and DBA roles to this user. One FlexiCapture
database corresponds to one user. If several FlexiCapture databases running under Oracle DBMS are required, create a user for each database. Note: If, for security reasons, you do not want to have a user with the DBA role, then after creating the database you can revoke the DBA role from the user. The CONNECT role and the privileges for all objects of the user scheme must be preserved (they must be granted by default), and the privilege for TABLESPACE where the FlexiCapture database is located should be granted explicitly (ALTER USER user QUOTA unlimited ON tablespace;). It should be noted that with these settings, you will not be able to apply patches to your database via the Administration and Monitoring Con-sole, but this is seldom required (patches are provided by ABBYY technical support service in case of problems with the database). For the time the patch is applied, the user should be reassigned the DBA role.
3. Establish the connection between the client and the Oracle server using the Net Manager utility, which is installed to-gether with the Oracle client (in the Administration configuration) and the database server. In the client utility, create a new Service Naming element (a local naming method), which must be connected with the Oracle database server by its SID. Test the connection with the database server on behalf of the user account created in step 2. Go to the next stop only if the connection test succeeds. If you cannot set up the connection, consult the Oracle documentation.
4. When creating the database in the Administration and Monitoring Console, specify the name of the Service Naming element created in step 3.
After you create the database using the Administration and Monitoring Console you should note that by default, an Oracle da-tabase allows a maximum of 40 processes and 49 sessions. When these limits are reached, the following error message occurs: “ORA-12516: TNS:listener could not find available handler with matching protocol stack”. If required, increase the default values by using a script similar to the following: connect sys/<Login> as sysdba;
alter system set sessions=<SessionCount> scope=spfile;
alter system set processes=<ProcessCount> scope=spfile;
shutdown immediate;
startup;

© 2011 ABBYY. All rights reserved. 71
Web-stations settings Web-stations are installed together with the Application Server, if Web-stations feature is selected in the Custom Setup dialog box.
Description of possible Web-stations settings
For each web-station located at <IIS Root Directory (e.g. C:\inetpub\wwwroot)>\<Station Name>, there is a web.config configu-ration file, whose section <appSettings> contains the following keys that define the behavior of the station:
ApplicationServer – the address of the Application Server in the format <machine name>, without «http://», has a default value of «localhost». The key allows you to move the web-station to a different computer than the one where the Application Server is installed, e.g. in DMZ network.
DefaultDomain – this key stores the name of the domain which will be added to the names of users who try to log into the sta-tion. By default the value is empty. It means that the user <domain>\user must enter the whole login: <domain>\user to log into the station. If the key has the value «domain», the domain name can be omitted and the shortened login «user» can be used. If the user belongs to a different domain or is a local user, it is possible to specify the whole login in the format of «machine\user». In this case, the value of the DefaultDomain key will not cause conflicts.
UseCustomAuthentication – this key allows you to switch the authentication mode used by the station: either standard IIS au-thentication or authentication by means of FlexiCapture authentication module can be used (see «How to choose the user authen-tication type»). If FlexiCapture authentication module is installed, the server installer sets the key value to true, otherwise – to false.
UseHashedPageAccess – this key determines whether automatic log off is performed when closing the browser window or a separate browser tab. If the key value is false, log off is performed only when closing the browser window. If you close the browser tab when working with the station without doing the log off, but the browser itself remains open, you will be able to open the station in a new tab and continue working with it without entering a login and password. If the key is set to true, automatic logoff is performed also when closing a separate browser tab. In this case, when you open the station in a new tab, you will have to enter login and password. Automatic logoff is performed also when refreshing any station page (using the Refresh command or the F5 key). This key can be used only for the Web Scanning and Web Capture stations. By default the key is set to false.
Security Settings in FlexiCapture 10 Distributed For user authentication, either Windows or Basic authentication or authentication by means of FlexiCapture Authentication Mod-ule can be used. Windows-authentication is more secure (login and password are not transmitted over the network in clear text), but this authenti-cation method is convenient only within a domain. Basic authentication and FlexiCapture authentication can work outside the domain as well, so these authentication types must be used for distributed work. The main disadvantage of these authentication types is that user identification information (login and password) are transmitted on each request to the server. Therefore, in the case of Basic authentication (or authentication by means of FlexiCapture which uses the same protocol), SSL encryption (https) must be used. Using SSL encryption prevents from reading or modifying data sent between client and server. Client applications working on Basic-authentication or authentication by means of FlexiCapture Authentication Module have to store the user name and password in a cookie to be able to pass them each time the server is accessed. In this case, security is en-sured by the fact that these data do not get to the drive or a client machine. If a user specifies the name/password when first ac-cessing the server, between requests these data are stored in the application memory and are deleted at log off or when closing the browser, so they do not pose a threat to security. To get the Application Server work over https protocol, the IIS certificate must be installed on the Application Server: Working over https To ensure safety, you can use https protocol. For this, you need to enable SSL support in IIS settings. To work with IIS over HTTPS protocol, you need to obtain a certificate for the server and connect it. Managing certificates To open the Certificates control panel, do the following:
1. Run Microsoft Management Console. For this, open Start->Run menu, type “mmc” and press Enter.

© 2011 ABBYY. All rights reserved. 72
2. In the console that opens, choose File->Add/Remove Snap-in. in the window that opens, click Add and from the list of
available modules choose Certificates. Click Add.
3. In the window that opens, choose “Computer account” and click Next. In the next window, choose Local Computer and
click Finish. 4. Add the certificate to the Personal folder. On Windows XP, you can obtain a certificate in the following ways:
• Import an existing certificate from file. For this, choose Action -> All Tasks -> Import and specify the path to the certificate file.
• Request a certificate from the domain Certificate Authority (provided that Certificate Authority is a part of do-main). For this, choose the menu item: Action -> All Tasks ->Request new certificate, in the certificate type, spec-ify “Computer”, then specify the name of the certificate.
• You can also obtain a certificate from an online Certificate Authority (e.g. a free certificate can be obtained at www.cacert.org).
Connecting certificate in IIS on Windows XP 1. On the IIS Manager panel, open the Default Web Site properties dialog box. 2. In the Secure Communications section of the Security tab click “Server Certificate…” 3. In the window that opens, choose a certificate to be used by the server.

© 2011 ABBYY. All rights reserved. 73
After you choose a certificate, you can enable the option which allows only https connections to the Internet for a selected site or for Default Web Site. For this:
1. Open the Security tab of the site properties. 2. In the Secure Communications section click Edit. 3. In the window that opens select the option “Require secure channel (SSL)”.

© 2011 ABBYY. All rights reserved. 74
Connecting certificate in IIS on Windows 7 In IIS settings, connect HTTPS protocol for Default Web Site. For this:
1. Run IIS Manager Console from the Control Panel. 2. Choose Default Web Site and on the Actions panel, click the Bindings link.
3. In the dialog box that opens click Add and select “https” protocol from the “Type” drop-down list. 4. From the “SSL Certificate” drop-down list, select a desired certificate and click Ok.
5. If you want the site to be available via https only, then choose it in the tree of sites, open SSL Settings and select the op-
tion «Require SSL». Note: Verification of client certificates is not performed, so when configuring SSL, set the value of the «Client certificates» op-tion to Ignore. Once the certificated is connected, the “https” protocol must be written in the address of the Application Server and the computer name must match the name for which the certificate is issued: https://<server name>.

© 2011 ABBYY. All rights reserved. 75
This requires in the following cases: 1) When specifying address of the Application Server on the Processing Server. To specify the address, do the following: - start the Processing Server Monitor; - in the Processing Server local menu, select the «Change Application Server» item; - in the dialog that opens, specify the address: https://<server name>. 2) When working on user stations, the server address https://<server name> must be specified when you start the station or open a project 3) Similarly, when working on Web Stations, the station URL must be entered starting from the server address: https://<server name>/<web station name>
Recommendation for setting up FlexiCapture 10
General recommendation To improve performance of ABBYY FlexiCapture, use the following recommendations: - Install SQL Server and FlexiCapture Application Server on different computers. The Processing and Licensing servers can be installed on the computer where the Application Server is installed. - Do not install processing stations on the computes where FlexiCapture servers or SQL Server are installed. - Do not store all data in SQL database. For these purposes, a File Storage should be used. This option must be selected when creating a database in the Administration and Monitoring Console. If a file storage was not created when creating a database, it cannot be connected later while working. During work, it is also impossible to disconnect the file storage which was connected when creating the database. These recommendations are described in more detail below.
Configuring SQL Server
RAM
The amount of RAM available to SQL Server should be not less than the amount recommended by Microsoft for the given edition of MS SQL Server (see the table of recommendations for different editions).
The more RAM is available, the larger part of database can fit in RAM which allows faster access to database.
However, if FlexiCapture servers are installed on the same computer, the amount of RAM available to SQL Server must be re-stricted in SQL Server settings so that the amount of RAM was also sufficient for FlexiCapture servers including IIS (recom-mended amount of RAM is at least 4 GB). Thus, in order to improve performance, it is recommended that SQL Server and Flexi-Capture Servers should be installed on different computers.
Hard disk
It is desirable to place the database file on a fast hard drive (e.g., 15000 rpm/second). If MS SQL Server is installed on the same computer with FlexiCapture Servers, it is desirable to use one hard disk for the %temp% folder of IIS and the File Storage and another disk – for SQL database.
Database File
The process of increasing the database file may lead to a temporary decrease in SQL Server performance, so it is recommended to specify in database properties in Autogrowth settings that a one-time increment of the database file must be at least 100 MB.
Recovery model
To improve performance of SQL Server, it is desirable to use a Simple Recovery Mode for the database.
Rebuilding indexes
After long work of FlexiCapture, a significant increase in the size of database can be noticed. At the same time, more than 50% of the space can be occupied not with data, but with the indexes in tables.
In order to decrease the size of database and improve performance, it is recommended that indexes should be rebuilt periodically (e.g., once for every million pages processed). This operation should be performed on tables, which contain data to be changed frequently. It is recommended to perform this operation от a regular bases for the Batch, Document, Page, EventLog, Task, DocumentParameter and BatchParameter tables.
Estimating the size of File Storage
Most of the space in file storage is occupied by images being processed in the system. For each loaded file, its source image is stored as the original; besides black-and-white image copies and image thumbnails are created. For color images, color copies with quality loss are also created.
The level of quality loss is specified in batch type properties, in the Displayed image quality field.

© 2011 ABBYY. All rights reserved. 76
To get a relatively accurate estimate of the file storage size, you can upload 10 typical images to FlexiCapture and view the size of a file storage folder, in which the batch (<FileStorage>\<GUID>\project_<id>\0000-0999\<Batch Id>) is stored.
Estimates for the file storage obtained during testing are as follows: for 1 image, 3-6 times more space in the file storage than the image size is needed.
File Storage For the file storage, it is recommended to use a disk that is local relative to the Application Server (or a system of comparable performance). To achieve maximum performance, it is recommended that the %temp% for IIS should be located on the same physical disk as the File Storage. In order to increase performance, it is recommended that a file storage folder should be excluded from the scope of anti-virus software, Window indexing service and other processes that require long-term access to the disk. Preferably use a faster hard drive (e.g., 15 000 rpm/second).
Application Server
Caching
In order to decrease the amount of memory occupied by IIS, it is necessary to disable Output in the IIS settings. Using the cache does not lead to increasing performance, as the identical information is not frequently requested by FlexiCapture.
Hard disk
IIS uses the hard disk intensively as all files transmitted through it are saved to the disk. System environment variables TEMP/TMP are used by IIS as a directory for temporary files. By default they point to a folder on the system drive.
To achieve maximum performance, it is recommended to use a fast hard drive (e.g. 15 000 rpm/second) for storing the TEMP/TMP folders.
Overriding the variables TEMP/TMP to a disk other than the system drive can lead to a significant decrease in performance, so the system drive must be fast.
Configuring settings of the Application Server Recycling Pool

© 2011 ABBYY. All rights reserved. 77
For FlexiCapture 10 Web Services, the Application Server pool, it is necessary to specify Recycling settings, that is to enable cleanup of the pool when it reaches a certain threshold of consumed memory. The threshold is determined based on the amount of available memory in the system: when IIS consumes maximum memory, there must remain enough memory for normal function-ing of the operating system and other applications that can be installed on the same computer.
It is recommended to set up a forced cleanup of the Application Server pool when the amount of occupied memory reaches 1200000 KB.
Number of threads For the Application Server pool, the number of working processes can be specified. The optimal number of threads is two threads per processor core if hyper-threading technology is not used on the computer and one thread per virtual core if hyper-threading is used.

© 2011 ABBYY. All rights reserved. 78
Configuring FlexiCapture input and output Frequently, the bottleneck that limits performance of the system is the input (import) or the output (export).
Below are the two ways to increase performance in bottlenecks of FlexiCapture:
1. If it is assumed that a large number of Processing Stations will simultaneously import files from a hot folder or export files to file system, then the hot folder and/or the export target must be located on the computer with the server edition of the operating system. Normally, client operating systems support a limited number of connections which may lead to error in import/export tasks.
2. If a hot folder is assumed to be processed at several Processing Stations, then bandwidth to the hot folder will be divided between the Processing Stations which may lead to bandwidth shortage. In this case, it is recommended to use multiple independent hot folders. If export to files is performed, it is recommended that export target should not be on the same computer with the hot folders
Using performance counters To monitor FlexiCapture state and search for bottlenecks, the Performance Monitor utility can be used.
FlexiCapture counters FlexiCapture own counters are located in the category FlexiCapture.
Values of the counters are recorded by the Processing Server, so the counters are available in the computer where this server is installed.
As the Processing Server is a 32-bit application, the Performance Monitor utility must be run in 32-bit mode when used in 64-bit computers. For this, enter the following command in the command line (cmd.exe):
mmc /32 perfmon.msc
By default, recording counters by the Processing Server is disabled. To enable counters recording, perform the following actions:
1. Start the Processing Server console. For this, on the computer where the service of the Processing Server is started, exe-cute the following command in the command line (cmd.exe): FlexiBRSvc.exe please obey
2. Set the value of the server parameter PerformanceCounting to true. For this, execute the command: set PerformanceCounting=true

© 2011 ABBYY. All rights reserved. 79
3. Check the state of the PerformanceCounting parameter with the “view” command.
4. Quit the Processing Server Manager console using the “quit” command.
Note: To view help on the Processing Server Manager console, use the “help” command.
.
Description of counters:
1. ASCT Count – Application Server Communication Threads count. The number of running threads used for interaction with the Application Server. By default, takes values from 1 to 3. Each thread opens its session. Additional threads are started if, for the existing threads, latency (ASCT Latency) has reached two seconds.
2. ASCT Latency – Application Server Communication Thread latency (ms). The latency of processing requests in the flows of interaction with the Processing Server. The downtime of queuing requests measured in milliseconds.
The smaller this value, the better. The ideal value is zero. Values within 1000 (1 second) are the norm.
When the counter value reaches 2 seconds and the maximum number of threads is not running one more thread is started. When the value reaches 30000 (30 seconds), the Processing Server switches to a critical mode: it stops taking new tasks and retrieving information about projects on the server until the queue is unloaded. Therefore, a long stay is the state > 30 seconds is generally undesirable.
3. Primary Thread Latency – a delay in the response of the Processing Server measured in milliseconds. This index shows the responsiveness of the server. The increase of this index leads to “freezing” of the Processing Server Monitor.
It is desirable that the value of this counter be minimal. This counter is the most critical. The server does not have auto-adjusting by the value of this counter. A response delay of more the 10 seconds is highly undesirable. As a rule, an ex-cessive growth of this counter means that a network interaction with some station is extremely slow.
Note: With the “view” command of the Processing Server console, you can output the “Server lag time” value that cor-responds to the maximum of the Primary Thread Latency and ASCT Latency values.
4. Task Queue Size the size of the buffer allocated for the task. Includes all tasks displayed in the Processing Server Monitor as well as some of the tasks deleted over the past 5 minutes. This counter does not matter much in terms of ad-ministration however it can be used to monitor the correlation between the number of tasks in the Processing Server and the occupied memory.
5. Cores Count – the number of cores in all started (which are in a state Started) Processing Stations of FlexiCapture.
6. Free Cores – the number of free cores in all started (which are in a state Started) Processing Stations of FlexiCapture. Allows you to estimate, whether there are enough cores in FlexiCapture.

© 2011 ABBYY. All rights reserved. 80
7. Pending Tasks – the number of tasks taken into processing by the Processing Server, but not yet assigned to a Process-ing Station. Such tasks are displayed in the Processing Server Monitor in a Pending state. Note that this number is not the number of tasks queued in the Processing Server.
This number may be proportional to the total number of cores in the system, but it should not be increased indefinitely. Admissible value: up to 2 tasks per 1 core.
8. Running Tasks – the total number of tasks being executed in the Processing Server at the moment.
9. Export Count, Import Count, Recognition Count, Other Tasks Count – the number of corresponding tasks (export, import, recognition and others) over the past 5 minutes.
10. Export Time, Import Time, Recognition Time, Other Tasks Time – an average execution time for the corresponding tasks (export, import, recognition and others) over the past 5 minutes.
11. Modification Server Locks Count – the number of documents that are blocked for executors. The counter applies for the Processing Station only.
System counters Sometimes, insufficient performance can be caused by the used hardware. In order to determine whether the hardware complies with the load and whether it has bottlenecks, system performance counters must be used. Counter used for different system com-ponents are described below.
RAM
1. Memory: Available Mbytes – the amount of physical memory (RAM), in bytes, available to processes running on the computer. RAM consists of the physical memory and a swap file. If the RAM in the system is not enough, the paging mechanism is used which can lead to slowdown.
2. Paging File: Usage – the use of paging. Data and code in the memory are divided into pages. On Intel, one page is equal to 4096 byte. Paging is the process of moving pages between the physical to virtual memory. Excessive move-ment of pages from disk into memory and vice versa can lead to severe CPU load. Such a situation may look like a problem with the processor or disk.
3. Memory: Committed Bytes – the committed memory. The memory reserved in the file pagefile.sys in case you need to dump the contents of physical memory to disk. The amount of allocated memory of the process characterized the amount of memory actually consumed by it. The amount of allocated memory is limited to the size of the paging file. The limit of the amount of allocated memory in the system (Memory: Commit Limit) is determined by how much memory can be allocated to processes without increasing the size of the paging file. The counter shows the total amount of allocated memory for all processes that is the actual amount of memory used by the system.
4. Memory: Page Faults/sec shows how often the data are outside the working set. The working set is the physical mem-ory (RAM) visible to a process or a program. Page faults occur when the program requests a code or data page which is not in the working set and must be found elsewhere. Includes soft page faults and hard page faults. A soft page fault is a situation when the program requests a page which is memory but out of working set. In this case, restoring data from disk is not required. A hard page fault is a situation when the program requests a page which is not in the physical memory (RAM) and must be restored from disk. Faults of this type are the best to show the presence of bottlenecks in the memory configuration. More than 5 faults per second show that RAM should be increased.
5. Memory: Page Input/sec total number of pages read from disk to resolve hard page faults. Comparing this counter with Page Faults/sec shows the number of soft page faults.
6. Memory: Pages/sec – total number of pages read from disk and written to disk. This is the sum of Page Outputs/sec (the number of pages that had to be written to the disk to make room in RAM for other pages as a result of page fault) and Page Inputs/sec. The admissible average value is 0 – 20. The Pages/sec value of more than 5 per second indicates a bottleneck in memory configuration. Comparing this counter with Page Faults/sec gives an idea about the number of soft page faults and hard page faults.
It is also recommended to monitor the memory occupied by the following processes:
• FlexiBrSvc.exe – the process of the Processing Server and the Processing Station. If both services are installed on the computer (not recommended), they can be distinguished by PID specified for the corresponding services.
• w3wp.exe – IIS working processes.
• sqlserv.exe – SQL Server process
Processor
It is recommended to exclude memory and other bottlenecks that load the processor before diagnosing a bottleneck caused by a process.

© 2011 ABBYY. All rights reserved. 81
Identify processes that occupy more than 80% of CPU time. If the length of the queue is more than 2 threads, the bottleneck in operation of the system is probably caused by this process.
1. System: % Processor Time: _Total – time (in percentage of the whole working time) during which all processors were busy. For one processor, it is equal to the counter Processor: % Processor Time. For multiple processors, an average counter value is used. The counter measures how much time (in %) the system spends processing Idle processes and subtracts this percentage from 100 %. The resulting value corresponds to the percentage of time, the processor actually spent working on productive threads.
2. Processor: % Total Processor Time: - the same as System: % Processor Time, though measured for each processor.
3. System: Processor Queue Length shows how many threads are ready in the processor queue, but not currently able to use the processor. Does not include a thread that is processed at the moment. Shows the current (not an average) value. The counter value of more than 2 indicates a bottleneck.
Disk
1. LogicalDisk or PhysicalDisk: % Disk Time – indicates how busy the disk is (% of working time).
2. LogicalDisk or PhysicalDisk: Current Disk Queue Length – measures the number of the I/O transactions that are waiting to be handled. Contains the current value (not an average). The counter value of more than 2 for a long period of time indicates a bottleneck.
3. Disk Bytes / sec: - the number of bytes transferred to the disk per second. The primary measure of the disk performance.
4. Avg Disk Bytes / Transfer: - the average number of bytes transferred per read of the disk system. This is an indicator of the disk efficiency. The higher the value, the better.
Network interface 1. Network Interface: Current Bandwidth – bandwidth of the network interface. 2. Network Interface: Bytes Total/sec – load of the network interface. If the load of the network interface is 75% or more
of the bandwidth, then the network interface is a bottleneck. It is also worth comparing the load with the base mode in which the work was stable.
3. Network Interface: Output Queue Length – network interface. If an average value of the counter is more than two, it means that the network interface (or the capacity of the network infrastructure) cannot cope with transferring data pro-vided by the server. That is, server provides data at a faster rate than the network interface is able to pass.
IIS 1. W3SVC_W3WP: Active Threads Count: FlexiCapture 10 Web Services – the number of active threads in IIS. 2. WebService: Current ISAPI Extension requests: Default Web site (if the FlexiCapture Application Server has not
been transmitted to a different site by the user) – the queue of requests to be processed in IIS. If the queue is signifi-cantly (2-3 times) larger than the number of active threads in IIS, then IIS is likely to be a bottleneck. You should take into account that the bottleneck may also be the SQL Server that executes requests for a long time causing the queue of requests to increase.
SQL Server
SQL Server has a large number of performance counters which can help you not only estimate the server load, but also, for example, investigate the behavior in case of custom settings (non-optimal settings can increase the load on the server which can be visible with the help of the counters).
We recommend using the main counter responsible for the server performance:
1. SQLServer: SQL Statistics: Batch Requests/Sec counter – this counter measures the number of batch requests re-ceived by SQL Server per second and allows you to monitor the load of processors in the server. In general, more than 1000 batch requests per second tells of a very high load on the SQL Server and may mean that if you have not experi-enced a shortage of CPU resources, you may run into it in the near future. Of course, this number is relative, and the more powerful hardware you have, the more batch requests per second can be handled by SQL Server. In terms of network bottlenecks, a typical network card with a capacity of 100 Mb/s can only handle about 3000 batch requests per second. Under similar loads, you may need to switch to a network card with capacity of 1 Gb/s. You can also use the counter SQLServer: Databases: Transaction/Sec: _Total to measure the total activity of SQL Server. However, it measures only the activity within the transaction, not the whole activity, which can lead to errone-ous results.
You can also use the following counters to analyze the amount of memory consumed by the server and estimate whether the server has enough memory:
2. SQLServer: Memory Manager — Target Server Memory (KB) shows how much memory is required for SQL Server. If the value of this parameter matches the value of SQLServer: Memory Manager — Total Server Memory (KB), it means that SQL Server has enough memory.
3. SQLServer: Memory Manager — Total Server Memory (KB) shows how much memory SQL Server actually uses. If the value of this parameter matches the value of SQLServer: Memory Manager — Target Server Memory (KB),

© 2011 ABBYY. All rights reserved. 82
it means that SQL Server has enough memory. However, if the value of this counter is smaller, it means that more available memory is needed to optimize performance of SQL Server.

© 2011 ABBYY. All rights reserved. 83
Logging
Administration and Monitoring Console logs The event and error logs available in the Administration and Monitoring Console are the main logs that register errors that occur in the system in general. These logs record all errors that occur during document processing and affecting the processing and all events that occur during document processing. To view the logs, select Monitoring Event Log and Monitoring Error Log in the Administration and Monitoring Console. In the settings of the Administration and Monitoring Console, you can specify what type of events should be logged. Logging all events is not recommended, as it can lead to a significant increase in the size of the database during an intensive processing.
Task processing logs on the Processing Servers The Processing Server logs the processing of the tasks. The list of the active tasks and their logs can be accessed via the Process-ing Server Monitor. To view a task log, select Actions View Log… when selecting the task.
OS event logs on the servers The server components (Application Server, Processing Server, Licensing Server) and processing stations log errors and warnings in the local event log of the operating system under which they are running (section: Application, sources: FlexiCapture Executer for processing stations, FlexiCapture Processing Server for Processing Server, FlexiCapture Web Services for Application Server and Fine Objects for Licensing Server). These logs can be accessed by the administrators both locally and remotely via the stan-dard Event Viewer tool of the MMC console. The local OS event log records not only processing errors, but also all errors in the operation of the server components not directly related to the processing of documents. This log will list processing errors even if the Application Server is inaccessible at the time of error and the error cannot be logged in the ABBYY FlexiCapture log.

© 2011 ABBYY. All rights reserved. 84
Working with Clusters
ABBYY FlexiCapture 10 supports clusters. There are two important benefits of using clusters:
• Fault tolerance: in case of failure of one of the servers, the request will be executed by another server. • Distributed workloads: query processing is distributed among cluster nodes. This improves performance and increases
fault tolerance. The following ABBYY FlexiCapture 10 components can be installed on clusters:
• Processing Server • Licensing Server • Application Server
ABBYY FlexiCapture can work with Microsoft SQL Server installed on failover cluster. The Processing Server and the Licensing Server are installed on failover clusters. The Application Server, the Administration and Monitoring Console, and the Web Stations, which use IIS (Internet Information Services), are installed on NLB (Network Load Balancing) clusters. Note. Failover and Network Load Balancing clusters cannot work on the same computer. The following figure displays the clusterization of ABBYY FlexiCapture Servers and Microsoft SQL Server:
The deployment of the Processing Server and the Licensing Server on clusters is described below in this guide.
Setting Up the Processing Server Failover clusters are used for clustering the Processing Server. A detailed guide to failover clustering can be found on the Microsoft website.
Deploying the Processing Server on a Failover Cluster In this section, you will find step-by-step instructions for setting up the server on a failover cluster. Note. The addresses, computer names, domain names, etc. used below are not mandatory and may be changed by the administra-tor. Note. The following server configuration is intended only for local use in a local area network. Important! The names of servers, services, and shared folders must not contain spaces.

© 2011 ABBYY. All rights reserved. 85
Basic Configuration of the Failover Cluster In this example, the processing server is deployed on a FOC cluster (FOC.cluster2008r2.ru). The cluster uses a network with the address 192.168.0.0/24 and the domain cluster2008r2.ru. The cluster consists of two nodes: Node1 and Node2. Addressing in the Cluster The Node1 and Node2 nodes have two network interfaces: one interface belongs to the 192.168.0.0/24 network, the other may belong to your local area network (for example 10.0.0.0/16). The data storage only interfaces with the 192.168.0.0/24 network and is available only to the cluster nodes (i.e. Node1 and Node2). Both networks are available to the cluster FOC.cluster2008r2.ru. Cluster traffic should only be allowed in the designated network 192.168.0.0/24 for security and workload balancing reasons. External users can access the data storage through requests to Node1 and Node2. In order to allow cluster traffic in the 192.168.0.0/24 network, open the Failover Cluster Manager, select Cluster Network in the Networks group, and choose Enabled in the Cluster Use column (see the screenshot below).
Interfaces and networks: Interface Network Description Storage 192.168.0.1/24 Centralized storage Node1 192.168.0.11/24 Cluster node Node2 192.168.0.12/24 Cluster node FOC 192.168.0.10/24 Cluster address FC10ProcServer 192.168.0.2/24 Address of the service running in the cluster Domain users To set up domain user accounts:
1. Create two domain users, for example cluster2008r2\node1admin and cluster2008r2\node2admin. 2. Give administrator rights to cluster2008r2\node1admin on Node1 and to cluster2008r2\node2admin on Node2.

© 2011 ABBYY. All rights reserved. 86
Important! These user accounts will only be used for working with ABBYY FlexiCapture in a failover cluster to ensure correct usage of shared network resources. Important! Clustering requires the use of domain accounts. It is not possible to work under a local user account.
Adding the ABBYY FlexiCapture 10 Service to the Cluster
Install ABBYY FlexiCapture on Node1 and Node2, then create a network folder for the FlexiCapture service. Creating the Service
Complete the following steps to create the service:
1. Right-click the Services and Applications group and choose Configure a Service or Application…
2. Select Generic Service from the list of services and click Next.

© 2011 ABBYY. All rights reserved. 87
3. Choose ABBYY FlexiCapture 10 Processing Server from the list of available services and click Next.
4. Enter the name of the service (FC10ProcServer in this example) to be used by clients and choose an address (192.168.0.2 in this example). Click Next.

© 2011 ABBYY. All rights reserved. 88
5. Choose the shared drive you created for centralized storage and click Next.
6. Specify the registry key:
• HKEY_LOCAL_MACHINE\SOFTWARE\ABBYY\FlexiCapture\10 – for x32 systems

© 2011 ABBYY. All rights reserved. 89
• HKEY_LOCAL_MACHINE\SOFTWARE\Wow6432Node\ABBYY\FlexiCapture\10 – for x64 systems (see the screenshot below)
7. Click Next to confirm the settings.
8. To complete the creation of the service in the cluster, click Finish.

© 2011 ABBYY. All rights reserved. 90
Creating a Shared Folder for the Processing Server Service
1. The cluster nodes Node 1 and Node 2 need a shared folder where to store their temporary files. To create a shared folder for the nodes, right-click the service you created (in this case FC10ProcServer) and choose Add a Shared Folder. In this example, the shared drive H:\ was used (this drive was earlier created at the Storage computer). In the Location field, enter the name of the folder you want to share, for example H:\Cluster Temp.

© 2011 ABBYY. All rights reserved. 91
2. To edit access permissions, select the Yes, change NTFS permissions option and click the Edit Permissions… button.

© 2011 ABBYY. All rights reserved. 92
3. To add new users, click Add… The Select Users, Computers, Service Accounts, or Groups dialog box will open. Add the two previously created users from the cluster2008r2 domain and click OK.
4. Give full access permissions for the folder \\FC10ProcServer\ClusterTemp to the users node1admin and node2admin.
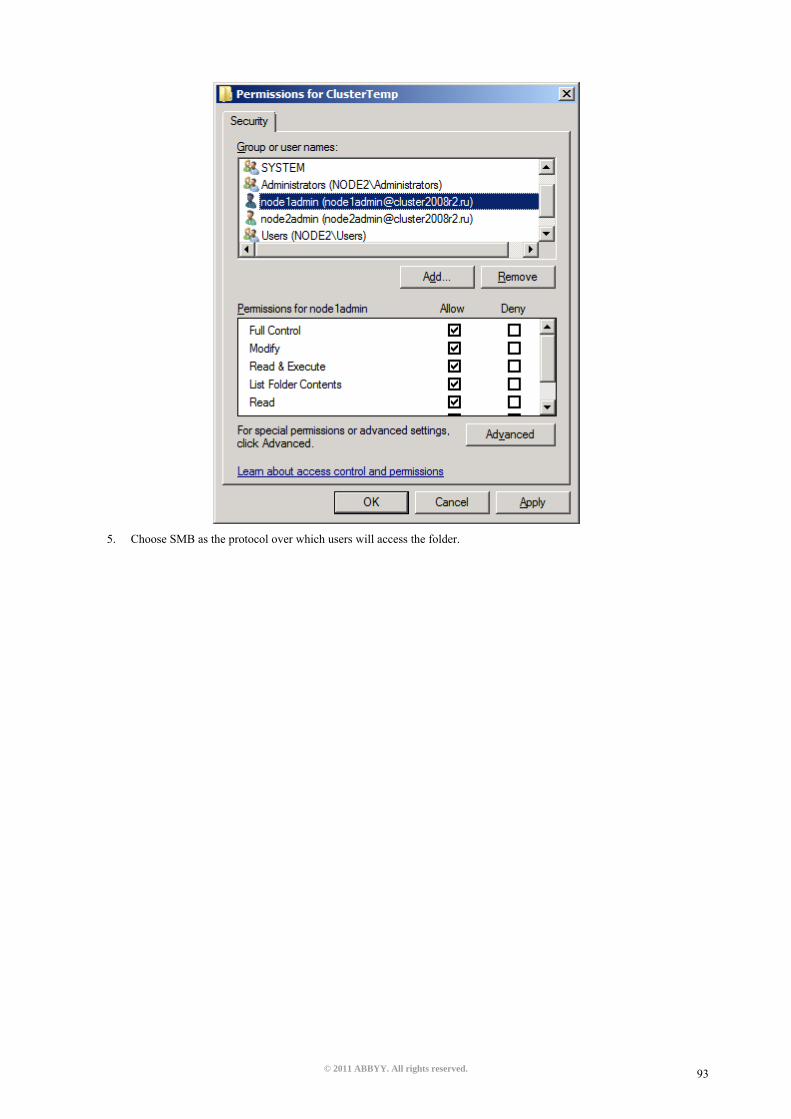
© 2011 ABBYY. All rights reserved. 93
5. Choose SMB as the protocol over which users will access the folder.

© 2011 ABBYY. All rights reserved. 94
6. In the Description field, provide a description for the folder which will help you with support and maintenance in the fu-ture. Click the Advanced… button to edit access permissions for SMB-based access.

© 2011 ABBYY. All rights reserved. 95
7. Click Add… The Permissions for ClusterTemp window will open. Add the two previously created users from the cluster2008r2 domain and click OK. Give the users node1admin and node2admin full access permissions for \\FC10ProcServer\ClusterTemp.

© 2011 ABBYY. All rights reserved. 96
8. If you want to publish the SMB share to a DFS namespace, select the corresponding option and click Next.

© 2011 ABBYY. All rights reserved. 97
9. Check your settings and click Create to create the shared folder.

© 2011 ABBYY. All rights reserved. 98
10. Click Close to complete the creation of the shared folder.

© 2011 ABBYY. All rights reserved. 99

© 2011 ABBYY. All rights reserved. 100
Setting Up the Cluster Nodes
Next you must set up the cluster nodes Node1 and Node2. The instructions below apply to Node1. The other nodes are set up identically. Setting Up the ABBYY FlexiCapture 10 Processing Server Local Service
To set up the service, complete the following steps: 1. Enter the following command in the command line (cmd.exe):
sc config ABBYY.ProcServer.FlexiCapture.10 binpath= "%systemdrive%\Program Files (x86)\ABBYY FlexiCapture 10 Servers\FlexiBRSvc.exe \service -stationType:server -inifile:\\fc10procserver\ClusterTemp\ServerSettings.xml" This command changes the default settings for the process ABBYY.ProcServer.FlexiCapture.10, which is launched from the file "%systemdrive% \ Program Files (x86) \ ABBYY FlexiCapture 10 Servers \ FlexiBRSvc.exe", and sets the path to the following file that contains the settings for the Processing Server: \ \ fc10procserver \ ClusterTemp \ ServerSettings.xml. Now the file ServerSettings.xml will be stored in the shared folder and will be available to all nodes in the cluster.
2. Find the service ABBYY FlexiCapture 10 Processing Server in the list of services (Start > Administrative Tools > Services). Right-click the service and choose Properties.
3. Make sure that the parameters you typed in the command line are displayed in the Path to executable field.

© 2011 ABBYY. All rights reserved. 101
4. Go to the Log On tab. For Node1, change the user NetworkService to node1admin. For Node2, change the user Net-workService to to node2admin. Click OK.

© 2011 ABBYY. All rights reserved. 102
Changing the variable %appdata%
The service ABBYY.ProcServer.FlexiCapture.10 creates and stores session data in the location referenced by the variable %appdata%. The users node1admin and node2admin must have the same folder specified for %appdata% in order for the service to switch between cluster nodes.
Important! For the user cluster2008r2\node1admin, the variable %appdata% must be changed on Node1. For the user clus-ter2008r2\node2admin, the variable %appdata% must be changed on Node2.
You can change the variable %appdata% through the command line or directly in the registry.
To change %appdata% through the command line:
1. Enter the following command in the command line (cmd.exe): REG ADD "HKCU\Software\Microsoft\Windows\CurrentVersion\Explorer\User Shell Folders" /v AppData /t REG_EXPAND_SZ /d \\FC10ProcServer\ClusterTemp, where \\FC10ProcServer\ClusterTemp should be replaced wit the path to your folder.
2. Confirm that you want to change the AppData folder if it already exists.
3. Repeat steps 1 and 2 for Node2.
To change %appdata% directly:
1. Find the key HKEY_CURRENT_USER\Software\Microsoft\Windows\CurrentVersion\Explorer\User Shell Folders in the registry.
2. If it doesn’t already exist, create a REG_EXPAND_SZ type variable with the name AppData in this key. Set its value to \\FC10ProcServer\ClusterTemp.
3. Repeat steps 1 and 2 for Node2.
Connecting the Processing Server Monitor
To connect the Processing Server Monitor, choose a node to which the FC10ProcServer service will belong, then open the Proc-essing Server Monitor on any computer in your LAN and add the clustered Processing Server.

© 2011 ABBYY. All rights reserved. 103
Setting Up the Licensing Server The Licensing Server service can be added to the cluster identically to the Processing Server service. The same serial number should be activated (the serial number must support at least two activations). The serial number must not change depending on the node provided by the Licensing Server. The stations must be restarted after the service switches between the cluster nodes. The Processing Server stops and automatically starts in 5 minutes. The remote stations continue working with their tickets if the same serial number is used for all of the cluster nodes. A separate log file with page use statistics is created on each cluster node in the folder %alluserspro-file%\ABBYY\FlexiCapture\10\Licenses. To obtain summary statistics, the values from all of the nodes must be added. If a serial number which allows two activations is activated on the nodes Node1 and Node2, then pages are counted for the Node1 license when Node1 is running and for Node2 license when Node2 is running. If the page limit specified for the serial number is 100 pages, then, besides the main 100 pages, 100 more pages are added to be used when working on the other node.
Setting Up the Application Server (and clustering the Administration and Monitoring Console and Web Stations) The ABBYY FlexiCapture 10 Application Server can be deployed on an NLB cluster to balance workloads and speed up query processing. Detailed information about Network Load Balancing technology can be found on the Microsoft website.
Setting Up an NLB Cluster for the Application Server In this section, you will find step-by-step instructions for setting up an NLB cluster for the Application Server. The Administration and Monitoring Console and Web Stations are clustered together with the Application Server. A detailed overview of NLB cluster settings can be found on the Microsoft website. Note. The addresses, computer names, domain names, etc. used below are not mandatory and may be changed by the administra-tor.
Setting Up the Cluster To set up the cluster, complete the following steps:
1. Install the Application Server on each cluster node. The database, File Storage Folder, Processing Server, Licensing Server, and Application Server clients must be located on a different computer, which must be accessible to all nodes in the cluster.
2. In Windows Features, add Network Load Balancing to each node in the cluster. This can be done by clicking the Add Features link in the main window of the Server Manager (Start > Administrative Tools > Server Manager).
3. Assign an IP address to the cluster via which the cluster can access the nodes as a unit. (This is a virtual cluster address.) If a single network interface is used for client/cluster traffic and other network traffic on the nodes (as is usual in Multicast mode), each host in the cluster must have a dedicated IP address (in addition to the virtual address, which is common to all cluster nodes). A host will use its dedicated IP address instead of the virtual cluster address for incoming connections to the cluster nodes over Telnet, SSH and other protocols, and for outbound connections from the cluster nodes. All cluster nodes must receive all incoming cluster traffic. The balancing algorithm determines which cluster node should re-spond to a given query. The choice between Unicast and Multicast depends on your network configuration. 4. You can use the Performance Monitor for IIS (accessible through the toolbar of the Microsoft Management Console
(MMC)) to monitor node activity. In the Web Service object, for each node, add the ISAPI Extension Requests/sec counter for Default Web Site (this is the location of the Application Server in the IIS).
Selecting the Unicast or Multicast Method of Distributing Incoming Requests

© 2011 ABBYY. All rights reserved. 104
The choice between the Unicast and Multicast methods depends on your network configuration. A detailed description of the two methods can be found on the Microsoft website.
Balancing Workloads in the Cluster, Setting Up Hosts You can set up cluster traffic to be balanced and filtered by ports. ABBYY FlexiCapture 10 requires the TCP protocol for its operation. There are two filtering modes: Single Host and Multiple Host.
• Single host This mode provides fault tolerance, but does not allow load balancing. Only one cluster node is active at a time.
• Multiple host Traffic from a predefined range of ports is handled by the node with the highest priority in the cluster. All cluster nodes function simultaneously. This mode provides both workload balancing and fault tolerance. Traffic from a predefined range of ports is balanced among nodes. You can also set the Affinity parameter to:
• None (not recommended) If this option is selected, multiple connections (TCP sessions) from a single client can be handled by different nodes.
• Single (recommended) If this option is selected, all connections from a single client are handled by one node.
• Network (Class C) (recommended) If this option is selected, all queries from the TCP/IP Class C address space are handled by one node. This may be nec-essary if there is a proxy server between the client and the cluster.
Setting Up the Application Server Complete the following steps to set up the Application Server:
1. Create a shared folder that can be accessed by all of the nodes in the cluster. 2. Install Microsoft SQL Server. Microsoft SQL Server must be available to all cluster nodes. 3. Install the Application Sever on all cluster nodes. 4. On the first cluster node, run the Administration and Monitoring Console and create a database and specify a shared
storage. 5. On each of the remaining cluster nodes, run the Administration and Monitoring Console and connect to the database
you created. Important! For this operation, SQL authentication must be used.
6. On the SQL Server, give full access permissions for the database to all users on all cluster nodes under whose accounts IIS is running (the World Wide Web Publishing Service must be running in the service list). Permissions for the first node are given automatically when the database is created, other permissions must be given manually. By default, IIS runs under the user Network Service. In this case, assuming IIS is running on computer NodeN, you must give full ac-cess permissions to the user DomainName\NodeN$ on the SQL Server.
7. If the Application Server is not unavailable in the cluster, but PING requests still reach the cluster, check if IIS is avail-able in the cluster. To do this check, place a static *.html file in the folder %systemdrive%\inetpub\wwwroot (usually this folder already contains an iisstart.htm file) and open this file in a browser: \\ClusterAddress\iisstart.htm. Pay atten-tion to the proxy server settings in your browser when opening the file.
Running Server Application Clients We recommend that you place all cluster nodes in one domain and run Application Server clients under domain user accounts. Running Application Server clients under local user accounts is not recommended for the following reason. In the usual (i.e. non-clustered) configuration of the Application Server, the following authentication method may be used: on the computer where the Application Server is installed, a local user is created, with its own user name and password; now any client may connect to the Application Server under this user’s account. In a clustered configuration, the Application Server that processes client requests may be placed on different computers, and the actual user name will change accordingly: on the computer node1, the user name will be node1\User, while on the computer node2, the user name will be node2\User. This may disrupt the operation of the system. Running Application Server clients under domain users avoids this problem. To connect clients on remote computers which are not in the domain, you can use basic authentication and a user account in the domain to which the cluster belongs. Suppose the clustered Application Server is in the cluster domain and the computer of the verification operator is not in this domain. All you need to do is create in the cluster domain an account for the user clus-ter\VerificationOperator and communicate the account name and password to the verification operator. Now the verification op-erator will be able to connect to the Application Server using this account and basic authentication on the Verification Station. Note. To use basic authentication for clients, be sure to enable basic authentication for the folder FlexiCapture10\Server in IIS. Otherwise, users will get HTTP 401 error when attempting to connect.

© 2011 ABBYY. All rights reserved. 105
Technical Support
Should you have any questions regarding the installation and use of ABBYY FlexiCapture 10, please contact the ABBYY techni-cal support service or the technical support service of the ABBYY partner from which you obtained the software. For contact details, see the Technical Support section of the ABBYY website at www.abbyy.com.