Synthetic Rope Installation Guide - Atlok
6
WARN INDUSTRIES 1 ORIGINAL INSTRUCTIONS WARN® and the WARN logo are registered trademarks of Warn Industries, Inc. © 2012 Warn Industries, Inc. Warn Industries Inc. 12900 SE Capps Road Clackamas, OR 97015 USA Customer Service: (800) 543-9276 International Fax: (503) 722-3005 Fax: (503) 722-3000 www.warn.com Synthetic Rope Installation Guide Premium, Ultra Performance & Zeon Winch Lines Every winching situation has the potential for personal injury. In order to minimize that risk, it is important to read this guide and The Basic Guide to Winching Techniques carefully. Please familiarize yourself with the operation of your winch before using it and be constantly safety oriented. Please read the Basic Guide to Winching Techniques for information on how to properly use your winch and proper rigging techniques. Please keep this manual and other product literature found in this kit for future reference. TABLE OF CONTENTS: SAFETY Symbol Index ............................................................................................................................................................................. 2 General Safety Precautions ............................................................................................................................................... 3-4 INSTRUCTIONS Rope Removal ............................................................................................................................................................................ 5 Installation............................................................................................................................................................................... 6-8 Spooling ................................................................................................................................................................................ 9-10 Maintenance and Care......................................................................................................................................................... 11 WARN INDUSTRIES 87968A2 2 SYMBOL INDEX SYMBOL EXPLANATION Read All Product Literature Wind Rope on Bottom of Drum Finger/Fairlead Crushing Hazard Hand Piercing/Cutting Hazard Never Hook Back on Rope SYMBOL EXPLANATION Always Wear Leather Gloves Always Use Supplied Hook Strap Never Apply Load to Hook Tip or Latch Never Wind Rope Over Top of Drum Fairlead Pinch Point
Transcript of Synthetic Rope Installation Guide - Atlok

WARN INDUSTRIES
1
ORIGINAL INSTRUCTIONS
WARN® and the WARN logo are registered trademarks of Warn Industries, Inc.
© 2012 Warn Industries, Inc.
Warn Industries Inc. 12900 SE Capps RoadClackamas, OR 97015
USA
Customer Service: (800) 543-9276International Fax: (503) 722-3005
Fax: (503) 722-3000www.warn.com
Synthetic Rope Installation GuidePremium, Ultra Performance & Zeon Winch Lines
Every winching situation has the potential for personal injury. In order to minimize that risk, it is important to read this guide and The Basic Guide to
Winching Techniques carefully. Please familiarize yourself with the operation of your winch before using it and be constantly safety oriented. Please
read the Basic Guide to Winching Techniques for information on how to properly use your winch and proper rigging techniques.
Please keep this manual and other product literature found in this kit for future reference.
TABLE OF CONTENTS:
SAFETY
Symbol Index .............................................................................................................................................................................2
General Safety Precautions ...............................................................................................................................................3-4
INSTRUCTIONS
Rope Removal ............................................................................................................................................................................5
Installation ...............................................................................................................................................................................6-8
Spooling ................................................................................................................................................................................ 9-10
Maintenance and Care ......................................................................................................................................................... 11
WARN INDUSTRIES
87968A2 2
SYMBOL INDEX
SYMBOL EXPLANATION
Read All Product Literature
Wind Rope on Bottom of Drum
Finger/Fairlead Crushing Hazard
Hand Piercing/Cutting Hazard
Never Hook Back on Rope
SYMBOL EXPLANATION
Always Wear Leather Gloves
Always Use Supplied Hook Strap
Never Apply Load to Hook Tip or Latch
Never Wind Rope Over Top of Drum
Fairlead Pinch Point
WARN INDUSTRIES
3 87968A2
GENERAL SAFETY PRECAUTIONS
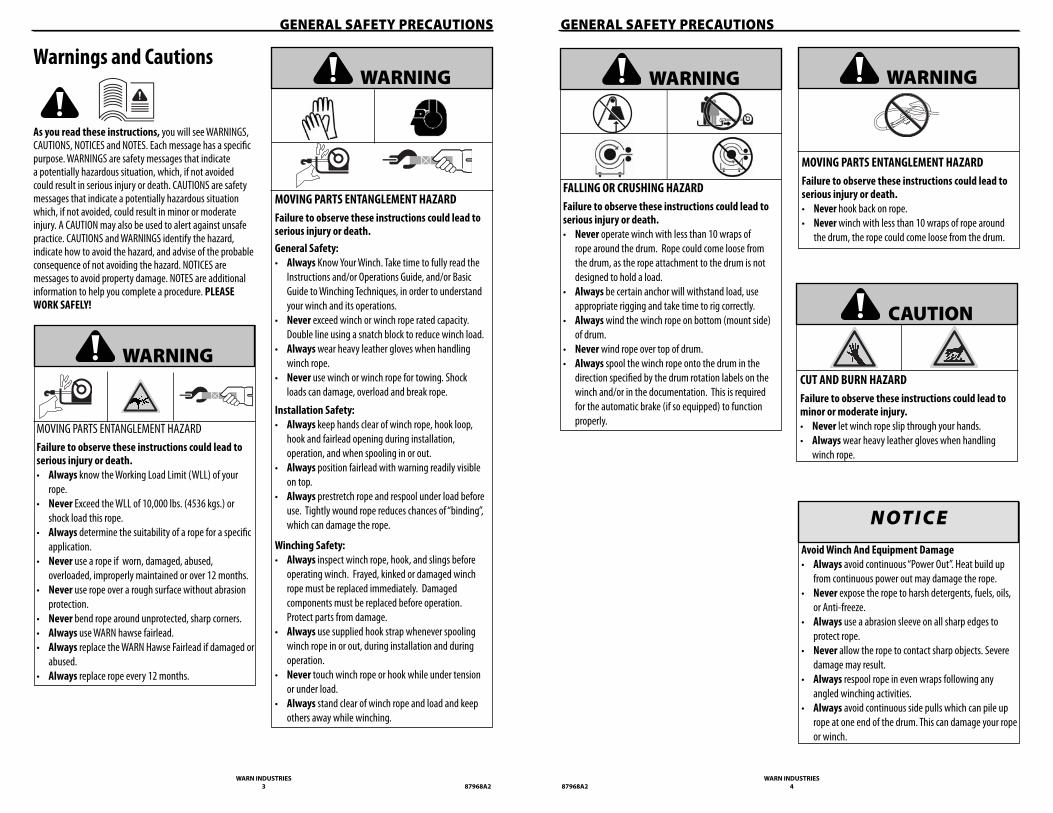
As you read these instructions, you will see WARNINGS, CAUTIONS, NOTICES and NOTES. Each message has a specifi c purpose. WARNINGS are safety messages that indicate a potentially hazardous situation, which, if not avoided could result in serious injury or death. CAUTIONS are safety messages that indicate a potentially hazardous situation which, if not avoided, could result in minor or moderate injury. A CAUTION may also be used to alert against unsafe practice. CAUTIONS and WARNINGS identify the hazard, indicate how to avoid the hazard, and advise of the probable consequence of not avoiding the hazard. NOTICES are messages to avoid property damage. NOTES are additional information to help you complete a procedure. PLEASE WORK SAFELY!
Warnings and Cautions
MOVING PARTS ENTANGLEMENT HAZARD
Failure to observe these instructions could lead to serious injury or death.
• Always know the Working Load Limit (WLL) of your
rope.
• Never Exceed the WLL of 10,000 lbs. (4536 kgs.) or
shock load this rope.
• Always determine the suitability of a rope for a specifi c
application.
• Never use a rope if worn, damaged, abused,
overloaded, improperly maintained or over 12 months.
• Never use rope over a rough surface without abrasion
protection.
• Never bend rope around unprotected, sharp corners.
• Always use WARN hawse fairlead.
• Always replace the WARN Hawse Fairlead if damaged or
abused.
• Always replace rope every 12 months.
WARNING
MOVING PARTS ENTANGLEMENT HAZARD
Failure to observe these instructions could lead to serious injury or death.
General Safety:
• Always Know Your Winch. Take time to fully read the
Instructions and/or Operations Guide, and/or Basic
Guide to Winching Techniques, in order to understand
your winch and its operations.
• Never exceed winch or winch rope rated capacity.
Double line using a snatch block to reduce winch load.
• Always wear heavy leather gloves when handling
winch rope.
• Never use winch or winch rope for towing. Shock
loads can damage, overload and break rope.
Installation Safety:
• Always keep hands clear of winch rope, hook loop,
hook and fairlead opening during installation,
operation, and when spooling in or out.
• Always position fairlead with warning readily visible
on top.
• Always prestretch rope and respool under load before
use. Tightly wound rope reduces chances of “binding”,
which can damage the rope.
Winching Safety:
• Always inspect winch rope, hook, and slings before
operating winch. Frayed, kinked or damaged winch
rope must be replaced immediately. Damaged
components must be replaced before operation.
Protect parts from damage.
• Always use supplied hook strap whenever spooling
winch rope in or out, during installation and during
operation.
• Never touch winch rope or hook while under tension
or under load.
• Always stand clear of winch rope and load and keep
others away while winching.
WARNING
WARN INDUSTRIES
87968A2 4
GENERAL SAFETY PRECAUTIONS
FALLING OR CRUSHING HAZARD
Failure to observe these instructions could lead to serious injury or death.
• Never operate winch with less than 10 wraps of
rope around the drum. Rope could come loose from
the drum, as the rope attachment to the drum is not
designed to hold a load.
• Always be certain anchor will withstand load, use
appropriate rigging and take time to rig correctly.
• Always wind the winch rope on bottom (mount side)
of drum.
• Never wind rope over top of drum.
• Always spool the winch rope onto the drum in the
direction specifi ed by the drum rotation labels on the
winch and/or in the documentation. This is required
for the automatic brake (if so equipped) to function
properly.
WARNING
Avoid Winch And Equipment Damage
• Always avoid continuous “Power Out”. Heat build up
from continuous power out may damage the rope.
• Never expose the rope to harsh detergents, fuels, oils,
or Anti-freeze.
• Always use a abrasion sleeve on all sharp edges to
protect rope.
• Never allow the rope to contact sharp objects. Severe
damage may result.
• Always respool rope in even wraps following any
angled winching activities.
• Always avoid continuous side pulls which can pile up
rope at one end of the drum. This can damage your rope
or winch.
N OT I C E
MOVING PARTS ENTANGLEMENT HAZARD
Failure to observe these instructions could lead to serious injury or death.
• Never hook back on rope.
• Never winch with less than 10 wraps of rope around
the drum, the rope could come loose from the drum.
WARNING
CUT AND BURN HAZARD
Failure to observe these instructions could lead to minor or moderate injury.
• Never let winch rope slip through your hands.
• Always wear heavy leather gloves when handling
winch rope.
CAUTION

WARN INDUSTRIES
5 87968A2
REMOVAL INSTRUCTIONS
WARNING Always Know Your Winch. Take time to fully read the Instructions and/or Operations Guide, and/or Basic Guide to Winching Techniques, in order to understand your winch and its operations.
Ultra Performance & Premium Series Synthetic Winch Rope Removal:
NOTE: For Zeon specific winches, skip to Zeon Series Winch Rope Removal section.
THE FOLLOWING STEPS ARE VERY IMPORTANT AND IF NOT PRECISELY FOLLOWED THE LIFE OF THE WINCH AND WINCH ROPE MAY BE COMPROMISED.
Things You Will Need:• Gloves• Standard Hex Wrench Set
CAUTION Always wear heavy leather gloves when handling winch rope.
1. Disconnect the negative cable from the battery that is used to power the winch.
2. Disengage the clutch.
3. Using gloves, freespool winch rope off drum.
NOTE: For ease of removal, ensure there is no tension on the winch rope prior to attempting removal.
4. Remove the button head fastener and rope washer securing winch rope. Remove winch rope completely and discard.
Zeon Synthetic Series Winch Rope Removal
THE FOLLOWING STEPS ARE VERY IMPORTANT AND IF NOT PRECISELY FOLLOWED THE LIFE OF THE WINCH AND WINCH ROPE MAY BE COMPROMISED.
Things You Will Need:• Gloves• Standard Flat Head Screwdriver
CAUTION Always wear heavy leather gloves when handling winch rope.
1. Disconnect the negative cables from the battery that are used to power the winch.
2. Disengage the clutch.
3. Using gloves, freespool winch rope off drum.
NOTE: For ease of removal, ensure there is no tension on the winch rope prior to attempting removal.
4. Using a flat head screwdriver, find the oblong hole in the puck. Insert end of flat head screwdriver in the hole of puck and using leverage against the drum, dislodge puck.
5. Remove the puck and pull the winch rope through and out of the rope anchor pocket.
Rope Rope Washer
1/4-20x1/2” Button Head Bolt
WARN INDUSTRIES
87968A2 6
INSTALLATION INSTRUCTIONS
WARNING When upgrading from wire to synthetic winch rope, a WARN Hawse Fairlead is necessary.
NOTICE Any wire rope damage on drum may be smoothed with fi ne emery paper.
Ultra Performance & Premium Synthetic Series Rope Installation:
THE FOLLOWING STEPS ARE VERY IMPORTANT AND IF NOT PRECISELY FOLLOWED THE LIFE OF THE WINCH AND WINCH ROPE MAY BE COMPROMISED.
Things You Will Need:• WARN® Synthetic Winch Rope• Abrasion Sleeve• Rope Washer• Button Head Bolt• Gloves• Loctite 271 or equivalent• WARN® Hawse Fairlead (if replacing wire rope)
WARNING MOVING PARTS ENTANGLEMENT HAZARD. Failure to observe these instructions could lead to serious injury or death.
WARNING Always position fairlead with warning readily visible on top.
CAUTION Always wear heavy leather gloves when handling winch rope.
WARNING Always replace the WARN Fairlead if damaged or abused.
WARNING Always keep hands clear of winch rope, hook loop, hook and fairlead opening during installation, operation, and when spooling in or out.
For synthetic winch rope applications, you must have a Hawse Fairlead mounted to your winch. For optimal performance, a WARN Hawse Fairlead is strongly recommended. If you need to purchase a new WARN Hawse Fairlead, contact your WARN product dealer.
1. Disconnect the negative cable from the battery that is used to power the winch.
WARNING Never bend rope around unprotected, sharp corners.
WARNING Never use rope over a rough surface without abrasion protection.
2. Slide the black abrasion sleeve over the rope from the end opposite of the hook. Slide the sleeve towards the hook end of the rope.
3. Insert the synthetic rope through the fairlead and around the winch drum from the bottom.
4. Apply Loctite 271 or equivalent product to the supplied 1/4”-20 x 1/2” long button head fastener.
5. Insert the button head fastener supplied and the machined rope washer. Before tightening the bolt, install the rope eyelet on the machined rope washer. Tighten the 1/4-20 button head bolt to 8 ft. lbs.
6. Reconnect negative cable to the battery that is used to power the winch.
WARNING Always wind the winch rope on bottom (mount side) of drum.
WARNING Never operate winch with less than 10 wraps of winch rope around the drum. Rope could come loose from the drum, as the winch rope attachment to the drum is not designed to hold a load.
WARNING Never touch winch rope or hook while someone else is at the control switch or during winching operation.
7. Turn the clutch lever on the winch to the “Engaged” position.
8. Power in and wind 10 wraps of winch rope onto the drum while applying tension on the winch rope.
Proceed to the ‘Rope Spooling Instructions’ section of this document.
Rope Rope Washer
1/4-20x1/2” Button Head Bolt

WARN INDUSTRIES
7 87968A2
INSTALLATION INSTRUCTIONS
WARNING When upgrading from wire to synthetic winch rope, a WARN Hawse Fairlead is necessary and you must use the 5/16” anchor puck supplied in your synthetic rope kit (sizes vary).
NOTICE Any wire rope damage on drum may be smoothed with fi ne emery paper.
Zeon Synthetic Series Rope Installation:
THE FOLLOWING STEPS ARE VERY IMPORTANT AND IF NOT PRECISELY FOLLOWED THE LIFE OF THE WINCH AND WINCH ROPE MAY BE COMPROMISED.
Things You Will Need:• WARN® Synthetic Winch Rope• Abrasion Sleeve• Zip Tie• 5/16” Anchor Puck• Gloves• WARN® Hawse Fairlead (if replacing wire rope)
WARNING MOVING PARTS ENTANGLEMENT HAZARD. Failure to observe these instructions could lead to serious injury or death.
WARNING Always Know Your Winch. Take time to fully read the Instructions and/or Operations Guide, and/or Basic Guide to Winching Techniques, in order to understand your winch and its operations.
WARNING Always position fairlead with warning readily visible on top.
CAUTION Always wear heavy leather gloves when handling winch rope.
WARNING Always replace the WARN Fairlead if damaged or abused.
For synthetic winch rope applications, you must have a Hawse Fairlead mounted to your winch. For optimal performance, a WARN Hawse Fairlead is strongly recommended. If you need to purchase a new WARN Hawse Fairlead, contact your WARN product dealer.
1. Disconnect the negative cable from the battery that is used to power the winch.
WARNING Never bend rope around unprotected, sharp corners.
WARNING Never use rope over a rough surface without abrasion protection.
2. Slide the abrasion sleeve over the rope from the end opposite the hook. Slide the sleeve back to the hook end of the rope.
3. Insert the synthetic rope through the fairlead and around the winch drum from the bottom.
4. Before installing the synthetic rope, a loop must be made using the supplied zip tie.
5. Use the cable tie to pull the synthetic rope through the rope anchor pocket.
6. Once the rope has been pulled through, cut and discard the zip tie while being careful not to harm the rope.
7. Install the 5/16” rope puck in the center of the rope eyelet.
WARN INDUSTRIES
87968A2 8
INSTALLATION INSTRUCTIONS
8. Keep the puck in place while slowly pulling the rope away from the drum. Once the puck is seated against the rope on all sides, pull the rope way from the drum until the puck lodges with the rope into position.
9. Ensure the loop does not protrude from the drum surface and that the rope is held into place tightly.
10. Reconnect negative cable to the battery that is used to power the winch.
WARNING Always wind the winch rope on bottom (mount side) of drum.
WARNING Never operate winch with less than 10 wraps of winch rope around the drum. Rope could come loose from the drum, as the winch rope attachment to the drum is not designed to hold a load.
WARNING Never touch winch rope or hook while someone else is at the control switch or during winching operation.
11. Turn the clutch lever on the winch to the “Engaged” position.
12. Wind 10 wraps of rope onto the drum while applying light tension on the rope.
Proceed to the ‘Rope Spooling Instructions’ section of this document.
WARN INDUSTRIES
9 87968A2
SPOOLING INSTRUCTIONS
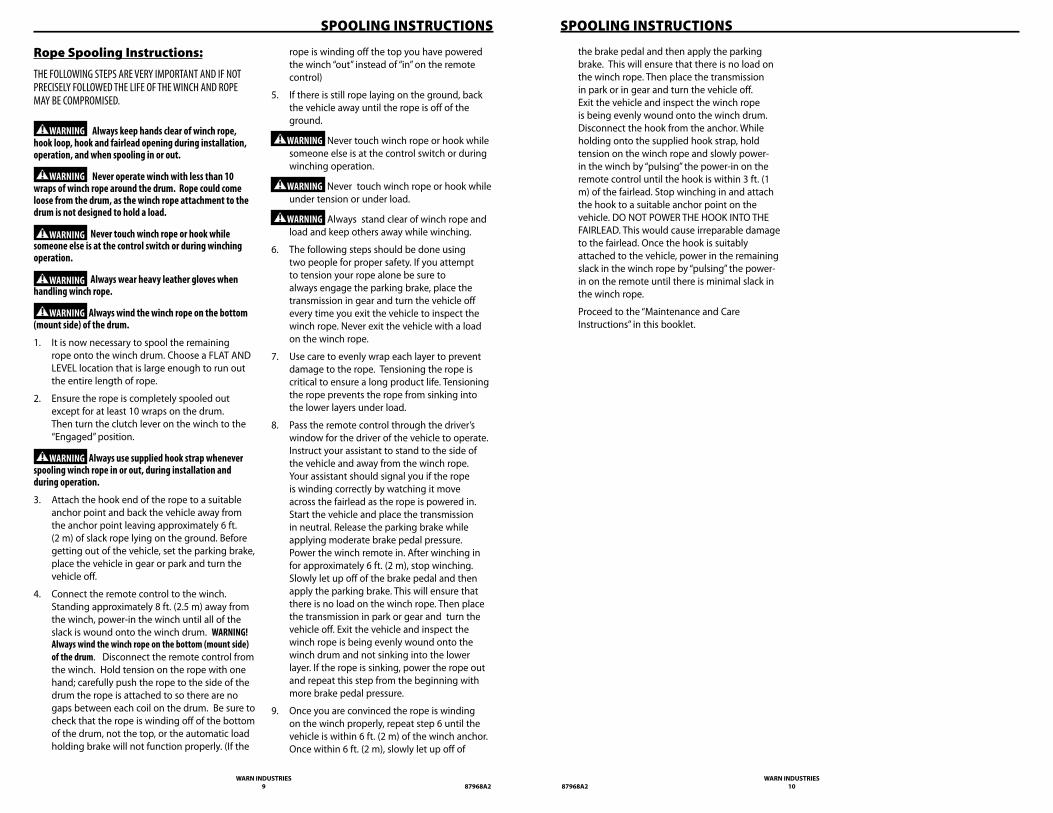
rope is winding off the top you have powered the winch “out” instead of “in” on the remote control)
5. If there is still rope laying on the ground, back the vehicle away until the rope is off of the ground.
WARNING Never touch winch rope or hook while someone else is at the control switch or during winching operation.
WARNING Never touch winch rope or hook while under tension or under load.
WARNING Always stand clear of winch rope and load and keep others away while winching.
6. The following steps should be done using two people for proper safety. If you attempt to tension your rope alone be sure to always engage the parking brake, place the transmission in gear and turn the vehicle off every time you exit the vehicle to inspect the winch rope. Never exit the vehicle with a load on the winch rope.
7. Use care to evenly wrap each layer to prevent damage to the rope. Tensioning the rope is critical to ensure a long product life. Tensioning the rope prevents the rope from sinking into the lower layers under load.
8. Pass the remote control through the driver’s window for the driver of the vehicle to operate. Instruct your assistant to stand to the side of the vehicle and away from the winch rope. Your assistant should signal you if the rope is winding correctly by watching it move across the fairlead as the rope is powered in. Start the vehicle and place the transmission in neutral. Release the parking brake while applying moderate brake pedal pressure. Power the winch remote in. After winching in for approximately 6 ft. (2 m), stop winching. Slowly let up off of the brake pedal and then apply the parking brake. This will ensure that there is no load on the winch rope. Then place the transmission in park or gear and turn the vehicle off. Exit the vehicle and inspect the winch rope is being evenly wound onto the winch drum and not sinking into the lower layer. If the rope is sinking, power the rope out and repeat this step from the beginning with more brake pedal pressure.
9. Once you are convinced the rope is winding on the winch properly, repeat step 6 until the vehicle is within 6 ft. (2 m) of the winch anchor. Once within 6 ft. (2 m), slowly let up off of
Rope Spooling Instructions:
THE FOLLOWING STEPS ARE VERY IMPORTANT AND IF NOT PRECISELY FOLLOWED THE LIFE OF THE WINCH AND ROPE MAY BE COMPROMISED.
WARNING Always keep hands clear of winch rope, hook loop, hook and fairlead opening during installation, operation, and when spooling in or out.
WARNING Never operate winch with less than 10 wraps of winch rope around the drum. Rope could come loose from the drum, as the winch rope attachment to the drum is not designed to hold a load.
WARNING Never touch winch rope or hook while someone else is at the control switch or during winching operation.
WARNING Always wear heavy leather gloves when handling winch rope.
WARNING Always wind the winch rope on the bottom (mount side) of the drum.
1. It is now necessary to spool the remaining rope onto the winch drum. Choose a FLAT AND LEVEL location that is large enough to run out the entire length of rope.
2. Ensure the rope is completely spooled out except for at least 10 wraps on the drum. Then turn the clutch lever on the winch to the “Engaged” position.
WARNING Always use supplied hook strap whenever spooling winch rope in or out, during installation and during operation.
3. Attach the hook end of the rope to a suitable anchor point and back the vehicle away from the anchor point leaving approximately 6 ft. (2 m) of slack rope lying on the ground. Before getting out of the vehicle, set the parking brake, place the vehicle in gear or park and turn the vehicle off.
4. Connect the remote control to the winch. Standing approximately 8 ft. (2.5 m) away from the winch, power-in the winch until all of the slack is wound onto the winch drum. WARNING! Always wind the winch rope on the bottom (mount side)
of the drum. Disconnect the remote control from the winch. Hold tension on the rope with one hand; carefully push the rope to the side of the drum the rope is attached to so there are no gaps between each coil on the drum. Be sure to check that the rope is winding off of the bottom of the drum, not the top, or the automatic load holding brake will not function properly. (If the
WARN INDUSTRIES
87968A2 10
SPOOLING INSTRUCTIONS
the brake pedal and then apply the parking brake. This will ensure that there is no load on the winch rope. Then place the transmission in park or in gear and turn the vehicle off. Exit the vehicle and inspect the winch rope is being evenly wound onto the winch drum. Disconnect the hook from the anchor. While holding onto the supplied hook strap, hold tension on the winch rope and slowly power-in the winch by “pulsing” the power-in on the remote control until the hook is within 3 ft. (1 m) of the fairlead. Stop winching in and attach the hook to a suitable anchor point on the vehicle. DO NOT POWER THE HOOK INTO THE FAIRLEAD. This would cause irreparable damage to the fairlead. Once the hook is suitably attached to the vehicle, power in the remaining slack in the winch rope by “pulsing” the power-in on the remote until there is minimal slack in the winch rope.
Proceed to the “Maintenance and Care Instructions” in this booklet.

WARN INDUSTRIES
11 87968A2
MAINTENANCE AND CARE
Rope should be replaced when:• Rope bulk anywhere along the length is reduced
by 10% or more by abrasion.
• Two or more adjacent strands are cut.
• Flat areas or lumps are found that are not eliminated by flexing rope.
• Excessive fused or melted fibers are found. Any such areas will be stiff and the rope will have a glazed appearance.
Maintenance:
• Replace rope every 12 months with WARN® synthetic winch rope only.
• Inspect the rope before and after each winching operation. Frayed or damaged rope must be replaced immediately. See rope care and storage.
• The rope must always spool onto the drum as indicated by the drum rotation decal on the winch.
Always take time to fully understand your winch and the winching operation by reviewing the Basic Guide to Winching Techniques included with your winch.
For further information or any questions contact:
WARN INDUSTRIES, INC. 12900 S.E. Capps Road, Clackamas
OR USA 97015-8903, 1-503-722-1200, Customer Service: 1-800-543-9276
Dealer Locator Service: 1-800-910-1122or visit www.warn.com.
Cleaning:• Use low pressure water to clean synthetic rope.
Do not use any chemicals.
• Do not direct high pressure water (pressure washers, car washes, etc.) directly between the drum support and drum flange or clutch lever.
• Use low pressure water and a soapy rag or sponge to clean the winch.
• Avoid using chemicals that may damage the finish.
• Thoroughly clean salt residue from the winch as soon as possible to minimize corrosion.
Rope Inspection:
WARNING Always inspect winch rope, hook, and slings before operating winch. Frayed, kinked or damaged winch rope must be replaced immediately. Damaged components must be replaced before operation. Protect parts from damage.
When rope is first used, the outer filaments of the rope will quickly fuzz up. This is the result of these filaments breaking and this roughened surface will actually protect the fibers underneath. The condition should stabilize, not progress. If the surface roughness increases, excessive abrasion is taking place and strength is being lost.
Look closely at both the inner and outer fibers. When either is worn the rope is obviously weakened. Open the strands and look for powdered fiber—this is a sign of internal wear.
Localized discolorations could potentially represent chemical attack by anything from gear oil to battery acid. When doubt exists, replace the rope.
• Rope with original bulk.
• Rope displaying 25% strand volume
reduction from abrasion—rope
should be replaced.
• Rope strand showing full volume.
• Rope strand reduced by 25%
abrasion—rope should be replaced.
• Rope exhibits fi ber-set from
compression. A slight sheen is
visible. This is not a permanent
characteristic and can be eliminated
by fl exing the rope.
• Rope displays two adjacent cut
strands—rope should be replaced.
WARN INDUSTRIES
12
INSTRUCTIONS
Warn® et le logo WARN sont des marques déposées de Warn Industries Inc.
© 2012 Warn Industries Inc.
Warn Industries Inc. 12900 SE Capps RoadClackamas, OR 97015
États-Unis
Service à la clientèle : (800) 543-9276No. de Fax international : (503) 722-3005
Télécopie : (503) 722-3000www.warn.com
Guide d'installation du câble synthétiqueCâbles de treuil Premium, Ultra Performance et Zeon
Chaque situation de treuillage peut potentiellement occasionner des blessures. Afin de minimiser ce risque, il est important de lire attentivement
le présent guide ainsi que le manuel de base des techniques de treuillage. Veillez à vous familiariser avec le maniement du treuil avant de l'utiliser et
à vous préoccuper avant tout de la sécurité. Veuillez lire le manuel de base des techniques de treuillage pour de plus amples informations concernant
l'utilisation correcte de votre treuil et les techniques adéquates de câblage.
À titre de référence, veuillez conserver ce manuel et les documents qui se trouvent dans ce kit.
TABLE DES MATIÈRES :
SÉCURITÉ
Index des symboles .............................................................................................................................................................. 13
Mesures générales de sécurité ...................................................................................................................................14-15
INSTRUCTIONS
Retrait du câble ...................................................................................................................................................................... 16
Installation ..........................................................................................................................................................................17-19
Déroulement et enroulement .....................................................................................................................................20-21
Maintenance et entretien ................................................................................................................................................... 22