Symbol V6 - Connect, Inc
280
Twin Client Reference For Devices Manufactured by Symbol Technologies
Transcript of Symbol V6 - Connect, Inc

Twin Client Reference For Devices Manufactured by Symbol Technologies
Copyright 1996 - 2004 by Connect, Inc.
All rights reserved. This document may not be reproduced in full or in part, in any form, without prior written permission of Connect Inc., 1701 Quincy Avenue, Suites 5 & 6, Naperville, IL 60540.
Connect, Inc. makes no representation or warranties with respect to the contents of this document and specifically disclaims any implied warranties of merchantability or fitness for any particular purpose. Further, Connect, Inc. reserves the right to revise this publication and to make changes to it from time to time without obligation to notify any person or organization of such revision or changes.
Trademarks
OpenAir Linux™, OpenAir Windows™, OpenAir 400™, TwinClient ™, and AirLinc™ are trademarks of Connect, Inc.
Other product names mentioned in this manual may be trademarks or registered trademarks of their respective companies and are hereby acknowledged.
Production This manual was written, edited, and produced by:
Connect, Inc. 1701 Quincy Avenue, Suites 5 & 6 Naperville, IL 60540 www.connectrf.com
Printed in the U.S.A.

Twin Client Reference • June, 2004 iii
Table of Contents Chapter 1 • Introduction...............................................................................................1-1
Release Notes………………………………………………………………………………… 1-1 Overview of Connect, Inc.’s Product Line……………………………………………….. 1-3 Twin Client Overview…………………………………………………………………………1-3 In This Manual………………………………………………………………………………… 1-5
Chapter 2 • Installation.................................................................................................2-1
Requirements…………………………………………………………………………………. 2-1 Downloading From the WEB……………………………………………………………….. 2-1 Running Setup from a Download File……………………………………………………. 2-1 Installation…………………………………………………………………………………….. 2-2 Running the Manager……………………………………………………………………….. 2-5
Chapter 3 • Quick Start.................................................................................................3-1
Configuring the Manager…………………………………………………………………… 3-1 Symbol 3000 Series Terminal Download Procedure……………………………………3-10 Symbol 7500 Terminal Download Procedure………………………………………….. 3-13 Symbol CE Terminal Download Procedure……………………………………………. 3-22 Cold Booting the Terminal………………………………………………………………… 3-23 Starting a Telnet Session…………………………………………………………………. 3-25
Chapter 4 • Standard Setup………………………………………………………………… 4-1
Setup Using Twin Client Manager………………………………………………………….4-1 Importing Custom Configurations………………………………………………………… 4-8 Terminal Setup Using Symbol-Style Barcodes…………………………………………. 4-9 Terminal Setup Using Symbol-Style Menus…………………………………………….. 4-9
Terminal Setup Using Twin Client Menus…………………………………………………4-9 Authorizing Twin Client……………………………………………………………………. 4-11
Chapter 5 • Advanced Setup………………………………………………………………. 5-1
Selecting the Advanced Setup…………………………………………………………….. 5-1 Customizing the Keyboard…………………………………………………………………. 5-2 Customizing the Display……………………………………………………………………. 5-4 Customizing the Scanner…………………………………………………………………… 5-8 External Scanner Setup…………………………………………………………………… 5-11 Setting Log Levels………………………………………………………………………….. 5-12

iv Twin Client Reference • June, 2004
Customizing Timers…………………………………………………………………………. 5-13 Customizing Alarms…………………………………………………………………………. 5-14 Customizing Printers………………………………………………………………………… 5-17 Miscellaneous Customizations……………………………………………………………. 5-20
Chapter 6 • Advanced Integration………………………………………………………….. 6-1
Keyboard/Mapping…………………………………………………………………………….. 6-1 Keyboard Macros……………………………………………………………………………… 6-5 Scanner/Data Mapping………………………………………………………………………... 6-7 Scanner/Data Editing…………………………………………………………………………. 6-8 Scanner/Decoder Control…………………………………………………………………… 6-11 Display/Mapping……………………………………………………………………………… 6-13 Display/Formatting…………………………………………………………………………… 6-15 Printer/Init……………………………………………………………………………………… 6-15 Dialog…………………………………………………………………………………………... 6-16 Extended Commands……………………………………………………………………….. 6-21 Advanced Display Options for VT/HP…………………………………………………….. 6-26 Advanced 3270 Keyboard Options………………………………………………………... 6-27 New Environ Telnet Extension…………………………………………………………….. 6-29
Chapter 7 • The Display Formatter………………………………………………………….7-1
Setting the Emulation………………………………………………………………………… 7-1 Starting the Emulator…………………………………………………………………………. 7-2 Taking Snapshots……………………………………………………………………………... 7-4 Formatting………………………………………………………………………………………. 7-5
Chapter 8 • Software Management………………………………………………………….8-1
Airloader Auto-Configuration……………………………………………………………….. 8-1 TN Plus Features………………………………………………………………………………. 8-7 AirLoad Configuration………………………………………………………………………. 8-17 Downloading Symbol Files…………………………………………………………………. 8-17 Creating Custom Hex Files…………………………………………………………………. 8-28
Chapter 9 • Character Sets……………………………………………………………………9-1
ISO 8859-1 Character Set…………………………………………………………………….. 9-1 ASCII Character Set I…………………………………………………………………………. 9-5 ASCII Character Set II…………………………………………………………………………. 9-6

Twin Client Reference • June, 2004 v
Chapter 10 • Keypad Configuration ........................................................................10-1
Keypad Figures……………………………………………………………………………. 10-1 Symbol Terminal Keypad Tables……………………………………………………… 10-50 Symbol Terminal Control Sequences………………………………………………… 10-77
Chapter 11 • Error Message Resolution Guide ......................................................11-1 Chapter 12 • AirBEAM Operation ............................................................................12-1
AirBEAM Introduction…………………………………………………………………….. 12-1 AirBEAM Instructions…………………………………………………………………….. 12-2


Twin Client Reference • June, 2004 1-1
Chapter 1 • Introduction
Release Notes The following new features are present in the Symbol 7.0 release. • = There is a new authorization code scheme involving updates to the Twin Client
Authorization screen and to the Connect web site. You are now able to enter more information on our web site while authorizing your terminal. Also, you may now add terminals to an existing OpenAir system.
• = There is a new Manual Authorization button in the Authorization screen. Using this button is an alternate method of obtaining an authorization code for a terminal. Clicking on this button, and manually entering your mac address in the screen that appears enables you to generate individual authorization codes.
• = There is a new Details button in the Authorization screen to prioritize Airloader options. Click on the Details button to number the options in its screen in the order of your priority. The options are moved using the Up and Down buttons in the Authorization Details screen.
• = There is a new Listing button in the Authorization screen. Click on the Listing button to view authorization codes issued. The authorization codes in use along with their corresponding serial numbers will appear.
• = There are new TN Plus options (Screen Watcher, Terminal Messenger, RF Monitor) in the Tools menu. With Screen Watcher, enter the terminal’s IP address and a screen will appear with a display resembling your terminal screen. With Terminal Messenger, you may enter a message to send, select the terminal to receive this message, and send the message. RF Monitor allows you to view a log of the terminal’s activity after entering its Terminal IP address and Terminal IP Port.
• = There is a new server object Get/Save feature in the Servers screen of the Settings menu. Use its Load button if you want to load an .svr file. Use its Save As button if you want to save your file as an .svr file.
• = There are new options in the Terminal Operations screen. "Use GUI menus and screens" is a CE option that makes the terminal program act more Windows-like. Additional options include check boxes to enable aggressive linear decoding and enable the centering beam during imaging.

Introduction
Twin Client Reference • June, 2004 1-2
• = There is a new Schedule button on the Group screen that is used for scheduling an automatic Airloader update. Click on this button to view a dialog box for scheduling an automatic Airloader update.
• = There is a new Thin Mode button in the Terminal Auto-Configuration screen. This button enables you to cause all terminals in a group that are currently running in thick mode to be switched to thin mode the next time Airloader is run on the terminal.
• = There is a new Server Transfer option in the Tools menu. You may enter your server address in its FTP Settings screen to send object editor and configuration files from Windows to your Linux box.
The following are known deficiencies of the Symbol 7.0 release.
• = 3000 terminal: If you load any 3000 terminal with the standard (serial) method, you will have reduced language support due to HEX space limitations. If you load using AirBeam AirLoad, or Custom HEX, you will have full language support.
• = 3000 terminal: The serially loaded 3270 1D hex file contains only the 46 key terminals due to hex space limitations. Using AirBeam, AirLoad, or Custom HEX, provides support for all of the keyboards.
• = 3000 terminal: The serially loaded 5250 1D and 2D hex files contain only the 46 key terminals due to hex space limitations. Using AirBeam, AirLoad, or Custom HEX, will provide support for all of the keyboards.
• = 6800 35-key terminal: This terminal is supported if you load with AirBeam, AirLoad, or Custom HEX. It is not supported using the standard serial load method due to HEX space limitations.
• = 7500 terminal: The full ISO-8859 character set is not supported.
• = 7500 terminal (when using AirBeam): Choosing the “Exit to DOS” option from the setup menu will result in the execution of AirLoader, after which the terminal will return to the DOS prompt.
• = 7500 terminal: When “backlight” is set under the “Timers” tab to any value other than “0”, the backlight still must be turned on manually, but will automatically turn off to the desired value set (in seconds).
• = 68xx and 7500 terminals: When these terminals that have 2D scanners are run in 3270 emulation, scanning of 2D barcodes over 80 characters is not supported due to memory limitation.

Overview of Connect, Inc.’s Product Line
Twin Client Reference • June, 2004 1-3
Overview of Connect, Inc.’s Product Line Connect, Inc.’s products bridge the gap between portable wireless devices and network applications, making the entire wireless enterprise as productive, efficient, and reliable as possible. The Connect, Inc. family of products supports the following: • = All Internet-compatible wireless networks, encompassing virtually all wireless LAN
technologies on the market today. Spectrum One, a proprietary spread spectrum wireless technology in the 900Mhz band, is also supported.
• = All Internet-compatible wire network media, including Ethernet. • = All major user interfaces, including HTML, VT/HP, 3270, and 5250. • = All possible network application architectures including direct client, client-server,
and three-tier client server.
The product line of Connect, Inc. consists of two major product families that work in unison to deliver a single, complete solution for the entire wireless enterprise. • = OpenAir: Hardware and middleware solutions for the wireless automatic
identification industry. This family includes OpenAir Linux, OpenAir Windows, OpenAir 400, and the universal terminal client software, Twin Client.
• = DataLinc: Application development tools for the wireless client-server environment. The family currently includes AirLinc for use with ODBC compliant databases.
Twin Client Overview Twin Client is a software package that provides VT100, VT220, HP700/92, TN3270 (Telnet 3270), and TN5250 (Telnet 5250) emulation on portable terminals. It includes a Windows program for configuring and downloading the software to the portable terminals.
Modes of Operation Twin Client operates in either of two modes: Telnet or Server client. • = Telnet mode provides a Telnet connection directly to host computers and their
applications. • = Server mode communicates directly with an OpenAir or AirLinc server, which in
turn provides the connection to host computers and their applications.
The primary difference between the two modes is in processing load distribution: In Telnet mode, all application protocol processing is performed on the terminal, while in Server mode all of the processing takes place on an intermediate OpenAir or AirLinc server. Another important difference is optimization: In Server mode, the OpenAir or AirLinc server introduces display optimization, data compression, and several other techniques that can dramatically reduce wireless network traffic.
These optimizations are not possible in Telnet mode. Additionally, Server mode provides the ability to do four Terminal Sessions.

Introduction
Twin Client Reference • June, 2004 1-4
All of the user interface features, functions, and capabilities remain the same, regardless of the mode of operation.
Major Features
Twin Client for Symbol terminals offers the following benefits: • = Simplicity: Twin Client is preset to match the default keyboard overlays and
functionality of the Symbol Telnet client. No special configuration procedures are required.
• = Compatibility: Existing Symbol installations that have been customized can be easily converted to Twin Client by importing the existing configuration file, and/or by using the alternate Symbol-style terminal configuration menu system.
• = Management: Administrators and integrators can monitor and modify the software revision and configuration of each portable terminal from any Windows PC attached to the TCP/IP network. Changes are downloaded to the terminals over the wireless LAN automatically.
• = Formatting: The Twin Client Terminal Screen Formatter feature is built-in, allowing integrators to tailor host application displays to suit the needs of the terminal operators without modifying the applications.
• = Internationalization: Error message language translations and character sets are menu selections. No additional integration is necessary.
• = Migration: Conversion to an OpenAir or AirLinc client-server environment is automatic because the server client is included in the Twin Client software already downloaded to the terminal.
In This Manual
Twin Client Reference • June, 2004 1-5
In This Manual This manual is organized as follows: • = Chapter one provides an overview of the Connect, Inc. product line and an
introduction to the Twin Client. • = Chapter two describes how to load the Twin Client Manager software on a Windows
95, 98, ME, XP, NT/2000, or 2003 PC. • = Chapter three describes how to quickly configure the Twin Client Manager and the
terminal for automatic, over-the-air software download and subsequent Telnet session startup.
• = Chapter four describes how to change the Standard setup options specific to VT/HP, 3270, and 5250 emulations. The simple, time-saving features for converting existing Symbol Telnet client installations to Twin Client are also described here.
• = Chapter five describes how to use the Advanced setup options for VT/HP, 3270, and 5250 emulations. These options are used to customize keyboard, display, scanner, timer, alarm, and printer operation.
• = Chapter six describes how to use the Twin Client advanced integration tools to further customize terminal operation. The creation and use of mapping, macro, dialog, and scanner control objects are described.
• = Chapter seven describes the use of the built-in Twin Client Formatter, and how to configure the portable terminal to use screen formatting.
• = Chapter eight describes how to use the Airloader Auto-Configuration tool to manage and automatically maintain the software configuration of all terminals on the wireless network. Also described are software management procedures and options that are unique to Symbol terminals.
• = Chapter nine is a reference for the ISO 8859-1 and ASCII character sets. • = Chapter ten is a reference for the default keyboard configurations for Symbol
terminals using Twin Client in advanced mode. Figures and tables are included for 3270, 5250, and VT/HP. Included are Symbol terminal control sequences.
• = Chapter eleven contains a reference for error message resolution in Twin Client. • = Chapter twelve is a guide to AirBEAM operation.

Introduction
Twin Client Reference • June, 2004 1-6
This page is intentionally blank.

Twin Client Reference • June, 2004 2-1
Chapter 2 • Installation This chapter describes the installation of the Twin Client software on a Windows 95, 98, ME, XP, NT/2000, or 2003 PC. The software can be downloaded from the Connect web site. Instructions are provided in the Downloading from the WEB section below.
Requirements Installation of Twin Client requires, at a minimum, the following: • = A Pentium-class processor • = 32 MB of RAM • = 10 MB of free hard disk space available • = Microsoft Windows 95, 98, ME, XP, NT/2000, or 2003 operating system
Downloading From the WEB 1. Go to http://www.connectrf.com on the Partner Services page.
2. Click on the Software Download icon.
3. Select the applicable Twin Client Manager software.
4. Click on the Version number to download software.
5. Click on Setup.exe and follow Installation Shield wizard.
6. Follow the steps in the Authorizing Twin Client section of Chapter 4.
Running Setup from a Download File The downloaded file is a compressed archive. After extraction using a utility such as WinZip or PKWARE, folders are created on the hard disk as shown in the following figure.

Installation
Twin Client Reference • June, 2004 2-2
Click on the Disk1 folder to view the files as shown in the following figure.
Click on the Setup application and proceed to the following section entitled Installation for further instructions.
Installation The InstallShield wizard runs and presents the following screen.
Click on Next to begin the installation process.

Installation
Twin Client Reference • June, 2004 2-3
To change the default Destination Location, click on Browse and select a location. Then click on Next.
The default folder is Twin Client. This default may be changed either by selecting an existing program group or by typing in a new name at the prompt. Then click on Next.

Installation
Twin Client Reference • June, 2004 2-4
Read the warning. Select Yes to continue with the installation, or No to close the setup.
When the installation is complete, reboot the system to initialize the Twin Client software.
a. To reboot the system immediately, click on Finish.
b. To reboot later, click on the option to restart the computer later, and click on Finish.

Running the Manager
Twin Client Reference • June, 2004 2-5
Running the Manager The Twin Client Manager is the utility that manages the terminal software and configurations. Select Start, Programs, PowerNet, and Twin Client Manager.
Note: If the PowerNet splash screen flashes for a second and ends when the Twin Client manager is run, move the file at this link (http://www.connectrf.com/Documents/fix-flash.reg) to the system with the problem and then run it. This issue, found in earlier versions of the Twin Client manager, has been fixed in later versions by using a later MS compiler and libraries.
The Twin Client Manager screen appears as shown in the following figure. This is the administrator's main screen, and all functions are accessed from its menu bar, tool bar, and tabs.
Menu Bar The menu bar provides access to the functions used to configure the terminals and manage their software. Subsequent chapters of this manual explain each menu and its options.
Toolbar Under the menu bar, the tool bar provides shortcuts to major features. The toolbar can be turned on or off by changing the Toolbar parameter found on the View menu. The shortcuts available from the toolbar are as follows:
Create a new terminal configuration.
Open an existing terminal configuration.
Save the current terminal configuration.
Download the configuration to terminal.
Download software to terminal.
Automatically configure terminals over the wireless network.
Twin Client Manager version.

Installation
Twin Client Reference • June, 2004 2-6
The Twin Client Manager is now successfully installed and ready for use. The next chapter provides detailed instructions for quickly configuring the terminal and starting a Telnet session.

Twin Client Reference • June, 2004 3-1
Chapter 3 • Quick Start This chapter describes how to prepare the Twin Client Manager and the Symbol terminal for a Telnet session with the host. Following an initial serial download, the terminal software and configuration is managed automatically, over the wireless network.
Note: Symbol terminals are normally delivered with Symbol files pre-installed. However, if the terminal does not have those files installed refer to Chapter 8, Downloading Symbol Files, before proceeding.
Configuring the Manager The first step is to configure the Twin Client Manager to meet site-specific requirements, and then prepare it for the automatic management of the terminal software and IP addresses. This simple procedure will require only a few minutes to complete.
Setting the Emulation Click on Start, Programs, PowerNet, and Twin Client Manager. Select the Settings menu, as shown below.
Click on Emulation, select the desired emulation, then click OK.

Quick Start
Twin Client Reference • June, 2004 3-2
Setting the Servers The Servers are the Telnet host systems the terminals will access.
To set these addresses from the Settings menu, click on Servers.
Click on Add. Enter the Server name, IP Address, IP Port (normally 23 for Telnet servers), and Terminal type. Use the Load button if you want to load an .svr file. Use the Save As button if you want to save your file as an .svr file.
Then click on OK. Repeat this step for each Telnet server the terminals are required to access.

Configuring the Manager
Twin Client Reference • June, 2004 3-3
On CE terminals it's possible to use DNS (Domain Name System) lookup to determine the host address. To set this up, key in the full DNS name in the "Server Name" field and set the IP address to 0.0.0.0. Note: Some DOS terminals also support DNS host lookup. You can determine if your
device supports this by looking for the presence of a DNS setup option under "Terminal Setup" (Shift C).
When the client sees the address of 0.0.0.0, it will issue a DNS lookup on the value in the "Server Name" field to determine the true IP address. Please make sure that you have DNS set up on the terminal. On CE terminals, use the control panel. On DOS terminals, use the Shift C menu. You can also "Test" the DNS name lookup in Twin Client manager (if the Windows PC is using the same DNS server as the RF terminal). Just click on the "Lookup" button and the true IP will be returned in the IP address field.
Please make sure to set the address back to 0.0.0.0 before sending this to the terminal.

Quick Start
Twin Client Reference • June, 2004 3-4
Terminal AirLoader and AirBEAM Operations In the Twin Client menu under Settings, choose Terminal Operation.
On a 3000 series terminal or a 7500 terminal, Run Airloader on terminal can be checked, and the Airloader server IP address can be entered, as shown below. Click on OK.
On a CE terminal, Run Airloader on terminal can be selected, the Airloader server IP address can be entered, and the Windows CE options of Run application at startup and Hide task bar can be selected. Also, there is an option "Use GUI menus and screens" that makes the terminal program act more "Windows-like". Click on OK.
See AirBEAM Operation at the end of this manual for instructions on the AirBEAM option in this screen.
Setting Terminal Model and COM Port The default terminal model is 3000s, and the default serial connection to the Symbol cradle is through COM1. To select a specific Symbol terminal model and keypad, or to change the COM port assignment, click on the Options menu as shown.

Configuring the Manager
Twin Client Reference • June, 2004 3-5
The default terminal model, 3000s, represents the default setup for all Symbol terminals under Twin Client (refer to Chapter 9). To maintain compatibility with existing Symbol Telnet client keyboard layouts, a specific terminal model and keypad must be selected from the Terminal Model window.
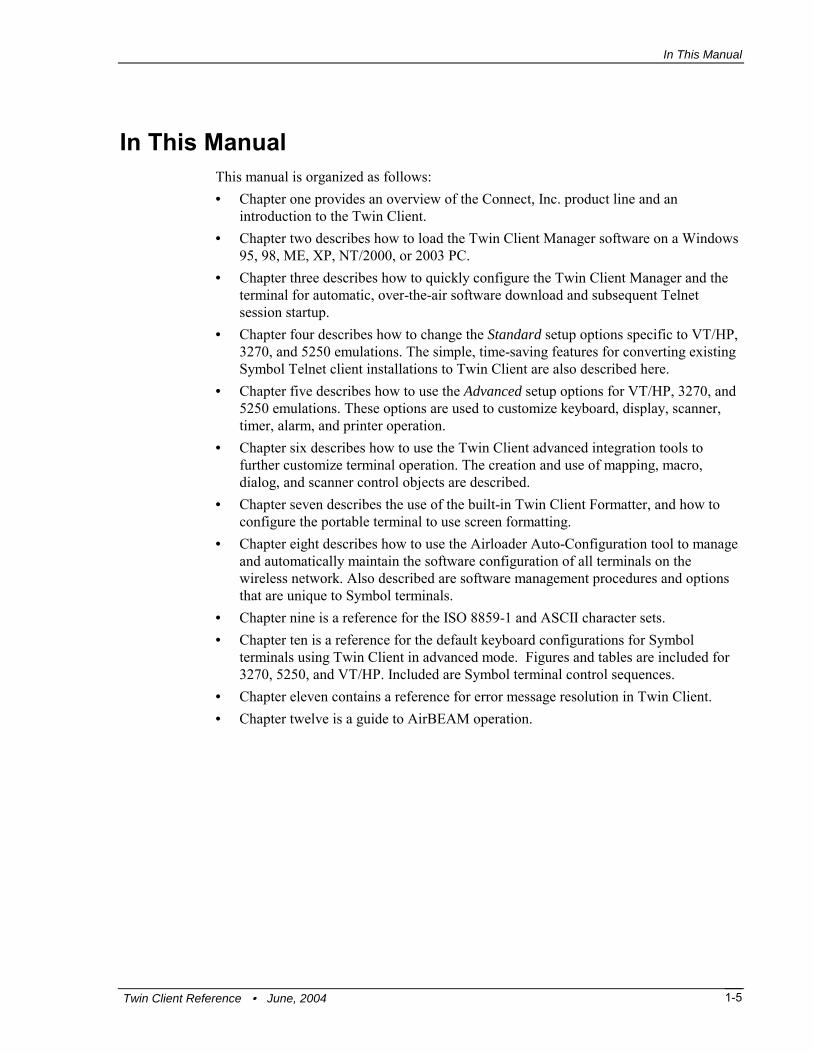
Saving the Configuration Click File, Save As, and enter a name for this configuration.
For the purposes of this example, the name is vt100.
Quick Start
Twin Client Reference • June, 2004 3-6
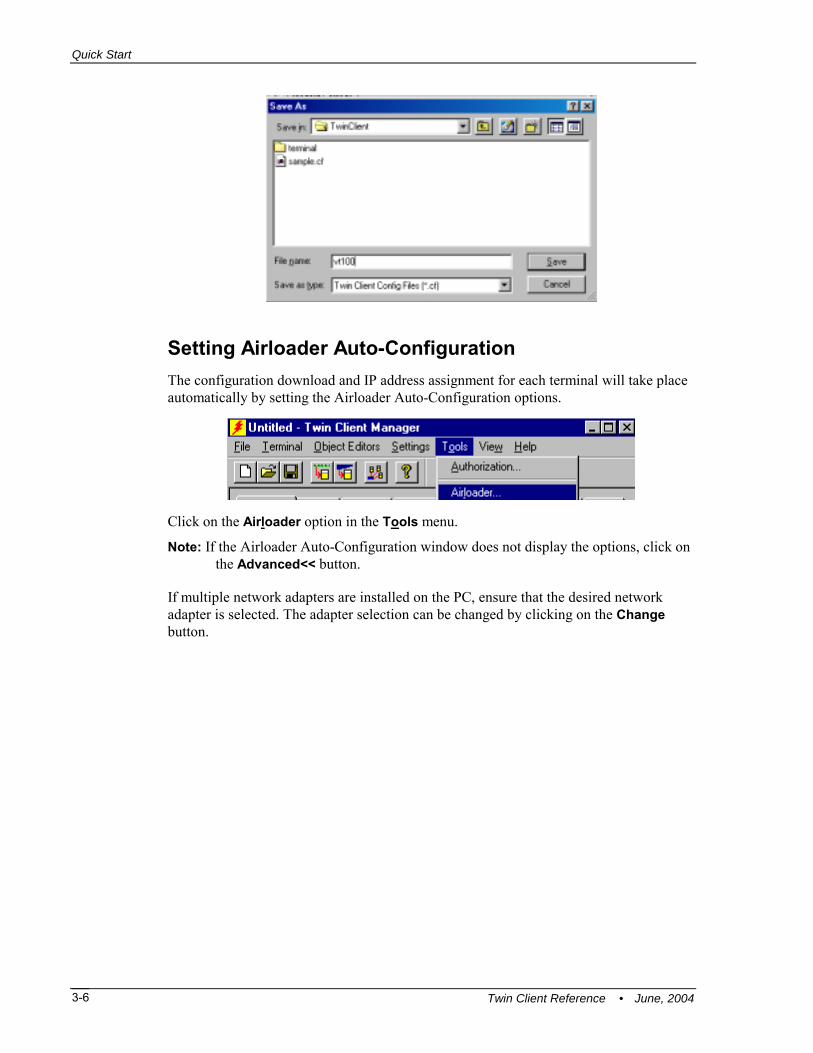
Setting Airloader Auto-Configuration The configuration download and IP address assignment for each terminal will take place automatically by setting the Airloader Auto-Configuration options.
Click on the Airloader option in the Tools menu.
Note: If the Airloader Auto-Configuration window does not display the options, click on the Advanced<< button.
If multiple network adapters are installed on the PC, ensure that the desired network adapter is selected. The adapter selection can be changed by clicking on the Change button.
Configuring the Manager
Twin Client Reference • June, 2004 3-7
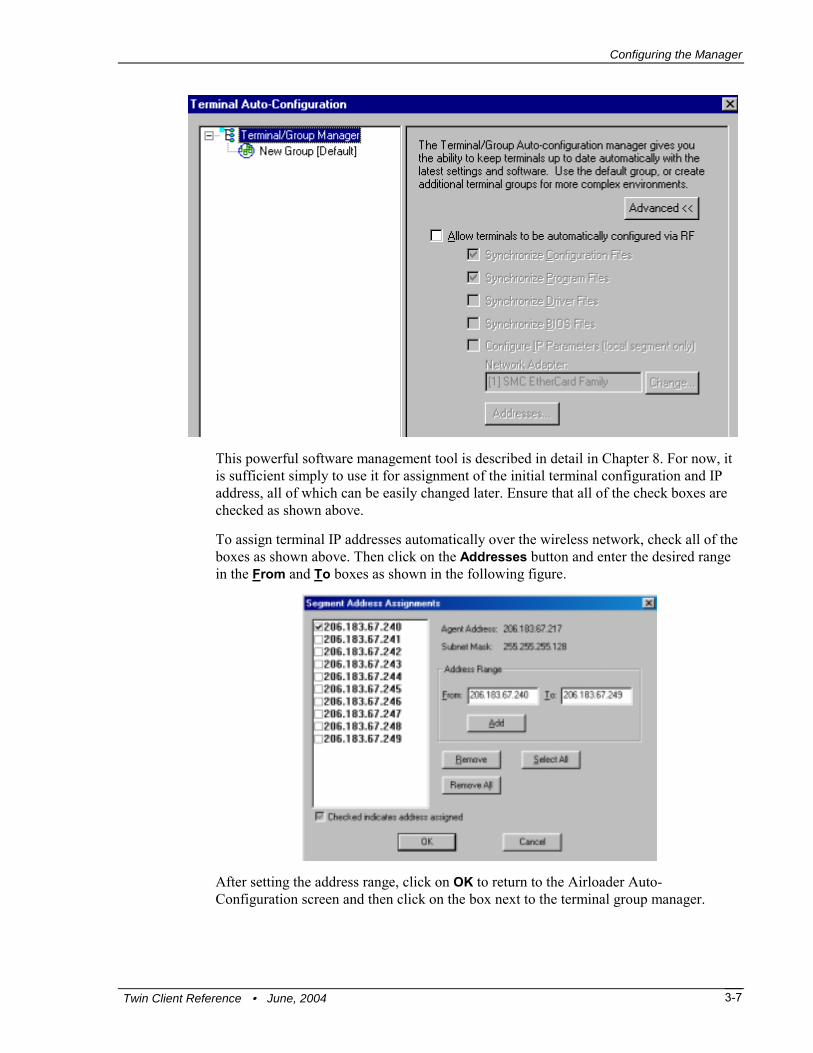
This powerful software management tool is described in detail in Chapter 8. For now, it is sufficient simply to use it for assignment of the initial terminal configuration and IP address, all of which can be easily changed later. Ensure that all of the check boxes are checked as shown above.
To assign terminal IP addresses automatically over the wireless network, check all of the boxes as shown above. Then click on the Addresses button and enter the desired range in the From and To boxes as shown in the following figure.
After setting the address range, click on OK to return to the Airloader Auto-Configuration screen and then click on the box next to the terminal group manager.
Quick Start
Twin Client Reference • June, 2004 3-8
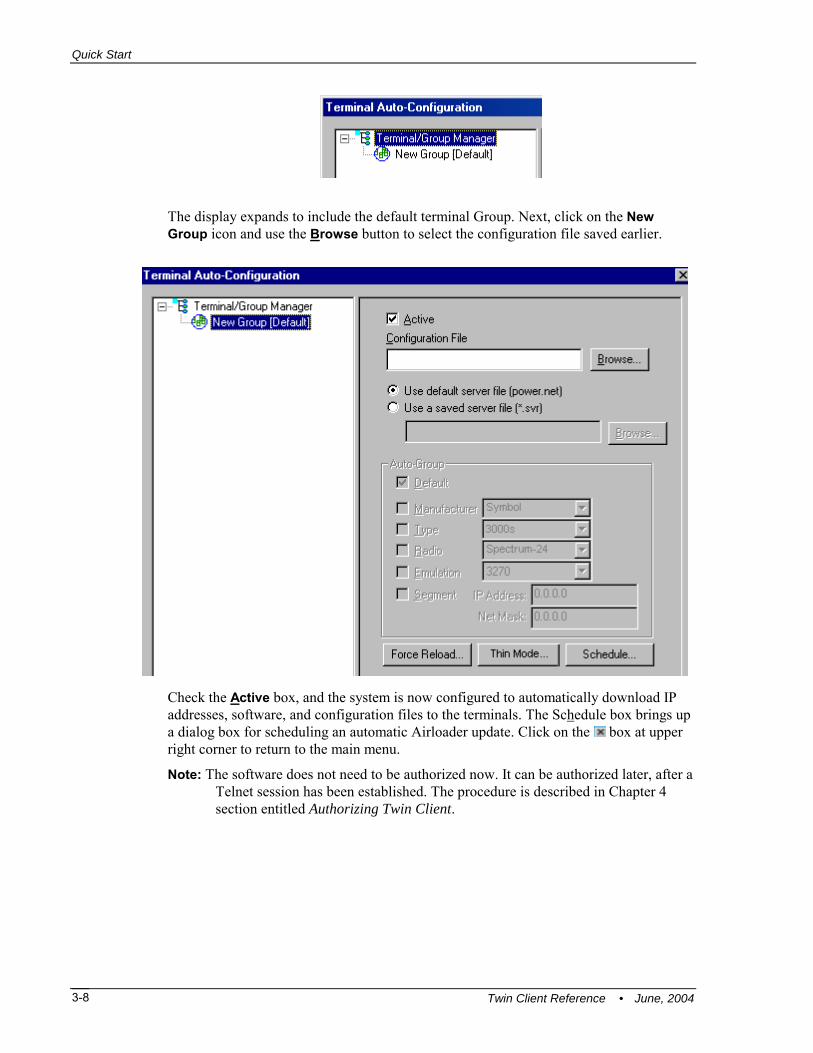
The display expands to include the default terminal Group. Next, click on the New Group icon and use the Browse button to select the configuration file saved earlier.
Check the Active box, and the system is now configured to automatically download IP addresses, software, and configuration files to the terminals. The Schedule box brings up a dialog box for scheduling an automatic Airloader update. Click on the box at upper right corner to return to the main menu.
Note: The software does not need to be authorized now. It can be authorized later, after a Telnet session has been established. The procedure is described in Chapter 4 section entitled Authorizing Twin Client.

Configuring the Manager
Twin Client Reference • June, 2004 3-9
Selecting the AirLoad File The Twin Client Manager provides downloading to the terminal through the cradle, and subsequently over the wireless network. Click on Terminal, then Send Program Files to Terminal.
Selecting the AirLoader Hex File allows the emulation program to be downloaded automatically after the terminal is cold-booted (as described in the next section). This also allows for automatic assignment of the terminal IP address. The AirLoader hex file itself is downloaded through the serial connection as described in the next section.
Click on OK and proceed to Symbol 3000 Series Terminal Download Procedure, Symbol 7500 Terminal Download Procedure, or Symbol CE Terminal Download Procedure.
Quick Start
Twin Client Reference • June, 2004 3-10
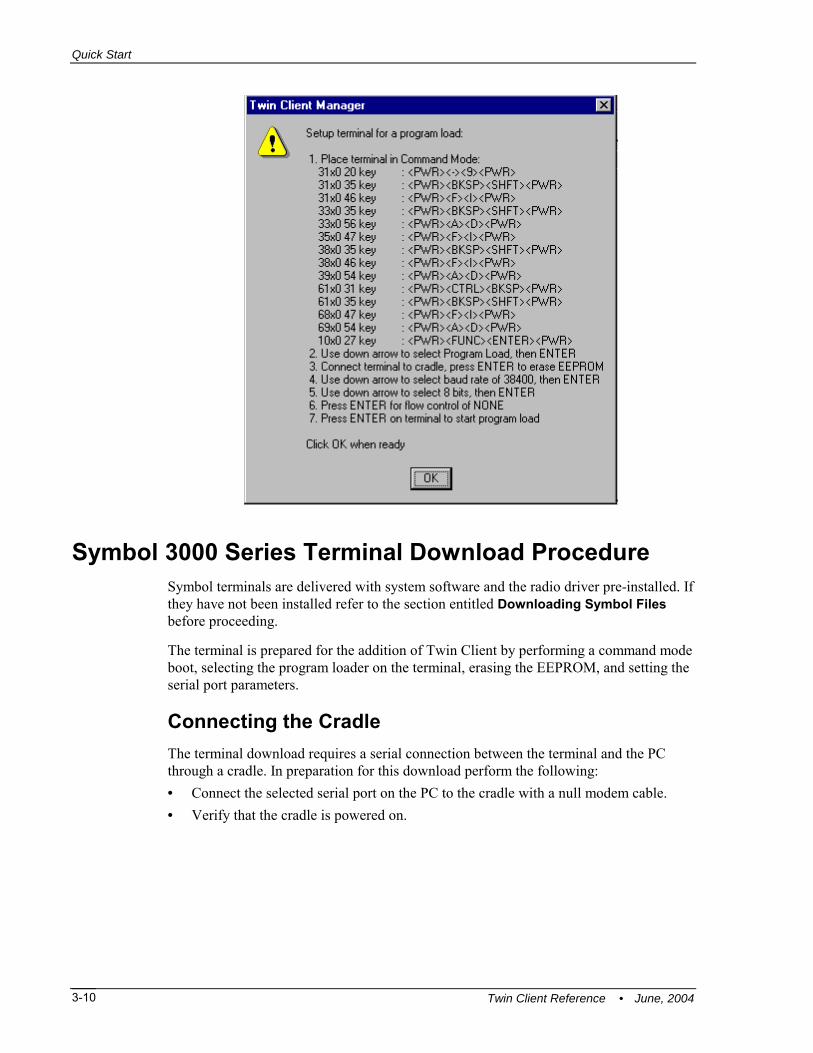
Symbol 3000 Series Terminal Download Procedure Symbol terminals are delivered with system software and the radio driver pre-installed. If they have not been installed refer to the section entitled Downloading Symbol Files before proceeding.
The terminal is prepared for the addition of Twin Client by performing a command mode boot, selecting the program loader on the terminal, erasing the EEPROM, and setting the serial port parameters.
Connecting the Cradle The terminal download requires a serial connection between the terminal and the PC through a cradle. In preparation for this download perform the following: • = Connect the selected serial port on the PC to the cradle with a null modem cable. • = Verify that the cradle is powered on.

Symbol 3000 Series Terminal Download Procedure
Twin Client Reference • June, 2004 3-11
Command Mode Boot On the portable terminal, power the terminal Off, then boot the terminal using the key sequence specific to the terminal model as shown in the following table:
Command Mode Boot Sequences Following Power Off
Terminal Model & Keypad Key Sequence 314x, 35-key 614x, 35-key
Hold Bksp and Shift keys. Press and release On/Off. Release Bksp and Shift keys.
314x, 46-key 354x, 47-key 384x, 46-key 684x, 46-key
Hold F and I keys. Press and release Power. Release F and I keys.
104x, 27-key Hold Enter and Func keys. Press and release Power. Release Enter and Func keys.
394x 694x
Hold A and D keys. Press and release Power. Release A and D keys.
Selecting Program Loader Use the Up-Arrow and Down-Arrow keys to select the Program Loader function. To correct an input error, press Clear to return to the command mode menu.
COMMAND MODE Select function Program loader
Place the terminal in the cradle and press Enter to erase the EEPROM.
Setting Serial Communications Parameters After the EEPROM has been erased, the following menu appears.
Comm Parameters Baud 4 9600
Use the Up-Arrow and Down-Arrow keys to select the communications parameters as follows. Baud 38400 Data Bits 8 Parity None Flow Control None

Quick Start
Twin Client Reference • June, 2004 3-12
The terminal then displays the following screen.
Comm Parameters Start? <ENT>
Note: If there are more terminals to download and a cradle that supports multiple terminals is present, repeat the steps in this section for each terminal.
The terminal is now configured to accept a download from the PC.
Downloading the Hex File Turn on the power to the terminals in the cradle, which should display the following screen.
Comm Parameters Start? <ENT>
Then press Enter on the terminal and return to the Twin Client Manager to click on the OK button. The following should be displayed on the terminal while the download is in progress.
Program loader Receiving:
The download requires approximately 2 minutes to complete, during which the following is displayed on the Twin Client Manager PC. Note that the file size may vary.
Following a successful download a status code of 0000 is displayed on the terminal. Use the following table of status codes to troubleshoot a download failure.

Symbol 7500 Terminal Download Procedure
Twin Client Reference • June, 2004 3-13
Status Code Error 0000 No Errors 0002 Receive overrun 0004 Receive framing 0008 Receive parity 0010 Programming voltage absent 0020 DSR or CD not detected on open 0060 Not enough power to program 0080 ABORT key pressed 0100 CD lost during session 0200 Illegal Intel hex record 0400 Unsupported Intel hex record
Address out of range NVM did not program correctly
0600 NVM EEPROM failed to erase 0800 Receive time-out error 1000 Control start character time-out 2000 CTS inactive time-out 4000 Receive buffer full
In the event of a failure, verify the following: • = The null modem cable connection between terminal and PC and condition of all
connectors. • = The specification of correct COM port. • = The correct cradle power supply. • = The blinking of the charging light on the cradle, indicating proper seating of terminal
in cradle.
Note: To change emulations with Airload: 1. Go to the DOS prompt at the e:/ drive. 2. Type “cleartnt” and press the Enter key. 3. Set up Airload for the new emulation (example:
C:\PowerNet\TwinClient\3270.cf) in the configuration file box of the Airloader auto-configuration screen.
4. Reboot the terminal (see the Cold Booting the Terminal section).
Symbol 7500 Terminal Download Procedure
Symbol 7000 series terminals may have the radio drivers pre-installed. If the radio drivers have not been installed, follow the preceding download procedures. After the radio drivers have been installed, choose either AirLoader or Standard download.
Note: This is required of your terminal does not have the Symbol radio drivers pre-
installed.

Quick Start
Twin Client Reference • June, 2004 3-14
Symbol Radio Driver Installation Process
Command Mode Boot Sequence
Following Power OFF
Terminal Model and Keypad Key Sequence 7500 Series Press and Hold the Power button and the
Scan button, Wait for a Beep, and Release. Note: If the first option on the startup menu is Scanning Demo, or you see menu options
regarding the IRDA port, then you must load radio drivers onto the terminal.
Terminal Model and Port Settings
From the Twin Client Manager, click on Settings, select Options, and click on 7500 from the Terminal Model window.
Click on Terminal, and Send Program Files to Terminal.
Select Custom Hex File and radio.hex. DO NOT click OK.

Symbol 7500 Terminal Download Procedure
Twin Client Reference • June, 2004 3-15
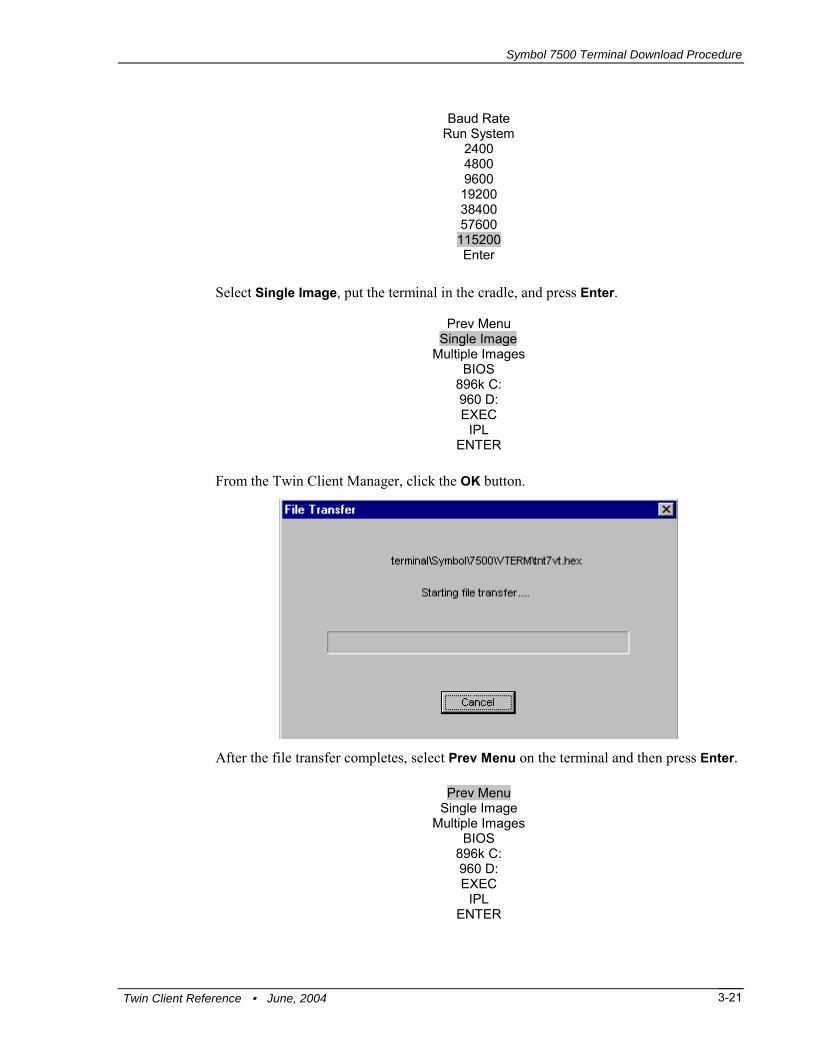
From the terminal, select 115200 for baud rate. Use the Up-Arrow and Down-Arrow keys to select the communication parameters as follows.
Baud Rate
Run System 2400 4800 9600 19200 38400 57600 115200 Enter
Select Single Image, put the terminal in the cradle, and press Enter.
Prev Menu
Single Image Multiple Images
BIOS 896k C: 960 D: EXEC
IPL ENTER
From the Twin Client Manager, click the OK button.
Quick Start
Twin Client Reference • June, 2004 3-16
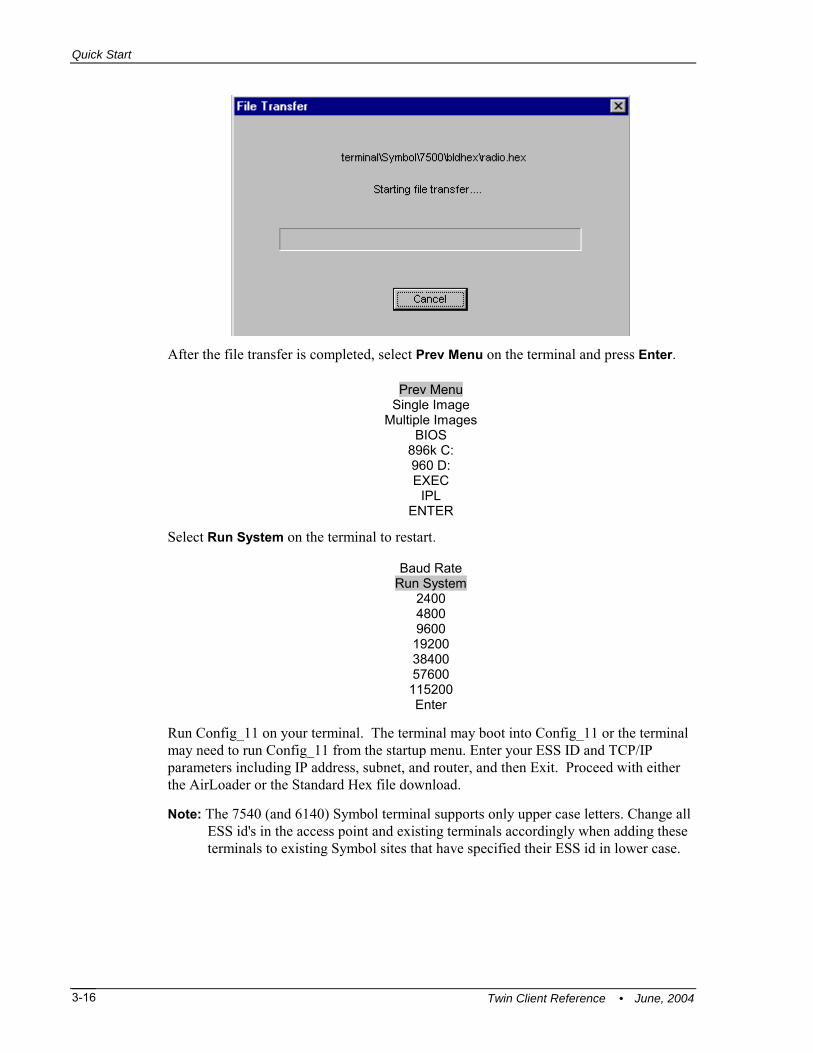
After the file transfer is completed, select Prev Menu on the terminal and press Enter.
Prev Menu Single Image
Multiple Images BIOS
896k C: 960 D: EXEC
IPL ENTER
Select Run System on the terminal to restart.
Baud Rate Run System
2400 4800 9600 19200 38400 57600 115200 Enter
Run Config_11 on your terminal. The terminal may boot into Config_11 or the terminal may need to run Config_11 from the startup menu. Enter your ESS ID and TCP/IP parameters including IP address, subnet, and router, and then Exit. Proceed with either the AirLoader or the Standard Hex file download.
Note: The 7540 (and 6140) Symbol terminal supports only upper case letters. Change all ESS id's in the access point and existing terminals accordingly when adding these terminals to existing Symbol sites that have specified their ESS id in lower case.

Symbol 7500 Terminal Download Procedure
Twin Client Reference • June, 2004 3-17
AirLoader Installation Procedure The AirLoader hex file prepares the terminal to receive the Twin Client emulation program and configuration files via the RF network. This powerful tool greatly minimizes the amount of time spent configuring terminals. Once this hex file has been installed on the terminal, the terminal will connect to the AirLoader Server to download the required program and configuration files. This also allows for the automatic assignment of the terminal IP address. The AirLoader hex file itself is downloaded through the serial connection.
Command Mode Boot Sequence Following Power OFF
Terminal Model and Keypad Key Sequence 7500 Series Press and Hold the Power button and the Scan
button, Wait for a Beep, and Release. Click on Terminal, then on Send Program Files to Terminal.
Select Airloader Hex File. DO NOT click OK.

Quick Start
Twin Client Reference • June, 2004 3-18
From the terminal, select 115200 for baud rate. Use the Up-Arrow and Down-Arrow keys to select the communications parameters as follows.
Baud Rate
Run System 2400 4800 9600 19200 38400 57600 115200 Enter
Select Single Image, put the terminal in the cradle, and press Enter.
Prev Menu Single Image
Multiple Images BIOS
896k C: 960 D: EXEC
IPL ENTER
From the Twin Client Manager, click the OK button.
After the file transfer completes, select Prev Menu on the terminal and press Enter.

Symbol 7500 Terminal Download Procedure
Twin Client Reference • June, 2004 3-19
Prev Menu Single Image
Multiple Images BIOS
896k C: 960 D: EXEC
IPL ENTER
Select Run System on the terminal to restart.
Baud Rate
Run System 2400 4800 9600 19200 38400 57600 115200 Enter
On the terminal, do the following: a. Select option 3 to get a dos prompt. b. Enter d:/tntload to restart in Twin Client mode. The terminal’s program and
configuration files will be updated and the terminal will reboot.
Note: To switch emulators after installation, do the following: 1. At the Twin Client ‘Any Key’ prompt, enter an uppercase C. 2. At the Setup menu, press [Ctrl-C] and terminate the batch job. 3. At the d: prompt, enter oldstart. 4. Reboot the terminal and repeat the steps above to download the AirLoader Hex
File or a Standard Serial Hex File. or 1. Go to the DOS prompt at the d:/ drive. 2. Delete the current emulation executable and the run.bat file. 3. Set up Airload for the new emulation (example: C:\PowerNet\TwinClient\3270.cf)
in the configuration file box of the airloader auto-configuration screen. 4. Reboot the terminal as follows. Press and hold the Power and Scan keys. Wait
for a beep. Release the keys).

Quick Start
Twin Client Reference • June, 2004 3-20
Symbol 7500 Serial Standard Hex File Installation The Standard Hex file includes the Twin Client emulation program files but does not include the custom configuration files. Once this hex file has been installed on the terminal, download the configuration files via a serial connection. See the Downloading Symbol Files section for instructions on downloading configuration files.
Twin Client Terminal Installation
Command Mode Boot Sequence Following Power OFF
Terminal Model and Keypad Key Sequence 7500 Series Press and Hold the Power button and the
Scan button, Wait for a Beep, and Release. Click on Terminal, and then on Send Program Files to Terminal.
Select Standard Hex File. DO NOT click OK.
From the terminal, select 115200 for baud rate. Use the Up-Arrow and Down-Arrow keys to select the communications parameters as follows.
Symbol 7500 Terminal Download Procedure
Twin Client Reference • June, 2004 3-21
Baud Rate
Run System 2400 4800 9600 19200 38400 57600 115200 Enter
Select Single Image, put the terminal in the cradle, and press Enter. Prev Menu Single Image
Multiple Images BIOS
896k C: 960 D: EXEC
IPL ENTER
From the Twin Client Manager, click the OK button.
After the file transfer completes, select Prev Menu on the terminal and then press Enter.
Prev Menu Single Image
Multiple Images BIOS
896k C: 960 D: EXEC
IPL ENTER

Quick Start
Twin Client Reference • June, 2004 3-22
Select Run System on the terminal to restart.
Baud Rate Run System
2400 4800 9600 19200 38400 57600 115200 Enter
On the terminal, do the following: a. Select option 7 to get a dos prompt. b. Enter d:\modstart to restart in Twin Client mode.
Symbol CE Terminal Download Procedure The following download procedure is for Symbol 2840, 7940, 8040, 8140, 8840, 8940, and 9000 terminals.
The terminal download requires a serial connection between the terminal and the PC through a cable. In preparation for this download, connect the cable to the selected serial port on the PC and to the terminal.
On the terminal, select Start, and choose Programs from the drop-down menu. Press the Connection icon, and then the ActiveSync icon.
On the PC, click on Twin Client Manager from under Start, Programs, and PowerNet. Under the Terminal menu, choose Send Program Files to Terminal, as shown in the following screen.
The following screen is displayed.
Choose Yes at the prompt. The following screen is displayed.

Cold Booting the Terminal
Twin Client Reference • June, 2004 3-23
Click on OK.
The PC is now configured to download to the terminal.
Cold Booting the Terminal Following a successful AirLoad hex file download, and at any time it is necessary to update the terminal software and/or configuration, the 3000 series terminal must be cold-booted. Use the following table to identify the required key sequence for specific terminal models.
Cold Boot Sequence Following Power Off
Terminal Model & Keypad Key Sequence 314x, 35-key 614x, 35-key
Hold Space, Func and Up-Arrow keys. Press and release On/Off. Release Space, Func and Up-Arrow keys.
314x, 46-key 354x, 47-key 384x, 46-key 684x, 46-key
Hold down A, B and D keys. Press and release Power. Release A, B and D keys.
104x, 27-key Hold Right-Arrow and Enter keys. Press and release Power. Release Right-Arrow and Enter keys.
394x, 54-key 694x, 54-key
Hold F1, F4 and Enter keys. Press and release Power. Release F1, F4 and Enter keys.
The completion of the cold boot is indicated by the following terminal display.
LOAD EMULATOR USING 1 - AirLoad 2 - Serial Download
Note: To minimize download time, remove the terminal from the cradle.
Enter 1 to continue. Option 2 is used for custom download options and is described in Downloading Symbol Files.
The terminal then associates with an access point, contacts the Twin Client Manager, and then downloads the program, configuration, and IP address of the terminal.

Quick Start
Twin Client Reference • June, 2004 3-24
During the download, progress messages are displayed on the terminal. Pauses in activity of up to 10 seconds will be observed as the terminal writes to EEPROM (This does not apply to Symbol CE terminals). The download requires approximately 2 minutes to complete.
The following table describes the error messages that will be displayed on the terminal in the event of a download failure, and can be used as a guide to correcting the problem. Error Indication
Possible Cause Corrective Action
NOT Associated
Invalid NETID or ESSID
Run CFG24 or CFG11 (or current Symbol radio setup program) and set NETID or ESSID to match the access point. See Terminal Setup Using Twin Client Menus.
No AirLoad Manager Found
AirLoad Manager not active, or not installed on the LAN segment
Ensure that the PC with Twin Client Manager is on the same segment and that the PC is operating. If the PC is not on the same segment, enter the address of the PC in response to the terminal prompt.
Manager not Active
Previously identified AirLoad Manager is no longer found.
Same as above.
Unable to open connection
IP stack on terminal failed to load.
Reload Symbol driver files.
Timeout waiting for data
Transient communications failure
Reboot terminal. If problem persists, check the RFSYNC.log in the TwinClientTN directory.
Download aborted
Socket closed during download
Ensure PC is operating. Reboot terminal and retry.
Manager inactive
PC not operating Restart the PC.
After taking the corrective action, the terminal must be cold booted again. A successful wireless connection and download is indicated by the display of the Twin Client main menu shown below.
Twin Client © 1991-2004, Connect, Inc. Keypress to Continue
The terminal is now ready to establish a Telnet session with the host system.

Starting a Telnet Session
Twin Client Reference • June, 2004 3-25
Starting a Telnet Session At the Twin Client main menu on the terminal, press any key to establish the connection. Until the terminal has been authorized, the following screen is displayed.
RECOVERABLE ERROR Terminal not Authorized for Twin Client Keypress to Continue
It is not necessary to authorize the terminal at this time, so press any key to continue. The terminal will establish a connection with the host system and start emulation. If the terminal fails to connect to the host, refer to the following table for the possible causes and the related corrective actions.
Failure Cause Corrective Action Incorrect Host IP address
Correct the Host List address on the terminal. Refer to Terminal Setup Using Twin Client Menus.
Incorrect netmask value
Access Radio Setup menu and correct the netmask value. Refer to Terminal Setup Using Twin Client Menus.
After a Telnet session has been successfully established, the terminal will remain in session for a maximum of 30 minutes at a time until it has been authorized. Once authorized, there is no software restriction the session time. The instructions for authorizing the terminal are presented in Authorizing Twin Client.

Quick Start
Twin Client Reference • June, 2004 3-26
This page is intentionally blank.

Twin Client Reference • June, 2004 4-1
Chapter 4 • Standard Setup The default terminal setup is sufficient for most installations. However, to meet site-specific requirements it may be necessary to customize terminal operation. Standard Setup is selected by choosing the Standard option from the View menu in Twin Client manager. The standard setup options simplify this process and can be modified using any one of the following methods: • = Using the Twin Client Manager. • = Using the Twin Client terminal menu system. • = Using the Symbol-style terminal menu system. • = Using Symbol-style configuration barcodes.
To simplify the task for experienced Symbol installers, the standard setup options of both the Twin Client Manager and the terminal menu system match those of other Symbol products. As an additional conversion aid, customized Symbol configuration files can be imported and automatically converted to Twin Client.
This chapter describes how to use the Twin Client Manager, the terminal menu systems, barcodes to setup the terminal, and the methods for authorizing the terminal software.
Setup Using Twin Client Manager The Twin Client Manager provides a Standard Settings tab for automatic setup of the terminals. The options within this tab vary according to the emulation selected, each of which is described below.
VT and HP Settings Select the VT and HP emulation setup by clicking on the Settings menu and then the Emulation menu, as shown below. Click on Standard under the View menu to access the Standard Settings tab.
Then click on the VT100, VT220, or HP700 selection, as shown below.

Standard Setup
Twin Client Reference • June, 2004 4-2
Click on OK after the selection is made, and return to the main Twin Client Manager menu. The standard settings tab will now reflect the settings for VT/HP emulation.
Auto Logon
This check box enables (checked) and disables (unchecked) the scanning of text entered in the “Scan for” box and the sending of text entered in the “Send” box for the user ID. Send Password This check box enables (checked) and disables (unchecked) the scanning of text entered in the “Scan for” box and the sending of text entered in the “Send” box for passwords.

Setup Using Twin Client Manager
Twin Client Reference • June, 2004 4-3
Local Echo
This check box enables (checked) or disables (unchecked) the local echoing of keyboard and scanner input on the terminal. This option can be enabled for host systems that do not echo terminal input. The default setting is disabled.
Map Underline as Reverse
This check box enables (checked) or disables (unchecked) the mapping of the underline display attribute to the reverse video display attribute. The default setting is disabled.
Printer Type
This scrolling list selects the attached printer type. The default value is none, indicating no printer is attached.
Control Codes
This button menu selects 7-bit (default) or 8-bit emulation control codes.
Backspace Sends
This button menu selects the control code sent by the Backspace key. The default setting is Backspace.
5250 Settings Select the 5250 emulation setup by clicking on the Settings menu and then the Emulation menu, as shown below.
Then click on the 5250 selection, as shown below.

Standard Setup
Twin Client Reference • June, 2004 4-4
Click on OK after the selection is made, and return to the main Twin Client Manager menu. The standard settings tab will now reflect the settings for 5250 emulation.
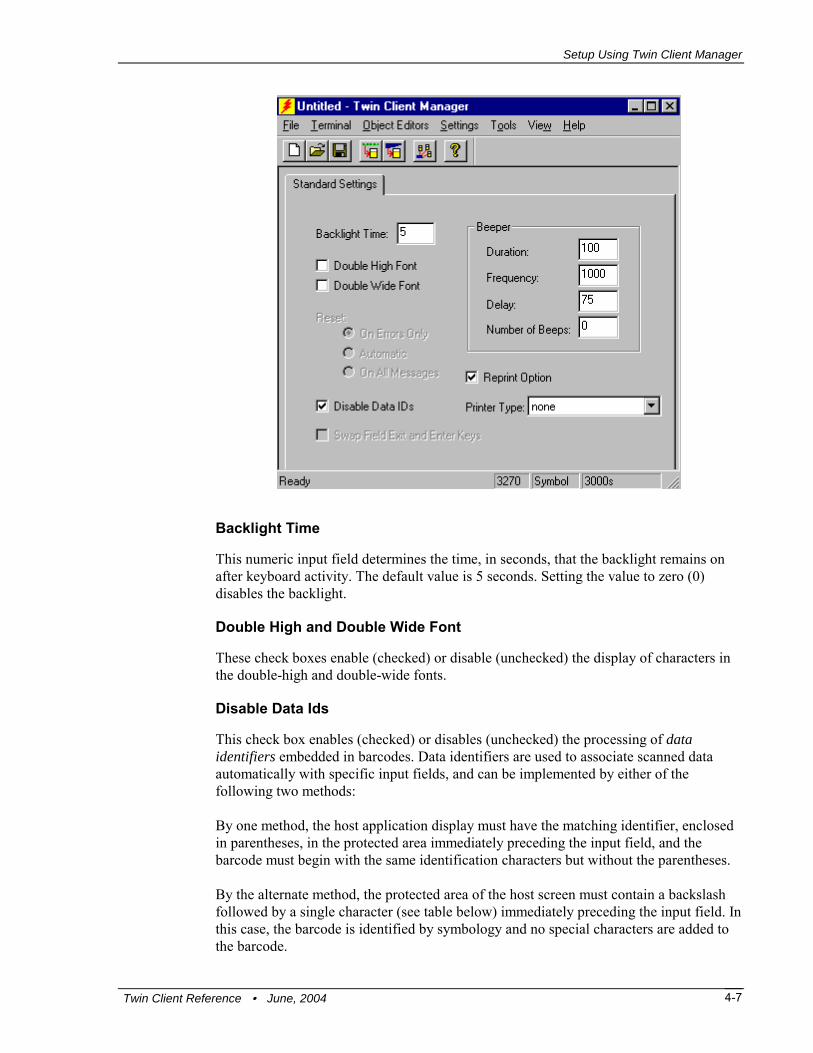
Backlight Time
This numeric input field determines the time, in seconds, that the backlight remains on after keyboard activity. The default value is 5 seconds. Setting the value to zero (0) disables the backlight.
Double High and Double Wide Font
These check boxes enable (checked) or disable (unchecked) the display of characters in double high and double wide font.
Reset
This button menu defines the behavior of the Reset key. Selecting On Errors Only prompts the user to press the key whenever a 5250 error condition is present. Selecting Automatic forces the automatic generation of a reset key in response to all 5250 error conditions, and selecting On All Messages prompts the user to press the key whenever a message is present on the 5250 error line. The default is On Errors Only.

Setup Using Twin Client Manager
Twin Client Reference • June, 2004 4-5
Disable Data Ids
This check box enables (checked) or disables (unchecked) the processing of data identifiers embedded in barcodes. Data identifiers are used to associate scanned data automatically with specific 5250 input fields, and can be implemented by either of the following two methods: By one method, the host application display must have the matching identifier, enclosed in parentheses, in the protected area immediately preceding the input field, and the barcode must begin with the same identification characters but without the parentheses. By the alternate method, the protected area of the host screen must contain a backslash followed by a single character (see table below) immediately preceding the input field. In this case, the barcode is identified by symbology and no special characters are added to the barcode. Identifier Symbology Identifier Symbology \A Any symbology \H Codabar \B UPCE 0 \I Code 3 of 9 \C UPC 1 \J D2 of 5 \D UPC A \K I2 of 5 \E MSI \L Code 11 \F EAN 8 \M Code 93 \G EAN 13 \N Code 128
Beeper Option Group
These numeric input options define the behavior of the terminal's audible alarm. Setting the number of beeps to zero (0), which is the default, disables the alarm.
Reprint Option
This check box enables (checked) or disables (unchecked) the display of a reprint option on the terminal after each print operation. The default is enabled.
Printer Type
This scrolling list selects the attached printer type. The default value is none, indicating no printer is attached.
Swap Field Exit and Enter Keys
This check box swaps the meaning of the Fexit and Enter keys on the terminal keyboard. The default value is unchecked (not swapped).

Standard Setup
Twin Client Reference • June, 2004 4-6
3270 Settings Select the 3270 emulation setup by clicking on the Settings menu and then the Emulation menu, as shown below.
Then click on the 3270 selection, as shown below.
Click on OK after the selection is made, and return to the main Twin Client Manager menu. The standard settings tab will now reflect the settings for 3270 emulation.
Setup Using Twin Client Manager
Twin Client Reference • June, 2004 4-7
Backlight Time
This numeric input field determines the time, in seconds, that the backlight remains on after keyboard activity. The default value is 5 seconds. Setting the value to zero (0) disables the backlight.
Double High and Double Wide Font
These check boxes enable (checked) or disable (unchecked) the display of characters in the double-high and double-wide fonts.
Disable Data Ids
This check box enables (checked) or disables (unchecked) the processing of data identifiers embedded in barcodes. Data identifiers are used to associate scanned data automatically with specific input fields, and can be implemented by either of the following two methods: By one method, the host application display must have the matching identifier, enclosed in parentheses, in the protected area immediately preceding the input field, and the barcode must begin with the same identification characters but without the parentheses. By the alternate method, the protected area of the host screen must contain a backslash followed by a single character (see table below) immediately preceding the input field. In this case, the barcode is identified by symbology and no special characters are added to the barcode.

Standard Setup
Twin Client Reference • June, 2004 4-8
Identifier Symbology Identifier Symbology \A Any symbology \H Codabar \B UPCE 0 \I Code 3 of 9 \C UPC 1 \J D2 of 5 \D UPC A \K I2 of 5 \E MSI \L Code 11 \F EAN 8 \M Code 93 \G EAN 13 \N Code 128
Beeper Option Group
These numeric input options define the behavior of the terminals audible alarm. Setting the number of beeps to zero (0), which is the default, disables the audible alarm.
Reprint Option
This check box enables (checked) or disables (unchecked) the display of a reprint option on the terminal after each print operation. The default is enabled.
Printer Type
This scrolling list selects the attached printer type. The default value is none, indicating no printer is attached.
Importing Custom Configurations Existing installations that use a custom Symbol configuration file are easily converted to Twin Client with the Import option found under the File tab of Twin Client Manager.
Click on Import, and if necessary then click on the Browse button to locate the file.

Terminal Setup Using Symbol-Style Barcodes
Twin Client Reference • June, 2004 4-9
To further simplify conversion, the import utility displays all conversion errors and warnings so that potential compatibility problems can be easily identified and corrected.
Note: For the 2840, 3000 series (10x0, 31x0, 35x0, 38x0, 39x0, 40x0, 61x0, 68x0, 69x0), 7940, and 8140 terminals, importing ROI configuration files works with Wavelink in release 7 or earlier, provided that the Wavelink client is using the term.cfg file.
Terminal Setup Using Symbol-Style Barcodes The Twin Client terminal software for Symbol recognizes the same configuration barcodes used by the Symbol Telnet Client product. Refer to the associated Symbol documentation for instructions.
Terminal Setup Using Symbol-Style Menus To simplify the upgrade from Symbol Telnet Client products to Twin Client, the Twin Client supports the same menu system. The Symbol-style configuration sub-menus are accessed from the Twin Client main terminal screen shown below.
Twin Client © 1991-2004, Connect, Inc. Keypress to Continue
The following table describes the key sequences used to access each of the Symbol-style configuration menus.
VTXX/HP Setup Fnc, Ctl, and t no password required Terminal Config Fnc, Ctl, and c password: config Config Host Fnc, Ctl, and r password: system
To quit, press the <q> key. To close the session, press the <Fnc>+<x> keys.
Note: The information on terminal setup using Symbol-style menus does not apply to Symbol’s CE terminals.
The keystrokes, menus, and options are identical to those found in the Symbol product. Refer to the Symbol Telnet Client product documentation for instructions.
Terminal Setup Using Twin Client Menus For compatibility with other products, the Twin Client for Symbol also supports the standard Twin Client configuration menu system on the terminal. This menu system is accessed by pressing Shift and C at the Twin Client main menu shown below.

Standard Setup
Twin Client Reference • June, 2004 4-10
Twin Client © 1991-2004, Connect, Inc. Keypress to Continue
The following menu, which is specific to the Twin Client for Symbol, is displayed.
SETUP 1 - Radio Setup 2 - Terminal Setup
To return to the main menu from this menu, press Q. To make a menu selection, enter the number next to the menu option. The Radio Setup option invokes CFG24 (or the current Symbol radio setup program) to access to the radio network parameters, which includes the terminal IP address and subnet mask. The Clear key terminates the Radio Setup program, after which the terminal reboots and returns to the main menu.
The Terminal Setup option invokes the following menu.
Edit Functions Edit Host List Edit Authorization Switch Modes Run Emulator Exit
Use the Up-Arrow and Down-Arrow keys to navigate the menu, and press Enter to select the highlighted option. Each menu option is described in the following sections.
Editing the Host List If the host IP address or addresses were not pre-configured as described earlier in the section Setting the Servers, or if you wish to change those settings using the terminal menus, select Edit Host List and enter up to four Host IP addresses as required.
Host 0 IP 206.183.67.155 Port 23__ <F3> Save <F7> Quit
Press FNC and 3 to save the configurations.
Editing the Authorization The client software can be authorized automatically, as described in the next section. This menu option permits authorization of each terminal manually. Select Edit Authorization to obtain the terminal's Identification Code, which is then used to obtain the Authorization code from the Connect web site as described in the next section.
The 12-digit value displayed at the top of the terminal screen is the Identification Code for the terminal.

Authorizing Twin Client
Twin Client Reference • June, 2004 4-11
00A0F826E614 Authorization ______________ not authorized <F3> Save <F7> Quit
Type the authorization code into the field as it appears on the WEB site. Punctuation characters, such as the hyphen (-), are required. Press FNC and 3 to save the authorization code.
Switching Modes The Twin Client normally operates in Telnet mode, which provides direct connection to Telnet hosts. It can also operate in Server mode, through an OpenAir server. Select the Switch Modes menu option to switch between Server and Telnet modes of operation. Note that the host socket address for the OpenAir servers is 1800, which must also be changed in the Edit Host List menu described at the beginning of this section.
Running the Emulator After all desired changes have been made, select the Run Emulator option to return to the Twin Client main menu. Then press any key to establish the Telnet session and begin emulation. Refer to the Chapter 3 sub-section, Starting a Telnet Session, for further instructions.
Authorizing Twin Client
Each PowerNet Twin Client will run for 30 minutes at a time without authorization. Uninterrupted operation for a production environment is the result of authorizing the software.
The Twin Client Manager can automatically authorize the terminal over the wireless network if the following requirements are met: • = A PC running Twin Client Manager is connected to the wire LAN segment with at
least one access point within range of the terminal. • = The AirLoad HEX file is installed on the terminal. • = The System ID of the PC on which Twin Client Manager is installed has been used
to obtain a site license Authorization code from the Connect web site.
To obtain the System ID of the Twin Client Manager, click on the Authorization option in the Tools menu, as shown below.

Standard Setup
Twin Client Reference • June, 2004 4-12
The Authorization window is displayed as shown below.
Go to http://www.connectrf.com. Click on Partner Services. Click on the Generate Authorization icon at the top of the page. Follow the directions on the web site.
Authorized Terminals The number of terminals authorized, the number of terminals in use, and the number of terminals remaining is provided in the Authorized Terminals box on the lower left side of the screen.
Click on the Details button to number the options in the screen below in the order of your priority.
Note: The terminal may or may not be able to utilize the Formatter feature depending on its authorization codes.

Authorizing Twin Client
Twin Client Reference • June, 2004 4-13
Click on an option and move it using the Up and Down buttons.
Click on OK when finished.
The Manual Authorization button is an alternate method of obtaining an authorization code for a terminal. This method does not utilize Airloader, as does the other method.
Click on this button, manually enter your mac address in the screen that appears, and click on OK. This enables you to generate individual authorization codes.
Add Licenses The Add Licenses feature is used when adding additional licenses to an already site licensed Twin Client manager.
An example of this is the instance in which Twin Client manager is licensed for 10 licenses, and the customer purchases another 10 licenses to make a total of 20 licenses.
From Twin Client manager, choose Authorization from under the Tools menu.
Click on the Add Licenses button.

Standard Setup
Twin Client Reference • June, 2004 4-14
A pop-up box appears with the machine ID and a space for the additional licenses authorization code.
Enter the additional license’s authorization code and click on OK.
Use the machine ID in the pop-up box instead of the original machine ID to get your authorization code.
If adding users, click on the Add Licenses button before generating the authorization code to get the most current machine ID.

Authorizing Twin Client
Twin Client Reference • June, 2004 4-15
Transfer Authorization The Transfer Authorization feature is used when moving a site license from one PC to another. After Twin Client manager is installed on a new PC, you will need the system/machine ID for it. This ID appears in the first box of the authorization screen. From Twin Client manager, select Authorization from under the Tools menu.
Click on the Transfer Authorization button on the old PC. You will be asked for the new system ID. Enter this new system ID. It will generate an authorization code for the new PC's Twin Client manager.
Note: This feature only works if there are licenses remaining on the old PC.

Standard Setup
Twin Client Reference • June, 2004 4-16
Listing Click on the Listing button to view authorization codes issued.
The authorization codes used along with their corresponding serial numbers will appear.
Click on OK when finished. Click on the Close button when finished.

Twin Client Reference • June, 2004 5-1
Chapter 5 • Advanced Setup The Twin Client permits the customization of all aspects of terminal operation without custom programming. This chapter describes all of the advanced setup options. Additional advanced customization features, such as Object Editors, are described in Chapter 6.
Experienced Symbol installers accustomed to performing customizations by manually-editing the Symbol Telnet client configuration file will find this interface easier to use. However, those that prefer the file editing method can still do so, and still achieve the same result, by using the Import option described in the previous chapter.
Selecting the Advanced Setup To change to the Advanced mode, click on the View menu and then on Advanced.
As a result, a new set of tabs is displayed, as shown below.
The following sections in this chapter describe each of the tabs and the options within each tab.

Advanced Setup
Twin Client Reference • June, 2004 5-2
Customizing the Keyboard Clicking on the Keyboard tab displays the setup options related to the terminal keyboard and its operation.
Note: Select New from under the File menu to view default settings.
End Key This scrolling list selection is used to set the terminal key that terminates both the host connection and the wireless session.
Auto Send Key This scrolling list selection is used to set the keystroke to be sent automatically by the terminal when an input field on the terminal is filled with keyed input. That is, if an input field is 9 characters long, and 9 characters are manually keyed into the field, the Auto Send key is automatically transmitted with the 9 characters. Selecting noop disables this feature.
Note: Selecting the Length Check option on the Scanner tab disables the Auto Send Key.

Customizing the Keyboard
Twin Client Reference • June, 2004 5-3
Key Click This check box enables (checked) or disables (unchecked) audible key clicks from the terminal.
Note: The option to turn on key clicks in TwinClient does not function in a Windows CE environment. The key clicks are controlled by Windows CE directly; there is no API under CE for turning key clicks on and off. Key clicks may be turned on in Settings / Sounds & Reminders from the Windows CE OS.
Case Conversion This scrolling list selection allows automatic conversion of keyed input to upper or lower case. The none value means that no conversion takes place.
Mapping Object This feature of Twin Client allows for custom keyboard development. For example, the Tab key can changed to generate a PF4. This is an advanced integration tool and its use is described in Chapter 6.
Macro Object (VT/HP emulation only) This feature is used to assign a key sequence to a specific terminal key. For example, the PF1 key can be set to generate a character string sequence such as receiving. This is an advanced integration tool and its use is described in Chapter 6.
Mode (VT/HP emulation only) This scrolling list selection controls the transmission characteristics of the VT/HP emulations. In char mode, each keystroke generates an individual transmission. In block mode, a transmission takes place only after a control key, such as Enter or a PF key, is depressed. The block mode is more efficient. Refer to Chapter 6, Advanced Display Options for VT/HP, for more details on setting block mode operation.
Note: When set to char mode, the Collection timer value in the Timers tab should be set to between 30 and 50 milliseconds for maximum performance.
Auto EOF (3270 emulation only) This check box option enables (checked) or disables (unchecked) the automatic erasure of all data in a field prior to keyed or scanned data input.
Clear First (3270 emulation only) This check box option enables (checked) or disables (unchecked) the automatic erasure of all data in a field prior to keyed or scanned data input.

Advanced Setup
Twin Client Reference • June, 2004 5-4
Serial Input (7500 terminal only) This check box option enables (checked) or disables (unchecked) the viewing of the terminal screen in hyperterminal.
Advanced (3270 emulation only) Clicking the Advanced button brings up the Advanced 3270 Keyboard screen and provides a variety of special key generation options. This is an advanced integration tool and its use is described in Chapter 6.
Customizing the Display Clicking on the Display tab shows the options related to the terminal display and its operation.
Note: Select New from under the File menu to view default settings.

Customizing the Display
Twin Client Reference • June, 2004 5-5
Quadrant Mode This scrolling list option defines the rules by which the terminal display is positioned in the larger host display. As defined by Twin Client, quadrants are fixed position "windows" in the host display, and the terminal display is located on whatever quadrant contains the current cursor position.
= Off disables quadrant processing and Twin Client simply centers the current host input field in the terminal display.
= On enables quadrant processing. However, input fields that cross quadrant boundaries result in a shift to the left in order to locate as much of the current input field on the terminal display.
= Soft always positions on a quadrant boundary regardless of input field boundaries. Viewing keys are enabled.
= Hard is the same as Soft except the viewing keys are disabled.
= Lock locks the terminal display origin (upper left corner) to fixed row and column (x,y) coordinates in the host display. The coordinates are zero-based.
Lock Row defines the Y coordinate for display position locking. Range is zero (0) to maximum number of rows on the host screen.
Lock Column defines the X coordinate for display position locking. Range is zero (0) to the maximum number of columns on the host screen.
Note: If you have selected Lock and data is received outside of the Lock zone, this can cause the session to lock up.
Scroll Mode This scrolling list option selects the rule used for moving the terminal display within the host display using the viewing keys.
= Half scrolls the terminal display in half-screen increments. For example, given a 16-column screen, the screen is scrolled left and right 8 columns at a time.
= Full scrolls the terminal display in full screen increments. For example, given a 16-column screen, the screen is scrolled left and right 16 columns at a time.
Language This scrolling list option selects the display character mapping and the translation table used for error messages displayed on the terminal. The file umsgs.txt, which is installed with Twin Client, contains all of the current language translations.
In the event a specific language is not translated, or if a specific message is not correctly translated, visit the Connect web site at http://www.connectrf.com and check the Support page for a related Tech Note. If the issue has not been addressed, email [email protected] and request a Product Change Request (PCR).

Advanced Setup
Twin Client Reference • June, 2004 5-6
Cursor Appearance This scrolling list option selects the manner in which the cursor is displayed on the terminal. Type Appearance soft Blinking Underscore (_) hard Blinking Block � hide None
Mapping Object This feature is used to modify the displayed character set. This is an advanced integration option and its use is described in Chapter 6.
Dialog Object This feature is used to build session automation scripts, and is an advanced integration option described in Chapter 6.
Formatting This feature is used to re-format the host display onto the terminal display. This is an advanced integration option and is described in Chapter 6.
Relocation Group This option group allows rows of the host display to be relocated automatically. This option is particularly useful when the application generates important error messages on a specific row that is not necessarily within the terminal's display area.
Source
Defines the starting row (zero-based) in the host display that is relocated to the destination row of the host display.
Destination
Defines the starting source row location (zero-based) in the host display.
Row Count
Specifies the number of host display rows to be relocated, starting with the row defined by the Source option and continuing from top to bottom of the display. Zero (0) disables row relocation.
Move Blank
This check box enables unconditional relocation (checked), or enables relocation only when data is present on the source row or rows (unchecked).

Customizing the Display
Twin Client Reference • June, 2004 5-7
Reverse Video This check box enables (checked), or disables (unchecked), the processing of the reverse video display attribute on the terminal.
Wait Message This check box enables (checked), or disables (unchecked), the display of the message Waiting for Data on the terminal display. This message is used to indicate that the terminal has transmitted data to the host application and is waiting for a response.
Default Data (3270/5250 only) This check box enables (checked), or disables (unchecked), editing of data present in the current input field prior to entry of new data by the terminal operator.
Double High and Double Wide These check boxes enable (checked), or disable (unchecked), the display of characters on the terminal screen in double high and double wide fonts, respectively. On a CE terminal, the double high and double wide check boxes are replaced with a font size scrolling list box and a bold font check box.
Alt Scan Key This scrolling list option within the formatter defines the control key automatically transmitted with scanned data. The list of keys depends on the type of emulation in use. The noop key indicates that no automatic control key will be sent.
Advanced Key (VT/HP only) This is the key that will be sent automatically for the formatter feature when using VT emulation to skip unformatted fields. Set this key to whatever is required by the application to move from field to field. This will allow you to skip unneeded fields and the formatter will automatically bypass them. This is not required for 3270 or 5250 emulation as there is a standard method for moving between fields.

Advanced Setup
Twin Client Reference • June, 2004 5-8
Customizing the Scanner Clicking on the Scanner tab shows the options related to the terminal scanner and its operation.
Note: Select New from under the File menu to view default settings.
Send Key This scrolling list option defines the control key automatically transmitted with scanned data. The list of keys depends on the type of emulation in use. The noop key indicates that no automatic control key will be sent.
Scan Ahead This scrolling list option defines the number of scans that can be transmitted by the terminal without a response from the host system. The maximum is 24.
Set to 0, scan ahead is disabled and you cannot scan again until the host response has been received. Set to 1, there is no scan ahead limit. Set to 2 and above, and the software will let you scan that many times until a host response is received. So if you set it for 3, it will allow you to scan only 2 more times before the host responds to the first scan.

Customizing the Scanner
Twin Client Reference • June, 2004 5-9
Note: Use Scan Ahead with caution. It can cause the operation to get out of sync with the application.
Length Check With Length Check off, and Auto Enter key set to "noop": Keyed or scanned input that is equal to or greater than the field length results in an error "Entry Too Long" and no data is transmitted. With Length Check off, and Auto Enter key set to anything other than "noop": a. Keyed input equal to the field length: The data and the specified Auto Enter key are transmitted. b. Keyed input greater than field length: This is not possible, due to a) above. c. Scanned input equal to or greater than the field length: The data is transmitted. If the data is greater than the field length, then that data is distributed among the subsequent input fields and the Scan Termination key is transmitted (unless it too is set to "noop").
With Length Check on: The Auto Enter key and its functionality are disabled for both scanned and keyed input. There are specific functionalities related to the various settings of length checking and the Auto Enter key. Setting the Auto Enter key to "noop" disables the Auto Enter function (i.e., automatic transmission of data when the field is filled or overfilled) for both scanned and keyed input. When it is set to anything other than "noop", keyed and scanned input is distinguished and the Auto Enter key is effective only for keyed input. Scanned data that is equal to or greater than the field length is terminated with the Scan Termination key instead of the Auto Enter key.
Note: Enabling Length Check disables the Truncation option (described below).
Truncation This check box option enables (checked), or disables (unchecked), the automatic truncation of scanned data that is greater than the length of the input field. With both Truncation and Length Checking disabled, oversized scans are automatically applied to subsequent input fields as needed. If either option is enabled, this automatic application is disabled.
Stripping This scrolling list option controls the rule for automatically removing trailing spaces and underscore characters. The rules are defined as follows:
Rule Operation off No stripping is performed. space Trailing spaces are stripped. score Trailing underscores are stripped. both Both trailing spaces and underscores are stripped.

Advanced Setup
Twin Client Reference • June, 2004 5-10
Binary-128 This check box enables (checked), or disables (unchecked), the processing of binary code 128 bar codes on the terminal.
Caution: If this option is disabled and binary-128 barcodes are used, the results are unpredictable.
Data Mapping, Data Editor, and Decoder Control These are advanced integration tools and are described in Chapter 6.
Scanner Type This scrolling list option defines the type of special scanner attachment in use, if present.
If you use AirLoader, you will be asked a one-time question if your 68xx terminal has a 1D or 2D scanner installed. If you use the standard method of loading the terminal, there are new hex images that have been included that have the 2D support built. Please follow the instructions below for standard loaded terminals. 1D Scanner Support - Load the terminal as normal. When you select the pull down "Terminal/Send Program files to Terminal" it will open the "Symbol HEX file Dialog box". From here select the "Standard HEX file" option. 2D Scanner Support - From the same "Symbol HEX file" dialog box select "Custom HEX file" option. Select the following file from the list to match the required emulation. VT100/VT220/HP700 TNTVT-2D.HEX 5250 TNT5250-2D.HEX 3270 TNT3270-2D.HEX Note: When you depress the Scan trigger on the 814x terminal, the scan beam does not
come on. There is a setting for IrCom that can cause the scanner not to function. If you turn this off as follows, the scanner will function as expected.
Select "Start/Settings". Select "Connections". Double tap the Beam icon. Uncheck the Click box for: "Receive all incoming beams and select discoverable mode". Boot the terminal by holding Func + End + Lamp keys.

External Scanner Setup
Twin Client Reference • June, 2004 5-11
External Scanner Setup RF terminals can be ordered with an Internal scanner or they can also support an external scanner. The external scanner is connected to the bottom of the terminal through the serial port. This requires the RS232 adapter be installed. The external scanner can be made to work even if an internal scanner is present. However, scanner decoder controls only apply to the internal scanner as we only have access to the internal decoder. The external scanner must be a serial based scanner. These are scanners that have on board decoder hardware/software and output their signals by normal RS232 signaling methods. These external scanners are controlled by their respective manufacturer’s program controls provided in the manual accompanying the scanner from the manufacturer. The following is an example of a setup for an RF terminal.
This is the order in which to set up the scanner.
1 - (SET RS-232C DEFAULTS)
2 - (SET ALL DEFAULTS)
3 - RS-232 HOST BAUD RATE (9600)
4 - RS-232 HOST PARITY (NONE)
5 - RS-232 HOST DATA TRANSMISSION FORMATS (<DATA><SUFFIX>)
6 - RS-232 HOST PREFIX/SUFFIX VALUES (SUFFIX) 7 - RS-232 HOST PREFIX/SUFFIX VALUES (<1><0><1><3>)

Advanced Setup
Twin Client Reference • June, 2004 5-12
Setting Log Levels The terminal maintains a logging facility that can be used by Technical Support and Engineering to assist in problem resolution. These levels should always be set to zero (0).
Note: The options on this tab will be ghosted out when a 3000s terminal is selected.
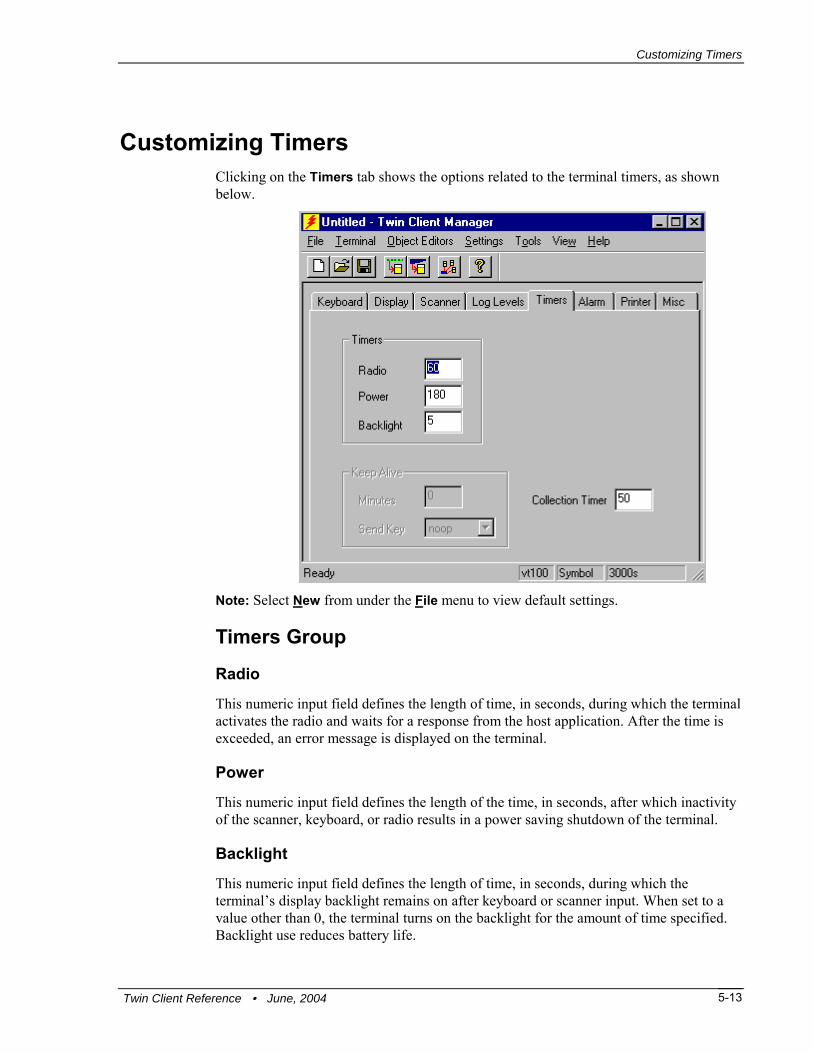
Customizing Timers
Twin Client Reference • June, 2004 5-13
Customizing Timers Clicking on the Timers tab shows the options related to the terminal timers, as shown below.
Note: Select New from under the File menu to view default settings.
Timers Group
Radio
This numeric input field defines the length of time, in seconds, during which the terminal activates the radio and waits for a response from the host application. After the time is exceeded, an error message is displayed on the terminal.
Power
This numeric input field defines the length of the time, in seconds, after which inactivity of the scanner, keyboard, or radio results in a power saving shutdown of the terminal.
Backlight
This numeric input field defines the length of time, in seconds, during which the terminal’s display backlight remains on after keyboard or scanner input. When set to a value other than 0, the terminal turns on the backlight for the amount of time specified. Backlight use reduces battery life.

Advanced Setup
Twin Client Reference • June, 2004 5-14
Keepalive (3270/5250 only) This option group circumvents host application connection timeouts by automatically generating the selected keystroke when the terminal is inactive for the specified period of time, in minutes.
Collection Timer (VT/HP only) This scrolling list option specifies the number of milliseconds the terminal waits for inactivity from the host before processing received data. This feature is useful in situations where the application and network latency fragments host transmissions to the terminal, and also when host applications generate intermediate displays that are not used.
Note: For maximum performance, adjust the collection time to 30-50ms when Mode on the Keyboard tab is set to char.
Customizing Alarms Clicking on the Alarm tab shows the options related to the terminal alarm mechanisms, as shown below.
Note: Select New from under the File menu to view default settings.
Mode This scrolling list option defines the operation of the audible alarm and scanner light on the terminal.

Customizing Alarms
Twin Client Reference • June, 2004 5-15
• = Off disables the audible alarm. • = Bell enables the audible alarm as a double beep. • = Flash enables the scan indicator light as the alarm – no audible alarm sounds. • = Both enables the double beep and the scan indicator light as the alarm. • = Spec1 enables the audible alarm as a single beep. • = Spec2 enables a single beep and the scan indicator light as the alarm.
Volume This scrolling list option set the volume of the audible alarm.
Duration & Frequency The next two options, duration and frequency, are used to make a distinction between alarms and scan decode tones when the Mode is set to spec1 or spec2.
Duration
This numeric entry field defines the length of the alarm sound in milliseconds.
Frequency
This numeric entry field defines the frequency of the audible alarm in Hertz. Zero (0) selects the terminal's factory-set default which is terminal model dependent.
Allow Multiple This check box enables (checked), or disables (unchecked), multiple alarms in a single host transmission.
Scan Duration & Frequency The next two options, scan duration and frequency, relate to the tones generated when the scan decoder successfully identifies a symbology.
Scan Duration
This numeric input field defines the duration of the tone generated by a successful scan decode, in milliseconds.
Scan Frequency
This numeric entry field defines the frequency of the scan decode tone in Hertz. Zero (0) selects the terminal's factory-set default which is terminal model dependent.

Advanced Setup
Twin Client Reference • June, 2004 5-16
By Attribute (3270 only) This scrolling list entry defines how 3270 field attributes can be used to generate alarms. The choices are off, pen for the light pen attribute, num for numeric attribute, hi for high intensity attribute, and hal for high intensity and light pen attributes.
Protected
This check box enables (checked), or disables (unchecked), the processing of the field attribute into audible alarms for all protected fields on the display.
Unprotected
This check box enables (checked), or disables (unchecked), the processing of the field attribute into audible alarms for all unprotected fields on the display.
Alternate (5250 only) This check box enables (checked), or disables (unchecked), the conversion of a single digit character at a specified row and column on the 5250 display into the corresponding number of audible alarms.
Row
This numeric input field specifies the zero-based row number in the 5250 display of the alternate alarm digit.
Column
This numeric input field specifies the zero-based row number in the 5250 display of the alternate alarm digit.

Customizing Printers
Twin Client Reference • June, 2004 5-17
Customizing Printers Clicking on the Printer tab shows the options related to the terminal printer, as shown below.
Note: Select New from under the File menu to view default settings.
Type This scrolling list option defines the type of printer attached to the terminal. On a CE terminal, this scrolling list option contains a list of baud rate options, as shown below.

Advanced Setup
Twin Client Reference • June, 2004 5-18
Init Object This feature allows printer initialization commands to be sent to the terminal immediately after the terminal establishes a session. This is an advanced integration tool and is described in Chapter 6.
Flag Byte, Row, Column, and Clear Key (3270,5250 only) This group of options provides 3270 and 5250 host application direct control over the terminal printer. See the Start and End later in this section for an alternate method. VT/HP applications rely on standard escape sequences for the printing function.
Flag Byte
This numeric input field is a decimal value that corresponds to the ASCII-converted value of an EBCDIC character generated by the host application. When the Flag Byte is set to a non-zero value, the terminal checks the host display for the value at the specified row and column (see Flag Row and Flag Column below). If the Flag Byte is present, all data in the display that follows the Flag Byte is routed directly to the printer, up to the next occurrence of a Flag Byte value in the display or else the end of the display.
Flag Row
This numeric input field specifies the row (zero-based, range of 0 to23) where the Flag Byte (defined above) is located.
Flag Column
This numeric input field specifies the column (zero-based, range of 0 to79) where the Flag Byte (defined above) is located.
Clear Key
This scrolling list option defines the keystroke transmitted by the terminal after printing has completed. Set the key to noop to disable transmission.
Start and End (3270 and 5250 only) This option group provides the host application direct control over the terminal printer.
Start
Specifies a unique character sequence that, when encountered in the host display, indicates that all subsequent characters up to but not including the End character sequence are to be transmitted to the printer attached to the terminal. The blank value indicates that this option is not in use.
Note: The print data limit is 1.5 K.

Customizing Printers
Twin Client Reference • June, 2004 5-19
End
Specifies a unique character sequence that terminates collection of data from the host display area for transmission to the printer attached to the terminal. The blank value indicates that this option is not in use.
Start and End Convert (3270/5250 only) This option group provides for conversion of print data collected with the Start and End option group from ASCII characters in hexadecimal format (0-9 and A-F) to binary. The feature allows binary data that might otherwise interfere with the emulation to be included in the display area. The host application generates the hexadecimal data.
Start Convert
Specifies a unique character sequence (ASCII-converted) within the print data collected with Start and End options that indicates the subsequent character pairs are hexadecimal values that are converted to binary. A blank value indicates that the option is not in use.
End Convert
Specifies a unique character sequence (ASCII-converted) that terminates binary conversion. Blank indicates that this option is not in use.
LXE Option (3270/5250 only) This check box enables (checked), or disables (unchecked) the processing of print data embedded in the datastream according to LXE printing rules.
Convert Flag Byte and Conversion (3270 only) This option group defines the conversion of a single character (Convert Flag Byte) found in the 3270 print data, to a printer control sequence defined by the Conversion scroll list.
Convert Flag Byte
This numeric input field defines an ASCII value, in decimal, that will be converted to a printer control sequence as defined by the Conversion option. Zero (0) disables conversion.
Conversion
Specifies what the Flag Byte is converted to. The options are crnl, cr, and nl which represent ASCII carriage return new line, carriage return, and new line, respectively.
Note: There is a potential problem with printer support on Symbol 68xx terminals after the unit is returned from repair. When attempting to print, you may get one or more of the following symptoms: garbled printing, no print output, or a false terminal complaint that the printer is not ready. Discuss options with your service provider. We have found no effective work-around, and most cases will require that the CPU be swapped with one that has the older "Light Pipe" style sensors.

Advanced Setup
Twin Client Reference • June, 2004 5-20
Miscellaneous Customizations Clicking on the Misc tab shows the following options window.
Note: Select New from under the File menu to view default settings.
Extended Command Group (3270 and 5250 only)
This option group provides 3270 and 5250 host applications with the same extended command set available to VT/HP applications. Refer to Chapter 6 for a detailed description of the Extended Commands.
Start
Specifies a unique character sequence that, when encountered within the host display, indicates that all subsequent characters up to but not including the End sequence, are to be interpreted as an Extended Command. Blank indicates that the option is not in use.
End
Specifies a unique character sequence that terminates the Extended Command.
Data Stream Group (3270 only)
Send All MDT
This check box enables (checked), or disables (unchecked) the transmission of all fields with the MDT (Modified Data Tag) bit set. When disabled, only unprotected fields are transmitted.

Miscellaneous Customizations
Twin Client Reference • June, 2004 5-21
Send NULL
This check box enables (checked), or disables (unchecked) the transmission of NULL characters to the host system.
Note: For AS400 hosts, this option must be checked.
Enable TN3270E
If this box is checked, will negotiate using TN3270E rules (see RFC 2355). If this box is unchecked, will NOT negotiate TN3270E and will use IBM 3278 Mod 2.
Answerback (VT/HP only) This text input field defines the response returned to the host application when the answerback command (as defined under VT/HP emulation) is received. If this value is left blank, the terminal automatically returns an ASCII string corresponding to the emulation in use (vt100, vt220, or hp700).
Non-graphic characters may be embedded in the answerback field using the escape sequence \nnn , where the backslash is followed by three digits representing the octal value. Refer to Chapter 9, ASCII Character Set Octal Values. $1 = terminal number. IP terminals = last two octets of the IP address. Spectrum One = 065-511 $M = 4 character terminal model number (i.e., "6840")
Inserting the sequences “$A”, “$B”, “$C”, and “$D” into the answerback string results in a substitution of four octets, three octets, two octets, and the last octet of the terminal IP address, respectively, as shown below. $A - all four octets of the IP address (206.183.067.226) $B - the last 3 octets (183.067.226) $C - the last 2 octets (067.226) $D - the last octet (226) Given a terminal with an IP address of 206.183.67.226, the following examples demonstrate how substitution and non-graphic escape sequences are processed. Answerback Data Sent in Response to Answerback Command Hello World Hello World $A 206.183.067.226 RF$A RF206.183.067.226 RF$A\015 RF206.183.067.226<carriage return> $B 183.067.226 RF$B RF183.067.226 RF$B\015 RF183.067.226<carriage return> $C 067.226 RF$C RF067.226 RF$C\015 RF067.226<carriage return> $D 226 RF$D RF226 RF$D\015 RF226<carriage return>

Advanced Setup
Twin Client Reference • June, 2004 5-22
This page is intentionally blank.

Twin Client Reference • June, 2004 6-1
Chapter 6 • Advanced Integration This chapter describes the use of the advanced integration features built in to the Twin Client. These features make it possible to tailor Twin Client operation to meet special customer requirements without custom programming.
Integration objects are used to implement the Twin Client advanced integration capability. An editor is used to create and modify each object, and the objects are associated with a terminal configuration using the Advanced setup options described in the previous chapter. The objects then become part of the terminal's software configuration and as a result are supported by the powerful Airloader Auto-Configuration tools described in Chapter 8.
Clicking on the Object Editors menu of the Twin Client Manager displays the editor menu.
The following sections describe the use of each object, how to create the object, and how to assign the object to a terminal configuration using the Advanced Setup options.
A detailed description of the Extended Commands, which are used by applications to dynamically control the terminal scanner and keyboard, is included in this chapter. The advanced emulation-specific configuration options to which the previous chapter refers are also described here.
Keyboard/Mapping The Keyboard/Mapping object is used to change the functionality of the terminal keyboard. This feature is most often used to simplify keyboard usage and reduce operator workload. It is also used to reduce re-training requirements when introducing new terminal models.

Advanced Integration
Twin Client Reference • June, 2004 6-2
The need for keyboard mapping is a result of the size-restricted keypads common to all portable terminal devices. Compensating for the physical limitations, the manufacturer uses state modifier keys to expand the functionality of the keypad. As a result, many keys (e.g., the Up-Arrow key) require the operator to press two or more keys to emulate a single keystroke. Because many applications tend to rely heavily on a small group of keys, it is advantageous to map those frequently used keys to single key strokes, thus increasing both productivity and user acceptance.
Note: If key re-mapping does not appear to work on the 694x terminal, press the key sequence Func+Shift after a cold boot. This will take the terminal out of Caps Lock state and the key mapping will work as expected. It will stay latched in this state until another cold boot or another Func+Shift sequence is performed.
Creating the Keyboard/Mapping Object Create the object by clicking on Object Editors, then click on Keyboard/Mapping and select a terminal type.
Click on the desired terminal model and click on OK, which starts the keyboard mapper for the selected terminal model.

Keyboard/Mapping
Twin Client Reference • June, 2004 6-3
The Keyboard Mapper screen provides a mock-up of a keypad on the left side of the window, and options for key remapping on the right. By clicking on a key on the keypad mock-up, the available options that apply to that key appear on the right. For example, clicking on the key at the lower right corner of this model changes the display as follows.
The first column on the right side of the window, entitled Transmit, defines the emulation key assigned to the highlighted keypad button in each of the available keyboard states (unshifted, shifted, alpha lock, etc.). Each modified key state is initially blank, indicating that the Twin Client default is in effect and no changes will be made to that key or its Mode of operation. Refer to Chapter 10 for the table of default Twin Client key assignments for each Symbol terminal.

Advanced Integration
Twin Client Reference • June, 2004 6-4
After a key is selected, the Mode options change depending on the key selection. The Mode column defines the action taken by the selected key combination.
The table of mode options, and their effect, is as follows.
xmit Transmits the key.
noop Disables the key.
edleft Non-destructive backspace (moves) to the left of the cursor within a field.
edrite Non-destructive space (moves) to the right of the cursor within a field.
edbksp Destructive backspace (moves) to the left of the cursor within a field.
edeeof Erases from current position to end of field.
edefld Erases entire field.
lhelp Displays terminal ID, date, time, and terminal software version number.
scan Activates the scanner.
Saving and Assigning the Keyboard/Mapping Object Save the object by clicking on File, Save As, and then enter a name. For the purposes of this example, the name is vt.

Keyboard Macros
Twin Client Reference • June, 2004 6-5
Then click on Save. Return to the Twin Client Manager menus by clicking on the button at the upper right corner of the Keyboard Mapper window.
Next, assign the object to a terminal configuration by opening a terminal configuration from the File menu. Click on the advanced setup Keyboard tab, then on the Mapping Object list button, and finally on the object name.
Save the updated terminal configuration by clicking on File, and then Save. The next time the terminal is cold-booted, the new configuration will be downloaded automatically and the keyboard mapping will take effect.
Keyboard Macros The Keyboard/Macro object is used to assign sequences of characters to the VT/HP programmable function keys. Using this feature, strings of characters can be assigned to a single keystroke.
Creating the Keyboard Macro Object Create the object by clicking on Object Editors, then Keyboard/Macros, and then enter a file name. For the purposes of this example, the name is vt.

Advanced Integration
Twin Client Reference • June, 2004 6-6
Click on the Open button, and then click on the Yes button to create the new file.
The Notepad utility is then invoked. The Keyboard/Macro object is a text file with one entry per line. Each entry uses the following format, <keyname>=<macro string>;
where <keyname> is pf1 to pf24, and <macro string> is the macro text assigned to that specific key. For example, to assign the text "vt100" followed by a carriage return to the pf9 key, the entry is:
Note: \015 represents the octal value for “carriage return”. Refer to Chapter 9, ASCII Character Set Octal Values.
Saving and Assigning the Keyboard Macro Object Save the object by clicking on File, then on Save, and then on Exit, which returns to the Twin Client Manager menu.
Next, assign the object to a terminal configuration by opening a terminal configuration from the File menu. Click on the advanced setup Keyboard tab, then on the Macro Object list button, and finally on the object name.

Scanner/Data Mapping
Twin Client Reference • June, 2004 6-7
Save the updated terminal configuration by clicking on File, and then Save. The next time the terminal is cold-booted, the new configuration will be downloaded automatically and the keyboard macro will take effect.
Scanner/Data Mapping The Scanner/Data Mapping object defines barcode sequences that, when encountered in scanned data, are automatically converted to emulator keystrokes. This feature can be used to reduce or eliminate keyboard entry by the operator. That is, instead of pressing the PF3 key to access a help screen, the operator scans a barcode that is mapped to the keystroke.
Creating the Scanner/Data Mapping Object Create the object by clicking on Object Editors, then Scanner Data/Mapping, and then enter a file name. For the purposes of this example, the name is vt.
Click on the Open button, and then click on the Yes button to create the new file.
The Notepad utility is then invoked. The Scanner/Data mapping object is a text file with one entry per line. Each entry uses the following format, <barcode>=<keystroke>;
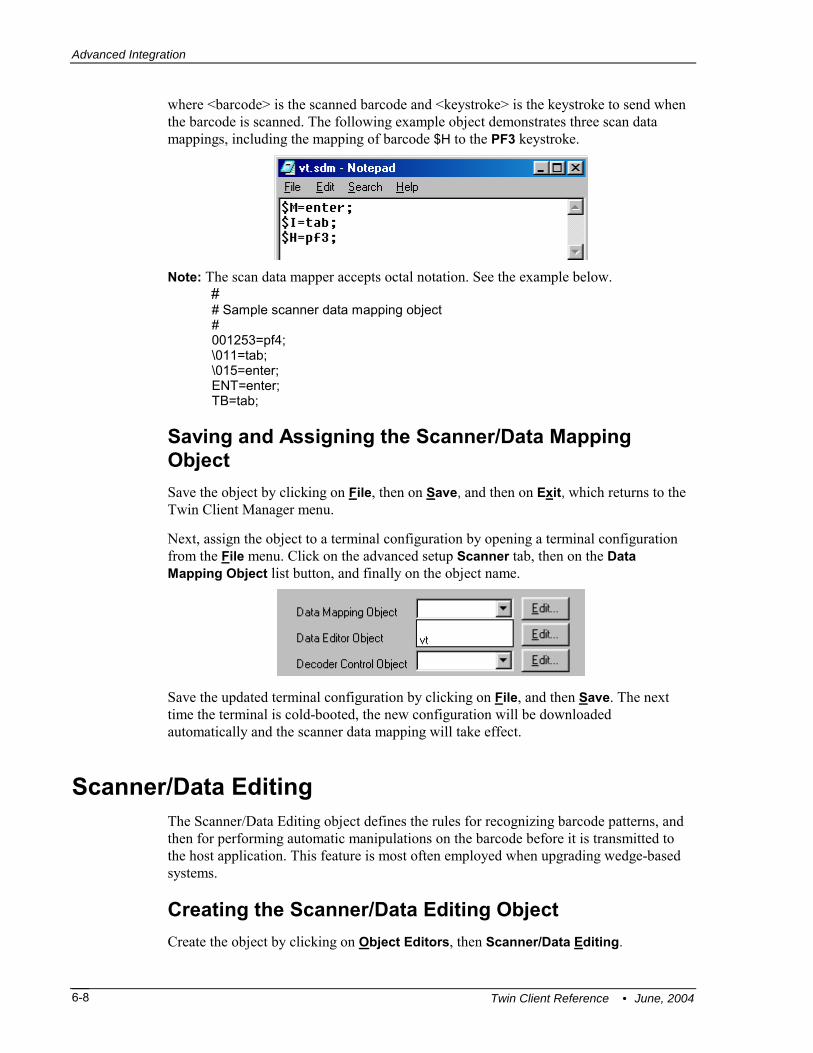
Advanced Integration
Twin Client Reference • June, 2004 6-8
where <barcode> is the scanned barcode and <keystroke> is the keystroke to send when the barcode is scanned. The following example object demonstrates three scan data mappings, including the mapping of barcode $H to the PF3 keystroke.
Note: The scan data mapper accepts octal notation. See the example below.
# # Sample scanner data mapping object # 001253=pf4; \011=tab; \015=enter; ENT=enter; TB=tab;
Saving and Assigning the Scanner/Data Mapping Object Save the object by clicking on File, then on Save, and then on Exit, which returns to the Twin Client Manager menu.
Next, assign the object to a terminal configuration by opening a terminal configuration from the File menu. Click on the advanced setup Scanner tab, then on the Data Mapping Object list button, and finally on the object name.
Save the updated terminal configuration by clicking on File, and then Save. The next time the terminal is cold-booted, the new configuration will be downloaded automatically and the scanner data mapping will take effect.
Scanner/Data Editing The Scanner/Data Editing object defines the rules for recognizing barcode patterns, and then for performing automatic manipulations on the barcode before it is transmitted to the host application. This feature is most often employed when upgrading wedge-based systems.
Creating the Scanner/Data Editing Object Create the object by clicking on Object Editors, then Scanner/Data Editing.

Scanner/Data Editing
Twin Client Reference • June, 2004 6-9
Barcode recognition is based on the size (length) and recognition specifiers. Once the pattern is recognized, operation specifiers manipulate the barcode.
The recognition specifiers consist of the four characters shown in the following table: A Alpha character
N Numeric character * Any character = Must match next character
The operation specifiers consist of the following constructs: X Delete character
* Copy as is ( ) Substitute ““ Insert
The following table illustrates how the recognition and operation specifiers identify and manipulate the data. Barcode Size Recognition Operation Result
PN-1245 7 AA=-NNNN “F”******* FPN-1245
5A5567BBAT 10 ********** **********”M” 5A5567BBATM
TGR87 5 =T=GAN* **(S)** TGS87
78-RHG 6 NN=-AAA **X*** 78RHG

Advanced Integration
Twin Client Reference • June, 2004 6-10
Quote Character If you need to insert a " (quote) character on the operation side you may now do this. You use the sequence \". Example: "\""***(AB)** This example will insert a " (quote) character to the front of each bar code. Variable Length Operation
The scan editor allows operations to be done on variable length labels. The variable length character is the ~ (tilde) and it must go into the operation side of the rule. Rules: 1. The size must be set to zero. 2. The tilde must be in the operation side. Example: This example will delete the first character from any bar code size that starts with any ALPHA character.

Scanner/Decoder Control
Twin Client Reference • June, 2004 6-11
Saving and Assigning the Scanner/Data Editing Object Save the object by clicking on File, Save As, and then enter a name. For the purposes of this example, the name is vt.
Then click on Save. Return to the Twin Client Manager menus by clicking on the button at the upper right corner of the Scan Editor window.
Next, assign the object to a terminal configuration by opening a terminal configuration from the File menu. Click on the advanced setup Scanner tab, then on the Data Editor Object list button, and finally on the object name.
Save the updated terminal configuration by clicking on File, and then Save. The next time the terminal is cold-booted, the new configuration will be downloaded automatically and the scan data editor object will take effect.
Scanner/Decoder Control The Scanner/Decoder Control object modifies the operation of the scan decoder in the terminal. Any of the supported symbologies can be enabled or disabled, and all of the parameters associated with a specific symbology can be modified to meet specific customer requirements.
This feature is used primarily to reduce errors and increase performance. For example, a terminal used in a receiving application can be restricted to symbologies used only in the receiving department, thus reducing the opportunity for scan decoder errors and, in many cases, increasing scanner performance. As another example, the scan decoder can be instructed to return a successful scan only when the barcode is of a certain length. As a result, the opportunity for a scan decoder error is further reduced.

Advanced Integration
Twin Client Reference • June, 2004 6-12
Twin Client also allows the scanner to be controlled dynamically by the application. This is accomplished through the use of the Extended Command set, which is described later in this chapter.
Creating the Scanner/Decoder Control Object Create the object by clicking on Object Editors, then Scanner/Decoder Control.
The check box next to the symbology enables (checked) or disables (unchecked) the symbology. The options for a specific symbology are available for modification by highlighting the select symbology.
Saving and Assigning the Scan/Decoder Control Object Save the object by clicking on File, Save As, and then enter a name. For the purposes of this example, the name is vt.

Display/Mapping
Twin Client Reference • June, 2004 6-13
Then click on Save. Return to the Twin Client Manager menus by clicking on the button at the upper right corner of the Decoder Control window.
Next, assign the object to a terminal configuration by opening a terminal configuration from the File menu. Click on the advanced setup Scanner tab, then on the Decoder Control Object list button, and finally on the object name.
Save the updated terminal configuration by clicking on File, and then Save. The next time the terminal is cold-booted, the new configuration will be downloaded automatically and the scan decoder control object will take effect.
Display/Mapping The Display/Mapping object is used to correct variations between application character sets and the terminal display character set. The terminal display uses the ISO-8859-1 font set, which is an international standard adhered to by most, but not all, applications. The display mapping is used to resolve any discrepancies.
Creating the Display/Mapping Object Create the object by clicking on Object Editors, then Display/Mapping, and then enter a file name. For the purposes of this example, the name is vt.
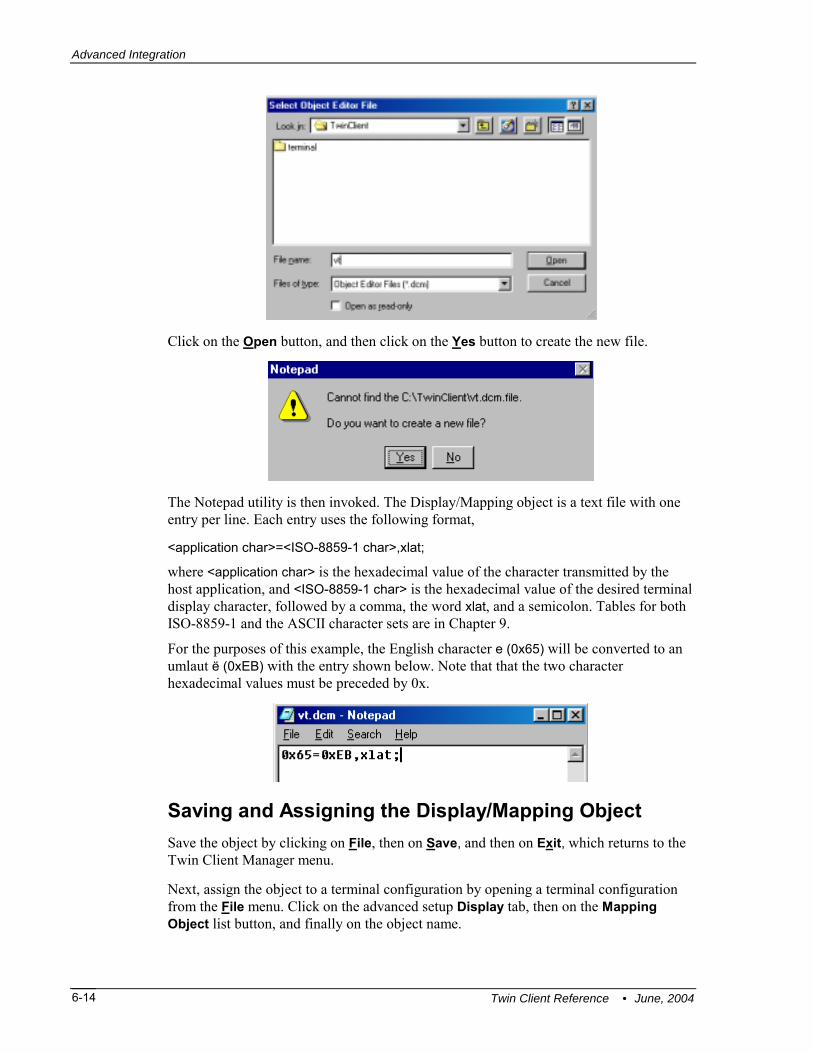
Advanced Integration
Twin Client Reference • June, 2004 6-14
Click on the Open button, and then click on the Yes button to create the new file.
The Notepad utility is then invoked. The Display/Mapping object is a text file with one entry per line. Each entry uses the following format,
<application char>=<ISO-8859-1 char>,xlat;
where <application char> is the hexadecimal value of the character transmitted by the host application, and <ISO-8859-1 char> is the hexadecimal value of the desired terminal display character, followed by a comma, the word xlat, and a semicolon. Tables for both ISO-8859-1 and the ASCII character sets are in Chapter 9.
For the purposes of this example, the English character e (0x65) will be converted to an umlaut ë (0xEB) with the entry shown below. Note that that the two character hexadecimal values must be preceded by 0x.
Saving and Assigning the Display/Mapping Object Save the object by clicking on File, then on Save, and then on Exit, which returns to the Twin Client Manager menu.
Next, assign the object to a terminal configuration by opening a terminal configuration from the File menu. Click on the advanced setup Display tab, then on the Mapping Object list button, and finally on the object name.
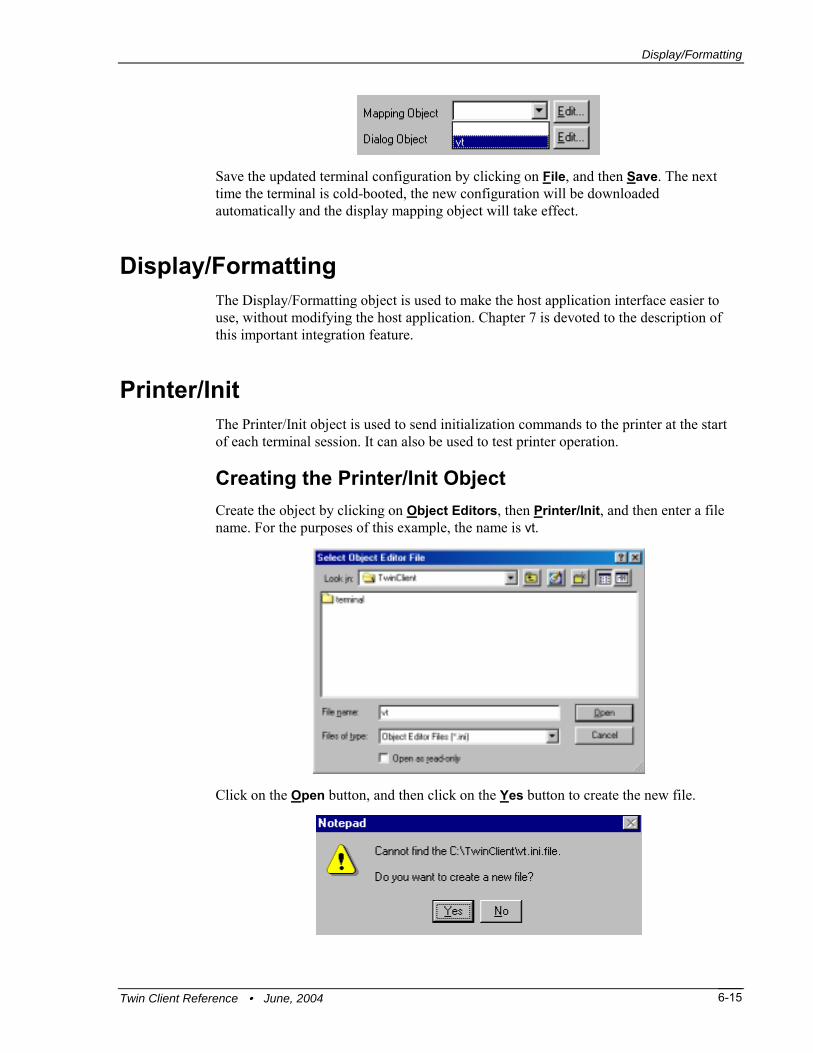
Display/Formatting
Twin Client Reference • June, 2004 6-15
Save the updated terminal configuration by clicking on File, and then Save. The next time the terminal is cold-booted, the new configuration will be downloaded automatically and the display mapping object will take effect.
Display/Formatting The Display/Formatting object is used to make the host application interface easier to use, without modifying the host application. Chapter 7 is devoted to the description of this important integration feature.
Printer/Init The Printer/Init object is used to send initialization commands to the printer at the start of each terminal session. It can also be used to test printer operation.
Creating the Printer/Init Object Create the object by clicking on Object Editors, then Printer/Init, and then enter a file name. For the purposes of this example, the name is vt.
Click on the Open button, and then click on the Yes button to create the new file.

Advanced Integration
Twin Client Reference • June, 2004 6-16
The Notepad utility is then invoked. The printer/init object is a text file, allowing for the entry of printer-specific commands. Refer to the documentation provided by the printer manufacturer for instructions.
Saving and Assigning the Printer/Init Object Save the object by clicking on File, then on Save, and then on Exit, which returns to the Twin Client Manager menu.
Next, assign the object to a terminal configuration by opening a terminal configuration from the File menu. Click on the advanced setup Printer tab, then on the Init Object list button, and finally on the object name.
Save the updated terminal configuration by clicking on File, and then Save. The next time the terminal is cold-booted, the new configuration will be downloaded automatically and the init object will be transmitted to the printer at the start of the next Telnet session.
Dialog The Dialog object is a script used to automate the user logon process with the host application. It can be used to create terminal screens, collect input, generate output, and make decisions based upon terminal keyboard or scanner input, and host application data.
Creating the Dialog Object Create the object by clicking on Object Editors, then Dialog. Commands selected from scrolling list on the right are added or inserted into the scripting area on the left using the click buttons between the two areas. The bottom left portion of the window is used to collect arguments for those commands that require them.
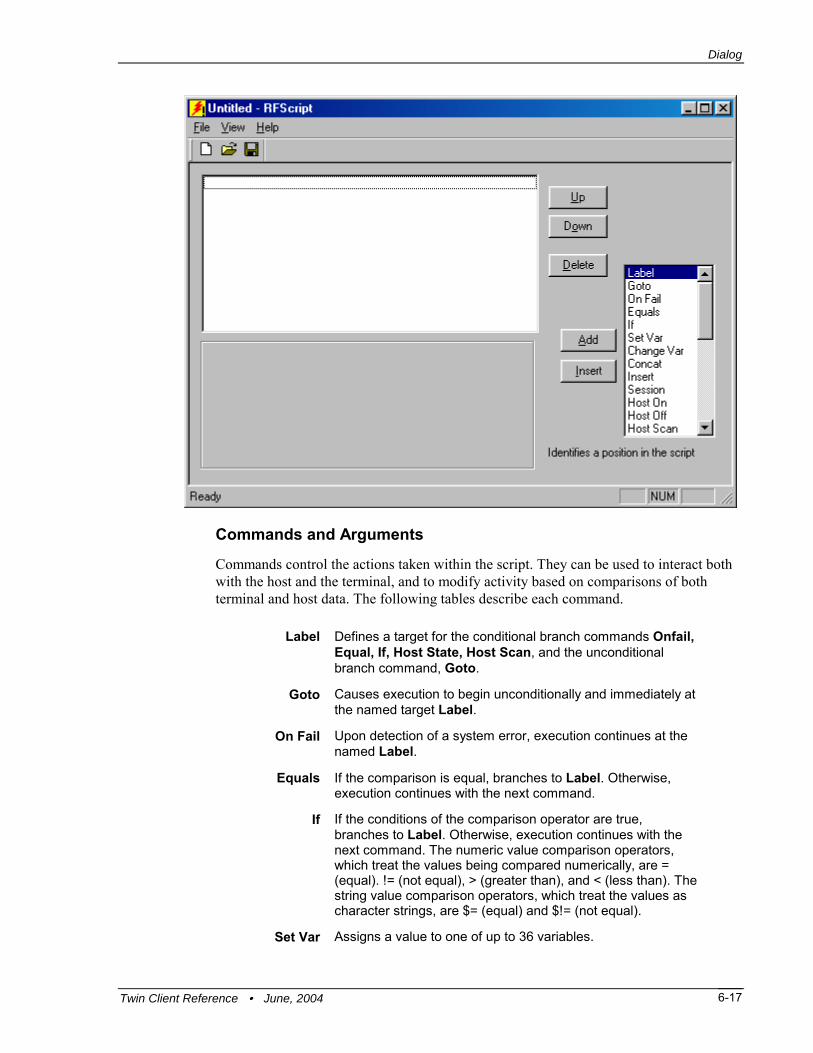
Dialog
Twin Client Reference • June, 2004 6-17
Commands and Arguments
Commands control the actions taken within the script. They can be used to interact both with the host and the terminal, and to modify activity based on comparisons of both terminal and host data. The following tables describe each command.
Label Defines a target for the conditional branch commands Onfail, Equal, If, Host State, Host Scan, and the unconditional branch command, Goto.
Goto Causes execution to begin unconditionally and immediately at the named target Label.
On Fail Upon detection of a system error, execution continues at the named Label.
Equals If the comparison is equal, branches to Label. Otherwise, execution continues with the next command.
If If the conditions of the comparison operator are true, branches to Label. Otherwise, execution continues with the next command. The numeric value comparison operators, which treat the values being compared numerically, are = (equal). != (not equal), > (greater than), and < (less than). The string value comparison operators, which treat the values as character strings, are $= (equal) and $!= (not equal).
Set Var Assigns a value to one of up to 36 variables.

Advanced Integration
Twin Client Reference • June, 2004 6-18
Change Var Adds to or subtracts from the value of a variable.
Concat Adds characters to the end of a variable.
Session Returns control of the session to the terminal operator. The operator returns control to the dialog object, at the next line, by pressing the key defined as the End Key in the Keyboard tab.
Host On Initiates a TCP/IP connection to the host system.
Host Off Terminates the TCP/IP connection to the host system.
Host Scan Scans the host display for a value, and continues execution at the named label if the value is found.
Host Update Refreshes the host display. This command is used after data has been sent to the host that may change the display, and prior to using the Host Scan or Host State conditional branch commands, or a Host Copy command.
Host Send Transmits data and/or a keystroke to the host.
Host Copy Copies characters from the host display to a variable.
Host State If the state of the session matches the value supplied, execution begins at the named Label. The possible values are inactive, meaning the host session has not been established, and plu, which means the host session has been established.
Settle Allows time for the host application to settle.
Term Enable Initializes the terminal configuration parameters.
Term Clear Clears the terminal display of all characters.
Term Display Puts a value or the value of a variable on the terminal display.
Term input Prompts the terminal operator to input data.
Term No Echo Prompts the terminal operator to input data, which will not be echoed on the terminal display.
Term Wait Waits for any input from the terminal.
Term Logoff Terminates the connection to the wireless network.
Exit Terminates execution of the dialog object.
Sleep Suspends all activity for the specified number of seconds.
Var Char Sets the character used internally by the dialog processor to indicate the name of a variable. The character is normaLoglly $. This command is used only when the first character of a value used in one of the conditional branching commands begins with a $.
Log Writes a message to the terminal log.
Comment Inserts documentation in the dialog object.

Dialog
Twin Client Reference • June, 2004 6-19
Adding Commands
The scrolling list box on the right side of the window is used to select a command. Click on the desired command and then click on the Add button to add the command to the dialog script.
All commands that require arguments prompt for them in the box at the lower left side of the window. In the example above, the Term Display command requires a row number and either a variable or a character string. In this case the display string is Hello World. Note that the text entry field scrolls to the right so that text longer than the size of the box can be entered.
Inserting and Deleting Commands
Click on the desired dialog line on the upper left side of the window to highlight the line, then click on the Insert button to insert a new command above the selected line, or click on the Delete button to remove the line.
Using Variables and Labels
The dialog object provides up to 36 variables to store temporary data collected during the execution of the script.

Advanced Integration
Twin Client Reference • June, 2004 6-20
These variables can be compared to fixed values or other variables using the if command. If the comparison is true, execution branches to the specified label.
Saving and Assigning the Dialog Object Save the object by clicking on File, Save As, and then enter a name. For the purposes of this example, the name is vt.

Extended Commands
Twin Client Reference • June, 2004 6-21
Then click on Save. Return to the Twin Client Manager menus by clicking on the button at the upper right corner of the Decoder Control window.
Next, assign the object to a terminal configuration by opening a terminal configuration from the File menu. Click on the advanced setup Display tab, then on the Dialog Object list button, and finally on the object name.
Save the updated terminal configuration by clicking on File, and then Save. The next time the terminal is cold-booted, the new configuration will be downloaded automatically and the dialog object will take effect.
Extended Commands The host application can control the terminal's scanner and keyboard dynamically, while the terminal is in session, by displaying in the host application presentation the extended commands described in the following sections.
Dynamic Decoder Control The format and content of the commands that control the scan decoder are described in the following sub-sections.
Note: There is an issue with Symbol's I2of5 decoder defaults. Symbol has specified a minimum length of 14 and a maximum length of 10 for the I2of5 decoder. This results in allowing only I2of5 barcodes of length 14 and 10 to be scanned. In order to scan I2of5 barcodes of length 6 to 14, you will need to create a barcode decoder object for I2of5 that specifies a minimum length of 6 and a maximum length of 14.

Advanced Integration
Twin Client Reference • June, 2004 6-22
CODABAR Control
Extended Command:
<ESC>[?0;<state>;<minlen>;<maxlen>;0z • = State: Disable/enable codabar scanning. 0=disabled, 1=enabled. • = Minlen: Minimum valid barcode length. Valid values are 1–54. • = Maxlen: Maximum valid barcode length. The maximum length must be greater
than or equal to the minimum length. Valid values are 1–54.
CODE 11 Control
Extended Command:
<ESC>[?11;<state>;<minlen>;<maxlen>;<depend>z • = State: Disable/enable code 11. 0=disabled, 1=enabled. • = Minlen: Minimum valid barcode length. Valid values are from 4 to 54. • = Maxlen: Maximum valid barcode length. The maximum length must be greater
than or equal to the minimum length. Valid values are from 4 to 54. • = Depend: Number of check digit. Valid values are 0, 1 or 27.
CODE 128
Extended Command:
<ESC>[?2;<state>;<minlen>;<maxlen>;0z • = State: Disable/enable code 128 scanning. 0=disabled, 1=enabled. • = Minlen: Specify minimum valid barcode length. Valid values are from 1 to 54. • = Maxlen: Specifies the maximum valid barcode length. The maximum length must
be greater than or equal to the minimum length. Valid values are from 1 to 54.
CODE 39
Extended Command:
<ESC>[?3;<state>;<minlen>;<maxlen>;<depend>z • = State: Disable/enable code 39 scanning. 0=disabled, 1=enabled. • = Minlen: Specifies the minimum valid barcode length. Valid values are from
1 to 54. • = Maxlen: Specifies the maximum valid barcode length. The maximum length must
be greater than or equal to the minimum length. Valid values are from 1 to 54. • = Depend: Disable/enable full ASCII code 39 interpretation. 0=disabled, 1=enabled.
CODE 49
Extended Command:
<ESC>[?4;<state>;0;0;0z • = State: Disable/enable code 49 scanning. 0=disabled, 1=enabled.

Extended Commands
Twin Client Reference • June, 2004 6-23
CODE 93
Extended Command:
<ESC>[?5;<state>;<minlen>;<maxlen>;0z • = State: Disable/enable code 93 scanning. 0=disabled, 1=enabled. • = Minlen: Minimum valid barcode length. Valid values are 1–54. • = Maxlen: Maximum valid barcode length. The maximum length must be greater
than or equal to the minimum length. Valid values are 1–54.
D 2 of 5
Extended Command:
<ESC>[?6;<state>;<minlen>;<maxlen>;0z • = State: Disable/enable code 25. 0=disabled, 1=enabled. • = Minlen: Minimum valid barcode length. Valid values range from 1–54. • = Maxlen: Maximum valid barcode length. The maximum length must be greater
than or equal to the minimum length. Valid values range from 1–54.
INTERLEAVED 2 OF 5
Extended Command:
<ESC>[?7;<state>;<minlen>;<maxlen>;0z • = State: Disable/enable interleaved 2 of 5 scanning. 0=disabled, 1=enabled. • = Minlen: Minimum valid barcode length. Valid values range from 1 to 54. • = Maxlen: Maximum valid barcode length. The maximum length must be greater
than or equal to the minimum length. Valid values range from 1–54.
EAN-13
Extended Command:
<ESC>[?8;<state>;0;0;0z • = State: Disable/enable EAN-13 scanning. 0=disabled, 1=enabled.
EAN-8
Extended Command:
<ESC>[?9;<state>;0;0;0z • = State: Disable/enable EAN-8 scanning. 0=disabled, 1=enabled.
PLESSEY/MSI
Extended Command:
<ESC>[?10;<state>;<minlen>;<maxlen>;<depend>z • = State: Disable/enable code MSI scanning. 0=disabled, 1=enabled.

Advanced Integration
Twin Client Reference • June, 2004 6-24
• = Minlen: Minimum valid barcode length. Valid values are from 4 to 54. • = Maxlen: Maximum valid barcode length. The maximum length must be greater
than or equal to the minimum length. Valid values are from 4 to 54. • = Depend: Specifies the number of required check digits. Valid values are 0, 1, or 2.
UPC-A
Extended Command:
<ESC>[?13;<state>;0;0;0z • = State: Disable/enable UPC-A scanning. 0=disabled, 1=enabled.
UPC-E0
Extended Command:
<ESC>[?14;<state>;0;0;0z • = State: Disable/enable UPC-E0 scanning. 0=disabled, 1=enabled.
UPC-E1
Extended Command:
<ESC>[?15;<state>;0;0;0z • = State: Disable/enable UPC-E1 scanning. 0=disabled, 1=enabled.
Supplemental Barcode Handling (UPC/EAN) Options
Extended Command:
<ESC>[?12;<state>;<minlen>;<maxlen>;<depend>z • = State: This flag should always be set to one. • = Minlen: Specifies if two character supplementals are enabled/disabled (only
applies to transmit mode 1). 0=no codes with two character supplementals decoded, 1=codes with two character supplementals decoded.
• = Maxlen: Indicates if five character supplementals are enabled/disabled (only applies to transmit mode 1). 0=no codes with five character supplementals decoded, 1=codes with five character supplementals decoded.
• = Depend: Specifies the supplemental transmit mode. 0=no supplementals transmitted to host, supplemental enable/disable ignored. 1=only codes with the appropriate supplemental (from minlen/maxlen) decoded. 2=all codes sent as is, supplemental enable/disable ignored.
Disabling All Decoders
Extended Command:
<ESC>[?z

Extended Commands
Twin Client Reference • June, 2004 6-25
This command is used to disable all barcodes on the handheld. Typically this would be issued before turning on an individual barcode type just to make sure of the state of the active barcodes.
Input Mode Command The input mode parameter sent from the application controls (via the host application) whether the terminal accepts input from the keyboard, the scanner or both. The format of this command is as follows:
<ESC>[!1;<mode>z
The mode parameter can be one of the following:
Mode Action Description
0 (default)
Scan and Key Data initially accepted from either the keyboard or scanner. Scanning, allowed on a partially keyed field, causes the keyed data to be discarded and the scanned data to be accepted.
1 Scan or Key Data initially accepted from either the keyboard or scanner. Scanning is not allowed on a partially keyed field. If the operator clears the field then scanning is again allowed.
2 Scan Only Data accepted only from the scanner. Use caution when using this command, bad barcode can block the user from completing input.
3 Key Only Data accepted only from keyboard, the scanner off.
Key Input Mode Command The processing of keyed input can be controlled dynamically, while the terminal is in session. The format of this command is as follows:
<ESC>[!2;<mode>z
The mode parameter can be one of the following.
Mode Description
0 (default)
Accepts characters between 0x20 and 0x7F.
1 Accepts alphabetic characters only.
2 Accepts numeric characters only.
3 Accepts alphanumeric characters only.
For example, to allow keyboard input of numeric characters only, use the following sequence: <ESC>[!1;3z<ESC>[!2;2z (HEX equivalent: 1B 5B 21 31 3B 33 7A 27 5B 21 32 3B 32 7A)

Advanced Integration
Twin Client Reference • June, 2004 6-26
To reset the terminal back to normal input, use the following sequence: <ESC>[!1;0z<ESC>[!2;0z (HEX equivalent: 1B 5B 21 31 3B 30 7A 27 5B 21 32 3B 30 7A)
Dynamic Font Change
Where DoubleHigh and DoubleWide can each be either 0 or 1: <ESC>[!5;<DoubleHigh>;<DoubleWide>;z To set only Double High mode: <ESC>[!5;1;0;z To set only Double Wide mode: <ESC>[!5;0;1;z To set Double High, Double Wide mode: <ESC>[!5;1;1;z To restore normal fonts: <ESC>[!5;0;0;z
Advanced Display Options for VT/HP The Advanced button in the advanced view Display tab is active when VT100, VT220, or HP700 emulation is selected. This option group controls how display attributes are processed, and it can also be used to simulate block mode operation (see the Mode option description in the Chapter 5 section, Customizing the Keyboard).
Attribute Mask
This check box group enables (checked), or disables (unchecked), the display of the indicated character attribute. Symbol character-based terminal displays are capable of displaying only the Reverse and Blinking attributes. All other attributes, if enabled, are displayed in Reverse, except for those attributes checked in the Blink Mask group (see below).

Advanced 3270 Keyboard Options
Twin Client Reference • June, 2004 6-27
Field Mask
The VT100 and VT220 protocols do not support the more efficient block mode of operation that is standard in the 3270 and 5250 protocols, since there are no VT100 or VT220 protocol commands for defining input fields.
However, Twin Client makes it possible to simulate block mode operation by using video display attributes to define input fields. Each box checked in the Field Mask window indicates a video attribute that will be recognized as an input field specification by the emulator. During a terminal session with a host, whenever the cursor is positioned on character with the selected attribute(s), all characters to the right of that position with the same attribute are interpreted to specify the length of the input field.
Blink Mask
This check box group is used to enable (checked), or disable (unchecked), the conversion of the selected attribute to Blinking.
Advanced 3270 Keyboard Options The Advanced button in the advanced view Keyboard tab is active when 3270 emulation is selected. The option groups in this window are used to automate keystroke generation under the special conditions described in the following subsections. It is also used determine the action taken with oversized scans.
Attribute Key This option is used to automatically transmit a keystroke to the 3270 host when the 3270 field matches the selected attribute. The automatic keystroke generation can be based on whether the input is scanned, or keyed, or both.
Note: When this feature is made active (setting the Key to a value other than noop and setting the Scan Field and or Key Field to a value other than off) it overrides all other automatic keystroke generation rules except for the Last Field Keys rules (described later in this section).

Advanced Integration
Twin Client Reference • June, 2004 6-28
Key
This scrolling list box is used to select the 3270 keystroke sent with scanned or keyed input when the field matches the selected attribute setting specified in Scan Field and Key Field (described below). This option overrides all other automatic keystroke generation, except for Last Field processing. The default key setting of noop disables this function.
Scan Field
This scrolling list box selects the 3270 field attribute that, when data is scanned into the field, results in automatic transmission of the selected Key with the data to the host. The choices are pen (for 3270 Light Pen Enabled), num (for 3270 Numeric Only), hi (for 3270 High Intensity) and hal (for 3270 High Intensity and Light Pen Enabled). The default value is off.
Key Field
This scrolling list box selects the 3270 field attribute that, when data is keyed into the field and the field is completely filled, results in automatic transmission of the selected Key with the data to the host. The choices are pen (for 3270 Light Pen Enabled), num (for 3270 Numeric Only), hi (for 3270 High Intensity) and hal (for 3270 High Intensity and Light Pen Enabled). The default value is off.
Last Field Keys This option is used to automate keystroke generation when the keyed or scanned input is into the last field on the 3270 display.
Note: When this rule generates a keystroke, it overrides all other automatic keystroke generation rules (i.e., Scan Key, Auto Send Key, and Attribute Key).
Scanned Input
This scrolling list box is used to select the 3270 keystroke to be sent when data is scanned into the last field on the 3270 display. The default value is noop, which disables this function.
Keyed Input
This scrolling list box is used to select the 3270 keystroke to be sent when data is keyed into the last field on the 3270 display, and the field is filled. The default value is noop, which disables this function.
Multiple Fields
This check box enables (checked) the Last Field Keys group only if the host display contains more than one input field.

New Environ Telnet Extension
Twin Client Reference • June, 2004 6-29
New Environ Telnet Extension The New Environ Telnet extension, also known as Workstation ID, is a mechanism for providing named variables with values to the host system via a Telnet negotiation at the beginning of each terminal session.
The New Environ option under the Twin Client Manager's Settings menu is used to create the variables, which are applied to all terminal configurations. Variables can be created that apply only to specific terminals (indicated by IP address). It is also possible to create variables that apply to all terminals.

Advanced Integration
Twin Client Reference • June, 2004 6-30
Creating Common Settings Variables that apply to all terminal sessions are created by clicking on the Common to all terminals button, and then entering the Variable and Value in the respective boxes. Then click on the Set button.
The variable and its value are then displayed in bottom list window.
Creating Terminal Specific Settings Variables that apply to specific terminal sessions are created by clicking on the Terminal Specific button, and entering the last two octets of the terminal IP address. Then enter the Variable and Value in the respective boxes and click on the Set button.

New Environ Telnet Extension
Twin Client Reference • June, 2004 6-31
Note: Click on the Show all settings check box to display both terminal specific and common variables.
When you set up the IP address in the New Environment entry form, you can get an “Invalid terminal address” error message. This error is from a routine that checks the IP address for accuracy. In IP settings, it is possible to use octal notation rather than the more common decimal method we see most often. The rule is that if there is a leading zero, it assumes octal notation and checks for a valid octal value (legal octal values are 0-7). For example if the second half of your terminal IP address is 078.131, the 8 in the .078 is what causes the error. The terminal client needs the leading zero(s) to correctly find the IP address. This leads to a catch 22.
Note: The following work-around will require that you hand edit the configuration file to
add the leading zeros if required. 1. Enter the address as normal without any leading zeros. If they are all 3-digit octets,
you need do nothing. If any octet is less than 3 digits, do the next step. 2. Open the PowerNet\TwinClient\tnenv.cf file for edit. Add leading zeros to entries:
78.132:DEVNAME=RF001;! → 078.132:DEVNAME=RF001;! 1.133:DEVNAME=RF002;! → 001.133:DEVNAME=RF002;! 12.134:DEVNAME=RF003;! → 012.134:DEVNAME=RF003;!
Save and send this to the terminal by doing a "Terminal/Send Configuration Files to Terminal" operation.
Changing and Deleting Settings Variable names and their values can be modified or deleted by clicking on the variable in the list window. Change the variable or value by editing the Variable and/or Value boxes, and click on the Set button. To delete the variable, press the Delete key on the PC. Deleted variables will continue to appear in the pull down list until after the settings have been saved.
Saving New Environ Click on the OK button to save the New Environ settings.
TN3270E Negotiation The following defines the TN3270E negotiation, permitting the transfer of some of the TN3270E Sub-negotiation variables such as Lunames from the Telnet terminal to the host during session initialization.
Note: This pertains to 3270 emulation.
TN3270E is implemented on OpenAir Linux using two text files located in the working directory (refer to /etc/.CRF/WORKDIR). The tnenvcom.cf file allows for the definition of variables that will be shared by all devices, and the tnenv.cf file allows for the definition of terminal-specific variables. These files are currently created and maintained

Advanced Integration
Twin Client Reference • June, 2004 6-32
with the system editor. Line Entry Format, tnenvcom.cf:
VARIABLE=VALUE;
Example *DEVTYP=IBM-3278-2;*CONNECT=RFZ81;
This will assign all terminals the luname of RFZ81. Line Entry format, tnenv.cf:
IDENT:VARIABLE=VALUE;[VARIABLE=VALUE]…!
Where IDENT is either the last two octets of the terminal's IP address, or the three digit Spectrum address (065-511). Multiple variables can be defined, separated by semi-colons. The entry is terminated with an exclamation.
Example file:
#IP terminals fully qualified octets 7 characters:
010.031:*DEVTYPE=IBM-3278-2;*CONNECT=RF3278.001;!
010.032:*DEVTYPE=IBM-3278-2;*CONNECT=RF3278.002;!
This will assign the terminal with an IP address of xxx.yyy.010.031 a device type of IBM-3278-2 to the luname of RF3278.001.
New Environ Negotiation The following defines the New Environ negotiation, permitting the transfer of environmental variables from the Telnet terminal to the host during session initialization.
Note: This pertains to the 5250 and VT emulations.
New Environ is implemented on OpenAir Linux using two text files located in the working directory (refer to /etc/.CRF/WORKDIR). The tnenvcom.cf file allows for the definition of variables that will be shared by all devices, and the tnenv.cf file allows for the definition of terminal-specific variables. These files are currently created and maintained with the system editor.
Line Entry Format, tnenvcom.cf:
VARIABLE=VALUE;
Line Entry format, tnenv.cf:
IDENT:VARIABLE=VALUE;[VARIABLE=VALUE]…!
Where IDENT is either the last two octets of the terminal's IP address, or the three digit Spectrum address (065-511). Multiple variables can be defined, separated by semi-colons. The entry is terminated with an exclamation.
Example file:

New Environ Telnet Extension
Twin Client Reference • June, 2004 6-33
#IP terminals fully qualified octets 7 characters:
010.031:DEVNAME=RF5291.001;!
#Spectrum ONE fully qualified radio ID 3 characters
065:DEVNAME=RF5291.002;!

Advanced Integration
Twin Client Reference • June, 2004 6-34
This page is intentionally blank.

Twin Client Reference • June, 2004 7-1
Chapter 7 • The Display Formatter The display formatter adapts full screen Telnet applications to the portable terminal environment without any modification to the host application. This powerful tool is included with Twin Client, and is also used with the OpenAir server when the Twin Client is operating in the Server mode.
A screen capture utility (included with the Twin Client Manager) is used to access the host application via Telnet and "capture" the host displays. Once captured, the screens are processed into a screen formatter object and assigned to a terminal configuration, which can then be downloaded automatically to the terminal, over the wireless network.
The Twin Client Display Formatter provides the following unique features: • = Performance – Optimized for minimum run-time overhead and maximum speed. • = Transparency – Fully transparent to the host application. • = Capacity – Up to 128 host screens per object, 16 terminal screens per host screen,
and 32 input fields per terminal screen. • = Simplicity – Intuitive drag-and-drop interface for screen capture and formatting. • = Flexibility – Supports all Twin Client terminals.
This chapter describes how to set the emulation, capture the host application displays, and process them into formatter objects for download to the terminal.
Setting the Emulation The first step in the formatting process is to set the emulation (VT/HP, 3270, or 5250) in preparation for capturing the host application displays. Click on and Start, Programs, PowerNet, Twin Client Manager, and then on the Settings menu, as shown below.
Click on Emulation and select an emulator from the list below.

The Display Formatter
Twin Client Reference • June, 2004 7-2
Then click on OK to return to the main Twin Client menu.
Starting the Emulator Start the emulator by clicking on the Object Editors menu and Screen Capture, as shown below.
The emulation window is displayed. Click on the Session menu, and then click on Session Settings.
In the Session Settings menu, enter the Host IP address and port of the host system, and then Click on OK to return to the emulator main menu.

Starting the Emulator
Twin Client Reference • June, 2004 7-3
Note: The Host Port of 23 is standard for Telnet. However, for security reasons the port number may be set to other values. Consult the local network administrator if a connection cannot be established on port 23.
To start a Telnet session with the host, click on the toolbar icon, or click on the Session menu and then on Connect. In this example, the 5250 emulator is used and the host system is an IBM AS/400.
Note: In vt emulation, the Twin Client screen above contains a scroll bar to select vt100, vt220, or hp700 emulation.
The host application displays are now ready to be captured.
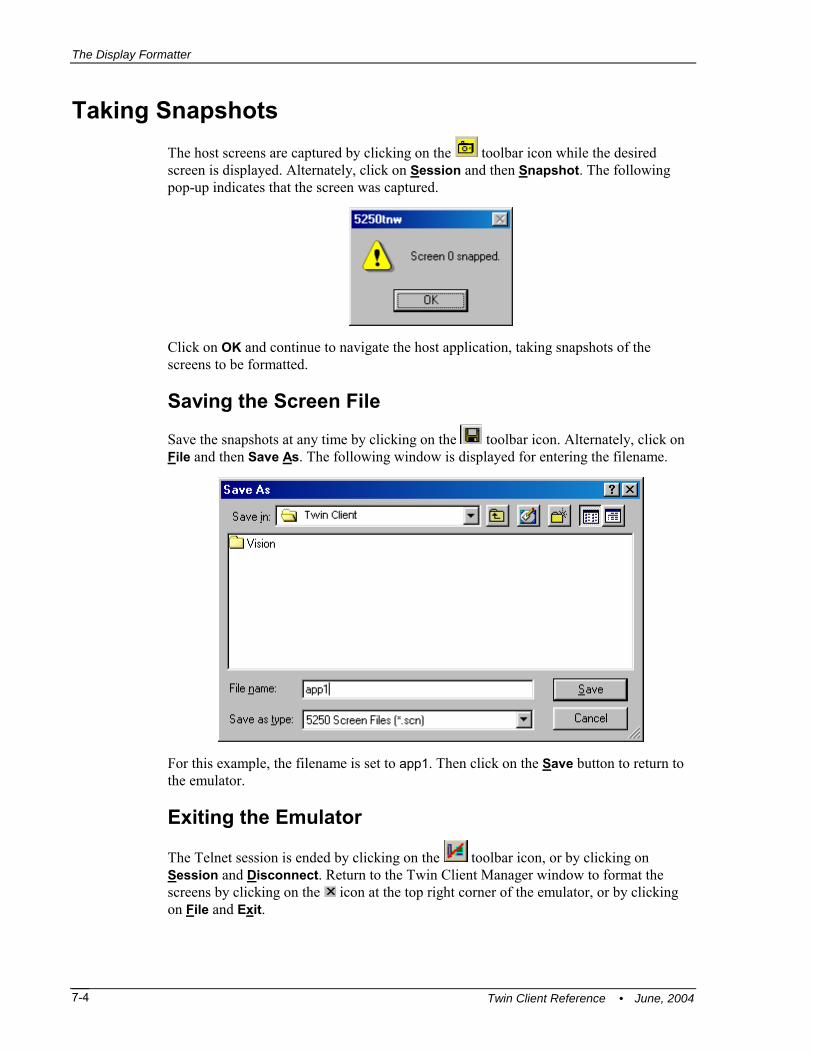
The Display Formatter
Twin Client Reference • June, 2004 7-4
Taking Snapshots The host screens are captured by clicking on the toolbar icon while the desired screen is displayed. Alternately, click on Session and then Snapshot. The following pop-up indicates that the screen was captured.
Click on OK and continue to navigate the host application, taking snapshots of the screens to be formatted.
Saving the Screen File
Save the snapshots at any time by clicking on the toolbar icon. Alternately, click on File and then Save As. The following window is displayed for entering the filename.
For this example, the filename is set to app1. Then click on the Save button to return to the emulator.
Exiting the Emulator
The Telnet session is ended by clicking on the toolbar icon, or by clicking on Session and Disconnect. Return to the Twin Client Manager window to format the screens by clicking on the icon at the top right corner of the emulator, or by clicking on File and Exit.

Formatting
Twin Client Reference • June, 2004 7-5
Formatting The screen file created in the previous sections can now be formatted. This section describes how to start the formatter, open a screen file, format the screens, save the formatted object, and finally to assign it to a configuration.
Starting the Formatter The formatter is started from the Twin Client Manager menu. Start the Twin Client Manager by clicking on Start, Programs, PowerNet, and Twin Client Manager. Then click on Object Editors, as shown below.
Click on the Display/Formatting option and the formatter window is displayed. To open the screen file, click on File.
Then click on Open, and click on the screen filename.

The Display Formatter
Twin Client Reference • June, 2004 7-6
Then click on the Open button and the formatter window is displayed, including the first host display that was captured. The terminal display window, which is blank at this time since no formatting has taken place, is also shown.
Note: The Terminal display window floats on top of the host screen. If it needs to be moved, click on the title bar and drag it to a different area of the host screen.
Setting Up the Formatter The terminal display must be set to match the terminal for which the formatter object is to be created. Click on the Tools menu and then Setup.
Note: While reformatting the host screens, you are able to create display fields larger than the selected screen size. This causes the reformatted screen not to appear on the terminal. The work around is to delete the terminal screen(s) in question, and then reformat them, paying attention to the width of the RF terminal screen.

Formatting
Twin Client Reference • June, 2004 7-7
Click on the desired terminal display size, and also ensure that the host screen size is set correctly. Then click on OK to return to the formatter.
Copying an Input Field An input field is copied from the host display to the terminal display by the same method used to copy text. Click the left side of the input field and drag the cursor to the right. The input field will be highlighted. Now click on the field again and drag it to the desired position in the Terminal display.
Adding an Input Field To add an input field, create text in the screen formatter window, highlight it, and choose Add Input Field from the Host menu. The input field added in the example below is a lower-case letter “x”.

The Display Formatter
Twin Client Reference • June, 2004 7-8
Adding and Copying Variable Display Text Variable text can be added to the terminal display by clicking on the Terminal window, moving the cursor to the desired display position, and typing in the text (in this case, variable text) as shown below.
To do this, move the cursor to the desired position in the host display and hold down the mouse button while moving the cursor to the right. Then, right-click on the text to be copied. This text will be highlighted as shown by the words “variable text” copied below. Then drag the highlighted text to the desired position in the terminal display and release the mouse button.
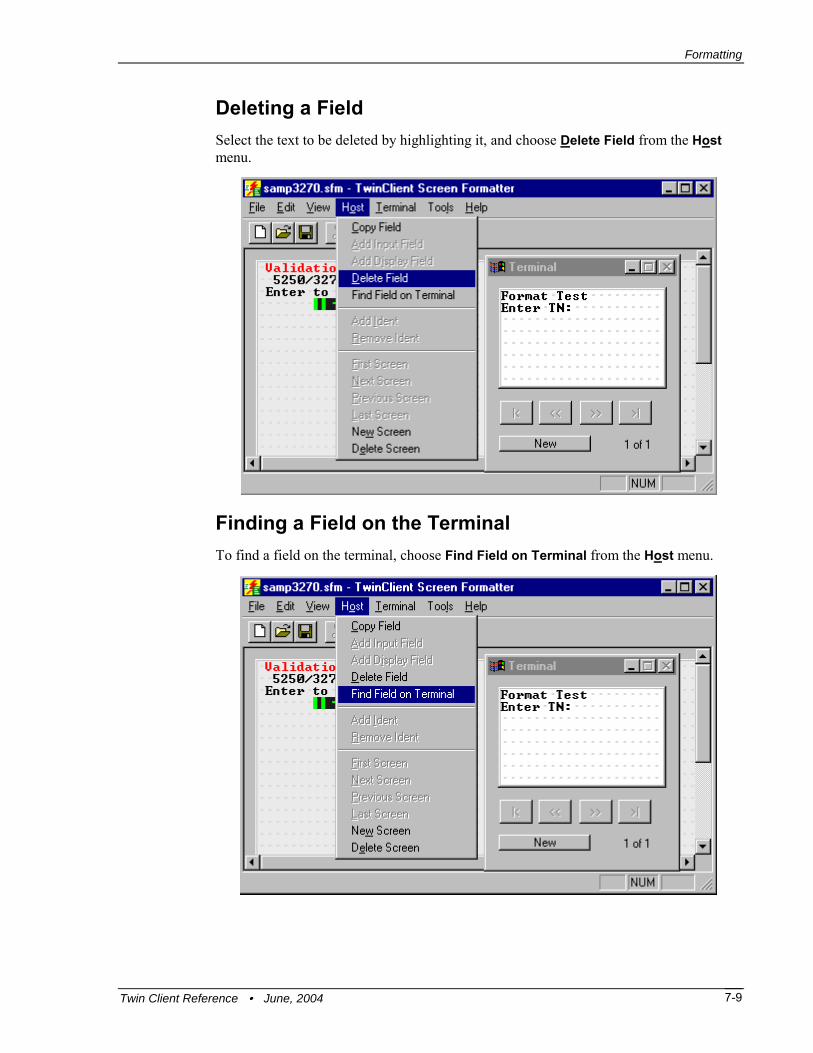
Formatting
Twin Client Reference • June, 2004 7-9
Deleting a Field Select the text to be deleted by highlighting it, and choose Delete Field from the Host menu.
Finding a Field on the Terminal To find a field on the terminal, choose Find Field on Terminal from the Host menu.

The Display Formatter
Twin Client Reference • June, 2004 7-10
Adding an Ident Formatting requires each host screen to be uniquely identified. One way to do this is to highlight unique text on the host screen (click on the left side of the text and drag the mouse to the right). Then click on the right mouse button, as shown below.
From the pull down menu, click on Add Ident. The highlighted field is now colored red on the host display, indicating that it is an Ident field. Up to 32 items can be highlighted on each host screen, so if a number of screens share similar features, they can be uniquely identified by adding more Idents. In the event that a group of host displays differ only by position of input fields, input fields can be used for Idents also.
Removing an Ident Remove an Ident field by highlighting it, and then selecting Remove Ident from the Host menu.

Formatting
Twin Client Reference • June, 2004 7-11
Navigating the Screen Formatter To move to the first screen in the screen formatter, choose First Screen from the Host menu.
To move to the next screen, select Next Screen from the Host menu.

The Display Formatter
Twin Client Reference • June, 2004 7-12
To move to the previous screen, select Previous Screen from the Host menu.
To move to the last screen, select Last Screen from the Host menu.

Formatting
Twin Client Reference • June, 2004 7-13
Adding a Terminal Screen New terminal screens are created by using the New button at the bottom of the Terminal display window. This is useful when more that one terminal screen is required to format the relevant data on the host screen. Up to 16 terminal displays can be associated with each formatted host display. These are called terminal pages, and the page that is displayed on the terminal at any point in time depends on the location of the host cursor position. The page to which the corresponding input field is formatted is the one displayed.
When multiple pages are present, the directional arrows are used to navigate through the pages.
Deleting a Screen To delete a screen, select Delete Screen from the Host menu.

The Display Formatter
Twin Client Reference • June, 2004 7-14
Saving the Formatter Object The formatter object is saved by clicking on the toolbar icon, or by clicking on File and Save.
Assigning the Object to a Terminal Configuration The formatter object is assigned to a terminal configuration by opening a terminal configuration in the Twin Client Manager, assigning the object to the Display Formatting Object, and saving the configuration.
To open a terminal configuration, click on File in the Twin Client Manager, as shown below.
Then click on Open, and click on the desired terminal configuration.

Formatting
Twin Client Reference • June, 2004 7-15
Then click on the advanced view Display tab, pull down the Display Formatter Object scrolling list box, and click on the object.
Save the newly modified terminal configuration using the toolbar icon, or click on File and then Save. The new configuration, incorporating the formatter object, is updated on the terminal, automatically, by cold booting the terminal.

The Display Formatter
Twin Client Reference • June, 2004 7-16
This page is intentionally blank.
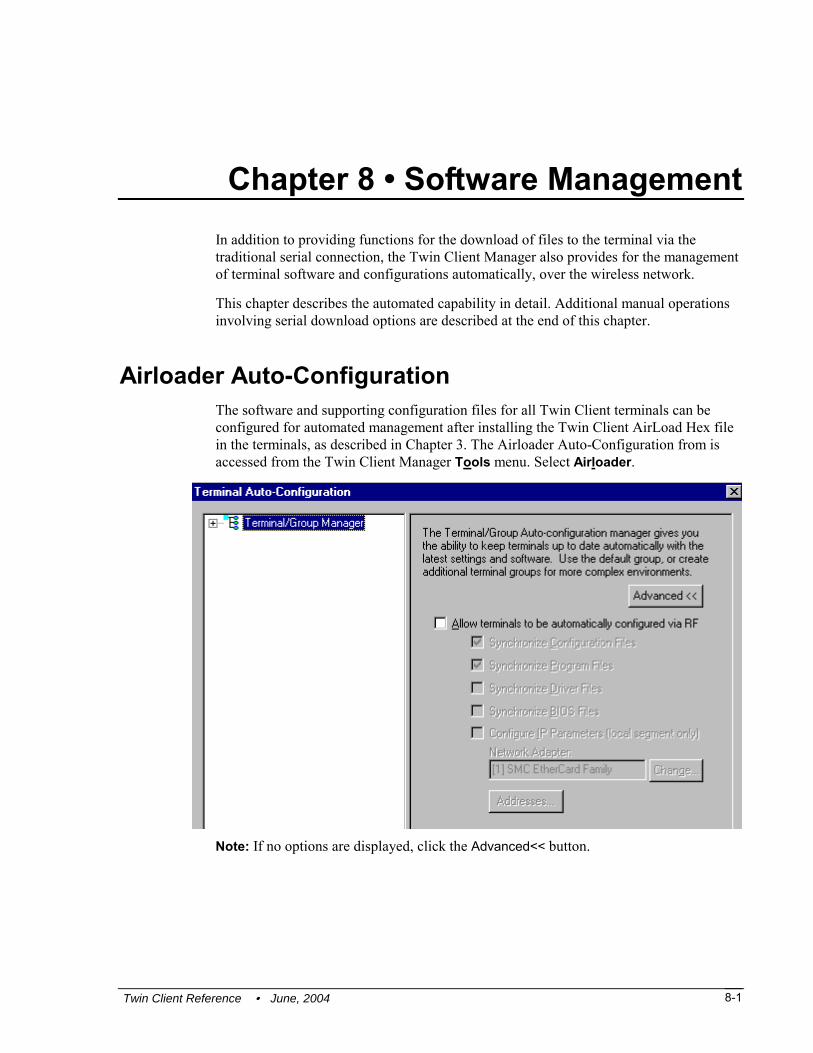
Twin Client Reference • June, 2004 8-1
Chapter 8 • Software Management In addition to providing functions for the download of files to the terminal via the traditional serial connection, the Twin Client Manager also provides for the management of terminal software and configurations automatically, over the wireless network.
This chapter describes the automated capability in detail. Additional manual operations involving serial download options are described at the end of this chapter.
Airloader Auto-Configuration The software and supporting configuration files for all Twin Client terminals can be configured for automated management after installing the Twin Client AirLoad Hex file in the terminals, as described in Chapter 3. The Airloader Auto-Configuration from is accessed from the Twin Client Manager Tools menu. Select Airloader.
Note: If no options are displayed, click the Advanced<< button.

Software Management
Twin Client Reference • June, 2004 8-2
Enabling Automatic Downloads Click to put a check in the Allow terminals to be automatically configured via RF box to enable automatic downloading. In the event another PC on the network is already configured and active, the following warning message is displayed.
Synchronizing Configuration Files Click to put a check in the Synchronize Configuration Files box to enable automatic synchronization of configuration files on the terminal. When the terminal is cold booted, its configuration files will be compared with the most recent on the PC. The terminal is updated automatically if it does not have the latest revision.
Synchronizing Program Files Click to put a check in the Synchronize Program Files box to enable automatic synchronization of program files on the terminal. When the terminal is cold booted, its program files will be compared with the most recent on the PC. The terminal is updated automatically if it does not have the latest revision.
Automatic IP Address Assignment New terminals will be assigned IP addresses automatically if the following box is checked.
Note: Do not check this option if a DHCP server is configured to manage address
assignments.
To set the addresses, click on the Addresses button to access the Segment Address Assignments dialog box, as shown in the following figure.

Airloader Auto-Configuration
Twin Client Reference • June, 2004 8-3
Enter the desired range in the From and To boxes as shown above, and then click on Add.
Creating New Groups New groups, with different configurations, can be created by clicking on the Terminal Group Manager, and then clicking the right mouse button as shown below.
After the new group has been created, the group settings option becomes available for change, as shown below.

Software Management
Twin Client Reference • June, 2004 8-4
After the Configuration File and all of the other parameters have been set, the group is made active by clicking on the Active check box.
Note: A setting under the Group allows you to associate a saved server file (.svr file) with a particular group. This means that the .svr file will get sent to the terminal in place of the default power.net file. The .svr files are created in Twin Client Manager under Tools/Servers.

Airloader Auto-Configuration
Twin Client Reference • June, 2004 8-5
Clicking on the Thin Mode button will cause all terminals in this group that are currently running in thick mode to be switched to thin mode the next time Airloader is run on the terminal. Click on the Schedule button to view a dialog box for scheduling an automatic Airloader update.
Select the desired time and click on OK. Click on Update Now to check all group members for updates.

Software Management
Twin Client Reference • June, 2004 8-6
Setting the Segment
Checking the Segment button restricts a terminal group to a range of IP addresses. The IP Address can be any valid address on the segment as it is used only to identify the segment. The setting of the Net Mask can be used to restrict the range. This feature is useful for segregating terminal groups by location.
Setting Force Reload
Clicking on the Force Reload button forces all terminals within a group to be automatically updated. The following warning message appears.
Click on the Yes button to force the reload.
Setting the Default Terminal Group New terminals that have not yet been assigned to any group are initially assigned to the default group in effect when they are cold-booted.
Any group can be made the default group by clicking on the group, and then clicking on the right mouse button. Then click on the Make Default option.
Reassigning Terminals After a terminal has been configured and assigned to the default group, it can be reassigned to a new group by clicking on the terminal icon as shown below.

TN Plus Features
Twin Client Reference • June, 2004 8-7
Then, holding the mouse button down, drag the terminal icon to the desired group as shown next.
Release the mouse button, which reassigns the terminal.
The next time the terminal is rebooted, it will be reconfigured as defined in the group specification.
TN Plus Features Under Tools in Twin Client Manager are the Screen Watcher, Terminal Messenger, and RF Monitor features. Note: The terminal may or may not be able to utilize the Screen Watcher or Terminal
Messenger features depending on its authorization codes.
Select Screen Watcher, enter the terminal’s IP address, and click on OK.

Software Management
Twin Client Reference • June, 2004 8-8
A screen will appear with a display resembling the terminal screen.
Clicking on the Font button on the upper left brings up a screen in which you can modify the font settings, as shown below.
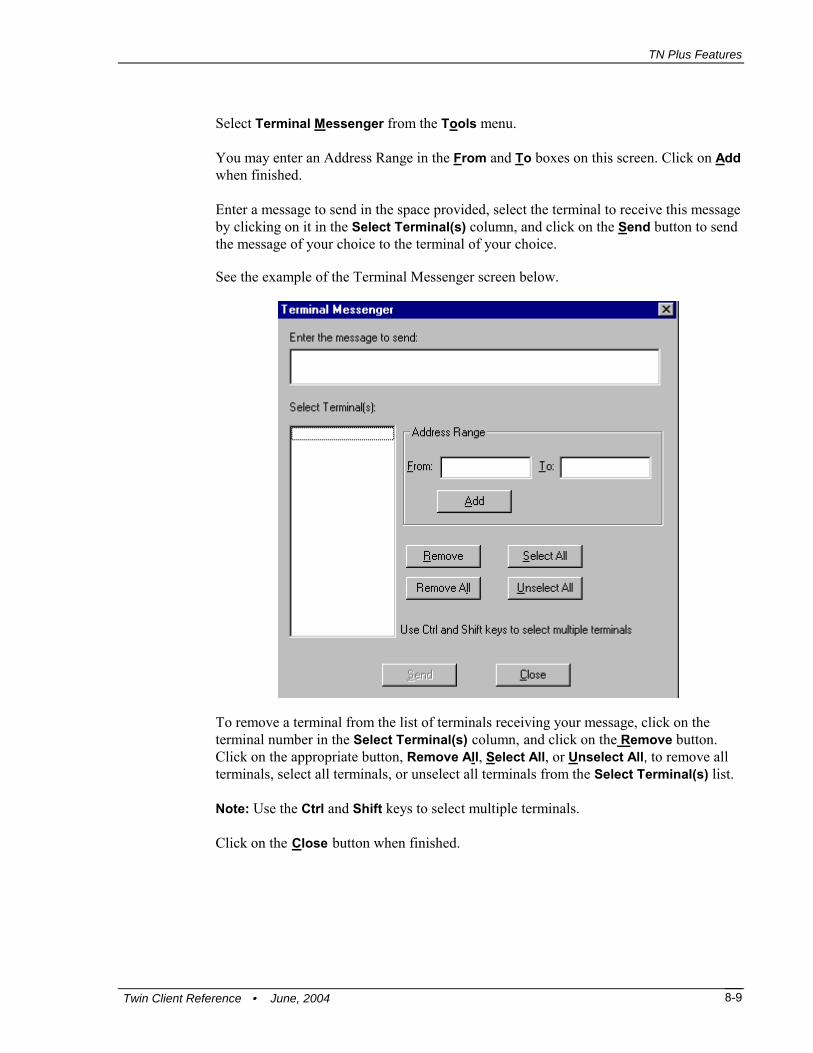
TN Plus Features
Twin Client Reference • June, 2004 8-9
Select Terminal Messenger from the Tools menu. You may enter an Address Range in the From and To boxes on this screen. Click on Add when finished. Enter a message to send in the space provided, select the terminal to receive this message by clicking on it in the Select Terminal(s) column, and click on the Send button to send the message of your choice to the terminal of your choice. See the example of the Terminal Messenger screen below.
To remove a terminal from the list of terminals receiving your message, click on the terminal number in the Select Terminal(s) column, and click on the Remove button. Click on the appropriate button, Remove All, Select All, or Unselect All, to remove all terminals, select all terminals, or unselect all terminals from the Select Terminal(s) list. Note: Use the Ctrl and Shift keys to select multiple terminals. Click on the Close button when finished.

Software Management
Twin Client Reference • June, 2004 8-10
Select RF Monitor from the Tools menu.
RF Monitor is an "Over The Air" diagnostic tool. It's used to collect diagnostic trace information from RF terminals running PowerNet Twin Client software.
It runs on a Windows PC and will send a command to the RF terminal to start tracing. The terminal, when it receives this command, will start sending the trace information over the RF link to the PC that issued the command. This will be written to a file on this PC that can be sent to us for analysis.
Click on File to Select Terminal or to Exit.
Choosing Select Terminal allows you to view a log of the terminal’s activity. Enter the Terminal IP address and Terminal IP Port, and click on OK.

TN Plus Features
Twin Client Reference • June, 2004 8-11
Click on Edit. Select Find, and/or Find Next to search for pieces of information in your log, or select Clear to clear the search.
Click on Actions to Start the Monitor or Stop the Monitor.
Click on Tools to set Debug Levels or Settings.
The options in Debug Levels are shown below.
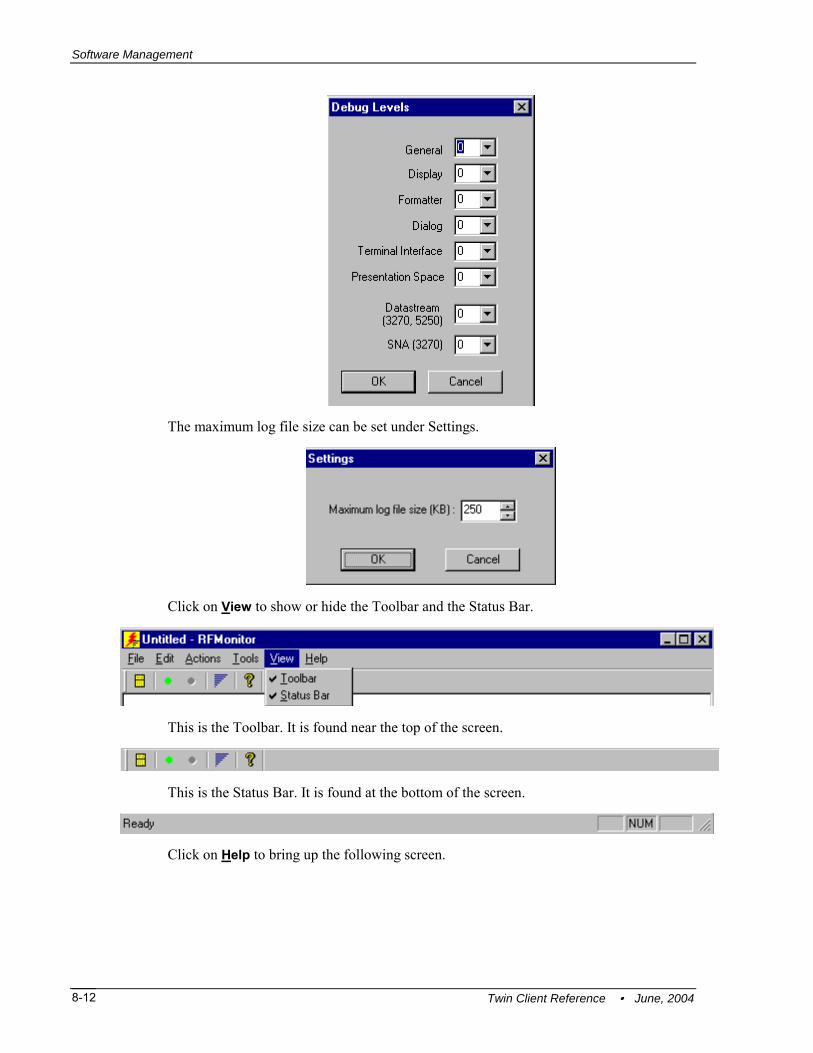
Software Management
Twin Client Reference • June, 2004 8-12
The maximum log file size can be set under Settings.
Click on View to show or hide the Toolbar and the Status Bar.
This is the Toolbar. It is found near the top of the screen.
This is the Status Bar. It is found at the bottom of the screen.
Click on Help to bring up the following screen.

TN Plus Features
Twin Client Reference • June, 2004 8-13
RF Monitor is a very small program and does not even require installation. Just place it in a directory on your PC and create a shortcut to run it. It will run on all versions of Windows except V3.1 and Win 95.
1. Move RF MONITOR to a Win PC with Network access to the RF terminal.
2. Run RF MONITOR (create a shortcut or do a start/run).
3. From the pull down menus, select File/Select Terminal.
4. Key in the RF terminal IP address and leave the port at 1802.
5. From the pull down menu, select Tools/Select Debug levels. Set all levels to 9
except Data stream and SNA.

Software Management
Twin Client Reference • June, 2004 8-14
6. With the RF terminal sitting at the Press Any Key prompt, select Actions/Start Monitor.
7. Press a key on the RF terminal to open a session, and you should see trace data in the RF Monitor window. When done, end the trace and the file will be named tnxxx.yyy.log (where xxx.yyy is the last 2 octets of the RF terminals IP address) in the directory in which RF Monitor was running.

TN Plus Features
Twin Client Reference • June, 2004 8-15
Common Problems with RF Monitor
• = The trace won’t start.
RF Monitor uses UDP to send commands to the RF Device. On busy networks UDP packets are not always delivered. The terminal can miss the command to start the trace. Below are some things that can be useful: a. Ping the RF terminal from the same PC before starting RF Monitor (seems to
"open" a path to the terminal).
b. Start the monitor with the terminal at the Press Any Key prompt. (While the terminal is at this prompt, it's not doing much and has a better chance of hearing the start trace command.)
• = I don't understand what this trace means.
The trace that this tool collects is engineering level information. It allows an end user to collect information that can be analyzed by Connect engineering. It will generally be requested by Connect support to help diagnose a reported problem. To be able to read and understand these completely, you need to have an understanding of:

Software Management
Twin Client Reference • June, 2004 8-16
a. Emulation protocols (IBM 5250, IBM3270, DEC VT200, etc.) b. PowerNet Twin Client products c. RF Network concepts d. Wired network concepts e. Telnet sessions f. TCP/IP
They are text files that can be read with any editor or viewer and can be useful to end users and integrators even if they may not have all the requirements above.
• = I have an intermittent problem and it could happen on any one of my 100
terminals. RF Monitor only does one terminal at a time. What can I do? RF Monitor is not the right diagnostic tool for this type of problem. PowerNet products have another diagnostic tool that can be used called the "Diagnostic Server". This tool can be setup to run trace diagnostics on up to 300 terminals at the same time. This tool will be provided as needed for systems under PowerNet support agreement OR by T&M when they are not covered. It also includes the service of a PowerNet support engineer.
Server Transfer is another feature. From the Tools menu, select Server Transfer.
The FTP Settings screen appears.
To send object editor and configuration files from Windows to your Linux box, enter your server address, and click on OK.

AirLoad Configuration
Twin Client Reference • June, 2004 8-17
AirLoad Configuration On the typical Symbol terminal, the client software will automatically find the Airloader auto-configuration server and check for updates.
Downloading Symbol Files Symbol terminals are normally delivered with Symbol software pre-installed. At the time of this writing, that software includes the OS and its utility programs, LWP, and the radio driver. Consult Symbol Technical documentation for the current files and version numbers.
If the Symbol software is not installed or is out of date, the Twin Client Manager provides for their installation. The following sections describe the required procedures.
Verifying the Symbol Files Verify the presence of LWP by cold-booting the terminal (refer to the Chapter 3 section Cold Booting the Terminal). Monitor the terminal display for a message similar to the one shown in the following figure.
FLASH TERMINAL LWP HEX v3.05-11 RF v1.04
If the message appears, then LWP, and the radio driver is already installed and the LWP version number should be noted for reference later in this procedure. If this message does not appear, then LWP.EXE is not installed; proceed to Symbol 3000 Series Terminal Download Procedure, Symbol 7500 Terminal Download Procedure, or Symbol CE Terminal Download Procedure.
If LWP and the radio driver are installed, the terminal will attempt to associate with an access point and then start an application. With nothing more than LWP and the radio driver installed, the terminal will display a message similar to that shown in the following figure.
No applications! D:\>
The terminal is now at a DOS prompt and OS programs can be executed. In the event that the terminal failed to associate, the Symbol radio configuration program, CFG24, can be run to set the radio parameters correctly so that the terminal successfully associates. Refer to Symbol documentation for detailed instructions on the use of CFG24.
If the terminal reboots and displays a cursor in the upper left hand corner of the display after LWP, UDP, and Twin Client are loaded, obtain the current version of Twin Client

Software Management
Twin Client Reference • June, 2004 8-18
software from the web site (It should be at least 6.3.1.) or give the terminal an IP address with cfg24 or cfg11. While being operated, Symbol 802b.11 RF terminals may randomly lock up after a power down. This is due to the radio not completely reviving on power up, and it eventually recovers after about an hour. These terminals may also experience increased disconnects and RF send errors. If so, contact Symbol for the latest drivers, LWP and UPD for 802.11b RF terminals. After setting the power down timer in Twin Client, the terminal may not power down. This is caused by the PWR Management function within Symbol's CFG11 and CFG24 program. If you set the mode to "CAM", it overrides the selection you made in Twin Client and the terminal will not power down. Set the PWR management to "PSP" within Symbol's CFG11 and CFG24.
The terminal may associate to the wrong Access Points, in the case of a terminal with two Access Points, one with the same ESSid as the terminal and the other with a different ESSid. After the terminal associates to the Access Point with the same ESSid and it roams to the other Access Point, it will associate but not communicate. This causes multiple issues with AirLoader being able to configure the terminals. It will appear to work, but actually won't. The terminal may hang, and you also may see poor radio performance. Configure both the terminals and all Access Points to the same ESSid. Contact Symbol for updated drivers.
Formatting the Flash Drive If the Symbol LWP requires replacement, format the flash drive and then download the desired LWP release. To format the drive, type FLSHFMT at the DOS prompt. After the format operation completes, proceed to the next section for download instructions.
Downloading Symbol 3000 Series Files Click on the Send Program Files to Terminal menu option.
Symbol files to be downloaded must be placed in the Twin Client subdirectory as shown in the following figure.

Downloading Symbol Files
Twin Client Reference • June, 2004 8-19
Then, click on the Custom Hex File button and then on the desired file from the window at the bottom, and then click on OK. Refer to Symbol 3000 Series Terminal Download Procedure, Symbol 7500 Terminal Download Procedure, or Symbol CE Terminal Download Procedure for instructions on preparing the terminal for download.
After the download of the Symbol software, the Twin Client AirLoad Hex file can be installed as described in the Selecting the AirLoad File section of Configuring the Manager. The Twin Client Manager will then automatically manage the terminal software and configuration.
The automated configuration management provided by the Twin Client Manager eliminates the need for serial download of terminal configuration. However, this function can be accomplished manually by clicking on Send Configuration Files to Terminal.
Note: This procedure assumes the Symbol LWP and Twin Client have been installed.
The following figure is displayed.
The procedure for running the LD.BAT utility on the terminal is described in the section entitled Reloading the Setup Files below.

Software Management
Twin Client Reference • June, 2004 8-20
Downloading Symbol 7500 Terminal Files 1. On the terminal, run Config_11 from the boot up menu and assign the ESS ID, and
TCP/IP parameters including IP address, subnet, and router.
2. In Twin Client Manager, do the following: a. Set the terminal type to Symbol 7500 and select the preferred emulation. b. Select Terminal->Send Program Files To Terminal. c. Select Standard Hex File and radio.hex, but don’t click OK just yet.
3. On the terminal, press and hold down the Power and Scan buttons until the terminal
reboots into IPL (Initial Program Loader) mode. 4. Select 115200 for baud rate. 5. Select Single Image and put the terminal in the cradle. 6. In Twin Client Manager, click the OK button. 7. After the transfer completes, select ‘Prev Menu’ then ‘Run System’ on the terminal
to restart.
8. Do Step 8 only if you first downloaded the hex file. On the terminal do the following: a. Select option 7 to get a dos prompt. b. Enter d:\modstart to restart in Twin Client mode.
9. To download the Twin Client configuration files:
a. After the terminal finishes booting and gets to the ‘Press Any Key’ prompt, press an uppercase C.
b. At the setup menu, press 4 – Receive Config and place the terminal in the cradle.
c. In Twin Client Manager, select Terminal->Send Setup Files To Terminal and click OK.
d. On the terminal, press Enter to start the transfer. When the transfer is complete, press Enter to continue. The terminal will reboot and should find the new configuration.
10. Repeat step 9 any time to download a new configuration.
11. Repeat steps 2 through 10 to switch emulations.

Downloading Symbol Files
Twin Client Reference • June, 2004 8-21
Downloading Symbol CE Terminal Files The following procedure is for Symbol 2840, 7940, 8040, 8140, 8840, 8940, and 9000 terminals. 1. Boot the terminal. 2. Go to Start, Settings, and Control Panel. 3. Double-click on the Communications icon. 4. Select the PC Connection tab. 5. Click on Change Connection if you want to change the baud rate. 6. Change the baud rate here if necessary, and click OK. 7. On the PC, choose Connection Settings from the File menu in ActiveSync.
The Connection Settings screen appears as follows.

Software Management
Twin Client Reference • June, 2004 8-22
8. Make sure that the box is checked in front of the option entitled, Allow serial cable or infrared connection to this COM port.
9. Click on OK. While ActiveSync is connecting, you will see the following screen.

Downloading Symbol Files
Twin Client Reference • June, 2004 8-23
When ActiveSync has connected, you will see the screen below.
10. Select No, and then click Next. The Connected screen appears.

Software Management
Twin Client Reference • June, 2004 8-24
11. On the PC, select Send Program Files to Terminal from the Terminal menu in Twin Client Manager.
The following screen will appear.
12. Click on OK.
The following screen will appear.

Downloading Symbol Files
Twin Client Reference • June, 2004 8-25
13. Click on OK.
14. On the PC, choose Send Configuration Files to Terminal from the Terminal menu
in Twin Client Manager.
You will see the following screen.
15. Click on OK.
The following screen will appear.
16. Click on OK. 17. On the terminal, click on Start, Programs, File Explorer, and Windows. 18. Select the Aironet Client Utility icon. 19. Enter the SSID, etc. 20. Click on OK. 21. Click on Start, Settings, and Control Panel. 22. Select the Network icon and choose on the Properties tab. 23. Set the IP Address, Subnet Mask, and Default Gateway, and click on OK. 24. Click on Start, Programs, TwinClient, and AirloaderSetup. 25. Make sure that the Run AirLoad checkbox is checked or unchecked, as desired. 26. Click on OK. 27. Warm boot the terminal.

Software Management
Twin Client Reference • June, 2004 8-26
Warm Boot the Terminal On the portable terminal, power the terminal Off, then boot the terminal using the key sequence specific to the terminal model as shown in the following table.
Warm Boot Sequence Following Power Off
Terminal Model & Keypad Key Sequence 284x Hold down both the up and down
scroll buttons and press the App 4 button.
314x, 35-key 614x, 35-key
Hold / and + keys. Press and release On/Off. Release / and + keys.
314x, 46-key 354x, 47-key 384x, 46-key 684x, 46-key
Hold 4 and 5 keys. Press and release Power. Release 4 and + keys.
104x, 27-key Hold P1 and Enter keys. Press and release Power. Release P1 and Enter keys.
394x, 54-key 6940, 54-key
Hold Shift and L keys. Press and release Power. Release Shift and L keys.
794x Press Power for 6 to 15 seconds. 804x Press and hold the PWR key (for
approximately 10 seconds) and release it as soon as the screen changes and the terminal begins to reboot.
814x Press Backlight, Func, and Down Arrow keys.
894x Press Power for 6 to 15 seconds. 9000 Press and hold the Power key for
5 seconds.
Note: The 7500 terminal does not require a warm boot.
If a configuration has already been downloaded to the terminal, or this is not the first time the terminal has been rebooted, proceed to the Reloading the Configuration section below.
First-time Download of Configuration Files After the first cold boot of the terminal following the download of a Twin Client application, the following screen is displayed.

Downloading Symbol Files
Twin Client Reference • June, 2004 8-27
SELECT MODE 1 - Telnet 2 - Server
Press 1 to select Telnet and place the terminal in the cradle. Then click OK on the PC to begin the download. After the download, warm boot the terminal, after which the following is displayed on the terminal.
Twin Client © 1991-2004, Connect, Inc. Keypress to Continue
The terminal is now ready to begin a Telnet session using the configuration files just downloaded.
Reloading the Configuration Files Reloading the configuration files through the serial port requires that LD.BAT be executed manually, before the radio driver is installed. This is accomplished by interrupting the normal Twin Client startup process using the following technique. Warm-boot the terminal and monitor the display for the message shown in the next figure.
Loading ….
While the message is displayed, press the Ctrl, Func, and 1 keys. In the case of the 394x and 694x series of terminals, press Ctrl and F1 instead. A DOS prompt is then displayed. Type LD.BAT at this DOS prompt. Then place the terminal in the cradle and click OK on the PC. After the download, warm boot the terminal, after which the following is displayed on the terminal.
Twin Client © 1991-2004, Connect, Inc. Keypress to Continue
The terminal is now ready to begin a Telnet session with the new configuration files.

Software Management
Twin Client Reference • June, 2004 8-28
Creating Custom Hex Files A custom hex file can be created for serial download to the terminal. The custom hex file can be built with the currently opened Twin Client configuration information, and is useful if the automatic configuration management capabilities are not used.
Click on the Send Program Files to Terminal menu option. Then click on the Create a New Custom Hex File button.
Enter the filename, and click on the Include configuration files in the hex file check box to include the current configuration file setup (if desired).
The new hex file is then created, and displayed in the bottom window.

Creating Custom Hex Files
Twin Client Reference • June, 2004 8-29
Refer to Symbol 3000 Series Terminal Download Procedure, Symbol 7500 Terminal Download Procedure, or Symbol CE Terminal Download Procedure for the detailed instructions to complete the download.

Software Management
Twin Client Reference • June, 2004 8-30
This page is intentionally blank.

Twin Client Reference • June, 2004 9-1
Chapter 9 • Character Sets
ISO 8859-1 Character Set
Description Char Dec Hex
non-breaking space 160 A0
inverted exclamation ¡ 161 A1
cent sign ¢ 162 A2
pound sterling £ 163 A3
general currency sign ¤ 164 A4
yen sign ¥ 165 A5
broken vertical bar ¦ 166 A6
section sign § 167 A7
umlaut (dieresis) ¨ 168 A8
copyright © 169 A9
feminine ordinal ª 170 AA
left angle quote, guillemot left « 171 AB
not sign ¬ 172 AC
soft hyphen - 173 AD
registered trademark ® 174 AE
macron accent ¯ 175 AF
degree sign ° 176 B0
plus or minus ± 177 B1
superscript two ² 178 B2
superscript three ³ 179 B3
acute accent ´ 180 B4

Character Sets
Twin Client Reference • June, 2004 9-2
Description Char Dec Hex
microsign µ 181 B5
paragraph sign ¶ 182 B6
middle dot · 183 B7
cedilla ̧ 184 B8
superscript one ¹ 185 B9
masculine ordinal º 186 BA
right angle quote, guillemot right » 187 BB
fraction one-fourth ¼ 188 BC
fraction one-half ½ 189 BD
fraction three-fourths ¾ 190 BE
inverted question mark ¿ 191 BF
capital A, grave accent À 192 C0
capital A, acute accent Á 193 C1
capital A, circumflex accent  194 C2
capital A, tilde à 195 C3
capital A, dieresis or umlaut mark Ä 196 C4
capital A, ring Å 197 C5
capital AE diphthong (ligature) Æ 198 C6
capital C, cedilla Ç 199 C7
capital E, grave accent È 200 C8
capital E, acute accent É 201 C9
capital E, circumflex accent Ê 202 CA
capital E, dieresis or umlaut mark Ë 203 CB
capital I, grave accent Ì 204 CC
capital I, acute accent Í 205 CD
capital I, circumflex accent Î 206 CE
capital I, dieresis or umlaut mark Ï 207 CF
capital Eth, Icelandic Ð 208 D0
capital N, tilde Ñ 209 D1
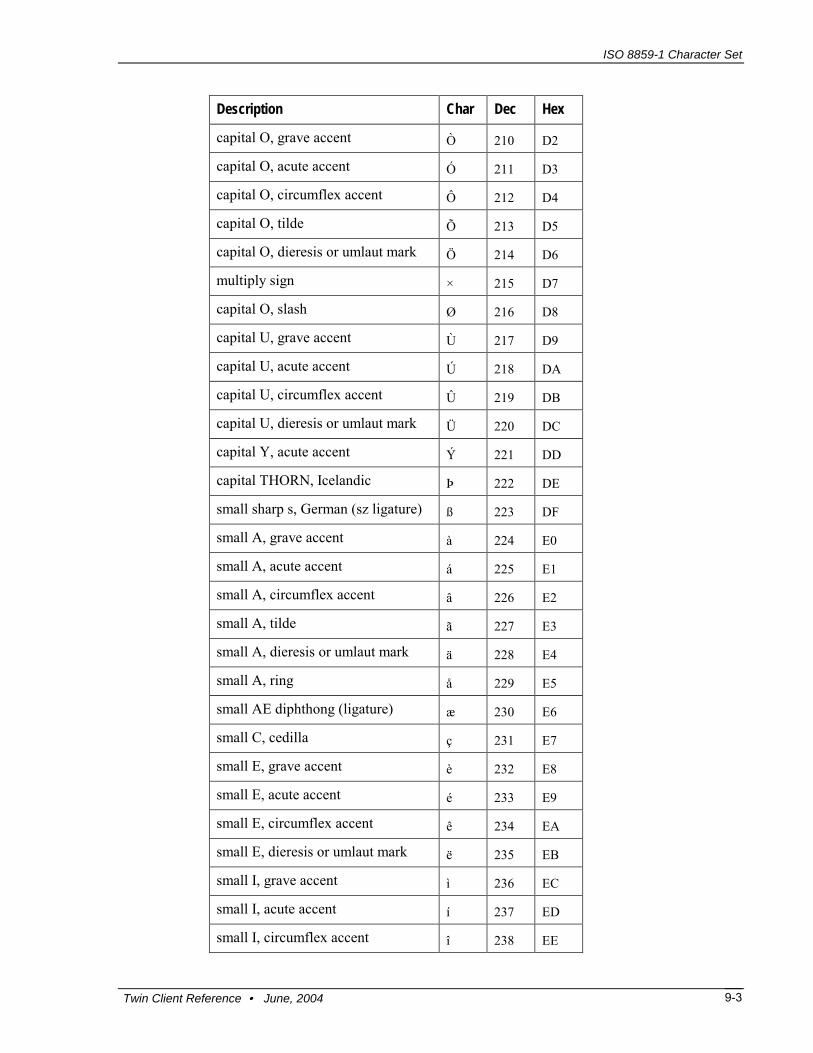
ISO 8859-1 Character Set
Twin Client Reference • June, 2004 9-3
Description Char Dec Hex
capital O, grave accent Ò 210 D2
capital O, acute accent Ó 211 D3
capital O, circumflex accent Ô 212 D4
capital O, tilde Õ 213 D5
capital O, dieresis or umlaut mark Ö 214 D6
multiply sign × 215 D7
capital O, slash Ø 216 D8
capital U, grave accent Ù 217 D9
capital U, acute accent Ú 218 DA
capital U, circumflex accent Û 219 DB
capital U, dieresis or umlaut mark Ü 220 DC
capital Y, acute accent Ý 221 DD
capital THORN, Icelandic Þ 222 DE
small sharp s, German (sz ligature) ß 223 DF
small A, grave accent à 224 E0
small A, acute accent á 225 E1
small A, circumflex accent â 226 E2
small A, tilde ã 227 E3
small A, dieresis or umlaut mark ä 228 E4
small A, ring å 229 E5
small AE diphthong (ligature) æ 230 E6
small C, cedilla ç 231 E7
small E, grave accent è 232 E8
small E, acute accent é 233 E9
small E, circumflex accent ê 234 EA
small E, dieresis or umlaut mark ë 235 EB
small I, grave accent ì 236 EC
small I, acute accent í 237 ED
small I, circumflex accent î 238 EE
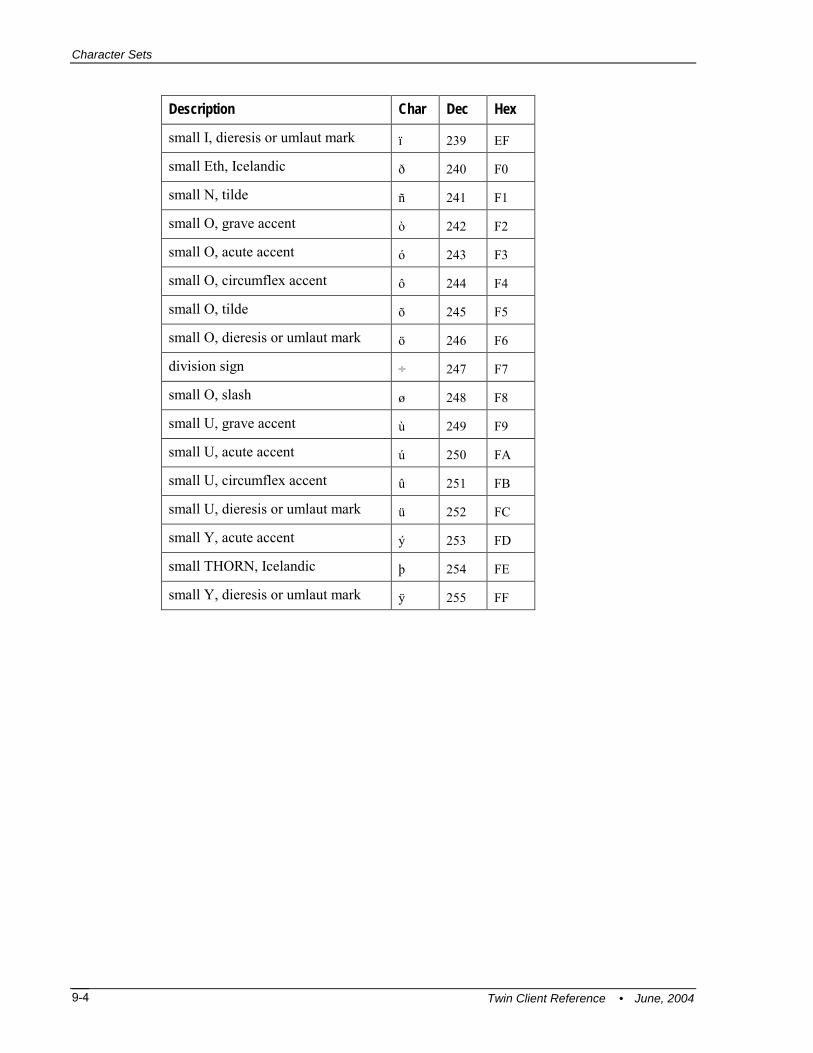
Character Sets
Twin Client Reference • June, 2004 9-4
Description Char Dec Hex
small I, dieresis or umlaut mark ï 239 EF
small Eth, Icelandic ð 240 F0
small N, tilde ñ 241 F1
small O, grave accent ò 242 F2
small O, acute accent ó 243 F3
small O, circumflex accent ô 244 F4
small O, tilde õ 245 F5
small O, dieresis or umlaut mark ö 246 F6
division sign ÷ 247 F7
small O, slash ø 248 F8
small U, grave accent ù 249 F9
small U, acute accent ú 250 FA
small U, circumflex accent û 251 FB
small U, dieresis or umlaut mark ü 252 FC
small Y, acute accent ý 253 FD
small THORN, Icelandic þ 254 FE
small Y, dieresis or umlaut mark ÿ 255 FF

ASCII Character Set
Twin Client Reference • June, 2004 9-5
ASCII Character Set Decimal and Hexadecimal Values
Dec Hex Dec Hex Dec Hex Dec Hex NUL 0 00 SP 32 20 @ 64 40 ` 96 60 SOH 1 01 ! 33 21 A 65 41 a 97 61 STX 2 02 " 34 22 B 66 42 b 98 62 ETX 3 03 # 35 23 C 67 43 c 99 63 EOT 4 04 $ 36 24 D 68 44 d 100 64 ENQ 5 05 % 37 25 E 69 45 e 101 65 ACK 6 06 & 38 26 F 70 46 f 102 66 BEL 7 07 ´ 39 27 G 71 47 g 103 67
BS 8 08 ( 40 28 H 72 48 h 104 68 HT 9 09 ) 41 29 I 73 49 i 105 69 NL 10 0A * 42 2A J 74 4A j 106 6A VT 11 0B + 43 2B K 75 4B k 107 6B NP 12 0C , 44 2C L 76 4C l 108 6C CR 13 0D - 45 2D M 77 4D m 109 6D SO 14 0E . 46 2E N 78 4E n 110 6E SI 15 0F / 47 2F O 79 4F o 111 6F
DLE 16 10 0 48 30 P 80 50 p 112 70 DC1 17 11 1 49 31 Q 81 51 q 113 71 DC2 18 12 2 50 32 R 82 52 r 114 72 DC3 19 13 3 51 33 S 83 53 s 115 73 DC4 20 14 4 52 34 T 84 54 t 116 74
NAK 21 15 5 54 35 U 85 55 u 117 75 SYN 22 16 6 54 36 V 86 56 v 118 76 ETB 23 17 7 55 37 W 87 57 w 119 77 CAN 24 18 8 56 38 X 88 58 x 120 78
EM 25 19 9 57 39 Y 89 59 y 121 79 SUB 26 1A : 58 3A Z 90 5A z 122 7A ESC 27 1B ; 59 3B [ 91 5B { 123 7B
FS 28 1C < 60 3C \ 92 5C | 124 7C GS 29 1D = 61 3D ] 93 5D } 125 7D RS 30 1E > 62 3E ^ 94 5E ~ 126 7E US 31 1F ? 63 3F _ 95 5F DEL 127 7F

Character Sets
Twin Client Reference • June, 2004 9-6
ASCII Character Set Octal Values
Oct Oct Oct OctNUL 000 SP 040 @ 100 ` 140SOH 001 ! 041 A 101 a 141STX 002 " 042 B 102 b 142ETX 003 # 043 C 103 c 143EOT 004 $ 044 D 104 d 144ENQ 005 % 045 E 105 e 145ACK 006 & 046 F 106 f 146BEL 007 ´ 047 G 107 g 147
BS 010 ( 050 H 110 h 150HT 011 ) 051 I 111 i 151NL 012 * 052 J 112 j 152VT 013 + 053 K 113 k 153NP 014 , 054 L 114 l 154CR 015 - 055 M 115 m 155SO 016 . 056 N 116 n 156SI 017 / 057 O 117 o 157
DLE 020 0 060 P 120 p 160DC1 021 1 061 Q 121 q 161DC2 022 2 062 R 122 r 162DC3 023 3 063 S 123 s 163DC4 024 4 064 T 124 t 164
NAK 025 5 065 U 125 u 165SYN 026 6 066 V 126 v 166ETB 027 7 067 W 127 w 167CAN 030 8 070 X 130 x 170
EM 031 9 071 Y 131 y 171SUB 032 : 072 Z 132 z 172ESC 033 ; 073 [ 133 { 173
FS 034 < 074 \ 134 | 174GS 035 = 075 ] 135 } 175RS 036 > 076 ^ 136 ~ 176US 037 ? 077 _ 137 DEL 177
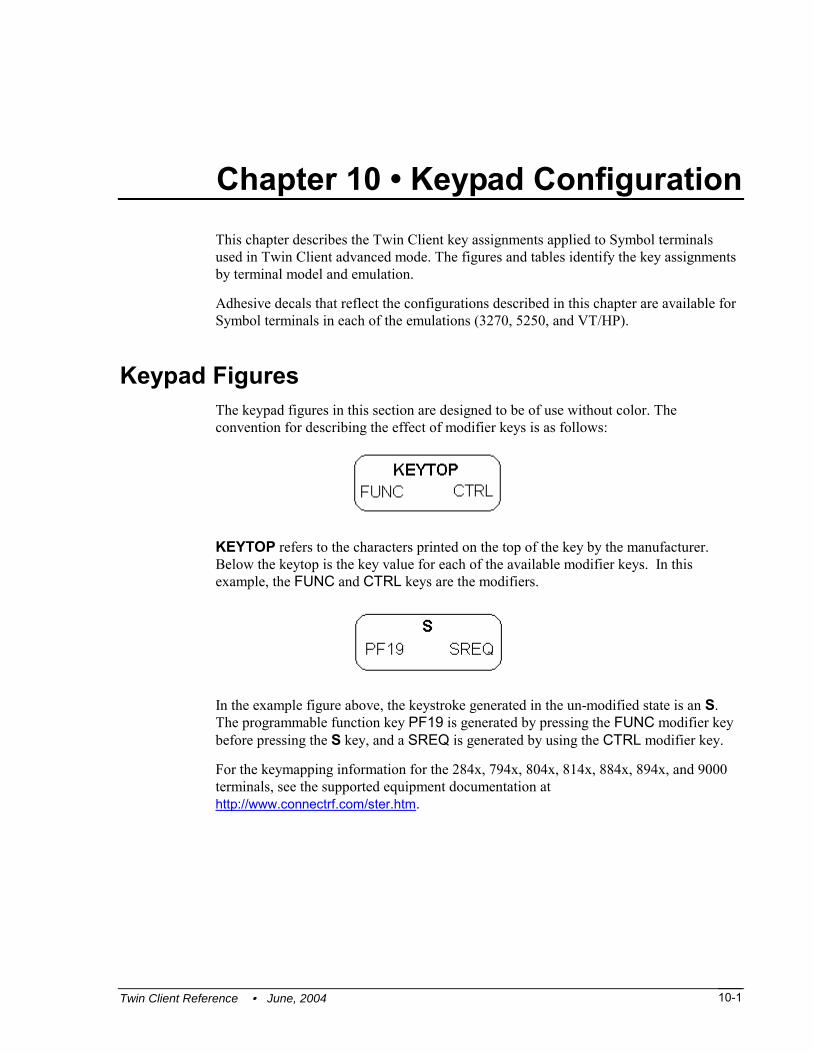
Twin Client Reference • June, 2004 10-1
Chapter 10 • Keypad Configuration This chapter describes the Twin Client key assignments applied to Symbol terminals used in Twin Client advanced mode. The figures and tables identify the key assignments by terminal model and emulation.
Adhesive decals that reflect the configurations described in this chapter are available for Symbol terminals in each of the emulations (3270, 5250, and VT/HP).
Keypad Figures The keypad figures in this section are designed to be of use without color. The convention for describing the effect of modifier keys is as follows:
KEYTOP refers to the characters printed on the top of the key by the manufacturer. Below the keytop is the key value for each of the available modifier keys. In this example, the FUNC and CTRL keys are the modifiers.
In the example figure above, the keystroke generated in the un-modified state is an S. The programmable function key PF19 is generated by pressing the FUNC modifier key before pressing the S key, and a SREQ is generated by using the CTRL modifier key.
For the keymapping information for the 284x, 794x, 804x, 814x, 884x, 894x, and 9000 terminals, see the supported equipment documentation at http://www.connectrf.com/ster.htm.

Keypad Configuration
Twin Client Reference • June, 2004 10-2
104x 27-key 3270
104x 27-Key 3270 Keyboard
KEYTOP FUNC CTRL SHF
1 2 53
6
4
7 8 9 0
! # $
^ & (*
%@
)MENU BKSP HELP SPACE CLEAR
CTRL
SHIFT
CAPS
FUNC
ENTER
PURPLE GREEN
TAB
◄
▲
►
▼
BkTab
PF1 PF11
PF8 PF18 PF7 PF17 PF6 PF16
PF5 PF15 PF4 PF14 PF2 PF12 PF3 PF13
PF10 PF20 PF9 PF19
PA1 PF21 PA3 PF23 Lamp PF24 PA2 PF22 \
Cntrst-Vw ↑
View ←
Cntrst+Vw↓
View →

Keypad Figures
Twin Client Reference • June, 2004 10-3
104x 27-key 5250
104x 27-Key 5250 Keyboard
KEYTOP FUNC CTRL SHF
1 2 53
6
4
7 8 9 0
! # $
^ & (*
%@
)MENU BKSP HELP SPACE CLEAR
CTRL
SHIFT
CAPS
FUNC
ENTER
PURPLE GREEN
TAB
◄
▲
►
▼
BkTab
PF1 PF11
PF8 PF18 PF7 PF17 PF6 PF16
PF5 PF15 PF4 PF14 PF2 PF12 PF3 PF13
PF10 PF20 PF9 PF19
Roll ↑ PF21 PF23 Lamp PF24 Roll ↓ PF22 \ Fld-
Cntrst-Vw ↑
View ←
Cntrst+Vw↓
View →

Keypad Configuration
Twin Client Reference • June, 2004 10-4
104x 27-key VT/HP
104x 27-Key VT Keyboard
KEYTOP FUNC CTRL SHF
1 2 53
6
4
7 8 9 0! # $
^ & (*
%@
)MENU BKSP HELP SPACE CLEAR
CTRL
SHIFT
CAPS
FUNC
ENTER
PURPLE GREEN
TAB
◄
▲
►
▼
BkTab
PF1 PF11
PF8 PF18 PF7 PF17 PF6 PF16
PF5 PF15 PF4 PF14 PF2 PF12 PF3 PF13
PF10 PF20 PF9 PF19
Lamp \
Cntrst-Vw ↑
View ←
Cntrst+Vw↓
View →

Keypad Figures
Twin Client Reference • June, 2004
104x 27-Key
PFC
1 5
7
SPACE CLEAR
CTRL
SHIFT
FUNC
(P)PURPLE
TAB
◄
▲
►
▼
U V
W X
M N - ’
A B ~ :
3E F + <EOF
3270 Keyb
KEYTOP urple Greunc P Funtrl P Ct
8
MENUY Z
SReq
4G H { >
oard
en c G rl G
9
HELP
I J } ?
2C D _ ”
0 CAPS
(G)GREEN S T ] /
Q R [ .
O P = ,
6 K L ` ;
BKSP
ENTER
|
10-5

Keypad Configuration
10-6
104x 27-Key
PFC
1 53
7
SPACE CLEAR
CTRL
SHIFT
FUNC
(P)PURPLE
TAB
◄
▲
►
▼
U V
W X
M N - ’
A B ~ : Attn
Fld+
E F + <Fexit
5250 Keyb
KEYTOP urple Greunc P Funtrl P Ct
MENU
Y Z
SReq
4G H { >
Tw
oard
en c G rl G
HELP
I J } ?
2C D _ ”
0 CAPS
(G)GREEN S T ] /
9Q R [ . Help Reset
8O P = ,
6 K L ` ;
BKSP
ENTER
|in Client Reference • June, 2004
Fld -

Keypad Figures
Twin Client Reference • June, 2004 10-7
104x 27-Key VT Keyboard
KEYTOP Purple Green Func P Func G Ctrl P Ctrl G
1 2 53
6
4
7 8 9 0
MENU BKSP HELP SPACE CLEAR
CTRL
SHIFT
CAPS
FUNC
ENTER
(P)PURPLE (G)GREEN
TAB
◄
▲
►
▼
E F + <
G H { >
U V
I J } ?
W X
Y Z
C D _ ”
S T ] /
Q R [ .
O P = ,
K L ` ;
M N - ’
A B ~ :
|

Keypad Configuration
10-8
314x/384x 46-key 3270
0
1
7 9
4 6
3
5
2
A B
L
C E
J
D
I
O
G H
X
CTL FUNC CLR-ESC SHF
▲
314x / 384x 46-Key 3270 Keyboard
KEYTOP FUNC CTL SHF
PWR
PF7 : &
PF9 < (
PF1 PA1 !
*
PF2 PA2 @
PF6 , ^
PF5 ‘ %
Lamp
PF3 PA3 #
PF4 ; $
PF10 { )
[
+
~
|
_
? EOF
\ Insert
/
= Home
-
F14
Tab BTb Cntrst- Space
} Contrast+ >
Vw ↑ Vw ← C Left
Vw ↓ Vw → C Right
PF19
F18
PF21
PF22
ENTER
.
8 PF8
K
F `
Y
▼
PF15
U
Z
PF11
P
WP
PF13
VBKSP
F12
N PF24
]
Q P
PF17 Help
PPF16
T PF20
M
R
PF23
S SReq
Twin Client Reference • June, 2004

Keypad Figures
Twin Client Reference • June, 2004 10-9
314x/384x 46-key 5250
0
1
7 9
4
8
6
3
5
2
A B
L
C
K
E
J
D
F I
O N
G
M
H
P
Y X
T
W
S
U
R
V
Q
Z
CTL FUNC CLR-ESC SHF
▼ BKSP ▲
.
314x / 384x 46-Key 5250 Keyboard
KEYTOP FUNC CTL SHF
PWR
PF7 : &
PF9 < (
PF1 Roll Up !
PF8
*
PF2 Roll Down @
PF6 , ^
PF5 ‘ %
Lamp
PF3 #
PF4 ; $
PF10 { )
[
+
~ Attn
|
_
? FExit
\ Insert
/
= Home
-
`
PF15
PF14 Erase
PF11
PF13
PF12
Tab BTb Cntrst- Space
} Contrast+ >
Vw ↑ Vw ← C Left
Vw ↓ Vw → C Right
PF24
PF19 SReq
PF18 Reset
PF17 Help
PF16
PF20
PF23
]
PF21 Fld+
PF22 Fld-
ENTER

Keypad Configuration
Twin Client Refe10-10
314x/384x 46-key VT/HP
0
1
7 9
4 6
3
5
2
B
L
C E
J
D
I
O N
G
M
H
X
S R
CTL FUNC SHF
▲
314x / 384x 46-Key VT Keyboard
KEYTOP FUNC CTL SHF
PWR
PF7 : &
PF9 < (
PF1 !
*
PF2 @
PF6 , ^
PF5 ‘ %
Lamp
PF3 #
PF4 ; $
PF10 { )
+
~
|
_
?
\ /
=
-
F14
Tab BTb Cntrst- Space
} Contrast+ >
Vw ↑ Vw ← C Left
Vw ↓ Vw → C Right
PF19
F18
]
ENTER
Insert
.
8 PF8
A
CLR-ESC [ Del Esc
K
F `
Y
▼
PF15
U
Z
PF11
P
WP
PF13
VBKSP
F12
Q P
PF17
PPF16
T PF20
rence • June, 2004

Keypad Figures
Twin Client Reference • June, 200
354x 47-key 3270
CLR
A
J L
F
X
2
FUNC
1 Enter 3
4 6 Space
↓
354x 47-Key 3270 Keyboard
CTRL SHF PWR
F
PF6 , ^
Tab /
PF2 PA2 @
PF4 ; $
PF3 PA3 #
PF1 PA1 !
Lamp
PF10 Cntrst- )
Contrast+ >
0 .
PF16
Vw ↓ Vw → →
~
KEYTOP
eq
UNC CTRL
SHF
7 PF7 : &
8 PF8 *
4
Bksp Btab
?
5 PF5 ‘ %
9 PF9 <
(
W PF15
V PF14
U PF13
Y PF11
Z PF12
↑ Vw ↑ Vw ← ←
T PF20
Q PF17
R PF18
S PF19
SR
P PF24
M PF21
N PF22
O PF23
]
K[
}I { Insert
D|
B_
C+
-
H \ Home
E ` EOF
G=
10-11

Keypad Configuration
10-12
354x 47-key 5250 →→→→→
CLR
I J K L
X
2
FUNC
1 Enter 3
4 6
↓
354x 47-Key 5250 Keyboard
CTRL SHF PWR
FUNC CTRL SHF
PF6 , ^
PF2 @
PF4 ; $
PF3 #
PF1 !
Lamp
PF10 Cntrst- )
Contrast+ >
0 .
PF16 Erase
Vw ↓ Vw → →
KEYTOP
Insert
Roll ↓ Roll ↑
7 PF7 : &
Space Tab Fld+
/
8 PF8 *
Bksp Btab Fld-
5 PF5 ‘ %
9 PF9 <
(
W PF15
V PF14
U PF13
Y PF11
Z PF12
↑ Vw ↑ Vw ← ←
T PF20
Q PF17 Help
R PF18 Reset
S PF19 SReq
P PF24
M PF21
N PF22
O PF23
]
[
} {D|
B_
C+
A ~ Attn
F-
H \ Home
E ` FExit
G=
Twin Client Reference • June, 2004

Keypad Figures
Twin Client Reference • June, 2004 10-13
354x 47-key VT/HP
CLR
A
E
I J K L
M N O P
T S R Q
D C B
H G F
W X
Y Z
V U
2
FUNC
1 Enter 3
4 5
7
6 Space
8 9
↓
Bksp
↑
354x 47-Key VT Keyboard
CTRL SHF PWR
FUNC CTRL SHF
PF7 : &
PF6 , ^
Tab /
PF8 *
Btab ?
PF5 ‘ %
PF2 @
PF4 ; $
PF3 #
PF1 !
PF9 < (
Lamp
PF10 Cntrst- )
Contrast+ >
0 .
PF16
PF15
PF14
Vw ↓ Vw → →
PF13
PF11 PF12
Vw ↑ Vw ← ←
PF20 PF17 PF18
PF19
]
[ } { Insert
| _ + ~
-
\ ` =
KEYTOP
Esc Del

Keypad Configuration
10-14
BKSP
1 2
8
4
7
5
F6
►
▲ ◄
▼
SPACE
FUNC ALPHA FU
0
F4 F7F5F3
L
E B
H
C D
O
Y
P
X
U
R
V
S
!
&
%$
)F11
F20
F16 F17 F15
18 F19
F14
F1
F10
F13
F2
F4 F5
F8 F7
F21 F22
F23 4
View ↑
View ↓
View
View →
} |{ [ ]
,
Tab
SReq
Reset
Light
A
Dark
Bk Tab
614x, 31-Key 3
EOF
KEYT
G
*9
6
3
CLEA
CTRL
NC CTRL
I
Z
W
‘
F12
F6
F9
<
>
H
270 Keyboa
OP
/
_ CTRL
J ? \
.
K M NFF
←
FUNC
(
elp
Q
ALPHA
^
TENTER
#: Lamp
@
F3F2
R
r
_
= ;
+ ~`
SCAN
Twin Client Reference • June, 2004
d

Keypad Figures
Twin Client Reference • June, 2004
BKSP
1 2
8
4
7
5
F6
►
▲ ◄
▼
SPACE /
FUNC ALPHA FU
0
F4 F7 F5F3
K M
F
E B
H
C
G
O
P
X
U
R
V
S
!
&
%$
)F11
F20
F16 F17 F15
F18 F19
F14
F1
F10
F13
F2
F4 F5
F8 F7
F21 F22
F23 4
View ↑
View ↓
View ←
View →
} | { [ ]
,
Fld +
Tab
SReq
Roll ↑
Reset
Roll ↓
Light
Home
FExit
Fld -
Dup
Dark
Attn
Bk Tab
614x, 31-Key 5
SCAN
KEYT
A
*
_ CTRL
I< ? \
.
C
CTR
NC CTR
Q
Z
T
W
‘
F1
F3
F6
F9
>
250 Ke
OP
N
L9
6
3 EN
LEAR
L
L
AL
FU
^
#
(
2
=
:
Help
yboard
J
D
TER
PHA
NC
;
Lamp
Y
@
F2
_+
~ `10-15

Keypad Configuration
10-16
BKSP
1 2
8
4
7
5
F6
►
▲ ◄
▼
SPACE /
FUNC ALPHA FU
0
F4 F7F5F3
L
F
E B
H
C
G
D
O
Y
P
U
R
V
S
!
&
%$
)F11
F20
F16 F17 F15
F18 F19
F14
F1
F10
F13
F2
F4 F5
F8 F7
F21 F22
23 4
View ↑
View ↓
View ←
View →
} |{ [ ]
,
Tab
Light
Dark
Bk Tab
614x, 31-Key V
Insert
N
A
*
_ CTRL
J I< ? \
.
N ‘>
KF
M9
6
3 ENTER
CLEAR
ALPHA
FUNC
Q
T
W
^
#
(
F12
F3
F6
F9
= ;
: Lamp
X
NC
T K
P
Z
@
F2
CTRL
CTRL
eyboard
_
+
~ `SCA
KEYTO
Twin Client Reference • June, 2004

Keypad Figures
Twin Client Reference •
614x 35-key 3270
B b
View Le ◄
N PWR
A
K
SHI
CTR
June, 2004
614x 35-Key 3270 Keyboard
F20 ~
F2 }
F21 +
F22 {
Insert F18 ]
Home F17 [
F16 = `
,
ft F11 :
View Up F13 ▲ “
iewDownF1
‘
ViewRightF12 ► ;
F4 4 $
F 6 ^
F5 5 %
Contrast+ . >
CTRL FUNC
NUM ALT
NUM = ALPHA OFF ALT = FUNC + CTRL
KEYTOP
B D C E
H G I
M L N
R S FT T
L
Z P
EOF F24 |
3
F19 \
L
4
6
/
J
CLEAR
ALPHA
ENTER AMP
FUNC
10-17
▼
V
ab
<
ta
F15
F
F7 7 &
O
F9 9 (Q
F88 *
P
TSPACE
PA1 F1 1 !
U
PA2 F2 2 @V
PA3 F3 3 #W
Contrast-F10 0 )
Y
? -X
_
SCA
BKS
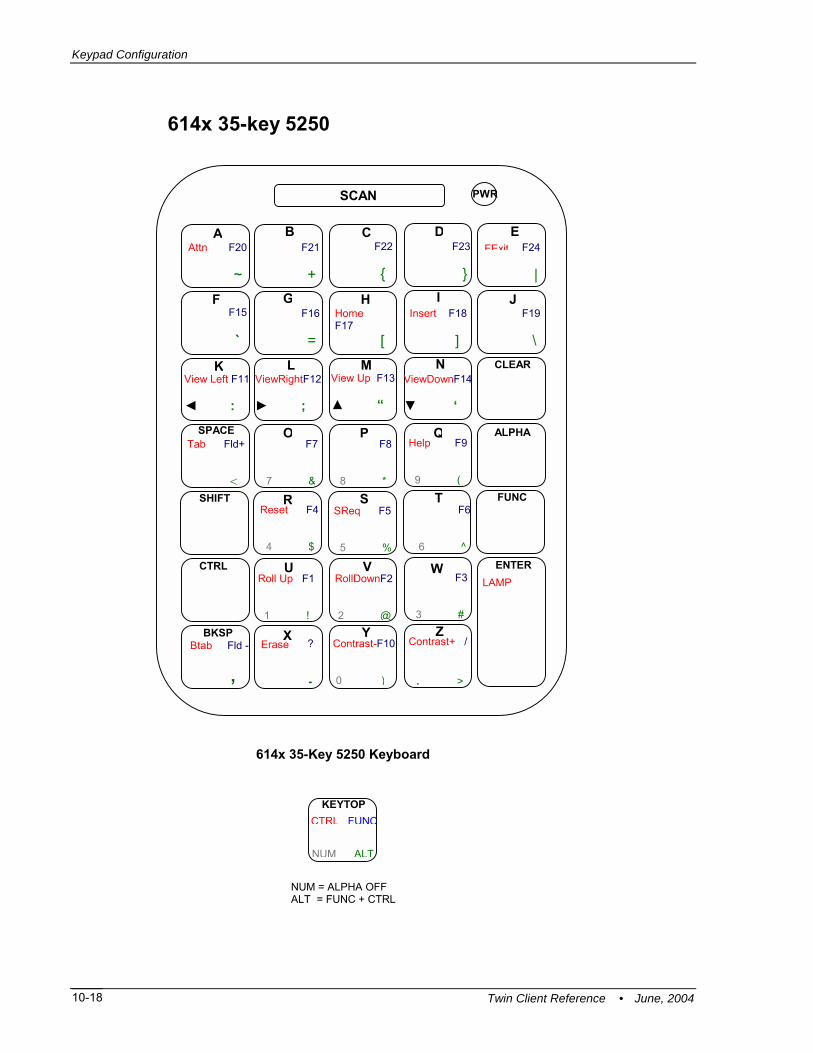
Keypad Configuration
T10-18
614x 35-key 5250
614x 35-Key 5250 Keyboard
Attn F20 ~
F24 |
F23 }
F21 +
F22 {
Insert F18 ]
Home F17 [
F19 \
F16 =
F15
`
Btab Fld -
,
F7 7 &
L
elp F9 9 (
F8 8 *
Tab Fld+
Reset F4 4 $
F6 6 ^
SReq F5 5 %
Roll Up F1 1 !
RollDownF2 2 @
F3 3 #
Contrast-F10 0 )
Contrast+ / . >
? -
CTRL FUNC
NUM ALT
NUM = ALPHA OFF ALT = FUNC + CTRL
KEYTOP
SCAN PWR
A CB
HG
D
F J
E
I
POSPACE
View Left F11 ◄ :
View Up F13 ▲ “
ViewDownF14
‘
ViewRightF12 ► ;
NML K CLEAR
SHIFT
Q
Y
R
Z
S
CTRL
BKSP X
T
VU W
<
Erase
t
win Client Reference •
AMPENTER
ALPHA
FUNC
H▼
FExi
June, 2004

Keypad Figures
Twin Client Reference • June, 2004
614x 35-key VT/HP
614x 35-Key VT Keyboar
KEYTOP CTRL FUNC
NUM ALT
NUM = ALPHA OFF ALT = FUNC + CTRL
F20 ~
|
}
+
{
F17 [
F16 =
F15
`
Btab
,
F7 7 &
View Left F11 ◄ :
View Up F13 ▲ “
ViewD ▼
ViewRightF12 ► ;
9
F8 8 *
Tab <
F4 4 $
6
F5 5 %
F1 1 !
F2 2 @
3
Contrast-F10 0 )
Cont .
?
-
SCAN PWR
SPACE
SHIFT
BKSP
CTRL
-
I
H
G
F
d
E
F18
]
LAM
ownF14
‘
F9
(
F6
^
F3
#
rast+ /
>
CL
F
AL
E
D C B AF19 \
Del Esc
EAR
PHA
O
N
M
L
K
J
UNC
T
S
R
Q
P
NTER P
Z
Y
X
V
W
U
10-19

Keypad Configuration
10-20
7 8 9
1 2 3
r
4 5 6
i j k l m n
o p q r s t
u v w x y z U F11 V F12 W F13 X F14 Y F15 Z F16
O F17 P F18 Q F19 R F20 S T
\ I / J K L M N
Ctl Clr
▲
Fnc
Shf
Bsp
a b c d
Vterm-614x
> d bktab
; $ F4 ‘ % F5 , ^ F6
: & F7 “ * F8 < ( F9
} ! F1 { @ F2 ] # F3
Spc
. 0 Ente
arken tab { ) F10 lamp lighten
~ A _ B + C | D
e f g h E ` F - G = H
?Twin Client Reference • Jun
keytop
Ctl Shf Fnc
↑◄←
↓ ►→
e
Esc Del
, 2004
▼

Keypad Figures
Twin Client Refere
7 8 9
1 2 3
r
4 5 6
i j k l m n
o p q r s t
u v w x y z U F11 V F12 W F13 X F14 Y F15 Z F16
O F17 P F18 Q F19 rst R F20 sreq S F21 T F22
\ I / J K F23 L F24 M N
Clr
▲
Fnc
Shf
Bsp
a b c d
3270-614x
> darken tab { ) F10 lamp lighten bktab
; $ F4 ‘ % F5 , ^ F6
: & F7 “ * F8 < ( F9
} ! F1 { @ F2 ] # F3
Spc
. 0 Ente
Ctl
nce •
~ A attn _ B pa1 + C pa2 | D pa3
Ju
e f g h
? E eof ` F - G = Hne, 2004
keytop
Ctl Shf Fnc
↑ ◄←
↓ ►→
10-21
▼

Keypad Configuration
10-22
7 8 9
1 2 3
r
4 5 6
i j k l m n
o p q r s t
u v w x y z rl↓ U F11 V F12 W F13 X F14 Y F15 Z F16
rl↑ O F17 P F18 Q F19 rst R F20 sreq S F21 T F22
\ I / J K F23 L F24 M N
Clr
▲
Fnc
Shf
Bsp
a b c d
5250-614x
> darken tab { ) F10 lamp lighten bktab
; $ F4 ‘ % F5 , ^ F6
: & F7 “ * F8 < ( F9
} ! F1 { @ F2 ] # F3
Spc
. 0 EnteCtl
~ A attn _ B + C fld+ | D
e f g h
? E fxt ` F - G fld- = H helpTwin Client Referen
keytop
Ctl Shf Fnc
↑ ◄ ←
↓ ► →
ce • June, 2004
▼

Keypad Figures
Twin Client Reference • June, 2004 10-23
684x 46-key 3270
684x 46-Key 3270 Keyboard
A
KEYTOP FUNC CTL
SHF
B
F J
C
G I
D
H
E
K NL OM
P Q TSR
U WV X Y
Z
7 0 9
CTL SHFCLR
2
5
FUNC
6
8
1
4
3
.BKSP ▲ ▼
PWR
Lamp
PF1 PA1 !
PF7 : &
PF4 ; $
PF5 ‘ %
PF9 < (
PF6 , ^
PF8 ”
*
PF3 PA3 #
PF2 PA2 @
PF10 } )
~
_ +
`
| ? EOF
- = Home
[
\ Insert /
PF21
]
PF24 PF23
PF22
PF19
PF20
PF18
PF17
PF16
PF11
PF15
PF13
PF14
PF12
{ Contrast+ >
Vw ↑ Wv← C Left
Btab Cntrst- Space
Vw ↓ Vw → C Right
Tab
ENTER
Sreq

Keypad Configuration
Twin10-24
684x 46-key 5250
684x 46-Key 5250 Keyboard
B
F J
C
G I
D
H
NL O
U W V Y
Z
7 0 9
CTL SHFCLR
2
5
FUNC
6
1
4
3
BKSP ▲ ▼
PWR
Lamp
PF1 Roll Up !
PF7 : &
PF4 ; $
PF5 ‘ %
PF9 < (
PF6 , ^
*
PF3 #
PF2 Roll Dn @
PF10 } )
_ +
`
|
- = Home
[
\ Insert /
]
PF24 PF22 Fld-
PF11
PF15
PF13
PF12
Vw ↑ Wv← C Left
Btab Cntrst- Space
Vw ↓ Vw → C Right
Tab
Clie
nt Refer
ence8 PF8 ”
A ~ Attn
E? FExit
K PF21 Fld+
M PF23
SPF19 SReq
T PF20
R PF18 Reset
Q PF17 Help
P PF16
XPF14 Erase
. { Contrast+ >
ENTER
KEYTOP FUNC CTL
SHF
• June, 2004

Keypad Figures
Twin Client Reference • June, 2004
684x 46-key VT/HP
684x 46-Key VT Keyboard
B
F J
C
G I
D
H
E
K L OM
Q SR
U WV X Y
Z
7 0 9
CTL SHFCLR
2
5
FUNC
6
1
4
3
BKSP ▲ ▼
PWR
Lamp
PF1 !
PF7 : &
PF4 ; $
PF5 ‘ %
PF9 < (
PF6 , ^
*
PF3 #
PF2 @
PF10 } )
_ +
`
| ?
- =
[ Del Esc
\ Insert /
PF19
PF18
PF17
PF11
PF15
PF13
PF14
PF12
Vw ↑ Wv← C Left
Btab Cntrst- Space
Vw ↓ Vw → C Right
Tab
ENTER
KEYTOP FUNC CTL
SHF
8 PF8 ”
A ~
N ]
TPF20
P PF16
.{ Contrast+ >
10-25

Keypad Configuration
Twin Client Reference • June, 2004 10-26
39x0 54-key 3270
KEYTOP FNC CTL SHF
F1 F2 F3 F4 F5 FNC
CTL
ENTER
CLEAR
PWR
N M J
Y
R S
394x 54-Key 3270 Keyboard
SHF
_
F10 F8 F9 F6 F7
F23 F24 F20
.
#
-
9 F9 < (
2 F2 @ PA
3 F3 PA3
1 F1 !
PA1
8 F8
*
7 F7 : &
▼ Tab Vw ↓
0 F10 )
5 F5 ‘ %
6 F6 , ^
Contrast+ >
4 F4 ; $
▲ Btab Vw ↑
2
◄ Vw ←
► Vw →
BKSP Contrast- Space
X\
W =
[Z ]
V `
B
F12
C F13
D F14
E F15 EOF
F F16
G F17
A
F11
K F21
L F22
H F18 Home
I F19 Insert
P +
Q|
}
U /
T ?
O ~
{
Keypad Figures
Twin Client Reference • June, 2004 10-27
394x 54-key 5250
F1 F2 F3 F4 F5 ▲ ► ◄ ▼
FNC
CTL
ENTER
A
CLEAR
PWR
B G
I
E
H
C F D
O
N
P
L M K J
V
Q
Z Y X W
U T R S
BKSP . -
4
3 2
6 5
7
1
9 8
0
394x 54-Key 5250 Keyboard
SHF
F9 < (
F2 @
F3 #
F1 !
F8
*F7 : &
Tab Vw ↓
F10 )
F5 ‘ %
F6 , ^
Contrast+ >
_
F4 ; $
Btab Vw ↑
Roll ↑
Roll ↓
F10 F8 F9 F6 F7 Vw ←
Vw →
Contrast- Space
\ Erase
=
[
]
`
F12
F13
F14
F15 FExit
F16
F17
F11
F21 Fld+
F22 Fld-
F23 F24 F20 F18 Home
F19 Insert
+
| Help
} SReq
/
?
~ { Reset
KEYTOP FNC CTL SHF
Attn

Keypad Configuration
Twin Client Reference • June, 2004 10-28
394x 54-key VT/HP
KEYTOP FNC CTL SHF
F1 F2 F3 F4 F5 ▲ ► ◄ ▼ FNC
CTL
ENTER
A
CLEAR
PWR
B G
I
E
H
C F D
O
N
P
L M K J
V
Q
Z Y X W
U T R S
BKSP . -
4
3 2
6 5
7
1
9 8
0
394x 54-Key VT Keyboard
SHF
F9 < (
F2 @
F3 #
F1 !
F8
*F7 : &
Tab Vw ↓
F10 )
F5 ‘ %
F6 , ^
Contrast+ >
_
F4 ; $
Btab Vw ↑
F10 F8 F9 F6 F7 Vw ←
Vw →
Contrast- Space
\
=
[
]
`
F12
F13
F14
F15
F16
F17
F11
F20 F18
F19
+
|
}
/
?
~ {
Del Esc
Insert

Keypad Figures
Twin Client Reference • June, 2004 10-29
694x 54-key 3270
F1 F2 F3 F4 F5 CTLPWR
BKSP ◄ ►
▼
▲
ENTER
A
CLEAR
B G
I
E
H
C F D
O
N
P
L M K J
V
Q
Z Y X W
U T R S
FNC >
$
# @
^ %
&
!
( *
)
694x 54-key 3270 Keyboard
FNC
SHF
CTL
F6 F10F8 F9F7
F11 F15 EOF
F21
|
F18 Home
} {
F22 F19 Ins
SHF
F13 F14 F12 F16 F17
F20 F24 F23
+ ~ / ?
` [ = ] \
1
0
9
4 5
8
2
6
7
3
. -
View →
View ←
View ↑
View ↓
Btb
Tab
Contrast -Space
F7 : F9 < F8
F3 PA3 F1 PA1 F2 PA2
F5 ‘ F6 ,F4 ;
F10 Contrast +
KEYTOP
_
Note: Key re-mapping does not appear to work on this terminal. After a cold boot,
hit the key sequence Func+ Shift. This will take the terminal out of Caps Lock state, and the key mapping will work as expected. It will stay latched in this state until another cold boot is performed or another Func + Shift sequence is performed.

Keypad Configuration
Twin Client Reference • June, 2004 10-30
69x0 54-key 5250
F1 F2 F3 F4 F5 CTLPWR
BKSP ◄ ►
▼
▲
ENTER
A
CLEAR
B G
I
E
H
C F D
O
N
P
L M K J
V
Q
Z Y X W
U T R S
FNC >
$
# @
^%
&
!
( *
)
694x 54-key 5250 Keyboard
FNC
SHF
CTL
F6 F10F8 F9F7
F11 Attn F15 Fexit
F21 Fld +
| Help
F18 Home
} Sreq{ Reset
F22 Fld - F19 Ins
SHF
F13 F14 F12 F16 F17
F20 F24 F23
+ ~ / ?
` [ = ] \ Erase
1
0
9
4 5
8
2
6
7
3
.-
View →
View ←
View ↑
View ↓
Btb
Tab
Contrast -Space
KEYTOP
F1 F2 F3
F4
F7
F5
F9 F8
F6
F10
, ‘
Roll ↓
:
Roll ↑
_
;
<
Contrast+

Keypad Figures
Twin Client Reference • June, 2004 10-31
69x0 54-key VT/HP
F1 F2 F3 F4 F5 CTLPWR
BKSP ◄ ►
▼
▲
ENTER
A
CLEAR
B G
I
E
H
C F D
O
N
P
L M K J
V
Q
Z Y X W
U T R S
FNC >
$
# @
^%
&
!
( *
)
694x 54-key VT Keyboard
FNC
SHF
CTL
F6 F10F8 F9F7
F11 F15
|
F18
} {
F19 Ins
SHF
F13 F14 F12 F16 F17
F20
+ ~ / ?
` [ = ] \
1
0
9
4 5
8
2
6
7
3
.-
View →
View ←
View ↑
View ↓
Btb
Tab
Contrast -Space
F7 : F9 < F8
F3 F1 F2
F5 ‘ F6 ,F4 ;
F10 Contrast +
Del Esc
KEYTOP
_

Keypad Configuration
10-32
354x/684x VT
func alpha clear shift power
bksp space ctrl [ A ] B
a A { b B }
vw
‘ C = D * E / F - G
c C “ d D + e E x f F ? g G
0
7
1
4
+ H . I , J \ K ; L
F7
F10
bklite
q
w
t
z
b ← vw→ vw↑ vw↓ light dark
F8 F9 Q R S
& * (
8 9
$ % ^
r s
F4 T F5 U F6 V
5 6#
u v
! @
F1 W F2 X F3 Y
h H x i I > j J < k K | l L :
c d e f g
_
a b
enter
2 3
Z
)
shift+func func alpha
key = shift alpha alpha
t
t
l
x y
lamp
alpha+shif
shiftctrl shif
shift+ctr
← M → N ↑ O ↓ P
m n o p
h i j k l
Twin Client Refere
ta
nce • June, 2004

Keypad Figures
Twin Client Refere
354x/684x 3270
func alpha clear shift power
bksp space ctrl [ A ] B
a A { b B }
z
vw
insert
‘ C = D * E / F - G
c C “ d D + e E x f F ? g G
nce •
0
7
1
4
+ H . I , J \ K ; L
F7
F10
bklite
q
w
t
← vw→ vw↑ vw↓
ereof
dark light
F8 F9 Q R S
& * (
8 9
$ % ^
r s
F4 T F5 U F6 V
5 6u v
! @ #
F1 W F2 X F3 Y
h H x i I > j J < k K | l L :
_
a b
June, 2004
enter
2 3
Z
)
t shift+func func alpha
key = shift alpha alpha
t
x y
lamp
alpha+shift
shifctrl shif
shift+ctrl
c d e f g
← M → N ↑ O ↓ P
m n o p
h i j k l
tab
10-33

Keypad Configuration
10-34
354x/684x 5250
func alpha clear shift power
bksp space ctrl [ A ] B a A { b B }
z
vw
attn
h
insert
‘ C = D * E / F - G
c C “ d D + e E x f F ? g G
0
7
1
4
+ H . I , J \ K ; L
F7
F10
bklite
q
w
t
b← vw→ vw↑ vw↓
fld ex
elp
light dark
F8 F9 Q R S
& * ( sysreq
8 9
$ % ^
r s
F4 T F5 U F6 V
5 6u v
! @ #
F1 W F2 X F3 Y
roll↓ roll↑
h H x i I > j J < k K | l L :
c d e f g
_
a b
enter
2 3
Z
)
shift+func func alpha
key = shift alpha alpha
x y
lamp
alpha+shift
shiftctrl shift
shift+ctrl
← M → N ↑ O ↓ P m n o p
h i j k l
Twin Clie
ta
nt Reference • June, 2004
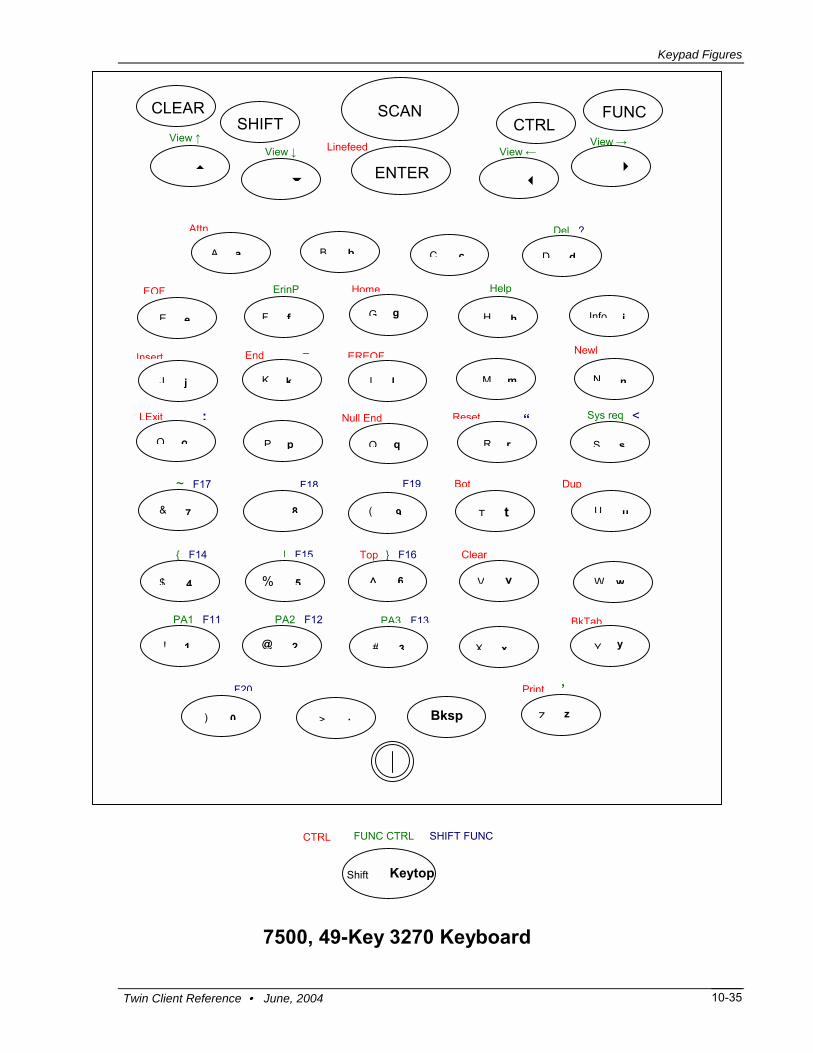
Keypad Figures
Twin Client Reference • June, 2004 10-35
7500, 49-Key 3270 Keyboard
View ↑
SCAN
ENTER
SHIFT View ←
CLEAR FUNC
Bksp
KeytopShift
CTRL FUNC CTRL SHIFT FUNC
F18
End
Home
| F15
<
BkTab
} F16
F13
Bot
Clear
EREOF
PA3
F19 Dup
Help
View →
ErinP
_ Newl
Null End Reset “
F G H
K L M N
P Q R S
9 T8 U
6 V5
2 3
W
X
Z
Y
p r
k
g hf
ml
q
��
Info
Top
#
v %
z
> .
( t
y x
&
@
^ w
View ↓
Del ?
DCB
Attn
A
�
J
E
O
b da
s
c
n
e
j
o
i
u
1
4
F20
$
7
) 0
!
�
CTRL
PA1 F11 PA2 F12
~ F17
{ F14
EOF
LExit :
Insert
,
Linefeed
Sys req
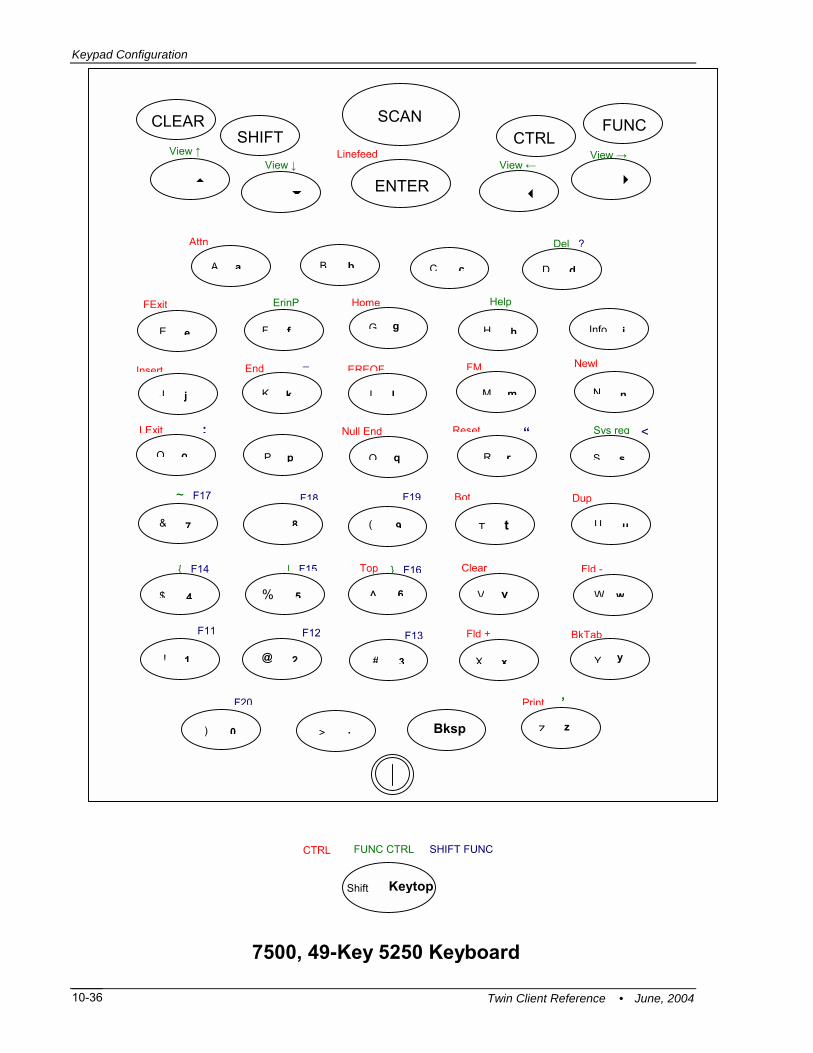
Keypad Configuration
View ↑
SCAN
ENTER
SHIFT View ←
FUNC
View ↓
CTRLLinefeed
e
5
-
b+
r
F
9
Help ErinP
_ Newl
g
q
T p
%
( t &
?
j
F11 F12
:
Du
10-36
CLEAR
7500, 49-Key 5
Bksp
L SHIFT FUNC
z .
y
0
)
,
Keytop
ShiftCTR
FUNC CTRL7
F18En
Hom
250 Key
FM
Twin
board
| F1
Client Reference •
<
Fld
BkTa
Fld} F16
F13
Bot
Clea
EREO
F1
Sys req
View →
Null End
ResetJune, 2004
“
F
G Hd
K
L M NP
Q R S9
T 8 Up
6
V 52
3W
X
Z
Y
p
rk
h
fm
l�
�Info
#
v
>
x
@o
^
wDel
D
C BAttn
A
�
J
er
E
O
x
b
d as
c
n
e
o
i
u
1
4
F2
$
7
0
!
�
~ F1
{ F14
FExit
LE it
Ins t

Keypad Figures
Twin Client Reference • June, 2004 10-37
7500, 49-Key VT Keyboard
View ↑
SCAN
ENTER
SHIFT View ←
CLEAR FUNC
Bksp
KeytopShift
CTRL FUNC CTRL SHIFT FUNC
F18
| F15
<
} F16
F13
Clear
F19
Help
View →
_
“
F G H
K L M N
P Q R S
9 T8 U
6 V5
2 3
W
X
Z
Y
p r
k
g hf
ml
q
��
Info
#
v%
z
> .
( t
y x
&
@
^ w
View ↓
?
DCBA
�
J
E
O
b da
s
c
n
e
j
o
i
u
1
4
F20
$
7
) 0
!
�
CTRL
F11 F12
~ F17
{ F14
:
,
Esc
Linefeed

Keypad Configuration
Twin Client Reference • June, 200410-38
7500, 49-Key 3270 Keyboard
SCAN
ENTER
SHIFT
FUNC
Bksp
C
[
3
9
]
g
q
F6
z
t
y
j
0
CTRL
F1 F21 F2 F22
F4 F24
Spac
Page ↑
Page ↓
ight
p
k
CLEAR
Keytop
FUNC
CTRL FUN F8=
F5
e
L
D F2/
a
F3
F
Ins`
,
‘9
86
52
3p
rk
h
fm
l�
�v
.
x
w
/
* - +�
b
d as
c
n
e
o
i
u
1
4
F1
7
0
�
F7
;
\
Cap Lk
L m
ar

Keypad Figures
Roll ↑
SCAN
ENTER
SHIFT
FUNC
[
9
]
g
q
F6
t
Roll ↓
j
CTRL
F1 F21 F2 F22
F4 F24
Page ↑
Cap Lk
Twin Client Reference • June, 2004 10-39
7500, 49-Key 5250 Keyboard
Bksp
C
3
z
y
0
Spac Page ↓
t
CLEAR
Keytop
FUNC
CTRL FUN F8=
F5
e
ig
D F2/
F3
F
Ins`
p
,
‘9
86
52
3p
rk
h
fm
l�
�v
.
x
w
/
* - +�
b
d as
c
n
e
o
i
u
1
4
F1
7
0
�
F7
;
\
Lamark
L h
Keypad Configuration
SCAN
ENTER
SHIFT
CLEAR FUNC
��
��
CTRL
CapLk
=
[
`
]
g hf
/*-+
b da c
e i
\ p
F8
F5
F23
/
Del
F3
F9
,‘
98
65
p r
k ml
q
F6
v
t
w
s
nj
o
u
4
7
F1 F21 F2 F22
F7
F4 F24
;
Page ↑
k
10-40
7500, 49-Key VT K
Bksp
Keytop
FUNC CTRL FUNC
2 3
.
1
F10
0
Space Page ↓
Dar
Twin
eyboard
x
Light
Lam
Client Reference • June, 2004
z
y

Keypad Figures
Vw ↑
Vw ←
c
Lamp
Vw ↓
|
D C B ~
A
�
d a
Del Esc
Twin Client Reference • June, 2004
7500, 48-Key VT K
KeyShift
Ctrl Shift
Bksp
F8
.
‘ % F5
F15 F14
^ F6
F3
F12
] #
F9 F20
& “ * < ( F18 7
F G
L N
P Q R
9 T 8 U
6 V 5
2
W
X
Z
Y
p r
k
g h f
ml
q
Info
#
v %
> .
( t
y x
@
J
E
O s
n
e
j
o
i
1
4
F10
$
7
) 0
!
} ! F1 [ @ F2
; F4
:
{ ) → arken Lighten
/
Func
eyboard
top
Scan
Shift
Clear FunF7
?
F19
F13
=
1
FVw→
\
_1
`
F
H
K
MS
3
�
�,
z
D&
^
w+
_b
cu
�
Ctrl
> F11
16
0-41

Keypad Configuration
10-42
7500, 48-Key 327
KeyShift
Ctrl Shift
Vw ↑
Vw ←
c
Bksp
F8
Lamp
.
‘ % F5
F15 F14
^ F6 Pa2 F12
F3 Pa3
] #
F9 F20 “ * < ( P 1
F18 Sreq t
F G
L N
P Q R
9 T 8 U
6 V 5
2
W
X
Z
Y
p r
k
g h f
ml
q
Info
#
v %
> .
( t
y x
@
Vw ↓
|
D C B ~ Attn
A
�
J
E
O
d a
s
n
e
j
o
i
1
4
F10
$
7
) 0
!
} ! F1 [ @ F2
; $ F4
{ ) Darken Lighten
/ F21 F 23 F24
Func
0 Keyboard
top
Scan
Shift
ClearTwin Clie
Fun
F7
? Eof
nt R
F19
F13
a
=
eferenc
Vw→
22 F\
_1
e •
`
F 7 Rese
H
K
MS
3
�
�,
z
→&
^
w+
_b
cu
�
Ctrl
:
> F11
F16
June, 2004

Keypad Figures
Twin Client Reference • June, 2004 10-43
7500, 48-Key 5250 Keyboard
Keytop Shift
Ctrl Shift Func
Vw ↑ Roll↑
Scan
Shift
Vw ← Fld-
Clear Func
Bksp
F8
? Fexit
Lamp
.
‘ % F5
Sreq F19
F13
F15 F14
^ F6
F3
F12
= Help
] #
F9 F20 “ * < (
Vw→ Fld+
\ _`
F18 F17 Reset
F G H
K L M N
P Q R S
9 T 8 U
6 V 5
2 3
W
X
Z
Y
p r
k
g h f
ml
q
��
Info
,
#
v %
z
> .
( t
y x
&
@
^ w
Vw ↓ Roll↓
|
D C B ~ Attn
A
�
J
E
O
b d a
s
c
n
e
j
o
i
u
1
4
F10
$
7
) 0
!
�
Ctrl
} ! F1 [ @ F2
F7
; $ F4
+
:
_
> F11
F16
{ ) → Darken ← Lighten
/ F21 F22 F23 F24

Keypad Configuration
10-44
A s
A B
E G
C
H
D
F
I L
O
J
N
K
M P
U
Y
T
V
S Q
W
R
7 8
6
9
5
3
0
2
4
1
_
,
[
�
�
�
�
E
R
L
N C
R
KEYTOPALPHA
CTRL FUNC CTRL
7540, 35-key, 3270 Keyboard
ATTN F17
F19 TOP
EREOF
FM ERINP
F14
F18
F15
F16
VIEW ↓↓↓↓ HOME
CLR
BOT
RFSH
RESET SYS REQUESTNULL END
BEGIN POS HELP
NEWL
VIEW ←←←←
DUP
F13
F20
F11
LOCAL EXIT
F12
P
PA1
BKTAB
EOF
VIEW ↑
*
X ;
A2 DEL
\
/.
+
Twin
Z ]
SHIFT FUNC
=
‘
SPAC
BKSP
CLEA
SHIFTCTR
SCA
ALPHAC
FUN
ENTE
END POS
INS CHAR
INFOlient Reference • June, 2004

Keypad Figures
Twin Client Reference • June, 2004
A s
A B
E G
C
H
D
F
I L
O
J
N
K
M P
U
Y
T
V
S Q
W
R
7 8
6
9
5
3
0
2
4
1
.
[
+
�
�
�
�
A
KEYTOPALPHA
CTRL FUNC CTRL
7540, 35-key, 5250 Keyboard
ATTN F17 DEL CHAR F19 TOP
EREOF FLD EXIT
FM ERINP
F14
F18
F15 F16
ROLL ↑
VIEW ↓ HOME
CLR
BK TAB
BOT
RFSH FLD -
RESET SYS REQUESTNULL END
BEGIN POS HELP NEWL
VIEW ←←←←
DUP
F13
F20
END POS
F11
LOCAL EXIT
F12
VIEW ↑
INS CHAR
*
X
FLD +
\
/_
Z ]
SHIFT FUNC
ROLL ↓ PRINT
=
SPACE
BKSP
CLEAR
SHIFTCTRL
SCAN
ALPH FUNCENTER
10-45

Keypad Configuration
10-46
A s
A B
E G
C
H
D
F
I L
O
J
N
K
M P
U
Y
T
V
S Q
W
R
7 8
6
9
5
3
0
2
4
1
_
,
[
+
�
�
�
�
E
T
L
A C
R
KEYTOPALPHA
CTRL FUNC CTRL
7540, 35-key, VT Keyboard
F17 VIEW ↑↑↑↑ F19
F14
F18
F15 F16 VIEW ↓↓↓↓
VIEW ←←←←
F13
F20
F11 F12
HELP
TOP
BOT
BKTAB
RESET
ESC
*
X
\
/.
Twin Client R
Z ]
SHIFT FUNC
=
SPAC
BKSP
CLEAR
SHIFCTR
SCAN
ALPHe
FUN
ENTE
ference • June, 2004

Keypad Figures
Twin Client Reference • June, 2004 10-47
A s
7 8
6
9
5
3
0
2
4
1
*
\/
_
.
[
+
]
�
�
=
�
�
SPACE
BKSP
CLEAR SHIFT
CTRL
SCANALPHA FUNC
ENTER
KEYTOP Shift
FUNC CTRL FUNC
7540, 35-key, 3270 Keyboard
F7 F9 F8
F4 F5
Tab
F6
F22 F23
F24
Dark F10
Lamp
F21
PA3
F3
Light
F1
View →
F2
! #
$ % ^
@
* ( &
)
+ _
:
>
?
{
<
~ |
}
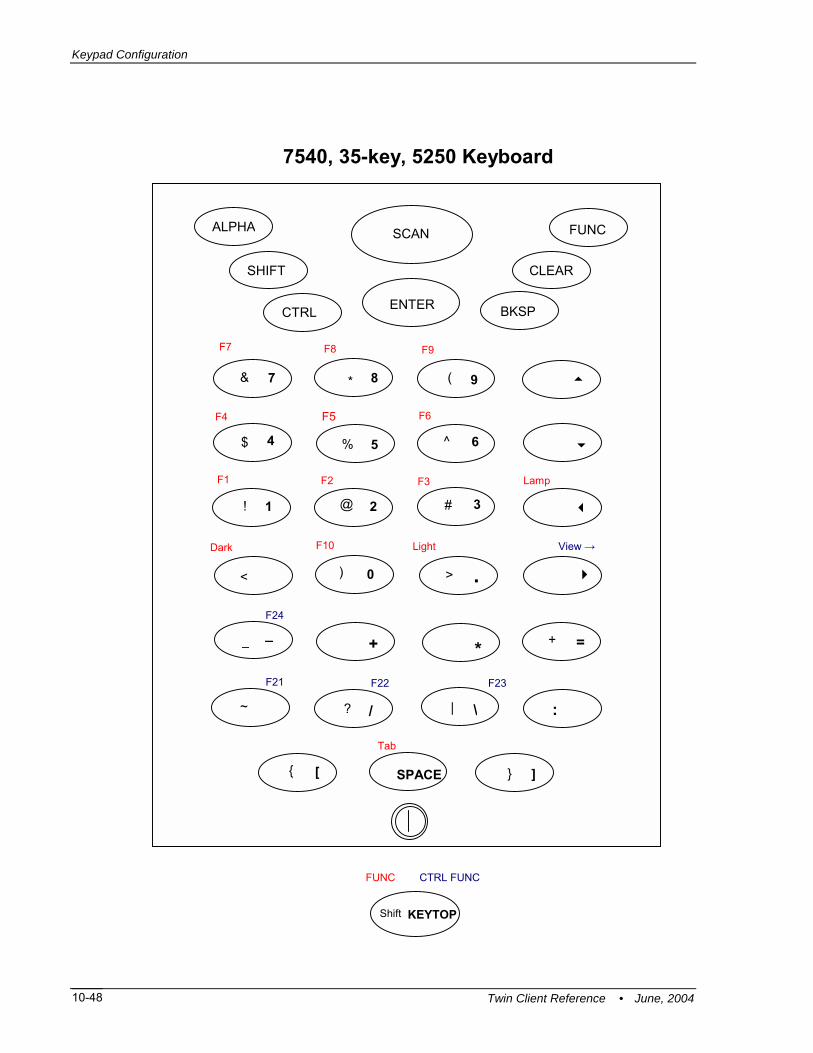
Keypad Configuration
Twin Client Reference • June, 2004 10-48
A s
7 8
6
9
5
3
0
2
4
1
*
\/
_
.
[
+
]
�
�
=
�
�
SPACE
BKSP
CLEAR SHIFT
CTRL
SCANALPHA FUNC
ENTER
KEYTOP Shift
FUNC CTRL FUNC
7540, 35-key, 5250 Keyboard
F7 F9 F8
F4 F5
Tab
F6
F22 F23
F24
Dark F10
Lamp
F21
F3
Light
F1
View →
F2
_
~
*
{
?
+
}
| :
><
^
@ #
$
!
%
(
)
&
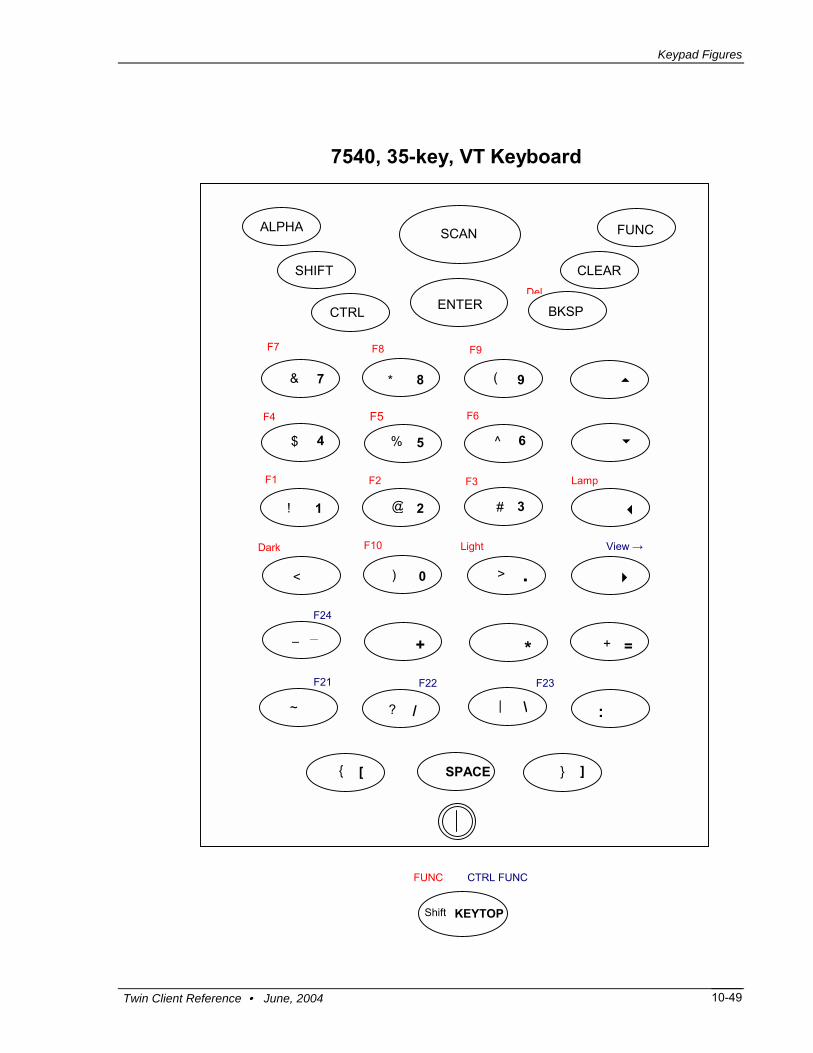
Keypad Figures
A s
7 8
6
9
5
3
0
2
4
1
*_
.
+
�
�
=
�
�
BKSP
CLEAR SHIFT
CTRL
SCANALPHA FUNC
ENTER
7540, 35-key, VT Keyboard
F7 F9 F8
F4 F5
F6
F24
Dark F10
Lamp
F3
Light
F1
View →
F2
*
+
< >
_
&
$ ^
@
(
%
#
)
!
Del
Twin Client Reference • June, 2004 10-49
\/
[ ] SPACE
KEYTOP Shift
FUNC CTRL FUNC
F22 F23 F21
~ ? |
}{
:

Keypad Configuration
Twin Client Reference • June, 2004 10-50
Symbol Terminal Keypad Tables The keypad tables in this section are organized by terminal model, keypad configuration, and emulation. The key values represent the default Twin Client keypad assignments applied to the terminal in Twin Client advanced mode.
Table entries that are blank indicate the key is not assigned, or not relevant to the emulation.
104x 27-key KEY 5250 3270 VT/HP OS ATTENTION <CTL><Purple><1> BACK TAB <SHF><P1> <SHF><P1> <SHF><P1> BACKSPACE <BKSP> <BKSP> <BKSP> <BKSP> CONTRAST - <FNC><UP> <FNC><UP> <FNC><UP> CONTRAST + <FNC><DOWN> <FNC><DOWN> <FNC><DOWN> CURSOR DOWN <DOWN> <DOWN> <DOWN> CURSOR LEFT <LEFT> <LEFT> <LEFT> <LEFT-ARROW> CURSOR RIGHT <RIGHT> <RIGHT> <RIGHT> <RIGHT-ARROW> CURSOR UP <UP> <UP> <UP> DELETE <LEFT><BKSP> ENTER <ENTER> <ENTER> <ENTER> <ENTER> ERASE FIELD ERASE EOF <CTL><Purple><3> ERROR RESET <CTL><Green><9> ESCAPE FIELD ADVANCE <CTL><Purple><P1> FIELD EXIT <CTL><Purple><3> FIELD MINUS <CTL><Purple><ENT> HELP <CTL><Purple><9> <HELP> HOME INSERT <RIGHT><HELP> LAMP <FNC><HELP> <FNC><HELP> <FNC><HELP> <LEFT><HELP> PAGE DOWN PAGE UP RETURN <ENTER> <ENTER> <ENTER> <ENTER> ROLL DOWN <FNC><SPACE> ROLL UP <FNC><CLEAR> SPACE <SPACE> <SPACE> <SPACE> <SPACE> SYS REQUEST <CTL><Purple><O> <CTL><Purple><O> TAB <P1> <P1> <P1> <LEFT><ENTER> VIEW DOWN <CTL><DN> <CTL><DN> <CTL><DN> VIEW LEFT <CTL><LEFT> <CTL><LEFT> <CTL><LEFT> VIEW RIGHT <CTL><RIGHT> <CTL><RIGHT> <CTL><RIGHT> VIEW UP <CTL><UP> <CTL><UP> <CTL><UP> PA1 <FNC><SPACE> PA2 <FNC><CLEAR> PA3 <FNC><MENU> PF1 <FNC><1> <FNC><1> <FNC><1> <FUNC><1> PF2 <FNC><2> <FNC><2> <FNC><2> <FUNC><2> PF3 <FNC><3> <FNC><3> <FNC><3> <FUNC><3> PF4 <FNC><4> <FNC><4> <FNC><4> <FUNC><4> PF5 <FNC><5> <FNC><5> <FNC><5> <FUNC><5> PF6 <FNC><6> <FNC><6> <FNC><6> <FUNC><6> PF7 <FNC><7> <FNC><7> <FNC><7> <FUNC><7> PF8 <FNC><8> <FNC><8> <FNC><8> <FUNC><8> PF9 <FNC><9> <FNC><9> <FNC><9> <FUNC><9>

Symbol Terminal Keypad Tables
Twin Client Reference • June, 2004 10-51
PF10 <FNC><0> <FNC><0> <FNC><0> <FUNC><0> PF11 <CTL><1> <CTL><1> <CTL><1> PF12 <CTL><2> <CTL><2> <CTL><2> PF13 <CTL><3> <CTL><3> <CTL><3> PF14 <CTL><4> <CTL><4> <CTL><4> PF15 <CTL><5> <CTL><5> <CTL><5> PF16 <CTL><6> <CTL><6> <CTL><6> PF17 <CTL><7> <CTL><7> <CTL><7> PF18 <CTL><8> <CTL><8> <CTL><8> PF19 <CTL><9> <CTL><9> <CTL><9> PF20 <CTL><0> <CTL><0> <CTL><0> PF21 <CTL><SPACE> <CTL><SPACE> PF22 <CTL><CLEAR> <CTL><CLEAR> PF23 <CTL><MENU> <CTL><MENU> PF24 <CTL><HELP> <CTL><HELP> ! exclamation <SHF><1> <SHF><1> <SHF><1> <SHIFT><1> @ at sign <SHF><2> <SHF><2> <SHF><2> <SHIFT><2> # pound <SHF><3> <SHF><3> <SHF><3> <SHIFT><3> $ dollar <SHF><4> <SHF><4> <SHF><4> <SHIFT><4> % percent <SHF><5> <SHF><5> <SHF><5> <SHIFT><5> ^ carat <SHF><6> <SHF><6> <SHF><6> <SHIFT><6> & ampersand <SHF><7> <SHF><7> <SHF><7> <SHIFT><7> ( left parenthesis <SHF><9> <SHF><9> <SHF><9> <SHIFT><9> ) right parenthesis <SHF><0> <SHF><0> <SHF><0> <SHIFT><0> - dash <FNC><Purple><7> <FNC><Purple><7> <FNC><Purple><7> <FNC><LEFT><P1> + plus <FNC><Purple><3> <FNC><Purple><3> <FNC><Purple><3> <SHF><FNC><ENT> ' apostrophe <FNC><Green><7> <FNC><Green><7> <FNC><Green><7> <FNC><LEFT><1> * asterisk <SHF><8> <SHF><8> <SHF><8> <SHF><8> , comma <FNC><Green><8> <FNC><Green><8> <FNC><Green><8> <FNC><LEFT><2> . period <FNC><Green><9> <FNC><Green><9> <FNC><Green><9> <SHF><FUNC><LEFT><BS> / forward slash <FNC><Green><0> <FNC><Green><0> <FNC><Green><0> <FNC><LEFT><3> [ left bracket <FNC><Purple><9> <FNC><Purple><9> <FNC><Purple><9> <FNC><LEFT><4> \ back slash <FNC><ENTER> <FNC><ENTER> <FNC><ENTER> <FNC><LEFT><9> ] right bracket <FNC><Purple><0> <FNC><Purple><0> <FNC><Purple><0> <FNC><LEFT><5> _ underline <FNC><Purple><2> <FNC><Purple><2> <FNC><Purple><2> <SHF><FNC><LEFT><P1> ` grave accent <FNC><Purple><6> <FNC><Purple><6> <FNC><Purple><6> <FNC><LEFT><7> : colon <FNC><Green><1> <FNC><Green><1> <FNC><Green><1> <SHF><FNC><LEF><6> ; semi-colon <FNC><Green><6> <FNC><Green><6> <FNC><Green><6> <FNC><LEFT><6> < less than <FNC><Green><3> <FNC><Green><3> <FNC><Green><3> <SHF><FNC><LEF><2> = equal <FNC><Purple><8> <FNC><Purple><8> <FNC><Purple><8> <FNC><ENTER> > greater than <FNC><Green><4> <FNC><Green><4> <FNC><Green><4> <SHF><RIGHT><P1> ? question <FNC><Green><5> <FNC><Green><5> <FNC><Green><5> <SHF><FNC><LEF><3> { left brace <FNC><Purple><4> <FNC><Purple><4> <FNC><Purple><4> <SHF><FNC><LEF><4> | vertical bar <FNC><Purple><P1> <FNC><Purp><P1> <FNC><Purp><P1> <SHF><FNC><LEF><9> } right brace <FNC><Purple><5> <FNC><Purple><5> <FNC><Purple><5> <SHF><FNC><LEF><5> ~ tilde <FNC><Purple><1> <FNC><Purple><1> <FNC><Purple><1> <SHF><FNC><LEF><7>

Keypad Configuration
Twin Client Reference • June, 2004 10-52
314x/384x/684x 46-key KEY 5250 3270 VT/HP OS ATTENTION <CTRL><A> BACK TAB <FUNC><BKSP> <FUNC><BKSP> <FUNC><BKSP> BACKSPACE <BKSP> <BKSP> <BKSP> <BKSP> CONTRAST - <CTRL><BKSP> <CTRL><BKSP> <CTRL><BKSP> CONTRAST + <CTRL><.> <CTRL><.> <CTRL><.> CURSOR DOWN <DN-ARROW> <DN-ARROW> <DN-ARROW> CURSOR LEFT <SHF><UP> <SHF><UP> <SHF><UP> <FUNC><UP CURSOR RIGHT <SHF><DN> <SHF><DN> <SHF><DN> <FUNC><DN> CURSOR UP <UP-ARROW> <UP-ARROW> <UP-ARROW> DELETE <CTL><CLR> <FUNC><V> ENTER <ENTER> <ENTER> <ENTER> <ENTER> ERASE FIELD <CTRL><X> ERASE EOF <CTRL><E> ERROR RESET <CTRL><R> ESCAPE <SHF><CLR> FIELD ADVANCE <CTL><K> FIELD EXIT <CTL><E> FIELD MINUS <CTL><L> HELP <CTL><Q> HOME <CTL><H> <CTL><H> <FUNC><P> INSERT <CTL><I> <CTL><I> <CTL><I> LAMP <FUNC><ENTER> <FUNC><ENTER> <FUNC><ENTER> NEWLINE <CTL><ENTER> PAGE DOWN <FUNC><PERIOD> PAGE UP <FUNC><W> RETURN <ENTER> <ENTER> <ENTER> <ENTER> ROLL DOWN <CTL><2> ROLL UP <CTL><1> SPACE <SHF><BKSP> <SHF><BKSP> <SHF><BKSP> <FUNC><BKSP> SYS REQUEST <CTL><S> <CTL><S> TAB <FUNC><Z> <FUNC><Z> <FUNC><Z> VIEW DOWN <FUNC><DN> <FUNC><DN> <FUNC><DN> VIEW LEFT <CTL><UP> <CTL><UP> <CTL><UP> VIEW RIGHT <CTL><DOWN> <CTL><DOWN> <CTL><DOWN> VIEW UP <FUNC><UP> <FUNC><UP> <FUNC><UP> PA1 <CTL><1> PA2 <CTL><2> PA3 <CTL><3> PF1 <FUNC><1> <FUNC><1> <FUNC><1> <FUNC><1> PF2 <FUNC><2> <FUNC><2> <FUNC><2> <FUNC><2> PF3 <FUNC><3> <FUNC><3> <FUNC><3> <FUNC><3> PF4 <FUNC><4> <FUNC><4> <FUNC><4> <FUNC><4> PF5 <FUNC><5> <FUNC><5> <FUNC><5> <FUNC><5> PF6 <FUNC><6> <FUNC><6> <FUNC><6> <FUNC><6> PF7 <FUNC><7> <FUNC><7> <FUNC><7> <FUNC><7> PF8 <FUNC><8> <FUNC><8> <FUNC><8> <FUNC><8> PF9 <FUNC><9> <FUNC><9> <FUNC><9> <FUNC><9> PF10 <FUNC><0> <FUNC><0> <FUNC><0> <FUNC><0> PF11 <FUNC><U> <FUNC><U> <FUNC><U> PF12 <FUNC><V> <FUNC><V> <FUNC><V> PF13 <FUNC><W> <FUNC><W> <FUNC><W> PF14 <FUNC><X> <FUNC><X> <FUNC><X> PF15 <FUNC><Y> <FUNC><Y> <FUNC><Y> PF16 <FUNC><P> <FUNC><P> <FUNC><P> PF17 <FUNC><Q> <FUNC><Q> <FUNC><Q> PF18 <FUNC><R> <FUNC><R> <FUNC><R> PF19 <FUNC><S> <FUNC><S> <FUNC><S> PF20 <FUNC><T> <FUNC><T> <FUNC><T>

Symbol Terminal Keypad Tables
Twin Client Reference • June, 2004 10-53
PF21 <FUNC><K> <FUNC><K PF22 <FUNC><L> <FUNC><L> PF23 <FUNC><M> <FUNC><M> PF24 <FUNC><N> <FUNC><N> ! exclamation <SHF><1> <SHF><1> <SHF><1> <SHF><1> @ at sign <SHF><2> <SHF><2> <SHF><2> <SHF><2> # pound <SHF><3> <SHF><3> <SHF><3> <SHF><3> $ dollar <SHF><4> <SHF><4> <SHF><4> <SHF><4> % percent <SHF><5> <SHF><5> <SHF><5> <SHF><5> ^ carat <SHF><6> <SHF><6> <SHF><6> <SHF><6> & ampersand <SHF><7> <SHF><7> <SHF><7> <SHF><7> ( left parenthesis <SHF><9> <SHF><9> <SHF><9> <SHF><9> ) right parenthesis <SHF><0> <SHF><0> <SHF><0> <SHF><0> - dash <FUNC><G> <FUNC><G> <FUNC><G> <SHF><FUNC><B> + plus <FUNC><C> <FUNC><C> <FUNC><C> <SHF><FUNC><A> ' apostrophe <CTL><5> <CTL><5> <CTL><5> <FUNC><R> * asterisk <SHF><8> <SHF><8> <SHF><8> <SHF><8> , comma <CTL><6> <CTL><6> <CTL><6> <FUNC><S> . period <PERIOD> <PERIOD> <PERIOD> <PERIOD> / forward slash <FUNC><J> <FUNC><J> <FUNC><J> <FUNC><T> [ left bracket <FUNC><CLR> <FUNC><CLR> <FUNC><CLR> <FUNC><M> \ back slash <FUNC><I> <FUNC><I> <FUNC><I> <FUNC><J> ] right bracket <FUNC><O> <FUNC><O> <FUNC><O> <FUNC><N> _ underline <FUNC><B> <FUNC><B> <FUNC><B> <SHF><FUNC><K> ` grave accent <FUNC><F> <FUNC><F> <FUNC><F> <FUNC><H> : colon <CTL><7> <CTL><7> <CTL><7> <SHF><FUNC><O> ; semi-colon <CTL><4> <CTL><4> <CTL><4> <FUNC><O> < less than <CTL><9> <CTL><9> <CTL><9> <SHF><FUNC><S> = equal <FUNC><H> <FUNC><H> <FUNC><H> <FUNC><I> > greater than <SHF><.> <SHF><.> <SHF><.> <SHF><.> ? question <FUNC><E> <FUNC><E> <FUNC><E> <SHF><FUNC><T> { left brace <CTL><0> <CTL><0> <CTL><0> <SHF><FUNC><H> | vertical bar <FUNC><D> <FUNC><D> <FUNC><D> <SHF><FUNC><J> } right brace <FUNC><.> <FUNC><.> <FUNC><.> <SHF><FUNC><M> ~ tilde <FUNC><A> <FUNC><A> <FUNC><A> <SHF><FUNC><N>

Keypad Configuration
Twin Client Reference • June, 2004 10-54
354x 47-key KEY 5250 3270 VT/HP OS ATTENTION <CTRL><A> BACK TAB <FUNC><BKSP> <FUNC><BKSP> <FUNC><BKSP> BACKSPACE <BKSP> <BKSP> <BKSP> <BKSP> CONTRAST - <CTRL><0> <CTRL><0> <CTRL><0> CONTRAST + <CTRL><.> <CTRL><.> <CTRL><.> CURSOR DOWN <DN-ARROW> <DN-ARROW> <DN-ARROW> CURSOR LEFT <SHF><UP> <SHF><UP> <SHF><UP> <FUNC><UP CURSOR RIGHT <SHF><DN> <SHF><DN> <SHF><DN> <FUNC><DN> CURSOR UP <UP> <UP> <UP> DELETE <CTL><CLR> <FUNC><V> ENTER <ENTER> <ENTER> <ENTER> <ENTER> ERASE FIELD <CTRL><X> ERASE EOF <CTRL><E> ERROR RESET <CTRL><R> ESCAPE <SHF><CLR> FIELD ADVANCE <CTL><SPACE> FIELD EXIT <CTL><E> FIELD MINUS <CTL><BKSP> HELP <CTL><Q> HOME <CTL><H> <CTL><H> <FUNC><P> INSERT <CTL><I> <CTL><I> <CTL><I> LAMP <FUNC><ENTER> <FUNC><ENTER> <FUNC><ENTER> PAGE DOWN <FUNC><PERIOD> PAGE UP <FUNC><W> RETURN <ENTER> <ENTER> <ENTER> <ENTER> ROLL DOWN <CTL><2> ROLL UP <CTL><1> SPACE <SPACE> <SPACE> <SPACE> <FUNC><BKSP> SYS REQUEST <CTL><S> <CTL><S> TAB <FUNC><SPACE> <FUNC><SPACE> <FUNC><SPACE> VIEW DOWN <FUNC><DN> <FUNC><DN> <FUNC><DN> VIEW LEFT <CTL><UP> <CTL><UP> <CTL><UP> VIEW RIGHT <CTL><DOWN> <CTL><DOWN> <CTL><DOWN> VIEW UP <FUNC><UP> <FUNC><UP> <FUNC><UP> PA1 <CTL><1> PA2 <CTL><2> PA3 <CTL><3> PF1 <FUNC><1> <FUNC><1> <FUNC><1> <FUNC><1> PF2 <FUNC><2> <FUNC><2> <FUNC><2> <FUNC><2> PF3 <FUNC><3> <FUNC><3> <FUNC><3> <FUNC><3> PF4 <FUNC><4> <FUNC><4> <FUNC><4> <FUNC><4> PF5 <FUNC><5> <FUNC><5> <FUNC><5> <FUNC><5> PF6 <FUNC><6> <FUNC><6> <FUNC><6> <FUNC><6> PF7 <FUNC><7> <FUNC><7> <FUNC><7> <FUNC><7> PF8 <FUNC><8> <FUNC><8> <FUNC><8> <FUNC><8> PF9 <FUNC><9> <FUNC><9> <FUNC><9> <FUNC><9> PF10 <FUNC><0> <FUNC><0> <FUNC><0> <FUNC><0> PF11 <FUNC><Y> <FUNC><Y> <FUNC><Y> PF12 <FUNC><Z> <FUNC><Z> <FUNC><Z> PF13 <FUNC><U> <FUNC><U> <FUNC><U> PF14 <FUNC><V> <FUNC><V> <FUNC><V> PF15 <FUNC><W> <FUNC><W> <FUNC><W> PF16 <FUNC><X> <FUNC><X> <FUNC><X> PF17 <FUNC><Q> <FUNC><Q> <FUNC><Q> PF18 <FUNC><R> <FUNC><R> <FUNC><R> PF19 <FUNC><S> <FUNC><S> <FUNC><S> PF20 <FUNC><T> <FUNC><T> <FUNC><T> PF21 <FUNC><M> <FUNC><M>

Symbol Terminal Keypad Tables
Twin Client Reference • June, 2004 10-55
PF22 <FUNC><N> <FUNC><N> PF23 <FUNC><O> <FUNC><O> PF24 <FUNC><P> <FUNC><P> ! exclamation <SHF><1> <SHF><1> <SHF><1> <SHF><1> @ at sign <SHF><2> <SHF><2> <SHF><2> <SHF><2> # pound <SHF><3> <SHF><3> <SHF><3> <SHF><3> $ dollar <SHF><4> <SHF><4> <SHF><4> <SHF><4> % percent <SHF><5> <SHF><5> <SHF><5> <SHF><5> ^ carat <SHF><6> <SHF><6> <SHF><6> <SHF><6> & ampersand <SHF><7> <SHF><7> <SHF><7> <SHF><7> ( left parenthesis <SHF><9> <SHF><9> <SHF><9> <SHF><9> ) right parenthesis <SHF><0> <SHF><0> <SHF><0> <SHF><0> - dash <FUNC><F> <FUNC><F> <FUNC><F> <SHF><FUNC><B> + plus <FUNC><C> <FUNC><C> <FUNC><C> <SHF><FUNC><A> ' apostrophe <CTL><5> <CTL><5> <CTL><5> <FUNC><R> * asterisk <SHF><8> <SHF><8> <SHF><8> <SHF><8> , comma <CTL><6> <CTL><6> <CTL><6> <FUNC><S> . period <PERIOD> <PERIOD> <PERIOD> <PERIOD> / forward slash <SHF><SPACE> <SHF><SPACE> <SHF><SPACE> <FUNC><T> [ left bracket <FUNC><K> <FUNC><K> <FUNC><K> <FUNC><M> \ back slash <FUNC><H> <FUNC><H> <FUNC><H> <FUNC><J> ] right bracket <FUNC><L> <FUNC><L> <FUNC><L> <FUNC><N> _ underline <FUNC><B> <FUNC><B> <FUNC><B> <SHF><FUNC><K> ` grave accent <FUNC><E> <FUNC><E> <FUNC><E> <FUNC><H> : colon <CTL><7> <CTL><7> <CTL><7> <SHF><FUNC><O> ; semi-colon <CTL><4> <CTL><4> <CTL><4> <FUNC><O> < less than <CTL><9> <CTL><9> <CTL><9> <SHF><FUNC><S> = equal <FUNC><G> <FUNC><G> <FUNC><G> <FUNC><I> > greater than <SHF><.> <SHF><.> <SHF><.> <SHF><.> ? question <SHF><BKSP> <SHF><BKSP> <SHF><BKSP> <SHF><FUNC><T> { left brace <FUNC><I> <FUNC><I> <CTL><I> <SHF><FUNC><H> | vertical bar <FUNC><D> <FUNC><D> <FUNC><D> <SHF><FUNC><J> } right brace <FUNC><J> <FUNC><J> <FUNC><J> <SHF><FUNC><M> ~ tilde <FUNC><A> <FUNC><A> <FUNC><A> <SHF><FUNC><N>

Keypad Configuration
Twin Client Reference • June, 2004 10-56
614x 35-key KEY 5250 3270 VT/HP OS ATTENTION <CTRL><A> BACK TAB <CTRL><BKSP> <CTRL><BKSP> <CTRL><BKSP> BACKSPACE <BKSP> <BKSP> <BKSP> <BKSP> CONTRAST - <CTRL><Y> <CTRL><Y> <CTRL><Y> <FUNC><Z> CONTRAST + <CTRL><Z> <CTRL><Z> <CTRL><Z> <FUNC><X> CURSOR DOWN <DN> <DN> <DN> CURSOR LEFT <LEFT> <LEFT> <LEFT> <LEFT> CURSOR RIGHT <RIGHT> <RIGHT> <RIGHT> <RIGHT> CURSOR UP <UP> <UP> <UP> DELETE <FUNC><CLEAR> ENTER <ENTER> <ENTER> <ENTER> <ENTER> ERASE FIELD <CTRL><X> ERASE EOF <CTRL><E> ERROR RESET <CTRL><R> ESCAPE <ALT><CLR> FIELD PLUS <FUNC><SPACE> FIELD EXIT <CTRL><E> FIELD MINUS <ALT><BKSP> HELP <CTRL><Q> HOME <CTRL><H> <CTRL><H> INSERT <CTRL><I> <CTRL><I> LAMP <CTRL><ENTER> <CTRL><ENTER> <CTRL><ENTER> <FUNC><L> NEWLINE PAGE DOWN PAGE UP RETURN <ENTER> <ENTER> <ENTER> <ENTER> ROLL DOWN <CTRL><V> ROLL UP <CTRL><U> SPACE <SPACE> <SPACE> <SPACE> <SPACE> SYS REQUEST <CTL><S> TAB <CTRL><SPACE> <CTRL><SPACE> <CTRL><SPACE> VIEW DOWN <CTRL><N> <CTRL><N> <CTRL><N> VIEW LEFT <CTRL><K> <CTRL><K> <CTRL><K> VIEW RIGHT <CTRL><L> <CTRL><L> <CTRL><L> VIEW UP <CTRL><M> <CTRL><M> <CTRL><M> PA1 <CTRL><U> PA2 <CTRL><V> PA3 <CTRL><W> PF1 <FUNC><U> <FUNC><U> <FUNC><U> <FUNC><U> PF2 <FUNC><V> <FUNC><V> <FUNC><V> <FUNC><V> PF3 <FUNC><W> <FUNC><W> <FUNC><W> <FUNC><W> PF4 <FUNC><R> <FUNC><R> <FUNC><R> <FUNC><R> PF5 <FUNC><S> <FUNC><S> <FUNC><S> <FUNC><S> PF6 <FUNC><T> <FUNC><T> <FUNC><T> <FUNC><T> PF7 <FUNC><O> <FUNC><O> <FUNC><O> <FUNC><O> PF8 <FUNC><P> <FUNC><P> <FUNC><P> <FUNC><P> PF9 <FUNC><Q> <FUNC><Q> <FUNC><Q> <FUNC><Q> PF10 <FUNC><Y> <FUNC><Y> <FUNC><Y> <FUNC><Y> PF11 <FUNC><K> <FUNC><K> <FUNC><K> PF12 <FUNC><L> <FUNC><L> <FUNC><L> PF13 <FUNC><M> <FUNC><M> <FUNC><M> PF14 <FUNC><N> <FUNC><N> <FUNC><N> PF15 <FUNC><F> <FUNC><F> <FUNC><F> PF16 <FUNC><G> <FUNC><G> <FUNC><G> PF17 <FUNC><H> <FUNC><H> <FUNC><H> PF18 <FUNC><I> <FUNC><I> <FUNC><I> PF19 <FUNC><J> <FUNC><J> <FUNC><J> PF20 <FUNC><A> <FUNC><A> <FUNC><A>

Symbol Terminal Keypad Tables
Twin Client Reference • June, 2004 10-57
PF21 <FUNC><B> <FUNC><B> PF22 <FUNC><C> <FUNC><C> PF23 <FUNC><D> <FUNC><D> PF24 <FUNC><E> <FUNC><E> ! exclamation <ALT><U> <ALT><U> <ALT><U> <SHF><1> @ at sign <ALT><V> <ALT><V> <ALT><V> <SHF><2> # pound <ALT><W> <ALT><W> <ALT><W> <SHF><3> $ dollar <ALT><R> <ALT><R> <ALT><R> <SHF><4> % percent <ALT><S> <ALT><S> <ALT><S> <SHF><5> ^ carat <ALT><T> <ALT><T> <ALT><T> <SHF><6> & ampersand <ALT><O> <ALT><O> <ALT><O> <SHF><7> ( left parenthesis <ALT><Q> <ALT><Q> <ALT><Q> <SHF><9> ) right parenthesis <ALT><Y> <ALT><Y> <ALT><Y> <SHF><0> - dash <ALT><X> <ALT><X> <ALT><X> + plus <ALT><B> <ALT><B> <ALT><B> <SHF><J> ' apostrophe <ALT><N> <ALT><N> <ALT><N> <NUM><C> * asterisk <ALT><P> <ALT><P> <ALT><P> <NUM><E> , comma <ALT><BKSP> <ALT><BKSP> <ALT><BKSP> <NUM><G> . period <NUM><Z> <NUM><Z> <NUM><Z> <NUM><Z> / forward slash <FUNC><Z> <FUNC><Z> <FUNC><Z> <NUM><F> [ left bracket <ALT><H> <ALT><H> <ALT><H> <NUM><A> \ back slash <ALT><J> <ALT><J> <ALT><J> <NUM><H> ] right bracket <ALT><I> <ALT><I> <ALT><I> <NUM><B> _ underline <NUM><X> <NUM><X> <NUM><X> <SHF><X> ` grave accent <ALT><F> <ALT><F> <ALT><F> <FUNC><B> : colon <ALT><K> <ALT><K> <ALT><K> <SHF><I> ; semi-colon <ALT><L> <ALT><L> <ALT><L> <NUM><I> < less than <ALT><SPACE> <ALT><SPACE> <ALT><SPACE> <SHF><G> = equal <ALT><G> <ALT><G> <ALT><G> <NUM><D> > greater than <ALT><Z> <ALT><Z> <ALT><Z> <SHF><Z> ? question <FUNC><X> <FUNC><X> <FUNC><X> <SHF><F> { left brace <ALT><C> <ALT><C> <ALT><C> <SHF><A> | vertical bar <ALT><E> <ALT><E> <ALT><E> <SHF><H> } right brace <ALT><D> <ALT><D> <ALT><D> <SHF><B> ~ tilde <ALT><A> <ALT><A> <ALT><A> <ALT> = <FUNC><CTRL> <NUM>= <ALPHA> OFF

Keypad Configuration
Twin Client Reference • June, 2004 10-58
394x/694x 54-key KEY 5250 3270 VT/HP OS ATTENTION <CTRL><A> BACK TAB <FUNC><UP> <FUNC><UP> <FUNC><UP> BACKSPACE <BKSP> <BKSP> <BKSP> <BKSP> CONTRAST - <CTRL><BKSP> <CTRL><BKSP> <CTRL><BKSP> <FUNC><J> CONTRAST + <CTRL><.> <CTRL><.> <CTRL><.> <FUNC><I> CURSOR DOWN <DOWN> <DOWN> <DOWN> CURSOR LEFT <LEFT> <LEFT> <LEFT> <LEFT> CURSOR RIGHT <RIGHT> <RIGHT> <RIGHT> <RIGHT> CURSOR UP <UP> <UP> <UP> DELETE <CTL><CLR> <FUNC><V> ENTER <ENTER> <ENTER> <ENTER> <ENTER> ERASE FIELD <CTRL><X> ERASE EOF <CTRL><E> ERROR RESET <CTRL><R> ESCAPE <SHF><CLR> FIELD ADVANCE <CTL><K> FIELD EXIT <CTL><E> FIELD MINUS <CTL><L> HELP <CTL><Q> HOME <CTL><H> <CTL><H> <FUNC><P> INSERT <CTL><I> <CTL><I> <CTL><I> LAMP PAGE DOWN <FUNC><.> PAGE UP <FUNC><W> RETURN <ENTER> <ENTER> <ENTER> <ENTER> ROLL DOWN <CTL><2> ROLL UP <CTL><1> SPACE <SHF><BKSP> <SHF><BKSP> <SHF><BKSP> <FUNC><BKSP> SYS REQUEST <CTL><S> TAB <FUNC><DOWN> <FUNC><DOWN> <FUNC><DOWN> VIEW DOWN <CTL><DOWN> <CTL><DOWN> <CTL><DOWN> VIEW LEFT <CTL><LEFT> <CTL><LEFT> <CTL><LEFT> VIEW RIGHT <CTL><RIGHT> <CTL><RIGHT> <CTL><RIGHT> VIEW UP <CTL><UP> <CTL><UP> <CTL><UP> PA1 <CTL><1> PA2 <CTL><2> PA3 <CTL><3> PF1 <FUNC><1> <FUNC><1> <FUNC><1> <FUNC><1> PF2 <FUNC><2> <FUNC><2> <FUNC><2> <FUNC><2> PF3 <FUNC><3> <FUNC><3> <FUNC><3> <FUNC><3> PF4 <FUNC><4> <FUNC><4> <FUNC><4> <FUNC><4> PF5 <FUNC><5> <FUNC><5> <FUNC><5> <FUNC><5> PF6 <FUNC><6> <FUNC><6> <FUNC><6> <FUNC><6> PF7 <FUNC><7> <FUNC><7> <FUNC><7> <FUNC><7> PF8 <FUNC><8> <FUNC><8> <FUNC><8> <FUNC><8> PF9 <FUNC><9> <FUNC><9> <FUNC><9> <FUNC><9> PF10 <FUNC><0> <FUNC><0> <FUNC><0> <FUNC><0> PF11 <FUNC><A> <FUNC><A> <FUNC><A> PF12 <FUNC><B> <FUNC><B> <FUNC><B> PF13 <FUNC><C> <FUNC><C> <FUNC><C> PF14 <FUNC><D> <FUNC><D> <FUNC><D> PF15 <FUNC><E> <FUNC><E> <FUNC><E> PF16 <FUNC><F> <FUNC><F> <FUNC><F> PF17 <FUNC><G> <FUNC><G> <FUNC><G> PF18 <FUNC><H> <FUNC><H> <FUNC><H> PF19 <FUNC><I> <FUNC><I> <FUNC><I> PF20 <FUNC><J> <FUNC><J> <FUNC><J> PF21 <FUNC><K> <FUNC><K

Symbol Terminal Keypad Tables
Twin Client Reference • June, 2004 10-59
PF22 <FUNC><L> <FUNC><L> PF23 <FUNC><M> <FUNC><M> PF24 <FUNC><N> <FUNC><N> ! exclamation <SHF><1> <SHF><1> <SHF><1> <SHF><1> @ at sign <SHF><2> <SHF><2> <SHF><2> <SHF><2> # pound <SHF><3> <SHF><3> <SHF><3> <SHF><3> $ dollar <SHF><4> <SHF><4> <SHF><4> <SHF><4> % percent <SHF><5> <SHF><5> <SHF><5> <SHF><5> ^ carat <SHF><6> <SHF><6> <SHF><6> <SHF><6> & ampersand <SHF><7> <SHF><7> <SHF><7> <SHF><7> ( left parenthesis <SHF><9> <SHF><9> <SHF><9> <SHF><9> ) right parenthesis <SHF><0> <SHF><0> <SHF><0> <SHF><0> - dash <DASH> <DASH> <DASH> <DASH> + plus <FUNC><P> <FUNC><P> <FUNC><P> ' apostrophe <CTL><5> <CTL><5> <CTL><5> <FUNC><R> * asterisk <SHF><8> <SHF><8> <SHF><8> <SHF><8> , comma <CTL><6> <CTL><6> <CTL><6> <FUNC><S> . period <PERIOD> <PERIOD> <PERIOD> <PERIOD> / forward slash <FUNC><U> <FUNC><U> <FUNC><U> <FUNC><T> [ left bracket <FUNC><Y> <FUNC><Y> <FUNC><Y> <FUNC><M> \ back slash <FUNC><X> <FUNC><X> <FUNC><X> <FUNC><J> ] right bracket <FUNC><Z> <FUNC><Z> <FUNC><Z> <FUNC><N> _ underline <FUNC><-> <FUNC><-> <FUNC><-> <SHF><FUNC><K> ` grave accent <FUNC><V> <FUNC><V> <FUNC><V> <FUNC><H> : colon <CTL><7> <CTL><7> <CTL><7> <SHF><FUNC><O> ; semi-colon <CTL><4> <CTL><4> <CTL><4> <FUNC><O> < less than <CTL><9> <CTL><9> <CTL><9> <SHF><FUNC><S> = equal <FUNC><W> <FUNC><W> <FUNC><W> <FUNC><I> > greater than <SHF><.> <SHF><.> <SHF><.> <SHF><.> ? question <FUNC><T> <FUNC><T> <FUNC><T> <SHF><FUNC><T> { left brace <FUNC><R> <FUNC><R> <FUNC><R> <SHF><FUNC><H> | vertical bar <FUNC><Q> <FUNC><Q> <FUNC><Q> <SHF><FUNC><J> } right brace <FUNC><S> <FUNC><S> <FUNC><S> <SHF><FUNC><M> ~ tilde <FUNC><O> <FUNC><O> <FUNC><O> <SHF><FUNC><N>

Keypad Configuration
Twin Client Reference • June, 2004 10-60
614x, 31-key, 5250,3270,VT/HP KEY 5250 3270 VT/HP ATTENTION <CTRL><F3> BACK TAB <CTRL><LEFT> <CTRL><LEFT> <CTRL><LEFT> BACKSPACE <BKSP> <BKSP> <BKSP> CLEAR <CLEAR> <CLEAR> <CLEAR> DARK <CTRL><UP> <CTRL><UP> <CTRL><UP> DOWN <DOWN> <DOWN> <DOWN> DUP <CTRL><F6> ENTER <ENTER> <ENTER> <ENTER> ERASE EOF <CTRL><F7> FIELD PLUS <CTRL><SPACE> FIELD EXIT <CTRL><F7> FIELD MINUS <CTRL><BKSP> HELP <CTRL><9> <CTRL><9> HOME <CTRL><*> INSERT <CTRL></> LAMP <CTRL><ENTER> <CTRL><ENTER> <CTRL><ENTER> LEFT <LEFT> <LEFT> <LEFT> LIGHT <CTRL><DOWN> <CTRL><DOWN> <CTRL><DOWN> RESET <CTRL><4> <CTRL><4> RIGHT <RIGHT> <RIGHT> <RIGHT> ROLL DOWN <CTRL><2> ROLL UP <CTRL><1> SPACE <SPACE> <SPACE> <SPACE> SYS REQUEST <CTRL><5> <CTRL><5> TAB <CTRL><RIGHT> <CTRL><RIGHT> <CTRL><RIGHT> UP <UP> <UP> <UP> VIEW DOWN <FUNC><CTRL><DOWN> <FUNC><CTRL><DOWN> <FUNC><CTRL><DOWN> VIEW LEFT <FUNC><CTRL><LEFT> <FUNC><CTRL><LEFT> <FUNC><CTRL><LEFT> VIEW RIGHT <FUNC><CTRL><RIGHT> <FUNC><CTRL><RIGHT> <FUNC><CTRL><RIGHT> VIEW UP <FUNC><CTRL>><UP> <FUNC><CTRL>><UP> <FUNC><CTRL>><UP> A <ALPHA><F3> <ALPHA><F3> <ALPHA><F3> B <ALPHA><F4> <ALPHA><F4> <ALPHA><F4> C <ALPHA><F5> <ALPHA><F5> <ALPHA><F5> D <ALPHA><F6> <ALPHA><F6> <ALPHA><F6> E <ALPHA><F7> <ALPHA><F7> <ALPHA><F7> F <ALPHA><UP> <ALPHA><UP> <ALPHA><UP> G <ALPHA><LEFT> <ALPHA><LEFT> <ALPHA><LEFT> H <ALPHA><*> <ALPHA><*> <ALPHA><*> I <ALPHA></> <ALPHA></> <ALPHA></> J <ALPHA><SPACE> <ALPHA><SPACE> <ALPHA><SPACE> K <ALPHA>< DOWN> <ALPHA>< DOWN> <ALPHA>< DOWN> L <ALPHA><RITE> <ALPHA><RITE> <ALPHA><RITE> M <ALPHA><PERIOD> <ALPHA><PERIOD> <ALPHA><PERIOD> N <ALPHA><HYPHEN> <ALPHA><HYPHEN> <ALPHA><HYPHEN> O <ALPHA><7> <ALPHA><7> <ALPHA><7> P <ALPHA><8> <ALPHA><8> <ALPHA><8> Q <ALPHA><9> <ALPHA><9> <ALPHA><9> R <ALPHA><4> <ALPHA><4> <ALPHA><4> S <ALPHA><5> <ALPHA><5> <ALPHA><5> T <ALPHA><6> <ALPHA><6> <ALPHA><6> U <ALPHA><1> <ALPHA><1> <ALPHA><1> V <ALPHA><2> <ALPHA><2> <ALPHA><2> W <ALPHA><3> <ALPHA><3> <ALPHA><3> X <ALPHA><BKSP> <ALPHA><BKSP> <ALPHA><BKSP> Y <ALPHA><0> <ALPHA><0> <ALPHA><0> Z <ALPHA><CLEAR> <ALPHA><CLEAR> <ALPHA><CLEAR> F1 <FUNC><1> <FUNC><1> <FUNC><1> F2 <FUNC><2> <FUNC><2> <FUNC><2>

Symbol Terminal Keypad Tables
Twin Client Reference • June, 2004 10-61
KEY 5250 3270 VT/HP F3 <FUNC><3> <FUNC><3> <FUNC><3> F4 <FUNC><4> <FUNC><4> <FUNC><4> F5 <FUNC><5> <FUNC><5> <FUNC><5> F6 <FUNC><6> <FUNC><6> <FUNC><6> F7 <FUNC><7> <FUNC><7> <FUNC><7> F8 <FUNC><8> <FUNC><8> <FUNC><8> F9 <FUNC><9> <FUNC><9> <FUNC><9> F10 <FUNC><0> <FUNC><0> <FUNC><0> F11 <FUNC><BKSP> <FUNC><BKSP> <FUNC><BKSP> F12 <FUNC><CLEAR> <FUNC><CLEAR> <FUNC><CLEAR> F13 <FUNC><F3> <FUNC><F3> <FUNC><F3> F14 <FUNC><F4> <FUNC><F4> <FUNC><F4> F15 <FUNC><F5> <FUNC><F5> <FUNC><F5> F16 <FUNC><F6> <FUNC><F6> <FUNC><F6> F17 <FUNC><F7> <FUNC><F7> <FUNC><F7> F18 <FUNC><UP> <FUNC><UP> <FUNC><UP> F19 <FUNC><LEFT> <FUNC><LEFT> <FUNC><LEFT> F20 <FUNC><*> <FUNC><*> <FUNC><*> F21 <FUNC></> <FUNC></> <FUNC></> F22 <FUNC><SPACE> <FUNC><SPACE> <FUNC><SPACE> F23 <FUNC><DOWN> <FUNC><DOWN> <FUNC><DOWN> F24 <FUNC><RITE> <FUNC><RITE> <FUNC><RITE> ! exclamation <FUNC><CTRL><1> <FUNC><CTRL><1> <FUNC><CTRL><1> @ at sign <FUNC><CTRL><2> <FUNC><CTRL><2> <FUNC><CTRL><2> # pound <FUNC><CTRL><3> <FUNC><CTRL><3> <FUNC><CTRL><3> $ dollar <FUNC><CTRL><4> <FUNC><CTRL><4> <FUNC><CTRL><4> % percent <FUNC><CTRL><5> <FUNC><CTRL><5> <FUNC><CTRL><5> ^ carat <FUNC><CTRL><6> <FUNC><CTRL><6> <FUNC><CTRL><6> & ampersand <FUNC><CTRL><7> <FUNC><CTRL><7> <FUNC><CTRL><7> ( left parenthesis <FUNC><CTRL><9> <FUNC><CTRL><9> <FUNC><CTRL><9> ) right parenthesis <FUNC><CTRL><0> <FUNC><CTRL><0> <FUNC><CTRL><0> - dash <DASH> <DASH> <DASH> + plus <FUNC><CTRL><BKSP> <FUNC><CTRL><BKSP> <FUNC><CTRL><BKSP> ' apostrophe <FUNC><DASH> <FUNC><DASH> <FUNC><DASH> * asterisk <*> <*> <*> , comma <FUNC><CTRL><8> <FUNC><CTRL><8> <FUNC><CTRL><8> . period <PERIOD> <PERIOD> <PERIOD> / forward slash </> </> </> [ left bracket <FUNC><CTRL><F5> <FUNC><CTRL><F5> <FUNC><CTRL><F5> \ back slash <FUNC><CTRL><SPACE> <FUNC><CTRL><SPACE> <FUNC><CTRL><SPACE> ] right bracket <FUNC><CTRL><F6> <FUNC><CTRL><F6> <FUNC><CTRL><F6> _ underline <FUNC><CTRL><DASH> <FUNC><CTRL><DASH> <FUNC><CTRL><DASH> ` grave accent <CTRL><CLEAR> <CTRL><CLEAR> <CTRL><CLEAR> : colon <FUNC><ENTER <FUNC><ENTER <FUNC><ENTER ; semi-colon <FUNC><CTRL><ENTER> <FUNC><CTRL><ENTER> <FUNC><CTRL><ENTER> < less than <FUNC><CTRL><*> <FUNC><CTRL><*> <FUNC><CTRL><*> = equal <FUNC><CTRL><CLEAR> <FUNC><CTRL><CLEAR> <FUNC><CTRL><CLEAR> > greater than <FUNC><CTRL><PERIOD> <FUNC><CTRL><PERIOD> <FUNC><CTRL><PERIOD> ? question <FUNC><CTRL></> <FUNC><CTRL></> <FUNC><CTRL></> { left brace <FUNC><CTRL><F3> <FUNC><CTRL><F3> <FUNC><CTRL><F3> | vertical bar <FUNC><CTRL><F7> <FUNC><CTRL><F7> <FUNC><CTRL><F7> } right brace <FUNC><CTRL><F4> <FUNC><CTRL><F4> <FUNC><CTRL><F4> ~ tilde <CTRL><0> <CTRL><0> <CTRL><0>

Keypad Configuration
Twin Client Reference • June, 2004 10-62
614x, 46-key, 5250,3270,VT/HP Key VTERM 3270 5250
a <a> <a> <a> b <b> <b> <b> c <c> <c> <c> d <d> <d> <d> e <e> <e> <e> f <f> <f> <f> g <g> <g> <g> h <h> <h> <h> i <i> <i> <i> j <j> <j> <j> k <k> <k> <k> l <l> <l> <l> m <m> <m> <m> n <n> <n> <n> o <o> <o> <o> p <p> <p> <p> q <q> <q> <q> r <r> <r> <r> s <s> <s> <s> t <t> <t> <t> u <u> <u> <u> v <v> <v> <v> w <w> <w> <w> x <x> <x> <x> y <y> <y> <y> z <z> <z> <z> A <Shift><a> <Shift><a> <Shift><a> B <Shift><b> <Shift><b> <Shift><b> C <Shift><c> <Shift><c> <Shift><c> D <Shift><d> <Shift><d> <Shift><d> E <Shift><e> <Shift><e> <Shift><e> F <Shift><f> <Shift><f> <Shift><f> G <Shift><g> <Shift><g> <Shift><g> H <Shift><h> <Shift><h> <Shift><h> I <Shift><I> <Shift><I> <Shift><I> J <Shift><j> <Shift><j> <Shift><j> K <Shift><k> <Shift><k> <Shift><k> L <Shift><l> <Shift><l> <Shift><l> M <Shift><m> <Shift><m> <Shift><m> N <Shift><n> <Shift><n> <Shift><n> O <Shift><o> <Shift><o> <Shift><o> P <Shift><p> <Shift><p> <Shift><p> Q <Shift><q> <Shift><q> <Shift><q> R <Shift><r> <Shift><r> <Shift><r> S <Shift><s> <Shift><s> <Shift><s> T <Shift><t> <Shift><t> <Shift><t> U <Shift><u> <Shift><u> <Shift><u> V <Shift><v> <Shift><v> <Shift><v> W <Shift><w> <Shift><w> <Shift><w> X <Shift><x> <Shift><x> <Shift><x> Y <Shift><y> <Shift><y> <Shift><y> Z <Shift><z> <Shift><z> <Shift><z> Clear <Clr> <Clr> <Clr> Backtab <Fnc><Enter> <Fnc><Enter> <Fnc><Enter> Tab <Fnc><.> <Fnc><.> <Fnc><.> Esc <Shf><Clr> --- --- Space <Shf><Bsp> <Shf><Bsp> <Shf><Bsp> Shift <Shf> <Shf> <Shf> Func <Fnc> <Fnc> <Fnc> Ctrl <Ctl> <Ctl> <Ctl>

Symbol Terminal Keypad Tables
Twin Client Reference • June, 2004 10-63
Backspace <Bsp> <Bsp> <Bsp> Enter <Enter> <Enter> <Enter> Del <Fnc><Clr> --- --- Lamp <Ctl><Enter> <Ctl><Enter> <Ctl><Enter> 1 <1> <1> <1> 2 <2> <2> <2> 3 <3> <3> <3> 4 <4> <4> <4> 5 <5> <5> <5> 6 <6> <6> <6> 7 <7> <7> <7> 8 <8> <8> <8> 9 <9> <9> <9> 0 <0> <0> <0> ! exclamation <Shift><1> <Shift><1> <Shift><1> @ at sign <Shift><2> <Shift><2> <Shift><2> # pound <Shift><3> <Shift><3> <Shift><3> $ dollar <Shift><4> <Shift><4> <Shift><4> % percent <Shift><5> <Shift><5> <Shift><5> ^ carat <Shift><6> <Shift><6> <Shift><6> & ampersand <Shift><7> <Shift><7> <Shift><7> * asterisk <Shift><8> <Shift><8> <Shift><8> ( left parenthesis <Shift><9> <Shift><9> <Shift><9> ) right parenthesis <Shift><0> <Shift><0> <Shift><0> F1 <Fnc><1> <Fnc><1> <Fnc><1> F2 <Fnc><2> <Fnc><2> <Fnc><2> F3 <Fnc><3> <Fnc><3> <Fnc><3> F4 <Fnc><4> <Fnc><4> <Fnc><4> F5 <Fnc><5> <Fnc><5> <Fnc><5> F6 <Fnc><6> <Fnc><6> <Fnc><6> F7 <Fnc><7> <Fnc><7> <Fnc><7> F8 <Fnc><8> <Fnc><8> <Fnc><8> F9 <Fnc><9> <Fnc><9> <Fnc><9> F10 <Fnc><0> <Fnc><0> <Fnc><0> F11 <Fnc><u> <Fnc><u> <Fnc><u> F12 <Fnc><v> <Fnc><v> <Fnc><v> F13 <Fnc><w> <Fnc><w> <Fnc><w> F14 <Fnc><x> <Fnc><x> <Fnc><x> F15 <Fnc><y> <Fnc><y> <Fnc><y> F16 <Fnc><z> <Fnc><z> <Fnc><z> F17 <Fnc><o> <Fnc><o> <Fnc><o> F18 <Fnc><p> <Fnc><p> <Fnc><p> F19 <Fnc><q> <Fnc><q> <Fnc><q> F20 <Fnc><r> <Fnc><r> <Fnc><r> F21 --- <Fnc><s> <Fnc><s> F22 --- <Fnc><t> <Fnc><t> F23 --- <Fnc><k> <Fnc><k> F24 --- <Fnc><l> <Fnc><l> / forward slash <Ctl><j> <Ctl><j> <Ctl><j> ` accent <Ctl><f> <Ctl><f> <Ctl><f> - hyphen <Ctl><g> <Ctl><g> <Ctl><g> = equal sign <Ctl><h> <Ctl><h> <Ctl><h> [ left bracket <Ctl><2> <Ctl><2> <Ctl><2> ] right bracket <Ctl><3> <Ctl><3> <Ctl><3> \ backward slash <Ctl><i> <Ctl><i> <Ctl><i> ; semicolon <Ctl><4> <Ctl><4> <Ctl><4> ‘ apostrophe <Ctl><5> <Ctl><5> <Ctl><5> , comma <Ctl><6> <Ctl><6> <Ctl><6> . period <.> <.> <.> ~ tilde <Ctl><a> <Ctl><a> <Ctl><a> _ underscore <Ctl><b> <Ctl><b> <Ctl><b> + addition sign <Ctl><c> <Ctl><c> <Ctl><c> { left brace <Ctl><0> <Ctl><0> <Ctl><0> } right brace <Ctl><1> <Ctl><1> <Ctl><1>

Keypad Configuration
Twin Client Reference • June, 2004 10-64
| broken vertical bar <Ctl><d> <Ctl><d> <Ctl><d> : colon <Ctl><7> <Ctl><7> <Ctl><7> “ quotation mark <Ctl><8> <Ctl><8> <Ctl><8> < less-than sign <Ctl><9> <Ctl><9> <Ctl><9> > greater-than sign <Ctl><.> <Ctl><.> <Ctl><.> ? question mark <Ctl><e> <Ctl><e> <Ctl><e> EOF --- <Fnc><e> --- Pa1 --- <Fnc><b> --- Pa2 --- <Fnc><c> --- Pa3 --- <Fnc><d> --- Roll up --- --- <Ctl><o> Roll down --- --- <Ctl><u> ▲ (Cursor up) <▲> <▲> <▲> ▼ (Cursor down) <▼> <▼> <▼> ► (Cursor right) <Shf><▼> <Shf><▼> <Shf><▼> ◄ (Cursor left) <Shf><▲> <Shf><▲> <Shf><▲> ↑ (View up) <Ctl><▲> <Ctl><▲> <Ctl><▲> ↓ (View down) <Ctl><▼> <Ctl><▼> <Ctl><▼> → (View right) <Fnc><▼> <Fnc><▼> <Fnc><▼> ← (View left) <Fnc><▲> <Fnc><▲> <Fnc><▲> Lighten <Shf><Enter> <Shf><Enter> <Shf><Enter> Darken <Shf><.> <Shf><.> <Shf><.> Attention --- <Fnc><a> <Fnc><a> Field exit --- --- <Fnc><e> Help --- --- <Fnc><h> Field - --- --- <Fnc><g> Field + --- --- <Fnc><c> Reset --- <Ctl><r> <Ctl><r> Sys req --- <Ctl><s> <Ctl><s>

Symbol Terminal Keypad Tables
Twin Client Reference • June, 2004 10-65
354x/684x Table Key VTERM 3270 5250 a <alpha><shift><A> <alpha><shift><A> <alpha><shift><A> b <alpha><shift><B> <alpha><shift><B> <alpha><shift><B> c <alpha><shift><C> <alpha><shift><C> <alpha><shift><C> d <alpha><shift><D> <alpha><shift><D> <alpha><shift><D> e <alpha><shift><E> <alpha><shift><E> <alpha><shift><E> f <alpha><shift><F> <alpha><shift><F> <alpha><shift><F> g <alpha><shift><G> <alpha><shift><G> <alpha><shift><G> h <alpha><shift><H> <alpha><shift><H> <alpha><shift><H> i <alpha><shift><I> <alpha><shift><I> <alpha><shift><I> j <alpha><shift><J> <alpha><shift><J> <alpha><shift><J> k <alpha><shift><K> <alpha><shift><K> <alpha><shift><K> l <alpha><shift><L> <alpha><shift><L> <alpha><shift><L> m <alpha><shift><M> <alpha><shift><M> <alpha><shift><M> n <alpha><shift><N> <alpha><shift><N> <alpha><shift><N> o <alpha><shift><O> <alpha><shift><O> <alpha><shift><O> p <alpha><shift><P> <alpha><shift><P> <alpha><shift><P> q <alpha><shift><Q> <alpha><shift><Q> <alpha><shift><Q> r <alpha><shift><R> <alpha><shift><R> <alpha><shift><R> s <alpha><shift><S> <alpha><shift><S> <alpha><shift><S> t <alpha><shift><T> <alpha><shift><T> <alpha><shift><T> u <alpha><shift><U> <alpha><shift><U> <alpha><shift><U> v <alpha><shift><V> <alpha><shift><V> <alpha><shift><V> w <alpha><shift><W> <alpha><shift><W> <alpha><shift><W> x <alpha><shift><X> <alpha><shift><X> <alpha><shift><X> y <alpha><shift><Y> <alpha><shift><Y> <alpha><shift><Y> z <alpha><shift><Z> <alpha><shift><Z> <alpha><shift><Z> A <alpha><A> <alpha><A> <alpha><A> B <alpha><B> <alpha><B> <alpha><B> C <alpha><C> <alpha><C> <alpha><C> D <alpha><D> <alpha><D> <alpha><D> E <alpha><E> <alpha><E> <alpha><E> F <alpha><F> <alpha><F> <alpha><F> G <alpha><G> <alpha><G> <alpha><G> H <alpha><H> <alpha><H> <alpha><H> I <alpha><I> <alpha><I> <alpha><I> J <alpha><J> <alpha><J> <alpha><J> K <alpha><K> <alpha><K> <alpha><K> L <alpha><L> <alpha><L> <alpha><L> M <alpha><M> <alpha><M> <alpha><M> N <alpha><N> <alpha><N> <alpha><N> O <alpha><O> <alpha><O> <alpha><O> P <alpha><P> <alpha><P> <alpha><P> Q <alpha><Q> <alpha><Q> <alpha><Q> R <alpha><R> <alpha><R> <alpha><R> S <alpha><S> <alpha><S> <alpha><S> T <alpha><T> <alpha><T> <alpha><T> U <alpha><U> <alpha><U> <alpha><U> V <alpha><V> <alpha><V> <alpha><V> W <alpha><W> <alpha><W> <alpha><W> X <alpha><X> <alpha><X> <alpha><X> Y <alpha><Y> <alpha><Y> <alpha><Y> Z <alpha><Z> <alpha><Z> <alpha><Z> Space <space> <space> <space> Clear <clear> <clear> <clear> Shift <shift> <shift> <shift> Alpha <alpha> <alpha> <alpha> Ctrl <ctrl> <ctrl> <ctrl> Func <func> <func> <func> Backspace <bksp> <bksp> <bksp> Enter <enter> <enter> <enter>

Keypad Configuration
Twin Client Reference • June, 2004 10-66
1 <alpha> <1> <alpha> <1> <alpha> <1> 2 <alpha> <2> <alpha> <2> <alpha> <2> 3 <alpha> <3> <alpha> <3> <alpha> <3> 4 <alpha> <4> <alpha> <4> <alpha> <4> 5 <alpha> <5> <alpha> <5> <alpha> <5> 6 <alpha> <6> <alpha> <6> <alpha> <6> 7 <alpha> <7> <alpha> <7> <alpha> <7> 8 <alpha> <8> <alpha> <8> <alpha> <8> 9 <alpha> <9> <alpha> <9> <alpha> <9> 0 <alpha> <0> <alpha> <0> <alpha> <0> F1 <func><1> <func><1> <func><1> F2 <func><2> <func><2> <func><2> F3 <func><3> <func><3> <func><3> F4 <func><4> <func><4> <func><4> F5 <func><5> <func><5> <func><5> F6 <func><6> <func><6> <func><6> F7 <func><7> <func><7> <func><7> F8 <func><8> <func><8> <func><8> F9 <func><9> <func><9> <func><9> F10 <func><0> <func><0> <func><0> ↑ <↑> <↑> <↑> ← <←> <←> <←> ↓ <↓> <↓> <↓> → <→> <→> <→> Backlight <func><;> <func><;> <func><;> Lighten <shift><N> <shift><N> <shift><N> Darken <shift><M> <shift><M> <shift><M> ? question mark <shift><func><F> <shift><func><F> <shift><func><F> / forward slash <shift><F> <shift><F> <shift><F> - hyphen <shift><G> <shift><G> <shift><G> = equal sign <shift><D> <shift><D> <shift><D> [ left bracket <shift><A> <shift><A> <shift><A> ] right bracket <shift><B> <shift><B> <shift><B> \ backward slash <shift><K> <shift><K> <shift><K> ; semicolon <shift><L> <shift><L> <shift><L> ‘ apostrophe <shift><C> <shift><C> <shift><C> , comma <shift><J> <shift><J> <shift><J> . period <shift><I> <shift><I> <shift><I> _ underscore <shift><func><G> <shift><func><G> <shift><func><G> + addition sign <shift><H> <shift><H> <shift><H> { left brace <shift><func><A> <shift><func><A> <shift><func><A> } right brace <shift><func><B> <shift><func><B> <shift><func><B> | broken vertical bar <shift><func><K> <shift><func><K> <shift><func><K> : colon <shift><func><L> <shift><func><L> <shift><func><L> “ quotation mark <shift><func><C> <shift><func><C> <shift><func><C> < less-than sign <shift><func><J> <shift><func><J> <shift><func><J> > greater-than sign <shift><func><I> <shift><func><I> <shift><func><I> ! exclamation <shift><func><W> <shift><func><W> <shift><func><W> @ at sign <shift><func><X> <shift><func><X> <shift><func><X> # pound <shift><func><Y> <shift><func><Y> <shift><func><Y> $ dollar <shift><func><T> <shift><func><T> <shift><func><T> % percent <shift><func><U> <shift><func><U> <shift><func><U> ^ carat <shift><func><V> <shift><func><V> <shift><func><V> & ampersand <shift><func><Q> <shift><func><Q> <shift><func><Q> * asterisk <shift><E> <shift><E> <shift><E> ( left parenthesis <shift><func><S> <shift><func><S> <shift><func><S> ) right parenthesis <shift><func><Z> <shift><func><Z> <shift><func><Z> Tab <shift><func><P> <shift><func><P> <shift><func><P> Roll Down <ctrl>< x> Roll Up <ctrl><w> PA1 Not supported PA2 Not supported PA3 Not supported Attention <ctrl><A>

Symbol Terminal Keypad Tables
Twin Client Reference • June, 2004 10-67
Erase Field Sys Request <ctrl><s> Insert <shift><ctrl><space> <shift><space> Field Exit <shift><ctrl><E> Erase EOF <shift><ctrl><L> View Up <ctrl><o> <ctrl><o> <ctrl><o> View Down <ctrl><p> <ctrl><p> <ctrl><p> View Left <ctrl><m> <ctrl><m> <ctrl><m> View Right <ctrl><n> <ctrl><n> <ctrl><n> Lamp <func><Enter> <func><Enter> <func><Enter> Home Not supported Not supported Help <ctrl><7>

Keypad Configuration
Twin Client Reference • June, 2004 10-68
7540,35 key, 5250,3270,VT/HP KEY 5250 3270 VT/HP ATTENTION <CTRL><7> <CTRL><7> BACK TAB <CTRL><[> <CTRL><[> <FUNC><CTRL><[> BACKSPACE <BKSP> <BKSP> <BKSP> BEGIN POS <FUNC><CTRL><COMMA> <FUNC><CTRL><COMMA> BOT <CTRL><=> <CTRL><=> <FUNC><CTRL><8> CLEAR <CTRL></> <CTRL></> DARK <FUNC><COMMA> <FUNC><COMMA> <FUNC><COMMA> DELETE <CTRL><;> <FUNC><BKSP> DEL CHAR <FUNC><CTRL><UP> DOWN <DOWN> <DOWN> <DOWN> DUP <CTRL><’> <CTRL><’> END POS <CTRL><3> <CTRL><3> EOF <CTRL><4> EREOF <FUNC><CTRL><4> <CTRL><\> ERINP <FUNC><CTRL><5> ESCAPE <CTRL><[> FIELD + <CTRL><;> FIELD EXIT <CTRL><4> FIELD - <CTRL><\> FM <CTRL><5> <CTRL><5> HELP <CTRL><COMMA> <CTRL><COMMA> <FUNC><CTRL><DOWN> HOME <CTRL><6> <CTRL><6> INFO <CTRL><1> INSCHAR <CTRL><2> <CTRL><2> LAMP <FUNC><LEFT> <FUNC><LEFT> <FUNC><LEFT> LEFT <LEFT> <LEFT> <LEFT> LIGHT <FUNC><PERIOD> <FUNC><PERIOD> <FUNC><PERIOD> LOCAL EXIT <CTRL><PERIOD> <CTRL><PERIOD> NEWL <CTRL><0> <CTRL><0> NULL END <CTRL><DASH> <CTRL><DASH> REFRESH <FUNC><CTRL></> <FUNC><CTRL></> RIGHT <RIGHT> <RIGHT> <RIGHT> PRINT <CTRL><]> RESET <CTRL><+> <CTRL><+> <FUNC><CTRL><+> ROLL DOWN <FUNC><CTRL><]> ROLL UP <FUNC><CTRL><[> SCAN <SCAN> <SCAN> <SCAN> SPACE <SPACE> <SPACE> <SPACE> SYS REQUEST <CTRL><*> <CTRL><*> TAB <FUNC><SPACE> <FUNC><SPACE> TOP <CTRL><8> <CTRL><8> <FUNC><CTRL><=> UP <UP> <UP> <UP> VIEW DOWN <CTRL><DOWN> <CTRL><DOWN> <CTRL><DOWN> VIEW LEFT <CTRL><LEFT> <CTRL><LEFT> <CTRL><LEFT> VIEW RIGHT <CTRL><FUNC><RIGHT> <CTRL><FUNC><RIGHT> <CTRL><FUNC><RIGHT> VIEW UP <CTRL><UP> <CTRL><UP> <CTRL><UP> PA1 <FUNC><CTRL><-> PA2 <FUNC><CTRL><\> PA3 <CTRL><FUNC><0> A <ALPHA><7> <ALPHA><7> <ALPHA><7> B <ALPHA><8> <ALPHA><8> <ALPHA><8> C <ALPHA><9> <ALPHA><9> <ALPHA><9> D <ALPHA><UP> <ALPHA><UP> <ALPHA><UP> E <ALPHA><4> <ALPHA><4> <ALPHA><4> F <ALPHA><5> <ALPHA><5> <ALPHA><5> G <ALPHA><6> <ALPHA><6> <ALPHA><6> H <ALPHA><DOWN> <ALPHA><DOWN> <ALPHA><DOWN> I <ALPHA><1> <ALPHA><1> <ALPHA><1> J <ALPHA><2> <ALPHA><2> <ALPHA><2>
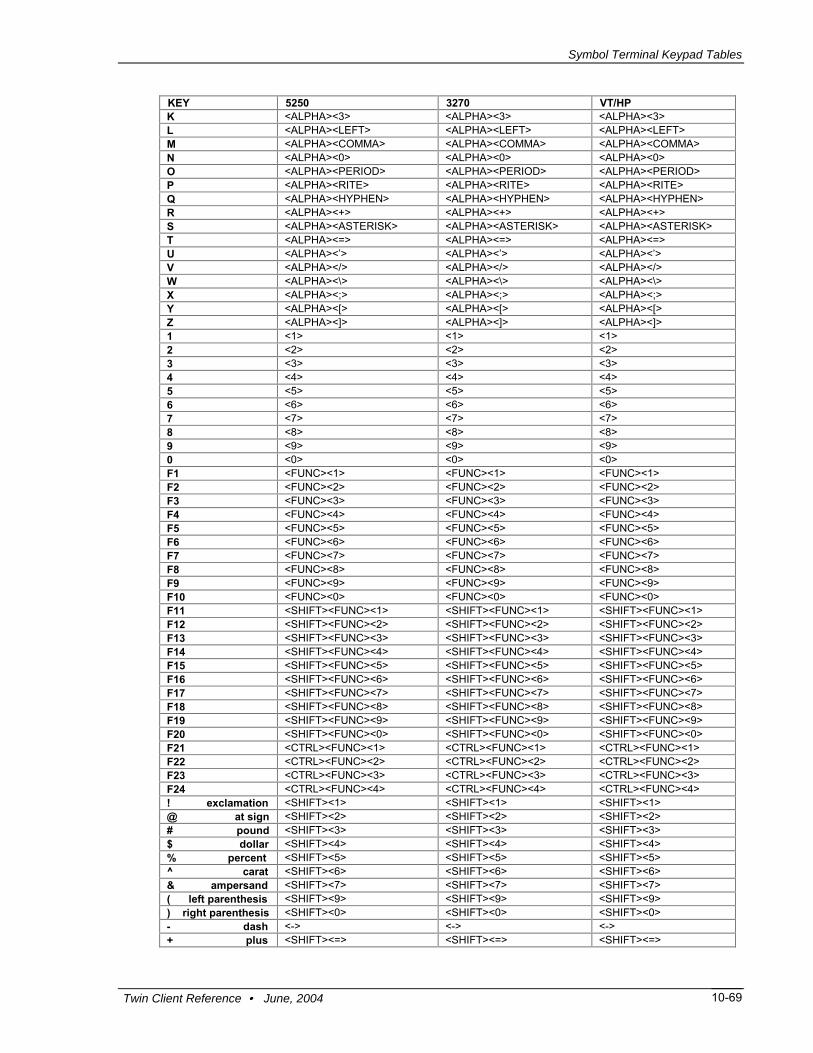
Symbol Terminal Keypad Tables
Twin Client Reference • June, 2004 10-69
KEY 5250 3270 VT/HP K <ALPHA><3> <ALPHA><3> <ALPHA><3> L <ALPHA><LEFT> <ALPHA><LEFT> <ALPHA><LEFT> M <ALPHA><COMMA> <ALPHA><COMMA> <ALPHA><COMMA> N <ALPHA><0> <ALPHA><0> <ALPHA><0> O <ALPHA><PERIOD> <ALPHA><PERIOD> <ALPHA><PERIOD> P <ALPHA><RITE> <ALPHA><RITE> <ALPHA><RITE> Q <ALPHA><HYPHEN> <ALPHA><HYPHEN> <ALPHA><HYPHEN> R <ALPHA><+> <ALPHA><+> <ALPHA><+> S <ALPHA><ASTERISK> <ALPHA><ASTERISK> <ALPHA><ASTERISK> T <ALPHA><=> <ALPHA><=> <ALPHA><=> U <ALPHA><’> <ALPHA><’> <ALPHA><’> V <ALPHA></> <ALPHA></> <ALPHA></> W <ALPHA><\> <ALPHA><\> <ALPHA><\> X <ALPHA><;> <ALPHA><;> <ALPHA><;> Y <ALPHA><[> <ALPHA><[> <ALPHA><[> Z <ALPHA><]> <ALPHA><]> <ALPHA><]> 1 <1> <1> <1> 2 <2> <2> <2> 3 <3> <3> <3> 4 <4> <4> <4> 5 <5> <5> <5> 6 <6> <6> <6> 7 <7> <7> <7> 8 <8> <8> <8> 9 <9> <9> <9> 0 <0> <0> <0> F1 <FUNC><1> <FUNC><1> <FUNC><1> F2 <FUNC><2> <FUNC><2> <FUNC><2> F3 <FUNC><3> <FUNC><3> <FUNC><3> F4 <FUNC><4> <FUNC><4> <FUNC><4> F5 <FUNC><5> <FUNC><5> <FUNC><5> F6 <FUNC><6> <FUNC><6> <FUNC><6> F7 <FUNC><7> <FUNC><7> <FUNC><7> F8 <FUNC><8> <FUNC><8> <FUNC><8> F9 <FUNC><9> <FUNC><9> <FUNC><9> F10 <FUNC><0> <FUNC><0> <FUNC><0> F11 <SHIFT><FUNC><1> <SHIFT><FUNC><1> <SHIFT><FUNC><1> F12 <SHIFT><FUNC><2> <SHIFT><FUNC><2> <SHIFT><FUNC><2> F13 <SHIFT><FUNC><3> <SHIFT><FUNC><3> <SHIFT><FUNC><3> F14 <SHIFT><FUNC><4> <SHIFT><FUNC><4> <SHIFT><FUNC><4> F15 <SHIFT><FUNC><5> <SHIFT><FUNC><5> <SHIFT><FUNC><5> F16 <SHIFT><FUNC><6> <SHIFT><FUNC><6> <SHIFT><FUNC><6> F17 <SHIFT><FUNC><7> <SHIFT><FUNC><7> <SHIFT><FUNC><7> F18 <SHIFT><FUNC><8> <SHIFT><FUNC><8> <SHIFT><FUNC><8> F19 <SHIFT><FUNC><9> <SHIFT><FUNC><9> <SHIFT><FUNC><9> F20 <SHIFT><FUNC><0> <SHIFT><FUNC><0> <SHIFT><FUNC><0> F21 <CTRL><FUNC><1> <CTRL><FUNC><1> <CTRL><FUNC><1> F22 <CTRL><FUNC><2> <CTRL><FUNC><2> <CTRL><FUNC><2> F23 <CTRL><FUNC><3> <CTRL><FUNC><3> <CTRL><FUNC><3> F24 <CTRL><FUNC><4> <CTRL><FUNC><4> <CTRL><FUNC><4> ! exclamation <SHIFT><1> <SHIFT><1> <SHIFT><1> @ at sign <SHIFT><2> <SHIFT><2> <SHIFT><2> # pound <SHIFT><3> <SHIFT><3> <SHIFT><3> $ dollar <SHIFT><4> <SHIFT><4> <SHIFT><4> % percent <SHIFT><5> <SHIFT><5> <SHIFT><5> ^ carat <SHIFT><6> <SHIFT><6> <SHIFT><6> & ampersand <SHIFT><7> <SHIFT><7> <SHIFT><7> ( left parenthesis <SHIFT><9> <SHIFT><9> <SHIFT><9> ) right parenthesis <SHIFT><0> <SHIFT><0> <SHIFT><0> - dash <-> <-> <-> + plus <SHIFT><=> <SHIFT><=> <SHIFT><=>

Keypad Configuration
Twin Client Reference • June, 2004 10-70
KEY 5250 3270 VT/HP ' apostrophe <’> <’> <’> ~ tilde <SHIFT><`> <SHIFT><`> <SHIFT><`> ` grave accent <`> <`> <`> * asterisk <SHIFT><8> <SHIFT><8> <SHIFT><8> , comma <COMMA> <COMMA> <COMMA> . period <PERIOD> <PERIOD> <PERIOD> / forward slash </> </> </> [ left bracket <[> <[> <[> \ back slash <\> <\> <\> ] right bracket <]> <]> <]> _ underline <SHIFT><-> <SHIFT><-> <SHIFT><-> : colon <SHIFT><;> <SHIFT><;> <SHIFT><;> ; semi-colon <;> <;> <;> < less than <SHIFT><COMMA> <SHIFT><COMMA> <SHIFT><COMMA> = equal <=> <=> <=> “ quote <SHIFT><’> <SHIFT><’> <SHIFT><’> > greater than <SHIFT><PERIOD> <SHIFT><PERIOD> <SHIFT><PERIOD> ? question <SHIFT></> <SHIFT></> <SHIFT></> { left brace <SHIFT><[> <SHIFT><[> <SHIFT><[> | vertical bar <SHIFT><\> <SHIFT><\> <SHIFT><\> } right brace <SHIFT><]> <SHIFT><]> <SHIFT><]> Note: Full 8859 character set not supported.

Symbol Terminal Keypad Tables
Twin Client Reference • June, 2004 10-71
7500 48-Key Key 5250 3270 VT a <a> <a> <a> b <b> <b> <b> c <c> <c> <c> d <d> <d> <d> e <e> <e> <e> f <f> <f> <f> g <g> <g> <g> h <h> <h> <h> i <i> <i> <i> j <j> <j> <j> k <k> <k> <k> l <l> <l> <l> m <m> <m> <m> n <n> <n> <n> o <o> <o> <o> p <p> <p> <p> q <q> <q> <q> r <r> <r> <r> s <s> <s> <s> t <t> <t> <t> u <u> <u> <u> v <v> <v> <v> w <w> <w> <w> x <x> <x> <x> y <y> <y> <y> z <z> <z> <z> A <Shift><a> <Shift><a> <Shift><a> B <Shift><b> <Shift><b> <Shift><b> C <Shift><c> <Shift><c> <Shift><c> D <Shift><d> <Shift><d> <Shift><d> E <Shift><e> <Shift><e> <Shift><e> F <Shift><f> <Shift><f> <Shift><f> G <Shift><g> <Shift><g> <Shift><g> H <Shift><h> <Shift><h> <Shift><h> J <Shift><j> <Shift><j> <Shift><j> K <Shift><k> <Shift><k> <Shift><k> L <Shift><l> <Shift><l> <Shift><l> M <Shift><m> <Shift><m> <Shift><m> N <Shift><n> <Shift><n> <Shift><n> O <Shift><o> <Shift><o> <Shift><o> P <Shift><p> <Shift><p> <Shift><p> Q <Shift><q> <Shift><q> <Shift><q> R <Shift><r> <Shift><r> <Shift><r> S <Shift><s> <Shift><s> <Shift><s> T <Shift><t> <Shift><t> <Shift><t> U <Shift><u> <Shift><u> <Shift><u> V <Shift><v> <Shift><v> <Shift><v> W <Shift><w> <Shift><w> <Shift><w> X <Shift><x> <Shift><x> <Shift><x> Y <Shift><y> <Shift><y> <Shift><y> Z <Shift><z> <Shift><z> <Shift><z> 1 <1> <1> <1> 2 <2> <2> <2> 3 <3> <3> <3> 4 <4> <4> <4> 5 <5> <5> <5> 6 <6> <6> <6> 7 <7> <7> <7> 8 <8> <8> <8> 9 <9> <9> <9>

Keypad Configuration
Twin Client Reference • June, 2004 10-72
0 <0> <0> <0> F1 <Func><1> <Func><1> <Func><1> F2 <Func><2> <Func><2> <Func><2> F3 <Func><3> <Func><3> <Func><3> F4 <Func><4> <Func><4> <Func><4> F5 <Func><5> <Func><5> <Func><5> F6 <Func><6> <Func><6> <Func><6> F7 <Func><7> <Func><7> <Func><7> F8 <Func><8> <Func><8> <Func><8> F9 <Func><9> <Func><9> <Func><9> F10 <Func><0> <Func><0> <Func><0> F11 <Func><u> <Func><u> <Func><u> F12 <Func><v> <Func><v> <Func><v> F13 <Func><w> <Func><w> <Func><w> F14 <Func><x> <Func><x> <Func><x> F15 <Func><y> <Func><y> <Func><y> F16 <Func><p> <Func><p> <Func><p> F17 <Func><q> <Func><q> <Func><q> F18 <Func><r> <Func><r> <Func><r> F19 <Func><s> <Func><s> <Func><s> F20 <Func><t> <Func><t> <Func><t> F21 <Func><k> <Func><k> F22 <Func><l> <Func><l> F23 <Func><m> <Func><m> F24 <Func><n> <Func><n> SCAN <Scan> <Scan> <Scan> CLEAR <Clear> <Clear> <Clear> SHIFT <Shift> <Shift> <Shift> CTRL <Ctrl> <Ctrl> <Ctrl> FUNC <Func> <Func> <Func> UP <▲> <▲> <▲> DOWN <▼> <▼> <▼> LEFT <◄> <◄> <◄> RIGHT <►> <►> <►> PERIOD <Ctrl><z> <Ctrl><z> <Ctrl><z> BKSP <Bksp> <Bksp> <Bksp> ATTN <Func><a> <Func><a> EOF <Func><e> FEXIT <Func><e> RESET <Func><r> <Func><r> FIELD- <Func><◄> FIELD+ <Func><►> ESC <Shift><Clear> HELP <Func><h> VIEW UP <Ctrl><▲> <Ctrl><▲> <Ctrl><▲> VIEW DOWN <Ctrl><▼> <Ctrl><▼> <Ctrl><▼> VIEW LEFT <Ctrl><◄> <Ctrl><◄> <Ctrl><◄> VIEW RIGHT <Ctrl><►> <Ctrl><►> <Ctrl><►> LIGHTEN <Func><.> <Func><.> <Func><.> DARKEN <Func><Bksp> <Func><Bksp> <Func><Bksp> LAMP <Ctrl><Scan> <Ctrl><Scan> <Ctrl><Scan> PA1 <Func><t> PA2 <Func><v> PA3 <Func><x> DEL <Func><Clear> SYSREQ <Ctrl><s> <Ctrl><s> ROLL UP <Func><▲> ROLL DOWN <Func><▼> ! exclamation <Shift><1> <Shift><1> <Shift><1> @ at sign <Shift><2> <Shift><2> <Shift><2> # pound <Shift><3> <Shift><3> <Shift><3> $ dollar <Shift><4> <Shift><4> <Shift><4> % percent <Shift><5> <Shift><5> <Shift><5> ^ carat <Shift><6> <Shift><6> <Shift><6>

Symbol Terminal Keypad Tables
Twin Client Reference • June, 2004 10-73
& ampersand <Shift><7> <Shift><7> <Shift><7> ( left parenthesis <Shift><9> <Shift><9> <Shift><9> ) right parenthesis <Shift><0> <Shift><0> <Shift><0> + addition sign <Ctrl><c> <Ctrl><c> <Ctrl><c> - hyphen <Ctrl><b> <Ctrl><b> <Ctrl><b> * asterisk <Shift><8> <Shift><8> <Shift><8> ` grave accent <Ctrl><f> <Ctrl><f> <Ctrl><f> = equal sign <Ctrl><h> <Ctrl><h> <Ctrl><h> \ backward slash <Ctrl><i> <Ctrl><i> <Ctrl><i> [ left bracket <Ctrl><2> <Ctrl><2> <Ctrl><2> ] right bracket <Ctrl><3> <Ctrl><3> <Ctrl><3> ; semicolon <Ctrl><4> <Ctrl><4> <Ctrl><4> ‘ apostrophe <Ctrl><5> <Ctrl><5> <Ctrl><5> , comma <Ctrl><6> <Ctrl><6> <Ctrl><6> / forward slash <Ctrl><j> <Ctrl><j> <Ctrl><j> { left brace <Ctrl><0> <Ctrl><0> <Ctrl><0> | vertical bar <Ctrl><d> <Ctrl><d> <Ctrl><d> } right brace <Ctrl><1> <Ctrl><1> <Ctrl><1> ~ tilde <Ctrl><a> <Ctrl><a> <Ctrl><a> ? question mark <Ctrl><e> <Ctrl><e> <Ctrl><e> _ underscore <Ctrl><g> <Ctrl><g> <Ctrl><g> : colon <Ctrl><7> <Ctrl><7> <Ctrl><7> “ quote <Ctrl><8> <Ctrl><8> <Ctrl><8> < less than sign <Ctrl><9> <Ctrl><9> <Ctrl><9> > greater than sign <Ctrl><u> <Ctrl><u> <Ctrl><u> Note: Full 8859 character set not supported.
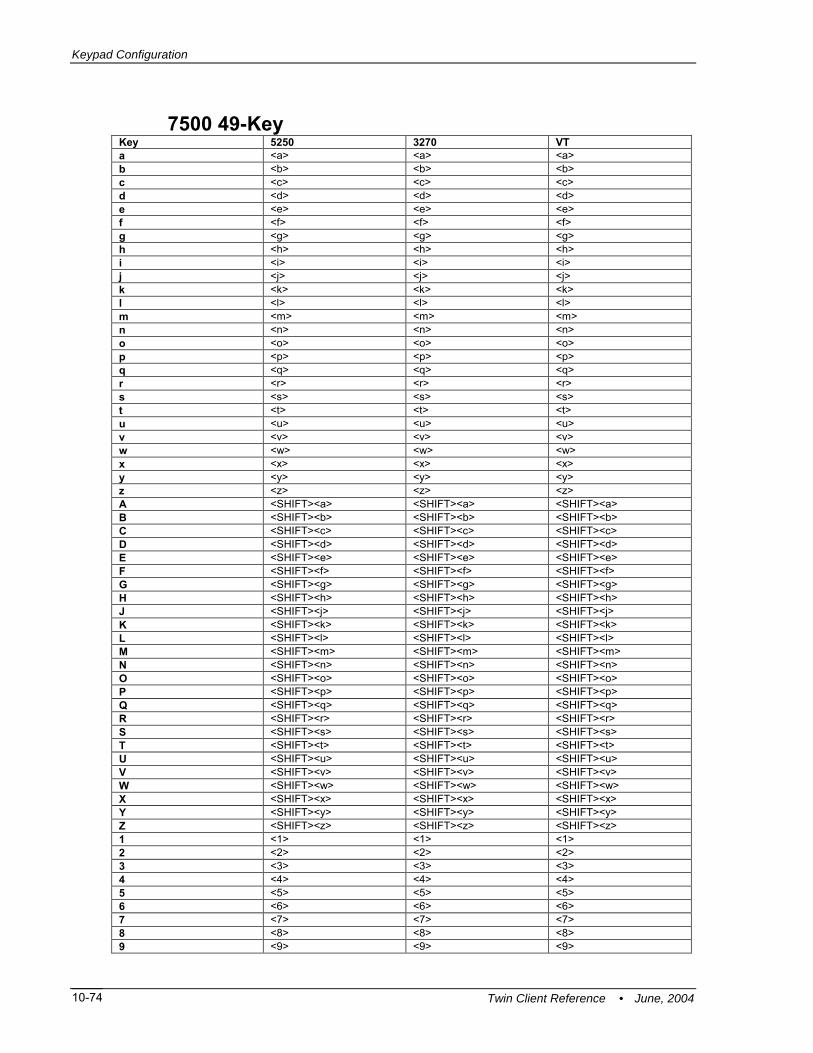
Keypad Configuration
Twin Client Reference • June, 2004 10-74
7500 49-Key Key 5250 3270 VT a <a> <a> <a> b <b> <b> <b> c <c> <c> <c> d <d> <d> <d> e <e> <e> <e> f <f> <f> <f> g <g> <g> <g> h <h> <h> <h> i <i> <i> <i> j <j> <j> <j> k <k> <k> <k> l <l> <l> <l> m <m> <m> <m> n <n> <n> <n> o <o> <o> <o> p <p> <p> <p> q <q> <q> <q> r <r> <r> <r> s <s> <s> <s> t <t> <t> <t> u <u> <u> <u> v <v> <v> <v> w <w> <w> <w> x <x> <x> <x> y <y> <y> <y> z <z> <z> <z> A <SHIFT><a> <SHIFT><a> <SHIFT><a> B <SHIFT><b> <SHIFT><b> <SHIFT><b> C <SHIFT><c> <SHIFT><c> <SHIFT><c> D <SHIFT><d> <SHIFT><d> <SHIFT><d> E <SHIFT><e> <SHIFT><e> <SHIFT><e> F <SHIFT><f> <SHIFT><f> <SHIFT><f> G <SHIFT><g> <SHIFT><g> <SHIFT><g> H <SHIFT><h> <SHIFT><h> <SHIFT><h> J <SHIFT><j> <SHIFT><j> <SHIFT><j> K <SHIFT><k> <SHIFT><k> <SHIFT><k> L <SHIFT><l> <SHIFT><l> <SHIFT><l> M <SHIFT><m> <SHIFT><m> <SHIFT><m> N <SHIFT><n> <SHIFT><n> <SHIFT><n> O <SHIFT><o> <SHIFT><o> <SHIFT><o> P <SHIFT><p> <SHIFT><p> <SHIFT><p> Q <SHIFT><q> <SHIFT><q> <SHIFT><q> R <SHIFT><r> <SHIFT><r> <SHIFT><r> S <SHIFT><s> <SHIFT><s> <SHIFT><s> T <SHIFT><t> <SHIFT><t> <SHIFT><t> U <SHIFT><u> <SHIFT><u> <SHIFT><u> V <SHIFT><v> <SHIFT><v> <SHIFT><v> W <SHIFT><w> <SHIFT><w> <SHIFT><w> X <SHIFT><x> <SHIFT><x> <SHIFT><x> Y <SHIFT><y> <SHIFT><y> <SHIFT><y> Z <SHIFT><z> <SHIFT><z> <SHIFT><z> 1 <1> <1> <1> 2 <2> <2> <2> 3 <3> <3> <3> 4 <4> <4> <4> 5 <5> <5> <5> 6 <6> <6> <6> 7 <7> <7> <7> 8 <8> <8> <8> 9 <9> <9> <9>

Symbol Terminal Keypad Tables
Twin Client Reference • June, 2004 10-75
0 <0> <0> <0> F1 <FUNC><1> <FUNC><1> <FUNC><1> F2 <FUNC><2> <FUNC><2> <FUNC><2> F3 <FUNC><3> <FUNC><3> <FUNC><3> F4 <FUNC><4> <FUNC><4> <FUNC><4> F5 <FUNC><5> <FUNC><5> <FUNC><5> F6 <FUNC><6> <FUNC><6> <FUNC><6> F7 <FUNC><7> <FUNC><7> <FUNC><7> F8 <FUNC><8> <FUNC><8> <FUNC><8> F9 <FUNC><9> <FUNC><9> <FUNC><9> F10 <FUNC><0> <FUNC><0> <FUNC><0> F11 <SHIFT><FUNC><1> <SHIFT><FUNC><1> <SHIFT><FUNC><1> F12 <SHIFT><FUNC><2> <SHIFT><FUNC><2> <SHIFT><FUNC><2> F13 <SHIFT><FUNC><3> <SHIFT><FUNC><3> <SHIFT><FUNC><3> F14 <SHIFT><FUNC><4> <SHIFT><FUNC><4> <SHIFT><FUNC><4> F15 <SHIFT><FUNC><5> <SHIFT><FUNC><5> <SHIFT><FUNC><5> F16 <SHIFT><FUNC><6> <SHIFT><FUNC><6> <SHIFT><FUNC><6> F17 <SHIFT><FUNC><7> <SHIFT><FUNC><7> <SHIFT><FUNC><7> F18 <SHIFT><FUNC><8> <SHIFT><FUNC><8> <SHIFT><FUNC><8> F19 <SHIFT><FUNC><9> <SHIFT><FUNC><9> <SHIFT><FUNC><9> F20 <SHIFT><FUNC><0> <SHIFT><FUNC><0> <SHIFT><FUNC><0> F21 <CTRL><FUNC><1> <CTRL><FUNC><1> <CTRL><FUNC><1> F22 <CTRL><FUNC><2> <CTRL><FUNC><2> <CTRL><FUNC><2> F23 <CTRL><FUNC><3> <CTRL><FUNC><3> <CTRL><FUNC><3> F24 <CTRL><FUNC><4> <CTRL><FUNC><4> <CTRL><FUNC><4> SCAN <SCAN> <SCAN> <SCAN> CLR (TAB) <CLR> <CLR> <CLR> SHIFT <SHIFT> <SHIFT> <SHIFT> CTRL <CTRL> <CTRL> <CTRL> FUNC <FUNC> <FUNC> <FUNC> PAGE UP <FUNC><W> <FUNC><W> <FUNC><W> PAGE DOWN <FUNC><.> <FUNC><.> <FUNC><.> UP <�> <�> <�> DOWN <�> <�> <�> LEFT <�> <�> <�> RIGHT <�> <�> <�> PERIOD <.> <.> <.> ENTER <ENTER> <ENTER> <ENTER> SPACE <FUNC><BKSP> <FUNC><BKSP> <FUNC><BKSP> BKSP <BKSP> <BKSP> <BKSP> POWER <POWER> <POWER> <POWER> ATTN <CTRL><a> <CTRL><a> EOF <CTRL><e> FEXIT <CTRL><e> HOME <CTRL><g> <CTRL><g> INFO <SHIFT><i> <SHIFT><i> <SHIFT><i> INSERT <CTRL><j> <CTRL><j> END <CTRL><k> <CTRL><k> EREOF <CTRL><l> <CTRL><l> FM <CTRL><m> NEWL <CTRL><n> <CTRL><n> LEXIT <CTRL><o> <CTRL><o> NULLEND <CTRL><q> <CTRL><q> RESET <CTRL><r> <CTRL><r> BOT <CTRL><t> <CTRL><t> DUP <CTRL><u> <CTRL><u> CLEAR <CTRL><v> <CTRL><v> FIELD- <CTRL><w> FIELD+ <CTRL><x> BKTAB <CTRL><y> <CTRL><y> PRINT <CTRL><z> <CTRL><z> TOP <CTRL><6> <CTRL><6> LINEFEED <CTRL><ENTER> <CTRL><ENTER> <CTRL><ENTER>

Keypad Configuration
Twin Client Reference • June, 2004 10-76
ESC <CTRL><y> HELP <FUNC><CTRL><h> <FUNC><CTRL><h> <FUNC><CTRL><h> VIEW UP <FUNC><CTRL><UP> <FUNC><CTRL><UP> <FUNC><CTRL><UP> VIEW DOWN <FUNC><CTRL><DOWN> <FUNC><CTRL><DOWN> <FUNC><CTRL><DOWN> VIEW LEFT <FUNC><CTRL><LEFT> <FUNC><CTRL><LEFT> <FUNC><CTRL><LEFT> VIEW RIGHT <FUNC><CTRL><RIGHT> <FUNC><CTRL><RIGHT> <FUNC><CTRL><RIGHT> ALT <FUNC><CTRL> <FUNC><CTRL> <FUNC><CTRL> LIGHT <FUNC><y> <FUNC><y> <FUNC><y> DARK <FUNC><x> <FUNC><x> <FUNC><x> LAMP <FUNC><l> <FUNC><l> <FUNC><l> PA1 <FUNC><CTRL><1> PA2 <FUNC><CTRL><2> PA3 <FUNC><CTRL><3> DEL <FUNC><CTRL><d> <FUNC><CTRL><d> <FUNC><v> ERINP <FUNC><CTRL><f> <FUNC><CTRL><f> SYSREQ <FUNC><CTRL><u> <FUNC><CTRL><u> ROLL UP <CTRL><FUNC><UP> ROLL DOWN <CTRL><FUNC><DOWN> CAPS LOCK <FUNC><SHIFT> <FUNC><SHIFT> <FUNC><SHIFT> ! exclamation <SHIFT><1> <SHIFT><1> <SHIFT><1> @ at sign <SHIFT><2> <SHIFT><2> <SHIFT><2> # pound <SHIFT><3> <SHIFT><3> <SHIFT><3> $ dollar <SHIFT><4> <SHIFT><4> <SHIFT><4> % percent <SHIFT><5> <SHIFT><5> <SHIFT><5> ^ carat <SHIFT><6> <SHIFT><6> <SHIFT><6> & ampersand <SHIFT><7> <SHIFT><7> <SHIFT><7> ( left parenthesis <SHIFT><9> <SHIFT><9> <SHIFT><9> ) right parenthesis <SHIFT><0> <SHIFT><0> <SHIFT><0> + addition <FUNC><a> <FUNC><a> <FUNC><a> - subtraction <FUNC><b> <FUNC><b> <FUNC><b> * multiplication <FUNC><c> <FUNC><c> <FUNC><c> / division <FUNC><d> <FUNC><d> <FUNC><d> ` grave accent <FUNC><h> <FUNC><h> <FUNC><h> = equal sign <FUNC><i> <FUNC><i> <FUNC><i> \ backward slash <FUNC><j> <FUNC><j> <FUNC><j> [ left bracket <FUNC><m> <FUNC><m> <FUNC><m> ] right bracket <FUNC><n> <FUNC><n> <FUNC><n> ; semicolon <FUNC><o> <FUNC><o> <FUNC><o> ‘ apostrophe <FUNC><r> <FUNC><r> <FUNC><r> , comma <FUNC><s> <FUNC><s> <FUNC><s> / forward slash <FUNC><t> <FUNC><t> <FUNC><t> { left brace <FUNC><CTRL><4> <FUNC><CTRL><4> <FUNC><CTRL><4> | vertical bar <FUNC><CTRL><5> <FUNC><CTRL><5> <FUNC><CTRL><5> } right brace <FUNC><CTRL><6> <FUNC><CTRL><6> <FUNC><CTRL><6> ~ tilde <FUNC><CTRL><7> <FUNC><CTRL><7> <FUNC><CTRL><7> ? question mark <SHIFT><FUNC><d> <SHIFT><FUNC><d> <SHIFT><FUNC><d> _ underscore <SHIFT><FUNC><k> <SHIFT><FUNC><k> <SHIFT><FUNC><k> : colon <SHIFT><FUNC><o> <SHIFT><FUNC><o> <SHIFT><FUNC><o> “ quote <SHIFT><FUNC><r> <SHIFT><FUNC><r> <SHIFT><FUNC><r> < less than sign <SHIFT><FUNC><s> <SHIFT><FUNC><s> <SHIFT><FUNC><s> > greater than sign <SHIFT><.> <SHIFT><.> <SHIFT><.> Note: Full 8859 character set not supported.

Symbol Terminal Control Sequences
Twin Client Reference • June, 2004 10-77
Symbol Terminal Control Sequences Command Mode Boot
Terminal Model & Keypad Key Sequence - Following Power Off 284x none 314x 35-key 614x 35-key
Hold Bksp and Shift keys. Press and release On/Off. Release Bksp and Shift keys.
314x 46-key, 354x 47-key, 384x 46-key, 684x 46-key
Hold F and I keys. Press and release PWR. Release F and I keys.
104x 27-key Hold Enter and Func keys. Press and release PWR. Release Enter and Func keys.
394x 694x
Hold A and D keys. Press and release PWR. Release A and D keys.
754x Press and hold PWR and Scan keys. Wait for a beep. Release PWR and Scan keys.
794x (to suspend or resume operation)
Press PWR button 1 to 6 seconds.
804x none 814x none 884x none 894x (to suspend or resume operation)
Press PWR button 1 to 6 seconds.
9000 none
Cold Boot Terminal Model & Keypad Key Sequence - Following Power Off 284x Remove the battery cover. While holding down
the function button, use the stylus to gently press the reset button. Replace the battery cover and press the power button. The symbol splash screen will display for about a minute. When the welcome screen appears, tap anywhere on the screen to continue to the align screen.
314x 35-key 614x 35-key
Hold Space, Func and Up-Arrow keys. Press and release On/Off. Release Space, Func and Up-Arrow keys.
314x 46-key, 354x 47-key, 384x 46-key, 684x 46-key
Hold down A, B and D keys. Press and release PWR. Release A, B and D keys.
104x 27-key Hold Right-Arrow and Enter keys.

Keypad Configuration
Twin Client Reference • June, 2004 10-78
Press and release PWR. Release Right-Arrow and Enter keys.
394x 54-key 694x 54-key
Hold F1, F4 and Enter keys. Press and release PWR. Release F1, F4 and Enter keys.
754x none 794x Press PWR button 15 seconds or more. 804x http://www.connectrf.com/Documents/8040.pdf 814x Press Func (blue key on terminal front) and
White button (in battery compartment on right side of battery) at same time.
884x http://www.connectrf.com/Documents/8800.pdf 894x Press PWR button 15 seconds or more. 9000 Press and hold the PWR key for 15 seconds.
Warm Boot Terminal Model & Keypad Key Sequence - Following Power Off 284x Hold down both the up and down scroll buttons
and press the App 4 button. 314x 35-key 614x 35-key
Hold / and + keys. Press and release On/Off. Release / and + keys.
314x 46-key 354x 47-key 384x 46-key 684x 46-key
Hold 4 and 5 keys. Press and release PWR. Release 4 and + keys.
104x 27-key Hold P1 and Enter keys. Press and release PWR. Release P1 and Enter keys.
394x 54-key 694x 54-key
Hold Shift and L keys. Press and release PWR. Release Shift and L keys.
754x none 794x Press PWR button 6 to 15 seconds. 804x Press and hold the PWR key (for approximately
10 seconds) and release it as soon as the screen changes and the terminal begins to reboot.
814x Press Backlight, Func (blue key), and Down Arrow keys all at the same time.
884x Press the Enter and Function keys while holding down either the left or right scan trigger and then release the keys.
894x Press PWR button 6 to 15 seconds. 9000 Press and hold the PWR key for 5 seconds.

Twin Client Reference • June, 2004 11-1
Chapter 11 • Error Message Resolution Guide Twin Client Error Message Resolution Guide
Message Reason Solution Reference Tech Note
ENTRY TOO LONG; Trying to key beyond the field size. Ensure that you are entering input into the
correct field. ---
ALPHABETIC ONLY; Trying to key a character that is not alphabetic.
Ensure that you are entering input into the correct field.
---
MINUS NOT VALID; Trying to key a Minus sign. Ensure that you are entering input into the correct field.
---
DECIMAL NOT VALID; Trying to key a Decimal (period). Ensure that you are entering input into the correct field.
---
ALPHANUMERIC ONLY; Trying to key characters other than Alphabetic and numeric.
Ensure that you are entering input into the correct field.
---
NUMERIC ONLY; Trying to key characters other than numeric.
Ensure that you are entering input into the correct field.
---
ENTRY TOO SHORT; Trying to exit the field before it is filled. Ensure that you are entering input into the correct field.
---

Error Message Resolution Guide
Twin Client Reference • June, 2004 11-2
Message Reason Solution Reference Tech Note
INVALID KEY; The key pressed is not valid. Ensure that you are entering input into the correct field.
---
MUST CLEAR FIELD; Trying to enter data in a field that must be cleared first.
Ensure that you are entering input into the correct field.
---
SCAN NOT ALLOWED; Trying to scan into a key only field. Ensure that you are entering input into the correct field.
---
KEY NOT ALLOWED; Trying to key into a scan only field. Ensure that you are entering input into the correct field.
---
ENTRY TOO SHORT; Trying to exit the field before it is filled. Ensure that you are entering input into the correct field.
---
RECOVERABLE ERROR; Encountered an error from which you can continue.
Verify your configuration settings for the hardware being used, usually a printer and cable issue.
---
UNRECOVERABLE ERROR; Encountered an error from which you can NOT continue.
Verify your Network settings are correct and you are in the correct mode using the correct Port.
T1113, T1114, T1161, T1171, T1187 and T1194
FUNCTION: \n\nFILE: \nLINE: \nCODE;
Encountered an error from which you can NOT continue.
Notify Connect over the WEB incident reporting system.
---
Press any key\nFor More Details...;
Press Enter for more information. Advisory message. ---
Press any key; Press a key to continue. Advisory message. ---

Error Message Resolution Guide
Twin Client Reference • June, 2004 11-3
Message Reason Solution Reference Tech Note
Connection ERROR.\nREBOOT MOBILE UNIT;
Could not Connect. Verify your Network settings are correct and you are in the correct mode using the correct Port.
T1113, T1114, T1161, T1171, T1187 and T1194
Disconnect ERROR.\nREBOOT MOBILE UNIT;
Could not Disconnect. Verify your Network settings are correct and you are in the correct mode using the correct Port.
T1113, T1114, T1161, T1171, T1187 and T1194
RF Send ERROR.\nREBOOT MOBILE UNIT;
Could not Send. Most likely range, access point, radio, host or network issue. Troubleshoot the customer’s environment.
T1113, T1114, T1161, T1171, T1187 and T1194
RF Receive ERROR.\nREBOOT MOBILE UNIT;
Could not Receive. Most likely range, access point, radio, host or network issue. Troubleshoot the customer’s environment.
T1113, T1114, T1161, T1171, T1187 and T1194
RF Check ERROR.\nREBOOT MOBILE UNIT;
Could not run the RF Survey. Most likely range, access point, radio, host or network issue. Troubleshoot the customer’s environment.
T1113, T1114, T1161, T1171, T1187 and T1194
RF Timeout ERROR.\nREBOOT MOBILE UNIT;
Have been trying to contact the host for the radio timeout period (2 minutes default).
Most likely range, access point, radio, host or network issue. Troubleshoot the customer’s environment.
T1113, T1114, T1161, T1171, T1187 and T1194
REBOOT MOBILE UNIT; Reboot the Mobile Unit do to loss of connection.
Most likely range, access point, radio, host or network issue. Troubleshoot the customer’s environment.
T1113, T1114, T1161, T1171, T1187 and T1194
Retry (Y/N)?; Try again. Try to send or receive again, or perhaps ensuring the printer is cabled to the Mobile Unit and is on.
---

Error Message Resolution Guide
Twin Client Reference • June, 2004 11-4
Message Reason Solution Reference Tech Note
TIMEOUT\n\nSending Data; Mobile Unit out of the coverage area. Most likely range, access point, radio, host or network issue. Troubleshoot the customer’s environment.
T1113, T1114, T1161, T1171, T1187 and T1194
TIMEOUT\n\nReceiving Data; Mobile Unit out of the coverage area. Most likely range, access point, radio, host or network issue. Troubleshoot the customer’s environment.
T1113, T1114, T1161, T1171, T1187 and T1194
Host Received Data\nAwaiting App Reply!;
Mobile Unit has sent and received an acknowledgement from the IP stack and is waiting for the application to return data.
Most likely host or network issue. Troubleshoot the customer’s environment. Probable causes are Database record locking, application program failure, Host failure or network failure.
T1113, T1114, T1161, T1171, T1187 and T1194
* WAITING TO SEND *; Mobile Unit out of the coverage area. Most likely range, access point, radio, host or network issue. Troubleshoot the customer’s environment.
T1113, T1114, T1161, T1171, T1187 and T1194
TCP Error Reading\nMAC Address.\nREBOOT MOBILE UNIT;
Could not obtain the Mac Address from the Mobile Unit.
Possible hardware, driver or stack problem Contact the Mobile Unit manufacturer.
---
Invalid TIP Command; Bad internal protocol. Notify Connect over the WEB incident reporting system.
---
Session Ended\nBy User or Host;
User, Host, application or network has ended the session.
If the user did not end the session, most likely host or network issues. Troubleshoot the customer’s environment.
T1113, T1114, T1161, T1171, T1187 and T1194
Server Packet Error; Bad Protocol detected. Usually a result of bad cabling, power or faulty transceiver. Also, will receive this if the Mobile Unit is in the wrong mode for server operation.
---
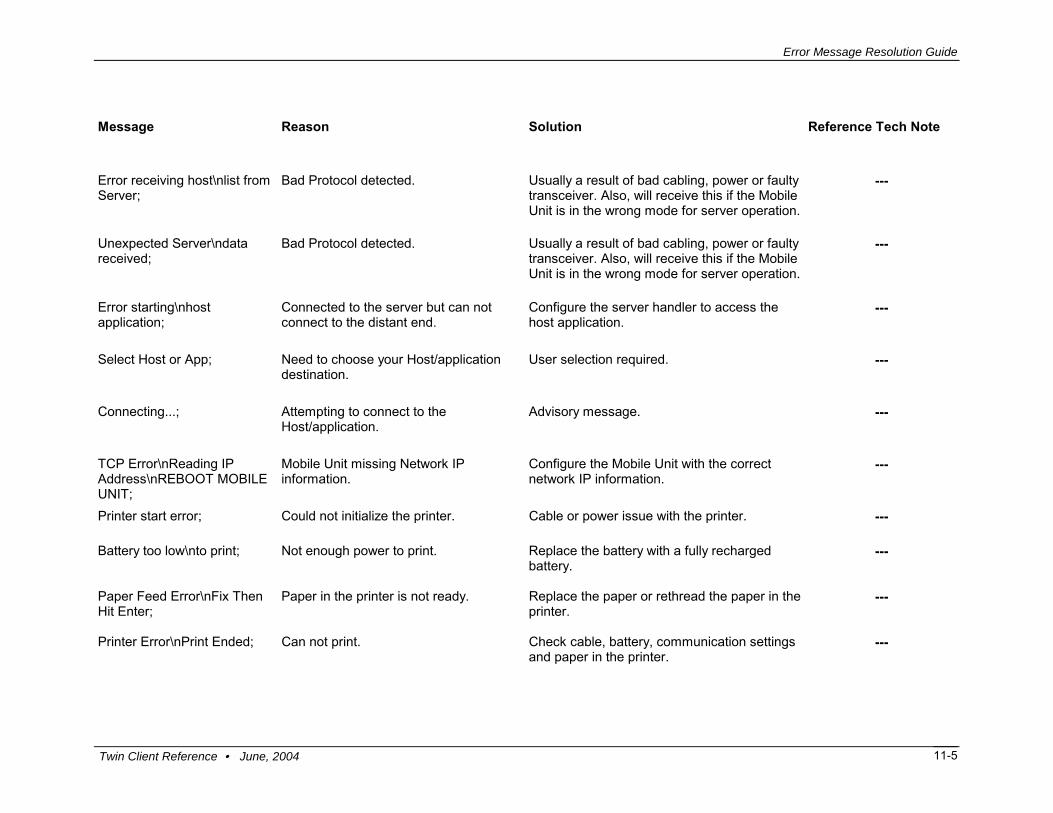
Error Message Resolution Guide
Twin Client Reference • June, 2004 11-5
Message Reason Solution Reference Tech Note
Error receiving host\nlist from Server;
Bad Protocol detected. Usually a result of bad cabling, power or faulty transceiver. Also, will receive this if the Mobile Unit is in the wrong mode for server operation.
---
Unexpected Server\ndata received;
Bad Protocol detected. Usually a result of bad cabling, power or faulty transceiver. Also, will receive this if the Mobile Unit is in the wrong mode for server operation.
---
Error starting\nhost application;
Connected to the server but can not connect to the distant end.
Configure the server handler to access the host application.
---
Select Host or App; Need to choose your Host/application destination.
User selection required. ---
Connecting...; Attempting to connect to the Host/application.
Advisory message. ---
TCP Error\nReading IP Address\nREBOOT MOBILE UNIT;
Mobile Unit missing Network IP information.
Configure the Mobile Unit with the correct network IP information.
---
Printer start error; Could not initialize the printer. Cable or power issue with the printer. ---
Battery too low\nto print; Not enough power to print. Replace the battery with a fully recharged battery.
---
Paper Feed Error\nFix Then Hit Enter;
Paper in the printer is not ready. Replace the paper or rethread the paper in the printer.
---
Printer Error\nPrint Ended; Can not print. Check cable, battery, communication settings and paper in the printer.
---

Error Message Resolution Guide
Twin Client Reference • June, 2004 11-6
Message Reason Solution Reference Tech Note
User Count Exceeded.\n Session Ended;
Possible authorization issue. Verify that you have the correct number of licenses for the number of Mobile Units you are using.
---
Primary Unavailable\nTrying Alternate;
First Host IP address not available trying the remaining addresses in the Host list.
Verify the host address. ---
APMAC.DAT Error\nSession Ended;
Access point Media Access Control error. Most likely range, access point, radio, host or network issue. Troubleshoot the customer’s environment.
T1113, T1114, T1161, T1171, T1187 and T1194
MUIP.DAT Error\nSession Ended;
Mobile Unit IP Error. Most likely a Mobile Unit network setting issue. Troubleshoot the customer’s environment.
T1113, T1114, T1161, T1171, T1187 and T1194
Missing Subnet IP\nSession Ended;
Mobile Unit IP Netmask Error. Most likely a Mobile Unit network setting issue. Troubleshoot the customer’s environment.
T1113, T1114, T1161, T1171, T1187 and T1194
Error Opening File; File is missing. Verify the configuration files are on the Mobile Unit. Or perhaps there is a hardware failure.
---
Telnet API\nnot found; Program files are missing. Reload program files. ---
Battery Low Warning\n\nReplace Battery Soon;
Not enough power to operate the Mobile Unit.
Replace the battery with a fully recharged battery.
---
No Host List.\nPress any key\nTo Edit Host IP's;
Have not configured your target hosts. Configure the target host IP addresses. ---
Unable to Allocate\nFont Memory;
Mobile unit does not have enough memory to load the fonts.
Reduce the fonts in use or expand the memory in the mobile unit.
---
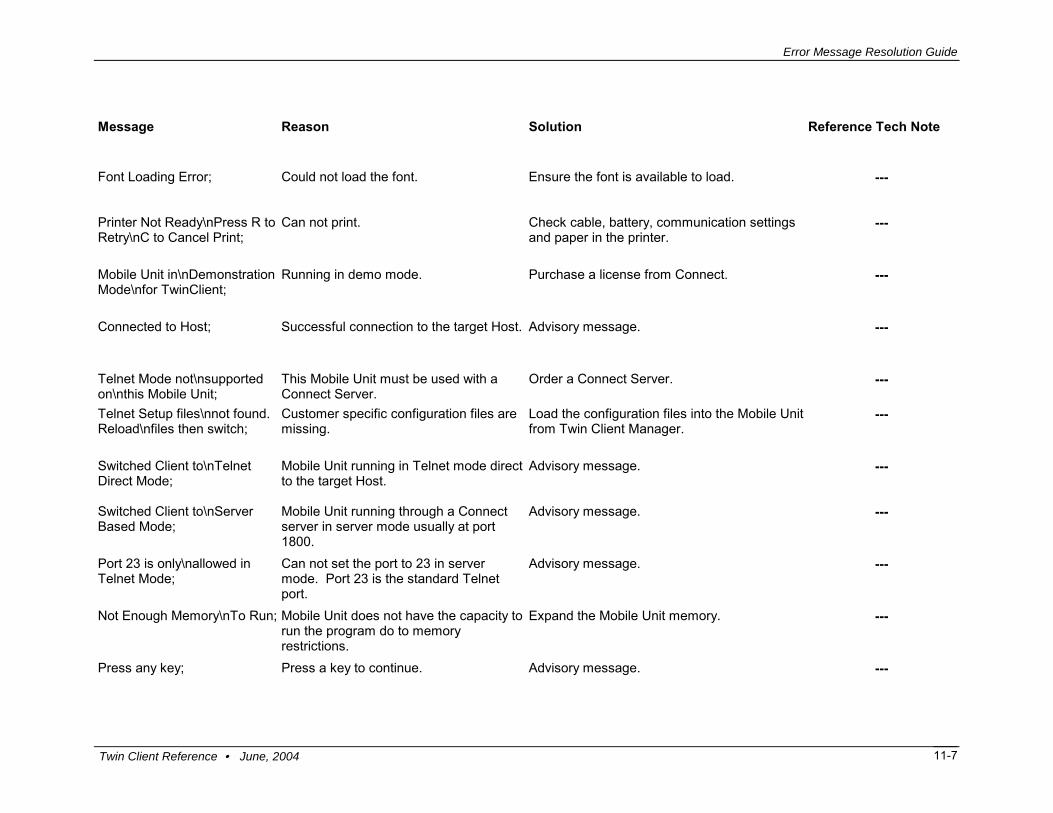
Error Message Resolution Guide
Twin Client Reference • June, 2004 11-7
Message Reason Solution Reference Tech Note
Font Loading Error; Could not load the font. Ensure the font is available to load.
---
Printer Not Ready\nPress R to Retry\nC to Cancel Print;
Can not print. Check cable, battery, communication settings and paper in the printer.
---
Mobile Unit in\nDemonstration Mode\nfor TwinClient;
Running in demo mode. Purchase a license from Connect. ---
Connected to Host; Successful connection to the target Host. Advisory message. ---
Telnet Mode not\nsupported on\nthis Mobile Unit;
This Mobile Unit must be used with a Connect Server.
Order a Connect Server. ---
Telnet Setup files\nnot found. Reload\nfiles then switch;
Customer specific configuration files are missing.
Load the configuration files into the Mobile Unit from Twin Client Manager.
---
Switched Client to\nTelnet Direct Mode;
Mobile Unit running in Telnet mode direct to the target Host.
Advisory message. ---
Switched Client to\nServer Based Mode;
Mobile Unit running through a Connect server in server mode usually at port 1800.
Advisory message. ---
Port 23 is only\nallowed in Telnet Mode;
Can not set the port to 23 in server mode. Port 23 is the standard Telnet port.
Advisory message. ---
Not Enough Memory\nTo Run; Mobile Unit does not have the capacity to run the program do to memory restrictions.
Expand the Mobile Unit memory. ---
Press any key; Press a key to continue. Advisory message. ---
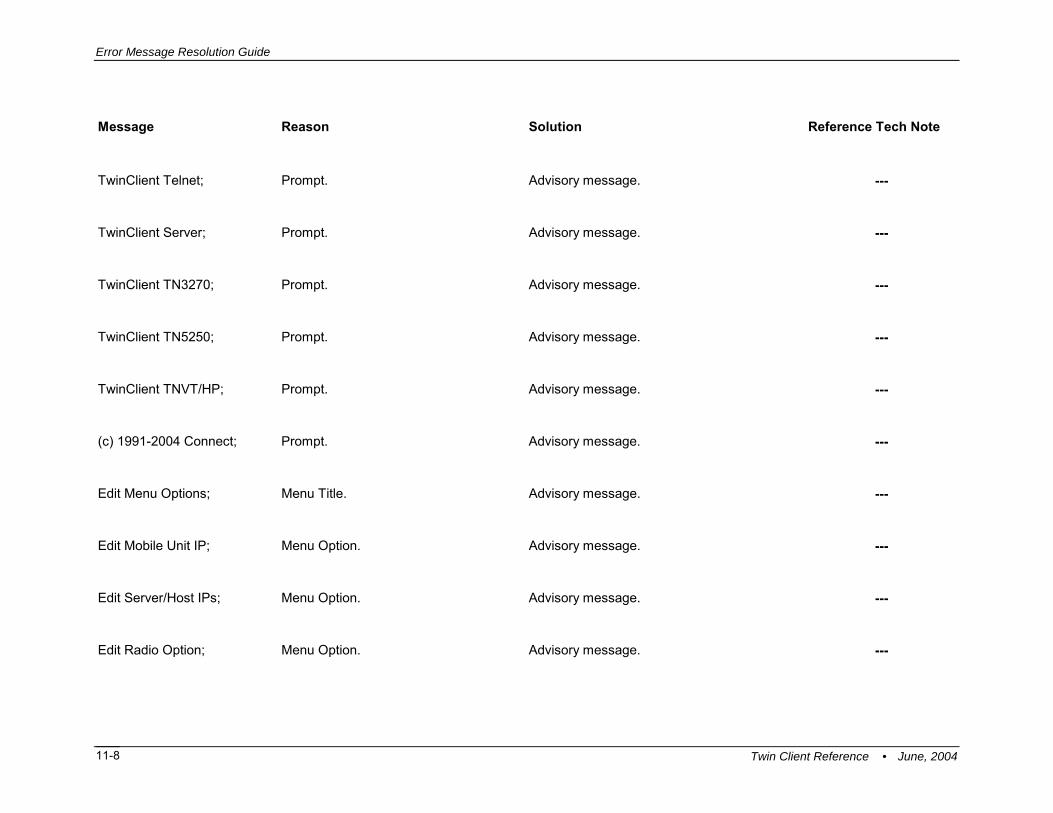
Error Message Resolution Guide
Twin Client Reference • June, 2004 11-8
Message Reason Solution Reference Tech Note
TwinClient Telnet; Prompt. Advisory message. ---
TwinClient Server; Prompt. Advisory message. ---
TwinClient TN3270; Prompt. Advisory message. ---
TwinClient TN5250; Prompt. Advisory message. ---
TwinClient TNVT/HP; Prompt. Advisory message. ---
(c) 1991-2004 Connect; Prompt. Advisory message. ---
Edit Menu Options; Menu Title. Advisory message. ---
Edit Mobile Unit IP; Menu Option. Advisory message. ---
Edit Server/Host IPs; Menu Option. Advisory message. ---
Edit Radio Option; Menu Option. Advisory message. ---

Error Message Resolution Guide
Twin Client Reference • June, 2004 11-9
Message Reason Solution Reference Tech Note
Edit License Key; Menu Option. Advisory message. ---
Run Site Survey; Menu Option. Advisory message. ---
Switch Client Modes; Menu Option. Advisory message. ---
Run TwinClient; Menu Option. Advisory message. ---
Exit to OS; Menu Option. Advisory message. ---
Printer may not be\nplugged in or\nturned on!;
Can not print. Check cable, battery, communication settings and paper in the printer.
---
OUT OF RANGE OF BASE; Mobile Unit out of the coverage area. Most likely range, access point, radio, host or network issue. Troubleshoot the customer’s environment.
T1113, T1114, T1161, T1171, T1187 and T1194
CONNECT SERIAL CABLE; Serial cable not connected to the Mobile Unit.
Check cable, battery and communication settings for the Mobile Unit.
---
REMOVE SERIAL CABLE; Remove serial cable from to the Mobile Unit.
Check cable, battery and communication settings for the Mobile Unit.
---
PLACE IN CRADLE; Place the Mobile Unit in the cradle. Advisory message. ---

Error Message Resolution Guide
Twin Client Reference • June, 2004 11-10
Message Reason Solution Reference Tech Note
REMOVE FROM CRADLE; Remove Mobile Unit from the cradle. Advisory message. ---
ACQUIRING CRADLE BUS; Attempting to access the cradle through the serial port you have configured.
Advisory message. ---
Printer Out\nOf Range; Printer out of the coverage area. Most likely range, access point or radio issue. Troubleshoot the customer’s environment.
T1113, T1114, T1161, T1171, T1187 and T1194
Connection Refused\nBy Host;
You connected to the target host but the host disconnected you.
Verify the configuration file has the correct Mobile Unit type and New environment variable set. Fallback to the Connect Default to verify the connection.
---
Connection Timed Out; You connected to the host but did not logon in the appropriate time so the host disconnected you.
Modify the Host parameters for login. ---
Connection Failed\nHost Not Responding;
Could not connect to the Host. Most likely range, access point, radio, host or network issue. Troubleshoot the customer’s environment.
T1113, T1114, T1161, T1171, T1187 and T1194
Connection Failed\nHost Unreachable;
Could not connect to the Host. Most likely range, access point, radio, host or network issue. Troubleshoot the customer’s environment.
T1113, T1114, T1161, T1171, T1187 and T1194
Mobile Unit Out\nOf Range, Unable\nTo Transmit;
Mobile Unit out of the coverage area. Most likely range, access point, radio, host or network issue. Troubleshoot the customer’s environment.
T1113, T1114, T1161, T1171, T1187 and T1194
Mobile Unit Out\nOf Range, Unable\nTo Receive;
Mobile Unit out of the coverage area. Most likely range, access point, radio, host or network issue. Troubleshoot the customer’s environment.
---

Error Message Resolution Guide
Twin Client Reference • June, 2004 11-11
Message Reason Solution Reference Tech Note
Printer Not\nResponding; Can not print. Check cable, battery, communication settings and paper in the printer.
---
Printer Out\nOf Range; Printer out of the coverage area. Most likely range, access point or radio issue. Troubleshoot the customer’s environment.
T1113, T1114, T1161, T1171, T1187 and T1194
Print Complete; Prompt. Advisory message. ---
Reprint (Y/N)?; Yes or No prompt for a reprint. Advisory message. ---
WARNING; Prompt. Advisory message. ---
Turning power off\nduring a session\nwill cause the\nprogram to restart;
This Mobile Unit will disconnect the session if powered off.
Mobile Unit manufacturer limitation. Advisory message.
---
Are you sure (y/n)?; Yes or No prompt for a confirmation. Advisory message. ---
You Sure? (YyNn); Yes or No prompt for a confirmation. Advisory message. ---
Domain Name Server\nNot Set;
DOMAIN NAME SERVER not configured.
Configure the Mobile Unit with the correct network IP information.
---
Domain Name Server\nQuery Memory Error;
Memory error on the Mobile Unit Expand the Mobile Unit memory or return the Mobile Unit for repair.
---

Error Message Resolution Guide
Twin Client Reference • June, 2004 11-12
Message Reason Solution Reference Tech Note
Domain Name Server\nQuery Sending Error;
Mobile Unit out of the coverage area. Most likely range, access point, radio, host or network issue. Troubleshoot the customer’s environment.
T1113, T1114, T1161, T1171, T1187 and T1194
Domain Name Server\nQuery Receive Error;
Mobile Unit out of the coverage area. Most likely range, access point, radio, host or network issue. Troubleshoot the customer’s environment.
T1113, T1114, T1161, T1171, T1187 and T1194
Domain Name Server\nUnavailable;
Could not connect to the DOMAIN NAME SERVER.
Most likely range, access point, radio, host or network issue. Troubleshoot the customer’s environment.
T1113, T1114, T1161, T1171, T1187 and T1194
Error loading\nparameter file; Could not load the parameter file. Reload the correct configuration files. ---
Could not open\ntelnet interface;
Could not telnet. Reload the program files. ---
Could not set\mtelnet options; Could not use the telnet configuration. Reload the correct configuration files. ---
Setup file\nsetting mismatch\nReload Setup;
Emulation program selected is not compatible with the configuration file on the Mobile Unit.
Remove the emulation and configuration files. Run clear Telnet on the Mobile Unit then reload the Mobile Unit with the proper emulation and configuration files.
---
Display formatting\ntoo large for\ncurrent screen;
Mobile Unit does not have enough memory to run your configured reformatted screens.
Expand the Mobile Unit memory or order a server from Connect.
---
Mobile Unit\ninitialization error;
Mobile Unit problem. Return the Mobile Unit to the manufacturer for repair.
---

Error Message Resolution Guide
Twin Client Reference • June, 2004 11-13
Message Reason Solution Reference Tech Note
Host/App/Network\nclosed the session;
Customer’s environment disconnected the Mobile Unit session.
Most likely range, access point, radio, host or network issue. Troubleshoot the customer’s environment.
T1113, T1114, T1161, T1171, T1187 and T1194
Disconnecting...; Prompt. Advisory message. ---
Scan Barcode; Bar code scanning test. Advisory message. ---
Enter Setup\nPassword; Prompt. Advisory message. ---
Enter Profile \nPassword; Prompt. Advisory message. ---
Host IP; Host IP address prompt. Enter target host IP address. ---
Host Name; Host name prompt. Enter target host Name. ---
Port; Host IP port required. Enter 23 for telnet or 1800 for a Connect server. Could also be a different number depending on the customer’s environment.
T1113, T1114, T1161, T1171, T1187 and T1194
Mobile Unit Type; Prompt. Advisory message. ---
WARNING: This will \nend any\ncurrent session;
Prompt. Advisory message. ---

Error Message Resolution Guide
Twin Client Reference • June, 2004 11-14
Message Reason Solution Reference Tech Note
Continue (Y/N)?; Prompt. Advisory message. ---
HOST ENTRY; Prompt. Advisory message. ---
VT(100/220)/HP Setup; Prompt. Advisory message. ---
Mobile Unit Info; Prompt. Advisory message. ---
Emulation Setup; Prompt. Advisory message. ---
ANSI Setup; Prompt. Advisory message. ---
Miscellaneous Setup; Prompt. Advisory message. ---
Mobile Unit Type; Prompt. Advisory message. ---
Control Codes; Prompt. Advisory message. ---
Local Echo; Prompt. Advisory message. ---
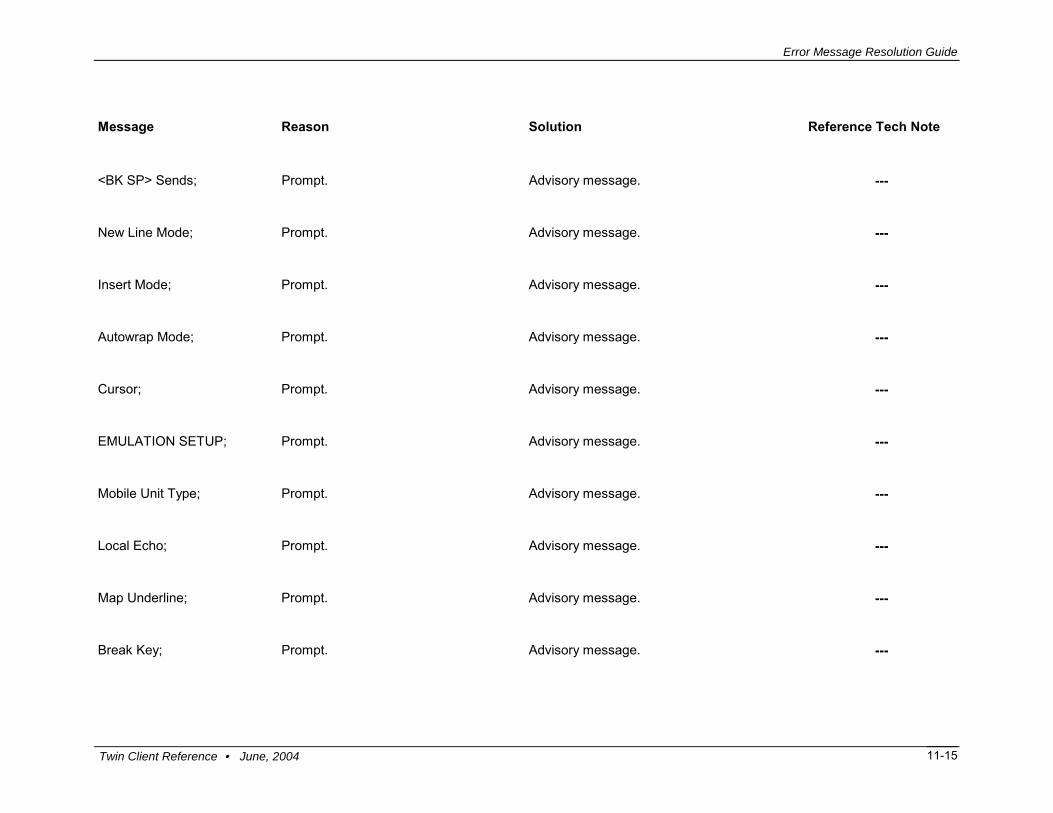
Error Message Resolution Guide
Twin Client Reference • June, 2004 11-15
Message Reason Solution Reference Tech Note
<BK SP> Sends; Prompt. Advisory message. ---
New Line Mode; Prompt. Advisory message. ---
Insert Mode; Prompt. Advisory message. ---
Autowrap Mode; Prompt. Advisory message. ---
Cursor; Prompt. Advisory message. ---
EMULATION SETUP; Prompt. Advisory message. ---
Mobile Unit Type; Prompt. Advisory message. ---
Local Echo; Prompt. Advisory message. ---
Map Underline; Prompt. Advisory message. ---
Break Key; Prompt. Advisory message. ---
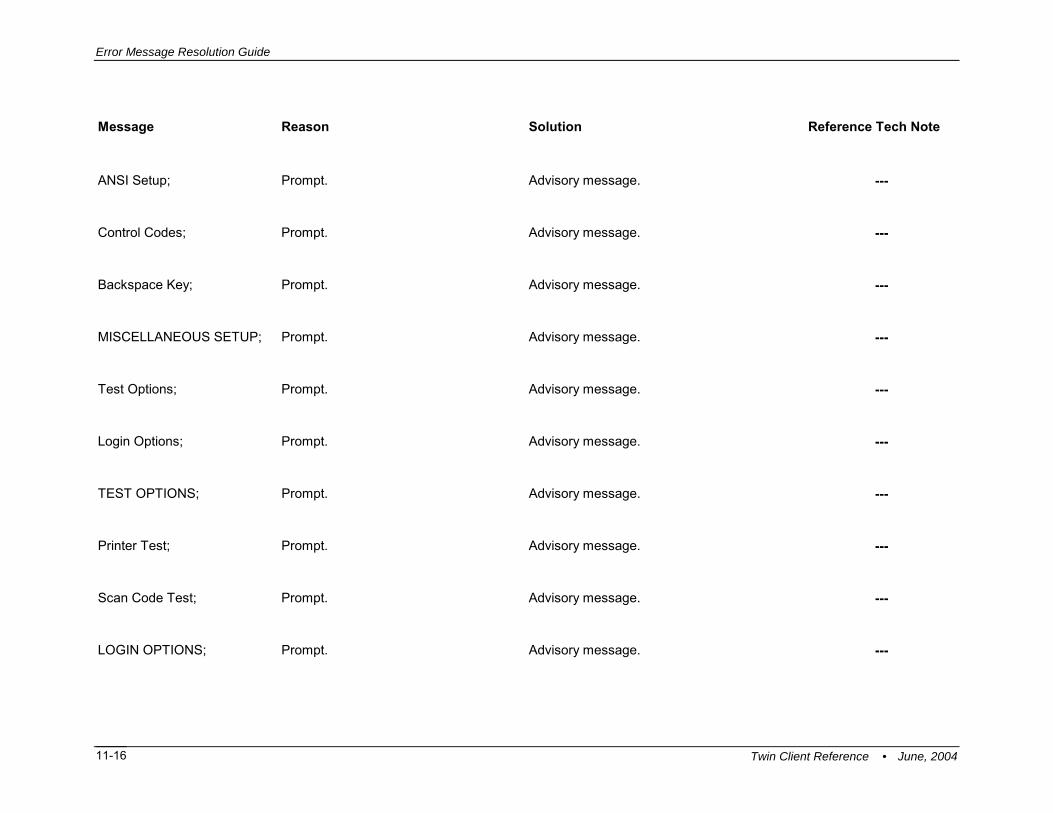
Error Message Resolution Guide
Twin Client Reference • June, 2004 11-16
Message Reason Solution Reference Tech Note
ANSI Setup; Prompt. Advisory message. ---
Control Codes; Prompt. Advisory message. ---
Backspace Key; Prompt. Advisory message. ---
MISCELLANEOUS SETUP; Prompt. Advisory message. ---
Test Options; Prompt. Advisory message. ---
Login Options; Prompt. Advisory message. ---
TEST OPTIONS; Prompt. Advisory message. ---
Printer Test; Prompt. Advisory message. ---
Scan Code Test; Prompt. Advisory message. ---
LOGIN OPTIONS; Prompt. Advisory message. ---

Error Message Resolution Guide
Twin Client Reference • June, 2004 11-17
Message Reason Solution Reference Tech Note
User Name; Prompt. Advisory message. ---
User Password; Prompt. Advisory message. ---
ON; Prompt. Advisory message. ---
OFF; Prompt. Advisory message. ---
Map; Prompt. Advisory message. ---
Don't Map; Prompt. Advisory message. ---
Enable Break; Prompt. Advisory message. ---
Disable Break; Prompt. Advisory message. ---
7 bit; Prompt. Advisory message. ---
8 bit; Prompt. Advisory message. ---

Error Message Resolution Guide
Twin Client Reference • June, 2004 11-18
Message Reason Solution Reference Tech Note
Send Delete; Prompt. Advisory message. ---
Send Backspace; Prompt. Advisory message. ---
Mobile Unit Setup; Prompt. Advisory message. ---
Scanner Options; Prompt. Advisory message. ---
Program Options; Prompt. Advisory message. ---
Special Options; Prompt. Advisory message. ---
Beeper Options; Prompt. Advisory message. ---
Exit to DOS; Prompt. Advisory message. ---
Backlight Time; Prompt. Advisory message. ---
Enter Key Action; Prompt. Advisory message. ---

Error Message Resolution Guide
Twin Client Reference • June, 2004 11-19
Message Reason Solution Reference Tech Note
Reset Options; Prompt. Advisory message. ---
Font Size; Prompt. Advisory message. ---
Portable Printer; Prompt. Advisory message. ---
Reprint Option; Prompt. Advisory message. ---
Data IDs; Prompt. Advisory message. ---
Internal/External; Prompt. Advisory message. ---
Modify Beeps; Prompt. Advisory message. ---
Message Beeps; Prompt. Advisory message. ---
Scan Identifier; Prompt. Advisory message. ---
AID Scan Setup; Prompt. Advisory message. ---

Error Message Resolution Guide
Twin Client Reference • June, 2004 11-20
Message Reason Solution Reference Tech Note
Long Scans; Prompt. Advisory message. ---
Scan Send; Prompt. Advisory message. ---
Yes; Prompt. Advisory message. ---
No; Prompt. Advisory message. ---
Normal; Prompt. Advisory message. ---
Double Wide; Prompt. Advisory message. ---
Double High; Prompt. Advisory message. ---
Double High and Wide; Prompt. Advisory message. ---
Errors Only; Prompt. Advisory message. ---
Automatic; Prompt. Advisory message. ---

Error Message Resolution Guide
Twin Client Reference • June, 2004 11-21
Message Reason Solution Reference Tech Note
All Messages; Prompt. Advisory message. ---
Reject; Prompt. Advisory message. ---
Truncate; Prompt. Advisory message. ---
Split; Prompt. Advisory message. ---
Do Not Send; Prompt. Advisory message. ---
Always Send; Prompt. Advisory message. ---
Last Field Only; Prompt. Advisory message. ---
Internal; Prompt. Advisory message. ---
External; Prompt. Advisory message. ---
none; Prompt. Advisory message. ---

Error Message Resolution Guide
Twin Client Reference • June, 2004 11-22
Message Reason Solution Reference Tech Note
monarch; Prompt. Advisory message. ---
pddumb; Prompt. Advisory message. ---
comtec; Prompt. Advisory message. ---
rascal; Prompt. Advisory message. ---
codewriter; Prompt. Advisory message. ---
comtec(S); Prompt. Advisory message. ---
User Name; Prompt. Advisory message. ---
Password; Prompt. Advisory message. ---
Frequency: Hz; Prompt. Advisory message. ---
Duration: ms; Prompt. Advisory message. ---

Error Message Resolution Guide
Twin Client Reference • June, 2004 11-23
Message Reason Solution Reference Tech Note
Delay: ms; Prompt. Advisory message. ---
Select Scanner; Prompt. Advisory message. ---
Setup Scanner; Prompt. Advisory message. ---
Scan Test; Prompt. Advisory message. ---
Scan Operation; Prompt. Advisory message. ---
Laser; Prompt. Advisory message. ---
Contact/Pulse; Prompt. Advisory message. ---
Contact/No Pulse; Prompt. Advisory message. ---
Auto/Pulse; Prompt. Advisory message. ---
Auto/No Pulse; Prompt. Advisory message. ---

Error Message Resolution Guide
Twin Client Reference • June, 2004 11-24
Message Reason Solution Reference Tech Note
Wand Simulation; Prompt. Advisory message. ---
VT100; Prompt. Advisory message. ---
VT220; Prompt. Advisory message. ---
HP700; Prompt. Advisory message. ---
SETUP; Prompt. Advisory message. ---
Mobile Unit IP/Radio; Prompt. Advisory message. ---
Host List; Prompt. Advisory message. ---
NULL; Prompt. Advisory message. ---
Bad command file name not recognized
There are incorrect versions of LWP and UDP802.11 on the terminal.
You must associate to any Access Point first. Obtain correct version of LWP and UDP802.11 from Symbol and reload on the terminal.
T1184
No applications Twin Client is not loaded on the terminal. Obtain current version of Twin Client from Terminal Manufacturer or Connect, and load on the terminal.
T1185
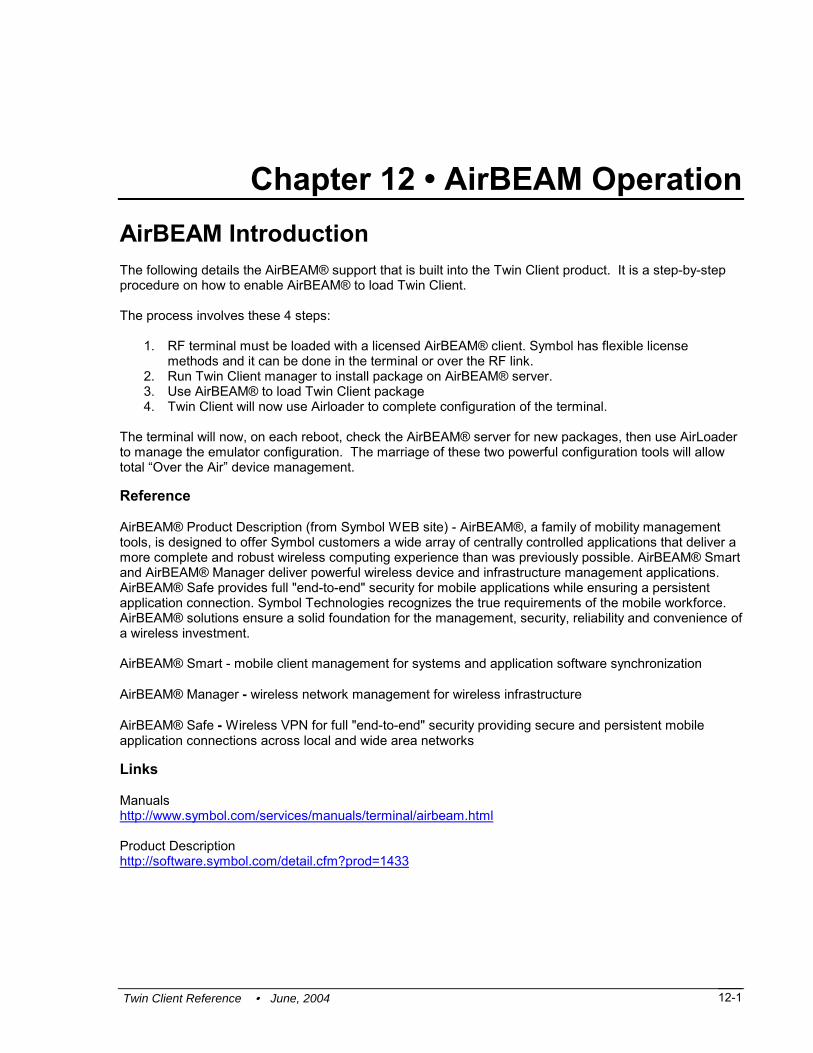
Twin Client Reference • June, 2004 12-1
Chapter 12 • AirBEAM Operation AirBEAM Introduction The following details the AirBEAM® support that is built into the Twin Client product. It is a step-by-step procedure on how to enable AirBEAM® to load Twin Client. The process involves these 4 steps:
1. RF terminal must be loaded with a licensed AirBEAM® client. Symbol has flexible license methods and it can be done in the terminal or over the RF link.
2. Run Twin Client manager to install package on AirBEAM® server. 3. Use AirBEAM® to load Twin Client package 4. Twin Client will now use Airloader to complete configuration of the terminal.
The terminal will now, on each reboot, check the AirBEAM® server for new packages, then use AirLoader to manage the emulator configuration. The marriage of these two powerful configuration tools will allow total “Over the Air” device management.
Reference AirBEAM® Product Description (from Symbol WEB site) - AirBEAM®, a family of mobility management tools, is designed to offer Symbol customers a wide array of centrally controlled applications that deliver a more complete and robust wireless computing experience than was previously possible. AirBEAM® Smart and AirBEAM® Manager deliver powerful wireless device and infrastructure management applications. AirBEAM® Safe provides full "end-to-end" security for mobile applications while ensuring a persistent application connection. Symbol Technologies recognizes the true requirements of the mobile workforce. AirBEAM® solutions ensure a solid foundation for the management, security, reliability and convenience of a wireless investment. AirBEAM® Smart - mobile client management for systems and application software synchronization AirBEAM® Manager - wireless network management for wireless infrastructure AirBEAM® Safe - Wireless VPN for full "end-to-end" security providing secure and persistent mobile application connections across local and wide area networks
Links Manuals http://www.symbol.com/services/manuals/terminal/airbeam.html Product Description http://software.symbol.com/detail.cfm?prod=1433

AirBEAM Operation
Twin Client Reference • June, 200412-2
AirBEAM Instructions 1. Select the terminal type from the Settings/Options dialog and the emulation from the
Settings/Emulation dialog. 2. Go to the Settings/Terminal Operation dialog to launch the package builder. If the Twin Client
manager can't find the package builder, the user will have to run it manually, and open the proper package file.
The following are the paths/file names of the package files: 2840 - ...TwinClient\terminal\Symbol\2840\AirBeam\TC2840.apr 7940 - ...TwinClient\terminal\Symbol\7940\AirBeam\TC7940.apr 8140 - ...TwinClient\terminal\Symbol\8140\AirBeam\TC8140.apr 8940 - ...TwinClient\terminal\Symbol\8940\AirBeam\TC8940.apr 3000 - ...TwinClient\terminal\Symbol\3000s\AirBeam\TC3000s.apr 7500 - ...TwinClient\terminal\Symbol\7500\AirBeam\TC7500.apr
Note: The user must have clicked the AirBEAM button in the operations dialog at least once, because
this is what causes an updated tnconfig.txt file to be generated that winds up in the package. 3. Once the file has been saved, go to the File menu and select Generate APF File.
4. The following screen will appear.

AirBEAM Operation
Twin Client Reference • June, 2004 12-3
5. Type a version number in the version field (in any alphanumeric combination, size limit is 30).
Click OK.
6. A “Save As” screen will appear.
7. Save the file as an .APF extension and click Save. 8. Go to the File menu and click Close.
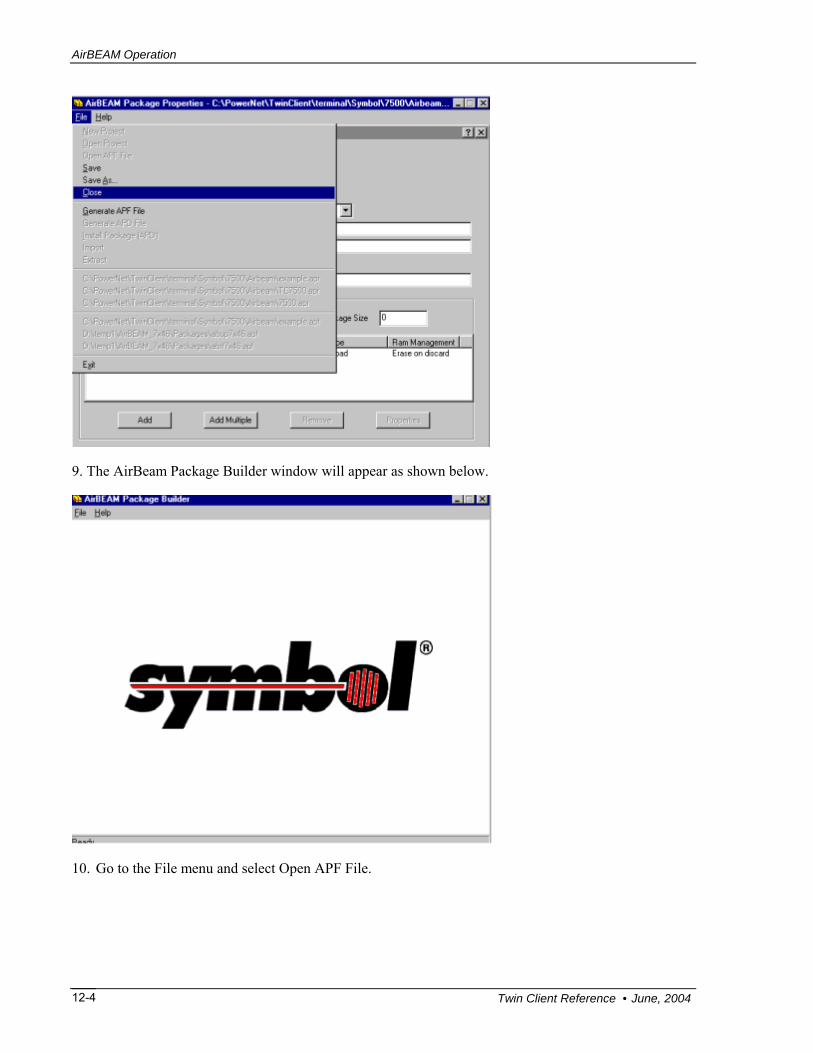
AirBEAM Operation
Twin Client Reference • June, 200412-4
9. The AirBeam Package Builder window will appear as shown below.
10. Go to the File menu and select Open APF File.

AirBEAM Operation
Twin Client Reference • June, 2004 12-5
11. Open the APF file. The Airbeam Package Properties dialog box will appear.
12. Click on File and then on Generate APD File.

AirBEAM Operation
Twin Client Reference • June, 200412-6
13. The following Generate AirBEAM Package screen will appear.
14. In the Server Default Package Component Directory, field type in the path where the apd file will be stored on your PC.
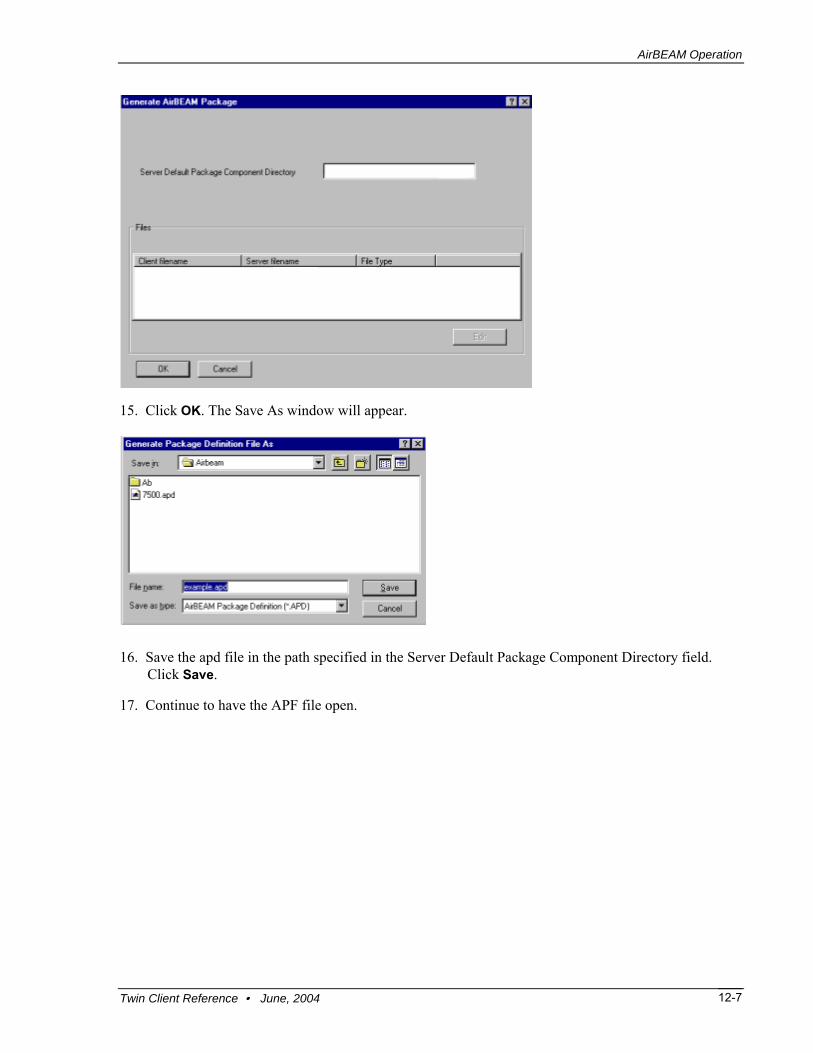
AirBEAM Operation
Twin Client Reference • June, 2004 12-7
15. Click OK. The Save As window will appear.
16. Save the apd file in the path specified in the Server Default Package Component Directory field. Click Save.
17. Continue to have the APF file open.

AirBEAM Operation
Twin Client Reference • June, 200412-8
18. Go to File Menu and select Install Package (APD).
19. The Install AirBEAM Package (APD) window will appear.
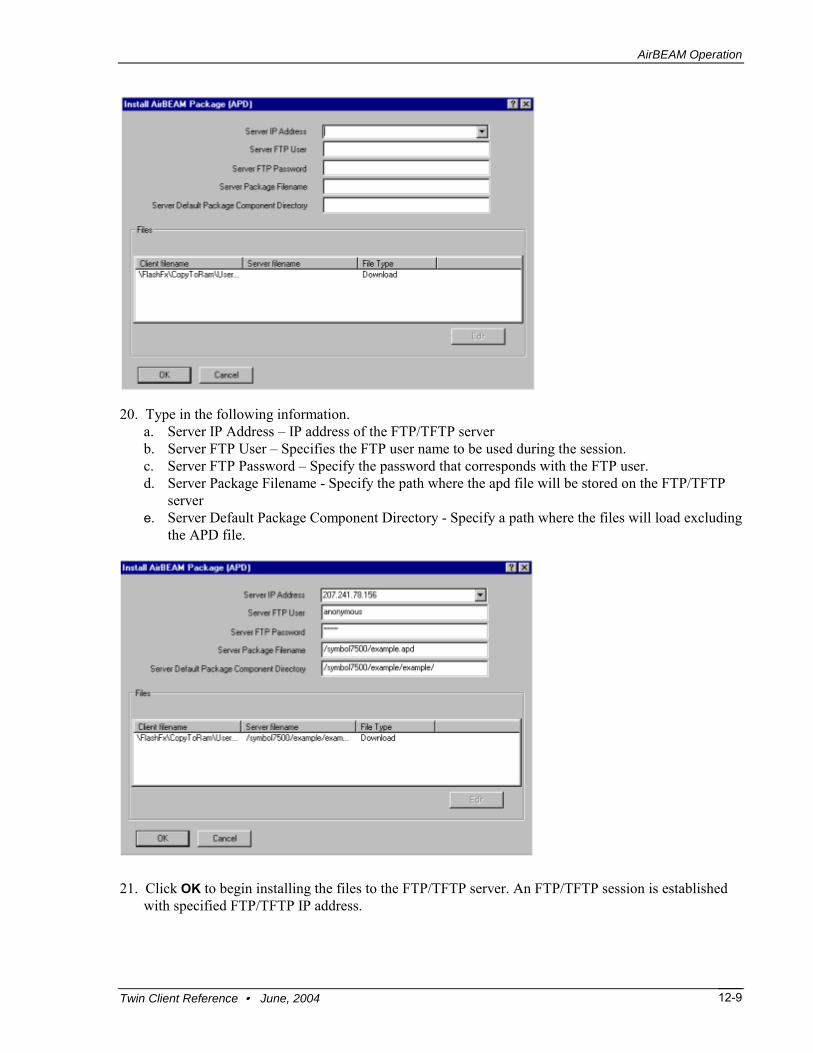
AirBEAM Operation
Twin Client Reference • June, 2004 12-9
20. Type in the following information. a. Server IP Address – IP address of the FTP/TFTP server b. Server FTP User – Specifies the FTP user name to be used during the session. c. Server FTP Password – Specify the password that corresponds with the FTP user. d. Server Package Filename - Specify the path where the apd file will be stored on the FTP/TFTP
server e. Server Default Package Component Directory - Specify a path where the files will load excluding
the APD file.
21. Click OK to begin installing the files to the FTP/TFTP server. An FTP/TFTP session is established with specified FTP/TFTP IP address.

AirBEAM Operation
Twin Client Reference • June, 200412-10
22. If successful, there will be no error message. If an error message does appear, please go to the AIRBEAM_Package_Builder.pdf on Symbol’s web site for further instructions. http://www.symbol.com/services/manuals/terminal/airbeam.html
Note: These instructions for building an AirBEAM package are the same for any Symbol terminal.