
SWING GENIE Swing Genie has successfully established your ...
14
Transcript of SWING GENIE Swing Genie has successfully established your ...


Swing Genie has successfully established your precise connection when there is a mild tension linking both arms together in the full set-up position when gripping a golf club. ******
Optimizing your Swing Genie Connection on the Practice Tee
Warm up as usual. Conduct your practice routine as normal, acquiring a full swing tempo. Properly fit your Swing Genie wrist and arm straps following Steps 1 and 2,
making certain the buckle remains open. Hit a series of golf shots, and on each occasion gradually reduce the buckle
strap length by following the refitting arm strap procedure described in Step 3.
Evaluate each executed golf shot. Locating the desired tension, which promotes the highest degree of
consistency, accuracy, and distance confirms you have established your precise connection!
Visit us at www.swinggeniegolf.com
SWING GENIE
STEP-BY-STEP FITTING INSTRUCTIONS
"FORMING YOUR PRECISE CONNECTION"
Congratulations!
You are now the owner of Swing Genie, "The most effective golf swing trainer money can buy." Before using your Swing Genie for the first time, please take a few moments to read this instruction guide, then keep it for reference.
Now you can experience firsthand why Swing Genie is fast becoming the world's #1 golf swing trainer!
Note: Pay attention to Step 3, Adjusting Buckle Strap Length and Tension, for proper fitting.
112
• Warm up as usual.• Conduct your practice routine as normal, acquiring a full swing tempo.• Properly fi t your Swing Genie wrist and arm straps following Steps 1 and 2, making certain the buckle remains open.• Hit a series of golf shots, and on each occasion gradually reduce the buckle strap length by following the refi tting arm strap procedure described in Step 3.• Evaluate each executed golf shot.• Locating the desired length/tension, which promotes the highest degree of consistency, accuracy, and distance confi rms you have established your precise connection!

The Golf Swing
In the full swing at impact, the trailing arm should be slightly bent and both arms should be “connected.” Both are keys to a great golf swing! Many golfers struggle with “flying elbow”, which creates a loss of power and distance during their swing.
Step 3. (b) To check buckle strap tension, refit the arm strap and assume the full set-up posi-tion while gripping a golf club. (note: your initial setting will likely be loose and free from tension).
Step 3. (c) Continue removing then refitting the arm strap until the adjustment of the buckle strap length produces a mild tension, linking both arms together. To open the buckle, simply pull back on the buckle flange, disengaging the lever. Repeat Steps 3(a) and 3(b) until the recommended buckle strap tension is achieved.
2 11
Adjusting Buckle Strap Length and Tension
Step 3. (a) To adjust the buckle strap length, remove the arm strap and pull a small portion of the buckle strap through the open buckle (approx. 1 inch), then close the buckle.
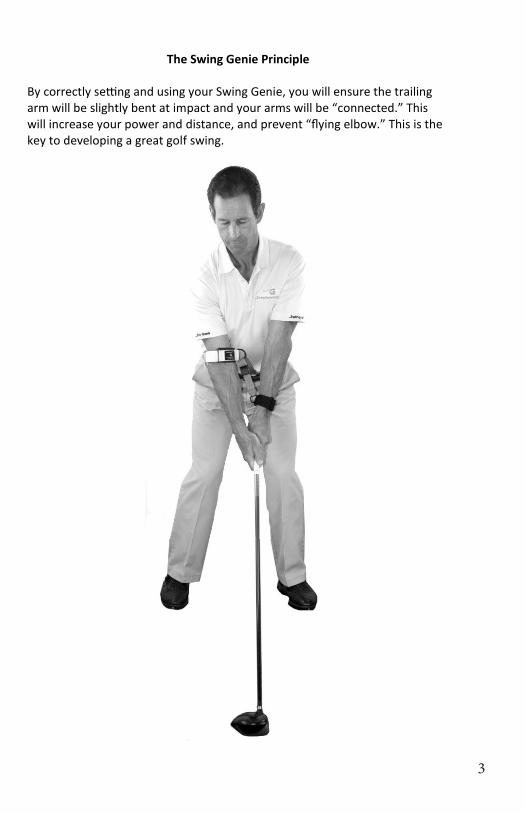
The Swing Genie Principle
By correctly setting and using your Swing Genie, you will ensure the trailing arm will be slightly bent at impact and your arms will be “connected.” This will increase your power and distance, and prevent “flying elbow.” This is the key to developing a great golf swing.
310

Learning more about your Swing Genie
In three simple steps, you will learn how Swing Genie enables you to deliver maximum power with both arms connected at the precise moment of impact. Step 1. Fitting the wrist strap. Step 2. Fitting the arm strap. Step 3. Securing a mild tension in the buckled Swing Genie strap, linking both arms together. This guide prepares you to establish your precise connection from the set-up position, which will ultimately deliver a very powerful, effortless, repeatable golf swing!
Getting Started
This instruction guide is for right handed players. (Left handed players should follow these same instructions, simply with the opposite arm). Familiarize yourself with the Swing Genie and prepare for the fitting procedure by making sure the arm, buckle, and wrist straps are fully opened.
Note: Before moving on to Step 3.
The remainder of the fitting instructions will refer to the full set-up position (see below). Throughout Step 3, you will be removing and refitting the arm strap. On each occasion, you will be gradually reducing the buckle strap length until a mild tension is formed. This ensures that both arms are linked together.
4 9

Step 2. (c) Check proper tension and function by gently guiding two fingers between the fitted strap and your lower inner arm. To open the strap, simply pull back on the arm tab, disengaging the Velcro. Repeat Step 2(b) until the recommended fit is achieved.
Step 2. (d) Position the D-ring on the center of your lower inner arm. Align the buckle strap facing up (as shown). The arm and wrist straps should now be positioned and aligned correctly.
Fitting the Wrist Strap
Step 1. (a) Hold the wrist strap with the arrows facing you and pointing straight up. Fit the left hand and wrist through the opening and position the strap on your lower forearm just above the wrist bone (just above where you would normally wear a wrist watch).
Step 1. (b) Close the strap by gently pulling up on the wrist tab, folding it over and away from the body, and securing the Velcro strip.
58

Step 1. (c) Check proper tension and function by guiding your index finger between the fitted strap and your lower inner forearm. To open the strap, pull back on the wrist tab, disengaging the Velcro. Repeat Step 1(b) until the recommended fit is achieved.
Step 1. (d) Position the D-ring on the center of your inner lower forearm.
Fitting the Arm Strap
Step 2. (a) Hold the arm strap with arrows facing you pointing straight up. Fit your right hand and forearm through the opening, then position the strap just above your elbow, directly on top of your lower arm, while your entire arm forms and maintains a ninety (90) degree angle.
Step 2. (b) Close the strap by gently pulling up on the arm tab, then folding it over and away from the body, securing the Velcro strip.
76

Step 2. (c) Check proper tension and function by gently guiding two fingers between the fitted strap and your lower inner arm. To open the strap, simply pull back on the arm tab, disengaging the Velcro. Repeat Step 2(b) until the recommended fit is achieved.
Step 2. (d) Position the D-ring on the center of your lower inner arm. Align the buckle strap facing up (as shown). The arm and wrist straps should now be positioned and aligned correctly.
Fitting the Wrist Strap
Step 1. (a) Hold the wrist strap with the arrows facing you and pointing straight up. Fit the left hand and wrist through the opening and position the strap on your lower forearm just above the wrist bone (just above where you would normally wear a wrist watch).
Step 1. (b) Close the strap by gently pulling up on the wrist tab, folding it over and away from the body, and securing the Velcro strip.
58

Learning more about your Swing Genie
In three simple steps, you will learn how Swing Genie enables you to deliver maximum power with both arms connected at the precise moment of impact. Step 1. Fitting the wrist strap. Step 2. Fitting the arm strap. Step 3. Securing a mild tension in the buckled Swing Genie strap, linking both arms together. This guide prepares you to establish your precise connection from the set-up position, which will ultimately deliver a very powerful, effortless, repeatable golf swing!
Getting Started
This instruction guide is for right handed players. (Left handed players should follow these same instructions, simply with the opposite arm). Familiarize yourself with the Swing Genie and prepare for the fitting procedure by making sure the arm, buckle, and wrist straps are fully opened.
Note: Before moving on to Step 3.
The remainder of the fitting instructions will refer to the full set-up position (see below). Throughout Step 3, you will be removing and refitting the arm strap. On each occasion, you will be gradually reducing the buckle strap length until a mild tension is formed. This ensures that both arms are linked together.
4 9

Adjusting Buckle Strap Length and Tension
Step 3. (a) To adjust the buckle strap length, remove the arm strap and pull a small portion of the buckle strap through the open buckle (approx. 1 inch), then close the buckle.
The Swing Genie Principle
By correctly setting and using your Swing Genie, you will ensure the trailing arm will be slightly bent at impact and your arms will be “connected.” This will increase your power and distance, and prevent “flying elbow.” This is the key to developing a great golf swing.
310

The Golf Swing
In the full swing at impact, the trailing arm should be slightly bent and both arms should be “connected.” Both are keys to a great golf swing! Many golfers struggle with “flying elbow”, which creates a loss of power and distance during their swing.
Step 3. (b) To check buckle strap tension, refit the arm strap and assume the full set-up posi-tion while gripping a golf club. (note: your initial setting will likely be loose and free from tension).
Step 3. (c) Continue removing then refitting the arm strap until the adjustment of the buckle strap length produces a mild tension, linking both arms together. To open the buckle, simply pull back on the buckle flange, disengaging the lever. Repeat Steps 3(a) and 3(b) until the recommended buckle strap tension is achieved.
2 11

Swing Genie has successfully established your precise connection when there is a mild tension linking both arms together in the full set-up position when gripping a golf club. ******
Optimizing your Swing Genie Connection on the Practice Tee
Warm up as usual. Conduct your practice routine as normal, acquiring a full swing tempo. Properly fit your Swing Genie wrist and arm straps following Steps 1 and 2,
making certain the buckle remains open. Hit a series of golf shots, and on each occasion gradually reduce the buckle
strap length by following the refitting arm strap procedure described in Step 3.
Evaluate each executed golf shot. Locating the desired tension, which promotes the highest degree of
consistency, accuracy, and distance confirms you have established your precise connection!
Visit us at www.swinggeniegolf.com
SWING GENIE
STEP-BY-STEP FITTING INSTRUCTIONS
"FORMING YOUR PRECISE CONNECTION"
Congratulations!
You are now the owner of Swing Genie, "The most effective golf swing trainer money can buy." Before using your Swing Genie for the first time, please take a few moments to read this instruction guide, then keep it for reference.
Now you can experience firsthand why Swing Genie is fast becoming the world's #1 golf swing trainer!
Note: Pay attention to Step 3, Adjusting Buckle Strap Length and Tension, for proper fitting.
112
• Warm up as usual.• Conduct your practice routine as normal, acquiring a full swing tempo.• Properly fi t your Swing Genie wrist and arm straps following Steps 1 and 2, making certain the buckle remains open.• Hit a series of golf shots, and on each occasion gradually reduce the buckle strap length by following the refi tting arm strap procedure described in Step 3.• Evaluate each executed golf shot.• Locating the desired length/tension, which promotes the highest degree of consistency, accuracy, and distance confi rms you have established your precise connection!

Thirty Day Limited Warranty
ble. Keep the original sales receipt. Proof of purchase is required to obtain warranty performance. SGG dealers and retail stores selling SGG products do not have the right to alter, modify, or any way
What are the limits on SGG's Liability?
Swing Genie Golf LLC is furnishing this item "as is." Swing Genie Golf does not provide any warranty of the item whatsoever, whether express, implied, or statutory. This is including, but not limited to, any
LLC incur any liability for any warranty that damages, including, but not limited to, direct, indirect, special, or the contents of the item will be error-free.
contract, tort, or otherwise, whether or not injury was sustained by persons or property or otherwise, and whether or not loss was sustained from, or arose out of, the item or any services that may be provided by Swing Genie Golf LLC.
How to Obtain Warranty Service: If you would like to obtain warranty service, please contact Swing Genie Golf at [email protected]
Copyright 2017 - Swing Genie Golf LLC - All Rights Reserved
Swing Genie Golf LLC (collectively SGG) warrants that for a period of thirty-days from the date of purchase, this product will be free from defects in material and workmanship. SGG, at its option, will repair or replace this product or any component found to be defective during this warranty period. Replacement will be made with a new or remanufactured product or component. If the product is no longer available, replacement may be made with a similar product of equal or greater value. This is your exclusive warranty, Do NOT attemtpt to repair or adjust any mechanical functions(s) on this product. Doing so will void this warranty.
2018
Patent No. 6,991,554 , 7,556,568


![Vol 39 - [Swing, Swing, Swing].pdf](https://static.fdocuments.net/doc/165x107/55cf8f6f550346703b9c5141/vol-39-swing-swing-swingpdf.jpg)