Swegon CASA Premium Archive/Home ventilation/Kitchen hood… · Swegon CASA PREMIUM CLASSIC ... 1.4...
12
Swegon CASA PREMIUM CLASSIC | Swegon CASA PREMIUM SWING Instructions for installation, use and maintenance Swegon CASA TM Premium
Transcript of Swegon CASA Premium Archive/Home ventilation/Kitchen hood… · Swegon CASA PREMIUM CLASSIC ... 1.4...

Swegon CASA PREMIUM CLASSIC | Swegon CASA PREMIUM SWING
Instructions for installation, use and maintenance
Swegon CASATM
Premium
Swegon reserves the right to alter specifications.2 www.swegon.com/casa
PRE.051110
Content
Installation, use and maintenance
Swegon CASA Premium Classic
1. Installation instructions ........................................ 31.1 To secure the cooker hood to the inside of a cabinet/
to a wall ..........................................................................31.2 Securing to the Swegon CASA R85 ventilation unit ..........31.3 Wiring diagram ................................................................31.4 The ventilation system settings .........................................41.5 Technical data ..................................................................4
2. Application ............................................................ 52.1 Push button for ventilation output ...................................52.2 Push button for boosted operation ..................................5
3. Instructions for maintenance ............................... 63.1 Service actions .................................................................63.2 Filter ................................................................................63.3 Lamp ...............................................................................63.4 Dimensions ......................................................................6
Swegon CASA Premium Swing
4. Installation instructions ........................................ 74.1 To secure the cooker hood to a wall .................................74.2 To install the duct-concealment covers .............................74.3 Wiring diagram ................................................................74.4 The ventilation system settings .........................................84.5 Technical data ..................................................................8
5. Application ............................................................ 95.1 Push button for ventilation output ...................................95.2 Key for boosted operation ...............................................9
6. Instructions for maintenance ............................. 106.1 Service actions ...............................................................106.2 Filter ..............................................................................106.3 Lamp .............................................................................106.4 Dimensions ....................................................................10

Swegon reserves the right to alter specifications. www.swegon.com/casa 3
PRE.051110
1.3 Wiring diagram
LIESIKUPU
SYÖTTÖ 230V 10A
4321LN
GREEN/REDVIOLET/RED
BLACK/GREEN
RED/BROWN
230V11WG23
OHJELMOINTILIITINNÄPPÄIMISTÖNAUHAKAAPELI
PREMIUM KORTILLEMODULAARIKAAPELI
M
LIGH
TU
NM
OTO
RO
C N
SUPPLY
L N
POWER SUPPLY 230 V, 10 A
COOKER HOOD
Caution: Do not secure the cooker hood with screws directly through its side walls to the inside surface of a cabinet! Doing so is forbidden.
Swegon CASA Premium Classic
1. Installation instructions1.1 To secure the cooker hood to the in-side of a cabinet/to a wallSecure the cooker hood to the rear wall using two screws and inside a cabinet using the side mounting brackets supplied with the hood.
The safety clearance from the surface of the cooker to the grease filter of the cooker hood should be at least 500 mm.
1.2 Securing to the Swegon CASA R85 ventilation unitType Swegon CASA SV 600 Pre and Swegon CASA SV 700 Pre cooker hoods can be secured at four points on the underside of the Swegon CASA R85 ventilation unit. Secure the cooker hood to the ventilation unit through the casing in corresponding mounting holes on the underside of the ventilation unit. The cover plate in the bottom of the ventilation unit must be removed before you secure the cooker hood with screws. Keep in mind while you are installing the hood that there must be sufficient open space above the cooker. Connect the power supply and modular cable from the backside of the ventilation unit to the back side of the cooker hood. A 700 mm wide front panel together with the Swegon CASA SV 700 Pre cooker hood is always used on the Swegon CASA R85 ventilation unit.

Swegon reserves the right to alter specifications.4 www.swegon.com/casa
PRE.051110
1.5 Technical dataSupply voltage 230 V, 50 Hz, 0.2 ATotal output 20 WLighting, wattage PL 11, 11 WConnection cable 2 m, wall plugDuct connection ∅125 mm/∅160 mmMaterial Stainless/whiteGrease filter 394 x 150 x 15 mmDimensions See separate illustrationTotal weight 8 kg
1.4 The ventilation system settings
200
180
160
140
120
100
80
60
40
20
00 2 4 6 8 10 12 14 16 18 20 22 24 26 28
Airflow (l/s)
3 4 5 6 7 8 9 10
Adjustment position, open holes in plastic non-return airflow flap
Pres
sure
diff
eren
tial (
Pa)
PREMIUM CLASSIC BASIC VENTILATION
200
180
160
140
120
100
80
60
40
20
015 20 25 30 35 40 45 50 55 60 65 70 75 80
Airflow (l/s)
Flap holes closed
Pres
sure
diff
eren
tial (
Pa)
PREMIUM CLASSIC BOOSTED VENTILATION

Swegon reserves the right to alter specifications. www.swegon.com/casa 5
PRE.051110
Swegon CASA Premium Classic
2. Application
2.1 Push button for ventilation output1. Operation when there are no occupants (press once,
one LED lights up). The function can be used when no one is at home.
2. Normal operation (press twice, two LEDs light up). The normal fan speed of the ventilation system.
3. Boosted operation (press three times, three LEDs light up). The function is used for cooking, showering, drying laundry or if many people are in the building. Boost with timer (60 min).
2.2 Push button for boosted operationThe ventilation output of the cooker hood can be temporarily increased by pressing the push button for boosted operation. When you press the push button, the LED lights up and the shut-off damper of the cooker hood opens. The duration of the boosted operation is determined by the number of times you press the but-ton.
1. First press boosted operation for 30 minutes
2. Second press boosted operation for 60 minutes
3. Third press boosted operation for 120 minutes
4. The fourth press switches off boosted operation.
Both the ventilation of the home, with three different fan speeds, and the on/off extract air function of the cooker hood are controlled from the cooker hood.
The ventilation of the home should oper-ate continuously for the wellbeing of the residents and for preventing damage to the structural elements of the home.
The flambéing of food below the cooker hood is forbidden.
In the event of an alarm initiated by the rotation detector in the ventilation unit heat exchanger for heat recovery (ONLY in combination with type R units) all the LEDs on the cooker hood push-button set will flash. More information is available in the instructions for operating the ventilation unit.
Cooker hood lamp On/Off
Ventilation outputBoosted operation

Swegon reserves the right to alter specifications.6 www.swegon.com/casa
PRE.051110
Swegon CASA Premium Classic
3. Instructions for maintenance3.1 Service actionsClean the cooker hood regularly with dishwashing detergent. On cooker hoods with stainless metallic sur-faces, use a detergent that is suitable for these surfaces. Never use corrosive cleaning agents.
3.2 FilterThe filter can be removed and washed up by hand using ordinary dishwashing detergent or in a dishwasher. The filter should be cleaned at 1−2-month intervals or more often if required.
3.3 LampTo change the fluorescent tube, remove the screws of the protective glass, remove the glass and pull the tube out of its socket.
Type of fluorescent tube: PL 11 (11 W).
Lamp
Filter
3.4 Dimensions
Swegon CASA SV/R PRE 500
Swegon CASA SV/R PRE 600 (L/R)
Swegon CASA SV/R PRE 600
Swegon CASA SV/R PRE 700 (L/R)

Swegon reserves the right to alter specifications. www.swegon.com/casa 7
PRE.051110
Swegon CASA Premium Swing
4. Installation instructions4.1 To secure the cooker hood to a wall• The minimum permissible safety clearance from the
bottom edge of the cooker hood to the surface of the cooker is 650 mm.
• Secure the wall mounting bracket of the cooker hood (D) to the wall, centred in relation to the cooker hood. The distance of the mounting bracket from the surface of the cooker should be at least 970 mm. Align the mounting bracket as horizontally as pos-sible.
• Hang the body of the cooker hood in the mounting bracket (D) and adjust to the horizontal position with the adjustment screws (J).
• Check that the distance from the surface of the cooker to the bottom edge of the cooker hood com-plies with the minimum permissible safety clearance. Finally, lock the cooker hood in the wall mounting bracket with the locking screws (I).
4.2 To install the duct-concealment covers• Two 500 mm long duct-concealment covers for the
outlet duct are supplied with the cooker hood. The maximum total length of the outlet duct is 900 mm.
• After you have wired the electrical connections and the (∅125) duct has been secured in position, fit the upper and lower duct-concealment covers above the cooker hood.
• Fasten the mounting bracket (E) of the upper duct- concealment cover (N) at an appropriate height on the wall.
• Push the upper duct-concealment cover (N) upward and fasten it with screws to the mounting bracket (E). Fasten the lower duct-concealment cover with screws to the cooker hood body.
4.3 Wiring diagram
LIESIKUPU
SYÖTTÖ 230V 10A
4321LN
GREEN
VIOLET
BLACK
RED
230V 12V
12V20WG4
12V20WG4
BROWN
BLUE
POWER SUPPLY 230 V, 10 A
COOKER HOOD
Swegon reserves the right to alter specifications.8 www.swegon.com/casa
PRE.051110
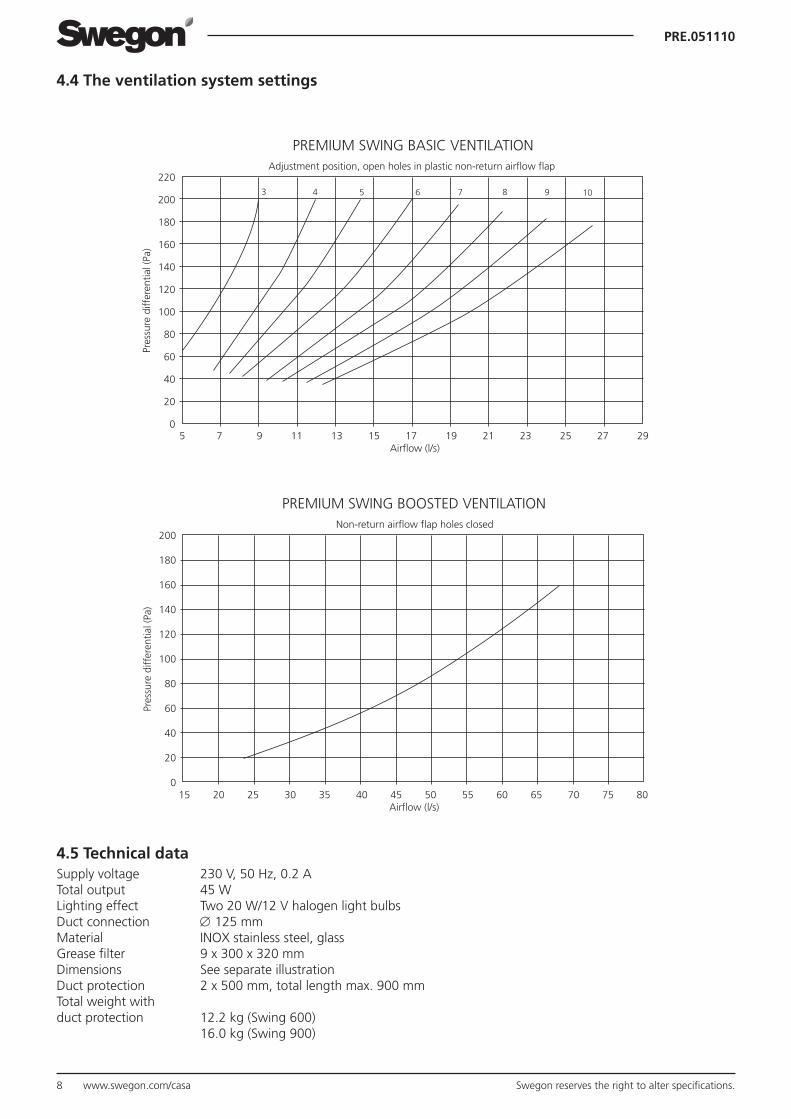
4.4 The ventilation system settings
4.5 Technical dataSupply voltage 230 V, 50 Hz, 0.2 ATotal output 45 WLighting effect Two 20 W/12 V halogen light bulbsDuct connection ∅ 125 mmMaterial INOX stainless steel, glassGrease filter 9 x 300 x 320 mmDimensions See separate illustrationDuct protection 2 x 500 mm, total length max. 900 mmTotal weight with duct protection 12.2 kg (Swing 600) 16.0 kg (Swing 900)
220
200
180
160
140
120
100
80
60
40
20
05 7 9 11 13 15 17 19 21 23 25 27 29
Airflow (l/s)
3 4 5 6 7 8 9 10
Adjustment position, open holes in plastic non-return airflow flap
Pres
sure
diff
eren
tial (
Pa)
PREMIUM SWING BASIC VENTILATION
200
180
160
140
120
100
80
60
40
20
015 20 25 30 35 40 45 50 55 60 65 70 75 80
Airflow (l/s)
Non-return airflow flap holes closed
Pres
sure
diff
eren
tial (
Pa)
PREMIUM SWING BOOSTED VENTILATION

Swegon reserves the right to alter specifications. www.swegon.com/casa 9
PRE.051110
Swegon CASA Premium Swing
5. Application
5.1 Push button for ventilation output1. Operation when there are no occupants (press once,
one LED lights up). The function can be used when no one is at home.
2. Normal operation (press twice, two LEDs light up). The normal fan speed of the ventilation system.
3. Boosted operation (press three times, three LEDs light up). The function is used for cooking, showering, dry-ing laundry or if many people are in the building.
5.2 Key for boosted operationThe ventilation output of the cooker hood can be tem-porarily increased by pressing the key for boosted op-eration. When you press the push button, the LED lights up and the shut-off damper of the cooker hood opens. The duration of the boosted operation is determined by the number of times you press the button.
1. First press boosted operation for 30 minutes
2. Second press boosted operation for 60 minutes
3. Third press boosted operation for 120 minutes
4. The fourth press switches off boosted operation.
Both the ventilation of the home, with three different fan speeds, and the on/off extract air function of the cooker hood are controlled from the cooker hood.
The ventilation of the home should oper-ate continuously for the wellbeing of the residents and for preventing damage to the structural elements of the home.
The flambéing of food below the cooker hood is forbidden.
In the event of an alarm initiated by the rotation detector in the ventilation unit heat exchanger for heat recovery (ONLY in combination with type R units) all the LEDs on the cooker hood push-button set will flash. More information is available in the instructions for operating the ventilation unit.
Cooker hood lamp On/Off
Ventilation output Boosted operation

Swegon reserves the right to alter specifications.10 www.swegon.com/casa
PRE.051110
Swegon CASA Premium Swing
6. Instructions for maintenance6.1 Service actionsClean the cooker hood regularly with dishwashing detergent. On cooker hoods with stainless metallic sur-faces, use a detergent that is suitable for these surfaces. Never use corrosive cleaning agents.
6.2 FilterThe filter can be removed and washed up by hand using ordinary dishwashing detergent or in a dishwasher. The filter should be cleaned at 1−2-month intervals or more often if required.
6.3 LampHalogen lamp: 12 V, 20 W power, G4 socket.
When the light bulb needs to be replaced, use a flat-pointed tool for removing the lamp protection with the metal ring.
Take the light bulb out of its holder and insert an identi-cal light bulb.
Do not touch the glass surface of the light bulb directly with your fingers.
6.4 Dimensions
Swegon reserves the right to alter specifications. www.swegon.com/casa 11
PRE.051110
Guarantee Conditions
GUARANTORSwegon ILTO OyAsessorinkatu 10, FI-20780 KAARINA, Finland.
GUARANTEE PERIODThe product has a two (2) year guarantee as from the date of purchase.
SCOPE OF THE GUARANTEEThe guarantee covers defects that have arisen during the guarantee period, which have been reported to the manufacturer, or been declared by the guarantor or a representative of the guarantor, and which refers to design, manufacture or material defects as well as consequential defects that have arisen on the product itself. The above mentioned defects are to be cleared by putting the prod-uct in working order.
GENERAL GUARANTEE LIMITATIONSThe guarantor’s guarantee liability is limited in accordance with these guarantee conditions and the guarantee does not cover dam-ages to property or personal injury. The guarantor is not bound to comply with verbal promises in addition to this guarantee.
LIMITATIONS ON GUARANTEE LIABILITYThis guarantee is granted on condition that the product is used in a normal way or under comparable circumstances for the intended purpose, and that the instructions for use have been observed.
The guarantee does not cover faults that have been caused by the following:- transport of the product.- careless use or overloading the product.- failure to follow the instructions dealing with installation, operation, maintenance and care.- incorrect installation of the product or incorrect location at the place where it is used.- circumstances which are not the fault of the guarantor, such as excessive variations in voltage, damage by lightning and fire or
other accidents.- repairs, maintenance or design modifications that have been done by unauthorized parties.- nor does the guarantee cover insignificant defects from an operational standpoint such as scratches on surfaces.- parts, which through handling or normal wear are exposed to a greater than normal risk of failure, such as lamps, glass, porcelain,
paper and plastic parts are not covered by the guarantee.- the guarantee does not cover settings, information about usage, care, service or cleaning which is normally described in the instruc-
tions for use or the work required to rectify faults caused by the user who has neglected to observe the warning or installation instructions, or investigation of such.
CHARGES DURING THE GUARANTEE PERIODThe authorized service partner will not charge the client for repairs, replaced parts, repair work, transport or travelling expenses necessary for carrying out the repair work that are within the scope of the guarantee.
This however assumes the following:- the defective parts are handed over to the authorized service partner.- that the repair begins and the work is carried out during normal working hours. The authorized service partner has the right to
charge the client for extra costs for urgent repairs, or repairs carried out outside of normal working hours. However if the defects are likely to cause a health risk or substantial economic losses, then the defects will be repaired immediately without extra charge.
- that a service vehicle or public means of transportation that follows a timetable (that boats, airplanes or snow vehicles are not con-sidered public means of transportation) can be used for the repair of the product or replacement of defective parts
- that the costs for dismantling and installation of equipment, which is securely mounted to the place where it is used, cannot be considered abnormal
REMEDIAL MEASURES WHEN A FAULT HAS BEEN DISCOVEREDIf a defect is discovered, the client must without delay report the defect to the manufacturer or to an authorized service partner. Specify which product has a fault (product model, type designation on the guarantee card or on the product identification plate, serial number); describe the type of fault as accurately as possible, and the circumstances under which the fault has arisen. If there is risk that the fault may have consequential impact on the environment, steps must be immediately taken to prevent this from occur-ring. A prerequisite for valid guarantee liability is that the manufacturer or a representative of the manufacturer is given opportunity to inspect the defects reported in the guarantee claim before the repair work begins. A prerequisite for repair under guarantee is also that the client, in a satisfactory manner, can prove that the guarantee is valid (= written receipt of purchase). After the guaran-tee period has expired, guarantee claims, which have not been submitted in writing prior to the expiration date of the guarantee, are not valid.

Swegon reserves the right to alter specifications.12 www.swegon.com/casa
PRE.051110
The undersigned, representing the following manufacturer:
Swegon ILTO Oy Asessorinkatu 10 20780 Kaarina FINLAND
Herewith declares that Swegon CASA kitchen hoods are in conformity with the provisions of the following EC directives:
Machinery Directive (2006/42/EC) Low Voltage Directive (2006/95/EC) EMC Directive (2004/108/EC)
And that the harmonized standards referenced below have been applied:
EN 60335-1:2002 +A1:2004 +A11:2004 +A12:2006 +A13:2008 +A2:2006 EN 60204-1:2006 +A1:2009 EN 60034-5:2001 +A1:2007 EN 55014-1:2006 EN 55014-2:1997 +A1:2001 +A2:2008 EN 61000-3-2:2006 EN 61000-3-3:2008
Person authorized to compile the technical file:
Name: Rami Wiberg Address: Asessorinkatu 10, 20780 Kaarina Email: [email protected]
Date: Kaarina 01.11.2010
Signature:
Ilari Niittymäki Managing Director Swegon ILTO Oy
Declaration of conformity