Suspension training
24
FULL-BODY TRAINING MANUAL Create over 2400 custom workout combinations ®
-
Upload
julius-adams -
Category
Documents
-
view
214 -
download
0
Transcript of Suspension training

FULL-BODYTRAININGMANUAL
Create over 2400 custom workout combinations
®

To learn more about functional fitness and how it can help you reach your fitness goals, visit www.lifelineusa.com.
Meet Jon Hinds
This product was developed by Master Natural Trainer, Owner & Founder of the Monkey Bar Gym, Jon Hinds. Jon has helped everyone from professional athletes to fitness novices increase their strength, power, balance and endurance with functional fitness.
What is functional fitness?
Functional fitness is the cutting-edge training approach elite athletes are using to increase performance and prevent injury. While standard training methods isolate muscles, functional fitness training techniques develop balanced, efficient muscles for extraordinary results.
Introducing the Jungle Gym® Tactical
Built for punishing commercial use, the Jungle Gym® Tactical is very different from traditional suspension bodyweight trainers on the market today. Most notably, it features a ‘split design’, which allows users to quickly and easily adjust the forces on the body by changing the width of the system. From “V-shaped” suspension (found on traditional suspension trainers), to neutral suspension (found in Olympic rings) and now wide-angle suspension, the Jungle Gym® Tactical offers new features and versatility unlike anything the category has seen before.
ALWAYS read ALL instructions and warnings completely and seek help if you do not understand their contents. If you
have questions, please contact LifelineUSA at (800) 553-6633 or email us at [email protected]

INSTALLATION OPTIONS
Door installation1. Face the side of your sturdy, three-hinged door that opens away
from you. This is the strongest way to anchor to a door. Never use on the side of your door that opens towards you.
2. Open door and place the non-scuff door anchors over the door and space them about shoulder width apart.
3. Close and always lock the door.4. Test anchor by getting into a low and wide stance and giving the
straps a controlled and firm tug. There should be no movement of the Jungle Gym® Tactical or anchoring point.
Hanging installation1. Connect both halves of your Jungle Gym® Tactical with the
included Duro-Link™ by pushing one door anchor through each loop in the Duro-Link™.
2. Throw one handle over a secure mounting object, such as an I-beam or tank barrel.
3. Pull the suspension straps to center the Duro-Link™ on top of the mounting object.
Note: A secure mounting object should be able to hold 3x the peak force you anticipate placing on the Jungle Gym® Tactical.
4. Adjust and always test the anchor point as described above.
Cinch installation
1. Maximize the length of your Jungle Gym® Tactical suspension straps by depressing the cam buckle and pulling the straps through.
2. Throw the door anchors over the top of your anchor point(s) so they are in reach.
3. Push the handle through the loop sewn directly under the door anchor and pull the handle. The loop will slide up the suspension strap and cinch on the anchor point. Repeat for the other side. Reverse to remove.
4. Adjust and always test the anchor point as described above.

3 wAyS TO ADJUST yOUR RESISTANCE LEVEL
The Jungle Gym® Tactical allows you to control the amount of body weight that you are using and the difficulty of the movement. There are three basic ways to control this: angle, stance and width.
AngleAs the distance between your body and the ground decreases, the difficulty of the exercise increases. This is accomplished by lengthening or shortening the system. A good way to measure and gradually increase the difficulty you use is to measure the handle position on your body. Stand directly under your anchor point so the handles hang in front of you. Align the handles with different reference features of your body. In general, the lower the handles, the harder the exercise. Your shoulders, hips and knees are good examples of reference features.
StanceIn addition to changing your workout angle, you may also increase or decrease the challenge of your workout by changing your stance. In general, as instability in your body position increases, so does the difficulty of the exercise. The Jungle Gym® Tactical delivers instability and free range of motion—you will quickly understand what this means and why it’s so effective for muscle and strength development.
WidthDo 3x as many exercises by adjusting the width of the Jungle Gym®
Tactical. Performing the same movement from each of the three anchoring zones works different muscles because the direction of the force on your body changes.
Note: To avoid injury, be sure to gradually build your way up to more challenging angles, widths and stances. It’s a good idea to use a spotter and pay attention to your body. Only perform movements and exercises that you can successfully complete using proper technique and body alignment.

wARNINGALwAyS read ALL instructions and warnings completely and seek help if you do not understand their contents.
Failure to do so could result in INJURY or DEATH!
It is the responsibility of the user to read and follow all instructions and warnings.
This training equipment is NOT A TOy.
1.ALWAYSkeepequipmentawayfromchildren.2.ALWAYSconsultwithaphysicianbeforeperforminganyphysicalactivity.3.NEVER exceed 300 lbs of force on a single handle (600 lbs total).4.ALWAYSexamineallpartsbeforeeachuseandlookfortears,cracks,
chips,discoloration,frayingoranyotherunusualsignsofdamageorwear.5.ALWAYSreplacedamagedpartsimmediatelybeforeadditionaluseorkeep
theequipmentoutofuse. 6.NEVERusedamagedequipmentorparts. 7.ALWAYSwearappropriateclothingandshoeswhenusingequipment. 8.ALWAYSensureequipmentanchorpointsaresecureandwillnotdamage
equipment. 9.DONOTuseanchorpointsthatarerough,orthatwillcutordamagethe
equipment. 10.ALWAYSuseequipmentanchorpointsthatcanSAFELYHOLD3xthepeak
forceexertedduringequipmentuse. 11.ALWAYS lock doors when they are being used as anchor points. 12. ALWAYSplacedooranchorsonhingedsideofdoorandtestholdwith
strong,directpulling. 13.NEVERreleaseoradjustfitnessequipmentwhenundertensionorinuse. 14.ALWAYSwarmupandstretchbeforeusingequipment. 15.ALWAYSdrinkplentyoffluidsbefore,duringandafterexercising.16.ALWAYS use a spotter and crashpad when performing hanging exercises. 17.ALWAYSbreathenaturallyandexerciseusingcontrolled,deliberate
movements. 18.NEVERplaceanypartofequipmentaroundneck. 19.ALWAYSuseequipmentonlyasdirected. 20.BEFOREyoubeginequipmentuse,imitateexercisesWITHOUTequipment
untilyouareabletoperformmovementswithconfidence. 21. LifelineInternational,Inc.assumesnoliabilityforaccidentsor
damagethatmayoccurwiththeuseofLifelineproducts.

POwER wHEEL PULLUP REVOLUTION TNT CABLE SySTEM
HOw TO ORGANIZE wORkOUT SEqUENCES:
A complete full-body workout should combine pulling, pushing, core and leg exercises. Flip through the following pages and choose one movement sequence from each category, for example, Pulling - Level 1, Pushing - Level 3, Core - Level 5, and Leg - Level 2.
By customising your full-body workout with the field manual’s flip-page design, you can challenge yourself with thousands of unique workouts that you can do almost anywhere. Or, try one of the following workout challenges:
“15:15” -- Simple, work for 15 seconds, rest for 15 seconds. Pick one of each of the movement sequences (pulling, pushing, core and legs) and set your stop watch or grab a clock. Begin by doing each sequence for five minutes before switching to the next one. A fantastic full-body strength and endurance workout in 20 minutes.
Victory Lap: Push it farther by going another round! Pick four new movement sequences and go another 3+ minutes on each.
“Deck of Cards of Death” -- Get ready to work! Shuffle a deck of cards and start drawing them, one at a time. Suits are the movement sequence, so hearts = pushing, and spades = pulling, and so on. The face value of the cards are the number of reps you do, Jacks = 11, Queens = 12, Kings = 13 and Aces = you call. The goal is to do the entire deck in 40 minutes or less.
“5 X 5” – Five sets, five reps with heavy loads…. This is an easy-to-remember strength workout that will challenge you and your workout partners. Pick one of each sequence; focus on the more difficult levels and you’re ready to go.
CHECK OUT OUR OTHER TACTICAL PRODUCTS:

PULLINGExercises
PUSHINGExercises
COREExercises
LEGExercises


Level 1 - Pulling Focus
60 to 90 DEGREE PULLUPSLower yourself into the starting position as pictured maintaining a straight line from the top of your head to your hips.
Slowly pull yourself up so that hands are just outside and above your chest. Focus on maintaining upper body alignment, and return to the starting position.
Increase the difficulty by increasing the strap length or stepping towards the anchor point(s).
Level 1 - Pushing Focus
60 DEGREE PUSHUPSStand as pictured, feet shoulder width apart and forming a straight line from your heels to your head, and keeping your chest out.
Drop into a pushup, as pictured, keeping your fists far enough out from your chest to keep your forearms square with your upper arms. Push back to the starting position.
Increase the difficulty by increasing the strap length or stepping towards the anchor point(s).
Level 1 - Core Focus
kNEES TO ELBOwSHook your toes into the foot stirrup as pictured with the arch of your foot against the handle. Focus on keeping a straight line from your heels to your head.
Slowly pull your knees in, underneath you, bringing them as close to your elbows as possible and return to the starting position. Focus on using slow, controlled movements.
Increase difficulty by moving away from anchor point(s).
Level 1 - Legs Focus
OVERHEAD SqUATSStand as pictured, feet shoulder width apart with toes pointed slightly out.
Hold the handles above you as pictured and bend from the knees into a squat. Keep your buttocks and head in straight alignment and return to the starting position.
Increase the difficulty by moving slightly towards the anchor point(s).
PU
LL
PU
SH
CO
RE
LE
GS

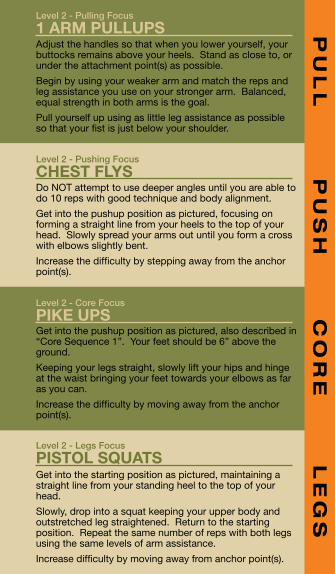
Level 2 - Pulling Focus
1 ARM PULLUPSAdjust the handles so that when you lower yourself, your buttocks remains above your heels. Stand as close to, or under the attachment point(s) as possible.
Begin by using your weaker arm and match the reps and leg assistance you use on your stronger arm. Balanced, equal strength in both arms is the goal.
Pull yourself up using as little leg assistance as possible so that your fist is just below your shoulder.
Level 2 - Pushing Focus
CHEST FLySDo NOT attempt to use deeper angles until you are able to do 10 reps with good technique and body alignment.
Get into the pushup position as pictured, focusing on forming a straight line from your heels to the top of your head. Slowly spread your arms out until you form a cross with elbows slightly bent.
Increase the difficulty by stepping away from the anchor point(s).
Level 2 - Core Focus
PIkE UPSGet into the pushup position as pictured, also described in “Core Sequence 1”. Your feet should be 6” above the ground.
Keeping your legs straight, slowly lift your hips and hinge at the waist bringing your feet towards your elbows as far as you can.
Increase the difficulty by moving away from the anchor point(s).
Level 2 - Legs Focus
PISTOL SqUATSGet into the starting position as pictured, maintaining a straight line from your standing heel to the top of your head.
Slowly, drop into a squat keeping your upper body and outstretched leg straightened. Return to the starting position. Repeat the same number of reps with both legs using the same levels of arm assistance.
Increase difficulty by moving away from anchor point(s).
PU
LL
PU
SH
CO
RE
LE
GS


Level 3 - Pulling Focus
60 to 90 DEGREE BODy ROwSDrop into the starting position as pictured, focusing on maintaining a straight line from your buttocks to your head.
Pull yourself up, finishing with your fists slightly below your chest using as little leg assistance as possible. Slowly lower yourself back into the starting position.
Increase the difficulty by moving towards or under the anchor point, or by lengthening the straps.
Level 3 - Pushing Focus
ALTERNATE 1 ARM PUSHUPSDrop into the starting position as pictured, focusing on maintaining a straight line from your heels to the top of your head.
Push up to the second position using your weaker arm first, as pictured. Alternate arms while maintaining your alignment. Do the same number of reps on both arms.
Increase the difficulty by moving towards or under the anchor point, or by lengthening the straps.
Level 3 - Core Focus
BEAR CRAwLSGet into the pushup position as pictured, also described in “Core Sequence 1”. Your feet should be 6” above the ground. Maintain a straight line from your heels to the top of your head.
Slowly walk forward on your hands two paces and then back to the starting position. Alternate which arm you lead with.
Increase difficulty by doing a pushup between each ‘step’.
Level 3 - Legs Focus
FOOT UP LUNGEGet into the starting position as pictured. Your back knee should gently touch the ground.
Slowly stand, raising your suspended leg as pictured, and rotating your arms as if walking. Begin with your weaker leg and do the same number of reps on your stronger leg.
Increase difficulty by moving away from anchor point(s).
PU
LL
PU
SH
CO
RE
LE
GS


Level 4 - Pulling Focus
SIDE TO SIDE BODy ROwSGet into the starting position as pictured, also described in “Pulling Sequence 3”.
Pull yourself up reaching out with your stronger arm outstretched and weaker arm in, as pictured. Use as little leg assistance as possible and alternate the same number of reps with both arms.
Increase the difficulty by moving towards the anchor point(s) or lengthening the straps.
Level 4 - Pushing Focus
ATOMIC PUSHUPSGet into the down, pushup position as pictured, without touching your chest or stomach to the floor. Focus on maintaining a straight line from your heels to your head.
In one movement, slowly pushup and bring your knees in towards your elbows as far as possible. Slowly return to the starting position.
Increase difficulty by moving away from anchor point(s).
Level 4 - Core Focus
V-UPSSit as pictured with legs and upper body outstretched and not touching the ground.
Slowly raise your legs and upper body as you push your hands forward so your fists are outside or just above your shins.
Increase difficulty by moving away from anchor point(s).
Level 4 - Legs Focus
FOOT UP LUNGE with JUMPGet into the starting position as pictured and described in “Leg Sequence 3”.
Step forward and jump at the same time, as pictured, and slowly reach back to the starting position. Begin with your weaker leg and do the same number of reps on your stronger leg.
Increase difficulty by moving away from anchor point(s).
PU
LL
PU
SH
CO
RE
LE
GS


Level 5 - Pulling Focus
NO-LEG BODy ROwSIt is recommended to use a spotter, and a mat placed beneath you for this movement. Get into the starting position as pictured.
Keep your back straight as you pull yourself up so your forearms and biceps are square, and slowly lower yourself back to the starting position.
Level 5 - Pushing Focus
REGULAR DIPSGet into the starting position as pictured, keeping your chest and shoulders out, or “proud” and head extended.
Slowly lower yourself into a dip, without letting your elbows come above your shoulders. If you need some assistance, gently touch your toes to the ground.
Increase the difficulty by bringing your legs forward and straightening them in front of you.
Level 5 - Core Focus
PRONE ANGEL HOLDGet into the starting position as pictured. This is the most difficult part of the movement, so calibrate your body angle to it.
Slowly bring your arms out in a large circle until you reach the second position, as pictured. Focus on maintaining a straight line from your heels to the top of your head.
Increase the difficulty by moving towards the anchor point(s) or lengthening the straps.
Level 5 - Legs Focus
LEG CURLSGet into the ‘supine’ position as pictured with your lower back and legs off the ground.
Curl your heels in towards your buttocks as far as you can while lifting your hips. Focus on forming a straight line from your shoulders to your knees.
PU
LL
PU
SH
CO
RE
LE
GS


Level 6 - Pulling Focus
CURL CLEANSGet into the starting position as pictured. Focus on forming a straight line from your knees to the top of your head with feet shoulder width apart.
Curl yourself into the second position as pictured, using as little leg assistance as possible. Slowly lower yourself into the starting position.
Increase the difficulty by moving towards the anchor point(s) or by lengthening the straps.
Level 6 - Pushing Focus
TRICEP OVERHEAD LAyOUTSGet into the starting position as pictured, forming a straight line from your heels to your head, and with arms outstretched in front of you.
Maintain body alignment as you drop into the second position; bring your fists just behind your head. Extend your arms back to the starting position.
Increase the difficulty by moving towards the anchor point(s) or by lengthening the straps.
Level 6 - Core Focus
SUPINE ANGEL HOLDSGet into the starting position, similar to “Core Sequence 5”. The starting position is the hardest part of the movement, so use it to calibrate your body angle.
Slowly bring your arms out in a large circle until you reach the second position, as pictured. Focus on maintaining a straight line from your heels to the top of your head.
Increase the difficulty by moving towards the anchor point(s) or lengthening the straps.
Level 6 - Legs Focus
LEG CURL RUNNERSGet into the starting position as described in “Leg Sequence 5”. Beginning with your weaker leg, curl it in quickly while keeping your stronger leg outstretched as pictured. Focus on pulling your heel in as far as you can and pushing it out quickly.
Alternate legs quickly, doing the same number of reps on both legs.
Increase difficulty by moving away from anchor point(s).
PU
LL
PU
SH
CO
RE
LE
GS


Level 7 - Pulling Focus
ASSISTED MUSCLE UPSGet into the starting position as pictured, facing the anchor point(s).
In a single, fast movement, pull yourself up and drive your fists down to arrive at the second position as pictured.
Slowly lower yourself back into the starting position. Use as little leg assistance as possible.
Level 7 - Pushing Focus
PLANCHE to L-SEATIt is a good idea to use a spotter for this movement to support your chest and thighs. Go from a dip position to the L-Seat position as pictured.
Slowly bring your legs back behind you and then rotate your upper body forward as pictured. Transition slowly. Lift your torso and head to return to the starting position.
Level 7 - Core Focus
ASSISTED FLAGPOLEGet into the starting position as pictured, with one foot in front of the other. Focus on maintaining a straight line from your heels to your head as you hold this position for a ten-count.
Face the opposite direction to work both stabilizing arms equally. Begin with your weaker arm on your down side.
Increase the difficulty by moving towards the anchor point(s) or lengthening the straps.
Level 7 - Legs Focus
1-LEG CURLSGet into the starting position as described in “Leg Sequence 5”, but leave one leg un-suspended.
Beginning with your weaker leg, curl it slowly while raising your un-suspended leg as pictured. Slowly return to the starting position. Do the same number of reps on both legs.
Increase the difficulty by raising your hips higher, and pulling your heel in further.
PU
LL
PU
SH
CO
RE
LE
GS


wARRANTy:LIMITED WARRANTY
wARRANTOR:LifelineInternational,Inc.,3201SyeneRoad,Madison,WI53713
PARTIES AND PRODUCTS COVERED:EachandeverypurchaserofeachandeveryproductmanufacturedandmarketedbyLifeline.
yOUR DUTIES AS A PURCHASER AND STEP-By-STEP PROCEDURES FOR yOU TO FOLLOw:
1. Inspecteverypackagepurchasedformissingorfactorydefectivepartscausedbythemanufacturer.
2. FollowandcomplywithinstructionssuppliedbyLifeline;heedallwarningsandyourphysician’srecommendations.
3. InformLifelinebytelephoneormailastoanymissingpart(s);sendanydefectivepart(s)toLifelineatyourexpenseforshipping;supplyyournameandaddressandexplanationofwhathappened.
4. Inspectequipmentbeforeandaftereveryuseforscratches,nicks,cracksandabrasionspots.
5. Replaceanypart(s)whichexhibitsthetypeofdamagedescribedinnumberfour.DAMAGEDPARTSCANBEDANGEROUS.
wHAT LIFELINE wILL DO:1. Lifelinewillreplaceallmissingandfactorydefectivepart(s)causedbythe
manufactureratLifeline’sexpense,exceptforyourcostofsendingdefectivepart(s)and/orinformationtoLifeline.
2. Thesereplacementpart(s)willbeshippedwithin30daysandusuallylessthan10daysafterLifelinereceivesallneededinformation.
Adefectivepartisonewhichexhibitsacrack,scratch,nick,notchorabradedportion(or,ifstitched,exhibitsmissingorimproperstitching),orwhichfailstoperformasdesignedwhenreceivedbyyou,thepurchaser.
LIMITATIONS:1. Thiswarrantyisgoodforandappliesforsix(6)monthsfromthedateofyourpurchase.2. IMPLIEDWARRANTIESARELIMITEDTOTHESAMEDURATION.3. INCIDENTALANDCONSEQUENTIALDAMAGESAREEXCLUDED.4. Somestatesdonotallowlimitationsonhowlonganimpliedwarrantylastsordonot
allowtheexclusionorlimitationofincidentalorconsequentialdamages,sotheabovelimitations(exceptasdescribedinnumberone)maynotapplytoyou.
5. Thiswarrantygivesyouspecificrightsandyoumayalsohaveotherrightswhichmayvaryfromstatetostate.
ANy qUESTIONS?Ifyouhaveanydoubtsorquestionsaboutwhatanyoftheseprecautionaryremarksordirectionsmean,itisyourresponsibilitytocontactLifelinebyletter,e-mailorfaxbeforebeginningexercisessothatyourquestionsandconcernsmaybeansweredtoyourcompletesatisfaction.

Lifeline International, Inc. • 3201 Syene Road • Madison, wI 53713P: 608-288-9252 • T: 800-553-6633 • F: 608-288-9294
www.lifelineusa.com • [email protected]© 2011 Lifeline International Inc. All Rights Reserved