SURGICAL PROCEDURES FOR DIAGNOSIS, …static.booktopia.com.au/pdf/9781259643927.pdfSURGICAL...
20
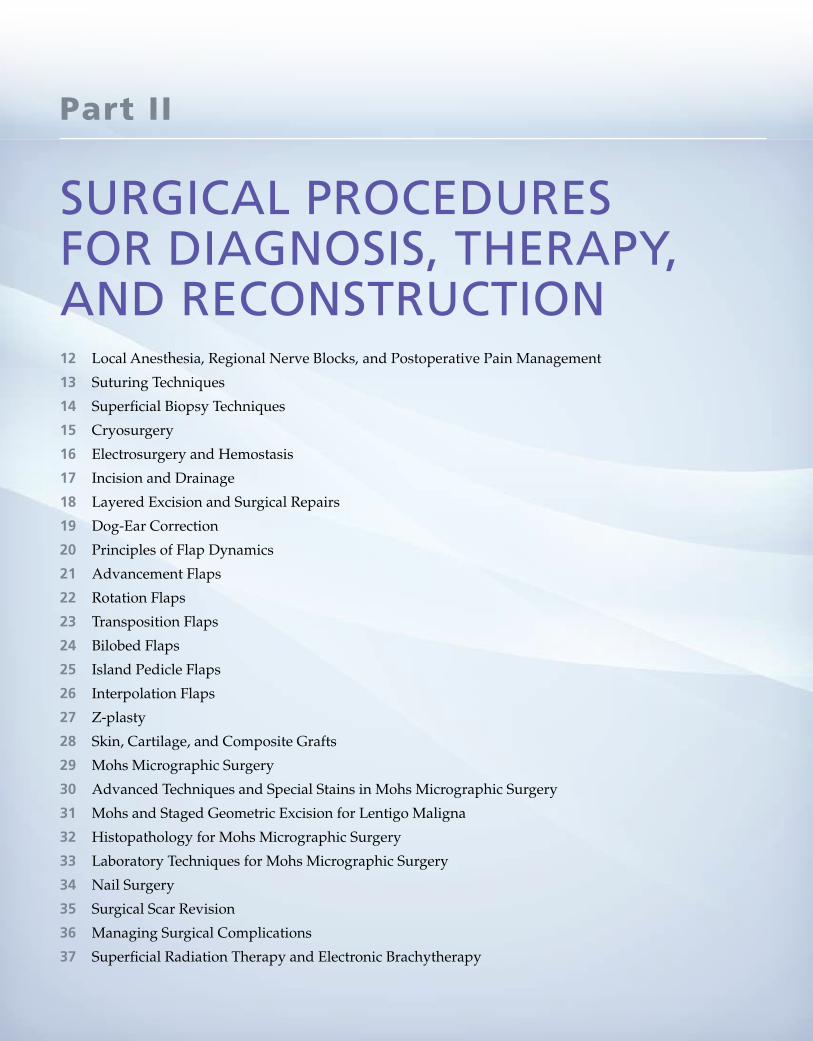
Part II SURGICAL PROCEDURES FOR DIAGNOSIS, THERAPY, AND RECONSTRUCTION 12 Local Anesthesia, Regional Nerve Blocks, and Postoperative Pain Management 13 Suturing Techniques 14 Superficial Biopsy Techniques 15 Cryosurgery 16 Electrosurgery and Hemostasis 17 Incision and Drainage 18 Layered Excision and Surgical Repairs 19 Dog-Ear Correction 20 Principles of Flap Dynamics 21 Advancement Flaps 22 Rotation Flaps 23 Transposition Flaps 24 Bilobed Flaps 25 Island Pedicle Flaps 26 Interpolation Flaps 27 Z-plasty 28 Skin, Cartilage, and Composite Grafts 29 Mohs Micrographic Surgery 30 Advanced Techniques and Special Stains in Mohs Micrographic Surgery 31 Mohs and Staged Geometric Excision for Lentigo Maligna 32 Histopathology for Mohs Micrographic Surgery 33 Laboratory Techniques for Mohs Micrographic Surgery 34 Nail Surgery 35 Surgical Scar Revision 36 Managing Surgical Complications 37 Superficial Radiation Therapy and Electronic Brachytherapy
Transcript of SURGICAL PROCEDURES FOR DIAGNOSIS, …static.booktopia.com.au/pdf/9781259643927.pdfSURGICAL...
Part II
SURGICAL PROCEDURES FOR DIAGNOSIS, THERAPY, AND RECONSTRUCTION12 Local Anesthesia, Regional Nerve Blocks, and Postoperative Pain Management13 Suturing Techniques
14 Superficial Biopsy Techniques
15 Cryosurgery
16 Electrosurgery and Hemostasis
17 Incision and Drainage
18 Layered Excision and Surgical Repairs
19 Dog-Ear Correction
20 Principles of Flap Dynamics
21 Advancement Flaps
22 Rotation Flaps
23 Transposition Flaps
24 Bilobed Flaps
25 Island Pedicle Flaps
26 Interpolation Flaps
27 Z-plasty
28 Skin, Cartilage, and Composite Grafts
29 Mohs Micrographic Surgery
30 Advanced Techniques and Special Stains in Mohs Micrographic Surgery
31 Mohs and Staged Geometric Excision for Lentigo Maligna
32 Histopathology for Mohs Micrographic Surgery
33 Laboratory Techniques for Mohs Micrographic Surgery
34 Nail Surgery
35 Surgical Scar Revision
36 Managing Surgical Complications
37 Superficial Radiation Therapy and Electronic Brachytherapy

CHAPTER
2Wound Healing and Surgical Wound Dressings
Amy Vandiver and Luis GarzaSUMMARY:Acute post-surgical wounds follow an orderly progression in healing, from hemostasis/ inflammation to proliferation, and on to maturation & remodeling.
Minimizing tension during primary wound closure will helplimit the proliferative phase of wound healing and decreasechances of keloid formation.
Simple wound dressings, such as polymer films, are generallyadequate for most postoperative wounds.
Beginner TipsAvoid dressing a wound with gauze directly adjacent to the wound bed, as it has a tendency to become incorporated into the wound.
An ounce of prevention truly is worth a pound of cure; pay attention to meticulous suturing and wound closure, and dressing choice will be far less important.
Be sure to affix the pressure dressing to the surrounding skin and not to the polymer film, or when the pressure dressing is removed the film will be as well.
Pitfalls and Cautions
Expert Tips Patient Education Points
Don’t Forget! Billing Pearls
▪
While polymer films, such as Tegaderm, may work well for wounds closed with buried sutures alone, nylon sutures that will require removal in under a week may be best dressed with non-adherent pads.
▪
When using a polymer film dressing, some moisture under the dressing is desirable, but excess serous drainage may lead to maceration.
Most surgical wounds do not require topical antibiotic dressings or ointments.
▪
Wound debridement is of vital importance, but can be painful. Generally, the removal of necrotic tissue is fairly painless, though pre-treatment with local anesthetics may be desirable.
Expensive wound dressings and devices generally addlittle (other than expense) to the healing of well-sutured operative wounds.
▪
▪
▪
▪
When using clear polymer films, advise patients that they will likely see some serous drainage or even frank bleeding under the dressing. A small amount of eschar present under the film is not concerning.
Patient education regarding leg elevation and compres-sion after lower leg procedures is of vital importance.
▪
While wound dressings are incorporated as part of any surgical procedure, debridement may be separately billable using the debridement codes (11042 series).
Wound debridement performed during the postopera-tive global period, however, cannot be billed separately.
▪
▪
▪
▪
▪
▪
▪
▪
▪
▪
▪
▪
▪
▪
▪
▪
▪
▪
▪
▪
▪
▪
▪
▪
CHAPTER
5 Infographic 5 Surgical Instruments
Michael S. LehrerAshish C. BhatiaAashish TanejaSUMMARY:Surgical instrument choice may have a direct impact on outcomes, and certainly leads to less traumatic and faster procedures.Investing in high quality instruments is generally a wise decision.The highest quality instruments are the longest lasting, provide the best surgical outcomes, and allow for optimal comfort and speed. Using inadequate instrumentation may lead to need for frequent replacement, poor performance, and tissue damage.While the majority of procedures may be completed with a few basic instruments, there is a wide array of available instruments that may be used for specialty procedures.
Beginner TipsConsider purchasing instruments at conferences in order to both sample the range of choices and save on costs.
Surgical packs do not require an exhaustive array of instruments.
When training staff, including a laminated photograph of the surgical pack above the area where instruments are washed and packaged is a helpful training tool.
Pitfalls and Cautions
Expert TipsConsider color-coding instrument packs for ease of organization and consistency.
Maintain basic surgical packs and add specializedinstrumentation as needed.
Instruments used in less than 25% of cases may be kept in separate packs as long as they are easily accessible.
When using larger suture needles, such as those on 2-0 suture, be sure to use larger and heavier needle drivers, as fine needle drivers may be loosened by clamping on more robust
Always autoclave instruments in the open position to avoid buckling.
Avoid using supercut scissors to cut anything but tissue.
Staff should always be responsible for their own sharps disposal, which should be performed before the used instruments are removed from the room.
Don’t Forget!Beware the temptation to create overly comprehensive surgical packs. Many accomplished dermatologicsurgeons work with a basic set of high quality instru-ments.
Suture tying platforms are extremely helpful; it is always preferable to use toothed forceps with platforms rather than non-toothed forceps, as the latter increase the risk of tissue strangulation.
2

▪
▪
▪
▪
▪
▪
▪
▪
▪
▪
▪
▪
▪
▪
▪
▪
▪
CHAPTER
5 Infographic 5 Surgical Instruments
Michael S. LehrerAshish C. BhatiaAashish TanejaSUMMARY:Surgical instrument choice may have a direct impact on outcomes, and certainly leads to less traumatic and faster procedures.Investing in high quality instruments is generally a wise decision.The highest quality instruments are the longest lasting, provide the best surgical outcomes, and allow for optimal comfort and speed. Using inadequate instrumentation may lead to need for frequent replacement, poor performance, and tissue damage.While the majority of procedures may be completed with a few basic instruments, there is a wide array of available instruments that may be used for specialty procedures.
Beginner TipsConsider purchasing instruments at conferences in order to both sample the range of choices and save on costs.
Surgical packs do not require an exhaustive array of instruments.
When training staff, including a laminated photograph of the surgical pack above the area where instruments are washed and packaged is a helpful training tool.
Pitfalls and Cautions
Expert TipsConsider color-coding instrument packs for ease of organization and consistency.
Maintain basic surgical packs and add specializedinstrumentation as needed.
Instruments used in less than 25% of cases may be kept in separate packs as long as they are easily accessible.
When using larger suture needles, such as those on 2-0 suture, be sure to use larger and heavier needle drivers, as fine needle drivers may be loosened by clamping on more robust
Always autoclave instruments in the open position to avoid buckling.
Avoid using supercut scissors to cut anything but tissue.
Staff should always be responsible for their own sharps disposal, which should be performed before the used instruments are removed from the room.
Don’t Forget!Beware the temptation to create overly comprehensive surgical packs. Many accomplished dermatologicsurgeons work with a basic set of high quality instru-ments.
Suture tying platforms are extremely helpful; it is always preferable to use toothed forceps with platforms rather than non-toothed forceps, as the latter increase the risk of tissue strangulation.
3
▪
▪
▪
▪
▪
▪
▪
▪
▪
▪
▪▪
CHAPTER
7Antibiotics: Preoperative and Postoperative Considerations
Beginner TipsThe differential diagnosis of postoperative infection includes irritant or allergic contact dermatitis, suture reactions/ suture abscesses, filler reactions (if relevant), and inflammatory chondritis.
Contact dermatitis should be considered, particularly when topical antibiotics or adhesives were used, or when the involved area is geometric.
Pitfalls and Cautions
Expert Tips Patient Education Points
Don’t Forget!
Risk factors for infection include patient factors, surgical factors, and surgical site factors.
One study demonstrated a statistically significant benefit to local intra-incisional clindamycin injection for Mohs micrographic surgery cases; the solution was prepared by adding 0.15 mL of clindamycin (150 mg/ mL) to a 50 cc bottle containing lidocaine (1%) with epinephrine (1:100,000) buffered with sodium bicarbonate (5 mL of an 8.4% solution)
Cephalexin or dicloxacillin can be used as prophylaxis for wedge excisions of the lip or ear, flaps on the nose, and grafts.
Clarithromycin, levofloxacin, TMP-SMX, metronidazole, and ciprofloxacin are associated with a higher risk of hypoglyce-mia in diabetic patients taking sulfonylurea medications.
No rigorous study has demonstrated a robust statisti-cally significant benefit to utilizing any single topical antibiotic preparation, and the American Academy of Dermatology has therefore warned against the routine use of topical antibiotics after clean surgical procedures as part of its Choosing Wisely campaign.
Patients often request perioperative antibiotics under the assumption that these will decrease their risk of developing an infection; therefore, adequate education may be valuable in dissuading patients from this practice and increasing their comfort level.
While antibiotics are typically given the hour before the procedure, there is ambiguous data about whether prophylactic antibiotic timing affects the risk of SSI.
Given the high rate of warfarin and sulfonylurea use in the patient population undergoing dermatologic surgery, systemic antibiotics should be prescribed with extreme caution and an eye to minimizing the risk of drug-drug interactions.
Allen F. ShihJonathan Kantor
SUMMARY:The rate of infection after skin surgery is likely between 1%and 4%.
Antibiotic use in dermatologic surgery has declinedmarkedly over the past several decades, as studieshighlighting the baseline low rate of wound infections, coupled with the individual and societal risks associated with wide-spread antibiotic use, have made the routine prescribing ofperioperative antibiotics no longer the standard of care.
2
4

▪
▪
▪
▪
▪
▪
▪
▪
▪
▪
▪▪
CHAPTER
7Antibiotics: Preoperative and Postoperative Considerations
Beginner TipsThe differential diagnosis of postoperative infection includes irritant or allergic contact dermatitis, suture reactions/ suture abscesses, filler reactions (if relevant), and inflammatory chondritis.
Contact dermatitis should be considered, particularly when topical antibiotics or adhesives were used, or when the involved area is geometric.
Pitfalls and Cautions
Expert Tips Patient Education Points
Don’t Forget!
Risk factors for infection include patient factors, surgical factors, and surgical site factors.
One study demonstrated a statistically significant benefit to local intra-incisional clindamycin injection for Mohs micrographic surgery cases; the solution was prepared by adding 0.15 mL of clindamycin (150 mg/ mL) to a 50 cc bottle containing lidocaine (1%) with epinephrine (1:100,000) buffered with sodium bicarbonate (5 mL of an 8.4% solution)
Cephalexin or dicloxacillin can be used as prophylaxis for wedge excisions of the lip or ear, flaps on the nose, and grafts.
Clarithromycin, levofloxacin, TMP-SMX, metronidazole, and ciprofloxacin are associated with a higher risk of hypoglyce-mia in diabetic patients taking sulfonylurea medications.
No rigorous study has demonstrated a robust statisti-cally significant benefit to utilizing any single topical antibiotic preparation, and the American Academy of Dermatology has therefore warned against the routine use of topical antibiotics after clean surgical procedures as part of its Choosing Wisely campaign.
Patients often request perioperative antibiotics under the assumption that these will decrease their risk of developing an infection; therefore, adequate education may be valuable in dissuading patients from this practice and increasing their comfort level.
While antibiotics are typically given the hour before the procedure, there is ambiguous data about whether prophylactic antibiotic timing affects the risk of SSI.
Given the high rate of warfarin and sulfonylurea use in the patient population undergoing dermatologic surgery, systemic antibiotics should be prescribed with extreme caution and an eye to minimizing the risk of drug-drug interactions.
Allen F. ShihJonathan Kantor
SUMMARY:The rate of infection after skin surgery is likely between 1%and 4%.
Antibiotic use in dermatologic surgery has declinedmarkedly over the past several decades, as studieshighlighting the baseline low rate of wound infections, coupled with the individual and societal risks associated with wide-spread antibiotic use, have made the routine prescribing ofperioperative antibiotics no longer the standard of care.
1 Autonomy2 Benefience3 Non-maleficence4 Justice
Principlism
Casuistry
Right theory
Virtueethics
Principlism
1 Autonomy
l
1 Autonomy
Principl
CasCasuistry
RigRighht theory
Virtueethics
Principlism
Utilitarianism
DeontologicalAspirational
ethics
Beginner Tips Pitfalls and Cautions
Expert Tips Don’t Forget!
▪
▪
▪
▪
▪
▪
▪
▪
▪
▪▪
CHAPTER
9 Ethics in Dermatologic Surgery
Jonathan KantorSUMMARY:Ethical action, like informed consent, is a process.
Real-world ethical challenges generally occur when various ethical imperatives are perceived as being in conflict, or when various duties, and those to whom the dermatologist isresponsible, appear to conflict.
For centuries, philosophers have struggled with the distinctions between ethics, morality, law, and—more recently—professionalism.
Ethics reflects a social imperative that is based on moral underpinnings; ethics can therefore be conceptualized as morality in action.
Professional morality may be broader and deeper than common morality, as it addresses the moral expectations for a particular group
Principlism, perhaps the most popular ethical framework, relies on the (equally weighted) principles of autonomy, beneficence, non-maleficence, and justice. These four principles are frequently used as a litmus test for ethical legitimacy
Keep in mind that there is often more than one reasonable solution to an ethical quandary.
An action can be legal without being ethical and ethical without being legal.
Body dysmorphic disorder is a common condition, and identifying such patients is an important challenge for the cosmetic dermatologist, not least because the patient is likely to be dissatisfied after any intervention.
Other approaches to ethical decision-making abound, including utilitarianism, aspirational ethics, casuistry, deontological approaches, rights theory, and virtue ethics.
While cosmetic dermatology patients may interact with physicians as if they are consumers, rather than patients, they should still be treated as the latter.
5

INTRODUCTION
Transposition flaps are often useful when tension at the primary defect precludes side-to-side closure or the use flaps. Common transposition flaps include the rhombic (single-lobed), bilobed, and trilobed flaps, though the lat-ter two flaps in particular involve a significant rotational component.
The ability of transposition flaps to push tissue into the defect by redirecting tension vectors perpendicular to close a defect using a smaller total surface area than slid-ing flaps (and the possible added benefit of a broken-up repair line), make these flaps particularly useful for larger facial defects.
PRINCIPLES OF TRANSPOSITION FLAP DESIGN AND EXECUTION
Using the pinch test to assess the primary wound for flap selectionPinching, or squeezing together the primary wound edges is a simple strategy to guide flap selection. If pinching eas-ily approximates the wound edges, then side-to-side clo-
sure or a sliding advancement or rotation flap will usually be possible (Figure 23-1). If pinching cannot approximate the wound edges because of excessive tension or anatomic distortion from pulling or compressing free margins (e.g., eyelids, distal nose, lips), then a transposition flap may be useful to transfer tension to and recruit tissue from a more generous adjacent reservoir.
Using the pinch test to identify a donor tissue reservoir After determining that direct closure of the primary wound is not possible, the pinch test can identify a suitable donor site for a transposition flap (Figure 23-2). If the skin immediately adjacent to the wound pinches easily and without anatomic distortion, a single-lobed rhombic flap may be possible. If the skin adjacent to the primary wound is too tight, then the pinch test may identify a sufficiently lax tissue reservoir more remote from the primary wound. A bilobed or trilobed flap may be necessary to reach a distant reservoir.
Assessing a wound on the distal nose illustrates pinch test application. If pinching the tight, adherent distal nasal then a transposition flap is considered. The pinch test is skin fails to approximate the wound edges, alters the posi-tion of the free margin, or compresses the nasal cartilages, then a transposition flap is considered. The pinch test is then applied to surrounding skin to identify a donor site. The skin of the nasal sidewall and proximal dorsum pinch easily without distorting the shape of the nose (Figure 23-3A). If the primary wound is directly adjacent to one of these reservoirs, a single-lobed rhombic flap may be pos-sible (Figure 23-3B). Adding lobes for a bilobed or trilobed flap may be necessary to bridge the distance between the primary wound the tissue reservoir (Figure 23-3C).
Tension vectorsTransposition flaps re-orient and displace tension vectors to adjacent tissue reservoirs, thereby preserving the posi-tion of free margins and restoring contour at the primary defect. In general, tension is transferred from the primary defect to the terminal donor site or lobe (i.e., the secondary lobe of a bilobed flap and the tertiary lobe of a trilobed flap, Figure 23-4). Closing the terminal donor site should allow rotation of the flap into the primary defect with min-imal tension (Figure 23-5). If tension at the primary defect is still excessive, strategically-placed tacking sutures can anchor flaps to immobile structures and minimize tension of the dermal sutures (Figure 23-6). On the central face, tacking the undersurface of the flap to the origin of the zy-gomaticus major muscle, the inferior orbital rim, and the medial canthal tendon can prevent lower eyelid ectropion, and tacking sutures to the pyriform aperture can mitigate the risk of alar margin distortion. These tacking sutures also recreate contour when transposition flaps drape over concavities, such as the alar groove or nasal facial sulcus.
Figure 23-1. Pinching the primary wound edges guides flap selection. A linear closure or sliding flap is usually possible if the wound edges are easily approx-imated. If pinching the wound edges causes excessive tension or free margin distortion, a transposition flap may be useful to transfer tension to and recruit tissue from an adjacent reservoir.
6 • SURGICAL PROCEDURES FOR DIAGNOSIS, THERAPY, AND RECONSTRUCTION

ROTATION FLAPS • 7
Figure 23-2. A suitable tissue reservoir for a transposition flap is identified using the pinch test. For this defect on the pre-auricular cheek, tissue reservoirs located superiorly (A) and posteriorly (D) lack sufficient volume, laxi-ty, and vascularity. Recruiting D, An appropriate donor site pinches easily without anatomic distortion. In order to reach this donor site, one or more lobes may be needed.
A B
C D

8 • SURGICAL PROCEDURES FOR DIAGNOSIS, THERAPY, AND RECONSTRUCTION
Figure 23-3. A) Tissue reservoirs on or near the nose. B) A single-lobed rhombic flap may be used when the tissue reservoir is immediately adjacent to the primary defect. C) Two or three lobes may be needed for more distal defects in order to bridge the distance between the primary defect and an appropriate donor site. (Re-produced, with permission, from Goldsmith LA, Katz SI, Gilchrest BA, et al, eds. Fitzpatrick’s Dermatology in General Medicine. 8th ed. New York, NY: McGraw-Hill; 2012.)
Figure 23-4. Transposition flaps displace tension from the primary defect to the final donor site (stars denote key stitch and green arrows demonstrate direction of tension vector).
A B
C
Kantor: Derm SurgFigure # 29.01Dragonfly Media Group01/20/1704/24/17
A Circumferentialundermining isperformed.
B A deep pedicle isleft to adequatelyperfuse the flap.
C The island of tissue atthe advancing edge of theflap may be aggressivelyundermined.
ROTATION FLAPS • 9
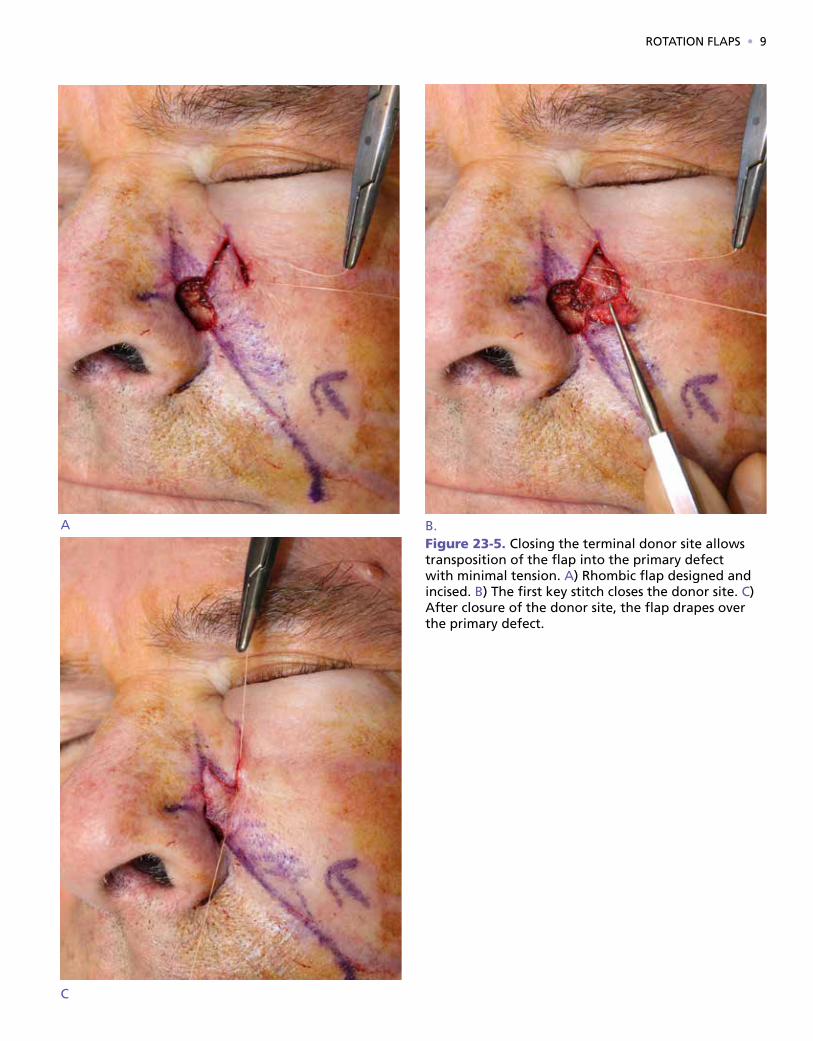
Figure 23-5. Closing the terminal donor site allows transposition of the flap into the primary defect with minimal tension. A) Rhombic flap designed and incised. B) The first key stitch closes the donor site. C) After closure of the donor site, the flap drapes over the primary defect.
A B.
C

10 • SURGICAL PROCEDURES FOR DIAGNOSIS, THERAPY, AND RECONSTRUCTION
Figure 23-6. Secondary motion at the 2o key stitch, denoted by the star, risks ectropion (left). Tacking the under-surface of the flap to the origin of the zygomaticus major muscle suspends the flap and prevents secondary mo-tion (right, green arrow). (Reproduced, with permission, from Goldsmith LA, Katz SI, Gilchrest BA, et al, eds. Fitzpatrick’s Dermatology in General Medicine. 8th ed. New York, NY: McGraw-Hill; 2012.)
Figure 23-7. A rhombic flap depicted as a rotation flap with a large back cut. The two red starts identify the areas where the flap is subject to pivotal restraint.
A B
Kantor: Derm SurgFigure # 23.02Dragonfly Media Group12/07/1601/09/17
Rule ofhalves
2
1
330°
30°
Complexity
Over-sewing
Optimaldesign
Bilateralor midlineincision
Suturingtecniques
S-plasty M-plasty Burow’sadvancement

Pivotal restraint and flap shortening with increased angle of rotationVisualizing a rhombic flap as a rotation flap with a large backcut helps illustrate the consequence of pivotal re-straint on flap movement (Figure 23-7). The fixed base at the pedicle tethers the flap and serves as a pivot point as the flap is rotated toward the primary defect. The pivot points for a rhombic flap are shown in Figure 23-8. As the arc of rotation increases, pivotal restraint increasingly re-stricts and shortens the flap length1. If the shortened flap does not have enough surface area to cover the defect, the consequent secondary motion of the recipient tissue will increase tension at the primary defect and may compro-mise the blood supply of the distal flap (Figure 23-8). Pre-operative flap design must account for pivotal restraint to avoid excessive tension, especially if secondary motion would pull on a free margin.
Placement and excision of standing conesWhen the flap is transposed to the primary defect, a stand-ing cone, or dog-ear, forms at the base of the pedicle. As the arc of flap rotation increases, the standing cone encroaches further into the vascular pedicle of the flap (Figure 23-9). The standing cone is typically excised to prevent contour irregularities, though if immediate excision would narrow the pedicle and threaten the flap’s blood supply, removal can be delayed.
Influences on Flap VascularityFlap vascularity is primarily influenced by 3 factors: (1) the depth of flap elevation(2) the width of the flap pedicle (3) the distance from flap tip to base of flap
Depth of flap elevationThe depth of flap elevation impacts the size of and the per-fusion pressure of the vessels within the pedicle. Deeper elevation planes incorporate vessels with larger diam-eters and greater perfusion pressures. The plane of flap elevation differs by anatomic location, and appropriate selection of undermining planes balances maximizing the blood supply with protection of critical anatomic struc-tures (especially branches of the facial motor nerve). Most transposition flaps are elevated at the junction of the sub-dermal fat and fascia (Figure 23-10). Routine exceptions include flaps on the midline nose and forehead, which are usually elevated deep to the muscles of facial expression, and those on the scalp, which are elevated deep to the ga-lea aponeurotica (Figure 23-11).
The width of the flap pedicleA narrow vascular pedicle compromises the blood supply to the flap. Factors influencing the pedicle width include the flap take-off point and angle from the defect, the loca-tion of the standing cone at the pedicle base, and the num-
Kantor: Derm SurgFigure # 29.01Dragonfly Media Group01/20/1704/24/17
A Circumferentialundermining isperformed.
B A deep pedicle isleft to adequatelyperfuse the flap.
C The island of tissue atthe advancing edge of theflap may be aggressivelyundermined.
Kantor: Derm SurgFigure # 29.01Dragonfly Media Group01/20/1704/24/17
A Circumferentialundermining isperformed.
B A deep pedicle isleft to adequatelyperfuse the flap.
C The island of tissue atthe advancing edge of theflap may be aggressivelyundermined.
Figure 23-8. If the flap design does not take into account the consequences of pivotal restraint and the recipient site is unable to provide secondary motion, excess tension may compromise blood supply to the distal edges of the flap.
Figure 23-9. An increased arc of rotation when trans-posing a flap into the primary defect results in further encroachment of the standing cone into the flap pedi-cle, which can compromise blood supply. The standing cone is directed away from the vascular pedicle when possible. Delayed removal can be considered if imme-diate removal would threaten the flap’s viability.
ROTATION FLAPS • 11

12 • SURGICAL PROCEDURES FOR DIAGNOSIS, THERAPY, AND RECONSTRUCTION
Figure 23-10. Transposition flap elevated underneath the subdermal fat, which consists of smaller, tightly packed lobules. Note that the plane of undermining is above the larger lobules of the buccal fat pad.
Kantor: Derm SurgFigure # 29.01Dragonfly Media Group01/20/1704/24/17
A Circumferentialundermining isperformed.
B A deep pedicle isleft to adequatelyperfuse the flap.
C The island of tissue atthe advancing edge of theflap may be aggressivelyundermined.
Kantor: Derm SurgFigure # 29.01Dragonfly Media Group01/20/1704/24/17
A Circumferentialundermining isperformed.
B A deep pedicle isleft to adequatelyperfuse the flap.
C The island of tissue atthe advancing edge of theflap may be aggressivelyundermined.
ber of lobes of the flap (e.g. bilobed versus trilobed). Distal take-off points result in a narrower pedicle than a proximal take-off point (Figure 23-12). The take–off angle is the an-gle created between the first limb of the rhombic flap and the primary defect (Figure 23-13A). As the take-off angle becomes more acute, the width of the flap pedicle increas-es (Figure 23-13B). However, more acute take-off angles usually require greater secondary motion around the pri-mary defect for wound closure. As noted above, as the arc of flap rotation increases, the standing cone encroaches further into the vascular pedicle of the flap. Finally, as the number of lobes increases, the width of the flap pedicle is enlarged, increasing flap vascularity (Figure 23-14).
The length of the flap relative to the pedicle widthThe transposition flap’s distal tip is most vulnerable to isch-emia, and all long flaps with narrow pedicles are vulnera-ble to ischemic compromise. Transposition flaps are often purposefully drawn with a long distal tip and apical angle of 30o or less to ease closure and minimize standing cone formation at the terminal donor site (banner flap design).
This is a run-in level 4 head. Consequently, the flap is frequently longer than necessary to cover the defect. Either
Figure 23-11. Transposition flaps on the nose are ele-vated deep to the muscular layer, above the perichon-drium or periosteum.
Figure 23-12. Compared to flaps with a take-off at the midpoint of the defect (left), flaps with distal take-off points result in a narrower vascular pedicle, which may comprise blood supply (right).

Kantor: Derm SurgFigure # 29.01Dragonfly Media Group01/20/1704/24/17
A Circumferentialundermining isperformed.
B A deep pedicle isleft to adequatelyperfuse the flap.
C The island of tissue atthe advancing edge of theflap may be aggressivelyundermined.
ROTATION FLAPS • 13
Figure 23-14. Bilobed flap design for a defect on the distal nose . The standing cone has a slight vertical orientation to avoid alar elevation. Note the narrow and tenuous vascular pedicle (bracket). Closure of the tertiary defect (green arrows) would distort the alar free margins. Converting from bilobed to trilobed flap (b) results in a wider, more robust vascular pedicle (bracket) and places the terminal donor site that is ver-tically oriented to minimize alar distortion and located at more favorable position within a generous tissue reservoir that facilitates side-to-side closure (green arrows).
Figure 23-13. A flap that takes off at a right angle from the defect requires less secondary motion that flaps with a more acute take-off angle (A). Closure of the donor site of a flap with an acute take-off angle widens the defect, increasing the sharing of tension at the recipient site (B).
A B

14 • SURGICAL PROCEDURES FOR DIAGNOSIS, THERAPY, AND RECONSTRUCTION
Figure 23-15. A defect on the upper lip is extended to the vermilion-cutaneous junction in order to camou-flage the incision within the cosmetic subunit junction. (Photos: design, immediate post-op, prior to revision re-create melolabial fold)
Kantor: Derm SurgFigure # 29.01Dragonfly Media Group01/20/1704/24/17
A Circumferentialundermining isperformed.
B A deep pedicle isleft to adequatelyperfuse the flap.
C The island of tissue atthe advancing edge of theflap may be aggressivelyundermined.
Figure 23-16. Minimal secondary motion at the recip-ient site is required when the flap area is equal to the defect area. An undersized flap increases the degree of secondary motion at the primary defect. In critical anatomic areas, secondary motion at the recipient site increases the risk of free margin distortion. A rhombic flap with a surface area equal to that of the defect is designed (A). Two month follow up shows excellent eyelid position (B).
the defect can be extended and angulated to accommo-date the triangular tip, or the distal flap can be trimmed to match the rounded defect. Trimming the angulated distal flap to fit the rounded defect reduces the risk of ischemia and is generally preferable.
Tension on the flapHigh tension on the flap increases the risk for ischemia. Transposition flaps on the scalp are particularly vulnera-ble to excessive tension.
Altering the defect or the flap to optimize flap design and executionIn order to maintain the appropriate contour of the recip-ient site, the primary defect is often deepened to match the flap thickness. For instance, on the nasal ala, the de-fect may be extended to the alar rim to camouflage the horizontal scar line from a nasolabial transposition flap. Similarly, a defect on the lip may be extended to the ver-milion-cutaneous junction (Figure 23-15).
Considerations for specific transposition flaps
Single lobed (rhombic, nasolabial or banner) transpo-sition flapsThe donor site of single-lobed transposition flaps is imme-diately adjacent to the defect. This proximity magnifies the impact of donor site selection and flap design on the ease of wound closure, flap vascularity, and the degree of sec-ondary motion required to close the defect.
Station Time Reagent1 30 seconds Formalin
2 20 Water
3 2 Hematoxylin
4 15 Water
5 90 Bluing agent
6 20 Water
7 20 Water
8 60 Eosin
9 20 95% Alcohol
10 20 95% Alcohol
11 20 100% Alcohol
12 20 100% Alcohol
13 20 100% Alcohol
14 30 Xylene
15 30 Xylene
16 Hold Xylene
Table 23-1. A Sample Staining Protocol

ROTATION FLAPS • 15
Figure 23-17. The flap take-off point and angle of a rhombic flap impact blood supply and tissue biome-chanics. The take-off point is usually at the midpoint of the defect, originating from the short axis for an asymmetric defect. A) Distal take-off point creates a narrow pedicle. B) Proximal take-off point results in a longer flap to cover the defect that may be vulnerable to ischemia.
Surface area of the flap versus the primary defectThe appropriate donor site for a single-lobed flap should have adequate tissue laxity to close the secondary defect after elevating a flap with sufficient surface area to cov-er the primary defect. Pinching the skin adjacent to the wound gauges tissue laxity. If the surface area of the flap and primary defect are similar, secondary motion at the primary defect will be minimized. If tension at the donor site requires an undersized flap, secondary motion will be necessary to close the difference between the flap and the primary defect, potentially displacing adjacent free mar-gins (Figure 23-16).
The impact of take-off point and angle on blood supply and tissue biomechanicsAfter a suitable tissue reservoir is identified, one must determine both the takeoff point and angle. The take-off point can influence flap vascularity and length. The take-off point is usually at the midpoint of the defect (Figure 23-17A). For ovoid or asymmetric defects, the takeoff point most often originates from the short axis. Taking off from the long axis of an asymmetric defect requires a greater arc of rotation and flap length, which both threaten the flap’s blood supply.
This is a run-in level 4 head. Distal take-off points narrow the pedicle and compromise the blood supply (Figure 23-17B). Occasionally, positioning the take-off point closer to the base of the defect may be advantageous, as this increases the width of the vascular pedicle and may move the take-off point (and the 1st key suture that bears

16 • SURGICAL PROCEDURES FOR DIAGNOSIS, THERAPY, AND RECONSTRUCTION
Issue CauseFracture in OCT Attempting to join OCT that was already set (frozen)
Block twists off chuck Non-room temperature chuck used, not allowing OCT time to enter grooves prior to freezing
Wrinkles in specimen Non-steady hand during pickup; not using sheeting action to drape specimen across the slide
Hematoxylin too light Decomposition
Eosin too prominent Alcohol from eosin evaporating
Erratic block cutting Blade angle too shallow
Wafer flips up Blade angle too steep
Ridges in sections Blade not sharp or blade/ specimen holder is loose
Shattering sections Not frozen completely/ too loose
Inconsistent section thickness Temperature too cold/ uniform hand wheel speed/ check angle/ tightness/ sharpness
Variable staining Replace reagents and adjust timing
Air bubbles Coverslipping technique/ verify media compatibility
Blurry spots Water contamination--change reagents
Blurry sections Overly thick sections of staining issue
Tearing sections Temperature adjustment/ blade sharpness
Table 23-2. Approaches to Common Challenges in Slide Preparation
Most issues stem from temperature settings, tightness issues (of blade and block), and blade sharpness.Reproduced, with permission, from Goldsmith LA, Katz SI, Gilchrest BA, et al, eds. Fitzpatrick’s Dermatology in General Medicine. 8th ed. New York, NY: McGraw-Hill; 2012.
maximal tension) away from critical anatomic structures. The trade-off is that a longer, more vulnerable flap is nec-essary to reach the defect (Figure 23-17C).
The take–off angle between the first limb of the rhom-bic flap and the primary defect also affects blood supply and flap biomechanics. To illustrate this principle, con-sider a traditional rhombic flap compared to the Dufour-mental modification. The traditional take-off angle for the classic rhombic flap is perpendicular to the defect, result-ing in a flap that moves 90° into place. Due to the nearly perpendicular tension vectors of the first and second key stitches, there is minimal secondary motion at the prima-ry defect (Figure 23-18A). Avoiding secondary motion is a priority for primary defect near free margins or with im-mobile surrounding skin. As the take-off angle becomes more acute, the width of the flap pedicle increases. How-ever, more acute take-off angles usually require greater secondary motion around the primary defect, because the tension vectors to close the primary and secondary defects compete. The Dufourmental modification takes off at a more acute angle and decreases the flap’s arc of rotation the flap.2 Closing the donor site of a flap with an acute takeoff angle widens the primary defect and requires sec-ondary motion for closure around the relatively under-sized flap (Figure 23-18B and Figure 23-19).
Banner flaps rely on a take-off angle that is nearly tan-gential to the defect (close to 180 degrees); coupled with
the removal of a standing cone at the opposite angle and the elevation of a long narrow flap pedicle (the banner), such flaps permit transposition of significant portions of tissue over large arcs.
Specific examples of single-lobed transposition flaps
1. Nasolabial transposition flapThe nasolabial single-lobed transposition flap is useful to reconstruct defects of the alar groove and ala, and is one of the most frequently performed banner flaps.3 The flap recruits tissue from the generous reservoir at the nasola-bial fold. Since the alar groove and ala have scant fat, and since the skin adheres firmly to the dermal insertions of the underlying muscles, this flap can appear too thick and pincushion without precise undermining plane and tack-ing sutures to recreate the alar groove.
The key design characteristics of the nasolabial trans-position flap are shown in Figure 23-20. The medial arm of the flap takes from the lateral aspect of the nasal defect and extends inferiorly along the nasolabial fold. The later-al arm of the defect extends along the cheek in a parallel line that gently tapers to join the inferior nasolabial fold with 30° or less. The horizontal widths of the proximal flap and defect should be identical. The superior aspect of the cheek limb of the flap should remain a couple milli-

ROTATION FLAPS • 17
CASE 1:
A 74 year old male was referred for an LM of the right malar cheek diagnosed with an incisional biopsy. Re-sidual pigment was evident at the time of referral so an excisional biopsy was performed and closed with a purse-string. Invasion was detected to a depth of 0.68 mm with no other adverse features (Stage IA: T1a). A staged excision was performed with a 1.0 cm margins with negative margins on the first stage. The defect was closed primarily.
A. 74 year old male referred for excision of LMB. Residual brown pigment seen on examC. Excisional biopsy closed with a pursestring. Histol-
ogy revealed invasion and the tumor was reclassi-fied as LMM, 0.68 mm
D, E. Patient presents for a staged excision with a 1 cm margin.F. Tumor is removed and a temporary intradermal re-
laxing suture placedG. Primary repair following confirmation of negative
histologic margins with one stage.
CASE 2:
An 88 year old female was referred for an LM of the left cheek diagnosed with an incisional biopsy. Resid-ual pigment was evident at the time of referral with a very ambiguous clinical margin. An excisional biopsy was performed and closed with a double purse-string. Invasion was detected to a depth of 0.36 mm with no other adverse features (Stage IA: T1a). A staged exci-sion was performed and negative margins were con-firmed after II stages and the defect was closed with a complex primary repair with a unilateral M-plasty. One can see the area of suspicion for residual tumor at the 10 to 12 o’ clock position that, in retrospect, should have been taken on the first stage. A. Patient referred for excision of LM.B. Close up photo showing residual tumor.C. Excisional biopsy closed with a double purse-
string. A nidus of invasion was seen on histology, tumor reclassified as LMM, 0.36 mm.
D. Patient presents for a staged excision. Area of suspicion by Wood’s lamp marked at the 10 to 11 o’clock position.
E. First stage excised.F. Area of residual LM recorded on tumor map with
45 melanocytes/400x (B) corresponding to area of suspicion on clinical exam (A).
G. Tumor map identifies site of residual LM at perim-eter margin.
H. Area of suspicion that was confirmed LM on first stage.
I. After negative margins confirmed, primary repair with M-plasty.
meters inferior to the origination point of the medial limb. This slight discrepancy is important to orient the primary tension vector in a superomedial vector that recruits skin from the mobile buccal cheek.
The flap is elevated to include only the subdermal fat (Figure 23-21a). If it includes the nasolabial fat pad, the flap will have too much volume. The nasolabial fold and cheek are undermined in the same tissue plane.
The key suture closes the donor defect at the flap’s origination point. If the wound is under high tension, tack-ing the cheek to the origin of the transverse nasalis along the pyriform aperture may be necessary to avoid lateral distraction of the nose (Figure 23-21b). The distal por-tion of the flap is trimmed to match the size of the defect, and it is sutured to the primary defect. The alar groove has a deep concavity and the flap will pincushion if the dead space is not closed. Tacking the base of the flap to the caudal margin of the transverse nasalis muscle is usu-ally necessary to close dead space and restore contour of the concave alar groove (Figure 23-21c). Transposition of and extends inferiorly along the nasolabial fold. The later-al arm of the defect extends along the cheek in a parallel the flap creates a standing cone along the nasal sidewall, which is removed while taking care to preserve the flap pedicle. Pincushion deformity of the transposed portion of the flap is the most common complication, which can be minimized by wide undermining of the recipient site
in the perichondrial/periosteal plane, placement of tack-ing sutures on the flap to the base of defect, and judicious thinning of the flap resulting in a concave surface when the flap is inset. The desired contour should be present im-mediately post-operatively (Figure 23-21d).
2. Double rhombic flapsTwo rhombic flaps may be used to cover defects that are too large for a single flap. Different variations of this strategy have been described. One variant has opposing and extends inferiorly along the nasolabial fold. The later-al arm of the defect extends along the cheek in a parallel rhombic flaps from opposite sides of the primary defect (Figure 23-22).4, 5 Another variant has two mirror image flaps on each side of the primary defect.6, 7 Each flap has a Dufourmental modification with an acute take-off angle, and they share a standing cone deformity when they are transposed.
CASE 1 CASE 2

18 • SURGICAL PROCEDURES FOR DIAGNOSIS, THERAPY, AND RECONSTRUCTION
Hemostasis with monopolar electrocautery
1. Defer hemostasis until the lesion is completely excised and appropriately undermined.
2. In order to achieve complete hemostasis, visualization of the wound bed and undermined surface should be achieved via skin hooks and ample gauze.
3. For electrocoagulation to work effectively, the operative field must be dry, as blood diffuses the current flowing from the electrode. A dry field is best achieved utilizing a two handed technique. With the non-dominant hand, use forceps and a piece of gauze to dry the field and visualize the source of bleeding. With the dominant hand, cauterize the source of bleeding with the active electrode. If possi-ble, an assistant should hold gauze at the dependent area of the wound to absorb any dripping blood.
4. It is easiest to achieve hemostasis by operating in the di-rection of gravity. For instance, if operating on the neck, work from the superior to the inferior pole.
Achieving hemostasis with bipolar electrocautery
1. Dry the field to visualize the sites that are bleeding
2. Clamp the tines of the bipolar electrode shut and touch it to the areas that are bleeding
MULTILOBED (BILOBED, TRILOBED, ETC.) TRANSPOSITION FLAPS
When there is not enough issue immediately adjacent to the wound to allow closure with a single-lobed flap, addi-tional lobes may be added to access a suitable tissue res-ervoir. A classic example is the use of bilobed and trilobed flaps to close distal nasal defects. The additional lobes ac-cess the more freely mobile tissue on the superior third of the nose, displacing tension away from the vulnerable free margin of the nose. Multi-lobed flaps are typically chosen when the surgeon needs to (1) recruit tissue from a more sizable reservoir than is available immediately adjacent to the defect, (2) reorient the tension vector of the key stitch or displace it to a more distant location, or (3) increase the width of the pedicle in order to minimize the risk of vascu-lar compromise. For a full discussion of bilobed flaps, see Chapter 25).
Specific examples of multi-lobed transposition flaps
1. Bilobed flapIf a rhombic flap is not possible because tension on the skin immediately adjacent to the primary defect is exces-sive or causes anatomic distortion, the bilobed flap can reach donor sites more remote from the defect. Compared to the rhombic flap, the geometry and execution of the bi-lobed flap are more complex. Excellent reviews have been written on this topic.8-11 The bilobed flap is most common-ly utilized to repair wounds on the nose or near the eyelid, though it can be used in nearly any anatomic location (Fig-ure 23-23 and 23-24). 12
Like the rhombic flap, the bilobed flap also rotates ap-proximately 90°. However, the bilobed flap distributes the rotation between the two lobes, each rotating 45 degrees. The second lobe incorporates a z-plasty that helps to push the flap toward the primary defect (Figure 23-25). If the primary defect is near a free margin, the tension vector to close the donor site for the secondary lobe (i.e., the tertiary defect) should generally be parallel to the free margin to preserve its position. To avoid secondary motion at a pri-mary defect near a free margin, the primary lobe should also be sized to match the primary defect. The secondary lobe may have 85-90% the surface area of the primary de-fect. The design details of a nasal tip defect repaired with a bilobed flap is shown in Figure 23-26. The first key suture closes the tertiary defect and ideally pushes the flap toward the primary defect. The second key suture sets the primary lobe into the defect. The exact position of this su-ture may vary or require adjustment to create tension vectors that avoid anatomic distortion, to align the standing cone, and to adjust the sizing of the primary lobe. The secondary lobe usually has excess length and must be trimmed to match the secondary defect.
2. Trilobed flapThe trilobed flap has tissue mechanics similar to the bi-lobed flap with a few distinct advantages (Figure 23-27). First, its third lobe allows the flap to reach tissue reservoirs increasingly remote from the primary defect, and it is par-ticularly useful to reconstruct distal nasal defects. Second, the third lobe extends the arc of rotation to 120-150 degrees and may provide a more favorable tension vector to close the quaternary defect. Third, the additional lobe adds the benefit of another z-plasty, which decreases the tension to transpose the flap, an important advantage when even mild tension at the distal nose can distort the free margins. Finally, the third lobe increases the width of the flap ped-icle. If the orientation of the standing cone would cut into the pedicle of a bilobed flap, the increased pedicle size of a trilobed flap can improve blood supply.13
Special circumstances for transposition flaps
1.Delaying removal of the standing cone.If immediate removal of the standing cone would compro-mise blood supply, its excision may be delayed until the flap has integrated into the recipient site (usually around

3-4 weeks). The need to delay standing cone removal is most likely for flaps whose large arc of rotation forms a standing cone that encroaches on the vascular pedicle (Figure 23-28).
2. Combining transposition flaps with other reconstructions
Large surgical defects may require a combination of a transposition flap and another flap or graft. The additional reconstruction may be necessary to help cover the primary defect or the secondary defect after transposing the flap (Figure 23-29).
COMPLICATIONS
Pincushioning, or trapdoor deformity, may occur with transposition flaps, especially on the nose. Several etiolo-gies have been suggested, such as excessive flap thickness, inadequate undermining, and circumferential wound contraction. Strategies to minimize pincushioning include appropriately sizing the flaps, careful suturing of all ana-tomic layers, and closing any dead space under the flap. Contact inhibition of the pincushioning effect may be ac-complished by assuring that the undersurface of the flap is sutured to the defect; a flap that is kept in contact with the wound bed may have a decreased tendency to pincushion. These buried quilting or basting sutures do not need to be tacked to deeper immobile structures, as is performed with suspension sutures, since the goal is to maintain contact of the flap base with the underlying defect, not to recreate a natural sulcus. The vascular supply to the flap should never be compromised, however, by overly-zeal-ous attempts at contact inhibition. If intralesional cortico-steroids do not resolve pincushioning, surgical thinning may be necessary.
CONCLUSIONS
Transposition flaps enable displacement of tension to a more favorable location and recruitment of tissue from ad-jacent and distant tissue reservoirs. They can be used to
ROTATION FLAPS • 19
repair defects in nearly any area of body, especially in lo-cations where preserving the position of free margins and restoring contour at the primary defect are of paramount importance.
REFERENCES
1. Dzubow LM. The dynamics of flap movement: effect of pivotal restraint on flap rotation and transposition. J Dermatol Surg Oncol 1987;13:1348-53.
2. Fee WE, Jr., Gunter JP , Carder HM. Rhomboid flap principles and common variations. Laryngoscope 1976;86:1706-11.
3. Zitelli JA. The nasolabial flap as a single-stage proce-dure. Arch Dermatol 1990;126:1445-8.
4. Bugatti L , Filosa G. The birhombic transposition flap to repair cutaneous lesions. J Eur Acad Dermatol Vene-reol 2005;19:503-4.
5. Johnson TM, Wang TS , Fader DJ. The birhombic trans-position flap for soft tissue reconstruction. J Am Acad Dermatol 1999;41:232-6.
6. Knackstedt TJ , Jellinek NJ. Birhombic Transposition Flap for Repair of Surgical Defects on the Nasal Dor-sum. Dermatol Surg 2016;42:1229-32.
7. Newlove T, Trufant JW , Cook J. The Bilateral Du-fourmentel Flap for Repair of Nasal Dorsum Defects After Mohs Micrographic Surgery. Dermatol Surg 2016;42:320-6.
8. Cook JL. A review of the bilobed flap’s design with particular emphasis on the minimization of alar dis-placement. Dermatol Surg 2000;26:354-62.
9. Cook JL. Reconstructive utility of the bilobed flap: les-sons from flap successes and failures. Dermatol Surg 2005;31:1024-33.
10. Miller CJ. Design principles for transposition flaps: the rhombic (single-lobed), bilobed, and trilobed flaps. Dermatol Surg 2014;40 Suppl 9:S43-52.
11. Zitelli JA. The bilobed flap for nasal reconstruction. Arch Dermatol 1989;125:957-9.
12. Ricks M , Cook J. Extranasal applications of the bilobed flap. Dermatol Surg 2005;31:941-8.
13. Albertini JG , Hansen JP. Trilobed flap reconstruction for distal nasal skin defects. Dermatol Surg 2010;36:1726-35.

Color palette: