
Support production and test Oracle databases on one array without reducing performance
25
Support production and test Oracle databases on one array without reducing performance February 2017 test/dev environments Create on one storage array without affecting performance low storage latency Maintain on average when processing database queries Support production and test Oracle databases on one array without reducing performance Dell EMC VMAX 250F all-flash storage and Dell EMC PowerEdge servers let I/O-intensive applications backed by Oracle Database 12c continuously perform well Database administrators are usually aware of the numerous improvements and upgrades available for database applications and workloads. But implementing these improvements can’t happen on live applications–too much can go wrong and negatively affect application performance. Instead, administrators create separate hardware environments for testing and development, which can introduce their own risks and impede database admin productivity. In the Principled Technologies datacenter, we found production and test/dev environments can exist together on a Dell EMC ™ VMAX ® 250F all-flash storage array. Using Dell EMC AppSync ® , we were able to quickly create 7 snapshots of our production Oracle ® Database 12 c environment, which continued to deliver low latency and high input/output operations per second (IOPS) as we added VMs. Having production and test/dev environments together can make it faster and easier for admins to control and check workload alterations and can provide opportunities to reduce hardware expenses. This report documents our findings with the VMAX 250F and PowerEdge ™ servers and shows you how your company could benefit from adding the Dell EMC solution to your datacenter. A Principled Technologies report: Hands-on testing. Real-world results.
-
Upload
principled-technologies -
Category
Technology
-
view
68 -
download
0
Transcript of Support production and test Oracle databases on one array without reducing performance

Support production and test Oracle databases on one array without reducing performance February 2017
test/dev environmentsCreate
on one storage arraywithout affecting performance
low storage latencyMaintain
on average when processing database queries
Support production and test Oracle databases on one array without reducing performanceDell EMC VMAX 250F all-flash storage and Dell EMC PowerEdge servers let I/O-intensive applications backed by Oracle Database 12c continuously perform wellDatabase administrators are usually aware of the numerous improvements and upgrades available for database applications and workloads. But implementing these improvements can’t happen on live applications–too much can go wrong and negatively affect application performance. Instead, administrators create separate hardware environments for testing and development, which can introduce their own risks and impede database admin productivity.
In the Principled Technologies datacenter, we found production and test/dev environments can exist together on a Dell EMC™ VMAX® 250F all-flash storage array. Using Dell EMC AppSync®, we were able to quickly create 7 snapshots of our production Oracle® Database 12c environment, which continued to deliver low latency and high input/output operations per second (IOPS) as we added VMs. Having production and test/dev environments together can make it faster and easier for admins to control and check workload alterations and can provide opportunities to reduce hardware expenses.
This report documents our findings with the VMAX 250F and PowerEdge™ servers and shows you how your company could benefit from adding the Dell EMC solution to your datacenter.
A Principled Technologies report: Hands-on testing. Real-world results.

Support production and test Oracle databases on one array without reducing performance February 2017 | 2
Maintain low latency with and without test/dev environments
Due to its all-flash storage and powerful storage processing, the Dell EMC VMAX 250F delivered average latencies of less than 1 millisecond. We saw average writes of .66 milliseconds and average reads of .60 milliseconds.
We started our analysis of the Dell EMC VMAX 250F array and Dell EMC PowerEdge servers with one Oracle Database 12c VM supporting a single workload created by Silly Little Oracle Benchmark (SLOB).1 By the end of our test, the Dell EMC solution supported 8 VMs: one for the original live workload and 7 VMs (from snapshots created by using AppSync each hour) that ran lighter workloads. The average storage latency for both reads and writes stayed at or under a millisecond. For a detailed breakdown of the storage latency, see Appendix C.
Automated production data cloning with Dell EMC AppSync
AppSync offers integrated copy data management for Dell EMC storage. It automates the process of copying production data, which can therefore become a simpler process in and of itself. Admins use a single interface to copy data for business and datacenter operations such as data repurposing, operational recovery, and disaster recovery. Cloning data with AppSync ultimately helps manage resource utilization, and the software can alert application owners and storage admins when applications don’t meet SLAs. For more information on AppSync, please visit https://www.emc.com/storage/data-replication/appsync.htm.

Support production and test Oracle databases on one array without reducing performance February 2017 | 3
Uphold live application productivity while increasing storage IOPS
We used the performance evaluation tool SLOB to create our live production database workload. We configured a 1.2TB Oracle 12c database running on an Oracle Linux® 7.2 VM to mimic a production database. First, we established a steady state for the production environment without resource contention. Then, we created snapshots on the hour. Each of the 7 snapshots that we mounted ran a SLOB workload sized to generate roughly 2,000 input/output operations per second (IOPS), which simulates lighter test/dev copy environment workloads.
Despite this increased activity for the VMAX 250F, the original live production environment maintained its intended performance level. After the first snapshot began its workload and before we created the second snapshot, the production environment averaged 26,949 IOPS. The production environment averaged 26,408 IOPS after the seventh snapshot began its workload. The average degradation of production environment IOPS between these two periods was 2.0 percent. For a detailed breakdown of the storage IOPS, see Appendix C.
Run live applications and test/dev environments together harmoniously
Having test/dev environments for updates and patches ensures a safety net for live applications. Looking at a national bank, this means improving risk management, customer relationship management (CRM), general ledger, and enterprise resource planning (ERP) software without affecting mission-critical applications that customers use for online banking and ecommerce. These applications, backed by Oracle Database 12c, require solid, constant access to assess financial risk of customers, to carry out marketing campaigns, and to authorize and process credit card payments.
This national bank, like most large banks, grew out of acquisitions and mergers. The number of applications the organization runs is quite high. Consolidating hardware, such as storage arrays, in their datacenters can provide an opportunity to reduce IT expenditures and ease the burden of some IT operations.
The Dell EMC VMAX 250F could support live applications and test/dev environments at the same time for this national bank without sacrificing performance or storage space. With these Oracle Database 12c databases existing together and functioning optimally, the national bank could gain a host of business growth-oriented benefits, including a reduction in storage hardware.

Support production and test Oracle databases on one array without reducing performance February 2017 | 4
Conclusion: The Dell EMC VMAX 250F can back live applications and test/dev environments concurrentlyKeeping critical applications up to date and online requires dedicated resources and a hard-working IT staff for testing and development before deployment. At Principled Technologies, we ran a live production environment and test/dev environments (all backed by Oracle Database 12c databases) on a single Dell EMC VMAX 250F storage array in a solution with Dell EMC PowerEdge servers. The production environment workload maintained an acceptable level of IOPS even as we added VMs designed for test/dev environments. What’s more, average storage latency for the VMAX 250F was less than a millisecond for both reads and writes. If running live applications harmoniously on the same array as test/dev environments seems beneficial for your company, consider the Dell EMC VMAX 250F for your datacenter.
Fast and vast storage: The Dell EMC VMAX 250F all flash array
The Dell EMC VMAX 250F is part of the VMAX All Flash enterprise storage family. The foundation of each VMAX All Flash array is the V-Brick, which encompasses a single VMAX engine. Each 250F can house either one or two V-Bricks and features up to 1.1 petabytes effective flash capacity. The array can use the latest 7.6TB and 15TB enterprise flash drives.
The array we used had 10.25 TB of usable storage capacity.
For more information on the Dell EMC VMAX All Flash enterprise storage family, please visit https://www.emc.com/en-us/storage/vmax-all-flash.htm.
1 For more information on SLOB, visit https://kevinclosson.net/2012/02/06/introducing-slob-the-silly-little-oracle-bench-mark/.

Support production and test Oracle databases on one array without reducing performance February 2017 | 5
On December 8, 2016, we finalized the hardware and software configurations we tested. Updates for current and recently released hardware and software appear often, so unavoidably these configurations may not represent the latest versions available when this report appears. For older systems, we chose configurations representative of typical purchases of those systems. We concluded hands-on testing on January 24, 2017.
Appendix A: Testing configurations and benchmarkAbout our Oracle Database 12c configurationWe created a new VM, installed Oracle Enterprise Linux on the VM, and configured the VM with 32GB RAM and 8 vCPUs. Each VM had a 70GB virtual disk, on which we installed the Oracle OS and database software. We then added eight 165GB VMDKs to hold the database data files, and four 5GB VMDKs to store the database log files.
We made the necessary networking adjustments and prepared the VM for Oracle installation prerequisites (see Appendix B). In addition, we configured other OS settings, such as stopping unneeded services, setting the system’s kernel parameters in sysctl.conf, and reserving huge pages for Oracle.
We installed Oracle Grid Infrastructure 12c for Linux x86-64 on the VM and created Oracle ASM disk groups for data and log, and then installed and configured the Oracle database. For each database instance, we set the database to use large_pages true.
Finally, we used the SLOB 2.3 tool to generate the initial database schema. We used a benchmark scale of 9,600MB in SLOB’s workload generator to create approximately 1.2TB of data, and we configured SLOB to create the tables and indices. For details, including the SLOB configuration file, see Appendix C and Appendix D.
About the SLOB 2.3 benchmarkThe Silly Little Oracle Benchmark (SLOB) can assess Oracle random physical I/O capability on a given platform in preparation for potential OLTP/ERP-style workloads by measuring IOPS capacity. The benchmark helps evaluate performance of server hardware and software, storage system hardware and firmware, and storage networking hardware and firmware.
SLOB contains simple PL/SQL and offers the ability to test the following:
1. Oracle logical read (SGA buffer gets) scaling2. Physical random single-block reads (db file sequential read)3. Random single block writes (DBWR flushing capacity)4. Extreme REDO logging I/O
SLOB is free of application contention yet is an SGA-intensive benchmark. According to SLOB’s creator Kevin Closson, SLOB can also offer more than testing IOPS capability, such as studying host characteristics via NUMA and processor threading. For more information on SLOB, links to information on version 2.2, and links to download the benchmark, visit https://www.kevinclosson.net/slob/.

Support production and test Oracle databases on one array without reducing performance February 2017 | 6
Server configuration information 2 x Dell EMC PowerEdge R930
BIOS name and version Dell EMC 2.1.3
Non-default BIOS settings Virtualization enabled
Operating system name and version VMware ESXi® 6.0.0 build-4192238
Date of last OS updates/patches applied 09/15/2016
Power management policy Performance
Processor
Number of processors 4
Vendor and model Intel® Xeon® E7-8890 v4
Core count (per processor) 24
Core frequency (GHz) 2.20
Stepping 1
Memory module(s)
Total memory in system (GB) 256
Number of memory modules 8
Vendor and model Samsung® M386AG40DM0-CPB
Size (GB) 32
Type PC4-2133P
Speed (MHz) 1,600
Speed running in the server (MHz) 1,600
Storage controller
Vendor and model Dell EMC PERC H730p
Cache size (GB) 2
Firmware version 25.4.1.0004
Driver version 6.903.82.00
Local storage
Number of drives 2
Drive vendor and model Seagate® ST9146852SS
Drive size (GB) 146
Drive information (speed, interface, type) 15K, 6Gb SAS, HDD
Network adapter
Vendor and model Intel Ethernet Converged Network Adapter X520-2
Number and type of ports 2 x 10GbE
Driver version 4.1.1.1-iov

Support production and test Oracle databases on one array without reducing performance February 2017 | 7
Server configuration information 2 x Dell EMC PowerEdge R930
Network adapter
Vendor and model QLogic® QLE2692 16Gb FC Adapter
Number and type of ports 2 x 16Gb
Driver version 2.1.24.0-1OEM.600.0.0.2768847
Cooling fans
Vendor and model Dell EMC A1234
Number of cooling fans 5
Power stupplies
Vendor and model R930-1: Dell EMC L1100E-S1; R930-2: Dell EMC E1100E-S0
Number of power supplies 4
Wattage of each (W) 1,100
Storage configuration information Dell EMC VMAX 250F
Controller firmware revision Hypermax OS 5977.945.890
Number of storage controllers 2
Number of storage shelves 2
Number of drives per shelf 8, 9
Drive vendor and model number TBD
Drive size (GB) 900
Drive information (RAID, type) RAID3+1, SSD
Table 1: Detailed configuration information for the server under test.
Table 2: Detailed configuration information for the storage solution.
Support production and test Oracle databases on one array without reducing performance February 2017 | 8
Appendix B: Detailed test procedureWe used the following steps to configure each server and our Oracle environment.
Installing VMware ESXi 6 Update 21. Attach the installation media.2. Boot the server. 3. At the VMware® Installer screen, press Enter. 4. At the EULA screen, to Accept and Continue, press F11. 5. Under Storage Devices, select the appropriate virtual disk, and press Enter. 6. As the keyboard layout, select US, and press Enter.7. Enter the root password twice, and press Enter.8. To start installation, press F11. 9. After the server reboots, press F2, and enter root credentials. 10. Select Configure Management Network, and press Enter.11. Select the appropriate network adapter, and select OK. 12. Select IPv4 settings, and enter the desired IP address, subnet mask, and gateway for the server.13. Select OK, and restart the management network.
14. Repeat steps 1-13 on the second R930.
Deploying the VMware vCenter Server® 6 Update 2We used a client server running VMware ESXi to host our clients and virtualized management servers. For the VMware vCenter server VM, we installed Microsoft® Windows Server® 2012 R2 and performed the following steps to install and configure vCenter.
1. Log into the vCenter VM.2. From the VMware vCenter Server 6.0 install media, to start the install wizard, click Run.3. Select vCenter Server, and click Install.4. At the Install wizard welcome screen, click Next.5. Agree to the License Agreement, and click Next.6. Select the Embedded Deployment option, and click Next.7. Enter the system IP address.8. Enter and confirm the password you wish to use with the Administrator account for vCenter Single Sign On, and click Next.9. Click Next.10. Accept the default database settings, and click Next.11. Accept the default https port, and click Next.12. Accept the default installation path, and click Next.13. Uncheck “Join the VMware Customer Experience Improvement Program”, and click Next.14. Click Install.15. To exit the wizard, click Finish.16. On the installer, click Exit.17. Restart the server. 18. Once completed, log into the first vCenter’s web client at https://vcenter-ip-address/vsphere-client/?csp.19. Add all the necessary ESXi and vCenter licenses to the vCenter.
Creating the cluster and adding the hosts and storage to VMware vCenter®
We used the following steps to create the R930 cluster and add the desired servers and storage to the vCenter.
1. Once logged into the vCenter, navigate to Hosts and Clusters.2. Select the primary site management vCenter.3. Right-click the vCenter object, and select New Datacenter…4. Enter a name for the new datacenter, and click OK.5. Right-click the new datacenter, and click New Cluster…6. Enter a name for the new cluster.7. Click OK.8. Once the cluster has been created, right-click the cluster, and click Add Host.

Support production and test Oracle databases on one array without reducing performance February 2017 | 9
9. Enter the IP address for the first PowerEdge R930 server, and click Next.10. Enter the root credentials for the server, and click Next.11. To accept the server’s certificate, click Yes.12. Review the server details, and click Next.13. Assign the desired license, and click Next.14. Disable Lockdown mode, and click Next.15. Click Finish.16. Repeat steps 8-15 for the remaining PowerEdge R930 server.17. Once all the hosts are added to vCenter, use Update Manager to update the hosts, and install the latest EMC PowerPath.18. Once all the servers are added to the cluster, right click a host, and click StorageNew Datastore.19. Select VMFS, and click Next.20. Enter a name for the new datastore as “OS”, select the appropriate Dell EMC VMAX 250F OS LUN, and click Next.21. Accept the defaults for the partition configuration, and click Next.22. Click Finish.23. Once the create datastore task is complete, ensure that all the hosts in the cluster are mounted on the new datastore.24. Repeat steps 18-23 for the remaining eight data and four log LUNs.
Creating the VMsWe created one gold image VM for Oracle using the following steps.
1. In VMware vCenter, navigate to Virtual Machines.2. To create a new VM, click the icon.3. Leave Create a new virtual machine selected, and click Next.4. Enter a name for the virtual machine, and click Next. 5. Place the VM on the desired host with available CPUs, and click Next.6. Select the Dell EMC VMAX 250F LUN for the 70GB OS VMDK, and click next.7. Select the guest OS as Oracle Linux, and click Next.8. In the Customize Hardware section, use the following settings:
a. Set the vCPU count to 8.b. Set the Memory to 32GB, and check the Reserve all guest memory box.c. Add 8 x 165GB VMDKs for data and 4 x 5GB VMDKs for log. Set all VMDKs to thick provision eager zeroed.d. Create 2 additional VMware Paravirtual SCSI controllers, and assign all data VMDKs to one and all log VMDKs to the other.e. Attach an Oracle Linux 7.2 ISO to the CD/DVD drive.
9. Click Next.10. Click Finish.11. Power on the VMs, and follow the steps outlined in the next section to install and configure the workload.
Installing Oracle Enterprise Linux 7.21. Attach the Oracle Enterprise Linux 7.2 ISO to the VM, and boot to it.2. Select Install or upgrade an existing system.3. Choose the language you wish to use, and click Continue.4. Select Date & Time, and ensure the VM is set to the correct date, time, and timezone.5. Click Done.6. Select Installation Destination.7. Select the desired virtual disk for the OS.8. Under Other Storage Options, select I will configure partitioning.9. Click Done.10. Select Click here to create them automatically.11. Remove the /home partition.12. Expand the swap partition to 20GB.13. Assign all remaining free space to the / partition.14. Click Done.15. Click Accept Changes.16. Select Kdump.17. Uncheck Enable kdump, and click Done.

Support production and test Oracle databases on one array without reducing performance February 2017 | 10
18. Select Network & Hostname.19. Enter the desired hostname for the VM.20. Turn on the desired network port, and click Configure.21. On the General tab, select Automatically connect to this network when it is available.22. On the IPv4 Settings tab, select Manual under Method.23. Under Addresses, click Add, and enter the desired static IP information for the VM.24. Enter the desired DNS information.25. Click save, and click Done.26. Click Begin Installation.27. Select Root Password.28. Enter the desired root password, and click Done.29. When the installation completes, select Reboot to restart the server.
Configuring OEL 7.2 for Oracle1. Log onto the server as root.2. Disable the firewall:
systemctl stop firewalld
systemctl disable firewalld
3. Disable SELinux:
vi /etc/selinux/config
SELINUX=disabled
4. Update OEL 7.2:
yum update
5. Install VMware tools:
yum install open-vm-tools
6. Install the Oracle 12c preinstall RPM:
yum install oracle-rdbms-server-12cR1-preinstall
7. Using yum, install the following prerequisite packages for Oracle Database:
yum install elfutils-libelf-devel
yum install xhost
yum install unixODBC
yum install unixODBC-devel
8. Disable auditd:
systemctl disable auditd
9. Create password for oracle user:
passwd oracle

Support production and test Oracle databases on one array without reducing performance February 2017 | 11
10. Create Oracle users and groups by running these shell commands:
groupadd -g 54323 oper
groupadd -g 54327 asmdba
groupadd -g 54328 asmoper
groupadd -g 54329 asmadmin
usermod -u 54321 -g oinstall -G dba,oper,asmdba,asmoper,asmadmin oracle
11. Login as the Oracle user, and add the following lines to the .bash_profile file:
export TMP=/tmp
export TMPDIR=$TMP
export ORACLE_HOSTNAME=oracle-01.test.local
export ORACLE_UNQNAME=orcl
export ORACLE_BASE=/u01/app/oracle
export GRID_HOME=/u01/app/12.1.0.2/grid
export DB_HOME=$ORACLE_BASE/product/12.1.0.2/dbhome_1
export ORACLE_HOME=$DB_HOME
export ORACLE_SID=orcl
export ORACLE_TERM=xterm
export BASE_PATH=/usr/sbin:$PATH
export PATH=$ORACLE_HOME/bin:$BASE_PATH
export LD_LIBRARY_PATH=$ORACLE_HOME/lib:/lib:/usr/lib
export CLASSPATH=$ORACLE_HOME/JRE:$ORACLE_HOME/jlib:$ORACLE_HOME/rdbms/jlib
alias grid_env=’. /home/oracle/grid_env’
alias db_env=’. /home/oracle/db_env’

Support production and test Oracle databases on one array without reducing performance February 2017 | 12
12. Create the following files in the Oracle user’s home folder.
>>>db_env<<<
export ORACLE_SID=orcl
export ORACLE_HOME=$DB_HOME
export PATH=$ORACLE_HOME/bin:$BASE_PATH
export LD_LIBRARY_PATH=$ORACLE_HOME/lib:/lib:/usr/lib
export CLASSPATH=$ORACLE_HOME/JRE:$ORACLE_HOME/jlib:$ORACLE_HOME/rdbms/jlib
>>>grid_env<<<
export ORACLE_SID=+ASM
export ORACLE_HOME=$GRID_HOME
export PATH=$ORACLE_HOME/bin:$BASE_PATH
export LD_LIBRARY_PATH=$ORACLE_HOME/lib:/lib:/usr/lib
export CLASSPATH=$ORACLE_HOME/JRE:$ORACLE_HOME/jlib:$ORACLE_HOME/rdbms/jlib
13. Create the following directories, and assign the following permissions.
mkdir -p /u01/app/12.1.0.2/grid
mkdir -p /u01/app/oracle/product/12.1.0.2/dbhome_1
chown -R oracle:oinstall /u01
chmod -R 775 /u01/
14. Create passwords for the oracle and grid accounts with passwd.15. Append the following to /etc/security/limits.conf:
oracle - nofile 65536
oracle - nproc 16384
oracle - stack 32768
oracle - memlock 152043520
* soft memlock unlimited
* hard memlock unlimited

Support production and test Oracle databases on one array without reducing performance February 2017 | 13
16. We modified the system’s kernel parameters by appending the following to /etc/sysctl.conf:
fs.file-max = 6815744
kernel.sem = 250 32000 100 128
kernel.shmmni = 4096
kernel.shmall = 1073741824
kernel.shmmax = 4398046511104
net.core.rmem_default = 262144
net.core.rmem_max = 20971520
net.core.wmem_default = 262144
net.core.wmem_max = 20971520
fs.aio-max-nr = 1048576
net.ipv4.ip_local_port_range = 9000 65500
vm.nr_hugepages = 14336
vm.hugetlb_shm_group = 54321
17. Install the oracleasmlib packages.
yum install -y oracleasm-support-* oracleasmlib-*
18. Create a partition on all VMDKs using fdisk.19. Edit /etc/sysconfig/oracleasm to contain the following:
# ORACLEASM_UID: Default UID owning the /dev/oracleasm mount point.
ORACLEASM_UID=oracle
# ORACLEASM_GID: Default GID owning the /dev/oracleasm mount point.
ORACLEASM_GID=oinstall
# ORACLEASM_SCANBOOT: ‘true’ means fix disk perms on boot
ORACLEASM_SCANBOOT=true
# ORACLEASM_USE_LOGICAL_BLOCK_SIZE: ‘true’ means use the logical block
# size reported by the underlying disk instead of the physical. The
# default is ‘false’
ORACLEASM_USE_LOGICAL_BLOCK_SIZE=false

Support production and test Oracle databases on one array without reducing performance February 2017 | 14
20. Run the following commands to configure all disks for Oracle ASM:
oracleasm createdisk DATA1 /dev/sdb1
oracleasm createdisk DATA1 /dev/sdc1
oracleasm createdisk DATA2 /dev/sdc1
oracleasm createdisk DATA3 /dev/sdd1
oracleasm createdisk DATA4 /dev/sde1
oracleasm createdisk DATA5 /dev/sdf1
oracleasm createdisk DATA6 /dev/sdg1
oracleasm createdisk DATA7 /dev/sdh1
oracleasm createdisk DATA8 /dev/sdi1
oracleasm createdisk LOG1 /dev/sdj1
oracleasm createdisk LOG2 /dev/sdk1
oracleasm createdisk LOG3 /dev/sdl1
oracleasm createdisk LOG4 /dev/sdm1
Installing Oracle Grid and RAC1. Log in as the oracle user.2. Unzip linuxamd64_12c_grid_1of2.zip and linuxamd64_12c_grid_2of2.zip3. Open a terminal to the unzipped database directory.4. Type grid_env to set the Oracle grid environment.5. To start the installer, type./runInstaller6. At the Updates screen, select Skip updates.7. In the Select Installation Option screen, select Install and Configure Grid Infrastructure for a Standalone Server, and click Next.8. Choose the language, and click Next.9. In the Create ASM Disk Group screen, choose the Disk Group Name, and change redundancy to External.10. Change the path to /dev/oracleasm/disks and select the eight disks that you are planning to use for the database, and click Next.11. In the Specify ASM Password screen, choose Use same password for these accounts, write the passwords for the ASM users, and
click Next.12. Leave the default Operating System Groups, and click Next.13. Leave the default installation, and click Next.14. Leave the default inventory location, and click Next.15. Under Root script execution, select Automatically run configuration scripts and enter root credentials.16. In the Prerequisite Checks screen, make sure that there are no errors. 17. In the Summary screen, verify that everything is correct, and click Finish to install Oracle Grid Infrastructure.18. At one point during the installation, the installation prompts you to execute two configuration scripts as root. Follow the instructions to
run the scripts.19. At the Finish screen, click Close.
Creating Oracle ASM disk groups for the database1. Log into the system as the oracle user.2. Set the X Window DISPLAY variable as appropriate for your configuration.3. Type grid_env to set the Oracle grid environment.4. Start the ASM configuration assistant, asmca.

Support production and test Oracle databases on one array without reducing performance February 2017 | 15
5. On the Disk Groups tab, click Create.6. On the Create Disk Group pop-up screen, enter LOG for the Disk Group Name.7. Select External (None) for Redundancy.8. Select /dev/oracleasm/disks for the Disk Path.9. Select the four Log disks.10. Click Show Advanced Options, and set the ASM and Database compatibilities to 12.1.0.0.11. Click OK to create the LOG disk group, and click OK on the completed-task pop-up screen.12. Right-click the DATA drive, and choose Edit Attributes. Make sure both ASM and Database Compatibility fields list 12.1.0.0.0, and
click OK.13. Click Exit to close the ASM configuration assistant.
Installing the software for Oracle Database 12c1. Log into the system as the oracle user.2. Set the X Window DISPLAY variable as appropriate for your configuration.3. Copy the extracted download files for the Database install to /database.4. Run the Database GUI installer.
./database/runInstaller.sh
5. On the Configure Security Updates screen, unselect I wish to receive security updates via My Oracle Support, and click Next.6. On the warning pop-up screen, click Yes.7. On the Download Software Updates screen, select Skip software updates, and click Next.8. On the Select Installation Option screen, select Install database software only, and click Next.9. On the Grid Installation Options screen, select Single instance database installation, and click Next.10. On the Select Product Languages screen, leave the default setting of English, and click Next.11. On the Select Database Edition screen, select Enterprise Edition, and click Next.12. On the Specify Installation Location, leave the defaults, and click Next.13. On the Create Inventory screen, leave the default settings, and click Next.14. On the Privileged Operating System groups screen, keep the defaults, and click Next.15. Allow the prerequisite checker to complete.16. On the Summary screen, click Install.17. Once the Execute Configuration scripts prompt appears, ssh into the server as root, and run the following command:
/home/oracle/app/oracle/product/12.1.0/dbhome_1/root.sh
18. Return to the prompt, and click OK.19. Once the installer completes, click Close.
Creating the databaseWe used the following steps to create our Oracle database. For specific spfile configurations, see Appendix D.
1. Log into the system as the oracle user.2. Set the X Window DISPLAY variable as appropriate for your configuration.3. Start the database configuration assistant, dbca.4. On the Database Operations screen, select Create a Database, and click Next.5. On the Creation Mode screen, select Advanced Mode, and click Next.6. On the Database Templates screen, select General Purpose or Transaction Processing. 7. Click Next.8. On the Database Identification screen, enter orcl for Global Database Name and SID Prefix, and click Next. 9. On the Management Options screen, keep the defaults, and click Next.10. On the Database Credentials screen, select Use the Same Administrative Password for All Accounts, enter the password twice, and
click Next.11. On the Storage Locations screen, select ASM for Storage Type, select Use Common Location for All Database Files, and enter +DATA
for Database Files Locations.12. On the Initialization Parameters screen, leave the defaults, and click Next.13. On the Creation Options screen, select Create Database, and click Next.14. On the Pre Requisite Checks screen, allow the prerequisite checker to complete, resolve any issues, and click Next.15. On the Summary pop-up screen, click OK.

Support production and test Oracle databases on one array without reducing performance February 2017 | 16
16. Click Exit on the final pop-up screen to close the configuration assistant.17. Once the database installed, we created two redo log groups. Each contained a single 9GB file on the +LOG ASM group. All default
groups were removed.18. On the database, we created a tablespace named TPCC, set it to smallfile, and add 40 datafiles sized at 32GB with no auto-extend.
Installing SLOB and populating the database1. Download the SLOB kit from www.kevinclosson.net/slob/.2. Copy and untar the files to /home/oracle/.3. Edit the slob.conf file to match Appendix D.4. As the oracle user in the SLOB folder, type ./setup.sh SLOB 128 to start the data population to the SLOB tablespace we
created earlier.5. When the setup is complete, the database is populated.
Creating the AppSync VMWe created a base Windows Server 2012 R2 VM on our vCenter host to configure AppSync on. We used the following steps to install and configure AppSync for our environment.
1. Download the AppSync install package from the DellEMC support website.2. Open the AppSync install package and run AppSync-3.1.0.0-win-x64.exe.3. In the Introduction, click Next.4. In License Agreement, accept the terms of the license agreement, and click Next.5. In Choose Install Folder, accept defaults, and click Next.6. In AppSync Administrator, write your admin password, and click Next.7. In AppSync Ports, accept defaults, and click Next.8. In Pre-Installation Summary, look over your choices to make sure you didn’t make a mistake, and click Install.9. In Installation Complete, click Next to complete the install.10. When the information pops up, click Done and your default web browser will open to AppSync.11. In the AppSync login, type your username and password, and click Login.12. Click SettingsStorage Infrastructure.13. Click AddVMAX.14. In SMI-S Provider, type the IP address, username, and password, and click Next.15. In Select VMAX, select the array you are trying to add, and click Next.16. In Groups and Pools, select the Storage Group and the Storage Pools you made for AppSync, then click Finish.17. Click SettingsVMware vCenter Servers.18. Click Add.19. In Add vCenter Server, type the hostname, username, and password for your vCenter server, then click OK.20. Click Service PlansVMware Datacenters.21. Click Create.22. In the Create New Plan window, select Bronze as your template AppSync service plan, name your service plan, and click OK.23. Click your new service plan.24. In Plan Startup, select On demand.25. In Create local copy, select Crash Consistent.26. Check Mount copy.27. In Mount Copy, select your host, change Mount Signature to Use new signature, and keep Cluster Mount at Yes, then click Apply.28. Click Copy ManagementVMware Datacenters.29. Click your VMware Datacenter you added earlier.30. Highlight the LUNs you wish to protect, and click ProtectSubscribe to PlanYour plan name.
Running the AppSync copy test1. Open a web browser and navigate to your AppSync address.2. In the AppSync login, type your username and password, and click Login.3. Click Service PlansVMware Datacenters.4. Select the service plan you made previously, and click Run.5. After the service plan has finished running, open a connection to your vCenter.6. Click Hosts & Clusters.

Support production and test Oracle databases on one array without reducing performance February 2017 | 17
7. Select the host on which you intend to add a VM.8. Select Related ObjectsDatastores.9. Right-click the new datastore that has your VM OS, and click Register VM.10. Navigate to the directory containing your VM address, and click OK.11. In Name and location, give your VM a different name from the original VM, select the datacenter, and click Next.12. In Host / Cluster, select your relevant cluster, and click Next.13. In Specify a Specific Host, select your host, and click Next.14. In Ready to Complete, click Finish.
Running the performance test1. Once the database build is complete or in between test runs, shut down the VM, and reboot the host.2. Once the host is rebooted, power on the baseline VM, and let it sit idle for 10 minutes to ensure that the database is started and ready
for testing.3. Start esxtop, capturing data every minute for twelve hours.4. As the oracle user, navigate to the SLOB folder, and type ./runit.sh 128 to kick off the SLOB run.5. After the baseline VM has been running for one hour, follow steps 3-14 in the Running the AppSync copy test section above to create
your first AppSync Copy VM. 6. When the VM is visible in your vCenter, highlight the VM, and reset the MAC address conflict to green.7. Power on the AppSync copy VM, and click Answer Question.8. Select I copied it, and click Finish.9. Once the VM has been fully powered on, right-click the VM and select Open Console.10. In the console that opens in a new browser tab, edit the ethernet adapter config file to change the IP address, and then activate the
ethernet adapter.11. Log into the AppSync Copy VM as the oracle user, and edit the /home/oracle/SLOB/slob.conf file.12. As the oracle user, navigate to the SLOB folder, and type ./runit.sh 128 to kick off the SLOB run.13. Repeat steps 5-12 every hour until there are 7 AppSync Copy VMs, and adjust the Hotspot_MB, Hotspot_MB_Offset, Run_Time, and
Think_TM settings for each VM to match Appendix E.14. Once the test is complete, collect all SLOB output files and esxtop data for parsing.15. Repeat steps 1-14 for all subsequent test runs.

Support production and test Oracle databases on one array without reducing performance February 2017 | 18
Appendix C: Oracle SpfileDatabase: ORCL
orcl.__data_transfer_cache_size=0
orcl.__db_cache_size=7952400384
orcl.__java_pool_size=67108864
orcl.__large_pool_size=100663296
orcl.__oracle_base=’/u01/app/oracle’#ORACLE_BASE set from environment
orcl.__pga_aggregate_target=3355443200
orcl.__sga_target=10066329600
orcl.__shared_io_pool_size=503316480
orcl.__shared_pool_size=1409286144
orcl.__streams_pool_size=0
*.audit_file_dest=’/u01/app/oracle/admin/orcl/adump’
*.audit_trail=’db’
*.compatible=’12.1.0.2.0’
*.control_files=’+DATA/ORCL/CONTROLFILE/current.261.926251959’,’/u01/app/oracle/fast_recovery_area/ORCL/controlfile/o1_mf_d11ohp17_.ctl’
*.db_block_size=8192
*.db_create_file_dest=’+DATA’
*.db_domain=’’
*.db_name=’orcl’
*.db_recovery_file_dest=’/u01/app/oracle/fast_recovery_area’
*.db_recovery_file_dest_size=4560m
*.diagnostic_dest=’/u01/app/oracle’
*.dispatchers=’(PROTOCOL=TCP) (SERVICE=orclXDB)’
*.fast_start_mttr_target=180
*.filesystemio_options=’setall’
*.local_listener=’LISTENER_ORCL’

Support production and test Oracle databases on one array without reducing performance February 2017 | 19
*.open_cursors=2000
*.pga_aggregate_target=3190m
*.processes=2000
*.recyclebin=’off’
*.remote_login_passwordfile=’EXCLUSIVE’
*.sga_target=9570m
*.trace_enabled=FALSE
*.undo_retention=1
*.undo_tablespace=’UNDOTBS1’

Support production and test Oracle databases on one array without reducing performance February 2017 | 20
Appendix D: Benchmark parametersWe used the following slob.conf parameter settings.
UPDATE_PCT=40
RUN_TIME=43200
WORK_LOOP=0
SCALE=9600M
WORK_UNIT=64
REDO_STRESS=LITE
LOAD_PARALLEL_DEGREE=8
THREADS_PER_SCHEMA=1
# Settings for SQL*Net connectivity:
#ADMIN_SQLNET_SERVICE=slob
#SQLNET_SERVICE_BASE=slob
#SQLNET_SERVICE_MAX=2
#SYSDBA_PASSWD=change_on_install
#########################
#### Advanced settings:
#
# The following are Hot Spot related parameters.
# By default Hot Spot functionality is disabled (DO_HOTSPOT=FALSE).
#
DO_HOTSPOT=TRUE
HOTSPOT_MB=100
HOTSPOT_OFFSET_MB=100
HOTSPOT_FREQUENCY=1
#
# The following controls operations on Hot Schema
# Default Value: 0. Default setting disables Hot Schema

Support production and test Oracle databases on one array without reducing performance February 2017 | 21
#
HOT_SCHEMA_FREQUENCY=0
# The following parameters control think time between SLOB
# operations (SQL Executions).
# Setting the frequency to 0 disables think time.
#
THINK_TM_FREQUENCY=1
THINK_TM_MIN=.175
THINK_TM_MAX=.175
#########################
export UPDATE_PCT RUN_TIME WORK_LOOP SCALE WORK_UNIT LOAD_PARALLEL_DEGREE REDO_STRESS
export DO_HOTSPOT HOTSPOT_MB HOTSPOT_OFFSET_MB HOTSPOT_FREQUENCY HOT_SCHEMA_FREQUENCY THINK_TM_FREQUENCY THINK_TM_MIN THINK_TM_MAX
Support production and test Oracle databases on one array without reducing performance February 2017 | 22
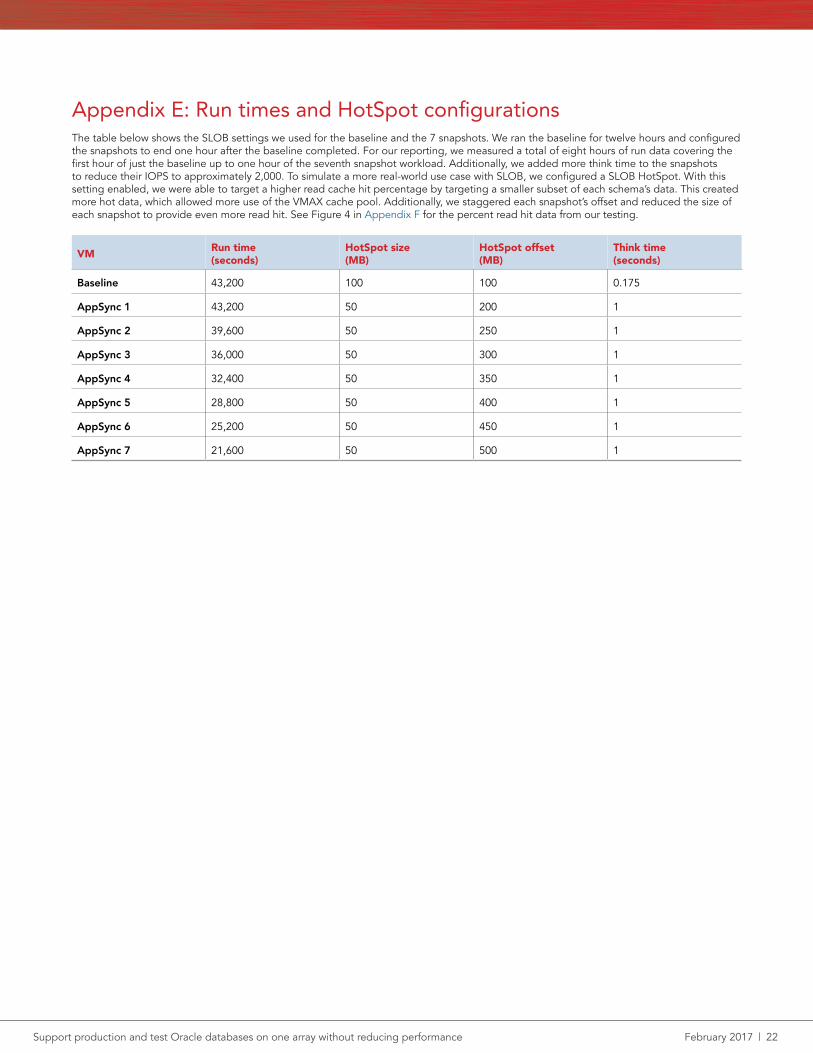
Appendix E: Run times and HotSpot configurationsThe table below shows the SLOB settings we used for the baseline and the 7 snapshots. We ran the baseline for twelve hours and configured the snapshots to end one hour after the baseline completed. For our reporting, we measured a total of eight hours of run data covering the first hour of just the baseline up to one hour of the seventh snapshot workload. Additionally, we added more think time to the snapshots to reduce their IOPS to approximately 2,000. To simulate a more real-world use case with SLOB, we configured a SLOB HotSpot. With this setting enabled, we were able to target a higher read cache hit percentage by targeting a smaller subset of each schema’s data. This created more hot data, which allowed more use of the VMAX cache pool. Additionally, we staggered each snapshot’s offset and reduced the size of each snapshot to provide even more read hit. See Figure 4 in Appendix F for the percent read hit data from our testing.
VM Run time (seconds)
HotSpot size (MB)
HotSpot offset(MB)
Think time(seconds)
Baseline 43,200 100 100 0.175
AppSync 1 43,200 50 200 1
AppSync 2 39,600 50 250 1
AppSync 3 36,000 50 300 1
AppSync 4 32,400 50 350 1
AppSync 5 28,800 50 400 1
AppSync 6 25,200 50 450 1
AppSync 7 21,600 50 500 1

Support production and test Oracle databases on one array without reducing performance February 2017 | 23
Appendix F: Detailed findingsWe pulled latency and IOPS data from the performance tracking tools provided by EMC Unisphere® for VMAX.
Figure 1: Data storage group latency during the test.
Figure 2: Host IOPS during the test.

Support production and test Oracle databases on one array without reducing performance February 2017 | 24
Figure 3: Oracle data IOPS from the test.
Figure 4: Percent read hit from the test.

Support production and test Oracle databases on one array without reducing performance February 2017 | 25
Principled Technologies is a registered trademark of Principled Technologies, Inc.All other product names are the trademarks of their respective owners.
DISCLAIMER OF WARRANTIES; LIMITATION OF LIABILITY:Principled Technologies, Inc. has made reasonable efforts to ensure the accuracy and validity of its testing, however, Principled Technologies, Inc. specifically disclaims any warranty, expressed or implied, relating to the test results and analysis, their accuracy, completeness or quality, including any implied warranty of fitness for any particular purpose. All persons or entities relying on the results of any testing do so at their own risk, and agree that Principled Technologies, Inc., its employees and its subcontractors shall have no liability whatsoever from any claim of loss or damage on account of any alleged error or defect in any testing procedure or result.
In no event shall Principled Technologies, Inc. be liable for indirect, special, incidental, or consequential damages in connection with its testing, even if advised of the possibility of such damages. In no event shall Principled Technologies, Inc.’s liability, including for direct damages, exceed the amounts paid in connection with Principled Technologies, Inc.’s testing. Customer’s sole and exclusive remedies are as set forth herein.
This project was commissioned by Dell Technologies.
PrincipledTechnologies®
Facts matter.®PrincipledTechnologies®
Facts matter.®