Sun Open Telecommunications Platform 20 Developer's Guide
92
Sun OpenTelecommunications Platform 2.0 Developer's Guide Sun Microsystems, Inc. 4150 Network Circle Santa Clara, CA 95054 U.S.A. Part No: 820–3065 February 2008
Transcript of Sun Open Telecommunications Platform 20 Developer's Guide

Sun Open TelecommunicationsPlatform 2.0 Developer's Guide
Sun Microsystems, Inc.4150 Network CircleSanta Clara, CA 95054U.S.A.
Part No: 820–3065February 2008

Copyright 2008 Sun Microsystems, Inc. 4150 Network Circle, Santa Clara, CA 95054 U.S.A. All rights reserved.
Sun Microsystems, Inc. has intellectual property rights relating to technology embodied in the product that is described in this document. In particular, and withoutlimitation, these intellectual property rights may include one or more U.S. patents or pending patent applications in the U.S. and in other countries.
U.S. Government Rights – Commercial software. Government users are subject to the Sun Microsystems, Inc. standard license agreement and applicable provisionsof the FAR and its supplements.
This distribution may include materials developed by third parties.
Parts of the product may be derived from Berkeley BSD systems, licensed from the University of California. UNIX is a registered trademark in the U.S. and othercountries, exclusively licensed through X/Open Company, Ltd.
Sun, Sun Microsystems, the Sun logo, the Solaris logo, the Java Coffee Cup logo, docs.sun.com, Java, and Solaris are trademarks or registered trademarks of SunMicrosystems, Inc. in the U.S. and other countries. All SPARC trademarks are used under license and are trademarks or registered trademarks of SPARCInternational, Inc. in the U.S. and other countries. Products bearing SPARC trademarks are based upon an architecture developed by Sun Microsystems, Inc.
The OPEN LOOK and Sun Graphical User Interface was developed by Sun Microsystems, Inc. for its users and licensees. Sun acknowledges the pioneering efforts ofXerox in researching and developing the concept of visual or graphical user interfaces for the computer industry. Sun holds a non-exclusive license from Xerox to theXerox Graphical User Interface, which license also covers Sun's licensees who implement OPEN LOOK GUIs and otherwise comply with Sun's written licenseagreements.
Products covered by and information contained in this publication are controlled by U.S. Export Control laws and may be subject to the export or import laws inother countries. Nuclear, missile, chemical or biological weapons or nuclear maritime end uses or end users, whether direct or indirect, are strictly prohibited. Exportor reexport to countries subject to U.S. embargo or to entities identified on U.S. export exclusion lists, including, but not limited to, the denied persons and speciallydesignated nationals lists is strictly prohibited.
DOCUMENTATION IS PROVIDED “AS IS” AND ALL EXPRESS OR IMPLIED CONDITIONS, REPRESENTATIONS AND WARRANTIES, INCLUDING ANYIMPLIED WARRANTY OF MERCHANTABILITY, FITNESS FOR A PARTICULAR PURPOSE OR NON-INFRINGEMENT, ARE DISCLAIMED, EXCEPT TOTHE EXTENT THAT SUCH DISCLAIMERS ARE HELD TO BE LEGALLY INVALID.
Copyright 2008 Sun Microsystems, Inc. 4150 Network Circle, Santa Clara, CA 95054 U.S.A. Tous droits réservés.
Sun Microsystems, Inc. détient les droits de propriété intellectuelle relatifs à la technologie incorporée dans le produit qui est décrit dans ce document. En particulier,et ce sans limitation, ces droits de propriété intellectuelle peuvent inclure un ou plusieurs brevets américains ou des applications de brevet en attente aux Etats-Uniset dans d'autres pays.
Cette distribution peut comprendre des composants développés par des tierces personnes.
Certaines composants de ce produit peuvent être dérivées du logiciel Berkeley BSD, licenciés par l'Université de Californie. UNIX est une marque déposée auxEtats-Unis et dans d'autres pays; elle est licenciée exclusivement par X/Open Company, Ltd.
Sun, Sun Microsystems, le logo Sun, le logo Solaris, le logo Java Coffee Cup, docs.sun.com, Java et Solaris sont des marques de fabrique ou des marques déposées deSun Microsystems, Inc. aux Etats-Unis et dans d'autres pays. Toutes les marques SPARC sont utilisées sous licence et sont des marques de fabrique ou des marquesdéposées de SPARC International, Inc. aux Etats-Unis et dans d'autres pays. Les produits portant les marques SPARC sont basés sur une architecture développée parSun Microsystems, Inc.
L'interface d'utilisation graphique OPEN LOOK et Sun a été développée par Sun Microsystems, Inc. pour ses utilisateurs et licenciés. Sun reconnaît les efforts depionniers de Xerox pour la recherche et le développement du concept des interfaces d'utilisation visuelle ou graphique pour l'industrie de l'informatique. Sun détientune licence non exclusive de Xerox sur l'interface d'utilisation graphique Xerox, cette licence couvrant également les licenciés de Sun qui mettent en place l'interfaced'utilisation graphique OPEN LOOK et qui, en outre, se conforment aux licences écrites de Sun.
Les produits qui font l'objet de cette publication et les informations qu'il contient sont régis par la legislation américaine en matière de contrôle des exportations etpeuvent être soumis au droit d'autres pays dans le domaine des exportations et importations. Les utilisations finales, ou utilisateurs finaux, pour des armes nucléaires,des missiles, des armes chimiques ou biologiques ou pour le nucléaire maritime, directement ou indirectement, sont strictement interdites. Les exportations ouréexportations vers des pays sous embargo des Etats-Unis, ou vers des entités figurant sur les listes d'exclusion d'exportation américaines, y compris, mais de manièrenon exclusive, la liste de personnes qui font objet d'un ordre de ne pas participer, d'une façon directe ou indirecte, aux exportations des produits ou des services quisont régis par la legislation américaine en matière de contrôle des exportations et la liste de ressortissants spécifiquement designés, sont rigoureusement interdites.
LA DOCUMENTATION EST FOURNIE "EN L'ETAT" ET TOUTES AUTRES CONDITIONS, DECLARATIONS ET GARANTIES EXPRESSES OU TACITESSONT FORMELLEMENT EXCLUES, DANS LA MESURE AUTORISEE PAR LA LOI APPLICABLE, Y COMPRIS NOTAMMENT TOUTE GARANTIEIMPLICITE RELATIVE A LA QUALITE MARCHANDE, A L'APTITUDE A UNE UTILISATION PARTICULIERE OU A L'ABSENCE DE CONTREFACON.
080312@19860
Contents
Preface .....................................................................................................................................................7
1 Supported Solution Topologies ........................................................................................................13Solution Topologies ............................................................................................................................ 13
One Provisioning Server for Each Sun OTP Instance ............................................................. 13One Provisioning Server for Each Tier ...................................................................................... 14One Provisioning Server for Each Solution Instance .............................................................. 15
2 Developing Applications Using Sun OTP ......................................................................................... 17Interfaces Exposed by Sun OTP ......................................................................................................... 17Sun OTP Protocols .............................................................................................................................. 18
3 Sun OTP Tools for Application Development .................................................................................. 21Tools for Application Development ................................................................................................. 21
4 Sun OTP Components .........................................................................................................................23N1 SPS Components ........................................................................................................................... 23N1 SPS Plans ........................................................................................................................................ 25
Order of Installing N1 SPS Plans ................................................................................................ 26Plan Re-runs ................................................................................................................................. 26Plan Configuration Files ............................................................................................................. 27Utility Plans .................................................................................................................................. 30
Sun OTP AHE Plug-in ........................................................................................................................ 30Customizing Sun OTP Deployment ................................................................................................. 30
Examples of Solution Specific Steps ........................................................................................... 31
3

5 Adapting Applications for Sun OTP .................................................................................................. 33Developing N1 SPS Plans for NEP Application Provisioning ....................................................... 33
Calling Existing Application Installers from N1 SPS ............................................................... 33Moving an Existing Application Installer Code to an SPS Component ................................ 34Using Native N1 SPS Provisioning Features ............................................................................. 36
Developing Sun Cluster HA Agents for NEP Application Management ..................................... 38Developing Agents Using Agent Builder .................................................................................. 38Developing Agents Using Scripts and C/C++ .......................................................................... 38
6 Installing Sun OTP As Part of Existing Solution Deployment .......................................................39Calling N1 SPS Plans From Shell Scripts .......................................................................................... 39
Examples ....................................................................................................................................... 40Calling N1 SPS Plans From C/C++ ................................................................................................... 41Calling N1 SPS Plans From Java ........................................................................................................ 43Using N1 SPS From JumpStart .......................................................................................................... 45Using N1 SPS From JET ..................................................................................................................... 46
7 Using Sun OTP for End-to-End Solution Deployment ................................................................... 47Stages in Using Sun OTP for End-to-End Solution Deployment .................................................. 47
Deployment Methods .................................................................................................................. 49
8 Using Sun OTP Security Services ....................................................................................................... 51Securing Web Applications With Sun OTP ..................................................................................... 51
Configuring Policy Agent ........................................................................................................... 51▼ To Configure Policy Agent for Web Server 6.1 on Solaris 10 11/06 ............................... 52
Integrating Web Applications Into Sun OTP Web SSO Environment ......................................... 54Web Applications Without Any Authentication Implementation ........................................ 54Web Applications With Their Own Authentication Implementation .................................. 54
Hardening Sun OTP and Hosted NEP Applications ....................................................................... 56
9 Examples of End-to-End Solution Deployment ............................................................................. 57Prerequisites for Sun OTP Installation ............................................................................................. 57
Prerequisite Tasks for Sun OTP Installation ............................................................................ 58▼ To Install Solaris OS from the Bootable DVD ................................................................... 58
Contents
Sun Open Telecommunications Platform 2.0 Developer's Guide • February 20084

▼ To Prepare the Sun OTP Hosts ........................................................................................... 59▼ To Set up the Self-Contained Sun OTP Provisioning Server .......................................... 60
Installing Sun OTP Using GUI Installation ..................................................................................... 61▼ To Install Sun OTP on a Clustered System ............................................................................... 61▼ To Configure the Quorum Disk on a Two-Host Cluster ........................................................ 76
Installing Sun OTP Using Command-Line Installation ................................................................. 77▼ To Install Sun OTP on a Clustered System ............................................................................... 77
A Sun OTP Plan Worksheet ....................................................................................................................81Sun OTP Plan Settings Description .................................................................................................. 81Sun OTP Plan Worksheet ................................................................................................................... 85
B Sun OTP Log Files .................................................................................................................................87Log Files ................................................................................................................................................ 87
OTP Installation Log Files .......................................................................................................... 87Log File Locations ........................................................................................................................ 87
Index ......................................................................................................................................................89
Contents
5

6
Preface
Sun Open Telecommunications Platform 2.0 Developer's Guide describes how to develop anddeploy applications using SunTM OTP.
The following topics are discussed:
■ “What is Sun OTP?” on page 7■ “Target Audience” on page 9■ “Component Product Mapping” on page 10■ “Sun OTP Documentation Set” on page 11■ “Sun Welcomes Your Comments” on page 12
What is Sun OTP?Sun Open Telecommunications Platform (Sun OTP) provides integrated high availabilityservices, system management services, application provisioning services, and security servicesthat enable you to develop, deploy, host, and secure Network Equipment Provider (NEP)applications.
Sun OTP version 2.0 provides the following services:
■ “Provisioning Service” on page 7■ “Management Service” on page 8■ “Availability Service” on page 8■ “Security Service” on page 9
Provisioning ServiceProvisioning service consists of platform and application provisioning services.
Platform ProvisioningThe platform provisioning service enables end-to-end provisioning of Sun OTP computeelements, including bare metal and firmware provisioning, operating system provisioning, andprovisioning of Sun OTP software components.
7
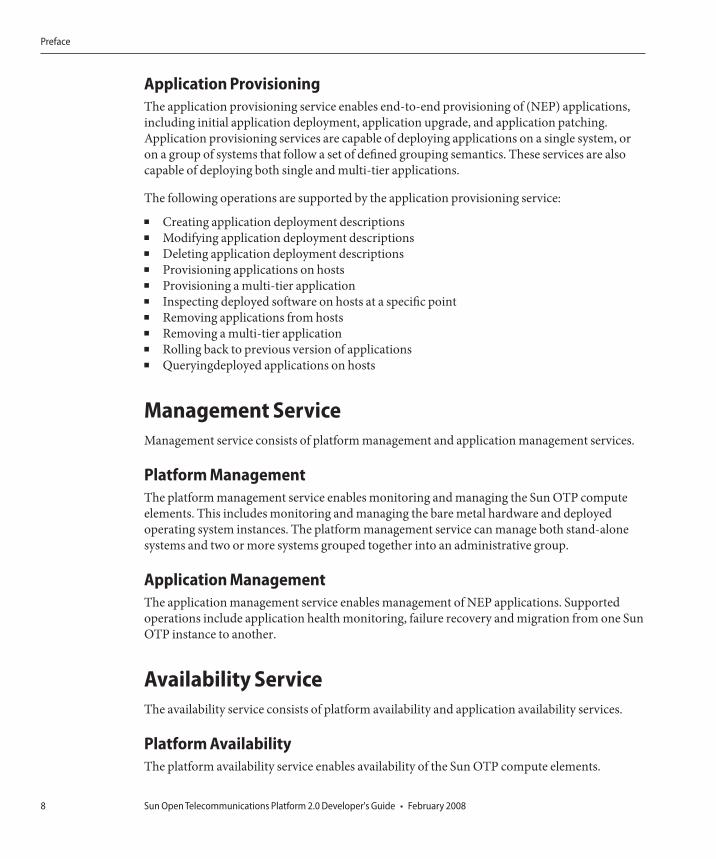
Application ProvisioningThe application provisioning service enables end-to-end provisioning of (NEP) applications,including initial application deployment, application upgrade, and application patching.Application provisioning services are capable of deploying applications on a single system, oron a group of systems that follow a set of defined grouping semantics. These services are alsocapable of deploying both single and multi-tier applications.
The following operations are supported by the application provisioning service:
■ Creating application deployment descriptions■ Modifying application deployment descriptions■ Deleting application deployment descriptions■ Provisioning applications on hosts■ Provisioning a multi-tier application■ Inspecting deployed software on hosts at a specific point■ Removing applications from hosts■ Removing a multi-tier application■ Rolling back to previous version of applications■ Queryingdeployed applications on hosts
Management ServiceManagement service consists of platform management and application management services.
Platform ManagementThe platform management service enables monitoring and managing the Sun OTP computeelements. This includes monitoring and managing the bare metal hardware and deployedoperating system instances. The platform management service can manage both stand-alonesystems and two or more systems grouped together into an administrative group.
Application ManagementThe application management service enables management of NEP applications. Supportedoperations include application health monitoring, failure recovery and migration from one SunOTP instance to another.
Availability ServiceThe availability service consists of platform availability and application availability services.
Platform AvailabilityThe platform availability service enables availability of the Sun OTP compute elements.
Preface
Sun Open Telecommunications Platform 2.0 Developer's Guide • February 20088

Application AvailabilityThe application availability service enables basic lifecycle and availability management of NEPapplications. Supported lifecycle operations include registration, activation, and deactivation ofapplications.
The following operations are supported by the application lifecycle and availabilitymanagement services:
■ Creating application manifests■ Modifying application manifests■ Deleting application manifests■ Creating application dependencies■ Modifying application dependencies■ Deleting application dependencies■ Registering applications■ Starting applications■ Stopping applications■ Querying application state■ Migrating applications from host A to host B■ Failing over applications from host A to host B■ Restarting applications on host X
Security ServiceThe security service is used to secure NEP applications by authenticating Web applicationsthrough a Web Single Sign-On (Web SSO) feature. Once you log into a web-basedadministration interface in Sun OTP, you can access the other web-based administrationinterfaces without any reauthentication. Additionally, you can use the Solaris Security Toolkit(SST) driver to harden the Sun OTP application hosting environment (AHE) to improve theoverall network security.
Target AudienceOEM developers who wish to install Sun OTP in their development environment and develop,deploy applications using Sun OTP.
Preface
9
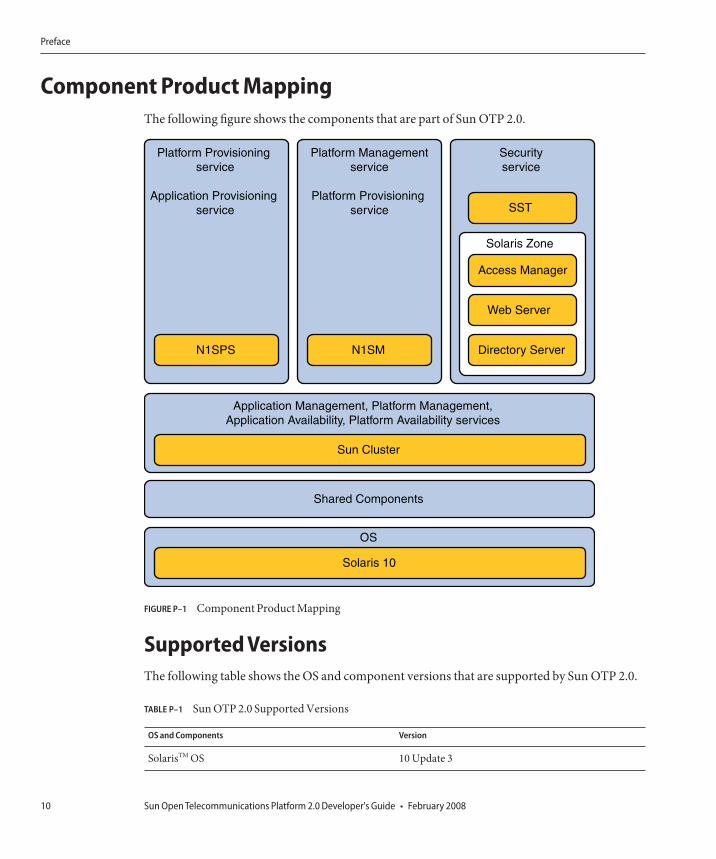
Component Product MappingThe following figure shows the components that are part of Sun OTP 2.0.
Supported VersionsThe following table shows the OS and component versions that are supported by Sun OTP 2.0.
TABLE P–1 Sun OTP 2.0 Supported Versions
OS and Components Version
SolarisTM OS 10 Update 3
SST
Directory ServerN1SMN1SPS
Sun Cluster
Solaris 10
Web Server
Access Manager
Solaris Zone
Platform Provisioning service
Application Provisioning service
Platform Managementservice
Platform Provisioning service
Securityservice
Shared Components
OS
Application Management, Platform Management, Application Availability, Platform Availability services
FIGURE P–1 Component Product Mapping
Preface
Sun Open Telecommunications Platform 2.0 Developer's Guide • February 200810

TABLE P–1 Sun OTP 2.0 Supported Versions (Continued)OS and Components Version
Sun Cluster 3.2
Sun N1TM Service Provisioning System 5.2.4
Sun N1 System Manager 1.3.3
OS Provisioning Plug-in 3.2
Sun JavaTM System Web Server 7.0 Update 1
Sun Java System Directory Server 6.1 Enterprise Edition
Sun Java System Access Manager 7.1
Solaris Security Toolkit 4.2
Sun OTP Documentation SetSun OTP guides are available as online files in PDF and HTML formats. The following table liststhe Sun OTP guides and their purpose.
TABLE P–2 Sun OTP Documentation Set
Documentation Purpose
Sun Open Telecommunications Platform 2.0 ReleaseNotes
Late-breaking information about the software anddocumentation
Sun Open Telecommunications Platform 2.0Installation Guide
To install Sun OTP in the development environment
Sun Open Telecommunications Platform 2.0Administration Guide
To administer, upgrade, update, backup, and restore SunOTP
Sun Open Telecommunications Platform 2.0Developer's Guide
■ To develop and deploy applications using Sun OTP■ To describe the Sun OTP tools for developing
applications■ To adapt applications for Sun OTP■ To install Sun OTP in the existing solution■ To use Sun OTP for end-to-end solution
deployment
The complete Sun OTP documentation is available athttp://docs.sun.com/app/docs/coll/1629.4.
Preface
11

Sun Welcomes Your CommentsSun is interested in improving its documentation and welcomes your comments andsuggestions. To share your comments, go to http://docs.sun.com and click Send Comments.In the online form, provide the full document title and part number. The part number is locatedon the book's title page and in the document's URL. For example, the name of this book is SunOpen Telecommunications Platform 2.0 Developer's Guide and the part number of this book is820-3065.
Preface
Sun Open Telecommunications Platform 2.0 Developer's Guide • February 200812

Supported Solution Topologies
You can deploy single-tier and multi-tier solutions using a centralized provisioning server ofSun OTP.
You can set up the provisioning server in the following ways:
■ If you have a separate physical system for the provisioning server, set up the provisioningserver on that system. This provisioning server is referred to as external provisioning server.
■ If you do not have a separate physical system for the provisioning server, set up theprovisioning server in the stand-alone host or in the first host of the cluster. Thisprovisioning server is referred to as self-contained provisioning server.
External provisioning server is deployed on top of a separate Sun OTP instance. Self-containedprovisioning server is deployed along with NEP applications on top of the Sun OTP instanceand within the same operating system.
Solution TopologiesThe following solution topologies are supported:
■ “One Provisioning Server for Each Sun OTP Instance” on page 13■ “One Provisioning Server for Each Tier” on page 14■ “One Provisioning Server for Each Solution Instance” on page 15
One Provisioning Server for Each Sun OTP InstanceIn this topology, one provisioning server is present for each Sun OTP instance.
In tier 3, the provisioning server within the normal box indicates the active node whereas theprovisioning server within the dotted line box indicates the failover node or additional node.The figure also shows where you can place your applications in each tier.
1C H A P T E R 1
13

One Provisioning Server for Each TierIn this topology, one provisioning server is present for each tier.
In tier 3, the provisioning server within the normal box indicates the active node whereas theprovisioning server within the dotted line box indicates the failover node or additional node.The figure also shows where you can place your applications in each tier.
In tier 3, the provisioning server is disabled in the second clustered OTP instance.
Tier 1
PS
App-1
App-2
App-3 App-3
App-1 App-1
PA
PS - Provisioning Server - Provisioning AgentPA
PS
PA
PS
PA
PS
PA
PS
PA
PS
PA
PS
PA
PS
PA
PS
PA
PS
PA
PS
PA
PS
PA
PS
PA
PS
PA
Tier 2
Tier 3
FIGURE 1–1 One Provisioning Server for Each Sun OTP Instance
Solution Topologies
Sun Open Telecommunications Platform 2.0 Developer's Guide • February 200814

One Provisioning Server for Each Solution InstanceIn this topology, one provisioning server is present for the entire solution instance.
In tier 3, the provisioning server within the normal box indicates the active node whereas theprovisioning server within the dotted line box indicates the failover node or additional node.The figure also shows where you can place your applications in each tier.
In tier 3, the provisioning server is disabled in the second clustered OTP instance.
Tier 1
PS
App-1 App-1App-1
App-2
App-3 App-3
PA
PS - Provisioning Server - Provisioning AgentPA
PA PA PA
PS
PA PA PA PA
PS
PA
PS
PA PA PA
PA PA
Tier 2
Tier 3
FIGURE 1–2 One Provisioning Server for Each Tier
Solution Topologies
Chapter 1 • Supported Solution Topologies 15

Tier 1
PA
App-1
App-2
App-3 App-3
App-1 App-1
PS - Provisioning Server - Provisioning AgentPA
PA PA PA
PA PA PA PA
PS
PA
PS
PA PA PA
PA PA
Tier 2
Tier 3
FIGURE 1–3 One Provisioning Server for Each Solution Instance
Solution Topologies
Sun Open Telecommunications Platform 2.0 Developer's Guide • February 200816

Developing Applications Using Sun OTP
This chapter lists the application programming interfaces (APIs) and protocols you can use forapplication development.
■ “Interfaces Exposed by Sun OTP” on page 17■ “Sun OTP Protocols” on page 18
Interfaces Exposed by Sun OTPThe following table lists the interfaces exposed by Sun Open Telecommunications Platform.
TABLE 2–1 Sun OTP Interfaces
OS and Components Interfaces Documentation
SolarisTM 10 OS ■ POSIX.1 (IEEE Std1003.1)
■ POSIX.2 (IEEE Std1003.2)
■ PAM (PluggableAuthenticationModules)
POSIX.1(5) man page POSIX.1(5)
POSIX.2(5) man page POSIX.2(5)
Solaris Security for Developers Guide
libpam (3LIB) man page libpam(3LIB)
JavaTM■ Java SE 1.4.2 Java
interfaces■ Java SE 5.0 Java
interfaces■ CORBA
(http://java.sun.com/j2se/1.4.2/docs/)
(http://java.sun.com/j2se/1.5.0/docs/)
(http://java.sun.com/j2se/1.5.0/docs/guide/idl/)
2C H A P T E R 2
17

TABLE 2–1 Sun OTP Interfaces (Continued)OS and Components Interfaces Documentation
Sun N1TM ServiceProvisioning System 5.2.4
■ XML■ Java APIs■ CLI■ GUI
■ Sun N1 Service Provisioning System 5.2 XMLSchema Reference Guide
■ Sun N1 Service Provisioning System JavaDoc
■ Sun N1 Service Provisioning System 5.2Command-Line Interface Reference Manual
■ Sun N1 Service Provisioning System 5.2System Administration Guide
Sun N1 System Manager1.3.3
■ Shell scripts■ CLI■ GUI
■ Sun N1 System Manager 1.3 Command LineReference Manual
■ Appendix A, “Sun N1 System ManagerProtocol, Ports, and Features Reference,” inSun N1 System Manager 1.3 Installation andConfiguration Guide
■ Sun N1 System Manager 1.3 Discovery andAdministration Guide
Sun Cluster 3.2 ■ Sun Cluster Manager■ HA Agent Development
Libraries■ CLI
■ Appendix A, “Sun Cluster Object-OrientedCommands,” in Sun Cluster SystemAdministration Guide for Solaris OS
■ Sun Cluster Data Services Developer’s Guidefor Solaris OS
Sun OTP ProtocolsThe following table lists the protocols used by Sun Open Telecommunications Platform.
TABLE 2–2 Sun OTP Protocols
Protocols Components Documentation
TCP/IPSolaris 10 OS tcp(7P) and ip(7P)
SNMP (Net-snmpSNMP V3)
Solaris 10 OS Solaris System Management Agent Developer’s Guide
SSH/SSLSolaris 10 OS ssh(1)
openssl(5)
Sun OTP Protocols
Sun Open Telecommunications Platform 2.0 Developer's Guide • February 200818

TABLE 2–2 Sun OTP Protocols (Continued)Protocols Components Documentation
DNSSolaris 10 OS System Administration Guide: Naming and Directory
Services (DNS, NIS, and LDAP)
iSCSISolaris 10 OS System Administration Guide: Devices and File Systems
FC (FCP) ANSIX3.269-1996
Solaris 10 OS Solaris Fibre Channel Storage Configuration andMultipathing Support Guide
RMIJava 2 SDK SE 1.4.2 andJava SE 5.0 platform
(http://java.sun.com/j2se/1.4.2/docs/guide/rmi/)
(http://java.sun.com/j2se/1.5.0/docs/guide/rmi/)
IIOP (RMI-IIOP)Java 2 SDK SE 1.4.2 andJava SE 5.0 platform
(http://java.sun.com/j2se/1.4.2/docs/guide/rmi-iiop/)
(http://java.sun.com/j2se/1.5.0/docs/guide/rmi-iiop/)
Sun OTP Protocols
Chapter 2 • Developing Applications Using Sun OTP 19

20
Sun OTP Tools for Application Development
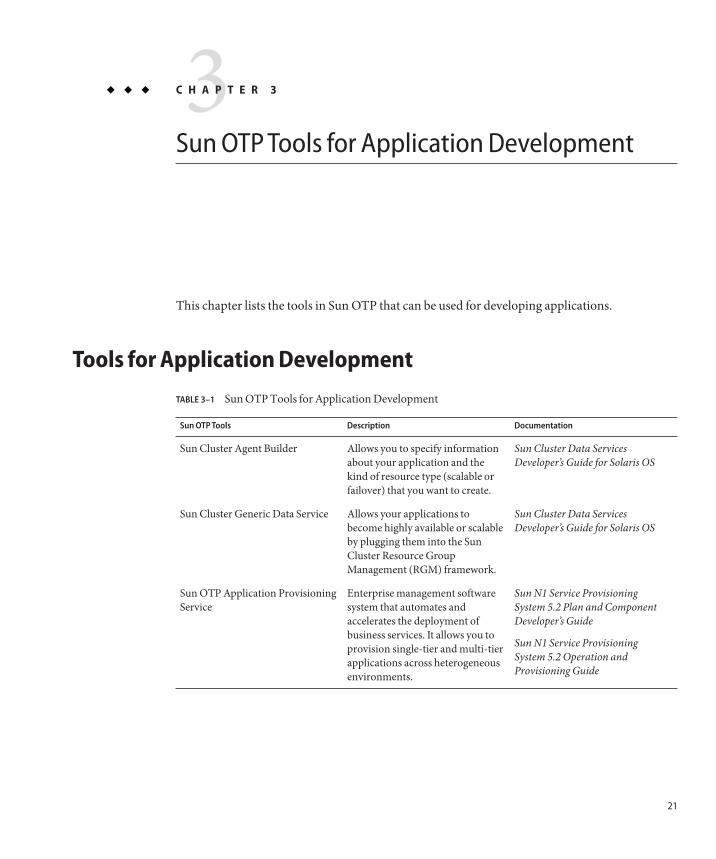
This chapter lists the tools in Sun OTP that can be used for developing applications.
Tools for Application DevelopmentTABLE 3–1 Sun OTP Tools for Application Development
Sun OTP Tools Description Documentation
Sun Cluster Agent Builder Allows you to specify informationabout your application and thekind of resource type (scalable orfailover) that you want to create.
Sun Cluster Data ServicesDeveloper’s Guide for Solaris OS
Sun Cluster Generic Data Service Allows your applications tobecome highly available or scalableby plugging them into the SunCluster Resource GroupManagement (RGM) framework.
Sun Cluster Data ServicesDeveloper’s Guide for Solaris OS
Sun OTP Application ProvisioningService
Enterprise management softwaresystem that automates andaccelerates the deployment ofbusiness services. It allows you toprovision single-tier and multi-tierapplications across heterogeneousenvironments.
Sun N1 Service ProvisioningSystem 5.2 Plan and ComponentDeveloper’s Guide
Sun N1 Service ProvisioningSystem 5.2 Operation andProvisioning Guide
3C H A P T E R 3
21

22

Sun OTP Components
This chapter describes Sun OTP components, plans, and plug-in. It also describes the Sun OTPdeployment options and how you can customize the Sun OTP deployment.
■ “N1 SPS Components” on page 23■ “N1 SPS Plans” on page 25■ “Sun OTP AHE Plug-in” on page 30■ “Customizing Sun OTP Deployment” on page 30
N1 SPS ComponentsThe components installed by the N1 SPS (N1 Service Provisioning System) plans are as follows:
TABLE 4–1 N1 SPS Components
Components Folder Description
N1SPS /com/sun/OTP/management/n1sps Component to install SunOTP application provisioningservice (Sun N1 ServiceProvisioning System)
N1SM /com/sun/OTP/management/n1sm Component to install SunOTP system managementservice (Sun N1 SystemManager)
SunCluster /com/sun/OTP/availability/sc Component to install SunOTP availability service (SunCluster)
4C H A P T E R 4
23
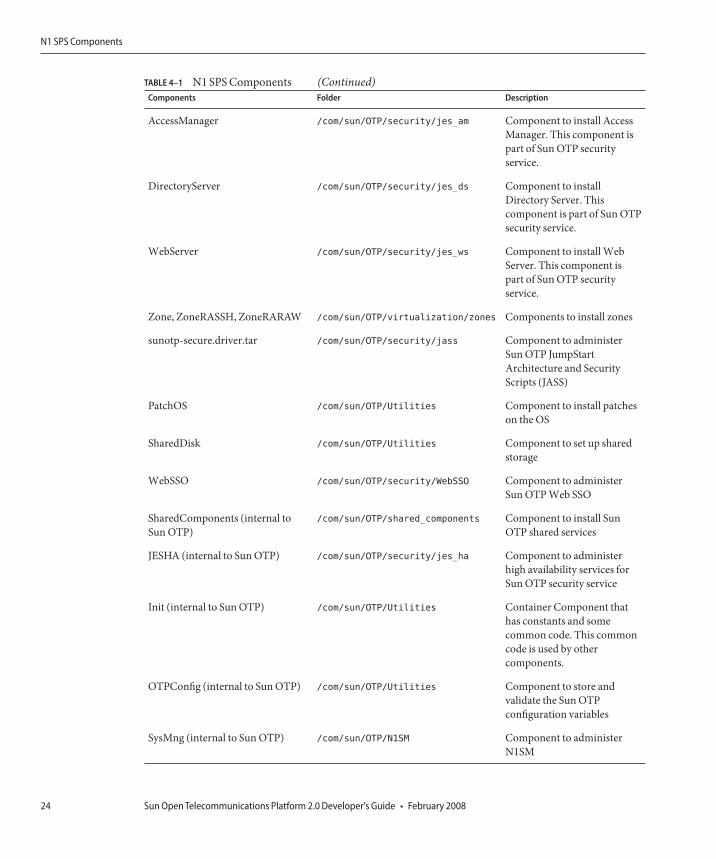
TABLE 4–1 N1 SPS Components (Continued)Components Folder Description
AccessManager /com/sun/OTP/security/jes_am Component to install AccessManager. This component ispart of Sun OTP securityservice.
DirectoryServer /com/sun/OTP/security/jes_ds Component to installDirectory Server. Thiscomponent is part of Sun OTPsecurity service.
WebServer /com/sun/OTP/security/jes_ws Component to install WebServer. This component ispart of Sun OTP securityservice.
Zone, ZoneRASSH, ZoneRARAW /com/sun/OTP/virtualization/zones Components to install zones
sunotp-secure.driver.tar /com/sun/OTP/security/jass Component to administerSun OTP JumpStartArchitecture and SecurityScripts (JASS)
PatchOS /com/sun/OTP/Utilities Component to install patcheson the OS
SharedDisk /com/sun/OTP/Utilities Component to set up sharedstorage
WebSSO /com/sun/OTP/security/WebSSO Component to administerSun OTP Web SSO
SharedComponents (internal toSun OTP)
/com/sun/OTP/shared_components Component to install SunOTP shared services
JESHA (internal to Sun OTP) /com/sun/OTP/security/jes_ha Component to administerhigh availability services forSun OTP security service
Init (internal to Sun OTP) /com/sun/OTP/Utilities Container Component thathas constants and somecommon code. This commoncode is used by othercomponents.
OTPConfig (internal to Sun OTP) /com/sun/OTP/Utilities Component to store andvalidate the Sun OTPconfiguration variables
SysMng (internal to Sun OTP) /com/sun/OTP/N1SM Component to administerN1SM
N1 SPS Components
Sun Open Telecommunications Platform 2.0 Developer's Guide • February 200824

The following figure shows the N1 SPS folder structure of Sun OTP plug-in.
N1 SPS PlansThis section describes the order of installing N1 SPS plans,plan re-runs, plan configuration files,and utility plans.
The following topics are discussed in this section:
■ “Order of Installing N1 SPS Plans” on page 26■ “Plan Re-runs” on page 26■ “Plan Configuration Files” on page 27■ “Utility Plans” on page 30
FIGURE 4–1 N1 SPS Folder Structure of Sun OTP Plug-in
N1 SPS Plans
Chapter 4 • Sun OTP Components 25

Order of Installing N1 SPS PlansA plan orchestrates deployment of multiple components.
To install Sun OTP, N1 SPS plans must be installed in the following order:
1. Setup Configuration2. Patch3. Install Availability Service4. Configure Availability Service5. Configure Solaris Containers (optional)6. Setup Shared Storage (optional)7. Install System Management Service8. Install Provisioning Service9. Install Security Service10. Configure Components11. Install Web SSO
Plan Re-runsPlan re-runs provides an option to re-run specific plans instead of reinstalling Sun OTP fromthe beginning. Plans can be re-run multiple times irrespective of the previous state of the plan.
The following plans can be re-run:
■ Set up Configuration■ Configure Solaris Containers■ Sun OTP system management service■ Sun OTP application provisioning service■ Sun OTP security service■ Configure Sun OTP services for high availability
When you re-run a plan, plan re-runs read the registry and determines the state of the plan.Based on the state of the plan, plan re-runs perform the following actions.
The following are the possible actions of plan re-runs:
■ If you are running the plan for the first time, plan re-run runs the plan and updates theregistry with the appropriate state.
■ If you are re-running a successful plan, plan re-run completes without performing anyinstallation.
■ If you are re-running a failed plan, plan re-run uninstalls and reinstalls the components.
N1 SPS Plans
Sun Open Telecommunications Platform 2.0 Developer's Guide • February 200826

Plan Configuration FilesPlan configuration files are the variable sets provided by N1 SPS. You can create componentvariables for your plans using the variable sets. The Setup Configuration plan provided by SunOTP accepts all the component variables and validates the variables provided in the variable set.
The following table lists the component variables used by Sun OTP plans. See “Sun OTP PlanSettings Description” on page 81 for descriptions of each component variable.
TABLE 4–2 Component Variables Used by Sun OTP Plans
Plan Component Variables
Patch ■ mediaDirectory
■ applyAllPatches
■ hostType
Install Availability Service ■ mediaDirectory
■ hostType
■ clusterName
■ sponsorNode
■ autoConfigureIPMP
■ secondaryInterface
■ secondaryIP
■ testIPAddress
■ privateInterface1
■ privateInterface2
■ nodeAuthentication
■ transportTypeInterface1
■ transportTypeInterface2
■ applyAllPatches
■ quorumAutoConfiguration
N1 SPS Plans
Chapter 4 • Sun OTP Components 27

TABLE 4–2 Component Variables Used by Sun OTP Plans (Continued)Plan Component Variables
Configure Availability Service ■ mediaDirectory
■ hostType
■ clusterName
■ sponsorNode
■ autoConfigureIPMP
■ secondaryInterface
■ secondaryIP
■ testIPAddress
■ privateInterface1
■ privateInterface2
■ nodeAuthentication
■ transportTypeInterface1
■ transportTypeInterface2
■ applyAllPatches
■ quorumAutoConfiguration
Configure Solaris Containers ■ mediaDirectory
■ hostType
■ zoneName
■ zoneInterface
■ zoneIPAddress
■ zonePath
■ zoneHostname
■ zoneMask
■ zoneDefaultRoute
■ zoneSPSHost
Setup Shared Storage ■ rootDisk
■ diskSlice
■ hostType
Install System Management Service ■ mediaDirectory
■ hostType
■ mgmtHost
■ mgmtIP
■ managementInterface
■ provisioningInterface
■ applyAllPatches
N1 SPS Plans
Sun Open Telecommunications Platform 2.0 Developer's Guide • February 200828

TABLE 4–2 Component Variables Used by Sun OTP Plans (Continued)Plan Component Variables
Install Provisioning Service ■ mediaDirectory
■ mgmtHost
■ mgmtIP
■ applyAllPatches
■ spsRAConnectionType
■ hostType
Install Security Service ■ mediaDirectory
■ hostType
■ hostName
■ zoneHostname
■ zoneIPAddress
■ jesHAHost
■ domainName
■ applyAllPatches
■ mmrHostList
Configure Components ■ mediaDirectory
■ mgmtHost
■ mgmtIP
■ applyAllPatches
■ spsRAConnectionType
■ hostType
■ hostName
■ zoneHostname
■ zoneIPAddress
■ jesHAHost
■ jesHANodeList
■ domainName
■ mmrHostList
Install Web SSO ■ hostName
■ hostType
■ mgmtHost
■ jesHAHost
■ ssoCookieDomain
■ zoneIPAddress
■ zoneHostname
■ domainName
N1 SPS Plans
Chapter 4 • Sun OTP Components 29

Utility PlansSun OTP provides the following utility plans:
TABLE 4–3 Sun OTP Utility Plans
Plan Description
Patch Installs the OS patches on the Sun OTP host.
Convert Converts the stand-alone Sun OTP host to the clustered Sun OTP host.
Enable & Disable Enables and disables Sun OTP system management service and Sun OTPapplication provisioning service.
Add User Adds Web SSO user.
Change User Password Changes the password of existing Web SSO user.
Remove User Removes Web SSO user.
Install Driver Installs the Sun OTP SST package.
UnInstall Driver Uninstalls the Sun OTP SST package.
Harden Improves the security of the system by hardening the Sun OTP host. You canclose the ports and disable the services that might present a security risk to thesystem.
UnHarden & Keep Reopens the ports and enables the services that were closed by the hardeningprocess. This plan rolls back only the unchanged configuration files to itsdefault state.
UnHarden & Revert Reopens the ports and enables the services that were closed by the hardeningprocess. This plan rolls back all the configuration files, including the changedfiles, to its default state.
Sun OTP AHE Plug-inA plug-in is a collection of plans and components. Sun OTP AHE plug-in is a collection of SunOTP plans and components.
Customizing Sun OTP DeploymentSun OTP plans are modularized in a way that NEP developers can insert their owncustomization. NEP developers can insert their customization before or after the Sun OTPplans. NEP developers can copy the Sun OTP AHE plug-in and customize the OTP deploymentwith native command execution or with new plans. They can also write their own variable set aspart of the new plans.
Sun OTP AHE Plug-in
Sun Open Telecommunications Platform 2.0 Developer's Guide • February 200830

Sun OTP components are meant to be called only from Sun OTP plans. Sun OTP plans can becalled from custom plans only if the order of installation of Sun OTP plans described in “Orderof Installing N1 SPS Plans” on page 26 is satisfied.
Note – Do not customize the Sun OTP plans and Sun OTP variable set.
Examples of Solution Specific StepsThe following table lists some of the examples of solution specific steps and where it can beinserted in Sun OTP deployment.
TABLE 4–4 Examples of Solution Specific Steps
Examples of Solution Specific Steps Insertion Point in Sun OTP Deployment
User Administration After Sun OTP is installed
Quorum Configuration After Sun OTP availability service is installed and configured
Naming Services After OS is installed
Shared Storage Configuration After Sun OTP availability service is installed and configured
Customizing Sun OTP Deployment
Chapter 4 • Sun OTP Components 31

32

Adapting Applications for Sun OTP
You need to create the provisioning and management plug-ins to adapt your application to SunOTP. A plug-in is a collection of plans and components. A plan orchestrates deployment ofmultiple components.
The following topics are discussed:
■ “Developing N1 SPS Plans for NEP Application Provisioning” on page 33■ “Developing Sun Cluster HA Agents for NEP Application Management” on page 38
Developing N1 SPS Plans for NEP Application ProvisioningRefer to Sun N1 Service Provisioning System 5.2 Plan and Component Developer’s Guide to createcomponents and plans for NEP applications.
The three options of adapting your application for application provisioning are as follows:
“Calling Existing Application Installers from N1 SPS” on page 33
“Moving an Existing Application Installer Code to an SPS Component” on page 34
“Using Native N1 SPS Provisioning Features” on page 36
Calling Existing Application Installers from N1 SPSIf the installation script for your application already exists, you can create a componenttemplate and call the installation script from the component template.
Example
<?xml version="1.0" encoding="UTF-8"?><component xmlns=’http://www.sun.com/schema/SPS’
name=’DeployMyComponent’
5C H A P T E R 5
33

version=’5.0’
description=’Deploy and configure My Component’
xmlns:xsi=’http://www.w3.org/2001/XMLSchema-instance’
path=’/com/sun/foobar’
author=’OEM Platforms’
softwareVendor=’Sun Microsystems’
xsi:schemaLocation=’http://www.sun.com/schema/SPS component.xsd’>
<extends>
<type name=’system#container’></type>
</extends>
<varList>
<var name="bashShell" modifier="FINAL" default="/usr/bin/bash"/><var name="installPath" default="/opt"/>
</varList>
<installList>
<installSteps name="deployMyComponent" access="PUBLIC">
<execNative userToRunAs=’root’ timeout=’7200’>
<inputText><![CDATA[
#run installer
/script_directory/installer.sh -p param1 -s param2
#check for errors
RET=$?; if [ $RET != 0 ]; then exit $RET; fi
]]></inputText> <exec cmd=":[bashShell]"></exec></execNative>
</installSteps>
</installList>
</component>
Moving an Existing Application Installer Code to anSPS ComponentYou can also copy the application deployment logic from the installation script of yourapplication and paste the logic into a provisioning component. This option can be used for atighter integration with Sun OTP provisioning service. In the following example, theapplication installation script is embedded in its provisioning component.
Example
<?xml version="1.0" encoding="UTF-8"?><component xmlns=’http://www.sun.com/schema/SPS’ name=’InstallMyComponent’
version=’5.2.4’
Developing N1 SPS Plans for NEP Application Provisioning
Sun Open Telecommunications Platform 2.0 Developer's Guide • February 200834
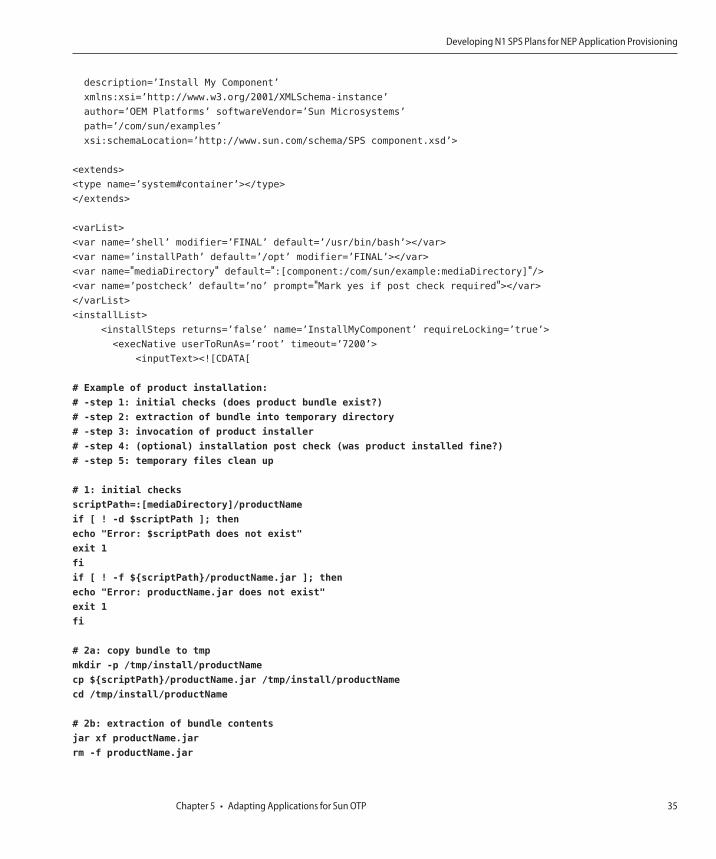
description=’Install My Component’
xmlns:xsi=’http://www.w3.org/2001/XMLSchema-instance’
author=’OEM Platforms’ softwareVendor=’Sun Microsystems’
path=’/com/sun/examples’
xsi:schemaLocation=’http://www.sun.com/schema/SPS component.xsd’>
<extends>
<type name=’system#container’></type>
</extends>
<varList>
<var name=’shell’ modifier=’FINAL’ default=’/usr/bin/bash’></var>
<var name=’installPath’ default=’/opt’ modifier=’FINAL’></var>
<var name="mediaDirectory" default=":[component:/com/sun/example:mediaDirectory]"/><var name=’postcheck’ default=’no’ prompt="Mark yes if post check required"></var></varList>
<installList>
<installSteps returns=’false’ name=’InstallMyComponent’ requireLocking=’true’>
<execNative userToRunAs=’root’ timeout=’7200’>
<inputText><![CDATA[
# Example of product installation:
# -step 1: initial checks (does product bundle exist?)
# -step 2: extraction of bundle into temporary directory
# -step 3: invocation of product installer
# -step 4: (optional) installation post check (was product installed fine?)
# -step 5: temporary files clean up
# 1: initial checks
scriptPath=:[mediaDirectory]/productName
if [ ! -d $scriptPath ]; then
echo "Error: $scriptPath does not exist"
exit 1
fi
if [ ! -f ${scriptPath}/productName.jar ]; then
echo "Error: productName.jar does not exist"
exit 1
fi
# 2a: copy bundle to tmp
mkdir -p /tmp/install/productName
cp ${scriptPath}/productName.jar /tmp/install/productName
cd /tmp/install/productName
# 2b: extraction of bundle contents
jar xf productName.jar
rm -f productName.jar
Developing N1 SPS Plans for NEP Application Provisioning
Chapter 5 • Adapting Applications for Sun OTP 35
# 3: invoke installer
java -cp /tmp/install/productName com.company.product.Boot -p param1 -d param2 -i :[installPath]
RET=$?; if [ $RET != 0 ]; then exit $RET; fi
# 4: post check
if [ "yes" = :[postcheck] ]; then
out=‘java -cp /tmp/install/productName com.company.product.diagnostics checkInstallation -p param1 \
-d param2 -i :[installPath] | grep "Status=OK"‘
RET=$?; if [ $RET != 0 ]; then exit $RET; fi
fi
# 5: cleanup
cd /
rm -rf /tmp/install/productName
]]></inputText>
<exec cmd=’:[shell]’></exec>
</execNative>
</installSteps>
</installList>
</component>
The embedded code can be any interpreted shell code or Java code. The shell code can bespecified by specifying the value for the cmd attribute in the exec element. The embedded Javacode can be specified by specifying the execJava element.
Using Native N1 SPS Provisioning FeaturesTo fully benefit from Sun OTP application provisioning service features, the target applicationdeployment can be redesigned using native Sun OTP provisioning components. This can bedone by mapping the application deployment elements to native provisioning components.Based on your application distribution model, these elements could be packages (Solaris SVR4,Linux RPM and Deb) or archives (such as zip, tar, jar, ear) or even individual files (like a library,a kernel module, or scripts).
The following sample code demonstrates package-based installation.
Example 1
<installList>
<installSteps returns=’false’ name=’default’ requireLocking=’true’>
<execNative timeout=’1800’>
<inputText><![CDATA[>
echo "Executing Pre-Install procedures before resource deployement"echo "This will be installed into: :[installPath]"
Developing N1 SPS Plans for NEP Application Provisioning
Sun Open Telecommunications Platform 2.0 Developer's Guide • February 200836

]]></inputText>
<exec cmd=’/bin/sh’></exec>
</execNative>
<deployResource></deployResource>
<execNative timeout=’1800’>
<inputText><![CDATA[
echo "Executing Post-Install procedures after resource deployement"pkgadd -d :[installPath] SampleAppPkg
]]></inputText>
exec cmd=’/bin/sh’></exec>
</execNative>
</installSteps>
</installList>
The following sample code demonstrates package-based uninstallation.
Example 2
<uninstallList>
<uninstallSteps returns=’false’ name=’default’ requireLocking=’true’>
<execNative timeout=’1800’>
<inputText><![CDATA[>
echo "Executing Pre-Uninstall procedures before resource undeployement"]]></inputText>
<exec cmd=’/bin/sh’></exec>
</execNative>
<undeployResource></undeployResource>
<execNative timeout=’1800’>
<inputText><![CDATA[
echo "Executing Post-Uninstall procedures after resource undeployement"yes | pkgrm SampleAppPkg
]]></inputText>
exec cmd=’/bin/sh’></exec>
</execNative>
</uninstallSteps>
</uninstallList>
Refer to the following guides to create plans, components, and plug-ins using N1 SPS.
■ Sun N1 Service Provisioning System 5.2 Plan and Component Developer’s Guide■ Sun N1 Service Provisioning System 5.2 Operation and Provisioning Guide■ Sun N1 Service Provisioning System 5.2 Plug-in Development Guide■ N1 Service Provisioning System 5.2.1 Plug-In Collection■ Best Practices Walkthrough document at
http://www.sun.com/bigadmin/hubs/sysmgmt/learn/training.jsp
■ Developer Guidelines document athttp://www.sun.com/bigadmin/hubs/sysmgmt/learn/training.jsp
Developing N1 SPS Plans for NEP Application Provisioning
Chapter 5 • Adapting Applications for Sun OTP 37

Developing Sun Cluster HA Agents for NEP ApplicationManagement
You need to create the management agents for your application to use the Sun OTP availabilityservice. You can develop agents using agent builder, scripts, and C/C++.
Developing Agents Using Agent BuilderSun Cluster agent builder is included in Sun OTP. The agent builder allows you to specifyinformation about your application and the kind of resource type (scalable or failover) that youwant to create.
You need to provide start, stop (optional), validate (optional), and probe (optional) commandsfor your application. Agent builder automatically generates an agent package that can be usedto put your application under Sun OTP management service control.
For more information on developing agents using agent builder, refer to Sun Cluster DataServices Developer’s Guide for Solaris OS.
Developing Agents Using Scripts and C/C++Refer to the following guides to develop agents using scripts and C/C++.
■ Sun Cluster Data Services Developer’s Guide for Solaris OS■ Sun Cluster 3.2 Data Services Collection for Solaris OS (SPARC Platform Edition)■ Sun Cluster Data Services Planning and Administration Guide for Solaris OS
Developing Sun Cluster HA Agents for NEP Application Management
Sun Open Telecommunications Platform 2.0 Developer's Guide • February 200838

Installing Sun OTP As Part of Existing SolutionDeployment
This chapter describes how to invoke the deployment plans from existing installationenvironments.
The following topics are discussed:
■ “Calling N1 SPS Plans From Shell Scripts” on page 39■ “Calling N1 SPS Plans From C/C++” on page 41■ “Calling N1 SPS Plans From Java” on page 43■ “Using N1 SPS From JumpStart” on page 45■ “Using N1 SPS From JET” on page 46
Calling N1 SPS Plans From Shell ScriptsYou can invoke the N1 SPS plans through the Command-Line Interface (CLI) by using thecr_cli binary. On a host that has Sun OTP 2.0, cr_cli is located in the/var/js/spsotp/N1_Service_Provisioning_System_5.2/cli/bin/cr_cli directory. Fordetailed description of the N1 SPS CLI, see Sun N1 Service Provisioning System 5.2Command-Line Interface Reference Manual.
A typical workflow of invoking the N1 SPS plan from a script consists of three steps. The scriptperforms the following tasks:
1. Creates a variable setting for the components that are installed as part of the plan.Alternatively, you can also use the default values of variables for a component.
2. Invokes the pe.p.run command through the N1 SPS CLI, which runs the specified planwith either the default values for variables or using specified variable settings.
Note – The choice between the default values and variable settings is done for eachcomponent that is installed as part of the plan.
6C H A P T E R 6
39

3. Waits until the running plan is completed and checks for errors.
ExamplesAn example for creating the variable settings for component foo is as follows:
/var/js/spsotp/N1_Service_Provisioning_System_5.2/cli/bin/cr_cli -cmd
cdb.vs.add -u otpadmin -p adminadmin -comp NM:/path/to/component/foo -name
foo-varset1 -vars "var1=value1;var2=value2"
The above example creates a variable setting for the component foo with the namefoo-varset1. You can use the foo-varset1 variable in the vs parameter of the pe.p.runcommand for plans that execute an install block on component foo.
An example for running the InstallSecurity plan from Sun OTP 2.0 plug-in is as follows:
/var/js/spsotp/N1_Service_Provisioning_System_5.2/cli/bin/cr_cli -cmd pe.p.run
-u otpadmin -p adminadmin -PID NM:/com/sun/OTP/security/plans/InstallSecurity
-tar "H:NM:otp-eng-x11;H:NM:otp-eng-x11;H:NM:otp-eng-x11" -comp
"+;+;+,+,+,+,+,+,+,+" -vs "+;+;+,+,+,+,+,+,+,+" -pto 9000 -nto 9000
In the above example, the InstallSecurity plan is run on a host named host otp-eng-x11.The user name is otpadmin and password is adminadmin. The default values for componentvariables are used and the time out is set to 9000 seconds.
Note the syntax of the vs parameter specifying the variable settings to use. TheInstallSecurity plan consists of three sub plans. Each sub plan takes a part of the vsparameter value and delimits it by semicolons, that is, the first sub plan takes +, the second takes+ and the third takes +,+,+,+,+,+,+,+. The third sub plan calls eight install blocks on variouscomponents. For each of these blocks, the default variable values are being used, which isspecified by the 8 (+) plus signs and (,) comma as a delimiter. Similar rules apply to the compparameter. The tar parameter specifying the target host consists of three parts that specify thetarget for each of the three sub plans.
For detailed information about the pe.p.run command, see Sun N1 Service ProvisioningSystem 5.2 Command-Line Interface Reference Manual.
If you use the correct syntax, the command will complete successfully and return a ID. You canuse this ID to check the plan status by running the pe.p.lo command. Error checking needs toparse the pe.p.lo command output.
The following example waits for running task ID010018158098-1200908797135-01929-1300304153.
/var/js/spsotp/N1_Service_Provisioning_System_5.2/cli/bin/cr_cli -cmd pe.p.lo
-u otpadmin -p adminadmin -ID 010018158098-1200908797135-01929-1300304153
Calling N1 SPS Plans From Shell Scripts
Sun Open Telecommunications Platform 2.0 Developer's Guide • February 200840
The output of this example lists the sub-tasks that run in the background before completing thistask.
Calling N1 SPS Plans From C/C++Since there is no N1 SPS C/C++ interface available, you can invoke the plans using N1 SPS CLI.Two N1 SPS CLI invocations are required.
■ The code runs the plan first. The N1 SPS CLI returns the ID of the newly created runningtask on a standard output.
■ To wait for task completion and check on the task progress, the code runs the N1 SPS CLIcommand with the -cmd pe.p.lo parameter and the ID of the task from the previous step.
For detailed information about N1 SPS CLI, see Sun N1 Service Provisioning System 5.2Command-Line Interface Reference Manual.
The following sample code illustrates how to run a plan from the C++ code.
/*
* Example of running an N1SPS plan from C++ code.
*
* To simplify this example, not all possible errors have been handled
* properly.
*/
///////////////////////////////////////////////////////////////////////////////
#include<iostream>
#include<sstream>
#include<cstdlib>
///////////////////////////////////////////////////////////////////////////////
//path to N1SPS CLI
#define N1SPS_CLI "/var/js/spsotp/N1_Service_Provisioning_System_5.2/cli/bin/cr_cli"
//plan to run
#define PLAN "/com/sun/OTP/security/plans/InstallSecurity"
//variable setting version string - see N1SPS CLI doc for more info
#define PLAN_COMP_DEFAULT_VS "+;+;+,+,+,+,+,+,+,+"
//component version string - N1SPS CLI doc for more info
#define DEFAULT_COMP DEFAULT_VS
//timeout in seconds - see N1SPS CLI doc (pto and nto parameters) for details
Calling N1 SPS Plans From C/C++
Chapter 6 • Installing Sun OTP As Part of Existing Solution Deployment 41

#define TIMEOUT_SEC 600
#define BUFF_SIZE 100
///////////////////////////////////////////////////////////////////////////////
using namespace std;
/**
* prints usage message
*/
void usage() {
cerr << "Usage:" << endl
<< "listTasks <login> <password> <target>" << endl;
}
///////////////////////////////////////////////////////////////////////////////
/**
* main function
* expected argv content: login, password, target
*/
int main(int argc, char **argv) {
if( argc != 4 ) {
//incorrect number of parameters, so print usage information
usage();
} else {
cout << "Running plan " << PLAN << ":" << endl << endl;
//prepare string for invocation of N1SPS CLI to run a plan
stringstream s;
s << N1SPS_CLI << " -cmd pe.p.run -u " << argv[1] << " -p " << argv[2]
<< " -tar H:NM:" << argv[3] << " -PID NM:" << PLAN
<< " -comp " << DEFAULT_COMP << " -vs " << DEFAULT_VS
<< " -pto " << TIMEOUT_SEC << " -nto " << TIMEOUT_SEC;
FILE *f = NULL;
if( (f = popen(s.str().c_str(), "r")) == NULL ) {
//popen failed (fork() or pipe() failed), so print error message
cerr << "Error running plan " << PLAN << ": popen() failed" << endl;
} else {
//read N1SPS CLI output (i.e. Task ID of running plan)
char buff[BUFF_SIZE];
fgets(buff, BUFF_SIZE, f);
//wait for N1SPS CLI to finish
if( pclose(f) != 0 ) {
Calling N1 SPS Plans From C/C++
Sun Open Telecommunications Platform 2.0 Developer's Guide • February 200842

cerr << "Error running plan " << PLAN << ": N1SPS CLI failed" << endl;
return -1;
}
cout << "Plan " << PLAN << "execution started." << endl
<< "Task ID:" << buff << endl;
/*
* prepare a new string for N1SPS CLI invocation to check on progress
* of the running task
*/
s.str("");s << N1SPS_CLI << " -cmd pe.p.lo -u " << argv[1] << " -p " << argv[2]
<< " -ID " << buff;
cout << "Checking progress of task ID " << buff << endl;
/*
* wait for the running task to finish
*
* return the same return code N1SPS CLI returns
*/
return system(s.str().c_str());
}
}
return -1;
}
To get a code in plain C, replace all stream related C++ specific code to equivalent code in C.
Calling N1 SPS Plans From JavaYou can invoke the N1 SPS plans through the Java API by using the sps-api.jar library. Thislibrary is located in the /var/js/spsotp/N1_Service_Provisioning_System_5.2/cli/lib/directory. For more information about the API documentation, see Sun N1 Service ProvisioningSystem JavaDoc.
A sample code indicating the running of the InstallSecurity plan from Sun OTP 2.0 plug-inand waiting for running plan of given ID is as follows:
Calling N1 SPS Plans From Java
Chapter 6 • Installing Sun OTP As Part of Existing Solution Deployment 43
Note – This example does not handle all plan execution scenarios. Consider a case where thereare 20 tasks that should be completed after the task that you specify completes. Before you checkthe status of task, the array that the pe.p.la command generates does not contain anyinformation regarding the task. However, in case the array does not contain any informationcorresponding to your task, you can rerun the pe.p.la command specifying a higher resultarray size or by specifying a plan name for the tasks to match.
For more information about the pe.p.la and pe.p.lo commands, see Sun N1 ServiceProvisioning System 5.2 Command-Line Interface Reference Manual.
package spsapitest;
import com.sun.n1.sps.client.*;
import com.sun.n1.sps.model.executor.RunningPlanBean;
import com.sun.n1.sps.model.executor.TaskID;
import com.sun.n1.sps.model.util.ClientException;
import java.io.File;
import java.util.HashMap;
import java.util.Map;
import java.util.logging.Level;
import java.util.logging.Logger;
public class SPSTest {
public static void main(String[] args) {
try {
CommandManagerBuilder cmb = new com.sun.n1.sps.client.CommandManagerBuilder();
cmb.setCLIInstallationDir(new File("/var/js/spsotp/N1_Service_Provisioning_System_5.2/cli"));CommandManager cm = cmb.build();
//running the plan
Map<String, String> arguments = new HashMap<String, String>();
arguments.put("u", "otpadmin"); //user
arguments.put("p", "adminadmin"); //password
arguments.put("PID", "NM:/com/sun/OTP/security/plans/InstallSecurity"); //plan name
arguments.put("tar", "H:NM:otp-eng-x11;H:NM:otp-eng-x11;H:NM:otp-eng-x11"); //target
arguments.put("vs", "+;+;+,+,+,+,+,+,+,+"); //variable settings
arguments.put("comp", "+;+;+,+,+,+,+,+,+,+"); //components versions
arguments.put("pto", "9000"); //plan timeout
arguments.put("nto", "9000"); //native call timeout
TaskID taskID = (TaskID)cm.execute("pe.p.run", arguments); //see pe.p.run in N1SPS CLI doc
//waiting for plan to complete
arguments.clear();
arguments.put("u", "otpadmin");
Calling N1 SPS Plans From Java
Sun Open Telecommunications Platform 2.0 Developer's Guide • February 200844

arguments.put("p", "adminadmin");arguments.put("ID", taskID.toString());
cm.execute("pe.p.lo", arguments);
//checking plan status
arguments.clear();
arguments.put("u", "otpadmin");arguments.put("p", "adminadmin");arguments.put("max", "20"); //maximum numbers of tasks to get info
RunningPlanBean[] rpba = (RunningPlanBean[]) cm.execute("pe.p.la", arguments);
for (RunningPlanBean rpb : rpba) {
if (taskID.equals(rpb.getTaskID())) {
System.out.println("Task ID: "+rpb.getTaskID().toString()+"\n"+"Plan name: "+rpb.getName()+"\n"+"Status: "+rpb.getTaskStatus().toString()+"\n"+"Start date: "+rpb.getStartDate().toString()+"\n"+"Complete date: "+rpb.getCompleteDate());
}
}
} catch (ConfigurationException ex) {
Logger.getLogger(SPSTest.class.getName()).log(Level.SEVERE, null, ex);
} catch (ClientException ex) {
Logger.getLogger(SPSTest.class.getName()).log(Level.SEVERE, null, ex);
}
}
}
Using N1 SPS From JumpStartTo invoke N1 SPS through JumpStart, perform the following steps.
1. Place the flash archive binary into the right location. The flash archive for Sun OTP isincluded in the bootable DVD that can be copied to jump start the system.
2. Create the JumpStart profile for flash archive.
# cat profile-flash
install_type flash_install
archive_location nfs <flash_archive_location>
partitioning explicit
filesys c0t0d0s0 free /
filesys c0t0d0s1 4096 swap
filesys c0t0d0s3 512 /globaldevices
filesys c0t0d0s7 128
3. Modify the rule file to point to the profile you created.
hostname otpclient37 sparc - profile-flash
Using N1 SPS From JumpStart
Chapter 6 • Installing Sun OTP As Part of Existing Solution Deployment 45

4. Update the JumpStart rules file by running the ~/rules_directory/check command.5. Update the JumpStart server using the addclient command to enable booting of the
system.6. Log in to the system console and type:
ok boot net - install
7. After the OS is installed, set up the Sun OTP Provisioning Service. See “To Install Sun OTPUsing Sun OTP Bootable DVD Image” in Sun Open Telecommunications Platform 2.0Installation Guide.
8. Deploy the Sun OTP AHE environment through the Sun OTP Provisioning Service. See “ToInstall Sun OTP Using Sun OTP Bootable DVD Image” in Sun Open TelecommunicationsPlatform 2.0 Installation Guide.
A sample JumpStart profile for a flash archive is as follows:
sample jumpstart profile for flash archive
samplel@sr1-usca-22:/net/otpinstall/export/jumpstart# cat profile-flash
install_type *flash_install*
archive_location nfs *anew20:/export/Flashes/sample_otp_sun4u*
partitioning explicit
filesys c0t0d0s0 free /
filesys c0t0d0s1 4096 swap
filesys c0t0d0s3 512 /globaldevices
filesys c0t0d0s7 128
Modify the rules files to point to archive.
hostname otpclient37 sparc - profile-flash
Using N1 SPS From JETYou can add additional JET modules to the Solaris boot and install (JET) server. Although theprocess is described in the context of a flash module, the logic extends to other JET modules. Forinstructions on how to add a flash module, see “How to Add a Flash Module” in Sun N1 ServiceProvisioning System User’s Guide for OS Provisioning Plug-In 3.1.
Using N1 SPS From JET
Sun Open Telecommunications Platform 2.0 Developer's Guide • February 200846
Using Sun OTP for End-to-End SolutionDeployment
This chapter lists the stages in using Sun OTP for end-to-end solution deployment.
Stages in Using Sun OTP for End-to-End Solution DeploymentBefore You Begin: Before using Sun OTP for end-to-end solution deployment, you need tocreate N1 SPS solution plans. The N1 SPS solution plans consist of Sun OTP plans and NEPspecific plans. The N1 SPS solution plans allows you to deploy OS, Sun OTP components, andNEP applications.
After creating N1 SPS solution plans, you typically follow these stages in this order forend-to-end solution deployment.
1. Deploy operating systems from solution plans.
2. Deploy Sun OTP components from solution plans.
3. Deploy hosted NEP applications from solution plans. NEP applications can also be installedbetween the Sun OTP plans.
The following figure shows the deployment path and deployment tools available in Sun OTP.
7C H A P T E R 7
47
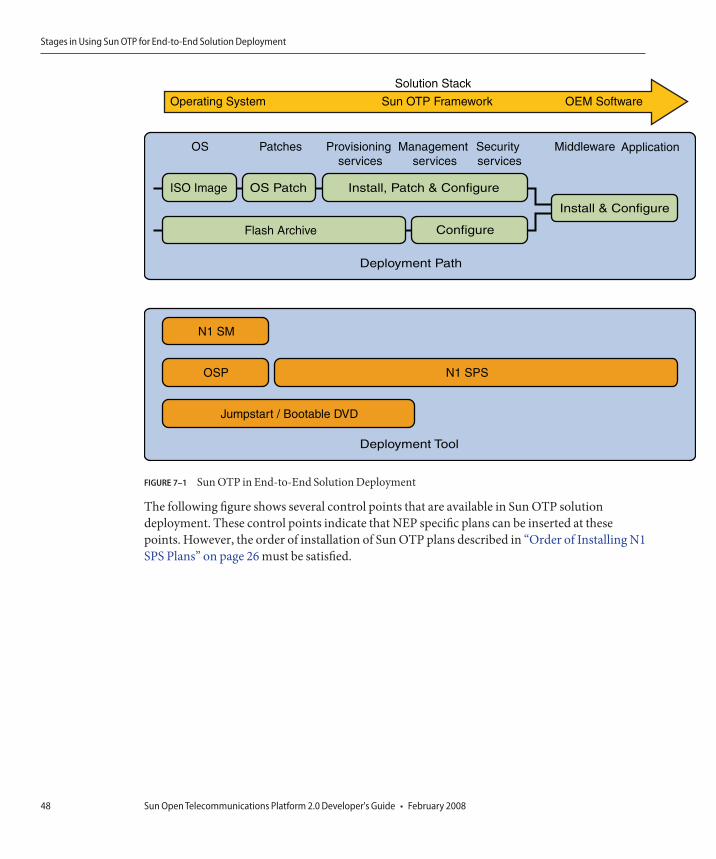
The following figure shows several control points that are available in Sun OTP solutiondeployment. These control points indicate that NEP specific plans can be inserted at thesepoints. However, the order of installation of Sun OTP plans described in “Order of Installing N1SPS Plans” on page 26 must be satisfied.
ISO Image
OS Patches Middleware ApplicationProvisioning services
Management services
Security services
Flash Archive
OS Patch Install, Patch & Configure
Install & Configure
Configure
Deployment Path
Deployment Tool
Operating System
Solution Stack
Sun OTP Framework OEM Software
N1 SM
OSP N1 SPS
Jumpstart / Bootable DVD
FIGURE 7–1 Sun OTP in End-to-End Solution Deployment
Stages in Using Sun OTP for End-to-End Solution Deployment
Sun Open Telecommunications Platform 2.0 Developer's Guide • February 200848

Deployment MethodsThe following table lists the deployment methods that you can use for end-to-end solutiondeployment.
TABLE 7–1 Deployment Methods
Component Method
Solaris OS ■ JumpStart or JET■ Bootable Sun OTP DVD■ N1 SM GUI/CLI■ N1 SPS GUI/CLI/JAVA API
NEP Applications SPS
3PP Middleware SPS
PlatformSun OTP AHE
CLI or GUI
based (SPS)
Operating System
N1SM
Jumpstart
Interactive
OSP (SPS)
Security
System Management
Application Provisioning
High Availability
Control Points
Solution StackProvisioning Plug-ins
Sun OTP AHEProvisioning Plans
FIGURE 7–2 Control Points Implementation
Stages in Using Sun OTP for End-to-End Solution Deployment
Chapter 7 • Using Sun OTP for End-to-End Solution Deployment 49

TABLE 7–1 Deployment Methods (Continued)Component Method
Sun OTP ■ JumpStart or JET■ Bootable Sun OTP DVD■ N1 SPS GUI/CLI/JAVA API
Third-party products N1 SPS GUI/CLI/JAVA API
NEP applications N1 SPS GUI/CLI/JAVA API
Stages in Using Sun OTP for End-to-End Solution Deployment
Sun Open Telecommunications Platform 2.0 Developer's Guide • February 200850

Using Sun OTP Security Services
Sun OTP 2.0 includes Access Manager, Web Server, and Directory Server. Do not deploy anyadditional web applications under the web server that is co-packaged with Sun OTP 2.0. If yourequire to deploy additional web applications, deploy it under a different web server.
The following topics are discussed:
■ “Securing Web Applications With Sun OTP” on page 51■ “Integrating Web Applications Into Sun OTP Web SSO Environment” on page 54■ “Hardening Sun OTP and Hosted NEP Applications” on page 56
Securing Web Applications With Sun OTPThis section describes the various methods to secure web applications with Sun OTP. You canconfigure the web server to use the Policy Agent software. The Policy Agent software helps inrestricting access to the server web pages.
Configuring Policy AgentThe standard way to secure a web application is to install Access Manager's Policy Agent on aweb server or an application server, and the agent protects the defined resources on thecontainer. It is necessary to change the configuration file for the Policy Agent. Change theusername and password that the agent uses to connect to the Access Manager. For Web Server6.1 on Solaris, see “Updating the Agent Profile Name and the Agent Profile Password in WebAgents” in Sun Java System Access Manager Policy Agent 2.2 Guide for Sun Java System WebServer 6.1.
For more information, see Sun Java System Access Manager Policy Agent 2.2 User’s Guide andSun Java System Access Manager 7.1 documentation collection athttp://docs.sun.com/app/docs/coll/1292.2.
8C H A P T E R 8
51

▼ To Configure Policy Agent for Web Server 6.1 on Solaris 10 11/06
Go to the configdirectory.cd /etc/opt/SUNWam/agents/es6/config/...instance.../
Edit the AMAgent.properties file.
Create a user name that you will use to log in to Access Manager. For example,com.sun.am.policy.am.username = amAdmin.
Check the settings com.sun.am.naming.url and com.sun.am.policy.am.login.url .The settings should point to the URLs where the naming service and login pages of AccessManager are available.
Go to the bindirectory.cd /opt/SUNWam/agents/bin
Encrypt the password for the user by using the crypt_util utility. For example, crypt_utilsecretPassword.
Note – The crypt_util utility is part of the Access Manager installation.
Edit the AMAgent.properties file again to set a password for the user name that you created inStep 3. Use the hash generated by crypt_util. For example,com.sun.am.policy.am.password = XFC3z18nqMEgWbnshtNfwQ==
For more information, see Sun Java System Access Manager Policy Agent 2.2 User’s Guide andSun Java System Access Manager 7.1 Documentation Collection.
Example of a Protected JSP PageThe following code illustrates a JavaServer Page (JSP) with the login and logout functionality.This page has a section that can be viewed only by authenticated users. This code uses the SingleSign On interface of Access Manager.
<%@page contentType="text/html"%><%@page pageEncoding="UTF-8"%><%@page import="com.iplanet.sso.*"%><h1>AuthTest</h1>
<p>
<a href="http://ipp-node11.czech.sun.com/amserver/UI/Login?org=dc%3Dczech%2Cdc%3Dsun%2Cdc%3Dcom&goto=/test.jsp&gotoOnFail=/error.jsp">Login</a>|
1
2
3
4
5
6
7
Securing Web Applications With Sun OTP
Sun Open Telecommunications Platform 2.0 Developer's Guide • February 200852

<a href="http://ipp-node11.czech.sun.com/amserver/UI/Logout?goto=/test.jsp">Logout</a></p>
<%
SSOTokenManager ssoManager = SSOTokenManager.getInstance();
SSOToken ssoToken = null;
String orgName = "";
boolean ok = false;
try{
ssoToken = ssoManager.createSSOToken(request);
}
catch(Exception e) {
out.write("<p>Exception! "+e+"</p>");}
if (ssoToken != null && ssoManager.isValidToken(ssoToken)) {
%>
<p>Access allowed!</p>
<%
}
else {
%>
<p>Access denied!</p>
<%
}
%>
In the above code, the login and logout links use the web interface of Access Manager to verifythe username and password of users. The remaining part of the code checks if the HTTP requestcontains a valid SSO token. If a valid SSO token is found, the user is authenticated and access isallowed.
For more details, see the following guides:
■ Sun Java System Access Manager 7.1 Documentation Collection■ Sun Java System Access Manager 7.1 Administration Guide■ Sun Java System Access Manager 7.1 Java API Reference
Securing Web Applications With Sun OTP
Chapter 8 • Using Sun OTP Security Services 53

Integrating Web Applications Into Sun OTP Web SSOEnvironment
There are two types of web applications that can be integrated into Web SSO. They are:■ Web applications without any authentication implementation■ Web applications with their own authentication implementation
Web Applications Without Any AuthenticationImplementationWeb applications that do not implement any type of authentication are protected by the PolicyAgent software of Access Manager, which is installed on the host web container. For moredetails about configuring the Policy Agent software, see “Configuring Policy Agent” on page 51.As Access Manager is integrated into Web SSO, you do not have to modify the web application.
Web Applications With Their Own AuthenticationImplementationThe Web SSO implementation is based on cookies and HTTP filters for redirection. Tointegrate a web application into Web SSO, add a filter that will redirect the user to the core WebSSO application, in case a user is not logged in. The core Web SSO application has to beextended with the authentication module. The authentication module will implement theAuthModule interface and provide the login and logout functionality.
Implementing the Web SSO FilterThe Web SSO filter is attached to a web application, which is part of a Web SSO. The filterintercepts all HTTP requests. When an unauthenticated HTTP request is recognized, the filterredirects the user to the Web SSO core application. When HTTP request belongs to anauthenticated user, the filter does nothing. For filter API details, see package javax.servlet.Also see the source code, for example, src/websso/filter/.
For more information, see Java Platform Enterprise Edition, v 5.0 API Specifications.
Extending Web SSO Core With New Authentication ModuleFor every web application that needs to be integrated with Web SSO, you have to implement thenew authentication module. You have to modify the Web SSO core, that is, add and embed thenew authentication module into the code.
The authentication module should extend the com.sun.otp.websso.AuthModule abstract class.The following listing illustrates it:
Integrating Web Applications Into Sun OTP Web SSO Environment
Sun Open Telecommunications Platform 2.0 Developer's Guide • February 200854

package com.sun.otp.websso.xxx;
import com.sun.otp.websso.AuthModule;
import com.sun.otp.websso.SunClusterUtils;
import com.sun.otp.websso.Util;
import com.sun.otp.websso.configuration.ConfigItem;
import java.net.HttpURLConnection;
import java.net.URL;
import javax.servlet.ServletContext;
import javax.servlet.http.Cookie;
/*******************************************************************************
* Authentication module for XXX application.
*/
public class SpsAuth extends AuthModule {
/**************************************************************************/
private static final String XXX_COOKIE = "XXXCookie";
/***************************************************************************
* Creates new instance of authentication module for N1 SPS.
* @param config configuration information for this module
* @param context servlet context
*/
public SpsAuth(ConfigItem config, ServletContext context) {
super(config, context);
log("XXX: "+protocol+", "+server+", "+port);}
/***************************************************************************
* Performs login into XXX application.
* @param username user’s name
* @param password user’s password
* @return array of cookies obtained from Lockhart that should be stored in
user’s browser */
public Cookie[] login(String username, String password) throws Exception {
//connect to XXX application, provide credentials, and return cookies
}
/***************************************************************************
* Performs logout from XXX application.
* @return array of cookies that should be updated (deleted) in
user’s browser */
public Cookie[] logout() throws Exception {
//connect to XXX application, do logout, and return cookies that
should be updated/deleted
}
Integrating Web Applications Into Sun OTP Web SSO Environment
Chapter 8 • Using Sun OTP Security Services 55
For filter API details, see package javax.servlet. Also see source code, for example,src/websso/filter/. For more information, see Java Platform Enterprise Edition, v 5.0 APISpecifications.
Hardening Sun OTP and Hosted NEP ApplicationsFor hardening the Sun OTP systems, Solaris Security Toolkit (SST) version 4.2 is used. SST isdelivered as part of the N1 SPS plug-in. The N1 SPS plug-in contains the SST drivers forhardening and unhardening Sun OTP. As the plug-in is compiled and signed, it cannot bechanged easily.
To modify a driver, do the following:
1. Create a new N1 SPS plug-in, which will inherit plans, components, and drivers from theoriginal plug-in.
2. Insert your drivers.3. Modify the new plug-in to use the drivers you insert.
The above steps will ensure that the plans and components from the original plug-in are reusedand invoked with the new SST drivers. For more information, refer to the SST and Sun N1 SPSdocumentation.
■ Solaris Security Toolkit 4.2 Documentation Collection■ Sun N1 Service Provisioning System 5.2 Collection
Hardening Sun OTP and Hosted NEP Applications
Sun Open Telecommunications Platform 2.0 Developer's Guide • February 200856

Examples of End-to-End Solution Deployment
This chapter provides examples of installing Sun OTP using GUI installation andcommand-line installation.
The following topics are discussed:
■ “Prerequisites for Sun OTP Installation” on page 57■ “Installing Sun OTP Using GUI Installation” on page 61■ “Installing Sun OTP Using Command-Line Installation” on page 77
Prerequisites for Sun OTP InstallationThe following table describes the prerequisites that you must meet before installing Sun OTP.
TABLE 9–1 Prerequisites for Sun OTP Installation
Tasks Documentation
Determine the system requirements of Sun OTPhosts. Upgrade firmware and install patches on SunOTP host if required. All Sun OTP hosts and storagedevices must meet the minimum patch and firmwarerequirements.
Appendix B, “Sun OTP Hardware and SoftwareRequirements,” in Sun Open TelecommunicationsPlatform 2.0 Installation Guide
Set up a naming service such as DNS, NIS, NIS+, or/etc/hosts and all host names and IP addresses mustbe set up on that naming service.
System Administration Guide: Naming and DirectoryServices (DNS, NIS, and LDAP)
Install Solaris 10 Update 3 OS on the Sun OTPprovisioning server and on each Sun OTP host.
Installing Solaris OS from the Bootable DVD
Prepare the Sun OTP hosts for Sun OTP installation. Preparing the Sun OTP Hosts
9C H A P T E R 9
57

TABLE 9–1 Prerequisites for Sun OTP Installation (Continued)Tasks Documentation
Set up the self-contained Sun OTP provisioningserver.
Setting up the Self-Contained Sun OTP ProvisioningServer
Prepare the Sun OTP host plan worksheet. Planinformation includes items such as logical host names,IP addresses for each Sun OTP host, the clustered SunOTP system name, IPMP options, zone information,and more. Using the worksheets will assist you duringinstallation and configuration, and reduce the chancefor errors.
Appendix A, “Sun OTP Plan Worksheet”
Prerequisite Tasks for Sun OTP InstallationThe following prerequisite tasks must be met before you install Sun OTP.
■ Installing Solaris OS from the Bootable DVD■ Preparing the Sun OTP Hosts■ Setting up the Self-Contained Sun OTP Provisioning Server
▼ To Install Solaris OS from the Bootable DVD
Install Solaris OS from the bootable OTP DVD.Refer to Solaris 10 11/06 Installation Guide: Basic Installations or Solaris 10 11/06 InstallationGuide: Solaris Flash Archives (Creation and Installation) for more information.
■ On SPARC systems
a. Insert the bootable Sun OTP DVD.
Note – The bootable DVD for SPARC contains the hybrid flash image that can be used fordeploying the sun4v and sun4u hardware architecture platforms.
b. Start the installation from the bootable DVD by typing the following command:boot cdrom
This will prompt you for an interactive Solaris installation.
c. Respond to the system identification and configuration screens.
d. From the Solaris Interactive Installation screen, select F4_Flash install.
●
Prerequisites for Sun OTP Installation
Sun Open Telecommunications Platform 2.0 Developer's Guide • February 200858
e. From the Flash Archive Retrieval Method screen, place the X symbol on Local File andpress F2_Continue.
f. From the Flash Archive Addition screen, provide the/cdrom/Solaris_10/otp_sparc.flarc path and then press F2_Continue.Continue to respond to the remaining screens until the installation starts and completes.
g. When the system reboots, insert the installation DVD.
■ On x64 systems
Caution – Installation does not ask for the partitioning or image name. The first disk ischosen automatically and OTP default disk formatting is applied. The existing data, if any, isoverwritten.
a. Select CDROM as a boot device in BIOS.
b. Respond to the system identification and configuration screens.
c. When the system reboots, insert the installation DVD.
▼ To Prepare the Sun OTP Hosts
Log in as root (su - root) to the Sun OTP host.
Install the remote agent on the Sun OTP host./opt/SUNWotp/cli/setupRemoteAgent -c RAW|SSH mediadir
mediadir is the fully qualified path name to the Open Telecommunications Platforminstallation source directory. The media directory is the path where the installation DVD ismounted.
Repeat this step on each Sun OTP host. All the remote agents on the cluster must use the sameconnection type (SSH or RAW).
(Applicable for SSH connection type) Configure SSH for the remote agent.
a. Set a password for the n1spsotpuser in the global zone on the Sun OTP host./usr/bin/passwd n1spsotp
(Applicable for SSH connection type) Initialize the SSH keys.
a. Log in as spsotp user (su - spsotp) to the Sun OTP provisioning server.
1
2
3
4
Prerequisites for Sun OTP Installation
Chapter 9 • Examples of End-to-End Solution Deployment 59
b. Append the ssh public key of spsotpuser from the Sun OTP provisioning server toauthorized ssh keys located in the home directory of n1spsotpuser on each Sun OTP host.
cat /var/otp/.ssh/id_rsa.pub | ssh n1spsotp@hostname "tee >>
/export/home/n1spsotp/.ssh/authorized_keys2"
hostname is the host name of Sun OTP host.
▼ To Set up the Self-Contained Sun OTP Provisioning ServerSelf-contained Sun OTP provisioning server is installed on the first host of the cluster.
Self-contained Sun OTP provisioning server uses a specific logical host name and IP addressdefined at the beginning of the Sun OTP installation. However, to make Sun OTP applicationprovisioning service highly available, the server is moved to a different logical host name(logical host name for management and provisioning services) at the end of “ConfigureComponents as Highly Available Services” plan. After “Configure Components as HighlyAvailable Services” plan is finished, this new logical host name has to be used to access the SunOTP provisioning server.
Log in as root (su - root) to the first host of the cluster.
Add the logical host name and the logical IP address to the /etc/hostsfile.
This logical host name and the logical IP address is used in the next step to set up the Sun OTPprovisioning server.
Set up the Sun OTP provisioning server in the first host of the cluster.
/opt/SUNWotp/cli/setupExternalInstallServer -M mediadir -N nodetype -R RAW|SSH -P
passwordfile -L logicalhost -I logicalip
mediadir is the fully qualified path name to the Open Telecommunications Platforminstallation source directory. The media directory is the path where the installation DVD ismounted.
nodetype can either be single (for stand-alone deployments) or first (for clustereddeployments).
-R is the connection type between Sun OTP application provisioning service master server andthe remote agent. RAW and SSH are the possible connection types between Sun OTP applicationprovisioning service master server and the remote agent.
logicalhost and logicalip are unused logical host names and logical IP addresses.
passwordfile is the absolute path of the password file. You can create this file in your homedirectory. The password file must contain a line with a valid password for the Sun OTPprovisioning server. The password can be 8 to 12 alphanumeric characters.
1
2
3
Prerequisites for Sun OTP Installation
Sun Open Telecommunications Platform 2.0 Developer's Guide • February 200860

Note – Once you set up the Sun OTP provisioning server with this password, the user name toaccess the Sun OTP provisioning server is otpadmin and the password is the password in thepassword file.
The password specified in this step and the password that will be specified during the SetupConfiguration plan must be the same.
Installing Sun OTP Using GUI InstallationThis section describes Sun OTP installation on a clustered system using the GUI installationmethod.
Note – Sun OTP can also be installed on a stand-alone system with logical domains. In thisconfiguration, all the Sun OTP components are deployed inside a logical domain. This logicaldomain must be created before installing Sun OTP.
The following topics are discussed:
■ “To Install Sun OTP on a Clustered System” on page 61■ “To Configure the Quorum Disk on a Two-Host Cluster” on page 76
▼ To Install Sun OTP on a Clustered System■ It is recommended that the shared storage is configured to provide redundancy of shared
disks using hardware RAID (RAID1 or RAID5).■ If the above feature is not available in the storage, it is recommended to use software RAID
(RAID1 or RAID5) for shared storage provided by Solaris Volume Manager. See SolarisVolume Manager Administration Guide for more information. In this case, the sharedstorage needs to be set up manually.
■ In this procedure, the cluster host set refers to all the Sun OTP hosts in the cluster and theadditional cluster host set refers to all the additional Sun OTP hosts in the cluster except thefirst Sun OTP host.
Make sure that you complete the tasks described in “Prerequisite Tasks for Sun OTPInstallation” on page 58.
Open a browser and log in to the Sun OTP application provisioning service on the Sun OTPprovisioning server.Go to the URL https://install server:9090 where install server is the IP address or thefully-qualified name of the Sun OTP provisioning server.
Before You Begin
1
Installing Sun OTP Using GUI Installation
Chapter 9 • Examples of End-to-End Solution Deployment 61

Type the user name and password.
The user name is otpadmin. The password is the password provided in the password file whilesetting up the Sun OTP provisioning server.
Add Sun OTP hosts to the Sun OTP provisioning server. Repeat this step on each Sun OTP host.
a. Click Host Setup in the left menu to display the Host Setup page.
b. Click hosts in the central menu to display the hosts page.
c. In the host field, type the name of the new Sun OTP host.
d. (Optional) In the description field, type a description of the new Sun OTP host.
e. Click create.
The host details edit page is displayed.
f. To include the remote agent, select the include remote agent on this physical host checkbox.
g. Choose SSH (encrypted) or RAW from the connection type drop-down list.
SSH (encrypted) is the recommended value.
h. Type the host name in the ip address or name field.
i. Type the appropriate entry according to the connection type.
2
3
Installing Sun OTP Using GUI Installation
Sun Open Telecommunications Platform 2.0 Developer's Guide • February 200862

■ If you chose SSH (encrypted) from the connection type drop-down list, type thefollowing entry in the advanced parameters field.
cprefix=/opt/SUNWn1sps-ra/N1_Service_Provisioning_System/agent,sshargs=-l|n1spsotp
■ If you chose RAW from the connection type drop-down list, type 7000 in the port field.
j. Click add to host sets.
k. Select com.sun.solaris#SolarisHostSet from the add host sets drop-down list.
l. Click add host to selected host sets.
FIGURE 9–1 Add OTP Hosts to the Provisioning Server Screen
Installing Sun OTP Using GUI Installation
Chapter 9 • Examples of End-to-End Solution Deployment 63

m. Scroll to the bottom of the page and click save.
The host preparation is in progress and Sun OTP host is added to the hosts list on the SunOTP provisioning server.
n. In the hosts page, click the name of the host that is added.
o. Click update remote agent.
p. After successful update, click prepare remote agent.The host is prepared for provisioning.
(Optional but recommended) Create host sets.It is recommended to create two host sets. One host set will contain all the Sun OTP additionalhosts in the cluster and the other host set will contain the previously created host set and thefirst cluster host.
a. Click Host Setup.
b. Click host sets to display the host sets page.
c. Click create.
d. Type the name of the host set in the host set field.
e. Click select from list.
f. Select the hosts that you want to add to the host set.
Note – Select only the Sun OTP host names and not the zone host names.
g. Click add hosts to main window.
h. Click add host.
i. Click save.
Click OTP Setup to display the Sun Open Telecommunications Platform installation steps page.
Configure Sun OTP installation plan variables. Repeat this step on each Sun OTP host.
a. Click Setup Configuration and click run.The SetupConfig screen appears.
4
5
6
Installing Sun OTP Using GUI Installation
Sun Open Telecommunications Platform 2.0 Developer's Guide • February 200864
b. Type the host name on which you want to install Sun OTP in the target host field.
c. Enter the password for the otpadminuser in the Enter otpadmin password field.
d. Confirm the password in the Confirm otpadmin password field.
e. Click select from list under variable settings.
The select variable setting from list... screen appears.
f. At the bottom of the select variable setting from list... screen, click create set to create a newvariable set.
g. Type a new variable set name in the Set Name field.
h. Click the check boxes for the appropriate plan variables for which you want to enter thevalues.
Installing Sun OTP Using GUI Installation
Chapter 9 • Examples of End-to-End Solution Deployment 65
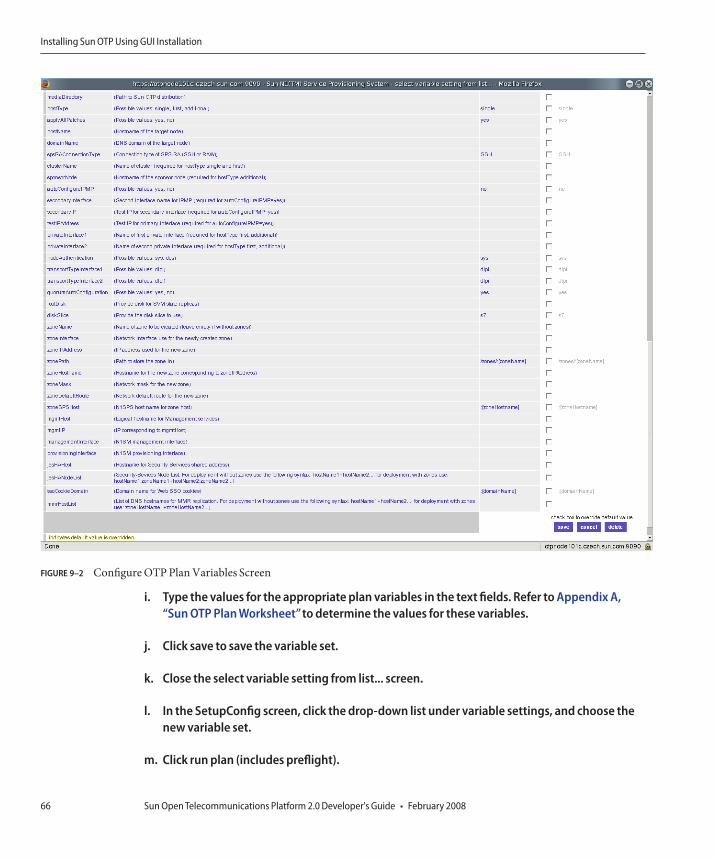
i. Type the values for the appropriate plan variables in the text fields. Refer to Appendix A,“Sun OTP Plan Worksheet”to determine the values for these variables.
j. Click save to save the variable set.
k. Close the select variable setting from list... screen.
l. In the SetupConfig screen, click the drop-down list under variable settings, and choose thenew variable set.
m. Click run plan (includes preflight).
FIGURE 9–2 Configure OTP Plan Variables Screen
Installing Sun OTP Using GUI Installation
Sun Open Telecommunications Platform 2.0 Developer's Guide • February 200866
Install the OS patches on the additional Sun OTP hosts.
a. Click Patch and click run.
The Patch screen appears.
b. Choose the additional cluster host set from the target host set drop-down list.
c. Click run plan (includes preflight).
The page is reloaded and a progress bar is displayed during the process.
Install the OS patches on the first Sun OTP host.
a. Click Patch and click run.
The Patch screen appears.
b. Type the first Sun OTP host name in the target host field.
c. Click run plan (includes preflight).
The page is reloaded and a progress bar is displayed during the process.
When the plan completes, wait for the first Sun OTP host to boot into multi-user mode.
Install and configure the Sun OTP high availability service on the first Sun OTP host.
a. Click Install Availability Service and click run.
The InstallAvailability1 screen appears.
b. Type the first Sun OTP host name in the target host field.
7
8
9
Installing Sun OTP Using GUI Installation
Chapter 9 • Examples of End-to-End Solution Deployment 67
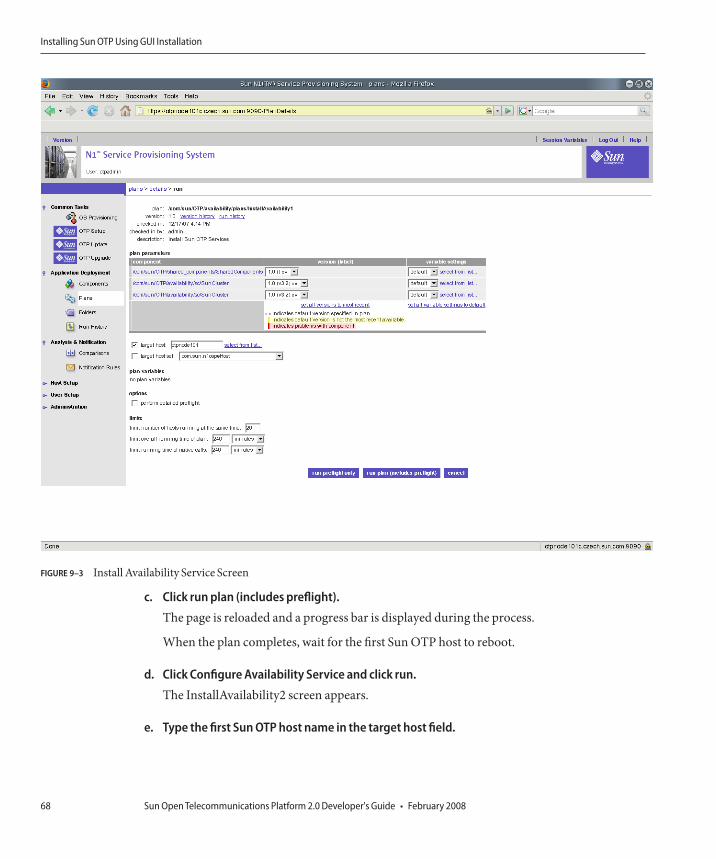
c. Click run plan (includes preflight).
The page is reloaded and a progress bar is displayed during the process.
When the plan completes, wait for the first Sun OTP host to reboot.
d. Click Configure Availability Service and click run.
The InstallAvailability2 screen appears.
e. Type the first Sun OTP host name in the target host field.
FIGURE 9–3 Install Availability Service Screen
Installing Sun OTP Using GUI Installation
Sun Open Telecommunications Platform 2.0 Developer's Guide • February 200868

f. Click run plan (includes preflight).The page is reloaded and a progress bar is displayed during the process.
Install and configure the Sun OTP high availability service on the additional Sun OTP hosts.
a. Click Install Availability Service and click run.The InstallAvailability1 screen appears.
b. Choose the additional cluster host set from the target host set drop-down list.
c. Click run plan (includes preflight).The page is reloaded and a progress bar is displayed during the process.
When the plan completes, wait for the Sun OTP host to reboot.
d. Click Configure Availability Service and click run.The InstallAvailability2 screen appears.
e. Choose the additional cluster host set from the target host set drop-down list.
f. Click run plan (includes preflight).The page is reloaded and a progress bar is displayed during the process.
(Applicable for zones) Create and configure a non-global zone on all the Sun OTP hosts.
a. Click Configure Solaris Containers and click run.The InstallZones screen appears.
This step also installs the remote agent in the non-global zone.
b. Choose the cluster host set from the target host set drop-down list.
c. Click run plan (includes preflight).The page is reloaded and a progress bar is displayed during the process.
(Applicable for zones) Configure SSH for the remote agent in the newly created non-global zoneon the Sun OTP host.
Note – Perform this step only when you have chosen SSH (encrypted) connection type betweenSun OTP application provisioning service master server and the remote agent.
a. Log in to the non-global zone on the Sun OTP host.zlogin zonename
10
11
12
Installing Sun OTP Using GUI Installation
Chapter 9 • Examples of End-to-End Solution Deployment 69

Where zonename is the name of the non-global zone.
b. Set a password for n1spsotpuser.
c. Log in as spsotp user (su - spsotp) on the Sun OTP provisioning server.
d. Append the sshpublic key of the spsotpuser from the Sun OTP provisioning server to theauthorized ssh keys located in the home directory of the n1spsotpuser on each non-globalzone on Sun OTP host.cat /var/otp/.ssh/id_rsa.pub | ssh n1spsotp@zonehostname "tee >>
/export/home/n1spsotp/.ssh/authorized_keys2"
where zonehostname is the zone host name of Sun OTP host.
Create shared storage on the clustered Sun OTP system.The shared storage is used for high availability of Sun OTP system management service and SunOTP application provisioning service. These services are installed on the shared storage. If onehost fails, the shared storage is mounted onto the other host and services will be restarted.
The shared storage will contain the otp-system-rg resource group.
a. Click Setup Shared Storage and click run.The CreateSharedStorage screen appears.
Ensure that the shared storage has at least 4 GB space.
b. Click select from list... under variable settings.The select variable setting from list... screen appears.
c. At the bottom of the select variable setting from list... screen, click create set to create a newvariable set.
d. Type the variable set name in the Set Name field.
e. Provide values for the following parameters:
■ rootDisk - Name of the root disk.■ diskSlice - Name of the disk slice where Solaris Volume Manager (SVM) database is
created.■ mntPoint - Name of the mount point. The value must be /var/js.■ diskGroup - Name of the disk group. For example, sm-dg.■ hostList - List of all the Sun OTP hosts. Separate the host names by a colon. For
example, hostname1:hostname2.■ metasetDID - Name of the valid shared did. For example, d5.
13
Installing Sun OTP Using GUI Installation
Sun Open Telecommunications Platform 2.0 Developer's Guide • February 200870
Type the command cldevice list -v to determine the shared did.
f. Close the select variable setting from list... screen.
g. In the CreateSharedStorage screen, click the drop-down list under variable settings, andchoose the new variable set.
h. Choose the cluster host set from the target host set drop-down list.
i. Click run plan (includes preflight).
Install and configure the Sun OTP system management service in the global zone on all the SunOTP hosts.
a. Click Install System Management Service and click run.
The InstallManagement screen appears.
14
Installing Sun OTP Using GUI Installation
Chapter 9 • Examples of End-to-End Solution Deployment 71

b. Choose the cluster host set from the target host set drop-down list.
c. Click run plan (includes preflight).
The page is reloaded and a progress bar is displayed during the process.
Install and configure the Sun OTP application provisioning service in the global zone on all theSun OTP hosts.
a. Click Install Provisioning Service and click run.
The InstallProvisioning screen appears.
FIGURE 9–4 Install System Management Service Screen
15
Installing Sun OTP Using GUI Installation
Sun Open Telecommunications Platform 2.0 Developer's Guide • February 200872
b. Choose the cluster host set from the target host set drop-down list.
c. Click run plan (includes preflight).
The page is reloaded and a progress bar is displayed during the process.
(Applicable for zones) Update and prepare the new zone host with the Sun OTP provisioningserver.
a. Click Host Setup in the left panel.
b. Click hosts.
c. In the hosts page, click the name of the host that is added.
d. Click update remote agent.
e. After successful update, click prepare remote agent.
(Applicable for zones) Configure Sun OTP installation plan variables for the new zone host.
a. Click OTP Setup to display the Sun Open Telecommunications Platform installation stepspage.
b. Click Setup Configuration and click run.
c. Choose the same variable set that you chose in Step 6.
d. Type the zone host name in the target host field.
e. Click run plan (includes preflight).
Install and configure the Sun OTP security service on all the Sun OTP hosts.
a. Click Install Security Service and click run.
The InstallSecurity screen appears.
16
17
18
Installing Sun OTP Using GUI Installation
Chapter 9 • Examples of End-to-End Solution Deployment 73
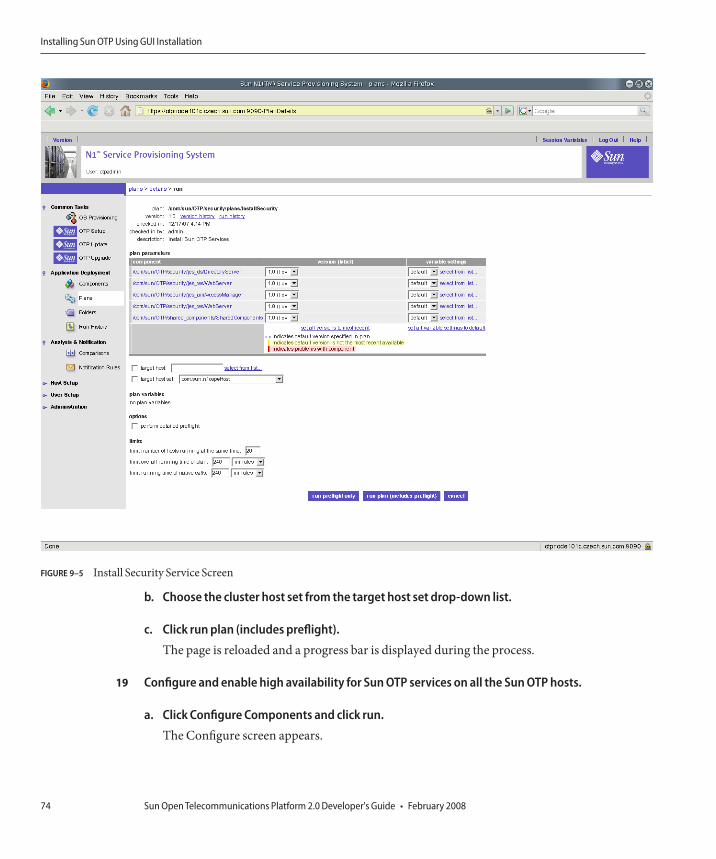
b. Choose the cluster host set from the target host set drop-down list.
c. Click run plan (includes preflight).
The page is reloaded and a progress bar is displayed during the process.
Configure and enable high availability for Sun OTP services on all the Sun OTP hosts.
a. Click Configure Components and click run.
The Configure screen appears.
FIGURE 9–5 Install Security Service Screen
19
Installing Sun OTP Using GUI Installation
Sun Open Telecommunications Platform 2.0 Developer's Guide • February 200874

This step creates and starts resource groups for Sun OTP system management service, SunOTP application provisioning service, and Sun OTP security service. This step alsoconfigures and starts master-to-master replication (MMR).
b. Choose the cluster host set from the target host set drop-down list.
c. Click run plan (includes preflight).The page is reloaded and a progress bar is displayed during the process.
Note – Self-contained Sun OTP provisioning server uses a specific logical host name and IPaddress defined at the beginning of the Sun OTP installation. However, to make Sun OTPapplication provisioning service highly available, the server is moved to a different logicalhost name (logical host name for management and provisioning services) at the end of thisplan. After this plan is finished, this new logical host name has to be used to access the SunOTP provisioning server.
Install Web SSO.
Note – When you install Sun OTP through GUI installation from a self-contained Sun OTPprovisioning server, you need to verify the completion status of the previous plan (Configureand Enable HA plan) through the /var/OTP/SUNWotp.log file before running the Install WebSSO plan. The file must have the line that reads “enableHA - COMPLETED”.
a. Click Install Web SSO and click run.The InstallWebSSO screen appears.
b. Choose the cluster host set from the target host set drop-down list.
c. Click run plan (includes preflight).
Note – Monitor the /var/OTP/SUNWotp-debug.log file to check whether the resource groupotp-system-rg has been restarted. If the resource group has not been restarted, restart theresource group manually by typing the following command on any host of the cluster.
/usr/cluster/bin/clrg online otp-system-rg
The installation log files, input files generated for the plans, installation registry information,and the debug log files are stored in the /var/OTP directory.
On a two-host cluster, if you chose no for quorumAutoConfiguration during variable setcreation, you must manually select and configure the quorum disk as described in “ToConfigure the Quorum Disk on a Two-Host Cluster” on page 76.
20
See Also
Installing Sun OTP Using GUI Installation
Chapter 9 • Examples of End-to-End Solution Deployment 75

▼ To Configure the Quorum Disk on a Two-Host ClusterOn a two-host cluster, if you chose no for Quorum Auto Configuration in the input_otp.datfile, you must manually select and configure the quorum disk as described in this procedure.
Note – The following substeps apply only to a two-host cluster. If you are setting up a three-hostor more clustered Sun OTP system, this procedure is optional.
Open a separate terminal window and log in as root to the first Sun OTP host.
Type the following command to display the cluster disk information./usr/cluster/bin/cldev list -v
DID Device Full Device Path
d1 pcl44-otp1:/dev/rdsk/c0t8d0
d1 pcl44-otp2:/dev/rdsk/c1t8d0
d2 pcl44-otp1:/dev/rdsk/c0t9d0
d2 pcl44-otp2:/dev/rdsk/c1t9d0
d3 pcl44-otp1:/dev/rdsk/c1t10d0
d4 pcl44-otp1:/dev/rdsk/c1t11d0
d4 pcl44-otp2:/dev/rdsk/c0t11d0
d5 pcl44-otp1:/dev/rdsk/c2t1d0
d6 pcl44-otp1:/dev/rdsk/c2t3d0
d7 pcl44-otp1:/dev/rdsk/c3t0d0
d9 pcl44-otp2:/dev/rdsk/c2t3d0
d10 pcl44-otp2:/dev/rdsk/c3t0d0
In the above example, disks d1 and d2 are shared by both hosts of the two-host cluster. Thequorum disk must be a shared disk.
Configure a quorum disk./usr/cluster/bin/clq add shared disk ID
Where shared disk ID is a shared disk ID.
For example, to configure d4 as a quorum disk, type the following command.
/usr/cluster/bin/clq add d4
Reset the two-host cluster to normal mode./usr/cluster/bin/clq reset
1
2
3
4
Installing Sun OTP Using GUI Installation
Sun Open Telecommunications Platform 2.0 Developer's Guide • February 200876

Installing Sun OTP Using Command-Line InstallationThis section describes Sun OTP installation on a clustered system using the command-lineinstallation method.
Note – The procedures for command-line installation are examples and are provided only fordemonstration purposes.
▼ To Install Sun OTP on a Clustered System■ It is recommended that the shared storage is configured to provide redundancy of shared
disks using hardware RAID (RAID1 or RAID5).■ If the above feature is not available in the storage, it is recommended to use software RAID
(RAID1 or RAID5) for shared storage provided by Solaris Volume Manager. See SolarisVolume Manager Administration Guide for more information. In this case, the sharedstorage needs to be set up manually.
Make sure that you complete the tasks described in “Prerequisite Tasks for Sun OTPInstallation” on page 58.
Log in as root (su - root) to the self-contained Sun OTP provisioning server.
Copy the input_otp.dat file to a local non-temporary directory.
cp /opt/SUNWotp/cli/templates/input_otp.dat /export/
Edit the /export/input_otp.dat file.
Type the values for the appropriate plan variables in the text fields. Refer to Appendix A, “SunOTP Plan Worksheet” to determine the values for these variables.
Set up the Sun OTP configuration on all the Sun OTP hosts.
/opt/SUNWotp/cli/deploy_otp -i S -f /export/input_otp.dat -o "-P passwordfile"
This command specifies the Sun OTP deployment parameters and validates these parametersprovided in the input_otp.dat file.
Install the OS patches on all the Sun OTP hosts.
/opt/SUNWotp/cli/deploy_otp -i P -f /export/input_otp.dat
When the command completes, wait for the Sun OTP hosts to boot into multi-user mode.
Before You Begin
1
2
3
4
5
Installing Sun OTP Using Command-Line Installation
Chapter 9 • Examples of End-to-End Solution Deployment 77

Install and configure the Sun OTP high availability service in the global zone on the first Sun OTPhost.
/opt/SUNWotp/cli/deploy_otp -i a -f /export/input_otp.dat -o "-N first"
When the command completes, wait for the Sun OTP host to reboot completely and then typethe following command:
/opt/SUNWotp/cli/deploy_otp -c a -f /export/input_otp.dat -o "-N first"
Install and configure the Sun OTP high availability service in the global zone on the additionalSun OTP hosts.
/opt/SUNWotp/cli/deploy_otp -i a -f /export/input_otp.dat -o "-N additional"
When the command completes, wait for the Sun OTP host to reboot completely and then typethe following command:
/opt/SUNWotp/cli/deploy_otp -c a -f /export/input_otp.dat -o "-N additional"
(Applicable for zones) Create and configure a non-global zone on all the Sun OTP hosts.
/opt/SUNWotp/cli/deploy_otp -i z -f /export/input_otp.dat
This command takes the zone-related parameters in the input_otp.dat file and creates anon-global zone. This command also installs the remote agent in the non-global zone on all theSun OTP hosts.
(Applicable for zones) Configure SSH for the remote agent in the newly created non-global zoneon all the Sun OTP hosts.
a. Log in to the non-global zone on the Sun OTP host.
zlogin zonename
Where zonename is the name of the non-global zone.
b. Set a password for n1spsotpuser in the global zone on the Sun OTP host.
c. Log in as the spsotp user (su - spsotp) on Sun OTP provisioning server.
d. Append the sshpublic key of the spsotpuser from the provisioning server to the authorizedssh keys located in the home directory of the n1spsotpuser on each Sun OTP host.
cat /var/otp/.ssh/id_rsa.pub | ssh n1spsotp@zonehostname "tee >>
/export/home/n1spsotp/.ssh/authorized_keys2"
where zonehostname is the zone host name of Sun OTP host.
6
7
8
9
Installing Sun OTP Using Command-Line Installation
Sun Open Telecommunications Platform 2.0 Developer's Guide • February 200878

Create shared storage on the clustered Sun OTP system.
The shared storage is used for high availability of Sun OTP system management service and SunOTP application provisioning service. These services are installed on the shared storage. If onehost fails, the shared storage is mounted onto the other host and services will be restarted.
The shared storage will contain the otp-system-rg resource group.
/opt/SUNWotp/cli/deploy_otp -i d -f /export/input_otp.dat -o "-D did -L hostlist -G
diskgroup -M mountpoint"
Where did is the valid shared did. For example, d5.
hostlist is the list of all Sun OTP hosts connected to shared storage. Separate the host names by acolon. For example, hostname1:hostname2.
diskgroup is the disk group. For example, sm-dg.
mountpoint is the mount point.
To determine the shared did, type the following command:
/usr/cluster/bin/cldev list -v
Choose the did that is shared among the Sun OTP hosts.
Install and configure the Sun OTP system management service in the global zone on all the SunOTP hosts.
/opt/SUNWotp/cli/deploy_otp -i m -f /export/input_otp.dat
Install and configure the Sun OTP application provisioning service in the global zone on all theSun OTP hosts.
/opt/SUNWotp/cli/deploy_otp -i p -f /export/input_otp.dat
Install and configure the Sun OTP security service on all the Sun OTP hosts.
/opt/SUNWotp/cli/deploy_otp -i s -f /export/input_otp.dat
Configure and enable high availability for Sun OTP services on the first Sun OTP host.
/opt/SUNWotp/cli/deploy_otp -c h -f /export/input_otp.dat
This command creates and starts resource groups for Sun OTP system management service,Sun OTP application provisioning service, and Sun OTP security service. This command alsoconfigures and starts master-to-master replication (MMR).
10
11
12
13
14
Installing Sun OTP Using Command-Line Installation
Chapter 9 • Examples of End-to-End Solution Deployment 79
Note – Self-contained Sun OTP provisioning server uses a specific logical host name and IPaddress defined at the beginning of the Sun OTP installation. However, to make Sun OTPapplication provisioning service highly available, the logical hostname that was previously usedwill be released upon successful completion of the Configure and Enable HA service plan, andthe Sun OTP application provisioning service will be accessible through the Management andProvisioning logical hostname and IP address.
Install Web SSO./opt/SUNWotp/cli/deploy_otp -i o -f /export/input_otp.dat
Note – Monitor the /var/OTP/SUNWotp-debug.log file to check whether the resource groupotp-system-rg has been restarted. If the resource group has not been restarted, restart theresource group manually by typing the following command on any host of the cluster.
/usr/cluster/bin/clrg online otp-system-rg
The installation log files, input files generated for the plans, installation registry information,and the debug log files are stored in the /var/OTP directory.
On a two-host cluster, if you chose no for quorumAutoConfiguration during variable setcreation, you must manually select and configure the quorum disk as described in “ToConfigure the Quorum Disk on a Two-Host Cluster” on page 76.
15
See Also
Installing Sun OTP Using Command-Line Installation
Sun Open Telecommunications Platform 2.0 Developer's Guide • February 200880

Sun OTP Plan Worksheet
This appendix provides descriptions of Sun OTP installation variables and plan worksheet.
The following topics are discussed:■ “Sun OTP Plan Settings Description” on page 81■ “Sun OTP Plan Worksheet” on page 85
Sun OTP Plan Settings DescriptionThe following list describes each of the Sun OTP plan settings that are used by the Sun OTPinstallation. These settings need to be specified in the Setup Configuration plan during theinstallation.■ mediaDirectory
The fully-qualified path name to the Sun Open Telecommunications Platform installationsource directory.
■ clusterNameName of the cluster. The length of the cluster name has to be less than 19 characters.
■ mgmtHostLogical host name used by the Sun OTP system management service. The logical host namemust correspond to the management logical IP address.
■ mgmtIPLogical IP address used by the Sun OTP system management service. The IP address mustbe an unused IP address.
■ jesHAHostHost name for Sun OTP security service shared address.
■ jesHANodeListList of host names and respective zones on which the Sun OTP security service is running.
AA P P E N D I X A
81
For deployment without zones, use the following syntax:h1_hostName+h2_hostName...For deployment with zones, use the following syntax:h1_hostName:h1_zoneName+h2_hostName:h2_zoneName...
■ mmrHostListList of host names or zone host names between which the master-to-master replication ofdata between directory server instances are provided.For deployment without zones, use the following syntax:h1_hostName+h2_hostName...For deployment with zones, use the following syntax:h1_zoneHostname+h2_zoneHostname...
■ applyAllPatchesSpecifies whether all patches or only mandatory patches are to be installed. The default valueis yes, which specifies that all patches must be installed. To install only mandatory patches,specify no.
■ spsRAConnectionTypeSpecifies the connection type between Sun OTP application provisioning service masterserver and the remote agent. The values can be SSH or RAW. The default and recommendedvalue is SSH.This variable must match the connection type that is provided while setting up the Sun OTPprovisioning server and installing the remote agent.
■ hostNameThe host name of the Sun OTP host. The length of the host name has to be less than 19characters.
■ hostTypeType of host in the cluster. The possible values are single, first, and additional. Forstand-alone host, the host type is single. For clustered configuration, the host type is firstfor the first host in the cluster and additional for the remaining hosts in the cluster.
■ sponsorNodeThe name of the first Sun OTP host in a clustered Sun OTP system. The first Sun OTP host isthe sponsoring node for all the additional Sun OTP hosts. This setting is required wheninstalling the Sun Open Telecommunications Platform on two or more hosts.This variable is required only for hosts of host type additional.
■ autoConfigureIPMPSetting to determine whether IPMP is configured automatically. The Possible values are yesand no. The default value is no.
Sun OTP Plan Settings Description
Sun Open Telecommunications Platform 2.0 Developer's Guide • February 200882

You should configure all physical interfaces of a multipathing group with a test IP address.Test addresses are required to detect failures.
If you set autoConfigureIPMP=yes, then you must also specify the following values:– secondaryInterface
Interface used as the failover interface if a fault is detected on the primary interface.– secondaryIP
IP address of the secondary interface that is used for failover. This variable is the same astestIPAddress but used for the secondary interface.
– testIPAddressAn unused IP address that is to be assigned as a routable, no-failover, and deprecated testIP address to the adapter. IP network multipathing uses test addresses to detect networkpath failures, switch port faults, and partial network equipment outages.
■ privateInterface1The first private network interface on Sun OTP host. Required when hostType is first oradditional.
■ privateInterface2The second private network interface on Sun OTP host. Required when _hostType is firstor additional.
■ transportTypeInterface1The transport type of the first private interconnect adapter on Sun OTP host. The requiredvalue is dlpi. Do not change the value.For more information, refer to dlpi(7P) man page.
■ transportTypeInterface2The transport type of the second private interconnect adapter on Sun OTP host. Therequired value is dlpi. Do not change the value.For more information, refer to dlpi(7P) man page.
■ nodeAuthenticationSetting to establish the authentication policies for hosts. The possible values are sys and des.The default value is sys.
■ quorumAutoConfiguration
Note – Quorum automatic configuration applies only to two-host clusters.
Quorum automatic configuration provides an option to enable or disable automaticconfiguration of the quorum device in a two-host only clustered Sun OTP system.
The possible values are yes and no. The default value is yes.
Sun OTP Plan Settings Description
Appendix A • Sun OTP Plan Worksheet 83

Note – If this value is set to no, a manual administrative procedure is required to configurethe quorum disk in a two-host clustered Sun OTP system. The cluster must be manuallyreset from the install mode to the normal mode. For details about how to configure quorumdisks, refer to the scconf command documentation in scconf(1M) man page.
■ rootDiskName of the root disk that is used to store the Solaris Volume Manager (SVM) database.
■ diskSliceThe disk slice where the Solaris Volume Manager (SVM) state database replicas are stored.The default value is s7. Refer to Solaris Volume Manager Administration Guide for moreinformation.
■ zoneNameName of the non-global zone for the Sun OTP security service. This variable has to be filledor remain empty for deployment with or without zones respectively.
■ zoneInterfaceNetwork interface to be used for the non-global zone, typically the primary interface of thehost.
■ zoneIPAddressIP address of the non-global zone.
■ zoneHostNameHost name of the non-global zone corresponding to zoneIPAddress.
■ zonePathPath to store the non-global zone.
■ zoneMaskNetwork mask of the non-global zone.
■ zoneDefaultRouteNetwork default route of the non-global zone. zoneDefaultRoute must be on the samelogical subnet as zoneIPAddress.
■ managementInterfaceName of the network interface used for Sun OTP system management services. The name ofthe interface depends on the platform type.
■ provisioningInterfaceName of the network interface used for Sun OTP application provisioning services. Thename of the interface depends on the platform type.
■ domainName
Sun OTP Plan Settings Description
Sun Open Telecommunications Platform 2.0 Developer's Guide • February 200884

Domain name used by the Sun OTP security service.■ ssoCookieDomain
Domain name for the Web SSO cookies. The Domain name must start with a dot (.) symbol.
Sun OTP Plan WorksheetThe following table lists the settings that you need to provide for each host during installationand configuration of the Sun Open Telecommunications Platform on a clustered Sun OTPsystem.
Tip – Print a copy of the following table for each host and then fill out the required informationto use when installing and configuring the Sun Open Telecommunications Platform on aclustered Sun OTP system.
TABLE A–1 Sun OTP Plan Worksheet
Setting Name Example
mediaDirectory /cdrom/otp_20_dvd/otp2.0
clusterName otp-cluster
mgmtHost otp-node1b
mgmtIP 10.18.144.85
jesHAHost otp-node1c
jesHANodeList otp-node1:jeszone+otp-node2:jeszone
mmrHostList otp-node1d+otp-node2d
applyAllPatches yes
spsRAConnectionType SSH
hostName otp-node1
hostType first
sponsorNode h2_sponsorNode=OTPfirsthost
autoConfigureIPMP yes
secondaryInterface bge1
secondaryIP 10.18.144.82
testIPAddress 10.18.144.81
Sun OTP Plan Worksheet
Appendix A • Sun OTP Plan Worksheet 85

TABLE A–1 Sun OTP Plan Worksheet (Continued)Setting Name Example
privateInterface1 bge2
privateInterface2 bge3
transportTypeInterface1 dlpi
transportTypeInterface2 dlpi
nodeAuthentication sys
quorumAutoConfiguration yes
rootDisk c0t0d0
diskSlice s7
zoneName jeszone
zoneInterface bge0
zoneIPAddress 10.18.144.86
zonePath /zone/jeszone
zoneHostname otp-node1d
zoneMask 255.255.255.0
zoneDefaultRoute 10.18.144.1
managementInterface bge0
provisioningInterface bge0
domainName czech.sun.com
ssoCookieDomain .sun.com
Sun OTP Plan Worksheet
Sun Open Telecommunications Platform 2.0 Developer's Guide • February 200886

Sun OTP Log Files
This appendix lists the useful log files and their locations.
Log Files
OTP Installation Log FilesThere are two OTP installation log files.
■ /var/OTP/SUNWotp.log
■ /var/OTP/SUNWotp-debug.log
Log File LocationsThe following table provides a list of log file locations.
TABLE B–1 Log File Locations
Log File Description
/var/OTP Installation log files, input files generated for the plans, installation registryinformation, and the debug log files
/var/SUNWotp Security services log files and run-time information in the zones
/etc/opt/SUNWotp Sun OTP Web SSO configuration files
/var/otp, /var/js Fail-over services installed on shared storage
/opt/SUNWotp Sun OTP packages, security services base
BA P P E N D I X B
87
TABLE B–1 Log File Locations (Continued)Log File Description
/var/opt/SUNWotp Security services runtime-instances, logs
Log Files
Sun Open Telecommunications Platform 2.0 Developer's Guide • February 200888
Index
AAdapting your application for management
agent builder, 38C/C++, 38scripts, 38
Adapting your application for provisioningcalling the installation script, 33-34moving the application deployment logic, 34-36using N1 SPS provisioning features, 36-37
BBootable DVD, Solaris OS installation, 58-59
CCalling N1 SPS
C/C++, 41-43Java, 43-45shell scripts, 39-41
CLI installation, Sun OTP, 77-80Component versions, Sun OTP, 10-11Components, Sun OTP, 23-25Configuration, IPMP, 82Configuring, policy agent, 51-53Control points, Sun OTP, 48CORBA, 17Customization, Sun OTP, 30-31
DDeployment methods, Sun OTP, 49-50DNS, 19
Eend-to-end solution deployment, Sun OTP, 47-50
FFC/FCP, 19
GGUI installation, Sun OTP, 61-76Guides, Sun OTP, 11
HHardening, Sun OTP and NEP applications, 56Host preparation, Sun OTP, 59-60
IIIOP, 19Installation log files, Sun OTP, 87-88Integrating web applications, Sun OTP Web
SSO, 54-56
89

Interfaces, Sun OTP, 17-18IPMP, configuration, 82iSCSI, 19
JJava interfaces, 17Java RMI, 19
NNEP applications, hardening, 56
PPAM, 17Plan settings, Sun OTP, 81-85Plans, Sun OTP, 25-30Plug-in, Sun OTP, 30Policy agent, configuration, 51-53POSIX, 17Prerequisite tasks, Sun OTP installation, 58-61Prerequisites, Sun OTP installation, 57-61Product mapping, Sun OTP, 10-11Protocols, Sun OTP, 18-19
RRMI, 19RMI-IIOP, 19
SSecuring web applications, Sun OTP, 51-53Services, Sun OTP, 7-9Setting up the provisioning server, Sun OTP, 60-61SNMP, 18Solaris OS installation, bootable DVD, 58-59Solution steps, Sun OTP, 31Solution topologies, Sun OTP, 13-15
SSH/SSL, 18Sun OTP
CLI installation, 77-80component versions, 10-11components, 23-25control points, 48customization, 30-31deployment methods, 49-50end-to-end solution deployment, 47-50GUI installation, 61-76guides, 11hardening, 56host preparation, 59-60installation log files, 87-88interfaces, 17-18order of plan installation, 26plan settings, 81-85plans, 25-30plug-in, 30product mapping, 10-11protocols, 18-19securing web applications, 51-53services, 7-9setting up the provisioning server, 60-61solution steps, 31solution topologies, 13-15tools for application development, 21utility plans, 30variable set, 27-30worksheet, 85-86
Sun OTP installationprerequisite tasks, 58-61prerequisites, 57-61
Sun OTP Web SSO, integrating webapplications, 54-56
TTCP/IP, 18Tools for application development, Sun OTP, 21
Index
Sun Open Telecommunications Platform 2.0 Developer's Guide • February 200890

UUsing N1 SPS
JET, 46JumpStart, 45-46
Utility plans, Sun OTP, 30
VVariable set, Sun OTP, 27-30
WWorksheet, Sun OTP, 85-86
Index
91

92