standars.optimeconsulting.netstandars.optimeconsulting.net/.../2014/06/JumpStartHTML5.pdfSummary of...
312
Summary of Contents Preface . . . . . . . . . . . . . . . . . . . . . . . . . . . . . . . . . . . . . . . . . . . . . . . . . . . . . . . . . . xix 1. Basics: What is HTML5? . . . . . . . . . . . . . . . . . . . . . . . . . . . . . . . . . . . . . . . . . . . 1 2. Basics: The Anatomy of HTML5 . . . . . . . . . . . . . . . . . . . . . . . . . . . . . . . . . . . . . 7 3. Basics: Structuring Documents . . . . . . . . . . . . . . . . . . . . . . . . . . . . . . . . . . . . 17 4. Basics: HTML5 Forms . . . . . . . . . . . . . . . . . . . . . . . . . . . . . . . . . . . . . . . . . . . . . 33 5. Basics: Multimedia, Audio and Video . . . . . . . . . . . . . . . . . . . . . . . . . . . . . . . 51 6. Multimedia: Preparing Your Media . . . . . . . . . . . . . . . . . . . . . . . . . . . . . . . . . 59 7. Multimedia: Using Native HTML5 Audio . . . . . . . . . . . . . . . . . . . . . . . . . . . . 69 8. Multimedia: Using Native HTML5 Video . . . . . . . . . . . . . . . . . . . . . . . . . . . . . 77 9. Multimedia: The source Element . . . . . . . . . . . . . . . . . . . . . . . . . . . . . . . . . 87 10. Mutimedia: The track Element . . . . . . . . . . . . . . . . . . . . . . . . . . . . . . . . . . 93 11. Multimedia: Scripting Media Players . . . . . . . . . . . . . . . . . . . . . . . . . . . . . 111 12. Canvas & SVG: An Introduction to Canvas . . . . . . . . . . . . . . . . . . . . . . . . 123 13. Canvas & SVG: Canvas Basics . . . . . . . . . . . . . . . . . . . . . . . . . . . . . . . . . . . 127 14. Canvas & SVG: Handling Non-supporting Browsers . . . . . . . . . . . . . . . . . 137 15. Canvas & SVG: Canvas Gradients . . . . . . . . . . . . . . . . . . . . . . . . . . . . . . . . 139 16. Canvas & SVG: Canvas Images and Videos . . . . . . . . . . . . . . . . . . . . . . . . . 145 17. Canvas & SVG: An Introduction to SVG . . . . . . . . . . . . . . . . . . . . . . . . . . . 149 18. Canvas & SVG: Using SVG . . . . . . . . . . . . . . . . . . . . . . . . . . . . . . . . . . . . . . 159 19. Canvas & SVG: SVG Bézier Curves . . . . . . . . . . . . . . . . . . . . . . . . . . . . . . . . 163 20. Canvas & SVG: SVG Filter Effects . . . . . . . . . . . . . . . . . . . . . . . . . . . . . . . . 169 21. Canvas & SVG: Canvas or SVG? . . . . . . . . . . . . . . . . . . . . . . . . . . . . . . . . . . 175 22. Offline Apps: Detecting When the User Is Connected . . . . . . . . . . . . . . . 179 23. Offline Apps: Application Cache . . . . . . . . . . . . . . . . . . . . . . . . . . . . . . . . . 185 24. Offline Apps: Web Storage . . . . . . . . . . . . . . . . . . . . . . . . . . . . . . . . . . . . . 197 25. Offline Apps: Storing Data With Client-side Databases . . . . . . . . . . . . . . 215 26. APIs: Overview . . . . . . . . . . . . . . . . . . . . . . . . . . . . . . . . . . . . . . . . . . . . . . . . 233 27. APIs: Web Workers . . . . . . . . . . . . . . . . . . . . . . . . . . . . . . . . . . . . . . . . . . . . 239
Transcript of standars.optimeconsulting.netstandars.optimeconsulting.net/.../2014/06/JumpStartHTML5.pdfSummary of...

Summary of Contents
Preface . . . . . . . . . . . . . . . . . . . . . . . . . . . . . . . . . . . . . . . . . . . . . . . . . . . . . . . . . . xix
1. Basics: What is HTML5? . . . . . . . . . . . . . . . . . . . . . . . . . . . . . . . . . . . . . . . . . . . 1
2. Basics: The Anatomy of HTML5 . . . . . . . . . . . . . . . . . . . . . . . . . . . . . . . . . . . . . 7
3. Basics: Structuring Documents . . . . . . . . . . . . . . . . . . . . . . . . . . . . . . . . . . . . 17
4. Basics: HTML5 Forms . . . . . . . . . . . . . . . . . . . . . . . . . . . . . . . . . . . . . . . . . . . . . 33
5. Basics: Multimedia, Audio and Video . . . . . . . . . . . . . . . . . . . . . . . . . . . . . . . 51
6. Multimedia: Preparing Your Media . . . . . . . . . . . . . . . . . . . . . . . . . . . . . . . . . 59
7. Multimedia: Using Native HTML5 Audio . . . . . . . . . . . . . . . . . . . . . . . . . . . . 69
8. Multimedia: Using Native HTML5 Video . . . . . . . . . . . . . . . . . . . . . . . . . . . . . 77
9. Multimedia: The source Element . . . . . . . . . . . . . . . . . . . . . . . . . . . . . . . . . 87
10. Mutimedia: The track Element . . . . . . . . . . . . . . . . . . . . . . . . . . . . . . . . . . 93
11. Multimedia: Scripting Media Players . . . . . . . . . . . . . . . . . . . . . . . . . . . . . 111
12. Canvas & SVG: An Introduction to Canvas . . . . . . . . . . . . . . . . . . . . . . . . 123
13. Canvas & SVG: Canvas Basics . . . . . . . . . . . . . . . . . . . . . . . . . . . . . . . . . . . 127
14. Canvas & SVG: Handling Non-supporting Browsers . . . . . . . . . . . . . . . . . 137
15. Canvas & SVG: Canvas Gradients . . . . . . . . . . . . . . . . . . . . . . . . . . . . . . . . 139
16. Canvas & SVG: Canvas Images and Videos . . . . . . . . . . . . . . . . . . . . . . . . . 145
17. Canvas & SVG: An Introduction to SVG . . . . . . . . . . . . . . . . . . . . . . . . . . . 149
18. Canvas & SVG: Using SVG . . . . . . . . . . . . . . . . . . . . . . . . . . . . . . . . . . . . . . 159
19. Canvas & SVG: SVG Bézier Curves . . . . . . . . . . . . . . . . . . . . . . . . . . . . . . . . 163
20. Canvas & SVG: SVG Filter Effects . . . . . . . . . . . . . . . . . . . . . . . . . . . . . . . . 169
21. Canvas & SVG: Canvas or SVG? . . . . . . . . . . . . . . . . . . . . . . . . . . . . . . . . . . 175
22. Offline Apps: Detecting When the User Is Connected . . . . . . . . . . . . . . . 179
23. Offline Apps: Application Cache . . . . . . . . . . . . . . . . . . . . . . . . . . . . . . . . . 185
24. Offline Apps: Web Storage . . . . . . . . . . . . . . . . . . . . . . . . . . . . . . . . . . . . . 197
25. Offline Apps: Storing Data With Client-side Databases . . . . . . . . . . . . . . 215
26. APIs: Overview . . . . . . . . . . . . . . . . . . . . . . . . . . . . . . . . . . . . . . . . . . . . . . . . 233
27. APIs: Web Workers . . . . . . . . . . . . . . . . . . . . . . . . . . . . . . . . . . . . . . . . . . . . 239

28. APIs: The Geolocation API . . . . . . . . . . . . . . . . . . . . . . . . . . . . . . . . . . . . . . 249
29. APIs: Server Sent Events . . . . . . . . . . . . . . . . . . . . . . . . . . . . . . . . . . . . . . . 255
30. APIs: The WebSocket API . . . . . . . . . . . . . . . . . . . . . . . . . . . . . . . . . . . . . . . 263
31. APIs: The Cross-document Messaging API . . . . . . . . . . . . . . . . . . . . . . . . . 269

JUMP STARTHTML5BY TIFFANY B. BROWN
KERRY BUTTERSSANDEEP PANDA

Jump Start HTML5by Tiffany B. Brown, Kerry Butters, and Sandeep Panda
Copyright © 2014 SitePoint Pty. Ltd.
English Editor: Paul FitzpatrickProduct Manager: Simon Mackie
Cover Designer: Alex WalkerTechnical Editor: Craig Buckler
Notice of RightsAll rights reserved. No part of this book may be reproduced, stored in a retrieval system or transmitted
in any form or by any means, without the prior written permission of the publisher, except in the case
of brief quotations embodied in critical articles or reviews.
Notice of LiabilityThe author and publisher have made every effort to ensure the accuracy of the information herein.
However, the information contained in this book is sold without warranty, either express or implied.
Neither the authors and SitePoint Pty. Ltd., nor its dealers or distributors will be held liable for any
damages to be caused either directly or indirectly by the instructions contained in this book, or by the
software or hardware products described herein.
Trademark NoticeRather than indicating every occurrence of a trademarked name as such, this book uses the names only
in an editorial fashion and to the benefit of the trademark owner with no intention of infringement of
the trademark.
Published by SitePoint Pty. Ltd.
48 Cambridge Street Collingwood
VIC Australia 3066
Web: www.sitepoint.com
Email: [email protected]
ISBN 978-0-9802858-2-6 (print)
ISBN 978-0-9870908-0-5 (ebook)
Printed and bound in the United States of America
iv

About Tiffany B. Brown
Tiffany B. Brown is a freelance web developer and technical writer based in Los Angeles.
She has worked on the web for more than a decade at a mix of media companies and agencies.
Before founding her consultancy, Webinista, Inc., she was part of the Opera Software De-
veloper Relations & Tools team. Now she offers web development and consulting services
to agencies and small design teams.
About Kerry Butters
Kerry Butters1 is a technology writer from the UK. With a background in technology and
publishing, Kerry writes across a range of techy subjects including web design and corporate
tech. Kerry also heads up markITwrite digital content agency2, loves to play around with
anything tech related and is an all-round geek.
About Sandeep Panda
Sandeep Panda is a web developer and writer with a passion for JavaScript and HTML5. He
has over four years' experience programming for the Web. He loves experimenting with new
technologies as they emerge and is a continuous learner. While not programming, Sandeep
can be found playing games and listening to music.
About SitePoint
SitePoint specializes in publishing fun, practical, and easy-to-understand content for web
professionals. Visit http://www.sitepoint.com/ to access our blogs, books, newsletters, articles,
and community forums. You’ll find a stack of information on JavaScript, PHP, Ruby, mobile
development, design, and more.
About Jump Start
Jump Start books provide you with a rapid and practical introduction to web development
languages and technologies. Typically around 150 pages in length, they can be read in a
weekend, giving you a solid grounding in the topic and the confidence to experiment on
your own.
1 https://plus.google.com/u/0/+KerryButters?rel=author2 http://markitwrite.com
v


Table of Contents
Preface . . . . . . . . . . . . . . . . . . . . . . . . . . . . . . . . . . . . . . . . . . . . . . . . . . . . . . xix
Who Should Read This Book . . . . . . . . . . . . . . . . . . . . . . . . . . . . . . . . . . . . xx
Conventions Used . . . . . . . . . . . . . . . . . . . . . . . . . . . . . . . . . . . . . . . . . . . . . xx
Code Samples . . . . . . . . . . . . . . . . . . . . . . . . . . . . . . . . . . . . . . . . . . . . xx
Tips, Notes, and Warnings . . . . . . . . . . . . . . . . . . . . . . . . . . . . . . . . . xxii
Supplementary Materials . . . . . . . . . . . . . . . . . . . . . . . . . . . . . . . . . . . . . . xxii
Tools You’ll Need . . . . . . . . . . . . . . . . . . . . . . . . . . . . . . . . . . . . . . . . . . . . . xxii
Do You Want to Keep Learning? . . . . . . . . . . . . . . . . . . . . . . . . . . . . . . . . xxiv
Chapter 1 Basics: What is HTML5? . . . . . . . . . . . . . . . . 1
A Brief History of HTML5 . . . . . . . . . . . . . . . . . . . . . . . . . . . . . . . . . . . . . . . . 2
HTML: The Early Years . . . . . . . . . . . . . . . . . . . . . . . . . . . . . . . . . . . . . . 2
A Detour Through XHTML Land . . . . . . . . . . . . . . . . . . . . . . . . . . . . . . 3
The Battle for World DOM-ination . . . . . . . . . . . . . . . . . . . . . . . . . . . . 4
Applets and Plugins . . . . . . . . . . . . . . . . . . . . . . . . . . . . . . . . . . . . . . . . 4
What HTML5 Isn’t . . . . . . . . . . . . . . . . . . . . . . . . . . . . . . . . . . . . . . . . . . . . . . 5
A Note on the HTML5 Specification . . . . . . . . . . . . . . . . . . . . . . . . . . . . . . . 6
Chapter 2 Basics: The Anatomy ofHTML5 . . . . . . . . . . . . . . . . . . . . . . . . . . . . . . . . . . . . . . . 7
Your First HTML5 Document . . . . . . . . . . . . . . . . . . . . . . . . . . . . . . . . . . . . . 8
The Two Modes of HTML5 Syntax . . . . . . . . . . . . . . . . . . . . . . . . . . . . . . . . . 9
HTML Syntax . . . . . . . . . . . . . . . . . . . . . . . . . . . . . . . . . . . . . . . . . . . . . 10
To Quote or Not Quote: Attributes in HTML5 . . . . . . . . . . . . . . . . . . 12
A Pared-down HTML5 Document . . . . . . . . . . . . . . . . . . . . . . . . . . . . 12
"XHTML5": HTML5’s XML Syntax . . . . . . . . . . . . . . . . . . . . . . . . . . . . 13

Chapter 3 Basics: Structuring Documents . . . . . . 17
The article Element . . . . . . . . . . . . . . . . . . . . . . . . . . . . . . . . . . . . . . . . . 20
Putting It Together . . . . . . . . . . . . . . . . . . . . . . . . . . . . . . . . . . . . . . . . . . . . 23
The section Element . . . . . . . . . . . . . . . . . . . . . . . . . . . . . . . . . . . . . . . . . 25
div Versus section . . . . . . . . . . . . . . . . . . . . . . . . . . . . . . . . . . . . . . 27
Other Document Elements . . . . . . . . . . . . . . . . . . . . . . . . . . . . . . . . . . . . . . 28
figure and figcaption . . . . . . . . . . . . . . . . . . . . . . . . . . . . . . . . . 28
main Element . . . . . . . . . . . . . . . . . . . . . . . . . . . . . . . . . . . . . . . . . . . . 29
Chapter 4 Basics: HTML5 Forms . . . . . . . . . . . . . . . . . . 33
Starting an HTML5 Form . . . . . . . . . . . . . . . . . . . . . . . . . . . . . . . . . . . . . . . 34
The input Element . . . . . . . . . . . . . . . . . . . . . . . . . . . . . . . . . . . . . . . . . . . 35
Collecting Names . . . . . . . . . . . . . . . . . . . . . . . . . . . . . . . . . . . . . . . . . . . . . 35
Using Form Labels . . . . . . . . . . . . . . . . . . . . . . . . . . . . . . . . . . . . . . . . 36
Requiring Form Fields . . . . . . . . . . . . . . . . . . . . . . . . . . . . . . . . . . . . . . . . . . 36
Styling Required Forms . . . . . . . . . . . . . . . . . . . . . . . . . . . . . . . . . . . . 37
Collecting Email Addresses, Phone Numbers, and URLs . . . . . . . . . . 38
Uploading Files . . . . . . . . . . . . . . . . . . . . . . . . . . . . . . . . . . . . . . . . . . . . . . . 42
The datalist Element . . . . . . . . . . . . . . . . . . . . . . . . . . . . . . . . . . . . . . . . 44
Other Input Types . . . . . . . . . . . . . . . . . . . . . . . . . . . . . . . . . . . . . . . . . 45
Date and Time Inputs . . . . . . . . . . . . . . . . . . . . . . . . . . . . . . . . . . . . . . 49
Chapter 5 Basics: Multimedia, Audio andVideo . . . . . . . . . . . . . . . . . . . . . . . . . . . . . . . . . . . . . . . . . 51
Adding Controls . . . . . . . . . . . . . . . . . . . . . . . . . . . . . . . . . . . . . . . . . . . . . . 52
Autoplaying and Looping Media . . . . . . . . . . . . . . . . . . . . . . . . . . . . . . . . . 53
Video-only Attributes . . . . . . . . . . . . . . . . . . . . . . . . . . . . . . . . . . . . . . . . . . 54
Place Holding with poster . . . . . . . . . . . . . . . . . . . . . . . . . . . . . . . . 54
Controlling Video Dimensions . . . . . . . . . . . . . . . . . . . . . . . . . . . . . . . 55
viii

Bandwidth Use and Playback Responsiveness . . . . . . . . . . . . . . . . . . . . . . 55
Cross-browser Audio and Video . . . . . . . . . . . . . . . . . . . . . . . . . . . . . . . . . 56
Using Multiple Video or Audio Files . . . . . . . . . . . . . . . . . . . . . . . . . . 58
Chapter 6 Multimedia: Preparing YourMedia . . . . . . . . . . . . . . . . . . . . . . . . . . . . . . . . . . . . . . . . 59
Codec Showdown . . . . . . . . . . . . . . . . . . . . . . . . . . . . . . . . . . . . . . . . . . . . . 59
The Current Landscape . . . . . . . . . . . . . . . . . . . . . . . . . . . . . . . . . . . . 60
Converting Files Using Miro Video Converter . . . . . . . . . . . . . . . . . . . . . . 61
Converting Media Using FFmpeg . . . . . . . . . . . . . . . . . . . . . . . . . . . . . . . . 64
Resizing Video Files . . . . . . . . . . . . . . . . . . . . . . . . . . . . . . . . . . . . . . . 66
Using FFmpeg to Generate a Poster Image . . . . . . . . . . . . . . . . . . . . 67
Using a Hosted Service . . . . . . . . . . . . . . . . . . . . . . . . . . . . . . . . . . . . . . . . . 67
Quality Versus File Size . . . . . . . . . . . . . . . . . . . . . . . . . . . . . . . . . . . . . . . . . 68
Chapter 7 Multimedia: Using Native HTML5Audio . . . . . . . . . . . . . . . . . . . . . . . . . . . . . . . . . . . . . . . . 69
The audio Element . . . . . . . . . . . . . . . . . . . . . . . . . . . . . . . . . . . . . . . . . . . 69
The autoplay Attribute . . . . . . . . . . . . . . . . . . . . . . . . . . . . . . . . . . . . . . . 71
Looping Media . . . . . . . . . . . . . . . . . . . . . . . . . . . . . . . . . . . . . . . . . . . . . . . 71
Muting Media . . . . . . . . . . . . . . . . . . . . . . . . . . . . . . . . . . . . . . . . . . . . . . . . 72
Buffer Hinting with the preload Attribute . . . . . . . . . . . . . . . . . . . . . . . 72
preload="auto" . . . . . . . . . . . . . . . . . . . . . . . . . . . . . . . . . . . . . . . 73
preload="none" . . . . . . . . . . . . . . . . . . . . . . . . . . . . . . . . . . . . . . . 73
preload="metadata" . . . . . . . . . . . . . . . . . . . . . . . . . . . . . . . . . . . 74
Fallback Content . . . . . . . . . . . . . . . . . . . . . . . . . . . . . . . . . . . . . . . . . . . . . . 75
ix

Chapter 8 Multimedia: Using Native HTML5Video . . . . . . . . . . . . . . . . . . . . . . . . . . . . . . . . . . . . . . . . . 77
Setting Video Dimensions . . . . . . . . . . . . . . . . . . . . . . . . . . . . . . . . . . . . . . 78
Percentages for Height . . . . . . . . . . . . . . . . . . . . . . . . . . . . . . . . . . . . 81
Setting a Poster Image . . . . . . . . . . . . . . . . . . . . . . . . . . . . . . . . . . . . 83
What We've Learned So Far . . . . . . . . . . . . . . . . . . . . . . . . . . . . . . . . 85
Chapter 9 Multimedia: The sourceElement . . . . . . . . . . . . . . . . . . . . . . . . . . . . . . . . . . . . . . 87
The source Element . . . . . . . . . . . . . . . . . . . . . . . . . . . . . . . . . . . . . . . . . . 87
Format Hinting With the type Attribute . . . . . . . . . . . . . . . . . . . . . . . . . 88
Troubleshooting Media Problems . . . . . . . . . . . . . . . . . . . . . . . . . . . . 89
Responsive Video With the media Attribute . . . . . . . . . . . . . . . . . . . . . . 90
Serving Videos With Different Aspect Ratios . . . . . . . . . . . . . . . . . . 90
So Far We've Learned . . . . . . . . . . . . . . . . . . . . . . . . . . . . . . . . . . . . . . . . . . 91
Chapter 10 Mutimedia: The track Element . . . . . 93
The State of track Support . . . . . . . . . . . . . . . . . . . . . . . . . . . . . . . . . . . . 94
Captions, Subtitles, and audio . . . . . . . . . . . . . . . . . . . . . . . . . . . . . 95
Adding the track Element . . . . . . . . . . . . . . . . . . . . . . . . . . . . . . . . . . . . . 95
Specifying Subtitles, Captions, and Metadata . . . . . . . . . . . . . . . . . . . . . . 96
Using Multiple track Elements . . . . . . . . . . . . . . . . . . . . . . . . . . . . . 97
Specifying the Language of Your Text Tracks . . . . . . . . . . . . . . . . . . . . . . 98
Labeling Your Tracks . . . . . . . . . . . . . . . . . . . . . . . . . . . . . . . . . . . . . . . . . . 100
Creating Text Tracks With WebVTT . . . . . . . . . . . . . . . . . . . . . . . . . . . . . . 102
What is WebVTT? . . . . . . . . . . . . . . . . . . . . . . . . . . . . . . . . . . . . . . . . 102
Creating a Simple WebVTT File . . . . . . . . . . . . . . . . . . . . . . . . . . . . . 102
WebVTT Cue Spans . . . . . . . . . . . . . . . . . . . . . . . . . . . . . . . . . . . . . . . 104
x

Styling Subtitles and Captions with the ::cue
Pseudo-element . . . . . . . . . . . . . . . . . . . . . . . . . . . . . . . . . . . . . . . . . 106
What We've Learned . . . . . . . . . . . . . . . . . . . . . . . . . . . . . . . . . . . . . . . . . 110
Chapter 11 Multimedia: Scripting MediaPlayers . . . . . . . . . . . . . . . . . . . . . . . . . . . . . . . . . . . . . . 111
Event-Driven DOM Scripting: An Introduction . . . . . . . . . . . . . . . . . . . . 112
Step 1: Creating Our Markup . . . . . . . . . . . . . . . . . . . . . . . . . . . . . . . . . . 113
Step 2: Retrieving Our Video Object . . . . . . . . . . . . . . . . . . . . . . . . . . . . . 115
Step 2: Playing and Pausing Video . . . . . . . . . . . . . . . . . . . . . . . . . . . . . . 116
Step 3: Determining the File's Duration . . . . . . . . . . . . . . . . . . . . . . . . . . 117
Step 4: Indicating Time Elapsed . . . . . . . . . . . . . . . . . . . . . . . . . . . . . . . . 118
Step 5: Seeking Using a range Input Type . . . . . . . . . . . . . . . . . . . . . . . 119
Step 6: Adjusting Volume . . . . . . . . . . . . . . . . . . . . . . . . . . . . . . . . . . . . . 120
Hinting at Bandwidth Consumption by Changing the Value of
preload . . . . . . . . . . . . . . . . . . . . . . . . . . . . . . . . . . . . . . . . . . . . . . . . . . . 121
Wrapping Up . . . . . . . . . . . . . . . . . . . . . . . . . . . . . . . . . . . . . . . . . . . . . . . . 122
Chapter 12 Canvas & SVG: An Introduction toCanvas . . . . . . . . . . . . . . . . . . . . . . . . . . . . . . . . . . . . . . 123
What Can Canvas Be Used For? . . . . . . . . . . . . . . . . . . . . . . . . . . . . . . . . 123
Before We Get Started . . . . . . . . . . . . . . . . . . . . . . . . . . . . . . . . . . . . . . . . 124
Canvas Looks Complex, Why Not Use Flash? . . . . . . . . . . . . . . . . . . . . . . 125
What About WebGL? . . . . . . . . . . . . . . . . . . . . . . . . . . . . . . . . . . . . . . . . . 125
Chapter 13 Canvas & SVG: Canvas Basics . . . . . . 127
HTML5 Canvas Template . . . . . . . . . . . . . . . . . . . . . . . . . . . . . . . . . . . . . . 127
Drawing a Simple Shape Onto the Canvas . . . . . . . . . . . . . . . . . . . . . . . 128
xi

Canvas Coordinates and Paths . . . . . . . . . . . . . . . . . . . . . . . . . . . . . . . . . 130
Drawing Circles . . . . . . . . . . . . . . . . . . . . . . . . . . . . . . . . . . . . . . . . . . . . . . 131
Drawing Text . . . . . . . . . . . . . . . . . . . . . . . . . . . . . . . . . . . . . . . . . . . . . . . . 132
Drawing a Triangle . . . . . . . . . . . . . . . . . . . . . . . . . . . . . . . . . . . . . . . . . . . 134
Canvas Sizing . . . . . . . . . . . . . . . . . . . . . . . . . . . . . . . . . . . . . . . . . . . . . . . 135
Scaling with JavaScript . . . . . . . . . . . . . . . . . . . . . . . . . . . . . . . . . . . 136
Scaling with CSS . . . . . . . . . . . . . . . . . . . . . . . . . . . . . . . . . . . . . . . . 136
CSS Transforms Using JavaScript . . . . . . . . . . . . . . . . . . . . . . . . . . . 136
Chapter 14 Canvas & SVG: HandlingNon-supporting Browsers . . . . . . . . . . . . 137
Create Alternative Content . . . . . . . . . . . . . . . . . . . . . . . . . . . . . . . . . . . . 137
Chapter 15 Canvas & SVG: CanvasGradients . . . . . . . . . . . . . . . . . . . . . . . . . . . . . . . . . . 139
Radial Gradients . . . . . . . . . . . . . . . . . . . . . . . . . . . . . . . . . . . . . . . . . . . . . 141
Playing with the Color Stops . . . . . . . . . . . . . . . . . . . . . . . . . . . . . . . . . . . 142
Chapter 16 Canvas & SVG: Canvas Images andVideos . . . . . . . . . . . . . . . . . . . . . . . . . . . . . . . . . . . . . . . 145
Images . . . . . . . . . . . . . . . . . . . . . . . . . . . . . . . . . . . . . . . . . . . . . . . . . . . . . 145
Using the image() Object . . . . . . . . . . . . . . . . . . . . . . . . . . . . . . . . 146
Video . . . . . . . . . . . . . . . . . . . . . . . . . . . . . . . . . . . . . . . . . . . . . . . . . . . . . . 146
Chapter 17 Canvas & SVG: An Introduction toSVG . . . . . . . . . . . . . . . . . . . . . . . . . . . . . . . . . . . . . . . . . . 149
Why Use SVG Instead of JPEG, PNG, or GIF? . . . . . . . . . . . . . . . . . . . . . . 150
xii

Getting Started . . . . . . . . . . . . . . . . . . . . . . . . . . . . . . . . . . . . . . . . . . . . . . 151
Other Shapes . . . . . . . . . . . . . . . . . . . . . . . . . . . . . . . . . . . . . . . . . . . 152
Gradients and Patterns . . . . . . . . . . . . . . . . . . . . . . . . . . . . . . . . . . . . . . . 156
Patterns . . . . . . . . . . . . . . . . . . . . . . . . . . . . . . . . . . . . . . . . . . . . . . . . 157
Chapter 18 Canvas & SVG: Using SVG . . . . . . . . . . 159
Inserting SVG Images on Your Pages . . . . . . . . . . . . . . . . . . . . . . . . . . . . 159
Which Method Should You Use? . . . . . . . . . . . . . . . . . . . . . . . . . . . 160
SVG Tools and Libraries . . . . . . . . . . . . . . . . . . . . . . . . . . . . . . . . . . . 161
Chapter 19 Canvas & SVG: SVG BézierCurves . . . . . . . . . . . . . . . . . . . . . . . . . . . . . . . . . . . . . . 163
Quadratic Bézier Curves . . . . . . . . . . . . . . . . . . . . . . . . . . . . . . . . . . . . . . . 164
Cubic Bézier Curves . . . . . . . . . . . . . . . . . . . . . . . . . . . . . . . . . . . . . . . . . . 166
Chapter 20 Canvas & SVG: SVG FilterEffects . . . . . . . . . . . . . . . . . . . . . . . . . . . . . . . . . . . . . . . 169
Using Filter Effects . . . . . . . . . . . . . . . . . . . . . . . . . . . . . . . . . . . . . . . . . . . 170
Playing with Filters . . . . . . . . . . . . . . . . . . . . . . . . . . . . . . . . . . . . . . 171
Chapter 21 Canvas & SVG: Canvas or SVG? . . . 175
Creation Languages . . . . . . . . . . . . . . . . . . . . . . . . . . . . . . . . . . . . . . . . . . 176
Typical Uses . . . . . . . . . . . . . . . . . . . . . . . . . . . . . . . . . . . . . . . . . . . . . . . . . 176
Chapter 22 Offline Apps: Detecting When theUser Is Connected . . . . . . . . . . . . . . . . . . . . . . 179
Determining Whether the User Is Online . . . . . . . . . . . . . . . . . . . . . . . . . 179
xiii

Listening for Changes in Connectivity State . . . . . . . . . . . . . . . . . . . . . . 180
Online and Offline Events in Internet Explorer 8 . . . . . . . . . . . . . . 181
Limitations of navigator.onLine . . . . . . . . . . . . . . . . . . . . . . . . . . . . 181
Checking Connectivity With XMLHttpRequest . . . . . . . . . . . . . . . . . . 182
What You’ve Learned . . . . . . . . . . . . . . . . . . . . . . . . . . . . . . . . . . . . . . . . . 184
Chapter 23 Offline Apps: ApplicationCache . . . . . . . . . . . . . . . . . . . . . . . . . . . . . . . . . . . . . . . 185
Cache Manifest Syntax . . . . . . . . . . . . . . . . . . . . . . . . . . . . . . . . . . . . . . . 186
Saving Files Locally with the CACHE: Section Header . . . . . . . . . 186
Forcing Network Retrieval with NETWORK: . . . . . . . . . . . . . . . . . . 187
Specifying Alternative Content for Unavailable URLs . . . . . . . . . . 188
Specifying Settings . . . . . . . . . . . . . . . . . . . . . . . . . . . . . . . . . . . . . . 188
Adding the Cache Manifest to Your HTML . . . . . . . . . . . . . . . . . . . . . . . 189
Serving the Cache Manifest . . . . . . . . . . . . . . . . . . . . . . . . . . . . . . . . . . . 189
Avoiding Application Cache “Gotchas” . . . . . . . . . . . . . . . . . . . . . . . . . . 189
Solving Gotcha #1: Loading Uncached Assets from a Cached
Document . . . . . . . . . . . . . . . . . . . . . . . . . . . . . . . . . . . . . . . . . . . . . . 190
Solving Gotcha #2: Updating the Cache . . . . . . . . . . . . . . . . . . . . . 190
Cache Gotcha #3: Break One File, Break Them All . . . . . . . . . . . . . 190
Testing for Application Cache Support . . . . . . . . . . . . . . . . . . . . . . . . . . 191
The Application Cache API . . . . . . . . . . . . . . . . . . . . . . . . . . . . . . . . . . . . . 191
The AppCache Event Sequence . . . . . . . . . . . . . . . . . . . . . . . . . . . . . 191
Setting Up Our Cache Manifest . . . . . . . . . . . . . . . . . . . . . . . . . . . . 193
Setting Up Our HTML . . . . . . . . . . . . . . . . . . . . . . . . . . . . . . . . . . . . 193
Setting Up Our CSS and JavaScript . . . . . . . . . . . . . . . . . . . . . . . . . 194
Chapter 24 Offline Apps: Web Storage . . . . . . . . . . . 197
Why Use Web Storage Instead of Cookies? . . . . . . . . . . . . . . . . . . . . . . . 198
xiv

Browser Support . . . . . . . . . . . . . . . . . . . . . . . . . . . . . . . . . . . . . . . . . . . . . 198
Inspecting Web Storage . . . . . . . . . . . . . . . . . . . . . . . . . . . . . . . . . . 199
Testing for Web Storage Support . . . . . . . . . . . . . . . . . . . . . . . . . . . . . . . 199
Setting Up Our HTML . . . . . . . . . . . . . . . . . . . . . . . . . . . . . . . . . . . . . . . . . 200
Saving Values With localStorage.setItem() . . . . . . . . . . . . . . . . 201
Adding an Event Listener . . . . . . . . . . . . . . . . . . . . . . . . . . . . . . . . . 202
Using localStorage.setItem to Update Existing Values . . . . 203
Retrieving Values With localStorage.getItem() . . . . . . . . . . . . . 203
Alternative Syntaxes for Setting and Getting Items . . . . . . . . . . . 205
Looping Over Storage Items . . . . . . . . . . . . . . . . . . . . . . . . . . . . . . . . . . . 205
Clearing the Storage Area With localStorage.clear() . . . . . . . . 207
Storage Events . . . . . . . . . . . . . . . . . . . . . . . . . . . . . . . . . . . . . . . . . . . . . . 207
Listening for the Storage Event . . . . . . . . . . . . . . . . . . . . . . . . . . . . 208
The StorageEvent Object . . . . . . . . . . . . . . . . . . . . . . . . . . . . . . . 208
Storage Events Across Browsers . . . . . . . . . . . . . . . . . . . . . . . . . . . . 209
Determining Which Method Caused the Storage Event . . . . . . . . 209
Storing Arrays and Objects . . . . . . . . . . . . . . . . . . . . . . . . . . . . . . . . . . . . 210
Limitations of Web Storage . . . . . . . . . . . . . . . . . . . . . . . . . . . . . . . . . . . . 212
Chapter 25 Offline Apps: Storing Data WithClient-side Databases . . . . . . . . . . . . . . . . . . 215
The State of Client-side Databases . . . . . . . . . . . . . . . . . . . . . . . . . . . . . . 215
About IndexedDB . . . . . . . . . . . . . . . . . . . . . . . . . . . . . . . . . . . . . . . . . . . . 216
Setting up Our HTML . . . . . . . . . . . . . . . . . . . . . . . . . . . . . . . . . . . . . . . . . 218
Creating a Database . . . . . . . . . . . . . . . . . . . . . . . . . . . . . . . . . . . . . . . . . . 220
Adding an Object Store . . . . . . . . . . . . . . . . . . . . . . . . . . . . . . . . . . . . . . . 221
Adding a Record . . . . . . . . . . . . . . . . . . . . . . . . . . . . . . . . . . . . . . . . . . . . . 223
Retrieving and Iterating Over Records . . . . . . . . . . . . . . . . . . . . . . . . . . . 226
Creating a Cursor Transaction . . . . . . . . . . . . . . . . . . . . . . . . . . . . . 226
Retrieving a Subset of Records . . . . . . . . . . . . . . . . . . . . . . . . . . . . . 227
xv

Retrieving or Deleting Individual Entries . . . . . . . . . . . . . . . . . . . . . . . . . 228
Updating a Record . . . . . . . . . . . . . . . . . . . . . . . . . . . . . . . . . . . . . . . . . . . 229
Deleting a Database . . . . . . . . . . . . . . . . . . . . . . . . . . . . . . . . . . . . . . . . . . 230
Wrapping Up and Learning More . . . . . . . . . . . . . . . . . . . . . . . . . . . . . . . 231
Chapter 26 APIs: Overview . . . . . . . . . . . . . . . . . . . . . . . . . . 233
A Quick Tour of the HTML5 APIs Covered . . . . . . . . . . . . . . . . . . . . . . . . 233
What You Are Going to Learn . . . . . . . . . . . . . . . . . . . . . . . . . . . . . . . . . . 235
Getting Started . . . . . . . . . . . . . . . . . . . . . . . . . . . . . . . . . . . . . . . . . . . . . . 235
Checking Browser Compatibility . . . . . . . . . . . . . . . . . . . . . . . . . . . 236
Setting Up the Environment . . . . . . . . . . . . . . . . . . . . . . . . . . . . . . . 238
Chapter 27 APIs: Web Workers . . . . . . . . . . . . . . . . . . . . . 239
Introduction and Usage . . . . . . . . . . . . . . . . . . . . . . . . . . . . . . . . . . . . . . . 239
Passing JSON data . . . . . . . . . . . . . . . . . . . . . . . . . . . . . . . . . . . . . . . 242
Web Worker Features . . . . . . . . . . . . . . . . . . . . . . . . . . . . . . . . . . . . 243
More Advanced Workers . . . . . . . . . . . . . . . . . . . . . . . . . . . . . . . . . . . . . . 244
Inline Workers . . . . . . . . . . . . . . . . . . . . . . . . . . . . . . . . . . . . . . . . . . 244
Creating Subworkers Inside Workers . . . . . . . . . . . . . . . . . . . . . . . . 246
Using External Scripts within Workers . . . . . . . . . . . . . . . . . . . . . . 246
Security Considerations . . . . . . . . . . . . . . . . . . . . . . . . . . . . . . . . . . . . . . . 246
Polyfills for Older Browsers . . . . . . . . . . . . . . . . . . . . . . . . . . . . . . . . . . . . 247
Conclusion . . . . . . . . . . . . . . . . . . . . . . . . . . . . . . . . . . . . . . . . . . . . . . . . . . 247
Chapter 28 APIs: The Geolocation API . . . . . . . . . . 249
Hitting the Surface . . . . . . . . . . . . . . . . . . . . . . . . . . . . . . . . . . . . . . . . . . . 249
Continuously Monitoring Position . . . . . . . . . . . . . . . . . . . . . . . . . . . . . . 252
Accuracy of Geolocation . . . . . . . . . . . . . . . . . . . . . . . . . . . . . . . . . . . . . . 253
Conclusion . . . . . . . . . . . . . . . . . . . . . . . . . . . . . . . . . . . . . . . . . . . . . . . . . . 254
xvi

Chapter 29 APIs: Server Sent Events . . . . . . . . . . . . . 255
The Motivation for SSEs . . . . . . . . . . . . . . . . . . . . . . . . . . . . . . . . . . . . . . . 255
The API . . . . . . . . . . . . . . . . . . . . . . . . . . . . . . . . . . . . . . . . . . . . . . . . . . . . . 256
The EventStream Format . . . . . . . . . . . . . . . . . . . . . . . . . . . . . . . . . . . . 257
How About a Little JSON? . . . . . . . . . . . . . . . . . . . . . . . . . . . . . . . . . . . . . 258
Associating an Event ID . . . . . . . . . . . . . . . . . . . . . . . . . . . . . . . . . . . . . . . 258
Creating Your Own Events . . . . . . . . . . . . . . . . . . . . . . . . . . . . . . . . . . . . . 259
Handling Reconnection Timeout . . . . . . . . . . . . . . . . . . . . . . . . . . . . . . . 260
Closing a Connection . . . . . . . . . . . . . . . . . . . . . . . . . . . . . . . . . . . . . . . . . 260
A Sample Event Source . . . . . . . . . . . . . . . . . . . . . . . . . . . . . . . . . . . . . . . 260
Debugging . . . . . . . . . . . . . . . . . . . . . . . . . . . . . . . . . . . . . . . . . . . . . . . . . . 262
Conclusion . . . . . . . . . . . . . . . . . . . . . . . . . . . . . . . . . . . . . . . . . . . . . . . . . . 262
Chapter 30 APIs: The WebSocket API . . . . . . . . . . . 263
The JavaScript API . . . . . . . . . . . . . . . . . . . . . . . . . . . . . . . . . . . . . . . . . . . 264
Sending Binary Data . . . . . . . . . . . . . . . . . . . . . . . . . . . . . . . . . . . . . . . . . 266
Sample Server Implementations . . . . . . . . . . . . . . . . . . . . . . . . . . . . . . . . 267
Conclusion . . . . . . . . . . . . . . . . . . . . . . . . . . . . . . . . . . . . . . . . . . . . . . . . . . 268
Chapter 31 APIs: The Cross-documentMessaging API . . . . . . . . . . . . . . . . . . . . . . . . . . . 269
The JavaScript API . . . . . . . . . . . . . . . . . . . . . . . . . . . . . . . . . . . . . . . . . . . 270
Basic Usage . . . . . . . . . . . . . . . . . . . . . . . . . . . . . . . . . . . . . . . . . . . . . . . . . 270
Detecting the Readiness of the Document . . . . . . . . . . . . . . . . . . . . . . . 275
Conclusion . . . . . . . . . . . . . . . . . . . . . . . . . . . . . . . . . . . . . . . . . . . . . . . . . . 276
xvii


PrefaceHTML (HyperText Markup Language) is the predominant language of web pages.
Whenever you read or interact with a page in your browser, chances are it’s an
HTML document. Originally developed as a way to describe and share scientific
papers, HTML is now used to mark up all sorts of documents and create visual in-
terfaces for browser-based software.
With HTML5, however, HTML has become as much an of API (Application Pro-
cessing Interface) for developing browser-based software as it is a markup language.
In this book, we’ll talk about the history of HTML and HTML5 and explore some
of its new features.
HTML5 also improves existing elements. With its new input types, we can create
rich form controls without the need for a JavaScript library. For example, if you
want a slider input control, you can use <input type=range>. Input types such as
email and url add client-side validation to the mix. New audio and video elements
let us embed audio and video media directly in our documents. Both elements also
have scripting interfaces that we can use to create custom media players or clever
visual effects. And we can do this without the need for a plugin in supporting
browsers.
We can draw in HTML5 with the addition of the canvas element and support for
inline Scalable Vector Graphics (or SVG). The canvas element is a powerful bitmap
drawing API that lets us create 2D or 3D images, charts, and games. SVG, on the
other hand, uses vector graphics to create reusable, scalable, scriptable images that
work across devices and screens.
Perhaps the biggest shift of HTML5 is this: APIs that are part of HTML's document
object model, but don't have corresponding markup elements. They are purely DOM
APIs that we can use with JavaScript to share and consume data, or create location-
aware applications. Web Workers, mimics multi-threaded JavaScript and background
tasks. The Geolocation API lets our apps take location into context. With cross-
document messaging, we can send data between documents, even across domains,
without exposing the full DOM of either. Finally, Server-Sent Events and WebSockets
enable near-real time communication between client and server.

After reading this book, you'll know the basics of everything mentioned above, and
be well on your way to developing amazing HTML5 websites and applications.
Who Should Read This BookAlthough this book is meant for HTML5 beginners, it isn't totally comprehensive.
As a result, we do assume some prior knowledge of HTML. If you are completely
new to web development, SitePoint’s Build Your Own Website Using HTML and
CSS1 may be a better book for you.
As we progress through the book, we'll tackle some more advanced topics, such as
APIs and offline applications. To follow these sections, you should be familiar with
HTML and the fundamentals of JavaScript and the Document Object Model (DOM).
It’s unnecessary to have deep knowledge of JavaScript. Still, you should understand
event handling, JavaScript data types, and control structures such as while loops
and if-else conditionals. We’ll keep our script examples simple, though, and ex-
plain them line by line. If you’re unfamiliar with JavaScript, you may like to read
SitePoint’s Simply JavaScript2 by Kevin Yank for an introduction. Mozilla Developer
Network 3also offers fantastic learning resources and documentation for both
JavaScript and the DOM.
Conventions UsedYou’ll notice that we’ve used certain typographic and layout styles throughout this
book to signify different types of information. Look out for the following items.
Code SamplesCode in this book will be displayed using a fixed-width font, like so:
<h1>A Perfect Summer's Day</h1><p>It was a lovely day for a walk in the park. The birds were singing and the kids were all back at school.</p>
1 http://www.sitepoint.com/store/build-your-own-website-the-right-way-using-html-css-3rd-edition/2 http://www.sitepoint.com/store/simply-javascript/3 https://developer.mozilla.org/en-US/
xx

If the code is to be found in the book’s code archive, the name of the file will appear
at the top of the program listing, like this:
example.css
.footer { background-color: #CCC; border-top: 1px solid #333;}
If only part of the file is displayed, this is indicated by the word excerpt:
example.css (excerpt)
border-top: 1px solid #333;
If additional code is to be inserted into an existing example, the new code will be
displayed in bold:
function animate() {new_variable = "Hello";
}
Also, where existing code is required for context, rather than repeat all the code, a
⋮ will be displayed:
function animate() { ⋮ return new_variable;}
Some lines of code are intended to be entered on one line, but we’ve had to wrap
them because of page constraints. A ➥ indicates a line break that exists for formatting
purposes only, and should be ignored.
URL.open("http://www.sitepoint.com/responsive-web-design-real-user-➥testing/?responsive1");
xxi

Tips, Notes, and Warnings
Hey, You!
Tips will give you helpful little pointers.
Ahem, Excuse Me …
Notes are useful asides that are related—but not critical—to the topic at hand.
Think of them as extra tidbits of information.
Make Sure You Always …
… pay attention to these important points.
Watch Out!
Warnings will highlight any gotchas that are likely to trip you up along the way.
Supplementary Materialshttp://www.sitepoint.com/store/jump-start-html5/
The book’s website, containing links, updates, resources, and more.
https://github.com/spbooks/jshtml
The downloadable code archive for this book.
http://www.sitepoint.com/forums/
SitePoint’s forums, for help on any tricky web problems.
Our email address, should you need to contact us for support, to report a prob-
lem, or for any other reason.
Tools You’ll NeedAll you’ll need to develop HTML5 documents is a text editor for writing, and a
browser for viewing your work. Don't use word processing software. Those programs
xxii

are made for writing documents, not for programming. Instead, you’ll need software
that can read and write plain text.
If you’re a Windows user, try Notepad++4, a free and open-source text editor. Mac
OS X users may want to try TextWrangler5 by Bare Bones software. It's free, but not
open source. Brackets6 is another option for Windows and Mac users. Linux users
can use gEdit, which is bundled with Ubuntu Linux, or try the free and open source
Bluefish7. Paid software options are also available, and are sometimes more refined
than free and open-source options.
You'll also need at least one browser that supports HTML5 in order to make use of
the examples in this book. Make sure you’re using the latest version of Google
Chrome, Microsoft Internet Explorer, Apple Safari, Opera, or Mozilla Firefox
available for your operating system. Internet Explorer and Safari are bundled with
Microsoft Windows and Mac OS X, respectively. Other browsers may be downloaded
from their company web sites.
For some of the later chapters in the book, you will also require web server software.
Apache HTTP Server8, Nginx9, or Lighttpd10 are all open-source server packages
available for Windows, Mac OS X, and Linux. Mac OS X users can also try MAMP11,
which bundles MySQL, Apache, and PHP into one easy-to-use package. Windows
users can try WAMP12 or XAMPP13, which are similar packages for that operating
system. Your operating system may also have a web server installed by default.
Check its documentation if you’re unsure.
4 http://notepad-plus-plus.org/5 http://www.barebones.com/products/textwrangler/6 http://brackets.io/7 http://bluefish.openoffice.nl/8 http://httpd.apache.org/9 http://wiki.nginx.org/Main10 http://www.lighttpd.net/11 http://www.mamp.info/en/index.html12 http://www.wampserver.com/en/13 http://www.apachefriends.org/index.html
xxiii

Do You Want to Keep Learning?You can now get unlimited access to courses and all SitePoint books at Learnable14
for one low price. Enroll now and start learning today! Join Learnable and you’ll
stay ahead of the newest technology trends: http://www.learnable.com.
14 https://learnable.com/
xxiv

JUMP STARTHTML5BASICS
BY TIFFANY B. BROWN


Chapter1Basics: What is HTML5?The easy answer is that it’s the latest version of HTML. But that doesn’t tell us much.
Specifically, HTML5:
■ defines a parsing algorithm for generating a consistent DOM (Document Object
Model) tree, even from ambiguous or poor-quality markup
■ adds new elements to support multimedia and web applications
■ redefines the rules and semantics of existing HTML elements
With HTML5, we can now embed audio and video natively within HTML documents.
We can use inline SVG (Scalable Vector Graphics) markup. We can build more robust
form experiences, complete with native error checking. We can create games, charts,
and animations using the canvas element. Documents can communicate with each
other using cross-document messaging. In other words, HTML5 is much more of
an application platform, not just a markup language.

A Brief History of HTML5The story of how and why HTML5 came to be is too long to adequately cover in
this book. That said, a little historical context may help you understand some of
how HTML5 came to be.
HTML has its roots in Standard General Markup Language, or SGML. Think of
SGML as a set of rules for defining and creating markup languages.
HTML, or HyperText Markup Language, began as an application of SGML. Created
in the early 1990s, HTML was a standardized way to describe the structure of hy-
pertext documents. "Hypertext" simply means that the text "contains links to other
texts" and is not constrained by linearity1.
By describing the structure of a document, we decouple it from how it looks, or
how it’s presented to the end user. This made it easier to share and redistribute.
The associated Hypertext Transfer Protocol (HTTP) made sharing documents over
the internet easy.
HTML: The Early Years"HTML 1" defined a simple, tag-based syntax for explaining document structure—a
very basic document structure. Paragraph (p) and list item (li) elements didn’t re-
quire an end tag. The earliest version2 didn’t even include the img or table elements.
Image support was added in version 1.23 of the specification.
HTML grammar changed only slightly with version 2.04. Now we could use end
tags for elements such as p and li, but these end tags were optional. The transition
from HTML 2.0 to HTML 3.2, however, marked a huge leap.
With HTML 3.2, we could change type rendering with the font element. We could
add robust interactivity with Java applets and the applet element. We could add
tabular data with the table, tr and td elements. But perhaps the most significant
feature introduced in HTML 3.2 was style sheets.
1 http://www.w3.org/WhatIs.html2 http://info.cern.ch/hypertext/WWW/MarkUp/MarkUp.html3 http://www.w3.org/MarkUp/draft-ietf-iiir-html-01.txt4 http://www.w3.org/MarkUp/html-spec/
Jump Start HTML52

Most of the web, however, settled on HTML 4. With the advent of HTML 4, we
could tell the browser how to parse our document by choosing a document type.
HTML 4 offered three options:
■ Transitional, which allowed for a mix of deprecated HTML 3.2 elements and
HTML 4
■ Strict, which only allowed HTML 4 elements
■ Frameset, which allowed multiple documents to be embedded in one using the
frame element
What HTML versions 1 through 4 didn’t provide, however, were clear rules about
how to parse HTML.
The W3C stopped working on HTML 4 in 1998, instead choosing to focus its efforts
on a replacement: XHTML.
A Detour Through XHTML LandXHTML 1.05 was created as "a reformulation of HTML 4 as an XML 1.0 application."
XML, eXtensible Markup Language, was a web-friendly revision of SGML, offering
stricter rules for writing and parsing markup.
XHTML, for example, required lower case tags while HTML allowed upper case
tags, lower case tags, or a mix of the two. XHTML required end tags for all non-
empty elements such as p and li. Empty elements such as br and img had to be
closed with a />. You had to quote all of your attributes, and escape your am-
persands. All pages had to be served as application/xml+xhtml MIME type.
XHTML taught us how to write better-quality markup. But ultimately suffered from
a lack of proper browser support.
XForms6, on the other hand, was supposed to replace HTML forms. XForms intro-
duced upload and range elements to provide richer ways to interact with web sites.
XForms didn’t gain much traction, however. After all, why introduce a specific
markup language for forms to the web? Why not enhance HTML instead?
5 http://www.w3.org/TR/xhtml1/6 http://www.w3.org/TR/2007/REC-xforms-20071029/
3Basics: What is HTML5?

The Battle for World DOM-inationIn 1996, Netscape released Netscape Navigator 2.0 with support for two separate,
but related technologies: JavaScript and the Document Object Model. We usually
talk about them as though they’re one and the same thing, but DOM is an API for
interacting with HTML documents. JavaScript is the primary language for interacting
with that API.
Netscape Navigator’s DOM interface turned each element of an HTML page into an
object that could be created, moved, modified, or deleted using a scripting language.
Now we could add animation or interactivity to our web pages, even if we had to
wait ages for them to download over our super-slow, 14.4Kbps modems.
The DOM was such a brilliant addition to the web that other browsers quickly fol-
lowed suit. But not every browser implemented the DOM in quite the same way.
Netscape Navigator, for example, used document.layers objects to reference the
entire collection of HTML nodes. Microsoft Internet Explorer went with docu-
ment.all. And web developers everywhere spent years struggling to reconcile the
two. Opera and WebKit, for what it’s worth, followed Internet Explorer’s lead. Both
browsers adopted document.all.
Eventually "DOM0" went from being a standard-through-implementation to a
standard-through-specification with the Document Object Model (DOM) Level 1
Specification7. Rather than document.layers and document.all, we could use
document.getElementById and document.getElementsByTagName. Today, all
browsers support the DOM.
Applets and PluginsIn the midst of all of this—the growth of HTML, the rise of the DOM, and the shift
to XHTML—applets and browser plugins joined the party. To their credit, applets
and plugins added functionality missing from HTML. For example, RealPlayer and
Apple’s QuickTime brought audio and video to the web. With Java applets, you
could run a spreadsheet program in your browser. Macromedia (now Adobe) Flash
and Shockwave let us add all of the above, plus animations.
Applets and plugins, however, suffered from three major problems:
7 http://www.w3.org/TR/REC-DOM-Level-1/
Jump Start HTML54

1. Users who don’t have the plugin (or the applet environment) can’t see the content.
2. Applets and plugins expanded the surface for internet-based security breaches.
3. They were commercial products, and required developers to pay a license fee.
What’s more, plugins and applets sometimes caused their host environment—the
browser—to slow or crash.
So what we had on the web was a scenario in which:
■ Browsers didn’t parse HTML according to the same rules.
■ New markup languages offered few clear advantages over HTML but added
overhead to implement.
■ Plugins and applets offered additional functionality, but created security and
stability issues for browsers and licensing costs for developers.
These are the problems that HTML5 solves:
■ It incorporates features and grammars introduced by XHTML and XForms.
■ It almost eliminates the need for plugins and the stability and security issues
they may introduce.
What HTML5 Isn’tI admit that I’m taking a bit of a purist approach in this book. HTML5 has become
a buzzword-y shorthand for "everything cool we can do in the browser that we
couldn’t do before." In this book, however, we mean HTML elements and their
Document Object Model (DOM) APIs.
We won’t talk much about features introduced with CSS (Cascading Style Sheets),
Level 3 in these pages. We will talk about what’s commonly called "JavaScript", but
is more accurately the DOM HTML API. We’ll also talk about Scalable Vector
Graphics, or SVG—but only to the extent that we discuss mixing SVG and HTML
within the same document.
5Basics: What is HTML5?

This book is intended as a short introduction to HTML5. For that reason, we won’t
cover advanced features in depth. This book will, however, give you an introduction
to what’s new and different about HTML5 versus previous versions.
A Note on the HTML5 SpecificationBoth the Web Hypertext Application Technology Working Group (WHATWG) and
the World Wide Web Consortium (W3C) publish HTML5 specifications. The two
groups worked together for years, creating a single specification managed by a single
editor. However in 2011, they diverged. There are now two competing, though
largely similar, versions of the specification. Each has its own editor.
The WHATWG version8 of the specification is a "living document." New features
are added, tweaked, and occasionally removed after some discussion within the
community. This version is far more fluid and subject to change.
The W3C, however, has a different process. Specification editors still consult the
community, but each document moves in phases from "Working Draft" to "Candidate
Recommendation" to "W3C Recommendation." As a result, W3C specifications are
versioned. The 2011 joint version of HTML5 specification became the W3C’s HTML5
Specification9. Subsequent revisions are part of the HTML 5.1 specification10.
There are differences between the two specifications, some subtle, some significant.
These differences are not well documented, however. Since this book doesn’t delve
in to the minutiae of HTML5, these differences won’t mean much for us.
8 http://www.whatwg.org/specs/web-apps/current-work/multipage/9 http://www.w3.org/TR/html5/10 http://www.w3.org/html/wg/drafts/html/master/Overview.html
Jump Start HTML56

Chapter2Basics: The Anatomy of HTML5Every HTML document is made from elements, and elements are represented by
tags. Tags are a sequence of characters that mark where different parts of an element
start and/or stops.
All tags begin with a left-facing angle bracket (<) and end with a right-facing angle
bracket (>). Every element has a start tag or opening tag, which starts with <, and
is followed by the element name (or an abbreviation of it). The element name may
be followed by an attribute (or series of attributes) that describes how that instance
of an element is supposed to behave. You can set an explicit value for an attribute
with an = sign. Some attributes, however, are empty. If an empty attribute is present,
the value is true. Let’s look at an example using the input element.
<input type="text" name="first_name" disabled>
Here, type, name and disabled are all attributes. The first two have explicit values,
but disabled is empty. Some elements allow empty attributes, and these are usually
those that might otherwise accept true/false values. Here’s the tricky part: The value
of an empty attribute is either true or false based on the presence or absence of the

attribute, regardless of its set value. In other words, both disabled="true" and
disabled="false" would also disable input control.
Most elements also have a closing tag. Closing tags also start with <, but rather than
being immediately followed by the element name, they are followed by a forward
slash (/). Then comes the element name, and right-angle bracket or >. However,
some elements are known as void elements. These elements cannot contain content,
and so do not have a closing tag. The input element shown above is an example of
a void element.
Now that we’ve covered the basics of tags, let’s take a closer look at an HTML5
document.
Your First HTML5 DocumentOpen up your favorite text editor and type the following. Save it as hi.html.
<!DOCTYPE html><html> <head> <title>Hi</title> </head> <body> <p>Hi</p> </body></html>
Congratulations—you’ve written your first HTML5 document! It’s not fancy, perhaps,
but it does illustrate the basics of HTML5.
Our first line, <!DOCTYPE html> is required. This is how the browser knows that
we’re sending HTML5. Without it, there’s a risk of browsers parsing our document
incorrectly. Why? Because of DOCTYPE switching.
DOCTYPE switching means that browsers parse and render a document differently
based on the value of the <!DOCTYPE declaration, if it's served with a Content-
type:text/html response header. Most browsers implemented some version of
DOCTYPE switching in order to correctly render documents that relied on non-
standard browser behavior, or outdated specifications.
Jump Start HTML58

HTML 4.01 and XHTML 1.0, for example, had multiple modes—strict, transitional,
and frameset—that could be triggered with a DOCTYPE declaration, whereas HTML
4.01 used the following DOCTYPE for its strict mode.
<!DOCTYPE HTML PUBLIC "-//W3C//DTD HTML 4.01//EN" "http://www.w3.org/TR/html4/strict.dtd">
Transitional, or loose DOCTYPE declarations trigger quirks mode. In quirks mode,
each browser parses the document a little bit differently based on its own bugs and
deviations from web standards.
Strict DOCTYPE declarations trigger standards mode or almost standards mode.
Each browser will parse the document according to rules agreed upon in the HTML
and CSS specifications.
A missing DOCTYPE, however, also triggers quirks mode. So HTML5 defined the
shortest DOCTYPE possible. The HTML5 specification explains:
"DOCTYPEs are required for legacy reasons. When omitted, browsers
tend to use a different rendering mode that is incompatible with
some specifications. Including the DOCTYPE in a document ensures
that the browser makes a best-effort attempt at following the relevant
specifications."
And so, using the HTML5 DOCTYPE (<!DOCTYPE html>) triggers standards mode,
even for older browsers that lack HTML5 parsers.
The Two Modes of HTML5 SyntaxHTML5 has two parsing modes or syntaxes: HTML and XML. The difference depends
on whether the document is served with a Content-type: text/html header or a
Content-type: application/xml+xhtml header.
If it’s served as text/html, the following rules apply:
■ Start tags are not required for every element.
■ End tags are not required for every element.
■ Only void elements such as br, img, and link may be "self-closed" with />.
9Basics: The Anatomy of HTML5

■ Tags and attributes are case-insensitive.
■ Attributes do not need to be quoted.
■ Some attributes may be empty (such as checked and disabled).
■ Special characters, or entities, do not have to be escaped.
■ The document must include an HTML5 DOCTYPE.
HTML SyntaxLet’s look at another HTML5 document.
<!DOCTYPE html> <html> <head> <meta charset=utf-8> <title>Hi</title> <!-- This is an example of a comment. The lines below show how to include CSS --> <link rel=stylesheet href=style.css type=text/css> <style> body{ background: aliceblue; } <style> </head> <body> <p> <img src=flower.jpg alt=Flower> Isn't this a lovely flower?
<p> Yes, that is a lovely flower. What kind is it?
<script src=foo.js></script> </body></html>
Again, our first line is a DOCTYPE declaration. As with all HTML5 tags, it’s case-
insensitive. If you don’t like reaching for Shift, you could type <!doctype html>
Jump Start HTML510

instead. If you really enjoy using Caps Lock, you could also type <!DOCTYPE HTML>
instead.
Next is the head element. The head element typically contains information about
the document, such as its title or character set. In this example, our head element
contains a meta element that defines the character set for this document. Including
a character set is optional, but you should always set one and it's recommended
that you use UTF-81.
Make Sure You’re Using UTF-8
Ideally, verify your text editor saves your documents with UTF-8 encoding "without
BOM" and uses Unix/Linux line-endings.
Our head element also contains our document title (<title>Hi</title>). In most
browsers, the text between the title tags is displayed at the top of the browser
window or tab.
Comments in HTML are bits of text that aren’t rendered in the browser. They’re
only viewable in the source code, and are typically used to leave notes to yourself
or a coworker about the document. Some software programs that generate HTML
code may also include comments. Comments may appear just about anywhere in
an HTML document. Each one must start with <!-- and end with -->.
A document head may also contain link elements that point to external resources,
as shown here. Resources may include style sheets, favicon images, or RSS feeds.
We use the rel attribute to describe the relationship between our document and
the one we’re linking to. In this case, we’re linking to a cascading style sheet, or
CSS file. CSS is the stylesheet language that we use to describe the way a document
looks rather than its structure.
We can also use a style element (delineated here by <style> and </style>) to in-
clude CSS in our file. Using a link element, however, lets us share the same style
sheet file across multiple pages.
1 http://www.w3.org/International/questions/qa-choosing-encodings
11Basics: The Anatomy of HTML5

By the way, both meta and link, are examples of void HTML elements; we could
also self-close them using />. For example, <meta charset=utf-8> would become
<meta charset=utf-8 />, but it isn’t necessary to do this.
To Quote or Not Quote: Attributes in HTML5In the previous example, our attribute values are unquoted. In our hi.html example,
we used quotes. Either is valid in HTML5, and you may use double (") or single (')
quotes.
Be careful with unquoted attribute values. It’s fine to leave a single-word value
unquoted. A space-separated list of values, however, must be enclosed in quotes.
If not, the parser will interpret the first value as the value of the attribute, and sub-
sequent values as empty attributes. Consider the following snippet:
<code class=php highlightsyntax><?php echo 'Hello!'; ?></code>
Because both values for the class attribute are not enclosed in quotes, the browser
interprets it like so:
<code class="php" highlightsyntax><?php echo 'Hello!'; ?></code>
Only php is recognized as a class name, and we’ve unintentionally added an empty
highlightsyntax attribute to our element. Changing class=php highlightsyntax
to class="php highlightsyntax" (or the single-quoted class='php highlightsyn-
tax') ensures that both class attribute values are treated as such.
A Pared-down HTML5 DocumentAccording to the rules of HTML—this is also true of HTML 4—some elements don’t
require start tags or end tags. Those elements are implicit. Even if you leave them
out of your markup, the browser acts as if they’ve been included. The body element
is one such element. We could, in theory, re-write our hi.html example to look like
this.
Jump Start HTML512

<!DOCTYPE html><head> <meta charset=utf-8> <title>Hi</title> <p>Hi
When our browser creates the document node tree, it will add a body element for
us.
Just because you can skip end tags doesn’t mean you should. The browser will need
to generate a DOM in either case. Closing elements reduces the chance that browsers
will parse your intended DOM incorrectly. Balancing start and end tags makes errors
easier to spot and fix, particularly if you use a text editor with syntax highlighting.
If you’re working within a large team or within a CMS (Content Management System),
using start and end tags also increases the chance that your chunk of HTML will
work with those of your colleagues. For the remainder of this book, we’ll use start
and end tags, even when optional.
Start and End Tags
To discover which elements require start and end tags, consult the World Wide
Web Consortium’s guide HTML: The Markup Language (an HTML language refer-
ence)2. The W3C also manages the Web Platform Docs3 which includes this in-
formation.
"XHTML5": HTML5’s XML SyntaxHTML5 can also be written using a stricter, XML-like syntax. You may remember
from Chapter 1 that XHTML 1.0 was "a reformulation of HTML 4 as an XML 1.0
application." That isn’t quite true of what is sometimes called "XHTML5". XHTML5
is best understood as HTML5 that’s written and parsed using the syntax rules of
XML and served with a Content-type: application/xml+xhtml response header.
The following rules apply to "XHTML5":
■ All elements must have a start tag.
2 http://www.w3.org/TR/html-markup/3 http://docs.webplatform.org/wiki/Main_Page
13Basics: The Anatomy of HTML5

■ Non-void elements with a start tag must have an end tag (p and li, for example).
■ Any element may be "self-closed" using />.
■ Tags and attributes are case sensitive, typically lowercase.
■ Attribute values must be enclosed in quotes.
■ Empty attributes are forbidden (checked must instead be checked="checked"
or checked="true").
■ Special characters must be escaped using character entities.
Our html start tag also needs an xmlns (XML name space) attribute. If we rewrite
our document from above to use XML syntax, it would look like the example below.
<!DOCTYPE html> <html xmlns="http://www.w3.org/1999/xhtml"> <head> <meta charset="utf-8" /> <title>Hi</title> </head> <body> <p> <img src="flower.jpg" alt="Flower" /> Isn't this a lovely flower? </p> <script src="foo.js" /> </body></html>
Here we’ve added the XML name space with the xmlns attribute, to let the browser
know that we’re using the stricter syntax. We’ve also self-closed the tags for our
empty or void elements, meta and img. According to the rules of XML and XHTML,
all elements must be closed either with an end tag or by self-closing with a space,
slash, and a right-pointing angle bracket (/>).
In this example, we have also self-closed our script tag. We could also have used
a normal </script> tag, as we’ve done with our other elements. The script element
is a little bit of an oddball. You can embed scripting within your documents by
placing it between script start and end tags. When you do this, you must include
an end tag.
Jump Start HTML514

However, you can also link to an external script file using a script tag and the src
attribute. If you do so, and serve your pages as text/html, you must use a closing
</script> tag. If you serve your pages as application/xml+xhtml, you may also
use the self-closing syntax.
Don’t forget: in order for the browser to parse this document according to
XML/XHTML rules, our document must be sent from the server with a Content-
type: application/xml+xhtml response header. In fact, including this header will
trigger XHTML5 parsing in conforming browsers even if the DOCTYPE is missing.
Configuring Your Server
In order for your web server or application to send the Content-type: applic-
ation/xml+xhtml response header, it must be configured to do so. If you’re using
a web host, there’s a good chance your web host has done this already for files
with an .xhtml extension. Here you would just need to rename hi.html to hi.xhtml.
If that doesn't work, consult your web server documentation.
As you may have realized, XML parsing rules are more persnickety. It’s much
easier to use the text/html MIME type and its looser HTML syntax.
15Basics: The Anatomy of HTML5


Chapter3Basics: Structuring DocumentsHTML5 adds several elements that provide a way to break a single document into
multiple chunks of content—content that may be either related or independent.
These elements add semantic richness to our markup, and make it easier to repurpose
our documents across media and devices.
We’ll take a look at these elements and how they interact using a fictitious top story
from a fictitious news web site: The HTML5 News-Press, as shown in Figure 3.1.

Figure 3.1. The HTML5 News-Press
Our news story page begins with a masthead and main navigation bar. In previous
versions of HTML, we might have marked that up like so:
<div id="header"> <h1>HTML5 <i>News-Press</i></h1> <h2>All the news that's fit to link</h2> <ul id="nav"> <li><a href="#">World</a></li> <li><a href="#">National</a></li> <li><a href="#">Metro area</a></li> <li><a href="#">Sports</a></li> <li><a href="#">Arts & Entertainment</a></li> </ul></div>
Our page ends with a footer element. Again, using HTML 4, our markup might look
like this:
Jump Start HTML518

<div id="footer"> <ul> <li><a href="#">Contact Us</a></li> <li><a href="#">Terms of Use</a></li> <li><a href="#">Privacy Policy</a></li> </ul> <p>No copyright 2013 HTML5 News-Press.</p></div>
HTML5, however, adds elements specifically for this purpose: header, nav and
footer.
The header element functions as a header for the contents of a document segment.
The footer functions as a footer for a document segment. Notice, I said segment
and not document or page. Some elements are considered sectioning elements.
They split a document into sections or chunks. One of these elements, of course, is
the new section element. Other sectioning elements include body, article, aside,
are nav as well. Here’s the tricky part: each sectioning element may contain its own
header and footer. It’s a bit confusing, but the main point here is that a document
may contain multiple header and footer elements.
<header> <h1>HTML5 <i>News-Press</i></h1> <h2>All the news that's fit to link</h2> <nav> <ul> <li><a href="#">World</a></li> <li><a href="#">National</a></li> <li><a href="#">Metro area</a></li> <li><a href="#">Sports</a></li> <li><a href="#">Arts & Entertainment</a></li> </ul> </nav></header>
Here, we’ve wrapped our masthead and navigation in header tags. We’ve also
swapped our id="nav" attribute and value for the nav element. Let’s re-write our
footer using HTML5’s footer element.
19Basics: Structuring Documents

<footer> <ul> <li><a href="#">Contact Us</a></li> <li><a href="#">Terms of Use</a></li> <li><a href="#">Privacy Policy</a></li> </ul> <p>No copyright 2013 HTML5 News-Press.</p></footer>
Here we’ve simply swapped <div id="footer"> for <footer>. Our document bones
are in place. Let’s add some flesh.
The article ElementAs defined by the HTML5 specification, the article element:
"[R]epresents a complete, or self-contained, composition in a docu-
ment, page, application, or site and that is, in principle, independ-
ently distributable or reusable, e.g. in syndication."
Magazine articles and blog posts are obvious examples of when an article element
would be semantically appropriate. But you could also use it for blog comments.
This element is appropriate for any almost content item that could be reused.
We can replace our <div id="article"> start and end tags with article tags.
<article> <h1>Sky fall imminent says young chicken leader</h1>
<p class="byline"> <b class="reporter">Foxy Loxy</b> <i class="employment-status">Staff Writer</i> </p>
<div class="aside">
<h2>About Henny Penny</h2>
<dl> <dt>Age</dt> <dd>32</dd>
Jump Start HTML520

<dt>Occupation</dt> <dd>President, National Organization of Chickens</dd>
<dt>Education</dt> <dd>B.A., Chicken Studies, Farmer University</dd> <dd>J.D., University of Cluckland</dd> </dl>
<p> Penny joined the National Organization of Chickens in 2002 ➥as a staff lobbyist after short, but effective career in ➥the Farmlandia senate. Penny rose through the ➥organization's ranks, serving as secretary, then vice- ➥president before being elected president by the group's ➥members in 2011. </p>
<p> The National Organization of Chickens is an advocacy group ➥focused on environmental justice for chickens. </p> </div>
<p> LONDON -- Henny Penny, young leader of the National ➥Organization of Chickens announced that the sky will fall ➥within the next week. Opponents criticize Penny, ➥suggesting that acorns are the more likely threat. </p>
<p> Phasellus viverra faucibus arcu ullamcorper sodales. Curabitur ➥tincidunt est in imperdiet ultrices. Sed dignissim felis a ➥neque dignissim, nec cursus sapien egestas. </p>
<div id="article-meta"> <p class="reporter-contact">You may reach reporter Foxy Loxy ➥via email at [email protected]</p> <p class="contributor">Staff writer Turkey Lurkey contributed ➥to this report.</p> <p class="pubdate">Published:
21Basics: Structuring Documents

➥<time>2013-07-11T09:00:00-07:00</time>.</p> </div></article>
The article element is an example of sectioning content, which means it may
contain a header and a footer. If we think about it, our <div id="article-meta">
could be considered a footer for our article element. How about we swap our div
element tags for footer tags?
<footer id="article-meta"> <p class="reporter-contact">You may reach reporter Foxy Loxy ➥via email at [email protected]</p> <p class="contributor">Staff writer Turkey Lurkey contributed ➥to this report.</p> <p class="pubdate">Published: ➥<time>2013-07-11T09:00:00-07:00</time>.</p></footer>
We are keeping our id attribute intact, however. This makes it easier to distinguish
from other footer elements on the page if we add CSS or DOM scripting.
Think of the aside element as the HTML5 equivalent of newspaper or magazine
sidebar. It denotes content that's related to the main article, but could stand alone.
In our HTML 4 example, we used <div class="sidebar"> to mark up our aside.
However, the aside element offers more meaning and context. Let’s change our
markup to use the aside element instead.
<aside> <h2>About Henny Penny</h2> <dl> <dt>Age</dt> <dd>32</dd>
<dt>Occupation</dt> <dd>President, National Organization of Chickens</dd>
<dt>Education</dt> <dd>B.A., Chicken Studies, Farmer University</dd> <dd>J.D., University of Cluckland</dd> </dl>
Jump Start HTML522

<p> Penny joined the National Organization of Chickens in 2002 ➥as a staff lobbyist after short, but effective career in ➥the Farmlandia senate. Penny rose through the ➥organization's ranks, serving as secretary, then vice- ➥president before being elected president by the group's ➥members in 2011. </p>
<p> The National Organization of Chickens is an advocacy group ➥focused on environmental justice for chickens. </p></aside>
Putting It TogetherOur finished HTML5 document looks like this.
<!DOCTYPE html><head> <meta charset="utf-8"> <title>HTML5 News-Press</title></head><body> <header> <h1>HTML5 <i>News-Press</i></h1> <h2>All the news that's fit to link</h2> <nav> <ul> <li><a href="#">World</a></li> <li><a href="#">National</a></li> <li><a href="#">Metro area</a></li> <li><a href="#">Sports</a></li> <li><a href="#">Arts & Entertainment</a></li> </ul> </nav></header>
<article> <h1>Sky fall imminent says young chicken leader</h1>
<p class="byline"> <b class="reporter">Foxy Loxy</b>
23Basics: Structuring Documents

<i class="employment-status">Staff Writer</i> </p>
<aside>
<h2>About Henny Penny</h2>
<dl> <dt>Age</dt> <dd>32</dd>
<dt>Occupation</dt> <dd>President, National Organization of Chickens</dd>
<dt>Education</dt> <dd>B.A., Chicken Studies, Farmer University</dd> <dd>J.D., University of Cluckland</dd> </dl>
<p> Penny joined the National Organization of Chickens in 2002 ➥as a staff lobbyist after short, but effective career in ➥the Farmlandia senate. Penny rose through the ➥organization's ranks, serving as secretary, then vice- ➥president before being elected president by the group's ➥members in 2011. </p>
<p> The National Organization of Chickens is an advocacy group ➥focused on environmental justice for chickens. </p> </aside>
<p> LONDON -- Henny Penny, young leader of the National ➥Organization of Chickens announced that the sky will fall ➥within the next week. Opponents criticize Penny, ➥suggesting that acorns are the more likely threat. </p>
<p> Phasellus viverra faucibus arcu ullamcorper sodales. Curabitur ➥tincidunt est in imperdiet ultrices. Sed dignissim felis a ➥neque dignissim, nec cursus sapien egestas.
Jump Start HTML524

</p>
<footer id="article-meta"> <p class="reporter-contact">You may reach reporter Foxy Loxy ➥via email at [email protected]</p> <p class="contributor">Staff writer Turkey Lurkey contributed ➥to this report.</p> <p class="pubdate">Published: ➥<time>2013-07-11T09:00:00-07:00</time>.</p> </footer> </article>
<footer> <ul> <li><a href="#">Contact Us</a></li> <li><a href=#">Terms of Use</a></li> <li><a href=#">Privacy Policy</a></li> </ul> <p>No copyright 2013 HTML5 News-Press.</p></footer>
The point of these new elements is to have a standardized way to describe document
structures. HTML is, at heart, a language for exchanging and repurposing documents.
Using these structural elements means that the same document can be published
as a web page and also syndicated for e-book readers without having to sort through
a jumble of arbitrary div elements and id attributes.
The section ElementHTML5 also introduces the section element, which is used to define segments of
a document that are neither a header, footer, navigation, article, or aside. It’s more
specific than our old friend, the div element, but more generic than article.
Let’s use the section element to mark up the HTML5 News-Press home page, shown
in Figure 3.2.
25Basics: Structuring Documents

Figure 3.2. HTML5 News-Press home page
Here we have three sections of news stories: "Top Stories," "Sports," and "Business."
In HTML 4, the div elements is the clear choice to define these sections because
it’s our only choice. But in HTML5, we have the somewhat more descriptive section
element.
<section id="topstories"> <h1>Top stories</h1>
<ul> <li><a href="#">Sky fall imminent says young chicken ➥leader</a></li> <li><a href="#">Wolf blows down homes of sticks, straw</a></li> <li><a href="#">Children lost after breadcrumb trail goes ➥missing found safe</a></li> <li><a href="#">Cow jumps over moon, witnesses ➥astounded</a></li> </ul>
<footer>
Jump Start HTML526

<p><a href="#" class="mlink">More news</a></p> </footer></section>
<section id="sports"> <h1>Sports</h1>
<ul> <li><a href="#">David beats Goliath in upset</a></li> <li><a href="#">Goods top Evils 3-2</a></li> <li><a href="#">Local swimmer qualifies for 2016 ➥Olympics</a></li> <li><a href="#">Woonsocket Little League team reaches ➥semis</a></li> </ul> <footer> <p><a href="#" class="mlink">More sports</a></p> </footer></section>
<section id="business"> <h1>Business</h1> <ul> <li><a href="#">BigWidgets, Ltd. expansion to create 3,000 ➥jobs</a></li> <li><a href="#">U.S. dollar, Euro achieve parity</a></li> <li><a href="#">GiantAirline and Air Humongous to merge</a></li> <li><a href="#">WorldDomination Banc deemed 'too big to ➥fail'</a></li> </ul> <footer> <p><a href="#" class="mlink">More business</a></p> </footer></section>
div Versus sectionWhile these new sectioning elements give us better semantics and meaning, they
also bring a touch of confusion. One question you may be asking is: "Is it still okay
to use the div element?
27Basics: Structuring Documents

The short answer is "Yes." After all, div is still a valid HTML5 element. But div has
little semantic value. It doesn’t tell us anything about what it contains, so use it for
those rare instances when another semantically-relevant tag doesn’t exist. For ex-
ample, you may find that you need to add an extra element as a "wrapper" to ease
styling. Or perhaps you want to group several French-language elements within an
English-language document. Enclosing those elements with <div lang="fr"> and
</div> is certainly appropriate. It most other cases, it’s better to use section,
header, nav, footer, article or aside.
Other Document ElementsNew sectioning elements aren’t the only new document-related elements introduced
in HTML5. In this chapter, we’ll look at the following elements:
■ figure and figcaption for defining figures, charts, and diagrams
■ main which explicitly defines the predominant portion of a document’s content
figure and figcaptionIf a document was accompanied by a chart or diagram, in HTML 4, we might have
used a combination of div and p elements to mark it up as shown below.
<div class="graph" id="figure1"> <img src="graph.jpg" alt="Price of chocolate since 2008"> <p class="caption">Figure 1: Chocolate has increased in price ➥by 200% since 2008.</p></div>
That’s an acceptable way to do it. But what happens when we want to read it on
our fancy-pants ereader that displays HTML documents using a book-style layout?
Using <div class="chart"> doesn’t tell us much about what this chunk of inform-
ation is and how it should be displayed.
In this case, we should use the figure element. It gives us a way to mark up charts
and captions and make them independent of document flow. How about we modify
our markup a bit?
Jump Start HTML528

<figure class="graph" id="figure1"> <img src="graph.jpg" alt="Price of chocolate since 2008"> <p class="caption">Figure 1: Chocolate has increased in price ➥by 200% since 2008.</p></figure>
Now our e-reader knows this is a chart, and can display it in a suitable way. We’ve
kept the class and ID attributes. The former comes in handy for CSS styling ― per-
haps we want to display graphs differently than diagrams. The latter makes it easy
to link to our figure.
We still have <p class="caption"> though, don’t we? How about we use the fig-
caption element instead? figcaption serves as a caption or legend for its sibling
content. It isn’t required, but if included, figcaption needs to be either the first
child or last child of a figure element. Let’s change our markup once more:
<figure class="graph" id="figure1"> <img src="graph.jpg" alt="Price of chocolate since 2008"> <figcaption>Figure 1: Chocolate has increased in price ➥by 200% since 2008.</figcaption></figure>
main ElementThe main element is one of the newest elements in HTML5. It actually isn’t in the
2011 version of the specification published by the World Wide Web Consortium,
but it is a part of the HTML 5.1 specification.
Unsurprisingly, main should be used to clarify the main part of a document or ap-
plication. By "main part," of a document, we mean content that:
■ is unique to the document or application
■ doesn’t include elements, such as a global header or footer, that are shared across
a site
To date, only Chrome 26+, Firefox 21+, and Opera 15+ support the main element.
Support should come to Internet Explorer and Safari in a future release.
29Basics: Structuring Documents

What’s the use case for main? Some browsers, such as Safari and Firefox for Android,
offer a "reader mode" that strips away headers, footers, and ads. These browsers
currently use heuristics—an educated guess—to determine the main content of a
document. Using main makes it clear to the browser which segment of the page it
should focus on. Browsers can also use the main element as a hook for accessibility
features, such the ability to skip navigation.
Let’s take one last look at our news article markup, this time including the main
element.
<!DOCTYPE html><html lang="en-us"><head> <meta charset="UTF-8"> <title>HTML5 News-Press</title> <link rel="stylesheet" href="s.css" media="screen"></head><body><div id="wrapper"> <header> <h1>HTML5 <i>News-Press</i></h1> <h2>All the news that's fit to link</h2> <nav> <ul> <li><a href="#">World</a></li> <li><a href="#">National</a></li> <li><a href="#">Metro area</a></li> <li><a href="#">Sports</a></li> <li><a href="#">Arts & Entertainment</a></li> </ul> </nav> </header> <main> <article> <header> <h1>Sky fall imminent says young chicken leader</h1> <p class="byline"> <b class="reporter">Foxy Loxy</b> <i class="employment-status">Staff Writer</i> </p> </header>
Jump Start HTML530

<aside> <h2>About Henny Penny</h2> <dl> <dt>Age</dt> <dd>32</dd>
<dt>Occupation</dt> <dd>President, National Organization of Chickens</dd>
<dt>Education</dt> <dd>B.A., Chicken Studies, Farmer University</dd> <dd>J.D., University of Cluckland</dd> </dl> <p> Penny joined the National Organization of Chickens in 2002 ➥as a staff lobbyist after short, but effective career in ➥the Farmlandia senate. Penny rose through the ➥organization's ranks, serving as secretary, then vice- ➥president before being elected president by the group's ➥members in 2011. </p>
<p> The National Organization of Chickens is an advocacy group ➥focused on environmental justice for chickens. </p> </aside>
<p> LONDON -- Henny Penny, young leader of the National ➥Organization of Chickens announced that the sky will fall ➥within the next week. Opponents criticize Penny, ➥suggesting that acorns are the more likely threat. </p>
<p> Phasellus viverra faucibus arcu ullamcorper sodales. ➥Curabitur tincidunt est in imperdiet ultrices. Sed ➥dignissim felis a neque dignissim, nec cursus sapien ➥egestas. </p> </article> </main>
31Basics: Structuring Documents

<footer> <ul> <li><a href="#">Contact Us</a></li> <li><a href="#">Terms of Use</a></li> <li><a href="#">Privacy Policy</a></li> </ul> <p>No copyright 2013 HTML5 News-Press.</p> </footer> </div></body></html>
Now we have a document that's more accessible and easier for browsers of all kinds
to consume and display.
Jump Start HTML532

Chapter4Basics: HTML5 FormsHTML5 forms are a leap forward from those in previous versions of HTML. We now
have a half dozen new input states or types, such as range and url; we have new
attributes that let us require fields, or specify a particular format; we have an API
that lets us constrain and validate input; and finally, we have new form elements,
such as datalist, that let us create engaging user interfaces without heavy JavaScript
libraries or plugins.
Unfortunately, not every browser supports all of these features just yet. For now we
still need to use JavaScript libraries, and polyfills1 (downloadable code which
provides facilities that are not built into a web browser) as fall back strategies.
The best way to understand HTML5 forms is to build one. Let’s try building a form
that collects story suggestions for the HTML5 News-Press site from the previous
chapter. We’ll need to gather the following information with our form:
■ Name
■ City of residence
1 http://remysharp.com/2010/10/08/what-is-a-polyfill/

■ Email address
■ A telephone number
■ A URL where we can learn more (if there is one)
■ The actual story idea
At the very least, we’ll want to require the user to provide a first name, email address,
and their story idea.
Starting an HTML5 FormTo build our HTML form, we’ll need to start with an opening form element tag.
Because we want to submit this form to a server-side processing script, we’ll need
to include two attributes.
■ action: the URL of the script
■ method: the HTTP request method to use, sometimes GET, but usually POST
Since this could be a lengthy message, we’ll use POST rather than GET. GET is better
suited to short key-value pairs, such as search boxes. Other HTTP methods, such
as PUT, HEAD, or DELETE may also be used with forms, but most of the time you’ll
use GET or POST.
It's worth noting here that application/x-www-form-urlencoded is the default
content type value for form data. We could also explicitly set it using the enctype
attribute, but we don’t have to.
We could also set our enctype attribute to multipart/form-data as shown below:
<form action="/script" method="post" enctype="multipart/form-data">
Either is fine for sending text. If we wanted to upload files, however, we would
need to use enctype="multipart/form-data".
Jump Start HTML534

The input ElementThe input element is the most commonly used element for creating form controls.
An input tag typically includes the following attributes.
■ name: the name of the field
■ type: indicates what kind of input control to display
■ id: a unique identifier for the field
■ value: sets a default value for the field
Of these, only name is required in order for our form to send data. Each name attribute
becomes a key or field name for our server-side script. That said, in most cases,
you'll also want to set the type attribute.
There are about a dozen possible values for the type attribute, most of which we’ll
cover in this chapter. Each type value corresponds to a different kind of user interface
control and set of validation constraints. The most liberal value for the type attrib-
ute—and the default state of the input element—is text.
Collecting NamesPeople names and place names are usually a mix of alphanumeric characters, spaces,
and punctuation marks. For this reason, we’ll use the text input state for those
fields. Let’s add form fields for the letter writer’s name and city of residence. Since
we want to require the user to provide a name, we’ll also add a required attribute.
<p> <label for="your_name">Your name:</label> <input type="text" name="your_name" id="your_name" required></p>
<p>
35Basics: HTML5 Forms

<label for="city">City of residence:</label> <input type="text" name="city" id="city"></p>
id and name attributes
The id attribute may, but does not have to be, the same as the name attribute.
Using Form LabelsWe’ve added an unfamiliar element here: label. The label element in an HTML
form works just like the label on a paper form. It tells the user what to enter in the
field. In order to associate a label with a form control, the label must have a for
attribute that matches the id attribute of its form field. Or you could place the form
control inside of the label element.
<label>Your name: <input type="text" name="your_name" id="your_name" required></label>
Using the for and id attributes, however, offers a little more flexibility for page
layouts.
Why not just use text without wrapping it in a label element? Using label increases
the usability of the web for those with physical or cognitive challenges. Screen-
reading software, for example, uses labels to help low-vision users in filling out
forms. It’s an accessibility feature that’s baked into HTML.
Requiring Form FieldsOne of the great improvements of HTML5 over previous versions is native form
validation. By adding the required attribute, we are asking the browser to make
sure this field has been filled out before submitting the form.
Empty Attributes
The required attribute is an example of an empty attribute. Its presence or absence
determines whether that value is set.
Jump Start HTML536

If the your_name field is empty when the user submits our form, Chrome, Opera,
and Internet Explorer 10+ will prevent submission and alert the user, as shown in
Figure 4.1. No DOM scripting is necessary.
Figure 4.1. A form submission error message in Chrome
Notice that I didn’t mention Safari. For better or worse, Safari versions 6.0.5 and
older don't provide native user interface feedback. It does support HTML5 validation,
but we’ll still need to use DOM scripting and CSS to alert the user about form sub-
mission. We’ll discuss one way to do this in the Validation API section.
Styling Required FormsYou may want to visually indicate which fields are required and which aren’t using
CSS. There are two CSS selectors we can use to target required fields.
1. Using the attribute selector [required].
2. Using the :required pseudo-class.
The :required pseudo-class is a CSS Selectors, Level 42 selector, but support is
available in the latest version of every major browser. CSS Level 4 selectors also
adds an :optional pseudo-class that we could use instead to target the input fields
that aren’t required.
2 http://www.w3.org/TR/selectors4/
37Basics: HTML5 Forms

To target older browsers that lack CSS4 selector support, use the attribute selector.
For example, if we want to add a 1 pixel red border around our required fields, we
could add the following to our CSS.
input[required], input:required{ border: 1px solid #c00;}
Collecting Email Addresses, Phone Numbers, and URLsWe’ll want to let our tipster know that we’ve received their input. That means our
form needs fields for the email address and phone number. We also want to collect
URLs where we can learn more information about this story idea, so our form will
also need a field for the URL.
With previous versions of HTML, we'd use a text field for all of these and validate
the data with JavaScript. HTML5, however, defines three new input types for this
purpose: email, tel and url.
Let’s add an email field to our form. We’ll also make it required.
<p> <label for="email">E-mail address</label> <input type="email" name="email" id="email" required></p>
Using the email type tells the browser to check this field for a valid email address.
It can’t, of course, tell whether the address can receive mail. But it will check that
the input for this field is syntactically valid. If a user enters an invalid address, most
browsers will alert the user when he or she submits the form.
You may also want to let the user provide multiple email addresses. In that case,
use the multiple attribute. The user can then enter one or more e-mail addresses,
each separated by a comma.
Any time you permit multiple values for one input field, it’s a good idea to indicate
that it’s allowed with a label or explanatory text.
Jump Start HTML538

On Validation
Although native data validation is a part of HTML5, you should still use server-
side validation and escape any output that originates with the user. Not all browsers
support HTML5, and not all input sent to your script will come from your form.
Phone numbers are another story. Email addresses adhere to a standard format, but
telephone numbers do not. In the United Kingdom, phone numbers may be up to
11 digits long. In the United States, they are no more than 10 digits. Some countries
have phone numbers that contain 13 digits. The formatting of phone numbers also
varies by country. Inconsistent lengths and formats make native phone number
validation difficult. As a result, the specification doesn’t define an algorithm for
doing so.
Let’s add a telephone field to our form. To do that, we do need to add an input field
and set the value of its type attribute to tel. We won’t make it required.
<p> <label for="telephone">Telephone number:</label> <input type="tel" name="telephone" id="telephone"></p>
The big advantage of using tel instead of text is to trigger a telephone input screen
in browsers that support it.
Figure 4.2. The tel input type in Firefox Mobile
Though tel doesn’t give us automatic validation, we can shape user input using
two attributes:
■ placeholder, which offers a 'hint' to the user about what format this field expects.
39Basics: HTML5 Forms

■ pattern, which sets a regular expression pattern that the browser can use to
validate input.
Our imaginary newspaper is based in the United States, and has a US-based audience.
We’ll reflect that in our attribute values.
<p> <label for="telephone">Telephone number:</label> <input type="tel" name="telephone" id="telephone" ➥placeholder="(000) 000-0000" ➥pattern="\([2-9][0-9]{2}\) [0-9]{3}-[0-9]{4}"></p>
For our placeholder attribute, we’ve just added text that reflects the expected format
for this phone number.
Placeholder Text
Placeholder text is not a replacement for the label element. Provide a label for
each input field, even if you use the placeholder attribute
For pattern, we’ve used a regular expression. This attribute provides a format or
pattern that the input must match before the form can be submitted. Almost any
valid JavaScript regular expressions can be used with the pattern attribute. Unlike
with JavaScript, you can’t set global or case-insensitive flags. To allow both upper
and lower case letters, your pattern must use [a-zA-Z].The pattern attribute itself
may be used with text, search, email, url and telephone input types.
Regular Expressions
Regular expressions are a big, complex topic and, as such, they’re beyond the
scope of this book. For a more complete reference, consult WebPlatform.org’s
documentation3.
The url input type works much the same way as email does. It validates user input
against accepted URL patterns. Protocol prefixes such as ftp:// and gopher:// are
3 http://docs.webplatform.org/wiki/concepts/programming/javascript/regex
Jump Start HTML540

permitted. In this case, we want to limit user input to domains using the http://
and https:// protocols. So we’ll add a pattern attribute here as well.
<p> <label for="url"> Please provide a web site where we can learn more (if ➥applicable): </label> <input type="url" name="current_site" id="current_site" ➥placeholder="http://www.example.com/" ➥pattern="http(|s)://[-0-9a-z]{1,253}\.[.a-z]{2,7}"> </p>
We’ve also added placeholder text as a cue to the user about what we’d like them
to tell us. Altogether, your form should resemble the one below:
<form action="./script" method="POST"> <p> <label for="your_name">Your name:</label> <input type="text" name="your_name" id="your_name"> </p>
<p> <label for="city">City of residence:</label> <input type="text" name="city" id="city"> </p>
<p> <label for="email"> E-mail address (separate multiple e-mail addresses with a comma): </label> <input type="email" name="email" id="email" ➥placeholder="[email protected]" multiple > </p>
<p> <label for="tel">Telephone number:</label> <input type="tel" name="phone_number" if="phone_number" ➥placeholder="(000) 000-0000" ➥pattern="\([2-9][0-9]{2}\) [0-9]{3}-[0-9]{4}"> </p>
<p>
41Basics: HTML5 Forms

<label for="url"> Please provide a web site where we can learn more (if ➥applicable): </label> <input type="url" name="current_site" id="current_site" ➥placeholder="http://www.example.com/" ➥pattern="http(|s)://[-0-9a-z]{1,253}\.[.a-z]{2,7}"> </p>
<p> <label for="project">Tell us your story idea:</label> <textarea name="story_idea" id="story_idea" ➥placeholder="Briefly tell us what we should write about and ➥why." ➥maxlength="2000"></textarea> </p>
<p> <button type="submit">Send it!</button> </p></form>
Uploading FilesThe file input type is not new to HTML. We’ve been able to upload files since
HTML 3.2. What is new, however, is the multiple attribute, which lets us upload
multiple files using one form field. In this section, we’ll build a form that lets users
upload audio files.
First we’ll need to create a start tag for the form element.
<form action="/script" method="post" enctype="multipart/form-data">
As with our previous form, our start tag has action and method attributes. But note
that the value of its enctype attribute is multipart/form-data. Again, when upload-
ing binary data, we must use the multipart/form-data encoding type.
Next, we need to add an input tag, and set the value of its type attribute to file.
We’ll name it upload, but you can choose almost any name you like. To permit
multiple file uploads, we’ll need to add the multiple attribute.
Jump Start HTML542

<input type="file" name="upload" id="upload" multiple>
PHP Form Keys
PHP requires form keys with multiple values to use square bracket array syntax.
If you’re using PHP to handle your forms, append square brackets to the name
(for example: name="upload" would become name="upload[]").
We can also restrict what files can be uploaded in the browser with the accept at-
tribute. The value of accept may be any of the following:
■ audio/*, video/*, image/*
■ a valid MIME type such as image/png or text/plain
■ a file extension that begins with '.'
You may include multiple accept values; separate them with a comma. Let’s update
our form field to accept only MP3 and Ogg Vorbis files.
<input type="file" multiple name="upload" id="upload"➥accept=".mp3,.ogv">
We’ll finish up our form with a submit button and closing form tag:
<form action="/script" method="post" enctype="multipart/form-data"> <p> <label for="upload">Your file(s):</label> <input type="file" multiple name="upload" id="upload" ➥accept=".mp3,.ogv"> </p> <p> <button type="submit">Upload!</button> </p></form>
When submitted, our server-side script will save those files, and return a "thank
you" message.
43Basics: HTML5 Forms

Take Appropriate Precautions
You can’t rely on browser-based validation or restrictions. Take appropriate pre-
cautions, and make sure that your file uploads are being placed in a directory that
is not web-accessible.
The datalist ElementWith the datalist element, we can add a predefined set of options to any form input
control. Let’s take a look at how we go about this. First, we’ll create a datalist of
destination options for a fictitious airline:
<datalist id="where_we_fly"> <option>Accra, Ghana</option> <option>Paris, France</option> <option>Melbourne, Australia</option> <option>Lima, Peru</option> <option>Los Angeles, United Sates</option> <option>Kuala Lumpur, Malaysia</option></datalist>
Now we can associate it with an input field using the list attribute.
<p> <label for="destination">Where would you like to go?</label> <input type="text" name="destination" id="destination" value="" ➥list="where_we_fly"></p>
In browsers that support the datalist element, the code above will associate a
predefined list of options with the input element. When the user enters text,
matching entries are displayed in the list below the field as shown in Figure 4.3.
Jump Start HTML544

Figure 4.3. datalist in IE
In browsers without support for datalist, the text input field will behave normally.
Although data lists may, in theory, be associated with other input types, not all
browsers support this.
Other Input TypesWe’ve already discussed several input types in this chapter, but there are a few
more that we’ll cover in this section.
■ search
■ range
■ number
■ color
■ datetime and datetime-local
■ date
■ month
■ week
■ time
Aside from the range input type and search, support for these types varies wildly.
Some browsers may have full support for one input type, complete with a user in-
terface control, but lack another one entirely.
45Basics: HTML5 Forms

It’s possible to determine whether a browser supports a particular input type by
testing the value returned by its type attribute. If a browser doesn’t support a partic-
ular type, the value of its type attribute will default to text. For example, consider
the following range input:
<input type="range" value="" id="slider">
We could test for browser support using the following bit of JavaScript code.
var hasRange = function( elID ){ return document.getElementById( elID ).type == 'range';}
In browsers that do not support range, the function above will return false. Other-
wise, it will return true. Libraries such as Modernizr4 make it easier to check for
support.
input type="search"
For the most part, search operates like the text input type. It merely provides a
type that can be visually distinct from text boxes. For example, in Safari, Chrome,
and Opera 15 on Mac OS X, search input fields have rounded corners.
Figure 4.4. The Search input type in Safari
input type="range"
The range input type presents the user with a slider control that’s well suited to
approximate value inputs between an upper and lower boundary. By default, it’s a
horizontal control, as shown in Figure 4.5. However with some CSS (transform:
rotate(-90deg)), you can also display range inputs vertically.
4 http://modernizr.com/
Jump Start HTML546

Figure 4.5. The range input type
By default, the upper and lower boundaries of the range type are 0 and 100. Change
this by setting the min and max attributes. You can also control the 'smoothness' and
precision of the thumb position using the step attribute as shown below.
<input type="range" value="" min="0" max="100" step="10">
Every time the user moves the thumb on this range input control, the value of the
range will increase or decrease by 10 between 0 and 100. You can also control pre-
cision by associating a datalist element with the range input. Each option will
be rendered as a 'notch' along the width of the range in browsers that support it—to
date, that’s Chrome and Opera 15.
Unfortunately, range isn’t supported in Internet Explorer 9 and older, or Firefox 22
and older. In those browsers, the form control will be a text box instead of a range
element.
input type="number"
The number type is another form control type for numeric input values. According
to the specification, any floating point number is a valid value. In practice, though,
things are little more complicated.
By default, the number input type only accepts integers. Entering 4.2776, for example,
will cause a validation error in conforming browsers, such as shown in Figure 4.6.
47Basics: HTML5 Forms

Figure 4.6. An error when entering a floating point number
In order to accept floating point values, we need to set the step attribute. In browsers
with incremental arrow controls, such as shown in Figure 4.7, step controls how
much the number is incremented or decremented with each press of the arrow
button.
Figure 4.7. Decimal values with the step attribute
For example, when step="0.5", both 1.5 and 98 are valid values, but 88.1 is not.
When step=".01", however, 88.1, 1.5, and 98 are all valid values, as is 3.14. In a
way, you can use the step attribute to control the floating point precision of your
numbers.
<!-- Increments number by 0.5 --><input type="number" name="num" id="num" value="" step=".05">
<!-- Increments number by .01; precision to the hundredth --><input type="number" name="num" id="num" value="" step=".01">
Jump Start HTML548

<!-- Increments number by 0.001; precision to the thousandth --><input type="number" name="num" id="num" value="" step=".001">
In order to make our 4.2776 value an accepted one, we would need to use set our
step attribute to .0001. Unfortunately, this workaround does not work in Opera 12
and older versions.
Date and Time InputsFinally, let’s look at the date and time input types. There are six of them, listed be-
low.
■ datetime: Select a date and time as a global, forced-UTC string
■ datetime-local: Select a date and time in the user’s local time zone
■ date: Select a single date with a time component of midnight UTC
■ month: Select a month and year
■ week: Select a week and year
■ time: Select a time in hours and minutes
Browsers that support these types will display a time picker widget (for the time
type), a date picker widget (for date, month, and week), or both (datetime and dat-
etime-local), as shown in Figure 4.8.
Figure 4.8. The time picker widget in Opera
49Basics: HTML5 Forms

The datetime and datetime-local input types are subtly different. The former
treats all input as a UTC (coordinated, universal) date and time. Browsers may in-
dicate to the user that this is a UTC time input—as Opera version 12 does—or it
may display a localized user interface, and convert the time under the hood.
Chrome and Opera 15 support all but datetime. Safari as of version 6.0.5, Firefox
as of version 25, and Internet Explorer as of version 10 do not support any of these
types.
input type="color"
With the color input type, we can add a native color picker control to our applica-
tions. What the color picker looks like depends on the browser and operating system.
However in all cases, only six-digit hexadecimal color values are valid. This means
that you can’t specify a color with transparency as you can with CSS. The default
value for the color type is #000000.
Unfortunately, the color input type is only supported by Chrome and Opera 11
and 12 (but not version 15.0). It’s not ready for prime time, but is mentioned here
for completeness.
Jump Start HTML550

Chapter5Basics: Multimedia, Audio and VideoPerhaps the biggest change in HTML5 is its multimedia capabilities. HTML5 brings
with it native audio and video, and almost replaces the plugins of the old web. I
say "almost" because browser vendors have yet to agree on a default format for web
audio and video.
We’ll talk about cross-browser support later in this chapter. First let’s look at the
bare minimum necessary to add video to your web page: a video tag and a src at-
tribute.
<video src="path_to_file.video"></video>
In HTML5, that closing tag is required. If you’re using XHTML syntax, you can self-
close it instead like so: <video src="path_to_file.video" />. The audio element
is almost the same. All that’s required is the opening audio tag, a src attribute and
a closing </audio> tag.
<audio src="path_to_file.audio"></audio>

Again, if we were using XHTML5 syntax, we could self-close our tag instead: <audio
src="path_to_file.audio" />.
Adding ControlsUnfortunately, as shown in Figure 5.1, our snippet from above won’t do anything
besides add the media file. We won’t be able to play our video, because it will be
stuck at the first frame. We won’t even know that there’s audio on the page.
Figure 5.1. An example of a video element without controls in Firefox. Image from Big Buck Bunny by the Blender
Foundation1.
What we need are some controls: perhaps a play button and a scrubbable progress
bar. We might also want a timer that reveals how much of the media has played,
and a volume control. Luckily for us, browsers have these built-in to their audio
and video support. We can activate them by adding the controls attribute.
<video src="path_to_file.video" controls>
1 http://bigbuckbunny.org/
Jump Start HTML552

The controls attribute tells the browser that we want playback controls to be
available for this media instance. In most browsers, this means the user will see a
play and pause button, elapsed time indicator, and volume control, as shown in
Figure 5.2. The player may also include a button that allows the user to toggle
between full-screen and original size. What these default controls look like depends
on the browser.
Figure 5.2. An example of a video element with controls in Firefox. Image from Big Buck Bunny by the Blender
Foundation2.
controls is another example of an empty attribute. We could also use con-
trols="true" or controls="controls" if we were using XML syntax. Adding the
controls attribute, regardless of its value, will make the controls visible. Using
controls=false will not hide them.
Autoplaying and Looping MediaPerhaps we want to use a short video clip as a background element. We might want
to create an "art installation" experience in which a video plays and re-plays auto-
2 http://bigbuckbunny.org/
53Basics: Multimedia, Audio and Video

matically. Not a problem. We can do this by adding the autoplay and loop attributes
to our video or audio tag.
<video src="path_to_file.video" autoplay loop></video>
<audio src="path_to_file.audio" autoplay loop></audio>
With autoplay, our media will begin as soon as the browser has received enough
data to start playback. When the audio or video ends, loop tells the browser to re-
start the media file from the beginning.
Use autoplay with Caution
Some audio and video can be embarrassingly bad or just embarrassing if heard.
Do your audience a favor: silence auto-playing media with the muted attribute.
<video src="annoying.video" autoplay loop muted></video>
Video-only AttributesAlthough most attributes that apply to the video tag also apply to audio, a
few—related to visual display—do not:
■ height: Sets the height of the video player.
■ width: Sets the width of the video player.
■ poster: Specifies an image to display prior to video playback.
Place Holding with posterA poster image acts as a placeholder for a video. It’s typically a still image from the
video, though it could be a company logo, title screen, icon, or some other image.
Once the page loads, visitors will see the poster image until the video begins play-
back.
To add a poster image, add a poster attribute. Set its value to the path of an image.
Most image formats work for poster images, although Internet Explorer sometimes
struggles with SVG files.
Jump Start HTML554

<video src="path_to_file.video" poster="path_to_poster_image.jpg"></video>
Be careful with the size of your poster image. Ideally, it should be the same dimen-
sions as your video. Initially the video player dimensions will match the poster
image dimensions. Then browser will resize the player once it has determined the
intrinsic height and width of the video. Setting an explicit height and width for
your video player prevents this resizing.
Controlling Video DimensionsWhether you use a poster image or not, explicitly setting the height and width of
your player prevents the browser from having to redraw the page once the video
loads. One way to do this, of course, is to include the height and width attributes
with the video tag. Both attributes accept percentages, which are useful when
building a responsive or fluid layout.
<video src="path_to_file.video" poster="path_to_poster_image.jpg" ➥width="100%" height="100%"></video>
You may also set the height and width of the video player using CSS.
video { width: 960px; height: 540px;}
In this example, we’ve used pixels. For responsive layouts, you may prefer to use
viewport percentage units: vh and vw. Any valid CSS length unit outlined in the
CSS Values and Units Module Level 33 is acceptable. Using CSS to set the video
player’s dimensions will override any width and height attributes applied to the
element itself.
Bandwidth Use and Playback ResponsivenessMost browsers download a portion of an audio or video file as the page loads.
Typically this snippet of media contains the file’s metadata, such as duration and
3 http://www.w3.org/TR/css3-values/
55Basics: Multimedia, Audio and Video

dimensions, and a few seconds of the playable data. When the user initiates playback,
the browser makes a second request for the rest of the file.
Each of these requests places an additional demand on the server, whether or not
your visitor interacts with the media file. You can change this behavior with the
preload attribute. Set it to one of three possible values:
■ metadata tells the browser that it’s okay to download a portion of the file.
■ auto tells the browser that it’s okay to download as much of the video as it wants.
■ none tells the browser not to download anything until the user requests it.
Using preload="auto" provides the fastest playback for the user. Browsers will
download as much of the resource as it needs to provide consistent playback. For
shorter clips, that could be the entire file.
With preload="none", users could experience a significant lag between pressing
the play control and media playback. However, this option will lead most browsers
to download the least amount of data.
Set Explicit Video Height and Width When Using preload="none"
With preload="none", you may want to set an explicit width and height either
in the video element itself, or using CSS. Otherwise, you may trigger a page reflow
when the video loads and begins to play.
Using preload="metadata" is a bit of a compromise between auto and none. In
most browsers, there won’t be a lag between the user requesting playback and the
action, as you often get with preload="none". But because the browser pre-loads a
smaller portion of the media file, playback may not instantaneous as with pre-
load="auto".
Cross-browser Audio and VideoThis almost sounds to good to be true, doesn’t it? Native audio and video without
a plug-in! Not so fast. There is one thing is holding us back: file format support.
Browser vendors disagree about whether there should be a default multimedia codec,
and if so, which one.
Jump Start HTML556

Apple and Microsoft have decided to support H.264/MPEG-4 video and MPEG-3
audio in their browsers (Safari and Internet Explorer, respectively). H.264 is a pro-
prietary, high-definition format for displaying video, usually within an MPEG-4
container. MPEG-3 is an audio compression format. Because these formats are pro-
prietary, browser developers must pay licensing fees if they’d like to add support
for these formats to their software.
Mozilla and Opera are opposed H.264 and MPEG-3 largely because of those royalty
fees. Instead their browsers (Firefox and Opera) support open source codecs such
as Ogg Theora and WebM. Firefox does support H.264 and MPEG-3 for mobile
devices, but not for desktop and laptops. Internet Explorer supports also other codecs
if the user has installed them. Google Chrome, to its credit, supports all of the above.
The Great Codec Divide means that cross-browser video requires one of two ap-
proaches:
1. Encode only an H.264 version of the video and use a Flash video container as a
fallback to serve the video to browsers that don’t support H.264 natively.
2. Encode the video in multiple formats, and let the browser choose which to play.
The first option is best if you need to support older browsers. Internet Explorer 8,
for example, lacks support for audio and video. JavaScript libraries such as Video.js4
and audio.js5 use this strategy.
The second option is better if you do not need to support older browsers. It will
work for desktop and mobile device browsers. We’ll use this approach here.
Transcoding Software
To transcode videos from one format to another, try FFMpeg6, a command-line
tool, or Miro Video Converter7. Both are free and open source, with Mac OS X,
Windows, and Linux builds available.
4 http://www.videojs.com/5 http://kolber.github.io/audiojs/6 http://www.ffmpeg.org/7 http://www.mirovideoconverter.com/
57Basics: Multimedia, Audio and Video

Using Multiple Video or Audio FilesTo offer multiple file formats, we need to use the source element: one <source>
tag for each file format. Attributes such as autoplay, loop, and controls should
still be a part of the <video> or <audio> tag. But our src attribute must move to our
<source> tags.
<audio controls> <source src="path_to_mpeg3_file.mp3"> <source src="path_to_ogg_file.ogg"></audio>
We can optionally add a type attribute to each source tag. At the very least, type
should contain a valid MIME type. But it may also include a codec as shown below.
<audio controls> <source src="mpeg3_file.mp3" type="audio/mpeg"> <source src="ogg_vorbis_file.ogg" type="audio/ogg; codecs=vorbis"> <source src="ogg_flac_file.oga" type="audio/ogg; codecs=flac"></audio>
preload=none on Safari
Using preload=nonewith multiple sources may prevent Safari from downloading
the correct file. Safari 6.0.5 will ignore any file besides the first one when pre-
load=none. Even if the user presses play, Safari will not load another video
source. Avoid this by listing a Safari-compatible source first. Otherwise set the
value of preload to metadata or auto.
Each browser will download the first available file that it's capable of playing.
Jump Start HTML558

JUMP STARTHTML5:
MULTIMEDIABY TIFFANY B. BROWN


Chapter6Multimedia: Preparing Your MediaBefore we begin talking about HTML5's multimedia elements, let's talk about pre-
paring your media. Though we can now use native HTML5 elements in most
browsers, we can't (yet) use the same files in every browser. We touched on this in
the introduction, but a fuller explanation is appropriate. I've tried my best to be fair
about it.
So why can't we use the same files in every browser? The short answer is: file
formats.
Codec ShowdownThe longer answer is this: browser vendors have not yet agreed on a single format
for audio and video on the web.
When multimedia was first added to the HTML5 specification, Ogg—Vorbis for
audio and Theora for video—was proposed as a standard, default format. The Ogg
specification is considered public domain. Most of its tools have open source li-
censes. It's believed to be patent-free, and non-infringing on other patents. For those
reasons, it seemed like a fairly good choice for a default codec.

Some browser vendors—primarily Apple and Nokia—disagreed with the choice of
Ogg and flatly refused to support it. Among their concerns was an uncertain patent
landscape. After all, just because Ogg is believed to be non-infringing, doesn't mean
that it is. Plus Ogg lacked the robust hardware support of formats such as H.264
video.
Speaking of H.264 video, Apple and Nokia made it their video format of choice.
H.264 is widely supported by hardware and software, particularly on mobile. Indeed
much of the video used on the web today relies on it. However, H.264 is what's
known as encumbered: it's a patented format. Adding H.264 support to your software
requires paying hefty royalty fees. Opera and Mozilla (developers of Firefox), balked
at that. Both refused to add H.264 support to their browsers.
Google, to its credit, chose to support H.264 and Ogg in its Chrome browser. But
Chromium, the open source codebase underlying Chrome, lacks H.264 support.
Microsoft largely avoided the fray but then also settled on H.264.
I should mention here that H.264 is a video codec, and largely what the fuss was
about. Audio formats are less contested, in part, because there are just so many to
choose from.
All that said: in 2009, specification authors removed the codec requirement. Browser
vendors implemented the codecs they wanted to. As a result, we have to encode
our audio and video in multiple formats. For all of the sordid details and angry
posts, comb through the WHATWG mailing list archives1 from about mid-2009.
The Current LandscapeSince the codec requirement was dropped from HTML5, things have changed slightly
in browser land. Mozilla and Opera now support H.264, but only if the hardware
or third-party software provides access—on Android devices, for example.
A new format—WebM—also joined the party. WebM is sponsored by Google, and
is a container format for the VP8 and VP9 video codecs. Not surprisingly, Google's
Chrome supports WebM natively. So does Opera as of version 10.60, and Firefox
as of version 4.0 (though only the VP8 codec at this time). Internet Explorer doesn't
1 http://lists.w3.org/Archives/Public/public-whatwg-archive/
Jump Start HTML560

support WebM natively, but will if third-party software is installed. Apple's Safari
is still H.264 only.
At a minimum, we'll need to encode our video files in at least two formats: H.264
and WebM. For audio files, use MP3 and WebM. These formats enjoy the widest
support among currently-used browsers. To support Firefox 3 or Opera 10.50 users
encode your files using Ogg ― Ogg Theora for video and Ogg Vorbis for audio.
Luckily for us, basic media transcoding is easy and there are free and open-source
tools for the job. In this chapter, we'll discuss two of them: the command-line tool
FFmpeg2 and the graphical user interface, Miro Video Converter3.
Beware Hosting Costs
Storing multiple files in multiple formats may affect your hosting costs, particularly
as the number of videos stored increases. Check the details your web hosting and
storage plan.
Converting Files Using Miro Video ConverterMiro Video Converter provides a graphical user interface for FFmpeg, the open
source, command line media conversion tool. It's less flexible than FFmpeg. But
it's also easier to use if the command line makes you queasy.
To convert a file using Miro, add it to the queue. You can do this by dragging and
dropping a file into the application. Or click "Choose File", and navigate to it. You
can add multiple files to the queue. Miro will process them sequentially. Once our
files are queued, we can choose our export format.
2 http://ffmpeg.org/3 http://www.mirovideoconverter.com/
61Multimedia: Preparing Your Media

Figure 6.1. The conversion queue for Miro Video Converter for OS X
Miro offers a slew of presets for targeting specific devices. Using the Apple > Apple
Universal preset is a good choice for H.264-capable browsers. For WebM and Ogg,
look under the Format menu instead.
Under the settings menu (the gear icon on the right), you'll also see options to create
thumbnails, resize your video, or adjust the aspect ratio. Click the gear icon again
to return to the main settings screen.
Jump Start HTML562

Figure 6.2. The settings panel in Miro Video Converter
Once you've selected a format and (optionally) adjusted your settings, click the
green button at the bottom of the screen to begin transcoding.
63Multimedia: Preparing Your Media

Figure 6.3. We're okay to convert! What Miro looks like once we've chosen an output format
Miro Video Converter will output your converted file to its output folder. Its location
varies by operating system, but you can find a link in the settings menu.
Converting Media Using FFmpegIf you want a bit more flexibility, try using FFmpeg. It's open source, and primarily
for Linux systems. But binaries for Mac OS X and Windows are available via the
FFmpeg web site. If you're using a Mac, you can also install FFmpeg using Homebrew
or Macports.
Jump Start HTML564

FFmpeg supports dozens of formats, including the ones we need for the web: Ogg
Vorbis and Theora, MPEG-3, MPEG-4/H.264, and WebM. You can also use it to export
still frames, which comes in handy for generating poster images.
Let's take a look at what it takes to convert a video from QuickTime (.mov) to WebM
using FFmpeg. Navigate to the directory that houses the file you want to convert.
Then open a terminal window.
FFmpeg conversions are straightforward. A simple version looks like this.
ffmpeg -i /path/to/input.file /path/to/output.file
FFmpeg will determine which codec to use based on the output file's extension.
In this case, our file is named tracy-sings.mov. To convert it to WebM, we'll type
the following.
ffmpeg -i tracy-sings.mov tracy-sings.webm
That's it. Your terminal window will then fill up with all sorts of details about the
input and output files.
Using FFmpeg Binary
If you're using an FFmpeg binary, you may also need to include the path to FFmpeg
(for example: /usr/local/ffmpeg).
65Multimedia: Preparing Your Media

Figure 6.4. An action shot of the FFmpeg conversion process
A few moments later you'll have a transcoded file in the output format you requested.
Resizing Video FilesServing a 1080p (typically 1920 pixels by 1080 pixels) video may be a larger file
than you need online. FFmpeg also includes tools to scale or resize video files. One
way to do this is with FFmpeg's scaling filter.
Let's try scaling our movie to a smaller 720p (1280 pixels by 720 pixels) resolution.
We'll also transcode it to WebM.
ffmpeg -i tracy-sings.mov -vf scale=-1:720 tracy-sings-720p.webm
What's new here is the -vf flag, which is a flag indicating we'd like to use a filter.
That's followed by our filter name (scale) and our desired ratio (width:height).
Though we could specify both dimensions, here we've used -1 instead. This indicates
to FFmpeg that we want to preserve our aspect ratio as it scales. As in our previous
example, the last part of our command is the output file name and extension.
Jump Start HTML566

Using FFmpeg to Generate a Poster ImageFFmpeg isn't limited to media conversions. We can also use it to export frames from
video files. This will come in handy when we discuss adding a poster image to our
videos. The basic command follows this pattern:
ffmpeg -ss 30 -t 2 -i /path/to/input.file -r 1 ➥/path/to/output-%02d.jpg
This example involves a few more command line flags than our previous ones. So
let's run through it.
The -ss flag instructs FFmpeg to seek the specified position, as expressed in seconds.
In this case, we'll start exporting frames from 30 seconds into our video.
Next is the -t flag or duration, or how many seconds of video we'd like to extract
as images. In this case, we'll capture two seconds worth of frames. As you may have
guessed by now the -i flag stands for "input," and we use it to specify our source
file.
The -r flag sets the frame rate, or number of frames per second in our video export.
In this case, it's 1 frame per second. This means we'll end up with two stills from
this video, one for each second specified by the -t flag. If we used a higher frame
rate, such as 24 frames per second, we'd extract 24 images.
Finally, we need to tell FFmpeg where to put the files. The %02d is a place holder
or wildcard of sorts. It tells FFmpeg to name our images in sequential order, padding
to 2 digits long where necessary. In this case, our images would be named
output-01.jpg, output-02.jpg and so on. If we used %03d, our files would be named
output-001.jpg, output-002.jpg instead.
Using a Hosted ServiceMiro Video Converter and FFMpeg are great for audio and video that you want to
host yourself. But there are a few services that offer hosting and transcoding.
Archive.org4 offers free hosting and transcoding for audio and video works released
4 http://archive.org/details/movies
67Multimedia: Preparing Your Media

under a Creative Commons license or to the public domain. Vid.ly5, Viddler6, and
Zencoder7 are three paid options, and also provide configurable players. Details
and pricing vary.
Quality Versus File SizeThis chapter isn't a comprehensive look at Miro Video Converter, FFmpeg, or op-
timizing media for the web. But it will get you started.
You should, however, consider bitrate and frames per second (FPS) for your audio
and video files. There are few hard-and-fast guidelines here. Which values you
choose will depend your ― and your audience's ― tolerance for quality versus file
size, bandwidth consumption and download times.
Popular video sites such as YouTube8, Vimeo9, and Dailymotion10 offer some
guidance for compressing media. Use FFmpeg to make these adjustments. Your best
bet is to start with these guides and experiment with different rates until you strike
the right balance.
Now that you know have some tools for converting media, let's talk about how to
add it to your page.
5 http://m.vid.ly/6 https://www.viddler.com/7 http://zencoder.com/en/8 https://support.google.com/youtube/answer/17221719 http://vimeo.com/help/compression10 http://www.dailymotion.com/upload/faq
Jump Start HTML568

Chapter7Multimedia: Using Native HTML5
AudioIn this chapter, we'll cover the audio element and its attributes. Though we're focus-
ing on the audio element, keep in mind that most of these attributes also apply to
video. In fact, it's possible to use the audio element to play video files and the video
element to play audio files. The main difference is that the video element will dis-
play an image track if it is available; audio never will.
The audio ElementAdding audio to your web page is super simple. Use the <audio> tag. At a minimum,
it requires a src attribute, which is the path to and name of the media file. Audio
elements also require a closing </audio> tag. Using your text editor, create a new
HTML file, and add the snippet below, changing the value of src to point to your
media file. Save it as audio.html, then open it in your browser.

<audio src="/path/to/media.file"></audio>
You should see and hear absolutely nothing. By default, the audio and video ele-
ments lack controls and load in an idle state.
In order to expose a player interface to our users, we'll need to add the controls
attribute.
<audio src="/path/to/media.file" controls></audio>
The controls attribute is an example of an empty attribute. For empty attributes,
its presence or absence determines whether the attribute value is true or false. It's
actually the equivalent of typing controls="" with an empty string for a value. If
you're using HTML5's stricter XHTML syntax, you should use controls="" or
controls="controls" instead of the empty attribute.
Adding the controls attribute will give us visible play/pause, volume, and thumb
head controls. What those default controls look like depends on the browser, as
does the ability to style them with CSS.
With JavaScript Disabled
When the user has disabled JavaScript, the browser will expose a media controls
user interface, regardless of the value of the controls attribute.
Figure 7.1. Default audio players in (from top to bottom) Internet Explorer 11, Chrome 30, Firefox 27, and Safari 6.0.5
Jump Start HTML570

Some browsers expose what's known as a "Shadow DOM," or a way of targeting
specific components with CSS. Support for a Shadow DOM varies from browser to
browser, so you'll need to consult each browser's documentation.
A more flexible approach is to build our own player. As we'll see later in this book,
we can also control appearance by using the multimedia API, CSS, and JavaScript.
The autoplay AttributeWe can choose to play our media as soon as it loads by adding the autoplay attribute.
Like controls, autoplay is an empty attribute.
<audio src="/path/to/media.file" autoplay></audio>
In your audio.html file, replace controls with autoplay and reload the page. Notice
that our audio file starts playing right away, but also notice that there isn't a way
to stop playback. If we want to allow the user to control this media, we'll need to
include them both, as shown below.
<audio src="/path/to/media.file" autoplay controls></audio>
Be considerate of your users and think carefully before using the autoplay attribute.
Auto-playing media consumes bandwidth both for you and your users. Media files
can "clog the pipes," so to speak, for users with limited bandwidth. For users who
also have metered bandwidth, auto-playing media literally costs money. And many
users just find it plain annoying. In most cases, user-initiated media is the better
way to go.
Looping MediaPerhaps you want to use some atmospheric audio to set a mood for your web site.
In that case, you may want your media to repeat automatically, without intervention
from the user. This is where the loop attribute comes in handy. When present, the
media will "rewind" itself at the end, and play from the beginning.
71Multimedia: Using Native HTML5 Audio

<audio src="/path/to/media.file" autoplay controls loop></audio>
Muting MediaHTML5 offers the ability to silence the audio output of a media file with the muted
attribute. The media file will still be downloaded. The progress bar and time will
continue to update. But the browser will not output any sound.
<audio src="/path/to/media.file" controls muted></audio>
Though perhaps nonsensical for audio files, it makes a bit more sense for video.
For example, a video ad can still capture the user's attention visually, without the
added disruptiveness of sound. Note again that muted is an empty attribute. For
XHTML syntax, you'll need to use muted="" or muted="muted" instead.
We can also control audio output with scripting and the volume property.
Buffer Hinting with the preload AttributeMultimedia uses a lot of bandwidth—both for your servers and your users. Audio
and video data takes a lot of bytes. As the document loads, the browser will request
and download a snippet of the media file. Usually this snippet is just long enough
to determine the file's duration or dimensions. In the case of video, it may also
download a frame or two. When playback begins, the browser will make another
request—sometimes multiple requests—for the rest of the media file.
Each of these requests places an additional demand on the server. And partial re-
quests happen whether or not the user listens to the audio or watches the video file.
The good news is that we can shape this behavior with the preload attribute, as
shown below.
<audio src="/path/to/media.file" controls muted preload="auto"></audio>
The preload attribute accepts three possible values.
■ none tells the browser not to download anything until the user requests it, but
it may download the entire video upon playback.
Jump Start HTML572

■ metadata hints to the browser that it's okay to download a portion of this media
file, and that it should throttle the download during playback.
■ auto tells the browser that it's okay to download as much of the video as it wants.
preload="auto"Using auto is the most demanding of these. A value of auto tells the browser that
it is okay to download as much of the file as it wants, up to the entire resource.
Playback is often more consistent, because more of the video is already in the
browser's buffer. This is great for the user, but it may not be so great for your band-
width usage. As you can see in Figure 7.2, Firefox made three requests for our media
file, Pontification.ogg.
Figure 7.2. Requests for Pontification.ogg when preload="auto" as shown in Firefox's developer tools
preload="none"A preload value of none tells the browser, "Don't you dare download a single byte
until the user tries to play this file!" On the plus side, preload="none" will reduce
the number of requests, thereby reducing bandwidth consumption. In Figure 7.3,
below, we can see that the browser makes a request for our HTML document, but
not our media file.
73Multimedia: Using Native HTML5 Audio

Figure 7.3. Requests for Pontification.ogg when preload="none" as shown in Firefox's developer tools
On the minus side, preload="none" means that playback will be less responsive.
The user may experience may be several seconds of lag time between when he or
she clicks 'play,' and when the media actually begins playing. Once playback starts,
however, the browser may aggressively download the file.
preload="metadata"Think of metadata as a nice compromise between the two. When the preload attrib-
ute is set to metadata, the browser will make one request, and only download a
portion of the file.
Jump Start HTML574

Figure 7.4. Requests for Pontification.ogg when preload="metadata" as shown in Firefox's developer tools
Using the metadata value also suggests to the browser that it should throttle the
download once playback begins. Neither preload="none" nor preload="auto"
prevent the browser from downloading an entire resource. However, pre-
load="metadata" hints to the browser that it should download the file at the
slowest possible rate that still allows consistent play.
Here's where things get interesting: we can use JavaScript to change the value of
preload once playback begins. We may, for example, want to start with pre-
load="none", so that no additional data will be downloaded. Then once the user
begins playback we can switch to preload="metadata" and reap the benefits of
download throttling. There's an example of how to do this in Chapter 6.
Fallback ContentNotice here that we're using both start and end tags for the audio element, but there
isn't anything in between. If a user visits our page using a browser that doesn't
support audio, they won't see any indication that the player is missing (unless other
content on the page tells them it is).
We can fix this issue by adding fallback content between the <audio> and </audio>
tags as shown below.
75Multimedia: Using Native HTML5 Audio

<audio src="/path/to/media.file" controls> Oh no! Your browser doesn't support HTML5 audio. Try upgrading your browser if you can. </audio>
You could also use an image as your alternative content, or embed a Flash-based
player between the tags. As we'll see in Chapters 8 and 9, our <source> and <track>
tags also sit between our opening and closing tags.
Remember: everything we've discussed so far also applies to the video element.
But the video element has a few more attributes that make sense for a visual medium.
We'll discuss those in the next chapter.
Jump Start HTML576

Chapter8Multimedia: Using Native HTML5
VideoAdding video to your HTML documents is just as straightforward as adding audio:
use the <video> tag. As with audio, the video element requires a closing tag
(</video>) and a src attribute.
Create a new HTML document, and add the code below, changing the value of src
to point to the media file of your choice. Save it as video.html, and open the file in
your browser.
<video src="/path/to/media.file"></video>
You should see the first frame of your video, and that's it, as shown in Figure 8.1.
As with audio, the video element lacks control by default (unless JavaScript is
disabled).

Figure 8.1. A video player in Chrome Canary when the controls attribute has not been set. Image from "Big Buck
Bunny" by the Blender Foundation, bigbuckbunny.org
To enable controls, we'll need to add a controls attribute, as shown below.
<video src="/path/to/media.file" controls></video>
As with the audio element, this will add a player user interface to the video, so that
the user can play, pause, seek, and adjust the volume. Video controls look more or
less like their audio counterparts. They usually have an additional control for enter-
ing and exiting full-screen playback, and in most browsers a control toggle subtitles
and captions. Exactly what the player looks like depends on the browser, and not
every browser makes re-styling these controls easy.
Setting Video DimensionsAll videos files have intrinsic dimensions of width and height. Intrinsic dimensions
are the "natural" or default height and width of a file. For example, a video file may
be 640 pixels wide and 480 pixels high. However, we can tell the browser to limit
Jump Start HTML578

the size of our video player within our document layout using the width and height
attributes. An example follows.
<video src="/path/to/media.file" controls width="427" height="240"></video>
This will constrain our video to a box that's 427 pixels wide by 240 pixels high.
The video file itself will retain its dimensions. But it will be displayed within the
space we've defined, as shown in Figure 8.2.
Figure 8.2. We've set our video to be 427 pixels wide by 240 pixels tall. The Google Chrome window is 640 pixels wide.
Image from "Big Buck Bunny" by the Blender Foundation, bigbuckbunny.org
Without a known width or height, the default size of an HTML5 video player is 300
pixels wide by 150 pixels high. Once the browser can determine the video's intrinsic
dimensions, it will resize the element. If you've used a preload value of auto or
metadata, this will happen as the video loads. If you've used a preload value of
none, it will happen once the user initiates playback.
79Multimedia: Using Native HTML5 Video

Figure 8.3. A default video player in Opera 16 when the preload attribute is set to none
This is similar to the way the img element works. When we don't specify the size
of our element box, the box will expand to accommodate the content. Setting a
height and width prevents this from happening.
In the example above, we specified the values in pixels, but we could also use per-
centage values. Let's change our values from the example above to use percentages.
<video src="/path/to/media.file" controls ➥width="100%" height="100%"></video>
Now the dimensions of our video element will grow or shrink relative to the height
and/or width of its containing element.
Setting width and height attributes aren't the only way we can control the size of
our video element. We can use CSS instead, as shown below.
video { width: 427px; height: 240px;}
Here we've used the video element selector, which means these styles will apply
to every video in our document and on our site. Between our curly braces, we've
Jump Start HTML580

added a width property and a value of 427px or 427 pixels and a height property
with a value of 240px. As with the HTML attributes, we're not restricted to pixel-
based values. We could also use percentages, or any other length value permitted
by CSS.
If you use CSS, keep in mind that those values will have priority over any width
and height attributes in your HTML. If you're not familiar with CSS, SitePoint's
book, Jump Start CSS1 by Louis Lazaris will bring you up to speed.
Percentages for HeightUsing a percentage value for height is tricky. It only works when the height of the
parent element has also been explicitly set. For example, if the parent element for
your video is the body element, you'll need to use CSS to specify its height, as shown
below.
body { height: 100%;}
Now your video element will expand in height as the body element does. There's
a caveat here, however. While the aspect ratio of your video element will change,
the aspect ratio of the video will not. When the aspect ratio of the video element
differs from that of the video itself, you'll end up with extra room around your video
image, as shown in Figure 8.4.
1 http://www.sitepoint.com/store/jump-start-css/
81Multimedia: Using Native HTML5 Video

Figure 8.4. The orange stripes at the top and bottom of the video is the difference between the aspect ratio of the video
element and the video file
For this reason, it's usually less hassle to use a percentage value for width and let
the browser adjust the height automatically. You can also use CSS to set the width
and height of a video as shown below.
video { width: 800px; height: auto; }
Here we've used the auto value for our height CSS property. This means our height
will be constrained by the aspect ratio and change with the value of our width
property. When using CSS, we can use length units such as px, em, and ex. We can
use percentage values. And in browsers that support it, we can use viewport units
vw and vh.
Jump Start HTML582

Setting a Poster ImageIf you've used the auto or metadata values for our preload attribute, your video
will load the first frame of your video. But if you've used none as a value, your vis-
itors will just see the player. We can do better than that. Let's specify an image
placeholder using the poster attribute.
<video src="/path/to/media.file" controls width="427" height="240" ➥poster="/path/to/poster.image"></video>
The value of the poster attribute must be the URL of an image file. It will be dis-
played when no video data is available. It's intended to be representative of the
video, but it could easily be a corporate logo or simple title frame. In Chapter 6, we
mentioned how to extract images from videos using FFmpeg, which you could use
for the poster frame. But you could also take a regular screen shot and edit it using
an image editor.
Poster Image Dimensions and video Element DimensionsPoster images have intrinsic dimensions, just as video files do. Initially, the size of
the video element will match the width and height of your poster image. Once the
browser knows the dimensions of the video it will resize the element to match. To
prevent this, either:
1. ensure that your poster image has the same height and width as your video; or
2. specify a height and width for the video element using attributes or CSS.
Almost any image format will work for your poster image, including SVG. Most
browsers will constrain the image to the dimensions of the video element, if they
are set, and expand to the size of the SVG file if not.
83Multimedia: Using Native HTML5 Video

Figure 8.5. Most browsers constrain the dimensions of an SVG poster image to those of the video element. SVG image
by Michele Brami from Openclipart.org
Internet Explorer does the opposite, however. It will constrain the poster image to
the default 300-by-150 size when the video element lacks a height and width. If the
dimensions are set, the SVG image will expand to its full intrinsic size.
Jump Start HTML584

Figure 8.6. Internet Explorer doesn't constrain SVG poster images when the video element has a set height and width.
SVG image by Michele Brami from Openclipart.org
To work around this, make the intrinsic size of your SVG file smaller than the height
and width of your video element.
What We've Learned So FarUp to this point in the book we've covered the audio and video elements, and most
of their important attributes. But what you may have noticed is that your audio and
video examples did not work in every browser. If you used MP3 and M4V files, for
example, your examples didn't work in Opera 16.
As we discussed in Chapter 6, browser vendors haven't yet agreed to support a
standard file format. That means we need to serve our media files in multiple formats.
But how can we do that when the video and audio elements only support a single
src attribute?
Well the answer is that we can't, exactly. But we can use multiple source elements
to supply multiple source files. Each browser will download the file format that it
can most likely play. We'll discuss cross-browser video in our next chapter.
85Multimedia: Using Native HTML5 Video


Chapter9Multimedia: The source ElementUp until this chapter, we've discussed using the audio and video elements with a
single src attribute. You may have noticed that this only works part of the time, in
some browsers, depending on the format of your file. For true, cross-browser multi-
media that works across browsers, you'll need to use multiple source elements,
and multiple source files.
We'll use video elements for the examples in this chapter, but most of what we'll
discuss also applies to the audio element. In order to serve multiple sources, you'll
need to have your media available in multiple formats. Refer to Chapter 6 for a
couple of ways to do this.
The source ElementThe source element lets us specify multiple, alternative media files for a multimedia
element. It's not an element that stands on its own; it must be used as the child of
an audio or video element. Place your source tags between the start and end tags
for the audio or video elements.

<video controls> <source src="/path/to/video.h264.m4v"> <source src="/path/to/video.webm"></video>
The source tag requires a src attribute whose value is the path and name of a
multimedia file. Ideally, when you specify multiple sources, the browser should
detect and select the file it is capable of playing. The current reality is slightly
messier.
In Chrome, Firefox, and Internet Explorer, the browser will attempt to download
the first source file specified. If it can't play that format, it will try the next file
specified, and so on, until it finds a file in a format that it's capable of playing.
Both Safari 6 (and older) and Opera 15 do the same, except when the value of pre-
load is none. When preload="none", these browsers will attempt to download the
first file, and fail if it proves to be incompatible. To prevent this, either:
1. Set the preload attribute to metadata or auto; or
2. Specify the MIME type using the type attribute.
Safari 7 no longer suffers from this bug.
Format Hinting With the type AttributeSpecifying a MIME type using the type attribute will keep your browser from running
a format compatibility check for each source element. It's especially important for
browsers in which that process is broken. Rather than executing a download-check-
repeat sequence, browsers will use the type attribute to select the file that it's capable
of playing. Let's add type attributes to our <source> elements from above.
<video controls> <source src="/path/to/video.h264.m4v" type="video/mp4"> <source src="/path/to/video.webm" type="video/webm"></video>
The value of a type attribute must be a valid MIME type that matches the format of
the file in question. For MPEG4/H.264 files, that will be video/mp4. For audio
MPEG-4 files, use audio/mp4. The MIME type for MP3 files should be audio/mpeg.
Jump Start HTML588

For Ogg files use video/ogg or audio/ogg. For WebM, the preferred MIME type is
video/webm.
You may also want to specify the codec used to encode your media file. Most file
formats are actually just containers for a variety of encoding formats. For example,
an Ogg audio file may actually be encoded using the Vorbis, FLAC, or Speex codecs.
An MPEG-4 file may be Xvid and H.264. Including a codec is optional, but offers
more specific information to the browser. To include codecs, add a codec parameter
to the value of the type attribute.
<source src="/path/to/video.ogv" ➥type="video/ogg; codecs='theora, vorbis'">
Note that the value of our codecs parameter is enclosed in single quotes. This is
because it's part of a value that's wrapped in double quotes. We could also invert
our quotes; that is, enclose the entire value of type in single quotes, while using
double quotes for the value of our codecs parameter.
Using a codec isn't strictly necessary. It's just as easy to leave it out, particularly if
you're not exactly sure what codec your file is using.
Troubleshooting Media ProblemsNow perhaps you've done all of this—your paths are correct, your file formats are
correct—and your video or audio still doesn't work. A couple of things could be
wrong.
Check that your server is sending the correct Content-type response header for the
file type. Many servers will send unknown file types with a Content-type:
text/html or Content-type: application/octet-stream header. You'll need to
add proper header support for each file format to your server or directory configur-
ation file. These header values should be the same as the MIME types we discussed
above. Consult the documentation for your server or contact your web hosting
support team for more.
If that doesn't work, you may have to re-encode your file. When you do, make sure
that you're using a codec that your target browser supports. (Consult the browser's
documentation.)
89Multimedia: The source Element

Responsive Video With the media AttributeThe source element can be used to serve files of different formats. But it can also
be used to serve different videos based on screen or device features. You can do
this with the media attribute.
The media attribute accepts a media query for a value. A media query consists of a
CSS media type (such as print, TV, or screen) and a media feature to test against.
For a full explanation of media queries and how they work, consult the Media
Queries1 specification from the World Wide Web Consortium. Here, we’ll just take
a look at an example using aspect ratios.
Serving Videos With Different Aspect RatiosOne of the media or device features we can test against is the aspect ratio. Media
queries allow us to test aspect-ratio and device-aspect-ratio. The former tests
the aspect ratio of the document content—typically the document window. The
latter tests the aspect ratio of the device screen. Sometimes these are the same. But
they're often different. In either case, we can test the condition and serve a different
video based on the results.
Here we are serving the same video content using two different files to serve a 1080p
video for screens that can accommodate that resolution, and a 720p video for screens
that can accommodate that lower resolution.
<video controls> <source src="/path/to/video.1080p.m4v" type="video/mp4" ➥media="screen and (device-aspect-ratio: 1920/1080)"> <source src="/path/to/video.720p.m4v" type="video/mp4" ➥media="screen and (device-aspect-ratio: 1280/720)"> <source src="/path/to/video.1080p.webm" type="video/webm" ➥media="screen and (device-aspect-ratio: 1920/1080)"> <source src="/path/to/video.720p.webm" type="video/webm" ➥media="screen and (device-aspect-ratio: 1280/720)"></video>
In this case, the browser will only download a supported video file only if the user
has an HD-compatible device. It's also worth mentioning that the media attribute
1 http://www.w3.org/TR/css3-mediaqueries/
Jump Start HTML590

only applies to the source element. Adding it to your video or audio tag won't
work.
There's far more to responsive web design and media queries, of course. Check out
SitePoint's Jump Start Responsive Web Design2 for an introduction.
So Far We've LearnedSo far we've covered the HTML5 audio and video elements and attributes. We've
also talked about how to serve cross-browser video, and how to troubleshoot. Next,
we'll take a look at captioning web video with the track element.
2 http://www.sitepoint.com/store/jump-start-responsive-web-design/
91Multimedia: The source Element


Chapter10Mutimedia: The track ElementIn the last chapter, we discussed how to make your media available to more users
with cross-browser techniques. In this chapter, we'll look at how to make it accessible
and "index-able", too, with the track element and WebVTT.
HTML5 multimedia comes with three challenges:
1. Lack of accessibility.
2. Lack of "index-ability".
3. Language barriers between the media and the viewer or listener.
Accessibility simply means supporting users with impairments or disabilities as
fully as possible. Audible media isn't usable to hearing-impaired users. Visually-
impaired users don't see visual media in the same way that fully-sighted users do.
HTML5 audio and video present clear challenges for these users.
What's more, search engine software struggles to correctly index binary data, such
as audio, video, and images. Even Google's Image Search relies on file names, alt
attributes, and surrounding text rather than actual file indexing. By themselves,

audio and video files are a bit of an information black hole. Data goes in, but is often
difficult to extract and use.
Language barriers are another challenge of HTML5 multimedia. The viewer or
listener may not understand, let alone be fluent in the language of the media played.
Subtitles within the video can help. However, they aren't readily swappable while
editing, viewing, or listening to media. And they too suffer from the indexing
problem.
HTML5 defines a track element as a way to solve these problems. With it, we can
add timed, text-based alternatives—such as subtitles, captions, and metadata—to
our media files. In this chapter, we'll look at this element, and a syntax for captions
and subtitles known as WebVTT.
The State of track SupportBefore we begin, however, let's talk about browser support. The <track> element
is at least partly supported by Internet Explorer 10+, Chrome 16+, Safari 6+, and
Opera 16+. However, its utility is limited in some of those browsers.
Safari 6.0.5 for OS X doesn't actually make captions or subtitles available to the
user, though the scripting interface is partially available. Captions are visible,
however, in Safari 7. (In iOS 7, they're only available when the video is in full-screen
mode.)
Opera 16+ for desktop supports track, but Opera for Android does not. On Android,
Opera passes video handling off to the operating system's software. Rather than
playing video in the browser, it launches an external application, making captions
irrelevant. Opera's new Coast browser for iOS behaves similarly, using that platform's
built-in video handling.
Firefox support for track is still in progress. Full support isn't yet available. How-
ever, partial support is available in the latest nightlies1 (Firefox 27.0a1 and higher).
Enable it by typing about:config in the address bar, and changing the media.web-
vtt.enabled setting to true.
1 http://nightly.mozilla.org/
Jump Start HTML594

To provide captioning in browsers that lack support, take a look at Captionator.js2
and MediaElementJS3.
Captions, Subtitles, and audioMost browsers don't fully support the track element when used with the audio
element. There are no subtitles, no captions, and no menu for them. For audio files
you currently have two options:
1. Include a text transcript in the same HTML document.
2. Use a video element instead of an audio element.
Since an audio file lacks intrinsic dimensions, the video element's will render at
its default 300x150-pixel size.
Adding the track ElementTo use the track element, place it between the opening <video> tag and closing
</video> tag, as shown below.
<video src="/path/to/media.file" controls> <track src="/path/to/tracktext.vtt" srclang="en"></video>
If you're using source elements instead, place your track tag or tags after your
source tags.
<video src="/path/to/media.file" controls> <source src="/path/to/media.m4v" kind="video/mp4"> <source src="/path/to/media.webm" kind="video/webm"> <track src="/path/to/tracktext.vtt" srclang="en"></video>
You've probably noticed that our track tag contains an src attribute. The value of
src must be the URL of a text file containing the alternative version. In theory, this
could be any captioning file format that the browser supports. In practice, it should
2 http://captionatorjs.com/3 http://mediaelementjs.com/
95Mutimedia: The track Element

be a WebVTT4 file. WebVTT enjoys support in every browser that supports the
track element. TTML5 is an alternative captioning syntax, but so far, only Internet
Explorer supports it.
A little later in this chapter, we'll discuss WebVTT's captioning syntax and how to
use it.
Specifying Subtitles, Captions, andMetadata
In our examples above, we've left out the kind attribute. It's optional, but recommen-
ded. The kind attribute tells our browser the function of each text track and guides
how it will be displayed.
The value of kind may be one of the following values:
■ subtitles: used to provide a transcription, or translation of dialogue
■ captions: used for transcription and translation, but also used to provide de-
scriptions specifically for hearing-impaired users
■ descriptions: used to describe the video component in cases where it's unavail-
able, or the user is visually impaired; Synthesized as audio
■ chapters: used for navigating the resource, similar to what you might find on a
DVD menu
■ metadata: data about the video that's intended for script or machine consumption
Of these five types, all but metadata are revealed to the user. Tracks of the descrip-
tions kind are synthesized as audio, and will be heard rather than seen by the user.
Both subtitles and captions are overlaid on the video file. For captions, the user
interface may include a closed caption button that lets the user toggle captions on
and off (Figure 10.1).
4 http://dev.w3.org/html5/webvtt/5 http://www.w3.org/TR/ttaf1-dfxp/
Jump Start HTML596

Figure 10.1. An example of a video with captions enabled in Chrome 32. Video still from "Sita Sings the Blues" by Nina
Paley, (sitasingstheblues.com)
Chapters are intended to be displayed as an interactive list in the user agent's inter-
face. To date, however, no major browser fully supports this feature. Metadata tracks
provide information about the media file or time range, and aren't displayed to the
user at all.
If you don't set the kind attribute, your track will be treated as a subtitles track.
That's the default state for the element. When the type is subtitles—whether ex-
plicitly, or implicitly—you must include a srclang attribute. Without the srclang
attribute, captions will not work.
Using Multiple track ElementsThough it's perfectly valid to use multiple track elements, doing so is not perfectly
supported in all browsers. To date, Internet Explorer 10+ and Safari 7 are the only
browsers that support multiple track elements. Both browsers provide the user with
a menu that allows him or her to select which text track he or she would like to use.
97Mutimedia: The track Element

Figure 10.2. The closed caption button in Chrome, when captions are turned on (top) and turned off
When multiple track elements are present, Chrome and Opera will use the first track
element listed. Rather than provide a menu of track elements, Chrome and Opera
include a CC button (for "Closed Captioning") that toggles the current set of captions
or subtitles on and off (Figure 10.2).
Specifying the Language of Your Text TracksYou'll also want to include a srclang attribute with your <track> tag. The value
of this attribute must be a valid BCP 47 language code. Usually these codes are two
letters, such as en for English, or de for German. But they could also include a
country or region code such as fr-CA for Canadian French, or en-GB for British
English.
There are loads of language and country or region codes—too many to list here.
Commit the ones you use most to memory. Should you need other language and
region codes, the best place to find them is Richard Ishida's Language Subtag
Lookup6 tool.
Without the srclang attribute, subtitles will not work (captions and descriptions
should). When present, some user agents allow the user to choose between tracks.
6 http://people.w3.org/rishida/utils/subtags/
Jump Start HTML598

Figure 10.3. Selecting a language for subtitles or captions in Safari for iOS 7. Video still from "Sita Sings the Blues" by
Nina Paley (sitasingstheblues.com)
For example, Safari for iOS 7 offers the user a captions menu when the video is
viewed in full screen mode (Figure 10.3, above). It uses the value of srclang to set
the language option in the menu.
99Mutimedia: The track Element

Figure 10.4. By default, tracks in Internet Explorer are untitled. Video still from "Sita Sings the Blues" by Nina Paley
(sitasingstheblues.com)
This is not the case for Internet Explorer, however. In Internet Explorer 10+ (Fig-
ure 10.4, above), tracks listed in the Closed Captions menu are untitled by default.
To fix this, we need to add the label attribute to each of our tracks. As of publication,
other browsers do not support multiple track elements.
Labeling Your TracksThe label attribute is self-explanatory. It defines a name or title that the browser
can use when exposing the track to the user.
<video src="/path/to/media.file" controls> <track src="/path/to/en-us.vtt" srclang="en-US" ➥label="English - USA"> <track src="/path/to/fr.vtt" srclang="fr" ➥label="Français"> <track src="/path/to/es-MX.vtt" srclang="es-mx" ➥label="Español - México"></video>
Without the label attribute, Internet Explorer gives track elements unhelpful default
titles, as we saw in Figure 3. When included, Internet Explorer will instead use the
value of the label attribute in the caption selection menu (Figure 10.5).
Jump Start HTML5100

Figure 10.5. When tracks have a label attribute, the label value becomes the name of the caption option. Video still
from "Sita Sings the Blues" by Nina Paley (sitasingstheblues.com)
Safari handles labels a bit differently. Each label in Safari includes the label and
the language in its captions and subtitles menu. To date, neither Firefox, Chrome,
nor Opera make multiple tracks available to the user.
Figure 10.6. Safari includes both the label and the language.
When selecting labels for your tracks, keep the following in mind:
101Mutimedia: The track Element

■ Avoid duplicating labels. It's confusing for the user.
■ Labels should describe the content and/or purpose of the track (for example:
"English - Fully captioned").
■ Labels are not a substitute for a srclang attribute.
Creating Text Tracks With WebVTTWebVTT is the most widely-supported text format for HTML5 captioning. Both
Chrome and Internet Explorer support it, and World Wide Web consortium members
are working to standardize the syntax for all browsers. We'll show a few examples
here. For a fuller discussion of WebVTT, consult the WebVTT draft specification7.
What is WebVTT?WebVTT is a simple, structured text format used to provide metadata, subtitles, and
captions for web-based audio and video. Though technically plain text, WebVTT
files must be served with a Content-type: text/vtt response header. Sending a
response header does require adjusting your server configuration. Consult your
server documentation or your web host's support team to learn how to do this.
WebVTT files must also use UTF-8 encoding. Check the settings or preferences for
your text editor. It should use UTF-8 character encoding, and Unix/Linux line
endings. (This should actually be your default since it's also required of HTML5.)
You may also wish to adjust your server configuration to include a charset parameter
with the Content-type header. This will make the full response header Content-
type: text/vtt; charset=UTF-8. Again, consult your server documentation or
your web hosting support team.
Creating a Simple WebVTT FileThe first line of a WebVTT file must begin with the string WEBVTT. You may see ex-
amples online that start with WEBVTT FILE. The WEBVTT part is what's important
here. A blank line must separate this string from the rest of your file.
WebVTT files consist of a series of cues. Each cue is made of a time range and a
subtitle or caption. Times should use an hh:mm:ss.mls format, where hh is the
7 http://dev.w3.org/html5/webvtt
Jump Start HTML5102

number of hours, mm is minutes, ss is seconds, and mls are the number of milli-
seconds. For a cue that should appear on screen at 1 hour, 33 minutes, and 58.3
seconds, you'd use 01:33:58.300.
You may leave off a leading zero for hours, but only for hours. This means our
previous cue could also be written as 1:33:58.300. Minutes and seconds, however,
must be expressed using two digits. Milliseconds must use three, zero padding if
necessary.
Start and end times for each cue must be separated by, -->. If, for example, your
cue should start 30 seconds into your media file, and end 45.4 seconds into it, you'd
note that like so.
00:00:30.000 --> 00:00:45.400
Every time range is then followed by the text that makes up the cue. The simplest
cue is plain text, and cues can break across multiple lines, as shown below. (Dialogue
from the movie "Sita Sings the Blues," sitasingstheblues.com).
WEBVTT
0:06:57.200 --> 0:07:01.000 [Music]
0:07:02.500 --> 0:07:08.000 When? I don't remember what year. There's no year. How do you know there's a year for that?
0:07:08.500 --> 0:07:10.000 I think they say the 14th century.
0:07:11.500 --> 0:07:13.000 The 14th century was recently. I know but ...
0:07:13.500 --> 0:07:16.500 That's when the Moguls were ruling in IndiaThe 11th then
0:07:17.500 --> 0:07:22.000 It's definitely B.C. It's B.C. for sure.And I think it's Ayodhya.
103Mutimedia: The track Element

Notice the blank lines between each cue? They're required. This is how the browser
determines where one cue ends and the next begins.
WebVTT Cue SpansWebVTT supports a set of HTML5-like tags known as cue spans that offer simple
formatting for subtitles and captions.
■ c or cue class span
■ i or italics span
■ b or bold span
■ u or underline span
■ ruby and rt or ruby and ruby text spans
■ v or voice cue span
■ lang or language cue tag
Much like HTML tags, each cue span start tag begins with a < and ends with >.
Ending tags begin with </ and end with >. Let's take our dialogue from above and
add some voice cue span tags.
WEBVTT
0:06:57.200 --> 0:07:01.000 <i.music>[Music]</i>
0:07:02.500 --> 0:07:08.000 <v Man1>When? I don't remember what year. There's no year. How do you know there's a year for that?</v>
0:07:08.500 --> 0:07:10.000 <v Woman>I think they say the 14th century.</v>
0:07:11.500 --> 0:07:13.000 <v Man1>The 14th century was recently</v><v Woman>I know but ...</v>
0:07:13.500 --> 0:07:16.500
Jump Start HTML5104

<v Man1>-That's when the Moguls were ruling in India</v><v Woman>- The 11th then</v>
0:07:17.500 --> 0:07:22.000 <v Man2>It's definitely B.C. It's B.C. for sure. And I think it's Ayodhya.</v>
Here, each character is denoted by a <v> tag. The name of each character—here
Man1, Woman, and Man2—are also part of the tag. It's an attribute of sorts. We've
also added an italic cue span to our first cue.
Validate Your WebVTT
Poorly-written WebVTT will keep captions and subtitles from working. Validate
your WebVTT syntax using Anne Van Kesteren's Live WebVTT Validator8.
Voice cue span tags don't change the appearance of each subtitle by themselves.
But they do add semantic data and become hooks for CSS, as we'll see in the next
section.
8 http://quuz.org/webvtt/
105Mutimedia: The track Element

Styling Subtitles and Captions with the ::cuePseudo-element
Figure 10.7. Un-styled captions in Internet Explorer 11. Video still from "Sita Sings the Blues" by Nina Paley
(sitasingstheblues.com)
Captions and subtitles are displayed in most browsers as white, sans-serif text. In-
ternet Explorer (Figure 10.7) adds a text shadow for readability. Chrome, Safari, and
Opera use a black background. They're always placed at the bottom of the video,
and centered on screen.
Though WebVTT offers a syntax for caption alignment and placement, browser
vendors haven't yet implemented it. For now, we have limited control over how
native captions look and where they are placed on screen.
We can, however, adjust the appearance of captions and subtitles with CSS and the
::cue pseudo-element (currently only supported in Chrome, Safari 7, and Opera
16+).
Not all CSS properties can be used to style WebVTT captions and subtitles. Only a
subset of properties are supported, largely related to text and color.
■ color
Jump Start HTML5106

■ opacity
■ visibility
■ text-decoration
■ text-outline
■ text-shadow
■ background properties such as background-color
■ outline properties such as outline-color
■ font properties such as font-family, but also line-height and white-space
Change Caption Colors With Caution!
Ensure that your color selections create enough contrast by using a contrast
ratio calculator9.
Let's look at an example of styling the ::cue pseudo-element. Here ::cue is our
selector, and we're using the font short hand property to make our caption text
bold.
::cue { font: bold 18px / 1.5 sans-serif;}
You can see the effect in Figure 10.8.
9 http://leaverou.github.io/contrast-ratio/
107Mutimedia: The track Element

Figure 10.8. Applying bold text styling to caption text. Image from "Sita Sings the Blues" sitasingstheblues.com
That's not all we can do, however. The ::cue pseudo-element also resembles a
function, and accepts a single argument. This argument must be one or more CSS
selectors, such as a class name or element. Recall the markup we used in our snippet
of dialogue from above.
0:07:11.500 --> 0:07:13.000 <v Man1>The 14th century was recently</v><v Woman>I know but ...</v>
We can use these tags with ::cue to create more specific CSS selectors. For example,
we may want to use different colored text for each character.
::cue(v[voice=Man1]) { color:#9f0; background: rgba(0,0,0,.8);}
::cue(v[voice=Woman]) {
Jump Start HTML5108

color:#ece; background: rgba(0,0,0,.8);}
Here we've combined an element selector (v) and an attribute selector (voice) to
assign each character a different color (Figure 10.9).
Figure 10.9. Caption text in which each character's lines are in a different color, as shown in Chrome 30
Perhaps we want to visually convey the character's volume or tone. We might add
a class using dot syntax as shown below.
0:07:11.500 --> 0:07:13.000 <v.softly Man1>The 14th century was recently</v><v Woman>I know but ...</v>
Then in our CSS, we would pass the class name as our argument to ::cue.
109Mutimedia: The track Element

::cue(.softly) { font-size: .9em;}
We've just scratched the surface of what you can do with track and WebVTT here.
HTML5Rocks has an excellent tutorial10 on the basics of both, as well as some neat
tricks achievable with the TextTrack scripting API.
What We've LearnedIn this chapter, we looked at how to increase the accessibility and findability of our
media files. In our next chapter, we'll take a look combining markup and JavaScript
to create a media player.
10 http://www.html5rocks.com/en/tutorials/track/basics/
Jump Start HTML5110

Chapter11Multimedia: Scripting Media PlayersNow that you know how to add video and audio elements using markup, let's add
some DOM scripting. In this chapter, we'll look at customizing the look and feel of
your audio or video element with HTML elements, CSS, and scripting.
If you're not familiar with DOM scripting—better known as JavaScript—don't worry.
We'll go easy in this chapter. But if you'd like to learn more (and you should) try
SitePoint's Jump Start JavaScript1. The World Wide Web Consortium's Web Platform
Docs also has some good tutorials2 to get you started.
Every HTML element has a DOM scripting interface. An interface is a group of at-
tributes, constants, events, and methods that are available to a scripting language.
Some elements, like p have simple interfaces. Not many properties apply to the p
element. Others like audio and video have a robust interface that allow us to interact
with and control every state of the element.
As we saw in earlier chapters, audio and video have a lot of attributes in common.
This is also true for their scripting interfaces. In this chapter, we'll focus on creating
1 http://www.sitepoint.com/store/jump-start-javascript/2 http://docs.webplatform.org/wiki/javascript/tutorials

a video player. However, most of what we'll discuss also holds true for audio. Dif-
ferences and exceptions are noted.
Event-Driven DOM Scripting: AnIntroduction
To create our player, we'll need use a technique known as event-driven programming.
The audio and video elements fire events during media loading and playback. We
can use DOM scripting to listen for these events, and take an action when one occurs.
It's a bit like an actor listening off-stage for his cue to walk on stage, but in code
form.
Both elements fire events for all sorts of things. For this player, however, we'll only
talk about three:
■ durationchange: fired when the browser has downloaded enough of the file to
determine the duration of our media file
■ timeupdate: fired whenever the media position is updated
■ volumechange: fired whenever the volume changes
There are two ways that we can listen for an event: We can use the element's event
handler attributes or we can use the addEventListener() DOM method. Event
handler attributes are basically the event names, prefixed with on ― onduration-
change, ontimeupdate, and onclick, for example. Most HTML5 events have these
attributes, and it's perfectly acceptable to use them, e.g.
object.onclick = function_to_invoke;
We're going to use addEventListener() in this chapter, however. Using addEvent-
Listener() gives us more flexibility. With event handler attributes, we can only
invoke one function per event. With addEventListener(), we can invoke several
functions at once. The basic syntax is as follows:
object.addEventListener('event_name', function_to_invoke);
Jump Start HTML5112

When an event fires, an event object will be passed to the listener or callback
function as its argument. An event object is a container for passing data. If we'd like
to use that data within our callback function, we need to make sure that our callback
function has a defined parameter. To build on the generic example above, our
function_to_invoke would resemble the sample below.
function function_to_invoke(event){ // function body that acts on our event}
Each event object contains several properties, and we can retrieve each property
using dot syntax. The basic form is eventobject.property where eventobject is
the name of our function parameter. We'll be most concerned with the target of
the event object in this chapter, so we'll use event.target in almost all of our
functions. The target property is a reference to the object on which the event was
fired.
target is also an object in its own right. It contains properties such as id that are
common to all HTML elements. But it also contains properties that are specific to
the object type: duration for video objects, or value for form controls. It is a tough
concept to wrap your brain around at first, so it may take you a few read-throughs
to grasp fully.
Step 1: Creating Our MarkupThere are two ways to create a media player using DOM scripting: completely with
JavaScript (and the document.createElement() method) or by scripting markup.
We're going to choose the latter. Let's build our markup:
<!DOCTYPE html><html> <head> <meta charset="utf-8"> <title> Scripting an audio and video player </title> <link rel="stylesheet" type="text/css" href="video.css"> </head> <body> <div id="video_wrapper">
113Multimedia: Scripting Media Players

<video preload="metadata"> <source src="./video_file.mp4" type="video/mp4"> <source src="./video_file.webm" type="video/webm"> </video> <div id="video_time"> <progress value="0" id="playback"></progress> <span id="elapsed"></span> <span id="duration"></span> </div> <div id="video_seek"> <label for="seek">Seek</label> <input type="range" id="seek" title="seek" ➥min="0" value="0" max="0"> </div> <div id="video_controls"> <button type="button" id="play">Play</button> <button type="button" id="pause" class="hidden"> Pause </button> <label for="volume">Volume</label> <input type="range" id="volume" title="volume" ➥min="0" max="1" step="0.1" value="1"> </div> </div> <script type="text/javascript" src="video.js"></script> </body></html>
Here, we're using range input types for our volume and seek controls. It's a new
form control type in HTML5. In older browsers, range inputs default to text fields.
We've also added a preload attribute and set its value to metadata. As you may
remember from earlier in this book, the preload attribute, when set to metadata
prompts the browser to download just enough to determine the duration and dimen-
sions (in the case of video). Your page will resemble Figure 11.1.
Jump Start HTML5114

Figure 11.1. What your video player should look like (with minimal styling) as shown in Opera 17
IE9 and Older Versions of Firefox
Internet Explorer 9 and Firefox 3.5 - 22 do not support input type="range".
You'll need to use a JavaScript alternative such as jQuery UI Slider3 or fd-slider4
for those browsers.
Step 2: Retrieving Our Video ObjectBefore we can do any more, we'll need to create a video object for our script to act
on. We'll use the video element from our markup, and retrieve it using the docu-
ment.querySelector() method. This method, part of the Selectors API5, will return
the first object in the document that matches the selector. It accepts a CSS selector
as an argument—in this case, the video element selector.
var video = document.querySelector('video');
3 http://jqueryui.com/slider/4 https://github.com/freqdec/fd-slider5 http://www.w3.org/TR/selectors-api/
115Multimedia: Scripting Media Players

If your video element has an id attribute, you could also use the document.getEle-
mentById() method, as shown below.
var video = document.getElementById('my_video');
Either of these will return an object of the type HTMLVideoElement. If this was an
audio element, our object would be an HTMLAudioElement object. Both HTMLVideoEle-
ment and HTMLAudioElement interfaces with defined properties that we can read
and write using DOM scripting. Some properties, such as controls have correspond-
ing HTML attributes. Others like volume are only available through the scripting
interface.
Through the rest of our chapter, we'll add event listeners to this object (and other
objects), then read and modify its properties using DOM scripting.
Step 2: Playing and Pausing VideoMost of what you'll ever want to do with a player is, well, play a video file. You
may also want to pause it to take a phone call, or hide your goofing off from your
boss. The HTMLVideoElement object has two, self-explanatory methods for these
tasks: play() and pause(). Any time the play() method is called, playback will
begin or resume. When the pause() method is invoked, playback will pause.
We'll make sure these methods are invoked at the user's request. Play and pause
buttons are already part of our markup, so now we just need to add an event
listener to each. First, let's reference our buttons as variables:
var play = document.getElementById('play');var pause = document.getElementById('pause');
Since these are buttons, they'll most likely be clicked on. So let's add click event
listeners to both.
play.addEventListener('click', clickhandler);pause.addEventListener('click', clickhandler);
Next, we'll need to define our clickhandler function. Because these buttons will
perform similar actions, we can use the same function for both. We'll invoke one
function or the other based on the value of the event.target.id property.
Jump Start HTML5116

function clickhandler(event){ var id = event.target.id;
if( id == 'play' ){ video.play(); } if( id == 'pause' ){ video.pause(); } }
Step 3: Determining the File's DurationMedia objects have a duration property that's only available through the scripting
interface. This property becomes defined once the browser has downloaded the
file's metadata.
When the browser can determine the running time of the media file, it fires a dura-
tionchange event on the audio or video object. We can listen for this event and use
it to update our duration display. Our markup also has a progress bar and a range
control for seeking. In order for those controls to work correctly, we'll need to set
the max attribute for those controls to the value of our duration property.
First let's look at our updateduration function:
function updateduration(event){ var durationdisplay = document.getElementById('duration'), elapseddisplay = document.getElementById('elapsed');
durationdisplay.innerHTML = event.target.duration; elapseddisplay.innerHTML = event.target.currentTime;}
In this function, we have retrieved the span#duration and span#elapsed elements.
Then we're updating the text between the <span> tags with the values of duration
and currentTime of our video object.
We'll also define two more functions, one that updates the value of the max attribute
for the progress bar, and another that updates the value of max for the seek control.
If we didn't set the max values, our progress bar wouldn't accurately indicate how
117Multimedia: Scripting Media Players

much of the video has elapsed, nor would our range control allow us to scrub forward
or backward.
var seek = document.getElementById('seek'), playback = document.getElementById('playback');
function updateseekmax(event){ if( event.target.duration ){ seek.max = event.target.duration; }}
function updateplaybackmax(event){ if( event.target.duration ){ playback.max = event.target.duration; }}
Now let's add these functions to our video object as durationchange event listeners.
video.addEventListener('durationchange', updateduration);video.addEventListener('durationchange', updateseekmax);video.addEventListener('durationchange', updateplaybackmax);
As our document loads and the durationchage event is fired, these three functions
will be called.
Step 4: Indicating Time ElapsedOnce our media file begins playback, we'll want to indicate how much time has
elapsed. To do this, we'll need to listen for the timechange event, and in our callback
function, read the currentTime property of our video object.
timechange is an event fired periodically—every 15 to 250 milliseconds—during
media playback. When fired, we'll check the value of the currentTime property and
update the text in our elapsed display. This currentTime property returns the current
playback position of the media file in seconds. Let's set up our callback function.
Jump Start HTML5118

function timeupdatehandler(event){ var elapsed = document.getElementById('elapsed'); elapsed.innerHTML = event.target.currentTime;}
Then we can add an event listener to the video object.
video.addEventListener('timechange', timeupdatehandler);
currentTime is what's known as a getter/setter property. We can use it to get the
current point in the media timeline. But we can also use it to move between points
in the media timeline. Using video.currentTime = 0, for example, resets the current
playback point to the beginning. This is the secret to creating a custom seek bar.
Step 5: Seeking Using a range Input TypeRange input types work by having a minimum value and a maximum value (set
using min and max attributes). Positions along the control correspond to values
between the minimum and maximum values of the range—in this case 0, and the
media file's total duration in seconds.
All input elements, including range, fire change events when a user changes the
value of the control. When the event object is passed to our handler, we can read
the range control's current value attribute, and update the value of video.current-
Time. To keep our progress bar in sync, we'll update its value as well.
Let's look at our callback function and event listener:
function seekhandler(event){ video.currentTime = event.target.value; playback.value = event.target.value}
seek.addEventListener('change', seekhandler);
When the user adjusts the seek control, our video will advance or reverse accord-
ingly.
119Multimedia: Scripting Media Players

Figure 11.2. Advancing the video using our seek control. Video image from "Sita Sings the Blues" by Nina Paley
(sitasingstheblues.com)
Step 6: Adjusting VolumeOur volume control works similarly to the seek control.
HTML media objects have a volume attribute that's available through the scripting
interface. Its lower boundary is 0.0, and its upper boundary is 1.0. Acceptable values
fall somewhere in between. All values are relative to the intrinsic volume of the
media file in question.
Our volume range control has a min value of 0 and a max values of 1 to correspond
to the upper and lower boundaries of the volume property. Since these values are
less than or equal to one, we need to add step="0.1" to our tag so that values incre-
ment appropriately.
As with our seek control, when the user changes the volume control, the browser
will fire a change event. We can then read its event.target.value property and
update the video objects's volume property with that value. In the code below, we've
defined our callback function, and adding an event listener to our volume control.
Jump Start HTML5120

var volume = document.getElementById('volume');
function volumehandler(event){ video.volume = event.target.value; }
volume.addEventListener('change', volumehandler);
From here, you can style your player as you'd like with CSS. I'll leave that to you.
Hinting at Bandwidth Consumption byChanging the Value of preload
In Chapter 7, we mentioned that the preload attribute provides hints to the browser
about how much of our media should be downloaded at a time. Using pre-
load="none" keeps the browser from downloading any portion of the file, but once
the user initiates playback, the browser could aggressively download the media.
Using preload="metadata" is a hint to the browser that it should behave as though
bandwidth were at a premium.
If bandwidth conservation is your goal, the combination of preload="none" and
preload="metadata" is the way to go. To do that, however, we'll need to use
scripting to change the value once the user initiates playback. Let's update our
clickhandler function from above.
function clickhandler(event){ var id = event.target.id;
if( id === 'play' ){ video.play(); video.preload = 'metadata'; } if( id === 'pause' ){ video.pause(); } }
When the user clicks Play, this function will also change the value of preload
alerting the browser that it should throttle its download. Remember, however, that
these are hints; browser behavior isn't guaranteed.
121Multimedia: Scripting Media Players

Wrapping UpIn this book we've covered media encoding and HTML5 markup. We've learned
how to make our media accessible. And we've learned the basics of building a
player using the multimedia scripting APIs. There's more than what we've covered
here, however.
Though dense, I recommend reading the documentation for the video element6 from
HTML: The Living Standard. It's maintained by the WHATWG and geared towards
web developers rather than browser vendors.
Advertising company LongTail maintains a The State Of HTML5 Video7 page that
tracks current browser support for particular multimedia features.
Mozilla.org also provides a guide to using HTML5 audio and video8 that talks a bit
more about things we haven't covered, like error handling, and specifying a playback
range. Also see Dev.Opera's Introduction to HTML5 video9 for more tips and tricks
on scripting a video player.
You're now equipped with what you need to know about HTML5 audio and video.
Happy coding!
6 http://developers.whatwg.org/the-video-element.html#the-video-element7 http://www.longtailvideo.com/html5/8 https://developer.mozilla.org/en-US/docs/Web/Guide/HTML/Using_HTML5_audio_and_video9 http://dev.opera.com/articles/view/introduction-html5-video/
Jump Start HTML5122

JUMP STARTHTML5:
CANVAS &SVG
BY KERRY BUTTERS


Chapter12Canvas & SVG: An Introduction to
CanvasAs the Web has evolved and matured, so too has the language used to display web
pages effectively. The previous version of HTML, v4.01 has many elements that are
now obsolete.
Modern internet users are sophisticated and demanding, and this means they expect
web pages to appear in a certain way and to load quickly. HTML5 seeks to address
what was lacking in earlier versions of HTML to better handle graphics and meet
those expectations.
What Can Canvas Be Used For?Canvas can be used to draw shapes, such as rectangles, squares and circles, or to
embed images or videos in an HTML5 document. You can use multiple instances
of it in one document, or just one, depending on your needs.
The basic canvas element looks like this:

<canvas id="myCanvas" width="300" height="150"></canvas>
At this point, it's worth noting that the HTML5 canvas element is the DOM (Docu-
ment Object Model) node that's embedded in the page. The context is then created,
which is an object that you use in order to render graphics within the container. If
you create multiple canvases, you'll need to create canvas elements for each context
and name them appropriately so that the browser understands to which object you're
referring.
The canvas element is superficially similar to the img element. Both have a height
and width, and display in a rectangular block on the page. However, img normally
loads a pre-prepared graphic, such as a photograph. canvas is a programmable image;
you use JavaScript drawing methods to directly manipulate the pixels. The techno-
logy is fast and permits you to create sophisticated animations and games. Overall,
canvas is often compared to technologies such as Flash and Silverlight.
Check out this animated graphic1 for a good example of what you can do using
canvas. You should also check out Canvas Demos2 for some great working examples,
including games and apps that have been created using canvas.
Before We Get StartedSome points to think about before we begin playing around with canvas:
■ It's usually best to give each canvas a unique id attribute so your scripts can
reference it directly. No other elements on that page should use the same ID.
■ When no styling is applied, the container or the canvas element will be transpar-
ent, with no border, so it'll appear as a see-through, rectangular box. The default
width is 300 pixels and the default height is 150 pixels.
■ In an ideal world, everyone would use the latest browsers. But it isn't, and they
don't. This means it's usually necessary to tell the browser how to behave when
canvas is not supported.
1 http://raksy.dyndns.org/torus.html2 http://www.canvasdemos.com/
Jump Start HTML5124

■ If you're used to working with the img element then you'll know that it doesn't
require the closing </img> tag. canvas, on the other hand, does require closing,
so you should always include </canvas> at the end of the container code.
It's also worth mentioning at this point that canvas uses coordinates, paths, and
gradients. These can look a little daunting when you first come across them, and
often have would-be developers running for the hills screaming "MATH!" But there's
little need to worry—you'll soon get the hang of it.
Canvas Looks Complex, Why Not Use Flash?I've come across a lot of questions posted on various forums that all say much the
same thing: "Canvas looks far too complicated for creating animations—why
shouldn't I just stick to using Flash since I know it already?"
Well, it's true that Flash enables you to create animations using professional tools,
which don't necessarily require coding skills. However, canvas is superior to Flash
in other ways, including:
■ good compatibility on desktop and mobile devices
■ it requires no plugins or dependencies outside of the browser
■ it's free to use
■ once you've learned to use it, canvas can create impressive animations using
minimal code
What About WebGL?WebGL enables 3D graphics to be rendered within the browser window, and for
those graphics to be manipulated using JavaScript. If you're interested in using
canvas then it's likely you'll be interested in investigating WebGL, too, at some
point; the idea that you can create 3D graphics without plugins is a very attractive
one. It's already supported3 by most browsers, too. That said, we won't be covering
WebGL in this book.
3 http://caniuse.com/webgl
125Canvas & SVG: An Introduction to Canvas


Chapter13Canvas & SVG: Canvas BasicsFirst of all, let's look at how to create a canvas document. As noted earlier in this
book, the canvas element itself looks like this:
<canvas id="MyCanvas" width="300" height="150"></canvas>
HTML5 Canvas TemplateLet's start with a basic template that we can use to begin working with. We'll add
the canvas element to the page and a small self-executing script that gets the context:
<html> <head> <title>Getting started with Canvas</title> <style type="text/css"> canvas { border: 1px solid black; } </style> </head> <body> <canvas id="MyCanvas" width="300" height="150"></canvas> <script>

(function() { var canvas = document.getElementById('MyCanvas'); if (canvas.getContext){ var ctx = canvas.getContext('2d'); } } </script> </body></html>
There are two essential attributes that canvas has: width and height. If the attributes
are not specified, then the default of 300px wide by 150px high will be used.
The getElementById function simply finds the canvas element in the DOM, based
on the ID we've assigned the canvas, which, in this case, is MyCanvas. The line var
ctx = canvas.getContext('2d'); is the 2D context method, which returns an
object that exposes the API for the drawing methods we'll use.
Canvas Element Styling
You can style the canvas element just as you would any other image, using bor-
ders, colors, backgrounds, and so on. However, the styling will not affect the ac-
tual drawing on the canvas. A canvas without any styling will simply appear as
a transparent area.
Drawing a Simple Shape Onto the CanvasLet's have a look at how we can draw some simple shapes. All drawing must be
done in our JavaScript function, after the line var ctx = canvas.getCon-
text('2d');. Let's draw a rectangle:
ctx.fillStyle="#0000FF";ctx.fillRect(0,0,300,150);
This draws a blue rectangle that fills the canvas area. The fillRect method requires
the top-left x and y coordinates of the rectangle to be drawn, followed by its width
and height. The code above creates a 300x150px rectangle that is positioned at with
its top-left corner at coordinate 0,0 and filled with the current fillStyle, which
Jump Start HTML5128

in this case is a solid blue (#0000FF)—see Figure 13.1. fillStyle can be a color,
gradient, or pattern.
Figure 13.1. Our blue rectangle
The canvas 2D API provides methods for drawing several basic shapes, including:
■ Rectangles
■ Arcs
■ Paths
■ Text
■ Images
W specified the size of the canvas as being 300x150px. If we reduce the rectangle's
size, then you'll see that you have a rectangle within the canvas. For example, if we
modify the code as follows:
129Canvas & SVG: Canvas Basics

ctx.fillStyle="#0000FF";ctx.fillRect(0,0,150,75);
Figure 13.2. A resized rectangle
The canvas itself remains as a transparent box, as you can see. As we've included
a black border around the canvas you can see its area. Without the border you'd see
nothing but the blue box, but the canvas would still be there.
Remember that the canvas width and height attributes determine the dimensions
of the pixel coordinate system. If you use CSS to specify a different width or height,
the canvas image will be squashed or stretched accordingly. For example, if we
apply a width of 600px and height of 300px to the canvas in CSS, each canvas 'pixel'
would be twice the size of a normal pixel.
Canvas Coordinates and PathsCanvas uses a two-dimensional coordinates grid. The top-left of the canvas has a
coordinate of (0,0). The bottom-right will have a positive x and y coordinate accord-
ing to the size of the element. In the example above, we used a canvas size of
300x150px, so the bottom-right pixel is at (299,149), because coordinates are zero-
based.
Lines are drawn on the canvas using paths. You create paths by using the moveTo()
and lineTo() methods, in conjunction with one of the ink methods, stroke() or
Jump Start HTML5130

fill(). moveTo() and lineTo() define the start and end points of the line to be
drawn. stroke() draws a shape by "stroking" its outline, while fill() draws a
solid shape by filling in the content area of a path.
So, to draw a simple white line through the rectangle we created above:
ctx.strokeStyle = "#FFFFFF";ctx.beginPath();ctx.moveTo(0,0);ctx.lineTo(300,150);ctx.stroke();
The beginPath method erases any outstanding path drawing operations in prepar-
ation for a new path. The stroke()method physically draws the path you've defined.
In this case, it's a single line.
Drawing CirclesNow let's look at how we'd draw a circle. The simplest way to do this is to use arc
to effectively create a circular path, which can then be used with ink methods, such
as stroke() or fill(), like this:
ctx.beginPath();ctx.arc(95,50,40,0,2*Math.PI);ctx.stroke();
Here we're using the arc method (which can still be part of a path). The parameters
specify the x and y coordinates of the arc's center, the arc's radius, the start angle,
and end angle (in radians1). Therefore, we've created an arc centered on coordinates
95,50, with a radius of 40 pixels, with a start angle of 0 and an end angle of 2*PI
(or 360 degrees). We've used the stroke() method to draw the path, which gives
us a circle, as shown in Figure 13.3:
1 http://en.wikipedia.org/wiki/Radian
131Canvas & SVG: Canvas Basics

Figure 13.3. Drawing a circle
If you added the fill() method, you would end up with a circle that is filled in
with the specified color, black by default, as shown in Figure 13.4.
Figure 13.4. A filled circle
Drawing TextYou can draw text onto a canvas using these methods:
■ font—defines the font properties
■ fillText(text,x,y)—draws text on the canvas
■ strokeText(text,x,y)—draws the outline of text on the canvas
Here's an example:
ctx.font = "25px Arial";ctx.fillText("HTML5 Canvas Rocks!",10,50);
This will draw the words "HTML5 Canvas Rocks!" using block text, using the font
Ariel at 25 pixel size, at the coordinates (10,50), as shown in Figure 13.5.
Jump Start HTML5132

Figure 13.5. Writing text to the canvas
If you were to replace fillText() now with strokeText(), you would instead have
outlined text, as shown in Figure 13.6.
Figure 13.6. Stroked text
You can also add text effects and colors:
ctx.fillStyle= '#0000FF';ctx.font="Italic 25px Arial";ctx.fillText("HTML5 Canvas Rocks!",10,50);
This will italicize the text and make it blue, as shown in Figure 13.7.
133Canvas & SVG: Canvas Basics

Figure 13.7. Blue italic text
Drawing a TriangleLet's draw a triangle. As there's no built-in triangle shape for us to draw with, we'll
need to construct it using paths. To create a basic triangle we can use the following
code:
ctx.beginPath();ctx.moveTo(25,25);ctx.lineTo(105,25);ctx.lineTo(25,105);ctx.fill();
This should appear as shown in Figure 13.8:
Figure 13.8. A filled triangle
To create a stroked triangle:
ctx.beginPath();ctx.moveTo(125,125);ctx.lineTo(125,45);
Jump Start HTML5134

ctx.lineTo(45,125);ctx.closePath();ctx.stroke();
Note the closePath() method; this closes the path by drawing a straight line from
the current point to the initial point. This will appear as shown in Figure 13.9:
Figure 13.9. A stroked triangle
So that's how to draw basic shapes in HTML5 using the canvas element and
JavaScript. Now that you've learned the basics, go and practice with different styles,
fonts, and shapes to get further accustomed to using the JavaScript code.
Canvas SizingDepending on what you're developing using canvas, you can resize to fit the device
being used—if you're needing to fill the screen for say, a game. This can be achieved
in a number of ways:
■ coding in JavaScript
■ using CSS
■ CSS transforms using JavaScript
135Canvas & SVG: Canvas Basics

Scaling with JavaScript
var canvas = document.getElementById('canvas');canvas.width = window.innerWidth;canvas.height = window.innerHeight;
This will create a canvas which extends to the current viewport size, but you will
need to ensure the element has no margin or is affected by other items on the page.
In addition, changing the browser window size will not modify the canvas dimen-
sions.
Scaling with CSS
#canvas { position: relative; left: 0; right: 0; top: 0; bottom: 0; margin: auto; width: 100%; height: 100%;}
This changes the size of the canvas box but not the pixel dimensions; the coordinate
system remains the same.
CSS Transforms Using JavaScript
var scaleX = canvas.width / window.innerWidth; var scaleY = canvas.height / window.innerHeight; var scaleToFit = Math.min(scaleX, scaleY); canvas.style.transformOrigin = "0 0"; canvas.style.transform = "scale("+scaleToFit+")";
Again, this changes the size of the canvas box, but not the pixel dimensions.
Jump Start HTML5136

Chapter14Canvas & SVG: Handling
Non-supporting BrowsersIn this short chapter, we'll look at creating code that tells the browser how to behave
if it doesn't support canvas rendering.
Create Alternative ContentThe best way to handle the possibility that a user's browser doesn't support canvas
is to place alternative content within the <canvas> tag. This does away with confu-
sion for the end user if they can't see what's supposed to be displayed.
You can use an img tag, explanatory text, or any other HTML you think necessary
for this alternative content. For example:

<canvas id="MyCanvas" width="150" height="300"> <img src="http://yoursite.com/locationofimage.jpg" ➥alt="Browser Not Supported" /></canvas>
If the browser supports canvas, the img tag and any other content between the
<canvas> and </canvas> tags are ignored and won't appear in the document.
How useful you want to make fallback content is up to you; you can offer a download
link to the latest version of the user's browser, or you can add a framework that'll
allow you to show the content using a different technology, such as SVG or Flash.
You can also use the getContext method to check for canvas support in JavaScript,
e.g.
function supports_canvas() { return !!document.createElement('canvas').getContext;}
Alternatively, you can use the getContext method on an existing element:
var canvas = document.createElement("MyCanvas");if (!canvas.getContext || !canvas.getContext("2d")) { alert("Sorry - canvas is not supported.");}else { // start drawing var ctx = canvas.getContext('2d');}
Jump Start HTML5138

Chapter15Canvas & SVG: Canvas GradientsWith HTML5 canvas, you're not limited to block colors, but can use gradients to
fill shapes such as rectangles and circles. There are two different types of gradient
you can use:
// create a linear gradientcreateLinearGradient(x,y,x1,y1)
Figure 15.1. An example of a linear gradient

// create a radial gradientcreateRadialGradient(x,y,r,x1,y1,r1)
Figure 15.2. An example of a radial gradient
Let's start by creating a linear gradient (the canvas context, ctx, has already been
defined):
// create linear gradientvar grd = ctx.createLinearGradient(0,0,400,0);grd.addColorStop(0,"blue");grd.addColorStop(1,"yellow");
// fill with gradientctx.fillStyle = grd;ctx.fillRect(40,20,300,160);
The result is shown in Figure 15.3.
Figure 15.3. Our linear blue-yellow gradient
The first line var grd = ctx.createLinearGradient(0,0,400,0); creates a Can-
vasGradient object which defines a gradient between two sets of coordinates
Jump Start HTML5140

(x1,y1,x2,y2). These determine the size and direction of the gradient. In our example,
we use (0,0) to (400,0) which results in a horizontal gradient which is 400 pixels in
width. If our box was wider, the last color would extend accordingly.
If we required a 300px vertical gradient, we would use:
var grd = ctx.createLinearGradient(0,0,0,300);
A 45-degree diagonal gradient in a 100x100px space would be defined as:
var grd = ctx.createLinearGradient(0,0,100,100);
We can now set the color values at certain color stop points within that gradient
using the addColorStop method. It is passed two values:
■ a stop value between 0 (the left-most end of the linear gradient) and 1 (the right-
most end of the gradient)
■ a color
We have used "blue" at stop value 0—or coordinate (0,0)—and "yellow" at stop
value 1—or coordinate (400,0). The browser uses the values to define a smooth
color gradient from blue to yellow.
You can add any number of gradient stops. For example, a "red" color stop at stop
value 0.5 would create a smooth gradient from blue, to red at the mid-point (200px),
to yellow at the end.
Radial GradientsNow let's look at a radial gradient:
// create radial gradientvar grd = ctx.createRadialGradient(150,100,10,180,120,200);grd.addColorStop(0,"blue");grd.addColorStop(1,"yellow");
141Canvas & SVG: Canvas Gradients

// fill with gradientctx.fillStyle = grd;ctx.fillRect(0,0,300,150);
The createRadialGradient parameters are:
■ the x and y coordinates of the starting circle
■ the radius of the starting circle
■ the x and y coordinates of the ending circle
■ the radius of the ending circle
Our code produces the output seen in Figure 15.4. You can experiment with different
values to create interesting effects.
Figure 15.4. A radial gradient
Playing with the Color StopsLet's modify the linear gradient code we created above and go a little crazy with
adding some color stops:
var grd = ctx.createLinearGradient(35,25,25,190,105,50);grd.addColorStop(0,"red");grd.addColorStop(0.25,"blue");grd.addColorStop(0.3,"yellow");grd.addColorStop(0.35,"magenta");grd.addColorStop(0.4,"green");grd.addColorStop(0.45,"pink");grd.addColorStop(0.5,"gray");grd.addColorStop(1,"white");
Jump Start HTML5142

// Fill with gradientctx.fillStyle=grd;ctx.fillRect(20,20,400,400);
The results are shown in Figure 15.5.
Figure 15.5. A crazy linear gradient
To create a radial gradient using the same colors you could modify one line as fol-
lows:
var grd=ctx.createRadialGradient(35,25,25,190,105,50);
which would display a pretty groovy effect, as shown in Figure 15.6:
Figure 15.6. A crazy radial fill
143Canvas & SVG: Canvas Gradients


Chapter16Canvas & SVG: Canvas Images and
VideosYou can use bitmap images and video with canvas. In this chapter, we’ll look at
how you can copy images and videos onto your canvas.
ImagesYou can copy a pre-defined bitmap image to your canvas using the drawImage()
method. The same method can also be used to draw part of an image or alter its
size. You can position the image on the canvas much in the same way as you would
draw a line:
var c = document.getElementById("MyCanvas");var ctx=c.getContext("2d");var img = document.getElementById("yourimage");ctx.drawImage(img,10,10);
As you can see here, the image (which is on our page with the ID "yourimage") is
positioned at the x,y coordinates passed in the method: ctx.drawImage(img,x,y).

You can specify the size of the image by adding width and height, like this:
ctx.drawImage(img,x,y,width,height);
To crop the image and position the cropped part only:
ctx.drawImage(img,sx,sy,swidth,sheight,x,y,width,height);
In the code above, the sx and sy coordinates dictate where to begin cropping the
image, and swidth and sheight dictate the dimensions of the image.
Using the image() ObjectThe above example assumes that the image is on the page already. You may find it
preferable to load the image dynamically using JavaScript.
// canvas set-upvar canvas = document.getElementById('MyCanvas');var ctx = canvas.getContext('2d');
// load image from a URLvar img = new Image();img.src = "http://mydomain.com/image1.png";
// is image loaded?if (img.complete) addToCanvas();else img.onload = addToCanvas;
// add image to canvasfunction addToCanvas() { ctx.drawImage(img,10,10);}
VideoThe content of an HTML5 video element can also be copied to a canvas. You may
want to do this so you can overlay additional text or apply processing effects.
Jump Start HTML5146

var video = document.createElement("video");video.src = "yourvideo.mp4";video.controls = true;
In order to then draw the video to canvas, you'll need to add a handler for the video's
onplay event, which copies the current video frame.
var canvas = document.getElementById('MyCanvas')var ctx = canvas.getContext('2d');
// set canvas dimensions to same as videovideo.onplay = function() { canvas.width = video.videoWidth; canvas.height = video.videoHeight; draw();};
// copy frame to canvasfunction draw() { if(video.paused || video.ended) return false; ctx.drawImage(video, 0, 0); setTimeout(draw, 20);}
// start video playbackvideo.play();
147Canvas & SVG: Canvas Images and Videos


Chapter17Canvas & SVG: An Introduction to SVGSVG stands for Scalable Vector Graphics. It allows you to create graphics using the
XML markup language. SVG's been around for quite some time and is supported
by the majority of browsers. Unlike Canvas, it's not intended for pixel manipulation.
It allows you to create scalable graphics and, as it's resolution independent, it's
ideal for use on projects that are likely to be used on a variety of screen resolutions
and sizes. For example, SVG is ideal for sites using Responsive Web Design (RWD).
In fact, the use of SVG in RWD is so obvious, you have to wonder why some websites
are redesigned using traditional images. SVG also displays perfectly on retina and
other high-resolution screens. As resolutions get better, it's likely they'll be more
widely used.
SVG uses an accessible DOM node-based API and is perfect for those with a good
understanding of HTML, CSS, and some JavaScript. You can style it using CSS and
make it interactive with JavaScript, and for those that aren't overly familiar with
JavaScript, there are plenty of libraries around to help.

As with any web technology, SVG is ever changing but many of its features are
available for animations, transforms, gradients, filter effects, and much more. It
works in all modern browsers—you can check compatibility at caniuse.com1.
Why Use SVG Instead of JPEG, PNG, or GIF?There are two types of graphics that can be used in computing: bitmap and vector.
Bitmaps, such as JPEG, PNG and GIF, are also known as raster graphics and are
composed of individual pixels with differing colors. Vector graphics like SVG, on
the other hand, define paths and points; they can be resized and retain their quality.
This makes them ideal for web uses such as:
■ logos
■ banners
■ signage
■ illustrations
■ line art
SVG images have a few inherent advantages over bitmap images:
■ Since SVG images are comprised of text, they are often more accessible and
search engine-friendly than bitmap images.
■ Vectors can also be placed over other objects and made translucent, so the object
below remains visible.
■ Graphics created using SVG can be edited with relative ease, and SVG can be
used in conjunction with CSS in order to style the output. This isn't something
that's currently achievable with traditional bitmap images.
■ SVG images are normally smaller in terms of file size than bitma
However, while they do have many advantages, like many things in life, vector
images are not a perfect solution for every application. For example, it's unlikely
that you'd be able to produce realistic-looking photos with vectors.
1 http://caniuse.com/svg
Jump Start HTML5150

You can embed SVG in standard HTML documents, and SVG can be created using
any text editor. However, you may prefer to use Adobe Illustrator or InkScape2 (an
open source vector graphics editor) to create your SVG images.
Now that you know what SVG is all about, let's get down to the good stuff: learning
how to use it.
Getting StartedTo get started, you can just use a bare bones HTML5 page and drop inline-SVG code
right into it. Let's start with an SVG image of a red circle:
<!DOCTYPE HTML><html><body> <h1>A red circle:</h1>
<!-- inline SVG --> <svg width="200" height="200" xmlns="http://www.w3.org/2000/svg"> <circle id="redcircle" cx="100" cy="100" r="100" fill="red" /> </svg>
</body></html>
Save the file and open it in your browser and you should see a page with a red circle
which is titled "A red circle:".
The SVG section is delimited by the svg tag, which defines dimensions of 200x200px
for the image on the page.
Try altering some of the code yourself. The circle element specifies the shape that
we want to draw with various attributes. The cx and cy attributes define the circle's
center in relation to the drawing area; the r attribute gives the circle's radius. This
means that the diameter (width) of the circle will appear as twice the value you've
set as the radius.
You can also add a border around the circle
2 http://inkscape.org/download/?lang=en
151Canvas & SVG: An Introduction to SVG

<circle id="redcircle" cx="100" cy="100" r="100" ➥stroke="black" stroke-width="1" fill="red"/>
Other ShapesAs well as a circle, it's a simple matter to create other shapes by appending appro-
priate tags within the svg block:
■ line—Creates a simple line
<line x1="25" y1="150" x2="300" y2="150" ➥stroke="#F00" stroke-width="5" />
Figure 17.1. A line
■ polyline—Defines shapes built from multiple line definitions
<polyline points="0,40 40,40 40,80 80,80 80,120 120,120 120,160"➥stroke="#F00" stroke-width="5" fill="#FFF" />
Jump Start HTML5152

Figure 17.2. A polyline
■ rect—Creates a rectangle
<rect width="300" height="100" fill="#F00" />
Figure 17.3. A rectangle
■ ellipse—Creates an ellipse
<ellipse cx="300" cy="80" rx="100" ry="50" fill="#F00"/>
153Canvas & SVG: An Introduction to SVG

Figure 17.4. Ellipse
■ polygon—Creates a polygon
<polygon points="200,10 250,190 160,210"➥stroke="#000" stroke-width="1" fill="#F00" />
Figure 17.5. A (polygon) triangle
Polygons define a series of x and y co-ordinates in the points attribute. This allows
you to create complex shapes with any number of sides.
Jump Start HTML5154

<polygon points="100,10 40,180 190,60 10,60 160,180 100,10" ➥stroke="#000" stroke-width="1" fill="pink" />
Figure 17.6. A star
■ path—Allows for the definition of arbitrary paths
The path element allows you to created drawings using special commands. These
can be upper or lowercase, which apply absolute and relative positioning accord-
ingly. It looks complex and there are many options so please refer to this SitePoint
tutorial3 for more information.
All the above shapes can be made using paths. The code below creates a segmented
circle using paths and, as you can see in Figure 17.7, this is perfect for creating pie
charts and similar graphics.
<path d="M300,200 h-150 a150,150 0 1,0 150,-150 z"➥fill="pink" stroke="red" stroke-width="3"/><path d="M275,175 v-150 a150,150 0 0,0 -150,150 z"➥fill="purple" stroke="red" stroke-width="3"/>
3 http://www.sitepoint.com/svg-path-element/
155Canvas & SVG: An Introduction to SVG

Figure 17.7. Paths
Gradients and PatternsAs with canvas, SVG enables you to paint or stroke shapes using gradients and
patterns. This is achieved by creating special gradient tags such as linearGradient
and radialGradient within a defs section of the SVG. Other elements can then
refer to these by name and reuse them on any shape.
To add a linear gradient to the circle within the svg:
<!-- define gradient --><defs> <linearGradient id="MyGradient"> <stop offset="10%" stop-color="yellow" /> <stop offset="90%" stop-color="blue" /> </linearGradient></defs>
<!-- use gradient in a circle --><circle cx="100" cy="100" r="100" fill="url(#MyGradient)" />
Now open it in your browser, you'll see that you now have a blue and yellow circle.
To make it a radial gradient, it's then just a case of using the radialGradient tag:
Jump Start HTML5156

<!-- define gradient --><defs> <radialGradient id="MyGradient"> <stop offset="10%" stop-color="yellow" /> <stop offset="90%" stop-color="blue" /> </radialGradient></defs>
<!-- use gradient in a circle --><circle cx="100" cy="100" r="100" fill="url(#MyGradient)" />
PatternsYou can also create repeating designs within a pattern tag. This defines a series of
SVG elements, which can be used to fill an area:
<svg><defs><pattern id="mypattern" x="0" y="0" width="150" height="100" ➥patternUnits="userSpaceOnUse"> <circle cx="50" cy="50" r="10" fill="red" stroke="black"/> <rect x="100" y="0" width="50" height="50" fill="cyan" stroke="red" /></pattern></defs> <ellipse fill="url(#mypattern)" stroke="black" stroke-width="1" cx="200" cy="200" rx="200" ry="200" /></svg> <!-- define pattern --><defs> <pattern id="mypattern" patternUnits="userSpaceOnUse" ➥x="0" y="0" width="50" height="50"> <circle cx="25" cy="25" r="25" fill="red" stroke="black" /> <rect x="25" y="25" width="25" height="25" ➥fill="cyan" stroke="red" /> </pattern></defs>
157Canvas & SVG: An Introduction to SVG

<!-- use pattern in a circle --><circle cx="100" cy="100" r="100" fill="url(#MyPattern)" ➥stroke-width="1" stroke="black" />
Save the code above and open it in a browser to see the results, shown in Figure 17.8.
Now you can experiment to see what other patterns you can make, using various
shapes and color gradients.
Figure 17.8. Pattern fill
Jump Start HTML5158

Chapter18Canvas & SVG: Using SVGIn modern browsers, SVG can be used anywhere where you would normally use
JPGs, GIFs or PNGs. Add to this the ability to add colors and gradients, plus the fact
that you get no loss of quality when scaled, and it's something to get excited about
for the majority of designers.
Inserting SVG Images on Your PagesThere are several ways to add SVG to your page:
■ The object tag
■ The embed tag
■ Within an iFrame
■ Using a CSS background
■ Inline SVG embedded into your HTML5 page
■ Using an img tag

Use CSS for Repeating Backgrounds
Only CSS can be used for repeating backgrounds. The other methods will just
show a single image.
Which Method Should You Use?That will depend on the project at hand but, generally, object or embed should be
used if you intend to use DOM scripting to manipulate the image in JavaScript. An
iframe can be used for the same purpose although the code becomes a little more
cumbersome. Alternatively, an inline SVG may be appropriate if you need scripting
but the image is used on a single page on your website.
If you just need a static SVG, use the img tag or a CSS background. These do not
permit the SVG to be modified on the client.
SVG MIME type
Your web server should return SVG images with the MIME type image/svg+xml.
Most servers should do this automatically, but double-check if images do not
display correctly.
Let's have a look at how you'd go about it using the object method using an SVG
file we created using an application such as Illustrator or Inkscape:
<object type="image/svg+xml" ➥width="400" height="400" data="image.svg"></object>
An embed tag is similar, but embed only became standard in HTML5. It's possible
some older browsers could ignore it, but most implement the tag:
<embed type="image/svg+xml" ➥width="400" height="400" src="image.svg"></embed>
An iframe loads the SVG much like any other web page:
Jump Start HTML5160
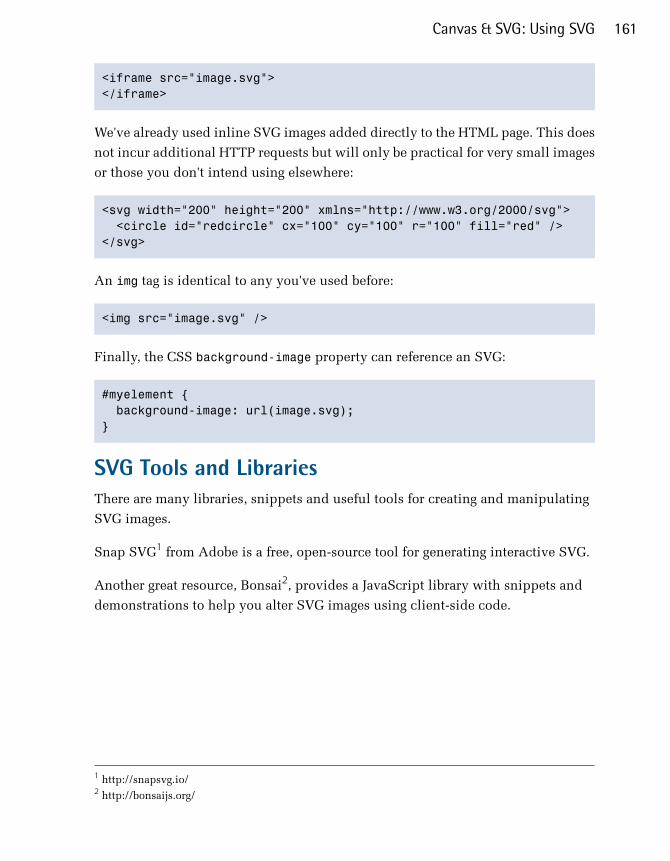
<iframe src="image.svg"></iframe>
We've already used inline SVG images added directly to the HTML page. This does
not incur additional HTTP requests but will only be practical for very small images
or those you don't intend using elsewhere:
<svg width="200" height="200" xmlns="http://www.w3.org/2000/svg"> <circle id="redcircle" cx="100" cy="100" r="100" fill="red" /></svg>
An img tag is identical to any you've used before:
<img src="image.svg" />
Finally, the CSS background-image property can reference an SVG:
#myelement { background-image: url(image.svg);}
SVG Tools and LibrariesThere are many libraries, snippets and useful tools for creating and manipulating
SVG images.
Snap SVG1 from Adobe is a free, open-source tool for generating interactive SVG.
Another great resource, Bonsai2, provides a JavaScript library with snippets and
demonstrations to help you alter SVG images using client-side code.
1 http://snapsvg.io/2 http://bonsaijs.org/
161Canvas & SVG: Using SVG


Chapter19Canvas & SVG: SVG Bézier CurvesBézier curves are used extensively in graphics software and are sometimes described
as a polynomial expression1, which is basically used to describe a curve. Sometimes,
Bézier curves are referred to simply as curves, which can be slightly confusing if
you're not familiar with all of the common (or less common) terms when it comes
to design.
A Bézier curve is constructed by control points, as shown in Figure 19.1. A quadratic
Bézier curve has one control point, whilst a cubic has two.
1 http://en.wikipedia.org/wiki/Polynomial

Quadratic Bézier Curves
Figure 19.1. A quadratic Bézier curve
Now let's look at creating this whole image in SVG. Save the following code using
your text editor and then open it up in your browser and you should see an A shape
with a curved line reaching to the line that crosses the shape:
<!DOCTYPE html><html><body><svg width="500" height="500"➥xmlns="http://www.w3.org/2000/svg" version="1.1">
<!-- lines --> <path id="lineAB" d="M 100 350 l 150 -300" stroke="gold" ➥stroke-width="10" fill="none" /> <path id="lineBC" d="M 250 50 l 150 300" stroke="gold" ➥stroke-width="10" fill="none" /> <path id="lineDE" d="M 175 200 l 150 0" stroke="purple"
Jump Start HTML5164

➥stroke-width="10" fill="none" />
<!-- quadratic bezier curve --> <path d="M 100 350 q 150 -300 300 0" stroke="black" ➥stroke-width="6" fill="none" />
<!-- mark points with a red dot --> <g stroke="red" stroke-width="5" fill="red"> <circle id="pointA" cx="100" cy="350" r="3" /> <circle id="pointB" cx="250" cy="50" r="3" /> <circle id="pointC" cx="400" cy="350" r="3" /> </g>
<!-- Add labels to each point --> <g font-size="25" font="sans-serif" fill="black" stroke="none" ➥text-anchor="middle"> <text x="100" y="350" dx="-30">A</text> <text x="250" y="50" dy="-10">B</text> <text x="400" y="350" dx="30">C</text> </g>
</svg></body></html>
The quadratic Bézier curve is defined by the path tag:
<path d="M 100 350 q 150 -300 300 0" stroke="black"➥stroke-width="6" fill="none" />
The d attribute instructs the parser to move to coordinate (100,350). The 'q' defines
two further coordinates which are relative to (100,350). The first is the control point
(150,-300)—which equates to the absolute position (450,50). The second is the
ending point of the curve at (300,0)—which equates to the absolute position
(400,350).
Alternatively, we could have used an uppercase 'Q' to use absolute, rather than rel-
ative, coordinate references.
165Canvas & SVG: SVG Bézier Curves

Cubic Bézier CurvesWhile quadratic Bézier curves have one control point, cubic Bézier curves have
two. This allows more complex shapes which can reverse direction or wrap back
on to themselves.
The following code provides three cubic Bézier examples:
<!DOCTYPE html><html><body> <svg width="1200" height="500" ➥xmlns="http://www.w3.org/2000/svg" version="1.1">
<!-- cubic bezier curves --> <path id="cubic1" d="M 100 350 c 150 -300 150 -300 300 0" ➥stroke="red" stroke-width="5" fill="none"/> <path id="cubic2" d="M 450 350 c 200 -300 100 -300 300 0" ➥stroke="red" stroke-width="5" fill="none"/> <path id="cubic3" d="M 800 350 c 100 -300 200 -300 300 0" ➥stroke="red" stroke-width="5" fill="none"/>
<!-- show control points --> <g stroke="blue" stroke-width="3" fill="blue">
<!-- left curve --> <circle cx="250" cy="50" r="3"/>
<!-- middle curve control points --> <circle cx="650" cy="50" r="3"/> <circle cx="550" cy="50" r="3"/>
<!-- right curve control points --> <circle cx="900" cy="50" r="3"/> <circle cx="1000" cy="50" r="3"/>
</g>
<!-- text --> <g font-size="30" font="sans-serif" ➥fill="red" stroke="none" text-anchor="middle">
<text x="250" y="50" dy="-10"> Both control points
Jump Start HTML5166

</text>
<text x="650" y="50" dy="-10"> CP1 </text> <text x="550" y="50" dy="-10"> CP2 </text>
<text x="900" y="50" dy="-10"> CP2 </text> <text x="1000" y="50" dy="-10"> CP1 </text>
</g>
</svg></body></html>
This will produce the output shown in Figure 19.2.
Figure 19.2. A cubic Bézier curve
Let's examine the third curve:
167Canvas & SVG: SVG Bézier Curves

<path id="cubic3" d="M 800 350 c 100 -300 200 -300 300 0"➥stroke="red" stroke-width="5" fill="none"/>
The d attribute instructs the parser to move to coordinate (800,350). The 'c' defines
three further coordinates which are relative to (800,350). The first is the start control
point (100,-300)—which equates to the absolute position (900,50). The second is
the end control point (200,-300)—which equates to the absolute position (1000,50).
The third is the ending point of the curve at (300,0)—which equates to the absolute
position (1100,350).
Alternatively, we could have used an uppercase 'C' directive to use absolute, rather
than relative, coordinate references.
There are also shorthand 'S' (absolute) and 's' (relative) directives. These accept two
coordinates; the end control point and the end point itself. The start control point
is assumed to be the same as the end control point.
These commands can be used to change the shape of cubic Bézier curves depending
on the position of the control points. Have a play about and don't just view your
results in the same browser window either, resize them, look at them on your tablet
or smartphone and marvel at how well SVG copes with resizing.
Fortunately, there are tools to help you define curve directives. SitePoint's Craig
Buckler has created Quadratic Bézier Curve2 and Cubic Bézier Curve3 tools, which
allow you to move the control points and copy/paste the resulting SVG code.
In the next chapter, we'll take a look at filters.
2 http://blogs.sitepointstatic.com/examples/tech/svg-curves/quadratic-curve.html3 http://blogs.sitepointstatic.com/examples/tech/svg-curves/cubic-curve.html
Jump Start HTML5168

Chapter20Canvas & SVG: SVG Filter EffectsYou can use filter effects in SVG. If you use any graphic design or photo manipula-
tion packages, then you're almost certain to have come across filters before. The
filters in SVG include:
■ feBlend
■ feColorMatrix
■ feComponentTransfer
■ feComposite
■ feConvolveMatrix
■ feDiffuseLighting
■ feDisplacementMap
■ feFlood
■ feGaussianBlur

■ feImage
■ feMerge
■ feMorphology
■ feOffset
■ feSpecularLighting
■ feTile
■ feTurbulence
■ feDistantLight
■ fePointLight
■ feSpotLight
If you've used image-editing software you'll probably be familiar with what filters
do. Essentially, they apply effects to an image such as bezels, blurring, soft-focus,
and so on. In essence, think of filter elements as a form of image processing for the
Web. Filter elements can be used in most modern browsers, with the exception of
Blackberry Browser. For an example of what filters can do, take a look at Microsoft's
hands on: SVG Filter Effects1.
Using Filter EffectsEspecially if you're new to using filters, it's a good idea to begin testing and experi-
menting with one filter at a time, otherwise you could end up with some pretty
weird-looking images. For a comprehensive overview and sample code on filters,
take a look at the SVG/Essentials Filters2 page on O'Reilly Commons.
Below is an example of the code used to create a circle (which you've already learned
how to create) with the feGaussianBlur filter applied. You can see the output in
Figure 20.1.
1 http://ie.microsoft.com/testdrive/graphics/hands-on-css3/hands-on_svg-filter-effects.htm2 http://commons.oreilly.com/wiki/index.php/SVG_Essentials/Filters
Jump Start HTML5170

<!DOCTYPE html><html><body> <svg xmlns="http://www.w3.org/2000/svg" version="1.1"> <defs> <filter id="f1" x="0" y="0"> <feGaussianBlur stdDeviation="14"/> </filter> </defs> <circle cx="200" cy="200" r="200" stroke="red" ➥stroke-width="5" fill="gold" filter="url(#f1)" />
</svg></body></html>
Figure 20.1. A circle with the Gaussian blur filter applied
Playing with FiltersAs you can see, you'll have to give the filter an ID so that this can later be specified
in the circle: filter="url(#f1). The parameter that's associated with this filter is
stdDeviation; this controls the amount of blurring. So, for example, if you were to
set the stdDeviation to a value of 1, then you would get such a minimal amount
of blurring as to be hardly noticeable. However, if you were to set this to, say, 200,
171Canvas & SVG: SVG Filter Effects

then it creates a blurring effect that's almost transparent. And as we've applied a
red stroke to the image (which you can't really see in the example above), this effect
fills the SVG canvas with an extremely blurred circle, as shown in Figure 20.2
Figure 20.2. A very blurry circle
If you were to apply a lower value, then the blurring wouldn't be so apparent and
would allow the stroke to be seen as an orange color with the yellow blurring into
the red, as shown in Figure 20.3.
Jump Start HTML5172

Figure 20.3. A less blurry circle
Let's try combining filter effects. We'll create a drop shadow using the feOffset
filter; this is achieved by taking the relevant SVG image or element and moving it
in the x-y plane. We'll use the feBlend and feOffset elements, which will create
a duplicate image that's slightly offset from the original, to create the effect that one
image is sitting behind the other, as shown in Figure 20.4.
<!DOCTYPE html><html><body> <svg xmlns="http://www.w3.org/2000/svg" version="1.1"> <defs> <filter id="f1" x="0" y="0" width="200%" height="200%"> <feOffset result="offOut" dx="25" dy="20" /> <feBlend in="SourceGraphic" in2="offOut" mode="normal" /> </filter> </defs> <polygon points="220,10 300,210 170,250 123,234" fill="blue" ➥stroke="purple" stroke-width="3" filter="url(#f1)" />
173Canvas & SVG: SVG Filter Effects

</svg></body></html>
Figure 20.4. Using multiple filters
Filters can help you to create excellent effects. For example, if we were to apply
feGaussianBlur to the above, then you could blur the rear image to create a kind
of 3D effect.
Filter Future
SVG filter technology is coming to CSS3 so you'll be able to apply effects to any
HTML element.
Jump Start HTML5174

Chapter21Canvas & SVG: Canvas or SVG?As we've seen, both canvas and SVG can do similar things. So how do you decide
which to use?
Firstly, let's look at how each one is defined:
■ SVG is short for Scalable Vector Graphics and is a language that's used to de-
scribe graphics in XML.
■ Canvas, on the other hand, is a way of drawing graphics on the fly using JavaS-
cript.
Now that really doesn't tell you a great deal about the differences between them
and how they can each be used, so let's look at it in a little more depth. In SVG,
drawn shapes are remembered as objects and therefore, if the attributes of that object
change, the browser can then re-render the shape automatically. However, as canvas
elements are drawn pixel-by-pixel, then any changes that are made will require the
entire scene to be redrawn.

All elements of SVG are available in the DOM, so you can easily attach JavaScript
event handlers to them. For the most part, the project will dictate which element
you use, so it's worth giving it some thought at the planning stage.
Bear in mind that SVG is fully scalable, unlike canvas, and so SVG may very well
be a better choice if you're designing a responsive site that has graphics that need
to scale.
Creation LanguagesTo create images on a canvas element you have one choice: JavaScript. Those who
understand the language will have a head start, but it's still necessary to learn the
drawing APIs. However, animating canvas images is incredibly fast; you can draw
and animate hundreds of items every second because the element is not constrained
by the number of items being shown. This makes it ideal for action games.
SVG files are XML—which is simply structured text. They can be pre-prepared in
a vector graphics package such as Illustrator or Inkscape, or you can dynamically
create them on the server using any language: Node.js, PHP, Ruby, Python, C#, Java,
BASIC, Cobol etc.
You can also create and manipulate SVG on the client using JavaScript with a famil-
iar DOM and event-handling API. It's rarely necessary to re-draw the whole image
because objects remain addressable. Unfortunately, this is far slower than moving
bitmaps on canvas. SVG may be ideal for an animated bar chart, but not necessarily
suitable for fast-moving action games.
Typical UsesIn general, SVG is ideal for:
■ static images, especially within responsive and fluid layouts
■ images which can be resized to any dimension without losing quality
■ projects which benefit from DOM methods to attach events and manipulate ob-
jects
■ projects which create images server-side
Jump Start HTML5176

■ projects where accessibility and SEO are important
Canvas is ideal for:
■ bitmap images, editing photographs or any operation which requires pixel-level
manipulation
■ images which must be created and animated on-the-fly
■ graphically-intense applications, such as games
Sometimes, there will not be an obvious best solution and either technology can be
used. Remember neither is mutually exclusive; you can use both canvas and SVG
on the same page at the same time, e.g. multiple animated canvas elements over a
static SVG background. The only limit is your imagination.
I hope you've enjoyed this book and are ready to get started with some awesome
examples of your own.
Thanks for reading, and have fun with canvas and SVG!
177Canvas & SVG: Canvas or SVG?


JUMP STARTHTML5:OFFLINE
APPLICATIONSBY TIFFANY B. BROWN


Chapter22Offline Apps: Detecting When the User
Is ConnectedPerhaps the hardest part of building an app that works offline is actually determining
when the user is offline.
In this chapter, we’ll cover the ononline and onoffline events of the window object
and the window.navigator.onLine property. We’ll also talk about their limits as
well as an alternative way to test for connectivity.
Determining Whether the User Is OnlineThe window.navigator.onLine property tells us whether or not the user is connected
to a network. It returns a Boolean true or false value:
if(navigator.onLine){ console.log('We are connected!');} else { console.log('We don't have connectivity.');}

We can use this property with other offline APIs to determine when and whether
to store data locally. Then we can sync it with a server once we have connectivity
again.
Anytime the value of navigator.onLine changes, it fires one of two events:
■ offline: when the value of navigator.onLine would be false
■ online: when the value of navigator.onLine would be true
We can listen for these events, of course, and take action when one is fired.
Listening for Changes in Connectivity StateIn Firefox, Internet Explorer 9+, and Safari, the online and offline events are fired
on the document.body object. In Chrome and Opera 15+, however, they are fired
on the window object.
The good news is that even when fired on the document.body, these online and
offline events “bubble up” to the window object. This means we can listen for
events fired there instead of setting event listeners or handlers for both.
There are two options in listening for our online and offline events. We can use
the event attributes onoffline and ononline, as shown here:
window.ononline = function(){ // Alert the user that connectivity is back. // Or sync local data with server data. }
window.onoffline = function(){ // Alert the user that connectivity was lost. // Or just silently save data locally. }
Or we can use the addEventListener method and listen for the online or offline
event:
Jump Start HTML5180

window.addEventListener('offline', offlineHandler); window.addEventListener('online', onlineHandler);
The addEventListener method requires two parameters: the event we want to listen
for, and the function to invoke ― known as a callback ― when the event occurs.
For compatibility with some older versions of Firefox (< 6.0) and Opera (< 11.6),
you will need to add a third parameter. This parameter tells the browser whether
to use event capture or event bubbling. A value of true means that events should
be captured. A false value means that events should bubble. In general, you should
set it to false.
Most modern browsers use event bubbling by default, making the third parameter
optional in those browsers. If you’d like to know more about bubbling versus capture,
read Peter-Paul Koch’s 2006 article, “Event order.”1
Online and Offline Events in Internet Explorer 8The exception to this rule is Internet Explorer 8. IE8 fires online and offline events
at the document.body object, but they do not bubble. What’s more, Internet Explorer
doesn’t support addEventListener(). You’ll need to use the attachEvent()
method instead, or a polyfill that smooths over the differences.
That said, the only component of offline applications that Internet Explorer supports
is web storage (which we’ll cover in Chapter 24). Internet Explorer 8 does have some
vendor-specific storage features, but in the interest of promoting web standards and
shortening the length and complexity of this book, we will not cover them here.
Limitations of navigator.onLineHere’s the downside of navigator.onLine: it’s unreliable. What’s more, it works
differently depending on the browser and operating system.
Chrome, Safari, Opera 15+, and Internet Explorer 9+ can detect when the user has
lost connectivity with the network. Losing or turning off a Wi-Fi connection will
trigger an offline event in those browsers. Reconnecting will trigger an online
1 http://www.quirksmode.org/js/events_order.html
181Offline Apps: Detecting When the User Is Connected

event. The value of navigator.onLine will be true if connected to the Internet,
and false if it is not.
Opera 12 (and older versions) will not fire online or offline events at all. It does,
however, report false for navigator.onLine when the user is disconnected from
a network and true when connected.
Firefox for desktop and laptop computers is a special case. Whether it fires offline
or online events depends on user activity. Firefox fires an offline event when the
user selects the Work Offline menu option, and fires an online event when the user
deselects it. It’s wholly unrelated to whether there is a functional internet connection.
Even if the user has disconnected from the network, the value of navigator.onLine
will be true if the user hasn’t also elected to work offline.
Firefox for Android and Firefox OS work differently, however. Those versions of
the browser will fire online and offline events when connectivity is lost or turned
off (as with Airplane Mode).
Where all browsers struggle, however, is when there is network connectivity but
not internet connectivity. If the browser can connect to a local network, the value
of navigator.onLine will be true, even if the connection from the local network
to the wider internet is down.
In other words, the navigator.onLine property may not tell you what you want to
know. So we need to use an alternative.
Checking Connectivity WithXMLHttpRequest
A better way to determine connectivity is to do it at the time of a network request.
We can do this using XMLHttpRequest and its error and timeout events.
In this example, we’ll attempt to send the contents of our form to the server. If we
have no connection, or if the connection takes too long to complete, we’ll save our
data to localStorage and tell the user.
First, let’s define our error and timeout event handler:
Jump Start HTML5182

var form = document.querySelector('form');var xhrerrorhandler = function(errorEvent){ var i = 0; // Save the value if we have one while(i < form.length){ if(form[i].value != ''){ localStorage.setItem(form[i].name, form[i].value); } i++; } }
We’ll use the same function for both events, since we want to do the same task in
both cases. This function saves each form field name as a localStorage key, and
each field’s corresponding value as a localStorage value.
Next, let’s define our submit event handler. This function will make the XHR request,
monitor it for failure, and add our error handlers:
submithandler = function(submitEvent){ var fd, ls, i=0, key;
// Prevent form submission submitEvent.preventDefault();
// If we have localStorage data, build a FormData object from it // Otherwise, just use the form if( localStorage.length > 0){ fd = new FormData(); ls = localStorage.length; while(i < ls){ key = localStorage.key(0); fd.append(key, localStorage.getItem(key)); i++; } } else { fd = new FormData(form); }
// Set a timeout for slow connections xhr.timeout = 3000; xhr.open('POST','return.php'); xhr.send(fd);
183Offline Apps: Detecting When the User Is Connected

// Set our error handlers. xhr.addEventListener('timeout', xhrerrorhandler); xhr.addEventListener('error', xhrerrorhandler);}form.addEventListener('submit', submithandler);
In this function, if there is localStorage data, we will append it to a FormData object.
Then we’ll send the FormData object as the payload for our request.
FormData is part of the XMLHttpRequest, Level 2 specification.2 It accepts a series
of key-value pairs using its append() method (append(key,value)). Alternatively,
you can pass a form object as an argument to the constructor. Here we’ve done both,
based on whether or not we have saved anything to localStorage. A more robust
version of this demo might handle this with separate features: one for sending form
data and another for syncing with the server.
This doesn’t work if the server response contains an HTTP error code. You can work
around this by checking the value of the status property in the XHR response, as
shown here:
var xhronloadhandler = function(loadEvent){ if( loadEvent.target.status >= 400){ xhrerrorhandler(); } else { // Parse the response. }}
If it’s 400 or greater―HTTP error codes start at 400―we’ll save the data locally.
Otherwise, parse the response.
What You’ve LearnedIn this chapter, we’ve discussed the advantages and limitations of the navigator.on-
Line property, an alternate way to test for connectivity. Now let’s talk about the
browser features and APIs that let us create offline web applications. In our next
chapter, we’ll look at the application cache.
2 http://www.w3.org/TR/XMLHttpRequest/
Jump Start HTML5184

Chapter23Offline Apps: Application CacheApplication Cache―“AppCache” for short―provides a way to save the assets of an
application locally so that they can be used without an internet connection. It’s es-
pecially well-suited to “single-page” applications that are JavaScript-driven and
use local data stores such as localStorage and IndexedDB.
AppCache consists of two parts: the plain text file known as a manifest, and a DOM
interface for scripting and help managing updates. By the end of this chapter, you’ll
know how to write a cache manifest file, how to manage updates, and some of the
aspects to watch out for when using this API.
AppCache in IE
Application Cache is not supported in Internet Explorer 9 or below. You’ll need
to use version 10 or later. For a complete list of browsers supporting AppCache,
try CanIUse.com.1
1 http://caniuse.com/#search=appcache

Cache Manifest SyntaxCache manifest files are plain text files, but they must adhere to the manifest syntax.
Let’s look at a simple example:
CACHE MANIFEST
# These files will be saved locally. This line is a comment.CACHE:js/todolist.jscss/style.css
Every cache manifest must begin with the line CACHE MANIFEST. Comments must
begin with a #. Notice that each file is also listed as a separate line.
The CACHE: line is a section header. There are four defined section headers in total:
■ CACHE: explicitly states which files should be stored locally
■ NETWORK: explicitly states which URLs should always be retrieved
■ FALLBACK: specifies which locally available file should be displayed when a
URL isn’t available
■ SETTINGS: defines caching settings
Saving Files Locally with the CACHE: Section HeaderCACHE: is unique because it is an optional section header―and it’s the only one
that is. Our cache manifest example could also be written without it:
CACHE MANIFEST
# These files will be saved locally. This line is a comment.js/todolist.jscss/style.css
In this case, js/todolist.js and css/style.css will be cached locally, since they
follow our CACHE: section header. So will the page that linked to our manifest, even
though we haven’t explicitly said that it should be saved.
Jump Start HTML5186

In these examples, we are using relative URLs. We can also cache assets across origins
but the details are a little bit more complicated. In recent versions of Firefox, you
can cache assets across origins when they share the same scheme or protocol (HTTP
or HTTPS). You can, for example, cache assets from http://sitepoint.com on http://ex-
ample.com. And you can cache assets from https://secure.ourcontentdeliverynet-
work.com on https://thisisasecureurl.com. In these cases, the protocol is the same.
What you can’t do is cache HTTPS URLs over HTTP or vice-versa. Current versions
of IE, Safari, Chrome, and Opera allow cross-origin caching regardless of scheme.
Caching assets from http://sitepoint.com on https://thisisasecureurl.com will work.
This behavior could change, however, since it is out of line with the specification.
Don’t depend on it. As of this writing, however, Chrome Canary ― version 33 ―doesn’t allow cross-origin requests from HTTP to HTTPS and vice versa.
Forcing Network Retrieval with NETWORK:NETWORK: allows us to explicitly tell the browser that it should always retrieve
particular URLs from the server. You may, for example, want a URL that syncs data
to be a NETWORK resource. Let’s update our manifest from earlier to include a NETWORK
section:
CACHE MANIFEST
# These files will be saved locally. This line is a comment.js/todolist.jscss/style.css
NETWORK:sync.cgi
Any requests for sync.cgi will be made to the network. If the user is offline, the
request will fail.
You may also use a wildcard—or * character—in the network section. This tells the
browser to use the network to fetch any resource that hasn’t been explicitly outlined
in the CACHE: section. Partial paths also work with the wildcard.
187Offline Apps: Application Cache

Specifying Alternative Content for Unavailable URLsUsing the FALLBACK: section header lets you specify what content should be shown
should the URL not be available due to connectivity. Let’s update our manifest to
include a fallback section:
CACHE MANIFEST
# These files will be saved locally. This line is a comment.CACHE:js/todolist.jscss/style.css
FALLBACK:status.html offline.html
Every line in the fallback section must adhere to the <requested file name> <alternate
file name> pattern. Here, should the user request the status.html page while offline,
he or she will instead see the content in offline.html.
Specifying SettingsTo date, there’s only one setting that you can set using the SETTINGS: section
header, and that’s the cache mode flag. Cache mode has two options: fast and prefer-
online. The fast setting always uses local copies, while prefer-online fetches re-
sources using the network if it’s available.
Fast mode is the default. You don’t actually need to set it in the manifest. Doing so
won’t cause any parsing errors, but there’s no reason to add it.
To override this behavior, you must use prefer-online, and add this to the end of
your manifest file:
SETTINGS:prefer-online
NETWORK:*
There’s a caveat here, however. The master file―the file that owns the manifest―will
still be retrieved from the local store. Other assets will be fetched from the network.
Jump Start HTML5188

Adding the Cache Manifest to Your HTMLNow for the simplest part of AppCache: adding it to your HTML document. This
requires adding a manifest attribute to your <html> tag:
<html manifest="todolist.appcache">
As your page loads, the browser will download and parse this manifest. If the
manifest is valid, the browser will also download your assets.
You’ll need to add the manifest to every HTML page that you wish to make available
offline. Adding it to http://example.com/index.html will not make http://ex-
ample.com/article.html work offline.
Verify Your Manifest Syntax
To avoid problems with your manifest file, verify that its syntax is correct by using
a validator, such as Cache Manifest Validator2. If you’re comfortable with Python
and the command line, try Caveman.3
Serving the Cache ManifestIn order for the browser to recognize and treat your cache manifest as a manifest,
it must be served with a Content-type: text/cache-manifest header. Best practice
is to use an .appcache extension (e.g. manifest.appcache or offline.appcache), though
it’s not strictly necessary. Without this header, most browsers will ignore the
manifest. Consult the documentation for your server (or ask your web hosting support
team) to learn how to set it.
Avoiding Application Cache “Gotchas”As mentioned, AppCache uses local file copies by default. This produces a more
responsive user interface, but it also creates two problems that are very confusing
at first glance:
■ uncached assets do not load on a cached page, even while online
2 http://manifest-validator.com/3 https://pypi.python.org/pypi/caveman
189Offline Apps: Application Cache

■ updating assets will not update the cache
That’s right: browsers will use locally stored files regardless of whether new file
versions are available, even when the user is connected to the network.
Solving Gotcha #1: Loading Uncached Assets from aCached DocumentApplication Cache is designed to make web applications into self-contained entities.
As a result, it unintelligently assumes all referenced assets have also been cached
unless we’ve said otherwise in our cache manifest. Browsers will look in the cache
first, and if they’re unable to find the referenced assets, those references break.
To work around this, include a NETWORK: section header in your manifest file, and
use a wildcard (*). A wildcard tells the browser to download any associated un-
cached file from the network if it’s available.
Solving Gotcha #2: Updating the CacheUnfortunately, if you need to push updates to your users, you can’t just overwrite
existing files on the server. Remember that AppCache always prefers local copies.
In order to refresh files within the cache, you’ll need to update the cache manifest
file. As a document loads, the browser checks whether the manifest has been up-
dated. If it has, the browser will then re-download all the assets outlined in the
manifest.
Perhaps the best way to update the manifest is to set and use version numbers.
Changing an asset name or adding a comment also works. When the browser encoun-
ters the modified manifest, it will download the specified assets.
Though the cache will update, the new files will only be used when the application
is reloaded. You can force the application to refresh itself by using location.re-
load() inside an updateready event handler.
Cache Gotcha #3: Break One File, Break Them AllSomething else to be aware of when using AppCache: any resource failure will
cause the entire caching process to fail. “404 Not Found,” “403 Forbidden,” and
Jump Start HTML5190

“500 Internal Server Error” responses can cause resource failures, as well as the
server connection being interrupted during the caching process.
When the browser encounters any of these errors, the applicationCache object will
fire an error event and stop downloading everything else. We can listen for this
event, of course; however, to date no browser includes the affected URL as part of
the error message. The best we can do is alert the user that an error has occurred.
Safari, Opera, and Chrome do report the failed URL in the developer console.
Testing for Application Cache SupportTo test for support, use the following code:
var hasAppCache = window.applicationCache === undefined;
If you’re going to use several HTML5 features, you may also want to try Modernizr4
to check for them all.
It’s unnecessary to test for AppCache support using JavaScript, unless your applic-
ation interacts with the cache programmatically. In browsers without support for
Application Cache, the manifest attribute will be ignored.
The Application Cache APINow that we’ve talked about the syntax of Application Cache, and a few of its quirks,
let’s talk about its JavaScript API. AppCache works quite well without it, but you
can use this API to create your own user interface for your application’s loading
process. Creating such a user interface requires understanding the event sequence,
as well as a bit of JavaScript.
The AppCache Event SequenceAs the browser loads and parses the cache manifest, it fires a series of DOM events
on the applicationCache object. Since they’re DOM events, we’ll use the addEvent-
Listener method to listen for and handle them.
4 http://modernizr.com/
191Offline Apps: Application Cache

When the browser first encounters the manifest attribute, it dispatches a checking
event. “Checking” means that the browser is determining whether the manifest has
changed, indicating an application update. We can use this event to trigger a message
to the user that our application is updating:
var checkinghandler = function(){ updatemessage('Checking for an update');}applicationCache.addEventListener('checking',checkinghandler);
If the cache hasn’t been downloaded before or if the manifest has changed
(prompting a new download), the browser fires a downloading event. Again, we
can use this event to update the user about our progress:
var downloadinghandler = function(){ updatemessage('Downloading files');}applicationCache.addEventListener('downloading',downloadinghandler);
If the cache manifest file hasn’t changed since the last check, the browser will fire
a noupdate event. Should we have an update, the browser will fire a series of pro-
gress events.
Every event is an object. We can think of this object as a container with information
about the operation that triggered it. In the case of progress events, there are two
properties to know about: loaded and total. The loaded property tells us where
the browser is in the download queue, while total tells us the number of files to
be downloaded:
var downloadinghandler = function(event){ var progress = document.querySelector('progress'); progress.max = event.total; progress.value = event.loaded;}applicationCache.addEventListener('downloading',downloadinghandler);
The first time a cache downloads, the browser fires a cached event if everything
goes well. Updates to the cache end with an updateready event.
Jump Start HTML5192

If there are problems, the browser will fire an error event. Typically this happens
when a file listed in the manifest returns an error message. But it can also happen
if the manifest can’t be found or reached, returns an error (such as “403 Forbidden”),
or changes during an update.
Let’s look at an example using a simple to-do list.
Setting Up Our Cache ManifestFirst, let’s define our manifest file: todolist.appcache. This file tells the browser
which files to cache offline:
CACHE MANIFEST# revision 1
CACHE:js/todolist.jsjs/appcache.jscss/style.cssimgs/checkOk.svg
Once the browser encounters the manifest attribute, it will begin downloading the
files listed, plus the master HTML page.
Setting Up Our HTMLIn order to set up our application, we first need to create an HTML document. This
is a single-page application without a lot of functionality, so our markup will be
minimal:
<!DOCTYPE html><html lang="en-us" manifest="todolist.appcache"><head> <meta charset="utf-8"> <title>To do list</title> <link rel="stylesheet" type="text/css" href="css/style.css"></head><body> <section id="applicationstatus"></section>
<section id="application" class="hidden"> <form id="addnew">
193Offline Apps: Application Cache

<p> <label for="newitem"> What do you need to do today? </label> <input type="text" id="newitem" required autofocus> <button type="submit" id="saveitem">Add</button> </p> <p> <button type="button" id="delete">Delete completed</button> </p> </form> <ul id="list"></ul> </section>
<script src="js/appcache.js"></script> <script src="js/todolist.js"></script></body></html>
Setting Up Our CSS and JavaScriptNotice here that we have added a manifest attribute to our html tag. Our stylesheet
controls the appearance of our application, including the styles we’ll need for our
interactions. The pertinent CSS from our stylesheet is shown:
.hidden { display:none;}
Our hidden class controls the display of our elements. We’ll use DOM scripting to
add and remove this class name from our elements when the browser has fired a
particular event.
First, let’s define our global variables:
var appstatus, app, progress, p;
appstatus = document.getElementById('applicationstatus');app = document.getElementById('application');progress = document.createElement('progress');p = document.createElement('p');
Jump Start HTML5194

appstatus.appendChild(p);appstatus.appendChild(progress);
We’ll also create an updatemessage function that we’ll use to update our messages:
/* Create a reusable snippet for updating our messages */function updatemessage(string){ var message = document.createTextNode(string); if (p.firstChild) { p.replaceChild(message, p.firstChild) } else { p.appendChild(message); }}
Next, let’s set up our checking event handler. This function will be called when the
browser fires a checking event:
function checkinghandler(){ updatemessage('Checking for an update');}applicationCache.addEventListener('checking', checkinghandler);
Here, we’ve updated our application to tell the user that the browser is checking
for an update.
Let’s also add a progress event handler. This handler will update our application
with the index of the file currently being downloaded:
function progresshandler(evt){ evt.preventDefault(); progress.max = evt.total; progress.value = evt.loaded; updatemessage('Checking for an update');}applicationCache.addEventListener('progress', progresshandler);
If this is the first time our application cache is downloading our application, it will
fire a cached event. In this function, we’re going to hide div#applicationstatus,
and show div#application by adding and removing the hidden class:
195Offline Apps: Application Cache

function whendonehandler(evt){ evt.preventDefault(); appstatus.classList.add('hidden'); app.classList.remove('hidden');}applicationCache.addEventListener('cached', whendonehandler);
This is what makes our application active. We’ll also use this function to handle
our noupdate event. If there isn’t an application update, we’ll just hide the status
screen and show the application:
applicationCache.addEventListener('noupdate', whendonehandler);
Finally, we need to take an action when the browser has downloaded an update.
Once the cache updates, the web application won’t use the latest files until the next
page load.
In order to force an update, we reload our page using location.reload(). And we
can invoke location.reload() when the browser fires the updateready event:
function updatereadyhandler(){ location.reload();}
applicationCache.addEventListener('updateready',updatereadyhandler);
That’s it! We have a loading interface for our application. Now let’s take a look at
the application itself. In the next chapter, we’ll take a look at web storage: the loc-
alStorage and sessionStorage objects.
Jump Start HTML5196

Chapter24Offline Apps: Web StorageWeb storage1 (also known as DOM storage) is a simple client-side, key-value system
that lets us store data in the client. It consists of two parts: localStorage and ses-
sionStorage.
The main difference between localStorage and sessionStorage is persistence.
Data stored using localStorage persists from session to session. It’s available until
the user or the application deletes it.
Data stored using sessionStorage, on the other hand, persists only as long as the
browsing context is available. Usually this means that we lose our sessionStorage
data once the user closes the browser window or tab. It may, however, persist in
browsers that allow users to save browsing sessions.
In this chapter, we’ll talk about some advantages web storage offers over cookies.
We’ll then discuss how to use the Web Storage API and look at some of its limita-
tions.
1 http://dev.w3.org/html5/webstorage/

Why Use Web Storage Instead of Cookies?There are three main reasons to use localStorage or sessionStorage over cookies:
■ HTTP request performance
■ data storage capacity
■ better protection against cross-site scripting attacks
Cookies are included with each request to the server, increasing the size and duration
of each request. Using smaller cookies helps, but using localStorage and session-
Storage helps most of all. Data is stored locally, and sent only when requested.
Another advantage of using web storage is that you can store much more data.
Modern browsers begin to max out at 50 cookies per domain. At 4 kilobytes per
cookie, we can safely store about 200KB before some browsers will start to delete
cookies. And no, we’re unable to control what’s deleted. Web storage limits, on the
other hand, range from about 2.5MB in Safari and Android to about 5MB in most
other browsers. And we can delete data by key.
Finally, web storage is less vulnerable to cross-site scripting attacks than cookies.
Cookies adhere to a same-domain policy. A cookie set for .example.com can be read
or overwritten by any subdomain of example.com, including hackedsubdomain.ex-
ample.com. If sensitivedata.example.com also uses the .example.com cookie, a script
at hackedsubdomain.example.com can intercept that data.
A same-origin restriction means that only the origin that created the data can access
the data. Data written to localStorage by http://api.example.com will not be
available to http://example.com, http://store.example.com, https://ex-
ample.com, or even http://api.example.com:80.
Browser SupportOf all of the APIs discussed in this book, Web Storage is the most widely supported
among major browsers. It’s available in Internet Explorer 8+, Firefox 3.5+, Safari
4+, Opera 10.5+, and Android WebKit. There are a few polyfill scripts that mimic
the Web Storage API in browsers that lack it. One such script is Storage polyfill by
Jump Start HTML5198

Remy Sharp.2 It uses cookies and window.name to mimic localStorage and ses-
sionStorage respectively.
Inspecting Web StorageFor this chapter, use Chrome, Safari, or Opera. The developer tools for these browsers
let you inspect and manage web storage values. In Chrome (seen in Figure 24.1),
Safari, and Opera 15+, you can find web storage under the Resources panel of the
developer tools. In Opera 12 (the only version of Opera available for Linux users),
you can find it under the Storage panel of Dragonfly.
Figure 24.1. The Local Storage inspector in Google Chrome.
Testing for Web Storage SupportBoth localStorage and sessionStorage are attributes of the window object. We
can test for browser support by testing whether these attributes are undefined:
2 https://gist.github.com/remy/350433
199Offline Apps: Web Storage

if( typeof window.localStorage == 'undefined' ){ // Use something other than localStorage.} else { // Save a key-value pair. }
Testing for sessionStorage works similarly; use typeof window.sessionStorage
== 'undefined' instead. Typically, though, if a browser supports localStorage it
also supports sessionStorage, and vice versa.
Let’s look at using the Storage API by building a simple to-do list. We’ll use local-
Storage to save our to-do items and their status. Although we’ll focus on localStor-
age in this chapter, keep in mind that this also works for sessionStorage. Just swap
the attribute names.
Setting Up Our HTMLA basic HTML outline is fairly simple. We’ll set up a form with an input field and
a button for adding new items. We’ll also add buttons for deleting items. And we’ll
add an empty list. Of course, we’ll also add links to our CSS and JavaScript files.
Your HTML should look a little like this:
<!DOCTYPE html><html lang="en-us"><head> <meta charset="utf-8"> <title>localStorage to do list</title> <link rel="stylesheet" href="css/style.css"> </head><body> <form> <p> <label for="newitem">What do you need to do today?</label> <input type="text" id="newitem" required> <button type="submit" id="saveitem">Add</button> </p> <p> <button type="button" id="deletedone">Delete completed</button> <button type="button" id="deleteall">Reset the list</button> </p> </form> <ul id="list"></ul>
Jump Start HTML5200

<script src="js/todolist.js"></script></body></html>
Our form will resemble the one seen in Figure 24.2.
Figure 24.2. Our to-do list interface rendered in Firefox after adding the barest bit of CSS magic.
On form submission―when a submit event is fired on our form―we will append
the new task to our unordered list element, and save it to localStorage.
Saving Values WithlocalStorage.setItem()
To add an item to local storage or session storage, we need to use the setItem
method. This method accepts two arguments: key and value, in that order. Both
arguments must be strings, or be converted to strings:
201Offline Apps: Web Storage

localStorage.setItem(keyname, value);
For our to-do list, we’ll take the text entered in <input type="text" id="newitem"
required>, create a new list item, and save it to localStorage. That’s what we’ve
done in this function:
function addItemToList(itemtxt){ var li = document.createElement('li'), list = document.getElementById('list');
/* Saves the item to storage */ localStorage.setItem(itemtxt, 0);
/* Update the innerHTML value of our list item and add as a child of our list */ li.innerHTML = itemtxt; list.appendChild(li);}
Notice here that we are setting the value of our key to 0 (localStor-
age.setItem(itemtxt, 0)). For this application, we'll use 0 to indicate a task that
needs to be completed and 1 for a task that is complete. When saved, these values
will be converted to numeric strings.
Sanitize Your Inputs
In this case, accepting user input for keys is low-risk from a security standpoint.
This application and its data is contained entirely within the user's browser. When
synchronizing the data with a server, be sure to sanitize and validate your input
and escape your output.
Since we want to update our list every time the form is submitted, we also need to
add an event listener to our form.
Adding an Event ListenerTo add an event listener, use the addEventListener() method and define a function
that will be invoked when our event is fired:
Jump Start HTML5202

var form, updateList;
form = document.forms[0];
var updateList = function(event){ /* Prevent the default action, in this case, form submission */ event.preventDefault();
/* Invoke the addItemToList function */ addItemToList( document.getElementById('newitem').value );
/* Clear the input field */ document.getElementById('newitem').value = '';}
form.addEventListener('submit', updateList);
Using localStorage.setItem to Update ExistingValuesShould a key already exist, using setItem will overwrite the old value rather than
create a new record. For our to-do list, this is exactly what we want. To prevent the
value of your key from being overwritten, check whether the key exists before saving
the item.
We will also use setItem to update our task's status when it's clicked, as we'll see
in the next section.
Retrieving Values WithlocalStorage.getItem()
To retrieve the value of a key, we use localStorage.getItem(). This method accepts
one argument, the key of the value we’d like to retrieve, which must be a string.
If the key exists, getItem will return the value of that key. Otherwise, it will return
null. That makes it useful for determining whether a key exists before calling
setItem. For example, if we wanted to test the presence of a lunch key, we might
do the following:
203Offline Apps: Web Storage

if( localStorage.getItem('lunch') ){ // do something.}
In our case, we’re going use getItem to retrieve the status of our task. Based on the
value returned by getItem, we will update the value of our key using setItem.
In the code below, we’ve added an event listener to our unordered list rather than
to each list item. We’re using a technique called event delegation. When an event
is fired on an element, it “bubbles up” to its ancestors. This means we can set a
listener on its parent element, and use the target property of the event object to
determine which element triggered the event. Because we only want to take an action
if the element clicked was a list item, we need to check the nodeName property of
the target object:
function toggleStatus(event){ var status; if(event.target.nodeName == 'LI'){ /* Using + is a trick to convert numeric strings to numbers. */ status = +localStorage.getItem(event.target.textContent); if(status){ localStorage.setItem(event.target.textContent,0); } else { localStorage.setItem(event.target.textContent,1); } /* Toggle a 'done' class */ event.target.classList.toggle('done'); }}
var list = document.getElementById('list'); list.addEventListener('click',toggleStatus);
The event.target property is a pointer to the element that was clicked. Every ele-
ment object also has a textContent attribute, which is its child text, if applicable.
Each list item’s textContentmatches a localStorage key, so we can use it to retrieve
the value we want. That’s what we’re doing with status = localStor-
age.getItem(event.target.textContent).
Jump Start HTML5204

localStorage keys and values are strings
Remember, all localStorage keys and values are strings. What look like numbers
are actually numeric strings. To make comparisons with numbers or Boolean
values, you’ll need to convert the variable type. Here we’ve used a + sign to convert
each key’s value to a number. Zero is a falsy value, equivalent to but not equal to
the Boolean false; 1 is a truthy value.
Alternative Syntaxes for Setting and Getting ItemsUsing setItem and getItem are not the only way to set or retrieve localStorage
values. You can also use square-bracket syntax or dot syntax to add and remove
them:
localStorage['foo'] = 'bar';
console.log(localStorage.foo) // logs 'bar' to the console
This is the equivalent of using localStorage.setItem('foo','bar') and local-
Storage.getItem('foo'). If there’s a chance that your keys will contain spaces
though, stick to square-bracket syntax or use setItem()/getItem() instead.
Looping Over Storage ItemsOn page reload, our list of to-dos will be blank. They’ll still be available in local-
Storage, but not part of the DOM tree. To fix this, we’ll have to rebuild our to-do
list by iterating over our collection of localStorage items, preferably when the
page loads. This is where localStorage.key() and localStorage.length come
in handy.
localStorage.length tells us how many items are available in our storage area.
The key() method retrieves the key name for an item at a given index. It accepts
one argument: an integer value that’s greater or equal to 0 and less than the value
of length. If the argument is less than zero, or greater than equal to length, local-
Storage.key() will return null.
Indexes and keys have a very loose relationship. Each browser orders its keys dif-
ferently. What’s more, the key and value at a given index will change as items are
205Offline Apps: Web Storage

added or removed. To retrieve a particular value, key() is a bad choice. But for
looping over entries, it’s perfect. An example follows:
var i = localStorage.length;while( i-- ){ /* As long as i isn't 0, this is true */ console.log( localStorage.key(i) );}
This will print every key in our storage area to the console. If we wanted to print
the values instead, we could use key() to retrieve the key name, then pass it to
getItem() to retrieve the corresponding value:
var i = localStorage.length, key;while( i-- ){ key = localStorage.key(i); console.log( localStorage.getItem(key) );}
Let’s go back to our to-do list. We have a mechanism for adding new items and
marking them complete. But if you reload the page, nothing happens. Our data is
there in our storage area, but not the page.
We can fix this by adding a listener for the load event of the window object. Within
our event handler, we’ll use localStorage.length and localStorage.key() along
with localStorage.getItem(key) to rebuild our to-do list:
function loadList(){ var len = localStorage.length; while( len-- ){ var key = localStorage.key(len); addItemToList(key, localStorage.getItem(key)); }}window.addEventListener('load', loadList);
Since we’re working with existing items in this loop, we want to preserve those
values. Let’s tweak our addItemToList function a bit to do that:
function addItemToList(itemtxt, status){ var li = document.createElement('li');
Jump Start HTML5206

if(status === undefined){ status = 0; localStorage.setItem(itemtxt, status); }
if(status == true){ li.classList.add('done'); }
li.textContent = itemtxt; list.appendChild(li);}
We’ve added a status parameter, which gives us a way to specify whether a task
is complete. When we add a task and call this item, we’ll leave out the status
parameter; but when loading items from storage as we are here, we’ll include it.
The line if(status == true){ li.classList.add('done'); } adds a done class
to the list item if our task status is 1.
Clearing the Storage Area WithlocalStorage.clear()
To clear the storage area completely, use the localStorage.clear() method. It
doesn’t accept any parameters:
function clearAll() { list.innerHTML = ''; localStorage.clear();}
Once called, it will remove all keys and their values from the storage area. Once
removed, these values are no longer available to the application. Use it carefully.
Storage EventsStorage events are fired on the window object whenever the storage area changes.
This happens when removeItem() or clear() deletes an item (or items). It also
happens when setItem() sets a new value or changes an existing one.
207Offline Apps: Web Storage

Listening for the Storage EventTo listen for the storage event, add an event listener to the window object:
window.addEventListener('storage', storagehandler);
Our storagehandler function that will be invoked when storage event is fired.
We’re yet to define that function―we’ll deal with that in a moment. First, let’s take
a look at the StorageEvent object.
The StorageEvent ObjectOur callback function will receive a StorageEvent object as its argument. The
StorageEvent object contains properties that are universal to all objects, and five
that are specific to its type:
■ key: contains the key name saved to the storage area
■ oldValue: contains the former value of the key, or null if this is the first time
an item with that key has been set
■ newValue: contains the new value added during the operation
■ url: contains the URL of the page that made this change
■ storageArea: indicates the storage object affected by the update―either local-
Storage or sessionsStorage
With these properties, you can update the interface or alert the user about the status
of an action. In this case, we’ll just quietly reload the page in other tabs/windows
using location.reload().
function storagehandler(event){ location.reload();}
Now our list is up-to-date in all tabs.
Jump Start HTML5208

Storage Events Across BrowsersStorage events are a bit tricky, and work differently to how you might expect in
most browsers. Rather than being fired on the current window or tab, the storage
event is supposed to be fired in other windows and tabs that share the same storage
area. Let’s say that our user has http://ourexamplesite.com/buy-a-ticket open in two
tabs. If they take an action in the first tab that updates the storage area, the storage
event should be fired in the second.
Chrome, Firefox, Opera, and Safari are in line with the web storage specification,
while Internet Explorer is not. Instead, Internet Explorer fires the storage event in
every window for every change, including the current window.
There isn’t a good hack-free way to work around this issue. For now, reloading the
application―as we’ve done above―is the best option across browsers.
IE’s Nonstandard remainingSpace Property
Internet Explorer includes a nonstandard remainingSpace property on its loc-
alStorage object. We can handle our storage event differently depending on
whether or not localStorage.remainingSpace is undefined. This approach
has its risks, though; Microsoft could remove the remainingSpace property
without fixing the storage event bug.
Determining Which Method Caused the Storage EventThere isn’t an easy way to determine which method out of setItem(), removeItem(),
or clear() triggered the storage event. But there is a way: examine the event prop-
erties.
If the storage event was caused by invoking localStorage.clear(), the key,
oldValue, and newValue properties of that object will all be null. If removeItem()
was the trigger, oldValue will match the removed value and the newValue property
will be null. If newValue isn’t null, it’s a safe bet that setItem() was the method
invoked.
209Offline Apps: Web Storage

Storing Arrays and ObjectsAs mentioned earlier in this chapter, web storage keys and arrays must be strings.
If you try to save objects or arrays, the browser will convert them to strings. This
can lead to unexpected results. First, let’s take a look at saving an array:
var arrayOfAnimals = ['cat','dog','hamster','mouse','frog','rabbit'];
localStorage.setItem('animals', arrayOfAnimals);
console.log(localStorage.animals[0])
If we look at our web storage inspector, we can see that our list of animals was saved
to localStorage, as shown in Figure 24.3.
Figure 24.3. An array saved to web storage as a string in Safari’s developer tools
But if you try to read the first item of that array, you’ll see that the first item is the
letter C and not cat as in our array. Instead, it’s been converted to a comma-separated
string.
Similarly, when an object is converted to a string, it becomes [object Object].
You lose all your properties and values, as shown in Figure 24.4.
Jump Start HTML5210

Figure 24.4. The result of saving an object to web storage in Safari’s developer tools
To prevent this from happening, use the native JSON.stringify() method to turn
your objects and arrays into strings before saving:
var foodcouples = { 'ham':'cheese', 'peanut_butter':'jelly', 'eggs':'toast'}
localStorage.setItem( 'foodpairs_string', JSON.stringify(foodcouples));
Using JSON.stringify() will serialize arrays and objects. They’ll be converted to
specially formatted strings that hold indexes or properties and values, as shown in
Figure 24.5.
211Offline Apps: Web Storage

Figure 24.5. Using JSON.stringify() to save an object to web storage in Safari’s developer tools
To retrieve these values, use JSON.parse() to turn it back into a JavaScript object
or array. A word of caution: JSON.parse() and JSON.stringify() can affect the
performance of your application. Use them sparingly, especially when getting and
setting items.
Limitations of Web StorageWeb storage comes with a couple of limitations: performance and capacity.
Web storage is synchronous. Reads and writes are added to the JavaScript processing
queue immediately. Other tasks in the queue won't be completed until the engine
is done writing to or reading from the storage area. For small chunks of data, this
usually is no issue. But for larger chunks of data or a large number of write opera-
tions, it will be.
Web storage also has a size limit. Should your application reach that limit, the
browser will throw a DOMException error. Use a try-catch statement to catch and
handle this error. In browsers that support it, you can also use window.onerror (or
use addEventListener and the error event):
try { localStorage.setItem('keyname',value);
Jump Start HTML5212

return true;} catch (error) { // Could alternatively update the UI. console.log(error.message); }
Size limits vary by browser and version. The web storage specification suggests an
initial size of 5MB per origin. However, Safari, currently allows 2.5MB of data to
be stored per origin. Chrome, Internet Explorer, and Opera 15+ currently store 5MB
of data. Firefox stores 5MB by default, but the user can adjust this limit in the
about:config menu. Older versions of Opera (12 and below) prompt the user to
raise the storage limit.
The good news is that these values may increase. The bad news is that most browsers
fail to expose the amount of storage space available to the application.
Now that we’ve covered the ins and outs of web storage, let’s take a look at a web
database: IndexedDB.
213Offline Apps: Web Storage


Chapter25Offline Apps: Storing Data With
Client-side DatabasesWeb storage (localStorage and sessionStorage) is fine for small amounts of data
such as our to-do list, but it’s an unstructured data store. You can store keys and
values, but you can’t easily search values. Data isn’t organized or sorted in a partic-
ular way, plus the 5MB storage limit is too small for some applications.
For larger amounts of structured searchable data, we need another option: web
databases. Web databases such as Web SQL and IndexedDB provide an alternative
to the limitations of web storage, enabling us to create truly offline applications.
The State of Client-side DatabasesUnfortunately, this isn’t as easy as it sounds. Browsers are split into three camps
in the way they support client-side databases:
■ both IndexedDB and Web SQL (Chrome, Opera 15+)
■ IndexedDB exclusively (Firefox, Internet Explorer 10+)

■ Web SQL exclusively (Safari)
IndexedDB is a bit of a nonstarter if you plan to support mobile browsers. Safari for
iOS and Opera Mobile 11-12 support Web SQL exclusively; same for the older ver-
sions of Android and Blackberry browsers.
If you want your application to be available across desktop browsers, you’re about
halfway there with Web SQL. It’s available in Safari, Chrome, and Opera 15+, but
Firefox and Internet Explorer 10+ have no plans to add support.
Here’s the thing: the World Wide Web Consortium has stopped work on the Web
SQL specification. As a result, there is a risk that browsers will drop Web SQL
support, or that further development will proceed in nonstandard ways. Relying
on it is risky, so for that reason we will focus on IndexedDB in this chapter, and
use a polyfill to support Safari and older versions of Opera.
The bright side is that there are a few JavaScript polyfills and libraries available to
bridge the gap between Web SQL and IndexedDB. Lawnchair1 supports both, and
will use localStorage if you prefer. There’s also PouchDB,2 which uses its own
API to smooth over the differences between Web SQL and Indexed DB. PouchDB
also supports synchronization with a CouchDB server, though CouchDB isn’t neces-
sary for building an app with PouchDB.
In this chapter, we’ll focus on IndexedDB, and use IndexedDBShim3 for other
browsers.
About IndexedDBIndexedDB is a schema-less, transactional, key-value store database. Data within
an IndexedDB database lacks the rigid, normalized table structure as you might find
with MySQL or PostgresSQL. Instead, each record has a key and each value is an
object. It’s a client-side “NoSQL” database that’s more akin to CouchDB or MongoDB.
Objects may have any number of properties. For example, in a to-do list application,
some objects may have a tags property and some may not, as evident in Figure 25.1.
1 http://brian.io/lawnchair/2 http://pouchdb.com/3 http://nparashuram.com/IndexedDBShim/
Jump Start HTML5216

Figure 25.1. Objects with and without a tags property
Two objects in the same database can even have completely different properties.
Usually, we’ll want to use a naming convention for our object property names.
IndexedDB is also transactional. If any part of the read or write operation fails, the
database will roll back to the previous state. These operations are known as trans-
actions, and must take place inside a callback function. This helps to ensure data
integrity.
IndexedDB has two APIs: synchronous and asynchronous. In the synchronous API,
methods return results once the operation is complete. This API can only be used
with Web Workers4, where synchronous operations won't block the rest of the ap-
plication. There is no browser support for the synchronous API at the time of writing.
In this chapter, we’ll cover the asynchronous API. In this mode, operations return
results immediately without blocking the calling thread. Asynchronous API support
is available in every browser that supports IndexedDB.
4 http://en.wikipedia.org/wiki/Web_worker
217Offline Apps: Storing Data With Client-side Databases

Examples in this book use the latest version of the IndexedDB5 specification. Older
versions of IndexedDB in Chrome (23 and earlier) and Firefox (16 and earlier) re-
quired a vendor prefix. These experimental versions had several inconsistencies
between them, which have been largely worked out through the specification process.
Since the standardized API has been available for several versions in both Firefox
and Chrome, and is available in Internet Explorer 10+, we won’t bother with older
versions.
Inspecting IndexedDB Records
If you’d like to inspect your IndexedDB records, use Chrome or Opera 15+. These
browsers currently have the best tools for inspecting IndexedDB object stores.
With IndexedDBShim, you can use Safari’s Inspector to view this data in Web
SQL, but it won’t be structured in quite the same way. Internet Explorer offers an
IDBExplorer package6 for debugging IndexedDB, but it lacks native support in its
developer tools. Firefox developer tools are yet to support database inspections.
Now, let’s look at the concepts of IndexedDB by creating a journaling application
to record diary entries.
Setting up Our HTMLBefore we dive into IndexedDB, let’s build a very simple interface for our journaling
application:
<!DOCTYPE html><html lang="en-us"><head> <meta charset="utf-8"> <title>IndexedDB Journal</title> <link rel="stylesheet" type="text/css" href="css/style.css"></head><body><form> <p> <label for="tags">How would you like to tag this entry?</label> <input type="text" name="tags" id="tags" value="" required>
5 http://www.w3.org/TR/IndexedDB/6 http://ie.microsoft.com/testdrive/HTML5/newyearslist/IDBExplorer.zip
Jump Start HTML5218

<span class="note">(Optional. Separate tags with a comma.)</span> </p> <p> <label for="entry">What happened today?</label> <textarea id="entry" name="entry" cols="30" rows="12" required> </textarea> <button type="submit" id="submit">Save entry</button> </p></form>
<section id="allentries" class="hidden"> <h1>View all entries</h1> </section>
<script src="js/IndexedDBShim.min.js"></script><script src="js/journal.js"></script></body></html>
This gives us a very simple interface consisting of two form fields and a Save entry
button, as shown in Figure 25.2. We've also added a view that displays all entries
after we've saved our latest one. A production-ready version of this application
might have a few more screens, but for this demo this is fine.
219Offline Apps: Storing Data With Client-side Databases

Figure 25.2. Our simple journal interface as shown in Firefox.
Creating a DatabaseTo create a database, use the open() method. It accepts two arguments: the name
of your database and an optional integer value that sets the version of the database:
var idb = indexedDB.open('myIDBJournal',1);
Your database name may be any string value, including the empty string (''). The
name just ties the database to its origin. As with localStorage, IndexedDB databases
can only be read to from—or written to by—scripts that share its origin. Remember
that an origin consists of the scheme (such as http:// or https://), the hostname,
and port number). These must match exactly, meaning that a database created at
http://example.com can't be accessed by scripts at http://api.example.com and
vice versa.
Jump Start HTML5220

Version numbers can be any integer from 1 to 2^53 (that’s 9,007,199,254,740,991).
Floats, or decimal values, won’t work. Floats will be converted to integers. For ex-
ample, 2.2 becomes 2 and 0.8 becomes 0 (and throws a TypeError). If you don’t
include a version number, the browser will use 1.
If the open operation is successful, the browser will fire a success event. We can
use the onsuccess callback to perform transactions or, as we’ve done here, use it
to assign our database object to a global variable:
// initialize the variable.var databaseObj;idb.onsuccess = function(successEvent){ // set its value. databaseObj = successEvent.target.result;}
As with all DOM events, our successEvent object contains a target property. In
this case, the target is our open request transaction. The target property is also an
object, and contains a result property, which is the result of our transaction. In
this case, the value of result is our database.
This is a really important point to understand. Every transaction requires an onsuc-
cess handler. The results of that transaction will always be a child property of the
target object, which is a property of the event object (event.target.result).
Now that we’ve set our global databaseObj variable to our database object, we can
use databaseObj for our transactions.
Adding an Object StoreCreating a database won’t automatically make it do anything by itself. To begin
storing data, you’ll have to create at least one object store. If you are familiar with
SQL databases, an object store is analogous to an SQL table. Object stores are where
we store our records, or entries. IndexedDB databases can contain multiple object
stores.
To add an object store, we first need to trigger a version change. To trigger a version
change, the version argument (the second parameter) needs to be greater than the
221Offline Apps: Storing Data With Client-side Databases

database’s current version value. For the first release of your application, this value
can be 1.
When the database version number increases (or is set for the first time), the browser
will fire an upgradeneeded event. Any structural changes―adding an object store,
adding an index to an object store―must be made within the onupgradeneeded
event handler method:
idb.onupgradeneeded = function(event){ // Change the database.}
Let’s create an object store named entries. To do this, we need to use the createO-
bjectStore method of the database object:
idb.onupgradeneeded = function(event){ try { event.target.result.createObjectStore( ['entries'], { keyPath: 'entrydate' } ); } catch(error) {}}
If the object store doesn’t exist, it will be created. If it does, the browser will fire a
constraint error. We’ve wrapped this in a try-catch block so that we can silently
handle an error should one occur. But we could also set an event handler using the
onerror event attribute:
idb.onerror = function(event){ // Log the error to the console, or alert the user}
At a minimum, createObjectStore requires a name argument. It must be a string,
but this string can’t contain any spaces. The second argument is optional, but it
must be a dictionary. Dictionaries are objects that have defined properties and values.
For createObjectStore, those properties and values are as follows:
■ autoIncrement: Must be either true or false; auto-generates keys and indexes
for each record in the store. Default value is false.
Jump Start HTML5222

■ keyPath: Specifies which object property to use as an index for each record in
the store. Default value is null. Makes the named field a required one.
Here we’ve chosen to set a keyPath. This means that every object we add to the
database will need to contain an entrydate property, and the value of the entrydate
property will become our key.
You don’t have to set autoIncrement or keyPath. It’s possible to add our object
store without it. If you choose not to set either, you must set a key for every record
stored. We’ll discuss this in the next section.
Notice that we didn’t use our databaseObj variable with our onupgradeneeded
callback? That’s because the onupgradeneeded event is fired before the onsuccess
event when working with IndexedDB. It won’t be defined when we need it.
Adding a RecordAdding records is a little more complicated. We need to create a transaction, and
then take an action once the transaction completes. The process is roughly as follows:
1. Open a transaction connection to one or more object stores.
2. Select which object store to use for the transaction request.
3. Create a request by invoking the put, add, delete or get methods.
4. Define an onsuccess handler to process our results.
These steps need to happen within a callback or event handler of some kind. Here
we’ll do it when our journal entry form is submitted:
document.forms[0].onsubmit = function(submitEvent){ var entry, i, transaction, objectstore, request, fields;
fields = submitEvent.target;
// Prevent form submission and page reload. submitEvent.preventDefault();
/* Build our record object */ entry = {};
223Offline Apps: Storing Data With Client-side Databases

entry.entrydate = new Date().getTime();
for( i=0; i < fields.length; i++){ if( fields[i].value !== undefined ){ entry[fields[i].name] = fields[i].value; } }
/* Set our success handler */ request.onsuccess = showAllEntries;
/* Start our transaction. */ transaction = databaseObj.transaction(['entries'],'readwrite');
/* Choose our object store (the only one we've opened). */ objectstore = transaction.objectStore('entries');
/* Save our entry. We could also use the add() method */ request = objectstore.put(entry);}
There’s a lot happening in this function, but the most important parts are the follow-
ing three lines:
/* Start our transaction. */transaction = databaseObj.transaction(['entries'],'readwrite');
/* Choose our object store (the only one we've opened). */objectstore = transaction.objectStore('entries');
/* Save our entry */request = objectstore.put(entry);
In these lines, we’ve first created a transaction by calling the transaction method
on our database object. transaction accepts two parameters: the name of the object
store or stores we’d like to work with, and the mode. The mode may be either
readwrite or readonly. Use readonly to retrieve values. Use readwrite to add,
delete, or update records.
Next, we’ve chosen which object store to use. Since the transaction connection was
only opened for the entries store, we’ll use entries here as well. It’s possible to
open a transaction on more than one store at a time, however.
Jump Start HTML5224

Let’s say our application supported multiple authors. We might then want to create
a transaction connection for the authors object store at the same time. We can do
this by passing a sequence—an array of object store names—as the first argument
of the transaction method, as shown here:
trans = databaseObj.transaction(['entries','authors'], 'readwrite');
This won’t write the record to both object stores. It just opens them both for access.
Which object store will be affected is determined by the objectStore() method.
Use Square Brackets
In newer versions of Chrome (33+) and Firefox, you may pass a single object store
name to the transaction method without square brackets; for example, databaseO-
bj.transaction('entries','readonly'). For the broadest compatibility,
though, use square brackets.
req = objectstore.put(entry); is the final line. It saves our entry object to the
database. The put method accepts up to two arguments. The first is the value we’d
like to store, while the second is the key for that value: for example: object-
Store.put(value, key).
In this example, we’ve just passed the entry object to the putmethod. That’s because
we’ve defined entrydate as our keyPath. If you define a keyPath, the property
name you’ve specified will become the database key. In that case, you don’t need
to pass one as an argument. If, on the other hand, we didn’t define a keyPath and
autoIncrement was false, we would need to pass a key argument.
When the success event fires, it will invoke the showAllEntries function.
put Versus add
The IndexedDB API has two methods that work similarly: put and add. You can
only use addwhen adding a record. But you can use putwhen adding or updating
a record.
225Offline Apps: Storing Data With Client-side Databases

Retrieving and Iterating Over RecordsYou probably noticed the line request.onsuccess = showAllEntries in our form’s
onsubmit handler. We’re yet to define that function, but this is where we’ll retrieve
all our entries from the database.
To retrieve multiple records there are two steps:
1. run a cursor transaction on the database object
2. iterate over the results with the continue() method
Creating a Cursor TransactionAs with any transaction, the first step is to create a transaction object. Next, select
the store. Finally, open a cursor with the openCursor method. A cursor is an object
consisting of a range of records. It’s a special mechanism that lets us iterate over a
collection of records:
function showAllEntries(){ var transaction, objectstore, cursor;
transaction = databaseObj.transaction(['entries'],'readonly'); objectstore = transaction.objectStore('entries'); cursor = objectstore.openCursor();};
Since we want to show our entries once this transaction completes, let’s add an
onsuccess handler to our cursor operation:
function showAllEntries(){ var transaction, objectstore, cursor;
transaction = databaseObj.transaction(['entries'],'readonly'); objectstore = transaction.objectStore('entries'); cursor = objectstore.openCursor();
cursor.onsuccess = function(successEvent) { var resultset = successEvent.target.result; if( resultset ){ buildList( resultset.value ); }
Jump Start HTML5226

resultset.continue(); };};
Within this handler, we’re passing each result of our search to a buildList function.
We won’t discuss that function here, but it is included in this chapter’s code sample.
That final line―resultset.continue()―is how we iterate over our result set. The
onsuccess handler is called once for the entire transaction, but this transaction may
return multiple results. The continue method advances the cursor until we’ve iter-
ated over each record.
Retrieving a Subset of RecordsWith IndexedDB, we can also select a subset or range of records by passing a key
range to the openCursor() method.
Key ranges are created with the IDBKeyRange object. IDBKeyRange is what’s known
as a static object, and it’s similar to the way the Math() object works. Just as you’d
type Math.round() rather than var m = new Math(), with IDBKeyRange, you must
always use IDBKeyRange.methodName().
In this example, we’re only setting a lower boundary using the lowerBound method.
Its value should be the lowest key value we want to retrieve. In this case, we’ll use
0 since we want to retrieve all the records in our object store, starting with the first
one:
objectstore.openCursor(IDBKeyRange.lowerBound(0));
If we wanted to set an upper limit instead, we could use the upperBound method.
It also accepts one argument, which must be the highest key value we want to retrieve
for this range:
objectstore.openCursor(IDBKeyRange.upperBound(1385265768757));
By default, openCursor sorts records by key in ascending order. We can change the
direction of the cursor and its sorting direction, however, by adding a second argu-
ment. This second argument may be one of four values:
227Offline Apps: Storing Data With Client-side Databases

■ next: puts the cursor at the beginning of the source, causing keys to be sorted
in ascending order
■ prev: short for “previous”, it places the cursor at the end of the source, causing
keys to be sorted in descending order
■ nextunique: returns unique values sorted by key in ascending order
■ prevunique: returns unique values sorted by key in descending order
To display these entries in descending order (newest entry first), change object-
store.openCursor(IDBKeyRange.lowerBound(0)) to objectstore.openCursor(IDB-
KeyRange.lowerBound(0), 'prev').
Retrieving or Deleting Individual EntriesBut what if we wanted to retrieve just a single entry instead of our entire store? For
that, we can use the get method:
var transaction, objectstore, request;
transaction = databaseObj.transaction(['entries'],'readonly');objectstore = transaction.objectStore('entries');request = objectstore.get(key_of_entry_to_retrieve);
request.onsuccess = function(event){ // display event.target.result}
When this transaction successfully completes, we can do something with the result.
To delete a record, use the delete method. Its argument should also be the key of
the object to delete:
var transaction, objectstore, request;
transaction = databaseObj.transaction(['entries'],'readwrite');objectstore = trans.objectStore('entries');request = objectstore.delete(1384911901899);
Jump Start HTML5228

request.onsuccess = function(event){ // Update the user interface or take some other action.}
Unlike retrieval operations, deletions are write operations. Use readwrite for this
transaction type, instead of readonly.
Updating a RecordTo update a record, we can once again use the put method. We just need to specify
which entry we’re updating. Since we’ve set a keyPath, we can pass an object with
the same entrydate value to our put method:
var transaction, objectstore, request;
transaction = databaseObj.transaction(['entries'],'readwrite');objectstore = trans.objectStore('entries');request = objectstore.put( { entrydate: 1384911901899, entry: 'Updated value for key 1384911901899.' });
request.onsuccess = function(event){ // Update the user interface or take some other action.}
The browser will update the value of the record whose key is 1384911901899, as
shown in Figure 25.3.
229Offline Apps: Storing Data With Client-side Databases

Figure 25.3. The updated value for our key
Updates, like additions, are write operations. When creating an update transaction,
the second parameter of the transaction method must be readwrite.
Be careful when using put for updates. Updates replace the entire object value with
the new one. You aren’t simply overwriting individual object properties; you’re
actually replacing the whole record.
Deleting a DatabaseDeleting a database is just as easy as opening one. It doesn’t require using a callback.
Just call the deleteDatabase method of the IndexedDB database object:
idb.deleteDatabase('myIDBJournal');
It accepts one argument: the name of the database you wish to delete. Use it with
caution.
We’ve covered enough to get you started with IndexedDB, but there’s more to the
API than can be covered in a single chapter. The Mozilla Developer Network7 has
7 https://developer.mozilla.org/en-US/docs/IndexedDB
Jump Start HTML5230

the most robust documentation available to date, including coverage of older versions
of the API.
Wrapping Up and Learning MoreWith offline web technologies, you can develop applications that work without an
internet connection. We’ve covered the basics of offline applications in this book.
If you’d like to learn more about any of these topics, a good place to start is with
the W3C’s WebPlatform.org.8 It features tutorials and documentation on HTML5,
CSS, JavaScript and web APIs.
Vendor-specific sites also have a wealth of information, particularly for documenting
browser-specific quirks. Yet Google’s HTML5Rocks.com9 and the Mozilla Developer
Network, mentioned above, are particularly good at documenting new technologies
in their browsers while also addressing other vendors’ implementations. The Mi-
crosoft Developer Network10 includes a wealth of documentation about web tech-
nologies, especially as supported in Internet Explorer.
To track specifications, pay attention to the World Wide Web Consortium (W3C)11
and the Web Hypertext Application Technology Working Group (WHATWG).12
These bodies develop specifications and documentation for current and future APIs.
And of course, you can always visit Learnable.com13 or SitePoint.com14 to stay up
to date on web technologies.
8 http://webplatform.org/9 http://html5rocks.com/10 http://msdn.microsoft.com/11 http://w3.org/12 http://whatwg.org/13 https://learnable.com/14 http://www.sitepoint.com/
231Offline Apps: Storing Data With Client-side Databases


JUMP STARTHTML5: APIS
BY SANDEEP PANDA


Chapter26APIs: OverviewIn this chapter, we’ll make a quick trip to the world of HTML5 APIs. I’ll outline the
APIs that are going to be discussed in this book, and what you’ll have learned by
the end. There’ll be no diving into any code in this chapter; rather, it will provide
a quick overview of each API so that you can get a clear idea about what you’re going
to learn.
Some HTML5 APIs are still fairly new, and not every version of every browser
supports them, which you’ll need to bear in mind while creating HTML5 apps.
Whenever you’re going to use any HTML5 API, it’s always a good idea to check the
support for that API in the browser. We’ll see how to do that in the last section of
the chapter.
A Quick Tour of the HTML5 APIs CoveredSince this is a short book, it’s impossible to cover each and every API. Some APIs
are already covered in other books in SitePoint’s Jump Start HTML5 range. In this
book we’ll focus on five important JavaScript APIs that you can use to create really
cool web apps. (Yes, web apps built with plain HTML5 and JavaScript! How cool
is that?) So, let’s see what we’ll be discussing:

■ The Web Workers API: Ever thought of bringing multi-threading to the Web?
Have you every fancied performing some ongoing task in the background without
hampering the main JavaScript thread? If yes, it’s probably time for you to get
cozy with the Web Workers API because it’s designed just for this purpose.
■ Formal definition: The Web Workers API is used to run scripts in a back-
ground thread that run in parallel to the main thread. In other words, you
can perform computationally expensive tasks or implement long polling in
the background and your main UI thread will remain unaffected.
■ The Geolocation API: This new API simply lets you know where your users are.
It enables you to find the position of your users—even when they are moving.
Furthermore, you can show them customized choices (maybe a nice café or a
theater near them) depending on their location, or plot their position on the map.
■ Formal definition: The Geolocation API lets your application receive the
current geographical position of the user through simple JavaScript.
■ The Server-sent Events API: The way Facebook pushes new updates to your wall
is awesome, isn’t it? Prior to the introduction of Server-sent Events (SSE, for
short) this type of functionality was achieved using long polling. But with the
all new SSEs, the server can automatically push new updates to the web page
as they become available. You can access those updates in your script and notify
your users.
■ Formal definition: The Server-sent Events API lets your clients receive push
notifications from the server without the need of long polling.
■ The WebSocket API: This API helps you build applications that allow bi-direc-
tional communication between client and server. The classic use case of the
WebSocket API is a chat application where a client sends a message to the
server and the server processes it and replies back!
■ Formal definition: This API enables low-latency, full-duplex single-socket
connection between client and server.
■ The Cross-document Messaging API: Because of dreaded CSRF attacks, documents
from different domains are usually not allowed to communicate with each other.
Jump Start HTML5234

But with this new Cross-document Messaging API, documents from different
origins can communicate with each other while still being safe against CSRF.
■ Formal Definition: This API introduces a messaging system that allows doc-
uments to communicate with each other—regardless of the source do-
main—without CSRF being a problem.
Cross-site Request Forgery (CSRF)
CSRF is a type of attack that tricks end users to perform sensitive operations on
a web application without their knowledge. Typically, websites only verify if the
request is coming from the browser of an authenticated user, but they don’t verify
if the actual authenticated user himself is making the request. That’s the common
cause of a CSRF attack.
To learn more about CSRF attacks, please visit the Open Web Application Security
Project.1
What You Are Going to LearnThis book will provide clear and concise explanations of the APIs just mentioned.
You will learn the purpose of each API and how to use them. By the end of the
book, you’ll be able to create cool and exciting apps using some amazing HTML5
features.
While explaining the APIs, I will provide some code snippets that describe the
general working principle of them. Since this is a short book, it’s impossible to
cover everything exhaustively, but I will try to cover as much as possible in each
chapter. I’ll also provide guidance and share example use cases for each of the APIs.
Getting StartedBefore diving into the world of HTML5, there is a caveat of which to be aware. As
mentioned, some HTML5 APIs are quite new so you should always make sure the
specific feature is supported in the browsers. If there’s no (or limited) support, you
should handle it gracefully by falling back to another technique. This is known as
graceful degradation; in other words, your app is designed for modern browsers
1 https://www.owasp.org/index.php/Cross-Site_Request_Forgery_(CSRF)
235APIs: Overview

but it is still functional in older browsers. On the other hand you could also opt for
progressive enhancement techniques, where you create an app with limited
functionalities and add new features when the browser supports them. For more
information on this, have a look at Craig Buckler’s article on sitepoint.com.2
In this section, we will discuss addressing the browser compatibility issues and
setting up the development environment.
Checking Browser CompatibilityIt’s always good to obtain an overview of the list of HTML5 features supported by
the browsers. Before using any API, refer to a compatibility chart that shows which
browsers support that API. Personally, I prefer caniuse.com3 where you just start
typing the name of the API and it shows the browser versions that support it; how-
ever, although a compatibility chart gives an overview, you should always check
for browser compatibility of API features in your JavaScript code.
Each HTML element is represented by an object inside the DOM, and each object
has several properties. So, in browsers that support HTML5 APIs, certain objects
will have a set of unique properties. This is the key to determining the browser’s
support for various HTML5 features.
Support for some HTML5 features can be detected just by checking the existence
of certain properties on the window or navigator objects. For example, you can
write the following code to check the support for Web Workers:
if(!!window.Worker){ //proceed further}else{ //do something else}
As you can see, in Web Worker-enabled browsers there will be a property called
Worker in the window object.
2 http://www.sitepoint.com/progressive-enhancement-graceful-degradation-choice3 http://caniuse.com
Jump Start HTML5236

Similar techniques can also be used to detect the support for other features. We will
see how to detect each feature when we examine the details of each API.
ModernizrWouldn’t it be great if there was a uniform interface for checking the support for
each API? Well, it just so happens there is an open-source JavaScript library that
helps detect HTML5 features: Modernizr.4
Using Modernizr is a matter of downloading the script and adding the the following
code to the <head> element:
<script type="text/javascript" src="modernizr.min.js">
Always put Modernizr in Your <head>
Just make sure to load the Modernizr script in the <head> section. The reason is
because the HTML5 Shiv, which enables the styling of HTML5 elements in
browsers prior to IE9, must execute before the body loads. Also if you are using
Modernizr-specific CSS classes, you might encounter an FOUC (flash of unstyled
content)5 if the script is not loaded in the <head>.
Now, let’s say you want to detect the support for Web Workers in the browser. The
following snippet does that for you:
if(Modernizr.webworkers){ //proceed further}else{ //no support for web workers}
So if the browser supports webworkers, the Modernizr.webworkers property will
be true. There are similar tests for all other features. We’ll be using Modernizr in
this book to check for browser compatibility.
4 http://modernizr.com/5 http://en.wikipedia.org/wiki/Flash_of_unstyled_content
237APIs: Overview

Setting Up the EnvironmentTo create HTML5 apps, you only really need your favorite text editor and browser.
But to use certain APIs such as Server-sent Events and WebSocket, you will need
a server. So I’ll ask you to install WAMP6 or XAMPP7 on your machine so that we
can easily create a local server to try things out. If you already have a server set up,
you’re good to go.
In this chapter, we discussed the list of APIs covered in the book and learned how
to detect browser support for each HTML5 feature. We also discussed the purpose
of each API in brief and finally set up our development environment.
I know you’ve been waiting to get your hands dirty. Now that you’re aware of all
the basic stuff, let’s start our journey into the world of HTML5 APIs, with Web
Workers being the first place to visit.
6 http://www.wampserver.com/en/7 http://www.apachefriends.org/en/xampp.html
Jump Start HTML5238

Chapter27APIs: Web WorkersEvery HTML5 app is written in JavaScript, but the single and the most crucial lim-
itation of HTML5 apps is that the browsers’ JavaScript runtimes are single-threaded
in nature. Some of you might say that you have run tasks asynchronously in the
past using functions like setTimeout, setInterval, and our all-time favorite, XML-
HttpRequest. But, in reality, those functions are just asynchronous, not concurrent.
Actually, all JavaScript tasks run one after the other and are queued accordingly.
Web Workers offer us a multi-threaded environment where multiple threads can
execute in parallel, offering true concurrency.
In this chapter, we’ll first discuss the purpose and how to use Web Workers, before
having a look at some its limitations and security considerations.
Introduction and UsageThe Web Worker API allows us to write applications where a computationally ex-
pensive script can run in the background without blocking the main UI thread. As
a result, unresponsive script dialogs—as shown in Figure 27.1, which is due to the
blocking of main thread—can be a thing of the past.

Figure 27.1. An unresponsive script message
There are two kinds of Web Workers: dedicated workers and shared workers. The
main difference is the visibility. A dedicated worker is accessible from the parent
script that created it, but a shared worker can be accessed from any script of the
same origin. Shared workers have limited browser support: Chrome 4.0+, Safari
5.0+ and Opera 10.6+. Neither Firefox nor IE has support for shared workers.
We’ll be discussing dedicated workers in this book, as that’s what you’ll most
probably use.
Detecting Support
Before going any further, I just want to make that sure you detect the browser's
support for Web Workers. In the previous chapter, I showed an example where
we detected the support for Web Workers using native JavaScript and Modernizr,
so we’ll skip repeating it here.
To use Web Workers, you just need to call the Worker constructor and pass the URI
of the Worker script:
var worker=new Worker('myworker.js');
Worker Script Path
Please note that the Worker script path must have the same origin as the parent
script, and be relative to the parent script’s location.
Jump Start HTML5240

Here, myworker.js is the Worker script that needs to be executed in the background.
To communicate with a Worker, you just need to call postMessage on the worker
object, passing a message, if any:
// start a worker without any messageworker.postMessage();
// pass a message and start workerworker.postMessage('Hey, are you in the mood to start work?');
But communication doesn’t have to be unidirectional. Our Worker can also reply!
To receive a message sent by our Worker, we attach an event listener to the worker
object, like so:
//register a callbackworker.addEventListener('message',function(e){ alert('Got message from worker, '+e.data);},false);
The handler function is also passed a message event object. This object has a property
called data that contains the actual message sent. So in the above code, we accessed
the e.data property to retrieve the data that was sent by our Worker.
And what happens to the message passed as an argument to postMessage() in our
main script? Well, that is passed to our Worker script, which can be retrieved at the
Worker side by registering the same event listener. The following snippet shows
how to do that:
myworker.js
//sent from workerself.addEventListener('message',function(e){ self.postMessage('Hey, I am doing what you told me to do!');},false);
Workers Are Sandboxed
Workers run in a sandboxed environment. This means that they’re unable to access
everything a normal script can. For example, in the previous code snippet you
can’t access the global object window inside myworker.js. So bad things will
241APIs: Web Workers

happen if you try to write window.addEventListener instead of self.ad-
dEventListener. Workers also have no access to the DOM. Why? More on that
later.
In case of any error occurring, the onerror handler is called. The following callback
should be registered in the parent script:
//register an onerror callbackworker.addEventListener('error',function(e) { console.log( 'Error occurred at line: '+e.lineno+' in file '+e.filename );},false);
Passing JSON dataWeb Workers can only be passed a single parameter; however, that parameter can
be a complex object containing any number of items. Let’s modify our code to pass
JSON data:
parentScript.js
var worker=new Worker('myworker.js');
worker.addEventListener('message',function(e){ alert('Got answer: '+e.data.answer+' from: '+e.data.answerer);},false);
worker.postMessage({'question':'how are you?','askedBy':'Parent'});
myworker.js
self.addEventListener('message', function(e) {
console.log( 'Question: ' + e.data.question + ' asked by: '+e.data.askedBy );
self.postMessage( { 'answer': 'Doing pretty good!', 'answerer':'Worker'
Jump Start HTML5242

} );
},false);
Worker Data Is Copied
The data you pass to the Worker is copied, not shared. The receiver will always
receive a copy of data that is sent. It means that just before being sent, the data is
serialized and becomes de-serialized on the receiving side. You may wonder why
it is implemented this way. Simple! To avoid threading issues.
Web Worker FeaturesAs noted previously, Web Workers run in a sandboxed environment. Their features
include:
■ read-only access to navigator and location objects
■ functions such as setTimeout/setInterval and XMLHttpRequest object, just
like the main thread
■ creating and starting subworkers
■ importing other scripts through importScripts() function
■ ability to take advantage of AppCache
They have no access to:
■ the window, parent, and document objects (use self or this in Workers for
global scope)
■ the DOM
Why Workers Are Unable to Access the DOM
Browsers (and the DOM) operate on a single thread. That's because your code can
prevent other actions, such as a link being clicked. Multiple threads could break
that. Also the DOM is not thread-safe. For these reasons, the Worker threads have
no access to the DOM—but that won't stop your Workers from modifying main
243APIs: Web Workers

page content. You can always pass a result back to the parent script and let the
UI thread update the DOM content. I will show you how at the end of the chapter.
There is just one final issue before we move onto more advanced features: how to
close a thread. To terminate a thread, just call worker.terminate() from main script
or self.close() from the worker itself.
More Advanced WorkersInline WorkersEverybody loves to do things on the fly. Since Web Workers run in a separate context,
the Worker constructor expects a URI that specifies an external script file to run.
But if you want to be really quick, you can create Inline Workers on the fly through
blobs. Have a look at the following code:
var blob = new Blob(["onmessage = function(e) {➥self.postMessage(e.data); };"]);
var worker = new Worker(window.URL.createObjectURL(blob));
worker.addEventListener('message', function(e){ alert('Got same Message: '+e.data+' from worker');},false);
worker.postMessage('Good Morning Worker!!');
In this snippet, we wrote the content of our Worker in a Blob. window.URL.createO-
bjectURL essentially creates a URI (for example, blob:null/027b645d-be05-4f14-
8866-e52604777608) that references the content of the Worker, and that URI is
passed to the Worker constructor. Then we proceed as usual.
Since it’s inconvenient to put all the Worker content into a Blob constructor, we
can alternatively put all the Worker code in a separate script tag inside the parent
HTML. Then, at runtime, we pass that content to the Blob constructor.
In the following example, we write the Worker in the parent HTML page itself. Once
the Worker starts, it will execute a function every second and return the current
time to the main thread. The main thread will then update the div with the time
(remember we talked about updating the DOM?):
Jump Start HTML5244

parentPage.html
<!DOCTYPE html><html><head><!-- The following script won't be parsed by the JavaScript engine because of its type--><script type="text/javascript-worker" id="jsworker">
setInterval(function(){ postMessage(getTime()); }, 1000);
function getTime(){ var d = new Date(); return d.getHours()+":"+d.getMinutes()+":"+d.getSeconds(); }
</script>
<script> var blobURI = new Blob( [document.querySelector("#jsworker").textContent] );
var worker=new Worker(window.URL.createObjectURL(blobURI));
worker.addEventListener('message',function(e){ document.getElementById('currTime').textContent=e.data; },false);
worker.postMessage();</script></head><body><div id="currTime"></div></body></html>
This code is fairly self-explanatory. Once the Worker starts, we register a function
that is executed every second and returns the current time. The same data is retrieved
and the DOM is updated by the main thread. Furthermore, #currTime can be cached
for better performance.
245APIs: Web Workers

If you’re creating many blob URLs, it’s good practice to release them once you’re
done (I’d recommend that you avoid creating too many blob URLs):
window.URL.revokeObjectURL(blobURI); // release the resource
Creating Subworkers Inside WorkersIn your Worker files you can further create subworkers and use them. The process
is the same. The main benefit is that you can divide your task between many threads.
The URIs of the subworkers are resolved relative to their parent script’s location,
rather than the main HTML document. This is done so that each Worker can manage
its dependencies clearly.
Using External Scripts within WorkersYour Workers have access to the importScripts() function, which lets them import
external scripts easily. The following snippet shows how to do it:
// import a single scriptimportScripts('external.js');
//import 2 script filesimportScripts('external1.js','external2.js');
URIs are Relative to the Worker
When you import an external script from the Worker, the URI of the script is re-
solved relative to the Worker file location instead of the main HTML document.
Security ConsiderationsThe Web Worker API follows the same origin principle. It means the argument to
Worker() must be of the same origin as that of the calling page.
For example, if my calling page is at http://xyz.com/callingPage.html, the
Worker cannot be on http://somethingelse.com/worker.js. The Worker is allowed
as long as its location starts with http://xyz.com. Similarly, an http page cannot
spawn a Worker whose location starts with https://.
Jump Start HTML5246

Figure 27.2 shows the error thrown by Chrome when trying to go out of the origin:
Figure 27.2. Origin error in Chrome
Some browsers may throw security exceptions if you try to access the files locally
(via the file:// protocol). If you are getting any such exceptions, just put your file
in the local server and access it with this: http://localhost/pro-
ject/somepage.html.
Polyfills for Older BrowsersWhat if the browser does not support the Web Workers API? There are several
polyfills available to support older browsers by simulating the behavior of Web
Workers. The Modernizr page on Github1 has a list of such polyfills, but long-running
code may fail with these implementations. In those cases, it may be necessary to
offload some processing to the server via Ajax.
ConclusionWeb Workers give you a big performance boost because of their multi-threaded
nature. All modern browsers, including IE10 and above, offer support for Web
Workers.
Here are a few use cases that you can try to implement:
■ long polling2 in the background and notifying the user about new updates
■ pre-fetching and caching content
■ performing computationally expensive tasks and long-running loops in the
background
■ a spell-checker that runs continuously in the background
1 https://github.com/Modernizr/Modernizr/wiki/HTML5-Cross-browser-Polyfills#web-workers2 http://techoctave.com/c7/posts/60-simple-long-polling-example-with-javascript-and-jquery
247APIs: Web Workers


Chapter28APIs: The Geolocation APIThe Geolocation API provides an easy way to retrieve the exact position of your
users. For example, you can create an app that gives personalized suggestions to
the users based on their current location. You may also plot their position on the
map to show navigation details.
In this chapter, I will give you an overview of the Geolocation API and show how
you can use it to create magical location-based HTML5 apps.
Hitting the SurfaceBefore using the API, let’s just make sure the browser supports it:
if (navigator.geolocation) { // do something awesome}else { // provide alternative content}
The same check can be achieved through Modernizr:

if (Modernizr.geolocation) { //do something awesome}else { //provide alternative content}
Use the following code for the actual position of the user:
navigator.geolocation.getCurrentPosition➥(success_callback,error_callback); function success_callback(position) { console.log("Hey, there you are at Longitude:" ➥+position.coords.longitude+"and latitude:" ➥+position.coords.latitude); } function error_callback(error) { var msg=""; switch(error.code){ case 1: msg="Permission denied by user"; break; case 2: msg="Position unavailable"; break; case 3: msg="Request Timed out"; break; } console.log("Oh snap!! Error logged: "+msg); }
The function getCurrentPosition() is asynchronous in nature. It means the
function returns immediately, and tries to obtain the location of the user asynchron-
ously. As soon as location information is retrieved, the success callback is executed.
A position object is also passed to the callback. All the data related to the
user'scurrent position is encapsulated in that object.
The following properties are available inside the position object:
■ coords.latitude: latitude of the position
Jump Start HTML5250

■ coords.longitude: longitude of the position
■ coords.accuracy: informs the developer how accurate the location information
is (this result is in meters)
■ coords.altitude: the current altitude in meters
■ coords.altitudeAccuracy: used to establish the accuracy of the altitude given
(previous point)
■ coords.heading: the direction in which the user is heading
■ coords.speed: the speed of the end user (device) in meters per second
■ timestamp: the timestamp indicating when the position is recorded
You may not need all the information contained in the position object. In most
cases, all you’ll ever need are the first three properties, as those are sufficient to
plot a user’s position on the map.
The next point to note is that you should handle any error gracefully. When your
app tries to retrieve the location, the browser asks the user if the requesting page
should be allowed to access the user’s location. If the user denies permission, the
error callback (see the previous piece of code) is called and an error object is passed.
The code property indicates the type of error that has occurred. There could also
be an error because the request timed out.
Now let’s see what else you can do with getCurrentPosition(). This function
takes an optional third parameter, PositionOptions, which is a JavaScript object
representing additional options. The available properties are:
1. enableHighAccuracy: If this is set true, it will instruct the hosting device to
provide the best possible location details. If the device is a smartphone, it may
use GPS to provide highly accurate information.
2. timeout: This essentially indicates how many milliseconds you want to wait to
obtain a position. For example, if you set the value to 5,000 milliseconds and the
app is unable to detect the current position of the user within that interval, it
will fail with an error.
251APIs: The Geolocation API

3. maximumAge: This property indicates if you want the device to cache the last
known location. Let’s assume the device detects the current location of the user
at 5.00 p.m. One minute later (at 5.01 p.m.), your app again calls getCurrentPos-
ition() with maximumAge of 100,000 (means 100 seconds). Since the device
knows where the user was 60 seconds ago and this is less than the maximumAge
property, it will answer back with that last known location. This is useful if you’re
satisfied with a previously known location rather than firing a new request for
the current position (conserving battery life in many cases). It’s like saying “hey
device, give me your current position, and I don’t mind if that position is x mil-
liseconds old.” Note that a value of 0 indicates no caching should be done.
The following snippet demonstrates using PositionOptions:
navigator.geolocation.getCurrentPosition( success_callback, error_callback, {enableHighAccuracy: true, timeout: 35000, maximumAge: 60000});
Continuously Monitoring PositionIf you want to monitor the user’s position continuously, getCurrentPosition()
will fail to work for you; instead, you should use watchPosition(). Both functions
have the same signatures but they differ in the way they work.
In the case of watchPosition(), the success callback is called every time the user’s
position changes. Yes, it’s that good! If your app needs to plot the user’s location
on the map as the user moves, this is the best way to do it. You don’t even have to
bother about when the position changes. The API takes care of that for you and ex-
ecutes your callback at the appropriate time.
The following code demonstrates the use of watchPosition():
var watchId;function startWatchingPosition() { watchId=navigator.geolocation.watchPosition(plotPosition);}
function plotPosition(position){ console.log(
Jump Start HTML5252

'got position: Latitude='+ position.coords.latitude+ ', longitude='+ position.coords.longitude );
// your code to update the position on map}
function stopWatchingPosition(){ navigator.geolocation.clearPosition(watchId);}
Here, the callback plotPosition() will be called every time a new location is re-
trieved. Note that the watchPosition() function returns a number that you can
store and later use with clearPosition() to stop monitoring; it works much like
setInterval() and clearInterval().
Fast-moving Users
If the user is moving very fast, the callback may execute frequently and slow down
the system. Some event throttling may be necessary to reduce the number of times
our callback runs. There is a small JavaScript library1 designed by Jonatan Heyman
that reduces the number of callbacks we receive from watchPosition().
Accuracy of GeolocationGeolocation accuracy may be important to your app. As discussed, you can always
choose to enable high location accuracy using PositionOptions.enableHighAccur-
acy. But that’s just hinting to the device to use a little more power so as to return a
more accurate position. The device may silently disregard it. In many situations,
the location retrieved may not be accurate enough or even be wrong. And sometimes
the user may have no interest in the retrieved location. In those cases, you may want
to allow the users to override the location.
1 https://github.com/heyman/geolocation-throttle
253APIs: The Geolocation API

ConclusionThe Geolocation API is a great tool for the developer who wants to build cool loca-
tion-based applications that give real-time feedback to the users; however, you
should remember that the user always has a choice. As mentioned, the user has to
explicitly grant permission to your application for you to actually access the location.
In those cases, you should be ready with alternative content.
Here are a few small projects you can try to implement on your own:
■ Detect your position and plot it on a Google Map.
■ Continuously monitor your own position and plot them on the map.
■ Detect the position of a user and show them theaters nearby.
■ Let your users check in at different places and plot these on a map to later show
them the places they visited that day.
Jump Start HTML5254

Chapter29APIs: Server Sent EventsServer Sent Events is an API by which browsers receive push notification from
servers through the HTTP connection. Once a connection is established, the server
can send updates to the client periodically as new data is available. In other words,
a client subscribes to the events generated on the server side. Once a particular
event occurs, the server sends a notification to the client. With Server Sent Events
(SSEs), you can create rich applications that provide real-time updates to the browser
without significant HTTP overhead.
In this chapter, we’ll discuss the concepts behind SSEs and learn how to use them
to build real-time HTML5 apps.
The Motivation for SSEsBefore moving any further, it’s important to understand the need for this API. To
explain, let me first ask you a question: how would you design a real-time app that
continuously updates the browser with new data if there were no Server Sent Events
API? Well, you could always follow the traditional approach of long polling through
setInterval()/setTimeout() and a little bit of Ajax. In this case, a callback executes
after a specified time interval and polls the server to check if new data is available.

If data is available. it's loaded asynchronously and the page is updated with new
content.
The main problem with this approach is the overhead associated with making
multiple HTTP requests. That’s where SSEs come to rescue. With SSEs, the server
can push updates to the browser as they’re made available through a single unidirec-
tional connection. And even if the connection drops, the client can reconnect with
the server automatically and continue receiving updates.
Keep in mind that SSEs are best suited for applications that require unidirectional
connection. For example, the server may obtain latest stock quotes periodically and
send the updates to the browser, but the browser doesn’t communicate back to the
server, it just consumes the data sent by server. If you want a bi-directional connec-
tion, you’ll need to use Web Sockets, which are covered in the next chapter.
Okay, enough talking. Let’s code!
The APIHere’s some example code showing the use of SSEs:
if (!!window.EventSource) { var eventsource=new EventSource('source.php'); eventsource.addEventListener('message',function(event) { document.getElementById("container").innerHTML = event.data; }, false);}else{ // fallback to long polling}
Using Modernizr
Note that we’re checking for browser support of SSEs. The same check can be
achieved using Modernizr:
if (Modernizr.eventsource) { // proceed further}
Jump Start HTML5256

else{ // fallback to long polling}
To use SSEs, you just call the EventSource constructor, passing the source URL.
The source may be any back-end script that produces new data in real time. Here I
have used a PHP script (source.php), but any server-side technology that supports
SSEs can be used.
You can then attach event listeners to the eventsource object. The message event
is fired whenever the server pushes some data to the browser and the corresponding
callback is executed. The callback accepts an event object and its data property
contains our data from the server. Once you have the data, you can perform tasks
such as updating a part of the page with new information automatically in real time.
You can be aware of when the connection opens and when an error occurs, as fol-
lows:
eventsource.addEventListener('open', function(event) { // connection to the source opened},false);
eventsource.addEventListener('error', function(event) { // Bummer!! an error occurred},false);
The EventStream FormatThere needs to be something in your server’s response to help the browser identify
the response as a Server Sent Event. When the server sends the data to the client,
the Content-Type response header has to be set to text/event-stream. The content
of the server’s response should be in the following format:
data: the data sent by server \n\n
data: marks the start of the data. \n\n marks the end of the stream.
257APIs: Server Sent Events

\n is the Carriage Return Character
You should note that the \n used above is the carriage return character, not simply
a backslash and an n.
While this works for single-line updates, in most cases we’ll want our response to
be multiline. In that case, the data should be formatted as follows:
data: This is the first line \ndata: Now it's the second line \n\n
After receiving this stream, client-side event.datawill have both the lines separated
by \n. You can remove these carriage returns from the stream as follows:
console.log(e.data.split('\n').join(' '));
How About a Little JSON?In most real-world apps, sending a JSON response can be convenient. You can send
the response this way:
data: {generator: "server", message: "Simple Test Message"}\n\n
Now in your JavaScript, you can access the data in the onmessage callback quite
simply:
var parsedData = JSON.parse(event.data);console.log( "Received from " + parsedData.generator + " and the message is: " + parsedData.message);
Associating an Event IDYou can associate an event id with the data you are sending as follows:
id: 100\ndata: Hey, how are you doing?\n\n
Jump Start HTML5258

Associating an event id can be beneficial because the browser tracks the last event
fired. This id becomes a unique identifier for the event. In case of any dropped
connection, when the browser reconnects to the server it will include an HTTP
header Last-Event-Id in the request. On the server side, you can check the presence
of the Last-Event-Id header. If it’s present, you can try to send only those events
to the browser that have event id greater than the Last-Event-Id header value. In
this way, the browser can consume the missed events.
Creating Your Own EventsOne of the most crucial aspects of SSEs is being able to name your events. In a sports
app, you can use a particular event name for sending score updates and another for
sending other information related to the game. To do that, you have to register
callbacks for each of those events on the client side. Here’s an example:
Response from server:
event: score \ndata: Some score!! \n\nevent: other \ndata: Some other game update\n\n
Client-side JavaScript:
var eventsource=new EventSource('source.php');
// our custom eventeventsource.addEventListener('score',function(e) { // proceed with your logic console.log(e.data);}, false);
//another custom eventeventsource.addEventListener('other',function(e) { // proceed in a different way console.log(e.data);}, false);
Having different event names allows your JavaScript code to handle each event in
a separate way, and keeps your code clean and maintainable.
259APIs: Server Sent Events

Handling Reconnection TimeoutThe connection between the browser and server may drop any time. If that happens,
the browser will automatically try to reconnect to the server by default after roughly
five seconds and continue receiving updates; however, you can control this timeout.
The following response from the server specifies how many milliseconds the browser
should wait before attempting to reconnect to the server in case of disconnection:
retry: 15000 \ndata: The usual data \n\n
The retry value is in milliseconds and should be specified once when the first
event is fired. You can set it to a larger value if your app does not produce new
content rapidly and it’s okay if the browser reconnects after a longer interval. The
benefit is that it may reduce the overhead of unnecessary HTTP requests.
Closing a ConnectionWe always reach this part in almost every API; when resources are no longer needed
and it’s better to release them. So, how do you close an event stream? Write the
following and you’ll no longer receive updates from the source:
eventsource.close(); //closes the event stream
A Sample Event SourceTo finish with, how about some Chuck Norris jokes? Let’s create a simple Event-
Source that will randomly fetch a joke and push it to our HTML page. Here’s a
simple PHP script that pushes the new data:
source.php
<?phpheader('Content-Type: text/event-stream');header('Cache-Control: no-cache'); ob_implicit_flush(true);ob_end_flush();while (true) { sleep(2);
Jump Start HTML5260

$curl=curl_init('http://api.icndb.com/jokes/random'); curl_setopt($curl, CURLOPT_RETURNTRANSFER, true); $result=curl_exec($curl); echo "data:$result\n\n";}?>
Some Notes on the PHP Script
The data from the API is in JSON format. SSEs require you to prepend your data
with data: and mark the end with \n\n. If you miss these points, the Event-
Source won’t work, and remember to also pay attention to the headers. The
reason for the loop is to keep the connection open. Without the loop, the browser
will attempt to open a new connection after five seconds or so.
As we are looping continuously in the PHP script, the execution time of the script
may exceed PHP’s max_execution_time. You may also face problems because
of the Apache user connection limit. Technologies such as Node.js may be a better
choice for these types of real-time apps.
Here’s the HTML page that displays the data:
jokes.html
<!DOCTYPE html><html><head><title>A Random Jokes Website</title><script>if(typeof(EventSource)!=="undefined"){ var eventsource=new EventSource('source.php'); eventsource.addEventListener('message', function(event) { document.getElementById("container").innerHTML = ➥JSON.parse(event.data).value.joke + '<br/>' + ➥document.getElementById("container").innerHTML; },false);}else console.log("No EventSource");</script></head><body>
<div id="container"></div>
261APIs: Server Sent Events

</body></html>
DebuggingIn case you encounter problems, you can debug your application using the browser’s
JavaScript console. In Chrome, the console is opened from Menu > Tools > JavaScript
Console. In Firefox, the same can be accessed from Menu > Web Developer > Web
Console. In case the event stream is not working as expected, the console may report
the errors, if any.
You need to pay special attentions to the following:
■ sending the header Content-Type: text/event-stream from the server
■ marking the start and end of content with data: and \n\n respectively
■ paying attention to same-origin policies
ConclusionServer Sent Events have solved the long polling hack that we previously used to
achieve real-time update functionality. Here are a few simple projects that you might
want to implement:
■ Creating a page that has a clock updated from the server side.
■ Reading and displaying the latest tweets with the help of the Twitter API.
■ Fetching a random photo with the Flickr API and updating the page.
The Mozilla Developer Network has a good resource for learning more about SSEs.1
Here, you can also find some demo apps and polyfills for older browsers.
1 https://developer.mozilla.org/en-US/docs/Server-sent_events
Jump Start HTML5262

Chapter30APIs: The WebSocket APII think that WebSockets are one of the coolest APIs available in HTML5. The real
strength of the WebSocket API comes to the fore when you want your clients to talk
to the server through a persistent connection. This means that once the connection
is opened, the server and the client can send messages to each other anytime. Gone
are the days when clients used to send a message to the server and wait until the
server responded back. Clearly, WebSockets eliminate the need for long polling!
The API is very useful if you want to create real-time apps where clients and the
server talk to each other continuously. For instance, you can build chat systems,
multi-player HTML5 games and similar apps with WebSockets.
WebSockets versus Server Sent Events (SSEs)
WebSockets and SSEs can achieve similar tasks but they are different. In the case
of SSEs, the server only pushes data to the client once new updates are available.
In the case of WebSockets, both client and server send data to each other; to be
precise, the communication is bi-directional (full-duplex, if you love more tech-
nical terms).

To use WebSockets, you’ll need a WebSocket-enabled server. Well, that’s the tricky
part. Don’t worry! There are implementations of WebSockets available for several
different languages. I will cover those shortly.
Additionally, you should always bear in mind that WebSockets allows cross-origin
communication. So, you should always only connect to the clients and servers that
you trust.
The JavaScript APILet’s quickly try it out. The developers at WebSocket.org1 have created a demo
WebSocket server at ws://echo.websocket.org. We can connect to it and start ex-
changing messages with it in no time.
The ws:// Protocol
ws:// is a protocol that’s similar to http://, except that it’s used for specifying
the Web Sockets server URLs.
First, let’s see how to connect to a simple WebSocket server using the JavaScript
API. After that, I will show how you can create your own WebSocket server and let
others connect with you.
// test if the browser supports the APIif('WebSocket' in window) {
var socket = new WebSocket('ws://echo.websocket.org');
if (socket.readyState == 0) console.log('Connecting...');
// As soon as connection is opened, send a message to the server socket.onopen = function () { if (socket.readyState == 1) { console.log('Connection Opened'); socket.send('Hey, send back whatever I throw at you!'); } };
// Receive messages from the server
1 http://www.websocket.org/
Jump Start HTML5264

socket.onmessage = function(e) { console.log('Socket server said: ' + e.data); };
socket.onclose = function() { if (socket.readyState == 2) console.log('Connection Closed'); };
// log errors socket.onerror = function(err) { console.log('An Error Occurred ' + err); };
}else { // sadly, no WebSockets!}
Using Modernizr
With Modernizr, we can check for the browser support of WebSockets this way:
if (Modernizr.websockets) { // proceed}else{ // No WebSocket}
So, you start by passing the socket server URL to the WebSocket constructor. The
constructor also accepts an optional second parameter, which is an array of sub-
protocols. This parameter defaults to an empty string.
Next, we attach different callbacks for different events. As soon as the connection
opens, the onopen event is fired and our callback executes. You can send a simple
message to the server by calling socket.send(). You can also send binary data,
which we’ll see in the next section.
Similarly, the server can also send us messages. In that case, the onmessage callback
fires. At the moment, the server sends us back whatever we send to it, and we simply
265APIs: The WebSocket API

log the message received. But you can always capture the message and dynamically
update your page with it.
Just paste the code in an HTML file and run it ― you’ll be delighted to see the
server’s response!
The readyState Property
The variable socket in the aforementioned code has a property called readyS-
tate indicating the status of the connection:
■ 0 = connecting
■ 1 = opened
■ 2 = closed
Sending Binary DataYou can also send binary data to the server. The following program sends the image
drawn on canvas to a sample WebSocket:
// you need to create this socket servervar connection=new WebSocket('ws://localhost:8080');
connection.onopen = function() {
// get an image from canvas var image = canvas2DContext.getImageData(0, 0, 440, 300); var binary_data = new Uint8Array(image.data.length); for (var i = 0; i < image.data.length; i++) { binary_data[i] = image.data[i]; } connection.send(binary_data.buffer); // send the data
}
In the code, we read the image from the HTML page and create an ArrayBuffer to
contain the binary data. Finally, connection.send() actually sends the data.
Jump Start HTML5266

Using Blobs
We can also send the binary data as a blob. For example, you could create a file
uploader and read the files through querySelector(). Then you can send those
files with the help of connection.send(). HTML5Rocks has an excellent tutorial
on WebSockets2 that also covers sending binary data to the server through blobs.
Sample Server ImplementationsHere are a few WebSockets implementations available for different server-side lan-
guages. You can choose a library based on your preferred language:
■ PHP: Ratchet3
■ Node.js: Socket.IO4
■ Java: jWebSocket5
For a complete overview of server-side libraries, Andrea Faulds maintains a com-
prehensive list.6
It’s beyond the scope of this short book to discuss each of these libraries in detail.
But regardless of the implementation, they all offer a simple API through which
you can interact with your clients. For example, they all offer a handler function
to receive messages from the browser and you can also communicate back with the
client. I encourage you to grab a library for your favorite language and play around
with it.
I have written an extensive tutorial on WebSockets on SitePoint.com.7 In that tutorial,
I’ve shown how to implement a WebSockets-enabled server using jWebSocket and
let others connect to it.
2 http://www.html5rocks.com/en/tutorials/websockets/basics/3 http://socketo.me/4 https://github.com/learnboost/socket.io5 http://jwebsocket.org/6 http://ajf.me/websocket/#libs7 http://www.sitepoint.com/introduction-to-the-html5-websockets-api/
267APIs: The WebSocket API

ConclusionIf you want to learn more about the WebSocket API, the following resources are
worth checking out:
■ the WebSocket API8
■ WebSocket tutorial at Mozilla Ddeveloper Network9
■ WebSocket demo apps10
Here are a few use cases of the API:
■ creating a simple online chat application
■ updating a page as new updates are available on the server and communicating
back
■ creating an HTML5 game with multiple users.
8 http://dev.w3.org/html5/websockets/9 https://developer.mozilla.org/en-US/docs/WebSockets10 http://www.websocket.org/demos.html
Jump Start HTML5268

Chapter31APIs: The Cross-document Messaging
APIThe Cross-document Messaging API in HTML5 makes it possible for two documents
to interact with each other without directly exposing the DOM. Just imagine the
following scenario: Your web page has an iframe that is hosted by a different website.
If you try to read some data from that iframe, the browser will be very upset and
may throw a security exception. It prevents the DOM from being manipulated by a
third-party document, thereby stopping potential attacks such as CSRF1 or cross-
site scripting (XSS).2 But the Cross-document Messaging API never directly exposes
the DOM. Instead, it lets HTML pages send messages to other documents through
a message event.
The Cross-document Messaging API is useful for creating widgets and allowing
them to communicate with third-party websites. For example, let’s say that you
have a page that serves ads and you allow the end-users to embed this page in their
websites. In this case, you can let users personalize the ads or modify the type of
1 http://en.wikipedia.org/wiki/Cross-site_request_forgery2 http://en.wikipedia.org/wiki/Cross-site_scripting

ads through the Cross-document Messaging API. Clients can send messages to your
page and you can receive those messages too.
The JavaScript APIThe Cross-document Messaging API revolves around a single method: window.post-
Message(). As its name suggests, this method allows you to post messages to a dif-
ferent page. When the method is called, a message event is fired on the receiving
document side. Before moving further, it’s crucial to understand the properties of
the message event. There are three properties we’re interested in:
1. data: This holds the message being sent. You have already played with it in
previous chapters (remember calling event.data in SSEs?).
2. origin: This property indicates the sender document’s origin; i.e the protocol
(scheme) along with the domain name and port, something like http://ex-
ample.com:80. Whenever you receive a message, you should always, always
check that the message is coming from a trusted origin. I will explain how to do
that in the next section.
3. source: This is a reference to the sender’s window. After receiving a cross-docu-
ment message, if you want to send something back to the sender, this is the
property you’ll use.
Basic UsageYou send a message to another document by calling window.postMessage(). This
function takes two arguments:
■ message: the actual message you want to send
■ targetOrigin: a simple string indicating the target origin—an additional security
feature (I’ll explain how this is useful in the next section)
The code looks like the following:
targetWindow.postMessage(message, targetOrigin);
Jump Start HTML5270

You should note that targetWindow refers to the window to which you want to send
a message. It may be a window you just opened through a call to window.open(),
or it can also be the contentWindow property of some iframe.
A Reference to an Open Window
window.open('a URL') returns a reference to the opened window. You can
always call postMessage() on it.
Let’s build a very simple example. Say that we have a parent page that has an iframe
inside it. The iframe’s src points to a third-party website that provides us with a
random image.
This is the page referenced by the iframe in our parent page:
child.html
.f<!DOCTYPE html><html><head><title>A page that provides a random image</title></head><body> <div id="container"> <img ➥src="http://randomimage.setgetgo.com/get.php?key=2323232" ➥id="image" /> <div></body></html>
So far, so good! Now let’s have a look at our parent page:
parent.html
<!DOCTYPE html><html><head><title>The Parent Document</title></head> <body> <iframe
271APIs: The Cross-document Messaging API

➥src="child.html" ➥height="500" width="500" id="iframe"> </iframe> <br/> </body></html>
When you open up the parent page, you can see the image coming from the page
child.html. For now, both parent.html and child.html are on the same server (local-
host) for testing purposes. But they should ideally be on different servers.
But we don’t want to keep showing a static image to our users, nor reload our iframe.
It would be really great if we could ask the page child.html to reload its image when
a user hits a button on our parent page; i.e. parent.html.
Let’s start by adding a button to our parent page. We’ll also write a function that
responds to the click event and sends a message to child.html.
parent.html
<!DOCTYPE html><html><head><title>The Parent Document</title></head> <body> <iframe ➥src="child.html" ➥height="500" width="500" id="iframe"> </iframe> <br/> <button id="reloadbtn">Reload</button>
<script> document.getElementById("reloadbtn"). ➥addEventListener("click", reload, false);
// reload handler function reload(e) { // is cross-messaging supported? if (window.postMessage) { document.getElementById('iframe'). ➥contentWindow.postMessage(
Jump Start HTML5272

Math.random()*1000, 'http://localhost' ); } else { console.log('postMessage() not supported'); } } </script>
</body></html>
Using Modernizr
If you’re using Modernizr to check browser compatibility, check for the property
Modernizr.postmessage.
As you can see, when a user clicks on reload button our callback reload() executes.
First, we ensure that postMessage() is supported by the browser. Next, we call
postMessage() on the iframe’s contentWindow. The contentWindow property of an
iframe is simply a reference to that iframe’s window. Here, our message is a simple
random number (we will see why shortly). The second argument to postMessage()
is http://localhost. This represents the targetOrigin to which the message can
be sent. The origin of the iframe’s src and this argument must be same in order for
postMessage() to succeed. This is done so that other unintended domains cannot
capture the messages. In this case, if you pass something else as the targetOrigin,
postMessage() will fail.
targetOrigin
Think of targetOrigin as a way of telling the browser to which origin the
message can be sent. You can also pass "*" as the targetOrigin. As you might
have guessed, * is a wildcard that says the message can be sent to documents from
any origin. But using a wildcard means loosening your security system by allowing
the message to be sent to any origin. I recommend passing the exact origin as the
second argument to postMessage() instead of the wildcard.
Now we have to receive the message in child.html and take appropriate action. Here’s
the modified child.html this:
273APIs: The Cross-document Messaging API

child.html
<!DOCTYPE html><html><head><title>A page that provides random image</title></head><body>
<div id="container"> <img ➥src="http://randomimage.setgetgo.com/get.php?key=2323232" ➥id="image" /> <div>
<script> window.addEventListener('message', messageReceiver, false);
function messageReceiver(event) {
// can the origin can be trusted? if (event.origin != 'http://localhost') return;
document.getElementById('image').src = ➥"http://randomimage.setgetgo.com/get.php?key=" + event.data;
console.log( 'source=' + event.source + ', data=' + event.data + ', origin=' + event.origin );
} </script>
</body></html>
First, we attach a callback to the message event. Whenever parent.html sends a
message to child.html, this callback will be executed. The first and most important
step is to check whether you are receiving messages from the intended origin. After
adding an event listener to the message event, you can receive messages from doc-
Jump Start HTML5274

uments of any origin. So, it’s recommended to always put a check inside your call-
back to ensure that the message is coming from a trusted origin.
Next, we retrieve the message from event.data. This particular API that we’re using
for random images requires a different random number each time so that the gener-
ated image will be a unique one. That’s why we’re generating a random number on
a button click (in parent.html) and passing that as a message to child.html. In child.html,
we simply construct a new image URL with the help of the random number and
update the image’s src. As a result, we can see a new image each time we click the
reload button from the main page.
Sending a Message Back
If you want to send a message back to parent.html, you can always use
event.source.postMessage() inside your event listener in child.html. Con-
sequently, you’ll also need an event handler in the parent page.
Detecting the Readiness of the DocumentMost of the time, you’ll send messages to iframes embedded in your pages. But
many times, you may also need to open a new window from your page and post
messages to that. In this case, ensure that the opened window has fully loaded. Inside
the opened window, attach a callback to the DOMContentLoaded event, and in that
function send a message to the parent window indicating that the current window
has fully loaded.
Getting a Reference
Inside the DOMContentLoaded event listener (in the opened window), you can
get a reference to the window by accessing event.currentTarget.opener and
calling postMessage() on it as usual. Tiffany Brown explains how to achieve
this in an excellent tutorial.3
3 http://dev.opera.com/articles/view/window-postmessage-messagechannel/#whenisdocready
275APIs: The Cross-document Messaging API

ConclusionThis was the overview of the Cross-document Messaging API. By using this API,
two cross-origin documents can securely exchange data. Because the DOM is not
directly exposed, it’s now possible for a page to directly manipulate a third-party
document.
The Cross-document Messaging API certainly gives you more power. But, as you
know, with great power comes great responsibility! If you fail to use this API
properly, you may end up exposing your website to various security risks. So, as
discussed in this chapter, you should be very, very careful while receiving cross-
document messages to avoid security risks. Similarly, while sending messages with
window.postMessage(), don’t use * as targetOrigin. Instead, provide a single
valid origin name.
Although it’s not possible to cover each and everything about the API in detail, this
chapter gives you a head start. You should now be able to experiment with different
things on your own. For further reading, I strongly recommend the following re-
sources:
■ the Mozilla Developer Network4
■ the W3C specification.5
So, this brings us to the end of our tour through five of the most important and
useful HTML5 APIs. I hope you've found this book a useful introduction to these
powerful technologies. Do take a look at the sample project ideas that I have shared
in the end of each chapter; I also encourage you to get creative and think of some
other good use cases that can be implemented.
Happy coding!
4 https://developer.mozilla.org/en-US/docs/Web/API/Window.postMessage5 http://www.w3.org/TR/webmessaging/
Jump Start HTML5276