Study Unit Motorcycle Troubleshooting - Indianmcinfo DC circuit-system problems ... Electric...
58
Study Unit Motorcycle Troubleshooting By Ed Abdo
Transcript of Study Unit Motorcycle Troubleshooting - Indianmcinfo DC circuit-system problems ... Electric...

Study Unit
MotorcycleTroubleshooting
By
Ed Abdo

About the Author
Edward Abdo has been actively involved in the motorcycle and ATV industry for more than 25years. He received factory training from Honda, Kawasaki, Suzuki, and Yamaha training schools.He has worked as a motorcycle technician, service manager, and Service/Parts departmentdirector.
After being a chief instructor for several years, Ed is now the Curriculum Development Managerfor the Motorcycle Mechanics Institute in Phoenix, Arizona. He is also a contract instructor andadministrator for American Honda’s Motorcycle Service Education Department.
All terms mentioned in this text that are known to be trademarks or servicemarks have been appropriately capitalized. Use of a term in this text shouldnot be regarded as affecting the validity of any trademark or service mark.
Copyright © 1996 by Thomson Education Direct
All rights reserved. No part of the material protected by this copyright may bereproduced or utilized in any form or by any means, electronic or mechanical,including photocopying, recording, or by any information storage and retrievalsystem, without permission in writing from the copyright owner.
Requests for permission to make copies of any part of the work should be mailedto Copyright Permissions, Thomson Education Direct, 925 Oak Street, Scranton,Pennsylvania 18515.
Printed in the United States of America

In this study unit, you’ll learn the art of diagnostics, which is essential to the troubleshootingprocess. Because it’s impossible to cover every type of motorcycle or ATV problem, we’llintroduce basic diagnostic and troubleshooting techniques and concepts that you can apply tomany different situations. Each major topic in this study unit includes a reference table that youcan use as a guide when troubleshooting motorcycle or ATV problems. To get the most from thisstudy unit, focus your attention on the concepts presented. Learning these concepts will allowyou to build a solid foundation for developing your own troubleshooting expertise.
When you complete this study unit, you’ll be able to
� Systematically approach motorcycle and ATV problems
� Troubleshoot engine problems
� Troubleshoot lower-end and exhaust-system problems
� Troubleshoot carburetor problems
� Troubleshoot ignition-system problems
� Troubleshoot electrical-system problems
� Troubleshoot chassis problems
� Troubleshoot hydraulic- and mechanical-brake problems
� Troubleshoot DC circuit-system problems
Preview
iii

New Table of ContentsINTRODUCTION . . . . . . . . . . . . . . . . . . . . . . . . . . . . . . . 1
SYSTEMATIC APPROACHES TO SOLVING PROBLEMS . . . . . . . . . . . . 2Types of ProblemsBeginning the Troubleshooting ProcessTroubleshooting Guides
TROUBLESHOOTING A MOTORCYCLE OR ATV THAT WON’T START . . . . . 6FuelCompressionIgnition
TROUBLESHOOTING ENGINE LOWER-END AND EXHAUST SYSTEMS . . . . 11Troubleshooting the Lower EndExhaust-system Troubleshooting
TROUBLESHOOTING CARBURETOR PROBLEMS . . . . . . . . . . . . . . . 14Is It Rich or Lean?When Is the Problem Apparent?Other Carburetor-related ProblemsCarburetor Operation SummaryTroubleshooting Suggestions
TROUBLESHOOTING ELECTRICAL PROBLEMS . . . . . . . . . . . . . . . . 23Charging-system TroubleshootingIgnition-system TroubleshootingDC Circuit TroubleshootingElectric Starter-motor Troubleshooting
TROUBLESHOOTING CHASSIS PROBLEMS . . . . . . . . . . . . . . . . . . 35
CONCLUSION . . . . . . . . . . . . . . . . . . . . . . . . . . . . . . . . 39
ROAD TEST ANSWERS . . . . . . . . . . . . . . . . . . . . . . . . . . . . 53
EXAMINATION . . . . . . . . . . . . . . . . . . . . . . . . . . . . . . . . 55
Contents
v

INTRODUCTIONThe ability to quickly and correctly troubleshoot motorcycle or ATVproblems is the first sign of a competent technician. Proper diagnosisof a malfunction makes motorcycle or ATV disassembly, repair, andreassembly relatively simple. If a malfunction has been improperlydiagnosed, the repair process can become long and tedious, or evenimpossible. In order to be a successful technician, you must possessproficient troubleshooting skills. First and foremost, troubleshootingbegins with a thorough knowledge of the
� Parts of a motorcycle
� Job each part performs
� Effect each part has on overall motorcycle operation
� Types of failure symptoms that a bad part will cause
Once you’ve gained this knowledge, troubleshooting becomes asystematic and controlled approach to solving a problem.
When troubleshooting, you’ll need to
� Gather all available information about the machine’smalfunction
� Analyze the symptoms related to the problem
� Pinpoint the most likely cause of the problem
The repair process doesn’t begin until after you’ve gotten a clearpicture of what’s causing the problem. To achieve this picture, you’llhave to
� Mentally divide the motorcycle into sections (carburetion,engine, electrical, and chassis)
� Picture each component of every section
� Picture each component and its relationship to the othercomponents and decide if each part is functioning properly
For example, suppose a spark plug isn’t firing correctly. You mustenvision the operation of the spark plug in relation to the othermotorcycle systems. After doing this, you’ll have a variety of possibleproblems identified, besides the obvious conclusion that the sparkplug is bad. The problem could be due to a dirty air filter that’screating an excessively rich fuel mixture. The source of the problemcould also be the ignition circuit or the carburetor system.
Motorcycle Troubleshooting
1

It’s imperative that you understand what you’re trying to repairbefore disassembling a machine. Once you begin the disassemblyprocess, the troubleshooting process is over. In our example, cleaningand replacing parts in the carburetor won’t solve the problem if thecause is a faulty ignition. Therefore, ensure that you’ve truly isolatedthe problem before beginning any repair.
SYSTEMATIC APPROACHES TO SOLVING PROBLEMSThis section of the study unit concentrates on techniques that expeditethe process of troubleshooting motorcycle and ATV problems.Developing a systematic approach to problem solving now will helpyou to perfect your skills as you gain experience.
Types of ProblemsA symptom is an indication of an abnormal condition that you canrecognize and identify. An example of a symptom would be amotorcycle that’s making a ticking sound when it’s idling. Thesymptom helps you determine the cause of the problem. Thefollowing paragraphs cover three types of failures that you mayencounter.
Constant FailuresA constant failure occurs when a symptom is always present. Forinstance, a motorcycle is functioning properly and without warning,the engine fails and the rear wheel locks up. The locked rear wheel isconsidered a constant failure.
Intermittent FailuresAn intermittent failure isn’t always present. This type of failureincreases the difficulty of the troubleshooting process. For example,a particular motorcycle functions properly with the exception ofoccasionally blowing a fuse when the vehicle hits a pothole. The riderreplaces the fuse and rides trouble-free until the problem recurs whenanother large bump is encountered. Chances are, this intermittentproblem is caused by multiple factors. In this instance especially, asystematic approach to troubleshooting the problem is required. Withany problem (performance, electrical, mechanical, or fuel), a systematicapproach allows the problem to be diagnosed in a reasonable amountof time with a high degree of accuracy.
2 Motorcycle Troubleshooting

Improper-service FailuresAn improper-service failure, as the name implies, is caused by atechnician who made a mistake during the servicing of theequipment. Suppose a customer brings an off-road vehicle to yourservice department for a new set of tires and the technician servicingthe vehicle fails to properly torque one of the wheel-retaining nutsand forgets to install a cotter pin on the rear-axle nut. Later thisimproper service causes the wheel to wobble and fall off while thecustomer is riding the machine. Obviously, most failures caused byimproper service aren’t this dramatic. It’s important not to overlookproblems resulting from bad service when you’re troubleshooting avehicle.
Beginning the Troubleshooting ProcessThe proper method of diagnostic troubleshooting consists of foursteps that must be followed in the proper sequence. Follow thesesteps for a foolproof approach to the troubleshooting and repairprocess.
1. Verify the problem.
2. Isolate the problem.
3. Repair the problem.
4. Verify the repair.
When troubleshooting, you must observe the failure and verify thatall of the information you’ve received is accurate and guides you tothe trouble area. After you’ve completed the verification stage, you’reready to begin the isolation phase.
Isolating a problem begins with the easiest and most obvious solutionto the problem. As the simplest solutions fail to correct the problem,progression to more involved and difficult checks needs to beperformed in a step-by-step manner. The most common diagnosticmistake is to overlook the obvious or easiest possible cause of afailure. For example, a motorcycle was functioning properly, thenstalled and wouldn’t restart. The owner took the motorcycle to aservice station. The technician removed and checked the sparkplugs, checked the air filter, replaced the battery, and performedcompression and leakdown tests. When all was said and done, theproblem was an empty fuel tank. Believe it or not, this situation isn’tuncommon and results from poor troubleshooting skills (not startingwith the simplest solutions first).
The symptoms of a problem guide you to the specific system youshould troubleshoot, provided you have an understanding of howeach system works and what it’s responsible for. For example,
Motorcycle Troubleshooting 3
� If the battery won’t turn the engine over, you can assume thatthe machine has a worn-out battery or a charging system that’sfailing to provide a proper charge to the battery.
� If gasoline is leaking from the carburetor overflow tube, you canassume that there’s an internal carburetor problem that’scausing excessive amounts of gasoline to enter the system.
As the severity of problems increases, the knowledge required torepair the problem increases. An example of this is poor engineperformance. A performance problem could be caused by an ignition-system failure, a mechanical engine problem, or even a fuel-relatedproblem. It’s imperative to use all available resources and anyinformation you can gather from your customer to assist you inidentifying which system is responsible for the problem.
After you’ve isolated the problem, you must repair the problem. Inorder to repair the problem, you must refer to the specific servicemanual for the particular motorcycle or ATV you’re servicing. Whenyou complete the repair, you must verify the repair. If you can’t verifythat the repair was successful (the problem still occurs), you mustrepeat the troubleshooting process, beginning with the verificationstage.
Troubleshooting GuidesThe appropriate manufacturer’s service manual contains checklists ortables of possible operating troubles and their probable causes. Thesetables aid in troubleshooting and problem solving. All possibilitiesshould be carefully checked because multiple factors may be causingthe overall problem. Throughout this study unit, examples of typicalproblems and possible solutions are provided. These examples havebeen derived from current service manuals and technical guides.However, you should note that the specific troubleshooting sectionsof this study unit and in manufacturer’s service manuals are intendedonly as a guide to diagnosing problems. Always read the detailedinformation in the specific chapters of the appropriate service manualbefore performing service work on any system or major component.Remember to adhere to all cautions and warnings.
As you learn more about various motorcycle and ATV systems, youmay develop a tendency to troubleshoot problems based on yourpersonal experience. This approach is a gamble that can occasionallysave you time; but if you guess wrong, it costs you time and money.Don’t be afraid to apply your experience to a good troubleshootingroutine, but don’t underestimate repairs because the failure looksfamiliar.
4 Motorcycle Troubleshooting

Locating and fixing a problem is very rewarding, provided you usegood troubleshooting techniques. Furthermore, the more difficultthe problem, the greater the reward when you’ve solved it. To besuccessful, the most important barrier to overcome is the lack ofself-confidence required to perform the job. Here are some things tokeep in mind when you’re troubleshooting a problem.
� Always think the problem through.
� Never overlook the obvious.
� Never assume anything.
� Never take shortcuts.
� Never make more than one change or adjustment at a time.
� Always use the appropriate service manual(s) for all removals,replacements, and adjustments.
� Remember to always verify the problem, isolate the problem,repair the problem, and most importantly, verify the repair.
Road Test 1
At the end of each section of Motorcycle Troubleshooting, you’ll be asked to check yourunderstanding of what you’ve just read by completing a “Road Test.” Writing the answersto these questions will help you review what you’ve learned so far. Please complete RoadTest 1 now.
1. Another word used to define a description of a problem is _______.
2. Where would you find a checklist or table of possible operating troubles and theirprobable causes?
3. What are the four procedures that must be followed when developing the proper methodof diagnostic troubleshooting?
4. What are the three basic categories of troubleshooting problems on motorcycles andATVs?
5. What one barrier must be overcome before you can troubleshoot any type of problem?
Check your answers with those on page 53.
Motorcycle Troubleshooting 5

TROUBLESHOOTING A MOTORCYCLE OR ATV THATWON’T START
A large number of problems can be responsible for a motorcycle orATV that won’t start. Frequently, only one of these potentialproblems occurs at a time, and correcting that problem allows themotorcycle or ATV to start and function properly. As mentioned,locating the problem can be a simple job if certain procedures arefollowed.
The first step in troubleshooting a motorcycle or ATV that won’t startis attempting to start the engine. As you attempt to rotate the engineusing the kick starter or electric starter, observe the following:
� If the engine doesn’t rotate
� If the engine makes unusual noises
� If engine compression is inadequate
If any of the above conditions exist, the problem is internal andrequires engine repair. If the engine fails to rotate when in neutral, theengine has seized and the problem lies within either the crankshaft,connecting rod, or piston. Repair of these parts was previouslydiscussed in the engine top-end and lower-end study units.
Engine rotation. When checking to see if the engine is rotating freely,you should also check the clutch. If the clutch is slipping badly, theengine may appear to rotate when in reality it has seized. If yoususpect the clutch is the source of the problem, refer to your studyunit discussing clutches.
Unusual engine noise. There could be a wide variety of reasons forunusual noises coming from the engine. For example, a heavyclunking sound coming from the lower end could indicate a looseconnecting rod. As you gain experience with motorcycles and ATVs,recognizing certain noises and identifying causes becomes an easytask.
Compression. If the engine doesn’t have proper compression(Figure 1), the problem probably lies within the pistons, rings, valves,or cylinder bore. If all lower-end parts appear to be in proper workingcondition, the problem must be related to combustion. Lower-endengine problems are discussed in detail as this study unit progresses.
After you’ve completed the preliminary checks while attempting tostart the engine, think about the three essential factors for propercombustion: fuel, compression, and ignition.
6 Motorcycle Troubleshooting

FuelAfter excluding major engine trouble, proceed to inspect the fuelsupply. When troubleshooting the fuel system, check the following:
� Fuel in the gas tank
� Fuel flow to the carburetor
� Fuel flow from the carburetor to the engine
A plugged gas-tank vent, fuel shut-off valve, or gas line can beresponsible for restricting the fuel supply to the carburetor. Tracethrough the system in search for blockage. Begin with the vent, thenthe shut-off valve (Figure 2), and finally the gas line. If any of thecomponents are plugged or dirty, they must be cleaned.
Motorcycle Troubleshooting 7
FIGURE 1—A compressioncheck is shown here.(Copyright by American Honda
Motor Co., Inc. and reprinted with
permission)
FIGURE 2—In order for fuelto flow from the fuel tankto the carburetor, the fuelshut-off valve must be inthe ON position. (Image
courtesy of Yamaha Motor
Corporation, U.S.A.)

Restriction of the gas flow to the engine creates a lean fuel mixtureand is indicated by a dry spark plug. Fuel flow from the carburetor tothe engine can be interrupted by air leaks between the carburetor andinlet manifold, or in the case of two-stroke engines, bad lower-endengine seals. Inspect and repair these parts as needed.
A wet spark plug indicates a rich mixture. The supply of gas is morethan the engine can burn (flooded). A rich mixture may be caused by
� A closed air choke valve (carburetor choke)
� A dirty air cleaner
� A stuck float
If the problem is caused by a rich mixture, ensure that the choke isopen. Then, check the air cleaner and clean as needed. Next, check thefloat shut-off level in the carburetor. A stuck float doesn’t shut off thegas flow to the carburetor when requested. Repairing this problemrequires the float bowl to be removed and fixed. Refer to your studyunit on carburetion.
CompressionThe piston, rings, valves, and cylinder must form an airtight seal tocompress the air-and-fuel mixture to the point where combustionoccurs in the cylinder. These parts are checked using a compressiongauge, as shown in Figure 1. Compression must be within factoryspecifications, which are provided in the appropriate service manualfor the particular model you’re working on.
When working on four-stroke engines, if compression is low, youshould perform a leakdown test (Figure 3). A leakdown test providesa more accurate indication of the area of the engine that’s causing theproblem. Always refer to the appropriate service manual, as well asthe study units covering the upper-end engine assembly.
IgnitionGenerally, as long as there is compression and the ignition system isworking correctly, the engine will start (even if it’s receiving toomuch gas). Therefore, if compression and fuel flow are satisfactory,but the engine still fails to start, there may be a problem in theignition system. Check the following items.
� Battery
� Fuses, connections, and switches
� Spark plugs
� Ignition system
8 Motorcycle Troubleshooting

Check for the obvious. Ensure that all ignition-related switches are inthe Run position. It isn’t uncommon to find a motorcycle or ATV thatwon’t start because an ignition switch is set to the Off position.
Check the battery. Turn on the lights. If they burn brightly, thebattery is probably all right. If the lights don’t operate, check the fuseand replace if needed. If the fuse is good, the problem may be adischarged battery. A quick check of the battery can be made using avoltmeter. Connect the negative voltmeter lead to the negative batteryterminal. Connect the positive voltmeter lead to the positive batteryterminal. Read the voltage on the meter. The voltage should be within0.5 volts of the specified voltage. In other words, a 12-volt batteryshould have a minimum reading of 11.5 volts. If the battery voltage islow, the battery must be recharged. If the battery is charged and thefuse is good, but the lights still fail to operate, inspect the connectionsof the battery cables to the battery terminals. The connections may becorroded, preventing the flow of current. Remove the cables or wires,clean the connections with a wire brush, and reconnect the cables tothe battery. If you still don’t have lights, there may be an open circuitin the wires or a switch. An open circuit means that the flow ofelectricity has been interrupted. To check for an open circuit in thelighting system, connect a test wire to the insulated side (not thegrounded side) of the battery and to the lights. The lights should nowlight up. If the situation allows, use a test light to test electricalcircuits. A test light is a bulb with one wire connected to the groundedside of the bulb and another wire to the filament. When the groundedside is connected to the frame or some other metal part, and thefilament lead is in contact with the motorcycle battery, the bulb will
Motorcycle Troubleshooting 9
FIGURE 3—Shown here isa leakdown test beingperformed on a four-stroke engine. (Copyright by
American Honda Motor Co., Inc.
and reprinted with permission)

glow because a complete circuit has been formed. Ensure that the testbulb is of the same voltage as the battery in the circuit you’re testing.
Check a spark plug. If the engine still won’t start after checkingcompression, fuel flow, and current flow to the ignition circuit, checkthe spark plugs. Remove a spark plug and check the gap. Ensure thatthe gap hasn’t been fouled by carbon deposits and the plug hasn’tbeen flooded by gas. As we mentioned before, a wet spark plug canbe caused by a rich fuel mixture or by a faulty ignition. Each time theengine revolves, gas is inducted into the cylinder. If the gas isn’tburned each time, it will eventually flood the spark plug. If the plugsare gas-fouled, they must be cleaned or replaced; and then the sparkplug must be tested to ensure that it’s firing properly. A commonmethod of checking the plug for spark is to remove the plug from thecylinder, install the high-tension lead (wire from the coil to the plug)on the plug, and ground the metal portion of the plug to the cylinderhead or engine. Then turn the engine over (be sure the ignition key ison). When the engine revolves, a sharp blue spark should jump theplug gap. No spark or a weak spark (red spark) indicates a faultyignition system, which can be caused by multiple factors. If youdon’t get a sharp, blue spark when you perform this test, the sparkplug itself may be bad. Repeat the procedure using a new plug.Troubleshooting faulty ignition systems is discussed in more detail asyou proceed in this study unit.
Check the ignition system. If a new plug doesn’t produce a sharp,blue spark, proceed to the ignition-system troubleshooting section inthe electrical section of this study unit to locate the problem.
Road Test 2
1. When a spark plug fires, the color of the spark in the electrode gap should be _______.
2. If an engine is seized (mechanically bound) when its transmission is in the neutralposition, what components may be the cause of the problem?
3. If a four-stroke engine has a problem with the piston(s), rings, or valves, the engine willprobably have low _______.
4. When checking for a possible ignition-system problem, what should you check first?
5. True or False? If a motorcycle or ATV won’t start, generally there are at least threeproblems causing the failure.
Check your answers with those on page 53.
10 Motorcycle Troubleshooting

TROUBLESHOOTING ENGINE LOWER-END AND EXHAUSTSYSTEMS
When troubleshooting a motorcycle or ATV, the problems willfrequently be found in the fuel system, electrical system, upper-endassembly, or chassis. However, problems may also occur in theengine lower-end assembly. Troubleshooting the lower-end enginecomponents follows a simple, step-by-step procedure of analyzingsystems and tracing possible problems.
Troubleshooting the Lower EndYou must have a thorough knowledge of all components of thelower-end assembly before you can begin troubleshooting. You mustknow what parts are used, understand how they work, and be awareof their relation to the entire system. After completing the primaryaspects of troubleshooting, the first thing to do in checking thelower-end components (connecting rods, flywheel, bearings, andother related lower-end parts) is to turn over the engine using thekick starter or the electric starter. Compression should resist freestarter movement, and there shouldn’t be excessive noise from thebearings.
CrankshaftCrankshaft-related problems generally consist of bearing or sealfailure. Bearing failure is easy to diagnose because it causes only twosymptoms. One is excessive noise, and the other is a frozen or seizedengine. However, you mustn’t forget that transmission and clutchdrive problems can also cause excessive noise or make it appear thatthe engine has seized. If you have an engine that can’t be turned overusing the starter, you should disconnect the engine-to-clutch driveand attempt to revolve the engine by hand. If the engine still won’tturn over, you’ll know the problem lies in the engine itself and not inthe transmission or clutch.
TransmissionThe two most common symptoms found when diagnosingmotorcycle or ATV transmission problems are
� The machine is hard to shift
� The transmission jumps out of gear
problems in the order that they’re most likely to occur.
Motorcycle Troubleshooting 11
The following table provides the most common causes of these

Table 1
TRANSMISSION TROUBLESHOOTING
Symptom Problem
Hard to shift a. Improper clutch operation
b. Improper clutch adjustment
c. Incorrect or contaminated transmission oil
d. Bent shift forks
e. Bent shift shaft
f. Damaged shifting drum
Transmission jumps out of gear a. Worn transmission-gear dogs or slots
b. Bent shift-fork shaft
c. Broken shifting-drum stopper spring
d. Bent shift forks
e. Broken shift-linkage return spring
Two-stroke Pressure TestingIn a two-stroke engine, bad crankcase seals can prevent theair-and-fuel mixture from being transferred into the combustionchamber. The correct way to check for lower-end seal failure is to usea special crankcase pressure tool. This tool is connected to the intakemanifold, and air pressure is pumped into the crankcase. If thepressure you pumped into the crankcase drops rapidly, you shouldsuspect seal failure. To check for air leaks, smear soap suds (such asdish soap) around the seal. If there’s a leak, the suds will bubble.Factory specifications require that the crankcase hold a given amountof pressure for a certain period of time. Refer to your service manualfor this information. If the soap test doesn’t indicate leaking seals andthe engine won’t hold pressure, suspect a leak in the case joints or thecylinder-to-crankcase gasket. Perform the soapsuds test on thesejoints.
Note: The crankcase and transmission generally use a commoncasting, and air can leak from the engine case into the transmissioncase. If this is the problem, soapsuds placed around the transmissionvent will bubble as air is pumped into the engine.
Two-stroke engines with more than one cylinder have a separatecrankcase cavity for each piston and rod. These cavities are separatedfrom each other by seals, which are located on the crankshaft.Although each cavity is sealed, it’s possible for these seals to leak.There’s no way to check for this problem using soapsuds. Theproblem here is that you know there’s a leak somewhere, but youhaven’t been able to locate it. Use the following test to determine ifthere’s a leak between the cylinders.
12 Motorcycle Troubleshooting
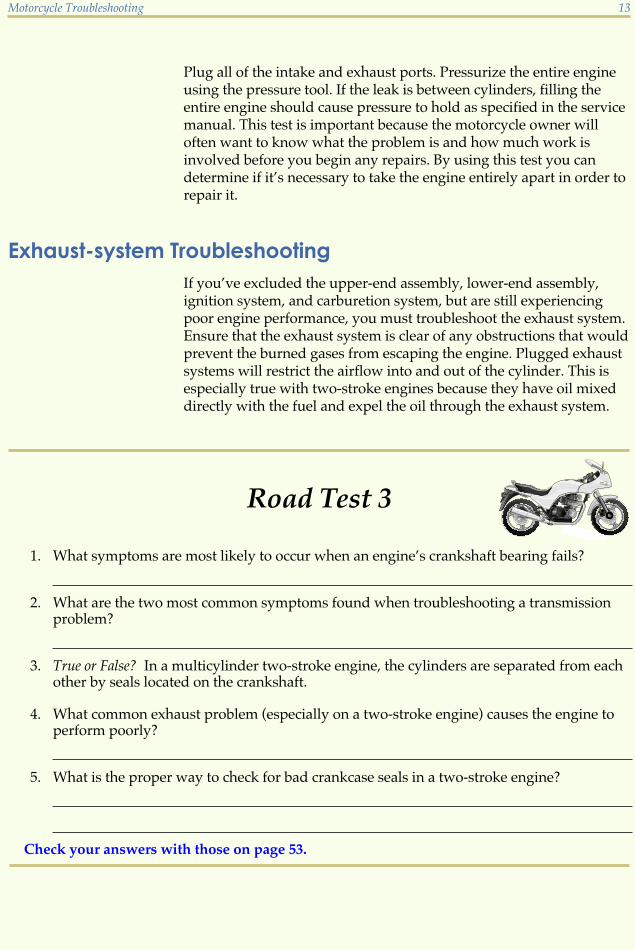
Plug all of the intake and exhaust ports. Pressurize the entire engineusing the pressure tool. If the leak is between cylinders, filling theentire engine should cause pressure to hold as specified in the servicemanual. This test is important because the motorcycle owner willoften want to know what the problem is and how much work isinvolved before you begin any repairs. By using this test you candetermine if it’s necessary to take the engine entirely apart in order torepair it.
Exhaust-system TroubleshootingIf you’ve excluded the upper-end assembly, lower-end assembly,ignition system, and carburetion system, but are still experiencingpoor engine performance, you must troubleshoot the exhaust system.Ensure that the exhaust system is clear of any obstructions that wouldprevent the burned gases from escaping the engine. Plugged exhaustsystems will restrict the airflow into and out of the cylinder. This isespecially true with two-stroke engines because they have oil mixeddirectly with the fuel and expel the oil through the exhaust system.
Road Test 3
1. What symptoms are most likely to occur when an engine’s crankshaft bearing fails?
2. What are the two most common symptoms found when troubleshooting a transmissionproblem?
3. True or False? In a multicylinder two-stroke engine, the cylinders are separated from eachother by seals located on the crankshaft.
4. What common exhaust problem (especially on a two-stroke engine) causes the engine toperform poorly?
5. What is the proper way to check for bad crankcase seals in a two-stroke engine?
Check your answers with those on page 53.
Motorcycle Troubleshooting 13

TROUBLESHOOTING CARBURETOR PROBLEMSCarburetor troubleshooting is one of the most common motorcycleand ATV repair jobs. Carburetor troubleshooting can be a simple,straightforward, rewarding procedure, or a tedious, complicated,unrewarding chore. The difference between these two extremes lieswithin your approach to problem solving. You can randomlydisassemble and replace components, or you can take a systematic,step-by-step approach.
Is It Rich or Lean?Usually, carburetor problems are based on an improper fuel-and-airmixture that’s either too rich or too lean. Observe the engine exhaustand check the condition of the spark plug to determine whether themixture is too rich or too lean. Always keep in mind that a rich or leanmixture can have more than one cause. A rich mixture can be causedby too much fuel or not enough air. A lean mixture can be caused bytoo much air or not enough fuel.
After a carburetor has been classified as too rich or too lean, the nextstep is to determine which throttle position is causing the malfunction.The following paragraphs provide some common symptoms of anexcessively rich or lean carburetor situation.
Common Symptoms of a Rich Carburetor MixtureEngine runs rough and/or misses. If this occurs in a two-strokeengine, it’s known as “four-stroking.” This problem results fromoccasional, incomplete combustion inside the engine.
Excessive exhaust smoke. In a two-stroke engine, this is sometimesdifficult to determine because exhaust smoke is common in mosttwo-stroke motorcycles, and most visible two-stroke exhaust is oil. Ina four-stroke engine, the smoke will be black in color.
Engine performance decreases as it warms up. The air-and-fuelmixture must be rich when the engine is cold. As the engine warms,the rich mixture is no longer needed. An engine with a rich mixturewill cause the engine to run poorly as it reaches normal operatingtemperature.
Spark plugs are fouled black with carbon deposits. Carbon depositsare relatively dry and free of oil, as well as being soft and easilyremoved. Don’t confuse this with excess oil. If the dark deposit on theplug is wet and oily, it isn’t primarily carbon.
Removing the air filter improves engine performance. Even if the airfilter is clean, it restricts airflow to the engine. Eliminating this
14 Motorcycle Troubleshooting

restriction allows more air into the engine. If the fuel-and-air mixtureis too rich, removing the air filter will make the engine run better.
Common Symptoms of a Lean Carburetor MixtureEngine overheats. This is difficult to verify from external evidence.Severe detonation can be present and isn’t always heard when itoccurs. Engines with a chrome exhaust system will show signs ofrecent severe bluing near the exhaust port. If the bluing appears to begetting worse, the engine is probably running too hot.
Activating the choke improves engine performance. This simplyrichens the mixture and is only a temporary cure to the problem.
Spark plugs have a burned white appearance. If spark plugs are usedin a lean-mixture condition for an extended period of time, theelectrodes of the spark plugs will be burned away.
Engine speed fluctuates. It’s not uncommon for a lean-fuel mixture tocause an engine to fluctuate or surge even though the throttle is at aconstant position.
Engine noticeably lacks power. Compare the power of a particularengine to what it should have. Low power can be dangerous, as therisk of engine seizure is greatly increased with an overheating engine.A considerable difference in power can be a result of a lean carburetor.
When Is the Problem Apparent?After determining whether the mixture is too rich or too lean, youmust determine in which throttle position the problem occurs toknow which circuit needs repair. Before starting to work on thecarburetor, you should always check out some of the external itemsthat can affect carburetion. If the mixture appears rich, check the airfilter and the cable to the carburetor choke. If the air cleaner isexcessively dirty, the air will have difficulty getting to the engine.If the choke cable is too tight, the choke will be allowing extra fuelinto the venturi or cutting off the air supply, depending on the cold-starting device used on the carburetor. If the mixture is too lean,ensure that the fuel is flowing properly from the fuel tank. Also,inspect the intake manifold for air leaks.
If everything on the external side of the engine is in proper workingorder, the carburetor will most likely need repairing. The following
rich and lean mixtures. Also included are common repairs for eachsituation, as well as suggestions to follow if none of the commonproblems are present.
Motorcycle Troubleshooting 15
tables are divided into throttle ranges and provide common causes of

Table 2
CARBURETOR TROUBLESHOOTING
0 — 1/4 THROTTLE OPENING
Too Rich Too Lean
Problem Remedy Problem Remedy
Choke activated Verify that the choke isin the Off position
Carburetor mountedloosely
Tighten carburetor
Pilot air passageblocked
Blow out passage areawith compressed air
Pilot jet plugged Clean jet withcompressed air
Pilot jet loose Tighten jet Pilot outlet or bypassports clogged
Clean with compressedair
Pilot jet air bleedblocked
Clean jet withcompressed air
Fuel level too low Adjust level as perservice manual
Fuel level too high Adjust level as perservice manual
Lean the mixture by turning the adjustment screw14 to 1
2 turn. (Check service manual to determine ifadjustment is CCW or CW)
Richen the mixture by turning the adjustmentscrew 1
4 to 12 turn. (Check service manual to
determine if adjustment is CCW or CW)
Table 3
CARBURETOR TROUBLESHOOTING
1/4 — 1/2 THROTTLE OPENING
Too Rich Too Lean
Problem Remedy Problem Remedy
Pilot jet loose Tighten Needle jet blocked Clean with compressedair
Pilot air passageobstructed
Clean with compressedair
Pilot outlet or bypassports clogged
Clean with compressedair
Primary air passageblocked
Clean with compressedair
Main jet clogged Clean with compressedair
Needle jet/jet needleworn
Replace Fuel level too low Adjust as needed
Main jet loose Tighten
Fuel level too high Adjust as needed
Air filter excessively dirty Clean or replace
If none of the above appear to help the problem,try fitting a slide with a larger cutaway.
If none of the above appear to help the problem,try fitting a slide with a smaller cutaway.
16 Motorcycle Troubleshooting

Table 4
CARBURETOR TROUBLESHOOTING
1/2 — 3/4 THROTTLE OPENING
Too Rich Too Lean
Problem Remedy Problem Remedy
Needle jet/jet needleworn
Replace Main jet clogged Clean with compressedair
Main jet loose Tighten Needle jet blocked Clean with compressedair
Primary air passageblocked
Clean with compressedair
Fuel level too low Adjust
Fuel level too high Adjust
Air filter excessively dirty Clean or replace
If none of the above appear to help the problem,lower the needle one position.
If none of the above appear to help the problem,raise the needle one position.
Table 5
CARBURETOR TROUBLESHOOTING
3/4 — FULL THROTTLE OPENING
Too Rich Too Lean
Problem Remedy Problem Remedy
Main jet loose Tighten Main jet clogged Clean
Needle jet/jet needleworn
Replace Needle jet clogged Clean
Air filter clogged Clean or replace Fuel level low Adjust
Fuel level too high Adjust
If none of the above appear to help the problem,install a smaller main jet.
If none of the above appear to help the problem,install a larger main jet.
Other Carburetor-related ProblemsAside from the carburetor problems previously discussed, othercommon problems will appear from time to time. The most commonof these problems is water in the float bowl. Water is heavier thangasoline and will penetrate the circuits of the carburetor andeventually reach the engine. When this occurs, the engine runs roughor not at all. Draining the float bowl cures the symptom; butultimately, the cause needs to be corrected.
Water in the system. Often washing a motorcycle or ATV with ahigh-pressure hose causes water to penetrate the sealing area betweenthe air filter and carburetor or the seal of the gas cap. If waterpenetrates either area, it eventually enters the carburetor and causesproblems. Carelessness when washing a motorcycle or ATV causesthis to become a recurring problem.
Motorcycle Troubleshooting 17

Clogged fuel-tank vent. Another widespread and potentially bafflingproblem is a clogged fuel-tank vent. Normally, air enters the tankthrough the vent and replaces the space left by the fuel as it’s burned.If the vent is clogged, a vacuum is created in the fuel tank and canrestrict the flow of fuel. This restriction can sometimes be enough tocause the engine to stall. Given this scenario, the rider opens the fuelcap to ensure that there’s gas in the tank. Opening the fuel tankdestroys the vacuum, the rider sees fuel, and starts the motorcycle orATV. The machine functions properly for a few more miles until thevacuum is re-created and the fuel flow is slowed or stopped. Inaddition, a clogged fuel-tank vent can cause a carburetor-floodingcondition. If the fuel tank is exposed to intense heat, such as the hotsun, gasoline vapors will expand. If the fuel vent is plugged, thevapors create pressure inside the tank. This pressure can forcegasoline past the carburetor float valve into the float bowl and intothe engine. This type of problem is rare and isn’t usually anticipated.
When confronted with a baffling carburetion problem, exercisingcommon sense is the only way to rectify the problem. Follow thesebasic tips when you’ve reached an impasse.
� Remove yourself from the situation and consider the totalprocess of carburetion.
� Thoroughly think out all options before doing anything drastic.
� Implement one change at a time; multiple adjustments madesimultaneously amplify the problem.
Carburetor Operation SummaryA complete understanding of how the carburetor on a motorcycle orATV functions is critical to the troubleshooting process. The followingparagraphs provide a basic summary of the internal workings of acarburetor. For a detailed description of carburetion operation, referto the study unit on fuel systems.
The fuel petcock allows the fuel to flow past the float valve and intothe float bowl (Figure 4). The level of fuel rises in the float bowl andlifts the float, which, in turn, operates the float valve. When thecorrect fuel level is reached, the float causes the float valve to contactthe valve seat and stop the flow of fuel. If the choke valve orenrichment valve (Figure 5) is turned on, the incoming air supply isrestricted. This allows a rich mixture to enter the carburetor. Whenthe engine is turned over, air and fuel are drawn into the carburetorventuri. The air and fuel are mixed with the pilot (or slow) system.Slow-system air and fuel enter through passages in the carburetorbody and are metered by the pilot mixture screw. Fuel is drawn upfrom the float bowl through the low-speed jet. Air-bleed holes in thejet allow the fuel to be atomized slightly as it’s mixed with the
18 Motorcycle Troubleshooting

incoming air. The mixture is then drawn into the venturi through thebypass and outlet ports in the circuit.
Motorcycle Troubleshooting 19
FIGURE 4—A Typical FloatChamber (Copyright by American
Honda Motor Co., Inc. and reprinted
with permission)
FIGURE 5—The choke andenrichment valves controlthe flow of fuel to theengine. (Copyright by American
Honda Motor Co., Inc. and reprinted
with permission)

After the engine warms up and is idling on the pilot system, thechoke system is no longer required. When the rider applies morethrottle, the carburetor throttle slide begins to lift, allowing moreair flow under the slide. At about 1
4 throttle, the first tapered sectionof the jet needle arrives at the top of the needle jet, and fuel begins toflow out of the clearance between the needle jet and the needle(Figure 6). This clearance increases as the slide is lifted, up to about 1
2
throttle. At 12 throttle, the second needle-jet taper section begins to
take effect. This second taper changes the rate at which fuel flows intothe engine, allowing an accelerated fuel flow into the venturi. Fuel forthe main system is drawn up from the float bowl through the main jetand the needle jet. As the fuel exits the needle jet, it’s mixed with airthat’s metered by an air jet in the primary air passage. The fuel andprimary air are mixed, aiding in the atomization process; the mixtureis then drawn into the venturi. At about 3
4 throttle, the clearancebetween the needle jet and the needle is so large that the main jetmeters the fuel as it enters the carburetor.
Maintenance procedures such as setting the idle speed, synchronizingmultiple carburetors, and adjusting cable free play are explained indetail in the individual service manuals. Specifications for the jetneedle, air-and-fuel mixture screw, and float level are also found inthe service manuals. The settings contained in these manuals arestandard recommendations. Some modifications may be necessary toaccommodate specific conditions or riding habits.
20 Motorcycle Troubleshooting
FIGURE 6—The jet needlelets more fuel into thecarburetor venturi as it risesin the slide. (Copyright by
American Honda Motor Co., Inc. and
reprinted with permission)

Troubleshooting SuggestionsThe following table (Table 5) provides common carburetor symptomsand problems. Use the table as a general guide to diagnosing problems,using a systematic approach. Always read the appropriate chapters ofthe specific service manual before performing any maintenance, andstrictly adhere to all warnings and cautions. You’ll have much bettersuccess when troubleshooting a carburetor if you use the followingguidelines instead of personal experience or your neighbor’s advice.
Table 6
CARBURETOR TROUBLESHOOTING
CARBURETOR-RELATED PROBLEMS
Symptom Problem
Engine won’t start � No fuel to carburetor
� Too much fuel to the engine
� Intake air leak
� Fuel contaminated or deteriorated
� Pilot (or slow) circuit clogged
Lean mixture � Pilot jet clogged
� Float level too low
� Fuel line partially restricted
� Carburetor air vent not operational
� Intake-manifold air leak
� Fuel pump not working properly
� Vacuum piston faulty (CV carburetor)
Rich mixture � Choke valve left in the On position
� Float valve leaking
� Float level too high
� Carburetor air jets clogged
� Air filter element excessively dirty
Hesitation during acceleration � Accelerator pump malfunction
(Continued)
Motorcycle Troubleshooting 21

Table 6
CARBURETOR TROUBLESHOOTING
CARBURETOR-RELATED PROBLEMS
Symptom Problem
Engine stalls, hard to start, rough idling � Fuel line restricted
� Ignition-system malfunction
� Fuel mixture incorrect
� Fuel contaminated/deteriorated
� Intake-manifold air leak
� Idle speed not properly adjusted
� Fuel pump not operating correctly
� Low-speed mixture screw misadjusted
� Pilot-circuit or starting-enrichment valve circuitclogged
� Float level incorrect
� Fuel tank breather clogged
� Evaporative-emission carburetor air-ventcontrol valve faulty
� Evaporative-emission purge-control valvefaulty
Backfiring or misfiring during deceleration � Air-cutoff valve inoperable
� Lean mixture in pilot circuit
� Secondary air-supply system faulty
� Hose of emission-control system faulty
Backfiring or misfiring during acceleration � Ignition system faulty
� Fuel mixture too lean
Poor driveability and poor fuel economy � Fuel system clogged
� Ignition malfunction
� Faulty evaporative-emission carburetorair-vent control valve
� Damaged/misconnected emission-controlsystem hose
22 Motorcycle Troubleshooting
Table 6—Continued

Road Test 4
1. When a two-stroke engine is functioning poorly and misfiring, this condition is referred toas _______.
2. If you turn on the choke and the engine runs better, this generally indicates a _______carburetor mixture problem.
3. _______ is a common contaminant that penetrates the float bowl and causes the engine torun rough or not at all.
4. If you’ve determined that a carburetor has an excessively rich mixture, what should youcheck first?
5. If the engine runs worse as it warms up, this generally indicates a _______ carburetormixture problem.
6. True or False? A clogged fuel tank vent can cause a carburetor flooding condition.
7. True or False? A carburetor with a float-level adjustment that’s too high will have a leanmixture.
8. A motorcycle or ATV that backfires or misfires during deceleration most likely has a_______ mixture condition in the pilot circuit.
9. If the spark plugs are fouled black with carbon deposits, you should look for a _______carburetor mixture problem.
Check your answers with those on page 53.
TROUBLESHOOTING ELECTRICAL PROBLEMSOf all problems that come into a motorcycle or ATV servicedepartment, electrical-system problems are usually considered themost difficult to troubleshoot and repair. One of the reasons for this isthat many technicians don’t fully understand electrical systems, andthey can’t actually see the electrical system working. They only knowthe symptoms. For instance, if a charging system stops functioning,you can’t see that electricity isn’t being produced. All you know isthat the battery is dead. But, if a tire goes flat, you can see the result ofthe problem as well as the nail that caused it!
Motorcycle Troubleshooting 23

After you’ve mastered the ability to properly and quickly analyzeelectrical problems, you’ll become a valuable asset to any motorcycleor ATV service department. With a complete understanding of howthe electrical systems in motorcycles and ATVs work, you shouldnever take more than an hour or so to diagnose any electricalproblem! To help you categorize electrical-system problems, we’llbreak down this section of your study unit into four basic areas:charging systems, ignition systems, DC circuits, and electricstarter-motor troubleshooting.
Charging-system TroubleshootingThe symptoms found in a charging system that’s not operatingproperly are simple and straightforward. The motorcycle or ATVcharging system is either not charging or overcharging!
In the case of a system that’s not charging, the battery will eventuallygo dead, and the electrical components will no longer functionproperly. On some older motorcycles that are used often at night andrun at constant low speed with the headlight turned on, the batterymay become weak and require charging. This may occur becausemany older motorcycles had charging systems that didn’t function totheir full potential until they were running at higher engine rpm.Charging systems in most of today’s motorcycles and ATVs aredesigned to provide more-than-adequate electrical output wheneverthe vehicle is being operated. If a battery constantly discharges eventhough it’s been properly maintained and the vehicle has been usedfrequently, check the charging system before replacing the batterywith a new one. Batteries can be quite expensive!
In the case of an electrical charging system that’s overcharging thebattery, there will undoubtedly be a faulty component in the chargingsystem—most likely, the voltage regulator.
Troubleshooting electrical problems isn’t difficult. As a matter of fact,it’s one of the cleanest jobs you’ll be required to do! In most cases, thecauses of the problems are as simple as a dirty or loose connection.One manufacturer has let it be known that out of every 150charging-system components that are returned for warrantypurposes, only one is actually defective! This tells us that as thetechnician is diagnosing the problem in the charging system, he orshe is fixing the problem without even knowing it! Over 85% of allcharging-system-related problems are connection-related, and notactual component problems!
Be sure you know the color codes used for wires before beginning towork on an electrical problem. Every manufacturer uses differentcolor wires for their electrical circuitry. As you perform each step inthe troubleshooting process, check to see if you’ve corrected theproblem.
24 Motorcycle Troubleshooting

Charging Systems That Discharge or ChargePoorlyAfter you’ve verified the complaint, visually check all of the relatedcharging-system wires and connections for damage which may resultin a short-circuit (Figure 7). Check the wires between the AC generatorand the regulator/rectifier, and between the regulator/rectifier and thebattery.
Carefully inspect the battery terminals to ensure that the electricalconnections are clean and secure (Figure 8). Many charging systemsuse external grounding on their regulator/rectifiers. Be sure toinspect all grounds very closely. Remember that electricity mustalways have a completed path through ground. Also, while checkingthe regulator/rectifier, make sure that it’s properly ventilated.
Motorcycle Troubleshooting 25
FIGURE 7—Inspect allwiring and terminals fordamage. (Copyright by
American Honda Motor Co., Inc.
and reprinted with permission)
FIGURE 8—Be sure that thebattery has tight and cleanconnections. (Copyright by
American Honda Motor Co., Inc.
and reprinted with permission)
If the system is charging, but not to the specifications given by themanufacturer, the problem is most likely a loose or dirty connection.After you’ve visually inspected all of the wires and connectors andfound no obvious problems, disconnect the charging-system-relatedconnectors and inspect the terminals closely for corrosion or looseconnections. In many cases, just disconnecting and reconnecting aconnector or coupler can repair the charging-system problem if it wasdirty or corroded. Clean any contaminated terminals with a high-quality contact cleaner and use dielectric grease when reconnectingthe wires.
If the charging system is still not operating correctly after inspectingall connections, check the AC generator wires for continuity betweenterminals and between each terminal and ground. The generatorspecifications are contained in the appropriate service manual. If thegenerator has a field coil, check the continuity of the coil. Next, checkthe output voltage of the generator with the engine running, byattaching the leads from your multimeter to the generator. Youshould get a reading of approximately 12–15 Volts AC at each of theconnectors in a 12-volt system.
The next item to check is the wire that’s connected from the regulator/rectifier to the battery’s positive terminal. Disconnect the wire from thebattery and check it for continuity. When you reconnect the wire,make sure that the connection is clean and tight.
Start the engine and listen for any abnormal noises or sounds in thecharging-system rotor area. If you hear anything unusual, remove thecover and inspect the rotor for damage. Sometimes a minor accidentwhere the motorcycle was tipped over can cause rotor damage.
If the motorcycle or ATV is still not charging properly, try replacingthe regulator/rectifier with a known good unit.
Charging Systems That OverchargeThe main symptoms of overcharging are usually the rapid use ofbattery electrolyte, which can lead to battery damage, and lights thatare frequently burned out. Overcharging occurs when the voltageregulator portion of the regulator/rectifier isn’t functioning properly.
If the regulator/rectifier has a wire to detect voltage from the battery,check the wire for damage and for a good connection. Also, check thatthe terminals of the regulator/rectifier coupler are clean.
troubleshooting procedures we’ve discussed. The troubleshootingprocedures in the tables can be used for any charging system.
26 Motorcycle Troubleshooting
Use the following tables to supplement the basic charging-system

Table 7
CHARGING-SYSTEM TROUBLESHOOTING
DISCHARGING OR WEAK CHARGING SYSTEM
Step If Measurement Is Correct If Measurement Is Incorrect
1. Measure the charging voltageat the battery with the enginerunning at the specified rpm.
a. Check the battery foramperage loss with the key inthe Off position. If excessiveamperage is being drawn,locate and repair.
b. Check the battery with a loadtester. Replace battery ifnecessary.
Go to step 2.
2. Check the voltage betweenthe battery’s positive terminaland the ground side of theregulator/rectifier while theengine is running.
The problem is fixed. a. Check for an open circuit orshort in the wire harness.
b. Check for poor connections.
c. Go to step 3.
3. Check the stator resistance atthe point where it connects tothe regulator/rectifier with thecoupler disconnected.
Go to step 4 (if applicable) or step5.
a. There’s a poor connection atthe coupler.
b. The charging coil is defective.
4. Check for field coil resistance(if applicable).
Go to step 5. a. Check for an open circuit.
b. The AC generator field coil isdefective.
5. Measure the charging voltageat the battery at the specifiedengine rpm.
The battery is defective. Go to step 6.
6. Replace the battery with a fullycharged battery that’s knownto be good.
The battery is defective. The regulator/rectifier is defective.
Table 8
CHARGING-SYSTEM TROUBLESHOOTING
OVERCHARGING CHARGING SYSTEM
Step If Measurement Is Correct If Measurement Is Low
1. Check for continuity betweenthe regulator/rectifier groundwire and chassis ground.
Go to step 2 (when applicable) orstep 3.
a. Check for proper connectionsat the regulator/rectifier.
b. Check for an open circuit in thewire harness.
2. Check for proper resistance ofthe field coil wire at theregulator/rectifier coupler(when applicable).
Go to step 3. a. Check for a short circuit in thefield coil.
b. Check for a short in the wireharness.
3. Replace the battery with a fullycharged battery that’s knownto be good.
The battery is defective. Replace the regulator/rectifier.
Motorcycle Troubleshooting 27

Ignition-system Troubleshooting
No SparkAfter you’ve determined that a motorcycle or ATV engine’s ignitionsystem isn’t producing a spark, the next step in the troubleshootingprocedure depends on the type of ignition system. If the ignitionsystem uses a breaker-points assembly (Figure 9), the points andcondenser are the most likely cause of the problem. To check thepoints, remove all necessary covers and components. Check thecontacts for pitting; check for dirt or moisture between the contacts.
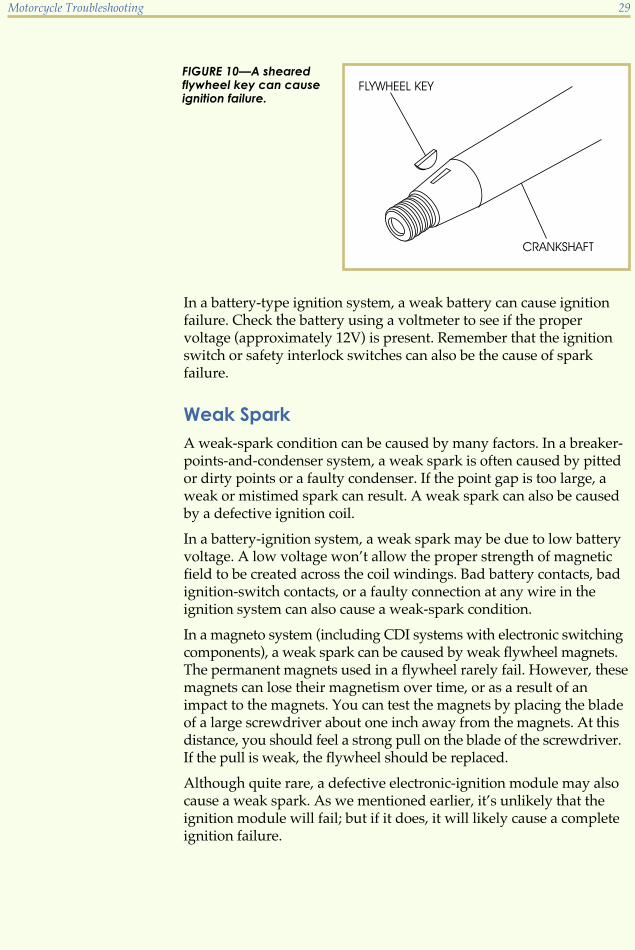
In an electronic ignition system, the problem of no spark may becaused by several different components. Fortunately, all of thesecomponents are easy to check. First, check to make sure that theengine stop-switch wire or grounding wire is properly connected andnot shorted out. Then, check for proper connections at all of theignition-related components. If these items appear to be good, checkfor proper resistance at the pulse generator and exciter coil (CDIignitions). If all of these components are in proper working order, theproblem is probably a failure in the ignition control module (ICM).Replace the ICM with a known good component and test the engine.If the engine operates properly, you can assume that the ICM was theproblem. In a CDI system, if the engine still won’t start, the flywheelkey (Woodruff key) may be sheared (Figure 10) or the flywheelmagnets may have lost their magnetism. Remove the flywheel tocheck for these conditions.
In most motorcycles and ATVs, it’s very easy to remove and replaceICMs; but this component is usually quite expensive, so it’s importantto check all other components before replacing an ICM. Note thatsome manufacturers offer a testing device that’s used to test thecondition of ICMs. However, this piece of equipment is quiteexpensive, and most motorcycle shops don’t have it. Remember thatICMs are very reliable, and the problem is likely to be found inanother area of the ignition system.
28 Motorcycle Troubleshooting
FIGURE 9—A Breaker-points Assembly
In a battery-type ignition system, a weak battery can cause ignitionfailure. Check the battery using a voltmeter to see if the propervoltage (approximately 12V) is present. Remember that the ignitionswitch or safety interlock switches can also be the cause of sparkfailure.
Weak SparkA weak-spark condition can be caused by many factors. In a breaker-points-and-condenser system, a weak spark is often caused by pittedor dirty points or a faulty condenser. If the point gap is too large, aweak or mistimed spark can result. A weak spark can also be causedby a defective ignition coil.
In a battery-ignition system, a weak spark may be due to low batteryvoltage. A low voltage won’t allow the proper strength of magneticfield to be created across the coil windings. Bad battery contacts, badignition-switch contacts, or a faulty connection at any wire in theignition system can also cause a weak-spark condition.
In a magneto system (including CDI systems with electronic switchingcomponents), a weak spark can be caused by weak flywheel magnets.The permanent magnets used in a flywheel rarely fail. However, thesemagnets can lose their magnetism over time, or as a result of animpact to the magnets. You can test the magnets by placing the bladeof a large screwdriver about one inch away from the magnets. At thisdistance, you should feel a strong pull on the blade of the screwdriver.If the pull is weak, the flywheel should be replaced.
Although quite rare, a defective electronic-ignition module may alsocause a weak spark. As we mentioned earlier, it’s unlikely that theignition module will fail; but if it does, it will likely cause a completeignition failure.
Motorcycle Troubleshooting 29
FIGURE 10—A shearedflywheel key can causeignition failure.

Mistimed SparkA mistimed ignition spark will usually be noticed as a hard-to-start ora “pinging” engine. In a breaker-points system, the point gap iscritical to ignition-system timing. The point gap must be set to themanufacturer’s specifications as given on the engine plate or in theservice manual.
On electronic ignition systems, the position of the pulse generator andits air gap play an important part in ignition timing. Some electronic-ignition systems have slots in their pulse-generator coils that allowboth up-and-down and side-to-side motion. This type of pulser coil issaid to have both an air-gap adjustment and an edge-gap adjustment.In such an engine, the edge gap should be adjusted using the timingmarks provided by the manufacturer.
Another possible problem with a mistimed electronic ignition is thatthe flywheel key has sheared. A partially sheared key will be bent,while a completely sheared key will be cut in half. A partially shearedkey (Figure 11) will cause the flywheel to be out of alignment with thecrankshaft, resulting in a mistimed spark. If the key is completelysheared, the engine probably won’t start at all. If the key is partiallysheared or completely sheared, replace it with a new key.
As we did with the charging-system portion of our troubleshooting
for CDI systems and one for battery-powered electronic-ignitionsystems.
In a CDI system, remember that the ignition system is powered by theexciter coil. The pulse generator triggers the ignition, and the ignitionis normally shut off by grounding the ignition circuit.
30 Motorcycle Troubleshooting
FIGURE 11—A partiallysheared key will appearas if the top and bottomsections of the key areoffset from each other.
discussion, we’ll give you two troubleshooting guideline tables—one
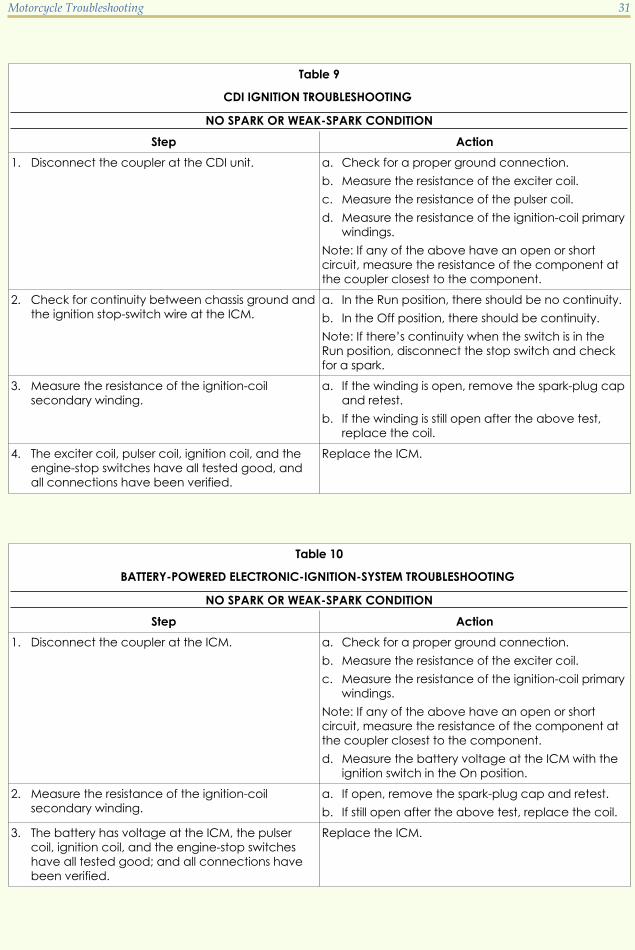
Table 9
CDI IGNITION TROUBLESHOOTING
NO SPARK OR WEAK-SPARK CONDITION
Step Action
1. Disconnect the coupler at the CDI unit. a. Check for a proper ground connection.
b. Measure the resistance of the exciter coil.
c. Measure the resistance of the pulser coil.
d. Measure the resistance of the ignition-coil primarywindings.
Note: If any of the above have an open or shortcircuit, measure the resistance of the component atthe coupler closest to the component.
2. Check for continuity between chassis ground andthe ignition stop-switch wire at the ICM.
a. In the Run position, there should be no continuity.
b. In the Off position, there should be continuity.
Note: If there’s continuity when the switch is in theRun position, disconnect the stop switch and checkfor a spark.
3. Measure the resistance of the ignition-coilsecondary winding.
a. If the winding is open, remove the spark-plug capand retest.
b. If the winding is still open after the above test,replace the coil.
4. The exciter coil, pulser coil, ignition coil, and theengine-stop switches have all tested good, andall connections have been verified.
Replace the ICM.
Table 10
BATTERY-POWERED ELECTRONIC-IGNITION-SYSTEM TROUBLESHOOTING
NO SPARK OR WEAK-SPARK CONDITION
Step Action
1. Disconnect the coupler at the ICM. a. Check for a proper ground connection.
b. Measure the resistance of the exciter coil.
c. Measure the resistance of the ignition-coil primarywindings.
Note: If any of the above have an open or shortcircuit, measure the resistance of the component atthe coupler closest to the component.
d. Measure the battery voltage at the ICM with theignition switch in the On position.
2. Measure the resistance of the ignition-coilsecondary winding.
a. If open, remove the spark-plug cap and retest.
b. If still open after the above test, replace the coil.
3. The battery has voltage at the ICM, the pulsercoil, ignition coil, and the engine-stop switcheshave all tested good; and all connections havebeen verified.
Replace the ICM.
Motorcycle Troubleshooting 31

DC Circuit TroubleshootingThe battery in a motorcycle or ATV provides electrical energy tooperate the ignition and many other electrical components. Becausethere are too many components to cover in this study unit, we’ll focuson two components that you’ll frequently encounter—lights andswitches.
Light BulbsBurned-out light bulbs are replaced and not repaired. To check a bulbthat has been removed from a circuit, you can use a battery and twowires. One wire is connected to the negative side of the battery and tothe ground on the light bulb. The other wire is connected to thepositive side of the battery and to the insulated side of the light bulb.If the bulb is good, it should light.
An ohmmeter can also be used to check light bulbs that have beenremoved from the circuit. Connecting one lead wire to the ground ofthe light bulb and the other to the insulated side of the bulb shouldcause the ohmmeter to show continuity—that is, a complete circuit.
Some light bulbs of different wattage and voltage are the samephysical size, so always be sure that the replacement bulb is the samevoltage and wattage as the one removed. Check the service manual ifyou aren’t certain about what size bulb should be installed. Rememberthat a 12-volt system must use 12-volt bulbs and a 6-volt system mustuse 6-volt bulbs.
Light bulbs can become defective because of the motorcycle or ATVvibration. Vibration can cause the filament inside the light bulb tobreak. When this happens, the light bulb must be replaced.
Another problem that you may encounter results from a looseconnection in the light bulb socket or circuit. This condition can causethe bulb to get brighter and dimmer, flicker, or not light at all. Thisproblem is corrected by repairing or tightening the faulty connection.
SwitchesSwitches are designed to open and close a circuit. You can check aswitch using an ohmmeter. The ohmmeter should indicate continuitywhen the switch is in the On position and shouldn’t indicate continuitywhen the switch is in the Off position. If a switch is defective, it must bereplaced.
32 Motorcycle Troubleshooting

Electric Starter-motor TroubleshootingThere are four main troubleshooting problems that occur withmotorcycle and ATV electric starter systems:
� The starter motor turns slowly.
� The starter solenoid makes a clicking sound, but the enginedoesn’t turn over.
� The starter motor turns without turning over the engine.
� The starter motor doesn’t turn at all.
problems.
Table 11
ELECTRIC STARTER-MOTOR TROUBLESHOOTING
Symptom Cause Problem
Starter motor turns slowly Low charge in the battery a. Check for a loose battery connection.
b. Check for a loose starter-motor cable.
c. Check for a faulty starter motor.
Starter motor turns, but theengine doesn’t turn over
Starter motor is turningbackwards due to improperbrush installation or improperterminal connection
a. Check for a worn starter clutch.
b. Check for a worn starter pinion gear.
c. Check for worn or damagedstarter-motor idler or reduction gears.
d. Check for a broken starter-motor chain.
Starter motor does not turnat all
Faulty fuse or safety device a. Check all fuses.
b. Check all safety devices such astransmission and side-stand lockoutdevices.
The starter solenoid makes a“click” sound
Faulty solenoid switch or startermotor
a. Connect the starter motor to a batterysource that is known to be good. (Uselarge-diameter wire for this due to theheavy current flow.)
b. If the starter motor turns, the solenoidswitch is faulty.
c. If the starter motor doesn’t turn, thestarter motor is defective.
(Continued)
Motorcycle Troubleshooting 33
Refer to the following table to troubleshoot these starter motor

Table 11
ELECTRIC STARTER-MOTOR TROUBLESHOOTING
Symptom Cause Problem
The starter solenoid does not“click”
Faulty switch a. Disconnect the starter solenoid switchcoupler and check for continuity fromthe ground side of the relay to ground.
b. If there’s no continuity, check thefollowing as applicable: neutral switch;clutch switch; starter switch; side-standswitch; open circuit in the wiringharness.
c. If there’s continuity, reconnect thesolenoid switch connector andmeasure the voltage at the connector.
d. If there’s no voltage, check thefollowing: ignition switch; break in thewire harness; loose connection at thecoupler.
e. If there’s voltage, replace the solenoid.
Road Test 5
1. True or False? Blown light bulbs can be repaired.
2. What are the two main problems associated with charging systems?
3. A switch should show that it has continuity when it’s in the _______ position.
4. Why is it important to thoroughly check for other failures before replacing an ICM?
5. True or False? It’s very rare that a flaw in an ICM causes a weak spark.
6. If a charging system is overcharging, the _______ is most likely the faulty component.
7. True or False? The ICM is often the cause of charging system failures.
8. A(n) _______ is used to test the continuity in a switch.
9. True or False? Motorcycle or ATV vibration can cause premature light bulb failures.
10. The flywheel is held in place by a small piece of metal known as a(n) _______.
Check your answers with those on page 53.
34 Motorcycle Troubleshooting
Table 11—Continued

TROUBLESHOOTING CHASSIS PROBLEMSThere are many different things that can go wrong with a motorcycleor ATV chassis, and determining the problem from a verbal complaintcan be very difficult. This is because of the ways in which a chassiscan react to different problems. An example is a steering head thatshakes at certain speeds. Shake in the steering head could be causedby a problem relating to the front of the motorcycle, or it could becaused by a worn or out-of-balance rear tire! Therefore, you must becareful when attempting to solve a chassis-related problem.
Whenever you’re troubleshooting a chassis problem, be sure to makeonly one adjustment at a time; and also, make only small adjustmentseach time. Chassis problems can be broken down into threecategories:
� Handling problems
� Wheel and tire problems
� Brake problems
related to motorcycle and ATV chassis systems, as well as suggestionsthat will most likely resolve the problem.
Table 12
HANDLING-AND-PERFORMANCE TROUBLESHOOTINGSymptom Problem
Difficult steering � Improper tire pressures
� Worn tires
� Worn or excessively tight steering-head bearings
� Steering-head nut too tight
� Steering stem bent
Steers off to one side or does not track straight � Improperly adjusted fork height
� Bent axle (front or rear)
� Bent forks
� Bent frame
� Wheels improperly aligned
� Swing arm bent
� Worn-out wheel bearings
� Worn swing arm
Machine wobbles � Bent rim
� Worn wheel bearings
� Worn-out tire
� Tires incorrect for application
� Tire pressure incorrect
(Continued)
Motorcycle Troubleshooting 35
The following tables give you some of the common problems found

Table 12
HANDLING-AND-PERFORMANCE TROUBLESHOOTINGSymptom Problem
Suspension excessively soft � Worn or improper fork springs
� Contaminated shock or fork oil
� Insufficient shock or fork-oil viscosity
� Fork air pressure too low (when applicable)
� Fork-oil level low
� Incorrect fork-spring adjustment
� Tire pressure too low
� Incorrect nitrogen pressure (rear gas shocks)
Suspension excessively hard � Bent fork or shock
� Fork-oil level too high
� Fork-oil viscosity too high
� Fork air pressure too high (when applicable)
� Tire pressure too high
� Incorrect shock-spring adjustment
Handlebars shake excessively � Tire(s) worn or out of balance
� Rim(s) bent
� Swing arm pivot worn
� Wheel bearings worn out
� Handlebar clamping device loose
� Steering stem loose
Table 13
WHEEL AND TIRE TROUBLESHOOTING
Symptom Problem
Wheel turns hard � Improperly adjusted brake
� Worn wheel bearings
Difficult steering � Improper tire pressures
� Worn tires
Steers off to one side or doesn’t track straight � Bent axle (front or rear)
� Wheels improperly aligned
� Worn wheel bearings
Machine wobbles � Bent rim
� Worn wheel bearings
� Worn-out tire
� Tires incorrect for application
� Tire pressure incorrect
Suspension excessively soft � Tire pressure too low
Suspension excessively hard � Tire pressure too high
(Continued)
36 Motorcycle Troubleshooting
Table 12—Continued

Table 13
WHEEL AND TIRE TROUBLESHOOTING
Symptom Problem
Handlebars shake excessively � Tire(s) worn or out of balance
� Rim(s) bent
� Worn wheel bearings
Table 14
BRAKE TROUBLESHOOTING
HYDRAULIC BRAKES
Symptom Problem
Brakes soft or spongy � Air in brake line
� Worn brake pads or disc
� Worn or leaking master-cylinder seals
� Worn or leaking caliper seals
� Sliding caliper stuck (when applicable)
� Low or contaminated brake fluid
� Bent brake lever
Brakes hard to pull or push � Clogged or restricted master-cylinder valve
� Sticking caliper piston
� Sliding caliper stuck (when applicable)
Brakes drag � Contaminated brake pads
� Wheel out of alignment
� Worn brake pads
� Warped brake disc
� Sliding caliper stuck (when applicable)
Brakes squeak when applied � Sticking caliper piston
� Worn brake pads
� Worn brake disc
� Contaminated brake pads or disc
Motorcycle Troubleshooting 37

Table 15
BRAKE TROUBLESHOOTING
MECHANICAL BRAKES
Symptom Problem
Poor brake performance � Improperly adjusted brakes
� Worn brake drum
� Worn brake linings
� Worn brake cam
� Brake cable in need of lubrication
� Contaminated brake linings or drum
Brake lever hard or slow to return � Broken brake-return spring
� Improperly adjusted brakes
� Brake cable sticking
� Improperly installed brake linings
Brakes squeak when applied � Worn brake drum
� Worn brake linings
� Contaminated brake linings or drum
Road Test 6
1. True or False? Improper tire pressures can be the cause of many different chassis-relatedproblems.
2. A hydraulic brake system that has a soft or spongy feel probably has _______ in the brakelines.
3. True or False? A motorcycle steering head vibration problem will always indicate aproblem in the front end of the machine.
4. What are the three major categories of chassis problems?
Check your answers with those on page 54.
38 Motorcycle Troubleshooting

CONCLUSIONWhen you are troubleshooting a motorcycle, you should ask thefollowing questions:
� Will the engine turn over?
� Is there compression?
� Is the air-and-fuel mixture in the proper ratio?
� Does ignition occur at the correct time?
When the answer to each of these questions is yes, the engine willrun. Your job as a repair technician is to be sure the answers are allyes. You can do this using the information and procedures describedin this study unit.
In addition to having the engine run, it’s important that the enginerun well. How well the engine runs depends on three of thepreviously mentioned factors (compression, air-and-fuel mixture, andignition) being set to the proper specifications.
To conclude this study unit on motorcycle and ATV troubleshooting,we’ve compiled a guide that covers virtually every aspect of trouble-shooting a motorcycle or ATV problem. This guide is designed for amotorcycle or ATV with an electric starting system and electronicignition system, which are used on the majority of vehicles. Althoughyou’ll find this list to be very large, it by no means contains everypossible cause for each problem listed. This guide is intended to aidyou in troubleshooting problems by giving you some of the morecommon causes of the problems listed.
Table 16
ENGINE TROUBLESHOOTING
DOESN’T START, STARTING DIFFICULTY
Symptom Problem
Starter motor not operating � Starter lockout or neutral-switch trouble
� Starter-motor trouble
� Battery voltage low
� Relays not contacting or operating
� Starter button not contacting
� Wiring open or short
� Ignition-switch trouble
� Engine stop-switch trouble
� Fuse blown
Starter motor operates but engine doesn’t turnover
� Starter-motor clutch trouble
(Continued)
Motorcycle Troubleshooting 39

Table 16
ENGINE TROUBLESHOOTING
DOESN’T START, STARTING DIFFICULTY
Symptom Problem
Engine won’t turn over � Valve seizure
� Rocker arm seizure
� Cylinder, piston seizure
� Crankshaft seizure
� Connecting rod seizure
� Transmission gear or bearing seizure
� Camshaft seizure
No fuel flow � Fuel petcock clogged
� Fuel tank air vent obstructed
� Fuel line clogged
� Float valve clogged
Engine flooded � Fuel level in carburetor float bowl too high
� Float valve worn or stuck open
� Starting technique faulty (When flooded, crankthe engine with the throttle fully open to allowmore air to reach the engine.)
No spark or weak spark � Battery voltage low
� Spark plug dirty, broken, or misadjusted
� Spark plug cap or high-tension wiring trouble
� Spark plug cap not making good contact
� Spark plug incorrect
� IC igniter trouble
� Neutral, starter lockout, or side-stand switchtrouble
� Pickup coil trouble
� Ignition coil trouble
� Ignition or engine stop switch shorted
� Wiring shorted or open
� Fuse blown
Compression low � Spark plug loose
� Cylinder head not sufficiently tightened down
� No valve clearance
� Cylinder, piston worn
� Piston ring bad (worn, weak, broken, orsticking)
� Cylinder-head gasket damaged
� Cylinder head warped
� Valve spring broken or weak
� Valve not seating properly (valve bent or worn,or carbon accumulation on the seatingsurface)
40 Motorcycle Troubleshooting
Table 16—Continued

Table 17
ENGINE TROUBLESHOOTING
RUNS POORLY AT LOW SPEED
Symptom Problem
Spark weak � Battery voltage low
� Spark plug dirty, broken, or improperly adjusted
� Spark plug cap or high-tension wiring trouble
� Spark plug cap shorted or not in good contact
� Spark plug incorrect
� Ignition coil trouble
Air-and-fuel mixture incorrect � Pilot screw improperly adjusted
� Pilot jet or air passage clogged
� Air-bleed pipe bleed holes clogged
� Air cleaner clogged, poorly sealed, or missing
� Choke stuck
� Fuel level in carburetor float bowl too high ortoo low
� Fuel tank air vent obstructed
� Carburetor holder loose
� Air-cleaner duct loose
Compression low � Spark plug loose
� Cylinder head not sufficiently tightened down
� No valve clearance
� Cylinder, piston worn
� Piston ring bad (worn, weak, broken, orsticking)
� Piston ring/land clearance excessive
� Cylinder head warped
� Cylinder-head gasket damaged
� Valve spring broken or weak
� Valve not seating properly (valve bent or worn,or carbon accumulation on the seatingsurface)
Other � IC igniter trouble
� Carburetors not synchronized
� Carburetor vacuum piston doesn’t slidesmoothly
� Engine oil viscosity too high
� Drive train trouble
� Brake dragging
� Air suction valve trouble
� Vacuum switch valve trouble
Motorcycle Troubleshooting 41

Table 18
ENGINE TROUBLESHOOTING
RUNS POORLY OR NO POWER AT HIGH SPEED
Symptom Problem
Firing incorrect � Spark plug dirty, broken, or improperly adjusted
� Spark plug cap shorted or not in good contact
� Spark plug incorrect
� IC igniter trouble
� Pickup coil trouble
� Ignition coil trouble
Air-and-fuel mixture incorrect � Choke stuck
� Main jet clogged or wrong-size jet needle orneedle jet worn
� Air jet clogged
� Fuel level in carburetor float bowl too high ortoo low
� Bleed holes of air-bleed pipe or needle jetclogged
� Air cleaner clogged, poorly sealed, or missing
� Air-cleaner duct poorly sealed
� Water or foreign matter in fuel
� Carburetor holder loose
� Fuel tank air vent obstructed
� Fuel petcock clogged
� Fuel line clogged
Compression low � Spark plug loose
� Cylinder head not sufficiently tightened down
� No valve clearance
� Cylinder, piston worn
� Piston ring bad (worn, weak, broken, orsticking)
� Piston ring/land clearance excessive
� Cylinder-head gasket damaged
� Cylinder head warped
� Valve spring broken or weak
� Valve not seating properly (valve bent or worn,or carbon accumulation on the seatingsurface)
Knocking � Carbon buildup in combustion chamber
� Fuel poor quality or incorrect fuel
� Spark plug incorrect
� IC igniter trouble
(Continued)
42 Motorcycle Troubleshooting

Table 18
ENGINE TROUBLESHOOTING
RUNS POORLY OR NO POWER AT HIGH SPEED
Symptom Problem
Miscellaneous � Throttle valve won’t fully open
� Vacuum piston doesn’t slide smoothly
� Brake dragging
� Clutch slipping
� Overheating
� Engine oil level too high
� Engine oil viscosity too high
� Drive train trouble
� Air suction valve trouble
� Vacuum switch valve trouble
Table 19
ENGINE TROUBLESHOOTING
OVERHEATING
Symptom Problem
Firing incorrect � Spark plug dirty, broken, or improperly adjusted
� Spark plug incorrect
� IC igniter trouble
Air-and-fuel mixture incorrect � Main jet clogged or wrong size
� Fuel level in carburetor float bowl too low
� Carburetor holder loose
� Air cleaner poorly sealed or missing
� Air-cleaner duct poorly sealed
� Air cleaner clogged
Compression high � Carbon buildup in combustion chamber
Engine load faulty � Clutch slipping
� Engine oil level too high
� Engine oil viscosity too high
� Drive train trouble
� Brake dragging
Lubrication inadequate � Engine oil level too low
� Engine oil poor quality or incorrect
Gauge incorrect � Water-temperature gauge broken
� Water-temperature sensor broken
Coolant incorrect � Coolant level too low
� Coolant deteriorated
(Continued)
Motorcycle Troubleshooting 43
Table 18—Continued

Table 19
ENGINE TROUBLESHOOTING
OVERHEATING
Symptom Problem
Cooling-system component incorrect � Radiator clogged
� Thermostat trouble
� Radiator cap trouble
� Thermostatic-fan switch trouble
� Fan relay trouble
� Fan motor broken
� Fan blade damaged
� Water pump not turning
� Water pump impeller damaged
Table 20
ENGINE TROUBLESHOOTING
OVERCOOLING
Symptom Problem
Gauge incorrect � Water-temperature gauge broken
� Water-temperature sensor broken
Cooling-system component incorrect � Thermostatic-fan switch trouble
� Thermostat trouble
44 Motorcycle Troubleshooting

Table 21
DRIVE TRAIN TROUBLESHOOTING
CLUTCH PROBLEMS
Symptom Problem
Clutch slipping � No clutch lever play
� Friction plate worn or warped
� Steel plate worn or warped
� Clutch spring broken or weak
� Clutch cable improperly adjusted
� Clutch inner cable catching
� Clutch-release mechanism trouble
� Clutch hub or housing unevenly worn
Clutch not disengaging properly � Clutch lever play excessive
� Clutch plate warped or too rough
� Clutch spring tension uneven
� Engine oil deteriorated
� Engine oil viscosity too high
� Engine oil level too high
� Clutch driveshaft or housing frozen
� Clutch-release mechanism trouble
� Clutch-hub locknut too tight
Table 22
DRIVE TRAIN TROUBLESHOOTING
GEAR SHIFT PROBLEMS
Symptom Problem
Doesn’t go into gear; shift pedal doesn’t return � Clutch not disengaging
� Shift fork bent or seized
� Gear stuck on the shaft
� Gear-positioning lever binding
� Shift return spring weak or broken
� Shift return-spring pin loose
� Shift-mechanism arm spring broken
� Shift-mechanism arm broken
� Shift pawl broken
Motorcycle Troubleshooting 45

Table 22
DRIVE TRAIN TROUBLESHOOTING
GEAR SHIFT PROBLEMS
Symptom Problem
Jumps out of gear � Shift fork worn
� Gear groove worn
� Gear dogs and/or dog holes worn
� Shift drum groove worn
� Gear positioning-lever spring weak or broken
� Shift fork pin worn
� Drive shaft, output shaft, and/or gear splinesworn
Overshifts � Gear positioning-lever spring weak or broken
� Shift-mechanism arm spring broken
Table 23
ABNORMAL-NOISE TROUBLESHOOTING
ENGINE
Symptom Problem
Knocking � IC igniter trouble
� Carbon buildup in combustion chamber
� Fuel poor quality or incorrect fuel
� Spark plug incorrect
� Overheating
Piston slap � Cylinder-to-piston clearance excessive
� Cylinder or piston worn
� Connecting rod bent
� Piston pin or piston holes worn
Valve noise � Valve clearance incorrect
� Valve spring broken or weak
� Camshaft bearing worn
46 Motorcycle Troubleshooting
Table 22—Continued

Table 23
ABNORMAL-NOISE TROUBLESHOOTING
ENGINE
Symptom Problem
Miscellaneous engine noise � Connecting rod small-end clearanceexcessive
� Connecting rod big-end clearance excessive
� Piston ring worn, broken or stuck
� Piston seizure, damage
� Cylinder-head gasket leaking
� Exhaust pipe leaking at cylinder-headconnection
� Crankshaft runout excessive
� Engine mounts loose
� Crankshaft bearing worn
� Primary chain worn
� Camshaft chain tensioner trouble
� Camshaft chain, sprocket, guide worn
� Loose alternator rotor
� Air suction valve damaged
� Vacuum switch valve damaged
� Balancer gear worn or chipped
� Balancer-shaft position improperly adjusted
� Balancer bearing worn
� Starter chain, sprocket, guide worn
Table 24
ABNORMAL-NOISE TROUBLESHOOTING
DRIVE TRAIN
Symptom Problem
Clutch noise � Weak or damaged rubber damper
� Clutch-housing/friction-plate clearanceexcessive
� Clutch-housing gear worn
Transmission noise � Bearings worn
� Transmission gears worn or chipped
� Metal chips jammed in gear teeth
� Engine oil insufficient
(Continued)
Motorcycle Troubleshooting 47
Table 23—Continued

Table 24
ABNORMAL-NOISE TROUBLESHOOTING
DRIVE TRAIN
Symptom Problem
Drive chain noise � Drive chain adjusted improperly
� Chain worn
� Rear sprocket and/or engine sprocket worn
� Chain lubrication insufficient
� Rear wheel misaligned
Table 25
ABNORMAL-NOISE TROUBLESHOOTING
FRAME
Symptom Problem
Front fork noise � Oil insufficient or too thin
� Spring weak or broken
Rear shock absorber noise � Shock absorber damaged
Disc-brake noise � Pad installed incorrectly
� Pad surface glazed
� Disc warped
� Caliper trouble
Miscellaneous frame noise � Bracket, nut, bolt, etc., not properly mountedor tightened
48 Motorcycle Troubleshooting
Table 24—Continued

Table 26
EXCESSIVE-EXHAUST-SMOKE TROUBLESHOOTING
Symptom Problem
Blue smoke � Piston oil ring worn
� Cylinder worn
� Valve oil seal damaged
� Valve guide worn
� Cylinder-head gasket damaged
� Engine-oil level too high
Black smoke � Air cleaner clogged
� Main jet too large or fallen off
� Starter plunger stuck open
� Fuel level in carburetor float bowl too high
Table 27
HANDLING/STABILITY TROUBLESHOOTING
Symptom Problem
Handlebar hard to turn � Steering-stem locknut too tight
� Bearing damaged
� Steering bearing lubrication inadequate
� Steering stem bent
� Tire air pressure too low
Handlebar shakes or excessively vibrates � Tire worn
� Swing-arm pivot bearing worn
� Rim warped or not balanced
� Wheel bearing worn
� Handlebar clamp loose
� Steering-stem head nut loose
Handlebar pulls to one side � Frame bent
� Wheel misalignment
� Swing arm bent or twisted
� Steering improperly adjusted
� Front fork bent
� Right/left fork legs unbalanced (oil level,air pressure)
(Continued)
Motorcycle Troubleshooting 49

Table 27
HANDLING/STABILITY TROUBLESHOOTING
Symptom Problem
Shock absorption too hard � Front-fork oil excessive
� Front-fork oil viscosity too high
� Front-fork air pressure too high
� Rear shock absorber improperly adjusted
� Tire air pressure too high
� Front fork bent
Shock absorption too soft � Front-fork oil insufficient and/or leaking
� Front-fork oil viscosity too low
� Front fork, rear shock-absorber spring weak
� Rear shock-absorber oil leaking
Table 28
BRAKE TROUBLESHOOTING
Symptom Problem
Front brake doesn’t hold � Air in brake line
� Brake pad or disc worn
� Brake fluid leak
� Disc warped
� Contaminated brake pad
� Brake fluid deteriorated
� Primary or secondary cup damaged
� Master cylinder scratched inside
Rear brake doesn’t hold � Brake improperly adjusted
� Brake lining or drum worn
� Overheated
� Water in brake drum
� Brake cam, camshaft worn
� Oil on brake linings
50 Motorcycle Troubleshooting
Table 27—Continued

Table 29
BATTERY/WARNING-LIGHT INDICATION TROUBLESHOOTING
Symptom Problem
Battery discharged � Battery faulty (e.g., plates sulfated, shortedthrough sedimentation, electrolyte level toolow)
� Battery leads making poor contact
� Excessive electrical load
� Ignition switch trouble
� Regulator/rectifier defective
� Wiring faulty
Battery overcharged � Regulator trouble
Oil pressure warning light goes on � Engine-oil pump damaged
� Engine-oil screen clogged
� Engine-oil level too low
� Engine-oil viscosity too low
� Camshaft bearings worn
� Crankshaft bearings worn
� Oil-pressure switch damaged
� Wiring damaged
� Relief valve stuck open
� O-ring at the oil pipe in the crankcasedamaged
Motorcycle Troubleshooting 51

1
1. symptom
2. In the appropriate service manual
3. Verify the problem, isolate the problem,repair the problem, and verify the repair
4. Constant failures, intermittent failures,and failures caused by improper service
5. Lacking the self-confidence to performthe task at hand
2
1. blue
2. Piston, connecting rod, or crankshaft
3. compression
4. Ensure that all ignition switches are inthe Run position.
5. False
3
1. Excessive noise or seized engine
2. Hard to shift, jumps out of gear
3. True
4. A clogged exhaust
5. Pressurize the crankcase and usesoapsuds to check for leaks.
4
1. four-stroking
2. lean
3. Water
4. You should ensure that the choke is off.
5. rich
6. True
7. False
8. lean
9. rich
5
1. False
2. Overcharging, undercharging
3. On
4. ICMs are expensive to replace.
5. True
6. regulator
7. False
8. ohmmeter
9. True
10. flywheel key (Woodruff key)
Road Test Answers
53

6
1. True
2. air
3. False
4. Handling, brake, wheel and tire
54 Road Test Answers
ONLINE EXAMINATION
When you’re confident that you’ve mastered the material in your studies, you cancomplete your examination online. Follow these instructions:
2. Click the Back button on your browser.3. Click the Take an Exam button near the top of the screen. 4. Type in the eight-digit examination number.
Examination
For the online exam, you must use this
EXAMINATION NUMBER:
03301900
1. Write down the eight-digit examination number shown in the box above.


![Troubleshooting Heating Problems - Armchair Patriot Stuff Works/How Stuff Works... · [Troubleshooting Air Conditioning Problems] [Troubleshooting Heating Problems] ... Below we have](https://static.fdocuments.net/doc/165x107/5a78d9ca7f8b9ae6228de8c9/troubleshooting-heating-problems-armchair-stuff-workshow-stuff-workstroubleshooting.jpg)