Student s Quick Reference Guide - k12.com...Student=s Quick Reference Guide For the A+nyWhere...
4
Page 1 ® Student=s Quick Reference Guide For the A+nyWhere Learning System Version 3.5 Java-based Clients, including Webstart Navigating . There are several student interfaces (screen styles) your teacher can assign. This guide uses screen shots from the Secondary interface, but most of them work the same way. Common Buttons The A+LS ® software makes it easy to study on the computer by making it easy to get around the program. These eight buttons are used in all of the screen interfaces or skins. Go to the next screen - Goes to the next screen on a lesson or test. If grayed out, there is no next page. Return to the previous screen - Works like the back button in a web browser. If it is grayed out, there is no previous page. Stop this activity - When in lessons, taking a test, or writing an essay, this button exits the activity. To avoid accidentally logging out, from the menus, we suggest using the Previous Screen instead. View help - Pops open a window that describes the features of the screen you are looking at. Click on the help window’s Stop button to close it. Replay sound - Whenever a lesson or test plays a sound for you, this button will let you play it again. Go to/exit study guide - In practice tests, clicking this button will take you back to the study guide. Clicking it again will return you to the practice test. It is not available in the real mastery tests. Show student=s answers - After you complete a Practice or Mastery test, you may get the chance to review the questions. When reviewing test questions, click on the green checkmark button to switch between your answer and the correct answer. Drop box open - If you see a box with a black triangle toward the right side, you’ve found a drop box. If you click on the triangle, the box will drop open and reveal your choices. This is commonly found when choosing your assignment lists (see Selecting a Class and Assignment on page 2). Mastery Icon This last item isn’t a button, but it’s always great to see. Red apple - When you see a red apple next to an assignment, you know that you have mastered all of the parts for that assignment. Starting the Program . Loading the Program Different schools make the A+LS software available in different ways. It could appear as an icon (little picture) on your screen or in a special menu program. Here we’ll describe common ways of loading the program. If the ways shown below don’t work, talk with your teacher. 1. If you are at school, be sure you are logged into your network. OR If you are a remote user (telephone modem, cable modem, DSL, etc.), please confirm your connection to the Internet. $ The software won’t load properly unless it can connect to the server that houses its databases (digital filing cabinets). It needs a network or the Internet to do that. 2. Common ways to open the client: Run the client by clicking on the A+LS desktop icon. OR Windows: Run the client by clicking on Start, then Programs or All Programs, then A+nyWhere Learning System, and finally A+LS. OS X: Open Finder, select Applications, open the als30 folder, then the ALSClient folder, and finally double click on ALSClient. Logging On Since your lessons are coming from a server, it is important that the computer knows who you are. This helps it keep your Progress Records accurate and private. It is very important that you do not write down or share your password with anyone. The first screen you’ll see after the program loads is the Log-on screen. See the figure below.
Transcript of Student s Quick Reference Guide - k12.com...Student=s Quick Reference Guide For the A+nyWhere...

Page 1
®
Student=s Quick Reference Guide
For the A+nyWhere Learning System Version 3.5 Java-based Clients, including Webstart
Navigating . There are several student interfaces (screen styles) your teacher can assign. This guide uses screen shots from the Secondary interface, but most of them work the same way.
Common Buttons
The A+LS® software makes it easy to study on the computer by making it easy to get around the program. These eight buttons are used in all of the screen interfaces or skins.
Go to the next screen - Goes to the next screen on a lesson or test. If grayed out, there is no next page.
Return to the previous screen - Works like the back button in a web browser. If it is grayed out, there is no previous page.
Stop this activity - When in lessons, taking a test, or writing an essay, this button exits the activity. To avoid accidentally logging out, from the menus, we suggest using the Previous Screen instead.
View help - Pops open a window that describes the features of the screen you are looking at. Click on the help window’s Stop button to close it.
Replay sound - Whenever a lesson or test plays a sound for you, this button will let you play it again.
Go to/exit study guide - In practice tests, clicking this button will take you back to the study guide. Clicking it again will return you to the practice test. It is not available in the real mastery tests.
Show student=s answers - After you complete a Practice or Mastery test, you may get the chance to review the questions. When reviewing test questions, click on the green checkmark button to switch between your answer and the correct answer.
Drop box open - If you see a box with a black triangle toward the right side, you’ve found a drop box. If you click on the triangle, the box will drop open and reveal your choices. This is commonly found when choosing your assignment lists (see Selecting a Class and Assignment on page 2).
Mastery Icon
This last item isn’t a button, but it’s always great to see.
Red apple - When you see a red apple next to an assignment, you know that you have mastered all of the parts for that assignment.
Starting the Program . Loading the Program
Different schools make the A+LS software available in different ways. It could appear as an icon (little picture) on your screen or in a special menu program. Here we’ll describe common ways of loading the program. If the ways shown below don’t work, talk with your teacher.
1. If you are at school, be sure you are logged into your network.
OR If you are a remote user (telephone modem, cable modem,
DSL, etc.), please confirm your connection to the Internet.
$ The software won’t load properly unless it can connect to the server that houses its databases (digital filing cabinets). It needs a network or the Internet to do that.
2. Common ways to open the client: Run the client by clicking on the A+LS desktop icon.
OR Windows: Run the client by clicking on Start, then
Programs or All Programs, then A+nyWhere Learning System, and finally A+LS.
OS X: Open Finder, select Applications, open the als30 folder, then the ALSClient folder, and finally double click on ALSClient.
Logging On Since your lessons are coming from a server, it is important that the computer knows who you are. This helps it keep your Progress Records accurate and private. It is very important that you do not write down or share your password with anyone.
The first screen you’ll see after the program loads is the Log-on screen. See the figure below.
Page 2
1. Logging on is simple. Just type your log-on name into the Log-on Name text box.
$ If the text doesn’t appear as you type, use your mouse to click on the text box and the text cursor (little black bar) will appear, allowing you to start typing.
2. Press the Tab key to move the text cursor to the Password box.
3. Type your password.
$ Don=t worry, instead of text, the computer only shows ***** to keep your password a secret. You will see one * for each letter or number in your password.
4. Press the Enter key OR click on the Log On button to finish.
$ It should only take a moment or two for the program to load.
$ If there is a problem, you stay at the Log-on screen. Carefully type your log-on name and password again.
Which screen appears next depends on your teachers, your assignments, and how you last exited the A+LS software:
• If you only have one class that uses the A+LS system, then you may go straight to the Select a Lesson screen.
• If you only have one assignment list, you may go straight to an assignment.
• If your last A+LS session was cut off (you didn’t exit normally), you may see the message, “Resuming your previous session” and will automatically return to your previous lesson.
We’ll assume that you have several classes.
Selecting a Class and Assignment . Now that you are in the A+LS software, it’s time to choose what you want to do.
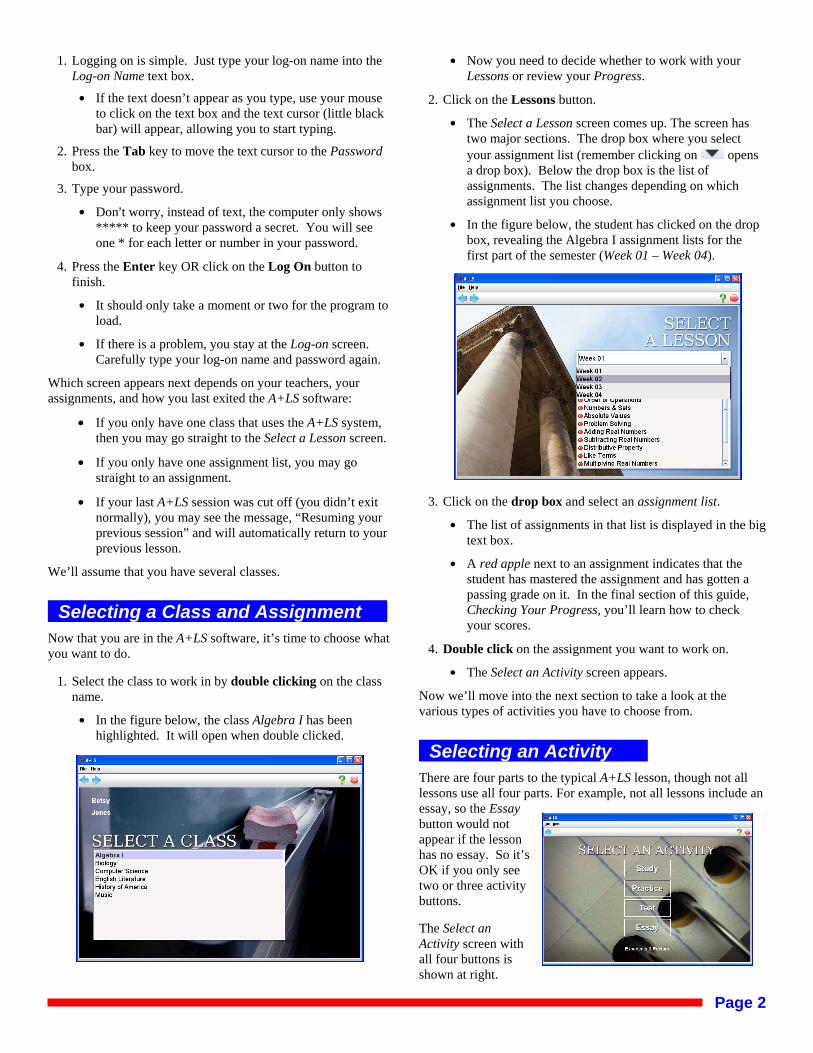
1. Select the class to work in by double clicking on the class name.
$ In the figure below, the class Algebra I has been highlighted. It will open when double clicked.
$ Now you need to decide whether to work with your Lessons or review your Progress.
2. Click on the Lessons button.
$ The Select a Lesson screen comes up. The screen has two major sections. The drop box where you select your assignment list (remember clicking on opens a drop box). Below the drop box is the list of assignments. The list changes depending on which assignment list you choose.
$ In the figure below, the student has clicked on the drop box, revealing the Algebra I assignment lists for the first part of the semester (Week 01 – Week 04).
3. Click on the drop box and select an assignment list.
$ The list of assignments in that list is displayed in the big text box.
$ A red apple next to an assignment indicates that the student has mastered the assignment and has gotten a passing grade on it. In the final section of this guide, Checking Your Progress, you’ll learn how to check your scores.
4. Double click on the assignment you want to work on.
$ The Select an Activity screen appears.
Now we’ll move into the next section to take a look at the various types of activities you have to choose from.
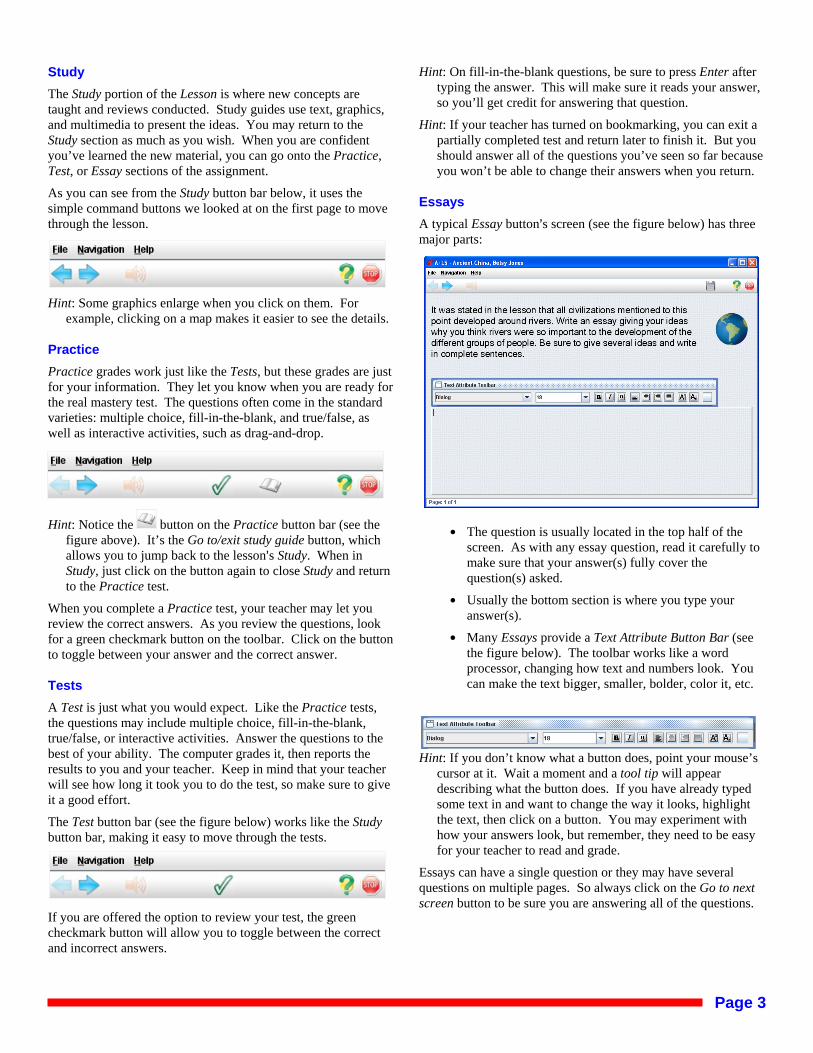
Selecting an Activity . There are four parts to the typical A+LS lesson, though not all lessons use all four parts. For example, not all lessons include an essay, so the Essay button would not appear if the lesson has no essay. So it’s OK if you only see two or three activity buttons.
The Select an Activity screen with all four buttons is shown at right.
Page 3
Study The Study portion of the Lesson is where new concepts are taught and reviews conducted. Study guides use text, graphics, and multimedia to present the ideas. You may return to the Study section as much as you wish. When you are confident you’ve learned the new material, you can go onto the Practice, Test, or Essay sections of the assignment.
As you can see from the Study button bar below, it uses the simple command buttons we looked at on the first page to move through the lesson.
Hint: Some graphics enlarge when you click on them. For example, clicking on a map makes it easier to see the details.
Practice Practice grades work just like the Tests, but these grades are just for your information. They let you know when you are ready for the real mastery test. The questions often come in the standard varieties: multiple choice, fill-in-the-blank, and true/false, as well as interactive activities, such as drag-and-drop.
Hint: Notice the button on the Practice button bar (see the figure above). It’s the Go to/exit study guide button, which allows you to jump back to the lesson=s Study. When in Study, just click on the button again to close Study and return to the Practice test.
When you complete a Practice test, your teacher may let you review the correct answers. As you review the questions, look for a green checkmark button on the toolbar. Click on the button to toggle between your answer and the correct answer.
Tests A Test is just what you would expect. Like the Practice tests, the questions may include multiple choice, fill-in-the-blank, true/false, or interactive activities. Answer the questions to the best of your ability. The computer grades it, then reports the results to you and your teacher. Keep in mind that your teacher will see how long it took you to do the test, so make sure to give it a good effort.
The Test button bar (see the figure below) works like the Study button bar, making it easy to move through the tests.
If you are offered the option to review your test, the green checkmark button will allow you to toggle between the correct and incorrect answers.
Hint: On fill-in-the-blank questions, be sure to press Enter after typing the answer. This will make sure it reads your answer, so you’ll get credit for answering that question.
Hint: If your teacher has turned on bookmarking, you can exit a partially completed test and return later to finish it. But you should answer all of the questions you’ve seen so far because you won’t be able to change their answers when you return.
Essays A typical Essay button=s screen (see the figure below) has three major parts:
$ The question is usually located in the top half of the
screen. As with any essay question, read it carefully to make sure that your answer(s) fully cover the question(s) asked.
$ Usually the bottom section is where you type your answer(s).
$ Many Essays provide a Text Attribute Button Bar (see the figure below). The toolbar works like a word processor, changing how text and numbers look. You can make the text bigger, smaller, bolder, color it, etc.
Hint: If you don’t know what a button does, point your mouse’s cursor at it. Wait a moment and a tool tip will appear describing what the button does. If you have already typed some text in and want to change the way it looks, highlight the text, then click on a button. You may experiment with how your answers look, but remember, they need to be easy for your teacher to read and grade.
Essays can have a single question or they may have several questions on multiple pages. So always click on the Go to next screen button to be sure you are answering all of the questions.
Page 4
Exiting
To exit from most activities, click on . Tests and Essays will ask you to confirm your decision so that you don’t accidentally quit and mess up your score. Some activities have a Submit button that saves your work and exits.
Checking Your Progress . You’ve done all that work studying and testing, now you want to know your scores. In the A+LS software, we call that Progress. Your scores are updated just as soon as you finish a test. Essay scores appear a moment after teachers grade them.
Checking your Progress is easy:
1. After you log in, select your class.
2. Click on the Progress button.
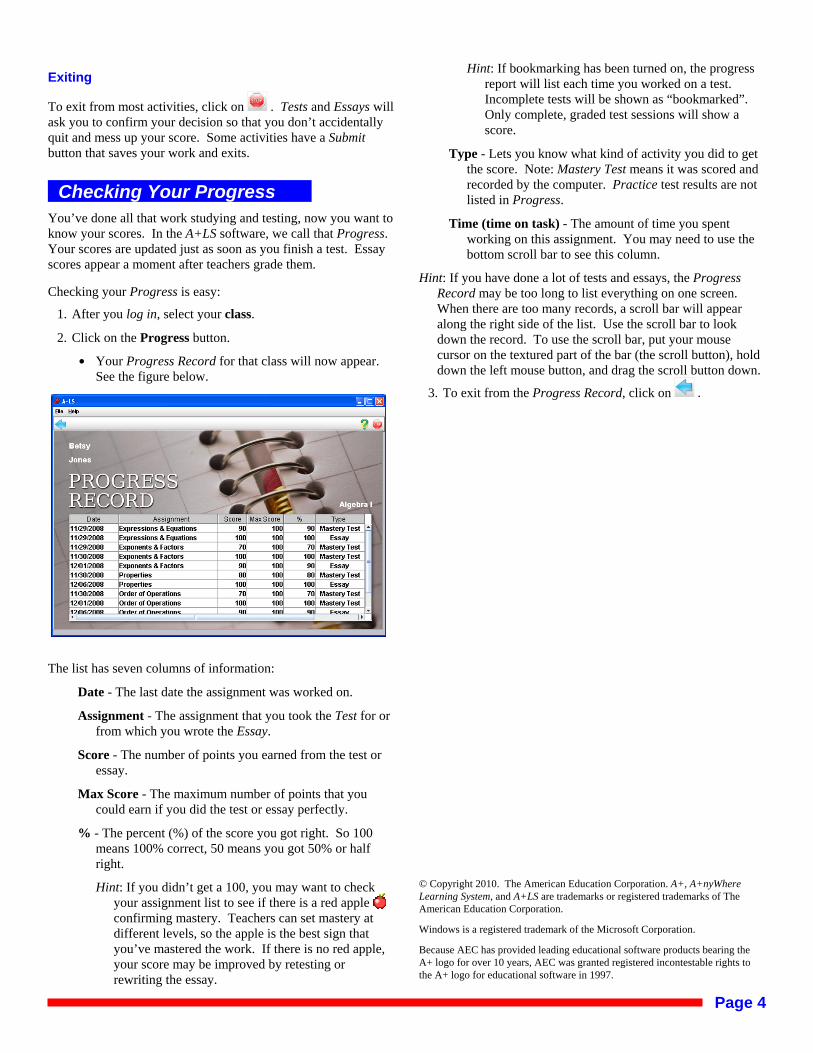
$ Your Progress Record for that class will now appear. See the figure below.
The list has seven columns of information:
Date - The last date the assignment was worked on.
Assignment - The assignment that you took the Test for or from which you wrote the Essay.
Score - The number of points you earned from the test or essay.
Max Score - The maximum number of points that you could earn if you did the test or essay perfectly.
% - The percent (%) of the score you got right. So 100 means 100% correct, 50 means you got 50% or half right.
Hint: If you didn’t get a 100, you may want to check your assignment list to see if there is a red apple confirming mastery. Teachers can set mastery at different levels, so the apple is the best sign that you’ve mastered the work. If there is no red apple, your score may be improved by retesting or rewriting the essay.
Hint: If bookmarking has been turned on, the progress report will list each time you worked on a test. Incomplete tests will be shown as “bookmarked”. Only complete, graded test sessions will show a score.
Type - Lets you know what kind of activity you did to get the score. Note: Mastery Test means it was scored and recorded by the computer. Practice test results are not listed in Progress.
Time (time on task) - The amount of time you spent working on this assignment. You may need to use the bottom scroll bar to see this column.
Hint: If you have done a lot of tests and essays, the Progress Record may be too long to list everything on one screen. When there are too many records, a scroll bar will appear along the right side of the list. Use the scroll bar to look down the record. To use the scroll bar, put your mouse cursor on the textured part of the bar (the scroll button), hold down the left mouse button, and drag the scroll button down.
3. To exit from the Progress Record, click on .
© Copyright 2010. The American Education Corporation. A+, A+nyWhere Learning System, and A+LS are trademarks or registered trademarks of The American Education Corporation.
Windows is a registered trademark of the Microsoft Corporation.
Because AEC has provided leading educational software products bearing the A+ logo for over 10 years, AEC was granted registered incontestable rights to the A+ logo for educational software in 1997.