Student Laboratory Manual - Bio-Link
60
Basics of Cell Culture A student laboratory manual By Golnar Afshar PhD
Transcript of Student Laboratory Manual - Bio-Link

Basics of Cell Culture A student laboratory manual By Golnar Afshar PhD

2
Table of Contents:
Introduction 3 Laboratory Exercises
Laboratory Safety 3 Aseptic Technique Exercise30 30
Laboratory Notebooks5
5 Plating Cells from Frozen
Stocks
31
Cell culture Laboratory
Equipment
7 Count and
Plate 104
Cells in a T25
33
Laminar-Flow Hood 7 Survival Assay-
Sensitivity to UV Exposure35
35
Inverted Microscopes 8 Live and Dead Cell
Identification by Using
Propidium Iodide and Calcein
AM41
41
Fluorescent
Inverted Microscopes
9 Transfection 44
Clinical Centrifuge 10 Freezing Cells 48
Incubator 11 Stem Cell Differentiation 50
370C Water Bath 12 Appendix A- Serial Dilution 54
Refrigerator and Freezers 12 Appendix B- Practice problems 55
Biohazard Waste Containers 12 Glossary 57
Cell Culture Vessels 12 References 60
Pipettes 13
Contamination 15 Edited by: Deborah Blancas, Carin
Zimmerman Ph.D., and Edie Kaeuper
Ph.D.
Common Laboratory Procedures 19
Media Preparation
20
Routine Cell Culture
Maintenance
(Feeding and Subculturing)
23 Note: Terms bolded in the paragraphs of
this text can be found in the glossary.
Counting Cells Using a
Hemocytometer
26
3
Basics of Cell Culture
Cell culture--a method of multiplying cells
under controlled, laboratory conditions--is
used by scientists to study cellular functions,
structures and behaviors. Cell culture is
rooted in tissue-culturing techniques first
developed in the early twentieth century.
Initially, tissue cultures were made by using
fragments of tissue or organs called
explants. However, this form of culture
yielded tissue with very limited growth
capabilities.
One of the first significant advances in
tissue growth was the ability to isolate
individual cells from tissue for use in the
laboratory. But, these individual cells were
also limited by a finite number of divisions,
a phenomenon known as Hayflick’s Limit
(Hayflick and Moorhead, 1961). This
limitation was overcome by the discovery in
the 1950s of special cervical carcinoma
cells, known as HeLa cells, which have an
indefinite lifespan (Gey et al. 1952). Due to
modern advances, cells can now be easily
grown in large numbers and stored
indefinitely.
In addition to studying cellular structure and
functions, cell cultures are used for a variety
of applications, including toxicology studies,
drug development, recombinant protein
production, diagnosis, treatment and more.
This course is designed to expose students to
the cell culture laboratory environment and
to introduce the fundamental concepts and
techniques of mammalian cell culture.
The class meets once a week for nine weeks.
Each class lasts four hours with a brief
lecture, followed by a laboratory exercise.
Laboratory safety and professional
conduct
Safety policies are essential for this class
and must be followed not only for your own
protection but for the protection of others as
well. Failure to follow these procedures will
not only severely affect your grade, but may
also lead to health complications. The
following policies must be adhered to while
in the laboratory.
1. Eating, drinking or chewing gum is
prohibited.
2. Keep your hands away from your mouth
during the laboratory class.
3. Horseplay or running in the laboratory is
not allowed.
4. You must wear a laboratory coat during
the laboratory session.
5. You must disinfect your laboratory work
area prior to and after each class.
6. You must wash your hands before starting
your work with the cells and after
completion of the laboratory class. Gloves
are required and will be provided for
procedures that use potentially hazardous
material.
7. Laboratory accidents, spills and injuries
must immediately be brought to the attention

4
of the instructor.
8. Friends or visitors are not permitted in the
laboratory.
9. Closed-toe shoes and long pants must be
worn.
10. Biohazard material and contaminated
cultures must be disposed of according to
the instructions.
11. Dispose of the glass Pasteur pipettes and
micropipette tips in the biohazard sharp
pouches. Dispose of serological pipettes into
the dedicated disposal trays beside your
work area; the pipettes will be sterilized
before disposal.
12. Aspirate liquid waste into waste bottles,
before throwing flasks and plates into trash.
13. Cell phones must be turned off for the
laboratory period.
14. Familiarize yourself with the locations
of emergency safety equipment in the
laboratory, such as first aid kit, eye-wash
station, and fire extinguisher.

5
Laboratory Notebooks
Accurate record keeping is essential to the
progress of science. Scientists place great
importance on recording the procedures and
data during the experiment. The original
hand-written notes and records are of great
importance for accuracy since rewriting
notes or relying on memory can increase the
risk of introducing errors to the records.
Laboratory notes need to be accurate,
readable and organized so that another
scientist, who is unfamiliar with the
experiment, can follow the procedures and
make sense of the data.
It is very important that the mistakes made
during a procedure or changes made to the
protocol are recorded in the notes. Mistakes
often lead to new questions and discoveries;
and knowing that a procedure was changed
due to mistakes or unexpected
circumstances help to interpret the data.
Laboratory notebooks are often used as legal
records for patenting discoveries and for
verification of compliance with regulations.
Therefore, it is important that the records are
properly documented in a way that makes it
difficult to change, add or delete the data
that has been recorded. In some industries
and research institutions the notebooks are
signed by the supervisors and kept in a safe.
Rules for laboratory notebooks:
Student notebooks will be collected at the
end of the semester and graded, based on
organization and completeness of the notes.
1. All laboratory notebooks must be
permanently bound. Binders and spiral-
bound notebooks are unacceptable. This will
prevent the addition and/or removal of
pages.
2. All entries must be made in black or blue
ink, except drawings or sketches, which may
be in pencil.
3. You must start your notebook with a table
of contents that lists titles of lab exercises
and their corresponding page numbers.
4. Every page should be numbered
sequentially with no pages missing or torn
out.
5. If you are repeating a protocol or part of
an experiment, it is acceptable to write "as
done previously on page A" without
rewriting the entire entry.
6. Do not leave any pages blank. Cross out
blank spaces in your notebook. This will
prevent adding notes to previously recorded
data.
7. Entries must be made in a chronological
order. If an experiment runs over for several
days, you can write at the bottom of your
entry "continued on page B". When you
continue an entry on another page start with
"continued from page C". Remember to note
the page numbers in your table of contents.
8. Figures and graphs must have a title and
be clearly labeled.
9. Graphs or material written on a separate
piece of paper must be glued to your
notebook. Do not use staples or tape.
10. Do not use white-out. If you make a
mistake, just cross the incorrect words with
a single line so that it is still readable.
11. Leave a space at the bottom of every
page for the student and the instructor to
sign and date.
6
12. The date must be in the international
scientific format, “day/month/year”.
13. Your name must be on the cover of your
notebook and on the three side edges.
14. If you follow the steps outlined above,
you will have an entry detailing the lab work
you performed on that day.
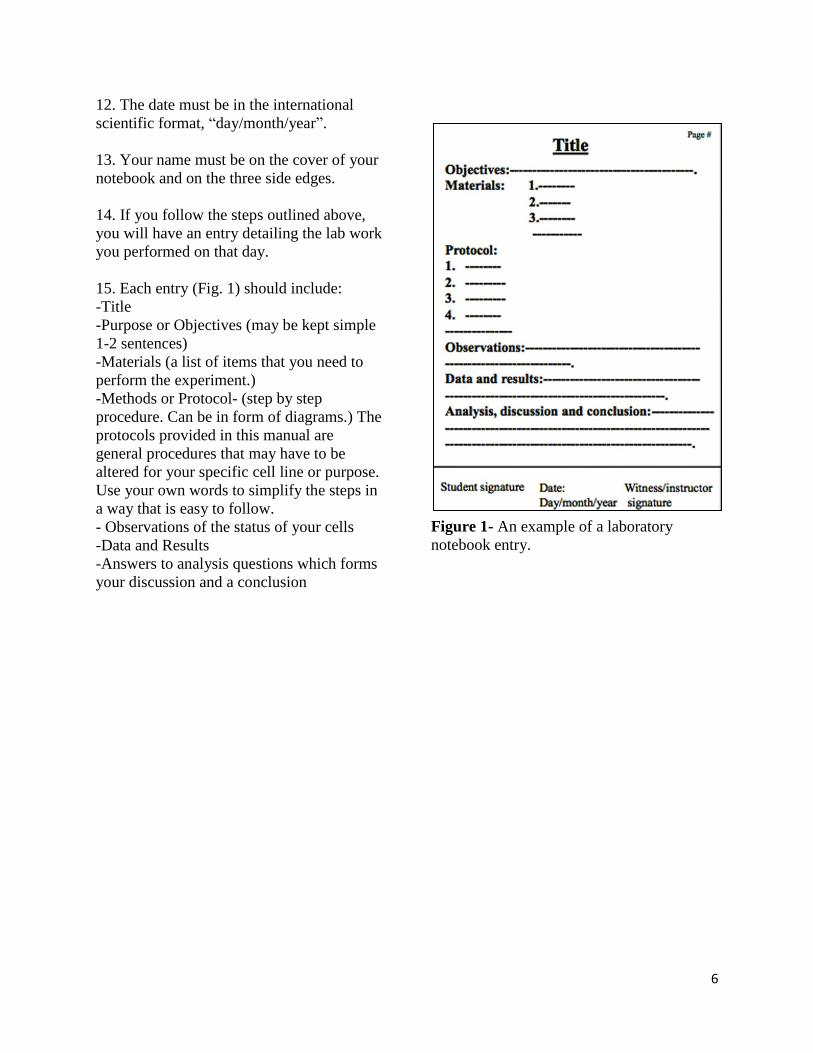
15. Each entry (Fig. 1) should include:
-Title
-Purpose or Objectives (may be kept simple
1-2 sentences)
-Materials (a list of items that you need to
perform the experiment.)
-Methods or Protocol- (step by step
procedure. Can be in form of diagrams.) The
protocols provided in this manual are
general procedures that may have to be
altered for your specific cell line or purpose.
Use your own words to simplify the steps in
a way that is easy to follow.
- Observations of the status of your cells
-Data and Results
-Answers to analysis questions which forms
your discussion and a conclusion
Figure 1- An example of a laboratory
notebook entry.
7
Cell Culture Laboratory
Equipment
Equipment commonly used in a cell-culture
laboratory:
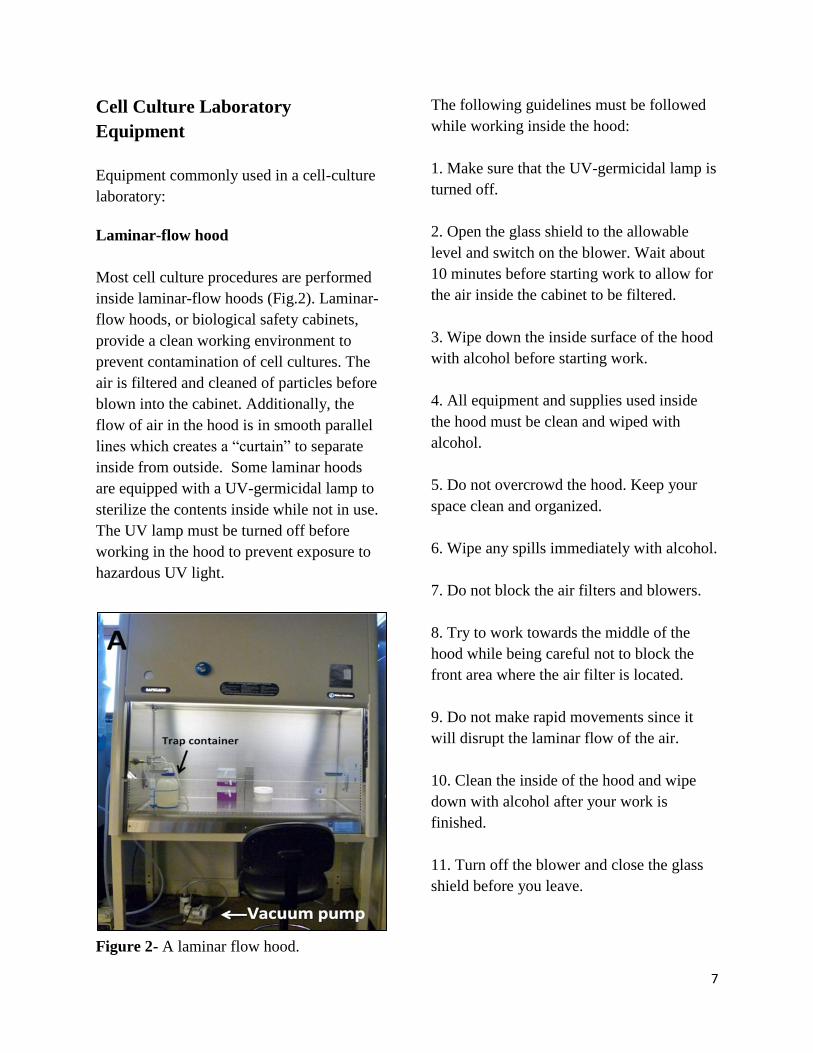
Laminar-flow hood
Most cell culture procedures are performed
inside laminar-flow hoods (Fig.2). Laminar-
flow hoods, or biological safety cabinets,
provide a clean working environment to
prevent contamination of cell cultures. The
air is filtered and cleaned of particles before
blown into the cabinet. Additionally, the
flow of air in the hood is in smooth parallel
lines which creates a “curtain” to separate
inside from outside. Some laminar hoods
are equipped with a UV-germicidal lamp to
sterilize the contents inside while not in use.
The UV lamp must be turned off before
working in the hood to prevent exposure to
hazardous UV light.
Figure 2- A laminar flow hood.
The following guidelines must be followed
while working inside the hood:
1. Make sure that the UV-germicidal lamp is
turned off.
2. Open the glass shield to the allowable
level and switch on the blower. Wait about
10 minutes before starting work to allow for
the air inside the cabinet to be filtered.
3. Wipe down the inside surface of the hood
with alcohol before starting work.
4. All equipment and supplies used inside
the hood must be clean and wiped with
alcohol.
5. Do not overcrowd the hood. Keep your
space clean and organized.
6. Wipe any spills immediately with alcohol.
7. Do not block the air filters and blowers.
8. Try to work towards the middle of the
hood while being careful not to block the
front area where the air filter is located.
9. Do not make rapid movements since it
will disrupt the laminar flow of the air.
10. Clean the inside of the hood and wipe
down with alcohol after your work is
finished.
11. Turn off the blower and close the glass
shield before you leave.

8
Inverted microscopes
Inverted microscopes are used to observe the
cells in culture (Fig. 3). Inverted
microscopes are a type of microscope with
the objective lenses below the stage and the
light source and the condenser above the
stage. These microscopes are especially
suitable for observing cells that are attached
to the bottom of the plates and/or flasks.
Figure 3- An inverted microscope.
The flask/plate is placed on the stage and the
image is focused by turning the focus knobs.
The objective lenses under the stage can
provide 4X, 10X, 20X and sometimes more
magnification of the image. The objective
turret, which holds the objective lenses, can
be turned to place the appropriate objective
lens in place. The phase rings above the
stage are placed in the light path to change
the phase of the light when going through
different structures of the cells in order to
make the transparent structures more visible
to the eyes. Different phase rings are located
on a slider and can be placed in the light
path for a clearer image. The condenser
above the stage concentrates and focuses the
light from the light source.
When observing your cells:
1. Wipe the stage with alcohol.
2. If you need to clean the lenses, only use
lens paper to avoid scratching any of the
microscope’s lens.
3. Place your plate or flask of cells on the
stage.
4. Turn on the light.
5. Turn the objective lens turret to the
smallest magnification (4X).
6. Look at the cells by using the ocular
lenses while moving the flask slightly and
focusing to find the cells.
7. Turn the turret to a higher magnification.
Usually 10X is sufficient for routine
observations.
8. Adjust the focus knobs for the best
possible image. To focus for both of your
eyes, close your right eye and focus with the
focus knob first. Then close your left eye
and focus by turning the right ocular lens.
9. You may want to slide a phase ring in the
light path for a clearer image. For observing
some cell types, phase rings may be helpful.
10. Turn off the microscope after you are
finished.

9
Fluorescent inverted microscopes
Fluorescent microscopes are inverted
microscopes, used to observe cells and
molecules that have been labeled with
fluorophores. Fluorophores are molecules
that can absorb energy of light at specific
wavelengths and emit less energetic
fluorescent light. Fluorescent microscopes
are equipped with filters that will separate
the absorbed light from the emitted
fluorescent light. A set of filters are mounted
on a block called the filter cube.
Fluorescent microscopes usually have
several filter cubes with different sets of
filters appropriate for observing
fluorophores that emit light at different
wavelengths. The filter cubes are
conveniently located on a turret that can be
rotated in order to place the appropriate cube
in place to observe a specific fluorophore.
Use of fluorophores and fluorescent
microscopes has enabled scientists to view
cellular structures and to study molecular
functions and interactions.
Your instructor will demonstrate the proper
use and care of the fluorescent microscopes
in detail. The following are some general
rules to be followed when using a
fluorescent microscope:
1. For better view, turn off the lights in the
room.
2. Turn on the high-intensity light source
(usually a xenon-arc or a mercury-vapor
lamp) and allow about 10 minutes for warm
up. Do not turn off the lamp until you are
completely done with your work. You
cannot turn the light back on again until it
has cooled off completely, which may take
up to 1-2 hours.
3. Block the light path to prevent your cells
from overexposure to the high intensity
light. Fluorophores that are exposed to
continuous light will eventually lose their
fluorescent properties, a phenomenon called
“photobleaching”.
4. Place your plate or flask of cells on the
stage and turn on the regular microscope
light.
5. Using the lower magnification objective
lens, find your specimen and focus.
6. Turn to the appropriate higher
magnification objective lens and adjust the
focus.
7. Turn off the regular microscope light and
unblock the high-intensity light path.
8. Place the appropriate filter cube in place.
9. Observe the cells and make notes.
10. Remember to provide protection against
photobleaching by blocking the light path
when not observing the cells.
11. Turn off the light source when your
work is finished.
12. Do not put the plastic cover on the
microscope until the light source has cooled
down.

10
Clinical Centrifuge
Clinical centrifuges (Fig. 4) are used to
concentrate the cells and to separate the cells
from the media or other reagents. Slow-
speed clinical centrifuge must be used in
order to prevent damage to the cells. For
routine spinning of the cells, speed of 80-
100g (gravitational force) is sufficient.
Higher speeds may damage the cells. Proper
care and operation of the centrifuge will be
explained in detail by your instructor.
Figure 4- Two different models of clinical
centrifuges.
General rules for using a centrifuge:
1. Transfer the liquid suspension to the
appropriately sized centrifuge tubes. Not all
tubes will be able to survive the forces of the
centrifugation, so please use the tubes
specifically manufactured for centrifuge you
are using.
2. Weigh your tubes with their contents on a
pan-balance to make sure that the tubes are
of equal weight. Fig. 5 depicted two tubes
that are properly balanced, i.e. weigh the
same amount.
3. Sometimes you must prepare a separate
balancing tube of the same size by filling it
with tap water. The balancing tube must be
of the same weight as the tube that needs to
be centrifuged.
4. Place the two tubes that have been
balanced into two opposing slots of the
centrifuge.
5. Close the safety lid.
6. Set the centrifuge to the appropriate speed
and time, then turn it on.
7. Stay close to the centrifuge for the first
minute to make sure the centrifuge is
running smoothly. If the centrifuge is not
balanced properly, it will vibrate. Some
centrifuges will turn off automatically if
unbalanced. You need to turn off the older
model centrifuges manually as soon as you
sense the imbalance and vibrations.
Continuation of the spin while the centrifuge
is imbalanced will damage the centrifuge.
8. Do not open the safety lid while the motor
is running.
9. Wipe any spills that might have occurred
after centrifugation.
11
Figure 5- Use a scale to balance your tubes
for centrifugation.
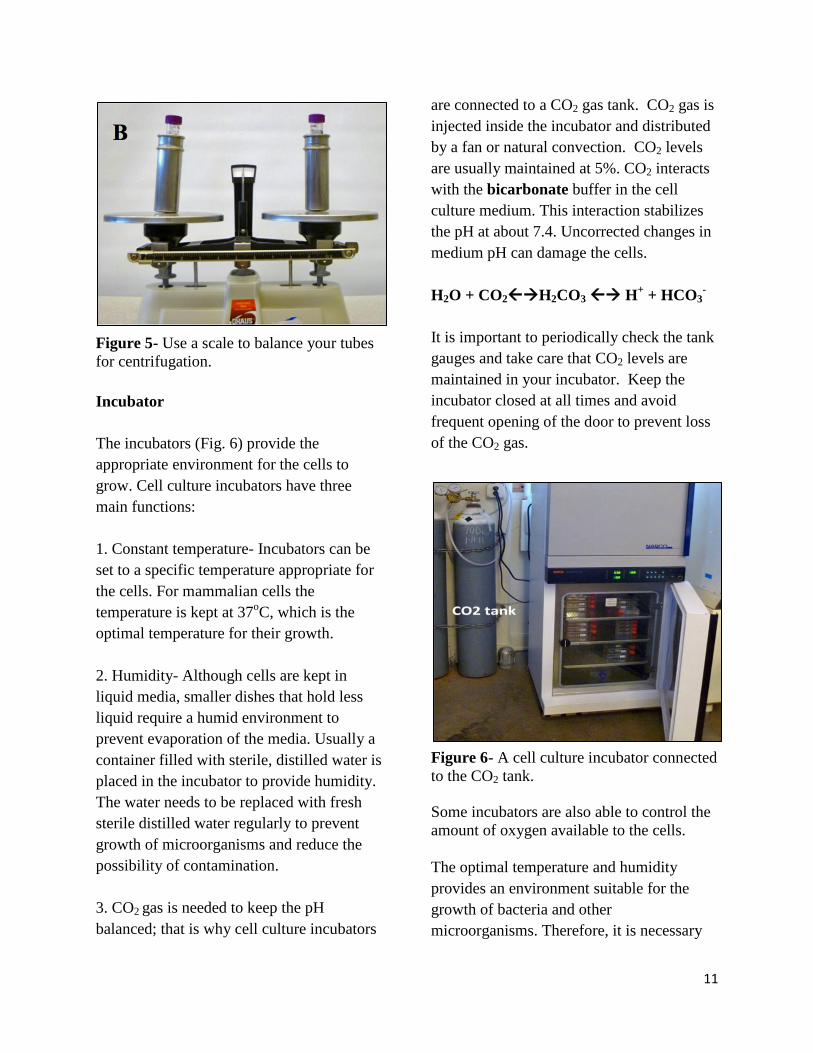
Incubator
The incubators (Fig. 6) provide the
appropriate environment for the cells to
grow. Cell culture incubators have three
main functions:
1. Constant temperature- Incubators can be
set to a specific temperature appropriate for
the cells. For mammalian cells the
temperature is kept at 37oC, which is the
optimal temperature for their growth.
2. Humidity- Although cells are kept in
liquid media, smaller dishes that hold less
liquid require a humid environment to
prevent evaporation of the media. Usually a
container filled with sterile, distilled water is
placed in the incubator to provide humidity.
The water needs to be replaced with fresh
sterile distilled water regularly to prevent
growth of microorganisms and reduce the
possibility of contamination.
3. CO2 gas is needed to keep the pH
balanced; that is why cell culture incubators
are connected to a CO2 gas tank. CO2 gas is
injected inside the incubator and distributed
by a fan or natural convection. CO2 levels
are usually maintained at 5%. CO2 interacts
with the bicarbonate buffer in the cell
culture medium. This interaction stabilizes
the pH at about 7.4. Uncorrected changes in
medium pH can damage the cells.
H2O + CO2H2CO3 H+ + HCO3
-
It is important to periodically check the tank
gauges and take care that CO2 levels are
maintained in your incubator. Keep the
incubator closed at all times and avoid
frequent opening of the door to prevent loss
of the CO2 gas.
Figure 6- A cell culture incubator connected
to the CO2 tank.
Some incubators are also able to control the
amount of oxygen available to the cells.
The optimal temperature and humidity
provides an environment suitable for the
growth of bacteria and other
microorganisms. Therefore, it is necessary

12
to clean the incubators frequently to prevent
growth and spread of contamination.
370C water bath
The media and most of the solutions used
for cell cultures are kept in the 4oC
refrigerator. The cells, however, are kept in
the 37oC incubator. In order to prevent
shocking the cells with cold temperature, the
media and reagents are warmed up in the
water bath before use. The warm water in
the water bath is the ideal environment for
the growth of microorganisms and
contaminants. Therefore, the water bath
needs to be cleaned and the water replaced
with fresh distilled water routinely. Bottles
and containers that have been warmed up in
the water bath must be wiped down
carefully with alcohol before being
transferred to the hood.
Refrigerator and freezers
Most reagents and solutions used for cell
culture are kept in the refrigerator for short-
term storage. Some of the reagents can be
kept in the -20oC freezer for longer term
storage. Cell-culture facilities often have a
-80oC freezer for storage of some of the
reagents and short-term storage of frozen
cells.
For long-term storage, cells are kept in
liquid nitrogen tanks. The temperature of
liquid nitrogen is -196 oC. Cells can be kept
frozen in liquid nitrogen for many years.
The very cold temperature of liquid nitrogen
is hazardous; therefore, thick gloves must be
worn when opening the tank with great care.
Biohazard waste containers
Potentially hazardous material must be
disposed of properly in biohazard waste
containers and sterilized before disposal.
Biohazard material must be handled
according to federal, local and institutional
regulations. Your instructor will explain the
proper disposal of material in class. It is
very important to comply with the rules to
prevent the spread of potentially hazardous
material to the environment.
Cell culture vessels
Most cells in culture need to attach to a
substrate in order to divide and grow. These
cells often form a monolayer and cover the
surface available to them. Cells that require
attachment for growth are said to be
anchorage-dependent. Hematopoietic cells
and a few other cell types can grow in liquid
suspension without attachment. These cells
are said to be anchorage-independent cells.
The vessels used to grow anchorage-
dependent and anchorage-independent cells
need to be designed in a way to support the
proper growth of these two cell types.
In most laboratories, disposable polystyrene
plastic vessels are used to grow anchorage-
dependent cells (Fig. 7). The vessels are flat
at the bottom to provide a surface for cell
growth. The bottom surface of the culture
vessels are coated by molecules such as
poly-L-lysine, laminin, gelatin, or
fibronectin. These mimic the natural
extracellular matrix and allow the cultured
cells to attach. There are three types of
commonly used culture vessels used for

13
anchorage-dependent cells: flasks, dishes,
and multi-well plates. All three types can be
of different sizes with different surface area.
The choice of the vessel depends on the
nature of the procedures and personal
preference.
Figure 7- Cell
culture dishes and
multi-well plates
(A). Cell culture
flasks (B) with
vented caps (C).
The vessels used to grow anchorage-
independent cells do not need to be treated
for cell attachment. Sterile, stirrer bottles are
normally used for agitation of the culture
and to keep the cells in suspension.
Both cell types need exchanges of gases (O2
and CO2) for growth. Therefore the cell
culture vessels must allow gases to enter.
Dishes and plates have loose fitting lids and
the caps of the flasks must be closed loosely
to allow gases to go in. Some flasks have
vented caps with an opening that is covered
by a filter to allow gases in, but prevent
entrance of contamination (Fig. 7C).
Pipettes
Pipettes are used for transfer of specific
volumes of liquid. Two kinds of pipettes are
commonly used in laboratories:
1. Serological pipettes can measure liquids
between 0.1 to 50 mls. You must choose the
appropriate size pipette for the volume that
you are transferring. Serological pipettes
are marked with calibrated lines to allow
measurement of accurate volumes. The
maximum volume that can be transferred
and the size of the pipette’s subdivisions are
printed close to the top of the pipette.
Serological pipettes require the use of
electrical or manual pumps to draw and
release liquid.
2. Micropipettes are used to transfer small
volumes of liquid, between 1-1000ls
(Fig.8). You must choose the micropipette
of the appropriate size to use for the volume
you are transferring. The range of volumes
that can be transferred is written on the
micropipette. It is important to stay within
the allowable range. Setting up the pipette to
volumes above or below the allowable range
will damage the pipette and will result in
inaccurate measurements. Micropipettes fit
tips that are specific for the specific
volumes. The tips are kept in color-coded
sterile boxes.
When using a micropipette:
1. Choose the appropriate size micropipette.
2. Set the dial to the desired volume to be
transferred.

14
3. Open the appropriate size tip box in a
sterile environment (inside the hood).
4. Pick up a tip using the pipette. Do not use
your fingers to fit the tip on the pipette.
Remember to shut the box after the tip is
removed to maintain sterility.
5. Press down gently on the plunger using
your thumb to the first point where you feel
resistance.
6. Place the tip inside the liquid just below
the surface.
7. Gently release the plunger to draw the
liquid in. If the plunger is released too
rapidly the liquid will aerate into the
micropipette and will increase the chances
of contamination.
8. To expel the liquid, hold the tip inside the
vessel, touching against the side of the
vessel while holding it slightly tilted. Press
down on the plunger, all the way to the
bottom (past the first resistance point).
9. To dispose of the used pipette tip, hold
the pipette above the disposal bucket and
eject the tip into disposal by pressing the
ejection button.
If used properly, micropipettes can measure
accurate small volumes of liquid. They are
very sensitive and expensive tools and must
be handled with great care.
Figure 8- Three different sized
micropipettes (p20, p100 and p1000) with
their appropriate tips (A). View of the
micropipette tops (B).
15
Contamination
Cell-culture contamination is a very
common problem in all cell-culture
facilities. Even the most experienced
scientist encounters contamination problems
once in a while. Contamination can be
frustrating and will lead to the loss of the
culture, time, effort, and of course is
expensive. Although eliminating the
problem of contamination is not completely
possible, it can be very well be managed and
reduced. Careful handling of the cultures
and reagent preparation and following good
laboratory practices can reduce the
contamination problem significantly.
Cell-culture contaminants can be divided
into two major categories; chemical and
microbial. Chemical contamination occurs
when an unwanted chemical substance is
present in the media or any of the reagents.
The unwanted chemical may be harmful to
the cells or may affect their behavior and,
therefore, affect the results of the
experiment. Chemical contamination is
usually not visible and difficult to detect.
Common sources of chemical contamination
are the media components, water and other
reagents. To prevent this kind of
contamination, care must be taken when
measuring and preparing the media and
other solutions. Presence of alcohol in cell
cultures is a common chemical
contamination problem, since it is routinely
used to clean the work environment. When
spraying alcohol you must make sure that
there are no open cell cultures or reagent
bottles/tubes in the area.
The warm temperature of the incubators and
the rich media in cell cultures provide an
ideal environment for the growth of various
microbial contaminants. Some of the most
common microbial contaminants in cell
cultures are bacteria, fungus, viruses,
mycoplasma and other microorganisms.
Some microbial contaminations such as
bacteria and fungus are visible and can be
detected easily. Bacterial growth in the cell
culture will often acidify the media. The
phenol red component in the media is a pH
marker and will turn yellow at low pH.
Therefore, a yellow-colored media may be
an indication of bacterial contamination. The
bacterial growth at later stages looks cloudy
and can easily be detected with the naked
eye. Examining the cells under the
microscope can also help in detecting
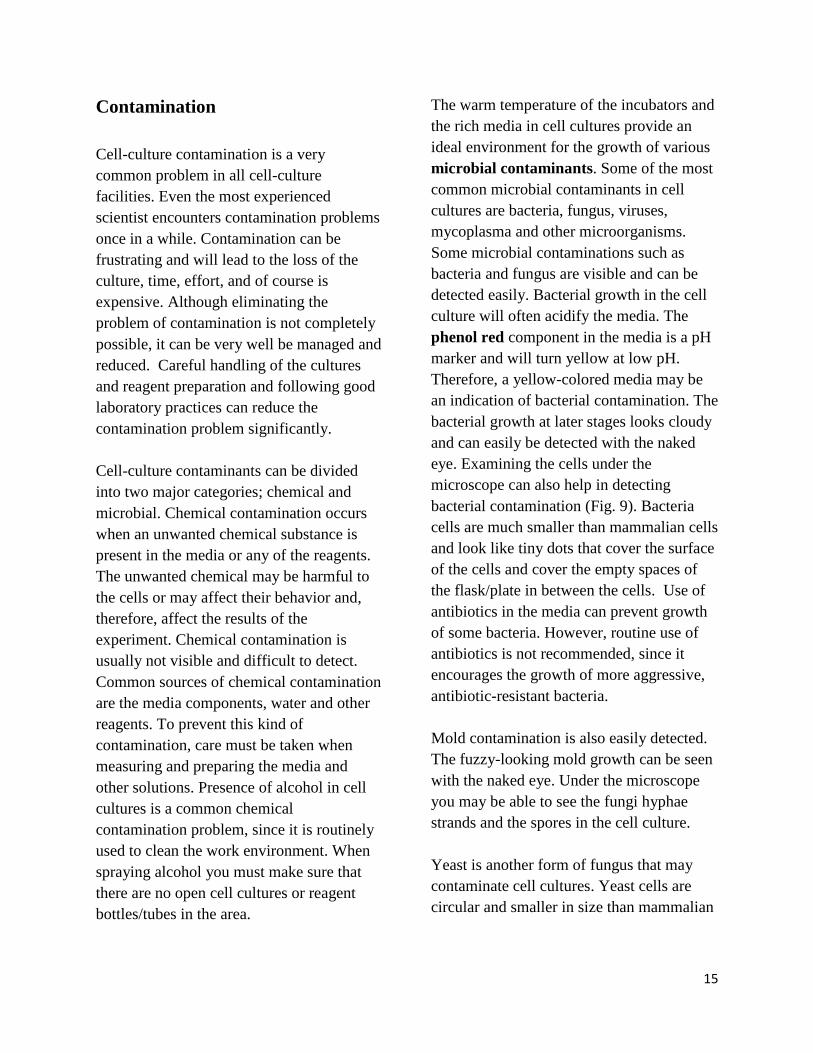
bacterial contamination (Fig. 9). Bacteria
cells are much smaller than mammalian cells
and look like tiny dots that cover the surface
of the cells and cover the empty spaces of
the flask/plate in between the cells. Use of
antibiotics in the media can prevent growth
of some bacteria. However, routine use of
antibiotics is not recommended, since it
encourages the growth of more aggressive,
antibiotic-resistant bacteria.
Mold contamination is also easily detected.
The fuzzy-looking mold growth can be seen
with the naked eye. Under the microscope
you may be able to see the fungi hyphae
strands and the spores in the cell culture.
Yeast is another form of fungus that may
contaminate cell cultures. Yeast cells are
circular and smaller in size than mammalian

16
cells and can be detected under the
microscope.
Figure 9- Mammalian (CHOk1) cells
contaminated with yeast.
Other types of microbial contamination such
as viruses and mycoplasma, are invisible to
the eyes and are, therefore, more difficult to
detect. Mycoplasma are very small
microorganisms that can grow rapidly in cell
cultures without being visible. Their
presence affects cellular growth and
metabolism. Viruses are very small particles
that often infect cells and destroy them.
Most laboratories perform routine molecular
tests to detect the presence of mycoplasma
and some of the common viruses. Cultures
that are found contaminated are destroyed
immediately.
Another form of cell culture contamination
is cross-contamination by a different cell
line. Scientists often may grow more than
one cell line in the laboratory. If careless, a
worker may mistake one cell line for
another; and two or more cell lines can
easily become mixed up. This can be a
serious problem, and will invalidate all of
the results obtained from a particular cell
line. Proper labeling of the culture dishes
and paying attention to the labels is critical
and can significantly reduce this problem.
Prevention of contamination and aseptic
techniques
Aseptic techniques are a series of
techniques and practices used to reduce the
chances of contamination of the cultures by
microorganisms and to protect laboratory
workers from contamination by cell cultures
and other potentially hazardous material.
Some of the common sources of cell culture
contamination in a laboratory are non-sterile
solutions and supplies, air-borne dust,
laboratory personnel and unclean
equipment, such as the water bath, incubator
and laminar hood. Below is a list of some
practices and aseptic techniques that can
reduce the chances of contamination:
1. Maintain and clean the equipment
routinely. Wipe down the laminar hood with
alcohol before and after every use. The hood
should also be cleaned more extensively
once a month. The incubator shelves need to
be cleaned and sterilized routinely and the
water container in the incubator must be
replaced every week. The 37oC water bath
has to be cleaned once a week. All other
equipment must also be cleaned routinely. In
addition, the equipment must be cleaned
when spills have occurred or contamination
had been detected.
2. All equipment and supplies must be
wiped down with 70% Ethanol, if possible,
and be cleaned before being used for cell-

17
culture handling. Remember, wiping down
with alcohol cleans, but does not sterilize the
equipment.
3. Do not put your notebooks, papers and
pens inside the hood. Everything in the hood
must be clean.
4. Do not cough or sneeze while facing the
hood.
5. All solutions and reagents used for cell
culture must be sterile.
6. To keep from contaminating your cells
wash hands before and after handling your
cells. Also you should wear a clean lab coat.
A clean lab coat covers your clothes that
may be harboring bacteria and other
microorganisms.
7. Always have back up cultures and freeze
your cells frequently. It is wise to freeze
some of your cells when possible, so that in
case of contamination, you have frozen cells
as back-ups that can be defrosted and used.
8. Aliquot (distribute) solutions and reagents
into smaller volumes in several sterile
containers, and use one aliquot at a time.
This way, if one aliquot gets contaminated,
you can use the other.
9. NEVER use other people’s media and
solutions. This is how contamination is
spread among cultures.
10. Label your reagents and cultures
properly to prevent mix-ups.
11. Open the wrapped and sterile serological
pipettes inside the hood. You can only touch
the upper part of the pipette with your
fingers. Be careful not to touch the lower
portion of the pipette to anything that is not
sterile.
12. Use new sterile serological pipettes and
micropipette tips in between solutions and
cells.
13. Do not open the tops of the culture
vessels, the sterile solution containers or the
pipette and tip boxes outside of the laminar
hood.
14. While working, be careful not to touch
the rims or the interiors of tubes, flasks and
their caps.
15. Micropipettes can be wiped clean with
alcohol before use, but they are not sterile.
Only the tip is sterile, therefore, only the tip
should touch the solutions and the interiors
of the containers. Be careful if you use a
micropipette inside of a tall tube. It is
preferred to use sterile serological pipettes
instead, if possible.
16. Always write a protocol ahead of time
and get organized before starting work.
Disorganization and confusion increase the
chances of contamination.
17. Do not overcrowd your hood and do not
block the flow of air in the hood.
18. Always observe your cells before
starting a procedure and destroy

18
contaminated cultures immediately (see
below).
19. Do not leave the tops of culture vessels
or reagent bottles open when they are not in
use.
20. Wipe the spills on the hood surface or
the exteriors of bottles and flasks
immediately with alcohol before it dries out
and you forget.
21. When in doubt, do not use. If you are not
sure if a solution or pipette is sterile or not,
just assume the latter and do not use it for
cell culture. You can put aside the non-
sterile solutions and pipettes to be used for
other procedures in the laboratory.
What to do in case of a microbial
contamination
Contaminated cultures must be destroyed
and disposed of immediately to prevent
further contamination.
1. Add a 10% bleach solution to the
contaminated culture vessel and wait for 10
min. The 10% bleach solution will be clearly
labeled for ease of use.
2. Discard the bleached culture in the sink
with running water. Dispose of the
flask/plate in trash.
3. Clean your work area and equipment that
has been in touch with the contaminated
culture.
4. Inform other lab personnel who are
sharing the incubator, so that they are aware
of the possible contamination.
5. If the contamination problem is
widespread among your cultures, discard all
media and reagents that you have been using
and start new.

19
Common Laboratory Procedures:
Important notes- For all procedures
remember to:
Practice good aseptic techniques.
Always wash your hands and clean
your work area before and after a
procedure.
Always observe your cells before
any procedure, to make sure the cells
are healthy and not contaminated.
For most routine procedures you
may have to sacrifice extreme
accuracy for the sake of speed. It is
important to work fast when cells are
outside of the incubator and
especially when cells are trypsinized
(enzymatically removed from plates
or flasks) since they are under a lot
of stress and may die. Therefore, it is
important to be organized and do one
procedure with one culture at a time,
if possible.

20
I. Media Preparation
Cells in culture are missing the tissue and
systemic interactions that normally occur in
the body of an organism to support their
growth. Therefore, cell cultures have
additional needs to those of cells in a whole
animal. Cells need an abundant source of
easy to use nutrients to enable them to
divide rapidly in culture. Formulations for
cell culture media are designed to mimic
natural conditions as much as possible with
additional supplemental nutrients and
building block components required for
cellular growth. Most cells are grown in a
basal media, containing nutrients, vitamins
and minerals supplemented with animal
serum, containing additional nutrients,
growth factors and hormones. This type of
media is said to be “undefined-media”
since the exact components of the
supplemental serum are unknown. The
serum is normally taken from different types
of animals such as calf, fetal bovine, horse
or human.
Different formulations of basal media are
available for purchase such as Eagle’s
Minimal Essential Medium (MEM) [Eagle,
1959], RPMI 1640 [Moore et al., 1967] or
Dulbecco’s Modification of Eagle’s Medium
(DMEM) [Dulbecco and Freeman, 1959].
Different cell types may prefer different
formulations for optimum growth. Although
the exact recipes may be slightly different,
all basal media contain the following
components:
Carbon source (glucose / glutamine)-
source of energy
Amino acids, which are necessary
building blocks of proteins.
Vitamins, which are needed to promote
cell survival and growth.
Balanced salt solution, which is an
isotonic mixture of ions to act as
cofactors for enzymatic reactions, cell
adhesion, etc.
Phenol Red dye, which has no
nutritional value but is a pH indicator.
The color of phenol red changes from
orange/red at pH 7-7.4 to yellow at
acidic lower pH and purple at basic
higher pH environments. The color
change is used to monitor the pH of the
media.
Bicarbonate or HEPES buffer, which is
used to maintain a balanced pH in the
media.
To prepare, a “complete media” serum is
added to the basal media. Antibiotics may be
added to the complete media to prevent
bacterial growth. Continuous use of
antibiotics, however, is not recommended
since it encourages the growth of more
aggressive, resistant bacteria.
Alternatively, individual growth factors,
proteins and other components can be added
to the basal media, without the use of serum,
in order to prepare the complete media. This
type of a media is said to be “defined
media”, since the exact components of the
factors added are known. Defined-media can

21
be customized and selective for a specific
cell type or experimental conditions. The
disadvantage of using the defined media is
that the preparation can be more time
consuming, since each component must be
added at proper concentrations, separately.
A number of serum replacements,
containing known concentrations of some of
the serum components, are also available
commercially.
For the cells used in this class we will
prepare undefined media using fetal-bovine
serum. To prepare 500ml of complete
media:
1. Wash your hands before starting.
2. Turn on the laminar hood and clean it
with 70% ethanol.
3. Gather the materials you need and wipe
them down with alcohol before putting them
in the hood:
Serological pipettes
50ml sterile tubes
Bottle of basal media containing
450 ml. Most manufacturers
include 450 ml of basal-media in
each bottle to make the
preparations easier.
Bottle of 200 mM L-Glutamine
(optional)
Bottle of fetal-bovine serum
Tube of antibiotics at 100X
concentration [penicillin and
streptomycin (Pen-strep)].
(Optional)
4. Thaw the fetal-bovine serum, L-
Glutamine and Pen-strep bottles that are
kept in the freezer in the 37oC water bath.
Wipe them down carefully with alcohol and
mix each of them well by swirling the
bottles a few times, before opening them in
the hood.
5. Read the formulation of the basal media.
Eagle’s MEM formulation is appropriate for
growth of most cell types; however, you
may have a different, but similar, basal
media available to you for your cells. Check
to see if there is any L-Glutamine already
included in the basal media.
6. Uncap the basal media bottle. To the 450
ml, add 50 ml of fetal-bovine serum, using a
serological pipette.
7. Using a new pipette, add 5 ml of L-
Glutamine to the bottle so the final
concentration of L-Glutamine is 2 mM. If L-
Glutamine is already included in the basal
media, you do not need to add additional L-
Glutamine. Depending on the cell type, the
final concentration of L-Glutamine may be
different (0.5-10 mM).
8. If using antibiotics, add 5 ml of 100X
pen-strep to the bottle. Remember to change
to a new serological pipette for every
different solution.
9. Recap all bottles.
10. Mix the bottle by swirling.

22
11. All reagents used for media preparation
must be sterile. (You can reassure yourself
by filtering the mixed complete media
through a 0.2m filter.)
12. Using a new serological pipette, aliquot
the complete media into 50 ml sterile plastic
tubes.
13. Label each tube of complete-media with
the date and your initials. If antibiotics are
used, note that as well.
14. Cap the tubes and keep them in the
refrigerator. Use one tube at a time.
Complete media can be kept in the
refrigerator for up to a month.

23
II. Routine cell-Culture
Maintenance (Feeding and
Subculturing)
Once the newly plated cells have attached to
the flask/plate, they will start dividing and
the cell culture will grow. The cell culture
media should be changed every 2-3 days to
provide nutrients to the cells. Changing of
the media is called feeding. When feeding,
you need to remove the old media from the
culture and replace it with fresh media.
The rate of growth is usually slow at first
after plating, but once the cells have become
accustomed to their new environment, they
will divide rapidly. As cells divide, they will
cover the bottom surface of the culture
vessel. The percentage of the surface
covered by cells is referred to as
confluency. Anchorage-dependent cells
keep dividing until the entire 2-dimentional
surface available to them is covered (100%
confluent) and they form a monolayer. The
cells will stop dividing as space, nutrients
and oxygen become insufficient for them, a
phenomenon known as density-dependent
growth inhibition. Most cancerous cells
however, may continue to divide on top of
each other and form a multilayer (above
100% confluent). These cultures become
very unhealthy if they are allowed to
continue dividing when they have
insufficient access to nutrients and oxygen.
For all cultures, in order to keep the cells
healthy, it is best to keep them at about 50-
80% confluent. This will assure that cells
have enough space, nutrients and oxygen
available to them. Once a culture is above
75% confluent, it needs to be subcultured.
Subculturing, splitting or passaging is
when cells in a culture are divided into two
or more subcultures. Depending on the cells’
growth rate, cultures may need to be
passaged every 3-7 days.
Anchorage-dependent cells in culture are
attached to each other and to the coating on
the bottom surface of the flask/plate via cell
surface glycoproteins. The adhesion
molecules are often dependent on Ca2+
for
attachment. Subculturing involves removal
of the media, detachment of cells from the
surface by use of dissociating enzymes and
removal of Ca2+
ions by a chelator. Trypsin
is the most commonly used dissociating
enzyme that digests the attachment proteins
on the surface of the cells. There are other
types of dissociating enzymes available that
may be suitable for a particular cell line,
such as collagenase and dispase.
Dissociating enzymes are often mixed with
EDTA (Ethylene diamine tetra acetic acid)
which is a chelator and removes Ca2+
ions.
Long exposure to trypsin is harmful to the
cells, so cells need to be separated from
trypsin by centrifugation.
The following is the protocol for routine
subculturing of a culture growing in a T25
flask using trypsin:
1. Turn on the hood and wipe down with
alcohol.
2. Gather the material you need and wipe
down with alcohol before placing them in
the hood:
Serological pipettes
Sterile centrifuge tube

24
Tube rack
Trypsin/EDTA [trypsin is
stored in the freezer for long
term storage and kept in the
refrigerator for short-term
storage. Trypsin is an
enzyme, and similar to other
proteins, it should not be re-
frozen and thawed and should
not be kept out of the
refrigerator for too long. Cold
trypsin needs to be warmed
to 37 oC before use.]
Complete media; warmed
Ca +2
/Mg+2
-free Phosphate-
buffered saline (PBS);
warmed. [PBS is an isotonic
solution that is often used for
rinsing cells and for routine
dilutions.]
Fresh flasks
3. Observe your cells using an inverted
microscope and note the confluency and
status of your culture.
4. Inside the hood, aspirate the media from
the flask.
5. Transfer about 3 ml of PBS to the flask.
6. Swirl gently to rinse the cells.
7. Aspirate out the PBS. This washing will
remove the residual serum from the flask.
Some components of the serum inhibit the
activity of trypsin.
8. Add 1ml of trypsin to the flask.
9. Lay down the flask and make sure all the
cells are covered by trypsin.
10. Wait 2-3 minutes. You may want to
transfer the flask to the incubator to speed
the process. Trypsin’s enzymatic activity is
more efficient at 37oC. It is more difficult to
trypsinize some cell lines as compared to
others. You may have to increase the
amount of trypsin and incubate the flask in
the incubator for longer time.
11. Observe your cells under the
microscope. Trypsinized cells round up and
are loosened.
12. Tap or rock the flask gently to detach all
of the cells.
13. Once the cells are floating, deactivate
trypsin by adding 4 ml of complete media to
the flask. Trypsin is harmful to the cells, so
as soon as cells are detached you should
dilute it by adding media and separate the
cells from trypsin. Do not leave the cells in
trypsin for too long.
14. Transfer the floating cells in trypsin and
media to a sterile centrifuge tube and label.
15. Centrifuge the tube at 100g (about 1000-
1500 rpm) for 3 minutes.
16. Wipe the tube clean and gently transfer
it back to the hood.
17. Using a sterile glass pipette, aspirate out
the supernatant. Be careful not to remove the
cells (pellet).

25
18. Resuspend the cells in 2-5ml of fresh
complete media. Cells that have been
trypsinized and centrifuged tend to clump
together. It is important to separate the cells
by pipetting up and down a few times. Try
to avoid creating too many bubbles.
19. Transfer the appropriate amount of the
cell suspension into new flasks. (Never re-
use the old flasks).
20. Add enough complete media to the flask
to bring up the volume to 5 ml.
21. Swirl the flask to ensure uniform
distribution of the cells.
22. Observe your cells again to make sure
there are cells floating and there are no big
clumps.
23. Label the flask with your name, date and
the cell-line’s name and place in the
incubator.
24. If there are any left-over cells, aspirate
them into the waste bottle and discard the
old flask.
Notes: The reason behind centrifugation, is
to separate the cells from the harmful
trypsin. Alternatively, you may deactivate
trypsin by diluting it sufficiently by adding
enough media. For most cell lines, if the
volume of trypsin in the media is diluted
enough that it is less than 1/20th
of the total
volume, then there is no need to spin the
cells. For example, after initial 5X dilution
of trypsin (step #13 above) by addition of
media and mixing, take out 1ml of the
mixture and transfer it to a fresh flask. Add
4 mls of media to the flask to bring up the
volume to total of 5 mls. So you have
diluted the cell mixture an additional 5X. the
total dilution factor of trypsin, therefore, is
(5X) x (5X) = 25X. Twenty five times
dilution of trypsin is sufficient to deactivate
it and make it harmless to the cells.

26
III. Counting Cells Using a
Hemocytometer
Hemocytometer is a device invented by
Louis-Charles Malassez (Verso, 1971). to
count cells. A hemocytometer is made of a
glass slide with a grid on each half (Fig. 10).
Each grid is made of nine squares. Each
square is subdivided into smaller squares.
The grid is covered by a cover slip and
creates a chamber. Each of the larger
squares in the grid can hold 0.1l of liquid.
Figure 10. Diagram of a grid of a hemocytometer.
Each square marked by a circle holds 0.1 l of liquid.
In order to count, cells are trypsinized first
and a small sample is placed in the
hemocytometer chamber. The cells are
visible under the microscope and can be
counted. Since the volume in each square is
known the concentration of cells can be
calculated.
To count cells in a T25 using a
hemocytometer:
1. Turn on the hood and wipe down with
alcohol.
2. Gather the material you need and wipe
them down with alcohol before placing them
in the hood:
Serological pipettes
Hemocytometer
Micropipettes and tips
Trypsin; warmed
Ca+2
/Mg+2
– free PBS;
warmed
Complete media; warmed
3. Remove the media from your flask.
4. Rinse the cells with 3ml of PBS once.
Remove the PBS.
5. Add 1 ml trypsin to the flask and allow 2-
3 minutes for the cells to detach from the
flask. Tap the flask on the side to loosen the
cells.
6. Observe the cells under the microscope to
make sure the cells are all floating.
7. Add 4 ml of media to quench trypsin. Mix
well by pipetting up and down a few times.
8. Using a micropipette transfer 12 l of the
cell suspension to each chamber of the
hemocytometer. Hold the coverslip on the
chamber loosely with your thumb, place the
pipette tip on the edge of the cover slip and
release the liquid. Repeat for the other half.

27
9. Place the hemocytometer on the stage of a
microscope. Find the grids using the low
magnification lens (4X). Change to higher
magnification (usually 10X is good) to see
each square and the cells easily.
10. Count number of cells in 5 squares of the
grid (shown in circles on figure 10), that is,
the four corner squares and the one in the
middle. Repeat counting five squares for the
other grid (Count 10 squares total). For
each square, count the cells resting on the
two outside border lines and exclude the
cells resting on the inside border lines. For
the center square, count the cells resting on
any two of the borders and exclude the cells
on the other two border-lines. Decide on
which borders you want to count and which
ones are excluded before counting and be
consistent for all your counts.
11. In order to get an accurate count you
should count approximately 10 to 50 cells
per square. If you have too many cells, the
chances of making mistakes are high so you
need to dilute your sample and repeat
counting. If you have too few cells, the
number is not statistically valid, and
therefore, you need to concentrate your cells
by spinning your cells and resuspending the
pellet in less volume of the media before
counting again.
12. Calculate cell concentration (cells/ml)
using the formula below:
(Total # cells counted)(104 )(dilution factor)
(Total # squares counted)
.
For an explanation of dilution facture see
examples 1-4 on page 31.
13. Clean the hemocytometer and its cover
slip by wiping down with alcohol.
Notes:
Hemocytometers are fragile and
expensive. Please be careful not to drop
and break them.
Floating cells settle to the bottom of the
flask or tube rapidly and they tend to
aggregate together and form clumps.
Clumps distort the count. It is very
important to mix the cells well by
pipetting up and down immediately
before counting to dissociate the clumps
and to ensure a homogenous cell
suspension.
Cells that are outside of the incubator
and trypsinized are under stress and may
die if not plated soon. Therefore,
sometimes it may be more important to
speed up the procedure rather than being
accurate. If you are short on time or
want to speed up the process, you may
count cells in five squares rather than
ten.
Observe your cells in culture before
trypsinizing for counting. If you have
very low confluency, you may not get a
large enough count to be accurate. So
you can take out a small sample of cells
after they have been trypsinized before
quenching and set aside in a tube for
counting. Then quench the rest of the
cells in the flask with media. Count the

28
cells in the tube; since they are more
concentrated, you are more likely to get
a large enough number for your count.
You can always dilute your sample
appropriately if the concentration is too
high (see the examples on page 31).
Alternatively, after quenching trypsin if
you count too little cells, you can
concentrate the cells and count again.
Transfer your cells to a centrifuge tube,
spin for 3 minutes, remove the
supernatant and resuspend the cells in
less volume of media. Count again.
If you have a very confluent flask, you
may want to quench trypsin with a larger
volume of media to dilute the cells
further. The amount of media depends
on the confluency of your culture. Note
that if you add too much media the cells
will become too dilute and obtaining an
accurate count becomes difficult. Keep
in mind, it is always easier to dilute than
to concentrate.
Depending on conditions, every cell
culture contains a low or high number of
dead cells. Dead cells are usually
detached from the surface and are
floating. When media is removed and
cells are washed with PBS for
trypsinization, most dead cells are
removed from the culture. However, for
some procedures it may be important to
collect and count the number of dead
cells as well as the live ones. To collect
the floating dead cells, the culture’s
media and the PBS used for washing the
cells are transferred to a sterile tube,
before cells are trypsinized. Live cells
are then trypsinized and pooled together
with the floating dead cells in the same
tube, before counting.
To distinguish between dead and live
cells a stain solution named Trypan-
blue may be added to the cells, before
counting. Transfer 50ls of your cells to
a small tube and add 50ls of 0.4%
trypan blue. After mixing, pipette 12 ls
to each half of a hemocytometer and
count.
Trypan-blue is a blue stain that can get
inside the dead cells through their porous
membranes. Live cells don’t allow the
stain to get in. The dead cells therefore
look blue as opposed to the clear live
cells. Once the cells are mixed with
trypan blue they must be counted
immediately. Live cells will eventually
die in the solution and will turn blue.
To calculate the concentration of the
cells that have been mixed with trypan
blue you must note that the dilution
factor is 2, since the cells were diluted
2X with trypan blue solution.

29
Example 1:
A student counted 80 cells in ten squares of
a hemocytometer. Since he didn’t dilute his
culture further the dilution factor is 1. His
culture’s cell concentration is:
(80 cells)(104)(1) = 8 x 10
4 cells/ml
(10 squares counted)
Example 2
A student has mixed 50ls of her cells with
50ls of trypan blue solution. She counts
120 cells in 10 squares of a hemocytometer.
Since she has diluted her cells 2X with
trypan blue, dilution factor is 2. The cell
concentration of her culture is
(120 cells)(104)(2) = 2.4 x 10
5 cells/ml
(10 squares counted)
Example 3:
A student counts more than 1000 cells in 10
squares of a hemocytometer. In order to get
a more accurate count, he decides to dilute
his sample before recounting. He takes out
100 ls of his cells and mixes with 900 ls
PBS in a separate tube. After mixing, he
pipettes 12 l in the upper chamber of a
hemocytometer. This time he counts 200
cells in 5 squares. The cell concentration for
his original culture in the T25 flask is
(200 cells)(104)(10) = 4 x 10
6 cells/ml
(5 squares counted)
Example 4:
A student has very little cells in her T25.
She trypsinizes the cells with 1ml trypsin.
After the cells are floating she mixes them
well and takes out 50 l and sets aside in a
tube. She then adds 4 ml of media to the rest
of the cells. She puts 12 ls from the tube
into each chamber of a hemocytometer and
counts 100 cells in ten squares.
(100 cells)(104)(1) = 10
5 cells/ml
(10 squares counted)
The cell suspension in the T25 flask is five
times less concentrated:
105 /5 = 2 x 10
4 cells/ml
See appendix B for practice problems.

30
Laboratory Exercises
Lab exercise 1: Aseptic Technique
Exercise
The objectives of this exercise are to
practice proper aseptic techniques and
become familiar with the concept of serial
dilution.
In this exercise you will pipette the less
expensive bacterial media into cell culture
plates, practicing the use of aseptic
techniques and the use of serological and
micropipettes. You will dilute water in LB
(Luria Bertani) media 103and 10
4 times
(refer to Appendix A for a review of serial
dilutions). Note that water (or PBS) is being
diluted in LB. You will pretend that water
(or PBS) is the cell suspension of 106
cells/ml and bacteria growth medium (LB) is
the cell culture medium.
1. Turn on the laminar flow hood and wipe it
with alcohol.
2. Gather the material you need and wipe
them down with alcohol before placing them
in the hood:
Serological pipettes
10 mls of LB
1ml of sterile dH2O
Tube rack
24-well cell culture plate
3. Pretend that the water you are given is a
cell suspension at the concentration of 106
cells/ml. You are asked to plate 3 wells of a
24-well plate with 1 ml of cells at the
concentration of 103cells/ml in each well
and 3 wells at the concentration of 102
cells/ml. Use 1ml for each well.
Think about your strategy and plan before
starting. You can use the extra wells in the
plate for your dilution steps. Remember, for
more accurate measurements, not to pipette
volumes less than 50 ls.
4. After plating, label the plates and place
them in the 37oC incubator.
5. Clean the hood and wipe with alcohol
before turning it off.
6. After a week, observe your plate. If there
are bacteria or fungus growing, it means that
you did not use good aseptic techniques. If
the media looks clear, then good aseptic
techniques were used.

31
Lab exercise 2: Plating Cells from
Frozen Stocks
When cells are frozen they are kept in
compete media plus 5-15% DMSO
(dimethyl sulfoxide). DMSO prevents
crystallization and breakage of the frozen
cellular components. Although beneficial to
preserve the frozen cells, DMSO is harmful
to cells while growing in culture. Therefore,
after defrosting, cells are centrifuged to
separate them from the DMSO before they
are plated. When cells are defrosted they
must be plated immediately. You should
organize your work area and be ready to
proceed with the plating before you take out
a frozen stock.
1. Turn on the laminar-flow hood and wipe
down with alcohol.
2. Gather your material and wipe down with
alcohol before putting them in the hood:
One 15-ml sterile centrifuge
tube
Tube rack
Serological pipettes
Complete media warmed up
at 37oC
One T-25 cell culture flask
3. Take out a frozen vial of cells from the
-80 0C freezer or the liquid nitrogen tank.
Always look at the label of the vial to ensure
you have the correct cell line and make a
note of the freezing date and other
information on the vial.
4. Place the frozen vial in a small container
in the 37oC water bath. Be careful that the
cap does not get wet to avoid possible
contamination.
5. As soon as the vial is defrosted (about 1-2
minutes) take it out of the water bath and
wipe down well with alcohol. Don’t let the
defrosted cells sit in DMSO for too long.
6. Mix the contents of the vial by inverting
the tube several times, and take it to the
hood.
7. Transfer 9mls of the complete media to
the 15ml tube.
8. Using a sterile serological pipette or a
micropipette, transfer the contents of the vial
(usually 1ml) to the same 15ml tube. This
will dilute the amount of DMSO ten times
(10X dilution).
9. To wash and remove any remaining cells
in the vial, pipette 1ml of the contents from
the tube back into the vial and then pipette it
back in the tube.
10. Close the top of the tube and label.
11. Using a balanced tube (see page 10),
centrifuge the cells at about 100g (about
1000-1500 rpm for most clinical
centrifuges) for about 3 minutes.
12. The heavy cells will form a pellet and
are separated from the media (supernatant).

32
The pellet may not be visible to the eyes.
The pellet may be found on the side of the
tube close to the bottom.
13. Take out the tube gently. Shaking the
tube will resuspend the cells. Wipe down the
tube with alcohol and put it back in the
hood.
14. Using the aspirator in the hood and a
sterile glass pipette, remove the supernatant
from the tube carefully. To avoid sucking
up the pellet, you may leave a small amount
(~500µl) of the supernatant behind.
15. Transfer 3mls of complete media to a T-
25.
16. Transfer 2mls of complete media to the
pellet and resuspend the pellet by pipetting
up and down a few times. Although it is not
possible to avoid bubbles, pipette gently to
reduce the formation of the bubbles.
17. Transfer the resuspended cells to the
T25. Mix by pipetting up and down a few
times. Close the flask’s cap.
18. Swirl the flask gently. Be careful not to
get the flask’s cap wet.
19. Observe the cells using an inverted
microscope. You should have plenty of cells
floating in the media.
20. Place the flask in the incubator.
(Remember to loosen the cap if the flask is
not vented).
Cells my take up to about a day to attach to
the bottom of the flask and start dividing.
Most of the cells may not survive the
process of freezing and defrosting and may
never attach to the flask. However, if the
number of cells is high enough, even a small
percentage of cells that survive are sufficient
to start a new culture.

33
Lab exercise 3: Count and Plate 104
Cells in a T25
The objectives of this exercise are to
practice trypsinizing, counting and plating a
specific number of cells. Please read all of
the protocol before starting.
1. Turn on the hood and wipe down with
alcohol.
2. Gather the material you need and wipe
down with alcohol before placing them in
the hood:
Serological pipettes
Micropipette tips
Microfuge tubes
Ca+2
/Mg+2
–free PBS,
warmed
Trypsin, warmed
Complete media, warmed
Trypan blue
3. Observe your cells and make sure they are
healthy. Note the confluency of your flask.
Trypsinize
4. Inside the hood remove the media from
your flask.
5. Wash the cells with 3 ml of PBS. Remove
PBS. This washes the serum away.
6. Add 1ml trypsin to the flask. Make sure
all of the cells are covered by trypsin.
7. Wait about 2-3 minutes for the cells to
detach.
8. Tap the side of the flask and observe
under the microscope to make sure all of the
cells are floating.
9. After cells are detached, quench trypsin
by adding 4 ml of media.
10. Mix well by pipetting up and down a
few times.
Count with a hemocytometer
11. Take out 50 l of the cells to a
microfuge tube.
12. Add 50 l of trypan blue solution to the
tube and mix.
13. Transfer 12ls of the cell suspension in
the tube to one half of the hemocytometer.
Repeat for the other half.
14. Count the number of live cells in 10
squares. If the number is too high (>500),
you need to dilute your cells appropriately
and count again. If the number is too low
(<50), you need to concentrate your cells by
transferring to a centrifuge tube, spinning,
removing the supernatant and resuspending
the cells in less volume of complete media.
15. Calculate cell concentration and total
number of cells.

34
# of cells in 10 squares
Dilution factor for mixing
with Trypan blue
Further dilution factors, if
any
Total dilution factor
Concentration of cells in
the flask (cells/ml)- C1
Total volume in the flask
Total number of cells
Plate
16. You are planning to plate 10, 000 cells
in a T25. Normally 5 ml of media is
sufficient for a T25 flask. So you need to
make a suspension of 10,000 cells in 5ml or
2000 cells/ml (final concentration).
Calculate the volume that you need to take
out of your culture which contains 10,000
cells using the formula (C1)(V1)= (C2)(V2),
where C1 is your culture’s concentration that
you have calculated. V1 is the unknown
volume containing 10,000 cells. C2 is the
final concentration of 2000 cells/ml and V2
is the final volume that is 5 ml. Solve for V1.
C1 (initial concentration,
calculated above)
C2 (final desired concentration) V2 (final desired volume) V1 (initial volume of culture to
start with, unknown)
17. If V1 is less than 50 l, then go back to
your original culture and dilute some of it
appropriately in order to get a larger V1.
(Refer to appendix A for serial dilutions).
18. Mix your culture well since cells might
have settled and might have formed clumps.
19. Calculate the amount of fresh media for
the final cell suspension and pipette it inside
a fresh T25 flask.
V1 (calculated above)
Volume of fresh media
Total volume 5 mls
20. Take out the correct volume (V1) of your
culture and add it to the media inside the
new flask.
21. Mix by pipetting.
22. Label the flask, observe it under the
microscope and place it in the incubator.
23. You may plate more than one plate for
future use or discard the remaining cells by
aspirating inside the waste bottle and
disposing of the flask appropriately.
24. Observe the cells after they are settled
next time you are in class and note the status
of the cells.
Analysis questions:
1. What was the status of your cells before
starting? (% Confluency, color of the media
and general health of the culture.)
2. Did you have enough cells to plate 104
cells? If so how many cells remained after
plating?
3. Did you have to dilute your culture
further or concentrate it for more accurate
count? If so how did you do it?

35
4. For step 17, did you have to dilute your
culture to increase the V1 value? How did
you do it?
5. What is the status of your cells after
settling (step 24)?

36
Lab Exercise 4: Survival Assay-
Sensitivity to UV Exposure
After plating, cells attach to the surface of
the culture vessel and start dividing. A
single cell divides into two daughter cells
which divide into four and then eight and so
forth, thus forming a colony. A colony
refers to a population of cells that are all
descendents of a single parental cell. Cells in
a colony sit close to each other and if there
are enough cells in a colony, they can easily
be seen without the help of the microscope.
When plating, many of the cells die in the
process and never reattach to the flask.
Among those who do attach, some may die
later. Some of the cells may stay alive but
will not divide enough times to make a
colony. Plating efficiency (or cloning
efficiency) is a measurement used to
identify the percentage of cells that survive
and are able to divide and form colonies
after being plated. Plating efficiency is a
value that measures cell survival when cells
are plated at low densities (2-50 cells/cm2).
When cells are plated at lower densities,
they are far apart and are not able to assist
each other for survival. These cells are on
their own, and if they survive they will
divide and form colonies. Each colony
represents a single cell that has managed to
survive. To measure plating efficiency, cells
are plated at low densities and allowed to
grow 7-10 days. During this time the cells
that have survived will divide and form
colonies. The colonies are then counted and
plating efficiency (PE) is calculated:
Plating efficiency is used to study
differences in cell survival and growth rate
within cells of the same population or
among cells of different populations. The
number of colonies represents cell survival
and the size of colonies represents growth
rate. The bigger colony size can be
interpreted as faster growth rate.
Plating efficiency is one of the techniques
often used for cytotoxic studies. Cytotoxic
studies involve measurement of altered
metabolism or loss of viability due to a toxic
factor. In vitro cytotoxicity studies are often
used by environmental scientists and
pharmaceutical companies to screen for
potentially toxic drugs and environmental
factors. Plating efficiency is a form of a
cytotoxicity assay that measures cell
viability several divisions after exposure to
the toxic reagent. To study the effects of a
toxic reagent or drugs on cell survival, cells
are plated at low densities in separate
vessels and exposed to different dosages of
the reagent. After several divisions, the
number of colonies is counted. PE and
surviving fraction (SF) values are
compared among cells that were exposed to
different dosages and control cells with no
exposure.
The lower SF values represent less survival
as a result of exposure. In addition, average
colony size can reveal the effect of the toxic
reagent on growth rate. The SF values can
be plotted against dosages to generate a
survival curve.
In the following exercise you will determine
the PE and SF values for cells that have
been exposed to different dosages of UV
(ultra violet) light. The objective is to
determine the level of sensitivity of your
cells to UV light. You may do the
experiment with two or more cell lines and
compare their UV sensitivity levels.

37
Ultraviolet light exposure causes formation
of covalent bonds between two adjacent
pyrimidines (C and T) in cellular DNA
forming pyrimidine dimers (Goodsell,
2001). Pyrimidine dimers block progression
of replication forks and, if left unrepaired,
may lead to base deletions or substitutions
and cause mutations. The mutations are
subsequently propagated as the cell goes
through more divisions and can have
disastrous effects for the organism (for
example, skin cancer). Fortunately, our cells
are equipped with a number of proteins that
are specialized in recognition and repair of
pyrimidine dimers. Mutations in the genes
that code for these proteins can make the
repair mechanism inefficient and cause
devastating diseases. People who are
affected by these mutations are very
sensitive to light exposure and develop
severe sunburns and tumors and die at
young ages.
In the following exercise you will compare
the sensitivity levels of two cell lines to UV
radiation. The following exercise will be
done over a week. On the first day, you will
plate your cells at low density in multi-well
plates. After one or two days, the cells are
exposed to several dosages of UV light. The
cells are allowed to divide and form colonies
for one week. The colonies are then stained
and counted. Finally, you will draw a
survival curve and determine the sensitivity
of your cells to UV light. Some of the steps
may be performed by the instructor or the
lab aids.
Plating of the cells
1. Turn on the hood and wipe down with
alcohol.
2. Gather the material you need and wipe
them down with alcohol before placing them
in the hood:
Serological pipettes
Micropipette tips
Sterile centrifuge tubes
Ca+2
/Mg+2
PBS-warmed
Trypsin- warmed
Hemocytometer
Five 6-well plates
3. Observe the cells under the microscope
and note the confluency of your cultures.
Work with one cell line at a time.
4. Remove the media, wash with PBS and
trypsinize cells with 1 ml trypsin. (Refer to
the page 34 for detailed protocol of
trypsinizing.)
5. After cells are detached and floating, add
4mls of media and mix by pipetting.
6. Using a hemocytometer count the number
of cells and calculate cell concentration.
(Refer to page 26, counting cells using a
hemocytometer, for a detailed protocol).
7. Plate 200 cells into one row or 3 wells of
the six-well plate (density of about 20
cells/cm2) according to the diagram in figure
12. Repeat for the other four plates. (The
number of cells that you need to plate may
be different depending on the plating
efficiency of your cells). When plating cells
in multi-well plates, it is best to prepare a
master-mix first and then aliquot into the
wells rather than plating each well
separately. This is to reduce the chances of
mistakes in plating each well and keeping
the wells consistent. For this experiment we
will plate three wells per plate for each cell
line, which is a total of 15 wells. You can

38
use 2 ml of media for each well. You must
always prepare a master-mix with slightly
larger volume than you need to account for
pipetting errors. Therefore, make 32 ml of
the master-mix with 2 ml extra. Calculate
the volume of cells you need to take out in
order to make your master-mix (V1). Use the
(C1)(V1)= (C2)(V2) formula.
Cell
line 1
Cell
line 2
# of cells counted in 10
squares of the
hemocytometer
Dilution factor for counting
Cell concentration, C1 Final cell concentration of
the master-mix (cells/ml), C2
Final volume of the master
mix (ml), V2
32 ml 32 ml
Initial volume of the culture,
V1
Volume of complete media
8. Prepare the master-mix by mixing the
appropriate volume (V1) of cells from your
culture to a large tube with enough complete
media to bring up the volume to 32 ml.
9. Mix well by pipetting.
10. Aliquot 2 ml into each well.
11. Label the plates as shown in (Fig. 11)
and put them in the incubator.
12. If you are using more than one cell line,
repeat the above procedure for the other cell
line, using the second set of three wells on
the six-well plates.
Figure 11- Diagram of the six-well plates. Seed 3
wells (or a row) of each plate with each cell line.
UV exposure
One day after plating:
13. Turn on the hood and wipe down with
alcohol. Gather you material and wipe down
with alcohol:
Serological pipettes
PBS (with Ca+2
/Mg+2
)
Complete media, warmed
UV protection goggles
14. Remove the media from your wells.
15. Wash the wells with 0.5 ml of PBS per
well. Remove the PBS such that the wells
are dry.
16. Expose each of the plates to one of the
following doses: 0, 2, 4, 8 or 10 seconds of
UV light. To expose the plates:
Wear protective goggles.

39
Remove all other cells that
you are NOT treating with
UV from under the hood.
Place the plate to be treated
under the UV light.
Remove the lid from the
cells that you are going to
treat with UV.
Turn on the UV lamp for 0,
2, 4, 8 and 10 seconds.
17. After UV treatment, quickly add 2 ml of
fresh complete media per well.
18. Put the plates back in the incubator and
do not move for 7-10 days.
Counting colonies
In order to see the colonies clearly, you will
stain the colonies with a blue/violet stain
called crystal violet. Crystal violet stain is
mixed with methanol, which is a fixative.
Methanol will kill the cells but keeps the cell
structures intact and prevents disintegration
of the cells.
19. Aspirate out the media.
20. Wash the cells once with about 0.5-1 ml
per well of PBS (with Ca+2
/Mg+2)
. Remove
the PBS.
21. Add 0.5 ml of Crystal violet/Methanol to
each well.
22. Allow the cells to stain at room
temperature for about 30-60 min.
23. Transfer the stain to the waste bottle (the
stain can be filtered and re-used). Do not use
the aspirator: crystal violet will stain the
tubing of the aspirator, which is difficult to
clean.
24. Gently pour some tap water into each
well and wash the excess stain 2-3 times.
Dump the water waste in the sink with
running water.
25. Invert the plates and let them dry.
26. Count number of colonies for each well.
Colonies that are too tiny (less than 50 cells)
are not counted. Different sizes of colonies
represent variations in growth rates among
cells in the same culture.
27. Calculate the average number of
colonies for each set of three wells with the
same treatment.
28. Calculate PE and surviving fraction
values for each dosage and each cell line.
29. Graph a surviving curve and analyze
your data.
Analysis questions:
1. Count the average number of colonies for
each set of three wells and calculate the PE
value for each dosage? Repeat for each cell
line. How do the PE values change with
different dosages?

40
Cell-line 1 Cell-line 2
Dosage
(sec)
Ave. # of
colonies
PE Ave. # of
colonies
PE
0
2
4
8
10
2. Calculate the SF for each dosage and each
cell line. How do the SF values change with
different dosages?
Dosage
(sec)
SF Cell-line 1 SF Cell-line 2
0 1 1
2
4
8
10
3. How do the average sizes of colonies
differ with different dosages of UV? What
do the differences in colony size indicate
about the effect of UV on your cells?
4. Draw a survival curve for this experiment.
Survival curves are drawn in a semi-log
graph format, with the SF values on the Y-
axis in the log format and dosage on the X-
axis in standard format. Draw both curves
for the two different cell lines on the same
graph.
5. What is the IC50 value for each cell line?
IC50 is the dosage at which there is 50%
inhibition of colony formation (SF value of
0.5). IC50 values are often used to compare
sensitivities to toxic reagents. Higher IC50
values indicate lower sensitivity and lower
IC50 means higher sensitivity. Which cell-
line is more sensitive to UV radiation?
6. If you were able to repeat the experiment,
how would you do it differently?
7. Discuss your results further in your
notebook.

41
Lab Exercise 5: Live and Dead Cell
Identification by Using Propidium
Iodide and Calcein AM
In this exercise you will use fluorescent
molecules to distinguish between live and
dead cells. Fluorescent molecules, also
known as fluorophores, can absorb the
energy of light at specific wavelengths and
emit less energetic fluorescent light. When a
fluorophore absorbs the energy of light it
becomes excited by elevating to a higher
energy level (excitation). The excited
fluorophores go back to the ground state by
releasing the energy in form of heat and
emitted light (emission). A large variety of
fluorophores have been made and modified
to interact with specific cellular structures in
order to study them.
Propidium Iodide (PI) is a fluorescent
molecule that absorbs light most efficiently
at 500-550 nm and emits bright red
fluorescent light at 600-650 nm
wavelengths. Live cells are impermeable to
PI, so PI can only enter dead cells that have
porous membranes. Once inside the cell, it
intercalates between nucleic acids (both
RNA and DNA). PI is considered hazardous
and you must wear gloves when working
with PI.
Calcein AM is a derivate of calcein and is
not fluorescent. Calcein AM is permeable to
both live and dead cells. Once inside the live
cells, esterase enzymes convert calcein AM
into calcein. Calcein is a bright green
fluorescence compound that absorbs and
emits light at 495/520 nm respectively. Dead
cells do not have functional esterases and so
will not be green.
Day 1- plating: (This can be done by your
instructor or the lab technicians)
1. Plate cells in 24-well plates (Fig. 12) so
the wells are 60-80% confluent for the day
of the experiment. Use 1ml of media per
well.
Figure 12- Diagram of the 24-well plate. One half of
the plate marked by X is not used for the experiment.
Day 2:
2. Your instructor will expose the first two
rows of the cells to UV radiation (or other
toxic reagents) prior to the start of the class.
The following steps are performed by the
students:
3. Turn on the hood and wipe it down with
alcohol.
4. Gather your material and wipe down with
alcohol before placing them in the hood:

42
Micropipettes and tips
Serological pipettes
70% methanol in dH2O
PBS (with Ca+2
/Mg+2
), warmed
Complete media, warmed
10 g/ml Propidium Iodide (PI)
Calcein AM
5. Observe the cells under the microscope.
Do you see a difference between the rows of
cells that were exposed to UV (or other
reagents) and cells in the other rows?
6. Remove the media from the third row of
cells.
7. Rinse the cells in the third row with 0.5
ml of PBS and remove PBS. Repeat the
wash.
8. Wash one more time with PBS, this time
leave the PBS in for 5 min.
9. Remove PBS.
10. Add 0.5 ml per well of 70% methanol to
the third row and incubate for 30 min.
Methanol will kill and fix the cells so the
cellular structures remain intact after dying.
11. Remove the methanol from the third
row.
12. Remove the media from the wells in the
first two columns of the plate labeled CAM
and CAM/PI.
13. Add 1 ml of media to the third well of
the third row.
14. Rinse all of the cells in the first two
columns with 0.5 mls/well of PBS twice.
Remove PBS.
15. Wash one more time with PBS and leave
the PBS in for 5 min.
16. Remove PBS from all of the wells in the
first two columns.
17. Add 200 l per well of 8M Calcein
AM per well of the first and second column
of cells.
18. Put the plate back in the incubator for 30
minutes.
19. Remove the Calcein AM and media
from all of the wells in all the rows and
columns.
20. Rinse all of the wells with PBS once.
Keep the PBS in the first column but remove
it from the second and third columns.
21. Add 200 µl per well of g/ml PI to
the wells of the second and third columns.
Incubate at room temperature for 1 min.
22. Examine the cells under the fluorescence
microscope. Use the green filter cube to see
the red color of PI and the blue filter cube to
see the green color of Calcein.

43
23. Compare the fluorescent colors in
different wells and write your observations
in your notebook.
Analysis questions:
1. What color fluorescence do you see for
each row and each column? Is what you see
the same as you expected? Why?
2. Is there a difference between the row of
cells exposed to high level of UV and the
row of cells exposed to the low level of UV?
3. What is the pattern of red fluorescence
that you observe for the cells stained with
PI? Explain which cellular structures are
red?
4. Do you recognize any pattern of green
fluorescence for the cells that are stained
with calcein?
5. Discuss the results in your notebook.

44
Lab Exercise 6: Transfection
Transfection is a method used to transfer
non-viral recombinant DNA into
mammalian cells. Transfer of viral genetic
material into eukaryotic cells is referred to
as infection. Transfected cells are used to
study gene expression and regulation,
protein expression and function, gene
therapy and more. DNA sequences of
interest are inserted into carrier DNA
molecules; commonly known as vectors, by
the use of recombinant DNA techniques.
One of the most commonly used vectors for
transfection is a plasmid. Plasmids are small
circular DNA molecules that naturally exist
in bacteria and some eukaryotic cells.
Plasmids are engineered and designed to
carry sequences that enable the plasmids to
be replicated by the host cell’s replication
machinery. There are various methods used
to introduce the vector, which is carrying the
DNA sequence of interest into the cells.
Examples of these methods for introducing
DNA into cells include the use of electric
currents, microinjection, shooting of DNA
coated particles into cells, and forming a
complex of DNA and cationic molecules
that can enter the cell by endocytosis or
membrane fusion. If there are sequences
that are recognized by the host cell present,
after entering the nucleus, the genes that are
carried on the foreign DNA may be
transcribed and expressed into proteins by
the cell. For most transfections, the foreign
DNA molecule stays independent of the host
genome and is eventually lost during
subsequent cell divisions. This type of
transfection in said to be transient. In order
to study transient transfections, the cells
are assayed 48-72 hours post transfection,
before the loss of DNA. Occasionally, the
introduced DNA is inserted into the host
genome. The DNA becomes part of the host
genome and is passed to the next
generations. This type of transfection is
known as stable transfection. The cells that
are stably transfected need to be selected for
and separated from the transient or non-
transfected cells.
In the following exercise, you will transfect
your cells transiently by using two different
plasmids:
1. pDsRed2-Mito vector (from Clontech
Laboratories Inc.
http://www.clontech.com/), carrying the
sequence coding for a fusion protein of a
red fluorescent protein and a mitochondrial
targeting sequence.
2. pEGFP-Actin vector (from Clontech
Laboratories Inc.), carrying the sequence for
a fusion protein, consisting of green
fluorescence protein (GFP) and cytoplasmic
-actin.
In the following protocol Fugene® HD
transfection reagent (from Promega
http://www.promega.com/tbs/tm328/tm328.
html) is used to insert the plasmid DNA into
the cells. You may have a different
transfection reagent available and need to
follow the manufacturer’s protocol. Note
that you may need to optimize the protocol
for your cell line and DNA preparations.
Two days after transfection, the cells are
fixed with 4% paraformaldehyde in order to

45
keep the cellular structures intact. The cells
are then observed by using a fluorescent
microscope.
Day 1- plating: (This can be done by your
instructor or the lab technicians).
1. Plate cells in 24-well plates, so the wells
are 70-80% confluent by the day of the
experiment. Use 1ml of media per well.
Day 2-Transfection:
2. Turn on the hood and wipe down with
alcohol.
3. Gather the material you need and wipe
them down with alcohol before placing them
in the hood:
Pipettors
Pipette tips
Basal media (serum-free)
Complete media, warmed
Fugene® HD
Vector DNA (1g/l), mix
before use
Sterile microfuge tubes
4. Observe the cells before the start of the
procedure. The cells should be healthy and
actively dividing.
5. Mix the vial containing Fugene® HD by
vortexing or manually inverting and bring it
to room temperature.
6. Dilute your DNA in serum-free media.
Prepare 4 tubes:
1 2 3 4
Control Mito Actin Mito/
Actin
Serum-
free
media
100 l 98 l 98 l 98 l
pDsRed2-
Mito
(1g/l)
0 2 l 0 1 l
pEGFP-
Actin
(1g/l)
0 0 2 l
l
7. Add 8 ls of Fugene® HD to each of the
mixtures (8:2 ratio of Fugene: DNA). Mix
by vortexing and incubate at room
temperature for 15 minutes.
8. While waiting, change the media in your
plate. Add 1mls of fresh media per well.
9. Add 25 ls of the transfection mixture to
each well drop-by-drop, according to the
diagram in figure 13. Note that there are
three wells for each mixture. Discard the
extra mixture.
10. Mix the plate by moving it back and
forth or left and right gently, without spilling
the media.
11. Place the plate in the incubator for 2
days.

46
Figure 13- Diagram of the 24-well plate. Half of the
plate marked by X is not used for the experiment.
Day 4- Fixing:
12. 48 hours after transfection, turn on the
hood, wipe down with alcohol and gather
your material (wipe down with alcohol):
Serological pipettes
PBS (with Ca+2
/Mg+2
),
warmed
4% paraformaldehyde in
PBS, wear gloves
Paraformaldehyde waste
bottle
13. Remove the media from your cells.
14. Add 0.5 ml of PBS per well and remove
PBS.
15. Add 0.5 ml of 4% paraformaldehyde per
well.
16. Wait 15 minutes at room temperature.
17. Transfer the paraformaldehyde to the
waste bottle (Paraformaldehyde is toxic and
should not be discarded in the sink).
18. Wash the cells with 0.5 mls of PBS per
well. Remove PBS.
19. Add another 0.5 ml of PBS per well and,
this time, keep the PBS in to prevent the
cells from drying out.
20. At this point you can store the plates in
the refrigerator for future viewing.
Fluorescent molecules are photosensitive, so
the plate should be kept in the dark.
View the cells:
21. Place the plates on a fluorescent
microscope and observe the results. You
need the green filter-cube to see the red
fluorescence and the blue filter cube to see
the green fluorescence.
22. Note your observations in your
notebook.
Analysis questions:
1. Do you see a difference in fluorescence
between the control cells and the transfected
cells? Are your observations as expected?
Explain.
2. What percentage of cells do you estimate
are transfected with pDsRed2-Mito?
Approximately what percentage of the cells
are transfected with pEGFP-Actin? Which
plasmid has a better transfection efficiency?
3. Do you recognize any pattern in
fluorescence of the cells transfected with

47
pDsRed2-Mito (where do you see the
fluorescence)? How about pEGFP-Actin?
4. Discuss your results in your note book.

48
Lab Exercise 7: Freezing Cells
When freezing, cells are resuspended in
freezing media which is complete media
plus 10% DMSO (Dimethyl sulfoxide).
DMSO prevents crystallization and damage
to the cells. To keep the cells viable, they
need to be frozen slowly. The cells are
transferred to cryo-vials and placed in
freezing boxes. Freezing boxes are filled
with isopropanol to keep the cells from
freezing too fast (Fig. 14). When the box is
placed in the -80oC freezer, the temperature
goes down at the rate of 1oC per minute. For
long-term storage, frozen vials are
transferred from the -80oC freezer to a liquid
nitrogen tank.
Figure 14. Cell culture freezing box and cryovials.
Many of the cells die in the process of
freezing and defrosting, therefore, usually
cells are frozen at very high concentrations
so, when defrosted, there is a good chance
that some cells will survive and make a
culture. A concentration of 1 x 10⁶ cells/ml
is usually used for freezing. Wear gloves
when working with DMSO.
To freeze cells:
1. Turn on the hood and wipe down with
alcohol.
2. Gather the material you need and wipe
them down with alcohol before placing them
in the hood:
Serological pipettes
Centrifuge tubes
Tube rack
Trypsin, warmed
PBS (Ca+2
/Mg+2
- free),
warmed
Complete media, warmed
DMSO, wear gloves
Cryovials
Hemocytometer
3. Observe your cells first. Your culture
must be healthy and more than 60%
confluent to be suitable for freezing.
4. In a sterile tube, prepare freezing media
by mixing 9mls of complete media with 1
ml of DMSO.
5. Remove the media from your culture.
6. Wash the cells with 3mls of PBS and
remove the PBS.
7. Add 1ml trypsin to the flask. Make sure
the cells are covered by trypsin.
8. Wait 2-3 minutes for the cells to detach.

49
9. Tap the side of the flask, and observe
under the microscope to make sure all of the
cells are floating.
10. Quench trypsin by adding 4mls of
complete media and mix well by pipetting
up and down.
11. Pipette 12ls on each side of a
hemocytometer and count cells.
12. Calculate cell concentration in your
culture.
13. Calculate total number of cells in your
culture:
(Total cell #)= (cells/ml)(total volume, mls)
14. Transfer the cells to a sterile centrifuge
tube.
15. Spin the cells at about 1000-1500 rpms
for 3 min.
16. Wipe the tube down with alcohol and
place it back in the hood.
17. Aspirate out the supernatant. Be careful
not to aspirate the cells in the pellet.
18. Add the appropriate volume of freezing
media to the pellet to get concentration of
1 x 10⁶ cells/ml.
19. Resuspend the cells in the freezing
media by pipetting up and down a few
times.
20. Transfer to cryotubes (up to 1ml per
tube).
21. Label the tubes with your name, cell
type and date.
22. Place the tubes in isopropanol freezing
boxes.
23. Put the box in the -80oC freezer. (Cells
may be kept in the -80oC freezer for up to a
few weeks, depending on the cell type.)
24. After one day you can transfer the tubes
to a liquid Nitrogen tank to keep
indefinitely.
# of cells in 10 squares of the
hemocytometer
Cell concentration Total number of cells Volume of the freezing media
Notes:
You can use Styrofoam boxes instead of
the isopropanol boxes for freezing the
cells. Place the tubes in Styrofoam
boxes. Make sure they are covered on all
sides. Label with your name, date and
cell type. After you are finished put it in
the -80oC freezer.
For routine freezing you can estimate the
number of cells without counting. For a
100% confluent T25 you can generally
use 4mls of freezing media and freeze
four vials. (Note that for different cell
lines this number may be different).
Freezing media is kept in the
refrigerator.
DMSO is light sensitive. Cover the tube
of freezing media with aluminum foil to
keep it in the dark.

50
Lab Exercise 8: Stem Cell
Differentiation
Stem cells are cells that are able to renew
themselves (self-renewal) indefinitely,
while producing cell progeny that can
mature into specialized cells
(differentiation). Adult stem cells in our
body are able to regenerate cells and renew
damaged tissues. Embryonic stem (ES)
cells are a type of stem cells that are formed
very early during embryonic development.
Embryonic stem cells are said to be
pluripotent, meaning that under proper
conditions they can generate all three cell
layers (ectoderm, mesoderm and endoderm).
ES cells are maintained as a monolayer
adhered to the culture vessel. The recipe for
stem cell culture media contains important
components to keep the cells from
differentiation and to preserve the
pluripotent characteristic of the stem cells
(pluripotent media). To trigger
differentiation, ES cells are grown in the
differentiation media that allows cells to
differentiate. The cells are plated on
uncoated plates to prevent adhesion to the
plates. The cells in suspension form
aggregates (spheres) called embryoid
bodies (EB); and differentiation initiates
spontaneously upon aggregation of cells.
The cells can potentially differentiate into all
cell types spontaneously. Several methods
have been developed to direct differentiation
into specific cell types by culturing stem
cells under appropriate and controlled
conditions. In the following exercise
(adopted from a protocol by Dr. J. Ng) you
will differentiate ES cells into specific cell
types. Half of the cells will be differentiated
spontaneously into cardiomyocytes (heart
muscle cells) and the other half will be
directed to differentiate into neurons.
The cells are grown in uncoated Petri dishes
to prevent adhesion of the cells to the plate.
The cells growing in suspension form
embryoid bodies (EB). The EBs are then
plated on gelatin-coated plates to adhere to
the plates and continue differentiation. In
order to direct cells into neuron
development, retinoic acid is added to the
media. Retinoic acid is a signaling molecule
that has an important role in neural
development and activity at the embryonic
stages (Dhara and Stice, 2008).
Since you are not here every day, some of
the steps will have to be done by the lab
technicians.
Day 1- Plating cells in suspension
1. Turn on the hood and wipe it down with
alcohol.
2. Gather your material and wipe down with
alcohol before placing them in the hood:
Serological pipettes
PBS (Ca+2
/Mg+2
-free),
warmed
Trypsin, warmed
Embryonic stem cell
differentiation media,
warmed
A hemocytometer

51
Centrifuge tube and tube rack
Sterile 10-cm bacteria culture
dish
3. You will be given a T25 flask of
pluripotent ES cells.
4. Observe the cells using a microscope.
5. Aspirate medium off.
6. Wash with 5 ml of PBS.
7. Rock the flask gently and aspirate PBS.
8. Repeat steps 6 and 7.
9. Add 1 ml of 0.5% trypsin to cover the
cells.
10. Incubate the flask in 37oC incubator for
1-4 minutes or until cells are uniformly
dispersed into small clumps.
11. Tap sides of flask gently to dislodge the
cells.
12. Add 5 ml of ESC differentiation media
to inactivate the trypsin.
13. Count the cells with a hemocytometer.
14. You need to prepare 10mls of 3 x 10 5
cells/ml suspension in ESC differentiation
media to be plated in one 10-cm bacteria
Petri dish. This means that you need 3 x 10 6
cells total for each dish. Therefore, transfer
the appropriate number of cells for two
plates (6 x 10⁶ cells) to two centrifuge tubes.
15. Spin the cells at 100 g (about 1000 rpm)
on a clinical centrifuge.
16. Remove the supernatant.
17. Resuspend the cells in the appropriate
volume of differentiation media (10 mls for
each plate to the concentration of 300,000
cells/ml).
18. Seed 10 ml of the cells onto each 10-cm
Petri dish.
19. Incubate the dishes in the 37°C
incubator.
Day 2 or 3- Feeding the embryoid bodies
20. Turn on your hood and wipe it down
with alcohol.
21. Gather your material and wipe them
down with alcohol before placing them in
the hood:
Serological pipettes
15-ml conical tubes
Tube rack
Differentiation media,
warmed
Sterile 10-cm bacteria Petri
dish
22. Observe your cells under the
microscope. By now the cells must have
aggregated together and formed floating
embryoid bodies (EB).
23. Carefully transfer all the media plus
embryoid bodies from each dish into a
separate sterile 15ml tube.
24. Wash each dish with 5mls of
differentiation media and add it to the tube.
25. Close the caps and transfer the tubes to

52
the incubator inside a clean rack.
26. Allow embryoid bodies to settle to the
bottom of the tubes for 10 minutes.
27. Transfer the tubes gently back to the
hood and carefully aspirate off the media,
leaving the EBs undisturbed.
28. Add 10mls of fresh ESC differentiation
media to each tube. (Do not pipette up and
down, it may break the EBs)
29. Using a serological pipette, gently
transfer the EBs back to new 10-cm Petri
dish.
30. Place the dishes back in the 37°C
incubator.
Day 4 or 5- Feeding and directing
differentiation
31. Turn on and wipe your hood down with
alcohol.
32. Gather and wipe down your material
with alcohol:
15-ml conical tubes
Tube rack
Serological pipettes
Differentiation media, warmed
Retinoic acid (5mM)
Bacteria 10-cm Petri dishes
33. Carefully transfer all the media plus
embryoid bodies from each dish into a
separate 15ml conical tube.
34. Place the tubes in a rack inside the 37°C
incubator.
35. Allow the embryoid bodies to settle to
the bottom of the tubes for 10 minutes.
36. Carefully aspirate off the media, leaving
the EBs undisturbed.
37. Prepare 10 ml of differentiation media
plus 5 M retinoic acid by adding 10 l of
themM stock solution.
38. Add the differentiation media plus
retinoic acid mixture to one of the tubes to
direct the cells into neuron differentiation.
39. Transfer the EBs plus the differentiation
media and retinoic acid to a new10-cm Petri
dish.
40. Add10 ml of plain differentiation media
to the second sterile tube (for
cardiomyocytes differentiation). And
transfer to a separate 10-cm Petri dish.
41. Label the dishes and incubate them back
in the 37°C incubator.
Day 7- Plating EBs on gelatin
42. Turn on the hood and wipe down with
alcohol.
43. Gather your material and wipe them
down with alcohol before placing them
under the hood:
Serological pipettes
P100 or p200 pipettors
Wide bore pipette tips
24-well tissue culture plates
0.1% gelatin in ddH2O

53
Differentiation media, warmed
5mM retinoic acid (RA)
44. Add 0.5 ml of 0.1% gelatin per well and
wait for 5 minutes. Aspirate off the gelatin.
This will gelatin coat your multi-well tissue
culture plate.
45. Add fresh ESC Differentiation media
with 5M RA for the neuron differentiation
and without RA for cardiomyocyte
differentiation to each well. Use 1ml per
well.
46. Using a P100 or P200 pipettor and
special wide bore tips (or 1-ml serological
pipette), gently transfer EBs into the gelatin-
coated plates. Transfer about 5-10 EBs into
each well.
47. Place plates into the 37°C incubator.
Day 9+- Observing the differentiated cells
48. Beating cardiomyocytes and neural cells
with long axonal projections should be
visible under the microscope.
Analysis questions:
1. What percentage of the cells are
differentiated into neurons? How efficient is
the above procedure in directing neuron
differentiation?
2. What percentage of the cells have
developed into beating cardiomyocytes?
How efficient is the above procedure in
directing cells to cardiomyocyte
differentiation?
3. Do you see any neurons in the plates
without RA?
4. Can you recognize any other cell type in
your plates?
5. Write your observations in your notebook
and discuss your results.

54
Appendix A
Serial Dilution
Serial dilutions are commonly used in
microbiology, chemistry and biotechnology.
Serial dilutions are performed to prepare
solutions that are less concentrated than the
original solution. Serial dilutions are usually
made in increments of 1000, 100 or 10. A
small amount of the original solution is
removed and added to the appropriate
amount of buffer.
For example, if you remove 10 l of your
original solution and add it to a tube
containing 990 l of water, you have made a
100X dilution. Meaning that your new
solution is 100 times less concentrated than
the original solution. If you remove 1l of
your diluted solution and add it to a third
tube containing 999 l of water, then you
have made another 1000X dilution. So the
concentration of the third tube is 1000 times
less than the second tube and 100,000 (105)
times less than the original tube.
In cell culture techniques, if we are going to
measure a volume of liquid containing cells,
it is more accurate to avoid measuring
amounts less than 50-100 l (there may be
times that we do not have enough cell
solution or not enough buffer solution for
multiple dilution steps, and so we would
have to measure less than 50 l).
For example, if we have a cell-culture
solution containing 5 x 10⁸ cells/ml and
need to prepare a solution of 5 x 10³ cells/ml
(Fig. 15), we need to first add 100 l of the
original culture to a tube containing 900 l
of buffer (10X dilution). In the second step,
add 100 l of the diluted sample to 9.9 ml
(9900 l) of buffer (100X dilution). In the
third step, take out 100 l of the later tube
and add it to a new tube with 9.9 ml of
buffer (100X dilution). Our total dilution
factor is 10 x 100 x 100 = 105. So the final
solution is 105 times less concentrated than
the original solution and it contains 5 x10³
cells/ml.
Note, if you were to dilute the original
solution 105 times in only one step, we
would need to add 100 l of solution to a
tube containing 9, 999, 900 l (9, 999.9 ml)
of buffer. This would require a very big
container that could hold large volumes of
liquid. It would also be impractical since a
lot of buffer would be wasted. Therefore,
serial dilution is the best method used for
large dilutions.
Figure 15- 10 5 times dilution of a 5 x 10
8 cells/ml
suspension completed in three steps.

55
Appendix B
Practice problems
1. A student has a cell suspension of 105
cells/ml. How is he going to prepare 10 ml
of a 102 cells/ml suspension?
2. A student has a cell suspension of 105
cells/ml. She needs to plate 5 ml of 5000
cells/ml culture into a T25 flask. How is she
going to plate her cells?
3. A student has a cell suspension of 105
cells/ml. She needs to plate 5 ml of 100
cells/ml culture into a T25 flask. How is she
going to plate her cells?
4. A student has trypsinized his cells with 1
ml of trypsin. He then adds 4 ml of media to
quench trypsin. Using a hemocytometer he
counts 150 cells in ten squares. What is the
concentration of his cells? How many total
cells does he have in his culture?
5. A student is interested in counting both
live and dead cells in a culture. After
collecting the floating cells and pooling with
the trypsinized cells from his culture, he
takes out 50 l and mixes it with 50 l of
Trypan blue. He then uses a hemocytometer
for counting. He counts 60 dead cells and
300 live cells in five squares. What is the
concentration of live and dead cells?
6. A student counts more than 600 cells in
ten squares of a hemocytometer. To get a
more accurate count, he dilutes his cells by
taking out 100 l of cells and mixing them
with 900 l of PBS. He then takes out 50 l
of the diluted sample and mixes it with 50 l
of Trypan blue. Using a hemocytometer he
counts 60 cells in ten squares. What is the
concentration of cells in his original culture?
7. A student is asked to plate 1000 cells per
well of a 24-well plate with 1ml of media in
each well. He first trypsinizes his cells in a
T25 flask and quenches the trypsin with
media. He then counts the cells using a
hemocytometer. He counts 200 cells in ten
squares. How is he going to plate the cells?
8. A student is asked to plate 100 cells per
well of a 6-well plate using 2 ml of media
per well. After trypsinizing she counts 400
cells in 10 squares of a hemocytometer.
How is she going to plate the cells?
9. A student is asked to plate cells in a T25
at the density of 1000 cells/cm2. She first
counts the cells using a hemocytometer. She
counts 240 cells in five squares. How is she
going to plate the cells?
10. A student is asked to seed a 12-well
plate with 2000 cells/cm2 using 1 ml of
media per well. Each well of a 12-well plate
is 3 cm2. He counts 60 cells in ten squares of
a hemocytometer. How is he going to plate
the cells?

56
11. A student is asked to freeze his cells
from a T25 flask at the concentration of 106
cells/ml. After trypsinizing his cells with
1ml trypsin, he adds 4 ml of media to
quench the trypsin. Using a hemocytometer,
he counts 315 cells in ten squares. How
much freezing media does he need to freeze
his cells in and how is he going to freeze his
cells?

57
Glossary:
Adult stem cells- Stem cells that are found
in adult tissue in the body and are able to
regenerate specific types of cells
(multipotent).
Anchorage-dependent cells- Cells that
need to attach to a solid support to survive
and divide.
Anchorage-independent cells- Cells that
can survive without attachment to a solid
support and grow in suspension.
Aseptic techniques- Series of techniques
and practices used to reduce the chances of
contamination of the cultures by
microorganisms and to protect laboratory
workers from contamination by cell cultures
and other potentially hazardous material.
Basal media- Media containing basic
nutrients, vitamins and minerals necessary
for cells to grow in culture. Basal media
needs to be supplemented with additional
growth hormones, growth factors and
proteins for efficient cell growth.
Bicarbonate buffer- A buffer used in cell
culture media that interacts with CO2 to
keep the pH balanced at about 7.4.
Chelator- Molecules that bind to certain
metal ions and inactivate the ions so that
they cannot react with other elements.
Colony- A population of cells that are all
descendents of a single parental cell. Cells in
a colony are located close together.
Complete-media- Basal media
supplemented with additional proteins,
growth factors and components necessary
for efficient cell growth.
Confluency- The percentage of the culture
vessel’s surface covered by cells.
Cytotoxic studies- Studies that involve
measurement of altered metabolism or loss
of viability of cells due to a toxic factor.
Defined media- Basal media plus additional
growth factors, proteins and other
components that are added without the use
of serum. Since the exact components of the
factors added are known, this type of media
is can be defined.
Density-dependent growth inhibition-
When the cells stop dividing due to
insufficient space, nutrients or oxygen
available to them.
Differentiation- A process when cells
mature and become specialized.
Embryoid bodies (EB)- Aggregates of
embryonic stem cells.
Embryonic stem (ES) cells- A type of stem
cell formed very early during development.
ES cells are pluripotent.
Extracellular matrix- Collection of
molecules outside of cells that provide
structural support for the cells in a tissue in
addition to having other important functions.

58
Feeding- When the old media is removed
from the culture and replaced with fresh
media.
Filter cube- An optical block with a set of
filters that allow selection of certain
wavelengths, used in fluorescence
microscopes.
Fluorophores- Molecules that can absorb
energy of light at specific wavelengths and
emit less energetic fluorescent light.
Fusion protein- A protein made by fusion
of two or more different proteins.
IC50- The dosage of a toxic reagent at which
there is 50% inhibition of colony formation.
Infection- Transfer of viral genetic material
into eukaryotic cells.
Isotonic solutions- Solutions with the same
concentration of solutes as the inside of the
cells.
Hayflick’s limit- A phenomenon of normal
cells in culture when they divide for a
limited number of times before they stop
dividing.
Liquid nitrogen tanks- Tanks filled with
liquid nitrogen, used for long-term storage
of cells at a very cold temperature.
Microbial contaminants- Microorganisms
that may grow in cell media and
contaminate the culture.
Micropipettes- Pipettes that are used to
transfer small volumes of liquid between 1-
1000 l.
Monolayer- Refers to cells growing in a
single layer, attached to the bottom of the
culture vessel.
Mycoplasma- Very small bacteria-like
microorganisms that can grow rapidly in cell
cultures without being visible.
Passaging- Splitting the cells in a culture
into subcultures.
Pellet- The components of a mixture that are
precipitated to the bottom after
centrifugation.
Phenol red- A component of the cell culture
media that is a pH marker and will change
color with the changes in the pH.
Photobleaching- the loss of fluorescent
properties of a fluorophore due to
continuous exposure to light at any
wavelength.
Plasmids- Small, circular DNA molecules
that naturally exist in bacteria and some
eukaryotic cells. Plasmids are used as tools
in biotechnology to carry foreign DNA
sequences into cells.
Plating efficiency (or cloning efficiency)-
The percentage of cells that survive and are
able to divide and form colonies after being
plated.

59
Pluripotent- A characteristic of embryonic
stem cells, which is their ability to generate
all cell types.
Propodium Iodide- A fluorescent molecule
that intercalates between nucleic acids (both
RNA and DNA) absorbing light most
efficiently at 500-550nm and emiting bright
red fluorescent light at 600-650nm
wavelengths.
Pyrimidines- Cytosine (C), Thymine (T),
and Uracil (U) nucleic acids.
Pyrimidine dimers- Molecular lesions
formed from adjacent thymine or cytosine
bases in DNA by formation of covalent
bonds caused by exposure to UV radiation.
Recombinant DNA- A DNA molecule that
is made artificially by combining two or
more different DNA sequences together.
Self-renewal- A characteristic of stem cells,
which is their ability to divide and make
more stem cells.
Serological pipettes- Pipettes that are used
to measure and transfer larger volumes of
liquid. Serological pipettes need the help of
the “pipette aid” pumps to draw and release
liquid.
Serum- Blood without the cellular
components.
Stable transfection- Transfection when the
foreign DNA becomes part of the host
genome and is passed to the next
generations.
Supernatant- The liquid component of a
mixture that stays on top of the pellet after
centrifugation.
Transfection- A method used to transfer
non-viral recombinant DNA into
mammalian cells.
Transformed cells- Mammalian cells that
have been immortalized.
Transient transfection- Transfection of
cells when the foreign DNA molecule stays
independent of the host genome and is
eventually lost during subsequent cell
divisions.
Trypan blue- A blue dye that is
impermeable to live cells but can go through
the porous membranes of dead cells and turn
them blue.
Trypsin- A commonly used dissociating
enzyme which digests the attachment
proteins on the surface of the cells. Used to
detach the cells from the surface of the
culture vessel.
Turret – Part of a microscope that holds
the objective lenses and can be rotated to put
an objective lens in the light path.
Undefined-media- Basal media plus serum.
Since the exact components of the serum are
unknown, this type of media is called
undefined.

60
References:
Dhara, S. K. and Stice, S. L. (2008) Neural
differentiation of human embryonic stem
cells. J. Cell Biochem. 105(3): 633-640.
Eagle, H. (1959) Amino acid metabolism in
mammalian cell cultures. Science 130: 432.
Freshney, R. I. (2005) Culture of animal
cells: a manual of basic techniques. 5th
ed.
Hoboken, New Jersey. John Wiley & sons
Inc.
Dulbecco, R. and Freeman, G. (1959)
Plaque formation by the polyoma virus.
Virology 8: 396-397.
Gey, G. O., Coffman, W. D. and Kubicek,
M. T. (1952) Tissue culture studies of the
proliferative capacity of cervical carcinoma
and normal epithelium . Cancer Res. 12:
364-365.
Goodsell, D. S. (2001) The Molecular
Perspective: Ultraviolet Light and
Pyrimidine Dimers. The Oncologist 6 (3):
298-299.
Hayflick L and Moorhead, P. S. (1961) The
serial cultivation of human diploid cell
strains. Exp. Cell Res. 25: 585-621.
Verso, M. L. (1971) Some nineteenth-
century pioneers of hematology. Med Hist.
15(1): 55–67.
Moore, G. E. Gerner, R. E. and Franklin H.
A. (1967) Culture of normal human
leukocytes. J. Am. Med. Assoc. 199: 519-
524.