Strip Stocking Yardage and Cutting - Quilt in a Day · 4 Strip Stocking Eleanor Burns Front...
3
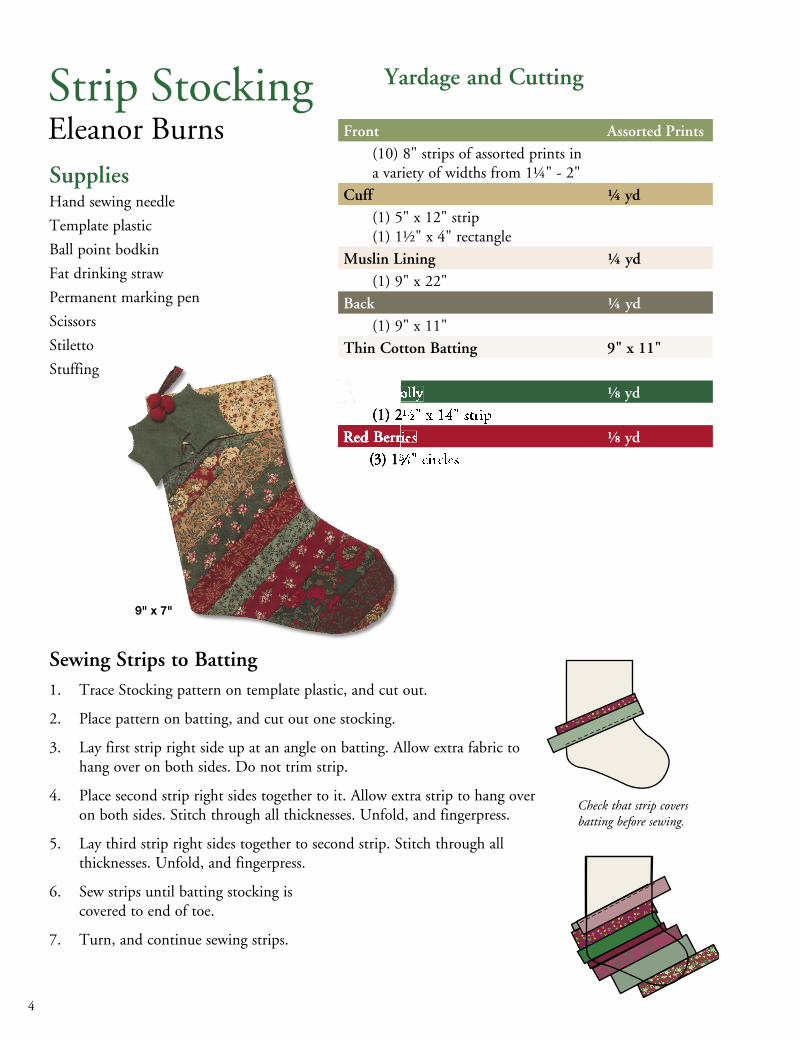
4 Strip Stocking Eleanor Burns Front Assorted Prints (10) 8" strips of assorted prints in a variety of widths from 1" - 2" Cuff yd (1) 5" x 12" strip (1) 1" x 4" rectangle Muslin Lining yd (1) 9" x 22" Back yd (1) 9" x 11" Thin Cotton Batting 9" x 11" yd yd Yardage and Cutting Supplies Hand sewing needle Template plastic Ball point bodkin Fat drinking straw Permanent marking pen Scissors Stiletto Stuffing Sewing Strips to Batting 1. Trace Stocking pattern on template plastic, and cut out. 2. Place pattern on batting, and cut out one stocking. 3. Lay first strip right side up at an angle on batting. Allow extra fabric to hang over on both sides. Do not trim strip. 4. Place second strip right sides together to it. Allow extra strip to hang over on both sides. Stitch through all thicknesses. Unfold, and fingerpress. 5. Lay third strip right sides together to second strip. Stitch through all thicknesses. Unfold, and fingerpress. 6. Sew strips until batting stocking is covered to end of toe. 7. Turn, and continue sewing strips. Check that strip covers batting before sewing. 9" x 7"
Transcript of Strip Stocking Yardage and Cutting - Quilt in a Day · 4 Strip Stocking Eleanor Burns Front...
4
Strip StockingEleanor Burns Front Assorted Prints
(10) 8" strips of assorted prints in a variety of widths from 11⁄4" - 2"Cuff 1⁄4 yd (1) 5" x 12" strip (1) 11⁄2" x 4" rectangleMuslin Lining 1⁄4 yd (1) 9" x 22"Back 1⁄4 yd (1) 9" x 11"Thin Cotton Batting 9" x 11"
Green Holly 1⁄8 yd(1) 21⁄2" x 14" strip
Red Berries 1⁄8 yd(3) 13⁄4" circles
Yardage and Cutting
SuppliesHand sewing needle
Template plastic
Ball point bodkin
Fat drinking straw
Permanent marking pen
Scissors
Stiletto
Stuffing Green HollyGreen Holly (1) 21⁄2" x 14" stripRed Berries
(3) 13⁄4" circles
Green HollyGreen Holly Red Berries
(3) 13⁄4" circles
Sewing Strips to Batting1. Trace Stocking pattern on template plastic, and cut out.
2. Place pattern on batting, and cut out one stocking.
3. Lay first strip right side up at an angle on batting. Allow extra fabric to hang over on both sides. Do not trim strip.
4. Place second strip right sides together to it. Allow extra strip to hang over on both sides. Stitch through all thicknesses. Unfold, and fingerpress.
5. Lay third strip right sides together to second strip. Stitch through all thicknesses. Unfold, and fingerpress.
6. Sew strips until batting stocking is covered to end of toe.
7. Turn, and continue sewing strips.
Check that strip covers batting before sewing.
9" x 7"

5 5
8. Cover batting stocking to top of Cuff.
9. Trim away excess fabric from wrong side.
4. Turn right side out. Fold in half with raw edges together to form a circle. The seam is on the inside. If desired, embellish fold on Cuff with decorative stitches, lace, or name of recipient.
Adding Cuff1. Measure around opening
of Stocking top. Add 1⁄2" to measurement for seam.
2. Cut 5" Cuff strip at that length.
3. Fold strip in half, right sides together. Sew ends together. Press seam open.
Making Hanger1. Fold 11⁄2" x 4" rectangle in
half lengthwise wrong sides together, and press.
2. Open and fold both edges to center crease. Press. Fold again. Press.
3. Sew 1⁄4" in from edge.
Completing Stocking1. Lay out one Back piece
wrong side up.2. Lay Muslin Lining, folded in
half right sides together, on top of Back.
3. Lay paper pattern on top. Pin.
6. Sew around outside edge with generous 1⁄4" seam. Leave top open. Clip curves.
6. Tuck hanger between Cuff and lining to right of matched seam. Leave ends showing. Pin Cuff in place.
7. Sew with 1⁄4" seam around top.
8. Pull Cuff out and fold down.
Fold4. Cut with scissors or rotary
cutter.5. Lay out quilted Stocking,
right side up. Place Stocking back right sides together to it. Lay both Linings on top. Pin.
5. Pull two Lining pieces apart. With raw edges up and seam to the left, tuck Cuff inside Stocking between Linings. Match Cuff seam with Stocking seam. Place one pin at matched seam.

6
Holly Pattern
Stocking PatternYo-Yo Circlefor Berry13⁄4"
Making Holly1. Trace Holly pattern on template plastic, and cut out.2. Fold 21⁄2" x 14" green fabric right sides together. 3. Trace two Holly on wrong
side of fabric with permanent marking pen, leaving 1⁄2" space between the two.
4. Sew on lines with 20 stitches per inch or 1.8 on computerized machines.
5. Trim 1⁄8" away from stitching.6. Clip small hole near top.
7. Turn right side out with straw and ball point bodkin.
Making Berries1. Find 13⁄4" circle on pattern
sheet. Trace circle on tem-plate plastic and cut out.
2. Trace three 13⁄4" circles on red fabric, and cut out.
3. With hand sewing needle, run gathering stitch around outside edge of 13⁄4" red fab-ric circles.
4. Lightly stuff with batting and draw up tightly.
5. Hand stitch Berries on top of Holly.
8. Press Holly.9. Hand stitch to top of Cuff.