Stretching, strength and cardio exercises for karate · PDF file1 Stretching, strength and...
24
1 Stretching, strength and cardio exercises for karate part 1 del 1 English version, 2017 By Eli Stamnes, photographs by Inge Stubdal
Transcript of Stretching, strength and cardio exercises for karate · PDF file1 Stretching, strength and...
1
Stretching, strength
and cardio exercises
for karate
part 1
del 1
English version, 2017
By Eli Stamnes, photographs by Inge Stubdal
2
Contents
Stretching programme ................................................................................................................ 3
Why stretch? ........................................................................................................................................... 3
Stretching in karate class ......................................................................................................................... 4
Inside of thigh ...................................................................................................................................... 4
Hamstrings .......................................................................................................................................... 6
Buttocks ............................................................................................................................................... 7
Front of thigh ....................................................................................................................................... 8
Calves – superficial muscle .................................................................................................................. 9
Calves – deep muscle and achilles tendon ........................................................................................ 10
Arm and chest .................................................................................................................................... 11
Principles for safety and efficiency .................................................................................................... 11
Stretching with the aim to increase flexibility ....................................................................................... 12
Belt exercise ....................................................................................................................................... 12
Front of thigh and hip flexors ............................................................................................................ 16
Additional principles for safety and efficiency................................................................................... 18
About doing the splits ........................................................................................................................... 18
How to do the splits correctly ............................................................................................................ 19
Exercises to increase the flexibility measured by front splits and side splits ..................................... 20
3
Stretching programme
Why stretch?
Reduce muscle tension
Maintain or increase flexibility (the range of motion that is affected by muscles)
Maintain or increase mobility (the ability to move your body freely and functionally)
Get to know your body and increase body control
Improve the ability to learn and maintain good technique
Learn how the breath affects the body
Improve training discipline (by learning how to endure discomfort) and experience a sense of mastery
Stretching should be an integral part of your training regime, and preferably you should dedicate
sessions to stretching with the aim to improve (or maintain) flexibility, in addition to your karate
sessions.
It is, however, important to note that flexibility needs to be balanced with strength – and stretching
with strength training. There is no point in having the flexibility required for a high Mawashi Geri if you
do not possess enough core and leg strength to maintain balance and kick with power and control. The
amount of time that should be dedicated to stretching vs strength training varies from person to
person. Typically, a naturally flexible person needs to work more on strength and a naturally strong
person needs to work more on flexibility, but most people would benefit from increasing both
strength and flexibility.1 When there is balance between strength and flexibility, and the joints are
aligned optimally, there is structural integrity in the body. This is beneficial both for your karate and
for maintaining a healthy body which functions well in your daily life.
It is important to have a sustainable stretching practice, that is, one with minimal wear and tear on
joints, tendons, ligaments and the spine, so that you can continue to do karate into old age. This
involves:
Learning the safety principles presented in this programme and trusting that these are based on solid anatomical knowledge
Being aware of your pelvic, spine and joint alignments while stretching
Listening to your body
Leaving your ego in the dressing room, not competing with others, not showing off while stretching, and not forcing your body into a position if it resists (the breath is a good indicator here)
Only going to your “soft edge” while stretching, which means backing off a little from you maximum expression of each posture
Remembering that all bodies are different and focusing on what serves your own body, not aiming to look or do exactly like other people.
1 Note that stretching is not the only means by which to improve flexibility and mobility, even though it is the sole focus here.
4
Stretching in karate class
On days/in session when you are training karate, the focus should be on reducing muscle tension in
order to utilise the mobility you have already acquired. For this you use stretching exercises that are
held for a relatively short time, e.g. 30 seconds. These can be performed towards the end of the warm-
up2 and/or at the end of class.
The exercises presented here are chosen because they are easy to teach, learn and perform correctly,
in addition to them being suitable for PNF and FRC stretching (which must be taught by a qualified
instructor). Seated positions have been avoided since many people find it hard to maintain a neutral
pelvis and spine while performing them. Note that these are active stretches – do not just “hang out”
in them.
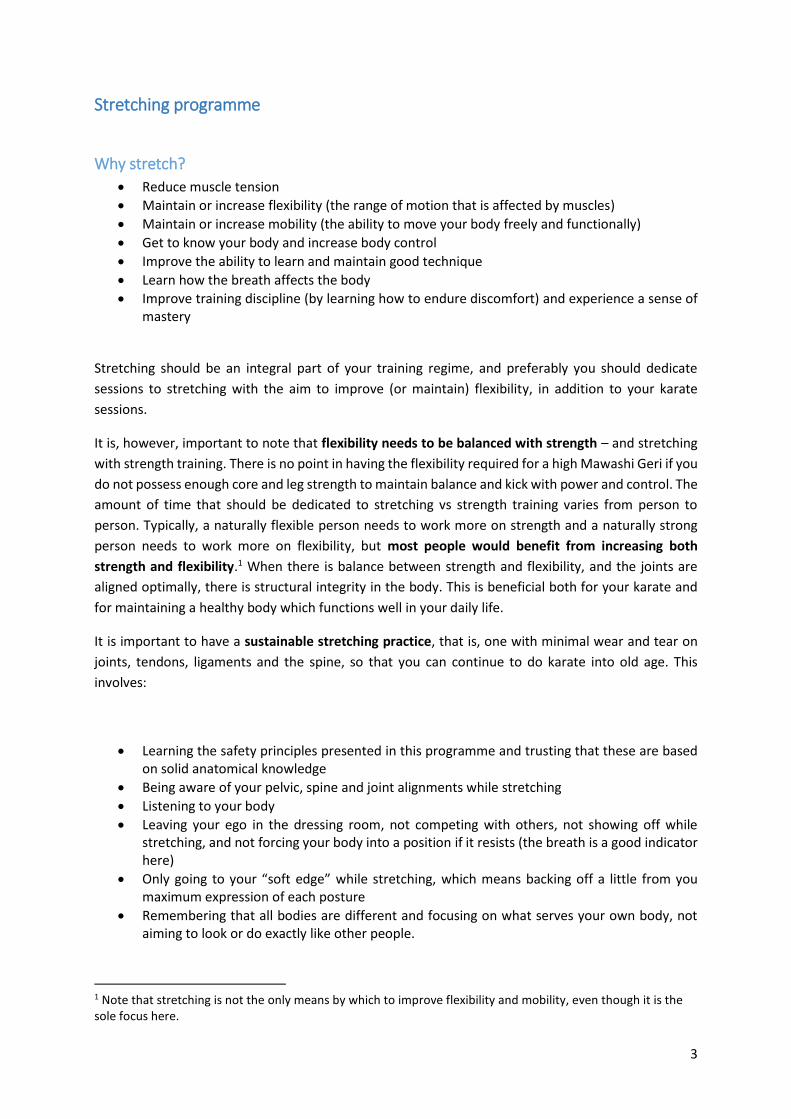
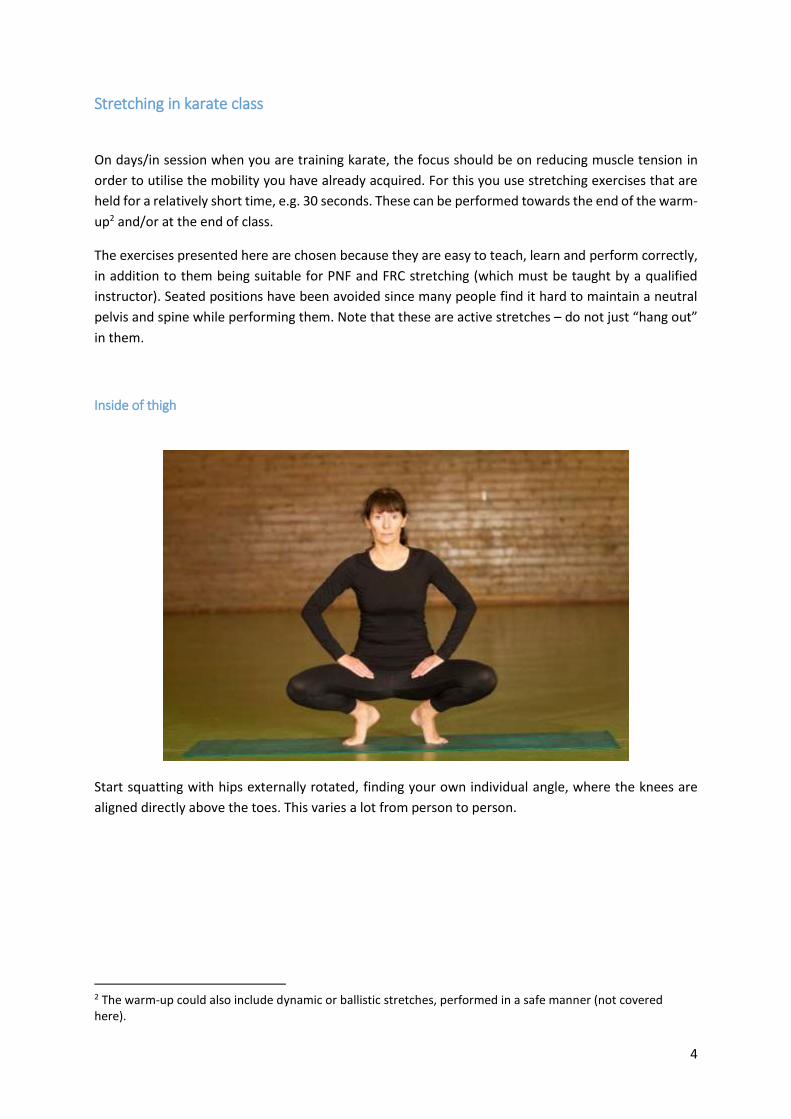
Inside of thigh
Start squatting with hips externally rotated, finding your own individual angle, where the knees are
aligned directly above the toes. This varies a lot from person to person.
2 The warm-up could also include dynamic or ballistic stretches, performed in a safe manner (not covered here).
5
Maintaining the angle of the hip, extend one leg. Spread your toes and point them towards the ceiling,
while carefully pressing the inside of the thigh towards the floor. Rest on the sole of the foot on the
opposite side. Repeat on the other side.
If your ankle joint does not have enough flexibility to sit in this position, or you knee feels
uncomfortable, place the shin on the floor instead.
6
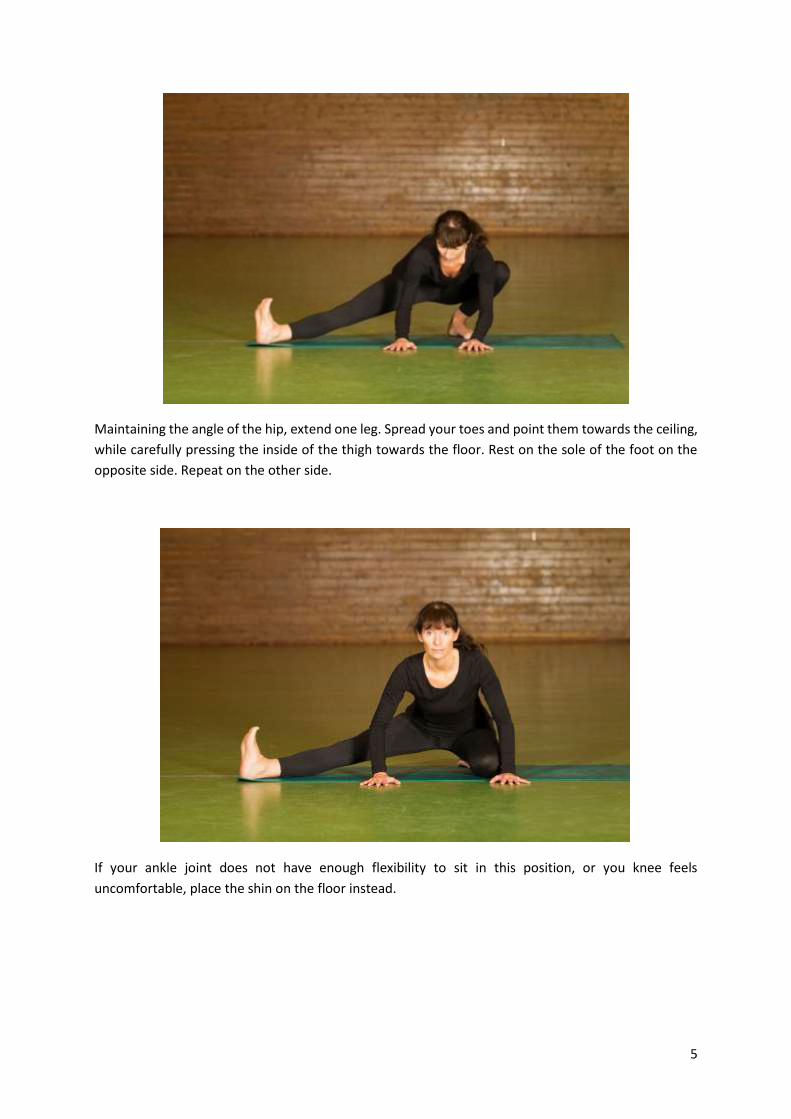
Hamstrings
Start with your knees hip-width apart and extend one leg in front of you. Spread your toes and point
them towards the ceiling. Check that your hip bones (more specifically, the anterior superior iliac
spines) are aligned and pointing straight forwards. Keep your hands at the folds of your hips, where
you hinge. Inhale and lengthen the back, exhale and go deeper into the stretch. Aim your belly towards
the front of your thigh – not the head towards the knee. Repeat on the other side.
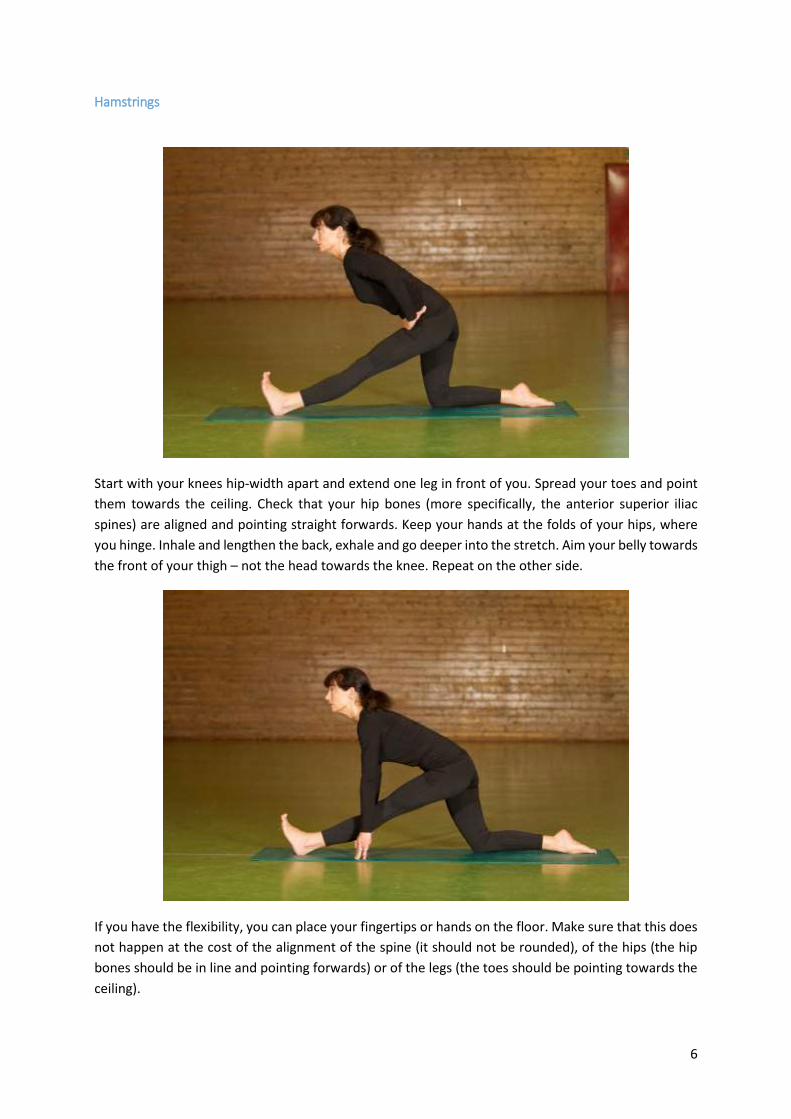
If you have the flexibility, you can place your fingertips or hands on the floor. Make sure that this does
not happen at the cost of the alignment of the spine (it should not be rounded), of the hips (the hip
bones should be in line and pointing forwards) or of the legs (the toes should be pointing towards the
ceiling).
7
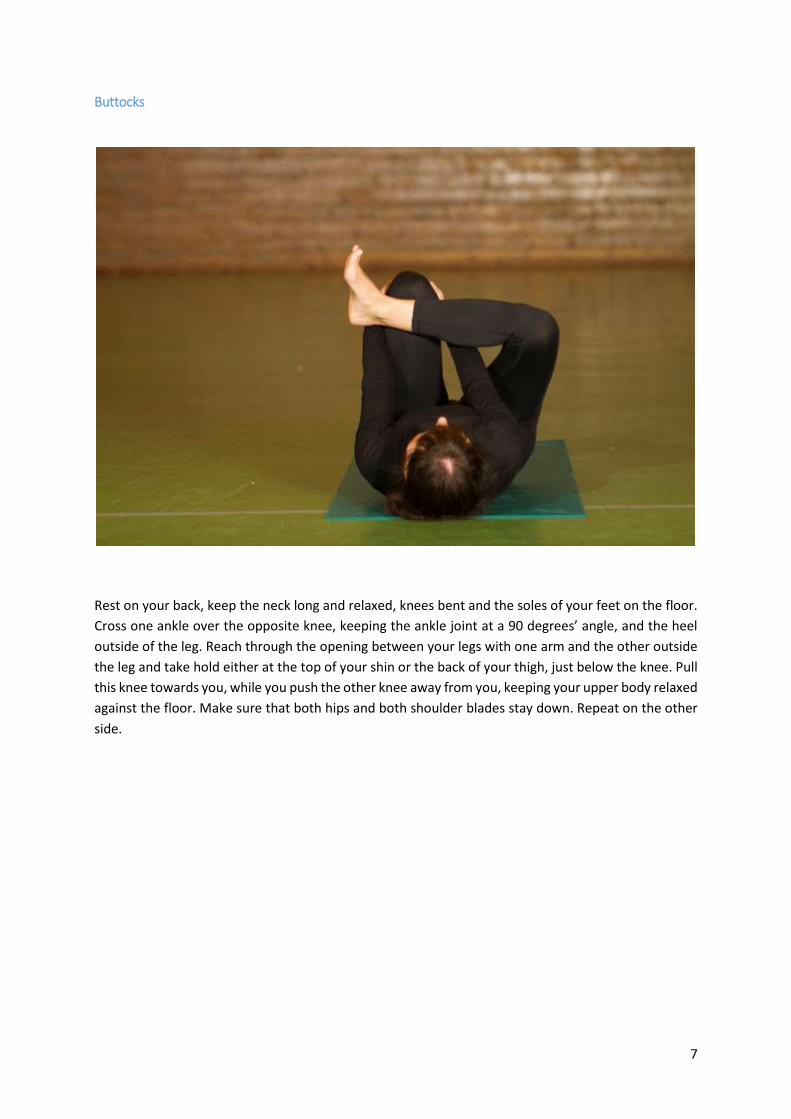
Buttocks
Rest on your back, keep the neck long and relaxed, knees bent and the soles of your feet on the floor.
Cross one ankle over the opposite knee, keeping the ankle joint at a 90 degrees’ angle, and the heel
outside of the leg. Reach through the opening between your legs with one arm and the other outside
the leg and take hold either at the top of your shin or the back of your thigh, just below the knee. Pull
this knee towards you, while you push the other knee away from you, keeping your upper body relaxed
against the floor. Make sure that both hips and both shoulder blades stay down. Repeat on the other
side.
8
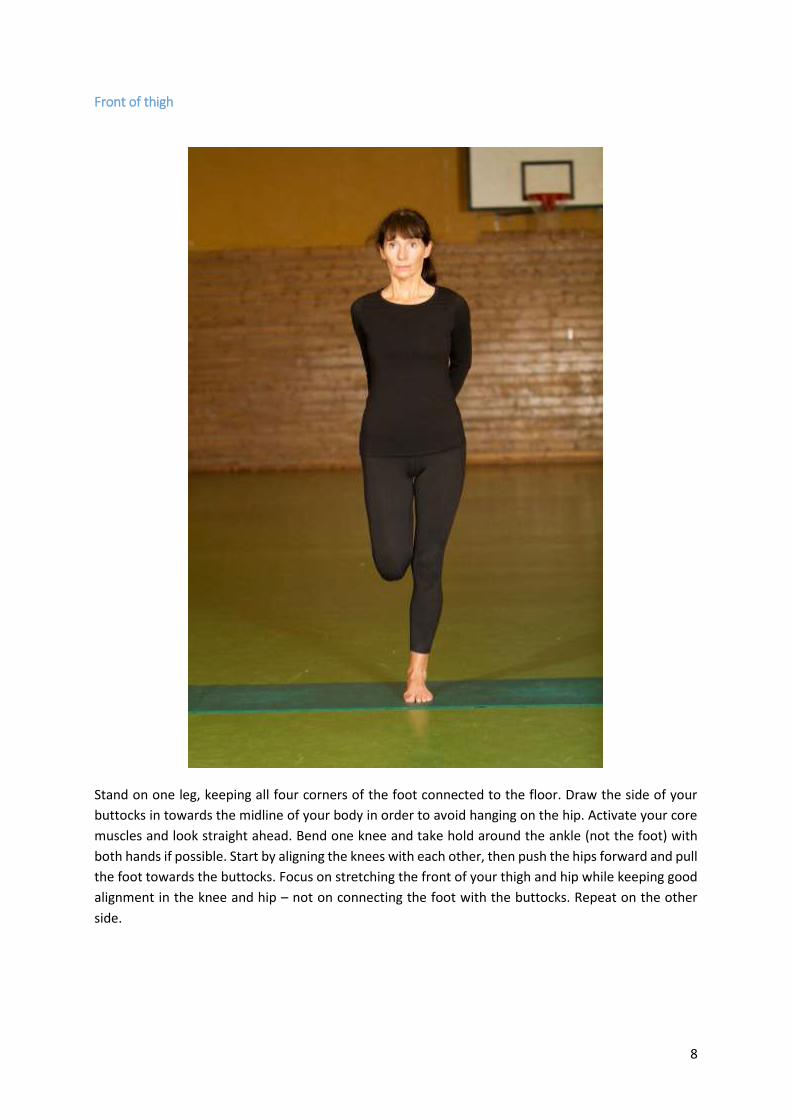
Front of thigh
Stand on one leg, keeping all four corners of the foot connected to the floor. Draw the side of your
buttocks in towards the midline of your body in order to avoid hanging on the hip. Activate your core
muscles and look straight ahead. Bend one knee and take hold around the ankle (not the foot) with
both hands if possible. Start by aligning the knees with each other, then push the hips forward and pull
the foot towards the buttocks. Focus on stretching the front of your thigh and hip while keeping good
alignment in the knee and hip – not on connecting the foot with the buttocks. Repeat on the other
side.
9
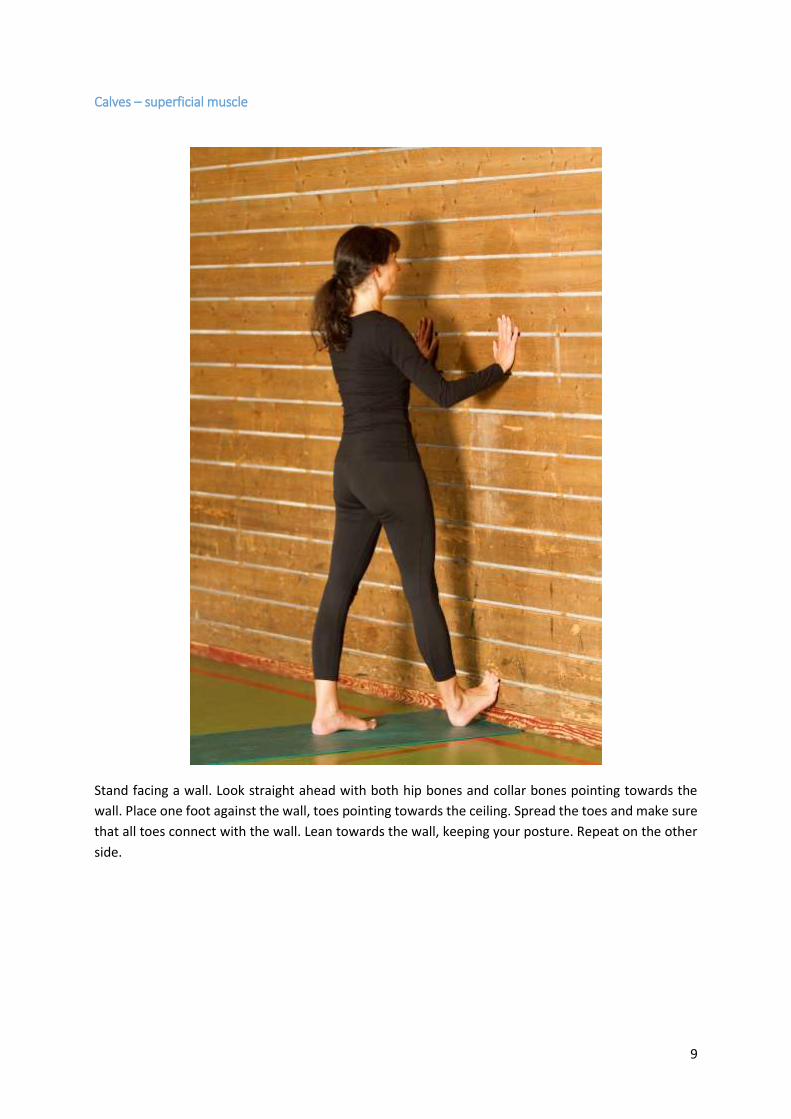
Calves – superficial muscle
Stand facing a wall. Look straight ahead with both hip bones and collar bones pointing towards the
wall. Place one foot against the wall, toes pointing towards the ceiling. Spread the toes and make sure
that all toes connect with the wall. Lean towards the wall, keeping your posture. Repeat on the other
side.
10
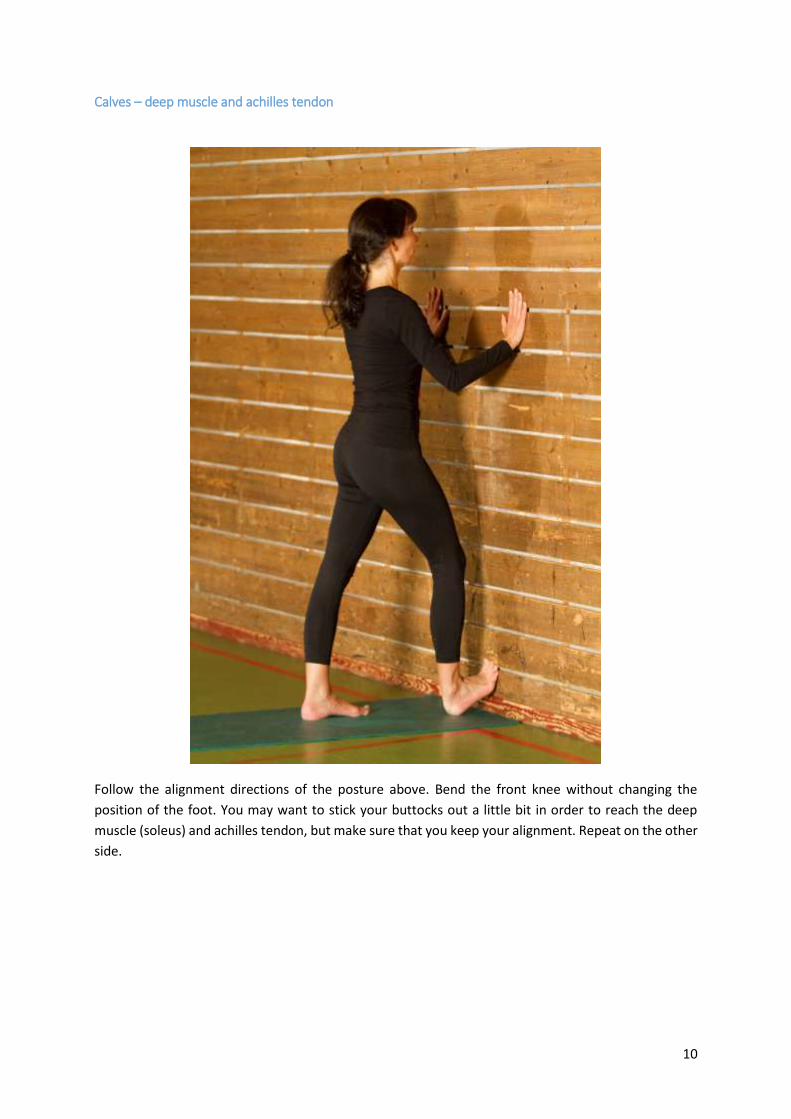
Calves – deep muscle and achilles tendon
Follow the alignment directions of the posture above. Bend the front knee without changing the
position of the foot. You may want to stick your buttocks out a little bit in order to reach the deep
muscle (soleus) and achilles tendon, but make sure that you keep your alignment. Repeat on the other
side.
11
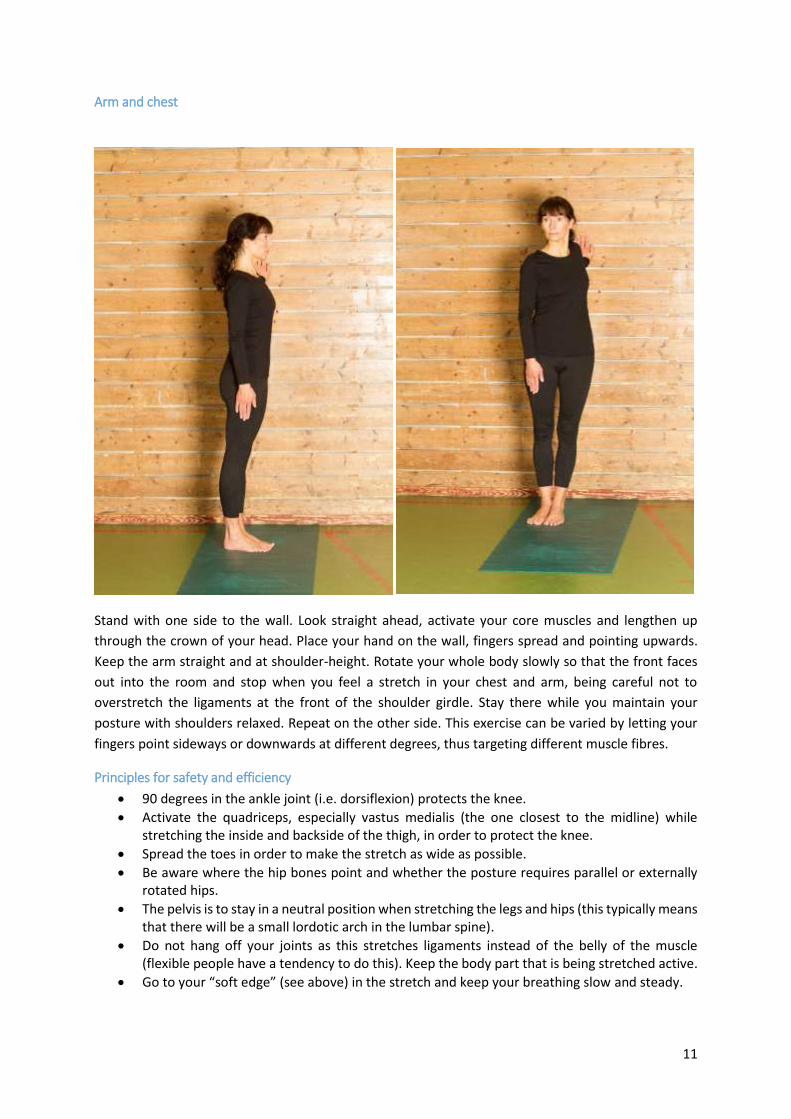
Arm and chest
Stand with one side to the wall. Look straight ahead, activate your core muscles and lengthen up
through the crown of your head. Place your hand on the wall, fingers spread and pointing upwards.
Keep the arm straight and at shoulder-height. Rotate your whole body slowly so that the front faces
out into the room and stop when you feel a stretch in your chest and arm, being careful not to
overstretch the ligaments at the front of the shoulder girdle. Stay there while you maintain your
posture with shoulders relaxed. Repeat on the other side. This exercise can be varied by letting your
fingers point sideways or downwards at different degrees, thus targeting different muscle fibres.
Principles for safety and efficiency
90 degrees in the ankle joint (i.e. dorsiflexion) protects the knee.
Activate the quadriceps, especially vastus medialis (the one closest to the midline) while stretching the inside and backside of the thigh, in order to protect the knee.
Spread the toes in order to make the stretch as wide as possible.
Be aware where the hip bones point and whether the posture requires parallel or externally rotated hips.
The pelvis is to stay in a neutral position when stretching the legs and hips (this typically means that there will be a small lordotic arch in the lumbar spine).
Do not hang off your joints as this stretches ligaments instead of the belly of the muscle (flexible people have a tendency to do this). Keep the body part that is being stretched active.
Go to your “soft edge” (see above) in the stretch and keep your breathing slow and steady.
12
Stretching with the aim to increase flexibility
These exercises are to be done on days when you are not training karate, or as a separate session if
you are training a lot. The postures are to be held longer (2 minutes or more). Warm up by doing some
slow katas, jogging, dancing etc. (avoid strength exercises) for 5-10 minutes before stretching. These
exercises can also be done without a warm-up, if you are careful and focus on your breathing. Mindful
breathing will aid relaxation, increase oxygen transport to the muscles and tell you when you push too
hard. Note that these are not passive stretches
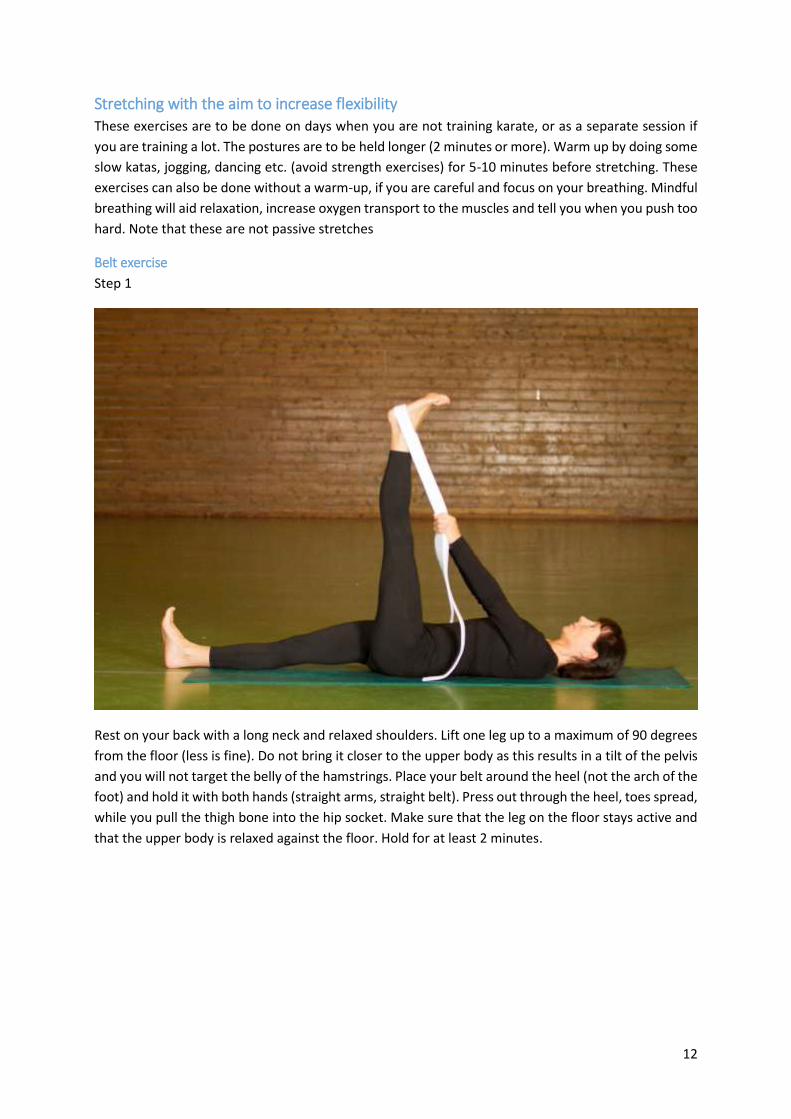
Belt exercise
Step 1
Rest on your back with a long neck and relaxed shoulders. Lift one leg up to a maximum of 90 degrees
from the floor (less is fine). Do not bring it closer to the upper body as this results in a tilt of the pelvis
and you will not target the belly of the hamstrings. Place your belt around the heel (not the arch of the
foot) and hold it with both hands (straight arms, straight belt). Press out through the heel, toes spread,
while you pull the thigh bone into the hip socket. Make sure that the leg on the floor stays active and
that the upper body is relaxed against the floor. Hold for at least 2 minutes.
13
Step 2
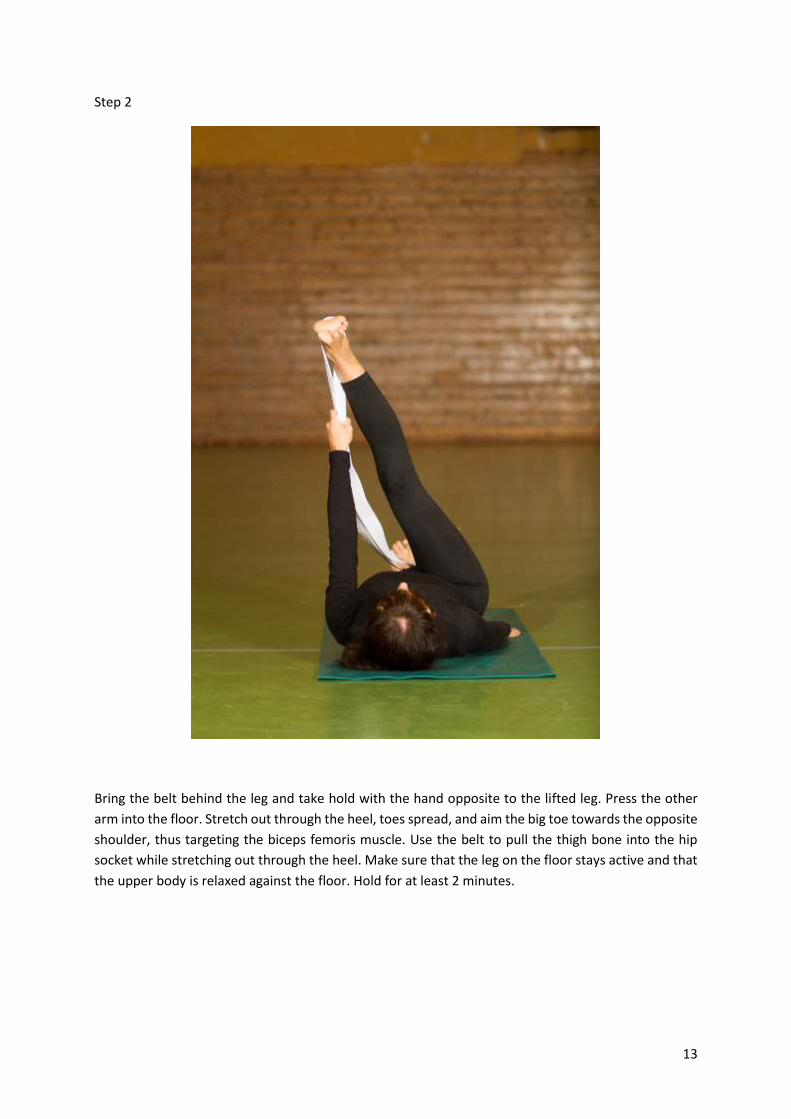
Bring the belt behind the leg and take hold with the hand opposite to the lifted leg. Press the other
arm into the floor. Stretch out through the heel, toes spread, and aim the big toe towards the opposite
shoulder, thus targeting the biceps femoris muscle. Use the belt to pull the thigh bone into the hip
socket while stretching out through the heel. Make sure that the leg on the floor stays active and that
the upper body is relaxed against the floor. Hold for at least 2 minutes.
14
Step 3
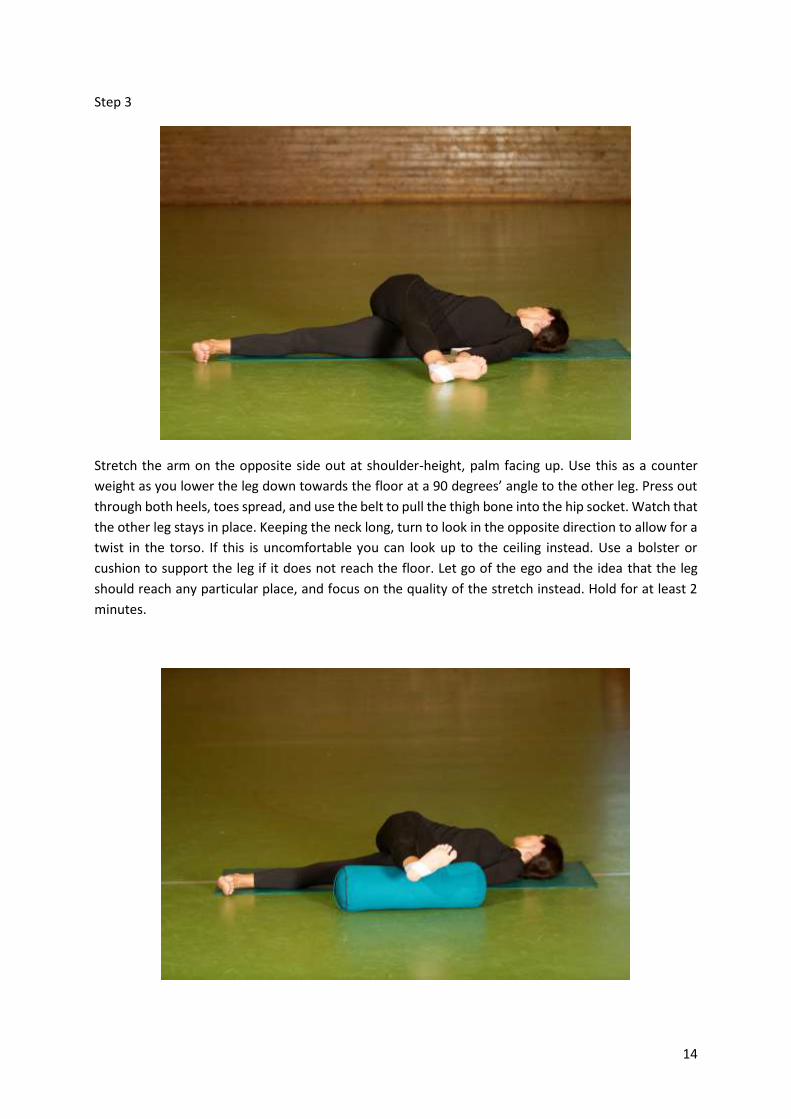
Stretch the arm on the opposite side out at shoulder-height, palm facing up. Use this as a counter
weight as you lower the leg down towards the floor at a 90 degrees’ angle to the other leg. Press out
through both heels, toes spread, and use the belt to pull the thigh bone into the hip socket. Watch that
the other leg stays in place. Keeping the neck long, turn to look in the opposite direction to allow for a
twist in the torso. If this is uncomfortable you can look up to the ceiling instead. Use a bolster or
cushion to support the leg if it does not reach the floor. Let go of the ego and the idea that the leg
should reach any particular place, and focus on the quality of the stretch instead. Hold for at least 2
minutes.
15
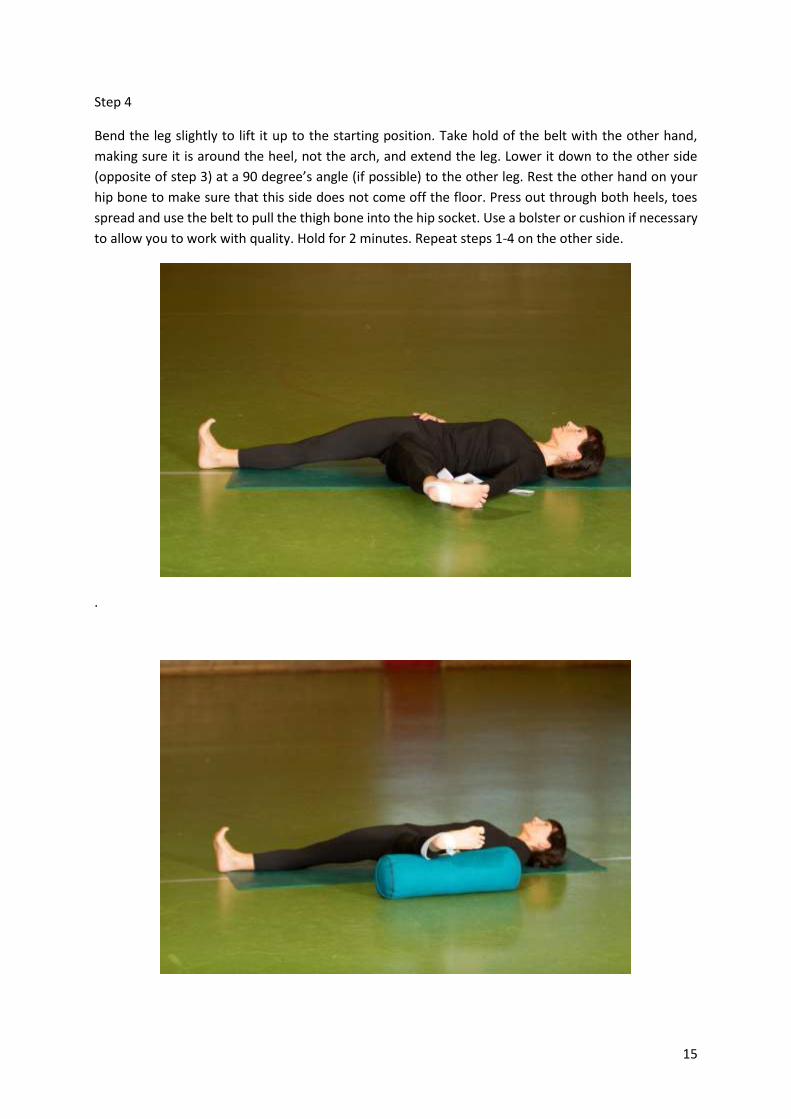
Step 4
Bend the leg slightly to lift it up to the starting position. Take hold of the belt with the other hand,
making sure it is around the heel, not the arch, and extend the leg. Lower it down to the other side
(opposite of step 3) at a 90 degree’s angle (if possible) to the other leg. Rest the other hand on your
hip bone to make sure that this side does not come off the floor. Press out through both heels, toes
spread and use the belt to pull the thigh bone into the hip socket. Use a bolster or cushion if necessary
to allow you to work with quality. Hold for 2 minutes. Repeat steps 1-4 on the other side.
.
16
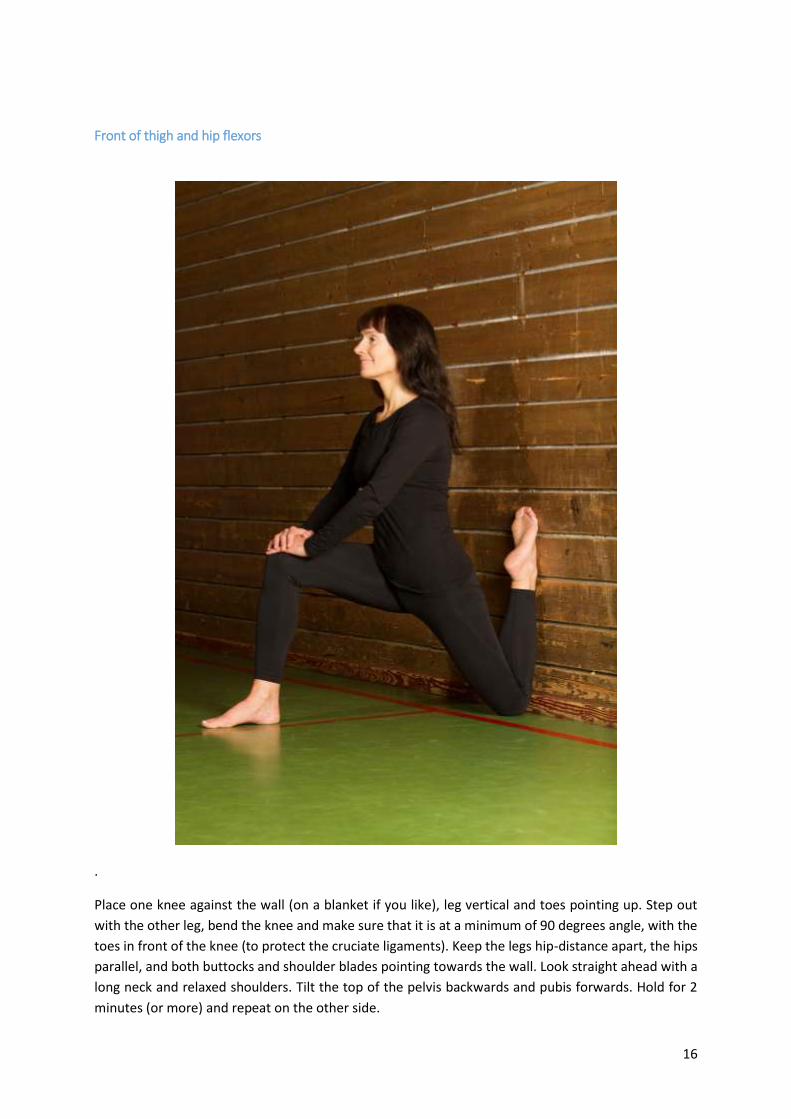
Front of thigh and hip flexors
.
Place one knee against the wall (on a blanket if you like), leg vertical and toes pointing up. Step out
with the other leg, bend the knee and make sure that it is at a minimum of 90 degrees angle, with the
toes in front of the knee (to protect the cruciate ligaments). Keep the legs hip-distance apart, the hips
parallel, and both buttocks and shoulder blades pointing towards the wall. Look straight ahead with a
long neck and relaxed shoulders. Tilt the top of the pelvis backwards and pubis forwards. Hold for 2
minutes (or more) and repeat on the other side.
17
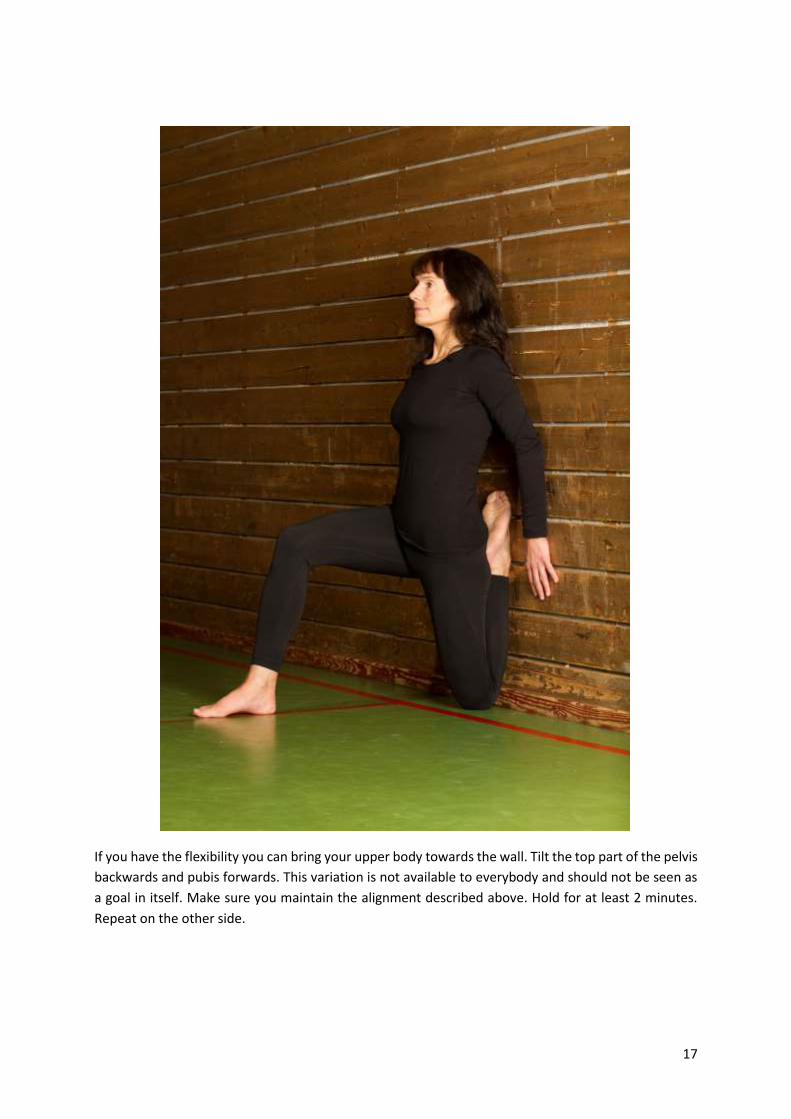
If you have the flexibility you can bring your upper body towards the wall. Tilt the top part of the pelvis
backwards and pubis forwards. This variation is not available to everybody and should not be seen as
a goal in itself. Make sure you maintain the alignment described above. Hold for at least 2 minutes.
Repeat on the other side.
18
Additional principles for safety and efficiency
Use bolsters, cushions, etc. to support your limbs in order not to create unnecessary tension while stretching and to allow for good alignment. Props are friends, not a sign of inadequacy.
Focus on the breath. It helps you relax and cope with the discomfort, and is a good indicator of whether you push yourself too hard or work with quality.
Go to your “soft edge” (see above) in the stretch.
Pay particular attention to your neck and spine alignment when holding postures for a long time in order to protect them from wear and tear.
About doing the splits
Not everybody has a hip structure that allows them to do the full splits (front splits or side splits), but
most of us have some way to go before we reach our structural limitations. In other words, it can be
useful to know that the shape of the hip socket and the femoral head varies a lot from person to
person, but this should not be an excuse to avoid stretching. Having said this, doing the splits should
not become a goal in itself. Representing such a definite endpoint, it can easily become an obsession,
leading people to train without listening to their bodies and pushing themselves too far, with injuries
as a result – injuries that may take years to heal.
The splits should therefore rather be seen as a yardstick for the overall flexibility in the legs and hips –
a posture you visit occasionally in order to gauge the progress or maintenance of your flexibility.
19
How to do the splits correctly
Front splits are to be done with parallel hips. Both hip bones are to point straight ahead and be aligned.
The front of the back leg should rest against the floor (many have a tendency to externally rotate the
back hip), and there should be equal weight on both legs.
Side splits are done with externally rotated hips (the version with internal rotation should be avoided
as it puts too much pressure on the pubic symphysis). It must be done with straight knees, since
bending and rotating the knee while weight bearing can cause wear and tear to the cartilage inside the
knee joint and the collateral and cruciate ligaments of the knee. Use the safety principles listed above.
Keep 90 degrees in the ankle joint, activate the quadriceps muscles, especially the vastus medialis, and
spread the toes for a wide stretch.
Do not twist directly from one type of splits to another, as this may cause damage inside the hip joint,
which in turn may cause arthritis and immobility in the long run. Get up to your knees and change the
rotation of your hips before you lower yourself down to the other type (parallel hips in front splits,
externally rotated hips in side splits).
It is crucial to activate the core muscles and arm muscles in order to control the downward movement
and avoid injury to muscles and tendons.
Listen to your body and stop before your reach your limit. Use a bolster or cushion as a buffer between
you and the floor in case your ego takes over before your body is ready.
20
Exercises to increase the flexibility measured by front splits and side splits
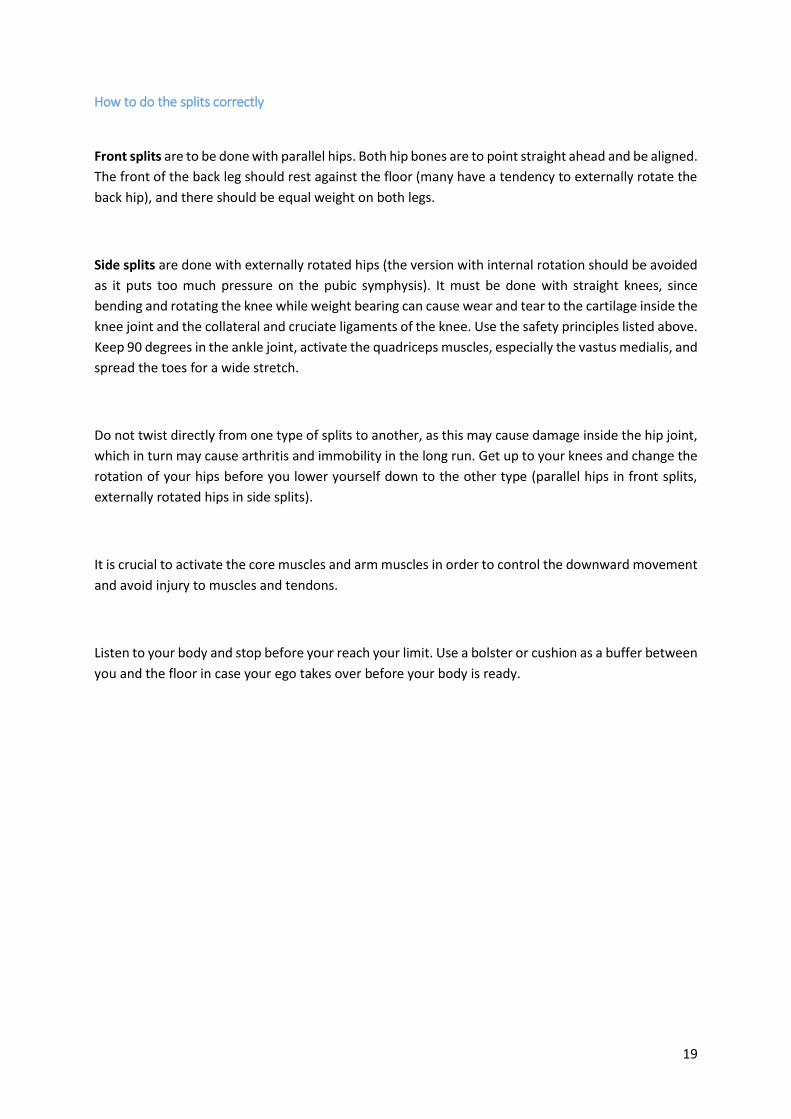
“Pigeon", for buttocks, iliotibial band and psoas
Sit down and place one shin bone along the short end of a yoga mat (or use a line on the floor), ankle
joint at 90 degrees, and knee bent at 90 degrees so that the thigh bone follows the side of the mat (or
a perpendicular line). Keep the back leg bent (but hip extended) at first and the back and neck long
and relaxed. Aim the midline of your body towards the middle of your shin bone. Sit upright or lower
yourself down to the elbows or further if that is available to you. Make sure that you do not round the
back. If you do, come up a little so that there is a small lordotic arch in the lumbar spine. Breathe deeply
and slowly. Use blankets, cushions etc. under the legs, hips and arms if necessary, in order to get
correct alignment and avoid unnecessary tension. After 2 minutes, stretch the back leg and rotate it
so that the front thigh points towards the floor. If this is too demanding, continue with the back leg
bent. Hold for an additional 2 minutes and repeat on the other side.
Please note that it is important to follow these alignment instructions in order to avoid wear and tear
in your knees, hips and sacroiliac joints. The “old-fashioned” pigeon that is still taught in some gyms
and yoga studios, in which the knee points straight forward towards the midline of the body and the
foot is held close to the pubic bone, is not in line with a sustainable stretching practice.
21
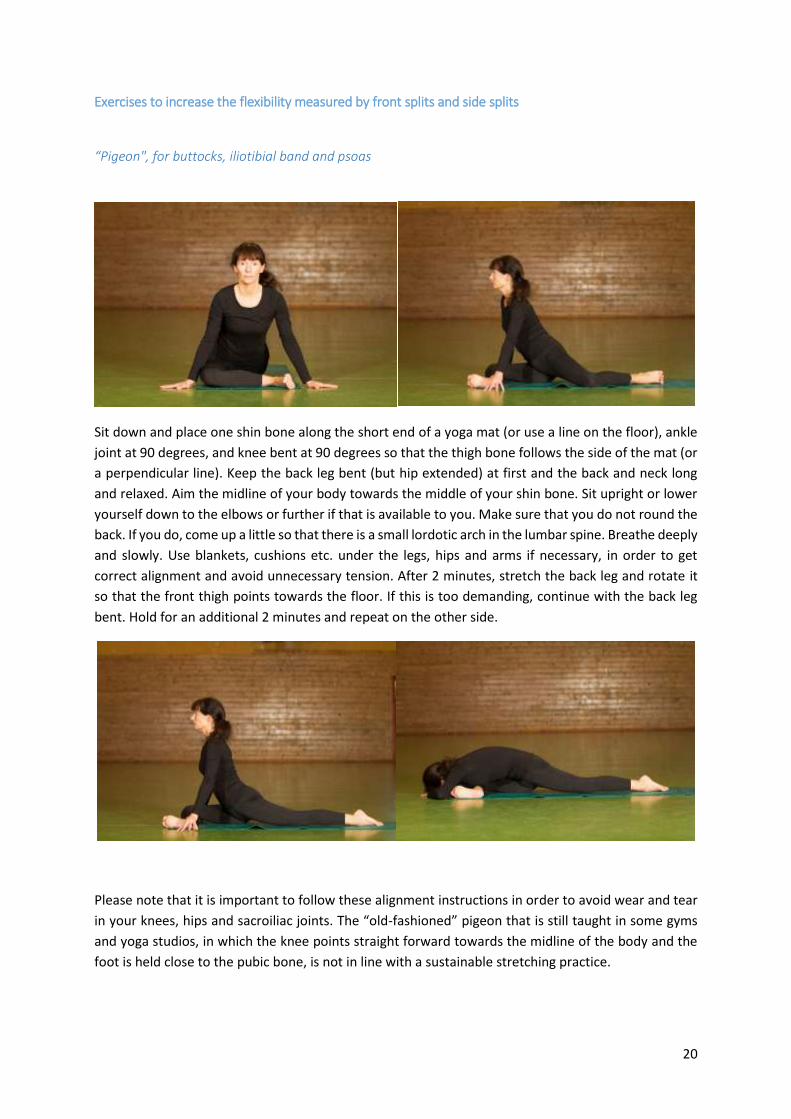
Hamstring stretch
Rest on your back by a door (or pillar), and extend one leg through the door while resting the other
against the wall. Make sure that your buttocks and leg touch the wall, that your neck and back are long
and relaxed, and that the arms rest by your side. Press out through both heels, keeping the ankles at
a 90 degrees’ angle and toes spread. Pull the thigh bone of the leg that is being stretched into the hip
socket. Hold for at least 2 minutes and repeat on the other side.
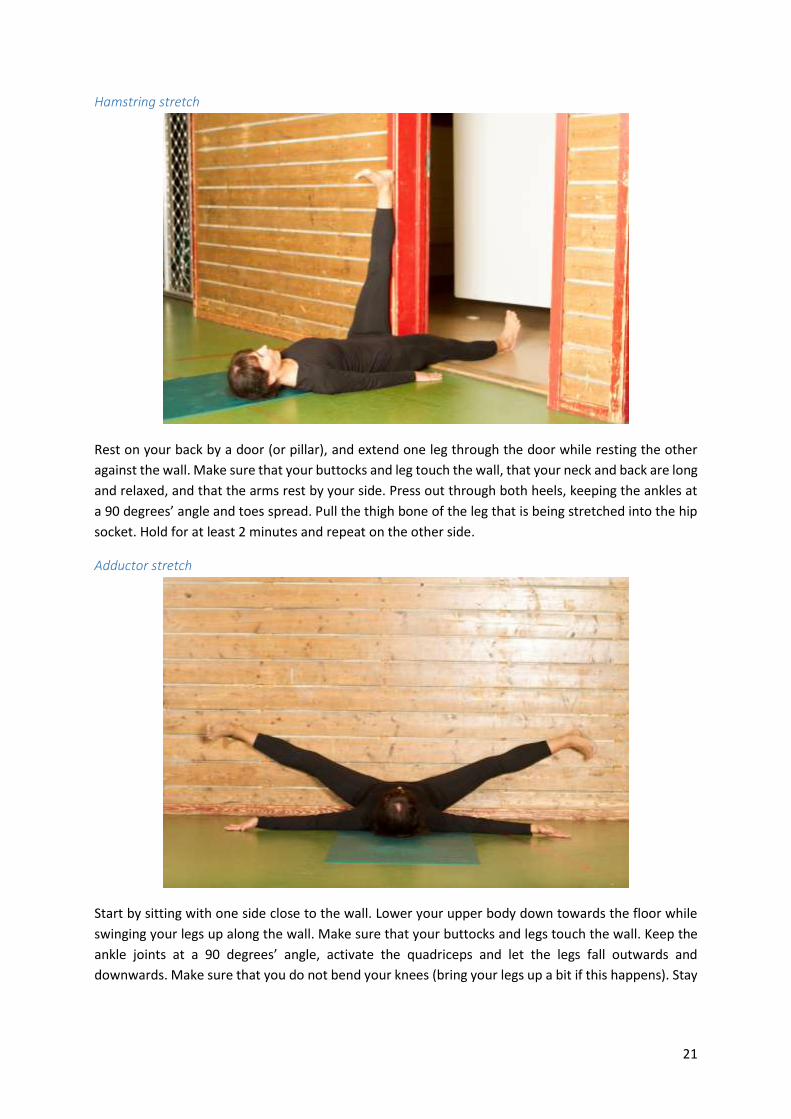
Adductor stretch
Start by sitting with one side close to the wall. Lower your upper body down towards the floor while
swinging your legs up along the wall. Make sure that your buttocks and legs touch the wall. Keep the
ankle joints at a 90 degrees’ angle, activate the quadriceps and let the legs fall outwards and
downwards. Make sure that you do not bend your knees (bring your legs up a bit if this happens). Stay
22
for at least 2 minutes. Take your time to get out of the posture, and help bring your legs together by
pushing with your hands on your outer thighs.
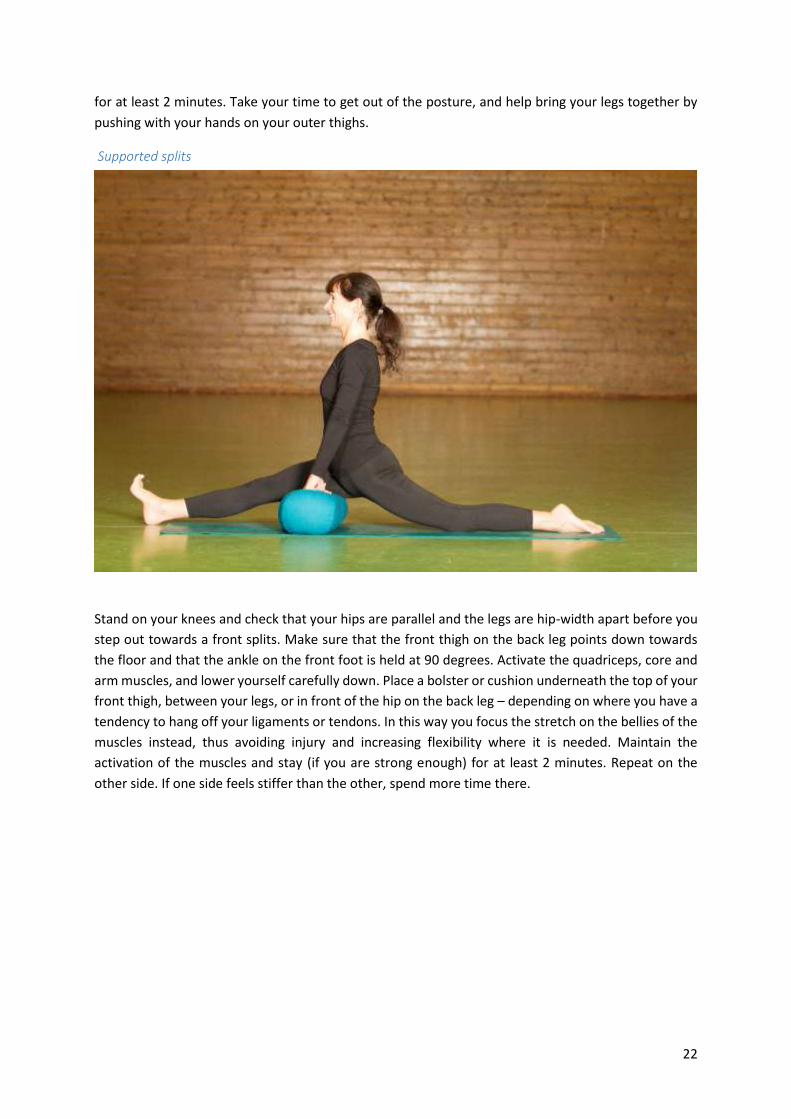
Supported splits
Stand on your knees and check that your hips are parallel and the legs are hip-width apart before you
step out towards a front splits. Make sure that the front thigh on the back leg points down towards
the floor and that the ankle on the front foot is held at 90 degrees. Activate the quadriceps, core and
arm muscles, and lower yourself carefully down. Place a bolster or cushion underneath the top of your
front thigh, between your legs, or in front of the hip on the back leg – depending on where you have a
tendency to hang off your ligaments or tendons. In this way you focus the stretch on the bellies of the
muscles instead, thus avoiding injury and increasing flexibility where it is needed. Maintain the
activation of the muscles and stay (if you are strong enough) for at least 2 minutes. Repeat on the
other side. If one side feels stiffer than the other, spend more time there.
23
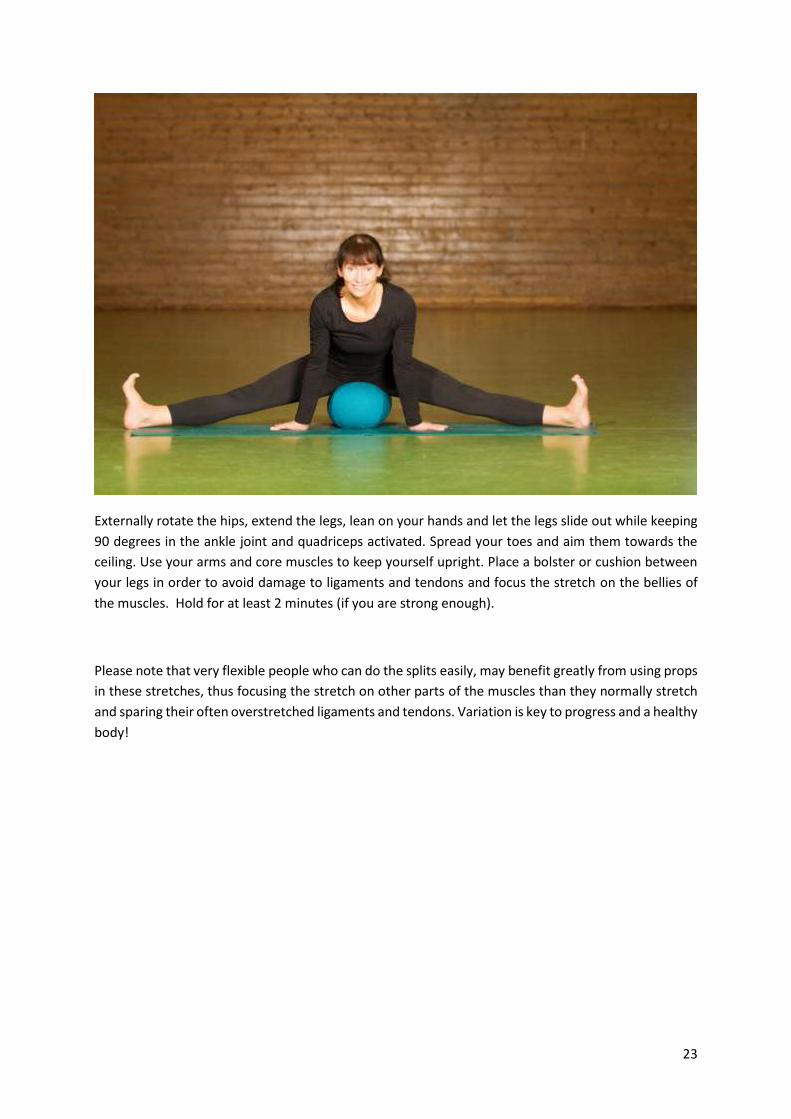
Externally rotate the hips, extend the legs, lean on your hands and let the legs slide out while keeping
90 degrees in the ankle joint and quadriceps activated. Spread your toes and aim them towards the
ceiling. Use your arms and core muscles to keep yourself upright. Place a bolster or cushion between
your legs in order to avoid damage to ligaments and tendons and focus the stretch on the bellies of
the muscles. Hold for at least 2 minutes (if you are strong enough).
Please note that very flexible people who can do the splits easily, may benefit greatly from using props
in these stretches, thus focusing the stretch on other parts of the muscles than they normally stretch
and sparing their often overstretched ligaments and tendons. Variation is key to progress and a healthy
body!
24
- - - - - - - - - -
All photographs were taken by Inge Stubdal.
This training programme was developed by Eli Stamnes for Nesodden Karateklubb, and can only be
reproduced with her explicit consent.
Eli Stamnes is an Experienced Registered Yoga Teacher (ERYT500) and has a range of trainer
qualifications and certifications in martial arts, natural movement, mobility, body weight training and
functional anatomy.
Thanks to Rune Eirik Flordalen and Daniel Sønstevold for commenting on the manuscript.