Streamline your Manufacturing Processes with
230
Open Source Software Fabien Pinckaers Els Van Vossel Streamline your Manufacturing Processes with Making Business Applications accessible A Simple Approach to Manage the Manufacturing and Supply Chain Complexity
Transcript of Streamline your Manufacturing Processes with

Open Source Software
Fabien Pinckaers
Els Van Vossel
Streamline your ManufacturingProcesses with
Making Business Applications accessible
A Simple Approach to Manage the Manufacturingand Supply Chain Complexity
Open Source SoftwareMaking Business Applications accessible to All Companies
Streamline your Manufacturing Processes with OpenERP
A Simple Approach to Manage the Manufacturing and Supply Chain Complexity
by Els Van Vossel and Fabien Pinckaers
This book is published under free license Creative CommonsshyBYshyNCshySA
httpcreativecommonsorglicensesbyshyncshysa20bedeeden_US
bull
You are free
bull to share mdash to copy distribute display and perform the work bull to remix mdash to make derivative works
bull Under the following conditions
bull Attribution You must attribute the work by stating laquoThe authors of the original work are Els Van Vossel and FabienPinckaersraquo with at least the same prominence as in the original work and as in any other attributions for this work (but not in any way that suggests that they endorse you or your use of the work)
bull Noncommercial You may not use this work for commercial purposes
bull Share Alike If you alter transform or build upon this work you may distribute the resulting work only under the same or similar license to this one
bull For any reuse or distribution you must make clear to others the license terms of this workThe best way to do this is with a link to the web page cited above
bull Any of the above conditions can be waived if you get permission from the copyright holder bull Nothing in this license impairs or restricts the authors moral rights
First Edition
Many of the designations used by manufacturers and suppliers to distinguish their products are claimed as trademarks Where those designations appear in this book and Open Object Press was aware of a trademark claim the designations have been printed in initial capitals
While every precaution has been taken in the preparation of this book the publisher and the authors assume no responsibility for errors or omissions or for damages resulting from the use of the information contained herein
Open Object Press is a division of OpenERP SA (wwwopenerpcom)
Copyright copy 2011 Els Van Vossel and Fabien Pinckaers
First edition July 2011 ISBN 978shy2shy9600876shy3shy5
40 Chausseacutee de Namur1367 GrandshyRosiegraverehttpopenerpcom
Special Thanks to Marc Laporte Olivier LaurentGary Malherbe and Greacutegory Dethier
OpenERP is a trademark of OpenERP SAThe software is available under the AGPL license version 3
40 Chausseacutee de Namur1367 GrandshyRosiegraverehttpopenerpcom
From the same Editor
OpenERP for Retail and Industrial Management ndash Steps towardsSales Logistics and Manufacturing Integration 2009Fabien Pinckaers and Geoff Gardiner ISBN 978shy2shy9600876shy0shy4
Drive your Sales amp Marketing Activities with OpenERP ndash Close Leads Automate Marketing Campaigns and Get AccurateForecasts 2011 Els Van Vossel and Fabien Pinckaers ISBN 978shy2shy9600876shy1shy1
Integrate your Logistic Processes with OpenERP ndash EfficientWarehouse Management with Sales and Purchases Integration2011 Els Van Vossel and Fabien Pinckaers ISBN 978shy2shy9600876shy2shy8
The Authors Els Van Vossel and Fabien Pinckaers
v
Contents
Foreword xiOpen Source Software Making Business Applications accessible xi
The OpenERP Solution xii
Structure of this book xii
About the authors xiii
Fabien Pinckaers xiii
Els Van Vossel xiii
Acknowledgements xiv
I First Steps Driving a PurchaseWarehouseManufacturing Flow 1
1 Configuring your OpenERP 3
2 Complete Example Sell Check the Stock Manufacture and Purchase 7
3 Letrsquos get Started and Configure a New Instance 21
31 Business Example 21
32 Basic Settings 22
33 Get your Database Up and Running without Demo Data 22
34 Fit your Needs 25
341 Configuring Accounts 26
342 Configuring Journals 29
343 Configuring the Main Company 30
344 Creating Partner Categories Partners and their Contacts 32
345 Creating Products and their Categories 34
346 Stock Locations 35
347 Setting up a Chart of Accounts 37
348 Make a Backup of the Database 38
35 Testing a Complete Purchase Cycle according to an Example 39
vi
351 Purchase Order 40
352 Receiving Goods 41
353 Invoice Control 42
354 Paying the Supplier 43
36 Testing a Complete Sales Cycle according to an Example 44
361 Sales Order 44
362 Preparing Goods for Shipping to Customers 45
363 Invoicing Goods 45
364 Customer Payment 46
II Advanced Features in Purchase Quotation Management 47
4 Driving your Purchases 49
41 All the Elements of a Complete Workflow 49
411 Setting up your Database 49
412 Price Request from the Supplier 49
413 Goods Receipt 53
414 Control of Invoicing 53
415 Control based on Orders 55
416 Control based on Goods Receipt 55
417 Tenders 56
418 Price Revisions 57
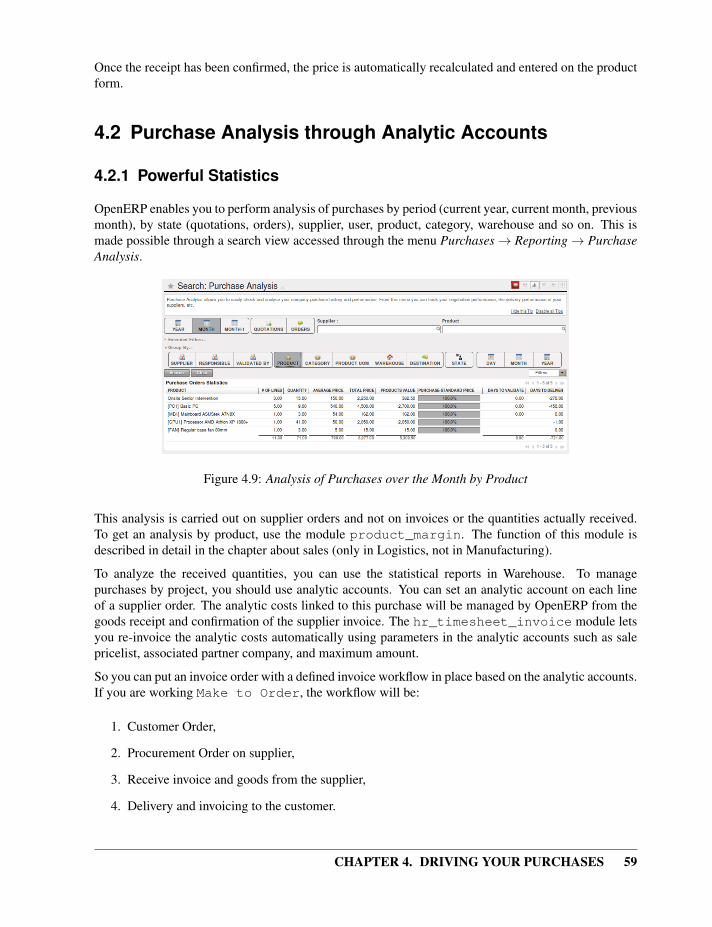
42 Purchase Analysis through Analytic Accounts 59
421 Powerful Statistics 59
422 To Each Enterprise its own Analytic Chart of Accounts 61
III Managing your Warehouse 69
5 Your Warehouse 71
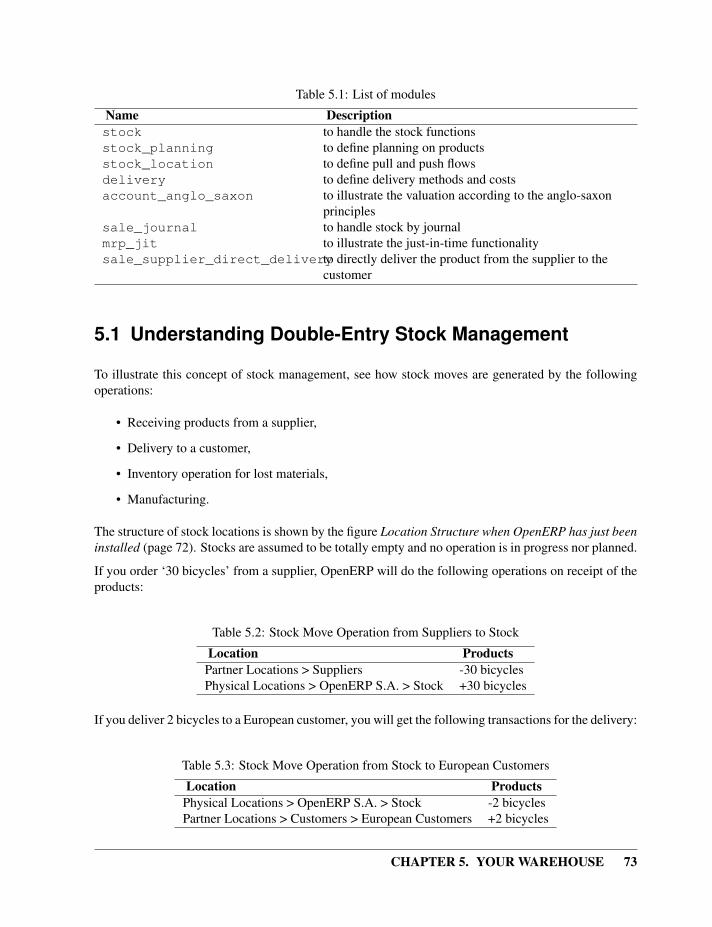
51 Understanding Double-Entry Stock Management 73
52 Managing Physical Inventory Structure 76
521 Warehouse 76
522 Location 79
vii
523 Shop 84
524 Stock 84
53 Keeping Track of Stock Movements 88
531 Goods Receipts 88
532 Internal Stock Moves 92
533 Shipping of Goods 94
534 Logistics Configuration through Advanced Routes 99
535 Procurement Methods ndash Make to Stock and Make to Order 104
536 Choosing Supply Methods 106
537 Packaging with Various Logistics Units of Measure 107
54 Scheduling Procurements 110
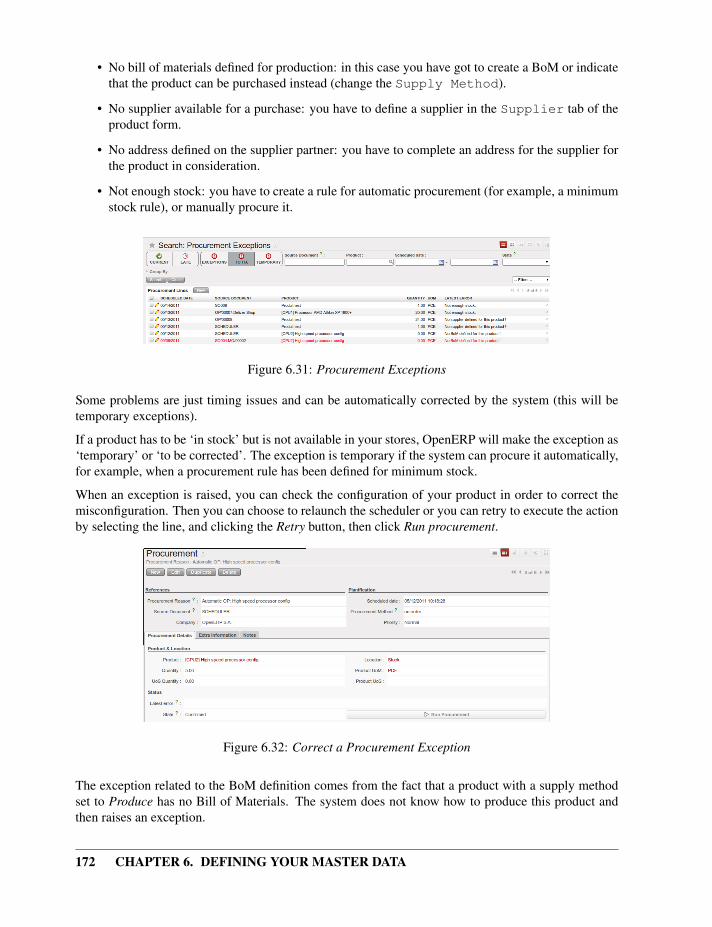
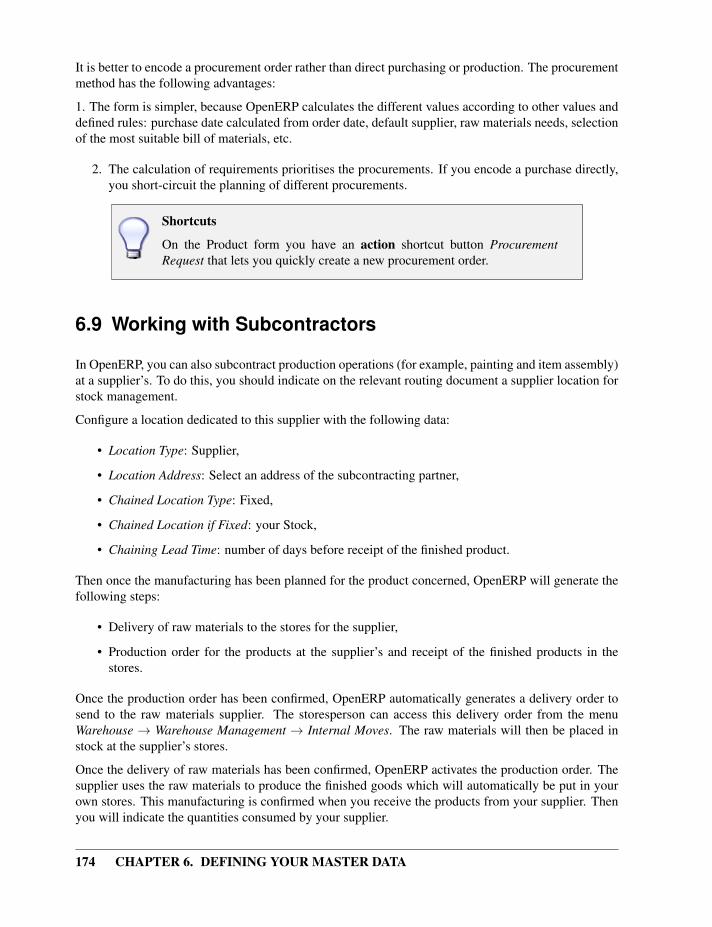
541 Processing Exceptions 110
542 Manual Procurement 111
543 Sales Forecasts 113
544 Production Plan 114
55 Managing Lots and Traceability 115
551 Stock Moves 116
552 Lots 117
553 Traceability 118
56 Scrapping Products 119
57 Identifying Products and Locations with Barcodes and RFID Devices 121
58 Financial Inventory Management 121
581 Manual and Real-time Stock Valuation 121
582 Managing Transportation Costs 122
59 Organize your Deliveries 124
591 The Different Journals 124
592 Using the Journals 125
510 Estimating Delivery Dates 127
5101 Standard Delivery Time 127
5102 Schedule Logistic Flows according to MRP1 Rules 128
511 Incoming and Outgoing Products Planning 128
512 Managing Inventory Reconciliation 129
viii
513 Building Reports to Track Activity 129
514 Import Export 130
5141 Stock 131
5142 Rental Locations 131
5143 Consigned Products 133
515 Stock Location Example 133
IV Streamlining your Manufacturing 137
6 Defining your Master Data 139
61 Bill of Materials and Components 140
611 Using Bills of Materials 140
612 Multi-level Bills of Materials 144
613 Phantom Bills of Materials 146
614 Bills of Materials for KitsSets 147
62 Work Centers 147
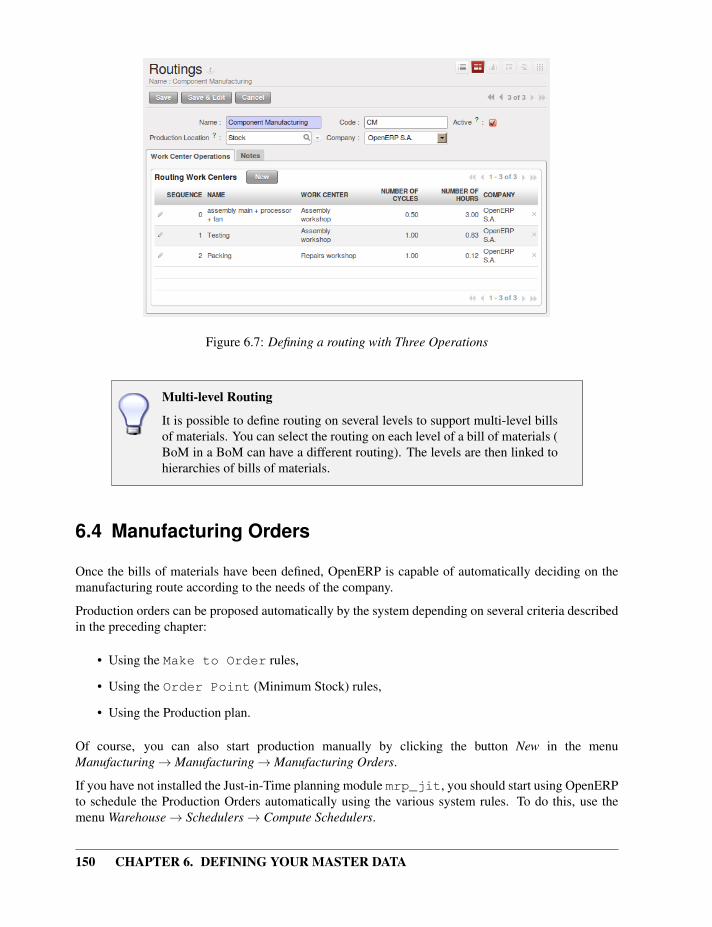
63 Routings 149
64 Manufacturing Orders 150
65 Complete Production Workflow 151
651 The Sales Order 152
652 Producing an Intermediate Product 152
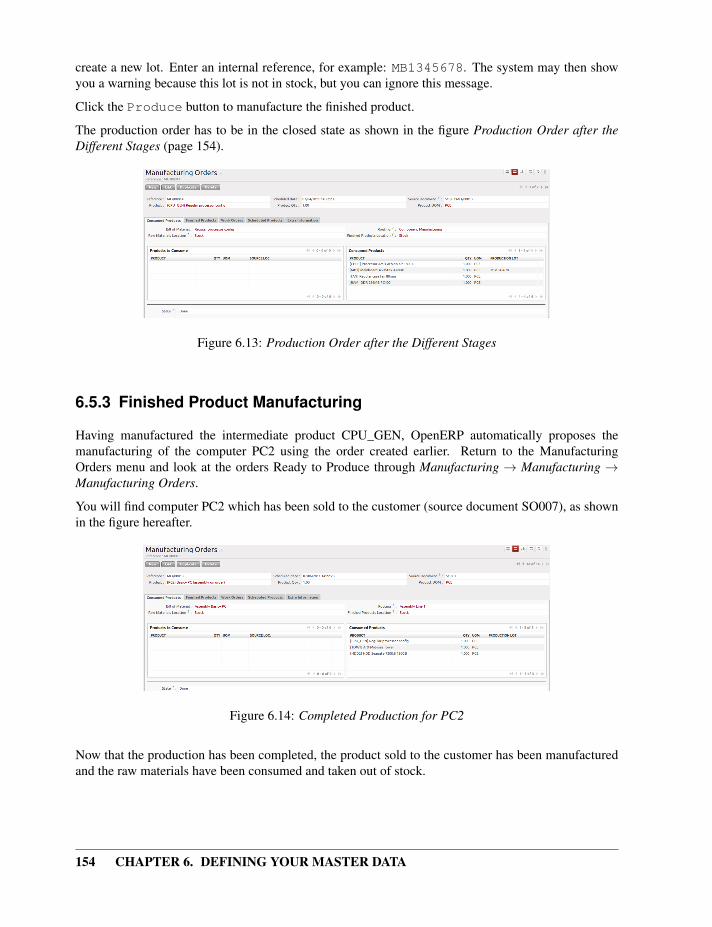
653 Finished Product Manufacturing 154
654 Subproduct Production 155
655 Scrapping 157
656 Production Orders 157
66 Logistics and Manufacturing 159
661 Manufacturing Stock Locations 159
662 Traceability 160
67 Managing Repairs from Repair to Invoicing and Stock Movements 161
671 Entering Data for a New Repair 162
672 Repair Workflow 163
673 Invoicing the Repair 165
674 Stock Movements and Repairs 165
ix
68 Forecasting and Supplying 166
681 Scheduler 166
682 Planning 167
683 Procurement 171
69 Working with Subcontractors 174
610 Matching Sales Orders and Bills of Materials 175
611 Production and Services 177
V On Site installation 179
7 OpenERP Installation on Linux 181
71 PostgreSQL Server Installation and Configuration 181
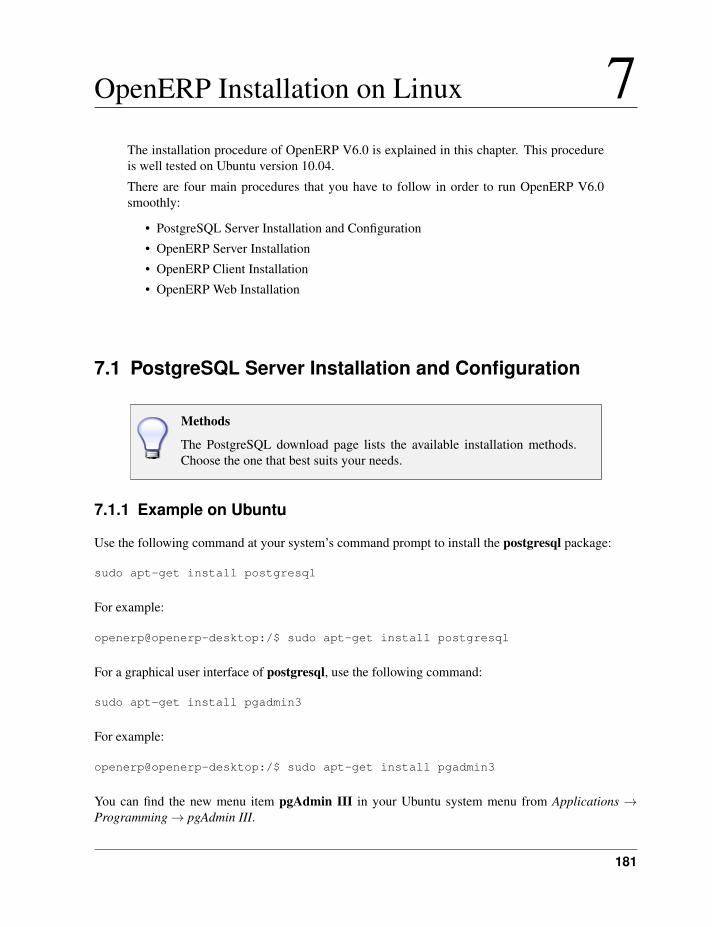
711 Example on Ubuntu 181
712 Setup a PostgreSQL user for OpenERP 182
72 OpenERP Server Installation 184
721 Installing the required packages 184
722 Downloading the OpenERP Server 186
723 Testing the OpenERP Server 186
724 Installing the OpenERP Server 186
73 OpenERP Client Installation 186
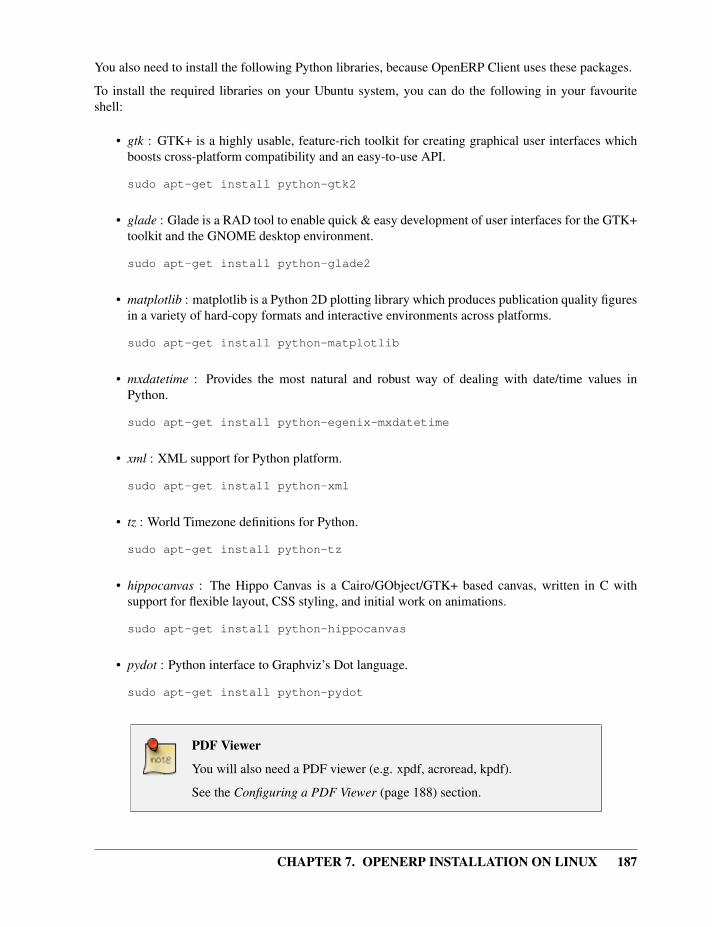
731 Installing the required packages 186
732 Downloading the OpenERP Client 188
733 Testing the OpenERP Client 188
734 Installing the OpenERP Client 188
735 Configuring a PDF Viewer 188
74 OpenERP Web Installation 189
741 Downloading amp Installing the OpenERP Web Client 189
742 Testing the OpenERP Web Client 190
743 Installing the OpenERP Web Client 190
744 Web Browser Compatibilities 190
8 OpenERP Installation on Windows 193
81 OpenERP All-In-One Installation 193
x
811 Downloading OpenERP All-In-One 193
812 Installing the OpenERP All-In-One 194
813 Starting the OpenERP Client 196
82 PostgreSQL Server Installation and Configuration 197
821 Installing PostgreSQL Server 197
822 Setup a PostgreSQL User 197
83 OpenERP Server Installation 199
831 Downloading the OpenERP Server 199
832 Installing the OpenERP Server 199
833 Customized Configuration 201
834 Monitoring the OpenERP Server 203
835 Congratulations you have successfully installed OpenERP Server 205
84 OpenERP Client Installation 205
841 Downloading the OpenERP Client 206
842 Installing the OpenERP Client 206
843 Starting the OpenERP Client 207
85 OpenERP Web Installation 207
851 Downloading the OpenERP Web 208
852 Installing the OpenERP Web 208
853 Starting the Web Client 209
86 Troubleshooting and Windows Complementary Install Information 210
861 PostgreSQL Administration 210
Index 213
xi
ForewordInformation Systems have played an increasingly visible role over the past several years in improvingthe competitiveness of business They are more than just tools for handling repetitive tasks they willguide and advance all of a companyrsquos daily activities Integrated Management Software is today veryoften a key source of significant competitive advantage
Open Source Software Making Business Applicationsaccessible
Some may look at the Business Application market as a mature market dominated by a few large keyplayers with no new business opportunities
This would be ignoring the market reality So many customers are frustrated by their experience withexisting vendors so many companies around the world need to have access to business applicationsbut cannot afford them
OpenERP believes that business applications should not be a luxury That any company anywhere inthe world should be able to afford the best tools to professionally expand business That is one of thereasons why OpenERP needs to break the existing rules of the ERPs and the Business Applicationsmarket
Customers should use their budget smartly and invest in customizing the application to their specificneeds rather than paying expensive license fees OpenERP is committed to the Open Source BusinessModel precisely because Open Source allows for this Open Source is a disruptive model as it createsmore value for the customers
For decades customers have developed applications which remained specific to their own needs and inthe end proved extremely expensive to maintain Open Source means that customers can benefit frompast developments of other companies Also by contributing to the evolution of the software the userswill enjoy the guarantee that their development will be included in future versions of the software Oneof the major advantages is that such a Community brings a wealth of new functionality
Open Source also allows us to engage with our customers differently Since there is no licensing costany potential customer can download test and use the software OpenERP has no need for an expensivesales force to promote the product OpenERP just needs to make the best product and make it availableto customers
Open Source allows for many barriers in this industry to be broken The software is available to manycompanies who could otherwise not afford expensive business applications license fees The OpenERPsolution allows customers to use their money smartly and tailor the software to their individual needsOpenERP leverages from its customer base to enrich the software and finally eradicate any lock-in toallow customers to use and even drop the software freely
xii
The OpenERP Solution
OpenERP can build a new breed of business applications more modular more customer-friendly fullyweb-based which others cannot due to the heritage of their legacy systems
OpenERP is a comprehensive suite of business applications including Sales CRM Projectmanagement Warehouse management Manufacturing Financial management and Human Resourcesjust to name a few More than 1000 OpenERP modules are available from the OpenERP Apps marketplace (httpappsopenerpcom)
The key to continued logistics success is effective Purchase Sales Warehouse amp ManufacturingManagement and these are precisely the main topics of the book you are reading OpenERPrsquos PurchaseSales Warehouse amp Manufacturing features are flexible and highly developed to assist you in managingall aspects of manufacturing
OpenERP allows you to create bills of materials and use properties allowing your salespeople to easilyselect what they need to sell Purchase proposals and sales forecasts can easily be created fromOpenERP In a few clicks your sales person can transfer necessary information to the customer aboutthe current and virtual stock
Structure of this book
In part One Configuring your OpenERP (page 3) we will show you how to set up an OpenERPdatabase A step-by-step approach will guide you through a complete workflow to discover OpenERPrsquosfeatures
Part Two Advanced Features in Purchase Quotation Management (page 47) guides you from pricerequest to purchase proposal and order and goods receipt Several advanced purchase features willalso be explained
Part Three Managing your Warehouse (page 69) explains the principles of OpenERPrsquos double-entrystock management The book will provide you with ways to manage inventories both on a physicaland a financial level Upstream and Downstream traceability and extensive reporting will be discussedas well
Part Four Defining your Master Data (page 139) guides you the manufacturing process explainingseveral advanced features
Part Five On Site installation (page 179) explains the basic steps to install OpenERP on site BothLinux and Windows installations will be described
To manage your manufacturing you do not need all the elements described in this book But we find itvery important to include an integrated flow from the first quotation to the final billing of the suppliersincluding all the steps quotation order receiving goods inventory manufacturing and billing In someexamples we will also talk about the sales part although advanced sales features will not be includedin this book
xiii
About the authors
Fabien Pinckaers
Fabien Pinckaers was only eighteen years old when he started his first company Today over ten yearslater he has founded and managed several new technology companies all based on Free Open Sourcesoftware
He originated Tiny ERP now OpenERP and is the director of two companies including OpenERPSA the editor of OpenERP In a few years time he has grown the Tiny group from one to sixty-fiveemployees without loans or external fund-raising and while making a profit
He has also developed several large scale projects such as Auction-in-Europecom which became theleader in the art market in Belgium Even today people sell more art works there than on ebaybe
He is also the founder of the LUG (Linux User Group) of Louvain-la-Neuve and of several free projectslike OpenReport OpenStuff and Tiny Report Educated as a civil engineer (polytechnic) he has wonseveral IT prizes in Europe such as Wired and lrsquoInscene
A fierce defender of free software in the enterprise he is in constant demand as a conference speakerand he is the author of numerous articles dealing with free software in the management of the enterprise
Follow Fabien on his blog httpfptinyblogspotcom or on twitter fpopenerp
Els Van Vossel
Els Van Vossel always had a dedication to both written and spoken word Clear and explicitcommunication is crucial
Educated as a Professional Translator in Antwerp she worked as an independent translator on thelocalization of major ERP software Els acquired ERP knowledge and decided to start working as afunctional ERP consultant and a Technical Communicator for ERP software
As such the world of OpenSource software became more and more attractive She started workingwith OpenERP software in her free time and doing so Els really wanted to meet Fabien Pinckaers toshare thoughts about documentation strategy Now Els is reviewing and writing the OpenERP Books
Being an author of several Software Manuals she finds it exciting to work on the OpenERPdocumentation and continuously take it to a higher level Please note that this is a hell of a job but Elsfinds great pleasure in doing it
Follow Els on her blog httptraining-openerpblogspotcom or on twitter elsvanvossel
xiv
Acknowledgements
From Els Van Vossel
Thank you Fabien for offering me the opportunity to work with OpenERP I thank all OpenERP teammembers for their support and understanding My special thanks to my family who encouraged me towrite this book
From Fabien Pinckaers
I address my thanks to all of the team at OpenERP for their hard work in preparing translating andre-reading the book in its various forms My particular thanks to Laurence Henrion and my family forsupporting me throughout all this effort
1
Part I
First Steps Driving aPurchaseWarehouseManufacturing
FlowTo manage your manufacturing you do not need all the elements described in this bookBut we find it very important to include an integrated flow from the first quotation to thefinal billing of the suppliers including all the steps quotation order receiving goodsinventory manufacturing and billing
2
3
Configuring your OpenERP 1In this chapter you can start exploring OpenERP through a basic configuration withthe modules that are discussed in this book As mentioned before we want to showan integrated flow not just manufacturing management Where appropriate we willalso talk about the sales part For information about advanced sales features pleaserefer to the book Integrate your Logistic Process with OpenERP - EfficientWarehouse Management with Sales and Purchases Integration
Use a web browser of your choice to connect to OpenERP Web
Figure 11 Web Client at Startup
Start by creating a new database from the Welcome page by clicking Databases and then completingthe following fields on the Create Database form
bull Super admin password by default it is admin if you or your system administrator have notchanged it
bull New database name DemoCompany
bull Load Demonstration data checkbox checked
bull Default Language English (US)
bull Administrator password admin (because it is the easiest to remember at this stage butobviously completely insecure)
bull Confirm password admin
Press Create to start creating the database
4 CHAPTER 1 CONFIGURING YOUR OPENERP
Language
You can install OpenERP in many languages To be able to easily followthe instructions in this book we recommend you to choose English (US)
OpenERP suggests that you configure your database using a series of questions In the software theseseries of questions are managed through so-called Configuration Wizards
Click the Start Configuration button to continue
The next configuration wizard will help you to decide what your user interface will look like whetherthe screens will only show the most important fields - Simplified - or whether you also want tosee the fields for the more advanced users the Extended view Select Extended and click Next tocontinue
User Preferences
You can easily switch from Simplified to Extended view by changing yourUser Preferences
In the next wizard you can fill your company data select your companyrsquos base currency and add yourcompany logo which can be printed on reports Click Next to continue
Select the Warehouse Management Purchase Management Sales ManagementManufacturing and Accounting amp Finance business applications for installation and clickInstall Now OpenERP will start to install these five applications allowing you to do a complete cyclefrom sales warehouse purchase to invoice You will have to wait for the next configuration wizard tobe displayed (Loading will appear)
Figure 12 Selecting the Required Functionality
OpenERPrsquos modularity enables you to install a single Business Application (such as Purchase)if that is all you need Of course you can choose to install extra applications such asSales Management to handle quotations sales orders and sales invoices as well For nowplease install Warehouse Management Purchase Management Sales Management
CHAPTER 1 CONFIGURING YOUR OPENERP 5
Manufacturing and Accounting amp Finance as these five Business Applications will bediscussed in this book
Reconfigure
Keep in mind that you can change or reconfigure the system any time forinstance through the Reconfigure option in the main bar
When you choose a business application for installation OpenERP will automatically propose to addor configure related (smaller) applications to enrich your system When you install Sales OpenERPwill also ask you whether you want to install Invoicing Journals for instance
The figure Selecting Accounting Configuration (page 5) shows the Accounting ApplicationConfiguration screen that appears when you select Accounting amp Finance to be installed
Figure 13 Selecting Accounting Configuration
Select the Generic Chart of Account and fill in the Sale Tax () applicable in your country ThePurchase Tax will automatically be set as well Click one of the disk icons in front of the bank accountsto confirm the bank accounts to be created Then click Configure to continue the configuration
OpenERP Logistics amp Manufacturing Management offers lots of features You can easily manage youraddress book (customers suppliers ) keep track of procurements and sales manage your warehouseand inventory and much more
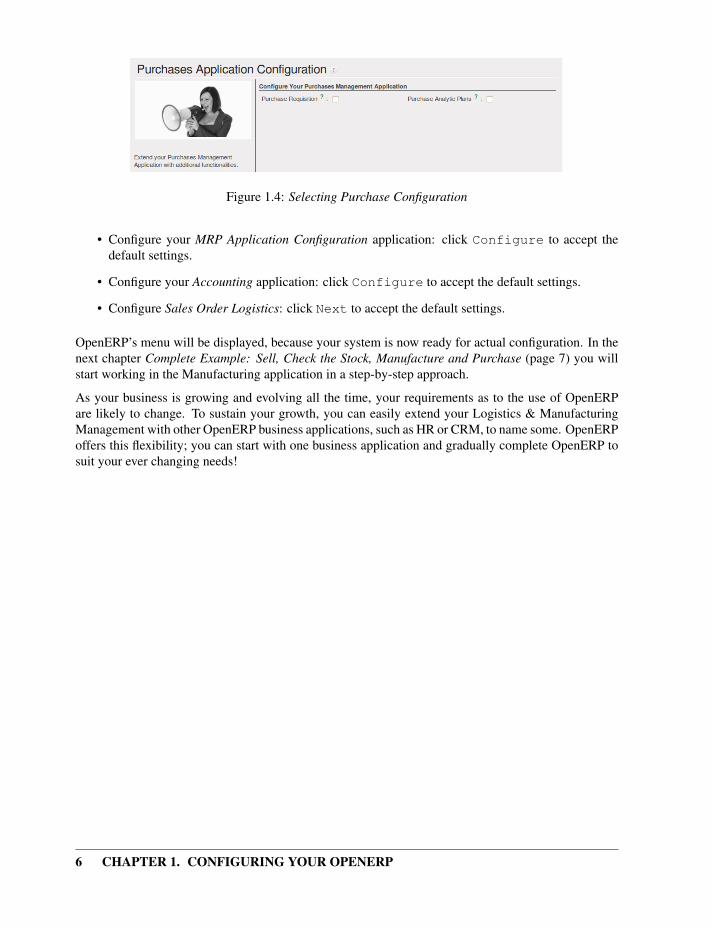
The figure Selecting Purchase Configuration (page 6) shows the Purchases Application Configurationscreen that appears when you select Purchase Management to be installed
Simply click Configure to continue the database creation
The following wizards will appear
bull Configure your Sales Management application click Configure to accept the default settings(no options checked)
6 CHAPTER 1 CONFIGURING YOUR OPENERP
Figure 14 Selecting Purchase Configuration
bull Configure your MRP Application Configuration application click Configure to accept thedefault settings
bull Configure your Accounting application click Configure to accept the default settings
bull Configure Sales Order Logistics click Next to accept the default settings
OpenERPrsquos menu will be displayed because your system is now ready for actual configuration In thenext chapter Complete Example Sell Check the Stock Manufacture and Purchase (page 7) you willstart working in the Manufacturing application in a step-by-step approach
As your business is growing and evolving all the time your requirements as to the use of OpenERPare likely to change To sustain your growth you can easily extend your Logistics amp ManufacturingManagement with other OpenERP business applications such as HR or CRM to name some OpenERPoffers this flexibility you can start with one business application and gradually complete OpenERP tosuit your ever changing needs
7
Complete Example Sell Check the Stock
Manufacture and Purchase 2In this chapter we will show you a complete Sales Purchase Manufacturing Warehouse flow Wewill explain how to create a product create a sales order have an automatic purchase proposal and orproduction order produce and receive the goods deliver to the customer and get sales and purchaseinvoices in a step-by-step scenario
First you will get an explanation about the scenario (what Thomas or one of his colleagues is supposedto do) Then the Notes will learn you how Thomas (or a colleague of his) enters the information inOpenERP For the simplicity of the use case we will do all of the steps under the Admin user Pleasenote that we will not discuss all elements in detail in this chapter Later in the book you will find allrequired information (apart from the advanced sales features)
Simplified or Extended View
In OpenERP your user interface will look slightly different according tothe User Preferences In Simplified view the screens will only showthe most important fields tab pages To see also the fields for the moreadvanced users you should switch to the Extended view You caneasily switch from Simplified to Extended view by changing your UserPreferences through the Edit Preferences button For this use case pleaseswitch to Extended view
Your company will have a stand at the House amp Design Fair to promote a series of products Thomasthe salesman shows the new products to the visiting prospects and customers
1 Create a new customer
John Smith from the company Clarkson Ltd visits your stand and decides to order the brandnew Deskand Chair you are promoting Thomas will have to create this new customer in OpenERP
8 CHAPTER 2 COMPLETE EXAMPLE SELL CHECK THE STOCKMANUFACTURE AND PURCHASE
New Customer
To create a new customer Thomas clicks the Sales button in OpenERPrsquosmain screen Then he goes to Sales rarr Address Book rarr Customers andclicks the New button The name of a customer is in blue because it is amandatory field so Thomas enters Clarkson in that field He notices thatthe Customer check box is already checked Thomas enters John Smith inthe Contact Name he selects the Default address type In the Streetfield Thomas enters London Street 40 he also enters the City London andthe Country United Kingdom as shown in the screenshot below He takes alook at the other three tabs and decides to keep the default values Thomasthen clicks the Save button to store the new customer
Figure 21 New Customer
2 Create a new product category and product
Because the desk and the chair from the new OfficeSecrets series do not yet exist in OpenERPMitchell the Product Manager will create this brandnew desk as a Make to Order product that willbe bought directly from the supplier concerned He will have to create a new product category for theOfficeSecrets series too
Configuring Products
For more information about configuring products please refer to the nextchapter Creating Products and their Categories (page 34)
CHAPTER 2 COMPLETE EXAMPLE SELL CHECK THE STOCK MANUFACTUREAND PURCHASE 9
Product Category
Product categories do have an effect on the products assigned to them and aproduct may belong to only one category To create a new product categoryMitchell goes to Warehouse selects the menu Configuration rarr Product rarrProducts Categories and clicks New to get an empty form for defining aproduct category Mitchell enters OfficeSecrets in the Name field andadds it to the parent category All products Sellable He leavesthe other fields as such and clicks Save
Then Mitchell will create three new products Note that he could also have created the new productcategory directly from the Product form
10 CHAPTER 2 COMPLETE EXAMPLE SELL CHECK THE STOCKMANUFACTURE AND PURCHASE
Product
To create a new product Mitchell goes to Warehouse rarr Product rarrProducts and clicks the New button The name of a product is in bluebecause it is a mandatory field so he enters 1600 Desk Wave Right-handW1600x D1200x H725mm Maple in that field He notices that the Can beSold and Can be Purchased check boxes are already checked by defaultMitchell selects the Stockable Product product type because he wants tokeep track of the stock movements of the desks In the ProcurementMethod field Mitchell selects Make to Order because the companydecided to only buy the product at the supplier when there is a sales orderfor it The Supply Method will be Buy He sets the Cost Price to 300and the Sales Price to 54125 as shown in the screenshot Product (page 11)Mitchell selects the product category OfficeSecrets Now he justhas to add the supplier from whom he will buy the desks He clicks theSuppliers tab then clicks New He clicks the Magnifying glass to geta list of suppliers from which he selects Wood y Wood Pecker He sets theminimal quantity to 1 and clicks the Save amp Close button He takes alook at the other tabs and decides to keep the default values He then clicksthe Save button to store the new product
To create the component to be included in the Bill of Material Mitchellclicks the Duplicate button to duplicate the Desk (available when a productis not in Edit mode) He changes the name to Leather for Chair in thatfield He unchecks the Can be Sold checkbox Mitchell changes theProcurement Method to Make to Stock because the company needs apermanent stock of leather to be able to fulfil the customerrsquos demands Hesets the Cost Price to 20 and the Sales Price to 0 Mitchell then clicks theSave button to store the new product
To create another component to be included in the Bill of Material Mitchellclicks the Duplicate button to duplicate the Leather for Chair He changesthe name to Chair Frame in that field He sets the Cost Price to 100Mitchell then clicks the Save button to store the new product
To create the finished product Mitchell goes to the list of products opensthe Desk product and clicks the Duplicate button to duplicate the Desk(available when a product is not in Edit mode) He changes the name toLeather Operator Chair in that field In the Procurement Methodfield Mitchell selects Make to Order then he changes the SupplyMethod to Produce He sets the Cost Price to 200 and the Sales Priceto 32550 From the supplier tab Mitchell deletes the supplier by clickingthe black cross He then clicks the Save button to store the new product
3 Add Minimum Stock Rules
To make sure the leather and the frame is always in stock Mitchell has to define minimum stock rulestelling OpenERP how many goods have to be ordered to keep a good stock level
CHAPTER 2 COMPLETE EXAMPLE SELL CHECK THE STOCK MANUFACTUREAND PURCHASE 11
Figure 22 Product
Minimum Stock Rules
To enter minimum stock rules for the Leather for Chair product heclicks the Minimum Stock Rules action and clicks the New buttonMitchell notices that the product is already preset in the form Heselects the OpenERP SA warehouse and notices that the Stock locationis automatically set As a minimum quantity he adds 10 and the maximumquantity will be 40 He then clicks the Save button to store the minimumstock rules as shown in the screenshot Minimum Stock Rules (page 11) Dothe same for the frame
Figure 23 Minimum Stock Rules
4 Create a Bill of Material
To produce the chair from the frame and the leather seat Mitchell has to create a Bill of Material forthe finished product (the Chair) This way he will tell OpenERP which components are required toproduce the Chair
12 CHAPTER 2 COMPLETE EXAMPLE SELL CHECK THE STOCKMANUFACTURE AND PURCHASE
BoM
Mitchell opens the Chair product clicks the Bill of Materialsaction then clicks the New button Mitchell notices that the Chair is alreadypreset in the form He clicks the New button next to Components to add theLeather for Chair He clicks the disk in front of the line to save his changesThen he adds a new line (which is displayed automatically) for the ChairFrame and clicks the disk to save Finally Mitchell clicks the Save buttonat the top
BoM
You can also create a Bill of Materials from the Manufacturing rarr MasterData rarr Bill of Materials More information on Bills of Material will beprovided in the next chapters
5 Warehouse and locations
Now Thomas will have a look at how the warehouse and the locations have been organised
Configuring locations
We will not create a warehouse and configure locations in this chapter Formore information please refer to the chapter Managing your Warehouse(page 69) later in this book Just have a look at the list of locations definedwith the demo data
Warehouse and Location Structure
OpenERP has three predefined top-level location types PhysicalLocations which define where your stock is physically storedPartner Locations for the customer and supplier stock andVirtual Locations representing counterparts for procurementproduction and inventory Thomas clicks Warehouse rarr Configuration rarrWarehouse Management rarr Locations to display a list view of the locations
6 Create a sales quotation
The customer Clarkson asked to receive a quotation for two Office Desks and two chairs from theOfficeSecrets series Thomas enters the sales quotation
CHAPTER 2 COMPLETE EXAMPLE SELL CHECK THE STOCK MANUFACTUREAND PURCHASE 13
Figure 24 Location Structure
Sales Quotation Order
Thomas goes to Sales rarr Sales rarr Sales Orders He clicks the New buttonto make a quotation He enters Clarkson in the Customer field Now hecan enter the products he will be selling Next to Sales Order LinesThomas clicks the New button to enter sales order lines He selects theDesk product and changes the quantity to 2 as specified in the screenshotSales Order (page 14) Thomas clicks the Save amp New button to adda second line He adds 2 chairs and notices that a message is displayedsaying that there is no stock Thomas clicks the Save amp Close buttonThen he clicks Compute to see the total price of the quotation He opensthe Other Information tab because he wants the sales invoice to becreated from the picking So he changes the Shipping Policy to Invoicefrom the Picking To print the quotation he clicks Quotation Orderin the Reports section at the right side of the screen
14 CHAPTER 2 COMPLETE EXAMPLE SELL CHECK THE STOCKMANUFACTURE AND PURCHASE
Figure 25 Sales Order
Price Lists
In this chapter the Public Pricelist will be used Later on you will learnmore about creating price lists
7 Confirm the sales order
John Smith calls Thomas to tell him that he agrees with the quotation Thomas now confirms the salesorder
Sales Quotation Order
Thomas goes to Sales rarr Sales rarr Sales Orders He enters Clarkson in theCustomer field and then clicks Search Thomas clicks the sales orderto open it He clicks the Confirm Order button to make a sales orderfrom the quotation To print the sales order he clicks Quotation Order inthe Reports section at the right side of the screen
Order Confirmation
When you click Confirm Order red text will be displayed at the top ofthe screen depending on the parameters of the sales order In our exampleyou will see two text lines one about the quotation conversion and anotherone about the delivery order You can click the second line to be directed tothe delivery order You can also open the delivery order from the Historytab of the sales order
8 Run the scheduler
CHAPTER 2 COMPLETE EXAMPLE SELL CHECK THE STOCK MANUFACTUREAND PURCHASE 15
The goods have to be produced and delivered to the customer but Thomas notices that the desks andchairs are not available in stock Because the Desk was defined as a Make to order amp Buy productOpenERP will automatically create a procurement order on confirmation of a sales order allowing youto directly generate a purchase order The same will be done for the Leather
OpenERP has a scheduler that will run by default every day In this case Jason your companyrsquosPurchaser will run the scheduler manually
Scheduler
Jason goes to Warehouse rarr Schedulers He clicks ComputeSchedulers because he needs to purchase material and wants to checkwhether anything needs to be added In the Wizard Jason clicks ComputeSchedulers to start the computation
Procurement Exceptions
Jason can also run the procurement for each product from the Warehouserarr Schedulers rarr Procurement Exceptions The procedurement exceptionsmenu also includes procurements that have not been scheduled yet
9 Change the purchase request and confirm it
Now OpenERP will have created procurements (in this example purchase requests) for the productsthat need to be supplied
Purchase Requests
Jason goes to Purchases rarr Purchase Management rarr Request forQuotation He notices three purchase requests for Wood y Wood Pecker Heselects these three purchase requests by clicking the checkbox in front ofthem then clicks the Merge Purchase Orders action at the right toorder all products in one go He clicks the yellow pencil to open the mergedpurchase request in Edit mode Now he decides to purchase some extradesks because Luke the Sales Manager told him he expects more salesTo do this he clicks the yellow pencil in front of the order line and changesthe quantity to 10 He clicks the Save amp Close button then he clicksCompute to see the total price of the quotation From the Delivery ampInvoicing tab he specifies that the invoice has to be created from thepicking (Invoicing Control From Picking) To confirm the purchaseorder he just has to click the Convert to Purchase Order button
10 Receive the products
The supplier Wood y Wood Pecker sends the goods to your company Jason receives the goods andenters this receipt in OpenERP
16 CHAPTER 2 COMPLETE EXAMPLE SELL CHECK THE STOCKMANUFACTURE AND PURCHASE
Incoming Shipments
Jason goes to Warehouse rarr Warehouse Management rarr IncomingShipments He notices the incoming shipment for Wood y Wood Peckerand clicks the green arrow to start receiving the products He clicks theValidate button to confirm that all products have been received from thesupplier From the Incoming Shipments list view he notices that theDelivery order for the customer is now ready to process (red text at the topof the screen) at least for the desks He wants to check the stock of Desksand goes to Warehouse rarr Product rarr Products In the Name field Jasontypes desk then clicks Search The real stock is 10 the virtual stock is 8because of the confirmed sales order for two desks
List versus Form view
You can receive deliver goods from both list and form view You can alsoreceive deliver goods by product instead of by complete order
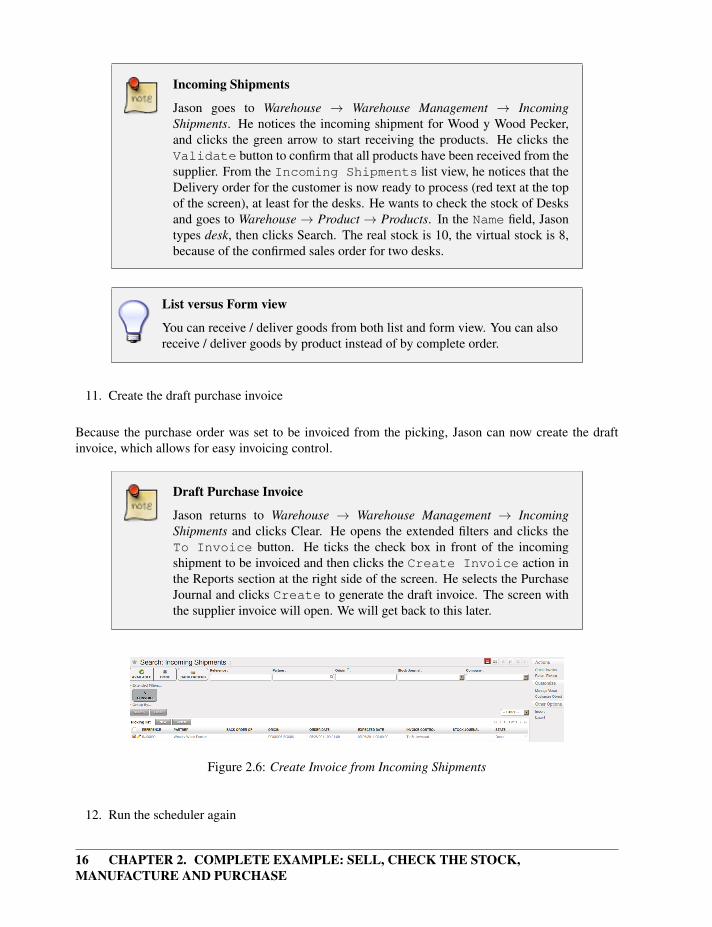
11 Create the draft purchase invoice
Because the purchase order was set to be invoiced from the picking Jason can now create the draftinvoice which allows for easy invoicing control
Draft Purchase Invoice
Jason returns to Warehouse rarr Warehouse Management rarr IncomingShipments and clicks Clear He opens the extended filters and clicks theTo Invoice button He ticks the check box in front of the incomingshipment to be invoiced and then clicks the Create Invoice action inthe Reports section at the right side of the screen He selects the PurchaseJournal and clicks Create to generate the draft invoice The screen withthe supplier invoice will open We will get back to this later
Figure 26 Create Invoice from Incoming Shipments
12 Run the scheduler again
CHAPTER 2 COMPLETE EXAMPLE SELL CHECK THE STOCK MANUFACTUREAND PURCHASE 17
To tell the system that the procurements have been received and that the raw materials are now in stockso that the production order can be generated Jason has to run the scheduler again
Scheduler
Jason goes to Warehouse rarr Schedulers He clicks ComputeSchedulers In the Wizard Jason clicks Compute Schedulers tostart the computation
Just in Time
You can also install the mrp_jit (Just in Time) so that this is computed inreal time In a production environment however you would typically havethe scheduler run
13 Start manufacturing
Jason checks his list of manufacturing orders which are ready to produce He notices the leatheroperator chair and decides to start manufacturing it
Manufacturing or Production Orders
Jason goes to Manufacturing rarr Manufacturing rarr Manufacturing Ordersand selects the order to start producing the chairs He opens it by clickingthe yellow pencil then clicks the Start Production button Henotices the products to be consumed He assembles the frame and theleather for both chairs When he has finished he clicks the Producebutton He keeps the default settings and clicks Confirm then Cancelto close the window He clicks the Save button to see the changes
14 Deliver the goods to the customer and create draft sales invoice
The Chairs are now also available in stock and the complete order can be delivered to the customer Inthe warehouse they check the open delivery orders
Delivery
Randy from the warehouse goes to Warehouse rarr Warehouse Managementrarr Delivery Orders to check the goods ready for delivery He clicks theyellow pencil to open the delivery order He clicks the Process button todeliver the 2 desks and chairs then he clicks Validate
15 Create the sales invoice
18 CHAPTER 2 COMPLETE EXAMPLE SELL CHECK THE STOCKMANUFACTURE AND PURCHASE
Thomas now checks whether the goods have been delivered to his customer He can check this fromthe sales order or he can tell from the status of the delivery order
Creating a Sales Invoice
To create the draft sales invoice Thomas has several possibilities
He opens Sales rarr Invoicing rarr Deliveries to Invoice and selects thecorresponding delivery for invoicing by ticking the check box and clickingthe Create Invoice action in the Reports section at the right of thescreen
He goes to Warehouse rarr Warehouse Management rarr Delivery Orders andclicks the Create Invoice button
He goes to the list of sales orders and opens the sales order concernedThomas clicks the History tab clicks the picking list and then the CreateInvoice button He selects the Sales Journal and clicks the Createbutton
The draft invoice is now displayed in list view Thomas opens the invoiceand clicks the Validate button To print the invoice he clicks the PrintInvoice button or the Invoices action in the Reports section at theright of the screen The printed invoice will automatically be added as pdfdocument to Attachments
16 Confirm the purchase invoice
Robin the accountant now receives the invoice from his supplier He can do the invoicing controlaccording to the picking directly from the Purchase Invoices screen
Invoice Control
Robin goes to Accounting rarr Suppliers rarr Supplier Invoices and opens theWood y Wood Pecker invoice Robin verifies whether the invoice fromthe supplier matches this draft invoice created from the picking order Theinvoice indeed matches and he clicks the Approve button to confirm theinvoice and assign a document number to it
Purchaser
The purchaser can also do the invoice matching from Purchases rarr InvoiceControl rarr Supplier Invoices to Receive
Below you find a graphical representation of the sales flow we explained before the part from quotationto invoice This view is available in OpenERP You can open this Process view by clicking the questionmark next to the Sales Order title
CHAPTER 2 COMPLETE EXAMPLE SELL CHECK THE STOCK MANUFACTUREAND PURCHASE 19
Figure 27 From Quotation to Invoice
20 CHAPTER 2 COMPLETE EXAMPLE SELL CHECK THE STOCKMANUFACTURE AND PURCHASE
21
Letrsquos get Started and Configure a New
Instance 3Now that you have discovered some of the many possibilities of OpenERP from a tour ofthe demonstration database you will develop a real case An empty database provides thestarting point for testing a classic workflow from product sales to purchase completingyour guided tour and your getting familiar with OpenERP
A database loaded with demonstration data is very useful to understand OpenERPrsquos general capabilitiesBut to explore OpenERP through a lens of your own companyrsquos needs you should start with an emptydatabase You will work in this chapter on a minimal database containing no demonstration data sothat there is no confusion about what you created You will keep the database you have created toallow you to build on it throughout the rest of this book if you want to
You will develop a real case through the following phases
1 Specify a real case
2 Describe the functional needs
3 Configure the system with the essential modules
4 Carry out the necessary data loading
5 Test the system with your database
The case is deliberately simple to provide you with a foundation for the more complex situations youmight have to handle in your company Throughout this chapter we assume that you access OpenERPthrough its web interface And it is also assumed (as in the rest of this book) that you are using thelatest download of OpenERP version 6 the stable production version at the time of writing (not thetrunk version which is likely to have new and potentially unstable features)
31 Business Example
In this example you will configure a system that enables you to
bull buy products from a supplier
bull stock the products in a warehouse
bull sell these products to a customer
The system should support all aspects of invoicing payments to suppliers and receipts from customers
22 CHAPTER 3 LETrsquoS GET STARTED AND CONFIGURE A NEW INSTANCE
32 Basic Settings
For this business case you will have to model
bull accounts and account types
bull the suppliers and a supplier category
bull the customers and a customer category
bull some products and a product category
bull an inventory
bull a purchase order
bull a sales order
bull invoices
bull payments
To test the system you will need at least one supplier one customer one product a warehouse aminimal chart of accounts and a bank account
33 Get your Database Up and Running without Demo Data
Please note that the new database you have to create will not include demo data and only the minimallyrequired functionality as a starting point You will need to know your super administrator password forthis ndash or you will have to ask your ICT manager for the password to be able to create this database
Please refer to Configuring your OpenERP (page 3) for more information about how to create a newdatabase that you will give the name of your company
As a reminder please find the steps below without further explanation
Start by creating a new database from the Welcome page by clicking Databases and then completingthe following fields on the Create Database form
bull Super admin password by default it is admin if you or your system administrator have notchanged it
bull New database name YourCompany
bull Load Demonstration data checkbox unchecked
bull Default Language English (US)
bull Administrator password admin
bull Confirm password admin
CHAPTER 3 LETrsquoS GET STARTED AND CONFIGURE A NEW INSTANCE 23
Press Create to start creating the database
OpenERP suggests that you configure your database using a series of questions In the software theseseries of questions are managed through so-called Configuration Wizards
Click the Start Configuration button to continue
The next configuration wizard will help you to decide what your user interface will look like whetherthe screens will only show the most important fields - Simplified - or whether you also want tosee the fields for the more advanced users the Extended view Select Extended and click Next tocontinue
User Preferences
You can easily switch from Simplified to Extended view by changing yourUser Preferences
In the next wizard you can fill your company data select your companyrsquos base currency and add yourcompany logo which can be printed on reports Fill out the required data and click Next to continue
Select the Warehouse Management Purchase Management Sales ManagementManufacturing and Accounting amp Finance business applications for installation and clickInstall Now OpenERP will start to install these five applications allowing you to do a completecycle from sales warehouse purchase manufacturing to invoice You will have to wait for the nextconfiguration wizard to be displayed (Loading will appear)
Figure 31 Selecting the Required Functionality
Reconfigure
Keep in mind that you can change or reconfigure the system any time forinstance through the Reconfigure option in the main bar
When you choose a business application for installation OpenERP will automatically propose to addor configure related (smaller) applications to enrich your system When you install Sales OpenERPwill also ask you whether you want to install Invoicing Journals for instance
24 CHAPTER 3 LETrsquoS GET STARTED AND CONFIGURE A NEW INSTANCE
Skip the step that asks you to configure your Accounting Chart because you will learn how to createaccounts
In the Purchases Application Configuration screen simply click Configure to continue the databasecreation
The following wizards will appear
bull Configure your Sales Management application click Configure to accept the default settings(no options checked)
bull Configure your MRP Application Configuration application click Configure to accept thedefault settings
bull Configure your Accounting application click Configure to accept the default settings
bull Configure Sales Order Logistics click Next to accept the default settings
OpenERPrsquos menu will be displayed because your system is now ready for actual configuration
Setup Wizard
You will have to go through the Setup wizard in steps You have twooptions
1 If you click the Start Configuration button OpenERP guides youthrough a series of steps to Configure Your Interface - proceedwith Simplified (the other option is Extended) and ConfigureYour Company Information - enter a Company Name and select aCurrency for your company Then OpenERP helps you to installvarious applications with different functionality through wizards
bull OR -
2 When you click the button Skip Configuration Wizards you can havethe screen as shown in screenshot Starting the minimal database(page 25) Then you can start working with this minimal database(we will not use this option here)
CHAPTER 3 LETrsquoS GET STARTED AND CONFIGURE A NEW INSTANCE 25
Figure 32 Starting the minimal database
34 Fit your Needs
Functional needs can be provided by core modules from OpenERP You just have to decide whichfunctionality you want in your system As explained before you can click the Check Box of thecorresponding application Another way of installing modules is to go the Administration rarr Modulesrarr Modules menu Here you will find a list of all modules available in OpenERP You can also checkour website httpappsopenerpcom for more information about modules
To manage your manufacturing you do not need all the elements described in this book But we findit very important to include an integrated flow from first quotation to the payment of the supplierincluding all the steps quotation order receiving goods inventory manufacturing
To manage such a flow we need at least the following applications
bull Manufacturing (the mrp module)
bull Warehouse Management (the stock module)
bull Accounting amp Finance (the account module)
bull Purchase Management (the purchase module)
bull Sales Management (the sale module)
When you log on OpenERP will display the opening screen with all selected business applicationsinstalled
You will create all the elements in the database that you need to carry out the use case These arespecified in the functional requirements
26 CHAPTER 3 LETrsquoS GET STARTED AND CONFIGURE A NEW INSTANCE
Figure 33 Database with all Required Functionality for this Example
Examples
Of course we will provide examples for you to configure your databasesuch as customers and suppliers Make sure to use your own data instead
341 Configuring Accounts
You need to start with a minimal set of accounts and therefore you will need a couple of account typesto determine the accountrsquos use how it will be transferred at year closing and what category it belongsto You can structure your accounts into a chart at any time (and in fact you can structure them intoseveral additional charts at the same time as you will see in the on line chapter of the OpenERP book)so you do not need to be concerned unduly about structure
Account Types
To create account types go to Accounting rarr Configuration rarr Financial Accounting rarr Accounts rarrAccount Types and click the New button You will need the following six types the first of which isshown in figure New Account Type (page 27) Click Save to confirm each account type
Table 31 Defining Account Types
Acc Type Name Code PampL BS Category Deferral MethodView view NoneIncome income Profit amp Loss (Income Accounts) NoneExpense expense Profit amp Loss (Expense Accounts) NoneCash cash Balance Sheet (Assets Accounts) BalanceReceivable receiv Balance Sheet (Assets Accounts) UnreconciledPayable pay Balance Sheet (Liability Accounts) Unreconciled
CHAPTER 3 LETrsquoS GET STARTED AND CONFIGURE A NEW INSTANCE 27
Figure 34 New Account Type
Accounts
To create accounts go to Accounting rarr Configuration rarr Financial Accounting rarr Accounts rarrAccounts and click the New button
You need accounts to keep track of your customers and suppliers two more to sell and buy goods andone for the payment and receipt of funds And also one lsquoorganizingrsquo account that is just a view of theother five So basically you will need at least the following six accounts one of which is shown in NewAccount (page 28) Click Save to confirm each account
Chart of Accounts Structure
When you create a chart of accounts you should always start with the mainview account to define the chart as shown in the table (Minimal Chart)This will allow you to easily link new accounts to the correct chart directly
Table 32 Defining Accounts
Name Code Parent Internal Type Account Type ReconcileMinimal Chart 0 View View uncheckedPayable AP 0 Minimal Chart Payable Payable checkedReceivable AR 0 Minimal Chart Receivable Receivable checkedBank B 0 Minimal Chart Liquidity Cash uncheckedPurchases P 0 Minimal Chart Regular Expense uncheckedSales S 0 Minimal Chart Regular Income unchecked
The Account Type entry is taken from the list of types that you just created Although it looks a bit likea text box it does not behave in quite the same way A single Del or Backspace keystroke is allyou need to delete the whole text and when you type the name (or part of the name) you still need to
28 CHAPTER 3 LETrsquoS GET STARTED AND CONFIGURE A NEW INSTANCE
Figure 35 New Account
associate that text with the entry by clicking the Tab or Enter key to confirm your selection You canalso use the Search icon to open a list of available account types
Properties
You now define some default properties so that you do not have to think about which account is used fora certain transaction every time you do something The main new properties are the four that associateaccounts payable and receivable to partners and expenses and income to product categories
Create properties using Administration rarr Configuration rarr Parameters rarr Configuration Parametersand then clicking the New button This menu is only available in Extended view
CHAPTER 3 LETrsquoS GET STARTED AND CONFIGURE A NEW INSTANCE 29
Selecting the correct field
When you have several fields with the same name make sure to select thefield for which the Field Name corresponds to the property name you aredefining Note that you can also duplicate properties and then change therequired fields
Table 33 Defining Properties
Name Field Type Valueproperty_account_payable Account Payable Many2One (accountaccount) AP Payableproperty_account_receivable Account Receivable Many2One (accountaccount) AR Receivableproperty_account_expense_categ Expense Account Many2One (accountaccount) P Purchasesproperty_account_income_categ Income Account Many2One (accountaccount) S Sales
To check the result of your configuration you can go to Accounting rarr Customers rarr Customers andopen the form containing your company data On the Accounting tab you will notice that both thedefault account receivable and account payable have been filled
Mistakes in configuring accounts and properties
It is easy to make mistakes in configuring accounts and their properties butthe consequences are not immediately obvious You will mostly discovermistakes when trying to make a Purchase or Sales Order (see later forexample Driving your Purchases (page 49)) where the accounts arerequired fields or if you are diligent when you set up Partners
If you configure them correctly at this stage then fields will be completedautomatically and you will never know a thing If you do not configure allthis correctly then you will not be able to save the order form until youhave corrected the problem or until you manually set the accounts
Since this configuration is quite tedious you would do best by finding acertified Chart of Accounts that has already been set up to meet your needsand adapt the predefined chart if necessary
342 Configuring Journals
You will also need to configure some journals which are used to record the transactions from oneaccount to another when invoices are raised and then paid Create journals from the menu Accountingrarr Configuration rarr Financial Accounting rarr Journals rarr Journals and then click the New button
30 CHAPTER 3 LETrsquoS GET STARTED AND CONFIGURE A NEW INSTANCE
Default Values
Notice that when you select the journal type the Display Mode will alreadybe preset An entry sequence for the journal will be created automaticallywhen you save the journal The default debit and credit account will beused as a counterpart when encoding manual journal entries Debit andcredit accounts are mandatory for bank journals
Table 34 Defining Journals
JournalName
Code Type Display Mode Default DebitAccount
Default CreditAccount
PurchaseJournal
PUJ Purchase SalePurchaseJournal View
P Purchases P Purchases
SalesJournal
SAJ Sale SalePurchaseJournal View
S Sales S Sales
BankJournal
BNK Bank andCheques
BankCash JournalView
B Bank B Bank
In this example validating a Purchase Order creates a draft invoice (see later again for exampleDriving your Purchases (page 49)) where a journal is required
As with accounts and properties if you configure them correctly at this stage the fields will becompleted automatically and you will never know a thing If you do not configure all this correctlythere will be errors with the order form or corresponding draft invoice until you have corrected theproblem or until you manually set the journal
343 Configuring the Main Company
In case you had chosen to Skip Configuration Wizards when you first created the database you mayconfigure your company information in the following manner Start configuring your database by typingyour companyrsquos name in the Main Company When you print standard documents such as quotationsorders and invoices you will find this configuration information used in the document headers andfooters
To do this click Sales rarr Address Book rarr Customers and click the name of the only company therewhich is YourCompany This gives you a read-only form view of the company so make it editableby clicking the Edit button to the upper left of the form
CHAPTER 3 LETrsquoS GET STARTED AND CONFIGURE A NEW INSTANCE 31
Editable Form in the Web Client
When toggling from the list view to the form view of an item you cangenerally click its name in the list view to show a non-editable view orthe pencil icon by the left-hand edge of the line to open it in an editableview You can toggle between editable and non-editable once you are inform view
Change the contact name to match your first name and name The company name and the contact namebelow are just an example
bull Name Ambitious Plumbing Entreprises
bull Contact Name George Turnbull
Before you save this look at the partnerrsquos accounting setup by clicking the Accounting tab Thefields Account Receivable and Account Payable have account values that were taken from the accountproperties you just created You do not have to accept those values you can enter any suitable accountyou like at this stage although OpenERP limits the selection to accounts that make accounting sense
Back at the first tab General change any other fields you like such as the address and phone numbersthen click Save This changes one Contact for the Partner which is sufficient for the example
From the MAIN MENU click Administration rarr Companies rarr Companies and edit the only entrythere Please note that you have to keep your own company data but for the example we use theAmbitious Plumbing company
bull Company Name AmbiPlum
bull Partner should already show Ambitious Plumbing Enterprises
bull Report Header Ambitious Plumbing
bull Report Footer 1 type your slogan ie Best Plumbing Services Great Prices
bull Report Footer 2 type your company details such as bank account or Ambitious - ourRegistered Company Details
Figure Changing Company Details (page 32) shows the effect of this You can also change variousother company-wide parameters for reports and scheduling in the other tabs and you can upload acompany logo of a specific size for the reports Click Save to store the changes
You can leave the currency at its default setting of EUR for this example Or you can change it in thisCompany and the two default Pricelists (Sales rarr Configuration rarr Pricelists rarr Pricelists) if you didnot set the correct company currency in the Configuration Wizard
Currency
The examples in this book are in USD and EUR You the reader can useyour home currency instead
32 CHAPTER 3 LETrsquoS GET STARTED AND CONFIGURE A NEW INSTANCE
Figure 36 Changing Company Details
344 Creating Partner Categories Partners and their Contacts
You will now create a supplier category and a customer category Partner categories are useful fororganizing groups of partners but have no special behaviour that affects partners so you can assignthem as you like Then you will define one supplier and one customer with a contact for each
To do this go to the menu Sales rarr Configuration rarr Address Book rarr Partner Categories and clickNew to open a new form for defining Partner Categories Define the two categories that follow by justentering their Category Name and saving them
bull Suppliers
bull Customers
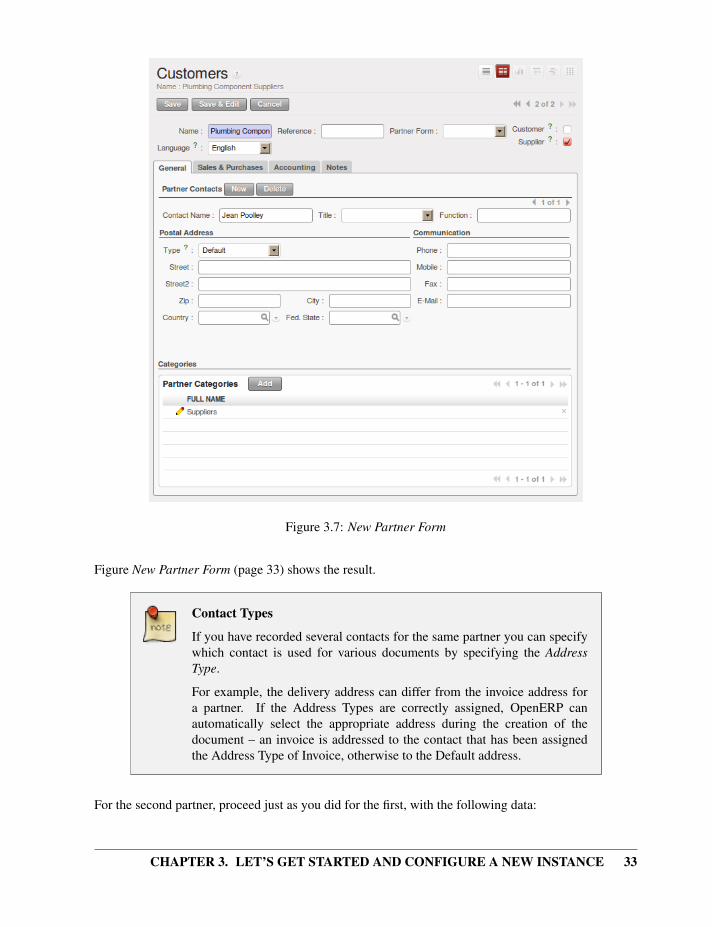
Then create two partners from the menu Sales rarr Address Book rarr Customers OpenERP allows youto create both suppliers and customers from this menu Please note that we provide some exampledata but of course you should define your own customers and suppliers Feel free to also complete theaddress which we donrsquot do in our example Click the New button to open a blank form and then addthe following data for the first partner
bull Name Plumbing Component Suppliers
bull Customer checkbox unchecked
bull Supplier checkbox checked
bull Contact Name Jean Poolley
bull Address Type Default
bull click Add and select Suppliers to add the category to the Partner Categories field by selectingit from the Search Partner Categories list
bull then save the partner by clicking the Save button
CHAPTER 3 LETrsquoS GET STARTED AND CONFIGURE A NEW INSTANCE 33
Figure 37 New Partner Form
Figure New Partner Form (page 33) shows the result
Contact Types
If you have recorded several contacts for the same partner you can specifywhich contact is used for various documents by specifying the AddressType
For example the delivery address can differ from the invoice address fora partner If the Address Types are correctly assigned OpenERP canautomatically select the appropriate address during the creation of thedocument ndash an invoice is addressed to the contact that has been assignedthe Address Type of Invoice otherwise to the Default address
For the second partner proceed just as you did for the first with the following data
34 CHAPTER 3 LETrsquoS GET STARTED AND CONFIGURE A NEW INSTANCE
bull Name Smith and Offspring
bull Customer checkbox checked
bull Supplier checkbox unchecked
bull Contact Name Stephen Smith
bull Address Type Default
bull add Customers in the Categories field
bull Save the form
To check your work you can go to the menu Sales rarr Configuration rarr Address Book rarr PartnerCategories and click on each category in turn to see the companies in the category
Multiple Partner Categories
If this partner was also a supplier then you would add Suppliers to thecategories as well but there is no need to do so in this example You canassign a partner to multiple categories at all levels of the hierarchy
345 Creating Products and their Categories
Unlike partner categories and their assigned partners product categories do have an effect on theproducts assigned to them ndash and a product may belong to only one category Under the main menulink Warehouse or Sales select the menu Configuration rarr Product rarr Products Categories and clickNew to get an empty form for defining a product category
Enter Radiators in the Name field Click Save You will see that other fields specifically those in theAccounting Properties section have been automatically filled in with values of accounts and journalsThese are the values that will affect products ndash equivalent fields in a product will take on these valuesif they too are blank when their form is saved
Property Fields
Properties have a rather unusual behaviour They are defined by parametersin the menus in Administration rarr Configuration rarr Parameters rarrConfiguration Parameters and they update fields only when a form issaved and only when the fields are empty at the time the form is savedYou can manually override any of these properties as you need
Property fields are used throughout the OpenERP system and extensivelyin a multi-company environment There property fields in a partner formcan be populated with different values depending on the userrsquos companyFor example the payment conditions for a partner could differ dependingon the company from which it is addressed
CHAPTER 3 LETrsquoS GET STARTED AND CONFIGURE A NEW INSTANCE 35
UOM
UOM is an abbreviation for Unit of Measure OpenERP manages multipleunits of measure for each product you can buy in tons and sell in kgs forexample The conversion between each category is made automatically (solong as you have set up the conversion rate in the product form first)
Managing Double Units of Measure
The whole management of stock can be carried out with double units ofmeasure (UOM and UOS ndash for Unit of Sale) For example an agro-foodcompany can stock and sell ham by piece but buy and value it by weightThere is no direct relationship between these two units so a weighingoperation has to be done
This functionality is crucial in the agro-food industry and can be equallyimportant in fabrication chemicals and many other industries
Now create a new product through the Warehouse or Sales menu
1 Go to Products rarr Products and click New
2 Create a product ndash type Titanium Alloy Radiator in the Name field
3 The Product Type field should be assigned as Stockable Product The fields ProcurementMethod Supply method Default Unit Of Measure and Purchase Unit Of Measure should stayat their default values For more information about these methods please refer to chapterProcurement Methods ndash Make to Stock and Make to Order (page 104)
4 Enter 5750 into the Cost Price field and 13250 into the Sale Price field
5 Click the Search icon to the right of the Category field to select the Radiators category
6 Click the Accounting tab then click Save and observe that Accounting Properties here remainempty When product transactions occur the Income and Expense accounts that you have justdefined in the Product Category are used by the Product unless an account is specified heredirectly in the product to override that
7 Once the product is saved it changes to a non-editable state If you had entered data incorrectly orleft a required field blank an error message would pop-up the form would have stayed editableand you would need to click from tab to tab to find a field colored red that would have to becorrectly filled in
346 Stock Locations
Click Warehouse rarr Inventory Control rarr Location Structure to see the hierarchy of stock locationsThese locations have been defined by the minimal default data loaded when the database was createdYou will use this default structure in this example
36 CHAPTER 3 LETrsquoS GET STARTED AND CONFIGURE A NEW INSTANCE
Figure 38 Product Form
OpenERP has three predefined top-level location types Physical Locations and PartnerLocations that act as their names suggest and Virtual Locations that are used by OpenERPfor its own purposes
1 From the Main Menu click Warehouse rarr Configuration rarr Warehouse Management rarrLocations to reach a list view of the locations (not the tree view)
2 Click the Clear button to display a complete list of all predefined locations
3 Click the name of a location such as Physical LocationsAmbitious PlumbingEnterprises to open a descriptive form view Each location has a Location Type and a ParentLocation that defines the hierarchical structure While you are here you might have to change thelocationrsquos name to Ambitious Plumbing Enterprises
4 From the Main Menu click Warehouse rarr Configuration Warehouse Management rarr Warehousesto view a list of warehouses There is only the one at the moment named after your company orin the example Ambitious Plumbing Enterprises
A Warehouse contains an input location a stock location and an output location for sold products Youcan associate a warehouse with a partner to give the warehouse an address That does not have to beyour own company (although it can be) you can easily specify another partner who may be holdingstock on your behalf
CHAPTER 3 LETrsquoS GET STARTED AND CONFIGURE A NEW INSTANCE 37
Location Structure
Each warehouse is composed of three locations Location Input LocationOutput and Location Stock Your available stock is given by the contentsof the Location Stock and its child locations
So the Location Input can be placed as a child of the Location Stock whichmeans that when Location Stock is interrogated for product quantities italso takes into account the contents of the Location Input Location Inputcould be used as a goods-in QC location The Location Output must neverbe placed as a child of Location Stock since items in Location Outputwhich can be considered to be packed ready for customer shipment shouldnot be thought of as available for sales elsewhere
347 Setting up a Chart of Accounts
You can set up a chart of accounts during the creation of a database but for this exercise you will startwith the minimal chart that you created (just a handful of required accounts without hierarchy tax orsubtotals)
A number of account charts have been predefined for OpenERP some of which meet the needs ofnational authorities (the number of those created for OpenERP is growing as various contributors createand freely publish them) You can take one of those without changing it if it is suitable or you can takeany chart as your starting point and design a complete chart of accounts to meet your exact needsincluding accounts for inventory asset depreciation equity and taxation
You can also run multiple charts of accounts in parallel ndash so you can put all of your transaction accountsinto several charts with different arrangements for taxation and depreciation aggregated differently forvarious needs
Before you can use any chart of accounts you need to specify a Fiscal Year This defines the differenttime periods available for accounting transactions
Create a Fiscal Year manually from Accounting rarr Configuration rarr Financial Accounting rarr Periodsrarr Fiscal Years
bull In the Fiscal Year field type the name of the current fiscal year (eg 2011)
bull In the Code field type the code of the current fiscal year (eg 11 or 2011)
bull In the Start Date field type the starting date of your companyrsquos fiscal year (eg 01012011)
bull In the End Date field type the ending date of your companyrsquos fiscal year (eg 12312011)
bull Click the Create Monthly Periods button if you have monthly declarations or click the Create 3Months Periods button for quarterly declarations
bull Usually you will also create an extra period 00 to post your opening balance and outstandinginvoices To do this click the New button then type 002011 as the Period Name 002011 as
38 CHAPTER 3 LETrsquoS GET STARTED AND CONFIGURE A NEW INSTANCE
the Code and the first day of your financial year as the Start of Period and the End ofPeriod dates Then check the OpeningClosing Period checkbox
Click Accounting rarr Charts rarr Charts of Accounts to open a Chart of Accounts form where you defineexactly what you want to see Simply click Open Charts to accept the defaults and display a hierarchicalstructure of the accounts
348 Make a Backup of the Database
If you know the super-administrator password make a backup of your database using the proceduredescribed below Then restore it to a new database testing
As a super-administrator you do not only have rights to create new databases but also to
bull backup databases
bull delete databases
bull restore databases
All of these operations can be carried out from the Databases button in the web clientrsquos Login screen
Backup (copy) a Database
To make a copy of a database go to the web Login screen and click theDatabases button Then click the Backup button select the database youwant to copy and enter the super-administrator password Click the Backupbutton to confirm that you want to copy the database
Drop (delete) a Database
To delete a database go to the web Login screen and click the Databasesbutton Then click the Drop button select the database you want to deleteand enter the super-administrator password Click the Drop button toconfirm that you want to delete the database
Restore a Database
To restore a database go to the web Login screen and click the Databasesbutton Then click the Restore button click the Choose File button to selectthe database you want to restore Give the database a name and enter thesuper-administrator password Click the Restore button to confirm that youwant to install a new copy of the selected database To restore a databaseyou need to have an existing copy of course
CHAPTER 3 LETrsquoS GET STARTED AND CONFIGURE A NEW INSTANCE 39
Duplicating a Database
To duplicate a database you can
1 make a backup file on your PC from this database
2 restore this database from the backup file on your PC and give it anew name
This can be a useful way of making a test database from a productiondatabase You can try out the operation of a new configuration newmodules or just the import of new data
A system administrator can configure OpenERP to restrict access to some of these database functionsso that your security is enhanced in normal production use
This operation enables you to test the new configuration on testing so that you can be sure everythingworks as designed Then if the tests are successful you can make a new database from perhaps calledlive or production for your real work
From here on connect to this new testing database logged in as admin if you can If you haveto make corrections do that on YourCompany and copy it to a new testing database to continuechecking it
Or you can just continue working with the YourCompany database to get through this chapter Youcan recreate YourCompany quite quickly if something goes wrong and you cannot recover from itbut again you would need to know your super-administrator password for that
35 Testing a Complete Purchase Cycle according to anExample
To familiarize yourself with the system workflow you will test a purchase-sales workflow in two phases
The first consists of a product purchase which requires the following operations
1 Place a purchase order with Plumbing Component Suppliers for 10 Titanium Alloy Radiators ata unit price of 5600
2 Receive these products at your Goods In
3 Generate a purchase invoice
4 Pay your supplier
Then you will sell some of these products using this sequence
1 Receive a sales order for 6 Titanium Alloy Radiators from Smith and Sons sold at a unit price of13000
40 CHAPTER 3 LETrsquoS GET STARTED AND CONFIGURE A NEW INSTANCE
2 Dispatch the products
3 Invoice the customer
4 Receive the payment
351 Purchase Order
To place a Purchase Order with your supplier use the menu Purchases rarr Purchase Management rarrPurchase Orders and click the New button
Complete the following field
bull Supplier Plumbing Component Suppliers
As you complete the Supplier field OpenERP automatically completes the Address field and thePricelist field from information it takes from the Partner record
Enter the following information in the Purchase Order Lines (click New)
bull Product Titanium Alloy Radiator - type in part of this name then press the tab key tocomplete it or click the Search icon at the end of the line to bring a search box (if product ispreviously configured)
When you have selected a product on the product line OpenERP automatically completes the followingfields from information it finds in the Product record
bull Product UOM the unit of measure for this product
bull Description the detailed description of the product
bull Scheduled Date based on the product lead time
bull Unit Price the unit price of the product
bull Analytic account if any account is specified and if you belong to the User Group Useability Analytic Accounting (see menu Administration rarr Users rarr Users) then it will appear on theorder line (it is not in this example)
bull Taxes applicable taxes defined in the partner if specified otherwise in the product if specified(there are no taxes in this example)
You can edit any of these fields to suit the requirements of the purchase order at the time of entryChange the
bull Quantity 10
bull Unit Price to 5600
CHAPTER 3 LETrsquoS GET STARTED AND CONFIGURE A NEW INSTANCE 41
Save the order line and close the Order Line window by clicking the Save amp Close button You canthen save the whole one-line order by clicking Save which makes the form non-editable
It is now in a state of Request for Quotation To approve the quotation click Convert toPurchase Order which corresponds to an approval from a manager or from Accounts within your owncompany and moves the order into Approved state
If you click the Delivery amp Invoicing tab you will see the delivery Destination is your own companyrsquosStock location and that the invoice was created from the order It is not entirely obvious at this stagebut the invoice is in a draft state so it can be edited and crucially it has no accounting impact yet it isjust ready for your accounting group to activate it
352 Receiving Goods
After confirming the order you would wait for the delivery of the products from your supplier Typicallythis would be somebody in Stores who would
1 Open the menu Warehouse rarr Warehouse Management rarr Incoming Shipments
From the Purchase Order
You could have clicked the Receptions link to the right of the PurchaseOrder to reach the same screen but this would confuse the purchasing rolewith the stores role That link is very useful during testing and traininghowever
2 When the Incoming Shipments window appears select the name of the entry in the list(IN00001) to display the Packing List itself ndash you would usually do a search for the suppliername or order number in a list that was larger than this ndash then click Process to load the ProcessDocument form
3 Click Validate to indicate that you are receiving the whole quantity of 10 units
At this point you have accepted 10 units into your company in a location that you have already seen
Using the menu Purchases rarr Products rarr Products you can find the product Titanium Alloy Radiatorswith Real Stock and Virtual Stock 10 Open the product form and click the Stock by Location link at theright side of the screen to see the Real Stock and Virtual Stock of this product in various locations Nowselect the checkbox in front of the Stock and Suppliers locations The right side menu appears Clickthe Location Inventory Overview report to see the inventory valuation for each of these two locations
42 CHAPTER 3 LETrsquoS GET STARTED AND CONFIGURE A NEW INSTANCE
Figure 39 List of Products and their Stock Levels
Traceability in Double-Entry
OpenERP operates a double-entry stock transfer scheme similar todouble-entry accounting Because of this you can carry out variousanalyses of stock levels in your warehouse along with the correspondinglevels in Partner Location at your Supplier The double-entry systemsimilar to that of accounting enables you to keep track of stock movementsquite easily and to resolve any errors that occur
353 Invoice Control
When you have received an invoice from your supplier (which would usually be sent to your Accountsdepartment) go to the menu Accounting rarr Suppliers rarr Supplier Invoices to open a list of supplierinvoices waiting for receipt These invoices enable your Accounts Department to match the the priceand quantities ordered against the price and quantities on the supplierrsquos invoice (and since it is notuncommon to receive an invoice showing details more favourable to the supplier than those agreed atthe time of purchase this is a useful function)
In this example you created an invoice automatically when you confirmed the supplierrsquos PurchaseOrder That is because the Invoicing Control field on the order was set to From Order (the defaultoption) Other options enable you to create invoices at the time of receiving goods or manually Theinitial state of an invoice is Draft
Now click the invoice for your order PO00001 to display its contents You can compare the goodsthat you have recorded there with the invoice received from your supplier If there is a difference it ispossible to change the invoice lines to for example add a delivery charge Select the correct InvoiceDate and click Approve to confirm the invoice and put it into the Open state
CHAPTER 3 LETrsquoS GET STARTED AND CONFIGURE A NEW INSTANCE 43
Accounting entries are generated automatically once the invoice is validated You can check the entryfrom the Other Info tab in the Journal Entry field To see the effects on your chart of accountsgo to the menu Accounting rarr Charts rarr Chart of Accounts and click Open Charts at the Chart ofAccounts page to see that you have a debit of 56000 in the Purchases account and a credit of56000 in the Payable account
Invoice Control
Should your purchase invoice have to be checked by the purchaser first hecan go to the menu Purchases rarr Invoice Control rarr Supplier Invoices toReceive to check whether the invoice corresponds with the order (or thegoods receipt according to the Invoice Control settings)
354 Paying the Supplier
Select the menu Accounting rarr Suppliers rarr Supplier Invoices and click the Unpaid button for a list ofsupplier invoices that have not yet been paid In practice you would search for the invoice by ordernumber or more generally for invoices nearing their payment date You can type PO00001 in theSource Document box to find the invoice
Open the invoice and click the Pay Invoice button It opens the Pay Invoice window in new tab with adescription of the payment
Supplier and Date comes automatically from invoice You just have to enter the PaymentMethod (ie the corresponding bank journal) When you select the payment method you will noticethat the corresponding invoice is displayed in Supplier Invoices and Outstanding Transactions and thatthe Amount is filled automatically Then click the Validate button to post this entry and consider theinvoice as Paid
Payment of an Invoice
The method described here is for companies that do not use their accountingsystem to pay bills but just to record the payments If you are usingthe account module with all its features other more efficient methodslet you manage payments such as entering bank statements reconcilingpaperwork using tools for preparing payments interfacing with banks
You can monitor the accounting impact of paying the invoice through the chart of accounts availablefrom the menu Accounting rarr Charts rarr Chart of Accounts OpenERP automatically creates accountingentries from the payment and can reconcile the payment to the invoice You now have a new transactionthat has debited the Payable account with 56000 and credited the Bank account
If you look in Accounting rarr Journal Entries rarr Journal Entries you will see both accountingtransactions one in the Purchase Journal and another one in the Bank Journal both with thePosted state
44 CHAPTER 3 LETrsquoS GET STARTED AND CONFIGURE A NEW INSTANCE
36 Testing a Complete Sales Cycle according to an Example
361 Sales Order
In OpenERP sales proposals and sales orders are managed using documents that are based on the samecommon functionality as purchase orders so you will recognize the following documents in generalbut see changes to their detail and to their workflows To create a new sales proposal use the menuSales rarr Sales rarr Sales Orders and click the New button which creates a new order as a Quotation then
1 Select the Customer Smith and Offspring This has the effect of automaticallycompleting several other fields Ordering Contact Invoice Address Shipping Address andthe Pricelist Public Pricelist (EUR) They are all only defaults so these fields can bemodified as you need
2 Click the New button in Sales Order Lines section to open a Sales Order Lines window
3 Select the product Titanium Alloy Radiator Although the Product field is not itselfrequired it is used by OpenERP to select the specific product so that several other fields can beautomatically completed on the order line of the quotation such as Description Unit of MeasureUnit Price Procurement Method Delivery Lead Time and Taxes
4 Change the Quantity (UoM) to 6 and the Unit Price to 13000 Then click Save amp Close andthe line appears on the quotation form
5 On the Other Information tab of this Sales Order select a Picking Policy of CompleteDelivery and a Shipping Policy of Invoice on Order After Delivery from thedropdown menu lists
6 Return to the first tab Sales Order and validate the document by clicking Confirm Order whichcalculates prices and changes the orderrsquos state from Quotation to In Progress as shown inscreenshot Sales Order Form (page 44) If you were in negotiation with the prospective customeryou would click Compute and Save to keep the document in Quotation state for as long asnecessary
Figure 310 Sales Order Form
CHAPTER 3 LETrsquoS GET STARTED AND CONFIGURE A NEW INSTANCE 45
7 In the last tab of the order History you can see the Picking List that has been created and youwill be able to see any invoices that relate to this order when they are generated
Go to Sales rarr Products rarr Products to display a list of products just the one Titanium AlloyRadiator currently exists in this example Its Real Stock still shows 1000 but its Virtual Stocknow shows 400 to reflect the new future requirement of 6 units for dispatch
362 Preparing Goods for Shipping to Customers
The stores manager selects the menu Warehouse rarr Warehouse Management rarr Delivery Orders to geta list of orders to dispatch For this example find the Delivery Order related to the sales order whichyou have created You should click the Available button to see all delivery orders because yourdelivery order will be in Confirmed state and not yet in Available state Open the Delivery Orderconcerned
Running Schedulers
At the moment your Sales Order is waiting for products to be reserved tofulfil it A stock reservation activity takes place periodically to calculate theneeds which also takes customer priorities into account The calculationcan be started from the menu Warehouse rarr Schedulers rarr ComputeSchedulers Running this automatically reserves products (ie the statuswill be set to Available if the products are in stock)
If you do not want to have to work out your stock needs but have a leanworkflow you can install the mrp_jit (Just In Time) module
Although OpenERP has automatically been made aware that items on this order will need to bedispatched it has not yet assigned any specific items from any location to fulfil it It is ready to move600 Titanium Alloy Radiators from the Stock location to the Customers location so startthis process by clicking Check Availability The Move line has now changed from the Confirmedstate to the Available state
Then click the Process button to reach the Process Document window where you click the Validatebutton to transfer the 6 radiators to the customer
To analyze stock movements that you have made during these operations go to Warehouse rarr Productrarr Products and select the radiator by clicking the checkbox in front of it then click the action Stockby Location which is at the right most side to see that your stocks have reduced to 4 radiators and thegeneric Customers location has a level of 6 radiators
363 Invoicing Goods
Use the menu Accounting rarr Customers rarr Customer Invoices to open a list of Sales invoices generatedby OpenERP If they are in the Draft state it means that they do not yet have any impact on theaccounting system You will find a draft invoice has been created for the order SO001 once you havedispatched the goods because you had selected Invoice on Order After Delivery
46 CHAPTER 3 LETrsquoS GET STARTED AND CONFIGURE A NEW INSTANCE
Once you confirm an invoice OpenERP assigns it a unique number and all of the correspondingaccounting entries are generated So open the invoice and click Validate to do that and move theinvoice into an Open state with a number of SAJ20110001
You can send your customer the invoice for payment at this stage Click Print Invoice to get a PDFdocument that can be printed or emailed to the customer
The PDF of your invoice will automatically be added as an attachment This gives you a permanentnon-editable record of your invoice on the OpenERP system
Review your chart of accounts to check the impact of these activities on your accounting You will seethe new revenue line from the invoice
364 Customer Payment
Registering an invoice payment by a customer is essentially the same as the process of paying a supplierFrom the menu Accounting rarr Customers rarr Customer Invoices click the name of the invoice that youwant to mark as paid
1 Use the Payment button which opens a new window Pay Invoice
2 Select the Payment Method for this example select Bank Journal then validate the entry
Figure 311 Invoice Form
Check your Chart of Accounts as before to see that you now have a healthy bank balance in the Bankaccount
47
Part II
Advanced Features in PurchaseQuotation Management
To manage your manufacturing you do not need all the elements described in this bookBut we find it very important to include an integrated flow from the first quotation to thefinal billing of the suppliers including all the steps quotation order receiving goodsinventory manufacturing and billing
48
49
Driving your Purchases 4In the preceding chapters you saw how to use customer invoices and delivery notes inOpenERP This chapter is about the management of purchases the process ahead of thesetwo operations You will now see how OpenERP handles and simplifies this and the controlof purchases from suppliers
For this chapter you can continue using the database already created or you should start with a freshdatabase that includes demonstration data with purchase and its dependencies installed and noparticular chart of accounts configured
41 All the Elements of a Complete Workflow
The supplier or purchase order is the document that lets you manage price negotiations control supplierinvoices handle goods receipts and synchronize all of these documents
Let us start by looking at the following order workflow
1 Price request to the supplier
2 Confirmation of purchase
3 Receipt and control of products
4 Control of invoicing
411 Setting up your Database
To set up a system for these examples create a new database with demonstration data in it and selectthe Extended interface when you log in as the admin user You can enter your own company detailswhen asked or just use the default if you want Then using the Configuration Wizard select PurchaseManagement in the Install Applications section to install the purchase module which also installsseveral other modules as dependencies Continue the remainder of this chapter logged in as the adminuser
412 Price Request from the Supplier
To enter data for a new supplier price request (ie request for quotation) use the menu Purchasesrarr Purchase Management rarr Request for Quotation When you click New OpenERP opens a blankrequest for quotation form that you use for requesting prices from a supplier This is shown in the figureData Entry for a Purchase Order (page 50) If the price request came from an automatic procurement
50 CHAPTER 4 DRIVING YOUR PURCHASES
created by OpenERP you will find a reference to the document that generated the request in the Originfield
Figure 41 Data Entry for a Purchase Order
Managing Alerts
If you install the warning module you will be able to define alerts thatappear when the purchaser enters a price request or order You can set alertson the product and on the supplier
The internal reference the date and the warehouse the products should be delivered to are completedautomatically by OpenERP but you can change these values if needed Next when you select asupplier OpenERP automatically completes the contact address for the supplier The pricelist isalso automatically completed from the pricelist in the supplier form This should bring in all of theconditions that you have negotiated with the supplier for a given period
Supplier Selection
Searching for a supplier is limited to all of the partners in the system thathave the Supplier checkbox checked If you do not find your supplier itmight be worth checking the whole list of all partners to make sure that thesupplier does not yet exist without the Supplier checkbox being checked
Once the main body of the purchase order has been completed you can enter the product lines
When you have selected the product OpenERP automatically completes the other fields in the form
CHAPTER 4 DRIVING YOUR PURCHASES 51
Figure 42 Purchase Order Line
bull Product UoM taken from the Purchase Unit of Measure field in the product form
bull The Description of the product in the supplierrsquos language
bull Scheduled Date calculated from the order date and the delivery lead time for the supplier (forthe given product)
bull Unit Price taken from the supplierrsquos pricelist
bull Taxes taken from the information on the product form and partner form depending on the rulesseen in Financial Analysis
Product Wording and Code
When you enter supplier names in the product form you can set a nameand a product code for each individual supplier If you do that OpenERPwill then use those details instead of your own internal product names forthat selected supplier
If you work with management by case you can also set the analytic account that should be used toreport all the purchase costs The costs will then be reported at the receipt of the supplier invoice
Management by Case
Analytic accounts can be very useful for all companies that manage costsby case by site by project or by folder To work with several analyticaxes you should install the module purchase_analytic_plans byselecting Purchase Analytic Plans in the Reconfigure wizard and clickingConfigure
52 CHAPTER 4 DRIVING YOUR PURCHASES
To make sure that the analytic account is automatically selected according to the partner the date theproducts or the user you can install the module account_analytic_default (which is installedautomatically as a dependency of purchase_analytic_plans)
In the Notes tab of the product line you can enter a note that will be attached when the orderconfirmation or price quotation is printed This note can be predefined on the product form toautomatically appear on each order for that product For example you can enter ldquoDo not forget tosend by express delivery as specified in our contract reference 1234rdquo
Once the document has been completed you can print it as a price estimate to send to the supplier Youcan set a note for the attention of the supplier in the formrsquos third tab
Figure 43 Printing the Supplier Price Quotation
Then leave the document in the Request for Quotation state When you receive a responsefrom the supplier use the menu Purchases rarr Purchase Management rarr Requests for Quotation Selectthe order and complete its details
When you want to approve the order use the button Convert to Purchase Order The price request thenpasses into the Approved state No further changes are possible
CHAPTER 4 DRIVING YOUR PURCHASES 53
Figure 44 Purchase Order Process
413 Goods Receipt
Once the order has been approved OpenERP automatically prepares the goods receipt order in thedraft state for you To get a list of the products you are waiting for from your suppliers use the menuWarehouse rarr Warehouse Management rarr Incoming Shipments
Purchasing Services
If you buy services from your supplier OpenERP does not generate a goodsreceipt note There is no service receipt equivalent to a goods receipt
Select the document that corresponds to the item that you are receiving Usually the goods receipt noteis found by making a search on the order reference or the supplier name You can then confirm thereceipt of the products
As described in Your Warehouse (page 71) if you receive only part of the order OpenERP manages theremainder of that order A second receipt note is then automatically created for the goods not receivedYou can cancel it if you think that you will never receive the remaining products
After receiving the goods OpenERP will show you which orders are open and the state of their receiptand invoicing if you return to the list of orders
414 Control of Invoicing
To control supplier invoicing OpenERP provides three systems as standard which can differ order byorder
54 CHAPTER 4 DRIVING YOUR PURCHASES
Figure 45 List of Open Orders and their Receipt and Invoice Status
bull From Order invoicing based on quantities ordered
bull From Picking invoicing based on quantities received
bull Manual manual invoicing
The mode of invoicing control is set in the second tab of the purchase order in the field InvoicingControl
Figure 46 Purchase Order Invoice Control
CHAPTER 4 DRIVING YOUR PURCHASES 55
Default Value
A company generally uses a single invoicing control method for all of itsinvoices So you are advised to set a default value in the Invoicing Controlfield after installation
415 Control based on Orders
If you selected your invoicing control based on orders OpenERP will automatically generate a supplierinvoice in the draft state when the order is confirmed You can obtain a list of invoices waiting usingthe menu Accounting rarr Suppliers rarr Supplier Invoices and enabling the Draft filter
When you receive a paper invoice from your supplier all you need to do is validate the invoice pre-generated by the system Do not forget to check the price and the quantities When the invoice isconfirmed the accounting entries represent the cost of purchase and are automatically entered into thesystem
The supplier order is automatically set as Paid when you pay the supplier invoice
This method of controlling invoices is often used in service companies because the invoiced amountscorrespond to the ordered amounts In logistics by contrast you most often work with invoicingcontrolled by goods receipt
416 Control based on Goods Receipt
To control your supplier invoices based on goods receipt set the field Invoicing Control on the secondtab of the order to From Picking
In this case no invoice draft state or any other is generated by the order On the goods receipt notethe field Invoice Control is set to To Be Invoiced
The storesperson can then receive different orders If he wants to generate the draft invoice for a goodsreceipt he can click the action Create Invoice OpenERP then asks you for the journal for this invoiceIt then opens that or the generated invoices (in the case of creating invoices for several receipts at onetime) which enables you to modify it before confirming it
This approach is useful when you receive the invoice at the same time as the item from the supplierUsually invoices are sent by post some days later In this case the storesperson leaves the itemunchanged without generating an invoice Then once per day or once per week the accountant willcreate the draft invoices based on all the receipts for the day To do that he uses the menu Purchasesrarr Invoice Control rarr Purchase Lines Not Invoiced He clicks the action Create invoices to generate alldraft invoices from the list of receipts that have not yet been invoiced At that point the accountant candecide if he wants to generate an invoice per item or group all items for the same partner into the sameinvoice
Invoices are then handled just like those controlled from On Order Once the invoice arrives at theaccounting service he just compares it with the invoices waiting to control what the supplier invoicesyou
56 CHAPTER 4 DRIVING YOUR PURCHASES
Delivery Charges
To manage delivery charges install the module delivery using theReconfigure wizard and selecting Delivery Costs in Sales ApplicationConfiguration section This will automatically add delivery charges tothe creation of the draft invoice as a function of the products delivered orordered
417 Tenders
To manage tenders you should use the module purchase_requisition installed via thePurchase Requisition option in the Reconfigure wizard This lets you create several supplier pricerequests for a single supply requirement Once the module is installed OpenERP adds a new PurchaseRequisitions menu in Purchases rarr Purchase Management You can then define the new tenders
Figure 47 Defining a Tender
To enter data for a new tender use the menu Purchases rarr Purchase Management rarr PurchaseRequisitions and select New OpenERP then opens a new blank tender form The reference number isset by default and you can enter information about your tender in the other fields
If you want to enter a supplierrsquos response to your tender request add a new draft purchase order intothe list on the Quotation tab of your tender document If you want to revise a supplier price in responseto negotiations edit any appropriate purchase order that you have left in the draft state and link that tothe tender
When one of the orders about a tender is confirmed all of the other orders are automatically cancelledby OpenERP if you selected the Purchase Requisition (exclusive) type That enables you to accept just
CHAPTER 4 DRIVING YOUR PURCHASES 57
one order for a particular tender If you select Multiple requisitions you can approve several purchaseorders without cancelling other orders from this tender
418 Price Revisions
OpenERP supports several methods of calculating and automatically updating product costs
bull Standard Price manually fixed and
bull Standard Price revalued automatically and periodically
bull Average Price updated at each receipt to the warehouse
This cost is used to value your stock and represents your product costs Included in that cost iseverything directly related to the received cost You could include such elements as
bull supplier price
bull delivery charges
bull manufacturing costs
bull storage charges
Standard Price
The mode of price management for the product is shown in the tab Information on the product formOn each individual product you can select if you want to work in Standard Price or on weightedAverage Price
Simplified Interface
If you work in the Simplified interface mode you will not see the fieldthat lets you manage the price calculation mode for a product In that casethe default value is Standard Price
The Standard Price setting means that the product cost is fixed manually for each product inthe field Cost Price This is usually revalued once a year based on the average of purchase costs ormanufacturing costs
You usually use standard costs to manage products where the price hardly changes over the course ofthe year For example the standard cost could be used to manage books or the cost of bread
Those costs that can be fixed for the whole year bring certain advantages
bull you can base the sale price on the product cost and then work with margins rather than a fixedprice per product
58 CHAPTER 4 DRIVING YOUR PURCHASES
bull accounting is simplified because there is a direct relationship between the value of stock and thenumber of items received
To get an automated periodic revaluation of the standard price you can use the action Update on theproduct form enabling you to update prices of all the selected products OpenERP then recalculatesthe price of the products as a function of the cost of raw materials and the manufacturing operationsgiven in the routing
Average Price
Working with standard prices does not lend itself well to the management of the cost price of productswhen the prices change a lot with the state of the market This is the case for many commodities andenergy
In this case you would want OpenERP to automatically set the price in response to each goods receiptmovement into the warehouse The deliveries (exit from stock) have no impact on the product price
Calculating the Price
At each goods receipt the product price is recalculated using the followingaccounting formula NP = (OP QS + PP QR) (QS + QR) where thefollowing notation is used
bull NP New Price
bull OP Old Price
bull QS Quantity actually in Stock
bull PP Price Paid for the quantity received
bull QR Quantity Received
If the products are managed as a weighted average OpenERP will open a window that lets you specifythe price of the product received at each goods receipt The purchase price is by default set from thepurchase order but you can change the price to add the cost of delivery to the various received productsfor example
Figure 48 Goods Receipt of Products managed in Weighted Average
CHAPTER 4 DRIVING YOUR PURCHASES 59
Once the receipt has been confirmed the price is automatically recalculated and entered on the productform
42 Purchase Analysis through Analytic Accounts
421 Powerful Statistics
OpenERP enables you to perform analysis of purchases by period (current year current month previousmonth) by state (quotations orders) supplier user product category warehouse and so on This ismade possible through a search view accessed through the menu Purchases rarr Reporting rarr PurchaseAnalysis
Figure 49 Analysis of Purchases over the Month by Product
This analysis is carried out on supplier orders and not on invoices or the quantities actually receivedTo get an analysis by product use the module product_margin The function of this module isdescribed in detail in the chapter about sales (only in Logistics not in Manufacturing)
To analyze the received quantities you can use the statistical reports in Warehouse To managepurchases by project you should use analytic accounts You can set an analytic account on each lineof a supplier order The analytic costs linked to this purchase will be managed by OpenERP from thegoods receipt and confirmation of the supplier invoice The hr_timesheet_invoice module letsyou re-invoice the analytic costs automatically using parameters in the analytic accounts such as salepricelist associated partner company and maximum amount
So you can put an invoice order with a defined invoice workflow in place based on the analytic accountsIf you are working Make to Order the workflow will be
1 Customer Order
2 Procurement Order on supplier
3 Receive invoice and goods from the supplier
4 Delivery and invoicing to the customer
60 CHAPTER 4 DRIVING YOUR PURCHASES
When re-invoicing based on costs you would get the following workflow
1 Enter the customer contract conditions from the analytic accounts
2 Purchase raw materials and write the services performed into the timesheets
3 Receive the supplier invoice and the products
4 Invoice these costs to the customer
Analytic Multi-plans
If you want several analysis plans you should install the modulepurchase_analytic_plans These let you split a line on a supplierpurchase order into several accounts and analytic plans
Sitting at the heart of your companyrsquos processes analytic accounts (or cost accounts) are indispensabletools for managing your operations well Unlike your financial accounts they are for more thanaccountants - they are for general managers and project managers too
You need a common way of referring to each user service or document to integrate all your companyrsquosprocesses effectively Such a common basis is provided by analytic accounts (or management accountsor cost accounts as they are also called) in OpenERP
Analytic accounts are often presented as a foundation for strategic enterprise decisions But because ofall the information they pull together OpenERPrsquos analytic accounts can be a useful management toolat the center of most system processes
There are several reasons for this
bull they reflect your entire management activity
bull unlike the general accounts the structure of the analytic accounts is not regulated by legalobligations so each company can adapt it to its needs
Independence from General Accounts
In some software packages analytic accounts are managed as an extensionof general accounts ndash for example by using the two last digits of theaccount code to represent analytic accounts
In OpenERP analytic accounts are linked to general accounts but are treatedtotally independently So you can enter various different analytic operationsthat have no counterpart in the general financial accounts
While the structure of the general chart of accounts is imposed by law the analytic chart of accounts isbuilt to fit a companyrsquos needs closely
CHAPTER 4 DRIVING YOUR PURCHASES 61
Just as in the general accounts you will find accounting entries in the different analytic accounts Eachanalytic entry can be linked to a general account or not as you wish Conversely an entry in a generalaccount can be linked to one several or no corresponding analytic accounts
You will discover many advantages of this independent representation below For the more impatienthere are some of those advantages
bull you can manage many different analytic operations
bull you can modify an analytic plan on the fly during the course of an activity because of itsindependence
bull you can avoid an explosion in the number of general accounts
bull even those companies that do not use OpenERPrsquos general accounts can use the analytic accountsfor management
Who Benefits from Analytic Accounts
Unlike general accounts analytic accounts in OpenERP are not so muchan accounting tool for Accounts as a management tool for everyone in thecompany (That is why they are also called management accounts)
The main users of analytic accounts should be the directors generalmanagers and project managers
Analytic accounts make up a powerful tool that can be used in different ways The trick is to createyour own analytic structure for a chart of accounts that closely matches your companyrsquos needs
422 To Each Enterprise its own Analytic Chart of Accounts
To illustrate analytic accounts clearly you will follow three use cases each in one of three differenttypes of company
1 Industrial Manufacturing Enterprise
2 Law Firm
3 IT Services Company
Case 1 Industrial Manufacturing Enterprise
In industry you will often find analytic charts of accounts structured into the departments and productsthat the company itself is built on
So the objective is to examine the costs sales and margins by department and by product The firstlevel of the structure comprises the different departments and the lower levels represent the productranges that the company makes and sells
62 CHAPTER 4 DRIVING YOUR PURCHASES
Analytic Chart of Accounts for an Industrial Manufacturing Company
1 Marketing Department
2 Commercial Department
3 Administration Department
4 Production
bull Product Range 1
bull Sub-groups
bull Product Range 2
In daily use it is useful to mark the analytic account on each purchase invoice The analytic accountis the one to which the costs of that purchase should be allocated When the invoice is approved itwill automatically generate the entries for both the general and the corresponding analytic accountsSo for each entry on the general accounts there is at least one analytic entry that allocates costs to thedepartment that incurred them
Here is a possible breakdown of some general accounting entries for the example above allocated tovarious analytic accounts
Table 41 Breakdown of general and analytic accounting entries (Case 1)
General accounts Analytic accountsTitle Account Debit Credit Account ValuePurchase of Raw Material 600 1500 Production Range 1 -1 500Subcontractors 602 450 Production Range 2 -450Credit Note for defective materials 600 200 Production Range 1 200Transport charges 613 450 Production Range 1 -450Staff costs 6201 10000 Marketing -2 000
Commercial -3 000Administrative -1 000Production Range 1 -2 000Production Range 2 -2 000
PR 614 450 Marketing -450
The analytic representation by department enables you to investigate the costs allocated to eachdepartment in the company
So the analytic chart of accounts shows the distribution of the companyrsquos costs using the exampleabove
CHAPTER 4 DRIVING YOUR PURCHASES 63
Table 42 Analytic chart of accounts(Case 1)
Account TotalMarketing Department -2 450Commercial Department -3 000Administration Department -1 000Production -6 200Product Range 1 -3 750Product Range 2 -2 450
In this example of a hierarchical structure in OpenERP you can analyze not only the costs of eachproduct range but also the costs of the whole of production The balance of a summary account (Production ) is the sum of the balances of the child accounts
A report that relates both general accounts and analytic accounts enables you to get a breakdown ofcosts within a given department An analysis of the Production Product Range 1 department is shownin this table
Table 43 Report merging both general andanalytic accounts for a department (Case 1)
Production Product Range 1General Account Amount600 ndash Raw Materials - 1 300613 ndash Transport charges - 4506201 ndash Staff costs -2 000Total -3 750
The examples above are based on a breakdown of the costs of the company Analytic allocations canbe just as effective for sales That gives you the profitability (sales - costs) of different departments
Representation by Unique Product Range
This analytic representation by department and by product range is usuallyused by trading companies and industries
A variant of this is not to break it down by sales and marketing departmentsbut to assign each cost to its corresponding product range This will giveyou an analysis of the profitability of each product range
Choosing one over the other depends on how you look at your marketingeffort Is it a global cost allocated in some general way or does eachproduct range have responsibility for its own marketing costs
Case 2 Law Firm
Law firms generally adopt management by case where each case represents a current client file All ofthe expenses and products are then attached to a given file
64 CHAPTER 4 DRIVING YOUR PURCHASES
A principal preoccupation of law firms is the invoicing of hours worked and the profitability by caseand by employee
Mechanisms used for encoding the hours worked will be covered in detail in the Human Resourceschapter on line Like most system processes hours worked are integrated into the analytic accountingEvery time an employee enters a timesheet for a number of hours that automatically generates analyticaccounts corresponding to the cost of those hours in the case concerned The hourly charge is a functionof the employeersquos salary So a law firm will opt for an analytic representation which reflects themanagement of the time that employees work on the different client cases
Example Representation of an Analytic Chart of Accounts for a LawFirm
1 Absences
bull Paid Absences
bull Unpaid Absences
2 Internal Projects
bull Administrative
bull Others
3 Client Cases
bull Client 1
bull Case 11
bull Case 12
bull Client 2
bull Case 21
All expenses and sales are then attached to a case This gives the profitability of each case and at aconsolidated level of each client
Billing for the different cases is a bit unusual The cases do not match any entry on the general accountand nor do they come from purchase or sale invoices They are represented by the various analyticoperations and do not have exact counterparts in the general accounts They are calculated on the basisof the hourly cost per employee These entries are automatically created on billing worksheets
At the end of the month when you pay salaries and benefits you integrate them into the general accountsbut not in the analytic accounts because they have already been accounted for in billing each accountA report that relates data from the analytic and general accounts then lets you compare the totals soyou can readjust your estimates of hourly cost per employee depending on the time actually worked
The following table gives an example of different analytic entries that you can find for your analyticaccount
CHAPTER 4 DRIVING YOUR PURCHASES 65
Table 44 Analytic entries for the account chart (Case 2)
Title Account Amount General Account Debit CreditStudy the file (1 h) Case 11 -15Search for information (3 h) Case 11 -45Consultation (4 h) Case 21 -60Service charges Case 11 280 705 ndash Billing services 280Stationery purchase Administrative -42 601 ndash Furniture purchase 42Fuel Cost -Client trip Case 11 -35 613 ndash Transports 35Staff salaries 6201 ndash Salaries 3 000
You will see that it allows you to make a detailed study of the profitability of different transactions Inthis example the cost of Case 11 is 9500 (the sum of the analytic costs of studying the files searchingfor information and service charges) but has been invoiced for 28000 which gives you a gross profitof 18500
But an interest in analytical accounts is not limited to a simple analysis of the profitability of differentcases
This same data can be used for automatic recharging of the services to the client at the end of the monthTo invoice clients just take the analytic costs in that month and apply a selling price factor to generatethe invoice Invoicing mechanisms for this are explained in greater detail in ch-services If the clientrequires details of the services used on the case you can then print the service entries in the analyticaccount for this case
Invoicing Analytic Costs
Most software that manages billing enables you to recharge for hoursworked In OpenERP these services are automatically represented byanalytic costs But many other OpenERP documents can also generateanalytic costs such as credit notes and purchases of goods
So when you invoice the client at the end of the month it is possible for youto include all the analytic costs not just the hours worked So for exampleyou can easily recharge the whole cost of your journeys to the client
Case 3 IT Services Company
Most IT service companies face the following problems
bull project planning
bull invoicing profitability and financial follow-up of projects
bull managing support contracts
To deal with these problems you would use an analytic chart of accounts structured by project and bycontract A representation of that is given in the following example
66 CHAPTER 4 DRIVING YOUR PURCHASES
Example Analytic Representation of a Chart of Accounts for an ITServices Company
1 Internal Projects
bull Administrative and Commercial
bull Research and Development
2 Client Projects
bull Client 1
bull Project 11
bull Project 12
bull Client 2
bull Project 21
bull Project 22
3 Support Contracts ndash 20h
bull Customer X
bull Customer Y
The management of services expenditures and sales is similar to that presented above for lawyersInvoicing and the study of profitability are also similar
But now look at support contracts These contracts are usually limited to a prepaid number of hoursEach service posted in the analytic accounts shows the remaining available hours of support For themanagement of support contracts you would use the quantities and not the amounts in the analyticentries
In OpenERP each analytic line lists the number of units sold or used as well as what you would usuallyfind there ndash the amount in currency units (USD or GBP or whatever other choice you make) So youcan sum the quantities sold and used on each analytic account to determine whether any hours of thesupport contract remain To differentiate services from other costs in the analytic account you use theconcept of the analytic journal Analytic entries are then allocated into the different journals
bull service journal
bull expense journal
bull sales journal
bull purchase journal
So to obtain the detailed breakdown of a support contract you only have to look at the service journalfor the analytic account corresponding to the contract in question
CHAPTER 4 DRIVING YOUR PURCHASES 67
Finally the analytic account can be used to forecast future needs For example monthly planning ofstaff on different projects can be seen as an analytic budget limited to the service journal Accountingentries are expressed in quantities (such as number of hours and numbers of products) and in amountsin units of currency (USD or GBP perhaps)
So you can set up planning on just the basis of quantities Analyzing the analytic budget enables youto compare the budget (that is your plan) to the services actually carried out by month end
Cash Budgets
Problems of cash management are amongst the main difficultiesencountered by small growing businesses It is really difficult to predictthe amount of cash that will be available when a company is young andrapidly growing
If the company adopts management by case then staff planning can berepresented on the analytic accounts report as you have seen
But since you know your selling price for each of the different projectsyou can see that it is easy to use the plan in the analytic accounts to moreprecisely forecast the amounts that you will invoice in the coming months
68 CHAPTER 4 DRIVING YOUR PURCHASES
69
Part III
Managing your Warehouse
70
71
Your Warehouse 5OpenERPrsquos stock management is at once very simple flexible and complete It is based onthe concept of double entry that revolutionized accounting The system can be describedby Lavoisierrsquos maxim ldquonothing lost everything changedrdquo or better ldquoeverything movedrdquoIn OpenERP you do not talk of disappearance consumption or loss of products insteadyou speak only of stock moves from one place to another
Just as in accounting the OpenERP system manages counterparts to each of its main operations suchas receipts from suppliers deliveries to customers profit and loss from inventory and consumption ofraw materials Stock movements are always made from one location to another To satisfy the need fora counterpart to each stock movement the software supports different types of stock locations
bull Physical stock locations
bull Partner locations
bull Virtual locations as counterparts for procurement production and inventory
Physical locations represent warehouses and their hierarchical structure These are generally thelocations that are managed by traditional stock management systems
Partner locations represent your customersrsquo and suppliersrsquo stocks To reconcile them with youraccounts these stores play the role of third-party accounts Reception from a supplier can be shownby the movement of goods from a partner location to a physical location in your own company Asyou see supplier locations usually show negative stocks and customer locations usually show positivestocks
Virtual locations as counterparts for production are used in manufacturing operations Manufacturingis characterized by the consumption of raw materials and the production of finished products Virtuallocations are used for the counterparts of these two operations
Inventory locations are counterparts of the stock operations that represent your companyrsquos profit andloss in terms of your stocks
The figure Location Structure when OpenERP has just been installed (page 72) shows the initialconfiguration of the locations when the software is installed (Warehouse rarr Warehouse Managementrarr Locations)
Hierarchical Stock Locations
In OpenERP locations are structured hierarchically You can structureyour locations as a tree dependent on a parent-child relationship Thisgives you more detailed levels of analysis of your stock operations and theorganization of your warehouses
72 CHAPTER 5 YOUR WAREHOUSE
Figure 51 Location Structure when OpenERP has just been installed
Locations and Warehouses
In OpenERP a Warehouse represents the place where your physical stockis stored A warehouse can be structured into several locations at multiplelevels Locations are used to manage all types of storage places such as atthe customer and production counterparts
For this chapter you can continue using the database with demo data from a previous chapter or startwith a fresh database that includes demo data with Warehouse Management and its dependenciesinstalled and any chart of accounts configured
In this chapter the following modules will be used
CHAPTER 5 YOUR WAREHOUSE 73
Table 51 List of modules
Name Descriptionstock to handle the stock functionsstock_planning to define planning on productsstock_location to define pull and push flowsdelivery to define delivery methods and costsaccount_anglo_saxon to illustrate the valuation according to the anglo-saxon
principlessale_journal to handle stock by journalmrp_jit to illustrate the just-in-time functionalitysale_supplier_direct_deliveryto directly deliver the product from the supplier to the
customer
51 Understanding Double-Entry Stock Management
To illustrate this concept of stock management see how stock moves are generated by the followingoperations
bull Receiving products from a supplier
bull Delivery to a customer
bull Inventory operation for lost materials
bull Manufacturing
The structure of stock locations is shown by the figure Location Structure when OpenERP has just beeninstalled (page 72) Stocks are assumed to be totally empty and no operation is in progress nor planned
If you order lsquo30 bicyclesrsquo from a supplier OpenERP will do the following operations on receipt of theproducts
Table 52 Stock Move Operation from Suppliers to Stock
Location ProductsPartner Locations gt Suppliers -30 bicyclesPhysical Locations gt OpenERP SA gt Stock +30 bicycles
If you deliver 2 bicycles to a European customer you will get the following transactions for the delivery
Table 53 Stock Move Operation from Stock to European Customers
Location ProductsPhysical Locations gt OpenERP SA gt Stock -2 bicyclesPartner Locations gt Customers gt European Customers +2 bicycles
74 CHAPTER 5 YOUR WAREHOUSE
When the two operations are complete you will see the following stock in each location
Table 54 Resulting Stock Situation
Location ProductsPartner Locations gt Suppliers -30 bicyclesPhysical Locations gt OpenERP SA gt Stock +28 bicyclesPartner Locations gt Customers gt European Customers +2 bicycles
So you can see that the sum of the stocks of a product in all the locations in OpenERP is always zeroIn accounting you would say that the sum of the debits is equal to the sum of the credits
Partner locations (customers and suppliers) are not located under your company in the hierarchicalstructure so their contents are not considered as part of your own stock So if you just look atthe physical locations inside your own company those two bicycles are no longer in your companyAlthough they are no longer in your own physical stock it is still very useful to see them in yourcustomerrsquos stock because that will help when you carry out detailed stock management analysis
Consignment Stock
To manage Consignment Stock you need to define the location for theconsignment customer or supplier as part of your own stock and not as apartner location
Accounts
In managing stock a gap between the data in the software and realquantities in stock is difficult to avoid Double-entry stock managementgives twice as many opportunities to find an error If you forget two items ofstock this error will automatically be reflected in the counterpartrsquos location
You can make a comparison with accounting where you will easily find an error because you can lookfor an anomaly in an account or in the counterparts if there is not enough in a bank account thenthat is probably because someone has forgotten to enter a customerrsquos invoice payment You alwaysknow that the sum of debits must equal the sum of the credits in both accounting and OpenERPrsquos stockmanagement
In accounting all documents lead to accounting entries that form the basis of management accountingIf you create invoices or enter statements of account for example the results of the operations areaccounting entries on accounts And it is the same for stock management in OpenERP All stockoperations are carried out as simple stock moves Whether you pack items or manufacture them orcarry out a stock inventory operation stock moves are carried out every time
You have seen a fairly simple example of goods receipt and product delivery but some operations areless obvious ndash a stock inventory operation for example An inventory operation is carried out when youcompare the stock shown in software with real stock numbers counted in the stores In OpenERP withits double-entry stock management you would use stock moves for this inventory operation That helps
CHAPTER 5 YOUR WAREHOUSE 75
you manage your stock traceability Suppose there are 26 bicycles in real stock but OpenERP shows28 in the system You then have to reduce the number in OpenERP to 26 This reduction of 2 unitsis considered as a loss or destruction of products and the correction is carried out as in the followingoperation
Table 55 Inventory Operation to Adjust Stock
Location ProductsPhysical Locations gt OpenERP SA gt Stock -2 bicyclesVirtual Locations gt Inventory Loss +2 bicycles
The product stock under consideration then becomes
Table 56 Real and Counterpart Stocks when Operations are Completed
Location ProductsPartner Locations gt Suppliers -30 bicyclesPhysical Locations gt OpenERP SA gt Stock +26 bicyclesPartner Locations gt Customers gt European Customers +2 bicyclesVirtual Locations gt Inventory Loss +2 bicycles
This example shows one of the great advantages of this approach in terms of performance analysisAfter a few months you can just make a stock valuation of the location Inventory Control rarr LocationStructure rarr Virtual Locations rarr Inventory Loss to give you the value of the companyrsquos stock losses inthe given period
Now see how the following manufacturing operation is structured in OpenERP To make a bicycle youneed two wheels and a frame This means that there should be a reduction of two wheels and a framefrom real stock and the addition of a bicycle there The consumption production is formalized bymoving products out of and into physical stock The stock operations for this are as follows
Table 57 Stock Situation Resulting from Manufacturing
Location Products StepPhysical Locations gt OpenERP SA gt Stock -2 Wheels Consumption of raw materialsVirtual Locations gt Production +2 Wheels Consumption of raw materialsPhysical Locations gt OpenERP SA gt Stock -1 Frame Consumption of raw materialsVirtual Locations gt Production +1 Frame Consumption of raw materialsVirtual Locations gt Production -1 Bicycle Manufacture of finished productsPhysical Locations gt OpenERP SA gt Stock +1 Bicycle Manufacture of finished products
So now you have got the outcome you need from the consumption of raw materials and themanufacturing of finished products
76 CHAPTER 5 YOUR WAREHOUSE
Assessing Created Value
You might already have noticed a useful effect of this approach if youdo a stock valuation in the Virtual Locations gt Productionlocation you get a statement of value created by your company (as anegative amount) Stock valuation in any given location is calculated bymultiplying quantities of products in stock by their cost In this case theraw material value is deducted from the finished product value
52 Managing Physical Inventory Structure
521 Warehouse
Warehouses are designed for physical locations from which you can deliver to the customer and towhich you receive raw materials When you buy products from a supplier you should take account ofthe Warehouse you use for this purchase This also enables the end user to not have to choose from alist of locations but simply a real warehouse Use the menu Warehouse rarr Configuration rarr WarehouseManagement rarr Warehouses then click New to configure a new warehouse
A warehouse is defined by a link between three locations
bull The Location Stock field shows the place of products available for delivery to a customer directlyfrom this warehouse Availability is given by all the products in that location and any childlocations
bull The Location Input field shows where ordered products are received from a supplier in thatwarehouse It can be the same as the stock location if for example you want to do a qualitycontrol operation on your incoming raw materials
bull The Location Output field (called Output in the demonstration database) is designed as a bufferzone in which you store all the items that have been picked but not yet delivered to a customerYou are strongly advised not to put this location within the stock hierarchy but instead at a higherlevel or at the same level
Figure 52 Warehouse Parameters
CHAPTER 5 YOUR WAREHOUSE 77
You can also set an address for the warehouse This address should ideally be an address of yourcompany Once the warehouse has been defined it can be used in
bull Minimum stock rules
bull Supplier orders
bull Customer orders (using the definition of a point of sale which is linked to a warehouse)
Automatic Procurement
Several methods of automatically procuring products can be carried out by OpenERP
bull the workflow used by products that have the procurement method Make to Order
bull using minimum stock rules for Make to Stock products
bull using the master production schedule for Make to Stock products
The last two methods are described below
Minimum Stock Rules
To automatically make stock replenishment proposals you can use minimum stock rules Go to themenu Warehouse rarr Automatic Procurements rarr Minimum Stock Rules
The rule is the following if the virtual stock for the given location is lower than the minimum stockindicated in the rule the system will automatically propose a procurement to increase the level of virtualstock to the maximum level given in the rule
Figure 53 List of Minimum Stock Rules
78 CHAPTER 5 YOUR WAREHOUSE
Conflict Resolution
You may find draft production or procurement orders to be created althoughthey should not exist That can happen if the system is badly configured (forexample if you have forgotten to set the supplier on a product)
To check this look at the list of procurements in the exception state in themenu Warehouse rarr Schedulers rarr Procurement Exceptions More detailsabout processing these exceptions is given in ch-mnf
We underline that the rule is based on virtual quantities and not just on real quantities It takes intoaccount the calculation of orders and receipts to come
Take the following example
bull Products in stock 15
bull Products ordered but not delivered 5
bull Products in manufacturing 2
The rules defined are
bull Minimum stock 13
bull Maximum stock 25
Once the rules have been properly configured the purchasing manager only needs to look at the listof orders for confirmation with the supplier using the menu Purchases rarr Purchase Management rarrRequests for Quotation
Procurement
Note that the procurement does not require that you buy from a supplier Ifthe product has a Supply Method Produce the scheduler will generate aManufacturing order instead of a supplier order
You can also set multiple quantities in the minimum stock rules If you set a multiple quantity of3 the system will propose procurement of 15 pieces and not the 13 it really needs In this case itautomatically rounds the quantity upwards
CHAPTER 5 YOUR WAREHOUSE 79
Maximum Quantity
Pay attention to the fact that the maximum quantity is not the maximumyou will have in stock If we take the following situation a company has10 pieces of product with minimum stock rules defined for this product byMin quantity = 10 Max quantity = 30 and Qty multiple = 12 If an orderof 2 pieces comes a purchase of 24 pieces order will be executed The first12 pieces will be ordered to reach the minimum quantity and the other 12to reach the maximum quantity At the end the stock of this product willbe equal to 32 pieces
In a minimum stock rule when you indicate a warehouse it suggests a stock location by default in thatwarehouse You can change that default location when the scheduler completes
522 Location
A location is one component of the warehouses that is used to managed all types of storage places suchas at the customerrsquos and production counterparts
There are different types of locations that allow you to structure your warehouses according to yourneeds Locations are structured hierarchically to account for the subdivision of a warehouse intosections aisles andor cupboards The hierarchical view also enables you to structure virtual locationssuch as production counterparts That gives you a finer level of analysis Go to the menu Warehouse rarrConfiguration rarr Warehouse Management rarr Locations then click New to define new locations
Figure 54 Defining a new Stock Location
Here are the different available types of locations
bull Supplier Location virtual location representing the source location for products received
80 CHAPTER 5 YOUR WAREHOUSE
from suppliers
bull View shows that the location is only an organizational node for the hierarchical structure andcannot be involved in stock moves itself The view type is not made into a leaf node in a structurendash it usually has children
bull Internal Location physical location inside your own stock
bull Customer Location virtual location representing the destination for products sent tocustomers
bull Inventory virtual location serving as the counterpart for inventory operations used to correctstock levels (physical inventories)
bull Procurement virtual location serving as temporary counterpart for procurement operationswhen you do not yet know the source (supplier or production) Products in this location shouldbe zero after the scheduler run completes
bull Production virtual counterpart location for production operations consuming raw materialand sending finished products
bull Transit Location for Inter-Companies Transfers used as an intermediatelocation in a multi-company environment
You can have several locations of the same type In that case your product supplier and warehouseconfigurations determine the location that is to be used for any given operation
Location Addresses
Each location can have a specific address that enables you to create a location for a customer ora supplier for example You can then give it the address of that customer or supplier Go to thepartner form to tell OpenERP it should use this location rather than the default location given to partnerdeliveries
Subcontracting Production
You will see in the on line chapter Manufacturing that it is possible toassign a location to a manufacturing workcenter If this location is at asupplierrsquos you must give it an address so that OpenERP can prepare adelivery order for the supplier and a receive operation for the manufacturedgoods Creating a location specifically for a partner is also a simple solutionfor handling consigned stocks in OpenERP
CHAPTER 5 YOUR WAREHOUSE 81
Consigned Stock
Consigned stock is stock that is owned by you (valued in your accounts)but is physically stocked by your supplier Or conversely it could be stockowned by your customer (not valued by you) but stocked in your companyMake sure that you create consignment locations as part of your internalstock
To enable you to easily consolidate at a higher level the location definition is hierarchical Thisstructure is given by the field Parent Location That also enables you to manage complex casesof product localization
For example you could imagine the following scenario One Company with Two Warehouses
A company has a warehouse in Paris and in Bordeaux For some orders you have to deliver theproducts from Paris and for others from Bordeaux But you should also specify a fictitious warehousethat OpenERP uses to calculate whether it should deliver products from Paris or from Bordeaux To dothis in OpenERP you would create a third warehouse lsquoFrancersquo which consolidates the warehouses inParis and Bordeaux You create the following physical locations
bull Company
ndash Output
Warehouses Francemiddot Warehouse Parismiddot Warehouse Bordeaux
OpenERP will then deliver the goods from the warehouse that has the ordered product in stock Whenproducts are available in several warehouses OpenERP will select the nearest warehouse To formalizethe notion of distance between warehouses you should use the geographic co-ordinates (X Y Z) of thedifferent stores to enable OpenERP to search for the nearest goods The same co-ordinates could alsobe used to structure the shelves aisles and interior rooms in a warehouse
Linked Locations
Locations in OpenERP can be linked between each other to define paths followed by products So youcan define rules such as all products that enter the warehouse should automatically be sent to qualitycontrol The warehouse and quality control are represented by two different locations
Then when a product arrives in a location OpenERP can automatically suggest that you send theproduct to another linked location Three link modes are available
bull Manual Operation
bull Automatic Move
bull Automatic No Step Added
82 CHAPTER 5 YOUR WAREHOUSE
The Manual Operation mode will create an internal move order to the linked location once productsarrive in the source locations This order will wait for a confirmation of the move by a user Thisenables you to have a list of moves to do proposed by the system and confirmed by the storesperson
The Automatic Move mode will do the same but will not wait for a confirmation from the user Productswill automatically be sent to the linked location without any intervening manual operation to do Thiscorresponds to the case where for simplicity you delete a step in the process so the end user can setoff the process automatically
The Automatic No Step Added mode will not include the additional stock move but will change thedestination move transparently to assign the linked location You could then assign a destinationlocation to which you send all the products that arrive in your warehouse The storesperson will modifythe goods receipt note
Product Logistics
The module stock_location lets you generate paths to follow not justat the level of locations but also at the level of products It then enables youto manage default locations for a given product or to refer to the productsas a function of operations such as quality control supplier receipt andafter-sales service
A more detailed explanation of this module with examples is given at theend of this chapter
If there is linking to do the Chained Location Type field allows you to determine the destinationlocation If the field is set to lsquoCustomerrsquo the location is given by the properties of the partner form Ifthe field is set to fixed the destination location is given by the field Chained Location If Fixed
Some operations take a certain time between order and execution To account for this lead time youcan set a value in days in the field Chaining Lead Time Then the extra move (automatic or not) willbe carried out several days after the original move If you use the mode Automatic No Step Added thelead time is inserted directly into the initial order In this way you can add security lead times at certaincontrol points in the warehouse
Structuring Locations
In the next part you will see that by linking locations you can manage a whole series of complex casesfor efficient production management
bull Handling multiple operations for a customer order
bull Tracking import and export by sea transport
bull Managing a production chain in detail
bull Managing rented products
bull Managing consigned products
CHAPTER 5 YOUR WAREHOUSE 83
To show these concepts different cases of structuring and configuring these locations are given belowMany other configurations are possible according to company needs
Examples
bull Handling customer orders
Customer orders are usually handled in one of two ways
bull item note (or preparation order) confirmed when the item is ready to send
bull delivery order (or freight note) confirmed when the transporter has delivered the item to acustomer
You use the following stock move in OpenERP to simulate these operations
bull Packing Note Stock gt Output
bull Delivery Order Output gt Customer
The first operation is automatically generated by the customer order The second one is generated bythe stock management showing that the Output location is linked to the Customer location The twooperations will be displayed in Waiting status If the Output location is not situated beneath the stocklocation you then have to move the item from stock to the place where the item is prepared
Some companies do not want to work in two steps because it just seems like extra work to haveto confirm a delivery note in the system You can then set the link mode to lsquoAutomaticrsquo to makeOpenERP automatically confirm the second step It is then assumed all the items have automaticallybeen delivered to the customer
bull Linked production
The stock_location module enables you to manage the linkages by product in addition to doingthat by location You can then create a location structure that represents your production chain byproduct
The location structure may look like this
bull Stock
ndash Level 1ndash Level 2
Link 1middot Operation 1middot Operation 2middot Operation 3middot Operation 4
You can then set the locations a product or a routing must go through in the relevant form All productsthat enter the production chain will automatically follow the predetermined path You can see thelocation structure using Warehouse rarr Inventory Control rarr Location Structure
84 CHAPTER 5 YOUR WAREHOUSE
523 Shop
The counterparts for procurement inventory and production operations are given by the locationsshown in the product form The counterparts of reception and delivery operations are given by thelocations shown in the partner form The choice of stock location is determined by the configuration ofthe warehouse linked to a Shop which can be defined using Sales rarr Configuration rarr Sales rarr Shop
Once a shop is defined you will be able to make sales orders from this shop You need at least oneshop in order to be able to make sales orders
524 Stock
In the Product form the Stock by Location action will give you the stock levels of the variousproducts in any selected location If you have not selected any location OpenERP calculates stocks forall of the physical locations When you are in the Stock by Location view click the Print button to printthe Location Content or the Location Inventory Overview reports
Availability of Stock
Depending on whether you look at the product from a customer order orfrom the menu of a product form you can get different values for stockavailability If you use the Product menu you get the stock in all of thephysical stock locations Looking at the product from the order you willonly see the report of the warehouse selected in the order
In this respect two important fields in the product form are
bull Real Stock Quantity physically present in your warehouse
bull Virtual Stock Calculated as follows real stock ndash outgoing + incoming
Virtual Stock
Virtual stock is very useful because it shows what the salespeople can sellIf the virtual stock is higher than the real stock this means products will becoming in If virtual stock is smaller than real stock certain products arereserved for other sales orders or work orders
Detail of Future Stock
To get more details about future stock you can click Stock LevelForecast to the right of the product form to get the report Forecast StockLevels as illustrated below OpenERP shows a graph of the changes in stockin the days to come varying as a function of purchase orders confirmedproduction and sales orders
CHAPTER 5 YOUR WAREHOUSE 85
Figure 55 Printout of forecast stock levels
Filter Stock by Location
By default in Product list view the columns Real Stock and Virtual Stockshow the stock figures for all stock locations where a product is stored Usethe Extended Filters to enter a specific stock location if you want to onlysee the stock in a specific location
Lead Times and Locations
The tab Procurement amp Locations in the Product form contains information about different lead timesand locations Three lead time figures are available
bull Customer Lead Time lead time promised to the customer expressed in number of days betweenthe order and the delivery to the customer
bull Manufacturing Lead Time lead time in days between a production order and the end ofproduction of the finished product
bull Warranty (months) length of time in months for the warranty of the delivered products
Warranty
The warranty period is used in the Repairs management and after-salesservice You can find more information on this subject in the on line chapterabout Manufacturing
86 CHAPTER 5 YOUR WAREHOUSE
Fields in the section Storage Localisation are for information only they do not have any impact on themanagement of stock
Counter-Part Locations Properties are automatically proposed by the system but the different valuescan be modified You will find counterpart locations for
bull Procurement
bull Production
bull Inventory
A procurement location is a temporary location for stock moves that have not yet been finalized by thescheduler When the system does not yet know if procurement is to be done by a purchase or productionOpenERP uses the counterpart location Procurement In this location you will find everything that hasnot yet been planned by the system The quantities of product in this location cancel each other out
Initial Inventory
Once a product has been defined use an initial inventory operation to put current quantities into thesystem by location for the products in stock Go to the menu Warehouse rarr Inventory Control rarrPhysical Inventories to do your initial inventory
Figure 56 Defining a New Inventory Operation
CHAPTER 5 YOUR WAREHOUSE 87
Give a name (for example Initial Inventory or Lost Product XYZ ) and a date (proposed by default) foreach inventory operation
You have three ways of doing an inventory
bull Click the Import Inventory action and select the location concerned You can choose to includechild locations and set the inventory to zero (especially useful to ensure the count is donecorrectly)
bull You can update the inventory from the Product form Go to the Information tab Stocks sectionand click the Update button On confirmation OpenERP will create a Physical Inventory
bull You can manually add inventory lines You can then enter data about the quantities available foreach product by location Start by entering the location for example Stock and then select theproduct OpenERP automatically completes the quantity available for that product in the locationshown You can then change that value to correct the value in stock
Enter data for a single line in your inventory
bull Location Stock
bull Product PC1 Basic PC
bull Quantity 23 Units
When your inventory operation is finished you can confirm it using the Confirm Inventory button to thebottom right of the form OpenERP will then automatically create the stock moves to close the gaps asmentioned at the start of this chapter You can verify the moves generated using the Posted Inventorytab of the inventory operation form
The correct levels of your product are now in your stock locations A simple way of verifying this is toreopen the product form to see the quantities available in stock
Periodical Inventory
You are usually legally required to do a stock check of all your productsat least once a year As well as doing a complete annual stock checkOpenERP also supports the method of periodical inventory
That means you can check the stock levels of a proportion of your productsevery so often This system is accepted in France as long as you canguarantee that all of your products have been counted at least once peryear To see the last inventory count per product use the report Warehouserarr Reporting rarr Last Product Inventories
You can do this the same way for all products and all locations so you onlycarry out small inventory operations through the year rather than a singlelarge stock check at one point in the year (which usually turns out to be atan inconvenient time)
88 CHAPTER 5 YOUR WAREHOUSE
53 Keeping Track of Stock Movements
531 Goods Receipts
In OpenERP you have the choice between three ways to receive goods from suppliers
The first method is to manually enter the information in the incoming shipment To receive the productsthrough this method you have to go to Incoming Shipments section in the Warehouse Managementsubmenu click New and then you enter the information about the receipt
Figure 57 Manual Data Entry for Product Receipt
The second method is to receive products from a generated incoming shipment To achieve thereception using this method you have to go to Incoming Shipments section in the WarehouseManagement submenu You will find the list of waiting incoming shipments
The third method is to receive products by waiting products without looking at the shipment documentYou can validate the reception by products in Receive Products section in the guilabellsquo Product Moveslsquosubmenu With this method you will be able to receive one product regardless of the document whichis attached to this product
Receipt of a Supplier Order by Purchase Order
If you use Purchase Orders in OpenERP product receipts are automatically generated by the systemwhen the purchase order is confirmed You do not have to enter any date just confirm that the quantitiesordered match the quantities received
Incoming Shipments forms are automatically prepared by OpenERP from the purchase managementprocess You will find a list of all the awaited receipts in the menu Warehouse rarr WarehouseManagement rarr Incoming Shipments Use the order number or the supplier name to find the rightgoods receipt form for confirmation of a goods-in This approach enables you to control quantities
CHAPTER 5 YOUR WAREHOUSE 89
received by referring to the quantities ordered
Figure 58 List of Items Waiting
You can also do goods-in data entry manually if there is no order using the same menu by clicking theNew button
A new goods-in data entry form opens Enter the supplier data in the Address field and type thereference number from your supplier in the field Origin You should then enter data about the productsreceived in the lines
The source location is already completed by default because of your supplier selection You shouldthen give the destination location where you will place the products For example enter Stock Atthis stage you can set a lot number for traceability (this function will be described later in this chapterso leave this field empty for the moment)
Once the form has been completed you can confirm the receipt of all the products at the same timeusing the Process Now button If you want to enter data for a goods receipt that you are still waitingfor click the button Process Later
90 CHAPTER 5 YOUR WAREHOUSE
Partial or Complete Reception
When you process the incoming shipment you can choose between partialor complete
If you have to validate a partial incoming shipment click Process nowand change the number of items according to the quantity received
Figure 59 Confirm partial reception
Another object will be generated with a back order reference equal to theReference number of the incoming shipment already confirmed
Figure 510 Process a Partial Incoming Shipment
Once the rest of the order has arrived and has been processed both orderswill be merged
Figure 511 Form for Entering Goods received from a Supplier Order
The products then arrive in stock and should reflect the quantities shown on the product form
In the Incoming Shipments form the field Invoice Control lets you influence the way you sendinvoices to suppliers If this is set to To be invoiced a supplier invoice will now be generated
CHAPTER 5 YOUR WAREHOUSE 91
automatically in the draft state based on the goods received Your accountant then has to confirmthis pre-invoicing once the supplierrsquos invoice is received This enables you to verify that the invoicedquantities correspond to the quantities received
Print the Packing List
In order to print the packing list of an incoming shipment select theincoming shipment of which you need the details and click PackingList in the panel at the right side of the screen
This link is available in the Internal Moves and DeliveryOrders sections
In case you received damaged or wrong products you can return them to the supplier In theIncoming shipment form click the Return Products button A window will open that letsyou choose the invoicing process to follow Once you click Process a stock move is generated withthe same reference number and return to specify that this is a return move
Figure 512 Stock Move for Returned Products
Receipt of a Supplier Order by Product
The approach shown above is very useful if goods receipts correspond to the original orders If yoursuppliers deliver items that do not necessarily coincide with the orders however it is easier to work byproducts received rather than by orders
From this version on you can also handle receptions by product even from List view Go to Warehouserarr Products Moves rarr Receive Products
Filters allow you to easily select receipts to be done and so on One way to quickly receive products isto Group by Supplier and select To Do
This is very useful functionality when your supplier sends the goods for several purchase orders at atime You can now just receive the products regardless of the purchase order they come from simplyby clicking the green arrow at the right side of the screen
The List view offers great flexibility and allows you to rapidly receive products by keeping fullfunctionality Of course you can handle both partial and complete receptions and you can addinformation about the production lots and packs
This can be also accomplished from Form view
92 CHAPTER 5 YOUR WAREHOUSE
Figure 513 Receipt of a Supplier Order using Group By
532 Internal Stock Moves
You should install the stock_location module (from the list of modules or through Reconfigurewizard Advanced Routes) if routing products to customers from suppliers or in your warehouse isdetermined by the identity of the product itself
Figure 514 Managing the Paths from one Location to Another in a Product Form
This will let you configure logistics rules individually for each product For example when a specificproduct arrives in stores it can automatically be sent to quality control In this case it has to beconfigured as a Push Flow with rules in the Product form The fields that make up those rules are
bull Source Location the rule only applies if a product comes from this location
bull Destination Location the rule only applies if a product ends up in this location
CHAPTER 5 YOUR WAREHOUSE 93
bull Automatic Move Automatic Move Manual Operation Automatic No StepAdded
bull Delay (days)
bull Operation a free text field which will be included in the automatic stock move proposed byOpenERP
There are two main logistic flows
bull Pushed Flows
bull Pulled Flows
Push flows are useful when the arrival of certain products in a given location should always be followedby a corresponding move to another location optionally after a certain delay The original Warehouseapplication already supports such Push flow specifications on the Locations themselves but thesecannot be refined per product Pull flows are a bit different from Push flows in the sense that theyare not related to the processing of product moves but rather to the processing of procurement ordersWhat is being pulled is a need not directly products You will now see some examples of using theselocations and logistics by product through Pushed Flows for
bull A rentable product
bull A product bought in China following its freight by ship from port to port
bull A product that you want to send to quality control before putting it in stocks
We will develop the third scenario the quality control
You can configure the system to put a given product in the Quality Control bay automatically when itarrives in your company To do that you just configure a rule for the product to be placed in the QualityControl location rather than the Input location when the product is received from the supplier
Table 58 Rule to Move Products manuallyfrom Input to Quality Control
Field ValueSource location StockDestination location Quality ControlAutomatic Move Manual OperationShipping Type Getting GoodsDelay (days) 0Operation Quality Control
Once this product has been received OpenERP will automatically manage the request for an internalmovement to send it to the Quality Control location If you want to do this automatically without havingto confirm it in the Automatic Move field select Automatic Move or Automatic No Step Added
94 CHAPTER 5 YOUR WAREHOUSE
Figure 515 Manual Stock Move to Quality Control
With the configuration described in the table above you will have to confirm the stock move manuallyonce you have received the goods
If you do not want to confirm the stock move manually but you want to see the move Suppliers ndashgtStock then Stock ndashgt Quality Control change the Automatic Move field and select Automatic MoveWith this configuration you will see the two stock moves
Figure 516 Automatic Stock Move to Quality Control
If you select Automatic Move No Step Added you will only see one stock move Suppliersndashgt Quality Control
Figure 517 Automatic Stock Move to Quality Control (No Step Added)
533 Shipping of Goods
In the same way as delivering goods you can ship goods in three different ways
bull manually enter data
bull deliver goods according to a sales order
bull deliver goods by product
CHAPTER 5 YOUR WAREHOUSE 95
Everything about goods receipt can also be done manually in the same way for a customer deliveryThis time use the automated product delivery processes based on customer orders Install the salemodule (Reconfigure wizard Sales Management) so that you can proceed further in this section of thechapter
Now create a new sales order from the menu Sales rarr Sales rarr Sales Orders Enter the following datain this order
bull Shop OpenERP SA
bull Customer Agrolait
bull Sales order lines
ndash Product [PC2] Basic+ PC (assembly on order)
ndash Quantity (UoM) 3
ndash Product UoM PCE
ndash Procurement Method from stock
You have already seen that OpenERP shows the available product stock in list view The real stock isequal to the virtual stock because you have nothing to deliver to customers and you are not waiting forany of these products to be received into stock The salesperson then has all the information needed totake orders efficiently
Figure 518 Entering an Order for Three Computers
Then confirm the quotation to convert it to an order If you return to the product form you will see thevirtual stock is now smaller than the real stock
Start the scheduler through the menu Warehouse rarr Schedulers rarr Compute Schedulers Itsfunctionality will be detailed in ch-mnf This manages the reservation of products and places ordersbased on the dates promised to customers and the various internal lead times and priorities Threeproducts will be reserved in the order that you created so they cannot be sold to another customer
96 CHAPTER 5 YOUR WAREHOUSE
Just in Time
Install the module mrp_jit to schedule each order in real time after it hasbeen confirmed This means that you do not have to start the scheduler orwait for its periodical start time
Now have a look at the list of deliveries waiting to be carried out using the menu Warehouse rarrWarehouse Management rarr Delivery Orders You find a line there for your order representing theitems to be sent Double-click the line to see the detail of the items proposed by OpenERP
Figure 519 Items on a Customer Order
States
OpenERP distinguishes between the states Confirmed and Assigned
An item is Confirmed when it is needed but the available stock may beinsufficient An item is Assigned when it is available in stock and thestoresperson reserves it the necessary products have been reserved for thisspecific operation
You can also confirm a customer delivery from a confirmed Sales Order When you click the Processbutton of Outgoing Deliveries a window opens where you can enter the quantities actually deliveredIf you enter a value less than the forecasted one OpenERP automatically generates a partial deliverynote and a new order for the remaining items For this exercise just confirm all the products
However if you want to look at a partial shipping an example will be developed at the end of thissection
CHAPTER 5 YOUR WAREHOUSE 97
If you return to the list of current orders you will see that your order has now been marked as delivered(Done) A progress indicator from 0 to 100 is shown by each order so that the salesperson canfollow the progress of his orders at a glance
Figure 520 List of Orders with their Delivery State
Negative Stock
Stock Management is very flexible to be more effective For example if youforget to enter products at goods-in this will not prevent you from sendingthem to customers In OpenERP you can force all operations manuallyusing the button Force Availability In this case your stocks risk to becomenegative You should monitor all stocks for negative levels and carry out aninventory correction when that happens
Partial Shipping
Should you have to process a partial delivery you can go to Warehouse rarr Warehouse Management rarrDelivery Orders then select the order to process it In the new window change the quantity to ship andthen confirm it
If you go back to the list view you will now see a new delivery order with a back order numberequal to the just confirmed order This is illustrated in the following figure
Figure 521 Partial Shipping
In the stock moves you will see that there are two moves The first move is for the remaining quantitiesto ship and the second one is for the shipped goods There will be more stock moves if you process
98 CHAPTER 5 YOUR WAREHOUSE
partial shipping in more than two times
Figure 522 Stock Moves in Partial Shipping
Return Products from Customers
If a customer returns damaged or wrongly delivered products you can enter this information inOpenERP via Warehouse rarr Warehouse Management rarr Delivery Orders
You have to select the order related to the returned products and click the Return Products A newwindow will open and will let you choose the invoicing method
Figure 523 Return Products from Customers
When the product is returned it will go back to your stock and you will see a stock move fromCustomers ndashgt Shelf 1
Figure 524 Stock Move for a Returned Product
Just In Time
By default scheduling starts automatically once a day You should make this scheduling executeovernight to ensure that the system does not slow down under a heavy load of scheduling when you arealso trying to use it interactively
To set the start time for the scheduler go to the menu Administration rarr Configuration rarr Scheduler rarrScheduled Actions Select the rule called lsquoRun mrp schedulerrsquo and modify the date and time of the nextexecution Some companies want to plan orders progressively as they are entered so they do not waituntil procurement orders are planned the next day Install the module mrp_jit (Reconfigure wizard
CHAPTER 5 YOUR WAREHOUSE 99
Just In Time Scheduling) to handle this Once the module is installed each requirement (that couldresult in a Production or Purchase Order) will be planned in real time as soon as it has been confirmed
Then if you make a sales order with a product that is Make To Order the quotation request to asupplier will immediately be generated
Delivery from the Supplier or to the Customer
The sale_supplier_direct_delivery module enables you todeliver the product directly from the supplier to the customer At thetime of writing this module is in extra-addons The logic that theproduct follows is configured individually for each product and affects onlyproducts marked Make to Order
This mode does not always makes sense Each order is processed immediately when confirmed Soif an order is to be delivered in three months the scheduler will reserve goods in stock for each orderonce it has been confirmed It would have been more sensible to leave these products available for otherorders
If a Purchase Orderrsquos Invoicing Control is configured From Order the scheduler will immediatelycreate the corresponding supplier quotation request It might have been better to delay it for severalweeks if you could have used the lead time to group the purchase with other future orders
So the negative effects of working with the Just in Time module are
bull Poor priority management between orders
bull Additionally stocked products
534 Logistics Configuration through Advanced Routes
To configure your logistics for advanced push and pull you need to install stock_locationmodule(Reconfigure wizard Advanced Routes) as explained before A complete scenario will be developed atthe end of this chapter
This module supplements the Warehouse application by adding support for location paths per producteffectively implementing Push and Pull inventory flows
Typically this could be used to
bull Manage product manufacturing chains
bull Manage default locations per product
bull Define routes within your warehouse according to business needs such as
ndash Quality Control
ndash After Sales Services
ndash Supplier Returns
100 CHAPTER 5 YOUR WAREHOUSE
bull Help rental management by generating automated return moves for rented products
Once this module is installed an additional Logistics Flows tab appears in the Product form allowingyou to add Push and Pull flow specifications
Push Flow
Push flows are useful when the arrival of certain products in a given location should always be followedby a corresponding move to another location optionally after a certain delay
Product
The core Warehouse Management application already supports such PushFlow specifications on the Locations but these cannot be refined perproduct
A push flow specification indicates which location is chained with another location as well as theparameters used As soon as a given quantity of products is moved to the source location a chainedmove is automatically foreseen according to the parameters set on the flow specification (destinationlocation delay type of move journal etc) The new move may be processed automatically or mayrequire a manual confirmation according to what you have defined
Suppose whenever the demo data product CPU3 enters the Stock location it first has to be moved tothe Quality Control location in order to check the quality
Look up the product CPU3 using the menu Warehouse rarr Product rarr Products
To have OpenERP accomplish this move automatically you have to configure the Push flow as follows
bull Operation Receptions to Quality Control
bull Source Location Stock
bull Destination Location Quality Control
bull Automatic Move Automatic No Step Added
bull Delay (days) 1
bull Shipping Type Getting Goods
bull Invoice Status Not Applicable
A push flow is related to how stock moves should be generated in order to increase or decreaseinventory
CHAPTER 5 YOUR WAREHOUSE 101
Figure 525 Push Flow Specification for Product CPU3
Pull Flow
Pull flows are a bit different from Push flows in the sense that they are not related to the processing ofproduct moves but rather to the processing of procurement orders What is being pulled is a need notdirectly products
A classical example of a Pull flow is when you have an Outlet company with a parent Company that isresponsible for the supplies of the Outlet
[ Customer ] lt- A - [ Outlet ] lt- B - [ Holding ] lt- C - [ Supplier ]
Demo Data
In our demo data example the Outlet Company is Shop 1 while OpenERPSA is the parent company
When a new procurement order A (resulting from the confirmation of a Sales Order for example) iscreated in the Outlet (Shop 1) it is converted into another procurement B (through a Pull flow of the
102 CHAPTER 5 YOUR WAREHOUSE
lsquomoversquo type) requested from the Holding When procurement order B is processed by the Holdingcompany (OpenERP SA) and if the product is out of stock it may be converted into a Purchase Order(C) from the Supplier (Push flow of the lsquoBuyrsquo type) The result is that the procurement order the needis pushed all the way between the Customer and Supplier
Technically Pull flows allow to process procurement orders differently not only depending on theproduct being considered but also depending on which location holds the ldquoneedrdquo for that product (iethe destination location of that procurement order)
To explain a pull flow for the product CPU1 we first have to configure the minimum stock rulesof CPU1 for the company OpenERP SA and Shop 1 using the menu Warehouse rarr AutomaticProcurements rarr Minimum Stock Rules or by selecting the product concerned and then clicking theMinimum Stock Rules action
Minimum Stock Rules
If you work with the demo data these minimum stock rules have alreadybeen defined
For the company OpenERP SA
bull Min Quantity 10
bull Max Quantity 50
For the company Shop 1
bull Min Quantity 10
bull Max Quantity 20
Look up the product CPU1 using menu Warehouse rarr Product rarr Products in order to define theconfiguration of the pulled flow
There are two specifications of a pull flow for product CPU1
Specification 1
bull Name Receive from Warehouse
bull Destination Location Shop 1
bull Type of Procurement Move
bull Source Location Internal Shippings
bull Partner Address OpenERP SA Belgium Gerompont Chaussee de Namur 40
bull Shipping Type Getting Goods
bull Procure Method Make to Order
CHAPTER 5 YOUR WAREHOUSE 103
Figure 526 Pull Flow Specification for Product CPU1
bull Invoice Status Not Applicable
Specification 2
bull Name Deliver Shop
bull Destination Location Internal Shippings
bull Type of Procurement Move
bull Source Location Stock
bull Partner Address Fabien
bull Shipping Type Sending Goods
bull Procure Method Make to Stock
bull Invoice Status Not Applicable
Now sell 1 unit of product CPU1 from the Shop1 (do not forget to confirm your sales order) and runthe scheduler using the menu Warehouse rarr Schedulers rarr Compute Schedulers Then check the stockmoves for product CPU1 from the menu Warehouse rarr Traceability rarr Stock Moves
104 CHAPTER 5 YOUR WAREHOUSE
Figure 527 Stock Move of CPU1 related to Pull Flow Specification
These moves can be explained like this
[ Customer ] ltndash [ Shop 1 ] ltndash Internal Shippings ltndash Stock ltndash [ OpenERP SA ]
When the company Shop 1 sells one unit of CPU1 to a customer its stock decreases to 10 unitsAccording to the minimum stock rule of the product CPU1 OpenERP generates a procurement orderof 21 units of CPU1 for the company Shop 1 (OP00007 or another number if you have added extradata) So 21 units of CPU1 move from OpenERP SA Stock to Shop 1 according to their internalconfiguration of Source and Destination Locations
A pull flow is related to how the procurement process runs in order to find products to increase ordecrease inventory
535 Procurement Methods ndash Make to Stock and Make to Order
The procurement method determines how the product will be replenished
bull Make to Stock your customers are supplied from available stock If the quantities in stock are toolow to fulfil the order a Purchase Order (according the minimum stock rules) will be generatedin order to get the products required Example a classic distributor
bull Make to Order when a customer order is confirmed you procure or manufacture the products forthis order A customer order lsquoMake to Orderrsquo will not modify stock in the medium term becauseyou restock with the exact amount that was ordered Example computers from a large supplierassembled on demand
CHAPTER 5 YOUR WAREHOUSE 105
You find a mix of these two modes used for the different final and intermediate products in mostindustries The procurement method shown on the product form is a default value for the order enablingthe salesperson to choose the best mode for fulfilling a particular order by varying the sales orderparameters as needed
The figures Change in Stock for a Make to Stock Product (page 105) and Change in Stock for a Maketo Order Product (page 105) show the change of stock levels for one product managed as Make toOrder and another managed as Make to Stock The two figures are taken from OpenERPrsquos Stock LevelForecast report available from the product form
Figure 528 Change in Stock for a Make to Stock Product
Figure 529 Change in Stock for a Make to Order Product
106 CHAPTER 5 YOUR WAREHOUSE
Logistical Methods
The Make to Stock logistical approach is usually used for high volumes andwhen the demand is seasonal or otherwise easy to forecast The Make toOrder approach is used for products that are measured or very expensiveto stock or have a short restocking time
536 Choosing Supply Methods
OpenERP supports two supply methods
bull Produce when the product is manufactured or the service is supplied from internal resources
bull Buy when the product is bought from a supplier
These are just the default settings used by the system during automated replenishment The sameproduct can be either manufactured internally or bought from a supplier
These three fields (Supply Method Procurement Method Product Type) determine the systemrsquosbehaviour when a product is required The system will generate different documents depending onthe configuration of these three fields when satisfying an order a price quotation to a supplier or amanufacturing order
OpenERP manages both stockable products and services A service bought from a supplier in Make toOrder mode will generate a subcontract order from the supplier in question
Figure Workflow for Automatic Procurement depending on the Product Configuration (page 107)illustrates different cases for automatic procurement
The table below shows all possible cases for the figure Workflow for Automatic Procurement dependingon the Product Configuration (page 107)
Table 59 Consequences of Procurement Methods Make to Stock (MTS)and Make To Order (MTO)
Procurement Method Produce BuyMTS Wait for availability Wait for availabilityMTO Production Order Purchase Order
Table 510 Consequences of Procurement Methodswhen using Services
Procurement Method Produce BuyMTS MTO Create task Subcontract
CHAPTER 5 YOUR WAREHOUSE 107
Figure 530 Workflow for Automatic Procurement depending on the Product Configuration
537 Packaging with Various Logistics Units of Measure
Units of Measure
OpenERP supports several units of measure Quantities of the same product can be expressed in severalunits of measure at once For example you can buy grain by the tonne and resell it by kg You just haveto make sure that all the units of measure used for a product are in the same units of measure category
Categories of Units of Measure
All units of measure in the same category are convertible from one unit toanother
The table below shows some examples of units of measure and their category The factor is used toconvert from one unit of measure to another as long as they are in the same category
108 CHAPTER 5 YOUR WAREHOUSE
Table 511 Example Units of Measure
UoM Category Ratio UoM TypeKg Weight 1 ReferenceGram Weight 1000 SmallerTonne Weight 1000 BiggerHour Working time 8 SmallerDay Working time 1 ReferenceHalf-day Working time 4 SmallerItem Unit 1100 Items Unit 001
Depending on the table above you have 1Kg = 1000g = 0001 Tonnes A product in the Weightcategory could be expressed in Kg Tonnes or Grammes You cannot express it in hours or pieces forexample
Use the menu Warehouse rarr Configuration rarr Products rarr Units of Measure rarr Units of Measure todefine a new unit of measure
In the definition of a Unit of Measure you have a Rounding precision factor which shows how amountsare rounded after the conversion A value of 1 gives rounding to the level of one unit 001 givesrounding to one hundredth
Secondary Units
OpenERP supports double units of measure Notice however that thedefault unit of measure and the purchase unit of measure have to be inthe same category Only the sales unit of measure may be in a differentcategory
This is very useful in the agro-food industry for example you sell ham bythe piece but invoice by the Kg A weighing operation is needed beforeinvoicing the customer
To activate the management options for double units of measure assign the group Useability ProductUoS View to your user
In this case the same product can be expressed in two units of measure belonging to different categoriesfor sales and stockpurchase You can then distinguish between the unit of stock management (the piece)and the unit of invoicing or sales (kg)
Figure 531 Secondary Unit of Measure
In the product form you can set one unit of measure for sales and stock management and one unit of
CHAPTER 5 YOUR WAREHOUSE 109
measure for purchases
For each operation on a product you can use another unit of measure as long as it can be found inthe same category as the two units already defined If you use another unit of measure OpenERPautomatically handles the conversion of prices and quantities
So if you have 430 Kg of carrots at 530 EURKg OpenERP will automatically make the conversion ifyou want to sell in tonnes ndash 043 tonnes at 5300 EUR tonne If you had set a rounding factor of 01for the tonne unit of measure OpenERP will tell you that you have only 04 tonnes available
Packaging
The packaging allows you to ship products in several ways For example you can ship goods by boxesor by pallets
At first you have to define possible packaging To define the packaging go to menuselectionWarehouse ndashgt Configuration ndashgt Product ndashgt Packaging and click New
Figure 532 Packaging definition
To complete the creation of a new packaging you have to give it a name and a type Different types areavailable in OpenERP Box Pack Pallet and Unit
Once all packaging is defined you can attach the packaging to your products through the followingmenu Warehouse rarr Configuration rarr Product rarr Packaging
Figure 533 Defining the Packaging for the Product
110 CHAPTER 5 YOUR WAREHOUSE
54 Scheduling Procurements
The master production plan sometimes called the MPS (Master Production Schedule) enables you togenerate forecasts for incoming and outgoing material It is based on forecasts of inputs and outputs bythe logistics manager
To be able to use the production plan you must install the stock_planning module
MPS Procurement and Production
OpenERP distinguishes between Production Purchase and Procurement
Production is manufacturing Purchase is the acquisition of goods fromanother party and Procurement is either one or both of those So it would bebetter to call the MPS the Master Procurement Schedule Which OpenERPdoes
Product Trading
Also called the Production Plan this tool is also very useful for tradedproducts which are not manufactured You can use it for stock managementwith purchased and manufactured products
541 Processing Exceptions
The set of stock requirements is generated by procurement orders
In normal system use you do not need to worry about procurement orders because they areautomatically generated by OpenERP and the user will usually work on the results of a procurement aproduction order a purchase order a sales order and a task
If there should be configuration problems the system can remain blocked by a procurement withoutgenerating a corresponding document For example suppose that you configure a product ProcurementMethod as Make to Order and Supply Method as Produce but you have not defined the bill ofmaterials In that case procurement of the product will stay blocked in an exception state No Billof Materials defined for this product You then have to create a bill of materials tosolve the problem
Troubleshooting
bull No bill of materials defined for production you need to create a BoM or indicate that the productcan be purchased instead
bull No supplier available for a purchase you have to define a supplier in the Supplier tab of theproduct form
bull No address defined on the supplier partner you have to complete an address for the defaultsupplier for the product concerned
CHAPTER 5 YOUR WAREHOUSE 111
bull No quantity available in stock you have to create a rule for automatic procurement (for examplea minimum stock rule) and put it in the order or manually procure it
Some problems are just those of timing and can be automatically corrected by the system
Use the menu Warehouse rarr Schedulers rarr Procurement Exceptions to see all the exceptions
If a product has to be lsquoin stockrsquo but is not available in your stores OpenERP will make the exception aslsquotemporaryrsquo or lsquoto be correctedrsquo The exception is temporary if the system can procure it automaticallyfor example if a procurement rule is defined for minimum stock
Figure 534 Example of a Procurement in Exception
If no procurement rule is defined the exception has to be corrected manually by the user Oncethe exception is corrected you can restart by clicking Retry If you do not do that OpenERP willautomatically recalculate on the next automated requirements calculation
542 Manual Procurement
To procure internally you can create a procurement order manually Use the menu Warehouse rarrSchedulers rarr Procurement Exceptions and click the New button to do this
The procurement order will then be responsible for calculating a proposal for automatic procurementfor the product concerned This procurement will start a task a purchase order for the supplier or aproduction depending on the product configuration
It is better to encode a procurement order rather than direct purchasing or production This method hasthe following advantages
bull The form is simpler because OpenERP calculates the different values from other values anddefined rules purchase date calculated from order date default supplier raw materials needsselection of the most suitable bill of materials etc
112 CHAPTER 5 YOUR WAREHOUSE
Figure 535 Encoding a New Procurement Order
Figure 536 Workflow for Handling a Procurement according to Product Configuration
CHAPTER 5 YOUR WAREHOUSE 113
bull The calculation of requirements prioritises the procurements If you encode a purchase directlyyou short-circuit the planning of different procurements
Shortcuts
On the product form you have an ACTIONS shortcut button CreateProcurements that lets you quickly create a new procurement order
543 Sales Forecasts
The first thing you have to do to work with a production plan is define the periods for stock managementSome companies plan daily others weekly or monthly
Stock Management Interval
The interval chosen for managing stock in the production plan will dependon the length of your production cycle You generally work daily weeklyor monthly
If it takes several days to assemble your products you most likely willdefine a weekly plan If your manufacturing cycles take several monthsyou can work with a monthly plan
To predefine these periods you can use the Stock and Sales PlanningPeriods that will automatically generate daily weekly or monthly periods
Figure 537 Stock and Sales Planning Periods
Go to the menu Sales rarr Configuration rarr Stock and Sales Periods rarr Create Stock and Sales PeriodsA window appears enabling you to automatically define the next periods that will be provided for stockmanagement For this example create weekly periods
Salespeople can then enter their sales forecasts by product and by period using the menu Sales rarr SalesForecasts rarr Sales Forecasts The forecasts can be made by quantity or by value For a forecast byamount OpenERP automatically calculates the quantity equivalent to the estimated amount This canbe modified manually as needed before completion A salesperson can create sales forecasts manuallyor he can use the Create Sales Forecasts wizard in the above menu
114 CHAPTER 5 YOUR WAREHOUSE
Figure 538 Defining Periods for Stock Management
Figure 539 Sales Forecast to Help Create a Master Production Plan
544 Production Plan
The manager responsible for logistics then plans receipts (manufacturing or purchases) and outgoings(consumption or customer deliveries) by period From the menu Warehouse rarr Stock Planning rarrCreate Stock Planning Lines you can create a stock planning per week for a specific product categoryThrough Warehouse rarr Stock Planning rarr Master Procurement Schedule you can adjust the planning
For each period and product OpenERP gives you the following information
bull Stock estimated at the end of the period calculated as stock in the following period less the totalestimated outgoings plus total estimated inputs
bull Closed entries coming from production or confirmed purchases
bull Forecast inputs for the period calculated using the incoming entries less the closing amounts
bull Planned inputs entered manually by the logistics manager
CHAPTER 5 YOUR WAREHOUSE 115
bull Closed outgoings which are the consumption of manufacturing waiting and deliveries to be madeto customers
bull Forecast outgoings calculated from the planned outgoings less the closing amounts
bull Planned outgoings manually entered by the logistics manager
bull Sales forecasts which represent the sum of forecasts made by the salespeople
Figure 540 The Master Production Schedule (MPS)
The production plan enables the logistics manager to play with the forecast receipts and outgoings andtest the impact on the future stock for the product concerned It enables you for example to check thatthe stock does not fall below a certain level for that product
You can also open the production plan for past periods In this case OpenERP shows you the real stockmoves by period for forecast reports
If you do not have automated procurement rules for a product you can start procurement at any timebased on the estimates of the production plan To do this press the button Procure Incoming Left (ieremaining) on the Master Procurement Schedule OpenERP plans procurement for an amount equal tothe entries forecast
55 Managing Lots and Traceability
The double-entry management in OpenERP enables you to run very advanced traceability Alloperations are formalized in terms of stock moves so it is very easy to search for the cause of anygaps in stock moves
116 CHAPTER 5 YOUR WAREHOUSE
Upstream Traceability
It runs from the raw materials received from the supplier and follows thechain to the finished products delivered to customers (Note that the name isconfusing - this would often be considered a downstream direction Thinkof it as Where Used)
Downstream Traceability
It follows the product in the other direction from customer to the differentsuppliers of raw material (Note that the name is confusing - this wouldoften be considered an upstream direction Think of it as Where Supplied)
551 Stock Moves
Use the menu Warehouse rarr Traceability rarr Stock Moves to track past stock transactions for a productor a given location All the operations are available You can filter on the various fields to retrieve theoperations about an order or a production activity or a source location or any given destination
Figure 541 History of Stock Movements
Each stock move is in a given state The various states are
bull Draft the move so far has no effect in the system The transaction has not yet been confirmed
bull Confirmed the move will be done so it will be counted in the calculations of virtual stockBut you do not know whether it will be done without problem because the products have beenreserved for the move
bull Validated the move will be done and the necessary raw materials have been reserved for thetransaction
CHAPTER 5 YOUR WAREHOUSE 117
bull Done the stock move has been done and entered into the calculations of real stock
bull Waiting in the case of transactions From Order this state shows that the stock move isblocked waiting for the end of another move
bull Cancelled the stock move was not carried out so it is not taken into account in either realstock or virtual stock
Delivery orders goods receipts and internal picking lists are just documents that group a set of stockmoves You can also consult the history of these documents using the menu Warehouse rarr Traceabilityrarr Packs
552 Lots
OpenERP can also manage product lots Two lot types are defined
bull Production lots (batch numbers) are represented by a unique product or an assembly of identicalproducts leaving the same production area They are usually identified by bar codes stuck on theproducts The batch can be marked with a supplier number or your own company numbers
bull Tracking numbers are logistical lots to identify the container for a set of products Thiscorresponds for example to the pallet numbers on which several different products are stocked
These lots can be encoded onto all stock moves and specifically on incoming shipments lines internalmoves and outgoing deliveries
Figure 542 Entering a Line for Production Receipt
118 CHAPTER 5 YOUR WAREHOUSE
To enter the lot number in an operation you can use an existing lot number or create a new pack Aproduction lot (batch number) is used for a single product A tracking number can be used several timesfor different products so you can mix different products on a pallet or in a box
Simplified View
In the Simplified view the tracking numbers cannot be seen the fieldis hidden To get to Extended view mode assign the group Useability Extended View to the current user or change the User Preferences
You can also specify on the product form the operations in which a lot number is required You can thencompel the user to set a lot number for manufacturing operations goods receipt or customer packing
You do not have to encode the lot numbers one by one to assign a unique lot number to a set of severalitems You only need to take a stock move for several products line and click the button Split inProduction Lots You can then give a lot number prefix (if you want) and OpenERP will complete theprefix in the wizard with a continuing sequence number This sequence number might correspond to aset of pre-printed barcodes that you stick on each product
Figure 543 Splitting a Lot into uniquely Identified Parts
553 Traceability
If you key in the lot numbers for stock moves as described above you can investigate the traceabilityof any given lot number Go to the menu Warehouse rarr Traceability rarr Production Lots or Warehouserarr Traceability rarr Packs
CHAPTER 5 YOUR WAREHOUSE 119
Product Shortcuts
From the product form the toolbar to the right offers useful information
bull Minimum Stock Rules
bull Stock by Location
bull Product Sales
bull Bills of Material
Search for a particular lot using the filters for the lot number the date or the product Once you can seethe form about this lot several actions can be performed
bull Upstream Traceability from supplier through to customers
bull Downstream Traceability from customer back to suppliers
bull Stock in all the physical and virtual locations
Figure 544 Tracing Upstream in Make to Order
Figure 545 Tracing Downstream in Make to Stock
Finally on a lot you can enter data on all the operations that have been done for the product Thatkeeps a useful history of the pre-sales operations
56 Scrapping Products
In OpenERP there are many ways to handle scrap products
1 Warehouse rarr Product Moves rarr Receive Products
120 CHAPTER 5 YOUR WAREHOUSE
2 Warehouse rarr Product Moves rarr Deliver Products
3 Warehouse rarr Warehouse Management rarr Incoming Shipments
Figure 546 Scrapping from an Incoming Shipment
4 Warehouse rarr Warehouse Management rarr Internal Moves
Figure 547 Scrapping from an Internal Move
5 Warehouse rarr Warehouse Management rarr Delivery Orders
When you decide to scrap some products they are transferred to the Scrap location To display thecontent of this Virtual Location go to menuselection Warehouse ndashgt Inventory Control ndashgt LocationStructure then select the virtual locations and display the Scrap location
If you want to transfer the products to another location you can create a new one and check the ScrapLocation in the additional information
CHAPTER 5 YOUR WAREHOUSE 121
Figure 548 Scrapping from a Delivery Order
57 Identifying Products and Locations with Barcodes andRFID Devices
You can the barcode in the product form in the field EAN13
58 Financial Inventory Management
581 Manual and Real-time Stock Valuation
If you have experience of managing with traditional software you will know the problem of gettinguseful indicators If you ask your accountant for a stock valuation or the value added by production hewill give you a figure
If you ask for the same figure from your stores manager you will get an entirely different amount Youhave no idea who is right
In OpenERP stock management is completely integrated with the accounts to give strong coherencebetween the two systems The double-entry structure of locations enables a very precise correspondencebetween stocks and accounts
Each stock movement also generates a corresponding accounting entry in an accounting journal toensure that the two systems can stay in permanent synchronization
To do that set up a general account for each location that should be valued in your accounts If aproduct goes to one location or another and the accounts are different in the two locations OpenERPautomatically generates the corresponding accounting entries in the accounts in the stock journal
If a stock move will go from a location without an account to a location where an account has beenassigned (for example goods receipt from a supplier order) OpenERP generates an accounting entryusing the properties defined in the product form for the counterpart You can use different accounts per
122 CHAPTER 5 YOUR WAREHOUSE
location or link several locations to the same account depending on the level of analysis needed
You use this system for managing consigned stocks
bull a supplier location that is valued in your own accounts or
bull a location in your own company that is not valued in your accounts
How to Configure Accounting Valuation
In the Product form go to the Accounting tab and select the Real Time (automated) option forInventory Valuation
To define your accounts you have two options Set them on the product category or on the product
1 From the Accounting Stock Properties section for the Product Category set theStock Input Account the Stock Output Account and the Stock VariationAccount
2 From the Accounting tab for the Product set the Stock Input Account and the StockOutput Account
You can also overwrite the accounts from the Product or the Product Category by defining Stock InputAccount and Stock Output Account for a Location
account_anglo_saxon
You can also install the account_anglo_saxon module (Reconfigure wizardAnglo-Saxon Accounting) to value your stock according to Anglo-saxonprinciples
The figure below shows the various accounts that can be used with and without theaccount_anglo_saxon module installed
582 Managing Transportation Costs
In OpenERP you can handle the delivery methods when installing the delivery module
This module will allow you
bull To select the delivery company
bull To define the delivery pricelist according to the price the weight or the volume
Now in each Delivery Order two new fields are available to enter the right value to deliver the productsto the customer You can also find a new field in the Sales Order form that enables you to select adelivery method
CHAPTER 5 YOUR WAREHOUSE 123
Figure 549 Setting up Stock Valuation Accounts
Figure 550 Define the Delivery Method
Figure 551 Define the Delivery Costs
Figure 552 Delivery Cost in the Delivery Orders
124 CHAPTER 5 YOUR WAREHOUSE
Figure 553 Delivery Method in the Sales Orders
59 Organize your Deliveries
You can manage stock through journals in the same way as you can manage your accounts throughjournals This approach has the great advantage that you can define journals in various ways to meetyour companyrsquos needs
For example a large company may want to organize deliveries by department or warehouse You canthen create a journal and a manager for each department The different users can work in a journal as afunction of their position in the company That enables you to better structure your information
A company doing a lot of transport could organize its journals by delivery vehicle The differentdelivery orders will then be assigned to a journal representing a particular vehicle When the vehiclehas left the company you can confirm all the orders that are found in the journal all at the same time
591 The Different Journals
Install the Reconfigure option Invoicing Journals for Sales Management or the sale_journalmodule to work with different journals This adds two new concepts to OpenERP
bull Invoicing journals
bull Stock journals or Delivery journals
Invoicing journals (Sales rarr Configuration rarr Sales rarr Invoice Types) are used to assign purchaseorders andor delivery orders to a given invoicing journal Everything in the journal can be invoicedin one go and you can control the amounts by journal For example you can create the followingjournals daily invoicing end-of-week invoicing and monthly invoicing It is also possible to show theinvoicing journal by default in the partner form Set the Invoicing Method to Grouped (one invoiceper customer) or Non Grouped (individual invoices) according to your needs
Stock journals (Warehouse rarr Configuration rarr Warehouse Management rarr Stock Journals) allow youto classify the delivery orders in various ways such as by department by salesperson or by type If asalesperson looks for a delivery order in his own journal he can easily see the work on current itemscompared with his own orders
CHAPTER 5 YOUR WAREHOUSE 125
Default Values
To enter all the orders in his own stock journal a salesperson can use thedefault values that are entered in the fields when creating orders
Finally the stock journals can also be used as delivery journals to post each item into a delivery journalFor example you can create journals dated according to customer delivery dates (such as Mondayrsquosdeliveries or afternoon deliveries) or these journals could represent the dayrsquos work for delivery vehicles(such as truck1 truck2)
592 Using the Journals
You will now see how to use the journals to organize your stock management in practice Afterinstalling the module sale_journal look at the list of partners In the tab Sales and Purchaseson any of them you will now see the field Invoicing Method
Figure 554 Partner Form in Invoicing Mode
You can create a new Invoicing Journal for a partner through the menu Sales rarr Configuration rarr Salesrarr Invoice Types You can decide if the invoices should be grouped or not when generating them in thejournal Create a second invoicing journal End-of-Month Invoicing which you can assign toanother partner
Then enter the data for some sales orders for these two partners After entering sales order data thefield Invoicing Mode in the second tab Other Information is completed automatically from thepartner settings
126 CHAPTER 5 YOUR WAREHOUSE
Figure 555 Defining an Invoicing Journal
Look at the History tab of the Sales order and observe the Picking List that has been created The fieldInvoicing Mode is automatically shown there
Figure 556 Generated Picking Lists
At the end of the day the invoicing supervisor can display the list by journal Go to the menu Sales rarrInvoicing rarr Lines to Invoice Add a New Filter by selecting Invoice Type contains Daily or any otherpart of the invoice journal you are using Select the different orders in the list You can automatically
CHAPTER 5 YOUR WAREHOUSE 127
carry out invoicing by clicking the action Make Invoices (the gears symbol)
Confirming Invoices
By default invoices are generated in the draft state which enables you tomodify them before sending them to the customer But you can confirm allthe invoices in one go by selecting them all from the list and selecting theaction Confirm Draft Invoices
At the end of the month the invoicing management does the same work but in the journal lsquomonth-endinvoicingrsquo
You can also enter a journal to confirm cancel all the orders in one go Then you can do severalquotations assign them to a journal and confirm or cancel them at once
Figure 557 View of an Order Journal
510 Estimating Delivery Dates
5101 Standard Delivery Time
In order to define the delivery time you have to know three things
bull Customer Lead Time
That is the time you promise to your customer for a delivery It corresponds to the average delaybetween the confirmation of the customer order and the delivery of the finished goods It can bedefined in the product form in the Procurement and Locations tab
This time will be influenced by the Manufacturing Lead Time and the Delivery Lead Time
bull Manufacturing Lead Time
This is the time you need to produce one unit of a product If this product needs othersub-products the different manufacturing times will be summed It can also be defined in theproduct form in the Procurement and Locations tab
bull Delivery Lead Time
This is the time your supplier needs to deliver the goods This delay can be defined in the productform in the Suppliers tab
128 CHAPTER 5 YOUR WAREHOUSE
For example if we have to deliver some products to a customer in a month (in 30 days) You promiseto deliver the goods to the customer within 10 days the manufacturing time is equal to 4 days and oursuppliers deliver the raw materials within 3 days
According to those numbers we will have to start the process in 23 days if we have to order rawmaterials
5102 Schedule Logistic Flows according to MRP1 Rules
MRP is a software-based production planning and inventory control system used to managethemanufacturing process
It is a computer-based system in which the given Master Schedule is exploded with Bills Of Materialinto the required amount of raw material parts and subassemblies needed to produce the final productsin each period
511 Incoming and Outgoing Products Planning
To be able to plan incoming and outgoing shipments of products you have to install the modulestock_planning
Figure 558 Planning the Deliveries of Customer Products
Thanks to this module you will be able to calculate a planning of the stock for a product
Planned dates on a packing order are put in each stock move line If you have a packing order containingseveral products not all of the lines necessarily need to be delivered the same day The minimum andmaximum dates in a packing order show the earliest and latest dates on the stock move lines for thepacking
CHAPTER 5 YOUR WAREHOUSE 129
If you move a packing order in the calendar view the planned date in the stock move lines willautomatically be moved as a result
512 Managing Inventory Reconciliation
Inventory reconciliation involves two steps physical and accounting
Physical inventory steps include taking a written inventory record and comparing it to the actual goodsin the companyrsquos warehouses Counting obsolete and damaged products is also a reconciliation activity
Reconciliation steps on the accounting side include verification that all inventory purchases are postedentering adjustments from the physical count and analysing the dollar differences between monthsInventory reconciliation frequency depends on the size location and type of inventory in a companyrsquosoperations
513 Building Reports to Track Activity
With OpenERP you can build your own reports in order to track the different activities in yourwarehouses To create your own reports you have to install the base_report_creator It will add asubmenu in Administration rarr Customization rarr Reporting
Figure 559 Create your Own Reports
This newly added section allows you to define for your new report
bull The general configuration
The aim of this tab is to choose the models your report will rely on
bull The view parameters
This tab will define the display of your report You can choose between the traditional availableviews (TreeList Form Graph and Calendar) and you can define three different ways to displayyour report
bull The fields to display
130 CHAPTER 5 YOUR WAREHOUSE
The fields available to display will depend on the models you choose in the GeneralConfiguration tab
When you add a new field to your report different fields have to be specified
ndash Sequence - defines the order in which the fields will be displayed in the report
ndash Field - the information you want to display in your report
ndash Grouping method - affects the way the field is displayed You can choose between Grouped SumMinimum Count Maximum and Average
ndash Graph mode - defines which axe of the graph the field will represent
ndash Calendar mode - defines the meaning of the field for the calendar (Starting or Ending date DelayEnd Date Unique Colours)
bull The filters on fields
This tab will let you choose which data to display according to the value of a field It is possibleto manually modify or add new filters according to your needs
bull The security
The security tab is used to select the groups that are able to display the report
Create Report with OpenOffice
You can also create or edit reports with OpenOffice using thebase_report_designer module
In order to add the extension to OpenOffice load this module and start theconfiguration A new window will ask you to Save As a file that containsthe extension
Once you have saved the file start OpenOffice and go to Tools rarrExtension Manager then click Add and select the previously saved file
Restart OpenOfficeorg and now you have the extension installed
Figure 560 Extension to Create a Report in OpenOffice
514 Import Export
Managing import export with foreign companies can sometimes be very complex Between adeparture port and the destination company products can get stopped for several weeks at sea orsomewhere in the numerous transportation stages and customs To manage such deliveries efficiently itis important to
bull know where your products are
CHAPTER 5 YOUR WAREHOUSE 131
bull know when they are likely to arrive at their destination
bull know your value in transit
bull follow the development of the different steps
Linked locations in OpenERP enable you to manage all this rather elegantly You can use a structurelike this
bull Suppliers
ndash European Suppliers
ndash Chinese Suppliers
bull In transit
ndash Shanghai Port
ndash Pacific Ocean
ndash San Francisco Port
ndash San Francisco Customs
5141 Stock
The transit locations are linked between themselves with a manual confirmation step The internalstock move is validated at each port and customs arrival OpenERP prepares all the linked movesautomatically
Intrastat
Companies that do import export should install the modulereport_intrastat This enables them to prepare the reports neededto declare product exports
You can use the lead times between different locations to account for real delays Your lead times andstock forecasts are calculated by OpenERP to estimate the arrival of incoming products so that you canrespond to a customerrsquos needs as precisely as possible
You can also value the products in transit in your account depending on the chosen stock locationconfiguration
5142 Rental Locations
You can manage rental locations in OpenERP very simply using the same system of linked locationsUsing the stock_location module you can set a return date for rental items sent to a customerlocation after a certain rental period
132 CHAPTER 5 YOUR WAREHOUSE
Then the set of real and virtual stocks is maintained daily in real time The different operations suchas delivery and receipt after a few days are automatically suggested by OpenERP which simplifies thework of data entry
You then have the product list found in the customer locations and your own stock in your stocklocation The list of waiting goods receipts is automatically generated by OpenERP using the locationlinks
Suppose you want to rent a product (PC3) to your customer (Axelor) for 30 days Two stock movemententries are needed to manage this scenario
1 Product goes from Stock (your companyrsquos location) to Axelor - Rental Location (your customerlocation)
2 Product will be returned into Stock (your companyrsquos location) from Axelor - Rental Location(your customer location) after 30 days
To manage rental products by linking locations configure a rental location (Axelor - Rental Location) asshown in the following figure using the menu Warehouse rarr Configuration rarr Warehouse Managementrarr Locations
Figure 561 Configuration of a Rental Location lsquoAxelor - Rental Locationlsquo
Through the menu Warehouse rarr Traceability rarr Stock Moves you can create a stock movement entryfrom Stock to Customer Location (Axelor - Rental Location) in OpenERP for a rental product (PC3)
The stock movement entry from Customer Location (Axelor - Rental Location) to Stock is generatedautomatically on the proper Scheduled Date by OpenERP when you have confirmed the previous stockmovement entry by clicking the Process Now button
CHAPTER 5 YOUR WAREHOUSE 133
Figure 562 Stock Movement Entry to Send the Product lsquoPC3lsquo to the Customer Location
The same principle is used for internal stock to generate quality control for certain products
5143 Consigned Products
The principle of linked locations is used to manage consigned products You can specify that certainproducts should be returned to you a certain number of days after they have been delivered to customers
When the products have been delivered OpenERP automatically creates goods receipts for theconsigned product The specified date is obviously approximate but enables you to forecast returns
515 Stock Location Example
In this section we will develop a more detailed example that includes different concepts seen in theprevious sections
The following example will use the Stock Location types the Logistic Flows and the Bill Of Materials
We have two companies OpenERP SA and OpenERP US
We have three products Product A Product B and Product C For each product we will have to definethe Stock Location to determine where to take these products
To make one unit of Product A we need the Product B and the Product C So we will have to define aBill of Material
134 CHAPTER 5 YOUR WAREHOUSE
Table 512 Bill of Materials
Field ValueProduct Product AProduct Qty 1Name Product ABoM Type NormalCompany OpenERP US
The different components to produce one unit of Product A are one unit of Product B and one unit ofProduct C
Table 513 Companies and Products
Company WhatOpenERP SA Sell the Product AOpenERP SA Store the Product COpenERP US Produce the Product AOpenERP US Store the Product B
Table 514 Logistics Flows
Name Type Product Goal of the flowAsk for Production Pull Product A OpenERP SA asks OpenERP US to produce the Product ALaunch Production Pull Product A OpenERP US launches the production of the Product ASend Product to Transit Pull Product C OpenERP US asks for the Product C to OpenERP SAGet Product from Transit Pull Product C OpenERP US receives the Product C
Here are the details of the different flows
Figure 563 Ask for Production
With this configuration when a Sales Order for 3 units of Product A is confirmed and the scheduler hasbeen launched you will have the following procurements
And the following stock moves have been generated
Because we are working in two different companies different stock moves have been generated Theproducts have to move from OpenERP SA to OpenERP US for the products C After the manufacturingprocess the products A have to move from OpenERP US to OpenERP SA to be sold to the customer
CHAPTER 5 YOUR WAREHOUSE 135
Figure 564 Launch Production
Figure 565 Send Product to Transit
Figure 566 Get Product from Transit
Figure 567 Procurements View
136 CHAPTER 5 YOUR WAREHOUSE
Figure 568 Stock Moves
Once you have confirmed the different moves for the products B and C the Manufacturing Order is inready to produce status So you can run the production of the three units of Product A
Figure 569 Launch the Production
Once again due to the use of two companies you have to confirm different deliveries One to deliver theproduct from OpenERP US to OpenERP SA and another to deliver the product from OpenERP SA tothe customer Now you have to confirm the delivery of the three units from OpenERP US to OpenERPSA then to confirm the reception of the products in OpenERP SA and finally deliver the products toyou final customer
137
Part IV
Streamlining your Manufacturing
138
139
Defining your Master Data 6The management of manufacturing described in this chapter covers planning orderingstocks and the manufacturing or assembly of products from raw materials and componentsIt also discusses consumption and production of products as well as the necessaryoperations on machinery tools or human resources
Manufacturing management in OpenERP is based on its stock management and equally very flexible inboth its operations and its financial control It particularly benefits from the use of double-entry stockmanagement for production orders Manufacturing management is implemented by the mrp moduleIt is used to transform all kinds of products
bull Assemblies of parts composite products soldered or welded products assemblies packs
bull Machined parts machining cutting planing
bull Foundries clamping heating
bull Mixtures mixing chemical processes distillation
You will work in two areas with products in the first part of this chapter and with operations in thesecond part The management of products depends on the concept of classifications while operationsmanagement is related to routing and workcenters
Bills of Materials
Bills of Materials or manufacturing specifications go by different namesdepending on their application area for example
bull Food Recipes
bull Chemicals Equations
bull Building Plans
For this chapter you should start with a fresh database that includes demo data with mrp(Manufacturing) and its dependencies installed and a generic chart of accounts configured Asyou will notice when you select Manufacturing to be installed OpenERP will install the linkedapplications automatically
140 CHAPTER 6 DEFINING YOUR MASTER DATA
61 Bill of Materials and Components
611 Using Bills of Materials
Bills of Materials are documents that describe the list of raw materials used to make a finished productTo illustrate the concept of specification you will work on a shelf (or cabinet) where the manufacturingplan is given by the figure Plan of Construction of a Shelf (page 140)
Figure 61 Plan of Construction of a Shelf
The shelf is assembled from raw materials and intermediate assemblies The Image Code refers to thepicture the Product Reference is the corresponding code in OpenERP
Change the unit of the Wood Lintel 4m (LIN40) product to m instead of PCE
Table 61 Product Definitions before defining Bills of Materials(already defined)
Image Code Product Reference DescriptionARM100 SHE100 Shelf 100 cmPANLAT SIDEPAN Side PanelPANA100 RPAN100 Rear Panel SHE100PROFIL PROFIL Assembly SectionETA100 RCK100 Rack 100cmBOIS002 WOOD002 Wood 2mmTAQ000 METC000 Metal CleatsLIN40 LIN40 Wood Lintel 4m
CHAPTER 6 DEFINING YOUR MASTER DATA 141
Table 62 New Products to be created before defining Billof Materials
Image Code Product Reference DescriptionPLET100 SPAN100 Shelf PanelBOIS010 WOOD010 Wood 10mm
Copy
To create the above products duplicate existing ones such as Side Paneland Wood 2mm from the Purchase or Sales menu Purchases rarr Productsrarr Products
To describe how this shelf should be assembled you define a bill of materials for each intermediateproduct and for the final shelf assembly These are shown in the tables below You can start from thedemo data and complete them according to the specifications To create or change a bill of materialsgo to Manufacturing rarr Master Data rarr Bill of Materials
Table 63 Bill of Materials for 1 SHE100 Unit(already defined)
Product Ref Quantity Unit of MeasurePROFIL 4 PCESIDEPAN 2 PCEMETC000 12 PCERPAN100 1 PCERCK100 3 PCE
Table 64 Bill of Materials for 1 RCK100 PCE
Product Code Quantity Unit of MeasureSPAN100 1 PCEMETC000 4 PCE
Table 65 Bill of Materials for 1 SPAN100 PCE
Product Code Quantity Unit of MeasureWOOD010 0083 m
Table 66 Bill of Materials for 1 PROFIL PCE
Product Code Quantity Unit of MeasureLIN40 025 m
Table 67 Bill of Materials for 1 RPAN100 PCE
Product Code Quantity Unit of MeasureWOOD002 025 m
142 CHAPTER 6 DEFINING YOUR MASTER DATA
Table 68 Bill of Materials for 1 SIDEPAN PCE
Product Code Quantity Unit of MeasureWOOD002 0083 m
The bills of materials are then used by the software to calculate the raw material needs based on therequirements of the finished products So if you want to manufacture 10 shelves the system cancalculate the actual products that will be consumed
Table 69 Total Quantities per Shelf
Product Code Quantity Unit of MeasureWOOD002 0416 (2 0083 + 025) mLIN40 1 (4 025) mWOOD010 0249 (0083 3) mMETC000 132 ((3 4) + (10 12)) PCE
Bill of Materials
To see the bill of materials in tree view use the menu Manufacturing rarrMaster Data rarr Bill of Materials then select the product and click the actionBOM Structure
Figure 62 Bill of Materials structure
Use the menu Manufacturing rarr Master Data rarr Bill of Materials and click the New button to define anew bill of materials
The Different Views
To change the view in the bill of materials you can
bull From the list select a bill of materials name and then click FormView
bull From a product form use the menu Product BoM Structure to theright
CHAPTER 6 DEFINING YOUR MASTER DATA 143
Figure 63 Defining a Bill of Materials (Extended view)
In the Product field of the bill of materials you should set the finished product which will bemanufactured or assembled Once the product has been selected OpenERP automatically completesthe name of the bill of materials and the default Unit of Measure for this product
The type of BoM (BoM Type SetsPhantom or Normal BoM) and the Routing field will bedescribed in more detail later in the chapter
Now you can select the raw materials (Components) that are used to manufacture the finishedproduct The quantities are set out based on the quantities of finished product and the quantities neededto produce them from the bill of materials The second tab Revisions is used to register all the changesmade to the bill of materials On each change you can specify a revision number and some notes onthe modifications you carried out
Simplified View
The Revisions tab is only visible if the user works in the Extended viewmode (which means that the user should belong to the group Useability Extended View
Figure 64 Revisions of a Bill of Materials (Extended view)
In the third tab Properties you can put a free text reference to a plan a sequence number that is usedto determine the priorities between bills of materials dates between which a bill of materials is validand values for rounding and production efficiency
Rounding is used to set the smallest Unit of Measure in which the quantities of the selected productcan be expressed So if you set the rounding to 100 you will not be able to manufacture half a pieceThe Efficiency of the product lets you indicate the percentage you lose during manufacturing This loss
144 CHAPTER 6 DEFINING YOUR MASTER DATA
Figure 65 Properties of a Bill of Materials
can be defined for the finished product or for each raw materials (components) line The impact of thisefficiency figure is that OpenERP will reserve more raw materials for manufacturing than you wouldotherwise use just from the Bill of Materials calculations
The final part of the third tab lets you set some properties for the productrsquos manufacturing processesThese will be detailed further on in the chapter in the section about configurable products
612 Multi-level Bills of Materials
In OpenERP each line of a bill of materials may itself be a bill of materials This allows you todefine BoMs with several levels Instead of defining several BoMs for the shelf in the figure Plan ofConstruction of a Shelf (page 140) you could define the single bill of materials below
Table 610 Single Bill of Materials for 1 SHE100Unit
Product Ref Quantity Unit of MeasureSHE100 1 PCESIDEPAN 2 PCEWOOD002 0166 mRPAN100 1 PCEWOOD002 025 mPROFIL 4 PCELIN40 1 mRCK100 3 PCESPAN100 3 PCEWOOD010 0249 mMETC000 132 PCE
OpenERP behaves differently depending on whether the bill of materials is defined in several smallBoMs each on a single level or in one BoM tree-structured on several levels
CHAPTER 6 DEFINING YOUR MASTER DATA 145
If you select a BoM using intermediate products that automatically generates production orders basedon calculated requirements OpenERP will propose to manufacture an intermediate product Tomanufacture a shelf according to the different bills of materials defined you would create 6 productionorders
Table 611 Production Order
Product Ref Quantity Unit of MeasureSPAN100 3 PCEWOOD010 0249 m
Table 612 Production Order
Product Ref Quantity Unit of MeasureRCK100 3 PCESPAN100 3 PCEMETC000 12 PCE
Table 613 Production Order
Product Ref Quantity Unit of MeasurePROFIL 4 PCELIN40 1 m
Table 614 Production Order
Product Ref Quantity Unit of MeasureRPAN100 1 PCEWOOD002 025 m
Table 615 Production Order
Product Ref Quantity Unit of MeasureSIDEPAN 2 PCEWOOD002 017 m
Table 616 Production Order
Product Ref Quantity Unit of MeasureSHE100 1 PCESIDEPAN 2 PCERPAN100 1 PCEPROFIL 4 PCERCK100 3 PCEMETC000 12 PCE
In the case where a single bill of materials is defined in multiple levels a single manufacturing orderwill be generated for each shelf including all of the sub BoMs You would then get the followingproduction order
146 CHAPTER 6 DEFINING YOUR MASTER DATA
Table 617 Single Production from a tree-structuredBoM
Product Ref Quantity Unit of MeasureSHE100 1 PCEWOOD002 017 mWOOD002 025 mLIN40 1 mWOOD010 0249 mMETC000 132 PCE
613 Phantom Bills of Materials
If a finished product is defined using intermediate products that are themselves defined using otherBoMs OpenERP will propose to manufacture each intermediate product This will result in severalproduction orders If you only want a single production order you can define a single BoM withseveral levels
Sometimes however it may be useful to define the intermediate product separately and not as part of amulti-level assembly even if you do not want separate production orders for intermediate products
In the example the intermediate product RCK100 is used in the manufacturing of different shelves(SHE100 SHE200 ) So you would prefer to define a unique BoM for it even though you do notwant any instances of this product to be built nor would you want to rewrite these elements in a seriesof different multi-level BoMs
If you only want a single production order for the complete shelf and not one for the BoM itself youcan define the BoM line corresponding to product RCK100 in the shelfrsquos BoM as type SetsPhantomThen OpenERP will automatically put RCK100lsquos BoM contents into the shelfrsquos production order eventhough it has been defined as multi-level
This way of representing the assembly is very useful because it allows you to define reusable assemblyelements and keep them isolated
If you define the BoM for the SHE100 shelf in the way shown by the table below you will get twoproduction orders on confirmation of a sales order as also shown in the tables
Table 618 Defining and Using Phantom BoMs
Product Ref Quantity Unit of Measure Type of BoMSHE100 1 PCE normalSIDEPAN 2 PCE normalRPAN100 1 PCE phantomPROFIL 4 PCE phantomRCK100 3 PCE phantom
CHAPTER 6 DEFINING YOUR MASTER DATA 147
Table 619 Production Order from Phantom BoMs
Product Ref Quantity Unit of MeasureSHE100 1 PCESIDEPAN 2 PCEWOOD002 025 mLIN40 1 mWOOD010 0249 mMETC000 12 PCE
Table 620 Production Order from Normal BoM
Product Ref Quantity Unit of MeasureSIDEPAN 2 PCEWOOD002 017 m
614 Bills of Materials for KitsSets
Sales Bills of Materials
In other software this is sometimes called a Sales Bill of Materials InOpenERP the term KitsSets is used because the effect of the bill ofmaterials is visible not only in sales but also elsewhere for example inthe intermediate manufactured products
KitsSets bills of materials enable you to define assemblies that will be sold directly These could alsobe used in deliveries and stock management rather than just sold separately For example if you deliverthe shelf in pieces for self-assembly set the SHE100 BoM to type Sets Phantom
When a salesperson creates an order for a SHE100 product OpenERP automatically changes theSHE100 from a set of components into an identifiable package for sending to a customer Then itasks the storesperson to pack 2 SIDEPAN 1 RPAN100 4 PROFIL 3 RCK100 This is described as aSHE100 not just the individual products delivered
62 Work Centers
Work centers represent units of product capable of doing material transformation operations You candistinguish two types of work centers machines and human resources
Work Center
Work centers are units of production consisting of one or several peopleandor machines that can be considered as a unit for the purpose offorecasting capacity and planning
148 CHAPTER 6 DEFINING YOUR MASTER DATA
Use the menu Manufacturing rarr Configuration rarr Resources rarr Work Centers to define a new workcenter You get a form as shown in the figure Defining a Work Center (page 148)
Figure 66 Defining a Work Center
Missing fields
If some fields such as Analytic Journal General Account in the view aremissing you have to add the user group Useability AnalyticAccounting
A work center should have a name You then assign a type Machine or Human a code and theoperating hours ie Working Period The Working Time(s) can be defined through the menuManufacturing rarr Configuration rarr Resources rarr Working Time The figure Defining a Work Center(page 148) represents the hours from Monday to Friday from 0800 to 1800 with a break of an hourfrom 1200
You can also add a description of the work center and its operations
Once the work center is defined you should enter data about its production capacity Depending onwhether you have a machine or a person a work center will be defined in cycles or hours If it representsa set of machines and people you can use cycles and hours at the same time
A Cycle
A cycle corresponds to the time required to carry out an assembly operationThe user is free to determine which is the reference operation for a givenwork center It should be represented by the cost and elapsed manufacturingtime
For example for a printing work center a cycle might be the printing of 1page or of 1000 pages depending on the printer
CHAPTER 6 DEFINING YOUR MASTER DATA 149
To define the capacity properly it is necessary to know for each work center what will be the referenceoperation which determines the cycle You can then define the data relative to the capacity
Capacity per Cycle (CA) the number of operations that can be done in parallel during a cycleGenerally the number defines the number of identical machines or people defined by the work center
Time for 1 cycle (hour) (TC) the duration in hours for one cycle or the operations defined by a cycle
Time before production (TS) the time in hours required to initialize production operations Generallythis represents the machine setup time
Time after production (TN) the delay in hours after the end of a production operation Generally thisrepresents the cleaning time necessary after an operation
Efficiency factor (ET) the factor that is applied to the TC TS and TN times to determine the realproduction time This factor enables you to readjust the different times progressively and as a measureof machine utilization You cannot re-adjust the other times because generally they are taken from themachinersquos data sheet By default the efficiency is set to 1 representing a load of 100 When you setthe efficiency to 2 (ie 200) the load will be 50
The total time for carrying out X operations is then given by the following formula
((X CA) TC + TS + TN ) ET
In this formula the result of the division is rounded upwards Then if the capacity per cycle is 6 ittakes 3 cycles to realize 15 operations (156 = 25 rounded upwards = 3)
With the Hour Account and Cycle Account you define the links to analytical accounting to report thecosts of the work center operations If you leave the different fields empty it will not have any effecton the analytic accounts
63 Routings
Routings define the manufacturing operations to be done in work centers to produce a certain productA routing is usually attached to bills of materials which will define the assembly of products requiredfor manufacturing or to produce finished products
A routing can be defined directly in a bill of materials or through the menu Manufacturing rarrConfiguration rarr Master Bill of Materials rarr Routings A routing has a name and a code You can alsoadd a description Later in this chapter you will see that a routing can also be associated with a stocklocation This enables you to indicate where an assembly takes place
Subcontracting Assembly
You will see further on in this chapter that you can also link a routingto a stock location for the customer or the supplier You can use thisfunctionality when you have subcontracted the assembly of a product toa supplier for instance
In the routing you have to enter the list of operations that has to be executed Each operation has to bedone at a specific work center and includes a number of hours andor cycles
150 CHAPTER 6 DEFINING YOUR MASTER DATA
Figure 67 Defining a routing with Three Operations
Multi-level Routing
It is possible to define routing on several levels to support multi-level billsof materials You can select the routing on each level of a bill of materials (BoM in a BoM can have a different routing) The levels are then linked tohierarchies of bills of materials
64 Manufacturing Orders
Once the bills of materials have been defined OpenERP is capable of automatically deciding on themanufacturing route according to the needs of the company
Production orders can be proposed automatically by the system depending on several criteria describedin the preceding chapter
bull Using the Make to Order rules
bull Using the Order Point (Minimum Stock) rules
bull Using the Production plan
Of course you can also start production manually by clicking the button New in the menuManufacturing rarr Manufacturing rarr Manufacturing Orders
If you have not installed the Just-in-Time planning module mrp_jit you should start using OpenERPto schedule the Production Orders automatically using the various system rules To do this use themenu Warehouse rarr Schedulers rarr Compute Schedulers
CHAPTER 6 DEFINING YOUR MASTER DATA 151
Figure 68 Manufacturing Order
Procurement Exceptions
Pay attention to the fact that you have to define minimum stock rules foreach product set as Make to Stock
65 Complete Production Workflow
To understand the usefulness and the functioning of the system you should test a complete workflowon the database installed with the demonstration data We will show you
bull How to create a sales order
bull The manufacturing workflow for an intermediate product
bull The manufacturing of an ordered product
bull The delivery of products to a customer
bull Invoicing at the end of the month
bull Traceability for after-sales service
Demonstration data
To exactly follow the workflow as shown below you should keep the samequantities as in the example and start from a new database Then you willnot run into exceptions resulting from a lack of stock
This more advanced case of handling problems in procurement will be sorted out later in the chapter
To be able to do the following step add Sales Management through the Reconfigure wizard
152 CHAPTER 6 DEFINING YOUR MASTER DATA
651 The Sales Order
Begin by encoding a sales (or customer) order through the menu Sales Management rarr Sales Orders-gt New Quotation Enter the following information
bull Customer Agrolait
bull Shipping Policy Invoice from the picking (Other Information tab)
bull Sales Order Lines click New
ndash Product PC2 ndash Basic PC (assembly on order)
ndash Quantity (UoM) 1
ndash Product UoM PCE
ndash Procurement Method on order
Once the quotation has been entered you can confirm it immediately by clicking the button ConfirmOrder at the bottom to the right Keep note of the order reference because this follows all through theprocess Usually in a new database this will be SO007 At this stage you can look at the processlinked to your order using the Question Mark button next to the Sales Orders title
Figure 69 Process for Handling Sales Order SO007
Start the requirements calculation using the menu Manufacturing rarr Compute All Schedulers
652 Producing an Intermediate Product
To understand the implications of requirements calculation you should know the configuration of thesold product To do this go to the form for product PC2 and click the link Product BoM Structure tothe right You get the scheme shown in Composition of PC2 (page 153) which is the composition ofthe selected product
The PC2 computer has to be manufactured in two steps
1 The intermediate product CPU_GEN
CHAPTER 6 DEFINING YOUR MASTER DATA 153
Figure 610 Composition of PC2
2 The finished product using that intermediate product PC2
The manufacturing supervisor can then consult the production orders using the menu Manufacturing rarrManufacturing rarr Manufacturing Orders You then get a list of orders to start (Ready to Produce)and the estimated start date (Scheduled Date) to meet the customer delivery date
Figure 611 List of Manufacturing Orders
You will see the production order for CPU_GEN but not the one for PC2 because it depends on anintermediate product that has to be produced first Return to the production order for CPU_GEN andclick it If there are several of them select the one corresponding to your order using the sourcedocument that contains your order number (in this example SO007 )
Figure 612 Details of a Production Order
The system shows you that you have to manufacture product CPU_GEN using the components MB1CPU1 FAN RAM You can then confirm the production twice
Start production consumption of raw materials
Produce manufacturing of finished product
Click the Start Production button then click the Edit button and edit the line for the productMB1 Enter a lot number for it by putting the cursor in the field Production Lot and pressing ltF1gt to
154 CHAPTER 6 DEFINING YOUR MASTER DATA
create a new lot Enter an internal reference for example MB1345678 The system may then showyou a warning because this lot is not in stock but you can ignore this message
Click the Produce button to manufacture the finished product
The production order has to be in the closed state as shown in the figure Production Order after theDifferent Stages (page 154)
Figure 613 Production Order after the Different Stages
653 Finished Product Manufacturing
Having manufactured the intermediate product CPU_GEN OpenERP automatically proposes themanufacturing of the computer PC2 using the order created earlier Return to the ManufacturingOrders menu and look at the orders Ready to Produce through Manufacturing rarr Manufacturing rarrManufacturing Orders
You will find computer PC2 which has been sold to the customer (source document SO007) as shownin the figure hereafter
Figure 614 Completed Production for PC2
Now that the production has been completed the product sold to the customer has been manufacturedand the raw materials have been consumed and taken out of stock
CHAPTER 6 DEFINING YOUR MASTER DATA 155
Automatic Actions
As well as managing the use of materials and the production of stocksmanufacturing can have the following automatic effects which are detailedfurther on in the chapter
bull adding value to stock
bull generating operations for assembly staff
bull automatically creating analytical accounting entries
654 Subproduct Production
If you need to manage subproducts you should install the module mrp_subproduct (Reconfigurewizard MRP Sub- products) The normal behaviour of manufacturing in OpenERP enables youto manufacture several units of the same finished product from raw materials (A + B gt C) WithSubproduct management the manufacturing result can be to have both finished products and secondaryproducts (A + B gt C + D)
Subproduct Material
In OpenERP subproduct material corresponds to secondary products thatare a by-product of the main manufacturing process For example cuttingplanks of timber will produce other planks but these bits of timber are toosmall (or the offcuts may have value for the company if they can be usedelsewhere)
If the module mrp_subproduct has been installed you get a new tab Sub products in the Bill ofMaterial that lets you set secondary products resulting from the manufacturing of the finished product
When OpenERP generates a production order based on a bill of materials that uses a secondaryproduct you pick up the list of all products in the the second tab of the production order FinishedProducts
Secondary products enable you to generate several types of products from the same raw materials andmanufacturing methods - only these are not used in the calculation of requirements Then if you needthe secondary products OpenERP will not ask you to manufacture another product to use the wasteproducts and secondary products of this production In this case you should enter another productionorder for the secondary product
156 CHAPTER 6 DEFINING YOUR MASTER DATA
Figure 615 Definition of Subproducts
Figure 616 Production Order producing Several Finished Products
Services in Manufacturing
Unlike most software for production management OpenERP managesservices as well as stockable products So it is possible to put productsof type Service in a bill of materials These do not appear in the productionorder but their requirements will be taken into account
If they are defined as Make to Order OpenERP will generate a task forthe manufacturing or a subcontract order for the operations The behaviourwill depend on the Supply Method configured in the product form Buy orProduce
CHAPTER 6 DEFINING YOUR MASTER DATA 157
655 Scrapping
If you have to scrap the final product before it is finished you will have to scrap every componentallowed for this product
Figure 617 Scrapping a Product to Finish
If you scrap a Product to Finish you will get the situation illustrated in the previous figure A finishedproduct will be created and put in the scrapped virtual location A new Product to Finish has beenadded to the manufacturing order
Scrap a product
To scrap a product you have to edit the manufacturing order and then selectthe product to be scrapped by clicking the little pencil at the left of the item
This new product has been added for the following reason when you have to manufacture a productand if this product has to be scrapped you have to produce another product to replace the scrapped oneThe reason why you have to scrap each component manually is that the production problem can comefrom one component
If the production process is finished and you see that you have to scrap the finished product you will nothave to scrap the different components They are already consumed They are not available anymorefor further manufacturing orders they have been moved to the production Stock Location
656 Production Orders
To open a Production Order use the menu Manufacturing rarr Manufacturing rarr Manufacturing Ordersand click the New button You get a blank form to enter a new production order as shown in the figureNew Production Order (page 158)
The production order follows the process given by the figure Process for Handling a Production Order(page 158)
The Scheduled date Product Qty and Reference are automatically completed when the form is firstopened Enter the product that you want to produce and the quantity required The Product UOM bydefault is completed automatically by OpenERP when the product is first selected
158 CHAPTER 6 DEFINING YOUR MASTER DATA
Figure 618 New Production Order
Figure 619 Process for Handling a Production Order
CHAPTER 6 DEFINING YOUR MASTER DATA 159
You then have to set two locations
bull The location from which the required raw materials should be found and
bull The location for depositing the finished products
For simplicity put the Stock location in both places The field Bill of Materials will automatically becompleted by OpenERP when you select the product You can then overwrite it with another BoM tospecify something else to use for this specific manufacturing then click the button Compute Data
The tabs Scheduled Products and Work Orders are also completed automatically when you clickCompute Data (in the Work Orders or Scheduled Products tabs) You will find the raw materials therethat are required for the production and the operations needed by the assembly staff
If you want to start production click the button Confirm Production and OpenERP automaticallycompletes the Products to Consume field in the Consumed Products tab and Products to Finish field inFinished Products tab
The information in the Consumed Products tab can be changed if
bull you want to enter a serial number for raw materials
bull you want to change the quantities consumed (lost during production)
For traceability you can set lot numbers on the raw materials used or on the finished products Notethe Production Lot and Pack numbers
Once the order is confirmed you should force the reservation of materials using the Force Reservationbutton This means that you do not have to wait for the scheduler to assign and reserve the raw materialsfrom your stock for this production run This shortens the procurement process
If you do not want to change the priorities just leave the production order in this state and the schedulerwill create a plan based on the priority and your planned date
To start the production of products click Start Production The raw materials are then consumedautomatically from stock which means that the draft ( Waiting ) movements become Done
Once the production is complete click Produce The finished products are now moved into stock
66 Logistics and Manufacturing
661 Manufacturing Stock Locations
OpenERP allows you to define a specific location to keep track of your manufacturing moves
To get an overview of all stock moves go to Warehouse rarr Traceability rarr Stock Moves You canenter your Production location in the Location search field and then group by Source or Destinationaccording to the moves you would like to check
160 CHAPTER 6 DEFINING YOUR MASTER DATA
662 Traceability
With traceability you can easily track your production lots in the software With this functionality youcan quickly find where your products are in your warehouse In counterpart you will be forced tomention a number of lot to each product to be able to track it in the system
To enable traceability in the manufacturing process go to Warehouse rarr Product rarr Products Inthe Product form you have to select the box Track Manufacturing Lots in the Lots section on theInformation tab
In the manufacturing order you have to mention a production lot number in order to continue theprocess You can select the production lot in the Manufacturing Order form on the second tab calledFinished Products You have to click the Products to Finish you want to trace a new window will openIn the Production Lot field click to link the manufacturing order to a production lot
Figure 620 Tracking a Manufacturing Order
When you have linked some manufacturing orders to production lots you can trace them from themenu Warehouse rarr Traceability rarr Production Lots In this view you see the different production lotslinked to a product If you select one lot you will have the possibility to choose between UpstreamTraceability or Downstream Traceability
Figure 621 Choosing between Upstream and Downstream Traceability
CHAPTER 6 DEFINING YOUR MASTER DATA 161
Traceability
Upstream Traceability It starts from the raw materials received fromthe supplier and follows the chain to the finished products delivered tocustomers Note that the name is confusing - this would often be considereda downstream direction Think of it as Where Used
Downstream Traceability It follows the product in the other directionfrom customer to the different suppliers of raw material Note that thename is confusing - this would often be considered an upstream directionThink of it as Where Supplied
Figure 622 Upstream Traceability
The different lines show the stock moves attached to the production of the product There are severalstock moves that are traced due to the Bill of Materials attached to the product [PC1] Basic PC
Figure 623 Downstream Traceability
In this window you only see the move for the finished product This is related to the definition of theconcept of Downstream Traceability which only shows the flow from the customer to the supplier ofraw materials
67 Managing Repairs from Repair to Invoicing and StockMovements
The management of repairs is carried out through the module mrp_repair Once installedthis module adds a new Manufacturing rarr Manufacturing rarr Repair Orders menu under theManufacturing menu to create repair jobs and review repairs in progress
162 CHAPTER 6 DEFINING YOUR MASTER DATA
Repairs
To install this module you can also use the Reconfigure wizard In theMRP Application Configuration screen check the Repairs option
In OpenERP a repair will have the following effects
bull Use of materials items for replacement
bull Production of products items replaced from reserved stock
bull Quality control tracking the reasons for repair
bull Accounting entries following stock moves
bull Receipt and delivery of product from and to the end user
bull Adding operations that can be seen in the productrsquos traceability
bull Invoicing items used andor free for repairs
671 Entering Data for a New Repair
Use the menu Manufacturing rarr Manufacturing rarr Repair Orders to enter a new repair into the systemYou will see a blank form for the repair data as shown in the figure Entering a New Repair (page 162)below
Figure 624 Entering a New Repair
CHAPTER 6 DEFINING YOUR MASTER DATA 163
First enter the product to repair then identify the product that will be repaired using the productlot number OpenERP then automatically completes fields from the selected lot ndash the partner fieldsaddress delivery location and stock move
If a warranty period has been defined in the product description in months OpenERP completes thefield Guarantee limit with the correct warranty date
Now you have to specify the components that you will be adding replacing or removing in theOperations part On each line you should specify the following
Add or remove a component of the finished product
bull Product
bull Qty
bull UoM
bull Unit Price
bull To Invoice or not
Once the component has been selected OpenERP automatically completes most of the fields
bull Qty 1
bull UoM unit for managing stock defined in the product form
bull Unit Price calculated from the customer list price
bull Source Location given by the stock management
bull To Invoice depends on the actual date and the guarantee period
This information is automatically proposed by the system but you can modify it all yourself
On the second tab of the Repair form Invoicing you can select whether the repair has to beinvoiced or not and if invoiced whether it should be before or after the repair You can also select theapplicable list price a specific address and encode additional charges that need to be added to the repairinvoice
The third tab Extra Info shows information about linked invoice and picking You receiveinformation about the current location and you can change the Delivery Location The Notestab allows you to register internal notes and information that should be written on the Quotation
672 Repair Workflow
A defined process handles a repair order ndash both the repair itself and the customer invoicing The figureProcess to Handle a Repair (page 164) shows this repair process
Once a repair has been entered in the system it is in the Quotation state In this state a repair orderhas no impact on the rest of the system You can print a quotation through the action Quotation Order
On the second tab you can specify the Invoice Method
164 CHAPTER 6 DEFINING YOUR MASTER DATA
Figure 625 Repair Form Invoicing Tab
Figure 626 Process to Handle a Repair
CHAPTER 6 DEFINING YOUR MASTER DATA 165
bull No Invoice
bull Before Repair
bull After Repair
You can then confirm the repair operation or create an invoice for the customer depending on the InvoiceMethod
The repair quotation can now be sent to the customer Once the customer approves the repair clickthe Confirm Repair button From the menu Manufacturing rarr Manufacturing rarr Repair Orders youcan easily find the confirmed repair orders by selecting the Confirmed button Click Start Repair toindicate that you can start working on the repair The Repair order will now be in the Under Repairstate When you finish the repair click the End Repair button
673 Invoicing the Repair
When the repair is to be invoiced a draft invoice is generated by the system For an After Repair invoiceyou can click the Make Invoice button OpenERP will then show the draft invoice created at thetop of the repair order (red text) You can easily go to that invoice simply by clicking the correspondingred text This invoice contains the raw materials used (replaced components) and any other costs suchas the time used for the repair These other costs are entered on the second tab of the Repair form Anyinformation you entered for the quotation on the Notes tab will also be displayed on the invoice
If the product to be repaired is still under guarantee OpenERP automatically suggests that thecomponents themselves are not invoiced but will still use any other defined costs You can overrideany of these default values while entering the data
Extra Info
The link to the generated invoice is shown on the Extra Infolsquolsquotabof the repair document To open the invoicesimply click the lsquolsquoInvoice field
674 Stock Movements and Repairs
When the repair has been carried out OpenERP automatically carries out stock movements forcomponents that have been removed added or replaced on the finished product From the menuWarehouse rarr Traceability rarr Stock Moves you can for instance enter the production lot to see allmoves for the repaired product
The move operations are carried out using the locations shown in the first tab of the Repair form Ifa destination location has been specified OpenERP automatically handles the final customer deliveryorder when the repair has been completed This also lets you manage the delivery of the repairedproducts
For example take the case of the shelf that was produced at the start of this chapter If you have toreplace the shelf SIDEPAN you should enter data for the repair as shown in figure Repair for a SidePanel (page 166)
166 CHAPTER 6 DEFINING YOUR MASTER DATA
Figure 627 Repair for a Side Panel
In this example you would carry out the following operations
bull Remove a SIDEPAN shelf in the cabinet and put the faulty shelf in the Scrapped location
bull Place a new SIDEPAN shelf that has been taken from stock
When the repair is ready to be confirmed OpenERP will generate the following stock moves
bull Put faulty SIDEPAN into suitable stock location Default Production gt Scrapped
bull Consume SIDEPAN Stock gt Production
If you analyze the traceability of this lot number you will see all the repair operations in the upstreamand downstream traceability lists of the products concerned
68 Forecasting and Supplying
681 Scheduler
The requirements scheduler is the calculation engine which plans and prioritises production andpurchasing automatically according to the rules defined on products By default the scheduler isset to run once a day (OpenERP automatically creates a Scheduled Action for this) You can alsostart the scheduler manually from the menu Warehouse rarr Schedulers rarr Compute Schedulers Thescheduler uses all the relevant parameters defined for products suppliers and the company to determinethe priorities between the different production orders deliveries and supplier purchases
CHAPTER 6 DEFINING YOUR MASTER DATA 167
Starting Time
You can set the starting time of the scheduler by modifying thecorresponding action in the menu Administration rarr Configuration rarrScheduler rarr Scheduled Actions Modify the Run mrp Schedulerconfiguration document
Figure 628 Configuring the Start Time to Calculate Requirements
Calculating Requirements Scheduling
Scheduling only validates procurements that are confirmed but not yetstarted These procurement reservations will themselves start productiontasks or purchases depending on the configuration of the requested product
You take into account the priority of operations when starting reservations and procurements Urgentrequests those with a date in the past or requests with a date earlier than the others will be started firstIn case there are not enough products in stock to satisfy all the requests you can be sure that the mosturgent requests will be produced first
682 Planning
In OpenERP you can plan the production in an easy way Simply by going to Manufacturing rarrPlanning you can plan manufacturing orders work orders andor work centers
By clicking Manufacturing Orders in the Planning menu a calendar view will open in whichyou can select a day to create the order whenever you want You will also see the already plannedorders By dragging and dropping a manufacturing order in Calendar view you can change the startingdate of the order
When you click in a day in the Calendar view an empty manufacturing order window will open and letyou choose which product you want to produce
168 CHAPTER 6 DEFINING YOUR MASTER DATA
Figure 629 Planning Manufacturing Orders
Figure 630 New Manufacturing Order
CHAPTER 6 DEFINING YOUR MASTER DATA 169
Scheduler and Just in Time
When you want to work according to the Just in Time way you should install the module mrp_jit
If you install this module you will not have to run the regular procurement scheduler anymore (but youstill need to run the minimum order point rule scheduler or for example let it run daily)
All procurement orders will be processed immediately which could in some cases entail a smallperformance impact
It may also increase your stock size because products are reserved as soon as possible and the schedulertime range is not taken into account anymore In that case you can no longer use priorities for thedifferent picking orders
Lead times
All procurement operations (that is the requirement for both production orders and purchase orders)are automatically calculated by the scheduler But more than just creating each order OpenERP plansthe timing of each step A planned date calculated by the system can be found on each order document
To organize the whole chain of manufacturing and procurement OpenERP bases everything on thedelivery date promised to the customer This is given by the date of the confirmation in the order andthe lead times shown in each product line of the order This lead time is itself proposed automaticallyin the field Customer Lead Time shown in the product form This Customer Lead Time is the differencebetween the time on an order and that of the delivery
To see a calculation of the lead times take the example of the cabinet above Suppose that the cabinetis assembled in two steps using the two following bills of materials
Table 621 Bill of Materials for 1 SHE100 Unit
Product Code Quantity Unit of MeasureSIDEPAN 2 PCEWOOD002 025 mLIN040 1 mWOOD010 0249 mMETC000 12 PCE
Table 622 Bill of Materials for 2 SIDEPAN Units
Product Code Quantity Unit of MeasureWOOD002 017 m
The SIDEPAN is made from an order using the workflow shown The WOOD002 is purchased onorder and the other products are all found in stock An order for the product SHE100 will then generatetwo production orders (SHE100 and SIDEPAN) then produce two purchase orders for the productWOOD002 Product WOOD002 is used in the production of both SHE100 and SIDEPAN Set the leadtimes on the product forms to the following
170 CHAPTER 6 DEFINING YOUR MASTER DATA
Table 623 Lead Times
Product Code Customer Lead Time Manufacturing Lead Time Supplier Lead TimeSHE100 30 days 5 daysSIDEPAN 10 daysWOOD002 5 days
A customer order placed on the 1st January will set up the following operations and lead times
bull Delivery SHE100 31 January (=1st January + 30 days)
bull Manufacture SHE100 26 January (=31 January ndash 5 days)
bull Manufacture SIDEPAN 16 January (=26 January ndash 10 days)
bull Purchase WOOD002 (for SHE100) 21 January (=26 January ndash 5 days)
bull Purchase WOOD002 (for SIDEPAN) 11 January (=16 January ndash 5 days)
In this example OpenERP will propose placing two orders with the supplier of product WOOD002Each of these orders can be for a different planned date Before confirming these orders the purchasingmanager could group (merge) these orders into a single order
Security Days
The scheduler will plan all operations as a function of the time configured on the products But it isalso possible to configure these factors in the company These factors are then global to the companywhatever the product concerned may be In the description of the company on the Configuration tabyou find the following parameters
bull Scheduler Range Days all the procurement requests that are not between today and today plusthe number of days specified here are not taken into account by the scheduler
bull Manufacturing Lead Time number of additional days needed for manufacturing
bull Purchase Lead Time additional days to include for all purchase orders with this supplier
bull Security Days number of days to deduct from a system order to cope with any problems ofprocurement
Purchase Lead Time
The security delay for purchases is the average time between the ordergenerated by OpenERP and the real purchase time from the supplier byyour purchasing department This delay takes into account the orderprocess in your company including order negotiation time
Take for instance the following configuration
CHAPTER 6 DEFINING YOUR MASTER DATA 171
bull Manufacturing Lead Time 1
bull Purchase Lead Time 3
bull Security Days 2
The example above will then be given the following lead times
bull Delivery SHE100 29 January (= 1st January + 30 days ndash 2 days)
bull Manufacture SHE100 23 January (= 29 January ndash 5 days ndash 1 day)
bull Manufacture SIDEPAN 12 January (= 26 January ndash 10 days ndash 1 day)
bull Purchase WOOD002 (for SHE100) 15 January (= 26 January ndash 5 days ndash 3 days)
bull Purchase WOOD002 (for SIDEPAN) 4 January (= 12 January ndash 5 days ndash 3 days)
683 Procurement
In normal system use you do not need to worry about procurement orders because they areautomatically generated by OpenERP and the user will usually work on the results of a procurement aproduction order a purchase order a sales order and a task
But if there are configuration problems the system can remain blocked by a procurement withoutgenerating a corresponding document Exception management allows you to solve possible issues
Automating Purchasing and Replenishment
In the Product form view you can choose between two procurement methods
bull Make to Stock (MTS)
bull Make to Order (MTO)
These two methods will impact the way you have to configure your automatic purchasing andreplenishment For the MTS method you will have to define Minimum Stock Rules to order productswhen the minimum treshold has been reached as well as a supplier to define where to order theproducts For the MTO method you have to define a supplier for the product in order to buy newproducts when a sales order or a manufacturing order is confirmed
Managing Scheduler Exceptions
In OpenERP you can have different procurement exceptions An exception appears in theProcurement Exception view when the system does not know what to do with an object suchas a Manufacturing Order or a Purchase Order
There are four types of exceptions
172 CHAPTER 6 DEFINING YOUR MASTER DATA
bull No bill of materials defined for production in this case you have got to create a BoM or indicatethat the product can be purchased instead (change the Supply Method)
bull No supplier available for a purchase you have to define a supplier in the Supplier tab of theproduct form
bull No address defined on the supplier partner you have to complete an address for the supplier forthe product in consideration
bull Not enough stock you have to create a rule for automatic procurement (for example a minimumstock rule) or manually procure it
Figure 631 Procurement Exceptions
Some problems are just timing issues and can be automatically corrected by the system (this will betemporary exceptions)
If a product has to be lsquoin stockrsquo but is not available in your stores OpenERP will make the exception aslsquotemporaryrsquo or lsquoto be correctedrsquo The exception is temporary if the system can procure it automaticallyfor example when a procurement rule has been defined for minimum stock
When an exception is raised you can check the configuration of your product in order to correct themisconfiguration Then you can choose to relaunch the scheduler or you can retry to execute the actionby selecting the line and clicking the Retry button then click Run procurement
Figure 632 Correct a Procurement Exception
The exception related to the BoM definition comes from the fact that a product with a supply methodset to Produce has no Bill of Materials The system does not know how to produce this product andthen raises an exception
CHAPTER 6 DEFINING YOUR MASTER DATA 173
Manual Procurement
To procure internally you can create a procurement order manually Use the menu Warehouse rarrSchedulers rarr Procurement Exceptions and click the New button to do this
Figure 633 Manual Procurement
The procurement order will then be responsible for calculating a proposal for automatic procurementfor the product concerned This procurement will start a task a purchase order for the supplier or aproduction depending on the product configuration
Figure 634 Procurement Flow
174 CHAPTER 6 DEFINING YOUR MASTER DATA
It is better to encode a procurement order rather than direct purchasing or production The procurementmethod has the following advantages
1 The form is simpler because OpenERP calculates the different values according to other values anddefined rules purchase date calculated from order date default supplier raw materials needs selectionof the most suitable bill of materials etc
2 The calculation of requirements prioritises the procurements If you encode a purchase directlyyou short-circuit the planning of different procurements
Shortcuts
On the Product form you have an action shortcut button ProcurementRequest that lets you quickly create a new procurement order
69 Working with Subcontractors
In OpenERP you can also subcontract production operations (for example painting and item assembly)at a supplierrsquos To do this you should indicate on the relevant routing document a supplier location forstock management
Configure a location dedicated to this supplier with the following data
bull Location Type Supplier
bull Location Address Select an address of the subcontracting partner
bull Chained Location Type Fixed
bull Chained Location if Fixed your Stock
bull Chaining Lead Time number of days before receipt of the finished product
Then once the manufacturing has been planned for the product concerned OpenERP will generate thefollowing steps
bull Delivery of raw materials to the stores for the supplier
bull Production order for the products at the supplierrsquos and receipt of the finished products in thestores
Once the production order has been confirmed OpenERP automatically generates a delivery order tosend to the raw materials supplier The storesperson can access this delivery order from the menuWarehouse rarr Warehouse Management rarr Internal Moves The raw materials will then be placed instock at the supplierrsquos stores
Once the delivery of raw materials has been confirmed OpenERP activates the production order Thesupplier uses the raw materials to produce the finished goods which will automatically be put in yourown stores This manufacturing is confirmed when you receive the products from your supplier Thenyou will indicate the quantities consumed by your supplier
CHAPTER 6 DEFINING YOUR MASTER DATA 175
Subcontract without Routing
If you do not use routing you can always subcontract work orders bycreating an empty routing in the subcontracting bill of materials
Production orders can be found in the menu Manufacturing rarr Manufacturing rarr ManufacturingOrders A production order is always carried out in two stages
1 Consumption of raw materials
2 Production of finished products
Depending on the companyrsquos needs you can specify that the first step is confirmed at theacknowledgement of the manufacturing supplier and the second at the receipt of finished goods inthe warehouse
610 Matching Sales Orders and Bills of Materials
In OpenERP you can define several bills of materials for the same product In fact you can haveseveral manufacturing methods or several approved raw materials for a given product You will see inthe following section that the manufacturing procedure (the routing) is attached to the Bill of Materialsso the choice of bill of materials implicitly includes the operations to make it
Once several bills of materials have been defined for a particular product you need to have a systemto enable OpenERP to select one of them for use By default the bill of materials with the lowestsequence number is selected by the system
To gain more control over the process during selling or procuring you can use Properties Themenu Manufacturing rarr Configuration rarr Master Bill of Materials rarr Properties enables you to defineproperties which can be set up arbitrarily to help you select a bill of materials when you have a choiceof BoMs
Properties
Properties is a concept that enables the selection of a method to manufacturea product Properties define a common language between salespeopleand technical people letting the salespeople have an influence on themanufacturing of the products using non-technical language and thechoices decided on by the technicians who define Bills of Materials
For example you can define the following property groups and properties
176 CHAPTER 6 DEFINING YOUR MASTER DATA
Table 624 Properties
Property Group PropertyWarranty 3 yearsWarranty 1 yearMethod of Manufacture SerialMethod of Manufacture Batch
Once the bills of materials have been defined you could associate the corresponding properties withthem Then when the salesperson enters a sales order line he can attach the properties required (ExtraInfo tab) If the product has to be manufactured OpenERP will automatically choose the bill ofmaterials that matches the defined properties in the order most closely
Extended View
Note that the properties are only visible in the Bills of Materials and SalesManagement if you are working in the Extended view mode If youcannot see it on your screen add the group Useability ExtendedView to your user
Figure 635 Properties in a Customer Order Line
Example Manufacturing in a Batch or on a Production Line
As an example take the manufacturing of the shelf presented above You can imagine that the companyhas two methods of manufacturing for this cabinet
bull Manually the staff assembles the shelves one by one and cuts the wood plank by plank This
CHAPTER 6 DEFINING YOUR MASTER DATA 177
approach is usually used to assemble prototypes It gets you very rapid production but at a highcost and only in small quantities
bull On a production line the staff uses machines that are capable of cutting wood by bandsawThis method is used for production runs of at least 50 items because the lead times using thismethod are quite lengthy The delay to start the production is much longer yet the cost per unitis considerably lower in this volume
You define two bills of materials for the same cabinet To distinguish between them you will define twoproperties in the same group manual assembly and production line assembly In thequotation the salesperson can set the method of manufacture he wants on each order line dependingon the quantities and the lead time requested by the customer
Bills of Materials and Substitute Products
In some software you use the term substitute for this principle ofconfigurable properties in a bill of materials
By putting a bill of materials on its own line you can also implement substitute products You set thebill of materials to type SetsPhantom to make the substitution transparent and to prevent OpenERPfrom proposing an intermediate production order
611 Production and Services
In OpenERP you can handle three types of goods two types of products (Stockable or Consumableproducts) and one type of services
For this last category OpenERP can react in two different ways Once a manufacturing order isgenerated for a product and this product contains a Service a task can be automatically generatedor not
Tasks
In order to automatically generate a task you have to install the moduleproject_mrp which requires the installation of the module project
By default the generated task is not linked to any project You can change this behaviour by creatinga project and link the service to this project This can be done in the Product form on the tabProcurement amp Locations in the Miscellaneous section Select the project to be linked in the Projectfield
To illustrate this process follow the next example
First you have to create a project to which you want to link the service We will call this projectConsulting After creating the project we have to create a new product Here are the characteristics ofthis product
178 CHAPTER 6 DEFINING YOUR MASTER DATA
Figure 636 Link a Service Product to a Project
Table 625 Configure a New Service
Field ValueName ConsultingReference CSLTProduct Type ServiceProcurement Method Make to OrderSupply Method ProduceDefault UoM HourProject Consulting
Once you have configured your project and your product you can create a Sales Order to order hoursof consultancy When you confirm the Sales Order a task will be created
If you go to Project rarr Project rarr Tasks you will find a new task called SO011[CSLT] ConsultingThis task is linked to the project guilabellsquoConsultinglsquo Note that the Sales Order number may bedifferent in your database
Figure 637 A Product linked to a Task and a Project
179
Part V
On Site installation
180
181
OpenERP Installation on Linux 7The installation procedure of OpenERP V60 is explained in this chapter This procedureis well tested on Ubuntu version 1004
There are four main procedures that you have to follow in order to run OpenERP V60smoothly
bull PostgreSQL Server Installation and Configuration
bull OpenERP Server Installation
bull OpenERP Client Installation
bull OpenERP Web Installation
71 PostgreSQL Server Installation and Configuration
Methods
The PostgreSQL download page lists the available installation methodsChoose the one that best suits your needs
711 Example on Ubuntu
Use the following command at your systemrsquos command prompt to install the postgresql package
sudo apt-get install postgresql
For example
openerpopenerp-desktop$ sudo apt-get install postgresql
For a graphical user interface of postgresql use the following command
sudo apt-get install pgadmin3
For example
openerpopenerp-desktop$ sudo apt-get install pgadmin3
You can find the new menu item pgAdmin III in your Ubuntu system menu from Applications rarrProgramming rarr pgAdmin III
182 CHAPTER 7 OPENERP INSTALLATION ON LINUX
712 Setup a PostgreSQL user for OpenERP
When the installations of the required software are done you must create a PostgreSQL user This usermust be the same as your system user OpenERP will use this user to connect to PostgreSQL
Figure 71 Figure demonstrating how OpenERP uses the PostgreSQL user to interact with it
Database
Without creating and configuring a PostgreSQL user for OpenERP asdescribed below you cannot create a database using OpenERP Client
First Method
The default superuser for PostgreSQL is called postgres You may need to login as this user first
openerpopenerp-desktop$ sudo su postgrespassword XXXXXXXXXX
Now create PostgreSQL user openerp using the following command
postgresopenerp-desktop$ createuser openerpShall the new role be a superuser (yn) y
Make this new user a superuser Only then you can create a database using OpenERP Client In shortopenerp is the new user created in PostgreSQL for OpenERP This user is the owner of all the tablescreated by OpenERP Client
Now check the list of tables created in PostgreSQL using following command
CHAPTER 7 OPENERP INSTALLATION ON LINUX 183
postgresopenerp-desktop$ psql -l
You can find the table template1 run the following command to use this table
postgresopenerp-desktop$ psql template1
To apply access rights to the role openerp for the database which will be created from OpenERP Clientuse the following command
template1= alter role openerp with password rsquopostgresrsquoALTER ROLE
Second Method
Another option to create and configure a PostgreSQL user for OpenERP is shown below
postgresopenerp-desktop$ createuser --createdb --username postgres --no-createrole--pwprompt openerpEnter password for new role XXXXXXXXXXEnter it again XXXXXXXXXXShall the new role be a superuser (yn) yCREATE ROLE
Password
Note that the password is postgres
Option explanations
bull --createdb the new user will be able to create new databases
bull --username postgres createuser will use the postgres user (superuser)
bull --no-createrole the new user will not be able to create new users
bull --pwprompt createuser will ask you the new userrsquos password
bull openerp the new userrsquos name
To access your database using pgAdmin III you must configure the database connection as shown inthe following figure
You can now start OpenERP Server You will probably need to modify the OpenERP configuration fileaccording to your needs which is normally located in ~openerprc
184 CHAPTER 7 OPENERP INSTALLATION ON LINUX
Developer Book
You can find information on configuration files in the Developer Booksection Configuration
72 OpenERP Server Installation
721 Installing the required packages
You need to have Python (at least 25 for OpenERP v60) in your Ubuntu system which is in-built inUbuntu version 1004 and above
You also need to install the following Python libraries because OpenERP Server uses these packages
To install the required libraries on your Ubuntu system you can do the following in your favouriteshell
bull lxml lxml is the most feature-rich and easy-to-use library for working with XML and HTML inthe Python language
CHAPTER 7 OPENERP INSTALLATION ON LINUX 185
sudo apt-get install python-lxml
bull mako Hyperfast and lightweight templating for the Python platform
sudo apt-get install python-mako
bull mxdatetime Provides the most natural and robust way of dealing with datetime values inPython
sudo apt-get install python-egenix-mxdatetime
bull python-dateutil The dateutil module provides powerful extensions to the standard datetimemodule available in Python 23+
sudo apt-get install python-dateutil
bull psycopg2 Psycopg is the most popular PostgreSQL adapter for the Python programminglanguage
sudo apt-get install python-psycopg2
bull pychart PyChart is a Python library for creating high quality Encapsulated Postscript PDFPNG or SVG charts
sudo apt-get install python-pychart
bull pydot This module provides a full interface to create handle modify and process graphs inGraphvizrsquos dot language
sudo apt-get install python-pydot
bull pytz World Timezone Definitions for Python
sudo apt-get install python-tz
bull reportlab The ReportLab Toolkit is the time-proven ultra-robust open-source engine forprogrammatically creating PDF documents and forms the foundation of RML It also containsa library for creating platform-independent vector graphics It is a fast flexible cross-platformsolution written in Python
sudo apt-get install python-reportlab
bull pyyaml PyYAML is a YAML parser and emitter for Python
sudo apt-get install python-yaml
bull vobject VObject simplifies the process of parsing and creating iCalendar and vCard objects
186 CHAPTER 7 OPENERP INSTALLATION ON LINUX
sudo apt-get install python-vobject
722 Downloading the OpenERP Server
The OpenERP server can be downloaded from the OpenERP websitersquos download page
723 Testing the OpenERP Server
If you only want to test the server you do not need to install it Just unpack the archive and start theopenerp-server executable
tar -xzf openerp-server-602targzcd openerp-server-602binpython openerp-serverpy
The list of available command line parameters can be obtained with the -h command-line switch
python openerp-serverpy -h
724 Installing the OpenERP Server
The OpenERP Server can be installed very easily using the setuppy file
tar -xzf openerp-server-602targzcd openerp-server-602sudo python setuppy install
If your PostgreSQL server is up and running you can now run the server using the following command
openerp-server
If you do not already have a PostgreSQL server up and running you can read PostgreSQL ServerInstallation and Configuration (page 181)
You can find the OpenERP server configuration file at ~openerp-server-602docopenerp-serverconf
73 OpenERP Client Installation
731 Installing the required packages
You need to have Python (at least 25 for OpenERP v60) in your Ubuntu system which is in-built inUbuntu version 1004 and above
CHAPTER 7 OPENERP INSTALLATION ON LINUX 187
You also need to install the following Python libraries because OpenERP Client uses these packages
To install the required libraries on your Ubuntu system you can do the following in your favouriteshell
bull gtk GTK+ is a highly usable feature-rich toolkit for creating graphical user interfaces whichboosts cross-platform compatibility and an easy-to-use API
sudo apt-get install python-gtk2
bull glade Glade is a RAD tool to enable quick amp easy development of user interfaces for the GTK+toolkit and the GNOME desktop environment
sudo apt-get install python-glade2
bull matplotlib matplotlib is a Python 2D plotting library which produces publication quality figuresin a variety of hard-copy formats and interactive environments across platforms
sudo apt-get install python-matplotlib
bull mxdatetime Provides the most natural and robust way of dealing with datetime values inPython
sudo apt-get install python-egenix-mxdatetime
bull xml XML support for Python platform
sudo apt-get install python-xml
bull tz World Timezone definitions for Python
sudo apt-get install python-tz
bull hippocanvas The Hippo Canvas is a CairoGObjectGTK+ based canvas written in C withsupport for flexible layout CSS styling and initial work on animations
sudo apt-get install python-hippocanvas
bull pydot Python interface to Graphvizrsquos Dot language
sudo apt-get install python-pydot
PDF Viewer
You will also need a PDF viewer (eg xpdf acroread kpdf)
See the Configuring a PDF Viewer (page 188) section
188 CHAPTER 7 OPENERP INSTALLATION ON LINUX
732 Downloading the OpenERP Client
The OpenERP client can be downloaded from the OpenERP websitersquos download page
733 Testing the OpenERP Client
If you only want to test the client you do not need to install it Just unpack the archive and start theopenerp-client executable
tar -xzf openerp-client-602targzcd openerp-client-602binpython openerp-clientpy
The list of available command line parameters can be obtained with the -h command-line switch
python openerp-clientpy -h
734 Installing the OpenERP Client
The client can be installed very easily using the setuppy file
tar -xzf openerp-client-602targzcd openerp-client-602sudo python setuppy install
You can now run the client using the following command
openerp-client
735 Configuring a PDF Viewer
To preview PDF files OpenERP Client by default supports
1 evince
2 xpdf
3 gpdf
4 kpdf
5 epdfview
6 acroread
CHAPTER 7 OPENERP INSTALLATION ON LINUX 189
The client will try to find one of these executables (in this order) in your system and open the PDFdocument with it
For example if xpdf kpdf and acroread are the only PDF viewers installedon your system the OpenERP client will use xpdf for previewing PDFdocuments
If you want to use another PDF viewer or if you do not want to use the first one the client will findyou have to edit the OpenERP configuration file normally located in ~openerprc Find the[printer] section and edit the softpath parameter For example
[printer]softpath = kpdf
74 OpenERP Web Installation
741 Downloading amp Installing the OpenERP Web Client
The OpenERP Web Client can be downloaded from the OpenERP websitersquos download page
You need to install the following Python libraries because OpenERP Web Client uses these packages
1 Python gt= 24
2 CherryPy gt= 312
3 Mako gt= 024
4 Babel gt= 094
5 FormEncode gt= 122
6 simplejson gt= 209
7 pyparsing gt= 150
There is no need to install the above packages one by one You can just run the following commandsin your favourite shell
$ sudo apt-get install python python-dev build-essential$ sudo apt-get install python-setuptools
This will install dependencies required for the following
190 CHAPTER 7 OPENERP INSTALLATION ON LINUX
$ cd pathtoopenerp-web-602lib$ populatesh$ cd
This will install all required dependencies in private lib directory and you do not need to installanything
742 Testing the OpenERP Web Client
If you only want to test the web client you do not need to install it Just unpack the archive and startthe openerp-web executable
tar -xzf openerp-web-602targzcd openerp-web-602python openerp-webpy
The list of available command line parameters can be obtained with the -h command line switch
python openerp-webpy -h
743 Installing the OpenERP Web Client
The OpenERP Web Client can be installed very easily using the setuppy file
tar -xzf openerp-web-602targzcd openerp-web-602sudo python setuppy install
You can now run the OpenERP Web Client using the following command
openerp-web
you can find the OpenERP Web Client configuration file at~openerp-web-602docopenerp-webconf
744 Web Browser Compatibilities
Supported Browsers
OpenERP Web Client is known to work best with Mozilla based web browsers Here is a list ofsupported browsers
1 Firefox gt= 36
CHAPTER 7 OPENERP INSTALLATION ON LINUX 191
2 Internet Explorer gt= 70
3 Safari gt= 41
4 Google Chrome gt= 90
5 Opera gt= 100
Flash Plugin
Your browser should have the Flash plugin installed because OpenERP Web Client uses some Flashcomponents
Apply the following command in order to install the Flash plugin on an Ubuntu system
$ sudo apt-get install flashplugin-nonfree
192 CHAPTER 7 OPENERP INSTALLATION ON LINUX
193
OpenERP Installation on Windows 8In this chapter you will see the installation of OpenERP v60 on a Windows system Thisprocedure is well-tested on Windows 7
You have two options for the installation of OpenERP on a Windows system
bull All-In-One Installation This is the easiest and quickest way to install OpenERPIt installs all components (OpenERP Server Client Web and PostgreSQLdatabase) pre-configured on one computer This installation is recommendedif you do not have any major customizations
bull Independent Installation If you choose this mode of installation all thecomponents required to run OpenERP will have to be downloaded and installedseparately You will have to opt for an independent installation if you plan toinstall the components on separate machines This mode is also practical if youare already working with or plan to use a different version of PostgreSQL thanthe one provided with the All-In-One installer
81 OpenERP All-In-One Installation
Each time a new release of OpenERP is made OpenERP supplies a complete Windows auto-installerfor it This contains all of the components you need ndash the PostgreSQL database server the OpenERPapplication server the GTK application client and the Web client
This auto-installer enables you to install the whole system in just a few mouse clicks The initialconfiguration is set up during installation making it possible to start using it very quickly as long asyou do not want to change the underlying code It is aimed at the installation of everything on a singlePC but you can later connect GTK clients from other PCs Macs and Linux boxes to it as well
811 Downloading OpenERP All-In-One
The first step is to download the OpenERP All-In-One installer At this stage you must choose whichversion to install ndash the stable version or the development version If you are planning to put it straightinto production we strongly advise you to choose the stable version
194 CHAPTER 8 OPENERP INSTALLATION ON WINDOWS
Stable Versions and Development Versions
OpenERP development proceeds in two parallel tracks stable versions anddevelopment versions
New functionality is integrated into the development branch This branchis more advanced than the stable branch but it can contain undiscoveredand unfixed faults A new development release is made every month or soand OpenERP has made the code repository available so you can downloadthe very latest revisions if you want
The stable branch is designed for production environments Here releasesof new functionality are made only about once a year after a long period oftesting and validation Only bug fixes are released through the year on thestable branch
To download OpenERP for Windows follow these steps
1 Navigate to the site httpwwwopenerpcom
2 Click the Downloads button at the right then under Windows Auto-Installer select All-In-One
3 Before you can proceed with the download you will be asked to fill an online form with yourcontact and company details and information regarding your interest in OpenERP
4 Once you submit the online form the All-In-One Windows installer (currentlyopenerp-allinone-setup-602exe) becomes available for download
5 Save the file on your PC - it is quite a substantial size because it downloads everything includingthe PostgreSQL database system (version 83 at the time of writing) so it will take some time
812 Installing the OpenERP All-In-One
To install OpenERP and its database you must be signed in as an Administrator on your PC
If you have previously tried to install the All-In-One version of OpenERP you will have to uninstallthat first because various elements of a previous installation could interfere with your new installationMake sure that all Tiny ERP OpenERP and PostgreSQL applications are removed you are likely tohave to restart your PC to finish removing all traces of them
Double-click the installer file to install OpenERP and accept the default parameters on each dialog boxas you go The All-In-One installer is the simplest mode of installation and has the following steps
bull 1 Select installation language The default is English The other option is French
bull 2 Welcome message Carefully follow the recommendations given in this step
bull 3 Licence Agreement It is important that you accept the GNU General Public License toproceed with installation
CHAPTER 8 OPENERP INSTALLATION ON WINDOWS 195
Figure 81 Welcome to OpenERP
bull 4 Select components to install You can proceed with the default install type All InOne which will install the OpenERP Server GTK Desktop Client Web Client andPostgreSQL Database (version 83 at the time of writing) Or you may customizeyour installation by selecting only the components you require
Figure 82 Customize component installation
bull 5 Configure PostgreSQL connection The installer will suggest default parameters to completeyour PostgreSQL connection configuration You may accept the defaults or change itaccording to your requirement
bull 6 Select folder for installation By default OpenERP is installed in CProgramFilesOpenERP 60 To install in a different folder browse for a differentlocation(folder) in this step
bull 7 Install The automatic installation of OpenERP begins and you can view its progress
196 CHAPTER 8 OPENERP INSTALLATION ON WINDOWS
Figure 83 PostgreSQL configuration
bull 8 Finish On successful installation of OpenERP you will get an appropriate confirmation You canclick Finish to close the setup wizard
Figure 84 End of setup wizard
813 Starting the OpenERP Client
You do not need to manually start the OpenERP Server because it is installed as a Windows serviceBut you may trigger various actions from the shortcuts created in the Start menu for OpenERP GTKClient 60 OpenERP Server 60 and PostgreSQL 83 The OpenERP Client can be opened ready to usethe OpenERP system once you have completed the All-In-One installation
You will find the OpenERP Client icon on your desktop which you double-click to access the OpenERPclient interface Use the menu File rarr Connect to connect to a database As this would be the firsttime you are using OpenERP since its installation your database will be empty You can create a newdatabase through File rarr Databases rarr New database
CHAPTER 8 OPENERP INSTALLATION ON WINDOWS 197
Figure 85 Database on first run
82 PostgreSQL Server Installation and Configuration
In this chapter you will see how to configure PostgreSQL for its use with OpenERP The followingprocedure is well-tested on PostgreSQL v90
821 Installing PostgreSQL Server
You can download the Windows installer from the PostgreSQL download page
Depending on your need choose either the One Click Installer or the pgInstaller and run the executableyou have just downloaded
822 Setup a PostgreSQL User
When the required software installations are complete you must create a PostgreSQL user OpenERPwill use this user to connect to PostgreSQL
Add a User
Start a Windows console (run the cmd command in the Search programs and files text box of the Startmenu)
Change the directory to the PostgreSQL bin directory (eg CProgramFilesPostgreSQL90bin) or add this directory to your PATH environment variable
The default superuser for PostgreSQL is called postgres The password was chosen during thePostgreSQL installation
In your Windows console type
CProgram FilesPostgreSQL90bingtcreateuserexe --createdb --username postgres --no-createrole --pwprompt openpgEnter password for new role openpgpwdEnter it again openpgpwdShall the new role be a superuser (yn) yPassword XXXXXXXXXX
198 CHAPTER 8 OPENERP INSTALLATION ON WINDOWS
line 1 is the command itself
line 2 asks you the new userrsquos password
line 3 asks you to confirm the new userrsquos password
line 4 new role is superuser or not
line 5 asks you the postgres userrsquos password
Option explanations
bull --createdb the new user will be able to create new databases
bull --username postgres createuser will use the postgres user (superuser)
bull --no-createrole the new user will not be able to create new users
bull --pwprompt createuser will ask you the new userrsquos password
bull openpg the new userrsquos name Alternatively you may specify a different username
bull openpgpwd the new userrsquos password Alternatively you may specify a different password
Password
In OpenERP v6 openpg and openpgpwd are the default username andpassword used during the OpenERP Server installation If you plan tochange these defaults for the server or have already installed the serverwith different values you have to use those user configuration values whenyou create a PostgreSQL user for OpenERP
Now use pgAdmin III to create database ldquoopenerpdemordquo with owner ldquoopenpgrdquo
CREATE DATABASE openerpdemo WITH OWNER = openpg ENCODING = rsquoUTF8rsquoCOMMENT ON DATABASE openerpdemo IS rsquoOpenERP Demo DBrsquo
If you have installed the OpenERP Server you can start it now If needed you can override the serverconfiguration by starting the server at a Windows console and specifying command-line options Formore on this refer the section Customized Configuration (page 201)
To change a userrsquos password in any Windows version execute the following
net user ltaccountnamegt ltnewpasswordgteg net user postgres postgres
If it is a domain account just add ldquoDOMAINrdquo at the end
If you want to delete it just execute
net user ltaccountnamegt delete
CHAPTER 8 OPENERP INSTALLATION ON WINDOWS 199
Case-Insensitive Search Issue
For an installation which needs full UTF8 character support consider using postgres gt= 82x Usingversions prior to this OpenERP search will not return the expected results for case-insensitive searcheswhich are used for searching partners products etc
Example
SELECT rsquoxrsquo FROM my_table WHERE rsquobeacutetrsquo ilike rsquoBEacuteTrsquo--matches only in 82x
83 OpenERP Server Installation
The OpenERP Server 60 installation works with disks formatted in NTFS (not a FAT or FAT32partition) The following installation procedure has been well-tested on Windows 7
Windows Versions
OpenERP Server does not work on Windows 98 or ME for obvious reasonsndash these cannot be formatted using NTFS
You will need a PostgreSQL server up and running If it is not the case you can read the PostgreSQLServer Installation and Configuration (page 197) section
831 Downloading the OpenERP Server
The OpenERP Server can be downloaded from OpenERP websitersquos download page
Under Windows Auto-Installer choose Server to download the OpenERP Server standalone
832 Installing the OpenERP Server
Execute the installer you have just downloaded It has the following stages
bull 1 Select installation language The default is English The other option is French
bull 2 Welcome message Carefully follow the recommendations given in this step
bull 3 Licence Agreement It is important that you accept the GNU General Public License toproceed with installation
bull 4 Select folder for installation By default OpenERP Server is installed in CProgramFilesOpenERP 60Server To install in a different folder browse for adifferent location(folder) in this step
200 CHAPTER 8 OPENERP INSTALLATION ON WINDOWS
bull 5 Configure PostgreSQL connection The installer will suggest default parameters tocomplete your PostgreSQL connection configuration You may accept the defaultsor change it according to your requirement
PostgreSQL configuration
bull 6 Create shortcuts Select a folder in the Start menu where you would like to create the programrsquosshortcuts
Create Start menu shortcuts
bull 7 Install The automatic installation of OpenERP Server begins and you can view its progress
bull 8 Finish On successful installation of OpenERP Server you will get an appropriate confirmationYou can click Finish to close the setup wizard
End of setup wizard
The OpenERP Server installs as a Windows service This means you do not have to start the servereach time you start the computer and it runs without the need of an open user session
CHAPTER 8 OPENERP INSTALLATION ON WINDOWS 201
833 Customized Configuration
To initialize the server with configurations of your choice you have to invoke it at the WindowsCommand prompt with the options you wish to override
Navigate to the installation directory in CProgram FilesOpenERP 60Server and typethis command but do not execute it yet
openerp-serverexe -d ltdb_namegt -r ltdb_usergt -w ltdb_passwordgt--db_host=ltpostgresql_server_addressgt--db_port=ltport_nogt --logfile=ltlogfilegt
The initialization of OpenERP Server provides necessary information for connection to the PostgreSQLdatabase and the choice of data to load Here is the explanation of used options
bull -d ltdb_namegt Name of the database created for OpenERP Server
bull -r ltdb_usergt Name of the PostgreSQL user (role)
bull -w ltdb_passwordgt Password of the PostgreSQL user
bull --db_host=ltpostgresql_server_addressgt Address of the server wherePostgreSQL is If you have installed PostgreSQL on the same computer as OpenERP Serveryou can enter localhost else the IP address or the name of the distant server
bull --db_port=ltport_nogt Port number where PostgreSQL listens The default is 5432
bull --stop-after-init This option stops the server after initialization
bull --logfile=ltlogfilegt specify an alternate logfile where all the outputof server will be saved The default is CProgram FilesOpenERP60Serveropenerp-serverlog
Before the execution of this command you have to decide the purpose of the database created inOpenERP
Sample command
202 CHAPTER 8 OPENERP INSTALLATION ON WINDOWS
openerp-serverexe -d openerpdemo -r openpg -w openpgpwd--db_host=localhost --logfile=CUserstinyDesktopdemo_dblog--db_port=5430 --stop-after-init
Here you have to enter the username and password specified in the PostgreSQL connectionconfiguration during server installation
When you execute the initialization command if you specify a logfile the server runtime output iswritten to that file and you will not see any server output in the prompt window You have only to waituntil the prompt comes back
Deciding about the purpose of the database
You can initialize the database with OpenERP Server to
1 Take a look at the system with modules installed and demo data loaded
2 Install a new clean database system (without demo data)
3 Upgrade an existing version
With modules and demo data
If you execute the sample command above you will get a database with only base modules installedand loaded with demo data To initialize OpenERP Server with additional modules and its demo datayou need to add this option to the above command
-i ltmodule namegt
Sample command
openerp-serverexe -d openerpdemo --stop-after-init -i sale
This command will initialize the OpenERP Server with the module sale and its dependencies andfill its PostgreSQL database with their related demo data As can be seen you must specify the targetdatabase for the module installation
To install more than one module specify a comma-separated module list at the command-line
Without demo data (or new clean version)
Execute the command with an option excluding the demo data
--without-demo=all
CHAPTER 8 OPENERP INSTALLATION ON WINDOWS 203
This will load base modules (and other modules if -i option is used) but will not load its demo data
Sample command usage
openerp-serverexe -d openerpdemo --stop-after-init --without-demo=all
If you have already initialized the database with demo data loaded you can create a new database andexecute the above command on it
Update the database
Execute the command with an option that updates the data structures
--update=all
Sample command usage
openerp-serverexe -d openerpdemo --stop-after-init --update=all
834 Monitoring the OpenERP Server
The service and some runtime information is accessible through the Computer Management console inAdministrative Tools
OpenERP Server 60 in the Services list
Here you can define how the service should act in case of server failure Access the servicersquos propertiesby double-clicking OpenERP Server 60 in the list
Recovery tab to set service failure response
The Computer Management logging service offers additional information about the execution of theOpenERP Server for example the startup or shutdown information of the service
204 CHAPTER 8 OPENERP INSTALLATION ON WINDOWS
Server information in Windows Logs list
OpenERP Server runtime output can be found in the default logfile Given that the server is nowrunning as a Windows service it does not output any runtime messages For this the logfile isthe only option Access it from the Start menu through the View log link in the group ofshortcuts for OpenERP Server 60 Alternatively use the path CProgram FilesOpenERP60Serveropenerp-serverlog
OpenERP Server log file
You can find out whether OpenERP Server is running by invoking Windows Task ManagerWhen you look at the Processes tab you will see OpenERPServerServiceexe andopenerp-serverexe both having SYSTEM as their user (to see these Show processes from allusers must be enabled in the Task Manager)
CHAPTER 8 OPENERP INSTALLATION ON WINDOWS 205
The services in Windows Task Manager
835 Congratulations you have successfully installed OpenERP Server
For more information please take a look at Additional Installation Information and Troubleshooting(page 210) where you can find some troubleshooting examples
84 OpenERP Client Installation
You must install configure and run the OpenERP Server before using the OpenERP Client The clientneeds the server to run You can install the server application on your computer or on an independent
206 CHAPTER 8 OPENERP INSTALLATION ON WINDOWS
server accessible by network
841 Downloading the OpenERP Client
The OpenERP Client can be downloaded from OpenERP websitersquos download page
Under Windows Auto-Installer choose Client to download the OpenERP Client standalone
842 Installing the OpenERP Client
Click the executable installation file you have just downloaded and proceed with the following steps
bull 1 Select installation language The default is English The other option is French
bull 2 Welcome message Carefully follow the recommendations given in this step
bull 3 Licence Agreement It is important that you accept the GNU General Public License toproceed with installation
bull 4 Select folder for installation By default OpenERP Client is installed in CProgramFilesOpenERP 60Client To install in a different folder browse for adifferent location(folder) in this step
bull 5 Create shortcuts Select a folder in the Start menu where you would like to create theprogramrsquos shortcuts
Create Start Menu Shortcuts
bull 6 Install The automatic installation of OpenERP Client begins and you can view its progress
bull 7 Finish On successful installation of OpenERP Client you will get an appropriateconfirmation Click Finish to close the setup wizard
End of Configuration Wizard
CHAPTER 8 OPENERP INSTALLATION ON WINDOWS 207
843 Starting the OpenERP Client
The installation program creates shortcuts in the main program menu and on the desktop which youcan use to start the client Be sure to have an OpenERP Server running somewhere (on your computeror a distant server) to be able to use the client software
Log in to openerpdemo database using default username and password
bull Username = admin
bull Password = admin
Enjoy
Connecting to the Demo Database
85 OpenERP Web Installation
You must install configure and run the OpenERP Server before using the OpenERP Web The webclient needs the server to run You can install the server application on your computer or on anindependent server accessible by network
208 CHAPTER 8 OPENERP INSTALLATION ON WINDOWS
851 Downloading the OpenERP Web
The OpenERP Web can be downloaded from OpenERP websitersquos download page
Under Windows Auto-Installer choose Web to download the OpenERP Web standalone
852 Installing the OpenERP Web
Click the executable installation file you have just downloaded and proceed with the following steps
bull 1 Select installation language The default is English The other option is French
bull 2 Welcome message Carefully follow the recommendations given in this step
bull 3 Licence Agreement It is important that you accept the OpenERP Public License (OEPL)Version 11 to proceed with installation This licence is based on the Mozilla PublicLicence (MPL) Version 11
OpenERP Public Licence
bull 4 Select folder for installation By default OpenERP Web is installed in CProgramFilesOpenERP 60Web To install in a different folder browse for a differentlocation(folder) in this step
bull 5 Create shortcuts Select a folder in the Start menu where you would like to create theprogramrsquos shortcuts
Create Start Menu Shortcuts
bull 6 Install The automatic installation of OpenERP Web begins and you can view its progress
bull 7 Finish On successful installation of OpenERP Web you will get an appropriateconfirmation Click Finish to close the setup wizard
The Windows service for OpenERP Web Server is also installed and is set up to start the serverautomatically on system boot
CHAPTER 8 OPENERP INSTALLATION ON WINDOWS 209
853 Starting the Web Client
The web server being initialized and the settings saved you can start the OpenERP Web Client
Use a web browser of your choice to connect to OpenERP Web If your web client is installed on thesame computer as the server you can navigate to httplocalhost8080 to connect to the OpenERP webversion If the server is installed on a separate computer you must know the name or IP address of theserver over the network and navigate to httpltserver_addressgt8080 to connect to OpenERP
Figure 86 Web Client at Startup
210 CHAPTER 8 OPENERP INSTALLATION ON WINDOWS
86 Troubleshooting and Windows Complementary InstallInformation
861 PostgreSQL Administration
OpenERP Server Connection Error with PostgreSQL
If you are initializing a database from the command-line with a custom usernamerole (-r) and password(-w) ensure that you have created a corresponding PostgreSQL user for the same Otherwise you mayencounter error messages as shown below
User authentication failure
You may also face another problem similar to this situation
Database connection failure
In this case check if the service postgresql-90 - PostgreSQL Server 90 is running inthe Services Manager (Control Panel rarr System and Security rarr Administrative Tools rarr Services)
PostgreSQL 90 in the Services list
You can edit the service configuration to start PostgreSQL as a service on system boot This is usuallythe default
Configure PostgreSQL 90 service
If your PostgreSQL service is running but you get connection errors you can restart the service
Restarting the service
CHAPTER 8 OPENERP INSTALLATION ON WINDOWS 211
212 CHAPTER 8 OPENERP INSTALLATION ON WINDOWS
Index
Aabsences 64access 39account
chart 37account types 26accountant 55accounts
configuring 26allocation
cost 62 66analytic
chart of accounts 61Analytic Accounts 59
Bbackup
database 38bill of materials 139
phantom 146BoM
multi-level 144revisions 143
BoM substitute products 177
Ccategory
partner 31product 34
chart of accounts 37analytic 61
contactpartner 31
costallocation 62 66
Ddatabase
backup 38drop 38duplicate 39
restore 38
Eexport
stock management 130
FFlow 6forecasts 113
Iimport
stock management 130Installation
OpenERP All-In-One (Windows) 193OpenERP Client (Linux) 186OpenERP Client (Windows) 205OpenERP Server (Linux) 184OpenERP Server (Windows) 199OpenERP Web (Linux) 189OpenERP Web (Windows) 207PostgreSQL 181PostgreSQL (Windows) 196Windows installation quirks 209
installationadministrator 194Windows (all-in-one) 194
invoicingrepair 165
Jjournals
configuring 29
Llocation structure 36Logistics 6 69
MMain Company
configuring 30
Manufacturing 6 137Master Procurement Schedule 109Master Production Schedule 109Module
mrp_jit 95Sale 95
moduleaccount 25 43account_analytic_default 51delivery 55hr_timesheet_invoice 59mrp 25 139mrp_jit 45 98 150mrp_repair 161product 25product_extended 58product_margin 59purchase 25 49purchase_analytic_analysis 51purchase_analytic_plans 51 60purchase_tender 56report_intrastat 131sale 25sale_journal 124sale_supplier_direct_delivery 99stock 25 73stock_location 131stock_planning 113warning 50
MPS 109multi-level BoM 144
OOpenERP All-In-One
Installation (Windows) 193OpenERP Client
Configuring a PDF viewer 188Installation (Linux) 186Installation (Windows) 205
OpenERP ServerInstallation (Linux) 184Installation (Windows) 199
OpenERP versions 193OpenERP Web
Installation (Linux) 189Installation (Windows) 207
Ppartner 31
category 31contact 31
PDF viewer 188phantom
bill of materials 146plan
production 113PostgreSQL
Installation 181Installation (Windows) 196setup a database 181setup a database (Windows) 197setup a user 181setup a user (Windows) 197
product 34category 34
productionmanagement 137
propertiesdefining 28
Purchase 6purchase
tender 56Purchasing 47
Qquotation 152
RReal Case 18rent 131repair
invoicing 165
SSales 6sales order 152semi-finished product 152Stock
Double-Entry 73Inventory operation 74Location 79Location types 79Negative 97Stock check 74
Warehouse 76stock
journal 124location 35
Stock Management 69
Ttender 56traceability
downstream 115upstream 115
traceability (stock) 118
Wwork center cycle 148

Open Source SoftwareMaking Business Applications accessible to All Companies
Streamline your Manufacturing Processes with OpenERP
A Simple Approach to Manage the Manufacturing and Supply Chain Complexity
by Els Van Vossel and Fabien Pinckaers
This book is published under free license Creative CommonsshyBYshyNCshySA
httpcreativecommonsorglicensesbyshyncshysa20bedeeden_US
bull
You are free
bull to share mdash to copy distribute display and perform the work bull to remix mdash to make derivative works
bull Under the following conditions
bull Attribution You must attribute the work by stating laquoThe authors of the original work are Els Van Vossel and FabienPinckaersraquo with at least the same prominence as in the original work and as in any other attributions for this work (but not in any way that suggests that they endorse you or your use of the work)
bull Noncommercial You may not use this work for commercial purposes
bull Share Alike If you alter transform or build upon this work you may distribute the resulting work only under the same or similar license to this one
bull For any reuse or distribution you must make clear to others the license terms of this workThe best way to do this is with a link to the web page cited above
bull Any of the above conditions can be waived if you get permission from the copyright holder bull Nothing in this license impairs or restricts the authors moral rights
First Edition
Many of the designations used by manufacturers and suppliers to distinguish their products are claimed as trademarks Where those designations appear in this book and Open Object Press was aware of a trademark claim the designations have been printed in initial capitals
While every precaution has been taken in the preparation of this book the publisher and the authors assume no responsibility for errors or omissions or for damages resulting from the use of the information contained herein
Open Object Press is a division of OpenERP SA (wwwopenerpcom)
Copyright copy 2011 Els Van Vossel and Fabien Pinckaers
First edition July 2011 ISBN 978shy2shy9600876shy3shy5
40 Chausseacutee de Namur1367 GrandshyRosiegraverehttpopenerpcom
Special Thanks to Marc Laporte Olivier LaurentGary Malherbe and Greacutegory Dethier
OpenERP is a trademark of OpenERP SAThe software is available under the AGPL license version 3
40 Chausseacutee de Namur1367 GrandshyRosiegraverehttpopenerpcom
From the same Editor
OpenERP for Retail and Industrial Management ndash Steps towardsSales Logistics and Manufacturing Integration 2009Fabien Pinckaers and Geoff Gardiner ISBN 978shy2shy9600876shy0shy4
Drive your Sales amp Marketing Activities with OpenERP ndash Close Leads Automate Marketing Campaigns and Get AccurateForecasts 2011 Els Van Vossel and Fabien Pinckaers ISBN 978shy2shy9600876shy1shy1
Integrate your Logistic Processes with OpenERP ndash EfficientWarehouse Management with Sales and Purchases Integration2011 Els Van Vossel and Fabien Pinckaers ISBN 978shy2shy9600876shy2shy8
The Authors Els Van Vossel and Fabien Pinckaers
v
Contents
Foreword xiOpen Source Software Making Business Applications accessible xi
The OpenERP Solution xii
Structure of this book xii
About the authors xiii
Fabien Pinckaers xiii
Els Van Vossel xiii
Acknowledgements xiv
I First Steps Driving a PurchaseWarehouseManufacturing Flow 1
1 Configuring your OpenERP 3
2 Complete Example Sell Check the Stock Manufacture and Purchase 7
3 Letrsquos get Started and Configure a New Instance 21
31 Business Example 21
32 Basic Settings 22
33 Get your Database Up and Running without Demo Data 22
34 Fit your Needs 25
341 Configuring Accounts 26
342 Configuring Journals 29
343 Configuring the Main Company 30
344 Creating Partner Categories Partners and their Contacts 32
345 Creating Products and their Categories 34
346 Stock Locations 35
347 Setting up a Chart of Accounts 37
348 Make a Backup of the Database 38
35 Testing a Complete Purchase Cycle according to an Example 39
vi
351 Purchase Order 40
352 Receiving Goods 41
353 Invoice Control 42
354 Paying the Supplier 43
36 Testing a Complete Sales Cycle according to an Example 44
361 Sales Order 44
362 Preparing Goods for Shipping to Customers 45
363 Invoicing Goods 45
364 Customer Payment 46
II Advanced Features in Purchase Quotation Management 47
4 Driving your Purchases 49
41 All the Elements of a Complete Workflow 49
411 Setting up your Database 49
412 Price Request from the Supplier 49
413 Goods Receipt 53
414 Control of Invoicing 53
415 Control based on Orders 55
416 Control based on Goods Receipt 55
417 Tenders 56
418 Price Revisions 57
42 Purchase Analysis through Analytic Accounts 59
421 Powerful Statistics 59
422 To Each Enterprise its own Analytic Chart of Accounts 61
III Managing your Warehouse 69
5 Your Warehouse 71
51 Understanding Double-Entry Stock Management 73
52 Managing Physical Inventory Structure 76
521 Warehouse 76
522 Location 79
vii
523 Shop 84
524 Stock 84
53 Keeping Track of Stock Movements 88
531 Goods Receipts 88
532 Internal Stock Moves 92
533 Shipping of Goods 94
534 Logistics Configuration through Advanced Routes 99
535 Procurement Methods ndash Make to Stock and Make to Order 104
536 Choosing Supply Methods 106
537 Packaging with Various Logistics Units of Measure 107
54 Scheduling Procurements 110
541 Processing Exceptions 110
542 Manual Procurement 111
543 Sales Forecasts 113
544 Production Plan 114
55 Managing Lots and Traceability 115
551 Stock Moves 116
552 Lots 117
553 Traceability 118
56 Scrapping Products 119
57 Identifying Products and Locations with Barcodes and RFID Devices 121
58 Financial Inventory Management 121
581 Manual and Real-time Stock Valuation 121
582 Managing Transportation Costs 122
59 Organize your Deliveries 124
591 The Different Journals 124
592 Using the Journals 125
510 Estimating Delivery Dates 127
5101 Standard Delivery Time 127
5102 Schedule Logistic Flows according to MRP1 Rules 128
511 Incoming and Outgoing Products Planning 128
512 Managing Inventory Reconciliation 129
viii
513 Building Reports to Track Activity 129
514 Import Export 130
5141 Stock 131
5142 Rental Locations 131
5143 Consigned Products 133
515 Stock Location Example 133
IV Streamlining your Manufacturing 137
6 Defining your Master Data 139
61 Bill of Materials and Components 140
611 Using Bills of Materials 140
612 Multi-level Bills of Materials 144
613 Phantom Bills of Materials 146
614 Bills of Materials for KitsSets 147
62 Work Centers 147
63 Routings 149
64 Manufacturing Orders 150
65 Complete Production Workflow 151
651 The Sales Order 152
652 Producing an Intermediate Product 152
653 Finished Product Manufacturing 154
654 Subproduct Production 155
655 Scrapping 157
656 Production Orders 157
66 Logistics and Manufacturing 159
661 Manufacturing Stock Locations 159
662 Traceability 160
67 Managing Repairs from Repair to Invoicing and Stock Movements 161
671 Entering Data for a New Repair 162
672 Repair Workflow 163
673 Invoicing the Repair 165
674 Stock Movements and Repairs 165
ix
68 Forecasting and Supplying 166
681 Scheduler 166
682 Planning 167
683 Procurement 171
69 Working with Subcontractors 174
610 Matching Sales Orders and Bills of Materials 175
611 Production and Services 177
V On Site installation 179
7 OpenERP Installation on Linux 181
71 PostgreSQL Server Installation and Configuration 181
711 Example on Ubuntu 181
712 Setup a PostgreSQL user for OpenERP 182
72 OpenERP Server Installation 184
721 Installing the required packages 184
722 Downloading the OpenERP Server 186
723 Testing the OpenERP Server 186
724 Installing the OpenERP Server 186
73 OpenERP Client Installation 186
731 Installing the required packages 186
732 Downloading the OpenERP Client 188
733 Testing the OpenERP Client 188
734 Installing the OpenERP Client 188
735 Configuring a PDF Viewer 188
74 OpenERP Web Installation 189
741 Downloading amp Installing the OpenERP Web Client 189
742 Testing the OpenERP Web Client 190
743 Installing the OpenERP Web Client 190
744 Web Browser Compatibilities 190
8 OpenERP Installation on Windows 193
81 OpenERP All-In-One Installation 193
x
811 Downloading OpenERP All-In-One 193
812 Installing the OpenERP All-In-One 194
813 Starting the OpenERP Client 196
82 PostgreSQL Server Installation and Configuration 197
821 Installing PostgreSQL Server 197
822 Setup a PostgreSQL User 197
83 OpenERP Server Installation 199
831 Downloading the OpenERP Server 199
832 Installing the OpenERP Server 199
833 Customized Configuration 201
834 Monitoring the OpenERP Server 203
835 Congratulations you have successfully installed OpenERP Server 205
84 OpenERP Client Installation 205
841 Downloading the OpenERP Client 206
842 Installing the OpenERP Client 206
843 Starting the OpenERP Client 207
85 OpenERP Web Installation 207
851 Downloading the OpenERP Web 208
852 Installing the OpenERP Web 208
853 Starting the Web Client 209
86 Troubleshooting and Windows Complementary Install Information 210
861 PostgreSQL Administration 210
Index 213
xi
ForewordInformation Systems have played an increasingly visible role over the past several years in improvingthe competitiveness of business They are more than just tools for handling repetitive tasks they willguide and advance all of a companyrsquos daily activities Integrated Management Software is today veryoften a key source of significant competitive advantage
Open Source Software Making Business Applicationsaccessible
Some may look at the Business Application market as a mature market dominated by a few large keyplayers with no new business opportunities
This would be ignoring the market reality So many customers are frustrated by their experience withexisting vendors so many companies around the world need to have access to business applicationsbut cannot afford them
OpenERP believes that business applications should not be a luxury That any company anywhere inthe world should be able to afford the best tools to professionally expand business That is one of thereasons why OpenERP needs to break the existing rules of the ERPs and the Business Applicationsmarket
Customers should use their budget smartly and invest in customizing the application to their specificneeds rather than paying expensive license fees OpenERP is committed to the Open Source BusinessModel precisely because Open Source allows for this Open Source is a disruptive model as it createsmore value for the customers
For decades customers have developed applications which remained specific to their own needs and inthe end proved extremely expensive to maintain Open Source means that customers can benefit frompast developments of other companies Also by contributing to the evolution of the software the userswill enjoy the guarantee that their development will be included in future versions of the software Oneof the major advantages is that such a Community brings a wealth of new functionality
Open Source also allows us to engage with our customers differently Since there is no licensing costany potential customer can download test and use the software OpenERP has no need for an expensivesales force to promote the product OpenERP just needs to make the best product and make it availableto customers
Open Source allows for many barriers in this industry to be broken The software is available to manycompanies who could otherwise not afford expensive business applications license fees The OpenERPsolution allows customers to use their money smartly and tailor the software to their individual needsOpenERP leverages from its customer base to enrich the software and finally eradicate any lock-in toallow customers to use and even drop the software freely
xii
The OpenERP Solution
OpenERP can build a new breed of business applications more modular more customer-friendly fullyweb-based which others cannot due to the heritage of their legacy systems
OpenERP is a comprehensive suite of business applications including Sales CRM Projectmanagement Warehouse management Manufacturing Financial management and Human Resourcesjust to name a few More than 1000 OpenERP modules are available from the OpenERP Apps marketplace (httpappsopenerpcom)
The key to continued logistics success is effective Purchase Sales Warehouse amp ManufacturingManagement and these are precisely the main topics of the book you are reading OpenERPrsquos PurchaseSales Warehouse amp Manufacturing features are flexible and highly developed to assist you in managingall aspects of manufacturing
OpenERP allows you to create bills of materials and use properties allowing your salespeople to easilyselect what they need to sell Purchase proposals and sales forecasts can easily be created fromOpenERP In a few clicks your sales person can transfer necessary information to the customer aboutthe current and virtual stock
Structure of this book
In part One Configuring your OpenERP (page 3) we will show you how to set up an OpenERPdatabase A step-by-step approach will guide you through a complete workflow to discover OpenERPrsquosfeatures
Part Two Advanced Features in Purchase Quotation Management (page 47) guides you from pricerequest to purchase proposal and order and goods receipt Several advanced purchase features willalso be explained
Part Three Managing your Warehouse (page 69) explains the principles of OpenERPrsquos double-entrystock management The book will provide you with ways to manage inventories both on a physicaland a financial level Upstream and Downstream traceability and extensive reporting will be discussedas well
Part Four Defining your Master Data (page 139) guides you the manufacturing process explainingseveral advanced features
Part Five On Site installation (page 179) explains the basic steps to install OpenERP on site BothLinux and Windows installations will be described
To manage your manufacturing you do not need all the elements described in this book But we find itvery important to include an integrated flow from the first quotation to the final billing of the suppliersincluding all the steps quotation order receiving goods inventory manufacturing and billing In someexamples we will also talk about the sales part although advanced sales features will not be includedin this book
xiii
About the authors
Fabien Pinckaers
Fabien Pinckaers was only eighteen years old when he started his first company Today over ten yearslater he has founded and managed several new technology companies all based on Free Open Sourcesoftware
He originated Tiny ERP now OpenERP and is the director of two companies including OpenERPSA the editor of OpenERP In a few years time he has grown the Tiny group from one to sixty-fiveemployees without loans or external fund-raising and while making a profit
He has also developed several large scale projects such as Auction-in-Europecom which became theleader in the art market in Belgium Even today people sell more art works there than on ebaybe
He is also the founder of the LUG (Linux User Group) of Louvain-la-Neuve and of several free projectslike OpenReport OpenStuff and Tiny Report Educated as a civil engineer (polytechnic) he has wonseveral IT prizes in Europe such as Wired and lrsquoInscene
A fierce defender of free software in the enterprise he is in constant demand as a conference speakerand he is the author of numerous articles dealing with free software in the management of the enterprise
Follow Fabien on his blog httpfptinyblogspotcom or on twitter fpopenerp
Els Van Vossel
Els Van Vossel always had a dedication to both written and spoken word Clear and explicitcommunication is crucial
Educated as a Professional Translator in Antwerp she worked as an independent translator on thelocalization of major ERP software Els acquired ERP knowledge and decided to start working as afunctional ERP consultant and a Technical Communicator for ERP software
As such the world of OpenSource software became more and more attractive She started workingwith OpenERP software in her free time and doing so Els really wanted to meet Fabien Pinckaers toshare thoughts about documentation strategy Now Els is reviewing and writing the OpenERP Books
Being an author of several Software Manuals she finds it exciting to work on the OpenERPdocumentation and continuously take it to a higher level Please note that this is a hell of a job but Elsfinds great pleasure in doing it
Follow Els on her blog httptraining-openerpblogspotcom or on twitter elsvanvossel
xiv
Acknowledgements
From Els Van Vossel
Thank you Fabien for offering me the opportunity to work with OpenERP I thank all OpenERP teammembers for their support and understanding My special thanks to my family who encouraged me towrite this book
From Fabien Pinckaers
I address my thanks to all of the team at OpenERP for their hard work in preparing translating andre-reading the book in its various forms My particular thanks to Laurence Henrion and my family forsupporting me throughout all this effort
1
Part I
First Steps Driving aPurchaseWarehouseManufacturing
FlowTo manage your manufacturing you do not need all the elements described in this bookBut we find it very important to include an integrated flow from the first quotation to thefinal billing of the suppliers including all the steps quotation order receiving goodsinventory manufacturing and billing
2
3
Configuring your OpenERP 1In this chapter you can start exploring OpenERP through a basic configuration withthe modules that are discussed in this book As mentioned before we want to showan integrated flow not just manufacturing management Where appropriate we willalso talk about the sales part For information about advanced sales features pleaserefer to the book Integrate your Logistic Process with OpenERP - EfficientWarehouse Management with Sales and Purchases Integration
Use a web browser of your choice to connect to OpenERP Web
Figure 11 Web Client at Startup
Start by creating a new database from the Welcome page by clicking Databases and then completingthe following fields on the Create Database form
bull Super admin password by default it is admin if you or your system administrator have notchanged it
bull New database name DemoCompany
bull Load Demonstration data checkbox checked
bull Default Language English (US)
bull Administrator password admin (because it is the easiest to remember at this stage butobviously completely insecure)
bull Confirm password admin
Press Create to start creating the database
4 CHAPTER 1 CONFIGURING YOUR OPENERP
Language
You can install OpenERP in many languages To be able to easily followthe instructions in this book we recommend you to choose English (US)
OpenERP suggests that you configure your database using a series of questions In the software theseseries of questions are managed through so-called Configuration Wizards
Click the Start Configuration button to continue
The next configuration wizard will help you to decide what your user interface will look like whetherthe screens will only show the most important fields - Simplified - or whether you also want tosee the fields for the more advanced users the Extended view Select Extended and click Next tocontinue
User Preferences
You can easily switch from Simplified to Extended view by changing yourUser Preferences
In the next wizard you can fill your company data select your companyrsquos base currency and add yourcompany logo which can be printed on reports Click Next to continue
Select the Warehouse Management Purchase Management Sales ManagementManufacturing and Accounting amp Finance business applications for installation and clickInstall Now OpenERP will start to install these five applications allowing you to do a complete cyclefrom sales warehouse purchase to invoice You will have to wait for the next configuration wizard tobe displayed (Loading will appear)
Figure 12 Selecting the Required Functionality
OpenERPrsquos modularity enables you to install a single Business Application (such as Purchase)if that is all you need Of course you can choose to install extra applications such asSales Management to handle quotations sales orders and sales invoices as well For nowplease install Warehouse Management Purchase Management Sales Management
CHAPTER 1 CONFIGURING YOUR OPENERP 5
Manufacturing and Accounting amp Finance as these five Business Applications will bediscussed in this book
Reconfigure
Keep in mind that you can change or reconfigure the system any time forinstance through the Reconfigure option in the main bar
When you choose a business application for installation OpenERP will automatically propose to addor configure related (smaller) applications to enrich your system When you install Sales OpenERPwill also ask you whether you want to install Invoicing Journals for instance
The figure Selecting Accounting Configuration (page 5) shows the Accounting ApplicationConfiguration screen that appears when you select Accounting amp Finance to be installed
Figure 13 Selecting Accounting Configuration
Select the Generic Chart of Account and fill in the Sale Tax () applicable in your country ThePurchase Tax will automatically be set as well Click one of the disk icons in front of the bank accountsto confirm the bank accounts to be created Then click Configure to continue the configuration
OpenERP Logistics amp Manufacturing Management offers lots of features You can easily manage youraddress book (customers suppliers ) keep track of procurements and sales manage your warehouseand inventory and much more
The figure Selecting Purchase Configuration (page 6) shows the Purchases Application Configurationscreen that appears when you select Purchase Management to be installed
Simply click Configure to continue the database creation
The following wizards will appear
bull Configure your Sales Management application click Configure to accept the default settings(no options checked)
6 CHAPTER 1 CONFIGURING YOUR OPENERP
Figure 14 Selecting Purchase Configuration
bull Configure your MRP Application Configuration application click Configure to accept thedefault settings
bull Configure your Accounting application click Configure to accept the default settings
bull Configure Sales Order Logistics click Next to accept the default settings
OpenERPrsquos menu will be displayed because your system is now ready for actual configuration In thenext chapter Complete Example Sell Check the Stock Manufacture and Purchase (page 7) you willstart working in the Manufacturing application in a step-by-step approach
As your business is growing and evolving all the time your requirements as to the use of OpenERPare likely to change To sustain your growth you can easily extend your Logistics amp ManufacturingManagement with other OpenERP business applications such as HR or CRM to name some OpenERPoffers this flexibility you can start with one business application and gradually complete OpenERP tosuit your ever changing needs
7
Complete Example Sell Check the Stock
Manufacture and Purchase 2In this chapter we will show you a complete Sales Purchase Manufacturing Warehouse flow Wewill explain how to create a product create a sales order have an automatic purchase proposal and orproduction order produce and receive the goods deliver to the customer and get sales and purchaseinvoices in a step-by-step scenario
First you will get an explanation about the scenario (what Thomas or one of his colleagues is supposedto do) Then the Notes will learn you how Thomas (or a colleague of his) enters the information inOpenERP For the simplicity of the use case we will do all of the steps under the Admin user Pleasenote that we will not discuss all elements in detail in this chapter Later in the book you will find allrequired information (apart from the advanced sales features)
Simplified or Extended View
In OpenERP your user interface will look slightly different according tothe User Preferences In Simplified view the screens will only showthe most important fields tab pages To see also the fields for the moreadvanced users you should switch to the Extended view You caneasily switch from Simplified to Extended view by changing your UserPreferences through the Edit Preferences button For this use case pleaseswitch to Extended view
Your company will have a stand at the House amp Design Fair to promote a series of products Thomasthe salesman shows the new products to the visiting prospects and customers
1 Create a new customer
John Smith from the company Clarkson Ltd visits your stand and decides to order the brandnew Deskand Chair you are promoting Thomas will have to create this new customer in OpenERP
8 CHAPTER 2 COMPLETE EXAMPLE SELL CHECK THE STOCKMANUFACTURE AND PURCHASE
New Customer
To create a new customer Thomas clicks the Sales button in OpenERPrsquosmain screen Then he goes to Sales rarr Address Book rarr Customers andclicks the New button The name of a customer is in blue because it is amandatory field so Thomas enters Clarkson in that field He notices thatthe Customer check box is already checked Thomas enters John Smith inthe Contact Name he selects the Default address type In the Streetfield Thomas enters London Street 40 he also enters the City London andthe Country United Kingdom as shown in the screenshot below He takes alook at the other three tabs and decides to keep the default values Thomasthen clicks the Save button to store the new customer
Figure 21 New Customer
2 Create a new product category and product
Because the desk and the chair from the new OfficeSecrets series do not yet exist in OpenERPMitchell the Product Manager will create this brandnew desk as a Make to Order product that willbe bought directly from the supplier concerned He will have to create a new product category for theOfficeSecrets series too
Configuring Products
For more information about configuring products please refer to the nextchapter Creating Products and their Categories (page 34)
CHAPTER 2 COMPLETE EXAMPLE SELL CHECK THE STOCK MANUFACTUREAND PURCHASE 9
Product Category
Product categories do have an effect on the products assigned to them and aproduct may belong to only one category To create a new product categoryMitchell goes to Warehouse selects the menu Configuration rarr Product rarrProducts Categories and clicks New to get an empty form for defining aproduct category Mitchell enters OfficeSecrets in the Name field andadds it to the parent category All products Sellable He leavesthe other fields as such and clicks Save
Then Mitchell will create three new products Note that he could also have created the new productcategory directly from the Product form
10 CHAPTER 2 COMPLETE EXAMPLE SELL CHECK THE STOCKMANUFACTURE AND PURCHASE
Product
To create a new product Mitchell goes to Warehouse rarr Product rarrProducts and clicks the New button The name of a product is in bluebecause it is a mandatory field so he enters 1600 Desk Wave Right-handW1600x D1200x H725mm Maple in that field He notices that the Can beSold and Can be Purchased check boxes are already checked by defaultMitchell selects the Stockable Product product type because he wants tokeep track of the stock movements of the desks In the ProcurementMethod field Mitchell selects Make to Order because the companydecided to only buy the product at the supplier when there is a sales orderfor it The Supply Method will be Buy He sets the Cost Price to 300and the Sales Price to 54125 as shown in the screenshot Product (page 11)Mitchell selects the product category OfficeSecrets Now he justhas to add the supplier from whom he will buy the desks He clicks theSuppliers tab then clicks New He clicks the Magnifying glass to geta list of suppliers from which he selects Wood y Wood Pecker He sets theminimal quantity to 1 and clicks the Save amp Close button He takes alook at the other tabs and decides to keep the default values He then clicksthe Save button to store the new product
To create the component to be included in the Bill of Material Mitchellclicks the Duplicate button to duplicate the Desk (available when a productis not in Edit mode) He changes the name to Leather for Chair in thatfield He unchecks the Can be Sold checkbox Mitchell changes theProcurement Method to Make to Stock because the company needs apermanent stock of leather to be able to fulfil the customerrsquos demands Hesets the Cost Price to 20 and the Sales Price to 0 Mitchell then clicks theSave button to store the new product
To create another component to be included in the Bill of Material Mitchellclicks the Duplicate button to duplicate the Leather for Chair He changesthe name to Chair Frame in that field He sets the Cost Price to 100Mitchell then clicks the Save button to store the new product
To create the finished product Mitchell goes to the list of products opensthe Desk product and clicks the Duplicate button to duplicate the Desk(available when a product is not in Edit mode) He changes the name toLeather Operator Chair in that field In the Procurement Methodfield Mitchell selects Make to Order then he changes the SupplyMethod to Produce He sets the Cost Price to 200 and the Sales Priceto 32550 From the supplier tab Mitchell deletes the supplier by clickingthe black cross He then clicks the Save button to store the new product
3 Add Minimum Stock Rules
To make sure the leather and the frame is always in stock Mitchell has to define minimum stock rulestelling OpenERP how many goods have to be ordered to keep a good stock level
CHAPTER 2 COMPLETE EXAMPLE SELL CHECK THE STOCK MANUFACTUREAND PURCHASE 11
Figure 22 Product
Minimum Stock Rules
To enter minimum stock rules for the Leather for Chair product heclicks the Minimum Stock Rules action and clicks the New buttonMitchell notices that the product is already preset in the form Heselects the OpenERP SA warehouse and notices that the Stock locationis automatically set As a minimum quantity he adds 10 and the maximumquantity will be 40 He then clicks the Save button to store the minimumstock rules as shown in the screenshot Minimum Stock Rules (page 11) Dothe same for the frame
Figure 23 Minimum Stock Rules
4 Create a Bill of Material
To produce the chair from the frame and the leather seat Mitchell has to create a Bill of Material forthe finished product (the Chair) This way he will tell OpenERP which components are required toproduce the Chair
12 CHAPTER 2 COMPLETE EXAMPLE SELL CHECK THE STOCKMANUFACTURE AND PURCHASE
BoM
Mitchell opens the Chair product clicks the Bill of Materialsaction then clicks the New button Mitchell notices that the Chair is alreadypreset in the form He clicks the New button next to Components to add theLeather for Chair He clicks the disk in front of the line to save his changesThen he adds a new line (which is displayed automatically) for the ChairFrame and clicks the disk to save Finally Mitchell clicks the Save buttonat the top
BoM
You can also create a Bill of Materials from the Manufacturing rarr MasterData rarr Bill of Materials More information on Bills of Material will beprovided in the next chapters
5 Warehouse and locations
Now Thomas will have a look at how the warehouse and the locations have been organised
Configuring locations
We will not create a warehouse and configure locations in this chapter Formore information please refer to the chapter Managing your Warehouse(page 69) later in this book Just have a look at the list of locations definedwith the demo data
Warehouse and Location Structure
OpenERP has three predefined top-level location types PhysicalLocations which define where your stock is physically storedPartner Locations for the customer and supplier stock andVirtual Locations representing counterparts for procurementproduction and inventory Thomas clicks Warehouse rarr Configuration rarrWarehouse Management rarr Locations to display a list view of the locations
6 Create a sales quotation
The customer Clarkson asked to receive a quotation for two Office Desks and two chairs from theOfficeSecrets series Thomas enters the sales quotation
CHAPTER 2 COMPLETE EXAMPLE SELL CHECK THE STOCK MANUFACTUREAND PURCHASE 13
Figure 24 Location Structure
Sales Quotation Order
Thomas goes to Sales rarr Sales rarr Sales Orders He clicks the New buttonto make a quotation He enters Clarkson in the Customer field Now hecan enter the products he will be selling Next to Sales Order LinesThomas clicks the New button to enter sales order lines He selects theDesk product and changes the quantity to 2 as specified in the screenshotSales Order (page 14) Thomas clicks the Save amp New button to adda second line He adds 2 chairs and notices that a message is displayedsaying that there is no stock Thomas clicks the Save amp Close buttonThen he clicks Compute to see the total price of the quotation He opensthe Other Information tab because he wants the sales invoice to becreated from the picking So he changes the Shipping Policy to Invoicefrom the Picking To print the quotation he clicks Quotation Orderin the Reports section at the right side of the screen
14 CHAPTER 2 COMPLETE EXAMPLE SELL CHECK THE STOCKMANUFACTURE AND PURCHASE
Figure 25 Sales Order
Price Lists
In this chapter the Public Pricelist will be used Later on you will learnmore about creating price lists
7 Confirm the sales order
John Smith calls Thomas to tell him that he agrees with the quotation Thomas now confirms the salesorder
Sales Quotation Order
Thomas goes to Sales rarr Sales rarr Sales Orders He enters Clarkson in theCustomer field and then clicks Search Thomas clicks the sales orderto open it He clicks the Confirm Order button to make a sales orderfrom the quotation To print the sales order he clicks Quotation Order inthe Reports section at the right side of the screen
Order Confirmation
When you click Confirm Order red text will be displayed at the top ofthe screen depending on the parameters of the sales order In our exampleyou will see two text lines one about the quotation conversion and anotherone about the delivery order You can click the second line to be directed tothe delivery order You can also open the delivery order from the Historytab of the sales order
8 Run the scheduler
CHAPTER 2 COMPLETE EXAMPLE SELL CHECK THE STOCK MANUFACTUREAND PURCHASE 15
The goods have to be produced and delivered to the customer but Thomas notices that the desks andchairs are not available in stock Because the Desk was defined as a Make to order amp Buy productOpenERP will automatically create a procurement order on confirmation of a sales order allowing youto directly generate a purchase order The same will be done for the Leather
OpenERP has a scheduler that will run by default every day In this case Jason your companyrsquosPurchaser will run the scheduler manually
Scheduler
Jason goes to Warehouse rarr Schedulers He clicks ComputeSchedulers because he needs to purchase material and wants to checkwhether anything needs to be added In the Wizard Jason clicks ComputeSchedulers to start the computation
Procurement Exceptions
Jason can also run the procurement for each product from the Warehouserarr Schedulers rarr Procurement Exceptions The procedurement exceptionsmenu also includes procurements that have not been scheduled yet
9 Change the purchase request and confirm it
Now OpenERP will have created procurements (in this example purchase requests) for the productsthat need to be supplied
Purchase Requests
Jason goes to Purchases rarr Purchase Management rarr Request forQuotation He notices three purchase requests for Wood y Wood Pecker Heselects these three purchase requests by clicking the checkbox in front ofthem then clicks the Merge Purchase Orders action at the right toorder all products in one go He clicks the yellow pencil to open the mergedpurchase request in Edit mode Now he decides to purchase some extradesks because Luke the Sales Manager told him he expects more salesTo do this he clicks the yellow pencil in front of the order line and changesthe quantity to 10 He clicks the Save amp Close button then he clicksCompute to see the total price of the quotation From the Delivery ampInvoicing tab he specifies that the invoice has to be created from thepicking (Invoicing Control From Picking) To confirm the purchaseorder he just has to click the Convert to Purchase Order button
10 Receive the products
The supplier Wood y Wood Pecker sends the goods to your company Jason receives the goods andenters this receipt in OpenERP
16 CHAPTER 2 COMPLETE EXAMPLE SELL CHECK THE STOCKMANUFACTURE AND PURCHASE
Incoming Shipments
Jason goes to Warehouse rarr Warehouse Management rarr IncomingShipments He notices the incoming shipment for Wood y Wood Peckerand clicks the green arrow to start receiving the products He clicks theValidate button to confirm that all products have been received from thesupplier From the Incoming Shipments list view he notices that theDelivery order for the customer is now ready to process (red text at the topof the screen) at least for the desks He wants to check the stock of Desksand goes to Warehouse rarr Product rarr Products In the Name field Jasontypes desk then clicks Search The real stock is 10 the virtual stock is 8because of the confirmed sales order for two desks
List versus Form view
You can receive deliver goods from both list and form view You can alsoreceive deliver goods by product instead of by complete order
11 Create the draft purchase invoice
Because the purchase order was set to be invoiced from the picking Jason can now create the draftinvoice which allows for easy invoicing control
Draft Purchase Invoice
Jason returns to Warehouse rarr Warehouse Management rarr IncomingShipments and clicks Clear He opens the extended filters and clicks theTo Invoice button He ticks the check box in front of the incomingshipment to be invoiced and then clicks the Create Invoice action inthe Reports section at the right side of the screen He selects the PurchaseJournal and clicks Create to generate the draft invoice The screen withthe supplier invoice will open We will get back to this later
Figure 26 Create Invoice from Incoming Shipments
12 Run the scheduler again
CHAPTER 2 COMPLETE EXAMPLE SELL CHECK THE STOCK MANUFACTUREAND PURCHASE 17
To tell the system that the procurements have been received and that the raw materials are now in stockso that the production order can be generated Jason has to run the scheduler again
Scheduler
Jason goes to Warehouse rarr Schedulers He clicks ComputeSchedulers In the Wizard Jason clicks Compute Schedulers tostart the computation
Just in Time
You can also install the mrp_jit (Just in Time) so that this is computed inreal time In a production environment however you would typically havethe scheduler run
13 Start manufacturing
Jason checks his list of manufacturing orders which are ready to produce He notices the leatheroperator chair and decides to start manufacturing it
Manufacturing or Production Orders
Jason goes to Manufacturing rarr Manufacturing rarr Manufacturing Ordersand selects the order to start producing the chairs He opens it by clickingthe yellow pencil then clicks the Start Production button Henotices the products to be consumed He assembles the frame and theleather for both chairs When he has finished he clicks the Producebutton He keeps the default settings and clicks Confirm then Cancelto close the window He clicks the Save button to see the changes
14 Deliver the goods to the customer and create draft sales invoice
The Chairs are now also available in stock and the complete order can be delivered to the customer Inthe warehouse they check the open delivery orders
Delivery
Randy from the warehouse goes to Warehouse rarr Warehouse Managementrarr Delivery Orders to check the goods ready for delivery He clicks theyellow pencil to open the delivery order He clicks the Process button todeliver the 2 desks and chairs then he clicks Validate
15 Create the sales invoice
18 CHAPTER 2 COMPLETE EXAMPLE SELL CHECK THE STOCKMANUFACTURE AND PURCHASE
Thomas now checks whether the goods have been delivered to his customer He can check this fromthe sales order or he can tell from the status of the delivery order
Creating a Sales Invoice
To create the draft sales invoice Thomas has several possibilities
He opens Sales rarr Invoicing rarr Deliveries to Invoice and selects thecorresponding delivery for invoicing by ticking the check box and clickingthe Create Invoice action in the Reports section at the right of thescreen
He goes to Warehouse rarr Warehouse Management rarr Delivery Orders andclicks the Create Invoice button
He goes to the list of sales orders and opens the sales order concernedThomas clicks the History tab clicks the picking list and then the CreateInvoice button He selects the Sales Journal and clicks the Createbutton
The draft invoice is now displayed in list view Thomas opens the invoiceand clicks the Validate button To print the invoice he clicks the PrintInvoice button or the Invoices action in the Reports section at theright of the screen The printed invoice will automatically be added as pdfdocument to Attachments
16 Confirm the purchase invoice
Robin the accountant now receives the invoice from his supplier He can do the invoicing controlaccording to the picking directly from the Purchase Invoices screen
Invoice Control
Robin goes to Accounting rarr Suppliers rarr Supplier Invoices and opens theWood y Wood Pecker invoice Robin verifies whether the invoice fromthe supplier matches this draft invoice created from the picking order Theinvoice indeed matches and he clicks the Approve button to confirm theinvoice and assign a document number to it
Purchaser
The purchaser can also do the invoice matching from Purchases rarr InvoiceControl rarr Supplier Invoices to Receive
Below you find a graphical representation of the sales flow we explained before the part from quotationto invoice This view is available in OpenERP You can open this Process view by clicking the questionmark next to the Sales Order title
CHAPTER 2 COMPLETE EXAMPLE SELL CHECK THE STOCK MANUFACTUREAND PURCHASE 19
Figure 27 From Quotation to Invoice
20 CHAPTER 2 COMPLETE EXAMPLE SELL CHECK THE STOCKMANUFACTURE AND PURCHASE
21
Letrsquos get Started and Configure a New
Instance 3Now that you have discovered some of the many possibilities of OpenERP from a tour ofthe demonstration database you will develop a real case An empty database provides thestarting point for testing a classic workflow from product sales to purchase completingyour guided tour and your getting familiar with OpenERP
A database loaded with demonstration data is very useful to understand OpenERPrsquos general capabilitiesBut to explore OpenERP through a lens of your own companyrsquos needs you should start with an emptydatabase You will work in this chapter on a minimal database containing no demonstration data sothat there is no confusion about what you created You will keep the database you have created toallow you to build on it throughout the rest of this book if you want to
You will develop a real case through the following phases
1 Specify a real case
2 Describe the functional needs
3 Configure the system with the essential modules
4 Carry out the necessary data loading
5 Test the system with your database
The case is deliberately simple to provide you with a foundation for the more complex situations youmight have to handle in your company Throughout this chapter we assume that you access OpenERPthrough its web interface And it is also assumed (as in the rest of this book) that you are using thelatest download of OpenERP version 6 the stable production version at the time of writing (not thetrunk version which is likely to have new and potentially unstable features)
31 Business Example
In this example you will configure a system that enables you to
bull buy products from a supplier
bull stock the products in a warehouse
bull sell these products to a customer
The system should support all aspects of invoicing payments to suppliers and receipts from customers
22 CHAPTER 3 LETrsquoS GET STARTED AND CONFIGURE A NEW INSTANCE
32 Basic Settings
For this business case you will have to model
bull accounts and account types
bull the suppliers and a supplier category
bull the customers and a customer category
bull some products and a product category
bull an inventory
bull a purchase order
bull a sales order
bull invoices
bull payments
To test the system you will need at least one supplier one customer one product a warehouse aminimal chart of accounts and a bank account
33 Get your Database Up and Running without Demo Data
Please note that the new database you have to create will not include demo data and only the minimallyrequired functionality as a starting point You will need to know your super administrator password forthis ndash or you will have to ask your ICT manager for the password to be able to create this database
Please refer to Configuring your OpenERP (page 3) for more information about how to create a newdatabase that you will give the name of your company
As a reminder please find the steps below without further explanation
Start by creating a new database from the Welcome page by clicking Databases and then completingthe following fields on the Create Database form
bull Super admin password by default it is admin if you or your system administrator have notchanged it
bull New database name YourCompany
bull Load Demonstration data checkbox unchecked
bull Default Language English (US)
bull Administrator password admin
bull Confirm password admin
CHAPTER 3 LETrsquoS GET STARTED AND CONFIGURE A NEW INSTANCE 23
Press Create to start creating the database
OpenERP suggests that you configure your database using a series of questions In the software theseseries of questions are managed through so-called Configuration Wizards
Click the Start Configuration button to continue
The next configuration wizard will help you to decide what your user interface will look like whetherthe screens will only show the most important fields - Simplified - or whether you also want tosee the fields for the more advanced users the Extended view Select Extended and click Next tocontinue
User Preferences
You can easily switch from Simplified to Extended view by changing yourUser Preferences
In the next wizard you can fill your company data select your companyrsquos base currency and add yourcompany logo which can be printed on reports Fill out the required data and click Next to continue
Select the Warehouse Management Purchase Management Sales ManagementManufacturing and Accounting amp Finance business applications for installation and clickInstall Now OpenERP will start to install these five applications allowing you to do a completecycle from sales warehouse purchase manufacturing to invoice You will have to wait for the nextconfiguration wizard to be displayed (Loading will appear)
Figure 31 Selecting the Required Functionality
Reconfigure
Keep in mind that you can change or reconfigure the system any time forinstance through the Reconfigure option in the main bar
When you choose a business application for installation OpenERP will automatically propose to addor configure related (smaller) applications to enrich your system When you install Sales OpenERPwill also ask you whether you want to install Invoicing Journals for instance
24 CHAPTER 3 LETrsquoS GET STARTED AND CONFIGURE A NEW INSTANCE
Skip the step that asks you to configure your Accounting Chart because you will learn how to createaccounts
In the Purchases Application Configuration screen simply click Configure to continue the databasecreation
The following wizards will appear
bull Configure your Sales Management application click Configure to accept the default settings(no options checked)
bull Configure your MRP Application Configuration application click Configure to accept thedefault settings
bull Configure your Accounting application click Configure to accept the default settings
bull Configure Sales Order Logistics click Next to accept the default settings
OpenERPrsquos menu will be displayed because your system is now ready for actual configuration
Setup Wizard
You will have to go through the Setup wizard in steps You have twooptions
1 If you click the Start Configuration button OpenERP guides youthrough a series of steps to Configure Your Interface - proceedwith Simplified (the other option is Extended) and ConfigureYour Company Information - enter a Company Name and select aCurrency for your company Then OpenERP helps you to installvarious applications with different functionality through wizards
bull OR -
2 When you click the button Skip Configuration Wizards you can havethe screen as shown in screenshot Starting the minimal database(page 25) Then you can start working with this minimal database(we will not use this option here)
CHAPTER 3 LETrsquoS GET STARTED AND CONFIGURE A NEW INSTANCE 25
Figure 32 Starting the minimal database
34 Fit your Needs
Functional needs can be provided by core modules from OpenERP You just have to decide whichfunctionality you want in your system As explained before you can click the Check Box of thecorresponding application Another way of installing modules is to go the Administration rarr Modulesrarr Modules menu Here you will find a list of all modules available in OpenERP You can also checkour website httpappsopenerpcom for more information about modules
To manage your manufacturing you do not need all the elements described in this book But we findit very important to include an integrated flow from first quotation to the payment of the supplierincluding all the steps quotation order receiving goods inventory manufacturing
To manage such a flow we need at least the following applications
bull Manufacturing (the mrp module)
bull Warehouse Management (the stock module)
bull Accounting amp Finance (the account module)
bull Purchase Management (the purchase module)
bull Sales Management (the sale module)
When you log on OpenERP will display the opening screen with all selected business applicationsinstalled
You will create all the elements in the database that you need to carry out the use case These arespecified in the functional requirements
26 CHAPTER 3 LETrsquoS GET STARTED AND CONFIGURE A NEW INSTANCE
Figure 33 Database with all Required Functionality for this Example
Examples
Of course we will provide examples for you to configure your databasesuch as customers and suppliers Make sure to use your own data instead
341 Configuring Accounts
You need to start with a minimal set of accounts and therefore you will need a couple of account typesto determine the accountrsquos use how it will be transferred at year closing and what category it belongsto You can structure your accounts into a chart at any time (and in fact you can structure them intoseveral additional charts at the same time as you will see in the on line chapter of the OpenERP book)so you do not need to be concerned unduly about structure
Account Types
To create account types go to Accounting rarr Configuration rarr Financial Accounting rarr Accounts rarrAccount Types and click the New button You will need the following six types the first of which isshown in figure New Account Type (page 27) Click Save to confirm each account type
Table 31 Defining Account Types
Acc Type Name Code PampL BS Category Deferral MethodView view NoneIncome income Profit amp Loss (Income Accounts) NoneExpense expense Profit amp Loss (Expense Accounts) NoneCash cash Balance Sheet (Assets Accounts) BalanceReceivable receiv Balance Sheet (Assets Accounts) UnreconciledPayable pay Balance Sheet (Liability Accounts) Unreconciled
CHAPTER 3 LETrsquoS GET STARTED AND CONFIGURE A NEW INSTANCE 27
Figure 34 New Account Type
Accounts
To create accounts go to Accounting rarr Configuration rarr Financial Accounting rarr Accounts rarrAccounts and click the New button
You need accounts to keep track of your customers and suppliers two more to sell and buy goods andone for the payment and receipt of funds And also one lsquoorganizingrsquo account that is just a view of theother five So basically you will need at least the following six accounts one of which is shown in NewAccount (page 28) Click Save to confirm each account
Chart of Accounts Structure
When you create a chart of accounts you should always start with the mainview account to define the chart as shown in the table (Minimal Chart)This will allow you to easily link new accounts to the correct chart directly
Table 32 Defining Accounts
Name Code Parent Internal Type Account Type ReconcileMinimal Chart 0 View View uncheckedPayable AP 0 Minimal Chart Payable Payable checkedReceivable AR 0 Minimal Chart Receivable Receivable checkedBank B 0 Minimal Chart Liquidity Cash uncheckedPurchases P 0 Minimal Chart Regular Expense uncheckedSales S 0 Minimal Chart Regular Income unchecked
The Account Type entry is taken from the list of types that you just created Although it looks a bit likea text box it does not behave in quite the same way A single Del or Backspace keystroke is allyou need to delete the whole text and when you type the name (or part of the name) you still need to
28 CHAPTER 3 LETrsquoS GET STARTED AND CONFIGURE A NEW INSTANCE
Figure 35 New Account
associate that text with the entry by clicking the Tab or Enter key to confirm your selection You canalso use the Search icon to open a list of available account types
Properties
You now define some default properties so that you do not have to think about which account is used fora certain transaction every time you do something The main new properties are the four that associateaccounts payable and receivable to partners and expenses and income to product categories
Create properties using Administration rarr Configuration rarr Parameters rarr Configuration Parametersand then clicking the New button This menu is only available in Extended view
CHAPTER 3 LETrsquoS GET STARTED AND CONFIGURE A NEW INSTANCE 29
Selecting the correct field
When you have several fields with the same name make sure to select thefield for which the Field Name corresponds to the property name you aredefining Note that you can also duplicate properties and then change therequired fields
Table 33 Defining Properties
Name Field Type Valueproperty_account_payable Account Payable Many2One (accountaccount) AP Payableproperty_account_receivable Account Receivable Many2One (accountaccount) AR Receivableproperty_account_expense_categ Expense Account Many2One (accountaccount) P Purchasesproperty_account_income_categ Income Account Many2One (accountaccount) S Sales
To check the result of your configuration you can go to Accounting rarr Customers rarr Customers andopen the form containing your company data On the Accounting tab you will notice that both thedefault account receivable and account payable have been filled
Mistakes in configuring accounts and properties
It is easy to make mistakes in configuring accounts and their properties butthe consequences are not immediately obvious You will mostly discovermistakes when trying to make a Purchase or Sales Order (see later forexample Driving your Purchases (page 49)) where the accounts arerequired fields or if you are diligent when you set up Partners
If you configure them correctly at this stage then fields will be completedautomatically and you will never know a thing If you do not configure allthis correctly then you will not be able to save the order form until youhave corrected the problem or until you manually set the accounts
Since this configuration is quite tedious you would do best by finding acertified Chart of Accounts that has already been set up to meet your needsand adapt the predefined chart if necessary
342 Configuring Journals
You will also need to configure some journals which are used to record the transactions from oneaccount to another when invoices are raised and then paid Create journals from the menu Accountingrarr Configuration rarr Financial Accounting rarr Journals rarr Journals and then click the New button
30 CHAPTER 3 LETrsquoS GET STARTED AND CONFIGURE A NEW INSTANCE
Default Values
Notice that when you select the journal type the Display Mode will alreadybe preset An entry sequence for the journal will be created automaticallywhen you save the journal The default debit and credit account will beused as a counterpart when encoding manual journal entries Debit andcredit accounts are mandatory for bank journals
Table 34 Defining Journals
JournalName
Code Type Display Mode Default DebitAccount
Default CreditAccount
PurchaseJournal
PUJ Purchase SalePurchaseJournal View
P Purchases P Purchases
SalesJournal
SAJ Sale SalePurchaseJournal View
S Sales S Sales
BankJournal
BNK Bank andCheques
BankCash JournalView
B Bank B Bank
In this example validating a Purchase Order creates a draft invoice (see later again for exampleDriving your Purchases (page 49)) where a journal is required
As with accounts and properties if you configure them correctly at this stage the fields will becompleted automatically and you will never know a thing If you do not configure all this correctlythere will be errors with the order form or corresponding draft invoice until you have corrected theproblem or until you manually set the journal
343 Configuring the Main Company
In case you had chosen to Skip Configuration Wizards when you first created the database you mayconfigure your company information in the following manner Start configuring your database by typingyour companyrsquos name in the Main Company When you print standard documents such as quotationsorders and invoices you will find this configuration information used in the document headers andfooters
To do this click Sales rarr Address Book rarr Customers and click the name of the only company therewhich is YourCompany This gives you a read-only form view of the company so make it editableby clicking the Edit button to the upper left of the form
CHAPTER 3 LETrsquoS GET STARTED AND CONFIGURE A NEW INSTANCE 31
Editable Form in the Web Client
When toggling from the list view to the form view of an item you cangenerally click its name in the list view to show a non-editable view orthe pencil icon by the left-hand edge of the line to open it in an editableview You can toggle between editable and non-editable once you are inform view
Change the contact name to match your first name and name The company name and the contact namebelow are just an example
bull Name Ambitious Plumbing Entreprises
bull Contact Name George Turnbull
Before you save this look at the partnerrsquos accounting setup by clicking the Accounting tab Thefields Account Receivable and Account Payable have account values that were taken from the accountproperties you just created You do not have to accept those values you can enter any suitable accountyou like at this stage although OpenERP limits the selection to accounts that make accounting sense
Back at the first tab General change any other fields you like such as the address and phone numbersthen click Save This changes one Contact for the Partner which is sufficient for the example
From the MAIN MENU click Administration rarr Companies rarr Companies and edit the only entrythere Please note that you have to keep your own company data but for the example we use theAmbitious Plumbing company
bull Company Name AmbiPlum
bull Partner should already show Ambitious Plumbing Enterprises
bull Report Header Ambitious Plumbing
bull Report Footer 1 type your slogan ie Best Plumbing Services Great Prices
bull Report Footer 2 type your company details such as bank account or Ambitious - ourRegistered Company Details
Figure Changing Company Details (page 32) shows the effect of this You can also change variousother company-wide parameters for reports and scheduling in the other tabs and you can upload acompany logo of a specific size for the reports Click Save to store the changes
You can leave the currency at its default setting of EUR for this example Or you can change it in thisCompany and the two default Pricelists (Sales rarr Configuration rarr Pricelists rarr Pricelists) if you didnot set the correct company currency in the Configuration Wizard
Currency
The examples in this book are in USD and EUR You the reader can useyour home currency instead
32 CHAPTER 3 LETrsquoS GET STARTED AND CONFIGURE A NEW INSTANCE
Figure 36 Changing Company Details
344 Creating Partner Categories Partners and their Contacts
You will now create a supplier category and a customer category Partner categories are useful fororganizing groups of partners but have no special behaviour that affects partners so you can assignthem as you like Then you will define one supplier and one customer with a contact for each
To do this go to the menu Sales rarr Configuration rarr Address Book rarr Partner Categories and clickNew to open a new form for defining Partner Categories Define the two categories that follow by justentering their Category Name and saving them
bull Suppliers
bull Customers
Then create two partners from the menu Sales rarr Address Book rarr Customers OpenERP allows youto create both suppliers and customers from this menu Please note that we provide some exampledata but of course you should define your own customers and suppliers Feel free to also complete theaddress which we donrsquot do in our example Click the New button to open a blank form and then addthe following data for the first partner
bull Name Plumbing Component Suppliers
bull Customer checkbox unchecked
bull Supplier checkbox checked
bull Contact Name Jean Poolley
bull Address Type Default
bull click Add and select Suppliers to add the category to the Partner Categories field by selectingit from the Search Partner Categories list
bull then save the partner by clicking the Save button
CHAPTER 3 LETrsquoS GET STARTED AND CONFIGURE A NEW INSTANCE 33
Figure 37 New Partner Form
Figure New Partner Form (page 33) shows the result
Contact Types
If you have recorded several contacts for the same partner you can specifywhich contact is used for various documents by specifying the AddressType
For example the delivery address can differ from the invoice address fora partner If the Address Types are correctly assigned OpenERP canautomatically select the appropriate address during the creation of thedocument ndash an invoice is addressed to the contact that has been assignedthe Address Type of Invoice otherwise to the Default address
For the second partner proceed just as you did for the first with the following data
34 CHAPTER 3 LETrsquoS GET STARTED AND CONFIGURE A NEW INSTANCE
bull Name Smith and Offspring
bull Customer checkbox checked
bull Supplier checkbox unchecked
bull Contact Name Stephen Smith
bull Address Type Default
bull add Customers in the Categories field
bull Save the form
To check your work you can go to the menu Sales rarr Configuration rarr Address Book rarr PartnerCategories and click on each category in turn to see the companies in the category
Multiple Partner Categories
If this partner was also a supplier then you would add Suppliers to thecategories as well but there is no need to do so in this example You canassign a partner to multiple categories at all levels of the hierarchy
345 Creating Products and their Categories
Unlike partner categories and their assigned partners product categories do have an effect on theproducts assigned to them ndash and a product may belong to only one category Under the main menulink Warehouse or Sales select the menu Configuration rarr Product rarr Products Categories and clickNew to get an empty form for defining a product category
Enter Radiators in the Name field Click Save You will see that other fields specifically those in theAccounting Properties section have been automatically filled in with values of accounts and journalsThese are the values that will affect products ndash equivalent fields in a product will take on these valuesif they too are blank when their form is saved
Property Fields
Properties have a rather unusual behaviour They are defined by parametersin the menus in Administration rarr Configuration rarr Parameters rarrConfiguration Parameters and they update fields only when a form issaved and only when the fields are empty at the time the form is savedYou can manually override any of these properties as you need
Property fields are used throughout the OpenERP system and extensivelyin a multi-company environment There property fields in a partner formcan be populated with different values depending on the userrsquos companyFor example the payment conditions for a partner could differ dependingon the company from which it is addressed
CHAPTER 3 LETrsquoS GET STARTED AND CONFIGURE A NEW INSTANCE 35
UOM
UOM is an abbreviation for Unit of Measure OpenERP manages multipleunits of measure for each product you can buy in tons and sell in kgs forexample The conversion between each category is made automatically (solong as you have set up the conversion rate in the product form first)
Managing Double Units of Measure
The whole management of stock can be carried out with double units ofmeasure (UOM and UOS ndash for Unit of Sale) For example an agro-foodcompany can stock and sell ham by piece but buy and value it by weightThere is no direct relationship between these two units so a weighingoperation has to be done
This functionality is crucial in the agro-food industry and can be equallyimportant in fabrication chemicals and many other industries
Now create a new product through the Warehouse or Sales menu
1 Go to Products rarr Products and click New
2 Create a product ndash type Titanium Alloy Radiator in the Name field
3 The Product Type field should be assigned as Stockable Product The fields ProcurementMethod Supply method Default Unit Of Measure and Purchase Unit Of Measure should stayat their default values For more information about these methods please refer to chapterProcurement Methods ndash Make to Stock and Make to Order (page 104)
4 Enter 5750 into the Cost Price field and 13250 into the Sale Price field
5 Click the Search icon to the right of the Category field to select the Radiators category
6 Click the Accounting tab then click Save and observe that Accounting Properties here remainempty When product transactions occur the Income and Expense accounts that you have justdefined in the Product Category are used by the Product unless an account is specified heredirectly in the product to override that
7 Once the product is saved it changes to a non-editable state If you had entered data incorrectly orleft a required field blank an error message would pop-up the form would have stayed editableand you would need to click from tab to tab to find a field colored red that would have to becorrectly filled in
346 Stock Locations
Click Warehouse rarr Inventory Control rarr Location Structure to see the hierarchy of stock locationsThese locations have been defined by the minimal default data loaded when the database was createdYou will use this default structure in this example
36 CHAPTER 3 LETrsquoS GET STARTED AND CONFIGURE A NEW INSTANCE
Figure 38 Product Form
OpenERP has three predefined top-level location types Physical Locations and PartnerLocations that act as their names suggest and Virtual Locations that are used by OpenERPfor its own purposes
1 From the Main Menu click Warehouse rarr Configuration rarr Warehouse Management rarrLocations to reach a list view of the locations (not the tree view)
2 Click the Clear button to display a complete list of all predefined locations
3 Click the name of a location such as Physical LocationsAmbitious PlumbingEnterprises to open a descriptive form view Each location has a Location Type and a ParentLocation that defines the hierarchical structure While you are here you might have to change thelocationrsquos name to Ambitious Plumbing Enterprises
4 From the Main Menu click Warehouse rarr Configuration Warehouse Management rarr Warehousesto view a list of warehouses There is only the one at the moment named after your company orin the example Ambitious Plumbing Enterprises
A Warehouse contains an input location a stock location and an output location for sold products Youcan associate a warehouse with a partner to give the warehouse an address That does not have to beyour own company (although it can be) you can easily specify another partner who may be holdingstock on your behalf
CHAPTER 3 LETrsquoS GET STARTED AND CONFIGURE A NEW INSTANCE 37
Location Structure
Each warehouse is composed of three locations Location Input LocationOutput and Location Stock Your available stock is given by the contentsof the Location Stock and its child locations
So the Location Input can be placed as a child of the Location Stock whichmeans that when Location Stock is interrogated for product quantities italso takes into account the contents of the Location Input Location Inputcould be used as a goods-in QC location The Location Output must neverbe placed as a child of Location Stock since items in Location Outputwhich can be considered to be packed ready for customer shipment shouldnot be thought of as available for sales elsewhere
347 Setting up a Chart of Accounts
You can set up a chart of accounts during the creation of a database but for this exercise you will startwith the minimal chart that you created (just a handful of required accounts without hierarchy tax orsubtotals)
A number of account charts have been predefined for OpenERP some of which meet the needs ofnational authorities (the number of those created for OpenERP is growing as various contributors createand freely publish them) You can take one of those without changing it if it is suitable or you can takeany chart as your starting point and design a complete chart of accounts to meet your exact needsincluding accounts for inventory asset depreciation equity and taxation
You can also run multiple charts of accounts in parallel ndash so you can put all of your transaction accountsinto several charts with different arrangements for taxation and depreciation aggregated differently forvarious needs
Before you can use any chart of accounts you need to specify a Fiscal Year This defines the differenttime periods available for accounting transactions
Create a Fiscal Year manually from Accounting rarr Configuration rarr Financial Accounting rarr Periodsrarr Fiscal Years
bull In the Fiscal Year field type the name of the current fiscal year (eg 2011)
bull In the Code field type the code of the current fiscal year (eg 11 or 2011)
bull In the Start Date field type the starting date of your companyrsquos fiscal year (eg 01012011)
bull In the End Date field type the ending date of your companyrsquos fiscal year (eg 12312011)
bull Click the Create Monthly Periods button if you have monthly declarations or click the Create 3Months Periods button for quarterly declarations
bull Usually you will also create an extra period 00 to post your opening balance and outstandinginvoices To do this click the New button then type 002011 as the Period Name 002011 as
38 CHAPTER 3 LETrsquoS GET STARTED AND CONFIGURE A NEW INSTANCE
the Code and the first day of your financial year as the Start of Period and the End ofPeriod dates Then check the OpeningClosing Period checkbox
Click Accounting rarr Charts rarr Charts of Accounts to open a Chart of Accounts form where you defineexactly what you want to see Simply click Open Charts to accept the defaults and display a hierarchicalstructure of the accounts
348 Make a Backup of the Database
If you know the super-administrator password make a backup of your database using the proceduredescribed below Then restore it to a new database testing
As a super-administrator you do not only have rights to create new databases but also to
bull backup databases
bull delete databases
bull restore databases
All of these operations can be carried out from the Databases button in the web clientrsquos Login screen
Backup (copy) a Database
To make a copy of a database go to the web Login screen and click theDatabases button Then click the Backup button select the database youwant to copy and enter the super-administrator password Click the Backupbutton to confirm that you want to copy the database
Drop (delete) a Database
To delete a database go to the web Login screen and click the Databasesbutton Then click the Drop button select the database you want to deleteand enter the super-administrator password Click the Drop button toconfirm that you want to delete the database
Restore a Database
To restore a database go to the web Login screen and click the Databasesbutton Then click the Restore button click the Choose File button to selectthe database you want to restore Give the database a name and enter thesuper-administrator password Click the Restore button to confirm that youwant to install a new copy of the selected database To restore a databaseyou need to have an existing copy of course
CHAPTER 3 LETrsquoS GET STARTED AND CONFIGURE A NEW INSTANCE 39
Duplicating a Database
To duplicate a database you can
1 make a backup file on your PC from this database
2 restore this database from the backup file on your PC and give it anew name
This can be a useful way of making a test database from a productiondatabase You can try out the operation of a new configuration newmodules or just the import of new data
A system administrator can configure OpenERP to restrict access to some of these database functionsso that your security is enhanced in normal production use
This operation enables you to test the new configuration on testing so that you can be sure everythingworks as designed Then if the tests are successful you can make a new database from perhaps calledlive or production for your real work
From here on connect to this new testing database logged in as admin if you can If you haveto make corrections do that on YourCompany and copy it to a new testing database to continuechecking it
Or you can just continue working with the YourCompany database to get through this chapter Youcan recreate YourCompany quite quickly if something goes wrong and you cannot recover from itbut again you would need to know your super-administrator password for that
35 Testing a Complete Purchase Cycle according to anExample
To familiarize yourself with the system workflow you will test a purchase-sales workflow in two phases
The first consists of a product purchase which requires the following operations
1 Place a purchase order with Plumbing Component Suppliers for 10 Titanium Alloy Radiators ata unit price of 5600
2 Receive these products at your Goods In
3 Generate a purchase invoice
4 Pay your supplier
Then you will sell some of these products using this sequence
1 Receive a sales order for 6 Titanium Alloy Radiators from Smith and Sons sold at a unit price of13000
40 CHAPTER 3 LETrsquoS GET STARTED AND CONFIGURE A NEW INSTANCE
2 Dispatch the products
3 Invoice the customer
4 Receive the payment
351 Purchase Order
To place a Purchase Order with your supplier use the menu Purchases rarr Purchase Management rarrPurchase Orders and click the New button
Complete the following field
bull Supplier Plumbing Component Suppliers
As you complete the Supplier field OpenERP automatically completes the Address field and thePricelist field from information it takes from the Partner record
Enter the following information in the Purchase Order Lines (click New)
bull Product Titanium Alloy Radiator - type in part of this name then press the tab key tocomplete it or click the Search icon at the end of the line to bring a search box (if product ispreviously configured)
When you have selected a product on the product line OpenERP automatically completes the followingfields from information it finds in the Product record
bull Product UOM the unit of measure for this product
bull Description the detailed description of the product
bull Scheduled Date based on the product lead time
bull Unit Price the unit price of the product
bull Analytic account if any account is specified and if you belong to the User Group Useability Analytic Accounting (see menu Administration rarr Users rarr Users) then it will appear on theorder line (it is not in this example)
bull Taxes applicable taxes defined in the partner if specified otherwise in the product if specified(there are no taxes in this example)
You can edit any of these fields to suit the requirements of the purchase order at the time of entryChange the
bull Quantity 10
bull Unit Price to 5600
CHAPTER 3 LETrsquoS GET STARTED AND CONFIGURE A NEW INSTANCE 41
Save the order line and close the Order Line window by clicking the Save amp Close button You canthen save the whole one-line order by clicking Save which makes the form non-editable
It is now in a state of Request for Quotation To approve the quotation click Convert toPurchase Order which corresponds to an approval from a manager or from Accounts within your owncompany and moves the order into Approved state
If you click the Delivery amp Invoicing tab you will see the delivery Destination is your own companyrsquosStock location and that the invoice was created from the order It is not entirely obvious at this stagebut the invoice is in a draft state so it can be edited and crucially it has no accounting impact yet it isjust ready for your accounting group to activate it
352 Receiving Goods
After confirming the order you would wait for the delivery of the products from your supplier Typicallythis would be somebody in Stores who would
1 Open the menu Warehouse rarr Warehouse Management rarr Incoming Shipments
From the Purchase Order
You could have clicked the Receptions link to the right of the PurchaseOrder to reach the same screen but this would confuse the purchasing rolewith the stores role That link is very useful during testing and traininghowever
2 When the Incoming Shipments window appears select the name of the entry in the list(IN00001) to display the Packing List itself ndash you would usually do a search for the suppliername or order number in a list that was larger than this ndash then click Process to load the ProcessDocument form
3 Click Validate to indicate that you are receiving the whole quantity of 10 units
At this point you have accepted 10 units into your company in a location that you have already seen
Using the menu Purchases rarr Products rarr Products you can find the product Titanium Alloy Radiatorswith Real Stock and Virtual Stock 10 Open the product form and click the Stock by Location link at theright side of the screen to see the Real Stock and Virtual Stock of this product in various locations Nowselect the checkbox in front of the Stock and Suppliers locations The right side menu appears Clickthe Location Inventory Overview report to see the inventory valuation for each of these two locations
42 CHAPTER 3 LETrsquoS GET STARTED AND CONFIGURE A NEW INSTANCE
Figure 39 List of Products and their Stock Levels
Traceability in Double-Entry
OpenERP operates a double-entry stock transfer scheme similar todouble-entry accounting Because of this you can carry out variousanalyses of stock levels in your warehouse along with the correspondinglevels in Partner Location at your Supplier The double-entry systemsimilar to that of accounting enables you to keep track of stock movementsquite easily and to resolve any errors that occur
353 Invoice Control
When you have received an invoice from your supplier (which would usually be sent to your Accountsdepartment) go to the menu Accounting rarr Suppliers rarr Supplier Invoices to open a list of supplierinvoices waiting for receipt These invoices enable your Accounts Department to match the the priceand quantities ordered against the price and quantities on the supplierrsquos invoice (and since it is notuncommon to receive an invoice showing details more favourable to the supplier than those agreed atthe time of purchase this is a useful function)
In this example you created an invoice automatically when you confirmed the supplierrsquos PurchaseOrder That is because the Invoicing Control field on the order was set to From Order (the defaultoption) Other options enable you to create invoices at the time of receiving goods or manually Theinitial state of an invoice is Draft
Now click the invoice for your order PO00001 to display its contents You can compare the goodsthat you have recorded there with the invoice received from your supplier If there is a difference it ispossible to change the invoice lines to for example add a delivery charge Select the correct InvoiceDate and click Approve to confirm the invoice and put it into the Open state
CHAPTER 3 LETrsquoS GET STARTED AND CONFIGURE A NEW INSTANCE 43
Accounting entries are generated automatically once the invoice is validated You can check the entryfrom the Other Info tab in the Journal Entry field To see the effects on your chart of accountsgo to the menu Accounting rarr Charts rarr Chart of Accounts and click Open Charts at the Chart ofAccounts page to see that you have a debit of 56000 in the Purchases account and a credit of56000 in the Payable account
Invoice Control
Should your purchase invoice have to be checked by the purchaser first hecan go to the menu Purchases rarr Invoice Control rarr Supplier Invoices toReceive to check whether the invoice corresponds with the order (or thegoods receipt according to the Invoice Control settings)
354 Paying the Supplier
Select the menu Accounting rarr Suppliers rarr Supplier Invoices and click the Unpaid button for a list ofsupplier invoices that have not yet been paid In practice you would search for the invoice by ordernumber or more generally for invoices nearing their payment date You can type PO00001 in theSource Document box to find the invoice
Open the invoice and click the Pay Invoice button It opens the Pay Invoice window in new tab with adescription of the payment
Supplier and Date comes automatically from invoice You just have to enter the PaymentMethod (ie the corresponding bank journal) When you select the payment method you will noticethat the corresponding invoice is displayed in Supplier Invoices and Outstanding Transactions and thatthe Amount is filled automatically Then click the Validate button to post this entry and consider theinvoice as Paid
Payment of an Invoice
The method described here is for companies that do not use their accountingsystem to pay bills but just to record the payments If you are usingthe account module with all its features other more efficient methodslet you manage payments such as entering bank statements reconcilingpaperwork using tools for preparing payments interfacing with banks
You can monitor the accounting impact of paying the invoice through the chart of accounts availablefrom the menu Accounting rarr Charts rarr Chart of Accounts OpenERP automatically creates accountingentries from the payment and can reconcile the payment to the invoice You now have a new transactionthat has debited the Payable account with 56000 and credited the Bank account
If you look in Accounting rarr Journal Entries rarr Journal Entries you will see both accountingtransactions one in the Purchase Journal and another one in the Bank Journal both with thePosted state
44 CHAPTER 3 LETrsquoS GET STARTED AND CONFIGURE A NEW INSTANCE
36 Testing a Complete Sales Cycle according to an Example
361 Sales Order
In OpenERP sales proposals and sales orders are managed using documents that are based on the samecommon functionality as purchase orders so you will recognize the following documents in generalbut see changes to their detail and to their workflows To create a new sales proposal use the menuSales rarr Sales rarr Sales Orders and click the New button which creates a new order as a Quotation then
1 Select the Customer Smith and Offspring This has the effect of automaticallycompleting several other fields Ordering Contact Invoice Address Shipping Address andthe Pricelist Public Pricelist (EUR) They are all only defaults so these fields can bemodified as you need
2 Click the New button in Sales Order Lines section to open a Sales Order Lines window
3 Select the product Titanium Alloy Radiator Although the Product field is not itselfrequired it is used by OpenERP to select the specific product so that several other fields can beautomatically completed on the order line of the quotation such as Description Unit of MeasureUnit Price Procurement Method Delivery Lead Time and Taxes
4 Change the Quantity (UoM) to 6 and the Unit Price to 13000 Then click Save amp Close andthe line appears on the quotation form
5 On the Other Information tab of this Sales Order select a Picking Policy of CompleteDelivery and a Shipping Policy of Invoice on Order After Delivery from thedropdown menu lists
6 Return to the first tab Sales Order and validate the document by clicking Confirm Order whichcalculates prices and changes the orderrsquos state from Quotation to In Progress as shown inscreenshot Sales Order Form (page 44) If you were in negotiation with the prospective customeryou would click Compute and Save to keep the document in Quotation state for as long asnecessary
Figure 310 Sales Order Form
CHAPTER 3 LETrsquoS GET STARTED AND CONFIGURE A NEW INSTANCE 45
7 In the last tab of the order History you can see the Picking List that has been created and youwill be able to see any invoices that relate to this order when they are generated
Go to Sales rarr Products rarr Products to display a list of products just the one Titanium AlloyRadiator currently exists in this example Its Real Stock still shows 1000 but its Virtual Stocknow shows 400 to reflect the new future requirement of 6 units for dispatch
362 Preparing Goods for Shipping to Customers
The stores manager selects the menu Warehouse rarr Warehouse Management rarr Delivery Orders to geta list of orders to dispatch For this example find the Delivery Order related to the sales order whichyou have created You should click the Available button to see all delivery orders because yourdelivery order will be in Confirmed state and not yet in Available state Open the Delivery Orderconcerned
Running Schedulers
At the moment your Sales Order is waiting for products to be reserved tofulfil it A stock reservation activity takes place periodically to calculate theneeds which also takes customer priorities into account The calculationcan be started from the menu Warehouse rarr Schedulers rarr ComputeSchedulers Running this automatically reserves products (ie the statuswill be set to Available if the products are in stock)
If you do not want to have to work out your stock needs but have a leanworkflow you can install the mrp_jit (Just In Time) module
Although OpenERP has automatically been made aware that items on this order will need to bedispatched it has not yet assigned any specific items from any location to fulfil it It is ready to move600 Titanium Alloy Radiators from the Stock location to the Customers location so startthis process by clicking Check Availability The Move line has now changed from the Confirmedstate to the Available state
Then click the Process button to reach the Process Document window where you click the Validatebutton to transfer the 6 radiators to the customer
To analyze stock movements that you have made during these operations go to Warehouse rarr Productrarr Products and select the radiator by clicking the checkbox in front of it then click the action Stockby Location which is at the right most side to see that your stocks have reduced to 4 radiators and thegeneric Customers location has a level of 6 radiators
363 Invoicing Goods
Use the menu Accounting rarr Customers rarr Customer Invoices to open a list of Sales invoices generatedby OpenERP If they are in the Draft state it means that they do not yet have any impact on theaccounting system You will find a draft invoice has been created for the order SO001 once you havedispatched the goods because you had selected Invoice on Order After Delivery
46 CHAPTER 3 LETrsquoS GET STARTED AND CONFIGURE A NEW INSTANCE
Once you confirm an invoice OpenERP assigns it a unique number and all of the correspondingaccounting entries are generated So open the invoice and click Validate to do that and move theinvoice into an Open state with a number of SAJ20110001
You can send your customer the invoice for payment at this stage Click Print Invoice to get a PDFdocument that can be printed or emailed to the customer
The PDF of your invoice will automatically be added as an attachment This gives you a permanentnon-editable record of your invoice on the OpenERP system
Review your chart of accounts to check the impact of these activities on your accounting You will seethe new revenue line from the invoice
364 Customer Payment
Registering an invoice payment by a customer is essentially the same as the process of paying a supplierFrom the menu Accounting rarr Customers rarr Customer Invoices click the name of the invoice that youwant to mark as paid
1 Use the Payment button which opens a new window Pay Invoice
2 Select the Payment Method for this example select Bank Journal then validate the entry
Figure 311 Invoice Form
Check your Chart of Accounts as before to see that you now have a healthy bank balance in the Bankaccount
47
Part II
Advanced Features in PurchaseQuotation Management
To manage your manufacturing you do not need all the elements described in this bookBut we find it very important to include an integrated flow from the first quotation to thefinal billing of the suppliers including all the steps quotation order receiving goodsinventory manufacturing and billing
48
49
Driving your Purchases 4In the preceding chapters you saw how to use customer invoices and delivery notes inOpenERP This chapter is about the management of purchases the process ahead of thesetwo operations You will now see how OpenERP handles and simplifies this and the controlof purchases from suppliers
For this chapter you can continue using the database already created or you should start with a freshdatabase that includes demonstration data with purchase and its dependencies installed and noparticular chart of accounts configured
41 All the Elements of a Complete Workflow
The supplier or purchase order is the document that lets you manage price negotiations control supplierinvoices handle goods receipts and synchronize all of these documents
Let us start by looking at the following order workflow
1 Price request to the supplier
2 Confirmation of purchase
3 Receipt and control of products
4 Control of invoicing
411 Setting up your Database
To set up a system for these examples create a new database with demonstration data in it and selectthe Extended interface when you log in as the admin user You can enter your own company detailswhen asked or just use the default if you want Then using the Configuration Wizard select PurchaseManagement in the Install Applications section to install the purchase module which also installsseveral other modules as dependencies Continue the remainder of this chapter logged in as the adminuser
412 Price Request from the Supplier
To enter data for a new supplier price request (ie request for quotation) use the menu Purchasesrarr Purchase Management rarr Request for Quotation When you click New OpenERP opens a blankrequest for quotation form that you use for requesting prices from a supplier This is shown in the figureData Entry for a Purchase Order (page 50) If the price request came from an automatic procurement
50 CHAPTER 4 DRIVING YOUR PURCHASES
created by OpenERP you will find a reference to the document that generated the request in the Originfield
Figure 41 Data Entry for a Purchase Order
Managing Alerts
If you install the warning module you will be able to define alerts thatappear when the purchaser enters a price request or order You can set alertson the product and on the supplier
The internal reference the date and the warehouse the products should be delivered to are completedautomatically by OpenERP but you can change these values if needed Next when you select asupplier OpenERP automatically completes the contact address for the supplier The pricelist isalso automatically completed from the pricelist in the supplier form This should bring in all of theconditions that you have negotiated with the supplier for a given period
Supplier Selection
Searching for a supplier is limited to all of the partners in the system thathave the Supplier checkbox checked If you do not find your supplier itmight be worth checking the whole list of all partners to make sure that thesupplier does not yet exist without the Supplier checkbox being checked
Once the main body of the purchase order has been completed you can enter the product lines
When you have selected the product OpenERP automatically completes the other fields in the form
CHAPTER 4 DRIVING YOUR PURCHASES 51
Figure 42 Purchase Order Line
bull Product UoM taken from the Purchase Unit of Measure field in the product form
bull The Description of the product in the supplierrsquos language
bull Scheduled Date calculated from the order date and the delivery lead time for the supplier (forthe given product)
bull Unit Price taken from the supplierrsquos pricelist
bull Taxes taken from the information on the product form and partner form depending on the rulesseen in Financial Analysis
Product Wording and Code
When you enter supplier names in the product form you can set a nameand a product code for each individual supplier If you do that OpenERPwill then use those details instead of your own internal product names forthat selected supplier
If you work with management by case you can also set the analytic account that should be used toreport all the purchase costs The costs will then be reported at the receipt of the supplier invoice
Management by Case
Analytic accounts can be very useful for all companies that manage costsby case by site by project or by folder To work with several analyticaxes you should install the module purchase_analytic_plans byselecting Purchase Analytic Plans in the Reconfigure wizard and clickingConfigure
52 CHAPTER 4 DRIVING YOUR PURCHASES
To make sure that the analytic account is automatically selected according to the partner the date theproducts or the user you can install the module account_analytic_default (which is installedautomatically as a dependency of purchase_analytic_plans)
In the Notes tab of the product line you can enter a note that will be attached when the orderconfirmation or price quotation is printed This note can be predefined on the product form toautomatically appear on each order for that product For example you can enter ldquoDo not forget tosend by express delivery as specified in our contract reference 1234rdquo
Once the document has been completed you can print it as a price estimate to send to the supplier Youcan set a note for the attention of the supplier in the formrsquos third tab
Figure 43 Printing the Supplier Price Quotation
Then leave the document in the Request for Quotation state When you receive a responsefrom the supplier use the menu Purchases rarr Purchase Management rarr Requests for Quotation Selectthe order and complete its details
When you want to approve the order use the button Convert to Purchase Order The price request thenpasses into the Approved state No further changes are possible
CHAPTER 4 DRIVING YOUR PURCHASES 53
Figure 44 Purchase Order Process
413 Goods Receipt
Once the order has been approved OpenERP automatically prepares the goods receipt order in thedraft state for you To get a list of the products you are waiting for from your suppliers use the menuWarehouse rarr Warehouse Management rarr Incoming Shipments
Purchasing Services
If you buy services from your supplier OpenERP does not generate a goodsreceipt note There is no service receipt equivalent to a goods receipt
Select the document that corresponds to the item that you are receiving Usually the goods receipt noteis found by making a search on the order reference or the supplier name You can then confirm thereceipt of the products
As described in Your Warehouse (page 71) if you receive only part of the order OpenERP manages theremainder of that order A second receipt note is then automatically created for the goods not receivedYou can cancel it if you think that you will never receive the remaining products
After receiving the goods OpenERP will show you which orders are open and the state of their receiptand invoicing if you return to the list of orders
414 Control of Invoicing
To control supplier invoicing OpenERP provides three systems as standard which can differ order byorder
54 CHAPTER 4 DRIVING YOUR PURCHASES
Figure 45 List of Open Orders and their Receipt and Invoice Status
bull From Order invoicing based on quantities ordered
bull From Picking invoicing based on quantities received
bull Manual manual invoicing
The mode of invoicing control is set in the second tab of the purchase order in the field InvoicingControl
Figure 46 Purchase Order Invoice Control
CHAPTER 4 DRIVING YOUR PURCHASES 55
Default Value
A company generally uses a single invoicing control method for all of itsinvoices So you are advised to set a default value in the Invoicing Controlfield after installation
415 Control based on Orders
If you selected your invoicing control based on orders OpenERP will automatically generate a supplierinvoice in the draft state when the order is confirmed You can obtain a list of invoices waiting usingthe menu Accounting rarr Suppliers rarr Supplier Invoices and enabling the Draft filter
When you receive a paper invoice from your supplier all you need to do is validate the invoice pre-generated by the system Do not forget to check the price and the quantities When the invoice isconfirmed the accounting entries represent the cost of purchase and are automatically entered into thesystem
The supplier order is automatically set as Paid when you pay the supplier invoice
This method of controlling invoices is often used in service companies because the invoiced amountscorrespond to the ordered amounts In logistics by contrast you most often work with invoicingcontrolled by goods receipt
416 Control based on Goods Receipt
To control your supplier invoices based on goods receipt set the field Invoicing Control on the secondtab of the order to From Picking
In this case no invoice draft state or any other is generated by the order On the goods receipt notethe field Invoice Control is set to To Be Invoiced
The storesperson can then receive different orders If he wants to generate the draft invoice for a goodsreceipt he can click the action Create Invoice OpenERP then asks you for the journal for this invoiceIt then opens that or the generated invoices (in the case of creating invoices for several receipts at onetime) which enables you to modify it before confirming it
This approach is useful when you receive the invoice at the same time as the item from the supplierUsually invoices are sent by post some days later In this case the storesperson leaves the itemunchanged without generating an invoice Then once per day or once per week the accountant willcreate the draft invoices based on all the receipts for the day To do that he uses the menu Purchasesrarr Invoice Control rarr Purchase Lines Not Invoiced He clicks the action Create invoices to generate alldraft invoices from the list of receipts that have not yet been invoiced At that point the accountant candecide if he wants to generate an invoice per item or group all items for the same partner into the sameinvoice
Invoices are then handled just like those controlled from On Order Once the invoice arrives at theaccounting service he just compares it with the invoices waiting to control what the supplier invoicesyou
56 CHAPTER 4 DRIVING YOUR PURCHASES
Delivery Charges
To manage delivery charges install the module delivery using theReconfigure wizard and selecting Delivery Costs in Sales ApplicationConfiguration section This will automatically add delivery charges tothe creation of the draft invoice as a function of the products delivered orordered
417 Tenders
To manage tenders you should use the module purchase_requisition installed via thePurchase Requisition option in the Reconfigure wizard This lets you create several supplier pricerequests for a single supply requirement Once the module is installed OpenERP adds a new PurchaseRequisitions menu in Purchases rarr Purchase Management You can then define the new tenders
Figure 47 Defining a Tender
To enter data for a new tender use the menu Purchases rarr Purchase Management rarr PurchaseRequisitions and select New OpenERP then opens a new blank tender form The reference number isset by default and you can enter information about your tender in the other fields
If you want to enter a supplierrsquos response to your tender request add a new draft purchase order intothe list on the Quotation tab of your tender document If you want to revise a supplier price in responseto negotiations edit any appropriate purchase order that you have left in the draft state and link that tothe tender
When one of the orders about a tender is confirmed all of the other orders are automatically cancelledby OpenERP if you selected the Purchase Requisition (exclusive) type That enables you to accept just
CHAPTER 4 DRIVING YOUR PURCHASES 57
one order for a particular tender If you select Multiple requisitions you can approve several purchaseorders without cancelling other orders from this tender
418 Price Revisions
OpenERP supports several methods of calculating and automatically updating product costs
bull Standard Price manually fixed and
bull Standard Price revalued automatically and periodically
bull Average Price updated at each receipt to the warehouse
This cost is used to value your stock and represents your product costs Included in that cost iseverything directly related to the received cost You could include such elements as
bull supplier price
bull delivery charges
bull manufacturing costs
bull storage charges
Standard Price
The mode of price management for the product is shown in the tab Information on the product formOn each individual product you can select if you want to work in Standard Price or on weightedAverage Price
Simplified Interface
If you work in the Simplified interface mode you will not see the fieldthat lets you manage the price calculation mode for a product In that casethe default value is Standard Price
The Standard Price setting means that the product cost is fixed manually for each product inthe field Cost Price This is usually revalued once a year based on the average of purchase costs ormanufacturing costs
You usually use standard costs to manage products where the price hardly changes over the course ofthe year For example the standard cost could be used to manage books or the cost of bread
Those costs that can be fixed for the whole year bring certain advantages
bull you can base the sale price on the product cost and then work with margins rather than a fixedprice per product
58 CHAPTER 4 DRIVING YOUR PURCHASES
bull accounting is simplified because there is a direct relationship between the value of stock and thenumber of items received
To get an automated periodic revaluation of the standard price you can use the action Update on theproduct form enabling you to update prices of all the selected products OpenERP then recalculatesthe price of the products as a function of the cost of raw materials and the manufacturing operationsgiven in the routing
Average Price
Working with standard prices does not lend itself well to the management of the cost price of productswhen the prices change a lot with the state of the market This is the case for many commodities andenergy
In this case you would want OpenERP to automatically set the price in response to each goods receiptmovement into the warehouse The deliveries (exit from stock) have no impact on the product price
Calculating the Price
At each goods receipt the product price is recalculated using the followingaccounting formula NP = (OP QS + PP QR) (QS + QR) where thefollowing notation is used
bull NP New Price
bull OP Old Price
bull QS Quantity actually in Stock
bull PP Price Paid for the quantity received
bull QR Quantity Received
If the products are managed as a weighted average OpenERP will open a window that lets you specifythe price of the product received at each goods receipt The purchase price is by default set from thepurchase order but you can change the price to add the cost of delivery to the various received productsfor example
Figure 48 Goods Receipt of Products managed in Weighted Average
CHAPTER 4 DRIVING YOUR PURCHASES 59
Once the receipt has been confirmed the price is automatically recalculated and entered on the productform
42 Purchase Analysis through Analytic Accounts
421 Powerful Statistics
OpenERP enables you to perform analysis of purchases by period (current year current month previousmonth) by state (quotations orders) supplier user product category warehouse and so on This ismade possible through a search view accessed through the menu Purchases rarr Reporting rarr PurchaseAnalysis
Figure 49 Analysis of Purchases over the Month by Product
This analysis is carried out on supplier orders and not on invoices or the quantities actually receivedTo get an analysis by product use the module product_margin The function of this module isdescribed in detail in the chapter about sales (only in Logistics not in Manufacturing)
To analyze the received quantities you can use the statistical reports in Warehouse To managepurchases by project you should use analytic accounts You can set an analytic account on each lineof a supplier order The analytic costs linked to this purchase will be managed by OpenERP from thegoods receipt and confirmation of the supplier invoice The hr_timesheet_invoice module letsyou re-invoice the analytic costs automatically using parameters in the analytic accounts such as salepricelist associated partner company and maximum amount
So you can put an invoice order with a defined invoice workflow in place based on the analytic accountsIf you are working Make to Order the workflow will be
1 Customer Order
2 Procurement Order on supplier
3 Receive invoice and goods from the supplier
4 Delivery and invoicing to the customer
60 CHAPTER 4 DRIVING YOUR PURCHASES
When re-invoicing based on costs you would get the following workflow
1 Enter the customer contract conditions from the analytic accounts
2 Purchase raw materials and write the services performed into the timesheets
3 Receive the supplier invoice and the products
4 Invoice these costs to the customer
Analytic Multi-plans
If you want several analysis plans you should install the modulepurchase_analytic_plans These let you split a line on a supplierpurchase order into several accounts and analytic plans
Sitting at the heart of your companyrsquos processes analytic accounts (or cost accounts) are indispensabletools for managing your operations well Unlike your financial accounts they are for more thanaccountants - they are for general managers and project managers too
You need a common way of referring to each user service or document to integrate all your companyrsquosprocesses effectively Such a common basis is provided by analytic accounts (or management accountsor cost accounts as they are also called) in OpenERP
Analytic accounts are often presented as a foundation for strategic enterprise decisions But because ofall the information they pull together OpenERPrsquos analytic accounts can be a useful management toolat the center of most system processes
There are several reasons for this
bull they reflect your entire management activity
bull unlike the general accounts the structure of the analytic accounts is not regulated by legalobligations so each company can adapt it to its needs
Independence from General Accounts
In some software packages analytic accounts are managed as an extensionof general accounts ndash for example by using the two last digits of theaccount code to represent analytic accounts
In OpenERP analytic accounts are linked to general accounts but are treatedtotally independently So you can enter various different analytic operationsthat have no counterpart in the general financial accounts
While the structure of the general chart of accounts is imposed by law the analytic chart of accounts isbuilt to fit a companyrsquos needs closely
CHAPTER 4 DRIVING YOUR PURCHASES 61
Just as in the general accounts you will find accounting entries in the different analytic accounts Eachanalytic entry can be linked to a general account or not as you wish Conversely an entry in a generalaccount can be linked to one several or no corresponding analytic accounts
You will discover many advantages of this independent representation below For the more impatienthere are some of those advantages
bull you can manage many different analytic operations
bull you can modify an analytic plan on the fly during the course of an activity because of itsindependence
bull you can avoid an explosion in the number of general accounts
bull even those companies that do not use OpenERPrsquos general accounts can use the analytic accountsfor management
Who Benefits from Analytic Accounts
Unlike general accounts analytic accounts in OpenERP are not so muchan accounting tool for Accounts as a management tool for everyone in thecompany (That is why they are also called management accounts)
The main users of analytic accounts should be the directors generalmanagers and project managers
Analytic accounts make up a powerful tool that can be used in different ways The trick is to createyour own analytic structure for a chart of accounts that closely matches your companyrsquos needs
422 To Each Enterprise its own Analytic Chart of Accounts
To illustrate analytic accounts clearly you will follow three use cases each in one of three differenttypes of company
1 Industrial Manufacturing Enterprise
2 Law Firm
3 IT Services Company
Case 1 Industrial Manufacturing Enterprise
In industry you will often find analytic charts of accounts structured into the departments and productsthat the company itself is built on
So the objective is to examine the costs sales and margins by department and by product The firstlevel of the structure comprises the different departments and the lower levels represent the productranges that the company makes and sells
62 CHAPTER 4 DRIVING YOUR PURCHASES
Analytic Chart of Accounts for an Industrial Manufacturing Company
1 Marketing Department
2 Commercial Department
3 Administration Department
4 Production
bull Product Range 1
bull Sub-groups
bull Product Range 2
In daily use it is useful to mark the analytic account on each purchase invoice The analytic accountis the one to which the costs of that purchase should be allocated When the invoice is approved itwill automatically generate the entries for both the general and the corresponding analytic accountsSo for each entry on the general accounts there is at least one analytic entry that allocates costs to thedepartment that incurred them
Here is a possible breakdown of some general accounting entries for the example above allocated tovarious analytic accounts
Table 41 Breakdown of general and analytic accounting entries (Case 1)
General accounts Analytic accountsTitle Account Debit Credit Account ValuePurchase of Raw Material 600 1500 Production Range 1 -1 500Subcontractors 602 450 Production Range 2 -450Credit Note for defective materials 600 200 Production Range 1 200Transport charges 613 450 Production Range 1 -450Staff costs 6201 10000 Marketing -2 000
Commercial -3 000Administrative -1 000Production Range 1 -2 000Production Range 2 -2 000
PR 614 450 Marketing -450
The analytic representation by department enables you to investigate the costs allocated to eachdepartment in the company
So the analytic chart of accounts shows the distribution of the companyrsquos costs using the exampleabove
CHAPTER 4 DRIVING YOUR PURCHASES 63
Table 42 Analytic chart of accounts(Case 1)
Account TotalMarketing Department -2 450Commercial Department -3 000Administration Department -1 000Production -6 200Product Range 1 -3 750Product Range 2 -2 450
In this example of a hierarchical structure in OpenERP you can analyze not only the costs of eachproduct range but also the costs of the whole of production The balance of a summary account (Production ) is the sum of the balances of the child accounts
A report that relates both general accounts and analytic accounts enables you to get a breakdown ofcosts within a given department An analysis of the Production Product Range 1 department is shownin this table
Table 43 Report merging both general andanalytic accounts for a department (Case 1)
Production Product Range 1General Account Amount600 ndash Raw Materials - 1 300613 ndash Transport charges - 4506201 ndash Staff costs -2 000Total -3 750
The examples above are based on a breakdown of the costs of the company Analytic allocations canbe just as effective for sales That gives you the profitability (sales - costs) of different departments
Representation by Unique Product Range
This analytic representation by department and by product range is usuallyused by trading companies and industries
A variant of this is not to break it down by sales and marketing departmentsbut to assign each cost to its corresponding product range This will giveyou an analysis of the profitability of each product range
Choosing one over the other depends on how you look at your marketingeffort Is it a global cost allocated in some general way or does eachproduct range have responsibility for its own marketing costs
Case 2 Law Firm
Law firms generally adopt management by case where each case represents a current client file All ofthe expenses and products are then attached to a given file
64 CHAPTER 4 DRIVING YOUR PURCHASES
A principal preoccupation of law firms is the invoicing of hours worked and the profitability by caseand by employee
Mechanisms used for encoding the hours worked will be covered in detail in the Human Resourceschapter on line Like most system processes hours worked are integrated into the analytic accountingEvery time an employee enters a timesheet for a number of hours that automatically generates analyticaccounts corresponding to the cost of those hours in the case concerned The hourly charge is a functionof the employeersquos salary So a law firm will opt for an analytic representation which reflects themanagement of the time that employees work on the different client cases
Example Representation of an Analytic Chart of Accounts for a LawFirm
1 Absences
bull Paid Absences
bull Unpaid Absences
2 Internal Projects
bull Administrative
bull Others
3 Client Cases
bull Client 1
bull Case 11
bull Case 12
bull Client 2
bull Case 21
All expenses and sales are then attached to a case This gives the profitability of each case and at aconsolidated level of each client
Billing for the different cases is a bit unusual The cases do not match any entry on the general accountand nor do they come from purchase or sale invoices They are represented by the various analyticoperations and do not have exact counterparts in the general accounts They are calculated on the basisof the hourly cost per employee These entries are automatically created on billing worksheets
At the end of the month when you pay salaries and benefits you integrate them into the general accountsbut not in the analytic accounts because they have already been accounted for in billing each accountA report that relates data from the analytic and general accounts then lets you compare the totals soyou can readjust your estimates of hourly cost per employee depending on the time actually worked
The following table gives an example of different analytic entries that you can find for your analyticaccount
CHAPTER 4 DRIVING YOUR PURCHASES 65
Table 44 Analytic entries for the account chart (Case 2)
Title Account Amount General Account Debit CreditStudy the file (1 h) Case 11 -15Search for information (3 h) Case 11 -45Consultation (4 h) Case 21 -60Service charges Case 11 280 705 ndash Billing services 280Stationery purchase Administrative -42 601 ndash Furniture purchase 42Fuel Cost -Client trip Case 11 -35 613 ndash Transports 35Staff salaries 6201 ndash Salaries 3 000
You will see that it allows you to make a detailed study of the profitability of different transactions Inthis example the cost of Case 11 is 9500 (the sum of the analytic costs of studying the files searchingfor information and service charges) but has been invoiced for 28000 which gives you a gross profitof 18500
But an interest in analytical accounts is not limited to a simple analysis of the profitability of differentcases
This same data can be used for automatic recharging of the services to the client at the end of the monthTo invoice clients just take the analytic costs in that month and apply a selling price factor to generatethe invoice Invoicing mechanisms for this are explained in greater detail in ch-services If the clientrequires details of the services used on the case you can then print the service entries in the analyticaccount for this case
Invoicing Analytic Costs
Most software that manages billing enables you to recharge for hoursworked In OpenERP these services are automatically represented byanalytic costs But many other OpenERP documents can also generateanalytic costs such as credit notes and purchases of goods
So when you invoice the client at the end of the month it is possible for youto include all the analytic costs not just the hours worked So for exampleyou can easily recharge the whole cost of your journeys to the client
Case 3 IT Services Company
Most IT service companies face the following problems
bull project planning
bull invoicing profitability and financial follow-up of projects
bull managing support contracts
To deal with these problems you would use an analytic chart of accounts structured by project and bycontract A representation of that is given in the following example
66 CHAPTER 4 DRIVING YOUR PURCHASES
Example Analytic Representation of a Chart of Accounts for an ITServices Company
1 Internal Projects
bull Administrative and Commercial
bull Research and Development
2 Client Projects
bull Client 1
bull Project 11
bull Project 12
bull Client 2
bull Project 21
bull Project 22
3 Support Contracts ndash 20h
bull Customer X
bull Customer Y
The management of services expenditures and sales is similar to that presented above for lawyersInvoicing and the study of profitability are also similar
But now look at support contracts These contracts are usually limited to a prepaid number of hoursEach service posted in the analytic accounts shows the remaining available hours of support For themanagement of support contracts you would use the quantities and not the amounts in the analyticentries
In OpenERP each analytic line lists the number of units sold or used as well as what you would usuallyfind there ndash the amount in currency units (USD or GBP or whatever other choice you make) So youcan sum the quantities sold and used on each analytic account to determine whether any hours of thesupport contract remain To differentiate services from other costs in the analytic account you use theconcept of the analytic journal Analytic entries are then allocated into the different journals
bull service journal
bull expense journal
bull sales journal
bull purchase journal
So to obtain the detailed breakdown of a support contract you only have to look at the service journalfor the analytic account corresponding to the contract in question
CHAPTER 4 DRIVING YOUR PURCHASES 67
Finally the analytic account can be used to forecast future needs For example monthly planning ofstaff on different projects can be seen as an analytic budget limited to the service journal Accountingentries are expressed in quantities (such as number of hours and numbers of products) and in amountsin units of currency (USD or GBP perhaps)
So you can set up planning on just the basis of quantities Analyzing the analytic budget enables youto compare the budget (that is your plan) to the services actually carried out by month end
Cash Budgets
Problems of cash management are amongst the main difficultiesencountered by small growing businesses It is really difficult to predictthe amount of cash that will be available when a company is young andrapidly growing
If the company adopts management by case then staff planning can berepresented on the analytic accounts report as you have seen
But since you know your selling price for each of the different projectsyou can see that it is easy to use the plan in the analytic accounts to moreprecisely forecast the amounts that you will invoice in the coming months
68 CHAPTER 4 DRIVING YOUR PURCHASES
69
Part III
Managing your Warehouse
70
71
Your Warehouse 5OpenERPrsquos stock management is at once very simple flexible and complete It is based onthe concept of double entry that revolutionized accounting The system can be describedby Lavoisierrsquos maxim ldquonothing lost everything changedrdquo or better ldquoeverything movedrdquoIn OpenERP you do not talk of disappearance consumption or loss of products insteadyou speak only of stock moves from one place to another
Just as in accounting the OpenERP system manages counterparts to each of its main operations suchas receipts from suppliers deliveries to customers profit and loss from inventory and consumption ofraw materials Stock movements are always made from one location to another To satisfy the need fora counterpart to each stock movement the software supports different types of stock locations
bull Physical stock locations
bull Partner locations
bull Virtual locations as counterparts for procurement production and inventory
Physical locations represent warehouses and their hierarchical structure These are generally thelocations that are managed by traditional stock management systems
Partner locations represent your customersrsquo and suppliersrsquo stocks To reconcile them with youraccounts these stores play the role of third-party accounts Reception from a supplier can be shownby the movement of goods from a partner location to a physical location in your own company Asyou see supplier locations usually show negative stocks and customer locations usually show positivestocks
Virtual locations as counterparts for production are used in manufacturing operations Manufacturingis characterized by the consumption of raw materials and the production of finished products Virtuallocations are used for the counterparts of these two operations
Inventory locations are counterparts of the stock operations that represent your companyrsquos profit andloss in terms of your stocks
The figure Location Structure when OpenERP has just been installed (page 72) shows the initialconfiguration of the locations when the software is installed (Warehouse rarr Warehouse Managementrarr Locations)
Hierarchical Stock Locations
In OpenERP locations are structured hierarchically You can structureyour locations as a tree dependent on a parent-child relationship Thisgives you more detailed levels of analysis of your stock operations and theorganization of your warehouses
72 CHAPTER 5 YOUR WAREHOUSE
Figure 51 Location Structure when OpenERP has just been installed
Locations and Warehouses
In OpenERP a Warehouse represents the place where your physical stockis stored A warehouse can be structured into several locations at multiplelevels Locations are used to manage all types of storage places such as atthe customer and production counterparts
For this chapter you can continue using the database with demo data from a previous chapter or startwith a fresh database that includes demo data with Warehouse Management and its dependenciesinstalled and any chart of accounts configured
In this chapter the following modules will be used
CHAPTER 5 YOUR WAREHOUSE 73
Table 51 List of modules
Name Descriptionstock to handle the stock functionsstock_planning to define planning on productsstock_location to define pull and push flowsdelivery to define delivery methods and costsaccount_anglo_saxon to illustrate the valuation according to the anglo-saxon
principlessale_journal to handle stock by journalmrp_jit to illustrate the just-in-time functionalitysale_supplier_direct_deliveryto directly deliver the product from the supplier to the
customer
51 Understanding Double-Entry Stock Management
To illustrate this concept of stock management see how stock moves are generated by the followingoperations
bull Receiving products from a supplier
bull Delivery to a customer
bull Inventory operation for lost materials
bull Manufacturing
The structure of stock locations is shown by the figure Location Structure when OpenERP has just beeninstalled (page 72) Stocks are assumed to be totally empty and no operation is in progress nor planned
If you order lsquo30 bicyclesrsquo from a supplier OpenERP will do the following operations on receipt of theproducts
Table 52 Stock Move Operation from Suppliers to Stock
Location ProductsPartner Locations gt Suppliers -30 bicyclesPhysical Locations gt OpenERP SA gt Stock +30 bicycles
If you deliver 2 bicycles to a European customer you will get the following transactions for the delivery
Table 53 Stock Move Operation from Stock to European Customers
Location ProductsPhysical Locations gt OpenERP SA gt Stock -2 bicyclesPartner Locations gt Customers gt European Customers +2 bicycles
74 CHAPTER 5 YOUR WAREHOUSE
When the two operations are complete you will see the following stock in each location
Table 54 Resulting Stock Situation
Location ProductsPartner Locations gt Suppliers -30 bicyclesPhysical Locations gt OpenERP SA gt Stock +28 bicyclesPartner Locations gt Customers gt European Customers +2 bicycles
So you can see that the sum of the stocks of a product in all the locations in OpenERP is always zeroIn accounting you would say that the sum of the debits is equal to the sum of the credits
Partner locations (customers and suppliers) are not located under your company in the hierarchicalstructure so their contents are not considered as part of your own stock So if you just look atthe physical locations inside your own company those two bicycles are no longer in your companyAlthough they are no longer in your own physical stock it is still very useful to see them in yourcustomerrsquos stock because that will help when you carry out detailed stock management analysis
Consignment Stock
To manage Consignment Stock you need to define the location for theconsignment customer or supplier as part of your own stock and not as apartner location
Accounts
In managing stock a gap between the data in the software and realquantities in stock is difficult to avoid Double-entry stock managementgives twice as many opportunities to find an error If you forget two items ofstock this error will automatically be reflected in the counterpartrsquos location
You can make a comparison with accounting where you will easily find an error because you can lookfor an anomaly in an account or in the counterparts if there is not enough in a bank account thenthat is probably because someone has forgotten to enter a customerrsquos invoice payment You alwaysknow that the sum of debits must equal the sum of the credits in both accounting and OpenERPrsquos stockmanagement
In accounting all documents lead to accounting entries that form the basis of management accountingIf you create invoices or enter statements of account for example the results of the operations areaccounting entries on accounts And it is the same for stock management in OpenERP All stockoperations are carried out as simple stock moves Whether you pack items or manufacture them orcarry out a stock inventory operation stock moves are carried out every time
You have seen a fairly simple example of goods receipt and product delivery but some operations areless obvious ndash a stock inventory operation for example An inventory operation is carried out when youcompare the stock shown in software with real stock numbers counted in the stores In OpenERP withits double-entry stock management you would use stock moves for this inventory operation That helps
CHAPTER 5 YOUR WAREHOUSE 75
you manage your stock traceability Suppose there are 26 bicycles in real stock but OpenERP shows28 in the system You then have to reduce the number in OpenERP to 26 This reduction of 2 unitsis considered as a loss or destruction of products and the correction is carried out as in the followingoperation
Table 55 Inventory Operation to Adjust Stock
Location ProductsPhysical Locations gt OpenERP SA gt Stock -2 bicyclesVirtual Locations gt Inventory Loss +2 bicycles
The product stock under consideration then becomes
Table 56 Real and Counterpart Stocks when Operations are Completed
Location ProductsPartner Locations gt Suppliers -30 bicyclesPhysical Locations gt OpenERP SA gt Stock +26 bicyclesPartner Locations gt Customers gt European Customers +2 bicyclesVirtual Locations gt Inventory Loss +2 bicycles
This example shows one of the great advantages of this approach in terms of performance analysisAfter a few months you can just make a stock valuation of the location Inventory Control rarr LocationStructure rarr Virtual Locations rarr Inventory Loss to give you the value of the companyrsquos stock losses inthe given period
Now see how the following manufacturing operation is structured in OpenERP To make a bicycle youneed two wheels and a frame This means that there should be a reduction of two wheels and a framefrom real stock and the addition of a bicycle there The consumption production is formalized bymoving products out of and into physical stock The stock operations for this are as follows
Table 57 Stock Situation Resulting from Manufacturing
Location Products StepPhysical Locations gt OpenERP SA gt Stock -2 Wheels Consumption of raw materialsVirtual Locations gt Production +2 Wheels Consumption of raw materialsPhysical Locations gt OpenERP SA gt Stock -1 Frame Consumption of raw materialsVirtual Locations gt Production +1 Frame Consumption of raw materialsVirtual Locations gt Production -1 Bicycle Manufacture of finished productsPhysical Locations gt OpenERP SA gt Stock +1 Bicycle Manufacture of finished products
So now you have got the outcome you need from the consumption of raw materials and themanufacturing of finished products
76 CHAPTER 5 YOUR WAREHOUSE
Assessing Created Value
You might already have noticed a useful effect of this approach if youdo a stock valuation in the Virtual Locations gt Productionlocation you get a statement of value created by your company (as anegative amount) Stock valuation in any given location is calculated bymultiplying quantities of products in stock by their cost In this case theraw material value is deducted from the finished product value
52 Managing Physical Inventory Structure
521 Warehouse
Warehouses are designed for physical locations from which you can deliver to the customer and towhich you receive raw materials When you buy products from a supplier you should take account ofthe Warehouse you use for this purchase This also enables the end user to not have to choose from alist of locations but simply a real warehouse Use the menu Warehouse rarr Configuration rarr WarehouseManagement rarr Warehouses then click New to configure a new warehouse
A warehouse is defined by a link between three locations
bull The Location Stock field shows the place of products available for delivery to a customer directlyfrom this warehouse Availability is given by all the products in that location and any childlocations
bull The Location Input field shows where ordered products are received from a supplier in thatwarehouse It can be the same as the stock location if for example you want to do a qualitycontrol operation on your incoming raw materials
bull The Location Output field (called Output in the demonstration database) is designed as a bufferzone in which you store all the items that have been picked but not yet delivered to a customerYou are strongly advised not to put this location within the stock hierarchy but instead at a higherlevel or at the same level
Figure 52 Warehouse Parameters
CHAPTER 5 YOUR WAREHOUSE 77
You can also set an address for the warehouse This address should ideally be an address of yourcompany Once the warehouse has been defined it can be used in
bull Minimum stock rules
bull Supplier orders
bull Customer orders (using the definition of a point of sale which is linked to a warehouse)
Automatic Procurement
Several methods of automatically procuring products can be carried out by OpenERP
bull the workflow used by products that have the procurement method Make to Order
bull using minimum stock rules for Make to Stock products
bull using the master production schedule for Make to Stock products
The last two methods are described below
Minimum Stock Rules
To automatically make stock replenishment proposals you can use minimum stock rules Go to themenu Warehouse rarr Automatic Procurements rarr Minimum Stock Rules
The rule is the following if the virtual stock for the given location is lower than the minimum stockindicated in the rule the system will automatically propose a procurement to increase the level of virtualstock to the maximum level given in the rule
Figure 53 List of Minimum Stock Rules
78 CHAPTER 5 YOUR WAREHOUSE
Conflict Resolution
You may find draft production or procurement orders to be created althoughthey should not exist That can happen if the system is badly configured (forexample if you have forgotten to set the supplier on a product)
To check this look at the list of procurements in the exception state in themenu Warehouse rarr Schedulers rarr Procurement Exceptions More detailsabout processing these exceptions is given in ch-mnf
We underline that the rule is based on virtual quantities and not just on real quantities It takes intoaccount the calculation of orders and receipts to come
Take the following example
bull Products in stock 15
bull Products ordered but not delivered 5
bull Products in manufacturing 2
The rules defined are
bull Minimum stock 13
bull Maximum stock 25
Once the rules have been properly configured the purchasing manager only needs to look at the listof orders for confirmation with the supplier using the menu Purchases rarr Purchase Management rarrRequests for Quotation
Procurement
Note that the procurement does not require that you buy from a supplier Ifthe product has a Supply Method Produce the scheduler will generate aManufacturing order instead of a supplier order
You can also set multiple quantities in the minimum stock rules If you set a multiple quantity of3 the system will propose procurement of 15 pieces and not the 13 it really needs In this case itautomatically rounds the quantity upwards
CHAPTER 5 YOUR WAREHOUSE 79
Maximum Quantity
Pay attention to the fact that the maximum quantity is not the maximumyou will have in stock If we take the following situation a company has10 pieces of product with minimum stock rules defined for this product byMin quantity = 10 Max quantity = 30 and Qty multiple = 12 If an orderof 2 pieces comes a purchase of 24 pieces order will be executed The first12 pieces will be ordered to reach the minimum quantity and the other 12to reach the maximum quantity At the end the stock of this product willbe equal to 32 pieces
In a minimum stock rule when you indicate a warehouse it suggests a stock location by default in thatwarehouse You can change that default location when the scheduler completes
522 Location
A location is one component of the warehouses that is used to managed all types of storage places suchas at the customerrsquos and production counterparts
There are different types of locations that allow you to structure your warehouses according to yourneeds Locations are structured hierarchically to account for the subdivision of a warehouse intosections aisles andor cupboards The hierarchical view also enables you to structure virtual locationssuch as production counterparts That gives you a finer level of analysis Go to the menu Warehouse rarrConfiguration rarr Warehouse Management rarr Locations then click New to define new locations
Figure 54 Defining a new Stock Location
Here are the different available types of locations
bull Supplier Location virtual location representing the source location for products received
80 CHAPTER 5 YOUR WAREHOUSE
from suppliers
bull View shows that the location is only an organizational node for the hierarchical structure andcannot be involved in stock moves itself The view type is not made into a leaf node in a structurendash it usually has children
bull Internal Location physical location inside your own stock
bull Customer Location virtual location representing the destination for products sent tocustomers
bull Inventory virtual location serving as the counterpart for inventory operations used to correctstock levels (physical inventories)
bull Procurement virtual location serving as temporary counterpart for procurement operationswhen you do not yet know the source (supplier or production) Products in this location shouldbe zero after the scheduler run completes
bull Production virtual counterpart location for production operations consuming raw materialand sending finished products
bull Transit Location for Inter-Companies Transfers used as an intermediatelocation in a multi-company environment
You can have several locations of the same type In that case your product supplier and warehouseconfigurations determine the location that is to be used for any given operation
Location Addresses
Each location can have a specific address that enables you to create a location for a customer ora supplier for example You can then give it the address of that customer or supplier Go to thepartner form to tell OpenERP it should use this location rather than the default location given to partnerdeliveries
Subcontracting Production
You will see in the on line chapter Manufacturing that it is possible toassign a location to a manufacturing workcenter If this location is at asupplierrsquos you must give it an address so that OpenERP can prepare adelivery order for the supplier and a receive operation for the manufacturedgoods Creating a location specifically for a partner is also a simple solutionfor handling consigned stocks in OpenERP
CHAPTER 5 YOUR WAREHOUSE 81
Consigned Stock
Consigned stock is stock that is owned by you (valued in your accounts)but is physically stocked by your supplier Or conversely it could be stockowned by your customer (not valued by you) but stocked in your companyMake sure that you create consignment locations as part of your internalstock
To enable you to easily consolidate at a higher level the location definition is hierarchical Thisstructure is given by the field Parent Location That also enables you to manage complex casesof product localization
For example you could imagine the following scenario One Company with Two Warehouses
A company has a warehouse in Paris and in Bordeaux For some orders you have to deliver theproducts from Paris and for others from Bordeaux But you should also specify a fictitious warehousethat OpenERP uses to calculate whether it should deliver products from Paris or from Bordeaux To dothis in OpenERP you would create a third warehouse lsquoFrancersquo which consolidates the warehouses inParis and Bordeaux You create the following physical locations
bull Company
ndash Output
Warehouses Francemiddot Warehouse Parismiddot Warehouse Bordeaux
OpenERP will then deliver the goods from the warehouse that has the ordered product in stock Whenproducts are available in several warehouses OpenERP will select the nearest warehouse To formalizethe notion of distance between warehouses you should use the geographic co-ordinates (X Y Z) of thedifferent stores to enable OpenERP to search for the nearest goods The same co-ordinates could alsobe used to structure the shelves aisles and interior rooms in a warehouse
Linked Locations
Locations in OpenERP can be linked between each other to define paths followed by products So youcan define rules such as all products that enter the warehouse should automatically be sent to qualitycontrol The warehouse and quality control are represented by two different locations
Then when a product arrives in a location OpenERP can automatically suggest that you send theproduct to another linked location Three link modes are available
bull Manual Operation
bull Automatic Move
bull Automatic No Step Added
82 CHAPTER 5 YOUR WAREHOUSE
The Manual Operation mode will create an internal move order to the linked location once productsarrive in the source locations This order will wait for a confirmation of the move by a user Thisenables you to have a list of moves to do proposed by the system and confirmed by the storesperson
The Automatic Move mode will do the same but will not wait for a confirmation from the user Productswill automatically be sent to the linked location without any intervening manual operation to do Thiscorresponds to the case where for simplicity you delete a step in the process so the end user can setoff the process automatically
The Automatic No Step Added mode will not include the additional stock move but will change thedestination move transparently to assign the linked location You could then assign a destinationlocation to which you send all the products that arrive in your warehouse The storesperson will modifythe goods receipt note
Product Logistics
The module stock_location lets you generate paths to follow not justat the level of locations but also at the level of products It then enables youto manage default locations for a given product or to refer to the productsas a function of operations such as quality control supplier receipt andafter-sales service
A more detailed explanation of this module with examples is given at theend of this chapter
If there is linking to do the Chained Location Type field allows you to determine the destinationlocation If the field is set to lsquoCustomerrsquo the location is given by the properties of the partner form Ifthe field is set to fixed the destination location is given by the field Chained Location If Fixed
Some operations take a certain time between order and execution To account for this lead time youcan set a value in days in the field Chaining Lead Time Then the extra move (automatic or not) willbe carried out several days after the original move If you use the mode Automatic No Step Added thelead time is inserted directly into the initial order In this way you can add security lead times at certaincontrol points in the warehouse
Structuring Locations
In the next part you will see that by linking locations you can manage a whole series of complex casesfor efficient production management
bull Handling multiple operations for a customer order
bull Tracking import and export by sea transport
bull Managing a production chain in detail
bull Managing rented products
bull Managing consigned products
CHAPTER 5 YOUR WAREHOUSE 83
To show these concepts different cases of structuring and configuring these locations are given belowMany other configurations are possible according to company needs
Examples
bull Handling customer orders
Customer orders are usually handled in one of two ways
bull item note (or preparation order) confirmed when the item is ready to send
bull delivery order (or freight note) confirmed when the transporter has delivered the item to acustomer
You use the following stock move in OpenERP to simulate these operations
bull Packing Note Stock gt Output
bull Delivery Order Output gt Customer
The first operation is automatically generated by the customer order The second one is generated bythe stock management showing that the Output location is linked to the Customer location The twooperations will be displayed in Waiting status If the Output location is not situated beneath the stocklocation you then have to move the item from stock to the place where the item is prepared
Some companies do not want to work in two steps because it just seems like extra work to haveto confirm a delivery note in the system You can then set the link mode to lsquoAutomaticrsquo to makeOpenERP automatically confirm the second step It is then assumed all the items have automaticallybeen delivered to the customer
bull Linked production
The stock_location module enables you to manage the linkages by product in addition to doingthat by location You can then create a location structure that represents your production chain byproduct
The location structure may look like this
bull Stock
ndash Level 1ndash Level 2
Link 1middot Operation 1middot Operation 2middot Operation 3middot Operation 4
You can then set the locations a product or a routing must go through in the relevant form All productsthat enter the production chain will automatically follow the predetermined path You can see thelocation structure using Warehouse rarr Inventory Control rarr Location Structure
84 CHAPTER 5 YOUR WAREHOUSE
523 Shop
The counterparts for procurement inventory and production operations are given by the locationsshown in the product form The counterparts of reception and delivery operations are given by thelocations shown in the partner form The choice of stock location is determined by the configuration ofthe warehouse linked to a Shop which can be defined using Sales rarr Configuration rarr Sales rarr Shop
Once a shop is defined you will be able to make sales orders from this shop You need at least oneshop in order to be able to make sales orders
524 Stock
In the Product form the Stock by Location action will give you the stock levels of the variousproducts in any selected location If you have not selected any location OpenERP calculates stocks forall of the physical locations When you are in the Stock by Location view click the Print button to printthe Location Content or the Location Inventory Overview reports
Availability of Stock
Depending on whether you look at the product from a customer order orfrom the menu of a product form you can get different values for stockavailability If you use the Product menu you get the stock in all of thephysical stock locations Looking at the product from the order you willonly see the report of the warehouse selected in the order
In this respect two important fields in the product form are
bull Real Stock Quantity physically present in your warehouse
bull Virtual Stock Calculated as follows real stock ndash outgoing + incoming
Virtual Stock
Virtual stock is very useful because it shows what the salespeople can sellIf the virtual stock is higher than the real stock this means products will becoming in If virtual stock is smaller than real stock certain products arereserved for other sales orders or work orders
Detail of Future Stock
To get more details about future stock you can click Stock LevelForecast to the right of the product form to get the report Forecast StockLevels as illustrated below OpenERP shows a graph of the changes in stockin the days to come varying as a function of purchase orders confirmedproduction and sales orders
CHAPTER 5 YOUR WAREHOUSE 85
Figure 55 Printout of forecast stock levels
Filter Stock by Location
By default in Product list view the columns Real Stock and Virtual Stockshow the stock figures for all stock locations where a product is stored Usethe Extended Filters to enter a specific stock location if you want to onlysee the stock in a specific location
Lead Times and Locations
The tab Procurement amp Locations in the Product form contains information about different lead timesand locations Three lead time figures are available
bull Customer Lead Time lead time promised to the customer expressed in number of days betweenthe order and the delivery to the customer
bull Manufacturing Lead Time lead time in days between a production order and the end ofproduction of the finished product
bull Warranty (months) length of time in months for the warranty of the delivered products
Warranty
The warranty period is used in the Repairs management and after-salesservice You can find more information on this subject in the on line chapterabout Manufacturing
86 CHAPTER 5 YOUR WAREHOUSE
Fields in the section Storage Localisation are for information only they do not have any impact on themanagement of stock
Counter-Part Locations Properties are automatically proposed by the system but the different valuescan be modified You will find counterpart locations for
bull Procurement
bull Production
bull Inventory
A procurement location is a temporary location for stock moves that have not yet been finalized by thescheduler When the system does not yet know if procurement is to be done by a purchase or productionOpenERP uses the counterpart location Procurement In this location you will find everything that hasnot yet been planned by the system The quantities of product in this location cancel each other out
Initial Inventory
Once a product has been defined use an initial inventory operation to put current quantities into thesystem by location for the products in stock Go to the menu Warehouse rarr Inventory Control rarrPhysical Inventories to do your initial inventory
Figure 56 Defining a New Inventory Operation
CHAPTER 5 YOUR WAREHOUSE 87
Give a name (for example Initial Inventory or Lost Product XYZ ) and a date (proposed by default) foreach inventory operation
You have three ways of doing an inventory
bull Click the Import Inventory action and select the location concerned You can choose to includechild locations and set the inventory to zero (especially useful to ensure the count is donecorrectly)
bull You can update the inventory from the Product form Go to the Information tab Stocks sectionand click the Update button On confirmation OpenERP will create a Physical Inventory
bull You can manually add inventory lines You can then enter data about the quantities available foreach product by location Start by entering the location for example Stock and then select theproduct OpenERP automatically completes the quantity available for that product in the locationshown You can then change that value to correct the value in stock
Enter data for a single line in your inventory
bull Location Stock
bull Product PC1 Basic PC
bull Quantity 23 Units
When your inventory operation is finished you can confirm it using the Confirm Inventory button to thebottom right of the form OpenERP will then automatically create the stock moves to close the gaps asmentioned at the start of this chapter You can verify the moves generated using the Posted Inventorytab of the inventory operation form
The correct levels of your product are now in your stock locations A simple way of verifying this is toreopen the product form to see the quantities available in stock
Periodical Inventory
You are usually legally required to do a stock check of all your productsat least once a year As well as doing a complete annual stock checkOpenERP also supports the method of periodical inventory
That means you can check the stock levels of a proportion of your productsevery so often This system is accepted in France as long as you canguarantee that all of your products have been counted at least once peryear To see the last inventory count per product use the report Warehouserarr Reporting rarr Last Product Inventories
You can do this the same way for all products and all locations so you onlycarry out small inventory operations through the year rather than a singlelarge stock check at one point in the year (which usually turns out to be atan inconvenient time)
88 CHAPTER 5 YOUR WAREHOUSE
53 Keeping Track of Stock Movements
531 Goods Receipts
In OpenERP you have the choice between three ways to receive goods from suppliers
The first method is to manually enter the information in the incoming shipment To receive the productsthrough this method you have to go to Incoming Shipments section in the Warehouse Managementsubmenu click New and then you enter the information about the receipt
Figure 57 Manual Data Entry for Product Receipt
The second method is to receive products from a generated incoming shipment To achieve thereception using this method you have to go to Incoming Shipments section in the WarehouseManagement submenu You will find the list of waiting incoming shipments
The third method is to receive products by waiting products without looking at the shipment documentYou can validate the reception by products in Receive Products section in the guilabellsquo Product Moveslsquosubmenu With this method you will be able to receive one product regardless of the document whichis attached to this product
Receipt of a Supplier Order by Purchase Order
If you use Purchase Orders in OpenERP product receipts are automatically generated by the systemwhen the purchase order is confirmed You do not have to enter any date just confirm that the quantitiesordered match the quantities received
Incoming Shipments forms are automatically prepared by OpenERP from the purchase managementprocess You will find a list of all the awaited receipts in the menu Warehouse rarr WarehouseManagement rarr Incoming Shipments Use the order number or the supplier name to find the rightgoods receipt form for confirmation of a goods-in This approach enables you to control quantities
CHAPTER 5 YOUR WAREHOUSE 89
received by referring to the quantities ordered
Figure 58 List of Items Waiting
You can also do goods-in data entry manually if there is no order using the same menu by clicking theNew button
A new goods-in data entry form opens Enter the supplier data in the Address field and type thereference number from your supplier in the field Origin You should then enter data about the productsreceived in the lines
The source location is already completed by default because of your supplier selection You shouldthen give the destination location where you will place the products For example enter Stock Atthis stage you can set a lot number for traceability (this function will be described later in this chapterso leave this field empty for the moment)
Once the form has been completed you can confirm the receipt of all the products at the same timeusing the Process Now button If you want to enter data for a goods receipt that you are still waitingfor click the button Process Later
90 CHAPTER 5 YOUR WAREHOUSE
Partial or Complete Reception
When you process the incoming shipment you can choose between partialor complete
If you have to validate a partial incoming shipment click Process nowand change the number of items according to the quantity received
Figure 59 Confirm partial reception
Another object will be generated with a back order reference equal to theReference number of the incoming shipment already confirmed
Figure 510 Process a Partial Incoming Shipment
Once the rest of the order has arrived and has been processed both orderswill be merged
Figure 511 Form for Entering Goods received from a Supplier Order
The products then arrive in stock and should reflect the quantities shown on the product form
In the Incoming Shipments form the field Invoice Control lets you influence the way you sendinvoices to suppliers If this is set to To be invoiced a supplier invoice will now be generated
CHAPTER 5 YOUR WAREHOUSE 91
automatically in the draft state based on the goods received Your accountant then has to confirmthis pre-invoicing once the supplierrsquos invoice is received This enables you to verify that the invoicedquantities correspond to the quantities received
Print the Packing List
In order to print the packing list of an incoming shipment select theincoming shipment of which you need the details and click PackingList in the panel at the right side of the screen
This link is available in the Internal Moves and DeliveryOrders sections
In case you received damaged or wrong products you can return them to the supplier In theIncoming shipment form click the Return Products button A window will open that letsyou choose the invoicing process to follow Once you click Process a stock move is generated withthe same reference number and return to specify that this is a return move
Figure 512 Stock Move for Returned Products
Receipt of a Supplier Order by Product
The approach shown above is very useful if goods receipts correspond to the original orders If yoursuppliers deliver items that do not necessarily coincide with the orders however it is easier to work byproducts received rather than by orders
From this version on you can also handle receptions by product even from List view Go to Warehouserarr Products Moves rarr Receive Products
Filters allow you to easily select receipts to be done and so on One way to quickly receive products isto Group by Supplier and select To Do
This is very useful functionality when your supplier sends the goods for several purchase orders at atime You can now just receive the products regardless of the purchase order they come from simplyby clicking the green arrow at the right side of the screen
The List view offers great flexibility and allows you to rapidly receive products by keeping fullfunctionality Of course you can handle both partial and complete receptions and you can addinformation about the production lots and packs
This can be also accomplished from Form view
92 CHAPTER 5 YOUR WAREHOUSE
Figure 513 Receipt of a Supplier Order using Group By
532 Internal Stock Moves
You should install the stock_location module (from the list of modules or through Reconfigurewizard Advanced Routes) if routing products to customers from suppliers or in your warehouse isdetermined by the identity of the product itself
Figure 514 Managing the Paths from one Location to Another in a Product Form
This will let you configure logistics rules individually for each product For example when a specificproduct arrives in stores it can automatically be sent to quality control In this case it has to beconfigured as a Push Flow with rules in the Product form The fields that make up those rules are
bull Source Location the rule only applies if a product comes from this location
bull Destination Location the rule only applies if a product ends up in this location
CHAPTER 5 YOUR WAREHOUSE 93
bull Automatic Move Automatic Move Manual Operation Automatic No StepAdded
bull Delay (days)
bull Operation a free text field which will be included in the automatic stock move proposed byOpenERP
There are two main logistic flows
bull Pushed Flows
bull Pulled Flows
Push flows are useful when the arrival of certain products in a given location should always be followedby a corresponding move to another location optionally after a certain delay The original Warehouseapplication already supports such Push flow specifications on the Locations themselves but thesecannot be refined per product Pull flows are a bit different from Push flows in the sense that theyare not related to the processing of product moves but rather to the processing of procurement ordersWhat is being pulled is a need not directly products You will now see some examples of using theselocations and logistics by product through Pushed Flows for
bull A rentable product
bull A product bought in China following its freight by ship from port to port
bull A product that you want to send to quality control before putting it in stocks
We will develop the third scenario the quality control
You can configure the system to put a given product in the Quality Control bay automatically when itarrives in your company To do that you just configure a rule for the product to be placed in the QualityControl location rather than the Input location when the product is received from the supplier
Table 58 Rule to Move Products manuallyfrom Input to Quality Control
Field ValueSource location StockDestination location Quality ControlAutomatic Move Manual OperationShipping Type Getting GoodsDelay (days) 0Operation Quality Control
Once this product has been received OpenERP will automatically manage the request for an internalmovement to send it to the Quality Control location If you want to do this automatically without havingto confirm it in the Automatic Move field select Automatic Move or Automatic No Step Added
94 CHAPTER 5 YOUR WAREHOUSE
Figure 515 Manual Stock Move to Quality Control
With the configuration described in the table above you will have to confirm the stock move manuallyonce you have received the goods
If you do not want to confirm the stock move manually but you want to see the move Suppliers ndashgtStock then Stock ndashgt Quality Control change the Automatic Move field and select Automatic MoveWith this configuration you will see the two stock moves
Figure 516 Automatic Stock Move to Quality Control
If you select Automatic Move No Step Added you will only see one stock move Suppliersndashgt Quality Control
Figure 517 Automatic Stock Move to Quality Control (No Step Added)
533 Shipping of Goods
In the same way as delivering goods you can ship goods in three different ways
bull manually enter data
bull deliver goods according to a sales order
bull deliver goods by product
CHAPTER 5 YOUR WAREHOUSE 95
Everything about goods receipt can also be done manually in the same way for a customer deliveryThis time use the automated product delivery processes based on customer orders Install the salemodule (Reconfigure wizard Sales Management) so that you can proceed further in this section of thechapter
Now create a new sales order from the menu Sales rarr Sales rarr Sales Orders Enter the following datain this order
bull Shop OpenERP SA
bull Customer Agrolait
bull Sales order lines
ndash Product [PC2] Basic+ PC (assembly on order)
ndash Quantity (UoM) 3
ndash Product UoM PCE
ndash Procurement Method from stock
You have already seen that OpenERP shows the available product stock in list view The real stock isequal to the virtual stock because you have nothing to deliver to customers and you are not waiting forany of these products to be received into stock The salesperson then has all the information needed totake orders efficiently
Figure 518 Entering an Order for Three Computers
Then confirm the quotation to convert it to an order If you return to the product form you will see thevirtual stock is now smaller than the real stock
Start the scheduler through the menu Warehouse rarr Schedulers rarr Compute Schedulers Itsfunctionality will be detailed in ch-mnf This manages the reservation of products and places ordersbased on the dates promised to customers and the various internal lead times and priorities Threeproducts will be reserved in the order that you created so they cannot be sold to another customer
96 CHAPTER 5 YOUR WAREHOUSE
Just in Time
Install the module mrp_jit to schedule each order in real time after it hasbeen confirmed This means that you do not have to start the scheduler orwait for its periodical start time
Now have a look at the list of deliveries waiting to be carried out using the menu Warehouse rarrWarehouse Management rarr Delivery Orders You find a line there for your order representing theitems to be sent Double-click the line to see the detail of the items proposed by OpenERP
Figure 519 Items on a Customer Order
States
OpenERP distinguishes between the states Confirmed and Assigned
An item is Confirmed when it is needed but the available stock may beinsufficient An item is Assigned when it is available in stock and thestoresperson reserves it the necessary products have been reserved for thisspecific operation
You can also confirm a customer delivery from a confirmed Sales Order When you click the Processbutton of Outgoing Deliveries a window opens where you can enter the quantities actually deliveredIf you enter a value less than the forecasted one OpenERP automatically generates a partial deliverynote and a new order for the remaining items For this exercise just confirm all the products
However if you want to look at a partial shipping an example will be developed at the end of thissection
CHAPTER 5 YOUR WAREHOUSE 97
If you return to the list of current orders you will see that your order has now been marked as delivered(Done) A progress indicator from 0 to 100 is shown by each order so that the salesperson canfollow the progress of his orders at a glance
Figure 520 List of Orders with their Delivery State
Negative Stock
Stock Management is very flexible to be more effective For example if youforget to enter products at goods-in this will not prevent you from sendingthem to customers In OpenERP you can force all operations manuallyusing the button Force Availability In this case your stocks risk to becomenegative You should monitor all stocks for negative levels and carry out aninventory correction when that happens
Partial Shipping
Should you have to process a partial delivery you can go to Warehouse rarr Warehouse Management rarrDelivery Orders then select the order to process it In the new window change the quantity to ship andthen confirm it
If you go back to the list view you will now see a new delivery order with a back order numberequal to the just confirmed order This is illustrated in the following figure
Figure 521 Partial Shipping
In the stock moves you will see that there are two moves The first move is for the remaining quantitiesto ship and the second one is for the shipped goods There will be more stock moves if you process
98 CHAPTER 5 YOUR WAREHOUSE
partial shipping in more than two times
Figure 522 Stock Moves in Partial Shipping
Return Products from Customers
If a customer returns damaged or wrongly delivered products you can enter this information inOpenERP via Warehouse rarr Warehouse Management rarr Delivery Orders
You have to select the order related to the returned products and click the Return Products A newwindow will open and will let you choose the invoicing method
Figure 523 Return Products from Customers
When the product is returned it will go back to your stock and you will see a stock move fromCustomers ndashgt Shelf 1
Figure 524 Stock Move for a Returned Product
Just In Time
By default scheduling starts automatically once a day You should make this scheduling executeovernight to ensure that the system does not slow down under a heavy load of scheduling when you arealso trying to use it interactively
To set the start time for the scheduler go to the menu Administration rarr Configuration rarr Scheduler rarrScheduled Actions Select the rule called lsquoRun mrp schedulerrsquo and modify the date and time of the nextexecution Some companies want to plan orders progressively as they are entered so they do not waituntil procurement orders are planned the next day Install the module mrp_jit (Reconfigure wizard
CHAPTER 5 YOUR WAREHOUSE 99
Just In Time Scheduling) to handle this Once the module is installed each requirement (that couldresult in a Production or Purchase Order) will be planned in real time as soon as it has been confirmed
Then if you make a sales order with a product that is Make To Order the quotation request to asupplier will immediately be generated
Delivery from the Supplier or to the Customer
The sale_supplier_direct_delivery module enables you todeliver the product directly from the supplier to the customer At thetime of writing this module is in extra-addons The logic that theproduct follows is configured individually for each product and affects onlyproducts marked Make to Order
This mode does not always makes sense Each order is processed immediately when confirmed Soif an order is to be delivered in three months the scheduler will reserve goods in stock for each orderonce it has been confirmed It would have been more sensible to leave these products available for otherorders
If a Purchase Orderrsquos Invoicing Control is configured From Order the scheduler will immediatelycreate the corresponding supplier quotation request It might have been better to delay it for severalweeks if you could have used the lead time to group the purchase with other future orders
So the negative effects of working with the Just in Time module are
bull Poor priority management between orders
bull Additionally stocked products
534 Logistics Configuration through Advanced Routes
To configure your logistics for advanced push and pull you need to install stock_locationmodule(Reconfigure wizard Advanced Routes) as explained before A complete scenario will be developed atthe end of this chapter
This module supplements the Warehouse application by adding support for location paths per producteffectively implementing Push and Pull inventory flows
Typically this could be used to
bull Manage product manufacturing chains
bull Manage default locations per product
bull Define routes within your warehouse according to business needs such as
ndash Quality Control
ndash After Sales Services
ndash Supplier Returns
100 CHAPTER 5 YOUR WAREHOUSE
bull Help rental management by generating automated return moves for rented products
Once this module is installed an additional Logistics Flows tab appears in the Product form allowingyou to add Push and Pull flow specifications
Push Flow
Push flows are useful when the arrival of certain products in a given location should always be followedby a corresponding move to another location optionally after a certain delay
Product
The core Warehouse Management application already supports such PushFlow specifications on the Locations but these cannot be refined perproduct
A push flow specification indicates which location is chained with another location as well as theparameters used As soon as a given quantity of products is moved to the source location a chainedmove is automatically foreseen according to the parameters set on the flow specification (destinationlocation delay type of move journal etc) The new move may be processed automatically or mayrequire a manual confirmation according to what you have defined
Suppose whenever the demo data product CPU3 enters the Stock location it first has to be moved tothe Quality Control location in order to check the quality
Look up the product CPU3 using the menu Warehouse rarr Product rarr Products
To have OpenERP accomplish this move automatically you have to configure the Push flow as follows
bull Operation Receptions to Quality Control
bull Source Location Stock
bull Destination Location Quality Control
bull Automatic Move Automatic No Step Added
bull Delay (days) 1
bull Shipping Type Getting Goods
bull Invoice Status Not Applicable
A push flow is related to how stock moves should be generated in order to increase or decreaseinventory
CHAPTER 5 YOUR WAREHOUSE 101
Figure 525 Push Flow Specification for Product CPU3
Pull Flow
Pull flows are a bit different from Push flows in the sense that they are not related to the processing ofproduct moves but rather to the processing of procurement orders What is being pulled is a need notdirectly products
A classical example of a Pull flow is when you have an Outlet company with a parent Company that isresponsible for the supplies of the Outlet
[ Customer ] lt- A - [ Outlet ] lt- B - [ Holding ] lt- C - [ Supplier ]
Demo Data
In our demo data example the Outlet Company is Shop 1 while OpenERPSA is the parent company
When a new procurement order A (resulting from the confirmation of a Sales Order for example) iscreated in the Outlet (Shop 1) it is converted into another procurement B (through a Pull flow of the
102 CHAPTER 5 YOUR WAREHOUSE
lsquomoversquo type) requested from the Holding When procurement order B is processed by the Holdingcompany (OpenERP SA) and if the product is out of stock it may be converted into a Purchase Order(C) from the Supplier (Push flow of the lsquoBuyrsquo type) The result is that the procurement order the needis pushed all the way between the Customer and Supplier
Technically Pull flows allow to process procurement orders differently not only depending on theproduct being considered but also depending on which location holds the ldquoneedrdquo for that product (iethe destination location of that procurement order)
To explain a pull flow for the product CPU1 we first have to configure the minimum stock rulesof CPU1 for the company OpenERP SA and Shop 1 using the menu Warehouse rarr AutomaticProcurements rarr Minimum Stock Rules or by selecting the product concerned and then clicking theMinimum Stock Rules action
Minimum Stock Rules
If you work with the demo data these minimum stock rules have alreadybeen defined
For the company OpenERP SA
bull Min Quantity 10
bull Max Quantity 50
For the company Shop 1
bull Min Quantity 10
bull Max Quantity 20
Look up the product CPU1 using menu Warehouse rarr Product rarr Products in order to define theconfiguration of the pulled flow
There are two specifications of a pull flow for product CPU1
Specification 1
bull Name Receive from Warehouse
bull Destination Location Shop 1
bull Type of Procurement Move
bull Source Location Internal Shippings
bull Partner Address OpenERP SA Belgium Gerompont Chaussee de Namur 40
bull Shipping Type Getting Goods
bull Procure Method Make to Order
CHAPTER 5 YOUR WAREHOUSE 103
Figure 526 Pull Flow Specification for Product CPU1
bull Invoice Status Not Applicable
Specification 2
bull Name Deliver Shop
bull Destination Location Internal Shippings
bull Type of Procurement Move
bull Source Location Stock
bull Partner Address Fabien
bull Shipping Type Sending Goods
bull Procure Method Make to Stock
bull Invoice Status Not Applicable
Now sell 1 unit of product CPU1 from the Shop1 (do not forget to confirm your sales order) and runthe scheduler using the menu Warehouse rarr Schedulers rarr Compute Schedulers Then check the stockmoves for product CPU1 from the menu Warehouse rarr Traceability rarr Stock Moves
104 CHAPTER 5 YOUR WAREHOUSE
Figure 527 Stock Move of CPU1 related to Pull Flow Specification
These moves can be explained like this
[ Customer ] ltndash [ Shop 1 ] ltndash Internal Shippings ltndash Stock ltndash [ OpenERP SA ]
When the company Shop 1 sells one unit of CPU1 to a customer its stock decreases to 10 unitsAccording to the minimum stock rule of the product CPU1 OpenERP generates a procurement orderof 21 units of CPU1 for the company Shop 1 (OP00007 or another number if you have added extradata) So 21 units of CPU1 move from OpenERP SA Stock to Shop 1 according to their internalconfiguration of Source and Destination Locations
A pull flow is related to how the procurement process runs in order to find products to increase ordecrease inventory
535 Procurement Methods ndash Make to Stock and Make to Order
The procurement method determines how the product will be replenished
bull Make to Stock your customers are supplied from available stock If the quantities in stock are toolow to fulfil the order a Purchase Order (according the minimum stock rules) will be generatedin order to get the products required Example a classic distributor
bull Make to Order when a customer order is confirmed you procure or manufacture the products forthis order A customer order lsquoMake to Orderrsquo will not modify stock in the medium term becauseyou restock with the exact amount that was ordered Example computers from a large supplierassembled on demand
CHAPTER 5 YOUR WAREHOUSE 105
You find a mix of these two modes used for the different final and intermediate products in mostindustries The procurement method shown on the product form is a default value for the order enablingthe salesperson to choose the best mode for fulfilling a particular order by varying the sales orderparameters as needed
The figures Change in Stock for a Make to Stock Product (page 105) and Change in Stock for a Maketo Order Product (page 105) show the change of stock levels for one product managed as Make toOrder and another managed as Make to Stock The two figures are taken from OpenERPrsquos Stock LevelForecast report available from the product form
Figure 528 Change in Stock for a Make to Stock Product
Figure 529 Change in Stock for a Make to Order Product
106 CHAPTER 5 YOUR WAREHOUSE
Logistical Methods
The Make to Stock logistical approach is usually used for high volumes andwhen the demand is seasonal or otherwise easy to forecast The Make toOrder approach is used for products that are measured or very expensiveto stock or have a short restocking time
536 Choosing Supply Methods
OpenERP supports two supply methods
bull Produce when the product is manufactured or the service is supplied from internal resources
bull Buy when the product is bought from a supplier
These are just the default settings used by the system during automated replenishment The sameproduct can be either manufactured internally or bought from a supplier
These three fields (Supply Method Procurement Method Product Type) determine the systemrsquosbehaviour when a product is required The system will generate different documents depending onthe configuration of these three fields when satisfying an order a price quotation to a supplier or amanufacturing order
OpenERP manages both stockable products and services A service bought from a supplier in Make toOrder mode will generate a subcontract order from the supplier in question
Figure Workflow for Automatic Procurement depending on the Product Configuration (page 107)illustrates different cases for automatic procurement
The table below shows all possible cases for the figure Workflow for Automatic Procurement dependingon the Product Configuration (page 107)
Table 59 Consequences of Procurement Methods Make to Stock (MTS)and Make To Order (MTO)
Procurement Method Produce BuyMTS Wait for availability Wait for availabilityMTO Production Order Purchase Order
Table 510 Consequences of Procurement Methodswhen using Services
Procurement Method Produce BuyMTS MTO Create task Subcontract
CHAPTER 5 YOUR WAREHOUSE 107
Figure 530 Workflow for Automatic Procurement depending on the Product Configuration
537 Packaging with Various Logistics Units of Measure
Units of Measure
OpenERP supports several units of measure Quantities of the same product can be expressed in severalunits of measure at once For example you can buy grain by the tonne and resell it by kg You just haveto make sure that all the units of measure used for a product are in the same units of measure category
Categories of Units of Measure
All units of measure in the same category are convertible from one unit toanother
The table below shows some examples of units of measure and their category The factor is used toconvert from one unit of measure to another as long as they are in the same category
108 CHAPTER 5 YOUR WAREHOUSE
Table 511 Example Units of Measure
UoM Category Ratio UoM TypeKg Weight 1 ReferenceGram Weight 1000 SmallerTonne Weight 1000 BiggerHour Working time 8 SmallerDay Working time 1 ReferenceHalf-day Working time 4 SmallerItem Unit 1100 Items Unit 001
Depending on the table above you have 1Kg = 1000g = 0001 Tonnes A product in the Weightcategory could be expressed in Kg Tonnes or Grammes You cannot express it in hours or pieces forexample
Use the menu Warehouse rarr Configuration rarr Products rarr Units of Measure rarr Units of Measure todefine a new unit of measure
In the definition of a Unit of Measure you have a Rounding precision factor which shows how amountsare rounded after the conversion A value of 1 gives rounding to the level of one unit 001 givesrounding to one hundredth
Secondary Units
OpenERP supports double units of measure Notice however that thedefault unit of measure and the purchase unit of measure have to be inthe same category Only the sales unit of measure may be in a differentcategory
This is very useful in the agro-food industry for example you sell ham bythe piece but invoice by the Kg A weighing operation is needed beforeinvoicing the customer
To activate the management options for double units of measure assign the group Useability ProductUoS View to your user
In this case the same product can be expressed in two units of measure belonging to different categoriesfor sales and stockpurchase You can then distinguish between the unit of stock management (the piece)and the unit of invoicing or sales (kg)
Figure 531 Secondary Unit of Measure
In the product form you can set one unit of measure for sales and stock management and one unit of
CHAPTER 5 YOUR WAREHOUSE 109
measure for purchases
For each operation on a product you can use another unit of measure as long as it can be found inthe same category as the two units already defined If you use another unit of measure OpenERPautomatically handles the conversion of prices and quantities
So if you have 430 Kg of carrots at 530 EURKg OpenERP will automatically make the conversion ifyou want to sell in tonnes ndash 043 tonnes at 5300 EUR tonne If you had set a rounding factor of 01for the tonne unit of measure OpenERP will tell you that you have only 04 tonnes available
Packaging
The packaging allows you to ship products in several ways For example you can ship goods by boxesor by pallets
At first you have to define possible packaging To define the packaging go to menuselectionWarehouse ndashgt Configuration ndashgt Product ndashgt Packaging and click New
Figure 532 Packaging definition
To complete the creation of a new packaging you have to give it a name and a type Different types areavailable in OpenERP Box Pack Pallet and Unit
Once all packaging is defined you can attach the packaging to your products through the followingmenu Warehouse rarr Configuration rarr Product rarr Packaging
Figure 533 Defining the Packaging for the Product
110 CHAPTER 5 YOUR WAREHOUSE
54 Scheduling Procurements
The master production plan sometimes called the MPS (Master Production Schedule) enables you togenerate forecasts for incoming and outgoing material It is based on forecasts of inputs and outputs bythe logistics manager
To be able to use the production plan you must install the stock_planning module
MPS Procurement and Production
OpenERP distinguishes between Production Purchase and Procurement
Production is manufacturing Purchase is the acquisition of goods fromanother party and Procurement is either one or both of those So it would bebetter to call the MPS the Master Procurement Schedule Which OpenERPdoes
Product Trading
Also called the Production Plan this tool is also very useful for tradedproducts which are not manufactured You can use it for stock managementwith purchased and manufactured products
541 Processing Exceptions
The set of stock requirements is generated by procurement orders
In normal system use you do not need to worry about procurement orders because they areautomatically generated by OpenERP and the user will usually work on the results of a procurement aproduction order a purchase order a sales order and a task
If there should be configuration problems the system can remain blocked by a procurement withoutgenerating a corresponding document For example suppose that you configure a product ProcurementMethod as Make to Order and Supply Method as Produce but you have not defined the bill ofmaterials In that case procurement of the product will stay blocked in an exception state No Billof Materials defined for this product You then have to create a bill of materials tosolve the problem
Troubleshooting
bull No bill of materials defined for production you need to create a BoM or indicate that the productcan be purchased instead
bull No supplier available for a purchase you have to define a supplier in the Supplier tab of theproduct form
bull No address defined on the supplier partner you have to complete an address for the defaultsupplier for the product concerned
CHAPTER 5 YOUR WAREHOUSE 111
bull No quantity available in stock you have to create a rule for automatic procurement (for examplea minimum stock rule) and put it in the order or manually procure it
Some problems are just those of timing and can be automatically corrected by the system
Use the menu Warehouse rarr Schedulers rarr Procurement Exceptions to see all the exceptions
If a product has to be lsquoin stockrsquo but is not available in your stores OpenERP will make the exception aslsquotemporaryrsquo or lsquoto be correctedrsquo The exception is temporary if the system can procure it automaticallyfor example if a procurement rule is defined for minimum stock
Figure 534 Example of a Procurement in Exception
If no procurement rule is defined the exception has to be corrected manually by the user Oncethe exception is corrected you can restart by clicking Retry If you do not do that OpenERP willautomatically recalculate on the next automated requirements calculation
542 Manual Procurement
To procure internally you can create a procurement order manually Use the menu Warehouse rarrSchedulers rarr Procurement Exceptions and click the New button to do this
The procurement order will then be responsible for calculating a proposal for automatic procurementfor the product concerned This procurement will start a task a purchase order for the supplier or aproduction depending on the product configuration
It is better to encode a procurement order rather than direct purchasing or production This method hasthe following advantages
bull The form is simpler because OpenERP calculates the different values from other values anddefined rules purchase date calculated from order date default supplier raw materials needsselection of the most suitable bill of materials etc
112 CHAPTER 5 YOUR WAREHOUSE
Figure 535 Encoding a New Procurement Order
Figure 536 Workflow for Handling a Procurement according to Product Configuration
CHAPTER 5 YOUR WAREHOUSE 113
bull The calculation of requirements prioritises the procurements If you encode a purchase directlyyou short-circuit the planning of different procurements
Shortcuts
On the product form you have an ACTIONS shortcut button CreateProcurements that lets you quickly create a new procurement order
543 Sales Forecasts
The first thing you have to do to work with a production plan is define the periods for stock managementSome companies plan daily others weekly or monthly
Stock Management Interval
The interval chosen for managing stock in the production plan will dependon the length of your production cycle You generally work daily weeklyor monthly
If it takes several days to assemble your products you most likely willdefine a weekly plan If your manufacturing cycles take several monthsyou can work with a monthly plan
To predefine these periods you can use the Stock and Sales PlanningPeriods that will automatically generate daily weekly or monthly periods
Figure 537 Stock and Sales Planning Periods
Go to the menu Sales rarr Configuration rarr Stock and Sales Periods rarr Create Stock and Sales PeriodsA window appears enabling you to automatically define the next periods that will be provided for stockmanagement For this example create weekly periods
Salespeople can then enter their sales forecasts by product and by period using the menu Sales rarr SalesForecasts rarr Sales Forecasts The forecasts can be made by quantity or by value For a forecast byamount OpenERP automatically calculates the quantity equivalent to the estimated amount This canbe modified manually as needed before completion A salesperson can create sales forecasts manuallyor he can use the Create Sales Forecasts wizard in the above menu
114 CHAPTER 5 YOUR WAREHOUSE
Figure 538 Defining Periods for Stock Management
Figure 539 Sales Forecast to Help Create a Master Production Plan
544 Production Plan
The manager responsible for logistics then plans receipts (manufacturing or purchases) and outgoings(consumption or customer deliveries) by period From the menu Warehouse rarr Stock Planning rarrCreate Stock Planning Lines you can create a stock planning per week for a specific product categoryThrough Warehouse rarr Stock Planning rarr Master Procurement Schedule you can adjust the planning
For each period and product OpenERP gives you the following information
bull Stock estimated at the end of the period calculated as stock in the following period less the totalestimated outgoings plus total estimated inputs
bull Closed entries coming from production or confirmed purchases
bull Forecast inputs for the period calculated using the incoming entries less the closing amounts
bull Planned inputs entered manually by the logistics manager
CHAPTER 5 YOUR WAREHOUSE 115
bull Closed outgoings which are the consumption of manufacturing waiting and deliveries to be madeto customers
bull Forecast outgoings calculated from the planned outgoings less the closing amounts
bull Planned outgoings manually entered by the logistics manager
bull Sales forecasts which represent the sum of forecasts made by the salespeople
Figure 540 The Master Production Schedule (MPS)
The production plan enables the logistics manager to play with the forecast receipts and outgoings andtest the impact on the future stock for the product concerned It enables you for example to check thatthe stock does not fall below a certain level for that product
You can also open the production plan for past periods In this case OpenERP shows you the real stockmoves by period for forecast reports
If you do not have automated procurement rules for a product you can start procurement at any timebased on the estimates of the production plan To do this press the button Procure Incoming Left (ieremaining) on the Master Procurement Schedule OpenERP plans procurement for an amount equal tothe entries forecast
55 Managing Lots and Traceability
The double-entry management in OpenERP enables you to run very advanced traceability Alloperations are formalized in terms of stock moves so it is very easy to search for the cause of anygaps in stock moves
116 CHAPTER 5 YOUR WAREHOUSE
Upstream Traceability
It runs from the raw materials received from the supplier and follows thechain to the finished products delivered to customers (Note that the name isconfusing - this would often be considered a downstream direction Thinkof it as Where Used)
Downstream Traceability
It follows the product in the other direction from customer to the differentsuppliers of raw material (Note that the name is confusing - this wouldoften be considered an upstream direction Think of it as Where Supplied)
551 Stock Moves
Use the menu Warehouse rarr Traceability rarr Stock Moves to track past stock transactions for a productor a given location All the operations are available You can filter on the various fields to retrieve theoperations about an order or a production activity or a source location or any given destination
Figure 541 History of Stock Movements
Each stock move is in a given state The various states are
bull Draft the move so far has no effect in the system The transaction has not yet been confirmed
bull Confirmed the move will be done so it will be counted in the calculations of virtual stockBut you do not know whether it will be done without problem because the products have beenreserved for the move
bull Validated the move will be done and the necessary raw materials have been reserved for thetransaction
CHAPTER 5 YOUR WAREHOUSE 117
bull Done the stock move has been done and entered into the calculations of real stock
bull Waiting in the case of transactions From Order this state shows that the stock move isblocked waiting for the end of another move
bull Cancelled the stock move was not carried out so it is not taken into account in either realstock or virtual stock
Delivery orders goods receipts and internal picking lists are just documents that group a set of stockmoves You can also consult the history of these documents using the menu Warehouse rarr Traceabilityrarr Packs
552 Lots
OpenERP can also manage product lots Two lot types are defined
bull Production lots (batch numbers) are represented by a unique product or an assembly of identicalproducts leaving the same production area They are usually identified by bar codes stuck on theproducts The batch can be marked with a supplier number or your own company numbers
bull Tracking numbers are logistical lots to identify the container for a set of products Thiscorresponds for example to the pallet numbers on which several different products are stocked
These lots can be encoded onto all stock moves and specifically on incoming shipments lines internalmoves and outgoing deliveries
Figure 542 Entering a Line for Production Receipt
118 CHAPTER 5 YOUR WAREHOUSE
To enter the lot number in an operation you can use an existing lot number or create a new pack Aproduction lot (batch number) is used for a single product A tracking number can be used several timesfor different products so you can mix different products on a pallet or in a box
Simplified View
In the Simplified view the tracking numbers cannot be seen the fieldis hidden To get to Extended view mode assign the group Useability Extended View to the current user or change the User Preferences
You can also specify on the product form the operations in which a lot number is required You can thencompel the user to set a lot number for manufacturing operations goods receipt or customer packing
You do not have to encode the lot numbers one by one to assign a unique lot number to a set of severalitems You only need to take a stock move for several products line and click the button Split inProduction Lots You can then give a lot number prefix (if you want) and OpenERP will complete theprefix in the wizard with a continuing sequence number This sequence number might correspond to aset of pre-printed barcodes that you stick on each product
Figure 543 Splitting a Lot into uniquely Identified Parts
553 Traceability
If you key in the lot numbers for stock moves as described above you can investigate the traceabilityof any given lot number Go to the menu Warehouse rarr Traceability rarr Production Lots or Warehouserarr Traceability rarr Packs
CHAPTER 5 YOUR WAREHOUSE 119
Product Shortcuts
From the product form the toolbar to the right offers useful information
bull Minimum Stock Rules
bull Stock by Location
bull Product Sales
bull Bills of Material
Search for a particular lot using the filters for the lot number the date or the product Once you can seethe form about this lot several actions can be performed
bull Upstream Traceability from supplier through to customers
bull Downstream Traceability from customer back to suppliers
bull Stock in all the physical and virtual locations
Figure 544 Tracing Upstream in Make to Order
Figure 545 Tracing Downstream in Make to Stock
Finally on a lot you can enter data on all the operations that have been done for the product Thatkeeps a useful history of the pre-sales operations
56 Scrapping Products
In OpenERP there are many ways to handle scrap products
1 Warehouse rarr Product Moves rarr Receive Products
120 CHAPTER 5 YOUR WAREHOUSE
2 Warehouse rarr Product Moves rarr Deliver Products
3 Warehouse rarr Warehouse Management rarr Incoming Shipments
Figure 546 Scrapping from an Incoming Shipment
4 Warehouse rarr Warehouse Management rarr Internal Moves
Figure 547 Scrapping from an Internal Move
5 Warehouse rarr Warehouse Management rarr Delivery Orders
When you decide to scrap some products they are transferred to the Scrap location To display thecontent of this Virtual Location go to menuselection Warehouse ndashgt Inventory Control ndashgt LocationStructure then select the virtual locations and display the Scrap location
If you want to transfer the products to another location you can create a new one and check the ScrapLocation in the additional information
CHAPTER 5 YOUR WAREHOUSE 121
Figure 548 Scrapping from a Delivery Order
57 Identifying Products and Locations with Barcodes andRFID Devices
You can the barcode in the product form in the field EAN13
58 Financial Inventory Management
581 Manual and Real-time Stock Valuation
If you have experience of managing with traditional software you will know the problem of gettinguseful indicators If you ask your accountant for a stock valuation or the value added by production hewill give you a figure
If you ask for the same figure from your stores manager you will get an entirely different amount Youhave no idea who is right
In OpenERP stock management is completely integrated with the accounts to give strong coherencebetween the two systems The double-entry structure of locations enables a very precise correspondencebetween stocks and accounts
Each stock movement also generates a corresponding accounting entry in an accounting journal toensure that the two systems can stay in permanent synchronization
To do that set up a general account for each location that should be valued in your accounts If aproduct goes to one location or another and the accounts are different in the two locations OpenERPautomatically generates the corresponding accounting entries in the accounts in the stock journal
If a stock move will go from a location without an account to a location where an account has beenassigned (for example goods receipt from a supplier order) OpenERP generates an accounting entryusing the properties defined in the product form for the counterpart You can use different accounts per
122 CHAPTER 5 YOUR WAREHOUSE
location or link several locations to the same account depending on the level of analysis needed
You use this system for managing consigned stocks
bull a supplier location that is valued in your own accounts or
bull a location in your own company that is not valued in your accounts
How to Configure Accounting Valuation
In the Product form go to the Accounting tab and select the Real Time (automated) option forInventory Valuation
To define your accounts you have two options Set them on the product category or on the product
1 From the Accounting Stock Properties section for the Product Category set theStock Input Account the Stock Output Account and the Stock VariationAccount
2 From the Accounting tab for the Product set the Stock Input Account and the StockOutput Account
You can also overwrite the accounts from the Product or the Product Category by defining Stock InputAccount and Stock Output Account for a Location
account_anglo_saxon
You can also install the account_anglo_saxon module (Reconfigure wizardAnglo-Saxon Accounting) to value your stock according to Anglo-saxonprinciples
The figure below shows the various accounts that can be used with and without theaccount_anglo_saxon module installed
582 Managing Transportation Costs
In OpenERP you can handle the delivery methods when installing the delivery module
This module will allow you
bull To select the delivery company
bull To define the delivery pricelist according to the price the weight or the volume
Now in each Delivery Order two new fields are available to enter the right value to deliver the productsto the customer You can also find a new field in the Sales Order form that enables you to select adelivery method
CHAPTER 5 YOUR WAREHOUSE 123
Figure 549 Setting up Stock Valuation Accounts
Figure 550 Define the Delivery Method
Figure 551 Define the Delivery Costs
Figure 552 Delivery Cost in the Delivery Orders
124 CHAPTER 5 YOUR WAREHOUSE
Figure 553 Delivery Method in the Sales Orders
59 Organize your Deliveries
You can manage stock through journals in the same way as you can manage your accounts throughjournals This approach has the great advantage that you can define journals in various ways to meetyour companyrsquos needs
For example a large company may want to organize deliveries by department or warehouse You canthen create a journal and a manager for each department The different users can work in a journal as afunction of their position in the company That enables you to better structure your information
A company doing a lot of transport could organize its journals by delivery vehicle The differentdelivery orders will then be assigned to a journal representing a particular vehicle When the vehiclehas left the company you can confirm all the orders that are found in the journal all at the same time
591 The Different Journals
Install the Reconfigure option Invoicing Journals for Sales Management or the sale_journalmodule to work with different journals This adds two new concepts to OpenERP
bull Invoicing journals
bull Stock journals or Delivery journals
Invoicing journals (Sales rarr Configuration rarr Sales rarr Invoice Types) are used to assign purchaseorders andor delivery orders to a given invoicing journal Everything in the journal can be invoicedin one go and you can control the amounts by journal For example you can create the followingjournals daily invoicing end-of-week invoicing and monthly invoicing It is also possible to show theinvoicing journal by default in the partner form Set the Invoicing Method to Grouped (one invoiceper customer) or Non Grouped (individual invoices) according to your needs
Stock journals (Warehouse rarr Configuration rarr Warehouse Management rarr Stock Journals) allow youto classify the delivery orders in various ways such as by department by salesperson or by type If asalesperson looks for a delivery order in his own journal he can easily see the work on current itemscompared with his own orders
CHAPTER 5 YOUR WAREHOUSE 125
Default Values
To enter all the orders in his own stock journal a salesperson can use thedefault values that are entered in the fields when creating orders
Finally the stock journals can also be used as delivery journals to post each item into a delivery journalFor example you can create journals dated according to customer delivery dates (such as Mondayrsquosdeliveries or afternoon deliveries) or these journals could represent the dayrsquos work for delivery vehicles(such as truck1 truck2)
592 Using the Journals
You will now see how to use the journals to organize your stock management in practice Afterinstalling the module sale_journal look at the list of partners In the tab Sales and Purchaseson any of them you will now see the field Invoicing Method
Figure 554 Partner Form in Invoicing Mode
You can create a new Invoicing Journal for a partner through the menu Sales rarr Configuration rarr Salesrarr Invoice Types You can decide if the invoices should be grouped or not when generating them in thejournal Create a second invoicing journal End-of-Month Invoicing which you can assign toanother partner
Then enter the data for some sales orders for these two partners After entering sales order data thefield Invoicing Mode in the second tab Other Information is completed automatically from thepartner settings
126 CHAPTER 5 YOUR WAREHOUSE
Figure 555 Defining an Invoicing Journal
Look at the History tab of the Sales order and observe the Picking List that has been created The fieldInvoicing Mode is automatically shown there
Figure 556 Generated Picking Lists
At the end of the day the invoicing supervisor can display the list by journal Go to the menu Sales rarrInvoicing rarr Lines to Invoice Add a New Filter by selecting Invoice Type contains Daily or any otherpart of the invoice journal you are using Select the different orders in the list You can automatically
CHAPTER 5 YOUR WAREHOUSE 127
carry out invoicing by clicking the action Make Invoices (the gears symbol)
Confirming Invoices
By default invoices are generated in the draft state which enables you tomodify them before sending them to the customer But you can confirm allthe invoices in one go by selecting them all from the list and selecting theaction Confirm Draft Invoices
At the end of the month the invoicing management does the same work but in the journal lsquomonth-endinvoicingrsquo
You can also enter a journal to confirm cancel all the orders in one go Then you can do severalquotations assign them to a journal and confirm or cancel them at once
Figure 557 View of an Order Journal
510 Estimating Delivery Dates
5101 Standard Delivery Time
In order to define the delivery time you have to know three things
bull Customer Lead Time
That is the time you promise to your customer for a delivery It corresponds to the average delaybetween the confirmation of the customer order and the delivery of the finished goods It can bedefined in the product form in the Procurement and Locations tab
This time will be influenced by the Manufacturing Lead Time and the Delivery Lead Time
bull Manufacturing Lead Time
This is the time you need to produce one unit of a product If this product needs othersub-products the different manufacturing times will be summed It can also be defined in theproduct form in the Procurement and Locations tab
bull Delivery Lead Time
This is the time your supplier needs to deliver the goods This delay can be defined in the productform in the Suppliers tab
128 CHAPTER 5 YOUR WAREHOUSE
For example if we have to deliver some products to a customer in a month (in 30 days) You promiseto deliver the goods to the customer within 10 days the manufacturing time is equal to 4 days and oursuppliers deliver the raw materials within 3 days
According to those numbers we will have to start the process in 23 days if we have to order rawmaterials
5102 Schedule Logistic Flows according to MRP1 Rules
MRP is a software-based production planning and inventory control system used to managethemanufacturing process
It is a computer-based system in which the given Master Schedule is exploded with Bills Of Materialinto the required amount of raw material parts and subassemblies needed to produce the final productsin each period
511 Incoming and Outgoing Products Planning
To be able to plan incoming and outgoing shipments of products you have to install the modulestock_planning
Figure 558 Planning the Deliveries of Customer Products
Thanks to this module you will be able to calculate a planning of the stock for a product
Planned dates on a packing order are put in each stock move line If you have a packing order containingseveral products not all of the lines necessarily need to be delivered the same day The minimum andmaximum dates in a packing order show the earliest and latest dates on the stock move lines for thepacking
CHAPTER 5 YOUR WAREHOUSE 129
If you move a packing order in the calendar view the planned date in the stock move lines willautomatically be moved as a result
512 Managing Inventory Reconciliation
Inventory reconciliation involves two steps physical and accounting
Physical inventory steps include taking a written inventory record and comparing it to the actual goodsin the companyrsquos warehouses Counting obsolete and damaged products is also a reconciliation activity
Reconciliation steps on the accounting side include verification that all inventory purchases are postedentering adjustments from the physical count and analysing the dollar differences between monthsInventory reconciliation frequency depends on the size location and type of inventory in a companyrsquosoperations
513 Building Reports to Track Activity
With OpenERP you can build your own reports in order to track the different activities in yourwarehouses To create your own reports you have to install the base_report_creator It will add asubmenu in Administration rarr Customization rarr Reporting
Figure 559 Create your Own Reports
This newly added section allows you to define for your new report
bull The general configuration
The aim of this tab is to choose the models your report will rely on
bull The view parameters
This tab will define the display of your report You can choose between the traditional availableviews (TreeList Form Graph and Calendar) and you can define three different ways to displayyour report
bull The fields to display
130 CHAPTER 5 YOUR WAREHOUSE
The fields available to display will depend on the models you choose in the GeneralConfiguration tab
When you add a new field to your report different fields have to be specified
ndash Sequence - defines the order in which the fields will be displayed in the report
ndash Field - the information you want to display in your report
ndash Grouping method - affects the way the field is displayed You can choose between Grouped SumMinimum Count Maximum and Average
ndash Graph mode - defines which axe of the graph the field will represent
ndash Calendar mode - defines the meaning of the field for the calendar (Starting or Ending date DelayEnd Date Unique Colours)
bull The filters on fields
This tab will let you choose which data to display according to the value of a field It is possibleto manually modify or add new filters according to your needs
bull The security
The security tab is used to select the groups that are able to display the report
Create Report with OpenOffice
You can also create or edit reports with OpenOffice using thebase_report_designer module
In order to add the extension to OpenOffice load this module and start theconfiguration A new window will ask you to Save As a file that containsthe extension
Once you have saved the file start OpenOffice and go to Tools rarrExtension Manager then click Add and select the previously saved file
Restart OpenOfficeorg and now you have the extension installed
Figure 560 Extension to Create a Report in OpenOffice
514 Import Export
Managing import export with foreign companies can sometimes be very complex Between adeparture port and the destination company products can get stopped for several weeks at sea orsomewhere in the numerous transportation stages and customs To manage such deliveries efficiently itis important to
bull know where your products are
CHAPTER 5 YOUR WAREHOUSE 131
bull know when they are likely to arrive at their destination
bull know your value in transit
bull follow the development of the different steps
Linked locations in OpenERP enable you to manage all this rather elegantly You can use a structurelike this
bull Suppliers
ndash European Suppliers
ndash Chinese Suppliers
bull In transit
ndash Shanghai Port
ndash Pacific Ocean
ndash San Francisco Port
ndash San Francisco Customs
5141 Stock
The transit locations are linked between themselves with a manual confirmation step The internalstock move is validated at each port and customs arrival OpenERP prepares all the linked movesautomatically
Intrastat
Companies that do import export should install the modulereport_intrastat This enables them to prepare the reports neededto declare product exports
You can use the lead times between different locations to account for real delays Your lead times andstock forecasts are calculated by OpenERP to estimate the arrival of incoming products so that you canrespond to a customerrsquos needs as precisely as possible
You can also value the products in transit in your account depending on the chosen stock locationconfiguration
5142 Rental Locations
You can manage rental locations in OpenERP very simply using the same system of linked locationsUsing the stock_location module you can set a return date for rental items sent to a customerlocation after a certain rental period
132 CHAPTER 5 YOUR WAREHOUSE
Then the set of real and virtual stocks is maintained daily in real time The different operations suchas delivery and receipt after a few days are automatically suggested by OpenERP which simplifies thework of data entry
You then have the product list found in the customer locations and your own stock in your stocklocation The list of waiting goods receipts is automatically generated by OpenERP using the locationlinks
Suppose you want to rent a product (PC3) to your customer (Axelor) for 30 days Two stock movemententries are needed to manage this scenario
1 Product goes from Stock (your companyrsquos location) to Axelor - Rental Location (your customerlocation)
2 Product will be returned into Stock (your companyrsquos location) from Axelor - Rental Location(your customer location) after 30 days
To manage rental products by linking locations configure a rental location (Axelor - Rental Location) asshown in the following figure using the menu Warehouse rarr Configuration rarr Warehouse Managementrarr Locations
Figure 561 Configuration of a Rental Location lsquoAxelor - Rental Locationlsquo
Through the menu Warehouse rarr Traceability rarr Stock Moves you can create a stock movement entryfrom Stock to Customer Location (Axelor - Rental Location) in OpenERP for a rental product (PC3)
The stock movement entry from Customer Location (Axelor - Rental Location) to Stock is generatedautomatically on the proper Scheduled Date by OpenERP when you have confirmed the previous stockmovement entry by clicking the Process Now button
CHAPTER 5 YOUR WAREHOUSE 133
Figure 562 Stock Movement Entry to Send the Product lsquoPC3lsquo to the Customer Location
The same principle is used for internal stock to generate quality control for certain products
5143 Consigned Products
The principle of linked locations is used to manage consigned products You can specify that certainproducts should be returned to you a certain number of days after they have been delivered to customers
When the products have been delivered OpenERP automatically creates goods receipts for theconsigned product The specified date is obviously approximate but enables you to forecast returns
515 Stock Location Example
In this section we will develop a more detailed example that includes different concepts seen in theprevious sections
The following example will use the Stock Location types the Logistic Flows and the Bill Of Materials
We have two companies OpenERP SA and OpenERP US
We have three products Product A Product B and Product C For each product we will have to definethe Stock Location to determine where to take these products
To make one unit of Product A we need the Product B and the Product C So we will have to define aBill of Material
134 CHAPTER 5 YOUR WAREHOUSE
Table 512 Bill of Materials
Field ValueProduct Product AProduct Qty 1Name Product ABoM Type NormalCompany OpenERP US
The different components to produce one unit of Product A are one unit of Product B and one unit ofProduct C
Table 513 Companies and Products
Company WhatOpenERP SA Sell the Product AOpenERP SA Store the Product COpenERP US Produce the Product AOpenERP US Store the Product B
Table 514 Logistics Flows
Name Type Product Goal of the flowAsk for Production Pull Product A OpenERP SA asks OpenERP US to produce the Product ALaunch Production Pull Product A OpenERP US launches the production of the Product ASend Product to Transit Pull Product C OpenERP US asks for the Product C to OpenERP SAGet Product from Transit Pull Product C OpenERP US receives the Product C
Here are the details of the different flows
Figure 563 Ask for Production
With this configuration when a Sales Order for 3 units of Product A is confirmed and the scheduler hasbeen launched you will have the following procurements
And the following stock moves have been generated
Because we are working in two different companies different stock moves have been generated Theproducts have to move from OpenERP SA to OpenERP US for the products C After the manufacturingprocess the products A have to move from OpenERP US to OpenERP SA to be sold to the customer
CHAPTER 5 YOUR WAREHOUSE 135
Figure 564 Launch Production
Figure 565 Send Product to Transit
Figure 566 Get Product from Transit
Figure 567 Procurements View
136 CHAPTER 5 YOUR WAREHOUSE
Figure 568 Stock Moves
Once you have confirmed the different moves for the products B and C the Manufacturing Order is inready to produce status So you can run the production of the three units of Product A
Figure 569 Launch the Production
Once again due to the use of two companies you have to confirm different deliveries One to deliver theproduct from OpenERP US to OpenERP SA and another to deliver the product from OpenERP SA tothe customer Now you have to confirm the delivery of the three units from OpenERP US to OpenERPSA then to confirm the reception of the products in OpenERP SA and finally deliver the products toyou final customer
137
Part IV
Streamlining your Manufacturing
138
139
Defining your Master Data 6The management of manufacturing described in this chapter covers planning orderingstocks and the manufacturing or assembly of products from raw materials and componentsIt also discusses consumption and production of products as well as the necessaryoperations on machinery tools or human resources
Manufacturing management in OpenERP is based on its stock management and equally very flexible inboth its operations and its financial control It particularly benefits from the use of double-entry stockmanagement for production orders Manufacturing management is implemented by the mrp moduleIt is used to transform all kinds of products
bull Assemblies of parts composite products soldered or welded products assemblies packs
bull Machined parts machining cutting planing
bull Foundries clamping heating
bull Mixtures mixing chemical processes distillation
You will work in two areas with products in the first part of this chapter and with operations in thesecond part The management of products depends on the concept of classifications while operationsmanagement is related to routing and workcenters
Bills of Materials
Bills of Materials or manufacturing specifications go by different namesdepending on their application area for example
bull Food Recipes
bull Chemicals Equations
bull Building Plans
For this chapter you should start with a fresh database that includes demo data with mrp(Manufacturing) and its dependencies installed and a generic chart of accounts configured Asyou will notice when you select Manufacturing to be installed OpenERP will install the linkedapplications automatically
140 CHAPTER 6 DEFINING YOUR MASTER DATA
61 Bill of Materials and Components
611 Using Bills of Materials
Bills of Materials are documents that describe the list of raw materials used to make a finished productTo illustrate the concept of specification you will work on a shelf (or cabinet) where the manufacturingplan is given by the figure Plan of Construction of a Shelf (page 140)
Figure 61 Plan of Construction of a Shelf
The shelf is assembled from raw materials and intermediate assemblies The Image Code refers to thepicture the Product Reference is the corresponding code in OpenERP
Change the unit of the Wood Lintel 4m (LIN40) product to m instead of PCE
Table 61 Product Definitions before defining Bills of Materials(already defined)
Image Code Product Reference DescriptionARM100 SHE100 Shelf 100 cmPANLAT SIDEPAN Side PanelPANA100 RPAN100 Rear Panel SHE100PROFIL PROFIL Assembly SectionETA100 RCK100 Rack 100cmBOIS002 WOOD002 Wood 2mmTAQ000 METC000 Metal CleatsLIN40 LIN40 Wood Lintel 4m
CHAPTER 6 DEFINING YOUR MASTER DATA 141
Table 62 New Products to be created before defining Billof Materials
Image Code Product Reference DescriptionPLET100 SPAN100 Shelf PanelBOIS010 WOOD010 Wood 10mm
Copy
To create the above products duplicate existing ones such as Side Paneland Wood 2mm from the Purchase or Sales menu Purchases rarr Productsrarr Products
To describe how this shelf should be assembled you define a bill of materials for each intermediateproduct and for the final shelf assembly These are shown in the tables below You can start from thedemo data and complete them according to the specifications To create or change a bill of materialsgo to Manufacturing rarr Master Data rarr Bill of Materials
Table 63 Bill of Materials for 1 SHE100 Unit(already defined)
Product Ref Quantity Unit of MeasurePROFIL 4 PCESIDEPAN 2 PCEMETC000 12 PCERPAN100 1 PCERCK100 3 PCE
Table 64 Bill of Materials for 1 RCK100 PCE
Product Code Quantity Unit of MeasureSPAN100 1 PCEMETC000 4 PCE
Table 65 Bill of Materials for 1 SPAN100 PCE
Product Code Quantity Unit of MeasureWOOD010 0083 m
Table 66 Bill of Materials for 1 PROFIL PCE
Product Code Quantity Unit of MeasureLIN40 025 m
Table 67 Bill of Materials for 1 RPAN100 PCE
Product Code Quantity Unit of MeasureWOOD002 025 m
142 CHAPTER 6 DEFINING YOUR MASTER DATA
Table 68 Bill of Materials for 1 SIDEPAN PCE
Product Code Quantity Unit of MeasureWOOD002 0083 m
The bills of materials are then used by the software to calculate the raw material needs based on therequirements of the finished products So if you want to manufacture 10 shelves the system cancalculate the actual products that will be consumed
Table 69 Total Quantities per Shelf
Product Code Quantity Unit of MeasureWOOD002 0416 (2 0083 + 025) mLIN40 1 (4 025) mWOOD010 0249 (0083 3) mMETC000 132 ((3 4) + (10 12)) PCE
Bill of Materials
To see the bill of materials in tree view use the menu Manufacturing rarrMaster Data rarr Bill of Materials then select the product and click the actionBOM Structure
Figure 62 Bill of Materials structure
Use the menu Manufacturing rarr Master Data rarr Bill of Materials and click the New button to define anew bill of materials
The Different Views
To change the view in the bill of materials you can
bull From the list select a bill of materials name and then click FormView
bull From a product form use the menu Product BoM Structure to theright
CHAPTER 6 DEFINING YOUR MASTER DATA 143
Figure 63 Defining a Bill of Materials (Extended view)
In the Product field of the bill of materials you should set the finished product which will bemanufactured or assembled Once the product has been selected OpenERP automatically completesthe name of the bill of materials and the default Unit of Measure for this product
The type of BoM (BoM Type SetsPhantom or Normal BoM) and the Routing field will bedescribed in more detail later in the chapter
Now you can select the raw materials (Components) that are used to manufacture the finishedproduct The quantities are set out based on the quantities of finished product and the quantities neededto produce them from the bill of materials The second tab Revisions is used to register all the changesmade to the bill of materials On each change you can specify a revision number and some notes onthe modifications you carried out
Simplified View
The Revisions tab is only visible if the user works in the Extended viewmode (which means that the user should belong to the group Useability Extended View
Figure 64 Revisions of a Bill of Materials (Extended view)
In the third tab Properties you can put a free text reference to a plan a sequence number that is usedto determine the priorities between bills of materials dates between which a bill of materials is validand values for rounding and production efficiency
Rounding is used to set the smallest Unit of Measure in which the quantities of the selected productcan be expressed So if you set the rounding to 100 you will not be able to manufacture half a pieceThe Efficiency of the product lets you indicate the percentage you lose during manufacturing This loss
144 CHAPTER 6 DEFINING YOUR MASTER DATA
Figure 65 Properties of a Bill of Materials
can be defined for the finished product or for each raw materials (components) line The impact of thisefficiency figure is that OpenERP will reserve more raw materials for manufacturing than you wouldotherwise use just from the Bill of Materials calculations
The final part of the third tab lets you set some properties for the productrsquos manufacturing processesThese will be detailed further on in the chapter in the section about configurable products
612 Multi-level Bills of Materials
In OpenERP each line of a bill of materials may itself be a bill of materials This allows you todefine BoMs with several levels Instead of defining several BoMs for the shelf in the figure Plan ofConstruction of a Shelf (page 140) you could define the single bill of materials below
Table 610 Single Bill of Materials for 1 SHE100Unit
Product Ref Quantity Unit of MeasureSHE100 1 PCESIDEPAN 2 PCEWOOD002 0166 mRPAN100 1 PCEWOOD002 025 mPROFIL 4 PCELIN40 1 mRCK100 3 PCESPAN100 3 PCEWOOD010 0249 mMETC000 132 PCE
OpenERP behaves differently depending on whether the bill of materials is defined in several smallBoMs each on a single level or in one BoM tree-structured on several levels
CHAPTER 6 DEFINING YOUR MASTER DATA 145
If you select a BoM using intermediate products that automatically generates production orders basedon calculated requirements OpenERP will propose to manufacture an intermediate product Tomanufacture a shelf according to the different bills of materials defined you would create 6 productionorders
Table 611 Production Order
Product Ref Quantity Unit of MeasureSPAN100 3 PCEWOOD010 0249 m
Table 612 Production Order
Product Ref Quantity Unit of MeasureRCK100 3 PCESPAN100 3 PCEMETC000 12 PCE
Table 613 Production Order
Product Ref Quantity Unit of MeasurePROFIL 4 PCELIN40 1 m
Table 614 Production Order
Product Ref Quantity Unit of MeasureRPAN100 1 PCEWOOD002 025 m
Table 615 Production Order
Product Ref Quantity Unit of MeasureSIDEPAN 2 PCEWOOD002 017 m
Table 616 Production Order
Product Ref Quantity Unit of MeasureSHE100 1 PCESIDEPAN 2 PCERPAN100 1 PCEPROFIL 4 PCERCK100 3 PCEMETC000 12 PCE
In the case where a single bill of materials is defined in multiple levels a single manufacturing orderwill be generated for each shelf including all of the sub BoMs You would then get the followingproduction order
146 CHAPTER 6 DEFINING YOUR MASTER DATA
Table 617 Single Production from a tree-structuredBoM
Product Ref Quantity Unit of MeasureSHE100 1 PCEWOOD002 017 mWOOD002 025 mLIN40 1 mWOOD010 0249 mMETC000 132 PCE
613 Phantom Bills of Materials
If a finished product is defined using intermediate products that are themselves defined using otherBoMs OpenERP will propose to manufacture each intermediate product This will result in severalproduction orders If you only want a single production order you can define a single BoM withseveral levels
Sometimes however it may be useful to define the intermediate product separately and not as part of amulti-level assembly even if you do not want separate production orders for intermediate products
In the example the intermediate product RCK100 is used in the manufacturing of different shelves(SHE100 SHE200 ) So you would prefer to define a unique BoM for it even though you do notwant any instances of this product to be built nor would you want to rewrite these elements in a seriesof different multi-level BoMs
If you only want a single production order for the complete shelf and not one for the BoM itself youcan define the BoM line corresponding to product RCK100 in the shelfrsquos BoM as type SetsPhantomThen OpenERP will automatically put RCK100lsquos BoM contents into the shelfrsquos production order eventhough it has been defined as multi-level
This way of representing the assembly is very useful because it allows you to define reusable assemblyelements and keep them isolated
If you define the BoM for the SHE100 shelf in the way shown by the table below you will get twoproduction orders on confirmation of a sales order as also shown in the tables
Table 618 Defining and Using Phantom BoMs
Product Ref Quantity Unit of Measure Type of BoMSHE100 1 PCE normalSIDEPAN 2 PCE normalRPAN100 1 PCE phantomPROFIL 4 PCE phantomRCK100 3 PCE phantom
CHAPTER 6 DEFINING YOUR MASTER DATA 147
Table 619 Production Order from Phantom BoMs
Product Ref Quantity Unit of MeasureSHE100 1 PCESIDEPAN 2 PCEWOOD002 025 mLIN40 1 mWOOD010 0249 mMETC000 12 PCE
Table 620 Production Order from Normal BoM
Product Ref Quantity Unit of MeasureSIDEPAN 2 PCEWOOD002 017 m
614 Bills of Materials for KitsSets
Sales Bills of Materials
In other software this is sometimes called a Sales Bill of Materials InOpenERP the term KitsSets is used because the effect of the bill ofmaterials is visible not only in sales but also elsewhere for example inthe intermediate manufactured products
KitsSets bills of materials enable you to define assemblies that will be sold directly These could alsobe used in deliveries and stock management rather than just sold separately For example if you deliverthe shelf in pieces for self-assembly set the SHE100 BoM to type Sets Phantom
When a salesperson creates an order for a SHE100 product OpenERP automatically changes theSHE100 from a set of components into an identifiable package for sending to a customer Then itasks the storesperson to pack 2 SIDEPAN 1 RPAN100 4 PROFIL 3 RCK100 This is described as aSHE100 not just the individual products delivered
62 Work Centers
Work centers represent units of product capable of doing material transformation operations You candistinguish two types of work centers machines and human resources
Work Center
Work centers are units of production consisting of one or several peopleandor machines that can be considered as a unit for the purpose offorecasting capacity and planning
148 CHAPTER 6 DEFINING YOUR MASTER DATA
Use the menu Manufacturing rarr Configuration rarr Resources rarr Work Centers to define a new workcenter You get a form as shown in the figure Defining a Work Center (page 148)
Figure 66 Defining a Work Center
Missing fields
If some fields such as Analytic Journal General Account in the view aremissing you have to add the user group Useability AnalyticAccounting
A work center should have a name You then assign a type Machine or Human a code and theoperating hours ie Working Period The Working Time(s) can be defined through the menuManufacturing rarr Configuration rarr Resources rarr Working Time The figure Defining a Work Center(page 148) represents the hours from Monday to Friday from 0800 to 1800 with a break of an hourfrom 1200
You can also add a description of the work center and its operations
Once the work center is defined you should enter data about its production capacity Depending onwhether you have a machine or a person a work center will be defined in cycles or hours If it representsa set of machines and people you can use cycles and hours at the same time
A Cycle
A cycle corresponds to the time required to carry out an assembly operationThe user is free to determine which is the reference operation for a givenwork center It should be represented by the cost and elapsed manufacturingtime
For example for a printing work center a cycle might be the printing of 1page or of 1000 pages depending on the printer
CHAPTER 6 DEFINING YOUR MASTER DATA 149
To define the capacity properly it is necessary to know for each work center what will be the referenceoperation which determines the cycle You can then define the data relative to the capacity
Capacity per Cycle (CA) the number of operations that can be done in parallel during a cycleGenerally the number defines the number of identical machines or people defined by the work center
Time for 1 cycle (hour) (TC) the duration in hours for one cycle or the operations defined by a cycle
Time before production (TS) the time in hours required to initialize production operations Generallythis represents the machine setup time
Time after production (TN) the delay in hours after the end of a production operation Generally thisrepresents the cleaning time necessary after an operation
Efficiency factor (ET) the factor that is applied to the TC TS and TN times to determine the realproduction time This factor enables you to readjust the different times progressively and as a measureof machine utilization You cannot re-adjust the other times because generally they are taken from themachinersquos data sheet By default the efficiency is set to 1 representing a load of 100 When you setthe efficiency to 2 (ie 200) the load will be 50
The total time for carrying out X operations is then given by the following formula
((X CA) TC + TS + TN ) ET
In this formula the result of the division is rounded upwards Then if the capacity per cycle is 6 ittakes 3 cycles to realize 15 operations (156 = 25 rounded upwards = 3)
With the Hour Account and Cycle Account you define the links to analytical accounting to report thecosts of the work center operations If you leave the different fields empty it will not have any effecton the analytic accounts
63 Routings
Routings define the manufacturing operations to be done in work centers to produce a certain productA routing is usually attached to bills of materials which will define the assembly of products requiredfor manufacturing or to produce finished products
A routing can be defined directly in a bill of materials or through the menu Manufacturing rarrConfiguration rarr Master Bill of Materials rarr Routings A routing has a name and a code You can alsoadd a description Later in this chapter you will see that a routing can also be associated with a stocklocation This enables you to indicate where an assembly takes place
Subcontracting Assembly
You will see further on in this chapter that you can also link a routingto a stock location for the customer or the supplier You can use thisfunctionality when you have subcontracted the assembly of a product toa supplier for instance
In the routing you have to enter the list of operations that has to be executed Each operation has to bedone at a specific work center and includes a number of hours andor cycles
150 CHAPTER 6 DEFINING YOUR MASTER DATA
Figure 67 Defining a routing with Three Operations
Multi-level Routing
It is possible to define routing on several levels to support multi-level billsof materials You can select the routing on each level of a bill of materials (BoM in a BoM can have a different routing) The levels are then linked tohierarchies of bills of materials
64 Manufacturing Orders
Once the bills of materials have been defined OpenERP is capable of automatically deciding on themanufacturing route according to the needs of the company
Production orders can be proposed automatically by the system depending on several criteria describedin the preceding chapter
bull Using the Make to Order rules
bull Using the Order Point (Minimum Stock) rules
bull Using the Production plan
Of course you can also start production manually by clicking the button New in the menuManufacturing rarr Manufacturing rarr Manufacturing Orders
If you have not installed the Just-in-Time planning module mrp_jit you should start using OpenERPto schedule the Production Orders automatically using the various system rules To do this use themenu Warehouse rarr Schedulers rarr Compute Schedulers
CHAPTER 6 DEFINING YOUR MASTER DATA 151
Figure 68 Manufacturing Order
Procurement Exceptions
Pay attention to the fact that you have to define minimum stock rules foreach product set as Make to Stock
65 Complete Production Workflow
To understand the usefulness and the functioning of the system you should test a complete workflowon the database installed with the demonstration data We will show you
bull How to create a sales order
bull The manufacturing workflow for an intermediate product
bull The manufacturing of an ordered product
bull The delivery of products to a customer
bull Invoicing at the end of the month
bull Traceability for after-sales service
Demonstration data
To exactly follow the workflow as shown below you should keep the samequantities as in the example and start from a new database Then you willnot run into exceptions resulting from a lack of stock
This more advanced case of handling problems in procurement will be sorted out later in the chapter
To be able to do the following step add Sales Management through the Reconfigure wizard
152 CHAPTER 6 DEFINING YOUR MASTER DATA
651 The Sales Order
Begin by encoding a sales (or customer) order through the menu Sales Management rarr Sales Orders-gt New Quotation Enter the following information
bull Customer Agrolait
bull Shipping Policy Invoice from the picking (Other Information tab)
bull Sales Order Lines click New
ndash Product PC2 ndash Basic PC (assembly on order)
ndash Quantity (UoM) 1
ndash Product UoM PCE
ndash Procurement Method on order
Once the quotation has been entered you can confirm it immediately by clicking the button ConfirmOrder at the bottom to the right Keep note of the order reference because this follows all through theprocess Usually in a new database this will be SO007 At this stage you can look at the processlinked to your order using the Question Mark button next to the Sales Orders title
Figure 69 Process for Handling Sales Order SO007
Start the requirements calculation using the menu Manufacturing rarr Compute All Schedulers
652 Producing an Intermediate Product
To understand the implications of requirements calculation you should know the configuration of thesold product To do this go to the form for product PC2 and click the link Product BoM Structure tothe right You get the scheme shown in Composition of PC2 (page 153) which is the composition ofthe selected product
The PC2 computer has to be manufactured in two steps
1 The intermediate product CPU_GEN
CHAPTER 6 DEFINING YOUR MASTER DATA 153
Figure 610 Composition of PC2
2 The finished product using that intermediate product PC2
The manufacturing supervisor can then consult the production orders using the menu Manufacturing rarrManufacturing rarr Manufacturing Orders You then get a list of orders to start (Ready to Produce)and the estimated start date (Scheduled Date) to meet the customer delivery date
Figure 611 List of Manufacturing Orders
You will see the production order for CPU_GEN but not the one for PC2 because it depends on anintermediate product that has to be produced first Return to the production order for CPU_GEN andclick it If there are several of them select the one corresponding to your order using the sourcedocument that contains your order number (in this example SO007 )
Figure 612 Details of a Production Order
The system shows you that you have to manufacture product CPU_GEN using the components MB1CPU1 FAN RAM You can then confirm the production twice
Start production consumption of raw materials
Produce manufacturing of finished product
Click the Start Production button then click the Edit button and edit the line for the productMB1 Enter a lot number for it by putting the cursor in the field Production Lot and pressing ltF1gt to
154 CHAPTER 6 DEFINING YOUR MASTER DATA
create a new lot Enter an internal reference for example MB1345678 The system may then showyou a warning because this lot is not in stock but you can ignore this message
Click the Produce button to manufacture the finished product
The production order has to be in the closed state as shown in the figure Production Order after theDifferent Stages (page 154)
Figure 613 Production Order after the Different Stages
653 Finished Product Manufacturing
Having manufactured the intermediate product CPU_GEN OpenERP automatically proposes themanufacturing of the computer PC2 using the order created earlier Return to the ManufacturingOrders menu and look at the orders Ready to Produce through Manufacturing rarr Manufacturing rarrManufacturing Orders
You will find computer PC2 which has been sold to the customer (source document SO007) as shownin the figure hereafter
Figure 614 Completed Production for PC2
Now that the production has been completed the product sold to the customer has been manufacturedand the raw materials have been consumed and taken out of stock
CHAPTER 6 DEFINING YOUR MASTER DATA 155
Automatic Actions
As well as managing the use of materials and the production of stocksmanufacturing can have the following automatic effects which are detailedfurther on in the chapter
bull adding value to stock
bull generating operations for assembly staff
bull automatically creating analytical accounting entries
654 Subproduct Production
If you need to manage subproducts you should install the module mrp_subproduct (Reconfigurewizard MRP Sub- products) The normal behaviour of manufacturing in OpenERP enables youto manufacture several units of the same finished product from raw materials (A + B gt C) WithSubproduct management the manufacturing result can be to have both finished products and secondaryproducts (A + B gt C + D)
Subproduct Material
In OpenERP subproduct material corresponds to secondary products thatare a by-product of the main manufacturing process For example cuttingplanks of timber will produce other planks but these bits of timber are toosmall (or the offcuts may have value for the company if they can be usedelsewhere)
If the module mrp_subproduct has been installed you get a new tab Sub products in the Bill ofMaterial that lets you set secondary products resulting from the manufacturing of the finished product
When OpenERP generates a production order based on a bill of materials that uses a secondaryproduct you pick up the list of all products in the the second tab of the production order FinishedProducts
Secondary products enable you to generate several types of products from the same raw materials andmanufacturing methods - only these are not used in the calculation of requirements Then if you needthe secondary products OpenERP will not ask you to manufacture another product to use the wasteproducts and secondary products of this production In this case you should enter another productionorder for the secondary product
156 CHAPTER 6 DEFINING YOUR MASTER DATA
Figure 615 Definition of Subproducts
Figure 616 Production Order producing Several Finished Products
Services in Manufacturing
Unlike most software for production management OpenERP managesservices as well as stockable products So it is possible to put productsof type Service in a bill of materials These do not appear in the productionorder but their requirements will be taken into account
If they are defined as Make to Order OpenERP will generate a task forthe manufacturing or a subcontract order for the operations The behaviourwill depend on the Supply Method configured in the product form Buy orProduce
CHAPTER 6 DEFINING YOUR MASTER DATA 157
655 Scrapping
If you have to scrap the final product before it is finished you will have to scrap every componentallowed for this product
Figure 617 Scrapping a Product to Finish
If you scrap a Product to Finish you will get the situation illustrated in the previous figure A finishedproduct will be created and put in the scrapped virtual location A new Product to Finish has beenadded to the manufacturing order
Scrap a product
To scrap a product you have to edit the manufacturing order and then selectthe product to be scrapped by clicking the little pencil at the left of the item
This new product has been added for the following reason when you have to manufacture a productand if this product has to be scrapped you have to produce another product to replace the scrapped oneThe reason why you have to scrap each component manually is that the production problem can comefrom one component
If the production process is finished and you see that you have to scrap the finished product you will nothave to scrap the different components They are already consumed They are not available anymorefor further manufacturing orders they have been moved to the production Stock Location
656 Production Orders
To open a Production Order use the menu Manufacturing rarr Manufacturing rarr Manufacturing Ordersand click the New button You get a blank form to enter a new production order as shown in the figureNew Production Order (page 158)
The production order follows the process given by the figure Process for Handling a Production Order(page 158)
The Scheduled date Product Qty and Reference are automatically completed when the form is firstopened Enter the product that you want to produce and the quantity required The Product UOM bydefault is completed automatically by OpenERP when the product is first selected
158 CHAPTER 6 DEFINING YOUR MASTER DATA
Figure 618 New Production Order
Figure 619 Process for Handling a Production Order
CHAPTER 6 DEFINING YOUR MASTER DATA 159
You then have to set two locations
bull The location from which the required raw materials should be found and
bull The location for depositing the finished products
For simplicity put the Stock location in both places The field Bill of Materials will automatically becompleted by OpenERP when you select the product You can then overwrite it with another BoM tospecify something else to use for this specific manufacturing then click the button Compute Data
The tabs Scheduled Products and Work Orders are also completed automatically when you clickCompute Data (in the Work Orders or Scheduled Products tabs) You will find the raw materials therethat are required for the production and the operations needed by the assembly staff
If you want to start production click the button Confirm Production and OpenERP automaticallycompletes the Products to Consume field in the Consumed Products tab and Products to Finish field inFinished Products tab
The information in the Consumed Products tab can be changed if
bull you want to enter a serial number for raw materials
bull you want to change the quantities consumed (lost during production)
For traceability you can set lot numbers on the raw materials used or on the finished products Notethe Production Lot and Pack numbers
Once the order is confirmed you should force the reservation of materials using the Force Reservationbutton This means that you do not have to wait for the scheduler to assign and reserve the raw materialsfrom your stock for this production run This shortens the procurement process
If you do not want to change the priorities just leave the production order in this state and the schedulerwill create a plan based on the priority and your planned date
To start the production of products click Start Production The raw materials are then consumedautomatically from stock which means that the draft ( Waiting ) movements become Done
Once the production is complete click Produce The finished products are now moved into stock
66 Logistics and Manufacturing
661 Manufacturing Stock Locations
OpenERP allows you to define a specific location to keep track of your manufacturing moves
To get an overview of all stock moves go to Warehouse rarr Traceability rarr Stock Moves You canenter your Production location in the Location search field and then group by Source or Destinationaccording to the moves you would like to check
160 CHAPTER 6 DEFINING YOUR MASTER DATA
662 Traceability
With traceability you can easily track your production lots in the software With this functionality youcan quickly find where your products are in your warehouse In counterpart you will be forced tomention a number of lot to each product to be able to track it in the system
To enable traceability in the manufacturing process go to Warehouse rarr Product rarr Products Inthe Product form you have to select the box Track Manufacturing Lots in the Lots section on theInformation tab
In the manufacturing order you have to mention a production lot number in order to continue theprocess You can select the production lot in the Manufacturing Order form on the second tab calledFinished Products You have to click the Products to Finish you want to trace a new window will openIn the Production Lot field click to link the manufacturing order to a production lot
Figure 620 Tracking a Manufacturing Order
When you have linked some manufacturing orders to production lots you can trace them from themenu Warehouse rarr Traceability rarr Production Lots In this view you see the different production lotslinked to a product If you select one lot you will have the possibility to choose between UpstreamTraceability or Downstream Traceability
Figure 621 Choosing between Upstream and Downstream Traceability
CHAPTER 6 DEFINING YOUR MASTER DATA 161
Traceability
Upstream Traceability It starts from the raw materials received fromthe supplier and follows the chain to the finished products delivered tocustomers Note that the name is confusing - this would often be considereda downstream direction Think of it as Where Used
Downstream Traceability It follows the product in the other directionfrom customer to the different suppliers of raw material Note that thename is confusing - this would often be considered an upstream directionThink of it as Where Supplied
Figure 622 Upstream Traceability
The different lines show the stock moves attached to the production of the product There are severalstock moves that are traced due to the Bill of Materials attached to the product [PC1] Basic PC
Figure 623 Downstream Traceability
In this window you only see the move for the finished product This is related to the definition of theconcept of Downstream Traceability which only shows the flow from the customer to the supplier ofraw materials
67 Managing Repairs from Repair to Invoicing and StockMovements
The management of repairs is carried out through the module mrp_repair Once installedthis module adds a new Manufacturing rarr Manufacturing rarr Repair Orders menu under theManufacturing menu to create repair jobs and review repairs in progress
162 CHAPTER 6 DEFINING YOUR MASTER DATA
Repairs
To install this module you can also use the Reconfigure wizard In theMRP Application Configuration screen check the Repairs option
In OpenERP a repair will have the following effects
bull Use of materials items for replacement
bull Production of products items replaced from reserved stock
bull Quality control tracking the reasons for repair
bull Accounting entries following stock moves
bull Receipt and delivery of product from and to the end user
bull Adding operations that can be seen in the productrsquos traceability
bull Invoicing items used andor free for repairs
671 Entering Data for a New Repair
Use the menu Manufacturing rarr Manufacturing rarr Repair Orders to enter a new repair into the systemYou will see a blank form for the repair data as shown in the figure Entering a New Repair (page 162)below
Figure 624 Entering a New Repair
CHAPTER 6 DEFINING YOUR MASTER DATA 163
First enter the product to repair then identify the product that will be repaired using the productlot number OpenERP then automatically completes fields from the selected lot ndash the partner fieldsaddress delivery location and stock move
If a warranty period has been defined in the product description in months OpenERP completes thefield Guarantee limit with the correct warranty date
Now you have to specify the components that you will be adding replacing or removing in theOperations part On each line you should specify the following
Add or remove a component of the finished product
bull Product
bull Qty
bull UoM
bull Unit Price
bull To Invoice or not
Once the component has been selected OpenERP automatically completes most of the fields
bull Qty 1
bull UoM unit for managing stock defined in the product form
bull Unit Price calculated from the customer list price
bull Source Location given by the stock management
bull To Invoice depends on the actual date and the guarantee period
This information is automatically proposed by the system but you can modify it all yourself
On the second tab of the Repair form Invoicing you can select whether the repair has to beinvoiced or not and if invoiced whether it should be before or after the repair You can also select theapplicable list price a specific address and encode additional charges that need to be added to the repairinvoice
The third tab Extra Info shows information about linked invoice and picking You receiveinformation about the current location and you can change the Delivery Location The Notestab allows you to register internal notes and information that should be written on the Quotation
672 Repair Workflow
A defined process handles a repair order ndash both the repair itself and the customer invoicing The figureProcess to Handle a Repair (page 164) shows this repair process
Once a repair has been entered in the system it is in the Quotation state In this state a repair orderhas no impact on the rest of the system You can print a quotation through the action Quotation Order
On the second tab you can specify the Invoice Method
164 CHAPTER 6 DEFINING YOUR MASTER DATA
Figure 625 Repair Form Invoicing Tab
Figure 626 Process to Handle a Repair
CHAPTER 6 DEFINING YOUR MASTER DATA 165
bull No Invoice
bull Before Repair
bull After Repair
You can then confirm the repair operation or create an invoice for the customer depending on the InvoiceMethod
The repair quotation can now be sent to the customer Once the customer approves the repair clickthe Confirm Repair button From the menu Manufacturing rarr Manufacturing rarr Repair Orders youcan easily find the confirmed repair orders by selecting the Confirmed button Click Start Repair toindicate that you can start working on the repair The Repair order will now be in the Under Repairstate When you finish the repair click the End Repair button
673 Invoicing the Repair
When the repair is to be invoiced a draft invoice is generated by the system For an After Repair invoiceyou can click the Make Invoice button OpenERP will then show the draft invoice created at thetop of the repair order (red text) You can easily go to that invoice simply by clicking the correspondingred text This invoice contains the raw materials used (replaced components) and any other costs suchas the time used for the repair These other costs are entered on the second tab of the Repair form Anyinformation you entered for the quotation on the Notes tab will also be displayed on the invoice
If the product to be repaired is still under guarantee OpenERP automatically suggests that thecomponents themselves are not invoiced but will still use any other defined costs You can overrideany of these default values while entering the data
Extra Info
The link to the generated invoice is shown on the Extra Infolsquolsquotabof the repair document To open the invoicesimply click the lsquolsquoInvoice field
674 Stock Movements and Repairs
When the repair has been carried out OpenERP automatically carries out stock movements forcomponents that have been removed added or replaced on the finished product From the menuWarehouse rarr Traceability rarr Stock Moves you can for instance enter the production lot to see allmoves for the repaired product
The move operations are carried out using the locations shown in the first tab of the Repair form Ifa destination location has been specified OpenERP automatically handles the final customer deliveryorder when the repair has been completed This also lets you manage the delivery of the repairedproducts
For example take the case of the shelf that was produced at the start of this chapter If you have toreplace the shelf SIDEPAN you should enter data for the repair as shown in figure Repair for a SidePanel (page 166)
166 CHAPTER 6 DEFINING YOUR MASTER DATA
Figure 627 Repair for a Side Panel
In this example you would carry out the following operations
bull Remove a SIDEPAN shelf in the cabinet and put the faulty shelf in the Scrapped location
bull Place a new SIDEPAN shelf that has been taken from stock
When the repair is ready to be confirmed OpenERP will generate the following stock moves
bull Put faulty SIDEPAN into suitable stock location Default Production gt Scrapped
bull Consume SIDEPAN Stock gt Production
If you analyze the traceability of this lot number you will see all the repair operations in the upstreamand downstream traceability lists of the products concerned
68 Forecasting and Supplying
681 Scheduler
The requirements scheduler is the calculation engine which plans and prioritises production andpurchasing automatically according to the rules defined on products By default the scheduler isset to run once a day (OpenERP automatically creates a Scheduled Action for this) You can alsostart the scheduler manually from the menu Warehouse rarr Schedulers rarr Compute Schedulers Thescheduler uses all the relevant parameters defined for products suppliers and the company to determinethe priorities between the different production orders deliveries and supplier purchases
CHAPTER 6 DEFINING YOUR MASTER DATA 167
Starting Time
You can set the starting time of the scheduler by modifying thecorresponding action in the menu Administration rarr Configuration rarrScheduler rarr Scheduled Actions Modify the Run mrp Schedulerconfiguration document
Figure 628 Configuring the Start Time to Calculate Requirements
Calculating Requirements Scheduling
Scheduling only validates procurements that are confirmed but not yetstarted These procurement reservations will themselves start productiontasks or purchases depending on the configuration of the requested product
You take into account the priority of operations when starting reservations and procurements Urgentrequests those with a date in the past or requests with a date earlier than the others will be started firstIn case there are not enough products in stock to satisfy all the requests you can be sure that the mosturgent requests will be produced first
682 Planning
In OpenERP you can plan the production in an easy way Simply by going to Manufacturing rarrPlanning you can plan manufacturing orders work orders andor work centers
By clicking Manufacturing Orders in the Planning menu a calendar view will open in whichyou can select a day to create the order whenever you want You will also see the already plannedorders By dragging and dropping a manufacturing order in Calendar view you can change the startingdate of the order
When you click in a day in the Calendar view an empty manufacturing order window will open and letyou choose which product you want to produce
168 CHAPTER 6 DEFINING YOUR MASTER DATA
Figure 629 Planning Manufacturing Orders
Figure 630 New Manufacturing Order
CHAPTER 6 DEFINING YOUR MASTER DATA 169
Scheduler and Just in Time
When you want to work according to the Just in Time way you should install the module mrp_jit
If you install this module you will not have to run the regular procurement scheduler anymore (but youstill need to run the minimum order point rule scheduler or for example let it run daily)
All procurement orders will be processed immediately which could in some cases entail a smallperformance impact
It may also increase your stock size because products are reserved as soon as possible and the schedulertime range is not taken into account anymore In that case you can no longer use priorities for thedifferent picking orders
Lead times
All procurement operations (that is the requirement for both production orders and purchase orders)are automatically calculated by the scheduler But more than just creating each order OpenERP plansthe timing of each step A planned date calculated by the system can be found on each order document
To organize the whole chain of manufacturing and procurement OpenERP bases everything on thedelivery date promised to the customer This is given by the date of the confirmation in the order andthe lead times shown in each product line of the order This lead time is itself proposed automaticallyin the field Customer Lead Time shown in the product form This Customer Lead Time is the differencebetween the time on an order and that of the delivery
To see a calculation of the lead times take the example of the cabinet above Suppose that the cabinetis assembled in two steps using the two following bills of materials
Table 621 Bill of Materials for 1 SHE100 Unit
Product Code Quantity Unit of MeasureSIDEPAN 2 PCEWOOD002 025 mLIN040 1 mWOOD010 0249 mMETC000 12 PCE
Table 622 Bill of Materials for 2 SIDEPAN Units
Product Code Quantity Unit of MeasureWOOD002 017 m
The SIDEPAN is made from an order using the workflow shown The WOOD002 is purchased onorder and the other products are all found in stock An order for the product SHE100 will then generatetwo production orders (SHE100 and SIDEPAN) then produce two purchase orders for the productWOOD002 Product WOOD002 is used in the production of both SHE100 and SIDEPAN Set the leadtimes on the product forms to the following
170 CHAPTER 6 DEFINING YOUR MASTER DATA
Table 623 Lead Times
Product Code Customer Lead Time Manufacturing Lead Time Supplier Lead TimeSHE100 30 days 5 daysSIDEPAN 10 daysWOOD002 5 days
A customer order placed on the 1st January will set up the following operations and lead times
bull Delivery SHE100 31 January (=1st January + 30 days)
bull Manufacture SHE100 26 January (=31 January ndash 5 days)
bull Manufacture SIDEPAN 16 January (=26 January ndash 10 days)
bull Purchase WOOD002 (for SHE100) 21 January (=26 January ndash 5 days)
bull Purchase WOOD002 (for SIDEPAN) 11 January (=16 January ndash 5 days)
In this example OpenERP will propose placing two orders with the supplier of product WOOD002Each of these orders can be for a different planned date Before confirming these orders the purchasingmanager could group (merge) these orders into a single order
Security Days
The scheduler will plan all operations as a function of the time configured on the products But it isalso possible to configure these factors in the company These factors are then global to the companywhatever the product concerned may be In the description of the company on the Configuration tabyou find the following parameters
bull Scheduler Range Days all the procurement requests that are not between today and today plusthe number of days specified here are not taken into account by the scheduler
bull Manufacturing Lead Time number of additional days needed for manufacturing
bull Purchase Lead Time additional days to include for all purchase orders with this supplier
bull Security Days number of days to deduct from a system order to cope with any problems ofprocurement
Purchase Lead Time
The security delay for purchases is the average time between the ordergenerated by OpenERP and the real purchase time from the supplier byyour purchasing department This delay takes into account the orderprocess in your company including order negotiation time
Take for instance the following configuration
CHAPTER 6 DEFINING YOUR MASTER DATA 171
bull Manufacturing Lead Time 1
bull Purchase Lead Time 3
bull Security Days 2
The example above will then be given the following lead times
bull Delivery SHE100 29 January (= 1st January + 30 days ndash 2 days)
bull Manufacture SHE100 23 January (= 29 January ndash 5 days ndash 1 day)
bull Manufacture SIDEPAN 12 January (= 26 January ndash 10 days ndash 1 day)
bull Purchase WOOD002 (for SHE100) 15 January (= 26 January ndash 5 days ndash 3 days)
bull Purchase WOOD002 (for SIDEPAN) 4 January (= 12 January ndash 5 days ndash 3 days)
683 Procurement
In normal system use you do not need to worry about procurement orders because they areautomatically generated by OpenERP and the user will usually work on the results of a procurement aproduction order a purchase order a sales order and a task
But if there are configuration problems the system can remain blocked by a procurement withoutgenerating a corresponding document Exception management allows you to solve possible issues
Automating Purchasing and Replenishment
In the Product form view you can choose between two procurement methods
bull Make to Stock (MTS)
bull Make to Order (MTO)
These two methods will impact the way you have to configure your automatic purchasing andreplenishment For the MTS method you will have to define Minimum Stock Rules to order productswhen the minimum treshold has been reached as well as a supplier to define where to order theproducts For the MTO method you have to define a supplier for the product in order to buy newproducts when a sales order or a manufacturing order is confirmed
Managing Scheduler Exceptions
In OpenERP you can have different procurement exceptions An exception appears in theProcurement Exception view when the system does not know what to do with an object suchas a Manufacturing Order or a Purchase Order
There are four types of exceptions
172 CHAPTER 6 DEFINING YOUR MASTER DATA
bull No bill of materials defined for production in this case you have got to create a BoM or indicatethat the product can be purchased instead (change the Supply Method)
bull No supplier available for a purchase you have to define a supplier in the Supplier tab of theproduct form
bull No address defined on the supplier partner you have to complete an address for the supplier forthe product in consideration
bull Not enough stock you have to create a rule for automatic procurement (for example a minimumstock rule) or manually procure it
Figure 631 Procurement Exceptions
Some problems are just timing issues and can be automatically corrected by the system (this will betemporary exceptions)
If a product has to be lsquoin stockrsquo but is not available in your stores OpenERP will make the exception aslsquotemporaryrsquo or lsquoto be correctedrsquo The exception is temporary if the system can procure it automaticallyfor example when a procurement rule has been defined for minimum stock
When an exception is raised you can check the configuration of your product in order to correct themisconfiguration Then you can choose to relaunch the scheduler or you can retry to execute the actionby selecting the line and clicking the Retry button then click Run procurement
Figure 632 Correct a Procurement Exception
The exception related to the BoM definition comes from the fact that a product with a supply methodset to Produce has no Bill of Materials The system does not know how to produce this product andthen raises an exception
CHAPTER 6 DEFINING YOUR MASTER DATA 173
Manual Procurement
To procure internally you can create a procurement order manually Use the menu Warehouse rarrSchedulers rarr Procurement Exceptions and click the New button to do this
Figure 633 Manual Procurement
The procurement order will then be responsible for calculating a proposal for automatic procurementfor the product concerned This procurement will start a task a purchase order for the supplier or aproduction depending on the product configuration
Figure 634 Procurement Flow
174 CHAPTER 6 DEFINING YOUR MASTER DATA
It is better to encode a procurement order rather than direct purchasing or production The procurementmethod has the following advantages
1 The form is simpler because OpenERP calculates the different values according to other values anddefined rules purchase date calculated from order date default supplier raw materials needs selectionof the most suitable bill of materials etc
2 The calculation of requirements prioritises the procurements If you encode a purchase directlyyou short-circuit the planning of different procurements
Shortcuts
On the Product form you have an action shortcut button ProcurementRequest that lets you quickly create a new procurement order
69 Working with Subcontractors
In OpenERP you can also subcontract production operations (for example painting and item assembly)at a supplierrsquos To do this you should indicate on the relevant routing document a supplier location forstock management
Configure a location dedicated to this supplier with the following data
bull Location Type Supplier
bull Location Address Select an address of the subcontracting partner
bull Chained Location Type Fixed
bull Chained Location if Fixed your Stock
bull Chaining Lead Time number of days before receipt of the finished product
Then once the manufacturing has been planned for the product concerned OpenERP will generate thefollowing steps
bull Delivery of raw materials to the stores for the supplier
bull Production order for the products at the supplierrsquos and receipt of the finished products in thestores
Once the production order has been confirmed OpenERP automatically generates a delivery order tosend to the raw materials supplier The storesperson can access this delivery order from the menuWarehouse rarr Warehouse Management rarr Internal Moves The raw materials will then be placed instock at the supplierrsquos stores
Once the delivery of raw materials has been confirmed OpenERP activates the production order Thesupplier uses the raw materials to produce the finished goods which will automatically be put in yourown stores This manufacturing is confirmed when you receive the products from your supplier Thenyou will indicate the quantities consumed by your supplier
CHAPTER 6 DEFINING YOUR MASTER DATA 175
Subcontract without Routing
If you do not use routing you can always subcontract work orders bycreating an empty routing in the subcontracting bill of materials
Production orders can be found in the menu Manufacturing rarr Manufacturing rarr ManufacturingOrders A production order is always carried out in two stages
1 Consumption of raw materials
2 Production of finished products
Depending on the companyrsquos needs you can specify that the first step is confirmed at theacknowledgement of the manufacturing supplier and the second at the receipt of finished goods inthe warehouse
610 Matching Sales Orders and Bills of Materials
In OpenERP you can define several bills of materials for the same product In fact you can haveseveral manufacturing methods or several approved raw materials for a given product You will see inthe following section that the manufacturing procedure (the routing) is attached to the Bill of Materialsso the choice of bill of materials implicitly includes the operations to make it
Once several bills of materials have been defined for a particular product you need to have a systemto enable OpenERP to select one of them for use By default the bill of materials with the lowestsequence number is selected by the system
To gain more control over the process during selling or procuring you can use Properties Themenu Manufacturing rarr Configuration rarr Master Bill of Materials rarr Properties enables you to defineproperties which can be set up arbitrarily to help you select a bill of materials when you have a choiceof BoMs
Properties
Properties is a concept that enables the selection of a method to manufacturea product Properties define a common language between salespeopleand technical people letting the salespeople have an influence on themanufacturing of the products using non-technical language and thechoices decided on by the technicians who define Bills of Materials
For example you can define the following property groups and properties
176 CHAPTER 6 DEFINING YOUR MASTER DATA
Table 624 Properties
Property Group PropertyWarranty 3 yearsWarranty 1 yearMethod of Manufacture SerialMethod of Manufacture Batch
Once the bills of materials have been defined you could associate the corresponding properties withthem Then when the salesperson enters a sales order line he can attach the properties required (ExtraInfo tab) If the product has to be manufactured OpenERP will automatically choose the bill ofmaterials that matches the defined properties in the order most closely
Extended View
Note that the properties are only visible in the Bills of Materials and SalesManagement if you are working in the Extended view mode If youcannot see it on your screen add the group Useability ExtendedView to your user
Figure 635 Properties in a Customer Order Line
Example Manufacturing in a Batch or on a Production Line
As an example take the manufacturing of the shelf presented above You can imagine that the companyhas two methods of manufacturing for this cabinet
bull Manually the staff assembles the shelves one by one and cuts the wood plank by plank This
CHAPTER 6 DEFINING YOUR MASTER DATA 177
approach is usually used to assemble prototypes It gets you very rapid production but at a highcost and only in small quantities
bull On a production line the staff uses machines that are capable of cutting wood by bandsawThis method is used for production runs of at least 50 items because the lead times using thismethod are quite lengthy The delay to start the production is much longer yet the cost per unitis considerably lower in this volume
You define two bills of materials for the same cabinet To distinguish between them you will define twoproperties in the same group manual assembly and production line assembly In thequotation the salesperson can set the method of manufacture he wants on each order line dependingon the quantities and the lead time requested by the customer
Bills of Materials and Substitute Products
In some software you use the term substitute for this principle ofconfigurable properties in a bill of materials
By putting a bill of materials on its own line you can also implement substitute products You set thebill of materials to type SetsPhantom to make the substitution transparent and to prevent OpenERPfrom proposing an intermediate production order
611 Production and Services
In OpenERP you can handle three types of goods two types of products (Stockable or Consumableproducts) and one type of services
For this last category OpenERP can react in two different ways Once a manufacturing order isgenerated for a product and this product contains a Service a task can be automatically generatedor not
Tasks
In order to automatically generate a task you have to install the moduleproject_mrp which requires the installation of the module project
By default the generated task is not linked to any project You can change this behaviour by creatinga project and link the service to this project This can be done in the Product form on the tabProcurement amp Locations in the Miscellaneous section Select the project to be linked in the Projectfield
To illustrate this process follow the next example
First you have to create a project to which you want to link the service We will call this projectConsulting After creating the project we have to create a new product Here are the characteristics ofthis product
178 CHAPTER 6 DEFINING YOUR MASTER DATA
Figure 636 Link a Service Product to a Project
Table 625 Configure a New Service
Field ValueName ConsultingReference CSLTProduct Type ServiceProcurement Method Make to OrderSupply Method ProduceDefault UoM HourProject Consulting
Once you have configured your project and your product you can create a Sales Order to order hoursof consultancy When you confirm the Sales Order a task will be created
If you go to Project rarr Project rarr Tasks you will find a new task called SO011[CSLT] ConsultingThis task is linked to the project guilabellsquoConsultinglsquo Note that the Sales Order number may bedifferent in your database
Figure 637 A Product linked to a Task and a Project
179
Part V
On Site installation
180
181
OpenERP Installation on Linux 7The installation procedure of OpenERP V60 is explained in this chapter This procedureis well tested on Ubuntu version 1004
There are four main procedures that you have to follow in order to run OpenERP V60smoothly
bull PostgreSQL Server Installation and Configuration
bull OpenERP Server Installation
bull OpenERP Client Installation
bull OpenERP Web Installation
71 PostgreSQL Server Installation and Configuration
Methods
The PostgreSQL download page lists the available installation methodsChoose the one that best suits your needs
711 Example on Ubuntu
Use the following command at your systemrsquos command prompt to install the postgresql package
sudo apt-get install postgresql
For example
openerpopenerp-desktop$ sudo apt-get install postgresql
For a graphical user interface of postgresql use the following command
sudo apt-get install pgadmin3
For example
openerpopenerp-desktop$ sudo apt-get install pgadmin3
You can find the new menu item pgAdmin III in your Ubuntu system menu from Applications rarrProgramming rarr pgAdmin III
182 CHAPTER 7 OPENERP INSTALLATION ON LINUX
712 Setup a PostgreSQL user for OpenERP
When the installations of the required software are done you must create a PostgreSQL user This usermust be the same as your system user OpenERP will use this user to connect to PostgreSQL
Figure 71 Figure demonstrating how OpenERP uses the PostgreSQL user to interact with it
Database
Without creating and configuring a PostgreSQL user for OpenERP asdescribed below you cannot create a database using OpenERP Client
First Method
The default superuser for PostgreSQL is called postgres You may need to login as this user first
openerpopenerp-desktop$ sudo su postgrespassword XXXXXXXXXX
Now create PostgreSQL user openerp using the following command
postgresopenerp-desktop$ createuser openerpShall the new role be a superuser (yn) y
Make this new user a superuser Only then you can create a database using OpenERP Client In shortopenerp is the new user created in PostgreSQL for OpenERP This user is the owner of all the tablescreated by OpenERP Client
Now check the list of tables created in PostgreSQL using following command
CHAPTER 7 OPENERP INSTALLATION ON LINUX 183
postgresopenerp-desktop$ psql -l
You can find the table template1 run the following command to use this table
postgresopenerp-desktop$ psql template1
To apply access rights to the role openerp for the database which will be created from OpenERP Clientuse the following command
template1= alter role openerp with password rsquopostgresrsquoALTER ROLE
Second Method
Another option to create and configure a PostgreSQL user for OpenERP is shown below
postgresopenerp-desktop$ createuser --createdb --username postgres --no-createrole--pwprompt openerpEnter password for new role XXXXXXXXXXEnter it again XXXXXXXXXXShall the new role be a superuser (yn) yCREATE ROLE
Password
Note that the password is postgres
Option explanations
bull --createdb the new user will be able to create new databases
bull --username postgres createuser will use the postgres user (superuser)
bull --no-createrole the new user will not be able to create new users
bull --pwprompt createuser will ask you the new userrsquos password
bull openerp the new userrsquos name
To access your database using pgAdmin III you must configure the database connection as shown inthe following figure
You can now start OpenERP Server You will probably need to modify the OpenERP configuration fileaccording to your needs which is normally located in ~openerprc
184 CHAPTER 7 OPENERP INSTALLATION ON LINUX
Developer Book
You can find information on configuration files in the Developer Booksection Configuration
72 OpenERP Server Installation
721 Installing the required packages
You need to have Python (at least 25 for OpenERP v60) in your Ubuntu system which is in-built inUbuntu version 1004 and above
You also need to install the following Python libraries because OpenERP Server uses these packages
To install the required libraries on your Ubuntu system you can do the following in your favouriteshell
bull lxml lxml is the most feature-rich and easy-to-use library for working with XML and HTML inthe Python language
CHAPTER 7 OPENERP INSTALLATION ON LINUX 185
sudo apt-get install python-lxml
bull mako Hyperfast and lightweight templating for the Python platform
sudo apt-get install python-mako
bull mxdatetime Provides the most natural and robust way of dealing with datetime values inPython
sudo apt-get install python-egenix-mxdatetime
bull python-dateutil The dateutil module provides powerful extensions to the standard datetimemodule available in Python 23+
sudo apt-get install python-dateutil
bull psycopg2 Psycopg is the most popular PostgreSQL adapter for the Python programminglanguage
sudo apt-get install python-psycopg2
bull pychart PyChart is a Python library for creating high quality Encapsulated Postscript PDFPNG or SVG charts
sudo apt-get install python-pychart
bull pydot This module provides a full interface to create handle modify and process graphs inGraphvizrsquos dot language
sudo apt-get install python-pydot
bull pytz World Timezone Definitions for Python
sudo apt-get install python-tz
bull reportlab The ReportLab Toolkit is the time-proven ultra-robust open-source engine forprogrammatically creating PDF documents and forms the foundation of RML It also containsa library for creating platform-independent vector graphics It is a fast flexible cross-platformsolution written in Python
sudo apt-get install python-reportlab
bull pyyaml PyYAML is a YAML parser and emitter for Python
sudo apt-get install python-yaml
bull vobject VObject simplifies the process of parsing and creating iCalendar and vCard objects
186 CHAPTER 7 OPENERP INSTALLATION ON LINUX
sudo apt-get install python-vobject
722 Downloading the OpenERP Server
The OpenERP server can be downloaded from the OpenERP websitersquos download page
723 Testing the OpenERP Server
If you only want to test the server you do not need to install it Just unpack the archive and start theopenerp-server executable
tar -xzf openerp-server-602targzcd openerp-server-602binpython openerp-serverpy
The list of available command line parameters can be obtained with the -h command-line switch
python openerp-serverpy -h
724 Installing the OpenERP Server
The OpenERP Server can be installed very easily using the setuppy file
tar -xzf openerp-server-602targzcd openerp-server-602sudo python setuppy install
If your PostgreSQL server is up and running you can now run the server using the following command
openerp-server
If you do not already have a PostgreSQL server up and running you can read PostgreSQL ServerInstallation and Configuration (page 181)
You can find the OpenERP server configuration file at ~openerp-server-602docopenerp-serverconf
73 OpenERP Client Installation
731 Installing the required packages
You need to have Python (at least 25 for OpenERP v60) in your Ubuntu system which is in-built inUbuntu version 1004 and above
CHAPTER 7 OPENERP INSTALLATION ON LINUX 187
You also need to install the following Python libraries because OpenERP Client uses these packages
To install the required libraries on your Ubuntu system you can do the following in your favouriteshell
bull gtk GTK+ is a highly usable feature-rich toolkit for creating graphical user interfaces whichboosts cross-platform compatibility and an easy-to-use API
sudo apt-get install python-gtk2
bull glade Glade is a RAD tool to enable quick amp easy development of user interfaces for the GTK+toolkit and the GNOME desktop environment
sudo apt-get install python-glade2
bull matplotlib matplotlib is a Python 2D plotting library which produces publication quality figuresin a variety of hard-copy formats and interactive environments across platforms
sudo apt-get install python-matplotlib
bull mxdatetime Provides the most natural and robust way of dealing with datetime values inPython
sudo apt-get install python-egenix-mxdatetime
bull xml XML support for Python platform
sudo apt-get install python-xml
bull tz World Timezone definitions for Python
sudo apt-get install python-tz
bull hippocanvas The Hippo Canvas is a CairoGObjectGTK+ based canvas written in C withsupport for flexible layout CSS styling and initial work on animations
sudo apt-get install python-hippocanvas
bull pydot Python interface to Graphvizrsquos Dot language
sudo apt-get install python-pydot
PDF Viewer
You will also need a PDF viewer (eg xpdf acroread kpdf)
See the Configuring a PDF Viewer (page 188) section
188 CHAPTER 7 OPENERP INSTALLATION ON LINUX
732 Downloading the OpenERP Client
The OpenERP client can be downloaded from the OpenERP websitersquos download page
733 Testing the OpenERP Client
If you only want to test the client you do not need to install it Just unpack the archive and start theopenerp-client executable
tar -xzf openerp-client-602targzcd openerp-client-602binpython openerp-clientpy
The list of available command line parameters can be obtained with the -h command-line switch
python openerp-clientpy -h
734 Installing the OpenERP Client
The client can be installed very easily using the setuppy file
tar -xzf openerp-client-602targzcd openerp-client-602sudo python setuppy install
You can now run the client using the following command
openerp-client
735 Configuring a PDF Viewer
To preview PDF files OpenERP Client by default supports
1 evince
2 xpdf
3 gpdf
4 kpdf
5 epdfview
6 acroread
CHAPTER 7 OPENERP INSTALLATION ON LINUX 189
The client will try to find one of these executables (in this order) in your system and open the PDFdocument with it
For example if xpdf kpdf and acroread are the only PDF viewers installedon your system the OpenERP client will use xpdf for previewing PDFdocuments
If you want to use another PDF viewer or if you do not want to use the first one the client will findyou have to edit the OpenERP configuration file normally located in ~openerprc Find the[printer] section and edit the softpath parameter For example
[printer]softpath = kpdf
74 OpenERP Web Installation
741 Downloading amp Installing the OpenERP Web Client
The OpenERP Web Client can be downloaded from the OpenERP websitersquos download page
You need to install the following Python libraries because OpenERP Web Client uses these packages
1 Python gt= 24
2 CherryPy gt= 312
3 Mako gt= 024
4 Babel gt= 094
5 FormEncode gt= 122
6 simplejson gt= 209
7 pyparsing gt= 150
There is no need to install the above packages one by one You can just run the following commandsin your favourite shell
$ sudo apt-get install python python-dev build-essential$ sudo apt-get install python-setuptools
This will install dependencies required for the following
190 CHAPTER 7 OPENERP INSTALLATION ON LINUX
$ cd pathtoopenerp-web-602lib$ populatesh$ cd
This will install all required dependencies in private lib directory and you do not need to installanything
742 Testing the OpenERP Web Client
If you only want to test the web client you do not need to install it Just unpack the archive and startthe openerp-web executable
tar -xzf openerp-web-602targzcd openerp-web-602python openerp-webpy
The list of available command line parameters can be obtained with the -h command line switch
python openerp-webpy -h
743 Installing the OpenERP Web Client
The OpenERP Web Client can be installed very easily using the setuppy file
tar -xzf openerp-web-602targzcd openerp-web-602sudo python setuppy install
You can now run the OpenERP Web Client using the following command
openerp-web
you can find the OpenERP Web Client configuration file at~openerp-web-602docopenerp-webconf
744 Web Browser Compatibilities
Supported Browsers
OpenERP Web Client is known to work best with Mozilla based web browsers Here is a list ofsupported browsers
1 Firefox gt= 36
CHAPTER 7 OPENERP INSTALLATION ON LINUX 191
2 Internet Explorer gt= 70
3 Safari gt= 41
4 Google Chrome gt= 90
5 Opera gt= 100
Flash Plugin
Your browser should have the Flash plugin installed because OpenERP Web Client uses some Flashcomponents
Apply the following command in order to install the Flash plugin on an Ubuntu system
$ sudo apt-get install flashplugin-nonfree
192 CHAPTER 7 OPENERP INSTALLATION ON LINUX
193
OpenERP Installation on Windows 8In this chapter you will see the installation of OpenERP v60 on a Windows system Thisprocedure is well-tested on Windows 7
You have two options for the installation of OpenERP on a Windows system
bull All-In-One Installation This is the easiest and quickest way to install OpenERPIt installs all components (OpenERP Server Client Web and PostgreSQLdatabase) pre-configured on one computer This installation is recommendedif you do not have any major customizations
bull Independent Installation If you choose this mode of installation all thecomponents required to run OpenERP will have to be downloaded and installedseparately You will have to opt for an independent installation if you plan toinstall the components on separate machines This mode is also practical if youare already working with or plan to use a different version of PostgreSQL thanthe one provided with the All-In-One installer
81 OpenERP All-In-One Installation
Each time a new release of OpenERP is made OpenERP supplies a complete Windows auto-installerfor it This contains all of the components you need ndash the PostgreSQL database server the OpenERPapplication server the GTK application client and the Web client
This auto-installer enables you to install the whole system in just a few mouse clicks The initialconfiguration is set up during installation making it possible to start using it very quickly as long asyou do not want to change the underlying code It is aimed at the installation of everything on a singlePC but you can later connect GTK clients from other PCs Macs and Linux boxes to it as well
811 Downloading OpenERP All-In-One
The first step is to download the OpenERP All-In-One installer At this stage you must choose whichversion to install ndash the stable version or the development version If you are planning to put it straightinto production we strongly advise you to choose the stable version
194 CHAPTER 8 OPENERP INSTALLATION ON WINDOWS
Stable Versions and Development Versions
OpenERP development proceeds in two parallel tracks stable versions anddevelopment versions
New functionality is integrated into the development branch This branchis more advanced than the stable branch but it can contain undiscoveredand unfixed faults A new development release is made every month or soand OpenERP has made the code repository available so you can downloadthe very latest revisions if you want
The stable branch is designed for production environments Here releasesof new functionality are made only about once a year after a long period oftesting and validation Only bug fixes are released through the year on thestable branch
To download OpenERP for Windows follow these steps
1 Navigate to the site httpwwwopenerpcom
2 Click the Downloads button at the right then under Windows Auto-Installer select All-In-One
3 Before you can proceed with the download you will be asked to fill an online form with yourcontact and company details and information regarding your interest in OpenERP
4 Once you submit the online form the All-In-One Windows installer (currentlyopenerp-allinone-setup-602exe) becomes available for download
5 Save the file on your PC - it is quite a substantial size because it downloads everything includingthe PostgreSQL database system (version 83 at the time of writing) so it will take some time
812 Installing the OpenERP All-In-One
To install OpenERP and its database you must be signed in as an Administrator on your PC
If you have previously tried to install the All-In-One version of OpenERP you will have to uninstallthat first because various elements of a previous installation could interfere with your new installationMake sure that all Tiny ERP OpenERP and PostgreSQL applications are removed you are likely tohave to restart your PC to finish removing all traces of them
Double-click the installer file to install OpenERP and accept the default parameters on each dialog boxas you go The All-In-One installer is the simplest mode of installation and has the following steps
bull 1 Select installation language The default is English The other option is French
bull 2 Welcome message Carefully follow the recommendations given in this step
bull 3 Licence Agreement It is important that you accept the GNU General Public License toproceed with installation
CHAPTER 8 OPENERP INSTALLATION ON WINDOWS 195
Figure 81 Welcome to OpenERP
bull 4 Select components to install You can proceed with the default install type All InOne which will install the OpenERP Server GTK Desktop Client Web Client andPostgreSQL Database (version 83 at the time of writing) Or you may customizeyour installation by selecting only the components you require
Figure 82 Customize component installation
bull 5 Configure PostgreSQL connection The installer will suggest default parameters to completeyour PostgreSQL connection configuration You may accept the defaults or change itaccording to your requirement
bull 6 Select folder for installation By default OpenERP is installed in CProgramFilesOpenERP 60 To install in a different folder browse for a differentlocation(folder) in this step
bull 7 Install The automatic installation of OpenERP begins and you can view its progress
196 CHAPTER 8 OPENERP INSTALLATION ON WINDOWS
Figure 83 PostgreSQL configuration
bull 8 Finish On successful installation of OpenERP you will get an appropriate confirmation You canclick Finish to close the setup wizard
Figure 84 End of setup wizard
813 Starting the OpenERP Client
You do not need to manually start the OpenERP Server because it is installed as a Windows serviceBut you may trigger various actions from the shortcuts created in the Start menu for OpenERP GTKClient 60 OpenERP Server 60 and PostgreSQL 83 The OpenERP Client can be opened ready to usethe OpenERP system once you have completed the All-In-One installation
You will find the OpenERP Client icon on your desktop which you double-click to access the OpenERPclient interface Use the menu File rarr Connect to connect to a database As this would be the firsttime you are using OpenERP since its installation your database will be empty You can create a newdatabase through File rarr Databases rarr New database
CHAPTER 8 OPENERP INSTALLATION ON WINDOWS 197
Figure 85 Database on first run
82 PostgreSQL Server Installation and Configuration
In this chapter you will see how to configure PostgreSQL for its use with OpenERP The followingprocedure is well-tested on PostgreSQL v90
821 Installing PostgreSQL Server
You can download the Windows installer from the PostgreSQL download page
Depending on your need choose either the One Click Installer or the pgInstaller and run the executableyou have just downloaded
822 Setup a PostgreSQL User
When the required software installations are complete you must create a PostgreSQL user OpenERPwill use this user to connect to PostgreSQL
Add a User
Start a Windows console (run the cmd command in the Search programs and files text box of the Startmenu)
Change the directory to the PostgreSQL bin directory (eg CProgramFilesPostgreSQL90bin) or add this directory to your PATH environment variable
The default superuser for PostgreSQL is called postgres The password was chosen during thePostgreSQL installation
In your Windows console type
CProgram FilesPostgreSQL90bingtcreateuserexe --createdb --username postgres --no-createrole --pwprompt openpgEnter password for new role openpgpwdEnter it again openpgpwdShall the new role be a superuser (yn) yPassword XXXXXXXXXX
198 CHAPTER 8 OPENERP INSTALLATION ON WINDOWS
line 1 is the command itself
line 2 asks you the new userrsquos password
line 3 asks you to confirm the new userrsquos password
line 4 new role is superuser or not
line 5 asks you the postgres userrsquos password
Option explanations
bull --createdb the new user will be able to create new databases
bull --username postgres createuser will use the postgres user (superuser)
bull --no-createrole the new user will not be able to create new users
bull --pwprompt createuser will ask you the new userrsquos password
bull openpg the new userrsquos name Alternatively you may specify a different username
bull openpgpwd the new userrsquos password Alternatively you may specify a different password
Password
In OpenERP v6 openpg and openpgpwd are the default username andpassword used during the OpenERP Server installation If you plan tochange these defaults for the server or have already installed the serverwith different values you have to use those user configuration values whenyou create a PostgreSQL user for OpenERP
Now use pgAdmin III to create database ldquoopenerpdemordquo with owner ldquoopenpgrdquo
CREATE DATABASE openerpdemo WITH OWNER = openpg ENCODING = rsquoUTF8rsquoCOMMENT ON DATABASE openerpdemo IS rsquoOpenERP Demo DBrsquo
If you have installed the OpenERP Server you can start it now If needed you can override the serverconfiguration by starting the server at a Windows console and specifying command-line options Formore on this refer the section Customized Configuration (page 201)
To change a userrsquos password in any Windows version execute the following
net user ltaccountnamegt ltnewpasswordgteg net user postgres postgres
If it is a domain account just add ldquoDOMAINrdquo at the end
If you want to delete it just execute
net user ltaccountnamegt delete
CHAPTER 8 OPENERP INSTALLATION ON WINDOWS 199
Case-Insensitive Search Issue
For an installation which needs full UTF8 character support consider using postgres gt= 82x Usingversions prior to this OpenERP search will not return the expected results for case-insensitive searcheswhich are used for searching partners products etc
Example
SELECT rsquoxrsquo FROM my_table WHERE rsquobeacutetrsquo ilike rsquoBEacuteTrsquo--matches only in 82x
83 OpenERP Server Installation
The OpenERP Server 60 installation works with disks formatted in NTFS (not a FAT or FAT32partition) The following installation procedure has been well-tested on Windows 7
Windows Versions
OpenERP Server does not work on Windows 98 or ME for obvious reasonsndash these cannot be formatted using NTFS
You will need a PostgreSQL server up and running If it is not the case you can read the PostgreSQLServer Installation and Configuration (page 197) section
831 Downloading the OpenERP Server
The OpenERP Server can be downloaded from OpenERP websitersquos download page
Under Windows Auto-Installer choose Server to download the OpenERP Server standalone
832 Installing the OpenERP Server
Execute the installer you have just downloaded It has the following stages
bull 1 Select installation language The default is English The other option is French
bull 2 Welcome message Carefully follow the recommendations given in this step
bull 3 Licence Agreement It is important that you accept the GNU General Public License toproceed with installation
bull 4 Select folder for installation By default OpenERP Server is installed in CProgramFilesOpenERP 60Server To install in a different folder browse for adifferent location(folder) in this step
200 CHAPTER 8 OPENERP INSTALLATION ON WINDOWS
bull 5 Configure PostgreSQL connection The installer will suggest default parameters tocomplete your PostgreSQL connection configuration You may accept the defaultsor change it according to your requirement
PostgreSQL configuration
bull 6 Create shortcuts Select a folder in the Start menu where you would like to create the programrsquosshortcuts
Create Start menu shortcuts
bull 7 Install The automatic installation of OpenERP Server begins and you can view its progress
bull 8 Finish On successful installation of OpenERP Server you will get an appropriate confirmationYou can click Finish to close the setup wizard
End of setup wizard
The OpenERP Server installs as a Windows service This means you do not have to start the servereach time you start the computer and it runs without the need of an open user session
CHAPTER 8 OPENERP INSTALLATION ON WINDOWS 201
833 Customized Configuration
To initialize the server with configurations of your choice you have to invoke it at the WindowsCommand prompt with the options you wish to override
Navigate to the installation directory in CProgram FilesOpenERP 60Server and typethis command but do not execute it yet
openerp-serverexe -d ltdb_namegt -r ltdb_usergt -w ltdb_passwordgt--db_host=ltpostgresql_server_addressgt--db_port=ltport_nogt --logfile=ltlogfilegt
The initialization of OpenERP Server provides necessary information for connection to the PostgreSQLdatabase and the choice of data to load Here is the explanation of used options
bull -d ltdb_namegt Name of the database created for OpenERP Server
bull -r ltdb_usergt Name of the PostgreSQL user (role)
bull -w ltdb_passwordgt Password of the PostgreSQL user
bull --db_host=ltpostgresql_server_addressgt Address of the server wherePostgreSQL is If you have installed PostgreSQL on the same computer as OpenERP Serveryou can enter localhost else the IP address or the name of the distant server
bull --db_port=ltport_nogt Port number where PostgreSQL listens The default is 5432
bull --stop-after-init This option stops the server after initialization
bull --logfile=ltlogfilegt specify an alternate logfile where all the outputof server will be saved The default is CProgram FilesOpenERP60Serveropenerp-serverlog
Before the execution of this command you have to decide the purpose of the database created inOpenERP
Sample command
202 CHAPTER 8 OPENERP INSTALLATION ON WINDOWS
openerp-serverexe -d openerpdemo -r openpg -w openpgpwd--db_host=localhost --logfile=CUserstinyDesktopdemo_dblog--db_port=5430 --stop-after-init
Here you have to enter the username and password specified in the PostgreSQL connectionconfiguration during server installation
When you execute the initialization command if you specify a logfile the server runtime output iswritten to that file and you will not see any server output in the prompt window You have only to waituntil the prompt comes back
Deciding about the purpose of the database
You can initialize the database with OpenERP Server to
1 Take a look at the system with modules installed and demo data loaded
2 Install a new clean database system (without demo data)
3 Upgrade an existing version
With modules and demo data
If you execute the sample command above you will get a database with only base modules installedand loaded with demo data To initialize OpenERP Server with additional modules and its demo datayou need to add this option to the above command
-i ltmodule namegt
Sample command
openerp-serverexe -d openerpdemo --stop-after-init -i sale
This command will initialize the OpenERP Server with the module sale and its dependencies andfill its PostgreSQL database with their related demo data As can be seen you must specify the targetdatabase for the module installation
To install more than one module specify a comma-separated module list at the command-line
Without demo data (or new clean version)
Execute the command with an option excluding the demo data
--without-demo=all
CHAPTER 8 OPENERP INSTALLATION ON WINDOWS 203
This will load base modules (and other modules if -i option is used) but will not load its demo data
Sample command usage
openerp-serverexe -d openerpdemo --stop-after-init --without-demo=all
If you have already initialized the database with demo data loaded you can create a new database andexecute the above command on it
Update the database
Execute the command with an option that updates the data structures
--update=all
Sample command usage
openerp-serverexe -d openerpdemo --stop-after-init --update=all
834 Monitoring the OpenERP Server
The service and some runtime information is accessible through the Computer Management console inAdministrative Tools
OpenERP Server 60 in the Services list
Here you can define how the service should act in case of server failure Access the servicersquos propertiesby double-clicking OpenERP Server 60 in the list
Recovery tab to set service failure response
The Computer Management logging service offers additional information about the execution of theOpenERP Server for example the startup or shutdown information of the service
204 CHAPTER 8 OPENERP INSTALLATION ON WINDOWS
Server information in Windows Logs list
OpenERP Server runtime output can be found in the default logfile Given that the server is nowrunning as a Windows service it does not output any runtime messages For this the logfile isthe only option Access it from the Start menu through the View log link in the group ofshortcuts for OpenERP Server 60 Alternatively use the path CProgram FilesOpenERP60Serveropenerp-serverlog
OpenERP Server log file
You can find out whether OpenERP Server is running by invoking Windows Task ManagerWhen you look at the Processes tab you will see OpenERPServerServiceexe andopenerp-serverexe both having SYSTEM as their user (to see these Show processes from allusers must be enabled in the Task Manager)
CHAPTER 8 OPENERP INSTALLATION ON WINDOWS 205
The services in Windows Task Manager
835 Congratulations you have successfully installed OpenERP Server
For more information please take a look at Additional Installation Information and Troubleshooting(page 210) where you can find some troubleshooting examples
84 OpenERP Client Installation
You must install configure and run the OpenERP Server before using the OpenERP Client The clientneeds the server to run You can install the server application on your computer or on an independent
206 CHAPTER 8 OPENERP INSTALLATION ON WINDOWS
server accessible by network
841 Downloading the OpenERP Client
The OpenERP Client can be downloaded from OpenERP websitersquos download page
Under Windows Auto-Installer choose Client to download the OpenERP Client standalone
842 Installing the OpenERP Client
Click the executable installation file you have just downloaded and proceed with the following steps
bull 1 Select installation language The default is English The other option is French
bull 2 Welcome message Carefully follow the recommendations given in this step
bull 3 Licence Agreement It is important that you accept the GNU General Public License toproceed with installation
bull 4 Select folder for installation By default OpenERP Client is installed in CProgramFilesOpenERP 60Client To install in a different folder browse for adifferent location(folder) in this step
bull 5 Create shortcuts Select a folder in the Start menu where you would like to create theprogramrsquos shortcuts
Create Start Menu Shortcuts
bull 6 Install The automatic installation of OpenERP Client begins and you can view its progress
bull 7 Finish On successful installation of OpenERP Client you will get an appropriateconfirmation Click Finish to close the setup wizard
End of Configuration Wizard
CHAPTER 8 OPENERP INSTALLATION ON WINDOWS 207
843 Starting the OpenERP Client
The installation program creates shortcuts in the main program menu and on the desktop which youcan use to start the client Be sure to have an OpenERP Server running somewhere (on your computeror a distant server) to be able to use the client software
Log in to openerpdemo database using default username and password
bull Username = admin
bull Password = admin
Enjoy
Connecting to the Demo Database
85 OpenERP Web Installation
You must install configure and run the OpenERP Server before using the OpenERP Web The webclient needs the server to run You can install the server application on your computer or on anindependent server accessible by network
208 CHAPTER 8 OPENERP INSTALLATION ON WINDOWS
851 Downloading the OpenERP Web
The OpenERP Web can be downloaded from OpenERP websitersquos download page
Under Windows Auto-Installer choose Web to download the OpenERP Web standalone
852 Installing the OpenERP Web
Click the executable installation file you have just downloaded and proceed with the following steps
bull 1 Select installation language The default is English The other option is French
bull 2 Welcome message Carefully follow the recommendations given in this step
bull 3 Licence Agreement It is important that you accept the OpenERP Public License (OEPL)Version 11 to proceed with installation This licence is based on the Mozilla PublicLicence (MPL) Version 11
OpenERP Public Licence
bull 4 Select folder for installation By default OpenERP Web is installed in CProgramFilesOpenERP 60Web To install in a different folder browse for a differentlocation(folder) in this step
bull 5 Create shortcuts Select a folder in the Start menu where you would like to create theprogramrsquos shortcuts
Create Start Menu Shortcuts
bull 6 Install The automatic installation of OpenERP Web begins and you can view its progress
bull 7 Finish On successful installation of OpenERP Web you will get an appropriateconfirmation Click Finish to close the setup wizard
The Windows service for OpenERP Web Server is also installed and is set up to start the serverautomatically on system boot
CHAPTER 8 OPENERP INSTALLATION ON WINDOWS 209
853 Starting the Web Client
The web server being initialized and the settings saved you can start the OpenERP Web Client
Use a web browser of your choice to connect to OpenERP Web If your web client is installed on thesame computer as the server you can navigate to httplocalhost8080 to connect to the OpenERP webversion If the server is installed on a separate computer you must know the name or IP address of theserver over the network and navigate to httpltserver_addressgt8080 to connect to OpenERP
Figure 86 Web Client at Startup
210 CHAPTER 8 OPENERP INSTALLATION ON WINDOWS
86 Troubleshooting and Windows Complementary InstallInformation
861 PostgreSQL Administration
OpenERP Server Connection Error with PostgreSQL
If you are initializing a database from the command-line with a custom usernamerole (-r) and password(-w) ensure that you have created a corresponding PostgreSQL user for the same Otherwise you mayencounter error messages as shown below
User authentication failure
You may also face another problem similar to this situation
Database connection failure
In this case check if the service postgresql-90 - PostgreSQL Server 90 is running inthe Services Manager (Control Panel rarr System and Security rarr Administrative Tools rarr Services)
PostgreSQL 90 in the Services list
You can edit the service configuration to start PostgreSQL as a service on system boot This is usuallythe default
Configure PostgreSQL 90 service
If your PostgreSQL service is running but you get connection errors you can restart the service
Restarting the service
CHAPTER 8 OPENERP INSTALLATION ON WINDOWS 211
212 CHAPTER 8 OPENERP INSTALLATION ON WINDOWS
Index
Aabsences 64access 39account
chart 37account types 26accountant 55accounts
configuring 26allocation
cost 62 66analytic
chart of accounts 61Analytic Accounts 59
Bbackup
database 38bill of materials 139
phantom 146BoM
multi-level 144revisions 143
BoM substitute products 177
Ccategory
partner 31product 34
chart of accounts 37analytic 61
contactpartner 31
costallocation 62 66
Ddatabase
backup 38drop 38duplicate 39
restore 38
Eexport
stock management 130
FFlow 6forecasts 113
Iimport
stock management 130Installation
OpenERP All-In-One (Windows) 193OpenERP Client (Linux) 186OpenERP Client (Windows) 205OpenERP Server (Linux) 184OpenERP Server (Windows) 199OpenERP Web (Linux) 189OpenERP Web (Windows) 207PostgreSQL 181PostgreSQL (Windows) 196Windows installation quirks 209
installationadministrator 194Windows (all-in-one) 194
invoicingrepair 165
Jjournals
configuring 29
Llocation structure 36Logistics 6 69
MMain Company
configuring 30
Manufacturing 6 137Master Procurement Schedule 109Master Production Schedule 109Module
mrp_jit 95Sale 95
moduleaccount 25 43account_analytic_default 51delivery 55hr_timesheet_invoice 59mrp 25 139mrp_jit 45 98 150mrp_repair 161product 25product_extended 58product_margin 59purchase 25 49purchase_analytic_analysis 51purchase_analytic_plans 51 60purchase_tender 56report_intrastat 131sale 25sale_journal 124sale_supplier_direct_delivery 99stock 25 73stock_location 131stock_planning 113warning 50
MPS 109multi-level BoM 144
OOpenERP All-In-One
Installation (Windows) 193OpenERP Client
Configuring a PDF viewer 188Installation (Linux) 186Installation (Windows) 205
OpenERP ServerInstallation (Linux) 184Installation (Windows) 199
OpenERP versions 193OpenERP Web
Installation (Linux) 189Installation (Windows) 207
Ppartner 31
category 31contact 31
PDF viewer 188phantom
bill of materials 146plan
production 113PostgreSQL
Installation 181Installation (Windows) 196setup a database 181setup a database (Windows) 197setup a user 181setup a user (Windows) 197
product 34category 34
productionmanagement 137
propertiesdefining 28
Purchase 6purchase
tender 56Purchasing 47
Qquotation 152
RReal Case 18rent 131repair
invoicing 165
SSales 6sales order 152semi-finished product 152Stock
Double-Entry 73Inventory operation 74Location 79Location types 79Negative 97Stock check 74
Warehouse 76stock
journal 124location 35
Stock Management 69
Ttender 56traceability
downstream 115upstream 115
traceability (stock) 118
Wwork center cycle 148

40 Chausseacutee de Namur1367 GrandshyRosiegraverehttpopenerpcom
Special Thanks to Marc Laporte Olivier LaurentGary Malherbe and Greacutegory Dethier
OpenERP is a trademark of OpenERP SAThe software is available under the AGPL license version 3
40 Chausseacutee de Namur1367 GrandshyRosiegraverehttpopenerpcom
From the same Editor
OpenERP for Retail and Industrial Management ndash Steps towardsSales Logistics and Manufacturing Integration 2009Fabien Pinckaers and Geoff Gardiner ISBN 978shy2shy9600876shy0shy4
Drive your Sales amp Marketing Activities with OpenERP ndash Close Leads Automate Marketing Campaigns and Get AccurateForecasts 2011 Els Van Vossel and Fabien Pinckaers ISBN 978shy2shy9600876shy1shy1
Integrate your Logistic Processes with OpenERP ndash EfficientWarehouse Management with Sales and Purchases Integration2011 Els Van Vossel and Fabien Pinckaers ISBN 978shy2shy9600876shy2shy8
The Authors Els Van Vossel and Fabien Pinckaers
v
Contents
Foreword xiOpen Source Software Making Business Applications accessible xi
The OpenERP Solution xii
Structure of this book xii
About the authors xiii
Fabien Pinckaers xiii
Els Van Vossel xiii
Acknowledgements xiv
I First Steps Driving a PurchaseWarehouseManufacturing Flow 1
1 Configuring your OpenERP 3
2 Complete Example Sell Check the Stock Manufacture and Purchase 7
3 Letrsquos get Started and Configure a New Instance 21
31 Business Example 21
32 Basic Settings 22
33 Get your Database Up and Running without Demo Data 22
34 Fit your Needs 25
341 Configuring Accounts 26
342 Configuring Journals 29
343 Configuring the Main Company 30
344 Creating Partner Categories Partners and their Contacts 32
345 Creating Products and their Categories 34
346 Stock Locations 35
347 Setting up a Chart of Accounts 37
348 Make a Backup of the Database 38
35 Testing a Complete Purchase Cycle according to an Example 39
vi
351 Purchase Order 40
352 Receiving Goods 41
353 Invoice Control 42
354 Paying the Supplier 43
36 Testing a Complete Sales Cycle according to an Example 44
361 Sales Order 44
362 Preparing Goods for Shipping to Customers 45
363 Invoicing Goods 45
364 Customer Payment 46
II Advanced Features in Purchase Quotation Management 47
4 Driving your Purchases 49
41 All the Elements of a Complete Workflow 49
411 Setting up your Database 49
412 Price Request from the Supplier 49
413 Goods Receipt 53
414 Control of Invoicing 53
415 Control based on Orders 55
416 Control based on Goods Receipt 55
417 Tenders 56
418 Price Revisions 57
42 Purchase Analysis through Analytic Accounts 59
421 Powerful Statistics 59
422 To Each Enterprise its own Analytic Chart of Accounts 61
III Managing your Warehouse 69
5 Your Warehouse 71
51 Understanding Double-Entry Stock Management 73
52 Managing Physical Inventory Structure 76
521 Warehouse 76
522 Location 79
vii
523 Shop 84
524 Stock 84
53 Keeping Track of Stock Movements 88
531 Goods Receipts 88
532 Internal Stock Moves 92
533 Shipping of Goods 94
534 Logistics Configuration through Advanced Routes 99
535 Procurement Methods ndash Make to Stock and Make to Order 104
536 Choosing Supply Methods 106
537 Packaging with Various Logistics Units of Measure 107
54 Scheduling Procurements 110
541 Processing Exceptions 110
542 Manual Procurement 111
543 Sales Forecasts 113
544 Production Plan 114
55 Managing Lots and Traceability 115
551 Stock Moves 116
552 Lots 117
553 Traceability 118
56 Scrapping Products 119
57 Identifying Products and Locations with Barcodes and RFID Devices 121
58 Financial Inventory Management 121
581 Manual and Real-time Stock Valuation 121
582 Managing Transportation Costs 122
59 Organize your Deliveries 124
591 The Different Journals 124
592 Using the Journals 125
510 Estimating Delivery Dates 127
5101 Standard Delivery Time 127
5102 Schedule Logistic Flows according to MRP1 Rules 128
511 Incoming and Outgoing Products Planning 128
512 Managing Inventory Reconciliation 129
viii
513 Building Reports to Track Activity 129
514 Import Export 130
5141 Stock 131
5142 Rental Locations 131
5143 Consigned Products 133
515 Stock Location Example 133
IV Streamlining your Manufacturing 137
6 Defining your Master Data 139
61 Bill of Materials and Components 140
611 Using Bills of Materials 140
612 Multi-level Bills of Materials 144
613 Phantom Bills of Materials 146
614 Bills of Materials for KitsSets 147
62 Work Centers 147
63 Routings 149
64 Manufacturing Orders 150
65 Complete Production Workflow 151
651 The Sales Order 152
652 Producing an Intermediate Product 152
653 Finished Product Manufacturing 154
654 Subproduct Production 155
655 Scrapping 157
656 Production Orders 157
66 Logistics and Manufacturing 159
661 Manufacturing Stock Locations 159
662 Traceability 160
67 Managing Repairs from Repair to Invoicing and Stock Movements 161
671 Entering Data for a New Repair 162
672 Repair Workflow 163
673 Invoicing the Repair 165
674 Stock Movements and Repairs 165
ix
68 Forecasting and Supplying 166
681 Scheduler 166
682 Planning 167
683 Procurement 171
69 Working with Subcontractors 174
610 Matching Sales Orders and Bills of Materials 175
611 Production and Services 177
V On Site installation 179
7 OpenERP Installation on Linux 181
71 PostgreSQL Server Installation and Configuration 181
711 Example on Ubuntu 181
712 Setup a PostgreSQL user for OpenERP 182
72 OpenERP Server Installation 184
721 Installing the required packages 184
722 Downloading the OpenERP Server 186
723 Testing the OpenERP Server 186
724 Installing the OpenERP Server 186
73 OpenERP Client Installation 186
731 Installing the required packages 186
732 Downloading the OpenERP Client 188
733 Testing the OpenERP Client 188
734 Installing the OpenERP Client 188
735 Configuring a PDF Viewer 188
74 OpenERP Web Installation 189
741 Downloading amp Installing the OpenERP Web Client 189
742 Testing the OpenERP Web Client 190
743 Installing the OpenERP Web Client 190
744 Web Browser Compatibilities 190
8 OpenERP Installation on Windows 193
81 OpenERP All-In-One Installation 193
x
811 Downloading OpenERP All-In-One 193
812 Installing the OpenERP All-In-One 194
813 Starting the OpenERP Client 196
82 PostgreSQL Server Installation and Configuration 197
821 Installing PostgreSQL Server 197
822 Setup a PostgreSQL User 197
83 OpenERP Server Installation 199
831 Downloading the OpenERP Server 199
832 Installing the OpenERP Server 199
833 Customized Configuration 201
834 Monitoring the OpenERP Server 203
835 Congratulations you have successfully installed OpenERP Server 205
84 OpenERP Client Installation 205
841 Downloading the OpenERP Client 206
842 Installing the OpenERP Client 206
843 Starting the OpenERP Client 207
85 OpenERP Web Installation 207
851 Downloading the OpenERP Web 208
852 Installing the OpenERP Web 208
853 Starting the Web Client 209
86 Troubleshooting and Windows Complementary Install Information 210
861 PostgreSQL Administration 210
Index 213
xi
ForewordInformation Systems have played an increasingly visible role over the past several years in improvingthe competitiveness of business They are more than just tools for handling repetitive tasks they willguide and advance all of a companyrsquos daily activities Integrated Management Software is today veryoften a key source of significant competitive advantage
Open Source Software Making Business Applicationsaccessible
Some may look at the Business Application market as a mature market dominated by a few large keyplayers with no new business opportunities
This would be ignoring the market reality So many customers are frustrated by their experience withexisting vendors so many companies around the world need to have access to business applicationsbut cannot afford them
OpenERP believes that business applications should not be a luxury That any company anywhere inthe world should be able to afford the best tools to professionally expand business That is one of thereasons why OpenERP needs to break the existing rules of the ERPs and the Business Applicationsmarket
Customers should use their budget smartly and invest in customizing the application to their specificneeds rather than paying expensive license fees OpenERP is committed to the Open Source BusinessModel precisely because Open Source allows for this Open Source is a disruptive model as it createsmore value for the customers
For decades customers have developed applications which remained specific to their own needs and inthe end proved extremely expensive to maintain Open Source means that customers can benefit frompast developments of other companies Also by contributing to the evolution of the software the userswill enjoy the guarantee that their development will be included in future versions of the software Oneof the major advantages is that such a Community brings a wealth of new functionality
Open Source also allows us to engage with our customers differently Since there is no licensing costany potential customer can download test and use the software OpenERP has no need for an expensivesales force to promote the product OpenERP just needs to make the best product and make it availableto customers
Open Source allows for many barriers in this industry to be broken The software is available to manycompanies who could otherwise not afford expensive business applications license fees The OpenERPsolution allows customers to use their money smartly and tailor the software to their individual needsOpenERP leverages from its customer base to enrich the software and finally eradicate any lock-in toallow customers to use and even drop the software freely
xii
The OpenERP Solution
OpenERP can build a new breed of business applications more modular more customer-friendly fullyweb-based which others cannot due to the heritage of their legacy systems
OpenERP is a comprehensive suite of business applications including Sales CRM Projectmanagement Warehouse management Manufacturing Financial management and Human Resourcesjust to name a few More than 1000 OpenERP modules are available from the OpenERP Apps marketplace (httpappsopenerpcom)
The key to continued logistics success is effective Purchase Sales Warehouse amp ManufacturingManagement and these are precisely the main topics of the book you are reading OpenERPrsquos PurchaseSales Warehouse amp Manufacturing features are flexible and highly developed to assist you in managingall aspects of manufacturing
OpenERP allows you to create bills of materials and use properties allowing your salespeople to easilyselect what they need to sell Purchase proposals and sales forecasts can easily be created fromOpenERP In a few clicks your sales person can transfer necessary information to the customer aboutthe current and virtual stock
Structure of this book
In part One Configuring your OpenERP (page 3) we will show you how to set up an OpenERPdatabase A step-by-step approach will guide you through a complete workflow to discover OpenERPrsquosfeatures
Part Two Advanced Features in Purchase Quotation Management (page 47) guides you from pricerequest to purchase proposal and order and goods receipt Several advanced purchase features willalso be explained
Part Three Managing your Warehouse (page 69) explains the principles of OpenERPrsquos double-entrystock management The book will provide you with ways to manage inventories both on a physicaland a financial level Upstream and Downstream traceability and extensive reporting will be discussedas well
Part Four Defining your Master Data (page 139) guides you the manufacturing process explainingseveral advanced features
Part Five On Site installation (page 179) explains the basic steps to install OpenERP on site BothLinux and Windows installations will be described
To manage your manufacturing you do not need all the elements described in this book But we find itvery important to include an integrated flow from the first quotation to the final billing of the suppliersincluding all the steps quotation order receiving goods inventory manufacturing and billing In someexamples we will also talk about the sales part although advanced sales features will not be includedin this book
xiii
About the authors
Fabien Pinckaers
Fabien Pinckaers was only eighteen years old when he started his first company Today over ten yearslater he has founded and managed several new technology companies all based on Free Open Sourcesoftware
He originated Tiny ERP now OpenERP and is the director of two companies including OpenERPSA the editor of OpenERP In a few years time he has grown the Tiny group from one to sixty-fiveemployees without loans or external fund-raising and while making a profit
He has also developed several large scale projects such as Auction-in-Europecom which became theleader in the art market in Belgium Even today people sell more art works there than on ebaybe
He is also the founder of the LUG (Linux User Group) of Louvain-la-Neuve and of several free projectslike OpenReport OpenStuff and Tiny Report Educated as a civil engineer (polytechnic) he has wonseveral IT prizes in Europe such as Wired and lrsquoInscene
A fierce defender of free software in the enterprise he is in constant demand as a conference speakerand he is the author of numerous articles dealing with free software in the management of the enterprise
Follow Fabien on his blog httpfptinyblogspotcom or on twitter fpopenerp
Els Van Vossel
Els Van Vossel always had a dedication to both written and spoken word Clear and explicitcommunication is crucial
Educated as a Professional Translator in Antwerp she worked as an independent translator on thelocalization of major ERP software Els acquired ERP knowledge and decided to start working as afunctional ERP consultant and a Technical Communicator for ERP software
As such the world of OpenSource software became more and more attractive She started workingwith OpenERP software in her free time and doing so Els really wanted to meet Fabien Pinckaers toshare thoughts about documentation strategy Now Els is reviewing and writing the OpenERP Books
Being an author of several Software Manuals she finds it exciting to work on the OpenERPdocumentation and continuously take it to a higher level Please note that this is a hell of a job but Elsfinds great pleasure in doing it
Follow Els on her blog httptraining-openerpblogspotcom or on twitter elsvanvossel
xiv
Acknowledgements
From Els Van Vossel
Thank you Fabien for offering me the opportunity to work with OpenERP I thank all OpenERP teammembers for their support and understanding My special thanks to my family who encouraged me towrite this book
From Fabien Pinckaers
I address my thanks to all of the team at OpenERP for their hard work in preparing translating andre-reading the book in its various forms My particular thanks to Laurence Henrion and my family forsupporting me throughout all this effort
1
Part I
First Steps Driving aPurchaseWarehouseManufacturing
FlowTo manage your manufacturing you do not need all the elements described in this bookBut we find it very important to include an integrated flow from the first quotation to thefinal billing of the suppliers including all the steps quotation order receiving goodsinventory manufacturing and billing
2
3
Configuring your OpenERP 1In this chapter you can start exploring OpenERP through a basic configuration withthe modules that are discussed in this book As mentioned before we want to showan integrated flow not just manufacturing management Where appropriate we willalso talk about the sales part For information about advanced sales features pleaserefer to the book Integrate your Logistic Process with OpenERP - EfficientWarehouse Management with Sales and Purchases Integration
Use a web browser of your choice to connect to OpenERP Web
Figure 11 Web Client at Startup
Start by creating a new database from the Welcome page by clicking Databases and then completingthe following fields on the Create Database form
bull Super admin password by default it is admin if you or your system administrator have notchanged it
bull New database name DemoCompany
bull Load Demonstration data checkbox checked
bull Default Language English (US)
bull Administrator password admin (because it is the easiest to remember at this stage butobviously completely insecure)
bull Confirm password admin
Press Create to start creating the database
4 CHAPTER 1 CONFIGURING YOUR OPENERP
Language
You can install OpenERP in many languages To be able to easily followthe instructions in this book we recommend you to choose English (US)
OpenERP suggests that you configure your database using a series of questions In the software theseseries of questions are managed through so-called Configuration Wizards
Click the Start Configuration button to continue
The next configuration wizard will help you to decide what your user interface will look like whetherthe screens will only show the most important fields - Simplified - or whether you also want tosee the fields for the more advanced users the Extended view Select Extended and click Next tocontinue
User Preferences
You can easily switch from Simplified to Extended view by changing yourUser Preferences
In the next wizard you can fill your company data select your companyrsquos base currency and add yourcompany logo which can be printed on reports Click Next to continue
Select the Warehouse Management Purchase Management Sales ManagementManufacturing and Accounting amp Finance business applications for installation and clickInstall Now OpenERP will start to install these five applications allowing you to do a complete cyclefrom sales warehouse purchase to invoice You will have to wait for the next configuration wizard tobe displayed (Loading will appear)
Figure 12 Selecting the Required Functionality
OpenERPrsquos modularity enables you to install a single Business Application (such as Purchase)if that is all you need Of course you can choose to install extra applications such asSales Management to handle quotations sales orders and sales invoices as well For nowplease install Warehouse Management Purchase Management Sales Management
CHAPTER 1 CONFIGURING YOUR OPENERP 5
Manufacturing and Accounting amp Finance as these five Business Applications will bediscussed in this book
Reconfigure
Keep in mind that you can change or reconfigure the system any time forinstance through the Reconfigure option in the main bar
When you choose a business application for installation OpenERP will automatically propose to addor configure related (smaller) applications to enrich your system When you install Sales OpenERPwill also ask you whether you want to install Invoicing Journals for instance
The figure Selecting Accounting Configuration (page 5) shows the Accounting ApplicationConfiguration screen that appears when you select Accounting amp Finance to be installed
Figure 13 Selecting Accounting Configuration
Select the Generic Chart of Account and fill in the Sale Tax () applicable in your country ThePurchase Tax will automatically be set as well Click one of the disk icons in front of the bank accountsto confirm the bank accounts to be created Then click Configure to continue the configuration
OpenERP Logistics amp Manufacturing Management offers lots of features You can easily manage youraddress book (customers suppliers ) keep track of procurements and sales manage your warehouseand inventory and much more
The figure Selecting Purchase Configuration (page 6) shows the Purchases Application Configurationscreen that appears when you select Purchase Management to be installed
Simply click Configure to continue the database creation
The following wizards will appear
bull Configure your Sales Management application click Configure to accept the default settings(no options checked)
6 CHAPTER 1 CONFIGURING YOUR OPENERP
Figure 14 Selecting Purchase Configuration
bull Configure your MRP Application Configuration application click Configure to accept thedefault settings
bull Configure your Accounting application click Configure to accept the default settings
bull Configure Sales Order Logistics click Next to accept the default settings
OpenERPrsquos menu will be displayed because your system is now ready for actual configuration In thenext chapter Complete Example Sell Check the Stock Manufacture and Purchase (page 7) you willstart working in the Manufacturing application in a step-by-step approach
As your business is growing and evolving all the time your requirements as to the use of OpenERPare likely to change To sustain your growth you can easily extend your Logistics amp ManufacturingManagement with other OpenERP business applications such as HR or CRM to name some OpenERPoffers this flexibility you can start with one business application and gradually complete OpenERP tosuit your ever changing needs
7
Complete Example Sell Check the Stock
Manufacture and Purchase 2In this chapter we will show you a complete Sales Purchase Manufacturing Warehouse flow Wewill explain how to create a product create a sales order have an automatic purchase proposal and orproduction order produce and receive the goods deliver to the customer and get sales and purchaseinvoices in a step-by-step scenario
First you will get an explanation about the scenario (what Thomas or one of his colleagues is supposedto do) Then the Notes will learn you how Thomas (or a colleague of his) enters the information inOpenERP For the simplicity of the use case we will do all of the steps under the Admin user Pleasenote that we will not discuss all elements in detail in this chapter Later in the book you will find allrequired information (apart from the advanced sales features)
Simplified or Extended View
In OpenERP your user interface will look slightly different according tothe User Preferences In Simplified view the screens will only showthe most important fields tab pages To see also the fields for the moreadvanced users you should switch to the Extended view You caneasily switch from Simplified to Extended view by changing your UserPreferences through the Edit Preferences button For this use case pleaseswitch to Extended view
Your company will have a stand at the House amp Design Fair to promote a series of products Thomasthe salesman shows the new products to the visiting prospects and customers
1 Create a new customer
John Smith from the company Clarkson Ltd visits your stand and decides to order the brandnew Deskand Chair you are promoting Thomas will have to create this new customer in OpenERP
8 CHAPTER 2 COMPLETE EXAMPLE SELL CHECK THE STOCKMANUFACTURE AND PURCHASE
New Customer
To create a new customer Thomas clicks the Sales button in OpenERPrsquosmain screen Then he goes to Sales rarr Address Book rarr Customers andclicks the New button The name of a customer is in blue because it is amandatory field so Thomas enters Clarkson in that field He notices thatthe Customer check box is already checked Thomas enters John Smith inthe Contact Name he selects the Default address type In the Streetfield Thomas enters London Street 40 he also enters the City London andthe Country United Kingdom as shown in the screenshot below He takes alook at the other three tabs and decides to keep the default values Thomasthen clicks the Save button to store the new customer
Figure 21 New Customer
2 Create a new product category and product
Because the desk and the chair from the new OfficeSecrets series do not yet exist in OpenERPMitchell the Product Manager will create this brandnew desk as a Make to Order product that willbe bought directly from the supplier concerned He will have to create a new product category for theOfficeSecrets series too
Configuring Products
For more information about configuring products please refer to the nextchapter Creating Products and their Categories (page 34)
CHAPTER 2 COMPLETE EXAMPLE SELL CHECK THE STOCK MANUFACTUREAND PURCHASE 9
Product Category
Product categories do have an effect on the products assigned to them and aproduct may belong to only one category To create a new product categoryMitchell goes to Warehouse selects the menu Configuration rarr Product rarrProducts Categories and clicks New to get an empty form for defining aproduct category Mitchell enters OfficeSecrets in the Name field andadds it to the parent category All products Sellable He leavesthe other fields as such and clicks Save
Then Mitchell will create three new products Note that he could also have created the new productcategory directly from the Product form
10 CHAPTER 2 COMPLETE EXAMPLE SELL CHECK THE STOCKMANUFACTURE AND PURCHASE
Product
To create a new product Mitchell goes to Warehouse rarr Product rarrProducts and clicks the New button The name of a product is in bluebecause it is a mandatory field so he enters 1600 Desk Wave Right-handW1600x D1200x H725mm Maple in that field He notices that the Can beSold and Can be Purchased check boxes are already checked by defaultMitchell selects the Stockable Product product type because he wants tokeep track of the stock movements of the desks In the ProcurementMethod field Mitchell selects Make to Order because the companydecided to only buy the product at the supplier when there is a sales orderfor it The Supply Method will be Buy He sets the Cost Price to 300and the Sales Price to 54125 as shown in the screenshot Product (page 11)Mitchell selects the product category OfficeSecrets Now he justhas to add the supplier from whom he will buy the desks He clicks theSuppliers tab then clicks New He clicks the Magnifying glass to geta list of suppliers from which he selects Wood y Wood Pecker He sets theminimal quantity to 1 and clicks the Save amp Close button He takes alook at the other tabs and decides to keep the default values He then clicksthe Save button to store the new product
To create the component to be included in the Bill of Material Mitchellclicks the Duplicate button to duplicate the Desk (available when a productis not in Edit mode) He changes the name to Leather for Chair in thatfield He unchecks the Can be Sold checkbox Mitchell changes theProcurement Method to Make to Stock because the company needs apermanent stock of leather to be able to fulfil the customerrsquos demands Hesets the Cost Price to 20 and the Sales Price to 0 Mitchell then clicks theSave button to store the new product
To create another component to be included in the Bill of Material Mitchellclicks the Duplicate button to duplicate the Leather for Chair He changesthe name to Chair Frame in that field He sets the Cost Price to 100Mitchell then clicks the Save button to store the new product
To create the finished product Mitchell goes to the list of products opensthe Desk product and clicks the Duplicate button to duplicate the Desk(available when a product is not in Edit mode) He changes the name toLeather Operator Chair in that field In the Procurement Methodfield Mitchell selects Make to Order then he changes the SupplyMethod to Produce He sets the Cost Price to 200 and the Sales Priceto 32550 From the supplier tab Mitchell deletes the supplier by clickingthe black cross He then clicks the Save button to store the new product
3 Add Minimum Stock Rules
To make sure the leather and the frame is always in stock Mitchell has to define minimum stock rulestelling OpenERP how many goods have to be ordered to keep a good stock level
CHAPTER 2 COMPLETE EXAMPLE SELL CHECK THE STOCK MANUFACTUREAND PURCHASE 11
Figure 22 Product
Minimum Stock Rules
To enter minimum stock rules for the Leather for Chair product heclicks the Minimum Stock Rules action and clicks the New buttonMitchell notices that the product is already preset in the form Heselects the OpenERP SA warehouse and notices that the Stock locationis automatically set As a minimum quantity he adds 10 and the maximumquantity will be 40 He then clicks the Save button to store the minimumstock rules as shown in the screenshot Minimum Stock Rules (page 11) Dothe same for the frame
Figure 23 Minimum Stock Rules
4 Create a Bill of Material
To produce the chair from the frame and the leather seat Mitchell has to create a Bill of Material forthe finished product (the Chair) This way he will tell OpenERP which components are required toproduce the Chair
12 CHAPTER 2 COMPLETE EXAMPLE SELL CHECK THE STOCKMANUFACTURE AND PURCHASE
BoM
Mitchell opens the Chair product clicks the Bill of Materialsaction then clicks the New button Mitchell notices that the Chair is alreadypreset in the form He clicks the New button next to Components to add theLeather for Chair He clicks the disk in front of the line to save his changesThen he adds a new line (which is displayed automatically) for the ChairFrame and clicks the disk to save Finally Mitchell clicks the Save buttonat the top
BoM
You can also create a Bill of Materials from the Manufacturing rarr MasterData rarr Bill of Materials More information on Bills of Material will beprovided in the next chapters
5 Warehouse and locations
Now Thomas will have a look at how the warehouse and the locations have been organised
Configuring locations
We will not create a warehouse and configure locations in this chapter Formore information please refer to the chapter Managing your Warehouse(page 69) later in this book Just have a look at the list of locations definedwith the demo data
Warehouse and Location Structure
OpenERP has three predefined top-level location types PhysicalLocations which define where your stock is physically storedPartner Locations for the customer and supplier stock andVirtual Locations representing counterparts for procurementproduction and inventory Thomas clicks Warehouse rarr Configuration rarrWarehouse Management rarr Locations to display a list view of the locations
6 Create a sales quotation
The customer Clarkson asked to receive a quotation for two Office Desks and two chairs from theOfficeSecrets series Thomas enters the sales quotation
CHAPTER 2 COMPLETE EXAMPLE SELL CHECK THE STOCK MANUFACTUREAND PURCHASE 13
Figure 24 Location Structure
Sales Quotation Order
Thomas goes to Sales rarr Sales rarr Sales Orders He clicks the New buttonto make a quotation He enters Clarkson in the Customer field Now hecan enter the products he will be selling Next to Sales Order LinesThomas clicks the New button to enter sales order lines He selects theDesk product and changes the quantity to 2 as specified in the screenshotSales Order (page 14) Thomas clicks the Save amp New button to adda second line He adds 2 chairs and notices that a message is displayedsaying that there is no stock Thomas clicks the Save amp Close buttonThen he clicks Compute to see the total price of the quotation He opensthe Other Information tab because he wants the sales invoice to becreated from the picking So he changes the Shipping Policy to Invoicefrom the Picking To print the quotation he clicks Quotation Orderin the Reports section at the right side of the screen
14 CHAPTER 2 COMPLETE EXAMPLE SELL CHECK THE STOCKMANUFACTURE AND PURCHASE
Figure 25 Sales Order
Price Lists
In this chapter the Public Pricelist will be used Later on you will learnmore about creating price lists
7 Confirm the sales order
John Smith calls Thomas to tell him that he agrees with the quotation Thomas now confirms the salesorder
Sales Quotation Order
Thomas goes to Sales rarr Sales rarr Sales Orders He enters Clarkson in theCustomer field and then clicks Search Thomas clicks the sales orderto open it He clicks the Confirm Order button to make a sales orderfrom the quotation To print the sales order he clicks Quotation Order inthe Reports section at the right side of the screen
Order Confirmation
When you click Confirm Order red text will be displayed at the top ofthe screen depending on the parameters of the sales order In our exampleyou will see two text lines one about the quotation conversion and anotherone about the delivery order You can click the second line to be directed tothe delivery order You can also open the delivery order from the Historytab of the sales order
8 Run the scheduler
CHAPTER 2 COMPLETE EXAMPLE SELL CHECK THE STOCK MANUFACTUREAND PURCHASE 15
The goods have to be produced and delivered to the customer but Thomas notices that the desks andchairs are not available in stock Because the Desk was defined as a Make to order amp Buy productOpenERP will automatically create a procurement order on confirmation of a sales order allowing youto directly generate a purchase order The same will be done for the Leather
OpenERP has a scheduler that will run by default every day In this case Jason your companyrsquosPurchaser will run the scheduler manually
Scheduler
Jason goes to Warehouse rarr Schedulers He clicks ComputeSchedulers because he needs to purchase material and wants to checkwhether anything needs to be added In the Wizard Jason clicks ComputeSchedulers to start the computation
Procurement Exceptions
Jason can also run the procurement for each product from the Warehouserarr Schedulers rarr Procurement Exceptions The procedurement exceptionsmenu also includes procurements that have not been scheduled yet
9 Change the purchase request and confirm it
Now OpenERP will have created procurements (in this example purchase requests) for the productsthat need to be supplied
Purchase Requests
Jason goes to Purchases rarr Purchase Management rarr Request forQuotation He notices three purchase requests for Wood y Wood Pecker Heselects these three purchase requests by clicking the checkbox in front ofthem then clicks the Merge Purchase Orders action at the right toorder all products in one go He clicks the yellow pencil to open the mergedpurchase request in Edit mode Now he decides to purchase some extradesks because Luke the Sales Manager told him he expects more salesTo do this he clicks the yellow pencil in front of the order line and changesthe quantity to 10 He clicks the Save amp Close button then he clicksCompute to see the total price of the quotation From the Delivery ampInvoicing tab he specifies that the invoice has to be created from thepicking (Invoicing Control From Picking) To confirm the purchaseorder he just has to click the Convert to Purchase Order button
10 Receive the products
The supplier Wood y Wood Pecker sends the goods to your company Jason receives the goods andenters this receipt in OpenERP
16 CHAPTER 2 COMPLETE EXAMPLE SELL CHECK THE STOCKMANUFACTURE AND PURCHASE
Incoming Shipments
Jason goes to Warehouse rarr Warehouse Management rarr IncomingShipments He notices the incoming shipment for Wood y Wood Peckerand clicks the green arrow to start receiving the products He clicks theValidate button to confirm that all products have been received from thesupplier From the Incoming Shipments list view he notices that theDelivery order for the customer is now ready to process (red text at the topof the screen) at least for the desks He wants to check the stock of Desksand goes to Warehouse rarr Product rarr Products In the Name field Jasontypes desk then clicks Search The real stock is 10 the virtual stock is 8because of the confirmed sales order for two desks
List versus Form view
You can receive deliver goods from both list and form view You can alsoreceive deliver goods by product instead of by complete order
11 Create the draft purchase invoice
Because the purchase order was set to be invoiced from the picking Jason can now create the draftinvoice which allows for easy invoicing control
Draft Purchase Invoice
Jason returns to Warehouse rarr Warehouse Management rarr IncomingShipments and clicks Clear He opens the extended filters and clicks theTo Invoice button He ticks the check box in front of the incomingshipment to be invoiced and then clicks the Create Invoice action inthe Reports section at the right side of the screen He selects the PurchaseJournal and clicks Create to generate the draft invoice The screen withthe supplier invoice will open We will get back to this later
Figure 26 Create Invoice from Incoming Shipments
12 Run the scheduler again
CHAPTER 2 COMPLETE EXAMPLE SELL CHECK THE STOCK MANUFACTUREAND PURCHASE 17
To tell the system that the procurements have been received and that the raw materials are now in stockso that the production order can be generated Jason has to run the scheduler again
Scheduler
Jason goes to Warehouse rarr Schedulers He clicks ComputeSchedulers In the Wizard Jason clicks Compute Schedulers tostart the computation
Just in Time
You can also install the mrp_jit (Just in Time) so that this is computed inreal time In a production environment however you would typically havethe scheduler run
13 Start manufacturing
Jason checks his list of manufacturing orders which are ready to produce He notices the leatheroperator chair and decides to start manufacturing it
Manufacturing or Production Orders
Jason goes to Manufacturing rarr Manufacturing rarr Manufacturing Ordersand selects the order to start producing the chairs He opens it by clickingthe yellow pencil then clicks the Start Production button Henotices the products to be consumed He assembles the frame and theleather for both chairs When he has finished he clicks the Producebutton He keeps the default settings and clicks Confirm then Cancelto close the window He clicks the Save button to see the changes
14 Deliver the goods to the customer and create draft sales invoice
The Chairs are now also available in stock and the complete order can be delivered to the customer Inthe warehouse they check the open delivery orders
Delivery
Randy from the warehouse goes to Warehouse rarr Warehouse Managementrarr Delivery Orders to check the goods ready for delivery He clicks theyellow pencil to open the delivery order He clicks the Process button todeliver the 2 desks and chairs then he clicks Validate
15 Create the sales invoice
18 CHAPTER 2 COMPLETE EXAMPLE SELL CHECK THE STOCKMANUFACTURE AND PURCHASE
Thomas now checks whether the goods have been delivered to his customer He can check this fromthe sales order or he can tell from the status of the delivery order
Creating a Sales Invoice
To create the draft sales invoice Thomas has several possibilities
He opens Sales rarr Invoicing rarr Deliveries to Invoice and selects thecorresponding delivery for invoicing by ticking the check box and clickingthe Create Invoice action in the Reports section at the right of thescreen
He goes to Warehouse rarr Warehouse Management rarr Delivery Orders andclicks the Create Invoice button
He goes to the list of sales orders and opens the sales order concernedThomas clicks the History tab clicks the picking list and then the CreateInvoice button He selects the Sales Journal and clicks the Createbutton
The draft invoice is now displayed in list view Thomas opens the invoiceand clicks the Validate button To print the invoice he clicks the PrintInvoice button or the Invoices action in the Reports section at theright of the screen The printed invoice will automatically be added as pdfdocument to Attachments
16 Confirm the purchase invoice
Robin the accountant now receives the invoice from his supplier He can do the invoicing controlaccording to the picking directly from the Purchase Invoices screen
Invoice Control
Robin goes to Accounting rarr Suppliers rarr Supplier Invoices and opens theWood y Wood Pecker invoice Robin verifies whether the invoice fromthe supplier matches this draft invoice created from the picking order Theinvoice indeed matches and he clicks the Approve button to confirm theinvoice and assign a document number to it
Purchaser
The purchaser can also do the invoice matching from Purchases rarr InvoiceControl rarr Supplier Invoices to Receive
Below you find a graphical representation of the sales flow we explained before the part from quotationto invoice This view is available in OpenERP You can open this Process view by clicking the questionmark next to the Sales Order title
CHAPTER 2 COMPLETE EXAMPLE SELL CHECK THE STOCK MANUFACTUREAND PURCHASE 19
Figure 27 From Quotation to Invoice
20 CHAPTER 2 COMPLETE EXAMPLE SELL CHECK THE STOCKMANUFACTURE AND PURCHASE
21
Letrsquos get Started and Configure a New
Instance 3Now that you have discovered some of the many possibilities of OpenERP from a tour ofthe demonstration database you will develop a real case An empty database provides thestarting point for testing a classic workflow from product sales to purchase completingyour guided tour and your getting familiar with OpenERP
A database loaded with demonstration data is very useful to understand OpenERPrsquos general capabilitiesBut to explore OpenERP through a lens of your own companyrsquos needs you should start with an emptydatabase You will work in this chapter on a minimal database containing no demonstration data sothat there is no confusion about what you created You will keep the database you have created toallow you to build on it throughout the rest of this book if you want to
You will develop a real case through the following phases
1 Specify a real case
2 Describe the functional needs
3 Configure the system with the essential modules
4 Carry out the necessary data loading
5 Test the system with your database
The case is deliberately simple to provide you with a foundation for the more complex situations youmight have to handle in your company Throughout this chapter we assume that you access OpenERPthrough its web interface And it is also assumed (as in the rest of this book) that you are using thelatest download of OpenERP version 6 the stable production version at the time of writing (not thetrunk version which is likely to have new and potentially unstable features)
31 Business Example
In this example you will configure a system that enables you to
bull buy products from a supplier
bull stock the products in a warehouse
bull sell these products to a customer
The system should support all aspects of invoicing payments to suppliers and receipts from customers
22 CHAPTER 3 LETrsquoS GET STARTED AND CONFIGURE A NEW INSTANCE
32 Basic Settings
For this business case you will have to model
bull accounts and account types
bull the suppliers and a supplier category
bull the customers and a customer category
bull some products and a product category
bull an inventory
bull a purchase order
bull a sales order
bull invoices
bull payments
To test the system you will need at least one supplier one customer one product a warehouse aminimal chart of accounts and a bank account
33 Get your Database Up and Running without Demo Data
Please note that the new database you have to create will not include demo data and only the minimallyrequired functionality as a starting point You will need to know your super administrator password forthis ndash or you will have to ask your ICT manager for the password to be able to create this database
Please refer to Configuring your OpenERP (page 3) for more information about how to create a newdatabase that you will give the name of your company
As a reminder please find the steps below without further explanation
Start by creating a new database from the Welcome page by clicking Databases and then completingthe following fields on the Create Database form
bull Super admin password by default it is admin if you or your system administrator have notchanged it
bull New database name YourCompany
bull Load Demonstration data checkbox unchecked
bull Default Language English (US)
bull Administrator password admin
bull Confirm password admin
CHAPTER 3 LETrsquoS GET STARTED AND CONFIGURE A NEW INSTANCE 23
Press Create to start creating the database
OpenERP suggests that you configure your database using a series of questions In the software theseseries of questions are managed through so-called Configuration Wizards
Click the Start Configuration button to continue
The next configuration wizard will help you to decide what your user interface will look like whetherthe screens will only show the most important fields - Simplified - or whether you also want tosee the fields for the more advanced users the Extended view Select Extended and click Next tocontinue
User Preferences
You can easily switch from Simplified to Extended view by changing yourUser Preferences
In the next wizard you can fill your company data select your companyrsquos base currency and add yourcompany logo which can be printed on reports Fill out the required data and click Next to continue
Select the Warehouse Management Purchase Management Sales ManagementManufacturing and Accounting amp Finance business applications for installation and clickInstall Now OpenERP will start to install these five applications allowing you to do a completecycle from sales warehouse purchase manufacturing to invoice You will have to wait for the nextconfiguration wizard to be displayed (Loading will appear)
Figure 31 Selecting the Required Functionality
Reconfigure
Keep in mind that you can change or reconfigure the system any time forinstance through the Reconfigure option in the main bar
When you choose a business application for installation OpenERP will automatically propose to addor configure related (smaller) applications to enrich your system When you install Sales OpenERPwill also ask you whether you want to install Invoicing Journals for instance
24 CHAPTER 3 LETrsquoS GET STARTED AND CONFIGURE A NEW INSTANCE
Skip the step that asks you to configure your Accounting Chart because you will learn how to createaccounts
In the Purchases Application Configuration screen simply click Configure to continue the databasecreation
The following wizards will appear
bull Configure your Sales Management application click Configure to accept the default settings(no options checked)
bull Configure your MRP Application Configuration application click Configure to accept thedefault settings
bull Configure your Accounting application click Configure to accept the default settings
bull Configure Sales Order Logistics click Next to accept the default settings
OpenERPrsquos menu will be displayed because your system is now ready for actual configuration
Setup Wizard
You will have to go through the Setup wizard in steps You have twooptions
1 If you click the Start Configuration button OpenERP guides youthrough a series of steps to Configure Your Interface - proceedwith Simplified (the other option is Extended) and ConfigureYour Company Information - enter a Company Name and select aCurrency for your company Then OpenERP helps you to installvarious applications with different functionality through wizards
bull OR -
2 When you click the button Skip Configuration Wizards you can havethe screen as shown in screenshot Starting the minimal database(page 25) Then you can start working with this minimal database(we will not use this option here)
CHAPTER 3 LETrsquoS GET STARTED AND CONFIGURE A NEW INSTANCE 25
Figure 32 Starting the minimal database
34 Fit your Needs
Functional needs can be provided by core modules from OpenERP You just have to decide whichfunctionality you want in your system As explained before you can click the Check Box of thecorresponding application Another way of installing modules is to go the Administration rarr Modulesrarr Modules menu Here you will find a list of all modules available in OpenERP You can also checkour website httpappsopenerpcom for more information about modules
To manage your manufacturing you do not need all the elements described in this book But we findit very important to include an integrated flow from first quotation to the payment of the supplierincluding all the steps quotation order receiving goods inventory manufacturing
To manage such a flow we need at least the following applications
bull Manufacturing (the mrp module)
bull Warehouse Management (the stock module)
bull Accounting amp Finance (the account module)
bull Purchase Management (the purchase module)
bull Sales Management (the sale module)
When you log on OpenERP will display the opening screen with all selected business applicationsinstalled
You will create all the elements in the database that you need to carry out the use case These arespecified in the functional requirements
26 CHAPTER 3 LETrsquoS GET STARTED AND CONFIGURE A NEW INSTANCE
Figure 33 Database with all Required Functionality for this Example
Examples
Of course we will provide examples for you to configure your databasesuch as customers and suppliers Make sure to use your own data instead
341 Configuring Accounts
You need to start with a minimal set of accounts and therefore you will need a couple of account typesto determine the accountrsquos use how it will be transferred at year closing and what category it belongsto You can structure your accounts into a chart at any time (and in fact you can structure them intoseveral additional charts at the same time as you will see in the on line chapter of the OpenERP book)so you do not need to be concerned unduly about structure
Account Types
To create account types go to Accounting rarr Configuration rarr Financial Accounting rarr Accounts rarrAccount Types and click the New button You will need the following six types the first of which isshown in figure New Account Type (page 27) Click Save to confirm each account type
Table 31 Defining Account Types
Acc Type Name Code PampL BS Category Deferral MethodView view NoneIncome income Profit amp Loss (Income Accounts) NoneExpense expense Profit amp Loss (Expense Accounts) NoneCash cash Balance Sheet (Assets Accounts) BalanceReceivable receiv Balance Sheet (Assets Accounts) UnreconciledPayable pay Balance Sheet (Liability Accounts) Unreconciled
CHAPTER 3 LETrsquoS GET STARTED AND CONFIGURE A NEW INSTANCE 27
Figure 34 New Account Type
Accounts
To create accounts go to Accounting rarr Configuration rarr Financial Accounting rarr Accounts rarrAccounts and click the New button
You need accounts to keep track of your customers and suppliers two more to sell and buy goods andone for the payment and receipt of funds And also one lsquoorganizingrsquo account that is just a view of theother five So basically you will need at least the following six accounts one of which is shown in NewAccount (page 28) Click Save to confirm each account
Chart of Accounts Structure
When you create a chart of accounts you should always start with the mainview account to define the chart as shown in the table (Minimal Chart)This will allow you to easily link new accounts to the correct chart directly
Table 32 Defining Accounts
Name Code Parent Internal Type Account Type ReconcileMinimal Chart 0 View View uncheckedPayable AP 0 Minimal Chart Payable Payable checkedReceivable AR 0 Minimal Chart Receivable Receivable checkedBank B 0 Minimal Chart Liquidity Cash uncheckedPurchases P 0 Minimal Chart Regular Expense uncheckedSales S 0 Minimal Chart Regular Income unchecked
The Account Type entry is taken from the list of types that you just created Although it looks a bit likea text box it does not behave in quite the same way A single Del or Backspace keystroke is allyou need to delete the whole text and when you type the name (or part of the name) you still need to
28 CHAPTER 3 LETrsquoS GET STARTED AND CONFIGURE A NEW INSTANCE
Figure 35 New Account
associate that text with the entry by clicking the Tab or Enter key to confirm your selection You canalso use the Search icon to open a list of available account types
Properties
You now define some default properties so that you do not have to think about which account is used fora certain transaction every time you do something The main new properties are the four that associateaccounts payable and receivable to partners and expenses and income to product categories
Create properties using Administration rarr Configuration rarr Parameters rarr Configuration Parametersand then clicking the New button This menu is only available in Extended view
CHAPTER 3 LETrsquoS GET STARTED AND CONFIGURE A NEW INSTANCE 29
Selecting the correct field
When you have several fields with the same name make sure to select thefield for which the Field Name corresponds to the property name you aredefining Note that you can also duplicate properties and then change therequired fields
Table 33 Defining Properties
Name Field Type Valueproperty_account_payable Account Payable Many2One (accountaccount) AP Payableproperty_account_receivable Account Receivable Many2One (accountaccount) AR Receivableproperty_account_expense_categ Expense Account Many2One (accountaccount) P Purchasesproperty_account_income_categ Income Account Many2One (accountaccount) S Sales
To check the result of your configuration you can go to Accounting rarr Customers rarr Customers andopen the form containing your company data On the Accounting tab you will notice that both thedefault account receivable and account payable have been filled
Mistakes in configuring accounts and properties
It is easy to make mistakes in configuring accounts and their properties butthe consequences are not immediately obvious You will mostly discovermistakes when trying to make a Purchase or Sales Order (see later forexample Driving your Purchases (page 49)) where the accounts arerequired fields or if you are diligent when you set up Partners
If you configure them correctly at this stage then fields will be completedautomatically and you will never know a thing If you do not configure allthis correctly then you will not be able to save the order form until youhave corrected the problem or until you manually set the accounts
Since this configuration is quite tedious you would do best by finding acertified Chart of Accounts that has already been set up to meet your needsand adapt the predefined chart if necessary
342 Configuring Journals
You will also need to configure some journals which are used to record the transactions from oneaccount to another when invoices are raised and then paid Create journals from the menu Accountingrarr Configuration rarr Financial Accounting rarr Journals rarr Journals and then click the New button
30 CHAPTER 3 LETrsquoS GET STARTED AND CONFIGURE A NEW INSTANCE
Default Values
Notice that when you select the journal type the Display Mode will alreadybe preset An entry sequence for the journal will be created automaticallywhen you save the journal The default debit and credit account will beused as a counterpart when encoding manual journal entries Debit andcredit accounts are mandatory for bank journals
Table 34 Defining Journals
JournalName
Code Type Display Mode Default DebitAccount
Default CreditAccount
PurchaseJournal
PUJ Purchase SalePurchaseJournal View
P Purchases P Purchases
SalesJournal
SAJ Sale SalePurchaseJournal View
S Sales S Sales
BankJournal
BNK Bank andCheques
BankCash JournalView
B Bank B Bank
In this example validating a Purchase Order creates a draft invoice (see later again for exampleDriving your Purchases (page 49)) where a journal is required
As with accounts and properties if you configure them correctly at this stage the fields will becompleted automatically and you will never know a thing If you do not configure all this correctlythere will be errors with the order form or corresponding draft invoice until you have corrected theproblem or until you manually set the journal
343 Configuring the Main Company
In case you had chosen to Skip Configuration Wizards when you first created the database you mayconfigure your company information in the following manner Start configuring your database by typingyour companyrsquos name in the Main Company When you print standard documents such as quotationsorders and invoices you will find this configuration information used in the document headers andfooters
To do this click Sales rarr Address Book rarr Customers and click the name of the only company therewhich is YourCompany This gives you a read-only form view of the company so make it editableby clicking the Edit button to the upper left of the form
CHAPTER 3 LETrsquoS GET STARTED AND CONFIGURE A NEW INSTANCE 31
Editable Form in the Web Client
When toggling from the list view to the form view of an item you cangenerally click its name in the list view to show a non-editable view orthe pencil icon by the left-hand edge of the line to open it in an editableview You can toggle between editable and non-editable once you are inform view
Change the contact name to match your first name and name The company name and the contact namebelow are just an example
bull Name Ambitious Plumbing Entreprises
bull Contact Name George Turnbull
Before you save this look at the partnerrsquos accounting setup by clicking the Accounting tab Thefields Account Receivable and Account Payable have account values that were taken from the accountproperties you just created You do not have to accept those values you can enter any suitable accountyou like at this stage although OpenERP limits the selection to accounts that make accounting sense
Back at the first tab General change any other fields you like such as the address and phone numbersthen click Save This changes one Contact for the Partner which is sufficient for the example
From the MAIN MENU click Administration rarr Companies rarr Companies and edit the only entrythere Please note that you have to keep your own company data but for the example we use theAmbitious Plumbing company
bull Company Name AmbiPlum
bull Partner should already show Ambitious Plumbing Enterprises
bull Report Header Ambitious Plumbing
bull Report Footer 1 type your slogan ie Best Plumbing Services Great Prices
bull Report Footer 2 type your company details such as bank account or Ambitious - ourRegistered Company Details
Figure Changing Company Details (page 32) shows the effect of this You can also change variousother company-wide parameters for reports and scheduling in the other tabs and you can upload acompany logo of a specific size for the reports Click Save to store the changes
You can leave the currency at its default setting of EUR for this example Or you can change it in thisCompany and the two default Pricelists (Sales rarr Configuration rarr Pricelists rarr Pricelists) if you didnot set the correct company currency in the Configuration Wizard
Currency
The examples in this book are in USD and EUR You the reader can useyour home currency instead
32 CHAPTER 3 LETrsquoS GET STARTED AND CONFIGURE A NEW INSTANCE
Figure 36 Changing Company Details
344 Creating Partner Categories Partners and their Contacts
You will now create a supplier category and a customer category Partner categories are useful fororganizing groups of partners but have no special behaviour that affects partners so you can assignthem as you like Then you will define one supplier and one customer with a contact for each
To do this go to the menu Sales rarr Configuration rarr Address Book rarr Partner Categories and clickNew to open a new form for defining Partner Categories Define the two categories that follow by justentering their Category Name and saving them
bull Suppliers
bull Customers
Then create two partners from the menu Sales rarr Address Book rarr Customers OpenERP allows youto create both suppliers and customers from this menu Please note that we provide some exampledata but of course you should define your own customers and suppliers Feel free to also complete theaddress which we donrsquot do in our example Click the New button to open a blank form and then addthe following data for the first partner
bull Name Plumbing Component Suppliers
bull Customer checkbox unchecked
bull Supplier checkbox checked
bull Contact Name Jean Poolley
bull Address Type Default
bull click Add and select Suppliers to add the category to the Partner Categories field by selectingit from the Search Partner Categories list
bull then save the partner by clicking the Save button
CHAPTER 3 LETrsquoS GET STARTED AND CONFIGURE A NEW INSTANCE 33
Figure 37 New Partner Form
Figure New Partner Form (page 33) shows the result
Contact Types
If you have recorded several contacts for the same partner you can specifywhich contact is used for various documents by specifying the AddressType
For example the delivery address can differ from the invoice address fora partner If the Address Types are correctly assigned OpenERP canautomatically select the appropriate address during the creation of thedocument ndash an invoice is addressed to the contact that has been assignedthe Address Type of Invoice otherwise to the Default address
For the second partner proceed just as you did for the first with the following data
34 CHAPTER 3 LETrsquoS GET STARTED AND CONFIGURE A NEW INSTANCE
bull Name Smith and Offspring
bull Customer checkbox checked
bull Supplier checkbox unchecked
bull Contact Name Stephen Smith
bull Address Type Default
bull add Customers in the Categories field
bull Save the form
To check your work you can go to the menu Sales rarr Configuration rarr Address Book rarr PartnerCategories and click on each category in turn to see the companies in the category
Multiple Partner Categories
If this partner was also a supplier then you would add Suppliers to thecategories as well but there is no need to do so in this example You canassign a partner to multiple categories at all levels of the hierarchy
345 Creating Products and their Categories
Unlike partner categories and their assigned partners product categories do have an effect on theproducts assigned to them ndash and a product may belong to only one category Under the main menulink Warehouse or Sales select the menu Configuration rarr Product rarr Products Categories and clickNew to get an empty form for defining a product category
Enter Radiators in the Name field Click Save You will see that other fields specifically those in theAccounting Properties section have been automatically filled in with values of accounts and journalsThese are the values that will affect products ndash equivalent fields in a product will take on these valuesif they too are blank when their form is saved
Property Fields
Properties have a rather unusual behaviour They are defined by parametersin the menus in Administration rarr Configuration rarr Parameters rarrConfiguration Parameters and they update fields only when a form issaved and only when the fields are empty at the time the form is savedYou can manually override any of these properties as you need
Property fields are used throughout the OpenERP system and extensivelyin a multi-company environment There property fields in a partner formcan be populated with different values depending on the userrsquos companyFor example the payment conditions for a partner could differ dependingon the company from which it is addressed
CHAPTER 3 LETrsquoS GET STARTED AND CONFIGURE A NEW INSTANCE 35
UOM
UOM is an abbreviation for Unit of Measure OpenERP manages multipleunits of measure for each product you can buy in tons and sell in kgs forexample The conversion between each category is made automatically (solong as you have set up the conversion rate in the product form first)
Managing Double Units of Measure
The whole management of stock can be carried out with double units ofmeasure (UOM and UOS ndash for Unit of Sale) For example an agro-foodcompany can stock and sell ham by piece but buy and value it by weightThere is no direct relationship between these two units so a weighingoperation has to be done
This functionality is crucial in the agro-food industry and can be equallyimportant in fabrication chemicals and many other industries
Now create a new product through the Warehouse or Sales menu
1 Go to Products rarr Products and click New
2 Create a product ndash type Titanium Alloy Radiator in the Name field
3 The Product Type field should be assigned as Stockable Product The fields ProcurementMethod Supply method Default Unit Of Measure and Purchase Unit Of Measure should stayat their default values For more information about these methods please refer to chapterProcurement Methods ndash Make to Stock and Make to Order (page 104)
4 Enter 5750 into the Cost Price field and 13250 into the Sale Price field
5 Click the Search icon to the right of the Category field to select the Radiators category
6 Click the Accounting tab then click Save and observe that Accounting Properties here remainempty When product transactions occur the Income and Expense accounts that you have justdefined in the Product Category are used by the Product unless an account is specified heredirectly in the product to override that
7 Once the product is saved it changes to a non-editable state If you had entered data incorrectly orleft a required field blank an error message would pop-up the form would have stayed editableand you would need to click from tab to tab to find a field colored red that would have to becorrectly filled in
346 Stock Locations
Click Warehouse rarr Inventory Control rarr Location Structure to see the hierarchy of stock locationsThese locations have been defined by the minimal default data loaded when the database was createdYou will use this default structure in this example
36 CHAPTER 3 LETrsquoS GET STARTED AND CONFIGURE A NEW INSTANCE
Figure 38 Product Form
OpenERP has three predefined top-level location types Physical Locations and PartnerLocations that act as their names suggest and Virtual Locations that are used by OpenERPfor its own purposes
1 From the Main Menu click Warehouse rarr Configuration rarr Warehouse Management rarrLocations to reach a list view of the locations (not the tree view)
2 Click the Clear button to display a complete list of all predefined locations
3 Click the name of a location such as Physical LocationsAmbitious PlumbingEnterprises to open a descriptive form view Each location has a Location Type and a ParentLocation that defines the hierarchical structure While you are here you might have to change thelocationrsquos name to Ambitious Plumbing Enterprises
4 From the Main Menu click Warehouse rarr Configuration Warehouse Management rarr Warehousesto view a list of warehouses There is only the one at the moment named after your company orin the example Ambitious Plumbing Enterprises
A Warehouse contains an input location a stock location and an output location for sold products Youcan associate a warehouse with a partner to give the warehouse an address That does not have to beyour own company (although it can be) you can easily specify another partner who may be holdingstock on your behalf
CHAPTER 3 LETrsquoS GET STARTED AND CONFIGURE A NEW INSTANCE 37
Location Structure
Each warehouse is composed of three locations Location Input LocationOutput and Location Stock Your available stock is given by the contentsof the Location Stock and its child locations
So the Location Input can be placed as a child of the Location Stock whichmeans that when Location Stock is interrogated for product quantities italso takes into account the contents of the Location Input Location Inputcould be used as a goods-in QC location The Location Output must neverbe placed as a child of Location Stock since items in Location Outputwhich can be considered to be packed ready for customer shipment shouldnot be thought of as available for sales elsewhere
347 Setting up a Chart of Accounts
You can set up a chart of accounts during the creation of a database but for this exercise you will startwith the minimal chart that you created (just a handful of required accounts without hierarchy tax orsubtotals)
A number of account charts have been predefined for OpenERP some of which meet the needs ofnational authorities (the number of those created for OpenERP is growing as various contributors createand freely publish them) You can take one of those without changing it if it is suitable or you can takeany chart as your starting point and design a complete chart of accounts to meet your exact needsincluding accounts for inventory asset depreciation equity and taxation
You can also run multiple charts of accounts in parallel ndash so you can put all of your transaction accountsinto several charts with different arrangements for taxation and depreciation aggregated differently forvarious needs
Before you can use any chart of accounts you need to specify a Fiscal Year This defines the differenttime periods available for accounting transactions
Create a Fiscal Year manually from Accounting rarr Configuration rarr Financial Accounting rarr Periodsrarr Fiscal Years
bull In the Fiscal Year field type the name of the current fiscal year (eg 2011)
bull In the Code field type the code of the current fiscal year (eg 11 or 2011)
bull In the Start Date field type the starting date of your companyrsquos fiscal year (eg 01012011)
bull In the End Date field type the ending date of your companyrsquos fiscal year (eg 12312011)
bull Click the Create Monthly Periods button if you have monthly declarations or click the Create 3Months Periods button for quarterly declarations
bull Usually you will also create an extra period 00 to post your opening balance and outstandinginvoices To do this click the New button then type 002011 as the Period Name 002011 as
38 CHAPTER 3 LETrsquoS GET STARTED AND CONFIGURE A NEW INSTANCE
the Code and the first day of your financial year as the Start of Period and the End ofPeriod dates Then check the OpeningClosing Period checkbox
Click Accounting rarr Charts rarr Charts of Accounts to open a Chart of Accounts form where you defineexactly what you want to see Simply click Open Charts to accept the defaults and display a hierarchicalstructure of the accounts
348 Make a Backup of the Database
If you know the super-administrator password make a backup of your database using the proceduredescribed below Then restore it to a new database testing
As a super-administrator you do not only have rights to create new databases but also to
bull backup databases
bull delete databases
bull restore databases
All of these operations can be carried out from the Databases button in the web clientrsquos Login screen
Backup (copy) a Database
To make a copy of a database go to the web Login screen and click theDatabases button Then click the Backup button select the database youwant to copy and enter the super-administrator password Click the Backupbutton to confirm that you want to copy the database
Drop (delete) a Database
To delete a database go to the web Login screen and click the Databasesbutton Then click the Drop button select the database you want to deleteand enter the super-administrator password Click the Drop button toconfirm that you want to delete the database
Restore a Database
To restore a database go to the web Login screen and click the Databasesbutton Then click the Restore button click the Choose File button to selectthe database you want to restore Give the database a name and enter thesuper-administrator password Click the Restore button to confirm that youwant to install a new copy of the selected database To restore a databaseyou need to have an existing copy of course
CHAPTER 3 LETrsquoS GET STARTED AND CONFIGURE A NEW INSTANCE 39
Duplicating a Database
To duplicate a database you can
1 make a backup file on your PC from this database
2 restore this database from the backup file on your PC and give it anew name
This can be a useful way of making a test database from a productiondatabase You can try out the operation of a new configuration newmodules or just the import of new data
A system administrator can configure OpenERP to restrict access to some of these database functionsso that your security is enhanced in normal production use
This operation enables you to test the new configuration on testing so that you can be sure everythingworks as designed Then if the tests are successful you can make a new database from perhaps calledlive or production for your real work
From here on connect to this new testing database logged in as admin if you can If you haveto make corrections do that on YourCompany and copy it to a new testing database to continuechecking it
Or you can just continue working with the YourCompany database to get through this chapter Youcan recreate YourCompany quite quickly if something goes wrong and you cannot recover from itbut again you would need to know your super-administrator password for that
35 Testing a Complete Purchase Cycle according to anExample
To familiarize yourself with the system workflow you will test a purchase-sales workflow in two phases
The first consists of a product purchase which requires the following operations
1 Place a purchase order with Plumbing Component Suppliers for 10 Titanium Alloy Radiators ata unit price of 5600
2 Receive these products at your Goods In
3 Generate a purchase invoice
4 Pay your supplier
Then you will sell some of these products using this sequence
1 Receive a sales order for 6 Titanium Alloy Radiators from Smith and Sons sold at a unit price of13000
40 CHAPTER 3 LETrsquoS GET STARTED AND CONFIGURE A NEW INSTANCE
2 Dispatch the products
3 Invoice the customer
4 Receive the payment
351 Purchase Order
To place a Purchase Order with your supplier use the menu Purchases rarr Purchase Management rarrPurchase Orders and click the New button
Complete the following field
bull Supplier Plumbing Component Suppliers
As you complete the Supplier field OpenERP automatically completes the Address field and thePricelist field from information it takes from the Partner record
Enter the following information in the Purchase Order Lines (click New)
bull Product Titanium Alloy Radiator - type in part of this name then press the tab key tocomplete it or click the Search icon at the end of the line to bring a search box (if product ispreviously configured)
When you have selected a product on the product line OpenERP automatically completes the followingfields from information it finds in the Product record
bull Product UOM the unit of measure for this product
bull Description the detailed description of the product
bull Scheduled Date based on the product lead time
bull Unit Price the unit price of the product
bull Analytic account if any account is specified and if you belong to the User Group Useability Analytic Accounting (see menu Administration rarr Users rarr Users) then it will appear on theorder line (it is not in this example)
bull Taxes applicable taxes defined in the partner if specified otherwise in the product if specified(there are no taxes in this example)
You can edit any of these fields to suit the requirements of the purchase order at the time of entryChange the
bull Quantity 10
bull Unit Price to 5600
CHAPTER 3 LETrsquoS GET STARTED AND CONFIGURE A NEW INSTANCE 41
Save the order line and close the Order Line window by clicking the Save amp Close button You canthen save the whole one-line order by clicking Save which makes the form non-editable
It is now in a state of Request for Quotation To approve the quotation click Convert toPurchase Order which corresponds to an approval from a manager or from Accounts within your owncompany and moves the order into Approved state
If you click the Delivery amp Invoicing tab you will see the delivery Destination is your own companyrsquosStock location and that the invoice was created from the order It is not entirely obvious at this stagebut the invoice is in a draft state so it can be edited and crucially it has no accounting impact yet it isjust ready for your accounting group to activate it
352 Receiving Goods
After confirming the order you would wait for the delivery of the products from your supplier Typicallythis would be somebody in Stores who would
1 Open the menu Warehouse rarr Warehouse Management rarr Incoming Shipments
From the Purchase Order
You could have clicked the Receptions link to the right of the PurchaseOrder to reach the same screen but this would confuse the purchasing rolewith the stores role That link is very useful during testing and traininghowever
2 When the Incoming Shipments window appears select the name of the entry in the list(IN00001) to display the Packing List itself ndash you would usually do a search for the suppliername or order number in a list that was larger than this ndash then click Process to load the ProcessDocument form
3 Click Validate to indicate that you are receiving the whole quantity of 10 units
At this point you have accepted 10 units into your company in a location that you have already seen
Using the menu Purchases rarr Products rarr Products you can find the product Titanium Alloy Radiatorswith Real Stock and Virtual Stock 10 Open the product form and click the Stock by Location link at theright side of the screen to see the Real Stock and Virtual Stock of this product in various locations Nowselect the checkbox in front of the Stock and Suppliers locations The right side menu appears Clickthe Location Inventory Overview report to see the inventory valuation for each of these two locations
42 CHAPTER 3 LETrsquoS GET STARTED AND CONFIGURE A NEW INSTANCE
Figure 39 List of Products and their Stock Levels
Traceability in Double-Entry
OpenERP operates a double-entry stock transfer scheme similar todouble-entry accounting Because of this you can carry out variousanalyses of stock levels in your warehouse along with the correspondinglevels in Partner Location at your Supplier The double-entry systemsimilar to that of accounting enables you to keep track of stock movementsquite easily and to resolve any errors that occur
353 Invoice Control
When you have received an invoice from your supplier (which would usually be sent to your Accountsdepartment) go to the menu Accounting rarr Suppliers rarr Supplier Invoices to open a list of supplierinvoices waiting for receipt These invoices enable your Accounts Department to match the the priceand quantities ordered against the price and quantities on the supplierrsquos invoice (and since it is notuncommon to receive an invoice showing details more favourable to the supplier than those agreed atthe time of purchase this is a useful function)
In this example you created an invoice automatically when you confirmed the supplierrsquos PurchaseOrder That is because the Invoicing Control field on the order was set to From Order (the defaultoption) Other options enable you to create invoices at the time of receiving goods or manually Theinitial state of an invoice is Draft
Now click the invoice for your order PO00001 to display its contents You can compare the goodsthat you have recorded there with the invoice received from your supplier If there is a difference it ispossible to change the invoice lines to for example add a delivery charge Select the correct InvoiceDate and click Approve to confirm the invoice and put it into the Open state
CHAPTER 3 LETrsquoS GET STARTED AND CONFIGURE A NEW INSTANCE 43
Accounting entries are generated automatically once the invoice is validated You can check the entryfrom the Other Info tab in the Journal Entry field To see the effects on your chart of accountsgo to the menu Accounting rarr Charts rarr Chart of Accounts and click Open Charts at the Chart ofAccounts page to see that you have a debit of 56000 in the Purchases account and a credit of56000 in the Payable account
Invoice Control
Should your purchase invoice have to be checked by the purchaser first hecan go to the menu Purchases rarr Invoice Control rarr Supplier Invoices toReceive to check whether the invoice corresponds with the order (or thegoods receipt according to the Invoice Control settings)
354 Paying the Supplier
Select the menu Accounting rarr Suppliers rarr Supplier Invoices and click the Unpaid button for a list ofsupplier invoices that have not yet been paid In practice you would search for the invoice by ordernumber or more generally for invoices nearing their payment date You can type PO00001 in theSource Document box to find the invoice
Open the invoice and click the Pay Invoice button It opens the Pay Invoice window in new tab with adescription of the payment
Supplier and Date comes automatically from invoice You just have to enter the PaymentMethod (ie the corresponding bank journal) When you select the payment method you will noticethat the corresponding invoice is displayed in Supplier Invoices and Outstanding Transactions and thatthe Amount is filled automatically Then click the Validate button to post this entry and consider theinvoice as Paid
Payment of an Invoice
The method described here is for companies that do not use their accountingsystem to pay bills but just to record the payments If you are usingthe account module with all its features other more efficient methodslet you manage payments such as entering bank statements reconcilingpaperwork using tools for preparing payments interfacing with banks
You can monitor the accounting impact of paying the invoice through the chart of accounts availablefrom the menu Accounting rarr Charts rarr Chart of Accounts OpenERP automatically creates accountingentries from the payment and can reconcile the payment to the invoice You now have a new transactionthat has debited the Payable account with 56000 and credited the Bank account
If you look in Accounting rarr Journal Entries rarr Journal Entries you will see both accountingtransactions one in the Purchase Journal and another one in the Bank Journal both with thePosted state
44 CHAPTER 3 LETrsquoS GET STARTED AND CONFIGURE A NEW INSTANCE
36 Testing a Complete Sales Cycle according to an Example
361 Sales Order
In OpenERP sales proposals and sales orders are managed using documents that are based on the samecommon functionality as purchase orders so you will recognize the following documents in generalbut see changes to their detail and to their workflows To create a new sales proposal use the menuSales rarr Sales rarr Sales Orders and click the New button which creates a new order as a Quotation then
1 Select the Customer Smith and Offspring This has the effect of automaticallycompleting several other fields Ordering Contact Invoice Address Shipping Address andthe Pricelist Public Pricelist (EUR) They are all only defaults so these fields can bemodified as you need
2 Click the New button in Sales Order Lines section to open a Sales Order Lines window
3 Select the product Titanium Alloy Radiator Although the Product field is not itselfrequired it is used by OpenERP to select the specific product so that several other fields can beautomatically completed on the order line of the quotation such as Description Unit of MeasureUnit Price Procurement Method Delivery Lead Time and Taxes
4 Change the Quantity (UoM) to 6 and the Unit Price to 13000 Then click Save amp Close andthe line appears on the quotation form
5 On the Other Information tab of this Sales Order select a Picking Policy of CompleteDelivery and a Shipping Policy of Invoice on Order After Delivery from thedropdown menu lists
6 Return to the first tab Sales Order and validate the document by clicking Confirm Order whichcalculates prices and changes the orderrsquos state from Quotation to In Progress as shown inscreenshot Sales Order Form (page 44) If you were in negotiation with the prospective customeryou would click Compute and Save to keep the document in Quotation state for as long asnecessary
Figure 310 Sales Order Form
CHAPTER 3 LETrsquoS GET STARTED AND CONFIGURE A NEW INSTANCE 45
7 In the last tab of the order History you can see the Picking List that has been created and youwill be able to see any invoices that relate to this order when they are generated
Go to Sales rarr Products rarr Products to display a list of products just the one Titanium AlloyRadiator currently exists in this example Its Real Stock still shows 1000 but its Virtual Stocknow shows 400 to reflect the new future requirement of 6 units for dispatch
362 Preparing Goods for Shipping to Customers
The stores manager selects the menu Warehouse rarr Warehouse Management rarr Delivery Orders to geta list of orders to dispatch For this example find the Delivery Order related to the sales order whichyou have created You should click the Available button to see all delivery orders because yourdelivery order will be in Confirmed state and not yet in Available state Open the Delivery Orderconcerned
Running Schedulers
At the moment your Sales Order is waiting for products to be reserved tofulfil it A stock reservation activity takes place periodically to calculate theneeds which also takes customer priorities into account The calculationcan be started from the menu Warehouse rarr Schedulers rarr ComputeSchedulers Running this automatically reserves products (ie the statuswill be set to Available if the products are in stock)
If you do not want to have to work out your stock needs but have a leanworkflow you can install the mrp_jit (Just In Time) module
Although OpenERP has automatically been made aware that items on this order will need to bedispatched it has not yet assigned any specific items from any location to fulfil it It is ready to move600 Titanium Alloy Radiators from the Stock location to the Customers location so startthis process by clicking Check Availability The Move line has now changed from the Confirmedstate to the Available state
Then click the Process button to reach the Process Document window where you click the Validatebutton to transfer the 6 radiators to the customer
To analyze stock movements that you have made during these operations go to Warehouse rarr Productrarr Products and select the radiator by clicking the checkbox in front of it then click the action Stockby Location which is at the right most side to see that your stocks have reduced to 4 radiators and thegeneric Customers location has a level of 6 radiators
363 Invoicing Goods
Use the menu Accounting rarr Customers rarr Customer Invoices to open a list of Sales invoices generatedby OpenERP If they are in the Draft state it means that they do not yet have any impact on theaccounting system You will find a draft invoice has been created for the order SO001 once you havedispatched the goods because you had selected Invoice on Order After Delivery
46 CHAPTER 3 LETrsquoS GET STARTED AND CONFIGURE A NEW INSTANCE
Once you confirm an invoice OpenERP assigns it a unique number and all of the correspondingaccounting entries are generated So open the invoice and click Validate to do that and move theinvoice into an Open state with a number of SAJ20110001
You can send your customer the invoice for payment at this stage Click Print Invoice to get a PDFdocument that can be printed or emailed to the customer
The PDF of your invoice will automatically be added as an attachment This gives you a permanentnon-editable record of your invoice on the OpenERP system
Review your chart of accounts to check the impact of these activities on your accounting You will seethe new revenue line from the invoice
364 Customer Payment
Registering an invoice payment by a customer is essentially the same as the process of paying a supplierFrom the menu Accounting rarr Customers rarr Customer Invoices click the name of the invoice that youwant to mark as paid
1 Use the Payment button which opens a new window Pay Invoice
2 Select the Payment Method for this example select Bank Journal then validate the entry
Figure 311 Invoice Form
Check your Chart of Accounts as before to see that you now have a healthy bank balance in the Bankaccount
47
Part II
Advanced Features in PurchaseQuotation Management
To manage your manufacturing you do not need all the elements described in this bookBut we find it very important to include an integrated flow from the first quotation to thefinal billing of the suppliers including all the steps quotation order receiving goodsinventory manufacturing and billing
48
49
Driving your Purchases 4In the preceding chapters you saw how to use customer invoices and delivery notes inOpenERP This chapter is about the management of purchases the process ahead of thesetwo operations You will now see how OpenERP handles and simplifies this and the controlof purchases from suppliers
For this chapter you can continue using the database already created or you should start with a freshdatabase that includes demonstration data with purchase and its dependencies installed and noparticular chart of accounts configured
41 All the Elements of a Complete Workflow
The supplier or purchase order is the document that lets you manage price negotiations control supplierinvoices handle goods receipts and synchronize all of these documents
Let us start by looking at the following order workflow
1 Price request to the supplier
2 Confirmation of purchase
3 Receipt and control of products
4 Control of invoicing
411 Setting up your Database
To set up a system for these examples create a new database with demonstration data in it and selectthe Extended interface when you log in as the admin user You can enter your own company detailswhen asked or just use the default if you want Then using the Configuration Wizard select PurchaseManagement in the Install Applications section to install the purchase module which also installsseveral other modules as dependencies Continue the remainder of this chapter logged in as the adminuser
412 Price Request from the Supplier
To enter data for a new supplier price request (ie request for quotation) use the menu Purchasesrarr Purchase Management rarr Request for Quotation When you click New OpenERP opens a blankrequest for quotation form that you use for requesting prices from a supplier This is shown in the figureData Entry for a Purchase Order (page 50) If the price request came from an automatic procurement
50 CHAPTER 4 DRIVING YOUR PURCHASES
created by OpenERP you will find a reference to the document that generated the request in the Originfield
Figure 41 Data Entry for a Purchase Order
Managing Alerts
If you install the warning module you will be able to define alerts thatappear when the purchaser enters a price request or order You can set alertson the product and on the supplier
The internal reference the date and the warehouse the products should be delivered to are completedautomatically by OpenERP but you can change these values if needed Next when you select asupplier OpenERP automatically completes the contact address for the supplier The pricelist isalso automatically completed from the pricelist in the supplier form This should bring in all of theconditions that you have negotiated with the supplier for a given period
Supplier Selection
Searching for a supplier is limited to all of the partners in the system thathave the Supplier checkbox checked If you do not find your supplier itmight be worth checking the whole list of all partners to make sure that thesupplier does not yet exist without the Supplier checkbox being checked
Once the main body of the purchase order has been completed you can enter the product lines
When you have selected the product OpenERP automatically completes the other fields in the form
CHAPTER 4 DRIVING YOUR PURCHASES 51
Figure 42 Purchase Order Line
bull Product UoM taken from the Purchase Unit of Measure field in the product form
bull The Description of the product in the supplierrsquos language
bull Scheduled Date calculated from the order date and the delivery lead time for the supplier (forthe given product)
bull Unit Price taken from the supplierrsquos pricelist
bull Taxes taken from the information on the product form and partner form depending on the rulesseen in Financial Analysis
Product Wording and Code
When you enter supplier names in the product form you can set a nameand a product code for each individual supplier If you do that OpenERPwill then use those details instead of your own internal product names forthat selected supplier
If you work with management by case you can also set the analytic account that should be used toreport all the purchase costs The costs will then be reported at the receipt of the supplier invoice
Management by Case
Analytic accounts can be very useful for all companies that manage costsby case by site by project or by folder To work with several analyticaxes you should install the module purchase_analytic_plans byselecting Purchase Analytic Plans in the Reconfigure wizard and clickingConfigure
52 CHAPTER 4 DRIVING YOUR PURCHASES
To make sure that the analytic account is automatically selected according to the partner the date theproducts or the user you can install the module account_analytic_default (which is installedautomatically as a dependency of purchase_analytic_plans)
In the Notes tab of the product line you can enter a note that will be attached when the orderconfirmation or price quotation is printed This note can be predefined on the product form toautomatically appear on each order for that product For example you can enter ldquoDo not forget tosend by express delivery as specified in our contract reference 1234rdquo
Once the document has been completed you can print it as a price estimate to send to the supplier Youcan set a note for the attention of the supplier in the formrsquos third tab
Figure 43 Printing the Supplier Price Quotation
Then leave the document in the Request for Quotation state When you receive a responsefrom the supplier use the menu Purchases rarr Purchase Management rarr Requests for Quotation Selectthe order and complete its details
When you want to approve the order use the button Convert to Purchase Order The price request thenpasses into the Approved state No further changes are possible
CHAPTER 4 DRIVING YOUR PURCHASES 53
Figure 44 Purchase Order Process
413 Goods Receipt
Once the order has been approved OpenERP automatically prepares the goods receipt order in thedraft state for you To get a list of the products you are waiting for from your suppliers use the menuWarehouse rarr Warehouse Management rarr Incoming Shipments
Purchasing Services
If you buy services from your supplier OpenERP does not generate a goodsreceipt note There is no service receipt equivalent to a goods receipt
Select the document that corresponds to the item that you are receiving Usually the goods receipt noteis found by making a search on the order reference or the supplier name You can then confirm thereceipt of the products
As described in Your Warehouse (page 71) if you receive only part of the order OpenERP manages theremainder of that order A second receipt note is then automatically created for the goods not receivedYou can cancel it if you think that you will never receive the remaining products
After receiving the goods OpenERP will show you which orders are open and the state of their receiptand invoicing if you return to the list of orders
414 Control of Invoicing
To control supplier invoicing OpenERP provides three systems as standard which can differ order byorder
54 CHAPTER 4 DRIVING YOUR PURCHASES
Figure 45 List of Open Orders and their Receipt and Invoice Status
bull From Order invoicing based on quantities ordered
bull From Picking invoicing based on quantities received
bull Manual manual invoicing
The mode of invoicing control is set in the second tab of the purchase order in the field InvoicingControl
Figure 46 Purchase Order Invoice Control
CHAPTER 4 DRIVING YOUR PURCHASES 55
Default Value
A company generally uses a single invoicing control method for all of itsinvoices So you are advised to set a default value in the Invoicing Controlfield after installation
415 Control based on Orders
If you selected your invoicing control based on orders OpenERP will automatically generate a supplierinvoice in the draft state when the order is confirmed You can obtain a list of invoices waiting usingthe menu Accounting rarr Suppliers rarr Supplier Invoices and enabling the Draft filter
When you receive a paper invoice from your supplier all you need to do is validate the invoice pre-generated by the system Do not forget to check the price and the quantities When the invoice isconfirmed the accounting entries represent the cost of purchase and are automatically entered into thesystem
The supplier order is automatically set as Paid when you pay the supplier invoice
This method of controlling invoices is often used in service companies because the invoiced amountscorrespond to the ordered amounts In logistics by contrast you most often work with invoicingcontrolled by goods receipt
416 Control based on Goods Receipt
To control your supplier invoices based on goods receipt set the field Invoicing Control on the secondtab of the order to From Picking
In this case no invoice draft state or any other is generated by the order On the goods receipt notethe field Invoice Control is set to To Be Invoiced
The storesperson can then receive different orders If he wants to generate the draft invoice for a goodsreceipt he can click the action Create Invoice OpenERP then asks you for the journal for this invoiceIt then opens that or the generated invoices (in the case of creating invoices for several receipts at onetime) which enables you to modify it before confirming it
This approach is useful when you receive the invoice at the same time as the item from the supplierUsually invoices are sent by post some days later In this case the storesperson leaves the itemunchanged without generating an invoice Then once per day or once per week the accountant willcreate the draft invoices based on all the receipts for the day To do that he uses the menu Purchasesrarr Invoice Control rarr Purchase Lines Not Invoiced He clicks the action Create invoices to generate alldraft invoices from the list of receipts that have not yet been invoiced At that point the accountant candecide if he wants to generate an invoice per item or group all items for the same partner into the sameinvoice
Invoices are then handled just like those controlled from On Order Once the invoice arrives at theaccounting service he just compares it with the invoices waiting to control what the supplier invoicesyou
56 CHAPTER 4 DRIVING YOUR PURCHASES
Delivery Charges
To manage delivery charges install the module delivery using theReconfigure wizard and selecting Delivery Costs in Sales ApplicationConfiguration section This will automatically add delivery charges tothe creation of the draft invoice as a function of the products delivered orordered
417 Tenders
To manage tenders you should use the module purchase_requisition installed via thePurchase Requisition option in the Reconfigure wizard This lets you create several supplier pricerequests for a single supply requirement Once the module is installed OpenERP adds a new PurchaseRequisitions menu in Purchases rarr Purchase Management You can then define the new tenders
Figure 47 Defining a Tender
To enter data for a new tender use the menu Purchases rarr Purchase Management rarr PurchaseRequisitions and select New OpenERP then opens a new blank tender form The reference number isset by default and you can enter information about your tender in the other fields
If you want to enter a supplierrsquos response to your tender request add a new draft purchase order intothe list on the Quotation tab of your tender document If you want to revise a supplier price in responseto negotiations edit any appropriate purchase order that you have left in the draft state and link that tothe tender
When one of the orders about a tender is confirmed all of the other orders are automatically cancelledby OpenERP if you selected the Purchase Requisition (exclusive) type That enables you to accept just
CHAPTER 4 DRIVING YOUR PURCHASES 57
one order for a particular tender If you select Multiple requisitions you can approve several purchaseorders without cancelling other orders from this tender
418 Price Revisions
OpenERP supports several methods of calculating and automatically updating product costs
bull Standard Price manually fixed and
bull Standard Price revalued automatically and periodically
bull Average Price updated at each receipt to the warehouse
This cost is used to value your stock and represents your product costs Included in that cost iseverything directly related to the received cost You could include such elements as
bull supplier price
bull delivery charges
bull manufacturing costs
bull storage charges
Standard Price
The mode of price management for the product is shown in the tab Information on the product formOn each individual product you can select if you want to work in Standard Price or on weightedAverage Price
Simplified Interface
If you work in the Simplified interface mode you will not see the fieldthat lets you manage the price calculation mode for a product In that casethe default value is Standard Price
The Standard Price setting means that the product cost is fixed manually for each product inthe field Cost Price This is usually revalued once a year based on the average of purchase costs ormanufacturing costs
You usually use standard costs to manage products where the price hardly changes over the course ofthe year For example the standard cost could be used to manage books or the cost of bread
Those costs that can be fixed for the whole year bring certain advantages
bull you can base the sale price on the product cost and then work with margins rather than a fixedprice per product
58 CHAPTER 4 DRIVING YOUR PURCHASES
bull accounting is simplified because there is a direct relationship between the value of stock and thenumber of items received
To get an automated periodic revaluation of the standard price you can use the action Update on theproduct form enabling you to update prices of all the selected products OpenERP then recalculatesthe price of the products as a function of the cost of raw materials and the manufacturing operationsgiven in the routing
Average Price
Working with standard prices does not lend itself well to the management of the cost price of productswhen the prices change a lot with the state of the market This is the case for many commodities andenergy
In this case you would want OpenERP to automatically set the price in response to each goods receiptmovement into the warehouse The deliveries (exit from stock) have no impact on the product price
Calculating the Price
At each goods receipt the product price is recalculated using the followingaccounting formula NP = (OP QS + PP QR) (QS + QR) where thefollowing notation is used
bull NP New Price
bull OP Old Price
bull QS Quantity actually in Stock
bull PP Price Paid for the quantity received
bull QR Quantity Received
If the products are managed as a weighted average OpenERP will open a window that lets you specifythe price of the product received at each goods receipt The purchase price is by default set from thepurchase order but you can change the price to add the cost of delivery to the various received productsfor example
Figure 48 Goods Receipt of Products managed in Weighted Average
CHAPTER 4 DRIVING YOUR PURCHASES 59
Once the receipt has been confirmed the price is automatically recalculated and entered on the productform
42 Purchase Analysis through Analytic Accounts
421 Powerful Statistics
OpenERP enables you to perform analysis of purchases by period (current year current month previousmonth) by state (quotations orders) supplier user product category warehouse and so on This ismade possible through a search view accessed through the menu Purchases rarr Reporting rarr PurchaseAnalysis
Figure 49 Analysis of Purchases over the Month by Product
This analysis is carried out on supplier orders and not on invoices or the quantities actually receivedTo get an analysis by product use the module product_margin The function of this module isdescribed in detail in the chapter about sales (only in Logistics not in Manufacturing)
To analyze the received quantities you can use the statistical reports in Warehouse To managepurchases by project you should use analytic accounts You can set an analytic account on each lineof a supplier order The analytic costs linked to this purchase will be managed by OpenERP from thegoods receipt and confirmation of the supplier invoice The hr_timesheet_invoice module letsyou re-invoice the analytic costs automatically using parameters in the analytic accounts such as salepricelist associated partner company and maximum amount
So you can put an invoice order with a defined invoice workflow in place based on the analytic accountsIf you are working Make to Order the workflow will be
1 Customer Order
2 Procurement Order on supplier
3 Receive invoice and goods from the supplier
4 Delivery and invoicing to the customer
60 CHAPTER 4 DRIVING YOUR PURCHASES
When re-invoicing based on costs you would get the following workflow
1 Enter the customer contract conditions from the analytic accounts
2 Purchase raw materials and write the services performed into the timesheets
3 Receive the supplier invoice and the products
4 Invoice these costs to the customer
Analytic Multi-plans
If you want several analysis plans you should install the modulepurchase_analytic_plans These let you split a line on a supplierpurchase order into several accounts and analytic plans
Sitting at the heart of your companyrsquos processes analytic accounts (or cost accounts) are indispensabletools for managing your operations well Unlike your financial accounts they are for more thanaccountants - they are for general managers and project managers too
You need a common way of referring to each user service or document to integrate all your companyrsquosprocesses effectively Such a common basis is provided by analytic accounts (or management accountsor cost accounts as they are also called) in OpenERP
Analytic accounts are often presented as a foundation for strategic enterprise decisions But because ofall the information they pull together OpenERPrsquos analytic accounts can be a useful management toolat the center of most system processes
There are several reasons for this
bull they reflect your entire management activity
bull unlike the general accounts the structure of the analytic accounts is not regulated by legalobligations so each company can adapt it to its needs
Independence from General Accounts
In some software packages analytic accounts are managed as an extensionof general accounts ndash for example by using the two last digits of theaccount code to represent analytic accounts
In OpenERP analytic accounts are linked to general accounts but are treatedtotally independently So you can enter various different analytic operationsthat have no counterpart in the general financial accounts
While the structure of the general chart of accounts is imposed by law the analytic chart of accounts isbuilt to fit a companyrsquos needs closely
CHAPTER 4 DRIVING YOUR PURCHASES 61
Just as in the general accounts you will find accounting entries in the different analytic accounts Eachanalytic entry can be linked to a general account or not as you wish Conversely an entry in a generalaccount can be linked to one several or no corresponding analytic accounts
You will discover many advantages of this independent representation below For the more impatienthere are some of those advantages
bull you can manage many different analytic operations
bull you can modify an analytic plan on the fly during the course of an activity because of itsindependence
bull you can avoid an explosion in the number of general accounts
bull even those companies that do not use OpenERPrsquos general accounts can use the analytic accountsfor management
Who Benefits from Analytic Accounts
Unlike general accounts analytic accounts in OpenERP are not so muchan accounting tool for Accounts as a management tool for everyone in thecompany (That is why they are also called management accounts)
The main users of analytic accounts should be the directors generalmanagers and project managers
Analytic accounts make up a powerful tool that can be used in different ways The trick is to createyour own analytic structure for a chart of accounts that closely matches your companyrsquos needs
422 To Each Enterprise its own Analytic Chart of Accounts
To illustrate analytic accounts clearly you will follow three use cases each in one of three differenttypes of company
1 Industrial Manufacturing Enterprise
2 Law Firm
3 IT Services Company
Case 1 Industrial Manufacturing Enterprise
In industry you will often find analytic charts of accounts structured into the departments and productsthat the company itself is built on
So the objective is to examine the costs sales and margins by department and by product The firstlevel of the structure comprises the different departments and the lower levels represent the productranges that the company makes and sells
62 CHAPTER 4 DRIVING YOUR PURCHASES
Analytic Chart of Accounts for an Industrial Manufacturing Company
1 Marketing Department
2 Commercial Department
3 Administration Department
4 Production
bull Product Range 1
bull Sub-groups
bull Product Range 2
In daily use it is useful to mark the analytic account on each purchase invoice The analytic accountis the one to which the costs of that purchase should be allocated When the invoice is approved itwill automatically generate the entries for both the general and the corresponding analytic accountsSo for each entry on the general accounts there is at least one analytic entry that allocates costs to thedepartment that incurred them
Here is a possible breakdown of some general accounting entries for the example above allocated tovarious analytic accounts
Table 41 Breakdown of general and analytic accounting entries (Case 1)
General accounts Analytic accountsTitle Account Debit Credit Account ValuePurchase of Raw Material 600 1500 Production Range 1 -1 500Subcontractors 602 450 Production Range 2 -450Credit Note for defective materials 600 200 Production Range 1 200Transport charges 613 450 Production Range 1 -450Staff costs 6201 10000 Marketing -2 000
Commercial -3 000Administrative -1 000Production Range 1 -2 000Production Range 2 -2 000
PR 614 450 Marketing -450
The analytic representation by department enables you to investigate the costs allocated to eachdepartment in the company
So the analytic chart of accounts shows the distribution of the companyrsquos costs using the exampleabove
CHAPTER 4 DRIVING YOUR PURCHASES 63
Table 42 Analytic chart of accounts(Case 1)
Account TotalMarketing Department -2 450Commercial Department -3 000Administration Department -1 000Production -6 200Product Range 1 -3 750Product Range 2 -2 450
In this example of a hierarchical structure in OpenERP you can analyze not only the costs of eachproduct range but also the costs of the whole of production The balance of a summary account (Production ) is the sum of the balances of the child accounts
A report that relates both general accounts and analytic accounts enables you to get a breakdown ofcosts within a given department An analysis of the Production Product Range 1 department is shownin this table
Table 43 Report merging both general andanalytic accounts for a department (Case 1)
Production Product Range 1General Account Amount600 ndash Raw Materials - 1 300613 ndash Transport charges - 4506201 ndash Staff costs -2 000Total -3 750
The examples above are based on a breakdown of the costs of the company Analytic allocations canbe just as effective for sales That gives you the profitability (sales - costs) of different departments
Representation by Unique Product Range
This analytic representation by department and by product range is usuallyused by trading companies and industries
A variant of this is not to break it down by sales and marketing departmentsbut to assign each cost to its corresponding product range This will giveyou an analysis of the profitability of each product range
Choosing one over the other depends on how you look at your marketingeffort Is it a global cost allocated in some general way or does eachproduct range have responsibility for its own marketing costs
Case 2 Law Firm
Law firms generally adopt management by case where each case represents a current client file All ofthe expenses and products are then attached to a given file
64 CHAPTER 4 DRIVING YOUR PURCHASES
A principal preoccupation of law firms is the invoicing of hours worked and the profitability by caseand by employee
Mechanisms used for encoding the hours worked will be covered in detail in the Human Resourceschapter on line Like most system processes hours worked are integrated into the analytic accountingEvery time an employee enters a timesheet for a number of hours that automatically generates analyticaccounts corresponding to the cost of those hours in the case concerned The hourly charge is a functionof the employeersquos salary So a law firm will opt for an analytic representation which reflects themanagement of the time that employees work on the different client cases
Example Representation of an Analytic Chart of Accounts for a LawFirm
1 Absences
bull Paid Absences
bull Unpaid Absences
2 Internal Projects
bull Administrative
bull Others
3 Client Cases
bull Client 1
bull Case 11
bull Case 12
bull Client 2
bull Case 21
All expenses and sales are then attached to a case This gives the profitability of each case and at aconsolidated level of each client
Billing for the different cases is a bit unusual The cases do not match any entry on the general accountand nor do they come from purchase or sale invoices They are represented by the various analyticoperations and do not have exact counterparts in the general accounts They are calculated on the basisof the hourly cost per employee These entries are automatically created on billing worksheets
At the end of the month when you pay salaries and benefits you integrate them into the general accountsbut not in the analytic accounts because they have already been accounted for in billing each accountA report that relates data from the analytic and general accounts then lets you compare the totals soyou can readjust your estimates of hourly cost per employee depending on the time actually worked
The following table gives an example of different analytic entries that you can find for your analyticaccount
CHAPTER 4 DRIVING YOUR PURCHASES 65
Table 44 Analytic entries for the account chart (Case 2)
Title Account Amount General Account Debit CreditStudy the file (1 h) Case 11 -15Search for information (3 h) Case 11 -45Consultation (4 h) Case 21 -60Service charges Case 11 280 705 ndash Billing services 280Stationery purchase Administrative -42 601 ndash Furniture purchase 42Fuel Cost -Client trip Case 11 -35 613 ndash Transports 35Staff salaries 6201 ndash Salaries 3 000
You will see that it allows you to make a detailed study of the profitability of different transactions Inthis example the cost of Case 11 is 9500 (the sum of the analytic costs of studying the files searchingfor information and service charges) but has been invoiced for 28000 which gives you a gross profitof 18500
But an interest in analytical accounts is not limited to a simple analysis of the profitability of differentcases
This same data can be used for automatic recharging of the services to the client at the end of the monthTo invoice clients just take the analytic costs in that month and apply a selling price factor to generatethe invoice Invoicing mechanisms for this are explained in greater detail in ch-services If the clientrequires details of the services used on the case you can then print the service entries in the analyticaccount for this case
Invoicing Analytic Costs
Most software that manages billing enables you to recharge for hoursworked In OpenERP these services are automatically represented byanalytic costs But many other OpenERP documents can also generateanalytic costs such as credit notes and purchases of goods
So when you invoice the client at the end of the month it is possible for youto include all the analytic costs not just the hours worked So for exampleyou can easily recharge the whole cost of your journeys to the client
Case 3 IT Services Company
Most IT service companies face the following problems
bull project planning
bull invoicing profitability and financial follow-up of projects
bull managing support contracts
To deal with these problems you would use an analytic chart of accounts structured by project and bycontract A representation of that is given in the following example
66 CHAPTER 4 DRIVING YOUR PURCHASES
Example Analytic Representation of a Chart of Accounts for an ITServices Company
1 Internal Projects
bull Administrative and Commercial
bull Research and Development
2 Client Projects
bull Client 1
bull Project 11
bull Project 12
bull Client 2
bull Project 21
bull Project 22
3 Support Contracts ndash 20h
bull Customer X
bull Customer Y
The management of services expenditures and sales is similar to that presented above for lawyersInvoicing and the study of profitability are also similar
But now look at support contracts These contracts are usually limited to a prepaid number of hoursEach service posted in the analytic accounts shows the remaining available hours of support For themanagement of support contracts you would use the quantities and not the amounts in the analyticentries
In OpenERP each analytic line lists the number of units sold or used as well as what you would usuallyfind there ndash the amount in currency units (USD or GBP or whatever other choice you make) So youcan sum the quantities sold and used on each analytic account to determine whether any hours of thesupport contract remain To differentiate services from other costs in the analytic account you use theconcept of the analytic journal Analytic entries are then allocated into the different journals
bull service journal
bull expense journal
bull sales journal
bull purchase journal
So to obtain the detailed breakdown of a support contract you only have to look at the service journalfor the analytic account corresponding to the contract in question
CHAPTER 4 DRIVING YOUR PURCHASES 67
Finally the analytic account can be used to forecast future needs For example monthly planning ofstaff on different projects can be seen as an analytic budget limited to the service journal Accountingentries are expressed in quantities (such as number of hours and numbers of products) and in amountsin units of currency (USD or GBP perhaps)
So you can set up planning on just the basis of quantities Analyzing the analytic budget enables youto compare the budget (that is your plan) to the services actually carried out by month end
Cash Budgets
Problems of cash management are amongst the main difficultiesencountered by small growing businesses It is really difficult to predictthe amount of cash that will be available when a company is young andrapidly growing
If the company adopts management by case then staff planning can berepresented on the analytic accounts report as you have seen
But since you know your selling price for each of the different projectsyou can see that it is easy to use the plan in the analytic accounts to moreprecisely forecast the amounts that you will invoice in the coming months
68 CHAPTER 4 DRIVING YOUR PURCHASES
69
Part III
Managing your Warehouse
70
71
Your Warehouse 5OpenERPrsquos stock management is at once very simple flexible and complete It is based onthe concept of double entry that revolutionized accounting The system can be describedby Lavoisierrsquos maxim ldquonothing lost everything changedrdquo or better ldquoeverything movedrdquoIn OpenERP you do not talk of disappearance consumption or loss of products insteadyou speak only of stock moves from one place to another
Just as in accounting the OpenERP system manages counterparts to each of its main operations suchas receipts from suppliers deliveries to customers profit and loss from inventory and consumption ofraw materials Stock movements are always made from one location to another To satisfy the need fora counterpart to each stock movement the software supports different types of stock locations
bull Physical stock locations
bull Partner locations
bull Virtual locations as counterparts for procurement production and inventory
Physical locations represent warehouses and their hierarchical structure These are generally thelocations that are managed by traditional stock management systems
Partner locations represent your customersrsquo and suppliersrsquo stocks To reconcile them with youraccounts these stores play the role of third-party accounts Reception from a supplier can be shownby the movement of goods from a partner location to a physical location in your own company Asyou see supplier locations usually show negative stocks and customer locations usually show positivestocks
Virtual locations as counterparts for production are used in manufacturing operations Manufacturingis characterized by the consumption of raw materials and the production of finished products Virtuallocations are used for the counterparts of these two operations
Inventory locations are counterparts of the stock operations that represent your companyrsquos profit andloss in terms of your stocks
The figure Location Structure when OpenERP has just been installed (page 72) shows the initialconfiguration of the locations when the software is installed (Warehouse rarr Warehouse Managementrarr Locations)
Hierarchical Stock Locations
In OpenERP locations are structured hierarchically You can structureyour locations as a tree dependent on a parent-child relationship Thisgives you more detailed levels of analysis of your stock operations and theorganization of your warehouses
72 CHAPTER 5 YOUR WAREHOUSE
Figure 51 Location Structure when OpenERP has just been installed
Locations and Warehouses
In OpenERP a Warehouse represents the place where your physical stockis stored A warehouse can be structured into several locations at multiplelevels Locations are used to manage all types of storage places such as atthe customer and production counterparts
For this chapter you can continue using the database with demo data from a previous chapter or startwith a fresh database that includes demo data with Warehouse Management and its dependenciesinstalled and any chart of accounts configured
In this chapter the following modules will be used
CHAPTER 5 YOUR WAREHOUSE 73
Table 51 List of modules
Name Descriptionstock to handle the stock functionsstock_planning to define planning on productsstock_location to define pull and push flowsdelivery to define delivery methods and costsaccount_anglo_saxon to illustrate the valuation according to the anglo-saxon
principlessale_journal to handle stock by journalmrp_jit to illustrate the just-in-time functionalitysale_supplier_direct_deliveryto directly deliver the product from the supplier to the
customer
51 Understanding Double-Entry Stock Management
To illustrate this concept of stock management see how stock moves are generated by the followingoperations
bull Receiving products from a supplier
bull Delivery to a customer
bull Inventory operation for lost materials
bull Manufacturing
The structure of stock locations is shown by the figure Location Structure when OpenERP has just beeninstalled (page 72) Stocks are assumed to be totally empty and no operation is in progress nor planned
If you order lsquo30 bicyclesrsquo from a supplier OpenERP will do the following operations on receipt of theproducts
Table 52 Stock Move Operation from Suppliers to Stock
Location ProductsPartner Locations gt Suppliers -30 bicyclesPhysical Locations gt OpenERP SA gt Stock +30 bicycles
If you deliver 2 bicycles to a European customer you will get the following transactions for the delivery
Table 53 Stock Move Operation from Stock to European Customers
Location ProductsPhysical Locations gt OpenERP SA gt Stock -2 bicyclesPartner Locations gt Customers gt European Customers +2 bicycles
74 CHAPTER 5 YOUR WAREHOUSE
When the two operations are complete you will see the following stock in each location
Table 54 Resulting Stock Situation
Location ProductsPartner Locations gt Suppliers -30 bicyclesPhysical Locations gt OpenERP SA gt Stock +28 bicyclesPartner Locations gt Customers gt European Customers +2 bicycles
So you can see that the sum of the stocks of a product in all the locations in OpenERP is always zeroIn accounting you would say that the sum of the debits is equal to the sum of the credits
Partner locations (customers and suppliers) are not located under your company in the hierarchicalstructure so their contents are not considered as part of your own stock So if you just look atthe physical locations inside your own company those two bicycles are no longer in your companyAlthough they are no longer in your own physical stock it is still very useful to see them in yourcustomerrsquos stock because that will help when you carry out detailed stock management analysis
Consignment Stock
To manage Consignment Stock you need to define the location for theconsignment customer or supplier as part of your own stock and not as apartner location
Accounts
In managing stock a gap between the data in the software and realquantities in stock is difficult to avoid Double-entry stock managementgives twice as many opportunities to find an error If you forget two items ofstock this error will automatically be reflected in the counterpartrsquos location
You can make a comparison with accounting where you will easily find an error because you can lookfor an anomaly in an account or in the counterparts if there is not enough in a bank account thenthat is probably because someone has forgotten to enter a customerrsquos invoice payment You alwaysknow that the sum of debits must equal the sum of the credits in both accounting and OpenERPrsquos stockmanagement
In accounting all documents lead to accounting entries that form the basis of management accountingIf you create invoices or enter statements of account for example the results of the operations areaccounting entries on accounts And it is the same for stock management in OpenERP All stockoperations are carried out as simple stock moves Whether you pack items or manufacture them orcarry out a stock inventory operation stock moves are carried out every time
You have seen a fairly simple example of goods receipt and product delivery but some operations areless obvious ndash a stock inventory operation for example An inventory operation is carried out when youcompare the stock shown in software with real stock numbers counted in the stores In OpenERP withits double-entry stock management you would use stock moves for this inventory operation That helps
CHAPTER 5 YOUR WAREHOUSE 75
you manage your stock traceability Suppose there are 26 bicycles in real stock but OpenERP shows28 in the system You then have to reduce the number in OpenERP to 26 This reduction of 2 unitsis considered as a loss or destruction of products and the correction is carried out as in the followingoperation
Table 55 Inventory Operation to Adjust Stock
Location ProductsPhysical Locations gt OpenERP SA gt Stock -2 bicyclesVirtual Locations gt Inventory Loss +2 bicycles
The product stock under consideration then becomes
Table 56 Real and Counterpart Stocks when Operations are Completed
Location ProductsPartner Locations gt Suppliers -30 bicyclesPhysical Locations gt OpenERP SA gt Stock +26 bicyclesPartner Locations gt Customers gt European Customers +2 bicyclesVirtual Locations gt Inventory Loss +2 bicycles
This example shows one of the great advantages of this approach in terms of performance analysisAfter a few months you can just make a stock valuation of the location Inventory Control rarr LocationStructure rarr Virtual Locations rarr Inventory Loss to give you the value of the companyrsquos stock losses inthe given period
Now see how the following manufacturing operation is structured in OpenERP To make a bicycle youneed two wheels and a frame This means that there should be a reduction of two wheels and a framefrom real stock and the addition of a bicycle there The consumption production is formalized bymoving products out of and into physical stock The stock operations for this are as follows
Table 57 Stock Situation Resulting from Manufacturing
Location Products StepPhysical Locations gt OpenERP SA gt Stock -2 Wheels Consumption of raw materialsVirtual Locations gt Production +2 Wheels Consumption of raw materialsPhysical Locations gt OpenERP SA gt Stock -1 Frame Consumption of raw materialsVirtual Locations gt Production +1 Frame Consumption of raw materialsVirtual Locations gt Production -1 Bicycle Manufacture of finished productsPhysical Locations gt OpenERP SA gt Stock +1 Bicycle Manufacture of finished products
So now you have got the outcome you need from the consumption of raw materials and themanufacturing of finished products
76 CHAPTER 5 YOUR WAREHOUSE
Assessing Created Value
You might already have noticed a useful effect of this approach if youdo a stock valuation in the Virtual Locations gt Productionlocation you get a statement of value created by your company (as anegative amount) Stock valuation in any given location is calculated bymultiplying quantities of products in stock by their cost In this case theraw material value is deducted from the finished product value
52 Managing Physical Inventory Structure
521 Warehouse
Warehouses are designed for physical locations from which you can deliver to the customer and towhich you receive raw materials When you buy products from a supplier you should take account ofthe Warehouse you use for this purchase This also enables the end user to not have to choose from alist of locations but simply a real warehouse Use the menu Warehouse rarr Configuration rarr WarehouseManagement rarr Warehouses then click New to configure a new warehouse
A warehouse is defined by a link between three locations
bull The Location Stock field shows the place of products available for delivery to a customer directlyfrom this warehouse Availability is given by all the products in that location and any childlocations
bull The Location Input field shows where ordered products are received from a supplier in thatwarehouse It can be the same as the stock location if for example you want to do a qualitycontrol operation on your incoming raw materials
bull The Location Output field (called Output in the demonstration database) is designed as a bufferzone in which you store all the items that have been picked but not yet delivered to a customerYou are strongly advised not to put this location within the stock hierarchy but instead at a higherlevel or at the same level
Figure 52 Warehouse Parameters
CHAPTER 5 YOUR WAREHOUSE 77
You can also set an address for the warehouse This address should ideally be an address of yourcompany Once the warehouse has been defined it can be used in
bull Minimum stock rules
bull Supplier orders
bull Customer orders (using the definition of a point of sale which is linked to a warehouse)
Automatic Procurement
Several methods of automatically procuring products can be carried out by OpenERP
bull the workflow used by products that have the procurement method Make to Order
bull using minimum stock rules for Make to Stock products
bull using the master production schedule for Make to Stock products
The last two methods are described below
Minimum Stock Rules
To automatically make stock replenishment proposals you can use minimum stock rules Go to themenu Warehouse rarr Automatic Procurements rarr Minimum Stock Rules
The rule is the following if the virtual stock for the given location is lower than the minimum stockindicated in the rule the system will automatically propose a procurement to increase the level of virtualstock to the maximum level given in the rule
Figure 53 List of Minimum Stock Rules
78 CHAPTER 5 YOUR WAREHOUSE
Conflict Resolution
You may find draft production or procurement orders to be created althoughthey should not exist That can happen if the system is badly configured (forexample if you have forgotten to set the supplier on a product)
To check this look at the list of procurements in the exception state in themenu Warehouse rarr Schedulers rarr Procurement Exceptions More detailsabout processing these exceptions is given in ch-mnf
We underline that the rule is based on virtual quantities and not just on real quantities It takes intoaccount the calculation of orders and receipts to come
Take the following example
bull Products in stock 15
bull Products ordered but not delivered 5
bull Products in manufacturing 2
The rules defined are
bull Minimum stock 13
bull Maximum stock 25
Once the rules have been properly configured the purchasing manager only needs to look at the listof orders for confirmation with the supplier using the menu Purchases rarr Purchase Management rarrRequests for Quotation
Procurement
Note that the procurement does not require that you buy from a supplier Ifthe product has a Supply Method Produce the scheduler will generate aManufacturing order instead of a supplier order
You can also set multiple quantities in the minimum stock rules If you set a multiple quantity of3 the system will propose procurement of 15 pieces and not the 13 it really needs In this case itautomatically rounds the quantity upwards
CHAPTER 5 YOUR WAREHOUSE 79
Maximum Quantity
Pay attention to the fact that the maximum quantity is not the maximumyou will have in stock If we take the following situation a company has10 pieces of product with minimum stock rules defined for this product byMin quantity = 10 Max quantity = 30 and Qty multiple = 12 If an orderof 2 pieces comes a purchase of 24 pieces order will be executed The first12 pieces will be ordered to reach the minimum quantity and the other 12to reach the maximum quantity At the end the stock of this product willbe equal to 32 pieces
In a minimum stock rule when you indicate a warehouse it suggests a stock location by default in thatwarehouse You can change that default location when the scheduler completes
522 Location
A location is one component of the warehouses that is used to managed all types of storage places suchas at the customerrsquos and production counterparts
There are different types of locations that allow you to structure your warehouses according to yourneeds Locations are structured hierarchically to account for the subdivision of a warehouse intosections aisles andor cupboards The hierarchical view also enables you to structure virtual locationssuch as production counterparts That gives you a finer level of analysis Go to the menu Warehouse rarrConfiguration rarr Warehouse Management rarr Locations then click New to define new locations
Figure 54 Defining a new Stock Location
Here are the different available types of locations
bull Supplier Location virtual location representing the source location for products received
80 CHAPTER 5 YOUR WAREHOUSE
from suppliers
bull View shows that the location is only an organizational node for the hierarchical structure andcannot be involved in stock moves itself The view type is not made into a leaf node in a structurendash it usually has children
bull Internal Location physical location inside your own stock
bull Customer Location virtual location representing the destination for products sent tocustomers
bull Inventory virtual location serving as the counterpart for inventory operations used to correctstock levels (physical inventories)
bull Procurement virtual location serving as temporary counterpart for procurement operationswhen you do not yet know the source (supplier or production) Products in this location shouldbe zero after the scheduler run completes
bull Production virtual counterpart location for production operations consuming raw materialand sending finished products
bull Transit Location for Inter-Companies Transfers used as an intermediatelocation in a multi-company environment
You can have several locations of the same type In that case your product supplier and warehouseconfigurations determine the location that is to be used for any given operation
Location Addresses
Each location can have a specific address that enables you to create a location for a customer ora supplier for example You can then give it the address of that customer or supplier Go to thepartner form to tell OpenERP it should use this location rather than the default location given to partnerdeliveries
Subcontracting Production
You will see in the on line chapter Manufacturing that it is possible toassign a location to a manufacturing workcenter If this location is at asupplierrsquos you must give it an address so that OpenERP can prepare adelivery order for the supplier and a receive operation for the manufacturedgoods Creating a location specifically for a partner is also a simple solutionfor handling consigned stocks in OpenERP
CHAPTER 5 YOUR WAREHOUSE 81
Consigned Stock
Consigned stock is stock that is owned by you (valued in your accounts)but is physically stocked by your supplier Or conversely it could be stockowned by your customer (not valued by you) but stocked in your companyMake sure that you create consignment locations as part of your internalstock
To enable you to easily consolidate at a higher level the location definition is hierarchical Thisstructure is given by the field Parent Location That also enables you to manage complex casesof product localization
For example you could imagine the following scenario One Company with Two Warehouses
A company has a warehouse in Paris and in Bordeaux For some orders you have to deliver theproducts from Paris and for others from Bordeaux But you should also specify a fictitious warehousethat OpenERP uses to calculate whether it should deliver products from Paris or from Bordeaux To dothis in OpenERP you would create a third warehouse lsquoFrancersquo which consolidates the warehouses inParis and Bordeaux You create the following physical locations
bull Company
ndash Output
Warehouses Francemiddot Warehouse Parismiddot Warehouse Bordeaux
OpenERP will then deliver the goods from the warehouse that has the ordered product in stock Whenproducts are available in several warehouses OpenERP will select the nearest warehouse To formalizethe notion of distance between warehouses you should use the geographic co-ordinates (X Y Z) of thedifferent stores to enable OpenERP to search for the nearest goods The same co-ordinates could alsobe used to structure the shelves aisles and interior rooms in a warehouse
Linked Locations
Locations in OpenERP can be linked between each other to define paths followed by products So youcan define rules such as all products that enter the warehouse should automatically be sent to qualitycontrol The warehouse and quality control are represented by two different locations
Then when a product arrives in a location OpenERP can automatically suggest that you send theproduct to another linked location Three link modes are available
bull Manual Operation
bull Automatic Move
bull Automatic No Step Added
82 CHAPTER 5 YOUR WAREHOUSE
The Manual Operation mode will create an internal move order to the linked location once productsarrive in the source locations This order will wait for a confirmation of the move by a user Thisenables you to have a list of moves to do proposed by the system and confirmed by the storesperson
The Automatic Move mode will do the same but will not wait for a confirmation from the user Productswill automatically be sent to the linked location without any intervening manual operation to do Thiscorresponds to the case where for simplicity you delete a step in the process so the end user can setoff the process automatically
The Automatic No Step Added mode will not include the additional stock move but will change thedestination move transparently to assign the linked location You could then assign a destinationlocation to which you send all the products that arrive in your warehouse The storesperson will modifythe goods receipt note
Product Logistics
The module stock_location lets you generate paths to follow not justat the level of locations but also at the level of products It then enables youto manage default locations for a given product or to refer to the productsas a function of operations such as quality control supplier receipt andafter-sales service
A more detailed explanation of this module with examples is given at theend of this chapter
If there is linking to do the Chained Location Type field allows you to determine the destinationlocation If the field is set to lsquoCustomerrsquo the location is given by the properties of the partner form Ifthe field is set to fixed the destination location is given by the field Chained Location If Fixed
Some operations take a certain time between order and execution To account for this lead time youcan set a value in days in the field Chaining Lead Time Then the extra move (automatic or not) willbe carried out several days after the original move If you use the mode Automatic No Step Added thelead time is inserted directly into the initial order In this way you can add security lead times at certaincontrol points in the warehouse
Structuring Locations
In the next part you will see that by linking locations you can manage a whole series of complex casesfor efficient production management
bull Handling multiple operations for a customer order
bull Tracking import and export by sea transport
bull Managing a production chain in detail
bull Managing rented products
bull Managing consigned products
CHAPTER 5 YOUR WAREHOUSE 83
To show these concepts different cases of structuring and configuring these locations are given belowMany other configurations are possible according to company needs
Examples
bull Handling customer orders
Customer orders are usually handled in one of two ways
bull item note (or preparation order) confirmed when the item is ready to send
bull delivery order (or freight note) confirmed when the transporter has delivered the item to acustomer
You use the following stock move in OpenERP to simulate these operations
bull Packing Note Stock gt Output
bull Delivery Order Output gt Customer
The first operation is automatically generated by the customer order The second one is generated bythe stock management showing that the Output location is linked to the Customer location The twooperations will be displayed in Waiting status If the Output location is not situated beneath the stocklocation you then have to move the item from stock to the place where the item is prepared
Some companies do not want to work in two steps because it just seems like extra work to haveto confirm a delivery note in the system You can then set the link mode to lsquoAutomaticrsquo to makeOpenERP automatically confirm the second step It is then assumed all the items have automaticallybeen delivered to the customer
bull Linked production
The stock_location module enables you to manage the linkages by product in addition to doingthat by location You can then create a location structure that represents your production chain byproduct
The location structure may look like this
bull Stock
ndash Level 1ndash Level 2
Link 1middot Operation 1middot Operation 2middot Operation 3middot Operation 4
You can then set the locations a product or a routing must go through in the relevant form All productsthat enter the production chain will automatically follow the predetermined path You can see thelocation structure using Warehouse rarr Inventory Control rarr Location Structure
84 CHAPTER 5 YOUR WAREHOUSE
523 Shop
The counterparts for procurement inventory and production operations are given by the locationsshown in the product form The counterparts of reception and delivery operations are given by thelocations shown in the partner form The choice of stock location is determined by the configuration ofthe warehouse linked to a Shop which can be defined using Sales rarr Configuration rarr Sales rarr Shop
Once a shop is defined you will be able to make sales orders from this shop You need at least oneshop in order to be able to make sales orders
524 Stock
In the Product form the Stock by Location action will give you the stock levels of the variousproducts in any selected location If you have not selected any location OpenERP calculates stocks forall of the physical locations When you are in the Stock by Location view click the Print button to printthe Location Content or the Location Inventory Overview reports
Availability of Stock
Depending on whether you look at the product from a customer order orfrom the menu of a product form you can get different values for stockavailability If you use the Product menu you get the stock in all of thephysical stock locations Looking at the product from the order you willonly see the report of the warehouse selected in the order
In this respect two important fields in the product form are
bull Real Stock Quantity physically present in your warehouse
bull Virtual Stock Calculated as follows real stock ndash outgoing + incoming
Virtual Stock
Virtual stock is very useful because it shows what the salespeople can sellIf the virtual stock is higher than the real stock this means products will becoming in If virtual stock is smaller than real stock certain products arereserved for other sales orders or work orders
Detail of Future Stock
To get more details about future stock you can click Stock LevelForecast to the right of the product form to get the report Forecast StockLevels as illustrated below OpenERP shows a graph of the changes in stockin the days to come varying as a function of purchase orders confirmedproduction and sales orders
CHAPTER 5 YOUR WAREHOUSE 85
Figure 55 Printout of forecast stock levels
Filter Stock by Location
By default in Product list view the columns Real Stock and Virtual Stockshow the stock figures for all stock locations where a product is stored Usethe Extended Filters to enter a specific stock location if you want to onlysee the stock in a specific location
Lead Times and Locations
The tab Procurement amp Locations in the Product form contains information about different lead timesand locations Three lead time figures are available
bull Customer Lead Time lead time promised to the customer expressed in number of days betweenthe order and the delivery to the customer
bull Manufacturing Lead Time lead time in days between a production order and the end ofproduction of the finished product
bull Warranty (months) length of time in months for the warranty of the delivered products
Warranty
The warranty period is used in the Repairs management and after-salesservice You can find more information on this subject in the on line chapterabout Manufacturing
86 CHAPTER 5 YOUR WAREHOUSE
Fields in the section Storage Localisation are for information only they do not have any impact on themanagement of stock
Counter-Part Locations Properties are automatically proposed by the system but the different valuescan be modified You will find counterpart locations for
bull Procurement
bull Production
bull Inventory
A procurement location is a temporary location for stock moves that have not yet been finalized by thescheduler When the system does not yet know if procurement is to be done by a purchase or productionOpenERP uses the counterpart location Procurement In this location you will find everything that hasnot yet been planned by the system The quantities of product in this location cancel each other out
Initial Inventory
Once a product has been defined use an initial inventory operation to put current quantities into thesystem by location for the products in stock Go to the menu Warehouse rarr Inventory Control rarrPhysical Inventories to do your initial inventory
Figure 56 Defining a New Inventory Operation
CHAPTER 5 YOUR WAREHOUSE 87
Give a name (for example Initial Inventory or Lost Product XYZ ) and a date (proposed by default) foreach inventory operation
You have three ways of doing an inventory
bull Click the Import Inventory action and select the location concerned You can choose to includechild locations and set the inventory to zero (especially useful to ensure the count is donecorrectly)
bull You can update the inventory from the Product form Go to the Information tab Stocks sectionand click the Update button On confirmation OpenERP will create a Physical Inventory
bull You can manually add inventory lines You can then enter data about the quantities available foreach product by location Start by entering the location for example Stock and then select theproduct OpenERP automatically completes the quantity available for that product in the locationshown You can then change that value to correct the value in stock
Enter data for a single line in your inventory
bull Location Stock
bull Product PC1 Basic PC
bull Quantity 23 Units
When your inventory operation is finished you can confirm it using the Confirm Inventory button to thebottom right of the form OpenERP will then automatically create the stock moves to close the gaps asmentioned at the start of this chapter You can verify the moves generated using the Posted Inventorytab of the inventory operation form
The correct levels of your product are now in your stock locations A simple way of verifying this is toreopen the product form to see the quantities available in stock
Periodical Inventory
You are usually legally required to do a stock check of all your productsat least once a year As well as doing a complete annual stock checkOpenERP also supports the method of periodical inventory
That means you can check the stock levels of a proportion of your productsevery so often This system is accepted in France as long as you canguarantee that all of your products have been counted at least once peryear To see the last inventory count per product use the report Warehouserarr Reporting rarr Last Product Inventories
You can do this the same way for all products and all locations so you onlycarry out small inventory operations through the year rather than a singlelarge stock check at one point in the year (which usually turns out to be atan inconvenient time)
88 CHAPTER 5 YOUR WAREHOUSE
53 Keeping Track of Stock Movements
531 Goods Receipts
In OpenERP you have the choice between three ways to receive goods from suppliers
The first method is to manually enter the information in the incoming shipment To receive the productsthrough this method you have to go to Incoming Shipments section in the Warehouse Managementsubmenu click New and then you enter the information about the receipt
Figure 57 Manual Data Entry for Product Receipt
The second method is to receive products from a generated incoming shipment To achieve thereception using this method you have to go to Incoming Shipments section in the WarehouseManagement submenu You will find the list of waiting incoming shipments
The third method is to receive products by waiting products without looking at the shipment documentYou can validate the reception by products in Receive Products section in the guilabellsquo Product Moveslsquosubmenu With this method you will be able to receive one product regardless of the document whichis attached to this product
Receipt of a Supplier Order by Purchase Order
If you use Purchase Orders in OpenERP product receipts are automatically generated by the systemwhen the purchase order is confirmed You do not have to enter any date just confirm that the quantitiesordered match the quantities received
Incoming Shipments forms are automatically prepared by OpenERP from the purchase managementprocess You will find a list of all the awaited receipts in the menu Warehouse rarr WarehouseManagement rarr Incoming Shipments Use the order number or the supplier name to find the rightgoods receipt form for confirmation of a goods-in This approach enables you to control quantities
CHAPTER 5 YOUR WAREHOUSE 89
received by referring to the quantities ordered
Figure 58 List of Items Waiting
You can also do goods-in data entry manually if there is no order using the same menu by clicking theNew button
A new goods-in data entry form opens Enter the supplier data in the Address field and type thereference number from your supplier in the field Origin You should then enter data about the productsreceived in the lines
The source location is already completed by default because of your supplier selection You shouldthen give the destination location where you will place the products For example enter Stock Atthis stage you can set a lot number for traceability (this function will be described later in this chapterso leave this field empty for the moment)
Once the form has been completed you can confirm the receipt of all the products at the same timeusing the Process Now button If you want to enter data for a goods receipt that you are still waitingfor click the button Process Later
90 CHAPTER 5 YOUR WAREHOUSE
Partial or Complete Reception
When you process the incoming shipment you can choose between partialor complete
If you have to validate a partial incoming shipment click Process nowand change the number of items according to the quantity received
Figure 59 Confirm partial reception
Another object will be generated with a back order reference equal to theReference number of the incoming shipment already confirmed
Figure 510 Process a Partial Incoming Shipment
Once the rest of the order has arrived and has been processed both orderswill be merged
Figure 511 Form for Entering Goods received from a Supplier Order
The products then arrive in stock and should reflect the quantities shown on the product form
In the Incoming Shipments form the field Invoice Control lets you influence the way you sendinvoices to suppliers If this is set to To be invoiced a supplier invoice will now be generated
CHAPTER 5 YOUR WAREHOUSE 91
automatically in the draft state based on the goods received Your accountant then has to confirmthis pre-invoicing once the supplierrsquos invoice is received This enables you to verify that the invoicedquantities correspond to the quantities received
Print the Packing List
In order to print the packing list of an incoming shipment select theincoming shipment of which you need the details and click PackingList in the panel at the right side of the screen
This link is available in the Internal Moves and DeliveryOrders sections
In case you received damaged or wrong products you can return them to the supplier In theIncoming shipment form click the Return Products button A window will open that letsyou choose the invoicing process to follow Once you click Process a stock move is generated withthe same reference number and return to specify that this is a return move
Figure 512 Stock Move for Returned Products
Receipt of a Supplier Order by Product
The approach shown above is very useful if goods receipts correspond to the original orders If yoursuppliers deliver items that do not necessarily coincide with the orders however it is easier to work byproducts received rather than by orders
From this version on you can also handle receptions by product even from List view Go to Warehouserarr Products Moves rarr Receive Products
Filters allow you to easily select receipts to be done and so on One way to quickly receive products isto Group by Supplier and select To Do
This is very useful functionality when your supplier sends the goods for several purchase orders at atime You can now just receive the products regardless of the purchase order they come from simplyby clicking the green arrow at the right side of the screen
The List view offers great flexibility and allows you to rapidly receive products by keeping fullfunctionality Of course you can handle both partial and complete receptions and you can addinformation about the production lots and packs
This can be also accomplished from Form view
92 CHAPTER 5 YOUR WAREHOUSE
Figure 513 Receipt of a Supplier Order using Group By
532 Internal Stock Moves
You should install the stock_location module (from the list of modules or through Reconfigurewizard Advanced Routes) if routing products to customers from suppliers or in your warehouse isdetermined by the identity of the product itself
Figure 514 Managing the Paths from one Location to Another in a Product Form
This will let you configure logistics rules individually for each product For example when a specificproduct arrives in stores it can automatically be sent to quality control In this case it has to beconfigured as a Push Flow with rules in the Product form The fields that make up those rules are
bull Source Location the rule only applies if a product comes from this location
bull Destination Location the rule only applies if a product ends up in this location
CHAPTER 5 YOUR WAREHOUSE 93
bull Automatic Move Automatic Move Manual Operation Automatic No StepAdded
bull Delay (days)
bull Operation a free text field which will be included in the automatic stock move proposed byOpenERP
There are two main logistic flows
bull Pushed Flows
bull Pulled Flows
Push flows are useful when the arrival of certain products in a given location should always be followedby a corresponding move to another location optionally after a certain delay The original Warehouseapplication already supports such Push flow specifications on the Locations themselves but thesecannot be refined per product Pull flows are a bit different from Push flows in the sense that theyare not related to the processing of product moves but rather to the processing of procurement ordersWhat is being pulled is a need not directly products You will now see some examples of using theselocations and logistics by product through Pushed Flows for
bull A rentable product
bull A product bought in China following its freight by ship from port to port
bull A product that you want to send to quality control before putting it in stocks
We will develop the third scenario the quality control
You can configure the system to put a given product in the Quality Control bay automatically when itarrives in your company To do that you just configure a rule for the product to be placed in the QualityControl location rather than the Input location when the product is received from the supplier
Table 58 Rule to Move Products manuallyfrom Input to Quality Control
Field ValueSource location StockDestination location Quality ControlAutomatic Move Manual OperationShipping Type Getting GoodsDelay (days) 0Operation Quality Control
Once this product has been received OpenERP will automatically manage the request for an internalmovement to send it to the Quality Control location If you want to do this automatically without havingto confirm it in the Automatic Move field select Automatic Move or Automatic No Step Added
94 CHAPTER 5 YOUR WAREHOUSE
Figure 515 Manual Stock Move to Quality Control
With the configuration described in the table above you will have to confirm the stock move manuallyonce you have received the goods
If you do not want to confirm the stock move manually but you want to see the move Suppliers ndashgtStock then Stock ndashgt Quality Control change the Automatic Move field and select Automatic MoveWith this configuration you will see the two stock moves
Figure 516 Automatic Stock Move to Quality Control
If you select Automatic Move No Step Added you will only see one stock move Suppliersndashgt Quality Control
Figure 517 Automatic Stock Move to Quality Control (No Step Added)
533 Shipping of Goods
In the same way as delivering goods you can ship goods in three different ways
bull manually enter data
bull deliver goods according to a sales order
bull deliver goods by product
CHAPTER 5 YOUR WAREHOUSE 95
Everything about goods receipt can also be done manually in the same way for a customer deliveryThis time use the automated product delivery processes based on customer orders Install the salemodule (Reconfigure wizard Sales Management) so that you can proceed further in this section of thechapter
Now create a new sales order from the menu Sales rarr Sales rarr Sales Orders Enter the following datain this order
bull Shop OpenERP SA
bull Customer Agrolait
bull Sales order lines
ndash Product [PC2] Basic+ PC (assembly on order)
ndash Quantity (UoM) 3
ndash Product UoM PCE
ndash Procurement Method from stock
You have already seen that OpenERP shows the available product stock in list view The real stock isequal to the virtual stock because you have nothing to deliver to customers and you are not waiting forany of these products to be received into stock The salesperson then has all the information needed totake orders efficiently
Figure 518 Entering an Order for Three Computers
Then confirm the quotation to convert it to an order If you return to the product form you will see thevirtual stock is now smaller than the real stock
Start the scheduler through the menu Warehouse rarr Schedulers rarr Compute Schedulers Itsfunctionality will be detailed in ch-mnf This manages the reservation of products and places ordersbased on the dates promised to customers and the various internal lead times and priorities Threeproducts will be reserved in the order that you created so they cannot be sold to another customer
96 CHAPTER 5 YOUR WAREHOUSE
Just in Time
Install the module mrp_jit to schedule each order in real time after it hasbeen confirmed This means that you do not have to start the scheduler orwait for its periodical start time
Now have a look at the list of deliveries waiting to be carried out using the menu Warehouse rarrWarehouse Management rarr Delivery Orders You find a line there for your order representing theitems to be sent Double-click the line to see the detail of the items proposed by OpenERP
Figure 519 Items on a Customer Order
States
OpenERP distinguishes between the states Confirmed and Assigned
An item is Confirmed when it is needed but the available stock may beinsufficient An item is Assigned when it is available in stock and thestoresperson reserves it the necessary products have been reserved for thisspecific operation
You can also confirm a customer delivery from a confirmed Sales Order When you click the Processbutton of Outgoing Deliveries a window opens where you can enter the quantities actually deliveredIf you enter a value less than the forecasted one OpenERP automatically generates a partial deliverynote and a new order for the remaining items For this exercise just confirm all the products
However if you want to look at a partial shipping an example will be developed at the end of thissection
CHAPTER 5 YOUR WAREHOUSE 97
If you return to the list of current orders you will see that your order has now been marked as delivered(Done) A progress indicator from 0 to 100 is shown by each order so that the salesperson canfollow the progress of his orders at a glance
Figure 520 List of Orders with their Delivery State
Negative Stock
Stock Management is very flexible to be more effective For example if youforget to enter products at goods-in this will not prevent you from sendingthem to customers In OpenERP you can force all operations manuallyusing the button Force Availability In this case your stocks risk to becomenegative You should monitor all stocks for negative levels and carry out aninventory correction when that happens
Partial Shipping
Should you have to process a partial delivery you can go to Warehouse rarr Warehouse Management rarrDelivery Orders then select the order to process it In the new window change the quantity to ship andthen confirm it
If you go back to the list view you will now see a new delivery order with a back order numberequal to the just confirmed order This is illustrated in the following figure
Figure 521 Partial Shipping
In the stock moves you will see that there are two moves The first move is for the remaining quantitiesto ship and the second one is for the shipped goods There will be more stock moves if you process
98 CHAPTER 5 YOUR WAREHOUSE
partial shipping in more than two times
Figure 522 Stock Moves in Partial Shipping
Return Products from Customers
If a customer returns damaged or wrongly delivered products you can enter this information inOpenERP via Warehouse rarr Warehouse Management rarr Delivery Orders
You have to select the order related to the returned products and click the Return Products A newwindow will open and will let you choose the invoicing method
Figure 523 Return Products from Customers
When the product is returned it will go back to your stock and you will see a stock move fromCustomers ndashgt Shelf 1
Figure 524 Stock Move for a Returned Product
Just In Time
By default scheduling starts automatically once a day You should make this scheduling executeovernight to ensure that the system does not slow down under a heavy load of scheduling when you arealso trying to use it interactively
To set the start time for the scheduler go to the menu Administration rarr Configuration rarr Scheduler rarrScheduled Actions Select the rule called lsquoRun mrp schedulerrsquo and modify the date and time of the nextexecution Some companies want to plan orders progressively as they are entered so they do not waituntil procurement orders are planned the next day Install the module mrp_jit (Reconfigure wizard
CHAPTER 5 YOUR WAREHOUSE 99
Just In Time Scheduling) to handle this Once the module is installed each requirement (that couldresult in a Production or Purchase Order) will be planned in real time as soon as it has been confirmed
Then if you make a sales order with a product that is Make To Order the quotation request to asupplier will immediately be generated
Delivery from the Supplier or to the Customer
The sale_supplier_direct_delivery module enables you todeliver the product directly from the supplier to the customer At thetime of writing this module is in extra-addons The logic that theproduct follows is configured individually for each product and affects onlyproducts marked Make to Order
This mode does not always makes sense Each order is processed immediately when confirmed Soif an order is to be delivered in three months the scheduler will reserve goods in stock for each orderonce it has been confirmed It would have been more sensible to leave these products available for otherorders
If a Purchase Orderrsquos Invoicing Control is configured From Order the scheduler will immediatelycreate the corresponding supplier quotation request It might have been better to delay it for severalweeks if you could have used the lead time to group the purchase with other future orders
So the negative effects of working with the Just in Time module are
bull Poor priority management between orders
bull Additionally stocked products
534 Logistics Configuration through Advanced Routes
To configure your logistics for advanced push and pull you need to install stock_locationmodule(Reconfigure wizard Advanced Routes) as explained before A complete scenario will be developed atthe end of this chapter
This module supplements the Warehouse application by adding support for location paths per producteffectively implementing Push and Pull inventory flows
Typically this could be used to
bull Manage product manufacturing chains
bull Manage default locations per product
bull Define routes within your warehouse according to business needs such as
ndash Quality Control
ndash After Sales Services
ndash Supplier Returns
100 CHAPTER 5 YOUR WAREHOUSE
bull Help rental management by generating automated return moves for rented products
Once this module is installed an additional Logistics Flows tab appears in the Product form allowingyou to add Push and Pull flow specifications
Push Flow
Push flows are useful when the arrival of certain products in a given location should always be followedby a corresponding move to another location optionally after a certain delay
Product
The core Warehouse Management application already supports such PushFlow specifications on the Locations but these cannot be refined perproduct
A push flow specification indicates which location is chained with another location as well as theparameters used As soon as a given quantity of products is moved to the source location a chainedmove is automatically foreseen according to the parameters set on the flow specification (destinationlocation delay type of move journal etc) The new move may be processed automatically or mayrequire a manual confirmation according to what you have defined
Suppose whenever the demo data product CPU3 enters the Stock location it first has to be moved tothe Quality Control location in order to check the quality
Look up the product CPU3 using the menu Warehouse rarr Product rarr Products
To have OpenERP accomplish this move automatically you have to configure the Push flow as follows
bull Operation Receptions to Quality Control
bull Source Location Stock
bull Destination Location Quality Control
bull Automatic Move Automatic No Step Added
bull Delay (days) 1
bull Shipping Type Getting Goods
bull Invoice Status Not Applicable
A push flow is related to how stock moves should be generated in order to increase or decreaseinventory
CHAPTER 5 YOUR WAREHOUSE 101
Figure 525 Push Flow Specification for Product CPU3
Pull Flow
Pull flows are a bit different from Push flows in the sense that they are not related to the processing ofproduct moves but rather to the processing of procurement orders What is being pulled is a need notdirectly products
A classical example of a Pull flow is when you have an Outlet company with a parent Company that isresponsible for the supplies of the Outlet
[ Customer ] lt- A - [ Outlet ] lt- B - [ Holding ] lt- C - [ Supplier ]
Demo Data
In our demo data example the Outlet Company is Shop 1 while OpenERPSA is the parent company
When a new procurement order A (resulting from the confirmation of a Sales Order for example) iscreated in the Outlet (Shop 1) it is converted into another procurement B (through a Pull flow of the
102 CHAPTER 5 YOUR WAREHOUSE
lsquomoversquo type) requested from the Holding When procurement order B is processed by the Holdingcompany (OpenERP SA) and if the product is out of stock it may be converted into a Purchase Order(C) from the Supplier (Push flow of the lsquoBuyrsquo type) The result is that the procurement order the needis pushed all the way between the Customer and Supplier
Technically Pull flows allow to process procurement orders differently not only depending on theproduct being considered but also depending on which location holds the ldquoneedrdquo for that product (iethe destination location of that procurement order)
To explain a pull flow for the product CPU1 we first have to configure the minimum stock rulesof CPU1 for the company OpenERP SA and Shop 1 using the menu Warehouse rarr AutomaticProcurements rarr Minimum Stock Rules or by selecting the product concerned and then clicking theMinimum Stock Rules action
Minimum Stock Rules
If you work with the demo data these minimum stock rules have alreadybeen defined
For the company OpenERP SA
bull Min Quantity 10
bull Max Quantity 50
For the company Shop 1
bull Min Quantity 10
bull Max Quantity 20
Look up the product CPU1 using menu Warehouse rarr Product rarr Products in order to define theconfiguration of the pulled flow
There are two specifications of a pull flow for product CPU1
Specification 1
bull Name Receive from Warehouse
bull Destination Location Shop 1
bull Type of Procurement Move
bull Source Location Internal Shippings
bull Partner Address OpenERP SA Belgium Gerompont Chaussee de Namur 40
bull Shipping Type Getting Goods
bull Procure Method Make to Order
CHAPTER 5 YOUR WAREHOUSE 103
Figure 526 Pull Flow Specification for Product CPU1
bull Invoice Status Not Applicable
Specification 2
bull Name Deliver Shop
bull Destination Location Internal Shippings
bull Type of Procurement Move
bull Source Location Stock
bull Partner Address Fabien
bull Shipping Type Sending Goods
bull Procure Method Make to Stock
bull Invoice Status Not Applicable
Now sell 1 unit of product CPU1 from the Shop1 (do not forget to confirm your sales order) and runthe scheduler using the menu Warehouse rarr Schedulers rarr Compute Schedulers Then check the stockmoves for product CPU1 from the menu Warehouse rarr Traceability rarr Stock Moves
104 CHAPTER 5 YOUR WAREHOUSE
Figure 527 Stock Move of CPU1 related to Pull Flow Specification
These moves can be explained like this
[ Customer ] ltndash [ Shop 1 ] ltndash Internal Shippings ltndash Stock ltndash [ OpenERP SA ]
When the company Shop 1 sells one unit of CPU1 to a customer its stock decreases to 10 unitsAccording to the minimum stock rule of the product CPU1 OpenERP generates a procurement orderof 21 units of CPU1 for the company Shop 1 (OP00007 or another number if you have added extradata) So 21 units of CPU1 move from OpenERP SA Stock to Shop 1 according to their internalconfiguration of Source and Destination Locations
A pull flow is related to how the procurement process runs in order to find products to increase ordecrease inventory
535 Procurement Methods ndash Make to Stock and Make to Order
The procurement method determines how the product will be replenished
bull Make to Stock your customers are supplied from available stock If the quantities in stock are toolow to fulfil the order a Purchase Order (according the minimum stock rules) will be generatedin order to get the products required Example a classic distributor
bull Make to Order when a customer order is confirmed you procure or manufacture the products forthis order A customer order lsquoMake to Orderrsquo will not modify stock in the medium term becauseyou restock with the exact amount that was ordered Example computers from a large supplierassembled on demand
CHAPTER 5 YOUR WAREHOUSE 105
You find a mix of these two modes used for the different final and intermediate products in mostindustries The procurement method shown on the product form is a default value for the order enablingthe salesperson to choose the best mode for fulfilling a particular order by varying the sales orderparameters as needed
The figures Change in Stock for a Make to Stock Product (page 105) and Change in Stock for a Maketo Order Product (page 105) show the change of stock levels for one product managed as Make toOrder and another managed as Make to Stock The two figures are taken from OpenERPrsquos Stock LevelForecast report available from the product form
Figure 528 Change in Stock for a Make to Stock Product
Figure 529 Change in Stock for a Make to Order Product
106 CHAPTER 5 YOUR WAREHOUSE
Logistical Methods
The Make to Stock logistical approach is usually used for high volumes andwhen the demand is seasonal or otherwise easy to forecast The Make toOrder approach is used for products that are measured or very expensiveto stock or have a short restocking time
536 Choosing Supply Methods
OpenERP supports two supply methods
bull Produce when the product is manufactured or the service is supplied from internal resources
bull Buy when the product is bought from a supplier
These are just the default settings used by the system during automated replenishment The sameproduct can be either manufactured internally or bought from a supplier
These three fields (Supply Method Procurement Method Product Type) determine the systemrsquosbehaviour when a product is required The system will generate different documents depending onthe configuration of these three fields when satisfying an order a price quotation to a supplier or amanufacturing order
OpenERP manages both stockable products and services A service bought from a supplier in Make toOrder mode will generate a subcontract order from the supplier in question
Figure Workflow for Automatic Procurement depending on the Product Configuration (page 107)illustrates different cases for automatic procurement
The table below shows all possible cases for the figure Workflow for Automatic Procurement dependingon the Product Configuration (page 107)
Table 59 Consequences of Procurement Methods Make to Stock (MTS)and Make To Order (MTO)
Procurement Method Produce BuyMTS Wait for availability Wait for availabilityMTO Production Order Purchase Order
Table 510 Consequences of Procurement Methodswhen using Services
Procurement Method Produce BuyMTS MTO Create task Subcontract
CHAPTER 5 YOUR WAREHOUSE 107
Figure 530 Workflow for Automatic Procurement depending on the Product Configuration
537 Packaging with Various Logistics Units of Measure
Units of Measure
OpenERP supports several units of measure Quantities of the same product can be expressed in severalunits of measure at once For example you can buy grain by the tonne and resell it by kg You just haveto make sure that all the units of measure used for a product are in the same units of measure category
Categories of Units of Measure
All units of measure in the same category are convertible from one unit toanother
The table below shows some examples of units of measure and their category The factor is used toconvert from one unit of measure to another as long as they are in the same category
108 CHAPTER 5 YOUR WAREHOUSE
Table 511 Example Units of Measure
UoM Category Ratio UoM TypeKg Weight 1 ReferenceGram Weight 1000 SmallerTonne Weight 1000 BiggerHour Working time 8 SmallerDay Working time 1 ReferenceHalf-day Working time 4 SmallerItem Unit 1100 Items Unit 001
Depending on the table above you have 1Kg = 1000g = 0001 Tonnes A product in the Weightcategory could be expressed in Kg Tonnes or Grammes You cannot express it in hours or pieces forexample
Use the menu Warehouse rarr Configuration rarr Products rarr Units of Measure rarr Units of Measure todefine a new unit of measure
In the definition of a Unit of Measure you have a Rounding precision factor which shows how amountsare rounded after the conversion A value of 1 gives rounding to the level of one unit 001 givesrounding to one hundredth
Secondary Units
OpenERP supports double units of measure Notice however that thedefault unit of measure and the purchase unit of measure have to be inthe same category Only the sales unit of measure may be in a differentcategory
This is very useful in the agro-food industry for example you sell ham bythe piece but invoice by the Kg A weighing operation is needed beforeinvoicing the customer
To activate the management options for double units of measure assign the group Useability ProductUoS View to your user
In this case the same product can be expressed in two units of measure belonging to different categoriesfor sales and stockpurchase You can then distinguish between the unit of stock management (the piece)and the unit of invoicing or sales (kg)
Figure 531 Secondary Unit of Measure
In the product form you can set one unit of measure for sales and stock management and one unit of
CHAPTER 5 YOUR WAREHOUSE 109
measure for purchases
For each operation on a product you can use another unit of measure as long as it can be found inthe same category as the two units already defined If you use another unit of measure OpenERPautomatically handles the conversion of prices and quantities
So if you have 430 Kg of carrots at 530 EURKg OpenERP will automatically make the conversion ifyou want to sell in tonnes ndash 043 tonnes at 5300 EUR tonne If you had set a rounding factor of 01for the tonne unit of measure OpenERP will tell you that you have only 04 tonnes available
Packaging
The packaging allows you to ship products in several ways For example you can ship goods by boxesor by pallets
At first you have to define possible packaging To define the packaging go to menuselectionWarehouse ndashgt Configuration ndashgt Product ndashgt Packaging and click New
Figure 532 Packaging definition
To complete the creation of a new packaging you have to give it a name and a type Different types areavailable in OpenERP Box Pack Pallet and Unit
Once all packaging is defined you can attach the packaging to your products through the followingmenu Warehouse rarr Configuration rarr Product rarr Packaging
Figure 533 Defining the Packaging for the Product
110 CHAPTER 5 YOUR WAREHOUSE
54 Scheduling Procurements
The master production plan sometimes called the MPS (Master Production Schedule) enables you togenerate forecasts for incoming and outgoing material It is based on forecasts of inputs and outputs bythe logistics manager
To be able to use the production plan you must install the stock_planning module
MPS Procurement and Production
OpenERP distinguishes between Production Purchase and Procurement
Production is manufacturing Purchase is the acquisition of goods fromanother party and Procurement is either one or both of those So it would bebetter to call the MPS the Master Procurement Schedule Which OpenERPdoes
Product Trading
Also called the Production Plan this tool is also very useful for tradedproducts which are not manufactured You can use it for stock managementwith purchased and manufactured products
541 Processing Exceptions
The set of stock requirements is generated by procurement orders
In normal system use you do not need to worry about procurement orders because they areautomatically generated by OpenERP and the user will usually work on the results of a procurement aproduction order a purchase order a sales order and a task
If there should be configuration problems the system can remain blocked by a procurement withoutgenerating a corresponding document For example suppose that you configure a product ProcurementMethod as Make to Order and Supply Method as Produce but you have not defined the bill ofmaterials In that case procurement of the product will stay blocked in an exception state No Billof Materials defined for this product You then have to create a bill of materials tosolve the problem
Troubleshooting
bull No bill of materials defined for production you need to create a BoM or indicate that the productcan be purchased instead
bull No supplier available for a purchase you have to define a supplier in the Supplier tab of theproduct form
bull No address defined on the supplier partner you have to complete an address for the defaultsupplier for the product concerned
CHAPTER 5 YOUR WAREHOUSE 111
bull No quantity available in stock you have to create a rule for automatic procurement (for examplea minimum stock rule) and put it in the order or manually procure it
Some problems are just those of timing and can be automatically corrected by the system
Use the menu Warehouse rarr Schedulers rarr Procurement Exceptions to see all the exceptions
If a product has to be lsquoin stockrsquo but is not available in your stores OpenERP will make the exception aslsquotemporaryrsquo or lsquoto be correctedrsquo The exception is temporary if the system can procure it automaticallyfor example if a procurement rule is defined for minimum stock
Figure 534 Example of a Procurement in Exception
If no procurement rule is defined the exception has to be corrected manually by the user Oncethe exception is corrected you can restart by clicking Retry If you do not do that OpenERP willautomatically recalculate on the next automated requirements calculation
542 Manual Procurement
To procure internally you can create a procurement order manually Use the menu Warehouse rarrSchedulers rarr Procurement Exceptions and click the New button to do this
The procurement order will then be responsible for calculating a proposal for automatic procurementfor the product concerned This procurement will start a task a purchase order for the supplier or aproduction depending on the product configuration
It is better to encode a procurement order rather than direct purchasing or production This method hasthe following advantages
bull The form is simpler because OpenERP calculates the different values from other values anddefined rules purchase date calculated from order date default supplier raw materials needsselection of the most suitable bill of materials etc
112 CHAPTER 5 YOUR WAREHOUSE
Figure 535 Encoding a New Procurement Order
Figure 536 Workflow for Handling a Procurement according to Product Configuration
CHAPTER 5 YOUR WAREHOUSE 113
bull The calculation of requirements prioritises the procurements If you encode a purchase directlyyou short-circuit the planning of different procurements
Shortcuts
On the product form you have an ACTIONS shortcut button CreateProcurements that lets you quickly create a new procurement order
543 Sales Forecasts
The first thing you have to do to work with a production plan is define the periods for stock managementSome companies plan daily others weekly or monthly
Stock Management Interval
The interval chosen for managing stock in the production plan will dependon the length of your production cycle You generally work daily weeklyor monthly
If it takes several days to assemble your products you most likely willdefine a weekly plan If your manufacturing cycles take several monthsyou can work with a monthly plan
To predefine these periods you can use the Stock and Sales PlanningPeriods that will automatically generate daily weekly or monthly periods
Figure 537 Stock and Sales Planning Periods
Go to the menu Sales rarr Configuration rarr Stock and Sales Periods rarr Create Stock and Sales PeriodsA window appears enabling you to automatically define the next periods that will be provided for stockmanagement For this example create weekly periods
Salespeople can then enter their sales forecasts by product and by period using the menu Sales rarr SalesForecasts rarr Sales Forecasts The forecasts can be made by quantity or by value For a forecast byamount OpenERP automatically calculates the quantity equivalent to the estimated amount This canbe modified manually as needed before completion A salesperson can create sales forecasts manuallyor he can use the Create Sales Forecasts wizard in the above menu
114 CHAPTER 5 YOUR WAREHOUSE
Figure 538 Defining Periods for Stock Management
Figure 539 Sales Forecast to Help Create a Master Production Plan
544 Production Plan
The manager responsible for logistics then plans receipts (manufacturing or purchases) and outgoings(consumption or customer deliveries) by period From the menu Warehouse rarr Stock Planning rarrCreate Stock Planning Lines you can create a stock planning per week for a specific product categoryThrough Warehouse rarr Stock Planning rarr Master Procurement Schedule you can adjust the planning
For each period and product OpenERP gives you the following information
bull Stock estimated at the end of the period calculated as stock in the following period less the totalestimated outgoings plus total estimated inputs
bull Closed entries coming from production or confirmed purchases
bull Forecast inputs for the period calculated using the incoming entries less the closing amounts
bull Planned inputs entered manually by the logistics manager
CHAPTER 5 YOUR WAREHOUSE 115
bull Closed outgoings which are the consumption of manufacturing waiting and deliveries to be madeto customers
bull Forecast outgoings calculated from the planned outgoings less the closing amounts
bull Planned outgoings manually entered by the logistics manager
bull Sales forecasts which represent the sum of forecasts made by the salespeople
Figure 540 The Master Production Schedule (MPS)
The production plan enables the logistics manager to play with the forecast receipts and outgoings andtest the impact on the future stock for the product concerned It enables you for example to check thatthe stock does not fall below a certain level for that product
You can also open the production plan for past periods In this case OpenERP shows you the real stockmoves by period for forecast reports
If you do not have automated procurement rules for a product you can start procurement at any timebased on the estimates of the production plan To do this press the button Procure Incoming Left (ieremaining) on the Master Procurement Schedule OpenERP plans procurement for an amount equal tothe entries forecast
55 Managing Lots and Traceability
The double-entry management in OpenERP enables you to run very advanced traceability Alloperations are formalized in terms of stock moves so it is very easy to search for the cause of anygaps in stock moves
116 CHAPTER 5 YOUR WAREHOUSE
Upstream Traceability
It runs from the raw materials received from the supplier and follows thechain to the finished products delivered to customers (Note that the name isconfusing - this would often be considered a downstream direction Thinkof it as Where Used)
Downstream Traceability
It follows the product in the other direction from customer to the differentsuppliers of raw material (Note that the name is confusing - this wouldoften be considered an upstream direction Think of it as Where Supplied)
551 Stock Moves
Use the menu Warehouse rarr Traceability rarr Stock Moves to track past stock transactions for a productor a given location All the operations are available You can filter on the various fields to retrieve theoperations about an order or a production activity or a source location or any given destination
Figure 541 History of Stock Movements
Each stock move is in a given state The various states are
bull Draft the move so far has no effect in the system The transaction has not yet been confirmed
bull Confirmed the move will be done so it will be counted in the calculations of virtual stockBut you do not know whether it will be done without problem because the products have beenreserved for the move
bull Validated the move will be done and the necessary raw materials have been reserved for thetransaction
CHAPTER 5 YOUR WAREHOUSE 117
bull Done the stock move has been done and entered into the calculations of real stock
bull Waiting in the case of transactions From Order this state shows that the stock move isblocked waiting for the end of another move
bull Cancelled the stock move was not carried out so it is not taken into account in either realstock or virtual stock
Delivery orders goods receipts and internal picking lists are just documents that group a set of stockmoves You can also consult the history of these documents using the menu Warehouse rarr Traceabilityrarr Packs
552 Lots
OpenERP can also manage product lots Two lot types are defined
bull Production lots (batch numbers) are represented by a unique product or an assembly of identicalproducts leaving the same production area They are usually identified by bar codes stuck on theproducts The batch can be marked with a supplier number or your own company numbers
bull Tracking numbers are logistical lots to identify the container for a set of products Thiscorresponds for example to the pallet numbers on which several different products are stocked
These lots can be encoded onto all stock moves and specifically on incoming shipments lines internalmoves and outgoing deliveries
Figure 542 Entering a Line for Production Receipt
118 CHAPTER 5 YOUR WAREHOUSE
To enter the lot number in an operation you can use an existing lot number or create a new pack Aproduction lot (batch number) is used for a single product A tracking number can be used several timesfor different products so you can mix different products on a pallet or in a box
Simplified View
In the Simplified view the tracking numbers cannot be seen the fieldis hidden To get to Extended view mode assign the group Useability Extended View to the current user or change the User Preferences
You can also specify on the product form the operations in which a lot number is required You can thencompel the user to set a lot number for manufacturing operations goods receipt or customer packing
You do not have to encode the lot numbers one by one to assign a unique lot number to a set of severalitems You only need to take a stock move for several products line and click the button Split inProduction Lots You can then give a lot number prefix (if you want) and OpenERP will complete theprefix in the wizard with a continuing sequence number This sequence number might correspond to aset of pre-printed barcodes that you stick on each product
Figure 543 Splitting a Lot into uniquely Identified Parts
553 Traceability
If you key in the lot numbers for stock moves as described above you can investigate the traceabilityof any given lot number Go to the menu Warehouse rarr Traceability rarr Production Lots or Warehouserarr Traceability rarr Packs
CHAPTER 5 YOUR WAREHOUSE 119
Product Shortcuts
From the product form the toolbar to the right offers useful information
bull Minimum Stock Rules
bull Stock by Location
bull Product Sales
bull Bills of Material
Search for a particular lot using the filters for the lot number the date or the product Once you can seethe form about this lot several actions can be performed
bull Upstream Traceability from supplier through to customers
bull Downstream Traceability from customer back to suppliers
bull Stock in all the physical and virtual locations
Figure 544 Tracing Upstream in Make to Order
Figure 545 Tracing Downstream in Make to Stock
Finally on a lot you can enter data on all the operations that have been done for the product Thatkeeps a useful history of the pre-sales operations
56 Scrapping Products
In OpenERP there are many ways to handle scrap products
1 Warehouse rarr Product Moves rarr Receive Products
120 CHAPTER 5 YOUR WAREHOUSE
2 Warehouse rarr Product Moves rarr Deliver Products
3 Warehouse rarr Warehouse Management rarr Incoming Shipments
Figure 546 Scrapping from an Incoming Shipment
4 Warehouse rarr Warehouse Management rarr Internal Moves
Figure 547 Scrapping from an Internal Move
5 Warehouse rarr Warehouse Management rarr Delivery Orders
When you decide to scrap some products they are transferred to the Scrap location To display thecontent of this Virtual Location go to menuselection Warehouse ndashgt Inventory Control ndashgt LocationStructure then select the virtual locations and display the Scrap location
If you want to transfer the products to another location you can create a new one and check the ScrapLocation in the additional information
CHAPTER 5 YOUR WAREHOUSE 121
Figure 548 Scrapping from a Delivery Order
57 Identifying Products and Locations with Barcodes andRFID Devices
You can the barcode in the product form in the field EAN13
58 Financial Inventory Management
581 Manual and Real-time Stock Valuation
If you have experience of managing with traditional software you will know the problem of gettinguseful indicators If you ask your accountant for a stock valuation or the value added by production hewill give you a figure
If you ask for the same figure from your stores manager you will get an entirely different amount Youhave no idea who is right
In OpenERP stock management is completely integrated with the accounts to give strong coherencebetween the two systems The double-entry structure of locations enables a very precise correspondencebetween stocks and accounts
Each stock movement also generates a corresponding accounting entry in an accounting journal toensure that the two systems can stay in permanent synchronization
To do that set up a general account for each location that should be valued in your accounts If aproduct goes to one location or another and the accounts are different in the two locations OpenERPautomatically generates the corresponding accounting entries in the accounts in the stock journal
If a stock move will go from a location without an account to a location where an account has beenassigned (for example goods receipt from a supplier order) OpenERP generates an accounting entryusing the properties defined in the product form for the counterpart You can use different accounts per
122 CHAPTER 5 YOUR WAREHOUSE
location or link several locations to the same account depending on the level of analysis needed
You use this system for managing consigned stocks
bull a supplier location that is valued in your own accounts or
bull a location in your own company that is not valued in your accounts
How to Configure Accounting Valuation
In the Product form go to the Accounting tab and select the Real Time (automated) option forInventory Valuation
To define your accounts you have two options Set them on the product category or on the product
1 From the Accounting Stock Properties section for the Product Category set theStock Input Account the Stock Output Account and the Stock VariationAccount
2 From the Accounting tab for the Product set the Stock Input Account and the StockOutput Account
You can also overwrite the accounts from the Product or the Product Category by defining Stock InputAccount and Stock Output Account for a Location
account_anglo_saxon
You can also install the account_anglo_saxon module (Reconfigure wizardAnglo-Saxon Accounting) to value your stock according to Anglo-saxonprinciples
The figure below shows the various accounts that can be used with and without theaccount_anglo_saxon module installed
582 Managing Transportation Costs
In OpenERP you can handle the delivery methods when installing the delivery module
This module will allow you
bull To select the delivery company
bull To define the delivery pricelist according to the price the weight or the volume
Now in each Delivery Order two new fields are available to enter the right value to deliver the productsto the customer You can also find a new field in the Sales Order form that enables you to select adelivery method
CHAPTER 5 YOUR WAREHOUSE 123
Figure 549 Setting up Stock Valuation Accounts
Figure 550 Define the Delivery Method
Figure 551 Define the Delivery Costs
Figure 552 Delivery Cost in the Delivery Orders
124 CHAPTER 5 YOUR WAREHOUSE
Figure 553 Delivery Method in the Sales Orders
59 Organize your Deliveries
You can manage stock through journals in the same way as you can manage your accounts throughjournals This approach has the great advantage that you can define journals in various ways to meetyour companyrsquos needs
For example a large company may want to organize deliveries by department or warehouse You canthen create a journal and a manager for each department The different users can work in a journal as afunction of their position in the company That enables you to better structure your information
A company doing a lot of transport could organize its journals by delivery vehicle The differentdelivery orders will then be assigned to a journal representing a particular vehicle When the vehiclehas left the company you can confirm all the orders that are found in the journal all at the same time
591 The Different Journals
Install the Reconfigure option Invoicing Journals for Sales Management or the sale_journalmodule to work with different journals This adds two new concepts to OpenERP
bull Invoicing journals
bull Stock journals or Delivery journals
Invoicing journals (Sales rarr Configuration rarr Sales rarr Invoice Types) are used to assign purchaseorders andor delivery orders to a given invoicing journal Everything in the journal can be invoicedin one go and you can control the amounts by journal For example you can create the followingjournals daily invoicing end-of-week invoicing and monthly invoicing It is also possible to show theinvoicing journal by default in the partner form Set the Invoicing Method to Grouped (one invoiceper customer) or Non Grouped (individual invoices) according to your needs
Stock journals (Warehouse rarr Configuration rarr Warehouse Management rarr Stock Journals) allow youto classify the delivery orders in various ways such as by department by salesperson or by type If asalesperson looks for a delivery order in his own journal he can easily see the work on current itemscompared with his own orders
CHAPTER 5 YOUR WAREHOUSE 125
Default Values
To enter all the orders in his own stock journal a salesperson can use thedefault values that are entered in the fields when creating orders
Finally the stock journals can also be used as delivery journals to post each item into a delivery journalFor example you can create journals dated according to customer delivery dates (such as Mondayrsquosdeliveries or afternoon deliveries) or these journals could represent the dayrsquos work for delivery vehicles(such as truck1 truck2)
592 Using the Journals
You will now see how to use the journals to organize your stock management in practice Afterinstalling the module sale_journal look at the list of partners In the tab Sales and Purchaseson any of them you will now see the field Invoicing Method
Figure 554 Partner Form in Invoicing Mode
You can create a new Invoicing Journal for a partner through the menu Sales rarr Configuration rarr Salesrarr Invoice Types You can decide if the invoices should be grouped or not when generating them in thejournal Create a second invoicing journal End-of-Month Invoicing which you can assign toanother partner
Then enter the data for some sales orders for these two partners After entering sales order data thefield Invoicing Mode in the second tab Other Information is completed automatically from thepartner settings
126 CHAPTER 5 YOUR WAREHOUSE
Figure 555 Defining an Invoicing Journal
Look at the History tab of the Sales order and observe the Picking List that has been created The fieldInvoicing Mode is automatically shown there
Figure 556 Generated Picking Lists
At the end of the day the invoicing supervisor can display the list by journal Go to the menu Sales rarrInvoicing rarr Lines to Invoice Add a New Filter by selecting Invoice Type contains Daily or any otherpart of the invoice journal you are using Select the different orders in the list You can automatically
CHAPTER 5 YOUR WAREHOUSE 127
carry out invoicing by clicking the action Make Invoices (the gears symbol)
Confirming Invoices
By default invoices are generated in the draft state which enables you tomodify them before sending them to the customer But you can confirm allthe invoices in one go by selecting them all from the list and selecting theaction Confirm Draft Invoices
At the end of the month the invoicing management does the same work but in the journal lsquomonth-endinvoicingrsquo
You can also enter a journal to confirm cancel all the orders in one go Then you can do severalquotations assign them to a journal and confirm or cancel them at once
Figure 557 View of an Order Journal
510 Estimating Delivery Dates
5101 Standard Delivery Time
In order to define the delivery time you have to know three things
bull Customer Lead Time
That is the time you promise to your customer for a delivery It corresponds to the average delaybetween the confirmation of the customer order and the delivery of the finished goods It can bedefined in the product form in the Procurement and Locations tab
This time will be influenced by the Manufacturing Lead Time and the Delivery Lead Time
bull Manufacturing Lead Time
This is the time you need to produce one unit of a product If this product needs othersub-products the different manufacturing times will be summed It can also be defined in theproduct form in the Procurement and Locations tab
bull Delivery Lead Time
This is the time your supplier needs to deliver the goods This delay can be defined in the productform in the Suppliers tab
128 CHAPTER 5 YOUR WAREHOUSE
For example if we have to deliver some products to a customer in a month (in 30 days) You promiseto deliver the goods to the customer within 10 days the manufacturing time is equal to 4 days and oursuppliers deliver the raw materials within 3 days
According to those numbers we will have to start the process in 23 days if we have to order rawmaterials
5102 Schedule Logistic Flows according to MRP1 Rules
MRP is a software-based production planning and inventory control system used to managethemanufacturing process
It is a computer-based system in which the given Master Schedule is exploded with Bills Of Materialinto the required amount of raw material parts and subassemblies needed to produce the final productsin each period
511 Incoming and Outgoing Products Planning
To be able to plan incoming and outgoing shipments of products you have to install the modulestock_planning
Figure 558 Planning the Deliveries of Customer Products
Thanks to this module you will be able to calculate a planning of the stock for a product
Planned dates on a packing order are put in each stock move line If you have a packing order containingseveral products not all of the lines necessarily need to be delivered the same day The minimum andmaximum dates in a packing order show the earliest and latest dates on the stock move lines for thepacking
CHAPTER 5 YOUR WAREHOUSE 129
If you move a packing order in the calendar view the planned date in the stock move lines willautomatically be moved as a result
512 Managing Inventory Reconciliation
Inventory reconciliation involves two steps physical and accounting
Physical inventory steps include taking a written inventory record and comparing it to the actual goodsin the companyrsquos warehouses Counting obsolete and damaged products is also a reconciliation activity
Reconciliation steps on the accounting side include verification that all inventory purchases are postedentering adjustments from the physical count and analysing the dollar differences between monthsInventory reconciliation frequency depends on the size location and type of inventory in a companyrsquosoperations
513 Building Reports to Track Activity
With OpenERP you can build your own reports in order to track the different activities in yourwarehouses To create your own reports you have to install the base_report_creator It will add asubmenu in Administration rarr Customization rarr Reporting
Figure 559 Create your Own Reports
This newly added section allows you to define for your new report
bull The general configuration
The aim of this tab is to choose the models your report will rely on
bull The view parameters
This tab will define the display of your report You can choose between the traditional availableviews (TreeList Form Graph and Calendar) and you can define three different ways to displayyour report
bull The fields to display
130 CHAPTER 5 YOUR WAREHOUSE
The fields available to display will depend on the models you choose in the GeneralConfiguration tab
When you add a new field to your report different fields have to be specified
ndash Sequence - defines the order in which the fields will be displayed in the report
ndash Field - the information you want to display in your report
ndash Grouping method - affects the way the field is displayed You can choose between Grouped SumMinimum Count Maximum and Average
ndash Graph mode - defines which axe of the graph the field will represent
ndash Calendar mode - defines the meaning of the field for the calendar (Starting or Ending date DelayEnd Date Unique Colours)
bull The filters on fields
This tab will let you choose which data to display according to the value of a field It is possibleto manually modify or add new filters according to your needs
bull The security
The security tab is used to select the groups that are able to display the report
Create Report with OpenOffice
You can also create or edit reports with OpenOffice using thebase_report_designer module
In order to add the extension to OpenOffice load this module and start theconfiguration A new window will ask you to Save As a file that containsthe extension
Once you have saved the file start OpenOffice and go to Tools rarrExtension Manager then click Add and select the previously saved file
Restart OpenOfficeorg and now you have the extension installed
Figure 560 Extension to Create a Report in OpenOffice
514 Import Export
Managing import export with foreign companies can sometimes be very complex Between adeparture port and the destination company products can get stopped for several weeks at sea orsomewhere in the numerous transportation stages and customs To manage such deliveries efficiently itis important to
bull know where your products are
CHAPTER 5 YOUR WAREHOUSE 131
bull know when they are likely to arrive at their destination
bull know your value in transit
bull follow the development of the different steps
Linked locations in OpenERP enable you to manage all this rather elegantly You can use a structurelike this
bull Suppliers
ndash European Suppliers
ndash Chinese Suppliers
bull In transit
ndash Shanghai Port
ndash Pacific Ocean
ndash San Francisco Port
ndash San Francisco Customs
5141 Stock
The transit locations are linked between themselves with a manual confirmation step The internalstock move is validated at each port and customs arrival OpenERP prepares all the linked movesautomatically
Intrastat
Companies that do import export should install the modulereport_intrastat This enables them to prepare the reports neededto declare product exports
You can use the lead times between different locations to account for real delays Your lead times andstock forecasts are calculated by OpenERP to estimate the arrival of incoming products so that you canrespond to a customerrsquos needs as precisely as possible
You can also value the products in transit in your account depending on the chosen stock locationconfiguration
5142 Rental Locations
You can manage rental locations in OpenERP very simply using the same system of linked locationsUsing the stock_location module you can set a return date for rental items sent to a customerlocation after a certain rental period
132 CHAPTER 5 YOUR WAREHOUSE
Then the set of real and virtual stocks is maintained daily in real time The different operations suchas delivery and receipt after a few days are automatically suggested by OpenERP which simplifies thework of data entry
You then have the product list found in the customer locations and your own stock in your stocklocation The list of waiting goods receipts is automatically generated by OpenERP using the locationlinks
Suppose you want to rent a product (PC3) to your customer (Axelor) for 30 days Two stock movemententries are needed to manage this scenario
1 Product goes from Stock (your companyrsquos location) to Axelor - Rental Location (your customerlocation)
2 Product will be returned into Stock (your companyrsquos location) from Axelor - Rental Location(your customer location) after 30 days
To manage rental products by linking locations configure a rental location (Axelor - Rental Location) asshown in the following figure using the menu Warehouse rarr Configuration rarr Warehouse Managementrarr Locations
Figure 561 Configuration of a Rental Location lsquoAxelor - Rental Locationlsquo
Through the menu Warehouse rarr Traceability rarr Stock Moves you can create a stock movement entryfrom Stock to Customer Location (Axelor - Rental Location) in OpenERP for a rental product (PC3)
The stock movement entry from Customer Location (Axelor - Rental Location) to Stock is generatedautomatically on the proper Scheduled Date by OpenERP when you have confirmed the previous stockmovement entry by clicking the Process Now button
CHAPTER 5 YOUR WAREHOUSE 133
Figure 562 Stock Movement Entry to Send the Product lsquoPC3lsquo to the Customer Location
The same principle is used for internal stock to generate quality control for certain products
5143 Consigned Products
The principle of linked locations is used to manage consigned products You can specify that certainproducts should be returned to you a certain number of days after they have been delivered to customers
When the products have been delivered OpenERP automatically creates goods receipts for theconsigned product The specified date is obviously approximate but enables you to forecast returns
515 Stock Location Example
In this section we will develop a more detailed example that includes different concepts seen in theprevious sections
The following example will use the Stock Location types the Logistic Flows and the Bill Of Materials
We have two companies OpenERP SA and OpenERP US
We have three products Product A Product B and Product C For each product we will have to definethe Stock Location to determine where to take these products
To make one unit of Product A we need the Product B and the Product C So we will have to define aBill of Material
134 CHAPTER 5 YOUR WAREHOUSE
Table 512 Bill of Materials
Field ValueProduct Product AProduct Qty 1Name Product ABoM Type NormalCompany OpenERP US
The different components to produce one unit of Product A are one unit of Product B and one unit ofProduct C
Table 513 Companies and Products
Company WhatOpenERP SA Sell the Product AOpenERP SA Store the Product COpenERP US Produce the Product AOpenERP US Store the Product B
Table 514 Logistics Flows
Name Type Product Goal of the flowAsk for Production Pull Product A OpenERP SA asks OpenERP US to produce the Product ALaunch Production Pull Product A OpenERP US launches the production of the Product ASend Product to Transit Pull Product C OpenERP US asks for the Product C to OpenERP SAGet Product from Transit Pull Product C OpenERP US receives the Product C
Here are the details of the different flows
Figure 563 Ask for Production
With this configuration when a Sales Order for 3 units of Product A is confirmed and the scheduler hasbeen launched you will have the following procurements
And the following stock moves have been generated
Because we are working in two different companies different stock moves have been generated Theproducts have to move from OpenERP SA to OpenERP US for the products C After the manufacturingprocess the products A have to move from OpenERP US to OpenERP SA to be sold to the customer
CHAPTER 5 YOUR WAREHOUSE 135
Figure 564 Launch Production
Figure 565 Send Product to Transit
Figure 566 Get Product from Transit
Figure 567 Procurements View
136 CHAPTER 5 YOUR WAREHOUSE
Figure 568 Stock Moves
Once you have confirmed the different moves for the products B and C the Manufacturing Order is inready to produce status So you can run the production of the three units of Product A
Figure 569 Launch the Production
Once again due to the use of two companies you have to confirm different deliveries One to deliver theproduct from OpenERP US to OpenERP SA and another to deliver the product from OpenERP SA tothe customer Now you have to confirm the delivery of the three units from OpenERP US to OpenERPSA then to confirm the reception of the products in OpenERP SA and finally deliver the products toyou final customer
137
Part IV
Streamlining your Manufacturing
138
139
Defining your Master Data 6The management of manufacturing described in this chapter covers planning orderingstocks and the manufacturing or assembly of products from raw materials and componentsIt also discusses consumption and production of products as well as the necessaryoperations on machinery tools or human resources
Manufacturing management in OpenERP is based on its stock management and equally very flexible inboth its operations and its financial control It particularly benefits from the use of double-entry stockmanagement for production orders Manufacturing management is implemented by the mrp moduleIt is used to transform all kinds of products
bull Assemblies of parts composite products soldered or welded products assemblies packs
bull Machined parts machining cutting planing
bull Foundries clamping heating
bull Mixtures mixing chemical processes distillation
You will work in two areas with products in the first part of this chapter and with operations in thesecond part The management of products depends on the concept of classifications while operationsmanagement is related to routing and workcenters
Bills of Materials
Bills of Materials or manufacturing specifications go by different namesdepending on their application area for example
bull Food Recipes
bull Chemicals Equations
bull Building Plans
For this chapter you should start with a fresh database that includes demo data with mrp(Manufacturing) and its dependencies installed and a generic chart of accounts configured Asyou will notice when you select Manufacturing to be installed OpenERP will install the linkedapplications automatically
140 CHAPTER 6 DEFINING YOUR MASTER DATA
61 Bill of Materials and Components
611 Using Bills of Materials
Bills of Materials are documents that describe the list of raw materials used to make a finished productTo illustrate the concept of specification you will work on a shelf (or cabinet) where the manufacturingplan is given by the figure Plan of Construction of a Shelf (page 140)
Figure 61 Plan of Construction of a Shelf
The shelf is assembled from raw materials and intermediate assemblies The Image Code refers to thepicture the Product Reference is the corresponding code in OpenERP
Change the unit of the Wood Lintel 4m (LIN40) product to m instead of PCE
Table 61 Product Definitions before defining Bills of Materials(already defined)
Image Code Product Reference DescriptionARM100 SHE100 Shelf 100 cmPANLAT SIDEPAN Side PanelPANA100 RPAN100 Rear Panel SHE100PROFIL PROFIL Assembly SectionETA100 RCK100 Rack 100cmBOIS002 WOOD002 Wood 2mmTAQ000 METC000 Metal CleatsLIN40 LIN40 Wood Lintel 4m
CHAPTER 6 DEFINING YOUR MASTER DATA 141
Table 62 New Products to be created before defining Billof Materials
Image Code Product Reference DescriptionPLET100 SPAN100 Shelf PanelBOIS010 WOOD010 Wood 10mm
Copy
To create the above products duplicate existing ones such as Side Paneland Wood 2mm from the Purchase or Sales menu Purchases rarr Productsrarr Products
To describe how this shelf should be assembled you define a bill of materials for each intermediateproduct and for the final shelf assembly These are shown in the tables below You can start from thedemo data and complete them according to the specifications To create or change a bill of materialsgo to Manufacturing rarr Master Data rarr Bill of Materials
Table 63 Bill of Materials for 1 SHE100 Unit(already defined)
Product Ref Quantity Unit of MeasurePROFIL 4 PCESIDEPAN 2 PCEMETC000 12 PCERPAN100 1 PCERCK100 3 PCE
Table 64 Bill of Materials for 1 RCK100 PCE
Product Code Quantity Unit of MeasureSPAN100 1 PCEMETC000 4 PCE
Table 65 Bill of Materials for 1 SPAN100 PCE
Product Code Quantity Unit of MeasureWOOD010 0083 m
Table 66 Bill of Materials for 1 PROFIL PCE
Product Code Quantity Unit of MeasureLIN40 025 m
Table 67 Bill of Materials for 1 RPAN100 PCE
Product Code Quantity Unit of MeasureWOOD002 025 m
142 CHAPTER 6 DEFINING YOUR MASTER DATA
Table 68 Bill of Materials for 1 SIDEPAN PCE
Product Code Quantity Unit of MeasureWOOD002 0083 m
The bills of materials are then used by the software to calculate the raw material needs based on therequirements of the finished products So if you want to manufacture 10 shelves the system cancalculate the actual products that will be consumed
Table 69 Total Quantities per Shelf
Product Code Quantity Unit of MeasureWOOD002 0416 (2 0083 + 025) mLIN40 1 (4 025) mWOOD010 0249 (0083 3) mMETC000 132 ((3 4) + (10 12)) PCE
Bill of Materials
To see the bill of materials in tree view use the menu Manufacturing rarrMaster Data rarr Bill of Materials then select the product and click the actionBOM Structure
Figure 62 Bill of Materials structure
Use the menu Manufacturing rarr Master Data rarr Bill of Materials and click the New button to define anew bill of materials
The Different Views
To change the view in the bill of materials you can
bull From the list select a bill of materials name and then click FormView
bull From a product form use the menu Product BoM Structure to theright
CHAPTER 6 DEFINING YOUR MASTER DATA 143
Figure 63 Defining a Bill of Materials (Extended view)
In the Product field of the bill of materials you should set the finished product which will bemanufactured or assembled Once the product has been selected OpenERP automatically completesthe name of the bill of materials and the default Unit of Measure for this product
The type of BoM (BoM Type SetsPhantom or Normal BoM) and the Routing field will bedescribed in more detail later in the chapter
Now you can select the raw materials (Components) that are used to manufacture the finishedproduct The quantities are set out based on the quantities of finished product and the quantities neededto produce them from the bill of materials The second tab Revisions is used to register all the changesmade to the bill of materials On each change you can specify a revision number and some notes onthe modifications you carried out
Simplified View
The Revisions tab is only visible if the user works in the Extended viewmode (which means that the user should belong to the group Useability Extended View
Figure 64 Revisions of a Bill of Materials (Extended view)
In the third tab Properties you can put a free text reference to a plan a sequence number that is usedto determine the priorities between bills of materials dates between which a bill of materials is validand values for rounding and production efficiency
Rounding is used to set the smallest Unit of Measure in which the quantities of the selected productcan be expressed So if you set the rounding to 100 you will not be able to manufacture half a pieceThe Efficiency of the product lets you indicate the percentage you lose during manufacturing This loss
144 CHAPTER 6 DEFINING YOUR MASTER DATA
Figure 65 Properties of a Bill of Materials
can be defined for the finished product or for each raw materials (components) line The impact of thisefficiency figure is that OpenERP will reserve more raw materials for manufacturing than you wouldotherwise use just from the Bill of Materials calculations
The final part of the third tab lets you set some properties for the productrsquos manufacturing processesThese will be detailed further on in the chapter in the section about configurable products
612 Multi-level Bills of Materials
In OpenERP each line of a bill of materials may itself be a bill of materials This allows you todefine BoMs with several levels Instead of defining several BoMs for the shelf in the figure Plan ofConstruction of a Shelf (page 140) you could define the single bill of materials below
Table 610 Single Bill of Materials for 1 SHE100Unit
Product Ref Quantity Unit of MeasureSHE100 1 PCESIDEPAN 2 PCEWOOD002 0166 mRPAN100 1 PCEWOOD002 025 mPROFIL 4 PCELIN40 1 mRCK100 3 PCESPAN100 3 PCEWOOD010 0249 mMETC000 132 PCE
OpenERP behaves differently depending on whether the bill of materials is defined in several smallBoMs each on a single level or in one BoM tree-structured on several levels
CHAPTER 6 DEFINING YOUR MASTER DATA 145
If you select a BoM using intermediate products that automatically generates production orders basedon calculated requirements OpenERP will propose to manufacture an intermediate product Tomanufacture a shelf according to the different bills of materials defined you would create 6 productionorders
Table 611 Production Order
Product Ref Quantity Unit of MeasureSPAN100 3 PCEWOOD010 0249 m
Table 612 Production Order
Product Ref Quantity Unit of MeasureRCK100 3 PCESPAN100 3 PCEMETC000 12 PCE
Table 613 Production Order
Product Ref Quantity Unit of MeasurePROFIL 4 PCELIN40 1 m
Table 614 Production Order
Product Ref Quantity Unit of MeasureRPAN100 1 PCEWOOD002 025 m
Table 615 Production Order
Product Ref Quantity Unit of MeasureSIDEPAN 2 PCEWOOD002 017 m
Table 616 Production Order
Product Ref Quantity Unit of MeasureSHE100 1 PCESIDEPAN 2 PCERPAN100 1 PCEPROFIL 4 PCERCK100 3 PCEMETC000 12 PCE
In the case where a single bill of materials is defined in multiple levels a single manufacturing orderwill be generated for each shelf including all of the sub BoMs You would then get the followingproduction order
146 CHAPTER 6 DEFINING YOUR MASTER DATA
Table 617 Single Production from a tree-structuredBoM
Product Ref Quantity Unit of MeasureSHE100 1 PCEWOOD002 017 mWOOD002 025 mLIN40 1 mWOOD010 0249 mMETC000 132 PCE
613 Phantom Bills of Materials
If a finished product is defined using intermediate products that are themselves defined using otherBoMs OpenERP will propose to manufacture each intermediate product This will result in severalproduction orders If you only want a single production order you can define a single BoM withseveral levels
Sometimes however it may be useful to define the intermediate product separately and not as part of amulti-level assembly even if you do not want separate production orders for intermediate products
In the example the intermediate product RCK100 is used in the manufacturing of different shelves(SHE100 SHE200 ) So you would prefer to define a unique BoM for it even though you do notwant any instances of this product to be built nor would you want to rewrite these elements in a seriesof different multi-level BoMs
If you only want a single production order for the complete shelf and not one for the BoM itself youcan define the BoM line corresponding to product RCK100 in the shelfrsquos BoM as type SetsPhantomThen OpenERP will automatically put RCK100lsquos BoM contents into the shelfrsquos production order eventhough it has been defined as multi-level
This way of representing the assembly is very useful because it allows you to define reusable assemblyelements and keep them isolated
If you define the BoM for the SHE100 shelf in the way shown by the table below you will get twoproduction orders on confirmation of a sales order as also shown in the tables
Table 618 Defining and Using Phantom BoMs
Product Ref Quantity Unit of Measure Type of BoMSHE100 1 PCE normalSIDEPAN 2 PCE normalRPAN100 1 PCE phantomPROFIL 4 PCE phantomRCK100 3 PCE phantom
CHAPTER 6 DEFINING YOUR MASTER DATA 147
Table 619 Production Order from Phantom BoMs
Product Ref Quantity Unit of MeasureSHE100 1 PCESIDEPAN 2 PCEWOOD002 025 mLIN40 1 mWOOD010 0249 mMETC000 12 PCE
Table 620 Production Order from Normal BoM
Product Ref Quantity Unit of MeasureSIDEPAN 2 PCEWOOD002 017 m
614 Bills of Materials for KitsSets
Sales Bills of Materials
In other software this is sometimes called a Sales Bill of Materials InOpenERP the term KitsSets is used because the effect of the bill ofmaterials is visible not only in sales but also elsewhere for example inthe intermediate manufactured products
KitsSets bills of materials enable you to define assemblies that will be sold directly These could alsobe used in deliveries and stock management rather than just sold separately For example if you deliverthe shelf in pieces for self-assembly set the SHE100 BoM to type Sets Phantom
When a salesperson creates an order for a SHE100 product OpenERP automatically changes theSHE100 from a set of components into an identifiable package for sending to a customer Then itasks the storesperson to pack 2 SIDEPAN 1 RPAN100 4 PROFIL 3 RCK100 This is described as aSHE100 not just the individual products delivered
62 Work Centers
Work centers represent units of product capable of doing material transformation operations You candistinguish two types of work centers machines and human resources
Work Center
Work centers are units of production consisting of one or several peopleandor machines that can be considered as a unit for the purpose offorecasting capacity and planning
148 CHAPTER 6 DEFINING YOUR MASTER DATA
Use the menu Manufacturing rarr Configuration rarr Resources rarr Work Centers to define a new workcenter You get a form as shown in the figure Defining a Work Center (page 148)
Figure 66 Defining a Work Center
Missing fields
If some fields such as Analytic Journal General Account in the view aremissing you have to add the user group Useability AnalyticAccounting
A work center should have a name You then assign a type Machine or Human a code and theoperating hours ie Working Period The Working Time(s) can be defined through the menuManufacturing rarr Configuration rarr Resources rarr Working Time The figure Defining a Work Center(page 148) represents the hours from Monday to Friday from 0800 to 1800 with a break of an hourfrom 1200
You can also add a description of the work center and its operations
Once the work center is defined you should enter data about its production capacity Depending onwhether you have a machine or a person a work center will be defined in cycles or hours If it representsa set of machines and people you can use cycles and hours at the same time
A Cycle
A cycle corresponds to the time required to carry out an assembly operationThe user is free to determine which is the reference operation for a givenwork center It should be represented by the cost and elapsed manufacturingtime
For example for a printing work center a cycle might be the printing of 1page or of 1000 pages depending on the printer
CHAPTER 6 DEFINING YOUR MASTER DATA 149
To define the capacity properly it is necessary to know for each work center what will be the referenceoperation which determines the cycle You can then define the data relative to the capacity
Capacity per Cycle (CA) the number of operations that can be done in parallel during a cycleGenerally the number defines the number of identical machines or people defined by the work center
Time for 1 cycle (hour) (TC) the duration in hours for one cycle or the operations defined by a cycle
Time before production (TS) the time in hours required to initialize production operations Generallythis represents the machine setup time
Time after production (TN) the delay in hours after the end of a production operation Generally thisrepresents the cleaning time necessary after an operation
Efficiency factor (ET) the factor that is applied to the TC TS and TN times to determine the realproduction time This factor enables you to readjust the different times progressively and as a measureof machine utilization You cannot re-adjust the other times because generally they are taken from themachinersquos data sheet By default the efficiency is set to 1 representing a load of 100 When you setthe efficiency to 2 (ie 200) the load will be 50
The total time for carrying out X operations is then given by the following formula
((X CA) TC + TS + TN ) ET
In this formula the result of the division is rounded upwards Then if the capacity per cycle is 6 ittakes 3 cycles to realize 15 operations (156 = 25 rounded upwards = 3)
With the Hour Account and Cycle Account you define the links to analytical accounting to report thecosts of the work center operations If you leave the different fields empty it will not have any effecton the analytic accounts
63 Routings
Routings define the manufacturing operations to be done in work centers to produce a certain productA routing is usually attached to bills of materials which will define the assembly of products requiredfor manufacturing or to produce finished products
A routing can be defined directly in a bill of materials or through the menu Manufacturing rarrConfiguration rarr Master Bill of Materials rarr Routings A routing has a name and a code You can alsoadd a description Later in this chapter you will see that a routing can also be associated with a stocklocation This enables you to indicate where an assembly takes place
Subcontracting Assembly
You will see further on in this chapter that you can also link a routingto a stock location for the customer or the supplier You can use thisfunctionality when you have subcontracted the assembly of a product toa supplier for instance
In the routing you have to enter the list of operations that has to be executed Each operation has to bedone at a specific work center and includes a number of hours andor cycles
150 CHAPTER 6 DEFINING YOUR MASTER DATA
Figure 67 Defining a routing with Three Operations
Multi-level Routing
It is possible to define routing on several levels to support multi-level billsof materials You can select the routing on each level of a bill of materials (BoM in a BoM can have a different routing) The levels are then linked tohierarchies of bills of materials
64 Manufacturing Orders
Once the bills of materials have been defined OpenERP is capable of automatically deciding on themanufacturing route according to the needs of the company
Production orders can be proposed automatically by the system depending on several criteria describedin the preceding chapter
bull Using the Make to Order rules
bull Using the Order Point (Minimum Stock) rules
bull Using the Production plan
Of course you can also start production manually by clicking the button New in the menuManufacturing rarr Manufacturing rarr Manufacturing Orders
If you have not installed the Just-in-Time planning module mrp_jit you should start using OpenERPto schedule the Production Orders automatically using the various system rules To do this use themenu Warehouse rarr Schedulers rarr Compute Schedulers
CHAPTER 6 DEFINING YOUR MASTER DATA 151
Figure 68 Manufacturing Order
Procurement Exceptions
Pay attention to the fact that you have to define minimum stock rules foreach product set as Make to Stock
65 Complete Production Workflow
To understand the usefulness and the functioning of the system you should test a complete workflowon the database installed with the demonstration data We will show you
bull How to create a sales order
bull The manufacturing workflow for an intermediate product
bull The manufacturing of an ordered product
bull The delivery of products to a customer
bull Invoicing at the end of the month
bull Traceability for after-sales service
Demonstration data
To exactly follow the workflow as shown below you should keep the samequantities as in the example and start from a new database Then you willnot run into exceptions resulting from a lack of stock
This more advanced case of handling problems in procurement will be sorted out later in the chapter
To be able to do the following step add Sales Management through the Reconfigure wizard
152 CHAPTER 6 DEFINING YOUR MASTER DATA
651 The Sales Order
Begin by encoding a sales (or customer) order through the menu Sales Management rarr Sales Orders-gt New Quotation Enter the following information
bull Customer Agrolait
bull Shipping Policy Invoice from the picking (Other Information tab)
bull Sales Order Lines click New
ndash Product PC2 ndash Basic PC (assembly on order)
ndash Quantity (UoM) 1
ndash Product UoM PCE
ndash Procurement Method on order
Once the quotation has been entered you can confirm it immediately by clicking the button ConfirmOrder at the bottom to the right Keep note of the order reference because this follows all through theprocess Usually in a new database this will be SO007 At this stage you can look at the processlinked to your order using the Question Mark button next to the Sales Orders title
Figure 69 Process for Handling Sales Order SO007
Start the requirements calculation using the menu Manufacturing rarr Compute All Schedulers
652 Producing an Intermediate Product
To understand the implications of requirements calculation you should know the configuration of thesold product To do this go to the form for product PC2 and click the link Product BoM Structure tothe right You get the scheme shown in Composition of PC2 (page 153) which is the composition ofthe selected product
The PC2 computer has to be manufactured in two steps
1 The intermediate product CPU_GEN
CHAPTER 6 DEFINING YOUR MASTER DATA 153
Figure 610 Composition of PC2
2 The finished product using that intermediate product PC2
The manufacturing supervisor can then consult the production orders using the menu Manufacturing rarrManufacturing rarr Manufacturing Orders You then get a list of orders to start (Ready to Produce)and the estimated start date (Scheduled Date) to meet the customer delivery date
Figure 611 List of Manufacturing Orders
You will see the production order for CPU_GEN but not the one for PC2 because it depends on anintermediate product that has to be produced first Return to the production order for CPU_GEN andclick it If there are several of them select the one corresponding to your order using the sourcedocument that contains your order number (in this example SO007 )
Figure 612 Details of a Production Order
The system shows you that you have to manufacture product CPU_GEN using the components MB1CPU1 FAN RAM You can then confirm the production twice
Start production consumption of raw materials
Produce manufacturing of finished product
Click the Start Production button then click the Edit button and edit the line for the productMB1 Enter a lot number for it by putting the cursor in the field Production Lot and pressing ltF1gt to
154 CHAPTER 6 DEFINING YOUR MASTER DATA
create a new lot Enter an internal reference for example MB1345678 The system may then showyou a warning because this lot is not in stock but you can ignore this message
Click the Produce button to manufacture the finished product
The production order has to be in the closed state as shown in the figure Production Order after theDifferent Stages (page 154)
Figure 613 Production Order after the Different Stages
653 Finished Product Manufacturing
Having manufactured the intermediate product CPU_GEN OpenERP automatically proposes themanufacturing of the computer PC2 using the order created earlier Return to the ManufacturingOrders menu and look at the orders Ready to Produce through Manufacturing rarr Manufacturing rarrManufacturing Orders
You will find computer PC2 which has been sold to the customer (source document SO007) as shownin the figure hereafter
Figure 614 Completed Production for PC2
Now that the production has been completed the product sold to the customer has been manufacturedand the raw materials have been consumed and taken out of stock
CHAPTER 6 DEFINING YOUR MASTER DATA 155
Automatic Actions
As well as managing the use of materials and the production of stocksmanufacturing can have the following automatic effects which are detailedfurther on in the chapter
bull adding value to stock
bull generating operations for assembly staff
bull automatically creating analytical accounting entries
654 Subproduct Production
If you need to manage subproducts you should install the module mrp_subproduct (Reconfigurewizard MRP Sub- products) The normal behaviour of manufacturing in OpenERP enables youto manufacture several units of the same finished product from raw materials (A + B gt C) WithSubproduct management the manufacturing result can be to have both finished products and secondaryproducts (A + B gt C + D)
Subproduct Material
In OpenERP subproduct material corresponds to secondary products thatare a by-product of the main manufacturing process For example cuttingplanks of timber will produce other planks but these bits of timber are toosmall (or the offcuts may have value for the company if they can be usedelsewhere)
If the module mrp_subproduct has been installed you get a new tab Sub products in the Bill ofMaterial that lets you set secondary products resulting from the manufacturing of the finished product
When OpenERP generates a production order based on a bill of materials that uses a secondaryproduct you pick up the list of all products in the the second tab of the production order FinishedProducts
Secondary products enable you to generate several types of products from the same raw materials andmanufacturing methods - only these are not used in the calculation of requirements Then if you needthe secondary products OpenERP will not ask you to manufacture another product to use the wasteproducts and secondary products of this production In this case you should enter another productionorder for the secondary product
156 CHAPTER 6 DEFINING YOUR MASTER DATA
Figure 615 Definition of Subproducts
Figure 616 Production Order producing Several Finished Products
Services in Manufacturing
Unlike most software for production management OpenERP managesservices as well as stockable products So it is possible to put productsof type Service in a bill of materials These do not appear in the productionorder but their requirements will be taken into account
If they are defined as Make to Order OpenERP will generate a task forthe manufacturing or a subcontract order for the operations The behaviourwill depend on the Supply Method configured in the product form Buy orProduce
CHAPTER 6 DEFINING YOUR MASTER DATA 157
655 Scrapping
If you have to scrap the final product before it is finished you will have to scrap every componentallowed for this product
Figure 617 Scrapping a Product to Finish
If you scrap a Product to Finish you will get the situation illustrated in the previous figure A finishedproduct will be created and put in the scrapped virtual location A new Product to Finish has beenadded to the manufacturing order
Scrap a product
To scrap a product you have to edit the manufacturing order and then selectthe product to be scrapped by clicking the little pencil at the left of the item
This new product has been added for the following reason when you have to manufacture a productand if this product has to be scrapped you have to produce another product to replace the scrapped oneThe reason why you have to scrap each component manually is that the production problem can comefrom one component
If the production process is finished and you see that you have to scrap the finished product you will nothave to scrap the different components They are already consumed They are not available anymorefor further manufacturing orders they have been moved to the production Stock Location
656 Production Orders
To open a Production Order use the menu Manufacturing rarr Manufacturing rarr Manufacturing Ordersand click the New button You get a blank form to enter a new production order as shown in the figureNew Production Order (page 158)
The production order follows the process given by the figure Process for Handling a Production Order(page 158)
The Scheduled date Product Qty and Reference are automatically completed when the form is firstopened Enter the product that you want to produce and the quantity required The Product UOM bydefault is completed automatically by OpenERP when the product is first selected
158 CHAPTER 6 DEFINING YOUR MASTER DATA
Figure 618 New Production Order
Figure 619 Process for Handling a Production Order
CHAPTER 6 DEFINING YOUR MASTER DATA 159
You then have to set two locations
bull The location from which the required raw materials should be found and
bull The location for depositing the finished products
For simplicity put the Stock location in both places The field Bill of Materials will automatically becompleted by OpenERP when you select the product You can then overwrite it with another BoM tospecify something else to use for this specific manufacturing then click the button Compute Data
The tabs Scheduled Products and Work Orders are also completed automatically when you clickCompute Data (in the Work Orders or Scheduled Products tabs) You will find the raw materials therethat are required for the production and the operations needed by the assembly staff
If you want to start production click the button Confirm Production and OpenERP automaticallycompletes the Products to Consume field in the Consumed Products tab and Products to Finish field inFinished Products tab
The information in the Consumed Products tab can be changed if
bull you want to enter a serial number for raw materials
bull you want to change the quantities consumed (lost during production)
For traceability you can set lot numbers on the raw materials used or on the finished products Notethe Production Lot and Pack numbers
Once the order is confirmed you should force the reservation of materials using the Force Reservationbutton This means that you do not have to wait for the scheduler to assign and reserve the raw materialsfrom your stock for this production run This shortens the procurement process
If you do not want to change the priorities just leave the production order in this state and the schedulerwill create a plan based on the priority and your planned date
To start the production of products click Start Production The raw materials are then consumedautomatically from stock which means that the draft ( Waiting ) movements become Done
Once the production is complete click Produce The finished products are now moved into stock
66 Logistics and Manufacturing
661 Manufacturing Stock Locations
OpenERP allows you to define a specific location to keep track of your manufacturing moves
To get an overview of all stock moves go to Warehouse rarr Traceability rarr Stock Moves You canenter your Production location in the Location search field and then group by Source or Destinationaccording to the moves you would like to check
160 CHAPTER 6 DEFINING YOUR MASTER DATA
662 Traceability
With traceability you can easily track your production lots in the software With this functionality youcan quickly find where your products are in your warehouse In counterpart you will be forced tomention a number of lot to each product to be able to track it in the system
To enable traceability in the manufacturing process go to Warehouse rarr Product rarr Products Inthe Product form you have to select the box Track Manufacturing Lots in the Lots section on theInformation tab
In the manufacturing order you have to mention a production lot number in order to continue theprocess You can select the production lot in the Manufacturing Order form on the second tab calledFinished Products You have to click the Products to Finish you want to trace a new window will openIn the Production Lot field click to link the manufacturing order to a production lot
Figure 620 Tracking a Manufacturing Order
When you have linked some manufacturing orders to production lots you can trace them from themenu Warehouse rarr Traceability rarr Production Lots In this view you see the different production lotslinked to a product If you select one lot you will have the possibility to choose between UpstreamTraceability or Downstream Traceability
Figure 621 Choosing between Upstream and Downstream Traceability
CHAPTER 6 DEFINING YOUR MASTER DATA 161
Traceability
Upstream Traceability It starts from the raw materials received fromthe supplier and follows the chain to the finished products delivered tocustomers Note that the name is confusing - this would often be considereda downstream direction Think of it as Where Used
Downstream Traceability It follows the product in the other directionfrom customer to the different suppliers of raw material Note that thename is confusing - this would often be considered an upstream directionThink of it as Where Supplied
Figure 622 Upstream Traceability
The different lines show the stock moves attached to the production of the product There are severalstock moves that are traced due to the Bill of Materials attached to the product [PC1] Basic PC
Figure 623 Downstream Traceability
In this window you only see the move for the finished product This is related to the definition of theconcept of Downstream Traceability which only shows the flow from the customer to the supplier ofraw materials
67 Managing Repairs from Repair to Invoicing and StockMovements
The management of repairs is carried out through the module mrp_repair Once installedthis module adds a new Manufacturing rarr Manufacturing rarr Repair Orders menu under theManufacturing menu to create repair jobs and review repairs in progress
162 CHAPTER 6 DEFINING YOUR MASTER DATA
Repairs
To install this module you can also use the Reconfigure wizard In theMRP Application Configuration screen check the Repairs option
In OpenERP a repair will have the following effects
bull Use of materials items for replacement
bull Production of products items replaced from reserved stock
bull Quality control tracking the reasons for repair
bull Accounting entries following stock moves
bull Receipt and delivery of product from and to the end user
bull Adding operations that can be seen in the productrsquos traceability
bull Invoicing items used andor free for repairs
671 Entering Data for a New Repair
Use the menu Manufacturing rarr Manufacturing rarr Repair Orders to enter a new repair into the systemYou will see a blank form for the repair data as shown in the figure Entering a New Repair (page 162)below
Figure 624 Entering a New Repair
CHAPTER 6 DEFINING YOUR MASTER DATA 163
First enter the product to repair then identify the product that will be repaired using the productlot number OpenERP then automatically completes fields from the selected lot ndash the partner fieldsaddress delivery location and stock move
If a warranty period has been defined in the product description in months OpenERP completes thefield Guarantee limit with the correct warranty date
Now you have to specify the components that you will be adding replacing or removing in theOperations part On each line you should specify the following
Add or remove a component of the finished product
bull Product
bull Qty
bull UoM
bull Unit Price
bull To Invoice or not
Once the component has been selected OpenERP automatically completes most of the fields
bull Qty 1
bull UoM unit for managing stock defined in the product form
bull Unit Price calculated from the customer list price
bull Source Location given by the stock management
bull To Invoice depends on the actual date and the guarantee period
This information is automatically proposed by the system but you can modify it all yourself
On the second tab of the Repair form Invoicing you can select whether the repair has to beinvoiced or not and if invoiced whether it should be before or after the repair You can also select theapplicable list price a specific address and encode additional charges that need to be added to the repairinvoice
The third tab Extra Info shows information about linked invoice and picking You receiveinformation about the current location and you can change the Delivery Location The Notestab allows you to register internal notes and information that should be written on the Quotation
672 Repair Workflow
A defined process handles a repair order ndash both the repair itself and the customer invoicing The figureProcess to Handle a Repair (page 164) shows this repair process
Once a repair has been entered in the system it is in the Quotation state In this state a repair orderhas no impact on the rest of the system You can print a quotation through the action Quotation Order
On the second tab you can specify the Invoice Method
164 CHAPTER 6 DEFINING YOUR MASTER DATA
Figure 625 Repair Form Invoicing Tab
Figure 626 Process to Handle a Repair
CHAPTER 6 DEFINING YOUR MASTER DATA 165
bull No Invoice
bull Before Repair
bull After Repair
You can then confirm the repair operation or create an invoice for the customer depending on the InvoiceMethod
The repair quotation can now be sent to the customer Once the customer approves the repair clickthe Confirm Repair button From the menu Manufacturing rarr Manufacturing rarr Repair Orders youcan easily find the confirmed repair orders by selecting the Confirmed button Click Start Repair toindicate that you can start working on the repair The Repair order will now be in the Under Repairstate When you finish the repair click the End Repair button
673 Invoicing the Repair
When the repair is to be invoiced a draft invoice is generated by the system For an After Repair invoiceyou can click the Make Invoice button OpenERP will then show the draft invoice created at thetop of the repair order (red text) You can easily go to that invoice simply by clicking the correspondingred text This invoice contains the raw materials used (replaced components) and any other costs suchas the time used for the repair These other costs are entered on the second tab of the Repair form Anyinformation you entered for the quotation on the Notes tab will also be displayed on the invoice
If the product to be repaired is still under guarantee OpenERP automatically suggests that thecomponents themselves are not invoiced but will still use any other defined costs You can overrideany of these default values while entering the data
Extra Info
The link to the generated invoice is shown on the Extra Infolsquolsquotabof the repair document To open the invoicesimply click the lsquolsquoInvoice field
674 Stock Movements and Repairs
When the repair has been carried out OpenERP automatically carries out stock movements forcomponents that have been removed added or replaced on the finished product From the menuWarehouse rarr Traceability rarr Stock Moves you can for instance enter the production lot to see allmoves for the repaired product
The move operations are carried out using the locations shown in the first tab of the Repair form Ifa destination location has been specified OpenERP automatically handles the final customer deliveryorder when the repair has been completed This also lets you manage the delivery of the repairedproducts
For example take the case of the shelf that was produced at the start of this chapter If you have toreplace the shelf SIDEPAN you should enter data for the repair as shown in figure Repair for a SidePanel (page 166)
166 CHAPTER 6 DEFINING YOUR MASTER DATA
Figure 627 Repair for a Side Panel
In this example you would carry out the following operations
bull Remove a SIDEPAN shelf in the cabinet and put the faulty shelf in the Scrapped location
bull Place a new SIDEPAN shelf that has been taken from stock
When the repair is ready to be confirmed OpenERP will generate the following stock moves
bull Put faulty SIDEPAN into suitable stock location Default Production gt Scrapped
bull Consume SIDEPAN Stock gt Production
If you analyze the traceability of this lot number you will see all the repair operations in the upstreamand downstream traceability lists of the products concerned
68 Forecasting and Supplying
681 Scheduler
The requirements scheduler is the calculation engine which plans and prioritises production andpurchasing automatically according to the rules defined on products By default the scheduler isset to run once a day (OpenERP automatically creates a Scheduled Action for this) You can alsostart the scheduler manually from the menu Warehouse rarr Schedulers rarr Compute Schedulers Thescheduler uses all the relevant parameters defined for products suppliers and the company to determinethe priorities between the different production orders deliveries and supplier purchases
CHAPTER 6 DEFINING YOUR MASTER DATA 167
Starting Time
You can set the starting time of the scheduler by modifying thecorresponding action in the menu Administration rarr Configuration rarrScheduler rarr Scheduled Actions Modify the Run mrp Schedulerconfiguration document
Figure 628 Configuring the Start Time to Calculate Requirements
Calculating Requirements Scheduling
Scheduling only validates procurements that are confirmed but not yetstarted These procurement reservations will themselves start productiontasks or purchases depending on the configuration of the requested product
You take into account the priority of operations when starting reservations and procurements Urgentrequests those with a date in the past or requests with a date earlier than the others will be started firstIn case there are not enough products in stock to satisfy all the requests you can be sure that the mosturgent requests will be produced first
682 Planning
In OpenERP you can plan the production in an easy way Simply by going to Manufacturing rarrPlanning you can plan manufacturing orders work orders andor work centers
By clicking Manufacturing Orders in the Planning menu a calendar view will open in whichyou can select a day to create the order whenever you want You will also see the already plannedorders By dragging and dropping a manufacturing order in Calendar view you can change the startingdate of the order
When you click in a day in the Calendar view an empty manufacturing order window will open and letyou choose which product you want to produce
168 CHAPTER 6 DEFINING YOUR MASTER DATA
Figure 629 Planning Manufacturing Orders
Figure 630 New Manufacturing Order
CHAPTER 6 DEFINING YOUR MASTER DATA 169
Scheduler and Just in Time
When you want to work according to the Just in Time way you should install the module mrp_jit
If you install this module you will not have to run the regular procurement scheduler anymore (but youstill need to run the minimum order point rule scheduler or for example let it run daily)
All procurement orders will be processed immediately which could in some cases entail a smallperformance impact
It may also increase your stock size because products are reserved as soon as possible and the schedulertime range is not taken into account anymore In that case you can no longer use priorities for thedifferent picking orders
Lead times
All procurement operations (that is the requirement for both production orders and purchase orders)are automatically calculated by the scheduler But more than just creating each order OpenERP plansthe timing of each step A planned date calculated by the system can be found on each order document
To organize the whole chain of manufacturing and procurement OpenERP bases everything on thedelivery date promised to the customer This is given by the date of the confirmation in the order andthe lead times shown in each product line of the order This lead time is itself proposed automaticallyin the field Customer Lead Time shown in the product form This Customer Lead Time is the differencebetween the time on an order and that of the delivery
To see a calculation of the lead times take the example of the cabinet above Suppose that the cabinetis assembled in two steps using the two following bills of materials
Table 621 Bill of Materials for 1 SHE100 Unit
Product Code Quantity Unit of MeasureSIDEPAN 2 PCEWOOD002 025 mLIN040 1 mWOOD010 0249 mMETC000 12 PCE
Table 622 Bill of Materials for 2 SIDEPAN Units
Product Code Quantity Unit of MeasureWOOD002 017 m
The SIDEPAN is made from an order using the workflow shown The WOOD002 is purchased onorder and the other products are all found in stock An order for the product SHE100 will then generatetwo production orders (SHE100 and SIDEPAN) then produce two purchase orders for the productWOOD002 Product WOOD002 is used in the production of both SHE100 and SIDEPAN Set the leadtimes on the product forms to the following
170 CHAPTER 6 DEFINING YOUR MASTER DATA
Table 623 Lead Times
Product Code Customer Lead Time Manufacturing Lead Time Supplier Lead TimeSHE100 30 days 5 daysSIDEPAN 10 daysWOOD002 5 days
A customer order placed on the 1st January will set up the following operations and lead times
bull Delivery SHE100 31 January (=1st January + 30 days)
bull Manufacture SHE100 26 January (=31 January ndash 5 days)
bull Manufacture SIDEPAN 16 January (=26 January ndash 10 days)
bull Purchase WOOD002 (for SHE100) 21 January (=26 January ndash 5 days)
bull Purchase WOOD002 (for SIDEPAN) 11 January (=16 January ndash 5 days)
In this example OpenERP will propose placing two orders with the supplier of product WOOD002Each of these orders can be for a different planned date Before confirming these orders the purchasingmanager could group (merge) these orders into a single order
Security Days
The scheduler will plan all operations as a function of the time configured on the products But it isalso possible to configure these factors in the company These factors are then global to the companywhatever the product concerned may be In the description of the company on the Configuration tabyou find the following parameters
bull Scheduler Range Days all the procurement requests that are not between today and today plusthe number of days specified here are not taken into account by the scheduler
bull Manufacturing Lead Time number of additional days needed for manufacturing
bull Purchase Lead Time additional days to include for all purchase orders with this supplier
bull Security Days number of days to deduct from a system order to cope with any problems ofprocurement
Purchase Lead Time
The security delay for purchases is the average time between the ordergenerated by OpenERP and the real purchase time from the supplier byyour purchasing department This delay takes into account the orderprocess in your company including order negotiation time
Take for instance the following configuration
CHAPTER 6 DEFINING YOUR MASTER DATA 171
bull Manufacturing Lead Time 1
bull Purchase Lead Time 3
bull Security Days 2
The example above will then be given the following lead times
bull Delivery SHE100 29 January (= 1st January + 30 days ndash 2 days)
bull Manufacture SHE100 23 January (= 29 January ndash 5 days ndash 1 day)
bull Manufacture SIDEPAN 12 January (= 26 January ndash 10 days ndash 1 day)
bull Purchase WOOD002 (for SHE100) 15 January (= 26 January ndash 5 days ndash 3 days)
bull Purchase WOOD002 (for SIDEPAN) 4 January (= 12 January ndash 5 days ndash 3 days)
683 Procurement
In normal system use you do not need to worry about procurement orders because they areautomatically generated by OpenERP and the user will usually work on the results of a procurement aproduction order a purchase order a sales order and a task
But if there are configuration problems the system can remain blocked by a procurement withoutgenerating a corresponding document Exception management allows you to solve possible issues
Automating Purchasing and Replenishment
In the Product form view you can choose between two procurement methods
bull Make to Stock (MTS)
bull Make to Order (MTO)
These two methods will impact the way you have to configure your automatic purchasing andreplenishment For the MTS method you will have to define Minimum Stock Rules to order productswhen the minimum treshold has been reached as well as a supplier to define where to order theproducts For the MTO method you have to define a supplier for the product in order to buy newproducts when a sales order or a manufacturing order is confirmed
Managing Scheduler Exceptions
In OpenERP you can have different procurement exceptions An exception appears in theProcurement Exception view when the system does not know what to do with an object suchas a Manufacturing Order or a Purchase Order
There are four types of exceptions
172 CHAPTER 6 DEFINING YOUR MASTER DATA
bull No bill of materials defined for production in this case you have got to create a BoM or indicatethat the product can be purchased instead (change the Supply Method)
bull No supplier available for a purchase you have to define a supplier in the Supplier tab of theproduct form
bull No address defined on the supplier partner you have to complete an address for the supplier forthe product in consideration
bull Not enough stock you have to create a rule for automatic procurement (for example a minimumstock rule) or manually procure it
Figure 631 Procurement Exceptions
Some problems are just timing issues and can be automatically corrected by the system (this will betemporary exceptions)
If a product has to be lsquoin stockrsquo but is not available in your stores OpenERP will make the exception aslsquotemporaryrsquo or lsquoto be correctedrsquo The exception is temporary if the system can procure it automaticallyfor example when a procurement rule has been defined for minimum stock
When an exception is raised you can check the configuration of your product in order to correct themisconfiguration Then you can choose to relaunch the scheduler or you can retry to execute the actionby selecting the line and clicking the Retry button then click Run procurement
Figure 632 Correct a Procurement Exception
The exception related to the BoM definition comes from the fact that a product with a supply methodset to Produce has no Bill of Materials The system does not know how to produce this product andthen raises an exception
CHAPTER 6 DEFINING YOUR MASTER DATA 173
Manual Procurement
To procure internally you can create a procurement order manually Use the menu Warehouse rarrSchedulers rarr Procurement Exceptions and click the New button to do this
Figure 633 Manual Procurement
The procurement order will then be responsible for calculating a proposal for automatic procurementfor the product concerned This procurement will start a task a purchase order for the supplier or aproduction depending on the product configuration
Figure 634 Procurement Flow
174 CHAPTER 6 DEFINING YOUR MASTER DATA
It is better to encode a procurement order rather than direct purchasing or production The procurementmethod has the following advantages
1 The form is simpler because OpenERP calculates the different values according to other values anddefined rules purchase date calculated from order date default supplier raw materials needs selectionof the most suitable bill of materials etc
2 The calculation of requirements prioritises the procurements If you encode a purchase directlyyou short-circuit the planning of different procurements
Shortcuts
On the Product form you have an action shortcut button ProcurementRequest that lets you quickly create a new procurement order
69 Working with Subcontractors
In OpenERP you can also subcontract production operations (for example painting and item assembly)at a supplierrsquos To do this you should indicate on the relevant routing document a supplier location forstock management
Configure a location dedicated to this supplier with the following data
bull Location Type Supplier
bull Location Address Select an address of the subcontracting partner
bull Chained Location Type Fixed
bull Chained Location if Fixed your Stock
bull Chaining Lead Time number of days before receipt of the finished product
Then once the manufacturing has been planned for the product concerned OpenERP will generate thefollowing steps
bull Delivery of raw materials to the stores for the supplier
bull Production order for the products at the supplierrsquos and receipt of the finished products in thestores
Once the production order has been confirmed OpenERP automatically generates a delivery order tosend to the raw materials supplier The storesperson can access this delivery order from the menuWarehouse rarr Warehouse Management rarr Internal Moves The raw materials will then be placed instock at the supplierrsquos stores
Once the delivery of raw materials has been confirmed OpenERP activates the production order Thesupplier uses the raw materials to produce the finished goods which will automatically be put in yourown stores This manufacturing is confirmed when you receive the products from your supplier Thenyou will indicate the quantities consumed by your supplier
CHAPTER 6 DEFINING YOUR MASTER DATA 175
Subcontract without Routing
If you do not use routing you can always subcontract work orders bycreating an empty routing in the subcontracting bill of materials
Production orders can be found in the menu Manufacturing rarr Manufacturing rarr ManufacturingOrders A production order is always carried out in two stages
1 Consumption of raw materials
2 Production of finished products
Depending on the companyrsquos needs you can specify that the first step is confirmed at theacknowledgement of the manufacturing supplier and the second at the receipt of finished goods inthe warehouse
610 Matching Sales Orders and Bills of Materials
In OpenERP you can define several bills of materials for the same product In fact you can haveseveral manufacturing methods or several approved raw materials for a given product You will see inthe following section that the manufacturing procedure (the routing) is attached to the Bill of Materialsso the choice of bill of materials implicitly includes the operations to make it
Once several bills of materials have been defined for a particular product you need to have a systemto enable OpenERP to select one of them for use By default the bill of materials with the lowestsequence number is selected by the system
To gain more control over the process during selling or procuring you can use Properties Themenu Manufacturing rarr Configuration rarr Master Bill of Materials rarr Properties enables you to defineproperties which can be set up arbitrarily to help you select a bill of materials when you have a choiceof BoMs
Properties
Properties is a concept that enables the selection of a method to manufacturea product Properties define a common language between salespeopleand technical people letting the salespeople have an influence on themanufacturing of the products using non-technical language and thechoices decided on by the technicians who define Bills of Materials
For example you can define the following property groups and properties
176 CHAPTER 6 DEFINING YOUR MASTER DATA
Table 624 Properties
Property Group PropertyWarranty 3 yearsWarranty 1 yearMethod of Manufacture SerialMethod of Manufacture Batch
Once the bills of materials have been defined you could associate the corresponding properties withthem Then when the salesperson enters a sales order line he can attach the properties required (ExtraInfo tab) If the product has to be manufactured OpenERP will automatically choose the bill ofmaterials that matches the defined properties in the order most closely
Extended View
Note that the properties are only visible in the Bills of Materials and SalesManagement if you are working in the Extended view mode If youcannot see it on your screen add the group Useability ExtendedView to your user
Figure 635 Properties in a Customer Order Line
Example Manufacturing in a Batch or on a Production Line
As an example take the manufacturing of the shelf presented above You can imagine that the companyhas two methods of manufacturing for this cabinet
bull Manually the staff assembles the shelves one by one and cuts the wood plank by plank This
CHAPTER 6 DEFINING YOUR MASTER DATA 177
approach is usually used to assemble prototypes It gets you very rapid production but at a highcost and only in small quantities
bull On a production line the staff uses machines that are capable of cutting wood by bandsawThis method is used for production runs of at least 50 items because the lead times using thismethod are quite lengthy The delay to start the production is much longer yet the cost per unitis considerably lower in this volume
You define two bills of materials for the same cabinet To distinguish between them you will define twoproperties in the same group manual assembly and production line assembly In thequotation the salesperson can set the method of manufacture he wants on each order line dependingon the quantities and the lead time requested by the customer
Bills of Materials and Substitute Products
In some software you use the term substitute for this principle ofconfigurable properties in a bill of materials
By putting a bill of materials on its own line you can also implement substitute products You set thebill of materials to type SetsPhantom to make the substitution transparent and to prevent OpenERPfrom proposing an intermediate production order
611 Production and Services
In OpenERP you can handle three types of goods two types of products (Stockable or Consumableproducts) and one type of services
For this last category OpenERP can react in two different ways Once a manufacturing order isgenerated for a product and this product contains a Service a task can be automatically generatedor not
Tasks
In order to automatically generate a task you have to install the moduleproject_mrp which requires the installation of the module project
By default the generated task is not linked to any project You can change this behaviour by creatinga project and link the service to this project This can be done in the Product form on the tabProcurement amp Locations in the Miscellaneous section Select the project to be linked in the Projectfield
To illustrate this process follow the next example
First you have to create a project to which you want to link the service We will call this projectConsulting After creating the project we have to create a new product Here are the characteristics ofthis product
178 CHAPTER 6 DEFINING YOUR MASTER DATA
Figure 636 Link a Service Product to a Project
Table 625 Configure a New Service
Field ValueName ConsultingReference CSLTProduct Type ServiceProcurement Method Make to OrderSupply Method ProduceDefault UoM HourProject Consulting
Once you have configured your project and your product you can create a Sales Order to order hoursof consultancy When you confirm the Sales Order a task will be created
If you go to Project rarr Project rarr Tasks you will find a new task called SO011[CSLT] ConsultingThis task is linked to the project guilabellsquoConsultinglsquo Note that the Sales Order number may bedifferent in your database
Figure 637 A Product linked to a Task and a Project
179
Part V
On Site installation
180
181
OpenERP Installation on Linux 7The installation procedure of OpenERP V60 is explained in this chapter This procedureis well tested on Ubuntu version 1004
There are four main procedures that you have to follow in order to run OpenERP V60smoothly
bull PostgreSQL Server Installation and Configuration
bull OpenERP Server Installation
bull OpenERP Client Installation
bull OpenERP Web Installation
71 PostgreSQL Server Installation and Configuration
Methods
The PostgreSQL download page lists the available installation methodsChoose the one that best suits your needs
711 Example on Ubuntu
Use the following command at your systemrsquos command prompt to install the postgresql package
sudo apt-get install postgresql
For example
openerpopenerp-desktop$ sudo apt-get install postgresql
For a graphical user interface of postgresql use the following command
sudo apt-get install pgadmin3
For example
openerpopenerp-desktop$ sudo apt-get install pgadmin3
You can find the new menu item pgAdmin III in your Ubuntu system menu from Applications rarrProgramming rarr pgAdmin III
182 CHAPTER 7 OPENERP INSTALLATION ON LINUX
712 Setup a PostgreSQL user for OpenERP
When the installations of the required software are done you must create a PostgreSQL user This usermust be the same as your system user OpenERP will use this user to connect to PostgreSQL
Figure 71 Figure demonstrating how OpenERP uses the PostgreSQL user to interact with it
Database
Without creating and configuring a PostgreSQL user for OpenERP asdescribed below you cannot create a database using OpenERP Client
First Method
The default superuser for PostgreSQL is called postgres You may need to login as this user first
openerpopenerp-desktop$ sudo su postgrespassword XXXXXXXXXX
Now create PostgreSQL user openerp using the following command
postgresopenerp-desktop$ createuser openerpShall the new role be a superuser (yn) y
Make this new user a superuser Only then you can create a database using OpenERP Client In shortopenerp is the new user created in PostgreSQL for OpenERP This user is the owner of all the tablescreated by OpenERP Client
Now check the list of tables created in PostgreSQL using following command
CHAPTER 7 OPENERP INSTALLATION ON LINUX 183
postgresopenerp-desktop$ psql -l
You can find the table template1 run the following command to use this table
postgresopenerp-desktop$ psql template1
To apply access rights to the role openerp for the database which will be created from OpenERP Clientuse the following command
template1= alter role openerp with password rsquopostgresrsquoALTER ROLE
Second Method
Another option to create and configure a PostgreSQL user for OpenERP is shown below
postgresopenerp-desktop$ createuser --createdb --username postgres --no-createrole--pwprompt openerpEnter password for new role XXXXXXXXXXEnter it again XXXXXXXXXXShall the new role be a superuser (yn) yCREATE ROLE
Password
Note that the password is postgres
Option explanations
bull --createdb the new user will be able to create new databases
bull --username postgres createuser will use the postgres user (superuser)
bull --no-createrole the new user will not be able to create new users
bull --pwprompt createuser will ask you the new userrsquos password
bull openerp the new userrsquos name
To access your database using pgAdmin III you must configure the database connection as shown inthe following figure
You can now start OpenERP Server You will probably need to modify the OpenERP configuration fileaccording to your needs which is normally located in ~openerprc
184 CHAPTER 7 OPENERP INSTALLATION ON LINUX
Developer Book
You can find information on configuration files in the Developer Booksection Configuration
72 OpenERP Server Installation
721 Installing the required packages
You need to have Python (at least 25 for OpenERP v60) in your Ubuntu system which is in-built inUbuntu version 1004 and above
You also need to install the following Python libraries because OpenERP Server uses these packages
To install the required libraries on your Ubuntu system you can do the following in your favouriteshell
bull lxml lxml is the most feature-rich and easy-to-use library for working with XML and HTML inthe Python language
CHAPTER 7 OPENERP INSTALLATION ON LINUX 185
sudo apt-get install python-lxml
bull mako Hyperfast and lightweight templating for the Python platform
sudo apt-get install python-mako
bull mxdatetime Provides the most natural and robust way of dealing with datetime values inPython
sudo apt-get install python-egenix-mxdatetime
bull python-dateutil The dateutil module provides powerful extensions to the standard datetimemodule available in Python 23+
sudo apt-get install python-dateutil
bull psycopg2 Psycopg is the most popular PostgreSQL adapter for the Python programminglanguage
sudo apt-get install python-psycopg2
bull pychart PyChart is a Python library for creating high quality Encapsulated Postscript PDFPNG or SVG charts
sudo apt-get install python-pychart
bull pydot This module provides a full interface to create handle modify and process graphs inGraphvizrsquos dot language
sudo apt-get install python-pydot
bull pytz World Timezone Definitions for Python
sudo apt-get install python-tz
bull reportlab The ReportLab Toolkit is the time-proven ultra-robust open-source engine forprogrammatically creating PDF documents and forms the foundation of RML It also containsa library for creating platform-independent vector graphics It is a fast flexible cross-platformsolution written in Python
sudo apt-get install python-reportlab
bull pyyaml PyYAML is a YAML parser and emitter for Python
sudo apt-get install python-yaml
bull vobject VObject simplifies the process of parsing and creating iCalendar and vCard objects
186 CHAPTER 7 OPENERP INSTALLATION ON LINUX
sudo apt-get install python-vobject
722 Downloading the OpenERP Server
The OpenERP server can be downloaded from the OpenERP websitersquos download page
723 Testing the OpenERP Server
If you only want to test the server you do not need to install it Just unpack the archive and start theopenerp-server executable
tar -xzf openerp-server-602targzcd openerp-server-602binpython openerp-serverpy
The list of available command line parameters can be obtained with the -h command-line switch
python openerp-serverpy -h
724 Installing the OpenERP Server
The OpenERP Server can be installed very easily using the setuppy file
tar -xzf openerp-server-602targzcd openerp-server-602sudo python setuppy install
If your PostgreSQL server is up and running you can now run the server using the following command
openerp-server
If you do not already have a PostgreSQL server up and running you can read PostgreSQL ServerInstallation and Configuration (page 181)
You can find the OpenERP server configuration file at ~openerp-server-602docopenerp-serverconf
73 OpenERP Client Installation
731 Installing the required packages
You need to have Python (at least 25 for OpenERP v60) in your Ubuntu system which is in-built inUbuntu version 1004 and above
CHAPTER 7 OPENERP INSTALLATION ON LINUX 187
You also need to install the following Python libraries because OpenERP Client uses these packages
To install the required libraries on your Ubuntu system you can do the following in your favouriteshell
bull gtk GTK+ is a highly usable feature-rich toolkit for creating graphical user interfaces whichboosts cross-platform compatibility and an easy-to-use API
sudo apt-get install python-gtk2
bull glade Glade is a RAD tool to enable quick amp easy development of user interfaces for the GTK+toolkit and the GNOME desktop environment
sudo apt-get install python-glade2
bull matplotlib matplotlib is a Python 2D plotting library which produces publication quality figuresin a variety of hard-copy formats and interactive environments across platforms
sudo apt-get install python-matplotlib
bull mxdatetime Provides the most natural and robust way of dealing with datetime values inPython
sudo apt-get install python-egenix-mxdatetime
bull xml XML support for Python platform
sudo apt-get install python-xml
bull tz World Timezone definitions for Python
sudo apt-get install python-tz
bull hippocanvas The Hippo Canvas is a CairoGObjectGTK+ based canvas written in C withsupport for flexible layout CSS styling and initial work on animations
sudo apt-get install python-hippocanvas
bull pydot Python interface to Graphvizrsquos Dot language
sudo apt-get install python-pydot
PDF Viewer
You will also need a PDF viewer (eg xpdf acroread kpdf)
See the Configuring a PDF Viewer (page 188) section
188 CHAPTER 7 OPENERP INSTALLATION ON LINUX
732 Downloading the OpenERP Client
The OpenERP client can be downloaded from the OpenERP websitersquos download page
733 Testing the OpenERP Client
If you only want to test the client you do not need to install it Just unpack the archive and start theopenerp-client executable
tar -xzf openerp-client-602targzcd openerp-client-602binpython openerp-clientpy
The list of available command line parameters can be obtained with the -h command-line switch
python openerp-clientpy -h
734 Installing the OpenERP Client
The client can be installed very easily using the setuppy file
tar -xzf openerp-client-602targzcd openerp-client-602sudo python setuppy install
You can now run the client using the following command
openerp-client
735 Configuring a PDF Viewer
To preview PDF files OpenERP Client by default supports
1 evince
2 xpdf
3 gpdf
4 kpdf
5 epdfview
6 acroread
CHAPTER 7 OPENERP INSTALLATION ON LINUX 189
The client will try to find one of these executables (in this order) in your system and open the PDFdocument with it
For example if xpdf kpdf and acroread are the only PDF viewers installedon your system the OpenERP client will use xpdf for previewing PDFdocuments
If you want to use another PDF viewer or if you do not want to use the first one the client will findyou have to edit the OpenERP configuration file normally located in ~openerprc Find the[printer] section and edit the softpath parameter For example
[printer]softpath = kpdf
74 OpenERP Web Installation
741 Downloading amp Installing the OpenERP Web Client
The OpenERP Web Client can be downloaded from the OpenERP websitersquos download page
You need to install the following Python libraries because OpenERP Web Client uses these packages
1 Python gt= 24
2 CherryPy gt= 312
3 Mako gt= 024
4 Babel gt= 094
5 FormEncode gt= 122
6 simplejson gt= 209
7 pyparsing gt= 150
There is no need to install the above packages one by one You can just run the following commandsin your favourite shell
$ sudo apt-get install python python-dev build-essential$ sudo apt-get install python-setuptools
This will install dependencies required for the following
190 CHAPTER 7 OPENERP INSTALLATION ON LINUX
$ cd pathtoopenerp-web-602lib$ populatesh$ cd
This will install all required dependencies in private lib directory and you do not need to installanything
742 Testing the OpenERP Web Client
If you only want to test the web client you do not need to install it Just unpack the archive and startthe openerp-web executable
tar -xzf openerp-web-602targzcd openerp-web-602python openerp-webpy
The list of available command line parameters can be obtained with the -h command line switch
python openerp-webpy -h
743 Installing the OpenERP Web Client
The OpenERP Web Client can be installed very easily using the setuppy file
tar -xzf openerp-web-602targzcd openerp-web-602sudo python setuppy install
You can now run the OpenERP Web Client using the following command
openerp-web
you can find the OpenERP Web Client configuration file at~openerp-web-602docopenerp-webconf
744 Web Browser Compatibilities
Supported Browsers
OpenERP Web Client is known to work best with Mozilla based web browsers Here is a list ofsupported browsers
1 Firefox gt= 36
CHAPTER 7 OPENERP INSTALLATION ON LINUX 191
2 Internet Explorer gt= 70
3 Safari gt= 41
4 Google Chrome gt= 90
5 Opera gt= 100
Flash Plugin
Your browser should have the Flash plugin installed because OpenERP Web Client uses some Flashcomponents
Apply the following command in order to install the Flash plugin on an Ubuntu system
$ sudo apt-get install flashplugin-nonfree
192 CHAPTER 7 OPENERP INSTALLATION ON LINUX
193
OpenERP Installation on Windows 8In this chapter you will see the installation of OpenERP v60 on a Windows system Thisprocedure is well-tested on Windows 7
You have two options for the installation of OpenERP on a Windows system
bull All-In-One Installation This is the easiest and quickest way to install OpenERPIt installs all components (OpenERP Server Client Web and PostgreSQLdatabase) pre-configured on one computer This installation is recommendedif you do not have any major customizations
bull Independent Installation If you choose this mode of installation all thecomponents required to run OpenERP will have to be downloaded and installedseparately You will have to opt for an independent installation if you plan toinstall the components on separate machines This mode is also practical if youare already working with or plan to use a different version of PostgreSQL thanthe one provided with the All-In-One installer
81 OpenERP All-In-One Installation
Each time a new release of OpenERP is made OpenERP supplies a complete Windows auto-installerfor it This contains all of the components you need ndash the PostgreSQL database server the OpenERPapplication server the GTK application client and the Web client
This auto-installer enables you to install the whole system in just a few mouse clicks The initialconfiguration is set up during installation making it possible to start using it very quickly as long asyou do not want to change the underlying code It is aimed at the installation of everything on a singlePC but you can later connect GTK clients from other PCs Macs and Linux boxes to it as well
811 Downloading OpenERP All-In-One
The first step is to download the OpenERP All-In-One installer At this stage you must choose whichversion to install ndash the stable version or the development version If you are planning to put it straightinto production we strongly advise you to choose the stable version
194 CHAPTER 8 OPENERP INSTALLATION ON WINDOWS
Stable Versions and Development Versions
OpenERP development proceeds in two parallel tracks stable versions anddevelopment versions
New functionality is integrated into the development branch This branchis more advanced than the stable branch but it can contain undiscoveredand unfixed faults A new development release is made every month or soand OpenERP has made the code repository available so you can downloadthe very latest revisions if you want
The stable branch is designed for production environments Here releasesof new functionality are made only about once a year after a long period oftesting and validation Only bug fixes are released through the year on thestable branch
To download OpenERP for Windows follow these steps
1 Navigate to the site httpwwwopenerpcom
2 Click the Downloads button at the right then under Windows Auto-Installer select All-In-One
3 Before you can proceed with the download you will be asked to fill an online form with yourcontact and company details and information regarding your interest in OpenERP
4 Once you submit the online form the All-In-One Windows installer (currentlyopenerp-allinone-setup-602exe) becomes available for download
5 Save the file on your PC - it is quite a substantial size because it downloads everything includingthe PostgreSQL database system (version 83 at the time of writing) so it will take some time
812 Installing the OpenERP All-In-One
To install OpenERP and its database you must be signed in as an Administrator on your PC
If you have previously tried to install the All-In-One version of OpenERP you will have to uninstallthat first because various elements of a previous installation could interfere with your new installationMake sure that all Tiny ERP OpenERP and PostgreSQL applications are removed you are likely tohave to restart your PC to finish removing all traces of them
Double-click the installer file to install OpenERP and accept the default parameters on each dialog boxas you go The All-In-One installer is the simplest mode of installation and has the following steps
bull 1 Select installation language The default is English The other option is French
bull 2 Welcome message Carefully follow the recommendations given in this step
bull 3 Licence Agreement It is important that you accept the GNU General Public License toproceed with installation
CHAPTER 8 OPENERP INSTALLATION ON WINDOWS 195
Figure 81 Welcome to OpenERP
bull 4 Select components to install You can proceed with the default install type All InOne which will install the OpenERP Server GTK Desktop Client Web Client andPostgreSQL Database (version 83 at the time of writing) Or you may customizeyour installation by selecting only the components you require
Figure 82 Customize component installation
bull 5 Configure PostgreSQL connection The installer will suggest default parameters to completeyour PostgreSQL connection configuration You may accept the defaults or change itaccording to your requirement
bull 6 Select folder for installation By default OpenERP is installed in CProgramFilesOpenERP 60 To install in a different folder browse for a differentlocation(folder) in this step
bull 7 Install The automatic installation of OpenERP begins and you can view its progress
196 CHAPTER 8 OPENERP INSTALLATION ON WINDOWS
Figure 83 PostgreSQL configuration
bull 8 Finish On successful installation of OpenERP you will get an appropriate confirmation You canclick Finish to close the setup wizard
Figure 84 End of setup wizard
813 Starting the OpenERP Client
You do not need to manually start the OpenERP Server because it is installed as a Windows serviceBut you may trigger various actions from the shortcuts created in the Start menu for OpenERP GTKClient 60 OpenERP Server 60 and PostgreSQL 83 The OpenERP Client can be opened ready to usethe OpenERP system once you have completed the All-In-One installation
You will find the OpenERP Client icon on your desktop which you double-click to access the OpenERPclient interface Use the menu File rarr Connect to connect to a database As this would be the firsttime you are using OpenERP since its installation your database will be empty You can create a newdatabase through File rarr Databases rarr New database
CHAPTER 8 OPENERP INSTALLATION ON WINDOWS 197
Figure 85 Database on first run
82 PostgreSQL Server Installation and Configuration
In this chapter you will see how to configure PostgreSQL for its use with OpenERP The followingprocedure is well-tested on PostgreSQL v90
821 Installing PostgreSQL Server
You can download the Windows installer from the PostgreSQL download page
Depending on your need choose either the One Click Installer or the pgInstaller and run the executableyou have just downloaded
822 Setup a PostgreSQL User
When the required software installations are complete you must create a PostgreSQL user OpenERPwill use this user to connect to PostgreSQL
Add a User
Start a Windows console (run the cmd command in the Search programs and files text box of the Startmenu)
Change the directory to the PostgreSQL bin directory (eg CProgramFilesPostgreSQL90bin) or add this directory to your PATH environment variable
The default superuser for PostgreSQL is called postgres The password was chosen during thePostgreSQL installation
In your Windows console type
CProgram FilesPostgreSQL90bingtcreateuserexe --createdb --username postgres --no-createrole --pwprompt openpgEnter password for new role openpgpwdEnter it again openpgpwdShall the new role be a superuser (yn) yPassword XXXXXXXXXX
198 CHAPTER 8 OPENERP INSTALLATION ON WINDOWS
line 1 is the command itself
line 2 asks you the new userrsquos password
line 3 asks you to confirm the new userrsquos password
line 4 new role is superuser or not
line 5 asks you the postgres userrsquos password
Option explanations
bull --createdb the new user will be able to create new databases
bull --username postgres createuser will use the postgres user (superuser)
bull --no-createrole the new user will not be able to create new users
bull --pwprompt createuser will ask you the new userrsquos password
bull openpg the new userrsquos name Alternatively you may specify a different username
bull openpgpwd the new userrsquos password Alternatively you may specify a different password
Password
In OpenERP v6 openpg and openpgpwd are the default username andpassword used during the OpenERP Server installation If you plan tochange these defaults for the server or have already installed the serverwith different values you have to use those user configuration values whenyou create a PostgreSQL user for OpenERP
Now use pgAdmin III to create database ldquoopenerpdemordquo with owner ldquoopenpgrdquo
CREATE DATABASE openerpdemo WITH OWNER = openpg ENCODING = rsquoUTF8rsquoCOMMENT ON DATABASE openerpdemo IS rsquoOpenERP Demo DBrsquo
If you have installed the OpenERP Server you can start it now If needed you can override the serverconfiguration by starting the server at a Windows console and specifying command-line options Formore on this refer the section Customized Configuration (page 201)
To change a userrsquos password in any Windows version execute the following
net user ltaccountnamegt ltnewpasswordgteg net user postgres postgres
If it is a domain account just add ldquoDOMAINrdquo at the end
If you want to delete it just execute
net user ltaccountnamegt delete
CHAPTER 8 OPENERP INSTALLATION ON WINDOWS 199
Case-Insensitive Search Issue
For an installation which needs full UTF8 character support consider using postgres gt= 82x Usingversions prior to this OpenERP search will not return the expected results for case-insensitive searcheswhich are used for searching partners products etc
Example
SELECT rsquoxrsquo FROM my_table WHERE rsquobeacutetrsquo ilike rsquoBEacuteTrsquo--matches only in 82x
83 OpenERP Server Installation
The OpenERP Server 60 installation works with disks formatted in NTFS (not a FAT or FAT32partition) The following installation procedure has been well-tested on Windows 7
Windows Versions
OpenERP Server does not work on Windows 98 or ME for obvious reasonsndash these cannot be formatted using NTFS
You will need a PostgreSQL server up and running If it is not the case you can read the PostgreSQLServer Installation and Configuration (page 197) section
831 Downloading the OpenERP Server
The OpenERP Server can be downloaded from OpenERP websitersquos download page
Under Windows Auto-Installer choose Server to download the OpenERP Server standalone
832 Installing the OpenERP Server
Execute the installer you have just downloaded It has the following stages
bull 1 Select installation language The default is English The other option is French
bull 2 Welcome message Carefully follow the recommendations given in this step
bull 3 Licence Agreement It is important that you accept the GNU General Public License toproceed with installation
bull 4 Select folder for installation By default OpenERP Server is installed in CProgramFilesOpenERP 60Server To install in a different folder browse for adifferent location(folder) in this step
200 CHAPTER 8 OPENERP INSTALLATION ON WINDOWS
bull 5 Configure PostgreSQL connection The installer will suggest default parameters tocomplete your PostgreSQL connection configuration You may accept the defaultsor change it according to your requirement
PostgreSQL configuration
bull 6 Create shortcuts Select a folder in the Start menu where you would like to create the programrsquosshortcuts
Create Start menu shortcuts
bull 7 Install The automatic installation of OpenERP Server begins and you can view its progress
bull 8 Finish On successful installation of OpenERP Server you will get an appropriate confirmationYou can click Finish to close the setup wizard
End of setup wizard
The OpenERP Server installs as a Windows service This means you do not have to start the servereach time you start the computer and it runs without the need of an open user session
CHAPTER 8 OPENERP INSTALLATION ON WINDOWS 201
833 Customized Configuration
To initialize the server with configurations of your choice you have to invoke it at the WindowsCommand prompt with the options you wish to override
Navigate to the installation directory in CProgram FilesOpenERP 60Server and typethis command but do not execute it yet
openerp-serverexe -d ltdb_namegt -r ltdb_usergt -w ltdb_passwordgt--db_host=ltpostgresql_server_addressgt--db_port=ltport_nogt --logfile=ltlogfilegt
The initialization of OpenERP Server provides necessary information for connection to the PostgreSQLdatabase and the choice of data to load Here is the explanation of used options
bull -d ltdb_namegt Name of the database created for OpenERP Server
bull -r ltdb_usergt Name of the PostgreSQL user (role)
bull -w ltdb_passwordgt Password of the PostgreSQL user
bull --db_host=ltpostgresql_server_addressgt Address of the server wherePostgreSQL is If you have installed PostgreSQL on the same computer as OpenERP Serveryou can enter localhost else the IP address or the name of the distant server
bull --db_port=ltport_nogt Port number where PostgreSQL listens The default is 5432
bull --stop-after-init This option stops the server after initialization
bull --logfile=ltlogfilegt specify an alternate logfile where all the outputof server will be saved The default is CProgram FilesOpenERP60Serveropenerp-serverlog
Before the execution of this command you have to decide the purpose of the database created inOpenERP
Sample command
202 CHAPTER 8 OPENERP INSTALLATION ON WINDOWS
openerp-serverexe -d openerpdemo -r openpg -w openpgpwd--db_host=localhost --logfile=CUserstinyDesktopdemo_dblog--db_port=5430 --stop-after-init
Here you have to enter the username and password specified in the PostgreSQL connectionconfiguration during server installation
When you execute the initialization command if you specify a logfile the server runtime output iswritten to that file and you will not see any server output in the prompt window You have only to waituntil the prompt comes back
Deciding about the purpose of the database
You can initialize the database with OpenERP Server to
1 Take a look at the system with modules installed and demo data loaded
2 Install a new clean database system (without demo data)
3 Upgrade an existing version
With modules and demo data
If you execute the sample command above you will get a database with only base modules installedand loaded with demo data To initialize OpenERP Server with additional modules and its demo datayou need to add this option to the above command
-i ltmodule namegt
Sample command
openerp-serverexe -d openerpdemo --stop-after-init -i sale
This command will initialize the OpenERP Server with the module sale and its dependencies andfill its PostgreSQL database with their related demo data As can be seen you must specify the targetdatabase for the module installation
To install more than one module specify a comma-separated module list at the command-line
Without demo data (or new clean version)
Execute the command with an option excluding the demo data
--without-demo=all
CHAPTER 8 OPENERP INSTALLATION ON WINDOWS 203
This will load base modules (and other modules if -i option is used) but will not load its demo data
Sample command usage
openerp-serverexe -d openerpdemo --stop-after-init --without-demo=all
If you have already initialized the database with demo data loaded you can create a new database andexecute the above command on it
Update the database
Execute the command with an option that updates the data structures
--update=all
Sample command usage
openerp-serverexe -d openerpdemo --stop-after-init --update=all
834 Monitoring the OpenERP Server
The service and some runtime information is accessible through the Computer Management console inAdministrative Tools
OpenERP Server 60 in the Services list
Here you can define how the service should act in case of server failure Access the servicersquos propertiesby double-clicking OpenERP Server 60 in the list
Recovery tab to set service failure response
The Computer Management logging service offers additional information about the execution of theOpenERP Server for example the startup or shutdown information of the service
204 CHAPTER 8 OPENERP INSTALLATION ON WINDOWS
Server information in Windows Logs list
OpenERP Server runtime output can be found in the default logfile Given that the server is nowrunning as a Windows service it does not output any runtime messages For this the logfile isthe only option Access it from the Start menu through the View log link in the group ofshortcuts for OpenERP Server 60 Alternatively use the path CProgram FilesOpenERP60Serveropenerp-serverlog
OpenERP Server log file
You can find out whether OpenERP Server is running by invoking Windows Task ManagerWhen you look at the Processes tab you will see OpenERPServerServiceexe andopenerp-serverexe both having SYSTEM as their user (to see these Show processes from allusers must be enabled in the Task Manager)
CHAPTER 8 OPENERP INSTALLATION ON WINDOWS 205
The services in Windows Task Manager
835 Congratulations you have successfully installed OpenERP Server
For more information please take a look at Additional Installation Information and Troubleshooting(page 210) where you can find some troubleshooting examples
84 OpenERP Client Installation
You must install configure and run the OpenERP Server before using the OpenERP Client The clientneeds the server to run You can install the server application on your computer or on an independent
206 CHAPTER 8 OPENERP INSTALLATION ON WINDOWS
server accessible by network
841 Downloading the OpenERP Client
The OpenERP Client can be downloaded from OpenERP websitersquos download page
Under Windows Auto-Installer choose Client to download the OpenERP Client standalone
842 Installing the OpenERP Client
Click the executable installation file you have just downloaded and proceed with the following steps
bull 1 Select installation language The default is English The other option is French
bull 2 Welcome message Carefully follow the recommendations given in this step
bull 3 Licence Agreement It is important that you accept the GNU General Public License toproceed with installation
bull 4 Select folder for installation By default OpenERP Client is installed in CProgramFilesOpenERP 60Client To install in a different folder browse for adifferent location(folder) in this step
bull 5 Create shortcuts Select a folder in the Start menu where you would like to create theprogramrsquos shortcuts
Create Start Menu Shortcuts
bull 6 Install The automatic installation of OpenERP Client begins and you can view its progress
bull 7 Finish On successful installation of OpenERP Client you will get an appropriateconfirmation Click Finish to close the setup wizard
End of Configuration Wizard
CHAPTER 8 OPENERP INSTALLATION ON WINDOWS 207
843 Starting the OpenERP Client
The installation program creates shortcuts in the main program menu and on the desktop which youcan use to start the client Be sure to have an OpenERP Server running somewhere (on your computeror a distant server) to be able to use the client software
Log in to openerpdemo database using default username and password
bull Username = admin
bull Password = admin
Enjoy
Connecting to the Demo Database
85 OpenERP Web Installation
You must install configure and run the OpenERP Server before using the OpenERP Web The webclient needs the server to run You can install the server application on your computer or on anindependent server accessible by network
208 CHAPTER 8 OPENERP INSTALLATION ON WINDOWS
851 Downloading the OpenERP Web
The OpenERP Web can be downloaded from OpenERP websitersquos download page
Under Windows Auto-Installer choose Web to download the OpenERP Web standalone
852 Installing the OpenERP Web
Click the executable installation file you have just downloaded and proceed with the following steps
bull 1 Select installation language The default is English The other option is French
bull 2 Welcome message Carefully follow the recommendations given in this step
bull 3 Licence Agreement It is important that you accept the OpenERP Public License (OEPL)Version 11 to proceed with installation This licence is based on the Mozilla PublicLicence (MPL) Version 11
OpenERP Public Licence
bull 4 Select folder for installation By default OpenERP Web is installed in CProgramFilesOpenERP 60Web To install in a different folder browse for a differentlocation(folder) in this step
bull 5 Create shortcuts Select a folder in the Start menu where you would like to create theprogramrsquos shortcuts
Create Start Menu Shortcuts
bull 6 Install The automatic installation of OpenERP Web begins and you can view its progress
bull 7 Finish On successful installation of OpenERP Web you will get an appropriateconfirmation Click Finish to close the setup wizard
The Windows service for OpenERP Web Server is also installed and is set up to start the serverautomatically on system boot
CHAPTER 8 OPENERP INSTALLATION ON WINDOWS 209
853 Starting the Web Client
The web server being initialized and the settings saved you can start the OpenERP Web Client
Use a web browser of your choice to connect to OpenERP Web If your web client is installed on thesame computer as the server you can navigate to httplocalhost8080 to connect to the OpenERP webversion If the server is installed on a separate computer you must know the name or IP address of theserver over the network and navigate to httpltserver_addressgt8080 to connect to OpenERP
Figure 86 Web Client at Startup
210 CHAPTER 8 OPENERP INSTALLATION ON WINDOWS
86 Troubleshooting and Windows Complementary InstallInformation
861 PostgreSQL Administration
OpenERP Server Connection Error with PostgreSQL
If you are initializing a database from the command-line with a custom usernamerole (-r) and password(-w) ensure that you have created a corresponding PostgreSQL user for the same Otherwise you mayencounter error messages as shown below
User authentication failure
You may also face another problem similar to this situation
Database connection failure
In this case check if the service postgresql-90 - PostgreSQL Server 90 is running inthe Services Manager (Control Panel rarr System and Security rarr Administrative Tools rarr Services)
PostgreSQL 90 in the Services list
You can edit the service configuration to start PostgreSQL as a service on system boot This is usuallythe default
Configure PostgreSQL 90 service
If your PostgreSQL service is running but you get connection errors you can restart the service
Restarting the service
CHAPTER 8 OPENERP INSTALLATION ON WINDOWS 211
212 CHAPTER 8 OPENERP INSTALLATION ON WINDOWS
Index
Aabsences 64access 39account
chart 37account types 26accountant 55accounts
configuring 26allocation
cost 62 66analytic
chart of accounts 61Analytic Accounts 59
Bbackup
database 38bill of materials 139
phantom 146BoM
multi-level 144revisions 143
BoM substitute products 177
Ccategory
partner 31product 34
chart of accounts 37analytic 61
contactpartner 31
costallocation 62 66
Ddatabase
backup 38drop 38duplicate 39
restore 38
Eexport
stock management 130
FFlow 6forecasts 113
Iimport
stock management 130Installation
OpenERP All-In-One (Windows) 193OpenERP Client (Linux) 186OpenERP Client (Windows) 205OpenERP Server (Linux) 184OpenERP Server (Windows) 199OpenERP Web (Linux) 189OpenERP Web (Windows) 207PostgreSQL 181PostgreSQL (Windows) 196Windows installation quirks 209
installationadministrator 194Windows (all-in-one) 194
invoicingrepair 165
Jjournals
configuring 29
Llocation structure 36Logistics 6 69
MMain Company
configuring 30
Manufacturing 6 137Master Procurement Schedule 109Master Production Schedule 109Module
mrp_jit 95Sale 95
moduleaccount 25 43account_analytic_default 51delivery 55hr_timesheet_invoice 59mrp 25 139mrp_jit 45 98 150mrp_repair 161product 25product_extended 58product_margin 59purchase 25 49purchase_analytic_analysis 51purchase_analytic_plans 51 60purchase_tender 56report_intrastat 131sale 25sale_journal 124sale_supplier_direct_delivery 99stock 25 73stock_location 131stock_planning 113warning 50
MPS 109multi-level BoM 144
OOpenERP All-In-One
Installation (Windows) 193OpenERP Client
Configuring a PDF viewer 188Installation (Linux) 186Installation (Windows) 205
OpenERP ServerInstallation (Linux) 184Installation (Windows) 199
OpenERP versions 193OpenERP Web
Installation (Linux) 189Installation (Windows) 207
Ppartner 31
category 31contact 31
PDF viewer 188phantom
bill of materials 146plan
production 113PostgreSQL
Installation 181Installation (Windows) 196setup a database 181setup a database (Windows) 197setup a user 181setup a user (Windows) 197
product 34category 34
productionmanagement 137
propertiesdefining 28
Purchase 6purchase
tender 56Purchasing 47
Qquotation 152
RReal Case 18rent 131repair
invoicing 165
SSales 6sales order 152semi-finished product 152Stock
Double-Entry 73Inventory operation 74Location 79Location types 79Negative 97Stock check 74
Warehouse 76stock
journal 124location 35
Stock Management 69
Ttender 56traceability
downstream 115upstream 115
traceability (stock) 118
Wwork center cycle 148