Strawberry Delight - Quilters Select · Strawberry Delight by Alex Anderson 5 Strawberry Delight...
5
By Alex Anderson; quilted by Angela Walters Quilt size 59 1 / 2˝ x 59 1 / 2˝; Block size 6˝ x 6˝ Strawberry Delight
Transcript of Strawberry Delight - Quilters Select · Strawberry Delight by Alex Anderson 5 Strawberry Delight...
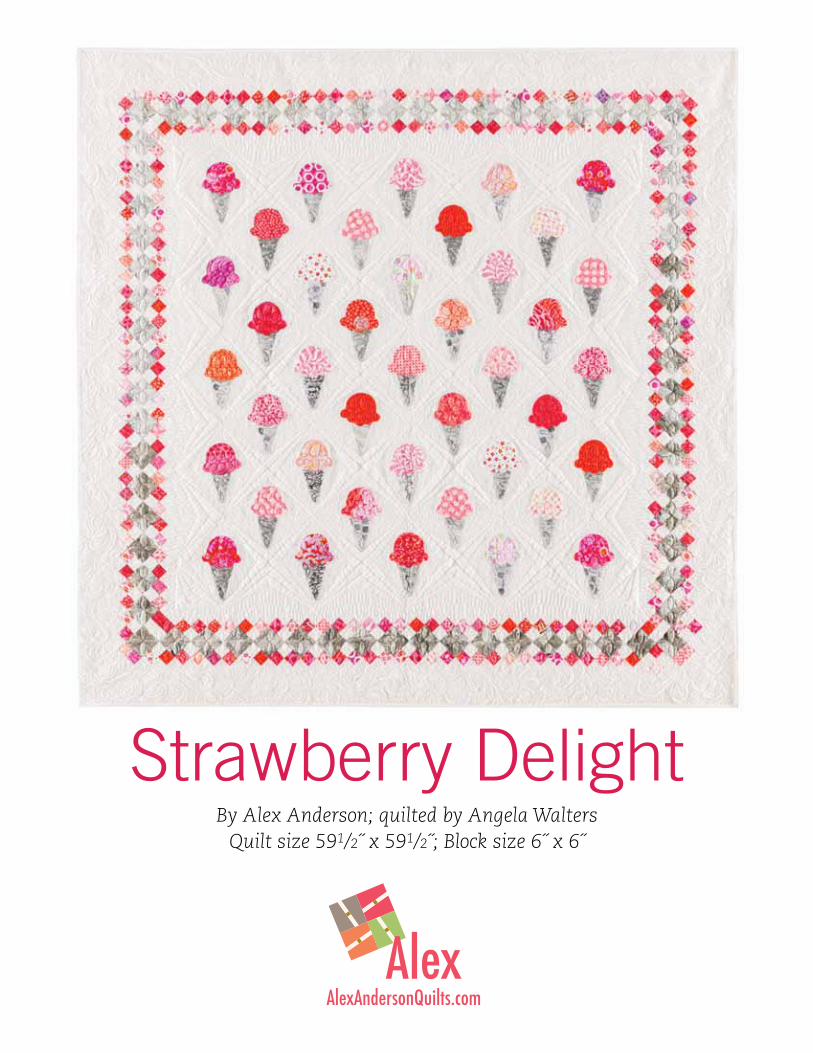
By Alex Anderson; quilted by Angela WaltersQuilt size 591/2˝ x 591/2˝; Block size 6˝ x 6˝
Strawberry Delight
Strawberry Delight by Alex Anderson 2
Quilt size 591/2˝ x 591/2˝
Block size 6˝ x 6˝
Fabric & Cutting Requirements Fabric Yards Cut
White solid 4 yds. 41 A, 272 B, 48 C, 36 D, 20 E, 6 F, 2 G 7 binding strips 21/4˝ x WOF
Pink and red prints 1 yd. 272 B, 41 scoops
Gray prints 3/4 yd. 68 C, 41 cones
Backing 4 yds. 2 panels 37˝ x 72˝
Batting 72˝ x 72˝
Yardage is based on fabric 40˝ wide.
Also needed: 2 yds. 20˝ Quilters Select Appli-Web Plus or equivalent, 2 yds. Quilters Select TearAway, Teflon pressing sheet or parchment paper; thread to match the applique fabrics; Quilters Select Soft Machine Batting
PatchesA = 71/2˝ square
B = 11/2˝ square
C = 21/2˝ square
D = 21/2˝ x 41/2˝ rectangle
E = 21/2˝ x 61/2˝ rectangle
F = 10˝ square
G = 51/4˝ square
Getting startedPresoak red, pink, and gray fabrics in hot water until all excess dye is released. Press all fabrics. Starch lightly if desired.
Print the Strawberry Delight applique pattern.
Strawberry Delight instructions
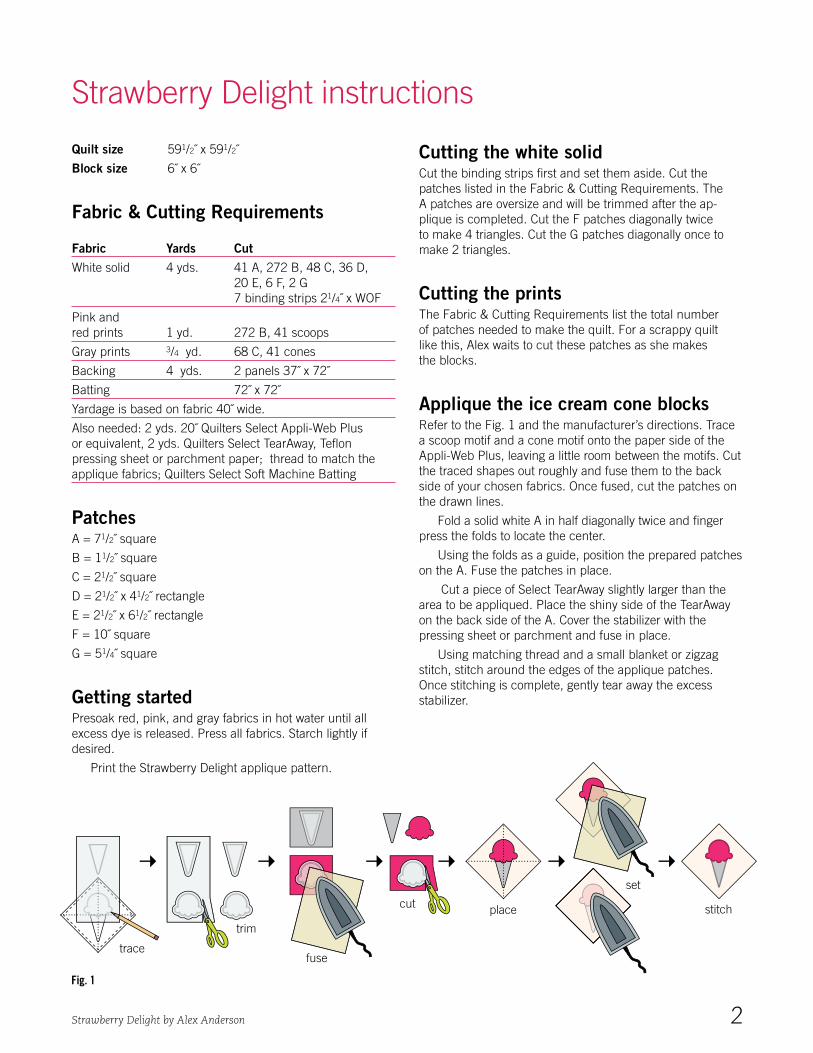
Cutting the white solid Cut the binding strips first and set them aside. Cut the patches listed in the Fabric & Cutting Requirements. The A patches are oversize and will be trimmed after the ap-plique is completed. Cut the F patches diagonally twice to make 4 triangles. Cut the G patches diagonally once to make 2 triangles.
Cutting the prints The Fabric & Cutting Requirements list the total number of patches needed to make the quilt. For a scrappy quilt like this, Alex waits to cut these patches as she makes the blocks.
Applique the ice cream cone blocksRefer to the Fig. 1 and the manufacturer’s directions. Trace a scoop motif and a cone motif onto the paper side of the Appli-Web Plus, leaving a little room between the motifs. Cut the traced shapes out roughly and fuse them to the back side of your chosen fabrics. Once fused, cut the patches on the drawn lines.
Fold a solid white A in half diagonally twice and finger press the folds to locate the center.
Using the folds as a guide, position the prepared patches on the A. Fuse the patches in place.
Cut a piece of Select TearAway slightly larger than the area to be appliqued. Place the shiny side of the TearAway on the back side of the A. Cover the stabilizer with the pressing sheet or parchment and fuse in place.
Using matching thread and a small blanket or zigzag stitch, stitch around the edges of the applique patches. Once stitching is complete, gently tear away the excess stabilizer.
trace
trim
fuse
cut place
set
stitch
Fig. 1
Strawberry Delight by Alex Anderson 3
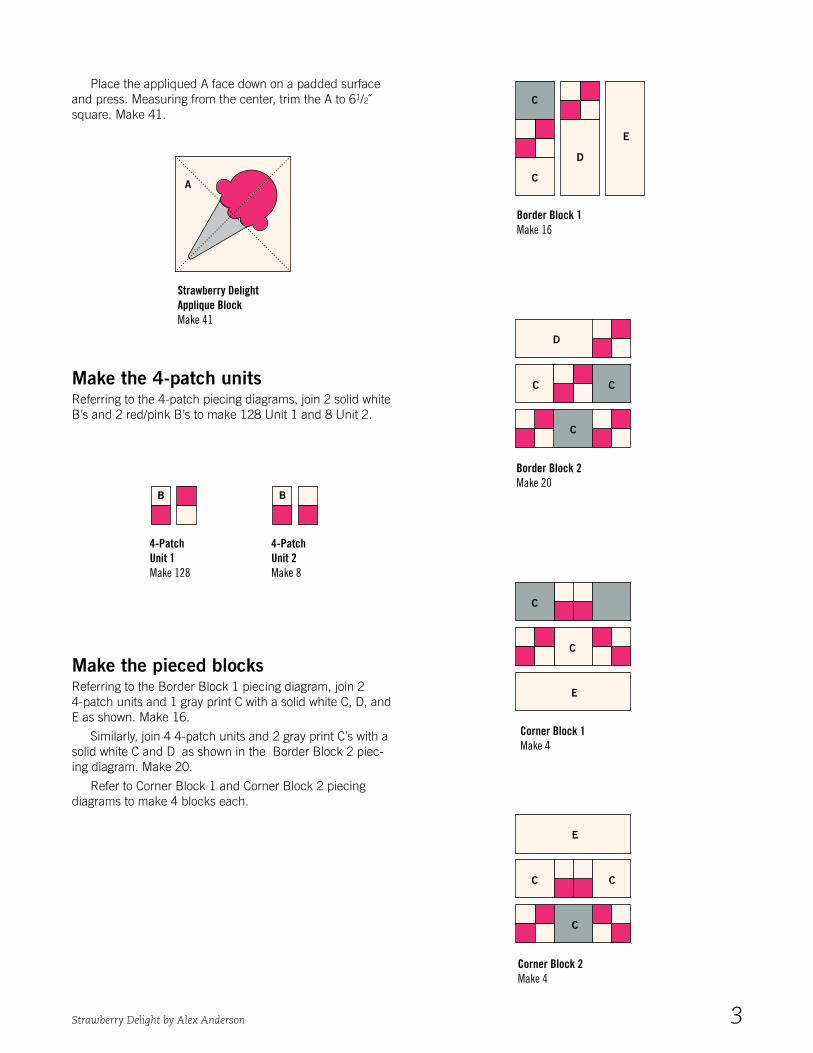
Place the appliqued A face down on a padded surface and press. Measuring from the center, trim the A to 61/2˝ square. Make 41.
Strawberry DelightApplique BlockMake 41
A
B
C
C C C C C
C
C
CC
D
D
E
E
E
F
FG
Corn
er 2
Corn
er 1
Corn
er 1
Corn
er 1
Corn
er 2
Corn
er 2
Border
2
Border
2
Border
1
Border
2
Border
1
Border
2
4-PatchUnit 2Make 8
B
4-PatchUnit 1Make 128
Border Block 1Make 16
Corner Block 1Make 4
Corner Block 2Make 4
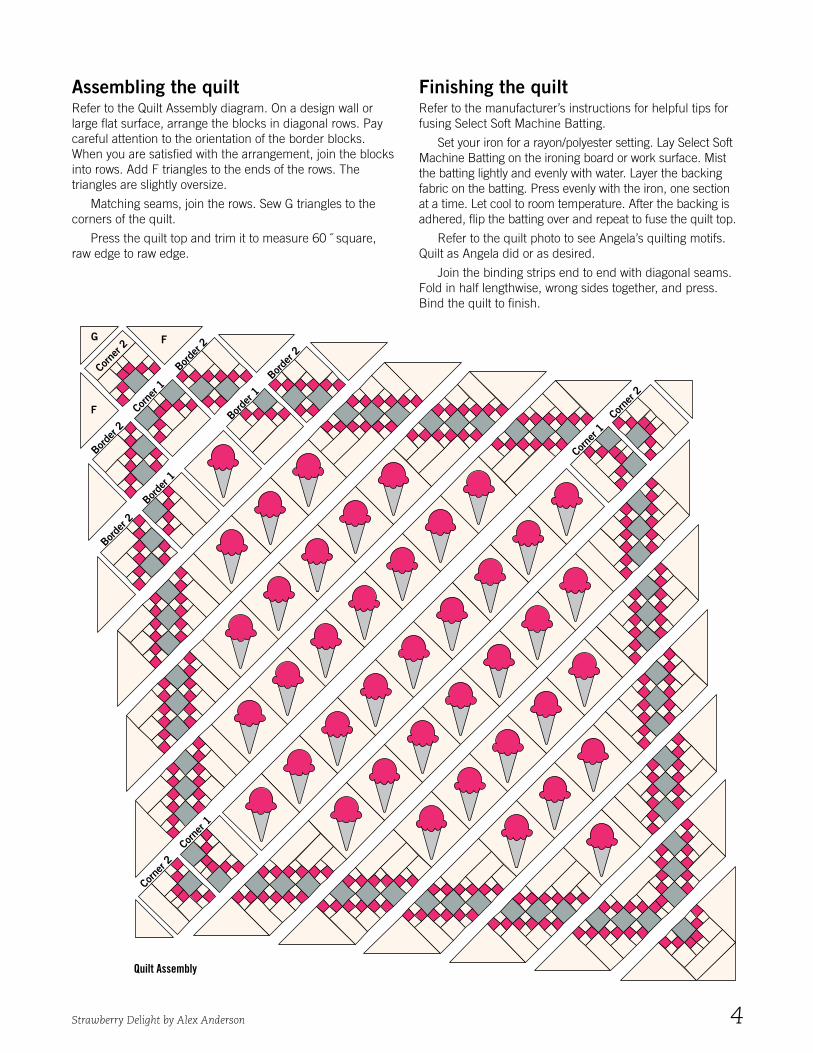
Quilt Assembly
Border Block 2Make 20
Strawberry DelightApplique BlockMake 41
A
B
C
C C C C C
C
C
CC
D
D
E
E
E
F
FG
Corn
er 2
Corn
er 1
Corn
er 1
Corn
er 1
Corn
er 2
Corn
er 2
Border
2
Border
2
Border
1
Border
2
Border
1
Border
2
4-PatchUnit 2Make 8
B
4-PatchUnit 1Make 128
Border Block 1Make 16
Corner Block 1Make 4
Corner Block 2Make 4
Quilt Assembly
Border Block 2Make 20
Make the 4-patch unitsReferring to the 4-patch piecing diagrams, join 2 solid white B’s and 2 red/pink B’s to make 128 Unit 1 and 8 Unit 2.
Make the pieced blocksReferring to the Border Block 1 piecing diagram, join 2 4-patch units and 1 gray print C with a solid white C, D, and E as shown. Make 16.
Similarly, join 4 4-patch units and 2 gray print C’s with a solid white C and D as shown in the Border Block 2 piec-ing diagram. Make 20.
Refer to Corner Block 1 and Corner Block 2 piecing diagrams to make 4 blocks each.
Strawberry Delight by Alex Anderson 4
Assembling the quiltRefer to the Quilt Assembly diagram. On a design wall or large flat surface, arrange the blocks in diagonal rows. Pay careful attention to the orientation of the border blocks. When you are satisfied with the arrangement, join the blocks into rows. Add F triangles to the ends of the rows. The triangles are slightly oversize.
Matching seams, join the rows. Sew G triangles to the corners of the quilt.
Press the quilt top and trim it to measure 60 ˝ square, raw edge to raw edge.
Finishing the quiltRefer to the manufacturer’s instructions for helpful tips for fusing Select Soft Machine Batting.
Set your iron for a rayon/polyester setting. Lay Select Soft Machine Batting on the ironing board or work surface. Mist the batting lightly and evenly with water. Layer the backing fabric on the batting. Press evenly with the iron, one section at a time. Let cool to room temperature. After the backing is adhered, flip the batting over and repeat to fuse the quilt top.
Refer to the quilt photo to see Angela’s quilting motifs. Quilt as Angela did or as desired.
Join the binding strips end to end with diagonal seams. Fold in half lengthwise, wrong sides together, and press. Bind the quilt to finish.
Strawberry DelightApplique BlockMake 41
A
B
C
C C C C C
C
C
CC
D
D
E
E
E
F
FG
Corn
er 2
Corn
er 1
Corn
er 1
Corn
er 1
Corn
er 2
Corn
er 2
Border
2
Border
2
Border
1
Border
2
Border
1
Border
2
4-PatchUnit 2Make 8
B
4-PatchUnit 1Make 128
Border Block 1Make 16
Corner Block 1Make 4
Corner Block 2Make 4
Quilt Assembly
Border Block 2Make 20
Strawberry Delight by Alex Anderson 5
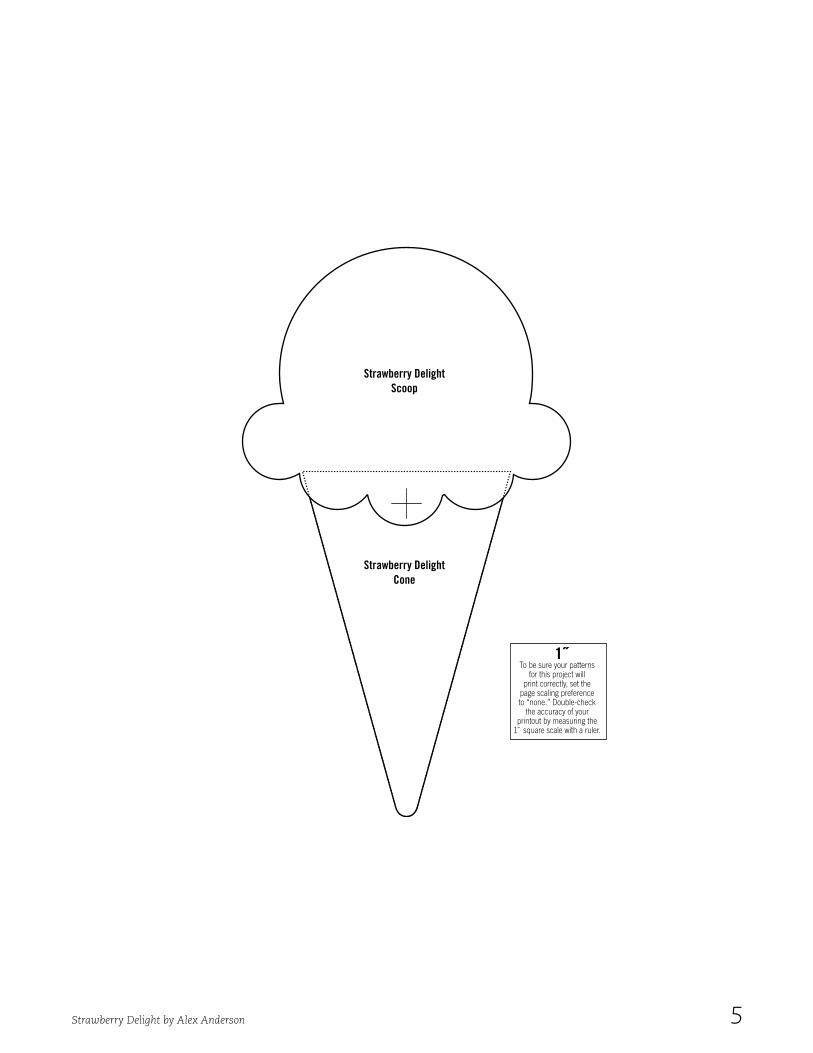
Strawberry DelightCone
Strawberry DelightScoop
1˝To be sure your patterns
for this project will print correctly, set the
page scaling preference to “none.” Double-check
the accuracy of your printout by measuring the
1˝ square scale with a ruler.