Stormwater Sampling Manual A guide for the Industrial ... Sampling Manual . A guide for the...
42
Stormwater Sampling Manual A guide for the Industrial Stormwater General Permit December 2015 Publication No. 15-03-044
Transcript of Stormwater Sampling Manual A guide for the Industrial ... Sampling Manual . A guide for the...

Stormwater Sampling Manual
A guide for the Industrial Stormwater General Permit
December 2015
Publication No. 15-03-044

Page 2
Publication information This report is available on the Department of Ecology’s website at https://fortress.wa.gov/ecy/publications/SummaryPages/1503044.html
This guidance is an update to How to do Stormwater Sampling which was originally developed by Ecology’s Environmental Assessment Program in 2002 and then updated in 2010. This most recent update was made in accordance with the new Industrial Stormwater General Permit that became effective on January 2, 2015.
Suggested Citation:
Washington State Department of Ecology. 2015. Stormwater Sampling Manual: A guide for the Industrial Stormwater General Permit. Washington State Department of Ecology, Olympia, WA. 41 p. Publication No. 15-03-044. https://fortress.wa.gov/ecy/publications/summarypages/1503044.html
Contact information For more information contact:
Publications Coordinator Environmental Assessment Program P.O. Box 47600, Olympia, WA 98504-7600 Phone: (360) 407-6764
Washington State Department of Ecology - www.ecy.wa.gov
o Headquarters, Olympia (360) 407-6000 o Northwest Regional Office, Bellevue (425) 649-7000 o Southwest Regional Office, Olympia (360) 407-6300 o Central Regional Office, Union Gap (509) 575-2490 o Eastern Regional Office, Spokane (509) 329-3400
Any use of product or firm names in this publication is for descriptive purposes only and does not imply endorsement by the author or the Department of Ecology.
Accommodation Requests: To request ADA accommodation including materials in a format for the visually impaired, call Ecology at 360-407-6764. Persons with impaired hearing may call Washington Relay Service at 711. Persons with speech disability may call TTY at 877-833-6341.

Page 3
Contributing authors The following Department of Ecology staff contributed their hard work and technical knowledge to the 2015 update.
Current staff
William Hobbs Jeff Killelea Kurt Baumgarten Brandi Lubliner Greg Stegman Vincent McGowan Kevin Hancock Marc Pacifico Tom Leonard
Former staff
Stephen Golding Elaine Tomita Julie Lowe Dewey Weaver

Page 4
Table of Contents Introduction ........................................................................................................................5
Advance Planning for Stormwater Sampling..................................................................6 Deciding what to sample ................................................................................................6 Selecting a lab to test your sample .................................................................................7 Contacting the lab in advance ........................................................................................7
Issues you may want to cover with the lab ..............................................................8 Deciding how you will take the sample .........................................................................9
Collecting total petroleum hydrocarbons – diesel fraction (TPH-Dx) samples .....10 Determining which discharges to sample ..............................................................11 S4.B.2. sample location(s) .....................................................................................12 Selecting sampling points ......................................................................................13 Obtaining supplies for sampling ............................................................................15
Planning Just Prior to Stormwater Sampling ...............................................................15 Being prepared .............................................................................................................15 Choosing when to sample ............................................................................................15 Check weather forecasts ..............................................................................................16
Conducting Sampling at Your Facility ..........................................................................17 Checklist for sampling .................................................................................................17
Visible oil sheen, zinc, copper, turbidity, and pH ..................................................17 How to fill sample bottles ......................................................................................18 Simple principles of good grab sample collection .................................................18
Keeping records ...........................................................................................................19
Special Sampling Considerations ...................................................................................21 Sampling stormwater discharges from a pipe into a receiving water ..........................21 Sampling from a manhole ............................................................................................21 Sampling from a storm drain with a filter or insert .....................................................22 Sampling from a drainage ditch or swale ....................................................................23 Sampling sheet flow .....................................................................................................24 Sampling from a stormwater detention pond or other BMP ........................................25 Sampling storm drain solids.........................................................................................26
Ecology Wants to Hear from You ..................................................................................27
References .........................................................................................................................28
Glossary, Acronyms, and Abbreviations .......................................................................29
Appendices ........................................................................................................................33 Appendix A - Proper and Improper Methods of Sampling ..........................................35 Appendix B - Guidance on Results near Lab Detection Limits...................................37 Appendix C - Tables from the Industrial Stormwater General Permit ........................39

Page 5
Introduction The Industrial Stormwater General Permit (ISGP) applies to all facilities conducting industrial activities that discharge stormwater to a surface water body or to a storm sewer system that drains to a surface water body.
The permit requires that facilities conduct sampling of stormwater and report the results to the Washington State Department of Ecology (Ecology). These requirements are outlined in the permit under “Special Condition S4. General Sampling Requirements.” This Stormwater Sampling Manual supports the sampling portion of the general permit but does not substitute for it.
Sources of pollutants that may enter surface water, sediments, or groundwater can be identified by sampling stormwater discharges. The results from sampling will help facilities develop their Stormwater Pollution Prevention Plan, determine if the existing plan is adequate, and implement or assess best management practices.
The purpose of this manual is to help those who operate facilities do their own sampling. The manual provides a step-by-step procedure of what facilities need to do to sample, gather, and report data in order to describe the quality of stormwater leaving the facility.
The purpose of this guide is to help those who operate facilities do their own sampling.

Page 6
Advance Planning for Stormwater Sampling Deciding what to sample Before beginning your sampling, you’ll need to determine the specific pollutants (water quality parameters) you are required to sample and test for. All facilities must monitor for turbidity, pH, zinc, copper, and the presence of a visible oil sheen. Your parameters are based on:
The standard set of parameters for all facilities (turbidity, pH, zinc, copper and visible oil sheen).
The industrial activities at your site, often classified by your facility’s Standard Industrial Classification (SIC) code.
Whether your facility discharges to an impaired (303(d) listed) water body, Puget Sound Sediment Cleanup Site, or a water body with a TMDL or other water cleanup plan.
Any additional parameters Ecology assigned to your facility by administrative order.
Ecology listed the required parameters for your facility in the permit coverage letter mailed to you when the permit was issued. Your required parameters are also shown on your facility’s Discharge Monitoring Report (DMR) data entry screen (WQWebDMR). Contact Ecology if you have any questions about the required parameters for your facility.
All facilities must monitor for turbidity, pH, zinc, copper, and
a visible oil sheen.
Summary of Stormwater Sampling Guidance Manual
1. Decide what to sample – sample turbidity, pH, zinc, copper, a visible oil sheen, and additional parameters as per the permit; check your permit coverage letter.
2. Select and contact a lab – verify analytical methods, detection limits, sample preservation, and data reporting requirements.
3. Decide how you will sample – identify sample locations; make sure you sample only your stormwater; verify if you have to sample petroleum hydrocarbons; obtain sampling supplies.
4. Plan your sampling events – choose sampling times; check weather forecasts.
5. Conduct sampling – review guidance on how to sample; take notes; read through Special Considerations in this manual.
Discuss any questions or issues with the Department of Ecology.
Page 7
Selecting a lab to test your sample Having identified the parameters you will need tested, the next step is to select a lab to perform the tests. You are required to select a lab accredited by Ecology. The lab must be accredited for each analytical method required by the permit for each parameter. Accreditation assures Ecology that the lab is able to do quality testing using the analytical methods specified under
Monitoring Requirements in your permit. To ensure the lab can meet the required detection and reporting limits, send the lab a copy of relevant quantitation levels from Appendix C, highlighting your parameters of interest. You can search for an accredited lab on Ecology’s website1.
Contacting the lab in advance You should contact the lab well ahead of time. They will be providing you with the sampling bottles you’ll need. For some water quality parameters, such as Total Petroleum Hydrocarbons (TPH), it is not only desirable but necessary to collect the sample directly into a specially-cleaned container, so you will need to have bottles from the lab on hand before you sample. You can also ask your lab to send narrow-range pH paper (with a resolution not greater than ± 0.5 SU) along with your sample bottles.
Note that not all facilities are required to collect TPH samples. Page 26 of the permit lists the industrial activities and SIC codes that require TPH sampling. Also, your permit coverage letter contains a sampling summary that will indicate whether TPH sampling is required based on the SIC codes Ecology has on file for your facility. If there is a discrepancy between the permit and your permit coverage letter, the permit takes precedence. Contact Ecology if you have any questions or need to correct an error in your sampling requirements.
1 https://fortress.wa.gov/ecy/laboratorysearch/
Contact the lab well ahead of time.
Typical Sampling Information
Parameter Bottle Type Minimum Sample
Required
Holding Time Preservation
Turbidity 500 ml wide-mouthed poly 100 ml 48 hours Cool to 4 oC
Total Zinc 1 liter (L) bottle cleaned according to protocol 500 ml 6 months
HNO3 to pH<2 Cool to 4 oC
Total Copper 500 ml HDPE Dependent on
the lab 6 months
HNO3 to pH<2 Cool to 4 oC

Page 8
Discuss with the lab the analytical methods they will use, as specified in the sample parameter tables included in S5. A and S5. B of the general permit (pages 23 - 25) and shown in Appendix C of this manual. The lab will give you helpful information and explanations that go beyond the scope of this guide. If you must meet effluent limits listed in S5.C, Landfills and Airports Subject to Effluent Limitation Guidelines (pages 25- 27) carefully review them with the lab.
Issues you may want to cover with the lab Confirmation that the lab is accredited for the testing methods the permit requires.
The type and size of bottle that will be supplied for each water quality parameter to be sampled and tested.
How full to fill the bottle.
Any safety concerns with materials supplied by the lab.
What you need to know about preserving your samples: For some tests, a preservative is necessary. The table of Typical Sampling Information (see page 7) provides information for preserving zinc, turbidity, and copper samples−three water quality parameters that must be monitored under the Industrial Stormwater General Permit. Make a note of the parameters for which bottles will have preservative inside. The preservative is a substance that stabilizes certain chemicals at the time of sampling so that a valid test can be done later. It is critical that you use the correct bottles because tests requiring preservative will not be valid without the correct preservative. In some cases, the wrong preservative will interfere with a test. It is important not to lose the preservative that comes in the bottles supplied by the lab, so fill preserved bottles slowly to ensure no overflow occurs resulting in preservative loss. In many cases, the preservatives listed in the table come pre-measured in the sampling bottles. Chemicals have their own scientific notation. Nitric acid for example is HNO3. Temperature is measured in degrees Celsius (ºC). Typical United States thermometers measure temperature in Fahrenheit (F) and 4 ºC is about 39 °F. For your purposes, Cooling to 4 ºC means putting the samples on crushed ice or packed with blue ice in an ice chest so they will be kept just above freezing. Cooling the sample is also a means of preserving it.
The kind of labels the lab will supply for the bottles and how the labels should be filled out. The labels or tags you use to identify the samples you take must be waterproof, and if you write on them, the writing must be waterproof also.
The Chain of Custody (COC) form from the lab and the process to complete these before sampling the first time.
A description of forms or other paperwork to submit to the lab with the samples and how to fill them out.
Whether the lab will supply pH paper, sample bottles, tags, or labels for the bottles, and blank forms.
How bottles and other supplies from the lab will be delivered to you.
The holding times for each water quality parameter to be sampled and tested. A holding time is the maximum time allowed between taking the sample and doing the lab analysis. If you exceed holding time, the sample analysis is not acceptable.
Ask questions – the lab can help.
Page 9
How and when you will deliver samples to the lab. Plan with the lab how you will get the samples to them in time to begin analysis before the parameter with the shortest holding time reaches that holding time. The fastest way to deliver samples to the lab may be in person, but it may be possible to ship samples (cooled in an insulated ice-chest) and still meet holding times. Some labs will provide a courier service. If you deliver samples in person, you can pick up bottles and supplies for the next quarter at the same time.
How to read the lab reports for the sample results. Sampling requirements tend to use scientific words and units of measure. Metric units are used to measure weight, volume, and distance. Liquid volumes use liters (L) and milliliters (mL), not quarts and cups. Be aware that some parameters (e.g., zinc and copper) need to be reported on your DMR as µg/L (micrograms per liter), while other parameters need to be reported as mg/L (milligrams per liter). Most labs report concentrations in the same units that need to be reported on the DMR. However, in some cases, you may need to convert from mg/L to µg/L, in order to properly report the correct results on your DMR. For example if a lab were to report total copper values of 0.035 mg/L, you would need to convert from mg/L to µg/L; move the decimal 3 places to the right, and report 35.0 µg/L. Ensure the lab uses data qualifiers (or flags) for data near the method detection limit that are consistent with Appendix B of this document. Be sure to have the lab explain any words or expressions that you do not understand.
Summing data for total values. You will be asked to report total values for organic parameters (total PCBs, PAH compounds, and Northwest Total Petroleum Hydrocarbons (NWTPH-Dx). Ensure you understand the appropriate way to sum and average data that are close to the method detection limit (Appendix B). Work with the lab to help you report summed values.
Deciding how you will take the sample Section S4.B.1(d) on page 19 of the Industrial Stormwater General Permit states that a grab, time-proportionate, or flow- proportionate sample may be taken. A grab sample is a single sample grabbed by filling up a container, either by hand or with the container attached to a pole. It is the simplest type of sample to collect, and it is expected that most permit holders will choose to collect grab samples. Ecology provides standard operating procedures (SOP) for obtaining grab samples (Lowe et al., 2009)2. As we will discuss in the next section, NWTPH (herein called TPH-Dx) samples must be collected as grab samples.
Some permit holders may choose to better represent water quality parameters other than TPH-Dx by collecting time-proportionate or flow-proportionate samples. These samples consist of a number of subsamples taken at intervals rather than a single grab sample. Time-proportionate or flow-proportionate sampling can accurately define pollutant loading during various times of
2 http://www.ecy.wa.gov/programs/eap/qa/Agency/ECY_WQ_SOP_GrabSampling_v1_0ECY001.pdf
Practice sampling before you do the
real thing.

Page 10
discharge throughout a storm event and determine whether or not higher pollution is occurring during first flush of the storm.
A time-proportionate sample is one made up of a number of small samples (subsamples) of equal volume collected at regular time intervals combined into a single large sample. A flow-proportionate sample is one made up of a number of subsamples where each subsample is collected in such a way as to represent a given amount of stormwater discharge. Time-proportionate and flow-proportionate samples provide the advantage of including a number of smaller samples (subsamples) in the sample so that the stormwater discharge is better represented than with a grab sample.
Time-proportionate and flow-proportionate samples can be collected either by hand or with automated equipment. Automated equipment can provide unstaffed sample collection outside of normal business hours. Additional information regarding requirements for automated stormwater sampling is available online3. Collecting time-proportionate or flow-proportionate samples by hand is somewhat difficult and collecting them with automated equipment involves additional expenses, such as the installation of a flow meter for automated sampling.
Permittees who collect time-proportionate or flow-proportionate samples (or collect more than one grab sample during a 24-hour period) must calculate and report quarterly averages to Ecology according to Condition S4.B.6.c on page 21 of the permit.
Collecting total petroleum hydrocarbons – diesel fraction (TPH-Dx) samples In addition to the requirement for all permit holders to monitor for a visible oil sheen, the general permit requires that facilities with the following industrial activities and SIC codes collect TPH-Dx samples: Primary Metals (33xx), Metals Mining (10xx), Automobile Salvage and Scrap Recycling (5015 and 5093), Metals Fabricating (34xx), Hazardous Waste Treatment, Storage and Disposal Facilities and Dangerous Waste Recyclers subject to the provisions of Resource Conservation and Recovery Act (RCRA) Subtitle C, Air Transportation (45xx), Transportation (40xx – 44xx, except 4221-4225), and Petroleum Bulk Stations and Terminals (5171). Because of the particular way TPH-Dx samples must be collected, this requirement may govern your overall approach to sampling.
For some parameters other than TPH-Dx, it is possible to sample in difficult situations by filling a container and transferring it to the sample bottle to be sent to the lab. TPH-Dx samples, however, must be collected from the stormwater source directly. The sample cannot be transferred from another container because oil and grease tends to stick to the inside surfaces of containers. Since you must sample directly into the TPH-Dx bottle (grab sample), taking grab
3 http://www.ecy.wa.gov/programs/eap/qa/Agency/ECY_WQ_SOP_AutomatedSampling_v1_0ECY002.pdf

Page 11
samples may be the easiest way to collect additional samples for the other parameters. Take samples by collecting stormwater directly from the discharge into the bottles supplied by the lab, filling each bottle one after another.
Because TPH-Dx samples cannot be transferred between containers, a sample cannot be formed from separate grab samples combined together. If more than one TPH-Dx sample is desired from a sampling site during a storm event, additional TPH-Dx grab samples must be collected and analyzed separately.
TPH-Dx samples must be collected directly and not through the tubing of an automatic sampler; therefore, those using automatic
samplers will still have to grab TPH-Dx samples by hand. This is also true for facilities that must sample for fecal coliform. An exception to sampling through tubing is the use of a peristaltic pump to sample below catch basin inserts (see Special Sampling Considerations).
When reporting NWTPH-Dx results, ensure that the lab sums all fractions in the diesel range to give one total value of TPH-Dx. This includes the #2 diesel oil and motor oil fractions which some labs may report as diesel fraction and heavy oil fraction. If your lab reported these fractions separately, you must add them together when you report NWTPH-Dx on your DMR. For more information on NWTPH-Dx see Ecology’s guidance document4. This is a potentially confusing aspect of sampling and reporting, so contact Ecology if you have any questions.
Determining which discharges to sample The first step in selecting sampling points is to consider the areas draining your facility. The site map in your Stormwater Pollution Prevention Plan (SWPPP) will show the drainage areas for each discharge point.
The next step is to determine where the runoff from each drainage area is discharged from your facility. If there are separate drainage areas with separate discharge points, stormwater must be sampled at each discharge point unless the substantially identical discharge point criteria is met, which would allow you to consolidate sample locations.
4 https://fortress.wa.gov/ecy/publications/summarypages/97602.html
TPH-Dx samples must be collected directly into the
bottle you send to the lab.

Page 12
Section S4.B.2 on page 19 of the Industrial Stormwater General Permit describes the requirements for selecting sampling points:
S4.B.2. sample location(s) The Permittee shall designate each sampling location at the point where it discharges
stormwater associated with industrial activity off-site.
The Permittee is not required to sample onsite discharges to ground (e.g., infiltration) or sanitary sewer discharges, unless specifically required by Ecology order (Condition G12, page 48).
The Permittee shall sample each distinct point of discharge off-site except as otherwise exempt from monitoring as a substantially identical discharge point per S3.B.5.b (page 18). If applicable, the Permittee is only required to monitor applicable parameters at one of the substantially identical discharge point.
In general, your stormwater discharge samples will be taken where your facility’s stormwater is discharged off-site. If your facility discharges stormwater collected over areas that are used for similar activities and have similar site conditions, and there is reason to believe pollutant types will be similar in such areas, a single sampling point can be used to represent several discharge points.
The Industrial Stormwater General Permit allows you to sample at only one discharge point when multiple discharge points from your facility have similar industrial activities, best management practices (BMPs), exposed materials, and impervious surfaces that could affect stormwater percolation into the ground. Discharge points that have these similar characteristics are called substantially identical discharge points, and you can choose to monitor only one of the substantially identical discharge points rather than all of them.
If your facility has multiple discharge points from areas with different industrial activities, BMPs, exposed materials, or impervious surfaces, the discharge points would not be considered substantially identical, and therefore you would need to sample all of the discharge points. For example, if one portion of the site is used to store raw materials and discharges separately from another portion of the site where vehicle maintenance (e.g., fueling, lubrication, etc.) takes place, the stormwater discharge points would not be substantially identical and both discharge points would need to be sampled.
If you determine that some of your discharge points do not need to be sampled, the Sampling Plan in your SWPPP needs to include documentation for each discharge point not sampled per Condition S4.B.2.c, including:
a) The location of which discharge points the Permittee does not sample because the pollutant concentrations are substantially identical to a discharge point being sampled.
b) General industrial activities conducted in the drainage area of each discharge point.
c) Best management practices conducted in the drainage area of each discharge point.
Take time to get ready for sampling.

Page 13
d) Exposed materials located in the drainage area of each discharge point that are likely to be significant contributors of pollutants to stormwater discharges.
e) Impervious surfaces in the drainage area that could affect the percolation of stormwater runoff into the ground (e.g., asphalt, crushed rock, grass).
f) Reasons why the Permittee expects the discharge points to discharge substantially identical effluents.
If you add, remove, or relocate discharge or sample points from your facility, you must notify Ecology by submitting an Industrial Stormwater General Permit Discharge/Sample Point Update Form5. This enables Ecology to update the site-specific information in the Permit and Reporting Information System (PARIS) database so that your DMR data entry screen is accurate. If you have any questions, contact Ecology.
Selecting sampling points Three types of sampling points are usually not too difficult to access and the flow within them tends to be fast enough, with enough turbulence, to allow you to collect well mixed, representative samples. These include:
Pipes discharging your facility’s stormwater off-site. Ditches carrying your facility’s stormwater off-site. Manhole access to storm drains carrying your
facility’s stormwater, so you can lower a sample bottle attached to a pole into the manhole.
In general, manhole access on your property may be simpler and safer than access off property and more readily verifiable as carrying only your facility’s stormwater. Contact the municipality beforehand to discuss sampling from the manhole and associated safety issues, particularly for manholes in areas with vehicular traffic.
In some cases, portions of industrial stormwater runoff leave a site as sheet flow. Specific approaches to sampling of pipes, ditches, manholes, grated storm drains, and sheet flow will be covered in the final section of this guide manual.
Make sure your sampling points will provide for sampling only the stormwater that comes from your facility. If the stormwater in a pipe (storm drain) contains water from other properties, move your sampling point upstream to a point where the flow is from your facility only. If it is not possible to sample only flow from your facility, document the reason for this and provide information concerning the source of the flow you are sampling.
5 https://fortress.wa.gov/ecy/publications/summarypages/ecy070373.html
Manhole access can be a good sample point if it can be
accessed safely from your facility.

Page 14
If possible, the stormwater your facility samples must not be a mixture of your facility’s stormwater with other water. Some examples of situations where a sample would be of a mixture of water sources−and where you should not sample−are listed below:
Examples of mixed water sources situations in which you should not sample:
A ditch that carries additional stormwater from properties upstream. In this case, the stormwater from your facility is mixed with other water and you must find a location or locations where only your facility’s stormwater can be sampled.
A stormwater drain or pipe (culvert) discharges to a creek or other receiving water, the pipe being partially submerged where it discharges into the receiving water (outfall). In this case, this final discharge point will not be able to be used as a sampling point because the stormwater flow is mixed with the receiving water.
A manhole to a storm drain that carries stormwater, not only from your facility but also from other stormwater sources. If you are grabbing a sample from a manhole, make sure that the flow in that pipe is entirely from your facility, that the pipe is not submerged or partly submerged and that you are otherwise not prevented from collecting stormwater from your facility only. If you are not sure that a storm drain carries only flow from your facility, the municipality may have storm drain plans to help you determine this.
It is important to sample flow from only your facility if possible, because otherwise it is not representative. In other words, it wouldn’t accurately characterize the stormwater runoff generated at your facility. If you discharge stormwater to a stormwater conveyance system that includes stormwater from other sources, you need to sample before your stormwater commingles with stormwater from other sources. However, if stormwater runs onto your property in an uncontrolled fashion (for example, sheet flow) from adjacent property, into areas of industrial activity on your site so that it becomes a part of the stormwater discharge from your site, it may be necessary to include it in your sample. If you are concerned about this off-site source, you could evaluate the possibility of diverting or otherwise preventing the run-on from commingling with your site’s runoff. If that’s not possible, you probably need to find a better, more representative, sampling location.
It is a good idea to observe the sampling point(s) you have chosen during actual stormwater runoff conditions to see how readily stormwater can be sampled there. Keep in mind that changing tides and flow conditions in receiving waters, including flood stages, may occur during storm events. This may cause a pipe that is discharging your facility’s stormwater to become submerged or partly submerged, preventing you from sampling during some conditions.

Page 15
Obtaining supplies for sampling The supplies you will want to have on hand before sampling include:
Sampling bottles from the accredited lab, including a few extra of each type. When needed, a pole to hold sample bottles and filament strapping tape or rubber bands. New powder-free disposable nitrile or latex gloves. These are sold by medical and lab
suppliers. Do not use powdered gloves as the powder may contain metals that could contaminate samples being analyzed for metals such as zinc.
Foul-weather gear. One or more coolers, depending on the number of samples to be stored and transported or
shipped. A bound notebook to serve as a field book for keeping records concerning sampling.
Notebooks with waterproof pages are available for these field notes at office supply stores. The information to be included in the notes will be described in the Keeping Records section of this guide. You may find it helpful to create a standardized form containing the information in this as well.
Planning Just Prior to Stormwater Sampling There are a few things to keep in mind before actually sampling.
Being prepared It is important to assemble everything that will be needed for the sampling event ahead of time because opportunities to sample during storm events often come with little advance notice. Complete the identification tags and Lab Services Required form as far as possible. Place the tags, lab form, field notebook, permanent ink pen, meter, and pH paper in the cooler with the sample bottles. Have resealable plastic bags or other means on hand to keep the pH paper dry. If you are using a turbidity meter or pH meter, be prepared to protect them from the rain. Have foul-weather gear ready and available. It will be necessary to keep sufficient ice onsite or plan to purchase ice that day.
Choosing when to sample The permit requires that you sample the discharge from each designated location at least once per quarter:
1st Quarter = January, February, and March 3rd Quarter = July, August, and September
2nd Quarter = April, May, and June 4th Quarter = October, November, and December
Sample during the first 12 hours of a
stormwater discharge.

Page 16
You will need to sample the first fall storm event each year. The permit defines the first fall storm event as the first time after October 1st that precipitation occurs and results in a stormwater discharge from the facility. Note that you are not required to sample storm events that outside of normal business hours or in unsafe conditions. If the first fall storm event occurs outside normal business hours (e.g., weekend), sample the next discharge that occurs during normal business hours.
Collect samples within the first 12 hours of stormwater discharge. If you are not able to collect a sample within the first 12 hours, collect the sample as soon as possible. In the sampling records, keep documentation explaining why you could not collect samples within the first 12 hours.
In some cases, you may be unable to determine when the discharge began (e.g., when arriving at a facility on a Monday morning) and unable to determine if the sample was collected within first 12 hours of discharge. If this occurs, you must record that in their on-site sampling notes.
If your facility receives an accumulation of snow, the snowmelt runoff from the facility could be considered a stormwater discharge for purposes of sampling.
Check weather forecasts Keeping up with the weather forecast and planning so that sampling can be carried out on short notice are the keys to successful sampling.
Local forecasts, including televised satellite and radar images can give an indication of the expected intensity of coming storms. The National Weather Service is an excellent source of information on upcoming storms. It also includes local current radar and satellite images. Their website is: http://www.wrh.noaa.gov/index.php. A number of commercial websites, such as http://www.weather.com/ and http://www.accuweather.com/ also provide weather information and forecasts.
When evaluating a weather forecast, consider indications of expected intensity, for example 90% chance rather than 30% chance and rain rather than showers. In addition to intensity, consider the predicted duration of the storm. It will be very helpful to spend time observing rain events at your site with attention to how rain intensity relates to stormwater discharges from your site, before you begin sampling.
Page 17
Once the decision has been made to attempt to sample a storm event, the personnel who will be sampling must be notified and they should prepare to sample. If it does rain, they must be at the sampling sites before stormwater begins discharging so they can document the time of discharge and be ready to sample.
Conducting Sampling at Your Facility After you have selected a storm event and it begins raining, the personnel conducting the sampling must prepare their equipment and go to the sampling site(s). They will be collecting grab samples at the sampling site(s), placing the samples in picnic coolers containing ice, and keeping notes in a field book. Sampling for the first time may require working
out some logistics, but once personnel perform these duties, they will not find future sampling as challenging.
Checklist for sampling Because stormwater sampling is not a daily part of the workload of a facility, it is a good idea to keep a checklist of things to have prepared before sampling and to do during sampling. You can make the checklist by jotting down the things you did for the first sampling event to remember for subsequent sampling events. If necessary, update this checklist based on the experience you gain with each sampling event.
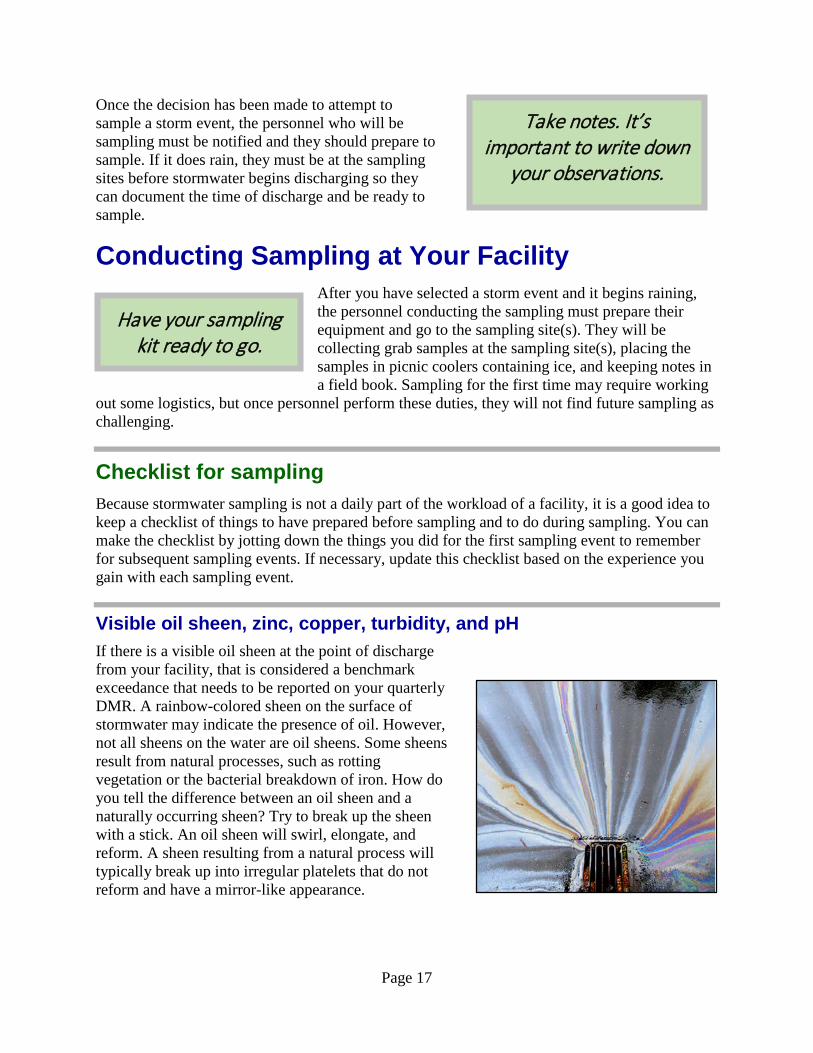
Visible oil sheen, zinc, copper, turbidity, and pH If there is a visible oil sheen at the point of discharge from your facility, that is considered a benchmark exceedance that needs to be reported on your quarterly DMR. A rainbow-colored sheen on the surface of stormwater may indicate the presence of oil. However, not all sheens on the water are oil sheens. Some sheens result from natural processes, such as rotting vegetation or the bacterial breakdown of iron. How do you tell the difference between an oil sheen and a naturally occurring sheen? Try to break up the sheen with a stick. An oil sheen will swirl, elongate, and reform. A sheen resulting from a natural process will typically break up into irregular platelets that do not reform and have a mirror-like appearance.
Take notes. It’s important to write down
your observations.
Have your sampling kit ready to go.

Page 18
Turbidity can be measured directly in the field using a handheld meter, or sampled and analyzed in the lab. You must measure pH in the field using either a calibrated pH meter or pH paper rather than sending it to a lab. This is due to the short (15 minute) holding time for pH. You can get pH paper from a
distributor of scientific/lab supplies or through the same lab that will be doing your sample analysis. Zinc, copper, and other parameters required by the permit (other than turbidity and pH) are measured by sending bottled samples to a lab for analysis.
How to fill sample bottles This section and an illustrated appendix at the end of this guide describe how to collect a sample properly. Collecting a grab sample can be as simple as holding a bottle under the stormwater falling from a pipe and filling the bottle properly. Still, the person doing the sampling must use care in applying the principles outlined below so that the sample will be representative of the water being sampled. Additional information regarding grab sampling is available in Ecology’s standard operating procedures (SOPs) for grab sampling online6.
Simple principles of good grab sample collection
Wear new, disposable, powder-free gloves when sampling.
Grab samples with the stormwater entering directly into bottles supplied by your lab. Do not transfer the samples from a container that may not be specifically cleaned for collecting lab samples. Metal contamination of ordinary containers is common and household detergents often contain phosphorus, a tested parameter for some industries. Again, transferring the sample from another container is not an option for TPH-Dx samples under any circumstances.
When holding the sample bottle your lab has provided, keep your hands away from the opening in order to prevent contaminating the sample.
Always hold the bottle with its opening facing upstream (into the flow of water) so that the water enters directly into the bottle and does not first flow over the bottle or your hands.
Sample where the water has a moderate flow and, if possible, some turbulence, so that the stormwater discharge will be well-mixed and the sample will be representative. Sampling in still water should be avoided. Include in your field book a note about the sample location and how briskly the water appears to be moving.
Sample from a central portion of the stormwater flow, avoiding touching the bottom of channels or pipes to avoid stirring up solid particles.
Do not rinse or overfill the bottles. The bottles supplied by your lab for some parameters (e.g., metals and TPH-Dx) will include small amounts of liquid preservative (generally a few
6 http://www.ecy.wa.gov/programs/eap/qa/Agency/ECY_WQ_SOP_GrabSampling_v1_0ECY001.pdf
Get the best sample you can.
You must measure pH in the field.

Page 19
drops). Fill the bottle to about ½ inch from the top (not quite full) to ensure that no preservative is lost.
As soon as the sample is collected, cap the bottle and label it. It is important that the bottles are labeled correctly so that the lab will be able to identify samples by sample site and ensure proper preservation for each parameter. It is a good idea to place sample bottles in resealable bags. Place the samples in a picnic cooler partially filled with ice. Plan to maintain ice in the picnic cooler until the samples arrive at the lab. Remember to make certain that the samples will be delivered to the lab soon enough for the lab to meet holding times.
TPH-Dx sampling raises additional concerns: ◊ TPH-Dx sampling requires special attention. TPH-Dx samples must be collected directly
into the sample bottles supplied by the lab because oil and grease floats on water and tends to stick to the sides of containers. Do not rinse the sampling bottles beforehand or pour the sample from another container. Do not fill the bottle completely and do not pour out some of the sample if the bottle is overfilled by mistake. If you do overfill a bottle, use a new bottle instead to collect your sample. Because you only get one try at filling a TPH-Dx bottle, it is a good idea to have plenty of extra bottles on hand.
◊ TPH-Dx samples must be collected as the stormwater falls from a pipe or from a running, turbulent stream of flow when possible so the source will be well mixed. When the samples must be collected from a water surface, the person holding the bottle should plunge the bottle mouth below the surface and then in a sweeping arc bring it upwards through the water surface again. This motion ensures the water surface is broken twice by the mouth of the bottle. When sampling an oil/water separator, collect the sample in the afterbay or just prior to discharge from the separator. Be sure to note in your field book how you collected your samples as this is especially important for the TPH-Dx sample.
Keeping records Section S9 on page 39 of the general permit specifies requirements for reporting and recordkeeping. In order to comply with the requirement that lab reports include sampling date and sampling location, you will need to supply this information to the lab when submitting samples. You can do this by using the sample location as the field station identification on your labels or sample tags.
You should purchase a notebook for use in the field. Water-resistant “rite in the rain” notebooks serve the purpose well.
Section S4.B3 on page 20 of the permit requires that you record Sample Documentation for the following:
a) Sample date.
b) Sample time.
c) A notation describing if the Permittee collected the sample within the first 12 hours of stormwater discharge events.

Page 20
d) An explanation of why the Permittee could not collect a sample within the first 12 hours of a stormwater discharge event, if it was not possible; or, if it is unknown (e.g., discharge was occurring during start of regular business hours), an explanation of why the Permittee does not know if a sample was collected within or outside the first 12 hours of stormwater discharge.
e) Sample location (using SWPPP identifying number).
f) Method of sampling and method of sample preservation, if applicable.
g) Name of the individual who performed the sampling.
h) Weather conditions.
Although not required, it would also be beneficial to record the following information:
Weather preceding the sampling event: ◊ How many days/weeks/months since
last significant rainfall. ◊ Estimate of time it began raining. ◊ Estimate of time that discharge
began at the sampling point. ◊ Amount (inches) and/or intensity of
precipitation. ◊ Whether discharge includes ice or
snowmelt runoff.
How you collected the sample, example, from a ditch by hand or from a manhole with the bottles on a pole.
The number and types (parameters) of samples collected.
Field measurement results, such as pH or visible oil sheen.
Any unusual circumstances that may affect the sample results.
Entries in the field book must be made with ink. If you make an error in the field book, cross it out with a single line rather than whiting it out or erasing. Number the pages of the field book consecutively. To ensure that the bound field book is a complete record, do not rip pages from it.
Section S9 in the general permit also requires preservation of laboratory documentation. Along with required information from the laboratories as found in Section S4.B4, your clear and detailed field notes such as date, time, and location of each sample collected are essential for laboratory records.

Page 21
Special Sampling Considerations Safety must be the primary consideration in sampling. Samples should never be collected in a way that compromises the safety of the sampler. In cases where there is a physical hazard, such as a trip hazard or when sampling near deep water bodies, samplers should work in pairs. Do not wade in water where it is unsafe to do so (e.g., the estimated depth in feet times the velocity in feet per second is equal to or greater than 8), as swift currents can lead to drowning accidents. Be aware of the slip hazard common near the banks of water bodies and decide whether a bank is too steep to negotiate safely. Safety comes down to individual judgment.
Never put yourself in a position you consider to be unsafe. Samples can be collected easily in some locations, but not all stormwater discharges are as readily sampled as the flow in a ditch or from a pipe falling into a receiving water. Below are some situations you may encounter and suggested approaches for handling them. We focus mainly on methods for collecting samples directly by hand or with a bottle attached to a pole. When sampling in these or other situations, keep in mind the steps outlined in the section, How to Fill Sample Bottles. Additional information is available in Ecology’s standard operating procedures (SOPs) for stormwater sampling available online7.
Sampling stormwater discharges from a pipe into a receiving water If stormwater is being discharged from your facility through a pipe into a ditch, creek, or other receiving water, it can be readily sampled as it falls from the pipe before it reaches the receiving water if the discharge pipe is safely accessible and not submerged. Hold the bottles with the bottle opening facing upstream into the flow and be sure not to overfill them. You may need to fasten the collection bottles to a pole to reach the pipe. Attaching a bottle to a pole is described in the section below, Sampling from a Manhole and shown in Appendix A.
Sampling from a manhole When sampling from the manhole of a municipal storm drain, remember to contact the municipality beforehand. Be sure to discuss safety concerns when talking to the municipality about sampling. Open a manhole with a hook or pick axe, exercising care not to drop the manhole cover on hands or feet. Do not, under any circumstances, enter the manhole unless trained to safely enter confined spaces, but you can sample the flow in a manhole from above ground by taping the sampling bottles, one at a time, to a pole and lowering the pole into the manhole (see photos in Appendix A).
7 http://www.ecy.wa.gov/programs/eap/quality.html
Don’t take risks. Know how to sample safely.

Page 22
Each bottle can be fastened to the pole by holding the bottle against it and wrapping tape tightly around the bottom and the top of the bottle as you hold the bottle firmly to the pole. Filament strapping tape works well for this purpose as it is waterproof and strong. Rubber bands and zip-ties are also a possibility. Commercially available sampling extension poles are also available from a number of suppliers and relatively inexpensive.
If the flow in the storm drain is shallow, the bottle may have to be positioned horizontally with the bottle’s opening somewhat higher than its bottom. When sampling in a manhole, be careful not to scrape the bottle against the sides of the pipe to avoid picking up extra solids in your sample.
Collecting into bottles for TPH samples with a pole is done by plunging the bottle on the pole below the water surface and back upwards. This must be done as a single motion and only once. Because you only get one try at getting a good TPH grab sample, it may take some practice and extra bottles to collect the amount of sample you need without overfilling the bottle.
Collecting samples, other than TPH, into bottles with preservative can be done by quickly plunging the pole into the flow repeating if necessary until the bottle is most but not all of the way full. If you overfill the bottle, remove it, tape a clean bottle to the pole, and try again. When collecting samples with a pole, be sure to follow clean principles by keeping the pole downstream of the bottle while sampling.
Sampling from a storm drain with a filter or insert When sampling a storm drain or catch basin that has been retrofitted with a stormwater insert or filter, the goal is to get a sample that represents post-filter stormwater. There are 3 possible scenarios for sampling, in order of preference:
1. Use an available sample port or access point in the conveyance line after the filter but prior to discharge or mixing with stormwater from other sites.
2. If the insert or filter has a sample port or overflow port, remove the grate, reach through the port and collect the sample of water flowing through the insert or filter.
3. If the insert or filter is situated above a sump, use a pole or tubing to access the water while taking care not to disturb accumulated solids. Make sure the sump is collecting water only from your site. Using tubing with a peristaltic pump is permitted; however, if TPH-Dx is being sampled ensure that the tubing is Teflon–lined. All tubing should be purged using 3 times the tubing volume prior to sampling.
When sampling from a manhole, use a pole to safely sample from above ground. Avoid touching the sides of the manhole or pipes with the bottle to prevent contamination. Place the opening of the bottle upstream so that the flow enters the bottle directly.

Page 23
Make every attempt to avoid disturbing the filtration device. But if this must be done to access a sampling location, allow sufficient time for any disturbance of solids or material around the grate or device to settle or wash away (e.g., 10 minutes). This may apply if you have a series of catch basins on-site and are sampling the last in the series prior to discharge; if so, you may want to remove the grate and filter for ease of access.
Sampling from a drainage ditch or swale If a drainage ditch carries stormwater flow from your facility offsite, and if it carries no flow other than the flow from your facility, you can sample the water in the ditch simply by placing the bottle where the stormwater is freely flowing, with the bottle opening facing upstream. If you cannot reach a freely flowing portion of the ditch by hand, you may need to attach the bottles, one at a time, to a pole for sampling. Follow the procedure outlined in the section, How to Fill Sample Bottles.
If the flow is carried in a small ditch or swale, you can install a barrier device in the channel or deepen a small area so you can gain enough depth of flow to sample directly into the bottles. Make sure to allow for sufficient time after disturbing the bottom so that the solids resulting from muddying the water will not become part of your sample.
Schematic figure of a catch basin insert with an overflow opening that could be used for sampling (King County, 2009).
Simple filter fabric fitted over a catch basin grate (King County, 2009).

Page 24
Sampling sheet flow It is not always possible to sample stormwater runoff in locations such as ditches or pipes where the flow is concentrated. Sometimes the permittee has no choice but to select sample locations for which sheet flow is sampled before it becomes concentrated. Approaches to sampling sheet flow are described below and illustrated in the figures that follow.
In some cases, a stormwater discharge from a facility is not concentrated at any point and leaves the property in the form of sheet flow as it runs off a work area or driveway or grassy area. In this case the flow may be too shallow for the collection bottle to be filled with sample. It is often possible to find a way to collect the stormwater runoff in these situations.
One way to concentrate sheet flow is to install a barrier device or trough, gutter, strip drain/trench drain, or ditch to intercept and concentrate stormwater flow. As with other sample sites, the flow should be moving and somewhat turbulent so the samples will be well-mixed. Be sure that any excavation you do does not expose the stormwater to be sampled to newly worked soil surfaces that the runoff may erode, increasing the solids in your samples. You may want to consider lining the trough, gutter, or ditch with plastic or PVC. Be sure not to introduce materials such as metals that include zinc that may contaminate the samples. Sheet flow on paved areas can be concentrated and collected by constructing small bumps, similar to speed bumps.
Another way to collect samples from sheet flow is to use a special peristaltic hand pump to pump samples from shallow surface flows. If being used to collect TPH samples, ensure the tubing is Teflon-lined.
An additional resource for guidance on sampling sheet flow can be found on the Minnesota Pollution Control Agency website8. There is a YouTube video and guidance document detailing the use of a plastic bag to collect and sample sheet flow. It should be noted that the use of plastic could affect the collection of organics samples, so this technique must be described in field notes if it is used.
Roger Bannerman of the Wisconsin Department of Natural Resources has developed simple devices to grab samples of sheet flow from paved areas, rooftops, and lawns (Bannerman et al., 1993). Though the devices are intended to be used for simple, automatic sampling or for pouring a container of collected sample into other sample bottles, the ways in which the devices intercept and concentrate flows can be adopted for direct grab sampling.
8 http://www.pca.state.mn.us/index.php/water/water-types-and-programs/stormwater/industrial-stormwater/industrial-stormwater-steps-to-compliance/industrial-stormwater-steps-to-compliance-step-9-inspect-monthly-report-annually.html

Page 25
The following figures illustrate the methods of sampling sheet flow discussed above:
Sampling from a stormwater detention pond or other BMP When stormwater from a facility discharges after flowing through a detention pond or other treatment system, sample as the stormwater flows out at the discharge point. Ponds may hold stormwater for a time before discharge begins. Attempt to sample within the first 12 hours from when the pond begins to discharge, and follow the previous guidance when that is not possible, or it is unknown.
Deepening an existing ditch can allow samples to be collected directly into bottles in some cases. Be careful not to stir up solids from the sides or bottom of the ditch.
Overland flow from vegetated areas can be sampled by constructing a shallow ditch to intercept the runoff and a deepened area to place bottles to catch the runoff.
Overland flow on paved areas can be sampled by constructing asphalt or concrete bumps to collect and concentrate the flow. A box positioned below ground surface in the paved area or the edge of an unpaved area can provide a place to collect samples directly into bottles. Note that dirt and other debris can often build up along the bumps and in the “V”, so you may want to clean the area prior to taking the sample. Runoff entering a catch basin can sometimes be collected
directly into bottles by removing the grate and allowing the runoff to fall into the bottles.

Page 26
Sampling storm drain solids Beginning in 2015, facilities that discharge to a Puget Sound Sediment Cleanup Site, either directly or indirectly through a stormwater drainage system, must sample their storm drain solids for a list of physical and chemical parameters. At least once prior to October 1, 2016, facilities must collect and sample storm drain solids from a representative catch basin, sump, pipe, or other feature within the storm drain system that corresponds to the discharge point(s) where Total Suspended Solid (TSS) samples are collected per Condition S6.C.1 (pages 29-30).
Similar to sampling stormwater runoff, the most appropriate location and method for the collection of storm drain solids will depend on the site. Solids must be collected from within the storm drain system as outlined under the permit section S6.C.2 (pages 31-34). The recommended method to collect samples of storm drain solids is a grab or composite of catch basin, sump, or conveyance line accumulations. Sampling the forebay of an oil-water separator can also be used to characterize stormwater solids. The necessary parameters and procedures for analysis of solids are found in Table 8 of the permit (Condition S6.C.2.e (pages 32-34).
A description of materials and estimated volume of sample necessary for analysis can be found in the Storm Drain Solids Sampling table below. Materials that are necessary include: latex or nitrile gloves, labeled lab-supplied glass and plastic jars, stainless steel spoon and bowl (organics samples), and thick plastic spoon and bowl (metals and conventionals sample). Spoons and bowls must be cleaned with soap prior to use and in between samples. If possible stainless steel equipment should be rinsed with solvent (hexane) and wrapped in aluminum foil prior to use. Solvents must only be used if the appropriate safety considerations can be met (i.e., appropriate storage of solvent, proper ventilation, and disposal of waste solvent).
Storm Drain Solids Sampling
Parameter group Individual parameters Mixing bowl and spoon
Cleaning the bowl
Estimated volume of sample
Conventionals Percent total solids, total organic carbon, and grain size
Plastic or stainless steel Soap
~ 250ml (8 oz) glass or plastic jar for each individual parameter
Metals
Antimony, arsenic, beryllium, cadmium, chromium, copper, lead, mercury, nickel, selenium, silver,
thallium, and zinc
Plastic Soap 1 – 250ml (8 oz) glass jar
Organics PAHs, PCBs, and TPH-Dx Stainless steel Soap and solvent
~ 250ml (8 oz) glass jar w/ Teflon lined
cap for each individual parameter
Catch basin solid grab samples do not need to be sampled during a storm, in fact they should be collected following storms when there is little water overlying the solids in the catch basin, sump or area of accumulation in the conveyance line. If there is overlying water, siphon or pump the water off without disturbing the solids; leave a thin layer of water intact.

Page 27
Wearing gloves, sample the area of accumulated solids, using the spoons, and collect them in the bowls. Sample a representative portion of the solids in the area of accumulation (i.e., dig below surface if there are a few inches of accumulation) and enough to fill the required jars. Mix and blend the sample in the bowl and fill the required sample jars for all parameters. Metals sample jars should be filled from the plastic bowl and organics sample jars from the stainless steel bowl. Document the field conditions and appearance of the sample. Pack the samples in a Ziploc bag; put on ice, in a cooler, and send to the lab for analysis.
If there are no spots of solids accumulation in the storm drain system, consider using in-line storm drain solids traps. Further guidance on in-line solids traps can be found elsewhere (Lubliner, 2012)9. Contact Ecology if you have any questions concerning sampling in-line storm drain solids.
Under section S6.C.2.f of the general permit, all storm drain solids sampling data shall be reported to Ecology on a Solids Monitoring Report (SMR) along with a copy of the laboratory report. Make sure all required and recommended information as listed above is recorded in field notes and on laboratory documents. There can be variability among the samples collected using different methods, so it is important to document exactly how and where the sample was collected.
Ecology Wants to Hear from You If you have suggestions on how Ecology can improve this guidance document, if you have developed innovative sampling techniques, or if you just want to comment on stormwater sampling, contact:
Jeff Killelea Water Quality Specialist (360) 407-6127 [email protected]
9 https://fortress.wa.gov/ecy/publications/summarypages/1203053.html

Page 28
References Bannerman, R.T., D.W. Owens, R.B. Dodds, and N.J. Hornewer, 1993. Sources of Pollutants in Wisconsin Stormwater, Wat. Sci. Tech. Vol. 28. No. 3-5, pp 241-259.
Ecology, 2015. The Industrial Stormwater General Permit: A National Pollutant Discharge Elimination System and State Waste Discharge General Permit for Stormwater Discharges Associated with Industrial Activities. State of Washington Department of Ecology, January 2, 2015.
King County, 2009. King County, Washington Surface Water Design Manual. King County Department of Natural Resources and Parks. http://www.kingcounty.gov/environment/water-and-land/stormwater/documents/surface-water-design-manual.aspx. Accessed 10/12/15.
Lowe, J., D. deLeon, J. Collins, D. Turner, R. Hoover, and S. Book, 2009. Standard Operating Procedure for Collecting Grab Samples from Stormwater Discharges. Washington State Department of Ecology, Olympia, WA. SOP Number EAP079. www.ecy.wa.gov/programs/eap/quality.html
Lubliner, B., 2012. Evaluation of Stormwater Suspended Particulate Matter Samplers. Washington State Department of Ecology. Olympia, WA. Publication No. 12-03-053. https://fortress.wa.gov/ecy/publications/summarypages/1203053.html.
US Environmental Protection Agency, 2007. Report of the Federal Advisory Committee on Detection and Quantitation Approaches and Uses in Clean Water Act Programs. US EPA, Washington D.C. Accessed at: http://water.epa.gov/scitech/methods/cwa/det/upload/final-report-200712.pdf

Page 29
Glossary, Acronyms, and Abbreviations
Glossary
303(d)-listed water body: Water body as listed as Category 5 on Washington State's Water Quality Assessment.
Average: Arithmetic mean, which is equal to the sum of the measurements divided by the number of measurements.
Best Management Practices (BMPs - general definition): Schedules of activities, prohibitions of practices, maintenance procedures, and other physical, structural and/or managerial practices to prevent or reduce the pollution of waters of the state. BMPs include treatment systems, operating procedures, and practices to control: facility site runoff, spillage or leaks, sludge or waste disposal, or drainage from raw material storage. In the permit BMPs are further categorized as operational source control, structural source control, erosion and sediment control, and treatment BMPs.
Benchmark: A pollutant concentration used as a permit threshold, below which a pollutant is considered unlikely to cause a water quality violation, and above which it may. When pollutant concentrations exceed benchmarks, corrective action requirements take effect. Benchmark values are not water quality standards and are not numeric effluent limitations; they are indicator values.
Daily Average: The average measurement of the pollutant throughout a period of 24 consecutive hours starting at 12:01 A.M. and ending at the following 12:00 P.M. (midnight).
Detention: The temporary storage of stormwater to improve quality and/or to reduce the mass flow rate of discharge.
Discharge [of a pollutant]: Any addition of any pollutant or combination of pollutants to waters of the United States from any point source. This definition includes additions of pollutants into waters of the United States from: surface runoff that is collected or channeled by man; discharges through pipes, sewers, or other conveyances owned by a State, municipality, or other person which do not lead to a treatment works; and discharges through pipes, sewers, or other conveyances, leading into privately owned treatment works.
Discharge point: The location where a discharge leaves the Permittee’s facility. Discharge point also includes the location where a discharge enters the ground on-site (e.g., infiltration BMP).
Discharger: An owner or operator of any facility or activity subject to regulation under Chapter 90.48 RCW or the Federal Clean Water Act.
Facility: Any source (including land or appurtenances thereto) that is subject to regulation under the permit. See Special Condition S1.

Page 30
First fall storm event: The first time on or after October 1st of each year that precipitation occurs and results in a stormwater discharge from a facility. This storm event tends to wash off and discharge pollutants that accumulate during the preceding dry months.
General Permit: A permit which covers multiple dischargers of a point source category within a designated geographical area, in lieu of individual permits being issued to each discharger.
Groundwater: Water in a saturated zone or stratum beneath the land surface or a surface water body.
Industrial Activity: (1) The 10 categories of industrial activities identified in 40 CFR 122.26(b)(14)(i-ix and xi), (2) any facility conducting any activities described in Table 1, or (3) any facility identified by Ecology as a significant contributor of pollutants.
Landfill: An area of land or an excavation in which wastes are placed for permanent disposal, and which is not a land application site, surface impoundment, injection well, or waste pile.
Municipality: A political unit such as a city, town, or county; incorporated for local self- government.
Outfall: The point where a discharge from a facility enters a receiving water body or receiving waters.
Pollutant: The discharge of any of the following to waters of the state: dredged spoil, solid waste, incinerator residue, filter backwash, sewage, garbage, domestic sewage sludge (biosolids), munitions, chemical wastes, biological materials, radioactive materials, heat, wrecked or discarded equipment, rock, sand, cellar dirt, and industrial, municipal, and agricultural waste. This term does not include sewage from vessels within the meaning of section 312 of the Federal Water Pollution Control Act (FWPCA) nor does it include dredged or fill material discharged in accordance with a permit issued under section 404 of the FWPCA.
Pollution: Contamination or other alteration of the physical, chemical, or biological properties of waters of the state; including change in temperature, taste, color, turbidity, or odor of the waters; or such discharge of any liquid, gaseous, solid, radioactive or other substance into any waters of the state as will or is likely to create a nuisance or render such waters harmful, detrimental or injurious to the public health, safety or welfare; or to domestic, commercial, industrial, agricultural, recreational, or other legitimate beneficial uses; or to livestock, wild animals, birds, fish, or other aquatic life.
Puget Sound Sediment Cleanup Site: Category 4B (Sediment) portions of Budd Inlet (Inner), Commencement Bay (Inner), Commencement Bay (Outer), Dalco Passage and East Passage, Duwamish Waterway (including East and West Waterway), Eagle Harbor, Elliot Bay, Hood Canal (North), Liberty Bay, Rosario Strait, Sinclair Inlet, and Thea Foss Waterway; Category 5 (Sediment) portions of the Duwamish Waterway (including East and West Waterway), and Port Gardner and Inner Everett Harbor; and Port Angeles Harbor sediment cleanup area, as mapped on Ecology’s Industrial Stormwater General Permit (ISGP) website. All references to Category 4B and 5 pertain to the 2012 EPA-approved Water Quality Assessment.

Page 31
Quantitation Level (QL) also known as Minimum Level of Quantitation (ML): The lowest level at which the entire analytical system must give a recognizable signal and acceptable calibration point for the analyte. It is equivalent to the concentration of the lowest calibration standard, assuming that all method-specified sample weights, volumes, and cleanup procedures have been employed.
Regular Business Hours: Those timeframes when the facility is engaged in its primary production process, but does not include additional shifts or weekends when partial staffing is at the site primarily for maintenance and incidental production activities. Regular business hours do not include periods of time that the facility is inactive and unstaffed.
Representative [sample]: A sample of the discharge that accurately characterizes stormwater runoff generated in the designated drainage area of the facility.
Runoff: That portion of rainfall or snowmelt water not absorbed into the ground that becomes surface flow.
Sanitary Sewer: A sewer which is designed to convey domestic wastewater.
Sediment: The fragmented material that originates from the weathering and erosion of rocks, unconsolidated deposits, or unpaved yards, and is transported by, suspended in, or deposited by water.
Standard Industrial Classification (SIC): The statistical classification standard underlying all establishment-based federal economic statistics classified by industry as reported in the 1987 SIC Manual by the Office of Management and Budget.
Stormwater: That portion of precipitation that does not naturally percolate into the ground or evaporate, but flows via overland flow, interflow, pipes, and other features of a stormwater drainage system into a defined surface water body, or a constructed infiltration facility.
Stormwater Drainage System: Constructed and natural features that function together as a system to collect, convey, channel, hold, inhibit, retain, detain, infiltrate or divert stormwater.
Stormwater Pollution Prevention Plan (SWPPP): A documented plan to implement measures to identify, prevent, and control the contamination of point source discharges of stormwater.
Substantially Identical Discharge Point: A discharge point that shares the following characteristics with another discharge point: (1) the same general industrial activities conducted in the drainage area of the discharge point, (2) the same Best Management Practices conducted in the drainage area of the discharge point, (3) the same type of exposed materials located in the drainage area of the discharge point that are likely to be significant contributors of pollutants to stormwater discharges, and (4) the same type of impervious surfaces in the drainage area that could affect the percolation of stormwater runoff into the ground (e.g., asphalt, crushed rock, grass).

Page 32
Unstaffed: The facility has no assigned staff. A site may be unstaffed even when security personnel are present, provided that pollutant generating activities are not included in their duties.
Vehicle: A motor-driven conveyance that transports people or freight, such as an automobile, truck, train, or airplane.
Vehicle Maintenance: The rehabilitation, mechanical repairing, painting, fueling, and/or lubricating of a motor-driven conveyance that transports people or freight, such as an automobile, truck, train, or airplane.
Acronyms and Abbreviations
BMP Best management practice DMR Discharge Monitoring Report Ecology Washington State Department of Ecology EPA U.S. Environmental Protection Agency FWPCA Federal Water Pollution Control Act ISGP Industrial Stormwater General Permit ML Minimum level of quantitation N Nitrogen NWTPH-Dx Northwest Total Petroleum Hydrocarbons – Diesel fraction PAHs Polycyclic aromatic hydrocarbons PCBs Polychlorinated biphenyls QL Quantitation level SIC Standard Industrial Classification SWPPP Stormwater Pollution Prevention Plan TPH Total Petroleum Hydrocarbon

Page 33
Appendices

Page 34
This page is purposely left blank

Page 35
Appendix A - Proper and Improper Methods of Sampling
DO always wear gloves when taking.
DO NOT touch openings of bottles. Keep bottles clean to prevent contamination.
DO NOT sample in stagnant areas with little flow. DO NOT stir up bottom sediments or allow foreign materials to enter the sample bottle. (DO be careful to grab a clean sample in cases where stormwater runoff is shallow.) If the runoff is so shallow that it is not possible to sample without the sample being contaminated in the process, then find an alternative way to sample.
DO NOT allow bottle lids to touch ground. Keep lids clean to prevent contamination.
DO attach a bottle to a pole for sampling in manholes or when a hand sample would be in stagnant water. A boathook is used in this example and the bottle is attached to it with filament strapping tape.

Page 36
If the water is too shallow to sample with the bottle upright on the pole, try taping it on sideways, but tilted up slightly.
DO NOT sample with the bottle opening facing downstream, when using a pole or sampling by hand. Water flowing past your container, pole, or hand and into the container can be contaminated by such contact.
DO sample with the opening of the bottle facing upstream, into the flow so the water will enter directly into the bottle. This is true when sampling either by hand or with a pole. DO sample water that is rapidly flowing rather than stagnant.
DO NOT allow water to overfill the bottle, particularly not for sample bottles with preservative. TPH samples must be collected from water falling into the bottle when possible, or otherwise in a single swoop.
DO collect samples without overfilling the bottles.

Page 37
Appendix B - Guidance on Results near Lab Detection Limits Water quality criteria and permit limits based on those criteria may be set at very low concentrations. Lab methods approved for use in National Pollutant Discharge Elimination System (NPDES) permitting are sometimes not capable of measuring chemical concentrations at these low levels. Labs use many different terms to describe these levels. Ecology’s Water Quality program uses the following terms for NPDES permitting.
Detection Limit (DL): the minimum concentration of an analyte (substance) that can be measured and reported with a 99% confidence that the analyte concentration is greater than zero as determined by the procedure given in 40 CFR part 136, Appendix B of the Clean Water Act (amended in 1977).
Quantitation Limit (QL): the smallest detectable concentration of analyte greater than the detection level (DL) where the accuracy (precision & bias) achieves the objectives of the intended purpose (US EPA, 2007).
Reporting using WQWebDMR
Currently the Construction Stormwater general permit and the Industrial Stormwater general permit require permittees to submit Discharge Monitoring Reports (DMR) electronically using WQWebDMR with some limited exceptions. As Ecology reissues both general and individual permits, it is including permit conditions requiring the use of WebDMR. To obtain an exception under the stormwater permits, the permittee must apply for a waiver. See Ecology’s Water Quality Stormwater Permits webpage for more details: http://www.ecy.wa.gov/programs/wq/stormwater/index.html.
Below is some guidance for reporting analytical values on a DMR. If a permit or DMR conflicts with this guidance, follow the instructions in the permit or DMR.
Report single analytical values below detection as less than the detection level (DL) by entering < followed by the numeric value of the DL (e.g. < 2.0) on the DMR.

Page 38
Report single analytical values between the DL and QL by entering the estimated value, the qualifier for estimated value/below quantitation level (J) and any additional information in the comments. Submit a copy of the lab report as an attachment to the DMR.
Report single analytical values above the QL by entering the numeric value.
Calculate average values (unless otherwise specified in a permit) using: ◊ The reported numeric value for those parameters measured above the QL or between the
DL and QL. ◊ One-half the DL (for values reported below the DL) if the lab detected the parameter in
another sample from the same monitoring point for the reporting period. ◊ Zero (for values reported below the DL) if the lab did not detect the parameter in another
sample for the reporting period.
Calculate total values (e.g., Total PCBs, TPH-Dx) (unless otherwise specified in a permit) using:
The reported numeric value for all individual compounds or isomers measured above the QL or between the DL and QL.
One-half the DL (for values reported below the DL) if the lab detected the individual compound or isomer in another sample from the same monitoring point for the reporting period.
Zero (for values reported below the DL) if the lab did not detect the individual compound or isomer in another sample for the reporting period.
If all individual compounds or isomers in the sample were not detected, report less than the detection level (DL) by entering < followed by the numeric value of the highest individual DL (e.g. < 2.0) on the DMR.
For all analytical values reported, if the method used did not meet the minimum DL and QL identified in the permit, report the actual DL and QL in the comments or in the location provided.
When dilutions are performed in the analysis, report the adjusted DL and QL as appropriate. Submit a copy of the lab report as an attachment to the DMR.
When required, lab reports must provide the following information: date sampled, sample location, date of analysis, parameter name, CAS number, analytical method/number, DL, QL, reporting units, and concentration detected. The lab report must also include information on the chain of custody, Quality Assurance/Quality Control (QA/QC) results, and documentation of accreditation for the parameter.

Page 39
Appendix C - Tables from the Industrial Stormwater General Permit Table 2: Benchmarks and Sampling Requirements Applicable to All Facilities
Parameter Units Benchmark
Value Analytical
Method
Laboratory Quantitation
Level a
Minimum Sampling
Frequency b
Turbidity NTU 25 EPA 180.1 0.5 1/quarter
pH Standard units Between 5.0 – 9.0 Meter/paper c ±0.5 1/quarter
Oil Sheen Yes/No No visible oil sheen N/A N/A 1/quarter
Copper, Total µg/L Western WA: 14 Eastern WA: 32 EPA 200.8 2.0 1/quarter
Zinc, Total µg/L 117 EPA 200.8 2.5 1/quarter
a. The Permittee shall ensure laboratory results comply with the quantitation level (QL) specified in the table. However, if an alternate method from 40 CFR Part 136 is sufficient to produce measurable results in the sample, the Permittee may use that method for analysis. Any Permittee using an alternative method must report the test method and QL on the DMR. If the Permittee is unable to obtain the required QL due to matrix effects, the Permittee must report the matrix-specific method detection level (MDL) and QL on the DMR. b. 1/quarter means at least one sample taken each quarter, year-round. c. Permittees shall use either a calibrated pH meter or narrow-range pH indicator paper with a resolution not greater than ± 0.5 SU.

Page 40
Table 3: Additional Benchmarks and Sampling Requirements Applicable to Specific Industries.
Parameter Units Benchmark Value
Analytical Method
Laboratory Quantitation
Level a
Minimum Sampling
Frequency b 1. Chemical and Allied Products (28xx), Food and Kindred Products (20xx) Biological Oxygen Demand (BOD) mg/L 30 SM 5210B 2 1/quarter
Nitrate + Nitrite Nitrogen, as N mg/L 0.68 SM 4500; NO3-E/F/H 0.1 1/quarter
Phosphorus, Total mg/L 2.0 EPA 365.1 0.1 1/quarter 2. Primary Metals (33xx), Metals Mining (10xx), Automobile Salvage and Scrap Recycling (5015 and 5093), Metals Fabricating (34xx) Lead, Total µg/L 81.6 EPA 200.8 0.5 1/quarter Petroleum Hydrocarbons (Diesel Fraction) mg/L 10 NWTPH-Dx 0.1 1/quarter 3. Hazardous Waste Treatment, Storage and Disposal Facilities and Dangerous Waste Recyclers subject to the provisions of Resource Conservation and Recovery Act (RCRA) Subtitle C Chemical Oxygen Demand (COD) mg/L 120 SM 5220-D 10 1/quarter Total Ammonia (as N) mg/L 2.1 SM 4500; NH3-GH 0.3 1/quarter Total Suspended Solids (TSS) mg/L 100 SM 2540-D 5 1/quarter Arsenic, Total µg/L 150 EPA 200.8 0.5 1/quarter Cadmium, Total µg/L 2.1 EPA 200.8 0.25 1/quarter Cyanide, Total µg/L 22 EPA 335.4 10 1/quarter Lead, Total µg/L 81.6 EPA 200.8 0.5 1/quarter Magnesium, Total µg/L 64 EPA 200.8 50 1/quarter Mercury, Total µg/L 1.4 EPA 1631E 0.0005 1/quarter Selenium, Total µg/L 5.0 EPA 200.8 1.0 1/quarter Silver, Total µg/L 3.8 EPA 200.8 0.2 1/quarter Petroleum Hydrocarbons (Diesel Fraction) mg/L 10 NWTPH-Dx 0.1 1/quarter 4. Air Transportation (45xx) c Total Ammonia (as N) mg/L 2.1 SM 4500; NH3-GH 0.3 1/quarter Biological Oxygen Demand (BOD) mg/L 30 SM 5210B 2 1/quarter Chemical Oxygen Demand (COD) mg/L 120 SM 5220-D 10 1/quarter
Nitrate + Nitrite Nitrogen, as N mg/L 0.68 SM 4500; NO3-E/F/H 0.1 1/quarter
Petroleum Hydrocarbons (Diesel Fraction) mg/L 10 NWTPH-Dx 0.1 1/quarter 5. Timber Product Industry (24xx), Paper and Allied Products (26xx) Chemical Oxygen Demand (COD) mg/L 120 SM 5220-D 10 1/quarter Total Suspended Solids (TSS) mg/L 100 SM 2540-D 5 1/quarter 6. Transportation (40xx – 44xx, except 4221-25), Petroleum Bulk Stations and Terminals (5171) Petroleum Hydrocarbons (Diesel Fraction) mg/L 10 NWTPH-Dx 0.1 1/quarter
a. The Permittee shall ensure laboratory results comply with the quantitation level (QL) specified in the table. However, if an alternate method from 40 CFR Part 136 is sufficient to produce measurable results in the sample, the Permittee may use that method for analysis. Any Permittee using an alternative method must report the test method and QL on the DMR. If the Permittee is unable to obtain the required QL due to matrix effects, the Permittee must report the matrix-specific method detection level (MDL) and QL on the DMR. b. 1/quarter means at least one sample taken each quarter, year-round. c. For airports where a single Permittee, or a combination of permitted facilities use more than 100,000 gallons of glycol-based deicing chemicals and/or 100 tons or more of urea on an average annual basis, monitor these additional five parameters in those discharge points that collect runoff from areas where deicing activities occur (SIC 4512-4581).

Page 41
Table 5: Effluent Limit Applicable to Airports Subject to 40 CFR Part 449.
Parameter Units Benchmark Value a
Analytical Method b
Laboratory Quantitation
Level c
Minimum Sampling
Frequency d
Total Ammonia (as N) mg/L 14.7 SM 4500; NH3-GH 0.3 1/quarter
a. Maximum daily effluent limit means the highest allowable daily discharge. The daily discharge means the discharge of a pollutant measured during a calendar day. The daily discharge is the average measurement of the pollutant over the day. b. Or other equivalent EPA-approved method with the same or lower quantitation level. c. The Permittee shall ensure laboratory results comply with the quantitation level (QL) specified in the table. However, if an alternate method from 40 CFR Part 136 is sufficient to produce measurable results in the sample, the Permittee may use that method for analysis. Any Permittee using an alternative method must report the test method and QL on the DMR. If the Permittee is unable to obtain the required QL due to matrix effects, the Permittee must report the matrix-specific method detection level (MDL) and QL on the DMR. d. 1/quarter means at least one sample taken each quarter, year-round.
Table 7: Benchmarks and Sampling Requirements Applicable to Discharges to Puget Sound Sediment Cleanup Sites that are not Category 5 for Sediment Quality.
Parameter Units Benchmark Value a
Analytical Method
Laboratory Quantitation
Level b
Minimum Sampling
Frequency c
Total Suspended Solids (TSS) mg/L 30 SM 2540-D 5 1/quarter
a. Permittees sampling more than once per quarter shall average the sample results and compare the average value to the benchmark to determine if it the discharge has exceeded the benchmark value. However, if Permittees collect more than one sample during a 24-hour period, they must first calculate the daily average of the individual grab sample results collected during that 24-hour period; then use the daily average to calculate a quarterly average. b. The Permittee shall ensure laboratory results comply with the quantitation level (QL) specified in the table. However, if an alternate method from 40 CFR Part 136 is sufficient to produce measurable results in the sample, the Permittee may use that method for analysis. Any Permittee using an alternative method must report the test method and QL on the DMR. If the Permittee is unable to obtain the required QL due to matrix effects, the Permittee must report the matrix-specific method detection level (MDL) and QL on the DMR. c. 1/quarter means at least one sample taken each quarter, year-round.

Page 42
Table 8: Sampling and Analytical Procedures for Storm Drain Solids.
Analyte Method in Solids Quantitation
Levela
Conventional Parameters
Percent total solids SM 2540G, or ASTM Method D 2216 N/A
Total organic carbon Puget Sound Estuary Protocols (PSEP 1997), or EPA 9060 0.1%
Grain size Ecology Method Sieve and Pipette (ASTM 1997), ASTMD422,
or PSEP 1986/2003 N/A
Metals
Antimony, Total EPA Method 200.8 (ICP/MS), EPA Method 6010, or EPA Method 6020 0.2 mg/kg dw
Arsenic, Total EPA Method 200.8 (ICP/MS), EPA Method 6010, or EPA Method 6020 0.1 mg/kg dw
Beryllium, Total EPA Method 200.8 (ICP/MS), EPA Method 6010, or EPA Method 6020 0.2 mg/kg dw
Cadmium, Total EPA Method 200.8 (ICP/MS), EPA Method 6010, or EPA Method 6020 0.2 mg/kg dw
Chromium, Total EPA Method 200.8 (ICP/MS), EPA Method 6010, or EPA Method 6020 0.5 mg/kg dw
Copper, Total EPA Method 200.8 (ICP/MS), EPA Method 6010, or EPA Method 6020 0.2 mg/kg dw
Lead, Total EPA Method 200.8 (ICP/MS), EPA Method 6010, or EPA Method 6020 0.2 mg/kg dw
Mercury, Total EPA Method 200.8 (ICP/MS), EPA Method 6010, or EPA Method 6020 0.005 mg/kg dw
Nickel, Total EPA Method 200.8 (ICP/MS), EPA Method 6010, or EPA Method 6020 0.1 mg/kg dw
Selenium, Total EPA Method 200.8 (ICP/MS), EPA Method 6010, or EPA Method 6020 0.5 mg/kg dw
Silver, Total EPA Method 200.8 (ICP/MS), EPA Method 6010, or EPA Method 6020 0.1 mg/kg dw
Thallium, Total EPA Method 200.8 (ICP/MS), EPA Method 6010, or EPA Method 6020 0.2 mg/kg dw
Zinc, Total EPA Method 200.8 (ICP/MS), EPA Method 6010, or EPA Method 6020 5.0 mg/kg dw
Organics
PAH compoundsc EPA Method 8270D 70 µg/kg dw
PCBs (aroclors), Totald EPA Method 8082 10 µg/kg dw
Petroleum Hydrocarbons
NWTPH-Dx NWTPH-Dx 25.0-100 mg/kg dw
a. The Permittee shall ensure laboratory results comply with the quantitation level (QL) specified in the table. However, if an alternate method is sufficient to produce measurable results in the sample, the Permittee may use that method for analysis. Any Permittee using an alternative method must report the test method and QL on S6.C.2.f the sediment monitoring report. All results shall be reported. For values below the QL, or where a QL is not specified, report results at the method detection level (MDL) from the lab and the qualifier of “U” for undetected at that concentration. If the Permittee is unable to obtain the required QL due to matrix effects, the Permittee must report the matrix-specific MDL and QL on the DMR. b. dw = dry weight. c. PAH compounds include: 1-methylnaphthalene, 2-methylnaphthalene, 2-chloronaphthalene, acenaphthylene, acenaphthene, anthracene, benzo(a)anthracene, benzo(a)pyrene, benzo(b, k)fluoranthene, benzo(ghi)perylene, dibenzo(a,h)anthracene, dibenzofuran, carbazole, chrysene, fluoranthene, fluorene, indeno(1,2,3-cd)pyrene, naphthalene, phenanthrene, and pyrene. d. Total = sum of PCB aroclors 1016+1221+1232+1242+1248+1254+1260.