Self Storage Melbourne FL | Viera Storage Company | (321) 752-0022
Upload
allen-danielCategory
view
56download
2
StorageTreasures.com Step-By-Step Guide to Online Auctions
Step 1: Creating a Storage Company Account Step 2: Adding a Facility Step 3: Completing Account Set-Up Step 4: Adding an Auction Step 5: Adding Additional Unit(s) to Auction Step 6: Cancelling a Unit Step 7: Completing the Sale of a Unit
1

Step 1 Creating a Storage Company Account
Skip this step if you were provided log in info. from Storage Treasures or Storage Battles.
If you are unsure, give us a call 480.397.6503
2

Register
Thank you for your interest in a Storage Treasures Storage Company account. We sincerely appreciate your business.
Visit www.StorageTreasures.com in your browser.
In the middle of the page you will see a Register form, fill it in and follow the steps.
3

Create Your Profile
Fill in the required fields, then click Create My Profile.
4

Social Media Share us with your friends!
Share or skip
5
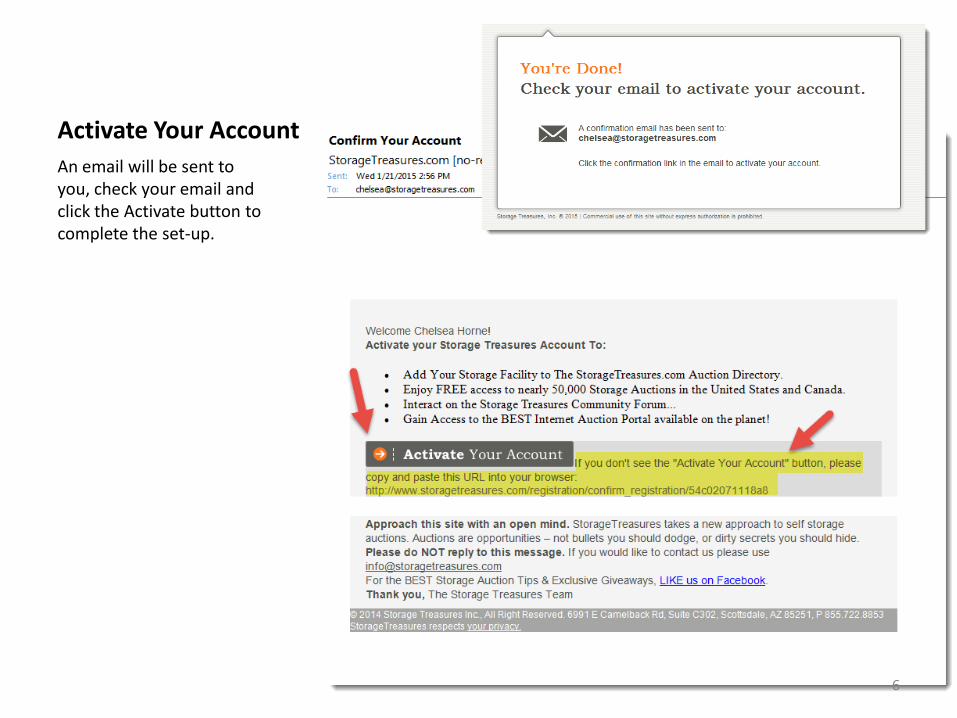
Activate Your Account
An email will be sent to you, check your email and click the Activate button to complete the set-up.
6

Log In & Dashboard
Once you click the Activate button, the website will automatically log you in. The first page you see is your Dashboard, this is where you will manage your account, facilities, facility details, auctions, and more.
7

Step 2 Adding a Facility
Add your company’s facilities
*This step is not for accounts transferring from StorageBattles.com, your facilities should already be
added.*
8

Adding a Facility
Log in to your ST account.
(Visit www.StorageTreasures.com, enter your email address and password)
1. Click Manage Facilities on the left navigation pane
2. Click Add New Facility
If your facilities are listed here already, you can skip this step.
9

Select Plan Type
Choose the $199/year Per Facility, Corporate Plan.
10
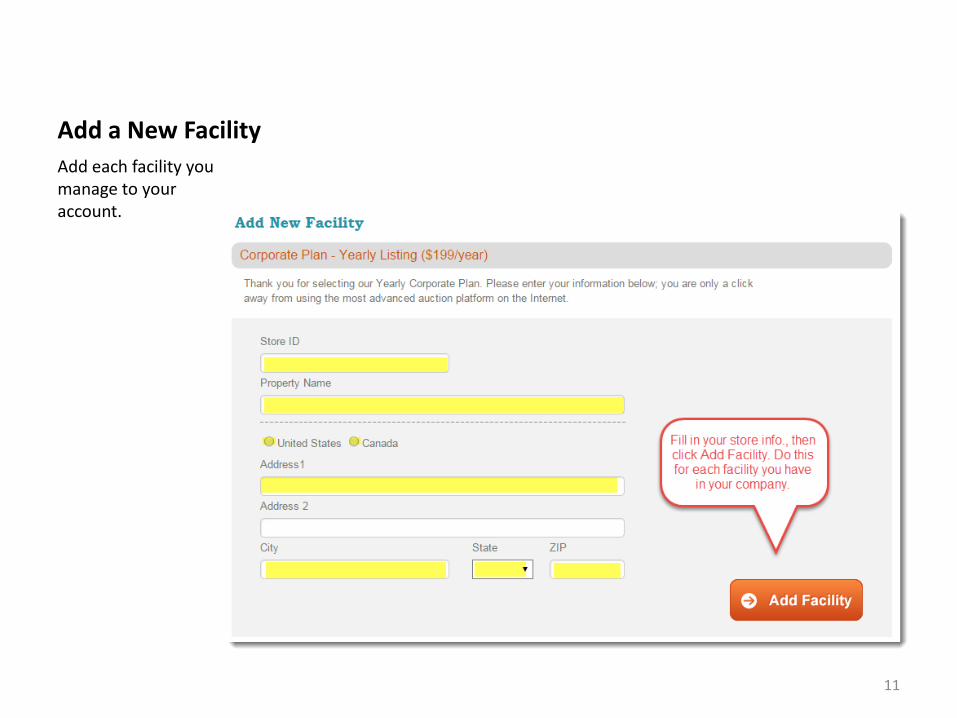
Add a New Facility
Add each facility you manage to your account.
11

12

Step 3 Completing Account Set-Up
Complete this step after you have been given your log in information from Storage Treasures or Storage Battles, or after you create your own account. If creating your own account, this step should be completed after step 2, Add a Facility
13

Complete Account Set-Up
Once logged in, click Manage Facilities located on the left navigation pane.
Find the facility you are trying to set-up and click the Edit button. •If you do not see your facility, it needs to be added, see Adding a Facility, Step 2
You will see five tabs that need to be filled out. Please be thorough and fill in all fields to the best of your ability.
• General Info.
• Details
• Contacts
• Photos
• Ad
Continue to next page for further instructions.
14

Edit General Info.
Fill in all the missing information.
Please do not stress about the questionnaire at the bottom of the page, this is only for our use and further development of the site. If you do not know the answer take your best guess as this is a required field.
Click update on each tab.
Continue to next page for further instructions.
15

Edit Details Add your hours of operation, information about auctions held online, information about auction conducted at the facility, and facility features. Information about auctions conducted at the facility, If you no longer hold auctions at your facility, you can bypass this step. Information about auction held online, this MUST be filled out before posting any online auctions. • Cleaning Deposit: We recommend
charging a $100/cash deposit to ensure bidder does not leave a mess.
• Clean-out time: The two options are 48 or 72 hours. The more time the better; this will expand your bidder base.
• Sales Tax: Enter your store’s sales tax percentage. (8.5% sales tax = 8.5)
• Invoice Notes: Please place general information about your facility in this section, specific rules, etc.
16
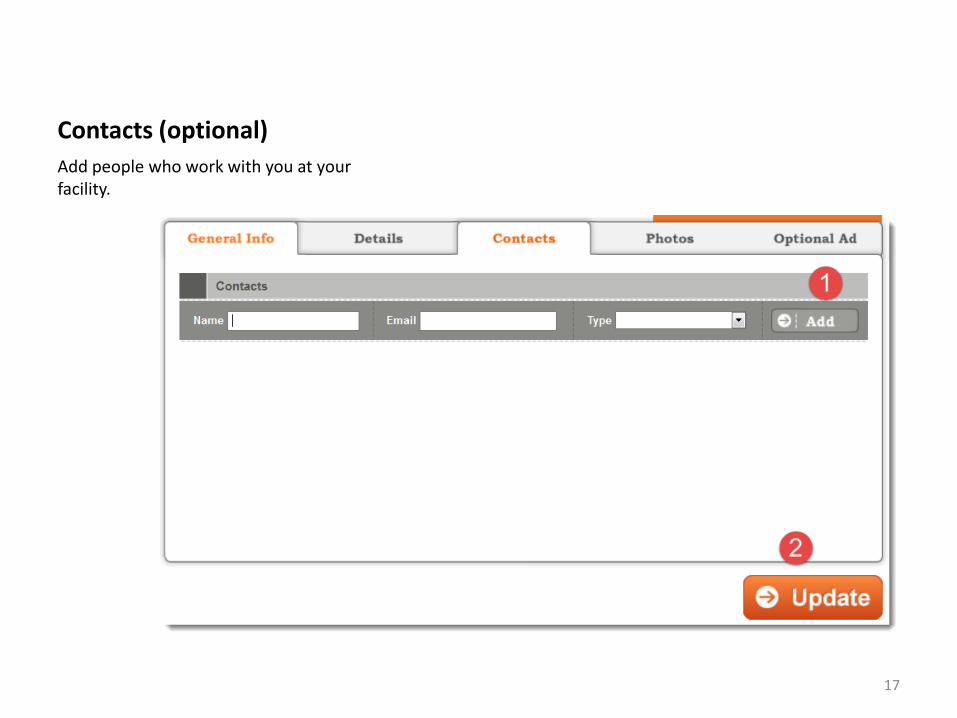
Contacts (optional)
Add people who work with you at your facility.
17
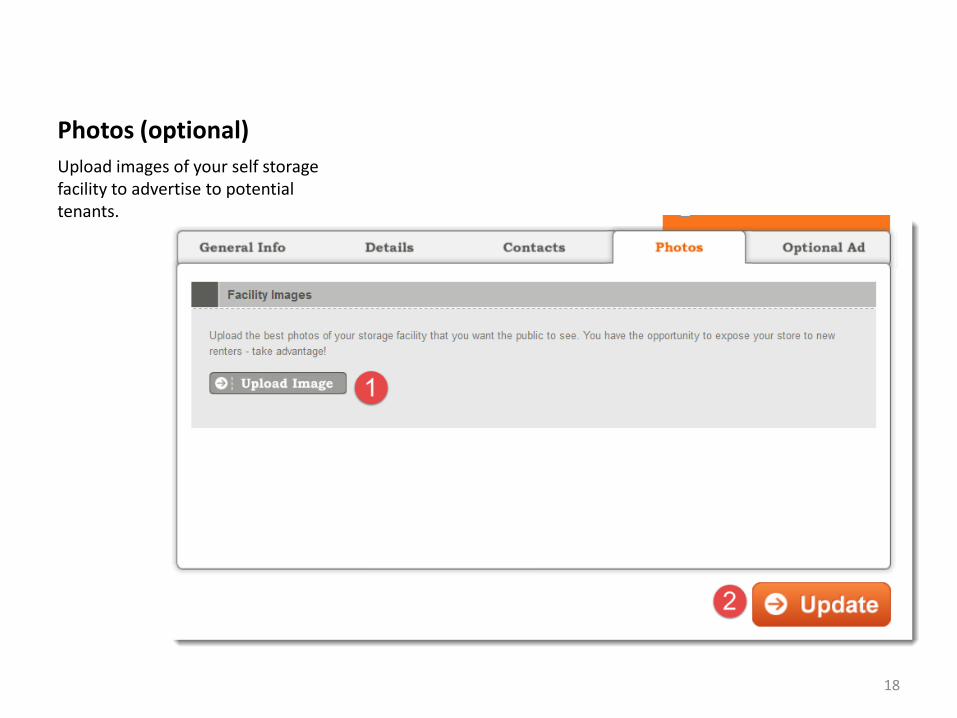
Photos (optional)
Upload images of your self storage facility to advertise to potential tenants.
18

Optional Ad
Upload or create your own advertisement to show potential tenants. (I.e. 1st month rent 50% off, 1st month rent is free, $19.99 truck rental, etc.)
Use our templates or upload your own, the recommended image size is 340px × 185px.
Once finished click Update at the bottom of the page to finish your Account Set-Up
19

Step 4 Adding an Auction
Make sure to complete Step 3 before adding your first auction. Also, be sure and do your prep work ahead of time (Send lien notices, cut locks, take photos,
inventory unit, etc.)
Remember, the lien notices and legal ads you produce must state that the auction will be online at www.StorageTreasures.com.
Add your auction to your account at least 2 weeks before the date of the sale.
20

Adding an Auction
First things first, make sure to log in to your account via StorageTreasures.com
Once logged in you will see your Dashboard.
Click Manage Facilities on the left navigation pane, locate the facility you need to add an auction for, click Manage Auctions (button with the gavel).
21
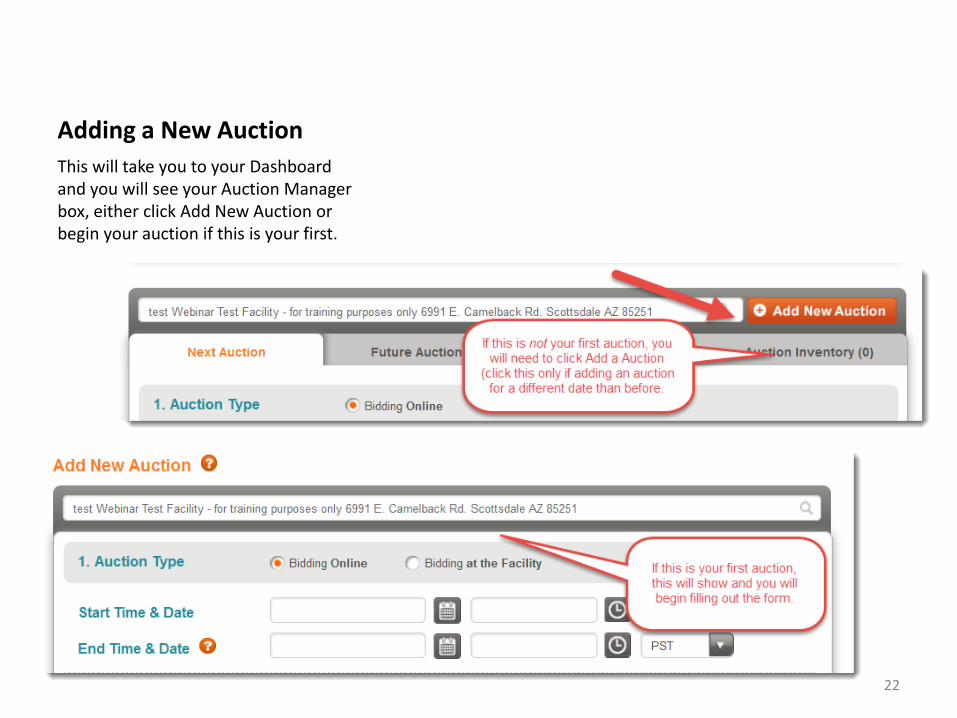
Adding a New Auction
This will take you to your Dashboard and you will see your Auction Manager box, either click Add New Auction or begin your auction if this is your first.
22

Be sure you are adding your auction to the correct facility.
23

Fill in the Posting Form Create Your Auction Auction Info.
*This will only need to be filled out once for each auction you post.*
• Choose Bidding Online
• Start Time & Date: Select today’s date & the current time.
• End Time & Date: This should be the same date/time listed on your lien notice.
• Auction Manager Email: Choose your SSF’s email address
• Sales Tax: Should auto-populate, if not see Step 3
• Accepted Payment Method: Choose whatever your SSF accepts
• Invoice Notes: Should auto-populate, if not see Step 3
24

Add Unit 1 • Select Tenant Type
• Business, this means there is a business name on the account.
• Personal, this means it belongs to a person.
• Abandoned, this is NOT A LIEN SALE, i.e.. Manager Special, abandoned items, etc.
• Charity Storage, this means the proceeds are being donated to charity.
• Delinquent Tenant Info.: This is optional, it is recommended to help manage auctions. This info. is never visible to bidders.
• Remember to select USA or Canada
• Unit Size: Select the most appropriate approximate unit size available. If you do not see the exact size, choose the best fit.
• Unit Number
• Tamper Tag: Enter the locking tag # you put on the unit to keep the unit from being tampered with.
• Starting Bid / Reserve Price: This is done for you unless posting a Charity unit.
• Estimated Unit Value / Sold Amount: Skip!
• Lien Amount: Enter the amount your tenant owes, include future rent and fees.
25

Add Unit Contents
•Fill the information in as best as you can.
•Please be careful not to speculate or make assumptions about what is in the unit.
•It is also best before typing your description to add the words, “This unit appears to contain…”
•Use the categories below the Description for searching purposes, select whatever applies. (Drag & Drop categories to the box above)
26
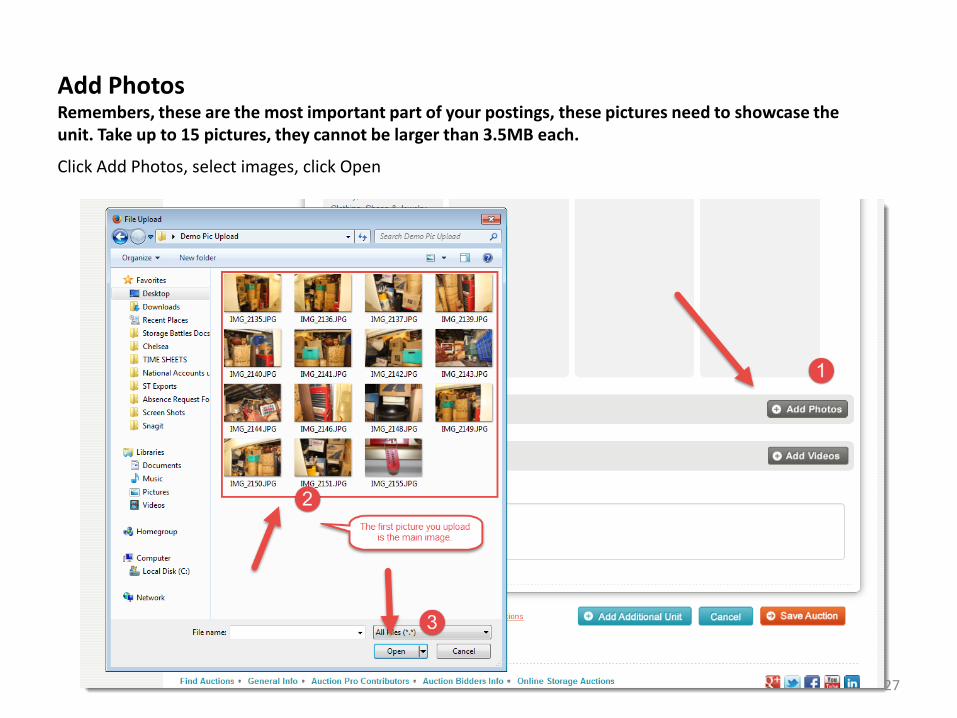
Add Photos Remembers, these are the most important part of your postings, these pictures need to showcase the unit. Take up to 15 pictures, they cannot be larger than 3.5MB each.
Click Add Photos, select images, click Open
27
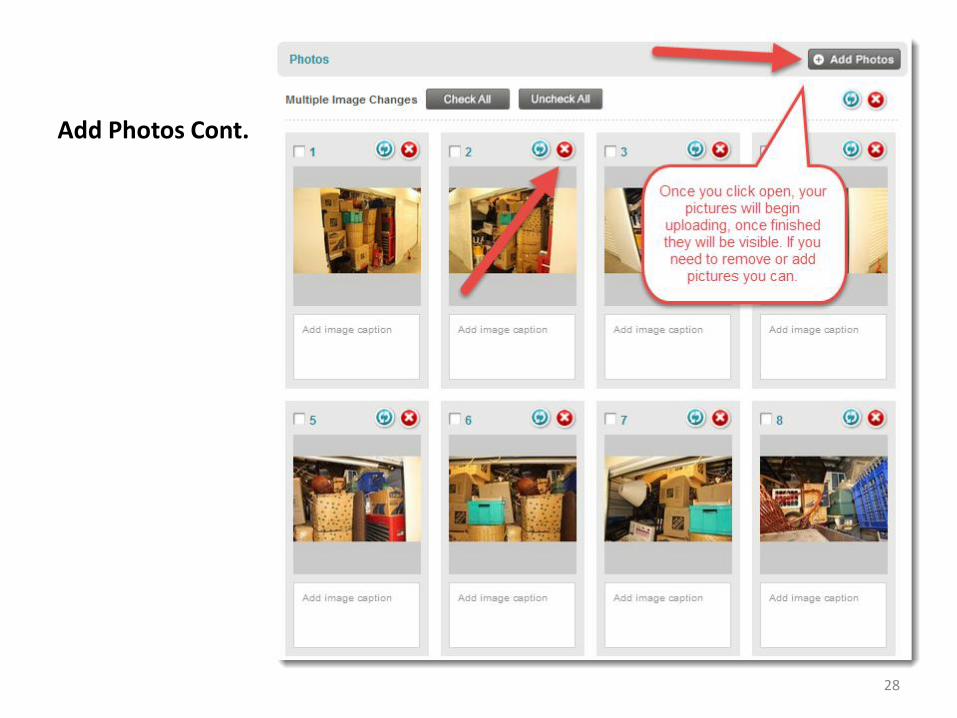
Add Photos Cont.
28
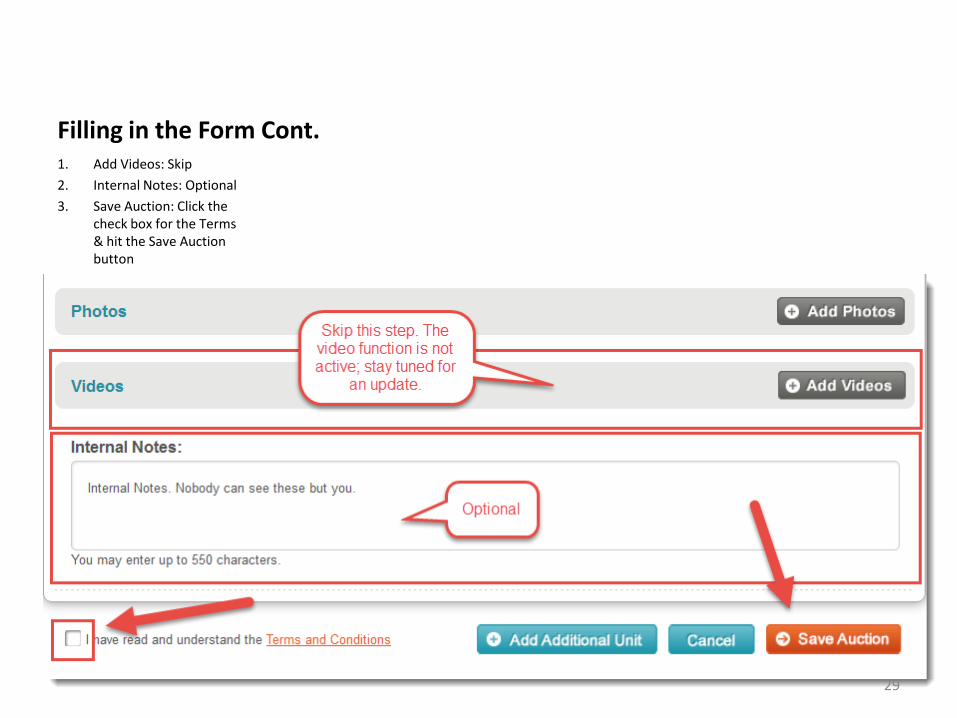
Filling in the Form Cont. 1. Add Videos: Skip
2. Internal Notes: Optional
3. Save Auction: Click the check box for the Terms & hit the Save Auction button
29

Step 5 Adding Additional Unit(s) to Auction
Complete this step after creating your auction. An auction can have 1 unit or 30+
units. Add units to an auction if the units are supposed to sell the same day as the others.
30

Add Units Before Saving Auction (not recommended) *Save auction first, then add units so you don’t lose your info accidentally*
31

Adding Units After Saving Auction
When adding units after saving the auction, the system will auto-save.
Be Careful Do not click Add New Auction if
you are trying to add units. This will create a new auction for a different date.
32

Step 6 Canceling a Unit
Cancel a unit due to tenant payment or posting error.
33

Cancel Unit Before Time Expires
• Log into your account
• Click Manage Facilities in left navigation pane
• Find the facility whose unit you need to cancel
• Click Manage Auctions (gavel button)
34

Cancel Unit Before Time Expires Cont.
• Locate Auction under Next Auction tab or Future Auction tab
• Find unit needing to be cancelled, click the cancel button.
• Click Yes on the popup
• The unit is now canceled
35

Cancel a Unit After Time Expires
This is posted on each unit and is visible to bidders.
NOTICE: The defaulted tenant has the legal right to cure the account thus cancelling the auction up until the cash payment is received from the winning bidder unless otherwise stated in the state's lien laws or by the storage company.
You will need to cancel a unit after it expires when your tenant comes in with payment after their unit has expired online and before the bidder shows up to pay. Locate the unit under the Past Auction tab and click cancel, see previous page. Once that is done, there are 2 very important steps. 1. Call bidder to tell them it was canceled,
see invoice. • Call the bidder first, you do not
want them driving 2 hours for nothing, or renting a moving truck for nothing. They will appreciate you letting them know as soon as possible.
2. Call ST to let us know, we need to refund the bidder the money charged to their card. • 480.397.6503
36

Step 7 Completing the Sale of a Unit
When an auction expires the winner is chosen, the sale occurs at your SSF.
37

As soon as the auction ends, what to expect. When an auction ends, an invoice gets sent to the bidder with all the necessary information. You get a copy of this invoice with the subject line, “Successful Payment and Confirmation”.
From that moment, the bidder has 48 or 72 hours to come to your facility, pay for and clean out the unit. The amount of time depends on what your company chose when Completing Your Account Set-Up (Step 3).
Typically the bidder will call you and schedule an appointment, we always tell them to call first! When they come to your facility, collect the money and deposit (if you have one, see Step 3), and then give them access to the unit.
When you have verified the unit is cleared out you will refund them their cleaning deposit.
If the bidder has a resale license, they are tax exempt. Make a manual deduction from the invoice. We suggest you get a copy of the resale license and put it in the unit folder with the invoice.
Before the invoice can be sent, the bidder’s credit card is charged our Buyer Premium (BP) fee of 10% or 15%, depending on the type of account they have with us. Also, they are charged a 10% deposit of the sale price. This is our Seller Premium (SP).
For example, if a unit sells for $100. The winning bidder’s credit card will be charged $10 for their BP, and $10 for our deposit, or SP. They will bring your facility $90 for the unit. (They also must pay tax, if applicable, see invoice)
See invoice on next page.
38

Example of Auction Unit Invoice (1/2)
39

Example of Auction Unit Invoice (2/2)
40

StorageTreasures.com Step-By-Step Guide to Online Auctions
If you have questions, give us a call
@ 480.397.6503 or email [email protected].
41