StorageTek ACSLS-HA 8.1 Cluster · Replicate the VTOC to 2nd Boot Disk ... 2540-M2 Storage Array...
82
Submit comments about this document to [email protected]. StorageTek ACSLS-HA 8.1 Cluster Installation, Configuration, and Operation Part Number: E26325-02 April 2012
Transcript of StorageTek ACSLS-HA 8.1 Cluster · Replicate the VTOC to 2nd Boot Disk ... 2540-M2 Storage Array...

Submit comments about this document to [email protected].
StorageTek ACSLS-HA 8.1 Cluster
Installation, Configuration, and Operation
Part Number: E26325-02April 2012

2 ACSLS-HA Cluster 8.1 April 2012
StorageTek ACSLS-HA 8.1 Cluster Installation, Configuration, and Operation
E26325-02
Oracle welcomes your comments and suggestions for improving this book. Contact us at [email protected]. Please include the title, part number, issue date, and revision.
Copyright © 2004, 2012, Oracle and/or its affiliates. All rights reserved.
This software and related documentation are provided under a license agreement containing restrictions on use and disclosure and are protected by intellectual property laws. Except as expressly permitted in your license agreement or allowed by law, you may not use, copy, reproduce, translate, broadcast, modify, license, transmit, distribute, exhibit, perform, publish, or display any part, in any form, or by any means. Reverse engineering, disassembly, or decompilation of this software, unless required by law for interoperability, is prohibited.
The information contained herein is subject to change without notice and is not warranted to be error-free. If you find any errors, please report them to us in writing.
If this is software or related software documentation that is delivered to the U.S. Government or anyone licensing it on behalf of the U.S. Government, the following notice is applicable:
U.S. GOVERNMENT RIGHTS Programs, software, databases, and related documentation and technical data delivered to U.S. Government customers are "commercial computer software" or "commercial technical data" pursuant to the applicable Federal Acquisition Regulation and agency-specific supplemental regulations. As such, the use, duplication, disclosure, modification, and adaptation shall be subject to the restrictions and license terms set forth in the applicable Government contract, and, to the extent applicable by the terms of the Government contract, the additional rights set forth in FAR 52.227-19, Commercial Computer Software License (December 2007). Oracle USA, Inc., 500 Oracle Parkway, Redwood City, CA 94065.
This software or hardware is developed for general use in a variety of information management applications. It is not developed or intended for use in any inherently dangerous applications, including applications which may create a risk of personal injury. If you use this software or hardware in dangerous applications, then you shall be responsible to take all appropriate fail-safe, backup, redundancy, and other measures to ensure the safe use. Oracle Corporation and its affiliates disclaim any liability for any damages caused by use of this software or hardware in dangerous applications.
Oracle is a registered trademark of Oracle Corporation and/or its affiliates. Oracle and Java are registered trademarks of Oracle and/or its affiliates. Other names may be trademarks of their respective owners.
AMD, Opteron, the AMD logo, and the AMD Opteron logo are trademarks or registered trademarks of Advanced Micro Devices. Intel and Intel Xeon are trademarks or registered trademarks of Intel Corporation. All SPARC trademarks are used under license and are trademarks or registered trademarks of SPARC International, Inc. UNIX is a registered trademark licensed through X/Open Company, Ltd.
This software or hardware and documentation may provide access to or information on content, products, and services from third parties. Oracle Corporation and its affiliates are not responsible for and expressly disclaim all warranties of any kind with respect to third-party content, products, and services. Oracle Corporation and its affiliates will not be responsible for any loss, costs, or damages incurred due to your access to or use of third-party content, products, or services.

April 2012 Summary of Changes 3
Summary of Changes
Date Revision Description
December 2011 E26325-01 This release supports the Oracle StorageTek ACSLS-HA 8.1 Cluster software for Solaris.
April 2012 E26325-02 Update to ACSLS HA Installation chapter.

4 ACSLS-HA 8.1 Cluster April 2012

April 2012 1
Table of Contents
Summary of Changes ............................................................................................................ 3
Preface ........................................................................................................................................ 3
Access to Oracle Support ............................................................................................................ 3
1 Getting Started ......................................................................................................................... 5
Installing ACSLS HA ................................................................................................................. 6
Recommended Hardware Configurations .................................................................................. 6
Optional SPARC or X86 server Configurations ...................................................................... 7
System Requirements ................................................................................................................. 9
Network Requirements ......................................................................................................... 9
Software Requirements ....................................................................................................... 10
2 Operating System Installation ......................................................................................... 11
Boot Device Partitions .............................................................................................................. 11
globaldevices ........................................................................................................................... 11
state database replicas .............................................................................................................. 12
3 System Configuration Changes ...................................................................................... 13
Fiber HBA Change ................................................................................................................... 13
IPMP Fail-over Change ............................................................................................................ 13
Add the root user to the sysadmin group ................................................................................. 14
Enable ssh and allow root access on both servers ...................................................................... 14
4 Create Metadevice ................................................................................................................ 15
Replicate the VTOC to 2nd Boot Disk ....................................................................................... 15
Create Metadata Replicates ...................................................................................................... 15
Verify Replicates ...................................................................................................................... 16
Configure a metadevice to mirror the root partition. ................................................................. 16
Configure a metadevice for swap ............................................................................................. 16
Configure a metadevice for /globaldevices .............................................................................. 16
Create metadevices for optional partitions ................................................................................ 17
Verify the metadevice configuration ......................................................................................... 17
Update the /etc/vfstab file ...................................................................................................... 17
Update the /etc/system file ..................................................................................................... 18
Activate 1-way mirrors ............................................................................................................ 18
2 ACSLS-HA 8.1 Cluster April 2012
Attach the metadevices to the sub-mirrors ................................................................................ 18
Attach any optional mirrors ..................................................................................................... 18
Update Dump Device .............................................................................................................. 19
Update Boot Device Order ....................................................................................................... 19
For SPARC environments: ................................................................................................... 19
For X86 environments: ........................................................................................................ 19
5 Network Configuration ....................................................................................................... 21
Physical Configuration ............................................................................................................. 21
The Public Interface and IPMP ................................................................................................. 22
The Library Interface ................................................................................................................ 24
General NIC Configuration ...................................................................................................... 24
6 Enable MPXIO Multi-pathing ............................................................................................. 27
If Shared Disks and Boot Disks Utilize a Common Driver ......................................................... 28
If Shared Disks and Boot Disks Employ Different Drivers ......................................................... 29
Verifying the new MPXIO device path ..................................................................................... 29
Disabling MPXIO from a pair of physical devices ..................................................................... 30
7 Oracle Solaris Cluster 3.3 Installation ......................................................................... 31
Download and Extract Solaris Oracle Solaris Cluster 3.3 ........................................................... 31
Install Oracle Solaris Cluster 3.3 .......................................................................................... 32
Required Patches ..................................................................................................................... 33
Creating a two-node cluster ..................................................................................................... 33
Configure automatic login access for “root” between nodes ................................................ 34
Configure the cluster ........................................................................................................... 35
Check default system settings ............................................................................................. 35
Removing Solaris Cluster ......................................................................................................... 36
8 Disk Set and ACSLS File-Systems Creation ............................................................... 37
Create disk-set on the Primary Node ........................................................................................ 37
Verify Access on Secondary Node ............................................................................................ 38
9 ACSLS Installation ............................................................................................................... 41
10 ACSLS HA Installation ........................................................................................................ 43
Final Cluster Configuration Details .......................................................................................... 43
Downloading ACSLS HA ......................................................................................................... 44
Library Failover Policy ............................................................................................................. 45
Starting ACSLS HA .................................................................................................................. 45
11 Uninstalling ACSLS HA ...................................................................................................... 47
12 ACSLS HA Operation .......................................................................................................... 49
Normal ACSLS Operation ........................................................................................................ 49
Powering Down the ACSLS HA Cluster ................................................................................... 49
Powering Up a Suspended ACSLS Cluster System. .................................................................. 50
Installing ACSLS software updates with ACSLS HA. ............................................................... 50
Creating a Single Node Cluster ................................................................................................ 51
Restoring from non-cluster mode ........................................................................................ 52
A Logging, Diagnostics, and Testing ................................................................................ 53
April 2012 3
Solaris Cluster Logging ............................................................................................................ 53
ACSLS ..................................................................................................................................... 53
Cluster monitoring utilities ...................................................................................................... 53
Recovery and Failover Testing ................................................................................................. 54
Recovery conditions ............................................................................................................ 54
Recovery Monitoring .......................................................................................................... 55
Recovery Tests .................................................................................................................... 55
Failover Conditions ............................................................................................................. 56
Failover Monitoring ............................................................................................................ 57
Failover Tests ...................................................................................................................... 57
Additional Tests .................................................................................................................. 58
B Monitoring the ACSLS HA Agent .................................................................................... 59
About the ACSLS HA Agent .................................................................................................... 59
Monitoring the Status and Activities of the ACSLS HA Agent .................................................. 60
Messages from the ACSLS HA Agent ....................................................................................... 60
Diagnostic Messages ................................................................................................................ 64
C Troubleshooting Tips .......................................................................................................... 65
Procedure to Verify that ACSLS is Running .............................................................................. 65
Procedure to Restore Normal Cluster Operation after Serious Interruption ............................... 66
Procedure to Determine Why You Cannot 'ping' the Logical Host ............................................ 68
D Software Support Utilities for Gathering Data ........................................................... 71

4 ACSLS-HA 8.1 Cluster April 2012

April 2012 1
Single HBCr library interface card connected to two Ethernet ports on each server node 21Dual-HBC configuration on a library with Redundant Electronics 22Two Fibre Connections Per Server to External Shared Storage Array 27

2 ACSLS-HA Cluster 8.1 Installation April 2012

April 2012 1
Optional SPARC Server Configuration 7Optional X86 Server Configuration 82530-M2 Storage Array (SAS-Attached) 82540-M2 Storage Array (Fibre-Attached) 9

2 ACSLS-HA Cluster 8.1 Installation April 2012

April 2012 Preface 3
Preface
The guide contains guidelines and procedures for installing and configuring the Oracle StorageTek ACSLS-HA 8.1 Cluster software on both Solaris SPARC-based systems and x86-based systems.
This document is intended for experienced system administrators with extensive knowledge of Oracle software and the volume-manager software that is used with Oracle Solaris Cluster software
This document offers moderate background information for most of the technologies that are used and it provides guidance for the standard anticipated installation procedures. However this document alone does not replace an implied requirement for Unix system familiarity and expertise.
Access to Oracle SupportOracle customers have access to electronic support through My Oracle Support. For information, visit http://www.oracle.com/support/contact.html or visit http://www.oracle.com/accessibility/support.html if you are hearing impaired.

Access to Oracle Support
4 ACSLS-HA 8.1 Cluster April 2012
April 2012 Getting Started 5
1
Getting Started
ACSLS HA is a hardware and software configuration that provides dual-redundancy, automatic recovery and automatic fail-over recovery to ensure uninterrupted tape library control service in the event of component or subsystem failure. This document explains the configuration, setup and testing procedures required to provide High Availability to ACSLS software.
The configuration is a two-node cluster shown in FIGURE 5-1 on page 21 and FIGURE 5-2 on page 22. It includes two complete subsystems, (one active and one standby) with monitoring software capable of detecting serious system failures. It has the ability to switch control from the primary to the standby system in the event of any non-recoverable subsystem failure. The configuration provides redundant power supplies, and redundant network and IO interconnections that can recover subsystem communication failures instantly without the need for a general switchover.
ACSLS HA leverages the monitor and fail-over features in Solaris Cluster and the multipath features in Solaris operating system to provide resilient library control operation with minimal down time. Solaris offers IP multipathing to assure uninterrupted network connectivity and Multipath disk I/O with RAID-1 to assure uninterrupted access to system data. Solaris Cluster watches the health of system resources including the operating system, internal hardware and external I/O resources and it can manage a system switchover if needed. And the ACSLS HA agent monitors the ACSLS application, its database, its file system, and connectivity to StorageTek library resources, invoking the Solaris Cluster failover service, if needed.
In this redundant configuration, the ACSLS Library Control Server has a single logical host identity which is always known within the cluster framework and to the rest of the world. This identity is transferred automatically as needed between the cluster nodes with minimal down time during the transition.
Please read and understand the complete process of installing and configuring ACSLS HA. Once you understand its complexity, you may want to consider engaging Oracle Advanced Customer Support personnel. They are available to install your ACSLS HA system in a timely manner. The use of these trained professionals can help you avoid typical problems that emerge and bring seasoned expertise to bear should unanticipated problems arise.

Installing ACSLS HA
6 ACSLS-HA 8.1 Cluster April 2012
Installing ACSLS HAThe activity of installing ACSLS in a clustered Solaris environment involves low-level configurations of disk, network, and system resources. Before proceeding, please review the entire procedure documented here.
Recommended Hardware ConfigurationsThis is the current list of recommended SPARC or X86 hardware components to enable full High Availability capability for ACSLS. A standard configuration includes two (SPARC or X86) servers, each with two internal disk drives, a total of eight network ports, and two (SAS or fibre) host bus adapters. It also includes an external dual-ported SAS or fibre RAID disk array.

Recommended Hardware Configurations
April 2012 Getting Started 7
Optional SPARC or X86 server ConfigurationsTABLE 1-1 Optional SPARC Server Configuration
Quantity Oracle Part Number Description
2 SE3AA111Z SPARC T3-1 Server:
• 16 Core 1.65 GHz SPARC T3 processor
• Four x 10/100/1000 Mbps autonegotiating Network ports
• One maintenance RJ-45 port
• Five USB ports (4 external)
• Six PCI-E 2.0 low profile slots
• On-board Maintenance processor
• Integrated Lights Out Manager (ILOM) 3.0
• One DB-15 VGA connector
8 SE6Y2A11Z (Four each server) 2GB DDR3 DIMM memory
2 SE3Y5BA1Z (One each server) Disk Drive Backplane
4 SE6Y3G11Z (Two each server) 300GB 10KRPM 2.5" SAS disk drive
2 SE3Y9DV2Z (One each server) SATA DVD+/-RW, slot-in optical drive
2 SG-PCIE2FC-QF8-Z (One each server) dual-channel 8Gb fibre channel PCIe HBA (optional for logical library target connection).
2 X4446A-Z (One each server) PCIE Quad gigabit Ethernet Adapter
4 SE3Y5PS1Z (Two each server) 1200W power supply (required)
1 SOLZ9-10HC9A7M Expanded Solaris 10 Media kit, DVD only. No license. Contains Oracle Solaris Cluster 3.3 software.
2 CLUII-320-AB29 Oracle Solaris Cluster 3.3 server entitlement fee for Sun T3-1 Server. One entitlement required per server.
1 TB6180R11A2-0-N-SS6180
Sun Storage 6180 Array:
• 4GB Cache
• 4 Fibre-channel host ports
5 TC-ST1CF-1TB7KZ-N CSM200 1TB 7000RPM SATA Disk Drives
2 333A-25-NEMA Power cord kit
1 Sun Rack II (optional)

Recommended Hardware Configurations
8 ACSLS-HA 8.1 Cluster April 2012
TABLE 1-2 Optional X86 Server Configuration
Quantity Oracle Part Number Description
2 X4470-M2 Server7100142
SunFire X4470-M2 server:
• 3RU chassis with motherboard
• 2 100-240 VAC power supplies
• 4 x 10/100/1000 base-T Ethernet ports
• 10 PCIe expansion slots
• 5 USB ports
• Integrated Lights Out Manager (ILOM)
4 333a-25-15-NEMA Power Cord
2 7100140 2 Intel (R) Xeon (R) E7-7530 6-core, 1.86GHz processor
8 7100152 Two 4GB DDR3-1333 DIMMs
4 RB-SS2CF-146G10K-N 146 GB hot-swap 2.5" SAS 10,000 RPM disk drive
2 SG-XPCIE2FC-QF8-N Dual QLogic 8GB PCIe fibre port (logical library connect)
2 X4446-A-Z x4 PCIe quad gigabit Ethernet HBA
2 SG-PCIE2FC-QF8-Z (One each server) dual channel 8GB fibre channel PCIe HBA (optional for logical library target connection)
TABLE 1-3 2530-M2 Storage Array (SAS-Attached)
Quantity Oracle Part Number Description
1 7100184 2530-M2 Storage Array (SAS-attached):
• Rack-ready controller tray
• 2 GB cache
• 4 SAS-2 ports
• Redundant cooling fans
• Rail kit
• StorageTek Common Array Manager Software
• Two storage domains
• Sun StorageTek Storage Domains Software
5 7100019 300GB 3.5 in 15000 rpm SAS drives
2 7100021 Redundant AC power supplies
2 Power cords
4 SAS-2 host cables.
2 SG-SAS6-EXT-Z 8-port 6GB external SAS HBA
System Requirements
April 2012 Getting Started 9
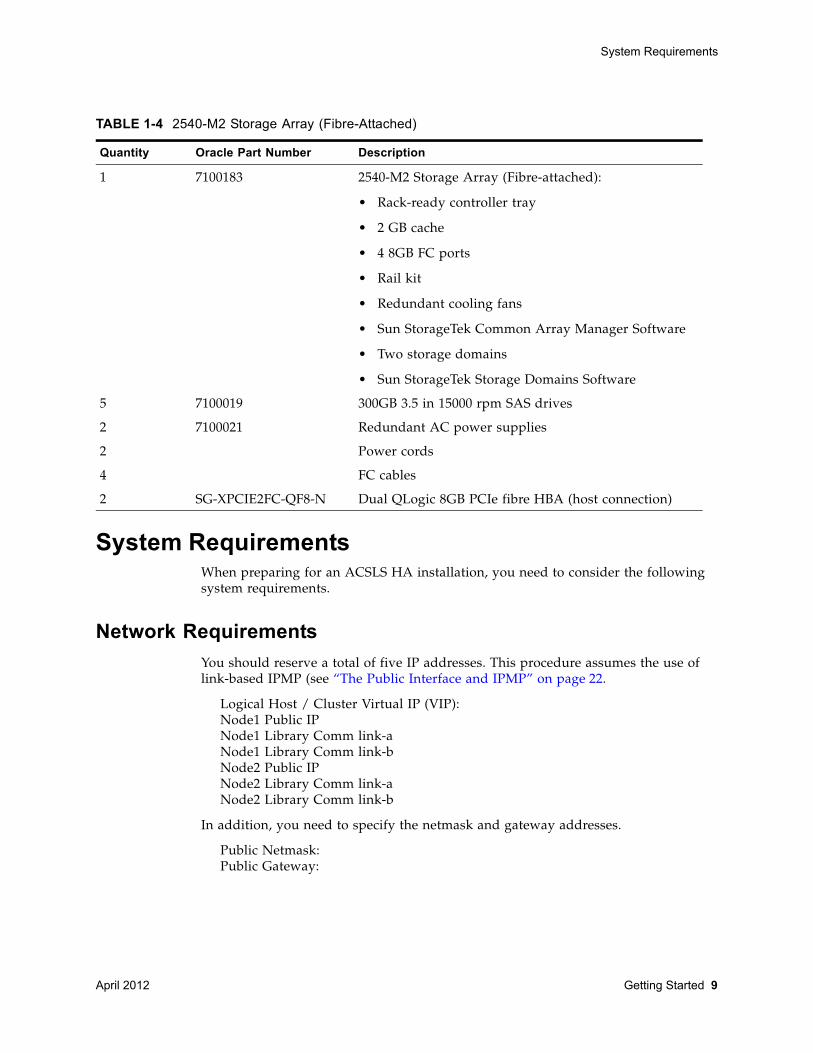
System RequirementsWhen preparing for an ACSLS HA installation, you need to consider the following system requirements.
Network Requirements
You should reserve a total of five IP addresses. This procedure assumes the use of link-based IPMP (see “The Public Interface and IPMP” on page 22.
Logical Host / Cluster Virtual IP (VIP):Node1 Public IPNode1 Library Comm link-aNode1 Library Comm link-bNode2 Public IPNode2 Library Comm link-aNode2 Library Comm link-b
In addition, you need to specify the netmask and gateway addresses.
Public Netmask:Public Gateway:
TABLE 1-4 2540-M2 Storage Array (Fibre-Attached)
Quantity Oracle Part Number Description
1 7100183 2540-M2 Storage Array (Fibre-attached):
• Rack-ready controller tray
• 2 GB cache
• 4 8GB FC ports
• Rail kit
• Redundant cooling fans
• Sun StorageTek Common Array Manager Software
• Two storage domains
• Sun StorageTek Storage Domains Software
5 7100019 300GB 3.5 in 15000 rpm SAS drives
2 7100021 Redundant AC power supplies
2 Power cords
4 FC cables
2 SG-XPCIE2FC-QF8-N Dual QLogic 8GB PCIe fibre HBA (host connection)

System Requirements
10 ACSLS-HA 8.1 Cluster April 2012
Software Requirements
ACSLS HA requires the following software components.
• Solaris 10 update 9
• Oracle Solaris Cluster 3.3 with any necessary updates
• ACSLS 8.1 on both nodes with latest PUTs/PTFs
• ACSLS HA 8.1 on both nodes with latest PUTs/PTFs

April 2012 Operating System Installation 11
2
Operating System Installation
There must be ample space on each internal disk to contain the Solaris operating system. It is recommended that you install the Entire Distribution Plus OEM Support Software Group (SUNWCXall):
• Select POSIX C (C) locale to be used
• Enable all remote services when asked during the install procedure.
• Install required and recommended Solaris 10 patches.
Boot Device Partitions The layout below summarizes the recommended partitioning scheme.
• Slice 0 / at least >= 10 GB (root) Use remaining space after slices 1, 3, 7 & 8.
• Slice 1 swap >= 3 GB (swap)
• Slice 3 /globaldevices >= 1024MB
• Slice 4 Leave empty
• Slice 5 Leave empty
• Slice 6 Leave empty
• Slice 7 Used for Solaris Volume Manager >= 120MB
• Slice 8 (X86 only) boot ~ 8MB (configured automatically)
globaldevicesThe /globaldevices partition is required by Solaris Cluster. It must exist to install and configure the cluster.
If you did not specify /globaldevices during an initial Solaris 10 install, follow these steps to create the /globaldevices filesystem and mount it to slice 3:
# mkdir /globaldevices# newfs /dev/rdsk/c0t0d0s3
1. Edit /etc/vfstab and enter the following line:
/dev/dsk/c0t0d0s3 /dev/rdsk/c0t0d0s3 /globaldevices ufs 1 yes -

state database replicas
12 ACSLS-HA 8.1 Cluster April 2012
2. Mount the /globaldevices filesystem.
# mount /globaldevices
3. Verify that the filesystem is mounted.
# mount | grep globaldevices
state database replicasThe 120MB on slice 7 is reserved for Solaris Volume Manager (SVM) to store state database replicas. The state database contains configuration and status information for all physical disk volumes, hot spares and disk sets. SVM requires multiple replicas (three or more copies) of this information in order to carry out its 'majority consensus algorithm' providing confidence that the data is always valid. A consensus can be reached as long as two of the three state database replicas are available. The three replicas are stored in slice 7 of each node boot disk in the cluster. We have configured partition seven in this section, and we assign the state database replicas later in “Create Metadata Replicates” on page 15.

April 2012 System Configuration Changes 13
3
System Configuration Changes
ACSLS HA on Solaris Cluster requires the following system configuration changes. After making these changes on each node, a reboot is required for the changes to take effect.
Fiber HBA ChangeWhen connected to a fibre-attached SCSI library such as the SL500, ACSLS-HA attempts to monitor the link of the FC HBA for a SCSI library connection.
To allow monitoring by the software, the 'enable-link-down-error' parameter in the /kernel/drv/qlc.conf file must be set to ‘0’. This change takes effect after the next reboot.
This monitor point applies only to the link on the server side HBA. It does not apply to connections at the switch or the library.
Example: modify the /kernel/drv/qlc.conf…# Name: Link down error# Type: Integer, flag; Range: 0 (disable), 1 (enable); Default: 1# Usage: This field disables the driver error reporting during link down# conditions.enable-link-down-error=0;…
IPMP Fail-over ChangeTo avoid ping pong behavior from an intermittently failing network interface, set the FAILBACK parameter in the /etc/default/mpathd file to "no".
Add the root user to the sysadmin group
14 ACSLS-HA 8.1 Cluster April 2012
Example: modify the /etc/default/mpathd…## Failback is enabled by default. To disable failback turn off this option## FAILBACK=yesFAILBACK=no
Add the root user to the sysadmin group1. Edit /etc/group.
2. Add the root user to the sysadmin group:
Example: Before Change
daemon::12:rootsysadmin::14:smmsp::25:gdm::50:
Example: After Change
daemon::12:rootsysadmin::14:rootsmmsp::25:gdm::50:
Enable ssh and allow root access on both servers1. Change to the SSH daemons configuration directory
# cd /etc/ssh
2. Make a backup copy of the daemon's configuration file
# cp sshd_config sshd_config.orig
3. Edit the daemon's configuration file
# vi sshd_config
Change From: PermitRootLogin no
Change To: PermitRootLogin yes
4. Force the SSH daemon to restart with the new configuration:
# svcadm refresh ssh# svcadm enable ssh

April 2012 Create Metadevice 15
4
Create Metadevice
A metadevice is a virtual disk created from two or more physical disks. A metadevice is visible to the file system as a single disk, even though it is comprised of multiple physical devices, each containing a mirror copy of the file system that is mounted to it.
The filesystems /, swap, /globaldevices, and optionally, /opt and /var need to be protected, so these partitions are each placed on a metadevice. We create the necessary stripes of each partition to create the mirror and edit the necessary system files to assure that the metadevices are appropriately mounted to the filesystem.
The following procedure must be carried out on each node in the cluster.
Replicate the VTOC to 2nd Boot DiskThis process duplicates the boot drive’s volume-table-of-contents table onto the secondary drive then adds three (3) metadatabase replicates to each drive’s slice 7.
• The available disk partitions are listed in /dev/dsk.
# ls /dev/dsk
• The manner that the disks are partitioned is seen in the vtoc.
# prtvtoc /dev/dsk/c0t0d0s0
• Copy the vtoc table from the primary disk onto the secondary disk partition you have selected for the mirror drive.
# prtvtoc /dev/rdsk/c0t0d0s2 > /tmp/state_database# fmthard -s /tmp/state_database /dev/rdsk/c0t1d0s2
Create Metadata ReplicatesA metadevice state database records, stores, and tracks information on disk about the state of the physical components in the metadevice disk configuration. Multiple copies of this database are used as a means to verify that the data contained in any single database is valid. By using a 'majority rule' algorithm in the event of disk corruption, this method protects against data loss resulting from any single point of failure.
Add 3 metadatabase replicas on slice 7 of each drive.

Verify Replicates
16 ACSLS-HA 8.1 Cluster April 2012
# metadb -a -f -c 3 c0t0d0s7 #boot drive# metadb -a -f -c 3 c0t1d0s7 #Secondary drive
Verify ReplicatesVerify that three database replicas exist on slice 7 of each drive.
# metadb flags first blk block count a u 16 8192 /dev/dsk/c0t0d0s7 a u 8208 8192 /dev/dsk/c0t0d0s7 a u 16400 8192 /dev/dsk/c0t0d0s7 a u 16 8192 /dev/dsk/c0t1d0s7 a u 8208 8192 /dev/dsk/c0t1d0s7 a u 16400 8192 /dev/dsk/c0t1d0s7
Configure a metadevice to mirror the root partition.1. Create submirrors d1 and d2 and assign them to the root partition.
# metainit -f d1 1 1 c0t0d0s0 (root)# metainit -f d2 1 1 c0t1d0s0 (root mirror)
2. Create a one-way mirror from submirror d1 to metadevice d0.
# metainit d0 -m d1
We attach d0 to d2 later in the step, “Attach the metadevices to the sub-mirrors” on page 18.
3. Make sure the system knows to mount the root metadevice at boot time.
# metaroot d0
This automatically edits the /etc/vfstab so the system mounts the root directory / to the mirrored metadevice d0 instead of physical device c0t0d0s0. To verify:
# cat /etc/vfstab
Configure a metadevice for swap1. Create submirrors d11 and d12 and assign them to the swap partition.
# metainit -f d11 1 1 c0t0d0s1 (swap)# metainit –f d12 1 1 c0t1d0s1 (swap mirror)
2. Create a one-way mirror from submirror d11 to the metadevice d10.
# metainit d10 -m d11
We attach d10 to d12 later in “Attach the metadevices to the sub-mirrors” on page 18.
Configure a metadevice for /globaldevices1. Create submirrors d31 and d32

Create metadevices for optional partitions
April 2012 Create Metadevice 17
# metainit -f d31 1 1 c0t0d0s3# metainit –f d32 1 1 c0t1d0s3
2. Create a one-way mirror from submirror d31 to the metadevice d30.
# metainit d30 -m d31
We attach d30 to d32 later in the step “Attach the metadevices to the sub-mirrors” on page 18.
3. The /globaldevices metadevice must have a unique name on each of the two nodes. For the second node, use the name "d35".
# metainit d35 -m d31
4. If you have already created d30 on both nodes, you can rename d30 on the second node to d35 as follows:
# metarename d30 d35
Create metadevices for optional partitionsThe /opt and /var directories are optional filesystems that may requiring mirroring. The need to configure mirroring for these depends upon whether you have explicitly mounted these filesystems to unique disk partitions during initial OS installation. If specific mount points had not been created for /opt and /var, then these directories are part of the root file system which you have already configured for mirroring.
1. For each optionally mounted partition requiring mirroring, create submirrors and a one-way mirror to the metadevice.
# metainit -f <submirror1> 1 1 <primary disk partition># metainit -f <submirror2> 1 1 <second disk partition># metainit <metadevice> -m <submirror1>
2. Be sure to attach <metadevice> to <submirror2> as is done in “Attach the metadevices to the sub-mirrors” on page 18.
Verify the metadevice configuration1. List the mounted filesystems:
# df –h
2. Display the metadevice configuration.
# metastat
Update the /etc/vfstab fileTo ensure the system uses these metadevices, make sure the correct changes were made to the /etc/vfstab file. Where the defined metadevices apply, comment out the entry for the physical device and replace it using the metadevice name.
Note – Each partition used for /globaldevices must have a different metadevice id than the other node in the cluster. Example: d30 on node1 and d35 on node2

Update the /etc/system file
18 ACSLS-HA 8.1 Cluster April 2012
Update the /etc/system fileTo ensure the system can boot in the event that one of the mirrored boot devices fails and only 50% of the metadatabase replicates are available, add the following to the /etc/system file, usually at the bottom of the file:
set md:mirrored_root_flag=1
Example: Pre Change
* Begin MDD root info (do not edit)rootdev:/pseudo/md@0:0,0,blk* End MDD root info (do not edit)
Example: Post Change
*Begin MDD root info (do not edit)rootdev:/pseudo/md@0:0,0,blkset md:mirrored_root_flag=1* End MDD root info (do not edit)
Activate 1-way mirrorsTo activate the changes on each node, it is necessary to reboot the node.
# reboot
Attach the metadevices to the sub-mirrors# metattach d0 d2# metattach d10 d12# metattach d30 d32 # (on the primary node)# metattach d35 d32 # (on the alternate node)
Attach any optional mirrorsIf /var or /swap or any other filesystem requires mirroring, see “Create metadevices for optional partitions” on page 17.

Update Dump Device
April 2012 Create Metadevice 19
# metattach <metadevice> <submirror>
Update Dump DeviceNormally the operating system uses the configured swap space for dumping the contents of the processor stack subsequent to a system crash. Since we have re-assigned swap to be a metadevice, it is necessary to advise the dump utility of this change.
# /usr/sbin/dumpadm -d /dev/md/dsk/d10
Update Boot Device OrderThis ensures that if the 1st boot device fails, the system automatically selects the 2nd boot device for booting.
For SPARC environments:
Example: if boot devices are disk0 and disk1
/usr/sbin/eeprom boot-device=”disk0 disk1 "
For X86 environments:
1. Determine the device path to the alternate boot drive:
Example: if the mirrored boot drive is c0t1d0s0
# altBP=`ls -l /dev/dsk/c0t1d0s0 | sed 's/devices/^/' | cut -d^ -f2`
This example extracts the device path name from beneath the 'devices' directory and places it in a variable called altBP. To verify altBP:
# echo $altBP
2. Define the alternate boot path in the eeprom:
# eeprom altbootpath=$altBP
3. Verify the altbootpath in the eeprom:
# eeprom altbootpathaltbootpath=/pci@0,0/pci@1022,7450@2/pci1000,3060@3/sd@1,0:a

Update Boot Device Order
20 ACSLS-HA 8.1 Cluster April 2012

April 2012 Network Configuration 21
5
Network Configuration
Physical ConfigurationDual redundancy is the overall scheme for network connectivity. Redundancy applies not only to the servers, but to each communication interface on each server. For the public interface, this means using IPMP on Solaris. This allows for instant fail-over recovery in the event of any communication failure without the need for a general system fail over. For the library interface, this means using a dual-tcp/ip connection with two network interfaces across two independent routes. If any element in one route should fail, ACSLS continues to communicate over the alternate interface.
The figures in this section show eight Ethernet ports accessible by means of two separate controllers on each server. We use six ports to provide the three redundant connections. Two ports in this configuration remain unused. Despite the seeming complexity, there are only three dual-path Ethernet connections from each server: (1) Server-library communication; (2) Server-to-server heartbeat exchange over a private network; (3) Server-to-client communication over a public network.
FIGURE 5-1 Single HBCr library interface card connected to two Ethernet ports on each server node

The Public Interface and IPMP
22 ACSLS-HA 8.1 Cluster April 2012
The electronics behind these redundant ports include the embedded Ethernet controller on the server motherboard and a second Ethernet controller on a PCIe HBA (X4446A-Z). Notice that redundant connections (1), (2), and (3) are established via two separate component paths on each server. This averts a single point of failure with any of the network interface controllers (NICs) on the Sun servers.
Heartbeat messages (2) are sent as raw Ethernet packets using the Medium Access Control (MAC) layer and not IP addresses. Consequently these connections must be run directly or through redundant switches, but the messages cannot be routed across subnets since there is no IP addresses assigned to this interface.
External Ethernet routers or switches are used as hubs to provide redundant connections from both server nodes to the library. Each server node has two separate, independent, and active paths to the dual-ported HBCr library interface card.
In a library with redundant electronics, we see two independent paths from each server node to each HBCr library controller. If communication to both ports on one HBCr interface should fail, ACSLS-HA invokes an automatic switch to the alternate HBCr card. All of this is accomplished without the need to fail over to the alternate server node.
The Public Interface and IPMPSolaris IPMP, or Internet Protocol Multi Pathing, provides a mechanism for building redundant network interfaces to guard against failures with NIC’s, cables, switches or other networking hardware. When configuring IP Multipathing on your Solaris host you combine two or more physical network interfaces into an IPMP group.
FIGURE 5-2 Dual-HBC configuration on a library with Redundant Electronics

The Public Interface and IPMP
April 2012 Network Configuration 23
In this procedure, we create a public IPMP group represented by two NIC devices on each server. To configure IPMP, you need to know the names of each physical interface and the node name of the system. The node name is the host name of the individual cluster node. The device names in the examples below assume one NIC controller on the motherboard (e1000g0-e1000g3) and another quad-port NIC card added via the PCIe bus (e1000g4-e1000g7).
To get a list of the actual device names for the NIC devices on your system, use the command:
# dladm show-dev
Example:
Note – The examples in this document use the network interface naming convention, 'e1000gx'. The HBA Network adapter on your system may use a different naming convention, such as 'nxgex'.
In creating the public interface pair on each node we select one device from the embedded NIC controller (e1000g0) and one device from the attached quad-port NIC adapter (e1000g4).
To create an IPMP fail-over group using link-based IPMP, create two hostname files in /etc, one for each NIC device you wish to assign to the group. Each file is named, "hostname", appended by the name of the NIC device: hostname.<device name>.
The first file contains the node name and system configuration parameters.
For example, the file hostname.e1000g0 contains a single line with four fields:
<Node Name> netmask + broadcast + group <groupname> up
The "netmask +" parameter, instructs Solaris to consult the file /etc/netmask for the proper netmask associated with the logical ip address that’s assigned to the group. Similarly, the "broadcast +" parameter causes the broadcast address to be reset to the default (typically 00.00.00.FF) or to a specified value that you may include in this string. The word 'up' instructs Solaris to enable the interface whenever the system boots.
There is no probing to a test interface, so no hostname or node name is associated with the secondary NIC interface. Consequently, the secondary hostname file, hostname.e1000g4, for example, contains only three fields:
group <groupname> up

The Library Interface
24 ACSLS-HA 8.1 Cluster April 2012
The node IP Address assigned to this group is plumbed to the alternate device in the event of a NIC failure. Any servers accessing the ACSLS HA cluster only accesses the logical host name or logical host IP address.
The groupname binds the two interfaces together into a single IPMP group. Only one IP address is needed to identify the two interfaces. That address is assigned to the host name of each node in the respective /etc/hosts file
The Library InterfaceAs mentioned in the section,“Physical Configuration” on page 21, we utilize the dual-tcp/ip configuration supported by ACSLS to a dual-ported library controller. In doing so, we assign two conventional NIC devices on each node for the library interface. Each is given a unique name when you create the hostname file for that interface in /etc.
For example, the files hostname.e1000g1 and hostname.e1000g5 contain a single line with one or more fields. The first field is the hostname assigned to that interface. The remaining fields are optional to define the netmask and broadcast parameters and to instruct Solaris to bring the interface up with each boot cycle.
General NIC ConfigurationAt this point, you have created four hostname files on each server node. Here is an example of what you might expect in the four hostname files configured on node-1.
# hostnameacslsha1# cd /etc# grep "up" hostname*hostname.e1000g0: acslsha1 netmask + broadcast + group public_group uphostname.e1000g1: libcom1a netmask + broadcast + uphostname.e1000g4: group public_group uphostname.e1000g5: libcom2a netmask + broadcast + up
A similar set of hostname files is created on the sister node:
# hostnameacslsha2# cd /etc# grep "up" hostname*hostname.e1000g0: acslsha2 netmask + broadcast + group public_group uphostname.e1000g1: libcom1b netmask + broadcast + uphostname.e1000g4 group public_group uphostname.e1000g5: libcom2b netmask + broadcast + up
The /etc/hosts file should contain IP addresses for the localhost address, plus the system logical IP address, plus the public IP address assigned to the individual node (represented by the IPMP pair), plus each of the two NICs configured for library communications. This file should also contain host information about the sister node.

General NIC Configuration
April 2012 Network Configuration 25
# hostnameacslsha1# cat /etc/hosts127.0.0.1 localhost192.168.2.3 acslsha # HA system logical host name192.168.2.1 acslsha1 loghost # local host public interface (IPMP)192.168.2.2 acslsha2 # sister node public interface192.168.0.1 libcom1a # library connection 192.168.1.1 libcom1b # library connection
Similarly, from the sister node:
# hostnameacslsha2# cat /etc/hosts127.0.0.1 localhost192.168.2.3 acslsha # HA system logical host name192.168.2.2 acslsha2 loghost # local host public interface (IPMP)192.168.2.1 acslsha1 # sister node public interface192.168.0.2 libcom2a # library connection 192.168.1.2 libcom2b # library connection
To eliminate complexity, the public IPMP group needs to be the same across both nodes for the public interface. You associate the logical hostname to the public_group when you start ACSLS HA. The start script checks to make sure the logical host and the public group name have been configured on both nodes.
Verify that the file modifications are correct and reboot the server so the changes take effect and are permanent. After a successful reboot, verify that the changes have been made on each node.
# ifconfig -a# netstat -nr
Repeat this check on each server node. Confirm that two interfaces are assigned to the public group. Confirm that two interfaces have been created for library communication, and that two private interfaces (172.x.x.x) have been created for heartbeat communication between the cluster nodes.

General NIC Configuration
26 ACSLS-HA 8.1 Cluster April 2012

April 2012 Enable MPXIO Multi-pathing 27
6
Enable MPXIO Multi-pathing
The disk storage configuration in ACSLS HA includes two redundant internal boot drives on each server and an external RAID storage device to be shared between the two servers. The internal drives contain the operating system and the external device contains the application filesystems, /export/home and /export/backup.
As shown in the figure above, there are two fibre connections from each server to the external shared storage array.
If you were to run the format command at this point, the display would list four external drives (two LUNs each with two drives). But in reality there are only two external drives, each with two redundant paths.
Solaris Multiplexed I/O (MPxIO) enables a storage device to be accessible to each server by means of more than one hardware path. If a fibre connection fails from the active server to the /export/home or /export/backup filesystem, MpxIO moves the shared disk LUNS to an alternate path, enabling the system to continue operating on the active server without the need for a general switchover to the standby server.
To configure the external disk driver for MPxIO, first backup the <driver name>.conf file and then edit the original.cp -pr /kernel/drv/<driver name>.conf /kernel/drv/<driver name>.conf.save
FIGURE 6-1 Two Fibre Connections Per Server to External Shared Storage Array

If Shared Disks and Boot Disks Utilize a Common Driver
28 ACSLS-HA 8.1 Cluster April 2012
... where <driver name> is fp (fibre), mpt (SAS), or mpt_sas (LSI SAS2xx).
If Shared Disks and Boot Disks Utilize a Common Driver
If the internal disk drives have the same device driver as the external shared disk array (for example: external SAS array [2530] and internal SAS disks [X4470-M2]) then special considerations must be made to prevent changes to the mirrored boot device when you configure MPXIO on the shared drive. Applying MPXIO globally under this driver could cause your system to loose the path to its boot device.
To avoid this problem, you must manually modify the <driver>.conf file for the respective driver to enable MPXIO on all drives except the boot drives.
You must first be able to uniquely identify the drives for which MPXIO must be disabled. To do this, run the format utility:
# formatSearching for disks...done
AVAILABLE DISK SELECTIONS: 0. c1t0d0 <SUN146G cyl 14087 alt 2 hd 24 sec 848> /pci@0/pci@0/pci@2/scsi@0/sd@0,0 1. c1t1d0 <SUN146G cyl 14087 alt 2 hd 24 sec 848> /pci@0/pci@0/pci@2/scsi@0/sd@1,0 2. c2t0d0 <SUN-LCSM100_S-0735 cyl 17918 alt 2 hd 64 sec 64> /pci@0/pci@0/pci@9/pci@0/sas@0,0 3. c3t0d0 <SUN-LCSM100_S-0735 cyl 15358 alt 2 hd 64 sec 64> /pci@0/pci@0/pci@a/pci@0/sas@0,0
1. Look for the common parent device path to the mirrored boot drives.
In this example, the first two available disk selections (“0” and “1”) are the internal disk drives. The parent device path to these drives is the string.
/pci@0/pci@0/pci@2
The Solaris kernel views this expression as the 'parent' to devices sd@0,0 and sd@1,0.
2. Assuming that the boot disks use the mpt driver, you would manually edit the file ‘/kernel/drv/mpt.conf’. Enable mpxio generally (mpxio-disable="no") and specifically disable mpxio for the boot drives sharing the parent device path that you determined above. This involves the addition of the following two lines in the mpt.conf file:
mpxio-disable=”no";
name="mpt" parent="/pci@0/pci@0/pci@2" unit-address="0" mpxio-disable="yes";
3. After this change, execute the command ‘stmsboot -D mpt -u’.
Do not execute the command ‘stmsboot -D mpt -e’ as this overwrites ‘mpt.conf’ file and the manual change to disable MPxIO on the internal disk device path is lost.
The resulting ‘format’ output looks something like:
# formatSearching for disks...done

If Shared Disks and Boot Disks Employ Different Drivers
April 2012 Enable MPXIO Multi-pathing 29
AVAILABLE DISK SELECTIONS: 0. c1t0d0 <SUN146G cyl 14087 alt 2 hd 24 sec 848> /pci@0/pci@0/pci@2/scsi@0/sd@0,0 1. c1t1d0 <SUN146G cyl 14087 alt 2 hd 24 sec 848> /pci@0/pci@0/pci@2/scsi@0/sd@1,0 2. c7t600A0B800075FC33000002314E1D7005d0 <SUN-LCSM100_S-0735 cyl 17918 alt 2 hd 64 sec 64> /scsi_vhci/disk@g600a0b800075fc33000002314e1d7005 3. c7t600A0B800075FD4E0000020D4E1D6F86d0 <SUN-LCSM100_S-0735 cyl 15358 alt 2 hd 64 sec 64> /scsi_vhci/disk@g600a0b800075fd4e0000020d4e1d6f86
Notice that the original path to the boot drives was preserved but the path to the shared drives was reassigned by MPXIO.
If Shared Disks and Boot Disks Employ Different Drivers
No special consideration is needed when the shared drives are the only devices running under a given device driver. This would be the case if your internal boot drives were SAS and the external shared drive is the fibre-attached 2540-M2.
In this example, the shared drive is controlled under the fp driver. To enable MPXIO on the desired disk devices, simply instruct the fp driver to enable mpxio. In this example:
1. Edit the fp.conf file and change the mpxio setting.
From:
mpxio-disable="yes";
To:
mpxio-disable="no";
The change applies to all drives that are controlled by that driver and takes effect upon the next boot.
2. Run 'stmsboot' to apply the change.
stmsboot –D <driver name> –e
The stmsboot utility prompts you for permission to reboot. While rebooting, the system displays error messages posted on the console that reflect the changes. When enabled, MPxIO discovers the duplicate paths to the same external drives and maps the two paths as a single device under a new name.
Verifying the new MPXIO device pathAfter the boot cycle, you can verify the change by running mpathadm list lu.
# mpathadm list lu
This command provides a list of all the logical devices for which multiple paths have been configured.

Disabling MPXIO from a pair of physical devices
30 ACSLS-HA 8.1 Cluster April 2012
You can map the logical devices to their physical device components using stmsboot -L. This command shows the original device names before control was assumed by the Storage Traffic Manager System (STMS) and the new name now assigned under STMS control. You should see two physical devices corresponding to each logical device. The output of this command is easier to evaluate if you sort it by the logical device name (second field) as follows:
# stmsboot -L | sort -k2
Note – The command stmsboot -L does not work if you have configured the devices with cfgadm -c or if you have performed a reconfiguration boot (touch /reconfigure; reboot) or (reboot -- -r).
Once multipathing is configured, you can run the format command to confirm the change. The format utility should display only two drives, one for each LUN, configured behind a new controller and new target ID.
Disabling MPXIO from a pair of physical devicesIf you wish to disable multipathing for the configured device pair, edit the <driver>.conf file then run the command:
# stmsboot –D <driver name> –d
The stmsboot utility prompts you for permission to reboot.
Note – The command stmsboot -D does not work if you have configured the devices with cfgadm -c, or if you have performed a reconfiguration boot (touch /reconfigure; reboot) or (reboot -- -r).

April 2012 Oracle Solaris Cluster 3.3 Installation 31
7
Oracle Solaris Cluster 3.3 Installation
This chapter is not intended to circumvent the procedures described in the Oracle Solaris Cluster Software Installation Guide and the Oracle Solaris Cluster System Administration Guide which are available on the Oracle Technical network.
You can install, configure, and administer the Oracle Solaris Cluster (OSC) system either through the OSC Manager GUI or through the command line interface (CLI).
It is necessary to install Oracle Solaris Cluster 3.3 on both nodes. This section describes the detailed installation procedure.
Download and Extract Solaris Oracle Solaris Cluster 3.3
Follow the procedures for your specific platform.
x86 Platform
1. As 'root' user, create an installation directory for Solaris Cluster.
# mkdir /opt/cluster
2. Download the package, solaris-cluster-3_3-ga-x86.zip to the /opt/cluster directory.
3. Unzip the package:
# unzip solaris-cluster-3_3-ga-x86.zip
4. Change to the Solaris-x86 directory and run the installer script.
# cd /Solars_x86# ./installer
This launches the OSC Manager GUI.
SPARC Platform
1. As 'root' user, create an installation directory for Solaris Cluster.
# mkdir /opt/cluster
2. Download the package, solaris-cluster-3_3-ga-sparc.zip to the /opt/cluster directory.

Download and Extract Solaris Oracle Solaris Cluster 3.3
32 ACSLS-HA 8.1 Cluster April 2012
3. Unzip the package:
# unzip solaris-cluster-3_3-ga-sparc.zip
4. Change to the Solaris-sparc directory and run the installer script.
# cd /Solaris_sparc# ./installer
This launches the OSC Manager GUI.
Install Oracle Solaris Cluster 3.3
Install using the GUI Wizard
1. Read the Welcome Screen and click 'next'.
2. Accept the license agreement and select "Oracle Solaris Cluster 3.3".
3. From the Software Components screen, click "Select All" and then 'next'.
4. The installer checks for the required resources and if all is present displays the message, 'System Ready for Installation'. Click 'next'.
5. When prompted to select a configuration type, select 'Configure Now' and click 'next'.
6. The install wizard lists the items that must be configured after the installation is complete. Click 'next'.
7. Select 'Yes' or 'No' whether to enable remote configuration support and click 'next'.
8. Specify the port, directory, and admin group (or select the defaults) and click 'next'.
9. The wizard lists the components to be installed. Click 'Install'.
The wizard displays a status bar as the installation proceeds.
10. When the installation is complete, you have the option to view the installation summary and the install log.
Click “close” after viewing.
Install using the Command Line
1. Acknowledge the Copyright notice.
a. Answer 'Yes' to the license agreement.
b. Answer 'No' to the full set of Cluster Products
c. Answer 'No' to multi-lingual support.
The installer checks for adequate system resources.
2. Enter '1' to continue.
3. Select (1) Install now or (2) Install later (for manual configuration.)
4. The installer lists components that must be configured after the installation.
Required Patches
April 2012 Oracle Solaris Cluster 3.3 Installation 33
5. At the prompt, “Select (1) yes or (2) no for remote configuration support for Solaris Cluster”, select 1.
6. Accept the defaults:
Port number [1862]resource directory [/var/opt]Admin group [root]Automatically start HADB [Yes]Allow group management [No]
7. Select (1) to install.
The installer displays the progress of the installation.
8. When complete, select (1) to view the installation summary or (2) to view the installation logs.
9. Enter "!" to exit the installation.
Adding the Cluster Command Path
To add /usr/cluster/bin to root's path, create a file by the name .profile in the top-level root directory. Place the following lines in that file:
PATH=$PATH:/usr/cluster/binexport PATH
Now, repeat the Cluster installation process on the sister node.
Required PatchesCheck The Oracle Web for any updates or required patches to Solaris Cluster.
Creating a two-node clusterDuring a fail-over event, Solaris Cluster requires remote secure shell (ssh) access for the root user between the two nodes. This enables the cluster software, operating on one node, to initiate actions on the sister node. For example, when the active node becomes inactive, it is necessary for the software running on the secondary node to initiate a take-over of the shared disk resource. To do so, it must first reach across to the active node in order to unmount the shared disk.
Before asserting the Cluster install routine, please verify that the following prerequisites have been established.
• Private network connections are in place.
Ideally, one private interconnect should be placed on the server’s internal NIC port and the other placed on the added PCIe card to avert a single point of failure.
• A redundant, dual path, RAID-1 disk array is connected with redundant paths to both nodes. See the cabling diagram, “Dual-HBC configuration on a library with Redundant Electronics” on page 22.
• The network interface, for example e1000g0, on each node is connected to a public network.
Creating a two-node cluster
34 ACSLS-HA 8.1 Cluster April 2012
• Oracle Solaris Cluster 3.3 has been installed on both nodes.
• You have root access to both machines for ssh.
On this last point, configuring for root access involves two files:
1. Edit /etc/default/login. Place a comment in front of ‘CONSOLE=/dev/console’.
# CONSOLE=/dev/console
2. Edit the file, /etc/ssh/sshd_config. Make sure root has login permission:
PermitRootLogin yes
3. You may need to restart the secure shell daemon for these changes to take effect.
# pkill sshd
Configure automatic login access for “root” between nodes
This section configures remote secure shell (ssh) access for the root user between the two nodes without need of a password. We’ll configure a trusted relationship for 'root' between the two nodes by generating a pair of authentication keys. Follow this procedure on the primary node, then repeat the procedure on the secondary node.
1. Create a public/private rsa key pair. To allow login without a password, do not enter a passphrase.
# cd /.ssh# ssh-keygen -t rsaEnter file in which to save the key (//.ssh/id_rsa): ./id_rsaEnter passphrase (empty for no passphrase):Enter same passphrase again:Your identification has been saved in ./id_rsa.Your public key has been saved in ./id_rsa.pub.The key fingerprint is:1a:1b:1c:1d:1e:1f:2a:2b:2c:2d:2e:2f:ea:3b:3c:3d root@node1
This creates two files in the /.ssh directory: id_rsa and id_rsa.pub.
2. Copy id_rsa.pub to the /.ssh directory on the sister node:
# cat id_rsa.pub | ssh root@node2 'cat >> /.ssh/authorized_keys'Password:
3. With the authentication key in place, test the ability to assert commands remotely without a password.
# hostnamenode1# ssh root@node2 hostnamenode2
4. Repeat this process on the sister node beginning at step 1.

Creating a two-node cluster
April 2012 Oracle Solaris Cluster 3.3 Installation 35
Configure the cluster
This process defines the cluster name, the nodes that are included within the cluster, and the quorum device. This procedure can be carried out on either node and applies to both nodes.
1. Run the Solaris Cluster install utility:
# scinstall
2. Select “Create a new cluster or add a new node”.
3. Select “Create a new cluster”.
4. This step reminds you to verify the pre-requisites listed above. Enter 'yes' to continue.
5. Select “Typical” Cluster.
6. What is the name of the cluster you want to establish? ACSLSHA
7. Enter the host name of each node in the cluster.
The first node you enter is selected by the Solaris Cluster software as the primary node. After you have entered the second node, type, < Ctrl/D> to finish, and then confirm the list with 'yes'.
8. Select the two private transport adapters to be used for the Cluster heartbeat exchanges shown as item (2) in FIGURE 5-1 on page 21 and FIGURE 5-2 on page 22.
The install utility listens for traffic on each network interface you specify. If it finds both interfaces to be silent, the selections are accepted by scinstall and the utility plumbs the devices to a private network address.
9. Select "no" to allow for automatic quorum device detection.
Setup now locates the third necessary quorum device, typically a disk on the array.
10. Answer "yes" to the question, "Is it okay to create the new cluster?"
11. In response to the question, "Interrupt cluster creation for sccheck errors?" you can answer either way here.
If you answer 'yes', the install routine stops and alerts you whenever it finds something amiss. If you answer 'no', you need to check the log for any specific errors in the configuration.
12. At this point, sccheck checks for errors.
If there are none, both nodes are configured and both are rebooted so the configuration takes effect.
Check default system settings
1. Check the setting for rpc bind:
# svcprop network/rpc/bind:default | grep local_only
1. The value for 'local_only' should be 'false'.

Removing Solaris Cluster
36 ACSLS-HA 8.1 Cluster April 2012
If it is 'true', adjust the setting using 'svccfg' and refresh rpc/bind:
# svccfgsvc:> select network/rpc/bindsvc: /network/rpc/bind> setprop config/local_only=falsesvc: /network/rpc/bind> quit# svcadm refresh network/rpc/bind:default# svcprop network/rpc/bind:default | grep local_only
Removing Solaris ClusterIf you intend to continue running ACSLS in a non-cluster mode, please refer to “Creating a Single Node Cluster” on page 51. Should it be necessary to uninstall Solaris Cluster, it is necessary to reboot each node in non-cluster mode.
# reboot -- -x
When the boot cycle is complete:
1. Run scinstall -r to remove Solaris Cluster
Warning – This command removes the cluster software without asking you to confirm your intent.
2. Remove Java ES
# /var/sadm/prod/SUNWentsys5/uninstall
Note – Cluster software needs to be removed from each node. Since the software is distributed across the two nodes, the uninstall procedure on the first node affects some files on the sister node. Consequently, after removing cluster on the first node, you may find it difficult to remove the software from the second node. To avoid this difficulty, you can fully re-install cluster software on the second node in order to be able to fully remove the Cluster package from that node.

April 2012 Disk Set and ACSLS File-Systems Creation 37
8
Disk Set and ACSLS File-Systems Creation
This process should be used to set up the shared storage file-systems for ACSLS-HA. The procedure creates a disk-set, volumes for the filesystems, creates the filesystems, and edits the /etc/vfstab. This process is performed on only one node (it doesn’t matter which one), since it affects the external shared disk storage. The only exception is step 5 when creating the disk-set on the primary node which specifically instructs action on both nodes. Both nodes must be up and operational.
Create disk-set on the Primary Node1. Assign the name of the disk set "acsls_ds" and list the host names associated
with the set.
# metaset –s acsls_ds -a -h <node1> <node2>
2. Add the disks to the disk-set by path /dev/did/rdsk/d#. You can identify the disk’s path by using the command:
# cldevice list -vDID Device Full Device Path---------- ----------------d1 acsls02:/dev/rdsk/c0t0d0d2 acsls02:/dev/rdsk/c0t1d0d3 acsls02:/dev/rdsk/c1t0d0d4 acsls02:/dev/rdsk/c2t8d0 1st external disk ( /export/home and /export/backup)d5 acsls02:/dev/rdsk/c3t10d0 2nd external disk ( /export/home and /export/backup)
3. Assign /export/home and /export/backup to the ACSLS disk set (acsls_ds).
# metaset -s acsls_ds -a /dev/did/rdsk/d4 /dev/did/rdsk/d5
4. The shared disk resource consists of a primary and a secondary disk which are to be mirrored. Using the format command, create three partitions on each disk in the shared disk array.
partition-0 30GB (or more) used for /export/homepartition-1 30GB (or more) used for /export/backuppartition-last 10MB used for Cluster metadatabase replicas.

Verify Access on Secondary Node
38 ACSLS-HA 8.1 Cluster April 2012
The last partion will either be partition-6 for an EFI disk or partition-7 for a standard disk. Tag all of the partitions as unassigned. Check the cylinder values in the format display to make sure these partitions do not overlap.
5. Create volumes on the slice you created above. For example d4 is primary and d5 is secondary.
a. Take ownership of the disk set.
# /usr/sbin/metaset -s acsls_ds -t
b. Configure the metadevices.
# /usr/sbin/metainit -s acsls_ds d101 1 1 /dev/did/rdsk/d4s0# /usr/sbin/metainit -s acsls_ds d102 1 1 /dev/did/rdsk/d5s0# /usr/sbin/metainit -s acsls_ds d201 1 1 /dev/did/rdsk/d4s1# /usr/sbin/metainit -s acsls_ds d202 1 1 /dev/did/rdsk/d5s1
c. Create mirror relationships to the metadevices.
# /usr/sbin/metainit –s acsls_ds d100 -m d101# /usr/sbin/metainit –s acsls_ds d200 -m d201
d. Attach submirrors.
# /usr/sbin/metattach -s acsls_ds d100 d102# /usr/sbin/metattach -s acsls_ds d200 d202
e. Display and review the overall disc configuration you have created.
# /usr/sbin/metastat -s acsls_ds
6. Create UFS filesystems for /export/home and /export/backup.
# /usr/sbin/newfs /dev/md/acsls_ds/rdsk/d100# /usr/sbin/newfs /dev/md/acsls_ds/rdsk/d200
7. Create mount points for the filesystems on both nodes.
# /usr/bin/mkdir /export/home (both nodes)# /usr/sbin/mkdir /export/backup (both nodes)
8. Add the following line to the /etc/vfstab on both nodes./dev/md/acsls_ds/dsk/d100 /dev/md/acsls_ds/rdsk/d100 /export/home ufs 2 no -/dev/md/acsls_ds/dsk/d200 /dev/md/acsls_ds/rdsk/d200 /export/backup ufs 2 no -
Verify Access on Secondary Node1. On node 1, verify that the filesystems are mountable:
a. Assign ownership of the disk set to node1.
# cldg switch -n <node1> acsls_ds
b. Mount the file system mount points to the physical disk partitions.
# mount /export/home# mount /export/backup
c. Verify that the filesystems are mounted
# df -h

Verify Access on Secondary Node
April 2012 Disk Set and ACSLS File-Systems Creation 39
d. Un-mount the filesystems.
# umount /export/home# umount /export/backup
2. Now, verify the same capability on node 2:
a. Assign ownership of the disk set to node2.
# cldg switch -n <node2> acsls_ds
b. Mount the file system mount points to the physical disk partitions.
# mount /export/home# mount /export/backup
c. Verify that the filesystems are mounted
# df -h
d. Un-mount the filesystems.
# umount /export/home# umount /export/backup

Verify Access on Secondary Node
40 ACSLS-HA 8.1 Cluster April 2012

April 2012 ACSLS Installation 41
9
ACSLS Installation
The ACSLS installation procedure is to be performed on both nodes, even though the bulk of the application resides on the shared disk. This procedure installs needed drivers, registers ACSLS users, and establishes system environments on each node.
Refer to the ACSLS 8.1 Installation Guide for more information on the ACSLS installation.
1. On the current node, take ownership of the disk set
# cldg switch -n <node1> acsls_ds
where <node1> is the host name for the current node.
2. Mount the filesystems:
# mount /export/home# mount /export/backup
3. On the primary node, install ACSLS 8.1 and all required PUTs/PTFs. If desired, include the STKacsnmp package in the installation.
# pkgadd –d .
4. Change directory to /export/home/ACSSS/install/ and run the ACSLS installation script.
# ./install.sh
5. Set the passwords for acsss, acssa, and acsdb
# passwd acsss# passwd acssa# passwd acsdb
Note – Be aware that these user accounts may expire unless explicitly set not to expire (see man usermod). When expired. ACSLS software fails to function, even in an HA setting.
6. Un-mount the filesystems.
# umount /export/home# umount /export/backup

42 ACSLS-HA 8.1 Cluster April 2012
Note – ACSLS (and if desired, the acsnmp agent) must be installed on both nodes! Repeat steps 1-6 on the other node. You may be prompted whether to overwrite conflicting files and permissions. Answer 'yes' to these.
The following steps creates the ACSLS database.
1. As user 'acsss', verify communication with the library.
$ testlmutcp <library i.p. address>
2. Build the library configuration.
$ acsss_config
3. Shutdown ACSLS
$ acsss shutdown
4. As 'root' user, change to the root directory and un-mount file-systems:
$ su -passwd:# umount /export/home# umount /export/backup

April 2012 ACSLS HA Installation 43
10
ACSLS HA Installation
Final Cluster Configuration DetailsBefore installing ACSLS-HA, you will need to make sure that all quorum devices have been configured and that all necessary resource types have been registered with Solaris Cluster.
1. Verify all quorum devices.
# clquorum list -v
A valid quorum includes the following members:
node-1 hostname
node-2 hostname
shared-disk device-1
shared-disk device-2
If the shared disk devices are not listed, then you need to determine their device id's and then add them to the quorum.
a. Identify the device id for each shared disk.
# cldevice list -v
b. Run clsetup to add the quorum devices.
# clsetup
- Select '1' for quorum.
- Select '1' to dd a quorum device.
- Select 'yes' to continue.
- Select 'Directly attached shared disk'
- Select 'yes' to continue.
- Enter the device id (d<n>) for the first shared drive.
- Answer 'yes' to add another quorum device.
- Enter the device id for the second shared drive.

Downloading ACSLS HA
44 ACSLS-HA 8.1 Cluster April 2012
c. Run clquorum show to confirm the quorum membership.
# clquorum show
2. Verify the list of registered resource types.
# clrt list
SUNW.LogicalHostname:4
SUNW.SharedAddress:2
SUNW.gds:6
If SUNW.gds is not listed, then register it
# clrt register SUNW.gds
Confirm with clrt list.
Downloading ACSLS HAIf you are downloading ACSLS HA from the Oracle eDelivery Web site, you find a zip file with an iso image enclosed. Follow the directions provided with the Download_ISO.txt file to access the SUNWscacsls package on a mounted block device using lofi.
The ACSLS HA software must be installed on both nodes of the cluster.
1. Change your working directory to the mounted device where software is located (either on a CDROM or on a mounted block device).
# cd /cdrom/cdrom0
2. Install the software using the Solaris pkagdd command:
# pkgadd –d .
Sun StorageTek ACSLS High Availability Solution displays.
Note – The default installation directory is /opt.
3. Switch the acsls device group to the other node and install ACSLS-HA on other system.
# umount /export/home# umount /export/backup# cldg switch -n <other_node> acsls_ds# ssh <other node>passwd:# mount /export/home# mount /export/backup# cd /cdrom/cdrom0# pkgadd –d .
4. Copy testlmutcp to /usr/bin on each node.
In the event that ACSLS-HA cannot establish library communication on the primary node, it attempts a switch to the secondary node. But to avoid needless ping-pong behavior, the software verifies that the library can be reached from the

Library Failover Policy
April 2012 ACSLS HA Installation 45
secondary node. Since ACSLS (with library communication capability) is mounted only on the active node, we must copy a small library test routine to a system directory on the secondary node. This allows ACSLS-HA to verify library
communication on the secondary node before asserting a fail-over event.
# cp /export/home/ACSSS/diag/bin/testlmutcp /usr/bin/
Now copy testlmu on the other node to /usr/bin on the other node
Library Failover PolicyConnection between the active server node and the library is critical for continuous ACSLS operation. But how that connection is monitored and what action should be taken in the event of communication failure may depend on numerous factors.
In multiple-ACS environments, is it desirable to assert a general system fail-over in the event that communication with a single ACS has failed? Or might there be a better recovery strategy that is localized to the single library?
Some libraries employ redundant electronics with dual path connections. In such cases, a general fail-over event should be applied only after all possible connection links have failed with the active server.
ACSLS monitors communications to all libraries and logs communication failures when they occur. If all communication to the active library controller on a single, non-partitioned library with Redundant Electronics fails, ACSLS attempts to switch to the standby library controller.
There is a policy table in the $ACS_HOME/acslsha directory that identifies theTCP/IP attached ACSs where the ACSLS HA agent causes a failover to the alternate node when all communication to the ACS is lost and cannot be restored. The file, ha_acs_list.txt, contains a list of entries with two fields. The first field is the ACS number and the second has the Boolean value of "true" or "false".
• Where the second field is “false”, the ACSLS HA agent does not failover to the alternate node when communication to the ACS is lost and cannot be restored. (The ACSLS HA agent responds to library communication difficulties by attempting to switch to an alternate library controller, if possible, and logging communication failures when they occur.)
• Where the second field is "true" and when the ACSLS HA agent cannot restore communications to a TCP/IP attached ACS by switching to the standby library controller, a test is made to confirm whether library communication can be established from the alternate node. If library communication is successful from the alternate node, then ACSLS HA instructs Solaris Cluster to initiate a system fail-over to the alternate node.
Starting ACSLS HAAssuming the logical hostname has been added to the /etc/hosts file on both nodes, you should be able to run the start_acslsha.sh script to create and bring the resources and resource groups on-line. This creates the resource group acsls-rg and the resources acsls-rs, logical-host, acsls-storage and brings them online. It takes up to a minute or more to create the resource groups and all the resources.
• To start the HA software, login to the active node...

Starting ACSLS HA
46 ACSLS-HA 8.1 Cluster April 2012
cd /opt/SUNWscacsls/util/start_acslsha.sh -h <logical hostname> -g <public IPMP group name>
... where <logical hostname> is the Cluster virtual IP (from /etc/hosts file) and <IPMP group name> is the group to which the public interface belongs. (Use ifconfig -a to find out group name.)
The group needs to be the same across both nodes as described in “The Public Interface and IPMP” on page 22.
• To halt Cluster monitoring of ACSLS:
clrg suspend acsls-rg
This allows you to bring the ACSLS application up and down for maintenance purposes without worry that Cluster attempts to recover or fail over.
• To check whether the ACSLS resource is being monitored:
clrg status
The suspended state of "No" indicates that monitoring is active.
• To resume Cluster monitoring of ACSLS
clrg resume acsls-rg

April 2012 Uninstalling ACSLS HA 47
11
Uninstalling ACSLS HA
In the event that de-installation is required, this chapter outlines the procedure to remove the ACSLS HA software.
1. Suspend cluster control:
# clrg suspend acsls-rg
2. Get a list of configured resources.
# clrs list
3. Disable, then delete each of the listed resources.
# clrs disable acsls-rs# clrs disable acsls-storage# clrs disable <Logical Host Name>
# clrs delete acsls-rs# clrs delete acsls-storage# clrs delete <Logical Host Name>
4. Get the name of the resource group and delete it by name.
# clrg list# clrg delete <Group Name>
5. Reboot both nodes into non-cluster mode.
# reboot -- -x
6. Remove cluster configuration
# scinstall -r
7. Remove Java ES
# /var/sadm/prod/SUNWentsys5/uninstall

48 ACSLS-HA 8.1 Cluster April 2012

April 2012 ACSLS HA Operation 49
12
ACSLS HA Operation
This appendix describes special considerations that may be required for normal ACSLS operations in an HA environment, including power-down, power-up, and software upgrade procedures.
Normal ACSLS OperationWith ACSLS-HA 8.1 and Oracle Solaris Cluster 3.3, system control defers to the Solaris System Management Facility (SMF) where appropriate. This means that under normal circumstances, SMF is responsible for starting, stopping and re-starting ACSLS whenever such control is needed. Solaris Cluster does not intervene as long as SMF remains in control.
This simplifies ACSLS operation on an HA server. Under normal circumstances the user starts and stops ACSLS services in the same fashion on an HA system as is normally done on a standard ACSLS server. You can start and stop ACSLS operation with the standard acsss command:
$ acsss enable
$ acsss disable
$ acsss db
Manually starting or stopping acsss services with these commands in no way causes Solaris Cluster to intervene in an attempted fail-over operation. Nor will the use of the Solaris svcadm command cause Solaris Cluster to intervene with regard to acsss services. Whenever acsss services are aborted or interrupted for any reason, SMF is primarily responsible for restarting these services.
Solaris Cluster only intervenes at times when the system looses communication with the ACSLS filesystems or with the redundant public Ethernet ports, or when communication is lost and cannot be re-established with one or more attached libraries where the user has specified failover (see “Library Failover Policy” on page 45).
Powering Down the ACSLS HA ClusterThe following procedure provides for a safe power-down sequence in the event that it is necessary to power down the ACSLS HA System.
Powering Up a Suspended ACSLS Cluster System.
50 ACSLS-HA 8.1 Cluster April 2012
1. Determine the active node in the cluster
# clrg status
and look for the online node.
2. Login as root to the active node and halt the Solaris Cluster monitoring routine for the ACSLS resource group.
# clrg suspend acsls-rg
3. Switch to user acsss and shutdown the acsss services:
# su - acsss
$ acsss shutdown
4. Logout as acsss.
$ exit
5. As root, gracefully power down the node with init 5.
# init 5
6. Login as root to the alternate node and power it down with init 5.
7. Power down the shared disk array using the physical power switch.
Powering Up a Suspended ACSLS Cluster System.If the ACSLS HA cluster has been powered down in the fashion described in the previous section, then to restore ACSLS operation on the node that was active before the controlled shutdown, use the following procedure.
1. Power on both nodes locally using the physical power switch or remotely using the Sun Integrated Lights Out Manager.
2. Power on the shared disk array.
3. Login to either node as root.
If you attempt to list the /export/home directory, you find that the shared disk resource is not mounted to either node. To resume cluster monitoring, run the following command:
# clrg resume acsls-rg
With this action, Solaris Cluster mounts the shared disk to the node that was active when you brought the system down. This action should also automatically restart the acsss services and normal operation should resume.
Installing ACSLS software updates with ACSLS HA.Software updates to ACSLS or the shared disk regions can require downtime. To manage this downtime properly, use the following procedure to suspend Solaris Cluster while the software update is in progress.
1. From either node suspend Solaris Cluster monitoring of ACSLS:
# clrg suspend acsls-rg

Creating a Single Node Cluster
April 2012 ACSLS HA Operation 51
This action prevents any attempt by Solaris Cluster to fail over during the maintenance operation.
2. On the active node, as user acsss, shutdown the acsss services.
# su - acsss
$ acsss shutdown
This action shuts down all acsss services, enabling you to install or update any STKacsls package. Follow the recommended procedure in the respective package README.
3. When the software update is complete, as root user, resume Solaris Cluster monitoring of the ACSLS_HA system:
# clrg resume acsls-rg
This action automatically restarts acsss services and resumes normal operation.
Creating a Single Node ClusterThere may be occasions where ACSLS must continue operation from a standalone server environment on one node while the other node is being serviced. This would apply in situations of hardware maintenance, an OS upgrade, or an upgrade to Solaris Cluster.
Use the following procedures to create a standalone ACSLS server.
1. Boot the desired node in a non-cluster mode.
If the system is running, you can use ‘reboot -- -x’ on SPARC or X86.
To boot into non-cluster mode from power down state:
• On SPARC servers:
ok: boot -x
• On X86 Servers it is necessary to edit the GRUB boot menu.
a. Power on the system.
b. When the GRUB boot menu appears, press "e" (edit).
c. From the submenu, using the arrow keys, select
kernel /platform/i86pc/multiboot
When this is selected, press "e".
d. In the edit mode, add ‘-x’ to the multipboot option
kernel /platform/i86pc/multiboot -x
and press 'return'.
e. With the multiboot -x option selected, press ‘b’ to boot with that option.
2. Once the boot cycle is complete, login as root and take ownership of the diskset that contains the shared disk area. Use the command:
# metaset –s acslsds –t [-f]

Creating a Single Node Cluster
52 ACSLS-HA 8.1 Cluster April 2012
Use the -f (force) option if necessary when the disk resource remains tied to another node.
3. Mount the filesystems:
# mount /export/home
# mount /export/backup
4. Bring up the acsss services.
# su - acsss
$ acsss enable
5. Configure the virtual ACSLS IP address, using the following example command (this may not exactly match your specific site):
# ifconfig e1000g0:1 plumb
# ifconfig e1000g0:1 <virtual_IP_address> netmask + up
Restoring from non-cluster mode
1. Reboot both nodes.
2. During the boot cycle, the nodes negotiates with the quorum to determine which node is to assume active status.
When the boot cycle is complete, from either node, run clrg status to identify which node is pending online.
3. Login to the node that is pending online, and verify that /export/home and /export/backup are mounted.
# df
4. Switch user to acsss and start acsss services.
# su - acsss
$ acsss enable
5. Confirm that the pending online node is online.
# clrg status

April 2012 Logging, Diagnostics, and Testing 53
A
Logging, Diagnostics, and Testing
Solaris Cluster LoggingSolaris Cluster messages during a fail-over event are written to the /var/adm/messages file. This file has messages regarding Cluster functions, ACSLS errors and info messages. Only the active node writes cluster messages to the /var/adm/messages file.
Solaris Cluster monitors the health of ACSLS with a probe once every sixty seconds. You can view the log of this probe activity here:
/var/cluster/logs/DS/acsls-rg/acsls-rs/probe_log.txt
In the same directory is a file which logs every start and stop event in the context of a fail-over sequence.
/var/cluster/logs/DS/acsls-rg/acsls-rs/start_stop_log.txt
ACSLSThe ACSLS event log is /export/home/ACSSS/log/acsss_event.log. This log includes messages with regard to start and stop events from the perspective of ACSLS software. The log reports changes to the operational state of library resources and it logs all errors that are detected by ACSLS software. The acsss_event. log is managed and archived automatically from parameters defined in 'acsss_config' option-2.
Cluster monitoring utilitiesSolaris Cluster utilities are found in the /usr/cluster/bin directory.
• To view the current state of the ACSLS resource group:
clrg list -v
• To view the current status of the two cluster nodes:
clrg status
• To view the status of the resource groups:
clrs status
Recovery and Failover Testing
54 ACSLS-HA 8.1 Cluster April 2012
• To get verbose status on the nodes, the quorum devices, and cluster resources:
cluster status
• For a detailed component list in the cluster configuration:
cluster show
• To view the status of each ethernet node in the resource group:
clnode status -m
• Resource Group status:
scstat -g
• Device group status:
scstat -D
• Health of the heartbeat network links:
scstat -W
or
clintr status
• IPMP status:
scstat -i
• Node status:
scstat -n
• Quorum configuration and status:
scstat -q
or
clq status
• Show detailed cluster resources, including timeout values:
clresource show -v
Recovery and Failover Testing
Recovery conditions
There are numerous fatal system conditions that can be recovered without the need of a system fail over event. For example, with IPMP, one Ethernet connection in each group may fail for whatever reason, but communication should resume uninterrupted via the alternate path.
With MPXIO, if I/O access by means of one path is interrupted, the I/O operation should resume without interruption over the alternate path.
Recovery and Failover Testing
April 2012 Logging, Diagnostics, and Testing 55
ACSLS is comprised of several software 'services' that are monitored by the Solaris Service Management Facility (SMF). As user acsss, you can list each of the acsss services with the command acsss status. Among these services are the PostgreSQL database, the WebLogic Web application server, and the ACSLS application software. If any given service fails on a Solaris system, SMF should automatically restart that service without the need for a system failover.
The 'acsls' service itself is comprised of numerous child processes that are monitored by the parent, acsss_daemon. To list the ACSLS sub-processes, use the command, psacs (as user acsss). If any of the child processes is aborted for any reason, the parent should immediately restart that child and recover normal operation.
Recovery Monitoring
The best location to view recovery of system resources (such as disk I/O and Ethernet connections), is the system log, /var/adm/messages.
SMF maintains a specific log for each software service that it monitors. This log displays start-up, re-start, and shutdown events. To get the full path to the service log, run the command, svcs -l <service-name>. ACSLS services can be listed using the acsss command,
$ acsss status
and subprocesses can be listed with the command,
$ acsss p-status
To view recovery of any ACSLS sub-process, you can monitor the acsss_event.log (/export/home/ACSSS/log/acsss_event.log). This log displays all recovery events involving any of the ACSLS sub-processes.
Recovery Tests
Redundant network connections should be restarted by IPMP, redundant data connections should be restarted by MPXIO, and services under SMF control should be restarted by SMF. All such recovery should happen on the same node without the need for a system switchover. Suggested validation methods of this behavior might include the following:
1. While ACSLS is operational, disconnect one Ethernet connection from each IPMP group on the active node. Monitor the status using
# scstat -i
Observe the reaction in /var/adm/messages. ACSLS operation should not be interrupted by this procedure.
2. While ACSLS is operational, disconnect one fibre or SAS connection from the active server to the shared disk resource.
Observe the reaction in /var/adm/messages. ACSLS operation should not be interrupted by this procedure.
Repeat this test with each of the redundant I/O connections.
3. Bring down ACSLS abruptly by killing the acsss_daemon.
Recovery and Failover Testing
56 ACSLS-HA 8.1 Cluster April 2012
Run ‘svcs -l acsls’ to locate the service log.
View the tail of this log as you kill the acsss_daemon. You should observe that the service is restarted automatically by SMF. Similar action should be seen if you stop acsls with ‘acsls shutdown’.
4. Using SMF, disable the acsls service.
This can be done as root with ‘svcadm disable acsls’ or it can be done as user acsss with ‘acsss disable’.
Because SMF is in charge of this shutdown event, there is no attempt to restart the acsls service. This is the desired behavior. You need to restart the acsls service under SMF using:
$ acsss enable
or
# svcadm enable acsls
5. Bring down the acsdb service.
As user acsdb, abruptly disable the PostgreSQL database with the following command:
pg_ctl stop \ -D /export/home/acsdb/ACSDB1.0/data \ -m immediate
This action should bring down the database and also cause the acsls processes to come down. Run ‘svcs -l acsdb’ to locate the acsdb service log.
View the tail of both the acsdb service log and the acsls service log as you bring down the database. You should observe that when the acsdb service goes down, it also brings down the acsls service. Both services should be restarted automatically by SMF.
6. While ACSLS is operational, run ‘psacs’ as user acsss to get a list of sub-processes running under the acsss_daemon.
Kill any one of these sub-processes. Observe the acsss_event.log to confirm that the sub-process is restarted and a recovery procedure is invoked.
Failover Conditions
Solaris Cluster Software monitors the Solaris system, looking for fatal conditions that would necessitate a system fail-over event. Among these would be a user-initiated failover (clrg switch), a system reboot of the active node, or any system hang, fatal memory fault, or unrecoverable i/o communications on the active node. Solaris Cluster also monitors HA agents that are designed for specific applications. The ACSLS HA Agent requests a system fail-over event under any of the following conditions:
• TCP/IP communication is lost between the active node and the logical host.
• The /export/home file system is not mounted.
• The /export/backup file system is not mounted.

Recovery and Failover Testing
April 2012 Logging, Diagnostics, and Testing 57
• Communication is lost to an ACS that is listed in the file $ACS_HOME/acslsha/ha_acs_list.txt whose desired state is online and where a switch lmu is not otherwise possible or successful.
Failover Monitoring
From moment to moment, you can monitor the failover status of the respective nodes using the command:
# clrg status
Or you can monitor failover activity by observing the tail of the start_stop_log:# tail -f /var/cluster/logs/DS/acsls-rg/acsls-rs/start_stop_log.txt
It may be useful to view (tail -f) the /var/adm/messages file on both nodes as you perform diagnostic fail-over operations.
Failover Tests
1. The prescribed method to test Cluster failover is to use the ‘clrg switch’ command:
# clrg switch -M -e -n <standby node name> acsls-rg
This action should bring down the ACSLS application and switch operation from the active server to the standby system. The options "-M -e" instruct the cluster server to enable SMF services on the new node. Observe this sequence of events on each node by viewing the tail of the /var/adm/messages file. You can also tail the start-stop log:
# tail -f /var/cluster/logs/DS/acsls-rg/acsls-rs start_stop_log.txt
Periodically run the command,
# clrg status
2. A system reboot on the active node should initiate an immediate HA switch to the alternate node.
This operation should conclude with ACSLS running on the new active node. On the standby node, watch the tail of the /var/adm/messages file as the standby system assumes its new role as the active node. You can also periodically run the command,
# clrg status
3. Using init 5, power down the active server node and verify system failover.
4. Unmount the /export/home file system on the primary node and verify recovery on the same node or a system switch to the alternate node.
# umount -f /export/home
View the sequence of events in the tail of the /var/adm/messages file on both nodes as you unmount the file system on the primary node. You can monitor the probe log and the start-stop log:
# tail -f /var/cluster/logs/DS/acsls-rg/acsls-rs/probe_log.txt# tail -f /var/cluster/logs/DS/acsls-rg/acsls-rs/start_stop_log.txt
Recovery and Failover Testing
58 ACSLS-HA 8.1 Cluster April 2012
You can also periodically run the command,
# clrg status
5. Unplug both data lines between the active server node and the shared disk Storage Array and verify a system switch to the standby node.
6. Assuming that a given library is listed in the policy file, ha_acs_list.txt, disconnect both Ethernet communication lines between the active server node and that library.
Verify system failover to the standby node.
Additional Tests
If your mirrored boot drives are hot-pluggable, you can disable one of the boot drives and confirm that the system remains fully operational. With one boot drive disabled, reboot the system to verify that the node comes up from the alternate boot drive. Repeat this action for each of the boot drives on each of the two nodes.
Remove any single power supply from the active node and the system should remain fully operational with the alternate power supply.

April 2012 Monitoring the ACSLS HA Agent 59
B
Monitoring the ACSLS HA Agent
About the ACSLS HA AgentThe ACSLS HA agent monitors ACSLS on the active node and the resources on which ACSLS depends. These resources include:
• IP communication to the HA logical host
• ACSLS filesystems being mounted
• IPC communication to ACSLS
• ACSLS communication with the library(s) it manages
• Ensuring that the ACSLS CSI is registered with RPC
The ACSLS HA agent actively tries to restore ACSLS library management services on the active node by the following:
• If ACSLS CSI (client-side interface for ACSAPI communication) is no longer registered with RPC, the ACSLS HA agent kills the CSI, so the CSI is automatically re-started and re-registered with RPC.
• If ACSLS loses communication with the active library controller (LC) in a stand-alone RE library or the master LMU in a Dual LMU 9330 configuration, but ACSLS can still communicate with the standby LC/LMU, and the ACS is not partitioned, the ACSLS HA agent sends a switch command to the LC/LMU to cause it to switch it to current standby LC.
The ACSLS HA Agent requests a system fail-over event under any of the following conditions:
• TCP/IP communication is lost between the active node and the logical host.
• The /export/home file system is not mounted.
• The /export/backup file system is not mounted.
• Communication is lost to an ACS that is listed in the file $ACS_HOME/acslsha/ha_acs_list.txt whose desired state is online and where a 'switch lmu' is not otherwise possible or successful.

Monitoring the Status and Activities of the ACSLS HA Agent
60 ACSLS-HA 8.1 Cluster April 2012
Monitoring the Status and Activities of the ACSLS HA Agent
Three logs are useful in monitoring the ACSLS HA agent:
• Messages related to the ACSLS HA agent are sent to the system log, in the /var/adm/messages file on the active ACSLS HA server.
These include both messages from Solaris Cluster and messages from the ACSLS HA agent.
Note – There are separate /var/adm/messages files on the each HA node.
• The probe_log.txt and start_stop_log.txt in the /var/cluster/logs/DS/acsls-rg/acsls-rs/ directory and the archived versions of these logs.
• The start_stop_log.txt logs each time the ACSLS HA agent is started or stopped.
• The probe_log.txt records each probe sent to the ACSLS HA agent, and the return code received from the probe. Solaris Cluster probes the ACSLS HA agent every minute. Return codes include:
0 – Normal processing
1 – Minor error encountered
2 – ACSLS is starting, but not yet in run state
54 – IPC communications failure (should not occur)
201 – failover requested by the ACSLS HA agent
Messages from the ACSLS HA AgentThe ACSLS HA agent sends messages to the system log, in the /var/adm/messages file on the active ACSLS HA server.
The messages from the ACSLS agent are identified by: ACSLS-HA-nnn, where nnn is a number.
This message identifier is followed by a one-letter classification of the message. The classifications are as follows:
I - information only
W – warning
E - error
ACSLS-HA_101 - The ACSLS HA agent processed start command.
Explanation: The ACSLS HA agent that monitors ACSLS and communication between ACSLS and the library has received a “start” command from Solaris Cluster. This starts monitoring of the acsls-rg resource group.
Variable: none
User Response: none

Messages from the ACSLS HA Agent
April 2012 Monitoring the ACSLS HA Agent 61
ACSLS-HA_102 - The ACSLS HA agent processed stop command.
Explanation: The ACSLS HA agent that monitors ACSLS and communication between ACSLS and the library received a “stop” command from Solaris Cluster. This stops monitoring of the acsls-rg resource group.
Variable: none
User Response: none
ACSLS-HA_103 - Logical IP logical_host failure. Cluster is failing over.
Explanation: The ACSLS HA agent could not ping the logical_host address. It returned a FAILOVER status code to cause an HA failover.
Variable: logical_host – The logical host address.
User Response: This condition causes an automatic HA failover. Determine why the ACSLS agent could not ping the logical_host from this ACSLS server. Refer to “Troubleshooting Tips” on page 65 for diagnostic and recovery procedures.
ACSLS-HA_104 E - File system /export/home not found. Cluster is failing over.
Explanation: The /export/home file system is not mounted. It is required for ACSLS operation. The ACSLS HA agent returned a FAILOVER status code to cause an HA failover.
Variable: none
User Response: This condition causes an automatic HA failover.
Determine why the /export/home file system was no longer mounted to this ACSLS server. Note that after after the failover, the /export/home file system is automatically mounted to the other ACSLS server.
ACSLS-HA_105 E - File system /export/backup not found. Cluster is failing over.
Explanation: The /export/backup file system is not mounted. It is required for ACSLS operation. The ACSLS HA agent returned a FAILOVER status code to cause an HA failover.
Variable: none
Explanation: This condition causes an automatic HA failover.
Determine why the /export/backup file system was no longer mounted to this ACSLS server. Note that after the failover, the /export/backup file system is automatically mounted to the other ACSLS server.
ACSLS-HA_106 E - CSI was not registered with RPC. Killing the CSI to attempt a re-register with RPC.
Explanation: The CSI (Client Side Interface that handles communication with ACSAPI clients) was not registered with RPC. Killing the CSI so it is automatically re-started and re-registered with RPC.
Variable: none
User Response: Killing and re-starting the CSI should cause it to re-register with RPC. Determine why the CSI was no longer registered with RPC.

Messages from the ACSLS HA Agent
62 ACSLS-HA 8.1 Cluster April 2012
ACSLS-HA_107 W - Less than two arguments in ha_acs_list.txt line.
Explanation: The ha_acs_list.txt file in $ACS_HOME/acslsha directory identifies ACSs for which the ACSLS HA system should failover to the other node if communication to the ACS is lost. Each policy line should contain an ACS number and a failover policy for the ACS that should be either “true” (to cause failover if communication is lost) or “false” (if ACSLS HA should not failover if communication is lost). One of the non-comment lines in this file had less than two arguments.
Variable: none
User Response: Correct the policy line in ha_acs_list.txt. Each line should have an ACS number followed by a “true” or “false” failover policy.
ACSLS-HA_108 W - Invalid ACS: acs_id in ha_acs_list.txt line.
Explanation: The ha_acs_list.txt file in $ACS_HOME/acslsha directory identifies ACSs for which the ACSLS HA system should failover to the other node if communication to the ACS is lost. Each policy line should contain an ACS number and a failover policy for the ACS that should be either “true” (to cause failover if communication is lost) or “false” (if ACSLS HA should not failover if communication is lost). The first argument of one of the non-comment lines in this file was not a valid ACS ID.
Variable: acs_id – This should be a valid ACS ID.
User Response: Correct the policy line in ha_acs_list.txt. Each line should have a valid ACS ID followed by a “true” or “false” failover policy.
ACSLS-HA_109 W - IPC failure issuing ‘query lmu all’ command to ACSLS.
Explanation: There was an IPC (inter-process communication) failure in issuing a “query lmu all” command to ACSLS. “query lmu all” is used to monitor the status of ACSLS communication with all attached libraries.
IPC communication failures usually occur because ACSLS is down, but Solaris Cluster is continuing to probe the ACSLS HA agent to monitor the status of communication with the library.
When this happens, the return code to the probe is 54 (in /var/cluster/logs/DS/acsls-rg/acsls-rs/probe_log.txt).
Variable: none.
User Response: If ACSLS is supposed to be down, ignore this message. If ACSLS should be up, and is not in the process of starting, start it.
ACSLS-HA_110 I - ACS acs_id, attempting to switch library controllers.
Explanation: This ACSLS HA server lost communication with the active library controller, aka LC, (or LMU) in the specified ACS. The ACSLS HA agent can still communicate with the standby library controller, and this library is not partitioned. The HA agent issues a Redundant Electronics switch, to cause the standby LC to become the new active LC.

Messages from the ACSLS HA Agent
April 2012 Monitoring the ACSLS HA Agent 63
Note – An RE switch takes minutes, and exceeds the Solaris Cluster probe timeout of 60 seconds, so this probe times out. Subsequent probes of the acsls-rg are processed normally.
Variable: acs_id identifies the ACS involved.
User Response: None. ACSLS HA automatically switches to the standby library controller, if this is possible.
ACSLS-HA_111 I - Switch LC for ACS acs_id, successfully initiated.
Explanation: The ACSLS HA server successfully initiated an RE switch to make the standby library controller, aka. LC, (or LMU) take over from the old active LC in the specified ACS. The old standby is now the new active LC and ACSLS is going through recovery to bring the ACS back online.
Variable: acs_id identifies the ACS involved.
User Response: None. The RE switch is proceeding normally.
ACSLS-HA_112 I - Unsuccessful performing an LC switch of ACS acs_id.
Explanation: The ACSLS HA server was unsuccessful in attempting an RE switch to the old standby library controller, aka LC, (or an LMU). The ACSLS HA agent now examines whether it should failover to the other HA node to restore library communication.
Variable: acs_id identifies the ACS involved.
User Response: None. If the failover policy for this ACS is “true” and the other HA node can communicate with the library, the ACSLS HA agent attempts to failover to the other HA node.
ACSLS-HA_113 I - Communication lost to ACS acs_id. Attempt a failover to the other ACSLS HA node.
Explanation: The ACSLS HA server cannot restore communication with this ACS. However, the failover policy for this ACS is “true” and the other HA node can communicate with the library, so we attempt to failover to the other HA node.
Variable: acs_id identifies the ACS involved.
User Response: None. The ACSLS HA agent automatically attempts to failover to the other ACSLS HA node.
ACSLS-HA_114 I - Port port_id changed from old_state to new_state.
Explanation: This port changed from the old state to a new state.
Variable:
• port_id identifies the port.
• old_state is the port’s former state
• new_state is the port’s current state.
User Response: None. The ACSLS HA agent continues to monitor the status of the ports and maintain communication with the libraries.

Diagnostic Messages
64 ACSLS-HA 8.1 Cluster April 2012
ACSLS-HA_115 I - ACS acs_id came online.
Explanation: This ACS came online.
Variable: acs_id identifies the ACS.
User Response: None. The ACSLS HA agent continues to monitor the status of the ACSs and maintain communication with the libraries.
ACSLS-HA_116 I - ACS acs_id went offine.
Explanation: This ACS went offline.
Variable: acs_id identifies the ACS.
User Response: None. The ACSLS HA agent continues to monitor the status of the ACSs and maintain communication with the libraries.
Diagnostic MessagesACSLS HA messages 131 and above are diagnostic messages for further analysis by Oracle. They do not require your action. These messages relate to events that should not happen. They are used by Oracle Support and Oracle’s Advanced Customer Support (ACS).

April 2012 Troubleshooting Tips 65
C
Troubleshooting Tips
ACSLS HA is the integration of the ACSLS application operating on a two-node system under Solaris-10 with IPMP and MPXIO under the control of Solaris Cluster. Such system complexity does not lend itself to a single troubleshooting approach, and a single prescribed troubleshooting algorithm is not offered in this section. Instead, what follows is a set of procedures to verify the operation of the various subsystem components.
Procedure to Verify that ACSLS is RunningTo verify that ACSLS services are running on the active node, run the following command as user 'acsss':
# su - acsss$ acsss status
If one or more services are disabled, enable them with acsss enable.
$ acsss enable
If the status display reveals that one or more of the ACSLS services is in maintenance mode, then run the command:
$ acsss l-status
Look for the path to the log file of the faulty service and view that log for hints that might explain why the service was placed in maintenance mode.
If one or more of the acsls services is in maintenance mode, they can be cleared by disabling then enabling them with the 'acsss' command.
$ acsss shutdown$ acsss enable
As ‘root’, you can also clear an individual service.
# svcadm clear <service name>
The service will not be cleared until the underlying fault has been corrected.
Specific operational logs should also be reviewed as a means to reveal the source of a problem. Most of these are found in the /export/home/ACSSS/log directory.
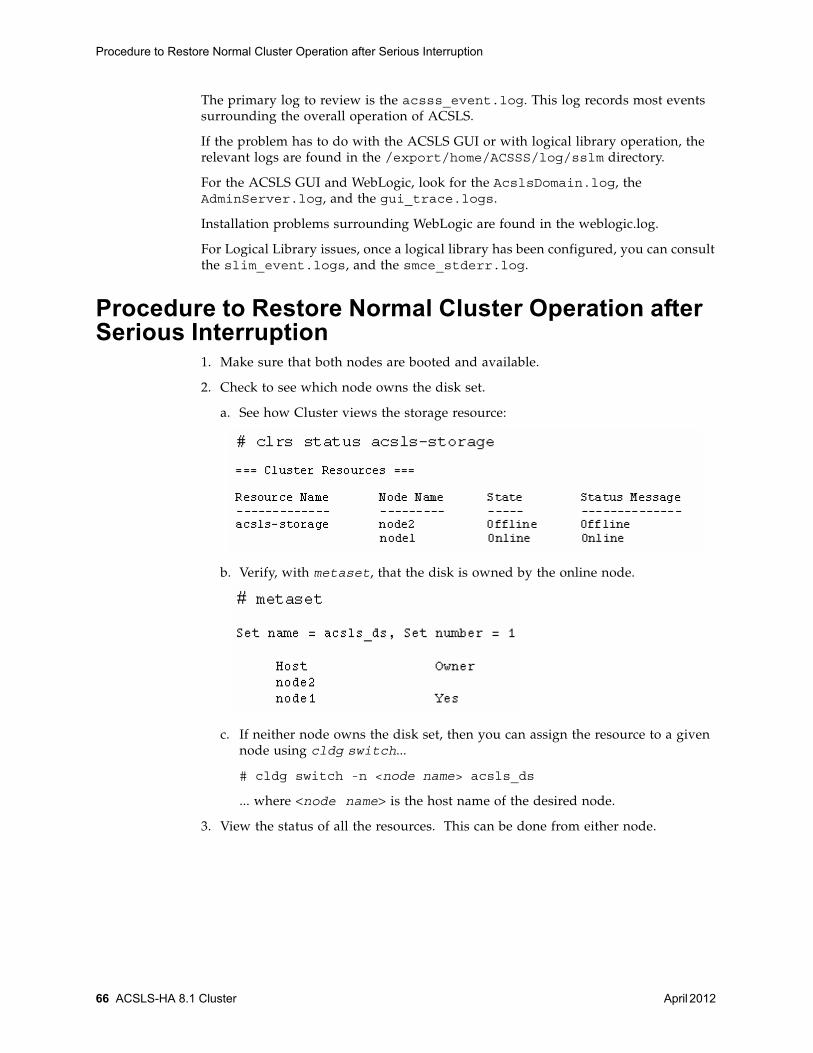
Procedure to Restore Normal Cluster Operation after Serious Interruption
66 ACSLS-HA 8.1 Cluster April 2012
The primary log to review is the acsss_event.log. This log records most events surrounding the overall operation of ACSLS.
If the problem has to do with the ACSLS GUI or with logical library operation, the relevant logs are found in the /export/home/ACSSS/log/sslm directory.
For the ACSLS GUI and WebLogic, look for the AcslsDomain.log, the AdminServer.log, and the gui_trace.logs.
Installation problems surrounding WebLogic are found in the weblogic.log.
For Logical Library issues, once a logical library has been configured, you can consult the slim_event.logs, and the smce_stderr.log.
Procedure to Restore Normal Cluster Operation after Serious Interruption
1. Make sure that both nodes are booted and available.
2. Check to see which node owns the disk set.
a. See how Cluster views the storage resource:
b. Verify, with metaset, that the disk is owned by the online node.
c. If neither node owns the disk set, then you can assign the resource to a given node using cldg switch...
# cldg switch -n <node name> acsls_ds
... where <node name> is the host name of the desired node.
3. View the status of all the resources. This can be done from either node.

Procedure to Restore Normal Cluster Operation after Serious Interruption
April 2012 Troubleshooting Tips 67
Notice in the response to cldg status that the secondary column shows a dash - . This is a sign that there is no fail-over node available. Make sure both nodes are up and then check the Cluster private interconnects.
The faulted status indicates trouble in the ethernet connections between the nodes. Check the cables and the NIC cards.
From each node, verify the link status of each interface:

Procedure to Determine Why You Cannot 'ping' the Logical Host
68 ACSLS-HA 8.1 Cluster April 2012
4. If status displays in step 3 show that all resources are offline, then bring them online.
a. From the primary node, re-enable the acsls-rg:
# clrg online acsls-rg
This action should start the resource group and bring all other resources online.
b. Using tail -f, monitor /var/adm/messages to view the start commands from cluster. If any of the resources are offline on your primary node, bring them online individually.
# clrg online acsls-rg# clrs enable acsls-rs# clrs enable acsls-storage# clrs enable <logical host># cldg enable acsls_ds
or, depending on the current error:
# cldg online acsls_ds
Procedure to Determine Why You Cannot 'ping' the Logical Host
1. Verify that the logical hostname is registered with Solaris Cluster.
# clrslh list
If the logical host is not listed, then review the section, “Starting ACSLS HA” on page 45.
2. Determine the active node:
# clrg status | grep -i Online
3. Verify that you can ping the active node.
# ping <node name>
4. Verify that the logical-host-name resource is online to the active node.
# clrslh status
If the logical host is not online, then enable it.
# clrs enable <logical host>
5. Determine the interfaces that are assigned to the public group.
# grep <public group name> /etc/hostname*

Procedure to Determine Why You Cannot 'ping' the Logical Host
April 2012 Troubleshooting Tips 69
6. For each interface revealed in step 5, verify that its logical status is 'up'.
# ifconfig <interface>
7. For each interface revealed in step 5, verify that its link status is 'up'.
# dladm show-dev <interface>
8. Verify that the logical host name is listed in /etc/hosts.
# grep <logical host name> /etc/hosts
9. Verify that the ip address of the logical host (revealed in step 8) is plumbed to one of the two ethernet addresses (revealed in step 6).
# arp <logical host name>

Procedure to Determine Why You Cannot 'ping' the Logical Host
70 ACSLS-HA 8.1 Cluster April 2012

April 2012 Software Support Utilities for Gathering Data 71
D
Software Support Utilities for Gathering Data
To enable Oracle Support to adequately troubleshoot problems that may arise, Oracle provides specific utilities for gathering diagnostic data.
The utility, get_data.sh, collects specific ACSLS and Solaris Cluster files that may be relevant to any specific problem. Files from both nodes of the cluster need to be collected.
To run get_data, you must source the acsss user environment.
# su - acsss$ get data
There is a Solaris Cluster utility called sccheck that reports on any vulnerable Cluster configurations.
Note – The sccheck command may complain about the database replicas being on the same controller for the internal disks. In this case, the system may have only one internal controller.

72 ACSLS-HA 8.1 Cluster April 2012


![StorageTek Automated Cartridge System Library … comments about this document by clicking the Feedback [+] link at: StorageTek Automated Cartridge System Library Software ... ii ACSLS](https://static.fdocuments.net/doc/165x107/5b2b29a07f8b9a55588b4585/storagetek-automated-cartridge-system-library-comments-about-this-document-by-clicking.jpg)